ml densiquickstart print - x-rite photo€¦ · functional elements pass/fail indicator locking...
TRANSCRIPT

DensiEye™
Quick Start GuideKurzanleitungMise en routeGuida introduttivaGuía de introducción rápidoクイックスタートガイド
快速使用指南


CN
JP
ES
ITFR
DE
ENE N G L I S H
D E U T S C H
F R A N Ç A I S
I T A L I A N O
E S P A Ñ O L
J A P A N E S E
C H I N E S E


Table of contents
1. Safety instruction . . . . . . . . . . . . . . . . . . . . . . . . . . . . . . . . . . . . . . . . . . . . . . . . . . . . . . . . . . . . . . . . . . . . . . . . . . . . . . . . . . . . . . . . . . . . . . . . . . . . . . . . . . . . . . 2 2. Package contents. . . . . . . . . . . . . . . . . . . . . . . . . . . . . . . . . . . . . . . . . . . . . . . . . . . . . . . . . . . . . . . . . . . . . . . . . . . . . . . . . . . . . . . . . . . . . . . . . . . . . . . . . . . . . . 33. Packaging and transportation . . . . . . . . . . . . . . . . . . . . . . . . . . . . . . . . . . . . . . . . . . . . . . . . . . . . . . . . . . . . . . . . . . . . . . . . . . . . . . . . . . . . . . . . . . . . . . . . . . . 44. Functional elements . . . . . . . . . . . . . . . . . . . . . . . . . . . . . . . . . . . . . . . . . . . . . . . . . . . . . . . . . . . . . . . . . . . . . . . . . . . . . . . . . . . . . . . . . . . . . . . . . . . . . . . . . . . . 55. Release and lock measuring head . . . . . . . . . . . . . . . . . . . . . . . . . . . . . . . . . . . . . . . . . . . . . . . . . . . . . . . . . . . . . . . . . . . . . . . . . . . . . . . . . . . . . . . . . . . . . . . 6 6. Factory settings. . . . . . . . . . . . . . . . . . . . . . . . . . . . . . . . . . . . . . . . . . . . . . . . . . . . . . . . . . . . . . . . . . . . . . . . . . . . . . . . . . . . . . . . . . . . . . . . . . . . . . . . . . . . . . . . 67. Standard buttons . . . . . . . . . . . . . . . . . . . . . . . . . . . . . . . . . . . . . . . . . . . . . . . . . . . . . . . . . . . . . . . . . . . . . . . . . . . . . . . . . . . . . . . . . . . . . . . . . . . . . . . . . . . . . . 78. Special buttons and button combinations . . . . . . . . . . . . . . . . . . . . . . . . . . . . . . . . . . . . . . . . . . . . . . . . . . . . . . . . . . . . . . . . . . . . . . . . . . . . . . . . . . . . . . . . . 89. Symbols and their functionality . . . . . . . . . . . . . . . . . . . . . . . . . . . . . . . . . . . . . . . . . . . . . . . . . . . . . . . . . . . . . . . . . . . . . . . . . . . . . . . . . . . . . . . . . . . . . . . . . . 910. Display and Pass/Fail indicator . . . . . . . . . . . . . . . . . . . . . . . . . . . . . . . . . . . . . . . . . . . . . . . . . . . . . . . . . . . . . . . . . . . . . . . . . . . . . . . . . . . . . . . . . . . . . . . . . 1211. Function selection . . . . . . . . . . . . . . . . . . . . . . . . . . . . . . . . . . . . . . . . . . . . . . . . . . . . . . . . . . . . . . . . . . . . . . . . . . . . . . . . . . . . . . . . . . . . . . . . . . . . . . . . . . . . 1312. Symbol selection. . . . . . . . . . . . . . . . . . . . . . . . . . . . . . . . . . . . . . . . . . . . . . . . . . . . . . . . . . . . . . . . . . . . . . . . . . . . . . . . . . . . . . . . . . . . . . . . . . . . . . . . . . . . . . 1313. Positioning and measurement . . . . . . . . . . . . . . . . . . . . . . . . . . . . . . . . . . . . . . . . . . . . . . . . . . . . . . . . . . . . . . . . . . . . . . . . . . . . . . . . . . . . . . . . . . . . . . . . . . 1414. Calibration . . . . . . . . . . . . . . . . . . . . . . . . . . . . . . . . . . . . . . . . . . . . . . . . . . . . . . . . . . . . . . . . . . . . . . . . . . . . . . . . . . . . . . . . . . . . . . . . . . . . . . . . . . . . . . . . . . . 1415. Step by step density measurement instructions. . . . . . . . . . . . . . . . . . . . . . . . . . . . . . . . . . . . . . . . . . . . . . . . . . . . . . . . . . . . . . . . . . . . . . . . . . . . . . . . . . . 1516. Auto Mode . . . . . . . . . . . . . . . . . . . . . . . . . . . . . . . . . . . . . . . . . . . . . . . . . . . . . . . . . . . . . . . . . . . . . . . . . . . . . . . . . . . . . . . . . . . . . . . . . . . . . . . . . . . . . . . . . . . 1617. Warranty registration. . . . . . . . . . . . . . . . . . . . . . . . . . . . . . . . . . . . . . . . . . . . . . . . . . . . . . . . . . . . . . . . . . . . . . . . . . . . . . . . . . . . . . . . . . . . . . . . . . . . . . . . . . 1618. Recertification . . . . . . . . . . . . . . . . . . . . . . . . . . . . . . . . . . . . . . . . . . . . . . . . . . . . . . . . . . . . . . . . . . . . . . . . . . . . . . . . . . . . . . . . . . . . . . . . . . . . . . . . . . . . . . . . 1619. Service . . . . . . . . . . . . . . . . . . . . . . . . . . . . . . . . . . . . . . . . . . . . . . . . . . . . . . . . . . . . . . . . . . . . . . . . . . . . . . . . . . . . . . . . . . . . . . . . . . . . . . . . . . . . . . . . . . . . . . 1620. CE Declaration of conformity . . . . . . . . . . . . . . . . . . . . . . . . . . . . . . . . . . . . . . . . . . . . . . . . . . . . . . . . . . . . . . . . . . . . . . . . . . . . . . . . . . . . . . . . . . . . . . . . . . . 17
DensiEye™ is a registered trademark of X-Rite, Incorporated and its associated companies.
Quick Start Guide E N G L I S H
7X-Rite® DensiEye™ Quick Start Guide
EN

Quick Start GuideE N G L I S H
2 X-Rite® DensiEye™ Quick Start Guide
EN
1. Safety instructions
The X-Rite DensiEye must not be used in environments where there is a risk of explosion.
The DensiEye must not be exposed to strong electromagnetic fields. The DensiEye must only be operated at ambient temperatures between 10°C and 40°C with a relative air humidity of 20% to 80% (non-condensing).The DensiEye must only be stored at ambient temperatures between -20°C and 70°C with a relative air humidity of 5% to 90% (non-condensing).The DensiEye must not be exposed to direct sunlight.The DensiEye should be protected against chemical substances, corrosive vapors, strong vibrations and mechanical influences.The DensiEye should always be transported in the original packaging.The DensiEye must not be opened. The warranty is invalidated immediately on unauthorised opening.Only genuine X-Rite accessories and spare parts may be used.
The DensiEye should only be used by trained personnel. The samples being measured should be placed on a stable measuring base.The plastic device casing can be cleaned using a damp cloth and a small amount of soap.Never short-circuit the batteries!Always replace both batteries at the same time.Dispose of batteries in accordance with regulations.

Quick Start Guide Quick Start Guide E N G L I S H
3X-Rite® DensiEye™ Quick Start Guide
EN
2. Package contents
1 DensiEye 2 Calibration card 3 USB Cable 4 Quick start guide 5 Device certificate 6 Registration card 7 CD with operating instructions and software 8 Device case

Quick Start GuideE N G L I S H
4 X-Rite® DensiEye™ Quick Start Guide
EN
3. Packaging and transportation
The DensiEye should always be transported in the original packaging.

Quick Start Guide Quick Start Guide E N G L I S H
5X-Rite® DensiEye™ Quick Start Guide
EN
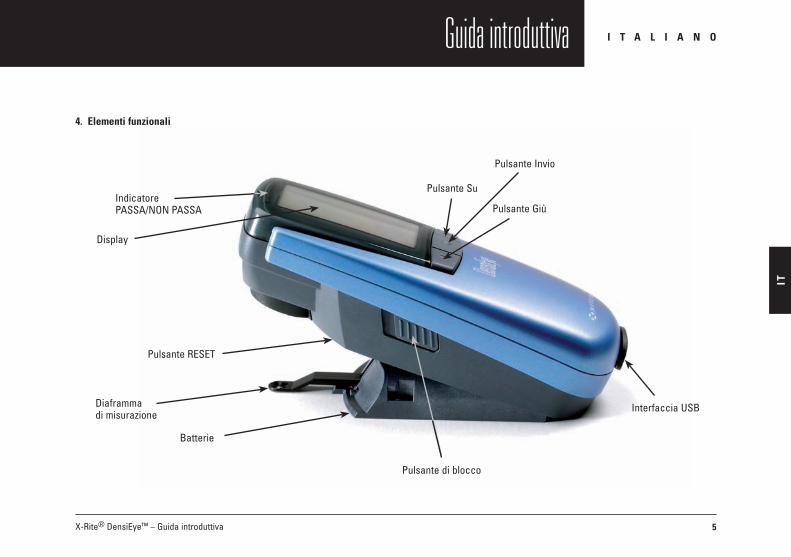
4. Functional elements
PASS/FAIL indicator
Locking button
Up button
Down button
USB interface
Reset Button
Enter button
Batteries
Display
Measuring diaphragm

Quick Start GuideE N G L I S H
6 X-Rite® DensiEye™ Quick Start Guide
EN
5. Release and lock measuring head
Release measuring head• Releasethemeasuringheadbypushingbackthelockingbuttonontheleft-handsideofthemeasuringhead• Whenthedeviceisopenedforthefirsttime,themainmenuwillbedisplayedwiththelastdisplayselectedasareference• Thedisplayisswitchedoffafterapprox.30seconds• TheDensiEyecanbeswitchedbackonbypressinganybutton
Lock measuring head• FolduptheDensiEyeandpushforwardthelockingbuttonontheleft-handsideofthemeasuringhead• Thedisplaygoesoutafterapprox.30seconds
6. Factory settings• Absolute/Difference: Absolute• Whitebase: Paper• Referenceset: 1streferenceset• Filter/colourselection: Auto• Pass/Fail: Off• Scalinggraduation: 10%• Numberofdecimalplaces: 2• Language: English• Left/right-handedoperation: Right-handedoperation
Quick Start Guide Quick Start Guide E N G L I S H
7X-Rite® DensiEye™ Quick Start Guide
EN
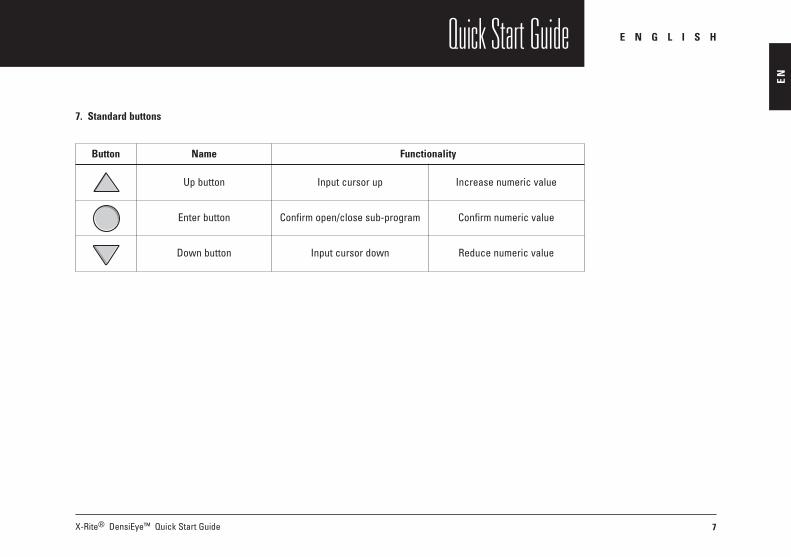
FunctionalityButton Name
Up button Input cursor up Increase numeric value
Enter button Confirm open/close sub-program Confirm numeric value
Down button Input cursor down Reduce numeric value
7. Standard buttons

Quick Start GuideE N G L I S H
8 X-Rite® DensiEye™ Quick Start Guide
EN
8. Special buttons and button combinations
Button(s) Description
Enter + Measure 1) Execute a white measurement
Reset Auto Mode (DensiEye700) or Density (DensiEye100) function is pre-selected in the main menu All settings are retained
Reset + Enter 2) Auto Mode (DensiEye700) or Density (DensiEye100) function is pre-selected in the main menu.All settings are reset to factory settingsThe reference- and tolerance values are retainedThe calibration is reset. The device must be re-calibrated
Enter (3 sec) Back to function selection (main menu)
Enter (10 sec) Displays the language selection menu
1)Sequence: - Press the Enter button - Execute a white measurement - Release the Enter button
2)Sequence: - Press the Reset button - Press the Enter button - Release the Reset button - Release the Enter button

Quick Start Guide Quick Start Guide E N G L I S H
9X-Rite® DensiEye™ Quick Start Guide
EN
9. Symbols and their functionality
Symbol Name Description
Return The program returns to next menu level up, accepts data
Paper Measure paper white / Measure absolute white reference (calibration)
Filter selection Select density filter (automatic or manual)
Reference selection Select one of four reference sets
Solid Measure solid patch / Edit or measure solid reference
Halftone 1 Measure 1. halftone / Edit 1. halftone reference
Halftone 2 Measure 2. halftone / Edit 2. halftone reference
Halftone 3 Measure 3. halftone / Edit 3. halftone reference
Grey balance patch Measure gray balance patch / Edit or measure gray balance reference
Any patch Measure any patch using Auto Mode function
Quick Start GuideE N G L I S H
10 X-Rite® DensiEye™ Quick Start Guide
EN
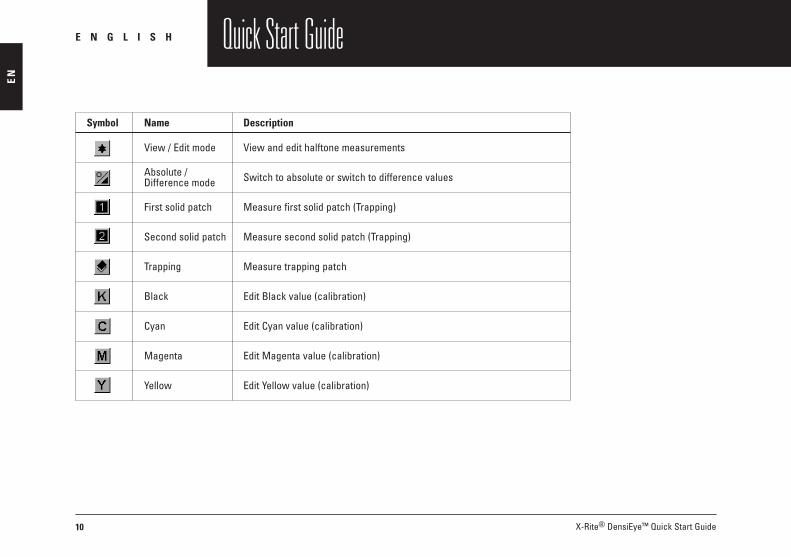
Symbol Name Description
View / Edit mode View and edit halftone measurements
Absolute / Difference mode Switch to absolute or switch to difference values
First solid patch Measure first solid patch (Trapping)
Second solid patch Measure second solid patch (Trapping)
Trapping Measure trapping patch
Black Edit Black value (calibration)
Cyan Edit Cyan value (calibration)
Magenta Edit Magenta value (calibration)
Yellow Edit Yellow value (calibration)

Quick Start Guide Quick Start Guide E N G L I S H
11X-Rite® DensiEye™ Quick Start Guide
EN
Symbol Name Description
Pass/Fail Switch Pass/Fail indicator on and off
White base Set white base to paper white or absolute white
Scale graduation Set scale graduation for print characteristics
Decimal places Set number of decimal places for density
Turn display Turn display for right- or left handed operation
Instrument type Display device type information
Language Select language

Quick Start GuideE N G L I S H
12 X-Rite® DensiEye™ Quick Start Guide
EN
10. Display and Pass/Fail indicator
Display layoutThedisplayisdividedintomainfields:•Header->displaysthebasicfunctionselected•Helpbar->displayshelponthespecificfunction•Symbolfield->displayssymbolsandmeasuringsequencesfornavigationviaoptionsandmenus•Outputfield->displaystheresults•Statusfield->displaysstatusmessages(thelengthofthedisplayismodifieddynamically):
•DensityfiltersettingAuto,Cyan,Magenta,YellowandBlack•Selectedreferencesetfordifferencedisplay
Symbol field
Header
Status field
Output field
Help bar

Quick Start Guide Quick Start Guide E N G L I S H
13X-Rite® DensiEye™ Quick Start Guide
EN
Message boxMessages as “White measurement done“ and error messages will be displayed in the in the message box, within the output field.
Pass/Fail IndicatorPass/Fail is indicated by a green and red LED on top of the measuring head next to the display for the functions Density, Dot Gain and Gray balance.
Pass/Fail information on the displayIf the measured value is within tolerance a check mark behind the value is displayed.If the measured value is out of tolerance an “arrow up” or “arrow down” will be displayed.
11. Function selection •Therequiredfunctionispre-selectedinthemenuusingtheUp/Downbuttons•PressingtheEnterbuttoninthemainmenuopensthedisplaywindowforthefunction•PressingtheEnterbuttoninapopupmenuactivatestheselectedsetting
12. Symbol selection•Therequiredsymbolispre-selectedusingtheUp/Downbuttons• Depending on the functionality of the symbols, as described in the previous chapters, the Enter button needs to be pressed or a
measurement initiated

Quick Start GuideE N G L I S H
14 X-Rite® DensiEye™ Quick Start Guide
EN
13. Positioning and measurement•Theprintedsheetshouldalwaysbeplacedonastablemeasuringbase•PositiontheDensiEyeonthemeasuringfieldusingthemeasuringdiaphragm•Byloweringthemeasuringhead,themeasuringdiaphragmispulledbackandameasurementisinitiated•Themeasuringheadcanbeliftedoffagainoncethemeasuringresultshavebeendisplayed,oramessage
14. Calibration•Theprerequisiteforprecisemeasuringresultsisthecalibrationofthedeviceusingtherelevantcalibrationcard•Thedensitystandardandthefilteronthecalibrationcardmustmatchthedevicedata•PaperwhitebaseorabsolutewhitebasemustbeselectedbeforecalibrationusingtheFunctionSettingsmenubarinthemainmenu•SelecttheCalibrationfunctioninthemainmenu•Dependingonthewhitebase,“CalibrationPaper”or“CalibrationAbsolute”willbedisplayedintheheaderrow• The relevant reference values for paper white or absolute white standard on the calibration card should be used, depending on the white base
selected•Calibratethedeviceaccordingtotheinstructionsgiveninthehelpbar•X-Riterecommendscheckingthecalibrationusingdensitymeasurements•X-Riterecommendsusingacalibrationcardonlyifmultipledevicesneedtobecalibrated
Quick Start Guide Quick Start Guide E N G L I S H
15X-Rite® DensiEye™ Quick Start Guide
EN
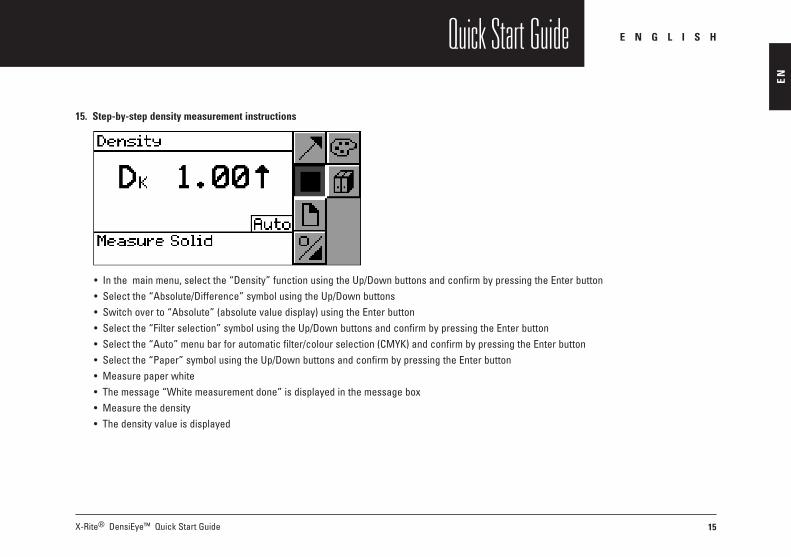
15. Step-by-step density measurement instructions
•Inthemainmenu,selectthe“Density”functionusingtheUp/DownbuttonsandconfirmbypressingtheEnterbutton•Selectthe“Absolute/Difference”symbolusingtheUp/Downbuttons•Switchoverto“Absolute”(absolutevaluedisplay)usingtheEnterbutton•Selectthe“Filterselection”symbolusingtheUp/DownbuttonsandconfirmbypressingtheEnterbutton•Selectthe“Auto”menubarforautomaticfilter/colourselection(CMYK)andconfirmbypressingtheEnterbutton•Selectthe“Paper”symbolusingtheUp/DownbuttonsandconfirmbypressingtheEnterbutton•Measurepaperwhite•Themessage“Whitemeasurementdone”isdisplayedinthemessagebox•Measurethedensity•Thedensityvalueisdisplayed

Quick Start GuideE N G L I S H
16 X-Rite® DensiEye™ Quick Start Guide
EN
16. Auto Mode (DensiEye 700 only)This function automatically detects the Solid, Halftone, Trapping and Grey Balance measurement fields. To do this, the solid colour density fields must first be measured in accordance with the printing sequence.
17. Warranty registration In order to receive technical support, you need to register your new DensiEyeToregistertheDensiEyeyoucaneithercompleteandreturntheregistrationcardorregisteritonlineathttp://www.xrite.com.
18. RecertificationX-Rite recommends annual re-certification of the DensiEye reflectance densitometer. Contact your X-Rite dealer or your nearest X-Rite Service Centre for more information on the recertification process.
19. ServiceNever try to repair the X-Rite DensiEye yourself in any circumstancesAll warranty claims are immediately invalidated if the device is opened without authorisation.Contact X-Rite Support or your nearest X-Rite Service Centre if you think the device is no longer functioning or is not functioning correctly.

Quick Start Guide Quick Start Guide E N G L I S H
17X-Rite® DensiEye™ Quick Start Guide
EN
20. CE declaration of conformity
The undersigned declare for and on behalf of the manufacturer X-Rite Althardstrasse 70 CH-8105 Regensdorf Switzerland
that the product Reflectance densitometer DensiEye™700, DensiEye™100
isinconformitywiththeprovisionsofthefollowingCEdirective(s)(includingallapplicableamendments):73/23/EEC Electrical equipment for use within specified voltage limits89/336/EEC Electromagnetic compatibility and the standards and/or technical specifications referenced overleaf have been applied.
ThelasttwodigitsoftheyearinwhichtheCEmarkingwasaffixed:03
CH-8105 Regensdorf, Switzerland Dr. Iris Mangelschots Christian BenzFebruary 18th 2004 Vice President Product Manager

X-Rite® DensiEye™ Kurzanleitung
Inhaltsverzeichnis
1. Sicherheitshinweise . . . . . . . . . . . . . . . . . . . . . . . . . . . . . . . . . . . . . . . . . . . . . . . . . . . . . . . . . . . . . . . . . . . . . . . . . . . . . . . . . . . . . . . . . . . . . . . . . . . . . . . . . . . 2 2. Lieferumfang . . . . . . . . . . . . . . . . . . . . . . . . . . . . . . . . . . . . . . . . . . . . . . . . . . . . . . . . . . . . . . . . . . . . . . . . . . . . . . . . . . . . . . . . . . . . . . . . . . . . . . . . . . . . . . . . . . 33. Verpackung und Transport . . . . . . . . . . . . . . . . . . . . . . . . . . . . . . . . . . . . . . . . . . . . . . . . . . . . . . . . . . . . . . . . . . . . . . . . . . . . . . . . . . . . . . . . . . . . . . . . . . . . . . 44. Funktionselemente . . . . . . . . . . . . . . . . . . . . . . . . . . . . . . . . . . . . . . . . . . . . . . . . . . . . . . . . . . . . . . . . . . . . . . . . . . . . . . . . . . . . . . . . . . . . . . . . . . . . . . . . . . . . . 55. Messkopf entriegeln und verriegeln . . . . . . . . . . . . . . . . . . . . . . . . . . . . . . . . . . . . . . . . . . . . . . . . . . . . . . . . . . . . . . . . . . . . . . . . . . . . . . . . . . . . . . . . . . . . . . 6 6. Fabrikeinstellungen . . . . . . . . . . . . . . . . . . . . . . . . . . . . . . . . . . . . . . . . . . . . . . . . . . . . . . . . . . . . . . . . . . . . . . . . . . . . . . . . . . . . . . . . . . . . . . . . . . . . . . . . . . . . 67. Standard Tasten . . . . . . . . . . . . . . . . . . . . . . . . . . . . . . . . . . . . . . . . . . . . . . . . . . . . . . . . . . . . . . . . . . . . . . . . . . . . . . . . . . . . . . . . . . . . . . . . . . . . . . . . . . . . . . . 78. Spezialtasten und Tastenkombinationen . . . . . . . . . . . . . . . . . . . . . . . . . . . . . . . . . . . . . . . . . . . . . . . . . . . . . . . . . . . . . . . . . . . . . . . . . . . . . . . . . . . . . . . . . . 89. Symbole und ihre Funktionalität. . . . . . . . . . . . . . . . . . . . . . . . . . . . . . . . . . . . . . . . . . . . . . . . . . . . . . . . . . . . . . . . . . . . . . . . . . . . . . . . . . . . . . . . . . . . . . . . . . 910. Anzeige und Pass/Fail Anzeige . . . . . . . . . . . . . . . . . . . . . . . . . . . . . . . . . . . . . . . . . . . . . . . . . . . . . . . . . . . . . . . . . . . . . . . . . . . . . . . . . . . . . . . . . . . . . . . . . 1211. Funktionswahl . . . . . . . . . . . . . . . . . . . . . . . . . . . . . . . . . . . . . . . . . . . . . . . . . . . . . . . . . . . . . . . . . . . . . . . . . . . . . . . . . . . . . . . . . . . . . . . . . . . . . . . . . . . . . . . . 1312. Symbolwahl . . . . . . . . . . . . . . . . . . . . . . . . . . . . . . . . . . . . . . . . . . . . . . . . . . . . . . . . . . . . . . . . . . . . . . . . . . . . . . . . . . . . . . . . . . . . . . . . . . . . . . . . . . . . . . . . . . 1313. Positionierung und Messung . . . . . . . . . . . . . . . . . . . . . . . . . . . . . . . . . . . . . . . . . . . . . . . . . . . . . . . . . . . . . . . . . . . . . . . . . . . . . . . . . . . . . . . . . . . . . . . . . . . 1414. Kalibration . . . . . . . . . . . . . . . . . . . . . . . . . . . . . . . . . . . . . . . . . . . . . . . . . . . . . . . . . . . . . . . . . . . . . . . . . . . . . . . . . . . . . . . . . . . . . . . . . . . . . . . . . . . . . . . . . . . 1415. Dichte messen Schritt für Schritt . . . . . . . . . . . . . . . . . . . . . . . . . . . . . . . . . . . . . . . . . . . . . . . . . . . . . . . . . . . . . . . . . . . . . . . . . . . . . . . . . . . . . . . . . . . . . . . 1516. Auto Mode . . . . . . . . . . . . . . . . . . . . . . . . . . . . . . . . . . . . . . . . . . . . . . . . . . . . . . . . . . . . . . . . . . . . . . . . . . . . . . . . . . . . . . . . . . . . . . . . . . . . . . . . . . . . . . . . . . . 1617. Garantie Registration . . . . . . . . . . . . . . . . . . . . . . . . . . . . . . . . . . . . . . . . . . . . . . . . . . . . . . . . . . . . . . . . . . . . . . . . . . . . . . . . . . . . . . . . . . . . . . . . . . . . . . . . . 1618. Rezertifizierung . . . . . . . . . . . . . . . . . . . . . . . . . . . . . . . . . . . . . . . . . . . . . . . . . . . . . . . . . . . . . . . . . . . . . . . . . . . . . . . . . . . . . . . . . . . . . . . . . . . . . . . . . . . . . . . 1619. Service . . . . . . . . . . . . . . . . . . . . . . . . . . . . . . . . . . . . . . . . . . . . . . . . . . . . . . . . . . . . . . . . . . . . . . . . . . . . . . . . . . . . . . . . . . . . . . . . . . . . . . . . . . . . . . . . . . . . . . 1620. CEKonformitätserklärung . . . . . . . . . . . . . . . . . . . . . . . . . . . . . . . . . . . . . . . . . . . . . . . . . . . . . . . . . . . . . . . . . . . . . . . . . . . . . . . . . . . . . . . . . . . . . . . . . . . . . . 17
DensiEye™ ist ein registriertes Warenzeichen von X-Rite, Incorporated und ihren angegliederten Unternehmen.
Kurzanleitung D E U T S C H
DE
KurzanleitungD E U T S C H
2 X-Rite® DensiEye™ Kurzanleitung
DE
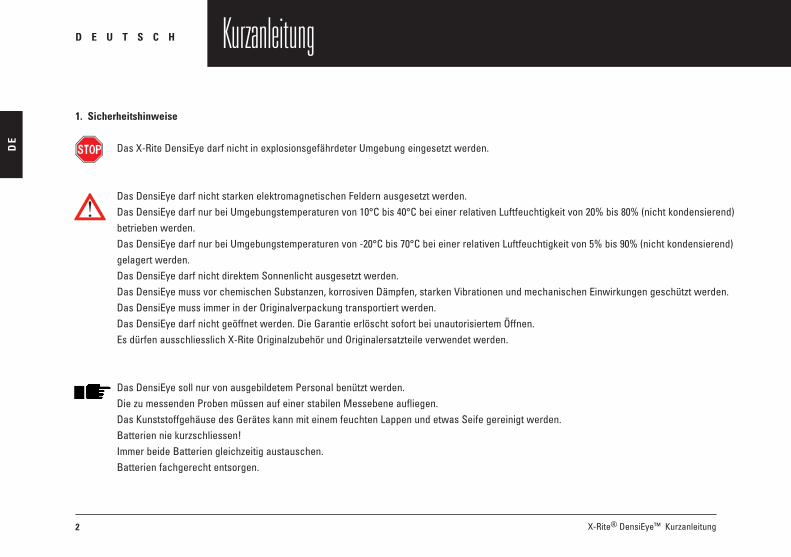
1. Sicherheitshinweise
Das X-Rite DensiEye darf nicht in explosionsgefährdeter Umgebung eingesetzt werden.
Das DensiEye darf nicht starken elektromagnetischen Feldern ausgesetzt werden. Das DensiEye darf nur bei Umgebungstemperaturen von 10°C bis 40°C bei einer relativen Luftfeuchtigkeit von 20% bis 80% (nicht kondensierend) betrieben werden.Das DensiEye darf nur bei Umgebungstemperaturen von -20°C bis 70°C bei einer relativen Luftfeuchtigkeit von 5% bis 90% (nicht kondensierend) gelagert werden.Das DensiEye darf nicht direktem Sonnenlicht ausgesetzt werden.Das DensiEye muss vor chemischen Substanzen, korrosiven Dämpfen, starken Vibrationen und mechanischen Einwirkungen geschützt werden.Das DensiEye muss immer in der Originalverpackung transportiert werden.Das DensiEye darf nicht geöffnet werden. Die Garantie erlöscht sofort bei unautorisiertem Öffnen.Es dürfen ausschliesslich X-Rite Originalzubehör und Originalersatzteile verwendet werden.
Das DensiEye soll nur von ausgebildetem Personal benützt werden.Die zu messenden Proben müssen auf einer stabilen Messebene aufliegen.DasKunststoffgehäusedesGeräteskannmiteinemfeuchtenLappenundetwasSeifegereinigtwerden.Batterien nie kurzschliessen!Immer beide Batterien gleichzeitig austauschen.Batterien fachgerecht entsorgen.

Kurzanleitung Kurzanleitung D E U T S C H
3X-Rite® DensiEye™ Kurzanleitung
DE
2. Lieferumfang
1 DensiEye 2 Kalibrationskarte3 USBKabel4 Kurzanleitung5 Geräte Zertifikat 6 Registrationskarte 7 CD mit Anleitungen und Software 8 GeräteKoffer
KurzanleitungD E U T S C H
4 X-Rite® DensiEye™ Kurzanleitung
DE
3. Verpackung und Transport
Das DensiEye muss immer in der Originalverpackung transportiert werden.
Kurzanleitung Kurzanleitung D E U T S C H
5X-Rite® DensiEye™ Kurzanleitung
DE
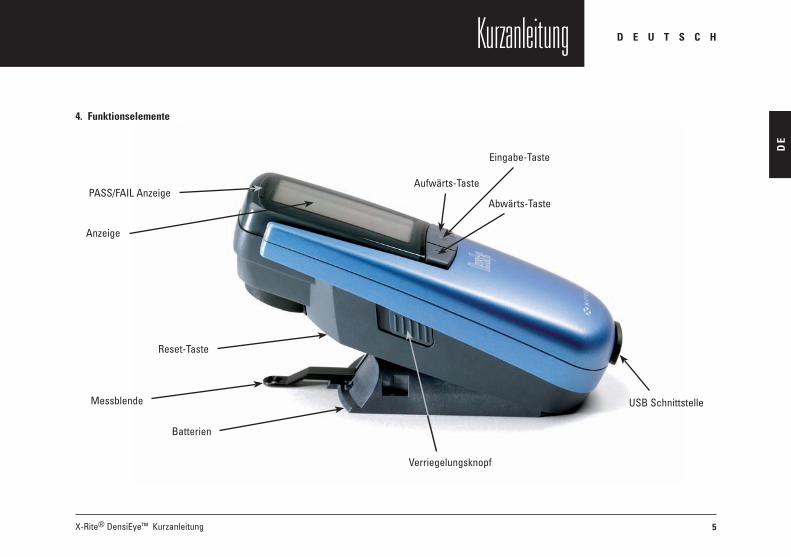
4. Funktionselemente
PASS/FAIL Anzeige
Verriegelungsknopf
Aufwärts-Taste
Abwärts-Taste
USB Schnittstelle
Reset-Taste
Eingabe-Taste
Batterien
Anzeige
Messblende

KurzanleitungD E U T S C H
6 X-Rite® DensiEye™ Kurzanleitung
DE
5. Messkopf entriegeln und verriegeln
Messkopfes entriegeln•EntriegelnSiedenMesskopf,indemSiedenVerriegelungsknopfaufderlinkenSeitedesMesskopfesnachhintenschieben•NachdemerstenÖffnenerscheintdasHauptmenü,bezugsweisediezuletztgewählteAnzeige•Nachca.30SekundenverlöschtdieAnzeige•DurchBetätigeneinerTasteschaltetdasDensiEyewiederein
Messkopf verriegeln•DensiEyezusammenklappenunddenVerriegelungsknopfaufderlinkenSeitedesMesskopfesnachvorneschieben•Nachca.30SekundenverlöschtdieAnzeige
6. Fabrikeinstellungen•Absolut/Differenz: Absolut•Weissbezug: Papier•ReferenzSet: 1.ReferenzSet•Filter/Farbwahl: Auto•Pass/Fail: Ausgeschaltet•Skalierungsstufe: 10%•AnzahlDezimalstellen: 2•Sprache: Englisch•Rechts/linkshändigeBedienung: RechtshändigeBedienung
Kurzanleitung Kurzanleitung D E U T S C H
7X-Rite® DensiEye™ Kurzanleitung
DE
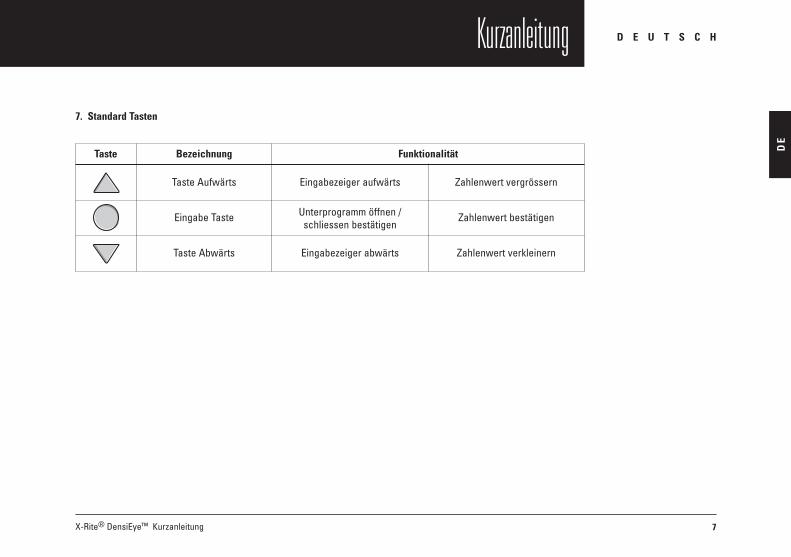
7. Standard Tasten
FunktionalitätTaste Bezeichnung
Taste Aufwärts Eingabezeiger aufwärts Zahlenwert vergrössern
Eingabe Taste
Unterprogramm öffnen / schliessen bestätigen
Zahlenwert bestätigen
Taste Abwärts Eingabezeiger abwärts Zahlenwert verkleinern

KurzanleitungD E U T S C H
8 X-Rite® DensiEye™ Kurzanleitung
DE
8. Spezialtasten und Tastenkombinationen
Taste (n) Beschreibung
Eingabe + Messen 1) Weissmessung ausführen
Reset Im Hauptmenü ist Auto Modus (DensiEye 700) oder Dichte (DensiEye 100) gewähltAlle Einstellungen bleiben erhalten
Reset + Eingabe 2) Im Hauptmenü ist Auto Modus (DensiEye 700) oder Dichte (DensiEye 100) gewähltAlle Einstellungen werden auf die Fabrikeinstellungen zurückgesetztDie Referenz- und Toleranzwerte bleiben erhalten.DieKalibrationwirdzurückgesetzt.DasGerätmussneukalibriertwerden
Eingabe (3 sec) Zurück in die Funktionswahl (Hauptmenü)
Eingabe (10 sec) Anzeige des Sprachauswahl Menüs
1) Sequenz: - Taste Eingabe drücken - Weissmessung ausführen - Taste Eingabe loslassen2) Sequenz: - Taste Reset drücken - Taste Eingabe drücken - Taste Reset loslassen - Taste Eingabe loslassen

Kurzanleitung Kurzanleitung D E U T S C H
9X-Rite® DensiEye™ Kurzanleitung
DE
9. Symbole und ihre Funktionalität
Symbol Bezeichnung Beschreibung
Zurück Das Programm kehrt in die nächst höhere Menüebene zurück, akzeptiert Daten
Papier Papierweissmessen/AbsolutweissReferenzmessen(Kalibration)
Filterwahl Dichte Filter wählen (automatisch oder manuell)
Referenzwahl Wahl eines von vier Referenz Sets
Vollton Volltonfeld messen / Volltonwert editieren oder messen
Rasterton 1 Rasterton 1 messen / Rastertonwert 1 editieren
Rasterton 2 Rasterton 2 messen / Rastertonwert 2 editieren
Rasterton 3 Rasterton 3 messen / Rastertonwert 3 editieren
Graubalance Graubalance Feld messen / Graubalancewert editieren oder messen
Beliebiges Messfeld Beliebiges Messfeld im Auto Mode messen

KurzanleitungD E U T S C H
10 X-Rite® DensiEye™ Kurzanleitung
DE
Symbol Bezeichnung Beschreibung
Ansicht/Editier Modus Anzeigen/editieren der Messwerte
Absolut/Differenz Modus Wechseln zu Absolut- oder wechseln zu Differenzwerten
Erster Vollton Erstgedruckten Vollton messen (Farbannahme)
Zweiter Vollton Zweitgedruckten Vollton messen (Farbannahme)
Farbannahme Übereinanderdruck messen (Farbannahme)
Schwarz SchwarzWerteditieren(Kalibration)
Cyan CyanWerteditieren(Kalibration)
Magenta MagentaWerteditieren(Kalibration)
Gelb GelbWerteditieren(Kalibration)
Kurzanleitung Kurzanleitung D E U T S C H
11X-Rite® DensiEye™ Kurzanleitung
DE
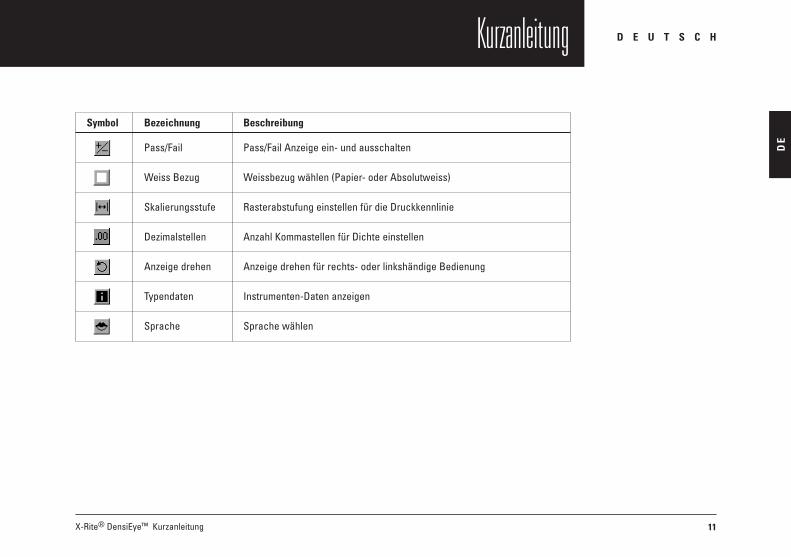
Symbol Bezeichnung Beschreibung
Pass/Fail Pass/Fail Anzeige ein- und ausschalten
Weiss Bezug Weissbezug wählen (Papier- oder Absolutweiss)
Skalierungsstufe Rasterabstufung einstellen für die Druckkennlinie
Dezimalstellen AnzahlKommastellenfürDichteeinstellen
Anzeige drehen Anzeige drehen für rechts- oder linkshändige Bedienung
Typendaten Instrumenten-Daten anzeigen
Sprache Sprache wählen

KurzanleitungD E U T S C H
12 X-Rite® DensiEye™ Kurzanleitung
DE
10. Anzeige und Pass/Fail Anzeige
AnzeigefelderDieAnzeigeistinHauptfelderunterteilt:•Kopfeile->zeigtdiegewählteBasisfunktion•Hilfezeile->zeigtfunktionsspezifischeHilfe•Symbolfeld->zeigtSymboleundMesssequenzenzurNavigationdurchOptionenundMenüs•Ausgabefeld->zeigtResultatean•Statusfeld->zeigtStatusmeldungenan(DieLängederAnzeigewirddynamischangepasst):
•DichtefiltereinstellungAuto,Cyan,Magenta,GelbundSchwarz•SelektiertesReferenz-SetfürdieDifferenzanzeige
Symbolfeld
Kopfzeile
Statusfeld
Ausgabefeld
Hilfezeile

Kurzanleitung Kurzanleitung D E U T S C H
13X-Rite® DensiEye™ Kurzanleitung
DE
Meldungs-BoxMeldungen wie “Weissmessung ausgeführt” oder Fehlermeldungen werden in der Meldungs-Box innerhalb des Ausgabefeldes angezeigt.
Pass/Fail AnzeigePass/Fail wird mit einer grünen und roten LED auf dem Messkopf angezeigt für die Funktionen Dichte, Zunahme und Graubalance.
Pass/Fail Informationen auf der AnzeigeWenn der gemessene Wert innerhalb der Toleranz liegt, wird ein Häkchen angezeigt.Wenn der gemessene Wert ausserhalb der Toleranz liegt, wird ein Pfeil nach oben oder unten angezeigt.
11. Funktionswahl •DiegewünschteFunktionimMenüwirdmittelsAufwärts-/Abwärts-Tastenvorgewählt•DurchBetätigenderEingabetasteimHauptmenüwirddasAnzeigefensterderFunktiongeöffnet•DurchBetätigenderEingabetasteineinemPopUpMenüwirddiegewählteEinstellungaktiv
12. Symbolwahl•DasgewünschteSymbolwirdmittelsAufwärts-/Abwärts-Tastenvorgewählt• JenachFunktionalitätderSymbolewieinvorangehendenKapitelnbeschriebenmussdieEingabetastebetätigtodereineMessung
ausgelöst werden

KurzanleitungD E U T S C H
14 X-Rite® DensiEye™ Kurzanleitung
DE
13. Positionierung und Messung•DasDruckerzeugnismussimmeraufeinerstabilenMessebeneaufliegen•DasDensiEyeaufdemMessfeldpositionierenmittelsderMessblende•DurchAbsenkendesMesskopfeswirddieMessblendezurückgezogenundeineMessungausgelöst•NachdemErscheinendesMessresultatesodereinerMeldungkannderMesskopfwiederangehobenwerden
14. Kalibration•VoraussetzungfürgenaueMessresultateistdieKalibrationdesGerätesmitderzugehörigenKalibrationskarte•DerDichteStandardunddasFilteraufderKalibrationskartemüssenmitdenGerätedatenübereinstimmen•Papierweiss-oderAbsolutweiss-BezugmussvorderKalibrationgewähltwerdenüberdieMenüzeileFunktionseinstellungenimHauptmenü•DieFunktionKalibrationimHauptmenüwählen•JenachWeissbezugerscheintinderKopfzeileKalibrationPapieroderKalibrationAbsolut• JenachWeissbezugsinddieentsprechendenReferenzwertefürPapierweiss-oderAbsolutweiss-BezugaufderKalibrationskartezu
verwenden•GerätkalibrierenanhandderAnweisungeninderHilfezeile•X-RiteempfiehltdieKalibrationmittelsDichtemessungenzuprüfen•X-RiteempfiehltnureineKalibrationskartezuverwenden,wennmehrereGerätekalibriertwerdenmüssen

Kurzanleitung Kurzanleitung D E U T S C H
15X-Rite® DensiEye™ Kurzanleitung
DE
15. Dichte messen Schritt für Schritt
•ImHauptmenüdieFunktion„Dichte“wählenmittelsAufwärts-/Abwärts-TastenundmitderEingabe-Tastebestätigen•Symbol„Absolut/Differenz“wählenmittelsAufwärts-/Abwärts-Tasten•Auf„Absolut“(AnzeigedesAbsolutwertes)umschaltenmittelsEingabe-Taste•Symbol„Filterwahl“wählenmittelsAufwärts-/Abwärts-TastenundmitderEingabe-Tastebestätigen•Menüzeile„Auto“fürautomatischeFilter/Farbwahl(CMYK)wählenundmitderEingabe-Tastebestätigen•Symbol„Papier“wählenmittelsAufwärts-/Abwärts-TastenundmitderEingabe-Tastebestätigen•Papierweissmessen•EserscheintdieMeldung„Papierweissgemessen“•Dichtemessen•AnzeigedesDichtewertes

KurzanleitungD E U T S C H
16 X-Rite® DensiEye™ Kurzanleitung
DE
16. Auto Mode (nur DensiEye 700)In dieser Funktion werden die Messfelder Vollton, Rasterton, Übereinanderdruck oder Graufeld automatisch erkannt. Dazu müssen zuerst die Volltondichtefelder entsprechend der Druckreihenfolge gemessen werden.
17. Garantie Registration Um technische Unterstützung zu erhalten, müssen Sie ihr neues DensiEye registrieren lassen.Zur Registrierung des DensiEye können Sie entweder die ausgefüllte Registrationskarte einsenden oder eine Online Registration unter http://www.xrite.comvornehmen.
18. RezertifizierungX-Rite empfiehlt eine jährliche Rezertifizierung des DensiEye Remissionsdensitometers. KontaktierenSieIhrenX-RiteHändleroderdasnächstgelegeneX-RiteServiceCenter,ummehrüberdieRezertifizierungzuerfahren.
19. ServiceVersuchen Sie auf keinen Fall das X-Rite DensiEye selber zu reparieren.Bei unbefugtem Öffnen des Gerätes erlöschen alle Garantieansprüche.KontaktierenSiedenX-RiteSupportoderdasnächstgelegeneX-RiteServiceCenter,wennSieglaubendasGerätfunktionierenicht mehr oder nicht mehr richtig.

Kurzanleitung Kurzanleitung D E U T S C H
17X-Rite® DensiEye™ Kurzanleitung
DE
20. CE Konformitätserklärung
Die Unterzeichner erklären in Vertretung des Herstellers X-Rite Althardstrasse 70 CH-8105 Regensdorf Switzerland
dass das Produkt Remissionsdensitometer DensiEye™700, DensiEye™100
mit den Bestimmungen der folgenden EU-Richtlinie(n) (einschliesslich aller zugehörigen Änderungen) der folgenden CE-Bestimmung (oderdennachfolgendenCE-Bestimmungen)entspricht,einschliesslichallezutreffendenErgänzungen:73/23/EEC Elektrische Geräte zum Einsatz innerhalb festgelegter Spannungsgrenzen89/336/EEC Elektromagnetische Verträglichkeitund dass die eingangs aufgeführten Normen und/oder technische Daten eingehalten wurden.
DieletztenbeidenDatenstellendesJahres,aufwelchesdieCE-Bezeichnungzutrifft:03
CH-8105 Regensdorf, Switzerland Dr. Iris Mangelschots Christian BenzFebruary 18th 2004 Vice President Product Manager


Mise en route F R A N Ç A I S
Mise en route – DensiEye™ de X-Rite®
FR
Table des matières
1. Consignes de sécurité . . . . . . . . . . . . . . . . . . . . . . . . . . . . . . . . . . . . . . . . . . . . . . . . . . . . . . . . . . . . . . . . . . . . . . . . . . . . . . . . . . . . . . . . . . . . . . . . . . . . . . . . . . 2 2. Contenu du coffret . . . . . . . . . . . . . . . . . . . . . . . . . . . . . . . . . . . . . . . . . . . . . . . . . . . . . . . . . . . . . . . . . . . . . . . . . . . . . . . . . . . . . . . . . . . . . . . . . . . . . . . . . . . . . 33. Emballage et transport. . . . . . . . . . . . . . . . . . . . . . . . . . . . . . . . . . . . . . . . . . . . . . . . . . . . . . . . . . . . . . . . . . . . . . . . . . . . . . . . . . . . . . . . . . . . . . . . . . . . . . . . . . 44. Éléments fonctionnels . . . . . . . . . . . . . . . . . . . . . . . . . . . . . . . . . . . . . . . . . . . . . . . . . . . . . . . . . . . . . . . . . . . . . . . . . . . . . . . . . . . . . . . . . . . . . . . . . . . . . . . . . . 55. Verrouillage et déverrouillage de la tête de mesure . . . . . . . . . . . . . . . . . . . . . . . . . . . . . . . . . . . . . . . . . . . . . . . . . . . . . . . . . . . . . . . . . . . . . . . . . . . . . . . . 6 6. Paramètres d’usine . . . . . . . . . . . . . . . . . . . . . . . . . . . . . . . . . . . . . . . . . . . . . . . . . . . . . . . . . . . . . . . . . . . . . . . . . . . . . . . . . . . . . . . . . . . . . . . . . . . . . . . . . . . . 67. Boutons standard . . . . . . . . . . . . . . . . . . . . . . . . . . . . . . . . . . . . . . . . . . . . . . . . . . . . . . . . . . . . . . . . . . . . . . . . . . . . . . . . . . . . . . . . . . . . . . . . . . . . . . . . . . . . . . 78. Boutons spéciaux et combinaisons de boutons . . . . . . . . . . . . . . . . . . . . . . . . . . . . . . . . . . . . . . . . . . . . . . . . . . . . . . . . . . . . . . . . . . . . . . . . . . . . . . . . . . . . 89. Symboles et fonctionnalités . . . . . . . . . . . . . . . . . . . . . . . . . . . . . . . . . . . . . . . . . . . . . . . . . . . . . . . . . . . . . . . . . . . . . . . . . . . . . . . . . . . . . . . . . . . . . . . . . . . . . 910. Écranetindicateurd’acceptation/refus(OK/Hors) . . . . . . . . . . . . . . . . . . . . . . . . . . . . . . . . . . . . . . . . . . . . . . . . . . . . . . . . . . . . . . . . . . . . . . . . . . . . . . . . 1211. Sélection de fonction . . . . . . . . . . . . . . . . . . . . . . . . . . . . . . . . . . . . . . . . . . . . . . . . . . . . . . . . . . . . . . . . . . . . . . . . . . . . . . . . . . . . . . . . . . . . . . . . . . . . . . . . . . 1312. Sélection d’un symbole . . . . . . . . . . . . . . . . . . . . . . . . . . . . . . . . . . . . . . . . . . . . . . . . . . . . . . . . . . . . . . . . . . . . . . . . . . . . . . . . . . . . . . . . . . . . . . . . . . . . . . . . 1313. Placement et mesure . . . . . . . . . . . . . . . . . . . . . . . . . . . . . . . . . . . . . . . . . . . . . . . . . . . . . . . . . . . . . . . . . . . . . . . . . . . . . . . . . . . . . . . . . . . . . . . . . . . . . . . . . . 1414. Étalonnage . . . . . . . . . . . . . . . . . . . . . . . . . . . . . . . . . . . . . . . . . . . . . . . . . . . . . . . . . . . . . . . . . . . . . . . . . . . . . . . . . . . . . . . . . . . . . . . . . . . . . . . . . . . . . . . . . . . 1415. Instructions pas à pas de mesure de la densité . . . . . . . . . . . . . . . . . . . . . . . . . . . . . . . . . . . . . . . . . . . . . . . . . . . . . . . . . . . . . . . . . . . . . . . . . . . . . . . . . . . 1516. Auto Mode . . . . . . . . . . . . . . . . . . . . . . . . . . . . . . . . . . . . . . . . . . . . . . . . . . . . . . . . . . . . . . . . . . . . . . . . . . . . . . . . . . . . . . . . . . . . . . . . . . . . . . . . . . . . . . . . . . . 1617. Enregistrement de la garantie . . . . . . . . . . . . . . . . . . . . . . . . . . . . . . . . . . . . . . . . . . . . . . . . . . . . . . . . . . . . . . . . . . . . . . . . . . . . . . . . . . . . . . . . . . . . . . . . . . 1618. Recertification . . . . . . . . . . . . . . . . . . . . . . . . . . . . . . . . . . . . . . . . . . . . . . . . . . . . . . . . . . . . . . . . . . . . . . . . . . . . . . . . . . . . . . . . . . . . . . . . . . . . . . . . . . . . . . . . 1619. Réparations . . . . . . . . . . . . . . . . . . . . . . . . . . . . . . . . . . . . . . . . . . . . . . . . . . . . . . . . . . . . . . . . . . . . . . . . . . . . . . . . . . . . . . . . . . . . . . . . . . . . . . . . . . . . . . . . . . 1620. Déclaration de conformité CEE . . . . . . . . . . . . . . . . . . . . . . . . . . . . . . . . . . . . . . . . . . . . . . . . . . . . . . . . . . . . . . . . . . . . . . . . . . . . . . . . . . . . . . . . . . . . . . . . . 17
DensiEye™ est une marque commerciale déposée de X-Rite, Incorporated et de ses filiales.
Mise en routeF R A N Ç A I S
2 Mise en route – DensiEye™ de X-Rite®
FR
1. Consignes de sécurité
Évitez d’utiliser le DensiEye de X-Rite dans un environnement comportant des risques d’explosion.
Évitez d’exposer le DensiEye à des champs électromagnétiques puissants. Le DensiEye est conçu pour fonctionner à des températures ambiantes comprises entre 10 °C et 40 °C, pour une humidité relative de 20 % à 80 % (sans condensation). Le DensiEye doit être conservé à une température ambiante comprise entre -20 °C et 70 °C, pour une humidité relative de 5 % à 90 % (sans condensation). Évitez d’exposer le DensiEye au rayonnement direct du soleil. Le DensiEye doit être maintenu à l’abri des substances chimiques, émanations corrosives, fortes vibrations et chocs mécaniques. Le DensiEye doit toujours être transporté dans son emballage d’origine. Il est interdit d’ouvrir le DensiEye. Toute ouverture non autorisée de l’instrument entraîne l’annulation immédiate de la garantie. N’utilisez que des accessoires et pièces détachées d’origine X-Rite.
Seul le personnel formé à ce titre doit être habilité à utiliser l’instrument DensiEye. Les échantillons mesurés doivent être placés sur un-plan-stable. Le boîtier plastique de l’instrument peut se nettoyer à l’aide d’un chiffon humidifié et d’un peu de savon. Ne court-circuitez jamais les piles ! Remplacez toujours les deux piles en même temps. Conformez-vous à la législation en vigueur pour jeter les piles usagées.

Mise en route Mise en route F R A N Ç A I S
3Mise en route – DensiEye™ de X-Rite®
FR
2. Contenu du coffret
1 DensiEye 2 Carte d’étalonnage 3 Câble USB 4 Mise en route 5 Certificat de l’instrument 6 Carte d’enregistrement 7 CD contenant les instructions d’utilisation et le logiciel 8 Boîtier
Mise en routeF R A N Ç A I S
4 Mise en route – DensiEye™ de X-Rite®
FR
3. Emballage et transport
Le DensiEye doit toujours être transporté dans son emballage d’origine.

Mise en route Mise en route F R A N Ç A I S
5Mise en route – DensiEye™ de X-Rite®
FR
4. Éléments fonctionnels
Indicateur d’acceptation/ refus(OK/Hors)
Curseur de verrouillage
Bouton Haut
Bouton Bas
Bouton de réinitialisation
Bouton Entrée
Piles
Écran
Diaphragme

Mise en routeF R A N Ç A I S
6 Mise en route – DensiEye™ de X-Rite®
FR
5. Verrouillage et déverrouillage de la tête de mesure
Déverrouillage de la tête de mesure• Pourdébloquerlatêtedemesure,poussezversl’arrièrelecurseursituésurlecôtégauchedelatêtedemesure.• Lorsquel’instrumentestouvertpourlapremièrefois,lemenuprincipals’ouvreetafficheledernierécransélectionnécommeréférence.• L’écrans’éteintauboutd’unetrentainedesecondes.• VouspouvezensuiterallumerleDensiEyeenappuyantsurn’importequelbouton.
Verrouillage de la tête de mesure• RepliezleDensiEyeetrepoussezversl’avantlecurseursituésurlecôtégauchedelatêtedemesure.• L’écrans’éteintauboutd’unetrentainedesecondes.
6. Paramètres d’usine• Absolu/Différence: Absolu• Blancdebase: Papier• Référence: Référence1• Sélectionfiltre/couleur: Auto• Acceptation/refus(OK/Hors): Off• Échelle: 10%• Nombrededécimales: 2• Langue: Français• Droitier/gaucher: Droitier

Mise en route Mise en route F R A N Ç A I S
7Mise en route – DensiEye™ de X-Rite®
FR
7. Boutons standard
Bouton Nom Fonctionnalité
Bouton Haut Fait monter le curseur. Augmente la valeur numérique.
Bouton Entrée Confirme l’ouverture/fermeture du sous-programme.
Confirme la valeur numérique.
Bouton Bas Fait descendre le curseur. Réduit la valeur numérique.

Mise en routeF R A N Ç A I S
8 Mise en route – DensiEye™ de X-Rite®
FR
8. Boutons spéciaux et combinaisons de boutons
Bouton(s) Description
Entrée + Mesure 1) Exécute une mesure du blanc.
Réinitialisation Mode automatique (DensiEye 700) ou Densité (DensiEye 100) est sélectionné dans le menu principal.Tous les paramètres sont conservés.
Réinitialisation + Entrée 2)
Mode automatique (DensiEye 700) ou Densité (DensiEye 100) est sélectionné dans le menu principal.Tous les paramètres sont remplacés par les paramètres d’usine.Les valeurs de référence et de tolérance sont conservées.L’étalonnage est réinitialisé. L’instrument doit être réétalonné.
Entrée (3 secondes) Retour à la sélection de fonction (menu principal).
Entrée (10 secondes) Affiche le menu de sélection de la langue.
1)Séquence: - Appuyez sur le bouton Entrée. - Exécutez une mesure du blanc. - Relâchez le bouton Entrée.
2)Séquence: - Appuyez sur le bouton de réinitialisation. - Appuyez sur le bouton Entrée. - Relâchez le bouton de réinitialisation. - Relâchez le bouton Entrée.

Mise en route Mise en route F R A N Ç A I S
9Mise en route – DensiEye™ de X-Rite®
FR
9. Symboles et fonctionnalités
Symbole Nom Description
Retour Le programme revient au prochain menu supérieur et accepte les données.
Papier Mesure le blanc papier. / Mesure la référence du blanc absolu (étalonnage).
Sélection du filtre Sélectionne le filtre de densité (automatique ou manuel).
Sélection de la référence Sélectionne une référence parmi les quatre disponibles.
Aplat Mesure un aplat. / Modifie ou mesure la référence d’aplat.
Demi-ton 1 Mesure le demi-ton 1. / Modifie la référence demi-ton 1.
Demi-ton 2 Mesure le demi-ton 2. / Modifie la référence demi-ton 2.
Demi-ton 3 Mesure le demi-ton 3. / Modifie la référence demi-ton 3.
Balance de gris Mesure la plage de balance de gris. / Modifie ou mesure la référence de balance de gris.
Toute plage Mesure n’importe quelle plage par la fonction Auto Mode.

Mise en routeF R A N Ç A I S
10 Mise en route – DensiEye™ de X-Rite®
FR
Symbole Nom Description
Mode Affichage/ Modification Affiche et modifie les mesures de demi-tons.
Mode Absolu/ Différence Alterne entre valeurs absolues et différentielles.
Premier aplat Mesure la première zone en aplat (superposition).
Deuxième aplat Mesure la deuxième zone en aplat (superposition).
Superposition Mesure une zone en superposition.
Noir Modifie la valeur du noir (étalonnage).
Cyan Modifie la valeur du cyan (étalonnage).
Magenta Modifie la valeur du magenta (étalonnage).
Jaune Modifie la valeur du jaune (étalonnage).

Mise en route Mise en route F R A N Ç A I S
11Mise en route – DensiEye™ de X-Rite®
FR
Symbole Nom Description
Acceptation/refus Activeoudésactivel’indicateurd’acceptation/refus(OK/Hors).
Blanc de base Définitleblancdebase:blancpapierouleblancabsolu.
Graduation Définit la graduation de la courbe caractéristique.
Nombre de décimales Définit le nombre de décimales pour les densités.
Rotation d’écran Oriente l’écran pour un gaucher ou un droitier.
Type d’instrument Affiche des informations sur le type de l’appareil.
Langue Sélectionne la langue de travail.

Mise en routeF R A N Ç A I S
12 Mise en route – DensiEye™ de X-Rite®
FR
10. Écran et indicateur d’acceptation/refus (OK/Hors)
Organisation de l’écranL’écranestorganiséenchamps:•En-tête->Affichelafonctiondebasesélectionnée.•Barred’aide->Affichelarubriqued’aided’unefonctionspécifique.•Champdesymboles->Affichedessymbolesd’exécutiondemesureetdenavigationdanslesoptionsetlesmenus.•Champderésultat->Affichelesrésultats.•Champd’état->Affichedesmessagesd’état(lalongueurduchampestmodifiéedynamiquement):
•ConfigurationdufiltrededensitéAuto,Cyan,Magenta,JauneetNoir•Référencesélectionnéepourl’affichagedesdifférences
Champ de symboles
En-tête
Champ d’état
Champ de résultat
Barre d’aide
Mise en route Mise en route F R A N Ç A I S
13Mise en route – DensiEye™ de X-Rite®
FR
Zone des messagesCette zone, située dans le champ de résultat, affiche des messages du type « Blanc papier réalisé » ou des messages d’erreur.
Indicateur d’acceptation/refus (OK/Hors)Unedioderougeouverteindiquesilamesureestacceptéeourefuséeenhautdelatêtedemesure,àcôtédel’affichagedesfonctionsDensité,Engraissement et Balance de gris.
Information d’acceptation/refus à l’écranSilavaleurmesuréeestdanslafourchettedetolérancespécifiée,unecocheapparaîtàcôtédelavaleur.Si la valeur mesurée est en dehors de la fourchette de tolérance, une flèche vers le haut ou vers le bas apparaît.
11. Sélection de fonction•Laprésélectiondelafonctionvoulues’effectuedanslemenuàl’aidedesboutonsHaut/Bas.•L’activationduboutonEntréeauniveaudumenuprincipalouvrelafenêtrecorrespondantàlafonctionsélectionnée.•L’activationduboutonEntréeauniveaud’unmenulocalactiveleparamètresélectionné.
12. Sélection d’un symbole•Laprésélectiondusymbolevoulus’effectueàl’aidedesboutonsHaut/Bas.• Selon la fonctionnalité du symbole (décrite dans les chapitres précédents), vous devez appuyer sur le bouton Entrée ou
entamer une mesure.

Mise en routeF R A N Ç A I S
14 Mise en route – DensiEye™ de X-Rite®
FR
13. Placement et mesure•Lafeuilled’impressiondoittoujoursêtreplacéesurunplandemesurestable.•PositionnezleDensiEyesurlechampdemesureenvousaidantdudiaphragme.•Lesimplefaitd’abaisserlatêtedemesureentraîneleretraitdudiaphragmeetdéclenchelamesure.•Latêtedemesurepeutêtrerelevéedèsquelesrésultatsapparaissentouqu’unmessages’affiche.
14. Étalonnage•Laprécisiondesrésultatsdemesurevadépendredel’étalonnagedel’instrumentàl’aidedelacarted’étalonnageappropriée.•Lestandarddensitométriqueetletypedefiltrementionnésurlacarted’étalonnagedoiventcorrespondreauxinformationsdutyped’appareil.• Avant de procéder à l’étalonnage, sélectionnez un blanc de base, blanc papier ou blanc absolu à partir de la barre de menus Paramètres
du-menu-principal.•Danslemenuprincipal,sélectionnezlafonction«Calibration».•Selonlabaseblanchesélectionnée,«CalibrationPapier»ou«CalibrationAbsolu»s’affichedansl’en-tête.• Selon la base blanche sélectionnée, vous devez utiliser les valeurs de référence du blanc papier ou du blanc absolu sur la carte d’étalonnage.•Étalonnezl’instrumentconformémentauxinstructionsfourniesdanslabarred’aide.•X-Ritepréconiseunemesuredeladensitéenvuedevérifierl’étalonnage.•X-Ritepréconisel’utilisationd’unecarted’étalonnageuniquelorsqueplusieursdispositifsdoiventêtreétalonnés.

Mise en route Mise en route F R A N Ç A I S
15Mise en route – DensiEye™ de X-Rite®
FR
15. Instructions pas à pas de mesure de la densité
•Danslemenuprincipal,sélectionnezlafonction«Densité»àl’aidedesboutonsHaut/BasetvalidezvotrechoixenappuyantsurleboutonEntrée.•Sélectionnezlesymbole«Absolu/Différence»àl’aidedesboutonsHaut/Bas.•Basculezvers«Absolu»(affichagedelavaleurabsolue)àl’aideduboutonEntrée.•Sélectionnezlesymbole«Sélectiondufiltre»àl’aidedesboutonsHaut/BasetvalidezvotrechoixenappuyantsurleboutonEntrée.• Sélectionnez la barre de menus « Auto » pour activer la sélection automatique du filtre et de la couleur (CMJN) et validez votre choix en appuyant
sur le bouton Entrée.•Sélectionnezlesymbole«Papier»àl’aidedesboutonsHaut/BasetvalidezvotrechoixenappuyantsurleboutonEntrée.•Mesurezleblancpapier.•Lemessage«Blancpapierréalisé»s’affichedanslazonedemessages.•Mesurezladensité.•Lavaleurdedensitémesurées’affiche.
Mise en routeF R A N Ç A I S
16 Mise en route – DensiEye™ de X-Rite®
FR
16. Auto Mode (DensiEye 700 uniquement)Cette fonction détecte les champs de mesure d’aplat, de demi-ton, de superposition d’encres ou de balance de gris. Pour ce faire, les champs de densité des couleurs en aplat doivent d’abord être mesurés conformément à l’ordre d’impression.
17. Enregistrement de la garantieSi vous souhaitez pouvoir bénéficier d’une assistance technique, vous devez enregistrer votre nouveau DensiEye. Vous pouvez pour ce faire, soit renvoyer la carte d’enregistrement dûment complétée, soit enregistrer le DensiEye en ligne sur le site http://www.xrite.com.
18. RecertificationX-Rite recommande une recertification annuelle pour le densitomètre à réflectance DensiEye. Si vous souhaitez de plus amples informations sur le processus de recertification, veuillez contacter votre revendeur X-Rite ou votre centre de service X-Rite le plus proche.
19. RéparationsN’essayez jamais, en aucun cas, de réparer le DensiEye de X-Rite vous-même. Toute ouverture non autorisée de l’instrument entraîne l’annulation immédiate de la garantie. Si vous pensez que l’instrument ne fonctionne plus ou qu’il ne donne plus entière satisfaction, contactez l’assistance X-Rite ou votre centre de service X-Rite le plus proche.

Mise en route Mise en route F R A N Ç A I S
17Mise en route – DensiEye™ de X-Rite®
FR
20. Déclaration de conformité CEE
Je, soussigné, agissant au nom de et pour le compte du constructeur X-Rite Althardstrasse 70 CH-8105 Regensdorf
déclare que le produit Densitomètre à réflectance DensiEye™700, DensiEye™100
estconformeauxdispositionsdesdirectivesCEEsuivantes(ycompristouslesamendementsd’application):73/23/CEE Matériel électrique destiné à être employé dans certaines limites de tension89/336/CEE La compatibilité électromagnétique et toutes les normes ou spécifications techniques en référence au verso ont été respectées.
Deuxdernierschiffresdel’annéependantlaquellelemarquageCEEaétéapposé:03
CH-8105 Regensdorf, Suisse Iris Mangelschots Christian Benz 18 février 2004 Vice-présidente Chef de produit


Guida introduttiva I T A L I A N O
X-Rite® DensiEye™ – Guida introduttiva
IT
Sommario
1. Norme di sicurezza . . . . . . . . . . . . . . . . . . . . . . . . . . . . . . . . . . . . . . . . . . . . . . . . . . . . . . . . . . . . . . . . . . . . . . . . . . . . . . . . . . . . . . . . . . . . . . . . . . . . . . . . . . . . 2 2. Contenuto della confezione . . . . . . . . . . . . . . . . . . . . . . . . . . . . . . . . . . . . . . . . . . . . . . . . . . . . . . . . . . . . . . . . . . . . . . . . . . . . . . . . . . . . . . . . . . . . . . . . . . . . . 3 3. Imballaggio e trasporto . . . . . . . . . . . . . . . . . . . . . . . . . . . . . . . . . . . . . . . . . . . . . . . . . . . . . . . . . . . . . . . . . . . . . . . . . . . . . . . . . . . . . . . . . . . . . . . . . . . . . . . . . 4 4. Elementi funzionali . . . . . . . . . . . . . . . . . . . . . . . . . . . . . . . . . . . . . . . . . . . . . . . . . . . . . . . . . . . . . . . . . . . . . . . . . . . . . . . . . . . . . . . . . . . . . . . . . . . . . . . . . . . . . 5 5. Blocco e sblocco della testina di misurazione . . . . . . . . . . . . . . . . . . . . . . . . . . . . . . . . . . . . . . . . . . . . . . . . . . . . . . . . . . . . . . . . . . . . . . . . . . . . . . . . . . . . . 6 6. Impostazioni di fabbrica . . . . . . . . . . . . . . . . . . . . . . . . . . . . . . . . . . . . . . . . . . . . . . . . . . . . . . . . . . . . . . . . . . . . . . . . . . . . . . . . . . . . . . . . . . . . . . . . . . . . . . . . 6 7. Pulsanti standard . . . . . . . . . . . . . . . . . . . . . . . . . . . . . . . . . . . . . . . . . . . . . . . . . . . . . . . . . . . . . . . . . . . . . . . . . . . . . . . . . . . . . . . . . . . . . . . . . . . . . . . . . . . . . . 7 8. Pulsanti speciali e combinazioni di pulsanti . . . . . . . . . . . . . . . . . . . . . . . . . . . . . . . . . . . . . . . . . . . . . . . . . . . . . . . . . . . . . . . . . . . . . . . . . . . . . . . . . . . . . . . 8 9. Simboli e relativa descrizione. . . . . . . . . . . . . . . . . . . . . . . . . . . . . . . . . . . . . . . . . . . . . . . . . . . . . . . . . . . . . . . . . . . . . . . . . . . . . . . . . . . . . . . . . . . . . . . . . . . . 9 10. Display e indicatore Pass/Fail . . . . . . . . . . . . . . . . . . . . . . . . . . . . . . . . . . . . . . . . . . . . . . . . . . . . . . . . . . . . . . . . . . . . . . . . . . . . . . . . . . . . . . . . . . . . . . . . . . 12 11. Selezione delle funzioni . . . . . . . . . . . . . . . . . . . . . . . . . . . . . . . . . . . . . . . . . . . . . . . . . . . . . . . . . . . . . . . . . . . . . . . . . . . . . . . . . . . . . . . . . . . . . . . . . . . . . . . 13 12. Selezione dei simboli . . . . . . . . . . . . . . . . . . . . . . . . . . . . . . . . . . . . . . . . . . . . . . . . . . . . . . . . . . . . . . . . . . . . . . . . . . . . . . . . . . . . . . . . . . . . . . . . . . . . . . . . . . 13 13. Posizionamento e misurazione . . . . . . . . . . . . . . . . . . . . . . . . . . . . . . . . . . . . . . . . . . . . . . . . . . . . . . . . . . . . . . . . . . . . . . . . . . . . . . . . . . . . . . . . . . . . . . . . . 14 14. Calibrazione . . . . . . . . . . . . . . . . . . . . . . . . . . . . . . . . . . . . . . . . . . . . . . . . . . . . . . . . . . . . . . . . . . . . . . . . . . . . . . . . . . . . . . . . . . . . . . . . . . . . . . . . . . . . . . . . . . 14 15. Istruzioni dettagliate per la misurazione della densità . . . . . . . . . . . . . . . . . . . . . . . . . . . . . . . . . . . . . . . . . . . . . . . . . . . . . . . . . . . . . . . . . . . . . . . . . . . . . 15 16. Modalità Auto . . . . . . . . . . . . . . . . . . . . . . . . . . . . . . . . . . . . . . . . . . . . . . . . . . . . . . . . . . . . . . . . . . . . . . . . . . . . . . . . . . . . . . . . . . . . . . . . . . . . . . . . . . . . . . . . 16 17. Registrazione della garanzia . . . . . . . . . . . . . . . . . . . . . . . . . . . . . . . . . . . . . . . . . . . . . . . . . . . . . . . . . . . . . . . . . . . . . . . . . . . . . . . . . . . . . . . . . . . . . . . . . . . 16 18. Ricertificazione . . . . . . . . . . . . . . . . . . . . . . . . . . . . . . . . . . . . . . . . . . . . . . . . . . . . . . . . . . . . . . . . . . . . . . . . . . . . . . . . . . . . . . . . . . . . . . . . . . . . . . . . . . . . . . . 16 19. Assistenza . . . . . . . . . . . . . . . . . . . . . . . . . . . . . . . . . . . . . . . . . . . . . . . . . . . . . . . . . . . . . . . . . . . . . . . . . . . . . . . . . . . . . . . . . . . . . . . . . . . . . . . . . . . . . . . . . . . 16 20. Dichiarazione di conformità CE . . . . . . . . . . . . . . . . . . . . . . . . . . . . . . . . . . . . . . . . . . . . . . . . . . . . . . . . . . . . . . . . . . . . . . . . . . . . . . . . . . . . . . . . . . . . . . . . . 17
DensiEye™ è un marchio registrato di X-Rite, Incorported e delle relative consociate.

Guida introduttivaI T A L I A N O
2 X-Rite® DensiEye™ – Guida introduttiva
IT
1. Norme di sicurezza
X-Rite DensiEye non deve essere utilizzato in ambienti esposti a rischio di esplosione.
Non esporre DensiEye a forti campi elettromagnetici.DensiEye deve essere utilizzato solo a temperature ambiente comprese tra 10°C e 40°C, con un’umidità relativa dell’aria compresa tra il 20% e l’80% (senza condensa). DensiEye deve essere conservato solo a temperature ambiente comprese tra -20°C e 70°C, con un’umidità relativa dell’aria compresa tra il 5% e il 90% (senza condensa). Non esporre DensiEye alla luce diretta del sole.Proteggere DensiEye da agenti chimici, vapori corrosivi, forti vibrazioni e influssi meccanici.Trasportare sempre DensiEye nella confezione originale.Non aprire DensiEye. In caso di apertura non autorizzata, la garanzia perderà di validità.Usare solo accessori e pezzi di ricambio originali X-Rite.
DensiEye deve essere utilizzato da personale qualificato.I campioni da misurare devono essere collocati su una superficie di misurazione stabile. L’involucro in plastica dello strumento può essere pulito con un panno umido e una piccola quantità di detergente. Non mettere in corto circuito le batterie! Sostituire sempre le due batterie contemporaneamente. Smaltire le batterie secondo le norme vigenti.

Guida introduttiva Guida introduttiva I T A L I A N O
3X-Rite® DensiEye™ – Guida introduttiva
IT
2. Contenuto della confezione
1 DensiEye2 Scheda di calibrazione 3 Cavo USB 4 Guida di riferimento rapido 5 Certificato dello strumento 6 Scheda di registrazione 7 CD con software e istruzioni per l’uso 8 Custodia dello strumento

Guida introduttivaI T A L I A N O
4 X-Rite® DensiEye™ – Guida introduttiva
IT
3. Imballaggio e trasporto
Trasportare sempre DensiEye nella confezione originale.
Guida introduttiva Guida introduttiva I T A L I A N O
5X-Rite® DensiEye™ – Guida introduttiva
IT
4. Elementi funzionali
Indicatore PASSA/NON PASSA
Pulsante di blocco
Pulsante Su
Pulsante Giù
Interfaccia USB
Pulsante RESET
Pulsante Invio
Batterie
Display
Diaframma di misurazione

Guida introduttivaI T A L I A N O
6 X-Rite® DensiEye™ – Guida introduttiva
IT
5. Blocco e sblocco della testina di misurazione
Sblocco della testina di misurazione• Sbloccarelatestinaspingendoindietroilpulsantedibloccosullatosinistrodellatestinadimisurazione• Laprimavoltachesiaprelostrumentoverràvisualizzatoilmenuprincipaleconl’ultimaschermataselezionatacomeriferimento• Ildisplaysispegnedopocirca30secondi• PerriaccendereDensiEyepremereunpulsantequalsiasi
Blocco della testina di misurazione• RipiegareDensiEyeepremereinavantiilpulsantedibloccosullatosinistrodellatestinadimisurazione• Ildisplaysispegnedopocirca30secondi
6. Impostazioni di fabbrica• Assoluto/Differenza: Assoluto• BiancoBase: Carta• Referenza: 1°referenza• Selezionecolore/filtro: Auto• Pass/Fail: Off• Scala: 10%• Numerodicifredecimali: 2• Lingua: Inglese• Utilizzoconmanodestra/sinistra: Utilizzoconmanodestra

Guida introduttiva Guida introduttiva I T A L I A N O
7X-Rite® DensiEye™ – Guida introduttiva
IT
7. Pulsanti standard
Pulsante Nome Funzione
Pulsante Su Sposta il cursore verso l’alto Aumenta il valore numerico
Pulsante Invio Conferma apertura/chiusura del programma secondario
Conferma il valore numerico
Pulsante Giù Sposta il cursore verso il basso Riduce il valore numerico

Guida introduttivaI T A L I A N O
8 X-Rite® DensiEye™ – Guida introduttiva
IT
8. Pulsanti speciali e combinazioni di pulsanti
Pulsante/i Descrizione
Invio + misurazione 1) Esegue la misurazione del bianco
RESET Nel menu principale, selezionare Modalità Automatica (DensiEye 700) o Densità (DensiEye 100) Tutte le impostazioni vengono conservate
RESET 2) + Invio
Nel menu principale, selezionare Modalità Automatica (DensiEye 700) o Densità (DensiEye 100)Tutte le impostazioni vengono reimpostate sui valori di fabbricaI valori di referenza e tolleranza vengono conservatiLa calibrazione viene reimpostata. Lo strumento deve essere ricalibrato
Invio (3 sec) Torna alla selezione delle funzioni (menu principale)
Invio (10 sec) Visualizza il menu per la selezione della lingua
1)Sequenza: - Premere il pulsante Invio - Eseguire la misurazione del bianco - Rilasciare il pulsante Invio
2)Sequenza: - Premere il pulsante Reimposta - Premere il pulsante Invio - Rilasciare il pulsante Reimposta - Rilasciare il pulsante Invio
Guida introduttiva Guida introduttiva I T A L I A N O
9X-Rite® DensiEye™ – Guida introduttiva
IT
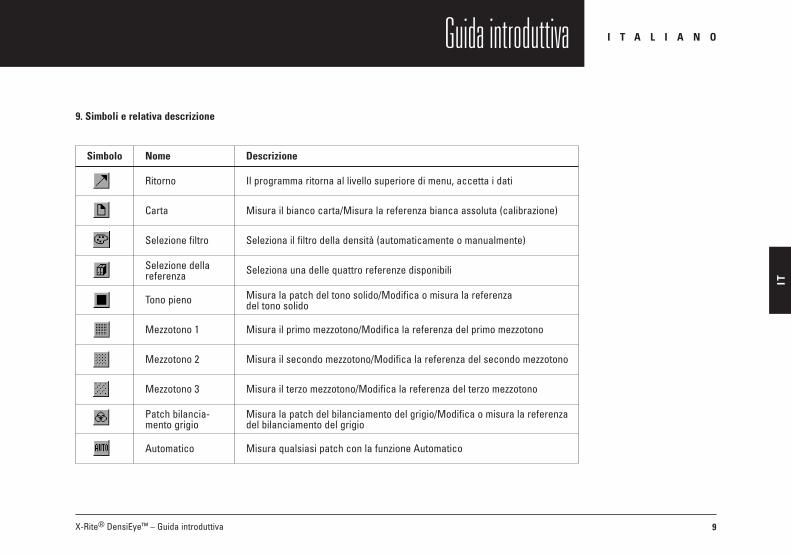
9. Simboli e relativa descrizione
Simbolo Nome Descrizione
Ritorno Il programma ritorna al livello superiore di menu, accetta i dati
Carta Misura il bianco carta/Misura la referenza bianca assoluta (calibrazione)
Selezione filtro Seleziona il filtro della densità (automaticamente o manualmente)
Selezione della referenza Seleziona una delle quattro referenze disponibili
Tono pieno Misura la patch del tono solido/Modifica o misura la referenza del tono solido
Mezzotono 1 Misura il primo mezzotono/Modifica la referenza del primo mezzotono
Mezzotono 2 Misura il secondo mezzotono/Modifica la referenza del secondo mezzotono
Mezzotono 3 Misura il terzo mezzotono/Modifica la referenza del terzo mezzotono
Patch bilancia- mento grigio
Misura la patch del bilanciamento del grigio/Modifica o misura la referenza del bilanciamento del grigio
Automatico Misura qualsiasi patch con la funzione Automatico

Guida introduttivaI T A L I A N O
10 X-Rite® DensiEye™ – Guida introduttiva
IT
Simbolo Nome Descrizione
Modalità Visua lizza/ Modifica Visualizza e modifica le misurazioni dei mezzitoni
Modalità Assoluto/ Differenza Passa ad Assoluto o ai valori di Differenza
Prima patch tono pieno Misura la prima patch del tono pieno (Sovrapposizione)
Seconda patch tono pieno Misura la seconda patch del tono pieno (Sovrapposizione)
Sovrapposizione Misura la patch di sovrapposizione
Nero Modifica il valore del nero (calibrazione)
Ciano Modifica il valore del ciano (calibrazione)
Magenta Modifica il valore del magenta (calibrazione)
Giallo Modifica il valore del giallo (calibrazione)

Guida introduttiva Guida introduttiva I T A L I A N O
11X-Rite® DensiEye™ – Guida introduttiva
IT
Simbolo Nome Descrizione
Pass/Fail Accende e spegne l'indicatore Pass/Fail
Bianco base Imposta il bianco base su bianco carta o bianco assoluto
Scala Imposta la scala per le caratteristiche di stampa
Cifre decimali Imposta il numero di cifre decimali per la densità
Gira display Gira il display per l'utilizzo con la mano destra o sinistra
Tipo di strumento Visualizza le informazioni sul tipo di strumento
Lingua Seleziona la lingua

Guida introduttivaI T A L I A N O
12 X-Rite® DensiEye™ – Guida introduttiva
IT
10. Display e indicatore Pass/Fail
Layout del displayIldisplayèsuddivisoinareeprincipali:•Intestazione->visualizzalafunzionedibaseselezionata•BarradellaGuida->visualizzainformazionisuunafunzionespecifica•Campodeisimboli->visualizzaisimbolielesequenzedimisurazioneperlospostamentoattraversoopzioniemenu•Campodeirisultati->visualizzairisultati•Campodistato->visualizzaimessaggidistato(lalunghezzadelcampovienemodificatainmododinamico):
•Impostazionefiltrodensità:Auto,Ciano,Magenta,GialloeNero•Referenzaselezionataperlavisualizzazionedelladifferenza
Campo dei simboli
Intestazione
Campo di stato
Campo dei-risultati
Barra della-Guida

Guida introduttiva Guida introduttiva I T A L I A N O
13X-Rite® DensiEye™ – Guida introduttiva
IT
Casella dei messaggiNella casella dei messaggi, all’interno del campo dell’output, verranno visualizzati messaggi di errore e messaggi di avviso quale “Bianco carta misurato”.
Indicatore Pass/FailPer le funzioni Densità, Ingrossamento e Bilanciamento grigio, il risultato Pass/Fail è indicato da un LED verde e rosso sopra la testa di misurazione, accanto al display.
Informazioni di Pass/Fail sul displaySe il valore misurato rientra nei limiti di tolleranza, accanto al valore è visualizzato un segno di spunta. Se il valore misurato è fuori limite, verrà visualizzata una “freccia Su” o una “freccia Giù”.
11. Selezione delle funzioni•LafunzionedesideratapuòessereselezionatanelmenumedianteipulsantiSu/Giù•PremendoilpulsanteInvionelmenuprincipalevieneapertalafinestradivisualizzazionedellafunzione•PremendoilpulsanteInvioinunmenupopupvieneattivatal’impostazioneselezionata
12. Selezione dei simboli•IlsimbolodesideratopuòessereselezionatomedianteipulsantiSu/Giù• A seconda della funzionalità dei simboli, descritta nei capitoli precedenti, potrebbe essere necessario premere il pulsante Invio o avviare
una misurazione
Guida introduttivaI T A L I A N O
14 X-Rite® DensiEye™ – Guida introduttiva
IT
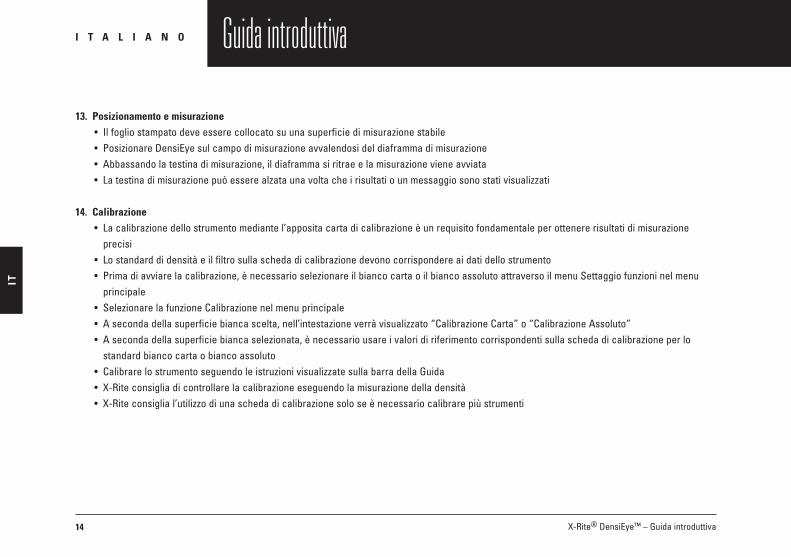
13. Posizionamento e misurazione•Ilfogliostampatodeveesserecollocatosuunasuperficiedimisurazionestabile•PosizionareDensiEyesulcampodimisurazioneavvalendosideldiaframmadimisurazione•Abbassandolatestinadimisurazione,ildiaframmasiritraeelamisurazionevieneavviata•Latestinadimisurazionepuòesserealzataunavoltacheirisultatiounmessaggiosonostativisualizzati
14. Calibrazione• La calibrazione dello strumento mediante l’apposita carta di calibrazione è un requisito fondamentale per ottenere risultati di misurazione
precisi•Lostandarddidensitàeilfiltrosullaschedadicalibrazionedevonocorrispondereaidatidellostrumento• Prima di avviare la calibrazione, è necessario selezionare il bianco carta o il bianco assoluto attraverso il menu Settaggio funzioni nel menu
principale•SelezionarelafunzioneCalibrazionenelmenuprincipale•Asecondadellasuperficiebiancascelta,nell’intestazioneverràvisualizzato“CalibrazioneCarta”o“CalibrazioneAssoluto”• A seconda della superficie bianca selezionata, è necessario usare i valori di riferimento corrispondenti sulla scheda di calibrazione per lo
standard bianco carta o bianco assoluto•CalibrarelostrumentoseguendoleistruzionivisualizzatesullabarradellaGuida•X-Riteconsigliadicontrollarelacalibrazioneeseguendolamisurazionedelladensità•X-Riteconsiglial’utilizzodiunaschedadicalibrazionesoloseènecessariocalibrarepiùstrumenti

Guida introduttiva Guida introduttiva I T A L I A N O
15X-Rite® DensiEye™ – Guida introduttiva
IT
15. Istruzioni dettagliate per la misurazione della densità
•Nelmenuprincipaleselezionarelafunzione“Densità”attraversoipulsantiSu/Giù,quindiconfermarelaselezionepremendoilpulsanteInvio•Selezionareilsimbolo“Assoluto/Differenza”medianteipulsantiSu/Giù•Passaread“Assoluto”(visualizzazionedelvaloreassoluto)utilizzandoilpulsanteInvio•SelezionareilsimbolodiselezionedelfiltromedianteipulsantiSu/Giù,quindiconfermarelaselezionepremendoilpulsanteInvio•Selezionarelabarradeimenu“Auto”perlaselezioneautomaticadifiltro/colore(CMYK),quindiconfermarelaselezionepremendoilpulsanteInvio•Selezionareilsimbolo“Carta”medianteipulsantiSu/Giù,quindiconfermarelaselezionepremendoilpulsanteInvio•Misurareilbiancocarta•Nellacaselladeimessaggiverràvisualizzato“Biancocartamisurato”•Misurareladensità•Verràvisualizzatoilvaloredelladensità

Guida introduttivaI T A L I A N O
16 X-Rite® DensiEye™ – Guida introduttiva
IT
16. Modalità Auto (solo DensiEye 700)Questa funzione rileva automaticamente i campi di misurazione Tono pieno, Mezzotono, Sovrapposizione Bilanciamento grigio. A tale scopo, è necessario che i campi della densità dei toni pieni vengano misurati in base alla sequenza di stampa.
17. Registrazione della garanziaPer poter usufruire dell’assistenza tecnica, è necessario registrare lo strumento DensiEye acquistato. A tale scopo, compilare e inviare la scheda di registrazione acclusa oppure eseguire la registrazione on line all’indirizzo http://www.xrite.com.
18. RicertificazioneX-Rite consiglia la ricertificazione annuale del densitometro per la misurazione della riflettanza DensiEye. Per ulteriori informazioni sul processo di ricertificazione, contattare il rivenditore X-Rite di fiducia o il Centro di assistenza X-Rite di zona.
19. AssistenzaNon tentare in alcun modo di riparare personalmente X-Rite DensiEye. Se lo strumento viene aperto senza autorizzazione, non sarà possibile richiedere il risarcimento di eventuali danni. Contattare l’assistenza X-Rite o il Centro di assistenza X-Rite di zona se lo strumento non funziona o presenta un funzionamento strano.
Guida introduttiva Guida introduttiva I T A L I A N O
17X-Rite® DensiEye™ – Guida introduttiva
IT
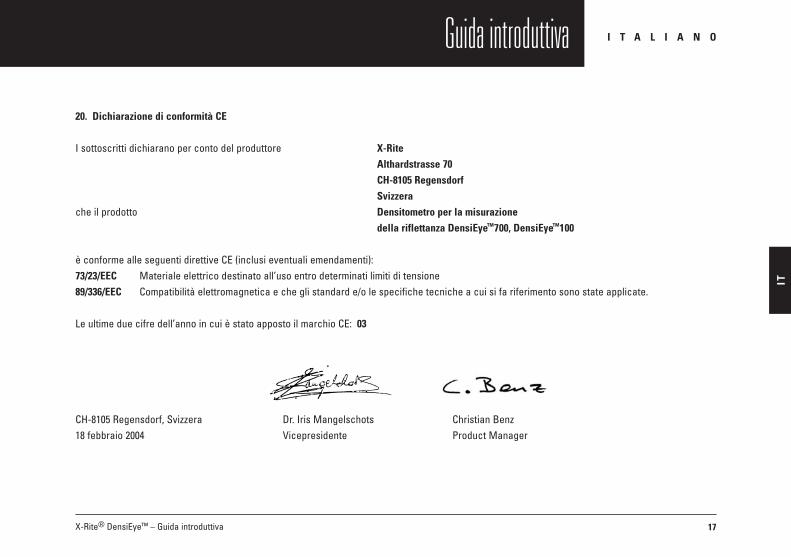
20. Dichiarazione di conformità CE
I sottoscritti dichiarano per conto del produttore X-Rite Althardstrasse 70 CH-8105 Regensdorf Svizzera
che il prodotto Densitometro per la misurazione della riflettanza DensiEye™700, DensiEye™100
èconformealleseguentidirettiveCE(inclusieventualiemendamenti):73/23/EEC Materiale elettrico destinato all’uso entro determinati limiti di tensione89/336/EEC Compatibilità elettromagnetica e che gli standard e/o le specifiche tecniche a cui si fa riferimento sono state applicate.
Leultimeduecifredell’annoincuièstatoappostoilmarchioCE:03
CH-8105 Regensdorf, Svizzera Dr. Iris Mangelschots Christian Benz 18 febbraio 2004 Vicepresidente Product Manager


Guía de introducción rápida E S P A Ñ O L
X-Rite® DensiEye™ Guía de introducción rápida
ES
Tabla de contenido
1. Normas de seguridad . . . . . . . . . . . . . . . . . . . . . . . . . . . . . . . . . . . . . . . . . . . . . . . . . . . . . . . . . . . . . . . . . . . . . . . . . . . . . . . . . . . . . . . . . . . . . . . . . . . . . . . . . . 2 2. Contenido del paquete . . . . . . . . . . . . . . . . . . . . . . . . . . . . . . . . . . . . . . . . . . . . . . . . . . . . . . . . . . . . . . . . . . . . . . . . . . . . . . . . . . . . . . . . . . . . . . . . . . . . . . . . . 33. Embalaje y transporte . . . . . . . . . . . . . . . . . . . . . . . . . . . . . . . . . . . . . . . . . . . . . . . . . . . . . . . . . . . . . . . . . . . . . . . . . . . . . . . . . . . . . . . . . . . . . . . . . . . . . . . . . . 4 4. Elementos funcionales . . . . . . . . . . . . . . . . . . . . . . . . . . . . . . . . . . . . . . . . . . . . . . . . . . . . . . . . . . . . . . . . . . . . . . . . . . . . . . . . . . . . . . . . . . . . . . . . . . . . . . . . . 55. Bloqueo y desbloqueo del cabezal de medición . . . . . . . . . . . . . . . . . . . . . . . . . . . . . . . . . . . . . . . . . . . . . . . . . . . . . . . . . . . . . . . . . . . . . . . . . . . . . . . . . . . 6 6. Configuración de fábrica . . . . . . . . . . . . . . . . . . . . . . . . . . . . . . . . . . . . . . . . . . . . . . . . . . . . . . . . . . . . . . . . . . . . . . . . . . . . . . . . . . . . . . . . . . . . . . . . . . . . . . . 67. Botones Estándar . . . . . . . . . . . . . . . . . . . . . . . . . . . . . . . . . . . . . . . . . . . . . . . . . . . . . . . . . . . . . . . . . . . . . . . . . . . . . . . . . . . . . . . . . . . . . . . . . . . . . . . . . . . . . . 78. Botones especiales y combinaciones de botones . . . . . . . . . . . . . . . . . . . . . . . . . . . . . . . . . . . . . . . . . . . . . . . . . . . . . . . . . . . . . . . . . . . . . . . . . . . . . . . . . 89. Símbolos y sus funciones . . . . . . . . . . . . . . . . . . . . . . . . . . . . . . . . . . . . . . . . . . . . . . . . . . . . . . . . . . . . . . . . . . . . . . . . . . . . . . . . . . . . . . . . . . . . . . . . . . . . . . . 910. Pantalla e indicador Pasa / Falla . . . . . . . . . . . . . . . . . . . . . . . . . . . . . . . . . . . . . . . . . . . . . . . . . . . . . . . . . . . . . . . . . . . . . . . . . . . . . . . . . . . . . . . . . . . . . . . . 1211. Selección de funciones . . . . . . . . . . . . . . . . . . . . . . . . . . . . . . . . . . . . . . . . . . . . . . . . . . . . . . . . . . . . . . . . . . . . . . . . . . . . . . . . . . . . . . . . . . . . . . . . . . . . . . . 1312. Selección de símbolos . . . . . . . . . . . . . . . . . . . . . . . . . . . . . . . . . . . . . . . . . . . . . . . . . . . . . . . . . . . . . . . . . . . . . . . . . . . . . . . . . . . . . . . . . . . . . . . . . . . . . . . . 1313. Colocación y medición . . . . . . . . . . . . . . . . . . . . . . . . . . . . . . . . . . . . . . . . . . . . . . . . . . . . . . . . . . . . . . . . . . . . . . . . . . . . . . . . . . . . . . . . . . . . . . . . . . . . . . . . 1414. Calibración . . . . . . . . . . . . . . . . . . . . . . . . . . . . . . . . . . . . . . . . . . . . . . . . . . . . . . . . . . . . . . . . . . . . . . . . . . . . . . . . . . . . . . . . . . . . . . . . . . . . . . . . . . . . . . . . . . 1415. Instrucciones detalladas para la medición de la densidad . . . . . . . . . . . . . . . . . . . . . . . . . . . . . . . . . . . . . . . . . . . . . . . . . . . . . . . . . . . . . . . . . . . . . . . . . 1516. Modo Automático . . . . . . . . . . . . . . . . . . . . . . . . . . . . . . . . . . . . . . . . . . . . . . . . . . . . . . . . . . . . . . . . . . . . . . . . . . . . . . . . . . . . . . . . . . . . . . . . . . . . . . . . . . . . 1617. Registro de garantía . . . . . . . . . . . . . . . . . . . . . . . . . . . . . . . . . . . . . . . . . . . . . . . . . . . . . . . . . . . . . . . . . . . . . . . . . . . . . . . . . . . . . . . . . . . . . . . . . . . . . . . . . . 1618. Renovación de la certificación . . . . . . . . . . . . . . . . . . . . . . . . . . . . . . . . . . . . . . . . . . . . . . . . . . . . . . . . . . . . . . . . . . . . . . . . . . . . . . . . . . . . . . . . . . . . . . . . . 1619. Servicio . . . . . . . . . . . . . . . . . . . . . . . . . . . . . . . . . . . . . . . . . . . . . . . . . . . . . . . . . . . . . . . . . . . . . . . . . . . . . . . . . . . . . . . . . . . . . . . . . . . . . . . . . . . . . . . . . . . . . 1620. Declaración de conformidad con la normativa CE . . . . . . . . . . . . . . . . . . . . . . . . . . . . . . . . . . . . . . . . . . . . . . . . . . . . . . . . . . . . . . . . . . . . . . . . . . . . . . . . 17
DensiEye™ es una marca registrada de X-Rite, Incorporated y de sus compañías asociadas.

Guía de introducción rápidaE S P A Ñ O L
2 X-Rite® DensiEye™ Guía de introducción rápida
ES
1. Normas de seguridad
El sistema X-Rite DensiEye no se debe utilizar en entornos en los que exista riesgo de explosión.
El sistema DensiEye no debe estar expuesto a campos electromagnéticos fuertes. DensiEye sólo debe funcionar a una temperatura ambiente de entre 10°C y 40°C con una humedad relativa del aire del 20% al 80% (sin condensación). DensiEye sólo se debe almacenar a una temperatura ambiente entre -20°C y 70°C con una humedad relativa del aire del 5% al 90% (sin condensación). DensiEye no debe estar expuesto a la luz directa del sol. Proteja el DensiEye de productos químicos, vapores corrosivos, y vibraciones y presiones mecánicas fuertes. El DensiEye siempre debe ser transportado en su embalaje original. No se debe abrir el DensiEye. Si se abre de una manera no autorizada, la garantía queda invalidada de inmediato. Sólo se pueden utilizar accesorios y recambios originales de X-Rite.
El DensiEye sólo debe ser utilizado por personal cualificado. Las muestras medidas se deben colocar en una base de medidas estable. La carcasa de plástico del equipo se puede limpiar con un paño húmedo y una pequeña cantidad de jabón. No cortocircuite las pilas. Es importante cambiar las dos pilas al mismo tiempo. Tire las pilas respetando las normas establecidas al respecto.

Guía de introducción rápida Guía de introducción rápida E S P A Ñ O L
3X-Rite® DensiEye™ Guía de introducción rápida
ES
2. Contenido del paquete
1 DensiEye 2 Tarjeta de calibración 3 Cable USB 4 Guía de introducción rápida 5 Certificado del equipo 6 Tarjeta de registro 7 CD con instrucciones de funcionamiento y software 8 Caja del equipo

Guía de introducción rápidaE S P A Ñ O L
4 X-Rite® DensiEye™ Guía de introducción rápida
ES
3. Embalaje y transporte
El DensiEye siempre debe ser transportado en su embalaje original.

Guía de introducción rápida Guía de introducción rápida E S P A Ñ O L
5X-Rite® DensiEye™ Guía de introducción rápida
ES
4. Elementos funcionales
Indicador PASA / FALLA
Botón de bloqueo
Botón Arriba
Botón Abajo
Interfaz USB
Botón Reiniciar
Botón Intro
Baterías
Pantalla
Diafragma de medición

Guía de introducción rápidaE S P A Ñ O L
6 X-Rite® DensiEye™ Guía de introducción rápida
ES
5. Bloqueo y desbloqueo del cabezal de medición
Desbloqueo del cabezal de medición• Suelteelcabezaldemediciónpulsandoelbotóndebloqueoalaizquierdadelcabezal.• Cuandoseabreelequipoporprimeravez,apareceelmenúprincipalconlaúltimapantallaseleccionadacomoreferencia.• Lapantallaseapagadespuésdeunos30segundos.• ElDensiEyepuedeactivarsedenuevopulsandocualquierbotón.
Bloqueo del cabezal de medición• PliegueelDensiEyeypulseelbotóndebloqueosituadoalaizquierdadelcabezaldemedición.• Lapantalladesaparecedespuésdeunos30segundos.
6. Configuración de fábrica• Absoluto/Diferencia: Absoluto• Blancobase: Papel• Setdereferencia: Primersetdereferencia• Seleccióndefiltroycolor: Automático• Pasa/Falla: Off(Desactivado)• Ajustedeescala: 10%• Númerodeposicionesdecimales: 2• Idioma: Inglés• Manejoconladerechaoconlaizquierda: Manejoconladerecha

Guía de introducción rápida Guía de introducción rápida E S P A Ñ O L
7X-Rite® DensiEye™ Guía de introducción rápida
ES
7. Botones Estándar
Botón Nombre Función
Botón Arriba Desplaza el cursor hacia arriba. Aumenta el valor numérico.
Botón Intro Confirma el subprograma para abrir/cerrar.
Confirma el valor numérico.
Botón Abajo Desplaza el cursor hacia abajo. Reduce el valor numérico.

Guía de introducción rápidaE S P A Ñ O L
8 X-Rite® DensiEye™ Guía de introducción rápida
ES
8. Botones especiales y combinaciones de botones
1)Secuencia: - Pulse el botón Intro. - Ejecute una medición de blanco. - Suelte el botón Intro.
2)Secuencia: - Pulse el botón Reiniciar. - Pulse el botón Intro. - Suelte el botón Reiniciar. - Suelte el botón Intro
Botones Descripción
Intro + Medir 1) Ejecuta una medición de blanco.
Reiniciar Modo Automático (DensiEye 700) o Densidad (DensiEye 100) se seleccionan en el menú principal.Se mantiene la configuración.
Reiniciar + Intro 2) Modo Automático (DensiEye 700) o Densidad (DensiEye 100) se seleccionan en el menú principal.Todos los parámetros se restablecen a sus valores de fábrica.Se mantienen los valores de referencia y tolerancia.La calibración se ha reiniciado. El equipo se debe calibrar de nuevo.
Intro (3 s) Vuelve a la selección de funciones (menú principal).
Intro (10 s) Muestra el menú de selección de idiomas.

Guía de introducción rápida Guía de introducción rápida E S P A Ñ O L
9X-Rite® DensiEye™ Guía de introducción rápida
ES
Símbolo Nombre Descripción
Regresar El programa regresa al siguiente nivel de menú y acepta los datos.
Papel Mide el blanco papel / Mide la referencia de blanco absoluto (calibración).
Selección de filtro Selecciona el filtro de la densidad (automático o manual).
Selección de referencia Selecciona uno de los cuatro sets de referencia.
Sólido Mide el parche sólido / Edita o mide la referencia de sólido.
Mediotono 1 Mide el mediotono 1 / Edita la referencia de mediotono 1.
Mediotono 2 Mide el mediotono 2 / Edita la referencia de mediotono 2.
Mediotono 3 Mide el mediotono 3 / Edita la referencia de mediotono 3.
Parche Balance de Gris
Mide el parche del balance de grises / Edita o mide la referencia del balance de grises.
Medir cualesquiera Parche Mide cualquier parche con la función Modo Automático.
9. Símbolos y sus funciones

Guía de introducción rápidaE S P A Ñ O L
10 X-Rite® DensiEye™ Guía de introducción rápida
ES
Símbolo Nombre Descripción
Modo Ver / Editar Permite ver y editar las mediciones de mediotonos.
Absoluto / Diferencia Cambia a los valores Absoluto o Diferencia.
Sólido primero Mide el primer parche sólido (Trapping).
Sólido segundo Mide el segundo parche sólido (Trapping).
Trapping Mide el parche de trapping.
Negro Edita el valor de negro (calibración).
Cyan Edita el valor de cyan (calibración).
Magenta Edita el valor de magenta (calibración).
Amarillo Edita el valor de amarillo (calibración).
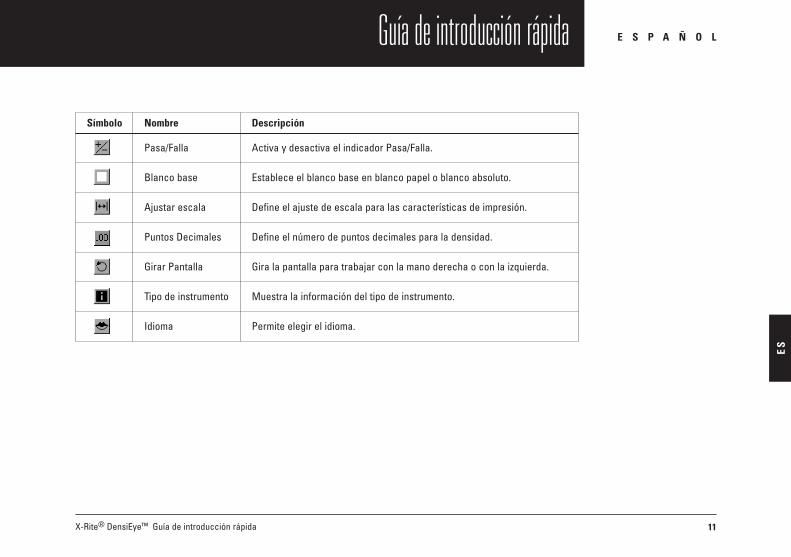
Guía de introducción rápida Guía de introducción rápida E S P A Ñ O L
11X-Rite® DensiEye™ Guía de introducción rápida
ES
Símbolo Nombre Descripción
Pasa/Falla Activa y desactiva el indicador Pasa/Falla.
Blanco base Establece el blanco base en blanco papel o blanco absoluto.
Ajustar escala Define el ajuste de escala para las características de impresión.
Puntos Decimales Define el número de puntos decimales para la densidad.
Girar Pantalla Gira la pantalla para trabajar con la mano derecha o con la izquierda.
Tipo de instrumento Muestra la información del tipo de instrumento.
Idioma Permite elegir el idioma.
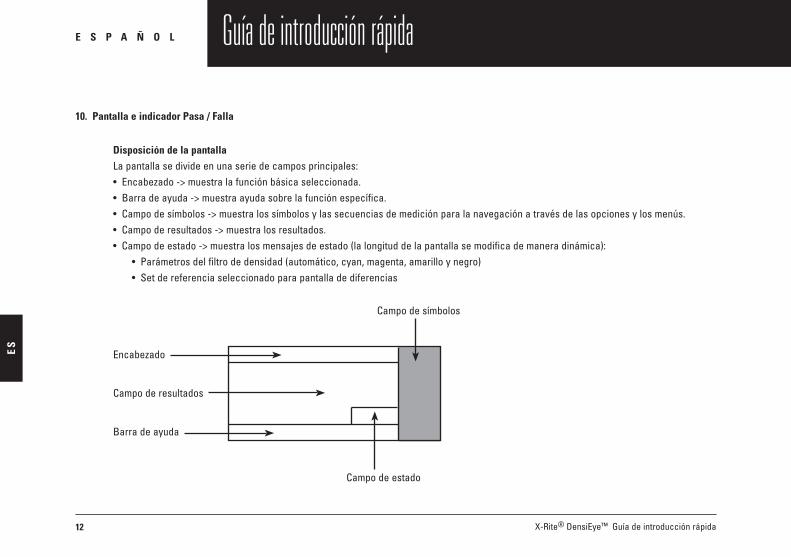
Guía de introducción rápidaE S P A Ñ O L
12 X-Rite® DensiEye™ Guía de introducción rápida
ES
10. Pantalla e indicador Pasa / Falla
Disposición de la pantallaLapantallasedivideenunaseriedecamposprincipales:•Encabezado->muestralafunciónbásicaseleccionada.•Barradeayuda->muestraayudasobrelafunciónespecífica.•Campodesímbolos->muestralossímbolosylassecuenciasdemediciónparalanavegaciónatravésdelasopcionesylosmenús.•Campoderesultados->muestralosresultados.•Campodeestado->muestralosmensajesdeestado(lalongituddelapantallasemodificademaneradinámica):
•Parámetrosdelfiltrodedensidad(automático,cyan,magenta,amarilloynegro)•Setdereferenciaseleccionadoparapantalladediferencias
Campo de símbolos
Encabezado
Campo de estado
Campo de resultados
Barra de ayuda

Guía de introducción rápida Guía de introducción rápida E S P A Ñ O L
13X-Rite® DensiEye™ Guía de introducción rápida
ES
Cuadro de mensajesLos mensajes del tipo "Blanco Medido" y los mensajes de error aparecerán en el cuadro de mensajes, dentro del campo de resultados.
Indicador Pasa / FallaEl indicador Pasa / Falla aparece con un LED verde y rojo en la parte superior del cabezal de medición, junto a la pantalla de las funciones Densidad, Ganancia de Punto y Balance de Grises.
Información Pasa / Falla en la pantallaSi el valor medido se encuentra dentro de la tolerancia, aparecerá una marca de verificación detrás del valor. Si el valor medido está fuera de la tolerancia, aparecerá una “flecha arriba” o una “flecha abajo”.
11. Selección de funciones•LafunciónrequeridaseseleccionapreviamenteenelmenúmediantelosbotonesArriba/Abajo.•AlpulsarelbotónIntroenelmenúprincipal,seabrelaventanadepresentacióndelafunción.•AlpulsarelbotónIntroenunmenúemergente,seactivalaconfiguraciónseleccionada.
12. Selección de símbolos•ElsímbolorequeridoseseleccionapreviamentemediantelosbotonesArriba/Abajo.• Según la función de los símbolos, tal como se describe en los capítulos anteriores, se deberá pulsar el botón Intro o bien iniciar una
medición.

Guía de introducción rápidaE S P A Ñ O L
14 X-Rite® DensiEye™ Guía de introducción rápida
ES
13. Colocación y medición•Lahojaimpresasedebecolocarenunabasedemedidasestable.•ColoqueelDensiEyeenelcampodemediciónmedianteeldiafragmademedición.•Albajarelcabezaldemedición,eldiafragmademediciónseretirayseiniciaunamedición.•Elcabezaldemediciónsepuedelevantardenuevocuandosehayanvisualizadolosresultadosdelamediciónounmensaje.
14. Calibración• El requisito previo para obtener resultados precisos en las mediciones es la calibración del equipo mediante la tarjeta
de calibración correspondiente.•Elestándardeladensidadyelfiltrodelatarjetadecalibracióndebencoincidirconlosdatosdelequipo.• Antes de la calibración, se debe seleccionar el blanco base en papel o el blanco base absoluto mediante la barra de menú Ajustes de función
del menú principal.•SeleccionelafunciónCalibraciónenelmenúprincipal.•Segúnelblancobase,lafiladelencabezadomostrará“Papel”o“Absoluto”.• Se deben utilizar los valores de referencia correspondientes para el estándar de blanco papel o blanco absoluto en la tarjeta de calibración,
en función del blanco base seleccionado.•Calibreelequiposegúnlasinstruccionesdelabarradeayuda.•X-Riterecomiendaverificarlacalibraciónmediantelasmedicionesdeladensidad.•X-Riterecomiendautilizarúnicamenteunatarjetadecalibraciónsiesnecesariocalibrarvariosequipos.

Guía de introducción rápida Guía de introducción rápida E S P A Ñ O L
15X-Rite® DensiEye™ Guía de introducción rápida
ES
15. Instrucciones detalladas para la medición de la densidad
•Enelmenúprincipal,seleccionelafunción“Densidad”mediantelosbotonesArriba/AbajoyconfirmelaoperaciónpulsandoelbotónIntro.•Seleccioneelsímbolo“Absoluto/Diferencia”mediantelosbotonesArriba/Abajo.•Cambiea“Absoluto”(pantalladevalorabsoluto)medianteelbotónIntro.•Seleccioneelsímbolo“Seleccióndefiltro”conlosbotonesArriba/AbajoyconfirmelaoperaciónpulsandoelbotónIntro.•Seleccionelabarrademenú“Auto”paraseleccionarautomáticamenteelfiltrooelcolor(CMYK)yconfirmelaoperaciónpulsandoelbotónIntro.•Seleccioneelsímbolo“Papel”conlosbotonesArriba/AbajoyconfirmelaoperaciónpulsandoelbotónIntro.•Midaelblancopapel.•Enelcuadrodemensajesapareceelmensaje“BlancoMedido”.•Midaladensidad.•Apareceelvalordeladensidad.
Guía de introducción rápidaE S P A Ñ O L
16 X-Rite® DensiEye™ Guía de introducción rápida
ES
16. Modo Automático (sólo DensiEye 700)Esta función detecta automáticamente los campos de medición Sólido, Mediotono, Trapping y Balance de Grises. Para ello, se deben medir primero los campos de densidad de color sólido de acuerdo con la secuencia de impresión.
17. Registro de garantíaPara obtener asistencia técnica debe registrar su nuevo equipo DensiEye; paraello,puederellenaryenviarlatarjetaderegistroobienrealizarloenlíneaenladirecciónhttp://www.xrite.com.
18. Renovación de la certificaciónX-Rite aconseja volver a certificar el densitómetro de reflectancia DensiEye una vez al año. Para obtener más información acerca del proceso de renovación de la certificación, póngase en contacto con su distribuidor de X-Rite o con el centro de asistencia técnica de X-Rite más cercano.
19. ServicioNo intente reparar por sí mismo el DensiEye de X-Rite bajo ninguna circunstancia; todas las reclamaciones de garantía quedarán anuladas de inmediato si el equipo se abre sin autorización. Póngase en contacto con el centro de servicio de X-Rite o con el centro de asistencia técnica más cercano de X-Rite si cree que el equipo no funciona o lo hace de un modo incorrecto.

Guía de introducción rápida Guía de introducción rápida E S P A Ñ O L
17X-Rite® DensiEye™ Guía de introducción rápida
ES
20. Declaración de conformidad con la normativa CE
El abajo firmante declara por y en nombre del fabricante X-Rite Althardstrasse 70 CH-8105 Regensdorf (Suiza)
que el producto Densitómetro de reflectancia DensiEye™700, DensiEye™100
cumpleconlasdisposicionesdelassiguientesdirectivaseuropeas(incluidaslasenmiendaspertinentes):73/23/CEE Material eléctrico destinado a utilizarse con determinados límites de tensión89/336/CEE Se han aplicado la compatibilidad electromagnética y los estándares o las especificaciones técnicas descritas en el reverso.
DosúltimascifrasdelañoenqueseincluyólamarcaCE:03
CH-8105 Regensdorf (Suiza) Dr. Iris Mangelschots Christian Benz18 de febrero de 2004 Vicepresidente Responsable de producto


クイックスタートガイド
X-Rite® DensiEye™ クイックスタートガイド
J A P A N E S E
JP
目 次
1. 安全性について . . . . . . . . . . . . . . . . . . . . . . . . . . . . . . . . . . . . . . . . . . . . . . . . . . . . . . . . . . . . . . . . . . . . . . . . . . . . . . . . . . . . . . . . . . . . . . . . . . . . . . . . . . . . . . 2 2. パッケージ内容 . . . . . . . . . . . . . . . . . . . . . . . . . . . . . . . . . . . . . . . . . . . . . . . . . . . . . . . . . . . . . . . . . . . . . . . . . . . . . . . . . . . . . . . . . . . . . . . . . . . . . . . . . . . . . 33. パッケージおよび輸送. . . . . . . . . . . . . . . . . . . . . . . . . . . . . . . . . . . . . . . . . . . . . . . . . . . . . . . . . . . . . . . . . . . . . . . . . . . . . . . . . . . . . . . . . . . . . . . . . . . . . . . . 44. 各部構成 . . . . . . . . . . . . . . . . . . . . . . . . . . . . . . . . . . . . . . . . . . . . . . . . . . . . . . . . . . . . . . . . . . . . . . . . . . . . . . . . . . . . . . . . . . . . . . . . . . . . . . . . . . . . . . . . . . . . 55. 測定ヘッドの解除とロック . . . . . . . . . . . . . . . . . . . . . . . . . . . . . . . . . . . . . . . . . . . . . . . . . . . . . . . . . . . . . . . . . . . . . . . . . . . . . . . . . . . . . . . . . . . . . . . . . . . 6 6. 工場出荷時の設定 . . . . . . . . . . . . . . . . . . . . . . . . . . . . . . . . . . . . . . . . . . . . . . . . . . . . . . . . . . . . . . . . . . . . . . . . . . . . . . . . . . . . . . . . . . . . . . . . . . . . . . . . . . . 67. 標準ボタン . . . . . . . . . . . . . . . . . . . . . . . . . . . . . . . . . . . . . . . . . . . . . . . . . . . . . . . . . . . . . . . . . . . . . . . . . . . . . . . . . . . . . . . . . . . . . . . . . . . . . . . . . . . . . . . . . . . 78. 特殊ボタンおよびボタンの組み合わせ . . . . . . . . . . . . . . . . . . . . . . . . . . . . . . . . . . . . . . . . . . . . . . . . . . . . . . . . . . . . . . . . . . . . . . . . . . . . . . . . . . . . . . . 89. アイコンおよびその機能 . . . . . . . . . . . . . . . . . . . . . . . . . . . . . . . . . . . . . . . . . . . . . . . . . . . . . . . . . . . . . . . . . . . . . . . . . . . . . . . . . . . . . . . . . . . . . . . . . . . 910. 表示画面および Pass/Fail 表示 . . . . . . . . . . . . . . . . . . . . . . . . . . . . . . . . . . . . . . . . . . . . . . . . . . . . . . . . . . . . . . . . . . . . . . . . . . . . . . . . . . . . . . . . . . . . 1211. 機能選択 . . . . . . . . . . . . . . . . . . . . . . . . . . . . . . . . . . . . . . . . . . . . . . . . . . . . . . . . . . . . . . . . . . . . . . . . . . . . . . . . . . . . . . . . . . . . . . . . . . . . . . . . . . . . . . . . . . . 1312. アイコン選択 . . . . . . . . . . . . . . . . . . . . . . . . . . . . . . . . . . . . . . . . . . . . . . . . . . . . . . . . . . . . . . . . . . . . . . . . . . . . . . . . . . . . . . . . . . . . . . . . . . . . . . . . . . . . . 1313. 位置決めおよび測定 . . . . . . . . . . . . . . . . . . . . . . . . . . . . . . . . . . . . . . . . . . . . . . . . . . . . . . . . . . . . . . . . . . . . . . . . . . . . . . . . . . . . . . . . . . . . . . . . . . . . . . . . 1414. キャリブレイション . . . . . . . . . . . . . . . . . . . . . . . . . . . . . . . . . . . . . . . . . . . . . . . . . . . . . . . . . . . . . . . . . . . . . . . . . . . . . . . . . . . . . . . . . . . . . . . . . . . . . . . . 1415. 濃度測定方法の手順 . . . . . . . . . . . . . . . . . . . . . . . . . . . . . . . . . . . . . . . . . . . . . . . . . . . . . . . . . . . . . . . . . . . . . . . . . . . . . . . . . . . . . . . . . . . . . . . . . . . . . . . . 1516. 自動モード . . . . . . . . . . . . . . . . . . . . . . . . . . . . . . . . . . . . . . . . . . . . . . . . . . . . . . . . . . . . . . . . . . . . . . . . . . . . . . . . . . . . . . . . . . . . . . . . . . . . . . . . . . . . . . . . . . 1617. 保証登録 . . . . . . . . . . . . . . . . . . . . . . . . . . . . . . . . . . . . . . . . . . . . . . . . . . . . . . . . . . . . . . . . . . . . . . . . . . . . . . . . . . . . . . . . . . . . . . . . . . . . . . . . . . . . . . . . . . . 1618. 証明書の更新 . . . . . . . . . . . . . . . . . . . . . . . . . . . . . . . . . . . . . . . . . . . . . . . . . . . . . . . . . . . . . . . . . . . . . . . . . . . . . . . . . . . . . . . . . . . . . . . . . . . . . . . . . . . . . . 1619. サービス . . . . . . . . . . . . . . . . . . . . . . . . . . . . . . . . . . . . . . . . . . . . . . . . . . . . . . . . . . . . . . . . . . . . . . . . . . . . . . . . . . . . . . . . . . . . . . . . . . . . . . . . . . . . . . . . . . 1620. CE適合宣言. . . . . . . . . . . . . . . . . . . . . . . . . . . . . . . . . . . . . . . . . . . . . . . . . . . . . . . . . . . . . . . . . . . . . . . . . . . . . . . . . . . . . . . . . . . . . . . . . . . . . . . . . . . . . . . . . . 17
DensiEye は、X-Rite, Incorporated とその関連会社の登録商標です。

クイックスタートガイド
2 X-Rite® DensiEye™ クイックスタートガイド
J A P A N E S E
JP
1. 安全性について
X-Rite DensiEye を、爆発の危険性のある場所で使用しないで下さい。
DensiEye を強い電磁場に近づけないで下さい。
DensiEye は、周辺温度 10°C〜40°°C 、相対空気湿度 20%〜80%(非結露)の環境のみで使用して下さい。
DensiEye は、周辺温度 -20°C〜70°°C 、相対空気湿度 5%〜90%(非結露)の環境のみで保管して下さい。
DensiEye を直射日光に当てないで下さい。
DensiEye を化学薬品、腐食性蒸気、強度の振動、他の装置の影響から保護して下さい。
DensiEye を輸送する場合は、常に購入時のパッケージに入れて下さい。
DensiEye を開けないで下さい。装置を許可なく開けた場合は、その時点で品質保証の対象外になります。
DensiEye には、X-Rite 純正の付属品およびパーツのみを使用して下さい。
DensiEye は、訓練を受けたユーザーのみが使用して下さい。
測定対象となるサンプルは、安定した場所に置いて下さい。
プラスチック製の装置ケースのクリーニングは、湿らせた布および少量の石鹸で行なって下さい。
バッテリーを漏電させないで下さい。
バッテリーは常に2つを同時交換して下さい。
バッテリーは規制に従って廃棄して下さい。

クイックスタートガイド
3X-Rite® DensiEye™ クイックスタートガイド
J A P A N E S E
JP
2. パッケージ内容
1 DensiEye 2 キャリブレイションカード 3 USBケーブル 4 クイックスタートガイド 5 製品保証書
6 登録カード
7 操作手順およびソフトウェアを収録したCD8 装置ケース

クイックスタートガイド
4 X-Rite® DensiEye™ クイックスタートガイド
J A P A N E S E
JP
3. パッケージおよび輸送
DensiEye を輸送する場合は、常に購入時のパッケージに入れて下さい。
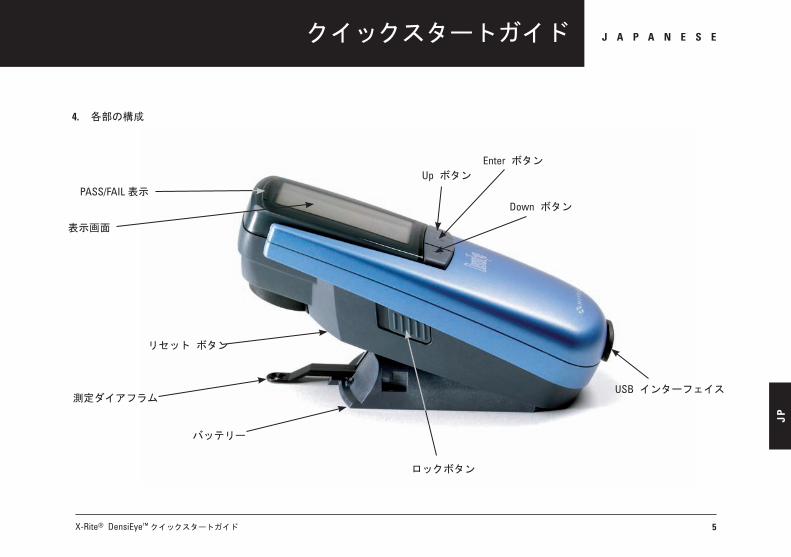
クイックスタートガイド
5X-Rite® DensiEye™ クイックスタートガイド
J A P A N E S E
JP
4. 各部の構成
PASS/FAIL 表示
ロックボタン
Up ボタン
Down ボタン
USB インターフェイス
リセット ボタン
Enter ボタン
バッテリー
表示画面
測定ダイアフラム

クイックスタートガイド
6 X-Rite® DensiEye™ クイックスタートガイド
J A P A N E S E
JP
5. 測定ヘッドの解除とロック
測定ヘッドの解除
• 測定ヘッドを解除するには、測定ヘッド左側にあるロックボタンを向こう側に押します。
• 装置を開くと、前回に基準値として選択された画面がメインメニューに表示されます。 • 表示画面は約30秒後にオフになります。
• DensiEye を再びオンにするには、いずれかのボタンを押します。
測定ヘッドのロック
• DensiEye を閉じ、測定ヘッド左側にあるロックボタンを手前に押します。
• 表示画面は約30秒後にオフになります。
6. 工場出荷時の設定
• 絶対/差異: 絶対
• 白色標準: 用紙
• 基準値セット: 1. 基準値セット
• フィルター/カラー選択: 自動
• Pass/Fail 表示: オフ
• 印刷特性曲線の網点段階: 10%• 濃度表示の小数桁: 2 • 言語: 英語
• 左利き/右利きユーザー向け操作: 右利き操作

クイックスタートガイド
7X-Rite® DensiEye™ クイックスタートガイド
J A P A N E S E
JP
7. 標準ボタン
ボタン 名 称 機 能
Up ボタン カーソルを上げる 値を上げる
Enter ボタン サブメニューの表示/終了の確認 値の確認
Down ボタン カーソルを下げる 値を下げる
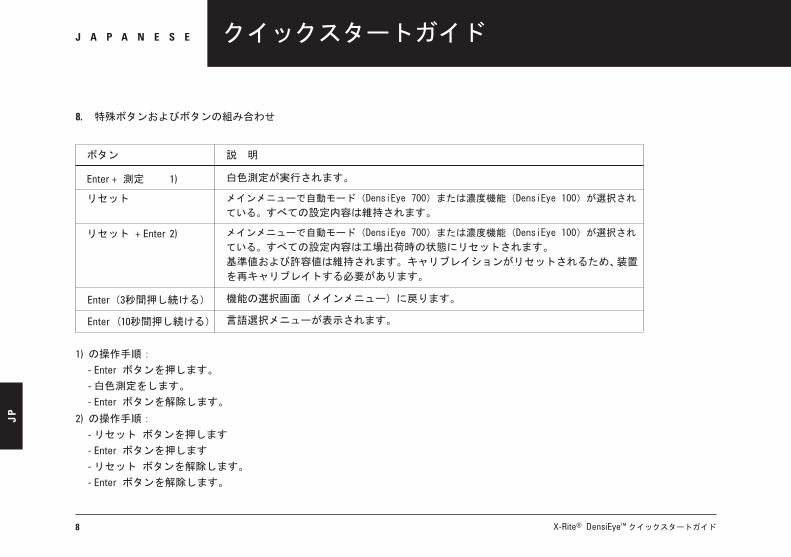
クイックスタートガイド
8 X-Rite® DensiEye™ クイックスタートガイド
J A P A N E S E
JP
8. 特殊ボタンおよびボタンの組み合わせ
1) の操作手順:
- Enter ボタンを押します。
- 白色測定をします。
- Enter ボタンを解除します。
2) の操作手順:
- リセット ボタンを押します
- Enter ボタンを押します
- リセット ボタンを解除します。
- Enter ボタンを解除します。
ボタン 説 明
Enter + 測定 1) 白色測定が実行されます。
リセット メインメニューで自動モード(DensiEye 700)または濃度機能(DensiEye 100)が選択され
ている。すべての設定内容は維持されます。
リセット + Enter 2) メインメニューで自動モード(DensiEye 700)または濃度機能(DensiEye 100)が選択され
ている。すべての設定内容は工場出荷時の状態にリセットされます。
基準値および許容値は維持されます。キャリブレイションがリセットされるため、装置
を再キャリブレイトする必要があります。
Enter(3秒間押し続ける) 機能の選択画面(メインメニュー)に戻ります。
Enter (10秒間押し続ける) 言語選択メニューが表示されます。

クイックスタートガイド
9X-Rite® DensiEye™ クイックスタートガイド
J A P A N E S E
JP
9. アイコンおよびその機能
アイコン 名 称 説 明
戻る プログラムがメニューの次のレベルに進み、データを読み込みます。
用紙 紙の白い部分または絶対白色値を測定します(キャリブレイション)。
フィルターの選択 濃度フィルターを選択します(自動または手動)。
基準値の選択 4つの基準値セットから1つを選択します。
ベタ ベタパッチの測定、およびベタ基準値の編集および測定を行ないます。
網点1 1色目の網点値の測定、およびこの網点の基準値を編集します。
網点2 2色目の網点値の測定、およびこの網点の基準値を編集します。
網点3 3色目の網点値の測定、およびこの網点の基準値を編集します。
グレイバランスパッチ グレイバランスパッチの測定、あるいはグレイバランスの基準値の編集および測定をします。
すべてのパッチ [自動モード]機能であらゆるパッチを測定します。
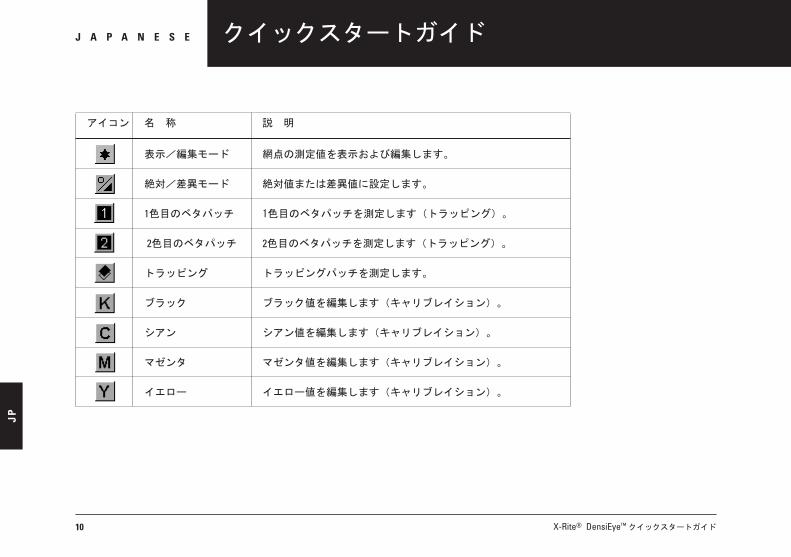
クイックスタートガイド
10 X-Rite® DensiEye™ クイックスタートガイド
J A P A N E S E
JP
アイコン 名 称 説 明
表示/編集モード 網点の測定値を表示および編集します。
絶対/差異モード 絶対値または差異値に設定します。
1色目のベタパッチ 1色目のベタパッチを測定します(トラッピング)。
2色目のベタパッチ 2色目のベタパッチを測定します(トラッピング)。
トラッピング トラッピングパッチを測定します。
ブラック ブラック値を編集します(キャリブレイション)。
シアン シアン値を編集します(キャリブレイション)。
マゼンタ マゼンタ値を編集します(キャリブレイション)。
イエロー イエロー値を編集します(キャリブレイション)。
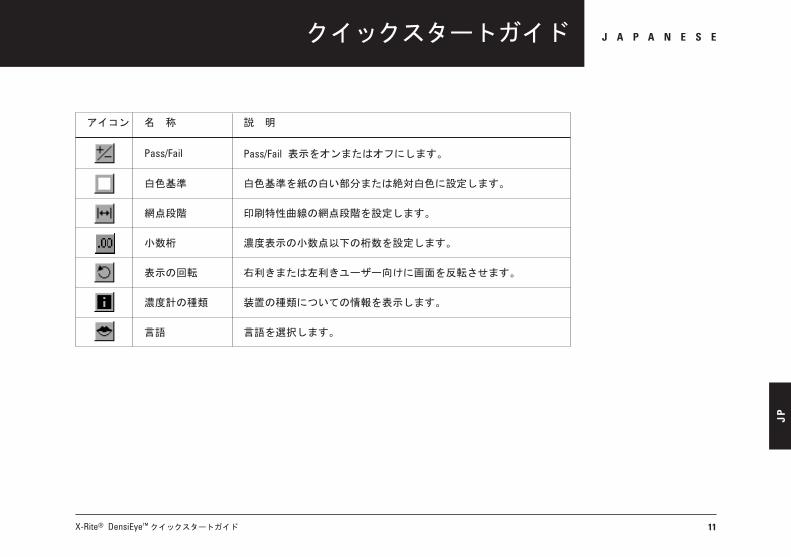
クイックスタートガイド
11X-Rite® DensiEye™ クイックスタートガイド
J A P A N E S E
JP
アイコン 名 称 説 明
Pass/Fail Pass/Fail 表示をオンまたはオフにします。
白色基準 白色基準を紙の白い部分または絶対白色に設定します。
網点段階 印刷特性曲線の網点段階を設定します。
小数桁 濃度表示の小数点以下の桁数を設定します。
表示の回転 右利きまたは左利きユーザー向けに画面を反転させます。
濃度計の種類 装置の種類についての情報を表示します。
言語 言語を選択します。
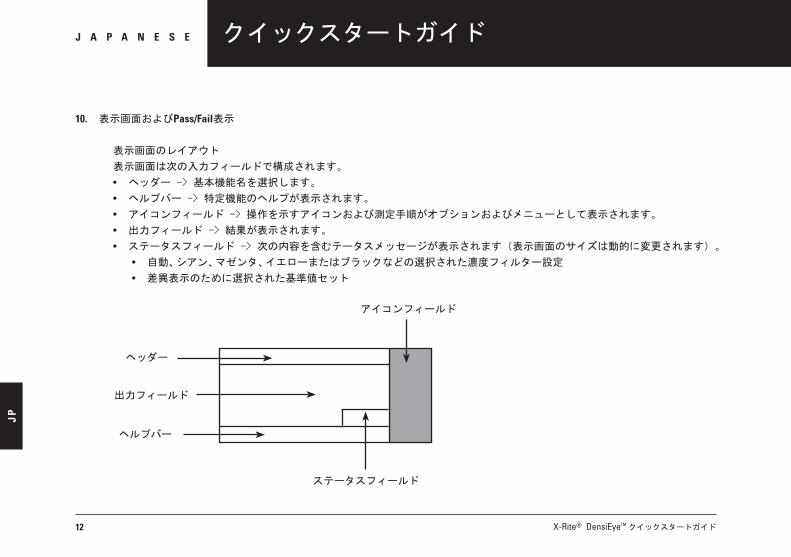
クイックスタートガイド
12 X-Rite® DensiEye™ クイックスタートガイド
J A P A N E S E
JP
10. 表示画面およびPass/Fail表示
表示画面のレイアウト
表示画面は次の入力フィールドで構成されます。
• ヘッダー -> 基本機能名を選択します。
• ヘルプバー -> 特定機能のヘルプが表示されます。
• アイコンフィールド -> 操作を示すアイコンおよび測定手順がオプションおよびメニューとして表示されます。
• 出力フィールド -> 結果が表示されます。
• ステータスフィールド -> 次の内容を含むテータスメッセージが表示されます(表示画面のサイズは動的に変更されます)。
• 自動、シアン、マゼンタ、イエローまたはブラックなどの選択された濃度フィルター設定
• 差異表示のために選択された基準値セット
アイコンフィールド
ヘッダー
ステータスフィールド
出力フィールド
ヘルプバー

クイックスタートガイド
13X-Rite® DensiEye™ クイックスタートガイド
J A P A N E S E
JP
メッセージボックス
出力フィールド内のメッセージボックスに、「白色測定終了」というメッセージやエラーメッセージが表示されます。
Pass/Fail 表示
Pass/Fail 表示は濃度、ドットゲイン、グレイバランスなどに対して行なわれます。
測定ヘッドの上部かつ表示画面の横の位置に、緑色と赤色の発光ダイオード(LED)で表示されます。
表示画面上のPass/Fail 情報
測定値が指定された許容範囲内の場合は、値の横にチェックマークが表示されます。
測定値が指定された許容範囲外の場合は、上矢印または下矢印が表示されます。
11. 機能の選択
• 利用したい機能は、Up/Down ボタンを使用してメインメニューであらかじめ選択できます。
• メインメニューでEnter ボタンを押すと、選択した機能のウィンドウが表示されます。
• ポップアップウィンドウでEnter ボタンを押すと、選択した設定が実行されます。
12. アイコンの選択
• 利用したいアイコンは、Up/Down ボタンを使用してあらかじめ選択できます。
• すでに前章で説明したアイコンの機能によっては、測定を開始するには、Enter ボタンを押さなければならない場合が
あります。
クイックスタートガイド
14 X-Rite® DensiEye™ クイックスタートガイド
J A P A N E S E
JP
13. 位置決めおよび測定
• 印刷済みの用紙は、必ず安定した場所に置いてから測定して下さい。
• 測定ダイアフラムを使用して、DensiEyeを測定部に位置決めします。
• 測定ヘッドを下げると測定ダイアフラムが引っ張られ、測定が開始します。
• 測定結果またはメッセージが表示されてから、測定ヘッドを持ち上げます。
14. キャリブレイション
• 正確な測定を実行するには、装置を適切なキャリブレイション基準値でキャリブレイトする必要があります。
• キャリブレイションカードの濃度基準およびフィルターは、装置のデータと一致していなければなりません。
• 紙白基準または絶対白色基準を選択してから、メインメニューの[機能の設定]メニューバーを使用してキャリブレイトして下
さい。
• メインメニューで[キャリブレイション]機能を選択します。
• 使用する白色基準によって、[キャリブレイション(用紙)]または[キャリブレイション(絶対)]がヘッダー行に表示され
ます。
• 選択した白色基準に合わせ、キャリブレイションカードの紙白基準または絶対白色基準を基準値として使用して下さい。
• ヘルプバーに表示される手順に従って、装置をキャリブレイトします。
• 濃度測定値を使用してキャリブレイションを確認することをお勧めします。
• キャリブレイションカードは、複数の装置をキャリブレイトする場合のみに使用して下さい。

クイックスタートガイド
15X-Rite® DensiEye™ クイックスタートガイド
J A P A N E S E
JP
15. 濃度測定方法の手順
• Up/Down ボタンを使用してメインメニューで[濃度]機能を選択し、Enter ボタンを押します。
• Up/Down ボタンを使用して、[絶対/差異]アイコンを選択します。
• 入力 ボタンを使用して、[絶対](絶対値の表示)に設定します。
• Up/Down ボタンを使用して[フィルターの選択]アイコンを選択し、入力 ボタンを押します。
• [自動]メニューバーを選択して自動フィルター/カラー選択 (CMYK)に設定し、入力 ボタンを押します。
• Up/Down ボタンを使用して[用紙]アイコンを選択し、入力 ボタンを押します。
• 紙の白い部分を測定します。
• 「白色測定終了」というメッセージがメッセージボックスに表示されます。
• 濃度を測定します。
• 濃度値が表示されます。
クイックスタートガイド
16 X-Rite® DensiEye™ クイックスタートガイド
J A P A N E S E
JP
16. 自動モード (DensiEye 700 に適用)
この機能によって、ベタ、網点、トラッピング、グレイバランスの測定部分が検出されます。この機能を使用するには、最初にベタ色部
分を印刷順に測定する必要があります。
17. 保証登録 テクニカルサポートを受けるには、新たに購入された DensiEye を登録する必要があります。
DensiEye の登録は、登録カードに必要事項を記入して返送して頂くか、http://www.xrite.comでオンライン登録して頂けます。
18. 証明書の更新
X-Rite は、DensiEye 反射濃度計の証明書を毎年更新することをお勧めします。
照明書の更新方法については、X-Rite 販売代理店または最寄りのX-Rite サービスセンターにお問い合わせ下さい。
19. サービス
いかなる状況でも、X-Rite DensiEye の修理を自分で行なわないで下さい。
装置を許可なく開けた場合は、その時点で品質保証の対象外になります。
装置に障害が発生したり、正常に機能しなくなった場合は、X-Rite サポートまたは最寄りの X-Rite サービスセンターにお問い
合わせ下さい。

クイックスタートガイド
17X-Rite® DensiEye™ クイックスタートガイド
J A P A N E S E
JP
20. CE 適合宣言
署名者が代表する製造業者 X-Rite Althardstrasse 70 CH-8105 Regensdorf Switzerland
の製品 Reflectance densitometer DensiEye™ 700, DensiEye™ 100
は、次のCE指令 (適用可能なすべての修正を含む)の条項に適合することをこれにより宣言する。
73/23/EEC 指定の電圧上下限値の範囲内で使用する電子機器
89/336/EEC 電磁機互換性および電磁基準、および(または)裏面に記載のテクニカル仕様に適合している。
CEマーキングが貼付された西暦年の下2桁は03である。
CH-8105 Regensdorf, Switzerland Dr. Iris Mangelschots Christian BenzFebruary 18th 2004 Vice President Product Manager


X-Rite® DensiEye™ 快速使用指南
中 文快速使用指南
CN
目录
1. 安全使用须知 . . . . . . . . . . . . . . . . . . . . . . . . . . . . . . . . . . . . . . . . . . . . . . . . . . . . . . . . . . . . . . . . . . . . . . . . . . . . . . . . . . . . . . . . . . . . . . . . . . . . . . . . . . . . . . . . 2 2. 装箱单 . . . . . . . . . . . . . . . . . . . . . . . . . . . . . . . . . . . . . . . . . . . . . . . . . . . . . . . . . . . . . . . . . . . . . . . . . . . . . . . . . . . . . . . . . . . . . . . . . . . . . . . . . . . . . . . . . . . . . . 33. 包装运输 . . . . . . . . . . . . . . . . . . . . . . . . . . . . . . . . . . . . . . . . . . . . . . . . . . . . . . . . . . . . . . . . . . . . . . . . . . . . . . . . . . . . . . . . . . . . . . . . . . . . . . . . . . . . . . . . . . . . 44. 仪器外观 . . . . . . . . . . . . . . . . . . . . . . . . . . . . . . . . . . . . . . . . . . . . . . . . . . . . . . . . . . . . . . . . . . . . . . . . . . . . . . . . . . . . . . . . . . . . . . . . . . . . . . . . . . . . . . . . . . . . 55. 开/锁测量头 . . . . . . . . . . . . . . . . . . . . . . . . . . . . . . . . . . . . . . . . . . . . . . . . . . . . . . . . . . . . . . . . . . . . . . . . . . . . . . . . . . . . . . . . . . . . . . . . . . . . . . . . . . . . . . . . . . 6 6. 出厂设置 . . . . . . . . . . . . . . . . . . . . . . . . . . . . . . . . . . . . . . . . . . . . . . . . . . . . . . . . . . . . . . . . . . . . . . . . . . . . . . . . . . . . . . . . . . . . . . . . . . . . . . . . . . . . . . . . . . . . 67. 标准按键 . . . . . . . . . . . . . . . . . . . . . . . . . . . . . . . . . . . . . . . . . . . . . . . . . . . . . . . . . . . . . . . . . . . . . . . . . . . . . . . . . . . . . . . . . . . . . . . . . . . . . . . . . . . . . . . . . . . . 78. 特殊按键及按键组合 . . . . . . . . . . . . . . . . . . . . . . . . . . . . . . . . . . . . . . . . . . . . . . . . . . . . . . . . . . . . . . . . . . . . . . . . . . . . . . . . . . . . . . . . . . . . . . . . . . . . . . . . . . 89. 图标及功能介绍 . . . . . . . . . . . . . . . . . . . . . . . . . . . . . . . . . . . . . . . . . . . . . . . . . . . . . . . . . . . . . . . . . . . . . . . . . . . . . . . . . . . . . . . . . . . . . . . . . . . . . . . . . . . . . 910. 显示界面和红绿灯 . . . . . . . . . . . . . . . . . . . . . . . . . . . . . . . . . . . . . . . . . . . . . . . . . . . . . . . . . . . . . . . . . . . . . . . . . . . . . . . . . . . . . . . . . . . . . . . . . . . . . . . . . . . 1211. 功能选择 . . . . . . . . . . . . . . . . . . . . . . . . . . . . . . . . . . . . . . . . . . . . . . . . . . . . . . . . . . . . . . . . . . . . . . . . . . . . . . . . . . . . . . . . . . . . . . . . . . . . . . . . . . . . . . . . . . . 1312. 图标选择 . . . . . . . . . . . . . . . . . . . . . . . . . . . . . . . . . . . . . . . . . . . . . . . . . . . . . . . . . . . . . . . . . . . . . . . . . . . . . . . . . . . . . . . . . . . . . . . . . . . . . . . . . . . . . . . . . . . 1313. 定位及测量 . . . . . . . . . . . . . . . . . . . . . . . . . . . . . . . . . . . . . . . . . . . . . . . . . . . . . . . . . . . . . . . . . . . . . . . . . . . . . . . . . . . . . . . . . . . . . . . . . . . . . . . . . . . . . . . . . 1414. 校正 . . . . . . . . . . . . . . . . . . . . . . . . . . . . . . . . . . . . . . . . . . . . . . . . . . . . . . . . . . . . . . . . . . . . . . . . . . . . . . . . . . . . . . . . . . . . . . . . . . . . . . . . . . . . . . . . . . . . . . . . 1415. 密度测量逐步介绍 . . . . . . . . . . . . . . . . . . . . . . . . . . . . . . . . . . . . . . . . . . . . . . . . . . . . . . . . . . . . . . . . . . . . . . . . . . . . . . . . . . . . . . . . . . . . . . . . . . . . . . . . . . 1516. 自动模式 . . . . . . . . . . . . . . . . . . . . . . . . . . . . . . . . . . . . . . . . . . . . . . . . . . . . . . . . . . . . . . . . . . . . . . . . . . . . . . . . . . . . . . . . . . . . . . . . . . . . . . . . . . . . . . . . . . . 1617. 保修注册 . . . . . . . . . . . . . . . . . . . . . . . . . . . . . . . . . . . . . . . . . . . . . . . . . . . . . . . . . . . . . . . . . . . . . . . . . . . . . . . . . . . . . . . . . . . . . . . . . . . . . . . . . . . . . . . . . . . 1618. 重新校验 . . . . . . . . . . . . . . . . . . . . . . . . . . . . . . . . . . . . . . . . . . . . . . . . . . . . . . . . . . . . . . . . . . . . . . . . . . . . . . . . . . . . . . . . . . . . . . . . . . . . . . . . . . . . . . . . . . . 1619. 服务 . . . . . . . . . . . . . . . . . . . . . . . . . . . . . . . . . . . . . . . . . . . . . . . . . . . . . . . . . . . . . . . . . . . . . . . . . . . . . . . . . . . . . . . . . . . . . . . . . . . . . . . . . . . . . . . . . . . . . . . . 1620. 符合认证声明 . . . . . . . . . . . . . . . . . . . . . . . . . . . . . . . . . . . . . . . . . . . . . . . . . . . . . . . . . . . . . . . . . . . . . . . . . . . . . . . . . . . . . . . . . . . . . . . . . . . . . . . . . . . . . . . 17
DensiEye 注册商标属 X-Rite, Incorporated 及其相关公司拥有.

CN
2 X-Rite® DensiEye™ 快速使用指南
中 文 快速使用指南
1. 安全说明
X-Rite DensiEye 不能在易燃易爆的环境中使用.
DensiEye 不能暴露于强磁场中;
DensiEye 必须在环境温度为 10° C - 40° C,相对湿度为 20% - 80% 的条件下使用;
DensiEye 必须存储于环境温度为 -20° C - 70° C,相对湿度 5% - 90% 的条件下
DensiEye 不能暴露于直射阳光下;
DensiEye 防止接触化学物质、有毒气体、避免强振动和机械损伤
DensiEye 运输时应使用原包装箱;
维修需专业人员,用户不能擅自拆装,否则保修自动中止;
只能使用 X-Rite 自己的零件和配件。
只有经过培训的人员,才可使用仪器;
测量时,样张要放在平稳的测量台上;
塑料外壳可以用湿布和少量洗涤液清洗;
切忌电池短路!
两节电池要同时更换;
按规定处理废电池。
3X-Rite® DensiEye™ 快速使用指南
中 文快速使用指南
CN
2. 装箱单
1 DensiEye
2 校正板
3 USB 连接线
4 快速使用指南
5 仪器认证证书
6 注册卡
7 CD: 内有软件和使用手册
8 仪器箱
CN
4 X-Rite® DensiEye™ 快速使用指南
中 文 快速使用指南
3. 包装运输
运输时,必须用仪器原包装箱封装。

5X-Rite® DensiEye™ 快速使用指南
中 文快速使用指南
CN
4. 仪器外观
红绿灯
开关锁
向上按键
向下按键
USB 接口
复位按键
回车按键
电池
显示器
测量孔

CN
6 X-Rite® DensiEye™ 快速使用指南
中 文 快速使用指南
5. 打开与锁定测量头
打开测量头
• 向后推位于仪器左侧的“锁开关”,测量头就会被打开;
• 设备第一次打开时, 主菜单里会显示最近一次使用的参考值;
• 显示屏30秒后自动关闭;
• 按任意键,仪器即被重新开启;
锁测量头
• 下压仪器,并且向前推位于左侧的“开关锁”,测量头就会被锁上;
• 显示屏30秒后自动关闭。
6. 出厂设置
• 绝对值/差值: 绝对值
• 底白: 纸张
• 参考组别: 第一参考组
• 滤色镜/颜色选择: 自动
• 红绿灯: 关
• 阶调分级单位: 10%
• 小数位数: 2
• 语言: 英文
• 左/右手操作: 右手

7X-Rite® DensiEye™ 快速使用指南
中 文快速使用指南
CN
7. 標準ボタン
ボタン 名 称 功 能
向上键 光标向上移动 增加数值
回车键 打开/关闭选择功能 确定数据
向下键 向下光标按键 减小数值

CN
8 X-Rite® DensiEye™ 快速使用指南
中 文 快速使用指南
8. 快捷键组合
1) 操作顺序:
- 按住回车键;
- 测量底白;
- 松开回车键。
2) 操作顺序:
- 按住复位按钮;
- 按住回车键;
- 松开复位键;
- 松开复位键。
按 键 说 明
回车 + 测量 1) 底白测量
复位 在主菜单中“自动模式”(DensiEye 700) 或“密度”(DensiEye 100) 能被选择 所有的设置会被保留
复位 + 回车 2) 在主菜单中“自动模式”(DensiEye 700) 或“密度”(DensiEye 100) 能被选择所有设置将回到出厂设置参考值和容差值会被保留校正数据被重置,必须重新校正
回车(3秒) 回到功能选择(主菜单中)
回车(10秒) 显示语言选择(主菜单中)
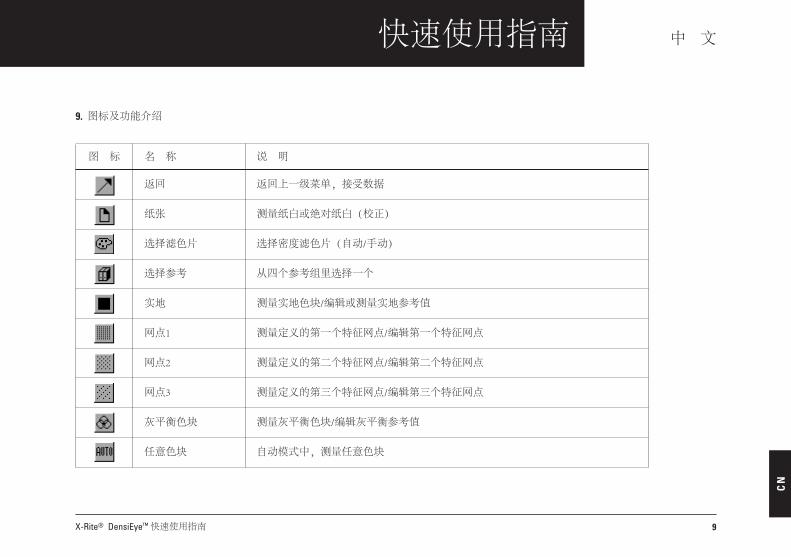
9X-Rite® DensiEye™ 快速使用指南
中 文快速使用指南
CN
9. 图标及功能介绍
图 标 名 称 说 明
返回 返回上一级菜单,接受数据
纸张 测量纸白或绝对纸白(校正)
选择滤色片 选择密度滤色片(自动/手动)
选择参考 从四个参考组里选择一个
实地 测量实地色块/编辑或测量实地参考值
网点1 测量定义的第一个特征网点/编辑第一个特征网点
网点2 测量定义的第二个特征网点/编辑第二个特征网点
网点3 测量定义的第三个特征网点/编辑第三个特征网点
灰平衡色块 测量灰平衡色块/编辑灰平衡参考值
任意色块 自动模式中,测量任意色块

CN
10 X-Rite® DensiEye™ 快速使用指南
中 文 快速使用指南
图 标 名 称 说 明
查看/编辑模式 查看并编辑网点测量
绝对值/差值 转换到绝对值或差值
第一色实地 测量第一色实地密度(叠印率)
第二色实地 测量第二色实地密度(叠印率)
叠印色块 测量叠印色
黑 编辑黑色密度值(校正)
青 编辑青色密度值(校正)
品红 编辑品红密度值(校正)
黄 编辑黄色密度值(校正)

11X-Rite® DensiEye™ 快速使用指南
中 文快速使用指南
CN
图 标 名 称 说 明
红绿灯 开/关红绿容差指示灯
底白 设置底白为纸张底白或绝对底白
阶调分级单位 为印刷特性曲线设置分级单位
小数位数 为密度设置小数位数
旋转显示 为左手操作而设的旋转显示
仪器类型 显示设备类型等信息
语言 选择语言

CN
12 X-Rite® DensiEye™ 快速使用指南
中 文 快速使用指南
10. 显示界面及红绿灯
显示屏布局
显示屏分为以下几个主要区域:
• 标题 -> 显示所选择的基本功能;
• 帮助栏 -> 显示指定功能的帮助信息
• 图标区 -> 显示图标和测量顺序。
• 输出区 -> 显示测量值及结果
• 状态区 -> 显示测量状态(显示长度根据内容可变)
• 密度滤色设置:自动、青、品红、黄、黑
• 选择参考组来计算差值
图标区
标题
状态区
输出区
帮助栏

13X-Rite® DensiEye™ 快速使用指南
中 文快速使用指南
CN
提示框
提示框在输出区内,会显示诸如“底白测量完成”或报错信息。
红绿灯
位于测量头顶部,显示屏旁边,用红绿灯来指示。可用于密度、网点扩大、和灰平衡等功能测量结果是否在容差范围内。
显示屏上的通过/失败信息
如果测量数据在容差范围内,则数据后会被打上勾号;
如果测量数据超过容差范围,则会显示“向上箭头”或“向下箭头”。
11. 功能选择
• 用“上”“下”键在菜单中选择到想要的功能;
• 按“回车”键打开所选功能;
• 按“回车”键在弹出对话框中,激活所选的设置。
12. 图标选择
• 用“上”“下”键选择到想要的图标;
• 依据前面章节介绍的图标功能,按下“回车”键或开始测量

CN
14 X-Rite® DensiEye™ 快速使用指南
中 文 快速使用指南
13. 定位和测量
• 印刷样张应该放置在平稳的测量台上;
• 用仪器底部的测量孔将 DensiEye 定位在测量区域上。
• 压低仪器,定位器会被拉回,仪器开始测量;
• 当显示测量结果,或者是提示信息后方可抬起测量头。
14. 校正
• 用相应的校正板校正仪器,是准确测量的先决条件;
• 校正板上的密度标准和滤色片必须与设备匹配;
• 校正前,要先确定密度模式是“纸张底白”(减去纸白)还是“绝对底白”;在主菜单的“功能设置”条里设置;
• 在主菜单中选择校正功能;
• 依据所选底白, 标题栏会显示“校正纸张底白”或“校正绝对底白”;
• 依据所选的白基准,选用相应的纸白参考值或绝对白点值;
• 根据帮助栏提示校正仪器;
• X-Rite 建议用密度测量进行校正;
• X-Rite 建议,如果想要多台仪器测量数值相同,最好用同一块校正板。

15X-Rite® DensiEye™ 快速使用指南
中 文快速使用指南
CN
15. 密度测量逐步介绍
• 在主菜单,通过上下键选择到“密度”功能,按回车按键;
• 用上下键选择到“绝对值/差值”图标;
• 按“回车”键,转为绝对值;
• 用上下键选择“选择滤色镜”图标,按“回车”键;
• 选择“自动”菜单,仪器自动识别CMYK颜色密度值,按“回车”键;
• 选择“纸张”图标,按“回车”键;
• 测量纸白;
• 显示“白点测量完成”;
• 测量密度;
• 显示出密度值。

CN
16 X-Rite® DensiEye™ 快速使用指南
中 文 快速使用指南
16. 自动模式 (仅限 DensiEye 700)
这个功能可以自动检测实地、网点、叠印和灰平衡区域,为了作到这一点,应首先根据印刷色序测量四色实地密度值。
17. 保修注册 为了得到技术支持,需要注册你的仪器
你可以填写注册卡,也可以在网上注册,网址:http://www.xrite.com
18. 重新校验
X-Rite 建议每年对 DensiEye 作一次校验;
关于校验更多信息,请联系 X-Rite 代理商或 X-Rite 服务中心
19. 服务
任何时间、任何情况下都不要尝试自己动手修理仪器;
未经授权擅自开机,保修即刻终止;
如果仪器不能正常运行,或怀疑不能正常运行,请联系X-Rite代理或服务中心
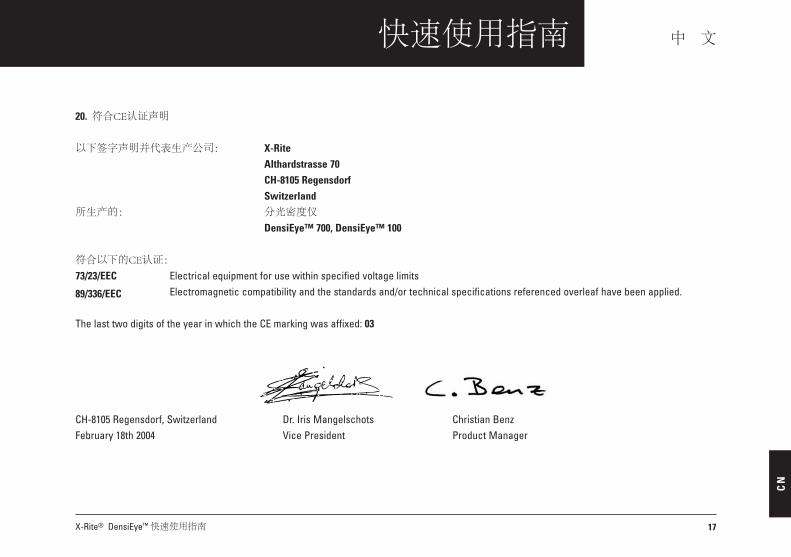
17X-Rite® DensiEye™ 快速使用指南
中 文快速使用指南
CN
20. 符合CE认证声明
以下签字声明并代表生产公司: X-Rite Althardstrasse 70 CH-8105 Regensdorf Switzerland
所生产的: 分光密度仪
DensiEye™ 700, DensiEye™ 100
符合以下的CE认证:
73/23/EEC Electrical equipment for use within specified voltage limits
89/336/EEC Electromagnetic compatibility and the standards and/or technical specifications referenced overleaf have been applied.
ThelasttwodigitsoftheyearinwhichtheCEmarkingwasaffixed:03
CH-8105 Regensdorf, Switzerland Dr. Iris Mangelschots Christian BenzFebruary 18th 2004 Vice President Product Manager
xrite.com
X-Rite WoRld HeadquaRteRsGrand Rapids, Michigan USA • (800) 248-9748 • +1 616 803 2100
© 2009, X-Rite, Incorporated. All rights reserved. Part. No. 98.53.18 (03/09)