ml700p printer manual
TRANSCRIPT

ML- 7000 SeriesLASER PRINTER
User’s Guide

ELECTRONICS
Printed in Korea
P/N: JC68-61021A Rev. 3.00

CCooppyyrriigghhtt
The software described in this document is supplied under a license agreement. The software may be used or copied only in accordance with the terms of this agreement. It is against the lawto copy the software on any medium except as specifically allowed in the license agreement. The purchaser may make only one copy of the software for backup purposes.
No part of this manual may be photocopied or transmitted in any from or by any means, electronic or mechanical including photocopying, recording or information storage and retrievalsystems, for any purpose other than the purchaserÕs personal use, without the expressly writtenconsent of Samsung Electronics Co., Ltd.
Information in this document is subject to change without notice and does not represent a commitment on the part of Samsung Electronics Co., Ltd. Samsung Electronics Co., Ltd. or itsdistributors can in no circumstances be held responsible for any prejudice, whether direct orindirect, resulting from the use of the software or the documentation.
July 1998
TTrraaddeemmaarrkk NNoottiicceess
◆ Copyright 1998 SAMSUNG Electronics Co., Ltd. All rights reserved.
◆ All other brand or product names are trademarks or registered trademarks of their respective companies or organizations.
◆ ML-7000 series and Samsung logo are trademarks of Samsung Electronics Co., Ltd.
◆ Centronics is a registered trademark of Centronics Data Computer Corporation.
◆ HP, PCL5e, PCLXL are registered trademarks of Hewlett-Packard Company.
◆ IBM, IBM PC, XT, AT, PS/2 are registered trademarks of International Business Machines Corporation.
◆ Apple, AppleTalk, LocalTalk, LaserWriter, TrueType, Macintosh are registered trademarksof Apple Computer Inc.
◆ Microsoft, MS-windows, MS-DOS are registered trademarks of Microsoft Corporation.
◆ CompuServe is a registered trademark of CompuServe inc.
◆ TrueDoc R is a registered trademark of Bitstream Inc.
◆ Font NavigatorTM is a registered trademark of Bitstream Inc.
◆ PostScript is a registered trademark of Adobe Systems Inc.
◆ PowerPage R is a registered trademark of Electronics for Imaging, Inc.
5 Contents2
CCoonntteennttssSafety PrecautionsFeatures and Model Descriptions
Setting up Your PrinterUnpacking Your Printer
Items SuppliedFront ViewRear ViewPreparation
Installing Toner CartridgeConnecting the Parallel Cable
Cable SpecificationsConnecting the Parallel Cable
Connecting the AC Power Cord Loading Paper into the CassetteLoading Paper into the MP TrayTesting the Printer
67
9
9
10
10
11
12
14
14
14
16
17
20
22
23
24
24
24
24
25
27
28
28
29
29
29
29
30
Getting Started
Setting up the Printer Driver
OverviewInstalling the Driver
Hardware RequirementsSoftware RequirementsInstall Procedure
- With Windows 95/98/NT 4.0- In case of Plug & Play- With Windows 3.1
Uninstalling the Printer DriverSelecting the Printer
Default PrinterSelection
Loading the Smart MonitorFont Navigator Directory (FontNav)
Contents 3
32
33
33
34
35
35
36
37
38
39
40
41
42
42
43
44
45
49
52
55
55
56
58
58
59
60
61
62
62
63
65
66
Using Your PrinterOverviewUsing Features in the Printer Driver
With Windows 95/98/NT 4.0With Windows 3.1
Using the Samsung 7000 Series Printer DriverPaper TabGraphics TabFinishing TabPrinter TabOverlays TabWatermarks Tab
Using the Operator PanelOperator Panel ButtonsOperator Panel Menus
Changing Printer SettingsOverview of Printer MenuPRINTING MENUCONFIG MENUJOB MENU
TEST MENUI/O MENUPCL MENUPrinting Both Sides of Paper
ProcedureMenu Setting ProcedurePaper Orientation for Printing both sides of Paper
Manually Feeding Paper from MP TrayPrinting Special Paper
Letterhead/Prepunched PaperEnvelopesLabelTransparencies
Operation

Contents4
Memory and Option CardsOverviewPreparations- Understanding the Printer Control Board- Closing the Printer Cover Printer Memory- Installing Procedure- Removing the Printer Memory OptionNetwork Option Card(PortThru)- Installing Procedure
Options
68
69
69
69
69
72
72
74
75
76
80
83
84
85
87
88
89
90
92
92
95
96
96
Caring for Your PrinterOverviewMaintaining the Toner Cartridge
Toner Cartridge StorageToner Cartridge LifeDistributing the Toner
Cleaning the PrinterProcedureCleaning LSU
Troubleshooting
Problem SolvingOverviewClearing Paper JamsError MessagesGeneral Printing ProblemsPoor Print QualityPS Problems
Problem Solving

Contents 5
Memory and Option CardsPrinting a document Using PS option in PC- Adding more Memory- Installing PS SIMM- Installing PS Driver- Selecting the Default PrinterPrinting a document using PS option in Macintosh- Adding more Memory- Installing PS SIMM- Installing Serial/LocalTalk Option Card- Connecting the LocalTalk Cable- Installing the PS Driver
OverviewInstalling procedurePrinting Procedure
OverviewInstalling ProcedureLoading the Plain Paper into the Option CassettePaper Source Selection
Options
Technical Specifications
Appendix
Technical SpecificationsPaper Specifications
Supported Types of PaperGuidelines for Using Paper
Printer Specifications
Notices
99
99
99
100
105
107
107
107
108
110
110
112
113
114
115
116
117
121
124125125
126
129
134
Infrared Adapter
Optional Cassette
Safety Precautions6
Before using the printer, please read the instructions in this guide carefully and putthe guide in a safe place close to the printer, so that it is available when you need itlater. Please take the following precautions when using and maintaining your printer.
● Unplug the printer before cleaning it. Do Not use any liquid or aerosol cleaners. Simply use a damp cloth. Refer to the page of this guide for further details.
● Do Not place the printer on an unstable surface or close to a radiator or source of heat.
● Take care not to block or cover the ventilation holes on the side of the printer. Do Not insert any object in these holes.
● Check that the electrical power source to which you wish to connect the printer complies with the electrical specifications of this printer : (230V)
● Connect all your computer equipment, including the printer to a power point with earthing device. Avoid plugging your printer into the same power point as equipment likely to cause voltage variations, such as a photocopying machine or an air conditioner.
● Check regularly that the power cable is in good condition and is not damaged in any way.
● If you use an extension cord, check that total intensity of all equipment connected to it does not exceed the maximum intensity allowed for the extention cord. Check that the total intensity of the equipment connected to the same power point does not exceed 15 amps.
● Unless otherwise indicated in this guide, do not attempt to repair the printer yourself. Should you detect a fault, return your printer to an authorized service center or your dealer.
● Systematically return your printer to an authorised service center or your local dealer if one of the following situations occurs :- The power cord or plug is damaged- A liquid has been spilled on and/or in the printer.- The printer has fallen or been dropped or the bodywork is damaged in any way.- The printer is not operating correctly or you have noticed a significant drop in
the quality of the printing.
SSaaffeettyy PPrreeccaauuttiioonnss
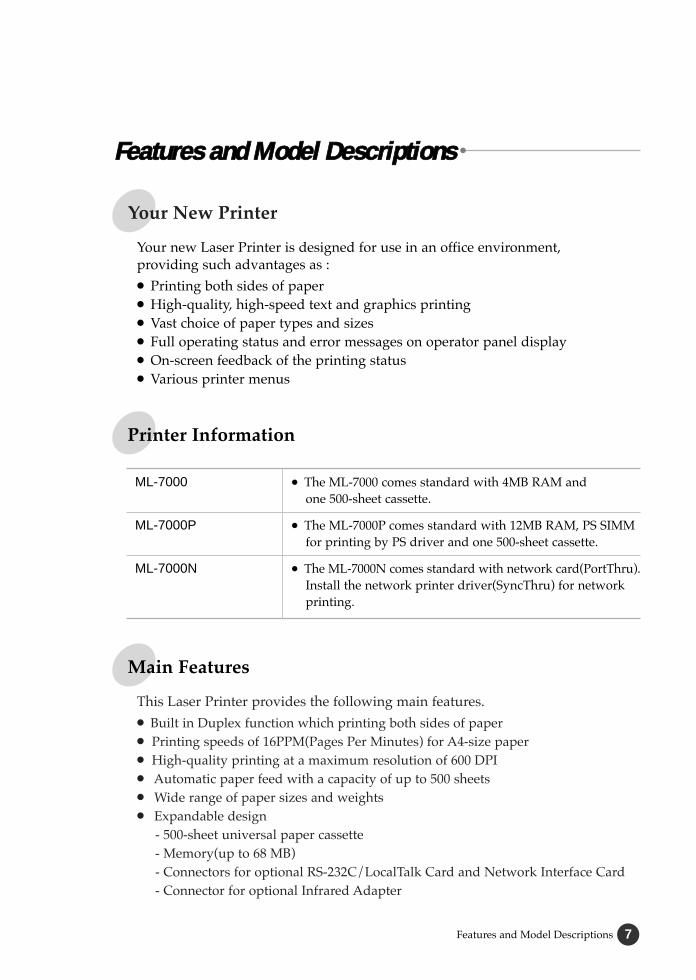
Your new Laser Printer is designed for use in an office environment,providing such advantages as :● Printing both sides of paper● High-quality, high-speed text and graphics printing● Vast choice of paper types and sizes● Full operating status and error messages on operator panel display● On-screen feedback of the printing status● Various printer menus
FFeeaattuurreess aanndd MMooddeell DDeessccrriippttiioonnss
Your New Printer
This Laser Printer provides the following main features.● Built in Duplex function which printing both sides of paper● Printing speeds of 16PPM(Pages Per Minutes) for A4-size paper● High-quality printing at a maximum resolution of 600 DPI● Automatic paper feed with a capacity of up to 500 sheets● Wide range of paper sizes and weights● Expandable design
- 500-sheet universal paper cassette- Memory(up to 68 MB)- Connectors for optional RS-232C/LocalTalk Card and Network Interface Card- Connector for optional Infrared Adapter
Main Features
Printer Information
Features and Model Descriptions 7
ML-7000
ML-7000P
ML-7000N
● The ML-7000 comes standard with 4MB RAM and one 500-sheet cassette.
● The ML-7000P comes standard with 12MB RAM, PS SIMM for printing by PS driver and one 500-sheet cassette.
● The ML-7000N comes standard with network card(PortThru).Install the network printer driver(SyncThru) for network printing.

Getting Started
Getting Started8
Setting Up your Printer 9
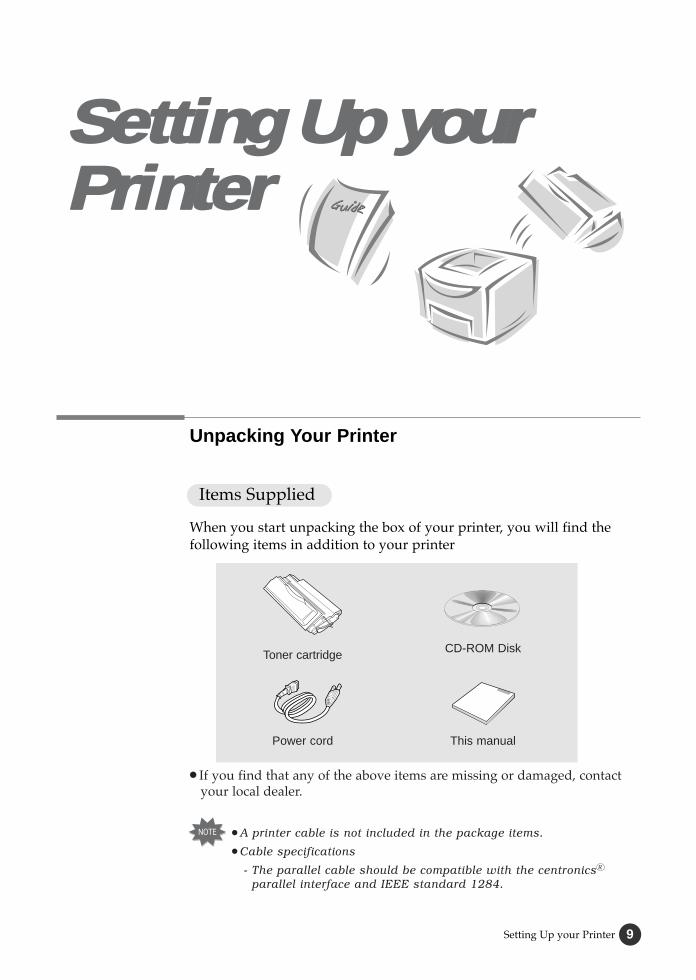
Unpacking Your Printer
Items Supplied
When you start unpacking the box of your printer, you will find the following items in addition to your printer
SSeettttiinngg UUpp yyoouurrPPrriinntteerr
Power cord
● If you find that any of the above items are missing or damaged, contact your local dealer.
Toner cartridge CD-ROM Disk
This manual
● A printer cable is not included in the package items.
● Cable specifications
- The parallel cable should be compatible with the centronics R
parallel interface and IEEE standard 1284.
Setting Up your Printer10
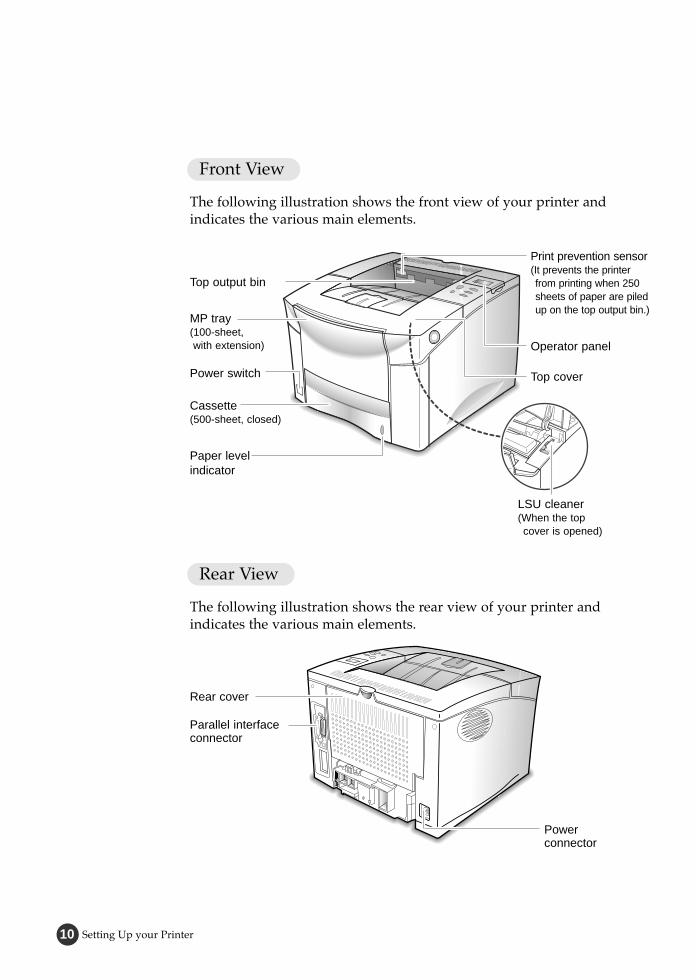
Front View
The following illustration shows the front view of your printer and indicates the various main elements.
Top output bin
Operator panel
Print prevention sensor(It prevents the printer from printing when 250 sheets of paper are piled up on the top output bin.)
Paper level indicator
Cassette(500-sheet, closed)
Top cover
MP tray(100-sheet, with extension)
Power switch
Rear View
The following illustration shows the rear view of your printer and indicates the various main elements.
Rear cover
Powerconnector
Parallel interface connector
LSU cleaner(When the top cover is opened)

Setting Up your Printer 11
Preparation
During the storage and transport of your printer, adhesive tape is used to block some of the elements that may move or openunexpectedly and consequently be damaged.
1. Before connecting up your printer and starting to use it, you must 1. therefore remove all the adhesive tapes, as illustrated in the figure 1. below.
2. Slide cassette out of the printer. 1. Remove the packaging material from the cassette.

Setting Up your Printer12
Installing Toner Cartridge
To install a toner cartridge in your printer proceed as follows.
1. Remove the toner cartridge from its packaging.
2. Open the top cover of the printer by pressing the button on right side of the printer.
● Do not remove the cartridge from its packaging until you are ready to use it.
● Do not expose the cartridge to light, it could damage the cartridge permanently.
Setting Up your Printer 13
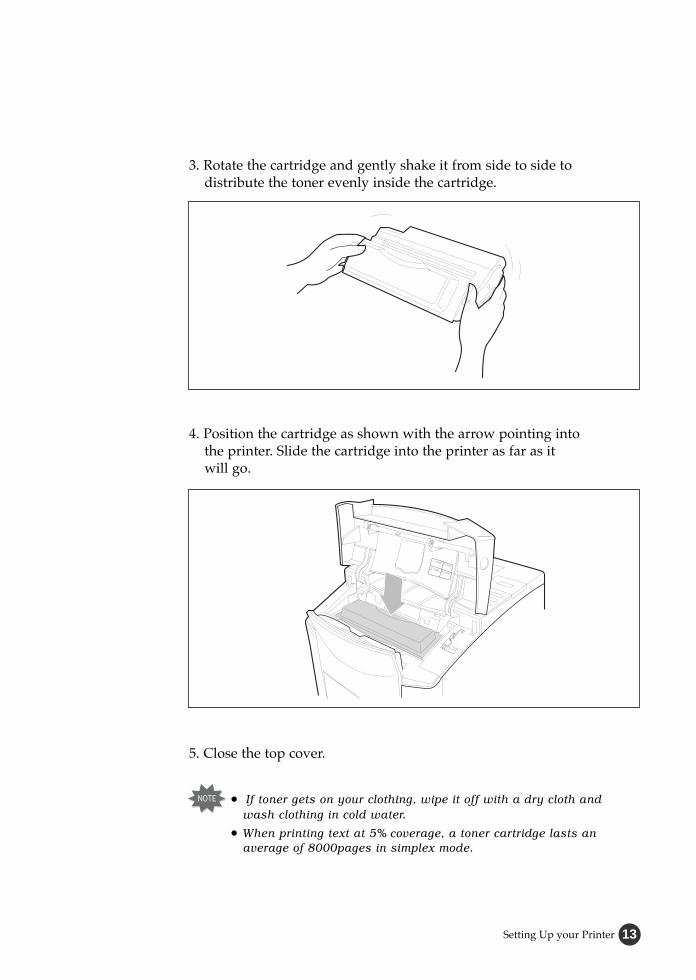
3. Rotate the cartridge and gently shake it from side to side to distribute the toner evenly inside the cartridge.
4. Position the cartridge as shown with the arrow pointing into the printer. Slide the cartridge into the printer as far as it will go.
5. Close the top cover.
● If toner gets on your clothing, wipe it off with a dry cloth and wash clothing in cold water.
● When printing text at 5% coverage, a toner cartridge lasts an average of 8000pages in simplex mode.

Setting Up your Printer14
Connecting the Parallel Cable
To print from computer software, you need to connect your printer to your computer with a parallel interface cable.
Cable Specifications (Not provided)
The parallel cable should be compatible with the Centronics R parallel interface and IEEE standard 1284. If you purchase parallel cable, ensurethat it :
● Is compatible with Centronics interface.● Supports bi-directional communications(IEEE standard 1284)● Is shielded● Has the appropriate connector :
- 25 pin D-Sub connector on the computer side - Amphenol 36 connector on the printer side
Connecting the Parallel Cable
To connect the printer to your computer use a parallel cable and proceed as follows.
1. Check that both the printer and the computer to which it is to be connected are powered off and disconnected from the power point.
2. Plug the appropriate end of the parallel cable into the connector on the rear of the printer.

Setting Up your Printer 15
3. Push the clip at each end of the connector down into the notches on the plug as shown.
4. Plug the other end of the cable into the appropriate parallel connector on your computer and tighten the screw.
MIDI/GAME PHONE LINELINEOUT
LINEIN

1. Plug the appropriate end of the power cable supplied to the connector on the rear of the printer.
3. Power the printer on by pressing the power on/off button.
Connecting the AC Power Cord
To connect the printer to a power point, proceed as follows.
2. Plug the other end into a suitable power point 230V(220~240).
You will hear some movement inside the printer. The printer enters the Ready state.
RReessuulltt
Setting Up your Printer16

Setting Up your Printer 17
Loading Paper into the Cassette
Your printer has a standard Cassette that can hold up to 500 sheets of paper and a MP(Multi-Purpose) tray that can hold up to 100 sheets ofpaper, 10 envelopes or 10 index cards.
Cassette
To load paper in the cassette, proceed as follows.
1. Pull the cassette completely out of the printer.
2. Squeeze the back of the rear paper guide and slide it to the desired paper size until it clicks into place.The paper sizes are indicated on the bottom of the cassette.
Rear paper guide

Setting Up your Printer18
3. Lift the rear right guide and slide it to match the width of the paper.The paper sizes are indicated on the bottom of the cassette.
4. Squeeze the width guide, rear right guide and slide it to the far right side of the cassette.
Width guide
Printing side(down)
Paper Limit Line
Rear right guide
5. Place the paper against the left of the rear paper guide.
If the cassette is not properly adjusted, the printer might display anerror message or paper might jam.
● Do not fold or crease the paper.● Place the paper with the recommended print side face down.● DonÕt exceed the paper limit line indicated on the cassette when
the paper is held up.

Setting Up your Printer 19
6. Squeeze the width guide and slide it to the left until it lightly rests against the edge of the paper.
7. Make sure the paper is set below the tab on the cassette.
8. Gently slide the cassette back into the printer.The printer automatically senses the size of paper loaded if the cassette is adjusted correctly.
To load the paper of the Legal or Folio(24Ib,90g/m2) size into the cassette, push down thelever on the left side of the cassette to lock it.
Setting Up your Printer20
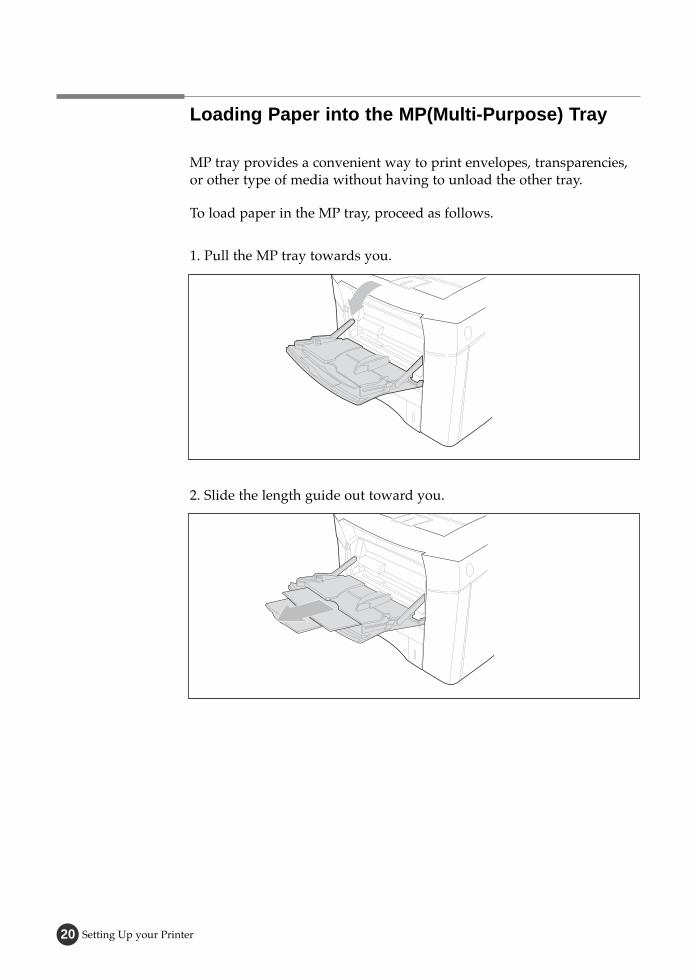
1. Pull the MP tray towards you.
2. Slide the length guide out toward you.
Loading Paper into the MP(Multi-Purpose) Tray
MP tray provides a convenient way to print envelopes, transparencies, or other type of media without having to unload the other tray.
To load paper in the MP tray, proceed as follows.
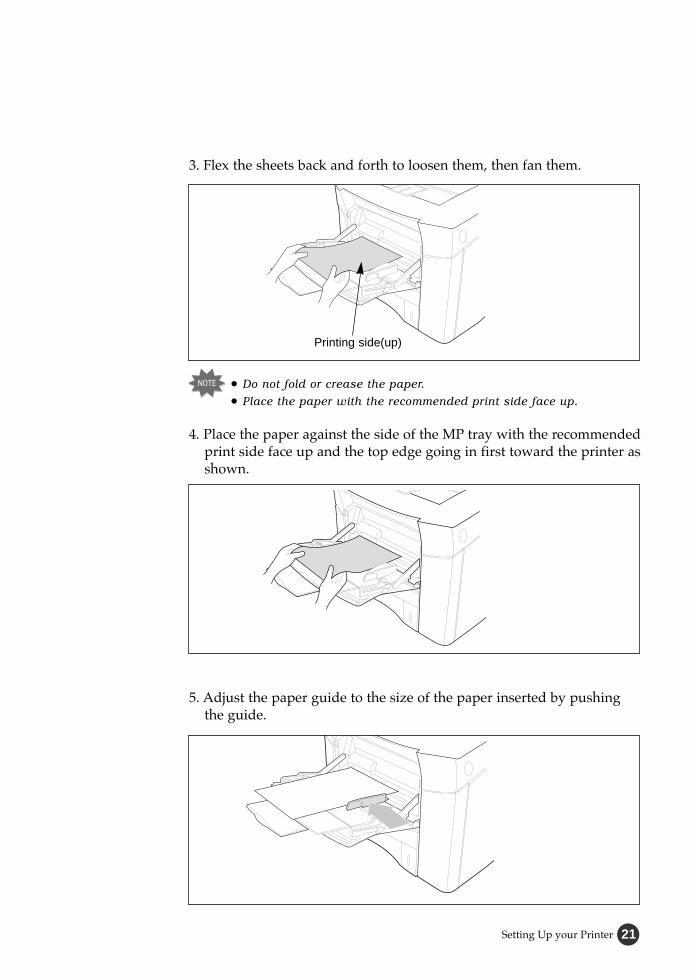
4. Place the paper against the side of the MP tray with the recommended print side face up and the top edge going in first toward the printer as shown.
5. Adjust the paper guide to the size of the paper inserted by pushingthe guide.
3. Flex the sheets back and forth to loosen them, then fan them.
● Do not fold or crease the paper.● Place the paper with the recommended print side face up.
Printing side(up)
Setting Up your Printer 21

Setting Up your Printer22
Testing the Printer
Print a configuration page to make sure the printer is operating correctly.
1. Make sure the printer is plugged in and the READY status message appears on the display.
RE ADY
0F F L NE
TE S TME NU
SE L F TE S T
2. Press On Line.
3. Press Menu > or < Menu to enter the menus.
4. Press Menu > or < Menu one or more times until the TEST MENU message is displayed.
5. Press Item> or <Item one or more times until the SELFTEST message is displayed.
6. Press Enter to print.
The OFFLINE message appears on the display and the printer is off-line.
RReessuulltt
● The message ÔPRINTING PCL6Õ appears and remains on l the display until the page prints.● The printer returns to the Ready state after printing.
RReessuulltt

Setting Up your Printer 23
SSeettttiinngg UUpp tthheePPrriinntteerr DDrriivveerr
Overview
The printer drivers provided on the CD must be installed to take full advantage of the printerÕs features. Printer drivers access the printer features and allow the computer tocommunicate with the printer.
Printer driver
If you install the printer driver using the CD, PCLXL and PCL5e are installed.The CD includes the printer drivers as follows.
● PCL5e ● PCLXL- You can use PCL5e driver in Windows 3.x/95/98 and Windows NT4.0.
In case of PCLXL, you can use only Windows 3.x/95/98 but it supports Watermark, Overlay, N-up printing and so forth.
● PS(ML-7000P or if the PS option is installed)● Font Navigator● SyncThru(ML-7000N or if the network card is installed)
● You cannot use PCLXL driver in Windows NT 4.0
● You cannot use PS in Windows 3.1
● PCL6 is the combination of PCL5e and the
new PCLXL printer language.
Setting Up your Printer24
Installing the Driver
Hardware Requirements
To install and run the PCL printer driver, you must have the following minimum hardware configuration.
● PC-compatible 486 microcomputer or better ● 8MB of RAM for Windows 3.1 and 3.11 (16MB recommended for some
applications) or 16MB for Windows 95/98, Windows NT 4.0● 10MB available hard-disk space.● CD-ROM Drive
Software Requirements
To install and run the printer driver, you must have one of the following minimum software configuration :
● Windows 3.1 or Windows for Workgroups (Windows 3.11) ● Windows 95, Windows 98, Windows NT 4.0● Novell NetWare Version 3.x or 4.x (If the Network card is installed)● Above the Macintosh System 7.x (To print the document from
Macintosh)
Install Procedure
To install the printer driver on your hard disk, make backup copies of the print driver CD. Keep the original CD in a safe place and use thecopies.
If you do not have access to a CD-ROM drive, contact your localdealer and request the printer driver diskettes.

Setting Up your Printer 25
1. Insert the CD into the CD-ROM drive.
2. Type the user name and company.Click on the NEXT button.
3. Select the printer model which is connected to your computer(ML-7000 Series or QwikLaser 7000 Series).Click on the NEXT button.
Then, proceed as follows.
With Windows 95/98/NT 4.0 :
4. Select the printer driver to install. Click on the NEXT button.● The installation of the printer driver is started.

Setting Up your Printer26
5. Select the desired language, and then click on the NEXT button in the Font Navigator dialogue box.
6. Follow the instructions on the screen.
7. Select the directory to install Font Navigator. Click on the Finish button.
8. Click on the Yes button, when asked to restart windows.
If the printer driver is installed togetherwith SyncThru, the SyncThru installationdialogue box is displayed.
Windows is restarted. The installation of theprinter driver and Font Navigator is completed.
RReessuulltt
If windows does not run the CD-ROM1. Insert the compact disk into the CD-ROM drive.
2. Select Start-Run from the windows task bar.
3. Type d:(or e:)\ Setup.exe on the command line, then click on the OK button.
4. Follow the instructions on the screen.

Setting Up your Printer 27
In case of Win 95
1. Make sure the printer is plugged and connected to your computer.
2. Turn on the printer and start Windows on your PC.
3. Windows recognizes the printer, and ÔNew Hardware FoundÕ dialogue box is displayed.
4. Click on the OK button.
5. Insert CD into the CD-ROM drive, and click on the Browse button.
6. Select the CD-ROM drive, then click on the OK button.
7. Follow step2 through 8 on page 25 to complete the installation.
In case of Win 98
1. Make sure the printer is plugged and connected to your computer.
2. Turn on the printer and start Windows on your PC.
3. Windows recognizes the printer, and ÔAdd New Hardware WizardÕ dialogue box is displayed.
4. Select search for the best driver for your device(Recommended), then click on the NEXT button.
5. Insert CD into the CD-ROM drive, then click on the Browse button.
6. Select the CD-ROM drive, then click on the OK button.
7. Follow step2 through 8 on page 25 to complete the installation.
In case of Plug & Play
To Install Shared Win 95/98 Printer Driver from NT Server to Client PC
1. Select Sharing in Properties of the printer driver.
2. Select Windows 95 in Alternate Drivers.
3. Type D:(or E:)\ PCLDRV\PCLXL\ENGLISH\WIN95_98\ML-7000
4. Install the network printer in the client PC.

Setting Up the Printer Driver28
The Run dialogue box appears.RReessuulltt
1. Make sure the printer is plugged and connected to your computer.
2. Turn on the computer.
3. Insert the compact disk into the CD-ROM drive.
4. From program manager window, select Run from the file menu.
With Windows 3.1 :
5. Type d:(or e:)\ Setup.exe on the command line, then click on the OK button.
6. From now on, follow the instructions on page 25 to completethe installation.
Uninstalling the Printer Driver
An uninstall utility is supplied with the printer driver to enable you to remove the driver and all associated files from your hard disk, if sorequired.
To uninstall the driver, proceed as follows.
Select Start-Programs-Samsung ML&QwikLaser 7000-Samsung 7000 Series uninstaller from the windows task bar.
● PCLXL and PCL5e drivers are removed from your hard disk.
Setting Up the Printer Driver 29
Selecting the Printer
Default Printer
After installing the printer driver Samsung 7000 Series PCLXL is selected automatically as the default printer.
If you did not select this Laser printer as the default printer when you installed it, you must select it before attempting to print adocument on it.
Selection
To select the printer, proceed as follows.
1. Select Start-Settings-Printers from the Windows task bar.
2. Double click the desired printer drivers(PCL5e, PCLXL) icon.
3. Select File-Default Printer.
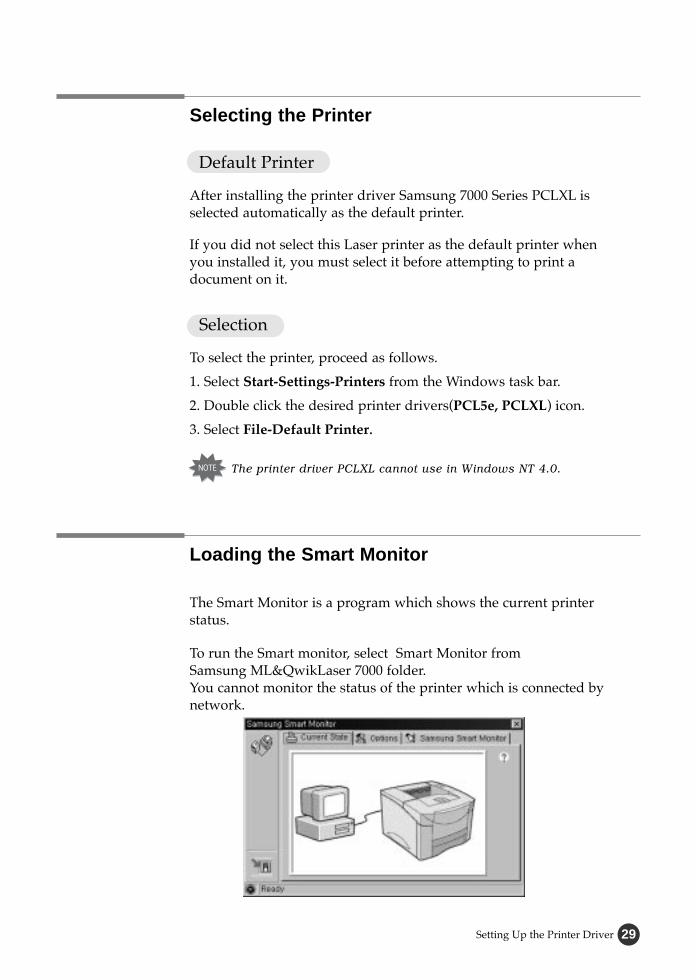
Loading the Smart Monitor
The Smart Monitor is a program which shows the current printer status.
To run the Smart monitor, select Smart Monitor from Samsung ML&QwikLaser 7000 folder.You cannot monitor the status of the printer which is connected bynetwork.
The printer driver PCLXL cannot use in Windows NT 4.0.

Setting Up the Printer Driver30
Font Navigator Directory(FontNav)
Font Navigator is a font manager for Windows 95/98, Windows NT(4.0), and Windows 3.1. It gives a quick and easy way to find fonts, install those fonts, and viewand print font samples.
Font Navigator is installed automatically when the printer driver is installed. If the printer driver is installed together with SyncThru, FontNavigator is not installed. In that case, install it.
To access the Font Navigator, select Start ➔ Programs ➔ Font Navigator.

Operation 31
Operation
Using Your Printer32
UUssiinngg YYoouurrPPrriinntteerr
Overview
This chapter contains information about using features in the printer driver, using the printer operator panel, understanding operator panel menus, and using your printer.
● Using Features in the Printer Driver
● Using the Operator Panel
● Printer Menu
● Printing Tasks

Using Your Printer 33
Using Features in the Printer Driver
When you print from software application, many of the printerÕs features are available from the printer driver.
To change the settings from a software application, do the following way.
With Windows 95/98/NT 4.0
1. Select Start-Settings-Printers from the windows task bar.
2. Double-Click on the desired printer driver icon.
3. Select Printer-Properties.
4. Click on the appropriate tab.
5. Select the required options.
Using Your Printer34
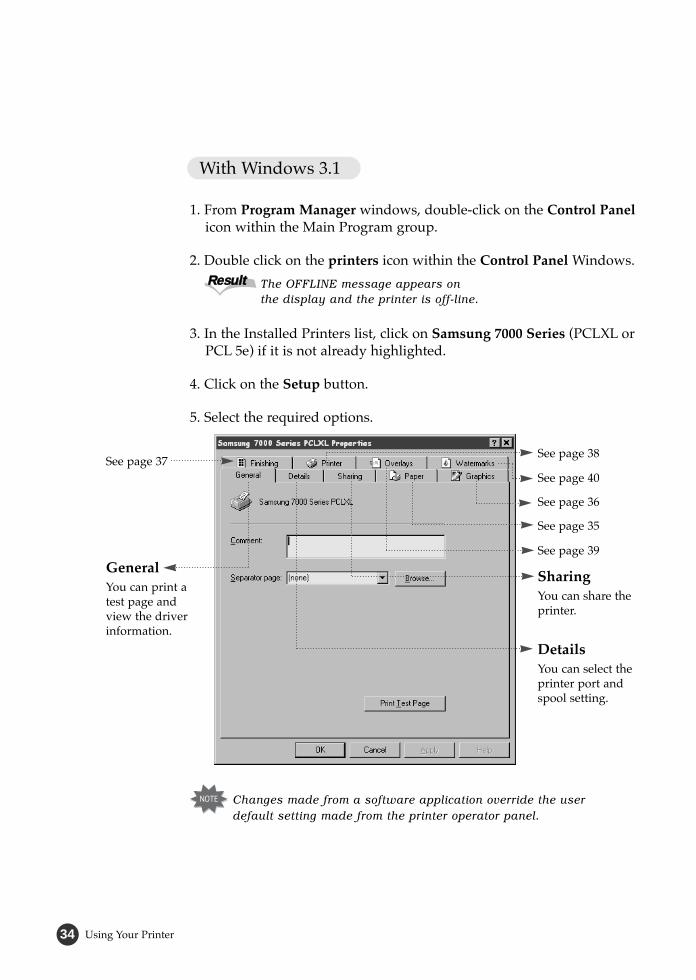
With Windows 3.1
1. From Program Manager windows, double-click on the Control Panelicon within the Main Program group.
2. Double click on the printers icon within the Control Panel Windows.
3. In the Installed Printers list, click on Samsung 7000 Series (PCLXL orPCL 5e) if it is not already highlighted.
4. Click on the Setup button.
5. Select the required options.
The OFFLINE message appears on the display and the printer is off-line.
RReessuulltt
Changes made from a software application override the userdefault setting made from the printer operator panel.
GeneralYou can print a test page and view the driver information.
See page 37
SharingYou can share the printer.
See page 38
DetailsYou can select the printer port andspool setting.
See page 40
See page 36
See page 35
See page 39

Using Your Printer 35
Each tab of Samsung 7000 Series PCLXL is described as an examplein this section.
Paper Tab
If you want to know more about each menu, click on the Help button.The help screen gives detailed information about each menu.
OrientationChoose Portrait or Landscape to selectthe defaultorientation of theprinted page.
Paper sizesUse this setting to select the paper size.
DuplexUse the Duplex box to select theboth side printing.
CopiesUse the Copies box to set thenumber of copiesyou want to print.
SourceThe source settingidentifies thedefault paper tray.
You can restore all settingsof PCLXL printer driver byclicking Restore Defaults.
You can see version andcopyright informationabout this printer driver byclicking About.
Using the Samsung 7000 Series Printer Driver
The features of the printer driver are arranged on nine tabs : To access one of the tab dialog boxes, click the tab at the top of the properties windows.

Using Your Printer36
If you want to know more about each menu, click on the Help button.The help screen gives detailed information about each menu.
Graphics Tab
The settings on the Graphics tab allow you to fine tune your image quality and to balance print quality and print speed.
Graphics ModeThis setting can imagethe page in severaldifferent ways.
HalftoningThis setting lets you fine-tune the waycolors in graphicsimages are covered togray dot patterns.
SRT ModeYou can set the
resolutionfor the graphicsimages.
Paper typeThe Paper type setting lets you specify the type of print material
installed in each tray.
Using Your Printer 37
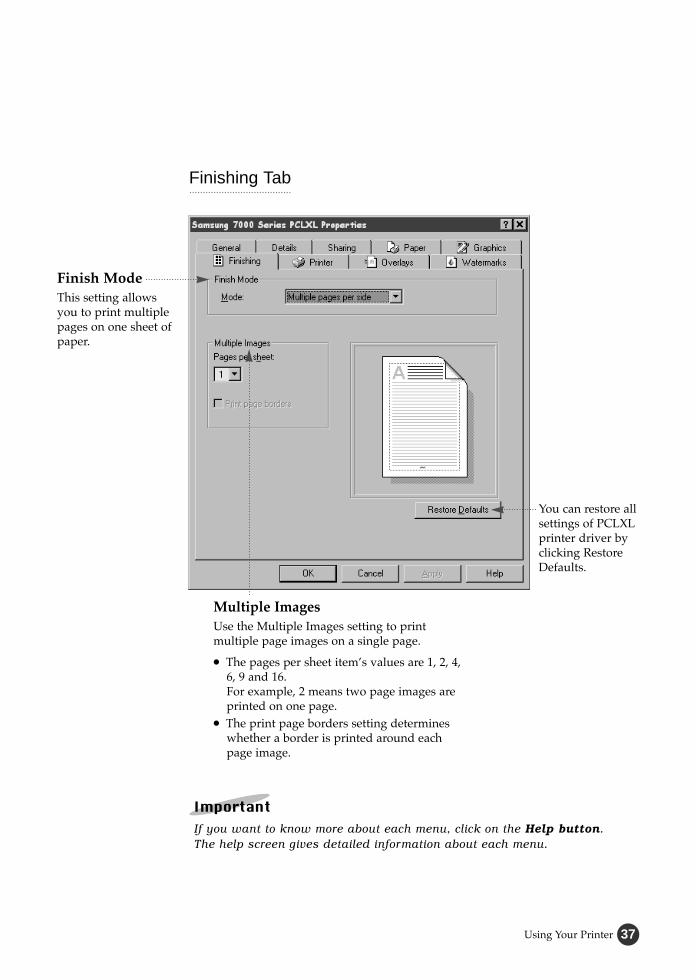
Finishing Tab
Finish ModeThis setting allowsyou to print multiplepages on one sheet ofpaper.
Multiple ImagesUse the Multiple Images setting to print multiple page images on a single page.
● The pages per sheet itemÕs values are 1, 2, 4, 6, 9 and 16. For example, 2 means two page images are printed on one page.
● The print page borders setting determines whether a border is printed around each page image.
You can restore allsettings of PCLXLprinter driver byclicking RestoreDefaults.
If you want to know more about each menu, click on the Help button.The help screen gives detailed information about each menu.

Using Your Printer38
Printer Tab
ResolutionSelect from the available setting to setthe maximumresolution for yourprint jobs.
Printer MemorySelect the value of the printer memoryinstalled in theprinter.
After adding morememory, set thevalue of the printermemory.
If you want to know more about each menu, click on the Help button.The help screen gives detailed information about each menu.

Using Your Printer 39
Overlays Tab
The Overlay is a graphic that is superimposed on your final output, usually in a lighter gray. You can also create an overlay with your graphic.
OverlaysTo select a bitmap to be used as a graphic,enter the path tolocate the bitmap file.
Load OverlayYou can use an externally sourcefile as an overlay.
Create OverlayYou can create a page overlay.
Selected OverlayStatusThe preview area shows any selectedbitmap.
If you want to know more about each menu, click on the Help button.The help screen gives detailed information about each menu.

Using Your Printer40
Watermarks Tab
A Watermark is text that is superimposed on your final output. Usually in a lighter gray you can create a watermarkwith your own text.
EditUse this dialog box toenter the text andlayout of yourwatermark. You canset the watermarkÕsfont, size anddarkness, as well asthe angle and positionon the page.
WatermarkYou can select a watermark from list.
The preview areashows the effect ofyour settings.
If you want to know more about each menu, click on the Help button.The help screen gives detailed information about each menu.

Using Your Printer 41
Using the Operator panel
The operator panel, on the front right sideof your printer, has a 2-line LCD(LiquidCrystal Display) and five buttons.
Operator PanelDisplay
Light Color Light State The Printer is...
Green
Orange
On
Off
Blinking
On
Blinking
Online
Offline
Processing information
In Non-recoverable error state● Solve the problems for the error
message, by going through check lists and tests.
In recoverable error state

Using Your Printer42
Operator Panel Menus
A number of menus are available to make it easy for you to change printer settings. Some menus are displayed only if a specific option isinstalled in the printer.
When you select a new setting from the operator panel, the asterisk(❊) moves next to the selected setting to identify it as the current userdefault setting.
Operator Panel Buttons
Use the five operator panel buttons to open a menu, scroll through a list of values, change printer settings, and respond to printer messages. The following table describes the functions of each button.
Button Function
On Line/Continue
Enter/Cancel
Menu
Item
Value
● Places the printer either online or offline.
● Allows the printer, to continue printing when the printer is in recoverable error state.
● Cancels the print job that the printer is processing when the printer is online.
● Saves the selected value for that item whenthe printer is offline.
● Cycles through the operator panel menus.
● Cycles through the selected menuÕs items.
● Cycles through the selected menu itemÕs values.
Changes mode from a software application override the user defaultsettings made from the printer operator panel.

Using Your Printer 43
Changing Printer Settings
To change an operator panel setting, proceed as follows.
A value can be :● A phrase or word that describes a setting● A numerical value that you can increase or decrease● An On or Off setting.
1. Make sure the ÔREADYÕ message appears on the display.
2. Press On Line
3. Press Menu until the menu you need appears on the display.
4. Press Item until the menu item you need appears on the display.
5. Press Value until the setting you need appears on the display.
6. Press Enter to save the selection.
The ÔOFF LINEÕ message appears on the display and theprinter is off-line
RReessuulltt
An asterisk(❊) appears beside the current user defaultsetting for that menu item.
RReessuulltt
Using Your Printer44
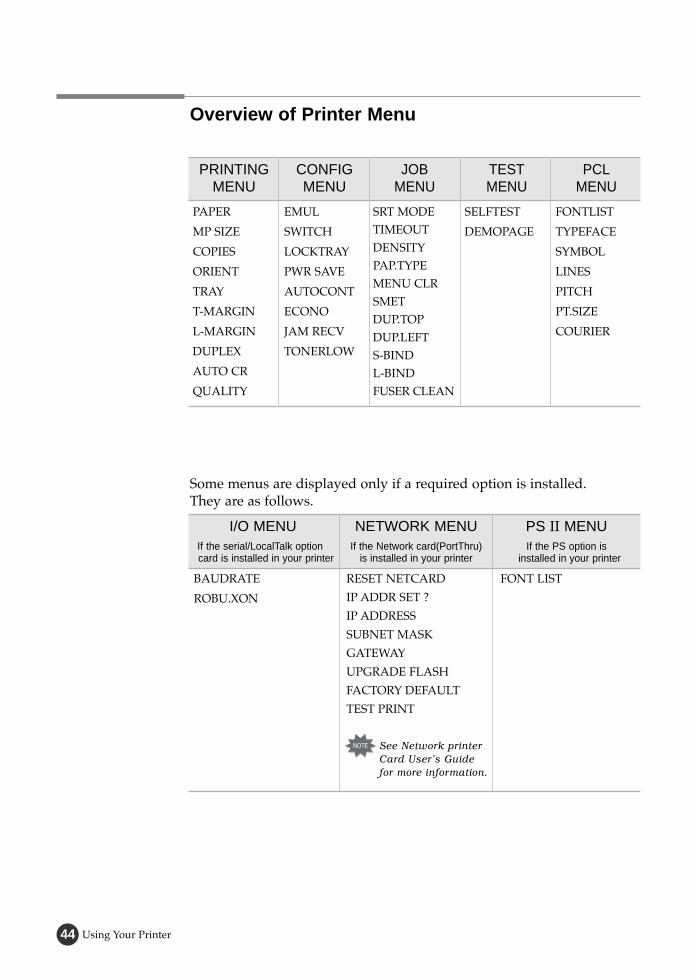
Overview of Printer Menu
Some menus are displayed only if a required option is installed. They are as follows.
PAPER
MP SIZE
COPIES
ORIENT
TRAY
T-MARGIN
L-MARGIN
DUPLEX
AUTO CR
QUALITY
EMUL
SWITCH
LOCKTRAY
PWR SAVE
AUTOCONT
ECONO
JAM RECV
TONERLOW
SRT MODETIMEOUTDENSITYPAP.TYPEMENU CLRSMET DUP.TOPDUP.LEFTS-BINDL-BINDFUSER CLEAN
SELFTEST
DEMOPAGE
FONTLIST
TYPEFACE
SYMBOL
LINES
PITCH
PT.SIZE
COURIER
PRINTINGMENU
CONFIG MENU
JOB MENU
TESTMENU
PCLMENU
BAUDRATE
ROBU.XON
FONT LISTRESET NETCARD
IP ADDR SET ?
IP ADDRESS
SUBNET MASK
GATEWAY
UPGRADE FLASH
FACTORY DEFAULT
TEST PRINT
I/O MENUIf the serial/LocalTalk option3card is installed in your printer
NETWORK MENUIf the Network card(PortThru)
is installed in your printer
PS II MENUIf the PS option is
installed in your printer
See Network printerCard UserÕs Guidefor more information.

Using Your Printer 45
PRINTING MENU
Use the PRINTING MENU to define all settings relating to printer input and output, as well as the specific print materials you are using with yourprinter.
PRINTING MENU Items
Item Values and Functions
PAPER
MP SIZE
Cassette Size
A4(country specific) ; Factory DefaultLEGAL, A4, EXE, JIS B5, ISO B5, FOLIO
Mp Tray Size
LETTER(country specific), A4, EXE, JIS B5,ISO B5, COM-10, MONARCH, DL, C5, POST A6, C6, FOLIO, A5, STS, A6
Option Tray Size
Letter(country specific), A4 (country specific),Legal, Executive, ISO B5, JIS B5,Envelope (Com - 10, Monarch, DL, C5)
Duplex Size
Letter (country specific), A4 (country specific),Legal, ISO B5, JIS B5, FOLIO
The PAPER SIZE setting identifies the default formatting size for each tray. It is important toselect the correct paper size from the menu whenusing trays.
Using Your Printer46
LandscapePortrait
Item Values and Functions
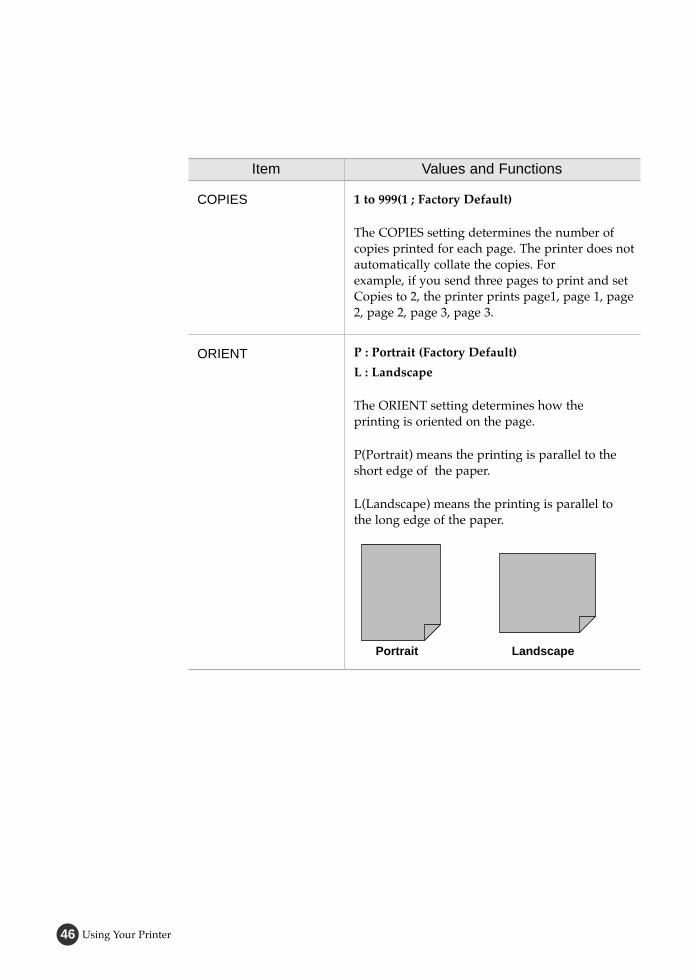
COPIES
ORIENT
1 to 999(1 ; Factory Default)
The COPIES setting determines the number of copies printed for each page. The printer does notautomatically collate the copies. Forexample, if you send three pages to print and setCopies to 2, the printer prints page1, page 1, page2, page 2, page 3, page 3.
P : Portrait (Factory Default)
L : Landscape
The ORIENT setting determines how the printing is oriented on the page.
P(Portrait) means the printing is parallel to the short edge of the paper.
L(Landscape) means the printing is parallel to the long edge of the paper.

Using Your Printer 47
AUTO(Factory Default)
1ST
MP
OPT(If the optional cassette is installed)
MANUAL
The TRAY setting identifies the default paper tray.
1ST means that the printer feeds print materialfrom Cassette unless it is empty or closed.
MP means that the printer feeds print materialfrom MP tray unless it is empty or closed
Use the MANUAL selection when manually feeding envelopes or other print material throughthe MP tray.
OPT is available only if the optionaltray is installed. See ÔOptional CassetteÕ on page 115.
Auto means that the printer feeds print material from the other tray when one tray isempty. If you are using the same size and type ofprint material in all the trays, the trays areautomatically linked.
0.0Ó ~ 9.9Ó
The T-MARGIN menu item lets you select the top margin of the print materials
Item Values and Functions
TRAY
T-MARGIN

Using Your Printer48
Item Values and Functions
L-MARGIN
DUPLEX
AUTO CR
QUALITY
0.0Ó ~ 9.9Ó
The L-MARGIN menu item lets you select the left margin of the print materials
OFF (Factory Default)
LONG
SHORT
The printer can automatically print on both sides of paper
Use the OFF selection when printing of one side of a sheet of paper. For more information, seepage 58.
LF(Factory Default)
LF + CR
The AUTO CR setting determines if the printerautomatically performs carriage return after a linefeed control command.
3 0 0
6 0 0(Factory Default)
QUALITY setting determines the print resolutionwhile printing the page.
Long Short

49Using Your Printer
CONFIG MENU
Use the CONFIG MENU to configure a variety of printer features.
CONFIG MENU Items
Item Values and Functions
EMUL
PWR SAVE
AUTOCONT
AUTO (Factory Default)
PCL
PS II(If the PS option is installed)
HEXDUMP
You can select the emulation for printinga document.
OFF
1 5
3 0 (Factory Default)
4 5
6 0
The PWR SAVE menu item lets you reduce power usage when the printer is idle. The PWR SAVE setting determines the length of time(in minutes) the printer waits after a job is printed before it goes to a reduced power state.
ON (Factory Default)
OFF
The AUTOCONT setting determines whether the printer continues printing after itdetects paper mismatch.
If an error occurs and AUTOCONT is set to OFF, the printer stops and waits for operator intervention. If the Continue button on the operator panel ispressed, the printer continues printing regardlessof paper mismatch.When AUTOCONT is set to ON, the printer automatically resumes processing.

Using Your Printer50
Item Values and Functions
ECONO
JAM RECV
TONERLOW
OFF (Factory Default)
ON
The ECONO setting helps conserve the toner cartridge by controlling how much toner theprinter uses for print job.
Select OFF if toner conservation is not a concern.
But this setting may affect the print quality of your job.
OFF (Factory Default)
ON
When JAM RECV is set to OFF, the printer does not reprint a page that has been jammedafter all the image has been drawn on the page.
When JAM RECV is set to ON, the printer keeps printed page until the printer signals that thepage has successfully exited the printer. The printer reprints the jammed page .
CONTINU (Factory Default)
STOP
This setting determines whether the printercontinue printing after the printer detects thatthe toner is low.
If the toner is low and TONERLOW is set to ÔStopÕ, press the Continue button to print. In that case,replace the toner cartridge or set the TONERLOWmenu item to CONTINU.

Using Your Printer 51
Item Values and Functions
SWITCH(If the optional cassette is installed)
LOCKTRAY(If the optional cassette is installed and the SWITCH menu item is set to on)
ON (Factory Default)
OFF
The ON setting makes the printer supply thepaper from another cassette when a cassette isempty.
In case of the OFF setting, an error message is displayed.
NONE (Factory Default)
1ST
OPT
MP
The cassette set to LOCKTRAY doesnÕt occurres cassette change.
For example, If LOCKTRAY is set to MP, the cassette is not switched to MP tray.
Using Your Printer52
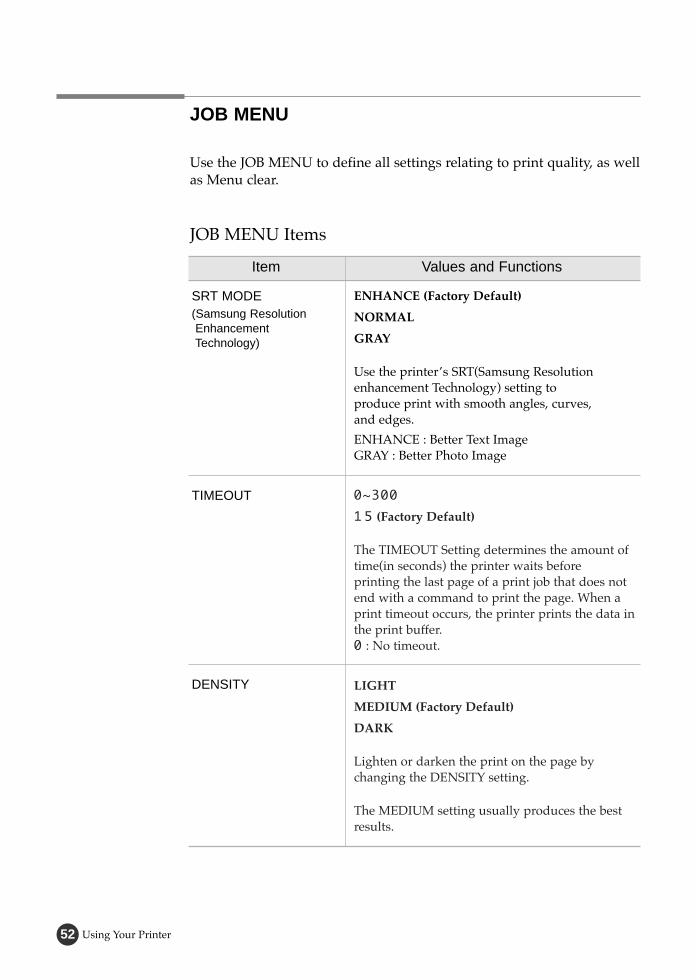
JOB MENU
Use the JOB MENU to define all settings relating to print quality, as well as Menu clear.
JOB MENU Items
Item Values and Functions
SRT MODE(Samsung ResolutionEnhancement Technology)
TIMEOUT
DENSITY
ENHANCE (Factory Default)
NORMAL
GRAY
Use the printerÕs SRT(Samsung Resolution enhancement Technology) setting to produce print with smooth angles, curves, and edges.
ENHANCE : Better Text ImageGRAY : Better Photo Image
0~300
1 5 (Factory Default)
The TIMEOUT Setting determines the amount of time(in seconds) the printer waits before printing the last page of a print job that does notend with a command to print the page. When aprint timeout occurs, the printer prints the data inthe print buffer. 0 : No timeout.
LIGHT
MEDIUM (Factory Default)
DARK
Lighten or darken the print on the page by changing the DENSITY setting.
The MEDIUM setting usually produces the bestresults.
Using Your Printer 53
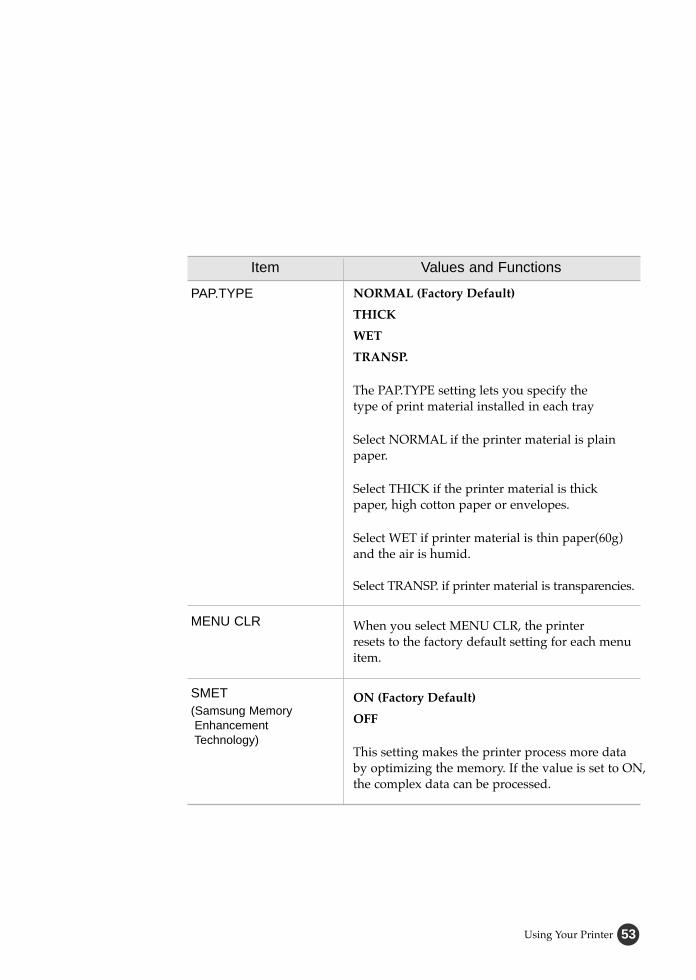
Item Values and Functions
PAP.TYPE
MENU CLR
SMET(Samsung MemoryEnhancement Technology)
NORMAL (Factory Default)
THICK
WET
TRANSP.
The PAP.TYPE setting lets you specify the type of print material installed in each tray
Select NORMAL if the printer material is plain paper.
Select THICK if the printer material is thick paper, high cotton paper or envelopes.
Select WET if printer material is thin paper(60g) and the air is humid.
Select TRANSP. if printer material is transparencies.
When you select MENU CLR, the printer resets to the factory default setting for each menuitem.
ON (Factory Default)
OFF
This setting makes the printer process more data by optimizing the memory. If the value is set to ON,the complex data can be processed.
Using Your Printer54
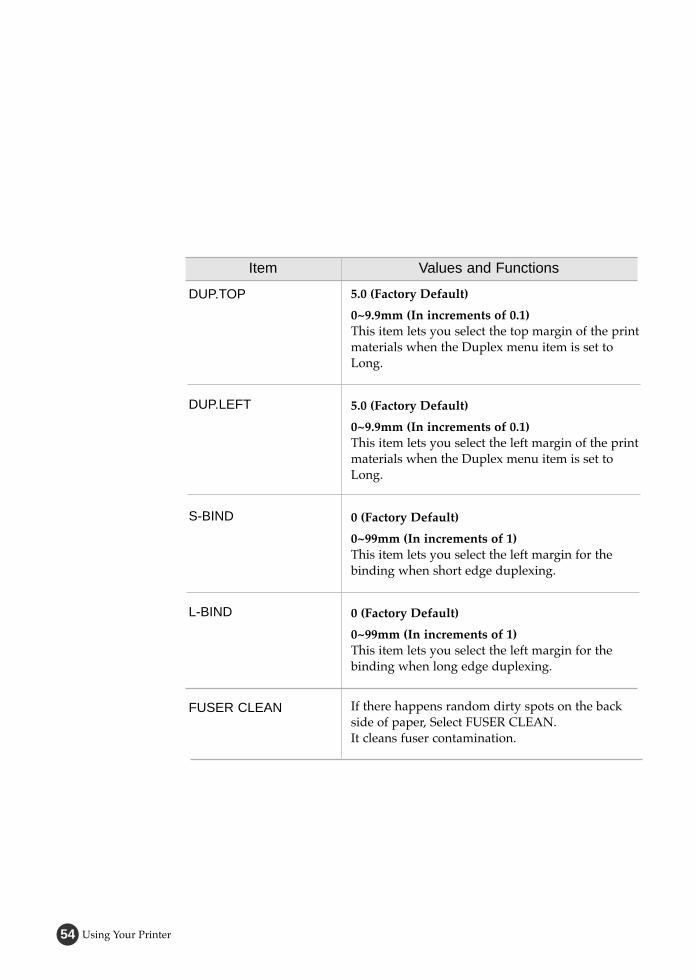
Item Values and Functions
DUP.TOP
DUP.LEFT
S-BIND
L-BIND
FUSER CLEAN
5.0 (Factory Default)
0~9.9mm (In increments of 0.1)This item lets you select the top margin of the printmaterials when the Duplex menu item is set toLong.
5.0 (Factory Default)
0~9.9mm (In increments of 0.1)This item lets you select the left margin of the printmaterials when the Duplex menu item is set toLong.
0 (Factory Default)
0~99mm (In increments of 1)This item lets you select the left margin for thebinding when short edge duplexing.
0 (Factory Default)
0~99mm (In increments of 1)This item lets you select the left margin for thebinding when long edge duplexing.
If there happens random dirty spots on the backside of paper, Select FUSER CLEAN. It cleans fuser contamination.

Using Your Printer 55
I/O MENU
This menu is only available if the Serial/LocalTalk option card isinstalled in your printer.
I/O MENU Items
Item Values and Functions
BAUDRATE
ROBU.XON
This setting lets you select the rate at which data is being sent to or from your computer.
300~115200
9600 (Factory Default)
ON(Factory Default)
OFF
TEST MENU
Use the TEST MENU to print a variety of listings relating to available printer resources, printer settings and print jobs.
TEST MENU Items
Item Values and Functions
SELFTEST
DEMOPAGE
Select SELFTEST to print a configuration page. Thismenu item lets you make sure the printer is operat-ing correctly. For more information, See page 22.
Select DEMOPAGE to print the standard demonstration page.

Using Your Printer56
PCL MENU
Use the PCL MENU to change printer settings that only affect jobs printed using the PCL emulation printer language.
PCL MENU Items
Item Values and Functions
FONTLIST
TYPEFACE
SYMBOL
LINES
You can print a font sample list showing all the fonts available for PCL emulation.
PCL 1 ~ PCL 54
PCL 1 (Factory Default)
ROMAN 8
DESKTOP.
PC8 (Factory Default)
List of symbol set name
A SYMBOL set is a set of alphabetic and numericcharacters, punctuation, and specific symbols usedwhen printing with a selected font.
In PCL emulation, a symbol set also defines which character will be print for each key on thekeyboard (or more specifically, for each code point)
5 ~ 128
6 4 (Factory Default)
Use the LINES menu item to change the number of lines that print on each page. The set-ting can range from 5 to 128 lines per page.
The printer sets the amount of space between each line based on the Lines, Paper size, andOrientation settings.

Using Your Printer 57
Item Values and Functions
PITCH
PT.SIZE
COURIER
0.44 ~ 99.99
1 0 (Factory Default)
If you chose a scalable monospaced font, you can select the font pitch. PITCH refers to the number of fixed - space charac-ters in a horizontal inch of type.
You can select from 0.44 to 99.99 characters per inch in increments of 0.01 cpi.
You can select the character size for the font. PITCH or PT.SIZE appears according to the valueof TYPEFACE.
REGULAR (Factory Default)
DARK
Using Your Printer58
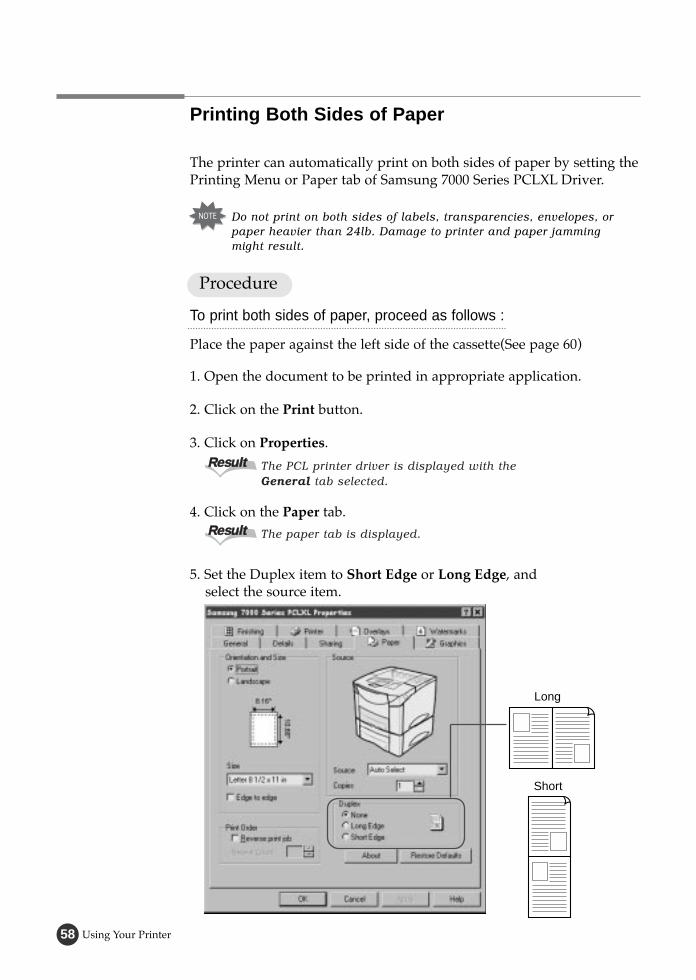
Printing Both Sides of Paper
The printer can automatically print on both sides of paper by setting the Printing Menu or Paper tab of Samsung 7000 Series PCLXL Driver.
To print both sides of paper, proceed as follows :
1. Open the document to be printed in appropriate application.
2. Click on the Print button.
3. Click on Properties.
4. Click on the Paper tab.
5. Set the Duplex item to Short Edge or Long Edge, and select the source item.
Place the paper against the left side of the cassette(See page 60)
The PCL printer driver is displayed with theGeneral tab selected.
RReessuulltt
The paper tab is displayed.RReessuulltt
Do not print on both sides of labels, transparencies, envelopes, orpaper heavier than 24lb. Damage to printer and paper jammingmight result.
Long
Short
Procedure

Using Your Printer 59
1. Make sure the READY message appears on the display.
2. Press On Line.
3. Press Menu until you see PRINTING MENU.
4. Press Item until you see DUPLEX.
5. Press Value until the setting you need appears on the display.(For more information, see page 48.)
6. Press Enter to save the selection.
The ÔOFFLINEÕ message appears on thedisplay and the printer is off-line.
RReessuulltt
Menu Setting Procedure
If you use the driver which has not the properties, you can select ÔDUPLEXÕ by setting the control panel menu.
Settings in the printer driver and software application overrideoperator panel setting.
An asterisk(❊) appears beside the current user default setting for that menu item.
RReessuulltt

Using Your Printer60
Paper Orientation for Printing both sides of Paper
The printer prints the second sides of paper first, so paper such as letterhead and preprinted paper needs to be oriented as illustrated inthe figure below.
For MP tray, load the first side facing down and the top toward you. ● Set the source item in the properties dialogue box to Manual or MP.
- To print continuously from MP tray, set the source item to MP.- To print a sheet of paper from MP tray, set the source item to Manual.
For all other cassettes, load the first side facing up and the top towardthe printer.
MP Tray
Cassette

Using Your Printer 61
Sam sung
To print from the MP Tray, proceed as follows.
1. Select Manual as the paper source.● Set the source item in the properties dialogue box to Manual● You can select Manual as the paper source by setting the Tray item
of the operator panel menu.
2. Print your document.
3. Place a sheet of paper in the MP tray.
4. Press continue key when you are prompted.
Manually Feeding Paper from MP Tray
The Manual Feed feature allows you to print on special paper from MPtray such as envelopes or letterhead. If the Tray menu item is set toManual, the printer will print only from MP tray. Manual Feed is selected through the software or print driver too.
Using Your Printer62
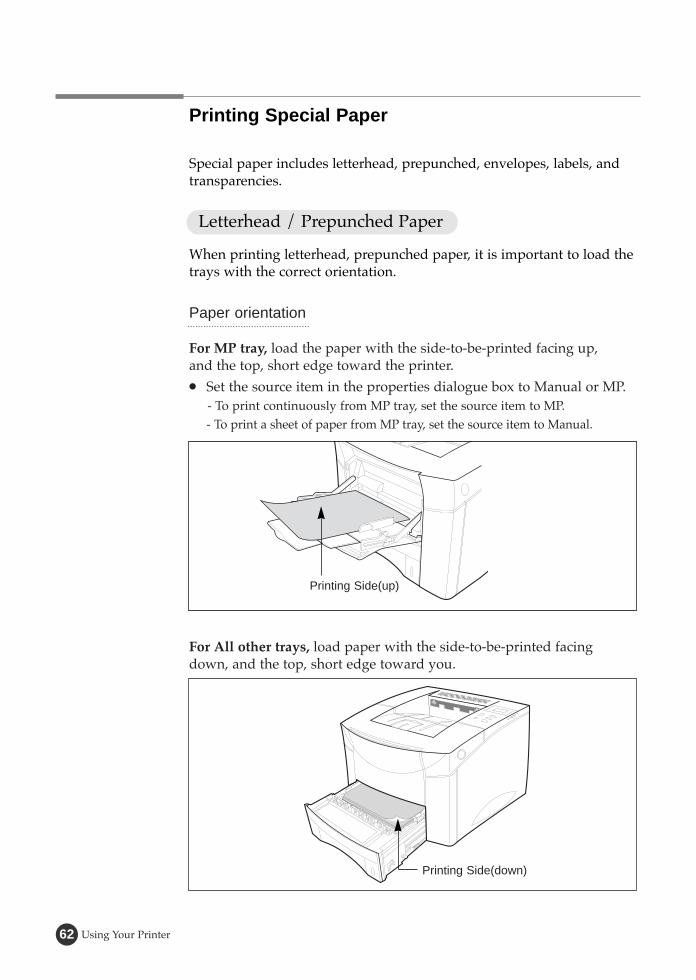
Printing Special Paper
Special paper includes letterhead, prepunched, envelopes, labels, andtransparencies.
Letterhead / Prepunched Paper
When printing letterhead, prepunched paper, it is important to load the trays with the correct orientation.
For MP tray, load the paper with the side-to-be-printed facing up, and the top, short edge toward the printer.● Set the source item in the properties dialogue box to Manual or MP.
- To print continuously from MP tray, set the source item to MP.- To print a sheet of paper from MP tray, set the source item to Manual.
Printing Side(up)
Printing Side(down)
For All other trays, load paper with the side-to-be-printed facing down, and the top, short edge toward you.
Paper orientation

Using Your Printer 63
1. Open the MP tray. Pull out the extension.
Envelopes
Many types of envelopes can be printed from MP tray. The types of envelopes are COM-10, MONARCH, DL, C5 andC6(60~90g/m2)The printer will automatically feed up to 10 envelopes.Printing performance depends on the construction of the envelope.
Printing information
● Set margins at least 0.6inch(15mm) from the edge of the envelope.● Always test a few sample envelopes before purchasing large quantities.● Select THICK paper for better quality.
Envelopes guidelines
For best performance, use envelopes made from 75g/m2(20lb bond) paper.
Do not use envelopes that :
● Are damaged in any way. ● Use metal claps, string ties, metal folding bars.● Contain windows, holes, cutouts or embossing.● Have exposed flap adhesive when the flap is in the sealed or closed
position. For envelope specifications, see page 124.
Loading envelopes
Using Your Printer64
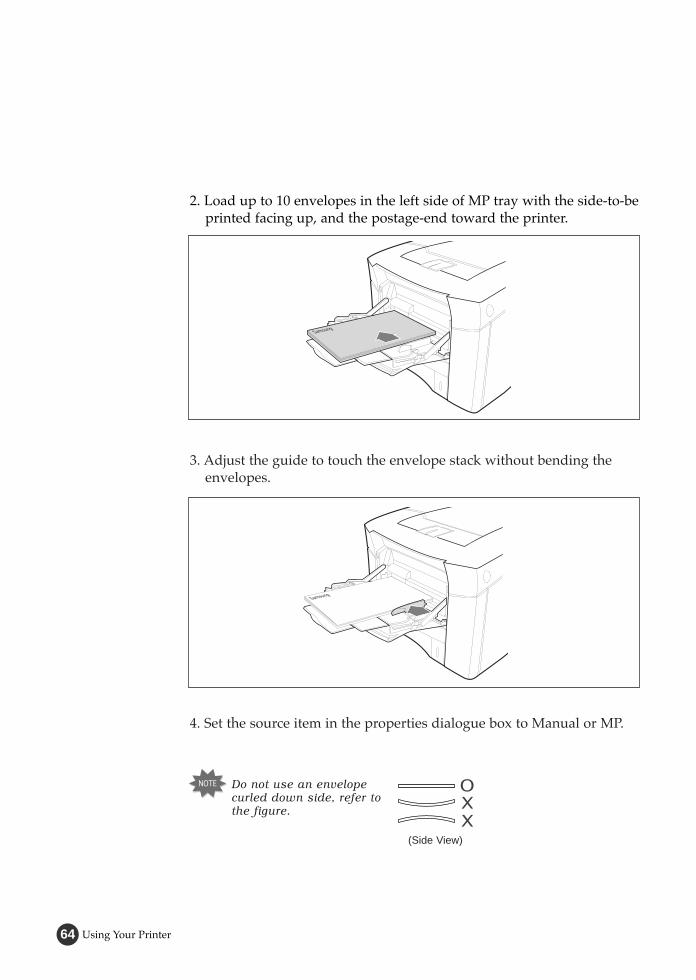
2. Load up to 10 envelopes in the left side of MP tray with the side-to-be printed facing up, and the postage-end toward the printer.
Samsung
3. Adjust the guide to touch the envelope stack without bending the envelopes.
4. Set the source item in the properties dialogue box to Manual or MP.
Samsung
Do not use an envelopecurled down side, refer tothe figure.
(Side View)

Using Your Printer 65
Label
Labels automatically feed from the MP tray or the other trays.
Label guidelines
Make sure that labels meet the specifications for the tray you use.
● Use full label sheet. Partial sheets may cause labels to peel off during printing, resulting in a paper jam.
● The adhesive material should be stable at 400OF(205OC), the printers maximum temperature.
● Do not use labels that have the backing sheet exposed.
Label Orientation
Do not print on both sides of labels.
● For MP tray, load the labels with the side-to-be-printed facing up, and the short edge toward the printer. Print a stack of 25 labels from MP tray.

Using Your Printer66
● For MP tray, load the transparencies with side-to-be-printed facing up, and the top toward the printer. Print a stack of 30 transparencies from MP tray.
Transparencies
Transparencies automatically feed from the MP tray or the other trays. Some brand of transparencies may require manual feeding.The MP tray is a tray that holds the paper of A4 or Letter, including upto 30 sheets.
Transparencies guidelines
● Use only transparencies recommended for use in laser printers.● Place transparencies on a flat surface to cool after removing them
from printer
Transparencies orientation
● Because transparencies are heavier than paper, do not load the trays to capacity.
● Remove each transparency from the output bin before printing another.

Troubleshooting 67
Troubleshooting
Caring for Your Printer68
CCaarriinngg ffoorr YYoouurrPPrriinntteerr
Overview
This chapter provides information about maintaining your printer.
● Maintaining the Toner Cartridge.● Cleaning the Printer.● Cleaning the LSU

Caring for Your Printer 69
Maintaining the Toner Cartridge
Toner Cartridge Storage
Do not remove the toner cartridge from its package until you are ready to use it.
To prevent damage to toner cartridge, do not expose it to light.
Toner Cartridge Life
The life of the toner cartridge depends on the amount of toner that print jobs require.When printing text at 5% coverage, a Samsung toner cartridge lasts anaverage of 8000 pages in simplex mode, depending on which tonercartridge is installed. This assumes that print DENSITY and ECONOmenu items are set to default.
Distributing the Toner
When toner is low, faded or light area might appear on a printed page. You might be able to temporarily improve print quality by distributing the toner.

Caring for Your Printer70
Procedure
To distribute the toner, proceed as follows.
1. Open the top cover by pushing the button on the side of the printer.
2. Remove the toner cartridge from the printer.

Caring for Your Printer 71
3. Rotate the toner cartridge and gently shake it from side to side to distribute the toner.
4. Reinsert the toner cartridge into the printer and close the top cover.
If the print remains light, install a new toner cartridge.

Caring for Your Printer72
2. Remove the paper from MP tray.
1. Check that the printer is powered off and disconnected from power point.
3. Open the top cover and remove the toner cartridge.
Cleaning the Printer
To maintain print quality, you should clean the printer.
● Never use alcohol or solvent based cleaning agents to clean the printer as they may damage the printer casing and components.
● Never use a hard-bristled brush or abrasive pad.
Procedure
To clean your printer, proceed as follows.

Caring for Your Printer 73
5. If the outer casing or the paper feed guides are dirty, clean them with3. a soft, clean cloth, slightly dampened with a gentle detergent.
6. Clean the inside of the printer with a damp cloth
4. Use a soft cloth to remove any dust.
7. Replace the toner cartridge, close the top cover, plug in the power cord, and turn the printer on.
While cleaning the printer, be careful not to touch the transferroller(the black, rubber roller, located under neath the tonercartridge). Skin oils on the roller can cause print quality problems.

Caring for Your Printer74
2. Pull up on the LSU cleaner and put it on the LSU.
1. Open the top cover and remove the toner cartridge.
3. Slide the LSU cleaner horizontally across a track on the top of the LSU.
Cleaning LSU(Laser Scanning Unit)
To obtain high quality from your printer, clean the LSU whencharacters have lines running through them.
For more information on using method, see attached label on theinside of the top cover.

Problem Solving 75
PPrroobblleemm SSoollvviinngg
Overview
Introduction
Most printer problems can be easily solved, by going through simple check lists and test. To help you locate the check list applicable to thetype of problem that you are encountering. The most frequent problemshave been divided into several categories, as listed below.
Problem Categories
The problems that you may encounter when using your printer have been divided into the following categories.
● Paper jams● Error messages● General printing problems● Poor print quality● PS problems
Problem Solving76
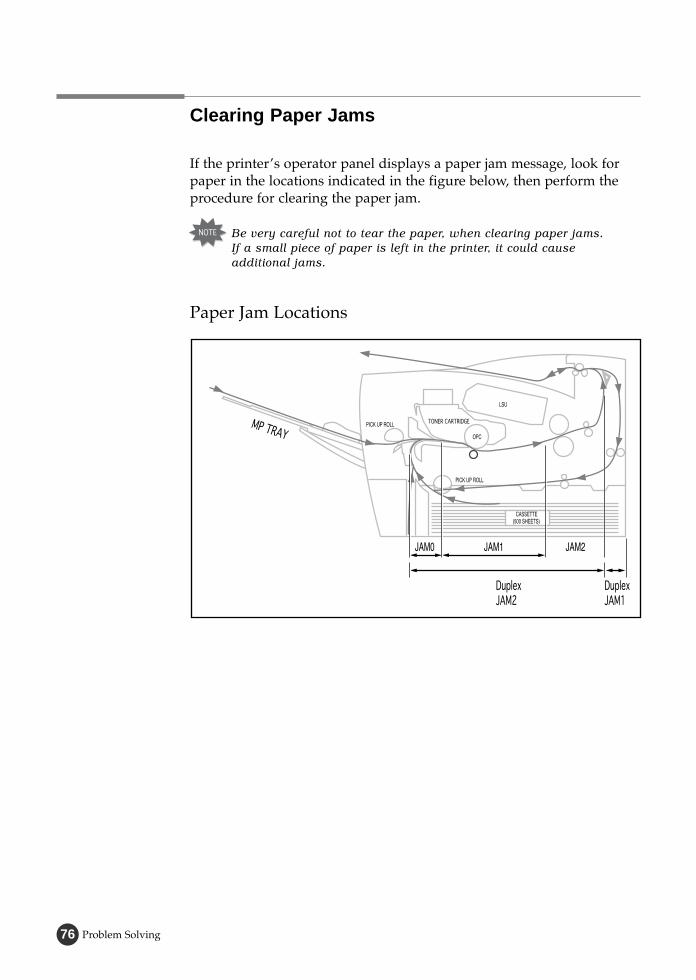
Clearing Paper Jams
If the printerÕs operator panel displays a paper jam message, look for paper in the locations indicated in the figure below, then perform theprocedure for clearing the paper jam.
Paper Jam Locations
Be very careful not to tear the paper, when clearing paper jams. If a small piece of paper is left in the printer, it could causeadditional jams.

Problem Solving 77
Problem Solution
‘PAPER JAM 0’message appears on the LCD
1. Slide the cassette out of the printer, and remove any damaged paper from the tray.
2. Make sure the paper is below the tab on the guide.
3. Replace the cassette.
4. Open and close the top cover to clear the paper jam message.
If the edge of paper is visible in thefeed area, slowly pull the paper downand out of the printer.

Problem Solving78
The paper jam locations for both sides printing are different fromthose of normal printing. Refer to page 76.
Problem Solution
‘PAPER JAM 1’ or‘PAPER JAM 2’messages appear on the LCD
Check 1
● Open and close the top cover
The paper comes out of the printer.
Check 2 (JAM 1)
● Open the top cover and remove the toner cartridge.
● Slowly pull the paper out of the printer. Do not tear the paper.
● Replace the toner cartridge, and close the top cover.
Check 3 (JAM 2)
● Open the rear cover
● Grasp both sides of the paper, and slowly pull the paper out of the printer.
Check 4
● Open and close the top cover to clear the paper jam message.

Problem Solving 79
Problem Solution
‘DUPLEX JAM 1’or ‘DUPLEX JAM 2’messages appear on the LCD
Check 1 (DUPLEX JAM 1)
● Open the rear cover
● Grasp both sides of the paper, and slowly pull the paper out of the printer.
Check 2 (DUPLEX JAM 2)
● Pull the cassette completely out of the printer.
● Pull down the metal plate inside of the printer.
● Slowly pull the paper out of the printer.

Problem Solving80
Error Messages
The following table explains messages that might display on the printeroperator panel.
A cover is open.
● Close the cover.COVE ROP EN
The printer is running out of toner. Purchase a new cartridge and replace the tonercartridge.To n e r
R EADYLow
The toner is low. The TonerLow menu item is set to STOP.
● Purchase a new cartridge and replace the toner cartridge.
● Set the TonerLow menu item to CONTINU.● Press the Continue button.
To n e rSTOP
Low
The printer detects a paper jam. Open the cover andremove the jammed paper, Refer to page 77for more information.
PAP E R JA,0 , 1 2
M
DU P LE X1J AM , 2
The printer detects a paper jam while printing bothsides of paper.
● Open the cover and remove the jammed paper.
EA4MP T Y 1 S
MPaperSize
POP T
T Load the paper to clear the message.
Message Meaning and Required Action

Problem Solving 81
Press Continue key.MANUALLOAD
Load the paper into the MP tray.MANUALEMP T Y
An internal error has occurred.
● Turn the printer off, and then turn the printer on.● Contact your local dealer or after-sales service.
I NT ERNALERR OR
Data which was too complex was sent to the printer.
● If this message persists, expand the memory.OVE RRUN
Message Meaning and Required Action
The program in the memory has been damaged insomeway.
● Contact your local dealer.
WA I TI MAGE
LA4OAD 1 S
MPaperSize
POP T
T The requested paper size does not correspond withthe loaded paper size in the displayed cassette.

Problem Solving82
The printer detects a serial interface error.
● Set the same Baudrate.SER I ALER ROR
There is not enough memory in the printer.
● You might want to add more memory to the printer.
● Check that the SMET menu item is set to ON.
MEMOR YOVE R FLOW
Message Meaning and Required Action

Problem Solving 83
● Check the power cord connections
● Check that the power supplied to the printer is steady and meets printer specifications.
● Turn the printer off, and then turn the printer on.
1. Select START-Settings-Printers from Window 95 task bar.(See page 33)
2. Click on the PCLXL, PCL5e or PS printer icon.
3. Select File-Default Printer.
● Check the printer cable connections.(See page 14)
● Check the printer port on your computer.
● Check that all trays are properly loaded, adjusted, and installed in the printer.
● Check that all covers are correctly closed.
The power does notturn on.
The printer does not operate bypressing the buttonon the operatorpanel.
It cannot printfrom softwareapplication.
The printed data is not sent tothe printer.
The test page is not printed.
Problem Solution
General Printing Problems

Problem Solving84
● Distribute the toner in toner cartridge.(See page 69)
● Adjust the ÔDensityÕ menu item setting.(See page 52)
● Clean the inside of the printer.(See page 72.)
● Print a few more pages to see if the problem will correct itself.
● Clean the inside of the printer.(See page 72.)
● Check the paper type and quality.
● Check the paper type and quality.
● Check the printers environment.
● Install a new toner cartridge.
● Check the printer cable connections.
● Close the SM(Smart Monitor) program.
● Check the printer cable connections.
● You cannot monitor the status of the printer which is connected by network. Close the SM(Smart Monitor) program.
● Much printing may accumulate toners on the pressure roller of fuser assy. The accumulated toner may be melted and transferred on the back side of paper.
● Select ÔFUSER CLEANÕ in the JOB MENU.
● ÔFUSER CLEANÕ selection rotate the motor about 10 seconds and print one page duplex printing ofspecified pattern for fuser clean and stop.
The vertical lines areprinted on the page. Print is too light.
There are toner speckles.
The printer drops letters
The printer drops letters in case ofprinting from Dosmode in Windows 95
“Check parallel Cable/Smart Monitorcan not monitornetwork printing”appears in SmartMonitor program.
Dirty spots on theback side of paper offuser assycontamination.
Poor Print Quality
Problem Solution

Problem Solving 85
● Check that the PS is available for printing, and thetotal memory is installed more than or equal to 12MB by printing selftest page.
- If PS is not available for printing, install the PS SIMM. (For information about installing procedure of the PS SIMM, see page 99)
- If the total memory is lower than 12MB, Install the 8MB SIMM provided with the PS option.(For more information about installing procedure of the printer memory, see page 92)
1. Open the Properties of PS driver.
2. Click on PostScript.
3. Click on the Advanced button.
4. The pure binary data is not supported.Choose the others.
● Make sure that the printer is powered on.
● Check that the LocalTalk cable is completely plugged into the printer and your Macintosh.
1. Open the PS driver Properties.
2. Set Ôoption cassetteÕ item of Device Option to installed.
The PS file is notprinted.
The Error messages(This job containsbinary data...) are printed.
For Macintosh User
Your printer name does not appear onthe chooser dialoguebox.
The Optional cassette is not selected in PSdriver.
Problem Solution
PS(PostScript) Problems

Options86
Options
Memory and Option Cards 87
MMeemmoorryy aannddOOppttiioonn CCaarrddss
Overview
You can customize your printer memory and connectivity. This chapterprovides instructions for installing.
Turn to the appropriate section for instructions on installing the option.
Option Go to page...
● Printer Memory
● Network Option Card(installed in ML-7000N already)
● PS SIMM(installed in ML-7000P already)
● Serial/LocalTalk
92
96
99
108
You need a small screwdriver to do the installation of some options

Memory and Option Cards88
2. Disconnect all cables from the back of the printer.
3. Remove the printer cover.
a. Open the rear cover.
b. Remove the two screws from the back of the printer. Save the screws.
c. Grasp the cover(as illustrated) and pull it firmly toward the rear of the printer until it stops.
d. Remove the cover from the printer.
1. Unplug the printer power cord.
Preparations
Complete the following steps before you install the printer options
Memory and Option Cards 89
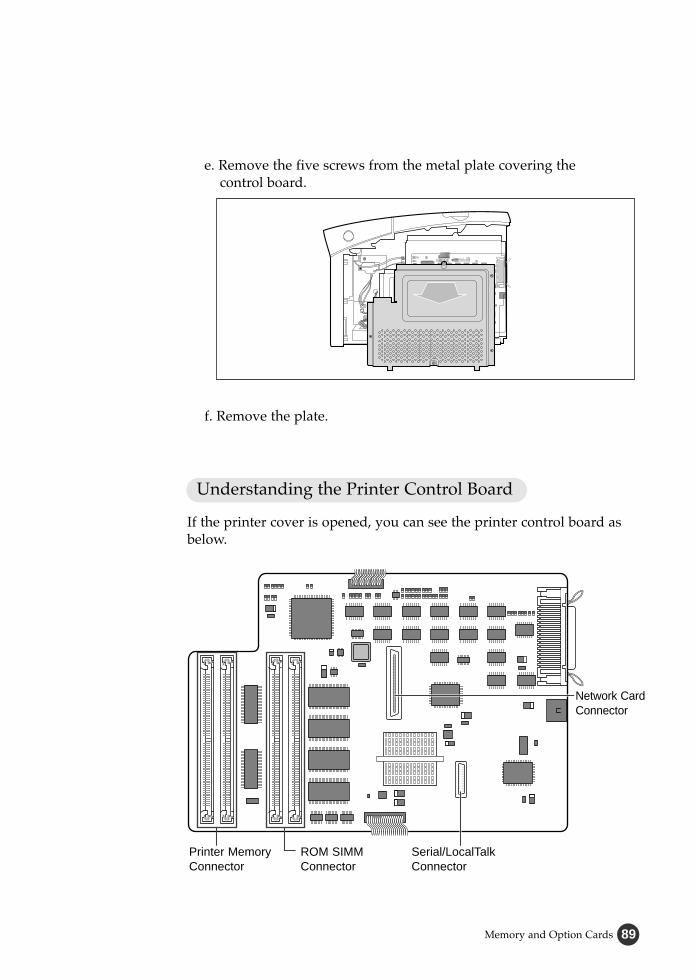
Network CardConnector
Serial/LocalTalk Connector
Printer MemoryConnector
ROM SIMMConnector
Understanding the Printer Control Board
If the printer cover is opened, you can see the printer control board as below.
e. Remove the five screws from the metal plate covering the control board.
f. Remove the plate.
Memory and Option Cards90
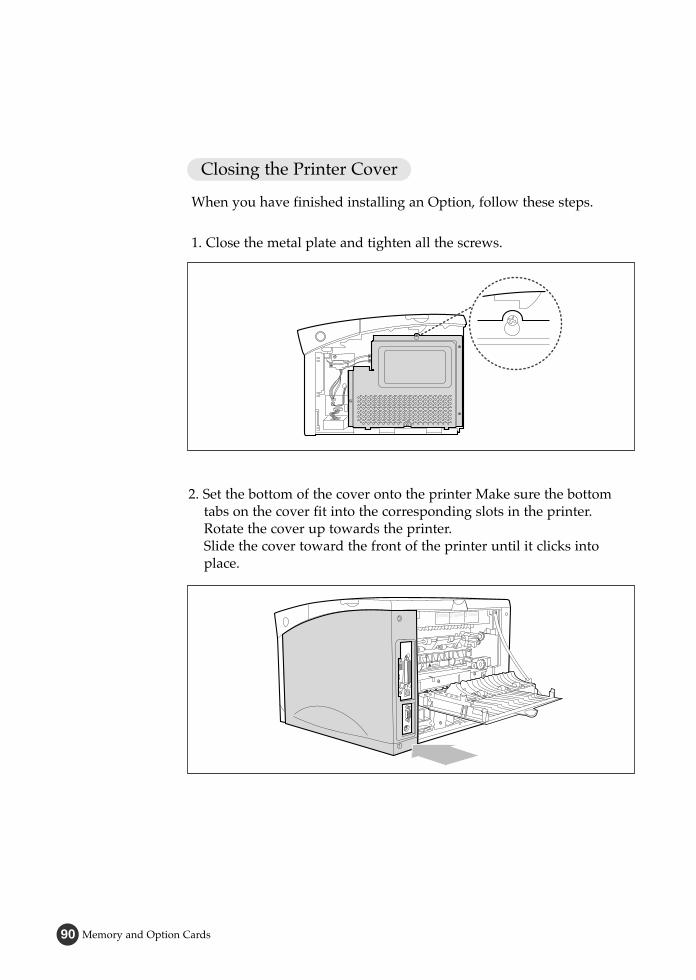
1. Close the metal plate and tighten all the screws.
2. Set the bottom of the cover onto the printer Make sure the bottom tabs on the cover fit into the corresponding slots in the printer. Rotate the cover up towards the printer.Slide the cover toward the front of the printer until it clicks into place.
Closing the Printer Cover
When you have finished installing an Option, follow these steps.

Memory and Option Cards 91
3. Gently tighten all the screws.
4. Reconnect any interface cables and the power cord.

Memory and Option Cards92
Printer Memory
The printer memory option increases the printer dynamic randomaccess memory(DRAM).
Your printer was shipped with 4MB of standard printer Memory.You can install two printer memory options in your printer. Printermemory upgrade options available are 4, 8, 16 or 32MB.
DRAM SIMM Features for Upgrade- Speed(Access Time): 60nS- Refresh Time: 1K(1024 cycles/16 ms) / 2K(2048 cycles/32 ms)
- The Method of refresh is CAS-befor-RAS refresh- Mode: EDO Mode / Fast Page Mode- Single +5V +/-10% power supply- The SDRAM does not support.
1. Locate the memory connector on the printer control board.
Memory Connector
Installing Procedure
Before you install the printer memory option, follow steps underÔpreparationsÕ on page 88.
The printer memory option is easily damaged by static electricity.Touch something metal before you touch the memory option.

Memory and Option Cards 93
2. Unpack the memory option.
Notch
Connection points
3. Hold the memory option with the connection points pointing toward the connector and position the notch as shown.Insert the memory option all the way into the connector at a 30O
angle, and rotate it left until it snaps into place.
Avoid touching the connection points along the edge. Save thepackaging.

Memory and Option Cards94
4. Make sure both metal clips on the connector are fastened, and the two pins on each of the connector are pushed through the holes on the memory option.
5. Continue with Ôclosing the printer coverÕ on page 90.
6. Set the printer memory item on the printer tab of the properties dialogue box to the value of the added printer memory.

Memory and Option Cards 95
1. Push the metal clips at each end of the connector away from memoryoption.
Removing the Printer Memory Option
Complete the following steps if you need to remove a printer memoryoption before you install a new one.
2. Rotate the memory option right to a 30O angle and gently pull it out of the connector as shown.
3. Place the printer memory option in its original packaging.
If you did not save the packaging, wrap the memory option in paperand store it in a box.
Memory and Option Cards96
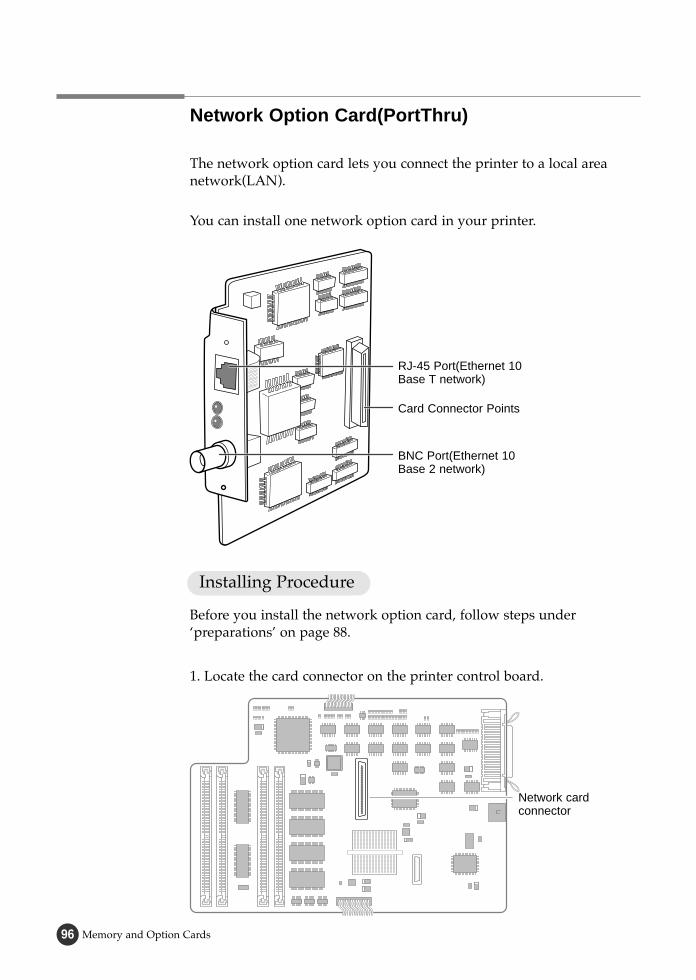
Network Option Card(PortThru)
The network option card lets you connect the printer to a local areanetwork(LAN).
You can install one network option card in your printer.
1. Locate the card connector on the printer control board.
Network cardconnector
Installing Procedure
Before you install the network option card, follow steps underÔpreparationsÕ on page 88.
BNC Port(Ethernet 10 Base 2 network)
Card Connector Points
RJ-45 Port(Ethernet 10 Base T network)
Memory and Option Cards 97
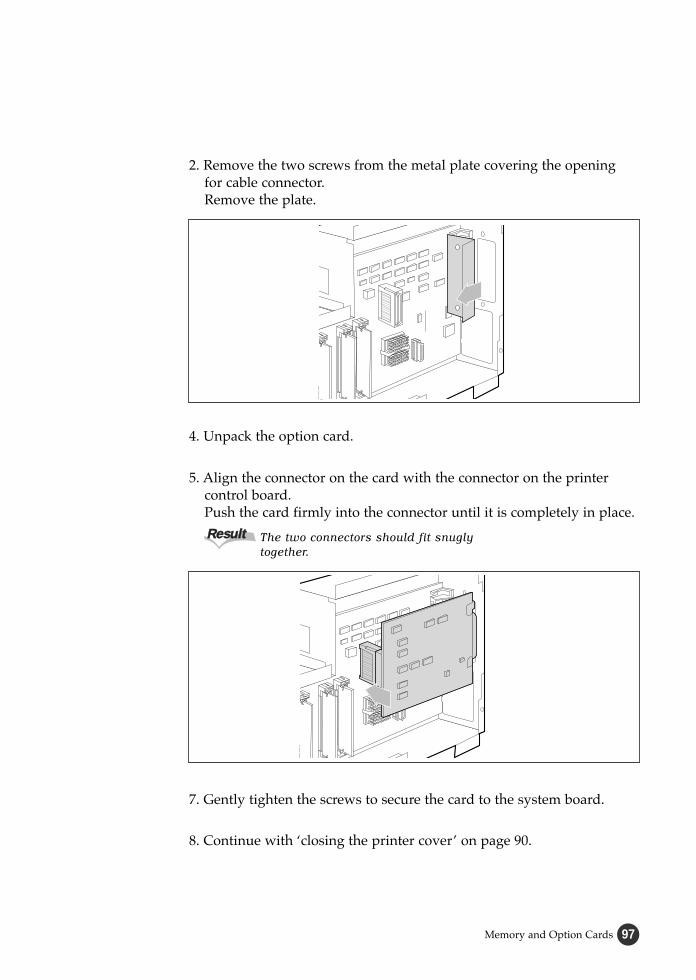
2. Remove the two screws from the metal plate covering the opening for cable connector.Remove the plate.
4. Unpack the option card.
7. Gently tighten the screws to secure the card to the system board.
8. Continue with Ôclosing the printer coverÕ on page 90.
5. Align the connector on the card with the connector on the printer control board.Push the card firmly into the connector until it is completely in place.
The two connectors should fit snuglytogether.
RReessuulltt

Memory and Option Cards98
Connecting to Ethernet 10 Base 2 Network
Attach your ThinLAN cable to the BNC ÔTÕ connector.
Connecting to Ethernet 10 Base-T Network
Connect a twisted-pair network cable to the RJ-45 port.
9. Install the network printer driver(called SyncThru) provided on the CD-ROM.See Network Printer Card UserÕs Guide for installation instructions and network menu displayed on the operator panel display.

Memory and Option Cards 99
Printing a document using PS Option in PC
PS Option Items Supplied : ● PS SIMM ● 8MB RAM SIMM● PS Driver Diskette ● PS Option Guide
To print, complete the following three sections in order : ● Adding more memory ● Installing PS SIMM ● Install PS driver & Selecting the default printer
Adding more Memory
For information about adding more memory, See ÔPrinter MemoryÕon page 92.
Installing PS SIMM
Before you install the PS SIMM, follow steps under ÔPreparationsÕon page 88.
1. Locate the ROM SIMM connector on the printer control board.
2. Follow the 2 through 4 on page 93 to install the PS SIMM.
ROM SIMMConnector
Printer MemoryConnector
PS SIMM Contains the PowerPage R Level 2Jinterpreter from Electronics for Imaging, Inc.

Memory and Option Cards100
Installing PS Driver
This can be accomplished in two ways.
1. Using CD-ROM.
Using CD-ROM
1. Insert CD in a CD-ROM drive.
2. Copy two files from PS\English\Others\Win 95_98 to any folder.
3. Select Start-Settings-Printers from the windows task bar.
4. Double click the Add Printer icon, and click on the Next button.
2. Using the Diskette provided with the PS option.
● You must have the CD(or diskette) for Òwindows 95Ó or ÒWindows 98Ó now being used.
● You cannot use PS in Windows 3.1
Memory and Option Cards 101
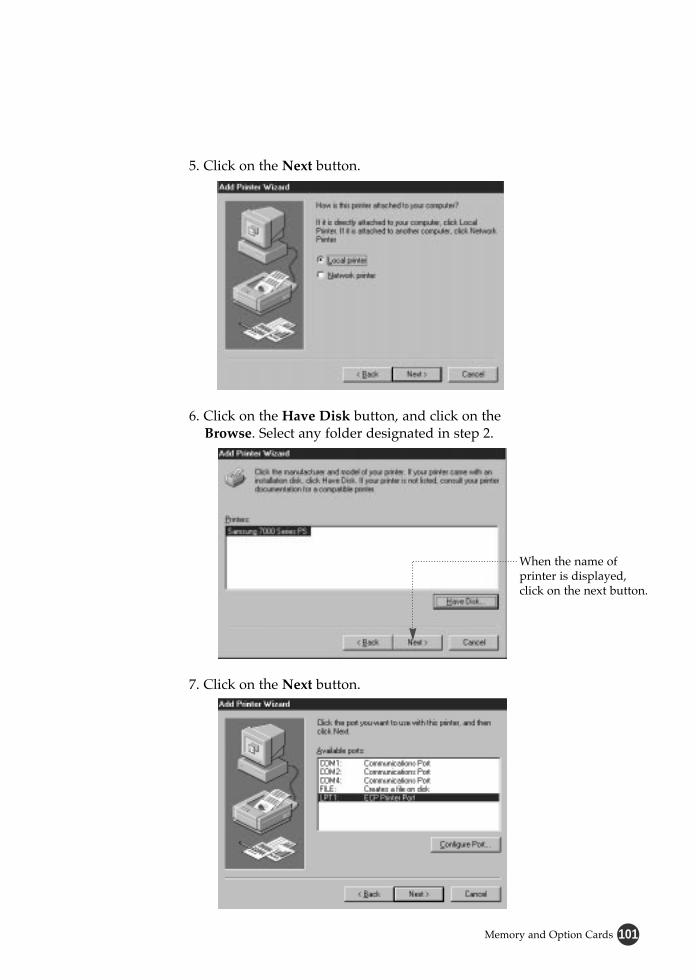
5. Click on the Next button.
6. Click on the Have Disk button, and click on the Browse. Select any folder designated in step 2.
When the name ofprinter is displayed,click on the next button.
7. Click on the Next button.
Memory and Option Cards102
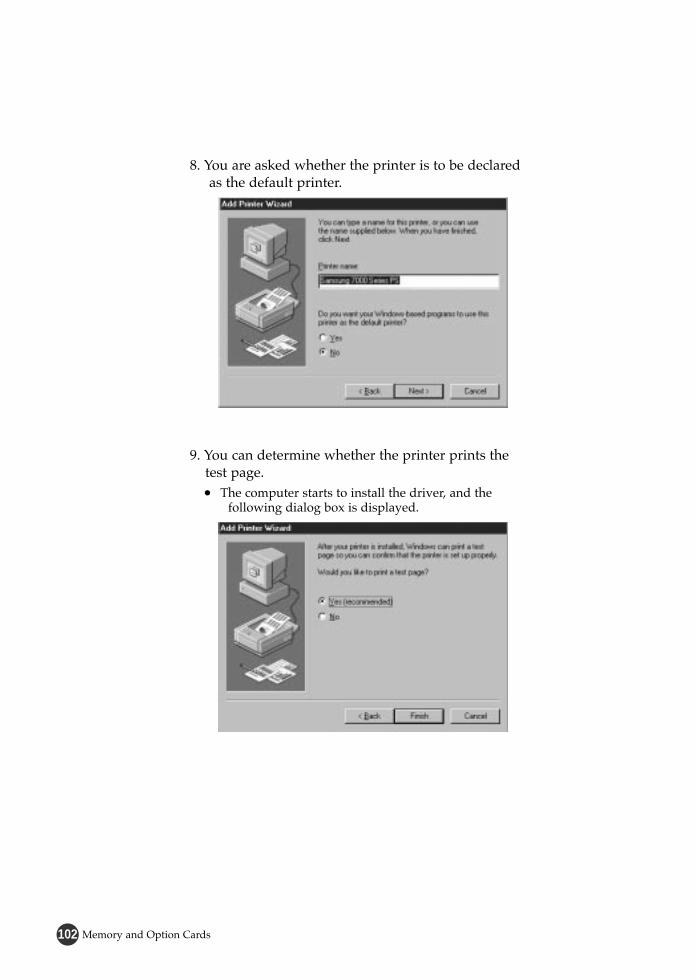
8. You are asked whether the printer is to be declared as the default printer.
9. You can determine whether the printer prints the test page.● The computer starts to install the driver, and the
following dialog box is displayed.

Memory and Option Cards 103
11. Insert the original CD for windows. Select the CD-ROM drive, then select Win 95(or Win 98) folder. Click on the OK button.
10. The message box of ÔInsert the disk labeled windows 95 CD-ROM or windows 95 Disk XXÕ appears.
12. The installation is completed.
In case of windows NT 4.0, the installation issimilar to windows 95/98 installation.
When you insert windows 95 Disk XX in step 10,select disk drive and click on the OK button.

Memory and Option Cards104
Using the Diskette
1. Select Start-Settings-Printers from the windows task bar.
2. Double click the Add Printer icon, then click on the Next button.
3. Choose Local or Network, then click on the Next button.
4. Click on the Have Disk button.Insert the driver diskette into the disk drive and select it(i.e: A:\)
5. Select English\Others\Win95_98 folder in Diskette folder.
6. When the name of printer is displayed, click on the Next button.
7. Select the port to which the printer is connected(generally LPT1), then click on the Next button.
8. You are asked whether the printer is to be declared as the default printer.
9. You can determine whether the printer prints the test page.
10. Insert the original CD for windows. Select Win 95(or Win 98) folder. Click on the OK button.
11. The installation is completed.
It needs the original CD for windows.
In case of windows NT 4.0, the installation issimilar to windows 95/98 installation.

Memory and Option Cards 105
Selecting the Default Printer
1. Start windows on your pc.
2. Select Start-Settings-Printers from the windows 95 task bar.
3. Double click the SAMSUNG 7000 Series PS printer icon.
4. Select File-Default Printer.
5. Print the document on your Samsung 7000 series.

Memory and Option Cards106
To set the PS driver features, proceed as follows :
1. Double- click on the PS driver icon.
2. Select Printer - Properties.
3. Select the required options.
Memory and Option Cards 107
Printing a document using PS Option in Macintosh
To print, complete the following five sections in order :
● Adding more Memory● Installing PS SIMM● Installing Serial/LocalTalk Option Card● Connecting the LocalTalk Cable● Installing the PS Driver
Adding more Memory
For information about adding more memory, See ÔPrinter MemoryÕon page 92.
Installing PS SIMM
For information about installing PS SIMM, see ÔInstalling PS SIMMÕ on page 99.
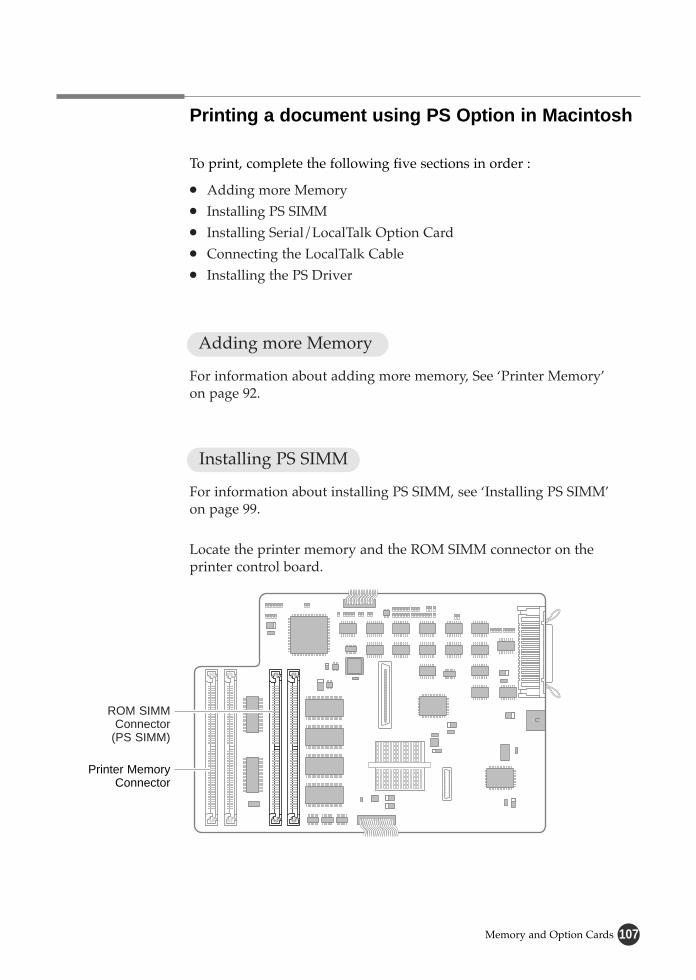
Locate the printer memory and the ROM SIMM connector on theprinter control board.
ROM SIMMConnector
(PS SIMM)
Printer MemoryConnector
Memory and Option Cards108
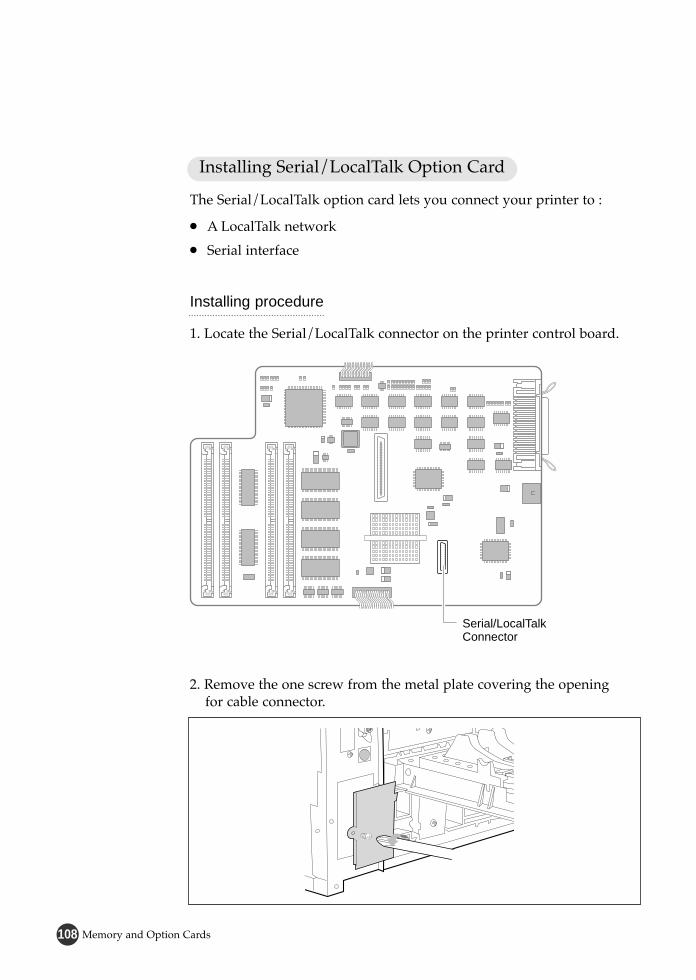
Installing Serial/LocalTalk Option Card
The Serial/LocalTalk option card lets you connect your printer to :
● A LocalTalk network
● Serial interface
2. Remove the one screw from the metal plate covering the openingfor cable connector.
1. Locate the Serial/LocalTalk connector on the printer control board.
Serial/LocalTalkConnector
Installing procedure

Memory and Option Cards 109
6. Push the card firmly into the connector until it is completely in place.
7. Continue with ÔClosing the printer coverÕ on page 90.
The two connectors should fit snugly together.RReessuulltt
3. Remove the plate.
4. Insert the Serial/LocalTalk option card into the option card slot.
5. Align the connector on the card with the connector on the printer control board.
Memory and Option Cards110
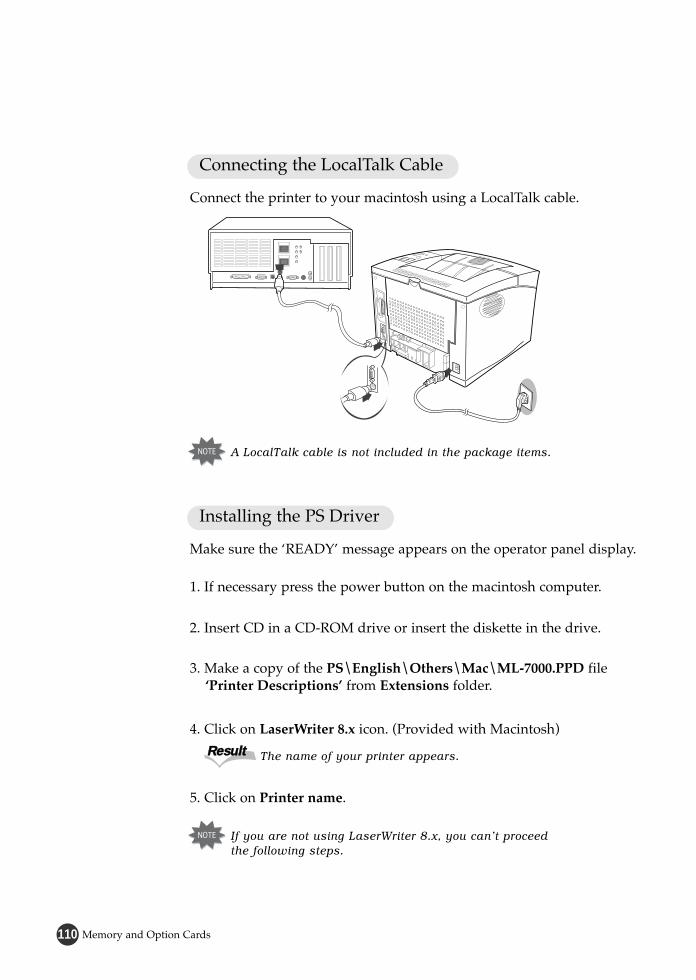
Connecting the LocalTalk Cable
Connect the printer to your macintosh using a LocalTalk cable.
Installing the PS Driver
Make sure the ÔREADYÕ message appears on the operator panel display.
1. If necessary press the power button on the macintosh computer.
2. Insert CD in a CD-ROM drive or insert the diskette in the drive.
3. Make a copy of the PS\English\Others\Mac\ML-7000.PPD file ÔPrinter DescriptionsÕ from Extensions folder.
5. Click on Printer name.
4. Click on LaserWriter 8.x icon. (Provided with Macintosh)
The name of your printer appears.RReessuulltt
A LocalTalk cable is not included in the package items.
If you are not using LaserWriter 8.x, you canÕt proceedthe following steps.
Memory and Option Cards 111
The diskette included in your PS option contains the PPD filefor Macintosh. If you do not have a CD-ROM drive or lost CD,use the diskette.
● Keep the original CD-ROM and diskette in a safe place.
This step appears on some driver versions.
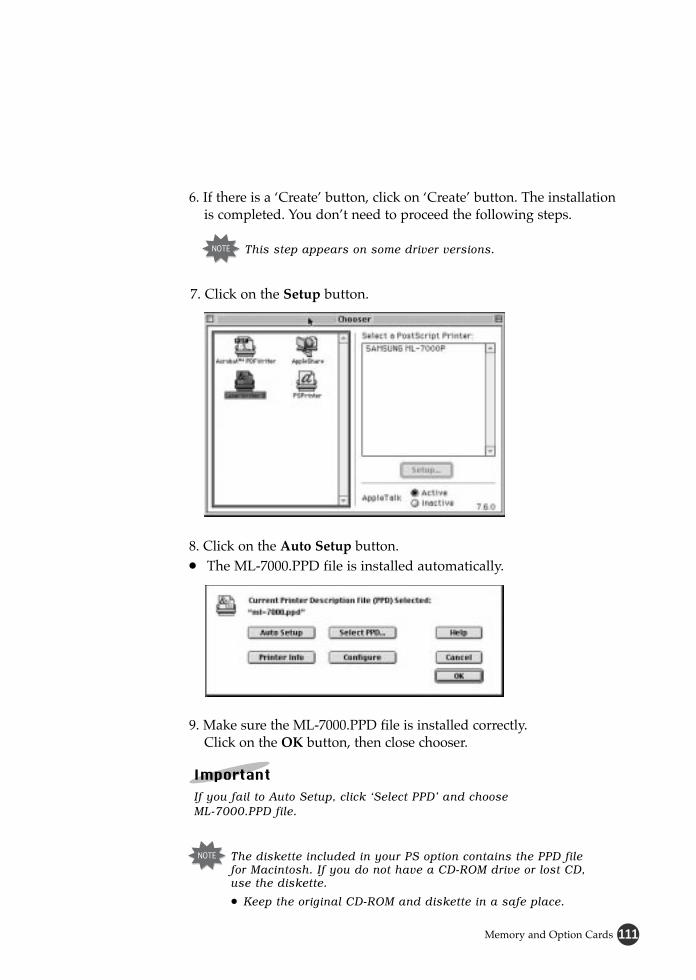
7. Click on the Setup button.
8. Click on the Auto Setup button.● The ML-7000.PPD file is installed automatically.
6. If there is a ÔCreateÕ button, click on ÔCreateÕ button. The installation is completed. You donÕt need to proceed the following steps.
9. Make sure the ML-7000.PPD file is installed correctly. Click on the OK button, then close chooser.
If you fail to Auto Setup, click ÔSelect PPDÕ and chooseML-7000.PPD file.

Infrared Adapter112
IInnffrraarreedd AAddaapptteerr
Overview
You can use a infrared adapter to print remotely from an IrDA-Compatiblecomputer equipped with an infrared port.
The infrared port is compliant with the specifications established by theInfrared Data Association(IrDA).
The infrared port operates transmitting data at speeds up to 115,200bits per second.
Infrared Adapter 113
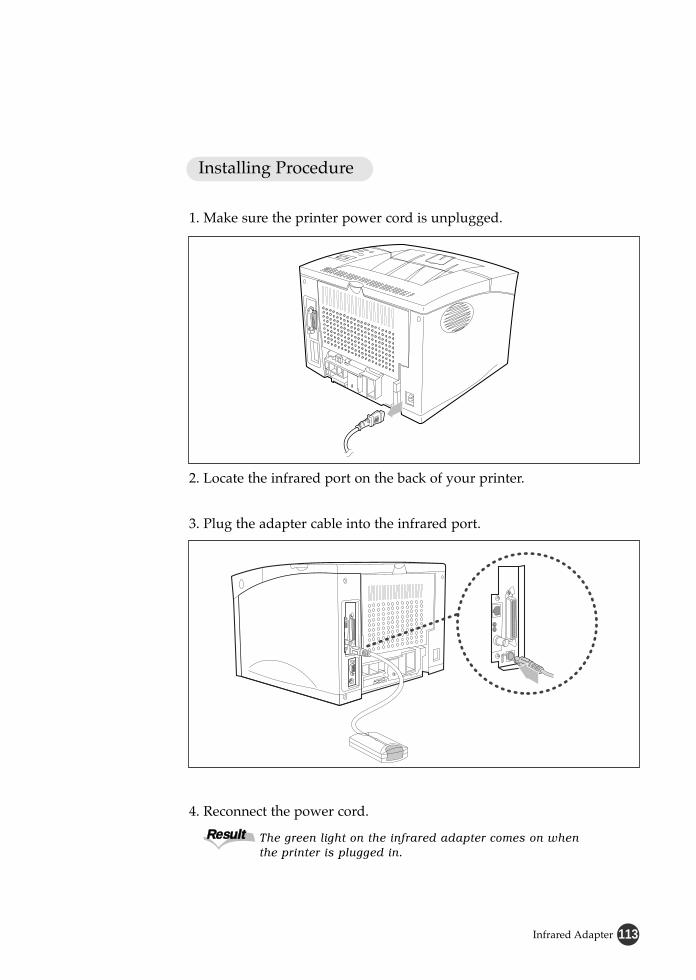
4. Reconnect the power cord.
3. Plug the adapter cable into the infrared port.
The green light on the infrared adapter comes on whenthe printer is plugged in.
RReessuulltt
Installing Procedure
1. Make sure the printer power cord is unplugged.
2. Locate the infrared port on the back of your printer.

Infrared Adapter114
1. To print with infrared port, you should install infrared port driver onyour computer.
● If you do not have the driver, please ask to your PC manufacturer.
● You can download infrared driver of Windows 95 from the internet with no charge.(http://www.microsoft.com)
2. Aim the computer infrared port at the infrared port on the back of the printer.
3. Aim the infrared port on your computer within 15 degrees of either side of the line as shown.
4. The printer must be within 3 feet(1 meter) of the computer.
5. Make sure the printer is in ready state.
6. Send the print job from the computer.
Printing Procedure
Optional Cassette 115
OOppttiioonnaall CCaasssseettttee
Overview
You can install an optional cassette. Complete the following steps beforeyou install the optional cassette.
● Unplug the printer power cord.● Disconnect all cables from the back of the printer

Optional Cassette116
2. Reconnect all cables to the back of the printer.
3. Reconnect the power cord to the printer.
4. Make sure the ÔREADYÕ message appears on the operator panel display.
Installing Procedure
1. Carefully place the printer on top of the optional cassette unit.● Make sure the connector is properly inserted.

Optional Cassette 117
Loading the Plain Paper into the Option Cassette
Your printer has an optional cassette that can hold up to 500 sheets of papers or 40 envelopes.
To load paper in the optional cassette, proceed as follows.
1. Pull the cassette completely out of the printer.
2. Press down on the bottom plate to lock it into position.
To load the envelope into the cassette, lift thelever on the left side of the cassette.

Optional Cassette118
3. Squeeze and lift the length guide and slide it to the desired paper size until it click into place.
4. Lift the width guide on the paper guide it to the desired paper size until it click into place.The paper size is indicated on the bottom of the optional cassette.

Optional Cassette 119
5. Squeeze the width guide and slide it to the for right side of the cassette.
6. Place the paper against the left of the rear paper guide.
7. Squeeze the width guide and slide it to the right and left until it touches the edge of the paper.
● Do not fold or crease the paper.
● This mark indicates the height of paper loaded.
The printer may pull paper from first cassette first. To change this,see ÔPaper source selectionÕ on page 121.

Optional Cassette120
Loading the envelopes into the Option Cassette
1 Lift the lever on the left side of the cassette.
2 Press down on thebottom plate to lock it into position.
3 Left the width guide and slide it to the envelope size indicated
on the bottom.
4 Lift the length guide and slideit to the envelope size
indicated on the bottom.
5 Place the envelopes against the left side of the cassette.Squeeze the envelope guide lever and slide it to the left until it touches the edge of the envelopes.
6 Squeeze the width guide and slide it to the right and left untilit touches the edge of the envelopes.

Optional Cassette 121
Paper Source Selection
Use PCL driver to select the tray you wish to print.
To select Paper Source in PCL properties dialogue box.
1. Select Start-Settings-Printers from the windows 95 task bar.
2. Click on the Samsung 7000 Series PCLXL or PCL5e icon.
3. Select Files-Properties.
4. Click on the Paper tab.
5. Set the source item to Auto Select or Option cassette.
Settings in the printer driver and softwareapplication override operator panel setting.
Click

Optional Cassette122
1. Press On Line. 0F F L NE
PRME NU
NT NG2. Press the Menu > or < buttons one or more times until ÔPrinting MenuÕ is displayed.
TRAUT0
YA3. Press the Item < or > buttons one or moretimes until ÔTrayÕ appears on the display.
TR0P T
YA4. Press the Value + or - buttons one or more times to select ÔOPTÕ.
TR0P T
YA5. Press the Select button.
● An asterisk(❊) appears beside the current user default setting for that menu item.
The OFFLINE message appears on the display and the printer is off-line.
RReessuulltt
You can select paper source by setting TRAY item of the control panel menu.
To Select optional cassette as the default settings :
Technical Specifications 123
TechnicalSpecifications
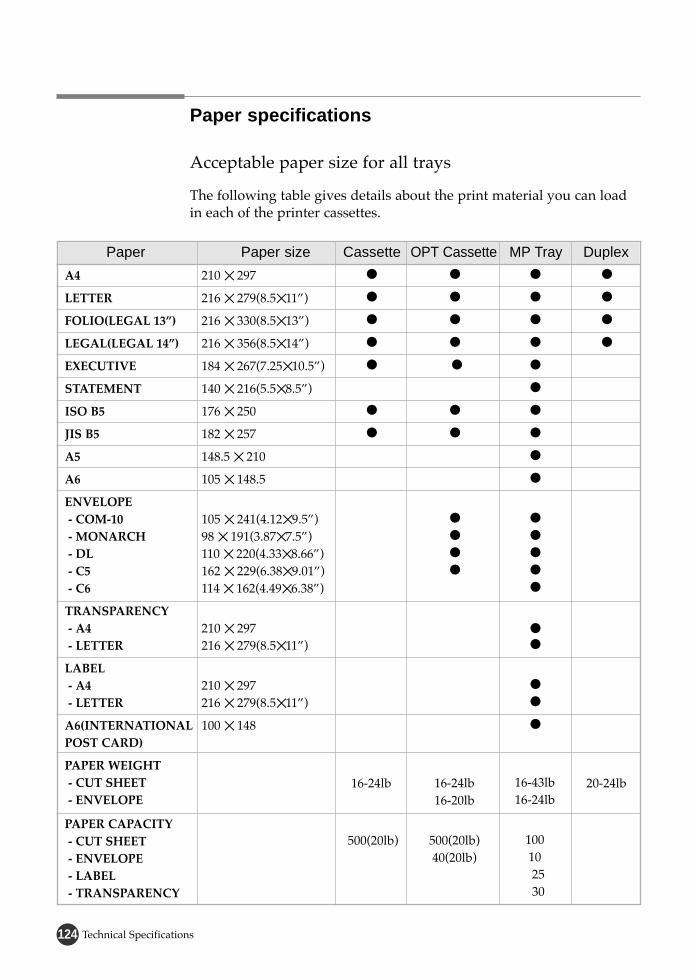
Technical Specifications124
Paper specifications
Acceptable paper size for all trays
The following table gives details about the print material you can load in each of the printer cassettes.
A4
LETTER
FOLIO(LEGAL 13Ó)
LEGAL(LEGAL 14Ó)
EXECUTIVE
STATEMENT
ISO B5
JIS B5
A5
A6
ENVELOPE- COM-10- MONARCH- DL- C5- C6
TRANSPARENCY - A4- LETTER
LABEL- A4- LETTER
A6(INTERNATIONALPOST CARD)
PAPER WEIGHT- CUT SHEET- ENVELOPE
PAPER CAPACITY- CUT SHEET- ENVELOPE- LABEL- TRANSPARENCY
Paper
210 ✕ 297
216 ✕ 279(8.5✕11Ó)
216 ✕ 330(8.5✕13Ó)
216 ✕ 356(8.5✕14Ó)
184 ✕ 267(7.25✕10.5Ó)
140 ✕ 216(5.5✕8.5Ó)
176 ✕ 250
182 ✕ 257
148.5 ✕ 210
105 ✕ 148.5
105 ✕ 241(4.12✕9.5Ó)98 ✕ 191(3.87✕7.5Ó)110 ✕ 220(4.33✕8.66Ó)162 ✕ 229(6.38✕9.01Ó)114 ✕ 162(4.49✕6.38Ó)
210 ✕ 297216 ✕ 279(8.5✕11Ó)
210 ✕ 297216 ✕ 279(8.5✕11Ó)
100 ✕ 148
Paper size
●
●
●
●
●
●
●
16-24lb
500(20lb)
Cassette
●
●
●
●
●
●
●
●
●
●
●
16-24lb16-20lb
500(20lb)40(20lb)
OPT Cassette
●
●
●
●
●
●
●
●
●
●
●
●
●
●
●
●
●
●
●
●
16-43lb16-24lb
100 1025 30
MP Tray
●
●
●
●
20-24lb
Duplex
Technical Specifications 125
Supported Types of Paper
The printer supports the following types of paper :
Guidelines for Using Paper
Make sure the paper is good quality
● Plain● Letterhead● Bond● Rough
● Prepunched● Preprinted● Color● Recycled
● Transparency● Labels● Card Stock
Labels
To avoid damaging the printer, use only labels recommended for use in laser printers.
● The adhesive material should be stable at 400OF(205OC), the printerÕs maximum temperature.
Transparencies
To avoid damaging the printer, use only transparencies recommendedfor use in laser printers.
● Transparencies used in the printer must be able to withstand 400OF(205OC), the printers maximum temperature.

Technical Specifications126
Printer Specifications
Controller
Power PC, 100MHZ
● Default : PCL6● Option : PS II
● 4MB Standard● Max up to 68MB● PS : 12MB Standard
● IEEE 1284 B type● Option :
Serial RS-232C/LocalTalkInfrared Adapter ConnectorNetwork
45 Scalable font, 1 Bitmap
● Ethernet● 10 base T● SNMP in MIB● TCP/IP● Netware, Windows, OS/2, Unix, Mac
PCL : Windows 3.1/95/98/NT 4.0
CPU
Emulations
Memory
Interface
Font
N/W Card
Device Driver
Characteristic Description

Technical Specifications 127
Engine
16 PPM
600 DPI + SRT
Eletrophotography
Non-mag monocomponent/contact
Less than 60 secs
Less than 13 secs
472 ✕ 442 ✕ 301(W ✕ D ✕ H)mm
Less than 16.5kg
350W Printing Avg/ Max 34W printing sleep
Printing : 50dBStandby : 36dBSleep : Background noise
8000 pages Avg at 5% coverageIn duplex mode, less than 8000 pages
Speed
Resolution
Imaging
Toning/Fusing
WarmUp time
FPOT
Size(WDH)
Weight
Power Consumption
Noise Level
Toner Cartridge
Characteristic Description
Cable
IEEE 1284
RS-232CLocalTalk(RS-422)
Parallel
Serial
Characteristic Description

Technical Specifications128
Paper Handling
500 sheets - Standard Cassette
500 sheets(40 envelopes) - Option Cassette
250 sheets Facedown
100 sheets(10 envelopes)
● 1st Tray : A4, LTR, Folio, Legal, Exec, ISO B5, JIS B5 (16~24lbs)
● MP Tray : A4, LTR, Folio, Legal, Exec, Statement, ISO B5, JIS B5, A5, A6,OHP, Label, COM-10, MON, DL,C5, C6
● Option Cassette : A4, LTR, Folio, Legal, COM-10, MON, DL, C5
● Paper : A4, LTR, Folio, Legal
Input Capacity
Optional Input
Output Capacity
MP Tray
Type of Media
Duplexing
Characteristic Description
Environment
Operating : 10 OC ~ 30 OC
Storage : 0 OC ~ 35 OC
Operating : 30% ~ 80%
Storage : 10% ~ 90%
Temperature
Humidity
Characteristic Description
Others
● 8 ✕ 2 LCD
● LCD Display angle adjusting
● Backlighting
Control Panel
Characteristic Description

Notices 129
NNoottiicceess
Without a Network Card Installed
EC DECLARATION OF CONFORMITY
We,SAMSUNG ELECTRONICS CO.,LTD#259, Gong Dan-Dong, Gumi-City, Kyung Buk, Korea
declare sole responsibility that the
ML-7000, ML-7000P Laser Printer
meets the intent of Directive 89/336/EEC for Electromagnetic Compatibility and LowVoltage Directive 73/23/EEC.Compliance was demonstrated to the following specifications as listed in the official journal of the European Communities:
Electromagnetic Interference :EN 55022 Radiated, Class BEN 55022 Conducted, Class BEN 61000-3-2 Power Harmonics
EN 50082-1 Electromagnetic Susceptibility :IEC 801-2 Electrostatic DischargeIEC 801-3 RF EM FieldIEC 801-4 Fast Transients/Burst
EN 60950-Safety
EElleeccttrroonniicc EEmmiissssiioonn

Notices130
With a Network Card Installed
EC DECLARATION OF CONFORMITY
We,SAMSUNG ELECTRONICS CO.,LTD#259, Gong Dan-Dong, Gumi-City, Kyung Buk, Korea
declare sole responsibility that the
ML-7000N Laser Printer
meets the intent of Directive 89/336/EEC for Electromagnetic Compatibility and LowVoltage Directive 73/23/EEC.Compliance was demonstrated to the following specifications as listed in the official journal of the European Communities:
Electromagnetic Interference :EN 55022 Radiated, Class AEN 55022 Conducted, Class AEN 61000-3-2 Power Harmonics
EN 50082-1 Electromagnetic Susceptibility :IEC 801-2 Electrostatic DischargeIEC 801-3 RF EM FieldIEC 801-4 Fast Transients/Burst
EN 60950-Safety
This is a class A product. In a domestic environment, this product may cause radiointerference, in which case the user may be required to take adequate measures.

Notices 131
The printer is certified in the U.S. to conform to the requirements of DHHS 21 CFR , Chapter1Subchapter J for Class I(1) laser products, and elsewhere is certified as a Class I laser product conforming to the requirements of IEC 825.
Class I laser products are not considered to be hazardous.
The laser system and printer are designed so there is never any human access to laser radiation above a Class I level during normal operation, user maintenance, or prescribed service condition.
Never operate or service the printer with the protective cover removedfrom Laser Scanner assembly. The reflected beam, although invisible,can damage your eyes.
CLASS 1 LASER PRODUCT LASER KLASSE 1LUOKAN 1 LASERLAITEAPPAREIL A LASER DE CLASSE 1 TO IEC 825
CAUTION
Class 1 Laser Statement Label
Õ
LLaasseerr ssaaffeettyy ssttaatteemmeenntt

Notices132
CAUTION - INVISIBLE LASER RADIATION WHEN THIS COVER IS OPEN . DO NOT OPEN THIS COVER
VORSICHT - UNSICHTBARE LASERSTRAHLUNG, WENN ABDECKUNG GEOFFENT. NICHT DEM STRAHL AUSSETZEN.
ATTENTION - RAYONNEMENT LASER INVISIBLE EN CAS D’OUVERTURE. EXPOSITION DANGEREUSE AU FAISCEAU.
ATTENZIONE - RADIAZIONE LASER INVISIBLE IN CASO DI APERTURA. EVITARE L’ESPOSIZIONE AL FASCIO.
PRECAUCION - RADIACION LASER IVISIBLE CUANDO SE ABRE. EVITAR EXPONERSE AL RAYO.
ADVARSEL - USYNLIG LASERSTRALNING VED ABNING NAR SIKKERHEDSBRYDERE ER UDE AF FUNKTION. UNDGA UDSAETTELSE FOR STRALNING.
ADVARSEL - USYNLIG LASERSTRALNING NAR DEKSEL APNES. STIRR IKKE INN I STRALEN. UNNGA EKSPONERING FOR STRALEN.
VARNING - OSYNLIG LASERSTRALNING NAR DENNA DEL AR OPPAND OCH SPARREN AR URKOPPLAD. BETRAKTA EJ STRALEN STRALEN AR FARLIG.
VARO - AVATTAESSA JA SUOJALUKITUS OHITETTAESSA OLET ALTTIINANAKYMATTOMALLE LASER SATEILYLLE ALA KATSO SATEESEEN.
..
.. .. ..
..
.. ..
.. .. .. .. .. .. .. ..
O O O
O O
O O O O
O O
O
O O
Laser Caution label is located on the LSU top side.
LLaasseerr CCaauuttiioonn LLaabbeell

Notices 133
Safety and Regulatory Listing for this printer.
SSAAFFEETTYY IINNFFOORRMMAATTIIOONN
PRODUCT SAFETY
USA & CANADA Evaluated by UL according to UL 1950and CSA C22.2 No. 950 for C-UL
EEC(Europe) IEC 60950/EN 60950(TUV GS Certification)
CB IEC 60950
LASER SAFETY
EEC(Europe) HD 194. & EN 60825
USA 21 CFR, Chapter 1, Subchapter J(CDRH Certified)
..

Index134
IInnddeexx
4MB RAM
8MB RAM
16PPM
600dpi
500-Sheet cassette
250 Sheets of paper
100 Sheets of paper
10 envelopes
10 index cards
7
99
7
7
17
10
17
17
17
Numerics
About
Adhesive tape
AUTO CR
AUTOCONT
35
11
48
49
A
BAUD RATE
BNC port
55
96
B
Cassette
Cassette size
CD
CD-Rom drive
Config menu
Copies
COURIER
COVER OPEN
17
45
23
25
49
35
57
80
C
Default printer
DEMOPAGE
DENSITY
Details tab
DRAM
Duplex
DUPLEX(menu)
Duplex size
29
54
52
34
92
35
48
45
D

Index 135
ECONO
Empty manual
EMUL
Enter/Cancel button
Envelopes
Error message
Ethernet 10 Base 2
Ethernet 10 Base-T
50
81
49
42
63
80
98
98
E
Halftoning
Hardware Requirements
Help button
36
24
42
H
Infrared Adapter● Installing
● Printing
Infrared port
INTERNAL ERROR
I/O menu
IrDA
Item button
Items Supplied
113
114
113
81
55
112
42
9
I
JAM.RECV
Job menu
50
52
J
Finishing tab● Finish mode
● Multiple Images
Folio
Font Navigator
Front view
37
19
30
10
F
General tab
Graphics tab● Graphics Mode
● Halftoning
● SRT Mode
34
36
G

Index136
IInnddeexx
Macintosh
Memory Overflow
MENU CLR
Menu button
ML-7000
ML-7000P
ML-7000N
MP size
MP tray
MP tray size
Multiple Images
107
82
53
42
7
7
7
45
20
45
37
M
Label
LAN
Landscape
Legal
Length guide
Lever
Light color● Green
● Orange
LINES
L-MARGIN
LocalTalk cable
LOCKTRAY
LSU cleaner
65
96
46
19
20
19
41
56
48
110
51
74
L
Network Connector
Network menu
Network Option Card
Notch
Novell Netware
89
44
96
93
24
N

Index 137
OFFLINE
On line
Online/Continue button
Operator panel
Option tray size
Optional Cassette● Installing
● Loading the Paper
ORIENT
Orientation
Overlays tab● Creat Overlay
● Load Overlay
● Overlays
● Selected Overlay Status
OVERRUN
43
43
42
41
45
116
117
46
35
39
81
O
PAP.TYPE
PAPER
Paper jam● Location
● Paper Jam 0
● Paper Jam 1 or 2
● Duplex Jam 1 or 2
Paper level indicator
Paper Limit Line
Paper tab ● Paper sizes
● Orientation
● Source
● Copies
● Duplex
Parallel cable
Parallel interface connector
PCL Menu
PITCH
Plug&Play
Poor print quality
Portrait
PortThru
Power connector
Power cord
53
45
76
77
78
79
10
18
35
14
10
56
57
27
84
46
96
10
16
P
Index138
IInnddeexx
QUALITY 48
Q
43
80
17
18
10
38
96
55
89
R
READY status message
READY TonerLow
Rear paper guide
Rear right guide
Rear view
Resolution
RJ-45 Port
ROBU-XON
Rom SIMM Connector
Power switch
PPD file
Print prevention sensor
Printer Control Board
Printer driver● PCL 5e
● PS
● PCL XL
● Font Navigator
● SyncThru
Printer memory
Printer Memory Connector
Printer menu
Printer tab● Resolutions
● Printer Memory
Printing Menu
Printing PCL6 message
Printing problem
Printing Tasks
PS driver● Installing
● Setting
PS SIMM
PS II menu
PT.SIZE
PWR SAVE
16
111
10
89
23
92
89
44
38
45
22
83
32
100/110
106
99
44
57
49
P

Index 139
SELFTEST
Selection
SERIAl ERROR
Serial/LocalTalk connector
Serial/Localtalk Option Card
Setting up
Sharing tab
SM(Status Monitor)
SMET
Software requirements
Sources
SRT MODE
SWITCH
SYMBOL
SyncThru
22
29
82
89
108
23
34
29
53
24
35
52
51
56
23
S
T-MARGIN
TEST MENU
Testing the printer
TIMEOUT
Toner cartridge ● Installing
● Maintaining
TONERLOW
TonerLow STOP
Top cover
Top output bin
Transparencies
TRAY
TYPEFACE
47
54
22
52
12
69
50
80
10
10
66
47
56
T
Index140
Uninstall Utility
Unpacking your Printer
28
9
U
Value button 42
V
Watermarks tab● Watermark
● Edit
Width guide
Windows 95
Windows 98
Windows NT 4.0
Windows 3.1
40
17
25/27
25/27
25
28
W
IInnddeexx

Installing the Cleaning Felt
The cleaning felt is used to prevent the pollution of the pressure roller.
2. Pull the green grip towards you.
1. Open the rear cover.
4. Put the cleaning felt into place as illustrated in the figure below.
3. Unpack the cleaning felt.
5. Pull the green grip lightly to return to the original position.
6. Close the rear cover.
● Avoid touching the contact area.
● Do not remove the cleaning felt from its packaging previously.
● If you purchase a new toner cartridge, the cleaning felt is included in its package. When you change the toner cartridge, change the cleaning felt too.
When the cleaning felt is installed, take
caution against changing itÕs
direction.(Insert up the part marked
ÔUPÕ of the cleaning felt to your printer.)
For more information on installing procedure, see the attached label.