mobile clinical assistant software development kit … clinical assistant software development kit...
TRANSCRIPT

Document Number: PLAN-SDK2.0_072508
Mobile Clinical Assistant Software Development Kit (SDK) V2.0
Developer Guide
July 2008

Mobile Clinical Assistant SDK 2.0 Developer Guide
Intel Confidential
Document Number: PLAN-SDK2.0_072508 7/24/2008 Page 2
INFORMATION IN THIS DOCUMENT IS PROVIDED IN CONNECTION WITH INTEL® PRODUCTS. NO LICENSE, EXPRESS OR IMPLIED, BY ESTOPPEL OR OTHERWISE, TO ANY INTELLECTUAL PROPERTY RIGHTS IS GRANTED BY THIS DOCUMENT. EXCEPT AS PROVIDED IN INTEL'S TERMS AND CONDITIONS OF SALE FOR SUCH PRODUCTS, INTEL ASSUMES NO LIABILITY WHATSOEVER, AND INTEL DISCLAIMS ANY EXPRESS OR IMPLIED WARRANTY, RELATING TO SALE AND/OR USE OF INTEL PRODUCTS INCLUDING LIABILITY OR WARRANTIES RELATING TO FITNESS FOR A PARTICULAR PURPOSE, MERCHANTABILITY, OR INFRINGEMENT OF ANY PATENT, COPYRIGHT OR OTHER INTELLECTUAL PROPERTY RIGHT.
UNLESS OTHERWISE AGREED IN WRITING BY INTEL, THE INTEL PRODUCTS ARE NOT DESIGNED NOR INTENDED FOR ANY APPLICATION IN WHICH THE FAILURE OF THE INTEL PRODUCT COULD CREATE A SITUATION WHERE PERSONAL INJURY OR DEATH MAY OCCUR.
Intel may make changes to specifications and product descriptions at any time, without notice. Designers must not rely on the absence or characteristics of any features or instructions marked "reserved" or "undefined." Intel reserves these for future definition and shall have no responsibility whatsoever for conflicts or incompatibilities arising from future changes to them. The information here is subject to change without notice. Do not finalize a design with this information.
The products described in this document may contain design defects or errors known as errata which may cause the product to deviate from published specifications. Current characterized errata are available on request.
Contact your local Intel sales office or your distributor to obtain the latest specifications and before placing your product order.
Notice: The mobile clinical assistant is not a regulated medical device and should not be used for the diagnosis, treatment or prevention of disease.
Should Buyer purchase or use Intel’s Products for any such unintended use, Buyer shall indemnify and hold Intel and its directors, officers, subsidiaries, sub-contractors and affiliates harmless against all claims, costs, damages, and expenses, and reasonable attorney fees arising out of, directly or indirectly, any claim of product liability, personal injury or death associated with such unintended use, even if such claim alleges that Intel or its sub-contractor was negligent regarding the design or manufacture of the Intel Product or any of its parts.
Any user of this document and its specification information is not authorized to publicly state or claim that its products or applications conform with the mobile clinical assistant unless and until a conformance program is developed and implemented. By requesting or using the information herein, the user agrees to this limitation and condition.
Intel Corporation may have patents or pending patent applications, trademarks, copyrights, or other intellectual property rights that relate to the presented subject matter. The furnishing of documents and other materials and information does not provide any license, express or implied, by estoppels or otherwise, to any such patents, trademarks, copyrights, or other intellectual property rights. Intel is not obligated to provide any support, installation, or other assistance with regard to these devices or this information. The information in this document is furnished for informational use only, is subject to change without notice, and should not be construed as a commitment by Intel Corporation. Intel Corporation assumes no responsibility or liability for any errors or inaccuracies that may appear in this document. Use of any of the information contained herein is solely at the recipient’s own risk.
This Mobile Clinical Assistant SDK 2.0 Developer Guide, as well as the software described in it, is furnished under license and may only be used or copied in accordance with the terms of the license. The information in this manual is furnished for informational use only, is subject to change without notice, and should not be construed as a commitment by Intel Corporation. Intel Corporation assumes no responsibility or liability for any errors or inaccuracies that may appear in this document or any software that may be provided in association with this document.
Except as permitted by such license, no part of this document may be reproduced, stored in a retrieval system, or transmitted in any form or by any means without the express written consent of Intel Corporation.
Any software source code reprinted in this document is furnished under a software license and may only be used or copied in accordance with the terms of that license.
Citrix, Citrix Presentation Server, and Citrix ICA are trademarks of Citrix Systems, Inc. and/or one or more of its subsidiaries, and may be registered in the United States Patent and Trademark Office and in other countries.
*Other names and brands may be claimed as the property of others.
Intel’s name and the Intel logo are trademarks or registered trademarks of Intel Corporation or its subsidiaries in the United States and other countries.
Copyright© 2008, Intel Corporation. All rights reserved

Mobile Clinical Assistant SDK 2.0 Developer Guide Intel Confidential
7/24/2008 Document Number PLAN-SDK2.0_072508 Page 3
Intel® Mobile Clinical Assistant (MCA) SDK Agreement
IMPORTANT - READ BEFORE COPYING, INSTALLING OR USING.
Do not use or load this software and any associated materials (collectively, the “Software”) until you have carefully read the following terms and conditions. By loading or using the Software, you agree to the terms of this Agreement. If you do not wish to so agree, do not install or use the Software.
LICENSE: You may reproduce and distribute the Software only as an integral part of or incorporated in your product or as a standalone Software maintenance update for existing end users of your products, excluding any other standalone products, subject to these conditions:
1. This Software is licensed for use only in conjunction with Intel component products. Use of the Software in conjunction with non-Intel component products is not licensed hereunder.
2. You may not copy, modify, rent, sell, distribute or transfer any part of the Software except as provided in this Agreement, and you agree to prevent unauthorized copying of the Software.
3. You may not reverse engineer, decompile, or disassemble the Software.
4. You may only distribute the Software to your customers pursuant to a written license agreement. Such license agreement may be a "break-the-seal" license agreement. At a minimum such license shall safeguard Intel's ownership rights to the Software.
5. The Software may include portions offered on terms in addition to those set out here, as set out in a license accompanying those portions.
NO OTHER RIGHTS. No rights or licenses are granted by Intel to You, expressly or by implication, with respect to any proprietary information or patent, copyright, mask work, trademark, trade secret, or other intellectual property right owned or controlled by Intel, except as expressly provided in this Agreement.
OWNERSHIP OF SOFTWARE AND COPYRIGHTS. Title to all copies of the Software remains with Intel or its suppliers. The Software is copyrighted and protected by the laws of the United States and other countries, and international treaty provisions. You may not remove any copyright notices from the Software. Intel may make changes to the Software, or to items referenced therein, at any time without notice, but is not obligated to support or update the Software. Except as otherwise expressly provided, Intel grants no express or implied right under Intel patents, copyrights, trademarks, or other intellectual property rights. You may transfer the Software only if the recipient agrees to be fully bound by these terms and if you retain no copies of the Software.
LIMITED MEDIA WARRANTY. If the Software has been delivered by Intel on physical media, Intel warrants the media to be free from material physical defects for a period of ninety days after delivery by Intel. If such a defect is found, return the media to Intel for replacement or alternate delivery of the Software as Intel may select.
EXCLUSION OF OTHER WARRANTIES. EXCEPT AS PROVIDED ABOVE, THE SOFTWARE IS PROVIDED "AS IS" WITHOUT ANY EXPRESS OR IMPLIED WARRANTY OF ANY KIND INCLUDING WARRANTIES OF MERCHANTABILITY, NONINFRINGEMENT, OR FITNESS FOR A PARTICULAR PURPOSE. Intel does not warrant or assume responsibility for the accuracy or completeness of any information, text, graphics, links, or other items contained within the Software.
LIMITATION OF LIABILITY. IN NO EVENT SHALL INTEL OR ITS SUPPLIERS BE LIABLE FOR ANY DAMAGES WHATSOEVER (INCLUDING, WITHOUT LIMITATION, LOST PROF¬ITS, BUSINESS INTERRUPTION, OR LOST INFORMATION) ARISING OUT OF THE USE OF OR IN¬ABILITY TO USE THE SOFTWARE, EVEN IF INTEL HAS BEEN ADVISED OF THE POSSIBILITY OF SUCH DAMAGES. SOME JURISDICTIONS PROHIBIT EXCLUSION OR LIMITA¬TION OF LIABILITY FOR IMPLIED WARRANTIES OR CONSEQUENTIAL OR INCIDENTAL DAMAGES, SO THE ABOVE LIMITA¬TION MAY NOT APPLY TO YOU. YOU MAY ALSO HAVE OTHER LEGAL RIGHTS THAT VARY FROM JURISDICTION TO JURISDICTION.
TERMINATION OF THIS AGREEMENT. Intel may terminate this Agreement at any time if you violate its terms. Upon termination, you will immediately destroy the Software or return all copies of the Software to Intel.
APPLICABLE LAWS. Claims arising under this Agreement shall be governed by the laws of California, excluding its principles of conflict of laws and the United Nations Convention on Contracts for the Sale of Goods. You may not export the Software in violation of applicable export laws and regulations. Intel is not obligated under any other agreements unless they are in writing and signed by an authorized representative of Intel.
GOVERNMENT RESTRICTED RIGHTS. The Software is provided with "RESTRICTED RIGHTS." Use, duplication, or disclosure by the Government is subject to restrictions as set forth in FAR52.227-14 and DFAR252.227-7013 et seq. or its successor. Use of the Software by the Government constitutes acknowledgment of Intel's proprietary rights therein. Contractor or Manufacturer is Intel.

Mobile Clinical Assistant SDK 2.0 Developer Guide
Intel Confidential
Document Number: PLAN-SDK2.0_072508 7/24/2008 Page 4
Contents 1 Introduction ................................................................................................................ 7
1.1 Document Purpose and Scope............................................................................... 7 1.2 MCA Platform, Software, and Development Environment........................................... 7
1.2.1 Intel® MCA Software Development Kit (SDK) .............................................. 7 1.2.2 Intel® MCA Platform Driver (PD)................................................................ 8 1.2.3 MCA Device-Class Plug-Ins ....................................................................... 8
1.3 Customer Support ............................................................................................... 9 1.3.1 Intel® Software Network Forums ............................................................... 9 1.3.2 Intel® Premier Support ............................................................................ 9
2 Set Up the Development Environment ........................................................................... 11 2.1 Required Software for Developer Workstations ...................................................... 11 2.2 MCA SDK Installation Directories ......................................................................... 11
2.2.1 MCA SDK Install Directory (optional and default) ....................................... 11 2.2.2 Top Level Directories and Files ................................................................ 11
2.3 Install MCA SDK on Developer Workstation ........................................................... 12 2.4 Configure the Development Environment.............................................................. 13
2.4.1 Configure Microsoft Visual Studio* 2005 for C/C++ Development ................ 13 2.4.2 Configure Microsoft Visual Studio* 2005 for C# Development...................... 13 2.4.3 Configure Eclipse* IDE for JAVA* Development ......................................... 13 2.4.4 Configure Microsoft Visual Basic* 6.0 for COM Development........................ 14
2.5 Setting Up Citrix® Environment (optional)............................................................. 14 2.5.1 Installing MCA Remote Proxy for Presentation Server on the Citrix® Server ... 14 2.5.2 Installing Citrix® Client on Developer WorkStation ..................................... 15
2.6 Set Up Programming Language Example Files ....................................................... 20 3 Multi-Language Programming Interfaces........................................................................ 21
3.1 Native Code Interface ........................................................................................ 22 3.1.1 C Interface (Accessible from C++) .......................................................... 22
3.2 Additional Interface Layers ................................................................................. 23 3.2.1 .Net* Interface ..................................................................................... 23 3.2.2 Java* Interface..................................................................................... 24 3.2.3 COM Interface ...................................................................................... 26
4 Peripherals and Plug-Ins ............................................................................................. 27 4.1 Device Class Plug-ins......................................................................................... 27 4.2 Loopback Plug-ins ............................................................................................. 28
4.2.1 How They Work .................................................................................... 28 5 Migrating from Development to Run-Time Binaries .......................................................... 30
6 Button Functionality and Handling ................................................................................ 31 6.1 Handling Registered Calls and Button Presses........................................................ 31
6.1.1 “ToolTray” Application ........................................................................... 31

Mobile Clinical Assistant SDK 2.0 Developer Guide Intel Confidential
7/24/2008 Document Number PLAN-SDK2.0_072508 Page 5
6.1.2 Defining “Active” Window....................................................................... 32 6.1.3 Button Actions...................................................................................... 32
6.2 “Default” Button Actions..................................................................................... 33 6.2.1 Customizing Default Button Actions ......................................................... 33 6.2.2 Per Application Setting........................................................................... 33 6.2.3 Configuring an Application as “Default” Action ........................................... 33 6.2.4 Barcode “Default” Actions....................................................................... 34 6.2.5 Camera “Default” Actions ....................................................................... 34 6.2.6 Programmable MedApp Button “Default” Actions........................................ 35 6.2.7 Generic OEM Product Button “Default” Actions........................................... 35
6.3 “Callback with Data” Button Actions ..................................................................... 35 6.4 “Callback without Data” Button Actions ................................................................ 36 6.5 “Key Press” Button Actions ................................................................................. 36 6.6 Canceling Button Actions.................................................................................... 36 6.7 Button Simulation ............................................................................................. 36
7 Peripheral Device Capabilities ...................................................................................... 37 7.1 Barcode Reader ................................................................................................ 37
7.1.1 Reading Barcodes ................................................................................. 37 7.1.2 Barcode Device Parameters .................................................................... 38 7.1.3 Barcode Reader Keyboard Emulation........................................................ 38
7.2 RFID Reader / Writer ......................................................................................... 39 7.2.1 Reading RFID Tags................................................................................ 39 7.2.2 Writing RFID Tags ................................................................................. 39 7.2.3 RFID Device Settings............................................................................. 40
7.3 Camera ........................................................................................................... 40 7.3.1 Programming for the Camera API ............................................................ 41 7.3.2 Camera Device Settings ......................................................................... 41
8 Log Files ................................................................................................................... 43 8.1 Logging Content ............................................................................................... 43 8.2 Setting Log Message Level.................................................................................. 43 8.3 System Event Log ............................................................................................. 44
9 MCA SDK Configuration............................................................................................... 45 9.1 MCA Configuration Editor Tool............................................................................. 45 9.2 MCA SDK Configuration File ................................................................................ 47 9.3 Configuring Logging .......................................................................................... 48 9.4 Configuring the “ToolTray” Application.................................................................. 50
9.4.1 Button Simulation Configuration.............................................................. 50 9.4.2 Button Definition Configuration ............................................................... 51 9.4.3 Button KeyPress Action Configuration ...................................................... 52 9.4.4 Button Handler Configuration.................................................................. 53 9.4.5 Default Handler Configuration ................................................................. 56 9.4.6 Configuring Application as Default Action.................................................. 58 9.4.7 Per Application Configuration .................................................................. 59
9.5 Configuring Barcode Loopback Plug-in.................................................................. 61 9.6 Configuring RFID Loopback Plug-in ...................................................................... 62 9.7 Configuring Camera Plug-in ................................................................................ 64
9.7.1 Configuration Parameters....................................................................... 64 9.7.2 Maintaining Multiple Camera Configurations .............................................. 66
9.8 Configuring Camera Image Scaling Support .......................................................... 67 9.8.1 Configuration Parameters....................................................................... 67

Mobile Clinical Assistant SDK 2.0 Developer Guide
Intel Confidential
Document Number: PLAN-SDK2.0_072508 7/24/2008 Page 6
10 Citrix Considerations................................................................................................... 68 10.1 Camera ........................................................................................................... 68 10.2 Buttons ........................................................................................................... 69 10.3 Processes......................................................................................................... 69
11 Terminology .............................................................................................................. 70
12 Help Files and Code Samples ....................................................................................... 72 12.1 Language-Specific ............................................................................................. 72 12.2 Others............................................................................................................. 73
Figures
Figure 1:Seamless Flags Directory .................................................................................................................. 15 Figure 2:HKEY_LOCAL_MACHINE\SOFTWARE\Citrix\ICA............................................................................ 18 Figure 3:HKEY_LOCAL_MACHINE\SOFTWARE\Citrix\ICA............................................................................ 18 Figure 4:HKEY_LOCAL_MACHINE\SOFTWARE\Citrix\ICA............................................................................ 19 Figure 5:Native Code with Additional Interface Layers ............................................................................... 21 Figure 6:Net Interface........................................................................................................................................ 24 Figure 7:Java Interface ...................................................................................................................................... 25 Figure 8:COM Interface...................................................................................................................................... 26 Figure 9:Plug-In Support ................................................................................................................................... 27 Figure 10:Active Window................................................................................................................................... 32 Figure 11:MCA Configuration Editor Tool ....................................................................................................... 46
Revision History
Version Description Date
314183-xxx Update for Intel® MCA Remote Proxy for Citrix Presentation Server™.
July 31, 2007
318792-001 Final draft for V1.1 product release. Replaces and is a revision of 314183-001
November 16, 2007
318792-002 Edited draft for V1.11 product release. Replaces and is a revision of 314183-002
December 14, 2007
314183-001 First public release. June 22, 2007
PLAN-SDK2.0-0725-08 Edited by Tech Pubs. July 25, 2008

Mobile Clinical Assistant SDK 2.0 Developer Guide Intel Confidential
7/24/2008 Document Number PLAN-SDK2.0_072508 Page 7
1 Introduction
The Mobile Clinical Assistant (MCA) is a reference design for tablet platforms and healthcare applications. MCA combines hardware and software, in a rational solution for the healthcare industry, to improve the quality and effectiveness of healthcare.
1.1 Document Purpose and Scope This document describes the Intel® Mobile Clinical Assistant (MCA) Software Development Kit (SDK), and the development environment that is required by software application developers who write applications for MCA products.
Note: For the remainder of this document, the Intel® Mobile Clinical Assistant (MCA) Software Development Kit (SDK) will be referred to as the MCA SDK.
For additional resources and late-breaking news regarding the MCA SDK, please see Section 1.3.
For a comprehensive list of language-specific help files and examples provided by the MCA SDK, please see Section Error! Reference source not found..
1.2 MCA Platform, Software, and Development Environment
Intel Corporation developed a software development platform to support the MCA reference design. Its major components are defined below.
1.2.1 Intel® MCA Software Development Kit (SDK)
The MCA SDK is a set of Intel proprietary application development tools and documentation provided to MCA software developers. The MCA SDK provides emulation for MCA Platform Drivers, device-class peripheral plug-ins, and button controls to enable software development on application developers’ workstations. The MCA SDK is optimized to run on Intel® Architecture.
The MCA SDK includes the following:
• Development libraries
• Language-specific help files
• Language-specific samples
• Header files
• Loopback plug-ins (emulated peripheral plug-ins for testing)
• Documentation for the platform driver upper API and MCA SDK software
• An MCA SDK configuration file
The MCA SDK contains the binaries in the MCA Platform Driver, plus the developer resources listed above. It enables code execution and debugging on developer workstations, without requiring you to copy binaries to an actual MCA product. After you have built and tested your applications on a developer’s workstation, you should copy the applications to an MCA product and test against actual hardware.

Mobile Clinical Assistant SDK 2.0 Developer Guide
Intel Confidential
Document Number: PLAN-SDK2.0_072508 7/24/2008 Page 8
Warning: Do not use any of the binaries from the MCA SDK on an MCA product with the MCA Platform Driver installed. The two are incompatible.
If you install the MCA SDK software onto an OEM’s MCA product, MCA SDK will overwrite the installed platform driver and plug-ins, and will not allow the developer application to interact directly with the actual hardware devices (e.g. barcode, RFID, camera).
1.2.2 Intel® MCA Platform Driver (PD)
The Platform Driver is a set of Intel proprietary run-time software components that are shipped with an OEM’s MCA product. The Platform Driver provides device-category functional translation between…
(1) An upper API provided to software developers; and,
(2) Lower device-class APIs provided to OEMs and peripheral vendors. (These APIs include but are not limited to barcode scanners, RFID readers, camera, device controls).
The Platform Driver allows functional interoperability between these elements via standard access methods for device classes.
In addition to functional translation, the MCA Platform Driver also provides value-added functional enhancements to increase usage environments for the MCA integrated technologies. These enhancements include, but are not limited to the following:
• Device management
• Logging
• Configuration
• Multi-threading support
• Citrix® software environment exposure of device classes
These functional enhancements apply to one or more device classes. The MCA Platform Driver contains no logic that is specific to any device-class plug-in.
Support for vendor-specific peripherals requires the MCA Device-Class Plug-Ins that are included with the OEM’s MCA product software.
When the Platform Driver is released on an official OEM MCA product, the Platform Driver will come pre-installed and will be specifically configured and validated for each OEM’s chosen peripheral.
Warning: None of the binaries from the Platform Driver should be used on a developer’s workstation with the development package installed. The Platform Driver binaries and the development package are not compatible.
1.2.3 MCA Device-Class Plug-Ins
MCA Device-Class Plug-Ins are run-time software components that provide an interface between the MCA Platform Driver and a given hardware peripheral device driver. Device-class peripherals may include, but are not limited to: (1) barcode scanner, (2) RFID reader, (3) camera, and (4) other medical devices.
Mobile Clinical Assistant SDK 2.0 Developer Guide Intel Confidential
7/24/2008 Document Number PLAN-SDK2.0_072508 Page 9
MCA Device-Class Plug-Ins allow each MCA OEM to maintain supply-chain flexibility within a software interoperable application environment.
Example: If MCA OEM’s supplier X of a barcode scanner is replaced with supplier Y, the OEM just replaces the device plug-in for Supplier X with a new barcode plug-in for supplier Y. The change is invisible to the application developer that has enabled their applications to work on MCA platforms.
1.3 Customer Support Intel Customer Support offers technical assistance and information for the MCA SDK. Your Intel Customer Support contact addresses developer questions in a timely manner.
1.3.1 Intel® Software Network Forums
The Mobile Clinical Assistant (MCA) SDK forum answers general questions and provides feedback on the MCA SDK. This public forum is setup for the developer community and has active participation from Intel developers and6 3rd party developers. You can use this forum to float ideas and foster dialog regarding mobile clinical assistant design, technology, and potential.
The Intel® Software Network Forums webpage also provides a portal, called Intel® Mobile Clinical Assistant Software (MCA) Need to Know, which provides links to the following:
• Latest MCA SDK software versions, release notes;
• MCA SDK user documentation;
• MCA SDK sample code;
• Frequently asked questions (FAQs).
You can access the Mobile Clinical Assistant (MCA) SDK forum at the following URL.
http://softwarecommunity.intel.com/isn/Community/en-us/Forums/
Go to the Intel Software Development Products section and look for any Mobile Clinical Assistant (MCA) entries.
1.3.2 Intel® Premier Support
Intel® Premier Support is a 24x7x365 interactive web site that allows customers and developers to work privately and directly with Intel. It is a more discreet alternative to the public communications of the Intel Software Network forums.
Customers and developers can accomplish the following with Intel® Premier Support:
• Submit questions, problems, and other technical support issues.
• Monitor previously submitted issues.
• Provide feedback for specific MCA SDK requirements.
• Link to the Mobile Clinical Assistant (MCA) SDK forum for any of the following:
− Latest MCA SDK software versions, release notes, and errata;
− MCA SDK user documentation;
− MCA SDK sample code;

Mobile Clinical Assistant SDK 2.0 Developer Guide
Intel Confidential
Document Number: PLAN-SDK2.0_072508 7/24/2008 Page 10
− Frequently asked questions (FAQs).
You can access Intel® Premier Support at the following URL.
https://premier.intel.com
You need an account to access Intel® Premier Support. There is no cost for this account, but you must have a Non-Disclosure Agreement in place with Intel to acquire the account. If you don't have a Premier Support account and would like one, contact your Intel Field Application Engineer (FAE) or other local Intel representative.
After you’re registered, a Premier Support account will be established for you. You will be given a logon ID and password that you can use to access the Intel Premier Support website.
Mobile Clinical Assistant SDK 2.0 Developer Guide Intel Confidential
7/24/2008 Document Number PLAN-SDK2.0_072508 Page 11
2 Set Up the Development Environment
This chapter tells you how to install the MCS development package and configure the development environment. It also explains how to set up the Citrix® environment, optionally install language packs for Java and Com, and set up language example files that are provided for each installed language.
2.1 Required Software for Developer Workstations You must install the following software on all developer workstations:
• Microsoft Windows Vista* Business edition /or Microsoft Windows XP* (SP2). Warning: Installation on Microsoft Windows XP versions in languages other than French, German, and English is not supported.
• Microsoft DirectX 9* SDK is the minimum requirement; however, Microsoft DirectX 10* SDK is recommended for Microsoft Windows Vista
• Microsoft Visual Studio SP1.
IMPORTANT: You must install Intel® MCA SDK after the required software has been installed.
2.2 MCA SDK Installation Directories Installing the MCA SDK development package creates a number of new directories and files on the development machine. This section describes these directories and files, and their locations.
2.2.1 MCA SDK Install Directory (optional and default)
At the time of installation, you may install the MCA SDK to the default location or to a location of choice. The install location becomes the MCA SDK installation directory.
Throughout the remainder of this document, the MCA SDK installation directory is referred to as <MCA SDK Install Directory>.
The default (recommended) location for <MCA SDK Install Directory> is
C:\Program Files\Intel\MCA\
2.2.2 Top Level Directories and Files
<MCA SDK Install Directory>\Bin\ ― Contains all of the executables, dynamic link libraries, and configuration files needed for running MCA SDK-enabled programs.
<MCA SDK Install Directory>\Cfg\ ― Contains a sample configuration file for reference only. This file is useful if you want to have several configuration files for testing. To activate a configuration file, you must rename it to IntelHealthcare.cfg and place it into the \Bin directory.

Mobile Clinical Assistant SDK 2.0 Developer Guide
Intel Confidential
Document Number: PLAN-SDK2.0_072508 7/24/2008 Page 12
<MCA SDK Install Directory>\Documentation\ ― Contains this document, and an Internet shortcut to the Intel® Software Network Forum.
<MCA SDK Install Directory>\Examples\ ― Contains source code for example applications that demonstrate API calls for the different MCA-integrated peripherals. There are peripheral examples and coding language examples.
<MCA SDK Install Directory>\Help\― Contains all of the files comprising the language-specific API help.
<MCA SDK Install Directory>\Include\ ― Contains all of the public C/C++ header files with the public API call definitions.
<MCA SDK Install Directory>\Lib\ ― Contains the compiled object file library file to link against.
<MCA SDK Install Directory>\Sounds\ ― Contains the various sound files you can use to designate specific events that occur on the OEM’s MCA product.
<MCA SDK Install Directory>\Release Notes.PDF ― Contains the current installation’s release notes.
<MCA SDK Install Directory>\Intel MCA SDK 2.0 Errata.PDF ― Contains the current installation’s errata report.
<MCA SDK Install Directory>\DHDK\ - This folder contains DHDK documentation, C/C++ Header files, Help files, compiled object file library file and sample example code. Please refer <MCA SDK Install Directory>\DHDK\Documentation\ Intel MCA DHDK Dev Guide 2.0.PDF for more details.
2.3 Install MCA SDK on Developer Workstation Follow the steps below to install the MCA SDK on your developer’s workstation.
1) Ensure that all required software is installed on the developer workstation. See Section 2.1 for details.
2) Copy and run MCASDK_Setup-XXX.exe from the local disk.
3) If it is needed, .NET 2.0 Framework is installed as part of the MCA SDK installation. MCA SDK needs this framework to proceed with installation. If .NET 2.0 is already installed, proceed to Step 4.
a) Select “yes” when prompted for installation MCA SDK.
b) Proceed with .NET 2.0 installation.
4) Review the license agreement. Accept the license agreement and click “Next” to continue installation.
5) Select “Next” to accept the default location of the installation OR enter a custom location. Libraries, header files, and other MCA SDK files will be installed in the selected location. By default, the installation will install to C:\Program Files\Intel\MCA. See Section 2.2 for a detailed list of installed directories and files.

Mobile Clinical Assistant SDK 2.0 Developer Guide Intel Confidential
7/24/2008 Document Number PLAN-SDK2.0_072508 Page 13
6) Select “Install.” Installation should begin.
7) Click “Finish” to complete the installation.
2.4 Configure the Development Environment You must configure your development environment for the application and language that you are using with the MCA SDK development package.
2.4.1 Configure Microsoft Visual Studio* 2005 for C/C++ Development
To configure Microsoft Visual Studio* 2005 for C/C++ Development, perform the following steps:
1) In project properties, go to [Configuration Properties->C/C++->General->Additional Include Directories] and set to point at <MCA SDK Install Directory>\Include.
2) In project properties, go to [Configuration Properties->Linker->General->Additional Library Directories] and set to point at <MCA SDK Install Directory>\Lib.
3) In project properties, go to [Configuration Properties->Linker->Input->Additional Dependencies] and set to IntelHealthcareSDK.lib
4) Add the directive #include "HealthcareSDK.h" to the source code.
2.4.2 Configure Microsoft Visual Studio* 2005 for C# Development
To configure Microsoft Visual Studio* 2005 for C# Development, perform the following steps:
1) From the Solution Explorer, right-click on References->Add Reference.
2) Use the .NET tab or the Browse tab to select the Intel.Healthcare.dll file from <MCA SDK Install Directory>\Bin.
3) Click 'OK' to accept.
4) Include these three lines
• using Intel.Healthcare;
• using Intel.Healthcare.Device;
• using Intel.Healthcare.Exception.
2.4.3 Configure Eclipse* IDE for JAVA* Development
To configure Eclipse* IDE for JAVA*Development, perform the following steps:
1) From the Package Explorer, right-click on “Project” and select Properties Java Build Path Libraries tab.
2) Click on “Add External JARs” button and select Intel.HealthcareJNI.jar from <MCA SDK Install Directory>\Bin folder.

Mobile Clinical Assistant SDK 2.0 Developer Guide
Intel Confidential
Document Number: PLAN-SDK2.0_072508 7/24/2008 Page 14
2.4.4 Configure Microsoft Visual Basic* 6.0 for COM Development
To configure Microsoft Visual Basic* 6.0 for COM Development, perform the following steps:
1) From the VB6 menu, go to [Project->References…] and open the References dialog.
2) In the available references list, find “Intel Healthcare 2.0 Type Library” and click on the box on the left to add a reference to it.
3) Press OK to close the References dialog.
2.5 Setting Up Citrix® Environment (optional) To test your application in the Citrix® environment, the following must be installed:
• Intel® MCA Remote Proxy for Citrix Presentation Server™ must be installed on the Citrix® server.
• Citrix® client must be installed on the developer workstation. Microsoft® Windows Vista supports only Citrix® client version 10.
2.5.1 Installing MCA Remote Proxy for Presentation Server on the Citrix® Server
To test in the Citrix* environment, the MCA Remote Proxy for Presentation Server must be installed on the Citrix server. To perform this installation, perform the following steps.
1) Copy and run MCACitrix_Setup-XXX.exe from the local disk.
2) Follow .NET 2.0 Framework installation steps: The MCA Remote Proxy for Presentation Server installation requires that .NET 2.0 Framework exists on the server.
• If the framework is missing, select “yes” when prompted for installation and then proceed with .NET 2.0 installation.
• If .NET 2.0 Framework already exists, then proceed to Step 3.
3) Review the license agreement. Accept the license agreement and click “Next” to continue installation.
4) Select “Next” to install to the default location OR enter a custom location.
Note: By default, files are installed to C:\Program Files\Intel\MCA.
5) Select “Install” to begin the installation.
6) Click “Finish” to complete the installation.
7) Follow the proper steps to back up your registry (see Microsoft article #322756 for more info).
8) To work with the MCA applications, you need to turn off the session sharing feature for Citrix*. Add/modify keys in your registry (see Microsoft article #322756 for steps on how to modify the registry).

Mobile Clinical Assistant SDK 2.0 Developer Guide Intel Confidential
7/24/2008 Document Number PLAN-SDK2.0_072508 Page 15
Note: The quotes below encapsulate the name of the key/value. Do not actually use the quotes when adding/modifying these values.
a) In “HKEY_LOCAL_MACHINE\SYSTEM\CurrentControlSet\Control\Citrix\Wfshell\TWI\”,:
i) Add a new REG_DWORD/data pair.
• “SeamlessFlags” / “1”
Figure 1: Seamless Flags Directory
Note: If the session sharing feature is turned off, it affects all other published applications. To re-enable the session sharing feature for Citrix, delete this key.
2.5.2 Installing Citrix® Client on Developer WorkStation
This installation is applicable only if Citrix development and testing are required.
At the time of installation, you may install Citrix to a default location or to a location of choice. The install location becomes the Citrix installation directory.
The Citrix installation directory is referred to as <Citrix Install Directory>.
The default location for <Citrix Install Directory> is C:\Program Files\Citrix\.

Mobile Clinical Assistant SDK 2.0 Developer Guide
Intel Confidential
Document Number: PLAN-SDK2.0_072508 7/24/2008 Page 16
2.5.2.1 Citrix ICA® Client, Version 9 1) Install the Citrix ICA® client for Microsoft Windows*.
2) Copy the file vdIMCA.dll and vdIMCARes.dll from <MCA SDK Install Directory>\bin to<Citrix Install Directory>\ICA Client.
3) Edit the MODULE.INI file in the <Citrix Install Directory>\ICA Client as follows.
a) In the section [ICA 3.0] there is a VirtualDriver line. Add "IMCA" to the end of the line.
[ICA 3.0] DriverName = WDICA30.DDL DriverNameWin16 = WDICA30W.DLL DriverNameWin32 = WDICA30N.DLL ProtocolSupport = Modem, RFrame, Frame, Reliable, Encrypt, Compress VirtualDriver =
Thinwire3.0,ClientDrive,ClientPrinterQueue,ClientPrinterPort,Clipboard,ClientComm,ClientAudio,ClientManagement,LicenseHandler,ProgramNeighborhood,TWI,ZL_FONT,ZLC,SmartCard,Multimedia,ICACTL,SpeechMike,SSPI,TwainRdr,IMCA BufferLength = 2048 BufferLength2 = 5000 XmsReserve = 0 LowMemReserve = 51200 ConnectTTY = On ConnectTTYDelay = 1000 Reducer = ICAREDU.DDL ReducerWin16 = ICAREDUW.DLL ReducerWin32 = ICAREDUN.DLL
b) At the end of the [VirtualDriver] section, add a driver assignment statement in the form: “IMCA =”
[VirtualDriver] Thinwire3.0 = ClientDrive = ClientPrinterQueue = ClientPrinterPort = Clipboard = ClientComm = ClientAudio = TWI = ClientManagement = LicenseHandler = ProgramNeighborhood = ZL_FONT = ZLC = SmartCard = ICACTL = Multimedia = SpeechMike = SSPI = TwainRdr = IMCA =

Mobile Clinical Assistant SDK 2.0 Developer Guide Intel Confidential
7/24/2008 Document Number PLAN-SDK2.0_072508 Page 17
c) At the end of the file, create a new section, [IMCA], as follows:
[IMCA] DriverName = VDIMCA.DLL DriverNameWin16 = Unsupported DriverNameWin32 = VDIMCA.DLL
Note: DriverName, DriverNameWin16, and DriverNameWin32 are used by the Citrix ICA client engine to determine the module filename to load for the operating system.
4) To prevent Client Auto Update from overwriting your modified client components, turn off the “Allow Automatic Client Updates” option in the Program Neighborhood client side ICA Settings.
5) The Citrix ICA client is now configured.
To validate the installation of the client, perform the following steps:
1) Open an ICA console to a remote server.
2) On the server, run one of the precompiled sample applications (RfidTest or BarcodeTest) located in <MCA SDK Install directory>\Bin.
Note: The sample applications should run on the server exactly as they run on the client, independent of whether the client is using actual peripheral or loopback plug-ins.
2.5.2.2 Citrix ICA® Client, Version 10 1) Install the Citrix ICA® client for Microsoft Windows*.
2) Copy the file vdIMCA.dll and vdIMCARes.dll from <MCA SDK Install Directory>\Bin to<Citrix Install Directory>\ICA Client.
3) Follow the proper steps to back up your registry (see Microsoft article #322756 for more info).
4) Add/modify keys in your registry (see Microsoft article #322756 for steps on modifying the registry).
Note: Quotes are used to encapsulate the name of the key/value. Do not actually use the quotes when adding/modifying these values:
a) In “HKEY_LOCAL_MACHINE\SOFTWARE\Citrix\ICA Client\Engine\Configuration\Advanced\Modules”:
i) Add a new key “IMCA”.
ii) In this new key add the following string/data pairs:
• “DriverName” / “VDIMCA.DLL”
• “DriverNameWin16” / with empty data
• “DriverNameWin32” / “VDIMCA.DLL”

Mobile Clinical Assistant SDK 2.0 Developer Guide
Intel Confidential
Document Number: PLAN-SDK2.0_072508 7/24/2008 Page 18
Note: The Citrix ICA® client engine uses DriverName, DriverNameWin16, and DriverNameWin32 to determine the correct module filename to load for the operating system.
Figure 2: HKEY_LOCAL_MACHINE\SOFTWARE\Citrix\ICA
b) In “HKEY_LOCAL_MACHINE\SOFTWARE\Citrix\ICA Client\Engine\Configuration\Advanced\Modules\Virtual Driver”
i) Add the new string/data pair:
“IMCA” / with empty data.
Figure 3: HKEY_LOCAL_MACHINE\SOFTWARE\Citrix\ICA
c) Locate the string “HKEY_LOCAL_MACHINE\SOFTWARE\Citrix\ICA Client\Engine\Configuration\Advanced\Modules\ICA 3.0\Virtual Driver”.
i) Add “, IMCA” to the end of this data value.

Mobile Clinical Assistant SDK 2.0 Developer Guide Intel Confidential
7/24/2008 Document Number PLAN-SDK2.0_072508 Page 19
Figure 4: HKEY_LOCAL_MACHINE\SOFTWARE\Citrix\ICA
5) To prevent Client Auto Update from overwriting your modified client components, turn off the “Allow Automatic Client Updates” option in the Program Neighborhood client-side ICA Settings, if present.
6) The Citrix ICA client is now configured.
To validate the installation of the client, perform the following steps:
1) Open an ICA console to a remote server.
2) On the server, run one of the precompiled sample applications (RfidTest or BarcodeTest) located in <MCA SDK install directory>\Bin.
Note: The sample applications should run on the server exactly as they run on the client, independent of whether the client is using actual peripheral or loopback plug-ins.
Mobile Clinical Assistant SDK 2.0 Developer Guide
Intel Confidential
Document Number: PLAN-SDK2.0_072508 7/24/2008 Page 20
2.6 Set Up Programming Language Example Files Language-specific source code example applications are provided for each installed language. These applications are designed to give developers a “head start” in understanding and developing applications with the Intel MCA SDK.
Each programming example focuses on the control of specific peripherals (RFID, barcode, camera, and buttons), using either the actual peripherals or the loopback plug-ins. Each example demonstrates common and basic API calls for communicating with these peripherals. See Section 4 for more information on peripherals and loopback plug-ins.
• C and C# examples can be compiled using Microsoft Visual Studio* 2005. C and C# examples are automatically installed with the MCA SDK.
• Java examples can be compiled using the Eclipse* IDE or a similar Java compiler. Java examples are automatically installed with the MCA SDK. Java applet examples also can be viewed using Microsoft Internet Explorer*.
• COM VB examples can be compiled using Microsoft Visual Basic* 6.0. You must install the COM language pack for these examples to be present.
• COM Jscript examples can be run with Internet Explorer 6.0.
Before running camera examples, you may need to register prjimagecontrol.ocx, using regsvr32.

Mobile Clinical Assistant SDK 2.0 Developer Guide Intel Confidential
7/24/2008 Document Number PLAN-SDK2.0_072508 Page 21
3 Multi-Language Programming Interfaces
The MCA SDK provides application developers with both native and higher level interfaces that support application development with a variety of programming languages. The higher level interfaces are built on top of the native code (C language) interface.
Figure 5: Native Code with Additional Interface Layers
Using a single code base for the native code provides consistency of performance, quality, and the benefits of reuse. In addition, the MCA SDK behaves the same regardless of which programming language the application developer chooses to use.
APIs for each programming language are provided in the style of the language used. For example, the C API looks and feels like a typical C API, and the C# API looks and feels like a typical C# API. Although these interfaces are stylistically unique, the underlying core of the native code is common to all interfaces.

Mobile Clinical Assistant SDK 2.0 Developer Guide
Intel Confidential
Document Number: PLAN-SDK2.0_072508 7/24/2008 Page 22
As of this release, the MCA SDK provides the following APPLICATION DEVELOPER interfaces and programming languages access. Future releases will provide additional programming options.
• Native Code Interface
C / C++
• .Net 2005 Interface
C#
Other languages should work, but have not been validated:
− VB.Net*
− Managed C++
− Etc.
• Java Interface
Java Applications
Java Applets
• COM Interface
VBScript and JScript
Visual Basic 4-6
Etc.
The remainder of this section discusses the programming languages supported by the MCA SDK and any language-specific information that is appropriate, including the location of code examples and language-specific programming help files. Section 12 provides a comprehensive list of all the language-specific help files and code examples provided by the MCA SDK.
3.1 Native Code Interface The core logic for the C# and COM language interfaces is provided in the form of native Windows DLLs. The core logic for Java is in the form of a JAR file. At this level, all device encapsulations are managed with the traditional use of handles (these handles should not be confused with Microsoft Windows* handles).
The MCA SDK protects against the concurrent use of the same hardware resource. As a result, it is important that you “reserve” a peripheral just before you need it and “release” the peripheral as soon as you no longer need it. The MCA SDK provides functions to facilitate these actions.
3.1.1 C Interface (Accessible from C++)
The C interface is a standard C-style interface containing a series of calls that allow access into devices. The C API is a streamlined interface that provides for the simplest of integrations for application programmers. The provided C interface manipulates the underlying C++ device objects without using direct object references.

Mobile Clinical Assistant SDK 2.0 Developer Guide Intel Confidential
7/24/2008 Document Number PLAN-SDK2.0_072508 Page 23
Each function call returns a variety of documented values. These return values range from informational in nature to warnings and errors. It is important for you to (1) be aware of the return values for each function call, (2) inspect the return codes, and (3) take the appropriate action. The possible return codes for each function call are listed in the C API documentation.
Help Files: The C API help files are available from the following location: <MCA SDK Install Directory>\Help\C_API\<files>.html.
Code Examples: Example projects that demonstrate accessing the MCA SDK via a C language application are included with the MCA SDK and are installed in the following directory: <MCA SDK Install Directory>/Examples/C. See Section 2.4.1 to Configure Microsoft Visual Studio* 2005 for C/C++ Development.
3.2 Additional Interface Layers The higher-level code of the additional interfaces is built on top of the native code interface.
3.2.1 .Net* Interface
The .Net* interface is included as a managed DLL. It supports C# projects as well as other .Net 2005 managed code projects, including VB.Net* and managed C++.
Errors and warnings are “thrown” as .Net exceptions in the standard .Net style and documented in the provided .Net documentation. You should “catch” and handle these exceptions accordingly.
Help File: The CHM help file included in the MCA SDK is available in the following location: <MCA SDK Install Directory>\Help\MCA .Net API.chm.
Code Examples: Example projects that demonstrate accessing the SDK via a .NET application are included with the MCA SDK. They are installed in the following directory: <MCA SDK Install Directory>/Examples/CSharp. See Section 2.4.2 to Configure Microsoft Visual Studio* for C#.

Mobile Clinical Assistant SDK 2.0 Developer Guide
Intel Confidential
Document Number: PLAN-SDK2.0_072508 7/24/2008 Page 24
Figure 6: Net Interface
3.2.2 Java* Interface
The Java interface is included as a JAR file. It is written in Java and supports Java projects developed using Sun Microsystems JDK*, version 1.4.1 and above.
Errors and warnings are “thrown” as Java run-time exceptions in the standard Java style and are documented in the provided Java API documentation. You should “catch” and handle these exceptions using Java exceptions handling mechanisms.
Help Files: The Java HTML help files are installed to the following location: <MCA SDK Install Directory> \Help\Java_API\<files>.html.
Code Examples: Example projects that demonstrate accessing the SDK via a Java language application are installed to the following directory: <MCA SDK Install Directory>/Examples/Java. See Section 2.4.3.

Mobile Clinical Assistant SDK 2.0 Developer Guide Intel Confidential
7/24/2008 Document Number PLAN-SDK2.0_072508 Page 25
Figure 7: Java Interface

Mobile Clinical Assistant SDK 2.0 Developer Guide
Intel Confidential
Document Number: PLAN-SDK2.0_072508 7/24/2008 Page 26
3.2.3 COM Interface
The COM language interface is included as an in-process COM server. It is written in C++ and ATL. By implementing dual interfaces, it supports COM-enabled high-level and scripting languages.
Errors and warnings are returned using the standard COM IErrorInfo interface, and are documented in the provided COM documentation. Developers should use language-specific error objects to handle these erroneous scenarios accordingly.
Help File: The CHM help file is installed to the following location: <MCA SDK Install Directory>\Help\IntelHealthcareLib.chm.
Code Examples: Example projects that demonstrate accessing the SDK via a COM language application are installed in the following directory: <MCA SDK Install Directory> /Examples/COM. Code examples for the languages JScript and VB6 are provided. See Section 2.4.4.
Figure 8: COM Interface

Mobile Clinical Assistant SDK 2.0 Developer Guide Intel Confidential
7/24/2008 Document Number PLAN-SDK2.0_072508 Page 27
4 Peripherals and Plug-Ins
This chapter discusses two types of plug-ins: device class plug-ins and loop-back plug-ins.
• Device plug-ins support the peripherals on an actual MCA product. They are run-time components of the Intel® MCA Platform Driver that come pre-installed with the product.
• A loopback plug-in is used by developers when actual hardware peripherals or MCA products are unavailable for use.
4.1 Device Class Plug-ins Even though device class plug-ins are not used in the development environment, this section is provided to educate the application developers about the extensibility and re-use provided by the Intel MCA SDK.
A device plug-in is a software interface for a hardware peripheral. Device-class peripherals may include, but are not limited to: (1) barcode scanners, (2) RFID readers, (3) cameras, and (4) other medical peripherals. Each peripheral has a plug-in that lets the MCA SDK core communicate with them in a consistent and defined manner. Using plug-ins allows the core MCA SDK to remain the same, even if the attached peripherals change between OEM offerings. The programming language interface, or APIs described in Section 3, interface with the MCA SDK core, which, in turn, interfaces with the device-class interfaces. The programming language interfaces/APIs remain the same, regardless of the peripheral brand that will ultimately be used by an MCA OEM.
Figure 9: Plug-In Support
Native Code
OEM Device Interfaces
OEM Devices
SDK Device Interfaces
SDK Device Interface Definitions
Connectors (type 1)
MCA SDK device interface definitions allow hardware and software providers to write software libraries that can be added to the MCA SDK. These plug-ins need to be accompanied by a “signature” to function as part of the MCA SDK.

Mobile Clinical Assistant SDK 2.0 Developer Guide
Intel Confidential
Document Number: PLAN-SDK2.0_072508 7/24/2008 Page 28
4.2 Loopback Plug-ins The MCA SDK provides another type of plug-in, called the loopback plug-in. A loopback plug-in emulates a hardware peripheral.
• The loopback plug-ins and associated MCA SDK configuration file are preconfigured during installation of the Intel MCA SDK.
• Application code does not need to be altered to use a loopback plug-in instead of a device plug-in.
Loopback plug-ins interact with the MCA SDK core in much the same way that an actual device plug-in interacts with the SDK core. The loopback plug-ins return known data from the MCA SDK configuration file, rather than access an actual hardware peripheral for data. This behavior allows you to write and test your code on a development workstation without accessing actual MCA products.
The loopback plug-ins and associated configuration file are preconfigured during installation of the Intel MCA SDK.
Loopback plug-ins are provided for the following peripheral device classes:
• RFID readers
• Barcode scanners
Important: There is no loopback plug-in for the camera device. For this device only, both the MCA SDK and the Platform Driver use the same plug-in. The MCA SDK uses an actual device plug-in to access a real camera. You can configure this camera plug-in to work with most USB camera devices. To write a camera application, you need to install a USB camera device on your developer’ workstation. Please refer to the MCA SDK Release Notes for additional information on compatibility with specific camera hardware.
The examples and sample code, provided with the MCA SDK, return loopback data when executed. You can use the MCA SDK configuration file to configure the loopback data for the emulated plug-ins. RFID and barcode types and values may be specified to reflect real life scenarios. Simulated delay times, from button press to actual data acquisition, may also be set. See Sections 9.5 and 9.6 for more information on the MCA SDK configuration file.
WARNING: Do not install the loopback plug-ins on MCA based devices that have actual hardware available. The loopback plug-ins work only with the MCA SDK binaries, not with the MCA platform driver binaries.
4.2.1 How They Work
When you make a call on your developer’s workstation to retrieve peripheral data, the loopback plug-in emulates the peripheral and automatically returns MCA SDK configuration file data that is associated with the peripheral. This action allows you to test your application without using the actual peripheral.
To see this, simply press the button simulation keys for the RFID ({SHIFT}+F2 by default) after installing the MCA SDK. A dialog will pop up, displaying the tag UID and tag data from a RFID loopback plug-in ― just as if an actual RFID reader were connected to the workstation. The UID and data portions of this tag are set in the configuration file.
Note: For button simulation to work, make sure that the “ToolTray” application is running and that button simulation is enabled in the MCA SDK configuration file.

Mobile Clinical Assistant SDK 2.0 Developer Guide Intel Confidential
7/24/2008 Document Number PLAN-SDK2.0_072508 Page 29
See Section 6 for more information on buttons. See Section 9 for more information on the MCA SDK Configuration file.

Mobile Clinical Assistant SDK 2.0 Developer Guide
Intel Confidential
Document Number: PLAN-SDK2.0_072508 7/24/2008 Page 30
5 Migrating from Development to Run-Time Binaries
Intel® designed the MCA SDK so that the loopback plug-ins (used for testing) and the actual peripheral plug-ins (installed on the OEM’s MCA product) interact with the core in exactly the same way. This feature makes it possible for you to code your application on your development workstation, and have it run exactly the way you designed it when you finally load it onto an OEM’s MCA product. Consequently, if you test and compile your application against the MCA SDK, there is no need to do additional code work when you are ready to port your application to the final product.
When you are ready to migrate your application from your development environment to an OEM’s MCA product, you must build the application, and copy the resulting binaries and any other required files over to the MCA product. Do not copy the binaries provided with the MCA SDK to the product. At this point, the device plug-ins previously installed on the MCA product will operate the actual physical peripherals for real data capture. No coding changes are required.
A properly designed application is able to run on a variety of MCA products that use peripherals from different hardware vendors. To ensure the widest degree of compatibility, consider the following when designing applications and when testing them on actual MCA hardware:
• The MCA SDK limits peripheral configuration options and functionality to a subset of the capabilities provided by some common peripherals. As you migrate your applications to an OEM product, you may find that the peripheral manufacturers provided configuration software that can be used to alter or “enhance” the peripheral’s functionality. Avoid designing applications that rely on any vendor-specific functionality, as the application may break when installed on OEM hardware that uses different peripherals.
• Many of the options available in the MCA SDK configuration file are global and therefore affect all applications running on the MCA product. These options may be configured differently on different OEM products or in different end-user environments. Wherever possible, an application should code directly to the MCA APIs to avoid any reliance on specific configuration options. Relying on custom configurations ― or on the default configuration options ― may cause an application to break when installed on an OEM product that uses a different configuration.
• Use the MCA SDK APIs to configure peripheral behavior at runtime, and to react appropriately to any returned errors or return values. For example, when designing a barcode application that scans a specific type of barcode, do not assume that you can scan the barcode type, since it might be disabled in the end-user environment, or even not supported by the barcode hardware in a specific OEM product. In such an example, the application should use the appropriate API to attempt to configure the required barcode type before scanning, so that it can detect an unsupported type and take appropriate action.

Mobile Clinical Assistant SDK 2.0 Developer Guide Intel Confidential
7/24/2008 Document Number PLAN-SDK2.0_072508 Page 31
6 Button Functionality and Handling
The MCA SDK provides button support to allow applications to integrate with the button-activated peripherals that are part of your OEM’s MCA product. Because the MCA SDK and the Intel MCA Platform Driver manage the data acquisition process activated by a button press, you are freed to concentrate your efforts on how you wish to process the data when you are developing your applications.
While each OEM MCA product may have a different set of buttons, buttons generally may be placed into one of three categories.
•Generic OEM Product buttons that are handled by the operating system;
•Peripheral control buttons on the OEM’s MCA product, which are handled by the MCA SDK and are typically tied to a device or usage that is particularly useful in the healthcare industry. The following devices are currently supported:
• Barcode
• RFID
• Camera
•Medical Application (MedApp) buttons, which are additional buttons that can be programmed to provided for customization within a software application.
This section presents the high level concepts used for programming peripheral-control buttons and medical application buttons. Regardless of the programming language that is being used to access the MCA SDK, the functionality provided to the application is basically the same.
6.1 Handling Registered Calls and Button Presses In the development environment, Button activation can be triggered by the following:
• Physical Button Press – Pressing a physical button on an actual MCA product.
• Simulated Button Press – Pressing a key or combination of keys on a keyboard that’s been configured to simulate a button press on an actual MCA product. Simulated button presses are useful for development work when an actual MCA product is not available. Simulation button action is controlled from the MCA SDK configuration file. See Section 9.4.1 for more information on configuration.
6.1.1 “ToolTray” Application
The “ToolTray” application is a window application that handles button activations. It is available on both the Intel MCA SDK and the Intel MCA Platform Driver. The “ToolTray” application is installed and running in the background as soon as the MCA SDK or Platform Driver is installed. The application displays a tablet icon in the tool tray portion of the task bar when it is running. Visibility of the tool tray icon in the status area of task bar can be altered. To know more about this feature, please refer section 9.4.

Mobile Clinical Assistant SDK 2.0 Developer Guide
Intel Confidential
Document Number: PLAN-SDK2.0_072508 7/24/2008 Page 32
NOTE: To verify that the “ToolTray” application is running, check the tool tray portion of the task bar for the following icon:
On an OEM’s MCA product, the “ToolTray” application interfaces with physical button presses to retrieve data from a peripheral. Alternatively, in the development environment, the “ToolTray” application can interface with a simulated button press to retrieve data from loopback plug-ins that provide test data stored in the MCA SDK configuration file. (See Section 4.2 for information on loopback plug-ins.)
Once the data has been retrieved, the “ToolTray” application provides the data to the application that requested it.
6.1.2 Defining “Active” Window
In the following example, two application windows are visible. The window with the keyboard input focus (see the cursor) is the “active” window. The “ToolTray” application manages button action requests based upon the application that has the active window. The term “active window” is referred to in following sections.
Figure 10: Active Window
6.1.3 Button Actions
When you press a button or the system simulates a button press, the “ToolTray” application handles the button press by performing one of the following button actions.
• Default Action (Section 6.2)
• Callback with Data Action (Section 6.3)
• Callback without Data Action (Section 6.4
• Key Press Action
Cursor
“ToolTray” Application

Mobile Clinical Assistant SDK 2.0 Developer Guide Intel Confidential
7/24/2008 Document Number PLAN-SDK2.0_072508 Page 33
Applications can register to have any of the above actions occur when a button (or simulated button) is pressed. However, an application can register only one of the above actions, per button, at a time.
The following logic determines which of the preceding actions occurs when a button is pressed.
• If no applications have registered for a button press action, then the DEFAULT ACTION IS PERFORMED. If a button is pressed, but the application with the current “active window” has NOT registered for an action to be performed for that button, then the DEFAULT ACTION IS PERFORMED. See Section 6.2 for Default button actions.
• If an application has the “active window” at the time of the button press and it has already registered a particular action for that button type, then the REGISTERED ACTION IS PERFORMED. The registered action may be any of the remaining actions listed above (excluding Default action). See Sections 6.3 through 6.5 for details.
6.2 “Default” Button Actions Default actions provide basic functionality for their corresponding peripherals, without requiring additional application development. This basic functionality allows for a smooth transition path to the platform, while still receiving some benefits from the peripherals on the tablet.
6.2.1 Customizing Default Button Actions
Basic behaviors for Default actions are pre-defined for Barcode, RFID, and Camera button actions which are explained in sections 6.2.4, 6.2.5 and 6.2.6 respectively. However, Default actions can be changed by developers by associating their own default button handlers with “ToolTray.” Please refer section 12.2 for more information on how to develop default handlers using MCA DHDK.
6.2.2 Per Application Setting
The behaviors of default button handlers are controlled by a set of modifiers accessible through the MCA SDK configuration file. However, default behaviors can be customized at an application level. This means that if two applications are present on an OEM MCA product, they may have different configurations for each default behavior. The default action performed will be based on the configuration for the active window. Refer to section 9.4.7 for more details on how to configure per-application-settings.
6.2.3 Configuring an Application as “Default” Action
This feature is to facilitate the ISV/OEM in configuring an executable to launch as a default action for the button key press. This would provide the application developer the flexibility to use their development language of choice. Refer section 9.4.6 for configuring Default EXE.

Mobile Clinical Assistant SDK 2.0 Developer Guide
Intel Confidential
Document Number: PLAN-SDK2.0_072508 7/24/2008 Page 34
6.2.4 Barcode “Default” Actions
What is provided by a Default action:
• Ability to inject barcode characters into the keyboard input stream as simulated key strokes (not Unicode characters).
• Ability to set the following attributes. (These default actions can be controlled in the MCA SDK configuration file. See Section 9.4.5 Default Handler Configuration for details on how to set these attributes.)
− Scan timeout, prefix, postfix, and AIMSI inclusion.
− Filtering by barcode type (e.g. Code 128, Code 39) and length (minimum and maximum length).
• Ability to Change the scan parameters and filters on a per-application basis. See Section 6.2.2.
What is not provided by a Default action:
• Usage pattern matching to remove or alter portions of the barcode before it is returned to the application.
• RFID “Default” Actions
What is provided by a Default action:
• Ability to scan ISO 15693 tag(s) in the field and display a window showing both the Id and data (ASCII and Hex) portions of the tags.
• Ability to copy data portions from the window to the clipboard and use in applications.
• Ability to write to selected range of data portion in the tags.
• Ability to set the following attributes. (These default actions can be controlled in the MCA SDK configuration file. See Section 9.4.5 Default Handler Configuration for details on how to set these attributes.)
− Data read range, end-of-data marker, whether or not the end-of-data is displayed.
− Filter by protocol (currently only ISO 15693 tags supported).
• Changing the scan parameters and filters on a per-application basis. See Section 6.2.2.
What is not provided by a Default action:
• Using the MCA configuration file to customize the data.
• Injecting tag UID or tag data into the keyboard buffer.
• Copying and pasting the UID portion of the tag.
6.2.5 Camera “Default” Actions
What is provided by a Default action:
• A button to start the preview window with timeout.
• A second press to capture a picture as a bitmap image.

Mobile Clinical Assistant SDK 2.0 Developer Guide Intel Confidential
7/24/2008 Document Number PLAN-SDK2.0_072508 Page 35
• Ability to copy and paste images into other applications.
• Image can be saved in Bitmap, JPG, GIF, TIFF and PNG file format.
• Ability to set the following attributes. (These default actions can be controlled in the MCA SDK configuration file. See Section 9.4.5 Default Handler Configuration for details on how to set these attributes.)
− Video parameters such as size and frame rate for the preview.
− Preview window size and position.
− Captured image resolution.
• Changing the preview or image parameters on a per-application basis. See Section 6.2.2.
What is not provided by a Default action:
• Automatically injecting the image into an application.
• Bringing up the Microsoft Camera and Scanner Wizard*.
• Adjusting image attributes such as contrast, exposure, and saturation.
6.2.6 Programmable MedApp Button “Default” Actions
Medical Application (MedApp) buttons do not have a Default action.
6.2.7 Generic OEM Product Button “Default” Actions
The generic OEM product buttons include a tablet’s Power-On/-Off button, arrow buttons, SAS, etc. These buttons can be configured only in the pen/tablet settings within Microsoft Windows* Device Manager.
6.3 “Callback with Data” Button Actions For the “Callback with Data” button action, the “ToolTray” application acquires the appropriate data (barcode, RFID, or picture) from the corresponding peripheral on the OEM MCA product and provides the data to the registered application. This action allows the application to use the data captured from the peripherals without programming to the peripherals. All data acquired from the peripheral is presented to the application without requiring the application to develop any code that interacts with the peripherals. The details of how the “ToolTray” application presents the data to the registered application are dependent upon the specific programming language being used.
When an application uses the Callback with Data Action, the application may also want to access the peripheral that captured the data programmatically. For example, after the RFID button is pressed, the “ToolTray” application reads the RFID tags available in the field and presents that data to the registered application. The application may now want to write to these tags. For this reason, the actual device handles or the device objects (depending on programming language) that acquired the data become available to application programmers when the data is presented to the application.
Documentation and Samples: Please see Section 3 of this document for the location of language-specific programming documentation and examples.
Mobile Clinical Assistant SDK 2.0 Developer Guide
Intel Confidential
Document Number: PLAN-SDK2.0_072508 7/24/2008 Page 36
6.4 “Callback without Data” Button Actions The “Callback without Data” button action allows you to have greater control over what happens when a peripheral-control button is pressed. For this action, the “ToolTray” application does not attempt to acquire any data from the corresponding peripheral, but instead just notifies the application that the button was pressed. In this case, it is your responsibility to access the corresponding peripheral. You are free to use any of the normal MCA SDK functions to access the peripheral.
6.5 “Key Press” Button Actions The Key Press button action injects a sequence of keystrokes into the keyboard input stream when the button is pressed. You can configure these keystrokes in the MCA SDK configuration file. For details on configuring these keystrokes, please refer to Section 9.4.3 of this document.
6.6 Canceling Button Actions Button actions that require the “ToolTray” application to interact with a peripheral do not happen instantaneously, so the MCA SDK allows you to cancel these actions. In the event of a cancelled action, no data is presented to the application that registered the button action.
Each button action and its associated cancellation mechanism follow:
• Barcode button (“Callback with Data” and “Default” actions): The first button press starts the barcode device scanning; a second button press, while scanning is in progress, cancels the action.
• RFID button (“Callback with Data” and “Default” actions): The first button press starts the RFID device scanning; a second button press, while scanning is in progress, cancels the action.
• Camera button (“Callback with Data” and “Default” actions): The first button press presents a camera preview window to the user; the second button press, while the preview window is up, captures the current frame. To cancel the preview window, click on the preview window with the stylus.
6.7 Button Simulation If your application is running on an OEM's MCA product, button simulation should be unnecessary. However, since you will be developing on a workstation, which may have no peripheral-control buttons, the MCA SDK provides a way to simulate button presses. The MCA SDK is already preconfigured for button simulation. For advanced configuration options, please see Section 9.4.1.
When the “ToolTray” application is configured for button simulation, the keystrokes in the following list will, by default, simulate button keystrokes for the associated peripherals. Note that some of these keystrokes may also be configured:
• Shift-F1 = ButtonTypeBarcode
• Shift-F2 = ButtonTypeRfid
• Shift-F3 = ButtonTypePicture
• Shift-F4 = ButtonTypeMedAppA
• Shift-F5 = ButtonTypeMedAppB

Mobile Clinical Assistant SDK 2.0 Developer Guide Intel Confidential
7/24/2008 Document Number PLAN-SDK2.0_072508 Page 37
7 Peripheral Device Capabilities
The MCA SDK provides encapsulation and abstraction for a variety of peripherals that are used in the healthcare industry. These peripherals include barcode scanning, button presses, camera capture, and RFID reading and writing.
MCA SDK also provides programming samples for many of the languages supported by the MCA SDK’s multi-language interfaces. Please consult specific language subsections in Section 3.
7.1 Barcode Reader The barcode interface provides support for a number of usage scenarios, including but not limited to the verification of devices, medications, and identification. The MCA SDK API provides access to recently scanned barcode values and types that are supported by the hardware.
The barcode support within the MCA SDK is capable of encapsulating 1D/Linear or 2D/Image based scanners. All barcode support is dependent on the underlying barcode device present in the OEM’s MCA product. Intel limits barcode configurability to the capabilities provided natively by the physical barcode peripheral that is installed on the OEM’s MCS product.
Developers interested in reading barcodes from within their application have two options for getting the barcodes into their application.
1) The preferred method is to program directly to the barcode portion of the MCA SDK, by issuing commands to the barcode device.
Note: This approach provides the flexibility to set barcode device parameters at runtime.
Note: By programming directly with API calls, you can bypass the physical button and initiate scanning by the application dynamically.
2) An alternative method is to use the button support within the MCA SDK. This method allows the “ToolTray” application to access the barcode device on the OEM’s MCA product and present the barcodes to the application after they are scanned. See Section 6.1.3 for more information on Button Programming within the MCA SDK. See notes from Section 6.2.4 for more information on barcode Default actions.
Note: When using button support to scan barcodes, the barcode device parameters are set via the MCA SDK configuration file. Configuration file settings have significant implications for all applications running on an OEM’s MCA product. Please see the Warning in Section 9.2.
7.1.1 Reading Barcodes
The general steps that are required when you are programming directly to the barcode API, to read barcodes, are as follows:
1) Reserve the barcode device (automatic for some programming languages).
2) Set barcode device parameters (See Section 7.1.2).
3) Start the barcode device scanning.

Mobile Clinical Assistant SDK 2.0 Developer Guide
Intel Confidential
Document Number: PLAN-SDK2.0_072508 7/24/2008 Page 38
4) Wait for a barcode to be scanned.
5) Process each barcode.
6) Release the barcode device (automatic for some programming languages).
7.1.2 Barcode Device Parameters
Some of the Barcode device parameters that affect barcode scanning operation are described here:
• Scan Types: Specifies the barcode types that will be recognized when scanning barcodes. Important: Only barcode types supported by an underlying physical barcode reader are supported.
• Minimum Length: Specifies a minimum length for barcodes read. Any barcodes less then this length will not be returned.
• Maximum Length: Specifies a maximum length for barcodes read. Any barcodes greater then this length will not be returned.
7.1.3 Barcode Reader Keyboard Emulation
You can use keyboard emulation to read barcode values. Keyboard emulation provides barcode values to the foreground application as keystrokes, sometimes referred to as a “keyboard buffer.” Most barcode manufacturers allow access via either the keyboard buffer or via their API, but most don’t provide both simultaneously.
The MCA SDK supports simultaneous keyboard emulation and API access by providing the “ToolTray” application, which allows you to use either option: this application gives you the flexibility to do a phased migration from keyboard emulation to API. Keyboard emulation is the default behavior for a barcode read (See Section 6.2 for more information on default button actions.) Button Applications that are coded to take advantage of the MCA SDK API may override this behavior with their own specialized behavior.
Keyboard emulation also includes support for a prefix string and a postfix string. Add prefix strings before the barcode and add postfix strings after the barcode. Add the strings to a barcode that was read before the keyboard emulation is performed. You can set up the prefix and postfix strings using the configuration file. Please see Section 9.4.5 “Default Handler Configuration”, for the configuration details for prefix and postfix strings.
IMPORTANT: To enable keyboard emulation, the “ToolTray” application must be running. To verify that the “ToolTray” application is running, check the tool tray portion of the task bar for the following icon. If icon is not visible, please refer to section 9.3:
“ToolTray” Application

Mobile Clinical Assistant SDK 2.0 Developer Guide Intel Confidential
7/24/2008 Document Number PLAN-SDK2.0_072508 Page 39
7.2 RFID Reader / Writer The MCA SDK provides easy access to key RFID reader capabilities. These capabilities include reading the tag ID and user data, and writing user data to the tags. The MCA SDK provides support for only BMP, JPEG, and PNG Image formats. MCA SDK provides API to scale up and down captured images.
Because the manufacturer sets up the UID (tag ID) from ISO 15693 tags to be a unique identifier, the UID is often used for authentication and/or as a means of identifying physical items, such as hardware, bed frames, and patient ID bracelets. Note that tags also include a data segment that is not unique, and that can be read ― or written to ― by developer applications.
The MCA SDK supports simple read / write transactions, allowing you to store small amounts of data (ISO 15693 allows up to 2KB) on the tags.
As with barcode and camera devices, developers who want to capture RFID tags from within their application, have two options for getting the tag data into their application.
1) The preferred method is to Program directly to the RFID portion of the MCA SDK, by issuing commands to the RFID device.
Note: This approach provides the flexibility to set RFID device settings at runtime.
Note: By programming directly with API calls, you can bypass the physical button and scan dynamically from within the application.
2) Use the Button support within the MCA SDK, which allows the “ToolTray” application to access the RFID device on the MCA product and have the tag data presented to the application after the tags are read. (See Section 6.1.3 for more information on Button Programming within the MCA SDK.)
Note: When using button support to scan RFID tags, set RFID device settings using the MCA SDK configuration file. Configuration file settings have significant implications for all applications running on an OEM’s MCA product. Please see the Warning in Section 9.2.
7.2.1 Reading RFID Tags
Following are the general steps required when programming directly to the RFID API to read tags:
1) Reserve RFID device (automatic for some programming languages).
2) Set RFID device read parameters. (See Section 7.2.3)
3) Start the RFID device scanning.
4) Wait for an RFID tag to be scanned.
5) Process each tag that was read.
6) Release the RFID device (automatic for some programming languages).
7.2.2 Writing RFID Tags
The RFID device on an MCA product may also have the capability to write to an RFID tag. If you need to write to RFID tags from within your application, you will need to program directly to the RFID portion of the MCA SDK.

Mobile Clinical Assistant SDK 2.0 Developer Guide
Intel Confidential
Document Number: PLAN-SDK2.0_072508 7/24/2008 Page 40
The general steps required when programming directly to the RFID API to write tags are as follows:
1) Reserve RFID device (automatic for some programming languages).
2) Set RFID device settings (See Section 7.2.3).
3) Start the RFID device scanning.
4) Wait for an RFID tag to be scanned.
5) For each tag that was read, determine if the tag should be written to: if yes, then write data to the tag.
6) Release the RFID device (automatic for some programming languages).
Note: The general algorithm above shows that prior to writing to a tag, the tag is first read. This sequence of events makes it possible to write to a specific tag, rather than to all tags in the field.
7.2.3 RFID Device Settings
Some RFID device settings that affect read and write operations are described below:
• Scan Protocols: Specifies the RFID protocols that will be recognized for read and write operations.
• Pre-read Mode: Controls when a tag's data segment is read. By default, this property is set to True and the read takes place as soon as the tag is found during the scanning process. Setting this property to False instructs the reader to wait until the application queries the tag data.
• End of Data Marker: Defines an end-of-data marker pattern that signifies where the end of data is when reading tag data. When the end-of-data pattern is found, the read operation terminates.
• Data Read Range: Specifies a range within the data segment that will be read during the read operation.
7.3 Camera The MCA SDK provides support for the preview and capturing of digital images. Captured images are temporarily cached on disk in an encrypted format to prevent other applications or users from gaining access to them.
The MCA SDK provides support only for BITMAP, JPG, GIF, TIFF and PNG. For other image formats, users need to handle image conversion and compression on their own.
Unlike RFID and Barcode, there is no loopback plug-in for a camera. Instead, the MCA SDK uses an external USB camera that behaves similarly to a camera in an OEM’s MCA product. The MCA SDK configuration file comes preconfigured for use with a generic 1.3 Mpixel USB camera.
Most USB cameras should work. Please refer to the MCA SDK Release Notes for additional information on compatibility with specific camera hardware.

Mobile Clinical Assistant SDK 2.0 Developer Guide Intel Confidential
7/24/2008 Document Number PLAN-SDK2.0_072508 Page 41
If you are interested in capturing digital images within your application, you have two options for getting the images into your application:
1) The preferred method is to program directly to the camera portion of the MCA SDK, by issuing commands to the camera device.
Note: This approach provides the flexibility to set camera device parameters at runtime.
Note: By programming directly with API calls, you can bypass the physical button and can dynamically initiate image capture by the application.
2) An alternate method uses the Button support within the MCA SDK. This feature allows the “ToolTray” application to access the camera device on the MCA product and have the images presented to the application after they are captured. For more information, see Section 6.1.3 for more information on button programming within the MCA SDK.
7.3.1 Programming for the Camera API
The general steps for programming directly to the camera portion of the MCA SDK to capture digital images are as follows:
1) Reserve camera device (automatic for some programming languages).
2) Set image and video resolution.
3) Start the camera preview.
4) Set optional camera settings as needed. (See Section 7.3.2 for more information).
5) Capture a current frame from the preview window.
6) Process the captured image.
7) Release the camera device (automatic for some programming languages).
7.3.2 Camera Device Settings
Some camera device settings for the image capture operation are described in the following list:
• Image Parameters: Specify the size (width and height) of the image that will be captured.
• Video Parameters: Specify the size (width and height) and the frame rate of the video stream. Note: Some camera hardware may not support setting the image and video frame size independently. In this case, the image size takes priority.
• Illumination Level: Specifies the brightness of a flash device or illumination lamp, if one is available.
• Camera Options: Optional camera settings that may be supported by some cameras. If used, they must be set while preview is active.
• Brightness: The camera brightness setting.
• Contrast: The camera contrast setting.
• Hue: The camera hue setting.
• Saturation: The camera color saturation setting.
• Sharpness: The camera sharpness setting.

Mobile Clinical Assistant SDK 2.0 Developer Guide
Intel Confidential
Document Number: PLAN-SDK2.0_072508 7/24/2008 Page 42
• Gamma: The camera gamma correction setting.
• Color Enable: The camera color setting.
• White Balance: The camera white balance setting.
• Backlight Compensation: The camera backlight compensation setting
• Pan: The camera pan setting.
• Tilt: The camera tilt setting.
• Roll: The camera roll setting.
• Zoom: The camera zoom setting.
• Exposure: The camera exposure compensation setting.
• Focus: The camera focus setting.
• Iris: The camera iris setting.
• Gain: The camera gain value setting.
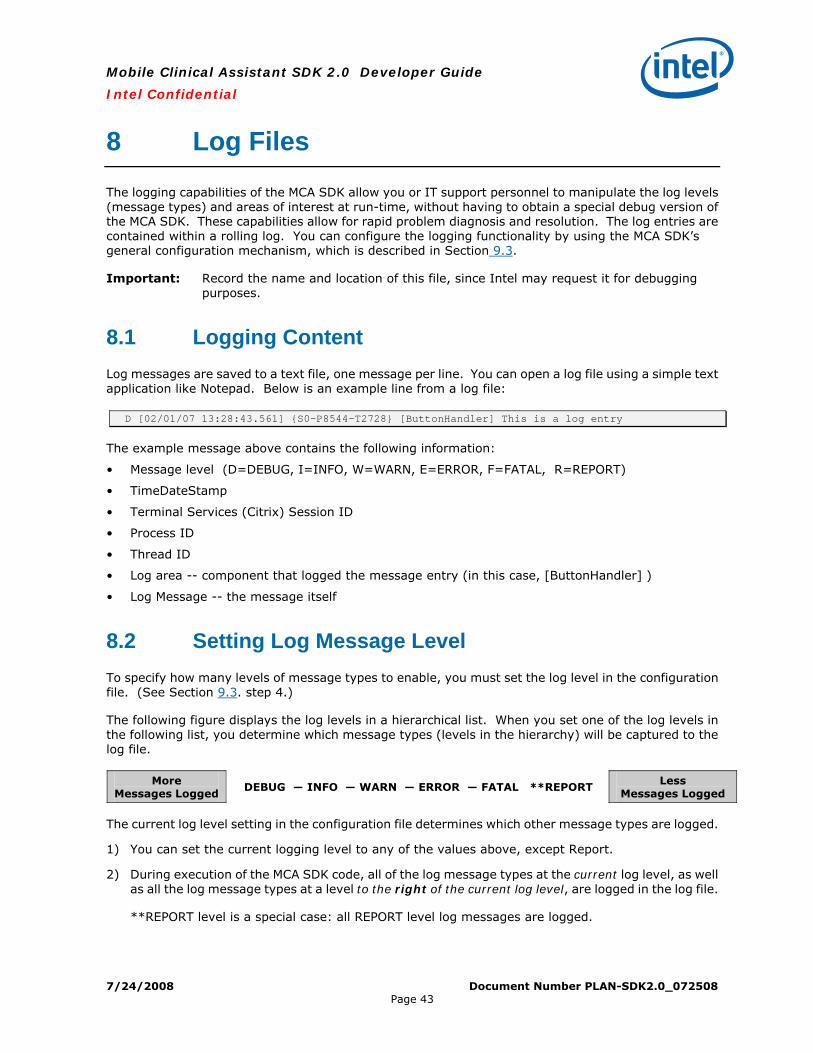
Mobile Clinical Assistant SDK 2.0 Developer Guide Intel Confidential
7/24/2008 Document Number PLAN-SDK2.0_072508 Page 43
8 Log Files
The logging capabilities of the MCA SDK allow you or IT support personnel to manipulate the log levels (message types) and areas of interest at run-time, without having to obtain a special debug version of the MCA SDK. These capabilities allow for rapid problem diagnosis and resolution. The log entries are contained within a rolling log. You can configure the logging functionality by using the MCA SDK’s general configuration mechanism, which is described in Section 9.3.
Important: Record the name and location of this file, since Intel may request it for debugging purposes.
8.1 Logging Content Log messages are saved to a text file, one message per line. You can open a log file using a simple text application like Notepad. Below is an example line from a log file:
D [02/01/07 13:28:43.561] {S0-P8544-T2728} [ButtonHandler] This is a log entry
The example message above contains the following information:
• Message level (D=DEBUG, I=INFO, W=WARN, E=ERROR, F=FATAL, R=REPORT)
• TimeDateStamp
• Terminal Services (Citrix) Session ID
• Process ID
• Thread ID
• Log area -- component that logged the message entry (in this case, [ButtonHandler] )
• Log Message -- the message itself
8.2 Setting Log Message Level To specify how many levels of message types to enable, you must set the log level in the configuration file. (See Section 9.3. step 4.)
The following figure displays the log levels in a hierarchical list. When you set one of the log levels in the following list, you determine which message types (levels in the hierarchy) will be captured to the log file.
More Messages Logged
DEBUG ― INFO ― WARN ― ERROR ― FATAL **REPORT Less
Messages Logged
The current log level setting in the configuration file determines which other message types are logged.
1) You can set the current logging level to any of the values above, except Report.
2) During execution of the MCA SDK code, all of the log message types at the current log level, as well as all the log message types at a level to the right of the current log level, are logged in the log file.
**REPORT level is a special case: all REPORT level log messages are logged.

Mobile Clinical Assistant SDK 2.0 Developer Guide
Intel Confidential
Document Number: PLAN-SDK2.0_072508 7/24/2008 Page 44
Example 1:
More Messages Logged DEBUG ― O ― WARN ― ERROR ― FATAL **REPORT
Less Messages Logged
If you set the current log level to DEBUG, then all messages are logged, including DEBUG.
Example 2:
More Messages Logged DEBUG ― INFO ― WARN ― ERROR ― FATAL **REPORT
Less Messages Logged
If you set the current log level to WARN, then WARN, ERROR, FATAL, and REPORT log messages are logged.
8.3 System Event Log ERROR and FATAL level log messages can be sent to System event log. We can either restrict only FATAL level log messages to be sent to System event log or send all ERROR and FATAL level log messages to System event log. Please See Section 9.3 Step 11 to configure system event logging in MCA SDK.

Mobile Clinical Assistant SDK 2.0 Developer Guide Intel Confidential
7/24/2008 Document Number PLAN-SDK2.0_072508 Page 45
9 MCA SDK Configuration
This chapter describes MCA SDK Configuration. It includes a description of the Configuration Editor Tool, configuration logging, the SDK Configuration File, the “ToolTray” Configuration, configuring the RFID Loopback Plug-In, configuring the camera, and configuring camera image scaling support.
9.1 MCA Configuration Editor Tool MCA Configuration Editor is a Windows based graphical user interface (GUI) application developed using .Net Framework designed to support easy editing of Intel MCA configuration file (See Section 9.2). This tool generates the IntelHealthcare.cfg file during installation process by parsing the XML files which contain key/values information.
This tool is part of installer and can be located in path <MCA Installation Directory>\Bin\CFGEditor.exe with its respective help file. When Configuration Editor Tool is launched through command line or clicking the CFGEditor.exe file the below UI is shown to the user. Example. Keys related to Logging section are shown in UI below.

Mobile Clinical Assistant SDK 2.0 Developer Guide
Intel Confidential
Document Number: PLAN-SDK2.0_072508 7/24/2008 Page 46
Figure 11: MCA Configuration Editor Tool
The entries in the “Key” and “Value” columns represent keys and values in the Configuration file respectively. For example, the entry in Key column with name “Maximum Log file Backups” represents the key “/Intel/HealthcareSDK/Logging/MaxLogFileBackups”. For this key, the default value, the range of applicable values and description are shown in the lower text area.
Note: Use the Configuration Editor Tool, which provides an easily understandable UI to the user to edit the MCA SDK configuration file (IntelHealthcare.cfg) with added features like back up of Configuration file, Restoring to defaults, etc. Although the MCA SDK configuration file is a text file that can be directly modified in Microsoft Notepad* or in any similar Unicode-compatible editor, but it is not recommended.
Value of the MaxLogFileBackups key.
Default value, constraints and description of the MaxLogFileBackups key.
This entry corresponds to key “/Intel/HealthcareSDK/Logging/MaxLogFileBackups” in Config file.

Mobile Clinical Assistant SDK 2.0 Developer Guide Intel Confidential
7/24/2008 Document Number PLAN-SDK2.0_072508 Page 47
9.2 MCA SDK Configuration File The MCA SDK configuration file is IntelHealthcare.cfg, which is created in the same directory as the IntelHealthcareSDK.dll (<MCA SDK Install Directory>/bin) during installation.
Important: Use the Configuration Editor tool for editing/adding key values in the MCA Configuration file (IntelHealthcare.cfg). But if you are using Microsoft Notepad* or any similar Unicode-compatible editor to edit keys, then be sure to back up the configuration file before making any changes.
Warning: The configuration file comes pre-configured to match the needs of most applications. Only advanced users should make changes to the configuration file. Consider two important ramifications before making any changes:
1. All changes to the configuration file affect all the applications running on the OEM’s MCA product. DO NOT expect to have any influence on the ultimate settings within the file in a production environment, since the configuration file is owned by the end user’s IT department. The production settings will likely be set to best accommodate all applications loaded on the MCA product. However, relying on changes made in the configuration file that are specific to your application, may make it impossible for your application to coexist with others on the same MCA product.
2. Making changes to many of the entries will have adverse effects, which can cause the integrated peripherals to return undesired results, or even ultimately stop working altogether.
The configuration file structure contains a single parameter and the value to which that parameter is being set in each line. The entries in the configuration file are not case-sensitive.
The file contains a series of grouped configuration entries, each of which is basically a key-value pair.
• You can specify parameters with a string that is similar to a directory path or registry key.
• Put an equal sign (=) after the parameters.
• Everything to the right of the equal sign is the value to which you are setting the parameter.
• There is no limit to the number of levels (number of ‘/’ characters) you can use in the parameter.
Example:
/Intel/HealthcareSDK/parameter = <value>
The character sequence of “//” designates the start of a comment. The comment continues until the end of the line on which the comment occurs.
Example:
// Type is listed so plug-in should return BC_Code128 as the type. AIM type is included

Mobile Clinical Assistant SDK 2.0 Developer Guide
Intel Confidential
Document Number: PLAN-SDK2.0_072508 7/24/2008 Page 48
9.3 Configuring Logging You can configure logging to enable tracing messages according to Message Level, Type, Format, and Location. Below are the specific configuration entries regarding logging.
See Section 8.1 for a sample log file entry.
1. /Intel/HealthcareSDK/Logging/FormatString = %L [%D %T] {S%s-P%p-T%t} [%A] %m
Logging parameters with corresponding values are as follows:
%p – Process id
%t – Thread id
%s – Terminal services (Citrix) session id
%P – Process name
%T – Time without zone – hh :mm:ss.fff in 24 hour time
%D – Date MM/DD/YY
%Z – Time zone - UTC, PST, GMT etc. should be daylight savings aware, PDT vs. PST
%f – The source file where the log message was generated, for example RfidReader.cpp
%l – The line number in the source file where the log message was generated
%A – Area identifier representing the area in the Intel HealthCare SDK that generated the log message
%% – Prints %
%m – Message text
%L – Log entry level, D for DEBUG, I for INFO, W for WARN, E for ERROR, F for FATAL and R for REPORT
Note: %D parameter: If the format string key is not specified, then the default format is used. “%L %D %T %Z %A {%P-%t} %m”.
2. /Intel/HealthcareSDK/Logging/MaxLogFileBackups = 3
The parameter above specifies the maximum number of rolling log file backups. Defaults to 5 if no maximum is provided.
3. /Intel/HealthcareSDK/Logging/MaxLogFileSize = 100000000
The parameter above specifies the maximum size of log file size (in bytes) before creating the rolling back up files. Defaults to 1000000000 if no maximum is provided.
See note, below.

Mobile Clinical Assistant SDK 2.0 Developer Guide Intel Confidential
7/24/2008 Document Number PLAN-SDK2.0_072508 Page 49
4. /Intel/HealthcareSDK/Logging/DefaultLevel = ERROR
The parameter above sets the log message level, which is described in Section 8.2. If a value is missing, then it takes “DEBUG” as default value.
5. /Intel/HealthcareSDK/Logging/LogFileLocation = c:\temp\log
This parameter is the location of log file. If it is commented out, then use the path of the executable file that is running IntelHealthcareSDK.dll. The logger automatically generates the directory, one level down, if it does not already exist. If the directory c:\temp exists on the hard drive and the LogFileLocation is c:\temp\log, then the directory is created. If the directory c:\temp does not exist, then the c:\temp\log directory is also created. If the directory c:\temp\log exists and the LogFileLocation is c:\temp, then no directory is created and the log file is not generated under c:\temp.
6. /Intel/HealthcareSDK/Logging/LogFileName = MCA.log
The parameter above establishes the name of the log file. You can view it in any Unicode-compatible text editor.
7. /Intel/HealthcareSDK/Logging/FreeSpaceMinimum = 1000000000
The byte value of disk threshold, this parameter disables logging when the disk space reaches the minimum. Defaults to 1000000000 if no value is provided.
8. /Intel/HealthcareSDK/Logging/ThresholdExceeded = pauseLogging or deleteOld
• Set to “pauseLogging”: When diskthreshold is exceeded, disables logging.
• Set to “deleteOld”: When diskthreshold is exceeded, the logger deletes the oldest file in the directory that is specified in the following parameter: /Intel/HealthcareSDK/Logging/LogFileLocation.
9. /Intel/HealthcareSDK/Logging/WriteErrorsToEventLog = true or false
When the parameter above is set to “true”, all ERROR or FATAL level messages are written to the event log. When set to “false” no error messages are sent to the event log.
10. /Intel/HealthcareSDK/Logging/DebugAreas = AREA
The Area identified above results in DEBUG log entries for the AREA defined. Multiple areas can be identified by separating each AREA by a space or a comma.
11. /Intel/HealthcareSDK/Logging/SysDefaultLevel = FATAL
The above parameter specifies what type of messages should be written to the system event log.

Mobile Clinical Assistant SDK 2.0 Developer Guide
Intel Confidential
Document Number: PLAN-SDK2.0_072508 7/24/2008 Page 50
When set to “FATAL” Only FATAL messages are sent to the system event log. When set to “ERROR”, all ERROR and FATAL level messages will be written to the event log. This parameter is applicable only if the key /Intel/HealthcareSDK/Logging/WriteErrorsToEventLog is true.
9.4 Configuring the “ToolTray” Application The “ToolTray” application has a number of configuration parameters that start with the prefix of “/Intel/HealthcareSDK/ToolTray”.
1. /Intel/HealthcareSDK/ToolTray/ToolTray/ShowIcon = true
The parameter above specifies whether or not the “ToolTray” application should show an icon on the status area of the taskbar. Valid values are “true” or “false”.
Each of the following subsections includes a logical grouping of these parameters, along with descriptions. When appropriate, example values are provided.
9.4.1 Button Simulation Configuration
1. /Intel/HealthcareSDK/ToolTray/ButtonAdapter/ButtonSimulation = true
The parameter above specifies whether or not the “ToolTray” application should simulate button presses with key combinations. Valid values are “true” and “false”.
2. /Intel/HealthcareSDK/ToolTray/ButtonAdapter/SimulateWithModifier = true
The parameter above specifies whether or not a modifier key is required for button simulation via the keyboard. Valid values are “true” and “false”. If set to “true”, then a modifier key triggers the button simulation. The modifier key is usually shift, alt, or ctrl, but could be any key.
3. /Intel/HealthcareSDK/ToolTray/ButtonAdapter/SimulationModifierVkey = 16
The parameter above is the decimal representation of the virtual key code for the modifier key that is used for button simulation. Typical values are 16 for the Shift key, 17 for the Control key, and 18 for the Alt key. The Microsoft* header file WINUSER.H defines all windows virtual key codes.
4. /Intel/HealthcareSDK/ToolTray/ButtonAdapter/SimulatePreviewButton = false
The parameter above specifies if a separate camera preview button should be simulated via the keyboard. This parameter should be set to “true” when ButtonSimulation is also set to “true”. Many tablets don’t support a separate camera preview button, so this parameter should be set to “false” unless there is a specific need to set it to “true”.

Mobile Clinical Assistant SDK 2.0 Developer Guide Intel Confidential
7/24/2008 Document Number PLAN-SDK2.0_072508 Page 51
9.4.2 Button Definition Configuration
/Intel/HealthcareSDK/ToolTray/ButtonAdapter/ButtonDef1 = 0x0c, 0x01, 0x0001, 4, 0x3647, 0x0000
The parameter above (and all similar parameters that differ only by the last number in the parameter name) specifies a specific button definition for a physical button on the MCA product for which the “ToolTray” application will perform button actions.
The value consists of four mandatory numbers― separated by commas ― followed by 3 optional numbers (two of the three are shown in the example above).
• First number is the HID UsagePage.
• Second number is the HID usage.
• Third number is the Button ID.
• Fourth number is the button type, which corresponds to the Button types in the MCA SDK header files.
• The three optional numbers are vendorID, productID, and versionNumber.
WARNING: Changing these entries can adversely affect button functionality. Do NOT change these values unless specifically requested to do so.

Mobile Clinical Assistant SDK 2.0 Developer Guide
Intel Confidential
Document Number: PLAN-SDK2.0_072508 7/24/2008 Page 52
9.4.3 Button KeyPress Action Configuration 1. /Intel/HealthcareSDK/ToolTray/ButtonAction/KeyPressAction/KeyPress[1]
The parameter above (and all similar parameters that differ only by the number in square brackets) specifies the key strokes to emulate when a particular button type is pressed and an active application is registered for the key press action for that button.
Valid values for these parameters are the following:
• Any alpha characters
• {SHIFT}
• {ALT}
• {CONTROL}
• {ADD}
• The plus sign (+)
• {VKxxx} where xxx is a decimal representation of any Microsoft Windows* virtual key code
Some example parameter values follow, along with their translations:
• “abc” translates to “abc”
• “{SHIFT}+abc” translates to “Abc”
• “{SHIFT}+a+b+c” translates to “ABC”
Note: The current state of the keyboard is considered when key stokes are emulated. For example, if you are holding the Shift key during the above example, or if Caps Lock were active, the resulting text would shift back down to “abc.” This feature includes using the {SHIFT} key when performing a button simulation, such as {SHIFT} + F1 for barcode.
• “{ALT}+fx” translates to a key sequence that typically exits an application
• “{ALT}+f” brings up the File menu and “x” selects the Exit option on the File menu.
• “{VK096}” translates to “VK_NUMPAD0”

Mobile Clinical Assistant SDK 2.0 Developer Guide Intel Confidential
7/24/2008 Document Number PLAN-SDK2.0_072508 Page 53
9.4.4 Button Handler Configuration
The button handler configuration specifies how the “ToolTray” application interacts with the MCA product when capturing data for the Callback with Data button action. These parameters specify how the “ToolTray” application will configure the specific devices, in response to the corresponding button press, when an application with an “active” window is registered for the Callback with Data button action.
1. /Intel/HealthcareSDK/ToolTray/ButtonHandler/HandlerList/ButtonType[1] = ButtonHandler.dll
The parameter above (and all similar parameters that differ only by the number in square brackets) specifies the DLL that the “ToolTray” application calls to handle button presses for a particular button type. The number in brackets is the button type, and the value is the name of the DLL. This DLL must be in the same directory as the “ToolTray” application. It is provided and installed as part of the MCA SDK.
2. /Intel/HealthcareSDK/ToolTray/ButtonHandler/ButtonHandler.dll/RF-FriendlyName
The parameter above specifies the friendly name of the RFID device to use when reading RFID tags in response to the RFID button press.
3. /Intel/HealthcareSDK/ToolTray/ButtonHandler/ButtonHandler.dll/RF-ProtocolList = 1
The parameter above specifies the RFID protocols that will be enabled. Valid values are: RF_ISO15693 = 1, RF_ISO14443A = 2, RF_ISO14443B = 3, RF_TagIt = 4, RF_HfEpc = 5, RF_ISO18000p3 = 6.
Note: In MCA SDK version 2.0, only RF_ISO15693 is supported.
4. /Intel/HealthcareSDK/ToolTray/ButtonHandler/ButtonHandler.dll/RF-EndOfData = 0xFF
The parameter above specifies the end of data tag that will be used when reading RFID tags. Valid values are numbers in typical hexadecimal format such as: 0xFF.
5. /Intel/HealthcareSDK/ToolTray/ButtonHandler/ButtonHandler.dll/ RF-DataReadRange = 0, 255
The parameter above specifies the reading range to use when reading RFID tags. The format is two decimal numbers separated by a comma. If specified, the first number is the start of the read range, and the second number is the total number of bytes to read. A zero in the second position instructs to read to the end of the tag.
Mobile Clinical Assistant SDK 2.0 Developer Guide
Intel Confidential
Document Number: PLAN-SDK2.0_072508 7/24/2008 Page 54
6. /Intel/HealthcareSDK/ToolTray/ButtonHandler/ButtonHandler.dll/ RF-ScanTimeoutMS = 5000
The parameter above specifies the time out in milliseconds to use when reading RFID tags.
7. /Intel/HealthcareSDK/ToolTray/ButtonHandler/ButtonHandler.dll/RF-ReadData = 1
The parameter above specifies whether or not the data of an RFID tag will be read in addition to the tag ID. A value of “1” indicates that the data will be read, and a value of “0” indicates that the data will not be read.
8. /Intel/HealthcareSDK/ToolTray/ButtonHandler/ButtonHandler.dll/ BC-FriendlyName
The parameter above specifies the friendly name of the Barcode device to use when scanning barcodes in response to a barcode button press.
9. /Intel/HealthcareSDK/ToolTray/ButtonHandler/ButtonHandler.dll/ BC-ScanTypes = 100, 200, 300
The parameter above specifies the barcode types to consider when scanning barcodes. If a type is not listed, it is not scanned.
10. /Intel/HealthcareSDK/ToolTray/ButtonHandler/ButtonHandler.dll/ BC-IncludeSI = 1
The parameter above specifies that scanned barcodes should include the symbology identifier.
11. /Intel/HealthcareSDK/ToolTray/ButtonHandler/ButtonHandler.dll/ BC-MinLength = 3
The parameter above specifies the minimum length barcode to consider when scanning barcodes.
12. /Intel/HealthcareSDK/ToolTray/ButtonHandler/ButtonHandler.dll/ BC-MaxLength = 5000
The parameter above specifies the maximum length barcode to consider when scanning barcodes.
13. /Intel/HealthcareSDK/ToolTray/ButtonHandler/ButtonHandler.dll/ BC-ScanTimeoutMS = 5000
The parameter above specifies the time in MS after which the barcode scanner will turn off if no barcode is read.

Mobile Clinical Assistant SDK 2.0 Developer Guide Intel Confidential
7/24/2008 Document Number PLAN-SDK2.0_072508 Page 55
14. /Intel/HealthcareSDK/ToolTray/ButtonHandler/ButtonHandler.dll/CA-FriendlyName
The parameter above specifies the friendly name of the camera device to use when capturing digital images.
15. /Intel/HealthcareSDK/ToolTray/ButtonHandler/ButtonHandler.dll/CA-ImageX = 640
The parameter above specifies the preferred image width (pixels) for the camera device. If the value specified is not supported by the hardware, the closest supported value is used.
16. /Intel/HealthcareSDK/ToolTray/ButtonHandler/ButtonHandler.dll/CA-ImageY = 480
The parameter above specifies the preferred image height (pixels) for the camera device. If the value specified is not supported by the hardware, the closest supported value is used.
17. /Intel/HealthcareSDK/ToolTray/ButtonHandler/ButtonHandler.dll/CA-VideoX = 320
The parameter above specifies the preferred preview video stream width (pixels) for the camera preview window. If the value specified is not supported, the closest supported value will be used.
18. /Intel/HealthcareSDK/ToolTray/ButtonHandler/ButtonHandler.dll/CA-VideoY = 240
The parameter above specifies the preferred video stream height (pixels) for the camera preview window. If the value specified is not supported, the closest supported value is used.
19. /Intel/HealthcareSDK/ToolTray/ButtonHandler/ButtonHandler.dll/ CA-FramesPerSec = 29.33333
The parameter above specifies the preferred frame rate (frames per second) to use for the camera preview. If the value specified is not supported, the closest supported value is used.
20. /Intel/HealthcareSDK/ToolTray/ButtonHandler/ButtonHandler.dll/ CA-IlluminationLevel = 99
The parameter above specifies the illumination level of a flash if a flash is available. Valid values are 0-99.
21. /Intel/HealthcareSDK/ToolTray/ButtonHandler/ButtonHandler.dll/ CA-PreviewButtonActive = 0
The parameter above specifies whether or not there is a separate preview button on the MCA product. A value of “0” indicates that no separate preview button exists. A value of “1” indicates that it does exist. Many tablets do not support separate preview buttons. This setting should be “0” unless running on a MCA product that does have a separate camera preview button.

Mobile Clinical Assistant SDK 2.0 Developer Guide
Intel Confidential
Document Number: PLAN-SDK2.0_072508 7/24/2008 Page 56
22. /Intel/HealthcareSDK/ToolTray/ButtonHandler/ButtonHandler.dll/ CA-PreviewTimeAfterPicMS = 3000
The parameter above specifies the length of time (milliseconds) that the preview window should remain displayed after a picture is snapped.
23. /Intel/HealthcareSDK/ToolTray/ButtonHandler/ButtonHandler.dll/ CA-PreviewTimeoutMS = 15000
The parameter above specifies the length of time that the preview window will remain active before timing out if no picture is taken.
24. /Intel/HealthcareSDK/ToolTray/ButtonHandler/ButtonHandler.dll/CA-WindowTop = 10
The parameter above is the Y position on the desktop, where the upper left corner of the preview window will be displayed.
25. /Intel/HealthcareSDK/ToolTray/ButtonHandler/ButtonHandler.dll/CA-WindowLeft = 10
The parameter above is the X position on the desktop, where the upper left corner of the preview window will be displayed.
26. /Intel/HealthcareSDK/ToolTray/ButtonHandler/ButtonHandler.dll/CA-WindowWidth = 10
The parameter above is the width of the preview window (in pixels.)
27. /Intel/HealthcareSDK/ToolTray/ButtonHandler/ButtonHandler.dll/CA-WindowHeight = 10
The parameter above is the height of the preview window (in pixels.)
9.4.5 Default Handler Configuration
The default handler configuration defines what the “ToolTray” application will do for the Default button actions for the different button types. Many of the default handler parameters have the same name as corresponding parameters in the Button Handler configuration. Such parameters will not be listed here. Parameters that are unique to the Default Handler Configuration are addressed in this section.
1. /Intel/HealthcareSDK/ToolTray/DefaultHandler/HandlerList/ButtonType[1] = BarcodeDefaultHandler.dll
The parameter above (and all similar parameters that differ only by the number in square brackets) specifies the DLL that the “ToolTray” application will call to handle the Default action for a particular

Mobile Clinical Assistant SDK 2.0 Developer Guide Intel Confidential
7/24/2008 Document Number PLAN-SDK2.0_072508 Page 57
button type. The number in brackets is the button type, and the value is the name of the DLL. This DLL must be in the same directory as the “ToolTray” application and is provided and installed as part of the MCA SDK.
2. /Intel/HealthcareSDK/ToolTray/DefaultHandler/HandlerList/ButtonType[1]/InterfaceVersion = 1
This parameter specifies the version of interface used between “ToolTray” application and the default button handlers. This value will be incremented as the interface changes. Currently this interface version is 1.
3. /Intel/HealthcareSDK/ToolTray/DefaultHandler/ RfidDefaultHandler.dll/ RF-DisplayEndOfData = 1
The parameter above specifies whether or not the End of Data marker should be displayed along with the data when an RFID tag is read.
4. /Intel/HealthcareSDK/ToolTray/DefaultHandler/BarcodeDefaultHandler.dll/ BC-BarcodePrefix
The parameter above specifies a prefix that is prepended to all barcodes read. The string specifies the keys on the keyboard that will be emulated.
Valid characters for this string include a-z, A-Z, {, }, 0-9, and +.
• The characters a through z and A through Z specify the keys a through z on the keyboard. There is no difference between an upper and a lower-case character. For example, a and A each specify the A key.
• The plus character (+ not {ADD}) in this string specifies that the key on the left of the + should be held down while the key on the right is held down. The keys are interpreted and held down from left to right. Multiple keys can be joined with multiple plus signs.
• When a character is encountered that is not followed by a + then all keys are simulated as released.
To specify keys other than a-z, special sequences in curly braces are used. Supported special sequences include: {SHIFT}, {CONTROL}, {ALT}, {ADD}, {VKxxx}. They are defined as follows:
• {SHIFT} is the shift key.
• {CONTROL} is the control key.
• {ALT} is the alt key.
• {ADD} is the + key. (not to be confused with the string character + ) (See note below.)
• {VKxxx) can be any key, where ‘xxx’ is a place holder for a decimal number representing the Microsoft Windows* virtual key code for the key. The virtual key codes are defined in the windows header file winuser.h. This sequence allows keys, such as the return key or curser-up, curser down, curser -left, curser- right, to be emulated.
5. /Intel/HealthcareSDK/ToolTray/DefaultHandler/BarcodeDefaultHandler.dll/ BC-BarcodePostfix
The parameter above specifies a postfix that is to be appended to all barcodes read. Valid values are the same as those described for the BC-BarcodePrefix parameter. See Section 7.1.2 for information on barcode parameters.

Mobile Clinical Assistant SDK 2.0 Developer Guide
Intel Confidential
Document Number: PLAN-SDK2.0_072508 7/24/2008 Page 58
6. /Intel/HealthcareSDK/ToolTray/DefaultHandler/BarcodeDefaultHandler.dll/BC-UseBarcodeKeyPresses = 0
The above parameter specifies whether to send Unicode or virtual key press code for barcode data. False - MCA will send the data as Unicode characters. True - MCA will send the data as virtual key press code.
7. /Intel/HealthcareSDK/ToolTray/DefaultHandler/CameraDefaultHandler.dll/ CA-DefaultPath
The parameter above specifies a default path for saving pictures as part of the default action.
8. /Intel/HealthcareSDK/ToolTray/DefaultHandler/ CameraDefaultHandler.dll / CA-DefaultFilebase = pic_
The parameter above specifies a prefix for the default file name used for pictures that are saved.
9.4.6 Configuring Application as Default Action
The configuration file would provide the support for configuring an application as button specific default handler. The same would be launched when a default handler supposed to run for that application.
The parameters which need to be configured for this functionality are mentioned below.
1. /Intel/HealthcareSDK/ToolTray/DefaultHandler/<Device>DefaultHandler.dll/<Device>-LaunchApp
The above parameter specifies the name of the valid win32 application to be launched for handling default action.
Note: MCA does not have any control over the lifetime of the launched application.
2. /Intel/HealthcareSDK/ToolTray/DefaultHandler/<Device>DefaultHandler.dll/<Device>-SupportsConcurrentInstances
The above parameter specifies whether concurrent instances are supported for the application to be launched. It can have two values as below.
0 – Single Instance of the application.
1 – Allow to launch multi-instance application on each action.
3. /Intel/HealthcareSDK/ToolTray/DefaultHandler/<Device>DefaultHandler.dll<Device>-LaunchAppCmdLine

Mobile Clinical Assistant SDK 2.0 Developer Guide Intel Confidential
7/24/2008 Document Number PLAN-SDK2.0_072508 Page 59
The above parameter specifies the Command line parameters to launch the application. This value can be blank. Command line support is needed particularly for the scripting languages. If the value is blank or the key is missing, it is interpreted as no parameters for the command line.
Example 1: In case of BarcodeDefaultHandler DLL the configurations is as follows.
/Intel/HealthcareSDK/ToolTray/DefaultHandler/BarcodeDefaultHandler.dll/BC-LaunchApp = Application1.exe
/Intel/HealthcareSDK/ToolTray/DefaultHandler/BarcodeDefaultHandler.dll/BC-SupportsConcurrentInstances = 0
/Intel/HealthcareSDK/ToolTray/DefaultHandler/BarcodeDefaultHandler.dll/BC-LaunchAppCmdLine = cmd1 cmd2
Example 2: In case of RfidDefaultHandler DLL the configurations is as follows.
/Intel/HealthcareSDK/ToolTray/DefaultHandler/RfidDefaultHandler.dll/RF-LaunchA pp = Application2.exe
/Intel/HealthcareSDK/ToolTray/DefaultHandler/RfidDefaultHandler.dll/RF-SupportsConcurrentInstances = 1
/Intel/HealthcareSDK/ToolTray/DefaultHandler/RfidDefaultHandler.dll/RF-LaunchAppCmdLine = cmd1 cmd2
To configure an executable published over the Citrix Presentation Server, please configure it as shown below.
Provide the application name (LaunchApp) to be launched as “pn.exe”, it can be traced in the folder "[Installed Drive]\Program Files\Citrix\ICA Client", and add “/pn:[Application Set] /APP:[ICA Connection Name]" part as the command line argument (LaunchAppCmdLine).
pn.exe /pn:[Application Set] /APP:[ICA Connection Name]
Example: pn.exe /pn:"AppSet" /APP:"MyPublishedApp.exe"
9.4.7 Per Application Configuration
The developer can define different button press actions for a single button press, depending on the application in focus (active window). For example. When Notepad is in focus, the barcode data should be prefixed with NOTEPAD, but it should not alter the default behavior when other applications are in focus. In order to do this, the application must be registered and mapped to the required handler.
Following are the keys related to this functionality:
1. /Intel/HealthcareSDK/ToolTray/DefaultHandler/Application[<index1>] = <application-full-path>

Mobile Clinical Assistant SDK 2.0 Developer Guide
Intel Confidential
Document Number: PLAN-SDK2.0_072508 7/24/2008 Page 60
This parameter specifies the application for which button actions can be customized. When the specified application is in focus, the button actions associated with that button will be performed. The value for the key Application[index1] is the application name, complete with its extension (this application name should correspond to the executable name). Index1 can starts from 0. While any number of applications can be configured, only 20 applications can be configured using the CFGEditor tool.
2. /Intel/HealthcareSDK/ToolTray/DefaultHandler/Application[<index1>]/Prefix = /Intel/HealthcareSDK/ToolTray/DefaultHandler[<index2>]
Under Prefix, the registered handler which contains the required behavior needs to be added. This registered handler will have a value such as DefaultHandler[index2]. The index will be generated when the Handler is registered. Once this mapping is completed the device specific parameter values would need to be added. The Application Key is used to register the application with its own default handler, which will be specified with help of the Application [index]/Prefix key. The Prefix key will refer to the Handler Prefix for a registered DefaultHandler.
For example, if we register DefaultHandler_Notepad.dll as a handler for Button type 1 for DefaultHandler[1] and we need to register the notepad application to invoke the behavior of DefaultHandler_Notepad.dll, then this action can be done as follows:
Step 1: New set of default handlers can be defined in the configuration file to provide custom button actions as shown in following examples:
/Intel/HealthcareSDK/ToolTray/DefaultHandler[1]/HandlerList/ButtonType[1] = BarcodeDefaultHandler.dll
/Intel/HealthcareSDK/ToolTray/DefaultHandler[1]/HandlerList/ButtonType[1]/InterfaceVersion = 1
Step 2: They can be registered to the applications by specifying them as value of Application[index]/Prefix key as shown below
/Intel/HealthcareSDK/ToolTray/DefaultHandler/Application[0] = notepad.exe
/Intel/HealthcareSDK/ToolTray/DefaultHandler/Application[0]/Prefix = /Intel/HealthcareSDK/ToolTray/DefaultHandler[1]
When an application is registered with a DefaultHandler as mentioned above, then the set of key/values corresponding to this functionality will be in following format to provide custom button actions:
3. /Intel/HealthcareSDK/ToolTray/DefaultHandler/<Device DLL Name in the Registered DefaultHandler>/<Exe Name>*<Device Prefix>-<KeyName>
Example: If an Application is registered with Notepad.exe and registered with DefaultHandler[1], then keys will be in following format.

Mobile Clinical Assistant SDK 2.0 Developer Guide Intel Confidential
7/24/2008 Document Number PLAN-SDK2.0_072508 Page 61
/Intel/HealthcareSDK/ToolTray/DefaultHandler/CameraDefaultHandler.dll/Notepad.exe*CA-FriendlyName //Camera.
/Intel/HealthcareSDK/ToolTray/DefaultHandler/RfidDefaultHandler.dll/Notepad.exe*RF-FriendlyName //RFID.
/Intel/HealthcareSDK/ToolTray/DefaultHandler/BarcodeDefaultHandler.dll/Notepad.exe*BC-FriendlyName //Barcode.
9.5 Configuring Barcode Loopback Plug-in The barcode loop back plug-in returns the barcode information specified in the configuration file. All barcode loopback configuration parameters begin with the following prefix: /Intel/HealthcareSDK/PluginConfig/Barcode/Barcode Loopback Device/
Within this section of the document; this prefix may not be specifically included, but should be assumed.
The following configuration parameters specify the version information for the barcode loopback plug-in.
• DriverVersion: Specifies the driver version number to be reported by the barcode loopback plug-in.
• FirmwareVersion: Specifies the firmware version number to be reported by the barcode loopback plug-in.
• PluginVersion: Can be any non-empty value. Not currently used.
The barcode loopback plug-in supports up to 30 barcodes that are entered in the configuration file. Each barcode mentioned in the configuration file should have a type and a value associated with it. A delay parameter is also used to specify when the barcode needs to be available to the reader.
• Type: Any string can be associated for the type. If the specified type is not found in the barcode types list, the plug-in uses “BC_UnknownType” value. If “-“ is specified for the type, the plug-in will attempt to determine the type from the AIM symbology identifier prefix in the Value field.
• Value: The value is the actual barcode value. The value can have the AIM symbology identifiers if desired. If the AIM symbology identifier is not specified as a prefix, the plug-in uses a prefix based on the barcode type specified in the ‘Type’ parameter. The maximum size of this parameter, including the symbology identifier, is 64 characters.
• DelayInMs: The tags are available to the plug-in after the time specified. This value should be an unsigned integer and specified in milliseconds.

Mobile Clinical Assistant SDK 2.0 Developer Guide
Intel Confidential
Document Number: PLAN-SDK2.0_072508 7/24/2008 Page 62
Below is an example of the barcode that is specified in the configuration file.
// Type is listed so plug-in should return BC_Code128 as the type. AIM type is included // in the barcode so core should be able to interpret it as Code 128. /Intel/HealthcareSDK/PluginConfig/Barcode/Barcode Loopback Device/Barcode[0]/Type = Code 128 /Intel/HealthcareSDK/PluginConfig/Barcode/Barcode Loopback Device/Barcode [0]/ Value = ]C00128 /Intel/HealthcareSDK/PluginConfig/Barcode/Barcode Loopback Device/ Barcode [0]/DelayInMs = 500
Please note that the tags are indexed by zero.
If any of the parameters for a barcode are missing, or the parameter has no value, then the error barcode and its following barcodes are not used by the loopback plug-in. See the following figure.
/Intel/HealthcareSDK/PluginConfig/Barcode/Barcode Loopback Device/Barcode[4]/Type = /Intel/HealthcareSDK/PluginConfig/Barcode/Barcode Loopback Device/Barcode[4]/Value = 123456 /Intel/HealthcareSDK/PluginConfig/Barcode/Barcode Loopback Device/Barcode[4]/DelayInMs = 700 /Intel/HealthcareSDK/PluginConfig/Barcode/Barcode Loopback Device/Barcode[5]/Type = Code 128 /Intel/HealthcareSDK/PluginConfig/Barcode/Barcode Loopback Device/Barcode[5]/Value = ]C00128 /Intel/HealthcareSDK/PluginConfig/Barcode/Barcode Loopback Device/Barcode[5]/DelayInMs = 900
In the preceding example, the “Type” parameter for barcode 4 has no value associated with it. The result is that barcode 4 and its following barcodes (barcode 5, barcode 6, etc.) are not considered for scanning.
Only Barcode 0, Barcode 1, Barcode 2, and Barcode 3 values are used by loopback plug-in during barcode scanning.
9.6 Configuring RFID Loopback Plug-in The RFID loopback plug-in can be configured to simulate reading of specific RFID tags, including tag IDs and tag data.
Some items common to all RFID configuration parameters include:
• All RFID loopback configuration parameters begin with the following prefix: /Intel/HealthcareSDK/PluginConfig/Rfid/Rfid/Loopback Device Within this section of the document, the prefix may not be specifically included but should be assumed.
• The tags are always indexed from zero. The tags fields should not be out of order in the sequence. That means Tag 0 information is followed by Tag 1, followed by Tag 2, and so on.
• All the fields for the tags are mandatory.
The following configuration parameters specify the version information about the loopback plug-in.
• DriverVersion: Specifies the driver version number to be reported by the RFID loopback plug-in.
• FirmwareVersion: Specifies the firmware version number to be reported by the RFID loopback plug-in.
• PluginVersion: Can be any non-empty value. Not currently used.

Mobile Clinical Assistant SDK 2.0 Developer Guide Intel Confidential
7/24/2008 Document Number PLAN-SDK2.0_072508 Page 63
The plug-in software also has the ability to return the RFID protocols it supports. For the RFID loopback plug-in, this information is provided in the “SupportedProtocols” parameter. The loopback plug-in supports ISO15693, ISO14443A, and ISO14443B protocols only. The protocols mentioned in this parameter should be from the protocol list supported by the MCA SDK. Please do not change the values for this parameter.
Note: Even though the loopback plug-in supports ISO14443 protocols, the initial plug-in will only support ISO15693.
RFID loopback supports a maximum of 8 tags in the configuration file. There must be at least one character of tag data for the plug-in to work. All the fields for the RFID tags are mandatory.
• UID: Contains the unique identifier information for the tag. This parameter can be any character string. The maximum number of characters specified in this field depends on the protocol specified in the ‘Protocol’ field. Here are the maximum length values to be used for each RFID protocol.
•ISO15663 – 17 characters including the ‘\0’ character
•ISO14443A – 18 characters including the ‘\0’ character
•ISO14443B – 19 characters including the ‘\0’ character
• Data: Contains the tag data. The tag data always starts at block zero. This parameter can be any character string. The maximum number of characters should not be greater than 512 characters.
• NumBlocks: Defines the number of data blocks present in the tag. This parameter should always be an unsigned integer type. The maximum number of blocks that can be specified is 64.
• BlockSize: Defines the data block size in bytes. This parameter should always be an unsigned integer type. The block size multiplied by the number of blocks parameter value should not be more than the maximum data size supported (512 bytes).
• ReadSizeInBlocks: Defines the number of blocks the reader device can read from the tag in one single command.
• WriteSizeInBlocks: Defines the number of blocks the reader device can write to the tag in one single command.
• Protocol: Defines the RFID protocol supported by the tag. The protocol value should always be the one supported by the plug-in. The supported protocols for the plug-in are indicated in the “SupportedProtocols” parameter.
• DelayInMs: The tags are available to the plug-in after the time specified. This value should be an unsigned integer and specified in milliseconds.
Below is a sample tag for the RFID loopback plug-in in the configuration file:
/Intel/HealthcareSDK/PluginConfig/Rfid/Rfid Loopback Device/Tag[0]/UID = E05631AC56BD0000 /Intel/HealthcareSDK/PluginConfig/Rfid/Rfid Loopback Device/Tag[0]/Data = B10CDAT01234 This is
the Data0 Portion /Intel/HealthcareSDK/PluginConfig/Rfid/Rfid Loopback Device/Tag[0]/NumBlocks = 63 /Intel/HealthcareSDK/PluginConfig/Rfid/Rfid Loopback Device/Tag[0]/BlockSize = 4 /Intel/HealthcareSDK/PluginConfig/Rfid/Rfid Loopback Device/Tag[0]/ReadSizeInBlocks = 1 /Intel/HealthcareSDK/PluginConfig/Rfid/Rfid Loopback Device/Tag[0]/WriteSizeInBlocks = 1 /Intel/HealthcareSDK/PluginConfig/Rfid/Rfid Loopback Device/Tag[0]/Protocol = ISO15693 /Intel/HealthcareSDK/PluginConfig/Rfid/Rfid Loopback Device/Tag[0]/DelayInMs = 1000
Note: The tags are indexed by zero. For a given tag, if any of the parameter is not specified or if the parameter value is not specified, the plug-in returns an error during initialization.

Mobile Clinical Assistant SDK 2.0 Developer Guide
Intel Confidential
Document Number: PLAN-SDK2.0_072508 7/24/2008 Page 64
Example 1:
/Intel/HealthcareSDK/PluginConfig/Rfid/Rfid/Loopback Device/Tag[1]/Protocol= xyz
In the above example the RFID protocol for the Tag 1 is specified as “xyz”. This protocol is not supported by the loopback plug-in (See the “SupportedProtocols” parameter values), which results in the initialization function RF_Reserve() to fail with a return value of “HC_DeviceNotFound”.
Example 2:
/Intel/HealthcareSDK/PluginConfig/Rfid/Rfid/Loopback Device/Tag [1]/UID =
In the above example, the UID field parameter for Tag 1 has an empty value, which results in the initialization function RF_Reserve() to fail with a return value of “HC_DeviceNotFound”.
Example 3:
/Intel/HealthcareSDK/PluginConfig/Rfid/Rfid Loopback Device/Tag[2]/UID = E05631AC56BD0002 /Intel/HealthcareSDK/PluginConfig/Rfid/Rfid Loopback Device/Tag[2]/Data = B10CDAT01234 This is
the Data2 Portion /Intel/HealthcareSDK/PluginConfig/Rfid/Rfid Loopback Device/Tag[2]/NumBlocks = 63 /Intel/HealthcareSDK/PluginConfig/Rfid/Rfid Loopback Device/Tag[2]/ReadSizeInBlocks = 1 /Intel/HealthcareSDK/PluginConfig/Rfid/Rfid Loopback Device/Tag[2]/WriteSizeInBlocks = 1 /Intel/HealthcareSDK/PluginConfig/Rfid/Rfid Loopback Device/Tag[2]/Protocol = ISO15693 /Intel/HealthcareSDK/PluginConfig/Rfid/Rfid Loopback Device/Tag[2]/DelayInMs = 1000
In the above example, the parameter “BlockSize” is missing for Tag 2, which results in the initialization function RF_Reserve() failing, with a return value of “HC_DeviceNotFound.”
9.7 Configuring Camera Plug-in The MCA SDK does NOT provide a loopback plug-in for cameras. Instead, it ships with a camera configuration that should work for most USB cameras. The following is a list of settings that affect the operation of the camera and may need to be adjusted, depending on the make and model of the camera on the development workstation.
9.7.1 Configuration Parameters
1. /Intel/HealthcareSDK/PluginConfig/Camera/Generic/CameraDeviceId = <camera Hardware ID>
The parameter above specifies the hardware ID of the camera to use. Normally this line can be left commented out to use the first camera found. However, on systems using multiple cameras or with additional DirectShow-compatible video hardware (such as some video cards), it may be necessary to use this line to specify the actual hardware Id of the device.
To configure a specific camera device, un-comment this line and replace <camera Hardware ID>with a substring of Hardware Id of the camera as it appears in Device Manager for camera Hardware ID.

Mobile Clinical Assistant SDK 2.0 Developer Guide Intel Confidential
7/24/2008 Document Number PLAN-SDK2.0_072508 Page 65
Note: Use the MCA Configuration Editor tool, see Section 9.1, to update value of <camera Hardware ID> for a camera.
2. /Intel/HealthcareSDK/PluginConfig/Camera/Generic/MaxVideoWidth=640 /Intel/HealthcareSDK/PluginConfig/Camera/Generic/MaxVideoHeight=480
The settings above limit the maximum video width and height supported by the camera. Normally, the width and height reported by the camera are used. However, these settings can limit the resolution to a value less than the maximum supported. These parameters cannot be used to increase the maximum resolution beyond what the camera actually supports.
Only used for cameras that support setting the video and image capture resolutions independently.
3. /Intel/HealthcareSDK/PluginConfig/Camera/Generic/MaxStillWidth=1280 /Intel/HealthcareSDK/PluginConfig/Camera/Generic/MaxStillHeight=960
The settings above limit the maximum image width and height supported by the camera. Normally, the width and height reported by the camera are used. However, these settings can limit the resolution to a value less than the maximum supported. These parameters cannot be used to increase the maximum resolution beyond what the camera actually supports.
4. /Intel/HealthcareSDK/PluginConfig/Camera/Generic/ForceDisableStillCapture=1
The setting above forces the MCA software to ignore the “still pin” if the camera reports that it supports still pin functionality. With “still image capture” disabled (or on hardware that does not support it), images are captured from the video stream. "Still pin" allows a camera to capture an image at a different (generally higher) resolution than the video stream. Change this value to 0 to enable the MCA software to use the “still pin” on cameras that support it.
5. /Intel/HealthcareSDK/PluginConfig/Camera/Generic/WarmupDelayMS = 1000
The setting above specifies the minimum delay required, after starting preview, before the camera is ready to capture a frame. This setting is useful to non-GUI applications that may attempt to start preview and snap a frame very quickly.
6. /Intel/HealthcareSDK/PluginConfig/Camera/Generic/DeviceEnumerationTimeout = 1000
The setting above is a time-out interval used when looking for a camera. Normally this setting is not required unless you are developing an application that is capable of powering the physical camera on and off. If the camera is powered on or plugged in immediately before use, it may not be immediately enumerated by Microsoft Windows*. This timeout specifies the maximum amount of time to wait for the camera to enumerate before the MCA software stops searching and reports that the camera is not found.
7.
/Intel/HealthcareSDK/PluginConfig/Camera/Generic/CameraPropertyOverride/<option>/AutoOverride=0 /Intel/HealthcareSDK/PluginConfig/Camera/Generic/CameraPropertyOverride/<option>/AutoOverride=1
Some camera options support an Auto setting. For options with an Auto setting, the normal behavior of the MCA camera software is to (1) enable the Auto setting when the option is set to the default value; and, (2) disable it when set to other values.

Mobile Clinical Assistant SDK 2.0 Developer Guide
Intel Confidential
Document Number: PLAN-SDK2.0_072508 7/24/2008 Page 66
Use the parameter above to force the auto setting on (=0) or off (=1) for the specified camera option, regardless of what the camera reports for this setting. This parameter is useful for camera options that support both an Auto and Manual setting, when the default setting differs from the desired behavior.
Note that <option> should be replaced by the actual vendor name of the camera option. For a complete list of available options see Section 7.3.2, “Camera Device Parameters.”
8.
/Intel/HealthcareSDK/PluginConfig/Camera/Generic/CameraPropertyOverride/<option>/MinLimit=<value> /Intel/HealthcareSDK/PluginConfig/Camera/Generic/CameraPropertyOverride/<option>/MaxLimit=<value>
The settings above limit the minimum and maximum values reported for the specified camera option. This parameter is useful when the camera is known to report invalid values for the camera option range. For example, a number of cameras on the market report minimum exposure values that are not actually supported by the hardware.
Note that <option> should be replaced by the actual vendor name of the camera option. For a complete list of available options see Section 7.3.2., “Camera Device Parameters.”
9.7.2 Maintaining Multiple Camera Configurations
The MCA Software is distributed with generic camera configuration parameters. You may find it useful to maintain settings for multiple cameras in your configuration file in a way that makes it easy to switch between cameras.
To add a section with settings for a specific model camera:
1) Copy the entire /Intel/HealthcareSDK/PluginConfig/Camera/Generic/ section.
2) Change “Generic” to something that matches the new camera model.
3) Edit any settings, including <camera Hardware ID>, as described in Section 9.7.1
For example: Below are possible settings for a theoretical 2 MPixel camera that supports still capture. /Intel/HealthcareSDK/PluginConfig/Camera/Cam2MP/CameraDeviceId = <camera Hardware ID>/Intel/HealthcareSDK/PluginConfig/Camera/Cam2MP/MaxVideoWidth=640 /Intel/HealthcareSDK/PluginConfig/Camera/Cam2MP/MaxVideoHeight=480 /Intel/HealthcareSDK/PluginConfig/Camera/Cam2MP/MaxStillWidth=1600 /Intel/HealthcareSDK/PluginConfig/Camera/Cam2MP/MaxStillHeight=1200 /Intel/HealthcareSDK/PluginConfig/Camera/Cam2MP/WarmupDelayMS=1000 /Intel/HealthcareSDK/PluginConfig/Camera/Cam2MP/ForceDisableStillCapture=0 /Intel/HealthcareSDK/PluginConfig/Camera/Cam2MP/DeviceEnumerationTimeout=1000
To force the MCA software to use the following parameters for this camera, change the following line in the MCA SDK configuration file to reference the new configuration section, as shown below. /Intel/HealthcareSDK/Plugin[4]/ParameterPrefix = /Intel/HealthcareSDK/PluginConfig/Camera/Cam2MP/

Mobile Clinical Assistant SDK 2.0 Developer Guide Intel Confidential
7/24/2008 Document Number PLAN-SDK2.0_072508 Page 67
9.8 Configuring Camera Image Scaling Support The MCA SDK provides Image format support scaling of an image captured by the Camera device using a Camera plug-in. Image will continue to be stored in BMP format in SDK storage. If you want the image in JPEG /PNG format, the stored image is converted to that format. Following is a list of settings that affects the image captured by a Camera device using Camera plug-in.
9.8.1 Configuration Parameters
The following parameter specifies the minimum scaling width of the image be scaled. Its value should not be changed. If its value is set to less than 0 or greater than 5000, then internally it will take default value stored.
1. /Intel/HealthcareSDK/Camera/ImageScaling/MinScalingWidth = 1
The following parameter specifies the maximum scaling width of the image be scaled. Its value should not be changed. If its value is set to less than 0 or greater than 5000 then internally it will take default value stored.
2. /Intel/HealthcareSDK/Camera/ImageScaling/MaxScalingWidth = 5000
The following parameter specifies the minimum scaling height of the image be scaled. Its value should not be changed. If its value is set to less than 0 or greater than 5000 then internally it will take default value stored.
3. /Intel/HealthcareSDK/Camera/ImageScaling/MinScalingHeight = 1
The following parameter specifies the maximum scaling height of the image be scaled. Its value should not be changed. If its value is set to less than 0 or greater than 5000, then internally it will take default value stored.
4. /Intel/HealthcareSDK/Camera/ImageScaling/MaxScalingHeight = 5000

Mobile Clinical Assistant SDK 2.0 Developer Guide
Intel Confidential
Document Number: PLAN-SDK2.0_072508 7/24/2008 Page 68
10 Citrix Considerations
Application developers should consider the following to ensure that their application behaves the same way in a Citrix® environment that it does when it is run locally.
10.1 Camera Because Citrix creates a "presentation window" to display the application windows on the client, the actual camera preview window or control doesn’t actually exist on the client. To preserve performance, the MCA SDK keeps the camera’s preview video stream local to the client ― instead of sending the preview video stream to the Citrix®server and waiting for the server to return it to the client as a screen display. The MCA SDK creates a local window that matches the coordinates of the preview control specified in the application ― and then displays a local window over the Citrix presentation window. This MCA SDK “optimization” creates a few special cases that should be considered.
1) When calling the StartPreview API, an application passes a handle (HWND) to a window or control that will display the camera preview video stream. The MCA SDK must resolve the Citrix presentation window HWND given the server side HWND that is passed by the application, so that it can display the local preview in the correct location. To do this properly, several restrictions apply:
a) When an application calls StartPreview, the top-level parent of the preview window or control must be visible.
b) When an application calls StartPreview, the top-level parent of the preview window or control must have a unique size and position relative to any other top-level window created by the application.
2) The MCA SDK creates a local preview to overlap the Citrix presentation window. There are a few things to consider:
a) There may be some lag time associated with the preview when moving the parent window, since the position and cropping information must be transferred from server to client.
b) When the preview is stopped ― the local window is destroyed: so the residual image left by the preview operation is deleted as well.
c) The locally created preview window has a pop-up menu associated with it that allows it to “undock” in case the window gets out of synch with the server or mistakenly overlaps/covers another window. To “undock” the preview window, right-click the window and de-select “docked.”
3) Call CopyImageToClipboard API; copies the image on the clipboard of the client.

Mobile Clinical Assistant SDK 2.0 Developer Guide Intel Confidential
7/24/2008 Document Number PLAN-SDK2.0_072508 Page 69
10.2 Buttons When a button press is registered through Citrix, all windows belonging to that process are registered for the callback.
10.3 Processes A multi-process application running in Citrix should only have one process communicating with the MCA SDK at any given time. If a process has any buttons registered ― no other process within that application will be able to use the MCA SDK until the registered process deregisters for the button press.

Mobile Clinical Assistant SDK 2.0 Developer Guide
Intel Confidential
Document Number: PLAN-SDK2.0_072508 7/24/2008 Page 70
11 Terminology
Term Definition
AIM Association for Automatic Identification and Mobility
API Application Programming Interface
CHM Microsoft* compressed help file
ISV Independent Software Vendor
DLL Dynamic Link Library
IDE Independent Development Environment
MCA Mobile Clinical Assistant
MCA SDK
Intel® MCA Software Development Kit
Intel proprietary software API to support the development of third-party applications that will run on any MCA product. This software runs on a developer’s workstation.
MCA DHDK
Intel® MCA Default Handler Development Kit
Intel MCA Default Handler Development Kit (MCA DHDK) is a development kit for ISVs/OEMs to develop their default handlers. Please refer to DHDK Developers guide for more information. It provides Intel proprietary software API to support the development of third-party DLLs that will perform default button actions.
OEM Original Equipment Manufacturer
PD
Intel® MCA Platform Driver
Intel proprietary runtime software that integrates peripheral plug-in technologies and applications software with an OEM’s mobile clinical assistant platform. This software package is shipped on every genuine MCA product.
PDK Intel® MCA Plug-in Development Kit
Intel proprietary software API to support the development of peripherals that can plug-in to any MCA product.
RFID Radio Frequency Identification
SI Symbology identifier: the AIM Global-defined code used to specify a barcode type
SRM Strategic Relationship Manager

Mobile Clinical Assistant SDK 2.0 Developer Guide Intel Confidential
7/24/2008 Document Number PLAN-SDK2.0_072508 Page 71
Term Definition
“ToolTray” Application
An SDK software component that handles button press interactions between the developer’s application and the button handler DLL files, and when necessary, capturing and passing data from the button-activated peripheral to requesting application.
UDSI User Defined Symbology Identifier
A non-standard or application defined prefix configured in the barcode scanner that enables software applications to distinguish between types of barcodes scanned.
UID Unique Identifier
CFGEditor Configuration Editor – A tool for editing the MCA Configuration file (IntelHealthcare.cfg).

Mobile Clinical Assistant SDK 2.0 Developer Guide
Intel Confidential
Document Number: PLAN-SDK2.0_072508 7/24/2008 Page 72
12 Help Files and Code Samples
This chapter includes language-specific and tools-specific help files and code examples.
12.1 Language-Specific
Language-Specific Help Files / Code Examples
Location
Native Code (C) API Help File The C API help files are available from the following location: <MCA SDK Install Directory>\Help\C_API\<files>.html.
Native Code (C) Code Examples
Example projects that demonstrate accessing the SDK via a C language application are included with the MCA SDK and are installed in the following directory: <SDK Install Directory>/Examples/C.
See Section 2.4.1 to Configure Microsoft Visual Studio* 2005 for C/C++ Development.
.NET* (C#) API Help File The CHM help file included in the MCA SDK is available in the following location: <MCA SDK Install Directory>\Help\MCA .Net API.chm
.NET* (C#) Code Examples
Example projects that demonstrate accessing the SDK via a .NET application are included with the MCA SDK. They are installed in the following directory: <MCA SDK Install Directory>/Examples/CSharp.
See Section 2.4.2 to Configure Microsoft Visual Studio* 2005 for C# Development.
Java* API Help File The Java HTML help files are installed to the following location: <MCA SDK Install Directory>\Help\Java_API\<files>.html.
Java Code Examples
Example projects that demonstrate accessing the SDK via a Java language application are installed to the following directory: <MCA SDK Install Directory>/Examples/Java.
See Section 2.4.3 to Configure Eclipse* IDE for JAVA* Development.
COM API Help File The CHM help file is installed to the following location: <MCA SDK Install Directory>\Help\IntelHealthcareLib.chm
COM Code Examples
Example projects that demonstrate accessing the SDK via a COM language application are installed in the following directory: <MCA SDK Install Directory>/Examples/COM.
Code examples for the languages JScript and VB6 are provided.
See Section 2.4.4 to Configure Microsoft Visual Basic* 6.0 for COM Development.

Mobile Clinical Assistant SDK 2.0 Developer Guide Intel Confidential
7/24/2008 Document Number PLAN-SDK2.0_072508 Page 73
12.2 Others Help Files /Code Examples Location
Intel MCA Default Handler Development Kit (MCA DHDK) Help File
The C API DHDK help files are available from the following location
<MCA SDK Install Directory>\DHDK\Help\ <files>.html.
MCA Configuration Editor Help File
MCA Configuration Editor Tool can be found at following location: <MCA SDK Install Directory>\Bin\CFGEditor.exe User can click F1 or click on the “Help->Help Contents” menu item in the tool to access the help file.
Barcode Default Handler Code Example
Example project demonstrate how to develop Barcode default action using MCA DHDK is installed in the following location
<MCA SDK Install Directory>\DHDK\Examples\ BarcodeDefaultHandler
RFID Default Handler Code Example
Example project demonstrate how to develop RFID default action using MCA DHDK is installed in the following location
<MCA SDK Install Directory>\DHDK\Examples\ RfidDefaultHandler
Image Edit Code Example
Example project demonstrate Image cropping and annotation features using Microsoft INK API
<MCA SDK Install Directory>\ Examples\ImageEdit
Note: Install Tablet PC Platform Software Development Kit (SDK) to compile this example.