model training service - support.huaweicloud.com
TRANSCRIPT

NAIEV200R021C30
Model Training Service
Issue 01
Date 2020-12-30
HUAWEI TECHNOLOGIES CO., LTD.

Copyright © Huawei Technologies Co., Ltd. 2021. All rights reserved.
No part of this document may be reproduced or transmitted in any form or by any means without priorwritten consent of Huawei Technologies Co., Ltd. Trademarks and Permissions
and other Huawei trademarks are trademarks of Huawei Technologies Co., Ltd.All other trademarks and trade names mentioned in this document are the property of their respectiveholders. NoticeThe purchased products, services and features are stipulated by the contract made between Huawei andthe customer. All or part of the products, services and features described in this document may not bewithin the purchase scope or the usage scope. Unless otherwise specified in the contract, all statements,information, and recommendations in this document are provided "AS IS" without warranties, guaranteesor representations of any kind, either express or implied.
The information in this document is subject to change without notice. Every effort has been made in thepreparation of this document to ensure accuracy of the contents, but all statements, information, andrecommendations in this document do not constitute a warranty of any kind, express or implied.
Issue 01 (2020-12-30) Copyright © Huawei Technologies Co., Ltd. i

Contents
1 Documentation Guide............................................................................................................ 1
2 Introduction.............................................................................................................................. 22.1 Overview.................................................................................................................................................................................... 22.2 Advantages................................................................................................................................................................................ 22.3 Functions.................................................................................................................................................................................... 32.4 Architecture............................................................................................................................................................................... 42.5 Application Scenarios............................................................................................................................................................. 52.6 Basic Concepts.......................................................................................................................................................................... 62.7 Service Dependencies.............................................................................................................................................................72.8 Billing Description................................................................................................................................................................... 72.9 How to Access the Model Training Service.................................................................................................................... 82.10 Change History...................................................................................................................................................................... 9
3 Quick Start.............................................................................................................................. 103.1 Using the Model Training Service for Efficient Algorithm Model Training....................................................... 103.1.1 Operation Process............................................................................................................................................................. 103.1.2 Prerequisites........................................................................................................................................................................ 113.1.3 Subscribing to the Model Training Service............................................................................................................... 113.1.4 Accessing the Model Training Service........................................................................................................................ 123.1.5 Project Creation..................................................................................................................................................................123.1.6 Dataset.................................................................................................................................................................................. 143.1.7 Feature Engineering..........................................................................................................................................................163.1.8 Model Training................................................................................................................................................................... 233.1.9 Model Management......................................................................................................................................................... 293.1.10 Model Verification.......................................................................................................................................................... 293.1.11 Cloud-based Inference...................................................................................................................................................333.2 Change History...................................................................................................................................................................... 39
4 User Guide...............................................................................................................................414.1 About This Document......................................................................................................................................................... 414.2 Training Service Overview.................................................................................................................................................. 424.3 Prerequisites............................................................................................................................................................................434.3.1 Subscribing to the Model Training Service............................................................................................................... 434.3.2 Operation Process............................................................................................................................................................. 43
NAIEModel Training Service Contents
Issue 01 (2020-12-30) Copyright © Huawei Technologies Co., Ltd. ii

4.3.3 Accessing the Model Training Service........................................................................................................................ 444.4 Project Creation..................................................................................................................................................................... 444.4.1 Introduction to the Training Service Homepage.................................................................................................... 444.4.2 Creating a Project.............................................................................................................................................................. 474.4.3 Project Overview................................................................................................................................................................ 494.5 Dataset..................................................................................................................................................................................... 504.5.1 Dataset Overview.............................................................................................................................................................. 504.5.2 Creating a Dataset and Importing Data....................................................................................................................544.5.3 Performing Dataset Operations....................................................................................................................................644.6 Feature Engineering............................................................................................................................................................. 694.6.1 Feature Engineering Overview......................................................................................................................................694.6.2 Python and Spark Development Platforms.............................................................................................................. 724.6.2.1 Creating a Feature Engineering Project..................................................................................................................724.6.2.2 Data Sampling................................................................................................................................................................ 764.6.2.3 Column Filtering............................................................................................................................................................. 774.6.2.4 Data Preparation............................................................................................................................................................ 804.6.2.5 Performing Feature Operations................................................................................................................................ 834.6.2.6 Notebook Development...............................................................................................................................................904.6.2.7 Applying Feature Operations to All Data.............................................................................................................. 914.6.2.8 Publishing a Service.......................................................................................................................................................924.6.3 JupyterLab Development Platform..............................................................................................................................954.6.3.1 Creating a Feature Engineering Project..................................................................................................................954.6.3.2 Dataset.............................................................................................................................................................................. 994.6.3.3 Data Exploration.......................................................................................................................................................... 1024.6.3.4 Data Sampling.............................................................................................................................................................. 1134.6.3.5 Data Cleansing............................................................................................................................................................. 1144.6.3.6 Data Combination....................................................................................................................................................... 1204.6.3.7 Data Conversion...........................................................................................................................................................1224.6.3.8 Feature Selection......................................................................................................................................................... 1294.6.3.9 Time Series Data Processing.................................................................................................................................... 1314.6.3.10 Customization.............................................................................................................................................................1384.6.3.11 Applying the Feature Operation Flow to All Data.........................................................................................1384.6.3.12 Publishing a Feature Engineering Service.........................................................................................................1394.6.3.13 Model Training........................................................................................................................................................... 1394.6.3.14 Transfer Learning.......................................................................................................................................................1494.6.3.15 Learnware.................................................................................................................................................................... 1544.7 Model Training.................................................................................................................................................................... 1544.7.1 Model Training Overview............................................................................................................................................. 1544.7.2 Creating a Model Training Project............................................................................................................................ 1564.7.2.1 Creating a Project........................................................................................................................................................ 1564.7.2.2 Training Code Editing (Simple Editor).................................................................................................................. 1604.7.2.3 Training Code Editing (WebIDE)............................................................................................................................ 164
NAIEModel Training Service Contents
Issue 01 (2020-12-30) Copyright © Huawei Technologies Co., Ltd. iii

4.7.2.4 Model Training..............................................................................................................................................................1664.7.2.5 MindSpore Sample...................................................................................................................................................... 1724.7.3 Creating a Federated Learning Project.................................................................................................................... 1764.7.3.1 Creating a Project........................................................................................................................................................ 1764.7.3.2 Editing Code (Simple Editor)................................................................................................................................... 1804.7.3.3 Editing Code (WebIDE)..............................................................................................................................................1834.7.3.4 Model Training..............................................................................................................................................................1854.7.4 Creating a Training Service.......................................................................................................................................... 1924.7.5 Creating a Hyperparameter Optimization Service.............................................................................................. 1964.7.6 Creating a TensorBoard.................................................................................................................................................2034.7.7 Packaging a Training Model........................................................................................................................................ 2054.8 Model Management.......................................................................................................................................................... 2064.8.1 Model Management Overview.................................................................................................................................. 2064.8.2 Creating a Model Package........................................................................................................................................... 2084.8.3 Editing a Model Package.............................................................................................................................................. 2094.8.4 Releasing a Model Package to the AI Marketplace............................................................................................ 2104.8.5 Publishing an Inference Service..................................................................................................................................2104.8.6 Verifying Model Package Integrity............................................................................................................................2124.9 Model Verification.............................................................................................................................................................. 2134.9.1 Model Verification Overview...................................................................................................................................... 2134.9.2 Creating a Verification Service................................................................................................................................... 2144.9.3 Creating a Verification Task........................................................................................................................................ 2174.10 Cloud-based Inference Framework............................................................................................................................ 2184.10.1 Inference Service........................................................................................................................................................... 2184.10.2 Model Repository..........................................................................................................................................................2214.10.3 Template Management.............................................................................................................................................. 2224.11 Change History................................................................................................................................................................. 224
5 Learnware User Guide....................................................................................................... 2275.1 Introduction to the Learnware Capability.................................................................................................................. 2275.2 Subscribing to the Model Training Service................................................................................................................ 2295.3 Accessing the Model Training Service......................................................................................................................... 2305.4 KPI Anomaly Detection Learnware Service............................................................................................................... 2305.4.1 Creating a Project............................................................................................................................................................2305.4.2 Dataset............................................................................................................................................................................... 2325.4.3 Model Training................................................................................................................................................................. 2365.4.3.1 SDK Import.................................................................................................................................................................... 2365.4.3.2 Data Selection...............................................................................................................................................................2375.4.3.3 Feature Profiling...........................................................................................................................................................2385.4.3.4 Model Selection............................................................................................................................................................2395.4.3.5 Model Training..............................................................................................................................................................2405.4.3.6 Model Test......................................................................................................................................................................2425.4.3.7 Inference Development............................................................................................................................................. 243
NAIEModel Training Service Contents
Issue 01 (2020-12-30) Copyright © Huawei Technologies Co., Ltd. iv
5.4.3.8 Model Archiving........................................................................................................................................................... 2435.4.4 Model Management...................................................................................................................................................... 2445.4.5 Inference Service............................................................................................................................................................. 2445.5 Multi-layer Nesting Anomaly Detection Learnware...............................................................................................2465.5.1 Creating a Project............................................................................................................................................................2465.5.2 Importing Sample Data to the Training Platform................................................................................................2465.5.3 Performing Model Training..........................................................................................................................................2485.5.4 Performing Model Testing............................................................................................................................................2505.6 Hard Disk Fault Root Cause Analysis Learnware.................................................................................................... 2535.6.1 Creating a Project............................................................................................................................................................2535.6.2 Importing Sample Data to the Training Platform................................................................................................2545.6.3 Performing Model Training..........................................................................................................................................2565.7 Change History.................................................................................................................................................................... 260
6 FAQs....................................................................................................................................... 2616.1 Training Platform Home Page........................................................................................................................................2616.1.1 How Can I Return to the Homepage of the Training Platform?.................................................................... 2616.1.2 What Is the Meaning of the Public or Not Parameter During Project Creation?..................................... 2616.2 Feature Engineering...........................................................................................................................................................2616.2.1 How Do I Select All Feature Columns?....................................................................................................................2616.2.2 Is Sampling Mandatory Before Feature Engineering Processing?..................................................................2626.2.3 How Can I Apply Feature Processing Results to All Data in a Dataset?......................................................2626.3 Model Training.................................................................................................................................................................... 2626.3.1 What Is the Purpose of Selecting a Common Algorithm When I Create a Model Training Project forModel Training?..........................................................................................................................................................................2626.3.2 Where Can I Edit the Inference Entry Function Used for Online Inference Using the Training Model?......................................................................................................................................................................................................... 2626.3.3 How Can I Obtain Data in the Development Code After the Data Is Imported through a Dataset?......................................................................................................................................................................................................... 2636.3.4 How Can I Check the Python Library Version During Model Training?....................................................... 2636.3.5 How Do I Set the Log Level During Model Training?.........................................................................................2636.3.6 How Do I Customize the Installation of a Third-Party Python Library?...................................................... 2636.4 Model Verification.............................................................................................................................................................. 2646.4.1 What Is the Meaning of the Model Verification Service?................................................................................. 2646.5 Common Questions........................................................................................................................................................... 2646.5.1 What Are the Entries to AutoML?............................................................................................................................. 2646.6 Change History.................................................................................................................................................................... 265
7 Glossary................................................................................................................................. 266
NAIEModel Training Service Contents
Issue 01 (2020-12-30) Copyright © Huawei Technologies Co., Ltd. v

1 Documentation Guide
Documents including the Introduction, Quick Start, User Guide, FAQs, andGlossary are provided for users to help them quickly get familiar with and use theNAIE model training platform for model training and model management.
Table 1-1 Documentation guide
Document Description
Introduction This document describes the positioning, advantages, functions,architecture, and application scenarios of the NAIE modeltraining service.
Quick Start This document uses the training of the hard disk fault detectionmodel as an example to describe how to use the NAIE trainingplatform. Datasets, feature engineering, model training, modelmanagement, and model validation are described, helpingdevelopers quickly get familiar with the NAIE training platform.
User Guide This document describes the preparations for using the NAIEtraining platform, and how to use the platform to import data,and perform feature operations, model training, modelpackaging, and model validation.
LearnwareUser Guide
This document describes the entire process of using thelearnware, including dataset, model training, modelmanagement, and online inference service release.
FAQs This document provides answers to frequently asked questions(FAQs) for users of the NAIE training platform.
Glossary This document describes the product terms related to the NAIEmodel training service.
NAIEModel Training Service 1 Documentation Guide
Issue 01 (2020-12-30) Copyright © Huawei Technologies Co., Ltd. 1

2 Introduction
2.1 OverviewThe NAIE model training service provides developers with a one-stop modeldevelopment service in the telecom domain, including data preprocessing, featureextraction, model training, model verification, and online inference. This serviceprovides developers with development environments, simulated verificationenvironments, APIs, and a series of development tools, helping developers quicklyand efficiently develop models for the telecom domain.
2.2 Advantages
Embedded Telecom Experience Lowers the Model DevelopmentRequirements
● More than 50 AI operators and project templates in the telecom field areintegrated to improve training efficiency and lower the AI developmentrequirements, enabling developers to quickly complete model developmentand training.
● AutoML can be invoked to automatically select features, hyperparameters,and algorithms, improving model development efficiency.
● Efficient development tools JupyterLab and WebIDE are available, offeringinteractive coding experience, zero-coding data exploration, and cloud-basedcoding and debugging.
Federated Learning and Retraining Ensure the Model Application Effect● Federated learning is supported. Models can be jointly trained using data
from multiple locations, improving sample diversity and model effect.
● Transfer learning is supported. Model training can be performed for a non-first site with only a small amount of data, improving model generalization.
● Automatic model retraining is supported. The model effect can becontinuously optimized to resolving the aging and deterioration problems.
NAIEModel Training Service 2 Introduction
Issue 01 (2020-12-30) Copyright © Huawei Technologies Co., Ltd. 2

Multiple Value-added Services for High-Value Communications ArePreconfigured to Shorten the Model Delivery Period
● Models can be automatically generated and quickly used by service personnelwithout AI skills.
● Multiple value-added communication services are out-of-the-box, quicklysupporting AI applications in the telecom field.
Support for Three Deployment Modes● Public cloud: Outgoing data transfer is supported. This mode is applicable to
small- and medium-sized carriers, partners, and Huawei R&D engineers.● Jointly-operated cloud: Outgoing data transfer is not supported. This mode is
applicable to tier-1 carriers with a jointly-operated cloud.● HUAWEI CLOUD Stack: Outgoing data transfer is not supported. This mode is
applicable to tier-1 carriers without a jointly-operated cloud.
2.3 Functions
Dataset
The dataset used for model training is imported, and the maximum value,minimum value, average value, variance, and visualized data analysis capabilityare provided to evaluate and analyze the data quality.
Feature Engineering
Feature engineering is necessary for model training. It can combine, filter, andtransform dataset features and maximize the extraction of key features from thedatasets for model training. Currently, feature processing is supported for featuresof service objects in the telecom domain, such as base stations, switches, androuters, helping to identify key features and improve the model training effect.
Model Training
An online simplified editor and an online VS code IDE programming tool areprovided, allowing developers to switch models online and develop modelscoordinately. Huawei-developed AI framework MindSpore and multiplemainstream AI computing frameworks in the industry, such as TensorFlow, SparkMLlib, MXNet, and PyTorch, are supported. Multiple model training tasks can besubmitted concurrently. Integrated learning is supported. Both GPU and CPUcomputing resources are provided for developers.
Model Management
Training model development and optimization require considerable efforts initeration and debugging. Any changes of datasets, training algorithms, orhyperparameters may affect the model quality. Users can package high-quality,trained models on the model management page for unified management. Modelmanagement supports the following functions:
NAIEModel Training Service 2 Introduction
Issue 01 (2020-12-30) Copyright © Huawei Technologies Co., Ltd. 3

● Create a model package (generally in a scenario where multiple models arepackaged into a model package).
● Delete or download a model.
● Edit models and model-related data processing capabilities using the onlineVS code IDE.
● Release a model to the AI marketplace.
● Publish a model as an online inference service and update a published onlineinference service.
● Verify model package integrity.
● Create a federated learning instance.
Model Verification
During model verification, models that have been packaged on the trainingplatform are verified based on new datasets or hyperparameters. The modelquality is evaluated based on the verification report.
Cloud-based Inference Framework
A cloud-based model running framework is provided to quickly release AI modelsas real-time inference services on the cloud and offer service APIs that can beinvoked externally. This helps users efficiently and cost-effectively deploy, verify,and release models.
2.4 ArchitectureFigure 2-1 shows the architecture of the training platform.
Figure 2-1 Architecture
Table 2-1 describes the architecture of the training platform.
NAIEModel Training Service 2 Introduction
Issue 01 (2020-12-30) Copyright © Huawei Technologies Co., Ltd. 4

Table 2-1 Architecture description
FunctionModule
Description
APIgateway
Provides APIs of the training platform.
Frontendconsole
Provides IDE capabilities of the training platform.
Service External services provided by the training platform.
Trainingplatformcapability
Provides scalable SDK capabilities of the training platform.
Storage Provides storage capabilities of the training platform.
Computing(ModelArts)
Integrates the ModelArts capability provided by Huawei cloudservices into the training platform.
Systemmanagement
Provides system management capabilities of the training platform.
2.5 Application ScenariosThe model training service provides an integrated AI development environment forpersonnel in four network communications domains to train and verify models,including wireless, fixed network, core network, and data center, helping themimprove network resource efficiency, energy efficiency, O&M efficiency, and userexperience.
Huawei Product Line UsersDevelop AI algorithms to generate models based on data in the data service andprovide the models for carriers.
Operator Users● Tertiary industry companies use the training service to develop AI algorithms
based on their own data and generate models for their own use.● Subscribe to and download models from the AI application market, deploy
the models to the inference framework, and perform inference.● Release the models provided by the model training service as online inference
services for online real-time verification.
Scientific Research Users in Colleges and UniversitiesDevelop AI algorithms, generate models based on data in the data service,research AI algorithms, and publish papers.
NAIEModel Training Service 2 Introduction
Issue 01 (2020-12-30) Copyright © Huawei Technologies Co., Ltd. 5

Ecosystem Partners
Develop AI algorithms, generate models based on data in the data service, andrelease the models to the AI application market for user subscription
2.6 Basic Concepts
AI Engine
The AI engine is a framework, such as Tensorflow, Spark MLlib, MXNet, orPyTorch, which supports machine learning, deep learning, and model training jobdevelopment.
Dataset
A dataset is a logical collection of data with the same data format of a service.
Data Preparation
After data instances are imported into a dataset, empty values, data redundancy,or data insufficiency may occur. In addition, users may need to perform datajoining, data union, or data restoration.
In old experience-based development mode, the functions include data repair,data filtering, data union, data joining, and data denoising. These functions can beperformed by some data processing items under the Data Processing menu in
in the upper right corner of the JupyterLab interactive development modepage.
Feature Operation
Feature operations mainly include modifications to the sample data values offeatures as well as feature column renaming, deletion, and filtering.
In old experience-based development mode, the training platform supports thefollowing feature operations: renaming, normalization, numeralization,standardization, feature discretization, one-hot encoding, data transformation,column deletion, feature selection, chi-square test, information entropy, featureaddition, and PCA. These operations can be performed by some data processing
items under the Data Processing menu in in the upper right corner of theJupyterLab interactive development mode page.
Model Package
A model package is a raw package of a training model, including the model files.The model verification service and training service can be created based on modelpackages. Model packages can be released in the application market and bedownloaded to the inference framework after subscription.
NAIEModel Training Service 2 Introduction
Issue 01 (2020-12-30) Copyright © Huawei Technologies Co., Ltd. 6

2.7 Service Dependencies
ModelArts ServiceThe NAIE platform uses the ModelArts service provided by the Huawei publiccloud system to implement data preprocessing and large-scale distributed modeltraining.
IAM ServiceThe NAIE platform uses the Identity and Access Management (IAM) serviceprovided by the Huawei public cloud system to implement unified identityauthentication and permission management.
API GatewayThe NAIE platform must interconnect with the unified API gateway provided bythe Huawei public cloud system. The API gateway provides a unified entrance forusers to invoke NAIE cloud service APIs. APIs provided by the NAIE cloud servicefor tenants must be registered with the API gateway before being released.
Relationship with the OBSThe NAIE platform uses the Object Storage Service (OBS) to store data and modelbackup and snapshots, achieving secure, reliable, and low-cost storage.
Relationship with the CCEThe NAIE platform uses the Cloud Container Engine (CCE) to deploy models asonline services, satisfying requirements for high concurrency and elastic scaling.
2.8 Billing Description
Billing ItemsThe model training service is charged based on the selected instance specificationsand usage duration. The billing items include the model training environment andcloud-based inference service, as shown in Table 2-2.
Table 2-2 Billing items
Billing Item Description
Modeltrainingservice
The model training service is charged based on the CPU andGPU specifications and usage duration. If the service is notused, no fee is charged.After the training service is started and the instance is in theRunning status, fees are charged. Stop unnecessary instances ina timely manner to avoid unnecessary fees.
NAIEModel Training Service 2 Introduction
Issue 01 (2020-12-30) Copyright © Huawei Technologies Co., Ltd. 7

Billing Item Description
Cloud-basedinference
The cloud-based inference service is charged based on the CPUand GPU specifications and usage duration. If the service is notused, no fee is charged.Once a model is deployed in the cloud-based inference service,is started, and the instance is in the Running status, fees arecharged. Stop unnecessary instances in a timely manner toavoid unnecessary fees.
Billing Mode
Pay-per-use mode is used. Fees are charged based on the specifications and usageduration of Running instances.
● Billing formula: Unit price x Number of instances x Usage duration. The fee isdeducted by cent.
● With pay-per-use pricing, if the estimated price is a decimal numeral, it will beaccurate to two decimal places with the third digit rounded off. For example,if the estimated price is less than 0.01 after being rounded off, 0.01 isdisplayed.
● The model training service uses the OBS.
Changing Billing Mode
Subscribing to the model training service does not incur fees, but runninginstances incur fees. Therefore, no service change configuration is involved. Youcan select and run instances with the required specifications.
Renewal
Users can recharge their accounts in time as required to ensure that the modeltraining service can be used properly.
Expiration and Overdue Payment
If you do not renew your subscription on time, the cloud platform provides a graceperiod and a retention period. For details, see Grace Period and RetentionPeriod.
If the account is not recharged after the retention period expires, the resources arecleared.
2.9 How to Access the Model Training ServiceStep 1 Enter https://console-intl.huaweicloud.com/naie/ in the address box of a
browser on a user PC and press Enter to access the NAIE service official website.
Step 2 Click Sign In in the upper right corner to access the login page.
NAIEModel Training Service 2 Introduction
Issue 01 (2020-12-30) Copyright © Huawei Technologies Co., Ltd. 8

Step 3 Select IAM User Login and enter the tenant name, user name, and password.
You can also log in using an account. Change the password after the firstsuccessful login and change the password periodically.
Step 4 Click Log In to access the NAIE service official website.
Step 5 Choose AI Services > Model and Training Service > Model Training > ModelTraining Service. The model training service introduction page is displayed.
Step 6 Click Enter Service. The model training service page is displayed.
----End
2.10 Change HistoryDate Description
2020-08-30 Updated the following sections based on the latest trainingplatform:● Advantages● Functions● Basic Concepts
2020-06-30 Added section "Billing Description."
2019-12-30 Optimized service functions and updated the entiredocument.
2019-04-30 Released this document officially for the first time.
NAIEModel Training Service 2 Introduction
Issue 01 (2020-12-30) Copyright © Huawei Technologies Co., Ltd. 9

3 Quick Start
3.1 Using the Model Training Service for EfficientAlgorithm Model Training
This document uses the training of the hard disk fault detection model as anexample to describe how to use the model training service. Datasets, featureengineering, model training, model management, and model validation aredescribed, helping developers quickly get familiar with the training platform.
A project template is available for hard disk fault detection. To train the hard diskfault detection model, you are advised to use the hard disk fault detectiontemplate for project creation.
3.1.1 Operation ProcessFigure 3-1 shows the process of the model training service.
NAIEModel Training Service 3 Quick Start
Issue 01 (2020-12-30) Copyright © Huawei Technologies Co., Ltd. 10

Figure 3-1 Operation flowchart
3.1.2 Prerequisites● You have registered a HUAWEI CLOUD account.● The administrator tenant and IAM user of the NAIE platform have been
registered.● You have subscribed to the model training service of the NAIE.
3.1.3 Subscribing to the Model Training ServiceStep 1 Enter https://console-intl.huaweicloud.com/naie/ in the address box of a
browser on a user PC and press Enter to access the NAIE service official website.
When you access the NAIE service official website for the first time, the AccessAuthorization page is displayed. Click Authorize.
Step 2 Click Sign In in the upper right corner of the page. The login page is displayed.
Step 3 Enter the tenant name and password, and click Log In to access the NAIE serviceofficial website.
Change the password after the first successful login and change the passwordperiodically.
Step 4 Choose AI Services > Model and Training Service > Model Training > ModelTraining Service. The model training service introduction page is displayed.
Step 5 Click Buy Now. The page shown in Figure 3-2 is displayed.
NAIEModel Training Service 3 Quick Start
Issue 01 (2020-12-30) Copyright © Huawei Technologies Co., Ltd. 11

Region: HUAWEI CLOUD region that provides services.
You can click Learn about billing details to better understand the resources,specifications, and price information provided by the training service. In addition,when you use a specific resource, the training service displays an eye-catchingcharging prompt on the page.
Figure 3-2 Subscribing to the training service
Step 6 Click Use Immediately. The service subscription is complete.
----End
3.1.4 Accessing the Model Training ServiceStep 1 Enter https://console-intl.huaweicloud.com/naie/ in the address box of a
browser on a user PC and press Enter to access the NAIE service official website.
Step 2 Click Sign In in the upper right corner to access the login page.
Step 3 Select IAM User Login and enter the tenant name, user name, and password.
You can also log in using an account. Change the password after the firstsuccessful login and change the password periodically.
Step 4 Click Log In to access the NAIE service official website.
Step 5 Choose AI Services > Model and Training Service > Model Training > ModelTraining Service. The model training service introduction page is displayed.
Step 6 Click Enter Service. The model training service page is displayed.
----End
3.1.5 Project CreationStep 1 On the homepage of the training platform, click the plus sign (+) above Create
Project to create a hard disk fault detection project.
Figure 3-3 shows parameter settings.
The parameters are described as follows:
● Template: Use existing telecom experience to create a project. Relateddataset, feature processing operations, model training algorithms, and modelverification algorithms are preconfigured in the project.
NAIEModel Training Service 3 Quick Start
Issue 01 (2020-12-30) Copyright © Huawei Technologies Co., Ltd. 12

● Public or Not: When creating a user, you can set the user group to which theuser belongs. If you set this parameter to Yes, the Public to Group parameteris displayed.
● Public to Group: By default, all user groups to which the current user belongsare displayed. If a user group to which the user belongs is selected, all users inthe selected user group can view the project created by the current user.
● Icon: project icon Users can upload images from the local PC.
Figure 3-3 Creating a project
Step 2 Click Create.
The project overview page is displayed.
NO TE
If the current operation is performed on the project overview, dataset, feature engineering,model training, model management, or model verification page, you can click HOME onthe right of the brand icon in the upper left corner and select Model Training Service fromthe drop-down list to return to the training platform homepage.
----End
NAIEModel Training Service 3 Quick Start
Issue 01 (2020-12-30) Copyright © Huawei Technologies Co., Ltd. 13

3.1.6 DatasetThe following datasets are used for hard disk fault detection:
● HardDisk-Detect_Train_Good.csv: healthy hard disk training data● HardDisk-Detect_Train_Fail.csv: faulty hard disk training data● HardDisk-Detect_Test_Good.csv: healthy hard disk test data● HardDisk-Detect_Test_Fail.csv: faulty hard disk test data
Step 1 In the Project area, click Create under Dataset.
The dataset page is displayed, as shown in Figure 3-4.
Create a healthy hard disk training dataset. The parameters are described asfollows:
● Dataset: The default value is Default. You can enter a value as required, forexample, Harddisk. After you click Create, a Harddisk node is automaticallyadded to the navigation pane.
● Entity Name: The parameter value can be customized. Set this parameter toTrainGood.
● Entity Alias: The parameter value can be customized. Set this parameter toTrainGood to facilitate data identification.
● Data Source: The first option in the drop-down list box is Local, whichindicates that a data file obtained from a local path are automaticallyuploaded to the OBS tenant space. The second is Data Catalog, whichindicates that if a user has subscribed to a dataset, the user can subscribe toand select dataset files and import them to the training platform. The thirdoption is Sample Data, which indicates sample data preconfigured on thetraining platform.
NAIEModel Training Service 3 Quick Start
Issue 01 (2020-12-30) Copyright © Huawei Technologies Co., Ltd. 14

Figure 3-4 Importing data
Step 2 Click Create. The data file is automatically uploaded to the OBS tenant space.
Step 3 Click in the Operation column corresponding to the data record.
The data operation page is displayed, as shown in Figure 3-5.
Figure 3-5 Data operation page
Step 4 Click Metadata next to the import status.
The data analysis page is displayed.
NO TE
● For a text dataset instance, click Metadata next to Status above the data. All CSV filesof the dataset instance are combined for analysis.
● For a single CSV file under a dataset instance, click Metadata in the Operation columnto analyze the metadata of the file.
NAIEModel Training Service 3 Quick Start
Issue 01 (2020-12-30) Copyright © Huawei Technologies Co., Ltd. 15

Step 5 Set the engine and specifications and click Analyze Data in the lower right cornerof the page.
Figure 3-6 shows the data details after data analysis.
Figure 3-6 Data details
Step 6 Click in the upper right corner of the data preview page to return to the dataoperation page.
Step 7 In the navigation pane, click dataset node Harddisk to return to the datasethomepage.
Step 8 Click LOCAL in the upper right corner of the page to create a faulty hard disktraining task, a healthy hard disk test task, and a faulty hard disk test dataset, andperform data analysis. For details, see Step 1 to Step 7.
After the datasets are created, four data records are displayed on the page, asshown in Figure 3-7.
Figure 3-7 Hard disk fault detection
----End
3.1.7 Feature EngineeringStep 1 Click in the Operation column of the row that contains the training dataset
of a normal hard disk. In the drop-down list, click .
NAIEModel Training Service 3 Quick Start
Issue 01 (2020-12-30) Copyright © Huawei Technologies Co., Ltd. 16

The feature processing page is displayed, as shown in Figure 3-8.
The parameters are described as follows:
● Development mode: Feature engineering development environment. SelectJupyterLab Interactive Development.
● Specifications: Resource configuration information. Set this parameter basedon the site requirements, for example, 2U|8G.
● Instance: If no environment instance is available, select Create a newdevelopment environment from the drop-down list box.
For details about feature operations in feature engineering, see section "FeatureEngineering" in the User Guide of the model training service.
Figure 3-8 Feature processing
Step 2 Click Create.
The feature engineering page is displayed. After the feature engineering project iscreated, the feature engineering status is Running next to Environment of thenew feature engineering project.
Step 3 Click in the Operation column corresponding to the new feature engineeringproject.
Enter the JupyterLab environment editing page of the feature engineering project.By default, the main operation file of the feature engineering project with thesame name as the feature engineering project and the suffix ipynb is opened.
CA UTION
Before data processing, run the Import sdk code block. Otherwise, an error occursduring data selection.
NAIEModel Training Service 3 Quick Start
Issue 01 (2020-12-30) Copyright © Huawei Technologies Co., Ltd. 17

Step 4 In the main operation file of the feature engineering project on the right, click to run the Import sdk code block, as shown in Figure 3-9.
Figure 3-9 Running the Import sdk code block
Step 5 Click to expand the menu on the right of the JupyterLab environment editingpage of the feature engineering project, click the Data Processing tab page, andclick Load Data under Dataset. Alternatively, click Load Data under the Importsdk code block.
Step 6 In the Load Data area, set the dataset and dataset instances, and click to runthe code block, as shown in Figure 3-10.● Set Dataset to the dataset set in Step 1 in Dataset.● Set Entity Name to the normal hard disk training instance imported in Step 1
in Dataset.● Data File List: Select the actual data file corresponding to the dataset
instance. In this example, only one file is uploaded to the dataset instance,and this parameter is optional. If a data instance contains multiple files, youmust set the file to be loaded.
● Data File Type: Format of the data file, which generally is CSV.
Figure 3-10 Loading data
After the execution is successful, the feature data table is displayed under theLoad Data code box, as shown in Figure 3-11.
Figure 3-11 Feature data
NAIEModel Training Service 3 Quick Start
Issue 01 (2020-12-30) Copyright © Huawei Technologies Co., Ltd. 18

Step 7 Click the main operation file of the feature engineering project to return to thefeature engineering editing page. On the Data Processing tab page of the menu, choose Feature Selection > Reserve Columns.
Step 8 In the Reserve Columns dialog box, select the feature columns for training.
1. Set Column Selection Method to Column selection.2. In the Column Name box, click . In the displayed Column Name dialog
box, select the following feature columns, as shown in Figure 3-12:serial_number, D_date, model, failure, smart_1_normalized, smart_1_raw,smart_5_raw, smart_7_normalized, smart_187_raw, smart_197_raw,smart_198_raw, smart_1_normalized_slope, smart_1_raw_slope,smart_5_raw_slope, smart_7_normalized_slope, smart_187_raw_slope,smart_197_raw_slope, and smart_198_raw_slope
Figure 3-12 Selecting feature columns
3. Click Confirm.Figure 3-13 shows the set Reserve Columns area on the displayed featureengineering editing page.
Figure 3-13 Column selection
4. Click in the Reserve Columns code box to run the code.
NAIEModel Training Service 3 Quick Start
Issue 01 (2020-12-30) Copyright © Huawei Technologies Co., Ltd. 19

After the execution is successful, the feature data table of the selected featurecolumns is displayed under the Reserve Columns code box.
Step 9 On the Data Processing tab page of the menu, choose Feature Selection >Delete Columns.
Step 10 In the Delete Columns code box, select feature columns that do not requiretraining.
1. Set Column Selection Method to Column selection.
2. In the Column Name box, click . In the displayed Column Name dialogbox, select the following feature columns, as shown in Figure 3-14:
D_date, and model
Figure 3-14 Selecting feature columns to be deleted
3. Click Confirm.
Figure 3-15 shows the set Delete Columns area on the displayed featureengineering editing page.
Figure 3-15 Deleting columns
4. Click in the Delete Columns code box to run the code.
After the execution is successful, the feature data table after the selectedfeature columns are deleted is displayed under the Delete Columns code box.
NAIEModel Training Service 3 Quick Start
Issue 01 (2020-12-30) Copyright © Huawei Technologies Co., Ltd. 20

Step 11 Expand the menu anc click the Data Processing tab page. Choose Dataset >Create Dataset Entity to apply the feature operation flow to the imported data,and generate new data after feature processing.
Step 12 In the Create Dataset Entity area, select a dataset and set the new dataset entityname, as shown in Figure 3-16.
Figure 3-16 Generating full data instances
After the script is successfully executed, expand the dataset directory in thenavigation pane. New data files are generated in the dataset directory, as shownin Figure 3-17.
Figure 3-17 Full datasets
Step 13 Click on the feature engineering menu bar.
A dialog box is displayed, as shown in Figure 3-18.
ServiceName: Name of the service as which the feature engineering project is tobe published. Set this parameter as required.
NAIEModel Training Service 3 Quick Start
Issue 01 (2020-12-30) Copyright © Huawei Technologies Co., Ltd. 21

Figure 3-18 Feature engineering service
Step 14 Click Publish to publish the feature engineering project as a service.
Step 15 After the feature engineering project is published, click OK in te displayed Successdialog box.
Step 16 Click Feature. On the displayed Feature Engineering Management page, clickthe Service List tab page to view the feature engineering service, as shown inFigure 3-19.
Figure 3-19 Published feature engineering project
Step 17 Click in the Operation column corresponding to the row of the generatedfeature engineering service.
A dialog box is displayed, as shown in Figure 3-20.
Details about parameter configurations are as follows:
● Dataset: Select the dataset created in Step 1 from the drop-down list box.
● Data Entity: Select the training dataset of the faulty disk from the drop-downlist box.
● Target Dataset: Select the dataset created in Step 1 from the drop-down listbox.
● Target Dataset Entity: Indicates the name of the dataset generated after thefeature engineering task is processed. Set the parameter based on siteconditions.
● AI Engine: AI algorithm running platform. Select TF-1.8.0-python3.6.
● Specifications: Resource configuration information. Set this parameter basedon the site requirements, for example, 2U|8G.
NAIEModel Training Service 3 Quick Start
Issue 01 (2020-12-30) Copyright © Huawei Technologies Co., Ltd. 22

Figure 3-20 Creating a task
Step 18 Click Create. The feature engineering task details page is displayed.
You can view the progress of the current task. If Job Status is FINISHED, thefeature processing of the faulty hard disk training set is complete.
Step 19 Perform feature processing operations on the faulty hard disk training dataset,healthy hard disk test dataset, and faulty hard disk test dataset in sequence byreferring to Step 17 to Step 18.
Step 20 On the menu bar, choose Dataset.
On the dataset page, four data records generated after the feature processing aredisplayed, as shown in Figure 3-21.
Figure 3-21 Data details
----End
3.1.8 Model TrainingStep 1 On the menu bar, choose Training.
Step 2 Click Create and create an algorithm, as shown in Figure 3-22.
NAIEModel Training Service 3 Quick Start
Issue 01 (2020-12-30) Copyright © Huawei Technologies Co., Ltd. 23

The parameters are described as follows:
● Please select model training type: Select Create New model trainingproject from the drop-down list box.
● Model Training Name: Set this parameter as prompted.● Select Development Environment: Select Simple Editor.
Figure 3-22 Creating a model training project
Step 3 Click OK.
The page of the created training project is displayed.
Step 4 Click in the upper right corner of the page.
The training code editing page is displayed.
Step 5 Click to expand the code directory. You can add code files in the codedirectory as required. Click a code file to edit code in the editing area on the right.Hard disk anomaly detection is used as an example to describe the following codedirectory and how to create files.
1. Click the root directory of the project, click , and create the code folderhardisk in the root directory.
2. Click the hardisk folder, click , and create three code files in the folder:__init__.py, preprocess.py, and train.py.
3. Copy the edited code to the preprocess.py and train.py files and press Ctrl+S.4. Click the .py main entry file with the same name as the training project, copy
the edited code to the main entry file, and press Ctrl+S to save theconfiguration.
NAIEModel Training Service 3 Quick Start
Issue 01 (2020-12-30) Copyright © Huawei Technologies Co., Ltd. 24

Step 6 Click on the left of the code directory and view the dataset directory, asshown in Figure 3-23.
Under the Harddisk node, four raw datasets and four datasets generated afterfeature processing are displayed.
NO TE
The number of data instances displayed in the dataset directory is greater than thatdisplayed on the dataset page. This is normal and can be ignored.
Figure 3-23 Dataset
Step 7 Click Training. On the displayed Training Job Configuration page, configure atraining task, as shown in Figure 3-24.
The parameters are described as follows:
● AI Engine: AI algorithm running platform. Select TensorFlow from the firstdrop-down list box and select TF-1.8.0-python3.6 (a matched Pythonlanguage version) from the second drop-down list box.
● Computing Node Specifications: Resource configuration information aboutmodel training.
● Computing Node Quantity: The value 1 indicates that one node is used fortraining. The value 2 or a larger value indicates that distributed training isused and developers need to compile the corresponding invoking code. Thebuilt-in MoXing distributed training acceleration framework can be used fortraining. The training algorithm must comply with the MoXing programstructure. Reference documents are as follows:
NAIEModel Training Service 3 Quick Start
Issue 01 (2020-12-30) Copyright © Huawei Technologies Co., Ltd. 25

https://github.com/huaweicloud/ModelArts-Lab/tree/master/docs/moxing_api_doc
● Dataset hyperparameter: All dataset hyperparameters set in the algorithmare displayed here. Each row corresponds to one hyperparameter. Ahyperparameter name is automatically displayed in the first box of each line.You need to select the dataset and data instance corresponding to thehyperparameter from the second and third drop-down list boxes respectively.Select Failure from the fourth drop-down list box. The details are as follows:– train_good_path: Set this parameter to the dataset generated after
feature processing is performed on the healthy hard disk training datasetcreated on the Dataset page.
– test_good_data: Set this parameter to the dataset generated afterfeature processing is performed on the faulty hard disk test datasetcreated on the Dataset page.
– train_failure_data: Set this parameter to the dataset generated afterfeature processing is performed on the faulty hard disk training datasetcreated on the Dataset page.
● Running hyperparameter: Model parameters are internal model variables.The parameter values can be automatically estimated based on data.Parameters are the key to machine learning and are usually summarized fromhistorical training data. Hyperparameters are external parameters of a model,which must be set and adjusted manually, and can be used to estimate modelparameter values. The first column is the hyperparameter name. The secondcolumn is the hyperparameter data type. If Parameter optimize is selected,the third and fourth columns are displayed. Set the upper and lower limits ofthe parameter value range.
● Optimization Method: Algorithm for selecting hyperparameter combinations.Retain the default value.
● Early Stop: Condition for stopping hyperparameter optimization. Retain thedefault value. If Iteration Number is selected, the Bayesian optimizationalgorithm selects 10 hyperparameter combinations for model training.
Figure 3-24 Training configuration
NAIEModel Training Service 3 Quick Start
Issue 01 (2020-12-30) Copyright © Huawei Technologies Co., Ltd. 26

Step 8 Click Start Training. You can click Training Jobs to view the training task status,as shown in Figure 3-25.
After the training is added, the model training log, running result log, runningdiagram, and TensorBoard window are automatically displayed in the lower partof the page. You can also click Training Jobs in the upper right corner and click
in the expanded training task record to open the console window.
Figure 3-25 Training task
After model training is complete, click to view the training evaluation resultsof the 10 models corresponding to the 10 hyperparameter combinations, as shownin Figure 3-26.
● The Score tab page displays the scores of 10 model training tasks.● The Hyperparameter tab page displays the values of 10 hyperparameter
combinations.● The Trial duration tab page displays the model training durations for 10
hyperparameter combinations.● The Detail tab page displays the iteration information, durations, evaluation
values, and hyperparameter values of 10 hyperparameter combinations. Eachhyperparameter combination can be retrained.
NAIEModel Training Service 3 Quick Start
Issue 01 (2020-12-30) Copyright © Huawei Technologies Co., Ltd. 27

Figure 3-26 Model training evaluation result
Step 9 On the Score tab page, select the model task with the highest score and recordthe values of the three hyperparameters. Perform steps Step 7 and Step 8 toconfigure an optical model training task and perform training.
Alternatively, on the Detail tab page shown in Figure 3-26, click in theOperation column corresponding to the model with the highest score.
NO TE
The training task is created for the model with the highest score to archive the optimalmodel package after the training. During hyperparameter configuration for the modeltraining task, deselect Parameter optimize and set the three hyperparameter values tothose of the optimal model.
Step 10 On the menu bar, choose Training.
The model training page is displayed.
Step 11 Click the row where the model training task is located.
The model training task details page is displayed.
Step 12 Under Model Training Jobs, click in the row where the training taskgenerated for the optimal model is located.
The Archive dialog box is displayed, as shown in Figure 3-27.
The parameter descriptions are as follows:
● Generate Model: Whether to pack a model package during archiving. Thevalue Yes indicates that the model is packaged during archiving. The value Noindicates that the model is only archived. The default value is Yes.
● Contain Code: Whether the model package contains training and inferencecode. The value Yes indicates contained. The value No indicates notcontained. The default value is Yes.
NAIEModel Training Service 3 Quick Start
Issue 01 (2020-12-30) Copyright © Huawei Technologies Co., Ltd. 28

Figure 3-27 Archiving a model
Step 13 Click OK.
----End
3.1.9 Model ManagementYou can view packaged models on the model management page, as shown inFigure 3-28.
Figure 3-28 Model management
3.1.10 Model VerificationStep 1 On the menu bar, choose Verification.
Step 2 Click Create. A dialog box is displayed, as shown in Figure 3-29.
In the Model Type area, select a value from the drop-down list box and you donot need to select Create template validation code.
NAIEModel Training Service 3 Quick Start
Issue 01 (2020-12-30) Copyright © Huawei Technologies Co., Ltd. 29
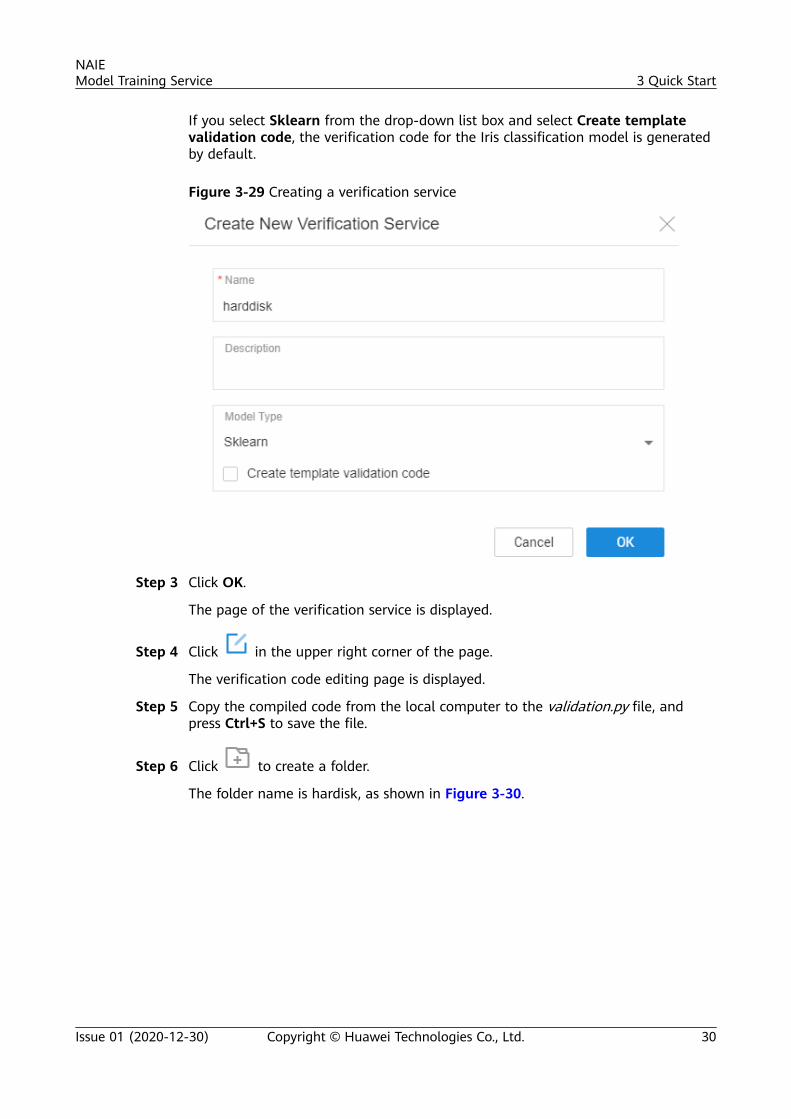
If you select Sklearn from the drop-down list box and select Create templatevalidation code, the verification code for the Iris classification model is generatedby default.
Figure 3-29 Creating a verification service
Step 3 Click OK.
The page of the verification service is displayed.
Step 4 Click in the upper right corner of the page.
The verification code editing page is displayed.
Step 5 Copy the compiled code from the local computer to the validation.py file, andpress Ctrl+S to save the file.
Step 6 Click to create a folder.
The folder name is hardisk, as shown in Figure 3-30.
NAIEModel Training Service 3 Quick Start
Issue 01 (2020-12-30) Copyright © Huawei Technologies Co., Ltd. 30

Figure 3-30 Creating a folder
Step 7 Click OK.
Step 8 Select hardisk and click to create an algorithm file.
The folder name is utils.py, as shown in Figure 3-31.
Figure 3-31 Creating a file
Step 9 Click OK.
Step 10 In the navigation pane, click utils.py to open the file, copy the compiled code tothe file, and press Ctrl+S to save the file.
Step 11 Select hardisk and click to create an algorithm file.
Name the file __init__.py. The file is an empty file by default and is used to identifya Python package.
Step 12 Click OK.
Step 13 Click Verification. The Verification Configuration dialog box is displayed, asshown in Figure 3-32.
The parameters are described as follows:
NAIEModel Training Service 3 Quick Start
Issue 01 (2020-12-30) Copyright © Huawei Technologies Co., Ltd. 31

● Verification Model Package: Select a model listed on the modelmanagement page from the drop-down list box.
● Verification Dataset: Each row corresponds to a dataset hyperparameter.Enter a hyperparameter name in the first box of each row. You need to selectthe dataset and data instance name corresponding to the hyperparameterfrom the second and third drop-down list boxes respectively. If the labelcolumn has been set in the Parameter Configuration area, the fourth drop-down list box can be left blank.– train_good_path: Set this parameter to the dataset generated after
feature processing is performed on the healthy hard disk training datasetcreated on the Dataset page.
– test_good_data: Set this parameter to the dataset generated afterfeature processing is performed on the faulty hard disk test datasetcreated on the Dataset page.
– train_failure_data: Set this parameter to the dataset generated afterfeature processing is performed on the faulty hard disk training datasetcreated on the Dataset page.
● Parameter Configuration: Set label_column to failure.● AI Engine: Select TensorFlow from the first drop-down list box and select
TF-1.8.0-python3.6 (a matched Python language version) from the seconddrop-down list box.
● Computing Node Specifications: Resource configuration information aboutmodel training.
Figure 3-32 Verification configuration
Step 14 Click Create. Click Verification Task to view verification tasks, as shown in Figure3-33.
NAIEModel Training Service 3 Quick Start
Issue 01 (2020-12-30) Copyright © Huawei Technologies Co., Ltd. 32

After the verification is added, the model verification logs, running result logs, andrunning diagram are automatically displayed in the lower part of the page. You
can also click Verification Task and click in the expanded verification tasklist to open the console window.
Figure 3-33 Verifying a task
After model verification is complete, click to view the model verificationreport, as shown in Figure 3-34.
Figure 3-34 Model verification report
----End
3.1.11 Cloud-based InferenceStep 1 Click Training on the menu bar to return to the Training page.
Step 2 Click corresponding to the training project. The page for editing the modeltraining project is displayed.
Step 3 In the code directory area on the left, click and create the training code filehardisk_detect_predict.py in the root directory of the project.
Step 4 Click the chardisk_detect_predict.py file, copy the edited inference code to the file,and press Ctrl+S to save the file.
NAIEModel Training Service 3 Quick Start
Issue 01 (2020-12-30) Copyright © Huawei Technologies Co., Ltd. 33

Step 5 Click .
Step 6 Set the training task parameters, as shown in Figure 3-35.
Figure 3-35 Configuring a training task
Step 7 Click Start Training.
Step 8 After the training is successful, click corresponding to the training task tocreate a model training package that contains the inference code, as shown inFigure 3-36.
NAIEModel Training Service 3 Quick Start
Issue 01 (2020-12-30) Copyright © Huawei Technologies Co., Ltd. 34

Figure 3-36 Packaging an inference model package
Step 9 On the menu bar, choose Model.
Step 10 Click Development Environment in the upper right corner of the Model page tocreate a Webide environment, as shown in Figure 3-37.
Figure 3-37 Creating the Webide environment
NAIEModel Training Service 3 Quick Start
Issue 01 (2020-12-30) Copyright © Huawei Technologies Co., Ltd. 35

Step 11 After the environment is created, click Select Environment corresponding to themodel package in Step 8 to switch to the new Webide environment, as shown inFigure 3-38.
Figure 3-38 Switching the Webide development environment
Step 12 Click in the Operation column corresponding to a model package. TheWebide code editing page is displayed.
Step 13 In the code directory on the left, expand the folder with the same name as themodel package, click the metadata.json file, and change the name in the red boxto the inference file name, as shown in Figure 3-39.
Figure 3-39 Modifying the metadata.json file
Step 14 Right-click in the blank area of the code directory on the left of the Webideediting page and choose NAIE Package from the shortcut menu.
Step 15 Return to the Model page and click in the Operation column correspondingto the model package.
The model package here is the model package packaged in Step 8.
Step 16 On the Deploy Inference Service page, set Version, Computing NodeSpecifications, and other information, and click OK, as shown in Figure 3-40.
Wait for about 10 minutes for the system to publish an inference service.
NAIEModel Training Service 3 Quick Start
Issue 01 (2020-12-30) Copyright © Huawei Technologies Co., Ltd. 36

After the publishment is successful, changes to .
Figure 3-40 Publishing an inference service
Step 17 Click in the Operation column corresponding to the model packagepublished as an inference service. The fast verification page of the inferenceservice is displayed.
Step 18 Enter the verification data in json format in the Test JSON Message area on theleft and click Quick test, as shown in Figure 3-41.
An example of the verification data is as follows:
{ "smart_1_normalized": { "ZA19CLVQ": 0.176685, "ZA1A6RN7": -1.624761, "ZA1APLSW": -0.223636, "ZA1APWX6": 0.777167, "ZA1AQ5E2": -0.223636 }, "smart_1_raw": { "ZA19CLVQ": 0.218284, "ZA1A6RN7": -1.476697, "ZA1APLSW": -0.488849, "ZA1APWX6": 1.600456, "ZA1AQ5E2": -0.659933 }, "smart_5_raw": { "ZA19CLVQ": -0.12219, "ZA1A6RN7": -0.12219,
NAIEModel Training Service 3 Quick Start
Issue 01 (2020-12-30) Copyright © Huawei Technologies Co., Ltd. 37

"ZA1APLSW": -0.12219, "ZA1APWX6": -0.12219, "ZA1AQ5E2": -0.12219 }, "smart_7_normalized": { "ZA19CLVQ": -0.400716, "ZA1A6RN7": -1.372835, "ZA1APLSW": 0.247364, "ZA1APWX6": 0.571403, "ZA1AQ5E2": 0.571403 }, "smart_187_raw": { "ZA19CLVQ": -0.0285, "ZA1A6RN7": -0.028502, "ZA1APLSW": -0.028502, "ZA1APWX6": -0.028502, "ZA1AQ5E2": -0.028502 }, "smart_197_raw": { "ZA19CLVQ": -0.113942, "ZA1A6RN7": -0.113942, "ZA1APLSW": -0.113942, "ZA1APWX6": -0.113942, "ZA1AQ5E2": -0.113942 }, "smart_198_raw": { "ZA19CLVQ": -0.113942, "ZA1A6RN7": -0.113942, "ZA1APLSW": -0.113942, "ZA1APWX6": -0.113942, "ZA1AQ5E2": -0.113942 }, "smart_1_normalized_slope": { "ZA19CLVQ": 1.235054, "ZA1A6RN7": -2.284543, "ZA1APLSW": 2.028689, "ZA1APWX6": 0.26889, "ZA1AQ5E2": 0.510431 }, "smart_1_raw_slope": { "ZA19CLVQ": 1.187602, "ZA1A6RN7": -3.581751, "ZA1APLSW": 0.022689, "ZA1APWX6": 0.506134, "ZA1AQ5E2": 0.060546 }, "smart_5_raw_slope": { "ZA19CLVQ": -0.107928, "ZA1A6RN7": -0.107928, "ZA1APLSW": -0.107928, "ZA1APWX6": -0.107928, "ZA1AQ5E2": -0.107928 }, "smart_7_normalized_slope": { "ZA19CLVQ": -0.254698, "ZA1A6RN7": 0.733461, "ZA1APLSW": 0.107928, "ZA1APWX6": 0.107928, "ZA1AQ5E2": 0.107928 }, "smart_187_raw_slope": { "ZA19CLVQ": -0.02716,
NAIEModel Training Service 3 Quick Start
Issue 01 (2020-12-30) Copyright © Huawei Technologies Co., Ltd. 38

"ZA1A6RN7": -0.02716, "ZA1APLSW": -0.02716, "ZA1APWX6": -0.02716, "ZA1AQ5E2": -0.02716 }, "smart_197_raw_slope": { "ZA19CLVQ": -0.063217, "ZA1A6RN7": -0.063217, "ZA1APLSW": -0.063217, "ZA1APWX6": -0.063217, "ZA1AQ5E2": -0.063217 }, "smart_198_raw_slope": { "ZA19CLVQ": -0.063217, "ZA1A6RN7": -0.063217, "ZA1APLSW": -0.063217, "ZA1APWX6": -0.063217, "ZA1AQ5E2": -0.063217 }}
The online inference result is displayed in the Test Result area on the right.
Figure 3-41 Fast verification
----End
3.2 Change HistoryDate Description
2020-12-30 Revised section "Cloud-based Inference."
2020-11-30 Revised sections "Dataset", "Feature Engineering", and"Cloud-based Inference."
2020-09-30 Changed the framework and replaced all screenshots.Revised section "Cloud-based Inference."
NAIEModel Training Service 3 Quick Start
Issue 01 (2020-12-30) Copyright © Huawei Technologies Co., Ltd. 39

Date Description
2020-08-17 Added section "Cloud-based Inference."Modified the screenshots in sections "Model Management"and "Model Verification."
2020-07-16 Optimized the Jupyterlab, and updated screenshots insection "Feature Engineering."Optimized the model training GUI, and updated screenshotsin section "Model Training."
2020-06-30 Added the inference service entry and federated learningcase creation entry on the model management page, andupdated screenshots in section "Model Management."Changed the Jupyterlab operator menu location andoperator groups, and changed menu entry descriptions insection "Feature Engineering."Supported time series data selection and multi-dataselection in Jupyterlab feature engineering, and updated alloperation screenshots in section "Feature Engineering."
2020-03-30 Optimized the training platform GUI, and updated alloperation GUI screenshots of the training service.
2019-12-30 Changed the iris classification modeling to hard diskanomaly detection modeling in Getting Started, andrewrote the entire document.
2019-04-30 Released this document officially for the first time.
NAIEModel Training Service 3 Quick Start
Issue 01 (2020-12-30) Copyright © Huawei Technologies Co., Ltd. 40

4 User Guide
4.1 About This DocumentThis document describes the preparations for using the model training service, andoperation guide of using the training platform to import data and perform featureoperations, model training, model packaging, model verification, and cloud-basedinterference framework. You can search for required information based on Table4-1.
Table 4-1 About this document
Phase Section
Understand the model trainingservice
Training Service Overview
Understand operation processes onthe training platform and how toaccess the platform.
● Operation Process● 3.4-Accessing the Training Platform
Get familiar with operationsrelated to dataset, featureengineering, model training, andmodel management on thetraining platform.
● Project Creation● Dataset● Feature Engineering● Model Training● Model Management
Test and verify training modelsonline.
Model Verification
Verify the model inference effectonline after the model is publishedas a service.
Cloud-based Inference Framework
NAIEModel Training Service 4 User Guide
Issue 01 (2020-12-30) Copyright © Huawei Technologies Co., Ltd. 41

4.2 Training Service OverviewThe NAIE model training service provides developers with a one-stop modeldevelopment service in the telecom domain, including data preprocessing, featureextraction, model training, model verification, and online inference. This serviceprovides developers with development environments, simulated verificationenvironments, APIs, and a series of development tools, helping developers quicklyand efficiently develop models for the telecom domain.
Embedded Telecom Experience Lowers the Model DevelopmentRequirements
● More than 50 AI operators and project templates in the telecom field areintegrated to improve training efficiency and lower the AI developmentrequirements, enabling developers to quickly complete model developmentand training.
● AutoML can be invoked to automatically select features, hyperparameters,and algorithms, improving model development efficiency.
● Efficient development tools JupyterLab and WebIDE are available, offeringinteractive coding experience, zero-coding data exploration, and cloud-basedcoding and debugging.
Federated Learning and Retraining Ensure the Model Application Effect● Federated learning is supported. Models can be jointly trained using data
from multiple locations, improving sample diversity and model effect.
● Transfer learning is supported. Model training can be performed for a non-first site with only a small amount of data, improving model generalization.
● Automatic model retraining is supported. The model effect can becontinuously optimized to resolving the aging and deterioration problems.
Multiple Value-added Services for High-Value Communications ArePreconfigured to Shorten the Model Delivery Period
● Models can be automatically generated and quickly used by service personnelwithout AI skills.
● Multiple value-added communication services are out-of-the-box, quicklysupporting AI applications in the telecom field.
Support for Three Deployment Modes● Public cloud: Outgoing data transfer is supported. This mode is applicable to
small- and medium-sized carriers, partners, and Huawei R&D engineers.
● Jointly-operated cloud: Outgoing data transfer is not supported. This mode isapplicable to tier-1 carriers with a jointly-operated cloud.
● HUAWEI CLOUD Stack: Outgoing data transfer is not supported. This mode isapplicable to tier-1 carriers without a jointly-operated cloud.
NAIEModel Training Service 4 User Guide
Issue 01 (2020-12-30) Copyright © Huawei Technologies Co., Ltd. 42
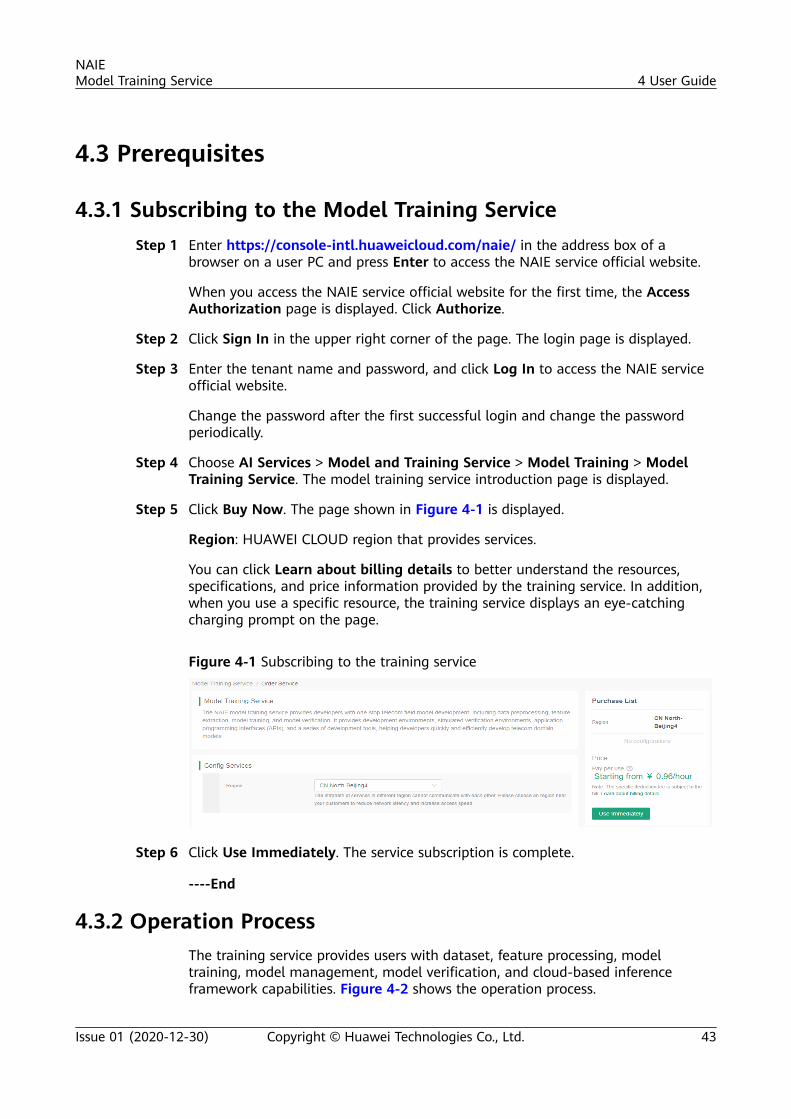
4.3 Prerequisites
4.3.1 Subscribing to the Model Training ServiceStep 1 Enter https://console-intl.huaweicloud.com/naie/ in the address box of a
browser on a user PC and press Enter to access the NAIE service official website.
When you access the NAIE service official website for the first time, the AccessAuthorization page is displayed. Click Authorize.
Step 2 Click Sign In in the upper right corner of the page. The login page is displayed.
Step 3 Enter the tenant name and password, and click Log In to access the NAIE serviceofficial website.
Change the password after the first successful login and change the passwordperiodically.
Step 4 Choose AI Services > Model and Training Service > Model Training > ModelTraining Service. The model training service introduction page is displayed.
Step 5 Click Buy Now. The page shown in Figure 4-1 is displayed.
Region: HUAWEI CLOUD region that provides services.
You can click Learn about billing details to better understand the resources,specifications, and price information provided by the training service. In addition,when you use a specific resource, the training service displays an eye-catchingcharging prompt on the page.
Figure 4-1 Subscribing to the training service
Step 6 Click Use Immediately. The service subscription is complete.
----End
4.3.2 Operation ProcessThe training service provides users with dataset, feature processing, modeltraining, model management, model verification, and cloud-based inferenceframework capabilities. Figure 4-2 shows the operation process.
NAIEModel Training Service 4 User Guide
Issue 01 (2020-12-30) Copyright © Huawei Technologies Co., Ltd. 43

Figure 4-2 Training service operation process
4.3.3 Accessing the Model Training ServiceStep 1 Enter https://console-intl.huaweicloud.com/naie/ in the address box of a
browser on a user PC and press Enter to access the NAIE service official website.
Step 2 Click Sign In in the upper right corner to access the login page.
Step 3 Select IAM User Login and enter the tenant name, user name, and password.
You can also log in using an account. Change the password after the firstsuccessful login and change the password periodically.
Step 4 Click Log In to access the NAIE service official website.
Step 5 Choose AI Services > Model and Training Service > Model Training > ModelTraining Service. The model training service introduction page is displayed.
Step 6 Click Enter Service. The model training service page is displayed.
----End
4.4 Project Creation
4.4.1 Introduction to the Training Service HomepageThe training service homepage displays projects created by a user and publicprojects created by other users under the same tenant. The training servicehomepage provides the following functions:
● Creating a project.
● Using a template to quickly create a project. The template is preconfiguredwith dataset, feature processing algorithms, model training algorithms, andmodel verification algorithms.
● Viewing and editing project information.
The following figure shows the training service homepage.
NAIEModel Training Service 4 User Guide
Issue 01 (2020-12-30) Copyright © Huawei Technologies Co., Ltd. 44
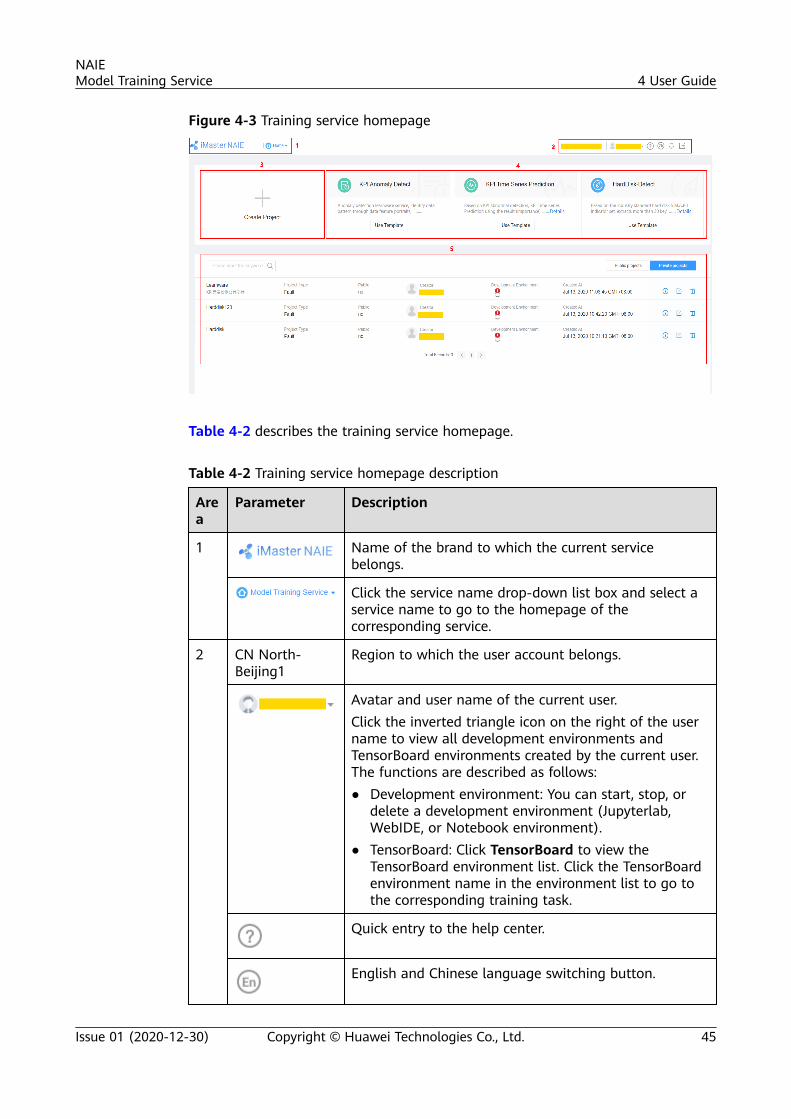
Figure 4-3 Training service homepage
Table 4-2 describes the training service homepage.
Table 4-2 Training service homepage description
Area
Parameter Description
1 Name of the brand to which the current servicebelongs.
Click the service name drop-down list box and select aservice name to go to the homepage of thecorresponding service.
2 CN North-Beijing1
Region to which the user account belongs.
Avatar and user name of the current user.Click the inverted triangle icon on the right of the username to view all development environments andTensorBoard environments created by the current user.The functions are described as follows:● Development environment: You can start, stop, or
delete a development environment (Jupyterlab,WebIDE, or Notebook environment).
● TensorBoard: Click TensorBoard to view theTensorBoard environment list. Click the TensorBoardenvironment name in the environment list to go tothe corresponding training task.
Quick entry to the help center.
English and Chinese language switching button.
NAIEModel Training Service 4 User Guide
Issue 01 (2020-12-30) Copyright © Huawei Technologies Co., Ltd. 45

Area
Parameter Description
Notifications about project creation, including allnotifications about task execution failures in dataset,feature engineering, model training, modelmanagement, and model verification.
Logout.
3 Project creation.
4 ● KPI AnomalyDetect
● KPI TimeSeriesPrediction
● HardDisk-Detect
Preconfigured development templates for trainingservices in the network domain. You can click UseTemplate to generate a project that is preconfiguredwith dataset, feature engineering operation flow, modeltraining algorithm, and model verification algorithm.
5 Search for a project by keyword.
When creating a project, a user can choose to open theproject to a specified user group. Then all users in theuser group can view and use the project.
When creating a project, a user can set the project asprivate. Then only the current user can view and usethe project.
Walkthroughs_55068
Project name.
Type Project type.The options are as follows:● Fault● Energy Usage● Resource Usage● User Experience● Others
Public or Not Whether a project is open to other users of the currenttenant.The options are as follows:● yes● no
Creator User avatar and user name for the created project.
NAIEModel Training Service 4 User Guide
Issue 01 (2020-12-30) Copyright © Huawei Technologies Co., Ltd. 46

Area
Parameter Description
DevelopmentEnvironment
Number of Jupyterlab, WebIDE, and common Notebookenvironments created in the current project by category.Click the Jupyterlab, WebIDE, or Notebook icon to openthe development environment information of thecorresponding type in the current project. In thedisplayed dialog box, click More to view thedevelopment environment list of other types.
Created At Project creation time.
Click this button to view the project overview page.
Click this button to modify the following items of aproject:● Description● Public or Not● Customize Project IconIf the icon is dimmed, you are not allowed to modifythe project information as you are not the projectcreator.
Click this button to delete a project.If the icon is dimmed, you are not allowed to delete theproject as you are not the project creator.
4.4.2 Creating a ProjectBefore using the training service for model training, you need to create a project.The training platform provides computing resources for each project.
Step 1 On the homepage of the training platform, click + above Create Project. TheCreate Project dialog box is displayed, as shown in Figure 4-4.
NAIEModel Training Service 4 User Guide
Issue 01 (2020-12-30) Copyright © Huawei Technologies Co., Ltd. 47

Figure 4-4 Creating a project
Step 2 Set parameters in the Create Project dialog box, as described in Table 4-3.
Table 4-3 Parameter description
Parameter Description
Name Project name.The name must contain 2 to 20 characters. It must start with aletter, consist of only letters, digits, underscores (_), and hyphens(-), and cannot end with an underscore (_) or a hyphen (-).
Description Brief description of a projectThe value cannot exceed 500 characters.
NAIEModel Training Service 4 User Guide
Issue 01 (2020-12-30) Copyright © Huawei Technologies Co., Ltd. 48

Parameter Description
Type Type of a project to be created. The options are as follows:● Fault● Energy Usage● Resource Usage● User Experience● Others
Template Experience in the network domain is accumulated, and experienceof existing projects can be used for reference. After a project iscreated using a template, the project is preconfigured with relateddatasets, feature processing operations, model training algorithms,and model verification algorithms. Currently, the followingtemplates are supported:● KPI Anomaly Detect● KPI Time Series Detection● HardDisk-Detect
Public orNot
Whether a project can be accessed by other users in a user groupto which the project belongs. The options are as follows:● Yes● No
Public toGroup
Public to Group is displayed only when Public or Not is set toYes.By default, all user groups to which the current user belongs aredisplayed. If a user group to which the user belongs is selected, allusers in the selected user group can view the project.
Icon Project icon.You can upload an image file from a local path.
Step 3 Click Create. A project is created on the training platform.
----End
4.4.3 Project OverviewThe project overview page provides the information about the current project, asshown in Figure 4-5.
NAIEModel Training Service 4 User Guide
Issue 01 (2020-12-30) Copyright © Huawei Technologies Co., Ltd. 49
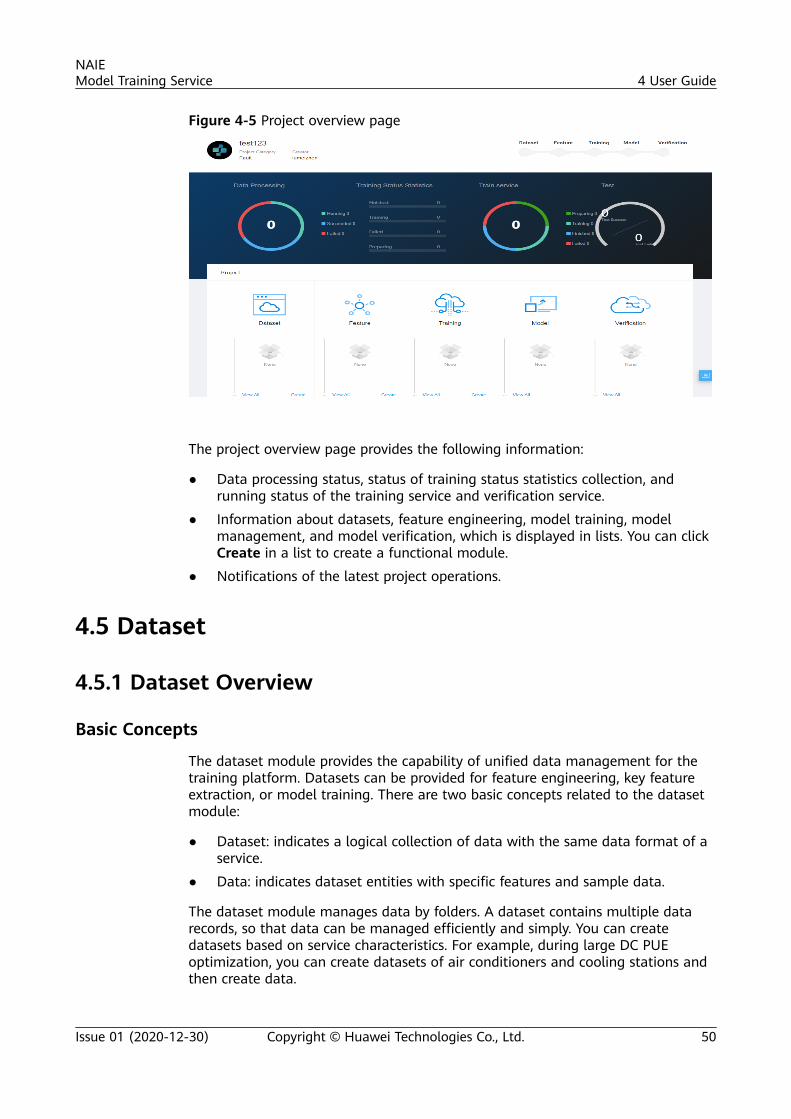
Figure 4-5 Project overview page
The project overview page provides the following information:
● Data processing status, status of training status statistics collection, andrunning status of the training service and verification service.
● Information about datasets, feature engineering, model training, modelmanagement, and model verification, which is displayed in lists. You can clickCreate in a list to create a functional module.
● Notifications of the latest project operations.
4.5 Dataset
4.5.1 Dataset Overview
Basic Concepts
The dataset module provides the capability of unified data management for thetraining platform. Datasets can be provided for feature engineering, key featureextraction, or model training. There are two basic concepts related to the datasetmodule:
● Dataset: indicates a logical collection of data with the same data format of aservice.
● Data: indicates dataset entities with specific features and sample data.
The dataset module manages data by folders. A dataset contains multiple datarecords, so that data can be managed efficiently and simply. You can createdatasets based on service characteristics. For example, during large DC PUEoptimization, you can create datasets of air conditioners and cooling stations andthen create data.
NAIEModel Training Service 4 User Guide
Issue 01 (2020-12-30) Copyright © Huawei Technologies Co., Ltd. 50

Data Source
There are five types of dataset entity sources:
● Data uploaded from a local path
● Imported sample data
● Data subscribed to from a data directory.
● Data automatically generated by the system after feature processing isperformed and a feature operation flow is performed on all data.
● Target data automatically generated by the system after data union orjoining.
Operation Description
Data can be imported in three modes: uploading from a local path, importing thesample data, and subscribing to a data directory. Data automatically generated bythe system after feature processing, data union, or data joining cannot bemanually imported.
You can analyze the data after creating a dataset and importing data. You canevaluate the data quality based on the data analysis result and determine whetherthe dataset can be directly used for model training or used after featureprocessing. The dataset module also supports data union and data joiningoperations on multiple data records for enhancing samples or expanding featuredimensions. For details about dataset operations, see Performing DatasetOperations.
Dataset Page
The Dataset page contains the data catalog area on the left and the datasetdetails area on the right. In the left area, you can create datasets, import datasetentities, or delete data. In the right area, you can view data details in a list,perform feature engineering for data, create a feature engineering project basedon data, redirect to the model training page, or delete data. For details about thedataset page, see Figure 4-6. For details about operations on the dataset page,see Table 4-4.
Figure 4-6 Dataset page
NAIEModel Training Service 4 User Guide
Issue 01 (2020-12-30) Copyright © Huawei Technologies Co., Ltd. 51
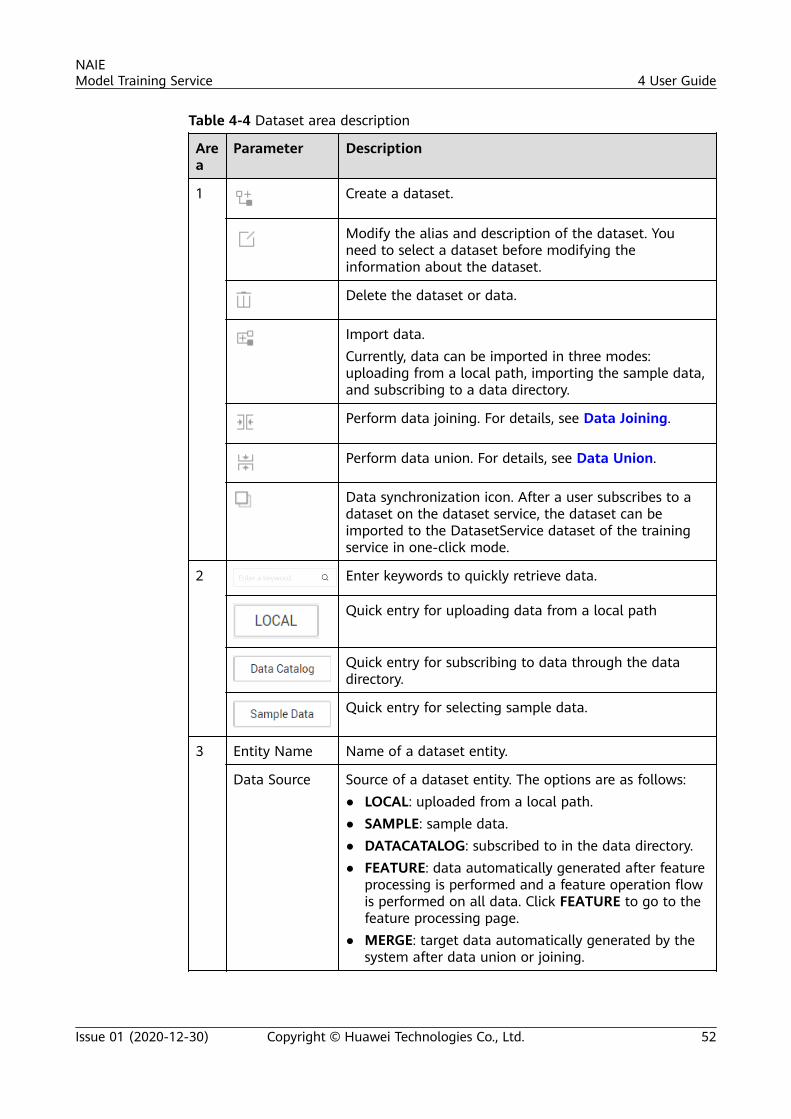
Table 4-4 Dataset area description
Area
Parameter Description
1 Create a dataset.
Modify the alias and description of the dataset. Youneed to select a dataset before modifying theinformation about the dataset.
Delete the dataset or data.
Import data.Currently, data can be imported in three modes:uploading from a local path, importing the sample data,and subscribing to a data directory.
Perform data joining. For details, see Data Joining.
Perform data union. For details, see Data Union.
Data synchronization icon. After a user subscribes to adataset on the dataset service, the dataset can beimported to the DatasetService dataset of the trainingservice in one-click mode.
2 Enter keywords to quickly retrieve data.
Quick entry for uploading data from a local path
Quick entry for subscribing to data through the datadirectory.
Quick entry for selecting sample data.
3 Entity Name Name of a dataset entity.
Data Source Source of a dataset entity. The options are as follows:● LOCAL: uploaded from a local path.● SAMPLE: sample data.● DATACATALOG: subscribed to in the data directory.● FEATURE: data automatically generated after feature
processing is performed and a feature operation flowis performed on all data. Click FEATURE to go to thefeature processing page.
● MERGE: target data automatically generated by thesystem after data union or joining.
NAIEModel Training Service 4 User Guide
Issue 01 (2020-12-30) Copyright © Huawei Technologies Co., Ltd. 52

Area
Parameter Description
Data Category Category of the imported data.The options are as follows:● Text● Image● Others
Rows Number of data samples.
Columns Number of data feature columns.
Status Current data status.
Create Time Time when data is created.
Operation Operation that can be performed on data. The optionsare as follows:
● : View data details.
● : Modify data information, including entity alias,data category, file code, delimiter, and headline.
● : Delete data.
● : Execute the operation flow of an existingfeature engineering project for a dataset entity andgenerate new data. For details about the featureengineering operations, see Feature Engineering.The data processed by a feature engineering projectcannot be processed by the same feature engineeringproject again.
● : Create a feature engineering project based oncurrent data. For details about how to create afeature engineering project, see Creating a FeatureEngineering Project.
● : Go to the Model Training page. For detailsabout the model training operation, see ModelTraining.
DatasetService Dataset
The DatasetService dataset is preset in the model training service to store datasetssubscribed from the dataset service.
After subscribing to datasets in the dataset service, return to the dataset menu ofthe model training service, click the DatasetService dataset on the left, and click
NAIEModel Training Service 4 User Guide
Issue 01 (2020-12-30) Copyright © Huawei Technologies Co., Ltd. 53
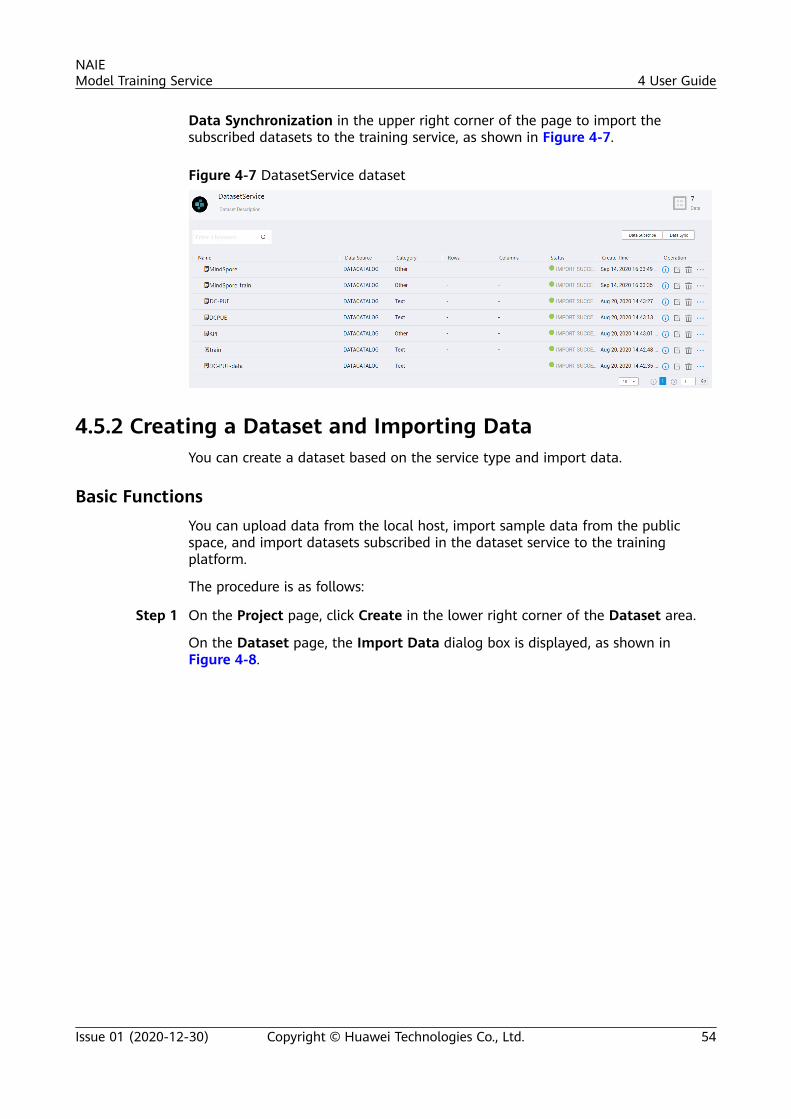
Data Synchronization in the upper right corner of the page to import thesubscribed datasets to the training service, as shown in Figure 4-7.
Figure 4-7 DatasetService dataset
4.5.2 Creating a Dataset and Importing DataYou can create a dataset based on the service type and import data.
Basic FunctionsYou can upload data from the local host, import sample data from the publicspace, and import datasets subscribed in the dataset service to the trainingplatform.
The procedure is as follows:
Step 1 On the Project page, click Create in the lower right corner of the Dataset area.
On the Dataset page, the Import Data dialog box is displayed, as shown inFigure 4-8.
NAIEModel Training Service 4 User Guide
Issue 01 (2020-12-30) Copyright © Huawei Technologies Co., Ltd. 54

Figure 4-8 Importing data
Table 4-5 describes the parameters.
Table 4-5 Parameter description
Parameter Description
Dataset You can generate a new dataset. A dataset nameexample is Harddisk.
Data Category Category of the imported data.The options are as follows:● Text● Image● Others● Multiple files and directories (The maximum file size
is 10 GB.) Oversized File Upload (10 GB) describesthe operation details for this category.
NAIEModel Training Service 4 User Guide
Issue 01 (2020-12-30) Copyright © Huawei Technologies Co., Ltd. 55

Parameter Description
Entity Name Name of a dataset entity.The value must contain 1 to 128 characters. It must startwith a letter, consist of only letters, digits, underscores(_), and hyphens (-), and cannot end with an underscore(_) or a hyphen (-).
Entity Alias Alias of the data.The value is a string of 1 to 128 characters. It consists ofonly letters, Chinese characters, digits, underscores (_),hyphens (-), and parentheses. After an alias is created,the system preferentially displays the dataset based onthe alias.
Data Source Data upload mode.The options are as follows:● LOCAL: Upload data from a local path.● Data Catalog: Import the data subscribed in the
dataset service.● Sample Data: Use the experience data preconfigured
on the training platform. Sample data includes theraw Iris test set, Iris training set, Iris test set, KPI dataof 15 mins, KPI data of 60 mins, and KPI detectdataset.Nulls are contained in the raw Iris test set, KPI dataof 15 mins, and KPI data of 60 mins. You can repairdata and drop nulls through feature engineering.
LOCAL-File size islimited to 80M, andtext file should becsv or txt
Local path where a data file is stored. Available if DataSource is set to LOCAL.Upload a .csv or .txt data file as required to avoidsubsequent data processing failure.
NAIEModel Training Service 4 User Guide
Issue 01 (2020-12-30) Copyright © Huawei Technologies Co., Ltd. 56

Parameter Description
Data Catalog-SelectDataset
Available if Data Source is set to Data Catalog.Select the data subscribed to in the dataset service.
● : Click Subscribe. The data servicepage is displayed. You can query and subscribe todata.
● : Refresh the list of data subscribed toin the dataset service.
● Data Name: Name of the dataset service subscriptiondata.
● Apply Status: Application status of the datasetservice subscription data.
● Approver: Approver of the dataset servicesubscription data.
● Data Origin: Source of the dataset servicesubscription data.
NOTEBefore subscribing to data of the data directory, you need toread and sign the Agreement and comply with the terms orconditions of using sensitive data.
Sample Data-SelectDataset
Available if Data Source is set to Sample Data.The system provides six dataset entities by default:● iris_raw: raw Iris test set● iris_training: Iris training set● iris_test: Iris test set● KPI_15mins: KPI data of 15 mins● KPI_60mins: KPI data of 60 mins● TPC-iSPS11_60: KPI anomaly detection datasetNulls are contained in the iris_raw, KPI_15mins, andKPI_60mins datasets. You can repair data and drop nullsthrough feature engineering.
Charset Encoding format of a data file.Currently, the UTF-8, GBK, and GB2312 formats aresupported.
Delimiter Select a delimiter based on the format of the data file tobe imported. Delimiters are used by the system toidentify data fields.Currently, commas (,), semicolons (;), and vertical bars(|) are supported.
NAIEModel Training Service 4 User Guide
Issue 01 (2020-12-30) Copyright © Huawei Technologies Co., Ltd. 57

Parameter Description
Headline Whether the data contains a headline. You can select avalue according to the format of the imported data file.The options are as follows:● Has headline● No headline
Step 2 Click Create to import a data file.
If IMPORT SUCCESS is displayed in the Status column of the imported data, thedata is imported successfully.
Step 3 Click in the Operation column corresponding to the data instance. The datadetails page is displayed, as shown in Figure 4-9.
Figure 4-9 Data details
Step 4 Click View in the Operation column of the dataset to view the data, as shown inFigure 4-10.
Click Delete in the Operation column corresponding to the dataset to delete thedataset.
Figure 4-10 Data
Step 5 Click Metadata in the Operation column corresponding to the data file. The dataanalysis page is displayed, as shown in Figure 4-11.
Note: The current operation is applicable to only a single dataset. If you need toperform data analysis on all datasets in the dataset list on the current data
NAIEModel Training Service 4 User Guide
Issue 01 (2020-12-30) Copyright © Huawei Technologies Co., Ltd. 58

instance page, click Metadata in the Status column of the data instance, asshown in Figure 4-9.
Figure 4-11 Data analysis
Step 6 Select an AI engine and its specifications from the drop-down list box based onthe site requirements (no AI engine or specifications are available when the datavolume is small), and click Analyze Data.
You can view details about a data instance, including the field name, field type,data distribution, valid value, null value, abnormal value, maximum value,minimum value, average value, variance, and quantile, as shown in Figure 4-12.
On the current page, you can perform the following operations:
● In the Operation column of the data analysis result page, click to changethe data field type. Currently, the data type can be TEXT, REAL, or INTEGER.
● Click to set the current field as the label column.
NAIEModel Training Service 4 User Guide
Issue 01 (2020-12-30) Copyright © Huawei Technologies Co., Ltd. 59

Figure 4-12 Data analysis result
----End
Oversized File Upload (10 GB)Multiple files and directories can be uploaded. The maximum size to be uploadedis 10 GB. Resumable download is supported.
Step 1 On the dataset page, click in the upper left corner.
Set parameters in the displayed Import Data dialog box, as shown in Figure 4-13.
The parameters are described as follows:
● Dataset: Select an existing dataset from the drop-down list box or edit anexisting dataset to generate a new one. An example is Case.
● Data Category: Select Files & Folders(Total size limit 10GB) from the drop-down list box.
● Entity Name: Set this parameter based on the site requirements. An exampleis data.
● Entity Alias: Set this parameter based on the site requirements. Chinesecharacters are supported.
NAIEModel Training Service 4 User Guide
Issue 01 (2020-12-30) Copyright © Huawei Technologies Co., Ltd. 60

Figure 4-13 Importing data
Step 2 Click Create to generate data named data.
Step 3 In the dataset directory on the left, click data, as shown in Figure 4-14.
The data details page is displayed on the right.
Figure 4-14 Sample data
Step 4 Click Upload in the upper left corner of the page. The page for dragging files isdisplayed, as shown in Figure 4-15.
Figure 4-15 File upload panel
NAIEModel Training Service 4 User Guide
Issue 01 (2020-12-30) Copyright © Huawei Technologies Co., Ltd. 61

Step 5 Drag data files and catalogs from the local PC to the gray border area, as shownin Figure 4-16.
Currently, the following functions and restrictions are supported:
● A maximum of 1000 files can be uploaded in the right pane, and themaximum size of all files is 10 GB.
● Do not close or refresh the page during file upload. Otherwise, data uploadwill be interrupted.
● After a large file upload task is interrupted, the upload can be resumed fromthe breakpoint.
Click on the right of the file to be uploaded, select the current file fromthe local PC, and click Upload in the upper right corner of the page tocomplete the resumable upload.
● You can delete or update the uploaded files.
Figure 4-16 Dragging multiple files and directories
Step 6 Click Upload in the upper right corner of the page and wait until the data uploadis complete, as shown in Figure 4-17.
Local files can be uploaded in batches by page.
NAIEModel Training Service 4 User Guide
Issue 01 (2020-12-30) Copyright © Huawei Technologies Co., Ltd. 62

Figure 4-17 Uploading data
Step 7 After the data is uploaded, click data in the dataset catalog on the left.
Multi-file datasets can be displayed in a tree structure by catalog, as shown inFigure 4-18. The file list on the right can be displayed on multiple pages. You cansearch for files in the current catalog by prefix (fuzzy match is not supported).
On the file list page in the right pane, click View on the right of a data file to viewthe content. The file types are as follows:
● Data files in CSV format, which are displayed in tables● Formatted JSON files● CodeMirror rendering of JSON files, Python code files, and Markdown files● Image files in most formats● Playback of MP3, OGG, and WAV audio files● Playback of MP4, MKV, or WebM videos
Figure 4-18 Data page
----End
NAIEModel Training Service 4 User Guide
Issue 01 (2020-12-30) Copyright © Huawei Technologies Co., Ltd. 63

4.5.3 Performing Dataset OperationsIf the number of data samples is insufficient or in certain scenarios, for example,when data collected from different systems or NEs is combined into one piece ofdata, you can perform data joining and data union on the dataset page.
● Data joining: Join two pieces of data whose feature column dimensions arenot completely the same into one piece of data for extending the featuredimension.
● Data union: Combine two data copies into one to increase the sample size.
Data Joining
When you need to increase feature dimensions and add a dataset entity bycombining imported dataset entities in the horizontal dimension, perform the datajoining operation. Data joining is the process of joining two dataset entities inleftouter, rightouter, inner, or outer mode based on the primary key field.
NO TE
The key values of the two pieces of data must be the same. Otherwise, the data joiningoperation cannot be performed.
The two pieces of data can be regarded as a left table and a right table. Thejoining types are described as follows:
● leftouter: Use the left table as the primary table, and return all data from theleft table and the matching data from the right table. Duplicate fields fromthe right table are suffixed with __duplicate.
● rightouter: Use the right table as the primary table, and return all data fromthe right table and the matching data from the left table. Duplicate fieldsfrom the left table are suffixed with __duplicate.
● inner: Use the left table as the primary table, and return data from the rightand left tables based on a common field between them. Duplicate fields fromthe right table are suffixed with __duplicate.
● outer: Use the left table as the primary table, and return all data from theright and left tables. Duplicate fields from the right table are suffixed with__duplicate.
Examples are Table 4-6 and Table 4-7. If the key value is the ID column, thereturned results after the leftouter, rightouter, inner, and outer joining aredescribed in Table 4-8, Table 4-9, Table 4-10, and Table 4-11 respectively.
Table 4-6 Left table data
ID Name Height
1 A 1
3 B 2
5 C 2
7 D 2
NAIEModel Training Service 4 User Guide
Issue 01 (2020-12-30) Copyright © Huawei Technologies Co., Ltd. 64

ID Name Height
9 E 2
Table 4-7 Right table data
ID Name Weight
2 A 2
4 B 3
5 C 4
7 D 5
Table 4-8 Data joining result (leftouter)
ID Name Height Name__duplicate Weight
7 D 2 D 5
9 E 2 null null
5 C 2 C 4
1 A 1 null null
3 B 2 null null
Table 4-9 Data joining result (rightouter)
ID Name__duplicate
Height Name Weight
7 D 2 D 5
5 C 2 C 4
2 null null A 2
4 null null B 3
Table 4-10 Data joining result (inner)
ID Name Height Name__duplicate
Weight
7 D 2 D 5
NAIEModel Training Service 4 User Guide
Issue 01 (2020-12-30) Copyright © Huawei Technologies Co., Ltd. 65

ID Name Height Name__duplicate
Weight
5 C 2 C 4
Table 4-11 Data joining result (outer)
ID Name Height Name__duplicate
Weight
7 D 2 D 5
9 E 2 null null
5 C 2 C 4
1 A 1 null null
3 B 2 null null
2 null null A 2
4 null null B 3
The data joining procedure is as follows:
Step 1 Click in the data directory area. The Data Joining dialog box is displayed, asshown in Figure 4-19.
Figure 4-19 Data joining dialog box
NAIEModel Training Service 4 User Guide
Issue 01 (2020-12-30) Copyright © Huawei Technologies Co., Ltd. 66

Step 2 Set parameters in the Data Joining dialog box.● Main Dataset: Main Dataset, Main Dataset Entity, and Key● External Dataset: External Dataset, External Dataset Entity, and Key● Target Dataset: Target Dataset and Target Dataset Entity. The value of
Target Data must contain 1 to 128 characters. It must start with a letter,consist of only letters, digits, underscores (_), and hyphens (-), and cannotend with an underscore (_) or a hyphen (-).
● Join Method: Select leftouter, rightouter, inner, or outer.
Step 3 Click OK.
After data joining is complete, the system generates a new dataset entity in thetarget dataset with the name specified by Target Data.
----End
Data UnionIf data joining is an extension of data features, data union is an extension of thenumber of data samples. After the data joining operation, the number of featurecolumns of a dataset entity increases. After the data union operation, the amountof feature column sample data of a dataset entity increases.
Data union is the process of combining samples of two pieces of data. Thenumber of rows of the combined data sample is the sum of the rows of the twodataset entities.
NO TE
If the number of feature columns in the left table is different from that in the right table,perform the following operations:● If the number of feature columns in the left table is larger than that in the right table,
supplement feature columns in the right table with nulls.● If the number of feature columns in the right table is larger than that in the left table,
delete the extra feature columns from the right table based on the left table.
Step 1 Click in the data directory area. The Data Union dialog box is displayed, asshown in Figure 4-20.
NAIEModel Training Service 4 User Guide
Issue 01 (2020-12-30) Copyright © Huawei Technologies Co., Ltd. 67

Figure 4-20 Data union dialog box
Step 2 Set parameters in the Data Union dialog box.● Main Dataset: Main Dataset and Main Dataset Entity● External Dataset: External Dataset and External Dataset Entity● Target Dataset: Target Dataset and Target Dataset Entity. The value of
Target Data must contain 1 to 128 characters. It must start with a letter,consist of only letters, digits, underscores (_), and hyphens (-), and cannotend with an underscore (_) or a hyphen (-).
Step 3 Expand advanced configurations. You can manually configure the feature columnsto be matched based on the features and types of data in the left and right tablesdisplayed on the page.
Step 4 Click OK.
After data union is complete, the system generates a new piece of data in thetarget dataset with the name specified by Target Dataset Entity.
----End
NAIEModel Training Service 4 User Guide
Issue 01 (2020-12-30) Copyright © Huawei Technologies Co., Ltd. 68

4.6 Feature Engineering
4.6.1 Feature Engineering OverviewYou can perform feature engineering, including data processing, featurecombination, and feature transformation, on datasets to maximize the extractionof features from raw data for model training. In addition, you can publish a high-quality feature engineering project as a service and use the service to preprocessdata with exactly the same features.
Basic concepts related to feature engineering:
● Feature engineering project: Project that processes data features.● Feature engineering service: High-quality feature engineering project can be
published as a service, which can be invoked directly by users for featureprocessing of data with the same features.
● Feature engineering task: Process of invoking the feature engineering service.When invoking a feature engineering service, you need to create a task basedon the feature engineering service.
Feature Engineering Management PageThe Feature Engineering Management page consists of two tab pages: FeatureEngineering List and Service List.
● The Feature Engineering List tab page lists information about the existingfeature engineering projects, as shown in Figure 4-21. On this tab page, youcan create, edit, export, copy, and delete a feature engineering project. Fordetails, see Table 4-12.
● The Service List tab page lists information about the published featureengineering services, as shown in Figure 4-22. On this tab page, you can viewdetails about published services, create feature engineering tasks, and deletefeature engineering services. For details, see Table 4-12.
Figure 4-21 Feature Engineering List tab page
Figure 4-22 Service List tab page
NAIEModel Training Service 4 User Guide
Issue 01 (2020-12-30) Copyright © Huawei Technologies Co., Ltd. 69

Table 4-12 Description of the feature engineering management page
TabPage
Parameter Description
FeatureEngineeringManagement
Create a feature engineering project.
You can quickly search for a feature engineeringproject based on the keyword of the featureengineering project name.
You can click the icon to view environmentinformation of the Jupyterlab platform, includingthe environment name, status, specifications,remaining usage time, and operations of stoppingthe running environment.
Spark resource environment information, used fordataset analysis and Spark feature engineering. Itincludes the resource ID, status, specifications, andresource deletion operation.
View the information about the copied featureengineering project, including the task type, sourcefeature engineering project, target featureengineering project, creation time, and status.
FeatureEngineeringList
Feature EngineeringName
Name of a feature engineering project. You can setthis parameter when creating a featureengineering project.
Develop Platform Computing platform for a feature engineeringproject to process a dataset. The options are asfollows:The following development platforms are included:● Jupyterlab● Python● Spark
EnvironmentInformation
Includes the resource configuration information(such as 2U|8G) and running status (such asCreating and Running) of the runningenvironment.
Dataset Data Name.
Creator User who creates a feature engineering project.
Created At Time when a feature engineering project iscreated.
Overview Description of a feature engineering project.
NAIEModel Training Service 4 User Guide
Issue 01 (2020-12-30) Copyright © Huawei Technologies Co., Ltd. 70
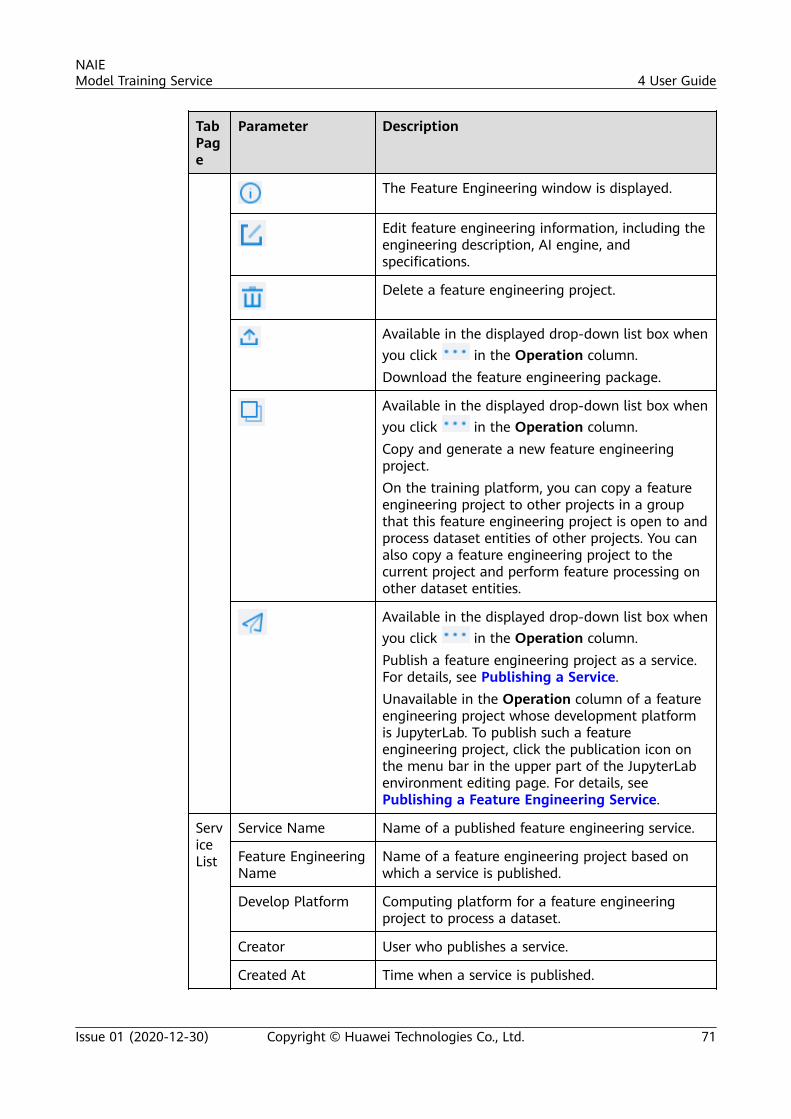
TabPage
Parameter Description
The Feature Engineering window is displayed.
Edit feature engineering information, including theengineering description, AI engine, andspecifications.
Delete a feature engineering project.
Available in the displayed drop-down list box whenyou click in the Operation column.Download the feature engineering package.
Available in the displayed drop-down list box whenyou click in the Operation column.Copy and generate a new feature engineeringproject.On the training platform, you can copy a featureengineering project to other projects in a groupthat this feature engineering project is open to andprocess dataset entities of other projects. You canalso copy a feature engineering project to thecurrent project and perform feature processing onother dataset entities.
Available in the displayed drop-down list box whenyou click in the Operation column.Publish a feature engineering project as a service.For details, see Publishing a Service.Unavailable in the Operation column of a featureengineering project whose development platformis JupyterLab. To publish such a featureengineering project, click the publication icon onthe menu bar in the upper part of the JupyterLabenvironment editing page. For details, seePublishing a Feature Engineering Service.
ServiceList
Service Name Name of a published feature engineering service.
Feature EngineeringName
Name of a feature engineering project based onwhich a service is published.
Develop Platform Computing platform for a feature engineeringproject to process a dataset.
Creator User who publishes a service.
Created At Time when a service is published.
NAIEModel Training Service 4 User Guide
Issue 01 (2020-12-30) Copyright © Huawei Technologies Co., Ltd. 71

TabPage
Parameter Description
Activity Time Time when a feature engineering task is lastexecuted.
Overview Introduction to a feature engineering service.
View feature engineering service details, includingthe feature engineering task list.
Create a feature engineering task.
Delete a feature engineering service.
4.6.2 Python and Spark Development Platforms
4.6.2.1 Creating a Feature Engineering ProjectYou can create a feature engineering project based on a dataset entity on thedataset details page and perform feature operations on the dataset, or create afeature engineering project on the Feature Engineering Management page. Thefollowing describes how to create a feature engineering project on the FeatureEngineering Management page.
Step 1 Click on the Feature Engineering Managementpage.
The Feature Processing dialog box is displayed, as shown in Figure 4-23.
NAIEModel Training Service 4 User Guide
Issue 01 (2020-12-30) Copyright © Huawei Technologies Co., Ltd. 72

Figure 4-23 Creating a feature engineering project
Set parameters in the Feature Processing dialog box. For details, see Table 4-13.
Table 4-13 Description of feature engineering project parameters
Parameter Description
ProjectName
Name of a feature engineering project.The value must contain 1 to 50 characters. It must start with aletter, consist of only letters, digits, underscores (_), and hyphens(-), and cannot end with an underscore (_).
ProjectDescription
Brief description of a feature engineering projectThe value contains a maximum of 500 characters.
NAIEModel Training Service 4 User Guide
Issue 01 (2020-12-30) Copyright © Huawei Technologies Co., Ltd. 73

Parameter Description
Developingmode
Feature engineering development environment. The options areas follows:● JupyterLab Interactive Development
Feature engineering development environment based onJupyterLab, which has good experience on real-timeinteraction, providing graphical interface operations forgeneral feature engineering and data analysis, and user-defined coding capabilities. Suitable for data scientists, andscenarios of custom algorithms.
● Old Experience-based DevelopmentDevelopment of feature engineering based on webpages,suitable for beginners and uncoded feature engineering.
DevelopPlatform
Available if Development mode is set to Old Experience-basedDevelopment. This parameter indicates the feature engineeringcomputing platform for processing datasets. The options are asfollows:● Python: For a dataset entity with a small amount of data,
select Python. Python consists of the local Python andModelArts Python. You can select one based on the datavolume to reduce the execution time of single-step featureoperations and improve user experience.
● Spark: For a dataset entity with a large amount of data,select Spark, but the creation process takes a long time.
AI Engine Running platform of feature processing operators.
Specifications
Resource configuration information of the AI engine.
Dataset Select a dataset from the drop-down list box.
DatasetEntity
Select a dataset entity from the drop-down list box.
Select File Import an existing feature engineering project package toperform feature processing on data.
Step 2 Click Create to create a feature engineering project. The feature engineeringproject editing page is displayed, as shown in Figure 4-24.
NAIEModel Training Service 4 User Guide
Issue 01 (2020-12-30) Copyright © Huawei Technologies Co., Ltd. 74

Figure 4-24 Feature engineering project editing page
Table 4-14 Description of the feature engineering project editing page
Area Description
1 Feature engineering project information area. It provides informationabout the development platform, data type, and dataset name.
2 Overview of feature engineering operation results, including thenumber of current data rows, number of raw data rows, number ofcurrent data columns, number of raw data columns, and number offeature operation flows that are being executed.
3 The operations are as follows:● Config: Set hyperparameters in the Notebook development
environment. Setting the hyperparameters can invoke the SDKcapabilities provided by the platform. For example, if thehyperparameter name is test, the SDK is as follows:sai.get_hyper_param("test", type=str)Click Config. In the Config Parameters dialog box, enter theparameter name, default value, and current value to change thehyperparameter value.
● Records: View historical records of full data applications. In addition,you can delete or re-execute the full data application operation.
● Execute: Apply the feature operation flow to the full data of theimported feature engineering project to generate new data afterfeature engineering.
4 Feature operation details area.Click Flow Overview to view feature operation flow details. Click theicon before the feature operation name to view the feature processingeffect of each operation.Only the last feature processing operation can be edited, modified, ordeleted.
NAIEModel Training Service 4 User Guide
Issue 01 (2020-12-30) Copyright © Huawei Technologies Co., Ltd. 75

Area Description
5 Feature operation area. You can perform data sampling, columnfiltering, data preparation, feature operations, Notebook development,mini chart drawing, chart inserting, data filtering, and data verification.For details, see the following sections:● Data Sampling● Column Filtering● Data Preparation● Performing Feature Operations● Notebook Development
● Draw Mini chart: Select a feature column, click , and selecta boxplots, line chart, or area chart. You can select multiple columnsat the same time. Some data types such as Text are not supportedby mini chart drawing. Note the prompt information displayed in theupper right corner of the page during your operation.
● Insert Chart: Select the feature column, click , and select thechart to be displayed. You can select multiple columns at the sametime. Some data types such as Text are not supported by chartinserting. Note the prompt information displayed in the upper rightcorner of the page during your operation.
● Filter: Similar to the data filtering function of Excel files, the datacan be sorted and displayed based on conditions.
● Verify Data: Click to verify all data and check whether there
are empty values. Click and to query the previousand next empty values, respectively.
----End
4.6.2.2 Data Sampling
You can sample data before performing other feature operations. After datasampling, all the feature operations are performed only on the sampled data,reducing the amount of data to be processed and speeding up data processing.After data sampling, the system applies the feature operation flow to the fulldataset to generate a new dataset for model training.
NO TE
Data can be sampled after being imported. However, if feature operations have beenperformed on the data after it is imported, sampling is not supported.
The data sampling procedure is as follows:
NAIEModel Training Service 4 User Guide
Issue 01 (2020-12-30) Copyright © Huawei Technologies Co., Ltd. 76

Step 1 On the homepage of the feature engineering project, click in the Operationcolumn of the feature engineering project. The feature operation page isdisplayed.
Step 2 Click . The Data Sampling dialog box is displayed.
Step 3 Set sampling parameters by referring to Table 4-15.
Table 4-15 Sampling parameter description
Parameter Description
SamplingMethod
Method for sampling data.The options are as follows:● Random Sampling: Randomly select a specified number of
samples.● Random Percentage: Randomly select data based on a
specified percentage.● Top N: Select a specified number of samples in sequence.● All: Select all samples.
SamplingParameter
If Sampling Method is set to Random Sampling or Top N, thevalue of this parameter is the number of records. If SamplingMethod is set to Random Percentage, the value is apercentage.
Step 4 Click OK. The message "Task Data Sampling executed successfully" is displayed.
----End
4.6.2.3 Column FilteringFeature columns can be filtered in the Filter Feature dialog box. You can view andanalyze specific feature columns through filtering.
The column filtering procedure is as follows:
Column Filtering
Step 1 Click on the feature engineering page. The Filter Feature dialog box isdisplayed, as shown in Figure 4-25.
NAIEModel Training Service 4 User Guide
Issue 01 (2020-12-30) Copyright © Huawei Technologies Co., Ltd. 77

Figure 4-25 Column filtering
Details about parameters on the Filter Feature page are as follows:
● Filter Rule Name: Set a name for a filter rule.
Click on the feature engineering page to view filtering history. The rulenames of the filtering records are the names set in Filter Rule Name. Click afilter rule name to view a filtering result.
● Available Features: All feature information of the current data is displayed.● Selected Features: All features selected from the Available Features area are
displayed. A selected feature can be deleted.
Step 2 In the Available Features area, select feature columns to be displayed.
The following operations are involved:
● Click and set By Index, Key Words, Data Type, and Quality to quicklysearch for feature columns, as shown in Figure 4-26.
NAIEModel Training Service 4 User Guide
Issue 01 (2020-12-30) Copyright © Huawei Technologies Co., Ltd. 78

Figure 4-26 Feature filtering conditions
● You can click to restore the filter conditions to the default settings inFigure 4-26.
Step 3 In the Selected Features area, confirm the feature columns and delete featurecolumns that do not need to be displayed.
If you need to further filter out a feature column that does not need to be
displayed, click in the Operation column to remove the feature column fromthis list.
You can click in the Selected Features area to quickly search for a feature
column that does not need to be displayed and click to remove the featurecolumn from this list based on the search result.
● You can set the Key Words parameter to display only feature columns thatcontain the specified keyword.
● You can set the Data Type parameter to display only feature columns of thespecified data type.
Step 4 Click Apply.
----End
Viewing Filtering History
Click on the feature engineering page. The dialog box automatically displaysall filtering operation records. You can click a record to view the column filteringresult.
NAIEModel Training Service 4 User Guide
Issue 01 (2020-12-30) Copyright © Huawei Technologies Co., Ltd. 79

Resetting Filtering Conditions
Click on the feature operation page to roll back the column filteringoperation.
4.6.2.4 Data PreparationAfter data in a dataset is imported to a feature engineering project, problems suchas nulls, redundant data, or insufficient data may exist. In addition, you may needto perform data union on imported dataset entities. You can handle the precedingproblems through data preparation. The functions include data repair, datafiltering, data union, data joining, and data denoising.
Data RepairYou can repair nulls and invalid values for single-column features in the DataRepair dialog box, repair data within a specified value range, and select multipleor all feature columns to repair nulls. You can use the default repair policy in thesystem or configure a repair policy. The procedure is as follows:
Step 1 In the table header, select a feature column whose data needs to be repaired.
Step 2 Click Data Preparation. Click Data Repair in the drop-down list box.
The Data Repair dialog box is displayed. Set the following parameters:
● Check whether the selected feature column is displayed in Selected Features.● Configure Repair Policy by referring to Table 4-16.
Table 4-16 Repair policy configuration
Parameter Description
NA value Repair nulls in feature column sample data. The repairpolicies are as follows:– Drop: Discard the rows with nulls.– Replace: Replace nulls with the values specified by the
user.Nulls are discarded by default.
Invalid Value Repairs invalid values in feature column sample data. Therepair policies are as follows:– Drop: Discard the rows with invalid values.– Replace: Replace invalid values with the values specified
by the user.Invalid values are discarded by default.
NAIEModel Training Service 4 User Guide
Issue 01 (2020-12-30) Copyright © Huawei Technologies Co., Ltd. 80

Parameter Description
Value Range Repair the feature column sample data within a specifiedvalue range.You can set a sample data value range. Data beyond therange will be discarded.By default, the system does not repair data based on avalue range.
Step 3 Click OK.
----End
Data Filtering
You can configure the filtering method and rule for single-column features to filterout redundant sample data rows or reserve only valid sample data rows. Theprocedure is as follows:
Step 1 In the table header, select a feature column whose data needs to be filtered.
Step 2 Click Data Preparation. Click Data Filter in the drop-down list box.
The Data Filter dialog box is displayed. Set the following parameters:
● Check whether the selected feature column is displayed in Selected Features.● Configure Filter Method and Filter Regulation by referring to Table 4-17.
Table 4-17 Filtering policy configuration
Parameter Description
Filter Method The filtering methods are as follows:– Reserve line: Reserve sample data rows that comply
with the filter rule.– Drop line: Discard sample data rows that comply with
the filter rule.
FilterRegulation
Set a filter rule based on sample data values. The filterrules are as follows:– greater than: Reserve or discard sample data rows
greater than the specified value.– less than: Reserve or discard sample data rows less than
the specified value.– equal to: Reserve or discard sample data rows equal to
the specified value.
Step 3 Click OK.
----End
NAIEModel Training Service 4 User Guide
Issue 01 (2020-12-30) Copyright © Huawei Technologies Co., Ltd. 81

Data Union
The data union principle of feature engineering is the same as that of datasets.For details, see Data Union. An opened dataset entity of the feature engineeringproject is used as the left table, and the data of the dataset in the Data Uniondialog box is used as the right table.
The data union procedure is as follows:
Step 1 Click Data Preparation. Click Data Union in the drop-down list box.
The Data Union dialog box is displayed. Set the following parameters:● Select the dataset and dataset entity that need to be combined from the
Dataset and Dataset Entity drop-down list boxes.The system automatically matches a dataset entity of feature engineeringwith the set dataset entity. The matching result is displayed below DatasetEntity.
● Expand advanced configurations. You can view the records of automaticallymatched features under Matched Features. Under Unmatched Features, youcan manually configure the feature columns to be matched based on thefeatures and types of data in the left and right tables displayed on the page.Features of different types of data cannot be matched. To cancel thematching, click Cancel Match in the Operation column.
Step 2 Click OK.
----End
Data Joining
The data joining principle of feature engineering is the same as that of datasets.For details, see Data Joining. The data joining parameters of feature engineeringare described as follows:
● An opened dataset entity of the feature engineering project is used as the lefttable, and the data of the dataset in the Data Join dialog box is used as theright table.
● The key of the left table is used as the primary key, and the key of the righttable is used as the foreign key. The primary key and foreign key must be thesame.
● The joining modes are leftouter, rightouter, inner, and outer, which are thesame as those of dataset data joining.
The data joining procedure is as follows:
Step 1 In the table header, select a data column as a reference column for the joining.
Step 2 Click Data Preparation. Click Data Join in the drop-down list box.
The Data Join dialog box is displayed. Set the following parameters:● Select the dataset and dataset entity that need to be combined from the
Dataset and Dataset Entity drop-down list boxes and use them as the righttable.
NAIEModel Training Service 4 User Guide
Issue 01 (2020-12-30) Copyright © Huawei Technologies Co., Ltd. 82

● In the Primary Key drop-down list box, select the primary key as the ID of theleft table. In the External Key drop-down list box, select the foreign key asthe ID of the right table. The primary key and foreign key must be the same.
● Select a joining mode from the Join Method drop-down list box.
Step 3 Click OK.
----End
Data DenoisingYou can filter out abnormal time series data through data denoising. Thefollowing is a noise analysis method:
1. Perform data smoothing through local linear regression to obtain thepredicted value corresponding to each point.
2. Calculate the error between the observed values and predicted values anddetermine the error upper limit using the three-sigma rule. The points thatexceed the upper limit are noise points.
The system removes noise points from the raw data, and constructs new datapoints using the linear interpolation method. The procedure is as follows:
Step 1 In the table header, select a feature column whose data needs to be denoised.
Step 2 Click Data Preparation. Click Data Denoising in the drop-down list box.
The Data Denoising dialog box is displayed. Check whether the selected featurecolumn is displayed in Selected Features.
Step 3 Click OK.
----End
4.6.2.5 Performing Feature OperationsFeature operations mainly include modifying sample data values of features aswell as feature column renaming, deletion, and filtering. The training platformintegrates the open-source interactive development and debugging tool, whichallows users to customize and modify feature columns by editing algorithms. Thetraining platform supports the following feature operations: renaming,normalization, numeralization, standardization, feature discretization, one-hotencoding, data transformation, column deletion, feature selection, chi-square test,information entropy, feature addition, and PCA.
RenamingThe feature engineering of the training platform allows users to modify thefeature name. The procedure is as follows:
Step 1 In the table header, select a feature column that needs to be renamed.
You cannot rename multiple columns at the same time.
Step 2 Click Feature Operation. Click Rename in the drop-down list box.
The Rename dialog box is displayed. Set the following parameters:
NAIEModel Training Service 4 User Guide
Issue 01 (2020-12-30) Copyright © Huawei Technologies Co., Ltd. 83

● Check whether the selected feature column is displayed in Selected Features.● The new feature column name cannot be the same as another feature column
name in the dataset, and consists of only letters, digits, underscores (_), andhyphens (-).
Step 3 Click OK.
A Rename node is added to the Flow Overview area.
----End
NormalizationNormalization is a simplified calculation method. The training platform supportsthe following normalization algorithms:
● MaxAbsScaler: maps the sample data in a feature column to the range of[-1,1].
● MinMaxScaler: maps the sample data in a feature column to the range of[0,1].
● StandardScaler: makes processed sample data follow a standard normaldistribution with a mean value of 0 and a variance of 1.
The procedure is as follows:
Step 1 In the table header, select a feature column that needs to be normalized.
Step 2 Click Feature Operation. Click Normalizaton in the drop-down list box.
The Normalization dialog box is displayed. Set the following parameters:
● Check whether the selected feature column is displayed in Selected Features.● Set Normalization Algorithm.
Step 3 Click OK.
A Normalization node is added to the Flow Overview area.
----End
NumeralizationIn many cases, sample data is not of the numeric type. For example, the gendervalue includes male and female, and the name value is Alex. In this case, featureoperations cannot be performed, and you need to convert them into numericvalues by using the numeralization function. Numeralization is a process ofencoding the sample data according to the type in the feature column. After thesample data is numeralized, the sample data is of the integer type in the range of[0,Number of sample data types – 1]. The following uses feature column Sepal(the sample data is abcadc) as an example. After the data is numeralized, thesample data is 012032.
Step 1 In the table header, select a feature column that needs to be numeralized.
Step 2 Click Feature Operation. Click Numeralization in the drop-down list box.
The Numeralization dialog box is displayed. Check whether the selected featurecolumn is displayed in Selected Features.
NAIEModel Training Service 4 User Guide
Issue 01 (2020-12-30) Copyright © Huawei Technologies Co., Ltd. 84

Step 3 Click OK.
A Numeralization node is added to the Flow Overview area.
----End
StandardizationFor standardization, the L1_norm and L2_norm algorithms are supported toprocess sample data in a feature column.
● L1_norm: The sum of absolute values of all sample data is used as thedenominator, and sample data is used as the numerator. The sample data ismapped to the range of (-1,1).
● L2_norm: The square root of the sum of all sample data is used as thedenominator, and sample data is used as the numerator. The sample data ismapped to the range of (-1,1).
The standardization procedure is as follows:
Step 1 In the table header, select a feature column that needs to be standardized.
The selected feature column must be of the numeric type.
Step 2 Click Feature Operation. Click Standardization in the drop-down list box.
The Standardization dialog box is displayed. Set the following parameters:
● Check whether the selected feature column is displayed in Selected Features.● Set Standardization Algorithm.
Step 3 Click OK.
A Standardization node is added to the Flow Overview area.
----End
Feature DiscretizationFeature discretization is to discretize continuous sample data in a feature columninto the data of the integer type in the range of [0,Discretized data quantity – 1].
The feature discretization procedure is as follows:
Step 1 In the table header, select a feature column that needs to be discretized.
The selected feature column must be of the numeric type.
Step 2 Click Feature Operation. Click Feature Discretization in the drop-down list box.
The Feature Discretization dialog box is displayed. Set the following parameters:
● Check whether the selected feature column is displayed in Selected Features.● Set Discrete Feature Quantity.
Step 3 Click OK.
A Feature Discretization node is added to the Flow Overview area.
----End
NAIEModel Training Service 4 User Guide
Issue 01 (2020-12-30) Copyright © Huawei Technologies Co., Ltd. 85

One-Hot EncodingOne-hot encoding is to use the N-bit state register to encode N states. In thefeature engineering, one-hot encoding is to split a feature column into multiplecolumns based on the type of the sample data and map data from the originalfeature column to new feature columns. If the data is the same in the columns,the data is encoded as 1; otherwise, the data is encoded as 0. For example, if thesample data in feature column Sepal is (2,9,2,8,4). After one-hot encoding, thefeature column is divided into four columns, and the sample data in each columnis as follows:
● Sepal_2: 10100● Sepal_4: 00001● Sepal_8: 00010● Sepal_9: 01000
The procedure is as follows:
Step 1 In the table header, select a feature column that requires one-hot encoding.
The number of different values in the selected column ranges from 2 to 100.
Step 2 Click Feature Operation. Click One-Hot Encoding in the drop-down list box.
The One-Hot Encoding dialog box is displayed. Check whether the selectedfeature column is displayed in Selected Features.
Step 3 Click OK.
A One-Hot Encoding node is added to the Flow Overview area.
----End
Data TransformationThe data transformation is to transform the sample data in a feature columnusing the natural logarithm (log) with natural constant e as the base and theexponential function (exp) with natural constant e as the base.
● log: If the current sample data quantity is large, you can transform the datausing the logarithmic function.
● exp: If the current sample data quantity is small, you can transform the datausing the exponential function.
The procedure is as follows:
Step 1 In the table header, select a feature column that requires data transformation.
The selected feature column must be of the numeric type and you cannot selectmultiple columns for data transformation at the same time.
Step 2 Click Feature Operation. Click Data Transformation in the drop-down list box.
The Data Transformation dialog box is displayed. Set the following parameters:
● Check whether the selected feature column is displayed in Selected Features.● Set Algorithm.
NAIEModel Training Service 4 User Guide
Issue 01 (2020-12-30) Copyright © Huawei Technologies Co., Ltd. 86

Step 3 Click OK.
A Data Transformation node is added to the Flow Overview area.
----End
Column DeletionTo delete a feature column specified in a dataset, perform the following steps:
Step 1 In the table header, select a feature column that needs to be deleted.
Step 2 Click Feature Operation. Click Delete Column in the drop-down list box.
The Delete Column dialog box is displayed. Check whether the selected featurecolumn is displayed in Selected Features.
Step 3 Click OK.
A Delete Column node is added to the Flow Overview area.
----End
Feature SelectionYou can select and retain a feature column in a dataset and delete other featurecolumns. The procedure is as follows:
Step 1 In the table header, select a feature column that needs to be executed.
Step 2 Click Feature Operation. Click Feature Selecting in the drop-down list box.
The Feature Selecting dialog box is displayed. Check whether the selected featurecolumn is displayed in Selected Features.
Step 3 Click OK.
A feature selecting node is added to the Flow Overview area.
----End
Chi-Square TestThe chi-square test selects valuable feature columns by calculating the deviations(chi-square values) between feature columns and the label column of the datasetto discover valuable feature columns. The chi-square values are sorted inascending order so that you can select the top N feature columns.
● A larger chi-square value indicates a larger deviation between a featurecolumn and the label column. This indicates that the feature column does notmeet the label column requirement.
● A smaller chi-square value indicates a smaller deviation between a featurecolumn and the label column. This indicates that the feature column is closeto the label column.
● If a feature column is equal to the label column, the chi-square value is 0,indicating that the feature column is the same as the label column.
For example, throw a coin 50 times, and record the actual values of the obversefeature value and reverse feature value, respectively. It is assumed that the coin
NAIEModel Training Service 4 User Guide
Issue 01 (2020-12-30) Copyright © Huawei Technologies Co., Ltd. 87

obverse and reverse are evenly distributed. That is, the theoretical values of theobverse feature value and reverse feature value are both 25. If the obverseappears 22 times, and the reverse appears 28 times, the chi-square value iscalculated as follows: (22 – 25) x (22 – 25)/25 + (28 – 25) x (28 – 25)/25 = 0.72
NO TE
● The number of different values in the selected feature column cannot exceed 10,000.● If a negative number exists in the sample data of a feature column, the system uses the
MinMaxScaler algorithm to normalize the feature column before performing the chi-square test.
● If the sample data in the feature column is of the character string type, the system firstquantifies the feature column and then uses the MinMaxScaler algorithm to normalizethe data.
The chi-square test procedure is as follows:
Step 1 In the table header, select a feature column as the label column.
Step 2 Click Feature Operation. Click Chi-Square Test in the drop-down list box.
The Chi-Square Test dialog box is displayed. Set the following parameters:
● Check whether the selected feature column is displayed in Selected Features.● Set Number of Transformed Features and retain the feature columns of the
number specified by this parameter.
Step 3 Click OK.
A Chi-Square Test node is added to the Flow Overview area.
----End
Information EntropyInformation entropy is to calculate the correlation between the feature columnsand the label column of a dataset to discover valuable feature columns. A largercorrelation indicates a larger information entropy. The system sorts theinformation entropies in descending order to discover the valuable featurecolumns with larger information entropies.
The information entropy operation procedure is as follows:
Step 1 In the table header, select a feature column as the label column.
The number of different values in the selected column cannot exceed 100.
Step 2 Click Feature Operation. Click Information Entropy in the drop-down list box.
The Information Entropy dialog box is displayed. Set the following parameters:
● Check whether the selected feature column is displayed in Selected Features.● Set Number of Transformed Features and retain the feature columns of the
number specified by this parameter.
Step 3 Click OK.
An Information Entropy node is added to the Flow Overview area.
----End
NAIEModel Training Service 4 User Guide
Issue 01 (2020-12-30) Copyright © Huawei Technologies Co., Ltd. 88

Feature AdditionYou can create feature columns based on existing feature columns by calculatingthe sum and mean value of the current data rows. For example, with two featurecolumns, ID1 (2,7,1) and ID2 (3,2,7), a feature column ID_SUM (5,9,8) can beobtained after the sum is calculated.
NO TE
To select multiple columns of features, ensure that they are of the numeric type and noabnormal value exists.
To add a feature, perform the following steps:
Step 1 In the table header, select multiple feature columns.
Step 2 Click Feature Operation. Click Add Feature in the drop-down list box.
The Add Feature dialog box is displayed. Set the following parameters:
● Check whether the selected feature column is displayed in Selected Features.● Set the value of New Feature Name. The value must contain 1 to 50
characters. It must start with a letter, consist of only letters, digits,underscores (_), and hyphens (-), and cannot end with an underscore (_).
● Set the value of Add Regular.– sum: Calculate the sum of the selected feature columns based on the
dimensions of the sample data rows.– mean: Calculate the mean value of the selected feature columns based
on the dimensions of the sample data rows.
Step 3 Click OK.
----End
PCAPrincipal component analysis (PCA) is to perform linear transformation on theoriginal feature as much as possible to represent the original feature and find theoptimal subspace of data distribution for dimension reduction and decorrelation.
The training platform supports two PCA algorithms:
● PCA: It is a statistical procedure that uses an orthogonal transformation toconvert a set of observations of possibly correlated variables (entities each ofwhich takes on various numerical values) into a set of values of linearlyuncorrelated variables called principal components.
● KPCA: indicates kernel principal component analysis. The basic principle ofKPCA is the same as that of PCA. The only difference is that KPCA requiresprojection before dimension raising because some non-linearly separabledatasets can be linearly separated only after dimension raising.
NO TE
Before PCA is executed, the system standardizes all the feature fields of the numeric type.For fields of the text type, the system performs numeric processing first and thenstandardizes the fields.
NAIEModel Training Service 4 User Guide
Issue 01 (2020-12-30) Copyright © Huawei Technologies Co., Ltd. 89

To execute the PCA, perform the following operations:
Step 1 Click Feature Operation. Click PCA in the drop-down list box.
The PCA dialog box is displayed. Set the following parameters:
● Number of Transformed Features: Number of feature columns aftertransformation. For example, if the number of features before dimensionreduction is 5 and Number of Transformed Features is set to 2, after PCA isexecuted, the system calculates two feature columns that cover the mostinformation.
● Select an algorithm: The options include PCA and KPCA. The Sparkdevelopment platform does not support the KPCA algorithm.
Step 2 Click OK.
----End
4.6.2.6 Notebook Development
You can compile algorithms in the Notebook development environment to modifyfeature columns. The procedure is as follows:
Step 1 Click Notebook Development.
The Notebook Development dialog box is displayed, as shown in Figure 4-27.Enter the operation name and description.
Figure 4-27 Notebook development dialog box
Step 2 Click OK.
The feature engineering algorithm editing page is displayed. For details about theNotebook algorithm development page and model training algorithm page, seeEditing Code. You can edit the algorithm file (**.py) and press Ctrl+S to save thealgorithm.
NAIEModel Training Service 4 User Guide
Issue 01 (2020-12-30) Copyright © Huawei Technologies Co., Ltd. 90

NO TE
After editing a feature processing algorithm developed through the Notebook, you need toclick Save in the upper right corner of the page to prevent edited algorithm content frombeing lost.
Step 3 (Optional) Configure the Notebook debugging environment and debug thealgorithm.
1. Click . The Notebook Configuration dialog boxis displayed.If there are created Notebook environments, select an environment in runningstate and click Save. To create another Notebook environment, perform thefollowing steps:
a. Select an AI engine and specifications. Click Create NotebookEnvironment.
b. When the created Notebook environment is in Running state, select theenvironment and click Save.
2. Click the *.ipynb file. The algorithm debugging page is displayed.
3. Click to debug the algorithm.
Step 4 After the algorithm is successfully debugged, click Save in the upper right cornerof the page. The customized feature processing algorithm is executed.
A Customize Operation node is added to the Flow Overview area.
----End
4.6.2.7 Applying Feature Operations to All DataAfter feature operations are complete, click Execute to apply the feature operationflow to all data. You can apply the current feature operation flow to otherdatasets and dataset entities. To apply operations to all data, perform thefollowing steps:
Step 1 Click .
The Execute dialog box is displayed, as shown in Figure 4-28.
NAIEModel Training Service 4 User Guide
Issue 01 (2020-12-30) Copyright © Huawei Technologies Co., Ltd. 91

Figure 4-28 Applying feature operations to all data
Step 2 Select a dataset and data from the Dataset and Data drop-down list boxes,respectively.
Multiple data copies can be added at the same time. Each data copy must havethe same data feature dimension as that in the current feature engineeringproject.
Target Dataset Entity indicates the name of the dataset entity generated afterfeature processing. Set this parameter as required.
Step 3 Click EXECUTE to execute the feature operation flow on the data.
The system automatically generates data after feature processing. You can viewthe data in dataset.
You can perform the following operations:● On the feature engineering details page, click Records to view the dataset
entity name, target dataset entity name, time, and status. You can click abutton in the Operation column to apply feature operations to all data again,create an algorithm based on the generated dataset entity, or delete thegenerated dataset entity.
● On the dataset page, view the new dataset entity generated after executingthe feature operation flow. The data source of this type of data is FEATURE.
----End
4.6.2.8 Publishing a Service
If the operation flow of the current feature engineering project has good effect,high-quality training data can be obtained. In this case, you can publish the
NAIEModel Training Service 4 User Guide
Issue 01 (2020-12-30) Copyright © Huawei Technologies Co., Ltd. 92

current feature engineering project as a service. You can reuse this featureengineering service to perform the same feature operations on other data.
Publishing a Feature Engineering Service
Step 1 On the Feature Engineering List tab under Feature Engineering Management,
click in the Operation column of a feature engineering project. Click inthe displayed drop-down list box.
The Publish dialog box is displayed. Set the following parameters:● Service Name: Name of a feature engineering service. The name must start
with a letter, can contain only letters, digits, and hyphens (-), and cannot endwith a hyphen (-).
● Service Description: Brief description of a feature engineering service. Thevalue cannot exceed 256 characters.
Step 2 Click OK to publish the feature engineering service.
Step 3 Click the Service List tab and view information about published featureengineering services, including the service name, feature engineering projectname, development platform, creator, creation time, activity time, and overview.You can also perform the following operations:● View details about the feature engineering service. Figure 4-29 shows the
feature engineering service page. Table 4-18 describes the featureengineering service page.
Figure 4-29 Feature engineering service page
Table 4-18 Description of the feature engineering service page
Area Parameter Description
1 (Featureengineeringservice)
Created Time Time when a featureengineering service is created.
Type Type of a service. The value ofthis parameter is FeatureEngineering Service.
Creator User who creates a featureengineering service.
Activity Time Time when the latest featureengineering task is executed.
NAIEModel Training Service 4 User Guide
Issue 01 (2020-12-30) Copyright © Huawei Technologies Co., Ltd. 93

Area Parameter Description
Create a feature engineeringtask. For details, see Creatinga Feature Engineering Task.
Delete a feature engineeringservice.
2 (Featureengineeringtasks)
Quickly search for averification task based on thestatus.
Job Name Name of a featureengineering task.
Job Creation Time Time when a featureengineering task is created.
Job Duration Execution duration of afeature engineering task.
Job Status Execution status of a featureengineering task.
View hyperparameterconfigurations of a featureengineering task.
View running logs of a featureengineering task.
Delete a feature engineeringtask.
● Create a feature engineering task based on the feature engineering service.For details, see Creating a Feature Engineering Task.
● Delete a feature engineering service.
You can click Create in the upper right corner of the feature engineering servicepage and create a feature engineering service based on another featureengineering project.
----End
Creating a Feature Engineering Task
You can click the Service List tab page and click in the Operation columncorresponding to a feature engineering service to create a feature engineering
task. Alternatively, you can click in the upper right corner of the details pageof the feature engineering service to create a feature engineering task. Thefollowing describes how to create a feature engineering task on the featureengineering service page:
NAIEModel Training Service 4 User Guide
Issue 01 (2020-12-30) Copyright © Huawei Technologies Co., Ltd. 94

Step 1 Click in the upper right corner of the feature engineering service page. TheCreate Job dialog box is displayed.
Step 2 Set parameters in the dialog box. Table 4-19 describes the parameters.
Table 4-19 Parameters for creating a feature engineering task
Area Parameter Description
JobInformation
Job Name Name of a feature engineering task.The name must contain 1 to 26 characters.It must start with a letter, consist of onlyletters, digits, and underscores (_), andcannot end with an underscore (_).
Dataset Dataset on which the feature engineeringtask is to be performed. Select a valuefrom the drop-down list box.
Dataset Entity Data on which the feature engineeringtask is to be performed. Select a valuefrom the drop-down list box.
Target DatasetEntity
After a feature engineering task iscomplete, the system automaticallygenerates new target data whose source isFEATURE in the dataset.The value must contain 1 to 128characters. It must start with a letter,consist of only letters, digits, underscores(_), and hyphens (-), and cannot end withan underscore (_) or a hyphen (-).
EnvironmentConfiguration
AI Engine Development platform for featureengineering operators.
Specifications Resource configuration information of theAI engine.
Step 3 Click Create.
During task execution, you can click to view run logs.
After the task is complete, you can view the new target data whose data source isJOB in the dataset.
----End
4.6.3 JupyterLab Development Platform
4.6.3.1 Creating a Feature Engineering ProjectYou can create a feature engineering project based on a dataset entity on thedataset details page and perform feature operations on the dataset, or create a
NAIEModel Training Service 4 User Guide
Issue 01 (2020-12-30) Copyright © Huawei Technologies Co., Ltd. 95

feature engineering project on the Feature Engineering Management page. Thefollowing describes how to create a feature engineering project on the FeatureEngineering Management page.
Step 1 Click on the Feature Engineering Managementpage.
The Feature Processing dialog box is displayed, as shown in Figure 4-30.
Figure 4-30 Creating a feature engineering project
Set parameters in the Feature Processing dialog box. Table 4-20 describes theparameters.
Table 4-20 Description of feature engineering project parameters
Parameter Description
ProjectName
Name of a feature engineering project.The value must contain 1 to 50 characters. It must start with aletter, consist of only letters, digits, underscores (_), and hyphens(-), and cannot end with an underscore (_).
ProjectDescription
Description of a feature engineering project.The value contains a maximum of 500 characters.
DevelopPlatform
Computing platform for a feature engineering project to processa dataset. The JupyterLab option is selected.
NAIEModel Training Service 4 User Guide
Issue 01 (2020-12-30) Copyright © Huawei Technologies Co., Ltd. 96

Parameter Description
Specifications
Resource configuration information of the computing platform.Select a value as required.
Instance Instance of the JupyterLab running environment. You can selectan existing running environment from the drop-down list box orselect Create a new development environment.
Step 2 Click Create.
A new feature engineering project is generated on the Feature Engineering Listtab page by default.
Wait until the status in the Environment column corresponding to the featureengineering project changes from Creating to Running, which indicates that theJupyterLab environment instance is created.
Step 3 Click in the Operation column corresponding to the feature engineeringproject.
The JupyterLab environment editing page is displayed.
Step 4 In the displayed Select Kernel dialog box, select a kernel version and click Select.
The JupyterLab environment editing page is displayed, as shown in Figure 4-31.Table 4-21 describes the JupyterLab environment editing page.
Figure 4-31 JupyterLab environment editing page
NAIEModel Training Service 4 User Guide
Issue 01 (2020-12-30) Copyright © Huawei Technologies Co., Ltd. 97

Table 4-21 Description of the JupyterLab environment editing page
Area Description
1 Area for viewing feature engineering details.The icons are described as follows:
● : Feature engineering project directory list. All directories with thesame name as the feature engineering project are displayed. Double-click the directory name to view all subdirectories and files in thefeature engineering project. Details are listed as follows:– softcomai: SDK provided by the training service.– _train.json: Hyperparameter configuration information.– *.ipynb: Main file for code editing and debugging in a feature
engineering project.– requirements.txt: Third-party dependency package list of the
training service. You can write the third-party dependencypackages as required. Example: tensorflow==1.8.1
● : Dataset directory list. All datasets in the OBS space of thecurrent project are displayed. Double-click the dataset directory toview the data list.
● : To view information about all running JupyterLab environments,click SHUT DOWN.
● : Jupyterlab function set.
● : Attribute checker. You can click this icon to view cell attributesin the right editing area.
● : All feature engineering operation flows created based on theJupyterLab platform. You can click a feature operation name tolocate the feature operation on the editing page.
● : Jupyterlab third-party extension function management.
2 Menu of the JupyterLab platform.
3 Shortcut button for editing a file.
4 Feature service publishment preset on the training platform. Jupyterlab-based model package archiving and conversion of the formats of themajor feature engineering operation files are supported.
5 Kernel information for feature engineering. Click the current kernelversion to reselect the kernel.
6 JupyterLab preset operators, including data processing, model training,and transfer learning capabilities.
7 Feature engineering operation and editing area. The main file of featureengineering operations is an .ipynb file.
NAIEModel Training Service 4 User Guide
Issue 01 (2020-12-30) Copyright © Huawei Technologies Co., Ltd. 98

----End
4.6.3.2 Dataset
You can obtain the description of the SDK capability provided by the platform ineither of the following ways:
● Enter ?dataflow.rename_columns in a new code box to run the code boxand view the description.
● Click Help Center and then click SDK Document to view the description inthe SDK document.
Loading Data
Before performing feature operations, you need to select data.
You can select data in either of the following ways:
● On the editing page, click Load Data under Import sdk.
● In the upper right corner of the feature engineering page, click andchoose Data Processing > Dataset > Load Data.
The data selection procedure is as follows:
Step 1 Click on the left of the Import sdk code box to run the code.
SDK import must be performed before all other operations. Otherwise, an erroroccurs during data loading.
Step 2 On the editing page, click Load Data.
Table 4-22 describes the parameters on the right of the code box. You can also
click on the right of the current operator to add multiple data instances to bebound.
Table 4-22 Data Selection
Parameter Description
Dataset Select the name of the dataset created in the Datasetmenu from the drop-down list box.
Entity Name Select the name of the data instance created on theDataset menu from the drop-down list box.
Data File List If data is uploaded from a local directory and DataCategory is set to Files & Folders (Total size limit 10G),you need to set Data File List and Data File Encoding toadd the multiple directories and files uploaded from thelocal directory. Datasets are automatically combined. Thecolumn names of each file must be the same.
NAIEModel Training Service 4 User Guide
Issue 01 (2020-12-30) Copyright © Huawei Technologies Co., Ltd. 99

Parameter Description
Data File Type Format of a data file. Select a value based on the siterequirements.
Data File Encoding Encoding format of a data file.
Whether to enablelocal cache
Whether to enable the local cache of the container foracceleration.
Step 3 Click to run the Load Data code box. The dataset entity is successfullyimported.
----End
Generating a Dataset EntityOn the JupyterLab feature engineering project editing page, all feature operationsare complete. Then, you need to apply the feature operation flow to the selecteddata to generate new data after feature processing.
The procedure is as follows:
Step 1 Click in the upper right corner of the page and choose Data Processing >Dataset > Create Dataset Entity.
Set the parameters for creating a dataset entity. Table 4-23 describes theparameters.
Table 4-23 Parameters for creating a dataset entity
Parameter Description
Dataset Select an existing dataset from the drop-down list box.
DatasetEntity
Name of the data generated after feature processing, which canbe user-defined.
Currentflow name
Advanced parameter. Select the name of the current inputoperation flow from the drop-down list box.
Step 2 Click to generate new data in existing datasets.
You can double-click a dataset name directory to view the newly generateddataset, as shown in Figure 4-32.
You can double-click a dataset name to view the data in the right pane.
NAIEModel Training Service 4 User Guide
Issue 01 (2020-12-30) Copyright © Huawei Technologies Co., Ltd. 100

Figure 4-32 Dataset list
----End
Modifying Metadata
The data time series information is extracted as the Modify Metadata operator.
The procedure is as follows:
Step 1 Click in the upper right corner of the page and choose Data Processing >Dataset > Modify Metadata.
On the editing page, add Modify Metadata content. Table 4-24 describes theparameters.
Table 4-24 Modifying metadata
Parameter Description
Current DataReference
Select the loaded data from the Load Data drop-downlist box.
Whether it is timeseries
This switch can be turned when the selected data is timeseries data.After this switch is turned on, the following parametersmust be configured:● Time Column: Name of the time field.● Time format: Time format of the time field. The
default value is Automatic parse, which indicates thatthe time format is automatically parsed.
● ID column: Dataset ID column.
NAIEModel Training Service 4 User Guide
Issue 01 (2020-12-30) Copyright © Huawei Technologies Co., Ltd. 101

Parameter Description
Whether to detectseasonal andstationarity
If this function is enabled, the system checks the timeseries data period, determines whether the specifiedperiod is the time series data period, and checks whetherthe time series data is stable.This function requires a long running duration. Bydefault, this function is disabled.
Step 2 Click and run the content in the Modify Metadata code box. The datasetentity is successfully imported.
----End
Creating a Data Operation Flow
If feature processing needs to be performed on multiple data records at the sametime, you need to specify the Operation flow variable name for each data recordto prevent conflicts. You do not need to set this parameter when only one datarecord is processed.
The procedure is as follows:
Step 1 Click in the upper right corner of the page and choose Data Processing >Dataset > Create Flow.
On the editing page, add Create Flow content. Table 4-25 describes theparameters.
Table 4-25 Modifying metadata
Parameter Description
Current DataReference
Select the loaded data from the Load Data drop-downlist box.
Operation flowvariable name
During feature engineer, if feature processing needs to beperformed on multiple data records to prevent dataconflicts, you need to set this parameter to distinguishdata.
Step 2 Click to run the content in the Create Flow code box. The operation flowvariable name is configured.
----End
4.6.3.3 Data Exploration
After data is selected, you can explore the selected data, including statistics, chartanalysis, feature analysis, and time series analysis.
NAIEModel Training Service 4 User Guide
Issue 01 (2020-12-30) Copyright © Huawei Technologies Co., Ltd. 102

Date StatisticsCurrent feature data can be fully displayed, including the types and values of allfeature fields. In addition, you can collect statistics on a specific feature field,including the average value, variance, maximum value, minimum value,percentages, and quantiles. You can draw a histogram, boxplot, line, or area chartfor a feature column.
The procedure is as follows:
Step 1 In the feature engineering operation and editing area, click Data Explorationunder the Import Data code box.
On the feature engineering project editing page, the data exploration file isdisplayed on the right and the *.ipynb main file for code editing is displayed onthe left by default. You can drag and set the display area of the data explorationfile. Left-click the title area of the data exploration file, hold down and drag thefile to a displayed blue area, and release the mouse. The data exploration file and*.ipynb main file for code editing can be displayed upward and downward,leftward and rightward, or at the same level. If they are displayed at the samelevel, only one file page is displayed on the feature engineering project editingpage. Click file titles to switch between file pages.
Step 2 Expand the Data Statistics tab page to view the feature data full table.
Step 3 You can click a feature column name of the numeric type to view the histogramand box plot of the feature column. If the data is time series data, you can draw atrend chart. You can view the value statistics of the feature column under the fullfeature statistics table.
In the statistics of time series data, if Is the time interval uniform is set to No,you need to preprocess the time series data.
If Whether to detect seasonal and stationarity is disabled during time seriesdata selection, you can manually check items Is it stable and Period (Number ofsamples). If the data volume is large, the check takes a long time. This check isoptional.
----End
Chart AnalysisThe current feature data can be displayed in charts.
The procedure is as follows:
Step 1 In the feature engineering operation and editing area, click Data Explorationunder the Import Data code box.
Step 2 Expand the Charts tab page to set a chart as required. Table 4-26 describes theparameters.
NAIEModel Training Service 4 User Guide
Issue 01 (2020-12-30) Copyright © Huawei Technologies Co., Ltd. 103

Table 4-26 Parameter description
NavigationPath
Function Parameter Description
Parametersettings forthe charttype andthe chart
Chart Type Type of a feature data chart, includingScatter, Line, Histogram, Boxplot,Scatter Matrix, KDE Curve, and 3DScatter.If the feature data is time series data,the following chart types aresupported: Trend, Histogram, Boxplot,KDE Curve, and ACF and PACF.
Chart Title Title of a feature data chart.
X-Axis Click and select a data columnfrom the feature column of the featuredata as the X axis of the chart.
Y-Axis Click and select a data columnfrom the feature column of the featuredata as the Y axis of the chart.
Z-Axis Click and select a data columnfrom the feature column of the featuredata as the Z axis of the chart.
Column Name Click to select feature columnsfrom feature data as the data sourcefor display of a histogram, boxplot,KDE curve, scatter matrix, or ACF andPACF chart.
VisualDimensionConfigurations
If Enable the Visual Dimensions is setto Enable, click corresponding toLabel Column Name to select afeature column from feature data asthe visual dimension label of a scatter,line, or 3D scatter chart. The visualdimension label is displayed in theupper right corner of the chart.
IncludingGaussianDistributionCurve
Whether to display the Gaussiandistribution curve. Available if ChartType is set to Histogram.
HistogramColumn Count
Number of display columns in ahistogram.Available if Chart Type is set toHistogram.
NAIEModel Training Service 4 User Guide
Issue 01 (2020-12-30) Copyright © Huawei Technologies Co., Ltd. 104
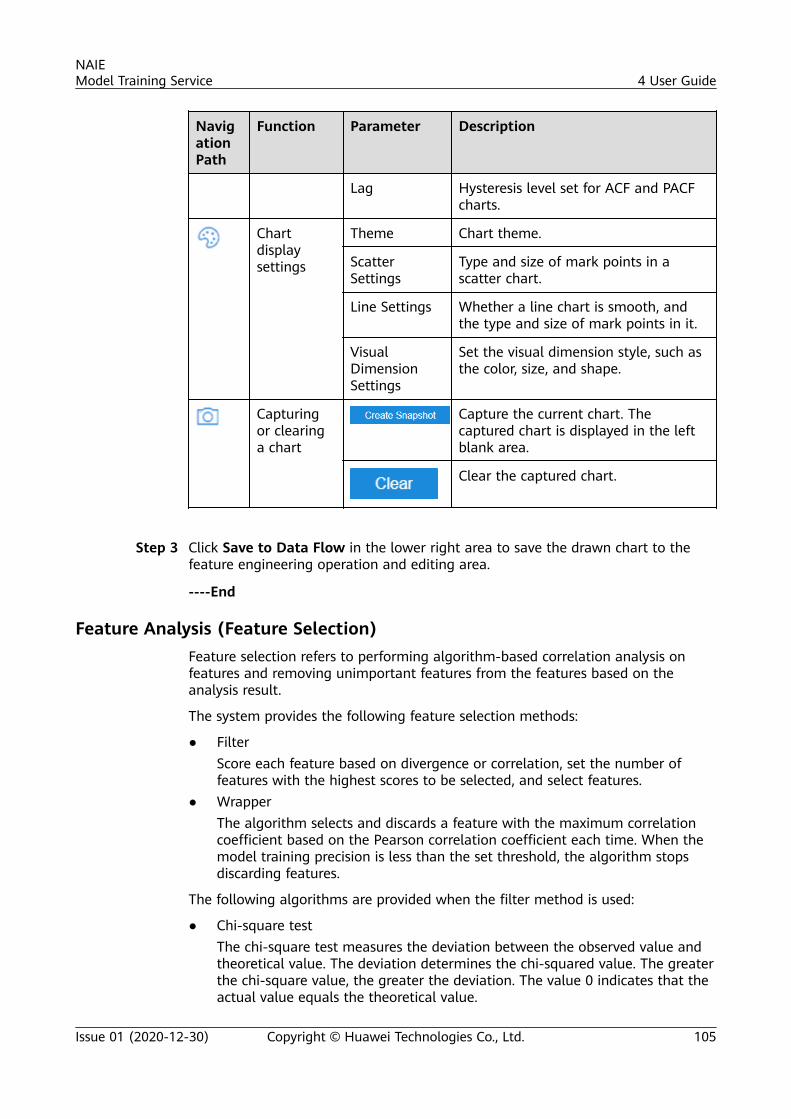
NavigationPath
Function Parameter Description
Lag Hysteresis level set for ACF and PACFcharts.
Chartdisplaysettings
Theme Chart theme.
ScatterSettings
Type and size of mark points in ascatter chart.
Line Settings Whether a line chart is smooth, andthe type and size of mark points in it.
VisualDimensionSettings
Set the visual dimension style, such asthe color, size, and shape.
Capturingor clearinga chart
Capture the current chart. Thecaptured chart is displayed in the leftblank area.
Clear the captured chart.
Step 3 Click Save to Data Flow in the lower right area to save the drawn chart to thefeature engineering operation and editing area.
----End
Feature Analysis (Feature Selection)Feature selection refers to performing algorithm-based correlation analysis onfeatures and removing unimportant features from the features based on theanalysis result.
The system provides the following feature selection methods:
● FilterScore each feature based on divergence or correlation, set the number offeatures with the highest scores to be selected, and select features.
● WrapperThe algorithm selects and discards a feature with the maximum correlationcoefficient based on the Pearson correlation coefficient each time. When themodel training precision is less than the set threshold, the algorithm stopsdiscarding features.
The following algorithms are provided when the filter method is used:
● Chi-square testThe chi-square test measures the deviation between the observed value andtheoretical value. The deviation determines the chi-squared value. The greaterthe chi-square value, the greater the deviation. The value 0 indicates that theactual value equals the theoretical value.
NAIEModel Training Service 4 User Guide
Issue 01 (2020-12-30) Copyright © Huawei Technologies Co., Ltd. 105

● F testThe f test is a test in which statistics follow an f distribution under a nullhypothesis.
● Information gainThe information gain measures the amount of related information betweentwo random variables. The greater the information gain value, the strongerthe correlation between the variables.
Among the algorithms, the chi-square test, f test, and information gain can beused for classification tasks. The f test and information gain can be used forregression tasks.
Step 1 In the feature engineering operation and editing area, click Data Explorationunder the Import Data code box.
Step 2 Click the Feature Analysis tab page.
Step 3 In the navigation pane, click Select.
Step 4 Set parameters, such as Label Column, Method, and Algorithm. Table 4-27describes the parameters.
Table 4-27 Parameter description
Parameter Description
Label Column Click to select a label column toanalyze the correlation betweenfeature columns and the label column.
Method Available feature analysis methods.The options are as follows:● Filter● Wrapper
Algorithm Available analysis algorithms whenMethod is set to Filter. The optionsare as follows:● Chi-Squared Test● F-test● Information Gain
Number of Retained Features Number of top N features displayed bycorrelation after feature analysis iscomplete.
The label column is category type After the label column is set, thesystem automatically determineswhether the label column is ofcategory type. You can use the defaultvalue.
NAIEModel Training Service 4 User Guide
Issue 01 (2020-12-30) Copyright © Huawei Technologies Co., Ltd. 106

Parameter Description
Random Seed Random number. This parameter isavailable when Algorithm is set toInformation Gain.
Excluded Columns Feature columns to be excluded beforethe Wrapper method is used. Theseexcluded columns are not involved insubsequent feature selection. Click to select and exclude feature columns.
Threshold Model training precision threshold.Features are repeatedly trained if theWrapper method is used. When thetraining precision is less than the setthreshold, features are no longerdiscarded.
Submit an analysis request.
Stop an analysis task after the analysistask is submitted and before theanalysis is complete.
Capture the bar chart of top N featurecolumns. The chart can be saved toyour local PC.
Clear the captured correlation analysisbar chart of top N feature columns.
Step 5 Click Analyze.
NO TE
After the automatic analysis is complete, the analysis result is displayed in a bar chart orlist. The number of feature columns displayed in the bar chart is set in Number ofRetained Features. The list displays all feature columns in descending order of theircorrelation scores by default.
Step 6 Select feature columns.● Retain all top N feature columns in the analysis result.
a. Click Apply in the lower part of the bar chart of top N feature columns.The feature engineering operation and editing area is displayed, with aReserve Columns code box. Column Name under Column selectiondisplays all feature columns in the bar chart.
b. Click to run the Reserve Columns code box.● Retain some feature columns in the analysis result.
a. Select the check boxes in front of feature columns in the Analysis Resultlist. To select all feature columns, select the check box in the list header.
NAIEModel Training Service 4 User Guide
Issue 01 (2020-12-30) Copyright © Huawei Technologies Co., Ltd. 107

b. Click Apply under the Analysis Result list.The feature engineering operation and editing area is displayed, with aReserve Columns code box. Column Name under Column selectiondisplays the feature columns that you select.
c. Click to run the Reserve Columns code box.
----End
Feature Analysis (ACE)Alternating conditional expectation (ACE) is an algorithm used for optimaltransformation between the response variable Y (label column) and predictivevariable X (feature columns) in regression analysis. A maximum linear effect canbe achieved between the predictive and response variables after thetransformation. ACE analysis can be performed only for regression tasks.
Step 1 In the feature engineering operation and editing area, click Data Explorationunder the Import Data code box.
Step 2 Click the Feature Analysis tab page.
Step 3 In the navigation pane, click ACE.
Step 4 Set parameters, such as Label Column, Columns, and Feature columnstransformation initialization method. Table 4-28 describes the parameters.
Table 4-28 Parameter description
Parameter Description
Label Column Response variable. Click to select alabel column. Only one column can beselected.
Columns Predictive variable. Click to selectcolumns. Multiple columns can beselected.
Feature columns transformationinitialization method
Initialization mode of the featurecolumn during ACE analysis. Thefollowing options are supported:● zeros
The value 0 is used as the initialvalue.
● zero-meanThis value indicates that the featurevalue subtracted by the averagevalue is used as the initial value.
● stdThis value indicates that the featurevalue subtracted by the averagevalue and then divided by thevariance is used as the initial value.
NAIEModel Training Service 4 User Guide
Issue 01 (2020-12-30) Copyright © Huawei Technologies Co., Ltd. 108

Parameter Description
Label column transformationinitialization method
Initialization mode of the label columnduring ACE analysis. The followingoptions are supported:● zero-mean● std
Iterative error tolerance Iteration termination condition. If theiterative error reaches the value ofIterative error tolerance, the iterationterminates. The default value is 0.001.
Maximum number of iterations Iteration termination condition. If thenumber of iterations reaches the valueof Maximum number of iterations,the iteration terminates. The defaultvalue is 100.Whichever value of Iterative errortolerance and Maximum number ofiterations is reached first, the iterationterminates.
Nearest neighbors Number of adjacent points of eachpoint that needs to be calculatedduring algorithm iteration. The defaultvalue is 100.
Whether to use kd-tree Whether to use the k-dimensional treeto search for the number of neighbors.The k-dimensional tree is a datastructure that divides data space into kdimensions.
Submit an analysis request.
Stop an analysis task after the analysistask is submitted and before theanalysis is complete.
Capture the ACE analysis chart. Thechart can be saved to your local PC.
Clear the captured ACE analysis charton the page.
Step 5 Click Analyze.
After the analysis is complete, the analysis result chart is displayed on the right.You can click Save to Data Flow in the lower right area to save the chart to thefeature engineering operation and editing area.
----End
NAIEModel Training Service 4 User Guide
Issue 01 (2020-12-30) Copyright © Huawei Technologies Co., Ltd. 109

Time Series AnalysisThe change of the time series is affected by long-term trends (T), seasonalchanges (S), periodic changes (C), and irregular changes (L). Time series datadecomposition refers to splitting raw data into these four parts using an additionmodel or a multiplication model.
Step 1 In the feature engineering operation and editing area, click Data Explorationunder the Import Data code box.
Step 2 Click the Time Series Analysis tab page.
Step 3 In the navigation pane, click Decomposition.
Step 4 Set Time Column, Columns, Model, and other parameters. Table 4-29 describesthe parameters.
Table 4-29 Parameter description
Parameter Description
Time Column Time column of the time series data tobe decomposed.
Columns Feature column of the time series datato be decomposed.
Model Decomposition model used for timeseries data decomposition. The optionsare as follows:● Additive Model
Use this model if the amplitude andtrend of seasonal changes andperiodic fluctuation do not changewith time.
● Multiplicative ModelUse this model if the amplitude ortrend of seasonal changes andperiodic fluctuation do not changewith time.
Period (Number of samples) Periodic value of time series data.
Submit an analysis request.
Stop an analysis task after the analysistask is submitted and before theanalysis is complete.
Step 5 Click Analyze.
NAIEModel Training Service 4 User Guide
Issue 01 (2020-12-30) Copyright © Huawei Technologies Co., Ltd. 110

After the analysis is complete, the analysis result chart is displayed on the right.You can click Save to Data Flow in the lower right area to save the chart to thefeature engineering operation and editing area.
----End
Anomaly Detection
Time series data includes abnormal points with inconsistent modes (for example,the time series data exceeds the upper or lower limits, suddenly increases ordecreases, or changes in the trend). The abnormal detection of the time seriesdata aims to quickly and accurately identify these abnormal points.
Step 1 In the feature engineering operation and editing area, click Data Explorationunder the Import Data code box.
Step 2 Click the Time Series Analysis tab page.
Step 3 In the navigation pane, click Anomaly Detection.
Step 4 Set Time Column, Columns, Anomaly Detection Type, and other parameters.Table 4-30 describes the parameters.
Table 4-30 Parameter description
Parameter Description
Time Column Time column of the time series datafor anomaly detection.
Columns Feature column of the time series datafor anomaly detection.
Anomaly Detection Type The options are as follows:● Value Range
Whether the stable time series datais abnormal and provides thereference range for anomalyidentification.
● Sudden RiseAbnormal point with abruptincreases or decreases in stabletime series data.
Abnormal range acquisition method Method for obtaining the upper andlower limits for identifying abnormaltime series data. The options are asfollows:● Boxplot● 3 Sigma● Anomalies detected by either● Anomaly detected by both
NAIEModel Training Service 4 User Guide
Issue 01 (2020-12-30) Copyright © Huawei Technologies Co., Ltd. 111

Parameter Description
Number of mutation points This parameter is displayed only whenAnomaly Detection Type is set toSudden Rise. This parameter specifiesthe number of abrupt increase ordecrease points in the stable timeseries data to be detected.The default value is 5. The detectionresult may be less than the value.
Whether to perform periodicdecomposition
This parameter is displayed only whenAnomaly Detection Type is set toSudden Rise. This parameter specifieswhether to break down the periodicdata to be detected periodically toenhance data differences.By default, this function is disabled.
Amount of data in a cycle This parameter is displayed only whenWhether to perform periodicdecomposition is enabled. Thisparameter specifies the data volume ina period during period decomposition.
Whether to filter This parameter is displayed only whenAnomaly Detection Type is set toSudden Rise. This parameter specifieswhether to perform secondary filteringon top N detected points.By default, this function is disabled.
Filtering threshold This parameter is displayed whenfiltering is enabled. If the top Ndetected points are filtered for thesecond time, this parameter is used asthe filtering threshold. The pointswhose values are less than thethreshold are considered as abruptchange points.
Submit an analysis request.
Stop an analysis task after the analysistask is submitted and before theanalysis is complete.
Step 5 Click Analyze.
NAIEModel Training Service 4 User Guide
Issue 01 (2020-12-30) Copyright © Huawei Technologies Co., Ltd. 112

After the analysis is complete, the analysis result chart is displayed on the right.You can click Save to Data Flow in the lower right area to save the chart to thefeature engineering operation and editing area.
----End
4.6.3.4 Data SamplingA large amount of data causes long waiting time for feature operations. You canreduce the data amount by sampling to speed up feature processing.
You can sample data in either of the following ways:
● Random sampling: Select sample data based on a rate.● Stratified sampling: If data in a feature or multiple features has various types,
you can set sampling rates for different data types to ensure the diversity ofsample data.
Two navigation paths are available for data sampling:
● Click in the upper right corner of the feature engineering page andchoose Data Processing > Data Sampling. This navigation path is adopted inthe following sampling steps.
● The Random Sampling and Stratified Sampling quick entries in the featureengineering operation and editing area.
Random samplingThe procedure is as follows:
Step 1 Click in the upper right corner of the page and choose Data Processing >Data Sampling > Random Sampling. Content about Random Sampling is addedon the GUI.
Table 4-31 describes the parameters.
Table 4-31 Parameter description
Parameter Description
SamplingRate
Data sampling rate. The value range is (0, 1). Set the parameterbased on site conditions.
Currentflow name
Select the name of the current data operation flow from thedrop-down list box.
Operationflowvariablename
If there are multiple data operation flows, you can rename thevariable names of the operation flow objects to avoid conflicts.
Step 2 Click to run the Random Sampling code box.
----End
NAIEModel Training Service 4 User Guide
Issue 01 (2020-12-30) Copyright © Huawei Technologies Co., Ltd. 113

Stratified Sampling
The procedure is as follows:
Step 1 Click in the upper right corner of the page and choose Data Processing >Data Sampling > Stratified Sampling. Content about Stratified Sampling isadded on the GUI.
Table 4-32 describes the parameters.
Table 4-32 Parameter description
Parameter Description
ColumnSelectionMethod
Method for filtering feature columns. The options are asfollows:● Column selection● Regular matching
Column Name Available if Column Selection Method is set to Columnselection. Click to select one or more columns.
RegularExpression
Available if Column Selection Method is set to Regularmatching. Enter a regular expression to set feature columns.
fractions Set sampling rates for different data types.Example: {(0,): 0.2, (1,): 0.8}. (0,) and (1,) each indicatescombined sample data in a feature column or feature columns.
seed Change the seed used by the random number generator togenerate random numbers. The value must be an integer.The default value is empty and stratified sampling is notaffected. If the seed value is not fixed, the number of samplesselected each time and the columns selected at each stratumare not fixed.
Current flowname
Select the name of the current data operation flow from thedrop-down list box.
Operationflow variablename
If there are multiple data operation flows, you can rename thevariable names of the operation flow objects to avoid conflicts.
Step 2 Click to run the Stratified Sampling code box.
----End
4.6.3.5 Data Cleansing
Null Dropping
You can drop sample data in a row containing nulls by null dropping.
NAIEModel Training Service 4 User Guide
Issue 01 (2020-12-30) Copyright © Huawei Technologies Co., Ltd. 114

Two navigation paths are available for null dropping:
● Click in the upper right corner of the feature engineering page andchoose Data Processing > Data Cleansing > Drop Nulls. This navigationpath is adopted in the following null dropping steps.
● The Drop Nulls quick entry in the feature engineering operation and editingarea.
The procedure is as follows:
Step 1 Click in the upper right corner of the page and choose Data Processing >Data Cleansing > Drop Nulls. Content about Drop Nulls is added on the GUI.
Table 4-33 describes the parameters.
Table 4-33 Parameter description
Parameter Description
ColumnSelectionMethod
Method for filtering feature columns. The options are asfollows:● Column selection● Regular matching
Column Name Available if Column Selection Method is set to Columnselection. Click to select one or more columns.
RegularExpression
Available if Column Selection Method is set to Regularmatching. Enter a regular expression as required. The systemautomatically screens out all feature columns meeting theregular expression.
ColumnsRelationship
The relationship between null dropping and feature columns.The values are as follows:● all: Discard a row of data if all set feature columns in the
row contain nulls.● any: Discard a row of data if any set feature column in the
row contains nulls.
Current flowname
Select the name of the current data operation flow from thedrop-down list box.
Operationflow variablename
If there are multiple data operation flows, you can rename thevariable names of the operation flow objects to avoid conflicts.
Step 2 Click to run the Drop Nulls code box.
----End
NAIEModel Training Service 4 User Guide
Issue 01 (2020-12-30) Copyright © Huawei Technologies Co., Ltd. 115

Null FillingYou can fill nulls by null filling if the amount of sample data is small or the actualsample value can be inferred based on features.
The procedure is as follows:
Step 1 Click in the upper right corner of the page and choose Data Processing >Data Cleansing > Fill Nulls. Content about Fill Nulls is added on the GUI.
Table 4-34 describes the parameters.
Table 4-34 Parameter description
Parameter Description
ColumnSelectionMethod
Method for filtering feature columns. The options are asfollows:● Column selection● Regular matching
Column Name Available if Column Selection Method is set to Columnselection. Click to select one or more columns.
RegularExpression
Available if Column Selection Method is set to Regularmatching. Enter a regular expression as required. The systemautomatically screens out all feature columns meeting theregular expression.
Fill With Data that replaces nulls.
Current flowname
Select the name of the current data operation flow from thedrop-down list box.
Operationflow variablename
If there are multiple data operation flows, you can rename thevariable names of the operation flow objects to avoid conflicts.
Step 2 Click to run the Fill Nulls code box.
----End
Data ReplacementYou can replace erroneous data in batches by data replacement if data in featurecolumns is erroneous or not as expected.
The procedure is as follows:
Step 1 Click in the upper right corner of the page and choose Data Processing >Data Cleansing > Data Replacement. Content about Data Replacement isadded on the GUI.
Table 4-35 describes the parameters.
NAIEModel Training Service 4 User Guide
Issue 01 (2020-12-30) Copyright © Huawei Technologies Co., Ltd. 116

Table 4-35 Parameters for data replacement
Parameter Description
ColumnSelectionMethod
Method for filtering feature columns. The options are asfollows:● Column selection● Regular matching
Column Name Available if Column Selection Method is set to Columnselection. Click to select one or more columns.
RegularExpression
Available if Column Selection Method is set to Regularmatching. Enter a regular expression as required. The systemautomatically screens out all feature columns meeting theregular expression.
To Replace Data to be replaced.
Replace With Data after replacement.
Current flowname
Select the name of the current data operation flow from thedrop-down list box.
Operationflow variablename
If there are multiple data operation flows, you can rename thevariable names of the operation flow objects to avoid conflicts.
Step 2 Click to run the Data Replacement code box.
----End
Data MappingYou can map data in a feature column to required data. A new feature column isgenerated. The original feature column is retained and not affected.
The procedure is as follows:
Step 1 Click in the upper right corner of the page and choose Data Processing >Data Cleansing > Data Mapping. Content about Data Mapping is added on theGUI.
Table 4-36 describes the parameters.
Table 4-36 Parameter description
Parameter Description
Column Name Click to set the feature column to be mapped as required.Only one column can be set.
New Name Enter the name of the feature column generated after datamapping.
NAIEModel Training Service 4 User Guide
Issue 01 (2020-12-30) Copyright © Huawei Technologies Co., Ltd. 117

Parameter Description
To Replace Data to be replaced.
Replace With Data after replacement.
Current flowname
Select the name of the current data operation flow from thedrop-down list box.
Operationflow variablename
If there are multiple data operation flows, you can rename thevariable names of the operation flow objects to avoid conflicts.
Step 2 Click to run the Map Column code box.
----End
Data Filtering
The provided data may not be accurate. For example, negative values arecontained in features that can only be positive. You can discard all rows containingnegative values by data filtering.
The procedure is as follows:
Two navigation paths are available for data filtering:
● Click in the upper right corner of the feature engineering page andchoose Data Processing > Data Cleansing > Data Filtering.
● The Data Filtering quick entry in the feature engineering operation andediting area.
Step 1 Click in the upper right corner of the page and choose Data Processing >Data Cleansing > Data Filtering. Content about Data Filtering is added on theGUI.
Table 4-37 describes the parameters.
Table 4-37 Parameter description
Parameter Description
ColumnSelectionMethod
Method for filtering feature columns. The options are asfollows:● Column selection● Regular matching
Column Name Available if Column Selection Method is set to Columnselection.Click to select one or more feature columns in the displayeddialog box.
NAIEModel Training Service 4 User Guide
Issue 01 (2020-12-30) Copyright © Huawei Technologies Co., Ltd. 118

Parameter Description
RegularExpression
Available if Column Selection Method is set to Regularmatching.Enter a regular expression as required. The systemautomatically screens out all feature columns meeting theregular expression.
Expression Expression for data filtering.To filter data in a single column, use the following symbols: >,>=, <, <=, ==. The following is an example. You can infer othersin the same way.● Obtain data greater than 0: col(columns[0]) > 0● Obtain data equal to 2: col(columns[0]) == 2To filter data in multiple columns, use symbols such as f_and,f_or, and f_not. The following is an example. You can inferothers in the same way.● Obtain data whose values in two columns are the same:
(col(columns[0])) == (col(columns[1]))● Obtain data whose values in two columns are both 2:
f_and((col(columns[0]) == 2), (col(columns[1]) == 2))
Current flowname
Select the name of the current data operation flow from thedrop-down list box.
Operationflow variablename
If there are multiple data operation flows, you can rename thevariable names of the operation flow objects to avoid conflicts.
Step 2 Click to run the Data Filtering code box.
----End
DeduplicationYou can delete sample rows with duplicate data by deduplication if featurecolumns contain duplicate data.
The procedure is as follows:
Step 1 Click in the upper right corner of the page and choose Data Processing >Data Cleansing > Deduplication. Content about Deduplication is added on theGUI.
Table 4-38 describes the parameters.
NAIEModel Training Service 4 User Guide
Issue 01 (2020-12-30) Copyright © Huawei Technologies Co., Ltd. 119

Table 4-38 Parameter description
Parameter Description
Column SelectionMethod
Method for filtering feature columns. The options are asfollows:● Column selection● Regular matching
Column Name Available if Column Selection Method is set to Columnselection. Click to select one or more columns.
Regular Expression Available if Column Selection Method is set to Regularmatching. Enter a regular expression as required. Thesystem automatically screens out all feature columnsmeeting the regular expression.
Current flow name Select the name of the current data operation flow fromthe drop-down list box.
Operation flowvariable name
If there are multiple data operation flows, you canrename the variable names of the operation flowobjects to avoid conflicts.
Step 2 Click to run the Deduplication code box.
----End
4.6.3.6 Data Combination
Data Joining
Data joining is to join datasets with not completely the same feature columndimensions into one piece of data. The reason why dataset features are notcompletely the same may be that, data is collected from various systems on thelive network. The principle is the same as that of data joining on the Datasetpage. For details, see Data Joining.
The procedure is as follows:
Step 1 Click in the upper right corner of the page and choose Data Processing >Data Merging > Data Joining. Content about Data Joining is added on the GUI.
Table 4-39 describes the parameters.
Table 4-39 Parameter description
Parameter Description
Right Data The data imported to the current feature engineering project isthe left data flow. You need to enter the right data flow fordata joining.
NAIEModel Training Service 4 User Guide
Issue 01 (2020-12-30) Copyright © Huawei Technologies Co., Ltd. 120

Parameter Description
Primary Key The left data and right data flow are matched based on aprimary key. Click to set the primary key.
Joining Type The data joining type.The options are as follows:● left: Return all data from the left table and the matching
data from the right table, and supplement unmatched datain the right table with NULL.
● right: Return all data from the right table and the matchingdata from the left table, and supplement unmatched datain the left table with NULL.
● outer: Return only data in a common field between the leftand right tables is returned, and discard data in a differentfield between the tables.
● inner: Match data from the left and right tables, return alldata from the tables, and supplement all unmatched datain the tables with NULL.
Suffix of LeftColumns
Duplicate feature columns from the left data flow are suffixed.The suffix can be user-defined.
Suffix of RightColumns
Duplicate feature columns from the right data flow aresuffixed. The suffix can be user-defined.
Current flowname
Select the name of the current data operation flow from thedrop-down list box.
Operationflow variablename
If there are multiple data operation flows, you can rename thevariable names of the operation flow objects to avoid conflicts.
Step 2 Click to run the Data Joining code box.
----End
Data UnionModels with generalization ability cannot be trained if data samples areinsufficient. The training platform supports data union for datasets with the samefeature dimensions to increase samples.
The procedure is as follows:
Step 1 Click in the upper right corner of the page and choose Data Processing >Data Merging > Data Union. Content about Data Union is added on the GUI.
Table 4-40 describes the parameters.
NAIEModel Training Service 4 User Guide
Issue 01 (2020-12-30) Copyright © Huawei Technologies Co., Ltd. 121

Table 4-40 Parameter description
Parameter Description
Data Flow List Data that needs to be united. Data records areseparated by commas.
Current flow name Select the name of the current data operation flowfrom the drop-down list box.
Operation flow variablename
If there are multiple data operation flows, you canrename the variable names of the operation flowobjects to avoid conflicts.
Step 2 Click to run the Data Union code box.
----End
4.6.3.7 Data Conversion
Renaming
You can rename a feature. The procedure is as follows:
Step 1 Click in the upper right corner of the page and choose Data Processing >Data Conversion > Rename. Content about Rename is added on the GUI.
Table 4-41 describes the parameters.
Table 4-41 Parameter description
Parameter Description
ColumnSelectionMethod
Method for filtering feature columns. The options are asfollows:● Column selection● Regular matching
Column Name Click to select feature columns to be renamed. Select atleast one column.
RegularExpression
Available if Column Selection Method is set to Regularmatching. Enter a regular expression as required. The systemautomatically screens out all feature columns meeting theregular expression.
New Name Feature name after modification.
Current flowname
Select the name of the current data operation flow from thedrop-down list box.
NAIEModel Training Service 4 User Guide
Issue 01 (2020-12-30) Copyright © Huawei Technologies Co., Ltd. 122

Parameter Description
Operationflow variablename
If there are multiple data operation flows, you can rename thevariable names of the operation flow objects to avoid conflicts.
Step 2 Click to run the Rename code box.
----End
Normalization
The model training effect may be poor if data is within the range of (0,100) andonly one value is 10,000, or the range of data distribution is too wide in a feature.You can map feature values to a specific data range by normalization to achievebetter model training effect.
The procedure is as follows:
Step 1 Click in the upper right corner of the page and choose Data Processing >Data Conversion > Normalization. Content about Normalization is added on theGUI.
Table 4-42 describes the parameters.
Table 4-42 Parameter description
Parameter Description
ColumnSelectionMethod
Method for filtering feature columns. The options are asfollows:● Column selection● Regular matching
Column Name Available if Column Selection Method is set to Columnselection. To normalize multiple columns of feature data to asame data range, click to select the columns.
New Name This parameter is left empty by default. Normalization isperformed on the original feature column. If this parameter isset, the original feature column remains unchanged, and anormalized column is added.
RegularExpression
Available if Column Selection Method is set to Regularmatching. Enter a regular expression as required. The systemautomatically screens out all feature columns meeting theregular expression.
Desired MinValue
All data after feature engineering normalization is greaterthan the Desired Min Value.The default value is 0.
NAIEModel Training Service 4 User Guide
Issue 01 (2020-12-30) Copyright © Huawei Technologies Co., Ltd. 123

Parameter Description
Desired MaxValue
All data after feature engineering normalization is less thanthe Desired Max Value.The default value is 1. In other words, the data after featurenormalization is within the range of (0,1).
Min Value ofColumn Data
Actual or theoretical minimum value of the feature data to benormalized. The value is obtained from the GUI if you enterthe value. Otherwise, the server automatically calculates theminimum value of the feature data.The default value is None. In other words, you do not need toenter the value.
Max Value ofColumn Data
Actual or theoretical maximum value of the feature data to benormalized. The value is obtained from the GUI if you enterthe value. Otherwise, the server automatically calculates themaximum value of the feature data.The default value is None. In other words, you do not need toenter the value.
Current flowname
Select the name of the current data operation flow from thedrop-down list box.
Operationflow variablename
If there are multiple data operation flows, you can rename thevariable names of the operation flow objects to avoid conflicts.
Step 2 Click to run the Normalization code box.
----End
NumeralizationNon-numerical features are not suitable for model training. You can convert themto numerical features by numeralization. Numeralization is a process of encodingthe sample data according to the type in the feature column. After the sampledata is numeralized, the sample data is of the integer type in the range of[0,Number of sample data types – 1].
The procedure is as follows:
Step 1 Click in the upper right corner of the page and choose Data Processing >Data Conversion > Numeralization. Content about Numeralization is added onthe GUI.
Table 4-43 describes the parameters.
NAIEModel Training Service 4 User Guide
Issue 01 (2020-12-30) Copyright © Huawei Technologies Co., Ltd. 124

Table 4-43 Parameter description
Parameter Description
ColumnSelectionMethod
Method for filtering feature columns. The options are asfollows:● Column selection● Regular matching
Column Name Feature name. Click to select feature columns. Select atleast one column.
RegularExpression
Available if Column Selection Method is set to Regularmatching. Enter a regular expression as required. The systemautomatically screens out all feature columns meeting theregular expression.
New Name If the new column name is set, new feature columns aregenerated after the numeralization. The original featurecolumns are retained. If the new column name is not set, theoriginal feature columns are overwritten after thenumeralization.
Current flowname
Select the name of the current data operation flow from thedrop-down list box.
Operationflow variablename
If there are multiple data operation flows, you can rename thevariable names of the operation flow objects to avoid conflicts.
Step 2 Click to run the Numeralization code box.
----End
Feature DiscretizationFeature discretization is to discretize continuous sample data in a feature columninto the data of the integer type in the range of [0,Discretized data quantity – 1].
The procedure is as follows:
Step 1 Click in the upper right corner of the page and choose Data Processing >Data Conversion > Feature Discretization. Content about Feature Discretizationis added on the GUI.
Table 4-44 describes the parameters.
NAIEModel Training Service 4 User Guide
Issue 01 (2020-12-30) Copyright © Huawei Technologies Co., Ltd. 125

Table 4-44 Parameter description
Parameter Description
ColumnSelectionMethod
Method for filtering feature columns. The options are asfollows:● Column selection● Regular matching
Column Name Feature name. Click to select feature columns. Select atleast one column.
RegularExpression
Available if Column Selection Method is set to Regularmatching. Enter a regular expression as required. The systemautomatically screens out all feature columns meeting theregular expression.
New Name If this parameter is set, a new feature column is generatedafter feature discretization, and the original feature columnremains unchanged. If this parameter is not set, the existingfeature column is overwritten by default.
QuantilesCount
Number of values after feature data discretization.
Bins Number of buckets. Set the parameter based on siteconditions.
Current flowname
Select the name of the current data operation flow from thedrop-down list box.
Operationflow variablename
If there are multiple data operation flows, you can rename thevariable names of the operation flow objects to avoid conflicts.
Step 2 Click to run the Discretization code box.
----End
One-Hot EncodingOne-hot encoding is to split a feature column into the same number of featurecolumns based on the type of the sample data and map data from the originalfeature column to new feature columns. If the data is the same in the columns,the data is encoded as 1; otherwise, the data is encoded as 0. For example, thesample data of the Sepal feature is (2,9,2,8,4), and the feature is split into fourfeatures after one-hot encoding. The sample data of the features is as follows:
● Sepal_2: 10100● Sepal_4: 00001● Sepal_8: 00010● Sepal_9: 01000
The procedure is as follows:
NAIEModel Training Service 4 User Guide
Issue 01 (2020-12-30) Copyright © Huawei Technologies Co., Ltd. 126

Step 1 Click in the upper right corner of the page and choose Data Processing >Data Conversion > One-Hot Encoding. Content about One-Hot Encoding isadded on the GUI.
Table 4-45 describes the parameters.
Table 4-45 Parameter description
Parameter Description
ColumnSelectionMethod
Method for filtering feature columns. The options are asfollows:● Column selection● Regular matching
Column Name Feature name. Click to select feature columns. Select atleast one column.
RegularExpression
Available if Column Selection Method is set to Regularmatching. Enter a regular expression as required. The systemautomatically screens out all feature columns meeting theregular expression.
Prefix of NewColumn
Name prefix of new features.If this parameter is not set, the current feature name is used bydefault.
Current flowname
Select the name of the current data operation flow from thedrop-down list box.
Operationflow variablename
If there are multiple data operation flows, you can rename thevariable names of the operation flow objects to avoid conflicts.
Step 2 Click to run the One-Hot Encoding code box.
----End
Feature Addition
You can add, subtract, multiple, or divide existing feature columns to generatenew features.
The procedure is as follows:
Step 1 Click in the upper right corner of the page and choose Data Processing >Data Conversion > Add Features. Content about Add Features is added on theGUI.
Table 4-46 describes the parameters.
NAIEModel Training Service 4 User Guide
Issue 01 (2020-12-30) Copyright © Huawei Technologies Co., Ltd. 127

Table 4-46 Parameter description
Parameter Description
Expression Expression for generating a new feature. You can performcommon operations such as addition, subtraction,multiplication, division, remainder, power, or modulo operationon an existing feature.You can perform the operations on multiple columns togenerate a new feature.
New Name Name of the new feature.
Add Before theColumn
Enter a feature name. The new feature is added before thefeature.The default value is empty. The new feature is added as thelast column of the data by default.
Current flowname
Select the name of the current data operation flow from thedrop-down list box.
Operationflow variablename
If there are multiple data operation flows, you can rename thevariable names of the operation flow objects to avoid conflicts.
Step 2 Click to run the Add Column code box.
----End
Box-Cox Conversion
Box-Cox conversion transforms data for continuous response variables to meet thenormal distribution. Box-Cox conversion introduces a parameter, estimates theparameter based on data, and then determines a data conversion mode.
The advantages of the Box-Cox conversion are as follows:
● The regression model created based on data is better than that used beforethe conversion. The conversion improves model performance, such as theinterpretation strength.
● The skewness is reduced , and the residual can better satisfy the hypothesis ofnormality, independence, and subsequent data distribution, reducing theprobability of pseudo-regression.
The procedure is as follows:
Step 1 Click in the upper right corner of the page and choose Data Processing >Data Conversion > Box-Cox Transformation. Content about Box-CoxTransformation is added on the GUI.
Table 4-47 describes the parameters.
NAIEModel Training Service 4 User Guide
Issue 01 (2020-12-30) Copyright © Huawei Technologies Co., Ltd. 128

Table 4-47 Parameter description
Parameter Description
ColumnSelectionMethod
Method for filtering feature columns. The options are asfollows:● Column selection● Regular matching
Column Name Feature name. Click to select feature columns. Select atleast one column.
RegularExpression
Available if Column Selection Method is set to Regularmatching. Enter a regular expression as required. The systemautomatically screens out all feature columns meeting theregular expression.
TransformationParameter
Box-Cox conversion parameter. The value must be a number.The default value is empty. If this parameter is left empty,optimal settings are automatically calculated for conversionparameters. If this parameter is set to a number, this value isused for all feature columns set by Column Name.
Current flowname
Select the name of the current data operation flow from thedrop-down list box.
Operation flowvariable name
If there are multiple data operation flows, you can renamethe variable names of the operation flow objects to avoidconflicts.
Step 2 Click to run the Box-Cox Transformation code box.
----End
4.6.3.8 Feature Selection
Column DeletionThere are many scenarios for deleting a feature column. For example, two featuresare in a linear change relationship, and one of the feature columns needs to bedeleted to reduce model training overheads.
The procedure is as follows:
Step 1 Click in the upper right corner of the page and choose Data Processing >Feature Selection > Delete Columns. Content about Delete Columns is addedon the GUI.
Table 4-48 describes the parameters.
NAIEModel Training Service 4 User Guide
Issue 01 (2020-12-30) Copyright © Huawei Technologies Co., Ltd. 129

Table 4-48 Parameter description
Parameter Description
ColumnSelectionMethod
Method for filtering feature columns. The options are asfollows:● Column selection● Regular matching
Column Name Available if Column Selection Method is set to Columnselection. To delete multiple columns of feature data, click
to select the columns.
RegularExpression
Available if Column Selection Method is set to Regularmatching. Enter a regular expression as required. The systemautomatically screens out all feature columns meeting theregular expression.
Current flowname
Select the name of the current data operation flow from thedrop-down list box.
Operation flowvariable name
If there are multiple data operation flows, you can renamethe variable names of the operation flow objects to avoidconflicts.
Step 2 Click to run the Delete Columns code box.
----End
Column Selection
If there are a large number of features and most of the features are invalid formodel training, you can select columns to retain only the features useful formodel training.
The procedure is as follows:
Step 1 Click in the upper right corner of the page and choose Data Processing >Feature Selection > Select Columns. Content about Select Columns is added onthe GUI.
Table 4-49 describes the parameters.
Table 4-49 Parameter description
Parameter Description
ColumnSelectionMethod
Method for filtering feature columns. The options are asfollows:● Column selection● Regular matching
NAIEModel Training Service 4 User Guide
Issue 01 (2020-12-30) Copyright © Huawei Technologies Co., Ltd. 130

Parameter Description
Column Name Available if Column Selection Method is set to Columnselection. To reserve multiple columns of feature data, click
to select the columns.
RegularExpression
Available if Column Selection Method is set to Regularmatching. Enter a regular expression as required. The systemautomatically screens out all feature columns meeting theregular expression.
Current flowname
Select the name of the current data operation flow from thedrop-down list box.
Operation flowvariable name
If there are multiple data operation flows, you can renamethe variable names of the operation flow objects to avoidconflicts.
Step 2 Click to run the Reserve Columns code box.
----End
4.6.3.9 Time Series Data Processing
Missing Time Filling
A time series is a series collected at intervals. Missing time filling is to supplementmissing time based on known time information. After the missing time is filled,you can choose Data Processing > Data Cleansing > Fill Missing Time.
The procedure is as follows:
Step 1 Click in the upper right corner of the page and choose Data Processing >Time Series Data Processing > Fill Missing Time. Content about Fill MissingTime is added on the GUI.
Table 4-50 describes the parameters.
Table 4-50 Parameter description
Parameter Description
Time column Time column to be filled with missing time feature data.
Current flowname
Select the name of the current data operation flow from thedrop-down list box.
Operation flowvariable name
If there are multiple data operation flows, you can renamethe variable names of the operation flow objects to avoidconflicts.
NAIEModel Training Service 4 User Guide
Issue 01 (2020-12-30) Copyright © Huawei Technologies Co., Ltd. 131

Step 2 Click to run the Fill Missing Time code box.
----End
Time Series Data Sorting
Time series data sorting is to sort time series data based on specified parameters.
The procedure is as follows:
Step 1 Click in the upper right corner of the page and choose Data Processing >Time Series Data Processing > Time Series Data Sorting. Content about TimeSeries Data Sorting is added on the GUI.
Table 4-51 describes the parameters.
Table 4-51 Parameter description
Parameter Description
Time column Time column of time series data. The system sorts timeseries data in ascending order of time based on thespecified time.
ID column ID column of time series data. This parameter is left blankby default. If you specify the ID column, the system sortstime series data in ascending order of (ID, time).
Current flowname
Select the name of the current data operation flow fromthe drop-down list box.
Operation flowvariable name
If there are multiple data operation flows, you can renamethe variable names of the operation flow objects to avoidconflicts.
Step 2 Click to run the Sort Time Series code box.
----End
Time Migration
Time transfer refers to moving the time when the time series data is convertedforward or backward.
The procedure is as follows:
Step 1 Click in the upper right corner of the page and choose Data Processing >Time Series Data Processing > Time Shift. Content about Time Shift is added onthe GUI.
Table 4-52 describes the parameters.
NAIEModel Training Service 4 User Guide
Issue 01 (2020-12-30) Copyright © Huawei Technologies Co., Ltd. 132

Table 4-52 Parameter description
Parameter Description
Time column Time field to be shifted.
Offset Time shift. For example, -3min9s indicates that the value ofthe specified time column minus 3 minutes and 9 seconds;2h30min indicates that the value of the specified time columnplus 2 hours and 30 minutes.
Current flowname
Select the name of the current data operation flow from thedrop-down list box.
Operationflow variablename
If there are multiple data operation flows, you can rename thevariable names of the operation flow objects to avoid conflicts.
Step 2 Click to run the Time Shift code box.
----End
Time Series Data ResamplingTime series data resampling is a process of converting a time series from onefrequency to another.
In the process:
● The conversion from high-frequency data (with short sampling intervals) tolow-frequency data (with long sampling intervals) is called down-sampling.
● The conversion from low-frequency data to high-frequency data is called up-sampling.
The procedure is as follows:
Step 1 Click in the upper right corner of the page and choose Data Processing >Time Series Data Processing > Time Series Data Resampling. Content aboutTime Series Data Resampling is added on the GUI.
Table 4-53 describes the parameters.
Table 4-53 Parameters for time series data resampling
Parameter Description
Timecolumn
Time field of time series data.
NAIEModel Training Service 4 User Guide
Issue 01 (2020-12-30) Copyright © Huawei Technologies Co., Ltd. 133

Parameter Description
Frequency Resampling frequency. For example, 5H.The frequency units are described as follows:● S: second● min: minute● H: hour● D: day● B: workday● W: week● M: month● Q: quarter● A: year
Method Currently, the following resampling methods are supported:● Up-sampling: not fill, front fill, back fill, and interpolate● Down-sampling: sum, mean, std, median, first, max, min, and
lastIf the sampling method is not set, the default up-samplingmethod is no filling; the default down-sampling method is meanaggregation. The sampling method supports user-definedfunctions.
ID column ID column of time series data.
Currentflow name
Select the name of the current data operation flow from the drop-down list box.
Operationflowvariablename
If there are multiple data operation flows, you can rename thevariable names of the operation flow objects to avoid conflicts.
Step 2 Click to run the Resampling code box.
----End
Time Series Data DenoisingTime series data may contain many noise data. The noises will seriously affectquantitative analysis and data mining. Therefore, data denoising is required.
The procedure is as follows:
Step 1 Click in the upper right corner of the page and choose Data Processing >Time Series Data Processing > Time Series Data Denoising. Content about TimeSeries Data Denoising is added on the GUI.
Table 4-54 describes the parameters.
NAIEModel Training Service 4 User Guide
Issue 01 (2020-12-30) Copyright © Huawei Technologies Co., Ltd. 134

Table 4-54 Parameter description
Parameter Description
Column SelectionMethod
Method for filtering feature columns. The options are asfollows:● Column selection● Regular matching
Column Name Available if Column Selection Method is set to Columnselection.Click to select one or more feature columns in thedisplayed dialog box.
Regular Expression Available if Column Selection Method is set to Regularmatching.Enter a regular expression as required. The systemautomatically screens out all feature columns meetingthe regular expression.
New column Column name of the new data generated afterdenoising. If this parameter is not set, the originalfeature column is directly used for denoising.
Time column Time column of the time series data to be denoised.
Other ParameterConfiguration
This parameter specifies the frac value during denoising.Denoising uses the locally weighted scatterplotsmoothing (LOWESS) of statsmodels. "Locally" indicatesthat only a part of data is processed each time. Theproportion of this part of data is specified by the fracparameter of LOWESS. The frac value can be transferredby this parameter. For details, see Help Center > SDKDocument.
Current flow name Select the name of the current data operation flow fromthe drop-down list box.
Operation flowvariable name
If there are multiple data operation flows, you canrename the variable names of the operation flow objectsto avoid conflicts.
Step 2 Click to run the Time Series de-noising code box.
----End
Time Feature Extraction
Time feature extraction is to extract date-related features from the time column oftime series data, such as year, month, day, hour, minute, second, quarter, day ofweek, week of year, and day of year.
The procedure is as follows:
NAIEModel Training Service 4 User Guide
Issue 01 (2020-12-30) Copyright © Huawei Technologies Co., Ltd. 135

Step 1 Click in the upper right corner of the page and choose Data Processing >Time Series Data Processing > Time Features Extraction. Content about TimeFeatures Extraction is added on the GUI.
Table 4-55 describes the parameters.
Table 4-55 Parameter description
Parameter Description
Time column Time column for which time features are to be extracted.
PreextractionTime Features
Time features to be extracted. The default value is all,indicating that all time features are extracted. In addition, thefollowing time features can be extracted: year, month, day,hour, minute, second, day of week, day of year, week ofyear, and quarter.
New column Column name of the new feature column generated after thetime feature is extracted. If this parameter is not set, the timecolumn name and feature name are used by default.
Current flowname
Select the name of the current data operation flow from thedrop-down list box.
Operation flowvariable name
If there are multiple data operation flows, you can renamethe variable names of the operation flow objects to avoidconflicts.
Step 2 Click to run the Time Features Extraction code box.
----End
Time Series Data Feature ExtractionTime series feature extraction is to extract statistical data characteristics from timeseries data, to find out the statistical characteristics and development rules of thetime series in samples to the maximum extent.
The procedure is as follows:
Step 1 Click in the upper right corner of the page and choose Data Processing >Time Series Data Processing > Time Series Feature Extraction. Content aboutTime Series Feature Extraction is added on the GUI.
Table 4-56 describes the parameters.
NAIEModel Training Service 4 User Guide
Issue 01 (2020-12-30) Copyright © Huawei Technologies Co., Ltd. 136
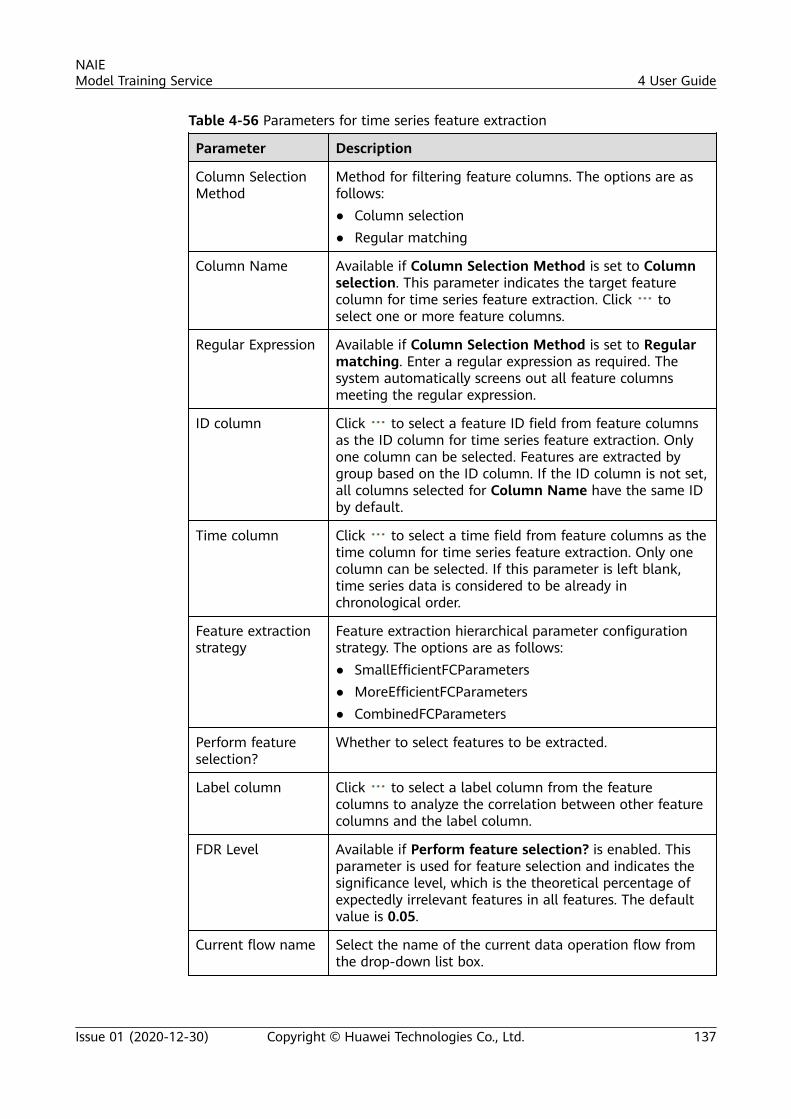
Table 4-56 Parameters for time series feature extraction
Parameter Description
Column SelectionMethod
Method for filtering feature columns. The options are asfollows:● Column selection● Regular matching
Column Name Available if Column Selection Method is set to Columnselection. This parameter indicates the target featurecolumn for time series feature extraction. Click toselect one or more feature columns.
Regular Expression Available if Column Selection Method is set to Regularmatching. Enter a regular expression as required. Thesystem automatically screens out all feature columnsmeeting the regular expression.
ID column Click to select a feature ID field from feature columnsas the ID column for time series feature extraction. Onlyone column can be selected. Features are extracted bygroup based on the ID column. If the ID column is not set,all columns selected for Column Name have the same IDby default.
Time column Click to select a time field from feature columns as thetime column for time series feature extraction. Only onecolumn can be selected. If this parameter is left blank,time series data is considered to be already inchronological order.
Feature extractionstrategy
Feature extraction hierarchical parameter configurationstrategy. The options are as follows:● SmallEfficientFCParameters● MoreEfficientFCParameters● CombinedFCParameters
Perform featureselection?
Whether to select features to be extracted.
Label column Click to select a label column from the featurecolumns to analyze the correlation between other featurecolumns and the label column.
FDR Level Available if Perform feature selection? is enabled. Thisparameter is used for feature selection and indicates thesignificance level, which is the theoretical percentage ofexpectedly irrelevant features in all features. The defaultvalue is 0.05.
Current flow name Select the name of the current data operation flow fromthe drop-down list box.
NAIEModel Training Service 4 User Guide
Issue 01 (2020-12-30) Copyright © Huawei Technologies Co., Ltd. 137
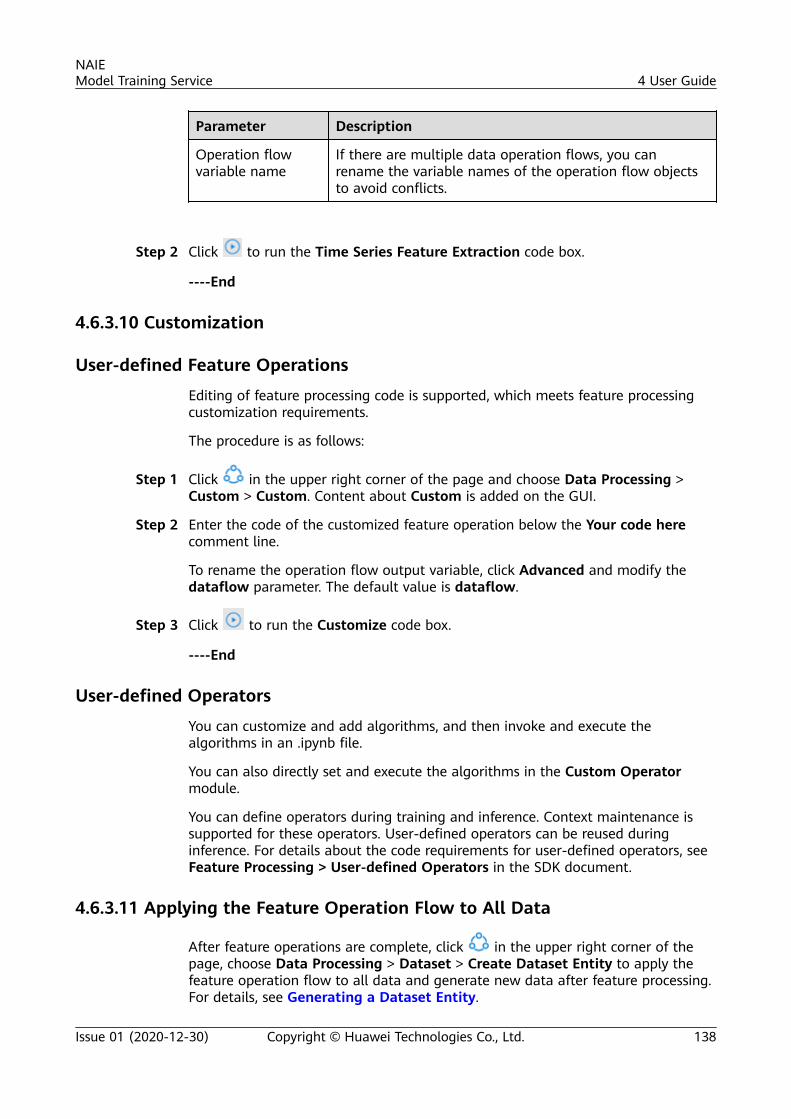
Parameter Description
Operation flowvariable name
If there are multiple data operation flows, you canrename the variable names of the operation flow objectsto avoid conflicts.
Step 2 Click to run the Time Series Feature Extraction code box.
----End
4.6.3.10 Customization
User-defined Feature Operations
Editing of feature processing code is supported, which meets feature processingcustomization requirements.
The procedure is as follows:
Step 1 Click in the upper right corner of the page and choose Data Processing >Custom > Custom. Content about Custom is added on the GUI.
Step 2 Enter the code of the customized feature operation below the Your code herecomment line.
To rename the operation flow output variable, click Advanced and modify thedataflow parameter. The default value is dataflow.
Step 3 Click to run the Customize code box.
----End
User-defined Operators
You can customize and add algorithms, and then invoke and execute thealgorithms in an .ipynb file.
You can also directly set and execute the algorithms in the Custom Operatormodule.
You can define operators during training and inference. Context maintenance issupported for these operators. User-defined operators can be reused duringinference. For details about the code requirements for user-defined operators, seeFeature Processing > User-defined Operators in the SDK document.
4.6.3.11 Applying the Feature Operation Flow to All Data
After feature operations are complete, click in the upper right corner of thepage, choose Data Processing > Dataset > Create Dataset Entity to apply thefeature operation flow to all data and generate new data after feature processing.For details, see Generating a Dataset Entity.
NAIEModel Training Service 4 User Guide
Issue 01 (2020-12-30) Copyright © Huawei Technologies Co., Ltd. 138

4.6.3.12 Publishing a Feature Engineering Service
If the operation flow of the current feature engineering project has good effect,high-quality training data can be obtained. In this case, you can publish thecurrent feature engineering project as a service. You can reuse this featureengineering service to perform the same feature operations on other data.
Step 1 On the feature engineering menu bar, click .
Step 2 In the displayed Publish dialog box, set the Service Name after publication.
Step 3 Click Publish.
Step 4 In the displayed Success dialog box, click OK.
You can view the published project on the Service List tab page on the featureengineering homepage.
You can create a feature engineering task for a published feature engineeringproject. For details, see Creating a Feature Engineering Task.
----End
4.6.3.13 Model Training
AutoML
The AutoML (VegaAutoML) is an SDK developed based on the VegaAutoMLprototype of Huawei Noah's Ark Laboratory, facilitating AI model application anddevelopment. The AutoML features a classic framework with five modules,including data preprocessing, feature engineering, algorithm model,hyperparameter optimization, and integrated learning. Hyperparameteroptimization is performed for the pipeline of data preprocessing, featureengineering, and algorithm models. Figure 4-33 shows the AutoML framework.
Figure 4-33 AutoML framework
The following uses the preconfigured sample data as an example to describe howto perform AutoML operations.
Step 1 Click to run the Import sdk code box.
NAIEModel Training Service 4 User Guide
Issue 01 (2020-12-30) Copyright © Huawei Technologies Co., Ltd. 139

Figure 4-34 Importing SDKs
Step 2 Click on the right of Import sdk to add a cell.
Enter the following code:
from naie.datasets import samplessamples.load_dataset("higgs", "higgs_train_10k")samples.load_dataset("higgs", "higgs_test_5k")
Step 3 Click on the left of the new cell to load two higgs datasets as the training setand test set, as shown in Figure 4-35.
Figure 4-35 Loading a training set
Step 4 In the upper right corner of the page, choose Operators > Data Processing >Dataset > Import Data.
Click Import Data to select data, as shown in Figure 4-36.
Set the following parameters and retain the default values for other parameters:
● Dataset: Select higgs from the drop-down list box.● Entity Name: Select higgs_train_10k from the drop-down list box.● Data reference variable name: This variable name can be used to reference
the current data. An example value is train.
NAIEModel Training Service 4 User Guide
Issue 01 (2020-12-30) Copyright © Huawei Technologies Co., Ltd. 140

Figure 4-36 Selecting data
Step 5 Click to run the Import Data code box. The training set is bound successfully.
Step 6 Bind the test set. For details, see Step 4 and Step 5.
Change the values of the following parameters:
● Entity Name: Select higgs_test_5k.● Data reference variable name: Set this parameter to test.
Step 7 In the upper right corner of the page, choose Operators > Data Processing >Model Training > AutoML.
The content shown in Figure 4-37 is added on the page.
NAIEModel Training Service 4 User Guide
Issue 01 (2020-12-30) Copyright © Huawei Technologies Co., Ltd. 141

Figure 4-37 AutoML parameter settings
Table 4-57 describes the parameters.
Table 4-57 AutoML parameter description
Parameter
Description
TrainDataset
Training dataset. Select train from the drop-down list box, which isthe value of Data reference variable name set in Step 4.
NAIEModel Training Service 4 User Guide
Issue 01 (2020-12-30) Copyright © Huawei Technologies Co., Ltd. 142
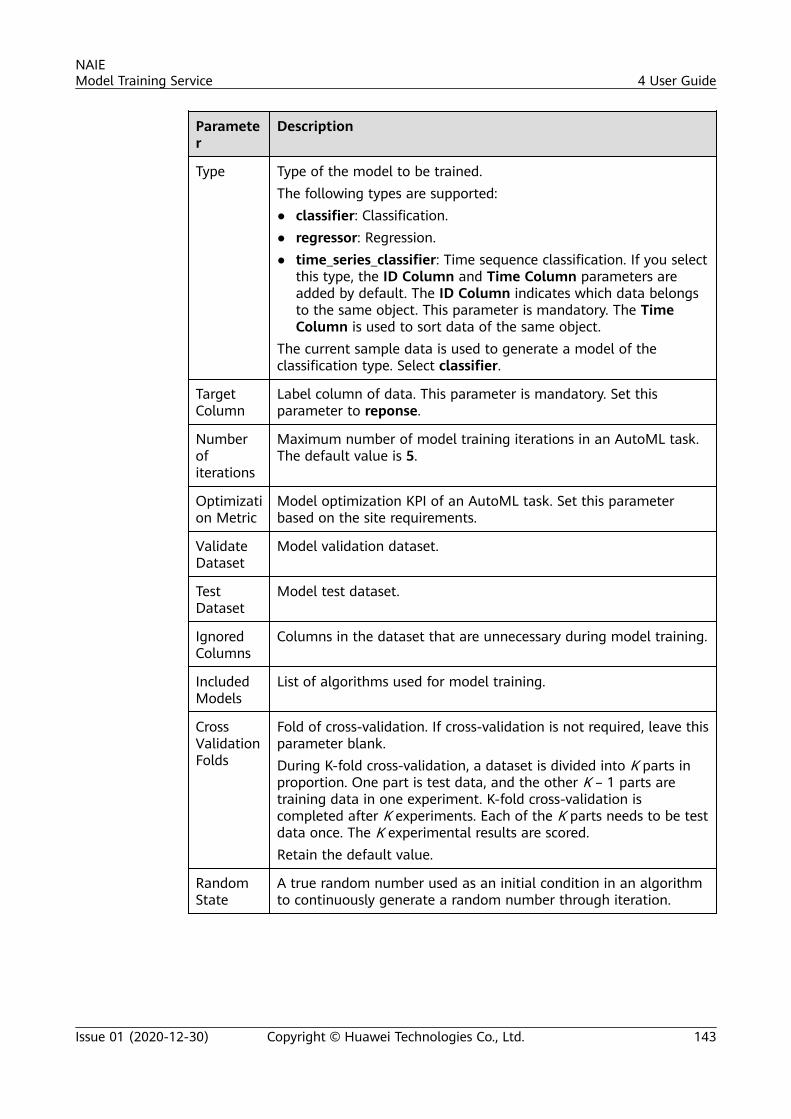
Parameter
Description
Type Type of the model to be trained.The following types are supported:● classifier: Classification.● regressor: Regression.● time_series_classifier: Time sequence classification. If you select
this type, the ID Column and Time Column parameters areadded by default. The ID Column indicates which data belongsto the same object. This parameter is mandatory. The TimeColumn is used to sort data of the same object.
The current sample data is used to generate a model of theclassification type. Select classifier.
TargetColumn
Label column of data. This parameter is mandatory. Set thisparameter to reponse.
Numberofiterations
Maximum number of model training iterations in an AutoML task.The default value is 5.
Optimization Metric
Model optimization KPI of an AutoML task. Set this parameterbased on the site requirements.
ValidateDataset
Model validation dataset.
TestDataset
Model test dataset.
IgnoredColumns
Columns in the dataset that are unnecessary during model training.
IncludedModels
List of algorithms used for model training.
CrossValidationFolds
Fold of cross-validation. If cross-validation is not required, leave thisparameter blank.During K-fold cross-validation, a dataset is divided into K parts inproportion. One part is test data, and the other K – 1 parts aretraining data in one experiment. K-fold cross-validation iscompleted after K experiments. Each of the K parts needs to be testdata once. The K experimental results are scored.Retain the default value.
RandomState
A true random number used as an initial condition in an algorithmto continuously generate a random number through iteration.
NAIEModel Training Service 4 User Guide
Issue 01 (2020-12-30) Copyright © Huawei Technologies Co., Ltd. 143
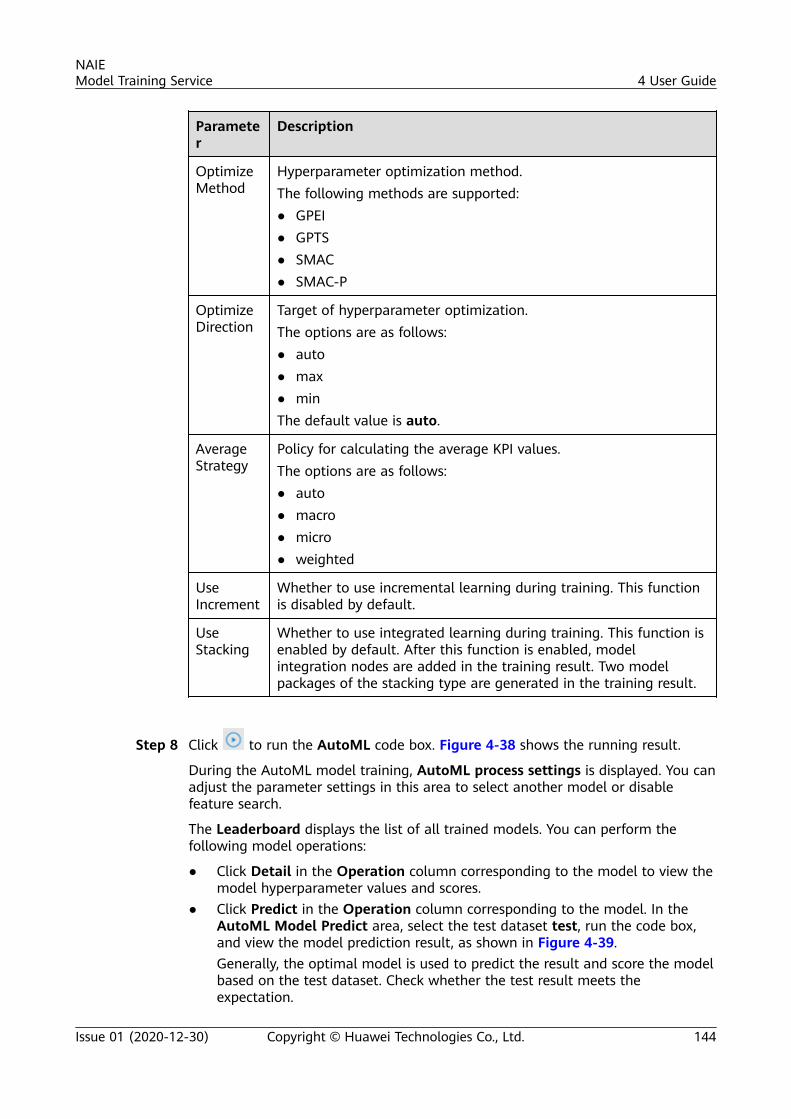
Parameter
Description
OptimizeMethod
Hyperparameter optimization method.The following methods are supported:● GPEI● GPTS● SMAC● SMAC-P
OptimizeDirection
Target of hyperparameter optimization.The options are as follows:● auto● max● minThe default value is auto.
AverageStrategy
Policy for calculating the average KPI values.The options are as follows:● auto● macro● micro● weighted
UseIncrement
Whether to use incremental learning during training. This functionis disabled by default.
UseStacking
Whether to use integrated learning during training. This function isenabled by default. After this function is enabled, modelintegration nodes are added in the training result. Two modelpackages of the stacking type are generated in the training result.
Step 8 Click to run the AutoML code box. Figure 4-38 shows the running result.
During the AutoML model training, AutoML process settings is displayed. You canadjust the parameter settings in this area to select another model or disablefeature search.
The Leaderboard displays the list of all trained models. You can perform thefollowing model operations:
● Click Detail in the Operation column corresponding to the model to view themodel hyperparameter values and scores.
● Click Predict in the Operation column corresponding to the model. In theAutoML Model Predict area, select the test dataset test, run the code box,and view the model prediction result, as shown in Figure 4-39.Generally, the optimal model is used to predict the result and score the modelbased on the test dataset. Check whether the test result meets theexpectation.
NAIEModel Training Service 4 User Guide
Issue 01 (2020-12-30) Copyright © Huawei Technologies Co., Ltd. 144

● Click Save in the Operation column corresponding to the model to save themodel. You can view the model package with the same name in the Featureprocessing project name/debug/output directory on the left.
Figure 4-38 AutoML execution result
Figure 4-39 Model prediction result
----End
Hyperparameter OptimizationHyperparameter optimization is performed for the pipeline of data preprocessing,feature engineering, and algorithm models. This process requires expert experienceand is time consuming. Hyperparameter optimization can quickly, automatically,and efficiently identify the optimal model hyperparameters, helping users savetime and reduce work complexity.
Step 1 Click in the upper right corner of the page and choose Model Training >Model Training > Hyperparameter Optimization.
The Hyper Optimization Config dialog box is added on the page. Figure 4-40shows the Hyper Optimization Config dialog box.
NAIEModel Training Service 4 User Guide
Issue 01 (2020-12-30) Copyright © Huawei Technologies Co., Ltd. 145

Figure 4-40 Hyperparameter optimization configurations
Table 4-58 describes hyperparameter optimization parameters.
Table 4-58 Hyperparameter optimization parameters
Parameter Description
Iteration Number Minimum number of iterations of a hyperparameteroptimization task.
Optimize Goal Target of a hyperparameter optimization task, which isdefined in the training algorithm. The values can be maxand min.
Optimize Method Hyperparameter optimization method. The options are asfollows:● smac● bayesian● random● grid
HyperparameterName
Hyperparameter name, which can be customized based onthe algorithm.
HyperparameterType
Hyperparameter type. Select a hyperparameter type basedon the site requirements.
HyperparameterRange
Hyperparameter value range. Set the minimum andmaximum hyperparameter values based on the siterequirements.
UseMultiprocessing
Whether to enable multiprocessing during hyperparameteroptimization. This function is enabled by default.
Step 2 Click corresponding to Hyper Optimization Config to run the code box.
Step 3 Use the template code to perform hyperparameter optimization.
NAIEModel Training Service 4 User Guide
Issue 01 (2020-12-30) Copyright © Huawei Technologies Co., Ltd. 146
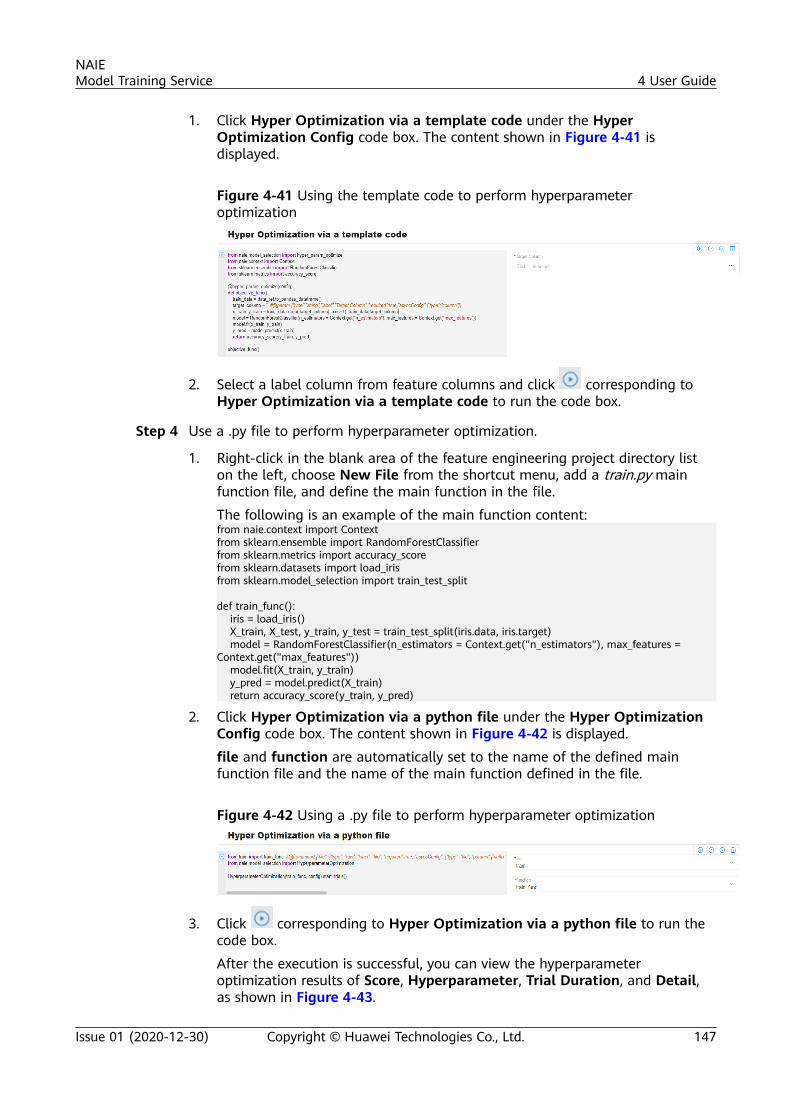
1. Click Hyper Optimization via a template code under the HyperOptimization Config code box. The content shown in Figure 4-41 isdisplayed.
Figure 4-41 Using the template code to perform hyperparameteroptimization
2. Select a label column from feature columns and click corresponding toHyper Optimization via a template code to run the code box.
Step 4 Use a .py file to perform hyperparameter optimization.
1. Right-click in the blank area of the feature engineering project directory liston the left, choose New File from the shortcut menu, add a train.py mainfunction file, and define the main function in the file.
The following is an example of the main function content:from naie.context import Contextfrom sklearn.ensemble import RandomForestClassifierfrom sklearn.metrics import accuracy_scorefrom sklearn.datasets import load_irisfrom sklearn.model_selection import train_test_split
def train_func(): iris = load_iris() X_train, X_test, y_train, y_test = train_test_split(iris.data, iris.target) model = RandomForestClassifier(n_estimators = Context.get("n_estimators"), max_features = Context.get("max_features")) model.fit(X_train, y_train) y_pred = model.predict(X_train) return accuracy_score(y_train, y_pred)
2. Click Hyper Optimization via a python file under the Hyper OptimizationConfig code box. The content shown in Figure 4-42 is displayed.
file and function are automatically set to the name of the defined mainfunction file and the name of the main function defined in the file.
Figure 4-42 Using a .py file to perform hyperparameter optimization
3. Click corresponding to Hyper Optimization via a python file to run thecode box.
After the execution is successful, you can view the hyperparameteroptimization results of Score, Hyperparameter, Trial Duration, and Detail,as shown in Figure 4-43.
NAIEModel Training Service 4 User Guide
Issue 01 (2020-12-30) Copyright © Huawei Technologies Co., Ltd. 147

Figure 4-43 Results of the hyperparameter optimization using the .py file
4. Click the Detail tab page shown in Figure 4-43. This tab page displays modelscores, training duration, as well as hyperparameter optimization parametersand their values, as shown in Figure 4-44.
Figure 4-44 Result details of the hyperparameter optimization using the .pyfile
5. Click Operator in the Operator column corresponding to a model to extracthyperparameters for further operations, as shown in Figure 4-45.
Figure 4-45 Hyperparameter optimization model operations
NAIEModel Training Service 4 User Guide
Issue 01 (2020-12-30) Copyright © Huawei Technologies Co., Ltd. 148

6. Select a label column from feature columns and click corresponding toModel Operators For Hyper-parameter Optimization to run the code box.
----End
4.6.3.14 Transfer Learning
If the feature data in the current dataset is not ideal and the data types in thedataset are partially the same as or slightly different from those in an idealdataset, you can perform feature transfer to transfer the feature data in an idealdataset to the current dataset.
Before feature transfer, perform the following operations:
● Import the source and target datasets. For details, see Dataset.
● Create a JupyterLab feature project for data transfer. For details, see Creatinga Feature Engineering Project.
CA UTION
Complete data transfer in the feature engineering according to the operationsequence in this chapter. If other data operations are involved, ensure that thedataflow names of the two correlated code boxes are the same.
Binding Source Data
Step 1 Go to the page for editing the data transfer feature engineering project and runthe Import sdk code box.
Step 2 Click in the upper right corner of the page and choose Transfer Learning >Feature Transfer > Feature Preparation > Import Source Data Before Transfer.Content about Import Source Data Before Transfer is added on the GUI.
Table 4-59 describes the parameters.
Table 4-59 Parameter description
Parameter Description
Dataset Dataset corresponding to the source data before thetransfer.
Dataset Entity Dataset instance of the source data before the transfer.
Source datareference variablename
Change the variable name referenced by the source data toavoid conflicts with the variable name referenced by thetarget data. When multiple data records need to betransferred, these names can be used to distinguish thevariable names referenced by the same type of data.
NAIEModel Training Service 4 User Guide
Issue 01 (2020-12-30) Copyright © Huawei Technologies Co., Ltd. 149

Parameter Description
Source operationflow variablename
Change the variable name of the source operation flow toavoid conflicts with the variable name of the targetoperation flow. When multiple data records need to betransferred, these names can be used to distinguish thevariable names referenced by the same type of operationflow.
Step 3 Click to run the Import Source Data Before Transferring code box.
----End
Binding Target Data
Step 1 Click in the upper right corner of the page and choose Transfer Learning >Feature Transfer > Feature Preparation > Source Data Binding. Content aboutImport Target Data Before Transfer is added on the GUI.
Table 4-60 describes the parameters.
Table 4-60 Parameter description
Parameter Description
Dataset Dataset corresponding to the target data before thetransfer.
Dataset Entity Dataset instance of the target data before the transfer.
Target datareference variablename
Change the variable name referenced by the target data toavoid conflicts with the variable name referenced by thesource data. When multiple data records need to betransferred, these names can be used to distinguish thevariable names referenced by the same type of data.
Target operationflow variablename
Change the variable name of the target operation flow toavoid conflicts with the variable name of the sourceoperation flow. When multiple data records need to betransferred, these names can be used to distinguish thevariable names referenced by the same type of operationflow.
Step 2 Click to run the Import Target Data Before Transferring code box.
----End
Evaluating Transfer DataBefore using the transfer algorithm to transfer data, you can use the data transferevaluation function to evaluate whether the current data is suitable for transfer.
NAIEModel Training Service 4 User Guide
Issue 01 (2020-12-30) Copyright © Huawei Technologies Co., Ltd. 150

Step 1 Click in the upper right corner of the page and choose Transfer Learning >Feature Transfer > Transfer Evaluation > Transfer Data Evaluation. Contentabout Transfer Data Evaluation is added on the GUI.
Table 4-61 describes the parameters.
Table 4-61 Parameters for evaluating transfer data
Parameter Description
Source operation flowvariable name
Name of the source operation flow variable bound tothe source data before the transfer.
Target operation flowvariable name
Name of the target operation flow variable bound tothe target data before the transfer.
Step 2 Change the values of SX and TX under # Select data from dataframe in the codearea on the left based on the values in the label columns of the source and targetdatasets.
Step 3 Click to run the code in the Evaluating Transfer Data dialog box.
----End
Evaluate Transfer AlgorithmsIf the current data is suitable for transfer, you can use the transfer evaluationalgorithm to evaluate which algorithm is suitable for migration.
Step 1 Click in the upper right corner of the page and choose Transfer Learning >Feature Transfer > Transfer Evaluation > Transfer Algorithm Evaluation.Content about Transfer Algorithm Evaluation is added on the GUI.
Table 4-62 describes the parameters.
Table 4-62 Parameter description
Parameter Description
Source operationflow variable name
Name of the source operation flow variable bound tothe source data before the transfer.
Target operationflow variable name
Name of the target operation flow variable bound to thetarget data before the transfer.
Step 2 Change the values of SX, SY, and TX under # Select data from dataframe in thecode area on the left based on the values in the label columns of the source andtarget datasets.
Step 3 Click to run the code in the Evaluating Transfer Algorithms dialog box.
----End
NAIEModel Training Service 4 User Guide
Issue 01 (2020-12-30) Copyright © Huawei Technologies Co., Ltd. 151

Transfer Operations
The following transfer algorithms are supported: CMF, CORAL, GFK, ITL, KMM,LSDT, MSDA, PCA, RANDPROJ, SA, and TCA. You do not need to set parameters foreach algorithm. You only need to change the values under # Select data fromdataframe on the left of the code box based on the label columns of the sourceand target data.
The CMF algorithm is used as an example.
Step 1 Click in the upper right corner of the page and choose Transfer Learning >Feature Transfer > Transfer Operation > CMF.
The content shown in Figure 4-46 is added on the page.
Figure 4-46 Using the CMF algorithm to transfer data
Table 4-63 describes the parameters.
Table 4-63 Parameters for transferring data using the CMF algorithm
Parameter Description
Source operation flow variable name Name of the source operation flowvariable bound to the source databefore the transfer.
Target operation flow variable name Name of the target operation flowvariable bound to the target databefore the transfer.
Step 2 Change the values in the red box based on the values in the label columns of thesource and target datasets, as shown in Figure 4-46. S indicates source data, Tindicates target data, X indicates data feature, and Y indicates data label.
NAIEModel Training Service 4 User Guide
Issue 01 (2020-12-30) Copyright © Huawei Technologies Co., Ltd. 152

Step 3 Click to run the Transfer Data Using CMF Algorithm code box.
----End
Generating Source Data Instances
Step 1 Click in the upper right corner of the page and choose Transfer Learning >Feature Transfer > Data Generation > Source Data Instance Generation.Content about Generating Source Data Instance After Transfer is added on theGUI.
Table 4-64 describes the parameters.
Table 4-64 Parameters for generating the source data instance after the transfer
Parameter Description
Dataset Dataset corresponding to the sourcedata after the transfer.
Dataset Entity Name of the dataset instancegenerated after source data transfer.The name can be customized.
Step 2 Click to run the Create Source Dataset After Transferring code box.
----End
Generating Target Data Instances
Step 1 Click in the upper right corner of the page and choose Transfer Learning >Feature Transfer > Data Generation > Target Data Instance Generation.Content about Generating Target Data Instance After Transfer is added on theGUI.
Table 4-65 describes the parameters.
Table 4-65 Parameters for generating the source data instance after the transfer
Parameter Description
Dataset Dataset corresponding to the targetdata after the transfer.
Dataset Entity Name of the dataset instancegenerated after target data transfer.The name can be customized.
Step 2 Click to run the Create Target Dataset After Transferring code box.
----End
NAIEModel Training Service 4 User Guide
Issue 01 (2020-12-30) Copyright © Huawei Technologies Co., Ltd. 153

4.6.3.15 LearnwareFor details about the multi-layer nested anomaly detection learnware and harddisk fault root cause analysis learnware, see Learnware Development Guide.
4.7 Model Training
4.7.1 Model Training OverviewThe training platform supports all mainstream algorithm frameworks, such as:TensorFlow, MXNet, Caffe, Spark_MLlib, Scikit_Learn, XGBoost, PyTorch, andAscend-Powered-Engine. The platform provides various computing resources, suchas CPUs and GPUs, and integrates an open-source interactive development anddebugging tool to provide a one-stop IDE model training environment for users.
The model training provides the following functions:
● Creating a model training project: You can edit and debug code online, train adataset of the model training project based on the compiled code, and outputa training report. You can optimize the code based on the training reports andthen train the dataset again using the optimized code. You can finally obtainthe optimal training code by repeating the code optimization and datasettraining operations.
● Creating a federated learning project: You can edit and debug code online,train a dataset of the federated learning project based on the compiled code,and output a training report. You can optimize the code based on the trainingreports and then train the dataset again using the optimized code. You canfinally obtain the optimal training code by repeating the code optimizationand dataset training operations.
● Creating a training service: You can invoke an archived model package to traina new dataset. In this way, you can obtain the training result.
● Creating a hyperparameter optimization service: Based on the comparison ofthe training results, you can select a group of optimal hyperparameters forthe created training project.
The platform also supports training model packaging. The packaged trainingmodels can be used for training service creation and model verification, or can bepublished to the app market. Model training packages include orchestration ofconfiguration files and model files. For details about model management, seeModel Management.
Model Training Page DescriptionThe existing training projects, training services, and hyperparameter optimizationservices are displayed on the Model Training page, as shown in Figure 4-47. Onthis page, you can view the creation information about training projects andtraining services, and create, edit, copy, or delete existing training projects ortraining services. For details, see Table 4-66.
NAIEModel Training Service 4 User Guide
Issue 01 (2020-12-30) Copyright © Huawei Technologies Co., Ltd. 154

Figure 4-47 Model training
Table 4-66 Model training page description
Parameter Description
DevelopmentEnvironment
WEB IDE environment resource configurations for modeldevelopment, including Specification and Instance. You canview the environment information about all projects thatare configured with web IDE environment resources.
Create Create a training project, federated learning project, trainingservice, or hyperparameter optimization service.
Name Model training name.
Model trainingprojectDescription
Description of a model training project.
Created Time Time when a training project, federated learning project,training service, or hyperparameter optimization service iscreated.
Type Model training type.The options are as follows:● Model training● Federated Learning● Retraining Service● Optimization Service
Creator User who creates a training project, federated learningproject, training service, or hyperparameter optimizationservice.
SelectDevelopmentEnvironment
Information on the model training running environment.The development environment of the web-based trainingmodel is the Simple Editor. The development environmentof the online IDE training model is the created web IDEenvironment. After a model training project is created, youcan select an environment from the Select DevelopmentEnvironment drop-down list box.
Go to the training project editing page and edit the trainingcode.
NAIEModel Training Service 4 User Guide
Issue 01 (2020-12-30) Copyright © Huawei Technologies Co., Ltd. 155

Parameter Description
Copy an existing training project and generate a newtraining project.
Delete a training project, federated learning project, trainingservice, or optimization service.
FINISHED Status of the latest task of a training project, federatedlearning project, training service, or hyperparameteroptimization service. The actual task status is displayed.
4.7.2 Creating a Model Training Project
4.7.2.1 Creating a Project
Creating a training project is an end-to-end code development process fromcreating a model training project, editing model training code, to debuggingmodel training code.
● Creating a model training project: Create an environment for editing anddebugging model training code.
● Editing model training code: Edit model training code online.
● Debugging model training code: Debug edited model training code online.
To create a training project, perform the following steps:
Step 1 Click Create. The Create Training dialog box is displayed.
Step 2 Set training engineering parameters, as described in Table 4-67.
Table 4-67 Parameters for creating a training project
Parameter Description
Please selectmodel trainingtype
Model training type. The options are as follows:● Create New model training project● Create Federated Learning project● Create New Training Service● Create Hyperparameter Optimization ServiceSelect Create New model training project.
Model TrainingName
Model training name.The name must contain 1 to 26 characters. It must startwith a letter, consist of only letters, digits, and underscores(_), and cannot end with an underscore (_).
Description Description of the new model training project.
NAIEModel Training Service 4 User Guide
Issue 01 (2020-12-30) Copyright © Huawei Technologies Co., Ltd. 156

Parameter Description
ExperimentAlgorithm
Common Algorithms: The options include ClassificationAlgorithm, Fitting Algorithm, Clustering Algorithm,Other Types. If you select Classification Algorithm,Import Getting Started Content is available. If ImportGetting Started Content is selected, sample code used forIris classification modeling is automatically generated.
SelectDevelopmentEnvironment
Development environment used by a training project. Theoptions are as follows:● WebIDE
The WebIDE provides encoding experience similar tothat of the local VSCode and supports functions such asautomatic code supplementation and debugging. TheWebIDE is applicable to scenarios where a large amountof code is written. When creating an online IDE-basedtraining model, select WebIDE.
● Simple EditorThe simple editor allows you to view and edit code. Itdoes not support debugging and is applicable toscenarios where a small amount of code needs to bemodified. When creating a web-based training model,select Simple Editor.
Specifications WebIDE resource specifications. This parameter is displayedwhen Select Development Environment is set toWebIDE. Select specifications based on the siterequirements.
Instance Environment instance corresponding to the currentenvironment specifications. This parameter is displayedwhen Select Development Environment is set toWebIDE.● If the selected specifications have an environment
instance, you can select the existing instance.● If no instance is available for the selected specifications,
click Create a new development environment.
Step 3 Then, click OK.
The model training project details page is displayed, as shown in Figure 4-48.Table 4-68 describes the page.
NAIEModel Training Service 4 User Guide
Issue 01 (2020-12-30) Copyright © Huawei Technologies Co., Ltd. 157

Figure 4-48 Model training project page
Table 4-68 Description of the model training project page
Area Parameter Description
1 (Trainingproject)
Created Time Time when a training project is created.
Type Model training type.
Creator User who creates the training project.
Activity Time Time when the latest model training isexecuted.
SelectDevelopmentEnvironment
Model training running environmentinformation. You can select the currentenvironment from the drop-down list box.
Access the model training editing page.
Create a training task. For details, see thefollowing sections:● Creating a Training Task (Simple
Editor)● Creating a Training Task (WebIDE)
Delete a training project.
Model trainingprojectDescription
Description of a model training project. Youcan click to edit the description.
Compare the training reports of trainingtasks, output the evaluation indicators oftraining tasks with differenthyperparameters, and display the tasksystem parameters of training tasks.NOTE
A maximum of three model reports can becompared.
NAIEModel Training Service 4 User Guide
Issue 01 (2020-12-30) Copyright © Huawei Technologies Co., Ltd. 158

Area Parameter Description
Switch to the model training page ofanother training project, training service, orhyperparameter optimization service.
Web IDE environment resourceconfiguration and management, includingcreating an environment, stop a runningenvironment, and deleting an environment.You can view the environment informationabout all projects that are configured withweb IDE environment resources.
Create a training project, federatedlearning project, training service, orhyperparameter optimization service.
2 (Modeltrainingtasks)
Quickly search for training tasks based onthe training status.
Only the followed tasks are displayed.
You can click next to the name of a
task to follow it, and click again tounfollow the task.
Search for a training task based on the taskcreation time and task name.By default, the search is performed basedon the task creation time.
Search for training tasks by task creationtime or task name. The search results aredisplayed in ascending or descending order.By default, the results are displayed indescending order.
Job Name Name of a model training task.
Task Description Description of a model training task.
Job Creation Time Time when a model training task iscreated.
Training Duration Model training duration.
Tensorboard TensorBoard status.
NAIEModel Training Service 4 User Guide
Issue 01 (2020-12-30) Copyright © Huawei Technologies Co., Ltd. 159

Area Parameter Description
Training Status Training task status.The options are as follows:● ALL: All training tasks are displayed.● WAITING: The training task is being
prepared.● RUNNING: The training is in progress.● FINISHED: The training is successful.● FAILED: The training fails.● STOPPED: The training task is stopped.
Training Report Click the icon to view details about thetraining evaluation report.
Resource Usage CPU, GPU, and RAM usage of a trainingalgorithm.
Peak value Peak usage of the CPU, GPU, and RAM of atraining algorithm.
Click this button to stop a training taskwhen the training status is RUNNING.
View details about a verification task,including the system logs, run logs, rundiagram, and TensorBoard information.
Delete a training task.
View the optimization report.
Package a training model.NOTE
Only models that are successfully trained can bepackaged.
----End
4.7.2.2 Training Code Editing (Simple Editor)
Editing CodeYou can use the simple editor to edit code and press Ctrl+S to save the file.
You can use either of the following methods to access the simple editor to editcode:
● On the Model Training page, if Select Development Environment is set to
Simple Editor, click corresponding to the model training project.
NAIEModel Training Service 4 User Guide
Issue 01 (2020-12-30) Copyright © Huawei Technologies Co., Ltd. 160

● On the Model Training page, click the row corresponding to the modeltraining project. The details page is displayed. If Select Development
Environment is set to Simple Editor, click corresponding to the modeltraining project.
Figure 4-49 shows the simple editor. Table 4-69 describes the page.
Figure 4-49 Simple editor page
Table 4-69 Description of the simple editor page
Area Description
1 Menu bar of the simple editor.● Model Training Name: project name entered when creating the
model training project● Debug Environment: selected debugging environment● Algorithm Template: name of the template used for creating the
project
NAIEModel Training Service 4 User Guide
Issue 01 (2020-12-30) Copyright © Huawei Technologies Co., Ltd. 161

Area Description
2 Task execution area.
● : Reconfigure the debugging environment for thecurrent training project.
● : Displays the system logs, run logs, run diagram, andTensorBoard of a training task on different tab pages. You can
click , , and to refresh, zoom in, and close the console,respectively, and search for logs by pressing Ctrl+F.
● : Train the current training project.
● : Return to the Model Training page of the currenttraining project.
● Training Jobs: View the status of a training task. You can viewthe run logs and training report of a training task or delete the
training task. You can click to pause a training task duringtask execution.
NAIEModel Training Service 4 User Guide
Issue 01 (2020-12-30) Copyright © Huawei Technologies Co., Ltd. 162

Area Description
3 Code Directory: Contains log folders, model file storage folders,debugging files, and the requirements.txt file. The model trainingor Notebook supports the installation or upgrade of third-partylibraries using the requirements.txt file. The following uses theinstallation of pystan 1.0.0 as an example.pystan == 1.0.0
In addition, the requirements.txt file supports the source codesecurity mode with parameters, for example, installing the lightgbmof the GPU version, as shown in Figure 4-50.
Figure 4-50 Installing the lightgbm
The code directory also supports the following operations:
● : Import a file. You can upload a file or folder.
● : Create a folder.
● : Create a file.
● : Rename a file, such as a debugging file and an inferencefile.
● : Delete a file or folder.
● : Update the code directory.● DataSet Directory: Contains dataset folders and dataset
instances. You can use the Spread editor to open CSV files, andcan open dataset instances on the training project editing page.
● Job Directory: Contains information about the training tasks thathave been executed and are being executed in the trainingproject. Code files, log files, metadata files, and model files aredisplayed.
4 Code editing area.
Debugging Code
Step 1 Click Notebook. In the Notebook dialog box, configure the debuggingenvironment.
NAIEModel Training Service 4 User Guide
Issue 01 (2020-12-30) Copyright © Huawei Technologies Co., Ltd. 163

If there are created Notebook environments, select an environment in runningstate and click Save. To create another Notebook environment, perform thefollowing steps:
1. Select the specified Python version, and select GPU and CPU debuggingresources.
2. Click Create Notebook Environment.3. When the environment is in the running state, select the environment and
click Save.
Step 2 Click the *.ipynb file. The debugging page is displayed.
Step 3 In the displayed dialog box, select a kernel and click Set Kernel.
Step 4 Configure the code in the text box and click to debug the code.
----End
4.7.2.3 Training Code Editing (WebIDE)
The WebIDE development environment can be used to edit code.
You can use either of the following methods to access the WebIDE to edit code:
● On the Model Training page, if Select Development Environment is set to a
web IDE, click corresponding to the model training project.● On the Model Training page, click the row corresponding to the model
training project. The details page is displayed. If Select Development
Environment is set to a web IDE, click corresponding to the modeltraining project.
Figure 4-51 shows the simple editor. Table 4-70 describes the page.
Figure 4-51 WebIDE page
NAIEModel Training Service 4 User Guide
Issue 01 (2020-12-30) Copyright © Huawei Technologies Co., Ltd. 164

Table 4-70 Description of the WebIDE page
Area Description
1 WebIDE menu bar.
2 Buttons for running and debugging the code.
● : Debug the code.
● : Run the code in the terminal window.
● : Split the editing area. Multiple file editing windows can bedisplayed at the same time.
3● : File management. All files are displayed. Double-click a file
to edit it in the right editing area. Right-click in the blank area ofthe file view to open the shortcut menu. Use a function on themenu as required.
● : Find and replace. Enter a keyword to find and replace thekeyword in all files.
● : Git function. Use the git function to implement versioncontrol.
● : Debug panel. Use the debug panel to view and manage thedebugging status of variables, stacks, and breakpoints duringcode debugging.
● : Plug-in management. Search for and install required plug-ins, and manage installed plug-ins by uninstalling and disabling.
● : Training task list. You can expand a training task to view thefiles and logs of the task.
4 Code editing area.
5 Panel area, including PROBLEMS, OUTPUT, DEBUG CONSOLE, andTERMINAL. You can enter command lines in the TERMINAL area.
The Code Directory contains log folders, model file storage folders, debuggingfiles, and the requirements.txt file. The model training or Notebook supports theinstallation or upgrade of third-party libraries using the requirements.txt file. Thefollowing uses the installation of pystan 1.0.0 as an example.pystan == 1.0.0
In addition, the requirements.txt file supports the source code security mode withparameters, for example, installing the lightgbm of the GPU version, as shown inFigure 4-52.
NAIEModel Training Service 4 User Guide
Issue 01 (2020-12-30) Copyright © Huawei Technologies Co., Ltd. 165

Figure 4-52 Installing the lightgbm
4.7.2.4 Model Training
Use the training set generated after feature engineering for model training.
Creating a Training Task (Simple Editor)
Step 1 Click Train in the upper right corner of the simple editor page. The Training JobConfiguration dialog box is displayed, as shown in Figure 4-53.
Figure 4-53 Configuring the training task
Step 2 Set parameters in the Training Job Configuration dialog box. Table 4-71describes the parameters.
Table 4-71 Training task parameters
Area Parameter Description
Basic Job Name Name of a training task.The name must contain 1 to 32 characters. It muststart with a letter, consist of only letters, digits,underscores (_), and hyphens (-), and cannot endwith an underscore (_).
NAIEModel Training Service 4 User Guide
Issue 01 (2020-12-30) Copyright © Huawei Technologies Co., Ltd. 166

Area Parameter Description
Description Description of a training task.
Environment
AI Engine AI engine and the corresponding Python version.
CreateTensorboardJob
Create a TensorBoard. For details, see Creating aTensorBoard.
CustomizeEngine
Customize an engine through the image address ofthe engine.
Main Entry Entry file and entry function of a training task.
ComputingNodeSpecifications
The model training service provides computing noderesources, including the CPU and GPU.You can select a computing node resource and set theComputing Node Quantity parameter.
ComputingNodeQuantity
Number of computing nodes. The options are asfollows:● 1: Single-node computing.● 2: Distributed computing. Developers need to write
corresponding call code. The built-in MoXingdistributed training acceleration framework can beused for training. The training algorithm mustcomply with the MoXing program structure. Fordetails, visit https://github.com/huaweicloud/ModelArts-Lab/tree/master/docs/moxing_api_doc.
DatasetParameterSetting
Datasethyperparameter
Configure the hyperparameters of dataset instances.Invoke the SDK (get_hyper_param) to obtain therelated dataset hyperparameters, including trainingdataset instances and verification dataset instances.You can enter multiple dataset hyperparameters. You
can click Add or to add or delete datasethyperparameters.For details about the SDK, click the floating box in thelower right corner of the training service homepage,click Help Center, and then click SDK Document.
HyperparameterSetting
Runninghyperparameter
Invoke the SDK (get_hyper_param) to obtain therunning hyperparameters, including the tag columnand iteration times. You can enter multiple running
hyperparameters. You can click Add or to add ordelete running hyperparameters.For details about the SDK, click the floating box in thelower right corner of the training service homepage,click Help Center, and then click SDK Document.
NAIEModel Training Service 4 User Guide
Issue 01 (2020-12-30) Copyright © Huawei Technologies Co., Ltd. 167

Area Parameter Description
Parameteroptimize
During the execution of a training task, thehyperparameter optimization operation can beperformed.Select the Hyperparameter optimization check boxnext to Running hyperparameter to configure theparameter type, start value, end value, optimizationmethod, optimization objective, and terminationcondition. After the training is complete, you can click
to view the optimization report and obtain themodel score and test duration under different valuesof running hyperparameters. For details, see Creatinga Hyperparameter Optimization Service.
Step 3 Click Start Training to submit the model training task.
CA UTION
If the training task status remains RUNNING, the foreground of the modeltraining service platform keeps sending messages to the background to query thestatus of the current training task. Even if the platform access times out, theinterface for querying the training task status keeps sending query messages tothe background and never times out. The interface does not stop querying theservice status until the training task status changes to FINISHED, FAILED, orSTOPPED.
Step 4 Click to view the training status. The options are as follows:● ALL: All training tasks are displayed.● WAITING: The training task is being prepared.● RUNNING: The training is in progress.● FINISHED: The training is successful.● FAILED: The training fails.● STOPPED: The training task is stopped.
Step 5 Click under a training task record to view the system logs, run logs, rundiagram, and TensorBoard information.● System logs: You can view the code execution process. System run log
information includes the code directory, log paths, and used SDK.● Run logs: During code editing, you can customize the information displayed in
run logs. You can view the code execution results in the run logs, for example,the user information, code directory, and execution commands. If a trainingtask fails, you can locate the failure cause by checking the run logs.
● Run diagram: Task execution information is displayed in charts when the SDKis called in the training project.
NAIEModel Training Service 4 User Guide
Issue 01 (2020-12-30) Copyright © Huawei Technologies Co., Ltd. 168

● TensorBoard: If you select Create Tensorboard Job during training taskcreation, you can view the following information on the TensorBoard tab pageafter the training: the calculation diagram of the TensorFlow during running,the change trend of various indicators over time, and the data informationused in training.
Click to view the model evaluation report.
● Evaluation indicators: data information of various indicators in values andcharts
● Hyperparameters: information about the training set, test set, and labelcolumn
● Task system parameters: training task parameter settings
----End
Creating a Training Task (WebIDE)
Step 1 Return to the Model Training page, click the row corresponding to the modeltraining project. The training project details page is displayed.
Step 2 Click in the upper right corner. The Training Job Configuration dialog box isdisplayed, as shown in Figure 4-54.
Figure 4-54 Configuring the training task
Step 3 Set parameters in the Training Job Configuration dialog box. Table 4-72describes the parameters.
NAIEModel Training Service 4 User Guide
Issue 01 (2020-12-30) Copyright © Huawei Technologies Co., Ltd. 169

Table 4-72 Training task parameters
Area Parameter Description
Basic Job Name Name of a training task.The name must contain 1 to 32 characters. It muststart with a letter, consist of only letters, digits,underscores (_), and hyphens (-), and cannot endwith an underscore (_).
Description Description of a training task.
Environment
AI Engine AI engine and the corresponding Python version.
CreateTensorboardJob
Create a TensorBoard. For details, see Creating aTensorBoard.
CustomizeEngine
Customize an engine through the image address ofthe engine.
Main Entry Entry file and entry function of a training task.
ComputingNodeSpecifications
The model training service provides computing noderesources, including the CPU and GPU.You can select a computing node resource and set theComputing Node Quantity parameter.
ComputingNodeQuantity
Number of computing nodes. The options are asfollows:● 1: Single-node computing.● 2: Distributed computing. Developers need to write
corresponding call code. The built-in MoXingdistributed training acceleration framework can beused for training. The training algorithm mustcomply with the MoXing program structure. Fordetails, visit https://github.com/huaweicloud/ModelArts-Lab/tree/master/docs/moxing_api_doc.
DatasetParameterSetting
Datasethyperparameter
Configure the hyperparameters of dataset instances.Invoke the SDK (get_hyper_param) to obtain therelated dataset hyperparameters, including trainingdataset instances and verification dataset instances.You can enter multiple dataset hyperparameters. You
can click Add or to add or delete datasethyperparameters.For details about the SDK, click the floating box in thelower right corner of the training service homepage,click Help Center, and then click SDK Document.
NAIEModel Training Service 4 User Guide
Issue 01 (2020-12-30) Copyright © Huawei Technologies Co., Ltd. 170
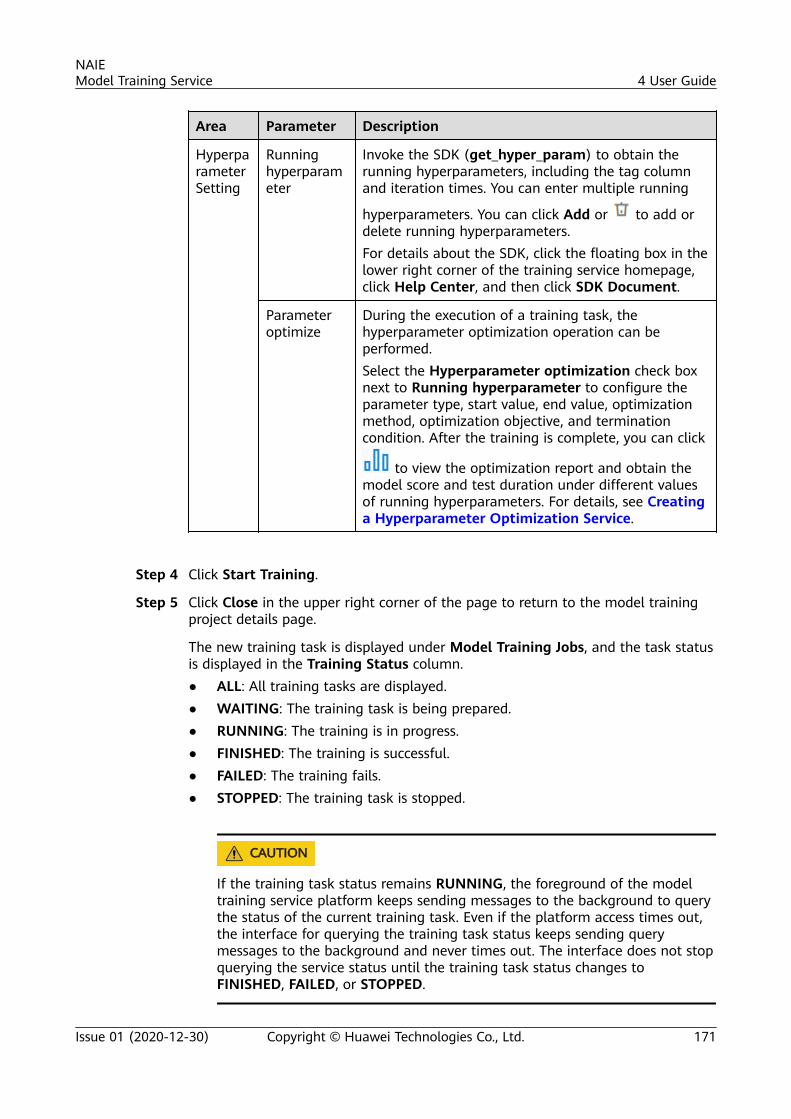
Area Parameter Description
HyperparameterSetting
Runninghyperparameter
Invoke the SDK (get_hyper_param) to obtain therunning hyperparameters, including the tag columnand iteration times. You can enter multiple running
hyperparameters. You can click Add or to add ordelete running hyperparameters.For details about the SDK, click the floating box in thelower right corner of the training service homepage,click Help Center, and then click SDK Document.
Parameteroptimize
During the execution of a training task, thehyperparameter optimization operation can beperformed.Select the Hyperparameter optimization check boxnext to Running hyperparameter to configure theparameter type, start value, end value, optimizationmethod, optimization objective, and terminationcondition. After the training is complete, you can click
to view the optimization report and obtain themodel score and test duration under different valuesof running hyperparameters. For details, see Creatinga Hyperparameter Optimization Service.
Step 4 Click Start Training.
Step 5 Click Close in the upper right corner of the page to return to the model trainingproject details page.
The new training task is displayed under Model Training Jobs, and the task statusis displayed in the Training Status column.● ALL: All training tasks are displayed.● WAITING: The training task is being prepared.● RUNNING: The training is in progress.● FINISHED: The training is successful.● FAILED: The training fails.● STOPPED: The training task is stopped.
CA UTION
If the training task status remains RUNNING, the foreground of the modeltraining service platform keeps sending messages to the background to querythe status of the current training task. Even if the platform access times out,the interface for querying the training task status keeps sending querymessages to the background and never times out. The interface does not stopquerying the service status until the training task status changes toFINISHED, FAILED, or STOPPED.
NAIEModel Training Service 4 User Guide
Issue 01 (2020-12-30) Copyright © Huawei Technologies Co., Ltd. 171

Step 6 Click corresponding to a training task record to view the system logs, run logs,run diagram, and TensorBoard information.● System logs: You can view the code execution process. System run log
information includes the code directory, log paths, and used SDK.● Run logs: During code editing, you can customize the information displayed in
run logs. You can view the code execution results in the run logs, for example,the user information, code directory, and execution commands. If a trainingtask fails, you can locate the failure cause by checking the run logs.
● Run diagram: Task execution information is displayed in charts when the SDKis called in the training project.
● TensorBoard: If you select Create Tensorboard Job during training taskcreation, you can view the following information on the TensorBoard tab pageafter the training: the calculation diagram of the TensorFlow during running,the change trend of various indicators over time, and the data informationused in training.
Click to view the model evaluation report.● Evaluation indicators: data information of various indicators in values and
charts● Hyperparameters: information about the training set, test set, and label
column● Task system parameters: training task parameter settings
----End
4.7.2.5 MindSpore SampleMindSpore is an all-scenario AI computing framework. It can significantly reducethe training time and cost (in the develop time), run with fewer resources and thehighest energy efficiency ratio (in the runtime), and adapt to all scenarios (in thedeploy time), including devices, edges, and clouds.
This section describes how to use the trial MindSpore sample on the trainingplatform. You can obtain the required training algorithm files from the NAIE cloudservice forum. You can download the attachment only after logging in to theHUAWEI CLOUD account. The download address is as follows:
https://bbs.huaweicloud.com/forum/thread-59601-1-1.html
The trial MindSpore sample contains two algorithm files:
● dataset.pyThis file is used to load the cifar dataset and perform simple dataenhancement. When using MindSpore, you do not need to process datasets orfeatures.
● resnet.pyThis file is the main entry function file of the trial MindSpore sample. It usesthe ResNet50 residual network of MindSpore and defines the loss function(SoftmaxCrossEntropyWithLogits), optimization method (Momentum), andconfigures checkpoints, and completes the overall definition of the networkstructure. This main function defines the running hyperparameters and their
NAIEModel Training Service 4 User Guide
Issue 01 (2020-12-30) Copyright © Huawei Technologies Co., Ltd. 172

default values. You can also configure the hyperparameters on the trainingplatform to overwrite the default values.
Step 1 Click Create. The Create Training dialog box is displayed.
Step 2 Set the parameters of the MindSpore sample training project, as shown in Figure4-55.
Figure 4-55 Creating a MindSpore sample training project
Step 3 Click OK.
The model training project details page is displayed, as shown in Figure 4-56.
Figure 4-56 Model training project details page
Step 4 Click in the upper right corner of the page. The code editing page is displayed,as shown in Figure 4-57.
NAIEModel Training Service 4 User Guide
Issue 01 (2020-12-30) Copyright © Huawei Technologies Co., Ltd. 173

Figure 4-57 Code editing page
Step 5 Click in the upper left corner and upload algorithm files in batches, as shownin Figure 4-58.
Figure 4-58 Uploading algorithm files
NO TE
The resnet.py file can be used in either of the following ways:● To upload the file to the code directory of the training project, select resnet.py as the
main entry file during model training. This document uses the upload mode as anexample.
● If you do not need to upload the file to the code directory of the training project, openthe algorithm file locally and copy the content of the algorithm file to the .py file withthe same name as the training project. During model training, select the .py file with thesame name as the training project as the main entry file.
NAIEModel Training Service 4 User Guide
Issue 01 (2020-12-30) Copyright © Huawei Technologies Co., Ltd. 174

Step 6 Click Upload.
Step 7 Click Train in the upper right corner of the page.
The Training Job Configuration page is displayed.
Step 8 Configure a training task, as shown in Figure 4-59.
The parameters are described as follows:
● AI Engine: AI algorithm running platform. Select Ascend-Powered-Enginefrom the first drop-down list box and select MindSpore-0.5-python3.7-aarch64 (a matched Python language version) from the second drop-downlist box.
● Main Entry: Main algorithm entry file of the MindSpore sample project.Select resnet.py.
● Computing Node Specifications: Resource configuration information forMindSpore sample model training.
● Computing Node Quantity: The value 1 indicates that one node is used fortraining. The value 2 or a larger value indicates that distributed training isused and developers need to compile the corresponding invoking code. Thebuilt-in MoXing distributed training acceleration framework can be used fortraining. The training algorithm must comply with the MoXing programstructure. Reference documents are as follows:https://github.com/huaweicloud/ModelArts-Lab/tree/master/docs/moxing_api_doc
● Dataset hyperparameter: The dataset hyperparameters have beenpreconfigured. You do not need to configure them on the training taskconfiguration page.
● Running hyperparameter: Figure 4-59 shows the running hyperparametersin this example. You can adjust the hyperparameter values or use the presethyperparameters for training.
Figure 4-59 Configuring a MindSpore training task
NAIEModel Training Service 4 User Guide
Issue 01 (2020-12-30) Copyright © Huawei Technologies Co., Ltd. 175

Step 9 Click Start Training.
The code editing page is displayed.
Step 10 Click Training Jobs in the upper right corner of the page to view the training task.
After the training status changes to Finished, click under the training task toview the training log, as shown in Figure 4-60. The value of acc is the modelprecision.
Figure 4-60 Viewing the training log
----End
4.7.3 Creating a Federated Learning Project
4.7.3.1 Creating a Project
Create a federated learning project, compile code, train a model, and generate amodel package. A federated learning model package can be imported to thefederated learning deployment service as a basic model package of the federatedlearning instance.
When creating a federated learning instance in the federated learning deploymentservice, set Basic Model Configuration to Import from the NAIE platform toautomatically match federated learning projects, training tasks, and modelpackages in the model training service.
To create a federated learning project, perform the following steps:
Step 1 Click Create. The Create Training dialog box is displayed.
Set federated learning engineering parameters, as shown in Table 4-73.
NAIEModel Training Service 4 User Guide
Issue 01 (2020-12-30) Copyright © Huawei Technologies Co., Ltd. 176

Table 4-73 Parameter description
Parameter Description
Please selectmodel trainingtype
Model training type. The options are as follows:● Create New model training project● Create Federated Learning project● Creating a Training Service● Creating a Hyperparameter Optimization ServiceSelect Create Federated Learning project.
Model TrainingName
Model training name.The name must contain 1 to 26 characters. It must startwith a letter, consist of only letters, digits, and underscores(_), and cannot end with an underscore (_).
Description Description of the new federated learning project.
SelectDevelopmentEnvironment
Development environment used by a training project. Theoptions are as follows:● WebIDE
The WebIDE provides encoding experience similar tothat of the local VSCode and supports functions such asautomatic code supplementation and debugging. TheWebIDE is applicable to scenarios where a large amountof code is written. When creating an online IDE-basedfederated learning training model, select WebIDE.
● Simple EditorThe simple editor allows you to view and edit code. Itdoes not support debugging and is applicable toscenarios where a small amount of code needs to bemodified. When creating a web-based federatedlearning training model, select Simple Editor.
Specifications WebIDE resource specifications. This parameter is displayedwhen Select Development Environment is set toWebIDE. Select specifications based on the siterequirements.
Instance Environment instance corresponding to the currentenvironment specifications. This parameter is displayedwhen Select Development Environment is set toWebIDE.● If the selected specifications have an environment
instance, you can select the existing instance.● If no instance is available for the selected specifications,
click Create a new development environment.
Step 2 In the displayed dialog box, click OK.
NAIEModel Training Service 4 User Guide
Issue 01 (2020-12-30) Copyright © Huawei Technologies Co., Ltd. 177

The federated learning project details page is displayed, as shown in Figure 4-61.Table 4-74 shows the tab page.
Figure 4-61 Federated learning project details page
Table 4-74 Page description
Area Parameter Description
1 (Trainingproject)
Created Time Time when a federated learning project iscreated.
Type Model training type.
Creator User who creates the federated learningtraining project.
Activity Time Time when the latest model training isexecuted.
SelectDevelopmentEnvironment
Model training running environmentinformation of the federated learningproject. You can select the currentenvironment from the drop-down list box.
Enter the code editing page
Create a federated learning training task.For details, see the following sections:● Creating a Federated Learning
Training Task (Simple Editor)● Creating a Federated Learning
Training Task (WebIDE)
Deleting a federated learning trainingproject.
Model trainingprojectDescription
Description. You can click to edit thedescription.
NAIEModel Training Service 4 User Guide
Issue 01 (2020-12-30) Copyright © Huawei Technologies Co., Ltd. 178

Area Parameter Description
Compare the training reports of trainingtasks, output the evaluation indicators oftraining tasks with differenthyperparameters, and display the tasksystem parameters of training tasks.NOTE
A maximum of three model reports can becompared.
Switch to the details page of anothermodel training project, federated learningproject, training service, or hyperparameteroptimization service.
Web IDE environment resourceconfiguration and management, includingcreating an environment, stop a runningenvironment, and deleting an environment.You can view the environment informationabout all projects that are configured withweb IDE environment resources.
Create a training project, federatedlearning project, training service, orhyperparameter optimization service.
2 (Modeltrainingtasks)
Quickly search for training tasks based onthe training status.
Only the followed tasks are displayed.
You can click next to the name of a
task to follow it, and click again tounfollow the task.
Search for a training task based on the taskcreation time and task name.By default, the search is performed basedon the task creation time.
Search for training tasks by task creationtime or task name. The search results aredisplayed in ascending or descending order.By default, the results are displayed indescending order.
Job Name Name of a model training task.
Task Description Description of a model training task.
Job Creation Time Time when a model training task iscreated.
NAIEModel Training Service 4 User Guide
Issue 01 (2020-12-30) Copyright © Huawei Technologies Co., Ltd. 179

Area Parameter Description
Training Duration Model training duration.
Tensorboard TensorBoard status.
Training Status Training task status.The options are as follows:● ALL: All training tasks are displayed.● WAITING: The training task is being
prepared.● RUNNING: The training is in progress.● FINISHED: The training is successful.● FAILED: The training fails.● STOPPED: The training task is stopped.
Training Report Click the icon to view details about thetraining evaluation report.
Resource Usage CPU, GPU, and RAM usage of a trainingalgorithm.
Peak value Peak usage of the CPU, GPU, and RAM of atraining algorithm.
Click this button to stop a training taskwhen the training status is RUNNING.
View details about a verification task,including the system logs, run logs, rundiagram, and TensorBoard information.
Delete a training task.
View the optimization report.
Package a training model.NOTE
Only models that are successfully trained can bepackaged.
----End
4.7.3.2 Editing Code (Simple Editor)
Editing Code
Code can be edited using a simple editor. You can use either of the followingmethods to access the simple editor to edit code:
NAIEModel Training Service 4 User Guide
Issue 01 (2020-12-30) Copyright © Huawei Technologies Co., Ltd. 180

● On the Model Training page, if Select Development Environment is set to
Simple Editor, click corresponding to the federated learning project.● On the Model Training page, click the row corresponding to the federated
learning project. The details page is displayed. If Select Development
Environment is set to Simple Editor, click corresponding to the modeltraining project.
Figure 4-62 shows the simple editor. Table 4-75 describes the page.
Figure 4-62 Simple editor page
Table 4-75 Description of the simple editor page
Area Description
1 Menu bar of the simple editor.● Model Training Name: project name entered when creating the
model training project● Debug Environment: selected debugging environment● Algorithm Template: name of the template used for creating the
project
NAIEModel Training Service 4 User Guide
Issue 01 (2020-12-30) Copyright © Huawei Technologies Co., Ltd. 181

Area Description
2 Task execution area.
● : Reconfigure the debugging environment for thecurrent training project.
● : Displays the system logs, run logs, run diagram, andTensorBoard of a training task on different tab pages. You can
click , , and to refresh, zoom in, and close the console,respectively, and search for logs by pressing Ctrl+F.
● : Train the current training project.
● : Return to the Model Training page of the currenttraining project.
● Training Jobs: View the status of a training task. You can viewthe run logs and training report of a training task or delete the
training task. You can click to pause a training task duringtask execution.
3 Code Directory: Contains log folders, model file folders, debuggingfiles, and the requirements.txt file. The model training or Notebooksupports the installation or upgrade of third-party libraries using therequirements.txt file. The following uses the installation of pystan1.0.0 as an example.pystan == 1.0.0
The code directory also supports the following operations:
● : Import a file. You can upload a file or folder.
● : Create a folder.
● : Create a file.
● : Rename a file, such as a debugging file and an inferencefile.
● : Delete a file or folder.
● : Update the code directory.● Dataset directory: Contains dataset folders and dataset instances.
You can use the Spread editor to open CSV files, and can opendataset instances on the training project editing page.
● Task directory: Contains information about the training tasks thathave been executed and are being executed in the federatedlearning training project. Code files, log files, metadata files, andmodel files are displayed.
NAIEModel Training Service 4 User Guide
Issue 01 (2020-12-30) Copyright © Huawei Technologies Co., Ltd. 182

Area Description
4 Code editing area. The main algorithm file of the current federatedlearning project can be directly used in training tasks. You do notneed to import data or configure the dataset during training. Ifcustomization is required, you can modify the code.
Debugging Code
Step 1 Click Notebook. In the Notebook dialog box, configure the debuggingenvironment.
If there are created Notebook environments, select an environment in runningstate and click Save. To create another Notebook environment, perform thefollowing steps:
1. Select the specified Python version, and select GPU and CPU debuggingresources.
2. Click Create Notebook Environment.3. When the environment is in the running state, select the environment and
click Save.
Step 2 Click the *.ipynb file. The debugging page is displayed.
Step 3 In the displayed dialog box, select a kernel and click Set Kernel.
Step 4 Configure the code in the text box and click to debug the code.
----End
4.7.3.3 Editing Code (WebIDE)The WebIDE development environment can be used to edit code. You can useeither of the following methods to access the WebIDE to edit code:
● On the Model Training page, if Select Development Environment is set to a
web IDE, click corresponding to the federated learning project.● On the Model Training page, click the row corresponding to the federated
learning project. The details page is displayed. If Select Development
Environment is set to a web IDE, click corresponding to the modeltraining project. Click Select Development Environment and set thedevelopment environment to WebIDE.
Figure 4-63 shows the simple editor. Table 4-76 describes the page.
NAIEModel Training Service 4 User Guide
Issue 01 (2020-12-30) Copyright © Huawei Technologies Co., Ltd. 183

Figure 4-63 WebIDE page
Table 4-76 Description of the WebIDE page
Area Description
1 WebIDE menu bar.
2 Buttons for running and debugging the code.
● : Debug the code.
● : Run the code in the terminal window.
● : Split the editing area. Multiple file editing windows can bedisplayed at the same time.
NAIEModel Training Service 4 User Guide
Issue 01 (2020-12-30) Copyright © Huawei Technologies Co., Ltd. 184

Area Description
3● : File management. All files are displayed. Double-click a file
to edit it in the right editing area. Right-click in the blank area ofthe file view to open the shortcut menu. Use a function on themenu as required.
● : Find and replace. Enter a keyword to find and replace thekeyword in all files.
● : Git function. Use the git function to implement versioncontrol.
● : Debug panel. Use the debug panel to view and manage thedebugging status of variables, stacks, and breakpoints duringcode debugging.
● : Plug-in management. Search for and install required plug-ins, and manage installed plug-ins by uninstalling and disabling.
● : Training task list. You can expand a training task to view thefiles and logs of the task.
4 Code editing area. The main algorithm file of the current federatedlearning project can be directly used in training tasks. You do notneed to import data or configure the dataset during training. Ifcustomization is required, you can modify the code.
5 Panel area, including PROBLEMS, OUTPUT, DEBUG CONSOLE, andTERMINAL. You can enter command lines in the TERMINAL area.
4.7.3.4 Model TrainingUse the training set generated after feature engineering for model training.
Creating a Federated Learning Training Task (Simple Editor)
Step 1 Click Train in the upper right corner of the simple editor page.
The Training Job Configuration page is displayed, as shown in Figure 4-64.
NAIEModel Training Service 4 User Guide
Issue 01 (2020-12-30) Copyright © Huawei Technologies Co., Ltd. 185

Figure 4-64 Training task configuration
Table 4-77 describes the parameters.
Table 4-77 Parameter configuration
Area Parameter Description
Basic Job Name Name of a training task.The name must contain 1 to 32 characters. It muststart with a letter, consist of only letters, digits,underscores (_), and hyphens (-), and cannot endwith an underscore (_).
Description Description of a training task.
Environment
AI Engine AI engine and the corresponding Python version.
CreateTensorboardJob
Create a TensorBoard. For details, see Creating aTensorBoard.
CustomizeEngine
Customize an engine through the image address ofthe engine.
Main Entry Entry file and entry function of a training task.
ComputingNodeSpecifications
The model training service provides computing noderesources, including the CPU and GPU.You can select a computing node resource and set theComputing Node Quantity parameter.
NAIEModel Training Service 4 User Guide
Issue 01 (2020-12-30) Copyright © Huawei Technologies Co., Ltd. 186

Area Parameter Description
ComputingNodeQuantity
Number of computing nodes. The options are asfollows:● 1: Single-node computing.● 2: Distributed computing. Developers need to write
corresponding call code. The built-in MoXingdistributed training acceleration framework can beused for training. The training algorithm mustcomply with the MoXing program structure. Fordetails, visit https://github.com/huaweicloud/ModelArts-Lab/tree/master/docs/moxing_api_doc.
DatasetParameterSetting
Datasethyperparameter
Configure the hyperparameters of dataset instances.Invoke the SDK (get_hyper_param) to obtain therelated dataset hyperparameters, including trainingdataset instances and test dataset instances. You canenter multiple dataset hyperparameters. You can click
Add or to add or delete dataset hyperparameters.For details about the SDK, click the floating box in thelower right corner of the training service homepage,click Help Center, and then click SDK Document.The training and test data have been preset for thecurrent algorithm. You can use the default values fortraining.
HyperparameterSetting
Runninghyperparameter
Invoke the SDK (get_hyper_param) to obtain therunning hyperparameters, including the tag columnand iteration times. You can enter multiple running
hyperparameters. You can click Add or to add ordelete running hyperparameters.For details about the SDK, click the floating box in thelower right corner of the training service homepage,click Help Center, and then click SDK Document.The running hyperparameters have been preset in thecurrent code. You can use the default values.
Parameteroptimize
During the execution of a training task, thehyperparameter optimization operation can beperformed.Select the Hyperparameter optimization check boxnext to Running hyperparameter to configure theparameter type, start value, end value, optimizationmethod, optimization objective, and terminationcondition. After the training is complete, you can click
to view the optimization report and obtain themodel score and test duration under different valuesof running hyperparameters. For details, see Creatinga Hyperparameter Optimization Service.
NAIEModel Training Service 4 User Guide
Issue 01 (2020-12-30) Copyright © Huawei Technologies Co., Ltd. 187

Step 2 Click Start Training.
CA UTION
If the training task status remains RUNNING, the foreground of the modeltraining service platform keeps sending messages to the background to query thestatus of the current training task. Even if the platform access times out, theinterface for querying the training task status keeps sending query messages tothe background and never times out. The interface does not stop querying theservice status until the training task status changes to FINISHED, FAILED, orSTOPPED.
Step 3 Click to view the training status. The options are as follows:● ALL: All training tasks are displayed.● WAITING: The training task is being prepared.● RUNNING: The training is in progress.● FINISHED: The training is successful.● FAILED: The training fails.● STOPPED: The training task is stopped.
Step 4 Click under a training task record to view the system logs, run logs, rundiagram, and TensorBoard information.● System logs: You can view the code execution process. System run log
information includes the code directory, log paths, and used SDK.● Run logs: During code editing, you can customize the information displayed in
run logs. You can view the code execution results in the run logs, for example,the user information, code directory, and execution commands. If a trainingtask fails, you can locate the failure cause by checking the run logs.
● Run diagram: Task execution information is displayed in charts when the SDKis called in the training project.
● TensorBoard: If you select Create Tensorboard Job during training taskcreation, you can view the following information on the TensorBoard tab pageafter the training: the calculation diagram of the TensorFlow during running,the change trend of various indicators over time, and the data informationused in training.
Click to view the model evaluation report.● Evaluation indicators: data information of various indicators in values and
charts● Hyperparameters: information about the training set, test set, and label
column● Task system parameters: training task parameter settings
----End
NAIEModel Training Service 4 User Guide
Issue 01 (2020-12-30) Copyright © Huawei Technologies Co., Ltd. 188

Creating a Federated Learning Training Task (WebIDE)
Step 1 Return to the Model Training page, click the row corresponding to the federatedlearning project. The project details page is displayed.
Step 2 Click in the upper right corner. The Training Job Configuration dialog box isdisplayed, as shown in Figure 4-65.
Figure 4-65 Training task configuration
Table 4-78 describes the parameters.
Table 4-78 Parameter description
Area Parameter Description
Basic Job Name Name of a training task.The name must contain 1 to 32 characters. It muststart with a letter, consist of only letters, digits,underscores (_), and hyphens (-), and cannot endwith an underscore (_).
Description Description of a training task.
Environment
AI Engine AI engine and the corresponding Python version.
CreateTensorboardJob
Create a TensorBoard. For details, see Creating aTensorBoard.
CustomizeEngine
Customize an engine through the image address ofthe engine.
Main Entry Entry file and entry function of a training task.
NAIEModel Training Service 4 User Guide
Issue 01 (2020-12-30) Copyright © Huawei Technologies Co., Ltd. 189

Area Parameter Description
ComputingNodeSpecifications
The model training service provides computing noderesources, including the CPU and GPU.You can select a computing node resource and set theComputing Node Quantity parameter.
ComputingNodeQuantity
Number of computing nodes. The options are asfollows:● 1: Single-node computing.● 2: Distributed computing. Developers need to write
corresponding call code. The built-in MoXingdistributed training acceleration framework can beused for training. The training algorithm mustcomply with the MoXing program structure. Fordetails, visit https://github.com/huaweicloud/ModelArts-Lab/tree/master/docs/moxing_api_doc.
DatasetParameterSetting
DatasetParameterSetting
Configure the hyperparameters of dataset instances.Invoke the SDK (get_hyper_param) to obtain therelated dataset hyperparameters, including trainingdataset instances and verification dataset instances.You can enter multiple dataset hyperparameters. You
can click Add or to add or delete datasethyperparameters.For details about the SDK, click the floating box in thelower right corner of the training service homepage,click Help Center, and then click SDK Document.The training and test data have been preset for thecurrent algorithm. You can use the default values fortraining.
HyperparameterSetting
Runninghyperparameter
Invoke the SDK (get_hyper_param) to obtain therunning hyperparameters, including the tag columnand iteration times. You can enter multiple running
hyperparameters. You can click Add or to add ordelete running hyperparameters.For details about the SDK, click the floating box in thelower right corner of the training service homepage,click Help Center, and then click SDK Document.The running hyperparameters have been preset in thecurrent code. You can use the default values.
NAIEModel Training Service 4 User Guide
Issue 01 (2020-12-30) Copyright © Huawei Technologies Co., Ltd. 190

Area Parameter Description
Parameteroptimize
During the execution of a training task, thehyperparameter optimization operation can beperformed.Select the Hyperparameter optimization check boxnext to Running hyperparameter to configure theparameter type, start value, end value, optimizationmethod, optimization objective, and terminationcondition. After the training is complete, you can click
to view the optimization report and obtain themodel score and test duration under different valuesof running hyperparameters. For details, see Creatinga Hyperparameter Optimization Service.
Step 3 Click Start Training.
Step 4 Click Close to return to the federated learning project details page. The newtraining task is displayed under Model Training Jobs, and the task status isdisplayed in the Training Status column.● ALL: All training tasks are displayed.● WAITING: The training task is being prepared.● RUNNING: The training is in progress.● FINISHED: The training is successful.● FAILED: The training fails.● STOPPED: The training task is stopped.
CA UTION
If the training task status remains RUNNING, the foreground of the modeltraining service platform keeps sending messages to the background to querythe status of the current training task. Even if the platform access times out,the interface for querying the training task status keeps sending querymessages to the background and never times out. The interface does not stopquerying the service status until the training task status changes toFINISHED, FAILED, or STOPPED.
Step 5 Click under a training task record to view the system logs, run logs, rundiagram, and TensorBoard information.● System logs: You can view the code execution process. System run log
information includes the code directory, log paths, and used SDK.● Run logs: During code editing, you can customize the information displayed in
run logs. You can view the code execution results in the run logs, for example,the user information, code directory, and execution commands. If a trainingtask fails, you can locate the failure cause by checking the run logs.
● Run diagram: Task execution information is displayed in charts when the SDKis called in the training project.
NAIEModel Training Service 4 User Guide
Issue 01 (2020-12-30) Copyright © Huawei Technologies Co., Ltd. 191

● TensorBoard: If you select Create Tensorboard Job during training taskcreation, you can view the following information on the TensorBoard tab pageafter the training: the calculation diagram of the TensorFlow during running,the change trend of various indicators over time, and the data informationused in training.
Click to view the model evaluation report.● Evaluation indicators: data information of various indicators in values and
charts● Hyperparameters: information about the training set, test set, and label
column● Task system parameters: training task parameter settings
----End
4.7.4 Creating a Training Service
Creating a Training Service
A training task needs to be created based on a training model that has beensuccessfully packaged, and uses a new training dataset, test dataset, and labelcolumn for model training.
Step 1 Click Create. The Create Training dialog box is displayed.
Table 4-79 describes the parameters for creating a training service.
Table 4-79 Parameter description
Parameter Description
Please selectmodel trainingtype
Model training mode. The options are as follows:● Create New model training project● Create Federated Learning project● Create New Training Service● Create Hyperparameter Optimization ServiceSelect Create New Training Service.
description Description of the training service to be created.
Retraining ServiceName
Training service name.The name must contain 1 to 26 characters. It must startwith a letter, consist of only letters, digits, and underscores(_), and cannot end with an underscore (_).
Archived ModelPackage
Select an archived model from the drop-down list box.
Step 2 In the displayed dialog box, click OK.
NAIEModel Training Service 4 User Guide
Issue 01 (2020-12-30) Copyright © Huawei Technologies Co., Ltd. 192

The training service details page is displayed, as shown in Figure 4-66. Table 4-80shows the tab page.
Figure 4-66 Model training
Table 4-80 Page description
Area Parameter Description
1 (Trainingservice)
Created Time Training service creation time.
Type Model training type.
Creator User who creates the trainingservice.
Activity Time Time when the latest modeltraining is executed.
Create a training task. Fordetails, see Model Training.
Delete a training task.
Model training projectDescription
Description of a training service.You can click to edit thedescription.
Switch to the model trainingpage of another trainingproject, federated learningproject, training service, orhyperparameter optimizationservice.
View and configure theinformation on the modeltraining running environment.
Create a training project,federated learning project,training service, orhyperparameter optimizationservice.
NAIEModel Training Service 4 User Guide
Issue 01 (2020-12-30) Copyright © Huawei Technologies Co., Ltd. 193

Area Parameter Description
2 (Modeltraining tasks)
Quickly search for training tasksbased on the training status.
Search for a training task basedon the task creation time andtask name.By default, the search isperformed based on the taskcreation time.
Search for training tasks by taskcreation time or task name. Thesearch results are displayed inascending or descending order.By default, the results aredisplayed in descending order.
Job Name Name of a model training task.
Task Description Description of a model trainingtask.
Job Creation Time Time when a model trainingtask is created.
Training Duration Model training duration.
Tensorboard TensorBoard status.
Training Status Training task status.The options are as follows:● ALL: All training tasks are
displayed.● WAITING: The training task
is being prepared.● RUNNING: The training is in
progress.● FINISHED: The training is
successful.● FAILED: The training fails.● STOPPED: The training task
is stopped.
Training Report Click the icon to view detailsabout the training evaluationreport.
Resource Usage CPU, GPU, and RAM usage of atraining algorithm.
NAIEModel Training Service 4 User Guide
Issue 01 (2020-12-30) Copyright © Huawei Technologies Co., Ltd. 194

Area Parameter Description
Peak value Peak usage of the CPU, GPU,and RAM of a trainingalgorithm.
View the system logs, run logs,and run diagram of the trainingtask.
Stop a training task when thetraining status is RUNNING.
Delete a training task.
Package a training model.NOTE
Only models that are successfullytrained can be packaged.
----End
Model Training
Step 1 Click on the training service details page.
The Create Job box is displayed, as shown in Figure 4-67.
Figure 4-67 Creating a task
Table 4-81 describes the parameters.
NAIEModel Training Service 4 User Guide
Issue 01 (2020-12-30) Copyright © Huawei Technologies Co., Ltd. 195

Table 4-81 Parameter description
Area Parameter Description
Basic Job Name Name of a model training task.The name must contain 1 to 32 characters. It muststart with a letter, consist of only letters, digits,underscores (_), and hyphens (-), and cannot end withan underscore (_).
Description Task description.
Autopackage
If this parameter is selected, the model of the modeltraining task is packaged during task creation. Afterthe task is successfully created, you can view thepackaged model on the Model page.
Auto PublishModelPackage
Available if Auto Package is selected. If Auto PublishModel Package is selected, the model of the modeltraining task is packaged during task creation. Thepackaged model is automatically released. After thetask is successfully created, you can view the model onthe Model page. The Status of the model isPublishing.
ModelPackageName
Available if Auto Package is selected. This parameterindicates the model package name.
Version Available if Auto Package is selected. This parameterindicates the model package version.
DatasetParameterSetting
Datasethyperparameter
Set the dataset hyperparameters of the currenttraining task, which must be the same as those inModel Training.
HyperparameterSetting
Runninghyperparameter
Names of running hyperparameters, which must bethe same as those in Model Training.
Step 2 Click Create. The training task starts.
Step 3 Click to view task execution details, including the system logs, run logs, andrun diagram. View the training result in the evaluation report.
----End
4.7.5 Creating a Hyperparameter Optimization ServiceThe hyperparameter optimization service can optimize the hyperparameters ofexisting model training projects. Specifically, you can select a group of optimalhyperparameters based on the comparison of training results. Not all trainingprojects support the creation of the hyperparameter optimization service. To
NAIEModel Training Service 4 User Guide
Issue 01 (2020-12-30) Copyright © Huawei Technologies Co., Ltd. 196

create the hyperparameter optimization service, the created training project mustmeet the following requirements:
● The training project can successfully execute the training task.● In the training project, the hyperparameters are called through the SDK
(softcomai.get_hyper_param), and the values are not defined in the trainingcode.
● The training project needs to provide the scores required by the optimizationprogram.
For details about the hyperparameter optimization service, see "Hyper ParameterOptimization Examples" in the latest version of the SDK document. For detailsabout the SDK, click the floating box in the lower right corner of the trainingservice homepage, click Help Center, and then click SDK Document.
Creating a Hyperparameter Optimization ServiceThe hyperparameter optimization service can optimize the hyperparameters ofexisting model training projects. Specifically, you can select a group of optimalhyperparameters based on the comparison of training results.
Step 1 Click Create. The Create Training dialog box is displayed.
Table 4-82 describes the parameters.
Table 4-82 Parameter description
Parameter Description
Please selectmodel trainingtype
Model training type.The options are as follows:● Create New model training project● Create Federated Learning project● Create New Training Service● Create Hyperparameter Optimization ServiceSelect Create Hyperparameter Optimization Service.
description Description information.
OptimizationService Name
Training service name.The name must contain 1 to 26 characters. It must startwith a letter, consist of only letters, digits, and underscores(_), and cannot end with an underscore (_).
Target TrainingProject
A created model training project. For details about how tocreate a training project, see Creating a Model TrainingProject.
Step 2 In the displayed dialog box, click OK.
The hyperparameter optimization service details page is displayed, as shown inFigure 4-68. Table 4-83 shows the tab page.
NAIEModel Training Service 4 User Guide
Issue 01 (2020-12-30) Copyright © Huawei Technologies Co., Ltd. 197

Figure 4-68 Hyperparameter optimization service details page
Table 4-83 Page description
Area Parameter Description
1 (Trainingservice)
Created Time Creation time of ahyperparameter optimizationservice.
Type Model training type.
Creator User who creates ahyperparameter optimizationservice.
Activity Time Time when the latest modeltraining is executed.
Target OptimizationAlgorithm
Target training project selectedduring hyperparameteroptimization service creation.
Model training projectDescription
Description of ahyperparameter optimizationservice. You can click to editthe description.
Create a training task. Fordetails, see Model Training.
Delete a training task.
Switch to the model trainingpage of another trainingproject, federated learningproject, training service, orhyperparameter optimizationservice.
View and configure theinformation on the modeltraining running environment.
NAIEModel Training Service 4 User Guide
Issue 01 (2020-12-30) Copyright © Huawei Technologies Co., Ltd. 198
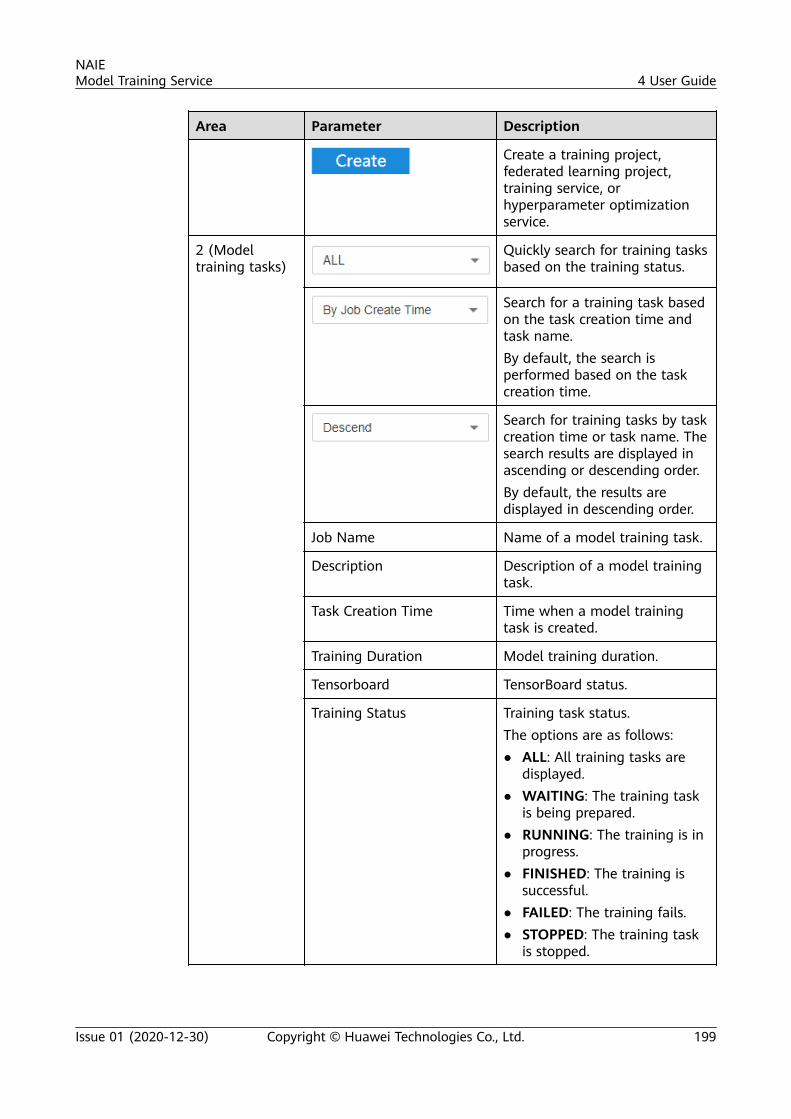
Area Parameter Description
Create a training project,federated learning project,training service, orhyperparameter optimizationservice.
2 (Modeltraining tasks)
Quickly search for training tasksbased on the training status.
Search for a training task basedon the task creation time andtask name.By default, the search isperformed based on the taskcreation time.
Search for training tasks by taskcreation time or task name. Thesearch results are displayed inascending or descending order.By default, the results aredisplayed in descending order.
Job Name Name of a model training task.
Description Description of a model trainingtask.
Task Creation Time Time when a model trainingtask is created.
Training Duration Model training duration.
Tensorboard TensorBoard status.
Training Status Training task status.The options are as follows:● ALL: All training tasks are
displayed.● WAITING: The training task
is being prepared.● RUNNING: The training is in
progress.● FINISHED: The training is
successful.● FAILED: The training fails.● STOPPED: The training task
is stopped.
NAIEModel Training Service 4 User Guide
Issue 01 (2020-12-30) Copyright © Huawei Technologies Co., Ltd. 199

Area Parameter Description
Training Report Click the icon to view detailsabout the training evaluationreport.
Resource Usage CPU, GPU, and RAM usage of atraining algorithm.
Peak value Peak usage of the CPU, GPU,and RAM of a trainingalgorithm.
View the system logs, run logs,and run diagram of the trainingtask.
View the optimization report.
Click this button to stop atraining task when the trainingstatus is RUNNING.
Delete a training task.
----End
Model Training
Step 1 On the hyperparameter optimization service details page, click in the upperright corner.
The Create optimize job dialog box is displayed, as shown in Figure 4-69.
NAIEModel Training Service 4 User Guide
Issue 01 (2020-12-30) Copyright © Huawei Technologies Co., Ltd. 200

Figure 4-69 Creating a hyperparameter optimization task
Table 4-84 describes the parameters.
Table 4-84 Parameter description
Area Parameter Description
Jobname
Job Name Name of a model training task.
Description
Description Description of a model training task.
OptimizationConfiguration
AI Engine AI engine and the corresponding Python version.
ComputingNodeSpecifications
Computing node specifications.The model training service provides computing noderesources, including the CPU and GPU.You can select a computing node resource and set theComputing Node Quantity parameter.
NAIEModel Training Service 4 User Guide
Issue 01 (2020-12-30) Copyright © Huawei Technologies Co., Ltd. 201

Area Parameter Description
ComputingNodeQuantity
Number of computing nodes. The options are asfollows:● 1: single-node computing● 2: distributed computing
Main Entry Entry file and entry function of a training task.
OptimizeMethod
Hyperparameter optimization method. The options areas follows:● Bayesian - GP● Bayesian - SMAC● Bayesian - TPE● Random● Grid
OptimizeGoal
Objective of the hyperparameter optimization task. It isdefined and fed back in the training algorithm. SelectMaximum or Minimum based on the training code.
Early Stop ● Iteration number● Time
parametersConfiguration
DatasetParameterSetting
Configure the hyperparameters of dataset instances.Invoke the SDK (get_hyper_param) to obtain therelated dataset hyperparameters, including trainingdataset instances and verification dataset instances.You can enter multiple dataset hyperparameters. Youcan click Add or to add or delete datasethyperparameters.For details about the SDK, click the floating box in thelower right corner of the training service homepage,click Help Center, and then click SDK Document.
Statichyperparameters
In each iteration training, the values of thehyperparameters are fixed.● Parameter Name: name of a static hyperparameter● Parameter Value: value of a static hyperparameterInvoke the SDK (get_hyper_param) to obtain the static
hyperparameters. You can click or to add ordelete a static hyperparameter.For details about the SDK, click the floating box in thelower right corner of the training service homepage,click Help Center, and then click SDK Document.
NAIEModel Training Service 4 User Guide
Issue 01 (2020-12-30) Copyright © Huawei Technologies Co., Ltd. 202

Area Parameter Description
Hyperparameters foroptimization
During each iteration training, the values of thehyperparameters are re-assigned based on theoptimization method.● Parameter Name: name of a dynamic
hyperparameter● Hyperparam type: type of a dynamic
hyperparameter, such as INT, FLOAT, STRING, andBOOL
● Hyperparam range: value range of a dynamichyperparameter, specified by Start and End
Invoke the SDK (get_hyper_param) to obtain the
dynamic hyperparameters. You can click or toadd or delete a dynamic hyperparameter.For details about the SDK, click the floating box in thelower right corner of the training service homepage,click Help Center, and then click SDK Document.
Step 2 Click Create. The training task starts.
Step 3 Click to view training task execution details, including the system logs, runlogs, and run diagram.
----End
Viewing the Hyperparameter Optimization Task Result
On the Model Training page, click to view the optimization report of thehyperparameter optimization task. The optimization report contains the followinginformation:
● Details about the hyperparameter optimization task: model score of theoptimal hyperparameter combination, training duration, parameter values,and parameter information of the hyperparameter optimization task.
● Scoring chart: The model score obtained in each iteration training is displayedin the chart.
● Hyperparameter chart: The chart displays the values of the hyperparametersand the corresponding model score for each iteration training.
● Training duration chart: The chart displays the values of the hyperparametersand the corresponding duration for each iteration training.
4.7.6 Creating a TensorBoardThe TensorBoard is a visualization tool that can effectively display the calculationdiagram of the TensorFlow during the running process, the change trend ofvarious indicators over time, and the data information used in training. Currently,the TensorBoard supports only training jobs based on the TensorFlow engine. A
NAIEModel Training Service 4 User Guide
Issue 01 (2020-12-30) Copyright © Huawei Technologies Co., Ltd. 203

maximum of five TensorBoard tasks can be created for multiple projects of thesame user. For concepts related to the TensorBoard, see the TensorBoard officialwebsite.
For a training job that uses the AI engine as the TensorFlow, you can use thesummary file generated during model training to create a TensorBoard job andwrite the indicators and data to be displayed to theContext.get("tensorboard_path") directory. The following shows a codeexample:
import tensorflow as tffrom naie.context import Contextwith tf.name_scope('graph') as scope: matrix1 = tf.constant([[3., 3.]],name ='matrix2') matrix2 = tf.constant([[2.],[2.]],name ='matrix3') product = tf.matmul(matrix1, matrix2,name='product') sess = tf.Session()writer = tf.summary.FileWriter(Context.get("tensorboard_path"), sess.graph)init = tf.global_variables_initializer()sess.run(init)
Three navigation paths are available for creating a TensorBoard:
● Create a TensorBoard at the same time when a training task is created.
● On the TensorBoard tab page of the code editing page of the model trainingproject, create a TensorBoard job.
● Create a TensorBoard on the TensorBoard tab page on the task details pageafter a model training project and a training task are created.
The following describes how to create a TensorBoard on the TensorBoard tabpage on the task details page.
Step 1 On the training task page of the created model training project, click on theright of the training task.
Step 2 On the training task details page, click the TensorBoard tab page and click Createto create a TensorBoard task, as shown in Figure 4-70.
Figure 4-70 TensorBoard page
NAIEModel Training Service 4 User Guide
Issue 01 (2020-12-30) Copyright © Huawei Technologies Co., Ltd. 204

After a TensorBoard task is created, the TensorBoard status is displayed on thetraining task page, as shown in Figure 4-71.
Figure 4-71 TensorBoard status
Step 3 Click the account information area on the top of the page and chooseTensorBoard from the drop-down list to manage the created TensorBoardenvironment, for example, deleting the TensorBoard environment. You can alsoclick the environment name to go to the corresponding training task page.
----End
4.7.7 Packaging a Training ModelThe system can archive and package a trained model into a model package. Youcan create verification services and training services based on the model package.For details about the model verification service, see Model Verification. Fordetails about the model training service, see Creating a Training Service.
A model package mainly includes a main inference entry function, a featureengineering operation flow, and model files of the model verification service. Youcan view published models in Model Management.
This section describes how to package a single model. To package multiple modelsinto a model package or import external model files, use the model packagecreation function on the model management page. For details, see Creating aModel Package.
Step 1 Click corresponding to a model training task. The Archive dialog box isdisplayed.
NO TE
Only successfully trained models can be packaged and can be packaged for multiple times.
Step 2 Set parameters in the Archive dialog box. Table 4-85 describes the parameters.
Table 4-85 Parameter settings
Parameter Description
Archive Name Package name of an archived model
Archive version Version of an archived training model.The default version is 1.0.0.
NAIEModel Training Service 4 User Guide
Issue 01 (2020-12-30) Copyright © Huawei Technologies Co., Ltd. 205

Parameter Description
Generate Model Whether to package a model during archiving.Yes: The model is archived and packaged. No: The modelis merely archived. The default value is Yes.
Contain Code Whether a model package contains relevant code fortraining and inference.Yes: The code is contained. No: The code is not contained.The default value is Yes.
Model Description Description of a training model.
Step 3 Click OK.
You can manage training models by referring to Model Management.
----End
4.8 Model Management
4.8.1 Model Management OverviewThe development and optimization of training models often require many times ofiteration and debugging. The changes of datasets, training algorithms, orhyperparameters may affect the model quality. You can package high-qualitymodels that have been trained on the Model page for unified management. Onthe Model page, you can view details about a model package, package multiplearchived or packaged models into a model package, publish a model package tothe app market, create federated learning instances, and publish a model packageas an online inference service.
For details, see Table 4-86.
Table 4-86 Model management operations
Parameter Description
Model Name Model name, which must be the same as that set duringmodel packaging.
Model Version Model version, which must be the same as that set duringmodel packaging.
Model Description Model description, which must be the same as that setduring model packaging.The value contains a maximum of 256 characters.
NAIEModel Training Service 4 User Guide
Issue 01 (2020-12-30) Copyright © Huawei Technologies Co., Ltd. 206

Parameter Description
Status Publication status of a model package. The options are asfollows:● Unpublished: not submitted for release.● Publishing: submitted for release and waiting for
approval from the app market.● Succeeded: released to the app market.● Failed: failed to be released to the app market.
Created At Packaging time for a model training task.
Updated At Last model update time.
Select DevelopmentEnvironment
Development environment for running a model package.
NAIEModel Training Service 4 User Guide
Issue 01 (2020-12-30) Copyright © Huawei Technologies Co., Ltd. 207

Parameter Description
Operation● : Edit a model package. Edit code files in the model
package or upload a new file. The model package canbe edited only if a development environment has beenconfigured for the model package.
● : Download a model package.
● : Release a model package to the app market.
● : Publish a model package as an inference service.For details, see Publishing an Inference Service.
● : Go to the quick verification page of a successfullypublished inference service.
● : Republish an inference service that has failed tobe published.
● : Click to update a published inference servicewhose model package is updated. By default, the lastdigit of the version number of the updated inferenceservice is that of the original version number plus 1.
● : Create federated learning instances. For details,see https://support.huawei.com/carrierics/Model%20Training%20%26%20Domain%20Model/Latest%20Version/topic/view.do?portalid=1575625982546&hdxfileid=DOC29856&pidid=pid_bookmap_0189622602&topicid=TOPIC_0208331303&relationid=default&path=DOCNAVI0ED2C09A97B4472EBF80C40BD0DB945B.
● : Delete a model package.
● : Generate the SHA256 verification code forintegrity verification.
4.8.2 Creating a Model PackageThis operation allows users to pack multiple archived models into a modelpackage. Alternatively, to import external model files, you can perform thisoperation to create a model package template and edit the created empty modelpackage to add the files as required.
You can create a model package for model packages archived in a Jupyterlabfeature engineering project.
NAIEModel Training Service 4 User Guide
Issue 01 (2020-12-30) Copyright © Huawei Technologies Co., Ltd. 208

Step 1 Click . The New Model Package dialog boxis displayed.
Step 2 Set parameters in the New Model Package dialog box. Table 4-87 describes theparameters.
Table 4-87 Parameters for packaging a model package
Parameter
Description
ModelName
Name of a model package.
ModelVersion
Version of a model package. The version format is Digit.Digit.Digit.Digit is a one-digit or two-digit positive integer.
ArchiveList
Archive packages to be packaged.The system automatically lists archived model packages on thetraining platform. Select one or multiple model packages to bepackaged.To import external model files, you can skip selecting models in themodel list. The system will create a model package template. Editthe empty model package to add the model files.
Modeldescription
Description of a model package.
Step 3 Click Package. The system displays the message "Model packaged successfully."
----End
4.8.3 Editing a Model PackageYou can use the editing function to edit files in a model package or upload newfiles.
Step 1 Click in the Operation column of a model package.
The web IDE–based model package editing page is displayed.
NO TE
The model package can be edited only if a web IDE has been configured for the modelpackage. If there are available development environments, select an available environmentfrom the drop-down list box in the Select Development Environment columncorresponding to the model package to change the current environment. If no developmentenvironment is available, click DEVELOPMENT ENVIRONMENT in the upper right corner ofthe Model page to create a web IDE.
Step 2 Click on the left. In the file directory, expand the folder with the same nameas the model package. Double-click the file to be edited and edit it in the rightediting area.
NAIEModel Training Service 4 User Guide
Issue 01 (2020-12-30) Copyright © Huawei Technologies Co., Ltd. 209

NO TE
The metadata.json file of the model package can be edited in a simple and graphicalmanner. In the file directory, click the file to edit the code in the editing area on the right.
You can also click in the upper right corner of the code editing area to open thegraphical editing page and edit the code. You can configure some of the metadata on thepage.
Step 3 Right-click in the blank area of the file directory and choose NAIE Upload. In theediting area on the right, select an upload type, select the file to be uploadedfrom the local PC, and upload the file.
Step 4 After you finish editing the model package, right-click the blank area of the filedirectory and select NAIE Package.
NO TE
You must perform the NAIE Package operation after finishing editing the model package.Otherwise, edited information cannot be synced to the model package.
----End
4.8.4 Releasing a Model Package to the AI Marketplace
Step 1 Click in the Operation column of a model package.
A submission confirmation dialog box is displayed.
Step 2 In the Confirm dialog box, click OK.
The system displays a message indicating that the model package is successfullyreleased to the AI marketplace.
----End
4.8.5 Publishing an Inference ServiceTraining services support one-click publication of online inference services. You cancreate an inference service based on a mature model package and call the serviceonline to obtain the inference results. The procedure is as follows:
Step 1 Click in the Operation column of a model package. The Deploy InferenceService dialog box is displayed, as shown in Figure 4-72.
NAIEModel Training Service 4 User Guide
Issue 01 (2020-12-30) Copyright © Huawei Technologies Co., Ltd. 210

Figure 4-72 Inference service
Step 2 Set parameters in the dialog box. Table 4-88 describes the parameters.
Table 4-88 Parameters for creating an inference service
Parameter Description
Model PackageName
Name of the model package to be published as an inferenceservice.
Version Version of an inference service.The recommended format is xx.xx.0. xx is an integer rangingfrom 0 to 99.
Auto Stop Whether to enable the automatic stop function for aninference service. If yes, set time for automatic stop. Theinference service for which the automatic stop function isenabled will stop running after the set time.
ComputingNodeSpecifications
Computing node resources, including CPUs and GPUs.You can select a computing node resource and set theComputing Node Quantity parameter.
NAIEModel Training Service 4 User Guide
Issue 01 (2020-12-30) Copyright © Huawei Technologies Co., Ltd. 211
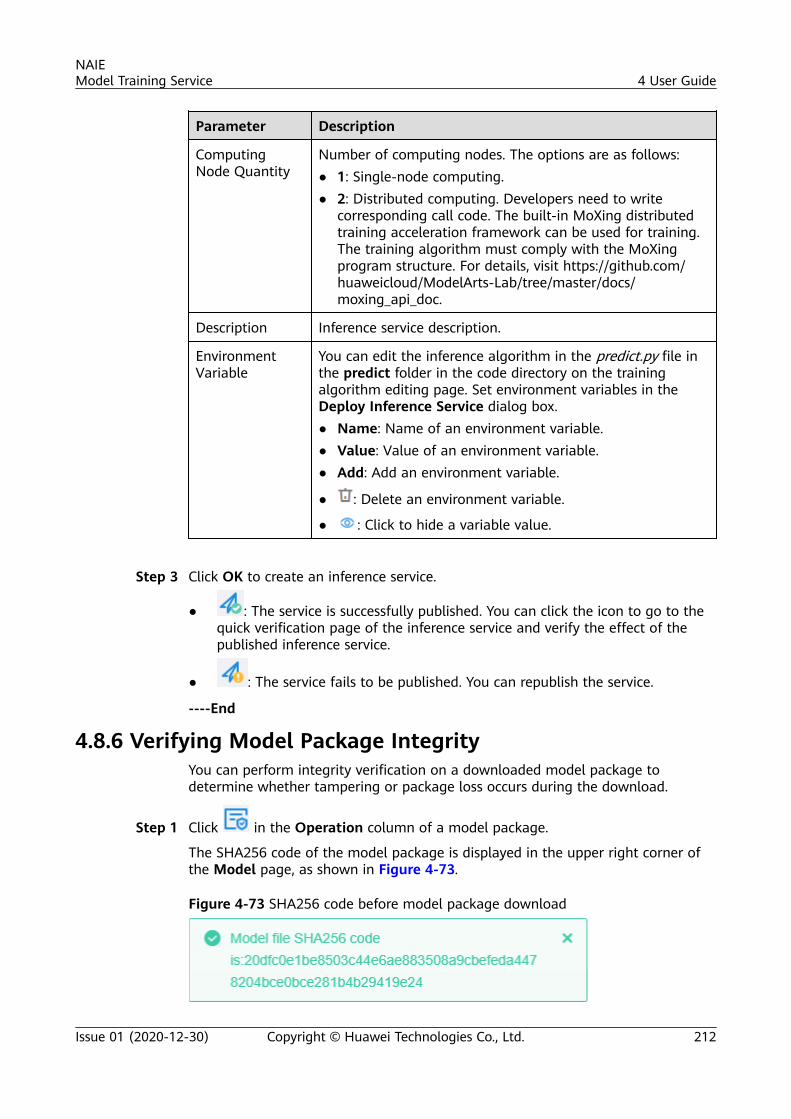
Parameter Description
ComputingNode Quantity
Number of computing nodes. The options are as follows:● 1: Single-node computing.● 2: Distributed computing. Developers need to write
corresponding call code. The built-in MoXing distributedtraining acceleration framework can be used for training.The training algorithm must comply with the MoXingprogram structure. For details, visit https://github.com/huaweicloud/ModelArts-Lab/tree/master/docs/moxing_api_doc.
Description Inference service description.
EnvironmentVariable
You can edit the inference algorithm in the predict.py file inthe predict folder in the code directory on the trainingalgorithm editing page. Set environment variables in theDeploy Inference Service dialog box.● Name: Name of an environment variable.● Value: Value of an environment variable.● Add: Add an environment variable.
● : Delete an environment variable.
● : Click to hide a variable value.
Step 3 Click OK to create an inference service.
● : The service is successfully published. You can click the icon to go to thequick verification page of the inference service and verify the effect of thepublished inference service.
● : The service fails to be published. You can republish the service.
----End
4.8.6 Verifying Model Package IntegrityYou can perform integrity verification on a downloaded model package todetermine whether tampering or package loss occurs during the download.
Step 1 Click in the Operation column of a model package.
The SHA256 code of the model package is displayed in the upper right corner ofthe Model page, as shown in Figure 4-73.
Figure 4-73 SHA256 code before model package download
NAIEModel Training Service 4 User Guide
Issue 01 (2020-12-30) Copyright © Huawei Technologies Co., Ltd. 212

Step 2 Click to download the model package and save it to a local directory.
Step 3 Open the command prompt dialog box on the local PC and run the followingcommand to obtain the SHA256 code of the downloaded model package:certutil -hashfile D:\test123-1.0.0.zip SHA256
D:\test123-1.0.0.zip indicates the local download path and package name of themodel package. Change the value based on the site requirements.
The command output is as follows:
SHA256 hash code of "D:\test123-1.0.0.zip":20dfc0e1be8503c44e6ae883508a9cbefeda4478204bce0bce281b4b29419e24
Step 4 Compare the SHA256 codes generated before and after the model packagedownload. If they are the same, no tampering or packet loss occurs during thedownload.
----End
4.9 Model Verification
4.9.1 Model Verification OverviewModel verification is to verify a model package generated by the training platformbased on a new dataset or new hyperparameters, and to evaluate the quality ofthe model package based on the verification report. The following concept isinvolved in the model verification:
● Verification service: Model verification service for editing and debuggingmodel verification code. You can create multiple verification services based ona packaged model.
● Verification task: Training task of a verification service. During verification, youcan select different datasets, hyperparameters, and computing resourcesbased on specified model packages to create verification tasks.
The Verification page lists the existing model verification services, as shown inFigure 4-74. On this page, you can view the information about model verificationservice creation, and create, edit, or delete a model verification service. For details,see Table 4-89.
Figure 4-74 Model verification page
NAIEModel Training Service 4 User Guide
Issue 01 (2020-12-30) Copyright © Huawei Technologies Co., Ltd. 213
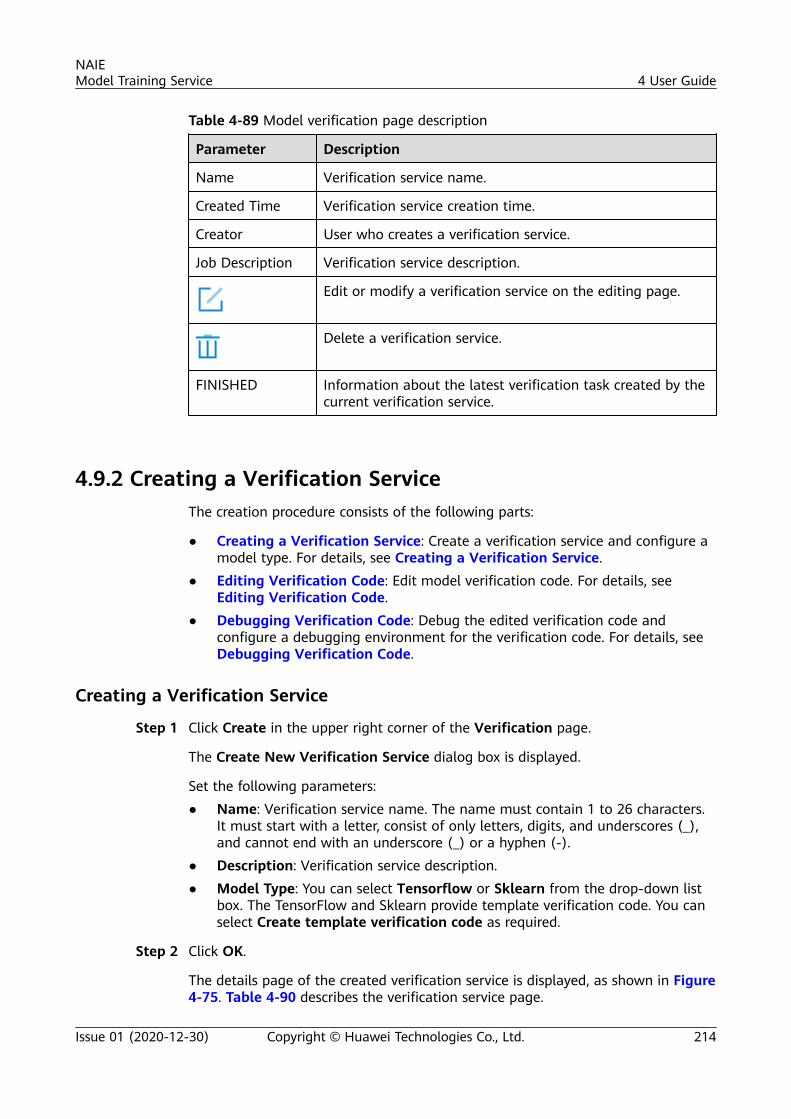
Table 4-89 Model verification page description
Parameter Description
Name Verification service name.
Created Time Verification service creation time.
Creator User who creates a verification service.
Job Description Verification service description.
Edit or modify a verification service on the editing page.
Delete a verification service.
FINISHED Information about the latest verification task created by thecurrent verification service.
4.9.2 Creating a Verification ServiceThe creation procedure consists of the following parts:
● Creating a Verification Service: Create a verification service and configure amodel type. For details, see Creating a Verification Service.
● Editing Verification Code: Edit model verification code. For details, seeEditing Verification Code.
● Debugging Verification Code: Debug the edited verification code andconfigure a debugging environment for the verification code. For details, seeDebugging Verification Code.
Creating a Verification Service
Step 1 Click Create in the upper right corner of the Verification page.
The Create New Verification Service dialog box is displayed.
Set the following parameters:● Name: Verification service name. The name must contain 1 to 26 characters.
It must start with a letter, consist of only letters, digits, and underscores (_),and cannot end with an underscore (_) or a hyphen (-).
● Description: Verification service description.● Model Type: You can select Tensorflow or Sklearn from the drop-down list
box. The TensorFlow and Sklearn provide template verification code. You canselect Create template verification code as required.
Step 2 Click OK.
The details page of the created verification service is displayed, as shown in Figure4-75. Table 4-90 describes the verification service page.
NAIEModel Training Service 4 User Guide
Issue 01 (2020-12-30) Copyright © Huawei Technologies Co., Ltd. 214

Figure 4-75 Verification service page
Table 4-90 Verification service page description
Area Parameter Description
1 (Verificationservice)
Created Time Verification service creationtime.
Creator User who creates a verificationservice.
Activity Time Time when the latestverification task is executed.
Access the page for editing averification service.
Create a verification task. Fordetails, see Creating aVerification Task.
Delete a verification service.
2 (Verificationtasks)
Quickly search for verificationtasks based on the status.
Search for a training task basedon the task creation time andtask name.By default, the search isperformed based on the taskcreation time.
Search for training tasks by taskcreation time or task name. Thesearch results are displayed inascending or descending order.By default, the results aredisplayed in descending order.
Job Name Verification task name.
Job Creation Time Verification task creation time.
NAIEModel Training Service 4 User Guide
Issue 01 (2020-12-30) Copyright © Huawei Technologies Co., Ltd. 215

Area Parameter Description
Model Model selected when averification task is created.
Dataset Verification data instance thatis configured when averification task is created.
Report Report generated after averification task is executed.
Job Used Time Verification task executionduration.
Job Status Verification task status.
View the running report of averification task, including thesystem logs, run logs, and rundiagram.
View a verification task report.
Delete a verification task.
----End
Editing Verification Code
You can access the verification code editing page in either of the following ways:
● On the Verification page, click of a verification service.
● On the verification service details page, click in the upper right corner.
Similar to the code editing page in model training, the verification code editingpage consists of the code editing menu bar, task execution area, code editing area,and code directory. For details, see Training Code Editing (Simple Editor).
You can edit the code on the page and press Ctrl+S to save it.
Debugging Verification Code
Step 1 Click in Code Directory to create the *.ipynb file corresponding to the *.py file.
Step 2 Click Notebook. The Notebook dialog box is displayed.
If there are created Notebook environments, select an environment in runningstate and click Save. To create another Notebook environment, perform thefollowing steps:
NAIEModel Training Service 4 User Guide
Issue 01 (2020-12-30) Copyright © Huawei Technologies Co., Ltd. 216

1. Select a value from the AI Engine drop-down list box and click CreateNotebook Environment.
2. Select GPU and CPU debugging resources from the debugging resource drop-down list box.
3. Select an environment in running state.4. Click Save.
Step 3 Click the *.ipynb file. The algorithm debugging page is displayed.
Step 4 On the menu bar, choose Kernel > Change kernel and select an AI engine.
Step 5 Configure the algorithm in the text box and click to debug the algorithm.
If no exception is reported in the Cell area of the debugging page, the algorithmis running normally and you can validate the dataset based on this algorithm.
----End
4.9.3 Creating a Verification TaskA verification task sets new datasets, hyperparameters, and computing resourcesbased on debugged verification code for a specified model package. Theverification task is executed to verify the quality of the model package.
You can create a verification task in either of the following ways:
● On the verification code editing page, click Verify in the upper right corner.The Verification Configuration dialog box is displayed. Set the parametersand create a verification task.
● On the verification service page, click in the upper right corner. TheVerification Configuration dialog box is displayed. Set the parameters andcreate a verification task.
The following describes how to create a verification task on the verification codeediting page.
Step 1 On the verification code editing page, click Verify in the upper right corner.
The Verification Configuration dialog box is displayed. Table 4-91 describes theparameters.
Table 4-91 Parameters in the Verification Configuration dialog box
Parameter Description
Verification ModelPackage
Model packages to be verified. The drop-down list box liststhe model packages that have been packaged in thesystem.
NAIEModel Training Service 4 User Guide
Issue 01 (2020-12-30) Copyright © Huawei Technologies Co., Ltd. 217

Parameter Description
VerificationDataset
Content of each dataset hyperparameter is displayed byrow. Each row displays the dataset hyperparameter name,dataset name, and data instance name generated afterfeature processing. If the label column has been set inRunning hyper-parameter, this parameter can be leftblank.
ParameterConfiguration
Parameters for reconfiguring a verification task. You can
click to add a parameter.
AI Engine AI engine and the corresponding version.
Computing NodeSpecifications
Computing node resource provided by the system.
Step 2 Click Create to create a verification task.
You can click in the upper right corner of the verificationcode editing page or access the verification service details page to view theverification task execution status.
● : Dynamically view the system logs, run logs, and run diagram of averification task during the task execution.
● : After a verification task is complete, view the report of the verificationtask. The current report supports only the numeric type.
During the execution of a verification task, you can click to stop the task.
----End
4.10 Cloud-based Inference Framework
4.10.1 Inference ServiceThe cloud-based inference framework provides a cloud-based model runningframework. You can verify the model inference effect online without computingresources or an inference framework. You only need to load model packages tothe cloud-based inference framework and publish them as cloud-based webinference services in one-click mode, to efficiently and cost-effectively completemodel verification.
By default, the Inference Service homepage displays all inference services. Youcan view the details of and perform operations on the inference services.
Step 1 On the Model page, click in the Operation column of a model package.
NAIEModel Training Service 4 User Guide
Issue 01 (2020-12-30) Copyright © Huawei Technologies Co., Ltd. 218

The inference service verification page is displayed, as shown in Figure 4-76. Youcan directly verify the model inference effect on the page.
The page displays the API information of the inference service. The POST / API issupported by default. The REST API can be customized in model packages. Themodel packages can be published as REST services.
Figure 4-76 Inference verification
Step 2 Enter the data in json format in the Test JSON Message area on the left and clickQuick test.
The online inference result is displayed in the Test Result area on the right.
Step 3 On the menu bar, click Inference Service.
The inference service homepage is displayed. All inference services are displayed incharts, as shown in Figure 4-77.
Figure 4-77 Inference service
Table 4-92 describes parameters on the page.
Table 4-92 Inference service page description
Area Parameter Description
1 Quick retrieve inference services by name.
NAIEModel Training Service 4 User Guide
Issue 01 (2020-12-30) Copyright © Huawei Technologies Co., Ltd. 219

Area Parameter Description
Quickly filter inference services in the samestate.The options are as follows: running, deploying,stopped, concerning, failed, and exception.
Refresh the inference service page.
Create an inference service using the modelpackage in the Model repository.
2 View details about an inference service,including current CPU/memory/GPU usage,model package details, update records, andevent details.
Logs of an inference service. Logs can be filteredbased on customized time ranges.
Copy the API address provided by an inferenceservice.
Enter the quick verification page. You candirectly verify the model inference effect on thepage.
Authorize an inference service to other users.After the service publisher authorizes theinference service to others, an access address isgenerated on the authorization page.Authorized users can use their account tokensand the access address to call the APIs of theinference service.
Stop an inference service.
Modify the configuration information about aninference service, including the version,computing node specifications, number ofcomputing nodes, weight, and environmentvariables.
Delete an inference service.
NO TE
To quickly access the inference service homepage:Click the Home drop-down list box next to the brand logo in the upper left corner of thetraining platform homepage, and select Prediction Service.
----End
NAIEModel Training Service 4 User Guide
Issue 01 (2020-12-30) Copyright © Huawei Technologies Co., Ltd. 220

4.10.2 Model RepositoryOn the menu bar, click Model repository.
The Model repository page is displayed. The page displays the list of modelpackages for which the inference service has been successfully created and detailsabout the model packages, as shown in Figure 4-78.
Figure 4-78 Model repository
Table 4-93 describes the tab page.
Table 4-93 Description of the model repository page
Area Parameter Description
1 Retrieve a model package by package name.
Upload model packages from a local path orimport them from the AI marketplace.
2 Model PackageName
Name of a model package.
Version Version of a model package.
Model Type AI algorithm framework type of a model.
Run Environment Python language version matched by the AIalgorithm framework.
Create Time Time when a model package is generated.
From Source of a model package. There are threesources: training platform, local path, and AImarketplace.
Status Status of a model package. The options are asfollows:
NAIEModel Training Service 4 User Guide
Issue 01 (2020-12-30) Copyright © Huawei Technologies Co., Ltd. 221

Area Parameter Description
Operation You can perform the following operations on amodel package:
● : View the model package information,including the name, version, description,basic information, and running dependency.
● : Publish the model package as aninference service.
● : Delete the model package.
4.10.3 Template ManagementThe cloud-based inference framework provides the template capability. You canuse a preset template in the system to publish a model package as an inferenceservice in the cloud-based inference framework.
BackgroundThe inference service published on the Model page of the training serviceencapsulates only TensorFlow models. There are many restrictions on the modelpackage format, which causes a large number of customization requirements.Besides, it is difficult to implement inference services for cases in certainenvironments, for example: The KPI exception detection service uses many Pythonframeworks and requires customized startup modes, and some cases require Javaand Tomcat.
The disadvantages are as follows:
1. The model package format is restricted. The cloud-based inference frameworkadapts and encapsulates the inference service published by the trainingservice, for example: Some necessary files are preset. However, hiddenconstraints are added to developers. For example: Some models areoverwritten in the traffic prediction services.
2. The implementation mode of the custom_service.py entry file is restricted.Specific interfaces must be implemented, for example: TensorflowService. Ifan inference service does not use the TensorFlow engine, the implementationresult may fail to meet expectations.
3. Only one inference service invoking interface is provided, which cannot meetthe requirements of some cases. For example: KPI exception detection.
Template AdvantagesThe template management function of the cloud-based inference framework hasthe following advantages:
Compared with the mode in which only the fixed model type TensorFlow can beused, the mode in which a model package is deployed by using a template can
NAIEModel Training Service 4 User Guide
Issue 01 (2020-12-30) Copyright © Huawei Technologies Co., Ltd. 222

meet only customization requirements. For example: Cases that use Java; KPIexception detection cases require customized startup commands and multipleinference service invoking interfaces.
Template Management PageThe Template Management page lists the templates that have been successfullycreated under the current tenant and details about the templates, as shown inFigure 4-79.
Figure 4-79 Template management
Table 4-94 describes the page.
Table 4-94 Description of the template management page
Parameter Description
Search for a template by keyword.
Template Name Name of a template.
Template Description Description of a template.
Template Theme Theme of a template. You can sort the templates inascending or descending alphabetical order.
Run Environment Running environment of the AI algorithm. You cansort the running environments in ascending ordescending alphabetical order.
AI Engine AI algorithm framework
Data Description Description of data
Doc Name of a document related to a template. You canclick the document name to go to the documentcontent page.
Create Time Creation time of the template.
NAIEModel Training Service 4 User Guide
Issue 01 (2020-12-30) Copyright © Huawei Technologies Co., Ltd. 223

Parameter Description
Operation You can perform the following operations on atemplate:
: View template configuration information.
4.11 Change HistoryDate Change Description
2020-11-30
Added the description of the relationship between creating afederated learning project on the training platform and thefederated learning service in Creating a Federated LearningProject.
2020-09-30
Optimized the dataset details page and revised Creating a Datasetand Importing Data.Added scenario-specific descriptions for AutoML and revised ModelTraining.Optimized the model management page. For details, see ModelManagement.Deleted the cloud-based inference entry on the modelmanagement page and revised Cloud-based InferenceFramework.
2020-08-17
Updated the description in Training Service Overview based onthe latest training platform.Enhanced the function of uploading ultra-large files (10 GB). Fordetails, see Creating a Dataset and Importing Data.Optimized the model training task page and updated thescreenshots and parameter description in Model Training.Optimized the model verification task page and updated thescreenshots and parameter description in Model Verification.
2020-07-16
Added Learnware.Added the description of the DatasetService dataset to DatasetOverview.Added the operations for uploading ultra-large files (10 GB) inCreating a Dataset and Importing Data.Optimized the training task GUI and updated screenshots in ModelTraining.Optimized inference service APIs and modified Inference Service.
2020-06-16
Added the MindSpore sample experience for model training andupdated Model Training accordingly.Added TensorBoard management and updated Model Training.
NAIEModel Training Service 4 User Guide
Issue 01 (2020-12-30) Copyright © Huawei Technologies Co., Ltd. 224

Date Change Description
2020-05-18
The changes are as follows:● Adjusted the menus on the Jupyterlab feature engineering
editing page, added time series data operators, Box-Coxconversion, optimization model training, and feature transferevaluation, as well as updated JupyterLab DevelopmentPlatform.
● Added the function of creating a federated learning project andits services in model training and added Creating a FederatedLearning Project.
● Supported the functions of creating a model package for modelsarchived in a Jupyterlab feature engineering project, creatingfederated learning instances for a specific model package, andupdating published model packages, as well as updated ModelManagement.
2020-04-16
The changes are as follows:● Optimized the Development Environment column in the
project list on the training service homepage and updatedIntroduction to the Training Service Homepage.
● Changed Jupyterlab feature engineering functions and updatedJupyterLab Development Platform.
● Optimized model training functions and updated ModelTraining.
● Added the function of model package integrity verification inmodel management and updated Verifying Model PackageIntegrity.
2020-03-30
Optimized the JupyterLab development platform GUI and functionsand updated all content in JupyterLab Development Platform.Optimized the Training menus in the model training service andupdated all content in Model Training.Added the inference service entry on the model training serviceModel page and updated Publishing an Inference Service.
2019-12-30
Added the following sections:● Subscribing to a Training Service● Introduction to the Training Service Homepage● JupyterLab Development Platform● Training Code Editing (WebIDE)● Creating a Model Package● Editing a Model Package● Releasing a Model Package to the AI Marketplace● Publishing an Inference Service● Cloud-based Inference Framework
NAIEModel Training Service 4 User Guide
Issue 01 (2020-12-30) Copyright © Huawei Technologies Co., Ltd. 225

Date Change Description
2019-10-30
Optimized the menus on the feature engineering editing page aswell as adjusted and optimized section "Feature Engineering."Added the following sections:● Notebook Development● Creating a Hyperparameter Optimization Service● Creating a TensorBoard
2019-04-30
Released this document officially for the first time.
NAIEModel Training Service 4 User Guide
Issue 01 (2020-12-30) Copyright © Huawei Technologies Co., Ltd. 226

5 Learnware User Guide
5.1 Introduction to the Learnware Capability
BackgroundNetwork AI feature development services have common requirements in manyO&M scenarios, such as anomaly detection, fault locating, as well as faultprevention and prediction. For example, there are the following commonrequirements in the KPI anomaly detection scenario:● Carriers and enterprises have common requirements for real-time KPI
monitoring and quick fault locating.● Carrier networks have a large number of KPIs. An example is that there are
more than 70,000 router KPIs, which contain more than 4000 KPIs related topacket loss and statistics.
● DCNs need to detect interface/device KPI, optical link, VM/applicationanomalies.
In the KPI anomaly detection scenario, there is a lack of common algorithmcapabilities for accumulation, resulting in low anomaly detection modeldevelopment efficiency and high costs. The following problems occur:● Products have increasing anomaly detection requirements. However, it takes
about six months to develop a single anomaly detection model, resulting inslow model generation.
● One or two algorithm experts are required for data cleansing, featureanalysis, as well as model selection and verification, resulting in high modeldevelopment costs.
Concept of LearnwareThe learnware capability supports partial reuse of others' results, without need fora "fresh start."
Learnware = Model + Specifications
The specifications need to provide proper descriptions for the model. The modelneeds to meet the following conditions:
NAIEModel Training Service 5 Learnware User Guide
Issue 01 (2020-12-30) Copyright © Huawei Technologies Co., Ltd. 227

● Reusable: Users can share the model. They do not need to share data,skipping data privacy and data protection.
● Evolvable: The learnware needs to be evolvable and adaptable to theenvironment, as well as supports incremental learning.
● Understandable: The specifications need to specify model adaption scenarios.
The learnware also has the following features and advantages:
● Independent of data: Models trained using data are provided. The learnwareprovides parameters and network structures instead of data to ensure datasecurity.
● Independent of experts: Basic models are provided and can be partially reusedin specified model adaption scenarios.
Common KPI Anomaly Detection Learnware
The anomaly detection learnware service identifies data types based on datafeature profiles, automatically recommends training algorithms and features, usesnon-supervision, supervision, and dynamic baseline algorithms for joint detection,and optimizes training and detection results based on expert experience to obtainthe final detection result. After model training is completed, the feature profileresults, features and parameters, as well as models and parameters can beretained. Feature analysis and model analysis are no longer required subsequently.Only new data needs to be used to retrain the model. Currently, the learnware hasintegrated various feature libraries of dozens of to hundreds of dimensions, as wellas algorithm libraries derived from various historical cases and general KPIanomaly detection algorithms. More feature and algorithm libraries are to beadded in the future.
Figure 5-1 shows the common KPI anomaly detection learnware capability.
Figure 5-1 Common KPI anomaly detection learnware
Table 5-1 describes the functions of the common KPI anomaly detectionlearnware.
NAIEModel Training Service 5 Learnware User Guide
Issue 01 (2020-12-30) Copyright © Huawei Technologies Co., Ltd. 228

Table 5-1 Function modules of the common learnware
Function Module Description
Data access module Provides interface and format conversion for variousdata sources.
Data managementmodule
Provides source data and labeled sample storage,import and export, as well as query.
Data processing module Provides data preprocessing, including tagprocessing, missing value filling, and datastandardization.
Feature engineeringmodule
Provides KPI data distribution feature analysis aswell as automatic feature and parameter selection,and provides automatic extraction of more than 80features of four types.
Model managementmodule
Provides automatic anomaly detection algorithmselection by KPI tag and data distribution feature,parameter setting, as well as model training andinference.
Data interaction module Provides interaction between the commonlearnware and users, including data management,visualized data display, and expert experienceinjection.
5.2 Subscribing to the Model Training ServiceStep 1 Enter https://console-intl.huaweicloud.com/naie/ in the address box of a
browser on a user PC and press Enter to access the NAIE service official website.
When you access the NAIE service official website for the first time, the AccessAuthorization page is displayed. Click Authorize.
Step 2 Click Sign In in the upper right corner of the page. The login page is displayed.
Step 3 Enter the tenant name and password, and click Log In to access the NAIE serviceofficial website.
Change the password after the first successful login and change the passwordperiodically.
Step 4 Choose AI Services > Model and Training Service > Model Training > ModelTraining Service. The model training service introduction page is displayed.
Step 5 Click Buy Now. The page shown in Figure 5-2 is displayed.
Region: HUAWEI CLOUD region that provides services.
You can click Learn about billing details to better understand the resources,specifications, and price information provided by the training service. In addition,when you use a specific resource, the training service displays an eye-catchingcharging prompt on the page.
NAIEModel Training Service 5 Learnware User Guide
Issue 01 (2020-12-30) Copyright © Huawei Technologies Co., Ltd. 229

Figure 5-2 Subscribing to the training service
Step 6 Click Use Immediately. The service subscription is complete.
----End
5.3 Accessing the Model Training ServiceStep 1 Enter https://console-intl.huaweicloud.com/naie/ in the address box of a
browser on a user PC and press Enter to access the NAIE service official website.
Step 2 Click Sign In in the upper right corner to access the login page.
Step 3 Select IAM User Login and enter the tenant name, user name, and password.
You can also log in using an account. Change the password after the firstsuccessful login and change the password periodically.
Step 4 Click Log In to access the NAIE service official website.
Step 5 Choose AI Services > Model and Training Service > Model Training > ModelTraining Service. The model training service introduction page is displayed.
Step 6 Click Enter Service. The model training service page is displayed.
----End
5.4 KPI Anomaly Detection Learnware Service
5.4.1 Creating a ProjectThe KPI anomaly detection learnware service is encapsulated in the KPI AnomalyDetect template of the model training service. You can create a KPI AnomalyDetect template project to experience the KPI anomaly detection learnwareservice.
Step 1 On the training platform homepage, click Use Template in the KPI AnomalyDetect template area.
The Create Project dialog box is displayed, as shown in Figure 5-3.
NAIEModel Training Service 5 Learnware User Guide
Issue 01 (2020-12-30) Copyright © Huawei Technologies Co., Ltd. 230

Figure 5-3 Creating a project
Step 2 Set parameters in the Create Project dialog box. Table 5-2 describes theparameters.
Table 5-2 Parameter description
Parameter Description
Name Project name.The name contains 2 to 20 characters. It must start with a letter,can contain letters, digits, underscores (_), and hyphens (-), aswell as cannot end with an underscore (_) or a hyphen (-).
Description Brief description of a project.The value cannot exceed 500 characters.
SelectDevelopmentEnvironment
A JupyterLab platform of corresponding specifications is createdafter project creation. The JupyterLab platform encapsulates thelearnware capability. You can perform feature profiling, featureselection and parameter setting, algorithm selection andparameter setting, as well as model training and evaluation.
NAIEModel Training Service 5 Learnware User Guide
Issue 01 (2020-12-30) Copyright © Huawei Technologies Co., Ltd. 231

Parameter Description
Public orNot
Whether a project can be accessed by other users in a user groupto which the project belongs. The options are as follows:● Yes● No
Public toGroup
Public to Group is displayed only when Public or Not is set toYes.By default, all user groups to which the current user belongs aredisplayed. If a user group to which the user belongs is selected, allusers in the selected user group can view the project.
Icon Project icon.You can perform local upload.
Step 3 Click Create.
----End
5.4.2 DatasetSample data is preset in a learnware project. This document uses the presetsample data to describe the learnware operation process.
If you need to use your own data, create a dataset and import data by referring toCreating a Dataset and Importing Data.
Data Import Requirements● You are advised to divide training data and test data into two instances to
facilitate training or test data location query for algorithms.● Training data can be labeled or unlabeled data. Test data must be labeled
data to facilitate model execution effect evaluation.
Viewing the Sample Data Preset in a Learnware Project
Step 1 Find a created learnware project in the project list on the training platform
homepage. Click in the row corresponding to the project.
The project editing page is displayed.
NAIEModel Training Service 5 Learnware User Guide
Issue 01 (2020-12-30) Copyright © Huawei Technologies Co., Ltd. 232

Figure 5-4 Learnware project
Step 2 Click Dataset from the menu bar. The Dataset page is displayed, as shown inFigure 5-5.
View the two types of sample data (Gpr and AbnormalDetectionData) preset inthe learnware project. If different types of sample data are used to experience thelearnware capability, corresponding algorithms are used and different models aregenerated through training.
Figure 5-5 Dataset page
----End
Creating a Dataset and Importing Data
Step 1 On the dataset menu page, click in the upper left corner.
The Import Data dialog box is displayed, as shown in Figure 5-6.
NAIEModel Training Service 5 Learnware User Guide
Issue 01 (2020-12-30) Copyright © Huawei Technologies Co., Ltd. 233

Figure 5-6 Importing data
Set parameters in the Import Data dialog box. Table 5-3 describes theparameters.
Table 5-3 Parameters for importing data
Parameter Description
Dataset Enter a user-defined name. After you import data andclick Create in the Import Data dialog box, a newdataset is automatically created.
Data Category Category of the data to be imported.
Entity Name Name of the data to be imported.
Entity Alias Alias of the data to be imported.
NAIEModel Training Service 5 Learnware User Guide
Issue 01 (2020-12-30) Copyright © Huawei Technologies Co., Ltd. 234

Parameter Description
Data Source Data upload mode.The options are as follows:● LOCAL: Upload data from a local path.● Data Catalog: Import the data that users subscribe
to in the dataset service of the data service.● Sample Data: User experience data preconfigured
on the training platform. Sample data includes theraw Iris test set, Iris training set, Iris test set, KPIdata of 15 mins, KPI data of 60 mins, and KPI detectdataset.Nulls are contained in the raw Iris test set, KPI dataof 15 mins, and KPI data of 60 mins. You can repairdata and drop nulls through feature engineering.
LOCAL-File size islimited to 80M, andtext file should be csvor txt
Local path where a data file is stored. Available if DataSource is set to LOCAL.Upload a .csv or .txt data file as required to avoidsubsequent data processing failure.
Data Catalog-SelectDataset
Available if Data Source is set to Data Catalog.Select the data subscribed to in the dataset service.
● : Click Subscribe. The data servicepage is displayed. You can query and subscribe todata.
● : Refresh the list of data subscribed toin the dataset service.
● Data Name: Name of the dataset servicesubscription data.
● Apply Status: Application status of the datasetservice subscription data.
● Approver: Approver of the dataset servicesubscription data.
● Data Origin: Source of the dataset servicesubscription data.
NOTEBefore subscribing to data of the data directory, you need toread and sign the Agreement and comply with the terms orconditions of using sensitive data.
Delimiter Select a delimiter based on the format of the data fileto be imported. Delimiters are used by the system toidentify data fields.Currently, commas (,), semicolons (;), and vertical bars(|) are supported.
NAIEModel Training Service 5 Learnware User Guide
Issue 01 (2020-12-30) Copyright © Huawei Technologies Co., Ltd. 235

Parameter Description
Charset Encoding format of a data file.Currently, the UTF-8, GBK, and GB2312 formats aresupported.
Headline Whether the data contains a headline. You can select avalue according to the format of the imported data file.The options are as follows:● Has headline● No headline
Step 2 Click Create to import a data file.
If IMPORT SUCCESS is displayed in the Status column of the imported data, thedata is imported successfully.
Step 3 (Optional) Analyze data.
1. Click in the Operation column corresponding to the data instance. Thedata details page is displayed.
2. Click Metadata in the Operation column corresponding to the data file. Thedata analysis page is displayed.
3. Select an AI engine and its specifications from the drop-down list box basedon the site requirements (no AI engine or specifications are available whenthe data volume is small), and click Analyze Data.After the analysis is completed, details of the data instance are displayed,including the field name, field type, data distribution, valid value, emptyvalue, abnormal value, maximum value, minimum value, average value,variance, and quantile.
----End
5.4.3 Model Training
5.4.3.1 SDK Import
Step 1 In the learnware project, click Training on the menu bar. The JupyterLab platformpage is displayed, as shown in Figure 5-7.
NAIEModel Training Service 5 Learnware User Guide
Issue 01 (2020-12-30) Copyright © Huawei Technologies Co., Ltd. 236

Figure 5-7 Project editing page
Step 2 Double-click the project name learnware in the navigation pane to go to thelearnware directory.
Step 3 Double-click the learnware.ipynb file on the left.
The Jupyterlab environment editing page of the learnware project is displayed, asshown in Figure 5-8.
Figure 5-8 Jupyterlab environment editing page
Step 4 Click on the left of the first code box to import the training platform SDK onwhich algorithms depend.
----End
5.4.3.2 Data SelectionYou need to select training data and test data before model training. You areadvised to divide training data and test data into two instances to facilitatetraining or test data location query for algorithms.
Step 1 Click Select Data under the first code box. The Select Data dialog box isdisplayed.
NAIEModel Training Service 5 Learnware User Guide
Issue 01 (2020-12-30) Copyright © Huawei Technologies Co., Ltd. 237

The concepts of training set, verification set, and test set are described in detail onthe page.
Table 5-4 describes the parameters to be set.
Table 5-4 Data selection
Parameter Description
Training dataset Select the dataset AbnormalDetectionData from thedrop-down list box.
Training entityname
Select training data train from the drop-down list box.
Test dataset Select the dataset AbnormalDetectionData from thedrop-down list box.
Test entity name Select training data test from the drop-down list box.
Whether it is timeseries
Disable this function.If this function is enabled, set the following parameters:● Time Column: Name of the time column.● Time format: Time format of the time field.● ID column: ID column of data.● Whether to check the period and stability: If this
function is enabled, the system checks the time seriesdata period, determines whether the specified periodis the time series data period, and checks whether thetime series data is stable.This function requires a long running duration. Bydefault, this function is disabled.
Data referencevariable name
If there are multiple operation flows in a featureengineering project, use this parameter to name theoperation flow objects to avoid conflicts.Retain the default value.
Step 2 Click on the left the Select data code box. Run the code to bind the trainingand test data instances.
After the code is successfully run, you can view the training data and test data.
----End
5.4.3.3 Feature ProfilingFeature profiling is to analyze data, extract basic features, such as periodicity,dispersion, time series rule, maximum and minimum values, and samplingfrequency, and calculate KPI curve characteristics (including periodicity, trend,noise, dispersion, and randomness). The KPI type is determined based on thecalculated curve characteristics. KPI types include burr, tiered, periodic, discrete,sparse, and multi-modal. The types correspond to different feature selection and
NAIEModel Training Service 5 Learnware User Guide
Issue 01 (2020-12-30) Copyright © Huawei Technologies Co., Ltd. 238

algorithm recommendation policies, effectively improving the model buildingefficiency.
Step 1 Click Feature portrait in the lower left corner of the Select data area.
The Feature portrait area is added, as shown in Figure 5-9.
Figure 5-9 Feature profiling
Step 2 Click on the left of the Feature portrait code box to run the code.
The two figures on the left of the running result intuitively show raw data anddata density distribution. Table 5-5 describes the parameters on the right of therunning result.
Table 5-5 Feature profiling parameters
Parameter Description
Devicenumber
Number of KPI detection objects, for example, the number ofdevices or ports.
Samples Total number of training data samples.
Sample rate Sampling frequency, in seconds. The value 60 indicates thatsampling is performed every 60 seconds.
Start time Sampling time range.
End time
Season Whether the KPI has periodicity. An evaluated value is provided.
Max Maximum value of the KPI.
Min Minimum value of the KPI.
Type Calculated KPI type.
Missing rate Whether values are missing. The value 0 indicates that no valueis missing.
Label info Statistics on the number of labeled samples.
----End
5.4.3.4 Model SelectionCurrently, the learnware has integrated various feature libraries of dozens of tohundreds of dimensions, as well as algorithm libraries derived from varioushistorical cases and general KPI anomaly detection algorithms. Automatic feature
NAIEModel Training Service 5 Learnware User Guide
Issue 01 (2020-12-30) Copyright © Huawei Technologies Co., Ltd. 239

recommendation and algorithm recommendation are implemented through datafeature profiling.
Step 1 Click Model select in the lower left corner of the Feature portrait area.
The Model select area is added, as shown in Figure 5-10.
Figure 5-10 Model selection
Step 2 Click on the left of the Model select code box to run the code.
The running result is as follows.● Feature params config: The learnware recommends common features (such
as the maximum, minimum, and average values) as well as features designedfor similar KPIs that bring good exception detection effects. Generally, theSliding Window Algorithm is used for anomaly detection. Currently, the lengthof all windows is recommended based on data characteristics, such as thedata periodicity, number of samples, and number of periods. The windowlength can be changed. If you are familiar with algorithms and the currentKPI, you can change the window length to a more proper value.
● Model params config: The selected data is labeled. Therefore, the supervisionalgorithm xgboost is recommended. The hyperparameter search function isadded in the Model params config area. Recommended parameter valueranges are provided. You can change them as required.If a non-supervision anomaly detection algorithm is recommended, severalalgorithms may also be recommended. The different algorithms are used formodel training to obtain different models, respectively. The ensemble learningvoting policy is used to recommend and obtain a more appropriate andaccurate anomaly detection model.
----End
5.4.3.5 Model TrainingAfter the features and algorithm are determined, you can start model training.
Model TrainingStep 1 Click Train model in the lower left corner of the Model select area.
The Train model area is added, as shown in Figure 5-11.
Figure 5-11 Model training
NAIEModel Training Service 5 Learnware User Guide
Issue 01 (2020-12-30) Copyright © Huawei Technologies Co., Ltd. 240

Step 2 Click on the left of the Train model code box for model training.
After model training is complete, the evaluation effect of the model is displayed inthe lower part of the page.
The contents in the first column are described as follows:
● 0: All samples labeled as 0. It can be considered as a label.● 1: All samples labeled as 1. It can be considered as a label.● macro average: Average value of all labels.● weighted average: Weighted average value of all labels.
The following describes the first line, which is the evaluation KPIs of the model:
● f1-score: The F1 score is calculated based on the precision and recall rates toachieve the highest values of both the rates and achieve a balance.
● precision: Precision rate, which emphasizes prediction results. It indicates theprobability that a sample predicted to be positive is actually positive.
● recall: Recall rate, which emphasizes original samples. It indicates theprobability that a positive sample is predicted to be positive.
● support: Number of labels of the type.
After the model training is completed, you can view archived model files, asdescribed in Model Training Directory Description.
----End
Model Training Directory DescriptionAfter the model training is completed, the trained model and related content arestored in the model directory shown in Figure 5-12. You can export the modeldirectory, use new data, and use existing features and parameters, as well asalgorithms and parameters for model retraining.
The upper-level directory learnware of the model directory indicates thelearnware project created by the user.
The subdirectories in the model directory are described as follows:
● feature_file: Stores the recommended feature configuration list file and KPIfeature profiling file.
● model: Stores the trained model.● parameter_file: Stores the recommended algorithm and parameter
configuration file.
NAIEModel Training Service 5 Learnware User Guide
Issue 01 (2020-12-30) Copyright © Huawei Technologies Co., Ltd. 241

Figure 5-12 model directory
5.4.3.6 Model TestThis section describes how to use test data to test the generalization capability ofthe model. Training data can be labeled or unlabeled data. Test data must belabeled data to facilitate model execution effect evaluation.
Step 1 Click Test Model in the lower left corner of the Train Model area and add testmodel content.
Retain the default values of the parameters.
Step 2 Click on the left of the Test model code box for model evaluation.
The model test result is displayed in a table in the lower part of the page.
The contents in the first column are described as follows:
● 0.0: All samples labeled as 0. It can be considered as a label.● 1.0: All samples labeled as 1. It can be considered as a label.● macro average: Average value of all labels.● weighted average: Weighted average value of all labels.
The following describes the first line, which is the evaluation KPIs of the model:
● f1-score: The F1 score is calculated based on the precision and recall rates toachieve the highest values of both the rates and achieve a balance.
● precision: Precision rate, which emphasizes prediction results. It indicates theprobability that a sample predicted to be positive is actually positive.
NAIEModel Training Service 5 Learnware User Guide
Issue 01 (2020-12-30) Copyright © Huawei Technologies Co., Ltd. 242

● recall: Recall rate, which emphasizes original samples. It indicates theprobability that a positive sample is predicted to be positive.
● support: Number of labels of the type.
----End
5.4.3.7 Inference DevelopmentCurrently, the Expert experience function is designed for Gpr datasets. If you usea Gpr dataset to experience the KPI anomaly detection learnware operationprocess, you can use the Expert experience function before using the Developpredict function. Expert experience will be automatically converted into code andassociated with the model inference function.
The Develop predict function is used to generate inference code in thelearnware_predict.py inference file. After the learnware model is packaged andpublished as an online inference service, you can use the inference code for quickonline inference verification.
Step 1 Click Develop predict in the lower left corner of the Test model area.
Step 2 After the inference code is generated, the generated learnware_predict.pyinference file is displayed in the directory tree on the left.
You can edit the code in the inference file as required.
----End
5.4.3.8 Model ArchivingAfter the model training is completed, you can archive the model. The procedure isas follows:
Step 1 Click Archive in the upper right corner of the page, as shown in Figure 5-13.
Figure 5-13 Archive icon
Step 2 In the displayed Archive dialog box, set parameters as prompted.
The parameters are described as follows:
● Name: Name of the model to be archived. The value starts with a letter andcan contain digits, letters, and hyphens (-). An example is Learnware-01.
● Version: Version of the model to be archived, in xx.yy.zzzz format. xx/yy is aninteger ranging from 0 to 99 and zzzz is an integer ranging from 0 to 9999.An example is 11.11.1.
NAIEModel Training Service 5 Learnware User Guide
Issue 01 (2020-12-30) Copyright © Huawei Technologies Co., Ltd. 243

● Model Path: Model file path relative to the storage path of the current ipynbediting file. An example is model.
● Generate Model Package: Whether to generate a model package. If thisparameter is set to no, the model is archived only and is not packaged.
● Description: Description of the model to be archived. Set this parameter asrequired.
Step 3 Click OK.
----End
5.4.4 Model ManagementOn the model management page, you can package the archived model into amodel package.
Step 1 On the menu bar, click Model. The Model page is displayed.
Step 2 Click New Model Package in the upper right corner of the page. The New ModelPackage dialog box is displayed.
Set Model Name, Model Version, and Model Description as required, and selectthe archived learnware model Learnware-01.
Step 3 Click Package to package the archived KPI anomaly detection learnware into amodel package.
After the packaging is completed, the Learnware model package is added on thepage.
----End
5.4.5 Inference ServiceYou can create an inference service based on a model package and invoke theservice online to obtain the inference result.
Step 1 On the Model page, click in the Operation column corresponding to alearnware model.
The Deploy Inference Service dialog box is displayed.
Set the following parameters as required and retain the default values of otherparameters.
● Version: Version of an inference service.● Auto Stop: Running time of an inference service. You are advised to set this
parameter to a long time. The maximum value is 24 hours.● Computing Node Specifications: CPU and GPU resource specifications.● Computing Node Quantity: 1 indicates single-node computing. 2 indicates
distributed computing.● Description: Description.
Step 2 Click OK to publish an online inference service.
NAIEModel Training Service 5 Learnware User Guide
Issue 01 (2020-12-30) Copyright © Huawei Technologies Co., Ltd. 244

Click Model Training Service in the upper left corner of the page and selectInference Service from the drop-down list box. The Inference Service page of thecloud-based NAIE-I is displayed, showing all released inference services. You canperform operations on the inference services, such as viewing details,authorization, and starting/stopping.
● : The inference service is successfully published. You can click the icon togo to the quick verification page of the inference service and verify the effectof the published online inference service.
● : The inference service fails to be published. You can publish it again.
Step 3 After the inference service is successfully published, click in the Operationcolumn corresponding to the learnware model.
The quick inference service verification page is displayed, as shown in Figure 5-14.
Figure 5-14 Quick inference service verification page
Step 4 By default, verification data in JSON format is displayed in the verificationinformation area.
The following is an example:
{ "data3.csv": { "time": { "0": "2018\\/7\\/12 16:28", "1": "2018\\/7\\/12 16:29", "2": "2018\\/7\\/12 16:30", "3": "2018\\/7\\/12 16:31", "4": "2018\\/7\\/12 16:32", "5": "2018\\/7\\/12 16:33", "6": "2018\\/7\\/12 16:34", "7": "2018\\/7\\/12 16:35", "8": "2018\\/7\\/12 16:36", "9": "2018\\/7\\/12 16:37", "10": "2018\\/7\\/12 16:38" }, "send_byte": { "0": 0, "1": 0,
NAIEModel Training Service 5 Learnware User Guide
Issue 01 (2020-12-30) Copyright © Huawei Technologies Co., Ltd. 245

"2": 0, "3": 0, "4": 0, "5": 0, "6": 0, "7": 0, "8": 0, "9": 0, "10": 0 } }}
Step 5 Click Quick test in the upper right corner of the page to invoke the inferenceservice. The inference result is returned.
----End
5.5 Multi-layer Nesting Anomaly Detection Learnware
5.5.1 Creating a ProjectThe multi-layer nesting anomaly detection service is encapsulated in theJupyterLab platform of the model training service. You can create a JupyterLabenvironment in the project to experience the multi-layer nesting anomalydetection service.
Step 1 On the training platform homepage, click the + icon above Create Project in theupper left corner.
The Create Project dialog box is displayed. Set the following parameters asrequired:
● Name: Project name.● Public or Not: Whether a project can be accessed by other users in a user
group to which the project belongs. The options are as follows:● Public to Group: This value is displayed only when Public or Not is set to Yes.
By default, all user groups to which the current user belongs are displayed. Ifa user group to which the user belongs is selected, all users in the selecteduser group can view the project. To share the project with only some users inthe user group, click Select user to select the users.
Step 2 Click Create. After the project is created, the project overview page is displayed.
----End
5.5.2 Importing Sample Data to the Training PlatformStep 1 On the project overview page, click Feature Processing on the menu bar. The
Feature Processing page is displayed.
Step 2 Click Feature Processing in the upper right corner of the page. The FeatureProcessing dialog box is displayed.
Set the following parameters as required:
● Project Name: Feature engineering project name.
NAIEModel Training Service 5 Learnware User Guide
Issue 01 (2020-12-30) Copyright © Huawei Technologies Co., Ltd. 246

● Development Mode: Select JupyterLab Interactive Development.● Specifications: Select the specifications of the container to be deployed in the
Jupyterlab environment.● Instance: Select Create a new development environment from the drop-
down list box.
Step 3 Click Create and wait for about 5 minutes until the Jupyterlab environment iscreated.
Step 4 After the Jupyterlab environment is created, click in the Operation column ofthe feature engineering project.
The Jupyterlab homepage is displayed, as shown in Figure 5-15.
Figure 5-15 Jupyterlab homepage
Step 5 Click Multi-layer Nesting Anomaly Detection Learnware in the lower part ofthe Notebook area. The Create dialog box is displayed.
Step 6 In the displayed Create dialog box, enter the learnware name, for example, FCN,and click OK.
The FCN.ipynb file page is displayed, as shown in Figure 5-16.
In the Select Kernel dialog box, select Python3 and click Select.
NAIEModel Training Service 5 Learnware User Guide
Issue 01 (2020-12-30) Copyright © Huawei Technologies Co., Ltd. 247

Figure 5-16 FCN.ipynb file page
Step 7 Click on the left of the Import sdk code box to import the training platformSDK on which the algorithm depends.
Step 8 Enter the following code in the blank code box shown in Figure 5-17 and run thecode:
Import the samples data to the training platform.
#if you want to use hyper param, edit '__debug.json' in 'naie_platform' folderfrom naie.datasets import samplessamples.list_dataset()samples.list_dataset_entities('samples')samples.load_dataset('samples', 'fcn_yahoo_train')samples.load_dataset('samples', 'fcn_yahoo_test')
Figure 5-17 Importing samples data to the training platform
----End
5.5.3 Performing Model TrainingStep 1 Click Import Data in the lower left corner of the code box.
The Select data code box is displayed, as shown in Figure 5-18.
NO TE
You can also choose Operators > Learnware > Multi-layer Anomaly Detection > ImportData from the menu bar in the upper right corner of the page to add the Import Datacode box.
The parameters are described as follows:
NAIEModel Training Service 5 Learnware User Guide
Issue 01 (2020-12-30) Copyright © Huawei Technologies Co., Ltd. 248

● Dataset: Select samples from the drop-down list box.● Entity Name: Select fcn_yahoo_train from the drop-down list box.
Figure 5-18 Selecting data
Step 2 Click on the left of the Import Data code box. Run the code to bind thetraining data.
After the code is run successfully, you can view the training data, as shown inFigure 5-19.
Figure 5-19 Viewing training data
Step 3 Click Data Pre-processing in the lower left corner of the page.
The Data Pre-processing dialog box is displayed, as shown in Figure 5-20.
NO TE
You can also choose Operators > Learnware > Multi-layer Anomaly Detection > DataPre-processing from the menu bar in the upper right corner of the page to add the DataPre-processing code box.
The parameters are described as follows:
● KPI Column: Retain the default value value.● Label Column: Retain the default value is_anomaly.● Data Process Mode: Retain the default value Training.
NAIEModel Training Service 5 Learnware User Guide
Issue 01 (2020-12-30) Copyright © Huawei Technologies Co., Ltd. 249

Figure 5-20 Data preprocessing
Step 4 Click on the left of the Data Pre-processing code box. Run the code topreprocess the training data.
Step 5 Click Anomaly Detection Model Training in the lower left corner of the page.
The Anomaly Detection Model Training dialog box is displayed, as shown inFigure 5-21.
Set model parameters as required.
NO TE
You can also choose Operators > Learnware > Multi-layer Nesting Anomaly DetectionLearnware > Anomaly Detection Training in the upper right corner of the page to add theAnomaly Detection Model Training code box.
Figure 5-21 Anomaly detection model training
Step 6 Click on the left of the Anomaly Detection Model Training code box. Waituntil the model training is complete.
You can view the displayed information to view the model training process. Themodel training evaluation results of 400 epochs are displayed in sequence.
----End
5.5.4 Performing Model TestingStep 1 Click Import Data in the lower left corner of the page.
The Select data code box is displayed, as shown in Figure 5-22.
NAIEModel Training Service 5 Learnware User Guide
Issue 01 (2020-12-30) Copyright © Huawei Technologies Co., Ltd. 250

NO TE
You can also choose Operators > Learnware > Multi-layer Anomaly Detection > ImportData from the menu bar in the upper right corner of the page to add the Import Datacode box.
The parameters are described as follows:
● Dataset: Select samples from the drop-down list box.● Entity Name: Select training data fcn_yahoo_test from the drop-down list
box.
Click Advanced and set Data reference variable name. The feature processingproject references multiple sets of data, including training data and test data. Toavoid conflicts, change the variable name of the test data to datareference1.
Figure 5-22 Selecting data
Step 2 Click on the left of the Import Data code box. Run the code and bind the testdata.
After the code is run successfully, you can view the test data.
Step 3 Click Data Pre-processing in the lower left corner of the page.
The Data Pre-processing dialog box is displayed, as shown in Figure 5-23.
NO TE
You can also choose Operators > Learnware > Multi-layer Anomaly Detection > DataPre-processing from the menu bar in the upper right corner of the page to add the DataPre-processing code box.
The parameters are described as follows:
● KPI Column: Retain the default value value.● Label Column: Retain the default value is_anomaly.● Data Process Mode: Select Test.
Modify the following content in the code box on the left:
● train_data has been used during training data preprocessing and needs to bechanged to test_data.
● Change datareference to the reference variable name datareference1 of thetest data.
NAIEModel Training Service 5 Learnware User Guide
Issue 01 (2020-12-30) Copyright © Huawei Technologies Co., Ltd. 251

Figure 5-23 Data preprocessing
Step 4 Click on the left of the Data Pre-processing code box. Run the code topreprocess the test data.
Step 5 Click Anomaly Detection Model Test in the lower left corner of the page.
The Anomaly Detection Model Test dialog box is displayed, as shown in Figure5-24.
Set Show Figures to Yes. You can view the test and verification effect of themodel in figures.
NO TE
You can also choose Operators > Learnware > Multi-layer Nesting Anomaly DetectionLearnware > Anomaly Detection Model Test in the upper right corner of the page to addthe Anomaly Detection Model Test code box.
Figure 5-24 Anomaly detection model testing
Step 6 Click on the left of the Anomaly Detection Model Test code box. Wait untilthe model test is complete.
Figure 5-25 shows an example of the result of the model test. This figure showsonly part of the test result. The actual result prevails.
In the figure, the black points are abnormal points predicted by the model, andthe red points are original abnormal points.
NAIEModel Training Service 5 Learnware User Guide
Issue 01 (2020-12-30) Copyright © Huawei Technologies Co., Ltd. 252

Figure 5-25 Model test result
----End
5.6 Hard Disk Fault Root Cause Analysis Learnware
5.6.1 Creating a ProjectThe hard disk fault root cause analysis service is encapsulated in the JupyterLabplatform of the model training service. You can create a JupyterLab environmentin the project to experience the hard disk fault root cause analysis service.
Step 1 On the training platform homepage, click Create Project in the upper left corner.
The Create Project dialog box is displayed, as shown in Figure 5-26.
Set the following parameters as required:
● Name: Project name.● Public or Not: Whether a project can be accessed by other users in a user
group to which the project belongs. The options are as follows:● Public to Group: This value is displayed only when Public or Not is set to Yes.
By default, all user groups to which the current user belongs are displayed. Ifa user group to which the user belongs is selected, all users in the selecteduser group can view the project. To share the project with only some users inthe user group, click Select user to select the users.
NAIEModel Training Service 5 Learnware User Guide
Issue 01 (2020-12-30) Copyright © Huawei Technologies Co., Ltd. 253

Figure 5-26 Creating a project
Step 2 Click Create. After the project is created, the project overview page is displayed.
----End
5.6.2 Importing Sample Data to the Training PlatformStep 1 On the project overview page, click Feature Processing on the menu bar. The
Feature Processing page is displayed.
Step 2 Click Feature Processing in the upper right corner of the page. The FeatureProcessing dialog box is displayed, as shown in Figure 5-27.
Set the following parameters as required:
● Project Name: Feature engineering project name.● Development Mode: Select JupyterLab Interactive Development.● Specifications: Select the specifications of the container to be deployed in the
Jupyterlab environment.● Instance: Select Create a new development environment from the drop-
down list box.
NAIEModel Training Service 5 Learnware User Guide
Issue 01 (2020-12-30) Copyright © Huawei Technologies Co., Ltd. 254

Figure 5-27 Feature processing
Step 3 Click Create and wait for about 5 minutes until the Jupyterlab environment iscreated.
Step 4 After the Jupyterlab environment is created, click in the Operation column ofthe feature engineering project.
The Jupyterlab homepage is displayed, as shown in Figure 5-28.
Figure 5-28 Jupyterlab homepage
NAIEModel Training Service 5 Learnware User Guide
Issue 01 (2020-12-30) Copyright © Huawei Technologies Co., Ltd. 255

Step 5 Click Hard Disk Fault Root Cause Analysis Learnware in the lower part of theNotebook area. The Create dialog box is displayed.
Step 6 In the displayed Create dialog box, enter the learnware name, for example,Harddisk, and click OK.
The Harddisk.ipynb file page is displayed, as shown in Figure 5-29.
In the Select Kernel dialog box, select Python3 and click Select.
Figure 5-29 Harddisk.ipynb file page
Step 7 Click on the left of the Import sdk code box to import the training platformSDK on which the algorithm depends.
Step 8 Enter the following code in the blank code box shown in Figure 5-30 and run thecode:
Import the samples data to the training platform.
# if you want to use hyper param, edit '__debug.json' in 'naie_platform' folderfrom naie.datasets import samplessamples.list_dataset()samples.list_dataset_entities('samples')samples.load_dataset('samples', 'rca_forest_kpi')
Figure 5-30 Importing samples data to the training platform
----End
5.6.3 Performing Model TrainingStep 1 Click Import Data in the lower left corner of the code box.
The Select data code box is displayed, as shown in Figure 5-31.
NAIEModel Training Service 5 Learnware User Guide
Issue 01 (2020-12-30) Copyright © Huawei Technologies Co., Ltd. 256

NO TE
You can also choose Operators > Learnware > Hard Disk Fault Root Cause Analysis >Import Data from the menu bar in the upper right corner of the page to add the ImportData code box.
The parameters are described as follows:
● Dataset: Select samples from the drop-down list box.● Entity Name: Select rca_forest_kpi from the drop-down list box.
Figure 5-31 Selecting data
Step 2 Click on the left of the Import Data code box. Run the code and bind thedata.
After the code is run successful;y, you can view the data, as shown in Figure 5-32.
Figure 5-32 Viewing training data
Step 3 Click Data Pre-processing in the lower left corner of the page.
The Data Pre-processing dialog box is displayed, as shown in Figure 5-33.
NO TE
You can also choose Operators > Learnware > Hard Disk Fault Root Cause Analysis >Data Pre-processing from the menu bar in the upper right corner of the page to add theData Pre-processing code box.
The parameters are described as follows:
● Column Filtering Mode: Use the default value Column selection.● Columns to Be Processed: Select all columns except the Unnamed: 0 time
column.● Time Column: Select Unnamed: 0.
NAIEModel Training Service 5 Learnware User Guide
Issue 01 (2020-12-30) Copyright © Huawei Technologies Co., Ltd. 257

● Number of Groups: Set this parameter based on site requirements. If thisparameter is set to 2, the result after data preprocessing is similar to Figure5-34. Two adjacent lines of data are combined into one line for display. If thedata in four adjacent lines is correlated, you need to combine the data in thefour lines into one line and set this parameter to 4. Retain the default value 2.
● Label Column: Select label.● Label Aggregation Method: If the value is logic_or, the label column value
after the conversion is the logical OR operation of multiple label columnvalues before the conversion. If the value is logic_and, the label column valueafter the conversion is the logical AND operation of multiple label columnvalues before the conversion.
Figure 5-33 Data preprocessing
Figure 5-34 Data conversion effect after grouping
Step 4 Click on the left of the Data Pre-processing code box. Run the code topreprocess the data.
Figure 5-35 shows the data preprocessing result.
NAIEModel Training Service 5 Learnware User Guide
Issue 01 (2020-12-30) Copyright © Huawei Technologies Co., Ltd. 258

Figure 5-35 Data preprocessing result
Step 5 Click Root Cause Analysis in the lower left corner of the page.
The Root Cause Analysis dialog box is displayed, as shown in Figure 5-36.
Set model parameters as required. Feature evaluation can be performed formodels using the RandomForest, XGBoost, and Ensemble algorithms. TheEnsemble includes the RandomForest and XGBoost algorithms. The value ofNumber of Selected Root Causes is the number of root cause KPIs displayed in theDisplay Result area.
NO TE
You can also choose Operators > Learnware > Hard Disk Fault Root Cause Analysis >Root Cause Analysis from the menu bar in the upper right corner of the page to add theRoot Cause Analysis code box.
Figure 5-36 Root cause analysis
Step 6 Click on the left of the Root Cause Analysis code box. Wait until the rootcause analysis is complete.
Step 7 Click Display Result in the lower left corner of the page.
The Display Result dialog box is displayed.
NAIEModel Training Service 5 Learnware User Guide
Issue 01 (2020-12-30) Copyright © Huawei Technologies Co., Ltd. 259

NO TE
You can also choose Operators > Learnware > Hard Disk Fault Root Cause Analysis >Display Result from the menu bar in the upper right corner of the page to add the DisplayResult code box.
Step 8 Click on the left of the Display Result code box.
Figure 5-37 shows the result. The result shows the top two root causes of harddisk faults and the percentages calculated by the model.
Figure 5-37 Result display
----End
5.7 Change HistoryDate Change Description
2019-07-30 Added the multi-layer nesting anomaly detectionlearnware. For details, see Multi-layer Nesting AnomalyDetection Learnware.Added the hard disk root cause analysis learnware. Fordetails, see Hard Disk Fault Root Cause AnalysisLearnware.
2019-06-30 Released this document officially for the first time.
NAIEModel Training Service 5 Learnware User Guide
Issue 01 (2020-12-30) Copyright © Huawei Technologies Co., Ltd. 260

6 FAQs
6.1 Training Platform Home Page
6.1.1 How Can I Return to the Homepage of the TrainingPlatform?
On the project overview, dataset, feature engineering, model training, modelmanagement, or model verification page, you can click HOME on the right to thebrand name in the upper left corner and select Model Training Service from thedrop-down list to return to the homepage where the project list is displayed.
6.1.2 What Is the Meaning of the Public or Not ParameterDuring Project Creation?
User groups are involved when users create IAM users. If an IAM user is added toa specified user group, the permissions of the IAM user are the same as those ofthe user group.
If Public or Not is selected during project creation, this group is the user group towhich the current IAM user belongs. After this group is selected, all IAM users inthe group can view the projects created by the current IAM user and shareexperience and collaborate with each other.
6.2 Feature Engineering
6.2.1 How Do I Select All Feature Columns?For a feature engineering project created on the Python or Spark developmentplatform, on the feature operation page, click the first cell marked with aninverted triangle in the upper left corner of the table.
For a feature engineering project created on the JupyterLab developmentplatform, in the feature engineering operation and editing area, run the Importsdk code box and then the Load Data code box. After the code boxes are
NAIEModel Training Service 6 FAQs
Issue 01 (2020-12-30) Copyright © Huawei Technologies Co., Ltd. 261

successfully run, click the first cell marked with an inverted triangle in the upperleft corner of the full-feature table under the Import Data code box.
6.2.2 Is Sampling Mandatory Before Feature EngineeringProcessing?
Feature engineering data sampling aims to improve the speed of each featureoperation on the GUI. You are advised to sample data before performingoperations on a large amount of data. After the data sampling, all the featureoperations are performed to process the sampled data, reducing the amount ofdata processed by the feature operations.
6.2.3 How Can I Apply Feature Processing Results to All Datain a Dataset?
For a feature engineering project created on the Python or Spark developmentplatform, after all feature operations are complete, clicking Execute applies thefeature operation flow to all data in a dataset to generate a dataset for modeltraining. When you click Execute, the Execute dialog box is displayed, in whichyou can select other datasets. You can execute the current feature processing flowusing the added data. The number of feature dimensions and feature columns inthe dataset to be added must be the same as that bound to the current featureproject. Otherwise, the dataset fails to be added.
For a feature engineering project created on the JupyterLab development
platform, after all feature operations are complete, click in the upper rightcorner of the page, choose Data Processing > Dataset > Create Data Entity,select the dataset and data instance on the right of the Create Data Entity codebox, and run the code box. The system automatically applies the feature operationflow to the all data in the dataset to generate a dataset after feature processingfor model training.
You can view the generated data on the Dataset page.
6.3 Model Training
6.3.1 What Is the Purpose of Selecting a Common AlgorithmWhen I Create a Model Training Project for Model Training?
Currently, common algorithms include the classification algorithm, fittingalgorithm, clustering algorithm, and algorithms of other types. You can select acommon algorithm type and select Import Getting Started Content toautomatically generate a code template of the corresponding type.
6.3.2 Where Can I Edit the Inference Entry Function Used forOnline Inference Using the Training Model?
Go to the simple editor page, create an inference file under the Code Directorynode, and write the inference code based on the site requirements.
NAIEModel Training Service 6 FAQs
Issue 01 (2020-12-30) Copyright © Huawei Technologies Co., Ltd. 262

6.3.3 How Can I Obtain Data in the Development Code Afterthe Data Is Imported through a Dataset?
The training platform provides an SDK for development personnel to directlyobtain a dataset. The procedure is as follows:
Step 1 Import the training platform SDK.from naie.datasets import data_referencefrom naie.feature_processing import data_flow
Step 2 Use get_data_reference to obtain the path for storing datasets.
Dataset air and dataset instance air_20190409 are used as examples. In this case,the SDK returns the file path of the dataset.data_reference=get_data_reference(dataset="air",dataset_entity="air_20190409")
----End
6.3.4 How Can I Check the Python Library Version DuringModel Training?
During model training, add the following line of code to the training code. Then,the Python library version is displayed when the training code is executed.
print(os.system("pip list"))
In a JupyterLab environment, run the following command in the cell:
!pip list
In a WebIDE environment, directly run the following command on the terminal:
pip list
6.3.5 How Do I Set the Log Level During Model Training?The log levels of TensorFlow are as follows:
● 0: Displays all logs (default level).● 1: Displays info, warning, and error logs.● 2: Displays warning and error logs.● 3: Displays error logs.
The following is an example for setting the log level to 3:
os.environ['TF_CPP_MIN_LOG_LEVEL']='3'
6.3.6 How Do I Customize the Installation of a Third-PartyPython Library?
The following describes the method of installing the libraries on which algorithmsdepend in the training platform.
● The training service allows third-party libraries on which algorithms depend tobe installed by using pip. The following describes the operation method bytaking the installation of the PyStan library as an example:os.system("pip install pystan")
NAIEModel Training Service 6 FAQs
Issue 01 (2020-12-30) Copyright © Huawei Technologies Co., Ltd. 263

● The Notebook allows third-party libraries on which algorithms depend to beinstalled by using pip. The following describes the operation method by takingthe installation of the PyStan library as an example:!pip install pystan == 1.0.0
● Both the training service and Notebook allow third-party libraries on whichalgorithms depend to be installed by using the requirements.txt file. Therequirements.txt file can be used to install only existing packages in the piprepository. If this file is used to install packages that are not in the piprepository, the installation fails. The following describes the operation methodby taking the installation of the PyStan library as an example:pystan == 1.0.0
6.4 Model Verification
6.4.1 What Is the Meaning of the Model Verification Service?On the model verification page, you can create a verification service and edit themodel verification code. Before the verification, you need to select a packagedmodel and set the AI engine, verification dataset, verification dataset instance,label column, running parameters, and computing node specifications. After theverification is complete, check the model accuracy and other information in theverification report.
6.5 Common Questions
6.5.1 What Are the Entries to AutoML?The following entries are provided:
1. On the Feature page, create a JupyterLab environment.
On the JupyterLab page, click in the upper right corner, choose ModelTraining > Model Training > AutoML, and add AutoML content to useAutoML without coding.
2. On the Training page, create a WebIDE environment.Import the AutoML module to the WebIDE. The code is "from naie.automlimport VegaAutoML". SDK is invoked using code to facilitate integrationdevelopment and debugging of other code.
3. Submit a model training task.AutoML requires multiple iterations and takes a long time to run. To runmultiple tasks, the model training service allows you to run AutoML bysubmitting model training tasks.
NAIEModel Training Service 6 FAQs
Issue 01 (2020-12-30) Copyright © Huawei Technologies Co., Ltd. 264

6.6 Change HistoryDate Change Description
2020-08-30 Added What Are the Entries to AutoML?.Updated the following sections:● Is Sampling Mandatory Before Feature Engineering
Processing?● How Can I Apply Feature Processing Results to All
Data in a Dataset?● Where Can I Edit the Inference Entry Function Used
for Online Inference Using the Training Model?● How Can I Obtain Data in the Development Code
After the Data Is Imported through a Dataset?
2020-03-30 This issue does not include any changes.
2019-12-30 Classified problems based on the menus of the trainingplatform.
2019-10-30 Added the following sections:● How Can I Return to the Homepage of the Training
Platform?● How Can I Obtain Data in the Development Code
After the Data Is Imported through a Dataset?● How Can I Check the Python Library Version During
Model Training?● How Do I Set the Log Level During Model Training?● How Do I Customize the Installation of a Third-Party
Python Library?
2019-04-30 This is the first official release.
NAIEModel Training Service 6 FAQs
Issue 01 (2020-12-30) Copyright © Huawei Technologies Co., Ltd. 265

7 Glossary
AAI Marketplace
The AI marketplace provides AI models. It is an online portal for AI consumers toaccess the NAIE cloud service and allows AI consumers to view, try, subscribe to,download, and provide feedback on published AI models.
AI Engine
The AI engine is a framework, such as Tensorflow, Spark MLlib, MXNet, orPyTorch, which supports machine learning, deep learning, and model training jobdevelopment.
BLabel Column
A label column is a feature column in a dataset. The prediction effect is evaluatedby comparing values in the label column with predicted values generated throughmodel training. For example, the iris classification modeling dataset has fivecolumns: petal length and width, sepal length and width, and iris type. The iristype is the label column.
CHyperparameter
A hyperparameter is an external parameter of a model, which must be manuallyconfigured and adjusted by a user and can be used to estimate model parametervalues.
MModel Package
After the model training is complete, the archived or packaged model is displayedon the Model Management page. Model verification services and trainingservices can be created based on model packages. Model packages can bepublished in the application market. After subscribing to a model package, a user
NAIEModel Training Service 7 Glossary
Issue 01 (2020-12-30) Copyright © Huawei Technologies Co., Ltd. 266

can download and deploy it to the inference framework. Model packages can bepublished as online inference services and federated learning instances can becreated by one click. The integrity of downloaded model packages can be verified.
NNotebook
Notebook is an interactive notepad, which is used for coding. Languages includingR, Python, Scala, and SQL are supported for coding.
PPython Language
Python is a portable, interpreted, object-oriented programming languagedeveloped and freely distributed by its developer. Python runs on many platforms,including UNIX, Windows, OS/2, and Macintosh, and is used for writing TCP/IPapplications.
SData Sampling
Data sampling needs to be performed on datasets before other feature operations.After the data sampling, all the feature operations are performed to process thesampled data, reducing the amount of data processed by the feature operationsand speeding up data processing.
Data Service
The data service can quickly collect various types of data, such as networkengineering parameters, performance data, and alarm data. Various tools areprovided to improve data governance efficiency. In addition, security technologies,such as multi-tenant isolation and encrypted storage, are used to ensure datasecurity throughout the entire lifecycle.
Dataset
A dataset is a logical collection of data with the same data format of a service.
Dataset Instance
A dataset instance has specific data.
Data Preparation
After data instances are imported into a dataset, empty values, data redundancy,or data insufficiency may occur. In addition, users may need to perform datajoining, data union, or data restoration.
In old experience-based development mode, the functions include data repair,data filtering, data union, data joining, and data denoising. These functions can beperformed by some data processing items under the Data Processing menu in
in the upper right corner of the JupyterLab interactive development modepage.
NAIEModel Training Service 7 Glossary
Issue 01 (2020-12-30) Copyright © Huawei Technologies Co., Ltd. 267

Schema
A schema is used to describe the property information about edges or vertices. Aschema consists of multiple labels and each label consists of one or moreproperties.
T
Feature Operation
Feature operations mainly include modifications to the sample data values offeatures as well as feature column renaming, deletion, and filtering.
In old experience-based development mode, the training platform supports thefollowing feature operations: renaming, normalization, numeralization,standardization, feature discretization, one-hot encoding, data transformation,column deletion, feature selection, chi-square test, information entropy, featureaddition, and PCA. These functions can be performed by some data processing
items under the Data Processing menu in in the upper right corner of theJupyterLab interactive development mode page.
W
NAIE-I
Based on the service scenario, the NAIE-I can be deployed on embedded NEs,network management systems, and cloud platforms (public or private cloud) tointerconnect with network control systems at different levels, collect service datain real time, adjust network running configurations in real time based on theoptimal algorithm model, and automatically isolate and rectify faults. This featuregreatly improves network usage and maintenance efficiency.
X
Training Platform
The model training service provides developers with one-stop model developmentservices in the telecom domain, including data preprocessing, feature extraction,model training, model management, and model verification. This service providesdevelopers with development environments, simulated verification environments,APIs, and a series of development tools, helping developers quickly and efficientlydevelop models for the telecom domain.
Training Dataset
A training dataset is a dataset instance used for model training.
Y
Verification Dataset
A verification dataset is for model verification.
NAIEModel Training Service 7 Glossary
Issue 01 (2020-12-30) Copyright © Huawei Technologies Co., Ltd. 268