model x owner's manualdig.abclocal.go.com/kgo/pdf/model_x_owners_manual_north...4 model x...
TRANSCRIPT

MODEL X OWNER'S MANUAL

Overview.............................................................2Interior Overview.........................................................................2Exterior Overview....................................................................... 3
Opening and Closing..................................... 4Doors............................................................................................... 4Windows....................................................................................... 12Rear Trunk.................................................................................... 13Front Trunk...................................................................................15Glove Box......................................................................................17Cup Holders................................................................................. 18Sun Visors.....................................................................................19
Seating and Safety Restraints................. 20Front and Rear Seats..............................................................20Seat Belts.....................................................................................27Child Safety Seats....................................................................30Airbags......................................................................................... 38
Driving...............................................................42Driver Profiles............................................................................ 42Steering Wheel......................................................................... 44Mirrors...........................................................................................47Starting and Powering Off....................................................48Gears.............................................................................................50Instrument Panel.......................................................................52Lights............................................................................................ 58Wipers and Washers............................................................... 62Brakes........................................................................................... 63Traction Control........................................................................ 65Park Assist...................................................................................66Vehicle Hold............................................................................... 68Acceleration Modes.................................................................69Trip Information..........................................................................71Getting Maximum Range.......................................................72Rear View Camera....................................................................74Active Spoiler.............................................................................75Towing and Accessories.........................................................76
Driver Assistance.......................................... 85About Driver Assistance........................................................85Traffic-Aware Cruise Control...............................................88Autosteer.....................................................................................94Auto Lane Change................................................................... 97Autopark......................................................................................99Lane Assist................................................................................ 104Collision Avoidance Assist.................................................. 106Speed Assist............................................................................. 109
Using the Touchscreen................................ 111Touchscreen Overview............................................................ 111Controls....................................................................................... 116Settings........................................................................................119Climate Controls...................................................................... 123Smart Air Suspension............................................................ 128Media and Audio..................................................................... 130Phone...........................................................................................135Maps and Navigation............................................................. 137Calendar..................................................................................... 142Security Settings.....................................................................143HomeLink® Universal Transceiver..................................... 144Connecting to Wi-Fi.............................................................. 146Software Updates................................................................... 147Mobile App................................................................................ 148
Charging......................................................... 149Electric Vehicle Components............................................. 149Battery Information.................................................................151Charging Instructions............................................................ 153
Maintenance.................................................. 158Maintenance Schedule.......................................................... 158Tire Care and Maintenance..................................................159Cleaning......................................................................................164Wiper Blades and Washer Jets..........................................167Fluid Reservoirs....................................................................... 168Jacking and Lifting.................................................................170Parts and Accessories............................................................ 171
Specifications................................................172Identification Labels...............................................................172Vehicle Loading....................................................................... 173Dimensions and Weights..................................................... 176Subsystems............................................................................... 179Wheels and Tires...................................................................... 181
Roadside Assistance.................................. 188Contacting Roadside Assistance...................................... 188Instructions for Transporters.............................................. 189
Consumer Information............................... 191Easter Eggs................................................................................ 191About this Owner Information...........................................192Disclaimers................................................................................ 193Reporting Safety Defects.................................................... 195Declarations of Conformity.................................................196
Contents

1. Interior door handles (Opening Doors from the Interior on page 7)2. Traffic-Aware Cruise Control (Traffic-Aware Cruise Control on page 88) and Autosteer
(Autosteer on page 94)3. High beams (High Beam Headlights on page 60), Turn signals (Turn Signals on page 60),
Wipers and washers (Wipers and Washers on page 62)4. Steering wheel buttons - left (Using Left Steering Wheel Buttons on page 44)5. Instrument panel (Instrument Panel on page 52)6. Steering wheel buttons - right (Using Right Steering Wheel Buttons on page 45)7. Gear selector (Shifting Gears on page 50)8. Touchscreen (Touchscreen Overview on page 111)9. Glovebox button (Glove Box on page 17)10. Power window switches (Opening and Closing on page 12)11. Exterior mirror adjustment switches (Mirrors on page 47)12. Seats (Front and Rear Seats on page 20)13. Steering column adjuster (hidden from view in the above image) (Steering Wheel on page
44)14. Horn (Horn on page 46)15. Brakes (Brakes on page 63)16. Hazard warning lights (Hazard Warning Flashers on page 61)17. Cabin climate control (Climate Controls on page 123)18. Cup holders (Cup Holders on page 18)
Interior Overview
2 Model X Owner's Manual

1. Exterior lights (Lights on page 58)2. Front doors (Opening and Closing Front Doors from Outside Model X on page 7)3. Falcon wing doors (Doors on page 4)4. Charge port (Charging Instructions on page 153)5. Active spoiler (optional) (Active Spoiler on page 75)6. Driver Assistance cameras (About Driver Assistance on page 85)7. Exterior mirrors (Mirrors on page 47)8. Radar sensor (hidden from view in the above image) (About Driver Assistance on page 85)9. Hood/Front trunk (Front Trunk on page 15)10. Wheels and tires (Wheels and Tires on page 181)11. Rear view camera (Rear View Camera on page 74 and About Driver Assistance on page
85)12. Rear trunk/liftgate (Rear Trunk on page 13)13. Ultrasonic sensors (Park Assist on page 66 and About Driver Assistance on page 85)
Exterior Overview
Overview 3

Keyless Locking and UnlockingLocking and unlocking Model X is convenient.Although you must be carrying a valid key,there is no need to use it. Model X has sensorsaround the driver's door that can recognizethe presence of a key within a range ofapproximately three feet (one meter). So, youcan keep your key in your pocket or purse andModel X detects it as you approach.
When you walk up to Model X carrying yourkey, the doors automatically unlock if PassiveEntry is on. To open the rear trunk, press theswitch located under the trunk’s exteriorhandle.
Note: Model X must detect your key near thedriver's door before the doors or rear trunkunlock.
Note: If Passive Entry is off, you must use thekey to unlock Model X. See Using the Key onpage 4.
If equipped with the premium upgradepackage, and the Automatic Doors setting isturned on, when you walk up to Model Xcarrying your key, doors automatically unlockand the driver's door partially opens. If notequipped, or if this setting is turned off, doorsautomatically unlock and a door opens whenyou press its handle.
Note: You can choose whether you want alldoors, or just the driver's door, to unlock whenyou approach Model X carrying your key (see Door Unlock Mode on page 10).
When carrying your key with you, you can alsoopen the rear trunk without having to use thekey. Simply press the switch located under thetrunk’s exterior handle. Door Unlock Mode(see Door Unlock Mode on page 10) mustbe set to All and the vehicle must detect thekey near the driver's door before opening therear trunk.
Model X also locks automatically. If you setWalk-Away Door Lock to ON, Model X lockswhen you walk away carrying your key withyou (see Walk-away Locking on page 10).
While sitting inside Model X, you can also lockand unlock the vehicle by touching the icon onthe touchscreen's status bar or by using thedoor controls that are available when youtouch Controls > Doors.
Using the KeyTo quickly familiarize yourself with the key,think of the key as a miniature version ofModel X, with the Tesla badge representingthe front. The key has three buttons on the topthat feel like softer areas on the surface, and ametal button on each side representing thefalcon wing doors.
1. Trunk
• Double-click to open the rear trunk.• If equipped with a powered liftgate,
double-click to close the rear trunk.You can also single-click to stop theliftgate when it is moving.
• Hold the button down for one to twoseconds to open the charge port door.
2. Lock/Unlock All
• Single-click to lock all doors and reartrunk. Hazard warning lights flashonce.
Note: If a door or the rear trunk isopen, hazard warning lights flashthree times and doors do not lock. Toenable a single-click to both close alldoors (and rear trunk) and lock them,touch Controls > Settings > Doors &Locks > Close All with Key Fob > ON.By default, this setting is OFF andwhen off, you must triple-click thisbutton to close and lock all doors.
Doors
4 Model X Owner's Manual

• Double-click to unlock Model X.Hazard warning lights flash twice.
Note: If Model X is equipped with thepremium upgrades package andAutomatic Doors is set to ON (touchControls > Settings > Doors & Locks >Automatic Doors > ON), doors unlockand the driver's door opens as youapproach Model X. When the driver'sdoor is open, double-clicking opensthe passenger front door.
Note: If Door Unlock Mode is set toDriver, double-clicking unlocks onlythe driver's door and you will need todouble-click again to unlock all doorsand trunks. If set to All, the firstdouble-click unlocks all doors andtrunks. Use the touchscreen to changethis setting (touch Controls >Settings > Doors & Locks > DoorUnlock Mode).
3. Front trunk (also called the "frunk")
• Double-click to open the front trunk.4. Falcon wing doors
• Double-click to open/close theassociated falcon wing door.
• Single-click to stop movement of theassociated falcon wing door.Subsequently double-clicking reversesmovement of the falcon wing door.For example if the door was opening,it closes, and vice versa.
Note: Falcon wing doors are designedto proactively detect obstacles thatprevent the doors from moving whenan obstacle is detected.
Warning: Model X falcon wingdoors have several sensors todetect the presence of an objectin the door's path. In most cases,when an object is detected, thedoor stops moving. However, thesensors are unable to detect allareas under all circumstances,particularly when closing,Therefore, you must monitor themovement of falcon wing doorsto ensure the door's path ofmovement is free of obstacles,staying prepared at all times toproactively intervene to stop thedoor from contacting an object(including a person). Failure to doso can cause serious damage orbodily injury.
You do not need to point the key at Model X,but you must be within operating range(which varies depending on the strength ofthe key’s battery).
If Model X is unable to detect the key, thetouchscreen displays a message indicatingthat a key is not inside. Place the key whereModel X can best detect it, which is below the12V power socket (see Key Not Inside on page48).
Radio equipment on a similar frequency canaffect the key. If this happens, move the key atleast one foot (30 cm) away from otherelectronic devices (phone, laptop, etc). If thekey does not work, you may need to changeits battery. If the key’s battery is discharged,you can open Model X by following theunlocking procedure (see Unlocking When theKey Doesn't Work on page 11).
Caution: Remember to bring the key withyou when you drive. Although you candrive Model X away from its key, you willbe unable to power it back on after itpowers off.
Caution: Protect the key from impact,high temperatures, and damage fromliquids. Avoid contact with solvents,waxes and abrasive cleaners.
Replacing the Key Battery
The key’s battery lasts for approximately ayear. When the battery is low, a messagedisplays on the instrument panel. Follow thesesteps to replace it:
Doors
Opening and Closing 5

1. With the key placed button side down ona soft surface, use a small flat-bladed tool,a fingernail, or the Tesla-provided tool* torelease the bottom cover.
*For convenience, Tesla provides a specialtool to make it easy to open the batterycover. This tool was included in the boxcontaining your key when Model X wasinitially purchased.
Note: If a lanyard is attached to the key(see Attaching a Lanyard on page 6),you can release the bottom cover byplacing your thumb against the "X" on thebottom cover, then firmly pulling thelanyard toward you (hence pushing thekey off of its cover). You can also pry thecover off by placing a small flat-bladedtool, a fingernail, or the Tesla-providedtool against the lanyard cord.
2. Remove the battery by sliding it out at anangle.
3. Insert the new battery (type CR2354) withthe ‘+’ side facing up. The battery fitssnugly so you must slide it into position atan angle toward the Positive contact (thecontact located near the center of thekey), then press down firmly on the otherside, ensuring it is held firmly in itsintended position.
Caution: The battery should pressagainst the spring on the positivecontact. Do not place the battery ontop of the contact and force it downvertically. Doing so may damage thecontact.
Note: Wipe the battery clean beforefitting and avoid touching the battery'sflat surfaces. Finger marks on the flatsurfaces of the battery can reduce batterylife.
4. Holding the cover at an angle, align thetabs on the widest side of the cover withthe corresponding slots on the key, thenpress the cover firmly onto the key until itsnaps into place.
Attaching a Lanyard
The Model X key supports the use of a smalllanyard. To attach a lanyard, release thebottom cover as described above. Place thelanyard over the pin on the back side of thekey. Re-align the cover and snap into place.
Doors
6 Model X Owner's Manual

Getting More Keys
If you lose a key or require an additional one,contact Tesla. Model X can recognize up toeight keys.
When ordering a new key for Model X, take allavailable keys with you for reprogramming.
Opening Doors from the InteriorTo open a front door, pull the interior doorhandle toward you.
You can also use the touchscreen to open andclose doors when inside Model X. TouchControls > Doors, then choose the door youwant to open or close. In addition, if Model Xis equipped with the premium upgradespackage, when you press the brake pedal, thedriver's door automatically closes.
Note: To prevent children from opening falconwing doors using the interior handles, use thetouchscreen, Controls > Settings > Doors &Locks > Child Protection Lock, to turn on thechild-protection locks (see Child-protectionLock on page 10).
Opening and Closing Front Doorsfrom Outside Model XModel X doors are electrically powered. Whenyou approach Model X carrying the key, youcan specify whether just the driver's doorunlocks or all doors unlock. On thetouchscreen, touch Controls > Settings >Doors & Locks > DOOR UNLOCK MODE andchoose DRIVER or ALL.
If equipped, you can also set the driver's doorto unlock and open automatically upon yourapproach. The door partially opens (between20° and 45° depending on obstacles detectedby sensors). Touch Controls > Settings >Doors & Locks > AUTOMATIC DOORS > ON.To open the driver's door when this setting ison, double-click the key's lock/unlock button.To open the front passenger's door, double-click the key's lock/unlock button again.
Caution: The front doors may not fullyopen or close automatically when parkedon a very steep hill. Never rely on Model Xto fully open or close the doors for youwhen parked on a steep hill.
Note: Depending on date of manufacture andoptions chosen at time of purchase, yourModel X may not be equipped withAUTOMATIC DOORS.
Whenever a door is open, the DoorOpen indicator displays on theinstrument panel. The image of theModel X on the touchscreen Controlswindow also shows which door ortrunk is open.
To close doors, you can:
• manually push them shut• use the touchscreen (Controls > Doors)• if the CLOSE ALL WITH KEY FOB setting
is set to OFF, triple-click the key's lock/unlock button (this closes and locks alldoors and trunks)
• if the CLOSE ALL WITH KEY FOB settingis set to ON, single-click the key's lock/unlock button (this closes and locks alldoors and trunks)
You can also close an exterior front door bytouching its handle when the door is alreadyopen.
Note: Powered doors stop moving if anobstacle is detected.
Warning: Before using an automaticfeature to open or close a front door
Doors
Opening and Closing 7

(rather than doing so manually), it isimportant to check that the area aroundthe door is free of obstacles (such aspeople and objects). You must proactivelymonitor the door's movement to ensurethat it does not contact a person orobject. Failure to do so can result indamage or serious injury.
Opening and Closing Falcon WingDoorsModel X has electrically-powered falcon wingdoors that easily open and close by pressing abutton, using the key, or touching the controlson the touchscreen (Controls > Doors). Thefalcon wing doors are equipped with severalsensors that detect the presence of peopleand objects and, if an object is detected, thedoor stops moving. Based on detectedobjects, the doors may adjust their outwardand upward movement in an attempt to avoidcontacting the object. For example, if anobject is detected above Model X, the door'smovement may extend further outward butlower, whereas if an object is detected besidethe door, the door may extend outward muchless.
Warning: It is important to keep yourhands clear of the falcon wing doorframes at all times. Proactively check thedoor frame area prior to closing, andmonitor the movement of the door duringclosing to ensure that it does not comeinto contact with a person or object.Failure to do so can result in damage orserious injury.
Warning: Before opening or closing afalcon wing door, it is important to checkthat the area around the door is free ofobstacles (people and objects). Althoughthe doors have many sensors, it can notdetect all objects at all times, particularlywhen moving. At any given moment,there may be areas near the door that arenot in the detection zone. Therefore,when opening or closing a falcon wingdoor, you and your passengers muststand away from the door as it is moving,while proactively monitoring the door'smovement and being prepared to takecorrective action at any time. To stop adoor from moving, single-click the falconwing door button on the key, press theswitch on the door or door pillar, or touchthe button on the touchscreen.
To open a falcon wing door from outsideModel X, press the door handle or press thefalcon wing door button on the key (see Usingthe Key on page 4).
To open a falcon wing door from inside ModelX, use the switch located on the door pillar, ortouch the door controls on the touchscreen(Controls > Doors):
Note: If Model X is locked, using the switch(illustrated above) the first time unlocks theassociated door. Pulling it a second timeopens it.
To close a falcon wing door, press the buttonlocated on the inside of the door. You can alsouse the key (see Using the Key on page 4, usethe switch on the door pillar (illustratedabove), or touch the door controls on thetouchscreen (Controls > Doors):
Note: To prevent children from opening falconwing doors using the interior switch, turn onchild-protection locks using the touchscreen(Controls > Settings > Doors & Locks >CHILD-PROTECTION LOCK). See Child-protection Lock on page 10.
Doors
8 Model X Owner's Manual

Note: You can configure Model X to open thefalcon wing doors to a lower height setting byusing the touchscreen (Controls > Settings >Doors & Locks > FALCON DOOR HEIGHT).
Note: If a falcon wing door detects anobstacle while closing, it reverses a few inchesbefore it stops moving.
Warning: Whenever a front door ispartially open (approximately 20°) as youare opening or closing the associatedfalcon wing door, you MUST keep yourhands (or any object) away from theopening edge of the front door. When afalcon wing door passes by a partiallyopened front door, the distance betweenthe two doors is very narrow. Objects,such as hands or fingers, placed in thisarea, are not detected by sensors and cantherefore become pinched between thedoors. To avoid bodily injury, it is a goodpractice to keep your hands away fromthe front door whenever you are openingor closing a falcon wing door.
Warning: When opening or closing afalcon wing door, it is important toproactively monitor the movement of thedoor to ensure that it does not come intocontact with a person or object. Failure todo so can cause serious damage or injury.
Caution: Remove accumulation of snowor ice before opening a falcon wing door.Snow can get inside Model X and ice canprevent the door from opening.
Caution: In rainy weather, leaving a falconwing open while opening the liftgate canresult in rain water falling from the liftgateinto the rear seating area.
Note: Falcon wing doors open only whenModel X is stationary.
Obstacle Detection
A falcon wing door stops moving when one ofits many sensors detects an obstacle, or whenthe door senses resistance because it hasmade contact with an object. The touchscreendisplays a warning on the Doors tab. In thesecases, provided it is appropriate to continueopening or closing the falcon wing door, youcan override obstacle detection by doing anyof the following:
• Pressing and holding the switch locatedon the door pillar.
• Touch and hold the appropriate door iconon the touchscreen.
When Model X detects a low ceiling (forexample, in a garage), it opens the falcon wingdoors (and trunk) to a lower height, even if noobstacle is detected. You can override thisheight and open the doors higher by touchingthe associated door icon on the touchscreen(Controls > Doors). Model X asks you on thetouchscreen if you always want to open thedoors to the higher height in this location, andsaves your choice. The next time you open thefalcon wing doors in this location, Model Xopens them to the height you saved.
Warning: Before overriding a falcon wingdoor's default opening height, visuallyinspect the area to ensure adequateclearance between the door and thedetected object.
Warning: Applying adhesive productssuch as wraps, stickers, rubber coating,etc. on the outside of the falcon wingdoors can affect the sensors’ ability todetect obstacles properly.
Calibration
If the falcon wing doors lose calibration, amessage displays on the touchscreen. Tocalibrate the doors, first ensure that bothdoors have plenty of space to open and closeand are clear of passengers, objects, etc. Thenpress and hold the Calibrate button until fiveseconds after calibration is complete. Duringcalibration, the lower door opens all the wayout (requiring extra space on the side ofModel X), the upper doors move all the waydown, and then the lower door closes.
Doors
Opening and Closing 9

Interior Locking and UnlockingFrom inside Model X, you can use thetouchscreen to lock or unlock doors andtrunks, provided a valid key is inside thevehicle. Touch the lock icon on thetouchscreen's status bar.
When you stop Model X and engage the Parkgear, you can choose whether you want doorsto unlock or remain locked. To do so, touchControls > Settings > Doors & Locks >UNLOCK ON PARK. When set to ON, doorsautomatically unlock when you engage thePark gear.
You can also unlock doors by pressing thePark button on the end of the gear selector asecond time (i.e., after pressing it one time toengage the Park gear).
Note: If a door or trunk is still open when youlock Model X, it locks when you close it.
Door Unlock ModeYou can choose whether you want all doors,or just the driver's door, to unlock when youapproach your vehicle carrying your key. To doso, touch Controls > Settings > Doors &Locks > DOOR UNLOCK MODE and chooseDRIVER or ALL.
Child-protection LockModel X has child-protection locks on thefalcon wing doors and liftgate to prevent themfrom being opened using interior handles. Usethe touchscreen to turn child protection lockson or off. Touch Controls > Settings > Doors &Locks > CHILD-PROTECTION LOCK.
Note: It is recommended that you turn child-protection locks on whenever children areseated in the rear seats.
Drive-away LockingModel X automatically locks all doors(including the trunks) whenever your drivingspeed exceeds 5 mph (8 km/h).
Walk-away LockingDoors and trunks can automatically lockwhenever you walk away carrying the key.
To turn this feature on or off, touch Controls >Settings > Doors & Locks > WALK-AWAYDOOR LOCK.
Note: If all doors are closed and you use thekey to unlock Model X, walk-away locking istemporarily suspended for one minute. If youopen a door within this minute, it does not re-lock until after all the doors are closed andyou have walked away with the key.
Doors
10 Model X Owner's Manual

Unlocking When the Key Doesn'tWorkIf Model X does not unlock when you walk upto it, or when you press the unlock button onyour key, the key’s battery may be dead. If thisis the case, you can still unlock and driveModel X.
To unlock Model X (and disable the securityalarm), first position the key at the base of thedoor pillar between the front door and thefalcon wing door, on the driver's side of thevehicle, as shown. Then press the front driver'sdoor handle. If Model X doesn't unlock, tryadjusting the position of the key. The key mustbe in the correct position. If Model X stilldoesn't unlock, remove the key's battery andtry again. See Replacing the Key Battery onpage 5.
To drive Model X, place the key against thecenter console, immediately below the 12Vpower outlet, then press and hold the brakepedal to turn Model X on.
Note: Unlocking Model X using this methoddisables walk-away locking. You mustmanually re-enable walk-away locking afterreplacing the key’s battery.
For instructions on how to replace the key’sbattery, see Replacing the Key Battery onpage 5.
Opening Interior Doors with NoPowerIf Model X has no electrical power, the frontdoors open as usual using the interior doorhandles. To open the rear doors, carefullyremove the speaker grille from the door andpull the mechanical release cable down andtowards the front of the vehicle. After thelatch is released, manually lift up the door.
Doors
Opening and Closing 11

Opening and ClosingPress down on a switch to lower theassociated window. Window switches operateat two levels:
• To lower a window fully, press the switchall the way down and immediately release.
• To lower a window partially, press theswitch gently and release when thewindow is where you want it.
Similarly, pull a switch to raise the associatedwindow:
• To raise a window fully, pull the switch allthe way up and immediately release.
• To raise a window partially, pull the switchgently and release when the window iswhere you want it.
Warning: Before closing a window, it isthe driver’s responsibility to ensure thatall occupants, especially children, do nothave any body parts extended throughthe window’s opening. Failure to do socan cause serious injury.
Locking WindowsTo prevent passengers from using the rearwindow switches, press the rear window lockswitch. The switch light turns on. To unlockrear windows, press the switch again.
Warning: To ensure safety, it isrecommended that you lock the rearwindow swiches whenever children areseated in the rear seats.
Warning: Never leave childrenunattended in Model X.
Windows
12 Model X Owner's Manual
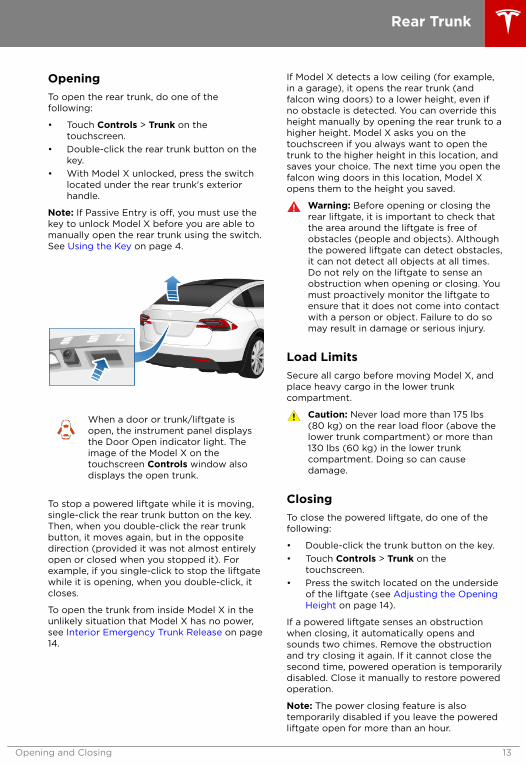
OpeningTo open the rear trunk, do one of thefollowing:
• Touch Controls > Trunk on thetouchscreen.
• Double-click the rear trunk button on thekey.
• With Model X unlocked, press the switchlocated under the rear trunk's exteriorhandle.
Note: If Passive Entry is off, you must use thekey to unlock Model X before you are able tomanually open the rear trunk using the switch.See Using the Key on page 4.
When a door or trunk/liftgate isopen, the instrument panel displaysthe Door Open indicator light. Theimage of the Model X on thetouchscreen Controls window alsodisplays the open trunk.
To stop a powered liftgate while it is moving,single-click the rear trunk button on the key.Then, when you double-click the rear trunkbutton, it moves again, but in the oppositedirection (provided it was not almost entirelyopen or closed when you stopped it). Forexample, if you single-click to stop the liftgatewhile it is opening, when you double-click, itcloses.
To open the trunk from inside Model X in theunlikely situation that Model X has no power,see Interior Emergency Trunk Release on page14.
If Model X detects a low ceiling (for example,in a garage), it opens the rear trunk (andfalcon wing doors) to a lower height, even ifno obstacle is detected. You can override thisheight manually by opening the rear trunk to ahigher height. Model X asks you on thetouchscreen if you always want to open thetrunk to the higher height in this location, andsaves your choice. The next time you open thefalcon wing doors in this location, Model Xopens them to the height you saved.
Warning: Before opening or closing therear liftgate, it is important to check thatthe area around the liftgate is free ofobstacles (people and objects). Althoughthe powered liftgate can detect obstacles,it can not detect all objects at all times.Do not rely on the liftgate to sense anobstruction when opening or closing. Youmust proactively monitor the liftgate toensure that it does not come into contactwith a person or object. Failure to do somay result in damage or serious injury.
Load LimitsSecure all cargo before moving Model X, andplace heavy cargo in the lower trunkcompartment.
Caution: Never load more than 175 lbs(80 kg) on the rear load floor (above thelower trunk compartment) or more than130 lbs (60 kg) in the lower trunkcompartment. Doing so can causedamage.
ClosingTo close the powered liftgate, do one of thefollowing:
• Double-click the trunk button on the key.• Touch Controls > Trunk on the
touchscreen.• Press the switch located on the underside
of the liftgate (see Adjusting the OpeningHeight on page 14).
If a powered liftgate senses an obstructionwhen closing, it automatically opens andsounds two chimes. Remove the obstructionand try closing it again. If it cannot close thesecond time, powered operation is temporarilydisabled. Close it manually to restore poweredoperation.
Note: The power closing feature is alsotemporarily disabled if you leave the poweredliftgate open for more than an hour.
Rear Trunk
Opening and Closing 13

Adjusting the Opening HeightYou can adjust the opening height of thepowered liftgate to make it easier to reach:
1. Open the liftgate, then manually lower orraise it to the desired opening height.
2. Press and hold the button on theunderside of the liftgate for two secondsuntil you hear a confirmation chime.
3. Confirm that you have set it to the desiredheight by closing the liftgate, thenreopening it.
Accessing the Cargo AreaTo access the cargo area inside the Model Xrear trunk, push down on the ridged portion ofthe handle of the cargo cover and then pullup. You can then adjust the position of thecargo cover or completely remove it fromModel X.
Caution: Never load more than 175 lbs(80 kg) on the rear load floor (above thelower trunk compartment) or more than130 lbs (60 kg) in the lower trunkcompartment. Doing so can causedamage.
Interior Emergency Trunk ReleaseAn illuminated mechanical release locatedinside the rear trunk allows you to open therear trunk from the inside if Model X has noelectrical power. This mechanical release alsoallows a person locked inside to get out.
1. Remove the cover by pulling its loweredge very firmly toward you.
2. Pull the cable to release the latch.3. Push the rear trunk open.
Note: The button glows for several hours aftera brief exposure to ambient light.
Warning: People should never climbinside the trunk. Never close or lock atrunk when a person is inside.
Rear Trunk
14 Model X Owner's Manual
OpeningTo open the front trunk:
1. Ensure that the area around the hood isfree of obstacles.
2. Touch Controls > Front Trunk on thetouchscreen, double-click the front trunkbutton on the key, or touch the front trunkbutton on the mobile app.
3. Pull the hood up.
When a door or trunk/liftgate isopen, the instrument panel displaysthe Door Open indicator light. Theimage of the Model X on thetouchscreen Controls window alsodisplays the open front trunk.
Warning: Before opening or closing thehood, it is important to check that thearea around the hood is free of obstacles(people and objects). Failure to do somay result in damage or serious injury.
Note: The front trunk locks whenever closedand you lock Model X using either thetouchscreen or externally using the key ormobile app, you leave Model X carrying yourkey (if Walk-away Locking on page 10 isturned on), or when Valet mode is active (see Valet Mode on page 43).
ClosingThe Model X hood is not heavy enough tolatch under its own weight and applyingpressure on the front edge or center of thehood can cause damage.
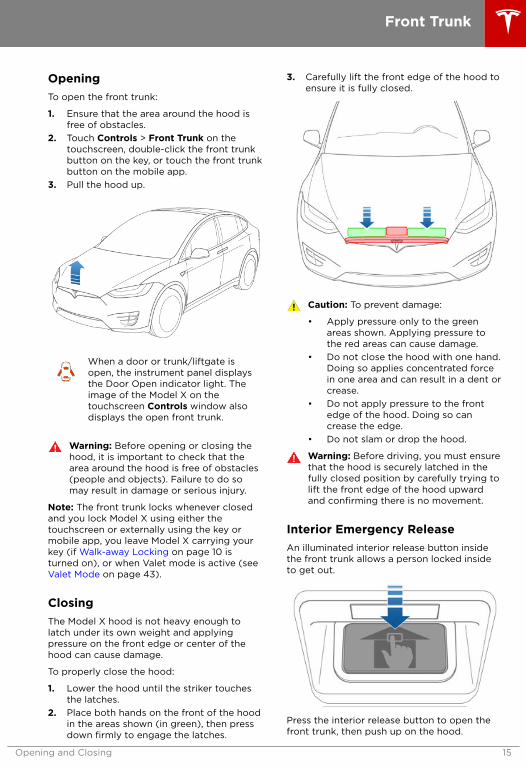
To properly close the hood:
1. Lower the hood until the striker touchesthe latches.
2. Place both hands on the front of the hoodin the areas shown (in green), then pressdown firmly to engage the latches.
3. Carefully lift the front edge of the hood toensure it is fully closed.
Caution: To prevent damage:
• Apply pressure only to the greenareas shown. Applying pressure tothe red areas can cause damage.
• Do not close the hood with one hand.Doing so applies concentrated forcein one area and can result in a dent orcrease.
• Do not apply pressure to the frontedge of the hood. Doing so cancrease the edge.
• Do not slam or drop the hood.
Warning: Before driving, you must ensurethat the hood is securely latched in thefully closed position by carefully trying tolift the front edge of the hood upwardand confirming there is no movement.
Interior Emergency ReleaseAn illuminated interior release button insidethe front trunk allows a person locked insideto get out.
Press the interior release button to open thefront trunk, then push up on the hood.
Front Trunk
Opening and Closing 15

Note: The interior release button glowsfollowing a brief exposure to ambient light.
Warning: People should never climbinside the front trunk. Never shut thefront trunk when a person is inside.
Warning: Care should be taken to ensurethat objects inside the front trunk do notbump against the release button, causingthe trunk to accidentally open.
Front Trunk
16 Model X Owner's Manual
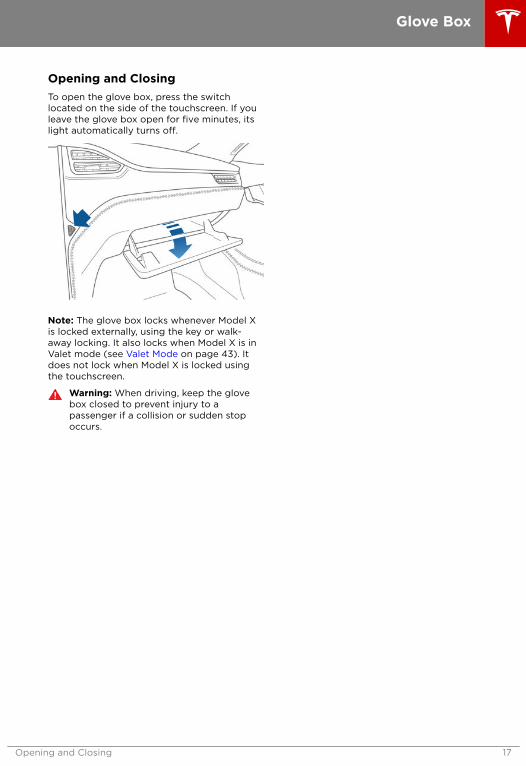
Opening and ClosingTo open the glove box, press the switchlocated on the side of the touchscreen. If youleave the glove box open for five minutes, itslight automatically turns off.
Note: The glove box locks whenever Model Xis locked externally, using the key or walk-away locking. It also locks when Model X is inValet mode (see Valet Mode on page 43). Itdoes not lock when Model X is locked usingthe touchscreen.
Warning: When driving, keep the glovebox closed to prevent injury to apassenger if a collision or sudden stopoccurs.
Glove Box
Opening and Closing 17

Opening and ClosingTo expose a front cup holder, slide back thearmrest.
To expose rear cup holders (if available onyour vehicle), press and release the cup holderface plate located at the back of the centerconsole.
Cup Holders
18 Model X Owner's Manual

The sun visors in Model X are held in place bymagnets. To protect occupants from sunlightcoming through the windshield, release thesun visor from the pillar and pivot it towardthe rear view mirror until the magnet snapsinto place. While held in place by the magnet,you can adjust the sun visor and lower theextender to provide maximum shade.
To expose the vanity mirror, lower the visorextender then lower the mirror cover. Whilethe cover is lowered, the mirror is exposed andlights are illuminated.
To protect front seat occupants from sunlightcoming through the side window, lower thesun visor from the pillar then lower the visorextender.
Sun Visors
Opening and Closing 19

Correct Driving PositionThe seat, head restraint, seat belt and airbagswork together to maximize your safety. Usingthese correctly ensures greater protection.
Position the seat so you can wear the seat beltcorrectly, while being as far away from thefront airbag as possible:
1. Sit upright with both feet on the floor andthe seat back reclined no more than 30degrees.
2. Make sure you can easily reach the pedalsand that your arms are slightly bent whenholding the steering wheel. Your chestshould be at least 10 inches (25 cm) fromthe center of the airbag cover.
3. Place the shoulder section of the seat beltmid-way between your neck and yourshoulder. Fit the lap section of the belttightly across your hips, not across yourstomach.
Adjusting the Driver’s Seat
1. Adjust lumbar support.
Note: This button is also used to movedthe head support up or down (see HeadSupports/Restraints on page 25). Whenyou touch this button, the touchscreendisplays a popup with an image of theseat. If the lumbar area on the image isnot highlighted in blue, touch the lumbararea on the image to specify that youwant to adjust lumbar support. Theselection you choose is retained until youmanually change it.
2. Adjust backrest.3. Move seat forward/backward.4. Adjust the seat’s height and tilt angle.
Warning: Before adjusting a front seat,check that the area around the seat isfree of obstacles (people and objects).
Warning: Do not adjust seats whiledriving. Doing so increases the risk of acollision.
Warning: Riding in a moving vehicle withthe seat back reclined can result in
Front and Rear Seats
20 Model X Owner's Manual
serious injuries in a collision, as you couldslide under the lap belt or be propelledinto the seat belt. Ensure your seat backis reclined no more than 30 degrees whenthe vehicle is moving.
Adjusting Second Row MonopostSeatsA Model X equipped with monopost seats canaccommodate up to three passengers in thesecond row, depending on the option chosenat time of purchase. There are two ways toadjust the position of these seats:
• Touch Controls > Seats on thetouchscreen. Press and hold the icon onthe touchscreen to adjust the associatedseat. White icons indicate that the seatcan be moved in that direction; gray iconsindicate that the seat cannot be movedany farther in that direction.
Note: If necessary, the front seats maymove forward slightly to accommodatethe forward movement of the monopostseats.
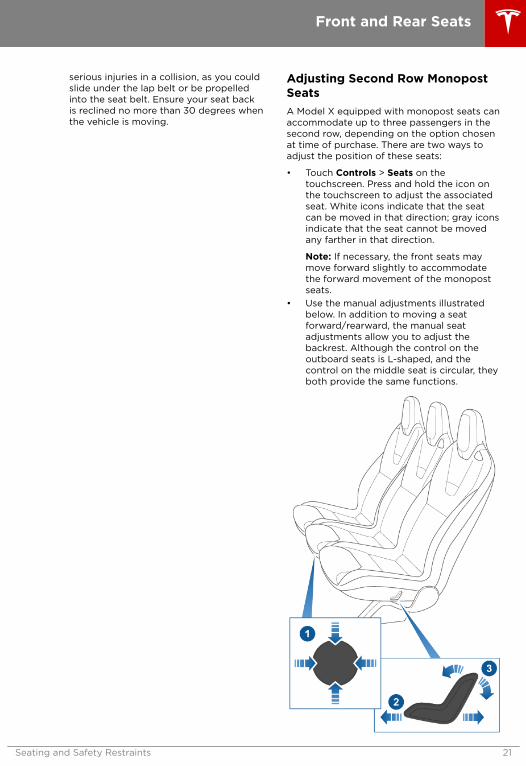
• Use the manual adjustments illustratedbelow. In addition to moving a seatforward/rearward, the manual seatadjustments allow you to adjust thebackrest. Although the control on theoutboard seats is L-shaped, and thecontrol on the middle seat is circular, theyboth provide the same functions.
Front and Rear Seats
Seating and Safety Restraints 21

1. Move seat forward/backward (up/downon the control) and adjust the backrest(left/right on the control).
2. Move seat forward/backward.3. Adjust backrest.
Note: The backrest locks into position whenyou release the lever. If a backrest is notlocked into position when a driving gear isengaged, the instrument panel displays analert for the unlocked backrest. Adjust thebackrest again, ensuring it locks into position.
Warning: Riding in a moving vehicle withthe seat back reclined can result inserious injuries in a collision, as you couldslide under the lap belt or be propelledinto the seat belt. Ensure the backs ofoccupied seats are reclined no more than30 degrees when the vehicle is moving.
Adjusting Second Row Bench SeatsIf your Model X is equipped with two rows ofseats, the second row bench seats canaccommodate up to three passengers. Use themechanical adjustment lever located at theside of each outboard seating position to foldor recline the seatbacks. The bench seat issplit 60/40 so the adjustment lever on the leftside moves the seatbacks for both the left andcenter seats (whereas the lever on the rightmoves the rightmost seatback only). Whilepulling and holding the lever, move theseatback to the desired position, and thenrelease the lever. When returning a seatbackto its upright position, push and pull to ensureit is securely latched into position.
Front and Rear Seats
22 Model X Owner's Manual

If your Model X is equipped with three rows ofseats, in addition to adjusting the seatbacks asdescribed above, you can use the mechanicallever located beneath each outboard seatingposition to move the second row bench seatsforward or rearward. The lever on the left sidemoves the seat for the left and center seats,and the lever on the right moves only the seaton the right, because of the 60/40 split of thebench seats. Pull and hold the lever to movethe seat forward or rearward to the desiredposition, and then release the lever.
Note: You can adjust bench seats using onlythe mechanical levers. (You cannot adjustbench seats on the touchscreen.) A benchseat in five-seat vehicles cannot be movedforward or rearward; a bench seat in seven-seat vehicles can be moved forward andrearward.
Warning: Riding in a moving vehicle withthe seat back reclined can result inserious injuries in a collision, as you couldslide under the lap belt or be propelledinto the seat belt. Ensure the backs ofoccupied seats are reclined no more than30 degrees when the vehicle is moving.
Folding Second Row Bench SeatsYou can fold Model X second row bench seatsflat. Before you fold second row seats flat,remove items from the seats and the rear footwell. To enable the second row seatbacks tofold completely flat, you may need to movethe front seats forward.
To fold second row bench seats flat, simplypull up on the mechanical lever located on theside of each outboard seat, and fold theseatback flat. The adjustment lever on the leftside folds the seatbacks for both the left andcenter seats, whereas the lever on the rightfolds the rightmost seatback only.
Accessing Third Row SeatsAccessing third row seats when monopostseats are installed in the second row:
The Easy Entry button located on the backrestof each second row outboard monopost seatmakes it easy for passengers to enter and exitthe third row seating positions (if equipped).When the Easy Entry setting is enabled (on bydefault), you can tilt and move the associatedoutboard seat fully forward and move thecenter seat forward with a single press of theEasy Entry button. If Easy Entry is disabled(recommended if a child seat is installed in thesecond row), you must hold the Easy Entrybutton to move the seats. Touch Controls >Settings > Vehicle > Easy Entry > OFF todisable single press Easy Entry. After you useEasy Entry to access third row monopostseats, simply press the Easy Entry button onthe backrest of either outboard seat to movethe seats back to their seating position.
Front and Rear Seats
Seating and Safety Restraints 23

Accessing third row seats when bench seatsare installed in the second row:
The Easy Entry button located on the backrestof each second row outboard bench seatmakes it easy for passengers to enter and exitthe third row seating positions (if equipped).Press and release the Easy Entry button onthe left outboard seat to tilt and move thecombined left and center seats forward. Pressand release the Easy Entry button on the rightoutboard seat to tilt and move the right seatforward. After you use Easy Entry to accessthe third row seats, push the bench seats backto their seating position, ensuring the seatsare securely latched into position by pushingand pulling on them.
Note: When bench seats are installed in thesecond row, you access the third row seatssimply by pressing and releasing the EasyEntry button.
In some situations, such as when you areparked on an incline or when the seat trimaffects the movement of the bench seats, afteryou press the Easy Entry button, the benchseats might not move forward completely, andyou may need to push the seats forwardgently until they reach the end of the track.
If a front row seat is positioned such that thesecond row monopost or bench seat willcollide with it during an easy entry operation,it automatically moves forward just enough toaccommodate the forward position of thesecond row seat.
Note: Forward movement of second row seatscancels if an occupant adjusts a second rowseat while it is moving.
Note: When an outboard seat tilts forward foreasy entry, its backrest resets to the neutralposition and may need to be re-adjusted.
Warning: Do not rely on Model X torecognize or accommodate occupantsseated in the vehicle while using the EasyEntry feature. Use Easy Entry only whenseats are unoccupied.
Folding Third Row SeatsIf Model X is equipped with third row seats,remove items from the seats and the rear footwell before folding. To allow the third row seatbacks to fold completely flat, you may need tomove the second row seats forward.
To fold a third row seat, press the buttonlocated in the top outside corner of the seat.The button has two detents.
Front and Rear Seats
24 Model X Owner's Manual

1. Fold head restraint forward.2. Fold seat forward.
Note: If necessary, the second row seat maymove forward slightly to accommodate theforward position of the third row seat.
Note: To raise the seats, hold the button onthe top outside corner of the seat then pullthe seat back upward until it latches intoplace. To confirm the seat back is locked in theupright position, try pulling it forward.
Warning: Always ensure the seat backsare locked in their upright position.Failure to do so increases the risk ofinjury.
Head Supports/RestraintsUse the round button on the seat to move theheadrest up/down. The same button is used toadjust the seat's lumbar support (see Adjusting the Driver’s Seat on page 20).Therefore, when you touch this button, thetouchscreen displays a popup with an imageof the seat. If the head support shown on theimage is not highlighted in blue, touch thisarea on the image to specify that you want toadjust the head support. The selection youchoose is retained until you manually changeit. You can save the head support setting toyour driver profile (see Driver Profiles on page42).
The second and third row seats haveintegrated non-removable head supports thatcan not be adjusted. However, the headsupports in the third row seats can be foldeddown for storage (see Folding Third RowSeats on page 24).
Seat HeatersThe front seats are equipped with heatingpads that operate at three levels from 3(highest) to 1 (lowest). To operate the seatheaters, see Climate Controls on page 123.
If Model X is equipped with the optional coldweather package, you can also control seatheaters in all rear seating positions, as well asheated wipers and washer nozzles bytouching Controls > Cold Weather (see Controls on page 116).
Warning: To avoid burns resulting fromprolonged use, individuals who haveperipheral neuropathy, or whose capacityto feel pain is limited because of diabetes,age, neurological injury, or some othercondition, should exercise caution whenusing the climate control system and seatheaters.
Front and Rear Seats
Seating and Safety Restraints 25

Seat CoversWarning: Do not use seat covers onModel X. Doing so could restrictdeployment of the seat-mounted side airbags if a collision occurs. It can alsoreduce the accuracy of the occupantdetection system.
Front and Rear Seats
26 Model X Owner's Manual

Wearing Seat BeltsUsing seat belts and child safety seats is themost effective way to protect occupants if acollision occurs. Therefore, wearing a seat beltis required by law in most jurisdictions.
Both the driver and passenger seats areequipped with three-point inertia reel seatbelts. Inertia reel belts are automaticallytensioned to allow occupants to movecomfortably during normal driving conditions.To securely hold child safety seats, allpassenger seating positions are equipped withan automatic locking retractor (ALR) that, bypulling the seat belt beyond the lengthneeded for a typical adult occupant, locks thebelt into place until the seat belt is unbuckled(see Installing Seat Belt Retained Child Seatson page 32).
The seat belt reel automatically locks toprevent movement of occupants if Model Xexperiences a force associated with hardacceleration, braking, cornering, or an impactin a collision.
The seat belt reminder on theinstrument panel alerts you if a seatbelt for an occupied seat is notfastened. If the belt remainsunfastened, the reminder flashes andan intermittent chime sounds. If alloccupants are buckled up and thereminder stays on, re-fasten seatbelts to ensure they are correctlylatched. Also remove any heavyobjects (such as a briefcase) from anunoccupied seat. If the reminderlight continues to stay on, contactTesla.
To Fasten a Belt
1. Ensure correct positioning of the seat (see Correct Driving Position on page 20).
2. Draw the belt out smoothly, ensuring thebelt lays flat across the pelvis, chest andmid-point of your collar bone, betweenthe neck and shoulder.
3. Insert the latch plate into the buckle andpress together until you hear a clickindicating it is locked in place.
4. Pull the belt to check that it is securelyfastened.
5. Pull the diagonal part of the belt towardthe reel to remove excess slack.
To Adjust the Shoulder Anchor Height
Model X is equipped with an adjustableshoulder anchor for each front seat to ensurethat the seat belt is positioned correctly. Theseat belt should lay flat across the mid-pointof your collar bone while in the correct drivingposition (see Correct Driving Position on page20). Adjust the height of the shoulder anchorif the seat belt is not positioned correctly:
1. Press and hold the button on the shoulderanchor to release the locking mechanism.
2. While holding the button, move theshoulder anchor up or down as necessaryso that the seat belt is positionedcorrectly.
3. Release the button on the shoulder anchorso that it locks into position.
4. Without pressing the button, pull on theseat belt webbing and attempt to movethe shoulder anchor downwards to checkthat it is locked into position.
Seat Belts
Seating and Safety Restraints 27

Warning: Ensure that the seat belt ispositioned correctly and that theshoulder anchor is locked into positionbefore driving. Riding in a moving vehiclewith the seat belt positioned incorrectlyor with the shoulder anchor not lockedinto position can reduce the effectivenessof the seat belt in a collision.
To Release a Belt
Hold the belt near the buckle to prevent thebelt from retracting too quickly, then press thebutton on the buckle. The belt retractsautomatically. Ensure there is no obstructionthat prevents the belt from fully retracting.The belt should not hang loose. If a seat beltdoes not fully retract, contact Tesla.
Wearing Seat Belts When PregnantDo not put the lap or shoulder sections of theseat belt over the abdominal area. Wear thelap section of the belt as low as possibleacross the hips, not the waist. Position theshoulder portion of the belt between thebreasts and to the side of the abdomen.Consult your doctor for specific guidance.
Warning: Never place anything betweenyou and the seat belt to cushion theimpact in the event of a collision.
Seat Belt Pre-tensionersThe front seat belts are equipped withpre‑tensioners that work in conjunction withthe airbags in a severe frontal collision. Thepre‑tensioners automatically retract both theseat belt anchor and the seat belt webbing,reducing slack in both the lap and diagonalportions of the belts, resulting in reducedforward movement of the occupant.
The rear outboard seats are equipped withshoulder pre-tensioners to retract the seatbelt webbing to reduce forward movement ofthe occupant.
If the pre-tensioners and airbags did notactivate in an impact, this does not mean theymalfunctioned. It usually means that thestrength or type of force needed to activatethem was not present.
Warning: Once the seat belt pre-tensioners have been activated, they mustbe replaced. After any collision, have theairbags, seat belt pre-tensioners and anyassociated components checked and, ifnecessary, replaced.
Testing Seat BeltsTo confirm that seat belts are operatingcorrectly, perform these three simple checkson each seat belt.
1. With the seat belt fastened, give thewebbing nearest the buckle a quick pull.The buckle should remain securely locked.
2. With the belt unfastened, unreel thewebbing to its limit. Check that unreelingis free from snags, and visually check thewebbing for wear. Allow the webbing toretract, checking that retraction is smoothand complete.
Seat Belts
28 Model X Owner's Manual

3. With the webbing half unreeled, hold thetongue plate and pull forward quickly. Themechanism should lock automatically andprevent further unreeling.
If a seat belt fails any of these tests, contactTesla immediately.
For information about cleaning seat belts, see Seat Belts on page 165.
Seat Belt WarningsWarning: Seat belts should be worn by alloccupants at all times, even if driving fora very short distance. Failure to do soincreases the risk of injury or death if acollision occurs.
Warning: Secure small children in asuitable child safety seat (see ChildSafety Seats on page 30). Always followthe child safety seat manufacturer'sinstructions when installing.
Warning: Ensure that all seat belts areworn correctly. An improperly worn seatbelt increases the risk of injury or death ifa collision occurs.
Warning: Do not wear seat belts overhard, fragile or sharp items in clothing,such as pens, keys, eyeglasses, etc. Thepressure from the seat belt on such itemscan cause injury.
Warning: Seat belts should not be wornwith any part of the strap twisted.
Warning: Each seat belt assembly mustbe used by one occupant only. It isdangerous to put a seat belt around achild being carried on an occupant’s lap.
Warning: Seat belts that have been wornin a collision must be inspected orreplaced by Tesla, even if damage to theassembly is not obvious.
Warning: Seat belts that show signs ofwear (such as fraying), or have been cutor damaged in any way, must be replacedby Tesla.
Warning: Avoid contaminating a seatbelt’s components with any chemicals,liquids, grit, dirt or cleaning products. If aseat belt fails to retract or latch into thebuckle, it must be replaced immediately.Contact Tesla.
Warning: Do not make modifications oradditions that can prevent a seat beltmechanism from taking up slack, or thatcan prevent a seat belt from being
adjusted to remove slack. A slack beltgreatly reduces occupant protection.
Warning: Do not make modifications thatcan interfere with the operation of a seatbelt, or that can cause a seat belt tobecome inoperable.
Warning: When seat belts are not in use,they should be fully retracted and nothanging loose. If a seat belt does not fullyretract, contact Tesla.
Seat Belts
Seating and Safety Restraints 29

Guidelines for Seating ChildrenYour Model X seat belts in all passenger seating positions are designed for adults and largerchildren. You must restrain infants and small children in the second and rear row seats only, andyou must use a suitable child safety seat appropriate for the child’s age, weight, and size.
Never use child safety seats in the front row passenger seat.
Warning: Never seat a child on a seat with an ACTIVE AIRBAG in front of it. DEATH orSERIOUS INJURY to the child can occur.
Note: If your Model X is equipped with second row monopost seats, it is recommended that youdisable Easy Entry whenever installing a child seat in the second row (see Accessing Third RowSeats on page 23).
Refer to the following label fitted to the sun visors.
Note: The images shown below are representative only and may not be identical to the labels inyour vehicle.
United States:
Canada:
Mexico:
Child Safety Seats
30 Model X Owner's Manual

Choosing a Child Safety SeatAll children age 12 and under should ride in the second and rear row seats. Always use a childsafety seat suitable for a young child’s age and weight.
Infants Toddlers Youngchildren
Age Birth to 1 year* Over 1 year* 4 years andolder, andless than 57in. (145 cm)tall
Weight Up to at least 20 lbs (9 kg)* Over 20 lbs (9 kg) (minimum)and up to 40 lbs (18 kg)*
Over 40 lbs(18 kg)
Type of childsafety seat
Rear facing (or convertible) Forward facing (orconvertible)*
Seat beltretainedboosterseat
Seat position Rear facing only* Forward facing* Forwardfacing
Recommendedattachmentmethod
If combined weight of childand safety seat is up to65 lbs (29 kg), attach usingeither LATCH** (lower anchoronly) or the seat belt only.***If combined weight of childand safety seat is over 65 lbs(29 kg), attach using the seatbelt only.***
If combined weight of childand safety seat is up to 65 lbs(29 kg), attach using eitherLATCH** (both lower anchorsand top tether anchor), or theseat belt and upper tetherstrap.*** If combined weight ofchild and safety seat is over65 lbs (29 kg), attach using theseat belt and upper tetherstrap.***
Attachboosterseats usingthe seatbelt only.
* Many child safety seats currently available allow children to ride rear-facing using the childsafety seat’s integrated 5-point harness for a longer period of time BASED UPON SPECIFICHEIGHT AND WEIGHT LIMITS. Keep your child in a rear facing seat for as long as possible.CHECK THE CHILD SAFETY SEAT MANUFACTURER’S INSTRUCTIONS AND CAREFULLYFOLLOW ALL INSTRUCTIONS
** LATCH - Lower Anchors and Tethers for Children. In Canada, this is also called LowerUniversal Anchorage System (LUAS), or CANFIX.
*** Subject to instructions provided by the child safety seat manufacturer.
Warning: Laws that govern how and where children should be carried when traveling in avehicle are subject to change. It is the driver’s responsibility to keep up to date on, andcomply with, all current regulations in the region(s) where Model X is driven. To check thechild passenger safety laws for states in the U.S., go to: http://www.ghsa.org/html/stateinfo/laws/childsafety_laws.html.
Child Safety Seats
Seating and Safety Restraints 31
Seating Larger ChildrenIf a child is too large to fit into a child safetyseat, but too small to safely fit into thestandard seat belts, use a booster seatappropriate for the child’s age and size.Carefully follow the manufacturer’sinstructions to secure the booster seat.
Installing Child Safety SeatsThere are two general methods used to installchild safety seats:
• Seat belt retained - these seats aresecured using the vehicle’s seat belts (see Installing Seat Belt Retained Child Seatson page 32).
• LATCH retained - these seats can attachto anchor bars built into the vehicle’s rearseats (see Installing LATCH Child Seats onpage 32).
Check the child safety seat manufacturer’sinstructions and the table at Child SafetySeats on page 30 to determine whichinstallation method to use. Some child safetyseats can be installed using either method.Always follow the child safety seatmanufacturer’s instructions.
Installing Seat Belt Retained ChildSeatsFirst, make sure that the child safety seat isappropriate for the weight, height, and age ofthe child.
Avoid dressing the child in bulky clothing anddo not place any objects between the childand the restraint system.
Adjust harnesses for every child, every trip.
To securely hold child safety seats, allpassenger seating positions are equipped withan automatic locking retractor (ALR) that, bypulling the seat belt beyond the lengthneeded for a typical adult occupant, locks thebelt into place until the seat belt is unbuckledand the webbing is fully retracted. The ALRmechanism operates as a ratchet, winding inslack and preventing the seat belt fromextending any further until it has beencompletely rewound. When installing a childsafety seat, engage the belt's automaticlocking retractor by pulling the seat beltwebbing until it is fully extended. The ALRsystem engages only when the seat belt is atits maximum extension point.
Note: An automatic locking retractordisengages only when the seat belt isunbuckled and fully retracted. The belt canthen be worn as a normal belt, sliding freely inand out and locking tight only in anemergency. Once disengaged, the belt mustbe fully extended to re-engage the lockingmechanism whenever you install a child safetyseat.
Always follow the detailed instructionsprovided by the child safety seatmanufacturer. General guidelines are providedbelow.
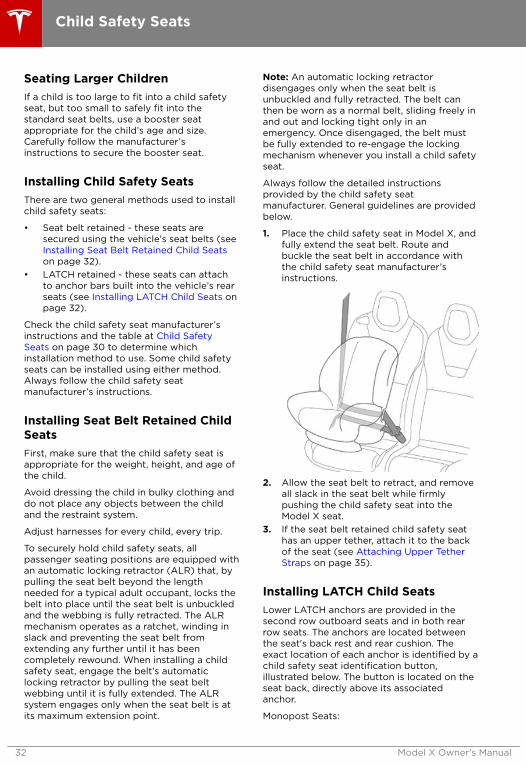
1. Place the child safety seat in Model X, andfully extend the seat belt. Route andbuckle the seat belt in accordance withthe child safety seat manufacturer’sinstructions.
2. Allow the seat belt to retract, and removeall slack in the seat belt while firmlypushing the child safety seat into theModel X seat.
3. If the seat belt retained child safety seathas an upper tether, attach it to the backof the seat (see Attaching Upper TetherStraps on page 35).
Installing LATCH Child SeatsLower LATCH anchors are provided in thesecond row outboard seats and in both rearrow seats. The anchors are located betweenthe seat's back rest and rear cushion. Theexact location of each anchor is identified by achild safety seat identification button,illustrated below. The button is located on theseat back, directly above its associatedanchor.
Monopost Seats:
Child Safety Seats
32 Model X Owner's Manual

Bench Seats:
In the second row, install LATCH child safetyseats in the outboard seating positions only.Use only a seat belt retained seat in the centerposition.
Note: If Model X is equipped with two seats inthe second row, both seats support the use ofLATCH child safety seats.
Monopost Seats:
Child Safety Seats
Seating and Safety Restraints 33

Bench Seats:
In the third row (if equipped), you can installLATCH child safety seats in both seatinglocations.
To install a LATCH child safety seat, slide thesafety seat latches onto the anchor bars untilthey click into place. Carefully read and followthe instructions provided by the child safetyseat manufacturer.
Monopost Seats:
Bench Seats:
Once installed, test the security of theinstallation before seating a child. Attempt totwist the child safety seat from side to sideand try to pull it away from the seat, thencheck to ensure the anchors remain securelyin place.
Child Safety Seats
34 Model X Owner's Manual

Note: Lower LATCH anchors should not beused with child seats or booster seats thathave an integrated safety belt in situationswhere the combined weight of the child plusthe child restraint is more than 65 lbs (29 kg).In these situations, use the safety belt instead.
Attaching Upper Tether StrapsIf an upper tether strap is provided, attach itshook to the anchor point located on the backof the second and third row seats.
Note: The location of anchor points may notbe readily visible but can be found byidentifying a slice in the seat's material.
Warning: Tighten upper tether strapsaccording to the instructions provided bythe manufacturer of the child safety seat.
Warning: USE ONLY SEAT BELTRETAINED CHILD SAFETY SEATS IN THECENTER SEATING POSITION.
For dual-strap tethers, position a strap oneach side of the head restraint.
Dual Straps - Second Row Monopost Seats:
Dual Straps - Second Row Bench Seats:
Dual Straps - Third Row Seats:
Child Safety Seats
Seating and Safety Restraints 35
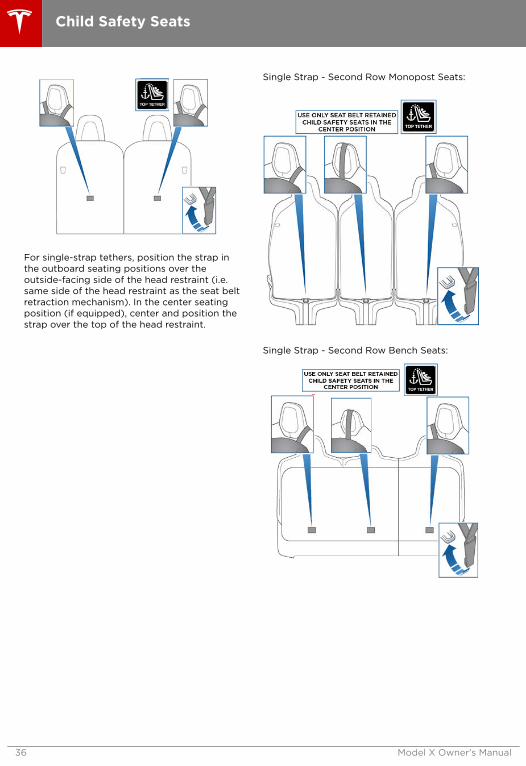
For single-strap tethers, position the strap inthe outboard seating positions over theoutside-facing side of the head restraint (i.e.same side of the head restraint as the seat beltretraction mechanism). In the center seatingposition (if equipped), center and position thestrap over the top of the head restraint.
Single Strap - Second Row Monopost Seats:
Single Strap - Second Row Bench Seats:
Child Safety Seats
36 Model X Owner's Manual
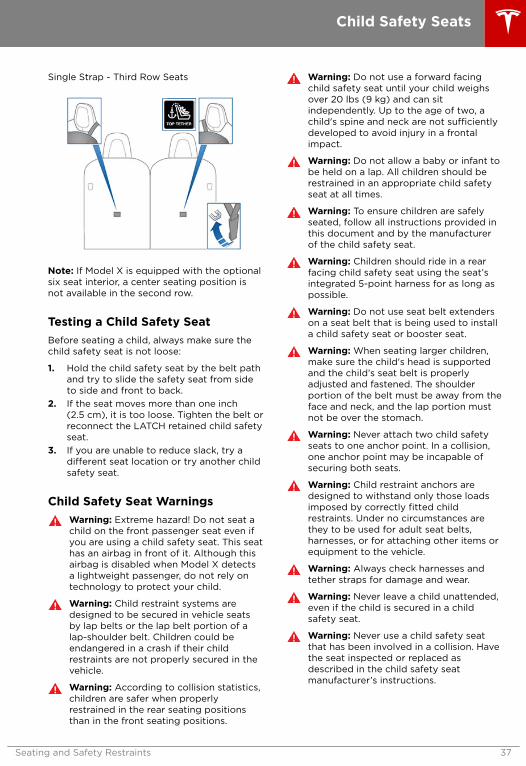
Single Strap - Third Row Seats
Note: If Model X is equipped with the optionalsix seat interior, a center seating position isnot available in the second row.
Testing a Child Safety SeatBefore seating a child, always make sure thechild safety seat is not loose:
1. Hold the child safety seat by the belt pathand try to slide the safety seat from sideto side and front to back.
2. If the seat moves more than one inch(2.5 cm), it is too loose. Tighten the belt orreconnect the LATCH retained child safetyseat.
3. If you are unable to reduce slack, try adifferent seat location or try another childsafety seat.
Child Safety Seat WarningsWarning: Extreme hazard! Do not seat achild on the front passenger seat even ifyou are using a child safety seat. This seathas an airbag in front of it. Although thisairbag is disabled when Model X detectsa lightweight passenger, do not rely ontechnology to protect your child.
Warning: Child restraint systems aredesigned to be secured in vehicle seatsby lap belts or the lap belt portion of alap-shoulder belt. Children could beendangered in a crash if their childrestraints are not properly secured in thevehicle.
Warning: According to collision statistics,children are safer when properlyrestrained in the rear seating positionsthan in the front seating positions.
Warning: Do not use a forward facingchild safety seat until your child weighsover 20 lbs (9 kg) and can sitindependently. Up to the age of two, achild's spine and neck are not sufficientlydeveloped to avoid injury in a frontalimpact.
Warning: Do not allow a baby or infant tobe held on a lap. All children should berestrained in an appropriate child safetyseat at all times.
Warning: To ensure children are safelyseated, follow all instructions provided inthis document and by the manufacturerof the child safety seat.
Warning: Children should ride in a rearfacing child safety seat using the seat’sintegrated 5-point harness for as long aspossible.
Warning: Do not use seat belt extenderson a seat belt that is being used to installa child safety seat or booster seat.
Warning: When seating larger children,make sure the child's head is supportedand the child’s seat belt is properlyadjusted and fastened. The shoulderportion of the belt must be away from theface and neck, and the lap portion mustnot be over the stomach.
Warning: Never attach two child safetyseats to one anchor point. In a collision,one anchor point may be incapable ofsecuring both seats.
Warning: Child restraint anchors aredesigned to withstand only those loadsimposed by correctly fitted childrestraints. Under no circumstances arethey to be used for adult seat belts,harnesses, or for attaching other items orequipment to the vehicle.
Warning: Always check harnesses andtether straps for damage and wear.
Warning: Never leave a child unattended,even if the child is secured in a childsafety seat.
Warning: Never use a child safety seatthat has been involved in a collision. Havethe seat inspected or replaced asdescribed in the child safety seatmanufacturer’s instructions.
Child Safety Seats
Seating and Safety Restraints 37

Location of AirbagsAirbags are located in the approximate areas shown here. Airbag warning information is printedon the sun visors.
Model X is equipped with an airbag and lap/shoulder belt at both front outboard seatingpositions. The airbag is a supplemental restraint at those seating positions. All occupants,including the driver, should always wear their seat belts whether or not an airbag is also providedat their seating position to minimize the risk of severe injury or death in the event of a crash.
1. Knee airbags2. Front airbags3. Curtain airbags4. Seat-mounted side airbags5. Door-mounted airbags
Airbags
38 Model X Owner's Manual

How the Airbags WorkAirbags inflate when sensors detect an impactthat exceeds deployment thresholds. Thesethresholds are designed to predict the severityof a crash in time for the airbags to helpprotect the vehicle's occupants.
Airbags inflate instantly with considerableforce accompanied by a loud noise. Theinflated bag, together with the seat belts,limits movement of occupants to reduce therisk of injury.
Front airbags are not ordinarily designed toinflate in rear collisions, rollovers, minor frontor side collisions, heavy braking, or drivingover bumps and potholes. Therefore,significant superficial damage can occur tothe vehicle without the airbags inflating or,conversely, a relatively small amount ofstructural damage can cause airbags to inflate.
If you are planning to modify your vehicle for aperson with disabilities in a way that mayaffect the airbag system, contact Tesla.
Types of AirbagsModel X has the following types of airbags:
• Advanced front airbags: The front airbagsare designed to reduce airbag relatedinjuries if children or small adults areriding in the front seats. On the driver’sside, the front airbag works with a seatposition sensor that adjusts the inflationlevel based on the seating position of theoccupant. On the passenger’s side, theairbag responds to a sensing system in theseat that determines whether or not thepassenger side front airbag inflates, andoptimizes the inflation level based on theweight of the occupant (described below).Follow all warnings related to seating achild on the front passenger seat.
• Knee airbags: Knee airbags and the frontairbags work together. The knee airbagslimit the forward motion of the front seatoccupants by restricting leg movement,thereby positioning the occupants so thatthe front airbags work more effectively.
• Seat-mounted side airbags: There is aseat-mounted side airbag in each of thefront driver, front passenger and secondrow outboard seats. Seat-mounted sideairbags protect the thorax region of thetorso and the pelvis. They inflate in theevent of severe side impact or severeoffset frontal impact. The seat-mountedside airbags on both the impacted andnon-impacted side of the vehicle willinflate. When the backrest of an outboardseat is fully folded in the forward position,its associated side airbag does not inflate.
• Curtain airbags: There is a curtain airbagon each side of Model X in the front roof-rail. Curtain airbags help protect the headand typically inflate in the event of asevere side impact, a severe offset frontalimpact, or if the vehicle rolls over. Curtainairbags on both the impacted and non-impacted side of the vehicle will inflate.
• Door-mounted airbags: There is an airbagon each side of Model X mounted in thetrim on the falcon wing doors. These arethe same as the curtain airbags in thatthey help protect the head and typicallyinflate in the event of a severe side impact,a severe offset frontal impact, or if thevehicle rolls over. The door-mountedairbags on both the impacted and non-impacted side of the vehicle will inflate.
Airbags
Seating and Safety Restraints 39

Passenger Front AirbagModel X has an occupancy sensor in the frontpassenger seat that controls the status of theairbags based on the weight of the occupant.If the passenger airbag is OFF, it will notinflate when a collision occurs, and thepassenger airbag off indicator displays in thetop right corner of the touchscreen. If thepassenger airbag is ON, it will inflate when acollision occurs, and its status does notdisplay in the top right corner of thetouchscreen.
Note: The occupancy sensor system meets theregulatory requirement of FMVSS 208 andautomatically detects when inflating thepassenger front airbags would be unnecessaryor potentially harmful.
Weight in frontpassenger seat
Passenger airbagstatus
Empty OFF
Up to 20 lbs/9 kg OFF
20-100 lbs/9-45 kg* OFF* or ON**
Over 100 lbs/45 kg ON**
*Values are approximate. A weight detectednear the threshold can cause the airbagstatus to occasionally turn on and offdepending on seating position andphysique.
**The absence of the passenger airbag offindicator in the top right corner of thetouchscreen indicates that the passengerairbag is ON and will inflate in the event of acollision.
Note: It takes approximately six seconds afteryou power on Model X for the occupancysensor to report accurate status of the frontpassenger airbag. As a result, when you firstpower on Model X, even in situations when itshould be OFF because the passenger seat iseither empty or carrying a weight of 20 lbs (9kg) or less, the touchscreen can take up to sixseconds to display the passenger airbag off
indicator. If it fails to do so, contact Teslaservice immediately and seat passengers inthe rear seating positions only.
If the passenger airbag is permanently off,even when the seat is empty, contact Teslaimmediately.
To make sure the sensing system can correctlydetect occupancy status, eliminate thefollowing:
• Objects lodged under the seat.• Heavy objects sitting on the seat
(briefcase, large purse).• Objects wedged between the seat back
and seat cushion.• Cargo interfering with the seat.• After market items attached to, or sitting
on, the seat (covers, mats, blankets, etc.).
These conditions can interfere with theoccupancy sensor. If you have eliminated theabove possibilities, and the airbag status is stillincorrect, ask passengers to ride in the rearseats and contact Tesla to have the airbagsystem checked.
Note: The front passenger seat’s sensingsystem affects the operation of the passengerfront and side airbags only. The otherpassenger airbags are not affected.
Warning: Never seat a child on the frontpassenger seat, even if the passengerairbag is off. All occupants age 12 andunder must ride in the second and rearrow seats (see Child Safety Seats on page30).
Warning: To ensure accuracy of theoccupant detection system, do not makeany modifications to the front passengerseat.
Warning: Do not use seat covers onModel X. Doing so could restrictdeployment of the seat-mounted side airbags if a collision occurs. It can alsoreduce the accuracy of the occupantdetection system, if equipped.
Inflation EffectsWarning: When airbags inflate, a finepowder is released. This powder canirritate the skin and should be thoroughlyflushed from the eyes and from any cutsor abrasions.
Airbags
40 Model X Owner's Manual

After inflation, the airbags deflate to provide agradual cushioning effect for the occupantsand to ensure the driver’s forward vision is notobscured.
If airbags have inflated, or if your vehicle hasbeen in a collision, always have the airbags,seat belt pre-tensioners and any associatedcomponents checked and, if necessary,replaced by Tesla.
In a collision, in addition to the airbagsinflating:
• Doors and liftgate unlock.• Hazard warning lights turn on.• Interior lights turn on.• High voltage is disabled.
To restore Battery power, use the touchscreento manually power off Model X (see PoweringOff on page 48), then press the brake topower it back on again.
Airbag Warning Indicator
The airbag indicator on theinstrument panel remains lit if theairbag system is malfunctioning. Theonly time this indicator should lightup is briefly when Model X firstpowers up, in which case it turns offwithin a few seconds. If it remains lit,contact Tesla immediately and donot drive.
Airbag WarningsWarning: Do not place objects over ornear airbags because any such objectscould cause harm if the vehicle is in acrash severe enough to cause the airbagto inflate.
Warning: All occupants, including thedriver, should always wear their seat belts,whether or not an airbag is also providedat their seating position, to minimize therisk of severe injury or death in the eventof a collision.
Warning: Front seat occupants shouldnot place their arms over the airbagmodule, as an inflating airbag can causefractures or other injuries.
Warning: Airbags inflate withconsiderable speed and force, which cancause injury. To limit injuries, ensure thatoccupants are wearing seat belts and arecorrectly seated, with the seat positioned
as far back as possible. The NationalHighway Traffic Safety Administration(NHTSA) recommends a minimumdistance of 10" (25 cm) between anoccupant’s chest and an airbag.
Warning: Do not use a child safety seat orseat young children on a seat with anoperational airbag in front of it. Doing socan cause injury or death if the airbaginflates.
Warning: To ensure correct inflation ofthe side airbags, maintain anunobstructed gap between an occupant’storso and the side of Model X.
Warning: Passengers shouldn't lean theirheads against doors. Doing so can causeinjury if a curtain airbag inflates.
Warning: Do not allow passengers toobstruct the operation of an airbag byplacing feet, knees or any other part ofthe body on or near an airbag.
Warning: Do not attach or place objectson or near the front airbags, the side ofthe front seats, the headliner at the sideof the vehicle, or any other airbag coverthat could interfere with inflation of anairbag. Objects can cause serious injury ifthe vehicle is in a collision severe enoughto cause the airbag to inflate.
Warning: Following inflation, some airbagcomponents are hot. Do not touch untilthey have cooled.
Airbags
Seating and Safety Restraints 41

Creating a Driver ProfileYou only need to adjust Model X once. Whenyou first adjust the driver’s seat, steeringwheel, or driver’s side mirror, the touchscreenprompts you to create a driver profile to savethese adjustments. Your profile also savessome of the preferences you make using thetouchscreen’s Settings window.
To add a new driver profile, touch Controls >Settings > Driver Profiles (you can also touchthe driver icon on the touchscreen's statusbar). Then touch Add New Driver, type thedriver's name and touch Create Profile. Followthe onscreen instructions to save the seatingposition to the driver profile. You can alsocheck the Use Easy Entry checkbox if youwant to save (or use existing) Easy Entrysettings in which the driver's seat and thesteering wheel are automatically adjusted tomake it easy to enter and exit Model X(described below).
If you change the position of the steeringwheel, driver’s seat, or driver’s side mirrorafter you have saved or chosen a driverprofile, the touchscreen prompts you to savethe new position or restore the previouslysaved position (other settings areautomatically saved). To change a settingwithout saving or restoring, just ignore theprompt.
To adjust Model X based on a driver’s profile,touch the driver profile icon and choose thedriver name. The saved adjustments areautomatically made.
Note: Valet Mode is a built-in driver profileused to limit speed and restrict access tosome Model X features (see Valet Mode onpage 43).
Easy Entry
You can define an Easy Entry setting thatmoves the steering wheel and driver's seat tomake it easy to enter and exit Model X. Anydriver can use the Easy Entry setting byassociating it with their driver's profile. Whenthe Easy Entry setting is associated with adriver's profile, the steering wheel and driver'sseat automatically adjust when the park gearis engaged, allowing an easy exit. Whenreturning to the vehicle and stepping on thebrake pedal, settings automatically adjustback to the settings used by the most recentdriver profile (or based on the key if it's linkedto a driver profile).
To set up Easy Entry, touch Controls >Settings > Driver Profiles (or touch the drivericon on the touchscreen's status bar). Choosea driver profile, check the Easy Entrycheckbox and follow the onscreen instructionsto save how you want the steering wheel andseat positioned when entering and exitingModel X. Once created, the Easy Entry profileappears on the driver profile list and anydriver can use these settings to enter and exit.
To use Easy Entry with a driver profile, ensurethe Use Easy Entry checkbox is checked.
Restoring a Driver’s Profile
To adjust Model X based on adriver’s profile, touch the driverprofile icon on the touchscreen'sstatus bar. Then choose the driverand Model X is adjusted based onthe settings that have been saved tothe chosen driver profile.
See What's SavedTo see what settings are associated with adriver profile, touch Controls > Settings >Driver Profiles. Then touch See what’s saved.A popup window lists all the settings that aresaved to driver profiles.
Note: The settings that are associated withdriver profiles may vary depending on theversion of software currently installed on yourModel X
Linking a Driver Profile to a KeyYou can link a driver profile to a specific key toallow Model X to automatically select thecorrect driver profile when the linked key isdetected as you approach the vehicle andopen the driver's door. To link a driver profileto a key, enter Model X with the key and touchControls > Settings > Driver Profiles on thevehicle's touchscreen. Select the driver profileyou would like to link to the key, then touchLink to Key Fob.
Note: Model X only detects one key at a time.The driver profile is linked to the key that isdetected by the vehicle at that time.Therefore, if you want to link driver profiles tomultiple keys, ensure that only the key thatyou would like to link the driver profile to iswithin detection range while performing thelinking procedure. Move all other keys outsideof the detection range (at least three feet (onemeter) away from Model X).
Driver Profiles
42 Model X Owner's Manual

Note: Model X can support up to eight linkedkeys. However, a driver profile can only belinked to one key.
To remove the link between a driver profileand key, touch Controls > Settings > DriverProfiles. Select the driver profile, then touchthe X next to Linked to Key Fob.
Valet ModeWhen Model X is in Valet Mode, the followingrestrictions apply:
• Speed is limited to 70 mph (113 km/h).• Maximum acceleration and power are
limited.• Front trunk and glove box are locked.• Home and Work locations are not
available in the navigation system.• Voice commands are disabled.• Cruise control is disabled.• Most status bar functions are disabled.• The Mobile Access setting is disabled.• HomeLink (if applicable in your market
region) is not accessible.• Driver Profiles are not accessible.• Summon is disabled.• Wi-Fi and Bluetooth are disabled. When
Model X is in Valet Mode, you cannot pairnew Bluetooth devices or view or deleteexisting paired devices.
Note: If a Bluetooth paired device or aknown Wi-Fi network is within operatingrange (approximately 30 feet or 9 meters)of Model X in Valet Mode, Model X willconnect to it.
Starting Valet Mode
With Model X in Park, touch the driver profileicon, located to the left of the Tesla "T" on thetouchscreen's status bar, then touch ValetMode.
The first time you start Valet Mode, you will beprompted to establish a 4-digit PIN that youwill use to cancel Valet Mode.
When Valet mode is active, the instrumentpanel displays the word Valet above thedriving speed and the Valet Mode driverprofile displays on the touchscreen's statusbar.
You can also use the Model X mobile app tostart and cancel Valet Mode (providedModel X is in Park). When using the mobileapp, you do not need to enter a PIN becauseyou are already required to log into the appusing your Tesla Account credentials.
Note: If you forget your PIN, reset it frominside Model X by entering your Tesla Accountcredentials (which also cancels Valet Mode).You can also reset your PIN using the Model Xmobile app.
Warning: Do not use Valet Mode whentowing a trailer. Torque limitations canmake it difficult for Model X to pull atrailer up a hill.
Canceling Valet Mode
With Model X in Park, touch the Valet Modedriver icon on the touchscreen's status bar,then enter the 4-digit PIN.
When you cancel Valet Mode, all settingsassociated with the most recently used driverprofile and climate control settings arerestored, and all features are available.
Note: You do not need to enter a PIN tocancel Valet Mode from the mobile app.
Driver Profiles
Driving 43
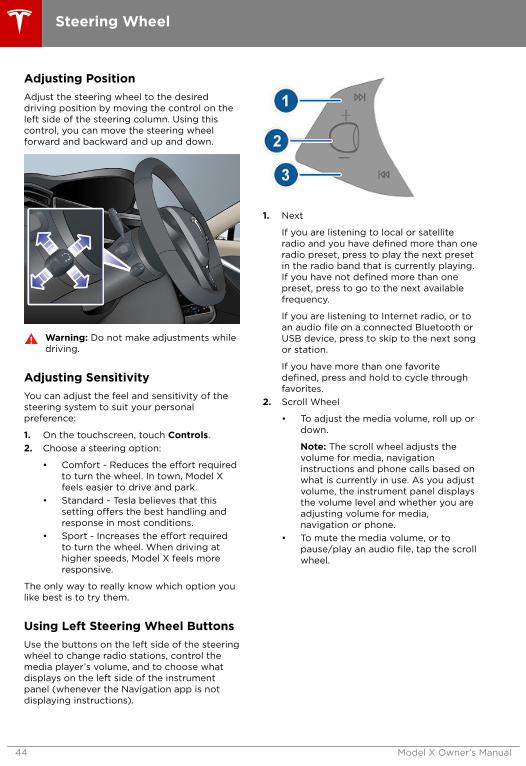
Adjusting PositionAdjust the steering wheel to the desireddriving position by moving the control on theleft side of the steering column. Using thiscontrol, you can move the steering wheelforward and backward and up and down.
Warning: Do not make adjustments whiledriving.
Adjusting SensitivityYou can adjust the feel and sensitivity of thesteering system to suit your personalpreference:
1. On the touchscreen, touch Controls.2. Choose a steering option:
• Comfort - Reduces the effort requiredto turn the wheel. In town, Model Xfeels easier to drive and park.
• Standard - Tesla believes that thissetting offers the best handling andresponse in most conditions.
• Sport - Increases the effort requiredto turn the wheel. When driving athigher speeds, Model X feels moreresponsive.
The only way to really know which option youlike best is to try them.
Using Left Steering Wheel ButtonsUse the buttons on the left side of the steeringwheel to change radio stations, control themedia player’s volume, and to choose whatdisplays on the left side of the instrumentpanel (whenever the Navigation app is notdisplaying instructions).
1. Next
If you are listening to local or satelliteradio and you have defined more than oneradio preset, press to play the next presetin the radio band that is currently playing.If you have not defined more than onepreset, press to go to the next availablefrequency.
If you are listening to Internet radio, or toan audio file on a connected Bluetooth orUSB device, press to skip to the next songor station.
If you have more than one favoritedefined, press and hold to cycle throughfavorites.
2. Scroll Wheel
• To adjust the media volume, roll up ordown.
Note: The scroll wheel adjusts thevolume for media, navigationinstructions and phone calls based onwhat is currently in use. As you adjustvolume, the instrument panel displaysthe volume level and whether you areadjusting volume for media,navigation or phone.
• To mute the media volume, or topause/play an audio file, tap the scrollwheel.
Steering Wheel
44 Model X Owner's Manual

• To choose what displays on the leftside of the instrument panel, press thescroll wheel briefly until the availableoptions are displayed. Roll the scrollwheel to choose Empty, Car Status,Clock, Media, Energy or Trips, etc.When the option you want ishighlighted, tap the scroll wheel.
Note: The option you choose todisplay using the left scroll wheel isretained until you manually change it.It is also saved in your driver profile.
Note: Car status displays informationsuch as status of doors and trunks,and on newer model vehicles, the tirepressure measurements.
• To restart the touchscreen, hold bothscroll wheel buttons for approximately5 seconds. See Restarting theTouchscreen on page 48.
3. Previous
Same as described above for Next, exceptit skips to the previous song or station. Ifyou have more than one favorite defined,press and hold to cycle through favorites.
Note: Regardless of how you customize theleft side of the instrument panel, itautomatically changes to display navigationinstructions (if applicable), or to let you knowif a door or trunk is open when Model X is in adriving gear.
Using Right Steering WheelButtonsUse the buttons on the right side of thesteering wheel to access call options while ona phone call, to choose what displays on theright side of the instrument panel, to adjustModel X features, and to use voice commands.
Note: Whenever you receive or make a phonecall, the right side of the instrument panelautomatically displays call options to help youeasily handle phone calls on your Bluetooth-connected phone.
1. Press to use a voice command to call acontact, navigate, or listen to Internetmusic. When you hear the tone, speakyour command. Press again to end thevoice command, or simply stop speaking.For details, see Using Voice Commands onpage 46.
2. Scroll Wheel
• During a phone call, touch the scrollwheel to display call options thatallow you to perform an action on thecall.
• Roll the wheel to adjust the mostrecently used feature from the featurelist (see Menu button).
• To choose what displays on the rightside of the instrument panel, press thescroll wheel briefly until the availableoptions are displayed. Roll the scrollwheel to choose Empty, Car Status,Clock, Media, Energy or Trips, etc.When the option you want ishighlighted, tap the scroll wheel.
Note: Car status displays informationsuch as status of doors and trunks,and on newer model vehicles, the tirepressure measurements.
Note: The option you choose todisplay using the right scroll wheel isretained until you manually change it.It is also saved in your driver profile.
• To restart the touchscreen, hold bothscroll wheel buttons for approximately5 seconds. See Restarting theTouchscreen on page 48.
3. Menu button
Press to display a menu that allows you tocontrol the following Model X features:
• Temperature. Roll the wheel tochange the driver side temperature, orpress the wheel to turn the climatecontrol system on and off.
Steering Wheel
Driving 45
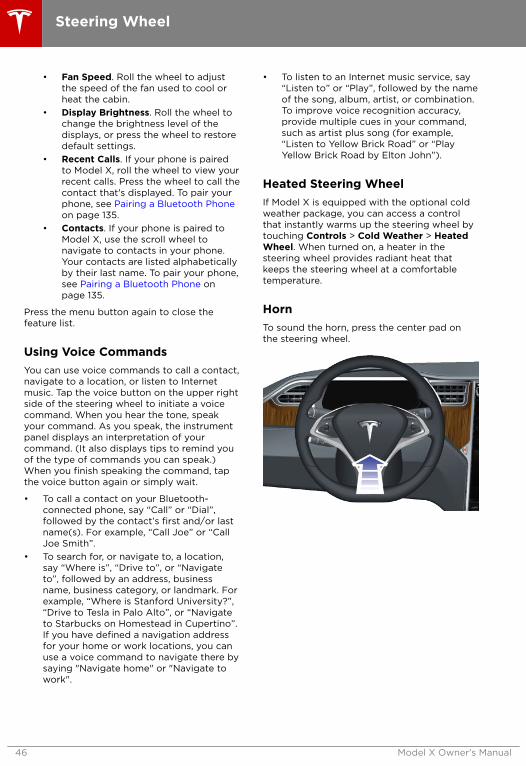
• Fan Speed. Roll the wheel to adjustthe speed of the fan used to cool orheat the cabin.
• Display Brightness. Roll the wheel tochange the brightness level of thedisplays, or press the wheel to restoredefault settings.
• Recent Calls. If your phone is pairedto Model X, roll the wheel to view yourrecent calls. Press the wheel to call thecontact that's displayed. To pair yourphone, see Pairing a Bluetooth Phoneon page 135.
• Contacts. If your phone is paired toModel X, use the scroll wheel tonavigate to contacts in your phone.Your contacts are listed alphabeticallyby their last name. To pair your phone,see Pairing a Bluetooth Phone onpage 135.
Press the menu button again to close thefeature list.
Using Voice CommandsYou can use voice commands to call a contact,navigate to a location, or listen to Internetmusic. Tap the voice button on the upper rightside of the steering wheel to initiate a voicecommand. When you hear the tone, speakyour command. As you speak, the instrumentpanel displays an interpretation of yourcommand. (It also displays tips to remind youof the type of commands you can speak.)When you finish speaking the command, tapthe voice button again or simply wait.
• To call a contact on your Bluetooth-connected phone, say “Call” or “Dial”,followed by the contact’s first and/or lastname(s). For example, “Call Joe” or “CallJoe Smith”.
• To search for, or navigate to, a location,say “Where is”, “Drive to”, or “Navigateto”, followed by an address, businessname, business category, or landmark. Forexample, “Where is Stanford University?”,“Drive to Tesla in Palo Alto”, or “Navigateto Starbucks on Homestead in Cupertino”.If you have defined a navigation addressfor your home or work locations, you canuse a voice command to navigate there bysaying "Navigate home" or "Navigate towork".
• To listen to an Internet music service, say“Listen to” or “Play”, followed by the nameof the song, album, artist, or combination.To improve voice recognition accuracy,provide multiple cues in your command,such as artist plus song (for example,“Listen to Yellow Brick Road” or “PlayYellow Brick Road by Elton John”).
Heated Steering WheelIf Model X is equipped with the optional coldweather package, you can access a controlthat instantly warms up the steering wheel bytouching Controls > Cold Weather > HeatedWheel. When turned on, a heater in thesteering wheel provides radiant heat thatkeeps the steering wheel at a comfortabletemperature.
HornTo sound the horn, press the center pad onthe steering wheel.
Steering Wheel
46 Model X Owner's Manual

Adjusting Exterior Side MirrorsPress the button associated with the mirroryou want to adjust (left or right). The button'slight turns on and you can then press the dialto move the mirror to the desired position.Repeat for the other side mirror. If prompted,touch Save on the touchscreen to save themirror adjustment in your driver profile.
To fold and unfold exterior mirrors, press thecenter button. You can set the mirrors to foldautomatically whenever Model X is locked bytouching Controls > Settings > Vehicle >Mirror Auto-Fold > ON. The mirrors unfoldautomatically whenever you unlock Model X.
When you use the center button to fold themirrors in for parking in a tight space, themirrors remain folded in until your drivingspeed reaches 10 mph (16 km/h), or until youuse the center button to unfold the mirrors.
Note: You cannot fold a mirror after you reach10 mph (16 km/h).
The driver’s side mirror automatically dims atnight, in proportion to the level of glare fromthe headlights of a vehicle behind you (exceptwhen in Reverse gear). Also, both exterior sidemirrors have heaters that turn on and off withthe rear window defroster.
Mirror Auto-tilt When Reversing
Both exterior mirrors can automatically tiltdownward when backing up. To adjust theauto-tilt position, shift into Reverse, thenadjust the mirrors as described above (pressthe button associated with the mirror youwant to adjust, then press the dial to move themirror to the desired position). Touch Save onthe touchscreen to save the mirror adjustmentin your driver profile.
When you shift back into Drive, the mirrors tiltback to their normal (upward) position. Butnow that you have adjusted them for backingup, they automatically tilt to the selecteddownward position whenever you shift intoReverse.
You can turn the auto-tilt feature on or offusing the touchscreen, Touch Controls >Settings > Vehicle > Mirror Auto-Tilt.
Rear View MirrorThe rear view mirror is adjusted manually.Except when in Reverse, the rear view mirrorautomatically dims in proportion to the levelof glare from the headlights of a vehiclebehind you.
Mirrors
Driving 47
StartingWhen you open a door, Model X powers onthe instrument panel and touchscreen and youcan operate all controls.
To drive Model X:
1. PRESS THE BRAKE PEDAL - Model Xpowers on and is ready to drive.
2. SELECT A GEAR - Move the gear lever allthe way down for Drive and all the way upfor Reverse. See Shifting Gears on page50.
Note: If passive entry is off and you do notpress the brake pedal to start Model X withinapproximately five minutes, a messagedisplays on the instrument panel and you mustuse the key to lock then unlock Model X againbefore starting the vehicle.
Everything you need to know when drivingModel X displays on the instrument panel.
Key Not Inside
If Model X does not detect a key when youpress the brake, the instrument panel displaysa message telling you that a key is not inside.
If you receive this message, place the key inthe center console cup holder where Model Xcan best detect it.
If Model X still does not detect the key, tryholding it against the center console,immediately below the 12V power socket (see 12V Power Socket on page 133). If the key isstill not detected, remove the key's batteryand try again. See Replacing the Key Batteryon page 5. Or try using another key. If anotherkey does not work, contact Tesla.
A number of factors can affect whetherModel X can detect the key. These include alow battery in the key, interference from otherdevices using radio signals, and objectsbetween the key and receiver.
Always keep the key with you. After driving,the key is needed to restart Model X after itpowers off. And when you leave Model X, youmust bring the key with you to lock Model X,either manually or automatically.
Powering OffWhen you finish driving, shift into Park bypressing the button on the end of the gearselector. The parking brake automaticallyengages and all systems keep operating.When you leave Model X with the key , itpowers off automatically, turning off theinstrument panel and touchscreen.
Model X also powers off automatically afterbeing in Park for 15 minutes, even if you aresitting in the driver’s seat.
Although usually not needed, you can poweroff Model X while sitting in the driver’s seat,provided the vehicle is not moving. TouchControls > E-Brake & Power Off > Power Off .Model X automatically powers back on again ifyou press the brake pedal or touch thetouchscreen.
Note: Model X automatically shifts into Parkwhenever it is determined that you are exitingthe vehicle, even when you shift into Neutralbefore exiting. To keep Model X in Neutral, see Keeping Your Vehicle in Neutral (Tow Mode)on page 50.
Restarting the TouchscreenIf your touchscreen is unresponsive ordemonstrates unusual behavior, restart it byshifting into Park then pressing and holdingboth scroll wheels on the steering wheel untilthe touchscreen turns black, releasing whenthe Tesla logo appears. Within approximately30 seconds, the touchscreen restarts. If thetouchscreen is still unresponsive ordemonstrating unusual behavior, contactTesla.
Note: Restarting the touchscreen does notpower Model X off and on.
Warning: Paying attention to road andtraffic conditions must always be thedriver's highest priority. To ensure thesafety of vehicle occupants as well asother road users, restarting the
Starting and Powering Off
48 Model X Owner's Manual

touchscreen should be done only whenthe vehicle is in Park.
Starting and Powering Off
Driving 49

Shifting GearsWhen Model X is in Park, you must press thebrake to shift to another gear.
Move the lever up or down to change gears.
If you try to shift into a gear that the currentdriving speed prohibits, a chime sounds andthe gear does not change.
Reverse
Push the lever all the way up and release. Youcan only shift into Reverse when Model X isstopped or moving less than 5 mph (8 km/h).If moving less than 1 mph (1.6 km/h), you mustpress the brake.
Neutral
Push the lever up or down to the first positionand release to shift into Neutral. Neutral allowsModel X to roll freely when youn are notpressing the brake pedal.
If Model X is in Park and you use thetouchscreen to release the parking brake(Controls > E-Brake & Power Off), Model Xshifts into Neutral (see Parking Brake on page64).
Model X automatically shifts into Park whenyou exit. To leave Model X in Neutral, use thetouchscreen to engage Tow mode (see Keeping Your Vehicle in Neutral (Tow Mode)on page 50).
Drive
Push the lever all the way down and release.You can shift into Drive when Model X isstopped or moving less than 5 mph (8 km/h)in Reverse. If Model X is moving less than1 mph (1.6 km/h), you must press the brake toshift into Drive.
Note: When in Drive, push the lever all the waydown and release to enable Traffic-AwareCruise Control (see Traffic-Aware CruiseControl on page 88). Push the lever all theway down twice in quick succession to enableAutosteer (see Autosteer on page 94).
Park
With Model X stopped, press the end of thegear selector. Whenever Model X is in Park,the parking brake is applied.
Model X automatically shifts into Parkwhenever:
• Model X determines that you are exitingthe vehicle.
• You connect a charge cable.
To make it convenient to pick up passengers,you can also unlock all doors at any time byshifting into Park then pressing the Parkbutton a second time.
Keeping Your Vehicle in Neutral(Tow Mode)Model X automatically shifts into Parkwhenever you finish driving and leaveModel X. To keep Model X in Neutral when youexit, allowing it to roll freely (for example,pulling onto a transporter, etc.), activate Towmode:
1. Shift into Park.2. Press the brake pedal.3. Touch Controls > Settings > Service &
Reset > Tow Mode.
Model X beeps, and shifts into Neutral (whichreleases the parking brake).
Gears
50 Model X Owner's Manual

When Tow mode is active, Model Xdisplays this indicator light on theinstrument panel, along with amessage telling you that Model X willroll freely.
Note: In Tow mode, Model X does not shiftinto a driving gear. To cancel Tow mode, shiftinto Park or touch Tow mode again. Tow modealso cancels if you use the touchscreen toapply the parking brake (Controls > E-Brake &Power Off > Parking Brake).
Gears
Driving 51
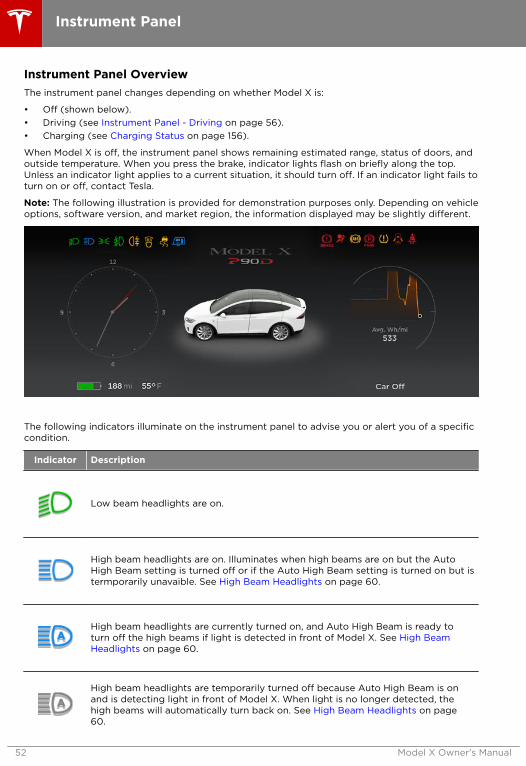
Instrument Panel OverviewThe instrument panel changes depending on whether Model X is:
• Off (shown below).• Driving (see Instrument Panel - Driving on page 56).• Charging (see Charging Status on page 156).
When Model X is off, the instrument panel shows remaining estimated range, status of doors, andoutside temperature. When you press the brake, indicator lights flash on briefly along the top.Unless an indicator light applies to a current situation, it should turn off. If an indicator light fails toturn on or off, contact Tesla.
Note: The following illustration is provided for demonstration purposes only. Depending on vehicleoptions, software version, and market region, the information displayed may be slightly different.
The following indicators illuminate on the instrument panel to advise you or alert you of a specificcondition.
Indicator Description
Low beam headlights are on.
High beam headlights are on. Illuminates when high beams are on but the AutoHigh Beam setting is turned off or if the Auto High Beam setting is turned on but istermporarily unavaible. See High Beam Headlights on page 60.
High beam headlights are currently turned on, and Auto High Beam is ready toturn off the high beams if light is detected in front of Model X. See High BeamHeadlights on page 60.
High beam headlights are temporarily turned off because Auto High Beam is onand is detecting light in front of Model X. When light is no longer detected, thehigh beams will automatically turn back on. See High Beam Headlights on page60.
Instrument Panel
52 Model X Owner's Manual

Indicator Description
Parking lights (side marker lights, tail lights, and license plate lights) are on. See Lights on page 58.
Front fog lights (optional). See Lights on page 58.
Adaptive Front Lighting (if equipped). See Adaptive Front Lighting System (AFS)on page 60.
Electronic stability control systems are actively minimizing wheel spin bycontrolling brake pressure and motor power (indicator flashes). See TractionControl on page 65. If this indicator stays illuminated, a fault is detected (contactTesla immediately).
Smart Air Suspension’s automatic self-leveling is disabled. In other words, Model Xis in Jack mode and is ready to be lifted or pulled onto a transporter. Jack modecancels when Model X is driven over 4.5 mph (7 km/h). See Smart Air Suspensionon page 128.
A Smart Air Suspension fault is detected. Contact Tesla. See Smart Air Suspensionon page 128.
A brake system fault is detected or the brake fluid level is low. See Brakes on page63. Contact Tesla immediately.
Airbag safety. If this indicator does not flash on briefly when Model X prepares todrive, or if it remains on, contact Tesla immediately. See Airbag Warning Indicatoron page 41.
An ABS (Anti-lock Braking System) fault is detected. See Brakes on page 63.Contact Tesla immediately.
Instrument Panel
Driving 53

Indicator Description
The parking brake is manually applied. See Parking Brake on page 64.
A parking brake fault is detected. Contact Tesla. See Parking Brake on page 64.
Vehicle Hold is actively applying the brakes. See Vehicle Hold on page 68.
Tire pressure warning. The pressure of a tire is out of range. If a fault with the TirePressure Monitoring System (TPMS) is detected, the indicator flashes. For a TPMSfault, contact Tesla. See Tire Care and Maintenance on page 159.
A door or trunk is open. See Doors on page 4, Rear Trunk on page 13, or FrontTrunk on page 15.
A seat belt for an occupied seat is not fastened. See Seat Belts on page 27.
Electronic stability control systems are no longer minimizing wheel spin (i.e. on asingle motor vehicle, the traction control system has been turned off, or on a dual-motor vehicle, Slip Start has been enabled). See Traction Control on page 65.
Model X is in Tow mode and can roll freely. It does not automatically shift into Parkwhen you exit. See Instructions for Transporters on page 189.
Trailer mode (if equipped) is active. See Towing and Accessories on page 76.
Instrument Panel
54 Model X Owner's Manual

Indicator Description
Flashes green when the left turn signal is operating. Both turn signal indicatorsflash green when the hazard warning flashers are operating.
Flashes green when the right turn signal is operating. Both turn signal indicatorsflash green when the hazard warning flashers are operating.
Instrument Panel
Driving 55

Instrument Panel - DrivingWhen Model X is driving (or ready to drive), the instrument panel shows your current drivingstatus and a real-time visualization of the road as detected by Model X's Driver Assistancecomponents (see About Driver Assistance on page 85).
Note: The following illustration is provided for demonstration purposes only. Depending on vehicleoptions, software version, and market region, the information displayed may be slightly different.
1. Indicator lights display along the top to provide status (see Instrument Panel Overview onpage 52).
2. When you are actively navigating to a destination, navigation instructions display here. Usethe left steering wheel buttons to change what displays on the left side of the instrumentpanel whenever navigation instructions are not displayed (see Using Left Steering WheelButtons on page 44).
3. Traffic-Aware Cruise Control is cruising at a set speed. When Traffic-Aware Cruise Control isavailable but you haven't set a cruising speed, the icon is gray and the speed is not shown(see Traffic-Aware Cruise Control on page 88).
4. Driving speed.5. Autosteer is actively steering Model X. When Autosteer is available but you haven't activated
it, the icon is gray (see Autosteer on page 94).6. On the Energy graph, dashed lines appear on the power meter if Model X is limiting power.
The dashed lines appear on the top portion (energy being used) when power available foracceleration is being limited, and on the bottom portion (energy being gained) when powerthat can be gained by regenerative braking is limited. Model X limits power for many reasons.Here are just a few examples:
• Acceleration may be limited when the Battery is reaching a low state of charge or if thepowertrain is hot.
• Both acceleration and regenerative braking may be limited when the ambient temperatureis either very high or very low.
• Regenerative braking may be limited when the Battery is fully charged.
Note: Use the right steering wheel buttons to control what displays on the right side of theinstrument panel (see Using Right Steering Wheel Buttons on page 45).
Instrument Panel
56 Model X Owner's Manual

7. Pay attention to important alert messages that display here. If any alerts are in effect, you canview information about them by touching the alert icon (exclamation mark) on thetouchscreen’s status bar (the topmost area of the touchscreen).
8. Use the right steering wheel buttons to change what displays on the right side of theinstrument panel whenever a phone call is not active (see Using Right Steering Wheel Buttonson page 45).
9. Total estimated driving distance (or energy) available. Instead of driving distance, you candisplay the percentage of battery energy remaining. To do so, touch Controls > Settings >Units & Format > Energy & Charging (see Settings on page 119).
Note: When anticipating when you need to charge, use range estimates as a general guidelineonly.
Note: In cold weather, some of the stored energy in the Battery may not be available on yourdrive because the Battery is too cold. When this happens, a portion of the Battery meter isblue and the driving distance value has a snowflake image next to it. If Model X is plugged in,you can heat your Battery using wall power by turning on climate control using the mobileapp. When the Battery warms up, the blue portion on the meter and the snowflake image areno longer displayed.
10. The speed limit (if available) that is currently being detected by Speed Assist (see SpeedAssist on page 109).
11. The car in front of you (if applicable).
Note: In situations where Autosteer is unable to detect lane markings, the driving lane isdetermined based on the vehicle you are following. In these situations, the car in front of youis highlighted in blue.
12. Pay attention to important driving-related messages that appear at the bottom center of theinstrument panel.
13. Your Model X.14. When Autosteer is active and detects the driving lane, it is highlighted in blue (see Autosteer
on page 94).15. Currently selected gear: Park, Reverse, Neutral, or Drive.
Instrument Panel
Driving 57

Controlling Lights
Touch Controls on the bottom corner of the touchscreen to control most of the lights.
In addition to the lights that you can control from the touchscreen, Model X has conveniencelights that turn on and off automatically based on what you are doing. For example, you willnotice interior lights, marker lights, tail lights, door handle lights, and puddle lights that turn onwhen you unlock Model X, when you open a door, and when you shift into Park. They turn offautomatically after a minute or two or when you shift into a driving gear or lock Model X.
Lights
58 Model X Owner's Manual

1. Touch to control front driver side map light.2. If you touch DOME, a popup appears that allow you to control cabin lights. If cabin lights are
set to ON, all interior cabin lights, including the light in the rear trunk, turn on when youunlock Model X, open a door upon exiting, or shift into P (Park). They turn off after 60seconds, when you lock Model X, or when you shift into a driving gear. If set to AUTO, cabinlights turn on only when little or no light is detected.
You can also turn on an individual dome light by touching its lens. If you manually turn a domelight on, it turns off when Model X powers off. If Model X was already powered off when youmanually turned the light on, it turns off after 60 minutes.
3. If you turn on AMBIENT lights, the lights on the door arm rests turn on whenever theheadlights are on.
4. Touch to control front passenger side map light.5. Touch to turn the fog lights on or off. Fog lights operate only when low beam headlights are
on. When headlights are turned off, fog lights also turn off.
The Rear Fog indicator displays on the instrument panel whenever rear foglights are on.
The Front Fog indicator displays on the instrument panel whenever theoptional front fog lights are on.
6. Exterior lights (headlights, tail lights, side marker lights, parking lights, and license platelights) are set to AUTO each time you start Model X.
AUTOExterior lights automatically turn on when driving in low lighting conditions.If you change to a different setting, lights always revert to this AUTO settingon your next drive.
Touch one of these options to temporarily change the exterior light setting:
OFF
Exterior lights turn off until you manually turn them back onor until the next time you drive Model X. If daytime runninglights are required in your region, the exterior lights used forthis purpose do not turn off.
PARKING Only the side marker lights, parking lights, tail lights andlicense plate lights turn on.
ON Exterior lights turn on.
Note: Model X has a series of lights along the lower rim of the headlights, also referred to as"signature" lights. These lights automatically turn on whenever Model X is powered on and adriving gear is engaged. In the U.S. only, these lights turn off to conserve energy when youturn the Range mode setting on (see Controls on page 116 or Driving Tips to MaximizeRange on page 72).
Warning: Always ensure that your headlamps are switched to AUTO or ON, asappropriate, during all low visibility conditions. Failure to do so may result in a collision.
7. If you turn on AUTO HIGH BEAM, high beam headlights turn on and off automatically basedon whether or not light is detected in front of Model X (see High Beam Headlights on page60).
Lights
Driving 59
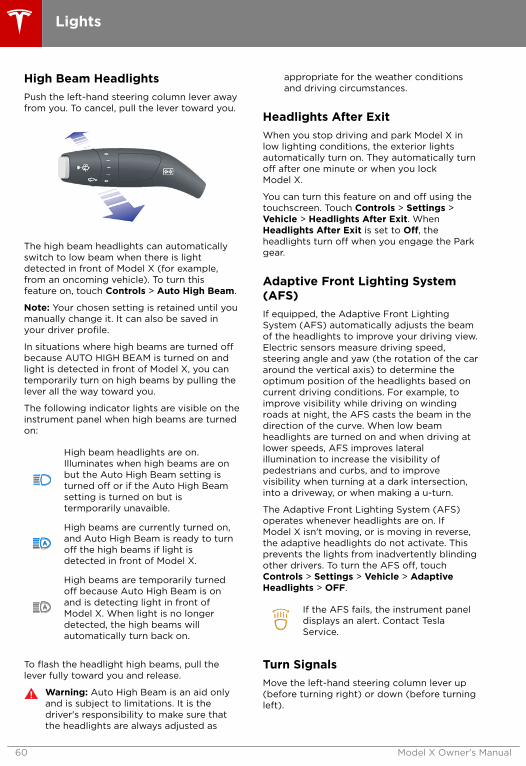
High Beam HeadlightsPush the left-hand steering column lever awayfrom you. To cancel, pull the lever toward you.
The high beam headlights can automaticallyswitch to low beam when there is lightdetected in front of Model X (for example,from an oncoming vehicle). To turn thisfeature on, touch Controls > Auto High Beam.
Note: Your chosen setting is retained until youmanually change it. It can also be saved inyour driver profile.
In situations where high beams are turned offbecause AUTO HIGH BEAM is turned on andlight is detected in front of Model X, you cantemporarily turn on high beams by pulling thelever all the way toward you.
The following indicator lights are visible on theinstrument panel when high beams are turnedon:
High beam headlights are on.Illuminates when high beams are onbut the Auto High Beam setting isturned off or if the Auto High Beamsetting is turned on but istermporarily unavaible.
High beams are currently turned on,and Auto High Beam is ready to turnoff the high beams if light isdetected in front of Model X.
High beams are temporarily turnedoff because Auto High Beam is onand is detecting light in front ofModel X. When light is no longerdetected, the high beams willautomatically turn back on.
To flash the headlight high beams, pull thelever fully toward you and release.
Warning: Auto High Beam is an aid onlyand is subject to limitations. It is thedriver's responsibility to make sure thatthe headlights are always adjusted as
appropriate for the weather conditionsand driving circumstances.
Headlights After ExitWhen you stop driving and park Model X inlow lighting conditions, the exterior lightsautomatically turn on. They automatically turnoff after one minute or when you lockModel X.
You can turn this feature on and off using thetouchscreen. Touch Controls > Settings >Vehicle > Headlights After Exit. WhenHeadlights After Exit is set to Off, theheadlights turn off when you engage the Parkgear.
Adaptive Front Lighting System(AFS)If equipped, the Adaptive Front LightingSystem (AFS) automatically adjusts the beamof the headlights to improve your driving view.Electric sensors measure driving speed,steering angle and yaw (the rotation of the cararound the vertical axis) to determine theoptimum position of the headlights based oncurrent driving conditions. For example, toimprove visibility while driving on windingroads at night, the AFS casts the beam in thedirection of the curve. When low beamheadlights are turned on and when driving atlower speeds, AFS improves lateralillumination to increase the visibility ofpedestrians and curbs, and to improvevisibility when turning at a dark intersection,into a driveway, or when making a u-turn.
The Adaptive Front Lighting System (AFS)operates whenever headlights are on. IfModel X isn't moving, or is moving in reverse,the adaptive headlights do not activate. Thisprevents the lights from inadvertently blindingother drivers. To turn the AFS off, touchControls > Settings > Vehicle > AdaptiveHeadlights > OFF.
If the AFS fails, the instrument paneldisplays an alert. Contact TeslaService.
Turn SignalsMove the left-hand steering column lever up(before turning right) or down (before turningleft).
Lights
60 Model X Owner's Manual

The turn signals stop operating when canceledby the steering wheel, or when you return thelever to the central position.
The corresponding turn signalindicator lights up on the instrumentpanel when a turn signal isoperating. You also hear a clickingsound.
Warning: If you have purchased theoptional Enhanced Autopilot or Full Self-Driving Capability packages and Traffic-Aware Cruise Control is active, engaginga turn signal can cause Model X toaccelerate when using Traffic-AwareCruise Control in specific situations (see Overtake Acceleration on page 91).
Warning: If you have purchased theoptional Enhanced Autopilot or Full Self-Driving Capability packages andAutosteer is active, engaging a turn signalmay cause Model X to change lanes (see Auto Lane Change on page 97).
Lane Change Flash
To indicate a lane change, quickly press thelever up or down against the spring pressure,then release. The corresponding turn signalflashes three times.
Hazard Warning FlashersTo turn on the hazard warning flashers, pressthe button located on the side of thetouchscreen closest to the steering wheel. Allturn signals flash. Press again to turn off.
Note: Hazard warning flashers operate evenwithout a Model X key nearby.
Lights
Driving 61

WipersTo wipe the windshield, rotate the end of theleft-hand steering column lever away fromyou. You can choose from four levels:
• 1st: Auto with low rain sensitivity.*
Note: This functionality is not available atthis time but is expected to beimplemented in a near future softwareupdate.
• 2nd: Auto with high rain sensitivity.*
Note: This functionality is not available atthis time but is expected to beimplemented in a near future softwareupdate.
• 3rd: Continuous, slow.• 4th: Continuous, fast.
For a single wipe, press and release the end ofthe lever.
If the wipers are set to Auto and Model Xdetects no liquid on the windshield, the wipersdo not wipe.
Note: This functionality is not available at thistime but is expected to be implemented in anear future software update.
When you operate the wipers, headlightsautomatically turn on (if they are not onalready).
*Model X detects whether or not it is raining.When wipers are set to Auto, the frequency atwhich they wipe depends on how much liquidis detected. When wipers are set to the 2ndlevel, Model X is more sensitive to liquid.
Note: This functionality is not available at thistime but is expected to be implemented in anear future software update.
To extend the life of wiper blades, remove icefrom the windshield before turning wipers on.Ice has sharp edges that can damage therubber on the blades.
Periodically check and clean the edge of thewiper blade. If damaged, contact TeslaService.
Caution: In harsh climates, ensure thatthe wiper blades are not frozen oradhered to the windshield.
De-icing Wipers
To make wiper blades easy to access so youcan remove any ice and snow, shift Model Xinto Park, turn the wipers off, then use thetouchscreen to move them to the serviceposition. Touch Controls > Settings > Service& Reset > Service Mode > ON. When parkingin cold outdoor climates, it is helpful to leaveModel X with the wipers in the serviceposition. In this position, they are closer to thedefrost vent, allowing you to thaw them bydirecting air from the climate control systemtowards the windshield.
Note: Wipers automatically return to theirnormal position when you shift Model X out ofPark.
If Model X is equipped with the optional coldweather package, you can de-ice wipers bytouching Controls > Cold Weather > HeatedWipers. Wiper heaters automatically turns offafter 15 minutes.
WashersPress the button on the end of the leftsteering column lever to spray washer fluidonto the windshield. You can press this buttonat two levels. Press partially for a single wipe,without any washer fluid. Press fully for bothwipe and wash. When washing the windshield,the wipers will perform two wipes after yourelease the button, then a third wipe a fewseconds later.
Periodically top up washer fluid (see ToppingUp Washer Fluid on page 169).
Wipers and Washers
62 Model X Owner's Manual
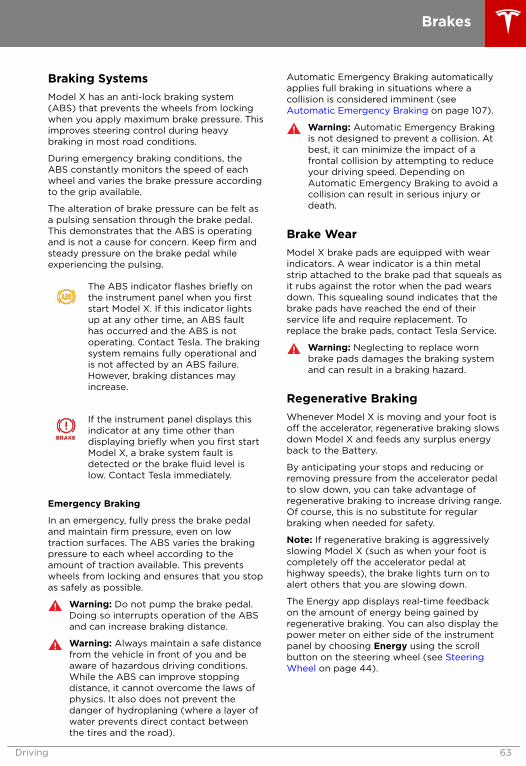
Braking SystemsModel X has an anti-lock braking system(ABS) that prevents the wheels from lockingwhen you apply maximum brake pressure. Thisimproves steering control during heavybraking in most road conditions.
During emergency braking conditions, theABS constantly monitors the speed of eachwheel and varies the brake pressure accordingto the grip available.
The alteration of brake pressure can be felt asa pulsing sensation through the brake pedal.This demonstrates that the ABS is operatingand is not a cause for concern. Keep firm andsteady pressure on the brake pedal whileexperiencing the pulsing.
The ABS indicator flashes briefly onthe instrument panel when you firststart Model X. If this indicator lightsup at any other time, an ABS faulthas occurred and the ABS is notoperating. Contact Tesla. The brakingsystem remains fully operational andis not affected by an ABS failure.However, braking distances mayincrease.
If the instrument panel displays thisindicator at any time other thandisplaying briefly when you first startModel X, a brake system fault isdetected or the brake fluid level islow. Contact Tesla immediately.
Emergency Braking
In an emergency, fully press the brake pedaland maintain firm pressure, even on lowtraction surfaces. The ABS varies the brakingpressure to each wheel according to theamount of traction available. This preventswheels from locking and ensures that you stopas safely as possible.
Warning: Do not pump the brake pedal.Doing so interrupts operation of the ABSand can increase braking distance.
Warning: Always maintain a safe distancefrom the vehicle in front of you and beaware of hazardous driving conditions.While the ABS can improve stoppingdistance, it cannot overcome the laws ofphysics. It also does not prevent thedanger of hydroplaning (where a layer ofwater prevents direct contact betweenthe tires and the road).
Automatic Emergency Braking automaticallyapplies full braking in situations where acollision is considered imminent (see Automatic Emergency Braking on page 107).
Warning: Automatic Emergency Brakingis not designed to prevent a collision. Atbest, it can minimize the impact of afrontal collision by attempting to reduceyour driving speed. Depending onAutomatic Emergency Braking to avoid acollision can result in serious injury ordeath.
Brake WearModel X brake pads are equipped with wearindicators. A wear indicator is a thin metalstrip attached to the brake pad that squeals asit rubs against the rotor when the pad wearsdown. This squealing sound indicates that thebrake pads have reached the end of theirservice life and require replacement. Toreplace the brake pads, contact Tesla Service.
Warning: Neglecting to replace wornbrake pads damages the braking systemand can result in a braking hazard.
Regenerative BrakingWhenever Model X is moving and your foot isoff the accelerator, regenerative braking slowsdown Model X and feeds any surplus energyback to the Battery.
By anticipating your stops and reducing orremoving pressure from the accelerator pedalto slow down, you can take advantage ofregenerative braking to increase driving range.Of course, this is no substitute for regularbraking when needed for safety.
Note: If regenerative braking is aggressivelyslowing Model X (such as when your foot iscompletely off the accelerator pedal athighway speeds), the brake lights turn on toalert others that you are slowing down.
The Energy app displays real-time feedbackon the amount of energy being gained byregenerative braking. You can also display thepower meter on either side of the instrumentpanel by choosing Energy using the scrollbutton on the steering wheel (see SteeringWheel on page 44).
Brakes
Driving 63
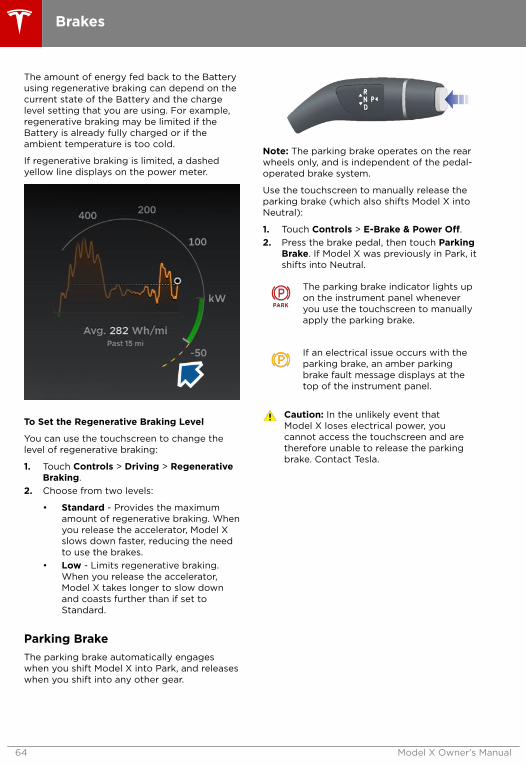
The amount of energy fed back to the Batteryusing regenerative braking can depend on thecurrent state of the Battery and the chargelevel setting that you are using. For example,regenerative braking may be limited if theBattery is already fully charged or if theambient temperature is too cold.
If regenerative braking is limited, a dashedyellow line displays on the power meter.
To Set the Regenerative Braking Level
You can use the touchscreen to change thelevel of regenerative braking:
1. Touch Controls > Driving > RegenerativeBraking.
2. Choose from two levels:
• Standard - Provides the maximumamount of regenerative braking. Whenyou release the accelerator, Model Xslows down faster, reducing the needto use the brakes.
• Low - Limits regenerative braking.When you release the accelerator,Model X takes longer to slow downand coasts further than if set toStandard.
Parking BrakeThe parking brake automatically engageswhen you shift Model X into Park, and releaseswhen you shift into any other gear.
Note: The parking brake operates on the rearwheels only, and is independent of the pedal-operated brake system.
Use the touchscreen to manually release theparking brake (which also shifts Model X intoNeutral):
1. Touch Controls > E-Brake & Power Off.2. Press the brake pedal, then touch Parking
Brake. If Model X was previously in Park, itshifts into Neutral.
The parking brake indicator lights upon the instrument panel wheneveryou use the touchscreen to manuallyapply the parking brake.
If an electrical issue occurs with theparking brake, an amber parkingbrake fault message displays at thetop of the instrument panel.
Caution: In the unlikely event thatModel X loses electrical power, youcannot access the touchscreen and aretherefore unable to release the parkingbrake. Contact Tesla.
Brakes
64 Model X Owner's Manual

How It WorksThe traction control system constantlymonitors the speed of the front and rearwheels. If Model X experiences a loss oftraction, the system minimizes wheel spin bycontrolling brake pressure and motor power.By default, the traction control system is on.Under normal conditions, it should remain onto ensure maximum safety.
This indicator flashes on theinstrument panel whenever thetraction control system is activelycontrolling brake pressure and motorpower to minimize wheel spin. If theindicator stays on, a fault is detectedwith the traction control system.Contact Tesla Service.
Warning: If the above indicator remainsilluminated in situations in which you havenot enabled Slip Start (described next),the traction control system may not beoperating correctly. Contact Tesla Serviceimmediately.
Warning: Traction control cannot preventcollisions caused by driving dangerouslyor turning too sharply at high speeds.
Allowing Wheel Slip
To allow the wheels to spin at a limited speed,you can enable Slip Start. Slip Start can beenabled only when Model X is moving 30 mph(48 km/h) or slower. Slip Start automaticallydisables when the speed exceeds 50 mph(80 km/h).
Under normal conditions, Slip Start should notbe enabled. Enable it only in circumstanceswhere you deliberately want the wheels tospin, such as:
• Starting on a loose surface, such as gravelor snow.
• Driving in deep snow, sand or mud.• Rocking out of a hole or deep rut.
To allow the wheels to spin, touch Controls >Driving > Traction Control > Slip Start.
The instrument panel displays analert message when Slip Start isenabled.
Although Slip Start is automatically disabledthe next time you start Model X, it is stronglyrecommended that you disable it immediatelyafter the circumstances that required you toenable it have passed.
Traction Control
Driving 65

How Park Assist WorksModel X has several sensors designed todetect the presence of objects. When movingslowly in Drive or Reverse (for example, whenparking), the sensors alert you if an object isdetected in close proximity to the front or rearof your Model X.
The sensors are activated when driving slowerthan 5 mph (8 km/h).
Note: Rear sensors are disabled when abicycle is detected or Model X is in trailermode.
Warning: Never depend on Park Assist toinform you if an area you are approachingis free of objects and/or people. Severalexternal factors can reduce theperformance of Park Assist, causingeither no readings or false readings (see Limitations and False Warnings on page67). Therefore, depending on Park Assistto determine if Model X is approaching anobstruction can result in damage to thevehicle and/or objects, and can
potentially cause serious injury. Alwaysinspect the area with your own eyes.When reversing, perform shoulder checksand use all mirrors. Park assist does notdetect children, pedestrians, bicyclists,animals, or objects that are moving,protruding, located too far above orbelow the sensors, or too close or too farfrom the sensors. Park Assist is forguidance purposes only and is notintended to replace your own direct visualchecks. It is not a substitute for carefuldriving.
Visual and Audio FeedbackWhen you shift to Reverse, the Park Assistview displays on the left side of the instrumentpanel, showing objects that are in closeproximity to the front and rear of Model X.This view closes when you shift into Driveunless an object is detected close to the frontof Model X, in which case the Park Assist viewcloses automatically when your driving speedexceeds 5 mph (8 km/h). When reversing,visual feedback also displays on thetouchscreen, immediately below the cameraview (see Rear View Camera on page 74).You can manually close the park assist view onthe touchscreen by touching the X in theupper left corner.
When driving with the Camera app displayedon the touchscreen, you can switch to thePark Assist view when driving at speeds below5 mph (8 km/h). Touch the button located inthe upper left corner of the Camera appwindow. This is useful if you need assistancewith parallel parking.
If chimes are turned on (see ControllingAudible Feedback on page 67), an audiblebeep sounds as you approach an object. Youcan temporarily mute the chime by pressingthe scroll wheel on the left side of the steeringwheel or by touching the mute button locatedon the bottom left corner of the Park Assistview.
Note: If a sensor is unable to providefeedback, the instrument panel displays analert message.
Caution: Keep sensors clean from dirt,debris, snow, and ice. Avoid using a highpressure power washer on the sensorsand do not clean a sensor with a sharp orabrasive object that can scratch ordamage its surface.
Caution: Do not install accessories orstickers on or near the parking sensors.
Park Assist
66 Model X Owner's Manual
Controlling Audible FeedbackYou can use Park Assist with or withoutaudible feedback. To turn chimes on or off,touch Controls > Settings > Safety &Security > Park Assist Chimes.
To mute the chimes temporarily, press thescroll wheel on the left side of the steeringwheel or touch the mute button in the bottomleft corner of the Park Assist view. The chimesare muted until you shift into a different gearor drive over 5 mph (8 km/h).
Limitations and False WarningsThe parking sensors may not functioncorrectly in these situations:
• One or more of the parking sensors isdamaged, dirty, or covered (such as mud,ice, or snow).
• The object is located below approximately8 inches (20 cm) (such as a curb or lowbarrier).
Caution: Shorter objects that aredetected (such as curbs or lowbarriers) can move into the blind spotof the sensors. Model X cannot alertyou about an object while it is in theblind spot of the sensors.
• Weather conditions (heavy rain, snow, orfog) are interfering with sensor operation.
• The object is thin (such as a sign post).• A sensor’s operating range has been
exceeded.• The object is sound-absorbing or soft
(such as powder snow).• The object is sloped (such as a sloped
embankment).• Model X has been parked in, or being
driven in, extremely hot or coldtemperatures.
• The sensors are affected by otherelectrical equipment or devices thatgenerate ultrasonic waves.
• The object is located too close to thebumper.
• A bumper is misaligned or damaged.• An object that is mounted to Model X is
interfering with and/or obstructing thesensor (such as a bike rack or bumpersticker).
Other Parking AidsIn addition to Park Assist, when shifted intoReverse, the backup camera displays a view ofthe area behind Model X (see Rear ViewCamera on page 74).
Park Assist
Driving 67

When Model X is stopped, Vehicle Hold cancontinue to apply the brakes even after youremove your foot from the brake pedal. Whendriving on a hill or on a flat surface, brake asyou normally would. After coming to acomplete stop, simply press the brake pedalagain (until the instrument panel displays theVehicle Hold indicator light) to enable VehicleHold. You can then release the brake pedaland remain stopped, even on a hill.
This indicator displays on theinstrument panel whenever VehicleHold is actively braking Model X.
To disengage Vehicle Hold, press theaccelerator pedal or press and release thebrake pedal.
Note: Shifting into Neutral also disengagesVehicle Hold.
Note: After actively braking Model X forapproximately ten minutes, Model X shifts intoPark and Vehicle Hold cancels. Model X alsoshifts into Park if it detects that the driver hasleft the vehicle.
Vehicle Hold
68 Model X Owner's Manual

The acceleration settings available on yourModel X vary depending on options chosen attime of purchase:
• Chill: limits acceleration for a smooth andgentle ride (available on all vehiclesequipped with driver assistancehardware).
• Standard: provides the normal level ofacceleration (available on non-performance dual motor vehicles).
• Sport: provides the normal level ofacceleration (available on performancedual motor vehicles).
• Insane: increases peak torque byapproximately 30 percent (available onperformance dual motor vehicles notequipped with the Ludicrous upgrade).
• Ludicrous: increases peak torque byapproximately 60 percent (available onperformance dual motor vehiclesequipped with the Ludicrous upgrade).
Note: Although Chill does not directly improvedriving range, using the increased torque andpower available in Insane or Ludicrous modecan reduce range and efficiency.
Note: When Chill is selected, Chill displays onthe instrument panel above the driving speed.
In addition, a performance dual motor Model Xalso features Launch Mode to provideoptimum acceleration on surfaces with goodtraction. For the specific driving instructionsrequired to use Launch Mode, see LaunchMode on page 69.
To choose an acceleration mode, touchControls > Driving > Acceleration.
Max Battery PowerIf you choose Insane or Ludicrous, additionalpower is available immediately. However, toachieve the absolute maximum power(designed for short term use), you can enableMax Battery Power, which heats the Battery toits ideal operating temperature to ensureaccess to 100% of available power. Heating theBattery can take over an hour, depending onenvironmental conditions and whether or notModel X is being driven.
To enable, touch Max Battery Power , whichdisplays as blue text immediately below theacceleration setting. While the battery is beingheated, the touchscreen displays a messageproviding you with an approximate wait time,and when the additional power is available,the message indicates that Max Battery Poweris READY!
Note: Max Battery Power is designed toachieve maximum performance for short termacceleration and is not intended for dailydriving. The tradeoff for the additional powerboost is extra energy consumption and earlierpower fade on long drives. The Insane orLudicrous acceleration settings provide asignificant increase in performance evenwithout Max Battery Power. In fact, in normaldriving situations, the additional power thatcan be achieved using Max Battery Power maynot be noticeable.
Note: To support Max Battery Power, thecharge level must be 20% or higher. Youcannot initiate Max Battery Power if thecharge level is less than 20%. In addition, MaxBattery Power immediately cancels if at anytime during its use, the charge level dropsbelow 20%.
When using Max Battery Power, Model Xconsumes more energy as it keeps the Batterywithin an optimal temperature range.
To cancel Max Battery Power at any time,change the acceleration level to Chill or Sport(or touch the button in the Max Battery Modepopup). To prevent excess and potentiallyunnecessary energy consumption (forexample, you leave the vehicle and forget tocancel Max Battery Power), Max BatteryPower cancels automatically in three hours,regardless of whether you are still driving orhave left the vehicle.
Note: Max Battery Power strives to keep thepack within an optimal temperature range. Inaddition to heating the Battery, Max BatteryPower also cools the battery when necessary(for example, while driving at high speeds,during rapid acceleration, driving for longperiods, etc.).
Launch ModeLaunch Mode, available on performance dualmotor vehicles only, provides optimumacceleration on surfaces with good traction.
Note: Hard acceleration including, but notlimited to, using launch mode, increases stresson the vehicle’s powertrain, and can causepremature wear and aging of variouscomponents. Model X constantly monitorspowertrain fatigue and damage, and notifiesyou if vehicle components need to beserviced.
Warning: Use Launch Mode only inappropriate locations where there is nocross traffic or pedestrians present.
Acceleration Modes
Driving 69

Launch Mode is designed for use onclosed circuit driving courses. It is thedriver’s responsibility to ensure thatdriving style and acceleration do notendanger or inconvenience other roadusers.
To Activate Launch Mode
Before activating Launch Mode, it isrecommended that the brakes are slightlywarm by driving for a few minutes and usingthe brakes a few times.
1. Set the acceleration level to Insane orLudicrous and enable Max Battery Power(described above).
Note: You can use Launch Modeimmediately after enabling Max BatteryPower. There is no need to wait until MaxBattery Power is in its READY state.
2. With Model X shifted into Drive and at acomplete stop with the steering wheelstraight, fully press the brake pedal withyour left foot.
3. While still pressing the brake with your leftfoot, fully press the accelerator pedal withyour right foot, then release theaccelerator pedal. The instrument paneldisplays a message indicating that LaunchMode is enabled.
4. Within eight seconds, fully press theaccelerator pedal a second time to pre-load motor torque, then within fourseconds, release the brake.
When you release the brake, Model X launchesforward.
Note: Launch Mode is not available if Slip Starthas been enabled (i.e. wheels can spin). See Traction Control on page 65.
Note: Launch Mode is available only if theambient temperature is 37° F (3° C) orwarmer.
Acceleration Modes
70 Model X Owner's Manual
Displaying Trip InformationTrip information displays on the touchscreenwhen you touch Controls > Trips. For thecurrent trip, you can display distance, durationand average energy usage. You can also showdistance and total and average energy usedsince your last charge and for additional trips.
To name or rename a trip, touch the trip'sname, enter a new name for the trip, thenpress Save. To reset a particular trip meter,touch its associated Reset button.
You can display information for up to threetrips on the instrument panel. Use thecheckboxes to specify the trip(s) you want todisplay. Then use the scroll bar on the steeringwheel to display the chosen trip(s) (see UsingLeft Steering Wheel Buttons on page 44 or Using Right Steering Wheel Buttons on page45).
OdometerTo display the odometer, touch the Tesla “T” atthe top center of the touchscreen.
Trip Information
Driving 71

Driving Tips to Maximize RangeYou can maximize your driving range usingthe same driving habits that you use toconserve fuel in a gasoline-powered vehicle. Inaddition to driving habits, energyconsumption depends on environmentalconditions (such as exceptionally cold or hotweather and driving on roads with steep hills).To get the maximum mileage from a charge:
• Slow down your driving and avoidfrequent and rapid acceleration.
• If safe to do so, modulate the acceleratorpedal instead of using the brake pedalwhen gradually slowing down. WheneverModel X is moving and you are notpressing the accelerator pedal,regenerative braking slows down Model Xand feeds surplus energy back to theBattery (see Regenerative Braking onpage 63).
• Keep tires at the recommended inflationpressures (see Tire Care and Maintenanceon page 159).
• Lighten your load by removing anyunnecessary cargo.
• Fully raise all windows.• Limit the use of resources such as heating,
signature lighting, and air conditioning.Using seat heaters to keep warm is moreefficient than heating the cabin. Toautomatically limit the amount of powerthat the climate control system uses tomaintain the temperature of the Batteryand the cabin area, touch Controls >Driving > Range Mode > ON.
The power meter on the instrument panel andthe Energy app (described next) providesfeedback on energy usage. With thisfeedback, you will soon become familiar withhow driving habits and environmentalconditions impact how much energy Model Xis using.
Energy AppUse the Energy app to view real-time andprojected energy usage. Choose from twotypes of charts:
• Consumption - display how much energyModel X has consumed over the past 5, 15or 30 miles (10, 25 or 50 km).
Touch Average Range to display a graphof the average energy consumed over thepast 5, 15 or 30 miles (10, 25 or 50 km).The average range and the energy usagedata are used to predict the projectedrange. Touch Instant Range to display agraph of the energy consumed over thelast few data points only. The instantrange and the energy usage data are usedto calculate the projected range.
• Trip - If your Model X is equipped withnavigation, you can monitor the amount ofenergy being used while navigating to adestination. You can track actual usageagainst the initial prediction. The greenline represents the actual usage whereasthe gray line represents predicted usage.To change the zoom level, touch the zoomicon located in the top right corner of thechart.
Note: The "Trip" chart displays energy usageonly if you are currently navigating to adestination.
Saving EnergyModel X has an energy-saving feature thatreduces the amount of energy beingconsumed when Model X is not in use. TouchControls > Displays > Energy Saving andchoose from the following options:
• OFF - Model X shifts to the energy-savingmode at night (10 pm to 5 am).
• ON - significantly less energy is consumedwhenever Model X is not in use. The start-up time of the instrument panel andBluetooth could be slower.
• Always Connected - preserves cellconnectivity when energy saving is active.This allows the mobile app to connect toModel X quicker, and provides immediateinternet access when entering the car.Slightly more energy is consumed.
Range AssuranceModel X protects you against running out ofenergy. Model X continuously monitors itsenergy level and proximity to known charginglocations.
Getting Maximum Range
72 Model X Owner's Manual
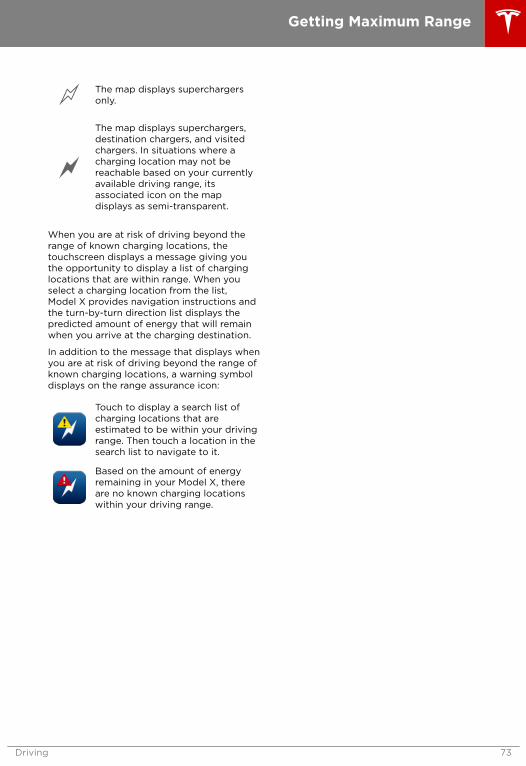
The map displays superchargersonly.
The map displays superchargers,destination chargers, and visitedchargers. In situations where acharging location may not bereachable based on your currentlyavailable driving range, itsassociated icon on the mapdisplays as semi-transparent.
When you are at risk of driving beyond therange of known charging locations, thetouchscreen displays a message giving youthe opportunity to display a list of charginglocations that are within range. When youselect a charging location from the list,Model X provides navigation instructions andthe turn-by-turn direction list displays thepredicted amount of energy that will remainwhen you arrive at the charging destination.
In addition to the message that displays whenyou are at risk of driving beyond the range ofknown charging locations, a warning symboldisplays on the range assurance icon:
Touch to display a search list ofcharging locations that areestimated to be within your drivingrange. Then touch a location in thesearch list to navigate to it.
Based on the amount of energyremaining in your Model X, thereare no known charging locationswithin your driving range.
Getting Maximum Range
Driving 73

Camera LocationModel X is equipped with a rear view cameralocated above the rear license plate.
Whenever you shift into Reverse, thetouchscreen displays the view from thecamera. Guide lines show your driving pathbased on the position of the steering wheel.These guide lines adjust appropriately as youmove the steering wheel.
Note: Visual feedback from the parkingsensors displays on the instrument panel (see Park Assist on page 66).
Warning: Never depend on the rear viewcamera to inform you if the area behindyou is free of objects and/or people whenreversing. The camera may not detectobjects or barriers that can potentiallycause damage or injury. In addition,several external factors can reduce theperformance of the camera, including adirty or obstructed lens. Therefore,depending on the rear view camera todetermine if Model X is approaching anobstruction can result in damage to thevehicle and/or objects, and canpotentially cause serious injury. Alwaysinspect the area with your own eyes.When reversing, perform shoulder checksand use all mirrors. Use the camera forguidance purposes only. It is not intendedto replace your own direct visual checksand is not a substitute for careful driving.
Cleaning the Camera
To ensure a clear picture, keep the cameralens clean, and free of obstructions. Removeany buildup of dirt by occasionally wiping thecamera lens with a soft damp cloth.
Caution: Do not use chemical-based orabrasive cleaners. Doing so can damagethe surface of the camera lens.
Rear View Camera
74 Model X Owner's Manual

Model X has a rear spoiler designed toimprove aerodynamics. If Model X is equippedwith the active spoiler, the position of thespoiler can vary depending on the status andspeed of Model X:
• When Model X is in Reverse or whendriving speed is below 10 mph (16 km/h),the spoiler provides maximum visibilitybehind Model X.
• When driving speed exceeds 45 mph(72 km/h), the spoiler lowers to theposition that provides the most effectiveaerodynamics.
• When Model X is powered off and locked,the spoiler retracts.
To allow the spoiler to automatically move asdescribed above, touch Controls > Settings >Service & Reset > Spoiler > Automatic. Todisable automatic movement of the spoiler,which keeps it in its extended position, choosethe Extended setting.
Note: If the spoiler can not automaticallylower or raise, the instrument panel displaysan alert. Contact Tesla Service.
Active Spoiler
Driving 75

The towing package allows you to tow a trailerwith your Model X. It also allows you to carryskis, snowboards, bicycles, etc. by attachingan accessory carrier to the hitch.
Carrying AccessoriesThe Model X towing package has a 2" hitchreceiver that can support an accessory carrier.
The hitch receiver is designed to supportvertical loads of up to 120 lbs (54 kg). Whencarrying bicycles or other items on the ModelX hitch, always check to ensure that themaximum weight is not exceeded. Whencalculating weight, remember to include theweight of the accessory carrier. For example,assuming the carrier weighs 40 lbs, the weightthreshold is sufficient for carrying two bicyclesweighing approximately 40 lbs each, or fourbicycles weighing approximately 20 lbs each.
Caution: The Model X hitch is designed tosupport up to 120 lbs (54 kg). Exceedingthis maximum weight can causesignificant damage.
Caution: Do not attempt to install acarrier on a Model X that is not equippedwith the towing package. Doing so cancause significant damage.
To install and use an accessory carrier, the towhitch must be connected (see Connecting theTow Hitch on page 81). Then follow theinstructions provided with your accessorycarrier. Observe all regulations and legalrequirements in your state/region that applyto carrying accessories.
The Model X towing package includes thewiring necessary for using an accessory carrierequipped with lights (see ElectricalConnections on page 83). The package alsoincludes Trailer Mode software (see TrailerMode on page 79).
When you connect an accessorycarrier's wiring harness, Model Xdetects a connection for trailer lightsand this indicator illuminates on theinstrument panel. Trailer Mode isdisabled.
When carrying accessories, periodicallyconfirm that the accessory carrier and itscargo remain secure at all times, and ifapplicable, that the lights on the accessorycarrier are working.
Note: Go to www.tesla.com to purchaseaccessories for your Model X. Although third-
party products are available, Teslarecommends and supports only Tesla-approved products (see Parts and Accessorieson page 171). The accessory productsavailable for your Model X vary based onmarket region. Before attempting to install anon-Tesla carrier, review the productinformation to ensure compatibility.
Note: When not in use, the hitch receivershould be removed and stored in a drylocation to prevent rust and corrosion. Keepthe dust cover over the hitch housing toprevent dirt and debris from entering.(see Disconnecting the Tow Hitch on page 82).
Caution: A carrier may obscure your viewfrom the rear view mirror, the rearcamera(s), the rear ultrasonic sensors. Inaddition, some driver assistance featuresmay not function as expected.
Warning: Tesla assumes no responsibilityfor damage or injuries resulting frominstalling and using an accessory carrier,for any omissions in the instructionsaccompanying an accessory carrier, or foryour failure to follow the instructions.Damage caused by using an accessorycarrier is not covered by the warranty.
Towing and Accessories
76 Model X Owner's Manual
Towing CapacityThe total trailer weight (including all cargo and additional equipment), and the trailer tongueweight, must never exceed the following:
Tires Maximum TowingCapacity*
Maximum TongueWeight**
275/45R20 110 V / Y SAE Class III – 4960 lbs(2250 kg)
SAE Class III – 500 lbs (227kg)
285/35R22 106 W SAE Class II – 3480 lbs(1580 kg)
SAE Class II – 350 lbs (158kg)
*Tesla recommends a separate braking system on trailers with a loaded weight of over 1000 lbs(450 kg). The braking system must be appropriate for the weight of the trailer. Follow theinstructions provided by the trailer brake manufacturer to ensure that trailer brakes are properlyinstalled, adjusted, and maintained.
**The tongue weight is the downward force that the weight of the trailer exerts on the hitch. Itmust not be less than 10% of the trailer load. Carrying a significant amount of equipment,passengers, or cargo in the tow vehicle can reduce the tongue weight it can handle, which alsoreduces the maximum towing capacity. Maximum towing capacity is calculated assuming theGVWR (Gross Vehicle Weight Rating) is not exceeded. The GVWR is printed on the VehicleCertification Label (see Vehicle Certification Label on page 174).
Note: If the towing capacity on the hitch label conflicts with the information provided in thisowner's manual, this owner's manual takes precedence.
Warning: Do not overload the vehicle or trailer. Doing so can cause poor performance, vehicledamage and loss of vehicle control, resulting in serious injury or death.
Warning: Do not use the trailer hitch to tow/transport Model X.
Warning: When Model X is equipped with winter tires, the Maximum Towing Capacity isreduced.
Caution: Tesla assumes no responsibility for damage or injuries resulting from towing a trailer,for any errors or omissions in the instructions accompanying towing equipment, or for yourfailure to follow the proper instructions. Damage caused by towing a trailer is not covered bythe warranty.
Towing and Accessories
Driving 77

Tire Pressures when TowingWhen towing a trailer, tire pressures must beadjusted to accommodate the additional load.Keep tires inflated to the pressures shownbelow (these pressures override the pressuresthat are provided on the Tire and Loadinginformation label):
Front Tires Rear Tires Cold TireInflationPressure
255/45R20
265/45R20
275/45R20 46 psi (320kPa)
265/35ZR22 285/35ZR22 50 psi (345kPa)
Warning: Check tire pressures using anaccurate pressure gauge when tires arecold. Driving one mile (1.6 km) warms thetires sufficiently to affect tire pressures.Parking the vehicle in direct sunlight or inhot weather can also affect tire pressures.If you must check warm tires, expectincreased pressures. Do not let air out ofwarm tires in an attempt to matchrecommended cold tire pressures. A hottire at or below the recommended coldtire inflation pressure is dangerouslyunder-inflated.
Warning: Never attempt to tow a trailerwhen a Model X tire is faulty or has beeninflated using a tire repair kit. Atemporarily repaired tire is not designedto sustain the towing load. Towing using afaulty or temporarily repaired tire canresult in tire failure and loss of vehiclestability.
Before Towing a TrailerBefore towing a trailer, you must do thefollowing:
• Inflate tires to the cold tire inflationpressure specified in Tire Pressures whenTowing.
• Set Smart Air Suspension to Standardheight (touch Controls > Suspension >Standard).
• Observe all regulations and legalrequirements in your state/region thatapply to trailer towing. Failure to complywith regulations can compromise yoursafety.
• Adjust side mirrors to provide a clearrearward view without a significant blindspot.
• Ensure that Trailer Mode is engaged.
Confirm the following:
• Model X rests horizontally with the trailerattached. If the vehicle is tipped sharplyup at the front, and down at the rear,check that you are not exceeding themaximum towing capacity and tongueloads provided in Carrying Capacity.
• All trailer hitch parts and attachments ,safety chains, and electrical connectorsare in good condition and are properlyconnected. If any problems are apparent,do not tow the trailer.
• Trailer lights (brake lights, turn signallights, and marker lights) are workingproperly.
• The trailer tongue is securely connectedto the hitch ball.
• Safety chains are properly connectedbetween the trailer and the tow vehicle.Cross the safety chains under the tongueof the trailer to help prevent the tonguefrom contacting the road if it separatesfrom the hitch. Leave enough slack in thesafety chains to allow for turns and ensurethat the chains can never drag on theground.
• All cargo is secured.• The trailer load is evenly distributed such
that the trailer tongue weight isapproximately 10% of the total trailerweight, without exceeding the maximumtongue weights provided in CarryingCapacity.
• If the trailer is equipped with a separatebraking system, check that the brakeswork and are properly adjusted. Toprovide safe stopping ability, you mustbalance the trailer brakes with the vehiclebrakes.
Note: For general information about trailersafety provided by the National HighwayTraffic Safety Administration, go to: http://www.nhtsa.gov/cars/problems/Equipment/towing/Towing.pdf.
Warning: The trailer tongue weight mustbe approximately 10% of the total trailerweight without exceeding the maximumtongue weights provided in CarryingCapacity. Loads that are balanced overthe wheels or heavier in the rear cancause trailer sway, resulting in loss ofvehicle control.
Towing and Accessories
78 Model X Owner's Manual

Warning: Always ensure that cargo issecured in the trailer and will not shift.Dynamic load shifts can cause loss ofvehicle control, resulting in serious injuryor death.
Trailer ModeTrailer Mode must always be active whentowing a trailer. When you connect a trailer'selectrical connection, Model X automaticallyengages Trailer Mode. When you disconnectthe trailer's electrical connection, Trailer Modedisengages. To engage or exit Trailer Modemanually, touch Controls > Driving > TrailerMode on the touchscreen. One of thefollowing indicators display on the instrumentpanel:
Trailer Mode is active.
Model X detects a connection fortrailer lights but Trailer Mode isdisabled. It is likely that a carryingaccessory has been connected.
Model X detects a faulty electricalconnection for the trailer lights.Some, or all, trailer lights may not befunctioning. Pull over as soon assafety permits and inspect the trailerlights for faulty cabling orconnections.
Note: In situations where Model X detects aheavy load, it assumes that a trailer isconnected and automatically engages TrailerMode. A message displays on the instrumentpanel informing you that Trailer Mode hasbeen engaged. When Trailer Mode is enteredautomatically due to detection of a heavyload, you can change the Trailer Mode settingonly by stopping Model X and engaging Parkor engaging Neutral and manually applyingthe parking brake using the touchscreen(Controls > Driving > E-Brake & Power Off >Parking Brake).
Warning: Do not use Trailer Mode whenattaching a carrying accessory to thetrailer hitch.
In Trailer Mode, the following are disabled:
• Autosteer.• Autopark.• Rear parking sensors.
In addition, these features may operatedifferently:
• Traffic-Aware Cruise Control increases thefollowing distance from the car in front ofyou.
• Smart Air Suspension will not makespeed-based adjustments fromSTANDARD to LOW.
• Smart Air Suspension does not makeautomatic height adjustments based onsaved location-based settings.
• Side collision warnings are active butautomatic steering interventions aredisabled.
• The braking force provided by AutomaticEmergency Braking (see CollisionAvoidance Assist on page 106) issignificantly limited.
Warning: Do not rely on Model X todetect the trailer and automaticallyengage Trailer Mode. Always check thatTrailer Mode is engaged before towing atrailer.
Warning: Under no circumstances shouldyou exit Trailer Mode when towing atrailer. Doing so can cause serious injuryand/or death.
Warning: Do not use the air suspensionsetting to appropriately match the heightof the hitch with the height of the trailer.You must choose a trailer hitch and trailerthat have the appropriate height forsuitable axle loading and trailer balance.
Trailer BrakesWhen towing a loaded trailer that weighsmore than 1000 lbs (450 kg), Teslarecommends that the trailer be equipped withits own brake system adequate for the weightof the trailer. Ensure compliance with localregulations.
Follow these steps to connect a brakecontroller:
Towing and Accessories
Driving 79

1. Connect the wiring on the brake controllerto the appropriate locations on the 4-pinpigtail connector included with yourModel X.
1 - Brake control output to trailer
2 - Ground
3 - Brake On Signal
4 - 12V Power (20A)2. Remove the cover located under the
dashboard in the driver's side foot well.
3. Peel back the carpet to expose Model X's4-pin connector on the wiring harness.
4. Connect the pigtail connector to thevehicle wiring connector.
Warning: Towing increases your stoppingdistance, even when the trailer isequipped with its own braking system.When towing, increase your followingdistance and avoid situations that couldpotentially cause heavy braking. Failure todo so can result in a collision.
Warning: Observe all regulations andlegal requirements in your regional andnational jurisdictions that applyspecifically to trailer towing and brakerequirements. Many regions require abreakaway switch, located on the tongueof the trailer, to activate the trailer brakesin the event that the trailer separates
from the vehicle. Failure to comply withregulations can compromise your safety.
Warning: Follow the instructions providedby the trailer brake manufacturer toensure that trailer brakes are properlyinstalled, adjusted, and maintained. Teslais not responsible for damages caused byincorrect installation of trailer brakingsystems.
Warning: Never attempt to connect trailerbrakes directly to the vehicle brakingsystem. Doing so can cause damage tothe vehicle and the trailer, and can causethe braking system to malfunction,resulting in serious injury or death.
Towing GuidelinesModel X is designed primarily as a passenger-carrying vehicle. Towing a trailer putsadditional load on the motor, drive train,brakes, tires, and suspension and significantlydecreases range. If you decide to tow a trailer,proceed with caution and follow these generalguidelines:
• Reduce your driving speed and avoidsudden maneuvers. Keep in mind thatwhen towing a trailer, steering, stability,turning radius, stopping distance andbraking performance are different whencompared to driving without a trailer.
• Increase your following distance bymaintaining twice the distance from avehicle ahead. This helps to avoidsituations that require heavy braking.Sudden braking may result in skidding orjack-knifing, and loss of control.
• Avoid very sharp turns. Sharp turns cancause the trailer to contact the vehicleand cause damage. Keep in mind that thetrailer wheels are closer to the inside ofthe turn than the vehicle’s wheels.Therefore, make wider turns to preventthe trailer from hitting curbs, road signs,trees or other objects.
• Periodically check the trailer lights andturn signals to confirm that bulbs are stillworking. When towing a trailer, the turnsignal arrows on the vehicle instrumentcluster flash as normal, even if the bulbson the trailer are burned out.
• Periodically confirm the cargo is secure.• Periodically confirm the trailer brakes are
working.• Avoid parking on a grade (see Parking
with a Trailer).
Towing and Accessories
80 Model X Owner's Manual

• Regularly confirm that all towingcomponents are securely tightened.
Parking with a TrailerWhenever possible, avoid parking on a grade.However, if parking on a grade is absolutelynecessary, place wheel chocks under thetrailer wheels:
• One person presses and holds the brakepedal.
• A second person places the wheel chocksunder the wheels on the downgrade sideof the tires.
• When the chocks are in place, release thebrake pedal and ensure the chocks holdthe weight of the vehicle and trailer.
Note: When testing chocks, ensure thatVehicle Hold (see Vehicle Hold on page68) is not engaged. If Vehicle Hold isbraking Model X, the Vehicle Holdindicator light displays on the instrumentpanel. To disengage Vehicle Hold, pressand release the brake pedal.
• Place the vehicle in Park. This engages theparking brake.
Warning: If parking on a grade isnecessary, always ensure that all trailerwheels have been securely chocked.Failure to do so can result in seriousdamage, injury, or death.
Trailer Sway MitigationWhen trailer sway is detected, the Model Xelectronic stability control system attempts toapply the appropriate amount of braking tominimize trailer sway. The instrument panelbriefly displays the traction control systemindicator. Pressing the brake pedal when thesystem is actively braking to mitigate trailersway does not cancel this automatic braking.
Connecting the Tow HitchThe Model X towing package includes aweight-carrying hitch with a 2” x 2” removablehitch receiver. When not in use, the hitchreceiver should be removed and stored in adry location to prevent rust and corrosion.Keep the dust cover over the hitch housing toprevent dirt and debris from entering.
Note: Always remove the ball mount beforeinstalling or removing the hitch receiver fromthe vehicle (see Attaching and Removing theBall Mount on page 83).
Warning: You must use the Model Xtrailer hitch when towing a trailer. Neverattempt to attach a different type oftrailer hitch.
To install the trailer hitch receiver:
1. Remove the dust cover from the hitchhousing.
2. Insert the key into the locking cylinder onthe hitch, and turn the cylinder so the topof the key is aligned with the “unlocked”position.
Towing and Accessories
Driving 81

3. Pull the locking cylinder out of theadapter approximately 1/8" (0.5 cm), andturn clockwise until the red marking onthe cylinder aligns with the white dot.
Warning: Be careful when turning thelocking cylinder. If it does not lockinto the “Open Position”, itautomatically retracts into its original“Closed Position” and can pinch yourfingers.
4. Firmly grasp the hitch from the bottomand align the triangular-shaped guides atthe sides of the hitch with thecorresponding cutouts in the hitchhousing.
Note: Do not grasp the locking cylinderbecause it needs to rotate freely.
5. Push the hitch into the hitch housing untilthe locking cylinder rotates approximately120° counter-clockwise and automaticallylocks into the "Closed Position". The greenarea on the locking cylinder (above thewhite arrow) aligns with the white dot onthe housing.
6. Visually check to confirm that the hitch isfully inserted into the housing. Try pullingdown on the hitch. The hitch should notdrop when you pull down.
Note: If the hitch does not lock into thehousing, it falls out when you pull downon it.
7. Turn the key so the arrows align with the“locked” marking on the locking cylinder.
8. Remove the key and store it in a safeplace (preferably inside the vehicle).
Note: The key can be removed only if thehitch is locked. This indicates a properconnection. Do not use the hitch if the keyis not removed.
Note: Tesla recommends making a note ofthe key code. You need this code if youlose the keys and need to order areplacement.
9. Close the dust cover to prevent dirt anddebris from entering the lock.
Note: To maintain the hitch, regularly greaseits surfaces with non-resinous grease.
Disconnecting the Tow HitchAfter towing, remove the hitch:
1. Insert the key and turn to align the top ofthe key with the “unlocked” position.
2. While firmly holding the bottom of thehitch (to prevent it from dropping to theground), pull the locking cylinder outapproximately 1/8" (0.5 cm), and turn itclockwise until the red marking on thelocking cylinder aligns with the white dot.At this point, the locking cylinder is lockedin the "open" and the hitch drops out ofthe housing.
Warning: Be careful when turning thelocking cylinder. If it does not lockinto the “Open Position”, itautomatically retracts into its original“closed" position and can pinch yourfingers.
3. Reinstall the dust cover on the hitchhousing to prevent dirt from accumulatinginside the housing.
4. Close the dust cover on the hitch's lockingcylinder and store the hitch in a securelocation.
5. Reinstall the dust cover on the hitchhousing compartment.
Towing and Accessories
82 Model X Owner's Manual

Attaching and Removing the BallMountThe Model X towing package does not includea ball mount. You must purchase a ball mountsuitable for the type of trailer you are towing.The Model X hitch receiver supports a ballmount up to 8” with a rise of up to 0.75”. Donot use any type of drop ball mount.
To attach a ball mount:
1. If necessary, remove the cotter pin fromthe locking bolt and slide the locking boltout of the hitch assembly.
2. Slide the ball holder into the hitchassembly.
3. Align the hole in the ball holder with theone in the hitch assembly.
4. Slide the locking bolt through the hitchassembly/ball holder.
5. Insert the cotter pin in the hole at the endof the locking bolt.
To remove a ball mount:
1. Remove the cotter pin from the lockingbolt and slide the locking bolt out of theball holder/hitch assembly.
2. Pull the ball holder out of the hitchassembly.
Electrical ConnectionsRegulations require all trailers to be equippedwith tail lights, brake lights, side marker lights,and turn signals. To provide power for trailerlighting, a built-in seven-way wiring connector(SAE J560) is attached to the tow bar nearthe tow hitch. Most trailer wiring plugs can beattached to this connector.
1. Reverse Lights (Purple)2. 12V Power (Red or Black)3. Right Turn Signal and Brake Light (Green)4. Brake Controller Output (Blue)5. Tail Lights and Running Lights (Brown)6. Left Turn Signal and Brake Light (Yellow)7. Ground (White)
Note: It is the driver's responsibility to ensurethat all electrical connections are working andall trailer lights are operating before andduring towing. Model X does not detect faultytrailer lights. You must perform manualchecks.
Note: Loss of trailer lights when towing maybe the result of a blown fuse. Model X doesnot provide a warning if the fuse is blown.Contact Tesla Service.
Plugging trailer wiring into the Model Xelectrical connector automatically engagesTrailer Mode (see Trailer Mode on page 79).
Warning: The brake controller outputoperates only when a brake controller isinstalled (see Trailer Brakes on page 79).
Warning: Use only the electricalconnection designed by Tesla. Do notattempt to directly splice or attempt toconnect trailer electrical wiring using anyother method. Doing so can damage thevehicle electrical system and causemalfunctions.
Caution: Always ensure that the trailerelectrical cable does not contact or dragon the ground and there is enough slackin the cable to allow for turns.
Towing and Accessories
Driving 83

Impact on RangeTowing a trailer and carrying accessoriesincreases vehicle weight and drag. As a result,driving range can decrease significantly.Although Trip Planner attempts to adjustestimates based on Trailer Mode, actualenergy consumption may vary. Plan trip lengthand charging destinations accordingly.
Towing and Accessories
84 Model X Owner's Manual

How It WorksYour Model X includes the following Driver Assistance components that actively monitor thesurrounding roadway:
1. A camera is mounted above the rear license plate.2. Ultrasonic sensors are located in the front and rear bumpers.3. A camera is mounted in each door pillar.4. Three cameras are mounted to the windshield above the rear view mirror.5. A camera is mounted to each front fender.6. Radar is mounted behind the front bumper on the right side of the vehicle.
Model X is also equipped with high precision electrically-assisted braking and steering systems.
About Driver Assistance
Driver Assistance 85
FeaturesThese safety features are available on all Teslavehicles equipped with Driver Assistancecomponents:
• Lane Assist (see Lane Assist on page104).
• Collision Avoidance Assist (see CollisionAvoidance Assist on page 106).
• Speed Assist (see Speed Assist on page109).
• Auto High Beam (see High BeamHeadlights on page 60).
These convenience features, designed toreduce driver workload, are available only ifyour Tesla vehicle is equipped with theoptional Enhanced Autopilot or Full Self-Driving Capability packages:
• Traffic-Aware Cruise Control (see Traffic-Aware Cruise Control on page 88).
• Autosteer (see Autosteer on page 94).• Auto Lane Change (see Auto Lane
Change on page 97).• Autopark (see Autopark on page 99).
You can enable/disable Driver Assistancefeatures and in some cases, control how theywork. To access settings for Driver Assistancefeatures, touch Controls > Settings > DriverAssistance.
CalibrationModel X must maneuver with a great deal ofprecision when Driver Assistance features arebeing used. Therefore, before some features(for example, Traffic-Aware Cruise Control orAutosteer) can be used for the first time,some cameras must complete a self-calibration process.
Calibration typically completes after driving20-25 miles (32-40 km), but the distancevaries depending on road and environmentalconditions. Driving on a straight road withhighly-visible lane lines allows Model X tocalibrate quicker. When calibration iscomplete, the features are available for usethe next time you drive (i.e. you must stop andshift into Park before you can use thefeatures). Contact Tesla if your Model X hasnot completed the calibration process afterdriving 100 miles (160 km).
Note: If you attempt to use a feature that isnot available until the calibration process iscomplete, the feature will not be enabled andthe instrument panel displays a message.
Note: Model X repeats the calibration processif the cameras are serviced by Tesla and insome cases, after a software update.
LimitationsMany factors can impact the performance ofDriver Assistance components, causing themto be unable to function as intended. Theseinclude (but are not limited to):
• Poor visibility (due to heavy rain, snow,fog, etc.).
• Bright light (due to oncoming headlights,direct sunlight, etc.).
• Damage or obstructions caused by mud,ice, snow, etc.
• Interference or obstruction by object(s)mounted onto the vehicle (such as a bikerack).
• Obstruction caused by applying excessivepaint or adhesive products (such aswraps, stickers, rubber coating, etc.) ontothe vehicle.
• Narrow or winding roads.• A damaged or misaligned bumper.• Interference from other equipment that
generates ultrasonic waves.• Extremely hot or cold temperatures.
Warning: The list above does notrepresent an exhaustive list of situationsthat may interfere with proper operationof Driver Assistance components. Neverdepend on these components to keepyou safe. It is the driver's responsibility tostay alert, drive safely, and be in controlof the vehicle at all times.
Caution: If a windshield replacement isneeded, take your vehicle to TeslaService. This will ensure appropriatehandling and mounting of the camera(s).Failure to do so can cause one or moreDriver Assistance features to malfunction.
Cleaning Cameras and SensorsTo ensure the various Driver Assistancecomponents can provide information that is asaccurate as possible, keep them clean and freeof obstructions or damage. Occasionallyremove any buildup of dirt by wiping thecomponents with a soft cloth dampened withwarm water.
Caution: Do not use chemical-based orabrasive cleaners. Doing so can damagesurfaces.
About Driver Assistance
86 Model X Owner's Manual

Caution: Avoid using a high-pressurepower washer.
Caution: Do not clean an ultrasonicsensor or camera lens with a sharp orabrasive object that can scratch ordamage its surface.
About Driver Assistance
Driver Assistance 87
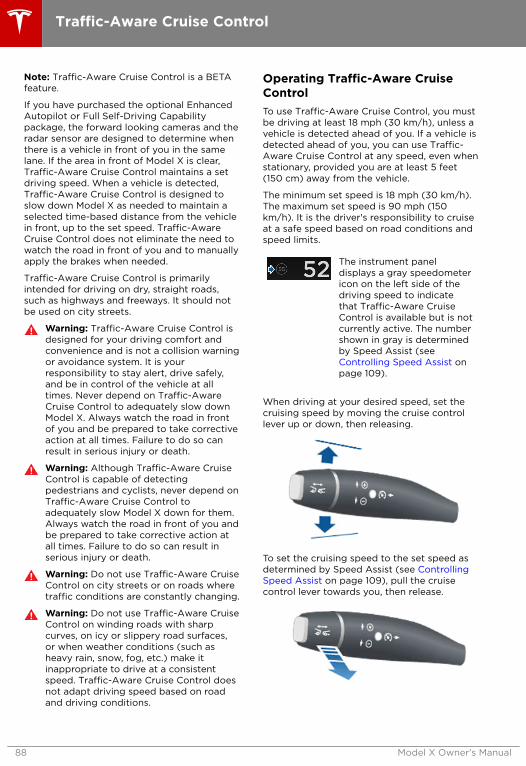
Note: Traffic-Aware Cruise Control is a BETAfeature.
If you have purchased the optional EnhancedAutopilot or Full Self-Driving Capabilitypackage, the forward looking cameras and theradar sensor are designed to determine whenthere is a vehicle in front of you in the samelane. If the area in front of Model X is clear,Traffic-Aware Cruise Control maintains a setdriving speed. When a vehicle is detected,Traffic-Aware Cruise Control is designed toslow down Model X as needed to maintain aselected time-based distance from the vehiclein front, up to the set speed. Traffic-AwareCruise Control does not eliminate the need towatch the road in front of you and to manuallyapply the brakes when needed.
Traffic-Aware Cruise Control is primarilyintended for driving on dry, straight roads,such as highways and freeways. It should notbe used on city streets.
Warning: Traffic-Aware Cruise Control isdesigned for your driving comfort andconvenience and is not a collision warningor avoidance system. It is yourresponsibility to stay alert, drive safely,and be in control of the vehicle at alltimes. Never depend on Traffic-AwareCruise Control to adequately slow downModel X. Always watch the road in frontof you and be prepared to take correctiveaction at all times. Failure to do so canresult in serious injury or death.
Warning: Although Traffic-Aware CruiseControl is capable of detectingpedestrians and cyclists, never depend onTraffic-Aware Cruise Control toadequately slow Model X down for them.Always watch the road in front of you andbe prepared to take corrective action atall times. Failure to do so can result inserious injury or death.
Warning: Do not use Traffic-Aware CruiseControl on city streets or on roads wheretraffic conditions are constantly changing.
Warning: Do not use Traffic-Aware CruiseControl on winding roads with sharpcurves, on icy or slippery road surfaces,or when weather conditions (such asheavy rain, snow, fog, etc.) make itinappropriate to drive at a consistentspeed. Traffic-Aware Cruise Control doesnot adapt driving speed based on roadand driving conditions.
Operating Traffic-Aware CruiseControlTo use Traffic-Aware Cruise Control, you mustbe driving at least 18 mph (30 km/h), unless avehicle is detected ahead of you. If a vehicle isdetected ahead of you, you can use Traffic-Aware Cruise Control at any speed, even whenstationary, provided you are at least 5 feet(150 cm) away from the vehicle.
The minimum set speed is 18 mph (30 km/h).The maximum set speed is 90 mph (150km/h). It is the driver's responsibility to cruiseat a safe speed based on road conditions andspeed limits.
The instrument paneldisplays a gray speedometericon on the left side of thedriving speed to indicatethat Traffic-Aware CruiseControl is available but is notcurrently active. The numbershown in gray is determinedby Speed Assist (see Controlling Speed Assist onpage 109).
When driving at your desired speed, set thecruising speed by moving the cruise controllever up or down, then releasing.
To set the cruising speed to the set speed asdetermined by Speed Assist (see ControllingSpeed Assist on page 109), pull the cruisecontrol lever towards you, then release.
Traffic-Aware Cruise Control
88 Model X Owner's Manual

The gray speedometer iconon the instrument panelturns blue and displays theset speed to indicate thatTraffic-Aware Cruise Controlis active.
Note: The minimum set speed is 18 mph(30 km/h). The maximum set speed is 90 mph(150 km/h). It is the driver's responsibility tocruise at a safe speed based on roadconditions and speed limits.
You can now release the accelerator pedal andallow Traffic-Aware Cruise Control to maintainyour set speed. When no vehicle is detectedahead, Traffic-Aware Cruise Control maintainsthe set speed. If a vehicle is detected, Traffic-Aware Cruise Control maintains your chosenfollowing distance, up to the set speed,accelerating and decelerating Model X asneeded. When the vehicle you are following isno longer detected, Traffic-Aware CruiseControl accelerates up to the set speed.Traffic-Aware Cruise Control also adjusts thespeed as appropriate when entering andexiting curves.
You can manually accelerate at any time whendriving at a set speed using Traffic-AwareCruise Control. But when you release theaccelerator, Model X returns to the set speed.
When following a vehicle, Traffic-Aware CruiseControl remains active at low speeds, even ifModel X comes to a standstill. When thevehicle is moving again, Traffic-Aware CruiseControl resumes operating at your current setspeed. However, under the followingcircumstances, Traffic-Aware Cruise Controlgoes into a HOLD state instead of resuming,and the instrument panel displays a messageindicating that you need to resume cruisecontrol:
• You have been at a standstill for 5minutes.
• The driver's seat belt is unbuckled.• Model X detects a pedestrian nearby (the
HOLD state may clear when thepedestrian is no longer close by).
• Model X suddenly loses visibility of thevehicle you are following.
• The ultrasonic sensors detect an obstaclein front of Model X.
To resume Traffic-Aware Cruise Control, pressthe accelerator pedal or pull the cruise controllever toward you (see Canceling andResuming on page 92).
In right hand traffic, engaging the right turnsignal when driving in the right-most lanewithin 164 feet (50 meters) of an exit (on acontrolled access road only, such as a highwayor freeway), causes Traffic-Aware CruiseControl to assume you are exiting. As a result,Traffic-Aware Cruise Control begins to slowdown the vehicle. Likewise in left hand traffic,when engaging the left turn signal whendriving in the left-most lane within 164 feet(50 meters) of an exit. The onboard GPS(Global Positioning System) determines if youare driving in a region with right or left handtraffic. In situations where GPS data isunavailable (for example, if there is inadequatesignal), engaging the turn signal near an exitdoes not cause Traffic-Aware Cruise Controlto slow down Model X.
Note: If you double-pull the cruise controllever (or single-pull when Traffic-Aware CruiseControl is active), Autosteer activates ifenabled (see Autosteer on page 94) and theset speed changes to either your currentdriving speed, or the speed limit plus anyoffset you have defined in Speed Assist,whichever is greater (see Cruising at theSpeed Limit on page 90).
Note: When Traffic-Aware Cruise Control isactively slowing down Model X to maintain theselected distance from the vehicle ahead, thebrake lights turn on to alert other road usersthat you are slowing down. You may alsonotice slight movement of the brake pedal.However, when Traffic-Aware Cruise Control isaccelerating Model X, the accelerator pedaldoes not move.
Warning: Due to limitations inherent inthe onboard GPS, you may experiencesituations in which Traffic-Aware CruiseControl slows down the vehicle, especiallynear highway exits where a curve isdetected and/or you are activelynavigating to a destination and notfollowing the route.
Warning: Traffic-Aware Cruise Controlcannot detect all objects and may notbrake/decelerate for stationary vehicles,especially in situations when you aredriving over 50 mph (80 km/h) and avehicle you are following moves out ofyour driving path and a stationary vehicleor object is in front of you instead. Alwayspay attention to the road ahead and stayprepared to take immediate correctiveaction. Depending on Traffic-AwareCruise Control to avoid a collision canresult in serious injury or death. Inaddition, Traffic-Aware Cruise Control
Traffic-Aware Cruise Control
Driver Assistance 89

may react to vehicles or objects thateither do not exist or are not in the laneof travel, causing Model X to slow downunnecessarily or inappropriately.
Warning: Traffic-Aware Cruise Controlmay be unable to provide adequatespeed control because of limited brakingcapability and hills. It can also misjudgethe distance from a vehicle ahead. Drivingdownhill can increase driving speed,causing Model X to exceed your setspeed (and potentially the road's speedlimit). Never depend on Traffic-AwareCruise Control to slow down the vehicleenough to prevent a collision. Alwayskeep your eyes on the road when drivingand be prepared to take corrective actionas needed. Depending on Traffic-AwareCruise Control to slow the vehicle downenough to prevent a collision can result inserious injury or death.
Warning: Traffic-Aware Cruise Controlmay occasionally cause Model X to brakewhen not required or when you are notexpecting it. This can be caused byclosely following a vehicle ahead,detecting vehicles or objects in adjacentlanes (especially on curves), etc.
Adjust your following distanceTo adjust the following distance you want tomaintain between Model X and a vehicletraveling ahead of you, rotate the cruisecontrol lever to choose a setting from 1 (theclosest following distance) to 7 (the longestfollowing distance). Each setting correspondsto a time-based distance that represents howlong it takes for Model X, from its currentlocation, to reach the location of the rearbumper of the vehicle ahead of you.
As you rotate the cruise control lever, theinstrument panel displays the current setting.Release the lever when the desired setting isdisplayed.
Note: Your setting is retained until youmanually change it.
Warning: It is the driver's responsibility todetermine and maintain a safe followingdistance at all times. Do not rely onTraffic-Aware Cruise Control to maintainan accurate or appropriate followingdistance.
Warning: Never depend on Traffic-AwareCruise Control to adequately slow downModel X to avoid a collision. Alwayswatch the road in front of you and stayprepared to take immediate correctiveaction.
Cruising at the Speed LimitTraffic-Aware Cruise Control makes it easy tocruise at the speed limit. You can cruise at thespeed limit that is currently being determinedby Speed Assist (see Speed Assist on page109). To do so, pull the cruise control levertoward you. When you release, your cruisingspeed is set to the speed that is determinedby Speed Assist, taking into consideration anyoffset you have specified. If you are alreadydriving faster than the speed limit when youpull the lever, the set speed does not adjust tothe speed limit—it adjusts to your currentdriving speed.
Note: When you adjust the cruising speedbased on the speed limit, the set speed doesnot change when the speed limit changes. Youmust pull the cruise control lever again tocruise at the new speed limit. You can alsomanually adjust your cruising speed at anytime (see Changing the Set Speed on page91).
Note: Your set speed will use your currentdriving speed if you move the cruise controllever up or down.
Note: If Speed Assist is unable to determine aspeed limit, your set speed does not changewhen you pull the cruise control lever towardyou.
Warning: Do not rely on Speed Assist orTraffic-Aware Cruise Control to
Traffic-Aware Cruise Control
90 Model X Owner's Manual
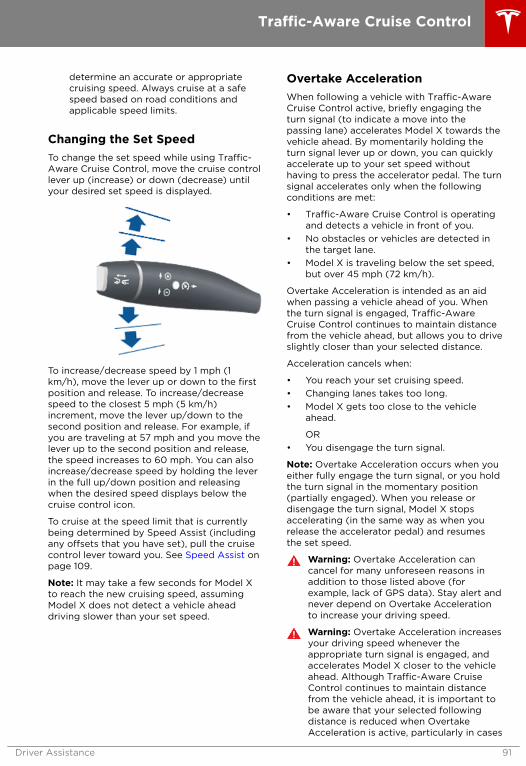
determine an accurate or appropriatecruising speed. Always cruise at a safespeed based on road conditions andapplicable speed limits.
Changing the Set SpeedTo change the set speed while using Traffic-Aware Cruise Control, move the cruise controllever up (increase) or down (decrease) untilyour desired set speed is displayed.
To increase/decrease speed by 1 mph (1km/h), move the lever up or down to the firstposition and release. To increase/decreasespeed to the closest 5 mph (5 km/h)increment, move the lever up/down to thesecond position and release. For example, ifyou are traveling at 57 mph and you move thelever up to the second position and release,the speed increases to 60 mph. You can alsoincrease/decrease speed by holding the leverin the full up/down position and releasingwhen the desired speed displays below thecruise control icon.
To cruise at the speed limit that is currentlybeing determined by Speed Assist (includingany offsets that you have set), pull the cruisecontrol lever toward you. See Speed Assist onpage 109.
Note: It may take a few seconds for Model Xto reach the new cruising speed, assumingModel X does not detect a vehicle aheaddriving slower than your set speed.
Overtake AccelerationWhen following a vehicle with Traffic-AwareCruise Control active, briefly engaging theturn signal (to indicate a move into thepassing lane) accelerates Model X towards thevehicle ahead. By momentarily holding theturn signal lever up or down, you can quicklyaccelerate up to your set speed withouthaving to press the accelerator pedal. The turnsignal accelerates only when the followingconditions are met:
• Traffic-Aware Cruise Control is operatingand detects a vehicle in front of you.
• No obstacles or vehicles are detected inthe target lane.
• Model X is traveling below the set speed,but over 45 mph (72 km/h).
Overtake Acceleration is intended as an aidwhen passing a vehicle ahead of you. Whenthe turn signal is engaged, Traffic-AwareCruise Control continues to maintain distancefrom the vehicle ahead, but allows you to driveslightly closer than your selected distance.
Acceleration cancels when:
• You reach your set cruising speed.• Changing lanes takes too long.• Model X gets too close to the vehicle
ahead.
OR• You disengage the turn signal.
Note: Overtake Acceleration occurs when youeither fully engage the turn signal, or you holdthe turn signal in the momentary position(partially engaged). When you release ordisengage the turn signal, Model X stopsaccelerating (in the same way as when yourelease the accelerator pedal) and resumesthe set speed.
Warning: Overtake Acceleration cancancel for many unforeseen reasons inaddition to those listed above (forexample, lack of GPS data). Stay alert andnever depend on Overtake Accelerationto increase your driving speed.
Warning: Overtake Acceleration increasesyour driving speed whenever theappropriate turn signal is engaged, andaccelerates Model X closer to the vehicleahead. Although Traffic-Aware CruiseControl continues to maintain distancefrom the vehicle ahead, it is important tobe aware that your selected followingdistance is reduced when OvertakeAcceleration is active, particularly in cases
Traffic-Aware Cruise Control
Driver Assistance 91

where it may not be your intention toovertake the vehicle you are following.
Canceling and ResumingTo manually cancel Traffic-Aware CruiseControl, briefly push the cruise control leveraway from you or press the brake pedal. Thespeedometer icon on the instrument panelturns gray to indicate that Traffic-AwareCruise Control is not actively controlling yourspeed.
To resume cruising at the previously setspeed, briefly pull the cruise control levertoward you.
To resume cruising at the current drivingspeed, move the cruise control lever up ordown, then release
Note: Depending on date of manufacture,some Model X vehicles have a button on theend of the cruise control lever. Pressing thisbutton when Traffic-Aware Cruise Control isactive cancels Traffic-Aware Cruise Control.
Note: When Traffic-Aware Cruise Controlcancels, Model X does not coast. Instead,regenerative braking slows down Model X inthe same way as when you move your foot offthe accelerator when driving without Traffic-Aware Cruise Control (see RegenerativeBraking on page 63).
Warning: Traffic-Aware Cruise Controlcancels, or may not be available, in thefollowing situations:
• You press the brake pedal.• Your driving speed drops below
5 mph (8 km/h) in situations whenModel X does not detect a vehicleahead within the specified distance.
• Your driving speed exceeds themaximum cruising speed of 90 mph(150 km/h).
• You shift Model X into a differentgear.
• The driver's seat belt is unbuckled.• A door is opened.• The view from the radar sensor or
camera(s) is obstructed. This couldbe caused by dirt, mud, ice, snow, fog,etc.
• The traction control setting ismanually disabled or is repeatedlyengaging to prevent wheels fromslipping.
• The wheels are spinning while at astandstill.
• The Traffic-Aware Cruise Controlsystem is failing or requires service.
When Traffic-Aware Cruise Control isunavailable or cancels, Model X no longerdrives consistently at a set speed and nolonger maintains a specified distancefrom the vehicle ahead.
Warning: Traffic-Aware Cruise Controlcan cancel unexpectedly at any time forunforeseen reasons. Always watch theroad in front of you and stay prepared totake appropriate action. It is the driver'sresponsibility to be in control of Model Xat all times.
Summary of Cruise Indicators
Traffic-Aware Cruise Control isavailable but is not activelycontrolling your speed until youactivate it. The number shown ingray is determined by Speed Assist(see Controlling Speed Assist onpage 109).
Traffic-Aware Cruise Control isoperating and is either maintainingthe set speed (no vehicle in front) oris maintaining a chosen followingdistance from a vehicle ahead (up tothe set speed).
Traffic-Aware Cruise Control
92 Model X Owner's Manual

Model X has fully stopped but is in aHOLD state. If safe, press theaccelerator pedal to resume cruisingat the set speed.
LimitationsTraffic-Aware Cruise Control is particularlyunlikely to operate as intended in thefollowing types of situations:
• The road has sharp curves.• Visibility is poor (due to heavy rain, snow,
fog, etc.).• Bright light (such as from oncoming
headlights or direct sunlight) is interferingwith the view of the camera(s).
• The radar sensor is obstructed (dirty,covered, etc.).
• The windshield is obstructing the view ofthe camera(s) (fogged over, dirty, coveredby a sticker, etc.).
Warning: The list above does notrepresent an exhaustive list of situationsthat may interfere with proper operationof Traffic-Aware Cruise Control.
Traffic-Aware Cruise Control
Driver Assistance 93

Note: Autosteer is a BETA feature.
If you have purchased the optional EnhancedAutopilot or Full Self-Driving Capabilitypackages, you can use Autosteer to managesteering and speed under certaincircumstances. Autosteer builds upon Traffic-Aware Cruise Control (see Traffic-AwareCruise Control on page 88), intelligentlykeeping Model X in its driving lane whencruising at a set speed. Using the vehicle'scamera(s), the radar sensor, and the ultrasonicsensors, Autosteer detects lane markings andthe presence of vehicles and objects, steeringModel X based on the lane markings and thevehicle directly in front of you.
Warning: Autosteer is a hands-on feature.You must keep your hands on the steeringwheel at all times.
Warning: Autosteer is intended for useonly on highways and limited-accessroads with a fully attentive driver. Whenusing Autosteer, hold the steering wheeland be mindful of road conditions andsurrounding traffic. Do not use Autosteeron city streets, in construction zones, orin areas where bicyclists or pedestriansmay be present. Never depend onAutosteer to determine an appropriatedriving path. Always be prepared to takeimmediate action. Failure to follow theseinstructions could cause damage, seriousinjury or death.
Operating AutosteerBefore you can operate Autosteer, you mustenable it by touching Controls > Settings >Driver Assistance > Autosteer > ON.
To indicate that Autosteer isavailable (but not activelysteering Model X), theinstrument panel displays agray Autosteer iconon theright side of the drivingspeed.
To initiate Autosteer, pull the cruise controllever toward you twice in quick succession.
Autosteer briefly displays a message on theinstrument panel reminding you to payattention to the road and be ready to takeover at any time. To indicate that Autosteer isnow actively steering Model X, the instrumentpanel displays the Autosteer icon in blue.When Autosteer is able to detect lanemarkings, it also displays the driving lane inblue.
Note: To initiate Autosteer when there is novehicle in front of you, you must be driving atleast 18 mph (30 km/h) on a roadway withvisible lane markings. If a vehicle is detectedahead of you, you can initiate Autosteer at anyspeed, even when stationary (if you are atleast 5 feet (150 cm) away from the vehicle).
The instrument panel displays a messageindicating that Autosteer is temporarilyunavailable if you attempted to engageAutosteer when driving at a speed that is notwithin the speed required for Autosteer tooperate. Autosteer may also be unavailable ifit is not receiving adequate data from thecamera(s) or sensors.
If Autosteer is unable to detect lane markings,the driving lane is determined based on thevehicle you are following. In these situations,the vehicle in front of you is highlighted inblue.
In most cases, Autosteer attempts to centerModel X in the driving lane. However, if thesensors detect the presence of an obstacle(such as a vehicle or guard rail), Autosteermay steer Model X in a driving path that isoffset from the center of the lane.
Warning: Autosteer is not designed to,and will not, steer Model X around objects
Autosteer
94 Model X Owner's Manual

partially or completely in the driving lane.Always watch the road in front of you andstay prepared to take appropriate action.It is the driver's responsibility to be incontrol of Model X at all times.
Restricted Speed
Autosteer is intended for use only by a fullyattentive driver on freeways and highwayswhere access is limited by entry and exitramps. If you choose to use Autosteer onresidential roads, a road without a centerdivider, or a road where access is not limited,Autosteer may limit the maximum allowedcruising speed. The maximum allowed cruisingspeed on such roads is calculated based onthe detected speed limit including a SpeedAssist offset of up to +5 mph (10 km/h). AnySpeed Assist offset above +5 mph (10 km/h) isrounded down to +5 mph (10 km/h). However,you can select a more restrictive cruisingspeed by reducing the speed limit offset (see Controlling Speed Assist on page 109) or byadjusting the cruise control lever.
In situations where the speed limit cannot bedetected when Autosteer is engaged,Autosteer reduces your driving speed andlimits the set speed to 45 mph (70 km/h).Although you can manually accelerate toexceed the limited speed, Model X may notbrake for detected obstacles. Autosteer willslow down to the limited speed when yourelease the accelerator pedal. When you leavethe road, or disengage Autosteer by using thesteering wheel, you can increase your setspeed again, if desired.
Hold Steering WheelAutosteer uses data from the camera(s),sensors, and GPS to determine how best tosteer Model X. When active, Autosteerrequires you to hold the steering wheel. If itdoes not detect your hands on the steeringwheel for a period of time, a flashing whitelight appears around the instrument panel andthe following message displays:
Autosteer detects your hands by recognizinglight resistance as the steering wheel turns, orfrom you manually turning the steering wheelvery lightly (i.e., without enough force toretake control). When your hands aredetected, the message disappears andAutosteer resumes normal operation.
Note: Autosteer may also sound a chime atthe same time that the message is initiallydisplayed.
Autosteer requires that you pay attention toyour surroundings and remain prepared totake control at any time. If Autosteer still doesnot detect your hands on the steering wheel,the request escalates by sounding chimes thatincrease in frequency.
If you repeatedly ignore hands-on prompts,Autosteer displays the following message andis disabled for the rest of the drive. If youdon't resume manual steering, Autosteersounds a continuous chime, turns on thewarning flashers, and slows the vehicle to acomplete stop.
For the rest of the drive, you must steermanually. Autosteer is available again afteryou stop and shift the vehicle into Park.
Take Over ImmediatelyIn situations where Autosteer is unable tosteer Model X, Autosteer sounds a warningchime and displays the following message onthe instrument panel:
When you see this message, TAKE OVERSTEERING IMMEDIATELY.
Canceling AutosteerAutosteer cancels when:
• You start steering manually.• You press the brake pedal.• You push the cruise control lever away
from you.• The maximum speed that Autosteer
supports–90 mph (150 km/h)–isexceeded.
• You shift into a different gear.
Autosteer
Driver Assistance 95

• An Automatic Emergency Braking eventoccurs (see Collision Avoidance Assist onpage 106).
When Autosteer cancels, it sounds chimes andthe Autosteer icon either turns gray toindicate that Autosteer is no longer active, ordisappears to indicate that it is not currentlyavailable.
Note: If Autosteer cancels because youstarted steering manually, Traffic-AwareCruise Control remains active. DisengageTraffic-Aware Cruise Control as you normallywould, by briefly pushing the cruise controllever away from you or pressing the brakepedal.
To disable Autosteer so it is no longeravailable, touch Controls > Settings > DriverAssistance > Autosteer > OFF.
LimitationsAutosteer is particularly unlikely to operate asintended when:
• Autosteer is unable to accuratelydetermine lane markings. For example,lane markings are excessively worn, havevisible previous markings, have beenadjusted due to road construction, arechanging quickly (lanes branching off,crossing over, or merging), objects orlandscape features are casting strongshadows on the lane markings, or the roadsurface contains pavement seams or otherhigh-contrast lines.
• Visibility is poor (heavy rain, snow, fog,etc.).
• A camera(s) or sensor(s) is obstructed,covered, or damaged.
• Driving on hills.• Approaching a toll booth.• Driving on a road that has sharp curves or
is excessively rough.• Bright light (such as direct sunlight) is
interfering with the view of the camera(s).• The sensors are affected by other
electrical equipment or devices thatgenerate ultrasonic waves.
Warning: Many unforeseen circumstancescan impair the operation of Autosteer.Always keep this in mind and rememberthat as a result, Autosteer may not steerModel X appropriately. Always driveattentively and be prepared to takeimmediate action.
Autosteer
96 Model X Owner's Manual

Warning: Auto Lane Change is designedto be used only when driving onrestricted-access highways (i.e. with on-ramps and off-ramps).
If you have purchased the optional EnhancedAutopilot or Full Self-Driving Capabilitypackages, you can use Auto Lane Change tomove Model X into an adjacent lane withoutmoving the steering wheel (which wouldcancel Autosteer). When both Traffic-AwareCruise Control and Autosteer are active, AutoLane Change intelligently steers Model X intoan adjacent driving lane. Using the forwardlooking camera(s), the radar sensor, andultrasonic sensors, Model X detects lanemarkings and the presence of other vehicles.
Auto Lane Change is designed for use onrestricted-access highways with visible lanemarkings and under relatively predictablecircumstances in which minimal steering anddriver intervention is needed.
Warning: It is the driver's responsibility todetermine whether a lane change is safeand appropriate. Auto Lane Changecannot detect oncoming traffic in thetarget lane, especially fast movingvehicles from the rear. Therefore, beforeinitiating a lane change, always checkblind spots, lane markings, and thesurrounding roadway to confirm it is safeand appropriate to move into the targetlane.
Warning: Never depend on Auto LaneChange to determine an appropriatedriving path. Drive attentively bywatching the road and traffic ahead ofyou, checking the surrounding area, andmonitoring the instrument panel forwarnings. Always be prepared to takeimmediate action.
Warning: Do not use Auto Lane Changeon city streets or on roads where trafficconditions are constantly changing andwhere bicycles and pedestrians arepresent.
Warning: The performance of Auto LaneChange depends on the ability of thecamera(s) to recognize lane markings.
Warning: Do not use Auto Lane Changeon winding roads with sharp curves, onicy or slippery roads, or when weatherconditions (such as heavy rain, snow, fog,etc.) may be obstructing the view fromthe camera(s) or sensors.
Warning: Failure to follow all warningsand instructions can result in seriousproperty damage, injury or death.
Operating Auto Lane ChangeBefore you can operate Auto Lane Change,you must enable it by touching Controls >Settings > Driver Assistance > Auto LaneChange > ON.
Note: Before you can turn on Auto LaneChange, you must turn on Autosteer (see Autosteer on page 94). Without Autosteer,Auto Lane Change cannot operate.
Note: Your chosen setting is retained until youmanually change it. It is also saved in yourdriver profile.
To change lanes using Auto Lane Change:
1. Perform visual checks to make sure it issafe and appropriate to move into thetarget lane.
2. Engage the appropriate turn signal.3. Disengage the turn signal after you are in
the target lane.
Auto Lane Change moves Model X into theadjacent lane in the direction indicated by theturn signal, provided the following conditionsare met:
• The Auto Lane Change setting is turnedon.
• The turn signal is engaged.• Autosteer is actively steering Model X.• The ultrasonic sensors do not detect a
vehicle or obstacle up to the center of thetarget lane.
• The lane markings indicate that a lanechange is permitted.
• The view of the camera(s) is notobstructed.
• Lane Assist does not detect a vehicle inthe blind spot (see Lane Assist on page104).
• Midway through the lane change, AutoLane Change can detect the outside lanemarking of the target lane.
• Driving speed is at least 30 mph(45 km/h).
Auto Lane Change
Driver Assistance 97
As the lane change is in progress, OvertakeAcceleration is activated, allowing Model X toaccelerate closer to a vehicle in front (see Overtake Acceleration on page 91). Midwaythrough the lane change, Auto Lane Changemust be able to detect the target lane'soutside lane marking. If this lane markingcannot be detected, both Auto Lane Changeand Autosteer will cancel.
Note: Auto Lane Change moves Model X onelane at a time. Moving into an additional lanerequires you to engage the turn signal asecond time after the first lane change iscomplete.
Warning: If Auto Lane Change abortsduring a lane change (for example, AutoLane Change cannot detect the outsideof the target lane midway through thelane change), Model X returns to itsoriginal driving lane.
When Auto Lane Change is active, it isimportant to monitor its performance bywatching the driving path in front of you andthe surrounding area. Stay prepared to takeover steering at any time. As you are crossingover into the adjacent lane, the instrumentpanel displays the lane marking as a dashedblue line. Once in your new lane, lane markingsare displayed as solid blue lines again.
In situations where Auto Lane Change isunable to operate at optimal performance, orcannot operate due to inadequate data, theinstrument panel displays a series of warnings.Therefore, when using Auto Lane Change,always pay attention to the instrument paneland be prepared to manually steer Model X.
Warning: When Auto Lane Change isactively steering Model X, the steeringwheel moves accordingly. Any significantrestriction of or force on the steeringwheel's movement can cancel both AutoLane Change and Autosteer.
Canceling Auto Lane ChangeAuto Lane Change cancels when you manuallymove the steering wheel, press the brakepedal, or disengage the turn indicator beforeModel X crosses the markers on the existinglane.
To disable Auto Lane Change so it is no longeravailable, touch Controls > Settings > DriverAssistance > Auto Lane Change > OFF.
LimitationsAuto Lane Change is particularly unlikely tooperate as intended in the following types ofsituations:
• Auto Lane Change is unable to accuratelydetermine lane markings. For example,lane markings are excessively worn, havevisible previous markings, have beenadjusted due to road construction, arechanging quickly (lanes branching off,crossing over, or merging), objects orlandscape features are casting strongshadows on the lane markings, or the roadsurface contains pavement seams or otherhigh-contrast lines.
• A vehicle is detected in your blind spotwhen you engage the turn signal.
• The road has sharp curves.• Visibility is poor (due to heavy rain, snow,
fog, etc.) or weather conditions areinterfering with sensor operation.
• Bright light (oncoming headlights ordirect sunlight) is interfering with the viewof the camera(s).
• A sensor or camera is damaged orobstructed (such as by mud, fog, ice,snow, etc.).
• The sensors are affected by otherelectrical equipment or devices thatgenerate ultrasonic waves.
• Model X is being driven very close to avehicle in front of it, which is blocking theview of the camera(s).
Warning: Many unforeseen circumstancescan impair the operation of Auto LaneChange. Always keep this in mind andremember that as a result, Auto LaneChange may not steer Model Xappropriately. Always drive attentivelyand stay prepared to immediately takeaction at any time.
Auto Lane Change
98 Model X Owner's Manual

If you have purchased the optional EnhancedAutopilot or Full Self-Driving Capabilitypackage, Autopark uses data from ultrasonicsensors and the Global Positioning System(GPS) to:
• Simplify parking on public roads bymaneuvering Model X into parallel andperpendicular parking spaces. See Parkingon Public Roads on page 99.
• Automatically park and retrieve Model Xfrom outside the vehicle on a privateresidential property. See Using Summonon page 101.
Warning: Summon is a BETA feature.Please use this feature with caution,staying prepared to take immediateaction at any time.
Warning: Autopark's performancedepends on the ability of the ultrasonicsensors to determine the vehicle'sproximity to curbs, objects, and othervehicles.
Parking on Public RoadsWhen driving, follow these steps to allowAutopark to maneuver Model X into a parkingspace:
1. When driving slowly on a public road,monitor the instrument panel todetermine when Autopark has detected aparking space. When Autopark detects apotential parking space, the instrumentpanel displays a parking icon. Autoparkdetects parallel parking locations whendriving below 15 mph (24 km/h) andperpendicular parking locations whendriving below 10 mph (16 km/h).
Note: The parking icon appears only if thevehicle's position and/or thecircumstances of the surrounding area aresuch that Autopark can determine anappropriate driving path. If Autoparkcannot determine an appropriate path (forexample, when driving on a narrow streetwhere moving into the parking spacecauses the front of the vehicle to extendinto the adjacent lane), you can eitherreposition the vehicle, find a differentparking space, or park manually.
2. Check to determine if the detectedparking space is appropriate and safe. Ifso, pull forward and stop approximately acar length ahead of the parking space (asyou normally would when parallel parkingor when backing into a perpendicularparking space).
3. Release the steering wheel, shift Model Xinto Reverse, then touch Start Autoparkon the touchscreen.
4. When parking is complete, Autoparkdisplays the "Complete" message.
In situations where Autopark cannot operatedue to inadequate sensor data, the instrumentpanel displays a message indicating that youmust manually park Model X.
Note: If you press the brake when Autopark isactively parking Model X, the parking processpauses until you touch Resume on thetouchscreen.
Note: Autopark detects potentialperpendicular parking spaces that are at least9.5 feet (2.9 meters) wide with a vehicle
Autopark
Driver Assistance 99

parked on each side. Autopark detects parallelparking spaces that are at least 20 feet (6meters), but less than 30 feet (9 meters) long.Autopark does not operate on angled parkingspaces.
Warning: Never depend on Autopark tofind a parking space that is legal, suitable,and safe. Autopark may not always detectobjects in the parking space. Alwaysperform visual checks to confirm that aparking space is appropriate and safe.
Warning: When Autopark is activelysteering Model X, the steering wheelmoves in accordance with Autopark'sadjustments. Do not interfere with themovement of the steering wheel. Doingso cancels Autopark.
Warning: During the parking sequence,continually check your surroundings. Beprepared to apply the brakes to avoidvehicles, pedestrians, or objects.
Warning: When Autopark is active,monitor the touchscreen and instrumentpanel to ensure that you are aware of theinstructions that Autopark is providing.
To Pause Parking
To pause Autopark, press the brake pedalonce. Model X stops and remains stopped untilyou touch Resume on the touchscreen.
To Cancel Parking
Autopark cancels the parking sequence whenyou manually move the steering wheel,change gears, or touch Cancel on thetouchscreen. Autopark also cancels parkingwhen:
• The parking sequence exceeds themaximum of seven moves.
• Model X detects that the driver is exitingthe vehicle.
• A door is opened.• You press the accelerator pedal.• You press the brake pedal while Autopark
is paused.• An Automatic Emergency Braking event
occurs (see Collision Avoidance Assist onpage 106).
Limitations
Autopark is particularly unlikely to operate asintended in the these situations:
• The road is sloped. Autopark is designedto operate on flat roads only.
• Visibility is poor (due to heavy rain, snow,fog, etc.).
• The curb is constructed of material otherthan stone, or the curb cannot bedetected.
• The target parking space is directlyadjacent to a wall or pillar (for example,the last parking space of a row in anunderground parking structure).
• One or more of the ultrasonic sensors isdamaged, dirty, or obstructed (such as bymud, ice, or snow).
• Weather conditions (heavy rain, snow, fog,or extremely hot or cold temperatures)are interfering with sensor operation.
• The sensors are affected by otherelectrical equipment or devices thatgenerate ultrasonic waves.
Warning: Many unforeseen circumstancescan impair Autopark's ability to parkModel X. Keep this in mind and rememberthat as a result, Autopark may not steerModel X appropriately. Pay attentionwhen parking Model X and stay preparedto immediately take control.
Autopark
100 Model X Owner's Manual

Using SummonNote: Summon is a BETA feature. Summon isdesigned and intended for use only on aprivate residential property where thesurrounding area is familiar and predictable.When using Summon, you must continuallymonitor the vehicle. It is the driver'sresponsibility to use this feature safely,responsibly, and as intended.
With Summon, you can move Model X in andout of a parking space from outside thevehicle using the mobile app or the key. Youcan also customize Summon to park orretrieve Model X with a single touch of abutton and to initiate parking automaticallyafter you double-press the Park gear and exitthe vehicle. Using data from the ultrasonicsensors, Summon maneuvers Model X forwardor reverse into a parking space. When parkingis complete Summon shifts Model X into Park.Parking is complete when:
• Model X detects an obstacle in its drivingpath (within a chosen distance)
• Summon has moved Model X themaximum distance of 39 feet (12 meters)
OR• In the case of reversing, Summon has
reached the maximum Summon Distance.
To use Summon:
• FIRST TIME ONLY: Enable Summon andcustomize how it works (see CustomizingSummon on page 101).
• Position Model X for parking (see Positionthe Vehicle for Parking on page 102).
• Initiate the parking maneuver using themobile app, the key, or by double-pressingthe Park gear. Detailed instructions foreach method are provided later.
You can summon Model X back to its originalposition if you previously auto parked it andthe vehicle has remained in the Park gear.Then, using the mobile app or key, simplyspecify the opposite direction. Summonmoves the vehicle along the original pathprovided the environment has not changed(i.e. no obstructions have been introduced). Ifobstacles are detected, Summon attempts toavoid the obstacles while staying as close aspossible to its original path.
To cancel Summon and stop Model X at anytime during a parking maneuver, use themobile app, press any button on the key, or (ifsitting in the vehicle) interact with the steeringwheel, brake pedal, accelerator pedal, or gearstalk.
Note: If you want Summon to move multipletimes in the same direction, up to themaximum of 39 feet (12 meters), cancelSummon and then re-initiate the parkingprocess, choosing the same direction.
Note: Summon can move Model X a shortdistance laterally to avoid an obstacle but indoing so, does not return the vehicle to itsdriving path (i.e. Summon does not attempt tomove Model X around an obstacle).
Warning: Summon is unable to operate asintended if the ultrasonic sensors areobstructed by a vehicle bra, excessivepaint, or adhesive products (such aswraps, stickers, rubber coating, etc.).
Warning: Model X cannot detectobstacles that are located lower than thebumper, very narrow (i.e. bicycles), orhanging from a ceiling. In addition, manyunforeseen circumstances can impairSummon's ability to move in or out of aparking space and as a result, Summonmay not appropriately steer Model X.Therefore, you must continually monitorthe vehicle's movement and surroundingsand remain prepared to stop Model X atany time.
Customizing Summon
Before operating Summon, use thetouchscreen to enable it. Touch Controls >Settings > Driver Assistance > Summon > ON.
Then touch Customize to specify howSummon operates whenever it parks orretrieves your vehicle:
• Bumper Clearance: Set the distance thatyou want Summon to stop from adetected object. For example, you maywant Summon to stop within just a fewinches of the garage wall. This distanceapplies only to objects detected directly infront of (when moving forward) or behind(when reversing) Model X.
• Summon Distance: Specify the distanceModel X travels when backing out of aparking space.
• Side Clearance: Allow Model X to enterand exit very narrow parking spaces.
Warning: Parking in a narrow spacelimits the ability of the sensors toaccurately detect the location ofobstacles, increasing the risk ofdamage to Model X and/orsurrounding objects.
Autopark
Driver Assistance 101

• Require Continuous Press (U.S. Only): Bydefault, Summon requires that you pressand hold a button on the mobile app tomove the vehicle during the parkingprocess. When you set RequireContinuous Press to NO, you can:
• Park Model X by simply doublepressing the Park gear, specifying thedirection on the touchscreen (ifreversing), then exiting the vehicle.
• Park or retrieve Model X with a singletouch of a button on the mobile app.
• Park or retrieve Model X using the key.• Use Auto HomeLink (if equipped): Set to
ON if you want to activate HomeLink toopen/close a programmed garage doorthat meets safety standards during theparking process. If enabled, the garagedoor automatically opens and closes whenModel X enters or exits.
Note: This setting automatically opensand closes the garage door only whenusing Summon. To automate HomeLink inother situations (such as when driving),you must access the HomeLink device'smain settings by touching Controls >Settings > HomeLink (see HomeLink®
Universal Transceiver on page 144).
Warning: Do not use this setting withgates or with a garage door that doesnot meet safety standards. A garagedoor opener that does not havesafety stop and reverse features(cannot detect an object in its pathand then automatically stop andreverse) does not meet thesestandards. Using a garage dooropener without these featuresincreases the risk of injury or death.
Note: All settings associated with Summon areretained until you manually change them.
Position the Vehicle for Parking
Before operating Summon, align Model Xlaterally with the parking space so Model Xcan move straight into the space in eitherDrive or Reverse. You must also positionModel X within 39 feet (12 meters) of theparking space (the maximum distance thatSummon can move Model X).
If applicable, open your garage door. Asdescribed earlier, this can be automated usingAuto HomeLink (if equipped).
Note: Use Summon on flat driveways onlywhere a raised concrete edge does not exceedapproximately 1 in (2.5 cm).
Operating Summon with the Mobile App
On the mobile app, start Summon and holddown the forward or reverse button to moveModel X into the parking space. (U.S. Only): IfRequire Continuous Press is set to NO (see Customizing Summon on page 101), you donot need to hold down the button, just touchand release.
Summon shifts Model X into Drive or Reverse(based on the direction you specified) anddrives into the parking space.
Note: Summon cancels if your phone enterssleep mode or is turned off.
Operating Summon with the Key (U.S. Only)
Note: To operate Summon with the key,Require Continuous Press must be set to NO(see Customizing Summon on page 101).
Follow these steps to park Model X fromoutside the vehicle using the key:
1. With Model X in Park, stand within 10 feet(3 meters) and press and hold the topcenter button on the key (Lock/Unlock Allbutton) until the hazard lights blinkcontinuously.
Note: The hazard lights flash once asModel X locks, then within five seconds,Model X powers on and the hazard lightsflash continuously. Do not proceed to thenext step until the hazard lights areflashing. If, after five seconds, the hazardlights are not flashing, release the buttonon the key, move closer to Model X, andtry again. If Summon receives no furtherinput within ten seconds, Summoncancels.
2. Press the Front Trunk (Frunk) button onthe key to move Model X forward into theparking space, or press the Rear Trunkbutton to reverse Model X into the parkingspace.
Initiate Automatic Parking Before Exiting theVehicle (U.S. Only)
If Require Continuous Press is set to NO, youcan initiate the parking maneuver from insideModel X before exiting:
Autopark
102 Model X Owner's Manual

1. While sitting in Model X with the vehiclepowered on, double press the Park gear.
The instrument panel displays a messageindicating that Summon is engaged, andthe touchscreen displays a popup window.
2. On the touchscreen, choose the directionof travel.
3. Exit Model X and close the door.
Note: All doors and trunks must beclosed.
Note: To cancel the parking maneuverbefore exiting the vehicle, touch Cancelon the popup window.
Note: If no direction of travel was selectedon the touchscreen, Model X will notattempt the parking maneuver after youexit the vehicle.
Summon now drives Model X into the parkingspace according to the direction you specifiedon the touchscreen.
Stopping or Canceling Summon
You can stop Model X at any time whileSummon is active by pressing any button onthe key or by using the mobile app. Summonalso cancels when:
• A door handle is pressed or a door isopened.
• You interact with the steering wheel, brakepedal, accelerator pedal, or gear stalk.
• Model X detects an obstacle and cannotmove forward for more thanapproximately two seconds.
• Summon has moved Model X themaximum distance of approximately 39feet (12 meters).
Limitations
Summon is unlikely to operate as intended inthe following types of situations:
• The road is sloped. Summon is designedto operate on flat roads only.
• Summon has detected a raised concreteedge when moving forward into theparking location. Summon does not driveforward over an edge that is higher thanapproximately 1 in (2.5 cm).
• One or more of the ultrasonic sensors isdamaged, dirty, or obstructed (such as bymud, ice, or snow).
• Weather conditions (heavy rain, snow, fog,or extremely hot or cold temperatures)are interfering with sensor operation.
• The sensors are affected by otherelectrical equipment or devices thatgenerate ultrasonic waves.
• Model X is in Trailer Mode or an accessoryis attached.
Note: Summon is disabled if Model X is inValet mode (see Valet Mode on page 43).
Warning: The list above does notrepresent an exhaustive list of situationsthat may interfere with proper operationof Autopark's Summon feature. It is thedriver's responsibility to remain in controlof Model X at all times. Pay closeattention whenever Summon is activelymoving Model X and stay prepared totake immediate action. Failure to do socan result in serious property damage,injury or death.
Autopark
Driver Assistance 103

The cameras monitor the markers on the laneyou are driving in and the ultrasonic sensorsmonitor the surrounding areas and the blindspot for the presence of a vehicle or otherobjects.
When an object is detected in your blind spotor close to the side of Model X (such as avehicle, guard rail, etc.), colored lines radiatefrom the image of Model X on the instrumentpanel. The location of the lines correspond tothe location of the detected object. The colorof the lines (white, yellow, orange, or red)represents the object's proximity to Model X,with white being the farthest and red beingvery close and requiring your immediateattention. These colored lines only displaywhen driving between approximately 7 and 85mph (12 and 140 km/h). When Autosteer isactive, these colored lines also display ifdriving slower than 7 mph (12 km/h). However,the colored lines do not display if Model X is ata standstill (for example, in heavy traffic).
Lane Assist also warns you of undesired lanedepartures by vibrating the steering wheelslightly if a front wheel passes over a lanemarking and the associated turn signal is off.This warning is active only when drivingbetween approximately 36 and 90 mph (59and 150 km/h). To turn this warning on or off,touch Controls > Settings > DriverAssistance > Lane Departure Warning. Yourchosen setting is retained until you manuallychange it. It is also saved in your driver profile.
In addition to the warnings described above,Lane Assist may provide steering interventionsif Model X drifts into (or close to) an adjacentlane in which an object, such as a vehicle, isdetected. In these situations, Model Xautomatically steers to a safer position in itsdriving lane. This steering is applied only whenModel X is traveling between 30 and 85 mph(48 and 140 km/h) on major roadways withclearly visible lane markings. When LaneAssist applies a steering intervention, theinstrument panel briefly displays a warningmessage.
Warning: Steering interventions areminimal and are not designed to moveModel X out of its driving lane. Do notrely on steering interventions to avoidside collisions.
Warning: Lane Assist features are forguidance purposes only and are notintended to replace your own direct visualchecks. Never depend on Lane Assist toinform you of unintentionally drivingoutside of the boundaries of the drivinglane or informing you that an object orvehicle is in your blind spot or close tothe side of your vehicle. Several externalfactors can reduce the performance ofLane Assist. It is the driver's responsibilityto stay alert, pay attention to the drivinglane and always be aware of other roadusers. Failure to do so can result inserious injury or death.
Warning: Lane Assist is designed todetect lane markings and may not detectthe edge of a road, especially if the roadhas no curb. It is the driver's responsibilityto drive attentively and stay within theboundaries of the driving lane.
Warning: Before changing lanes, alwaysvisually check the lane you are movinginto by using side mirrors and performingthe appropriate shoulder checks. Severalfactors can affect the performance of theLane Assist warnings, resulting in lack of,or false warnings (see Limitations andInaccuracies on page 104).
Limitations and InaccuraciesLane Assist cannot always clearly detect lanemarkings and you may experienceunnecessary or invalid warnings in thesesituations:
Lane Assist
104 Model X Owner's Manual

• Visibility is poor and lane markings are notclearly visible (due to heavy rain, snow,fog, etc.). The exact detection zone of theultrasonic sensors varies depending onenvironmental conditions.
• Bright light (such as from oncomingheadlights or direct sunlight) is interferingwith the view of the camera(s).
• A vehicle in front of Model X is blockingthe view of the camera(s).
• The windshield is obstructing the view ofthe camera(s) (fogged over, dirty, coveredby a sticker, etc.).
• Lane markings are excessively worn, havevisible previous markings, have beenadjusted due to road construction, or arechanging quickly (for example, lanesbranching off, crossing over, or merging).
• The road is narrow or winding.• Objects or landscape features are casting
strong shadows on lane markers.
Lane Assist may not provide warnings, or mayapply inappropriate warnings, in thesesituations:
• One or more of the ultrasonic sensors isdamaged, dirty, or obstructed (such as bymud, ice, or snow).
• Weather conditions (heavy rain, snow, fog,or extremely hot or cold temperatures)are interfering with sensor operation.
• The sensors are affected by otherelectrical equipment or devices thatgenerate ultrasonic waves.
• An object that is mounted to Model X isinterfering with and/or obstructing asensor (such as a bike rack or a bumpersticker).
In addition, Lane Assist may not steer Model Xaway from an adjacent vehicle, or may applyunnecessary or inappropriate steering, inthese situations:
• You are driving Model X on sharp cornersor on a curve at a relatively high speed.
• Bright light (such as from oncomingheadlights or direct sunlight) is interferingwith the view of the camera(s).
• You are drifting into another lane but anobject (such as a vehicle) is not present.
• A vehicle in another lane cuts in front ofyou or drifts into your driving lane.
• Model X is traveling slower than 30 mph(48 km/h) or faster than 90 mph (145km/h).
• One or more of the ultrasonic sensors isdamaged, dirty, or obstructed (such as bymud, ice, or snow).
• Weather conditions (heavy rain, snow, fog,or extremely hot or cold temperatures)are interfering with sensor operation.
• The sensors are affected by otherelectrical equipment or devices thatgenerate ultrasonic waves.
• An object mounted to Model X (such as abike rack or a bumper sticker) isinterfering with or obstructing a sensor.
• Visibility is poor and lane markings are notclearly visible (due to heavy rain, snow,fog, etc.).
• Lane markings are excessively worn, havevisible previous markings, have beenadjusted due to road construction or arechanging quickly (for example, lanesbranching off, crossing over, or merging).
Warning: The lists above do not representevery possible situation that may interferewith Lane Assist warnings. Lane Assistmay not operate as intended for manyother reasons. To avoid a collision, stayalert and always pay attention to theroadway when driving Model X so youcan anticipate the need to take correctiveaction as early as possible.
Lane Assist
Driver Assistance 105

The following collision avoidance features aredesigned to increase the safety of you andyour passengers:
• Forward Collision Warning - providesvisual and audible warnings in situationswhen Model X detects that there is a highrisk of a frontal collision.
• Automatic Emergency Braking -automatically applies braking to reducethe impact of a frontal collision (see Automatic Emergency Braking on page107).
Warning: Forward Collision Warning is forguidance purposes only and is not asubstitute for attentive driving and soundjudgment. Keep your eyes on the roadwhen driving and never depend onForward Collision Warning to warn you ofa potential collision. Several factors canreduce or impair performance, causingeither unnecessary, invalid, inaccurate, ormissed warnings. Depending on ForwardCollision Warning to warn you of apotential collision can result in seriousinjury or death.
Warning: Automatic Emergency Brakingis not designed to prevent a collision. Atbest, it can minimize the impact of afrontal collision by attempting to reduceyour driving speed. Depending onAutomatic Emergency Braking to avoid acollision can result in serious injury ordeath.
Forward Collision WarningThe forward looking camera(s) and the radarsensor monitor the area in front of Model X forthe presence of an object such as a vehicle,bicycle, or pedestrian. If a collision isconsidered likely unless you take immediatecorrective action, Forward Collision Warning isdesigned to sound a chime and highlight thevehicle in front of you in red on the instrumentpanel. If this happens, TAKE IMMEDIATECORRECTIVE ACTION!
Warnings cancel automatically when the riskof a collision has been reduced (for example,you have decelerated or stopped Model X, orthe object in front of your vehicle has movedout of your driving path).
If immediate action is not taken when Model Xissues a Forward Collision Warning, AutomaticEmergency Braking (if enabled) mayautomatically apply the brakes if a collision isconsidered imminent (see AutomaticEmergency Braking on page 107).
By default, Forward Collision Warning isturned on. To turn it off or adjust its sensitivity,touch Controls > Settings > DriverAssistance > Forward Collision Warning.Instead of the default warning level ofMedium, you can turn the warning Off, or youcan choose to be warned Late or Early.
Note: Your chosen setting for ForwardCollision Warning is retained until youmanually change it. It is also saved in yourdriver profile.
Warning: The camera(s) and sensorsassociated with Forward CollisionWarning are designed to monitor anapproximate area of up to 525 feet(160 meters) in your driving path. Thearea being monitored by ForwardCollision Warning can be adverselyaffected by road and weather conditions.Use appropriate caution when driving.
Warning: Forward Collision Warning isdesigned only to provide visual andaudible alerts. It does not attempt toapply the brakes or decelerate Model X.When seeing and/or hearing a warning, itis the driver's responsibility to takecorrective action immediately.
Warning: Forward Collision Warning mayprovide a warning in situations where thelikelihood of collision may not exist. Stay
Collision Avoidance Assist
106 Model X Owner's Manual

alert and always pay attention to the areain front of Model X so you can anticipatewhether any action is required.
Warning: Forward Collision Warningoperates only when driving betweenapproximately 7 mph (10 km/h) and 90mph (150 km/h).
Warning: Forward Collision Warning doesnot provide a warning when the driver isalready applying the brake.
Automatic Emergency BrakingThe forward looking camera(s) and the radarsensor are designed to determine the distancefrom an object (vehicle, motorcycle, bicycle, orpedestrian) traveling in front of Model X.When a frontal collision is consideredunavoidable, Automatic Emergency Braking isdesigned to apply the brakes to reduce theseverity of the impact.
When Automatic Emergency Braking appliesthe brakes, the instrument panel displays avisual warning and sounds a chime. You mayalso notice abrupt downward movement ofthe brake pedal. The brake lights turn on toalert other road users that you are slowingdown.
Automatic Emergency Braking operates onlywhen driving between approximately 7 mph(10 km/h) and 90 mph (150 km/h).
Automatic Emergency Braking does not applythe brakes, or stops applying the brakes,when:
• You turn the steering wheel sharply.• You press and release the brake pedal
while Automatic Emergency Braking isapplying the brakes.
• You accelerate hard (i.e., accelerator pedalpressure increases from below 90% toabove 90%) while Automatic EmergencyBraking is applying the brakes.
• The vehicle, motorcycle, bicycle, orpedestrian is no longer detected ahead.
Automatic Emergency Braking is alwaysenabled when you start Model X. To disable itfor your current drive, touch Controls >Settings > Driver Assistance > AutomaticEmergency Braking > Disable.
Warning: It is strongly recommended thatyou do not disable Automatic EmergencyBraking. If you disable it, Model X doesnot automatically apply the brakes insituations where a collision is consideredlikely.
Warning: Automatic Emergency Brakingis designed to reduce the severity of animpact. It is not designed to avoid acollision.
Warning: Several factors can affect theperformance of Automatic EmergencyBraking, causing either no braking orinappropriate or untimely braking. It is thedriver’s responsibility to drive safely andremain in control of the vehicle at alltimes. Never depend on AutomaticEmergency Braking to avoid or reducethe impact of a collision.
Warning: Automatic Emergency Brakingis designed to reduce the impact offrontal collisions only and does notfunction when Model X is in Reverse.
Warning: Automatic Emergency Brakingis not a substitute for maintaining a safetraveling distance between you and thevehicle in front of you.
Warning: The brake pedal movesdownward abruptly during automaticbraking events. Always ensure that thebrake pedal can move freely. Do not placematerial under or on top of the Tesla-supplied driver’s floor mat (including anadditional mat) and always ensure thatthe driver’s floor mat is properly secured.Failure to do so can impede the ability ofthe brake pedal to move freely.
Note: For advance notice of an AutomaticEmergency Braking event, turn on ForwardCollision Warning (see Forward CollisionWarning on page 106). When turned on, youhear a chime and see a collision warning onthe instrument panel if a collision isconsidered likely. Then, if you do not takeimmediate corrective action, a collision isconsidered imminent and AutomaticEmergency Braking applies braking to reducedriving speed. If enabled, AutomaticEmergency Braking applies braking when acollision is considered inevitable, even ifForward Collision Warning is turned off.
Collision Avoidance Assist
Driver Assistance 107
Limitations and InaccuraciesCollision Avoidance features cannot alwaysdetect all objects, vehicles, bikes, orpedestrians, and you may experienceunnecessary, inaccurate, invalid, or missedwarnings for many reasons, particularly if:
• The road has sharp curves.• Visibility is poor (due to heavy rain, snow,
fog, etc.).• Bright light (such as from oncoming
headlights or direct sunlight) is interferingwith the view of the camera(s).
• The radar sensor is obstructed (dirty,covered, etc.).
• The windshield is obstructing the view ofthe camera(s) (fogged over, dirty, coveredby a sticker, etc.).
Warning: The limitations described abovedo not represent an exhaustive list ofsituations that may interfere with properoperation of Collision Avoidance Assistfeatures. These features may fail toprovide their intended function for manyother reasons. It is the driver’sresponsibility to avoid collisions bystaying alert and paying attention to thearea beside Model X so you can anticipatethe need to take corrective action as earlyas possible.
Caution: If a fault occurs with a CollisionAvoidance Assist feature, Model Xdisplays an alert. Contact Tesla Service.
Collision Avoidance Assist
108 Model X Owner's Manual
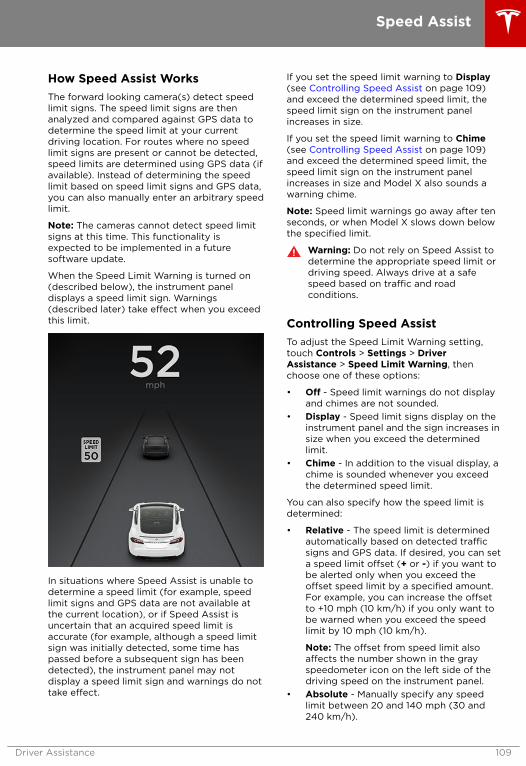
How Speed Assist WorksThe forward looking camera(s) detect speedlimit signs. The speed limit signs are thenanalyzed and compared against GPS data todetermine the speed limit at your currentdriving location. For routes where no speedlimit signs are present or cannot be detected,speed limits are determined using GPS data (ifavailable). Instead of determining the speedlimit based on speed limit signs and GPS data,you can also manually enter an arbitrary speedlimit.
Note: The cameras cannot detect speed limitsigns at this time. This functionality isexpected to be implemented in a futuresoftware update.
When the Speed Limit Warning is turned on(described below), the instrument paneldisplays a speed limit sign. Warnings(described later) take effect when you exceedthis limit.
In situations where Speed Assist is unable todetermine a speed limit (for example, speedlimit signs and GPS data are not available atthe current location), or if Speed Assist isuncertain that an acquired speed limit isaccurate (for example, although a speed limitsign was initially detected, some time haspassed before a subsequent sign has beendetected), the instrument panel may notdisplay a speed limit sign and warnings do nottake effect.
If you set the speed limit warning to Display(see Controlling Speed Assist on page 109)and exceed the determined speed limit, thespeed limit sign on the instrument panelincreases in size.
If you set the speed limit warning to Chime(see Controlling Speed Assist on page 109)and exceed the determined speed limit, thespeed limit sign on the instrument panelincreases in size and Model X also sounds awarning chime.
Note: Speed limit warnings go away after tenseconds, or when Model X slows down belowthe specified limit.
Warning: Do not rely on Speed Assist todetermine the appropriate speed limit ordriving speed. Always drive at a safespeed based on traffic and roadconditions.
Controlling Speed AssistTo adjust the Speed Limit Warning setting,touch Controls > Settings > DriverAssistance > Speed Limit Warning, thenchoose one of these options:
• Off - Speed limit warnings do not displayand chimes are not sounded.
• Display - Speed limit signs display on theinstrument panel and the sign increases insize when you exceed the determinedlimit.
• Chime - In addition to the visual display, achime is sounded whenever you exceedthe determined speed limit.
You can also specify how the speed limit isdetermined:
• Relative - The speed limit is determinedautomatically based on detected trafficsigns and GPS data. If desired, you can seta speed limit offset (+ or -) if you want tobe alerted only when you exceed theoffset speed limit by a specified amount.For example, you can increase the offsetto +10 mph (10 km/h) if you only want tobe warned when you exceed the speedlimit by 10 mph (10 km/h).
Note: The offset from speed limit alsoaffects the number shown in the grayspeedometer icon on the left side of thedriving speed on the instrument panel.
• Absolute - Manually specify any speedlimit between 20 and 140 mph (30 and240 km/h).
Speed Assist
Driver Assistance 109

Note: GPS data is not always accurate. TheGPS can miscalculate a road's location andprovide the speed limit for a directly adjacentroad that may have a different speed limit. Forexample, the GPS can assume Model X is on afreeway or highway when it is actually on anearby surface street, and vice versa.
Note: Your chosen setting is retained until youmanually change it. It is also saved in yourdriver profile.
Limitations and InaccuraciesSpeed Assist may not be fully functional ormay provide inaccurate information in thesesituations:
Note: The cameras cannot detect speed limitsigns at this time. This functionality isexpected to be implemented in a futuresoftware update.
• Visibility is poor and speed limit signs arenot clearly visible (due to heavy rain,snow, fog, etc.).
• Bright light (such as from oncomingheadlights or direct sunlight) is interferingwith the view of the camera(s).
• Model X is being driven very close to avehicle in front of it which is blocking theview of the camera(s).
• The windshield is obstructing the view ofthe camera(s) (fogged over, dirty, coveredby a sticker, etc.).
• Speed limit signs are concealed byobjects.
• The speed limits stored in the GPSdatabase are incorrect or outdated.
• Model X is being driven in an area whereGPS data is not available.
• Traffic signs do not conform to standardrecognizable formats.
• A road or a speed limit has recentlychanged.
Warning: The list above does notrepresent an exhaustive list of situationsthat may interfere with proper operationof Speed Assist. Speed Assist may fail toprovide warnings for many other reasons.
Speed Assist
110 Model X Owner's Manual

The Big Picture
The main components of the touchscreen are shown here. To manually control the brightness andcontrast, touch Controls > Displays. When set to Auto, the touchscreen changes between the Day(light background) and Night (dark background) setting depending on ambient lightingconditions.
Note: The following illustration is provided for demonstration purposes only. Depending on vehicleoptions, software version and market region, your touchscreen may appear slightly different.
Touchscreen Overview
Using the Touchscreen 111

Touchscreen Overview
112 Model X Owner's Manual

1. Status bar
The top line displays provides shortcuts to lock/unlock Model X, to access HomeLink (ifequipped) and Driver Profiles, display vehicle information (the Tesla “T”), download softwareupdates, display network strength and Bluetooth® status and Wi-Fi settings. If an alert icon(exclamation mark) is displayed, touch it to see warning messages that are in effect.
Note: The airbag status symbol displays only when Model X is powered on.
Note: You can also display the time and outside temperature on the instrument panel bychoosing the Clock option using the left or right scroll wheel on the steering wheel (see Steering Wheel on page 44).
Note: Touch the lock icon to unlock/lock all doors. In situations where only the driver's door isunlocked (for example, Door Unlock Mode is set to Driver), the lock icon displays as unlockedand touching it locks all doors. For more information on Door Unlock Mode, see Doors onpage 4.
Touchscreen Overview
Using the Touchscreen 113

2. Apps
Touch an app to display it in the viewing area. Apps have default positions. Navigation andCamera open in the top viewing area, whereas all other apps open in the bottom viewing area.Instead of displaying the app in the default viewing area, you can specify where you want todisplay the app by touching and holding the app's icon and dragging it onto the preferredviewing area.
Media. See Media and Audio on page 130.
Maps and Navigation (if equipped). See Maps and Navigation on page 137.
Note: When displaying maps in the top (or entire) viewing area when adriving gear is engaged, the status and app bars at the top disappear after afew seconds to maximize the size of the map. Touch the map to redisplaythem.
Calendar. See Calendar on page 142.
Energy. See Getting Maximum Range on page 72.
Web. Access the Internet using the web browser (if equipped).
Camera. Display the area behind Model X. This area also displaysautomatically whenever you shift into Reverse. See Rear View Camera onpage 74.
Phone. See Phone on page 135.
3. Main viewing area
The main viewing area changes depending on the app you have chosen. For some apps (suchas Navigation and Web), you can zoom in and out using standard touchscreen finger gestures.
4. Maximize/minimize app
Touch the small rectangle to expand the associated app to fill the entire main viewing area(some apps are not expandable). Touch again to display two apps in half-screen view.
5. Controls
Touch to access all Model X controls and settings (doors, locks, lights, etc).
Touchscreen Overview
114 Model X Owner's Manual

6. Climate controls (see Climate Controls on page 123).7. Volume control
Touch the up and down arrows to increase or decrease the volume of the speakers. You canalso adjust the volume using the scroll wheel on the left side of the steering wheel.
8. Reverse the position of the two currently displayed apps.
Warning: Paying attention to road and traffic conditions must always be the driver's highestpriority. To ensure the safety of vehicle occupants as well as other road users, using thetouchscreen should be done only when road and traffic conditions permit.
Touchscreen Overview
Using the Touchscreen 115

Controlling Features
Touch Controls on the bottom corner of the touchscreen to control and customize all mainfeatures of Model X.
Note: The following illustration is provided for demonstration purposes only. Depending on vehicleoptions, software version and market region, the options available on the Controls screen may bedifferent.
Controls
116 Model X Owner's Manual

1. Close
Touch the circled X in the top left corner of a window to close it (or you can touch anywhereoutside the window).
2. Doors
Touch to open or close doors.3. Seats
If Model X is equipped with monopost second row seats, touch to move the second row seatsforward or backward (see Adjusting Second Row Monopost Seats on page 21).
4. Suspension
If Model X is equipped with Smart Air Suspension, touch to manually raise or lower Model X,or to remove a previously saved auto-raising location (see Smart Air Suspension on page128). Model X must be powered on and you must press the brake pedal before you can changesuspension settings. Smart Air Suspension causes Model X to self-level, even when poweredoff. Therefore, when towing or lifting, you must disable self-leveling (see Instructions forTransporters on page 189 and Jacking and Lifting on page 170).
5. Driving
• Steering mode
Adjust the amount of effort required to turn the steering wheel. Sport feels moreresponsive whereas Comfort feels easier to drive and park (see Steering Wheel on page44).
• Acceleration (Performance dual-motor vehicles only)
Choose an acceleration level. Sport is the standard level of acceleration and allows you tomaximize driving range. Choose Insane to increase peak torque by approximately 30percent and Ludicrous to increase it by approximately 60%.
If you choose Insane or Ludicrous, additional power is available immediately. However, toachieve the absolute maximum power (designed for short term use), touch Max BatteryPower, which displays as blue text immediately below the acceleration setting. MaxBattery Power heats the Battery to its ideal operating temperature to ensure access to100% of available power. Heating the Battery can take over an hour, depending onenvironmental conditions and whether or not Model X is being driven. During this time, amessage displays providing you with an approximate wait time. When the additionalpower is available, the message indicates that Max Battery Power is READY! When usingMax Battery Power, Model X consumes more energy as it keeps the Battery within anoptimal temperature range. To cancel Max Battery Power at any time, change theacceleration level to Sport (or touch the button in the Max Battery Mode popup). Toprevent excess and potentially unnecessary energy consumption (for example, you leavethe vehicle and forget to cancel Max Battery Power), Max Battery Power cancelsautomatically in three hours, regardless of whether you are still driving or have left thevehicle.
Note: To support Max Battery Power, the charge level must be 20% or higher. You cannotinitiate Max Battery Power if the charge level is less than 20%. In addition, Max BatteryPower immediately cancels if at any time during its use, the charge level drops below20%.
Note: Max Battery Power strives to keep the pack within an optimal temperature range. Inaddition to heating the Battery, Max Battery Power also cools the battery when necessary(for example, during aggressive driving scenarios).
Note: Max Battery Power is designed to achieve maximum performance for short termacceleration and is not intended for daily driving. The tradeoff for the additional powerboost is extra energy consumption and earlier power fade on long aggressive drives. TheInsane or Ludicrous acceleration settings provide a significant increase in performanceeven without Max Battery Power. In fact, in normal driving situations, the additional powerthat can be achieved using Max Battery Power may not be noticeable.
Controls
Using the Touchscreen 117

• Creep
When on, Model X slowly moves forward when in Drive and backward in Reverse whenyou release the brake (similar to a conventional vehicle with an automatic transmission).You can adjust this setting only when Model X is in Park.
• Traction Control
In circumstances where you deliberately want the wheels to spin, you can enable SlipStart. A warning message displays on the instrument panel. Although Slip Start disablesautomatically when driving speed exceeds 50 mph (80 km/h) (or when you startModel X), it is strongly recommended that you disable it immediately after thecircumstances that required you to enable it have passed. See Traction Control on page65.
• Regenerative braking
When you release the accelerator when driving, regenerative braking slows Model X andfeeds any surplus energy back to the Battery. If set to Low, Model X does not slow downas quickly, but you may experience less range (see Regenerative Braking on page 63).
Note: Regardless of the setting, the energy gained by regenerative braking is reduced ifthe Battery is full, or if it is extremely cold or hot (the surplus energy is used to heat orcool the Battery).
• Range Mode
If on, Model X conserves energy by limiting the power of the climate control system andturning off signature lighting. Cabin heating and cooling may be less effective, but seatheaters can be used to provide warmth in colder climates. When turned on in a dual-motor vehicle, torque distribution between the motors is optimized to maximize range.
6. Cold Weather
If Model X is equipped with the optional cold weather package, you can control all seatheaters as well as the heated wipers and steering wheel. Heaters that are turned on aredisplayed in red. To turn off all seat heaters, touch All Off. Note that you can also control thefront driver and passenger seats using the main climate control panel located on the bottomof the touchscreen (see Climate Controls on page 123).
7. Trips
View and reset the trip meters that summarize how far you have driven (see Trip Informationon page 71).
8. Displays
Manually control the brightness and the Day (light background) or Night (dark background)setting of the touchscreen and instrument panel. When set to Auto, the brightness changesautomatically between day and night brightness based on ambient lighting conditions. WhenAuto-adjust is checked, the displays are further adjusted based on both the surroundings andby learning your preferences (i.e. it remembers the type of manual adjustments you make).
To disable the touchscreen momentarily for cleaning purposes, touch Clean Mode.
You can also put Model X into an energy saving mode so it consumes less energy when not inuse (see Getting Maximum Range on page 72).
Note: The Displays settings can also be accessed from the Settings screen.9. E-Brake & Power Off
You can manually:
• Apply and release the parking brake (see Parking Brake on page 64).• Power off (see Powering Off on page 48).
10. Lights (see Lights on page 58)
Warning: Do not read the touchscreen while driving. Doing so increases the likelihood of acollision. Everything you need to know when driving is displayed on the instrument panel.
Controls
118 Model X Owner's Manual

Customizing Your Vehicle
Touch the Settings tab on the Controls window to adjust Model X to suit your preferences.
Note: The following illustration is provided for demonstration purposes only. Depending on vehicleoptions, software version, and market region, the options available on the Settings screen may bedifferent. For example, in many regions, the “Language & Units” tab is called “Units & Format.”
Settings
Using the Touchscreen 119

1. Adjust settings associated with installed apps (applications). Settings associated with appsthat are either unavailable on Model X, or have no settings that you can adjust at this time, aregrayed out.
2. Manage driver profiles (see Driver Profiles on page 42).3. Units & Format
Adjust how Model X displays:
• Distance: Miles or km can be shown on the range display, speedometer, energy chart, tripmeters, Google map searches and navigation routes.
• Time Format: 12 or 24 hour.• Temperature: °C or °F.• Energy & Charging: Display remaining energy and charging units as either a percentage of
battery energy remaining, or as an estimate of the distance that you can drive. When youchoose Distance, you can display mileage based on either:
• Rated - based on EPA testing.• Ideal - assumes ideal driving conditions based on driving at a steady speed of 55 mph
(89 km/h) on a flat road, and using no additional energy (seat heaters, airconditioning, etc).
Note: When anticipating when you need to charge, use range estimates as a generalguideline only.
4. Vehicle
Note: Depending on date of manufacture and options chosen at time of purchase, somevehicles are not equipped with all features listed below.
• Easy Entry (vehicles with second row monopost seats only): If on, the associated outsideseat and center seat move to provide access to the third row seats (if equipped) with thesingle press of the Easy Entry button. If off, you must hold the Easy Entry button to movethe associated outside seat and center seat. See Accessing Third Row Seats on page 23.
• Headlights After Exit: If on, headlights stay on for two minutes after you exit, or until youlock the vehicle (see Headlights After Exit on page 60).
• Adaptive Headlights (if equipped): If on, the Adaptive Front Lighting System (AFS)automatically adjusts the beam of the headlights to improve your driving view (see Adaptive Front Lighting System (AFS) on page 60).
• Mirror Auto-Tilt: If on, exterior mirrors tilt downward when reversing (see Mirrors on page47).
• Mirror Auto-Fold: If on, exterior mirrors fold when you lock Model X with the key, mobileapp, or walk-away locking. They extend automatically when you return. You can also foldthe mirrors manually by touching the center mirror control button (see Mirrors on page47).
• Smart Preconditioning: If on, Model X predicts your driving schedule and automaticallyadjusts the temperature of the cabin based on your last set temperature and your drivingschedule, making Model X comfortable and ready to drive. It may take some time for yourvehicle to learn your driving habits and if you do not have a regular driving schedule, itwill be unable to identify a pattern.
Note: To conserve energy in situations where Model X has a low charge level, smartpreconditioning may not occur.
Note: Smart Preconditioning is available only if you save your home and work locations(see Favorite, Home, and Work Destinations on page 140).
Settings
120 Model X Owner's Manual

• Cabin Overheat Protection: If on, the air conditioning system can reduce cabintemperatures in extremely hot ambient conditions for a period of up to twelve hours afterexiting Model X (see Cabin Overheat Protection on page 127).
Warning: Never leave children or pets in the vehicle unattended. Due to automaticshut-off or extreme outside conditions, the inside of the vehicle can becomedangerously hot even with Cabin Overheat Protection enabled.
Note: Cabin Overheat Protection does not operate when the energy remaining in theBattery is 20% or less.
5. Doors & Locks
Note: Depending on date of manufacture and options chosen at time of purchase, somevehicles are not equipped with all features listed below.
• Door Unlock Mode: Choose whether you want ALL doors, or just the DRIVER door, tounlock when you approach Model X carrying your key.
• Child-Protection Lock: If on, safety locks prevent the rear doors and the liftgate frombeing opened from inside the vehicle.
• Walk-away Door Lock: If on, doors automatically lock when you walk away from thevehicle, carrying your key with you (see Walk-away Locking on page 10).
• Automatic Doors: With Automatic Doors set to ON, the door (or doors, if Door UnlockMode is set to ALL) unlocks and the driver's door opens whenever you approach Model X.If off, the door/doors unlock, but the driver's door doesn't open. Also, if on, the passengerdoor opens if you double-click the key's lock/unlock button after the driver's door hasopened (see Opening and Closing Front Doors from Outside Model X on page 7).
• Unlock on Park: If on, doors automatically unlock when you engage the Park gear.• Falcon Door Height: If set to AUTO, the falcon wing doors will open fully (respecting any
remembered location-based heights and assuming no obstacle is detected). If set toLOW, the falcon wing doors will open partially, further protecting the vehicle's interior andoccupants from inclement weather.
• Close All With Key Fob: If on, all doors (and the rear trunk) close and lock when yousingle-click the key's lock/unlock button (if set to OFF, you must triple-click this button).
• Passive Entry: If on, doors automatically unlock whenever you approach Model X carryinga key. If off, you must use the key to unlock Model X. See Using the Key on page 4.
Note: You must press the brake pedal to power Model X on before you can change thePassive Entry setting. See Starting on page 48.
Note: If Passive Entry is off and you do not press the brake pedal to start Model X withinapproximately five minutes, a message displays on the instrument panel and you must usethe key to lock then unlock Model X again before starting the vehicle.
6. Safety & Security
Turn various safety, security, and privacy features on and off:
• Active safety devices Model X is equipped with, such as Park Assist Chimes (see ParkAssist on page 66).
• Security features that Model X is equipped with, such as the alarm (see Security Settingson page 143).
• Privacy features such as allowing access by Tesla’s mobile applications (see Mobile Appon page 148) and enabling the sharing of road measurement data (see Data Sharing onpage 193).
Settings
Using the Touchscreen 121

7. Displays
Manually control the brightness and the DAY (light background) or NIGHT (dark background)setting of the touchscreen and instrument panel. When set to AUTO, the brightness changesautomatically between day and night brightness based on ambient lighting conditions. WhenAuto-adjust is checked, the displays are further adjusted based on both the surroundings andby learning your preferences (i.e. it remembers the type of manual adjustments you make).
To disable the touchscreen momentarily for cleaning purposes, touch CLEAN MODE.
You can also put Model X into an energy saving mode so it consumes less energy when not inuse (see Getting Maximum Range on page 72).
Note: The Displays settings can also be accessed from the Controls screen.8. HomeLink (if equipped)
If the HomeLink feature is available in your region, use it to control RF-enabled garage doors,lights, or security systems (see HomeLink® Universal Transceiver on page 144).
9. Driver Assistance
If Model X is equipped with Driver Assistance components, you can control the features thatprovide a safer and more convenient driving experience (see About Driver Assistance on page85).
10. Service & Reset
Turn various service-related features on and off:
• Service Mode: If on, moves wiper blades to the service position to make them easier toaccess when replacing them. Your Model X must be in Park (see Wipers and Washers onpage 62).
• Tow Mode: Activate Tow Mode to keep Model X in Neutral (see Keeping Your Vehicle inNeutral (Tow Mode) on page 50).
• Factory Reset: Touch ERASE & RESET to erase all personal data (saved addresses, musicfavorites, etc.) and restore all customized settings to their factory defaults.
11. Manual
Display this owner's manual.
Note: If upgrades are available for Model X (for example, an upgrade to include Autopilot or toincrease driving range), the Upgrades tab also appears on the Settings window. Simply choosethe upgrade that you want to purchase, then follow the onscreen instructions.
Warning: Do not read the touchscreen while driving. Doing so increases the likelihood of acollision.
Naming Your Vehicle
To further personalize Model X, you can name it. The name you give your Model X will appear inthe mobile app. To name your vehicle, touch the Tesla “T” at the top center of the touchscreen,then touch Name Your Vehicle.
When you save, Name Your Vehicle is replaced by the name you provided. You can touch thename at any time to rename your vehicle.
Erasing Personal DataYou can erase all personal data (saved addresses, music favorites, imported contacts, HomeLinkprogramming, etc.) and restore all customized settings to their factory defaults. This is usefulwhen transferring ownership of Model X. Touch Controls > Settings > Service & Reset > FACTORYRESET > ERASE & RESET. Before erasing, Model X verifies your credentials by prompting you toenter the user name and password associated with your Tesla Account.
Settings
122 Model X Owner's Manual

Overview of Climate Controls
The climate controls are always available at the bottom of the touchscreen. By default, climatecontrol is set to Auto, which maintains optimum comfort in all but the most severe weatherconditions. When you adjust the temperature, the system automatically adjusts the heating, airconditioning, air distribution, air circulation, and fan speed to maintain your selected temperature.To override these settings, touch Auto (see Customizing Climate Control on page 124).
The fan, heating, and air conditioning systems are powered by the Battery. Therefore, prolongeduse decreases driving range.
Note: The following illustration is provided for demonstration purposes only. Depending on vehicleoptions, software version, market region, and settings, the information displayed may be slightlydifferent.
1. The front seats are equipped with heating/cooling pads. When operating, the top indicatorturns red when heating or the bottom indicator turns blue when cooling.
Note: If Model X is equipped with the optional cold weather package, you can also controlseat heaters in the rear seats, heated wipers, and heated steering wheel by touchingControls > Cold Weather (see Controls on page 116).
2. Touch the up or down arrow to set the cabin temperature. To apply a temperature setting toboth the driver and passenger side at the same time, touch SYNC TEMP on the temperaturepopup that appears when you touch an arrow.
3. Touch the fan icon to customize and automate climate control settings for the front and rearcabin. (See Customizing Climate Control on page 124.)
4. The windshield defroster distributes air flow to the windshield. Touch once to turn on, touch asecond time to operate the heating and fan at their maximum level, and touch a third time toturn off and restore the air distribution, heating, and fan to their previous settings.
5. Turn climate control system on/off.
Note: The label on this button says Keep Climate On if you have set the climate control systemto maintain your temperature settings when parked (see Customizing Climate Control onpage 124).
6. The rear window defroster warms up the rear window for 15 minutes, then automatically shutsoff. Exterior side mirrors are also heated.
Warning: To avoid burns resulting from prolonged use, individuals who have peripheralneuropathy, or whose capacity to feel pain is limited because of diabetes, age, neurologicalinjury, or some other condition, should exercise caution when using the climate controlsystem and seat heaters.
Climate Controls
Using the Touchscreen 123

Customizing Climate Control
The climate control system is designed to automatically provide optimum comfort in mostsituations. All you need to do is set the desired temperature, and the air conditioning, airrecirculation, air distribution, and fan speed automatically maintain your selected temperature.You can even keep the climate control system on while you are away from the vehicle so that theselected temperature is maintained.
To override the automatic setting, touch FRONT or REAR to customize individual settings for thefront or rear seating areas. Then touch the setting you want to change. Touch RESET AUTO tochange all settings on the panel back to their defaults. Or, you can touch AUTO associated withany individual setting to change it back to its default.
In addition to the five settings shown above (and described below), if Model X is in Park, a ClimateTimer displays below the above popup (see Keep Climate On on page 126).
1. Touch RESET AUTO to change all settings on the currently displayed customization panelback to their default values.
2. Touch A/C ON or A/C OFF to turn the air conditioning on and off, respectively. Turning it offreduces cooling, but saves energy.
Because Model X runs much quieter than a gasoline-powered vehicle, you may notice thesound of the compressor as it is operating. To minimize noise, reduce the fan speed.
Climate Controls
124 Model X Owner's Manual

3. Choose how air is drawn into Model X:
Outside air is drawn into Model X (see Ventilation on page 127).
Air inside Model X is recirculated. This prevents outside air (traffic fumes)from entering, but reduces dehumidifying performance. Recirculating theair is the most efficient way to cool the front cabin area. To prevent thewindshield from fogging in some conditions, briefly change the settingevery hour to draw in outside air.
If your Model X is equipped with the HEPA (High Efficiency ParticulateAir) filter, you can ensure the best possible quality of air inside the cabin.When selected, outside air is drawn in and filtered through the medical-grade HEPA filter in addition to the secondary filtration systems. TheHEPA filter is extremely effective at removing particles, includingpollution, allergens, bacteria, pollen, mold spores, and viruses. Both theHEPA filter and the secondary filtration system also contain activatedcarbon to remove a broad spectrum of odors and gases. When youengage the HEPA option, the fan operates at the highest speed. Inaddition, the positive pressure inside the cabin minimizes the amount ofoutside air that can leak into the vehicle.
Note: Some gases, such as carbon monoxide, are not effectively removedby activated carbon.
4. Choose where air flows into the cabin. You can choose more than one location:
Foot-level vents
Face-level vents
Windshield vents
Note: When air is directed to the foot-level vents, approximately one third of the air continuesto flow to the windshield vents to assist in defogging. However, when air is directed to theface-level vents, no air flows to the windshield because the air flowing through the face-levelvents may be adequate to assist in defogging the windshield.
5. Touch the arrows to set the speed of the fan.
Note: Adjusting the fan speed may change the selected setting for how air is drawn intoModel X in order to increase or reduce airflow. If you set the fan speed very high (for example,setting 10), Model X may automatically switch from drawing in outside air to recirculating airto achieve the high air flow. Touch RESET AUTO to reset all settings to their default values.
Climate Controls
Using the Touchscreen 125

Rear Cabin Climate Controls
Note: When set to AUTO, the rear heating and air conditioning turn off when Model X detects thatthere are no occupants in the second or third row seats. To override this energy saving feature andsave the settings until you manually change them, touch the AUTO button located above theClimate On/Climate Off setting. Touching AUTO a second time cancels your manual setting andresumes the energy saving feature.
1. Touch RESET AUTO to change all settings back to their default values.2. Touch CLIMATE ON or CLIMATE OFF to turn the air conditioning on and off, respectively.
Turning it off reduces cooling, but saves energy.
Note: Because Model X runs much quieter than a gasoline-powered vehicle, you may noticethe sound of the compressor as it is operating. To minimize noise, reduce the fan speed orrecirculate the air.
3. Touch the arrows to adjust the temperature.4. Touch the arrows to set the speed of the fan.Keep Climate OnThe Keep Climate On settings allows you tokeep your climate control system running aslong as the vehicle is in Park, even after you'veleft. This is useful in situations where it isimportant that the cabin is maintained at acomfortable temperature (for example, youare leaving your pet in Model X or you aresleeping in Model X). To use the Keep ClimateOn setting, the Battery's charge level must beat least twenty percent.
To operate Keep Climate On:
1. Engage the Park gear. The Keep ClimateOn setting is available only when Model X.
2. On the Climate Controls, touch FRONT.The Climate Timer appears below theindividual settings you use to adjust theclimate settings in the front seating area.
3. If necessary, adjust the climate settings.4. Touch Keep Climate On > ON.
The climate control system maintains yourclimate settings until you shift out of Park ormanually turn it off. If the Battery's chargelevel drops to twenty percent, the climatecontrol system automatically turns off and theTesla mobile app sends you a notificationreminding you to check on anything that youhave left in Model X.
The next time you start Model X, the climatecontrol system will continue operating usingthe previous settings from your most recentdrive.
Warning: Never depend on the climatecontrol system to continue operating.Doing so can cause serious injury and/ordeath (for example, leaving a dog in thecar on a hot day).
Climate Controls
126 Model X Owner's Manual

VentilationTo direct the flow of air inside Model X, movethe interior vents up, down, or from side toside.
Note: You can direct the outer face level ventstoward the side windows to help defrost ordefog them.
Cabin Air Filter
Model X has an air filter that prevents pollen,industrial fallout, road dust and other particlesfrom entering through the vents. Teslareplaces the air filter at the regularlyscheduled maintenance intervals of every12 months, or every 12,500 miles (20,000 km).
Cabin Overheat ProtectionThe climate control system can reduce cabintemperatures in extremely hot ambientconditions for a period of up to twelve hoursafter you exit Model X. When enabled, airconditioning turns on when cabintemperatures exceed 105° F (40° C). Todisable this feature, touch Controls >Settings > Vehicle > Cabin OverheatProtection > OFF.
Warning: Never leave children or pets inthe vehicle unattended. Due to automaticshut-off or extreme outside conditions,the inside of the vehicle can becomedangerously hot even with CabinOverheat Protection enabled.
Note: Cabin Overheat Protection does notoperate, or stops operating, when the energyremaining in the Battery is 20% or less.
Climate Control Operating Tips• When you use the mobile app to turn on
the climate control system, itautomatically turns off after 30 minutes.To cool or heat the cabin for a longerperiod, you must turn it on again.
• To conserve energy, you can limit thepower of the climate control system byturning on Range Mode. Cabin heatingand cooling may be less effective, but seatheaters can be used to provide warmth incolder climates. Touch Controls >Driving > Range Mode.
• If the climate control system operatesmore loudly than you prefer, reduce thefan speed.
• In addition to cooling the interior, the airconditioning system also cools theBattery. Therefore, in hot weather, the airconditioning system can turn on even ifyou turned it off. This is normal becausethe system’s priority is to cool the Batteryto ensure it stays within an optimumtemperature range to support long lifeand optimum performance.
• To ensure the climate control systemoperates efficiently, close all windows andensure that the exterior grill in front of thewindshield is free of ice, snow, leaves, andother debris.
• In very humid conditions, it is normal forthe windshield to fog slightly when youfirst turn on the air conditioning.
• It is normal for a small pool of water toform under Model X when parked. Extrawater produced by the dehumidifyingprocess is drained underneath.
• To reduce the temperature in the cabin inhot weather conditions, the fan may turnon to vent the cabin when the vehicle isparked. (This occurs only if the battery'scharge level is above 20%.)
Climate Controls
Using the Touchscreen 127
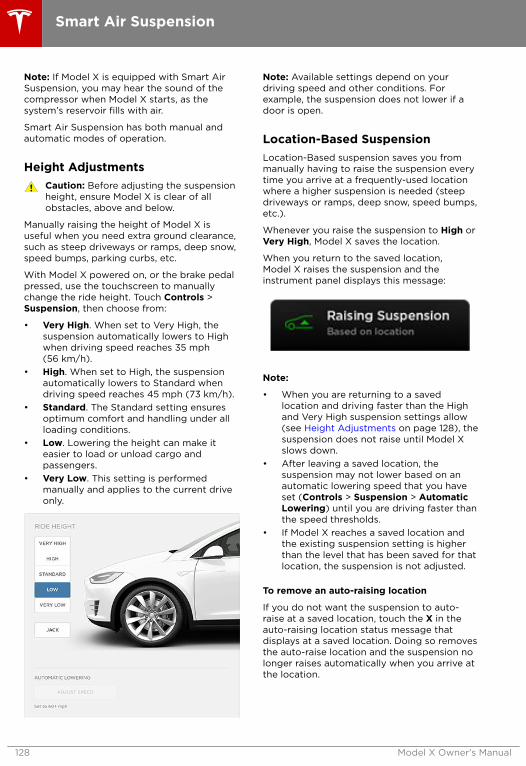
Note: If Model X is equipped with Smart AirSuspension, you may hear the sound of thecompressor when Model X starts, as thesystem’s reservoir fills with air.
Smart Air Suspension has both manual andautomatic modes of operation.
Height AdjustmentsCaution: Before adjusting the suspensionheight, ensure Model X is clear of allobstacles, above and below.
Manually raising the height of Model X isuseful when you need extra ground clearance,such as steep driveways or ramps, deep snow,speed bumps, parking curbs, etc.
With Model X powered on, or the brake pedalpressed, use the touchscreen to manuallychange the ride height. Touch Controls >Suspension, then choose from:
• Very High. When set to Very High, thesuspension automatically lowers to Highwhen driving speed reaches 35 mph(56 km/h).
• High. When set to High, the suspensionautomatically lowers to Standard whendriving speed reaches 45 mph (73 km/h).
• Standard. The Standard setting ensuresoptimum comfort and handling under allloading conditions.
• Low. Lowering the height can make iteasier to load or unload cargo andpassengers.
• Very Low. This setting is performedmanually and applies to the current driveonly.
Note: Available settings depend on yourdriving speed and other conditions. Forexample, the suspension does not lower if adoor is open.
Location-Based SuspensionLocation-Based suspension saves you frommanually having to raise the suspension everytime you arrive at a frequently-used locationwhere a higher suspension is needed (steepdriveways or ramps, deep snow, speed bumps,etc.).
Whenever you raise the suspension to High orVery High, Model X saves the location.
When you return to the saved location,Model X raises the suspension and theinstrument panel displays this message:
Note:
• When you are returning to a savedlocation and driving faster than the Highand Very High suspension settings allow(see Height Adjustments on page 128), thesuspension does not raise until Model Xslows down.
• After leaving a saved location, thesuspension may not lower based on anautomatic lowering speed that you haveset (Controls > Suspension > AutomaticLowering) until you are driving faster thanthe speed thresholds.
• If Model X reaches a saved location andthe existing suspension setting is higherthan the level that has been saved for thatlocation, the suspension is not adjusted.
To remove an auto-raising location
If you do not want the suspension to auto-raise at a saved location, touch the X in theauto-raising location status message thatdisplays at a saved location. Doing so removesthe auto-raise location and the suspension nolonger raises automatically when you arrive atthe location.
Smart Air Suspension
128 Model X Owner's Manual

Note: Manually lowering the suspension toStandard or Low while at a saved location alsoremoves the auto-raising location.
Automatic LoweringWhen Model X is moving above typicaldriveway or parking lot speeds, Smart AirSuspension automatically lowers ride height toimprove aerodynamics and handling. For mostaverage speed driving, the suspension isautomatically set to Standard. As describedabove, when you make manual heightadjustments, the suspension automaticallylowers at increased driving speeds.
When carrying loads, Smart Air Suspensionalso maintains a level height between the frontand rear.
You can adjust the speed at which the AirSuspension automatically transitions to theLOW ride height by touching Controls >Suspension > Automatic Lowering on thetouchscreen. This setting is saved to yourDriver Profile.
Note: You can temporarily override the rideheight by pressing the brake pedal, touchingan air suspension control in Controls >Suspension, and then manually choosing aride height. Your suspension's automaticlowering setting is restored the next time youdrive.
If a fault is detected that reduces theperformance of the air suspensionsystem, a yellow indicator lights upon the instrument panel. If theproblem persists, contact Tesla.
Jack ModeBefore jacking or lifting, set the suspension toJack mode to prevent the self-leveling thatoccurs even when Model X is powered off.
Press the brake pedal, then touch Controls >Suspension > Jack.
When Model X is in Jack mode, a redair suspension indicator lights up onthe instrument panel.
To deactivate, touch Jack again.
Note: Jack mode automatically cancels whenyou drive over 4.5 mph (7 km/h).
Note: Model X also sets Jack modeautomatically if it detects that the vehiclecannot lower to its target height, or if itdetects that an object is supporting thevehicle's weight (for example the bumper ofthe vehicle is resting on a curb).
Smart Air Suspension
Using the Touchscreen 129

OverviewTouch the Media Player application to listen toInternet radio, stream music or podcasts (ifavailable), or play audio files from a Bluetoothor USB-connected device. You can play FM,and SiriusXM satellite (if equipped) radio.
Available source content displays across thetop of Media Player: Radio, Streaming, TuneIn,and Phone. An additional source, USB,displays when you insert a flash drive into aUSB connection (see USB Connections onpage 133). You can browse the contentavailable on Media Player by touching asource, or you can use Search to find specificcontent (see Searching within Media Player onpage 130).
The Now Playing view, which displays at thebottom of Media Player, enables you to controlwhat's currently playing (for example,pausing/playing, skipping to the next track/station, etc.). You can also use the NowPlaying view to mark what's playing as afavorite (see Favorites and Recent on page132), and access recently played and favoritestations, music, and podcasts.
The Now Playing view displays regardless ofthe source (Radio, Streaming, TuneIn, Phone,and USB) you select in Media Player. You canmaximize and minimize the Now Playing viewsimply by touching it.
Volume ControlTo adjust Media Player's volume, roll the scrollwheel on the left side of the steering wheel upor down. To mute the volume, press the leftscroll wheel.
The scroll wheel adjusts the volume for media,navigation instructions, or phone calls, basedon what is currently being heard through thespeakers. If you're listening to a song, audiofile, or podcast, and you receive a phone callor Model X relays a step in Trip Planner's turn-by-turn directions through the speakers, thesong, audio file, or podcast is mutedtemporarily.
Note: Pressing the left scroll wheel during aphone call mutes both the sound and yourmicrophone.
Audio SettingsAchieve the sound you want by adjusting thefade (front/rear) and balance (left/right), orby customizing the strength of soundfrequencies. Press the equalizer icon on thetop right corner of the Media Player to accessaudio settings.
Adjust fade and balance on the left side of thescreen by positioning the center circle of thecross bars to the location in Model X whereyou want to focus the sound. Adjust any of thefive frequency bands (Bass, Bass/Mid, Mid,Mid/Treble, and Treble) on the right side of thescreen by dragging the corresponding sliderup or down on the decibel (dB) bar.
If your Model X is equipped with the UltraHigh Fidelity Sound option, touch the Dolbycheck box to enable Dolby Surround.
Searching within Media PlayerSearch is available throughout Media Player.You can search across all content categories,or you can limit your search to a particularcategory. Search results include the followingcontent:
• TuneIn• Streaming Personal Radio• USB content
To search, touch anywhere in Media Player'ssearch bar and enter the name of the song,album, artist, podcast, playlist, or station youwant to search for. Select a filter to narrow thescope of your search, or leave it at its defaultsetting to include top results from allcategories.
Note: You can also search hands-free usingvoice commands (see Using Voice Commandson page 46).
If you are using TuneIn, you can browsecontent by category from the Browse area ofthe TuneIn source. You can browse content bylocation (Africa, Asia, North America, and soon), by local radio, by talk radio, by favorites,and other categories. To return from browsingor to select another category to browse,simply touch TuneIn at the top of MediaPlayer.
Media and Audio
130 Model X Owner's Manual

FM RadioIf it's available in your location, Media Playerprovides FM radio service that you can selectfrom the Radio source. To tune the radio to aspecific frequency, choose a frequency andthen touch the next or previous arrows tomove from one frequency to the next (orprevious). You can also tap or drag your fingeron the tuner to the desired frequency. Thethree bars on the left side of the frequencynumber indicate the strength of the signal forthe chosen frequency. Touch HD to play highdefinition versions of available frequencies.
Mark a radio station as a favorite to display iton the Radio source for easy access (see Favorites and Recent on page 132).
SiriusXM Satellite RadioIf Model X is equipped with the optional soundpackage, you can listen to SiriusXM, asubscription-based satellite radio service. Toreceive satellite radio channels, you mustprovide the radio service provider with theradio ID for your touchscreen.
To display the radio ID:
1. Touch Radio and select the SiriusXM radiosource.
2. Move the channel selector to channel 0.3. The Radio ID displays in the station
information area.
To select a SiriusXM channel, you can eithermanually scroll through channel numbers, oryou can browse channels by category.
Note: SiriusXM radio is available only if ModelX is equipped with the optional soundpackage. To optimize aerodynamics, Model Xdoes not have an external antenna.
Internet RadioInternet radio services are accessed over adata connection. To use Internet radio, touchMedia Player's Streaming or TuneIn source,browse through the available categoriesand/or stations, and then touch what youwant to play. When browsing through a largecategory such as genres, a second browsepage displays. Use the left arrow button onthe left side of Media Player to return to theprior page, or tap on the source again toreturn to the main browse page.
With your Personal Streaming Radio account,you can create a radio station of your favoritesongs and songs that are similar to yourfavorites. When you like a song by touchingthumbs up, it is added to your Favorites and isused to tune your listening profile so thatsimilar songs are also added to your Favoritesstation. If you dislike a song by touchingthumbs down, the song is removed from yourFavorites station.
Note: Your Favorites station is linked to yourPersonal Streaming Radio account for the car.
To play the next (and in some cases previous)available station, episode, or track beingprovided by the Internet radio service, touchthe next (or previous) arrows on the NowPlaying view, or use the buttons on the leftside of the steering wheel (see Using LeftSteering Wheel Buttons on page 44). Thefunction of these controls vary depending onthe Internet service you are listening to.
You can also use voice commands onlyavailable when speaking the English languageonly) to play a specific song, artist, or albumfrom an Internet radio service (see UsingVoice Commands on page 46).
When you are listening to internet radio, youcan do the following on the Now Playing view:
• Touch the thumbs up or thumbs downicon (if available) to like or dislike anysong or podcast. When you like a song,more songs like that song will be played.When you dislike a song, the song won'tbe played again.
• Touch the DJ icon (if available) to includecommentary for the content you arestreaming. DJ commentary includes musichistory and behind-the-scenes stories.
• Touch the Favorites icon to save the radiostation or podcast as a favorite (see Favorites and Recent on page 132).
Media and Audio
Using the Touchscreen 131
• Touch any number to access digital radiostations (if available). Digital radio stationsprovide higher quality sound and, in somecases, different programming than theiranalog equivalents.
• Touch the right arrow to view a list oftracks for a podcast or playlist.
By default, TuneIn uses a Tesla account thathas been set up for you. To sign in to adifferent TuneIn account, scroll to the bottomof the TuneIn source, touch Sign In, and enterthe login information for the account.
Note: When playing a TuneIn podcast, you canrewind or fast forward to any location in thepodcast. On the Now Playing view, drag thearrow below the slider bar to the desiredlocation.
Note: Tesla also provides you with acomplimentary Streaming Personal Radioaccount for four years. To use your ownSlacker Plus or Premium account instead,scroll to the bottom of the Streaming source,enter your credentials, touch Use High Bitrateto stream higher quality sound (if yourModel X is equipped with the optional UltraHigh Fidelity Sound package), and then touchLOGIN. To switch back to your Tesla account,simply touch USE TESLA ACCOUNT; you don'tneed to enter a user name or password foryour Tesla account. You can purchase yourown Slacker Plus or Premium account at www.slacker.com. Model X does not supportbasic (free) Slacker services.
Favorites and RecentTo ensure you always have easy access to yourfavorite stations and audio files, they displayat the top of Media Player and on the NowPlaying view. Regardless of which source youare on (Radio, Streaming,TuneIn, Phone, orUSB), you see favorites from all sources. Youcan maximize or minimize source contentsimply by swiping.
Your USB favorites are available from the NowPlaying view in a Favorites folder. (You mayneed to scroll to see the folder.) Your first USBfavorite plays when you touch the Favoritesfolder in the Now Playing view. Use the next orprevious arrows to scroll through your USBfavorites.
To add a currently playing radiostation, podcast, or audio file to yourFavorites list, touch the Favoritesicon on the Now Playing view. (Youmay need to touch the Now Playingview to maximize it before you cantouch the Favorites icon.)
To delete a favorite, touch thehighlighted Favorites icon. You canalso delete one or more favorites onthe bottom of the Now Playing viewby pressing and holding a favorite.An X appears on all favorites. Touchthe X again to delete the selectedfavorites.
To see selections that you played recently,touch Recent on the Now Playing view. Yourrecently played selections are updatedcontinuously so you don't need to deletethem.
Note: Selections you play on FM radio stationsdo not display in your Recent selections.
Playing Media from DevicesYou can play audio files from a USB-connected flash drive or from a Bluetooth-connected device (like a phone). When youconnect a USB flash drive, Media Playerdisplays the USB source content. When youconnect a Bluetooth-capable device, the nameof the device displays on the Phone source.After connecting a USB flash drive orBluetooth device, touch the song, album, orplaylist you want to play.
To play the next song in a selected playlist oralbum, touch the previous or next arrows onthe Now Playing view, or use the buttons onthe left side of the steering wheel (see UsingLeft Steering Wheel Buttons on page 44). Youcan also shuffle tracks in a playlist or repeat aplaylist or track using the shuffle/repeat iconsdisplayed below the album cover art.
Media and Audio
132 Model X Owner's Manual
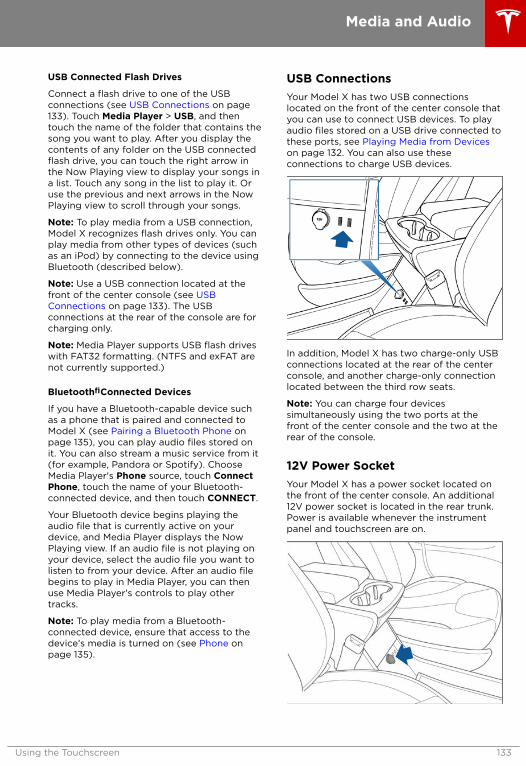
USB Connected Flash Drives
Connect a flash drive to one of the USBconnections (see USB Connections on page133). Touch Media Player > USB, and thentouch the name of the folder that contains thesong you want to play. After you display thecontents of any folder on the USB connectedflash drive, you can touch the right arrow inthe Now Playing view to display your songs ina list. Touch any song in the list to play it. Oruse the previous and next arrows in the NowPlaying view to scroll through your songs.
Note: To play media from a USB connection,Model X recognizes flash drives only. You canplay media from other types of devices (suchas an iPod) by connecting to the device usingBluetooth (described below).
Note: Use a USB connection located at thefront of the center console (see USBConnections on page 133). The USBconnections at the rear of the console are forcharging only.
Note: Media Player supports USB flash driveswith FAT32 formatting. (NTFS and exFAT arenot currently supported.)
Bluetooth® Connected Devices
If you have a Bluetooth-capable device suchas a phone that is paired and connected toModel X (see Pairing a Bluetooth Phone onpage 135), you can play audio files stored onit. You can also stream a music service from it(for example, Pandora or Spotify). ChooseMedia Player's Phone source, touch ConnectPhone, touch the name of your Bluetooth-connected device, and then touch CONNECT.
Your Bluetooth device begins playing theaudio file that is currently active on yourdevice, and Media Player displays the NowPlaying view. If an audio file is not playing onyour device, select the audio file you want tolisten to from your device. After an audio filebegins to play in Media Player, you can thenuse Media Player's controls to play othertracks.
Note: To play media from a Bluetooth-connected device, ensure that access to thedevice’s media is turned on (see Phone onpage 135).
USB ConnectionsYour Model X has two USB connectionslocated on the front of the center console thatyou can use to connect USB devices. To playaudio files stored on a USB drive connected tothese ports, see Playing Media from Deviceson page 132. You can also use theseconnections to charge USB devices.
In addition, Model X has two charge-only USBconnections located at the rear of the centerconsole, and another charge-only connectionlocated between the third row seats.
Note: You can charge four devicessimultaneously using the two ports at thefront of the center console and the two at therear of the console.
12V Power SocketYour Model X has a power socket located onthe front of the center console. An additional12V power socket is located in the rear trunk.Power is available whenever the instrumentpanel and touchscreen are on.
Media and Audio
Using the Touchscreen 133

The 12V power sockets are suitable foraccessories requiring up to 11A continuousdraw (15A peak) or a maximum of 150continuous watts (180 watts peak).
Note: In situations where Model X is unable todetect the key (low battery, interference, etc.),place it immediately below the 12V powersocket in the center console where Model Xcan best detect it.
Warning: The power socket and anaccessory’s connector can become hot.
Media and Audio
134 Model X Owner's Manual

Bluetooth® CompatibilityYou can use your Bluetooth-capable phonehands-free in Model X provided your phone iswithin operating range. Although Bluetoothtypically supports wireless communicationover distances of up to approximately 30 feet(9 meters), performance can vary based onthe phone you are using.
Before using your phone with Model X, youmust pair it. Pairing sets up Model X to workwith your Bluetooth-capable phone (see Pairing a Bluetooth Phone on page 135).
You can pair up to ten Bluetooth phones.Model X always automatically connects to thelast phone that was used (provided it is withinrange). If you want to connect to a differentphone, see Connecting to a Paired Phone onpage 136.
Note: On many phones, Bluetooth turns off ifthe phone’s battery is low.
Note: In addition to phones, you can also pairBluetooth-enabled devices with Model X. Forexample, you can pair an iPod Touch or aniPad or Android tablet to stream music.
Pairing a Bluetooth PhonePairing sets up Model X to work with yourBluetooth-capable phone. Once a phone ispaired, Model X can connect to it wheneverthe phone is within range.
To pair a phone, follow these steps whilesitting inside Model X:
1. Ensure both the touchscreen and thephone are powered on.
2. On the touchscreen’s status bar, touch theBluetooth icon.
3. On your phone, enable Bluetooth and setit to discoverable.
4. On the Model X touchscreen, touch StartSearch. The touchscreen searches thendisplays the list of all available Bluetoothdevices within operating distance.
5. On the Model X touchscreen, touch thephone with which you want to pair. Withina few seconds, the touchscreen displays arandomly generated number, and yourphone should display the same number.
6. Check that the number displayed on yourphone matches the number displayed onthe touchscreen. Then, on your phone,confirm that you want to pair.
When paired, Model X automatically connectsto the phone, and the touchscreen displaysthe Bluetooth symbol next to the phone’sname to show that the connection is active.
Importing Contacts and RecentCallsOnce paired, you can use the Bluetoothsettings screen (touch the Bluetooth icon onthe touchscreen's status bar) to specifywhether you want to allow access to yourphone’s contacts and recent calls.
If access is turned on, you can see your list ofcontacts and recent calls on the Model Xtouchscreen. Touch Phone > Contacts. Youcan then touch a contact to dial its phonenumber or navigate to its address.
Note: Before contacts can be imported, youmay need to either set your phone to allowsyncing, or respond to a popup on your phoneto confirm that it is OK to sync contacts. Thisvaries depending on the type of phone youare using. For details, refer to the ownerdocumentation provided with your phone.
If access is turned on, imported information isdisplayed when you touch the contacts tab onthe Phone app.
Note: For security reasons, erase yourcontacts if you sell Model X (see ErasingPersonal Data on page 122).
Unpairing a Bluetooth PhoneIf you want to disconnect your phone and useit again later, simply touch Disconnect on theBluetooth settings screen. If you do not wantto use your phone with Model X again, touchForget This Device. Once you forget a device,you need to pair it again if you want to use itwith Model X (see Pairing a Bluetooth Phoneon page 135).
Note: Your phone automatically disconnectswhenever you leave Model X.
Phone
Using the Touchscreen 135

Connecting to a Paired PhoneModel X automatically connects with the lastphone to which it was connected, provided itis within operating range and has Bluetoothturned on. If the last phone is not within range,it attempts to connect with the next phonethat it has been paired with.
To connect to a different phone, touch theBluetooth icon on the touchscreen's statusbar. The Bluetooth window displays a list ofpaired phones. Choose the phone you want toconnect to, then touch Connect. If the phoneyou want to connect to is not listed, follow theinstructions on Pairing a Bluetooth Phone onpage 135.
When connected, the Model X touchscreendisplays the Bluetooth symbol next to thephone name to show that the connection isactive.
Making a Phone CallYou can make a phone call by:
• Speaking a voice command (English) (see Using Voice Commands on page 46).
• Choosing a contact from your contact list.• Using the Model X on-screen dialer.
To make a phone call using the on-screendialer:
1. Touch the Phone app on the touchscreen,then touch Dialer.
2. Enter the phone number on the dialer.3. Touch Call. The touchscreen displays the
call screen and the number you are calling.
To make a phone call by choosing a contact:
1. Touch the Phone app on the touchscreen,then touch Contacts.
Note: Ensure that access to the phone’scontacts is turned on (see ImportingContacts and Recent Calls on page 135).
2. Touch the name of the contact you wantto call to display details about the contact.
3. Touch the number you want to dial (if youhave more than one number for thecontact). The touchscreen displays the callscreen and the name of the contact youare calling.
Note: If it is safe and legal to do so, you canalso initiate a call by dialing the number orselecting the contact directly from yourphone.
Receiving a Phone CallWhen your phone receives an incoming call,both the instrument panel and thetouchscreen display the caller’s number orname (if the caller is in your phone’s contactlist and Model X has access to your contacts).
Touch one of the options on the touchscreen,or use the scroll wheel on the right side of thesteering wheel to Answer or Ignore the call(see Using Right Steering Wheel Buttons onpage 45).
In Call OptionsWhen a call is in progress, you can display thecall menu on the instrument panel by pressingthe top button on the right side of thesteering wheel. Then use the right scroll wheelto scroll through and choose an option (see Using Right Steering Wheel Buttons on page45). To adjust the call volume, roll the steeringwheel's left scroll wheel during a call.
Warning: Stay focused on the road at alltimes while driving. Using or programinga phone while driving, even withBluetooth enabled, can result in seriousinjury or death.
Warning: Follow all applicable lawsregarding the use of phones while driving,including, but not limited to, laws thatprohibit texting and require hands-freeoperation at all times.
Phone
136 Model X Owner's Manual

OverviewThe Google MapsTM application provides thenavigation functions in the Model X .
• If Model X is equipped with the Navigationoption, the application is labeled Nav, andonboard maps are available. Onboardmaps allow you to navigate to anylocation, even if a data connection is notavailable, but you must enter thelocation's exact and complete address.
• If Model X is not equipped with theNavigation option, onboard maps are notavailable, but if you have a dataconnection, you can find and display anylocation.
When you specify a location, the touchscreendisplays the route and provides turn-by-turndirections. Each turn is preceded by thedistance to the maneuver. If you won't haveenough energy, and there is no Superchargeron the route, an alert at the top of the turn-by-turn directions tells you that charging isrequired to reach your destination.
If the energy remaining after a round-trip isless than ten percent, or if a round trip willconsume a significant amount of batteryenergy, a round trip estimate of the energyyou will use displays at the bottom of theturn-by-turn directions. You can display around trip energy estimate for all trips,regardless of battery energy used, byselecting Always Show Estimated Round TripEnergy in the settings for Maps andNavigation. When enabled, the round tripenergy estimate will always display at thebottom of the turn-by-turn directions. Youmay need to scroll to the bottom of the turn-by-turn directions to see the round trip energyestimate.)
Using MapsTouch Navigate, or speak a voice command(see Using Voice Commands on page 46), tospecify a location. You can enter or speak anaddress, landmark, business, etc. You can alsotouch Navigate and choose from Home andWork locations, a list of favorite destinations(see Favorite, Home, and Work Destinationson page 140), recent locations and searches(the most recently used locations display atthe top), and charging stations you havevisited.
When you touch the pin for a location,landmark, or business in the Recent orFavorites list, or touch a pin on the map, thechosen location is centered on the map, and apopup that provides more information aboutthe location is displayed. In the popup, thename, phone number, and address of thelocation, landmark, or business is displayed.Any of the following information may also bedisplayed: its Google rating, its price range,whether it's open or closed, and whether ithas chargers, Wi-Fi, restrooms, and food.
From this popup window, you can save thelocation as a favorite, and, if equipped withthe Navigation option, navigate to thedestination by touching Navigate, or callsomeone at the location by touching Call. Ifequipped with the Navigation option, whenyou touch the name of a location in theRecent or Favorites list (versus touching itspin), you can initiate navigation immediately.Model X calculates the route and displaysturn-by-turn directions.
By default, the map displays Superchargerlocations (see Charging Locations on page138). If Model X is equipped with theNavigation option, you can drop a pinanywhere on the map by pressing and holdinga location on the map.
Use the icons in the lower right corner tocustomize what the map displays:
Satellite Imagery - touch to turnsatellite imagery on and off.
Traffic - touch to turn the displayof traffic on and off. To ensure thatheavy traffic areas are easy toidentify along a navigation route,green traffic lines display under theblue route line, whereas yellow andred traffic lines display on top.
Charging locations - touch todisplay charging locations on themap and in a popup list thatincludes city and proximity (see Charging Locations on page 138).
Note: The popup list displays thestraight line distance to thelocation, not the driving distance tothe location. When you beginnavigating, the navigation systemdisplays the driving distance to thelocation.
Maps and Navigation
Using the Touchscreen 137

Touch the zoom icons in the top right area tozoom the map in and out on your current orchosen location. Touch the North/Heading Upicon to center the map on your currentlocation and change the orientation of themap:
North Up - North is always at thetop of the screen.
Heading Up - The direction you areheading is always at the top of thescreen. The map rotates when youchange direction. This icon has anintegrated compass that indicatesthe direction you are driving.
You can rotate the map in any direction usingyour fingers. When you rotate the map in aclockwise or counter-clockwise direction, ormove the map up, down, left, or right, theNorth/Heading Up icon turns gray and nolonger tracks your position. (The message"Tracking Disabled" is displayed next to theNorth/Heading Up icon.) To re-enabletracking, and adjust the orientation of the mapso that North, or the direction you aretraveling, is at the top of the screen, touch theNorth/Heading Up icon again. The North/Heading Up icon is reenabled, and themessage, "North Up" or "Heading Up" isdisplayed.
Note: To keep tracking enabled, zoom in orout using only the zoom icons or by pinchingyour fingers. To disable tracking, move themap in any direction.
To maximize the size of the map, thetouchscreen's status bar and app area, as wellas the icons on the map, disappear after a fewseconds. Simply touch the map to redisplaythem.
Charging LocationsSuperchargers are displayed on the map bydefault, represented by red pins that you cantouch to display more information about theSupercharger location, navigate to it, or markit as a favorite. When you touch the pin for aSupercharger location on the map,information about the Supercharger locationis displayed, including the total number ofSuperchargers, the number of Superchargersavailable, the address of the Supercharger, andits approximate distance from you. The popupalso displays any amenities that are availableat the Supercharger location, includingrestrooms, restaurants, lodging, shopping, andWi-Fi availability.
Note: The popup displays the straight linedistance to the charger location, not thedriving distance to the charger location. Whenyou begin navigating, the navigation systemdisplays the driving distance to the chargerlocation.
In addition to Superchargers, you can displaydestination chargers and charging stationsthat you used before by touching the chargingicon in the lower right corner of the map.Display details about any charging location bytouching its pin:
The Supercharger location isoperational.
The Supercharger location may beout of operation or is operating ata reduced capacity (touch the pinto display details).
The location is equipped with acharging station (Wall Connector).Touch to display more information,such as the charging station'scapacity and usage restrictions.
The location is equipped with morethan one charging station. Thenumber on the icon indicates howmany charging stations are locatedat the destination. Zoom in todisplay the pin for each chargingstation (described above).
Starting Navigation1. Touch the Nav app to display the map.2. Touch Navigate and enter a destination.
You can also use voice commands (see
Maps and Navigation
138 Model X Owner's Manual

Steering Wheel on page 44), touch alocation in the Recent or Favorites list, ortouch a pin on the map, and then touchNavigate from the popup.
• If you have a data connection, you canstart entering the destination, thenchoose one of the auto-completeentries that appear in the popup list.For example, you can enter just thestreet, business name, or category(such as hotels, coffee, etc.).
Note: The popup list displays thestraight line distance to the location,not the driving distance to thelocation. When you begin navigating,the navigation system displays thedriving distance to the location.
• If you don’t have a data connection,touch Navigate, touch the Searchfield, and then touch Offline AddressEntry to use the onboard maps. Enterthe complete address, and then touchFind.
Note: If a connected phone's calendar is setup to work with Model X, and a calendar eventincludes a specific location, you can initiatenavigation from the calendar (see Calendar onpage 142).
During NavigationDuring navigation, the touchscreen displays aturn-by-turn direction list that includesestimated mileage, driving time, arrival time,and an estimate of how much energy isremaining when you reach the destination.
Note: If Model X requires charging to reachthe destination and Trip Planner is turned on(see Trip Planner on page 140), thenavigation route includes Supercharger stops.
The touchscreen also displays your location onthe map. Depending on the map’s zoom level,you might not be able to see the entire route.Whenever a navigation route is active, you candisplay the full route on the map by touchingthe route overview icon:
The route overview icon is availablein the top right corner of the mapwhenever a navigation route isactive. You can touch this icon todisplay the current leg of your tripor to change the orientation of themap to North Up or Heading Up(see Using Maps on page 137).
During navigation, the instrument paneldisplays the turn-by-turn directions, and youwill also hear spoken directions. To change thevolume of the spoken directions, use the scrollwheel on the left side of the steering wheelwhile navigation directions are being spoken.You can also change or mute the volume bytouching the volume icon located in the topright corner of the turn-by-turn direction list.
Model X detects real-time traffic conditionsand automatically adjusts the estimateddriving and arrival times based on traffic. Insituations where traffic conditions will delayyour estimated time of arrival and an alternateroute is available, Model X reroutes you toyour destination. You can turn this feature offby touching Controls > Settings > Apps >Maps & Navigation > Traffic-Based Routing >Off. You can specify the amount of timesavings (in minutes) that must be achievedbefore you are rerouted by touching thearrows associated with the Re-Route If ItSaves More Than setting.
Model X can also monitor traffic to your worklocation (on weekday mornings) and to yourhome location (on weekday evenings) andadvise you if there is a better route insituations where traffic conditions will cause adelay by touching Controls > Settings >Apps > Maps & Navigation > Show CommuteAdvice > ON. You can specify that commuteadvice be given only when a faster route isavailable by selecting Only when a fasterroute is available.
Note: Traffic-Based Commute Advice is onlyavailable if your Model X is equipped with theNavigation option and you have saved Homeand Work locations.
Model X can route you around ferries and tolls.Touch Controls > Settings > Apps > Maps &Navigation, and then touch the associatedcheck boxes.
As you approach an upcoming turn on yournavigation route, a vertical progression bardisplays on the right side of the touchscreen'sturn-by-turn direction list. This vertical baralso displays on the right side of thenavigation instructions on the instrumentpanel. As you progress toward the locationwhere you will need to make a turn, the barfills, from bottom to top. When you arrive atthe location of the turn, the bar is completelyfilled.
Maps and Navigation
Using the Touchscreen 139

Predicting Energy Usage
When navigating to a destination, Model Xhelps you anticipate your charging needs bycalculating the amount of energy that willremain when you reach your destination. Thecalculation is an estimate based on drivingand environmental factors such as predictedspeed and elevation changes. The touchscreendisplays this calculation at the bottom of theturn-by-turn direction list when you firstinitiate the navigation route. Thereafter, youcan display it by touching the area at thebottom of the turn-by-turn direction list.
Throughout your route, Model X monitorsenergy usage and updates the calculation asneeded. A popup warning displays at thebottom of the turn-by-turn direction list inthese situations:
• A yellow warning displays when you havevery little energy remaining to reach yourdestination and should drive slowly toconserve energy. For tips on conservingenergy, see Getting Maximum Range onpage 72.
• A red warning displays when you mustcharge Model X to reach your destination.
If you select Always Show Estimated RoundTrip Energy in the Navigation settings,Model X also lets you know if you haveenough energy for a round trip at the bottomof the turn-by-turn directions. By default, anestimate of your round trip energy usagedisplays at the bottom of the turn-by-turndirections when the remaining battery energyis estimated at less than ten percent aftercompletion of the round trip, or when theround trip consumes a significant amount ofyour energy.
When navigating, you can also use the Energyapp to monitor energy usage while on yourtrip (see Getting Maximum Range on page72).
Trip Planner
Trip Planner helps you take longer road tripswith confidence. If reaching your destinationrequires charging, Trip Planner routes youthrough the appropriate Superchargerlocations. Trip Planner selects a route thatminimizes the time you spend driving andcharging. To use Trip Planner, touch Controls >Settings > Apps > Maps and Navigation > TripPlanner > On.
After you select a destination, Trip Plannerzooms out to give you an overview of yourtrip. As you begin your trip, Trip Plannerzooms in to start navigation. The turn-by-turndirections include:
• The list of Supercharger stops (TripPlanner does not consider charginglocations that are not Superchargers).
• The charging time required at eachSupercharger stop.
• The estimated amount of energy availablewhen you arrive at the first Superchargerlocation.
Note: You can scroll down the list (or zoomout on the map) to see the next Superchargerlocation on your trip. Trip Planner estimateshow much time you will need to charge ateach location.
While charging at a Supercharger stop, thecharging screen displays the remaining chargetime needed for your trip. If you charge for ashorter or longer length of time, the chargetime for subsequent stops are readjusted.
Note: If a Supercharger located on yourexisting route experiences an outage, TripPlanner displays a notification and reroutesyou to a different Supercharger location.
If Trip Planner estimates that you won't haveenough energy for your round trip, and thereis no Supercharger stop on your route, TripPlanner displays an alert at the top of theturn-by-turn directions and an empty batteryicon with the amount of additional energyneeded for your trip at the bottom of the turn-by-turn directions.
Favorite, Home, and WorkDestinations
Add any destination to yourFavorites list by either touching itspin while navigating to it, or bydisplaying it on the map and thentouching its pin. In the popup dialogthat appears, touch the Favoritesicon, and then touch Add toFavorites. To remove a favoritedestination, select it on the map,touch the Favorites icon in thepopup that displays, and confirmdeletion of the favorite by touchingDelete.
Maps and Navigation
140 Model X Owner's Manual

If you frequently drive to a destination, youmay want to add it as a Favorite to avoidhaving to enter the location's name or addresseach time. When you add a destination as aFavorite, you can easily navigate to it bytouching Navigate > Favorites and thenselecting it from the list.
The Navigate option also has placeholders foryour Home and Work locations. Based on yourusage patterns, Model X may prompt you tosave a current location as Home or Work.After you save a Home and a Work location,Model X may prompt you to navigate to yourWork location in the mornings and to yourHome location in the evenings and tell youhow long it will take to navigate in currenttraffic conditions. To navigate to your Work orHome location, simply press NAV TO WORKor NAV TO HOME when prompted. You canalso touch Controls > Settings > Apps > Maps& Navigation and specify an amount of timeto be saved (up to 30 minutes) beforeModel X re-routes your drive.
To edit Home and Work locations (or anylocation), touch Navigate, press and hold yourHome or Work location, and enter a newaddress in the popup. You can also delete anylocation in the Recent or Favorites list bypressing and holding the location, and thentouching its associated X.
Note: For security reasons, if you sell Model X,erase your Home and Work locations, andyour favorite destinations (see ErasingPersonal Data on page 122).
Updated MapsTo receive updated maps, periodically connectModel X to a Wi-Fi network (see Connectingto Wi-Fi on page 146). As updated mapsbecome available, they are sent to Model Xover Wi-Fi only. The touchscreen displays amessage informing you when new maps havebeen installed.
Maps and Navigation
Using the Touchscreen 141

OverviewThe Calendar app allows you to view your phone’s (iPhone® or Android™) calendar for the currentand next day. The Calendar app requires that:
• The Tesla Model X mobile app is running and you are logged in. When prompted on yourphone, you must grant calendar access to the mobile app. The mobile app can thenperiodically (and automatically) send calendar data from your phone to Model X. Also,whenever you display the mobile app on your phone, updated calendar data is sent toModel X. To ensure you have access to all features of the Calendar app, you will need thelatest version of the mobile app.
• Your phone is connected to Model X via Bluetooth (for privacy reasons, calendar data displaysonly from a phone that is connected via Bluetooth).
• Remote access to Model X is turned on (touch Controls > Settings > Safety & Security >Remote Access > On).
• Both your phone and Model X have good connectivity.
When you enter Model X, the touchscreen can display a reminder of the day's events. You cancustomize if and when your calendar events are displayed by touching Controls > Settings >Apps > Calendar > Show Calendar Upon Entry.
To view scheduled events for the next 48 hours, choose the Calendar app from the maintouchscreen window. The Calendar app displays events in chronological order.
1. If the calendar event includes an address, a navigation arrow displays to indicate that you cantouch the address to navigate to the event's location (if your Model X is equipped withNavigation).
2. If a phone number is associated with a calendar event, you can touch the number to initiate aphone call.
3. In situations where events are displayed from multiple calendars, you can filter to show onlyevents from one or more specific calendars.
4. If the calendar event has notes associated with it, touch the information icon to display thenotes in a popup window.
5. If an event's notes include one or more phone numbers, a phone symbol displays with theinformation icon and the first phone number found in the notes displays on the event list andyou can use this number to initiate a phone call (as described in item 2 above). But you canalso initiate a call from within the notes popup window by referencing other numbers that areincluded in the notes (this is particularly useful for conference calls). If the notes contain aweb link, you can touch the link to open it in the Web Browser app.
Calendar and NavigationIf Model X is equipped with navigation, and a calendar event has a location specified, you will begiven the option to navigate to that location. Also, when an event on your Calendar takes placewithin the next hour and has a uniquely specified location, the Model X navigation system notifiesyou if there is a better route due to traffic, even if you’re not using navigation.
Calendar
142 Model X Owner's Manual

About the Security SystemIf Model X does not detect a key nearby and alocked door or trunk is opened, an alarmsounds and headlights and turn signals flash.To deactivate the alarm, press any button onthe key.
Security Settings
Using the Touchscreen 143
About HomeLinkYou can program the HomeLink® UniversalTransceiver (if equipped) to operate up tothree Radio Frequency (RF) devices, includinggarage doors, gates, lights, and securitysystems.
Note: Depending on date of manufacture,options selected, and time of purchase, someModel X vehicles are not equipped withHomeLink.
Programming HomeLink1. Park Model X in front of the device you
want to program, and have the device'sremote control ready.
Note: Make sure you haven’t reached thelimit of learned remotes/vehicles. Mostdevice receivers can learn up to fiveremotes/vehicles. If necessary, clear thereceiver memory and restart theprogramming process. For informationabout clearing the receiver memory, referto the owner documentation for yourdevice.
2. On the touchscreen, touch Controls >Settings > HomeLink.
3. Touch Add New HomeLink, then use theonscreen keyboard to enter a name foryour HomeLink device.
4. Touch Program.5. Follow the onscreen instructions.
Once programmed, you can operate thedevice by touching its correspondingHomeLink icon on the touchscreen's statusbar. HomeLink remembers the location of yourprogrammed devices. When you approach aknown location, the HomeLink control on thetouchscreen automatically drops down. Whenyou drive away, it disappears.
Note: For security reasons, delete yourHomeLink devices if you sell your Model X(see Deleting a Device on page 144).
Warning: Your device might open orclose during programming. Beforeprogramming, make sure that the deviceis clear of any people or objects.
Warning: Do not use the HomeLinkUniversal Transceiver with a device thatdoes not have safety stop and reversefeatures. Using a device without thesesafety features increases the risk of injuryor death.
Auto Opening and ClosingTo operate a HomeLink device withouttouching the touchscreen, you can automatethe device to open as you approach and closeas you drive away:
• Touch Controls > Settings > HomeLinkand choose the device you want toautomate.
• Select the Auto-open when arrivingcheck box.
• Touch the arrows to specify the distanceyou want your vehicle to be from thedevice before it opens.
• Select the Auto-close when leaving checkbox if you want the device to close as youdrive away.
As you approach (or drive away from) adevice that is set to operate automatically, theHomeLink status icon displays a count-downmessage to let you know when the device willautomatically open. In situations where youdon't want the device to automatically openor close, touch Skip Auto-Open or Skip Auto-Close at any time during the count-downmessage.
Resetting the Location of theHomeLink DeviceIf you experience situations in which yousometimes drive up to your HomeLink deviceand it doesn't open, or the HomeLink icon onthe touchscreen's status bar does not displaythe dropdown when you approach the device,you may need to reset the device's location.To do so, park as close as possible to theHomeLink device (garage door, gate, etc.) anddisplay the HomeLink settings page bytouching Controls > Settings > HomeLink.Touch the name of the device you want toreset, then Reset Location.
Deleting a DeviceTo delete a HomeLink device, touch Controls >Settings > HomeLink. Touch the name of thedevice you want to delete, then touch Delete.
Note: You can also perform a factory reset toerase your HomeLink settings, along with allother personal data (saved addresses, musicfavorites, imported contacts, etc.). See ErasingPersonal Data on page 122.
HomeLink® Universal Transceiver
144 Model X Owner's Manual

Troubleshooting HomeLinkWhen programming a HomeLink device, thetouchscreen walks you through a two-partprogramming process:
1. Model X records the signal from theremote. The touchscreen instructs you tostand in front of the vehicle, point theremote at the front bumper and press andhold the button until the headlights flash.When the headlights flash, Model X haslearned the remote and you can touchContinue on the touchscreen. If theheadlights do not flash, refer to thefollowing guidelines.
2. The device's receiver learns Model X. Thetouchscreen instructs you to press theLEARN button on the device's receiver. Iftraining the receiver does not work, referto the following guidelines.
Note: Only devices that are equipped witha “rolling code” remote need to learnModel X. If you have an old device that isnot equipped with a "rolling code" remote,the device does not need to learn Model Xand you can skip this part of the process.You can also skip this part if your receiveris "Quick-Train" compatible.
Headlights do not flash
• Check the batteries in the remote. It is agood idea to replace the batteries beforeyou start programming.
• Hold the remote against the front bumper,with the button pressed, approximately 6in (15 cm) to the left of the Tesla emblem.In some cases you must hold the buttonon the remote for up to three minutes.
• Check compatibility of the remote bycontacting the HomeLink manufacturer(www.homelink.com).
After programming, the device does notwork
• Park Model X with its front bumper asclose as possible to the HomeLink device(garage door, gate, etc).
• Make sure you haven’t reached the devicereceiver's limit of learned remotes/cars.Most receivers can learn up to fiveremotes/cars. If the receiver's memory isfull, you must clear the memory andrestart the programming process. Forinstructions on how to clear the receiver'smemory, refer to the ownerdocumentation provided with theHomeLink device.
• Make sure you are pressing the receiver'sLEARN button. Most receivers have twobuttons and a LED. One button is a RESETbutton and the other is a LEARN button.Pressing the LEARN button usually causesthe LED to flash. For instructions on howto put the receiver into learning mode,refer to the owner documentationprovided with the HomeLink device.
• Most devices stay in learning mode foronly three to five minutes. Immediatelyafter pressing the device's LEARN button,follow the instructions displayed on thetouchscreen.
HomeLink® Universal Transceiver
Using the Touchscreen 145

Wi-Fi is available as a data connection methodand is often faster than cellular data networks.Connecting to Wi-Fi is especially useful inareas with limited or no cellular connectivity.To ensure fast, reliable delivery of Model Xupdates (see Software Updates on page 147),Tesla recommends leaving Wi-Fi turned onand connected to a Wi-Fi network. To connectto a Wi-Fi network:
1. Touch the LTE (or 3G) icon in thetouchscreen status bar. Model X will startscanning and display the Wi-Fi networksthat are within range.
2. Select the Wi-Fi network you want to use,enter the password (if necessary), thentouch Connect.
You can also connect to a hidden network thatisn't shown on the list of scanned networks.Just touch Wi-Fi Settings and enter the nameof the network in the resulting dialog box.
Once you have connected to a network,Model X automatically connects whenever thenetwork is within range. If more than onepreviously connected network is within range,Model X connects to the one most recentlyused.
Note: You can also use a mobile hotspot oryour phone's Internet connection via Wi-Fitethering.
Note: At Tesla Service Centers, Model Xautomatically connects to the Tesla ServiceWi-Fi network.
Connecting to Wi-Fi
146 Model X Owner's Manual
Loading New SoftwareModel X updates its software wirelessly,providing new features throughout your termof ownership. Tesla recommends that youinstall software updates as soon as they areavailable. The first time you enter Model Xafter an update is made available, a schedulingwindow displays on the touchscreen. Thescheduling window displays again at the endof your first driving session.
Note: Some software updates can take up tothree hours to complete. Model X must be inPark while the new software is being installed.To ensure the fastest and most reliabledelivery of software updates, leave the Wi-Fiturned on and connected whenever possible(see Connecting to Wi-Fi on page 146).
When a software update is available, a yellowclock icon appears on the touchscreen’s statusbar. Touch this clock icon to display theupdate window. You can then either:
• Schedule the update by setting the timeyou want the update to begin. Then touchSet For This Time. Once scheduled, theyellow clock icon changes to a white clockicon. You can reschedule the update anytime before it begins.
OR• Touch Install Now to immediately start the
update process.
If Model X is charging when the softwareupdate begins, charging stops. Chargingresumes automatically when the softwareupdate is complete. If you are driving Model Xat the scheduled update time, the update iscanceled and you need to reschedule it.
Note: Over time, the touchscreen may displaya software update window informing you toSET FOR THIS TIME or INSTALL NOW. Thissoftware update window will persist until youcomplete the installation of the softwareupdate. You must install all software updatesas soon as they are available and any harmrelating to the failure to install a softwareupdate will not be covered by the vehicle’swarranty. Failure or refusal to install suchupdates may result in the inaccessibility ofcertain vehicle features (includingincompatibility with digital media devices) orin Tesla being unable to diagnose and serviceyour vehicle.
Note: If software updates are not installed,some vehicle features may becomeinaccessible and digital media devices may
become incompatible. Reverting to a previoussoftware version is not possible.
If the touchscreen displays a messageindicating that a software update was notsuccessfully completed, contact Tesla.
Viewing Release NotesWhen a software update is complete, learnabout the new features by reading the releasenotes. To display release notes about yourcurrent software version at any time touch theTesla “T” at the top center of the touchscreen,then touch Release Notes.
Tesla strongly recommends reading all releasenotes. They may contain important safetyinformation or operating instructionsregarding your Model X.
Software Updates
Using the Touchscreen 147

Model X Mobile AppThe Tesla Model X mobile app allows you tocommunicate with Model X remotely usingyour iPhone® or Android™ phone. With thisapp, you can:
• View the vehicle's estimated range.• Check charging progress or stop charging
and receive notifications when charginghas started, has been interrupted, isnearing completion, or is complete.
Note: If Supercharging, additionalnotifications will alert you when idle feesare incurred. The idle fees are waived ifyour vehicle is moved within five minutesof when you finish charging. See Supercharger Usage Fees and Idle Fees onpage 157.
• Check the interior temperature and heator cool Model X before driving (even if it'sin a garage).
• Locate Model X with directions, or trackits movement across a map.
• Flash lights or honk the horn to findModel X when parked.
• Lock or unlock Model X from afar.• Enable valet mode.• Start Model X.• Park or unpark Model X using Summon
(see ).• Support the Model X Calendar app by
allowing the mobile app to send yourphone's calendar data to Model X.
• Receive notifications when the car alarmhas been triggered, or a new Model Xsoftware update is available.
• Receive notifications of scheduledsoftware updates.
• View the odometer, VIN, and currentsoftware version.
Simply download the Tesla Model X mobileapp to your phone and enter your TeslaAccount login credentials. You must alsoensure that Model X is ready to communicatewith the mobile app by turning on its remoteaccess setting. Touch Controls > Settings >Safety & Security > Remote Access > On(see Settings on page 119).
Note: Tesla does not support the use of thirdparty applications to contact Model X.
Note: To ensure access to new and improvedfeatures, download updated versions of themobile app as they become available.
Mobile App
148 Model X Owner's Manual

High Voltage Components
1. Front Motor2. AC Compressor3. Forward Junction Box4. High Voltage Cabling5. Battery Coolant Heater6. DC-DC Converter7. Cabin Heater8. High Voltage Battery9. On-board Charger10. Charge Port11. Rear Motor12. HV cable to Rear HVAC Assembly
Warning: The high voltage system has no user serviceable parts. Do not disassemble, removeor replace high voltage components, cables or connectors. High voltage cables are typicallycolored orange for easy identification.
Warning: Read and follow all instructions provided on the labels that are attached to Model X.These labels are there for your safety.
Warning: In the unlikely event that a fire occurs, immediately contact your local fireemergency responders.
Electric Vehicle Components
Charging 149

Charging EquipmentCharging equipment designed specifically tocharge your Model X is available from Tesla. ATesla Wall Connector, which installs in yourgarage, is the fastest way to charge Model Xat home.
In several market regions, Model X is equippedwith a Mobile Connector and the adapter(s)you need to plug into commonly used poweroutlets. When using the Mobile Connector,first plug the Mobile Connector into the poweroutlet, and then plug in Model X. For moreinformation about your Mobile Connector, seethe Mobile Connector Owner’s Manual(available on the touchscreen). Additionaladapters can be purchased from Tesla.
Tesla also offers various types of adapters(including J1772 and CHAdeMO) that allowyou to plug Model X into the most commonlyused public charging stations in your region.Connect the adapter to the charging station’scharge cable, open the charge port door usingthe touchscreen (see Charging Instructions onpage 153), and then plug in Model X.
For more information on the chargingequipment available for your region, go to www.tesla.com, choose your region, and thenview the available charging options.
Electric Vehicle Components
150 Model X Owner's Manual
About the BatteryModel X has one of the most sophisticatedbattery systems in the world. The mostimportant way to preserve the Battery is toLEAVE YOUR VEHICLE PLUGGED IN whenyou are not using it. This is particularlyimportant if you are not planning to driveModel X for several weeks. When plugged in,Model X wakes up when needed toautomatically maintain a charge level thatmaximizes the lifetime of the Battery.
There is no advantage to waiting until theBattery’s level is low before charging. In fact,the Battery performs best when chargedregularly.
Note: If the Model X Battery becomescompletely discharged in a situation in whichtowing is required, the owner is responsiblefor towing expenses. Discharge-related towingexpenses are not covered under the RoadsideAssistance policy.
The peak charging rate of the Battery maydecrease slightly after a large number of DCFast Charging sessions, such as those atSuperchargers. To ensure maximum drivingrange and Battery safety, the Battery chargerate is decreased when the Battery is too cold,when the Battery’s charge is nearly full, andwhen the Battery conditions change withusage and age. These changes in the conditionof the Battery are driven by battery physicsand may increase the total Superchargingduration by a few minutes over time.
Battery CareNever allow the Battery to fully discharge.Even when Model X is not being driven, itsBattery discharges very slowly to power theonboard electronics. On average, the Batterydischarges at a rate of 1% per day. Situationscan arise in which you must leave Model Xunplugged for an extended period of time (forexample, at an airport when traveling). Inthese situations, keep the 1% in mind to ensurethat you leave the Battery with a sufficientcharge level. For example, over a two weekperiod (14 days), the Battery discharges byapproximately 14%.
Discharging the Battery to 0% maypermanently damage the Battery. To protectagainst a complete discharge, Model X entersa low-power consumption mode when thecharge level drops to 5%. In this mode, theBattery stops supporting the onboardelectronics to slow the discharge rate toapproximately 4% per month. Once this low-power consumption mode is active, it isimportant to plug in Model X within twomonths to avoid Battery damage.
Note: When the low-power consumptionmode is active, the auxiliary 12V battery is nolonger being charged and can completelydischarge within 12 hours. In the unlikely eventthat this occurs, you may need to jump startor replace the 12V battery before you cancharge. In this situation, contact Tesla.
Temperature Limits
For better long-term performance, avoidexposing Model X to ambient temperaturesabove 140° F (60° C) or below -22° F (-30° C)for more than 24 hours at a time.
Energy Saving Feature
Model X has an energy-saving feature thatreduces the amount of energy beingconsumed when Model X is not in use. TouchControls > Displays > Energy Saving. Formore information on maximizing range andsaving energy, see Getting Maximum Rangeon page 72.
Battery Warnings and Cautions
Warning: The Battery has no parts that anowner or a non-Tesla authorized servicetechnician can service. Under nocircumstances should you open or tamperwith the Battery. Always contact Tesla toarrange for Battery servicing.
Caution: If the Battery’s charge level fallsto 0%, you must plug it in. If you leave itunplugged for an extended period, it maynot be possible to charge or use Model Xwithout jump starting or replacing the 12Vbattery. Leaving Model X unplugged foran extended period can also result inpermanent Battery damage. If you areunable to charge Model X, contact Teslaimmediately.
Caution: The Battery requires no ownermaintenance. Do not remove the coolantfiller cap and do not add fluid. If theinstrument panel warns you that the fluidlevel is low, contact Tesla immediately.
Battery Information
Charging 151

Caution: Do not use the Battery as astationary power source. Doing so voidsthe warranty.
Battery Information
152 Model X Owner's Manual
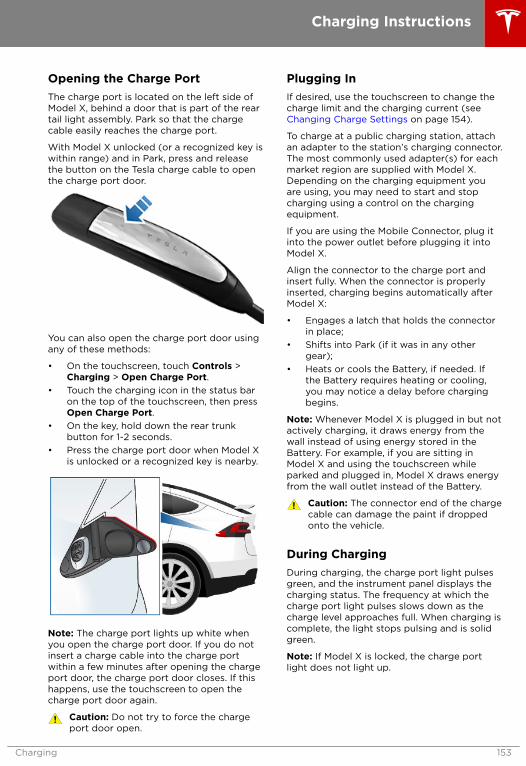
Opening the Charge PortThe charge port is located on the left side ofModel X, behind a door that is part of the reartail light assembly. Park so that the chargecable easily reaches the charge port.
With Model X unlocked (or a recognized key iswithin range) and in Park, press and releasethe button on the Tesla charge cable to openthe charge port door.
You can also open the charge port door usingany of these methods:
• On the touchscreen, touch Controls >Charging > Open Charge Port.
• Touch the charging icon in the status baron the top of the touchscreen, then pressOpen Charge Port.
• On the key, hold down the rear trunkbutton for 1-2 seconds.
• Press the charge port door when Model Xis unlocked or a recognized key is nearby.
Note: The charge port lights up white whenyou open the charge port door. If you do notinsert a charge cable into the charge portwithin a few minutes after opening the chargeport door, the charge port door closes. If thishappens, use the touchscreen to open thecharge port door again.
Caution: Do not try to force the chargeport door open.
Plugging InIf desired, use the touchscreen to change thecharge limit and the charging current (see Changing Charge Settings on page 154).
To charge at a public charging station, attachan adapter to the station’s charging connector.The most commonly used adapter(s) for eachmarket region are supplied with Model X.Depending on the charging equipment youare using, you may need to start and stopcharging using a control on the chargingequipment.
If you are using the Mobile Connector, plug itinto the power outlet before plugging it intoModel X.
Align the connector to the charge port andinsert fully. When the connector is properlyinserted, charging begins automatically afterModel X:
• Engages a latch that holds the connectorin place;
• Shifts into Park (if it was in any othergear);
• Heats or cools the Battery, if needed. Ifthe Battery requires heating or cooling,you may notice a delay before chargingbegins.
Note: Whenever Model X is plugged in but notactively charging, it draws energy from thewall instead of using energy stored in theBattery. For example, if you are sitting inModel X and using the touchscreen whileparked and plugged in, Model X draws energyfrom the wall outlet instead of the Battery.
Caution: The connector end of the chargecable can damage the paint if droppedonto the vehicle.
During ChargingDuring charging, the charge port light pulsesgreen, and the instrument panel displays thecharging status. The frequency at which thecharge port light pulses slows down as thecharge level approaches full. When charging iscomplete, the light stops pulsing and is solidgreen.
Note: If Model X is locked, the charge portlight does not light up.
Charging Instructions
Charging 153

If the charge port light turns red whilecharging, a fault is detected. Check theinstrument panel or touchscreen for amessage describing the fault. A fault canoccur due to something as common as apower outage. If a power outage occurs,charging resumes automatically when poweris restored.
Note: When charging, particularly at highcurrents, the refrigerant compressor and thefan operate as needed to keep the Batterycool. Therefore, it is normal to hear soundsduring charging.
Note: Air conditioning performance isgenerally not affected by charging. However,under certain circumstances (for example, youare charging at high currents during aparticularly warm day), the air coming fromthe vents may not be as cool as expected anda message displays on the instrument panel.This is normal behavior and ensures that theBattery stays within an optimum temperaturerange while charging to support longevity andoptimum performance.
Warning: Never spray liquid at a highvelocity (for example, if using a pressurewasher) towards the charge port whilecharging. Failure to follow theseinstructions can result in serious injury ordamage to the vehicle, chargingequipment, or property.
Stopping ChargingStop charging at any time by disconnectingthe charge cable or touching Stop Chargingon the touchscreen.
Note: To prevent unauthorized unplugging ofthe charge cable, Model X must be unlockedor able to recognize your key before you candisconnect the charge cable.
To disconnect the charge cable:
1. Press and hold the button on a Teslaconnector to release the latch. You canalso touch Stop Charging on the chargingscreen (see Changing Charge Settings onpage 154).
2. Pull the connector from the charge port.3. Push the charge port door closed.
Note: If Model X is equipped with a motorizedcharge port door, it automatically closes whenyou remove the charge cable.
Caution: Tesla strongly recommendsleaving Model X plugged in when not in
use. This maintains the Battery at theoptimum level of charge.
Charge Port Light• WHITE: The charge port door is open.
Model X is ready to charge and theconnector is not inserted, or the latch isreleased and the connector is ready to beremoved.
• BLUE: Model X detects that a connectorhas been plugged in, but charging has notstarted. Either Model X is preparing tocharge, or a charging session is scheduledto begin at a specified future time.
• BLINKING GREEN: Charging is inprogress. As Model X approaches a fullcharge, the frequency of the blinkingslows.
• SOLID GREEN: Charging is complete.• SOLID AMBER: The connector is not fully
plugged in. Realign the connector to thecharge port and insert fully.
• BLINKING AMBER: Model X is charging ata reduced current (AC charging only).
• RED: A fault is detected and charging hasstopped. Check the instrument panel ortouchscreen for a fault message.
Changing Charge SettingsThe charge settings screen displays on thetouchscreen whenever the charge port door isopen.
To display charge settings at any time, touchthe Battery icon on the top of thetouchscreen, or touch Controls > Charging(located in the upper right portion of theControls screen).
Note: The following illustration is provided fordemonstration purposes only and may varyslightly depending on software version andmarket region.
Charging Instructions
154 Model X Owner's Manual

Note: If charging at a Tesla Supercharger, andpaid supercharging is potentially in effect, thecharging screen also displays informationabout your previous or current Superchargersession (see Supercharger Usage Fees andIdle Fees on page 157).
1. Charge status messages (such asCharging Scheduled, Charging InProgress) display here.
2. To adjust the charge limit, touch SetCharge Limit, and drag the arrow tochange the charge limit setting. Thesetting you choose applies to immediateand scheduled charging sessions.
3. Location-specific schedule. With Model Xin Park, set a specific time to begincharging at the current location. If, at thescheduled time, Model X is not plugged inat the location, charging starts as soon asyou plug it in provided you plug it inwithin six hours of the scheduled time. Ifplugged in after six hours, charging doesnot start until the scheduled time on thenext day. To override this setting, touchStart Charging or Stop Charging (seeitem 4). When you set a scheduledcharging time, Model X displays the settime on the instrument panel andtouchscreen.
4. Touch to open the charge port door or tostart (or stop) charging.
5. The current automatically sets to themaximum current available from theattached charge cable, unless it waspreviously reduced to a lower level. Ifneeded, touch the up/down arrows tochange the current (for example, you maywant to reduce the current if you areconcerned about overloading a domesticwiring circuit shared by other equipment).It is not possible to set the chargingcurrent to a level that exceeds themaximum available from the attachedcharge cable. When you change thecurrent, Model X remembers the location.If you charge at the same location, you donot need to change it again.
Note: If Model X automatically reducedthe current at a charging location becauseof fluctuations in input power (see thenote in Charging Status on page 156),Tesla recommends charging at the lowercurrent until the underlying problem isresolved and the charging location canprovide consistent power.
Charging Instructions
Charging 155

Charging StatusThe following illustration is provided for demonstration purposes only and may vary slightlydepending on the software version and market region.
1. Charging status information. For example, when Model X is charging, it displays the timeremaining until fully charged at the currently selected charge level. When a charging session isscheduled, it displays when charging starts.
2. Total estimated driving distance (or energy) available. To choose between displaying distanceor energy percentage, touch Controls > Settings > Units & Format > Energy & Charging.
Note: A portion of the battery image may appear blue. This indicates that a small portion ofthe energy stored in the battery is not available because the battery is cold. This is normal andno reason for concern. When the battery warms up, the blue portion no longer displays.
3. Charging rate per hour.4. Estimated increase in driving distance (or energy) achieved so far in this charging session.5. Current supplied/available from the connected power supply (see Changing Charge Settings
on page 154).6. Voltage supplied by the charge cable.
Note: If Model X is charging and detects unexpected fluctuations in input power, the chargingcurrent is automatically reduced by 25%. For example, a 40 amp current is reduced to 30 amps.This automatic current reduction increases robustness and safety in situations when an externalproblem exists (for example, a home wiring system, receptacle, adapter or cord is unable to meetits rated current capacity). As a precaution, when Model X automatically reduces current, it savesthe reduced current at the charging location. Although you can manually increase it, Teslarecommends charging at the lower current until the underlying problem is resolved and thecharging location can provide consistent power.
Charging Instructions
156 Model X Owner's Manual
Supercharger Usage Fees and IdleFeesWhen charging using a Tesla supercharger,PAID SUPERCHARGING information displaysat the bottom of the charging screen. Thisinformation includes the location, the timethat charging started, and an estimate of howmuch the session will cost. When you stopcharging, the final cost displays until a newSupercharging session begins. If free chargingis applicable, the cost displays as zero.
When charging at a Tesla supercharger, youare subject to idle fees. Idle fees are designedto encourage drivers to move their vehiclefrom the Supercharger when charging iscomplete and are in effect whenever at leasthalf of the Superchargers at a site areoccupied. The Tesla mobile app notifies youwhen charging nears completion, and againwhen charging is complete. Additionalnotifications are sent if idle fees are incurred.Idle fees are waived if you move your vehiclewithin five minutes.
Log into your Tesla Account to view fees anddetails about Supercharger sessions, track theremaining balance of free credits, set up apayment method, and make payments. Once apayment method is saved, fees areautomatically paid from your account.
Charging Instructions
Charging 157

Service IntervalsRegular maintenance is the key to ensuringthe continued reliability and efficiency of yourModel X.
Maintain the correct tire pressures, and takeModel X to Tesla at the regularly scheduledmaintenance intervals of every 12 months, orevery 12,500 miles (20,000 km), whichevercomes first. It is also important to perform thedaily and monthly checks described below.
Model X should be serviced by Tesla-certifiedtechnicians. Damages or failures caused bymaintenance or repairs performed by non-Tesla certified technicians are not covered bythe warranty.
Daily Checks• Check the Battery’s charge level,
displayed on the instrument panel ormobile app.
• Check the condition and pressure of eachtire (see Tire Care and Maintenance onpage 159).
• Check that all exterior lights, horn, turnsignals, and wipers and washers areworking.
• Check the operation of the brakes,including the parking brake.
• Check the operation of the seat belts(see Seat Belts on page 27).
• Look for abnormal fluid depositsunderneath Model X that might indicate aleak. It is normal for a small pool of waterto form (caused by the air conditioningsystem’s dehumidifying process).
Monthly Checks• Check windshield washer fluid level and
top up if necessary (see Topping UpWasher Fluid on page 169).
• Check that the air conditioning system isoperating correctly (see Climate Controlson page 123).
Warning: Contact Tesla immediately ifyou notice any significant or sudden dropin fluid levels or uneven tire wear.
Fluid Replacement IntervalsDo not change or top up the Battery coolantor brake fluid. Tesla service technicians replacefluids at the regularly scheduled serviceintervals:
• Brake fluid. Every 2 years or 25,000 miles(40,000 km), whichever comes first.
• Battery coolant. Every 4 years or50,000 miles (80,000 km), whichevercomes first.
Note: Any damage caused by opening theBattery coolant reservoir is excluded from thewarranty.
High Voltage SafetyYour Model X has been designed and builtwith safety as a priority. However, be aware ofthese precautions to protect yourself from therisk of injury inherent in all high-voltagesystems:
• Read and follow all instructions providedon the labels that are attached to Model X.These labels are there for your safety.
• The high voltage system has no user-serviceable parts. Do not disassemble,remove or replace high voltagecomponents, cables or connectors. Highvoltage cables are colored orange for easyidentification.
• If a collision occurs, do not touch any highvoltage wiring, connectors, orcomponents connected to the wiring.
• In the unlikely event that a fire occurs,immediately contact your local fireemergency responders.
Warning: Always disconnect the chargecable before working underneathModel X, even if charging is not inprogress.
Warning: Keep your hands and clothingaway from cooling fans. Some fansoperate even when Model X is poweredoff.
Warning: Some fluids (battery acid,Battery coolant, brake fluid, windshieldwasher additives, etc.) used in vehiclesare poisonous and should not be inhaled,swallowed, or brought into contact withopen wounds. For your safety, alwaysread and follow instructions printed onfluid containers.
Maintenance Schedule
158 Model X Owner's Manual

Maintaining Tire PressuresIf you are not towing a trailer, keep tiresinflated to the pressures shown on the Tireand Loading Information label, even if it differsfrom the pressure printed on the tire itself. TheTire and Loading Information label is locatedon the center door pillar and is visible whenthe driver’s door is open.
If you are towing a trailer, do not use the tirepressures printed on the Tire and LoadingInformation Label. Instead, refer to the tirepressures published in the towing topic (see Towing and Accessories on page 76).
The Tire Pressure indicator light onthe instrument panel alerts you ifone or more tires is under- or over-inflated.
The Tire Pressure indicator light does notimmediately turn off when you adjust tirepressure. After inflating the tire to therecommended pressure, you must drive over15 mph (25 km/h) for more than 10 minutes toactivate the Tire Pressure Monitoring System(TPMS), which turns off the Tire Pressureindicator light.
If the indicator light flashes for one minutewhenever you power on Model X, a fault withthe Tire Pressure Monitoring System (TPMS) isdetected (see TPMS Malfunction on page163).
Checking and Adjusting Tire Pressures
Follow these steps when tires are cold andModel X has been stationary for over threehours:
1. Remove the valve cap.2. Firmly press an accurate tire pressure
gauge onto the valve to measure pressure.3. If required, add or remove air to reach the
recommended pressure.4. Re-check pressure by removing and re-
attaching the tire gauge.5. If you added too much air, release air by
pressing the metal stem in the center ofthe valve.
6. Recheck the pressure with the tire gaugeand adjust if necessary.
7. Replace the valve cap to prevent dirt fromentering. Periodically check the valve fordamage and leaks.
You can display tire pressures on theinstrument panel by choosing to display CarStatus using the right or left steering wheelbuttons (see Using Left Steering WheelButtons on page 44 or Using Right SteeringWheel Buttons on page 45).
Warning: Under-inflation is the mostcommon cause of tire failures and cancause a tire to overheat, resulting insevere tire cracking, tread separation, orblowout, which causes unexpected loss ofvehicle control and increased risk ofinjury. Under-inflation also reduces thevehicle's range and tire tread life.
Warning: Check tire pressures using anaccurate pressure gauge when tires arecold. It takes only about one mile (1.6 km)of driving to warm up the tires sufficientlyto affect tire pressures. Parking thevehicle in direct sunlight or in hot weathercan also affect tire pressures. If you mustcheck warm tires, expect increasedpressures. Do not let air out of warm tiresin an attempt to match recommendedcold tire pressures. A hot tire at or belowthe recommended cold tire inflationpressure is dangerously under-inflated.
Warning: Do not use any tire sealantother than the type provided in a Teslatire repair kit. Other types can cause tirepressure sensors to malfunction. If yourModel X did not include a tire repair kit,you can purchase one from Tesla.
Tire Care and Maintenance
Maintenance 159

Inspecting and Maintaining TiresRegularly inspect the tread and side walls forany sign of distortion (bulges), cuts or wear.
Warning: Do not drive Model X if a tire isdamaged, excessively worn, or inflated toan incorrect pressure. Check tiresregularly for wear, and ensure there areno cuts, bulges or exposure of the ply/cord structure.
Tire Wear
Adequate tread depth is important for propertire performance. Tires with a tread depth lessthan 4/32” (3 mm) are more likely tohydroplane in wet conditions and should notbe used. Tires with a tread depth less than5/32” (4 mm) do not perform well in snow andslush and should not be used when driving inwinter conditions.
Model X is originally fitted with tires that havewear indicators molded into the tread pattern.When the tread has been worn down to 4/32”(3 mm), the indicators start to appear at thesurface of the tread pattern, producing theeffect of a continuous band of rubber acrossthe width of the tire. For optimal performanceand safety, Tesla recommends replacing tiresbefore the wear indicators are visible.
Tire Rotation, Balance, and Wheel Alignment
Model X tires cannot be rotated, as tires areasymmetrical and front tires are a differentsize from rear tires.
Unbalanced wheels (sometimes noticeable asvibration through the steering wheel) affectvehicle handling and tire life. Even with regularuse, wheels can get out of balance. Therefore,they should be balanced as required.
If tire wear is uneven (on one side of the tireonly) or becomes abnormally excessive, checkthe alignment of wheels.
Note: When replacing only two tires, alwaysinstall the new tires on the rear.
Punctured Tires
A puncture eventually causes the tire to losepressure, which is why it is important to checktire pressures frequently. Permanently repairor replace punctured or damaged tires assoon as possible.
Your tubeless tires may not leak whenpenetrated, provided the object remains in thetire. If, however, you feel a sudden vibration orride disturbance while driving, or you suspecta tire is damaged, immediately reduce yourspeed. Drive slowly, while avoiding heavybraking or sharp steering and, when safe to doso, stop the vehicle. Arrange to have Model Xtransported to a Tesla Service Center, or to anearby tire repair center.
Note: In some cases, you can temporarilyrepair small tire punctures (under 1/4” (6mm)) using an optional tire repair kit availablefrom Tesla. This allows you to slowly driveModel X to Tesla or to a nearby tire repairfacility.
Warning: Do not drive with a puncturedtire, even if the puncture has not causedthe tire to deflate. A punctured tire candeflate suddenly at any time.
Flat Spots
If Model X is stationary for a long period inhigh temperatures, tires can form flat spots.When Model X is driven, these flat spots causea vibration which gradually disappears as thetires warm up and regain their original shape.
To minimize flat spots during storage, inflatetires to the maximum pressure indicated onthe tire wall. Then, before driving, release airto adjust tire pressure to the recommendedlevels.
Improving Tire Mileage
To improve the mileage you get from yourtires, maintain tires at the recommended tirepressures, observe speed limits and advisoryspeeds, and avoid:
• Pulling away quickly, or hard acceleration.• Fast turns and heavy braking.• Potholes and objects in the road.• Hitting curbs when parking.• Contaminating tires with fluids that can
cause damage.
Tire Care and Maintenance
160 Model X Owner's Manual

Replacing Tires and WheelsTires degrade over time due to the effects ofultraviolet light, extreme temperatures, highloads, and environmental conditions. It isrecommended that tires are replaced every sixyears, or sooner if required.
Wheel and tires are matched to suit thehandling characteristics of the vehicle.Replacement tires must comply with theoriginal specification. If tires other than thosespecified are used, ensure that the load andspeed ratings marked on the tire (see Understanding Tire Markings on page 182)equal or exceed those of the originalspecification.
Ideally, you should replace all four tires at thesame time. If this is not possible, replace thetires in pairs, placing the new tires on the rear.Always balance the wheel after replacing atire.
If you replace a wheel, the TPMS (Tire PressureMonitoring System) sensors need to be resetto ensure they provide accurate warningswhen tires are under- or over-inflated (see Automatic Resetting of TPMS Sensors onpage 163).
For the specification of the original wheelsand tires installed on Model X, see Wheels andTires on page 181.
Warning: For your safety, use only tiresand wheels that match the originalspecification. Tires that do not match theoriginal specification can affect theoperation of the Tire Pressure MonitoringSystem (TPMS).
Warning: Never exceed the speed ratingof your vehicle's tires. The speed rating isshown on the sidewall of your tires (see Understanding Tire Markings on page182).
Asymmetric Tires
Model X tires are asymmetric and must bemounted on the wheel with the correctsidewall facing outward. The sidewall of thetire is marked with the word OUTSIDE. Whennew tires are installed, make sure that the tiresare correctly mounted on the wheels.
Warning: Road holding is seriouslyimpaired if the tires are incorrectlyinstalled on the wheels.
Tire Care and Maintenance
Maintenance 161

Seasonal Tire Types
Summer Tires
Your Model X may be originally equipped withhigh performance summer tires, all seasontires, or winter tires. Summer tires and allseason tires are designed for maximum dryand wet road performance but are notdesigned to perform well in winter conditions.Tesla recommends using winter tires if drivingin cold temperatures or on roads where snowor ice may be present. If not equipped withwinter tires, contact Tesla for winter tirerecommendations.
Warning: In cold temperatures or onsnow or ice, summer tires do not provideadequate traction. Selecting and installingthe appropriate tires for winter conditionsis important to ensure the safety andoptimum performance of your Model X,even when equipped with dual-motors.
All-Season Tires
Your Model X may be originally equipped withall-season tires. These tires are designed toprovide adequate traction in most conditionsyear-round, but may not provide the samelevel of traction as winter tires in snowy or icyconditions. All-season tires can be identifiedby “ALL SEASON" and/or "M+S” (mud andsnow) on the tire sidewall.
Winter Tires
Use winter tires to increase traction in snowyor icy conditions. When installing winter tires,always install a complete set of four tires atthe same time. Winter tires must be the samesize, brand, construction and tread pattern onall four wheels. Contact Tesla for winter tirerecommendations.
Winter tires can be identified by amountain/snowflake symbol on thetire's sidewall.
When driving with winter tires, you mayexperience more road noise, shorter tread life,and less traction on dry roads.
Driving in Low TemperaturesTire performance is reduced in low ambienttemperatures, resulting in reduced grip and anincreased susceptibility to damage fromimpacts. Performance tires can temporarilyharden when cold, causing you to hearrotational noise for the first few miles (km)until the tires warm up.
Using Tire ChainsTesla has tested and approved Maggie GroupTrak Special LT51 snow chains to increasetraction in snowy conditions. These chainsmust only be installed on rear 19 or 20" tires.Do not use chains on 22" tires or on front tires.The approved snow chains can be purchasedfrom Tesla.
When installing tire chains, follow theinstructions provided by the tire chainmanufacturer. Mount them as tightly aspossible.
When using tire chains:
• Drive slowly. Do not exceed 30 mph(48 km/h).
• Avoid heavily loading Model X (heavyloads can reduce the clearance betweenthe tires and the body).
• Remove the tire chains as soon asconditions allow.
Note: Tire chains are prohibited in somejurisdictions. Check local laws before installingtire chains.
Caution: Using non-recommended tirechains, or using tire chains on other sizedtires, can damage the suspension, body,wheels, and/or brake lines. Damagecaused by using non-recommended tirechains is not covered by the warranty.
Caution: Do not use chains on a Model Xequipped with 22" tires and do not usetire chains on front tires.
Caution: Ensure that tire chains cannottouch suspension components or brakelines. If you hear the chains makingunusual noises that would indicatecontact with Model X, stop andinvestigate immediately.
Tire Care and Maintenance
162 Model X Owner's Manual

Tire Pressure MonitoringEach tire should be checked monthly whencold and inflated to the recommendedpressures that are printed on the Tire andLoading Information label located on thedriver’s door pillar (see Maintaining TirePressures on page 159). If your vehicle hastires of a different size than the size indicatedon the vehicle placard or tire inflation pressurelabel, determine the proper tire inflationpressure for those tires.
As an added safety feature, your vehicle hasbeen equipped with a tire pressure monitoringsystem (TPMS) that displays a tire pressuretelltale (Tire Pressure Warning) on theinstrument panel when one or more of yourtires is significantly under- or over-inflated.Accordingly, when the Tire Pressure indicatorlight displays on the instrument panel to alertyou about tire pressure, stop and check yourtires as soon as possible, and inflate them tothe proper pressure (see Maintaining TirePressures on page 159). Driving on asignificantly under-inflated tire causes the tireto overheat and can lead to tire failure. Under-inflation also reduces fuel efficiency and tiretread life, and may affect the vehicle'shandling and stopping ability.
If Model X detects a fault with theTire Pressure Monitoring System(TPMS), this indicator flashes for oneminute whenever you power onModel X.
Note: Installing accessories that are notapproved by Tesla can interfere with theTPMS.
Warning: The TPMS is not a substitute forproper tire maintenance, includingmanually checking tire pressures andregularly inspecting the condition of tires.It is the driver's responsibility to maintaincorrect tire pressure, even if under- orover-inflation has not reached the levelfor the TPMS to trigger the Tire PressureWarning on the instrument panel.
Automatic Resetting of TPMS Sensors
After replacing one or more wheels (but notafter replacing a tire or rotating wheels), theTPMS sensors are reset to ensure tire pressurewarnings are accurate. TPMS sensors resetautomatically after driving over 15 mph(25 km/h) for longer than 10 minutes.
Note: After replacing a wheel, false tirepressure warnings may display before you'vedriven 15 mph (25 km/h) for longer than 10minutes.
Replacing a Tire Sensor
If the Tire Pressure warning indicator displaysfrequently, contact Tesla to determine if a tiresensor needs to be replaced. If a non-TeslaService Center repairs or replaces a tire, thetire sensor may not work until Tesla performsthe setup procedure.
TPMS Malfunction
Model X has also been equipped with a TPMSmalfunction indicator to indicate when thesystem is not operating properly.
The TPMS malfunction indicator iscombined with the tire pressureindicator light. When the systemdetects a malfunction, the indicatorflashes for approximately one minuteafter Model X powers on, and thenremains continuously lit. Thissequence continues uponsubsequent vehicle start-ups as longas the malfunction exists. When theTPMS malfunction indicator is on, thesystem might not be able to detector signal under- and over-inflatedtires as intended.
TPMS malfunctions can occur for a variety ofreasons, including installing replacement oralternate tires or wheels that prevent theTPMS from functioning properly. Always checkthe TPMS malfunction indicator light afterreplacing one or more tires or wheels on yourvehicle to ensure that the replacement tires orwheels allow the TPMS to continue to functionproperly.
Note: If a tire has been replaced or repairedusing a different tire sealant than the oneavailable from Tesla, and a low tire pressure isdetected, it is possible that the tire sensor hasbeen damaged. Contact Tesla to have the faultrepaired as soon as possible.
Tire Care and Maintenance
Maintenance 163

Cleaning the ExteriorTo prevent damage to the paint, immediatelyremove corrosive substances (bird droppings,tree resin, dead insects, tar spots, road salt,industrial fallout, etc.). Do not wait untilModel X is due for a complete wash. Ifnecessary, use denatured alcohol to removetar spots and stubborn grease stains, thenimmediately wash the area with water and amild, non-detergent soap to remove thealcohol.
Follow these steps when washing the exteriorof Model X:
1. Rinse Thoroughly
Before washing, flush grime and grit fromthe bodywork using a hose. Flush awayaccumulations of mud in areas wheredebris easily collects (such as wheelarches and panel seams). If salt has beenused on the highways (such as duringwinter months), thoroughly rinse all tracesof road salt from the underside of thevehicle.
2. Hand Wash
Hand wash Model X using a clean softcloth and cold or lukewarm watercontaining a mild, high-quality carshampoo.
3. Rinse with Clean Water
After washing, rinse with clean water toprevent soap from drying on the surfaces.
4. Dry Thoroughly and Clean Exterior Glass
After washing and rinsing, dry thoroughlywith a chamois.
Clean windows and mirrors using anautomotive glass cleaner. Do not scrape,or use any abrasive cleaning fluid on glassor mirrored surfaces.
Cautions for Exterior Cleaning
Caution: Do not use windshield treatmentfluids. Doing so can interfere with wiperfriction and cause a chattering sound.
Caution: Do not use hot water ordetergents.
Caution: Do not wash in direct sunlight.
Caution: If using a pressure washer,maintain a distance of at least 12" (30 cm)between the nozzle and the surface ofModel X. Keep the nozzle moving and donot concentrate the water jet on any onearea.
Caution: Do not aim water hoses directlyat window, door or hood seals, or throughwheel apertures onto brake components.
Caution: Avoid using tight-napped orrough cloths, such as washing mitts.
Caution: If washing in an automatic carwash, use Touchless car washes only.These car washes have no parts (brushes,etc.) that touch the surfaces of Model X.Using any other type of car wash couldcause damage that is not covered by thewarranty.
Caution: Do not use chemical basedwheel cleaners. These can damage thefinish on the wheels.
Caution: Avoid using a high pressurepower washer on the camera(s) orparking sensors (if equipped) and do notclean a sensor or camera lens with asharp or abrasive object that can scratchor damage its surface.
Warning: Never spray liquid at a highvelocity (for example, if using a pressurewasher) towards the charge port whileModel X is charging. Failure to followthese instructions can result in seriousinjury or damage to the vehicle, chargingequipment, or property.
Cleaning
164 Model X Owner's Manual
Cleaning the InteriorFrequently inspect and clean the interior tomaintain its appearance and to preventpremature wear. If possible, immediately wipeup spills and remove marks. For generalcleaning, wipe interior surfaces using a softcloth (such as microfiber) dampened with amixture of warm water and mild non-detergent cleaner (test all cleaners on aconcealed area before use). To avoid streaks,dry immediately with a soft lint-free cloth.
Interior Glass
Do not scrape, or use any abrasive cleaningfluid on glass or mirrored surfaces. This candamage the reflective surface of the mirrorand the heating elements in the rear window.
Airbags
Do not allow any substance to enter an airbagcover. This could affect correct operation.
Dashboard and Plastic Surfaces
Do not polish the upper surfaces of thedashboard. Polished surfaces are reflectiveand could interfere with your driving view.
Leather Seats
Leather is prone to dye-transfer which cancause discoloration, particularly on lightcolored leather. White and tan leather iscoated with an anti-soiling treatment. Wipespills as soon as possible using a soft clothmoistened with warm water and non-detergent soap. Wipe gently in a circularmotion. Then wipe dry using a soft, lint-freecloth. Using detergents or commerciallyavailable leather cleaners and conditioners isnot recommended because they can discoloror dry out the leather.
Polyurethane Seats
Wipe spills as soon as possible using a softcloth moistened with warm water and non-detergent soap. Wipe gently in a circularmotion. For difficult stains on ultra-whiteseats, use isopropyl alcohol, then wipe with adamp cloth. After cleaning, allow the seats toair dry.
Cloth Seats
Wipe spills as soon as possible using a softcloth moistened with warm water and non-detergent soap. Wipe gently in a circularmotion. Then wipe dry using a soft, lint-freecloth. Vacuum the seats as needed to removeany loose dirt.
Carpets
Avoid over-wetting carpets. For heavily soiledareas, use a diluted upholstery cleaner.
Seat Belts
Extend the belts to wipe. Do not use any typeof detergent or chemical cleaning agent.Allow the belts to dry naturally whileextended, preferably away from directsunlight.
Touchscreen and Instrument Panel
Clean the touchscreen and instrument panelusing a soft lint-free cloth specificallydesigned to clean monitors and displays. Donot use cleaners (such as a glass cleaner) anddo not use a wet wipe or a dry statically-charged cloth (such as a recently washedmicrofiber). To wipe the touchscreen withoutactivating buttons and changing settings, youcan enable clean mode. Touch Controls >Displays > Clean Mode. The display darkens tomake it easy to see dust and smudges.
Chrome and Metal Surfaces
Polish, abrasive cleaners or hard cloths candamage the finish on chrome and metalsurfaces.
Cautions for Interior Cleaning
Caution: Using solvents (includingalcohol), bleach, citrus, naphtha, orsilicone-based products or additives oninterior components can cause damage.
Caution: Statically-charged materials cancause damage to the touchscreen orinstrument panel.
Warning: If you notice any damage on anairbag or seat belt, contact Teslaimmediately.
Warning: Do not allow any water,cleaners, or fabric to enter a seat beltmechanism.
Warning: Exposure to chemical cleanerscan be hazardous and can irritate eyesand skin. Read and observe the
Cleaning
Maintenance 165
instructions proviced by the manufacturerof the chemical cleaner.
Polishing, Touch Up, and BodyRepairTo preserve the cosmetic appearance of thebody, you can occasionally treat the paintsurfaces with an approved polish containing:
• Very mild abrasive to remove surfacecontamination without removing ordamaging the paint.
• Filling compounds that fill scratches andreduce their visibility.
• Wax to provide a protective coatingbetween the paint and environmentalelements.
Regularly inspect the exterior paint fordamage. Treat minor chips and scratchesusing a paint touch-up pen (available forpurchase from Tesla). Use the touch-up penafter washing but before polishing or waxing.
Repair rock chips, fractures or scratches. Bodyrepairs should be performed only by a Teslaapproved body shop. Contact Tesla for a list ofapproved body shops.
Caution: Do not use cutting pastes, colorrestoration compounds, or polishescontaining harsh abrasives. These canscour the surface and permanentlydamage the paint.
Caution: Do not use chrome polish orother abrasive cleaners.
Using a Car CoverTo preserve the cosmetic appearance of thebody when Model X is not being used, use agenuine Tesla car cover. Car covers can bepurchased from Tesla.
Caution: Use only a Tesla-approved carcover when Model X is plugged in. Usinga non-Tesla car cover can prevent theBattery from being adequately cooledduring charging.
Floor MatsTo extend the life of your carpet and makethem easier to clean, use genuine Tesla floormats. Maintain mats by regularly cleaningthem and checking that they are properlyattached. Replace floor mats if they becomeexcessively worn.
Warning: To avoid potential interferencewith a foot pedal, ensure that the driver’sfloor mat is securely fastened, and neverplace an additional floor mat on top of it.Floor mats should always rest on top ofthe vehicle carpeting surface and not onanother floor mat or other covering.
Cleaning
166 Model X Owner's Manual

Checking and Replacing WipersTo make wiper blades easy to access, turn offthe wipers, shift Model X into Park, then usethe touchscreen to move them to the serviceposition. Touch Controls > Settings > Service& Reset > Service Mode > ON.
Note: Wipers automatically return to theirnormal position when you shift Model X out ofPark.
Periodically check and clean the edge of thewiper blade and check the rubber for cracks,splits and roughness. If damaged, contactTesla Service to have the blades replaced.
Contaminants on the windshield, or on thewiper blades, can reduce the effectiveness ofthe wiper blades. Contaminants include ice,wax spray from car washes, washer fluid withbug and/or water repellent, bird droppings,tree sap, and other organic substances.
Follow these guidelines for cleaning:
• Clean the windshield using non-abrasiveglass cleaner.
• Lift the wiper arm a short distance awayfrom the windshield, just far enough toaccess the wiper blade, then wipe theblade clean using isopropyl (rubbing)alcohol or washer fluid.
If the wipers remain ineffective after cleaning,the wipers may need to be replaced. Thewiper washing system is an integrated part ofthe wiper blades and therefore it is notpossible to replace just the wiper blades. Forwiper replacement, contact Tesla Service.
Wiper Blades and Washer Jets
Maintenance 167

Removing the Maintenance PanelTo check fluid levels, remove the maintenancepanel:
1. Open the hood.2. Pull the maintenance panel upward to
release the clips that hold it in place.
Caution: The maintenance panel protectsthe front trunk from water. When re-attaching, make sure it is fully seated.
Checking Battery CoolantIf the quantity of fluid in the cooling systemdrops below the recommended level, theinstrument panel displays a warning message.Stop driving Model X as soon as safetypermits and contact Tesla.
Fluid Level Check
Tesla checks the Battery coolant level at theregularly scheduled maintenance intervals.
DO NOT REMOVE THE FILLER CAP AND DONOT ADD FLUID. Doing so can result indamage not covered by the warranty.
Do Not Top Up Battery Coolant
Warning: Battery coolant can behazardous and can irritate eyes and skin.Under no circumstances should youremove the filler cap and/or add coolant.If the instrument panel warns you that thefluid level is low, contact Teslaimmediately.
To maximize the performance and life of theBattery, the cooling system uses a specificmixture of G-48 ethylene-glycol coolant(HOAT). Contact Tesla for more specificinformation about the coolant.
Checking Brake FluidWarning: Contact Tesla immediately ifyou notice increased movement of thebrake pedal or a significant loss of brakefluid. Driving under these conditions canresult in extended stopping distances orcomplete brake failure.
The Brake indicator on theinstrument panel alerts you if thequantity of fluid in the brakereservoir drops below therecommended level. If it displayswhile driving, stop as soon as safetypermits by gently applying thebrakes. Do not continue driving.Contact Tesla immediately.
Fluid Level Check
Tesla checks the brake fluid level at theregularly scheduled maintenance intervals.
Topping Up the Brake Fluid
Do not top up your brake fluid. Tesla servicedoes this when you bring Model X in forregular servicing. The following instructionsare provided for information purposes andfuture reference only:
1. Clean the filler cap before removing toprevent dirt from entering the reservoir.
2. Unscrew the cap and remove.3. Top up the reservoir to the MAX mark
using the appropriate brake fluid.4. Replace the filler cap.
Warning: Only use new fluid from asealed air-tight container. Never usepreviously used fluid or fluid from apreviously opened container—fluidabsorbs moisture which decreasesbraking performance.
Warning: Brake fluid is highly toxic. Keepcontainers sealed and out of the reach ofchildren. In the event of accidentalconsumption, seek medical attentionimmediately.
Caution: Brake fluid damages paintedsurfaces. Immediately soak up any spillswith an absorbent cloth and wash thearea with a mixture of car shampoo andwater.
Fluid Reservoirs
168 Model X Owner's Manual

Topping Up Washer FluidThe only reservoir into which you can addfluid is the washer fluid reservoir locatedbehind the front trunk. When the level is low, amessage displays on the instrument panel.
Caution: Do not add formulated washerfluids that contain water repellent or bugwash. These fluids can cause streaking,smearing, and squeaking or other noises.
Operate the washers periodically to check thatthe nozzles are clear and properly directed.
To top up the washer fluid:
1. Open the hood.
1. Clean around the filler cap before openingto prevent dirt from entering the reservoir.
2. Open the filler cap.
3. Fill the reservoir until the fluid level isvisible just below the filler neck.
4. Replace the filler cap.
Note: Some national or local regulationsrestrict the use of Volatile OrganicCompounds (VOCs). VOCs are commonlyused as antifreeze in washer fluid. Use awasher fluid with limited VOC content only if itprovides adequate freeze resistance for allclimates in which you drive Model X.
Caution: Under no circumstances do youneed to inspect or top up other fluidreservoirs. Two additional fluid reservoirsare located next to the washer fluid, butunderneath the maintenance panel. In theunlikely event that you see a message onthe instrument panel that one of thesefluid levels is low, stop driving Model X assoon as safe to do so, and contact Tesla.
Caution: Do not spill washer fluid onbody panels. Doing so can cause damage.Wipe up spills immediately and wash theaffected area with water.
Warning: In temperatures below40° F (4° C), use a washer fluid withantifreeze. In cold weather, using awasher fluid without antifreeze can impairvisibility through the windshield.
Warning: Windshield washer fluid canirritate eyes and skin. Read and observethe instructions provided by the washerfluid manufacturer.
Fluid Reservoirs
Maintenance 169

Jacking ProcedureFollow the steps below to lift Model X. Ensurethat any non-Tesla repair facility is aware ofthese lifting points.
1. Position Model X centrally between the liftposts.
2. If your Model X is equipped with Smart AirSuspension, it automatically self-levels,even when power is off. Use thetouchscreen to set the suspension asfollows:
• Touch Controls > Suspension.• Press the brake pedal, then touch
Very High to maximize the height ofthe suspension.
• Touch Jack to disable self-leveling.
When Jack mode is active,Model X displays thisindicator light on theinstrument panel, along with amessage telling you thatactive suspension is disabled.
3. Close the falcon wing doors.4. Position the lift arm pads under the
designated body lift points at thelocations shown.
Warning: DO NOT position the liftarm pads under the Battery.
5. Adjust the height and position of the liftarm pads to ensure that they are correctlylocated.
6. With assistance, raise the lift, ensuring thelift arm pads remain in their correctpositions.
Note: Jack mode cancels when Model X isdriven over 4.5 mph (7 km/h).
Note: Jack mode may be unexpectedlyenabled in situations where an object issupporting the vehicle's weight (for examplethe bumper of the vehicle is resting on a curb).
Warning: If your Model X is equippedwith Smart Air Suspension, itautomatically self-levels, even whenpower is off. You MUST disable thissystem by engaging Jack mode beforelifting or jacking. If you do not disableSmart Air Suspension, Model X canattempt to self-level, causing seriousdamage, bodily injury, or death.
Warning: Never raise Model X when thecharge cable is connected, even ifcharging is not in progress.
Warning: Do not work on an incorrectlysupported vehicle. Doing so can causeserious damage, bodily injury, or death.
Caution: DO NOT lift from under theBattery. Place the lift arm pads under thedesignated body lift points only. Thelocations shown are the only approvedlifting points for Model X. Lifting at anyother points can cause damage. Damagecaused by incorrectly lifting Model X isnot covered by the warranty.
Jacking and Lifting
170 Model X Owner's Manual

Parts, Accessories, andModificationsUse only genuine Tesla parts and accessories.Tesla performs rigorous testing on parts toensure their suitability, safety, and reliability.Purchase these parts from Tesla, where theyare professionally installed and where you canreceive expert advice about modifications toModel X.
Tesla is unable to assess parts manufacturedby other distributors and therefore accepts noresponsibility if you use non-Tesla parts onModel X.
Warning: Installing non-approved partsand accessories, or performing non-approved modifications, can affect theperformance of Model X and the safety ofits occupants. Any damage caused byusing or installing non-approved parts, orby performing non-approvedmodifications, is not covered by thewarranty.
Warning: Tesla does not accept liabilityfor death, personal injury or damage thatoccurs if you use or install non-approvedaccessories or make non-approvedmodifications.
Body RepairsIf Model X is in a collision, contact Tesla toensure that it is repaired with genuine Teslaparts. Tesla has selected and approved bodyshops that meet strict requirements fortraining, equipment, quality, and customersatisfaction.
Some repair shops and insurance companiesmight suggest using non-original equipmentor salvaged parts to save money. However,these parts do not meet Tesla's high standardsfor quality, fit and corrosion resistance. Inaddition, non-original equipment and salvagedparts (and any damage or failures they mightcause) are not covered by the warranty.
Using RFID TranspondersWhen attaching an RFID transponder (used bymany automated toll systems) inside Model X,locate the transponder in the topmost area ofthe windshield as shown. This ensures bestresults and minimizes any obstruction to yourdriving view.
Parts and Accessories
Maintenance 171

Vehicle Identification NumberYou can find the VIN at the followinglocations:
• Touch the Tesla "T" at the top center ofthe touchscreen. The popup windowdisplays the VIN.
• Stamped on a plate located at the top ofthe dashboard. Can be seen by lookingthrough the windshield.
• Printed on the Vehicle Certification label,located on the door pillar. Can be seenwhen the driver’s door is open.
• Stamped on the chassis under the sillpanel on the rear passenger door. Toremove the sill panel, gently pry it upwardusing a flat-bladed tool.
Note: The VIN was not stamped on thechassis on vehicles manufactured betweenapproximately June 2, 2016 and Feb 28,2017.
Caution: Removing the sill panel toview the VIN is not recommendedbecause damage is likely to occur.The panel is held in place with fragileclips that break easily. Damagecaused by removing the sill panel isnot covered by the warranty.
Emission Control LabelThe emission control label is located on theopening face of the liftgate.
Identification Labels
172 Model X Owner's Manual

Load Capacity LabelingIt is important to understand how muchweight your Model X can safely carry. Thisweight is called the vehicle capacity weightand includes the weight of all occupants,cargo and any additional equipment added toyour Model X since it was manufactured.
One or more labels attached to the centerdoor pillar indicate how much weight Model Xcan safely carry. Labels are visible when thefront door is open.
1. Towing label (if equipped)2. Tire and Loading Information label3. Vehicle Certification label
Note: Towing capability is available only ifModel X is equipped with the Towing Package.
Warning: Overloading Model X has anadverse effect on braking and handling,which can compromise your safety orcause damage.
Caution: Never load more than 175 lbs(80 kg) on the rear load floor (above thelower trunk compartment) or more than130 lbs (60 kg) in the lower trunkcompartment. Doing so can causedamage.
Caution: Never store large amounts ofliquid in Model X. A significant spill cancause electrical components tomalfunction.
Towing LabelIf equipped with the towing package, theTowing Label instructs you to refer to thisowner's manual for tire pressures that shouldbe used when towing a trailer. Do not use thetire pressures printed on the Tire and LoadingInformation Label.
Note: Towing capability is available only ifModel X is equipped with the Towing Package.Tire pressure information, along with otherinformation related to towing, is located in thetopic "Towing a Trailer" in the Driving sectionof the onscreen owners manual.
Tire and Loading Information LabelThe Tire and Loading Information labelprovides:
• The maximum number of occupantseating positions.
• The maximum vehicle capacity weight.• The size of the original tires.• The cold inflation pressures for the
original front and rear tires. Thesepressures are recommended to optimizeride and handling characteristics.
U.S. and Canada:
Mexico:
Never change this label, even if you usedifferent tires in the future.
Note: If Model X is loaded to its full capacity,double check all tires to ensure they areinflated to their recommended pressure levels.
Warning: Tire pressures printed on theTire and Loading Information label DONOT APPLY to towing. When towing, tirepressures must be increased. Forinformation about the tire pressuresrequired when towing, see Towing andAccessories on page 76.
Vehicle Loading
Specifications 173

Vehicle Certification LabelThe Vehicle Certification label provides:
• GVWR - Gross Vehicle Weight Rating. Themaximum allowable total mass of Model X.This is calculated as the weight ofModel X, all passengers, fluids, and cargo.
• GAWR FRT and GAWR RR - Gross AxleWeight Rating for the front and rear axles.The GAWR is the maximum distributedweight that each axle can support.
United States:
Canada:
Mexico:
Caution: To prevent damage, never loadModel X so that it is heavier than GVWRor exceeds the individual GAWR weights.
Calculating Load Limits1. Locate the statement “The combined
weight of occupants and cargo shouldnever exceed XXX kg or XXX lbs” on the“Tire and Loading Information” label.
2. Determine the combined weight of alloccupants that will ride in the vehicle.
3. Subtract the combined weight of theoccupants from XXX kg or XXX lbs (seeStep 1).
4. The resulting figure equals the availablecargo load capacity. For example, if the“XXX” amount equals 1400 lbs (635 kg)and there will be five 150 lb (68 kg)passengers in the vehicle, the amount ofavailable cargo capacity is 650 lbs(1400 ‑ 750 (5 x 150) = 650 lbs) or 295 kg(635 ‑ 340 (5 x 68) = 295 kg).
5. Determine the combined cargo weightbeing loaded on the vehicle. That weightmust not exceed the available cargo loadcapacity calculated in Step 4.
Warning: Trunks are the preferred placesto carry objects. In a collision, or duringhard braking and sharp turns, loose itemsin the cabin could injure occupants.
Example Load Limit Calculations
How much cargo Model X can carry dependson the number and weight of passengers. Thefollowing calculated load limit examplesassume passengers weigh 150 lbs (68 kg). Ifpassengers weigh more or less, availablecargo weight decreases or increasesrespectively.
Driver and one passenger
Description Total
Vehicle capacity weight 954 lbs(433 kg)
Subtract occupant weight(2 x 150 lbs/68 kg)
300 lbs(136 kg)
Available cargo weight 654 lbs(297 kg)
Driver and four passengers
Description Total
Vehicle capacity weight 954 lbs(433 kg)
Subtract occupant weight (5 x150 lbs/68 kg)
750 lbs(340 kg)
Available cargo weight 204 lbs(93 kg)
Vehicle Loading
174 Model X Owner's Manual

The cargo weight should be distributedbetween the front and rear trunks.
Caution: Never load more than 175 lbs(80 kg) on the rear load floor (above thelower trunk compartment) or more than130 lbs (60 kg) in the lower trunkcompartment. Doing so can causedamage.
Vehicle Loading
Specifications 175

Exterior Dimensions
A Overall Length 199 in 5052 mm
B
Overall Width (including mirrors)Overall Width (including foldedmirrorsOverall Width (excluding mirrors)
89 in82 in79 in
2272 mm2017 mm1999 mm
C Overall Height 66 in* 1684 mm*
D Wheel Base 117 in 2965 mm
E Overhang - Front 39 in 989 mm
F Overhang - Rear 43 in 1098 mm
G
Ground Clearance:Standard, with skisStandard, without skisVery high, with skisVery high, without skis
7 in7 in8 in9 in
171 mm183 mm211 mm223 mm
H Track - FrontTrack - Rear
67 in67 in
1705 mm1710 mm
*Values are approximate. The dimensions can vary depending on vehicle configuration andvarious other factors.
Interior Dimensions
Head Room FrontRearThird
41.7 in40.9 in37.1 in
1059 mm1039 mm942 mm
Leg RoomFrontRearThird
41.2 in
38.4 in32.7 in
1046 mm
975 mm831 mm
Shoulder Room FrontRearThird
60.7 in56.8 in40 in
1542 mm1442 mm1016 mm
Dimensions and Weights
176 Model X Owner's Manual

Hip RoomFrontRearThird
55.6 in59 in
38.5 in
1412 mm1498 mm978 mm
Cargo Volume
Front Trunk Rear* Total
Seven Seat Vehicles 6.6 cu ft (187 L) 76.5 cu ft (2166 L)** 83.1 cu ft (2353 L)
Six Seat Vehicles 6.6 cu ft (187 L) 70.7 cu ft (2002 L)** 77.3 cu ft (2189 L)
Five Seat Vehicles 6.6 cu ft (187 L) 81.2 cu ft (2299.5 L)** 87.8 cu ft (2486.5 L)
* Maximum cargo volume behind the front row seats. Includes the 12.6 cu ft (357 L) cargo areain the rear trunk (area behind the third row seats, if equipped).
** Second row seats fully forward and/or folded.
Weights
Curb Weight* - 60D/75D 5185 lbs 2352 kg
Curb Weight* - 90D 5267 lbs 2389 kg
Curb Weight* - P90D 5377 lbs 2439 kg
Curb Weight* - 100D 5421 lbs 2459 kg
Curb Weight* - P100D 5483 lbs 2487 kg
GVWR** - 60D/75D 6581 lbs 2985 kg
GVWR** - 90D 6658 lbs 3020 kg
GVWR** - P90D 6768 lbs 3070 kg
GVWR** - 100D 6788 lbs 3079 kg
GVWR** - P100D 6878 lbs 3120 kg
Gross Vehicle Weight Distribution -60D/75D Front: 2890 lbs
Rear: 3690 lbs
Front: 1311 kgRear: 1674 kg
Gross Vehicle Weight Distribution -90D
Front: 2977 lbsRear: 3681 lbs
Front: 1350 kgRear: 1670 kg
Gross Vehicle Weight Distribution -P90D
Front: 2976 lbsRear: 3792 lbs
Front: 1350 kgRear: 1720 kg
Gross Vehicle Weight Distribution -100D
Front: 3097 lbsRear: 3690 lbs
Front: 1405 kgRear: 1674 kg
Gross Vehicle Weight Distribution -P100D
Front: 3027 lbsRear: 3851 lbs
Front: 1373 kgRear: 1747 kg
Dimensions and Weights
Specifications 177

Gross Axle Weight Rating- Front 3241 lbs 1470 kg
Gross Axle Weight Rating - Rear (atnominal tire pressure of 42 psi) 3968 lbs 1800 kg
Towing Capacity (if equipped) See Towing and Accessories on page 76.
*Curb Weight = weight of the vehicle with correct fluid levels, no occupants and no cargo
**GVWR = Gross Vehicle Weight Rating
Dimensions and Weights
178 Model X Owner's Manual

Motor
Type AC induction motor, liquid-cooled, withvariable frequency drive
Nominal Voltage 320 Volts
Maximum speed of large motors (rear motor onPerformance vehicles)
18700 rpm
Maximum speed of small motors (front motor on allvehicles, rear motor on non-Performance vehicles)
18200 rpm
Maximum net power* and motor speed of largemotors
375 kW @ 6150 rpm
Maximum net power* and motor speed of smallmotors
193 kW @ 6100-6800 rpm
Maximum torque of large motors 660 Nm
Maximum torque of small motors 330 Nm
*Tested in accordance with ECE R85
Transmission
Type Single speed fixed gear
Overall Final Drive Ratio Small motor: 9.34:1Large motor: 9.73:1
Reverse Gear Reverse direction of motor, limited to15 mph (24 km/h)
Steering
Type Rack and pinion with electronic powersteering, speed sensitive
Number of turns lock to lock 2.05
Turning Circle (curb to curb) 38.8 ft (11.8 m)
Brakes
Type
4-wheel anti-lock braking system (ABS)with Electronic Brake Force Distribution,Integrated Advanced Stability Control andElectronic Accelerator pedal actuatedregenerative braking system
Calipers Four piston fixed
Rotor Diameters (ventilated) Front: 13.98”/355 mmRear: 14.37”/365 mm
Subsystems
Specifications 179
Front Rotor thickness New: 1.26”/32 mmService limit: 1.18”/30 mm
Rear Rotor thickness New: 1.10”/28 mmService limit: 1.02”/26 mm
Front Brake Pad Thickness (excluding back plate) 0.393”/10 mm
Rear Brake Pad Thickness (excluding back plate) Base: 0.354”/9 mm
Parking brake Electrically actuated parking brakecalipers
Suspension
Front Independent, virtual pivot doublewishbone
Rear Independent, virtual pivot doublewishbone
Battery - 12V
Rating 33 amp hour or higher
Voltage and Polarity 12V negative (-) ground
Battery - High Voltage
Type Liquid-cooled lithium ion (Li-ion)
Rating 60, 70, 75, 85, 90, or 100 kWh (atbeginning of life)
Nominal Voltage - 85, 90, and 100 kWhNominal Voltage - 60, 70, and 75 kWh
350 V DC300 V DC
Temperature Range Do not expose Model X to ambienttemperatures above 140° F (60° C) orbelow -22° F (-30° C) for more than 24hours at a time.
Subsystems
180 Model X Owner's Manual

Wheel Specifications
Wheel Type Size Offset
20" - All Season - Front 9.0J x 20 1.378" 35 mm
20" - All Season - Rear 9.5J x 20 1.575" 40 mm
20" - Summer - Front 9.0J x 20 1.378" 35 mm
20" - Summer - Rear 10.0J x 20 1.378" 35 mm
22" - Summer - Front 9.0J x 22 1.378" 35 mm
22" - Summer - Rear 10.0J x 22 1.378" 35 mm
Lug Nut Torque 129 lb. ft (175 Nm)
Lug Nut Socket Size 21 mm
Note: For instructions on how to jack/lift Model X, see Jacking and Lifting on page 170.
Tire Specifications
Tire Type Size Load Index / Speed Rating
20" - Continental - Front 265/45R20 108 / V
20" - Continental - Rear 275/45R20 110 / V
20" - Michelin - Front 255/45R20 105 / Y
20" - Michelin - Rear 275/45R20 110 / Y
22" - Goodyear or Pirelli - Front 265/35R22 102 / W
22" - Goodyear or Pirelli - Rear 285/35R22 106 / W
Refer to the tire pressures printed on the Tire and Loading Information label. This label islocated on the driver’s door pillar and is visible when the driver’s door is open (see MaintainingTire Pressures on page 159).
Winter tires can be purchased from a Tesla store.
Wheels and Tires
Specifications 181

Understanding Tire MarkingsLaws require tire manufacturers to place standardized information on the sidewall of all tires. Thisinformation identifies and describes the fundamental characteristics of the tire. It also providesthe tire identification number (TIN) for certification of safety standards, and in case of a recall.
1 Tire category. P indicates that the tire is for passenger vehicles.
2 Tire width. This 3-digit number is the width (in millimeters) of the tire from sidewalledge to sidewall edge.
3 Aspect ratio. This 2-digit number is the sidewall height as a percentage of the treadwidth. So, if the tread width is 205 mm, and the aspect ratio is 50, the sidewall height is102 mm.
4 Tire construction. R indicates that the tire is of Radial ply construction.
5 Wheel diameter. This 2-digit number is the diameter of the wheel rim in inches.
6 Load index. This 2 or 3-digit number is the weight each tire can support. This number isnot always shown.
7 Speed rating. When stated, indicates the maximum speed (in mph) at which the tirecan be used for extended periods. Q=99 mph (160 km/h), R=106 mph (170 km/h),S=112 mph (180 km/h), T=118 mph (190 km/h), U=124 mph (200 km/h), H=130 mph(210 km/h), V=149 mph (240 km/h), W=168 mph (270 km/h), Y=186 mph (300 km/h).
8 Tire composition and materials. The number of plies in both the tread area and thesidewall area indicates how many layers of rubber coated material make up thestructure of the tire. Information is also provided on the type of materials used.
9 Maximum tire load. The maximum load which can be carried by the tire.
Wheels and Tires
182 Model X Owner's Manual

10 Maximum permissible inflation pressure. This pressure should not be used for normaldriving.
11 U.S. DOT Tire Identification Number (TIN). Begins with the letters DOT and indicatesthat the tire meets all federal standards. The next 2 digits/letters represent the plantcode where it was manufactured, and the last 4 digits represent the week and year ofmanufacture. For example, the number 1712 is used to represent the 17th week of 2012.The other numbers are marketing codes used at the manufacturer’s discretion. Thisinformation can be used to contact consumers if a tire defect requires a recall.
12 Treadwear grade. This number indicates the tire’s wear rate. The higher the treadwearnumber is, the longer it should take for the tread to wear down. A tire rated at 400, forexample, lasts twice as long as a tire rated at 200.
13 Traction grade. Indicates a tire’s ability to stop on wet roads. A higher graded tireshould allow you to stop your vehicle in a shorter distance than a tire with a lowergrade. Traction is graded from highest to lowest as AA, A, B, and C.
14 Temperature grade. The tire’s resistance to heat is grade A, B, or C, with A indicatingthe greatest resistance. This grading is provided for a correctly inflated tire, which isbeing used within its speed and loading limits.
Wheels and Tires
Specifications 183

Uniform Tire Quality GradingThe following information relates to the tiregrading system developed by the NationalHighway Traffic Safety Administration(NHTSA), which grades tires by tread wear,traction and temperature performance. Tiresthat have deep tread, and winter tires, areexempt from these marking requirements.
Where applicable, quality grades are found onthe tire’s sidewall between the tread shoulderand maximum section width. For example:
• TREADWEAR 180• TRACTION AA• TEMPERATURE A
The quality grades are described next.
Note: In addition to the marking requirements,passenger car tires must conform to FederalSafety Requirements.
Treadwear
The treadwear grade is a comparative ratingbased on the wear rate of the tire when testedunder controlled conditions on a specifiedgovernment test course.
For example, a tire graded 150 wears one anda half times better on a government testcourse than a tire graded 100. The relativeperformance of tires depends on the actualconditions of their use, however, and candepart significantly from the norm due tovariations in driving habits, service practices,road characteristics, and climate.
Traction
The traction grades, from highest to lowest,are: AA, A, B, and C. These grades represent atire’s ability to stop on wet pavement asmeasured under controlled conditions on testsurfaces of asphalt and concrete. A tiremarked C might have poor tractionperformance.
Warning: Defective tires are dangerous.Do not drive if a tire is damaged,excessively worn, or is inflated to anincorrect pressure. The safety of thevehicle and occupants can be adverselyaffected. Check tires regularly for wearand to ensure there are no cuts, bulges orexposure of the ply/cord structure.
Warning: The traction grade assigned tothe tire is based on straight-aheadbraking tests, and does not include:
acceleration, cornering, hydroplaning orpeak traction characteristics.
Temperature
The temperature grades are A (the highest), B,and C, representing the tire’s resistance to thegeneration of heat and its ability to dissipateheat when tested under controlled conditionson a specified indoor laboratory test wheel.Sustained high temperature can cause the tireto degenerate and reduce tire life, andexcessive temperature can lead to sudden tirefailure.
The grade C corresponds to the minimumlevel of performance that all passenger cartires must meet under the Federal MotorSafety Standard No. 109. Grades B and Arepresent levels of performance on thelaboratory test wheel that exceed theminimum requirements.
Warning: A tire’s temperature grade isestablished for a tire that is properlyinflated and not overloaded. Excessivespeed, under-inflation, or excessiveloading, either separately or incombination, can cause heat buildup andpossible tire failure.
Wheels and Tires
184 Model X Owner's Manual

Tire and Loading Glossaries
General Wheel and Tire Terms
Accessory Weight The combined weight (in excess of those items replaced) ofitems available as factory installed equipment.
Bead The inner edge of a tire that is shaped to fit to the rim and forman air tight seal. The bead is constructed of steel wires whichare wrapped, or reinforced, by the ply cords.
Cold Tire Pressure The air pressure in a tire that has been standing in excess ofthree hours, or driven for less than one mile.
Curb Weight The weight of a standard vehicle, including any optionalequipment fitted, and with the correct fluid levels.
Gross Vehicle Weight The maximum permissible weight of a vehicle with driver,passengers, load, luggage, and equipment.
kPa (kilo pascal) A metric unit used to measure pressure. One kilo pascal equalsapproximately 0.145 psi.
Maximum Inflation Pressure The maximum pressure to which the tire should be inflated.This pressure is given on the tire side wall in psi (lbf/in2).
Caution: This pressure marked on the tire is the maximumallowed by the tire manufacturer. It is not the pressureTesla recommends using for Model X.
Maximum Loaded VehicleWeight
The sum of curb weight, accessory weight, vehicle capacityweight, and production options weight.
Production Options Weight The combined weight of options installed which weigh inexcess of 3 lb more than the standard items that they replaced,and are not already considered in curb or accessory weights.
PSI (lbf/in2) Pounds per square inch (the unit used to measure tirepressure).
Recommended Tire InflationPressure
Tire inflation pressure, established by Tesla, which is based onthe type of tires that are mounted on the vehicle at the factory.This information can be found on the Tire and LoadingInformation label located on the door pillar.
Rim The metal support for a tire, or tire and tube, upon which thetire beads are seated.
Vehicle Capacity Weight The number of seats multiplied by 150 lbs plus the ratedamount of load/luggage.
Load Carrying Definitions
Normal occupant weight 68 kilograms (150 lbs) times the number of occupants specifiedin the second column of the tables for calculating load limits(see Vehicle Loading on page 173).
Occupant distribution Distribution of occupants in a vehicle.
Passenger car tire A tire intended for use on passenger cars, multipurposepassenger vehicles, and trucks, that have a gross vehicle weightrating (GVWR) of 10,000 pounds or less.
Wheels and Tires
Specifications 185

Rim diameter Nominal diameter of the bead seat.
Rim size designation Rim diameter and width.
Rim type designation The manufacturing industry's designation for a rim by style orcode.
Rim width Nominal distance between the rim's flanges.
Vehicle maximum load on thetire
Load on an individual tire that is determined by distributing toeach axle its share of the maximum loaded vehicle weight anddividing by two.
Vehicle normal load on the tire Load on an individual tire that is determined by distributing toeach axle its share of the curb weight, accessory weight, andnormal occupant weight and dividing by two.
Pneumatic Radial Tire Definitions
Bead separation A breakdown of the bond between components in the bead.
Bias ply tire A pneumatic tire in which the ply cords that extend to thebeads are laid at alternate angles substantially less than 90degrees to the center line of the tread.
Carcass The tire structure, except tread and sidewall rubber which, thatwhen inflated, bears the load.
Chunking The breaking away of pieces of the tread or sidewall.
Cord The strands forming the plies in the tire.
Cord separation The parting of cords from adjacent rubber compounds.
Cracking Any parting within the tread, sidewall, or inner liner of the tireextending to cord material.
Extra load tire A tire designed to operate at higher loads and higher inflationpressure than the corresponding standard tire.
Groove The space between two adjacent tread ribs.
Inner liner The layer(s) forming the inside surface of a tubeless tire thatcontains the inflating medium within the tire.
Inner liner separation The parting of the inner liner from cord material in the carcass.
Load rating The maximum load that a tire is rated to carry for a giveninflation pressure.
Maximum load rating The load rating for a tire at the maximum permissible inflationpressure for that tire.
Measuring rim The rim on which a tire is fitted for physical dimensionrequirements.
Open splice Any parting at any junction of tread, sidewall, or inner liner thatextends to the cord material.
Outer diameter The overall diameter of an inflated new tire.
Wheels and Tires
186 Model X Owner's Manual
Overall width The linear distance between the exteriors of the sidewalls of aninflated tire, including elevations due to labeling, decorations,or protective bands or ribs.
Ply A layer of rubber-coated parallel cords.
Ply separation A parting of rubber compound between adjacent plies.
Pneumatic tire A mechanical device made of rubber, chemicals, fabric andsteel or other materials, that, when mounted on an automotivewheel, provides the traction and contains the gas or fluid thatsustains the load.
Radial ply tire A pneumatic tire in which the ply cords that extend to thebeads are laid at substantially 90 degrees to the center line ofthe tread.
Reinforced tire A tire designed to operate at higher loads and at higherinflation pressures than the corresponding standard tire.
Section width The linear distance between the exteriors of the sidewalls of aninflated tire, excluding elevations due to labeling, decoration, orprotective bands.
Sidewall The portion of a tire between the tread and bead.
Sidewall separation The parting of the rubber compound from the cord material inthe sidewall.
Snow tire A tire that attains a traction index equal to or greater than 110,compared to the ASTM E1136-93 (re-approved 2003,incorporated by reference, see §571.5) Standard Reference TestTire when using the snow traction test as described in ASTMF1805-00 (incorporated by reference, see §571.5), and that ismarked with an Alpine Symbol specified in S5.5(i) on at leastone sidewall.
Test rim The rim on which a tire is fitted for testing, and may be any rimlisted as appropriate for use with that tire.
Tread The portion of a tire that comes into contact with the road.
Tread rib A tread section running around the circumference of a tire.
Tread separation The pulling away of the tread from the tire carcass.
Tread wear indicators (TWI) The projections within the principal grooves designed to give avisual indication of the degrees of wear of the tread.
Wheel-holding fixture The fixture used to hold the wheel and tire assembly securelyduring testing.
Wheels and Tires
Specifications 187

Tesla Roadside Assistance is available to you, 24 hours a day, 365 days a year, for the duration ofyour warranty period.
When contacting Tesla Roadside Assistance, please provide:
• Vehicle Identification Number (VIN). The VIN is displayed when you touch the Tesla "T" at thetop center of the touchscreen. The VIN can also been seen on the upper dashboard by lookingthrough the driver's side of the windshield.
• Your exact location.• The nature of the problem.
Tesla Roadside Assistance is available to speak with roadside service professionals 24/7/365 toanswer any questions and explain the proper procedure for transporting your Model X.
Regional Phone Number(s)Mexico: 1-800-228-8145
United States and Canada: 1-877-79TESLA (1-877-798-3752)
Contacting Roadside Assistance
188 Model X Owner's Manual

When Transporting Model XAlways transport Model X with all four tires offthe ground. A flatbed truck or comparabletransport vehicle is recommended. A wheel liftand dolly can be used only when transportingModel X for a maximum of 15 miles (25 km),provided the driving speed does not exceed45 mph (70 km/h). When transporting,whether on a flatbed truck or using a wheellift and dolly, Model X can face eitherdirection.
Do not transport Model X using any othermethod unless specified by Tesla. Follow thesteps provided and observe all warnings andcautions. Damage caused by transporting yourvehicle is not covered by the warranty.
Note: The following illustrations are fordemonstration purposes only.
Warning: Model X is equipped with highvoltage components (see High VoltageComponents on page 149). Beforetransporting Model X as a result of anevent (such as a collision) that may havecompromised a high voltage component,it is important to assume that thesecomponents are energized. Always followhigh voltage safety precautions (wearingpersonal protective equipment, etc.) untilemergency response professionals haveevaluated the vehicle and can accuratelyconfirm that all high voltage systems areno longer energized. Failure to do so mayresult in serious injury or death.
Disable Self-Leveling (airsuspension vehicles only)If Model X is equipped with Smart AirSuspension, it automatically self-levels, evenwhen power is off. To prevent damage, youmust activate Jack mode to disable self-leveling:
1. Touch Controls > Suspension on thetouchscreen.
2. Press the brake pedal, then touch VeryHigh to maximize height.
3. Touch Jack.
When Jack mode is active,Model X displays this indicatorlight on the instrument panel,along with a message telling youthat active suspension isdisabled.
Note: Jack mode cancels when Model X isdriven over 4.5 mph (7 km/h).
Warning: Failure to activate Jack modeon a Model X equipped with Smart AirSuspension can result in the vehiclebecoming loose during transport, whichmay cause significant damage.
Activate Tow ModeModel X may automatically shift into Parkwhen it detects the driver leaving the vehicle,even if it has previously been shifted intoNeutral. To keep Model X in Neutral (whichdisengages the parking brake), you must usethe touchscreen to activate Tow mode:
1. Shift into Park.2. Chock the tires or otherwise ensure
Model X is stable.3. Press and hold the brake pedal, then on
the touchscreen touch Controls >Settings > Service & Reset > Tow Mode >ON.
When Tow mode is active, Model Xdisplays this indicator light on theinstrument panel, along with amessage telling you that Model X isfree-rolling.
To cancel Tow Mode, shift Model X into Park.
Caution: If the electrical system is notworking, and you therefore cannot releasethe electric parking brake, attempt tojump start the 12V battery. Forinstructions, call Tesla RoadsideAssistance. If a situation occurs whereyou cannot disengage the parking brake,use a self-loading dolly or tire skates.Before doing so, always check themanufacturer’s specifications andrecommended load capacity.
Instructions for Transporters
Roadside Assistance 189

Pull onto the Flatbed TruckThe method used to pull Model X onto thetruck depends on whether a tow eye isavailable (provided with your vehicle at timeof purchase).
If equipped with a tow eye:
1. Locate the tow eye.2. Remove the tow eye cover by inserting a
small flat screwdriver into the slot locatedalong the top of the cover, then pryinggently to release the cover from the topsnap.
Caution: Keep the tow eye cover in asafe place so you can replace it whentowing is complete.
3. Fully insert the tow eye into the opening,then turn it counter-clockwise untilsecurely fastened.
4. Attach the winch cable to the tow eye.
Caution: Before pulling, make surethe tow eye is securely tightened.
5. Pull Model X slowly onto the flatbed truck.
6. Shift Model X into Park by pressing thebutton on the end of the gear selector.
If not equipped with a tow eye:
1. Attach the tow straps to the large hole oneach of the rearmost lower suspensionarms underneath the front of the vehicle.
2. To protect the underbody from anydamage, place a protective barrier (suchas a piece of wood) between the towstrap and the underbody.
3. Pull Model X slowly onto the flatbed truck.4. Shift Model X into Park by pressing the
button on the end of the gear selector.
Secure the TiresThe vehicle's tires must be secured onto thetruck using the eight-point tie-down method.
• Ensure any metal parts on the tie-downstraps do not contact painted surfaces orthe face of the wheels.
• Do not place tie-down straps over bodypanels or through the wheels.
Caution: Attaching tie-down straps to thechassis, suspension or other parts of thevehicle's body may cause damage.
Instructions for Transporters
190 Model X Owner's Manual

But wait, there's more! Below is a list of the Easter Eggs that have been discovered so far and howto access them. Alternatively, touch the Tesla T (top center of the touchscreen) then drag theAbout Your Tesla box downwards for one-touch access to all discovered Easter Eggs.
For This... Do This...
Rainbow Road Feeling nostalgic? Need more cowbell? Visit Rainbow Roadby pulling the cruise stalk toward you four times in quicksuccession while Autosteer is enabled.
Sketchpad Triple-tap the Tesla T (top center of the touchscreen) andchannel your inner Picasso. Show us what you got! TouchPublish to submit your artistic compositions to Tesla forcritiquing.
Mars Press and hold the Tesla T (top center of the touchscreen)then enter mars in the access code popup. The map showsyour Model X as a rover on the Martian landscape, and theAbout Your Tesla box displays SpaceX's interplanetaryspaceship.
007 Press and hold the Tesla T (top center of the touchscreen)and enter 007 in the access code popup. You are no longera "Driver", you're a "Diver"! Touch Controls > Suspension tochange your depth.
Ludicrous Speed (P100D vehiclesonly)
Press and hold the Ludicrous setting (Controls > Driving >Acceleration > Ludicrous) for approximately five seconds.Touch Yes, bring it on! if you want to go fast. To displaypower and acceleration readings on the instrument panel,press either scroll wheel briefly until the available optionsare displayed. Then, roll the scroll wheel to highlightReadout then press the scroll wheel again.
The Answer to the UltimateQuestion of Life, The Universe,and Everything
Rename your car to 42 (see Naming Your Vehicle on page122) and notice the new name of your Model X.
Holiday Show Park outside, turn the volume up, roll down your windows,then press and hold the Tesla T (top center of thetouchscreen) and enter modelxmas in the access codepopup. Enjoy the show.
Rainbow Charge Port When Model X is locked and charging, press the button onthe mobile connector ten times in quick succession.
Easter Eggs
Consumer Information 191

Document ApplicabilityOwner information is updated regularly toreflect updates to your vehicle. However, insome cases, recently released features maynot be described. To display information aboutrecently released features, view the ReleaseNotes on the touchscreen. Release Notes aredisplayed on the touchscreen after a softwareupdate, and can be displayed at any time bytouching the Tesla "T" at the top of thetouchscreen, then touching the Release Noteslink. If information related to how to use thetouchscreen conflicts with information in theRelease Notes, the Release Notes takeprecedence.
IllustrationsIllustrations are provided for demonstrationpurposes only. Depending on vehicle options,software version, region of purchase, andspecific settings, your vehicle may appearslightly different. Although the ownerinformation is applicable to both right-handdrive and left-hand drive vehicles, manyillustrations show only left-hand drive vehicles.However, the essential information that theillustrations are providing is correct.
Errors or InaccuraciesAll specifications and descriptions are knownto be accurate at time of publishing. However,because continuous improvement is a goal atTesla, we reserve the right to make productmodifications at any time. To communicateany inaccuracies or omissions, or to providegeneral feedback or suggestions regarding thequality of this owner information, send anemail to [email protected].
Location of ComponentsOwner information may specify the location ofa component as being on the left or right sideof the vehicle. As shown, left (1) and right (2)represent the side of the vehicle when sittinginside.
Copyrights and TrademarksAll information in this document and allvehicle software is subject to copyright andother intellectual property rights of Tesla, Inc.and its licensors. This material may not bemodified, reproduced or copied, in whole or inpart, without the prior written permission ofTesla, Inc. and its licensors. Additionalinformation is available upon request. Teslauses software created by the Open Sourcecommunity. Please visit Tesla’s Open Sourcesoftware website at http://www.tesla.com/opensource. The following are trademarks orregistered trademarks of Tesla, Inc. in theUnited States and other countries:
All other trademarks contained in thisdocument are the property of their respectiveowners and their use herein does not implysponsorship or endorsement of their productsor services. The unauthorized use of anytrademark displayed in this document or onthe vehicle is strictly prohibited.
About this Owner Information
192 Model X Owner's Manual

Vehicle TelematicsModel X is equipped with electronic modulesthat monitor and record data from variousvehicle systems, including the motor, driverassistance components, Battery, braking andelectrical systems. The electronic modulesrecord information about various driving andvehicle conditions, including braking,acceleration, trip and other relatedinformation regarding your vehicle. Thesemodules also record information about thevehicle’s features such as charging events andstatus, the enabling/disabling of varioussystems, diagnostic trouble codes, VIN, speed,direction and location.
The data is stored by the vehicle and may beaccessed, used and stored by Tesla servicetechnicians during vehicle servicing orperiodically transmitted to Tesla wirelesslythrough the vehicle’s telematics system. Thisdata may be used by Tesla for variouspurposes, including, but not limited to:providing you with Tesla telematics services;troubleshooting; evaluation of your vehicle’squality, functionality and performance;analysis and research by Tesla and its partnersfor the improvement and design of ourvehicles and systems; and as otherwise maybe required by law. In servicing your vehicle,we can potentially resolve issues remotelysimply by reviewing your vehicle’s data log.
Tesla’s telematics system wirelessly transmitsvehicle information to Tesla on a periodicbasis. The data is used as described above andhelps ensure the proper maintenance of yourvehicle. Additional Model X features may useyour vehicle’s telematics system and theinformation provided, including features suchas charging reminders, software updates, andremote access to, and control of, varioussystems of your vehicle.
Tesla does not disclose the data recorded inyour vehicle to any third party except when:
• An agreement or consent from thevehicle’s owner (or the leasing companyfor a leased vehicle) is obtained.
• Officially requested by the police or otherauthorities.
• Used as a defense for Tesla in a lawsuit.• Ordered by a court of law.• Used for research purposes without
disclosing details of the vehicle owner oridentification information.
• Disclosed to a Tesla affiliated company,including their successors or assigns, orour information systems and datamanagement providers.
In addition, Tesla does not disclose the datarecorded to an owner unless it pertains to anon-warranty repair service and in this case,will disclose only the data that is related to therepair.
Data SharingFor quality assurance and to support thecontinuous improvement of advanced featuressuch as Autopilot, Tesla measures roadsegment data of all participating vehicles. AllTesla vehicles can learn from the experience ofthe billions of miles that Tesla vehicles havedriven. Although Tesla shares this data withpartners that contribute similar data, the datadoes not include any personally identifiableinformation about you or your vehicle. Toallow data sharing, touch Controls >Settings > Safety & Security > Data Sharing,then touch the I agree checkbox to confirmthat you agree to allowing Tesla to collect thisdata.
Note: Although Model X uses GPS inconnection with driving and operation, asdiscussed in this owner's manual, Tesla doesnot record or store vehicle-specific GPSinformation. Consequently, Tesla is unable toprovide historical information about a vehicle'slocation (for example, Tesla is unable to tellyou where Model X was parked/traveling at aparticular date/time).
Quality ControlYou might notice a few miles/km on theodometer when you take delivery of yourModel X. This is a result of a comprehensivetesting process that ensures the quality ofyour Model X.
The testing process includes extensiveinspections during and after production. Thefinal inspection takes place at Tesla andincludes a road test conducted by atechnician.
California Proposition 65Warning: Certain vehicle componentscontain or emit chemicals known to theState of California to cause cancer andbirth defects or other reproductive harm.In addition, certain fluids contained in
Disclaimers
Consumer Information 193

vehicles and certain products ofcomponent wear contain or emitchemicals known to the State ofCalifornia to cause cancer and birthdefects or other reproductive harm.
Warning: Certain components of thisvehicle such as airbag modules and seatbelt pre-tensioners may containPerchlorate Material. Special handlingmay be required for service or vehicle endof life disposal. See www.dtsc.ca.gov/hazardouswaste/perchlorate.
Warning: Battery posts, terminals, andrelated accessories contain lead and leadcompounds. Wash hands after handling.
Disclaimers
194 Model X Owner's Manual

Contacting TeslaFor detailed information about your Model X,go to www.tesla.com, and log on to your TeslaAccount, or sign up to get an account.
If you have any questions or concerns aboutyour Model X, call 1-877-79TESLA(1-877‑798-3752).
Note: You can also use voice commands toprovide feedback to Tesla. Say "Note","Report", "Bug note", or "Bug report" followedby your brief comments. Model X takes asnapshot of its systems, including screencaptures of the touchscreen and instrumentpanel. Tesla periodically reviews these notesand uses them to continue improving Model X.
Reporting Safety Defects - USIf you believe that Model X has a defect whichcould cause a crash or could cause injury ordeath, you should immediately inform theNational Highway Traffic SafetyAdministration (NHTSA) in addition tonotifying Tesla.
If NHTSA receives similar complaints, it mayopen an investigation. If it finds that a safetydefect exists in a group of vehicles, it mayorder a recall and remedy campaign. However,NHTSA cannot become involved in individualproblems between you, your dealer, or Tesla.
To contact NHTSA, you may call the VehicleSafety Hotline toll-free at 1-888-327-4236(TTY: 1-800-424-9153); go to www.safercar.gov; or write to: Administrator,National Highway Traffic Safety, 1200 NewJersey Avenue SE., Washington, DC 20590.You can also obtain other information aboutmotor vehicle safety from www.safercar.gov.
Reporting Safety Defects - CanadaIf you believe that your Model X has a defectwhich could cause a crash or could causeinjury or death, you should immediately informTransport Canada, in addition to notifyingTesla. To contact Transport Canada, call theirtoll-free number: 1-800-333-0510.
Reporting Safety Defects
Consumer Information 195

Key and Passive Unlocking System
FCC Certification
Model Number Mfr GHz Tested For
Keyfob 1048598 Tesla 2.4 USACanada
Per FCC ID 2AEIM-1048598, the devices listed above comply with Part 15 of the FCC rules.Operation is subject to the following two conditions:
1. This device may not cause harmful interference, and2. This device must accept any interference received, including interference that may cause
undesired operation.
Changes or modifications not expressly approved by Tesla could void your authority to operatethe equipment.
IC Certification
The following device is used in vehicles in Canada:
• Keyfob Model Number: 1048598 (2.4 GHz)• Keyfob Manufacturer: Tesla
Per IC 20098-1048598, this device complies with Industry Canada licence-exempt RSSstandard(s). Operation is subject to the following two conditions:
1. This device may not cause harmful interference, and2. This device must accept any interference received, including interference that may cause
undesired operation.
Declarations of Conformity
196 Model X Owner's Manual

Central Body Controller
FCC Certification
Model Number Mfr MHz / GHz Tested For
Central Body Controller1031503
Tesla 315 / 2.4 USA
Canada
Per FCC ID 2AEIM-1031503, the devices listed above comply with Part 15 of the FCC rules.Operation is subject to the following two conditions:
1. This device may not cause harmful interference, and2. This device must accept any interference received, including interference that may cause
undesired operation.
Changes or modifications not expressly approved by Tesla could void your authority to operatethe equipment.
IC Certification
The following device is used in vehicles in Canada:
• Central Body Controller Model Number: 1031503 (315 MHz / 2.4 GHz)• Central Body Controller Manufacturer: Tesla
Per IC 20098-1031503, this device complies with Industry Canada licence-exempt RSSstandard(s). Operation is subject to the following two conditions:
1. This device may not cause harmful interference, and2. This device must accept any interference received, including interference that may cause
undesired operation.
Integral Component Only
The Central Body Controller is an integral part of the vehicle that is installed and secured aroundother interior trim components. The Central Body Controller is designed and intended for use onlyas an integral component and cannot be sold and/or marketed separately.
Tire Pressure Monitoring SystemFCC IDs: TZSTPMS201, Z9F-201FS43X
IC ID: 11852A-201FS4X
The tire pressure monitoring system (TPMS) complies with Part 15 of the FCC rules and RSS-210 ofInnovation, Science and Economic Development Canada. Operation is subject to the following twoconditions:
1. This device may not cause harmful interference, and2. This device must accept any interference received, including interference that may cause
undesired operation.
Changes or modifications not expressly approved by Tesla could void your authority to operatethe equipment.
HomeLinkThis device complies with Part 15 of the FCC rules, RSS-210 Industry Canada, and with EUDirective 2014/53/EU.
Operation is subject to the following conditions:
Declarations of Conformity
Consumer Information 197

• This device may not cause harmful interference.• This device must accept any interference received, including interference that may cause
undesired operation.
Any changes or modifications to the device not expressly approved by the manufacturer or Teslacould void your authority to operate the equipment.
Radio Frequency InformationThis equipment has been tested and found to comply with the limits for a Class B digital device,pursuant to Part 15 of the FCC Rules. These limits are designed to provide reasonable protectionagainst harmful interference in a residential installation. This equipment generates, uses and canradiate radio frequency energy and, if not installed and used in accordance with the instructions,may cause harmful interference to radio communications. However, there is no guarantee thatinterference will not occur in a particular installation. If this equipment does cause harmfulinterference to radio or television reception, which can be determined by turning the equipmentoff and on, try to correct the interference by one or more of the following measures:
• Reorient or relocate the receiving antenna.• Increase the separation between the equipment and receiver.• Connect the equipment into an outlet on a circuit different from that to which the receiver is
connected.• Consult the dealer or an experienced radio/TV technician for help.
Declarations of Conformity
198 Model X Owner's Manual

AABS (Anti-lock Braking System) 63absolute speed limit 109Acceleration (dual-motor) 116Acceleration settings 69access panel, removing 168accessories
installing 171plugging into power socket 133
accessory carrier 76adaptive headlights 60aero covers 162air circulation 124air conditioning 123air distribution 124air filter 127air suspension 129air vents 127airbags 38alarm 143all-season tires 162always connected, setting 72anti-lock braking (ABS) 63audio
playing files 130steering wheel buttons 44volume control 130
Auto High Beam 60Auto Lane Change 97auto-raising suspension 128automatic emergency braking 106, 107automatic emergency braking (autopilot) 106Autopark 99Autopilot components 85Autosteer 94average range 72
Bbackup camera 74battery (12V)
complete discharge 151specifications 180
Battery (high voltage)care of 151coolant 168specifications 180temperature limits 151
battery (key), replacing 5bicycle carrier 76blind spot warning 104Bluetooth
devices, playing audio files from 133general information 135phone, pairing and using 135
body repairs 171body touch up 166
brake fluid replacement 158brakes
automatic in emergencies 106, 107fluid level 168overview of 63specifications 179
brightness of displays 119
CCabin Overheat Protection setting 119cabin temperature control 123Calendar app 142California Proposition 65 193camera (rear view) 74cameras (autopilot) 85car cover 166car status, displaying 44, 45car washes 164cargo area 14cargo volume 177carpets, cleaning 165CE certifications 196CHAdeMO 150chains 162change of ownership 122charge port 153charge port light 154charging
charge settings 154components and equipment 149instructions 153public charging stations 150scheduling 154status of 156
charging locations, finding 138child protection
disabling liftgate and rear door handles10disabling rear window switches 12
child seatsinstalling and using 30
Chill acceleration 69cleaning 164climate controls 123Climate Timer 126Cold Weather controls 116collision avoidance assist 106console
12V power socket 133cup holders 18USB ports 133
consumption chart 72contact information
roadside assistance 188Tesla 195
coolantBattery, checking level of 168
Index
Index 199

coolant (continued)Battery, replacement interval 158
copyrights 192Creep 116cruise control 88cup holders 18
Ddashboard overview 2data recording 193data sharing 193day mode 119declarations of conformity 196delivery mileage 193devices
Bluetooth, playing audio files 133connecting 133playing audio files from 133
dimensions 176display brightness 119dome (map) lights 58door labels 173Door Unlock Mode 10doors 4doors, opening 4Drive gear 50drive-away locking 10driver
profiles 42seat adjustment 20
driver assistanceAuto Lane Change 97automatic emergency braking 106, 107Autopark 99Autosteer 94blind spot warning 104collision avoidance assist 106forward collision warning 106overtake acceleration 88overview 85settings for 119side collision warning 104speed assist 109speed limit warning 109staying inside lane markings 104staying within speed limits 109Traffic-Aware Cruise Control 88
drivingseating position 20starting 48tips to maximize range 72
EEaster Eggs 191Easy Entry 23
easy entry, driver profile 42EDR (event data recorder) 193electric parking brake 64emergency braking (autopilot) 106emergency flashers 61emergency rear door opening 11emission label 172energy
gained from regenerative braking 63range information 52
energy & charging setting 119Energy app 72energy saving mode 72Erase & Reset 122event data recording 193exterior
car cover 166cleaning 164dimensions 176lights 58overview 3polishing, touch up, & repair 166
Ffactory defaults, restoring 122factory reset 122fan speed, interior 124favorite destinations 140Favorites 137Favorites (Media Player) 132FCC certifications 196features, downloading new 147ferries, avoiding 139firmware (software) updates 147flash drives, playing audio files from 133flashers, warning 61floor mats 166fluids
replacement intervals 158reservoirs, checking 168
fog lights 58forward collision warning 106front passenger detection 40front trunk 15
Ggarage doors, opening 144gates, opening 144GAWR 174gears 50glove box 17Gross Axle Weight Rating 174Gross Vehicle Weight Rating 174ground clearance 176GVWR 174
Index
200 Model X Owner's Manual

Hhazard warning flashers 61head restraints 25head supports 25headlights
adaptive 60after exit 60high beams 60
heated wipers 62heating 123height adjustments (suspension)
auto-raising 128automatic and manual settings 129disabling (Jack mode) 129
high beam headlights 60high voltage
Battery specifications 180components 149safety 158
hills, stopping on 68Home location 140HomeLink
FCC certification 197programming and using 144
hood 15horn 46hub caps 162
IIC certifications 196Ideal range 119identification labels 172Insane acceleration (performance dual motor)69Insane setting (dual-motor) 116instant range 72instrument panel
charging status 156cleaning 165overview of 52
interiorcleaning 165dimensions 176lights 58overview 2temperature control 123
Internet radio 131intrusion detection 143
JJ1772 150Jack mode 129jacking 170
Kkey
FCC and IC certifications 196how to use 4key not inside 48ordering extras 7replacing battery 5
keyless entry 4
Llabel
Tire and Loading Information 173vehicle certification 174
lane assist 104lane change flash 61lane change, automatic 97lane departure warning 104language setting 119LATCH child seats, installing 32Launch Mode (performance dual motor) 69liftgate
adjust opening height 14opening 13
lifting 170lights
adaptive headlights 60hazard warning 61headlights after exit 60turn signals 60
load limits 173location-based suspension 128locking and unlocking doors 4Ludicrous acceleration (performance dualmotor) 69Ludicrous setting (dual-motor) 116lumbar support 20
Mmaintenance
brake fluid, checking 168cleaning 164daily and monthly checks 158fluid replacement intervals 158panel, removing 168replacing wipers 167service intervals 158tires 159washer fluid, topping up 169
map updates 141maps 137mats 166Max Battery Power 116Max Battery Power (performance dual motor)69
Index
Index 201

media 130mileage upon delivery 193mirrors 47mobile app 148Mobile Connector
description 150using 153
modifications 171my car does what? 191
Nnaming 122navigation 137NCC certifications 196Neutral gear 50NHTSA, contacting 195night mode 119
Ooccupancy sensor 40odometer 71offset from speed limit 109overhang dimensions 176overtake acceleration 88Owner Information, about 192
PPark Assist 66Park gear 50parking brake 64parking, automatic 99parts replacement 171passenger detection 40passenger front airbag 40Passive Entry setting 119personal data, erasing 122phone
steering wheel buttons 45using 135
PIN 43power management 72power socket 133power windows 12powering on and off 48Preconditioning 119preferences, setting 119Proposition 65 193public charging stations 150
Rradar 85
radio 130Radio Frequency information 196range
displayed on instrument panel 52driving tips to maximize 72regenerative braking 63
range assurance 72Range mode 72Range Mode 116Rated range 119re-routing 139rear seats, accessing 23rear view camera 74rear window switches, disabling 12Recent (Media Player) 132Recents 137regenerative braking 63region format 119relative speed limit 109release notes 147restarting the touchscreen 48Reverse gear 50RFID transponders 171roadside assistance 188rotating tires 160route overview 139
Ssafety defects, reporting 195safety information
airbags 41child seats 37seat belts 29
satellite radio 131seat belts
cleaning 165in a collision 28overview of 27pre-tensioners 28wearing when pregnant 28
seat covers 26seat heaters 123seating capacity 173seats
adjusting 20heaters 123
seats, second row 21security settings 143sensors 85service data recording 193service intervals 158Settings 119Settings, erasing 122shifting gears 50Show Commute Advice 139side collision warning 104SiriusXM 131
Index
202 Model X Owner's Manual

slip start 65Smart Preconditioning 119software reset 122software updates 147specifications
cargo volume 177dimensions 176exterior 176interior 176motor 179subsystems 179tires 181weights 177wheels 181
speed assist 109speed limit warning 109spoiler 75Sport acceleration (performance dual motor)69stability control 65Standard acceleration 69starting 48steering specifications 179steering wheel
adjusting position 44adjusting sensitivity 44buttons 44heated 44scroll wheels 44
steering, automatic 94Streaming radio 131summer tires 162Summon 99sun visors 19supercharging
described 157idle fees 157pay-per-use fees 157
suspension 129suspension specifications 180
Ttelematics 193temperature
Battery (high voltage), limits 151cabin, controls for 123heated steering wheel 46outside 52tires 184
third row seats, folding and raising 24tie-down straps 190tilt detection 143Tire and Loading Information label 173tire noise 162Tire Pressure Monitoring System
FCC certification 197overview of 163
tire pressures, checking 159tire pressures, when towing 77tires
all-season 162balancing 160chains 162inspecting and maintaining 160pressures, how to check 159quality grading 184replacing 161replacing a tire sensor 163rotation 160specification 181summer 162temperature grades 184tire markings 182traction grade 184treadwear grade 184winter 162
toll system transponders, attaching 171tolls, avoiding 139torque specifications 179touch up body 166touchscreen
clean mode 165cleaning 165Controls 116overview 111Settings 119software updates 147
tow eye, locating 190Tow mode 189towing 189towing a trailer 77towing capacity 77towing instructions 189Towing Label 173Towing Mode 77TPMS
FCC certification 197overview of 163
traction control 65trademarks 192Traffic-Aware Cruise Control 88Traffic-Based Routing 139trailer, towing 77transmission specifications 179transponders, attaching 171Transport Canada, contacting 195transporting 189trip chart 72trip meter 71trip overview 139trip planner 139trunk, front 15trunk, rear
child protection lock 10disabling interior handle 10
TuneIn radio 131turn signals 60
Index
Index 203

Uultrasonic sensors 85uniform tire quality grading 184Units & Format 119Unlock on Park 4unlocking and locking doors 4unlocking when key doesn't work 11USB devices
connecting 133playing audio files from 133
USB ports 133
VValet Mode 42, 43vehicle certification label 174Vehicle Hold 68Vehicle Identification Number (VIN) 172vehicle loading 173ventilation 127VIN (Vehicle Identification Number) 172voice commands 44volume control 111volume control (media) 130
Wwalk-away locking 10Wall Connector 150warning flashers 61washer fluid, topping up 169washers, using 62weight specifications 177wheel chocks 190wheels
alignment 160replacing 161specifications 181torque 181
Wi-Fi, connecting to 146windshield washer fluid, topping up 169winter tires 162wipers, de-icing 62wipers, replacing 167wipers, using 62Work location 140
Index
204 Model X Owner's Manual
