modern jamb systems · modern jamb systems finish drywall edges around jamb with l-bead or similar...
TRANSCRIPT

M O D E R N J A M B S Y S T E M S

Cross-Section of Casing-Less Jamb Installation with Concealed Hinge
Cross-Section of Casing-Less Jamb Installation with Barrel Hinge
2
Casing-Less Jambs
Recommended: Phillips U-200 trim or similar
Recommended: Phillips L-200 trim or similar
MODERN JAMB SYSTEMS
Jamb width should be same as stud width
Swing range may be limited
Swing range may be limited
Requires jamb installation prior to drywall
Jambs can be installed after drywall
Complexity Level
Complexity Level

3
MODERN JAMB SYSTEMS
Lift drywall to baseboard height using a block for support. Overlap jamb with drywall to create the desired amount of reveal.
Finish drywall edges with U-bead, J-bead or similar drywall trim.
Trim remaining drywall and install baseboard.
Assemble and install jamb before hanging drywall.
MOUNT CONCEALED HINGES TO JAMB FIRST USING SUPPLIED SCREWS.
Casing-Less Jamb Installation
Align door with hinges and mount with provided screws. Adjust hinges if necessary and attach cover plate.
Baseboard Idea:
Return your trim to the jamb for a beautiful
shadow line at the base of each opening.
Cross-Section of Flush-to-Wall Jamb Installation with Concealed Hinge
Cross-Section of Flush-to-Wall Jamb Installation with Barrel Hinge
4
MODERN JAMB SYSTEMS
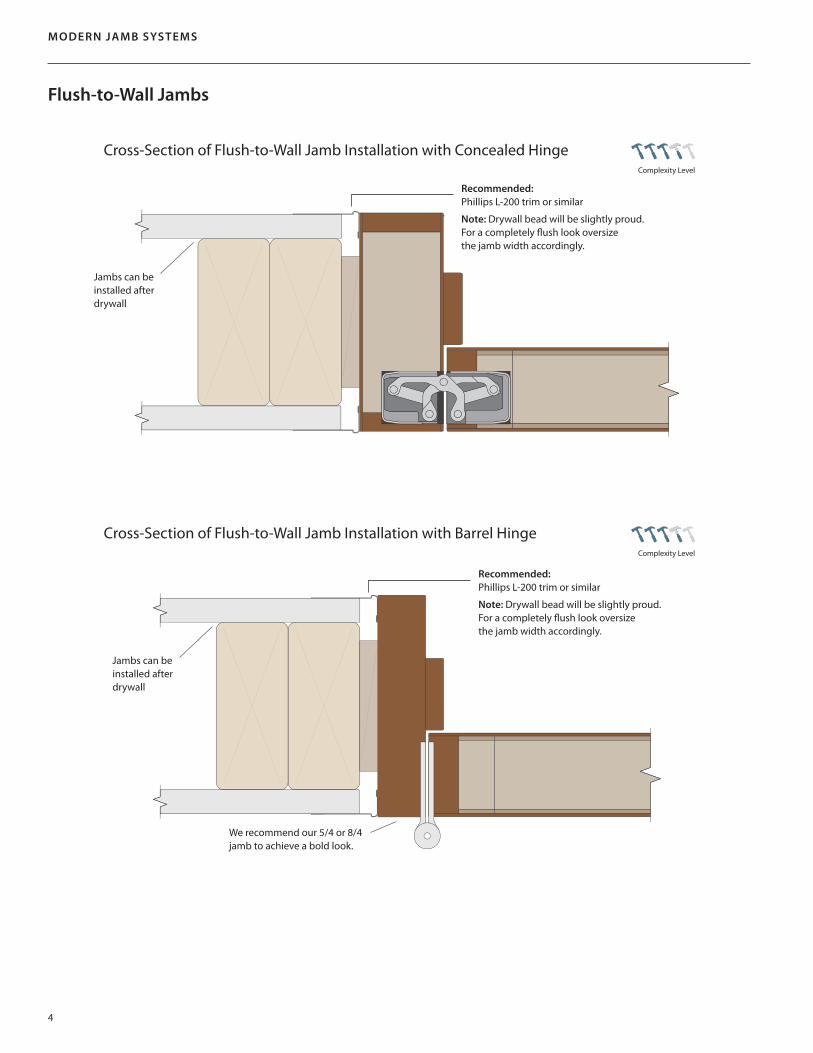
Flush-to-Wall Jambs
Recommended: Phillips L-200 trim or similar
Note: Drywall bead will be slightly proud. For a completely flush look oversize the jamb width accordingly.
Recommended: Phillips L-200 trim or similar
Note: Drywall bead will be slightly proud. For a completely flush look oversize the jamb width accordingly.
We recommend our 5/4 or 8/4 jamb to achieve a bold look.
Complexity Level
Complexity Level
Jambs can be installed after drywall
Jambs can be installed after drywall
5
MODERN JAMB SYSTEMS
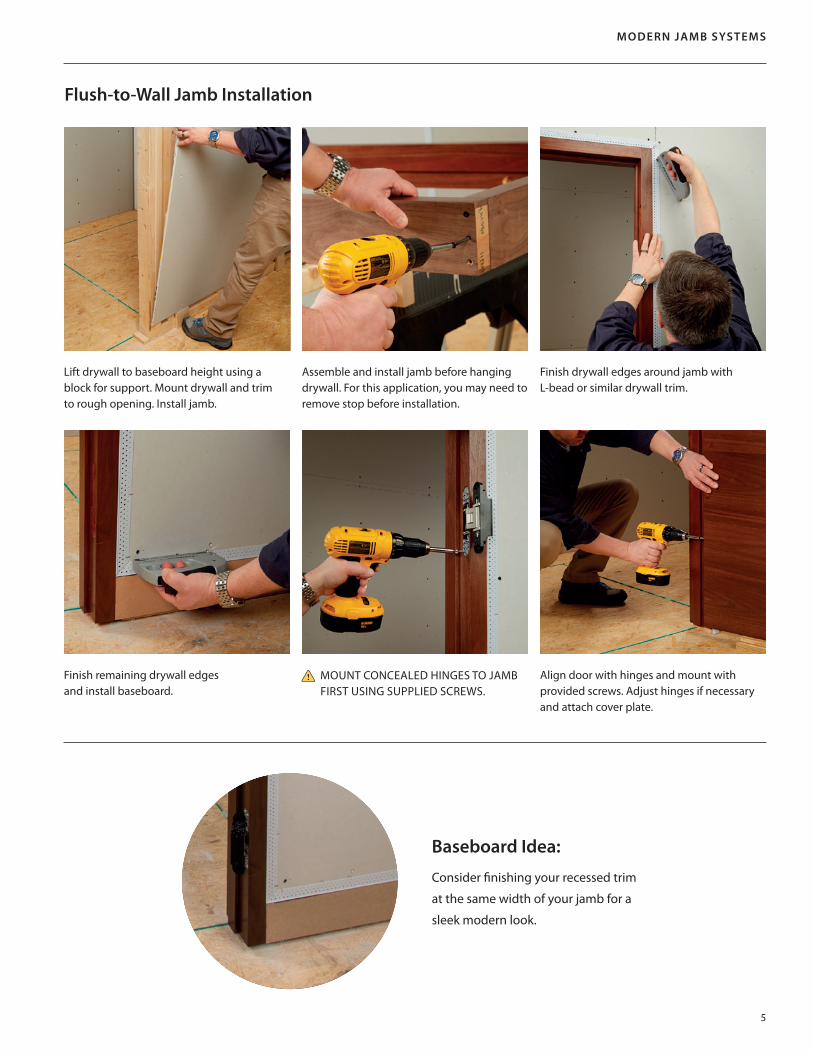
Finish drywall edges around jamb with L-bead or similar drywall trim.
Finish remaining drywall edges and install baseboard.
Lift drywall to baseboard height using a block for support. Mount drywall and trim to rough opening. Install jamb.
Flush-to-Wall Jamb Installation
Assemble and install jamb before hanging drywall. For this application, you may need to remove stop before installation.
Align door with hinges and mount with provided screws. Adjust hinges if necessary and attach cover plate.
Baseboard Idea:
Consider finishing your recessed trim
at the same width of your jamb for a
sleek modern look.
MOUNT CONCEALED HINGES TO JAMB FIRST USING SUPPLIED SCREWS.
Cross-Section of Reveal Jamb Installation with Concealed Hinge
Cross-Section of Reveal Jamb Installation with Barrel Hinge
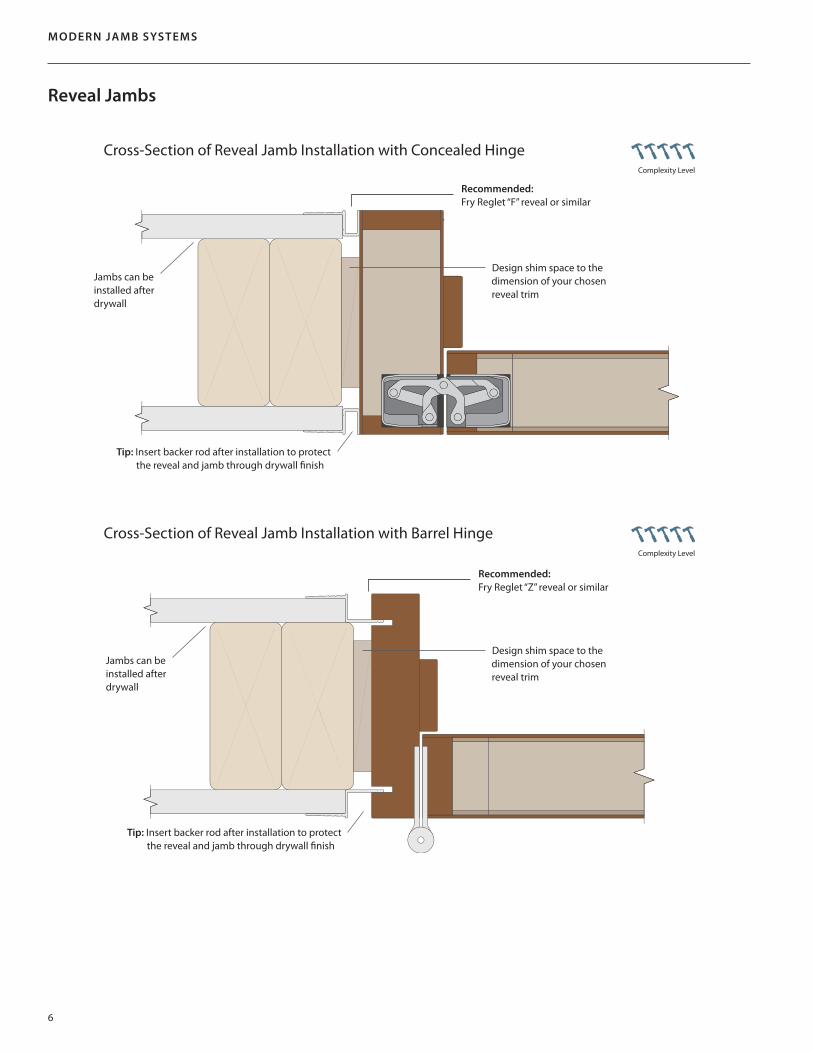
Reveal Jambs
6
MODERN JAMB SYSTEMS
Recommended: Fry Reglet “F” reveal or similar
Recommended: Fry Reglet “Z” reveal or similar
Tip: Insert backer rod after installation to protect the reveal and jamb through drywall finish
Tip: Insert backer rod after installation to protect the reveal and jamb through drywall finish
Design shim space to the dimension of your chosen reveal trim
Design shim space to the dimension of your chosen reveal trim
Complexity Level
Complexity Level
Jambs can be installed after drywall
Jambs can be installed after drywall
7
MODERN JAMB SYSTEMS
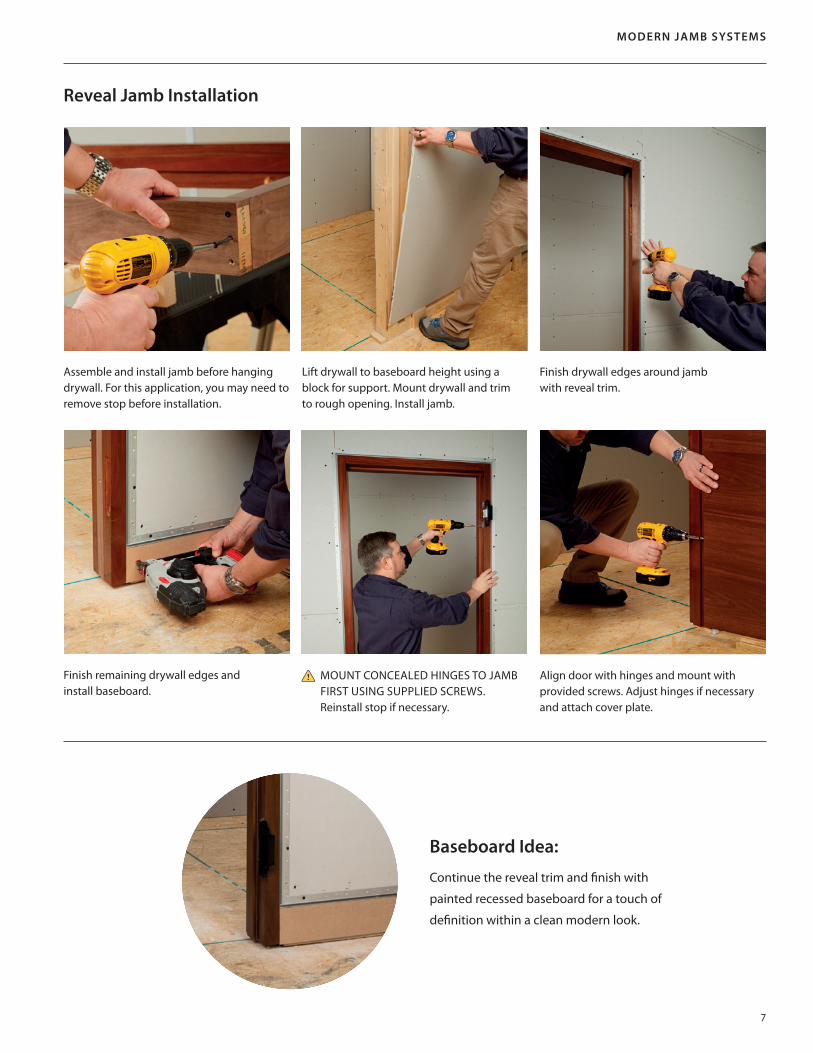
Finish drywall edges around jamb with reveal trim.
Finish remaining drywall edges and install baseboard.
Lift drywall to baseboard height using a block for support. Mount drywall and trim to rough opening. Install jamb.
Assemble and install jamb before hanging drywall. For this application, you may need to remove stop before installation.
Align door with hinges and mount with provided screws. Adjust hinges if necessary and attach cover plate.
Reveal Jamb Installation
Baseboard Idea:
Continue the reveal trim and finish with
painted recessed baseboard for a touch of
definition within a clean modern look.
MOUNT CONCEALED HINGES TO JAMB FIRST USING SUPPLIED SCREWS. Reinstall stop if necessary.

TRU&MODERN FLUSH WOOD DOOR SPECIFICATIONS
TruStile flush wood doors feature hand-selected veneers, precision matched to
optimize the beautiful character found across each species of natural wood.
Distinguishing Features:• Hand matched 1/16" veneers available in horizontal and vertical grain• Highly engineered core provides stability for the door, while the
matching hardwood edge provides a beautiful finish
Specification Description
Thickness 1-3/4"
Maximum size 48" × 120"
Matching for Pairs Pair matching standard
Stiles 5/8" wood laminated to 3/4" laminated strand lumber (LSL)
Rails 5/8" wood laminated to 3/4" laminated strand lumber (LSL)
Core HDF-faced laminated strand lumber (LSL) core
Face 1/16" wood veneer
Options 20-, 45-, 60- and 90-minute ratingRefer to fire door section of our website for details
Notes Doors under 80" tall will not have bottom lumber band
Warranty Life of original installationSee our website for complete warranty details
Factory finish Standard stainsCustom color match available
1/16" Veneer Faces
5/8" Hardwood Lumber Bands
3/4" LSL Cross Band
HDF Backer
LSL Core
TRUSTILE DOORS, LLC
1780 East 66th Avenue
Denver, Colorado 80229
888.286.3931Copyright © 2018 TruStile Doors, LLC. All rights reserved.