moderro iem administration guide rem administration guide.pdf · administration guide ......
TRANSCRIPT

1
Moderro Remote Expert Manager
Administration Guide
Release 11
Moderro Technologies
www.moderro.com

2
Table of Contents
Preface ...............................................................................................................................................5 Overview ....................................................................................................................................................................... 5 Audience ....................................................................................................................................................................... 5 Purpose ......................................................................................................................................................................... 5 Organization.................................................................................................................................................................. 5 Related Documentation .................................................................................................................................................... 6
Remote Expert Administration Console (REAC) ....................................................................................6 Chapter Overview ......................................................................................................................................................... 6 Introduction .................................................................................................................................................................. 7 REAC User Interface (UI) ............................................................................................................................................... 8
Browser Compatibility .............................................................................................................................................. 8 Admin Username and Password............................................................................................................................... 8 Access the REAC UI ................................................................................................................................................... 8 REAC Home Page and Tabs ...................................................................................................................................... 8 Filter .......................................................................................................................................................................... 9
Configuring a Locale .................................................................................................................................................... 10 Add a Locale ........................................................................................................................................................... 10 Modify a Locale ...................................................................................................................................................... 11
Configuring an Expert Type ......................................................................................................................................... 11 Add an Expert Type ................................................................................................................................................. 11 Modify an Expert Type ............................................................................................................................................ 12 Delete an Expert Type ............................................................................................................................................. 13
Configuring a Kiosk ..................................................................................................................................................... 13 Add a Kiosk ............................................................................................................................................................. 13 Modify a Kiosk ........................................................................................................................................................ 14 View Kiosk Health ................................................................................................................................................... 15 Delete a Kiosk ......................................................................................................................................................... 15
Configuring Groups of Kiosks ....................................................................................................................................... 15 Add a Group ............................................................................................................................................................ 16 Modify a Group ....................................................................................................................................................... 20 Delete a Group ........................................................................................................................................................ 20
Configuring an Expert ................................................................................................................................................. 20 Registration Status ................................................................................................................................................. 21 Add an Expert ......................................................................................................................................................... 21 Modify an Expert .................................................................................................................................................... 21 Delete an Expert ..................................................................................................................................................... 21
Configuring Desktop Share .......................................................................................................................................... 22 Add an Agent’s Workstation to the Desktop Share Tab ......................................................................................... 22 Modify a Desktop Share Entry ................................................................................................................................ 22 Remove a Desktop Share Entry............................................................................................................................... 23
Configuring a Video ..................................................................................................................................................... 23 Add a Video ............................................................................................................................................................ 23 Modify a Video ....................................................................................................................................................... 24 Delete a Video ......................................................................................................................................................... 24
Configuring Content ................................................................................................................................................... 25
3
Add a Content Item ................................................................................................................................................. 25 Modify a Content Item ............................................................................................................................................ 25 Delete a Content Item ............................................................................................................................................. 26
Configuring a Document ............................................................................................................................................... 26 Add a Document ..................................................................................................................................................... 26 Modify a Document ................................................................................................................................................ 26
Viewing Session Information ....................................................................................................................................... 27 Help Popup Window ............................................................................................................................................... 27 Sort the Sessions List............................................................................................................................................... 27 View Details of a Call .............................................................................................................................................. 27 Play Audio Recording of the Call............................................................................................................................. 28
Viewing the Status of the Databases .......................................................................................................................... 28 Managing a LongPen Tablet ........................................................................................................................................ 28 Managing Licenses ..................................................................................................................................................... 29
Obtain the REM Server’s MAC Address .................................................................................................................. 29 Generate a License File ........................................................................................................................................... 29 Upload the License File ........................................................................................................................................... 30 Modify a License ..................................................................................................................................................... 30 Delete a License ...................................................................................................................................................... 30
Configuring Session Result .......................................................................................................................................... 31 Add a Question ........................................................................................................................................................ 31 Modify a Question .................................................................................................................................................. 31 Delete a Question ................................................................................................................................................... 32 Add Answers ........................................................................................................................................................... 32 Modify an Answer ................................................................................................................................................... 32 Delete an Answer .................................................................................................................................................... 32 Manage Agent Questions and Answers ................................................................................................................. 33
Managing Users .......................................................................................................................................................... 33 Add a New User ...................................................................................................................................................... 33 Delete a User .......................................................................................................................................................... 34
Generating Session Reports ......................................................................................................................................... 34 Uploading Images to REAC.......................................................................................................................................... 35 Cleaning the Call Cache ............................................................................................................................................... 35 Setting Document Camera Predefined Zoom Buttons for Agents .................................................................................... 35 Downloading the Document Camera Application File ............................................................................................... 36 Downloading the Desktop Share Utility File ............................................................................................................... 37 Downloading the SNMP MIBs for NMS File ................................................................................................................ 37 Downloading Logs ....................................................................................................................................................... 37
User Interface Design Specification ................................................................................................... 38 Chapter Overview ...................................................................................................................................................... 38 Home Screen ............................................................................................................................................................... 38
Background ............................................................................................................................................................. 38 Expert Type Buttons ................................................................................................................................................ 39 Help and Language Buttons ................................................................................................................................... 41
Call Connecting Screen ............................................................................................................................................... 42 Cancel Button ......................................................................................................................................................... 43 Small Logo .............................................................................................................................................................. 43 Wait Video .............................................................................................................................................................. 43 Wait Image ............................................................................................................................................................. 44

4
Null ......................................................................................................................................................................... 46 Call Connected Screen ................................................................................................................................................ 48
Large Logo .............................................................................................................................................................. 48 Scan Screen ................................................................................................................................................................ 50 Signature Screen ......................................................................................................................................................... 52 Thank You Screen........................................................................................................................................................ 54 Session Result Screen ................................................................................................................................................. 55 Hold Screen ................................................................................................................................................................. 56 Help Wait Screen ........................................................................................................................................................ 58
Remote Expert Interactive Collaboration (REIC) User Interface ........................................................... 61 Chapter Overview ...................................................................................................................................................... 61 REIC Overview ............................................................................................................................................................. 61 REIC Properties ........................................................................................................................................................... 61 Background Image ...................................................................................................................................................... 62 Small Customer Logo Image ....................................................................................................................................... 62 Customer Header ........................................................................................................................................................ 62 Big Customer Logo Image ........................................................................................................................................... 62 Expert Types................................................................................................................................................................ 62
Expert Type Images ................................................................................................................................................. 63 Expert Type Icons Layout ........................................................................................................................................ 63
Kiosk Not Registered Message.................................................................................................................................... 66 Customizing Locales .................................................................................................................................................... 66
Locales .................................................................................................................................................................... 66 Images .................................................................................................................................................................... 67 Locale Properties File (Message Bundle) ................................................................................................................ 67
On Hold Video ............................................................................................................................................................... 71 Session Result Screen ................................................................................................................................................. 71 REIC Modules .............................................................................................................................................................. 72
Keyboard Module ................................................................................................................................................... 72 Card Reader Module ............................................................................................................................................... 72
Scanner Resolution Setting ......................................................................................................................................... 73 VNC Co-browsing Setting ............................................................................................................................................ 73
Remote Expert Agent Desktop Configuration ..................................................................................... 74 Chapter Overview ...................................................................................................................................................... 74 READ States................................................................................................................................................................. 74 DC Configuration in CAD ............................................................................................................................................. 75 Configure Finesse ........................................................................................................................................................ 75
Configuring the Video URL ................................................................................................................. 77 Appendix Overview ..................................................................................................................................................... 77 Configuring the Video URL .......................................................................................................................................... 77
Checking the Postgres Database ........................................................................................................ 78 Appendix Overview ..................................................................................................................................................... 78 Checking the Postgres Database................................................................................................................................. 78
Frequently Asked Questions (FAQs) ................................................................................................... 79 Appendix Overview ..................................................................................................................................................... 79 Frequently Asked Questions (FAQs) ........................................................................................................................... 79
5
Preface
Note All advertising materials mentioning features or use of this software must display the following
acknowledgement: "This product includes software developed by the University of California,
Berkeley and its contributors.”
Overview This preface describes the audience, purpose, and organization of the Moderro Remote Expert Manager
Administration Guide for Release 11.0. It also provides information on related documentation. This
preface includes the following sections:
• Audience
• Purpose
• Organization
• Related Documentation
Audience This guide is intended for administrators who will add and configure expert types, agents/experts, kiosks, videos, documents, and surveys. This guide also shows administrators how to design and configure the user interface.
Purpose This guide provides the information you need to administer and manage the solution after it has been
deployed. This guide contains information about the following topics:
• Moderro Remote Expert Administration Console (REAC)
• User interface graphics specification for the Moderro Remote Expert Manager (REM) Moderro Remote Expert Interactive Collaboration (REIC) user interface
Organization
This guide is organized into these chapters:
Chapter /
Appendix Title
Description
1 Remote Expert Administration
Console (REAC)
Explains how to add and modify locales, expert
types, experts, video files, content images,
documents, session result questions and answers,
and customer pods (kiosks).
2 User Interface Design
Specification
Provides the user interface graphics specifications
for REM.
6
3 Remote Expert Interactive
Collaboration (REIC) User
Interface Configuration
Describes how to customize the appearance of the
REIC user interface.
4 Remote Expert Agent Desktop
Configuration
Explains how to configure READ states and
Finesse
A Configuring the Video URL Provides the video URL for different video types.
B Checking the Postgres Database Explains how to check if the Postgres database is
running.
C Frequently Asked Questions
(FAQs)
Provides answers to commonly asked questions.
D Acronyms Provides acronyms used in this guide.
Related Documentation
These documents provide additional information about the Moderro Remote Expert Smart Solution:
Moderro Remote Expert Manager Installation Guide
http://www.cisco.com/c/en/us/support/customer-collaboration/remote-expert-manager/products-install
ation-guides-list.html
Moderro Remote Expert Manager Agent Workstation Setup Guide
http://www.cisco.com/c/en/us/support/customer-collaboration/remote-expert-manager/products-install
ation-guides-list.html
Moderro Remote Expert Manager Port Usage Guide
http://www.cisco.com/c/en/us/support/customer-collaboration/remote-expert-manager/products-install
ation-guides-list.html
Moderro Remote Expert Manager Troubleshooting and Serviceability Guide
http://www.cisco.com/c/en/us/support/customer-collaboration/remote-expert-manager/products-trouble
shooting-guides-list.html
Moderro Remote Expert Manager eREAD User Guide
http://www.cisco.com/c/en/us/support/customer-collaboration/remote-expert-manager/products-user-g
uide-list.html
Moderro Remote Expert Manager Release Notes
http://www.cisco.com/c/en/us/support/customer-collaboration/remote-expert-manager/products-release
-notes-list.html
Remote Expert Administration Console (REAC)
Chapter Overview
This chapter is intended for administrators who will install, configure, and manage the Remote Expert
7
Administration Console (REAC). This chapter explains how an administrator will add and modify locales, expert
types, experts, video files, content images, documents, session result questions and answers, and customer
pods (kiosks).
Topics in this chapter include:
• “Introduction”
• “REAC User Interface (UI)”
• “Configuring a Locale”
• “Configuring an Expert Type”
• “Configuring a Kiosk”
• “Configuring Groups of Kiosks”
• “Configuring an Expert”
• “Configuring Desktop Share”
• “Configuring a Video”
• “Configuring Content”
• “Configuring a Document”
• “Viewing Session Information”
• “Viewing the Status of the Databases”
• “Managing a LongPen Tablet”
• “Managing Licenses”
• “Configuring Session Result”
• “Managing Users”
• “Generating Session Reports”
• “Uploading Images to REAC”
• “Cleaning the Call Cache”
• “Setting Document Camera Predefined Zoom Buttons for Agents”
• “Downloading the Desktop Share Utility File”
• “Downloading the SNMP MIBs for NMS File”
• “Downloading Logs”
Introduction
The Moderro® Remote Expert Administration Console (REAC) application provides a graphical user
interface for remotely administering the components of the Remote Expert (RE) solution. RE
administrators can remotely provision new customer sites, configure expert types representing Cisco
Unified Contact Center Express (UCCX) and Unified Contact Center Enterprise (UCCE) queues, experts, and
content used during the session, or configure survey questions displayed at the Remote Expert Interactive
Controller (REIC) at the end of the session.
8
REAC User Interface (UI)
Browser Compatibility
REAC is compatible with multiple browsers and versions including Internet Explorer (IE) 11 and Mozilla
Firefox 46.0.1.
Admin Username and Password
The Admin username and password are admin by default. The Admin password can be changed after logging
into the REAC.
To change the password, follow these steps:
Step 1 Click the down arrow next to admin in the upper right corner and choose Change Password.
Step 2 In the Change Password dialog box, enter admin for the Current Password field. Then enter a new
password in the Password Text and Confirm Password fields. Click Change.
Access the REAC UI
Step 1 To access the REAC UI, enter its URL into a supported web browser. Its URL is the REM
hostname or REM IP address followed by “/reac”: https://<hostname>:8443/reac or
https://<REM_IP>:8443/reac.
Note The hostname needs DNS update to map to the REM’s host address. The REAC login page appears.
Step 2 Enter the username in the Username field.
Step 3 Enter the password in the Password field.
Step 4 Click the Log In button.
The REAC UI home page will appear.
Note By default, the user will be logged out of REAC if the session is idle for more than 50 minutes.
REAC Home Page and Tabs
The home page displays tabs that the administrator can edit to configure the REM. The
tabs are:
1. Locale – By default this tab is displayed as the home page after log in. In this screen, an administrator can configure language variants that customers can use in the REIC.
2. Expert Type – An administrator will configure various expert UCCX/UCCE pilot numbers to be
displayed on the REIC. An administrator can also configure queue videos, caption, and images

9
for various expert types.
3. Kiosk – An administrator configures new customer pods with TP information and IEC information.
4. Group – Use this tab to group kiosks based on locale(s) and expert types(s). The REIC user interface can be customized for each group.
5. Expert – An administrator configures remote experts.
6. Desktop Share – Use this tab to configure agents’ workstations in order to enable desktop sharing.
7. Video – In this screen, an administrator adds video files and modifies settings for those videos
that will be used by the remote experts during sessions. An administrator can also configure
the default On Hold video to be displayed on the REIC.
8. Content – An administrator can configure the times throughout the week when a static graphic image or a content URL is to be displayed on the TP screen when the customer pod
is idle.
9. Document – An administrator uploads document files to the REM in this tab. The documents appear in the agent’s eREAD. The agent can then print these documents to the printer in the customer pod.
10. Session – The administrator can view past calls and access their audio recordings.
11. DB Cluster – The administrator can view the status of the Postgres databases for the given nodes.
12. LongPen – The administrator can view the status of the LongPen tablets and writers.
13. Licensing – The administrator can upload Remote Expert Agent licenses. A license is required for each agent.
14. Session Result – An administrator can add and modify survey questions that will be displayed
on the customer pod at the end of a session in order to collect session results from
customers. An administrator can add and modify agent questions that agents can provide
in eREAD.
15. Manage Users – The administrator can create new Administrator and Guest privilege logins for the REAC.
16. Report Tool – An administrator can generate and download agent session and customer session reports as well as session information with customer follow up reports.
17. Clean Call Cache – The administrator can clean the call cache of a kiosk if a session hangs.
18. Document Camera – The administrator uses this tab to set up four predefined zoom buttons on the document camera application.
19. Download Apps – Use this tab to download application files including the Desktop Share Utility, Snapshot Capture App, and SNMP MIBs for NMS.
20. Download Logs – The administrator downloads logs from REAC, RESC, eREAD, and the Tomcat service as well as a list of RE events.
Filter
On pages that contain tables, such as the Locale, Expert, Expert Type, Video, Content, Document, Kiosk, Link,
Session, and Session Result pages, a Filter button appears in the upper right corner of the tables.
Click the Filter button to view filter fields above the columns of that table.
If you want to filter the entries of a particular column, enter a value in the filter field above the column. Only
the entries containing that value will be shown. For example, if the term “french” is entered in the filter field
10
above the Locale column, only the entries belonging to the French Locale will be displayed.
To show all entries, clear the search field by clicking the X within the filter field.
You can also use the filter to sort columns that contain numerical values. For example, the IEC Serial
Number column in the Kiosk page can be sorted either with the lowest number first or highest number
first. Click the arrow in the upper right corner of the filter to sort the entries.
If you want to hide the filter fields, click the Filter button again.
Configuring a Locale
Locales are the languages that the customer pods support. One locale is the default locale. Other locales can
be made available to a customer pod when configuring it.
A Google Translate API is included with the solution. The API provides a translation of the default English
customer pod screen text to dozens of languages.
Note In order for the translation to occur using the Google Translate API, the REM server must have access to
the Internet.
Add a Locale
To add a new locale, follow these steps:
Step 1 Click the Locale tab.
Step 2 Click the Add button.
The Add Locale dialog box appears.
Step 3 From the Locale drop-down list, choose a locale.
Name of the locale will automatically appear. Modify the locale name if needed.
Note Multiple variants of the same locale can be added. For example, English locale can have
English-US and English-UK as the variants.
Step 4 Enter a description of this locale in the Description field.
Step 5 Click Browse next to the Image field to find and upload an image for the language button that will appear on the customer pod’s home screen.
Step 6 Click Add/Modify Message Bundle to view the Resource Bundle file.
The Locale Properties pop up window will open and display the Locale Properties for that particular language.
Step 7 If you have uploaded images into REAC using the Upload Image tool (see the “Uploading Images to REAC”
section of this chapter for instructions and information), replace the file names with those that were
generated by the Upload Image tool.
Note Only enter the last part of the URL generated from the Upload Image tool starting from “/images/”.
Step 8 Now you will verify the translation.
• If the REM server has access to the Internet, a translation of the text will replace the original English text.
– If you are satisfied with the results of the Google translation, scroll to the bottom of the
11
window and click the Update button. Click Add to add the new locale.
– If you want to modify some or all of Google’s translations:
a. Replace Google’s translations in the text fields with your own translations.
b. When finished, scroll to the bottom of the window and click the Update button.
c. Click OK in the Info pop up box.
d. Click the red round button in the upper left corner to close the Locale Properties window.
e. Click Add to add the new locale.
• If REM server does not have access to the Internet, you will see a message that the Google server is not accessible.
a. Click OK to proceed with manual translation.
b. In the Locale Properties pop up window, replace the English text with translations.
c. When you have finished translating, scroll to the bottom of the window and click the Update
button.
d. Click the red round button in the upper left corner to close the Locale Properties window.
e. Click Add to add the new locale.
Modify a Locale
To modify an existing locale, follow these steps:
Step 1 Click the Locale tab.
Step 2 Click the Modify button.
The Modify Locale dialog box appears.
Step 3 Make changes.
Step 4 Click the Update button to save the changes.
Configuring an Expert Type
The Expert Type screen displays the list of expert types configured in the REM. These expert types are the
UCCX/UCCE pilot numbers where the call is queued and then redirected to the next available agent (expert)
under the respective expert type configured in the UCCX/UCCE.
Add an Expert Type
To add a new expert type, follow these steps:
Step 1 Click the Expert Type tab.
Step 2 Click Add.
The Add Expert Type dialog box appears.
12
Step 3 To create a new expert type, enter a name such as "Mortgage Origination" in the Expert Type field. Other examples of expert type names are “Commercial Banking” and “Wealth Management”. Otherwise choose
the Help or Reschedule expert type by clicking the drop-down menu in the Expert Type field.
Step 4 Enter the pilot number of the expertise from UCCX/UCCE in the IVR Phone Number field. To view the field’s parameters, click the field.
Note The ExpertType+Locale combination should be unique and the IVR number for the expert type
should be same irrespective of the locales. For example, if the “Commercial Lending” expert type
group has four locales (English, Spanish, French, and German) then the IVR number for the
"Commercial Lending" group should be same for all locales.
Note The help number can be a hunt group number in CUCM with which any call for help can be sent to
the help desk team who are not part of UCCX/UCCE.
Step 5 From the Locale drop-down list, choose the locale for this expertise; the locale corresponds to the
language that the experts speak. The expertise will be triggered from the customer pod based on the
locale chosen.
Step 6 Choose a Queue Video, which is also known as the Wait Video. This video will be shown on the customer pod when the customer initiates a call from the customer pod using the given Expert Type. Refer to the “Configuring a Video” section for instructions on how to add these videos. If no video is chosen, the default Queue Video will be streamed.
Step 7 Enter text for the caption that will appear below the image for the expert type on the customer pod screen. The same caption will also replace <<EXPERT_TYPE>> in the screen.call.connecting message inside the Locale
Properties window.
Step 8 Click Browse to find and upload an image without a caption so that it is language-neutral. The image will appear on the customer pod screen to represent this expert type. The caption entered above will appear
below this image on the customer pod screen.
Step 9 Click Add.
Modify an Expert Type
To modify an existing Expert Type, follow these steps:
Step 1 Click the Expert Type tab.
Step 2 Choose the expert type record that you want to modify and click its radio button.
Step 3 Click Modify.
The Modify Expert Type dialog box appears.
Step 4 Make the necessary changes.
Note If you modify the IVR Phone Number, it will update the phone number for all entries of that
expert type. For example, suppose the Commercial Lending expert type has the IVR phone number
1133. If it is changed to “1111” in the Spanish entry, the IVR phone number will also change for
English, French, and German.
Note If you modify the Expert Type name that is associated with one or more Groups, a popup message
13
will appear informing that the Locale or Name of the Expert Type cannot be modified.
Step 5 Click Update to save your changes.
Delete an Expert Type
Note If a call made from the selected Expert Type is still active, it cannot be deleted.
To delete an Expert Type, follow these steps:
Step 1 Click the Expert Type tab.
Step 2 Select the expert type to be deleted.
Step 3 Click the Delete button.
A warning message appears.
Step 4 Click Ok to delete the Expert Type.
Note If you delete the Expert Type that is associated with one or more Groups, a popup message will explain
that the Expert Type cannot be deleted.
Configuring a Kiosk
Note Starting with REM 11.0, the locale is no longer assigned using the Kiosk tab. Instead it is assigned using the Group tab. Please refer to that section below for instructions.
The Kiosk tab displays all the branch sites added to the REM. The kiosk or customer pod is the customer facing
touch screen that the customer touches to initiate a call.
Note AnIEC’s IP address and maintenance code are displayed in the Kiosk table. After a Kiosk has been added,
the maintenance code is automatically pulled from the IEM and populated into the table. An IEC’s IP address
and maintenance code are required for VNC co-browsing. When the agent clicks the VNC Co-browsing
button on eREAD, REM pulls the IEC’s maintenance code from REAC to enable the IEC’s VNC viewer.
Tip A quick way to determine to what group a kiosk is associated is to look at the Group column of the Kiosk tab.
If you see the term ‘default’, then that kiosk belongs to the default group. Refer to the “Group” section of
this chapter to learn how to add that kiosk and others to a group.
Add a Kiosk
To add a new kiosk or customer pod, follow these steps:

14
Step 1 Click the Kiosk tab.
The Kiosk table appears.
Step 2 Click Add.
The Add Kiosk dialog box appears.
Step 3 Enter a name in the Kiosk Name field. This name should match scheduler account name (e.g. exchange 2008). These names need not to be same as in the IEM, but it is recommended to have uniform naming across the
various configurations.
Step 4 Enter a description in the Description field.
Step 5 Enter an email address in the Local Support Mail-Id field. This email account will receive notification if errors are detected with the customer pod.
Tip Use commas to separate valid email addresses. Do not include spaces.
Step 6 Choose the video endpoint type from the Host Type drop-down menu. If using an IEC for a video endpoint, choose SIP.
Step 7 Enter the IP address of the branch TelePresence (TP) video endpoint in the TP IP Address field.
Step 8 Enter the branch TP directory number registered in the CUCM in the Directory Number field.
Step 9 In the IEC Serial Number field, enter the unique serial number of the IEC device used for this customer pod.
Step 10 If the Longpen tablet will be used at this kiosk, choose it from the drop-down menu.
Step 11 Click Add.
Modify a Kiosk
To modify the settings of a customer pod, follow these steps:
Step 1 Click a kiosk radio button in the Kiosk tab.
Step 2 Click Modify.
The Modify Kiosk dialog box appears.
Step 3 Edit the fields as necessary.
Step 4 Click Update.
Step 5 Now you will need to reboot the IEC. In the Kiosk tab, choose the modified kiosk and click the Restart button.
When the IEC is rebooted the following message appears in a pop up box: “The request to restart Kiosk has
been delivered”. Click Ok to continue.
Tip If the IEC at the customer pod does not reboot, the IEC can be rebooted manually. Refer to the
Moderro Interactive Experience Client Series 4600 User Guide for instructions on how to
reboot an IEC manually.

15
Note If the Video Endpoint IP and Directory Number have been modified, make sure to click Clean Call
Cache from REAC after updated the kiosk.
View Kiosk Health To view information about the health of the kiosk, follow these steps:
Step 1 Choose a kiosk.
Step 2 Click the Health button.
The Kiosk Health window opens.
Step 3 When you have finished viewing the information, click the Close button.
Delete a Kiosk
Note If the selected kiosk is currently on an active call, then that kiosk cannot be deleted.
Step 1 Click the Kiosk tab.
Step 2 Choose the kiosk to be deleted.
Step 3 Click the Delete button.
A warning message appears.
Step 4 Click Ok to delete the kiosk.
Configuring Groups of Kiosks
The Group tab allows administrators to group kiosks, customize the screen layout of each kiosk group, and
assign locales and expert types to each kiosk group.
Note Upon a fresh install, a ‘default’ group is created. This is the master copy from which all new groups will be
created.
Use the Group tab to:
• Create groups of kiosks - For example, a bank may want to group kiosks based on expert type;
there could be a group for business clients, a group for mortgage clients, and a group for
clients seeking wealth management. Or the kiosks could be grouped based on locale or
location; either may be useful for organizations that have presence in multiple countries.
• Customize REIC layouts - Each group can have a different kiosk screen layout. The Theme
parameters section of the Group dialog box allows administrators to arrange the expert type

16
buttons by selecting the number of rows and columns, the size of the gap between expert
type buttons, horizontal and vertical alignment, etc. In addition, administrators can specify
the video player dimensions as well as the style, size, and color for expert type, feedback, and
rollover fonts. Administrators can also choose whether customers will be prompted to type
their identification number using a physical keypad or swipe an identification card using a
magstripe card reader connected to the IEC. Image files for the background, logo, signature
capture screen, and scan screen are uploaded in this section. • Choose the locale(s) of a group
• Choose the expert type(s) of a group
• Assign kiosk(s) to a group
Note When a kiosk is first added, it will be assigned automatically to the ‘default’ group and its
screen will reflect the settings in that group.
Add a Group
If more than one group is desired, add groups using the Add button in the Group tab.
Tip It is best to add groups after the locales and expert types have been configured.
Step 1 Click the Group tab.
Step 2 Click the Add button.
Step 3 Enter the name of the group in the dialog box.
Step 4 Set the theme parameters.
The following table shows the list of theme parameters, descriptions, and valid values:
Table 1-1 Theme Parameters
Name Description Valid Value
Orientation Specify whether the expert type buttons are
arranged row by row or column by column.
columns, rows
Column Count Number of columns to be displayed. Set to -1 to
allow the REIC to determine the column count
automatically. This property is explicitly set if the
orientation property is set to columns.
Set the column count for expert
type layout.
* Numbers only
* Allowed minimum value is -1
Row Count Number of rows to be displayed. Set to -1 to
allow the REIC to determine the row count
automatically. This property is explicitly set if the
orientation property is set to rows.
Set the row count for expert type
layout.
* Numbers only
* Allowed minimum value is -1
Horizontal Gap Number of pixels between expert type buttons in
the horizontal direction.
* Any positive numbers
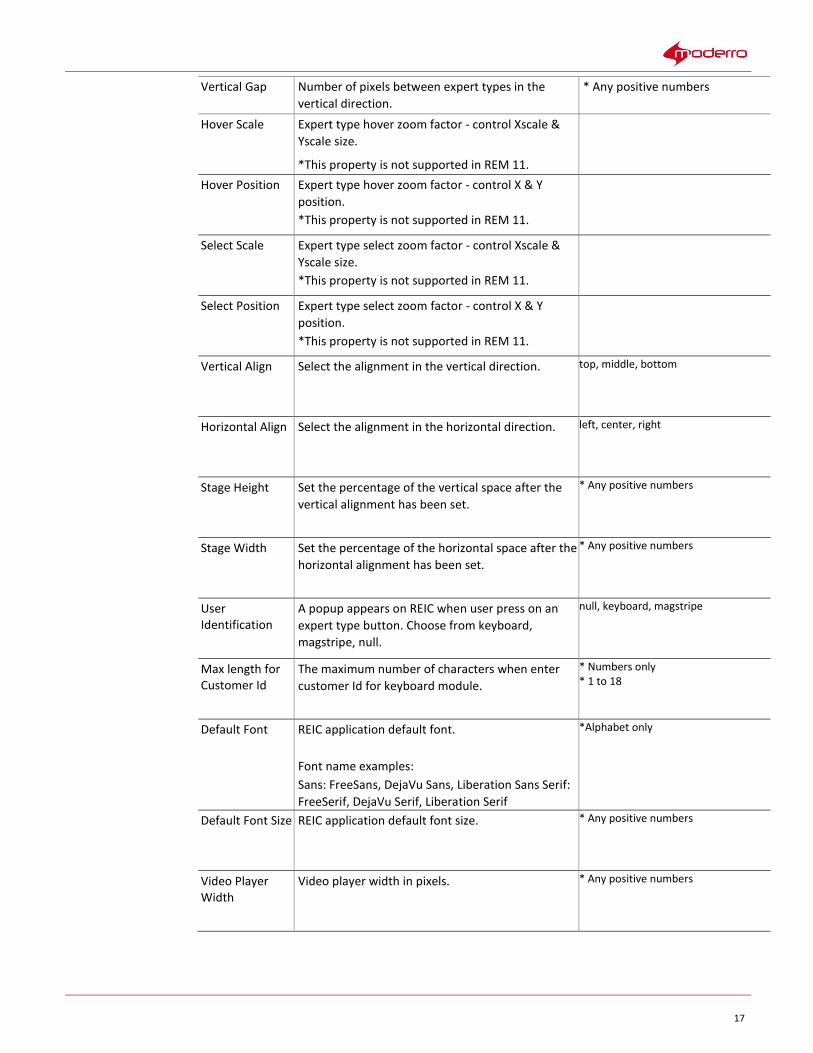
17
Vertical Gap Number of pixels between expert types in the
vertical direction.
* Any positive numbers
Hover Scale Expert type hover zoom factor - control Xscale &
Yscale size.
*This property is not supported in REM 11.
Hover Position Expert type hover zoom factor - control X & Y
position.
*This property is not supported in REM 11.
Select Scale Expert type select zoom factor - control Xscale &
Yscale size.
*This property is not supported in REM 11.
Select Position Expert type select zoom factor - control X & Y
position.
*This property is not supported in REM 11.
Vertical Align Select the alignment in the vertical direction. top, middle, bottom
Horizontal Align Select the alignment in the horizontal direction. left, center, right
Stage Height Set the percentage of the vertical space after the
vertical alignment has been set.
* Any positive numbers
Stage Width Set the percentage of the horizontal space after the
horizontal alignment has been set.
* Any positive numbers
User Identification
A popup appears on REIC when user press on an
expert type button. Choose from keyboard,
magstripe, null.
null, keyboard, magstripe
Max length for Customer Id
The maximum number of characters when enter
customer Id for keyboard module.
* Numbers only * 1 to 18
Default Font REIC application default font.
Font name examples:
Sans: FreeSans, DejaVu Sans, Liberation Sans Serif:
FreeSerif, DejaVu Serif, Liberation Serif
*Alphabet only
Default Font Size REIC application default font size. * Any positive numbers
Video Player Width
Video player width in pixels. * Any positive numbers
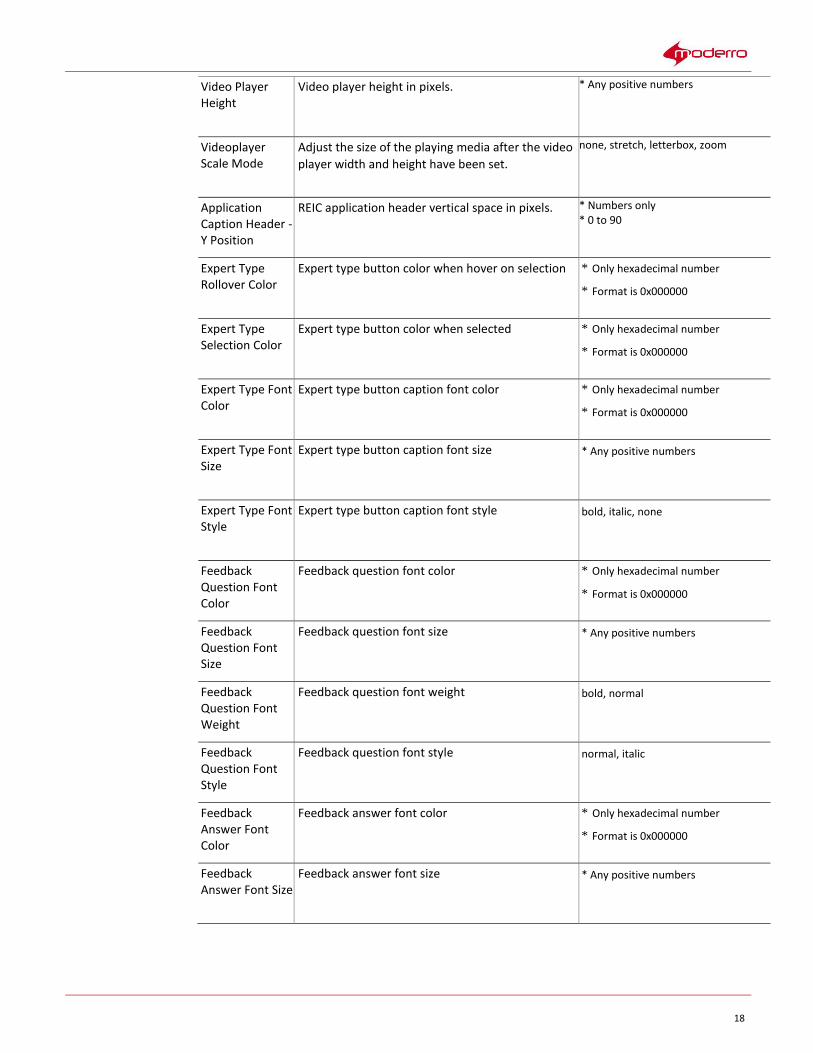
18
Video Player Height
Video player height in pixels. * Any positive numbers
Videoplayer Scale Mode
Adjust the size of the playing media after the video
player width and height have been set.
none, stretch, letterbox, zoom
Application Caption Header - Y Position
REIC application header vertical space in pixels. * Numbers only * 0 to 90
Expert Type Rollover Color
Expert type button color when hover on selection * Only hexadecimal number
* Format is 0x000000
Expert Type Selection Color
Expert type button color when selected * Only hexadecimal number
* Format is 0x000000
Expert Type Font Color
Expert type button caption font color * Only hexadecimal number
* Format is 0x000000
Expert Type Font Size
Expert type button caption font size * Any positive numbers
Expert Type Font Style
Expert type button caption font style bold, italic, none
Feedback Question Font Color
Feedback question font color * Only hexadecimal number
* Format is 0x000000
Feedback Question Font Size
Feedback question font size * Any positive numbers
Feedback Question Font Weight
Feedback question font weight bold, normal
Feedback Question Font Style
Feedback question font style normal, italic
Feedback Answer Font Color
Feedback answer font color * Only hexadecimal number
* Format is 0x000000
Feedback Answer Font Size
Feedback answer font size * Any positive numbers

19
Feedback Answer Font Weight
Feedback answer font weight bold, normal
Feedback Answer Font Style
Feedback answer font style normal, italic
Note Refer to the “REIC UI Configuration” section of this guide to see examples of Expert Type
button layouts.
Step 5 Upload the image files for the background, small and large logos, and the scan and signature capture screens.
Step 6 Choose all the locales necessary by clicking the boxes.
Note A group cannot have variants of the same locale. If you select multiple regions that is associated
to the same locale (e.g. English-US and English-UK), a popup message will ask you to select only
one variant of a locale.
Step 7 If more than one locale was chosen above, choose the Default Locale from the drop-down menu.
Step 8 Choose the expert type(s).
Note The only expert types shown in this list will be those that have been configured for the locales
that you have chosen above. If more than one locale has been chosen above, then the expert types
shown in the list are those that ALL chosen locales have the same expert type name. For example, if
you chose English, Spanish, and German and the same six expert types configured for both English
and Spanish but only four of them are also configure for German, the list will only show those four
that all three locales have the same expert type name.
Step 9 Choose the kiosk(s) that belong to this group.
Note Only kiosks that you have not assigned to other groups will be listed. Kiosks that are in the
‘default’ group will be listed because you have not assigned them yet.
Step 10 Click the Add button at the bottom of the dialog box.
Step 11 Clear the IEC media and web caches in IEM.
Step 12 Restart the Application from IEM or reboot the IECs from REAC.
Note Refer to the Moderro Interactive Experience Manager Installation Guide and the Moderro
Interactive Experience Manager Administration Guide for instructions on how to perform
the above two steps.
20
Modify a Group
Warning If you modify any settings in the ‘default’ group and save them, those settings will become the “default” settings moving forward. Then when you add a new group, those modified settings will appear in the new group rather than the factory settings.
Step 1 Click the radio button next to the group that you want to modify, and then click the Modify button.
Step 2 Modify the theme parameters if desired.
Step 3 Upload new image files if desired.
Step 4 If you want to alter the Locale section, click the Change button. After you choose additional locales or remove some, click the Done button to save your changes.
Step 5 If you made changes to the Locale section and need to change the Default Locale, choose the new locale from the drop-down menu.
Step 6 Choose additional expert type(s) or remove some if desired.
Step 7 Select additional kiosk(s) or remove those that should no longer belong to this group.
Note Only kiosks that have been previously assigned to this group or have not been assigned to another group (other than the ‘default’ group) will be listed.
Step 8 Click the Update button at the bottom of the dialog box.
Step 9 Clear the IEC media and web caches in IEM.
Step 10 Restart the Application from IEM or reboot the IECs from REAC.
Delete a Group
Note You cannot delete the ‘default’ group.
Step 1 If you no longer need a group, click the radio button next to it and then click the Delete button.
Step 2 When prompted, confirm that you want to delete it.
Note Kiosks that are associated with the deleted group will return to the ‘default’ group.
Configuring an Expert
The Expert tab displays all the call center agents designated as remote experts in the Remote Expert Manager.
Experts are the agents configured in CUCM as end-users with IPCC DNs assigned to them. They will be
assigned to different skill group or resource group in UCCX/UCCE so that they can receive selective calls.
Please refer to the respective UCCX/UCCE SRND for more information on agent routing.
21
Registration Status
The Registration Status column indicates whether the expert has been successfully registered in the CUCM. If
the box is green, the agent is registered. If the box is red, the agent is not registered or the Directory Number
(DN) is incorrect. The Administrator can update the expert’s registration status by clicking the Refresh
Registration button.
When there is a dual node setup (i.e. high availability (HA) is used), two columns will be shown under
Registration Status. Each box represents a particular REM node. If one of the REM nodes is down, then the
corresponding status column will be red for all given experts.
Add an Expert
To add a new Expert, follow these steps:
Step 1 Click the Expert tab.
Step 2 Click Add.
The Add Expert dialog box appears.
Step 3 In the Directory Number field, enter the IPCC DN assigned to the expert in the CUCM end-user
configuration. The call will be made to this number.
Step 4 Click Add.
Modify an Expert
To modify the DN of an existing Expert, follow these steps:
Step 1 Click the Expert tab.
Step 2 Choose an expert’s radio button.
Step 3 Click Modify.
The Modify Expert dialog box appears.
Step 4 Edit the Directory Number field.
Step 5 Click Update.
Delete an Expert
Note If the selected expert is on an active call, then that expert cannot be deleted.
Step 1 Click the Expert tab.
Step 2 Choose the expert to be deleted.
Step 3 Click the Delete button.
A warning message appears.
Step 4 Click Ok to delete the expert.
22
Configuring Desktop Share
Agents can share their desktop screen using the Desktop Share button on eREAD. The agents’ desktop MAC
addresses must be added to REAC.
The following is needed to add an agent’s desktop to the Desktop Share tab:
1. Agent's desktop MAC address - To get the MAC address of an agent's desktop, do one of the following:
– 1. Go to the command line and type ipconfig /all and press the Enter key. Find the Physical Address line. Place your cursor on that line, right-click, choose Mark, highlight the MAC address, right-click, and choose Copy.
– 2. Right-click the network icon on the agent's desktop task bar and then click the Open Network and Sharing Center at the bottom of the pop-up box. Click the blue Connections
link. In the Network Connections Status dialog box, click the Details button. Find the Physical Address. and record it.
2. RD Server passphrase from the agent’s desktop -The passphrase is a public key, which is a text
file generated by the RD Server. To get the passphrase, right-click on the RD Server icon on the
task bar and choose Settings. In the Setting dialog box, click the Security tab. Click the Show
public key button in the Security tab of the Settings window of the RD Server Settings dialog
box. Copy the passphrase and paste it into Notepad or Wordpad. Save the file to the agent's
desktop using ANSI encoding.
Note If the RD Server has not been installed on the agent’s desktop, refer to the
Moderro Remote Expert Manager Agent's Workstation Setup Guide for instructions
on how to install and configure it.
Add an Agent’s Workstation to the Desktop Share Tab
To add an agent’s workstation to REAC to enable desktop sharing on it, follow the steps below:
Step 1 In REAC, go to the Desktop Share tab and click the Add button.
Step 2 In the Add Agent Desktop dialog box, enter the MAC address of the agent's desktop.
Step 3 Enter 6050 for the port.
Step 4 Enter a password in both the Password and Confirm Password fields. Record this password since it will be
entered in the RD server on the agent's desktop during setup.
Step 5 Click the Browse button next to the Passphrase field. Find the passphrase file on the agent’s desktop and add it.
Step 6 Click the Add button to save.
The agent’s desktop MAC address and port number are displayed in the Desktop Share tab.
Modify a Desktop Share Entry
If you need to change the MAC address, port number, password, or passphrase of an existing entry, follow
the steps below:

23
Step 1 Click on the MAC address of the agent’s desktop that must be modified.
Step 2 Change the necessary values in the dialog box.
Step 3 Click the Update button to save your changes.
Remove a Desktop Share Entry
Step 1 Click on the MAC address of the agent’s desktop that must be modified.
Step 2 Click the Delete button.
Configuring a Video
The Video tab displays the videos in REM. It is also used to set the On Hold video. There
are three types of videos that you will add in this tab:
1. Wait/Queue video(s): This video is displayed on the customer pod when the customer
initiates a call from it. Different Queue videos can be chosen for different expert types.
Queue videos are first added in the Video tab and then the administrator can assign them to
expert types in the Expert Type tab.
Note The scheme for default wait video is changed to HTTPS in the sql script itself. This URL is
provided until the customer assigns a different wait video and is not applicable for video
hosted in AMS.
2. On Hold video: The REM always requires a default On Hold video to be designated in the system.
When the first video is added to the REM, this field is set to “Yes” by default, making it the On
Hold video. When a customer call is put on hold by the agent, the customer pod will display the
On Hold video.
Note At any one time there can be only one system-wide default On Hold video.
Once a video has been designated as the On Hold video, you cannot change its On Hold Video setting to “No”. Instead, you must set another video as the On Hold video; this video will then become the new default On Hold video for all agents. However, an expert may select any one of the available videos in eREAD as the On Hold video for the current session. After the end of the session, the agent-chosen On Hold video reverts back to the default On Hold video for all subsequent sessions.
3. Product and service videos: These videos can be streamed by the agent to the customer pod during sessions.
Add a Video
To add a new video, follow these steps:
Step 1 Click the Video tab.
The Videos list is displayed.
24
Step 2 Click Add.
The Add Video dialog box appears.
Step 3 Enter a category name in the Category field.
Step 4 Enter a description of the video in the Description field.
Step 5 If this video should be the video that streams when a customer is placed on hold, choose Yes from the On Hold Video drop-down list.
Note If this is the first video added to the REM, this field will be set to “Yes” by default, making this
video the default On Hold video.
Step 6 Enter the URL in the Video URL field. Refer to Appendix A for information regarding the Video URL.
Step 7 Click Browse to upload a thumbnail image that will be used to visually represent the video in the remote expert’s eREAD.
Tip Use a thumbnail image converter to create thumbnail images for all the videos.
Refer to the Moderro Remote Expert Manager eREAD User Guide for more information.
Step 8 Click Add.
Modify a Video
To modify an existing video, follow these steps:
Step 1 Click the Video tab.
Step 2 Choose a video and click its radio button.
Step 3 Click Modify.
The Modify Video dialog box appears.
Step 4 Edit the fields if necessary.
Step 5 Click Update.
Delete a Video
Note If the selected video is being streamed on an active call, then that video cannot be deleted.
Step 1 Click the Video tab.
Step 2 Choose the video to be deleted.
Step 3 Click the Delete button.
A warning message appears.
Step 4 Click Ok to delete the video.
25
Configuring Content
The purpose of this tab is to upload static graphic images, also known as dual content images. A static image or
a content URL will be displayed on the TP at the customer pod when no Remote Expert session is in progress.
Only one image is displayed at a time but multiple images can be scheduled to display at different times or days.
The image types are listed in the REAC Properties file that is located under the terminal user interface (TUI)
account: Main Menu > REM Server Administration > Edit REM Templates > a) REAC Properties. The images can
contain branding (e.g. company logo), the name of this solution (i.e. “Remote Expert”), hours of operation, and
important announcements. An image can be displayed on all days or just certain days.
The graphic image appears on the TP according to the IEC’s time zone. All the IECs configured in REAC will show
the same images configured for a particular time slot.
Add a Content Item
To add a new content item for the TP, follow these steps:
Step 1 Click the Content tab.
Step 2 Click Add in the Content screen.
The Add Content dialog box appears.
Step 3 Enter a name in the Name field.
Step 4 Supply an image.
• If you wish to supply an URL instead of uploading an image file, uncheck the Upload image
checkbox and then enter the URL in the Content URL field. You can enter the URL of a web
page (e.g. http://dualcontent.com/index.html) that contains a full-screen image or the URL of
an image uploaded into REAC. (See the “Uploading Images to REAC” section of this chapter
on how to upload an image to REAC and generate its URL.)
• If you wish to upload an image rather than supplying an URL, check the Upload image check box and then click Browse to find and upload an image that will appear on the customer pod’s TP.
Step 5 From the Day of Week drop-down list, choose which day the image should appear or All Days.
Step 6 In the Starts From field, enter the time in hours, minutes, and seconds that the image should start displaying.
Step 7 In the Ends At field, enter the time in hours, minutes, and seconds that the image should stop displaying.
Step 8 Click Add.
The image will appear on the TP at the customer pod according to the day and time configured.
Modify a Content Item
To modify a content image, follow these steps:
Step 1 Click the Content tab.
Step 2 Choose the content item that you want to modify.
Step 3 Click Modify.
26
The Modify Content dialog box appears.
Step 4 Edit the fields as necessary.
Step 5 Click Update.
Delete a Content Item
Step 1 Click the Content tab.
Step 2 Choose the content item to be deleted.
Step 3 Click the Delete button.
A warning message appears.
Step 4 Click Ok to delete the content item.
Configuring a Document
The purpose of the Document tab is to upload documents that can be printed at a customer pod’s printer
that is connected to an IEC or shared with a customer who is using a mobile device. The uploaded
documents are visible in eREAD. The document types supported, such as text, txt, pdf, jpg, jpeg, png, bmp,
gif, jfif, and jpe, are listed in the REAC Properties file located under the TUI account: Main Menu
> REM Server Administration > Edit REM Templates > a) REAC Properties.
Add a Document
To add a new document, follow these steps:
Step 1 Click the Document tab.
Step 2 Click Add.
The Add Document dialog box appears.
Step 3 Enter a category name in the Category field.
Step 4 Enter a description in the Description field.
Step 5 Click Browse to find and upload a document file.
Step 6 Click Add.
Modify a Document
To modify a document, follow these steps:
Step 1 Choose a document radio button in the Document tab.
Step 2 Click Modify.
The Modify Document dialog box appears.
27
Step 3 Edit the fields as necessary.
Step 4 Click Update.
Viewing Session Information
In the Session tab, the administrator can view the past calls made using the REM. The administrator can also
access the audio recording made for each call.
Click the Session tab to view the list of sessions.
By default, the sessions are sorted by status with active calls on top (i.e. Completed, On Hold, and Abnormal
Disconnect) and with start time in descending order.
Help Popup Window
The Session page contains a Help button which when clicked opens a popup window. This Help window contains
information to help you filter the sessions and find what you need.
Sort the Sessions List
Sort the data by clicking a column heading. Sorting is always done first based on status and then based on
the user-selected column.
Use the Scroll Bar to View All the Records
Initially only 25 records are displayed in the list. If you want to view more records, use the scroll bar.
Use Quick Filtering
Quick filtering is a feature that sorts the Start Time, End Time, Agents, and Kiosk DN fields. Choose
Quick Filter from the drop down list or click the Quick Filter icon.
• Start Time or End Time: Use the format yyyy-MM-dd HH:mm:ss.
• Experts: Enter a number that is contained within the Expert DN.
• Kiosk DN: Enter a number that is contained within the DN.
Refresh the Sessions List
Click the Refresh button to fetch all the latest records.
View Details of a Call
Select a record and click View Details. The Call Details window will open with the details for the
selected RE session.

28
Play Audio Recording of the Call
To play an audio recording of a call, you will need the following:
• Apple QuickTime Player plug-in if you are using Internet Explorer 11
Note If you are using Mozilla Firefox 46.0.1, there is no need to install the player plug-in.
• Credentials for the media server where the audio recordings are being stored
Step 1 In the Call Details dialog box, click the call record.
Step 2 In the QuickTime Internet Authentication pop up box, enter the username and password of the
MediaSense server.
Step 3 Click OK.
Note If you are using MediaSense version 10.5(1) or above, make sure to add the MediaSense self-signed
certificate into the Trusted Root Certification Authorities store for IE11. Refer to the “How to configure a
browser to run in-browser player in MediaSense” section of the following page to add the certificate.
http://docwiki.cisco.com/wiki/FAQs_for_Cisco_MediaSense#How_to_configure_a_browser_to_run_in
-browser_player_in_MediaSense.3F
Viewing the Status of the Databases
The DB Cluster tab allows the administrator to view the current status of the REM databases. To
view the database status, follow these steps:
Step 1 Click the DB Cluster tab.
Step 2 Look at the database status as indicated in the DB Cluster Nodes Column.
If status shown is green, then the Postgres Database is running properly. If the status shown is red, then the
Postgres Database is not up and running. If that is the case, you should activate the database to get the
database to run properly. Follow Steps 3-5 to activate the databases that are not up and running.
Step 3 Ensure that the Postgres process in running on the given REM node. See Appendix B for instructions on how to check if the Postgres Database process is running correctly.
Step 4 Choose the database that you want to activate by clicking the radio button next to its name.
Step 5 Click the Activate button.
Managing a LongPen Tablet
The administrator can check the health of the LongPen Tablets and Writers and restart them by using the
LongPen tab of the REAC.
To restart a tablet, follow these steps:
Step 1 Click the LongPen tab.
29
Step 2 Choose the tablet.
Step 3 Click the Restart Tablet button.
Managing Licenses
Each expert requires a license. You cannot add an expert if there is not an available license. An error message
will appear on the Expert page if you try to add an expert without sufficient licenses.
The number of available licenses and the number of used licenses are indicated in the bottom half of the
Licensing page.
You will need the following to add licenses to REAC:
• MAC address(es) of the REM server(s)
• The number of remote experts
• License file
Obtain the REM Server’s MAC Address
To obtain the REM server’s MAC address, you will need to use a terminal emulator such as PuTTY.
Step 1 Open a terminal emulator such as PuTTY.
Step 2 Enter the REM server’s IP address for the host.
Step 3 Enter 22 for the port number.
Step 4 Choose SSH for the connection type.
Step 5 Click Open.
Step 6 When connected, type installer for the login and press the Enter key.
Step 7 Type the password and press the Enter key.
Step 8 In the Main Menu, type a to choose System Settings.
Step 9 In the System Setting menu, type d to choose System Information.
Step 10 Scroll up and find the HWaddr (MAC) address.
Step 11 Copy the address.
Generate a License File
After you purchase the licenses, you will need to generate a license file that will be uploaded into REAC.
Step 1 Log into www.cisco.com with your customer or partner credentials.
Step 2 Purchase Remote Expert Agent licenses.
Step 3 Go to the Cisco Licensing site at https://tools.cisco.com/SWIFT/LicensingUI/Home.
Step 4 On the Product License Registration home page, click the green Continue to Product License Registration button.
Step 5 Click the Start License Wizard button.

30
Step 6 Enter the PAK numbers in the field.
Step 7 Enter the MAC address of the REM without the colons (e.g. 00000C11BB22). If there are two REM servers, separate the two MAC address with a space (e.g. 00000C11BB22 00000C33DD44)
Step 8 Click the Assign button and then click Next.
Step 9 Enter your email address. This email address will receive the license file.
Step 10 Check the I agree with the Terms of the License check box.
Step 11 Click the Get License button.
A green checkmark indicates that the request was successful. You will then receive an email with the license
file. The license file is required to add licenses to the REAC.
Upload the License File
After you have received the license file, you will upload it into the REAC.
Step 1 Choose the Licensing tab.
Step 2 Click the Upload License button.
Step 3 In the Add License dialog box, click the Browse button.
Step 4 Find the license file and click Open.
Step 5 Click the Upload button.
Modify a License
If there is a problem with the license file, you can upload a replacement or updated file.
Step 1 Choose a license file.
Step 2 Click the Modify button.
Step 3 In the Replace/Update License dialog box, click the Browse button.
Step 4 Find the license file and click Open.
Step 5 Click the Replace button.
Note The Modify License feature will only replace the content of an existing license file. The license file name
cannot be changed once it is uploaded.
Delete a License
Step 1 Choose the license to be deleted.
Step 2 Click the Delete button.
A warning message appears.

31
Step 3 Click Ok to delete the license.
Configuring Session Result
The Session Result tab contains the session result questions and answers that are displayed on the customer
pod after the call is disconnected from the expert. The Session Result Question tab displays the survey
questions, their locales (i.e. English or Spanish), and the type of answers (e.g. multiple choice) possible.
All the IECs will show the same set of questions and answers.
Add a Question
There is no limit to the number of questions that can be added to the REM. To
add a new question, follow these steps:
Step 1 Click the Session Result tab.
Step 2 Click Add.
The Add Question dialog box appears.
Step 3 From the Locale drop-down list, choose a locale.
Note Questions are associated with locales. If the customer has a choice of locales when initiating the
call, questions for the locale that the customer chose will appear at the end of the call.
Step 4 Enter a question in the Question field.
Tip The question should be one that can be answered by short multiple choice answers.
Step 5 From the Question Type drop-down list, choose Multiple Choice or Text.
Note A virtual keyboard will automatically appear on the REIC screen for text-based questions.
Step 6 Click Add.
Modify a Question
To modify a question, follow these steps:
Step 1 Choose the question that you want to modify.
Step 2 Click the Modify button.
The Modify Question dialog box appears.
Step 3 Make the changes.
Step 4 Click Update.
32
Delete a Question
To delete a question, follow these steps:
Step 1 Choose the question that you want to delete by clicking the radio button next to the question.
Step 2 Click the Delete button.
Step 3 When the warning dialog box appears, click Ok to delete the question.
Add Answers
For each multiple-choice question, you need to add at least two answers. Questions that require a “yes/no”
or “true/false” answer are considered multiple-choice questions with two answers.
To add an answer to a multiple-choice question, follow these steps:
Step 1 On the Questions page, choose the question to which you want to add answers.
Step 2 Click the Add Answer button.
The Add Answer dialog box appears.
Step 3 Enter an answer for the question in the Answer field.
Step 4 Click Add.
Repeat Steps 2-4 to create all the answers for that question.
Modify an Answer
To modify an answer, follow these steps:
Step 1 Go to the Session Result tab to display the drop-down menu.
Step 2 Choose the Answers button under the Customer category.
The Answers screen appears.
Step 3 Choose the answer that you want to modify.
Step 4 Click Modify.
The Modify Answer dialog box appears.
Step 5 Edit the answer in the Answer field.
Step 6 Click Update.
Delete an Answer
To delete an answer, follow these steps:
33
Step 1 In the Session Result drop-down menu, choose the Answers button under the Customer category.
The Answers screen appears.
Step 2 Choose the answer that you want to delete by clicking the radio button next to the answer.
Step 3 Click the Delete button.
Step 4 When the warning dialog box appears, click Ok to delete the answer.
Manage Agent Questions and Answers
You can create questions for the agent to answer during the session. The questions appear after you click
“Session Result” in eREAD.
To access the agent questions and answers, follow these steps:
Step 1 From the Session Result drop-down menu, choose the Questionnaire button under the Agent category.
The Questions screen for the agent appears.
Step 2 In this screen you can add, modify, or delete questions or add answers to a question. Follow the steps in the previous step sets to perform those actions.
Step 3 To modify or delete an answer, go to the Agent Answer screen by clicking the down arrow of the Session Result tab to display the drop-down menu and choosing the Answers button under the Agent category.
Step 4 Choose the answer that you want to modify or delete in the Answers screen.
Step 5 Follow the steps in the previous step sets to perform those actions.
Managing Users
The administrator can create Administrator and Guest users for REAC. A Guest user can view most of the tabs
and the records within them but cannot add, modify, or delete records. Only users with the role of
“Administrator” can add, modify, or delete records or playback MS recordings.
Add a New User
Follow these steps to add a new user:
Step 1 Click the Manage Users tab.
Step 2 Click Add.
The Add User dialog box appears.
Step 3 Enter a user name in the Preferred Username field.
Step 4 Enter the user’s real first and/or last name.
Step 5 Enter the user’s email address.
Step 6 Choose Administrator or Guest from the Role drop-down list.
Step 7 Check the Enable Account check box.

34
Note If the Enable Account check box is not checked, the user will not be able to access the REAC.
Step 8 Enter a password for this user in the Password Text and Confirm Password fields.
Step 9 Click Add.
Note Remember, a user will be logged out of REAC if the session is idle for more than 45minutes.
Delete a User
Step 1 Click the Manage Users tab.
Step 2 Choose the user to be
deleted. Step 3 Click the Delete
button.
A warning message appears.
Step 4 Click Ok to delete the user.
Generating Session Reports
The Report Tool tab contains a tool for generating reports about the sessions including agent session and
customer session results as well as session information with customer follow up.
To narrow down the search for specific session reports, the start and end dates for the sessions can be
chosen.
Once the report has been generated, its criteria can be filtered including the start time, end time, kiosk number,
queue name, queue number, expert, and locale.
Once the report is generated, it is emailed to the administrator. It can also be downloaded from the tool.
Step 1 Click the Report Tool tab.
Step 2 Click the Run button of the Report Generation Tool.
Step 3 In the Run Report Generation Tool dialog box, choose the type of report desired in the Report drop-down menu.
Step 4 Choose the start and end dates.
Step 5 Click the Run Report button to generate the report.
Step 6 The administrator will receive an email with the report(s). You can also download the reports by clicking the Download Reports button. Choose to Open or Save File. Click OK.
The zip file contains one or more spreadsheets.

35
Uploading Images to REAC
The Upload Image tool allows an administrator to upload user interface image files. Once uploaded, a URL is
generated that can be used in REAC such as for Background images (see the “Background Image” section in
Chapter 3) and Locale images (see the “Configuring a Locale” section in this chapter).
Step 1 Click the Upload Image tab of the REAC.
Step 2 Click Browse.
Step 3 Find the image on your workstation and click Open. The name of the image appears in the field.
Step 4 Click Upload.
The file loads. When the file has successfully loaded to the REM server, a message box appears in the lower
right corner of the REAC screen indicating that the file was saved.
Step 5 Click Show the URL. A dialog box opens containing the URL for the image.
Step 6 Press Ctrl + C and then the Enter key to copy the URL to your clipboard. Alternatively, right-click the URL and choose copy.
Step 7 Go the tab in REAC where you need the URL and paste it in the URL field. (Refer to the “Configuring a Locale”
section in this chapter or the “Background Image” section in Chapter 3 for an example of using the URL
generated.)
Cleaning the Call Cache
The administrator can clean the call cache of the kiosks if a session hangs. When a session hangs, a new call
cannot be initiated to or from the customer pod. By cleaning the call cache, the session’s status in the Session
tab is changed to “Completed”, which then allows the customer pod to start or receive a new call.
Step 1 Click the Clean Call Cache tab.
A Status box appears in the lower right corner of the screen indicating that the call cache was cleaned.
Setting Document Camera Predefined Zoom Buttons for Agents
There are four predefined zoom buttons in the document camera application that can be preset by the
administrator. This is helpful for standard documents that agents are expected to take snapshots. For
example, agents may routinely take snapshots of documents that are 8 1/2 x 11 inches as well as driver’s
licenses. By presetting buttons so that the camera zooms into the document with the touch of a button can
save the agent time manually zooming the camera in and out.
To preset the zoom buttons, follow these steps:
Step 1 Click Document Camera tab.
Step 2 Choose a radio button.
Step 3 Click Modify. The Modify Preset Data dialog box will open.
Step 4 In the Preset Label field, enter a name for the button that will appear on the agent’s document camera application. For example, if you are configuring the button for documents the size of drivers’ licenses, enter
“Driver’s License”.
Step 5 Now you will need to configure the RS232 Command, which is the zoom level.
a. Open the document camera application on your desktop.

36
b. Place a document with the desired size beneath the document camera.
c. Use the zoom buttons on the document camera application to zoom into the document so that its text can be easily read.
d. Click one of the Preset buttons.
e. Go to the IEM and choose the IEC that you used for capturing the document.
f. Go to the Events tab of that IEC and find the event where you clicked the Preset
button. You will need the value of the Camera Zoom position, for example,
“905002020B08FF”.
g. Save the events as a text file by entering 10000 in the Max number of events field and clicking Save As.
h. Open the file with Notepad.
i. Scroll tothe event.
Tip If you cannot find the event, repeat steps d-f.
j. Copy the value for the Camera Zoom position (e.g. 905002020B08FF).
k. Go to REAC and paste the value of the Camera Zoom position into the RS232 Command field.
Step 6 In the Button Status drop-down menu, choose Enabled so that the button will be activated for the
agents.
Step 7 Click Update.
Note If the document camera application is open on agents’ desktops during the configuration of these buttons, the buttons will not appear until the application is stopped and restarted. Click Stop Camera and then Start Camera.
Tip If you have questions about the document camera predefined zoom fields, click the Help button in the
Document Camera tab.
Downloading the Document Camera Application File
The Download Apps tab contains the file required to set up the Document Camera application on the agents’
workstations. The administrator will need to download the file and then distribute it to the agents or the
person who will install the application on the agents’ workstations.
Step 1 Rollover the Download Apps tab to view the drop-down menu.
Step 2 Click Snapshot Capture App.
Step 3 In the dialog box, choose the Save button to save the snapshotapp-dist.zip file to the desktop.

37
Downloading the Desktop Share Utility File
The Download Apps tab contains the file required to set up the Desktop Share application on the agents’
workstations. The administrator will need to download the file and then distribute it to the agents or the person
who will install the application on the agents’ workstations. Follow the instructions below to download the file
to your desktop:
Step 1 Rollover the Download Apps tab to view the drop-down menu.
Step 2 Click Desktop Share Utility.
Step 3 In the dialog box, choose the Save button to save the rem-desktopshare-utility.zip file to the desktop.
Downloading the SNMP MIBs for NMS File
The Download Apps tab contains the file required for SNMP Health Check feature. Follow the instructions
below to download the file:
Step 1 Rollover the Download Apps tab to view the drop-down menu.
Step 2 Click SNMP MIBs for NMS.
Step 3 In the dialog box, choose the Save button to save the snmpMIBS.zip file to the desktop.
Downloading Logs
The Download Logs tab contains lists of logs that can be used for troubleshooting issues:
1. Admin Console: Contains the reac.log from this REAC
2. Agent Desktop: Contains the read.log from eREAD
3. Session Manager: Contains the resc.log from the RESC
4. RE Events: Capture RE events during a specified time
5. Tomcat: Contains the catalina log for the Tomcat service Follow the steps
below to download a log.
Step 1 Hover over the Download Logs tab to open the drop-down menu.
Step 2 Choose one of the modules from the list.
Step 3 If you chose the Admin Console, Agent Desktop, Session Manager, or Tomcat module, you will see a list of logs that you can download. Choose the log that you want to download and then click the Download
button. Go to Step 5.
Step 4 If you chose the RE Events module:
a. Click the From field to open the calendar.
b. Choose the start date of the events that you want captured.
a. Click the To field to open the calendar.
b. Choose the end date of the events that you want captured.
38
c. Click the Submit button.
Step 5 Open or save the log file.
User Interface Design Specification
Chapter Overview
This guide shows the user interface graphics specifications for the touchscreen on the customer pod. Topics
in this chapter include:
• “Home Screen”
• “Call Connecting Screen”
• “Call Connected Screen”
• “Scan Screen”
• “Signature Screen”
• “Thank You Screen”
• “Session Result Screen”
• “Hold Screen”
• “Help Wait Screen”
Home Screen
The Home screen contains the following images:
• Background
• Expert Type Buttons
• Help Button
• Language Buttons
Background
The Background image is used for all the screens.
The background image has the following specifications:
• File Formats: JPG, PNG
Figure 2-1 Background Image Diagram
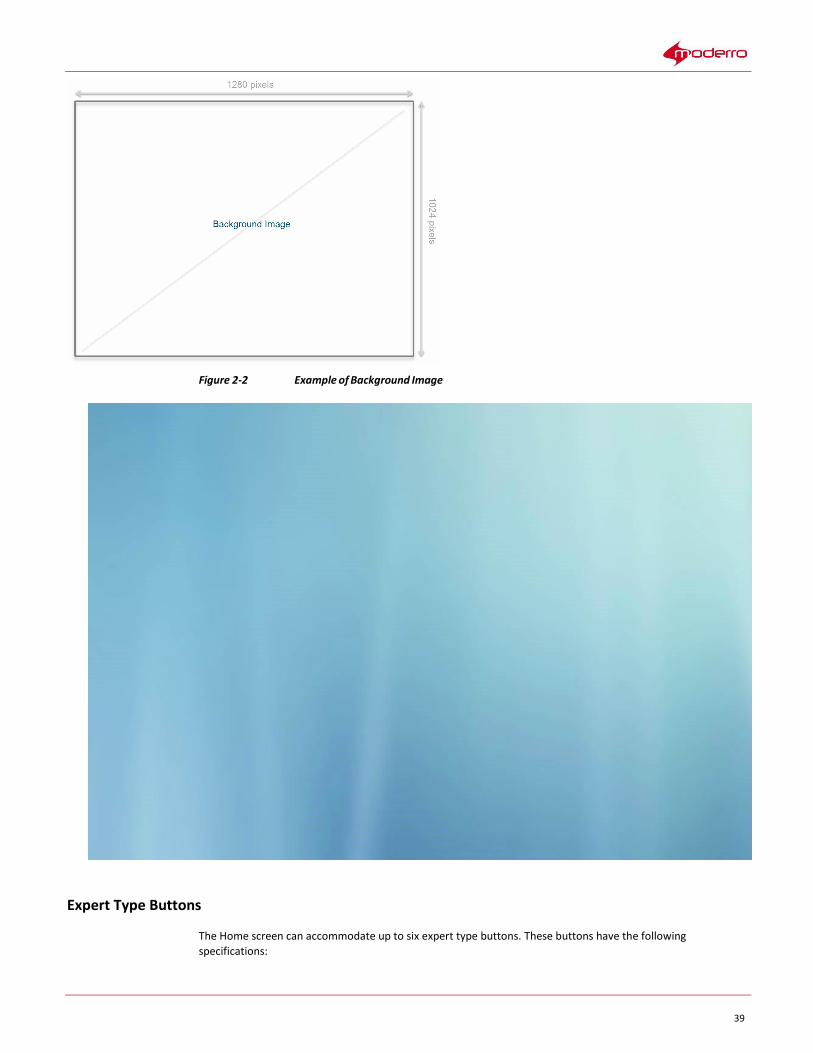
39
Figure 2-2 Example of Background Image
Expert Type Buttons
The Home screen can accommodate up to six expert type buttons. These buttons have the following
specifications:
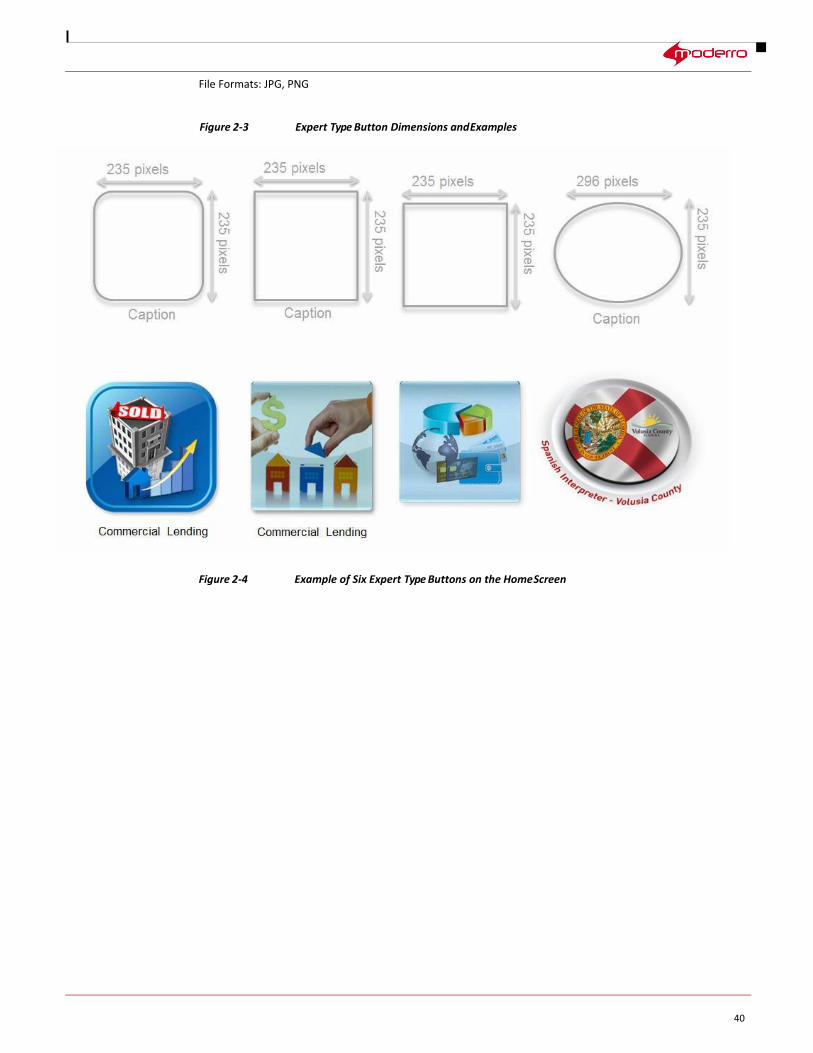
40
File Formats: JPG, PNG
Figure 2-3 Expert Type Button Dimensions and Examples
Figure 2-4 Example of Six Expert Type Buttons on the Home Screen
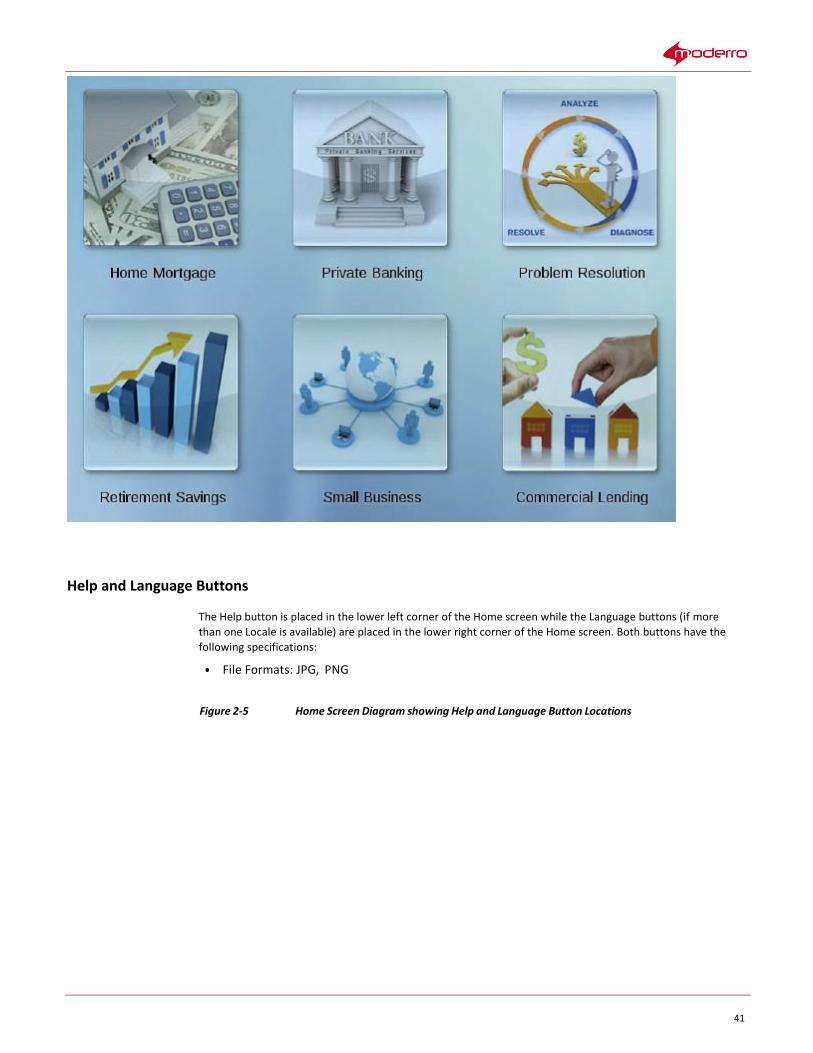
41
Help and Language Buttons
The Help button is placed in the lower left corner of the Home screen while the Language buttons (if more
than one Locale is available) are placed in the lower right corner of the Home screen. Both buttons have the
following specifications:
• File Formats: JPG, PNG
Figure 2-5 Home Screen Diagram showing Help and Language Button Locations

42
Figure 2-6 Example of a Home Screen showing Help and Language Buttons
Note The captions for the expert type images are configured through REAC while adding the expert type.
Refer to the “Add an Expert Type” section of Chapter 1.
Call Connecting Screen
The Call Connecting screen contains the following:
• Cancel Button

43
• Small Logo
• Wait Video or Wait Image or Null
Cancel Button • File Formats: JPG, PNG
Small Logo
The Small Logo appears in the upper left corner of the Call Connecting screen. It also appears on the Video
Streaming, Hold, and Helpline screens.
• File Formats: JPG, PNG
Wait Video
A Wait Video can be played during the Call Connecting screen.
Figure 2-7 Call Connecting Screen Diagram with Wait Video Location
Figure 2-8 Example of a Call Connecting Screen showing a Wait Video

44
Wait Image
A Wait Image can be displayed during the Call Connecting screen instead of a Wait Video. File
Format: JPG, PNG

45
Figure 2-9 Call Connecting Screen Diagram with Wait Image Location
Figure 2-10 Example of a Call Connecting Screen showing a Wait Image
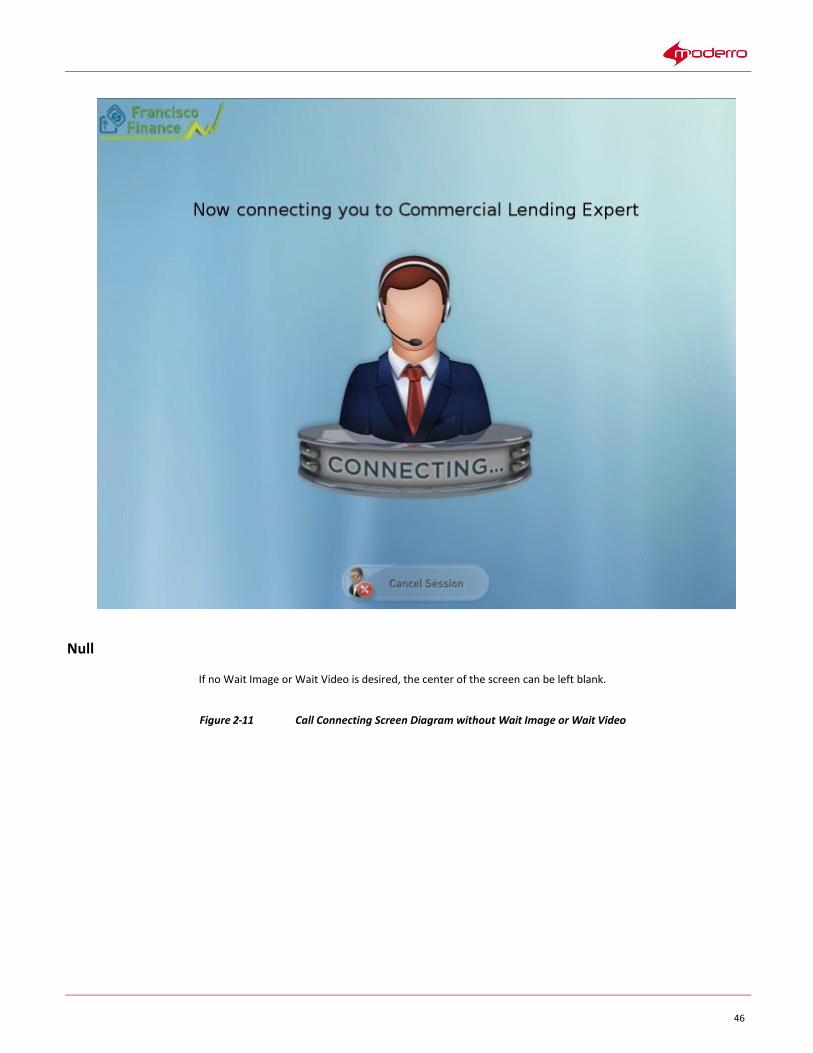
46
Null
If no Wait Image or Wait Video is desired, the center of the screen can be left blank.
Figure 2-11 Call Connecting Screen Diagram without Wait Image or Wait Video
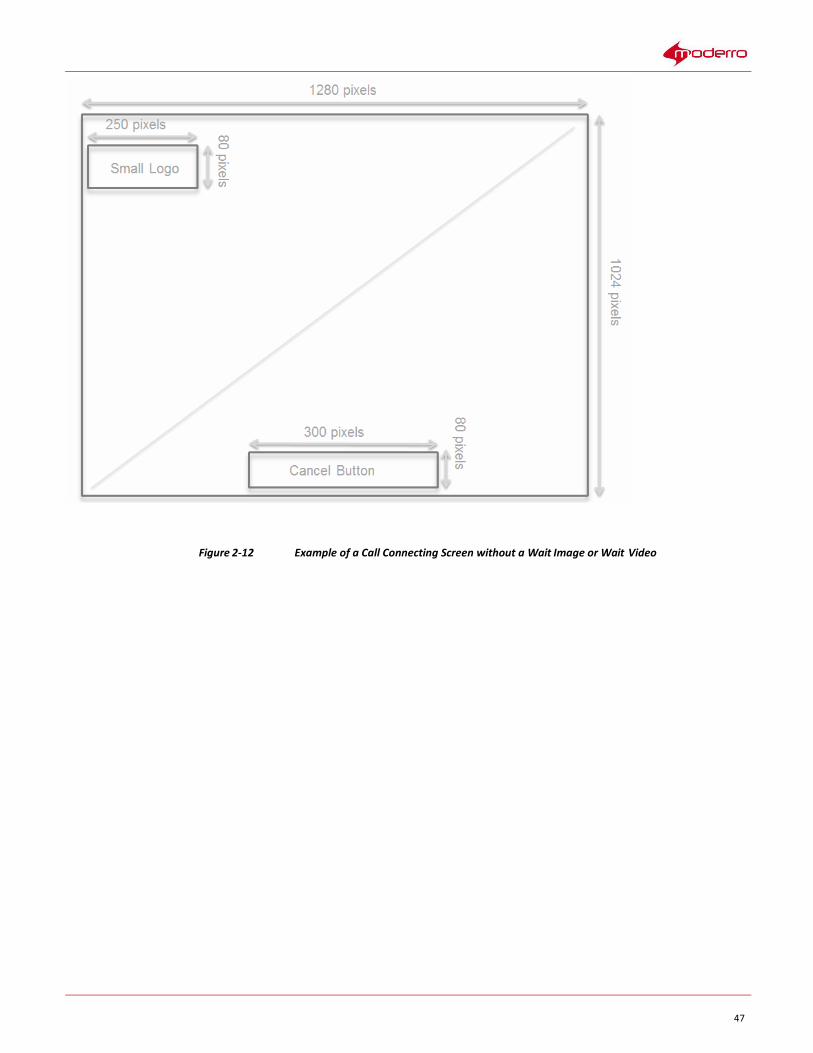
47
Figure 2-12 Example of a Call Connecting Screen without a Wait Image or Wait Video
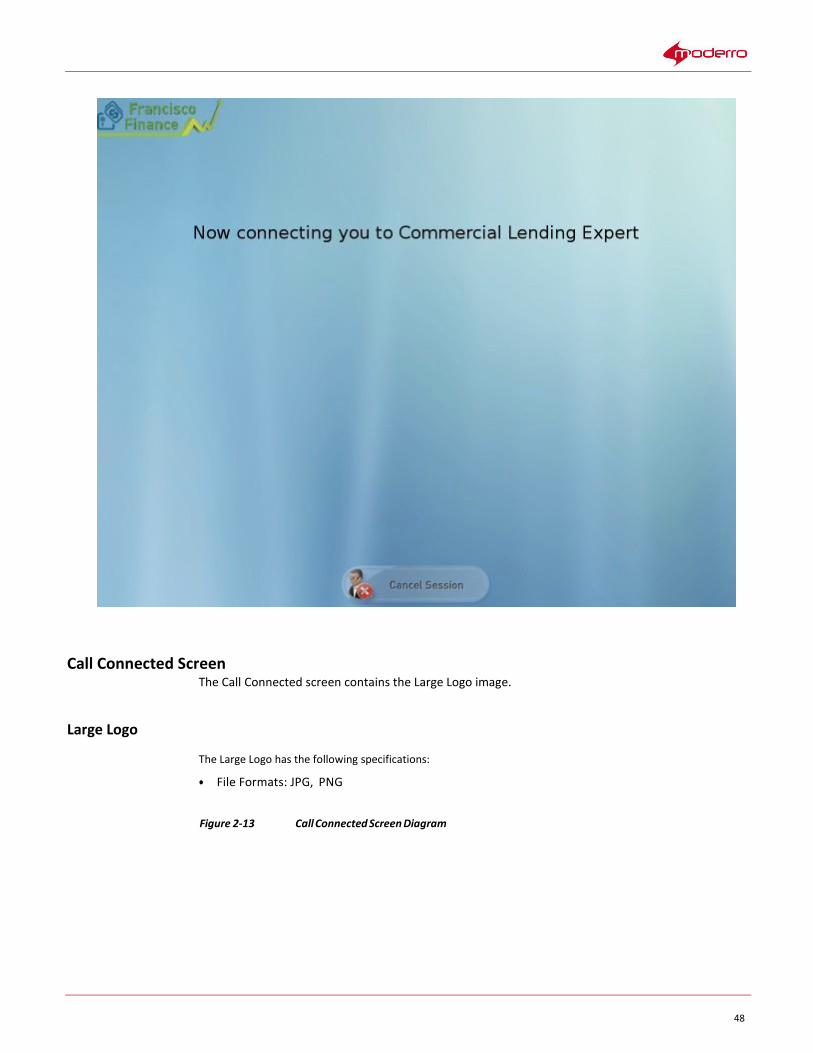
48
Call Connected Screen The Call Connected screen contains the Large Logo image.
Large Logo
The Large Logo has the following specifications:
• File Formats: JPG, PNG
Figure 2-13 Call Connected Screen Diagram

49
Figure 2-14 Example of a Call Connected Screen

50
Scan Screen
When the agent launches the Scan collaboration feature, the Scan screen appears on the customer pod. The
buttons for the Scan screen can be customized.
File Format: JPG, PNG
Figure 2-15 Scan Screen Diagram

51
Figure 2-16 Example of a Scan Screen
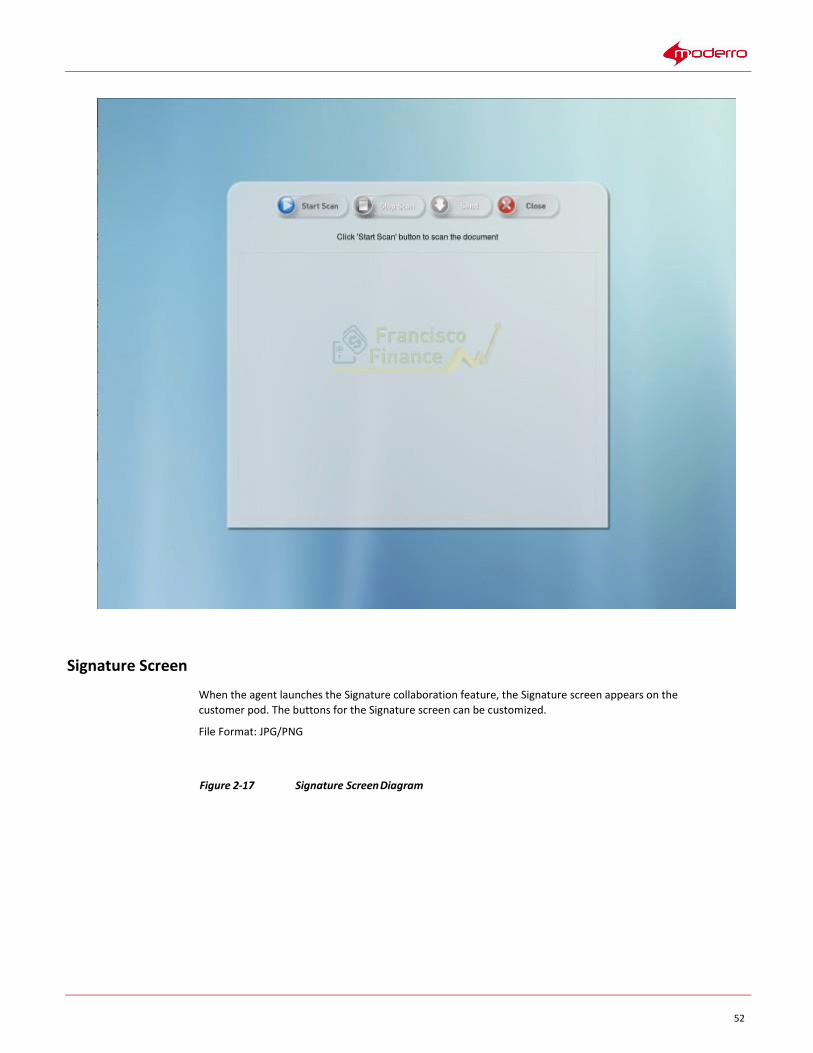
52
Signature Screen
When the agent launches the Signature collaboration feature, the Signature screen appears on the
customer pod. The buttons for the Signature screen can be customized.
File Format: JPG/PNG
Figure 2-17 Signature Screen Diagram

53
Figure 2-18 Example of a Signature Screen

54
Thank You Screen
The Thank You screen contains “Thank You” text in the middle.
Figure 2-19 Example of a Thank You Screen

55
Session Result Screen The Session Result screen is similar to the Thank You screen in that it contains text in the middle.
Figure 2-20 Example of a Session Result Screen

56
Hold Screen
The Hold screen contains the Hold video and the Small Logo image.
Figure 2-21 Hold Screen Diagram
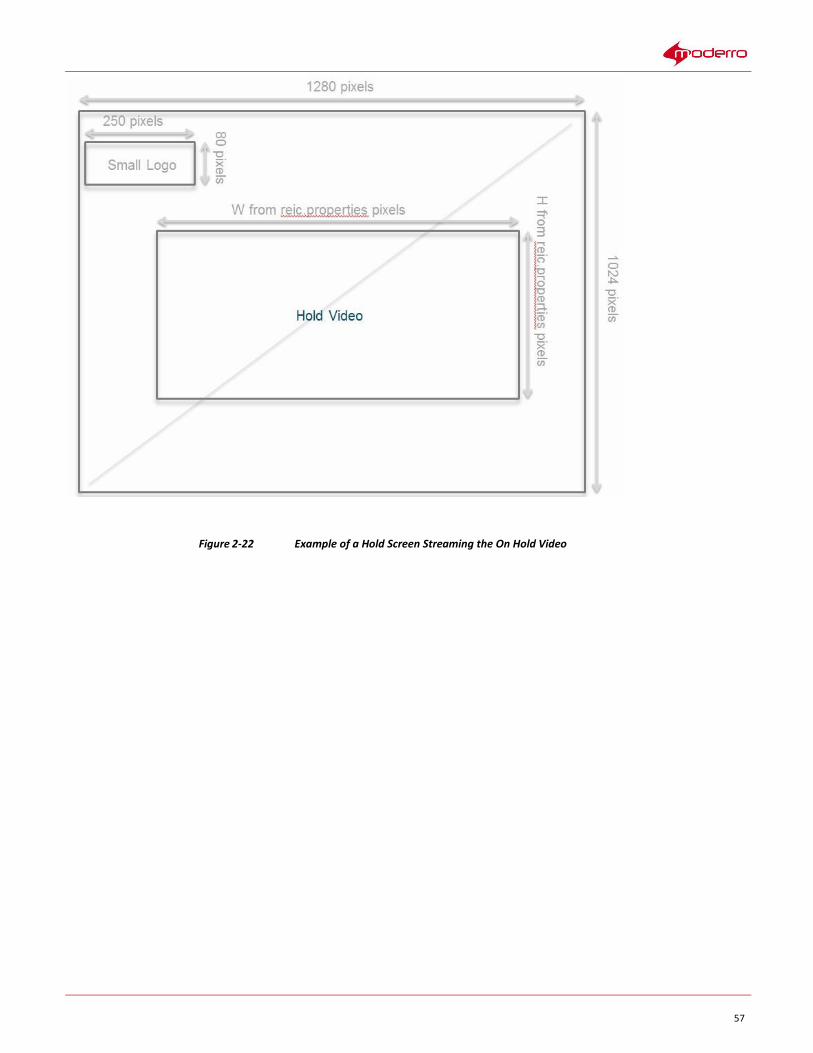
57
Figure 2-22 Example of a Hold Screen Streaming the On Hold Video
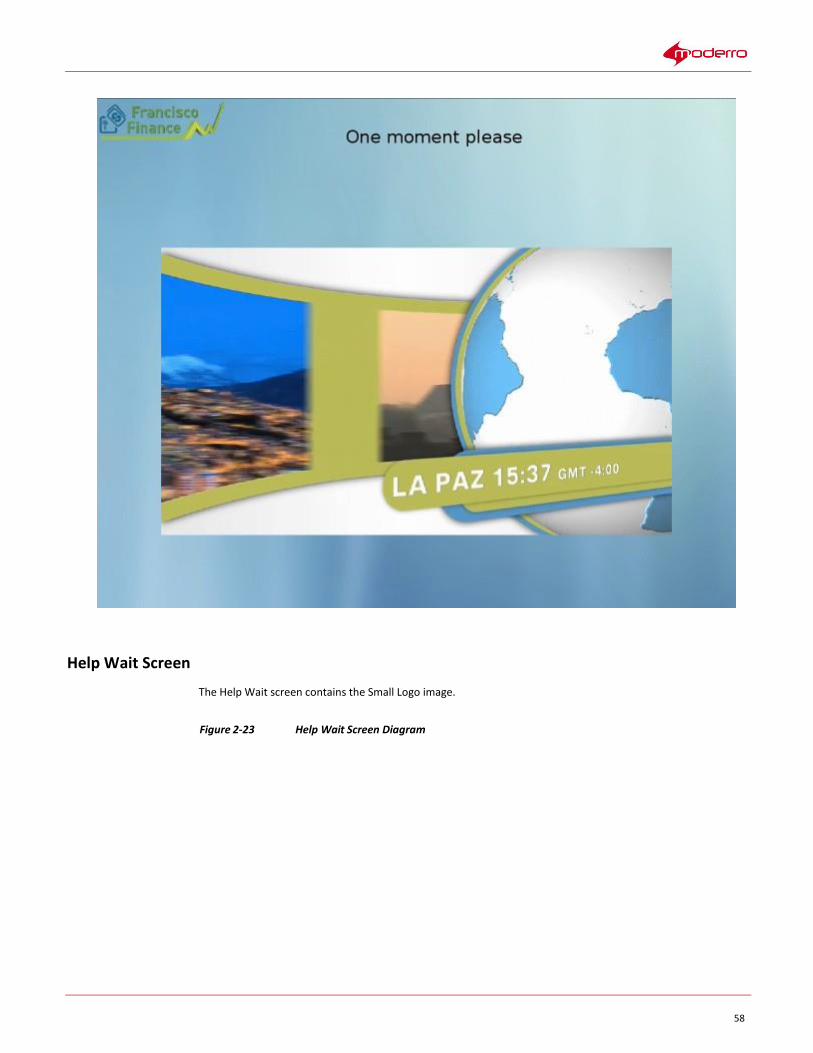
58
Help Wait Screen
The Help Wait screen contains the Small Logo image.
Figure 2-23 Help Wait Screen Diagram
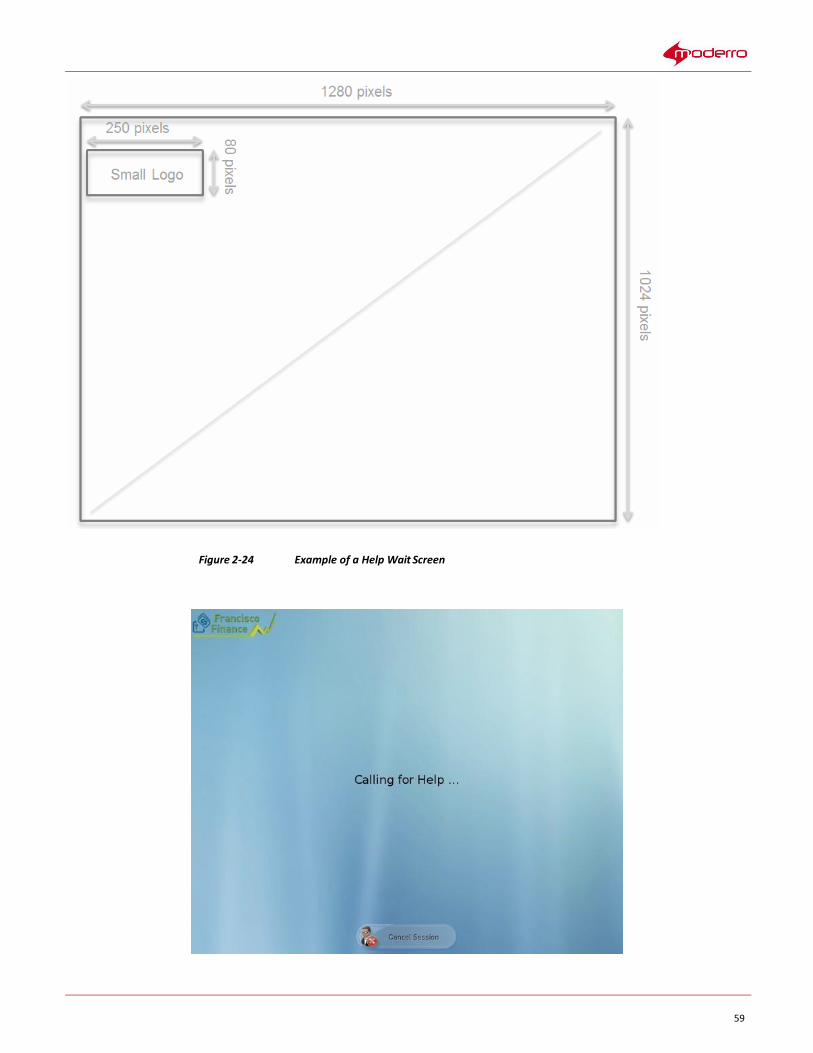
59
Figure 2-24 Example of a Help Wait Screen

60
61
Remote Expert Interactive Collaboration (REIC) User Interface
Chapter Overview
The Moderro® Remote Expert Interactive Collaboration (REIC) is the pod screen that appears on the
customer side of the Moderro Remote Expert (RE) solution.
This chapter is intended for administrators who will customize the appearance of the REIC user interface. It
explains how to change the appearance of the REIC including images and text. This chapter also explains
how an administrator will add locale and expert type images.
Topics in this chapter include:
• “REIC Overview”
• “REIC Properties”
• “Background Image”
• “Small Customer Logo Image”
• “Customer Header”
• “Big Customer Logo Image”
• “Expert Types”
• “Kiosk Not Registered Message”
• “Customizing Locales”
• “On Hold Video”
• “Session Result Screen”
• “REIC Modules”
• “Scanner Resolution Setting”
• “VNC Co-browsing Setting”
REIC Overview
The REIC is the customer pod screen that appears on the customer side of the RE solution. The customer
initiates a call from the REIC screen.
The REIC is part of the REM installation ISO. The ISO contains the default Locales and Expert Types already configured in the database on successful installation of the ISO.
REIC Properties
After the REIC is installed using the ISO, the REIC can be configured to customize the screen that the customer
views. The administrator can configure the big customer logo, the small customer logo or a header, the
background image, the expert type width, the signature pad image, the signature background image, the
scanner background image, or the screen module for customer identification. Use the Group tab in REAC to
configure the user interface and upload image files.
62
Background Image
The background image will be displayed on all screens of the REIC.
Note The size of the background image must be at least 1280x1024 pixels. Otherwise, the
image will not cover the customer pod screen completely. Refer to the Moderro Remote
Expert Manager Compatibility Guide for the certified touch screens.
Small Customer Logo Image
The small customer logo will appear on the following screens:
• Wait screen
• On Hold screen
• Video streaming screen
• Help Wait screen
• Help Connected screen
Note The size of the small customer logo image should be 250x80 pixels before uploading. Otherwise, the image will not appear correctly on the customer pod screen.
Customer Header
You can add a header that will appear at the top of the touchscreen. The header can be up to 90 pixels high.
Note If you want to use a header, the small customer logo should be masked in order for the header to display
properly. To mask the small logo, create a blank PNG file and upload it into the Group tab of REAC (see Chapter
1).
Big Customer Logo Image
The big customer logo image will appear on the REIC screen when the call is connected with the remote expert
or agent.
Note The size of the big customer logo image should be 360x360 pixels before uploading. Otherwise, the
image will not appear correctly on the customer pod screen.
Expert Types
The Expert Type is the expert to which the call is made from REIC. These expert types are added in the Expert
Type tab of the REAC.
The Expert Type tab includes the Queue Video column. A queue video must be selected for each expert type.
This queue video is the video displayed on the REIC screen while the customer waits for the expert to appear
63
on the video endpoint.
Expert Type Images
When the customer selects an expert type icon, a call is made from the REIC to an agent that has been
associated with that expert type in the REAC.
The REIC screen displays at least one expert type icon. If the enterprise has different types of experts,
customers can select the expert type icon on the REIC that best matches their need. In REM 11.0, the size
and number of expert type icons can be customized on the REIC screen. For example, a bank could have six
expert type icons: Commercial Lending, Home Mortgage, Private Banking, Problem Resolution, Retirement
Savings, and Small Business.
Note The captions for the expert type images are configured through REAC while adding the expert type. Refer to the “Add an Expert Type” section of Chapter 1.
In addition to the Expert Type icons, the Help icon also appears on the REIC screen. The Help icon can also
appear on the REIC screen if they are added in the Moderro REAC within the Expert Type tab.
Expert Type Icons Layout
In REM 11.0, the Expert Type Icons layout can be configured using Theme Parameters when adding a group in
the REAC. The default group has all the properties configured to display 6 default expert type images (235 x 235
pixels) properly on a screen with 1280 x 1024 pixels.
The Theme Parameters allow you to change the orientation, column and row count, alignment, color and size
of the expert type font, and the background image etc. to create a unique look and feel Home screen to the
customer.
Note Refer to the “Add a Group” section of Chapter 1.
The images will be displayed as their default image size so you will need to initially configure their image
sizes so that all the images will be of equal sizes and they are displayed in a grid.
Note Please contact the RE team for more details if you plan to use an expert type icon that has the size smaller
than 50x50 pixels or larger than 500x500 pixels.
In the figure below, the customer pod screen resolution is 1366x768 pixels. The size of the expert type icon is
500x500 pixels. The column and row count is 1. The expert type rollover color is 0x006600. The expert type font
color is 0xffff66 and the font size is 35.
Figure 3-1 Expert Type Layout Example 1
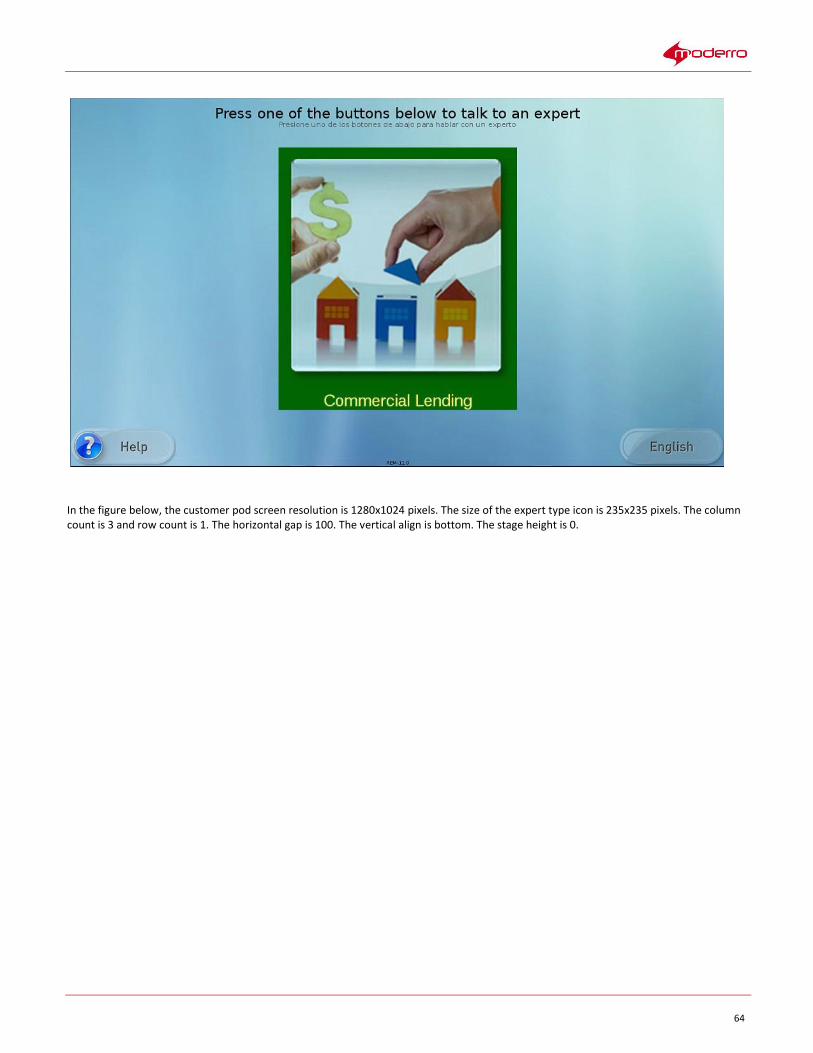
64
In the figure below, the customer pod screen resolution is 1280x1024 pixels. The size of the expert type icon is 235x235 pixels. The column count is 3 and row count is 1. The horizontal gap is 100. The vertical align is bottom. The stage height is 0.
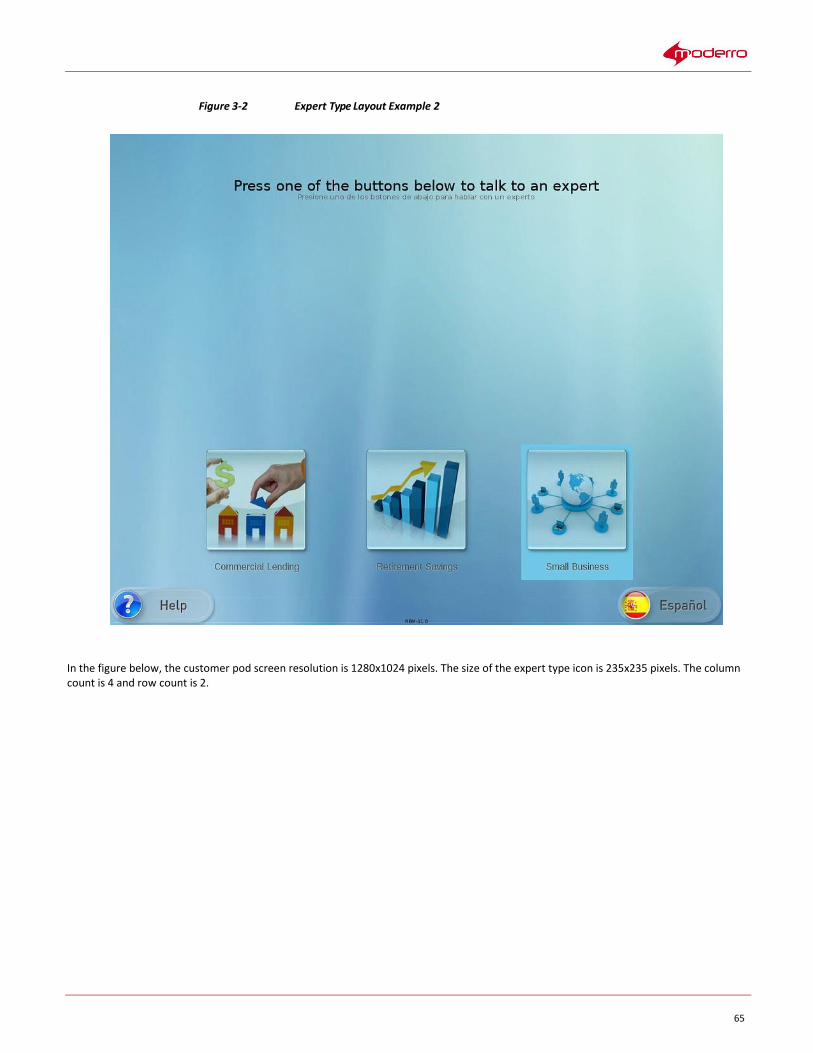
65
Figure 3-2 Expert Type Layout Example 2
In the figure below, the customer pod screen resolution is 1280x1024 pixels. The size of the expert type icon is 235x235 pixels. The column count is 4 and row count is 2.
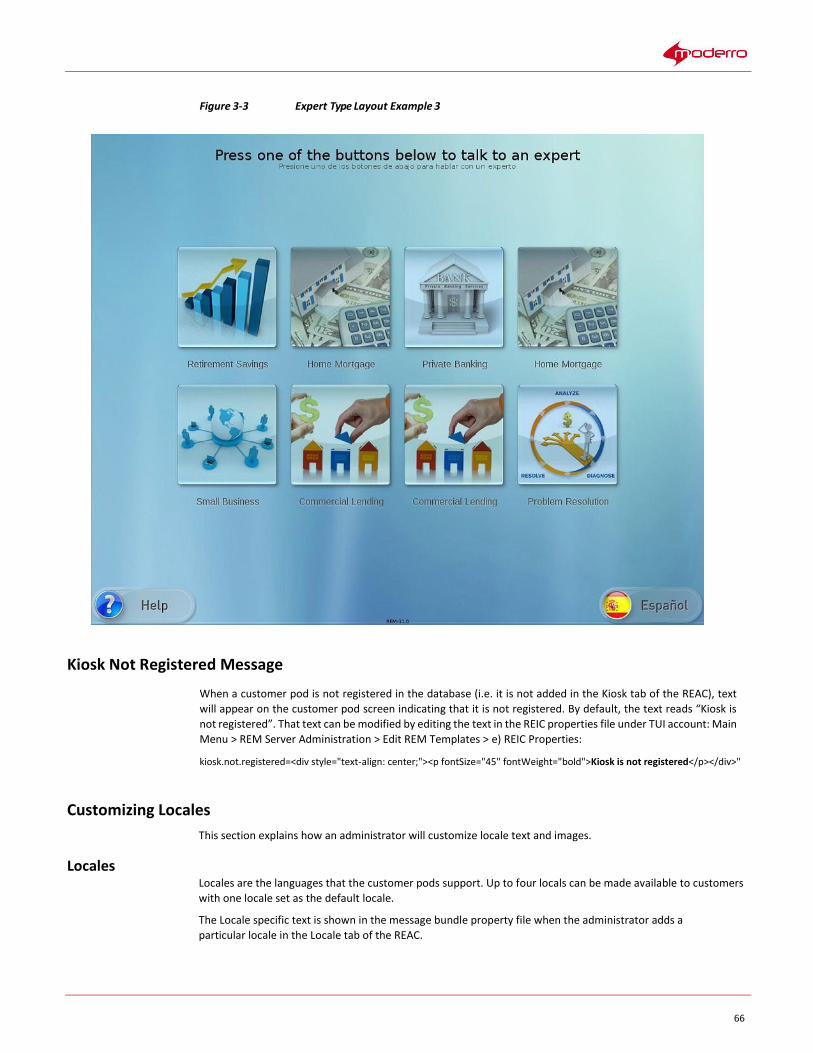
66
Figure 3-3 Expert Type Layout Example 3
Kiosk Not Registered Message
When a customer pod is not registered in the database (i.e. it is not added in the Kiosk tab of the REAC), text
will appear on the customer pod screen indicating that it is not registered. By default, the text reads “Kiosk is
not registered”. That text can be modified by editing the text in the REIC properties file under TUI account: Main
Menu > REM Server Administration > Edit REM Templates > e) REIC Properties:
kiosk.not.registered=<div style="text-align: center;"><p fontSize="45" fontWeight="bold">Kiosk is not registered</p></div>"
Customizing Locales
This section explains how an administrator will customize locale text and images.
Locales Locales are the languages that the customer pods support. Up to four locals can be made available to customers
with one locale set as the default locale.
The Locale specific text is shown in the message bundle property file when the administrator adds a
particular locale in the Locale tab of the REAC.
67
Images
The image for a locale, such as for Spanish, that displays on the REIC is added to the REAC.
The image can uploaded to a new or existing Locale using the Add or Modify button in the Locale tab. Click
the Browse button to find and upload the image.
The image file name then appears in the Image column of the Locale tab.
Locale Properties File (Message Bundle)
The Locale Properties form provides the text and images that will display on the REIC.
As explained in Chapter 1, the Google Translate API provides a translation of the default English customer pod
screen text to dozens of languages. In order for the translation to occur using the Google Translate API, the
REM server must have access to the Internet.
The table below provides details for each property as it appears in the English Locale. The Locale
Properties text can be edited and the images replaced. Edit the text directly in the form. To replace
images, first upload them into REAC using the Upload Image tool (see Chapter 1); then copy the last
portion of the URL starting at “/images/” and replace the default file name with it.
Table 3-1 English Locale Properties
Property
Text that appears on the REIC
Video or Image File Name
app.title Remote Expert
screen.home.title Press one of the buttons
below to talk to an expert
Presione uno de los botones
de abajo para hablar con un
experto
screen.home.connecting Please wait ..
screen.call.ewt Estimated Wait Time
${countDown}
call.ewt.-1001 No agents are available in
the new expert group,
<br/>Please try after some
time
call.ewt.-2001 Experts are not ready to
accept the call, please wait.
<br/>Transferring the call
to separate expert group
call.ewt.-2002 Experts are busy with other
calls, please wait
call.ewt.-2003 No agents are available to
accept the call, please wait.
<br/>Transferring the call
to separate expert group
call.ewt.-2004 No agents are available to
accept the call, please wait.
<br/>Transferring the call

68
to separate expert group
screen.call.connecting Now connecting you to
<<EXPERT_TYPE>>
Expert<br/>
screen.call.connecting. help
Calling for Help ...
screen.call.connected
screen.call.connected.h elp
Now connected To the Help
Line
screen.call.onhold One moment please
screen.call.waitvideo assets/video/wait.m4v
screen.call.waitimage /images/connecting_eng_296x296.png
cancel.icon Thanks for talking to our
expert
/images/cancel_english_300_80.png
screen.callend.thanks Please provide your
feedback<br/><br/>
screen.callend.skip Skip this Step
screen.callend.continue Continue
screen.thankyou.thanks Thank You
no.agents Agents are not available
currently. Please try after
some time
no.tp Expert not Available
server.down Server is down
screen.reschedule.mess age
Agent not answering.
rescheduling
screen.schduler.meeting pending
Welcome${customerName}
Your Live Chat will start in
few minutes
screen.schduler.meeting.starting
Welcome${customerName}
Your Live Chat will start in
few minutes
screen.schduler.busy.agent
Welcome${customerName}
Agent is
Busy<br/><br/>Please hold
on
screen.schduler.meeting.reschedule
Welcome${customerName}
Agent is
Busy<br/><br/>Please hold
on<br/><br/>At Any point
of time, If you want to
reschedule the session,
Please click the button
below
minute minute
minutes minutes

69
error.message.Decoding Error
Expert is not available
error.message.207 Sorry, there is already an
active call to an
Expert.<br/><br/> Please
try again after the current
call ends
error.message.206 Kiosk phone is out of
service
error.message.202 System is not available,
please try after some time
error.message.201 Expert type is not
configured, please try after
some time
error.message.208 Kiosk serial # is not
configured, cannot start a
call
call.in.progress Resuming the Session ...
screen.customerid.title Please enter the customer
account number
screen.customerid.subm it
Submit
screen.customerid.canc el Cancel
screen.customerid.error This field is required
screen.customerid.toolti p.error
This field is required
screen.magstripe.title Please Swipe the Card
screen.magstripe.cancel Cancel
screen.error Error
screen.feedback.max.le ngth
Feedback cannot exceed
250 characters
screen.feedback.submit Submit
screen.feedback.next Next
scanner.sending.docum ent
Sending scanned document
scanner.not.supported Scanner Not Supported
scanner.not.found Scanner Not Found
scanner.detecting Detecting Scanner
scanner.scanning Scanning Document
scanner.completed Scan Completed
scanner.click.to.start Click 'Start Scan' button to
scan the document
agent.scanner.sending.d ocument
Sending Document to
Agent
agent.scanner.scanning Now Agent is Scanning the

70
Document
agent.scanner.complete d Scan Completed, Please
Wait for Agent to download
and view the document
agent.scanner.click.to.st art
Please wait, Now the Agent
controlling the scanner
scanner.startbtn.mouseu p
/images/start_english_150_50.png
scanner.startbtn.mouseo ver
/images/start_english_over_150_50.png
scanner.startbtn.moused own
/images/start_english_down_150_50.png
scanner.startbtn.inactiv e /images/start_english_inactive_150_50.png
scanner.stopbtn.mouseu p
/images/stop_english_150_50.png
scanner.stopbtn.mouseo ver
/images/stop_english_over_150_50.png
scanner.stopbtn.moused own
/images/stop_english_down_150_50.png
scanner.stopbtn.inactive /images/stop_english_inactive_150_50.png
scanner.sendbtn.mouse up
/images/send_english_130_50.png
scanner.sendbtn.mouse over
/images/send_english_over_130_50.png
scanner.sendbtn.mouse down
/images/send_english_down_130_50.png
scanner.sendbtn.inactiv e /images/send_english_inactive_130_50.png
scanner.closebtn.mouse up
/images/close_english_130_50.png
scanner.closebtn.mouse over
/images/close_english_over_130_50.png
scanner.closebtn.mouse down
/images/close_english_down_130_50.png
scanner.closebtn.inactiv e /images/close_english_inactive_130_50.png
scanner.warning.busy Busy
scanner.operation.cance lled
Operation - Terminated
signature.clearbtn.mous eup
/images/clear_english_130_50.png
signature.clearbtn.mous eover
/images/clear_english_over_130_50.png
signature.clearbtn.mous edown
/images/clear_english_down_130_50.png
signature.clearbtn.inact ive
/images/clear_english_inactive_130_50.png
signature.sendbtn.mous eup
/images/send_english_130_50.png
71
signature.sendbtn.mous eover
/images/send_english_over_130_50.png
signature.sendbtn.mous edown
/images/send_english_down_130_50.png
signature.sendbtn.inacti ve
/images/send_english_inactive_130_50.png
signature.closebtn.mou seup
/images/close_english_130_50.png
signature.closebtn.mou seover
/images/close_english_over_130_50.png
signature.closebtn.mou sedown
/images/close_english_down_130_50.png
signature.closebtn.inact ive
/images/close_english_inactive_130_50.png
signature.instruction <br/>Please sign. Once
done click on 'Send' button
signature.closing.docu ment
<br/>Closing Signature Pad
signature.sending.docu ment
<br/>Sending your
Signature
On Hold Video
The On Hold video appears on the REIC screen when an expert uses Finesse to put an ongoing call on hold. The
On Hold video is configured in the REAC by adding the video in the Video tab and setting it as the On Hold
video.
In order to display video when the On Hold page is displayed on the kiosk, the call.onhold.view property in
the REIC Properties file must be set to “REM”. Follow these steps to update the call.onhold.view property:
Step 1 Log into the REM server under the TUI account.
Step 2 In the Main Menu, choose d) REM Server Administration.
Step 3 In the REM Server Administration menu, choose c) Edit REM Templates.
Step 4 In the Edit REM Templates menu, choose e) REIC Properties.
Step 5 Find call.onhold.view=text and replace “text” with “REM”.
Step 6 Save the file.
Step 7 Choose d) Run Configuration Tool in the REM Server Administration menu.
Session Result Screen
The Session Result screen appears when a Remote Expert session is over. If the user clicks the Continue button, the next screen shows the first question.
When the customer has finished the survey, the Thank You screen appears.
72
REIC Modules
Keyboard Module
The Keyboard module can be configured to allow an end user to enter their numeric customer account ID
number for further processing in the eREAD. This popup appears immediately after the end user presses any
one of the call buttons from the REIC screen. This popup will timeout after a certain period of duration that is
configured in the rem.properties file. The end user can touch the Submit button on the touchscreen or press
the Enter button on the keyboard to submit their customer ID number and continue the call. Or the end user
can touch the Cancel button on the touchscreen to continue the call without their customer ID.
Follow these steps to configure the keyboard module.
Step 1 Configure the keyboard in REAC:
a. Log into REAC and go to the Group tab.
b. Choose an existing group and click Modify or click Add to add a new group.
c. From the User Identification drop-down menu, choose keyboard.
d. Click Create or Update to save the configuration.
Step 2 Connect USB keyboards to the IECs.
Step 3 Reboot the IECs.
Step 4 (Optional) If you want to change the text that appears on the customer pod when the keyboard is used, log into REAC and go to the Locale tab. Select a locale, click Modify, and then click Add/Modify Message Bundle. Replace the screen.customerid.title, screen.customerid.submit, screen.customerid.error, and screen.customerid.cancel fields with the desired text. Click Update in the window, and click Update in REAC.
Card Reader Module
The Card Reader module can be configured to allow an end user to swipe a magnetic card such as a bank card,
credit card, loyalty card, badge, etc. at the customer pod. The information from the card is captured for
further processing in the eREAD. A popup image appears on the touchscreen immediately after the end user
presses any one of the call buttons. This popup informs the end user to swipe their card. The popup will
timeout after a certain period of duration that is configured in the reic.properties file. The end user can touch
the Cancel button on the touchscreen to skip swiping their card; the call will continue.
Follow these steps to configure the card reader module.
Step 1 Configure the magstripe card reader in REAC:
1. Log into REAC and go to the Group tab.
2. Choose an existing group and click Modify or click Add to add a new group.
3. From the User Identification drop-down menu, choose magstripe.
4. Click Create or Update to save the configuration.
Step 2 If you want to change the text that appears on the customer pod for the card reader, log into REAC and go to the Locale tab. Select a locale, click Modify, and then click Add/Modify Message Bundle. Then replace the screen.magstripe.title and screen.magstripe.cancel lines with the desired text. Click Update in the window, and click Update in REAC.
Step 3 In the IEM policy that is applied to the IEC, go to the application.data property.

73
Step 4 Add a key with the value magstripe.scanner.
Step 5 Add its value as Mag-Tek USB Swipe Reader.
Note If you are using the IEC 4650 model, use the value 0801:0001 MagTek Mini Swipe
Reader (Keyboard Emulation).
Step 6 Click Apply.
Step 7 In the policy, go to mouse > cursor > visible.
Step 8 Change the value of the property to Show mouse cursor.
Step 9 Click Apply.
Step 10 Connect USB MAGTEK card readers to the IECs.
Step 11 Reboot the IECs.
Scanner Resolution Setting
The scanner resolution can be set in the REM Template.
Step 1 Go to the REM Templates file in the TUI (Main Menu > REM Server Administration > c) Edit REM Templates > e) REIC Properties).
Step 2 Find the Scanner Resolution Settings section.
Step 3 The default value of the scanner.resolution.dpiX and scanner.resoltuion.dpiY properties is 300, which is the
maximum value. If you want to change the value of either or both properties, enter a new value(s) between
0 and 300.
Step 4 Save the file.
VNC Co-browsing Setting
The default setting of the VNCServer.readOnly property is ‘false’. The default setting allows agents to assist
customers by viewing the kiosk screen and then navigating the application, completing transactions, and
even filling out forms.
If it is desired that the agent should only be able to view the kiosk screen, the administrator should
change the setting to ‘true’.
Step 1 Go to the REM Templates file in the TUI (Main Menu > REM Server Administration > c) Edit REM Templates > e) REIC Properties).
Step 2 Find the VNC Server section.
Step 3 Change the VNCServer.readOnly property to true.
Step 4 Save the file.
Step 5 Select d) Run Configuration tool. Follow the instructions.
Step 6 Reboot the kiosk in order for the new setting to work.
74
Remote Expert Agent Desktop Configuration
Chapter Overview
This chapter explains how to configure the agent’s desktop.
Topics in this chapter include:
• “READ States”
• “DC Configuration in CAD”
• “Configure Finesse”
READ States
The remote expert’s CAD can be configured to display different READ web pages. The following READ web
pages and their URLS should be configured:
Table 4-1 READ States
HTTP Action / Action Name
Protocol
Host
Port
Path
Request Data Name
Request Data Value
Request Data Value Type
Answered https REM IP 8443 read/desktoppage agentDn LOCAL_PHONE_EXT DataField
calling Calling# DataField
Dropped https REM IP 8443 read/Common.jsp agentDn LOCAL_PHONE_EXT DataField
request disconnect UserDefined
Not Ready https REM IP 8443 read/Common.jsp agentDn LOCAL_PHONE_EXT DataField
request welcome UserDefined
state 0 UserDefined
Ready https REM IP 8443 read/Common.jsp agentDn LOCAL_PHONE_EXT DataField
request welcome UserDefined
state 1 UserDefined
Ringing https REM IP 8443 read/desktoppage agentDn LOCAL_PHONE_EXT DataField
calling Calling# DataField
Logout https REM IP 8443 read/Common.jsp request logout UserDefined
Refer to the Moderro Desktop Administrator User Guide for instructions on how to configure the
CAD voice contact work flows and CAD agent management work flows for the READ:
http://www.cisco.com/en/US/docs/voice_ip_comm/cust_contact/contact_center/crs/express_8_5/user/g
uide/cda85ccxug-cme.pdf
75
Note When configuring the CAD voice contact and agent management work flows in the Cisco Desktop
Workflow Administrator, ensure that all five states have been configured with “https” as the protocol and
“8443” as the port in the HTTP Action Setup dialog box.
DC Configuration in CAD
Follow the steps below to ensure DC is configured correctly in the agent’s CAD.
Step 1 Open the Cisco Desktop Workflow Administrator.
Step 2 Navigate to Work Flow Configuration.
Step 3 Choose the appropriate work flow.
Step 4 Click CAD Agent and then click Voice Contact Work Flow.
Step 5 Under Events, choose the Answered and Dropped states.
Step 6 Click Add to add an action item.
Step 7 In the Select Action dialog box, click the Launch External Application tab.
Step 8 Click Add Action and enter the action name as “DC Start”.
Step 9 Enter the application’s directory and click OK.
Step 10 Click Add Action and enter the action name as “DC Exit”.
Step 11 Enter the application’s directory and click OK.
Note Application directory can be selected by browsing for the appropriate directory from the folder
where DC is installed.
Step 12 Click Apply.
Step 13 Close the Cisco Desktop Workflow Administrator.
Configure Finesse
Now you need to make sure that the desktop layout used in Cisco Finesse is REM. You will change the IP
address of the home page of the desktop layout from the Cisco Finesse server to the REM server.
Step 1 Open your browser and enter https://[Finesse_server’s_IP_address]:8443/cfadmin. For example, https://134.42.7.49:8443/cfadmin.
Note If the customer is using the default setting for Cisco Finesse, Cisco Contact Center Enterprise (CCE)
will use port 8443 while Cisco Contact Center Express (CCX) will use port 8445
(https://[Finesse_server’s_IP_address]:8445/cfadmin). Also, in the CCE setup, Finesse is a different
VM. In CCX, on the other hand, Finesse is actually running on the CCX VM itself with a different port.
However, those port numbers may be reconfigured to different ones, depending on customer’s
requirements.
Step 2 The Cisco Finesse Administration login screen will appear.

76
Step 3 Enter the ID and password of the administrator and click the Sign In button.
The Settings page of the Cisco Finesse Administration application is displayed.
Step 4 Click the Desktop Layout button in the menu bar.
Step 5 Find the line of XML code that contains “<gadget>http://”.
Step 6 Replace the URL of that line of code to the following: <gadget>http://[REM_Server_IP_Address]:80/finesse/ERead.xml</gadget>
Note If using Cisco Finesse 10.0(1), replace the URL with the following: <gadget>http://[REM_Server_IP_Address]:80/finesse10/ERead.xml</gadget>
Note If using Cisco Finesse 10.5(1), replace the URL with the following: <gadget>http://[REM_Server_IP_Address]:80/finesse105/ERead.xml</gadget>
Step 7 Replace the IP address with that of the REM server.
Step 8 Click the Save button.
77
Configuring the Video URL
Appendix Overview
This appendix provides the video URLs that must be used depending on the video type.
Configuring the Video URL
Depending on the video type, the video URL must be configured accordingly.
Table A-1 Video URLs
Video Type Video URL Format Example
FLV rtmp://<Media Server
IP/Hostname>/vod/mp4:<Filename>.flv
rtmp://172.25.26.199/vod/mp4:cisco_net
work.flv
MP4 rtmp://<Media Server
IP/Hostname>/vod/mp4:<Filename>.mp
4
rtmp://172.25.26.199/vod/mp4:England_
8Mbps.mp4
MOV rtmp://<Media Server
IP/Hostname>/vod/mp4:<Filename>.mo
v
rtmp://172.25.26.199/vod/mp4:Skyfall_t
railer720p.mov
F4V rtmp://<Media Server
IP/Hostname>/vod/mp4:<Filename>.f4v
rtmp://172.25.26.199/vod/mp4:artbeats_
2min.f4v

78
Checking the Postgres Database
Appendix Overview
This appendix explains how to check if the Postgres database is running. If it is not running, this appendix
explains how to start the service.
Checking the Postgres Database
If one of the nodes shows as red in the DB Cluster tab, follow the below steps to make sure the Postgres process
is running correctly:
Step 1 Use a terminal emulator such as PuTTY to SSH into the REM server.
Step 2 In the Main menu. type c to access the Services Control menu. Press the Enter key.
Step 3 In the Services Control menu, type c to choose the Database Server menu. Press the Enter key.
Step 4 In the Database Server menu, type a to show database status. Press the Enter key. The Show Status screen shows that the process is running.
Note If the process is not running, then the Postgres DB is not working properly.
Step 5 After you see the message that the command was completed successfully, press the Enter key.
Step 6 To restart the Postgres DB, press any key to return to the Database Server menu. Then in the Database
Server menu, choose b and press the Enter key to start the service. The Start Service screen appears
showing that the Postgres service was started.
Step 7 Press any key to return to the previous menu.

79
Frequently Asked Questions (FAQs)
Appendix Overview
This appendix provides answers to frequently asked questions.
Frequently Asked Questions (FAQs)
1. How are IVR Phone Numbers configured?
The IVR Phone Number is a UCCX/UCCE pilot number where the call is queued. Refer to a UCCX/UCCE
configuration guide to configure a pilot number.
2. What is a Locale?
The Locale is the language of the text that appears on the screen and the language spoken by the
agents who answer calls after the customer presses an expert type button for that locale.
3. Can a customer pod have more than one Locale?
Yes. In the REM 1.9.x release, a maximum of four locales are supported.
4. Can different customer pods have different Locales?
Yes, you can set a specific Locale to a customer pod using the Modify Kiosk form.
5. Why are Expert Types associated with Locales?
Expert Types are associated with Locales that represent the languages that they speak. When a call is
made from a customer pod that displays content in the English language, the call is connected to an
expert type associated with the English Locale.
6. What happens if the TP IP address is incorrect in the Kiosk tab of the REAC?
The REM will be unable to setup call with UCCX/UCCE Pilot DN so it cannot proceed with the session.
7. What happens if the DN of a customer pod TP codec is incorrect in the Kiosk tab of the REAC?
If the DN of the customer pod TP codec is incorrectly entered, then a call cannot be made to an expert and a RE session cannot be established.
8. What happens if the IEC Server Host is incorrect in the Kiosk tab of the REAC?
If the IP address for the IEC is incorrect, then the IEC cannot be restarted from the REAC. Also, the aliveness
check will not work (dual content will not work when there is no TP reboot).
9. What are some of the errors that could be generated while rebooting the IEC and why do they occur?
Refer to the "Errors and Alerts from REAC" section of the Moderro Remote Expert Manager
Troubleshooting and Serviceability Guide.
10. What happens if the answers are not configured for a Session Result question?
If there are no answers configured, then the question is not displayed on the customer pod screen. The
Thank You screen will be displayed when the session is disconnected.
11. What happens if there are overlapping images for the day of the week and all days?
Preference is given to the image configured for a particular day and not to the all days content in case
of overlapping timings. For example, you configured one content image (“A”) to display from 8:00 to
16:00 on all days and another image (“B”) to display from 10:00 to 14:00 on Mondays. On Mondays, the

80
“A” image will appear from 8:00 to 10:00. Then the “B” image will appear from 10:00 to 14:00. Finally,
the “A” image will re-appear from 14:00 to 16:00. On all other days, the “A” image will appear from 8:00
to 16:00.
Copyright © 2017 Moderro Technologies, Inc.
9.11.17