modular chicken coop - northern tool expansion options the ytf-400cc modular chicken coop is...
TRANSCRIPT

Modular Chicken Coop
OWNER’S MANUAL
WARNING:
Read carefully and understand all ASSEMBLY AND OPERATION
INSTRUCTIONS before operating. Failure to follow the safety rules and other
basic safety precautions may result in serious personal injury.
-MODEL # YTF-400CC-
12232015
2
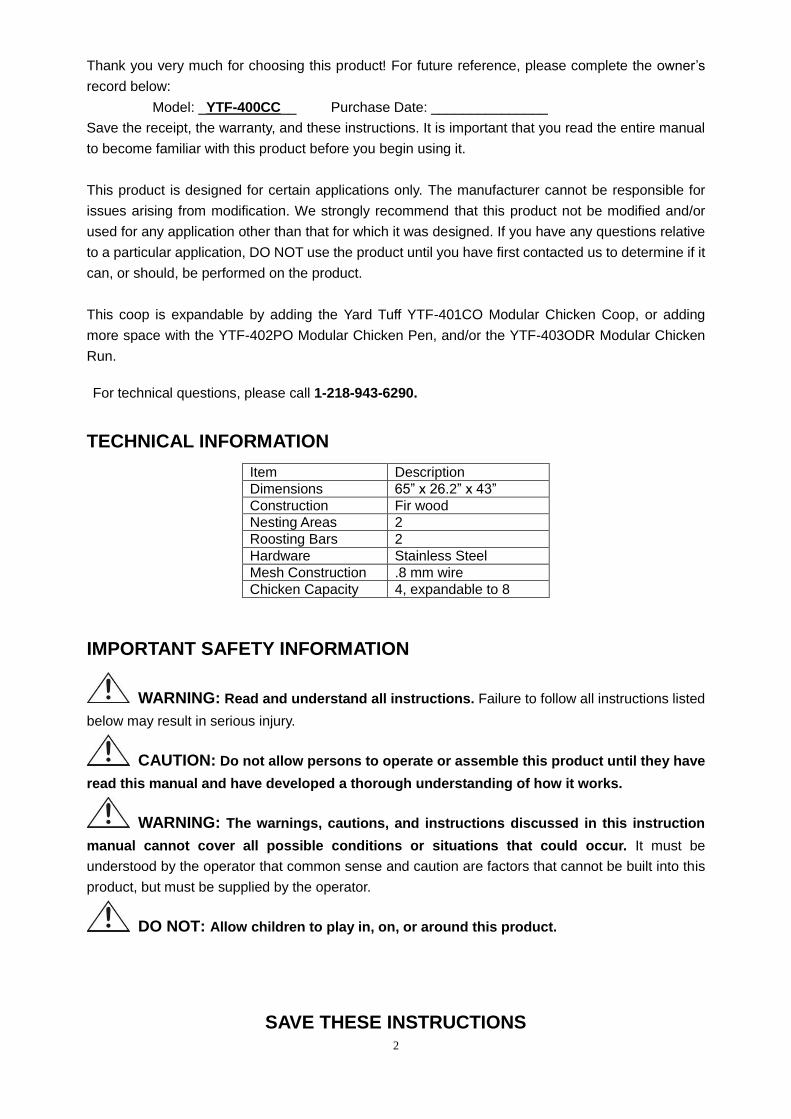
Thank you very much for choosing this product! For future reference, please complete the owner’s
record below:
Model: _YTF-400CC__ Purchase Date: _______________
Save the receipt, the warranty, and these instructions. It is important that you read the entire manual
to become familiar with this product before you begin using it.
This product is designed for certain applications only. The manufacturer cannot be responsible for
issues arising from modification. We strongly recommend that this product not be modified and/or
used for any application other than that for which it was designed. If you have any questions relative
to a particular application, DO NOT use the product until you have first contacted us to determine if it
can, or should, be performed on the product.
This coop is expandable by adding the Yard Tuff YTF-401CO Modular Chicken Coop, or adding
more space with the YTF-402PO Modular Chicken Pen, and/or the YTF-403ODR Modular Chicken
Run.
For technical questions, please call 1-218-943-6290.
TECHNICAL INFORMATION
IMPORTANT SAFETY INFORMATION
WARNING: Read and understand all instructions. Failure to follow all instructions listed
below may result in serious injury.
CAUTION: Do not allow persons to operate or assemble this product until they have
read this manual and have developed a thorough understanding of how it works.
WARNING: The warnings, cautions, and instructions discussed in this instruction
manual cannot cover all possible conditions or situations that could occur. It must be
understood by the operator that common sense and caution are factors that cannot be built into this
product, but must be supplied by the operator.
DO NOT: Allow children to play in, on, or around this product.
SAVE THESE INSTRUCTIONS
Item Description
Dimensions 65” x 26.2” x 43”
Construction Fir wood
Nesting Areas 2
Roosting Bars 2
Hardware Stainless Steel
Mesh Construction .8 mm wire
Chicken Capacity 4, expandable to 8

3
WORK AREA
• Keep work area clean, free of clutter, and well-lit. Cluttered and dark work areas can cause
accidents.
• Keep children and bystanders away while assembling this product.
PERSONAL SAFETY
• Use safety apparel and equipment. Use safety glasses with side shields that comply with
current national standards, while assembling this product. This applies to all persons in the work
area. Also use non-skid safety shoes, hard hats, gloves, dust collection systems, and hearing
protection when needed.
CHICKEN COOP USE AND CARE
• Do not modify this product in any way. Unauthorized modification may impair the function
and/or safety and could affect the life of the equipment. There are specific applications for which
this product was designed.
• Always check for damaged or worn-out parts before using this product. Broken parts will
affect operation. Replace or repair damaged or worn parts immediately.
ASSEMBLY
Step #1:
Attach the Left Pen Panel (A) and the Right Pen Panel (B) to the End Pen Panel (C) using six Screws (1).
Attach the Top Pen Panel (D) to the Pen frame using four Screws (1).
Right Pen Panel (B)
Left Pen Panel (A)
End Pen Panel (C)
Top Pen Panel (D)
4
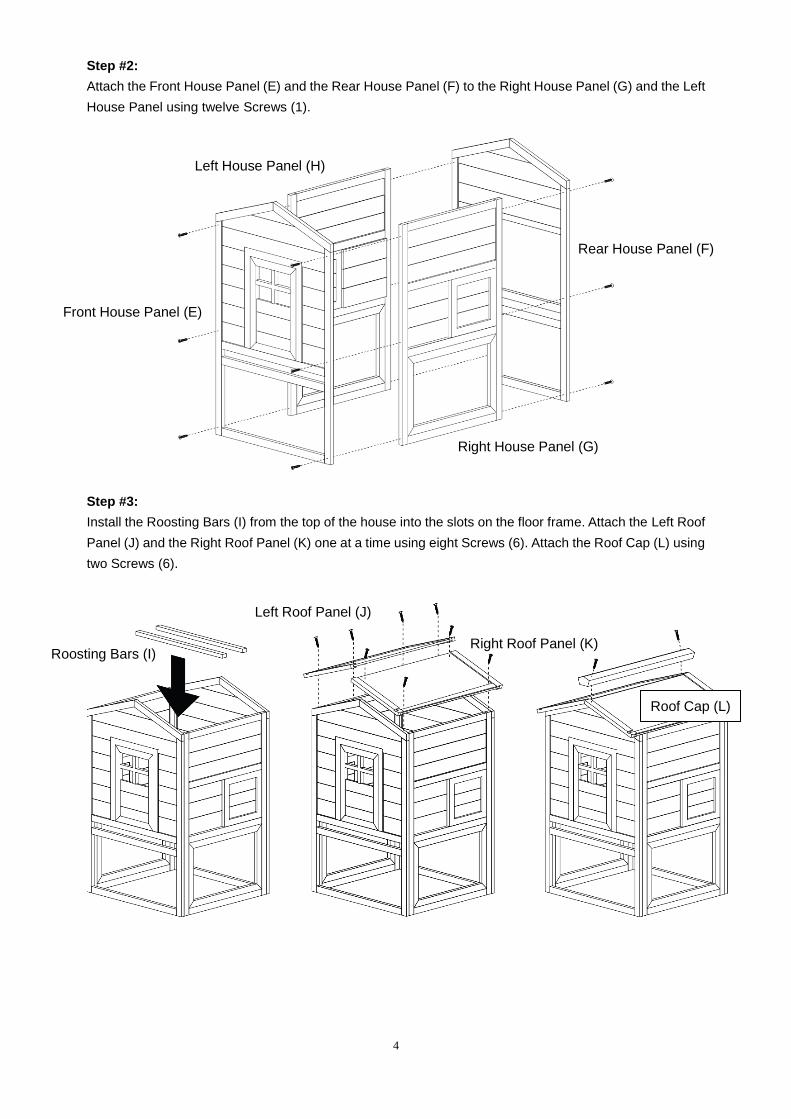
Step #2:
Attach the Front House Panel (E) and the Rear House Panel (F) to the Right House Panel (G) and the Left
House Panel using twelve Screws (1).
Step #3:
Install the Roosting Bars (I) from the top of the house into the slots on the floor frame. Attach the Left Roof
Panel (J) and the Right Roof Panel (K) one at a time using eight Screws (6). Attach the Roof Cap (L) using
two Screws (6).
Right House Panel (G)
Left House Panel (H)
Rear House Panel (F)
Front House Panel (E)
Roof Cap (L)
Right Roof Panel (K)
Left Roof Panel (J)
Roosting Bars (I)
5
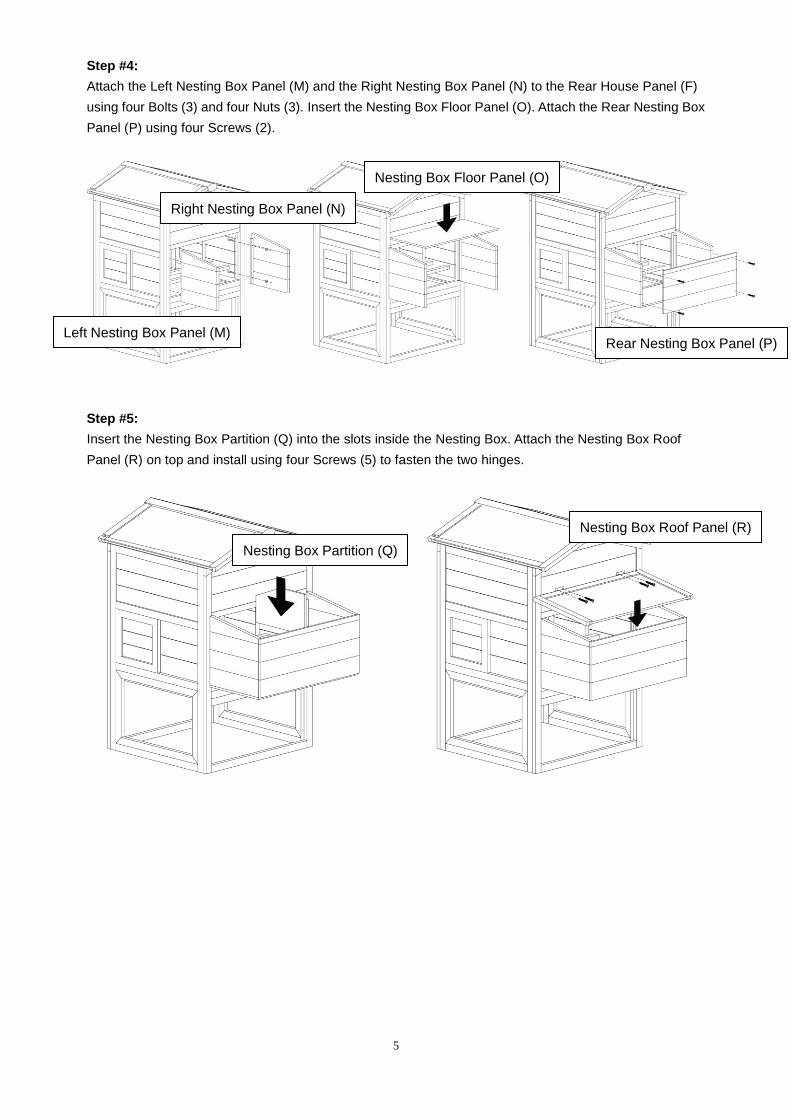
Step #4:
Attach the Left Nesting Box Panel (M) and the Right Nesting Box Panel (N) to the Rear House Panel (F)
using four Bolts (3) and four Nuts (3). Insert the Nesting Box Floor Panel (O). Attach the Rear Nesting Box
Panel (P) using four Screws (2).
Step #5:
Insert the Nesting Box Partition (Q) into the slots inside the Nesting Box. Attach the Nesting Box Roof
Panel (R) on top and install using four Screws (5) to fasten the two hinges.
Left Nesting Box Panel (M)
Right Nesting Box Panel (N)
Nesting Box Floor Panel (O)
Rear Nesting Box Panel (P)
Nesting Box Partition (Q)
Nesting Box Roof Panel (R)
6
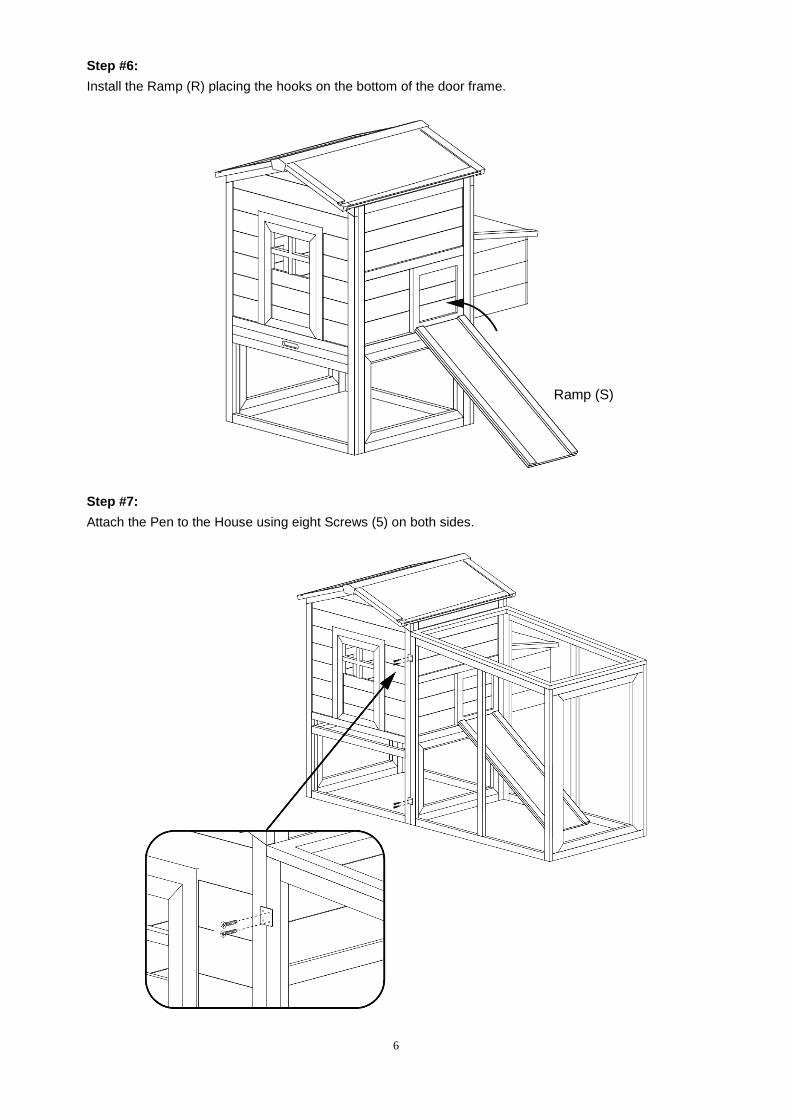
Step #6:
Install the Ramp (R) placing the hooks on the bottom of the door frame.
Step #7:
Attach the Pen to the House using eight Screws (5) on both sides.
Ramp (S)
7
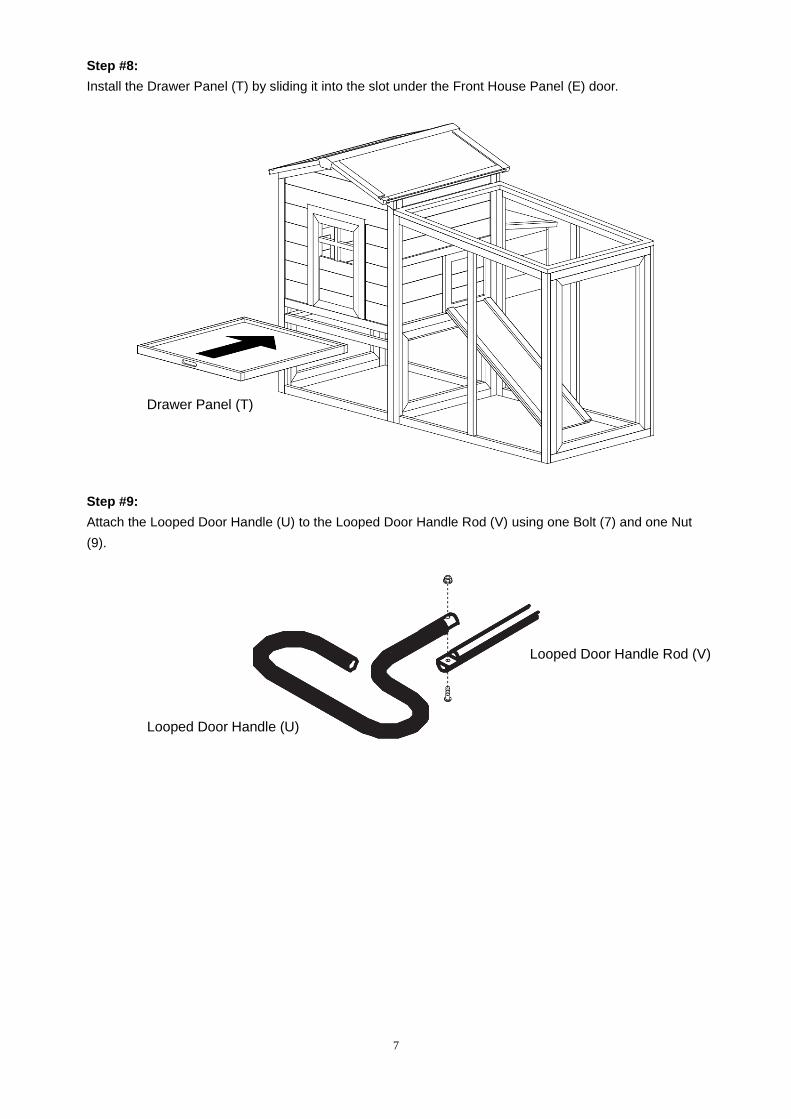
Step #8:
Install the Drawer Panel (T) by sliding it into the slot under the Front House Panel (E) door.
Step #9:
Attach the Looped Door Handle (U) to the Looped Door Handle Rod (V) using one Bolt (7) and one Nut
(9).
Drawer Panel (T)
Looped Door Handle (U)
Looped Door Handle Rod (V)
8
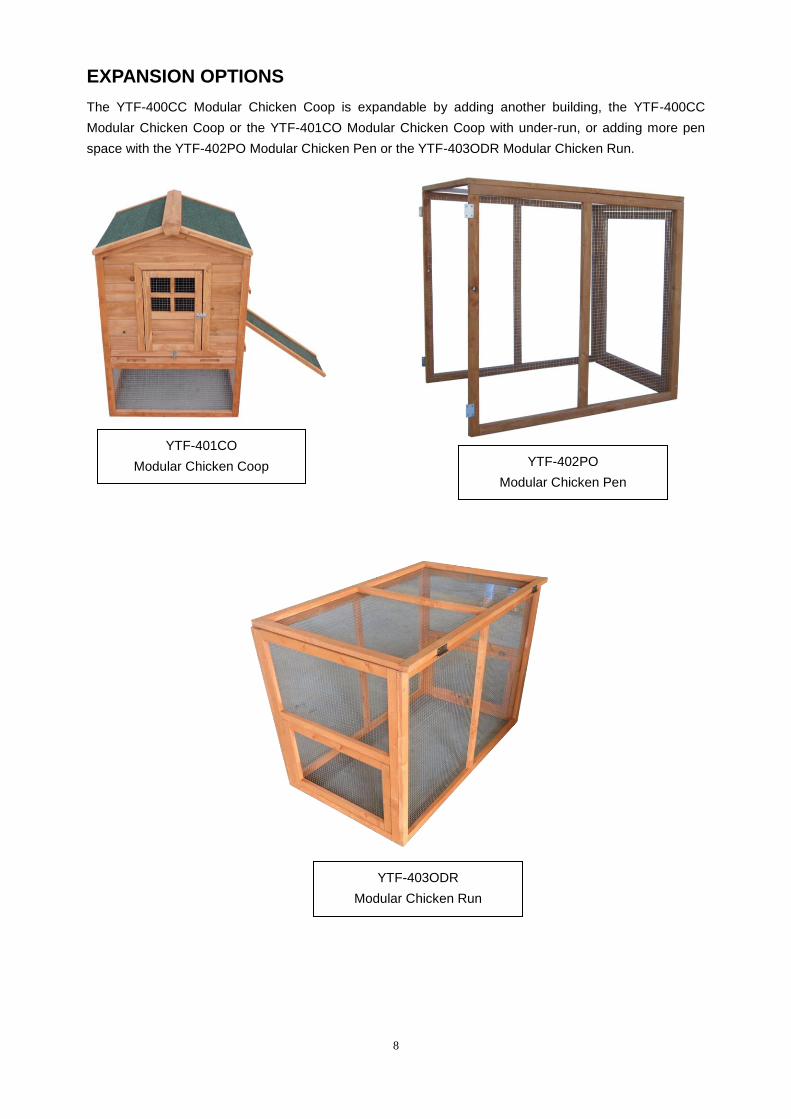
EXPANSION OPTIONS
The YTF-400CC Modular Chicken Coop is expandable by adding another building, the YTF-400CC
Modular Chicken Coop or the YTF-401CO Modular Chicken Coop with under-run, or adding more pen
space with the YTF-402PO Modular Chicken Pen or the YTF-403ODR Modular Chicken Run.
YTF-401CO
Modular Chicken Coop YTF-402PO
Modular Chicken Pen
YTF-403ODR
Modular Chicken Run

9
EXCHANGING SLIDING DOOR WITH FIXED DOOR
Step #1:
Unfasten the four Screws from Fixed Door and set aside. Unfasten the four Screws from the Top Lip and
Bottom Lip holding the Sliding Door and set aside.
Step #2:
Attach the Fixed Door on desired side and attach with the four Screws that were removed in Step #1.
10
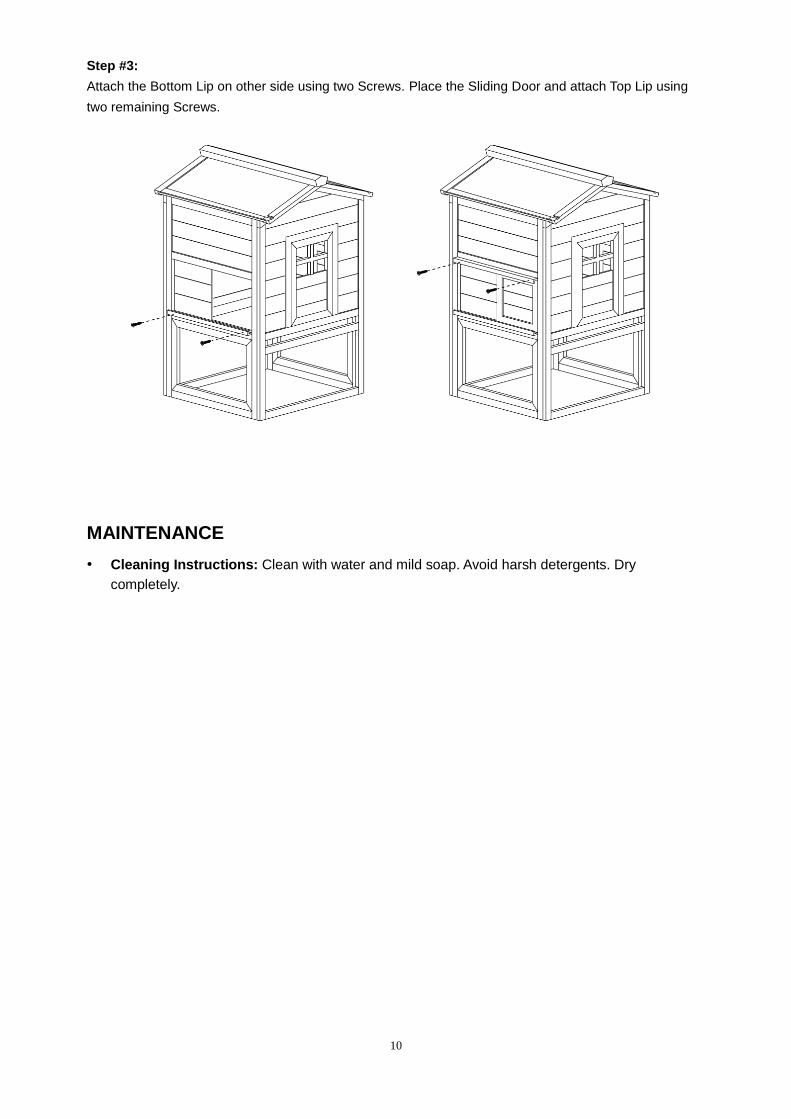
Step #3:
Attach the Bottom Lip on other side using two Screws. Place the Sliding Door and attach Top Lip using
two remaining Screws.
MAINTENANCE
• Cleaning Instructions: Clean with water and mild soap. Avoid harsh detergents. Dry
completely.
11
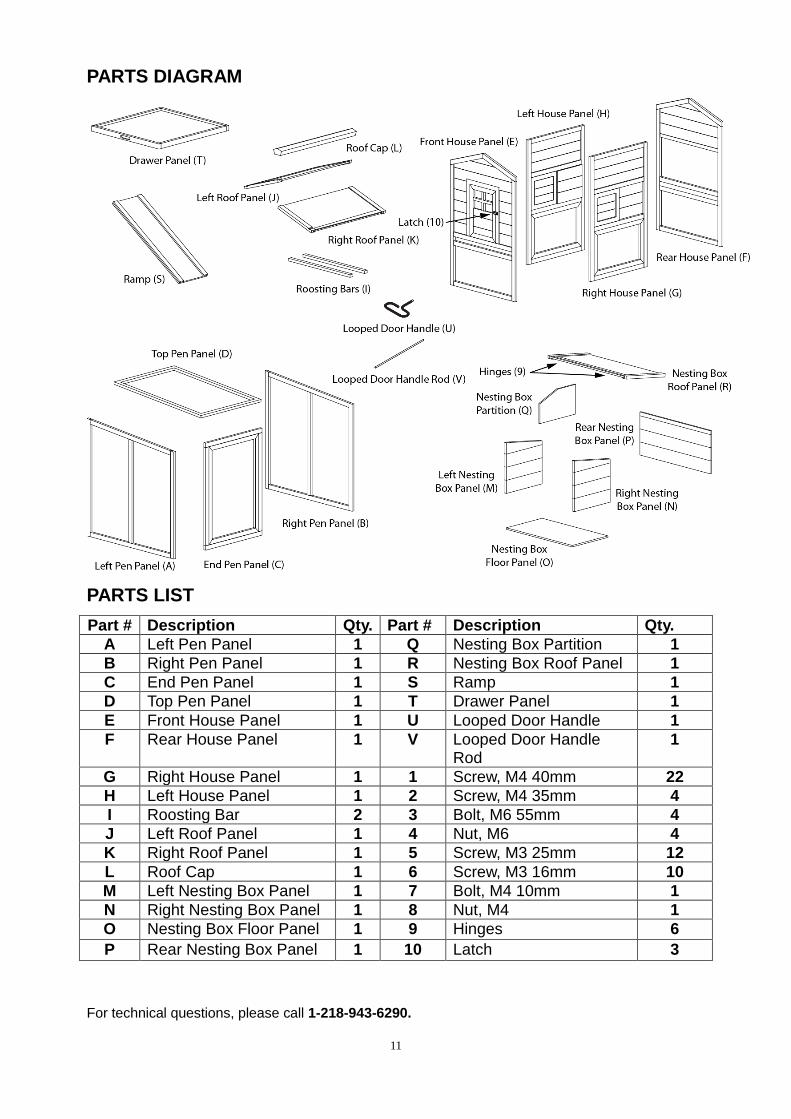
PARTS DIAGRAM
PARTS LIST
Part # Description Qty. Part # Description Qty.
A Left Pen Panel 1 Q Nesting Box Partition 1
B Right Pen Panel 1 R Nesting Box Roof Panel 1
C End Pen Panel 1 S Ramp 1
D Top Pen Panel 1 T Drawer Panel 1
E Front House Panel 1 U Looped Door Handle 1
F Rear House Panel 1 V Looped Door Handle Rod
1
G Right House Panel 1 1 Screw, M4 40mm 22
H Left House Panel 1 2 Screw, M4 35mm 4
I Roosting Bar 2 3 Bolt, M6 55mm 4
J Left Roof Panel 1 4 Nut, M6 4
K Right Roof Panel 1 5 Screw, M3 25mm 12
L Roof Cap 1 6 Screw, M3 16mm 10
M Left Nesting Box Panel 1 7 Bolt, M4 10mm 1
N Right Nesting Box Panel 1 8 Nut, M4 1
O Nesting Box Floor Panel 1 9 Hinges 6
P Rear Nesting Box Panel 1 10 Latch 3
For technical questions, please call 1-218-943-6290.
12
WARRANTY
One-year limited parts warranty.
BAC
PO BOX 155
Miltona, MN 56354
Made in China