module 2 - help and dxp system menu.pdf
TRANSCRIPT

Module 2: Help and DXP system menu

Module 2: Help and DXP system menu
2.1 Using the Help system ..................................................................... 2-1 2.1.1 Dynamic On-line Help ....................................................................................2-1 2.1.2 Searching the Documentation Library............................................................2-2 2.1.3 Using F1 .........................................................................................................2-2 2.1.4 What's This Help ............................................................................................2-2
2.2 Using the Altium website................................................................. 2-3 2.2.1 SUPPORTcenter ............................................................................................2-3 2.2.2 Altium Forums ................................................................................................2-6 2.2.3 DEMOcenter...................................................................................................2-8 2.2.4 TRAININGcenter ............................................................................................2-9
2.3 DXP System menu.......................................................................... 2-10 2.3.1 Customize ....................................................................................................2-10 2.3.2 Preferences ..................................................................................................2-10 2.3.3 Run Process.................................................................................................2-11 2.3.4 Licensing ......................................................................................................2-12 2.3.5 Altium Account Manager ..............................................................................2-13 2.3.6 Run Script and Run Script Debugger...........................................................2-18 2.3.7 Exercise – Configuring Altium Designer System Preferences.....................2-20
Software, documentation and related materials:
Copyright © 2009 Altium Limited.
All rights reserved. You are permitted to print this document provided that (1) the use of such is for personal use only and will not be copied or posted on any network computer or broadcast in any media, and (2) no modifications of the document is made. Unauthorized duplication, in whole or part, of this document by any means, mechanical or electronic, including translation into another language, except for brief excerpts in published reviews, is prohibited without the express written permission of Altium Limited. Unauthorized duplication of this work may also be prohibited by local statute. Violators may be subject to both criminal and civil penalties, including fines and/or imprisonment. Altium, Altium Designer, Board Insight, Design Explorer, DXP, LiveDesign, NanoBoard, NanoTalk, P-CAD, SimCode, Situs, TASKING, and Topological Autorouting and their respective logos are trademarks or registered trademarks of Altium Limited or its subsidiaries. All other registered or unregistered trademarks referenced herein are the property of their respective owners and no trademark rights to the same are claimed.
Module Seq = 2
2.1 Using the Help system
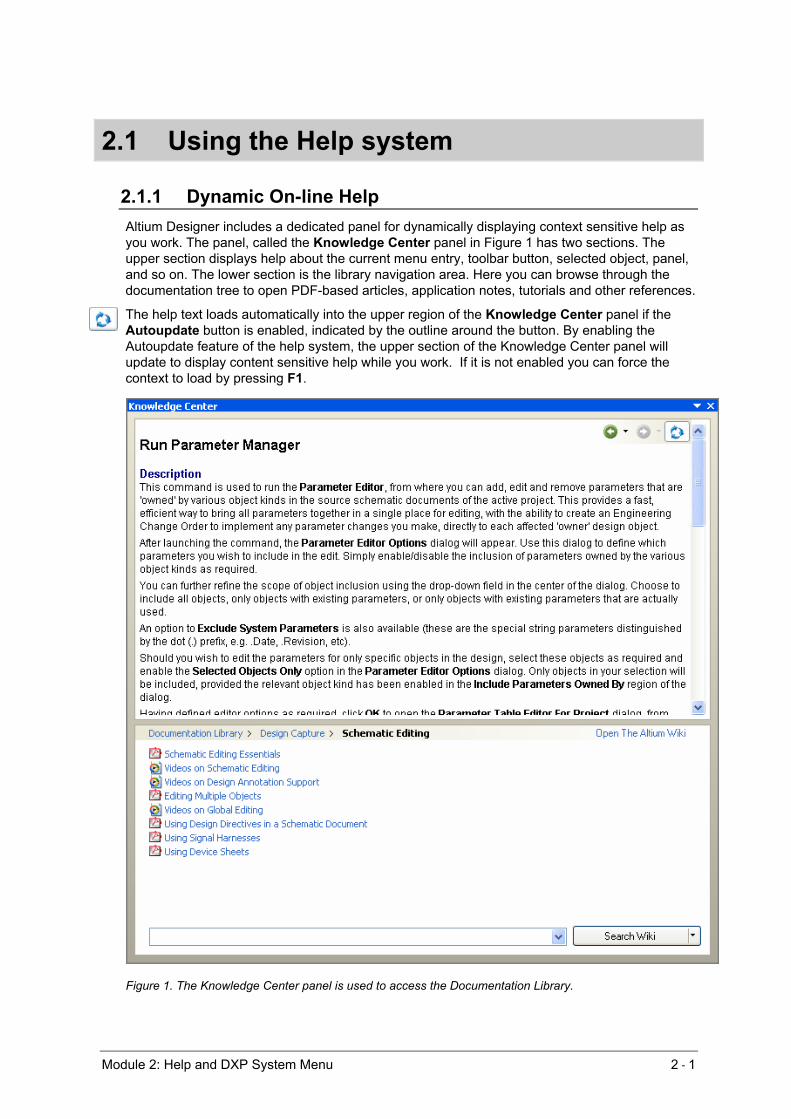
2.1.1 Dynamic On-line Help Altium Designer includes a dedicated panel for dynamically displaying context sensitive help as you work. The panel, called the Knowledge Center panel in Figure 1 has two sections. The upper section displays help about the current menu entry, toolbar button, selected object, panel, and so on. The lower section is the library navigation area. Here you can browse through the documentation tree to open PDF-based articles, application notes, tutorials and other references.
The help text loads automatically into the upper region of the Knowledge Center panel if the Autoupdate button is enabled, indicated by the outline around the button. By enabling the Autoupdate feature of the help system, the upper section of the Knowledge Center panel will update to display content sensitive help while you work. If it is not enabled you can force the context to load by pressing F1.
Figure 1. The Knowledge Center panel is used to access the Documentation Library.
Module 2: Help and DXP System Menu 2 - 1

2.1.2 Searching the Documentation Library Enter a search string in the field at the bottom of the panel and click Search Wiki to search the Wiki (http://wiki.altium.com) by default. This opens a web browser window in the software to view the search results. To search via the PDF based documentation in the documentation library click on the drop down arrow on the search button and select Search Local Documents. Note that the scope or this searching is controlled by your current location in the library, open a specific sub-folder to restrict searching to that topic area, return to the top of the library to search the entire library. Figure 1 shows navigating to the Design capture, schematic editing section.
2.1.3 Using F1 The Altium Designer environment includes extensive F1 help support. Virtually every aspect of the interface has F1 help support, for example:
• Press F1 while hovering the mouse cursor over a menu entry, toolbar button or dialog, to directly open the help topic about that command/dialog.
• Press F1 while hovering the mouse cursor over a panel to obtain detailed help specific to that panel.
• Press F1 in the Editor environment for help on that editor. If there is a design object under the cursor then you will be presented with help on that object.
2.1.4 What's This Help Use the dialog What's This Help ? to gain detailed information about each of the individual options available in a dialog.
Figure 2. Using the question mark icon to gain help in a dialog
Module 2: Help and DXP System Menu 2 - 2

2.2 Using the Altium website The Altium website (www.altium.com)includes extensive information about Altium’s products and services, including access to technical information and Service Packs. It is good practice to regularly visit the website to keep in touch with the latest information.
• Click on the Community section at the top the Home Page to access a variety of customer resources.
• The SUPPORTcenter and Learning Guides are two of the sections available in the Support sub-page. Learning guides, such as tutorials, articles and white papers, are in PDF format.
• The Altium Technical Forums can be joined by choosing the Forums option in the Community menu at the top of the Home Page. The Altium Designer forum is very popular amongst both Altium product users and Altium staff, as a meeting place where they can exchange advice and information.
• The DEMOcenter found on the home page to the left side is a useful tool for viewing short videos of new features or selective how-to’s in Altium Designer. Whenever a new release comes out with its usual array of new features, videos are created to help customers better utilize these new features in the product.
• The TRAININGcenter is another useful resource available in the Community section. These videos go into a lot more depth than the DEMOcenter movies. Current training material includes Project Management, layout, route and fill to Enterprise Integration videos.
2.2.1 SUPPORTcenter The SUPPORTcenter http://www.altium.com/supportcenter/ is one of the ways users can access high-quality product support and access to the latest product updates service packs. • Secure log in with username (email address) and password.
Figure 3. The login page
• Once in, it allows you to log, track and search through a solution database • The Find Solution button searches for possible solutions
Module 2: Help and DXP System Menu 2 - 3

Figure 4. Search engine for finding solutions
• Click on the Log a Case button and entering in the bug or support query if a valid solution is
not available.
Module 2: Help and DXP System Menu 2 - 4

Figure 5. Logging a case
• Once the support query is added, click on the Submit button to save. The View Cases
button allows editing, and adding attachments to the original query.
Module 2: Help and DXP System Menu 2 - 5

Figure 6. Home page for downloads
• The Download and update information section is on the main Home page of the
SupportCenter when you log in.
2.2.2 Altium Forums You can access the forums by going to http://forums.altium.com
• Secure log in with username (email address) and password.
• Access to unique resources developed by users
• Posts replied to by customers or Altium staff including R&D and even the CEO.
• Great 24 hour a day, 7 day a week resource of questions and answers from customers all over the world.
Module 2: Help and DXP System Menu 2 - 6

Figure 7.Altium Community forum home page
Module 2: Help and DXP System Menu 2 - 7

2.2.3 DEMOcenter The DEMOcenter can be accessed from, http://www.altium.com/Evaluate/DemoCenter/ . This resource is constantly updated when new releases come out showing short movies of the new features available.
Figure 8. A wide range of short movies are available through the DEMOcenter.
Module 2: Help and DXP System Menu 2 - 8

2.2.4 TRAININGcenter The TRAININGcenter can be found at, http://www.altium.com/community/trainingcenter/ . These training videos go into great depth into a very particular area of the product. These videos can be used as a resource in keeping your knowledge of the product and how to use it current. It’s a great resource if you’re completely new to the software or trying to get up to speed again from not using it for some time.
Figure 9. A list of TRAININGcenter material available – please note new videos will be added to this page regularly.
Module 2: Help and DXP System Menu 2 - 9

2.3 DXP System menu The DXP system menu provides commands for configuring the Altium Designer (DXP) environment. You can access these commands by clicking on the DXP icon located on the left-hand side of the Main menu. The DXP menu is always accessible in Altium Designer, regardless of which editor is currently in use.
Figure 10. Configure the environment via the DXP menu
The following sections describe the entries in the DXP system menu.
2.3.1 Customize The menu enables the management of resources associated with the current editor. For more information on this, the Advanced PCB training course covers this in a lot of detail.
2.3.2 Preferences Various global system preferences can be set for the DXP environment, including file backup and auto-save options, the system font used, the display of the Projects panel, environment view preferences including the popup and hide delay for panels, and enabling the version control interface. You can also access the environment preferences for each of the editors available in Altium Designer, such as the schematic and PCB editors.
To set Altium Designer environment preferences, select Preferences from the DXP menu. This will open the Preferences dialog shown in . Figure 11
Module 2: Help and DXP System Menu 2 - 10

Figure 11. Preferences dialog, used to configure Altium Designer and all editor preferences.
2.3.2.1 Autosave and manual save backup options Altium Designer supports two automatic file backup modes:
1. Backup-on-save – keep a backup whenever a user-initiated save action is performed (on by default). These files are saved in a History folder. The default is to create the History Folder below the active project folder, to configure an alternative central folder open the Local History page of the Version Control section of the Preferences dialog. History files are listed in the History section of the Storage Manager panel.
2. Timed backup – automatically save a copy of all open documents at a fixed time interval (off by default). Autosave settings, such as number of files and frequency of saves are configured in the Backup page of the DXP System section of the Preferences dialog.
Both backup modes support multiple copies, using the naming convention of: OriginalFileName.~(number of save).DocExtension.Zip Backup files are automatically compressed to reduce file size.
2.3.3 Run Process Selecting the Run Process command from the DXP System menu displays the Run Process dialog, which allows you to run any process in the DXP environment.
Module 2: Help and DXP System Menu 2 - 11

2.3.4 Licensing Selecting the My Account command from the DXP System menu displays the Licensing View, where you can select and configure the licensing type – Standalone or (Private Server). With the Summer 09 release there is also now the concept of an On-Demand license.
Figure 12. Connection to Altium based Server
The On Demand license requires that the user have a SupportCenter login and password in order to see the company or individual license(s) available. This login is entered via the account preferences in DXP » Preferences » System » Account Management. If you don’t have a SupportCenter login, your local support office can create one for you.
2.3.4.1 Roaming License With the new on-demand license in Altium Designer Summer 09 there is also the concept now of borrowing a license from a pool of company licenses. When a license is borrowed it can be taken offline until the license borrow time comes to pass, at which point the license automatically comes available again in the online pool for other users to use. This function is especially useful for designers that work from home or work on the road.
Figure 13. Right click on the license type to get the roam with license option.
A dialog appears when Roam with License option is used where the user can enter time in hours and days for the license to be borrowed from the pool. License can be borrowed for an unlimited amount of time in hourly increments.
Figure 14. Setting the borrowing time for an on demand license.
More details can be found here.
2.3.4.2 Standalone Altium Designer's Standalone licensing allows you to effectively manage your own license through use of a Standalone licensing file (*.alf). This file can be saved, copied and backed-up as required. The .alf file is reusable on a home computer (in accordance with the EULA ) simply by copying the file to a specific folder on that computer and then adding the file as part of
Module 2: Help and DXP System Menu 2 - 12

Standalone License Configuration. You also have the ability to convert a Standalone license to a single-seat On-Demand license.
With a Standalone license, the only time you need to sign in to your Altium account (through the Altium Portal), is when you initially activate your Standalone license, or if you want to convert it to an On-Demand license. Other than that, with this type of license, you really are working in a self-contained, offline fashion – the very definition of standalone. More details can be found here.
2.3.4.3 Private Server Altium Designer's Private Server licensing offers you floating license capability through implementation of your own dedicated Private License Server. Your administrator sets up this central server (also referred to as a network license, or local license server) to access and use Private Server licenses. Once a license is in use on the server, that server can then serve the license to multiple local computers. Users on the local network do not need to sign in to their Altium accounts to acquire the seats from the Private License Server. More details can be found here
2.3.5 Altium Account Manager To complement Altium Designer's licensing system, browser-based license management and reporting is provided, courtesy of the Altium Account Manager. The Account Manager allows you to firmly control how the licenses you purchase are assigned within your organization and lets you view license activity.
Figure 15. The browser-based Altium Account Manager.
2.3.5.1 Accessing the Account Manager Access the Account Manager – using your favorite web-browser – at myaccount.altium.com . The initial welcome page will load, as pictured below.
Module 2: Help and DXP System Menu 2 - 13

Figure 16. The browser-based Altium Account Manager.
To view and manage your account, you will need to sign in to your Altium account through the secure Altium Portal, using your standard login credentials.
The User Name and Password for the login are the same as those used to access the SUPPORTcenter and Altium Wiki.
2.3.5.2 Home Page Once signed in, you will be taken to the Account Manager's Home page, which presents top-level information for the account itself, such as company details, billing address and shipping address. Summary details for the number of users, groups and licenses associated to the account are also presented on this page.
Use the links associated to the summary entries to access the corresponding Users, Groups, and Licenses pages for the account, respectively. Alternatively, click directly on a page heading in the banner area of the page.
Module 2: Help and DXP System Menu 2 - 14

Figure 17. The Home page presents information for the account, along with controls to access pages on which to manage account users, groups and licenses.
To edit top-level account information, simply hover the cursor over the area of information you wish to change and click the change link that appears. A popup form will appear in which to make the required changes.
Figure 18. Make changes to account details using the associated popup forms.
Module 2: Help and DXP System Menu 2 - 15

Any changes you make to information on any of the Account Manager pages will refresh in your browser instance. However, it is possible that others, who have administrative access to the account, are also making changes. To refresh the account details – essentially retrieving the latest stored details from Altium, simply click on the button, located at the right of the banner area.
2.3.5.3 Users Management of users for the account is performed from the Users in account page. A user is simply a person who it is intended will use a licensed seat of the software.
Figure 19. Create a 'database' of people who are to use the license(s) associated to the account.
For each user, the page presents:
• Contact information (name, postal address, email address, phone number, cell phone number and fax number. The main language used by the user is also listed).
• How many groups the user belongs to (with a link to the corresponding group management page for that user).
• Whether or not the user can be contacted via email and, if so:
o What type of material the user has elected to receive from Altium. o Which Altium solutions the user is interested in.
Module 2: Help and DXP System Menu 2 - 16

2.3.5.4 Groups Management of groups for the account is performed from the Groups in account page. Groups allow you to further organize your users according to, for example, the particular section of the company in which they are involved, or the design team they are in. Groups make assignment of licenses more streamlined.
Figure 20. Create specific groupings (or 'memberships') of users and then assign licenses to those groupings.
There are two system groups, defined by default for an account. These are:
• All Account Members – this group automatically includes every user in the account. So if a license is assigned to this group, then any user in the account can use that license.
• Group Administrators – this group gives administrative privileges to the members of the group. Anyone who is a member of this group can make changes in the myaccount site, but anyone who is not a member cannot.
These two system groups cannot be edited or deleted. You can, however, manage members and license assignment for these groups, as with any user-created group.
2.3.5.5 Licenses Management of licenses for the account is performed from the Licenses for account page. From here, you can view all licenses that you have purchased from Altium.
Module 2: Help and DXP System Menu 2 - 17

Create specific groupings (or 'memberships') of users and then assign licenses to those groupings.
For an On-Demand license, you can:
• Allocate the license to one or more defined groups of users
• Determine how many seats of the license are assigned to each group (for a multi-seat license)
• Determine, on a group basis, whether or not the licenses can be 'roamed', and for how long.
For each license in the account, you can also view license statistics – showing weekly or monthly usage graphs and on which day the maximum number of concurrent seats for the license was used. This is most useful for On-Demand licenses, and can give you an indication of whether a license could be put to better use by simple reassignment between the groups that use it.
2.3.6 Run Script and Run Script Debugger Altium Designer includes a powerful scripting system, supporting the built-in DelphiScript language, as well as popular Windows scripting languages, including VisualBasic Script and JavaScript.
• The built-in scripting language, DelphiScript, is a Pascal-like language. There is also a complete Form design interface, allowing dialogs to be quickly created.
• Selecting the Run Script menu entry will pop up the Select Item to Run dialog, click on the script name to execute that script on the current document.
• Selecting the Run Script Debugger menu entry will open the Script Debugger, where you can set break points, single step through the script, and so on.
• There is more information on scripting in the Scripting section of the Documentation Library. Browse to it in the Configuring the System folder in the lower section of the Knowledge Center panel.
• Two useful scripts you can try are located in the directory \Altium Designer Summer 09\Examples\Scripts\Delphiscript Scripts\Pcb\. The names of the scripts are
Module 2: Help and DXP System Menu 2 - 18

CreateRegionsFromBitmap and PCB Logo Creator and they create regions from a bitmap and create tracks and arcs from a bitmap respectively. To use these scripts open the document with the *.PRJSCR extension, then open up a PCB document and use DXP » Run Script.
Figure 21. Executing a script
Click Ok, then load up a Bitmap file. You should see what’s in . Figure 22
Module 2: Help and DXP System Menu 2 - 19

Module 2: Help and DXP System Menu 2 - 20
Figure 22. Create regions from bitmap using Altium logo.
It is also possible to customize Altium Designer, and add a script to a menu item or toolbar, so that it doesn’t need to be opened each time. This functionality is covered in the Altium Designer Advanced Schematic Capture and PCB Editing training course.
2.3.7 Exercise – Configuring Altium Designer System Preferences
1. Open the DXP Preferences dialog and click on different nodes in the tree on the left of the dialog to get an idea of what options can be set – the options for the schematic and PCB editors will be covered later in the course.
2. In the System » View page of the Preferences dialog disable the Use animation option, and reduce the Hide delay option.
3. Close the Preferences dialog.
4. Hover the cursor over the Libraries tab on the right-hand side of the workspace to see how the popup of the panel is affected and then move the cursor away from the Libraries panel to check the hide delays. If you don’t have the libraries panel loaded go to the panel control down the bottom right of your screen and click System » Libraries.