module 2: interacting with the language - squeakftp.squeak.org/docs/bhoran/module02.pdfmodule 2 1...
TRANSCRIPT

Module 2 1
Module 2: Interacting with the Language
This module presents a brief introduction to the items seen on the screen, and
their relationship to things within the environment. The items include
Browsers , Workspaces, Prompters and Menus. The mouse⁄cursor combination,
the screen and the keyboard will be mentioned.
This is followed by an indication of how to start (and stop!) VisualWorks;
naturally, this aspect is somewhat dependent on the users’ local machine and
operating system. A discussion of the importance of snapshots and the “sources”
and “changes” files is provided.
The Smalltalk language syntax is straightforward, but is rather unusual
compared with more conventional languages. This module gives an
introduction to the syntax, covering all of the most important features, but
leaving some more complex aspects to later modules. Topics include the
expression syntax, literals and variables, the parsing rules, a brief introduction to
blocks and an introduction to variables.
Finally, we provide a complete introduction to the typing and editing functions
built–in to the user interface, using the Workspace as an example. Operations
include simple selection and editing using the mouse, copy, cut and paste
operations, and search and replace operations. The use of the cursor keys and
special key combinations will also be described. Simple evaluation of expressions
will also be discussed. This will be extensively illustrated with pictures taken
from the screen.
This module will include extensive small exercises, to ensure that the reader is
completely familiar with this level of operation of the VisualWorks system. This
is very important, as all further modules will rely on these skills.
Module 2: Interacting with the Language...............................................................12.1. Windows..........................................................................................................32.2. Menus, Prompters, etc...................................................................................32.3. The Mouse........................................................................................................42.4. Cursors..............................................................................................................52.5. Using VisualWorks........................................................................................6
2.5.1. Unix..........................................................................................................72.5.2. MS–Windows.........................................................................................72.5.3. Macintosh................................................................................................7
2.6. The Launcher...................................................................................................82.7. <Window> Button Menu Operations.......................................................92.8. The Window Menu.......................................................................................11
© Trevor Hopkins and Bernard Horan, 1994
Module 2 2
2.9. Smalltalk Expression Syntax........................................................................112.10. Literals.............................................................................................................12
2.10.1. Numbers................................................................................................122.10.2. Characters..............................................................................................122.10.3. Strings.....................................................................................................122.10.4. Symbols..................................................................................................122.10.5. Literal Arrays........................................................................................132.10.6. Byte Arrays............................................................................................13
2.11. Variables.........................................................................................................132.12. Pseudo–Variables..........................................................................................142.13. Messages..........................................................................................................14
2.13.1. Unary Messages....................................................................................142.13.2. Binary Messages...................................................................................142.13.3. Keyword Messages...............................................................................15
2.14. Parsing Rules.................................................................................................152.15. Assignments..................................................................................................172.16. Returning.......................................................................................................182.17. Blocks...............................................................................................................182.18. Comments......................................................................................................182.19. Using Workspaces........................................................................................182.20. Typing and Selecting....................................................................................192.21. Editing.............................................................................................................232.22. Evaluating Smalltalk Code.........................................................................262.23. The Settings Tool..........................................................................................302.24. Help..................................................................................................................31
© Trevor Hopkins and Bernard Horan, 1994
Module 2 3
2.1. Windows
The VisualWorks user interface consists of one or more (potentially)
overlapping windows, each of which may contain text or graphics. The windows
are managed by the host platform’s standard window manager, and not part of
VisualWorks. On UNIX systems, this will be X–windows, together with a
window manager such as twm, olwm (OpenLook) or mwm (Motif). On PC
machines it will be MS–Windows, and on the Macintosh it will be its own
distinctive user interface. Each window is manipulated using the mechanisms of
the native window manager, but can also be manipulated through VisualWorks.
Several types of windows are available as standard. These include windows with
the following labels:
VisualWorks a window with menu options and buttons for
launching other windows (herein after known as
the ‘Launcher’). It may also contain an area known
as the ‘System Transcript’ (see below). We
recommend that you keep this window open so
that you can see the messages are they are displayed.
Workspace a general work⁄edit area.
System Browser for managing (parts of) the class hierarchy.
Class Browser for managing a single class.
System Transcript displaying “system” messages.
File Browser access to underlying file system.
Inspector discover⁄change state of any object.
Debugger following⁄modifying evaluation paths.
The VisualWorks image contains much code and a uniform mechanism for
creating new windows.
2.2. Menus, Prompters, etc.
A number of other “things” can appear on the screen. These include:
© Trevor Hopkins and Bernard Horan, 1994
Module 2 4
Menus These are widely used in conjunction with windows.
These allow the user to select one of several items
using the mouse.
Confirmers These request the user to confirm or deny a request.
Prompters A mechanism for prompting the user for some typed
response.
Informers These typically inform the user that some user
request has failed.
Notifiers The means by which VisualWorks indicates that
some event has occurred. This may be an error
condition, a user interrupt or some other exception
condition.
The use of many of these items will be demonstrated later in the course.
2.3. The Mouse
VisualWorks requires the use of some form of pointing device — it is used for
much of the user’s interaction with the environment. A cursor on the display
screen follows the movement of the pointing device. Typically, the pointing
device will be a mouse with three buttons1.
Because VisualWorks also runs on machines with one– and two–button mice,
use of the terms “left”, “middle” and “right” is discouraged. The names for the
mouse buttons are:
<Select> is the left button (also called the “red” button in VisualWorks).
<Operate> is the middle button (also called the “yellow” button in
VisualWorks).
<Window> is the right button (also called the “blue” button in
VisualWorks).
Despite the recommendations, much Smalltalk code still uses the colour names!
The following terminology for the use of the mouse buttons is normally used:
1If you are using a Macintosh or a PC, now would be a good time to consult your manual to discover how tosimulate a three button mouse on your single–button (Macintosh) or double–button (PC) mouse.
© Trevor Hopkins and Bernard Horan, 1994

Module 2 5
Press press and hold the button down.
Release release the button.
Click press and release the button without moving the mouse.
Double Click click the button twice without moving the mouse betweenclicks.
When over a VisualWorks window, the general operations associated with
mouse buttons are as follows:
<Select> button Selecting and positioning within the “application”
displayed in the window.
<Operate> button “Application” (window) specific menu items.
<Window> button Window control function menu items, common to
all standard VisualWorks windows.
2.4. Cursors
Eight standard cursors are used to give feedback about VisualWorks’ activities
and the current mouse position. The eight cursors are described below:
shape name description
normal The cursor looks like this for most of the time. The
point of selection (or hot–spot) is the tip of the arrow.
execute The system is compiling a method, evaluating an
expression, etc. During this time, mouse button
movements are ignored and keyboard inputs are
deferred.
wait The system is carrying out some operation that
prevents it from responding to your input.
read Data is being read from an external file. User input is
ignored⁄deferred.
write Data is being written to an external file. User input is
ignored⁄deferred.
© Trevor Hopkins and Bernard Horan, 1994
Module 2 6
garbage
collector
Non–compacting garbage–collection is taking place.
This occurs only during “low–space conditions”. User
input is ignored⁄deferred.
memory
compactor
Memory is being compacted. This occurs when free
memory if heavily fragmented. User input is
ignored⁄deferred.
compacting
garbage
collector
A full compacting garbage–collection is taking place.
This only occurs during “low–space conditions”. User
input is ignored⁄deferred.
The wait and⁄or execute cursors are used when evaluating messages that require
several seconds to complete. The read and write cursors are used when file I⁄O is
being performed.
2.5. Using VisualWorks
At least the following files should be present:
visual.im this is the image file, representing the current (suspended)state of your Smalltalk evaluation.
visual.sou this file contains the source code for all the classes andmethods in the image1.
visual.cha this file contains the changes made to the image file since thesources file was created. Every new or modified method, andall evaluations performed are recorded here.
If any of these files is missing, you will not be able to run VisualWorks. It is very
important that the visual.im and visual.cha files remain consistent, so we
recommend that you do not directly modify either file.
The actions required to start your VisualWorks session depend on the platform
you are using. Here we will consider three possibilities: UNIX, MS–Windows
and Macintosh. You should consult your manual or system administrator if you
feel may need help accessing or installing the software.
1On distributed file systems, you may find that this file is elsewhere.
© Trevor Hopkins and Bernard Horan, 1994

Module 2 7
2.5.1. Unix1
To start the VisualWorks system, type visualworks visual.im. This starts the
Smalltalk Virtual Machine and loads the image file. A number of messages will
be printed in the console window as the image is loaded.
2.5.2. MS–Windows
Double click on the icon named ‘Visual’ in the appropriate Program Manager
window. This starts the Smalltalk Virtual Machine and loads the image file.
2.5.3. Macintosh
Double click on the icon named ‘Visual.im’ in the appropriate folder (usually
contained in a folder also called ‘Visual’). This starts the Smalltalk Virtual
Machine and loads the image file.
Once the image is loaded, two windows will appear on the screen: the Launcher
(labelled ‘VisualWorks’) and a Workspace.
Figure 2.1: Confirm that you wish to quit the VisualWorks image
To leave the VisualWorks environment, select the Exit VisualWorks… option
from the File menu of the Launcher. A Confirmer will appear (figure 2.1); select
Exit from this. Any changes you have made are not saved. If you want to save
the changes you have made to the image, then you should select the
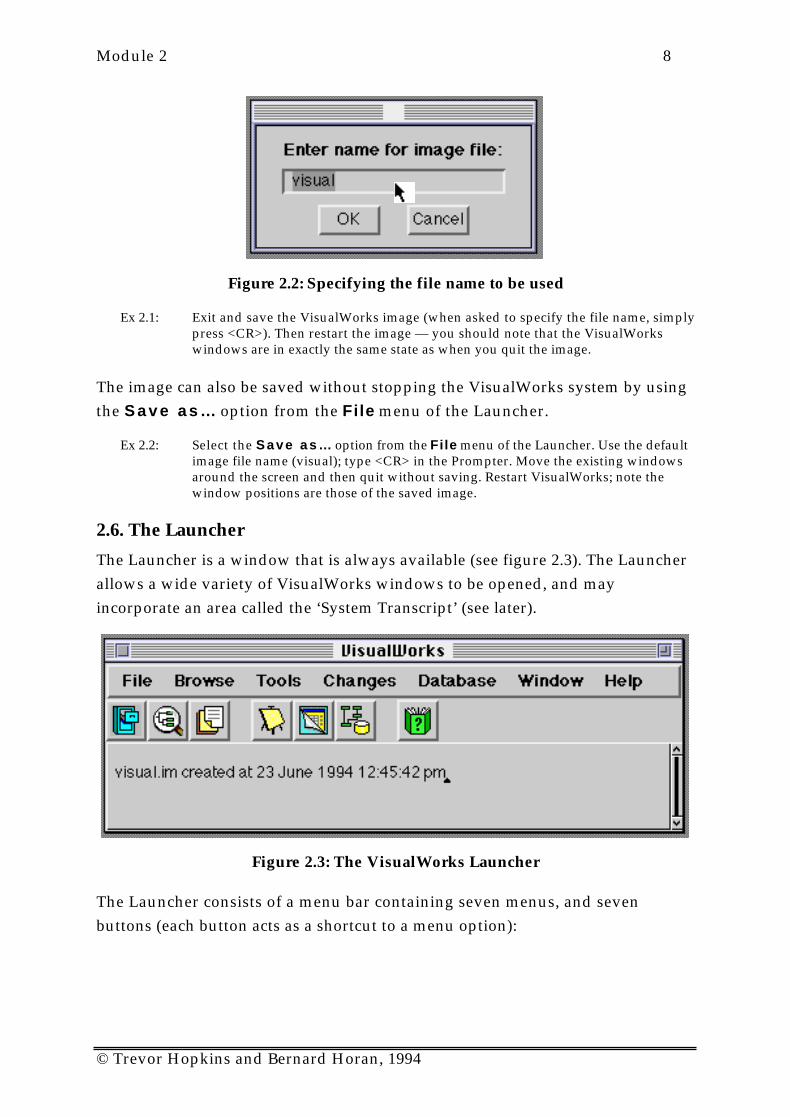
Save, then Exi t option. A Prompter will appear, asking for a filename to be
used for the image (figure 2.2).
1Note that the details here are Sun specific, and may be different on other machines.
© Trevor Hopkins and Bernard Horan, 1994
Module 2 8
Figure 2.2: Specifying the file name to be used
Ex 2.1: Exit and save the VisualWorks image (when asked to specify the file name, simplypress <CR>). Then restart the image — you should note that the VisualWorkswindows are in exactly the same state as when you quit the image.
The image can also be saved without stopping the VisualWorks system by using
the S a v e a s … option from the File menu of the Launcher.
Ex 2.2: Select the S a v e a s … option from the File menu of the Launcher. Use the defaultimage file name (visual); type <CR> in the Prompter. Move the existing windowsaround the screen and then quit without saving. Restart VisualWorks; note thewindow positions are those of the saved image.
2.6. The Launcher
The Launcher is a window that is always available (see figure 2.3). The Launcher
allows a wide variety of VisualWorks windows to be opened, and may
incorporate an area called the ‘System Transcript’ (see later).
Figure 2.3: The VisualWorks Launcher
The Launcher consists of a menu bar containing seven menus, and seven
buttons (each button acts as a shortcut to a menu option):
© Trevor Hopkins and Bernard Horan, 1994

Module 2 9
File Various special options, including saving the image
to a file, forcing a full garbage collection cycle, and
setting the user’s preferences.
Browse Allows a variety of browsers to be opened, including
System and Class browsers (module 3), and access to
VisualWorks’ “resources” (module 14).
Tools Allows file handling (module 3) and Workspace
windows to be opened. Additionally provides access
to VisualWorks window–building tools and other
advanced utilities (if available). The menu also
includes an option to specify if the System Transcript
should be included in the Launcher.
Changes Allows several different kinds of windows to be
opened, which support change management.
Database Allows access to database connectivity tools.
Window Provides window management features (see later).
Help Allows access to on–line documentation and
examples.
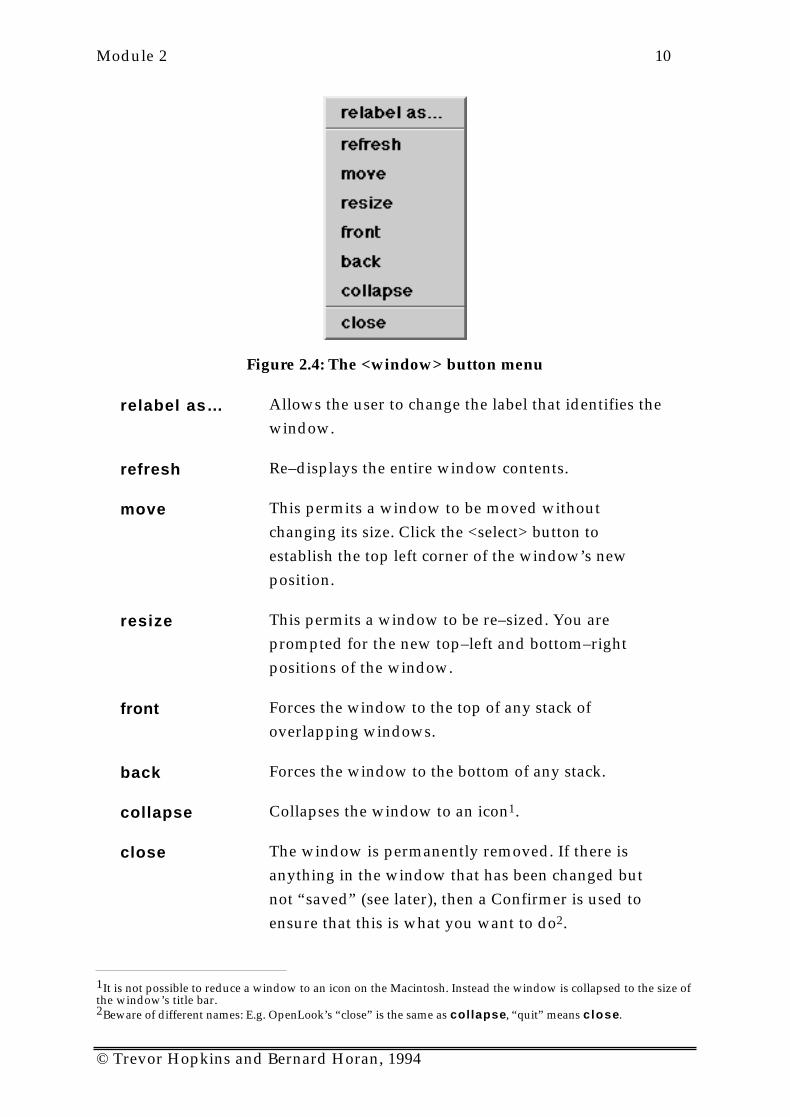
2.7. <Window> Button Menu Operations
Every window has a standard <window> button menu (figure 2.4), which
provides operations to control the window. The options provided by the menu
will usually be identical for each window.
© Trevor Hopkins and Bernard Horan, 1994
Module 2 10
Figure 2.4: The <window> button menu
relabel as… Allows the user to change the label that identifies the
window.
refresh Re–displays the entire window contents.
move This permits a window to be moved without
changing its size. Click the <select> button to
establish the top left corner of the window’s new
position.
resize This permits a window to be re–sized. You are
prompted for the new top–left and bottom–right
positions of the window.
front Forces the window to the top of any stack of
overlapping windows.
back Forces the window to the bottom of any stack.
collapse Collapses the window to an icon1.
close The window is permanently removed. If there is
anything in the window that has been changed but
not “saved” (see later), then a Confirmer is used to
ensure that this is what you want to do2.
1It is not possible to reduce a window to an icon on the Macintosh. Instead the window is collapsed to the size ofthe window’s title bar.2Beware of different names: E.g. OpenLook’s “close” is the same as collapse, “quit” means close.
© Trevor Hopkins and Bernard Horan, 1994

Module 2 11
Ex 2.3: Create a new Workspace by selecting the Workspace item from the Tools menu ofthe Launcher. Then experiment with the operations on the <window> button menu.Also, try the window manager operations provided by the host platform.
2.8. The Window Menu
The Window menu available from the Launcher (figure 2.5) contains more
options to control window management1.
Figure 2.5: The Window menu
The menu options are described below:
Refresh All re–draws all the open windows.
Collapse All collapses all the open windows, with theexception of the Launcher.
Restore All expands all collapsed windows.
Windows provides a sub–menu containing a list of windowlabels. Selecting an item from this menu willbring the corresponding window to the front.
2.9. Smalltalk Expression Syntax
Clearly, an expression syntax is required to express how objects interact with one
another. An expression is a sequence of characters which describe an object,
called the va lue of the expression.
Four types of expression are permitted:
• Literals describe constant objects (numbers, characters, strings, symbols and
arrays).
• Variable names describe accessible variables. The value of the variable
name is the current value of the variable with that name.
• Message expressions describe messages sent to receivers. The value of the
expression is determined by the method it invokes.
1The Macintosh version also includes a ‘window’ menu on its screen menu bar.
© Trevor Hopkins and Bernard Horan, 1994
Module 2 12
• Block expressions describe deferred activities. Blocks are often used for
control structures.
2.10. Literals
One of the simplest forms of Smalltalk expression is the “literal expression”.
Here we describe the syntax of these constant objects:
2.10.1. Numbers
A Number is represented as a sequence of digits, with an optional leading unary
minus sign and optional decimal point. There is no unary plus sign. Examples
include:
8 12.7 –0.0007
Numbers can also be represented in other bases, by preceding the base with a
radix and the letter ‘r’:
8r177 16r5E 2r100011 16r–12.37
Numbers can also be expressed in “scientific notation”, using the suffix letter ‘e’.
For example:
2.23e5 8r177e6 3e-2
Finally, numbers can also be represented as “fixed–point” (used, for example, to
represent currency values) using the suffix letter ‘f’. For example:
2.23f 177f6 3f-2
2.10.2. Characters
A Character is an individual letter of an alphabet. It is represented by a single
alphanumeric letter preceded by a ‘$’ sign. Examples include:
$D $+ $$ $9 $x
2.10.3. Strings
A String is a sequence of Characters surrounded by quote marks. Examples
include:
'test string' 'string with '' embedded single quote'
2.10.4. Symbols
A Symbol is an object that represents a string used for a name in Smalltalk. A
Symbol is represented using the ‘#’ sign, and is optionally surrounded by quote
marks. Symbols are always unique. Examples include:
#initialize #W80 #temp #'3x'
© Trevor Hopkins and Bernard Horan, 1994
Module 2 13
2.10.5. Literal Arrays
The literals are surrounded by brackets and preceded by the ‘#’ sign. Embedded
arrays may avoid the use of the ‘#’ sign. Examples:
#(40 41 42) #((1 '2') ('first' #second)) #(1 'one' ($5 'five'))
2.10.6. Byte Arrays
A Byte Array is a sequence of bytes (integers between 0 and 255) surrounded by
square brackets and preceded by a ‘#’ sign. For example:
#[1 2 3 0] #[16rff 0 2r111 2e2]
2.11. Variables
A variable points to an object. The variable’s name is an expression referring to
that object. Variable names are identifiers made up of letters and digits with an
initial letter:
someObject Integer Smalltalk temp3
When made up from more than one word, the first letter of each subsequent
word in the identifier is capitalised. You are strongly encouraged to conform
with this convention — it is used consistently throughout VisualWorks.
The “private” memory of an object has already been introduced. The term used
to describe the variables that represent an object’s private memory is instance
variables, since they are used to represent the private memory of an instance of a
class. Instance variables are only available to the specific object in which they are
contained. They are simply names for pointers to other objects.
Other types of variables are also provided; they are described below:
Temporary
Variables
exist only for the duration of some activity (e.g. the
evaluation of a method).
Class Variables are shared by all instances of a single class.
Global Variables are shared by all instances of all classes (i.e. all
objects). Try not to use Global variables except for
experimentation.
Pool variables are shared by all instances of some classes, and are
thus a way of creating common storage between
object classes. Pool variables are very rarely used.
© Trevor Hopkins and Bernard Horan, 1994

Module 2 14
By convention, private variables (instance variables, temporary variables) start
with an initial lower–case letter, whereas shared variables (class variables, global
variables, pool variables) start with an initial upper–case letter. We shall return
to different kinds of variables later in the course: module 4 gives examples of
global variables, and module 5 gives examples of class and pool variables.
2.12. Pseudo–Variables
A pseudo–variable name refers to an object which cannot be changed; these
include:
nil A value used when no other is appropriate, such as uninitialized
variables. nil is the sole instance of class UndefinedObject.
true Represents truth. It is the sole instance of class True.
false Represents falsehood. It is the sole instance of class False.
Classes True and False are subclasses of Boolean.
2.13. Messages
A message expression comprises a receiver, a selector and possibly some
arguments. The basic specification for sending a message in Smalltalk is
<receiver> <message>
where <receiver> is the name of some known object, and <message> is a unary,
binary, or keyword message including arguments.
2.13.1. Unary Messages
Unary messages are the simplest type of message in Smalltalk. An object is
followed by a single word (the message selector) and no arguments. The selector
must contain no colons. Examples:
3 negated
100 factorial
Window new
anArray size
theta sin
4 even
2.13.2. Binary Messages
Binary messages are more complex, since they also have one argument specified
with them. The selector is one or two non–alphabetic letters, the second of which
© Trevor Hopkins and Bernard Horan, 1994
Module 2 15
must not be a minus sign. Existing binary messages in the current Smalltalk
image include:
+ - / *= < > ~=<= >=& (logical “and”) | (logical “or”), (string concatenation)
These binary messages will be described in more detail in later modules.
Examples:
2 + 3
true & false
3 * 4
100 // 17
index – 1
2.13.3. Keyword Messages
Keyword messages are the most complex type of message. The structure of a
keyword message comprises one or more keywords each with its own argument.
For instance, in the message
anArray copyFrom: 1 to: 3
copyFrom: and to: are the keywords, and the numbers 1 and 3 are arguments.
Note that each keyword must end with a colon. A message can have no more
than 255 keywords. An argument can be an expression representing any object.
Other examples:
index max: limit
anArray at: first put: 'aardvark'
2.14. Parsing Rules
The order of evaluation in a Smalltalk statement is:
1) Unary messages left to right;
2) Binary messages left to right;
3) Keyword messages left to right.
© Trevor Hopkins and Bernard Horan, 1994

Module 2 16
Multiple expressions are separated by full stops1.
These rules are quite unlike those in many other languages, where precedence
depends on the function. There is no algebraic hierarchy. However, as with
many other languages, parentheses (round brackets) can be used to alter the order
of precedence. It is worthwhile considering some examples:
In the example:
1.5 tan rounded
the unary message tan is sent to 1.5, and the unary message rounded is sent to the
resulting object.
Similarly for binary messages:
a + b * 2
returns the result “twice (a+b)”. To get “(twice b)+a”, the expression should be
written:
a + (b * 2)
Parentheses also have precedence over unary messages.
In the example:
(anArray at: 14) even
the message even is sent to the 14th element of anArray , while:
anArray at: 14 even
the message even is sent to 14, and an attempt is made to use the resulting object
(true) as an index to anArray . This is probably an error.
When multiple keywords appear in an expression, they are parsed as a single
keyword message. For example:
frame scale: factor max: 5
contains a keyword message selector (scale:max:) with two arguments, factor and
5. Conversely:
frame scale: (factor max: 5)
sends the keyword message max: 5 to factor, and uses the resulting object as the
argument to the keyword message selector scale: sent to frame.
1For North American readers, a “full stop” is a “period”.
© Trevor Hopkins and Bernard Horan, 1994
Module 2 17
It is important therefore to exercise care when putting keyword messages
together:
2 raisedTo: 3 raisedTo: 7
As there is no raisedTo:raisedTo: message selector, the above expression will
result in an error. Similarly it is important to note that:
(2 raisedTo: 3) raisedTo: 7 is not equal to 2 raisedTo: (3 raisedTo: 7)
Omitting the parentheses in these sorts of cases is a common source of errors.
Parentheses can always be used to clarify the intention of an expression.
Nevertheless, use with care, otherwise your expressions will become very
cluttered.
Ex 2.4: What is the result for each of the following Smalltalk expressions?
2 + 3 negated
2 raisedTo: 3 + 7
(2 raisedTo: 3) + 7
2 raisedTo: 3 + 7 negated
(2 raisedTo: 3) + 7 negated
(2 raisedTo: 3 + 7) negated
2.15. Assignments
A variable name can refer to different objects at different times. The assignment
expression can be used to assign an object to a variable. It looks like:
<variable> := <message send>
Examples:
newIndex := 1
this := that
someString := 'Part Two'
anArray := #(1 2 3 4 5)
Assignment expressions return values (like other expressions) so several
assignments can be made together.
this := that := theOther
stop := end := 0
Ex 2.5: What is the result of the following assignment expressions?
a := 5 - 4.
© Trevor Hopkins and Bernard Horan, 1994

Module 2 18
a := 5 raisedTo: 3.
a := (b := 5) * 66.
a := 3 * (2 raisedTo: (b := 36 // 42)).
2.16. Returning
Every method returns a value to the sender when it has finished evaluating. If
this is not specified, the receiver itself is returned.
If something else must be specified, the ‘^’ symbol is used to return the value and
end the evaluation of the current method. Any object can be returned this way.
2.17. Blocks
A Block represents a deferred sequence of actions. A block is represented by a
sequence of expressions (separated by full stops), enclosed by square brackets. For
example:
aBlock := [index + 2]
aBlock := [anArray at: newIndex put: 42]
A block is evaluated when it receives the message value. For example:
aBlock := [a := 0].aBlock value
when aBlock receives the message value, it is evaluated, causing the variable a to
refer to the integer 0.
Blocks are used to implement control structures (see module 10). Examples
include:
aNumber evenifTrue: [aString := 'even']ifFalse: [aString := 'odd']
[index > 0]whileTrue: [index := index 1]
2.18. Comments
Sequences of characters (i.e. “words”) purely for documentation purposes are
indicated by their enclosure in double quotes (‘"’).
2.19. Using Workspaces
In any programming system, you will of course spend a great deal of time typing
at the keyboard. Unless you are a perfect typist, and also never make
programming mistakes, you will undoubtedly want to edit what you have typed.
© Trevor Hopkins and Bernard Horan, 1994
Module 2 19
The VisualWorks environment recognises these facts, and much effort has been
put into facilitating the process of editing (particularly Smalltalk code).
In this section, we will describe how text is manipulated within the VisualWorks
system. We will concentrate on using Workspaces, which are a simple kind of
edit⁄compile interface. However, you should remember that the same editing
mechanisms are available in all places where you can type; this is because all the
editors behind the Workspaces and other text areas are instances of the same
class, or at least instances of related classes.
2.20. Typing and Selecting
This section considers simple text editing within the VisualWorks system. First,
you will need to open a Workspace (unless, of course, you already have one open
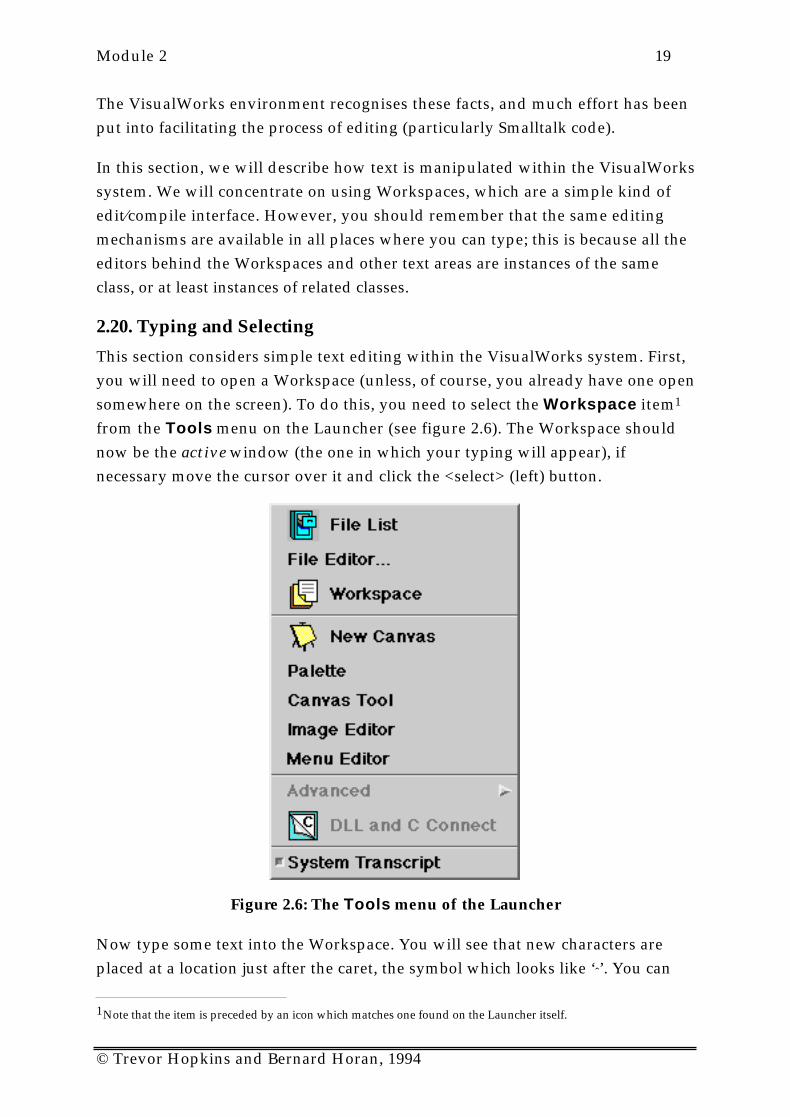
somewhere on the screen). To do this, you need to select the Workspace item1
from the Tools menu on the Launcher (see figure 2.6). The Workspace should
now be the active window (the one in which your typing will appear), if
necessary move the cursor over it and click the <select> (left) button.
Figure 2.6: The Tools menu of the Launcher
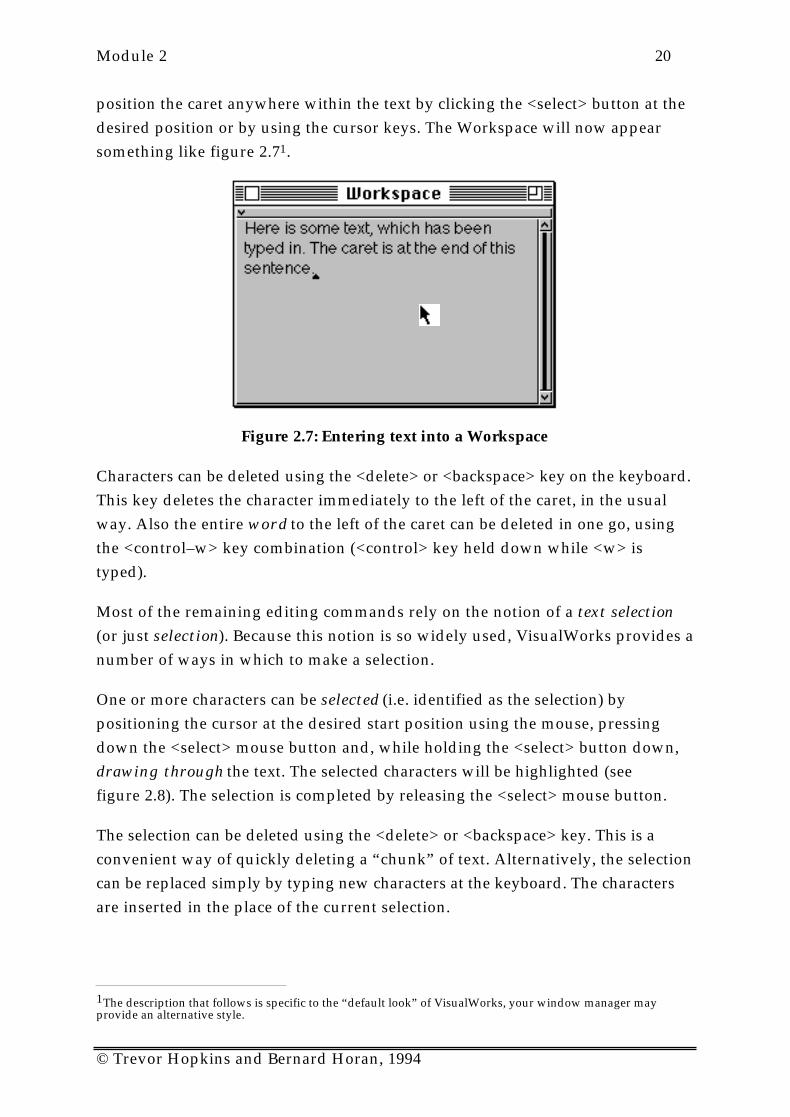
Now type some text into the Workspace. You will see that new characters are
placed at a location just after the caret, the symbol which looks like ‘ˆ’. You can
1Note that the item is preceded by an icon which matches one found on the Launcher itself.
© Trevor Hopkins and Bernard Horan, 1994
Module 2 20
position the caret anywhere within the text by clicking the <select> button at the
desired position or by using the cursor keys. The Workspace will now appear
something like figure 2.71.
Figure 2.7: Entering text into a Workspace
Characters can be deleted using the <delete> or <backspace> key on the keyboard.
This key deletes the character immediately to the left of the caret, in the usual
way. Also the entire word to the left of the caret can be deleted in one go, using
the <control–w> key combination (<control> key held down while <w> is
typed).
Most of the remaining editing commands rely on the notion of a text selection
(or just selection). Because this notion is so widely used, VisualWorks provides a
number of ways in which to make a selection.
One or more characters can be selected (i.e. identified as the selection) by
positioning the cursor at the desired start position using the mouse, pressing
down the <select> mouse button and, while holding the <select> button down,
drawing through the text. The selected characters will be highlighted (see
figure 2.8). The selection is completed by releasing the <select> mouse button.
The selection can be deleted using the <delete> or <backspace> key. This is a
convenient way of quickly deleting a “chunk” of text. Alternatively, the selection
can be replaced simply by typing new characters at the keyboard. The characters
are inserted in the place of the current selection.
1The description that follows is specific to the “default look” of VisualWorks, your window manager mayprovide an alternative style.
© Trevor Hopkins and Bernard Horan, 1994

Module 2 21
To extend the text selection, hold down a <shift> key and then click at the new
end point. To de–select the text selection, simply click once anywhere in the
active window.
Figure 2.8: Making a text selection
There are several other “shorthand” ways of making selections more quickly.
One which is particularly useful is to use the <escape>–<tab> key combination
(<escape> key fo l lowed by the <tab> key) to select all the text just typed (i.e. since
the caret was last moved, or since an editing operation was performed). This is
particularly useful should you wish to perform some operation on everything
you have just entered. You may find that this selection method is faster than
using the mouse, since you do not have to move your hands from the keyboard.
Another useful selection mechanism is “double–clicking” the <select> mouse
button. Double–clicking within a “word” selects the entire word; this is handy
should you wish to replace an entire word. Double–clicking at the beginning or
end of a line of text (up to the next carriage return) selects the entire line. All the
text in a Workspace may be selected by double–clicking at its beginning or its end.
You should note that the double–click selection is not determined by the speed of
clicking, but by location; the first click positions the caret, and a subsequent click
in the same location as the caret selects the word, line or complete text
appropriately.
A final mechanism by which double–clicking can be used to make selections
quickly is where there is a section of text surrounded by delimiters. These include
round brackets ‘( )’, square brackets ‘[ ]’, curly brackets ‘{ }’, angle brackets ‘< >’,
single quote marks ‘' '’ and double quotes ‘" "’. The text within any of these
delimiters can be selected by double–clicking between the delimiter and the first
© Trevor Hopkins and Bernard Horan, 1994
Module 2 22
(or last) character of the enclosed text. Almost all of these delimiters have some
meaning in the syntax of the Smalltalk language.
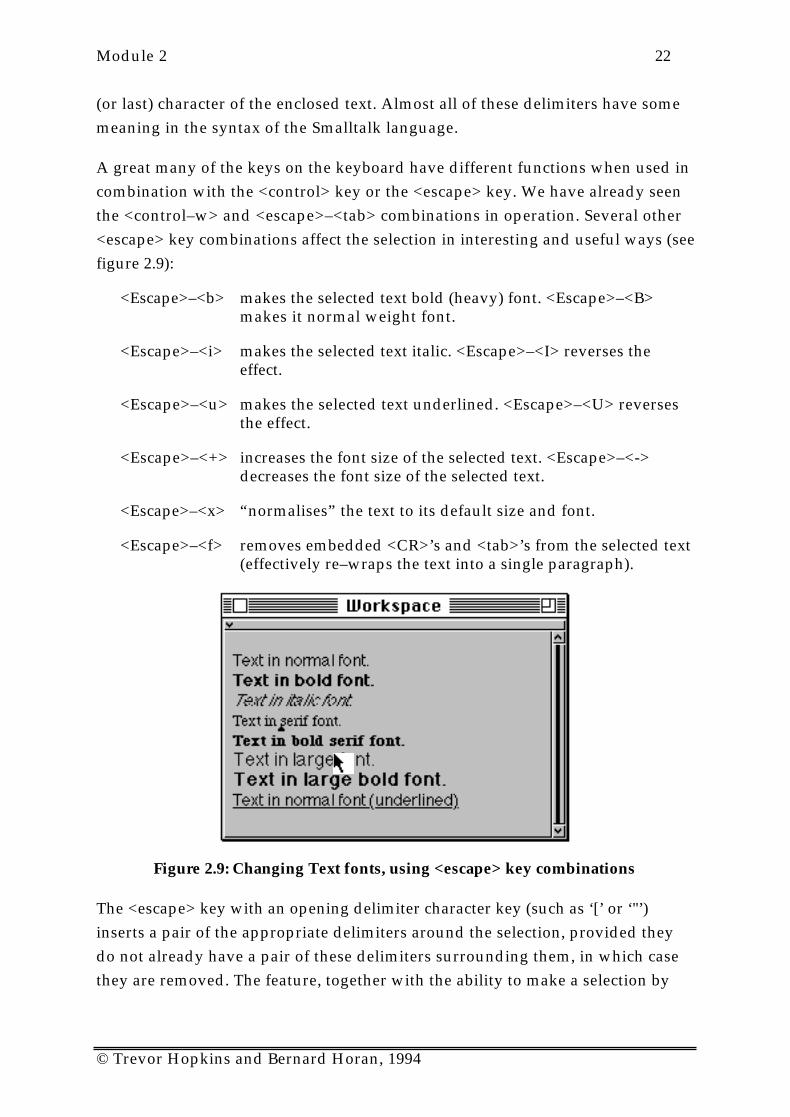
A great many of the keys on the keyboard have different functions when used in
combination with the <control> key or the <escape> key. We have already seen
the <control–w> and <escape>–<tab> combinations in operation. Several other
<escape> key combinations affect the selection in interesting and useful ways (see
figure 2.9):
<Escape>–<b> makes the selected text bold (heavy) font. <Escape>–<B>makes it normal weight font.
<Escape>–<i> makes the selected text italic. <Escape>–<I> reverses theeffect.
<Escape>–<u> makes the selected text underlined. <Escape>–<U> reversesthe effect.
<Escape>–<+> increases the font size of the selected text. <Escape>–<->decreases the font size of the selected text.
<Escape>–<x> “normalises” the text to its default size and font.
<Escape>–<f> removes embedded <CR>’s and <tab>’s from the selected text(effectively re–wraps the text into a single paragraph).
Figure 2.9: Changing Text fonts, using <escape> key combinations
The <escape> key with an opening delimiter character key (such as ‘[’ or ‘"’)
inserts a pair of the appropriate delimiters around the selection, provided they
do not already have a pair of these delimiters surrounding them, in which case
they are removed. The feature, together with the ability to make a selection by
© Trevor Hopkins and Bernard Horan, 1994
Module 2 23
double–clicking within a pair of delimiters, makes it very easy to add and
remove various brackets, and so on.
There are also some <control> key combinations that you may find of use later:
<Control–t> inserts ifTrue:
<Control–f> inserts ifFalse:
<Control–g> inserts :=
<Control–d> inserts the current date.
Ex 2.6: Try opening a Workspace, and then typing some text into it. Add characters atdifferent places within the Workspace, moving the caret by using the <select>mouse button and cursor keys.
Ex 2.7: Experiment with removing characters from the Workspace using the <backspace>,<delete> and <control–W> keys. Try determining what Smalltalk considers to be a“word”, when using the <control–W key>. Hint: consider the syntax of theSmalltalk language.
Ex 2.8: Try making text selections by “drawing through” using the <select> mouse button.Try deleting the text (using the <delete> or <backspace> key) and replacing thetext by typing in new characters.
Ex 2.9: Experiment with different ways of making selections, including using the<escape>–<tab> key combination, double–clicking within words and at thebeginning of lines and so on. Also, try selecting the text within various kinds ofdelimiters by double–clicking.
Ex 2.10 Experiment with changing the font of the text selection using the <escape> keycombinations. Also, experiment with inserting and deleting pairs of delimitersaround the selection.
Ex 2.11 Experiment with the <control> key combinations (but be careful with <control–c>).
2.21. Editing
In this section, we will consider further editing operations. These operations
invariably operate on the text selection (introduced in the previous section).
Editing operations are selected from the pop–up menu attached to the <operate>
mouse button.
© Trevor Hopkins and Bernard Horan, 1994

Module 2 24
Figure 2.10: Using the cut, copy and paste options (1)
The copy, cut and paste options on the <operate> button menu provide fairly
conventional cut–and–paste style editing functions. The cut option removes the
current selection, and puts it in a (hidden) paste buffer (figure 2.10). This can be
pasted back using the paste option; the text is inserted at the caret, or is used to
replace the current selection, just as if the text had been typed in at the keyboard
(figure 2.11). The resulting Workspace is shown in figure 2.12. The copy option
operates just like the cut option, except that the selection is not removed from
the Workspace.
© Trevor Hopkins and Bernard Horan, 1994

Module 2 25
Figure 2.11: Using the cut , copy and paste options (2)
Figure 2.12: Using the cut , copy and paste options (3)
You should note that the paste buffer is global, and is therefore shared by all text–
editing operations. This means that is possible to cut or copy text from one
Workspace, for example, and paste it into another Workspace. If a copy or cut
operation is performed outside VisualWorks, placing text in the operating
system’s clipboard, that text will be used instead. If the paste option is selected
from the <operate> button menu with a <shift> key held down, a list will appear
containing the last five items put into the paste buffer, possibly including the
contents of the operating system’s clipboard. You can then select the text you
actually want to paste into the Workspace from this list. You can also cut and
paste to and from non–VisualWorks windows.
© Trevor Hopkins and Bernard Horan, 1994

Module 2 26
Any editing operation can be reversed by selecting the undo option from the
<operate> button menu. This operation behaves as a toggle; undoing the
previously undone operation reverts to the original.
Ex 2.12: Try using the copy, cut and paste options from the <operate> button menu. Youshould be able to remove text from one part of the Workspace, and replace itelsewhere. You should also try inserting the same text several times, in differentplaces.
Ex 2.13: Also, try copying text between different Workspaces. You may have to open anotherWorkspace window, using the Launcher Tools menu. You may also wish to try thepaste option, using a <shift> key, to display the current contents of the pastebuffer.
Ex 2.14: Try repeatedly replacing a piece of text using the replace… option from the<operate> button menu. Also, try the effect of the undo <operate> button menuoption.
Ex 2.15: Try searching for text in a Workspace, using the f ind… option.
2.22. Evaluating Smalltalk Code
Unlike most systems, the primary “command” interface to Smalltalk is a
compiler; in fact, the Smalltalk language compiler. “Commands” are therefore
written in the Smalltalk language itself. There is no notion of a separate
“command interpreter”, as in MS–DOS or UNIX, for example.
Workspaces, and other text areas, allow textual expressions to be entered by the
user and sent to the compiler. Once again, it is the text selection which is
important. The d o i t option on the Workspace <operate> button menu
evaluates the selection. This means that simple expressions in the Smalltalk
language can be typed in and evaluated immediately.
More precisely, the text in the selection is fed to the Smalltalk compiler (an
instance of class Compiler, of course). This parses the text and, if there are no
syntax errors, generates code that can be evaluated by the underlying virtual
machine. This code is then evaluated. In practice, it takes less time to compile
and evaluate simple expressions than it takes to explain the process (see
figure 2.13).
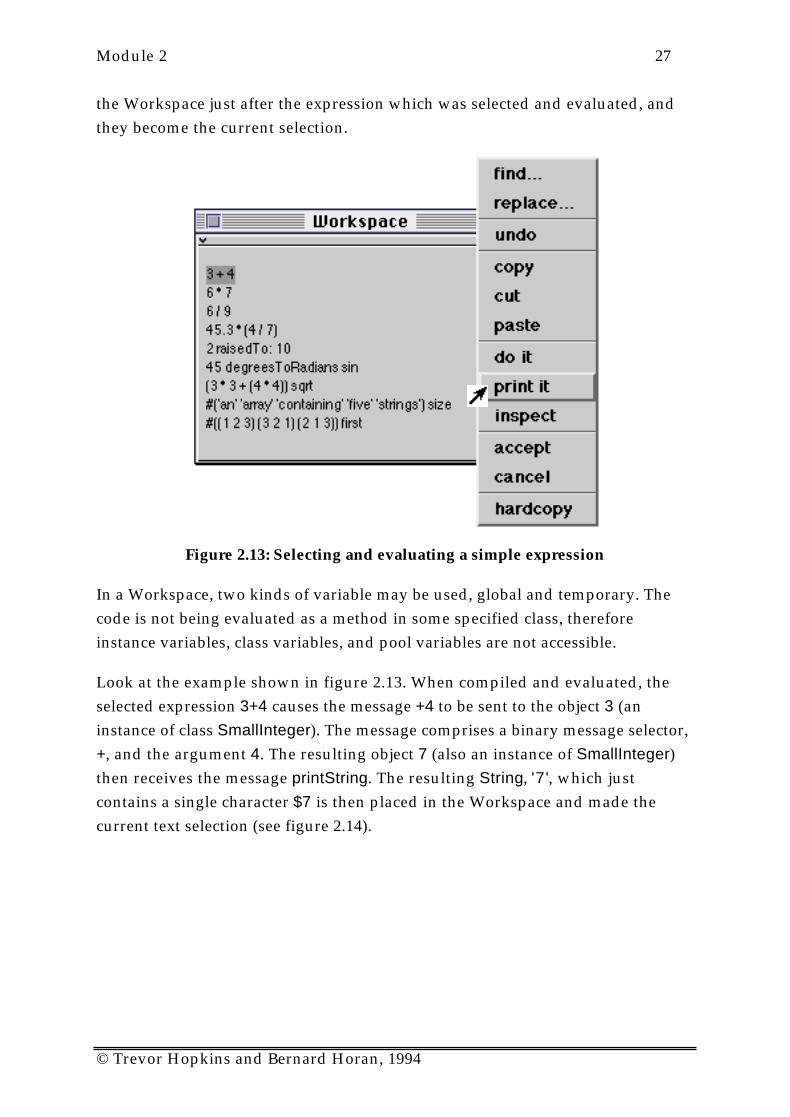
Frequently, we will wish to see the result of evaluating an expression. We can do
this by using the print it option from the <operate> button menu. This
compiles and evaluates the selected expression(s) just like the d o i t option but,
in addition, the object resulting from evaluating the code is sent the message
printString. Every object understands this message, and answers with a String
which represents its internal state. The characters in the string are then added to
© Trevor Hopkins and Bernard Horan, 1994
Module 2 27
the Workspace just after the expression which was selected and evaluated, and
they become the current selection.
Figure 2.13: Selecting and evaluating a simple expression
In a Workspace, two kinds of variable may be used, global and temporary. The
code is not being evaluated as a method in some specified class, therefore
instance variables, class variables, and pool variables are not accessible.
Look at the example shown in figure 2.13. When compiled and evaluated, the
selected expression 3+4 causes the message +4 to be sent to the object 3 (an
instance of class SmallInteger). The message comprises a binary message selector,
+, and the argument 4. The resulting object 7 (also an instance of SmallInteger)
then receives the message printString. The resulting String, '7', which just
contains a single character $7 is then placed in the Workspace and made the
current text selection (see figure 2.14).
© Trevor Hopkins and Bernard Horan, 1994
Module 2 28
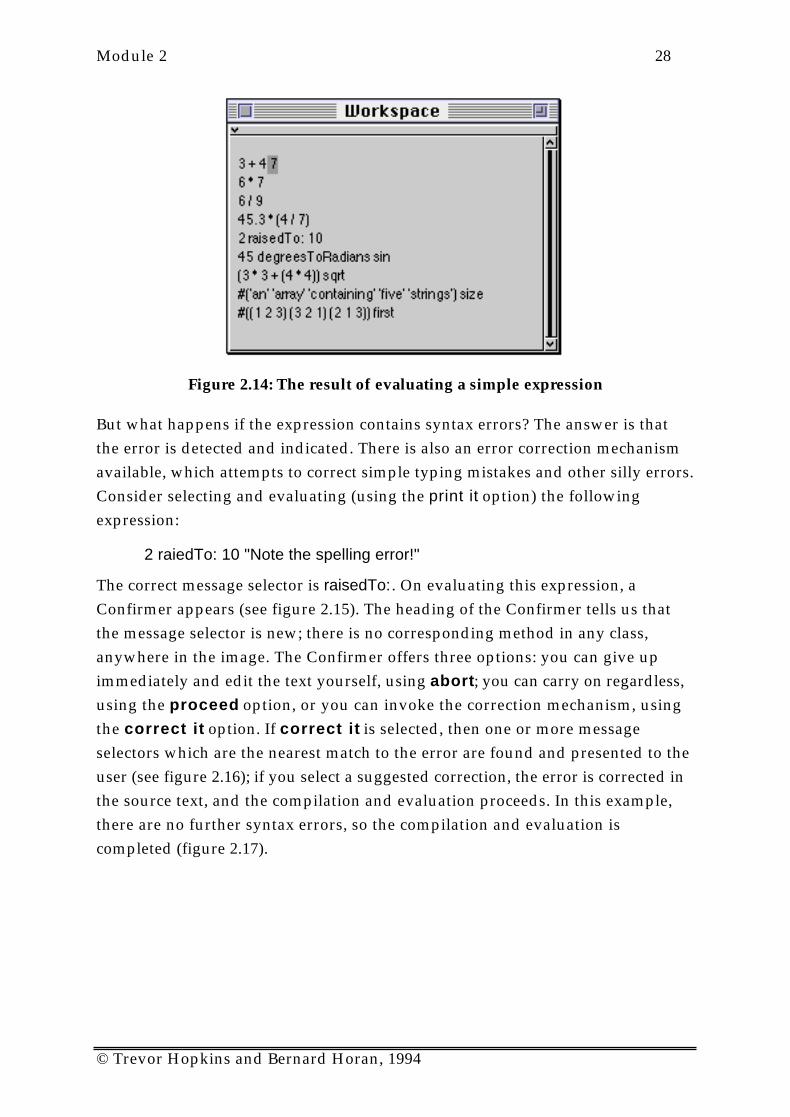
Figure 2.14: The result of evaluating a simple expression
But what happens if the expression contains syntax errors? The answer is that
the error is detected and indicated. There is also an error correction mechanism
available, which attempts to correct simple typing mistakes and other silly errors.
Consider selecting and evaluating (using the print it option) the following
expression:
2 raiedTo: 10 "Note the spelling error!"
The correct message selector is raisedTo: . On evaluating this expression, a
Confirmer appears (see figure 2.15). The heading of the Confirmer tells us that
the message selector is new; there is no corresponding method in any class,
anywhere in the image. The Confirmer offers three options: you can give up
immediately and edit the text yourself, using abort; you can carry on regardless,
using the proceed option, or you can invoke the correction mechanism, using
the correct it option. If correct it is selected, then one or more message
selectors which are the nearest match to the error are found and presented to the
user (see figure 2.16); if you select a suggested correction, the error is corrected in
the source text, and the compilation and evaluation proceeds. In this example,
there are no further syntax errors, so the compilation and evaluation is
completed (figure 2.17).
© Trevor Hopkins and Bernard Horan, 1994

Module 2 29
Figure 2.15: Syntax error correction in operation (1)
Figure 2.16: Syntax error correction in operation (2)
Figure 2.17: Correction complete
The other options on the <operate> button menu will be considered later.
Ex 2.16: Use the following expressions in a Workspace to discover (a) the current number ofobject unused object pointers; and (b) the current amount of free memory:
ObjectMemory current oopsLeft
ObjectMemory current availableFreeBytes
© Trevor Hopkins and Bernard Horan, 1994
Module 2 30
Ex 2.17: Try selecting and evaluating other simple expressions using the print i t <operate>button menu option. For example, you might like to try some of the other expressionsin figure 5.12.
Ex 2.18: Try inserting deliberate syntax errors and provoke the correction mechanism intoassisting you. You should note that Smalltalk is unable to correct all syntax errors.In some cases, the correction mechanism will give up.
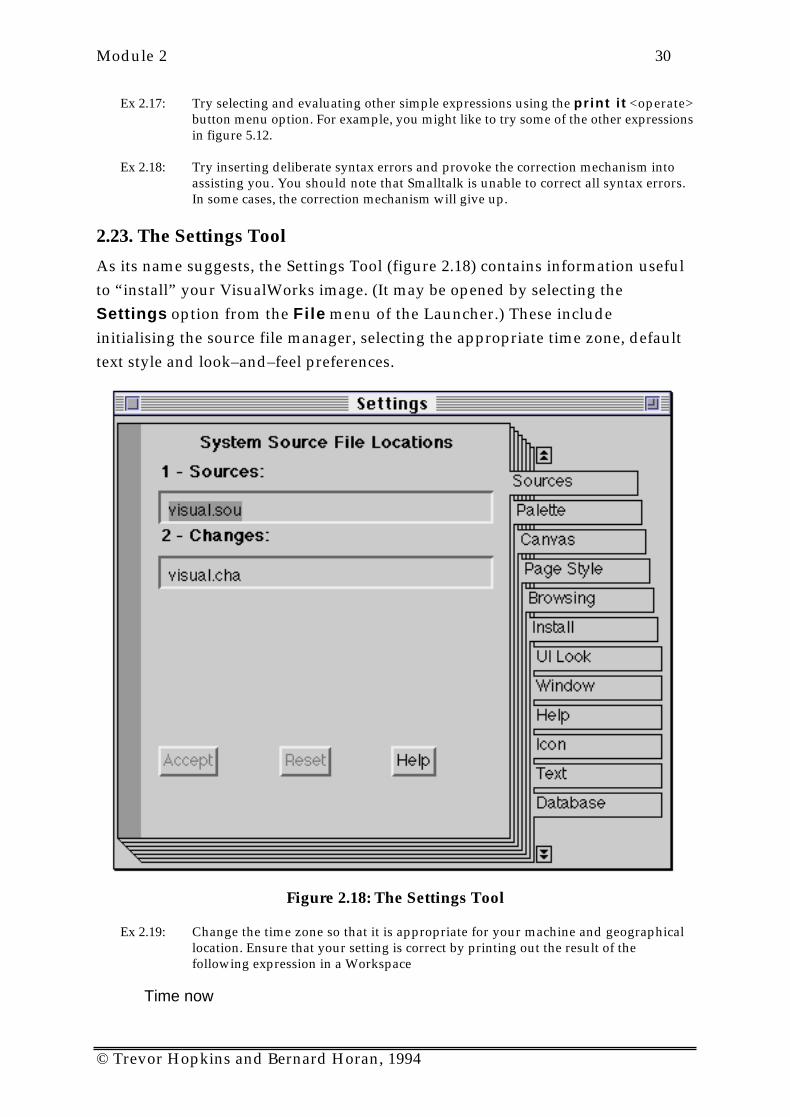
2.23. The Settings Tool
As its name suggests, the Settings Tool (figure 2.18) contains information useful
to “install” your VisualWorks image. (It may be opened by selecting the
Settings option from the File menu of the Launcher.) These include
initialising the source file manager, selecting the appropriate time zone, default
text style and look–and–feel preferences.
Figure 2.18: The Settings Tool
Ex 2.19: Change the time zone so that it is appropriate for your machine and geographicallocation. Ensure that your setting is correct by printing out the result of thefollowing expression in a Workspace
Time now
© Trevor Hopkins and Bernard Horan, 1994

Module 2 31
(i.e. type and select the expression, then evaluate it using the print i t option fromthe <operate> menu.)
2.24. Help
The Help menu (figure 2.20) on the Launcher provides access to the help system.
The menu contains four items; the first two both open the online
documentation (the latter goes directly to the chapter entitled ‘Database Quick
Start Guides’). The third option opens a Browser containing all the methods in
the VisualWorks image that give the user an opportunity to experiment with an
example. The last menu option opens a window describing your release of
VisualWorks.
Figure 2.20: The Help menu
Ex 2.20: Experiment with the example methods.
The online documentation is divided into three “books”, “chapters” and pages.
The titles of the books are: ‘Database Cookbook’ (containing one Chapter),
‘Database Quick Start Guides’ (containing six chapters — only one of which is
complete), and ‘VisualWorks Cookbook’ (containing 31 chapters). It’s worth
taking some time to examine the online documentation, using it as a
complement to this course. For example, Chapter 1 of the ‘VisualWorks
Cookbook’ describes similar material to this module (figure 2.21).
© Trevor Hopkins and Bernard Horan, 1994

Module 2 32
Figure 2.21: The Online Documentation
The window containing the online documentation also provides buttons to gain
access to examples, and to search the chapters.
Ex 2.21: Browse the examples in chapter 1 of the VisualWorks Cookbook chapter of theonline documentation.
© Trevor Hopkins and Bernard Horan, 1994