module 9. body mechanics - phi · module 9. body mechanics ... module is to help participants learn...
TRANSCRIPT

HOMECARE AIDE WORKFORCE INITIATIVE (HAWI)
Trainer’s Manual—Page 9.1
Home Health Aide Training
Module 9. Body Mechanics Goal The goal for this module is to help participants learn the principles of good body mechanics and how to use these principles to prevent injury when lifting or moving an object and/or helping a person to change position.
Time 3 hours
Activities Teaching Methods Time
1. Group Warm Up—Mirroring Large-group exercise 5 minutes 2. Demonstrating Good Body
MechanicsLifting an Object
Interactive presentation, demonstration, and large-group discussion
45 minutes
3. Demonstrating Good Body
MechanicsPositioning a Client
Demonstration, large-group discussion, and small-group work
50 minutes
4. Practice Lab Practice triads 1 hour and 20 minutes
Supplies Flip chart, markers, and tape
Paper and pencils
CD/audiotape player and “energizer” tape or CD
Ten-pound objects, such as filled boxes, bags of potatoes, sugar, cat litter (preferably non-perishable or sealed containers)
Beds (completely made, with turning sheet)

Module 9. Body Mechanics
HOMECARE AIDE WORKFORCE INITIATIVE (HAWI)
Trainer’s Manual—Page 9.2
Learner’s Book 1. Good Body Mechanics: What It Is and Why It’s Important 2. Using Good Body Mechanics 3. Tips for Lifting and Moving
Skills Checklists Skills Checklist 1. Lifting Things (no DOH Procedure Checklist)
Skills Checklist 2. Assisting a Client to a Sitting Position in Bed DOH Procedure Checklists XII-23 and D-1)
Skills Checklist 3. Assisting a Client to Move to the Side of the Bed (no DOH Procedure Checklist)
Skills Checklist 4. Assisting a Client to Move Up the Bed (no DOH Procedure Checklist)
Skills Checklist 5. Assisting a Client to Turn in Bed (DOH Procedure Checklist XII-4)
Handouts Handout 1: Key Terms
Handout 2: Summary of Key Information
Advance Preparation Review all the training instructions and learner’s materials for this module. Note that icons are used to remind the trainer of the following:
When you are presenting or covering Key Content in the discussion. (Key Content is also addressed in the Learner’s Book and the handouts, but we use the “key” icon only when it is covered elsewhere in the learning process.)
When it is important to ask a particular question to get participants’ input.
When it is time to refer to the Learner’s Book.

Module 9. Body Mechanics
HOMECARE AIDE WORKFORCE INITIATIVE (HAWI)
Trainer’s Manual—Page 9.3
When it is time to distribute a skills checklist.
When it is time to distribute and discuss a handout. Copy all handouts for participants. Prepare copies of the skills checklists. You will need one copy for each participant, to be collected and reused for subsequent trainings. Laminating the skills checklists will make them more durable and reusable. Gather all necessary supplies and equipment. Please note that the Key Content is meant to be background information for the trainer. DO NOT READ OUT LOUD TO PARTICIPANTS.
Activity 2. Demonstrating Good Body MechanicsLifting an Object
Prepare the following flip chart pages:
“Learning Agenda” (Step 1)
“Good Posture” (Step 3)
“1. Keep a Wide Base of Support” (Step 9)
“2. Lift With Your Legs and Buttocks” (Step 13)
“3. Turn Your Whole Body” (Step 16)
“4. Get Close to What You’re Lifting” (Step 17)
Put ten-pound objects on floor at the front of the room with a table close behind.
Activity 3. Demonstrating Good Body MechanicsPositioning a Client Set up a demonstration area with bed fully made, including turning sheet.

Module 9. Body Mechanics
HOMECARE AIDE WORKFORCE INITIATIVE (HAWI)
Trainer’s Manual—Page 9.4
Activity 4. Practice Lab Set up practice stations with two or three beds, fully made.
Put ten-pound objects around the room. Also, trainers should be prepared with additional copies of the skills checklists to document return demonstrations. Have additional trainers available to observe return demonstrations.

Module 9. Body Mechanics
HOMECARE AIDE WORKFORCE INITIATIVE (HAWI)
Trainer’s Manual—Page 9.5
Activity 1. Group Warm-Up—Mirroring 5 minutes
Learning Outcomes By the end of this activity, participants will be able to:
Relax, stretch, and warm up their muscles in preparation for the skills practice of body mechanics.
Key Content This activity is intended to energize participants but also to reinforce for them the
importance of stretching and warming up muscles before strenuous physical activity.
Activity Steps Large-Group Exercise—5 minutes 1. Introduce activity. Open this module with an energizing, fun warm-up and
stretching exercise. This will help prepare participants for the skills practice components of this topic.
2. Set up activity. Have each participant find a partner. You may need to pair with someone if the numbers are uneven. Have partners spread out so that they have enough room to move about freely without touching anything. Partners should stand about two feet apart, facing each other.
3. Give instructions and demonstrate. Explain that they will pretend that their partner is a mirror. Each partner will take a turn making a series of stretching
motionsstretching their arms, rolling their necks, bending, lunging sideways, etc.—which their partner must mirror. Demonstrate with a volunteer.
Module 9. Body Mechanics
HOMECARE AIDE WORKFORCE INITIATIVE (HAWI)
Trainer’s Manual—Page 9.6
4. Explain how partners will change roles. Have them decide which partner will start. Explain that, after a minute, you will say “switch” at which time they are to switch roles. You may call “switch” several times during the exercise.
5. Conduct activity and segue to module topic. Once you begin this exercise, continue it until the participants seem relaxed, but end it before they get bored. Call “stop” and invite the participants to return to their seats. Explain that the exercise was meant to
get them warmed up for the primary content of this topicbody mechanics. Although these stretches are not one of the “rules” of body mechanics, all athletes know that they have fewer injuries when their muscles are warmed up and stretched before doing sports.
Teaching Tip Playing some music during the warm-up can make this even more energizing.

Module 9. Body Mechanics
HOMECARE AIDE WORKFORCE INITIATIVE (HAWI)
Trainer’s Manual—Page 9.7
Activity 2. Demonstrating Good Body Mechanics—Lifting an Object
45 minutes
Learning Outcomes By the end of this activity, participants will be able to:
Define the term “body mechanics.” List benefits of using good body mechanics for the direct-care worker and the client. Describe good posture. List the four principles of body mechanics. List three other key guidelines to follow when lifting or moving objects or people.
Key Content The responsibilities of a direct-care worker frequently require physically lifting
objects and/or equipment, and helping clients move from one place or position to another. This lifting and assistance require the use of proper body mechanics in order to avoid injuring oneself or the client.
“Body mechanics” refers to the proper use of muscles to move and lift objects safely. It is defined as: a way of using one’s body so that the work is performed by several groups of muscles with the strongest ones being used.1 With good body mechanics, workers maximize their strength and minimize strain.
1 Birchenall, J. and Streight, E. Mosby’s Textbook for the Home Care Aide, 2nd Edition. St. Louis: Mosby, 2003, p. 203.

Module 9. Body Mechanics
HOMECARE AIDE WORKFORCE INITIATIVE (HAWI)
Trainer’s Manual—Page 9.8
Good body mechanics benefit the direct-care worker in the following ways:
Reducing muscle strain, fatigue, and injury to the body
Maintaining personal safety
Performing tasks efficiently
Good body mechanics benefit the client in the following ways:
Reducing anxiety and fear about being moved and/or falling
Avoiding injury
Increasing confidence in the worker’s abilities
Good posture should be maintained at all times—head erect, buttocks pulled in, stomach muscles tight, chest high, and shoulders back.
The principles of body mechanics are: 1. Maintain a wide base of support. 2. Use your legs; keep your back straight. 3. Turn your whole body. 4. Stay close to the object being lifted or moved.
Other guidelines for safely lifting and moving objects and people include:
Wear non-skid shoes and loose clothing. Plan the move. Push, pull, or roll instead of lifting, if at all possible. Use assistive devices or ask for help if needed. Let the client know what you’re going to do and what he or she can do to
assist you in the move.

Module 9. Body Mechanics
HOMECARE AIDE WORKFORCE INITIATIVE (HAWI)
Trainer’s Manual—Page 9.9
Activity Steps Interactive Presentation—15 minutes 1. Review the Learning Agenda. Refer to the prepared flip chart you have posted. Flip Chart
LEARNING AGENDA:
Body Mechanics
What does “good body mechanics” mean?
The principles of good body mechanics
How to lift heavy objects using good body mechanics
How to position a client in bed using good body mechanics
2. Define good body mechanics and explain its importance. Emphasize the need to use proper body mechanics whenever lifting objects or transferring clients. Refer to 1: Good Body Mechanics: What It Is and Why It’s Important in the Learner’s Book.
3. Review good posture. Explain that maintaining good body posture is essential to good body mechanics. Most of us have some idea about what “good posture” means. Ask participants to sit in their chairs using good body posture. Then have everyone look around the room at each other. Ask:
What is each person doing to demonstrate good body posture?
Label a flip chart page, “Good Posture,” and write only the responses that correspond with the elements of good body posture.

Module 9. Body Mechanics
HOMECARE AIDE WORKFORCE INITIATIVE (HAWI)
Trainer’s Manual—Page 9.10
Flip Chart
GOOD POSTURE
4. Describe and model good posture. Review and demonstrate the essential elements
of good body posture: head erect, buttocks pulled in, stomach muscles tight, chest high, and shoulders back. Ask everyone to practice this for a moment while sitting. Then ask them to stand and practice good posture while standing. Explain that, with each of the skills taught in this module, maintaining good body posture will help to avoid strain and save energy.
5. Make a transition to the demonstration steps. Note that, in addition to good posture, there are four basic principles of good body mechanics. Explain that you will demonstrate each principle now, and they will practice during the last activity.
Demonstration—20 minutes 6. Set up and conduct first demonstration. To demonstrate the first principle, ask for
two volunteers to assist you. Have one participant stand near you at the front of the room, with his or her feet right next to each other. Ask the other participant to stand beside the first volunteer, ready to catch the person if she or he falls. Ask the other participants:
Do you think it will be easy or hard to push this person over with her (or his) feet so close together?
After their responses, gently nudge the participant until he or she starts to sway. Both you and the other volunteer should be ready to catch the person if she or he does actually fall over!

Module 9. Body Mechanics
HOMECARE AIDE WORKFORCE INITIATIVE (HAWI)
Trainer’s Manual—Page 9.11
7. Repeat the demonstration. This time have the volunteer place his or her feet at
shoulder’s width. Ask the other participants:
Do you think it will be easy or hard to push her (or him) over with their feet so far apart?
8. After their responses, gently nudge the first volunteer again, with the second volunteer still ready to catch him or her just in case. Keep nudging harder, until it becomes clear that you would have to use a lot of force to push the person over. If the volunteer starts to sway, ask him or her to put one foot slightly ahead of the other and bend his or her knees. Push again with the same force, and ask the other participants:
Is this person more stable now or less stable?
9. Summarize Rule 1. Thank your volunteers. Ask participants what they learned about body mechanics from this demonstration. After a few responses, post and review the prepared flip chart page for Rule 1, “Keep a Wide Base of Support.”
Flip Chart
1. KEEP A WIDE BASE OF SUPPORT
Move your feet apart and
stand with one foot slightly forward.
A broad base of support makes it easier to stay balanced.

Module 9. Body Mechanics
HOMECARE AIDE WORKFORCE INITIATIVE (HAWI)
Trainer’s Manual—Page 9.12
10. Set up demonstration for Rule 2. Go to the ten-pound bag of potatoes (cat litter,
etc.) that you placed on the floor before the beginning of the module. Ask participants:
How do you think I should lift this?
Follow their instructions exactly, but do not try to lift the bag until they make suggestions using good body mechanics (Rules 1 and 2).
11. Conduct demonstration and facilitate debriefing. Lift the bag, then ask:
What would have happened if I had tried to lift the bag without my knees bent?
What would have happened if I had not kept my back straight?
12. You can demonstrate, without actually lifting anything, the position of the body when lifting something without good body mechanics and point to the areas of the body that would be strained.
13. Summarize Rule 2. Post and review the flip chart page for the second principle, “Lift
with Your Legs and Buttocks.” Flip Chart
2. LIFT WITH YOUR LEGS
AND BUTTOCKS
When reaching down to lift an object or to assist a client to change position:
Bend your knees and reach
down NEVER bend from the waist.
Use the LARGE muscles of your legs to push up.
Keep your back straight.

Module 9. Body Mechanics
HOMECARE AIDE WORKFORCE INITIATIVE (HAWI)
Trainer’s Manual—Page 9.13
14. Set up and conduct demonstration for Rule 3. Set the bag on the floor again, with a
table behind you. Stand beside the bag, facing the participants, bend sideways, and prepare to lift the bag with one hand. Ask participants:
Does this look okay? Can I do this without hurting myself? [Hopefully, participants will say, “No! Stop!”]
Ask them what you should change to use good body mechanics. Follow their instructions until you are facing the object, with your feet pointing forward (i.e., toward the object), with no turning or twisting of the back. Using good posture and Rules 1 and 2, you can now lift the object.
Teaching Tip The table and the bag should be positioned so that, once you have lifted the bag, you are close enough to the table to just turn and place the bag on it. This is for the next step, to demonstrate how NOT to turn the upper body, but rather to turn the whole body.
15. Continue demonstration. Holding the bag, tell participants: I want to put this bag on
the table behind me. How should I do that? Listen to participants’ instructions, but do not move until someone advises you to turn your whole body to face the table, and then set the bag down. After you set the bag down on the table, show the position of your body if you had turned your upper body only, in order to reach the table with the bag. Point out the twisting of the spine. Note that this can cause damage to your spine when you twist while carrying or holding a weight.
16. Summarize Rule 3. Post and review the flip chart page for the third principle, “Turn
Your Whole Body.”

Module 9. Body Mechanics
HOMECARE AIDE WORKFORCE INITIATIVE (HAWI)
Trainer’s Manual—Page 9.14
Flip Chart
3. TURN YOUR WHOLE BODY
Turn your body as a unit, using legs and feet.
Never bend to the side to lift an object.
NEVER twist your upper body when lifting or transferring.
17. Set up and conduct demonstration for Rule 4. Post and review the prepared flip
chart page for the fourth rule of body mechanics, “Get Close to What You’re Lifting.” Demonstrate by setting your object on the floor again, practicing all three previous rules of good body mechanics, but then stretching your arms out to grab the bag. (Stretching, or reaching, makes you bend your back, violating the second rule!) Ask:
Which body parts would be strained if a person tried to lift the bag while reaching? [The back]
Which body parts are used to lift that way? [The arms]
How much strength will you have if you try to lift that bag while reaching? [Not much!]
Flip Chart
4. GET CLOSE TO WHAT YOU’RE
LIFTING
Do not reach or stretch.
Work at waist level, if possible.
Do not try to lift objects over your head.

Module 9. Body Mechanics
HOMECARE AIDE WORKFORCE INITIATIVE (HAWI)
Trainer’s Manual—Page 9.15
18. Emphasize importance of safe lifting and summarize the fourth principle. Explain that while it might seem silly to reach for that heavy bag, all of us, every day, try to lift something that is just beyond our reach. Sometimes it hurts and sometimes it doesn’t. When working with clients, direct-care workers have to be aware that, if they hurt themselves while assisting a client to change positions, the client also may get hurt (for example, by being dropped).
19. Encourage participants to integrate these rules into their lives. Remind everyone that they will get a chance to practice using good body mechanics during the practice lab. However, they should keep in mind that good body mechanics are important for everything they do. They can “practice” at home, in the rest of the training, or wherever they go. Refer to 2: Using Good Body Mechanics in the Learner’s Book.
20. Review key points. Distribute Skills Checklist 1: Lifting Things and note that it identifies each of the steps that were demonstrated. This is the checklist that will be used to help them build and demonstrate their competency in this important skill. Ask if there are any questions regarding the steps for lifting heavy things.
Large-Group Discussion—10 minutes
21. Review additional safety tips. Note that, besides following the rules of good body mechanics, there are other things that direct-care workers can do to make lifting safer and easier. Refer to 3: Tips for Lifting and Moving in the Learner’s Book. Ask participants to take turns reading aloud.

Module 9. Body Mechanics
HOMECARE AIDE WORKFORCE INITIATIVE (HAWI)
Trainer’s Manual—Page 9.16
Activity 3. Demonstrating Good Body MechanicsPositioning a Client
50 minutes
Learning Outcomes By the end of this activity, participants will be able to:
Describe how to raise the client’s head and shoulders while in bed. Describe how to help a client move to the side of the bed. Describe how to help a client to move up in the bed and to turn in bed.
Key Content Many clients are not able to move themselves in bed. This can lead to problems with
circulation, pressure ulcers, and comfort. A direct-care worker needs to be able to use good body mechanics to assist clients to change their positions in bed.
Activity Steps Demonstration and Large-Group Discussion—30 minutes
1. Discuss the Key Content. Note that now participants will see how these principles of body mechanics are applied to assisting a client to move in bed.
2. Set up first demonstration. Ask for a volunteer to help with this demonstration. Note that, if anyone is tired, this would be an ideal time to volunteer, since, for the next 45 minutes, all the demonstrations involve positioning a client in bed!
3. Conduct demonstration. Make the volunteer comfortable in the bed and ask the rest of the participants to gather around so that they can see you clearly. Explain that you

Module 9. Body Mechanics
HOMECARE AIDE WORKFORCE INITIATIVE (HAWI)
Trainer’s Manual—Page 9.17
are going to demonstrate how to assist the client to raise his or her head and shoulders. Demonstrate each step in Skills Checklist 2: Assisting a Client to a Sitting Position in Bed explaining its importance and answering questions as you go. Emphasize communicating with the client, and the importance of having the client do as much of the movement as he or she can. Note any observations, related to this task, which should be recorded and reported.
4. Set up second demonstration. Thank the volunteer for “head and shoulders” and ask
for a new volunteer. While he or she is getting settled in the bed, explain that you will now demonstrate assisting a client to move to the side of the bed. This is important for preparing a client to get out of bed. Conduct the demonstration, following the steps in Skills Checklist 3: Assisting a Client to Move to the Side of the Bed.
5. Conduct demonstrations for the remaining tasks. Choose a new volunteer each time to model assisting the client to move up the bed (Skills Checklist 4) and assisting the client to turn in bed (Skills Checklist 5).
Small-Group Work—10 minutes
6. Set up small-group exercise. Quickly divide participants into groups of three. Assuming you have at least four groups, distribute Skills Checklist 2: Assisting a Client to a Sitting Position in Bed to the first group; distribute Skills Checklist 3: Assisting a Client to Move to the Side of the Bed to the second group; give Skills Checklist 4: Assisting a Client to Move Up the Bed to the third and Skills Checklist 5: Assisting a Client to Turn in Bed to the fourth. Ask participants to review the checklists in their groups, noting any questions they want to ask.
Teaching Tips Groups of three are used so that you do not have to “re-group” for the “practice triads” in the next activity. If you have more than four groups, you can give the same checklist to more than one group. If you have fewer than four groups, you can give more than one checklist to one or more of the groups. In each group, every member gets a copy of their assigned checklist. To avoid confusion, participants should have only the checklist(s) that you are asking them to review for the group activity. They will get the rest after the discussion.

Module 9. Body Mechanics
HOMECARE AIDE WORKFORCE INITIATIVE (HAWI)
Trainer’s Manual—Page 9.18
Large-Group Discussion—10 minutes 7. Review each skill. Ask the following questions for each checklist:
What steps are most important to ensure the client’s safety?
How are proper body mechanics used to ensure that the direct-care worker doesn’t get hurt?
Do you have any additional questions?
8. Distribute remaining checklists. Make sure every participant has all four checklists.
9. Summarize the module. Distribute and review Handout 1: Key Terms and Handout 2: Summary of Key Information. Ask participants if they have any questions.

Module 9. Body Mechanics
HOMECARE AIDE WORKFORCE INITIATIVE (HAWI)
Trainer’s Manual—Page 9.19
Activity 4. Practice Lab 1 hour and 20 minutes
Learning Outcomes By the end of this activity, participants will be able to:
Demonstrate correct posture while sitting and standing. Demonstrate lifting a ten-pound object using good body mechanics. Demonstrate how to raise the client’s head and shoulders while in bed. Demonstrate how to assist a client to move to the side of the bed. Demonstrate how to assist a client to move up the bed and to turn in bed.
Key Content Assisting clients with movement and positioning in bed requires the use of good body
mechanics, as well as infection control practices and communication skills. The body mechanics skills practiced in this module will be applied and reinforced throughout the training. [Infection control practices were covered in the Infection Control module. Communication skills will be covered in the Communication module. However, each skills checklist notes key points of communication with the client.]
Activity Steps Practice Triads—1 hour and 20 minutes 1. Introduce activity. Explain to participants that they will now have a chance to
practice the skills that were demonstrated in “Positioning a Client.” For this activity, participants will work in the same groups of three (“practice triads”) that they formed for “Positioning a Client.”

Module 9. Body Mechanics
HOMECARE AIDE WORKFORCE INITIATIVE (HAWI)
Trainer’s Manual—Page 9.20
2. Point out the workstations set up around the training space. Workstations for this practice lab include: beds for moving and positioning the client and various items for lifting. (Each workstation should have copies of the checklist for the skill being practiced.) Each triad will start at a different workstation but will move around the room until they have completed their skills practice at each workstation.
3. Give instructions for practice triads. In their groups of three, participants will take turns playing different roles. One person will be the direct-care worker, one person will be the client, and the third person will be the observer. When performance checklists are available for a particular task or skill, the observer will use the checklist to provide guidance to the participant who is practicing and to give feedback afterwards. After one participant has completed the task as the “direct-care worker,” he or she switches roles, so that the second participant can practice being the direct-care worker. After one more switch, all three participants will have performed in all three roles. Then the team moves on to the next available workstation.
4. Explain the role of the trainer(s). Tell participants that the trainer(s) will be moving around the room to monitor how participants are doing, to answer questions, and to provide additional instruction as necessary.
Teaching Tip If a participant feels that he or she is competent in any of the skills, he or she can ask an trainer to observe him or her doing the skill (“return demonstration”). At that time the trainer will fill out one of the skills checklists and give the participant feedback on how they did. If not enough trainers are available to monitor and observe return demonstrations, the return demonstrations will be done at another time.
5. Explain additional posture practice. If participants are waiting for a workstation,
they can practice the following exercise for correct posture:
In pairs, participants will: Stand facing each other a few feet apart.
Raise their hands up and put them against their partner’s hands.
Bend their knees and sink slowly to the floor. Keep hands together, maintain eye contact, and keep their backs straight.
Slowly come up again.
Repeat once more.

Module 9. Body Mechanics
HOMECARE AIDE WORKFORCE INITIATIVE (HAWI)
Trainer’s Manual—Page 9.21
Teaching Tips With each new practice lab, participants may need to continue practicing skills introduced in earlier modules. Having the materials available from previous practice labs will allow continuous skills development, as well as effective use of lab time.
In this case, materials should also be available from the infection control practice lab.
6. Wrap up triad work. When all the triads have rotated through all the workstations,
bring participants back to the large group for the closing activity. If there is not enough time for all participants to complete all the workstations, keep the equipment and materials available for the next practice lab.

HOMECARE AIDE WORKFORCE INITIATIVE (HAWI)
Learner’s Book—Page 9.1
Learner’s Book
Module 9. Body Mechanics
Activity 2. Demonstrating Good Body MechanicsLifting an Object 1. Good Body Mechanics: What It Is and Why It’s Important 2. Using Good Body Mechanics Skills Checklist 1. Lifting Things 3. Tips for Lifting and Moving Activity 3. Demonstrating Good Body MechanicsPositioning a Client Skills Checklist 2. Assisting a Client to a Sitting Position in Bed Skills Checklist 3. Assisting a Client to Move to the Side of the Bed Skills Checklist 4. Assisting a Client to Move Up the Bed Skills Checklist 5. Assisting a Client to Turn in Bed

Module 9. Body Mechanics
HOMECARE AIDE WORKFORCE INITIATIVE (HAWI)
Learner’s Book—Page 9.2
1. Good Body Mechanics: What It Is and Why It’s Important What is good body mechanics? Body mechanics is about how you move your body. “Good” body mechanics means using your strongest muscles so you don’t get hurt. How does good body mechanics help the direct-care worker?
Good body mechanics lets you: Avoid getting hurt Be as strong as possible Do your job faster
How does good body mechanics help the client?
Good body mechanics lets the client: Avoid getting hurt when moved Trust workers more Worry less about being moved

Module 9. Body Mechanics
HOMECARE AIDE WORKFORCE INITIATIVE (HAWI)
Learner’s Book—Page 9.3
2. Using Good Body Mechanics Page 1 of 2
There are four basic rules to good body mechanics. But they all begin with good posture. What is good posture?
Hold your head up. Keep your neck straight. Keep your chest high. Hold your shoulders back. Tighten your stomach muscles. Pull in your buttocks.
When should you use good posture?
Good posture helps you save energy and avoid muscle straineven when you aren’t lifting or moving something. Use good posture when you: Assist clients to change position Lift or move things Sit Stand
What are the four rules? Rule 1: Keep a wide base of support.
Move your feet apart to the width of your shoulders. Put one foot a little bit in front of the other. This helps you keep your balance.

Module 9. Body Mechanics
HOMECARE AIDE WORKFORCE INITIATIVE (HAWI)
Learner’s Book—Page 9.4
2. Using Good Body Mechanics
Page 2 of 2 Rule 2: Lift with your legs and buttocks.
Bend your knees. Keep your back straight. Then push up with your legs. This puts less strain on your back. And it helps you lift heavier things. Never bend from the waist.
Rule 3: Turn your whole body.
Move your feet and legs to face the person or thing you're lifting. This puts less strain on your back. And it keeps you from twisting your spine. Never turn at the waist.
Rule 4: Get close to what you're lifting.
Work at the level of your waist, if possible. This puts less strain on your back and saves energy. Never reach for or move something above your head.
Review—Good Body Mechanics:
Use good posture. Keep a wide base of support. Lift with your legs and buttocks. Turn your whole body. Get close to what you’re lifting.

Module 9. Body Mechanics
HOMECARE AIDE WORKFORCE INITIATIVE (HAWI)
Learner’s Book—Page 9.5
3. Tips for Lifting and Moving
Page 1 of 2
In addition to good posture and good body mechanics, here are some other ways to lift objects and assist people to move without getting hurt.
Syd’s tipDress right. “When I go to work, I wear loose clothes. I wear comfy shoes that don't slip. Sometimes I wear a back belt, too.”
Joy’s tipPlan the move. “Before I move something, I make sure there’s nothing in the way. And I check that the place I'm going is ready.”
Dave’s tipPush, pull, or roll. “If I need to move something heavy, I try not to lift it. If I can push or
pull itor even betteruse a cart to roll it, that’s what I do.”
Angel’s tipDon’t lift over your head. “If I need to lift something heavy over my head, or get it down, I get a sturdy chair or ladder to get up to that level. And then I ask someone to take it from me. If no one else is there, I might have to move it in stages.”
Sara’s tipGet help if you need it. “Some things are just too big or heavy for me. So I ask for help. I explain what I'm going to do and what I want the other person to do. I count 1-2-3, and then we move together.”
Mike’s tipTalk to the client. “When I move a client I tell them what I'm going to do and when. And I tell them what they can do to help.”

Module 9. Body Mechanics
HOMECARE AIDE WORKFORCE INITIATIVE (HAWI)
Learner’s Book—Page 9.6
3. Tips for Lifting and Moving
Page 2 of 2 Roberta’s tipDon’t lift clients.
“I was surprised in my training when I learned that we can really hurt ourselves and clients if we try to pick them up and move them. Instead
of lifting people, I learned how to “transfer” a personwhich means working with the client to move himself or herself, usually in stages. If transferring isn’t an option, I always ask another person to help me lift the client or use special lift equipment. And we need special training to use that equipment, too.”
Mira’s tipStay fit. “My muscles and joints work better when I'm in good shape. So I eat right and try to exercise a couple of times a week. Even a walk is good to help me stay fit.”
Lynn’s tipGet enough sleep. “When my muscles are tired, I get hurt more easily. And when my brain is tired, I might forget to use good body mechanics. So I make sure to get plenty of sleep.”
Review—Tips for Lifting and Moving:
Dress right. Plan the move. Push, pull, or roll. Don’t lift over your head. Get help if you need it. Talk to the client. Don’t lift clients. Stay fit. Get enough sleep.

Module 9. Body Mechanics
HOMECARE AIDE WORKFORCE INITIATIVE (HAWI)
Handouts
Handout 1: Key Terms Body mechanics [1]
Body mechanics is about how you move your body. “Good” body mechanics means using your strongest muscles so you don’t get hurt.
Posture [2]
The position of your body when standing or sitting.

Module 9. Body Mechanics
HOMECARE AIDE WORKFORCE INITIATIVE (HAWI)
Handouts
Handout 2: Summary of Key Information
Page 1 of 2
Good body mechanics is important in your work because it helps you avoid getting hurt and do your job faster. When you use good body mechanics, it also helps the client to avoid getting hurt during transfers. The client will worry less about being moved and will develop more trust in you.
Good body mechanics begins with good posture. Good posture helps you
save energy and avoid muscle straineven when you aren’t lifting or moving something. Tips for good posture:
o Hold your head up. o Keep your neck straight. o Keep your chest high. o Hold your shoulders back. o Tighten your stomach muscles. o Pull in your buttocks.
There are four rules in body mechanics.
Rule 1: Keep a wide base of support. Move your feet apart to the width of your shoulders. Put one foot a little bit in front of the other. This helps you keep your balance.
Rule 2: Lift with your legs and buttocks. Bend your knees. Keep your back straight. Then push up with your legs. This puts less strain on your back. And it helps you lift heavier things. Never bend from the waist.

Module 9. Body Mechanics
HOMECARE AIDE WORKFORCE INITIATIVE (HAWI)
Handouts
Handout 2: Summary of Key Information
Page 2 of 2
Rule 3: Turn your whole body. Move your feet and legs to face the person or thing you're lifting. This puts less strain on your back. And it keeps you from twisting your spine. Never turn at the waist.
Rule 4: Get close to what you're lifting. Work at the level of your waist, if possible. This puts less strain on your back and saves energy. Never reach for or move something above your head.
There are additional tips to avoid getting hurt when lifting or moving
people or objects:
o Dress right: wear loose clothes and comfortable shoes. o Plan the move: make sure nothing is in the way. o Push, pull, or roll heavy objects instead of lifting, if possible. o Don’t lift over your head. o Get help if you need it. o Talk to the client before moving them. o Don’t lift clients—use “transfer” techniques or lift equipment. o Stay fit: eat healthy and get exercise. o Get enough sleep: it’s easier to get hurt when you’re tired.

Module 9. Body Mechanics
HOMECARE AIDE WORKFORCE INITIATIVE (HAWI)
Skills Checklists
Skills Checklist 1. Lifting Things
Use good posture. Hold your head up. Keep your shoulders back and your chest high. Tighten your stomach muscles. Pull in your buttocks.
Keep a wide base of support. Spread your feet apart to the width of your shoulders. Put one foot a little bit in front of the other.
Lift from your legs and buttocks. Bend your knees to reach down. Do not bend at the waist. Keep your back straight. Push up with your legs.
Turn your whole body. Move your feet and legs to face the thing you are lifting. Do not turn at the waist.
Get close to what you’re lifting. Hold the thing at waist level. Work at waist level, if possible. Do not reach out when lifting. Use a ladder or step stool to reach or lift things above your head.

Module 9. Body Mechanics
HOMECARE AIDE WORKFORCE INITIATIVE (HAWI)
Skills Checklists
Skills Checklist 2. Assisting a Client to a Sitting Position in Bed Page 1 of 2
Get ready to assist the client. 1. Wash your hands. 2. Give the client privacy. 3. Explain the steps to the client. Be clear about what you will do and what he
or she will do. Watch the client’s face during this procedure, so you can see if she or he is in pain or about to pass out.
4. If the client is in a hospital bed:
Lock the wheels.
Raise the bed to waist level.
Lower the top of the bed.
Lower the side rail that is closer to you. 5. Puts on gloves, as necessary.
Position yourself and the client in the right place. 6. Stand at the side of the bed and face the head of the bed. Keep your feet
about 12 inches apart. Place the foot that is farther from the bed slightly in front of the other foot.
7. Raise the head of the bed if possible. If not, lock arms with the client (see steps 8 and 9).
8. Bend your arm that is closer to the client and place it between the client’s arm that is closer to you and her body. Reach under with your hand and hold the client’s shoulder.
9. Ask the client to bend that arm and reach up to hold your shoulder. This is called locking arms.
10. Ask the client to bend their other arm and place it across their abdomen and hold their wrist.
11. Ask the client to bend their knees if possible. 12. Slip your other arm under the client’s neck and shoulders. Put your hand on
the shoulder that is farther from you.

Module 9. Body Mechanics
HOMECARE AIDE WORKFORCE INITIATIVE (HAWI)
Skills Checklists
Skills Checklist 2. Assisting a Client to a Sitting Position in Bed
Page 2 of 2
Raise the client to a sitting position. 13. Count out loud 1-2-3.Then take your weight off the foot that is closer to the
top of the bed. Put your weight on the foot that is closer to the bottom of the bed. At the same time, pull the client to a sitting position. Use a rocking motion.
Use pillows to help the client stay sitting up. 14. Hold up the client with the arm that is under their shoulder. Use your other
arm to place pillows behind the client’s head, as needed. Lower the client’s head and shoulders.15. Put your free arm back under the client’s shoulders and neck. 16. Tell the client that you are ready to lower them. 17. Count out loud 1-2-3. Then lower the client’s head and shoulders onto the
pillows. Make sure the client is safe and comfortable.18. Check if the client feels dizzy or weak. 19. Make sure the client is comfortable. Ask them if they want a sheet or blanket.20. If the client is in a hospital bed, readjust as needed. 21. Wash your hands. 22. Observe, record, and report any changes in condition or behavior.

Module 9. Body Mechanics
HOMECARE AIDE WORKFORCE INITIATIVE (HAWI)
Skills Checklists
Skills Checklist 3. Assisting a Client to Move to the Side of the Bed Get ready to move the client. 1. Wash your hands. 2. Greet the client by name. 3. Give the client privacy. 4. Explain the steps to the client. Be clear about what you will do and what he
or she will do. 5. If the client is in a hospital bed:
Lock the wheels.
Raise the bed to waist level.
Lower the top of the bed.
Lower the side rail that is closer to you.
Move the client’s upper body. 6. Slip your arm under the top of their back. Hold the shoulder that is farther
from you. Put your other arm under the middle of their back. 7. Count to three. Then move the client toward you. Use a rocking motion. Move the client’s buttocks. 8. Slip one arm under the client’s waist. Put your other arm under their upper
thighs. Hold the thigh that is farther from you. 9. Count out loud 1-2-3. Then move the client toward you. Use a rocking
motion. Move the client’s legs. 10. Slip one arm under the client’s lower thighs. Hold the thigh that is farther
from you. Slip your other arm under the heel that is farther from you. 11. Count out loud 1-2-3. Then move the client toward you. Use a rocking
motion. Make sure the client is safe and comfortable. 12. Make sure the client is comfortable. Ask them if they want a sheet or blanket.13. If the client is in a hospital bed, readjust as needed. 14. Wash your hands.
Module 9. Body Mechanics
HOMECARE AIDE WORKFORCE INITIATIVE (HAWI)
Skills Checklists
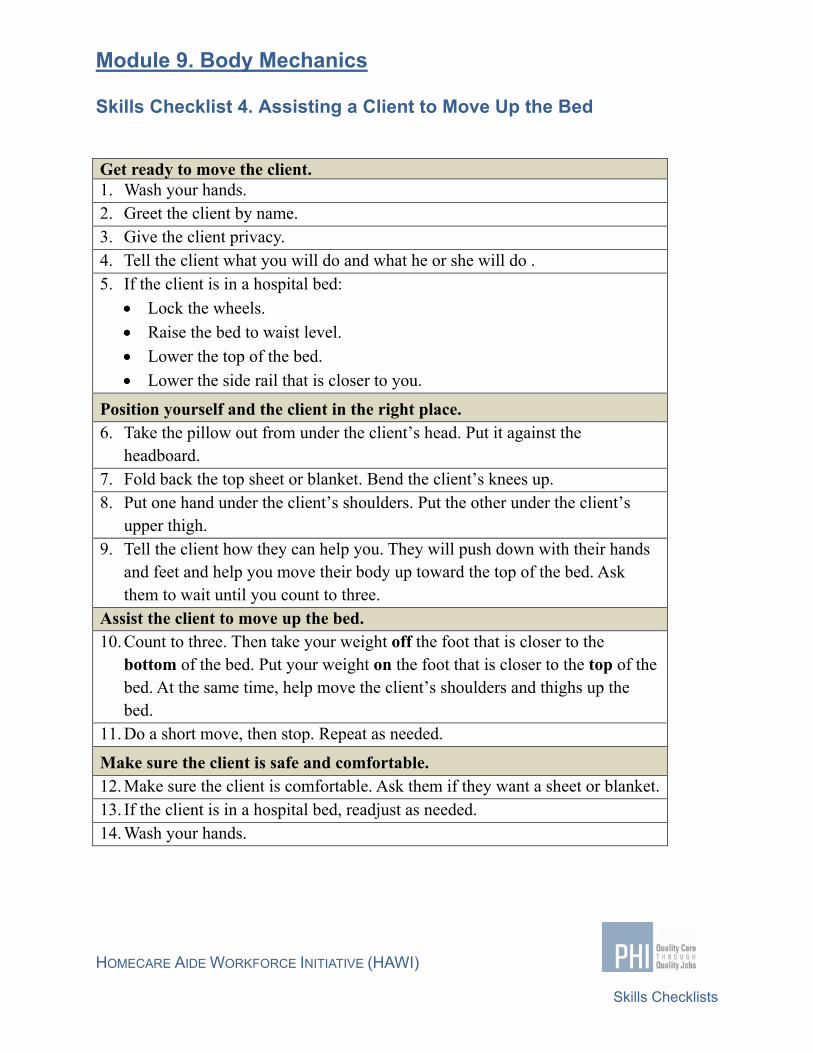
Skills Checklist 4. Assisting a Client to Move Up the Bed Get ready to move the client. 1. Wash your hands. 2. Greet the client by name. 3. Give the client privacy. 4. Tell the client what you will do and what he or she will do . 5. If the client is in a hospital bed:
Lock the wheels.
Raise the bed to waist level.
Lower the top of the bed.
Lower the side rail that is closer to you.
Position yourself and the client in the right place. 6. Take the pillow out from under the client’s head. Put it against the
headboard. 7. Fold back the top sheet or blanket. Bend the client’s knees up. 8. Put one hand under the client’s shoulders. Put the other under the client’s
upper thigh. 9. Tell the client how they can help you. They will push down with their hands
and feet and help you move their body up toward the top of the bed. Ask them to wait until you count to three.
Assist the client to move up the bed. 10. Count to three. Then take your weight off the foot that is closer to the
bottom of the bed. Put your weight on the foot that is closer to the top of the bed. At the same time, help move the client’s shoulders and thighs up the bed.
11. Do a short move, then stop. Repeat as needed.
Make sure the client is safe and comfortable. 12. Make sure the client is comfortable. Ask them if they want a sheet or blanket.13. If the client is in a hospital bed, readjust as needed. 14. Wash your hands.

Module 9. Body Mechanics
HOMECARE AIDE WORKFORCE INITIATIVE (HAWI)
Skills Checklists
Skills Checklist 5. Assisting a Client to Turn in Bed Page 1 of 2
Get ready to move the client. 1. Wash your hands. 2. Greet the client by name. 3. Give the client privacy. 4. Tell the client what you will do and what he or she will do. 5. If the client is in a hospital bed:
Lock the wheels.
Raise the bed to waist level.
Lower the top of the bed.
Lower the side rail that is closer to you. Get the client into the right place. 6. Move the client’s body toward your side of the bed. This gives you room to
turn them toward the other side. 7. Fold the client’s hands and arms on their chest. 8. Cross the client’s leg that is closer to you over their other leg. Turn the client away from you. 9. Put one of your hands under the client’s shoulder. Put your other hand on
their hip. Then gently roll the client away from you. Turn the client toward you. 10. Follow these steps:
Make sure the client is in the right place. Leave enough room to turn them.
Cross their leg that is farther from you over their other leg.
Hold the client behind their shoulder with one hand.
Hold them behind their hip with the other hand.
Roll the client gently and smoothly toward you. Use good body mechanics.

Module 9. Body Mechanics
HOMECARE AIDE WORKFORCE INITIATIVE (HAWI)
Skills Checklists
Skills Checklist 5. Assisting a Client to Turn in Bed Page 2 of 2
Make sure the client is safe and comfortable. 11. Make sure the client’s body is positioned correctly :
Their head is held up by a pillow.
They are not lying on their arm.
Their top arm is held up by their body.
Their back is held up by a supportive device.
Their top knee is bent.
Their top leg is held up by a pillow or supportive device.
Their hip is in the right place. 12. Make sure the client is comfortable. Ask them if they want a sheet or blanket.13. If the client is in a hospital bed, readjust as needed. 14. Wash your hands.