monza deluxe super automatic espresso machine · monza deluxe super automatic espresso machine 3 3...
TRANSCRIPT

Revised 1.30.14
Monza Deluxe
Super Automatic
Espresso Machine
By
Owner’s Manual
Monza Deluxe Super Automatic Espresso Machine
1 1
We would like to thank you for purchasing the Monza Deluxe Super Automatic Espresso Machine by Quick Mill. Before using the machine we suggest you carefully read this manual to obtain the necessary information for correct use and servicing of the product. If you have any questions please feel free to contact us at 518-452-5995 or [email protected] Please remember to save the shipping carton and packing materials that came with your machine. This is very important should you need to return your machine to us. If you do need to send your machine back for any reason, please contact our service department to get a return authorization number. Be sure to insure the machine and pack it securely with the original packing materials to prevent damage in shipping. We can’t be held responsible for any damage that may occur while in transit to us. Should you need to file a damage claim with the shipper, we would be happy to help you with the required forms. Thanks again for your business,
Features
Programmable pre-infusion from 0 to 4 seconds.
Programmable temperature setting from 176° to 210°F with heated brew group.
Programmable ground coffee and water volume dose.
Decaf mode allows user to use pre-ground decaf coffee.
Programmable seven day timer.
Five different language selections: English, Italian, German, and French.
Programmable auto off timer.
Command prompted descaling and group cleaning feature.
Stepless grinder adjustment.
Traditional no burn steam arm and adjustable auto milk frother.
Optional password protection to prevent changing of settings.
Cup warming tray
Removable cup pedestal to fit small and large cups.
Extensive component protection with 7 fuses as well as thermal protection for the pump, grinder, and heater.
Optional direct connect kit available for water line installation.
Low water sensor for cold water reservoir.
LED display with 5 color options.
Steam arm can be used for hot water for making tea and Americano’s.
Introduction
Monza Deluxe Super Automatic Espresso Machine
2 2
FEATURES ............................................................................................................................................................ 1
INTRODUCTION ................................................................................................................................................... 1
INDEX .................................................................................................................................................................... 2
DESCRIPTION ...................................................................................................................................................... 2
SAFETY ................................................................................................................................................................. 2
TECHNICAL SPECIFICATIONS ........................................................................................................................... 3
IMPORTANT SAFEGUARDS ............................................................................................................................... 3
DIAGRAMS ........................................................................................................................................................... 4
FRONT ................................................................................................................................................................... 4
INSIDE ................................................................................................................................................................... 4
BACK ..................................................................................................................................................................... 4
TOUCHPAD ........................................................................................................................................................... 5
DISPLAY ............................................................................................................................................................... 5
ACCESSORIES ..................................................................................................................................................... 5
DIRECT CONNECT KIT (OPTIONAL) .................................................................................................................. 5
FIRST TIME SET UP ............................................................................................................................................. 6
DIRECT CONNECT KIT ........................................................................................................................................ 6
GRINDER ADJUSTMENT ..................................................................................................................................... 7
MAKING ESPRESSO ........................................................................................................................................... 7
PROGRAMMING ESPRESSO .............................................................................................................................. 7
DECAF MODE ....................................................................................................................................................... 8
STEAM WAND OPERATION ................................................................................................................................ 8
MILK STEAMING TECHNIQUE ............................................................................................................................ 8
AUTOMATIC MILK FROTHER ............................................................................................................................. 9
HOT WATER WAND OPERATION ...................................................................................................................... 9
MENU SETTINGS ............................................................................................................................................... 10
MAINTENANCE .................................................................................................................................................. 12
TROUBLESHOOTING ........................................................................................................................................ 13
WARRANTY ........................................................................................................................................................ 17
WE ARE HERE TO HELP ................................................................................................................................... 17
The machine consists of an automatic group to dispense coffee. The hydraulic unit consists of a 1.5 liter capacity boiler
for dispensing coffee, hot water, and steam.
The machine base and housing are made of stainless steel.
SAFETY
DESCRIPTION
INDEX
Monza Deluxe Super Automatic Espresso Machine
3 3
The steam boiler is equipped with a pressure relief valve calibrated at 2.5 bar and a resettable hi-limit switch that interrupts heating in the event of a fault.
The heat exchanger is equipped with an
expansion valve calibrated to 9 bars for brewing espresso.
The coffee group heater is equipped with
an electronic temperature control and is protected by a safety thermal fuse to prevent overheating.
The pump is equipped with an automatic
resettable thermal protector in case of overheating.
All heating elements subject to electric
current are situated inside the machine housing.
Dimensions L 14.75” x W 17.5” x H 17.5”
Weight 63 lbs.
Voltage Power Current
110-120V /50-60 Hz 1600 W 14 A
Water tank capacity 3 lt
Working temperature +40° to +113° F
Packaging materials such as (plastic bags, expanded polystyrene, nails, boxes etc.) are a potential hazard and must not be left within reach of children.
Before plugging in the machine ensure that the outlet voltage is 110Volts. A resettable GFI outlet is recommended, but not necessary.
The power cord should be fully extended (avoid kinking or compressing) in a position where it cannot be knocked or tampered with by children; it should not be placed near water or other liquids or heat sources, it should not be damaged. If necessary, have it replaced by a qualified electrician.
The use of adaptors, multi-sockets or extension cords is not recommended.
In case of doubt or uncertainty, have a qualified electrician check the electrical system, which should be in accordance with local safety regulations in force, including:
- The appliance must have an Earth
grounded outlet.
- Electrical wire sufficient for the power
rating.
- Efficient circuit breaker.
Place the machine on a water-repellant surface (laminated, steel, ceramic etc.) away from heat sources (ovens, fireplaces etc.) and in an environment where the tempture does not go below 40°F.
TECHNICAL SPECIFICATIONS
IMPORTANT SAFEGUARDS

Monza Deluxe Super Automatic Espresso Machine
4 4
FRONT
INSIDE
BACK
1. Bean Hopper 2. Display 3. Touchpad 4. Water Reservoir 5. Drip Tray 6. Cup Warming Tray 7. Steam/Hot Water Wand 8. Grounds Drawer 9. Cup Pedestal 10. Raised Platform (optional)
1. Grinder Adjustment 2. Milk Frother 3. Piston Assembly 4. Piston O-Ring 5. Brew Chamber Cover
1. Reservoir/Water Line Switch* 2. Main Power Switch 3. Direct Connect Fitting 4. Power Cord Receptacle *Tanica = Water Reservoir Mode Rete = Plumbed Water Line Mode
DIAGRAMS

Monza Deluxe Super Automatic Espresso Machine
5 5
TOUCHPAD
ACCESSORIES
DIRECT CONNECT KIT (optional)
1. Power/Menu/Decaf Button 2. Short Espresso/- Button 3. Tall Espresso/+ Button 4. Hot Water Button 5. Steam Arm Button 6. Milk Frother/Exit Button
1. Steam Boiler Temperature 2. Brew Group Temperature
1. Coffee Scoop 2. Cleaning Brush 3. Spare Piston O-Ring
1. Regulator Adjustment Knob 2. Fiber Washer 3. Regulator Pressure Gauge 4. Braided Water Line
DISPLAY
Monza Deluxe Super Automatic Espresso Machine
6 6
Before using the machine, your water should be tested for hardness. This is important to help prolong the life of the machine and keep it in proper working order.
If your water is above 3 grains/50 ppm of hardness then the use of an in tank softener for reservoir use or a softening system if you are hooking the machine to a water line is recommended.
The machine comes with a raised
platform which requires the feet to be screwed into the base of the platform. The machine can be operated with or without the platform, but is required if the machine is going to be hooked up to a drain system.
Remove the machine from its packaging
and place on a level surface. Remove the power cord and cup pedestal from the water reservoir and grounds drawer.
Rinse the water reservoir out and fill with
softened water and then carefully place into the machine. (Not dishwasher safe)
Install the power cord into the receptacle
in the back of the machine. For reservoir use ensure the toggle
switch on the back is in the “TANICA” position.
Turn on the main power switch on the
back of the machine. Press the power button on the front
touchpad to turn the machine on. When the display reads “Machine
Ready” you are ready to make espresso. To turn the machine off hold the power
button and then hold the exit button at the same time until it powers down.
For direct connect installation the use of
a filter system is recomended. The direct connect kit is set up with a 1/4” John Guest quick connection for easy set up.
Unscrew the cap fitting from the back of
the machine labeled as 3 in diagram 4.3. Place the fiber washer in between the
braided water line and the direct connect fitting on the back of the machine and then screw the braided line on with a wrench. No teflon tape is needed.
Hook the regulator up to your water
supply with 1/4 tubing (not provided) The regulator has been set prior to shipping and should not require any adjustment.
Turn the water supply on and verify
there are no leaks. Flip the toggle switch on the back of the
machine to the “RETE” position and installation is complete.
If you are using a softening system with
your machine be sure to replace or recharge the softener as specified by the manufacturer. Lifespan will vary based on your waters hardness. Contact your dealer if you have any questions about water treatment.
Depending on your water pressure, you
may experience some “chattering” of the braided line. To adjust the regulator, pull the adjustment knob out and turn to adjust, push the knob in when done to lock setting. The regulator should only be adjusted while water is running through it (brewing espresso) Do not exceed 1 bar of water pressure.
Important: When using the machine
plumbed in there will be some residual fresh water that is discharged into the reservoir so it is necesary to periodically check and empty the reservoir.
FIRST TIME SET UP DIRECT CONNECT KIT
Monza Deluxe Super Automatic Espresso Machine
7 7
One of the most important factors in making delicious espresso is setting up the grinder properly.
If the grind is too coarse the shots will be very thin with no body and will come out too quickly.
If the grind is too fine then the shots will be bitter and will take a long time to brew or may not even come out at all.
Different coffee beans may require a different grind setting or the same beans that have aged may require a finer grinder adjustment.
The grind should be adjusted to produce a 2 oz shot of espresso in approximately 25 seconds.
If it’s coming out quicker then adjust the grind finer, if it’s coming out too slow or not at all then adjust the grind coarser.
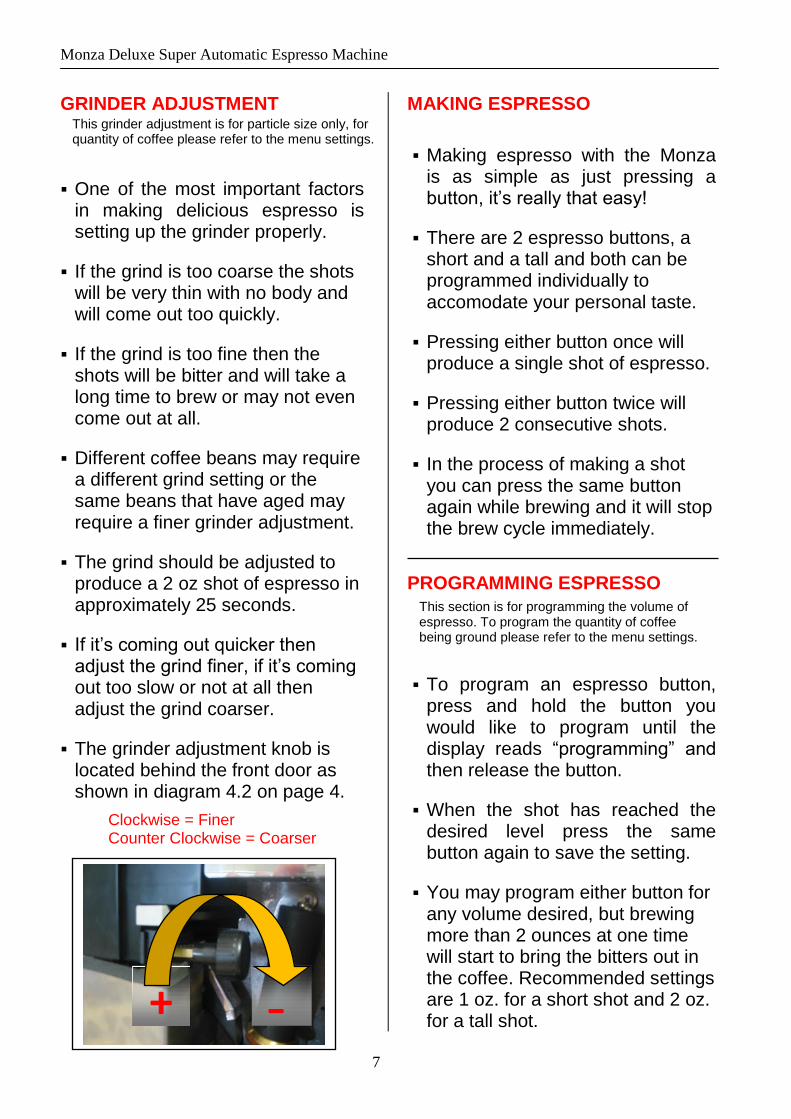
The grinder adjustment knob is located behind the front door as shown in diagram 4.2 on page 4.
Making espresso with the Monza
is as simple as just pressing a button, it’s really that easy!
There are 2 espresso buttons, a short and a tall and both can be programmed individually to accomodate your personal taste.
Pressing either button once will produce a single shot of espresso.
Pressing either button twice will produce 2 consecutive shots.
In the process of making a shot you can press the same button again while brewing and it will stop the brew cycle immediately.
To program an espresso button,
press and hold the button you would like to program until the display reads “programming” and then release the button.
When the shot has reached the desired level press the same button again to save the setting.
You may program either button for any volume desired, but brewing more than 2 ounces at one time will start to bring the bitters out in the coffee. Recommended settings are 1 oz. for a short shot and 2 oz. for a tall shot.
GRINDER ADJUSTMENT
+ -
Clockwise = Finer Counter Clockwise = Coarser
This grinder adjustment is for particle size only, for quantity of coffee please refer to the menu settings.
MAKING ESPRESSO
PROGRAMMING ESPRESSO This section is for programming the volume of espresso. To program the quantity of coffee being ground please refer to the menu settings.

Monza Deluxe Super Automatic Espresso Machine
8 8
The decaf mode allows the user to use pre-ground decaf coffee.
To use the decaf mode press the decaf button on the touchpad.
The front display will read “decaffeinated”
Open the door to access the brew chamber.
Remove the brew chamber cover shown below by sliding it up and then pull the left side out first.
Using the provided coffee scoop pour approximately 2 scoops of pre ground coffee into the brew chamber shown below.
Close the door and then press the short or tall espresso button to make a shot of decaf espresso.
Before steaming, purge the excess water from the wand by hanging the wand into the drip tray and then press the steam button to purge the water and then press the steam button again to turn it off.
To use the steam wand for a programmed dose of steam, press the steam button once and it will automatically shut off at the programmed time setting.
For continuous steam, press the steam button twice and then press the button again when you are done steaming to turn it off.
To program the steam button, press and hold the button until the display reads “programming” Press the steam button again at the desired time to stop the steam and save the setting.
After purging the steam wand, put the wand into the milk just below the surface and then press the steam button.
Position the steam tip just below the surface until you hear a sucking sound which is pulling air into the milk. Continue this until the milk reaches 100 degrees.
Then lower the steam tip a little and position the pitcher until the milk starts a rolling effect. Continue this until it reaches 150 degrees. When done purge the steam wand and then wipe with a damp cloth.
DECAF MODE
STEAM WAND OPERATION
MILK STEAMING TECHNIQUE

Monza Deluxe Super Automatic Espresso Machine
9 9
The Monza is equipped with an automatic milk frother for making delicious lattes and cappuccinos.
To use the frother position the carton of milk on the right side of the machine and insert the silicone tube as shown below.
There is an adjustment screw (1) for adding air. Turn the adjustment screw (1) clockwise to decrease the air and then counter clockwise to increase the amount of air. Increasing the air will create more bubbles and foam.
There is also an adjustment screw (2) on the silicone tube for milk temperature. Turn the screw (2) clockwise to increase temperature and counter clockwise to decrease the milk temperature.
Pressing the milk frother button once will give a programmed time setting which will then turn itself off automatically. (user adjustable)
Press the frother button twice for continuous frothing and then press the button again to stop frothing.
To program the frother button, press and hold the button until the display reads “programming” then release. When the desired amount of milk has been frothed, press the button again to stop the frothing and it will save the new setting.
Immediately after using the frother, put the silicone tube into clean water and press the frother button and let it run for a few seconds to keep the frother clean of milk.
It is very important that you follow this cleaning step or the frother will get clogged with dried up milk and will no longer function.
Warning: The water from the hot water wand is under pressure. It is advised to use a tall pitcher or cup when using the wand. Using too small of a container may cause the water to splash out and burn the user so extra caution is advised.
To use the hot water wand press the hot water button once. Press the hot water button again to stop the flow of water.
To program the hot water wand, press and hold the hot water button until the display reads “programming” and then release the button. When the water has reached the desired level press the hot water button again to save the setting.
AUTOMATIC MILK FROTHER
HOT WATER WAND OPERATION
Monza Deluxe Super Automatic Espresso Machine
Revised 1.30.14
The menu section goes over all of the advanced features and settings that are available through the touchpad. It is recommended that you read the following instructions before making any changes.
To access the menu, with the machine turned on press and hold the menu button until the display reads “1. Grinder” and then release the button.
1 GRINDER Enter to access sub-menu then scroll items with + and -
1.2 Quant. Coffee Enables adjustment of quantity of ground coffee allocated to one of the two coffee dispenser keys. A different grinding time can be allocated to each coffee dispenser key for stronger or weaker coffee.
1.2.1 Espresso (Short) A number appears on the display corresponding to the running time for the coffee grinder. This time is expressed in seconds; increasing the time increases the quantity of coffee ground for this brew. (Default setting 6.5)
1.2.2 Coffee (Tall Espresso) A number appears on the display corresponding to the running time for the coffee grinder. This time is expressed in seconds; increasing the time increases the quantity of coffee ground for this brew. (Default setting 6.5)
2 SETTINGS Enter to access sub-menus
2.1 Pre-Brewing Enables adjustment of the pre-infusion time allocated to one of the two coffee dispenser keys. A different pre-infusion time can be allocated to each coffee dispenser key.
2.1.1 Espresso (Short) Small squares corresponding to the pre-infusion time appear on the display. This time can be varied from 0 to 4 seconds. No little black square on the display means no pre-infusion has been selected. 2.1.2 Coffee (Tall)
2.2 Temperature Enter to access sub-menu
2.2.2 Units Enter to select Fahrenheit or Celsius
2.2.3 Steam Enter to change the temperature of the steam boiler. Each square corresponds to about 2°F.
2.2.4 Coffee group Small squares corresponding to the temperature set for the coffee brew group appear on the display. This temperature can be varied from 176°F to 208°F. Each square corresponds to about 2°F.
2.3 Date/time Enter to access sub-menu.
2.3.1 Date Enter to change the date shown on the display.
2.3.2 Time Enter to change the time shown on the display.
2.3.3 Format Enter to change the date format. (dd/mm/yy or mm/dd/yy)
2.4 Timer Enter to access sub-menu.
2.4.1 Progr. On/off
Enables machine to be turned on and off automatically at programmed times. Use the + key to scroll and view settings for each day of the week. To change the on/off times go to the day to be programmed and press enter, then use the + /- keys to change the hour and minutes for turning on and press enter to confirm. Then set the time for turning off, press enter to confirm the changes and go on to the next day. If automatic turning on or off of the machine is not required enter “weekly rest day”. (Machine can still be turned on manually)
MENU SETTINGS
Menu Button - Press to enter a sub menu or to save a changed setting. +/- Buttons - Press to cycle through menus and to change a setting.
Exit Button - Press to exit to previous menu or to exit menu programming.

Monza Deluxe Super Automatic Espresso Machine
11 11
2.4.2 Auto off
Enables the machine to turn off automatically after a pre-set time of inactivity. Time starts from when the last shot was made. Press enter to access the menu and use the + and – keys to set the automatic turn off time, press enter to confirm and esc to exit. (Machine can still be turned back on manually)
2.5 Water hardness Enables the descaling alarm to be set. The water being used should be tested before a value is set.
♦
Off Soft Average Hard
Enables the degree of hardness of the water supply to be set to activate the descaling alarm. To set the water hardness select the relative type of water used, press enter to confirm and then esc to exit. Off: 0-3 grains of hardness (No descaling needed) Soft: 3-5 grains of hardness Average: 5-7 grains of hardness Hard: 7 or more grains of hardness (Using softer water is recommended)
2.6 Grounds Num. Set the amount of spent grounds in the grounds drawer before the empty grounds drawer message appears. Default setting - 25
2.7 Water filter*
Enables softener filter replacement alarm to be set on the basis of the type of filter used. The instructions for the filter used should be read carefully before setting the alarm. *Applies to softening filters only. Carbon or Brita style filters will not remove any hardness and are strictly for taste and odor only.
♦ 0000/0050/0100/0150 50 litres = 13.2 gallons
A number corresponding to the liters to be dispensed before the alarm is is shown appears on the display. The number displayed is in increments of 50 litres; once set press enter to confirm and esc to exit
2.8 Password Activates the password for access to the menu (protection to prevent access by unauthorized users).
♦ On/off
A 5 number “user password” is required to activate or deactivate this function; enter it and press enter then select ON if you wish to block access to the menu The password will be requested each time you want to access the menu; or OFF if you want to deactivate the block. Password 23234
3 MAINTENANCE Enter to access the sub-menu then scroll the items with + and -
3.1 Total Supplies Enter to access a counter showing all drinks dispensed.
Espresso (short) Enter to show the total number of espressos dispensed.
Coffee (tall) Enter to show the total number of coffees dispensed.
Tea (hot water) Enter to show the total number of hot water extractions dispensed.
Steam Enter to show the total number of steam extractions dispensed.
3.2 Cleaning
Press enter to start a cleaning cycle. Before starting a cleaning cycle it is recommended to use the provided cleaning brush to clean the brew group and piston assembly. The use of a powdered cleanser such as Full Circle or Cafiza is recommended.
♦ Insert Cleanser The words “Insert Cleanser” appears on the display; open the door and insert a ½ teaspoon of powdered cleanser into the brew group chamber then press enter to start the cycle. During the cleaning cycle the display describes the various stages of the process. At the end of the cleaning a rinse cycle is automatically performed to eliminate any residual product. During the rinse cycle approximately 16 oz of water will exit the coffee chute so empty the drip tray before starting or have a pitcher available to catch the water.
♦ Cleaning in progress
♦ Rinse
3.3 Descaling
Enables a descaling cycle to be performed, press enter to access and follow the instructions step by step (Before carrying out descaling, carefully read the instructions for the product used). Mix descaling product in water reservoir. (Recommend using Dezcal or citric acid, Do NOT use cleaner)
♦ Descaling Start cycle? Do not leave the machine unattended during the descaling process. Put a
pitcher under the spout and be prepared to empty it several times during the process. The process takes approximately 15 minutes and will perform four flushes of 32 oz of water. Follow the prompts on the display. When the display reads “Rinse, Press Enter” then rinse and fill the reservoir with clean water to remove the descaling agent and then press enter to start the rinse cycle. When the cycle is complete you may get a “Steam Temperature Alarm” This is due to the amount of water being used causing temperature fluctuations in the boiler. To clear the alarm, turn the main power switch on and off.
♦ Descaling in progress
♦ Rinse
3.4 Credits Enter to access
♦ Password/0000 When the credit function is deactivated the word password appears; if activated the residual number of credits appears. With the function activated,

Monza Deluxe Super Automatic Espresso Machine
12 12
the machine will block when credits are used up and show “credit finished” (it can dispense only hot water and steam).
4 LANGUAGE Enter to access
Italian/German/English/ French
+ And – to select language then Enter to confirm and esc. to exit
5 Display Enter to change the display settings.
5.1 Contrast Enter to change contrast setting to make screen more visible.
5.2 Display Mode Enter to change display colors to normal or reversed.
5.3 Colour On Enter to change choice of seven different colors when machine is on.
5.4 Colour Off Enter to change the color of the display when the machine is turned off.
7 Technical Password protected for authorized service center use only.
8 Vending Password protected for authorized service center use only.
To keep your espresso machine in proper working order there a few maintenance procedures that should be carried out at various intervals.
Cleaning Cycle - A cleaning cycle should be done on a weekly basis for heavy use or a bi-weekly basis for light use to maintain optimum performance. If the machine is being used in a commercial setting then a daily cleaning should be done.
Descaling - The descaling feature is great for keeping the boiler free from mineral deposits and should only be performed when the descaling alarm is shown on the display. (See menu section for setting alarm). Although this feature will allow the use of hard water in the machine it is still strongly recommended to use soft water to prolong the life of the machine.
Piston O-Ring - The machine comes equipped with a spare piston o-ring which should be replaced on a yearly basis. To replace the o-ring, unplug the machine and allow it to cool off. Open the front door and then remove the brew chamber cover. Use a small dental pick or flat blade screwdriver to carefully remove the old o-ring. Then work the new o-ring on to the piston.
Lubrication - The piston slide assembly should be lubricated every 6 months with a high temperature food grade lubricant such as Dow 111.
MAINTENANCE
To lubricate the slide, unplug the machine and let it cool off. Remove the top cup tray and then remove the 4 phillips screws holding the top on. With the top removed slide off the clip # 1 and then slide the plastic cover # 2 off the piston.
Carefully press the lubricant into the 2 points shown where the square block goes into the machine. Jiggle the block with your hand while working the lubricant in for better coverage and then re-assemble.

Monza Deluxe Super Automatic Espresso Machine
13 13
How To Move The Piston Assembly In the case that your piston assembly becomes seized in the down position, please follow these simple instructions to get you back up and running again. It may be the case that your piston is out of alignment due your coffee being to fine, to coarse, the quantity of coffee is too much, or non lubrication of the piston assembly. Please follow the labeled diagram below.
TROUBLESHOOTING

Monza Deluxe Super Automatic Espresso Machine
14 14
TROUBLESHOOTING CONTINUED Refill Water Tank Alarm - The water reservoir is equipped with a water level float to let the machine know when it is out of water. If the refill water tank alarm becomes active then rinse out the reservoir and fill with fresh water.
If the reservoir is filled with water and the alarm is still active then the water level float could be getting stuck due to the accumulation of mineral deposits. To correct this fill the water reservoir with vinegar or citric acid just above the level of the float and let it sit for an hour. Then wash the reservoir with mild dish detergent and warm water. Do not wash the reservoir in a dishwasher.
Machine Does Not Turn On - Verify the main power switch is turned on and the power cable is firmly attached. Verify the outlet has power by testing with another appliance. If still no power then contact your dealer before attempting any repair.
Not Dispensing Espresso or Flowmeter Alarm - If plumbed in check the water supply to make sure the machine is getting water. If using the reservoir verify the screen on the end of the silicone hose in the reservoir is not clogged. Make sure the grind is not too fine, adjust coarser if necessary. Verify the toggle switch on the back of the machine is in the proper position for plumbed or reservoir operation.
Not Grinding Coffee Beans - Verify the hopper is filled with coffee beans. Try adjusting the grind coarser. Check that the grounds ejection chute (A) is not clogged with coffee. Check the fuse for the grinder. To do so slide out the hopper slide (B) then lift the hopper off. Turn the fuse holder (C) 1/4 turn left to remove the fuse and check for continuity. Replace if necessary.

Monza Deluxe Super Automatic Espresso Machine
15 15
TROUBLESHOOTING CONTINUED
No Steam From Steam Wand - Verify the machine is up to operating temperature. Check the steam tip holes for a milk blockage. Clean holes with a paper clip or unscrew steam tip to clean trapped milk inside tip and/or arm.
No Water From Hot Water Wand - Verify the machine is up to operating temperature. Check the steam tip holes for a milk blockage. Clean holes with a paper clip or unscrew steam tip to clean trapped milk inside tip and/or arm.
Milk Frother Not Working - Verify the machine is up to temperature. Disassemble and clean the frother parts. Frother pulls apart for easy cleaning. Special attention should be made to the small hole shown in the picture to the right. Use a small paper clip to clean out the hole and then wash the pieces with mild dish detergent. The frother should not be put in a dish washer. Steam Temperature Alarm - The steam temperature alarm may appear at
various stages of use. Whenever there is a large discrepancy between the actual temperature and the set temperature the alarm may appear to let the user know. This does not necessarily mean there is a problem and in most cases the alarm will clear itself once the machine goes into a heating cycle. If the alarm does not clear then turn off the main power switch and unplug the machine and then restart the machine. If this does not clear the alarm then contact your dealer for technical support before attempting any repairs.
Not Heating – Make sure the machine has been turned on for at least 15 minutes.
With the machine unplugged, firmly press the red reset button on top of the boiler shown in the picture to the right.

Monza Deluxe Super Automatic Espresso Machine
16 16
TROUBLESHOOTING CONTINUED
Particular Function Not Working – The control board on the Monza is equipped with 9 fuses to protect the various components throughout the machine. The picture below shows which component each fuse is for.
To check a fuse, be sure the machine is unplugged from the outlet and cooled off. The control board is located in the back of the machine. Remove the fuse from whichever feature is not working and then check the fuse for continuity with a multi meter or continuity tester. The fuse must be removed to get an accurate reading and must be tested for continuity; a visual inspection may not show the problem. Replace fuse as needed.

Monza Deluxe Super Automatic Espresso Machine
17 17
Warranty
The Monza comes with a 1 year warranty starting from the original date of purchase to protect against defects in materials or workmanship. The warranty is void if the product has been damaged by abuse, neglect, or modification. For more detailed information about the warranty please visit our website at the following link: http://www.chriscoffee.com/policy
We Are Here To Help
Enjoy your new espresso machine and remember, should you have any questions, either visit our FAQ section at the bottom of our web site or contact my staff or me by phone at 518-452-5995 or by email at [email protected]