morseutils - · pdf filenetlock.exe locking/unlockingthecu,orthewholenetwork ......
TRANSCRIPT

User application.
MORSE Utils.
version 10.0.23.06/4/2010


Table of Contents1. Morse Network Management Software ........................................................................................... 5
1.1. The most important applications .......................................................................................... 51.2. Application Control ............................................................................................................... 5
2. Setr.exe ........................................................................................................................................... 92.1. Macros .................................................................................................................................. 92.2. Default macro ..................................................................................................................... 102.3. Batch files ........................................................................................................................... 112.4. Parameters for Setr.exe ..................................................................................................... 122.5. Shortcuts for pro Setr.exe ................................................................................................... 13
3. Netcnf.exe ..................................................................................................................................... 143.1. Upload configuration from the CU to the PC ...................................................................... 143.2. Download configuration form PC to CU ............................................................................. 16
4. Memcp.exe .................................................................................................................................... 214.1. Example of downloading fw module E to the CU ............................................................... 214.2. Parameters for Memcp.exe ................................................................................................ 22
5. Netlock.exe .................................................................................................................................... 245.1. Local access ....................................................................................................................... 245.2. Local access with a password ............................................................................................ 265.3. Remote access ................................................................................................................... 265.4. Parameters for Netlock.exe ................................................................................................ 27
List of Figures3.1. Upload configuration .................................................................................................................. 143.2. Acknowledgement for local uploading of configuration .............................................................. 163.3. Acknowledgement for ignoring calibration ................................................................................. 173.4. Selection of configuration ........................................................................................................... 183.5. Selection of the configuration file ............................................................................................... 184.1. Transfer of a firmware module ................................................................................................... 21
3© RACOM s.r.o. – MORSE Utils

4
1. Morse Network Management SoftwareFor configuring and controlling CUs (Communication Units, e.g. MR400, MR25), or alternatively forconfiguring and managing the whole MORSE system several control applications (Utils) are available.The application runs on Linux or Windows platforms. The DOS platform is not supported in sw version586 and higher.
1.1. The most important applications
SETR.exe configuration, diagnosis
NETCNF.exe download / upload (backup) of complete configuration
MEMCP.exe download firmware
NETLOCK.exe locking / unlocking the CU, or the whole network
Common features for all utilities:
• The connection between the application and the MORSE network can be made via the RS232serial channel between the PC and CU or via the Ethernet channel
• If the PC is connected to the CU via the serial channel only one application can be started at a time.When using Ethernet a arbitrary number of the same or different applications can run on the PC inparallel.
• Upon making a successful connection the application is connected to the MORSE network node inthe connected CU. The application then carries out all operations using the system of services - itsends sevice packets to the respective nodes in the network and receives service messages.
1.2. Application Control
1.2.1. Connection to a CU (e.g. MR400, MR25) via the serial port
This uses serial communication with the MARS-A protocol. If you use a service cable (DSUB9-RJ12or DSUB9-Jack3,5) from the COM port of your PC to the service connector of the CU (recommendedconnection), then the connection is made automatically upon starting the application with the defaultparameters.
It is necessary to count on the fact that user communication in the respective port on the CU (e.g. SCC0in the case of MR400) is disconnected immediately as soon as you connect the service connector andthe COM port on the PC via the service cable.
After making a successful connection a message appears containing the address of the connectednode. Next the Main menu (for SETR) or the desired application operation (NETCNF, MEMCP, NET-LOCK) appears. If a "no response" message appears we recommend starting the application withappname.exe -mh monitoring switched on for ascertaining failures in the connection (typically it iscaused by use of a different port on the PC). Appname.exe is used here as alternative labelling forsome of the applications, use for example, setr.exe -mh.
5© RACOM s.r.o. – MORSE Utils
Morse Network Management Software

1.2.2. Connecting to the CU via Ethernet
Connecting the CU via Ethernet requires at least minimum configuration settings for IP communication.The easiest method for this purpose is to use Setr connected via the serial port; see above.
Basically there are two possible methods:
1. Direct PC - CU connection
For the CU configuration purposes there it is sufficient set the IP address and mask in CU only.Then connect the PC via crossed Ethernet cable and start Setr using the command e.g.:
setr -pIP192.168.0.1
Until 9.30 version inclusive it is necessary insert the non-zero MORSE address in the node 1 also.
The configuration must be completed for the communication through MORSE network. Configuree.g. MAS according to the manual MORSE Guide 31.
2. LAN
The CU can naturally be connected to a LAN and communication with it from the PC will either bedirect or via a router (default gw). In the case of connecting the CU to a standard hub (switch) astandard (uncrossed) Ethernet cable is used. A standard ICMP ping may be employed on Ethernetto test the correct setting of IP routing in the MORSE equipment.
1.2.3. Application Parameters
Whereas the SETR.exe application can be started without entering parameters the entering of para-meters is a necessity for MEMCP.exe. An overview of parameters for the respective application canbe obtained using the command:
setr -h
Using command System▻Screen to file change the list to a file and save it using a suitable name.
The parameters can be activated in more ways than one. Themethod by which the parameter is loadedhas differing priority. The following overview of loading parameters is ordered from the lowest to thehighest priority.
1. Not loaded
The application uses the default value - upon starting the application a parameter is not loadedand so the default value is used, for example, the parameter for selecting the communication porthas a value of -p1
2. File
Parameters can be prepared in the file appname.par, for example setr.par, which will be usedupon each start of the application, e.g. the contents of file setr.par are as follows:
1 https://www.racom.eu/eng/support/morse-m3/index.html
MORSE Utils – © RACOM s.r.o.6
Morse Network Management Software

-p2-mh# note - port p2, monitoring on
Then command SETR starts the application via port p2 and with monitoring of service packetsrunning. The file appname.par may also contain a link to another file, e.g. morse.par in theform:
+morse.par
in which common parameters used by more applications may be stored.
3. Command line
Parameters may be used in the command line when starting the application, for example:
SETR -pIP192.168.0.1
Starts setr.exe communicating with the CU via the Ethernet channel.
4. ALT+P
In the running application it is possible to enter a new parameter after command Alt+P.
1.2.4. Common parameters for all applications
-pb bit ratedesired bit rate on COM portpossible values 300, 1200, 2400, 4800, 9600, 19200, 38400, 57600 and 115200default value 19200example -pb57600
-p com port NoNo of com port on PC, which is useddefault value 1example -p2
-pIP addressIP address connected CU in decimal formexample -pIP192.168.0.1
-pI addressIP address connected CU v hexadecimal formexample -pIC0A80001
-m monitoringmonitoring mode of communication between PC and MCUpossible values h (= hex), a (= ascii), s(=size), o(=off)default value offexample -mh
-t set up the timezonethe difference between the local time and the GMTdefault values - none - a value from operating system is used
7© RACOM s.r.o. – MORSE Utils
Morse Network Management Software
example -t-3600
-nt net layer timeouttimeout in ms, which application waits for the service reportdefault value 6000example -nt15000
-nr net layer repeatsNo of repeats, which application tries to get the service report desireddefault value 2example -nr10
-cl[filename] captureeverything from console is saved into the filenameexample -cltest.capdefault value off
-cg[filename] macro sendmacro from the filename is executedexample -cgtest.macdefault value off
1.2.5. Close of the application
ALT+X standard closeCTRL+BREAK, CTRL+C - forced close
MORSE Utils – © RACOM s.r.o.8
Morse Network Management Software

2. Setr.exeThis is a powerful tool for manually or semi-automatically setting parameters, diagnosis andmaintenanceof the MORSE network. By means of the terminal type menu (MORSE main menu) it can control allCU services. A detailed description is provided in MORSE Firmware Documentation1. Button macrosand hot keys can also be used to control SETR.
2.1. Macros
A group of Setr commands can be incorporated into a macro and then launched with Setr running usingcommand :
!mname Enter
where name is the name of the file with the macro. For example, below is a macro which sets up thefrequency and output and reads the resulting values:
# example of macro xfreq.mac!l^MQ^MRpe^MT4264750^MR4264750^MlA^MwY^MIY^MSY^M^M
The macro is launched using command !mxfreq Enter. It uses Setr commands supplemented by ^Mmeaning Enter. Other symbols used:
^M - Enter~ - delay 1/2 sec^S - Net Service Call mode (default)-
waits for confirmation of command execution^D - Net Direct mode - does not wait for confirmation^X - end of operation and continuation with next address# - note
If the name is generated in the following manner the macro may also be launched, for example, usingbutton F1:
#This is an example, how to create a macro for keys CTRL/ALT/SHIFT F1..F10#Macro file names are generated as follows:#xxx_af01.mac for key ALT-F1#xxx_cf10.mac for key CTRL-F10#xxx_sf03.mac for key SHIFT-F3#xxx__f04.mac for key F4
The macro - example for return to the local address and into Main menu:
1 https://www.racom.eu/eng/support/firmware/mr400/index.html
9© RACOM s.r.o. – MORSE Utils
Setr.exe

The macro file name xxx__f01.macThe content of file !l^M
Q^MThe file location in the directory, where Setr.exe isCalling the macro from running Setr by F1 key
2.2. Default macro
The default macro is designed to set up default parameters in the CU.
Macro xfac.mac
Macro xfac.mac employs the Setr command f(a)ctory setting, which inscribes default parametersin S-RAMmemory for all menus (in the case of CUMR25 the parameters are written to FLASHmemory).Next the macro sets the middle power level 7 in the menu Rpe and clears Frequency off(s)et.The Art tables and routing tables are cleared. Finally the macro restarts the CU and in this way thedefault parameters are copied from S-RAM memory into computing memory. The macro is designedfirst of all for working with the local connection and hence it sets local mode as its first step.
The macro is named xfac.mac and can be found at www.racom.eu2, Support▻Firmware▻Config-uration macros or Download▻Software Manuals▻Utils Default macro. File xfac.mac is locatedin Setr´s current directory and is launched in Setr using command !mxfac.
Macro xde.mac
Macro xde.mac is more complicated but it offers additional possibilities for modifications. It successivelyvisits all menus and sets them with default parameters and stores them to RAM and to S-RAM. Finallyusing command sgB it resets the CU. Below is an example of part of the memory:
# Default Ne#Q^M ...return to MORSE Main menuNfY^M~ ...insert default parameters to RAMNwY^M~ ...insert default parameters to S-RAM
# Default Rpe # NOT ACTIVE ###Q^M#Rpe^M~#fY^M~#s0^M~#l7^M~#wY^M~ ...frequency and power settings remain unchanged
The macro can be modified as required, for example, by removing the six # symbols for menu Rpe itcan also be set to default. It is recommended, for a CU without an ETH module, to use the # symbolsfor blocking the work of the last paragraph of the macro, which presets the ETH module.
2 http://www.racom.eu/eng/support/default_macro.html
MORSE Utils – © RACOM s.r.o.10
Setr.exe

Macro xder.mac
In the CU with firmware 9.0.0.0 and higher macro xder.mac can be used. This is a version of themacro xde.mac which uses fewer idle periods and runs much faster.
2.3. Batch files
For simplifying application control, especially upon repeated use, it is possible to prepare batch files.The following example shows the following operations:
• submission of the prepared mac2.mac file for control
• storage of the original CU configuration
• setting of the default parameters in the CU
• entering of new address
• starting of setr
Batch file config1.bat :
echo offecho check the address prepared in the macro mac2.mactype mac\mac2.mac
echo STOP macro using Ctrl+Cecho storing original configuration in the filepause 1netcnf -aU -x
echo entering default parameterpause 1setr -cg.\mac\mac1.mac -x
echo entering new addresspause 1setr -cg.\mac\mac2.mac -x
echo starting Setr for further workpause 1setr
rem you can continue the work with SETR
The macros used in the batch file:
• File .\mac\mac1.mac
# entering default parameter except for tablesQ^Mca^MQ^MsgB^M~~~~~~~~~~
11© RACOM s.r.o. – MORSE Utils
Setr.exe

• File .\mac\mac2.mac
# entering new addressQ^MNe^M1a690F0004^Mw^MI^MQ^M
2.4. Parameters for Setr.exe
1. Common - see section Section 1.2.4, “Common parameters for all applications”
2. Special -cg, -df, -dp
Calling CU group :
setr -dfnnn -cgxtest.mac
Setr successively call addresses listed int he file .\net\nnn.txt and at each executes commandsof macro xtest.mac.
setr -df -cgxtest.mac
If the name of the file is not stated after parameter -df, setr looks for file .\net\anynet.txt andcalls the addresses contained in it.
Example of macro nnn.txt, which calls addresses 02, 03, 07 :
690F0002690F0003#690F0005690F0007
Example of file xtest.mac , which reads the version of firmware in individual modems :
Q^Msv^M
Calling with a path packet:
setr -dp.\net\ppp.ttt -cgxtest.mac
Setr calls to the destination address determined by file.\net\ppp.ttt according to the rules forthe path packet.
setr -dpppp.ttt -cgxtest.mac
Setr uses file ppp.ttt located in the setr directory.
setr -dp -cgxtest.mac
MORSE Utils – © RACOM s.r.o.12
Setr.exe
Setr uses file path.txt located in the setr directory.
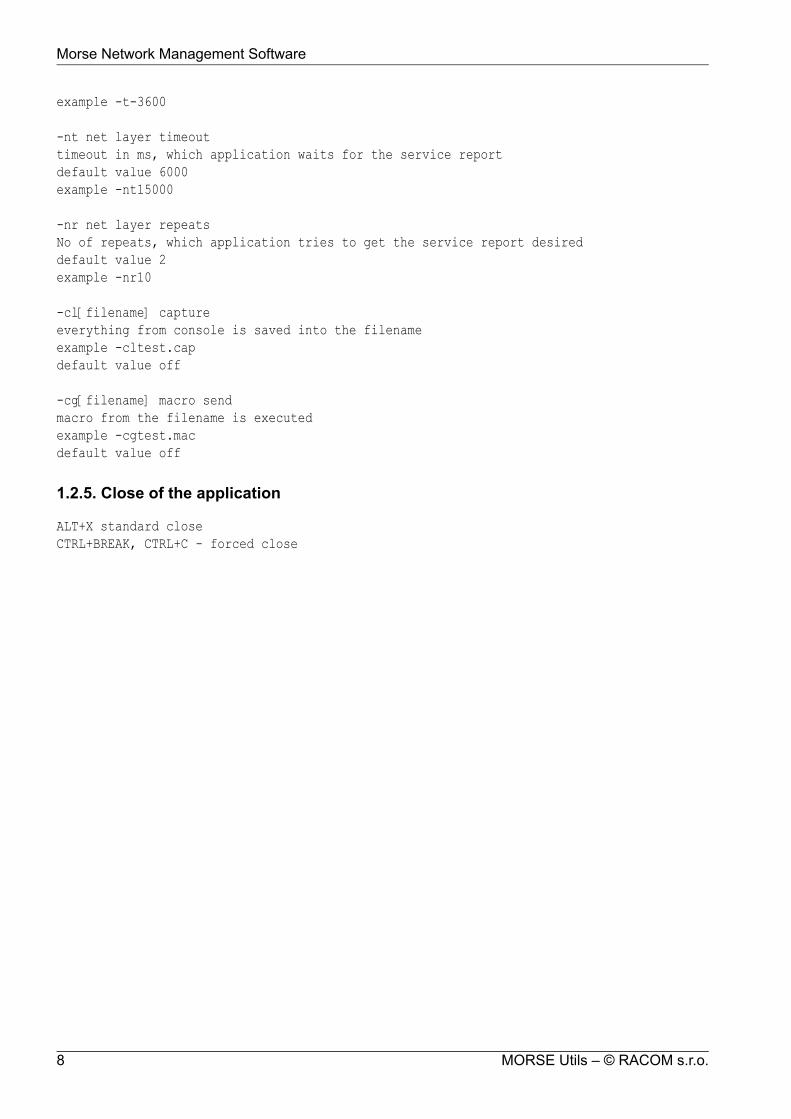
Example of file ppp.ttt for calling from address 1101 via address 5505 to address 3303 for thecase where the connection between these addresses is not configured in routing tables:
690F110100000000690F550500000000690F3303690F3303
2.5. Shortcuts for pro Setr.exe
With SETR running you may call up help by pressing Alt+Z:
Terminal mode help:F1...F12 .................. User defined macrosAlt-S .............................. Ascii sendAlt-G .............................. macro listAlt-I ................... Initialize connectionAlt-O ............................... Pull jackALT-A ............................... Save pathAlt-R ............................. Use SerCallAlt-P .............................. ParametersAlt-B ............................. Scroll backAlt-L .......................... Capture toggleAlt-X .................................... Exit.............. GUI version only ...............Alt-C .......................Scroll lock ON/OFFAlt-M/m .... Mark position before/after current
The meaning of main abbreviations:
Alt+I initialization of connection PC-SETRAlt+P put the parameter into running SETRAlt+B displays containing SETR operations done till nowAlt+L start/stop capture of operations into chosen fileAlt+C stop/start screen refreshAlt+X stop SETR
13© RACOM s.r.o. – MORSE Utils
Setr.exe

3. Netcnf.exeReplaces the former application Uds.exe and is used for upload and download of CU configurationstructures. It is possible to use this application locally or remotely, e.g. upload configuration structuresfrom all CU's in the network.
Netcnf.exe (when upload) saves configuration structures from FLASH or S-RAMmemory of CU intoaddress.cnf file, where address is the address of the connected node (locally or remotely), e.g.690F0001.cnf.
Netcnf.exe (when download) saves configuration structures directly into permanent memory in CU(FLASH, S-RAM). To use these parameters immediately it is necessary to put them into RAM too:
• by the command (s)ervice (g)o go MORSE (B) thus sgB
• or by the hw reset (off/on)
Fileaddress.cnf, which contains the CU configuration can be archived and downloaded to the sameor another CU. It is important to make sure that more CUs with the same MORSE address are notcreated in the network!
If we need to make a change in the stored configuration, we can use from fw version 9.0.13.0 the Setrwith -af parameter, e.g. Setr -afcnf/anynet/690f0001.cnf. In older versions we can downloadit to an auxiliary CU, use Setr to modify the configuration and again upload it to the file in the PC.
Since fw version 10.0.27.0 the CNI monitoring setting include Split is contained in the configurationfile. This parameters had to be set using macro or manually before.
3.1. Upload configuration from the CU to the PC
3.1.1. Locally
• Start program Netcnf.exe with the CU connected by the service cable :
Fig. 3.1: Upload configuration
By clicking on icon Configuration upload or selecting Application▻Configuration upload webegin transmission of the configuration from the CU to the file in the PC. Upload ends by displayinga message containing the name and location of the generated configuration file:
File .\cnf\anynet\69000006.cnf created.UPLOAD FINISHED
Press Alt+X to end program Netcnf.
MORSE Utils – © RACOM s.r.o.14
Netcnf.exe

• If we start the program with parameter application Upload -aU , it starts running without pressingicon:
Netcnf -aU
3.1.2. Remotely for 1 CU
For downloading the configuration from a remote CU we need to be locally connected to a CU whichis connected to the remote CU via the MORSE network. The Netcnf application can be started in oneof the following ways:
• Start Netcnf, click on icon Destination local , addr://local will appear in the window, replaceword local by the destination address and press Enter, e.g. addr://690F0003 and press Enter
Click on icon to start downloading the configuration, which is stored in directory .\cnf\anynet\
• Use parameter -da with the destination address, e.g.:
Netcnf.exe -da69000007
Click on icon to start downloading the configuration.
• Use parameter -aU with the destination address (application Upload), e.g.:
Netcnf.exe -aU69000006
Netcnf starts running without clicking on the mouse. This is suitable method when generatingbatch files.
3.1.3. Remotely for a group of CUs
For downloading configurations from more CUs their addresses first need to be added to a text file,e.g. aaa.txt:
69000007690000086900001A
Then we can use some of the following methods:
• Netcnf - start the application.
Click on icon Destination file to open the dialogue window. Select a file, e.g. aaa.txt, whichcontains one or more destination addresses.
Click on icon to start downloading configurations.
Configurations will be successively downloaded from these CUs and uploaded to the new directory.\cnf\aaa\.
• Start Netcnf with parameter -df and file, e.g. bbb:
Netcnf -dfbbb
15© RACOM s.r.o. – MORSE Utils
Netcnf.exe

File bbb.txt contains the addresses and is located in directory .\net\, i.e. .\net\bbb.txt.
Click on icon to start downloading configurations.
Files with configurations are uploaded to directory .\net\bbb\
• Use parameter application Upload -aU:
Netcnf -dfbbb -aU
Upload begins without clicking the mouse, files are uploaded to .\net\bbb\
3.1.4. Table of options for Netcnf Upload
Result saved it:Local Upload.\cnf\anynet\xxxxxxxx.cnfclick UploadNetcnf.\cnf\anynet\-aUNetcnf
Remota Upload for 1 CU.\cnf\anynet\click Uploadclick Dest local > addrNetcnf.\cnf\anynet\click Upload-daaddressNetcnf.\cnf\anynet\-aU-daaddressNetcnf
Remote Upload for more CUs.\cnf\aaa\click Uploadclick Dest file > aaa.txtNetcnf.\cnf\bbb\click Upload-dfbbbNetcnf.\cnf\bbb\-aU-dfbbbNetcnf
3.2. Download configuration form PC to CU
3.2.1. Locally
• Start program Netcnf.exe with CU connected via the service cable. Click on icon Configurationdownload to open the dialogue window. Select the configuration file, which should be sent to theCU. Netcnf makes connection with the CU and a message appears:
Fig. 3.2: Acknowledgement for local uploading of configuration
By acknowledging YES downloading begins. Then the following question appears:
MORSE Utils – © RACOM s.r.o.16
Netcnf.exe

Fig. 3.3: Acknowledgement for ignoring calibration
By acknowledging YES we jump the part of the configuration file which contains the calibrationconstants of the radio part. These constants are individually set up in each CU during manufacture.
After downloading has finished the following message appears: DOWNLOAD FINISHED. Bypressing Alt+X we exit Netcnf.
The configuration has now been uploaded to the S-RAM (previously FLASH) in the CU. It is uploadedinto RAM when restarting (switching the CU on and off). It is possible to restart from Setr usingcommand sgB.
• If we start the program with the parameter application Download -aD with the address of the filewhich contains the configuration then it begins running without clicking the icon:
Netcnf -aDcnf/anynet/690F0001.cnf
Acknowledge download with YES and ignore calibration with YES.
3.2.2. Remotely for 1 CU
For transfer the configuration to the CU we need to determine the address of the destination CU andthe file with the configuration which needs to be written:
• StartNetcnf, click on iconDestination local , addr://localwill appear in the window, replaceword local with the destination address and press Enter, e.g. addr://690F0003 and pressEnter
Continue by clicking icon Configuration download and select the file with the configuration. Ac-knowledge the control question by clicking YES and ignore calibration by clicking YES.
Note: until a hw or sw reset the remote station continues to work with the old configuration. UsingSetr we can communicate with it and even modify the configuration (e.g. the address). Only aftera sw reset sgB does the new configuration appear.
• Start Netcnf using the command with the destination address in parameter:
Netcnf -da690F0003
Continue by clicking icon Configuration download and select the file with the configuration. Ac-knowledge download by clicking YES and ignore calibration by clicking YES.
• It is possible to designate the source file with the configuration by parameter -aD:
Netcnf -da690F0003 -aDcnf/anynet/690F0003.cnf
17© RACOM s.r.o. – MORSE Utils
Netcnf.exe
Netcnf starts running and we only acknowledge download by clicking YES and ignore calibrationby clicking YES.
3.2.3. Remotely for a group of CUs
Add addresses to a text file, e.g. aaa.txt :
690F0002690F0003
Continue in any of the following ways:
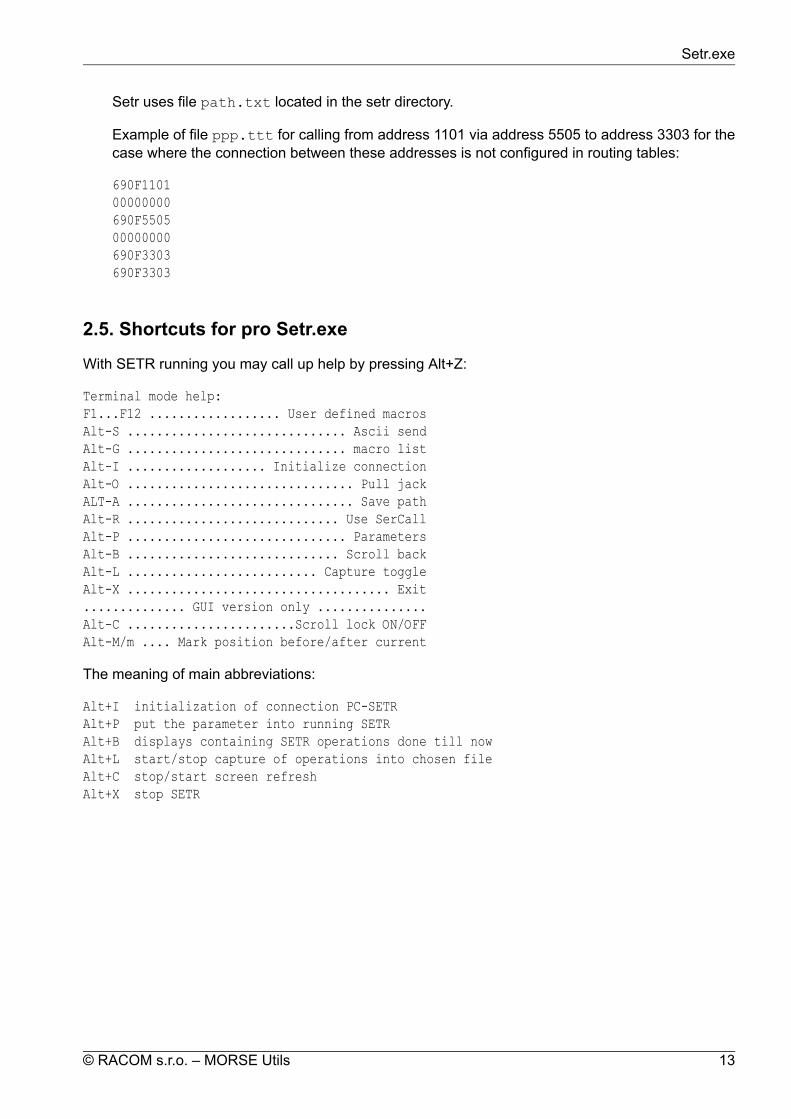
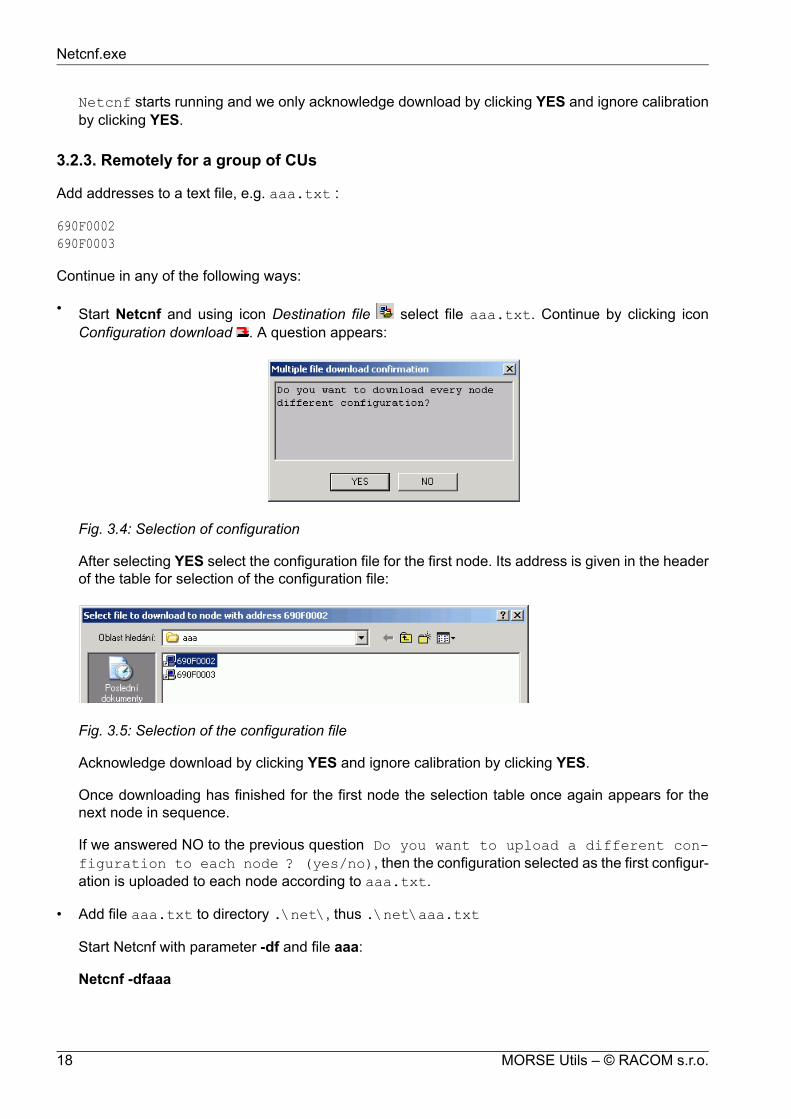
• Start Netcnf and using icon Destination file select file aaa.txt. Continue by clicking iconConfiguration download . A question appears:
Fig. 3.4: Selection of configuration
After selecting YES select the configuration file for the first node. Its address is given in the headerof the table for selection of the configuration file:
Fig. 3.5: Selection of the configuration file
Acknowledge download by clicking YES and ignore calibration by clicking YES.
Once downloading has finished for the first node the selection table once again appears for thenext node in sequence.
If we answered NO to the previous question Do you want to upload a different con-figuration to each node ? (yes/no), then the configuration selected as the first configur-ation is uploaded to each node according to aaa.txt.
• Add file aaa.txt to directory .\net\, thus .\net\aaa.txt
Start Netcnf with parameter -df and file aaa:
Netcnf -dfaaa
MORSE Utils – © RACOM s.r.o.18
Netcnf.exe
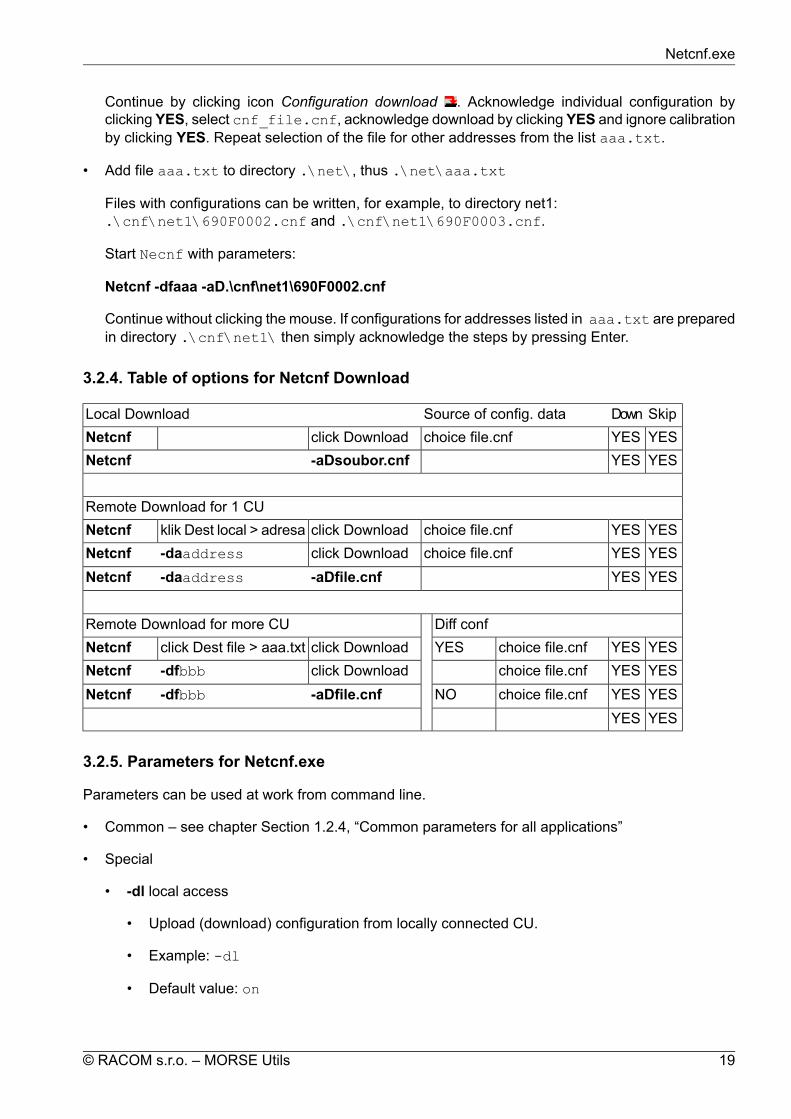
Continue by clicking icon Configuration download . Acknowledge individual configuration byclicking YES, select cnf_file.cnf, acknowledge download by clicking YES and ignore calibrationby clicking YES. Repeat selection of the file for other addresses from the list aaa.txt.
• Add file aaa.txt to directory .\net\, thus .\net\aaa.txt
Files with configurations can be written, for example, to directory net1:.\cnf\net1\690F0002.cnf and .\cnf\net1\690F0003.cnf.
Start Necnf with parameters:
Netcnf -dfaaa -aD.\cnf\net1\690F0002.cnf
Continue without clicking the mouse. If configurations for addresses listed in aaa.txt are preparedin directory .\cnf\net1\ then simply acknowledge the steps by pressing Enter.
3.2.4. Table of options for Netcnf Download
SkipDownSource of config. dataLocal DownloadYESYESchoice file.cnfclick DownloadNetcnfYESYES-aDsoubor.cnfNetcnf
Remote Download for 1 CUYESYESchoice file.cnfclick Downloadklik Dest local > adresaNetcnfYESYESchoice file.cnfclick Download-daaddressNetcnfYESYES-aDfile.cnf-daaddressNetcnf
Diff confRemote Download for more CUYESYESchoice file.cnfYESclick Downloadclick Dest file > aaa.txtNetcnfYESYESchoice file.cnfclick Download-dfbbbNetcnfYESYESchoice file.cnfNO-aDfile.cnf-dfbbbNetcnfYESYES
3.2.5. Parameters for Netcnf.exe
Parameters can be used at work from command line.
• Common – see chapter Section 1.2.4, “Common parameters for all applications”
• Special
• -dl local access
• Upload (download) configuration from locally connected CU.
• Example: -dl
• Default value: on
19© RACOM s.r.o. – MORSE Utils
Netcnf.exe

• Configuration is saved into: .\cnf\anynet\address.cnf
• Example of command from command line with application of default value -dl: netcnf
• -da[address] remote access
• Upload (download) configuration from remote CU of given address.
• Example: -da69DF1234
• Configuration is saved into: .\cnf\anynet\69DF1234.cnf
• Example of command from command line: netcnf -da69DF1234
• -df[file] communication with CUs according to file
• Netcnf.exe uploads configurations for all addresses (one by one) from abc.txt file. Thefile abc.txt must be put in .\net directory. If you do not specify filename, Netcnf looksfor .\net\anynet.txt
• Example: -dfabc
• Configurations are saved into: .\cnf\abc\*.cnf (* – for every address from abc.txtone file).
• Example of command from command line: netcnf -dfabc
• -aU application Upload
• Accomplishes the configuration upload without mouse click, suitable for the batch files.
• Example: -aU
• Example of command from command line: netcnf -aU
• -aD[addr.cnf] application Download local
• Accomplishes the configuration download of file addr.cnf into locally connected CUwithoutmouse click.
• Example: -aD69DF1234.cnf
• Netcnf.exe looks for file address.cnf in working directory. It is possible to specifycomplete path, e.g. -aDc:\com\morse\cnf\anynet\69DF8606.cnf or remaining partof the path only (e.g. from morse directory): -aDcnf\anynet\69DF8606.cnf
• Example of command from command line: netcnf -aDcnf\anynet\69DF8606.cnf
• -aD[address1.cnf] -da[address2] application Download remote
• Download the file address1.cnf into remote CU address2
• Example: -da69DF1245 -aDcnf\anynet\69DF1234.cnf
• Example of command from command line: Netcnf -da69DF1245 -aDcnf\any-net\69DF1234.cnf
MORSE Utils – © RACOM s.r.o.20
Netcnf.exe

4. Memcp.exeServes for downloading firmware, i.e. for recording program modules into the CU (e.g. into the MR400)via the service cable, Ethernet channel, IP network or through the MORSE network. Work with theMEMCP.exe application is described in more detail in the MORSEGuide documentation in the chapterDownload firmware to the CU - introduction and in next chapters. Here we provide a short example.
4.1. Example of downloading fw module E to the CU
Start the application with the batch file which is prepared in the MORSE package together with the filememcp.exe:
mr900_cbl_le.bat
The same result is achieved by starting utility memcp.exe with the respective parameters:
memcp -nt5000 -nr20 -as8 -pS -pb115200 -af.\fkl\ce10.fkl %1 %2 %3
For it to function it is important that files memcp.exe, starter.exe and sub-directory fkl con-taining file ce10.fkl are stored in the current directory where the macro mr900_cbl_le.bat islocated. If program setr.exe is running switch it off first.
Wait approx. 10 sec before communication is made and then monitor the transfer of packets indicatedby symbols ###. Once transfer is complete end Memcp using command Alt+X. During the next 10smodule ce10.fkl is copied within the CU and is prepared for operation.
Fig. 4.1: Transfer of a firmware module
21© RACOM s.r.o. – MORSE Utils
Memcp.exe
Other macros mr900_cbl_l.... are used in the same way :
mr900_cbl_ld.batmr900_cbl_le.batmr900_cbl_lg.batmr900_cbl_lh.batmr900_cbl_la.batmr900_cbl_lb.bat
For MR400, MC100, MR900 use macro mr900_cbl_le.bat and files ce10.fkl ...
For MR25, MCM302, MR25ET used macro mr25_cbl_le.bat and files me10.fkl...
Important
After fw download it is necessary to save the initial configuration into FLASH memory usingSetr and command (c)nf (b)ackup.
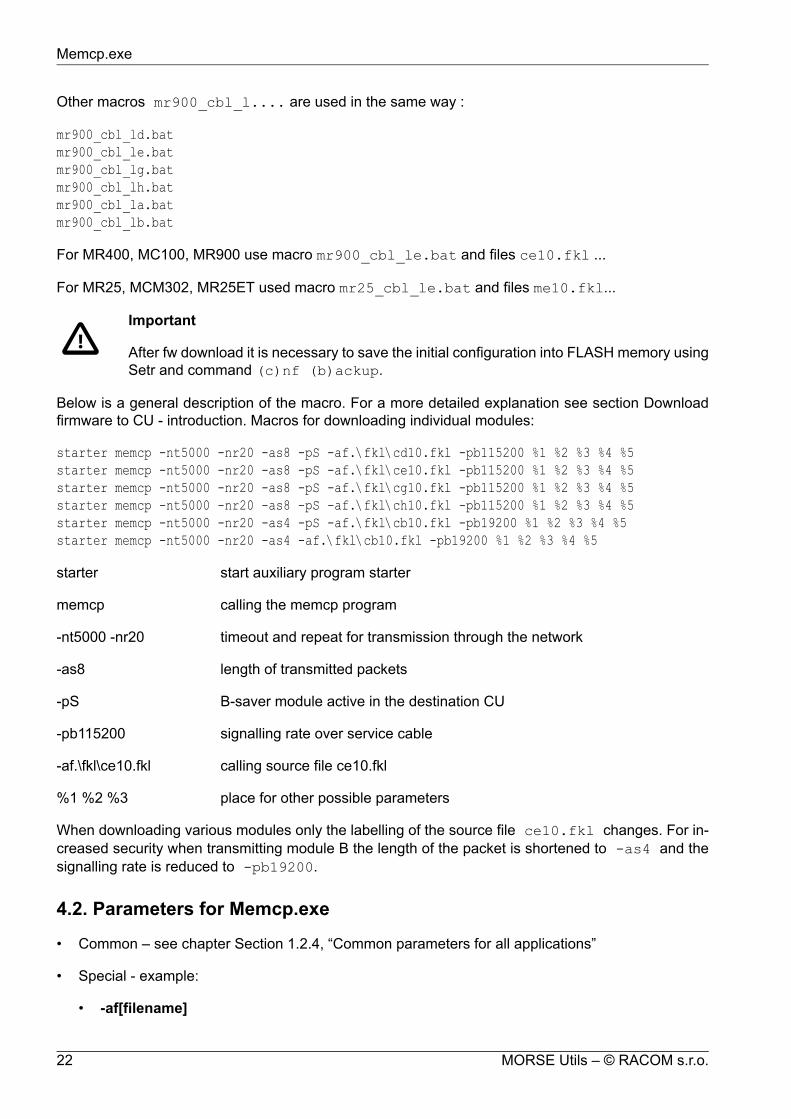
Below is a general description of the macro. For a more detailed explanation see section Downloadfirmware to CU - introduction. Macros for downloading individual modules:
starter memcp -nt5000 -nr20 -as8 -pS -af.\fkl\cd10.fkl -pb115200 %1 %2 %3 %4 %5starter memcp -nt5000 -nr20 -as8 -pS -af.\fkl\ce10.fkl -pb115200 %1 %2 %3 %4 %5starter memcp -nt5000 -nr20 -as8 -pS -af.\fkl\cg10.fkl -pb115200 %1 %2 %3 %4 %5starter memcp -nt5000 -nr20 -as8 -pS -af.\fkl\ch10.fkl -pb115200 %1 %2 %3 %4 %5starter memcp -nt5000 -nr20 -as4 -pS -af.\fkl\cb10.fkl -pb19200 %1 %2 %3 %4 %5starter memcp -nt5000 -nr20 -as4 -af.\fkl\cb10.fkl -pb19200 %1 %2 %3 %4 %5
starter start auxiliary program starter
memcp calling the memcp program
-nt5000 -nr20 timeout and repeat for transmission through the network
-as8 length of transmitted packets
-pS B-saver module active in the destination CU
-pb115200 signalling rate over service cable
-af.\fkl\ce10.fkl calling source file ce10.fkl
%1 %2 %3 place for other possible parameters
When downloading various modules only the labelling of the source file ce10.fkl changes. For in-creased security when transmitting module B the length of the packet is shortened to -as4 and thesignalling rate is reduced to -pb19200.
4.2. Parameters for Memcp.exe
• Common – see chapter Section 1.2.4, “Common parameters for all applications”
• Special - example:
• -af[filename]
MORSE Utils – © RACOM s.r.o.22
Memcp.exe

• calling the source file
• example -af.\fkl\ce10.fkl for MR400 and MR900
• example -af.\fkl\me10.fkl for MR25 and MCM302
• -pS
• communication with the Saver module
Other parameters are given in the example and in the detailed description.
23© RACOM s.r.o. – MORSE Utils
Memcp.exe
5. Netlock.exeProgram Netlock.exe serves for locking the CU. Configuration data can be remotely read from alocked unit, however it is not possible to remotely execute the write or Init functions or start the monit-oring or tests which would interrupt communication in the network. Netlock.exe is used by startingonce with the respective parameters. There are 3 levels for locking and unlocking the CU:
0 root1 racom2 nobody
The level of access is defined by the name and password used (the original names are root, racomand nobody). The levels differ in their rights to change names and passwords, but the possibilities forlocking and unlocking are the same. For local access where the CU us connected to the PC via theservice cable it is possible to overcome locking using parameter -aL.
5.1. Local access
Unlocking the CU via the service cable:
netlock -aL -au
After acknowledging by clicking y Enter we receive the message Successfully unlocked
Key to parameters:
-aL local access, means no need to use a name or password. If the parameter is used for work inthe distant CU then next PC must be connected to it using the service cable.
-au unlock - unlock station
-x exit - program netlock terminated after the given operation. If the parameter is not used the finalmessages can be seen. Exit the program using Alt+X.
-v0 If redundant messages appear when the application is running use this parameter to removethem.
Locking the CU via the service cable:
netlock -aL -al
-al lock - locks the stations
The status of the CU can be verified from MORSEMain menu, for example, using commandNe Enter,Init Enter - a locked station replies with the message !Unit locked and does not execute Init.
Inserting a new name:
The name for level 0 is root. The names for levels 1 and 2 can be set up using command:
netlock -aL -an2
-an1 name 1 - change level 1 name
MORSE Utils – © RACOM s.r.o.24
Netlock.exe
-an2 name 2 - change level 2 name
Upon a query Type new name insert the name and acknowledge by pressing y . It is necessary toinsert a new password after a name change.
Inserting a new password:
The password can be inserted for levels 0, 1, 2.
netlock -aL -ap2
-ap0 password 0 - change level 0 password
-ap1 password 1 - change level 1 password
-ap2 password 2 - change level 2 password
After inserting the same new password twice and pressing y the result is acknowledged with themessagePassword changed.
Simultaneously inserting a new name and password:
A name and password can be inserted for levels 1, 2.
netlock -aL -ab2
-ab1 both 1 - change level 1 name and password
-ab2 both 2 - change level 2 name and password
Viewing inserted names:
netlock -as
-as status - status of CU
The message obtained contains information about the locked/unlocked status and about the namesassigned to levels 1 and 2. For local access only.
Testing a new name and password in local access mode:
Passwords saved to the CU cannot be read directly. It is possible to check the functionality of a passwordand where necessary insert a new password from a higher level or via local access. Checking apassword in local access mode:
netlock
- Parameter -au for unlocking is a default setting and therefore does not need to be mentioned.
- Parameter -aL was not used and therefore the name and password are even requested in the caseof local access.
A correct result is acknowledged with the message Successfully unlocked.
25© RACOM s.r.o. – MORSE Utils
Netlock.exe

5.2. Local access with a password
If in the above commands we leave out parameter -aL then we need to use the name and passwordfor level 0, 1 or 2.
Unlocking and locking the CU
These functions can be executed at each level.
Inserting passwords
• If we log on using the name and password for level 0, we can change the password for level 0, 1,2.
• If we log on using the name and password for level 1, we can change the password for level 1, 2.
• If we log on using the name and password for level 2, we can change the password for level 2.
Inserting names, inserting names and passwords
• From level 0 it is possible to change the name for level 1, 2.
• From level 1 it is possible to change the name for level 2.
After inserting the name it is necessary to reinsert the password. Use parameter -ab to simultaneouslychange the name and password for the selected level.
When using parameter -aMname with the stated name we are not queried for the name by Netlockagain. Similarly it is possible to use the parameter for inserting a new name -aNname when changinga name using parameters -an, -ab.
5.3. Remote access
This differs from local access in the use of parameter -daADDRESS (watch the character order!), whichcontains the address of the destination CU, and also the need to use a name and password.
Unlocking a remote station:
netlock -da69112233 -au
to a query Login: insert name,
to a query Password: insert password,
acknowledge y
The result is acknowledged with the message Succesfully unlocked.
Other operations can also be performed remotely in a similar manner.
Reading names from a remote CU is not possible. However, if remote CU is connected to the PC viaa service cable it then behaves as in the case of local access. This means that it is possible to performthe same operations with parameters -da and -aL as in the CU connected via the service cable.
MORSE Utils – © RACOM s.r.o.26
Netlock.exe

5.4. Parameters for Netlock.exe
• Common - se chapter Section 1.2.4, “Common parameters for all applications”
• Special - parameters for Netlock application:
Application commands:Locker options:-as -al -au -aMnnn -aNnnn -ap[X] -an[X] -ab[X]
-al: lock-au: unlock-aMnnn: set my name-aNnnn: set new name-ap: change my password-apX: change password for user level X-an : change my name *-anX: change name for user level X-ab : change both my name and my password *-abX: change both name and password for user level X-as : locker status-aL : local mode - in remote modem is jack
Lines marked by * make sense in local mode only.My password and New password will be requested from the prompt.
• -al locking CU
• -au unlocking CU
• -aMnnn preset of user name
• -aNnnn inserting a new name
• -ap0 -ap1 -ap2 inserting a new password for level 0,1,2
• -an1 -an2 inserting a new name for level 1,2
• -ab1 -ab2 inserting a new name and password for level 1,2
• -as state CU
• -aL local mode
27© RACOM s.r.o. – MORSE Utils
Netlock.exe