motif_1(2)
TRANSCRIPT

8/10/2019 motif_1(2)
http://slidepdf.com/reader/full/motif12 1/300

8/10/2019 motif_1(2)
http://slidepdf.com/reader/full/motif12 2/300
PRODUCT SAFETY MARKINGS: Yamaha electronic productsmay have either labels similar to the graphics shown below or
molded/stamped facsimiles of these graphics on the enclosure.The explanation of these graphics appears on this page. Pleaseobserve all cautions indicated on this page and those indicated in
the safety instruction section.
The exclamation point within the equilateral triangle
is intended to alert the user to the presence ofimportant operating and maintenance (servicing)
instructions in the literature accompanying theproduct.
The lightning flash with arrowhead symbol, withinthe equilateral triangle, is intended to alert the user
to the presence of uninsulated “dangerousvoltage” within the product’s enclosure that may beof sufficient magnitude to constitute a risk of
electrical shock.
IMPORTANT NOTICE: All Yamaha electronic products are tested
and approved by an independent safety testing laboratory in order
that you may be sure that when it is properly installed and used inits normal and customary manner, all foreseeable risks have beeneliminated. DO NOT modify this unit or commission others to do sounless specifically authorized by Yamaha. Product performance
and/or safety standards may be diminished. Claims filed under theexpressed warranty may be denied if the unit is/has been modified.Implied warranties may also be affected.
SPECIFICATIONS SUBJECT TO CHANGE: The information
contained in this manual is believed to be correct at the time ofprinting. However, Yamaha reserves the right to change or modifyany of the specifications without notice or obligation to update
existing units.
ENVIRONMENTAL ISSUES: Yamaha strives to produce products
that are both user safe and environmentally friendly. We sincerelybelieve that our products and the production methods used to
produce them, meet these goals. In keeping with both the letter andthe spirit of the law, we want you to be aware of the following:
Battery Notice: This product MAY contain a small non-rechargeable battery which (if applicable) is soldered in place. Theaverage life span of this type of battery is approximately five years.
When replacement becomes necessary, contact a qualified servicerepresentative to perform the replacement.
Warning: Do not attempt to recharge, disassemble, or incineratethis type of battery. Keep all batteries away from children. Dispose
of used batteries promptly and as regulated by applicable laws.Note: In some areas, the servicer is required by law to return thedefective parts. However, you do have the option of having the
servicer dispose of these parts for you.
Disposal Notice: Should this product become damaged beyondrepair, or for some reason its useful life is considered to be at anend, please observe all local, state, and federal regulations that
relate to the disposal of products that contain lead, batteries,plastics, etc.
NOTICE: Service charges incurred due to lack of knowledgerelating to how a function or effect works (when the unit is operating
as designed) are not covered by the manufacturer’s warranty, andare therefore the owners responsibility. Please study this manualcarefully and consult your dealer before requesting service.
NAME PLATE LOCATION: The graphic below indicates the
location of the name plate. The model number, serial number,power requirements, etc., are located on this plate. You shouldrecord the model number, serial number, and the date of purchase
in the spaces provided below and retain this manual as apermanent record of your purchase.
Model
Serial No.
Purchase Date
SPECIAL MESSAGE SECTION
CAUTION: TO REDUCE THE RISK OF
ELECTRIC SHOCK, DO NOT REMOVE
COVER (OR BACK). NO USER-SERVICEABLE
PARTS INSIDE. REFER SERVICING TO
QUALIFIED SERVICE PERSONNEL.
CAUTIONRISK OF ELECTRIC SHOCK
DO NOT OPEN
CAUTION
POWERO N O FF AC INLET mLAN I O EXPANSION I O EXPANSION
CAUTION
POWERO N O FF ACINLET
CAUTION
ATTENTIONWARNING
RISK OF ELECTRIC SHOCK
:RISQUE DE CHOC ÉLECTRIQUE NE PAS OUVRIR.
THIS DEVICE COMPLIES WITH PART 15 OF THE FTHE FOLLOWING TWO CONDITIONS:(1) THIS DEVICE MAY NOT CAUSE HARMFUL INTE(2) THIS DEVICE MUST ACCEPT ANY INTERFEREN
THAT MAY CAUSE UNDESIRED OPERATION.
THIS CLASS B DEIGITAL APPARATUS COMPL
DU CANADA.CET APPAREIL NUMÉRIQUE DE LA CLASSE B
TO REDUCE THE RISK OF FIRE OR ELECTRICSHOCK, DO NOT EXPOSE THIS PRODUCT TO RAIN OR MOISTURE.
DO NOT OPEN
POWERON OFF ACINLET
MOTIF6
MOTIF7
MOTIF8
92-469- 1 (rear)
8/10/2019 motif_1(2)
http://slidepdf.com/reader/full/motif12 3/300
INFORMATION RELATING TO PERSONAL INJURY, ELECTRICAL SHOCK,AND FIRE HAZARD POSSIBILITIES HAS BEEN INCLUDED IN THIS LIST.
WARNING- When using any electrical or electronic product,
basic precautions should always be followed. These precautionsinclude, but are not limited to, the following:
1. Read all Safety Instructions, Installation Instructions, SpecialMessage Section items, and any Assembly Instructions found inthis manual BEFORE making any connections, including
connection to the main supply.
2. Do not attempt to service this product beyond that
described in the user-maintenance instructions. All other servicingshould be referred to qualified service personnel.
3. Main Power Supply Verification: Yamaha products aremanufactured specifically for the supply voltage in the area where
they are to be sold. If you should move, or if any doubt exists aboutthe supply voltage in your area, please contact your dealer forsupply voltage verification and (if applicable) instructions. Therequired supply voltage is printed on the name plate. For name
plate location, please refer to the graphic found in the SpecialMessage Section of this manual.
4.
DANGER
-Grounding Instructions: This product must begrounded and therefore has been equipped with a three pin
attachment plug. If this product should malfunction, the ground pinprovides a path of low resistance for electrical current, reducing therisk of electrical shock. If your wall socket will not accommodate this
type plug, contact an electrician to have the outlet replaced inaccordance with local electrical codes. Do NOT modify the plug or
change the plug to a different type!
5.
WARNING
: Do not place this product or any other objectson the power cord or place it in a position where anyone could walk
on, trip over, or roll anything over power or connecting cords of anykind. The use of an extension cord is not recommended! If you mustuse an extension cord, the minimum wire size for a 25’ cord (or less)
is 18 AWG. NOTE: The smaller the AWG number, the larger thecurrent handling capacity. For longer extension cords, consult a
local electrician.
6.
Ventilation: Electronic products, unless specifically
designed for enclosed installations, should be placed in locationsthat do not interfere with proper ventilation. If instructions for
enclosed installations are not provided, it must be assumed thatunobstructed ventilation is required.
7.
Temperature considerations: Electronic products should be
installed in locations that do not seriously contribute to theiroperating temperature. Placement of this product close to heatsources such as; radiators, heat registers etc., should be avoided.
8.
This product was NOT designed for use in wet/damp
locations and should not be used near water or exposed to rain.Examples of wet /damp locations are; near a swimming pool, spa,tub, sink, or wet basement.
9.
This product should be used only with the componentssupplied or; a cart ,rack, or stand that is recommended by the
manufacturer. If a cart, rack, or stand is used, please observe allsafety markings and instructions that accompany the accessoryproduct.
10.
The power supply cord (plug) should be disconnected fromthe outlet when electronic products are to be left unused for
extended periods of time. Cords should also be disconnected whenthere is a high probability of lightning and/or electrical storm
activity.
11.
Care should be taken that objects do not fall and liquids arenot spilled into the enclosure through any openings that may exist.
12.
Electrical/electronic products should be serviced by aqualified service person when:
a. The power supply cord has been damaged; orb. Objects have fallen, been inserted, or liquids have been
spilled into the enclosure through openings; orc. The product has been exposed to rain; ord. The product does not operate, exhibits a marked change
in performance; ore. The product has been dropped, or the enclosure of the
product has been damaged.
13. This product, either alone or in combination with an amplifierand headphones or speaker/s, may be capable of producing sound
levels that could cause permanent hearing loss. DO NOT operatefor a long period of time at a high volume level or at a level that isuncomfortable. If you experience any hearing loss or ringing in the
ears, you should consult an audiologist.IMPORTANT
: The louder the sound, the shorter the time period
before damage occurs.
14.
Some Yamaha products may have benches and/or
accessory mounting fixtures that are either supplied as a part of theproduct or as optional accessories. Some of these items are
designed to be dealer assembled or installed. Please make surethat benches are stable and any optional fixtures (whereapplicable) are well secured BEFORE using. Benches supplied byYamaha are designed for seating only. No other uses are
recommended.
PLEASE KEEP THIS MANUAL
IMPORTANT SAFETY INSTRUCTIONS
92-469-3

8/10/2019 motif_1(2)
http://slidepdf.com/reader/full/motif12 4/300
(2)-8
1/2
PRECAUTIONS
PLEASE READ CAREFULLY BEFORE PROCEEDING
* Please keep this manual in a safe place for future reference.
WARNING
Always follow the basic precautions listed below to avoid the possibility of serious injury or even death from electricalshock, short-circuiting, damages, fire or other hazards. These precautions include, but are not limited to, the following:
• Only use the voltage specified as correct for the instrument. The required voltage
is printed on the name plate of the instrument.
• Check the electric plug periodically and remove any dirt or dust which may have
accumulated on it.
• Use only the supplied power cord/plug.
• Do not place the power cord near heat sources such as heaters or radiators, and
do not excessively bend or otherwise damage the cord, place heavy objects on it,or place it in a position where anyone could walk on, trip over, or roll anything
over it.
• This instrument contains no user-serviceable parts. Do not attempt to
disassemble or modify the internal components in any way.
• Do not expose the instrument to rain, use it near water or in damp or wet
conditions, or place containers on it containing liquids which might spill into any
openings.
• Never insert or remove an electric plug with wet hands.
• Do not put burning items, such as candles, on the unit.
A burning item may fall over and cause a fire.
• If the power cord or plug becomes frayed or damaged, or if there is a sudden loss
of sound during use of the instrument, or if any unusual smells or smoke should
appear to be caused by it, immediately turn off the power switch, disconnect the
electric plug from the outlet, and have the instrument inspected by qualified
Yamaha service personnel.
CAUTION
Always follow the basic precautions listed below to avoid the possibility of physical injury to you or others, or damage tothe instrument or other property. These precautions include, but are not limited to, the following:
• Always connect the three-pin attachment plug to a properly grounded power
source. (For more information about the main power supply, see page 20.)
• When removing the electric plug from the instrument or an outlet, always hold the
plug itself and not the cord. Pulling by the cord can damage it.
• Remove the electric plug from the outlet when the instrument is not to be used for
extended periods of time, or during electrical storms.
• Do not connect the instrument to an electrical outlet using a multiple-connector.
Doing so can result in lower sound quality, or possibly cause overheating in the
outlet.
• Do not expose the instrument to excessive dust or vibrations, or extreme cold or
heat (such as in direct sunlight, near a heater, or in a car during the day) to prevent
the possibility of panel disfiguration or damage to the internal components.
• Do not use the instrument in the vicinity of a TV, radio, stereo equipment, mobile
phone, or other electric devices. Otherwise, the instrument, TV, or radio may
generate noise.
• Do not place the instrument in an unstable position where it might accidentally fall
over.
• Before moving the instrument, remove all connected cables.
• Do not place objects in front of the instrument's air vent, since this may prevent
adequate ventilation of the internal components, and possibly result in the
instrument overheating.
Power supply/Power cord
Do not open
Water warning
Fire warning
If you notice any abnormality
Power supply/Power cord Location

8/10/2019 motif_1(2)
http://slidepdf.com/reader/full/motif12 5/300
(2)-8
2/2
• Before connecting the instrument to other electronic components, turn off the
power for all components. Before turning the power on or off for all components,
set all volume levels to minimum. Also, be sure to set the volumes of all
components at their minimum levels and gradually raise the volume controls
while playing the instrument to set the desired listening level.
• When cleaning the instrument, use a soft, dry cloth. Do not use paint thinners,
solvents, cleaning fluids, or chemical-impregnated wiping cloths.
• Do not insert a finger or hand in any gaps on the instrument.
• Never insert or drop paper, metallic, or other objects into the gaps on the panel or
keyboard. If this happens, turn off the power immediately and unplug the power
cord from the AC outlet. Then have the instrument inspected by qualified Yamaha
service personnel.
• Do not place vinyl, plastic or rubber objects on the instrument, since this might
discolor the panel or keyboard.
• Do not rest your weight on, or place heavy objects on the instrument, and do not
use excessive force on the buttons, switches or connectors.
• Do not operate the instrument for a long period of time at a high or uncomfortable
volume level, since this can cause permanent hearing loss. If you experience any
hearing loss or ringing in the ears, consult a physician.
• This instrument has a built-in lithium backup battery. When you unplug the power
cord from the AC outlet, the SRAM data (see page 63) is retained. However, if the
backup battery fully discharges, this data will be lost. When the backup battery is
running low, the LCD display indicates “Change internal battery.” In this case,
immediately save the data to a Memory Card (SmartMedia)/a SCSI disk then have
qualified Yamaha service personnel replace the backup battery.
Saving and backing up your data
For instruments with DRAM (RAM that does not retain data)
• DRAM data (see page 63) is lost when you turn off the power to the instrument.
Save the data to a Memory Card (SmartMedia)/a SCSI disk.
For instruments with SRAM (RAM that retains data by using a lithium
battery)
• SRAM data (see page 63) is retained when the power is turned off, as long as the
backup battery retains a charge. However, the data could be lost due to
malfunction or incorrect operation. Save important data to a Memor y Card(SmartMedia)/a SCSI disk.
Backing up the Memory Card (SmartMedia)/SCSI disk
• To protect against data loss through media damage, we recommend that you save
your important data onto twoMemory Cards (SmartMedia)/SCSI disk.
Yamaha cannot be held responsible for damage caused by improper use or modifications to the instrument, or data that is lost or destroyed.
Always turn the power off when the instrument is not in use.
Make sure to discard used batteries according to local regulations.
Connections
Maintenance
Handling caution
Backup battery
Saving data

8/10/2019 motif_1(2)
http://slidepdf.com/reader/full/motif12 6/300
FCC INFORMATION (U.S.A.)
1.
IMPORTANT NOTICE: DO NOT MODIFY THIS UNIT!
This product, when installed as indicated in the instructions contained in thismanual, meets FCC requirements. Modifications not expressly approved byYamaha may void your authority, granted by the FCC, to use the product.
2. IMPORTANT:
When connecting this product to accessories and/or anotherproduct use only high quality shielded cables. Cable/s supplied with thisproduct MUST be used. Follow all installation instructions. Failure to followinstructions could void your FCC authorization to use this product in the USA.
3. NOTE:
This product has been tested and found to comply with the
requirements listed in FCC Regulations, Part 15 for Class "B" digital devices.Compliance with these requirements provides a reasonable level ofassurance that your use of this product in a residential environment will notresult in harmful interference with other electronic devices. This equipmentgenerates/uses radio frequencies and, if not installed and used according tothe instructions found in the users manual, may cause interference harmful tothe operation of other electronic devices. Compliance with FCC regulationsdoes not guarantee that interference will not occur in all installations. If thisproduct is found to be the source of interference, which can be determinedby turning the unit "OFF" and "ON", please try to eliminate the problem byusing one of the following measures:
Relocate either this product or the device that is being affected by theinterference.
Utilize power outlets that are on different branch (circuit breaker or fuse)circuits or install AC line filter/s.
In the case of radio or TV interference, relocate/reorient the antenna. If theantenna lead-in is 300 ohm ribbon lead, change the lead-in to co-axial typecable.
If these corrective measures do not produce satisfactory results, please
contact the local retailer authorized to distribute this type of product. If youcan not locate the appropriate retailer, please contact Yamaha Corporationof America, Electronic Service Division, 6600 Orangethorpe Ave, BuenaPark, CA90620
The above statements apply ONLY to those products distributed byYamaha Corporation of America or its subsidiaries.
* This applies only to products distributed by YAMAHA CORPORATION OF AMERICA. (class B)
IMPORTANT NOTICE FOR THE UNITED KINGDOM
Connecting the Plug and Cord
WARNING: THIS APPARATUS MUST BE EARTHEDIMPORTANT. The wires in this mains lead are coloured in accordance withthe following code:
GREEN-AND-YELLOW :EARTHBLUE :NEUTRALBROWN :LIVE
As the colours of the wires in the mains lead of this apparatus may notcorrespond with the coloured markings identifying the terminals in yourplug proceed as follows:
The wire which is coloured GREEN-and-YELLOW must be connected tothe terminal in the plug which is marked by the letter E or by the safetyearth symbol or colored GREEN or GREEN-and-YELLOW.
The wire which is coloured BLUE must be connected to the terminal which
is marked with the letter N or coloured BLACK.
The wire which is coloured BROWN must be connected to the terminalwhich is marked with the letter L or coloured RED.
* This applies only to products distributed by Yamaha-Kemble Music (U.K.) Ltd. (3 wires)
NEDERLAND / THE NETHERLANDS
• Dit apparaat bevat een lithium batterij voor geheugen back-up.
• This apparatus contains a lithium battery for memory back-up.
• Raadpleeg uw leverancier over de verwijdering van de batterij op het
moment dat u het apparaat ann het einde van de levensduur afdankt ofde volgende Yamaha Service Afdeiing:
Yamaha Music Nederland Service Afdeiing
Kanaalweg 18-G, 3526 KL UTRECHT
Tel. 030-2828425
• For the removal of the battery at the moment of the disposal at the endof the service life please consult your retailer or Yamaha Service Centeras follows:
Yamaha Music Nederland Service Center
Address :Kanaalweg 18-G, 3526 KL UTRECHT
Tel :030-2828425
• Gooi de batterij niet weg, maar lever hem in als KCA.• Do not throw away the battery. Instead, hand it in as small chemical
waste.
(lithium disposal)
ADVARSEL!
Lithiumbatteri—Eksplosionsfare ved fejlagtig håndtering. Udskiftning måkun ske med batteri af samme fabrikat og type. Levér det brugte batteritilbage til leverandoren.
VARNING
Explosionsfara vid felaktigt batteribyte. Använd samma batterityp eller enekvivalent typ som rekommenderas av apparattillverkaren. Kassera använtbatteri enligt fabrikantens instruktion.
VAROITUS
Paristo voi räjähtää, jos se on virheellisesti asennettu. Vaihda paristoainoastaan laitevalmistajan suosittelemaan tyyppiin. Hävitä käytetty paristovalmistajan ohjeiden mukaisesti.
(lithium caution)

8/10/2019 motif_1(2)
http://slidepdf.com/reader/full/motif12 7/300
7
MOTIF Introduction
Introduction
Congratulations and thank you for your purchase of the Yamaha MOTIF Music Production Synthesizer!
You now own what is perhaps the best-sounding, most versatile, and certainly most powerful synthesizer and total musicproduction instrument on the planet.
We strove to put virtually all our synthesizer technology and music making know-how into one instrument — and wesucceeded. The new MOTIF not only gives you the latest and greatest sounds and rhythms (as well as the ability to createand sample your own), it gives you powerful, easy-to-use tools for playing, combining and controlling these dynamic
sounds/rhythms — in real time, as you perform!
Take time to look through this manual carefully. It’s packed with important information on how to get the most from thisamazing instrument.
Dive in now and enjoy!
Package Contents
The following items have been included with your MOTIF. Check to see that you have everything listed here.• Synthesizer • AC Power cord • CD-ROM x 3• Owners Manual (this book) • Data List • Installation Guide
About the included CD-ROM
The accompanying CD-ROM features special software for use with the MOTIF. Included is a Voice Editor, which gives youcomprehensive and intuitive editing tools for the MOTIF, and a File Manager, which lets you easily transfer data betweenthe storage device connected to your MOTIF and a computer. For details, see the separate Installation Guide or the onlinemanuals included with the software.
Do NOT attempt to play back Track 1 (which contains the software data) on an audio CD player. Doing so may result in damageto your audio equipment and speakers, as well as your hearing.
About This Manual
This manual consists of the following sections.
■
The Controls & Connectors
Use this section to find out about all of the buttons, controls and connectors of the MOTIF.
■
Setting Up
Before going on to any other part of the manual, we strongly suggest you read this section
first. It shows you how to get started playing and using your new MOTIF.■
Basic Structure
This section provides a detailed overview of all of the main functions and features of theMOTIF, and shows how they fit together.
■
Basic Operation
This section introduces you to the basic operating conventions of the MOTIF, such asediting values and changing settings.
■
Quick Start Guide
In this tutorial section, youll take a guided tour through the various functions of theMOTIF, and get some hands-on experience in playing and using it.
■
Reference
The MOTIF encyclopedia. This section explains all parameters, settings, functions,features, modes and operations in full detail.
■
Appendix
This section contains detailed information on the MOTIF such as Specifications and anAlert Message List as well as instructions for installing optional equipment
(e.g., SIMM modules, AIEB2, mLAN8E interface, and Plug-in Boards).
■
Data List (separate booklet)
This contains various important lists such as the Voice List, Preset Pattern Phrase List,Effect List, MIDI Data Format, and MIDI Implementation Chart.
■
Installation Guide (separate booklet)
Refer to this for instructions on installing the included software programs (on the CD-ROM) to your computer.
●
Copying of the commercially available music sequence data and/or digital audio files is strictly prohibited, except foryour own personal use.
●
The illustrations and LCD screens as shown in this Owner’s Manual are for instructional purposes only, and mayappear somewhat different from those on your instrument.
●
The company names and product names in this Owner’s Manual are the trademarks or registered trademarks of theirrespective companies.

8/10/2019 motif_1(2)
http://slidepdf.com/reader/full/motif12 8/300
8
MOTIF Introduction
Important Features
■
Wide range of dynamic and authentic voices
— over512 in total, with 49 drum kits. Use the CategorySearch
function to quickly call up the sounds youwant, based on their instrument type.
■
Performance mode
lets you use four different voicestogether — in layers or in a keyboard split.
■
Integrated Sampling Sequencer
— seamlesslycombines audio and MIDI recording.
* Full Sample recording and editing
features, with4MB of memory (expandable to 64MB).
* Wide data compatibility
lets you load AIFF and WAVfiles, as well as samples and program/voice data fromother samplers.
* Convenient Resampling
function lets you sample thesound of the MOTIF itself directly. Play your ownmelodies, riffs and rhythms — and use them as samples.
* Unique Slice feature automatically chops up yourrhythms and riffs into their individual beats and notes.This lets you manipulate the component parts of yoursample loops as MIDI data — and gives you the powerto easily change tempo and even the rhythmic feel,without disturbing the pitch or sound quality.
* Using the Song mode
, record your music to thesequencer
in conventional linear fashion, from beginning to end. Or use the phrase-based functions
to assemble rhythms and patterns — “playing” yourarrangements in real time.
■
Extensive effect processing
, with Reverb (12 types),
Chorus (25 types), two separate Insertion sections(total 104 types), a Variation section (25 types), and aMaster 5-band EQ.
■
Comprehensive real-time control with four knobsand four sliders — letting you adjust filter, levels,effects, EG, and more, while you play.
■
Pattern mode
functions let you craft differentrhythmic sections and riffs as individual elements —which you can easily and intuitively combine in realtime to create full rhythm tracks.
■
The built-in Arpeggio
feature not only puts a wealth of
hip rhythmic sequences at your fingertips, it even hasspecial “human” patterns — such as guitar strummingand woodwind trills.
■
Once you’ve collected all the audio samples, loops,MIDI data, and patterns you need for your song, usePattern Chain
to arrange the pieces in real time. This hands-on approach makes it easier than ever to comeup with great ideas and amazing songs.
■ Song Scene is another powerful tool that lets you take“snapshots” of the sequencer track settings (such aspan, volume, and others). Then, during playback orrecording, simply switch among the Scenes for instant,dynamic changes.
■ Master mode for using the MOTIF as a masterkeyboard controller (with independent Zones), and foreasily reconfiguring the instrument between Voice/Performance play and Song/Pattern play in liveapplications.
■ Exceptionally easy-to-understand interface withtwo-tiered operation buttons: [F1] - [F6] and [SF1] -[SF5]
■ Remote Control — for operating your favoritesequencing software from the panel controls of theMOTIF. Mute tracks, control transport (Play, Stop,Record, etc.), mix both MIDI and audio tracks (up to
16) with the MOTIF’s knobs and sliders, pan thetracks, control EQ, and tweak effect sends — allwithout ever touching the mouse.
■ Three Modular Synthesis Plug-in System slots letyou upgrade the MOTIF with a completely newsynthesizer or sound-processing engine. These Plug-in boards give you more voices, more effects, morepolyphony and more instrument parts. Plus, specialPlug-in voices have already been programmed andstored to the MOTIF, ready to be played as soon as youinstall the proper board.
■ Comprehensive I/O terminals — including
assignable outputs, audio inputs, optical digital output,MIDI, USB for multi-port connection to a computer,SmartMedia card slot and SCSI terminal for datastorage. There’s even an expansion bay for installingthe optional AIEB board for additional ins and outs — both analog and digital.
■ Expansion bay for optional mLAN — Yamaha’s newmLAN interface technology makes it possible totransfer all your digital audio and MIDI data via asingle broad-band cable.
■ Included software — Packed with your MOTIF aretwo powerful software programs: Voice Editor andFile Utility. The Voice Editor puts all thecomprehensive editing features and parameters of theinstrument right on your computer screen for easyediting. With File Utility, you can access and organizeall your important MOTIF data (stored to Memorycard or SCSI device) directly from the computer.

8/10/2019 motif_1(2)
http://slidepdf.com/reader/full/motif12 9/300

8/10/2019 motif_1(2)
http://slidepdf.com/reader/full/motif12 10/300
10 MOTIF The Controls & Connectors
Front Panel
T h eC ont r ol &
C onnec t or s
The Controls & ConnectorsFront PanelMOTIF6
MOTIF7
OCTAVE
DOWN UP
KNOBCONTROLFUNCTION
PAN REVERB CHORUS TEMPO
A TT AC K R E LE A SECUTOFF RESONANCE
A SS I GN A A SS I GN B A S SI G N 1 A SS I GN 2
KN 1 KN 2 KN 3 KN 4
MEQ LOW MEQ HI MIDMEQLOWMID ME QHIGH
REMOTECONTROLON/OFF
EFFECT BYPASS ARPEGGIO
INSERTION SYSTEM ON/OFFMASTERVOLUME VOLUME 1 VOLUME 2 VOLUME 3 VOLUME 4
CS 1 CS 2 CS 3 CS 4
ZONE1 ZONE2 ZONE3 ZONE4
SEQ TRANSPORT
LOCATE 1 2
REC
MODE
V O IC E P E RF OR M M A ST ER
SEQUENCERS ON G PAT TE RN F IL E
INTEGRATEDSAMPLING MIXING UTILITY
EDIT JOB STORE
COMPARE SCENE STORESETLOCATE
OCTAVE
DOWN UP
KNOBCONTROLFUNCTION
PAN REVERB CHORUS TEMPO
A TTA CK R E LE A SECUTOFF RESONANCE
A SS I GN A A SS I GN B A S SI G N 1 A SS I GN 2
KN 1 KN 2 KN 3 KN 4
MEQ LOW MEQ HI MIDMEQLOWMID ME QHIGH
MASTERVOLUME
VOLUME 1 VOLUME 2 VOLUME 3 VOLUME 4
CS 1 CS 2 CS 3 CS 4
ZONE1 ZONE2 ZONE3 ZONE4
REMOTECONTROLON/OFF
EFFECT BYPASS ARPEGGIO
INSERTION S YS TE M O N/ OF F
SEQ TRANSPORT
LOCATE 1 2
REC
MODE
V OI C E P E RF OR M M A ST ER
SEQUENCERSONG PA TT ER N F IL E
INTEGRATEDSAMPLING MIXING UTILITY
EDIT JOB STORE
COMPARE SCENE STORESET LOCATE

8/10/2019 motif_1(2)
http://slidepdf.com/reader/full/motif12 11/300
11 MOTIF The Controls & Connectors
Front P
PL G2
A B C D E F G H
15
CATEGORYSEARCH
SONG SCENESF1 SF2 SF3 SF4 SF5
F1 F2 F3 F4 F6F5
INFORMATION
DEC/NO INC/YES
EXIT ENTER
EXECUTE
MUSIC PRODUCTIONSYNTHESIZERIntegratedSampling Sequencer
Real-timeExternalControlSurfaceModular SynthesisPlug-in System
DRUM KITS
FAVORITES
SLOT 1 SLOT 2 SLOT 3
PRE 1 PRE 2 PRE 3 GM USER PLG 1 PLG 3
A. PIANO KEYBOARD ORGAN GUITAR/ PLUCKED
BASS STRINGS BRASS REED/PIPE
SYN LEAD SYN PAD / CHOIR
SYN COMP CHROMATICPERCUSSION
DRUM/ PERCUSSION
SE M U SI C AL F X C O MBI
1 2 3 4 5 6 7 8
9 10 11 12 13 14 16
SECTION
TRACKSELECT
MUTE
SOLO
BANK
GROUP
NUMBER
COMMON
ELEMENT/PERF.PART/ZONE
SONG SCENESF1 SF2 SF3 SF4 SF5
F1 F2 F3 F4 F6F5
INFORMATION
DEC/NO INC/YES
EXIT ENTER
EXECUTE
MUSIC PRODUCTIONSYNTHESIZERIntegratedSampling Sequencer
Real-timeExternalControlSurfaceModular Synthesis Plug-inSystem
DRUM KITS
FAVORITES
SLOT 1 SLOT 2 SLOT 3
PRE 1 PRE 2 PRE 3 GM USER PLG 1 PLG 3
A.PIANO KEYBOARD ORGAN GUITAR/ PLUCKED
B AS S S TR IN GS BRASS REED/PIPE
SYN LEAD SYN PAD / CHOIR
SYN COMP CHROMATICPERCUSSION
DRUM/ PERCUSSION
S E M US IC AL F X C OM BI
A B C D E F G H
1 2 3 4 5 6 7 8
9 10 11 12 13 14 15 16
CATEGORYSEARCH BANK
GROUP
NUMBER
SECTION
TRACKSELECT
MUTE
SOLO
PL G2
COMMON
ELEMENT/PERF.PART/ZONE

8/10/2019 motif_1(2)
http://slidepdf.com/reader/full/motif12 12/300
12 MOTIF The Controls & Connectors
Front Panel
T h eC ont r ol &
C onnec t or s
MOTIF8
KNOBCONTROLFUNCTION
PAN REVERB CHORUS TEMPO
A TT AC K R E LE A SECUTOFF RESONANCE
A SS IG N A A SS IG N B A SS IG N 1 A SS IG N 2
KN 1 KN 2 KN 3 KN 4
MEQ LOW MEQ HI MIDMEQLOWMID ME Q HIGH
REMOTECONTROLON/OFF
MASTERVOLUME
VOLUME 1 VOLUME 2 VOLUME 3 VOLUME 4
CS 1 CS 2 CS 3 CS 4
ZONE 1 ZONE 2 ZONE 3 ZONE4
EFFECT BYPASS ARPEGGIO
INSERTION S YS TE M O N/ OF F
SEQ TRANSPORT
LOCATE 1 2
REC
V OI CE P ER FO RM M AS TE R
SEQUENCERS ON G PATTE RN FI LE
INTEGRATEDSAMPLING MIXING UTILITY
EDIT JOB STORE
COMPARE SCENESTORESETLOCATE
MODE
1 OCTAVE [UP] and [DOWN] buttons (page 127)Use these buttons to change the note range of thekeyboard. To restore the normal octave setting,press both buttons simultaneously.
n Because of its extended keyboard, the MOTIF 8does not have OCTAVE buttons.
2 PITCH bend wheel (page 48)Controls the pitch bend effect. You can also assignother functions to this controller.
3 MODULATION wheel (page 48)Controls the modulation effect. You can also assignother functions to this controller.
4 MASTER VOLUMEAdjusts the volume of the overall sound, as outputfrom the rear-panel OUTPUT L/MONO and R jacks as well as the PHONES jack.
5 [KNOB CONTROL FUNCTION] button andfour Knobs (pages 48, 132)These four highly versatile knobs let you adjustvarious aspects or parameters of the current Voice.Use the [KNOB CONTROL FUNCTION] button tochange the parameter set for the knobs. Thecorresponding LED lights to indicate which group
of parameters are active.
8/10/2019 motif_1(2)
http://slidepdf.com/reader/full/motif12 13/300
13 MOTIF The Controls & Connectors
Front P
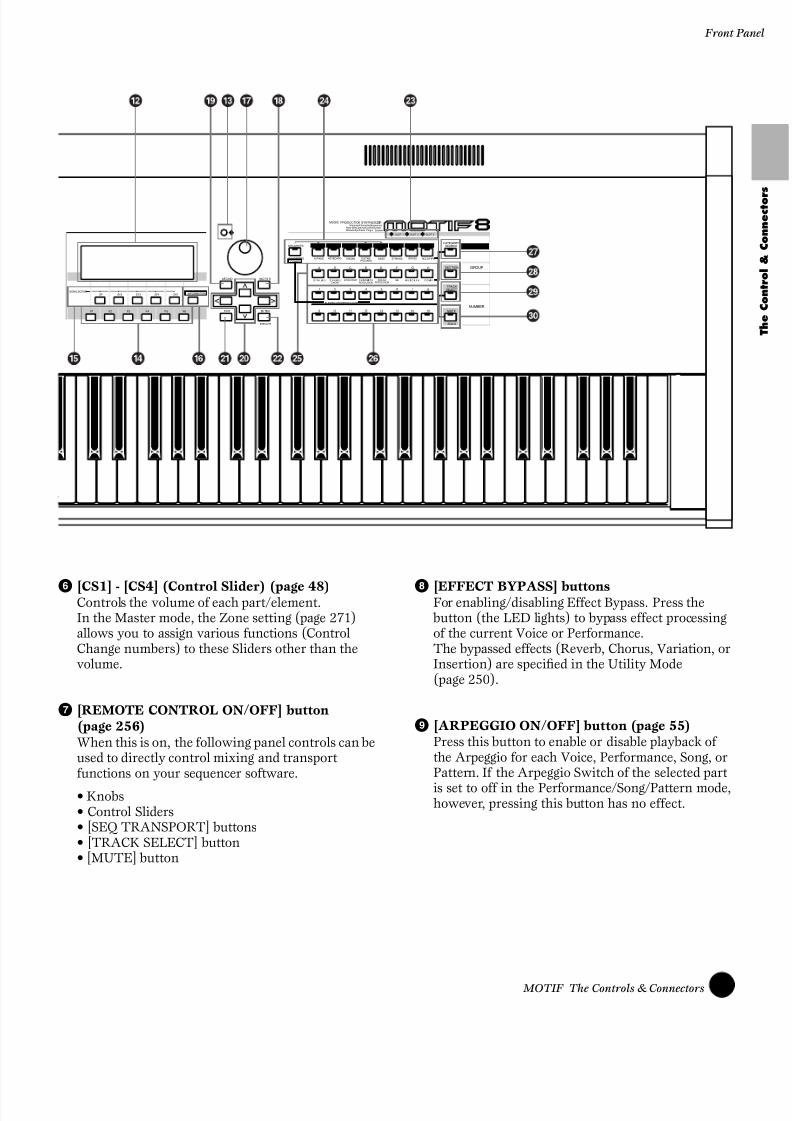
6 [CS1] - [CS4] (Control Slider) (page 48)Controls the volume of each part/element.In the Master mode, the Zone setting (page 271)allows you to assign various functions (ControlChange numbers) to these Sliders other than thevolume.
7 [REMOTE CONTROL ON/OFF] button(page 256)When this is on, the following panel controls can beused to directly control mixing and transportfunctions on your sequencer software.
• Knobs• Control Sliders• [SEQ TRANSPORT] buttons• [TRACK SELECT] button• [MUTE] button
8 [EFFECT BYPASS] buttonsFor enabling/disabling Effect Bypass. Press the button (the LED lights) to bypass effect processingof the current Voice or Performance.The bypassed effects (Reverb, Chorus, Variation, orInsertion) are specified in the Utility Mode(page 250).
9 [ARPEGGIO ON/OFF] button (page 55)Press this button to enable or disable playback ofthe Arpeggio for each Voice, Performance, Song, orPattern. If the Arpeggio Switch of the selected part
is set to off in the Performance/Song/Pattern mode, however, pressing this button has no effect.
SF1 SF2 SF3SONG SCENE
SF4 SF5
F1 F2 F3 F4 F6F5
INFORMATION
DEC/NO INC/YES
EXIT ENTER
EXECUTE
MUSIC PRODUCTION SYNTHESIZERIntegratedSamplingSequencer
Real-timeExternalControlSurfaceModularSynthesis Plug-in System
DRUM KITS
FAVORITES
SLOT 1 SLOT 2 SLOT 3
PRE 1 PRE 2 PRE 3 GM USER PLG 1 PLG 3
A. PIANO KEYBOARD ORGAN GUITAR/ PLUCKED
BASS STRINGS BRASS REED/PIPE
SYN L EAD SYN PAD / CHOIR
SYNCOMP CHROMATICPERCUSION
DRUM/ PERCUSION
SE M U SI C AL F X C O MBI
A B C D E F G H
1 2 3 4 5 6 7 8
9 10 11 12 13 14 15 16
CATEGORYSEARCH BANK
GROUP
NUMBER
SECTION
TRACKSELECT
MUTE
SOLO
PLG 2
COMMON
ELEMENT/PERF.PART/ZONE

8/10/2019 motif_1(2)
http://slidepdf.com/reader/full/motif12 14/300
14 MOTIF The Controls & Connectors
Front Panel
T h eC ont r ol &
C onnec t or s
) SEQ TRANSPORT buttons(page 78, 179, 183, 217, 221)These buttons control recording and playback of theSong/Pattern sequence data.
[ ](Top) button
Instantly returns to the first beginning of thecurrent song or pattern (i.e., the first beat of the firstmeasure).
[ ](Reverse) button
Press briefly to move back one measure at a time, or hold to continuously rewind.
[ ](Forward) button
Press briefly to move forward one measure at a time,or hold to continuously fast-forward.
[REC] (Record) button
Press this to enable recording (Song or patternphrase). (The indicator lights.)
[ ](Stop) button
Press to stop recording or playback.
[ ](Play) button
Press to start playback from the current point in thesong or pattern. During recording and playback, theindicator flashes at the current tempo.
! MODE buttons (page 67)These buttons select the MOTIF operating modes
(e.g., Voice mode).
@ LCD DisplayThe MOTIF’s large backlit LCD displays theparameters and values related to the currentlyselected operation or mode.
# LCD Contrast ControlUse this control to set the LCD display for optimum legibility.
$ [F1] - [F6] (Function) buttons (page 71)These buttons located directly below the LCDdisplay call up the corresponding functionsindicated in the display. In the display hierarchy,these functions [F] rank just below the modes.
% [SF1] - [SF5] (Sub Function) buttons (page 71)These buttons located directly below the LCDdisplay call up the corresponding sub functionsindicated in the display. In the display hierarchy,these sub functions [SF] rank just below thefunctions [F].These buttons can be also used to store/recall theSong Scene (page 115) in the Song Play/SongRecord/Pattern Chain Record modes.
^ [INFORMATION] button (page 73)For calling up a special “help” feature that showsinformation about the currently selected mode. Youcan go back to the previous display by pressing this button again or pressing any other button.
& Data dial (page 72)For editing (changing the value of) the currentlyselected parameter. To increase the value, turn thedial right (clockwise); to decrease the value, turn thedial left (counter-clockwise). If a parameter with awide value range is selected, you can change the valuein broader strokes by quickly turning the dial.
* [INC/YES] button (page 72)For increasing the value of the currently selectedparameter. Also use it to actually execute a Job or aStore operation.
( [DEC/NO] button (page 72)
For decreasing the value of the currently selectedparameter. Also use it to cancel a Job or a Storeoperation.
n When editing (changing) the value of theparameter, it is convenient to use the [INC/YES] button and the [DEC/NO] button simultaneously.Pressing the [DEC/NO] button while holding the[INC/YES] button increases the value by 10.Pressing the [INC/YES] button while holding the[DEC/NO] button decreases the value by 10.
º Cursor Buttons (page 72)The cursor buttons move the “cursor” around the
LCD display screen, highlighting and selecting thevarious parameters.
¡ [EXIT] button (page 72)The menus and displays of the MOTIF areorganized according to a hierarchical structure.Press this button to exit from the current displayand return to the previous level in the hierarchy.

8/10/2019 motif_1(2)
http://slidepdf.com/reader/full/motif12 15/300
15 MOTIF The Controls & Connectors
Front P
™ [ENTER] buttonUse this button to execute a Job or a Storeoperation. Also use this button to actually enter anumber when selecting a Memory or Bank for Voiceor Performance. In the File mode, use this button togo to the next lowest level in the selected directory.
£ SLOT 1-3 lamps (page 282)These three lamps show the installation status of
the Plug-in Boards.If the Plug-in Board has been correctly installed, thecorresponding SLOT lamp will light.
n The Vocal Harmony Plug-in Board (PLG100-VH)can be installed only to slot 1. It cannot be installedto slot 2 or 3.
n The Multi part Plug-in Board (PLG100-XG) can beinstalled only to slot 3. It cannot be installed to slot1 or 2.
¢ BANK buttons (page 124)Each button selects a Voice or Performance Bank.When the [CATEGORY SEARCH] button is turnedon, these buttons can be used to select the desiredcategory (printed below each button). When the[SECTION] button is turned on in the Patternmode, these buttons are used to select the desiredsection.
∞ GROUP [A] - [H] buttons (page 124)Each button selects a Voice or Performance Group.When the [CATEGORY SEARCH] button is turnedon, these buttons can be used to select the desiredcategory (printed below each button). When the[SECTION] button is turned on in the Pattern
mode, these buttons are used to select the desiredsection.
§ NUMBER [1] - [16] buttons (page 124)Use of these buttons differs depending on the on/offstatus of the [TRACK SELECT] and [MUTE] buttons.
¶ [CATEGORY SEARCH] button (page 126)When this button is turned on in the Performancemode, the [BANK] and [GROUP] buttons can beused to select the Performance category.When this button is turned on in another mode, the[BANK] and [GROUP] buttons can be used to selectthe Voice category.
• [SECTION] button (page 218)When this button is turned on in the Pattern mode,the [BANK] and [GROUP] buttons can be used to
select the Pattern Section.
ª [TRACK SELECT] button (page 181)Turning this button on in the Song/Pattern modeenables the NUMBER [1] - [16] buttons forselecting corresponding Song/Pattern tracks. Theon/off status of this button affects the NUMBER [1]- [16] buttons in different ways, depending on theselected mode. (See § “NUMBER [1] - [16] buttons” above.)
‚ [MUTE] button (page 180)Turning this button on in the Song/Pattern mode
enables the NUMBER [1] - [16] buttons for mutingcorresponding Song/Pattern tracks.Press one of the NUMBER [1] - [16] buttons while holding this button to solo the corresponding trackof the current selected Song/Pattern.The on/off status of this button affects theNUMBER [1] - [16] buttons in different ways,depending on the selected mode. (See § “NUMBER[1] - [16] buttons” above.)
Functions of the NUMBER [1] - [16] buttons
When [TRACKSELECT] is on
When [MUTE]is on
When both[TRACK SELECT]
[MUTE] are off
Voice Play modeKeyboard transmitchannel setting
—Voice selection,according to GroupsA - H
Voice Edit modeElement selection(1 - 4) and ElementMute setting(9 - 12) —
Performance Playmode
Keyboard transmitchannel setting
Performance par tMute setting(1 - 4)
Performance orVoice selection (ifcursor is located atVoice name),according to GroupsA - H
Performance Editmode
Performance par tselection (1 - 4)
Master Play mode Zone selection(1 - 4)
—Master selection,according to GroupsA - H
Master Edit modeZone selection(1 - 4)
Zone Mute setting(1 - 4)
—
Song/Patternmode
Song/Patterntrack selection
Song/Patterntrack Mute setting Song/Style selection,
according to GroupsA - HSong/Pattern
Mixing modeSong/Pattern partselection
Song/Pattern par tMute setting

8/10/2019 motif_1(2)
http://slidepdf.com/reader/full/motif12 16/300
16 MOTIF The Controls & Connectors
Rear Panel
T h eC ont r ol &
C onnec t or s
Rear PanelMOTIF6
MOTIF7
MOTIF8
CAUTION
POWERON OFF AC INLET mLAN I O EXPANSION
CAUTION
POWERON OFF AC INLET mLAN I O EXPANSION
CAUTION
ATTENTIONWARNING
RISKOF ELECTRICSHOCK
:RISQUE DE CHOC ÉLECTRIQUE NE PAS OUVRIR.
THIS DEVICE COMPLIES WITH PART 15 OF THE FCC RULES. OPERATION IS SUBJECT TOTHE FOLLOWING TWO CONDITIONS:(1) THIS DEVICE MAY NOT CAUSE HARMFUL INTERFERENCE, AND(2) THIS DEVICE MUST ACCEPT ANY INTERFERENCE RECEIVED, INCLUDINGINTERFERENCE
THAT MAY CAUSE UNDESIRED OPERATION.
THIS CLASS B DEIGITAL APPARATUS COMPLIES WITH CANADIAN ICES-003.
DU CANADA.CET APPAREIL NUMÉRIQUE DE LA CLASSE B EST CONFORME À LA NORME NMB-003
TO REDUCE THE RISK OF FIRE O R ELECTRICSHOCK,DO NOT EXPOSE THIS PRODUCT TO RAIN OR MOISTURE.
DONOTOPEN
mLAN I O EXPANSIONPOWER
ON OFF ACINLET

8/10/2019 motif_1(2)
http://slidepdf.com/reader/full/motif12 17/300
17 MOTIF The Controls & Connectors
Rear P
Rear Panel
OPTICALOUTPUT USB THRU
MIDIBREATH SUSTAIN
FOOTSWITCH
FOOTCONTROLLER
OUTPUTOUT IN
ASSIGNABLE OUTPUTASSIGNABLE L MONO PHONES
A D IN PUTGAIN
1 R L R R L
SCSI
CARD3.3V
2
GREENYELLOWORANGE
321Plug-in SLOT
OPTICALOUTPUT USB THRU
MIDIOUT IN
SCSI
BREATH SUSTAIN
FOOTSWITCH
FOOTCONTROLLER
ASSIGNABLE 1
CARD3.3V
2OUTPUTASSIGNABLEOUTPUT
L M O NO PH ON ES
A D IN PUTGAIN
R L R R L
GREENYELLOWORANGE
321Plug-in SLOT
OPTICALOUTPUT USB THRU
MIDIOUT IN
SCSI
CARD3.3V
BREATH SUSTAIN
FOOTSWITCH
ASSIGNABLE
FOOTCONTROLLER
12OUTPUTASSIGNABLEOUTPUT
L M O NO PH ON ESR L RA D IN PUT
GAINR L
GREENYELLOWORANGE
321Plug-in SLOT

8/10/2019 motif_1(2)
http://slidepdf.com/reader/full/motif12 18/300
18 MOTIF The Controls & Connectors
Rear Panel
T h eC ont r ol &
C onnec t or s
1 POWER Switch (page 29)Press to turn power ON or OFF.
2 AC Power Cord Socket (page 20)Be sure the plug the AC power cord into this socket before plugging the power cord into an AC outlet.Use only the AC power cord supplied with theMOTIF. If the supplied cord is lost or damaged andneeds to be replaced, contact your Yamaha dealer.
The use of an inappropriate replacement can pose afire and shock hazard!
3 mLAN expansion board (mLAN8E) or I/Oexpansion board (AIEB2) cover (page 22)Either the mLAN expansion board (mLAN8E) orthe I/O expansion board (AIEB2) sold separatelycan be installed to the MOTIF.With the mLAN8E board, you can convenientlyand easily hook up your MOTIF to other mLAN-compatible instruments or devices. The AIEB2 board gives you additional digital I/O options,
featuring both optical and coaxial connectors.Moreover, the board also includes three stereoASSIGNABLE OUTPUT pairs (six analog jacks).
4 OPTICAL OUT connectors (page 22)For output of digital audio, via optical fiber cables(at 44.1kHz).
5 USB connector (page 25)For connection to a computer having a USBinterface. The USB interface provides multi-portMIDI operation not possible with a single MIDIconnection.
n The USB connection can only be used for transfer ofMIDI data. No audio data can be transfered via USB.
USB
USB is an abbreviation for Universal Serial Bus. It isa serial interface for connecting a computer withperipheral devices, and enables much faster datatransfer (12Mbps) compared to conventional serialport connections. Also, it allows “hot swapping”(connecting peripheral devices while the power tothe computer is on).
6 MIDI IN/OUT/THRU connectors (page 24)MIDI IN is for receiving control or performancedata from another MIDI device, such as an externalsequencer.MIDI THRU is simply for redirecting any receivedMIDI data (via MIDI IN) to connected devices,allowing convenient chaining of additional MIDIinstruments.MIDI OUT is for transmitting all control,performance and playback data from the MOTIF toanother MIDI device, such as an external sequencer.
7 BREATH Controller Jack (page 28)Connect an optional Yamaha BC2 Breath Controller here for expressive breath control capability.
8 FOOT SWITCH jacks (page 28)For connection of optional FC4 or FC5Footswitches. When connected to the SUSTAIN jack, the Footswitch controls sustain. Whenconnected to ASSIGNABLE, it can control one of
various different assignable functions.
9 FOOT CONTROLLER jacks (page 28)For connection of optional foot controllers (FC7,etc.). Each jack lets you continuously control one ofvarious different assignable functions — such asvolume, tone, pitch, or other aspects of the sound.
) ASSIGNABLE OUT L and R jacks (page 21)Line level audio signals are output from the MOTIFvia these phone jacks (1/4" mono phone plug).These outputs are independent of the main output
(at the L/MONO and R jacks below), and can befreely assigned to any of the Parts. This lets youroute specific Voices or sounds for processing with afavorite outboard effect unit.
! OUTPUT L/MONO and R jacks (page 21)Line level audio signals are output via these phone jacks. For monophonic output, use just the L/MONO jack.
@ PHONES jack (page 21)For connection to a pair of stereo headphones.
# A/D INPUT jacks (page 23)External audio signals can be input via these phone jacks. These are used primarily for recordingsamples — either with a microphone, making theproper Utility settings (page 250), or from otheraudio equipment, such as a CD or MD player. Withthe optional Vocal Harmony Plug-in board(PLG100-VH, page 35), you can also apply specialeffects and harmonies to the microphone input.
$ GAIN knobFor adjusting the input gain of the audio at the A/DINPUT jacks (above). Depending on the connected
device (microphone, CD player, etc.), you may needto adjust this for optimum level.
% SCSI connectors (page 27)This SCSI-2 50-pin connector (D-sub, half-pitch)can be used to connect to an external SCSI datastorage device — allowing you to conveniently saveand store large quantities of data.

8/10/2019 motif_1(2)
http://slidepdf.com/reader/full/motif12 19/300
19 MOTIF The Controls & Connectors
Rear P
^ Card slot (pages 64, 262)Insert a Memory Card here to transfer various datato/from the MOTIF. Read carefully the precautionson using a Memory Card (page 289) beforeinserting a card.
& Plug-in board cover (page 35)Installing an optional Plug-in Board to the MOTIF lets you greatly expand the sonic palette of the
instrument. Up to three boards can be installed tothe MOTIF’s rear panel.
■ When the optional mLAN8E has been installed:
1 SERIAL I/O connectorFor connecting the mLAN8E directly to a personalcomputer via a serial cable. Use this jack to connectthe mLAN8E and the computer when using themLAN Patchbay and mLAN Mixer in Windows.This is not used to input or output MIDI or audiosignals.
2 mLAN (IEEE1394) connector1, 2, 3For connecting mLAN devices or IEEE1394-compatible devices via IEEE1394 standard (6-pin)cables.
About mLAN
“mLAN” is a digital network designed for musicalapplications. It uses and extends the industrystandard IEEE 1394 high performance serial bus.For details, refer to the Guide Book of themLAN8E.
The name “mLAN” and its logo (above) are
trademarks.
■ When the optional AIEB2 has been installed:
1 OPTICAL IN, OUT connectors (pages 22, 23)Use these connectors to input or output digitalsignals over optical-fiber cable. You can use theOPTICAL IN to record a digital signal of frequency48kHz, 44.1kHz, or 32kHz. The OPTICAL OUTconnector outputs a digital signal of frequency44.1kHz.
2 DIGITAL IN, OUT connectors (pages 22, 23)Use these connectors to input or output digital
signals over coaxial (RCA-pin) cable. The digitalsignal format is CD/DAT (S/P DIF). You can usethe DIGITAL IN connector to record a digital signalof frequency 48kHz, 44.1kHz, or 32kHz. TheDIGITAL OUT connector outputs a digital signal offrequency 44.1kHz.
3 ASSIGNABLE OUT jacks (AS1 to AS6)(page 22)Additional analog output jacks. Each pair (1&2,3&4, 5&6) operates independently of all otheroutputs on the MOTIF.
12
1 2 3

8/10/2019 motif_1(2)
http://slidepdf.com/reader/full/motif12 20/300
20 MOTIF Setting Up
Power Supply
S et t i ngUp
Setting UpThis section explains how to connect your MOTIF to an AC power source, external audio and MIDI devices, and acomputer system. Only switch the MOTIF on after you have made all the necessary connections.It is recommended that you read this section before using the MOTIF.
Power Supply
1 Make sure the POWER switch on the MOTIF is set to OFF.
2 Connect the supplied power cord to the AC INLET terminal on the instrument’s rear panel.
3 Connect the other end of the power cord to an AC outlet. Make sure your MOTIF meets the voltage requirementfor the country or region in which it is being used.
Make sure your MOTIF is rated for the AC voltage supplied in the area in which it is to be used (as listed on the rearpanel). Connecting the unit to the wrong AC supply can cause serious damage to the internal circuitry and may evenpose a shock hazard!
Use only the AC power cord supplied with the MOTIF. If the supplied cord is lost or damaged and needs to bereplaced, contact your Yamaha dealer. The use of an inappropriate replacement can pose a fire and shock hazard!
The type of AC power cord provided with the MOTIF may be different depending on the country in which it ispurchased (a third prong may be provided for grounding purposes). Improper connection of the grounding conductorcan create the risk of electrical shock. Do NOT modify the plug provided with the MOTIF. If the plug will not fit theoutlet, have a proper outlet installed by a qualified electrician. Do not use a plug adapter which defeats the groundingconductor.
Power cord(included)
AC INLET terminal
rear panel

8/10/2019 motif_1(2)
http://slidepdf.com/reader/full/motif12 21/300
21 MOTIF Setting Up
Connec
Connections
Connecting to External Audio Equipment
Since the MOTIF has no built-in speakers, you’ll need an external audio system or a set of stereo headphones toproperly monitor it. The following illustrations show various connection examples; use the one most similar to yourintended setup.
Analog output
■ Connecting stereo powered speakersA pair of powered speakers can accurately produce the instrument’s rich sounds with their own pan and effectsettings. Connect your powered speakers to the OUTPUT L/MONO and R jacks on the rear panel.
nWhen using just one powered speaker, connect it to the OUTPUT L/MONO jack on the rear panel.
■
Connecting to a mixerThere are extra audio outputs in addition to the OUTPUT (L/MONO and R) jacks. Connect these outputs to a mixerfor separately controlling the outputs of up to four Parts in Performance mode (page 164).
MOTIF
Headphones
PHONESOUTPUTL /MONO R
Powered speaker (Left) Powered speaker (Right)
PLG2
A B C D E F G H
15
CATEGORYSEARCH
OCTAVED O WN U P
KNOBCONTROLFUNCTION
P A N R E V E RB C H O RU S T E M P O
A T T A CK R E L E AS EC U TOFFR ESON AN C E
A S S I G N A A S S I G N B A S S I G N 1 A S S I G N 2
K N 1 K N 2 K N 3 K N 4
M E Q LO W M E QH I MI DM E QL OW M ID M E QH IGH
REMOTECONTROLON/OFF
EFFECTBYPASSARPEGGIOIN SER TIO N S Y S T E M O N / OF F
MASTERVOLU ME
VOLU ME 1VOLU ME 2VOLU ME 3VOLU ME 4
C S1 C S 2 C S 3 C S 4
Z O N E 1 Z O N E 2 Z O N E 3 Z O N E 4
SEQTRANSPORT
LO CA TE 1 2
REC
MODE
VOIC EPER FOR M MASTER
SEQUENCERS O N G P A T T E RN F I L E
INTEGRATEDSAMPLIN GMI XIN G U T I L I T Y
E D IT J O B S T O R E
C OMPAR E SC EN ESTOR ESETLOC ATE
SON GSC EN ES F1 S F2 S F3 S F4 S F5
F1 F2 F3 F4 F6F5
IN FOR MATION
D EC /N O I NC /Y ES
E XI T E NTE R
EXEC U TE
MUSICPRODUCTIONSYNTHESIZERIntegratedSamplingSequencer
R eal-timeExternalC ontrolSurfaceModular SynthesisPlug-inSystem
D R U MKITS
FAVOR ITES
S L O T 1 S L O T 2 S L O T 3
P R E1 P R E 2 P R E 3 G M U S ER P L G1 PLG3
A.PIAN O KEYBOAR D OR GAN GUITAR/ PLU C KED
B A S S S T R I N G S BR ASS R EED /PIPE
SYN LEAD SYN PAD / CHOIR
SYN C OMPC H R OMATICPER C U SSION
DRUM/ PER C U SSION
S E M U S IC A L F X C O M BI
1 2 3 4 5 6 7 8
9 10 11 12 13 14 16
SECTION
TRACKSELECT
MUTE
SOLO
BANK
GROUP
NUMBER
COMMON
ELEMEN T/PER F.PAR T/ZONE
1 2 3 4 5 6 7 8 9 10 1 1 1 2 1 3 1 4 1 5 1 6 L R
Headphones
MOTIF
Mixer
Speaker
AmplifierL
OUTPUT L
ROUTPUTL/MONOPHONES
R
R
ASSIGNABLEOUTPUT L, R
PLG2
A B C D E F G H
15
CATEGORYSEARCH
OCTAVED O WN U P
KNOBCONTROLFUNCTION
P A N R E V E RB C H O RU S T E M P O
A T T A CK R E L E AS EC U TOFF RESONANCE
A S S I G N A A S S I G N B A S S I G N 1 A S S I G N 2
K N 1 K N 2 K N 3 K N 4
M E Q LO W M E QH I MI DM E Q LO W M I D M E Q H I GH
REMOTECONTROLON/OFF
EFFECTBYPASS ARPEGGIOI N S E RT I O N S Y S T E M O N / OF F
MASTERVOLU ME
VOLU ME 1VOLU ME 2VOLU ME 3V OLU ME 4
C S1 C S 2 C S 3 C S 4
Z O N E 1 Z O N E 2 Z O N E 3 Z O N E 4
SEQTRANSPORT
LOCATE 1 2
REC
MODE
VOIC E P E R F O R M M A S T ER
SEQUENCERS O N G P A T T E R N F I L E
INTEGRATEDSAMPLIN G M I X I NG U T I LITY
ED IT JOB STOR E
C O M PA R E S C E NE S T O RESETLOC ATE
SON GSC EN ES F1 S F2 S F3 S F4 S F5
F1 F2 F3 F4 F6F5
IN FOR MATION
D EC /N O I NC /Y ES
EXIT ENTER
EXEC U TE
MUSICPRODUCTIONSYNTHESIZERIntegratedSamplingSequencer
Real-timeExternalC ontrolSurfaceModularSynthesisPlug-inSystem
D R U MKITS
FAVOR ITES
S L O T 1 S L O T 2 S L O T 3
P RE 1 P R E 2 P R E 3 G M U S E R P L G1 P LG 3
A.PIAN OKEYBOAR D OR GAN GU ITAR / PLU C KED
BASS STR IN GSBR ASS R EED /PIPE
SYN LEAD SYN PAD / C H OIR
SYN C OMPC H R OMATICPER C U SSION
DRUM/ PER C U SSION
SE MU SIC ALFXC OMBI
1 2 3 4 5 6 7 8
9 10 11 12 1 3 1 4 16
SECTION
TRACKSELECT
MUTE
SOLO
BANK
GROUP
NUMBER
COMMON
ELEMEN T/PER F.PAR T/ZON E

8/10/2019 motif_1(2)
http://slidepdf.com/reader/full/motif12 22/300
22 MOTIF Setting Up
Connections
S et t i ngUp
■ Connecting to a mixer (with the optional AIEB2)You can expand the MOTIF’s output capabilties with six additional OUTPUT jacks for outputting extra individualparts, by installing the optional I/O board (AIEB2).
nConnecting a pair of headphones does not affect audio output from the OUTPUT (L/MONO and R) jacks. You can monitor thesame sounds via headphones and at the OUTPUT jacks.
Digital output
■ When using the OPTICAL OUTPUT connector:This connector enables direct digital output of MOTIF playback and digital through-put.
■ When the optional AIEB2 I/O board has been installed:The board enables direct digital output of MOTIF sound also via the coaxial cable.For purposes of compatibility, the AIEB2 board includes two different output types: OPTICAL OUT (optical fiber)
and DIGITAL OUT (coaxial cable). Note that both of these outputs always produce identical signals.
MOTIF
1 2 3 4 5 6 7 8 9 10 1 1 1 2 1 3 1 4 1 5 1 6 L R
Mixer
Speaker
AmplifierL
OUTPUT L
OUTPUTL/MONO
R
R
R
ASSIGNABLEOUTPUT L
Headphone
PHONESR AIEB2
PLG2
A B C D E F G H
15
CATEGORYSEARCH
OCTAVED O WN U P
KNOBCONTROLFUNCTION
P A N R E V E RB C H O RU S T E M P O
A T T A CK R E L E AS EC U TOFFR ESON AN C E
ASSIG N A A S S I G N B A S S I GN 1 A S S I G N 2
K N 1 K N 2 K N 3 K N 4
MEQ LOW MEQH IMIDM E Q LO W M I D M E Q H I GH
REMOTECONTROLON/OFF
EFFECTBYPASS ARPEGGIOI N S E RT I O N S Y S T E M O N / O FF
MASTERVOLU ME
VOLU ME1VOLU ME 2VOLU ME 3VOLU ME 4
C S 1 C S 2 C S 3 C S 4
Z O N E 1 Z O N E 2 Z O N E 3 Z O N E 4
SEQTRANSPORT
L OCA TE 1 2
REC
MODE
VOIC EPER FOR M MASTER
SEQUENCERS O N G P A T T E R N F I L E
IN TEGR ATEDSAMPLIN G M I X I NG U T I L ITY
E D IT J O B S T O RE
C O M PA R E S C E NE S T O RESETLOC ATE
SON GSC EN ES F1 S F2 S F3 S F4 S F5
F1 F2 F3 F4 F6F5
IN FOR MATION
D EC /N O I NC /Y E S
E XI T E NT ER
EXEC U TE
MUSICPRODUCTIONSYNTHESIZERIntegratedSamplingSequencer
R eal-timeExternalC ontrolSurfaceModularSynthesisPlug-inSystem
D R U MKITS
FAVOR ITES
S L O T 1 S L O T 2 S L O T 3
P RE 1 P R E 2 P R E 3 G M U S E R P L G1 P LG 3
A.PIAN OKEYBOAR D OR GAN GU ITAR / PLU C KED
B A S S S T R IN G S B R A S S R E E D / P IP E
SYN LEAD SYN PAD / CHOIR
SYN C OMPC H R OMATICPER C U SSION
DRUM/ PERCUSSION
S E M U S IC ALFXC OMBI
1 2 3 4 5 6 7 8
9 10 11 12 13 1 4 16
SECTION
TRACKSELECT
MUTE
SOLO
BANK
GROUP
NUMBER
COMMON
ELEMEN T/PER F.PAR T/ZON E
DAT
MOTIF
DAT or CD recorder
OPTICALOUTPUT
OPTICALINPUTRecord
PLG2
A B C D E F G H
15
CATEGORYSEARCH
OCTAVED O WN U P
KNOBCONTROLFUNCTION
P A N R E V E RB C H O RU S T E M P O
A T T A C K R E L E A S EC U TOFFR ESON AN C E
ASSIGN A A S S I G N B A S S I G N 1 A S S I GN 2
K N 1 K N2 K N 3 K N 4
M E Q LO W M E QH I MI DM E Q LO W M ID M E Q H IG H
REMOTECONTROLON/OFF
EFFECTBYPASS ARPEGGIOI N S E RT I O N S Y S T E M O N / OFF
MASTERVOLU ME
VOLU ME 1VOLU ME2 V O L U M E 3 V O L U ME 4
C S 1 C S2 CS 3 CS 4
Z O N E 1 Z O N E 2 Z O N E 3 Z O N E 4
SEQTRANSPORT
LOC ATE 1 2
REC
MODE
VOIC EPER FOR M MASTER
SEQUENCERS O N G P A T T E RN F ILE
INTEGRATEDSAMPLIN G MIXIN G U TILITY
ED IT JOB STOR E
C O M PA R E S C E NE S T O RESETLOC ATE
SON G SC EN ES F1 S F2 S F3 S F4 S F5
F1 F2 F3 F4 F6F5
IN FOR MATION
D EC /N O I NC /Y E S
E XI T E NT ER
EXEC U TE
MUSICPRODUCTIONSYNTHESIZERIntegratedSamplingSequencer
R eal-timeExternalC ontrolSurfaceModularSynthesisPlug-inSystem
D R U MKITS
FAVOR ITES
S L O T 1 S L O T 2 S L O T 3
P RE 1 P R E 2 P R E 3 G M U S E R P L G1 P LG 3
A.PIAN OKEYBOAR D OR GAN GU ITAR / PLU C KED
BASS STR IN GSBR ASS R EED /PIPE
SYN LEAD SYN PAD / CHOIR
SYN C OMPC H R OMATICPER C U SSION
D R U M/ PER C U SSION
SE MU SIC ALFXC OMBI
1 2 3 4 5 6 7 8
9 10 11 12 13 14 16
SECTION
TRACKSELECT
MUTE
SOLO
BANK
GROUP
NUMBER
COMMON
ELEMEN T/PER F.PAR T/ZON E
DAT DAT
MOTIF
DAT or CD recorder
DIGITALOUTPUT
OPTICALOUTPUT
DIGITALINPUT
OPTICALINPUT
Record
Record
Coaxial cable
Optical cable
PLG2
A B C D E F G H
15
CATEGORYSEARCH
OCTAVED OWN U P
KNOBCONTROLFUNCTION
P A N R E V E RB C H O RU S T E M P O
A T T A CK R E L E AS EC U TOFFR ESON AN C E
A S S I G N A A S S I G N B A S S I G N 1 A S S I G N 2
K N 1 K N 2 K N 3 K N 4
M E Q LO W M E QH I MI DM E Q LO W M I D M E Q H I GH
REMOTECONTROLON/OFF
EFFECTBYPASSARPEGGIOI N S E RT I O N S Y S T E M O N / O FF
MASTERVOLU ME VOLU ME1VOLU ME 2VOLU ME 3VOLU ME 4
C S1 C S 2 C S 3 C S 4
Z O N E 1 Z O N E 2 Z O N E 3 Z O N E 4
SEQTRANSPORT
L OCA TE 1 2
REC
MODE
VOIC EPER FOR M MASTER
SEQUENCERS O N G P A T T E R N F I L E
IN TEGR ATEDSAMPLIN GMIXIN G U TILITY
E D IT J O B S T O RE
C O M PA R E S C E NE S T O RESETLOC ATE
SON GSC EN ES F1 S F2 S F3 S F4 S F5
F1 F2 F3 F4 F6F5
IN FOR MATION
D EC /N O I NC /Y ES
E XI T E NT ER
EXEC U TE
MUSICPRODUCTIONSYNTHESIZERIntegratedSamplingSequencer
R eal-timeExternalC ontrolSurfaceModularSynthesisPlug-inSystem
D R U MKITS
FAVOR ITES
S L O T 1 S L O T 2 S L O T 3
P RE 1 P R E 2 P R E 3 G M U S E R P L G1 P LG 3
A.PIAN O KEYBOAR D OR GAN GU ITAR / PLU C KED
B A S S S T R IN G S B R A S S R E E D / P IP E
SYN LEAD SYN PAD / CHOIR
SYN C OMPC H R OMATICPER C U SSION
DRUM/ PERCUSSION
S E M U S IC A L F X C O M BI
1 2 3 4 5 6 7 8
9 10 1 1 1 2 13 14 16
SECTION
TRACKSELECT
MUTE
SOLO
BANK
GROUP
NUMBER
COMMON
ELEMEN T/PER F.PAR T/ZON E

8/10/2019 motif_1(2)
http://slidepdf.com/reader/full/motif12 23/300
23 MOTIF Setting Up
Connec
A/D input
■ Connecting a microphone or other audio equipment (analog input)You can record or import external sounds or waveform data and use them as instrument sounds (see“Sampling” on page 58). When recording from an external audio source, connect a microphone or the audio sourceto the A/D INPUT jacks.
nAfter the above connections are complete, you are ready to set up for recording. When starting a recording, you may need to adjust theinput gain of the audio source using the GAIN knob. (page 18).
■ Connecting to mLAN-compatible audio equipment
nThe sound via either of the mLAN jacks and the A/D INPUT jacks can be input. You can set which jacks are used in the Utilitymode (page 252).
Digital input (when the optional AIEB2 has been installed)By installing the optional AIEB2 I/O expansion board, you can directly record digital audio from digital sources —such as a CD player or DAT deck. For maximum compatibility and flexibility, the AIEB2 board includes twodifferent input types: OPTICAL (optical fiber) and DIGITAL (coaxial cable).
nEither one of the connectors (OPTICAL or DIGITAL) can be used; however, both cannot be used at the same time. Select whichconnector is used for digital input in the Utility mode. See page 249.
Audio Device (Stereo)
L RSampling
RL
Mic (MONO)
AD INPUT
MOTIF MOTIF
Apply effects to the microphone
sound by using the Vocal HarmonyPlug-in board (PLG100-VH).AD INPUT
PLG2
A B C D E F G H
15
CATEGORYSEARCH
OCTAVED O WN U P
KNOBCONTROLFUNCTION
P A N R E V E RB C H O RU S T E M P O
A T T A C K R E L E A S EC U TOFFR ESON AN C E
A S S I G N A A S S I G N B A S S I G N 1 A S S I G N 2
K N 1 K N2 K N 3 K N 4
MEQL O W M E QH I MI DM E Q LO W M ID M E Q H IG H
REMOTECONTROLON/OFF
EFFECTBYPASSARPEGGIOI N S E RT I O N S Y S T E M O N / OFF
MASTERVOLU ME
VOLU ME 1VOLU ME2 V O L U M E 3 V O L U ME 4
C S 1 C S2 C S 3 C S 4
Z O N E 1 Z O N E 2 Z O N E 3 Z O N E 4
SEQTRANSPORT
L OCA TE 1 2
REC
MODE
VOIC EPER FOR M MASTER
SEQUENCERS O N G P A T T E RN F ILE
INTEGRATEDSAMPLIN G M I X I N G U T I L I T Y
E D IT J O B S T O RE
C OMPAR E SC EN ESTOR ESETLOC ATE
SON G SC EN ES F1 S F2 S F3 S F4 S F5
F1 F2 F3 F4 F6F5
IN FOR MATION
D EC /N O I NC /Y E S
E XI T E NT ER
EXEC U TE
MUSICPRODUCTIONSYNTHESIZERIntegratedSamplingSequencer
R eal-timeExternalC ontrolSurfaceModularSynthesisPlug-inSystem
D R U MKITS
FAVOR ITES
S L O T 1 S L O T 2 S L O T 3
P R E 1 P R E 2 P R E 3 G M U S ER P L G 1 PLG 3
A.PIAN O KEYBOAR D ORGAN GU ITAR / PLU C KED
B A S S S T R I N G S BR ASS R EED /PIPE
SYN LEAD SYN PAD / CHOIR
SYN C OMPC H R OMATICPER C U SSION
DRUM/ PER C U SSION
S E M U S I C A L F X C O MB I
1 2 3 4 5 6 7 8
9 10 11 12 13 14 16
SECTION
TRACKSELECT
MUTE
SOLO
BANK
GROUP
NUMBER
COMMON
ELEMEN T/PER F.PAR T/ZON E
PLG2
A B C D E F G H
15
CATEGORYSEARCH
OCTAVED O WN U P
KNOBCONTROLFUNCTION
P A N R E V E RB C H O RU S T E M P O
A T T A CK R E L E A SEC U TOFFR ESON AN C E
ASSIGNA A S S I G N B A S S I G N 1 A S S I GN 2
K N 1 K N 2 K N 3 K N4
M E Q LO W M E QH I MI DMEQLOWMID M EQ HI GH
REMOTECONTROLON/OFF
EFFECTBYPASSARPEGGIOIN S E R TI O N S Y S T E M O N / OF F
MASTERVOLU ME
VOLU ME 1VOLU ME 2VOLU ME 3VOLU ME 4
C S 1 C S 2 C S 3 C S 4
Z O N E 1 Z O N E 2 Z O N E 3 Z O N E 4
SEQTRANSPORT
LOC AT E 1 2
REC
MODE
VOIC EPER FOR M MASTER
SEQUENCERS O N G P A T T E RN F I L E
INTEGRATEDSAMPLIN G M I X I N G U T I L I T Y
E D IT J O B S T O R E
C OMPAR E SC EN ESTOR ESETLOC ATE
SON G SC EN ES F1 S F2 S F3 S F4 S F5
F1 F2 F3 F4 F6F5
IN FOR MATION
D EC /N O I NC /Y E S
E XI T E NT ER
EXEC U TE
MUSICPRODUCTIONSYNTHESIZERIntegratedSampling Sequencer
R eal-timeExternalC ontrolSurfaceModularSynthesisPlug-inSystem
D R U MKITS
FAVOR ITES
S L O T 1 S L O T 2 S L O T 3
P R E 1 P R E 2 P R E 3 G M U S ER P L G1 PLG 3
A.PIAN O KEYBOAR D OR GAN GU ITAR / PLU C KED
B A S S S T R I N G S BR ASS R EED /PIPE
SYN LEAD SYN PAD / CHOIR
SYN C OMPC H R OMATICPER C U SSION
D R U M/ PER C U SSION
S E M U S IC A L F X C O M BI
1 2 3 4 5 6 7 8
9 10 11 12 13 14 16
SECTION
TRACKSELECT
MUTE
SOLO
BANK
GROUP
NUMBER
COMMON
ELEMEN T/PER F.PAR T/ZONE
mLAN jacks
Sampling
MOTIF
mLAN audio device
PLG2
A B C D E F G H
15
CATEGORYSEARCH
OCTAVED O WN U P
KNOBCONTROLFUNCTION
P A N R E V E RB C H O RU S T E M P O
A T T A CK R E L E AS EC U TOFFR ESON AN C E
A S S I G N A A S S I G N B A S S I G N 1 A S S I G N 2
K N 1 K N 2 K N 3 K N 4
M E Q LO W M E QH I MI DM E Q LO W M I D M E Q H I GH
REMOTECONTROLON/OFF
EFFECTBYPASSARPEGGIOI N S E RT I O N S Y S T E M O N / O FF
MASTERVOLU ME VOLU ME1VOLU ME 2VOLU ME 3VOLU ME 4
C S1 C S 2 C S 3 C S 4
Z O N E 1 Z O N E 2 Z O N E 3 Z O N E 4
SEQTRANSPORT
L OCA TE 1 2
REC
MODE
VOIC EPER FOR M MASTER
SEQUENCERS O N G P A T T E R N F I L E
IN TEGR ATEDSAMPLIN G MIXIN GU TILITY
E D IT J O B S T O RE
C O M PA R E S C E NE S T O RESETLOC ATE
SON GSC EN ES F1 S F2 S F3 S F4 S F5
F1 F2 F3 F4 F6F5
IN FOR MATION
D EC /N O I NC /Y ES
E XI T E NT ER
EXEC U TE
MUSICPRODUCTIONSYNTHESIZERIntegratedSamplingSequencer
R eal-timeExternalC ontrolSurfaceModularSynthesisPlug-inSystem
D R U MKITS
FAVOR ITES
S L O T 1 S L O T 2 S L O T 3
P RE 1 P R E 2 P R E 3 G M U S E R P L G1 P LG 3
A.PIAN OKEYBOAR D ORGAN GU ITAR / PLU C KED
B A S S S T R IN GS BR ASS R EED /PIPE
SYN LEAD SYN PAD / CHOIR
SYN C OMPC H R OMATICPER C U SSION
DRUM/ PERCUSSION
S E M U S IC A L F X C O M BI
1 2 3 4 5 6 7 8
9 10 11 12 13 14 16
SECTION
TRACKSELECT
MUTE
SOLO
BANK
GROUP
NUMBER
COMMON
ELEMEN T/PER F.PAR T/ZON E
DAT
DAT or CD recorder
OPTICALINPUT
OPTICALOUTPUT
SamplingOptical cable
DAT
DAT or CD recorder
DIGITALINPUT
DIGITALOUTPUT
Sampling Coaxial cableMOTIF
MOTIF
PLG2
A B C D E F G H
15
CATEGORYSEARCH
OCTAVED OW N U P
KNOBCONTROLFUNCTION
P A N R E V E RB C H O RU S T E M P O
A T T A CK R E L E A SEC U TOFFR ESON AN C E
A S S I G N A A S S IG N B A S S I G N 1 A S S IGN 2
K N 1 K N 2 K N 3 K N 4
M E Q LO W M E QH I MI DM E Q LO W M I D M E Q H I GH
REMOTECONTROLON/OFF
EFFECTBYPASS ARPEGGIOI N S E RT I O N S Y S T E M O N / OF F
MASTERVOLU ME
VOLU ME 1VOLU ME 2VOLU ME 3 VOLU ME 4
C S 1 C S 2 C S 3 C S 4
Z O N E 1 Z O N E 2 Z O N E 3 Z O N E 4
SEQTRANSPORT
L O CA T E 1 2
REC
MODE
VOIC EPER FOR M MASTER
SEQUENCERS O N G P A T T E R N F I L E
INTEGRATEDSAMPLIN G MIXIN G U TILITY
E D IT J O B S T O RE
C O M PA R E S C E NE S T O RESETLOC ATE
SON G SC EN ES F1 S F2 S F3 S F4 S F5
F1 F2 F3 F4 F6F5
IN FOR MATION
D EC /N O I NC /Y E S
EXIT EN TER
EXEC U TE
MUSICPRODUCTIONSYNTHESIZERIntegratedSamplingSequencer
R eal-timeExternalC ontrolSurfaceModularSynthesisPlug-inSystem
D R U MKITS
FAVOR ITES
S L O T 1 S L O T 2 S L O T 3
P RE 1 P R E 2 P R E 3 G M U S E R P L G1 P LG 3
A.PIAN OKEYBOAR D OR GAN GU ITAR / PLU C KED
BASS STR IN GSBR ASS R EED /PIPE
SYN LEAD SYN PAD / CHOIR
SYN C OMPC H R OMATICPERCUSSION
DRUM/ PER C U SSION
SE MU SIC ALFX C OMBI
1 2 3 4 5 6 7 8
9 10 11 12 13 1 4 16
SECTION
TRACKSELECT
MUTE
SOLO
BANK
GROUP
NUMBER
COMMON
ELEMEN T/PER F.PAR T/ZON E
PLG2
A B C D E F G H
15
CATEGORYSEARCH
OCTAVED OW N U P
KNOBCONTROLFUNCTION
P A N R E V E RB C H O RU S T E M P O
A T T A CK R E L E A SEC U TOFFR ESON AN C E
A S S I G N A A S S IG N B A S S I G N 1 A S S IGN 2
K N 1 K N 2 K N 3 K N 4
M E Q LO W M E QH I MI DM E Q LO W M I D M E Q H I GH
REMOTECONTROLON/OFF
EFFECTBYPASS ARPEGGIOI N S E RT I O N S Y S T E M O N / OF F
MASTERVOLU ME
VOLU ME 1VOLU ME 2VOLU ME 3 VOLU ME 4
C S 1 C S 2 C S 3 C S 4
Z O N E 1 Z O N E 2 Z O N E 3 Z O N E 4
SEQTRANSPORT
L O CA T E 1 2
REC
MODE
VOIC EPER FOR M MASTER
SEQUENCERS O N G P A T T E R N F I L E
INTEGRATEDSAMPLIN G MIXIN G U TILITY
E D IT J O B S T O RE
C O M PA R E S C E NE S T O RESETLOC ATE
SON G SC EN ES F1 S F2 S F3 S F4 S F5
F1 F2 F3 F4 F6F5
IN FOR MATION
D EC /N O I NC /Y E S
E XI T E NT ER
EXEC U TE
MUSICPRODUCTIONSYNTHESIZERIntegratedSamplingSequencer
R eal-timeExternalC ontrolSurfaceModularSynthesisPlug-in System
D R U MKITS
FAVOR ITES
S L O T 1 S L O T 2 S L O T 3
P RE 1 P R E 2 P R E 3 G M U S E R P L G1 P LG 3
A.PIAN OKEYBOAR D OR GAN GU ITAR / PLU C KED
B A S S S T R I N G S B R A S S R E E D /P I P E
SYN LEAD SYN PAD / CHOIR
SYN C OMPC H R OMATICPERCUSSION
DRUM/ PER C U SSION
S E M U S IC ALFX C OMBI
1 2 3 4 5 6 7 8
9 10 11 12 13 1 4 16
SECTION
TRACKSELECT
MUTE
SOLO
BANK
GROUP
NUMBER
COMMON
ELEMEN T/PER F.PAR T/ZON E

8/10/2019 motif_1(2)
http://slidepdf.com/reader/full/motif12 24/300
24 MOTIF Setting Up
Connections
S et t i ngUp
Connecting External MIDI Equipment
Using a standard MIDI cable (available separately), you can connect an external MIDI device, and control it from theMOTIF. Likewise, you can use an external MIDI device (such as a keyboard or sequencer) to control the sounds onthe MOTIF. Below are several different MIDI connection examples; use the one most similar to your intended setup.
■ Controlling from an external MIDI keyboard
■ Controlling an external MIDI keyboard
■ Recording and playback using an external MIDI sequencer
■ Controlling another MIDI device via MIDI THRU
In the above setup, Synthesizer 2 can be played from the MOTIF (via MIDI OUT), while the external sequencerplays Synthesizer 1 (via MIDI THRU).
nThe MIDI cable should be no greater than 15 meters in length, and there should be no more than three devices in a MIDI chain(chained in series via each unit’s MIDI THRU). To connect more units, use a MIDI Thru Box for parallel connections. You mayencounter errors if the MIDI cables are too long or if too many devices are chained together via their MIDI THRU connectors.
■ Using an mLAN interface (when an optional mLAN8E has been installed)
nAny one of the these interfaces can be used for MIDI data transmission/reception: the MIDI connectors, the mLAN terminalconnector, or the USB connector. However, they cannot be used at the same time. Select which connector is used for MIDI datatransfer in the Utility mode. See page 259.
Extrnal MIDI keyboard or synthesizer
MUSICSYNTHESIZERREALTIMECONTROLEXTENDED SYNTHESIS
MOTIF
MIDI OUTMIDI INPLG2
A B C D E F G H
15
CATEGORYSEARCH
OCTAVED O WN U P
KNOBCONTROLFUNCTION
PAN R EVER B CHORUS TEMPO
A T T A CK R E L E A SEC U TOFFR ESON AN C E
ASSIGNA A S S I G N B A S S I G N 1 A S S I GN 2
K N 1 K N 2 K N 3 K N4
M E Q LO W M E QH I MI DMEQLOWMID M EQ HI GH
REMOTECONTROLON/OFF
EFFECTBYPASSARPEGGIOIN S E R TI O N S Y S T E M O N / OF F
MASTERVOLU ME VOLU ME 1VOLU ME 2VOLU ME 3VOLU ME 4
C S 1 C S 2 C S 3 C S 4
Z O N E 1 Z O N E 2 Z O N E 3 Z O N E 4
SEQTRANSPORT
L OC AT E 1 2
REC
MODE
VOIC EPER FOR M MASTER
SEQUENCERS O N G P A T T E RN F I L E
INTEGRATEDSAMPLIN G M I X I N G U T I L I T Y
E D IT J O B S T O R E
C O M PA R E S C E NE S T O RESETLOC ATE
SON G SC EN ES F1 S F2 S F3 S F4 S F5
F1 F2 F3 F4 F6F5
IN FOR MATION
DE C/ NO IN C /YES
E XI T E NT ER
EXEC U TE
MUSICPRODUCTIONSYNTHESIZERIntegratedSamplingSequencer
R eal-timeExternalC ontrolSurfaceModularSynthesisPlug-inSystem
D R U MKITS
FAVOR ITES
S L O T 1 S L O T 2 S L O T 3
P R E 1 P R E 2 P R E 3 G M U SE R P LG 1 P LG 3
A.PIAN OKEYBOAR D OR GAN GU ITAR / PLU C KED B A S S S T R I N G S B R A S S R E E D / PIPE
SYN LEAD SYN PAD / CHOIR
SYN C OMPC H R OMATICPER C U SSION
D R U M/ PER C U SSION
S E M U S IC A L F X C O M BI
1 2 3 4 5 6 7 8
9 10 11 1 2 13 14 16
SECTION
TRACKSELECT
MUTE
SOLO
BANK
GROUP
NUMBER
COMMON
ELEMEN T/PER F.PAR T/ZONE
External MIDI keyboard or synthesizer
MUSICSYNTHESIZERREALTIMECONTROLEXTENDEDSYNTHESIS
MOTIF
MIDI OUT MIDI INPLG2
A B C D E F G H
15
CATEGORYSEARCH
OCTAVED O WN U P
KNOBCONTROLFUNCTION
P A N R E V E RB C H O RU S T E M P O
A T T A CK R E L E AS EC U TOFFR ESON AN C E
A S S I G N A A S S I G N B A S S I G N 1 A S S I G N 2
K N 1 K N 2 K N 3 K N 4
M E Q LO W M E QH I MI DM E Q LO W M I D M E Q H I GH
REMOTECONTROLON/OFF
EFFECTBYPASSARPEGGIOI N S E RT I O N S Y S T E M O N / O FF
MASTERVOLU ME
VOLU ME1VOLU ME 2VOLU ME 3VOLU ME 4
C S1 C S 2 C S 3 C S 4
Z O N E 1 Z O N E 2 Z O N E 3 Z O N E 4
SEQTRANSPORT
L O CA T E 1 2
REC
MODE
VOIC EPER FOR M MASTER
SEQUENCERS O N G P A T T E R N F I L E
IN TEGR ATEDSAMPLIN G M I X I NG U T I L ITY
E D IT J O B S T O RE
C O M PA R E S C E NE S T O RESETLOC ATE
SON GSC EN ES F1 S F2 S F3 S F4 S F5
F1 F2 F3 F4 F6F5
IN FOR MATION
D EC /N O I NC /Y ES
E XI T E NT ER
EXEC U TE
MUSICPRODUCTIONSYNTHESIZERIntegratedSamplingSequencer
R eal-timeExternalC ontrolSurfaceModularSynthesisPlug-inSystem
D R U MKITS
FAVOR ITES
S L O T 1 S L O T 2 S L O T 3
P RE 1 P R E 2 P R E 3 G M U S E R P L G1 P LG 3
A.PIAN OKEYBOAR D OR GAN GU ITAR / PLU C KED
B A S S S T R IN G S B R A S S R E E D / P IP E
SYN LEAD SYN PAD / CHOIR
SYN C OMPC H R OMATICPER C U SSION
DRUM/ PERCUSSION
S E M U S IC A L F X C O M BI
1 2 3 4 5 6 7 8
9 10 11 12 13 1 4 16
SECTION
TRACKSELECT
MUTE
SOLO
BANK
GROUP
NUMBER
COMMON
ELEMEN T/PER F.PAR T/ZON E
MOTIF
MIDI OUT
MIDI OUT
MIDI IN
MIDI INExternal MIDI sequencer
PLG2
A B C D E F G H
15
CATEGORYSEARCH
OCTAVED OW N U P
KNOBCONTROLFUNCTION
P A N R E V E RB C H O RU S TEMPO
A T T A CK R E L E A SEC U TOFFR ESON AN C E
A S S I G N A A S S IG N B A S S I G N 1 A S S IGN 2
K N 1 K N 2 K N 3 K N 4
M E Q LO W M E QH I MI DM E Q LO W M I D M E Q H I GH
REMOTECONTROLON/OFF
EFFECTBYPASSARPEGGIOI N S E RT I O N S Y S T E M O N / OF F
MASTERVOLU ME
VOLU ME 1VOLU ME 2VOLU ME 3 VOLU ME 4
C S 1 C S 2 C S 3 C S 4
Z O N E 1 Z O N E 2 Z O N E 3 Z O N E 4
SEQTRANSPORT
L OCA TE 1 2
REC
MODE
VOIC EPER FOR M MASTER
SEQUENCERS O N G P A T T E R N F I L E
IN TEGR ATEDSAMPLIN GMIXIN G U TILITY
E D IT J O B S T O RE
C OMPAR E SC EN ESTOR ESETLOC ATE
SON G SC EN ES F1 S F2 S F3 S F4 S F5
F1 F2 F3 F4 F6F5
IN FOR MATION
D EC /N O I NC /Y E S
E XI T E NT ER
EXEC U TE
MUSICPRODUCTIONSYNTHESIZERIntegratedSamplingSequencer
R eal-timeExternalC ontrolSurfaceModularSynthesisPlug-inSystem
D R U MKITS
FAVOR ITES
S L O T 1 S L O T 2 S L O T 3
P R E1 P R E 2 P R E 3 GM U S E R P L G 1 PLG 3
A.PIAN OKEYBOAR D OR GAN GU ITAR / PLU C KED
B A S S S T R I N G S B R A S S R E E D /P I P E
SYN LEAD SYN PAD / CHOIR
SYN C OMPC H R OMATICPERCUSSION
DRUM/ PER C U SSION
S E M U S IC ALFX C OMBI
1 2 3 4 5 6 7 8
9 10 1 1 1 2 13 14 16
SECTION
TRACKSELECT
MUTE
SOLO
BANK
GROUP
NUMBER
COMMON
ELEMEN T/PER F.PAR T/ZON E
External MIDI sequencer External MIDI synthesizer 1
External MIDI synthesizer 2MOTIF
MIDI OUT
MIDI OUT MIDI IN
MIDI IN
MIDI THRUMIDI IN
PLG2
A B C D E F G H
15
CATEGORYSEARCH
OCTAVED OW N U P
KNOBCONTROLFUNCTION
PAN R EVER B CHORUS TEMPO
A T T A CK R E L E A SEC U TOFFR ESON AN C E
A S S I G N A A S S IG N B A S S I G N 1 A S S IGN 2
K N 1 K N 2 K N 3 K N 4
M E Q LO W M E QH I MI DM E Q LO W M I D M E Q H I GH
REMOTECONTROLON/OFF
EFFECTBYPASSARPEGGIOI N S E RT I O N S Y S T E M O N / OF F
MASTERVOLU ME
VOLU ME 1VOLU ME 2VOLU ME 3 VOLU ME 4
C S 1 C S 2 C S 3 C S 4
Z O N E 1 Z O N E 2 Z O N E 3 Z O N E 4
SEQTRANSPORT
L OCA TE 1 2
REC
MODE
VOIC EPER FOR M MASTER
SEQUENCERS O N G P A T T E R N F I L E
IN TEGR ATEDSAMPLIN GMIXIN G U TILITY
E D IT J O B S T O RE
C O M PA R E S C E NE S T O RESETLOC ATE
SON G SC EN ES F1 S F2 S F3 S F4 S F5
F1 F2 F3 F4 F6F5
IN FOR MATION
D EC /N O I NC /Y E S
E XI T E NT ER
EXEC U TE
MUSICPRODUCTIONSYNTHESIZERIntegratedSamplingSequencer
R eal-timeExternalC ontrolSurfaceModularSynthesisPlug-inSystem
D R U MKITS
FAVOR ITES
S L O T 1 S L O T 2 S L O T 3
PR E1 PR E2 PR E 3 G M U S ER P L G1 P LG 3
A.PIAN OKEYBOAR D OR GAN GU ITAR / PLU C KED
B A S S S T R I N G S B R A S S R E E D /P I P E
SYN LEAD SYN PAD / CHOIR
SYN C OMPC H R OMATICPERCUSSION
DRUM/ PER C U SSION
S E M U S IC ALFX C OMBI
1 2 3 4 5 6 7 8
9 10 1 1 1 2 13 14 16
SECTION
TRACKSELECT
MUTE
SOLO
BANK
GROUP
NUMBER
COMMON
ELEMEN T/PER F.PAR T/ZON E
C
mLan keyboard
IEEE1394 cable
Transmit & Receive
MOTIF
PLG2
A B C D E F G H
15
CATEGORYSEARCH
OCTAVED OW N U P
KNOBCONTROLFUNCTION
P A N R E V E RB C H O RU S T E M P O
A T T A CK R E L E A SEC U TOFFR ESON AN C E
A S S I G N A A S S I G N B A S S I G N 1 A S S IGN 2
K N 1 K N 2 K N 3 K N 4
M E Q LO W M E QH I MI DM E Q LO W M I D M E Q H I GH
REMOTECONTROLON/OFF
EFFECTBYPASSARPEGGIOIN SER TION SYSTEM ON /OFF
MASTERVOLU ME
VOLU ME 1VOLU ME 2VOLU ME 3 VOLU ME 4
C S 1 C S 2 C S 3 C S 4
Z O N E 1 Z O N E 2 Z O N E 3 Z O N E 4
SEQTRANSPORT
L OCA TE 1 2
REC
MODE
VOIC EPER FOR M MASTER
SEQUENCERS O N G P A T T E R N F I L E
IN TEGR ATEDSAMPLIN GMIXIN G U TILITY
E D IT J O B S T O RE
C O M PA R E S C E NE S T O RESETLOC ATE
SON G SC EN ES F1 S F2 S F3 S F4 S F5
F1 F2 F3 F4 F6F5
IN FOR MATION
D EC /N O I NC /Y E S
E XI T E NT ER
EXEC U TE
MUSICPRODUCTIONSYNTHESIZERIntegratedSamplingSequencer
R eal-timeExternalC ontrolSurfaceModularSynthesisPlug-inSystem
D R U MKITS
FAVOR ITES
S L O T 1 S L O T 2 S L O T 3
P RE 1 P R E 2 P R E 3 G M U S E R P L G1 P LG 3
A.PIAN OKEYBOAR D OR GAN GU ITAR / PLU C KED
BASS STR IN GSBR ASS R EED /PIPE
SYN LEAD SYN PAD / CHOIR
SYN C OMPC H R OMATICPERCUSSION
DRUM/ PER C U SSION
SE MU SIC ALFX C OMBI
1 2 3 4 5 6 7 8
9 10 11 12 13 1 4 16
SECTION
TRACKSELECT
MUTE
SOLO
BANK
GROUP
NUMBER
COMMON
ELEMEN T/PER F.PAR T/ZON E
C

8/10/2019 motif_1(2)
http://slidepdf.com/reader/full/motif12 25/300
25 MOTIF Setting Up
Connec
Connecting to a Personal Computer
By connecting a computer, you can transfer data between the MOTIF and the computer via MIDI, and use thecomputer to control, edit and organize data on the MOTIF. For example, you can use the included Voice Editorprogram to edit the MOTIF’s voices. There’s also a special File Utility program that lets you use your computer tomanage files in the Memory Card inserted in the MOTIF’s CARD slot or files in the SCSI device connected to theMOTIF.
■
Using an USB interface
n If you are using the Remote Control function to control operations on a computer sequencer, we recommend making connectionswith a USB cable.
nThe USB connection can only be used for transfer of MIDI data. No audio data can be transfered via USB.
nWhen you connect your computer to the MOTIF as illustrated above, you will need to select “USB” for MIDI data transmission inthe Utility mode. (page 258)
About the USB connectorUSB cables have different connectors on each end: the A type and the B type. When using the USB connection,connect the A type to your computer and the B type to the MOTIF.
Disconnecting/connecting the USB cable or turning the power off/on may cause the computer operation to hang-up,or may stop the MOTIF from functioning properly. Be careful NOT to disrupt the USB connection or turn the poweron/off in the following operating conditions.
• While the MOTIF is recognizing the device or while loading the driver.• While starting or shutting down the operating system.• While computer operation is suspended (with power management controls such as sleep or hibernation).• While a MIDI application is starting.
The computer may also hang up and/or the MOTIF’s functions may stop if you do the following:• Turn the power on/off, or connect/disconnect the cable too often.• Enter the sleep mode while trasmitting the MIDI data, and resume operation.• Disconnect/connect the cable while the MOTIF is on.• Turn the MOTIF on/off, start the computer, or install driver software while a huge amount of data is being transferred.
Computer with a USB Interface
USB cable
MOTIF
PLG2
A B C D E F G H
15
CATEGORYSEARCH
OCTAVED O WN U P
KNOBCONTROLFUNCTION
P A N R E V E RB C H O RU S T E M P O
A T T A CK R E L E AS EC U TOFFR ESON AN C E
A S S I G N A A S S I G N B A S S I G N 1 A S S I G N 2
K N 1 K N 2 K N 3 K N 4
MEQ LOW MEQH IMIDM E Q LO W M I D M E Q H I GH
REMOTECONTROLON/OFF
EFFECTBYPASSARPEGGIOI N S E RT I O N S Y S T E M O N / O FF
MASTERVOLU ME
VOLU ME1VOLU ME 2VOLU ME 3VOLU ME 4
C S1 C S 2 C S 3 C S 4
Z O N E 1 Z O N E 2 Z O N E 3 Z O N E 4
SEQTRANSPORT
L OCA TE 1 2
REC
MODE
VOIC EPER FOR M MASTER
SEQUENCERS O N G P A T T E R N F I L E
IN TEGR ATEDSAMPLIN G M I X I NG U T I L ITY
E D IT J O B S T O RE
C O M PA R E S C E NE S T O RESETLOC ATE
SON GSC EN ES F1 S F2 S F3 S F4 S F5
F1 F2 F3 F4 F6F5
IN FOR MATION
D EC /N O I NC /Y ES
E XI T E NT ER
EXEC U TE
MUSICPRODUCTIONSYNTHESIZERIntegratedSamplingSequencer
R eal-timeExternalC ontrolSurfaceModularSynthesisPlug-inSystem
D R U MKITS
FAVOR ITES
S L O T 1 S L O T 2 S L O T 3
P RE 1 P R E 2 P R E 3 G M U S E R P L G1 P LG 3
A.PIAN OKEYBOAR D OR GAN GU ITAR / PLU C KED
B A S S S T R IN G S B R A S S R E E D / P IP E
SYN LEAD SYN PAD / CHOIR
SYN C OMPC H R OMATICPER C U SSION
DRUM/ PERCUSSION
S E M U S IC A L F X C O M BI
1 2 3 4 5 6 7 8
9 10 11 12 13 1 4 16
SECTION
TRACKSELECT
MUTE
SOLO
BANK
GROUP
NUMBER
COMMON
ELEMEN T/PER F.PAR T/ZON E
PLG2
A B C D E F G H
15
CATEGORYSEARCH
OCTAVED O WN U P
KNOBCONTROLFUNCTION
P A N R E V E RB C H O RU S T E M P O
A T T A CK R E L E AS EC U TOFFR ESON AN C E
A S S I G N A A S S I G N B A S S I G N 1 A S S I G N 2
K N 1 K N 2 K N 3 K N 4
M E Q LO W M E QH I MI DM E QL OW M ID M E QH IGH
REMOTECONTROLON/OFF
EFFECTBYPASSARPEGGIOIN SER TIO N S Y S T E M O N / OF F
MASTERVOLU ME
VOLU ME 1VOLU ME 2VOLU ME 3VOLU ME 4
C S1 C S 2 C S 3 C S 4
Z O N E 1 Z O N E 2 Z O N E 3 Z O N E 4
SEQTRANSPORT
LOCATE 1 2
REC
MODE
VOIC EPER FOR M MASTER
SEQUENCERS O N G P A T T E RN F I L E
INTEGRATEDSAMPLIN G MIXIN G U T I L I T Y
E D IT J O B S T O R E
C O M PA R E S C E NE S T O RESETLOC ATE
SON GSC EN ES F1 S F2 S F3 S F4 S F5
F1 F2 F3 F4 F6F5
IN FOR MATION
D EC /N O I NC /Y ES
E XI T E NTE R
EXEC U TE
MUSICPRODUCTIONSYNTHESIZERIntegratedSamplingSequencer
R eal-timeExternalC ontrolSurfaceModularSynthesisPlug-inSystem
D R U MKITS
FAVOR ITES
S L O T 1 S L O T 2 S L O T 3
P RE 1 P R E 2 P R E 3 G M U S E R P L G1 P LG3
A.PIAN OKEYBOAR D OR GAN GU ITAR / PLU C KED
B A S S S T R I N G S B R A S S R E E D / PI P E
SYN LEAD SYN PAD / CHOIR
SYN C OMPC H R OMATICPER C U SSION
DRUM/ PER C U SSION
S E M U S IC A L F X C O M BI
1 2 3 4 5 6 7 8
9 10 11 1 2 1 3 14 16
SECTION
TRACKSELECT
MUTE
SOLO
BANK
GROUP
NUMBER
COMMON
ELEMEN T/PER F.PAR T/ZONE
MOTIF
MIDI OUT
MIDI IN
MIDI cable
MIDI IN
MIDI OUT
External MIDI synthesizer
External MIDI sequencer
Computer with a USB interface
USB cable
transmission & receive

8/10/2019 motif_1(2)
http://slidepdf.com/reader/full/motif12 26/300
26 MOTIF Setting Up
Connections
S et t i ngUp
■ Using an IEEE1394 interface (when an optional mLAN8E has been installed)
■ Using a MIDI interface
●Using the computer’s MIDI interface
●Using an external MIDI interface
nPlease use the appropriate MIDI interface for your computer.n If you are using a computer that has a USB interface, make sure to connect the computer and the MOTIF by USB. (The data
transfer rate is faster than MIDI and you’ll have access to multiple MIDI ports.)
Local On/Off - When Connected to a ComputerWhen connecting the MOTIF to a computer, the keyboard performance data is generally sent to the computer, andthen returned from the computer to play the tone generator or sound source. If the Local Switch is set to “on,” a“double” sound may result, since the tone generator is receiving performance data from both the keyboard directly andthe computer. Use the setting suggestions below as a guideline; specific instructions may differ depending on yourcomputer and the software used.
When MIDI “Echo” is enabled on the software/computer, set the MOTIF Local Switch to “off.”
n When transmitting or receiving System Exclusive data (such as with the Bulk Dump function), use the setting example below, making sure that MIDI “Echo” on the computer software is set to “off.”
MOTIF
IEEE1394 cable
Computer with a IEEE1394 interface
PLG2
A B C D E F G H
15
CATEGORYSEARCH
OCTAVED O WN U P
KNOBCONTROLFUNCTION
P A N R E V E RB C H O RU S T E M P O
A T T A CK R E L E A SEC U TOFFR ESON AN C E
ASSIGN A A S S I G N B A S S I G N 1 A S S I GN 2
K N 1 K N 2 K N 3 K N 4
M E Q LO W M E QH I MI DM E Q LO W M ID M E Q H IG H
REMOTECONTROLON/OFF
EFFECTBYPASSARPEGGIOI N S E RT I O N S Y S T E M O N / OFF
MASTERVOLU ME
VOLU ME 1VOLU ME2 V O L U M E3 V O L U M E4
C S 1 C S 2 C S 3 C S4
Z O N E 1 Z O N E 2 Z O N E 3 Z O N E 4
SEQTRANSPORT
L O CA T E 1 2
REC
MODE
VOIC EPER FOR M MASTER
SEQUENCERS O N G P A T T E RN F ILE
INTEGRATEDSAMPLIN G MIXIN G U TILITY
E D IT J O B S T O RE
C O M PA R E S C E NE S T O RESETLOC ATE
SON G SC EN ES F1 S F2 S F3 S F4 S F5
F1 F2 F3 F4 F6F5
IN FOR MATION
D EC /N O I NC /Y E S
E XI T E NT ER
EXEC U TE
MUSICPRODUCTIONSYNTHESIZERIntegratedSamplingSequencer
R eal-timeExternalC ontrolSurfaceModularSynthesisPlug-in System
D R U MKITS
FAVOR ITES
S L O T 1 S L O T 2 S L O T 3
P RE 1 P R E 2 P R E 3 G M U S E R P L G1 P LG 3
A.PIAN OKEYBOAR D OR GAN GU ITAR / PLU C KED
B A S S S T R I N G S B R A S S R E E D / PI P E
SYN LEAD SYN PAD / CHOIR
SYN C OMPC H R OMATICPER C U SSION
D R U M/ PER C U SSION
S E M U S I C A L F X C O MB I
1 2 3 4 5 6 7 8
9 10 11 12 13 14 16
SECTION
TRACKSELECT
MUTE
SOLO
BANK
GROUP
NUMBER
COMMON
ELEMEN T/PER F.PAR T/ZON E
Echo Back On
Local Off
Computer withApplication Software
ToneGenerator
Keyborad
MOTIF Local Sw=off
IN OUTUSB
OUT
IN

8/10/2019 motif_1(2)
http://slidepdf.com/reader/full/motif12 27/300
27 MOTIF Setting Up
Connec
When MIDI “Echo” is disabled on the software/computer, set the MOTIF Local Switch to “on.”
n Although not indicated in the illustration above, the MOTIF actually receives and responds to MIDI data from thecomputer application (sequencer), regardless of the Local Sw setting on the MOTIF.
* MIDI “Echo” is a function on sequencers that takes any data received via the MIDI IN and “echoes” it (or sendsit as is) through the MIDI OUT. In some software, this function is also called “MIDI Thru.”
n Refer to the owner's manual of your particular software for specific instructions.
Connecting to an External SCSI Device
Reference (page 262)
This SCSI-2 50-pin connector (D-sub, half-pitch) can be used to connect to an external SCSI data storage device —allowing you to conveniently save and store large quantities of data. For details about SCSI and connecting SCSIdevices, see page 64.
nThe SCSI ID for the MOTIF and for the connected SCSI device are set in the File mode (page 265).
◆ MOTIF-compatible SCSI devices/disks• Only DOS-format disks can be used by the MOTIF for saving data. Disks formatted by the MOTIF are
formatted using DOS format.• Disks formatted to DOS format by a personal computer can be used with the MOTIF. However, for best results,
we recommend using disks formatted by the MOTIF.• When formatted using the MOTIF, disks with a capacity of less than 2GB are formatted using FAT16 format,
and larger disks are formatted using FAT32 format.
• MO disks which can be used with the MOTIF include capacities of 128 MB, 230 MB, and 540 MB. MO diskswith a capacity of 640 MB and above cannot be used.
• The MOTIF can use removable media of capacities of up to 2 GB. Even if larger drives are connected, theMOTIF can only use a maximum of 2 GB. Furthermore, all removable media are formatted using the FAT16format, and partitioning is not possible.
• When a 31 GB disk is formatted, four 7.75 GB partitions will be created automatically.
Echo Back Off
Local On
Computer withApplication Software
MOTIF Local Sw=on
OUTUSB
INTone
Generator Keyborad
Hard Disk, etc.
SCSI
MOTIF
PLG2
A B C D E F G H
15
CATEGORYSEARCH
OCTAVED O WN U P
KNOBCONTROLFUNCTION
P A N R E V E RB C H O RU S T E M P O
A T T A CK R E L E AS EC U TOFFR ESON AN C E
A S S I G N A A S S I G N B A S S I G N 1 A S S I G N 2
K N 1 K N 2 K N 3 K N 4
M E Q LO W M E QH I MI DM E QL OW M ID M E QH IGH
REMOTECONTROLON/OFF
EFFECTBYPASSARPEGGIOIN SER TIO N S Y S T E M O N / OF F
MASTERVOLU ME
VOLU ME 1VOLU ME 2VOLU ME 3VOLU ME 4
C S1 C S 2 C S 3 C S 4
Z O N E 1 Z O N E 2 Z O N E 3 Z O N E 4
SEQTRANSPORT
LO CA TE 1 2
REC
MODE
VOIC EPER FOR M MASTER
SEQUENCERS O N G P A T T E RN F I L E
INTEGRATEDSAMPLIN G MIXIN G U T I L I T Y
ED IT JOB STOR E
C O M PA R E S C E NE S T O RESETLOC ATE
SON GSC EN ES F1 S F2 S F3 S F4 S F5
F1 F2 F3 F4 F6F5
IN FOR MATION
D EC /N O I NC /Y ES
E XI T E NTE R
EXEC U TE
MUSICPRODUCTIONSYNTHESIZERIntegratedSamplingSequencer
R eal-timeExternalC ontrolSurfaceModularSynthesisPlug-inSystem
D R U MKITS
FAVOR ITES
S L O T 1 S L O T 2 S L O T 3
P RE 1 P R E 2 P R E 3 G M U S E R P L G1 P LG3
A.PIAN OKEYBOAR D OR GAN GU ITAR / PLU C KED
B A S S S T R I N G S B R A S S R E E D / PI P E
SYN LEAD SYN PAD / CHOIR
SYN C OMPC H R OMATICPER C U SSION
DRUM/ PER C U SSION
S E M U S IC A L F X C O M BI
1 2 3 4 5 6 7 8
9 10 11 1 2 1 3 14 16
SECTION
TRACKSELECT
MUTE
SOLO
BANK
GROUP
NUMBER
COMMON
ELEMEN T/PER F.PAR T/ZONE

8/10/2019 motif_1(2)
http://slidepdf.com/reader/full/motif12 28/300
28 MOTIF Setting Up
Connections
S et t i ngUp
Connecting Various Controllers
Quick Start Guide (page 48)
The MOTIF features several controller jacks on the rear panel — letting you independently control various aspectsof the sound and a variety of functions with optional controllers.
BREATH SUSTAIN
FOOTSWITCH
FOOTCONTROLLER
ASSIGNABLE 12
FC7BC3 FC7FC4or
FC5
FC4or
FC5

8/10/2019 motif_1(2)
http://slidepdf.com/reader/full/motif12 29/300
29 MOTIF Setting Up
Powerin
Powering Up
Power-on Procedure
Once you’ve made all the necessary connections between your MOTIF and any other devices, make sure that allvolume settings are turned down all the way to zero. Then turn on the every device in your setup in the order ofMIDI masters (senders), MIDI slaves (receivers), then audio equipment (mixers, amplifiers, speakers, etc.). This
ensures smooth signal flow from the first device to the last (first MIDI, then audio).When powering down the setup, first turn down the volume for each audio devices, then switch off each device in the reverse order (first audio devices, then MIDI).
n If the SCSI device is connected to the MOTIF, first turn the SCSI device on and follow the instructions below. When turning thepower off in this case, turn the SCSI device off after all other devices.
When using the MOTIF as MIDI receiver:
Switching the MOTIF On
nBefore you switch your MOTIF on or off, first turn down the volume of any audio equipment connected to it.
1 Press the POWER switch.After a while, the default display appears (as set in the Utility parameter, Power On Mode Display).
2 Raise the sound system volume to a reasonable level.
3 Gradually raise the VOLUME control while playing the keyboard to set the desired listening level.
21 3
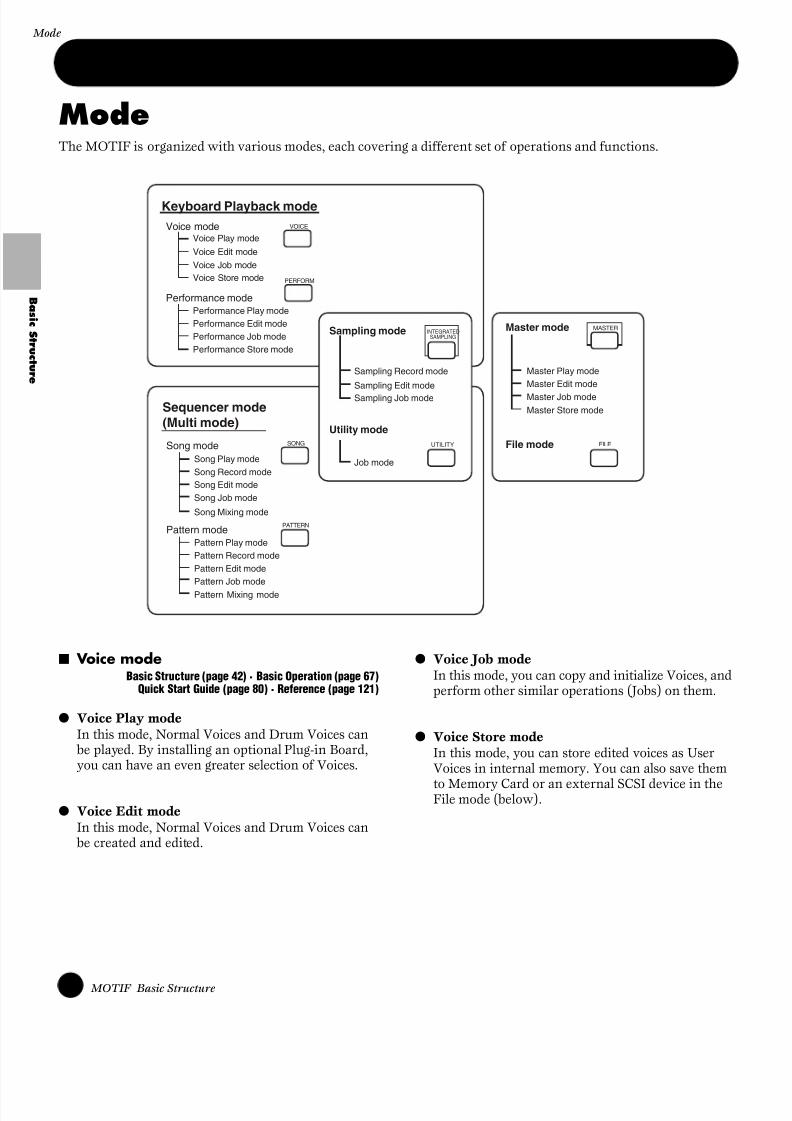
8/10/2019 motif_1(2)
http://slidepdf.com/reader/full/motif12 30/300
30 MOTIF Basic Structure
Mode
B as i c S t r uc t ur e
Basic StructureModeThe MOTIF is organized with various modes, each covering a different set of operations and functions.
■ Voice modeBasic Structure (page 42) · Basic Operation (page 67)
Quick Start Guide (page 80) · Reference (page 121)
● Voice Play modeIn this mode, Normal Voices and Drum Voices can be played. By installing an optional Plug-in Board,you can have an even greater selection of Voices.
● Voice Edit modeIn this mode, Normal Voices and Drum Voices can be created and edited.
● Voice Job modeIn this mode, you can copy and initialize Voices, andperform other similar operations (Jobs) on them.
● Voice Store modeIn this mode, you can store edited voices as UserVoices in internal memory. You can also save them
to Memory Card or an external SCSI device in theFile mode (below).
Voice Play modeVoice mode
Sequencer mode(Multi mode)
Sampling mode Master mode
Utility mode
File mode
Keyboard Playback mode
Voice Edit mode
Voice Job modeVoice Store mode
VOICE
PERFORM
SONG
PATTERN
FILE
MASTER
UTILITY
INTEGRATEDSAMPLING
Performance Play modePerformance mode
Performance Edit modePerformance Job modePerformance Store mode
Song Play modeSong mode
Song Record modeSong Edit mode
Song Job mode
Song Mixing mode
Pattern Play modePattern mode
Pattern Record mode
Pattern Edit modePattern Job mode
Pattern Mixing mode
Master Play modeMaster Edit mode
Master Job modeMaster Store mode
Sampling Record mode
Sampling Edit modeSampling Job mode
Job mode

8/10/2019 motif_1(2)
http://slidepdf.com/reader/full/motif12 31/300
31 MOTIF Basic Structure
M
■ Performance modeBasic Structure (page 42) · Basic Operation (page 67)
Quick Start Guide (page 88) · Reference (page 160)
● Performance Play modeIn this mode, Performances can be played — lettingyou use Voice splits, layers, etc,.
● Performance Edit modeIn this mode, Performances can be created and
edited.● Performance Job mode
In this mode, you can copy and initializePerformances, and perform other similar operations(Jobs) on them.
● Performance Store modeIn this mode, you can save edited Performances asUser Performances in internal memory. You canalso save them to Memory Card or an external SCSIdevice in the File mode (below).
■ Song modeBasic Structure (page 51) · Basic Operation (page 67)
Quick Start Guide (page 78) · Reference (page 177)
● Song Play modeIn this mode, you can use the sequencer and itsvarious functions (e.g., Track Mute/Solo) in playing back Songs.
● Song Record modeIn this mode, you can use the sequencer to recordyour keyboard performance to a User Song. TheMOTIF lets you record up to 16 separate sequence
tracks.● Song Edit mode
In this mode, you can edit the MIDI events of eachtrack of the recorded Song.
● Song Job modeIn this mode, you can perform a variety ofoperations on the Song data, such as copying anderasing. These can be done on individual measures,or on entire tracks.
● Song Mixing modeIn this mode, you can set the tone generation
parameters of each part of the recorded Song.
■ Pattern modeBasic Structure (page 51) · Basic Operation (page 67)Quick Start Guide (page 100) · Reference (page 215)
● Pattern Play modeIn this Mode, you can use the sequencer to play back Patterns. You can combine various Phrases (byusing the Patch function) to create a Pattern.
● Pattern Record mode
In this mode, you can use the sequencer to recordyour keyboard performance to a User Phrase — the basic building block for Patterns. The MOTIF letsyou record up to 16 separate sequence tracks.
● Pattern Edit modeIn this mode, you can edit the MIDI events of eachtrack of the recorded Pattern Phrase.
● Pattern Job modeIn this mode, you can perform a variety ofoperations on the Pattern data, such as copying anderasing. These can be done on individual measures,or on entire tracks.
● Pattern Mixing modeIn this mode, you can set the tone generationparameters of each part of the recorded Pattern.
■ Sampling modeBasic Structure (page 58) · Basic Operation (page 67)Quick Start Guide (page 100) · Reference (page 233)
This mode is s sub-mode of the Voice/Performance/Song/Pattern mode. Press the [INTEGRATEDSAMPLING] button in each mode to enter the
Sampling mode, and press the same button aftersampling to go back to the previous mode.
● Sampling Record modeIn this mode, you can record sounds into theMOTIF from a microphone or other audio source.These sounds (Samples) can then be played back inreal time via keyboard or can be saved to the Song/Pattern track.Moreover, you can process a recorded Sample (forexample, with Chorus or another effect), then re-record it as a new Sample — using the Resamplingfunction.
● Sampling Edit modeIn this mode, you can edit recorded Samples — forexample, their loop points and other parameters.
● Sampling Job modeIn this mode, you can copy and delete Samples, andperform other similar operations (Jobs) on them.

8/10/2019 motif_1(2)
http://slidepdf.com/reader/full/motif12 32/300
32 MOTIF Basic Structure
Mode
B as i c S t r uc t ur e
■ Utility modeBasic Operation (page 67) · Reference (page 249)
This mode is a sub-mode of the Voice/Performance/Song/Pattern mode. Press the [UTILITY] button ineach mode to enter the Sampling mode and press thesame button after sampling to go back to the previousmode.In this mode, you can set parameters that apply to the
entire system of the MOTIF. These include MIDIsettings and global setup parameters.
● Utility Job modeIn this Mode, you can restore the MOTIF’s factorysettings.
■ Master modeBasic Structure (page 56) · Basic Operation (page 68)
Quick Start Guide (page 93) · Reference (page 268)
This mode gives you a convenient way to register thesettings that are often used in the Voice, Performance,Song and Pattern mode to User Master, and to instantlyrecall them with simple operations.For the Voice or Performance mode, you can makeadditional Master Keyboard function settings (e.g.,separate Zone settings), and register them to a UserMaster.
● Master Play modeIn this mode, you can select the desired User Masterto play the MOTIF.
● Master Edit mode
In this mode, you can edit the Master settings.
● Master Job modeIn this mode, various jobs for Master settings areprovided.
● Master Store modeIn this mode, you can store settings for each modeto the internal memory as a User Master.
■ File modeBasic Structure (page 63) · Basic Operation (page 68)
Quick Start Guide (page 97) · Reference (page 261)
In this mode, you can save/load all your importantoriginal data to/from Memory Card (the MOTIFfeatures a built-in Card slot) or an external SCSIstorage device for future recall.

8/10/2019 motif_1(2)
http://slidepdf.com/reader/full/motif12 33/300
33 MOTIF Basic Structure
System Over
System Overview This section provides an overview of the MOTIF’s wide range of sophisticated and versatile features. The MOTIF ismade up of several blocks, as shown here.
Controller block
Basic Structure (pages 37, 48)
This block consists of the keyboard, Pitch Bend and Modulation Wheels, Ribbon Controller, Sound Control knobs,and so on. The keyboard itself doesn’t generate sounds, but instead sends note, velocity and other information (MIDIdata) to the synthesizer’s tone generator section when you play notes. The controllers also send changes.
Information from the keyboard and controllers can be transmitted to other external MIDI devices through the MIDIOUT connector or the USB connector.
Sequencer block
Basic Structure (page 51) · Quick Start Guide (pages 99 ~ 118) · Reference (pages 177, 215)
This block lets you create songs and patterns by recording/editing musical performances (MIDI data) recorded fromthe controller block, and then plays back this data, transmitting it to the tone generator block.The sequencer block can be operated in the Song mode, in the Pattern mode, and in using the Arpeggio feature.When a song or a pattern is played back, the musical data of each sequence track is transmitted to the tone generator block according to the Transmit Channel settings.
nDetails about track structure of a Song/Pattern/Arpeggio are described on pages 51 and 52 respectively.
Sampling block
Keyboard Controllers
MIDI sequence data
• Song• Pattern• Arpeggio
• Voice• Performance
• Reverb• Chorus• Variation• Master Equalizer
Microphone oraudio equipment A/D Input
Internal AWM2Plug-in board
DSP
MIDI data
MIDI out
MIDI data MIDI data MIDI data
Controller block
External MIDI device
Sequencer block Effect block Tone Generator block
Output
KN 1 KN 2 KN 3 KN 4
Sequencer Tone Generator block (example)
part 1
(Receive channel 3)
(Receive channel 2)
(Receive channel 10)
(Receive channel 1)
(Receive channel 9)
(Receive channel 16)
part 2
part 3
part 4
part 15
part 16
Track 1
Track 2
Track 3
Track 16 Percussion
Strings
Bass
Piano Ch1
Ch2
Ch3
Ch16

8/10/2019 motif_1(2)
http://slidepdf.com/reader/full/motif12 34/300
34 MOTIF Basic Structure
System Overview
B as i c S t r uc t ur e
Tone Generator block
The tone generator block is what actually produces sound in response to the MIDI messages received from thesequencer block, the controller block, and from the MIDI IN connector or the USB connector.The following example illustrates the signal flow within a Voice.
nFor details on the Voice structure, see page 40.
Internal AWM2 Tone Generator and optional Plug-in board
The tone generator block in the MOTIF consists of the built-in AWM2 and optional Plug-in units.
● AWM2(Advanced Wave Memory2)AWM2 (Advanced Wave Memory 2) is a synthesis system based on sampled waves (sound material), and is used inmany Yamaha synthesizers. For extra realism, each AWM2 Voice uses multiple samples of a real instrument’swaveform. Furthermore, a wide variety of envelope generator, filter, modulation, and other parameters can beapplied to the basic waveform.You can create your own waves via microphone or from external audio equipment by using the Sampling function.These are then stored in internal RAM and can be used just like the preseet waves.One voice can use up to four waves (elements) in AWM2 tone generator.
nAWM2 is not just limited to general musical instruments (Normal Voices). It can also be used for setting up percussiveinstruments (Drum Voices). For details on Normal and Drum Voices, see page 45.
●Plug-in boardPlug-in Boards give you an enormous amount of additional sonic flexibility and power. When installed, they work
seamlessly and transparently within the system of the MOTIF — meaning that you can use their sounds andfunctions just as if they were built right into the MOTIF at the factory.The boards that are available for and can be installed to the MOTIF are described below.Up to three Plug-in boards can be installed to the MOTIF. These boards are not simply a source of more Voices; theyare also tone generators in their own right and extend the system-level specifications such as maximum polyphony.In addition, they allow you to use synthesis systems besides AWM2. You can play Plug-in Voices just like ordinaryinternal Voices and use them as Parts in a Performance (page 42).The MOTIF is compatible with the Modular Synthesis Plug-in System (see next page). There are three types ofModular Synthesis Plug-in System-compatible Plug-in Boards: Single Part, Multi-Part and Effect Plug-in Board. Usingthese, you can build your own system based on the sounds you require.
Voice
Osillator
See page 46 See page 47 See page 47
See page 45
Pitch
Pitch EnvelopeGenerator
Filter EnvelopeGenerator
Low FrequencyOscillator
Amplitude EnvelopeGenerator
Filter Amplitude
Element 1
Element 2
Element 3
Element 4
PEG FEG
LFO
AEG
Internal AWM2Tone Generator
Plug-in board (optional)

8/10/2019 motif_1(2)
http://slidepdf.com/reader/full/motif12 35/300
35 MOTIF Basic Structure
System Over
Plug-in board line-up
● Single Part Plug-in BoardsSingle Part Plug-in Boards let you add a completely different synthesizer or tone generator and play its voices byusing a single part of the MOTIF.
• Analog Physical Modeling Plug-in Board (PLG150-AN)Using Analog Physical Modeling (AN) synthesis, the very latest digital technology is used to accurately reproducethe sound of analog synthesizers. With this board installed, you have real-time control over the playback of
vintage synthesizer sounds as well as the very latest sounds heard in today’s club-oriented music.
• Piano Plug-in Board (PLG150-PF)A massive waveform memory is dedicated to the reproduction of piano sounds. This board offers 136 stereosounds, including a number of acoustic and electric pianos, and up to 64-note polyphony. You can even install twoof these boards to double the polyphony to 128 notes.
• Advanced DX/TX Plug-in Board (PLG150-DX)The sounds of the DX7 are available on this Plug-in Board. Unlike PCM-based tone generators, this board uses thepowerful FM Synthesis system — the same as found on DX-series synthesizers — for extraordinarily versatileand dynamic sound shaping potential. Sounds are compatible with those of the DX7, and the board can evenreceive DX7 data via MIDI bulk dump.
• Virtual Acoustic Plug-in Board (PLG150-VL)
With Virtual Acoustic (VA) synthesis, the sounds of real instruments are modeled (simulated) in real time, givinga degree of realism that cannot be achieved using conventional PCM-based synthesis techniques. When playingthese sounds using an optional MIDI Wind Controller (WX5), you can even capture some of the physical feel ofwoodwind instruments.
● Effect Plug-in Board
• Vocal Harmony Plug-in Board (PLG100-VH)With this board installed, you can add harmonies to selected parts using four types of effects.Chorus parts for vocals can be created automatically from chords that have been prepared and stored as MIDIdata. You can also use the MOTIF like a vocoder by connecting and using a microphone while playing thekeyboard.
● Multi-Part Plug-in BoardMulti-Part Plug-in Boards let you expand the voice polyphony of the MOTIF by giving you a full 16 independentinstrumental parts. By using this type of board to play back sequencer tracks, you can reserve the maximumpolyphony of the MOTIF for your keyboard performance.
• XG Plug-in Board (PLG100-XG)This Plug-in Board is a 16-part XG sound generator. You can play back XG/GM song files using the rich variety ofsounds and effects on this board.
n Additional Plug-in Boards will be available in the future.
About MODULAR SYNTHESIS PLUG-IN SYSTEM
The Yamaha Modular Synthesis Plug-in System offers powerful expansion and upgrade capabilities for ModularSynthesis-Plug-in-compatible synthesizers, tone generators and sound cards. This enables you to easily and effectivelytake advantage of the latest and most sophisticated synthesizer and effects technology, allowing you to keep pace withthe rapid and multi-faceted advances in modern music production.

8/10/2019 motif_1(2)
http://slidepdf.com/reader/full/motif12 36/300
36 MOTIF Basic Structure
System Overview
B as i c S t r uc t ur e
Maximum Polyphony
The maximum sonic polyphony is 62 for AWM2, plus the polyphony of the Plug-in Board (if installed). The actualnote polyphony will vary depending on the type of tone generator unit used, the number of Elements in the Voice,and the note polyphony of the Plug-in Board.In the case of AWM2 Voices, the polyphony figure of 63 is divided by the number of Elements in the Voice.
Part structure of the Tone Generator block
The MOTIF plays its sounds (with the Tone Generator block) in response to MIDI data, received from the Controller block or Sequencer block.MIDI data is assigned to one of sixteen channels, and the MOTIF is capable of simultaneously playing sixteenseparate parts, via the sixteen MIDI channels. However, we can overcome the sixteen-channel limit by usingseparate MIDI “ports,” each supporting sixteen channels. The multiple sound sources of the MOTIF (internal tonegenerator and Plug-in Boards) take advantage of the three MIDI ports included on the instrument.
As shown in the above illustration, up to 48 parts can be used in the modes (excepting the Voice mode). However,the number of parts that are actually used is a maximum of 34 in the Song and Pattern modes, as we’ll see later insome examples.
nSee page 30 for details about the modes.
nThe USB cable supports up to eight separate MIDI ports. The MOTIF’s Tone Generator block supports three separate ports asillustrated above, and the MOTIF’s MIDI Thru function supports eight separate MIDI ports.
nThe MIDI cable and IEEE cable (when the mLAN8E has been installed) cannot handle MIDI port data.
These parts are used inmodes other than theVoice mode.
Tone Generator block
Part for Voice mode
Port 1 Port 2 Port 3
part 1
part 2
part 14
part 15
part 16
part 17
part 18
part 30
part 31
part 32
part 33
part 34
part 46
part 47
part 48

8/10/2019 motif_1(2)
http://slidepdf.com/reader/full/motif12 37/300
37 MOTIF Basic Structure
System Over
Relationship between the Part structure of the Tone Generator block and theController/Sequencer block for each mode
● Voice mode
n In the Voice mode, the MIDI port number is 1.
nThe Multi-Part Plug-in Board cannot be used in the Voice mode. However, other Plug-in Boards can be used.
● Performance mode
n In the Performance mode, the MIDI port number is 1.
nThe Multi-Part Plug-in Board cannot be used in the Performance mode. However, other Plug-in Boards can be used.
The sequencer block is notavailable in the Voice mode.
Part 1-48 are not used.
Tone Generator block (Internal / Plug-in)Part for Voice mode
Port 1 Port 2 Port 3
part 1
part 2
part 3
part 4
part 5
part 16
part 17
part 18
part 30
part 31
part 32
part 33
part 34
part 46
part 47
part 48
Keyboard Controllers
Output
Controller block
KN 1 KN 2 KN 3 KN 4
Parts 5-13 and 17-48are not used.
A maximum of four parts can be used among parts 1-4 and 14-16.Parts that are set to on in the Performance Play mode are used.
Keyboard Controllers
Output
Controller block
Tone Generator block (Internal / Plug-in)Port 1 Port 2 Port 3
Part 1
Part 2
Part 3
Part 4
Part 5
Part 14
Part 15
Part 16
Part 17
Part 18
Part 30
Part 31
Part 32
Part 33
Part 34
Part 46
Part 47
Part 48
PLG3 part
PLG2 part
PLG1 part
The sequencer block isnot available in thePerformance mode.
KN 1 KN 2 KN 3 KN 4
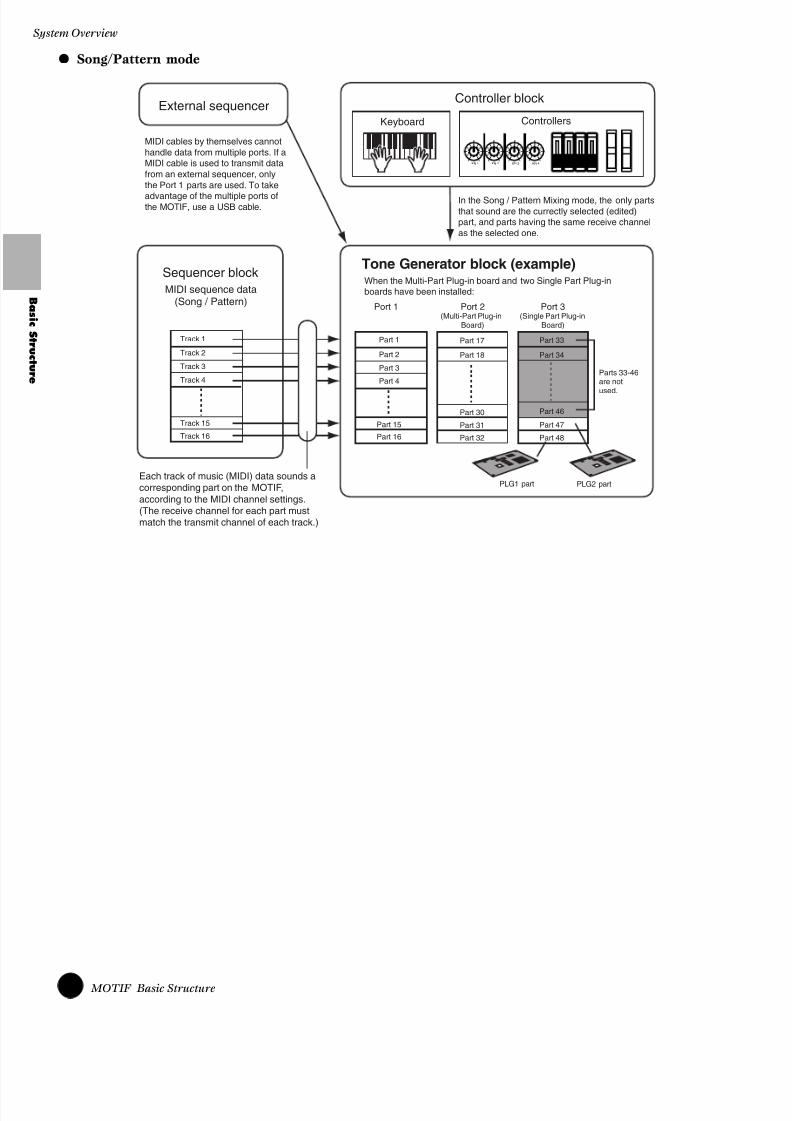
8/10/2019 motif_1(2)
http://slidepdf.com/reader/full/motif12 38/300
38 MOTIF Basic Structure
System Overview
B as i c S t r uc t ur e
● Song/Pattern mode
External sequencer
MIDI sequence data(Song / Pattern)
Tone Generator block (example)Sequencer block
Port 1 Port 2(Multi-Part Plug-in
Board)
Port 3(Single Part Plug-in
Board)
Part 1
Part 2
Part 3
Track 1
Track 2
Track 3
Track 4
Track 15
Track 16
Part 4
Part 15
Part 17
Part 18
Part 30
Part 31
Part 32
PLG1 part PLG2 part
Part 16
Part 33
Parts 33-46are not
used.
Part 34
Part 46
Part 47
Part 48
In the Song / Pattern Mixing mode, the only partsthat sound are the currectly selected (edited)part, and parts having the same receive channelas the selected one.
MIDI cables by themselves cannothandle data from multiple ports. If aMIDI cable is used to transmit datafrom an external sequencer, onlythe Port 1 parts are used. To take
advantage of the multiple ports ofthe MOTIF, use a USB cable.
When the Multi-Part Plug-in board and two Single Part Plug-inboards have been installed:
Each track of music (MIDI) data sounds acorresponding part on the MOTIF,according to the MIDI channel settings.(The receive channel for each part mustmatch the transmit channel of each track.)
Keyboard Controllers
Controller block
KN 1 KN 2 KN 3 KN 4

8/10/2019 motif_1(2)
http://slidepdf.com/reader/full/motif12 39/300
39 MOTIF Basic Structure
System Over
Effect block
This block of the MOTIF applies effects to the output of the tone generator, processing and enhancing the soundusing sophisticated DSP (digital signal processing) technology.
Effect structure
The MOTIF’s effect processing features the following effect units.
■ System Effects (Reverb, Chorus, Variation)System Effects are applied to the overall sound, whether it be a voice, an entire performance setup, a song, etc.With System effects, the sound of each part is sent to the effect according to the effect Send Level for each part. Theprocessed sound (referred to as “wet”) is sent back to the mixer, according to the Return Level, and output — after being mixed with the unprocessed “dry” sound. This arrangement lets you prepare an optimum balance of the effectsound and the original sound of the parts.
• ReverbThe Reverb effects add a warm ambience to the sound, simulating the complex reflections of actual performance
spaces, such as a concert hall or a small club. A total of 12 different Reverb types are available.
• ChorusThe Chorus effects use modulation to create a rich ensemble sound — as if one part were being played by severalinstruments simultaneously. A total of 25 different Chorus types are available.
• VariationThe Variation effects provide a wide variety of sound transformations and enhancements. A total of 25 differentVariation types are available. Variation is not available in the Voice mode.
■ Insertion Effects (1, 2)Insertion effects can be applied individually to each part.
Insertion effects are mainly used to directly process a single part. The depth of the effect is adjusted by setting thedry/wet balance. Since an Insertion effect can only be applied to one particular part, it should be used for sounds youwant to drastically change. You can also set the balance so that only the effect sound is heard, by setting Wet to100%.The MOTIF features two Insertion effect systems — one with a total of 104 internal effect types and the otherwith 25.
■ Plug-in Insertion EffectsThis is a special effect system, only available when an effect-type Plug-in Board is installed. Plug-in Board effects arenot available in the Voice mode.
■ Master EqualizerUsually an equalizer is used to correct the sound output from amps or speakers to match the special character of theroom. The sound is divided into several frequency bands, then by raising or lowering the level for each band, thecorrection is made.Adjusting the sound you play according to the genre—classical music being more refined, pops music more crisp, androck music more dynamic—can also serve to draw out the special characteristics of the music and make yourperformance more enjoyable.The MOTIF possesses a high grade five-band digital equalizer function.The four knobs can be used to adjust the gain of the four bands (among five).

8/10/2019 motif_1(2)
http://slidepdf.com/reader/full/motif12 40/300
40 MOTIF Basic Structure
System Overview
B as i c S t r uc t ur e
Effect connection
● In the Voice mode:Reference (page 137)
You can select the Insertion connection among three types.
n The parallel connection is not available for Plug-in voices.
● In the Performance mode:Reference (page 169)
The diagram below indicates the connection when the Vocal Harmony Plug-in Board (PLG100-VH) is installed to slot 1.
nThe Vocal Harmony Plug-in Board (PLG100-VH) can be installed only to slot 1. It cannot be installed to slot 2 or 3.
You can select the Insertion connectionfrom the three types shown below.
Tone Generator
block Element 1
Element 2
Element 3
Element 4
1
2 2
1
2
1
This determines which Insertionsystem, 1 or 2, is applied to eachElement (or to each key when theDrum voice is selected). TheInsertion effect can also be
bypassed.
1 to 2 2 to 1 parallel
Return LevelSend LevelInsertion Effect
1
2
OutputMaster Equalizer
System Effect
Reverb
Chorus
Part 1-4,Plug-in part 2-3
Select the part to which theInsertion effect is applied fromparts 1-4 and Plug-in parts 2-3.The connection type dependson the setting of the Voice
assigned to the selected part.
Select the part to whichthe Plug-in Insertioneffect is applied fromparts 1-4, Plug-in parts2-3 and A/D Input part.
Tone Generatorblock
A/D Input
• External audio source• Microphone sound
Return LevelSend Level
Insertion Effect(Plug-in)
Insertion Effect
1
2OutputMaster Equalizer
System Effect
Reverb
Chorus
Variation

8/10/2019 motif_1(2)
http://slidepdf.com/reader/full/motif12 41/300
41 MOTIF Basic Structure
System Over
● In the Song/Pattern mode:Reference (page 210)
The diagram below indicates the connection when the Vocal Harmony Plug-in Board (PLG100-VH) is installed toslot 1 and the Multi part Plug-in Board (PLG-100XG) is installed to slot 3.
* Please note that the Insertion Effect, Insertion Effect (Plug-in), and the System Effect cannot cannot be applied toparts 17~32 (using the Multi-part Plug-in board). The signal from parts 17~32 is directly sent to the MasterEqualizer.
nThe Vocal Harmony Plug-in Board (PLG100-VH) can be installed only to slot 1. It cannot be installed to slot 2 or 3.
nThe Multi part Plug-in Board (PLG100-XG) can be installed only to slot 3. It cannot be installed to slot 1 or 2.
Part 17-32 *(When the Multi-part Plug-in board has been installed)
Plug-in Part 2
(When the Single part Plug-in board has been installed)
Part 1~16
Tone Generatorblock
A/D Input
• External audio source• Microphone sound
Select the part to which the Insertioneffect is applied. The connection typedepends on the setting of the Voice
assigned to the selected part.
Select the part to whichthe Plug-in Insertioneffect is applied.
Return LevelSend Level
Output
System Effect
Reverb
Chorus
Variation
Insertion Effect
PLG100-VH
Insertion Effect(Plug-in)
1
2Master Equalizer

8/10/2019 motif_1(2)
http://slidepdf.com/reader/full/motif12 42/300
42 MOTIF Basic Structure
Main functions
B as i c S t r uc t ur e
Main functionsVoices and Performances
Quick Start Guide (pages 80, 88) · Reference (pages 121, 160)
A Voice is the main sound of the MOTIF, made up of a variety of parameter settings. Each Voice can consist of up tofour separate Elements, each of which is a high-quality wave, or basic sound.A Performance, on the other hand, is a program in which multiple Voices (parts) are combined — in a layer, or inother configurations. Each Performance can contain up to four different Parts.
One Voice One Performance
Element 1 Element 2 Element 3 Element 4
Up to four elements
Parameter settings
(Voice Edit)
+
Voice 1 Voice 2 Voice 3 Voice 4
Up to four voices
Parameter settings
(Performance Edit)
+
Oscillator
See page 46 See page 47 See page 47
See page 45
Pitch
Pitch EnvelopeGenerator
Filter EnvelopeGenerator
Low FrequencyOscillator
Amplitude EnvelopeGenerator
Filter Amplitude
Parameters related to theTone Generator block
Parameters released to the Effect block Parameters related to the Controller block
PEG FEG
LFO
AEG
Set the following parameters for each Element to create the Voice.
Returnlevel
Sendlevel
System Effect
Reverb
Chorus
Insertion Effect
1
2Master
Equalizer
KN 1 KN 2 KN 3 KN 4

8/10/2019 motif_1(2)
http://slidepdf.com/reader/full/motif12 43/300
43 MOTIF Basic Structure
Main func
In the Voice Play mode, you can select and play any of these Voices. In the Performance Play mode, you can select andplay any of these Performances.On the previous page, the illustration shows the structure of one Voice/Performance. The illustration below showsthe overall memory structure of all Voices and Performances. Taken together, these illustrations can help you betterunderstand the structure of the MOTIF’s Voices and Performances. These two illustrations help you to understandthe structure of Voice/Performance.
Preset 1(128 Normal Voices)
Group A~H
Number 1~16
Voice
Preset 2(128 Normal Voices)
Preset Voice(384 Normal Voices + 48 Drum Voices)
Group A~H
Number 1~16
Voice
Preset 3(128 Normal Voices)
Group A~H Group A~C
Group A~H
Number 1~16
Voice
Preset 1(48 Drum Voices)
Preset 1
Number 1~16
Voice
Plug-in Voice(The maximum amount of Preset and Users Banks is three -depending on
the number of Plug-in Board that are installed.)
User(128)
GM Preset(128 Normal Voices)
Group A~H
Number 1~16
Voice
GM Preset(1 Drum Voices)
GM Preset Voice(128 Normal Voices+1Drum Voices)
Voice
User(128 Normal Voices)
Group A~H
Number 1~16
Voice
User(16 Drum Voices)
User Voice(128 Normal Voices+16 Drum Voices)
Voices Performance
(AN, PF, DX board: 64 voice VLboard: 192 voice )
Preset 2
Number 1~16
Voice
(AN, PF, DX board: 64 voice VLboard: 192 voice )
Preset 3
Number 1~16
Voice
(AN, PF, DX board: 64 voice VLboard: 192 voice )
User 1(64 Voice)
Number 1~16
Voice
Group A~H
User 2(64 Voice)
Number 1~16
Voice
Group A~H
User 3(64 Voice)
Number 1~16
Voice
Group A~H
Number 1~16
Performance
For instructions on selecting Voices /Performances, see pages 124 and 162.
Indicates the separate "Banks"of Voices / Performances.
Number 1~16
Voice
Group A~C
Number 1~16
Voice

8/10/2019 motif_1(2)
http://slidepdf.com/reader/full/motif12 44/300
44 MOTIF Basic Structure
Main functions
B as i c S t r uc t ur e
Waves and Elements
Waves are the waveforms that make up the Elements, which in turn make up a Voice. A total of 1309 high-qualitypreset Waves are available. As shown in the following illustration, when creating a Voice, you can select the Wave to be used as an Element and then set its level, pitch, tone and other parameters.
User Waves — Samples
One very powerful feature of the MOTIF is its ability to import external audio samples (such as computer WAV/AIFF files), and record audio as well — and then use those samples as instrument sounds for playback. You canrecord Waves through the microphone or line level jacks, and you can load Waves saved on Memory Card or anexternal SCSI device.The Waves can then be processed and assigned to notes on the keyboard. You can play them via the keyboard or youcan assign them as Parts of a Song/Pattern.
Element 1
Element 4
Element 2
Element 3
VelocityOne Voice
Wave 1~1309
CDMemory Card
SCSI device
Load
MD
A/D INPUT jacks DIGITAL INconnector
mLAN (IEEE1394)connector
SEQ TRANSPORT
LOCATE 1 2
REC
When the optional AIEB2has been installed to theMOTIF.
When the optionalmLAN8E has beeninstalled to the MOTIF.
Sampling
Internal DRAM 4MB (Can be expanded up to 64 MB
by installing optional SIMM memory modules.)
Wave
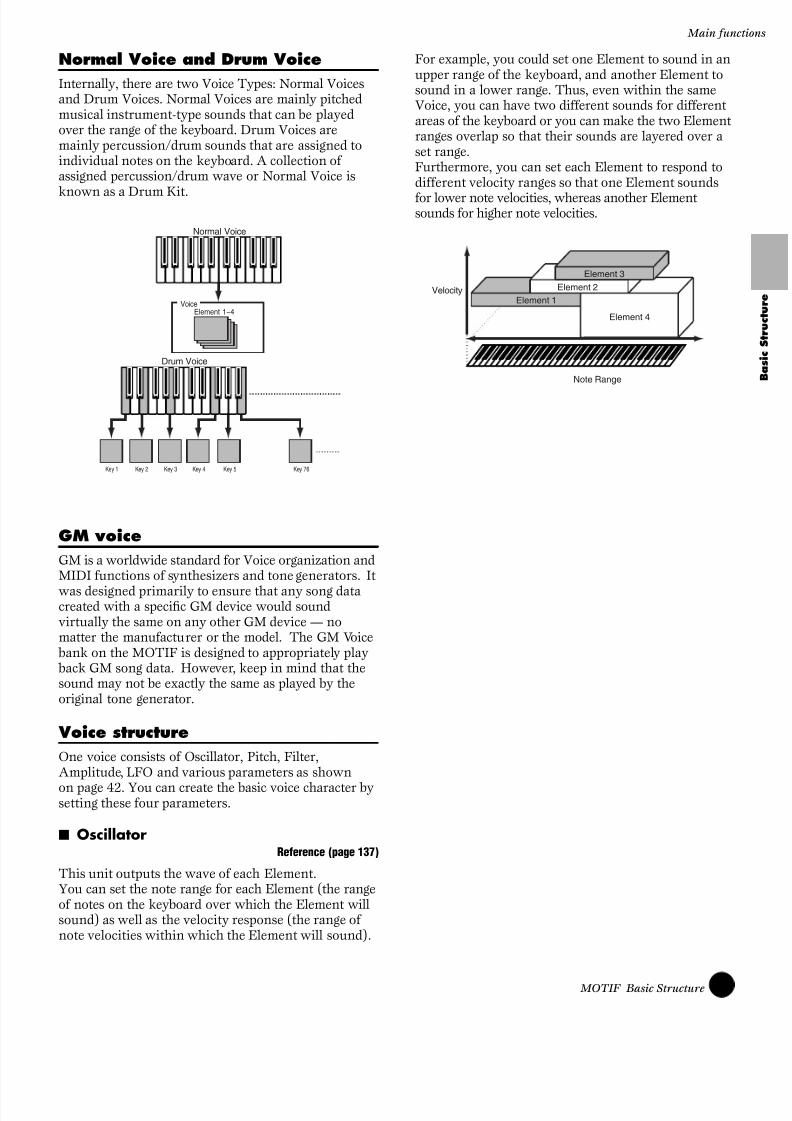
8/10/2019 motif_1(2)
http://slidepdf.com/reader/full/motif12 45/300
45 MOTIF Basic Structure
Main func
Normal Voice and Drum Voice
Internally, there are two Voice Types: Normal Voicesand Drum Voices. Normal Voices are mainly pitchedmusical instrument-type sounds that can be playedover the range of the keyboard. Drum Voices aremainly percussion/drum sounds that are assigned toindividual notes on the keyboard. A collection ofassigned percussion/drum wave or Normal Voice is
known as a Drum Kit.
GM voice
GM is a worldwide standard for Voice organization andMIDI functions of synthesizers and tone generators. It
was designed primarily to ensure that any song datacreated with a specific GM device would soundvirtually the same on any other GM device — nomatter the manufacturer or the model. The GM Voice bank on the MOTIF is designed to appropriately play back GM song data. However, keep in mind that thesound may not be exactly the same as played by theoriginal tone generator.
Voice structure
One voice consists of Oscillator, Pitch, Filter,Amplitude, LFO and various parameters as shown
on page 42. You can create the basic voice character bysetting these four parameters.
■ OscillatorReference (page 137)
This unit outputs the wave of each Element.You can set the note range for each Element (the rangeof notes on the keyboard over which the Element willsound) as well as the velocity response (the range ofnote velocities within which the Element will sound).
For example, you could set one Element to sound in anupper range of the keyboard, and another Element tosound in a lower range. Thus, even within the sameVoice, you can have two different sounds for differentareas of the keyboard or you can make the two Elementranges overlap so that their sounds are layered over aset range.Furthermore, you can set each Element to respond todifferent velocity ranges so that one Element sounds
for lower note velocities, whereas another Elementsounds for higher note velocities.
Drum Voice
Key 1 Key 2 Key 3 Key 4 Key 5 Key 76
Normal Voice
VoiceElement 1~4
Element 1
Element 4
Element 2
Element 3
Velocity
Note Range

8/10/2019 motif_1(2)
http://slidepdf.com/reader/full/motif12 46/300
46 MOTIF Basic Structure
Main functions
B as i c S t r uc t ur e
■ PitchReference (page 138)
This unit controls the pitch of each Element outputfrom OSC. You can detune Elements, apply PitchScaling and so on. Also, by setting the PEG (PitchEnvelope Generator), you can control how the pitchchanges over time.
●PEG (Pitch Envelope Generator)Using the PEG, you can control the transition inpitch from the moment a note is pressed on thekeyboard to the point at which it is released. Asillustrated at right, the Pitch Envelope consists offive Time (transition speed) parameters and fiveLevel (pitch) parameters. This is useful for creatingautomatic changes in pitch. Furthermore, differentPEG parameters can be set for each Element.
■ FilterQuick Start Guide (page 84) · Reference (page 140)
This unit modifies the tone of each Element output
from Pitch by cutting the output of a specific frequencyportion of the sound. You can also set the FilterEnvelope Generator (FEG), to control how the filterworks over time — letting you set up dynamic changesin tone.
● Cutoff Frequency and ResonanceFilters work by allowing the portion of the signal lower than a given frequency to pass, and cuttingthe portion of the signal above that frequency. Thisfrequency is referred to as the cutoff frequency. Youcan produce a relatively bright or darker sound bysetting the cutoff.
A parameter that boosts the level of the signal in thearea of the cutoff frequency is called Resonance. Byemphasizing the overtones in this area, this canproduce a distinctive “peaky” tone, making thesound brighter and harder.
● About the main Filter typesThe Low Pass Filter is shown in the illustrationabove — however, the MOTIF features other Filtertypes as well. This section introduces you to thefour types.
• Low Pass Filter (above)This only passes signals below the Cutoff frequency.You can then use the Reso (Resonance) parameter to
add further character to the sound.
• High Pass FilterThis only passes signals above the Cutoff frequency.You can then use the Reso (Resonance) parameter toadd further character to the sound.
0
ReleaseLevel
AttackLevel
Hold Level
AttackTime
HoldTime
Decay1Time
Decay2Time
ReleaseTime
Decay1Level
SustainLevel Key off
Time
Level
Cutoff frequency
Frequency (pitch)
Level
These resonance are"passed" by the filter.
Cutoff frequency
Resonance
Frequency (pitch)
Level
Resonance
Cutoff Frequency
These frequencies are"passed" by the f ilter.

8/10/2019 motif_1(2)
http://slidepdf.com/reader/full/motif12 47/300
47 MOTIF Basic Structure
Main func
• Band Pass FilterThis only passes a band of signals around the Cutofffrequency. The width of this band can be varied.
• Band Elimination FilterThis attenuates a band of signals around the Cutofffrequency, but passes everything else.
● FEG (Filter Envelope Generator)Using the FEG, you can control the transition intone from the moment a note is pressed on thekeyboard to the point at which it is released. Asillustrated at right, the Filter Envelope consists offive Time (transition speed) parameters and fiveLevel parameters (for the amount of filtering).When you press a note on the keyboard, the cutofffrequency will change according to these envelopesettings. This is useful for creating automatic wah
effects, for example. Furthermore, different FEGparameters can be set for each Element.
■ AmplitudeReference (page 145)
This unit controls the output level (amplitude) of eachElement output from Filter. The signals are then sentat this level to the Effect block. Also, by setting theAEG (Amplitude Envelope Generator), you cancontrol how the volume changes over time.
● AEG (Amplitude Envelope Generator)Using the AEG, you can control the transition involume from the moment a note is pressed on thekeyboard to the point at which it is released. Asillustrated at right, the Amplitude Envelope consistsof five Time (transition speed) parameters and fiveLevel parameters (for the amount of filtering).When you press a note on the keyboard, the volumewill change according to these envelope settings.
Furthermore, different AEG parameters can be setfor each Element.
■ LFO (Low Frequency Oscillator)Reference (page 147)
As its name suggests, the LFO creates waveforms of a low frequency.These waveforms can be used to vary the pitch, filter oramplitude of each Element to create effects such asvibrato, wah and tremolo. LFO can be setindependently for each Element; it can also be setglobally for all Elements.
Range passed
Frequency
LevelCutoff range Cutoff range
Center frequency
Cutoff range
Frequency
LevelRange passed Range passed
Center frequency
0
ReleaseLevel
AttackLevel
Hold Level
AttackTime
HoldTime
Decay1Time
Decay2Time
ReleaseTime
Decay1Level
SustainLevel Key off
Time
Level
0
ReleaseLevel
AttackLevel
InitLevel
AttackTime
Decay1Time
Decay2Time
ReleaseTime
Decay1Level
SustainLevel Key off
Time
Level

8/10/2019 motif_1(2)
http://slidepdf.com/reader/full/motif12 48/300
48 MOTIF Basic Structure
Main functions
B as i c S t r uc t ur e
Controllers
The MOTIF gives you an amazing amount of controloptions. Not only is it equipped with the conventionalPitch Bend and Modulation Wheels, it also featuresspecial knobs and sliders — and has an additional setof rear-panel jacks for connecting foot controllers andfootswitches. You can connect controllers to the rearpanel jacks to control various parameters by foot aswell as by hand.This section explains the basic functions of eachcontroller.
Pitch Bend Wheel
This wheel’s prime function is to control pitch.Move the wheel up or down to bend the pitch up ordown.
nPitch Bend Range can be set for each Voice (page 132).The wheel can also be assigned other parameters(page 134).
nEven if a different parameter is assigned to the wheel,Pitch Bend messages are still transmitted through MIDIOUT when it is being used.
Modulation Wheel
The more you move this wheel up, the greater themodulation that is applied to the sound.
nModulation depth can also be set beforehand. Also, thewheel can be assigned to different parameters, such asvolume or pan (page 134).
Knobs
These knobs let you change various aspects of theVoice’s sound in real time — while you play. Turn aknob to the right to increase the value, and left to
decrease it. You can change which particular group offunctions or parameters the knobs are assigned to bypressing the [KNOB CONTROL FUNCTION] button.Selecting the ASSIGN group (A, B, 1, 2) lets youcontrol a group of user-assignable functions.
nCommon system parameters are assigned to Knobs [A]and [B] (page 256). Voice-specific parameters areassigned to Knobs [1] and [2] (page 132). Knobs [1] and[2] can be assigned to Control Set Source.
nA preset of suitable parameter settings is assigned to eachVoice. By using each knobs [1] and [2], you are in effectadjusting these settings by a certain amount. If theseparameters are already preset at their minimum or
maximum settings, the settings cannot be exceeded.
Control Sliders (CS)
In the Voice mode, these are used to control the volumeof each of the four Elements. In the Performancemode, these are used to control the volume of thefour parts. In the Song/Pattern mode, these let youadjust the volume of specific tracks,(parts)depending on which group of tracks is currentlyselected.
When the Zone Switch is set to on in the Master Playmode, various functions (Control Number) can beassigned to these Control Sliders (page 273).
Pitch BendWheel
ModulationWheel
Pitch Up
Pitch Down
Pitch BendWheel
ModulationWheel
Deeper
KNOBCONTROLFUNCTION
PAN REVERB CHORUS TEMPO
ATTACK RELEASECUTOFF RESONANCE
ASSIGN A ASSIGN B ASSIGN 1 ASSIGN 2
MEQ LOW MEQ HI MIDMEQLOWMID MEQ HIGH
KN 1 KN 2 KN 3 KN 4
When the selectedtracks (parts) are 1-4: 1 2 3 4
When the selectedtracks (parts) are 5-8:
5 6 7 8
When the selectedtracks (parts) are 9-12: 9 10 11 12
When the selectedtracks (parts) are 13-16: 13 14 15 16
VOL UME 1 VOLUME 2 VOLUME 3 VOLUME 4
CS 1 CS 2 CS 3 CS 4
ZONE1 ZONE2 ZONE3 ZONE4

8/10/2019 motif_1(2)
http://slidepdf.com/reader/full/motif12 49/300
49 MOTIF Basic Structure
Main func
Foot Controller
An optional Foot Controller (such as the FC7),connected to the FOOT CONTROLLER jacks(page 18) on the rear panel, can be assigned to anumber of controller parameters. By using a footcontroller for parameter control, both your hands are left free to play the keyboard (or to operate othercontrollers), — exceptionally convenient when you’re
playing live.nFoot Controller parameters can be set for each Voice.
Footswitch (assignable)
An optional Yamaha FC4 or FC5 Foot Switchconnected to the rear panel FOOT SWITCHASSIGNABLE jack (page 18) can be assigned to arange of parameters. It is suited for switch-type (on/off) controls, such as Portamento Switch, increment/decrement of a Voice or Performance Number, start/stop of the Sequencer, and holding the Arpeggiator on
or off.nThe parameter assigned to the Footswitch is set in the
Utility mode (page 256).
Footswitch (sustain)
An optional FC4 or FC5 Footswitch connected to theSUSTAIN jack on the rear panel (page 18) lets youcontrol sustain — particularly useful when playingpiano and strings voices.
nYou cannot assign a function other than Sustain to theSUSTAIN jack.
Breath Controller
You can connect an optional Breath Controller (BC3)to the BREATH jack (page 18) on the rear panel. Thenuse it to control a large number of the MOTIF’sparameters, particularly those controlled by a windplayer’s breath: dynamics, timbre, pitch and so on.The Breath Controller is ideally suited for realisticexpression with wind instrument type Voices.
nBreath Controller parameters can be set for each Voice.
Aftertouch
Aftertouch lets you change the sound (adding vibrato,for example) by applying further pressure to a note onthe keyboard while it is being held down. This allowsreal-time expression and control. Aftertouch can beused to control a wide variety of parameters(page 134).
Control Sets
Aside from their default parameters, keyboardaftertouch, the controllers and some of the knobs onthe front panel can be assigned to various parameters,as explained on page 48. For example, you could assignResonance to the Modulation Wheel and set aftertouchto apply vibrato. You are free to assign parameters tosuit the kind of sound being played.
These controller assignments are known as ControlSets. As the following illustration shows, you canassign up to six different Control Sets per Voice.Within each Control Set, the controller is known as theSource (Src) and the parameter controlled by theSource is known as the Destination (Dest). There arevarious Dest parameters available; some will apply tothe Voice as a whole, while some will be specific to eachof its Elements. Details are given in the Controls List ofthe separate Data List.
nDetails about the available Dest parameter settings aregiven in the Destination Parameter List of the separateData List.
nThe Element Switches (page 134) will be disabled if theDest parameter setting is not specified for the Elements(i.e., to settings 00 to 33).
■ Using one source to control severaldestinations
By creating Control Sets, you can change soundsin avariety of ways.For example, set the Src (Source) parameter of ControlSet 1 to MW (Modulation Wheel) and the Dest(Destination) parameter to ELFO-PM (Element LFO
Pitch Modulation Depth). Then set the Src parameterof Control Set 2 also to MW, but set the Dest parameterto ELM PAN (Element Pan). You will also need tospecify the Element to be controlled and also the depth(amount) of control.In this example, when you move the Modulation Wheelupward, the amount of Pitch Modulation increasesaccordingly, and the Element is panned from left toright. In this way, you can have the sound change inseveral different ways, simply by adjusting a singlecontroller.
Destination
Control Parameters
Depth
Depth of control
SourceVoice
Control SetsController
PB,MW,etc
1
ON/OFF ON/OFF ON/OFF ON/OFF
Elements 2 3 4
1~6

8/10/2019 motif_1(2)
http://slidepdf.com/reader/full/motif12 50/300
50 MOTIF Basic Structure
Main functions
B as i c S t r uc t ur e
■ Using several sources to control onedestination
Continuing from the example above, now createanother Control Set where Src is set to FC (FootController) and Dest is set to ELFO-PM (Element LFOPitch Modulation Depth). Again, specify the Elementto be controlled and also the depth of control.Now, Pitch Modulation is assigned to both theModulation Wheel and Foot Controller. In otherwords, you can also assign several Src controllers toeach Dest parameter.
By assigning all six Control Sets, you will have astunning degree of real-time control over thesynthesizer’s sounds.
■ Control Sets and External MIDI ControlIn a Control Set, the controllers are assigned to theinternal parameters of the synthesizer. However, somecontrollers were originally designed for a particularpurpose, and send pre-defined MIDI Control Changemessages when used, regardless of their Control Setallocations within the synthesizer.For example, the Pitch Bend Wheel, Modulation Wheeland keyboard aftertouch were originally designed tocontrol pitch bend, modulation and aftertouch.Therefore, when you use these controllers, pitch bend,modulation and aftertouch information is always sent
to the MIDI Out.Let’s say the Pan parameter is assigned to the PitchBend Wheel in a Control Set. Now, when you move thePitch Bend Wheel, the internal tone generator of thesynthesizer will pan the sound; however, at the sametime, the original pre-defined Pitch Bend messages willstill be sent to the MIDI Out.
The controllers can also send MIDI Control Changemessages to control the parameters of external MIDIdevices. These assignments can be set in the UtilityMode.
nSince Pitch Bend Wheel, Modulation Wheel andkeyboard aftertouch are pre-defined with specific MIDIcontrols, other MIDI Control Change numbers cannot be
assigned to them.
You can also set up a controller such that it sends onekind of Control message to the synthesizer’s internaltone generator yet another kind to the MIDI Out.For example, in a Control Set you could assignresonance to Assignable Knob [1]. Then, in the UtilityMode, you could assign Control Change Number 1(Modulation) to the same knob. Now, when you turnthe knob, resonance will be applied to the sound of theinternal tone generator; however, at the same time,modulation information will be sent to the externalMIDI device connected to the MIDI Out.
ELFO-PM
Dest
ELM PAN
Dest
SET 1 SET 2
Src
MW(Modulation Wheel)
Src
MW(Modulation Wheel)
Moving theModulation Wheelchanges both theamount of PitchModulation and thepan position.
ELFO-PM
Dest
ELFO-PM
Dest
SET 1 SET 3Src
MW(Modulation Wheel)
Src
FC(Foot Controller)
You can control the
pitch modulation effect
using either of
Modulation Wheel
(MW) and Foot
Controller (FC).
OUT
Tone Generator
IN
Pitch LFO1 PAN
MIDI
MIDI Control
Pitch BendWheel
Controller Set

8/10/2019 motif_1(2)
http://slidepdf.com/reader/full/motif12 51/300
51 MOTIF Basic Structure
Main func
Song and Pattern(Sequencer mode)
Basic Operation (page 67) · Reference (pages 177, 215)
Songs and Patterns are MIDI sequence data consistingof 16 tracks.
● A Song on the MOTIF is effectively the same as aSong on a sequencer, and playback automaticallystops at the end of the recorded data.
● In the MOTIF, the term “pattern” refers to arelatively short pattern — say, 4 to 16 measures (upto 256 measures) — which is used for loopedplayback. Therefore, once Pattern playback starts, itcontinues until you press the [J] button. TheMOTIF features a variety of preset Phrase data thatis used as the basic material in making up Patterns.
Track structure of Song
The following illustration shows the track structure ofSong. Songs are created by recording MIDI data toindividual tracks.
Song playback uses up to 16 parts (from those shown above).
Song 64
Song 63
Tone Generator block (example)
Port 1 Port 2(Multi-Part Plug-in
board)
Port 3(Single part Plug-in
board)part 1
part 2
part 3
part 4
part 15
part 17
part 18
part 30
part 31
part 32
PLG1 part PLG2 part
part 16
part 33
Parts 33-46are not used.
part 34
part 46
part 47
part 48
When a Multi-Part Plug-in board and two Single part Plug-inboards have been installed:
Song Mixing
Song 01
Song 02
Song 62
Tempo track Tempo change
Scene track Track mute status/Scene memory change(including tempo, transpose etc,)
Track 1 MIDI sequence data
Track 2 MIDI sequence data
Track 3 MIDI sequence data
Track 16 MIDI sequence data
MIDI OUT ExternalToneGenerator
Scene1
Scene2
Scene3
Scene4
Scene5
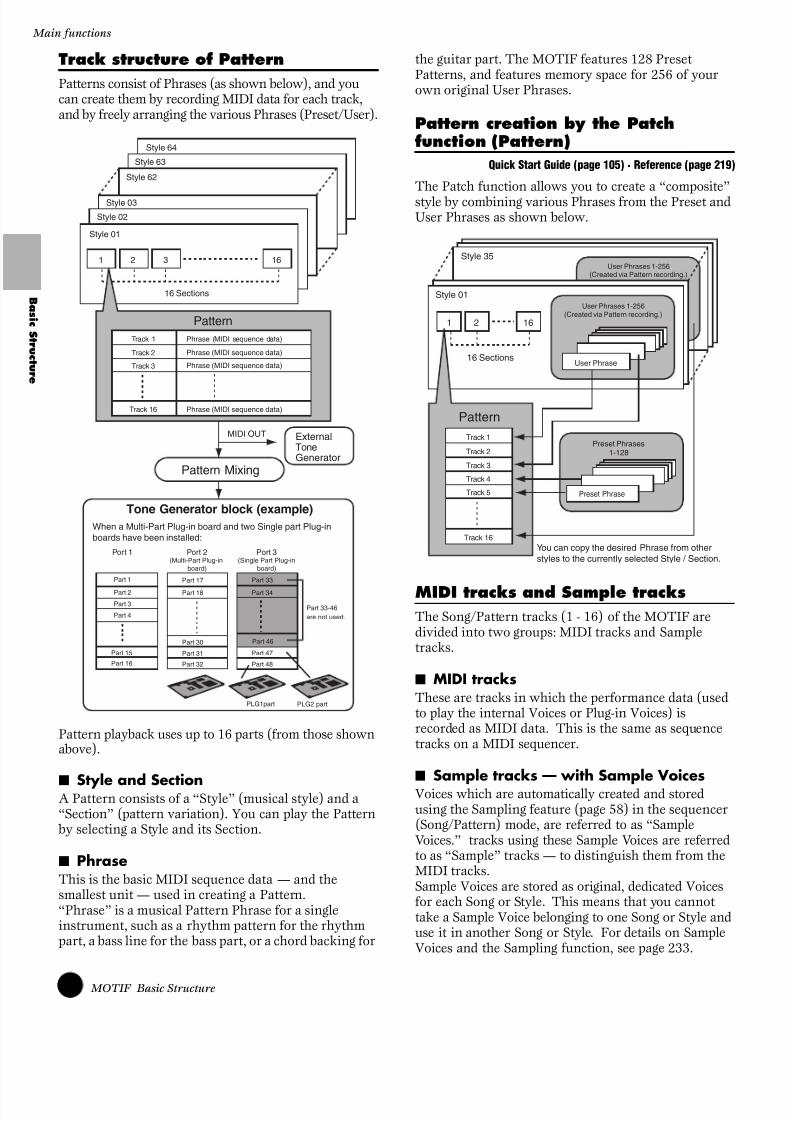
8/10/2019 motif_1(2)
http://slidepdf.com/reader/full/motif12 52/300
52 MOTIF Basic Structure
Main functions
B as i c S t r uc t ur e
Track structure of Pattern
Patterns consist of Phrases (as shown below), and youcan create them by recording MIDI data for each track,and by freely arranging the various Phrases (Preset/User).
Pattern playback uses up to 16 parts (from those shownabove).
■ Style and SectionA Pattern consists of a “Style” (musical style) and a“Section” (pattern variation). You can play the Pattern by selecting a Style and its Section.
■ PhraseThis is the basic MIDI sequence data — and thesmallest unit — used in creating a Pattern.“Phrase” is a musical Pattern Phrase for a singleinstrument, such as a rhythm pattern for the rhythmpart, a bass line for the bass part, or a chord backing for
the guitar part. The MOTIF features 128 PresetPatterns, and features memory space for 256 of yourown original User Phrases.
Pattern creation by the Patchfunction (Pattern)
Quick Start Guide (page 105) · Reference (page 219)
The Patch function allows you to create a “composite”style by combining various Phrases from the Preset andUser Phrases as shown below.
MIDI tracks and Sample tracksThe Song/Pattern tracks (1 - 16) of the MOTIF aredivided into two groups: MIDI tracks and Sampletracks.
■ MIDI tracksThese are tracks in which the performance data (usedto play the internal Voices or Plug-in Voices) isrecorded as MIDI data. This is the same as sequencetracks on a MIDI sequencer.
■ Sample tracks — with Sample VoicesVoices which are automatically created and storedusing the Sampling feature (page 58) in the sequencer(Song/Pattern) mode, are referred to as “SampleVoices.” tracks using these Sample Voices are referredto as “Sample” tracks — to distinguish them from theMIDI tracks.Sample Voices are stored as original, dedicated Voicesfor each Song or Style. This means that you cannottake a Sample Voice belonging to one Song or Style anduse it in another Song or Style. For details on SampleVoices and the Sampling function, see page 233.
Style 64
Style 63
Tone Generator block (example)
Port 1 Port 2(Multi-Part Plug-in
board)
Port 3(Single Part Plug-in
board)
Part 1
Part 2
Part 3
Part 4
Part 15
Part 17
Part 18
Part 30
Part 31
Part 32
PLG1part PLG2 part
Part 16
Part 33
Part 33-46are not used.
Part 34
Part 46
Part 47
Part 48
Pattern Mixing
ExternalToneGenerator
Style 02
Style 03
Style 62
MIDI OUT
When a Multi-Part Plug-in board and two Single part Plug-inboards have been installed:
Style 01
16 Sections
1 2 3 16
PatternTrack 1 Phrase (MIDI sequence data)
Phrase (MIDI sequence data)
Phrase (MIDI sequence data)
Phrase (MIDI sequence data)
Track 2
Track 3
Track 16
Style 35User Phrases 1-256
(Created via Pattern recording.)
Style 01
16 Sections
1 2 16
PatternTrack 1
Track 2
Track 3
Track 4
Track 5
Track 16
User Phrases 1-256(Created via Pattern recording.)
User Phrase
Preset Phrases1-128
Preset Phrase
You can copy the desired Phrase from otherstyles to the currently selected Style / Section.

8/10/2019 motif_1(2)
http://slidepdf.com/reader/full/motif12 53/300
53 MOTIF Basic Structure
Main func
MIDI track recording method
The following explanations are important points for
you to keep in mind as you record your User Songs/Patterns.
■ Realtime recording and Step recordingWith realtime recording, the MOTIF functions in thesame way as a tape recorder, recording theperformance data as it is played. This allows you tocapture all the nuances of an actual performance.With step recording, you can compose yourperformance by “writing” it down one event at a time.This is a non-realtime, step recording method —similar to writing music notation onto paper.
■ Replace and Overdub (Song/Pattern)
● ReplaceYou can use this method when you want to overwritean already recorded track with new data. The firstrecording is lost, and the new one takes its place.
● OverdubYou can use this method when you want to addmore data to a track that already contains data. Thefirst recording is not lost, and the new one is added.This method lets you build up a complex phrasetogether with Loop recording (below).
■ Loop Recording (Pattern)Pattern repeats the rhythm pattern of several measures(4 to 16 measures) in a “loop,” and its recording is alsodone using loops.This method is convenient when recording a PatternPhrase using the Overdub method (above).As shown in the example below, notes that you record
will play back from the next repetition (loop), lettingyou record while hearing previously recorded material.
nLoop Recording can only be used with Realtimerecording.
Style 50
Style 49
Style 02
Style 03
Style 48
Style 01
16 Sections
1 2 3 16
After selectingthe Song numberand track
After selectingthe Song numberand track
Song 01
Track 1
Track 2
Track 3
Track 16
MIDI data recording
In this example, Track 1 is a MIDItrack, and Track 3 is an Sample track.
Recording a Sample(Sampling)
Store as a Sample Voice
After selecting theStyle number,Section and track
After selecting the
Style number,Section and track
Pattern
Track 1
Track 2
Track 3
Track 16
MIDI data recording
In this example, Track 1 is a MIDItrack, and Track 3 is an Sample track.
Recording a Sample(Sampling)
Store as a Sample Voice
• Loop 1st round
Bass Drum
Bass Drum
Snare Drum
Bass Drum
Snare Drum
Hi-Hat
• Loop 2nd round
• Loop 3rd round

8/10/2019 motif_1(2)
http://slidepdf.com/reader/full/motif12 54/300
54 MOTIF Basic Structure
Main functions
B as i c S t r uc t ur e
■ Punch In/Out (Song)You can use this method when you want to re-recordonly over a specific area of the track. In this case, youmust set the start and end points before you begin there-recording.In the eight-measure example below, the thirdmeasures through the fifth measure are re-recorded.
nPunch In/Out Recording can only be used with Realtimerecording.
nNote that Punch In/Out method always replaces(destroys) the original data over the specified area.
Sample track recording method(Sampling)
See page 58.
Song Chain
This function allows songs to be “chained” together for
automatic sequential playback. The MOTIF allows youto create one Song Chain data.
Pattern Chain
Pattern Chain allows you to string several differentPatterns together to make a single Song. You can have
the MOTIF automatically change Styles and Sections by creating Pattern Chains in this way beforehand.You can also use them when creating Songs based on acertain Pattern, since the created Pattern Chains can beconverted into a Song. The MOTIF allows you tocreate one Pattern Chain data.
● Before re-recording
● After re-recording
1 2
Punch In Punch out
Recording start
Newly recorded data
Recording stop
3 4 5 6 7 8
1 2 3 4 5 6 7 8
Song 01 Song 22 Song 15
Pattern track Style/Section change
Track mute setting
Tempo change
Scene track
Tempo track
Style 01Section J
Pattern Chain
EXAMPLE
Style 05Section H
Style 26Section P

8/10/2019 motif_1(2)
http://slidepdf.com/reader/full/motif12 55/300
55 MOTIF Basic Structure
Main func
Arpeggio
Quick Start Guide (page 91) · Reference (page 128)
This function automatically triggers preset arpeggiophrases, according to the keys you play.The Arpeggio function is particularly suited to dance/techno music genres. You can assign the desiredArpeggio Types to each Voice/Performance, and adjust
the tempo. You can also set the Arpeggio playbackmethod, Velocity range and Play Effects to create yourown original grooves. What’s more, Arpeggio playbackcan be transmitted through the MIDI Out.
Arpeggio structure
The following illustration shows the Arpeggiostructure.
Four playback types of Arpeggio
Arpeggio types are divided into the four followingcategories.
■ SequenceCreates a general arpeggio phrase. Mainly octave up/down phrases.
■ PhraseCreates phrases that are more musical than Sequence.Starting with “Techno,” there are phrases for a widevariety of musical genres, and for creating backingtracks for guitar, piano and other instruments.
■ Drum PatternCreates drum pattern-type phrases. Any note producesthe same drum pattern.This type is ideal for use with drum and percussionsounds.
■ ControlCreates tonal changes by the control change datasequence. No note data is created.
Song/Pattern and Arpeggio
■ Recording Arpeggios to a Song/PatternYou can record Arpeggio data to a Song or Pattern.The actual note data of the Arpeggio is recorded as is toa specific track in the Song/Pattern during recording,
when you set Arpeggio Record to ON.
■ Arpeggio on/off during Song/Patternplayback
Also, Arpeggio On/Off can be set individually for eachpart of a Song/Pattern. Just like playing Arpeggiosmanually from the keyboard, this inserts Arpeggios inthe playback of Song/Pattern sequence data.
Arpeggio data
Each Arpeggio can assigned toeach Voice/Performance.
•In the Voicemode
•In the Performance mode
Preset 1(128)
Preset2(128)
User(128)
Voice Performance
Voice Performance
Voice Performance
Voice Performance
Voice Performance
Voice Performance
Arpeggio
Arpeggio
Arpeggio

8/10/2019 motif_1(2)
http://slidepdf.com/reader/full/motif12 56/300
56 MOTIF Basic Structure
Main functions
B as i c S t r uc t ur e
Creating User Arpeggios
Actually, there is no direct operation for recordingArpeggios. First, you have to record a Phrase to a Songtrack. Then, use the appropriate Song Job function toconvert the data to Arpeggio data.
nArpeggio data consists of four tracks. However, dataconversion in the Song Job is done one track at a time.
Master (Master mode)
Quick Start Guide (page 93) · Reference (page 268)
The MOTIF is loaded with such a wealth of different features,functions and operations, you may find it difficult to locateand call up the particular feature you need.This is where theMaster function comes in handy. You can use it to memorizethe operations you use most often in each mode, and call themup instantly anytime you need them with a single buttonpress. The MOTIF has space for a total of 128 of your ownUser Master settings.
•Zone(*) is available only when you specify “Voice” or “Performance” in the Memorydisplay in the Master Play mode and store the settings to a User Master. Details aredescribed later.
•Parameters other than those shown above (e.g., Knob/Slider settings) can bestored. See page 273 for details.
Keep in mind that the settings you can store to a UserMaster in the Voice/Performance mode differ fromthose you can store in the Song/Pattern mode. Hereare the main differences:
● Storing settings in the Song/Pattern modeIn general, you can store specific Song numbers in the
Song mode, Pattern numbers in the Pattern mode.
n Operations and settings in File mode, Utility modeand Sampling mode cannot be stored to a UserMaster.
● Storing settings in the Voice/PerformancemodeIn addition to specific Voice or Performance numbers,you can also store master keyboard functions — suchas the Zone settings, in which the MOTIF keyboard isdivided into up to four different Zones.
Converted viathe Song Job.
Song
User(128)
Track 1
Track 2
Track 3
Track 16
Arpeggio
Track 1
Track 2
Track 3
Track 4
Recording
Master number Setting examples
Master 001 Voice mode Voice number 102
Master 002 Voice mode Voice number 88
Master 003 Performance mode Performance number 043 *Zone Switch Off
Master 004 Performance mode Performance number 059 *Zone Switch Off
Master 005
Performance mode Performance number 077 *Zone Switch On
Master 006
Performance mode Performance number 093 *Zone Switch On
Master 007 Song mode Song 018
Master 008 Song mode Song 008
Master 009 Pattern mode Pattern 014
Master 010 Pattern mode Pattern 029
••
Master 128 Song mode Song 035
MIDI ch1 MIDI ch2 MIDI ch3 MIDI ch4
Tone Generator block
MIDI ch8 MIDI ch9
Tone Generator block

8/10/2019 motif_1(2)
http://slidepdf.com/reader/full/motif12 57/300
57 MOTIF Basic Structure
Main func
Four Zones (Voice Performance mode)
In the Voice Performance mode, the keyboard can bedivided into a maximum of four separate Zones (asshown below) — each with its own MIDI channelsetting. In this way, you can use just a singlekeyboard to control several different instrument partsindependently. Moreover, you can have theseindependent Zones control different channels on
connected MIDI devices as well.You can set these four Zones and store them as aUser Master in the Master mode.
The four Zones can also be configured as Voice“layers” — letting you have more than one Voicesound at the same time when you play within a
single Zone. (See the example below.)
■ SplitYou can use the Zone settings to create a “Split” —dividing the keyboard into two key ranges, at aspecific note (split point).In the example below, the keyboard is split at C3,with the lower range used to trigger Arpeggios, andthe upper range used conventionally to play a Voice.
■ LayerYou can also use the Zone settings to create a“Layer” — in which the keyboard is used to play twoseparate parts simultaneously, in unison with eachother.In the example below, the keyboard plays two Voicesin unison — one an internal Voice, and the other aPlug-in Voice.
MIDI ch1
MIDI OUT MIDI OUT MIDI OUT MIDI OUT
MIDI ch2 MIDI ch3 MIDI ch4
Tone Generator block (Internal/Plug-in)
External Tone Generator
Keyboard (Max 4 zone)
ZONE2 ZONE3ZONE1
ZONE4
MIDI ch1
MIDI OUT MIDI OUT
MIDI OUT
MIDI OUTMIDI ch2 MIDI ch3
MIDI ch4
Tone Generator block (Internal/Plug-in)
External Tone Generator
Ch1Part 1
For playingArpeggios
Ch2Part 2
For playing a Voice
Lower Upper
Split point
(C3)
Layer (Upper)
Layer (Lower)
Part 1
Voice
Plug-in 1 Part
Plug-in Voice

8/10/2019 motif_1(2)
http://slidepdf.com/reader/full/motif12 58/300
58 MOTIF Basic Structure
Main functions
B as i c S t r uc t ur e
Sampling
Quick Start Guide (page 99) · Reference (page 233)
Sampling is a powerful function that lets you bring your own recorded sounds — voice, instrument, rhythm,special sound effects, etc. — into the system of the MOTIF, and play those sounds just like any other MOTIFsound. Individual waveform data contained in the MOTIF is referred to as a “Sample.”The following diagram shows the Sampling structure.
CD MD
A/D INPUT jacks
DIGITAL INconnector
mLAN (IEEE1394)connector
When the optional AIEB2has been installed to theMOTIF
When the optionalmLAN8E has beeninstalled to the MOTIF
Waveform
Internal DRAM 4MB (Can be expanded up to 64 MB byinstalling optional SIMM memory modules.)
Wave
SEQ TRANSPORT
LOCATE 1 2
REC
A/D converter
Key Bank setting
Assigned to aPerformance part
Store as a User Voice
D/A converter
Output (sound)
Voice / Performancemode
Song / Patternmode
Key Bank setting(Automatically set when theSampling type is set to "Slice + Seq".)
By selecting the desired Song / Patterntrack, it is assigned to the appropriateMixing part as a Sample Voice.
Is automatically stored as on originalSample Voice for the selected Song /
When the Sampling type is set to"Sample + Note" or "Slice + Seq"

8/10/2019 motif_1(2)
http://slidepdf.com/reader/full/motif12 59/300
59 MOTIF Basic Structure
Main func
Data created by Sampling
Regardless of the mode, the raw Sampled data is thesame, of course. However, various parameters aredifferent, depending on the particular mode orsettings. Briefly, here is an explanation of whatkinds of data are created in the Sampling function.
● Sampling data common to all modes
• Wave (Sample data)This is the raw audio data stored in the MOTIF’smemory when sampling. For details on Wave, seepage 44.
• Key BankThe note range and velocity range to which theSample is assigned, is called the Key Bank.
• WaveformThe group of Key Banks to which sample data isassigned is called the Waveform.
For a clearer idea of the explanations above, see the followingillustration. In this example, the Waveform is made up of five
Samples, assigned to a key range of D#2 - F4, in five Key Banks.
● Data created by sampling in the Voice/Performance mode
• User VoiceThe sample data of Waves recorded or imported tothe MOTIF cannot be played directly. First, theymust be saved as User Voices, which when selected,can be played from the keyboard or sequencer. Also,these User Voices can be assigned as Performanceparts — just as with the Preset Voices.
● Data created by sampling in the Song/Pattern mode
• Sample Voice
Voices that are automatically stored when sampling in theSong/Pattern mode are referred to as “Sample Voices.”Sample Voices can be assigned to instrument partscorresponding to the track which was assigned in theSampling Setup display, and they can be sounded whileSong/Pattern data is being played back.Sample Voices are original, dedicated Voices for theparticular Song/Pattern that was selected when sampling.Because of this, you cannot take a Sample Voice belonging
to one Song or Pattern and use it in another Song orPatternIn essence, Sample Voice data is the same as that ofNormal Voices or Drum Voices — with the exception thatyou cannot select Sample Voices in the Voice orPerformance mode. (However, you CAN select the Waveof the Sample Voice in Voice Edit.)
• Note Data (when the Sample type is set to“Sample + Note” )This not only stores the sampled wave as a SampleVoice in the Song/Pattern mode, but it also records itto the assigned sequencer track.
• Key Bank and Sequence data according toAudio phrase (when the Sample type is set to“Slice + Seq”)
Velocity
127
40
Key bank
Wave form
Key Number(Note Number)
Waveform
D#2 A#2 G#2 F4
Sample 1 Sample 2 Sample 4
Sample 3 Sample 5
Song or Pattern
SamplingTrack 1
Track 2
Track 3
Track 16
Specify the track.
Store as a Sample Voice
SampleVoice
Sequencedata
Fixed to C - 2
Assigned toa specifiedkey (note)
Samplevoice
Sequencedata
Fixed to C - 2
Sliced intoseveral partsand assigned
to keys (notes)

8/10/2019 motif_1(2)
http://slidepdf.com/reader/full/motif12 60/300
60 MOTIF Basic Structure
Main functions
B as i c S t r uc t ur e
User Voices/Sample Voices and Waveform
nWhen using the Sampling function, samples are stored to destination waveforms in numerical order, starting from the lowestnumber waverform.
nUp to 128 keybanks can be assigned to a single waveform. The MOTIF allows for creation of a maximum 8192 keybanks.
nYou can select and check the 256 waveforms mentioned above from the Oscillator display in Voice Element Edit (page 137 ).
Velocity Keybank
Wave form
Sample1
Key number(Note number)
127
40
C#2 A#2 G#3 F4
Sample 2 Sample 4
Sample 3 Sample 5
Waveform(User 001~256)
When entering the Sampling modefrom the Voice/Performance mode
Sampling
Sampling
Sampling
● User's Voice (001~128)
When entering the Sampling modefrom the Pattern mode
Style 64
16 section
1 2 3 4
Pattern
Song01
Song 64
Track1
001
001
002
003
004005
006
007
008
009
010
251
252
253
254
255
256
002
003
004
005
128
Track2
Track3
Track16
Track1
Track2
Track3
Track16
● Recorded to the specified trackas a Sample voice.
● Recorded to the specified trackas a Sample voice.
When entering the Sampling modefrom the Song mode

8/10/2019 motif_1(2)
http://slidepdf.com/reader/full/motif12 61/300
61 MOTIF Basic Structure
Main func
Three methods of Sample RecordingStart
You can start sample recording with one of threemethods. This section covers the Sample RecordingStart methods corresponding to the available Triggermodes. For information on setting the Trigger mode,see page 237 .
■ When Trigger mode is set to “Manual”:Regardless of the selected mode, sampling startssoon after you press the[F6] (REC) button in theSampling Setup display (page 236). Sampling alsostarts regardless of the playback/stop status of theSong/Pattern.
■ When Trigger mode is set to “Level”:After pressing the [F6] (REC) button in theSampling Setup display (in any mode), sampling
starts as soon as a strong enough audio signal isreceived. The threshold for this audio-triggered startis called the Trigger Level (explained in theillustration below).
As you can see, the higher the Trigger Level setting,the louder the input audio needs to be in order tostart sampling. On the other hand, if the TriggerLevel is set too low, a soft noise may be enough toinadvertently start sampling. Sampling also starts
regardless of the playback/stop status of the Song/Pattern.
■ When Trigger mode is set to “Meas”:After pressing the [F6] (REC) button in theSampling Setup display (page 236), start and stop ofsampling is linked to playback of the Song/Pattern.This setting is available only when the Song/Patternmode and recording type (Rec Type) are set to“Slice + Seq” or “Sample + Note.”
Sample playback types
Samples can be played back in the following threedifferent ways.
■ One Shot
When you press a note on the keyboard, the Sampleplays from beginning to end just once. This type ofplayback is commonly used for drum and percussionsounds.
A B C D E
Sample recording start here.
Recordingtrigger level.
A B C D E
Sample recording start here.
Level
Level
1 2
Punch In Punch Out
Sampling
start
Song/Pattern
start
Wave data
Sampling
stop
3 4 5 6 7 8
1 2 3 4 5 6 7 8
Start Pont
Key on
End Point

8/10/2019 motif_1(2)
http://slidepdf.com/reader/full/motif12 62/300
62 MOTIF Basic Structure
Main functions
B as i c S t r uc t ur e
■ LoopThis is used primarily to create long continuoussounds, such as brass and strings, or instrumentswith naturally long decay, such as piano. Anappropriate part of the sample near the end is loopedto reproduce a long sustain or decay.When you play a note on the keyboard, the Sampleplays from the start point to the end point. It thenreturns to the loop start point and plays to the end
point again, and keeps doing this until you releasethe note. With musical instruments in general, thecharacteristic part of the sound (the “attack” section)is usually at the beginning, just after the start point.After this, the sound does not vary a great deal whilethe note is being held, and you can set the loop andend points at either end of this section. Whenplaying back a Sample of an instrument that has been looped like this, the attack section of the soundis played back once and then the looped section isplayed back continuously until you release the note.Looping is also way of creating usable instrument
sounds without using up too much memory.You can set each point in the Sampling mode.Since the MOTIF is capable of displaying the entireimage of the sampled audio data in the LCD (zoomin and zoom out are available), you can edit the looppoints visually — making sample editing accurate andeasy.
■ ReverseWhen you press a note on the keyboard, the Sampleplays from end to beginning just once. This is usefulfor creating reversed cymbal sounds and otherspecial effects.
Sample Wave Loop Playback
Start Pont Top Point End Point
Start Point End Point

8/10/2019 motif_1(2)
http://slidepdf.com/reader/full/motif12 63/300
63 MOTIF Basic Structure
Main func
Internal Memory and File Management
Quick Start Guide (page 97) · Reference (page 261)
The MOTIF creates a variety of different kinds of data, including Voice, Performance, Song, and Pattern. Inthis section, how to store the various types of data and use the memory devices/media for storing them.
Memory Structure
This diagram details the relationship among the MOTIF’s functions and the internal memory, memory card,and various external storage devices/media.
*
* Please make note of the following pointswhen using bulk transmission betweenSRAM memory and an external MIDI device.
• Bulk transmission cannot be used totransfer the data of User Arpeggiosand part of the System settings.
• Bulk transmission to an external MIDIdevice is executed only when MOTIFreceives a bulk request message.
I B M PersonalSystem/V
PS/V PersonalSystem/V
Recall BufferCompare Buffer(DRAM)
Other than "Master Edit"
Preset Data (ROM)• Voice• Plug-in Voice• Preset Phrase (Pattern)• Preset Arpeggio• Demo
External MIDI deviceMIDI bulk
Edit Buffer(DRAM)
• Voice Edit
• Plug-in Voice Edit
• Performance Edit
• Master Edit
S t o r e
User Memory (RAM)
SRAM
• User Plug-in Voice (64 Voices x 3 boards)
• User Performance (128)
• User Master (128)
• User Arpeggio (128)
• System setting (Utility setting)
• User Voice (Normal 128, Drum 16)
DRAM
• Song
• Song Chain
• Waveform(Sample Voice)
• Pattern (Phrase)
•˚Style
• Pattern Chain
• Song Chain
• Pattern Record
• Pattern Patch
• Song Record
Store
• Pattern Chain
• Sampling
S t o r e
• Pattern Mixing Edit
• Song Mixing Edit
Computer
• Plug-in Voice Edit usingthe computer
Plug-in board(DRUM)
• Plug-in All Bulk
File extensions".W2W"
File extensions".W2B"
• File extensions ".WAV" and".AIF"
• A5000/4000/3000 data• SU700 data• AKAI format data
File extensions".W2S"
File extensions".W2P"
File extensions".MID"
File extensions ".W2A"
File extensions".W2V"
File extensions".W2G"
• File extensions ".WAV" and".AIF"
• A5000/4000/3000 data• AKAI format data
Memory CardExternal SCSI device
L o a d / S a v e
C o v e r t ( J o b )
MOTIF Internal Memory

8/10/2019 motif_1(2)
http://slidepdf.com/reader/full/motif12 64/300
64 MOTIF Basic Structure
Main functions
B as i c S t r uc t ur e
Internal Memory
● ROM and RAMROM (Read Only Memory) is memory designedspecifically for reading out of data, and as suchdata cannot be written to it. This is the locationwhere preset data for the instrument ispermanently stored.On the other hand, RAM (Random Access
Memory) allows both reading and writing of data.This is the location for the edit buffer data anddata created by editing or recording.
● SRAM and DRAMThe MOTIF uses two different kinds of RAM ,depending on the condition for storing the data:SRAM (Static RAM) and DRAM (DynamicRAM). The data contained in SRAM ismaintained indefinitely, unless the backup battery(lithium battery; page 5) power is too low. On theother hand, data contained in DRAM is lost when
the power is turned off. Because of this, youshould always store any data residing in DRAMto a memory card or an external SCSI device before turning off the power.
Edit Buffer (DRAM) and RecallBuffer (DRAM)
● Edit Buffer and User MemoryThe edit buffer is the memory location for editeddata of these types: Voice, Performance, Master,Song, Song Mixing, and Pattern Mixing. Data
edited in this location will be stored to the UserMemory.If you select another Voice, Performance, Master,Song, or Pattern, the entire contents of the edit buffer will be rewrittenwith the newly selectedVoice/Performance/Master/Song Mixing/PatternMixing data. Make sure to store any importantdata before selecting another Voice, etc.
● Edit Buffer and Recall BufferIf you’ve selected another Voice or Performancewithout storing the one you were editing, you can
recall your original edits, since the edit buffer’scontents are stored in backup memory. Keep inmind that the recall buffer is available only in theVoice or Performance mode.
Memory Card/External SCSI storagedevice
To ensure that your data stored to User Memory aremaintained, it is the best way to save important datato Memory Card or external SCSI device so that youcan keep them indefinitely. See page 289 for detailsabout Memory Card and see page 27 for details aboutSCSI device.
There are two different ways to save data created onthe MOTIF to memory card or an external SCSidevice:
• By saving all data in the User memory as a singlefile (with the extension “.W2A”).
• By saving the files separately according to theirspecific functions (with the extensionscorresponding to each type). Seepage 262for details.
• Memory Card • SCSI device
Hard disk etc.
SCSI

8/10/2019 motif_1(2)
http://slidepdf.com/reader/full/motif12 65/300
65 MOTIF Basic Structure
Main func
Remote Control to Computer Sequence Software
Quick Start Guide (page 119) · Reference (page 256)
When the [REMOTE CONTROL ON/OFF] button is turned on, the following buttons/controllers can controlthe Audio track mixer and sequencer transport of the computer sequence software connected to the MOTIF.
J∆
MASTERVOLUME V OL UM E 1 V OL UM E 2 V OL UM E 3 V OL UM E 4
CS 1 CS 2 CS 3 CS 4
ZONE1 ZONE2 ZONE3 ZONE4
[SEQ TRANSPORT] buttonsControls the transport functions on the computer sequencesoftware. SEQ TRANSPORT
LOCATE 1 2
REC
[MUTE] buttonWhen this is turned on, the NUMBER [1] - [16]buttons are used to turn the corresponding tracks ofthe computer sequence software on or off.
15
1 2 3 4 5 6 7 8
9 10 11 12 13 14 16
TRACKSELECT
MUTE
SOLO
NUMBERELEMENT/PERF.PART/ZONE
NUMBER button[1]~[16]These buttons are used to select the correspondingtracks of the computer sequencer software, or toturn those tracks on/off, depending on the on/offstatus of the [TRACK SELECT] button and [MUTE]button.
15
1 2 3 4 5 6 7 8
9 10 11 12 13 14 16
TRACKSELECT
MUTE
SOLO
NUMBERELEMENT/PERF.PART/ZONE
[TRACK SELECT]buttonWhen this is turned on, the NUMBER[1] - [16] buttons are used to select thecorresponding tracks of the computersequence software.
15
1 2 3 4 5 6 7 8
9 10 11 12 13 14 16
TRACKSELECT
MUTE
SOLO
NUMBERELEMENT/PERF.PART/ZONE
KnobAdjusts the Pan, Effect send level, and Equalizerfor each track of the computer sequencer.
KNOBCONTROLFUNCTION
PAN REVERB CHORUS TEMPO
A TT AC K R EL EA SECUTOFF RESONANCE
A SS IG N A A SS IG N B A SS IG N 1 A SS IG N 2
KN 1 KN 2 KN 3 KN 4
MEQ LOW MEQ HI MIDMEQLOWMID MEQ HIGH
Control SlidersAdjusts the Volume for each track of the computersequence software.

8/10/2019 motif_1(2)
http://slidepdf.com/reader/full/motif12 66/300
66 MOTIF Basic Structure
Main functions
B as i c S t r uc t ur e
Computer Sequence Software
The following computer sequence software programs can be controlled via the MOTIF’s Remote Controlfunction.
WindowsCubase VST/32Logic Audio Plutinum Ver4.6Cakewalk ProAudio Ver9.0
Pro Tools V5.0
MacintoshCubase VST 5.0Logic Audio Plutinum Ver4.6Pro Tools V5.0
nThe parameters to be controlled via the Remote Control function differ depending on the computer sequence software. Fordetails, see the Reference section on page 257 .
nFor certain software programs, it may be necessary to install the setting file in the included CD-ROM. For details on how toinstall, see the Installation Guide manual.

8/10/2019 motif_1(2)
http://slidepdf.com/reader/full/motif12 67/300
67 MOTIF Basic Operation
Calling up the Operation Disp
Basic OperationIn this section, we’ll take a look at the fundamental operating conventions of the MOTIF. Here, you’ll learn the basics — how to select modes, call up the various functions, change settings, and edit parameter values. Take time tofamiliarize yourself with these nuts-and-bolts operations, and you’ll be on your way to mastering the instrument.
Calling up the Operation DisplaysTo call up a desired display or parameter, first select a mode, then select one of the function menus of the mode. Thesection below shows you the button presses necessary to navigate through the various modes and sub-modes.
Selecting Modes
The MOTIF is organized into various modes, each covering a different set of operations and functions.
nFor more information on each mode, see page 30.
Four Main modes (Play modes) — Voice, Performance, Song, Pattern
To select another mode, simply press the corresponding mode button.
Two Sub-modes — Sampling, Utility
The four main modes (Voice, Performance, Song, and Pattern) have sub-modes — Sampling mode and Utility mode.These two sub-modes can be selected in each main mode.Keep in mind that the particular displays and parameters in the Sampling and Utility modes differ depending onwhich main mode was active before calling up the sub-mode. For details on the specific differences, refer to thecorresponding explanations in the Reference section.
To select another mode, simply press the corresponding mode button.
MODE
V OI CE P ERFORM M AS TE R
SEQUENCERSONG PAT TER N F IL E
INTEGRATEDSAMPLING MIXING UTILITY
EDIT JOB STORE
COMPARE SCENE STORESET LOCATE
MODE
V OI CE P ERFORM M AS TE R
SEQUENCERSONG PAT TE RN F ILE
INTEGRATEDSAMPLING MIXING UTILITY
EDIT JOB STORE
COMPARE SCENE STORESET LOCATE
●Voice Play mode ●Performance Play mode ●Song Play mode ●Pattern Play mode
Keyboard playback modes Sequencer modes (multi-timbral operation)
MODE
V OI CE P ERFORM M AS TE R
SEQUENCERSONG PAT TER N F IL E
INTEGRATEDSAMPLING MIXING UTILITY
EDIT JOB STORE
COMPARE SCENE STORESET LOCATE
MODE
V OI CE P ERFORM M AS TE R
SEQUENCERSONG PAT TERN FI LE
INTEGRATEDSAMPLING MIXING UTILITY
EDIT JOB STORE
COMPARE SCENE STORESET LOCATE
MODE
V OI CE P ER FO RM M AS TE R
SEQUENCERSONG PAT TE RN F IL E
INTEGRATEDSAMPLING M IX IN G U TI LI TY
EDIT JOB STORE
COMPARE SCENE STORESET LOCATE
MODE
V OI CE P ER FO RM M AS TE R
SEQUENCERSONG PAT TER N F IL E
INTEGRATEDSAMPLING M IX IN G U TI LI TY
EDIT JOB STORE
COMPARE SCENE STORESET LOCATE
From the Voice mode From the Performance mode From the Song mode From the Pattern modeMODE
V OI CE P ER FO RM M AS TE R
SEQUENCERSONG PAT TER N F IL E
INTEGRATEDSAMPLING M IX IN G U TI LI TY
EDIT JOB STORE
COMPARE SCENE STORESET LOCATE
MODE
V OI CE P ER FO RM M AS TE R
SEQUENCERSONG PAT TER N F IL E
INTEGRATEDSAMPLING M IX IN G U TI LI TY
EDIT JOB STORE
COMPARE SCENE STORESET LOCATE
●Sampling mode

8/10/2019 motif_1(2)
http://slidepdf.com/reader/full/motif12 68/300
68 MOTIF Basic Operation
Calling up the Operation Displays
B as i c
Oper at i on
To select another mode, simply press the corresponding mode button.
nPlease note that the displays and parameters are different depending on the modes before entering the Sampling/Utility mode.
Special Modes — Master mode and File mode
In addition to the modes described above, special two modes are provided — Master mode and File mode.
To select another mode, simply press the corresponding mode button.
Mixing mode (in the Song/Pattern mode)
The two Sequencer modes, Song and Pattern, feature a special Mixing mode.
To exit from the File mode and select another mode, simply press the corresponding mode button.(The [EXIT] button cannot be used here.)
MODE
V OI CE P ER FO RM M AS TE R
SEQUENCERSONG PAT TER N F IL E
INTEGRATEDSAMPLING MIXING UTILITY
EDIT JOB STORE
COMPARE SCENE STORESET LOCATE
MODE
V OI CE P ER FO RM M AS TE R
SEQUENCERSONG PAT TE RN F IL E
INTEGRATEDSAMPLING MIXING UTILITY
EDIT JOB STORE
COMPARE SCENE STORESET LOCATE
From the Voice mode
●Utility mode
From the Performance mode From the Song mode From the Pattern modeMODE
V OI CE P ER FO RM M AS TE R
SEQUENCERSONG PAT TE RN F IL E
INTEGRATEDSAMPLING MIXING UTILITY
EDIT JOB STORE
COMPARE SCENE STORESET LOCATE
MODE
V OI CE P ER FO RM M AS TE R
SEQUENCERSONG PAT TER N F IL E
INTEGRATEDSAMPLING MIXING UTILITY
EDIT JOB STORE
COMPARE SCENE STORESET LOCATE
When the selected Masteris set to the Song mode :
When the selected Masteris set to the Pattern mode :
When the selected Masteris set to the Voice mode :
When the selected Master isset to the Performance mode :
MODE
V OI CE P ER FO RM M AS TE R
SEQUENCERSONG PAT TER N F IL E
INTEGRATEDSAMPLING MIXING UTILITY
EDIT JOB STORE
COMPARE SCENE STORE
SET LOCATE
MODE
V OI CE P ER FO RM M AS TE R
SEQUENCERSONG PAT TE RN F IL E
INTEGRATEDSAMPLING MIXING UTILITY
EDIT JOB STORE
COMPARE SCENE STORE
SET LOCATE
MODE
V OI CE P ER FO RM M AS TE R
SEQUENCERSONG PAT TE RN F IL E
INTEGRATEDSAMPLING MIXING UTILITY
EDIT JOB STORE
COMPARE SCENE STORE
SET LOCATE
MODE
V OI CE P ER FO RM M AS TE R
SEQUENCERSONG PAT TER N F IL E
INTEGRATEDSAMPLING MIXING UTILITY
EDIT JOB STORE
COMPARE SCENE STORE
SET LOCATE
●Master Play mode
MODE
V OI CE P ER FO RM M AS TE R
SEQUENCERSONG PAT TER N F IL E
INTEGRATEDSAMPLING MIXING UTILITY
EDIT JOB STORE
COMPARE SCENE STORE
SET LOCATE
●File mode
MODE
V OI CE P ER FO RM M AS TE R
SEQUENCERSONG PAT TE RN F IL E
INTEGRATEDSAMPLING MIXING UTILITY
EDIT JOB STORE
COMPARE SCENE STORESET LOCATE
MODE
V OI CE P ER FO RM M AS TE R
SEQUENCERSONG PAT TER N F IL E
INTEGRATEDSAMPLING MIXING UTILITY
EDIT JOB STORE
COMPARE SCENE STORESET LOCATE
●Song Mixing mode ●Pattern Mixing mode

8/10/2019 motif_1(2)
http://slidepdf.com/reader/full/motif12 69/300
69 MOTIF Basic Operation
Calling up the Operation Disp
Record mode (in the Song/Pattern and Sampling mode)
The MOTIF also features Record modes — one for sequencing in the Song and Pattern modes, and one for samplerecording in the Sampling mode.
Press the [EXIT] button to exit from the Sampling Record mode.
MODE
V OI CE P ER FO RM M AS TE R
SEQUENCERSONG PAT TER N F ILE
INTEGRATEDSAMPLING MIXING UTILITY
EDIT JOB STORE
COMPARE SCENE STORESET LOCATE
●Song Record mode
■ Press the [STOP] button to exit from SongRecord mode to the Song Play mode.
■ Press the [STOP] button to exit from the PatternRecord mode to the Pattern Play mode.
SEQ TRANSPORT
LOCATE 1 2
REC
MODE
V OI CE P ER FO RM M AS TE R
SEQUENCERSONG PAT TER N F ILE
INTEGRATEDSAMPLING MIXING UTILITY
EDIT JOB STORE
COMPARE SCENE STORESET LOCATE
●Pattern Record mode
SEQ TRANSPORT
LOCATE 1 2
REC
MODE
V OI CE P ER FO RM M AS TE R
SEQUENCERSONG PAT TE RN F IL E
INTEGRATEDSAMPLING MIXING UTILITY
EDIT JOB STORE
COMPARE SCENE STORESET LOCATE
MODE
V OI CE P ER FO RM M AS TE R
SEQUENCERSONG PAT TER N F IL E
INTEGRATEDSAMPLING MIXING UTILITY
EDIT JOB STORE
COMPARE SCENE STORESET LOCATE
From the Voice mode
●Sampling Record mode
From the Performance mode From the Song mode From the Pattern mode
MODE
V OI CE P ER FO RM M AS TE R
SEQUENCERSONG PAT TER N F IL E
INTEGRATEDSAMPLING MIXING UTILITY
EDIT JOB STORE
COMPARE SCENE STORESET LOCATE
MODE
V OI CE P ER FO RM M AS TE R
SEQUENCERSONG PAT TE RN F IL E
INTEGRATEDSAMPLING MIXING UTILITY
EDIT JOB STORE
COMPARE SCENE STORESET LOCATE
SONG SCENESF1 SF2 SF3 SF4 SF5
F1 F2 F3 F4 F6F5
INFORMATION

8/10/2019 motif_1(2)
http://slidepdf.com/reader/full/motif12 70/300
70 MOTIF Basic Operation
Calling up the Operation Displays
B as i c
Oper at i on
Edit mode
The four main modes (Voice/Performance/Song/Pattern), the Sampling mode and the Master mode described aboveall have their own specific Edit modes.
Press the [EXIT] button to exit from the Edit mode.
Press the [EXIT] button to exit from the Edit mode.
Press the [EXIT] button to exit from the Edit mode.
Job mode
Most of the mores described above — the main modes (Voice, Performance, Song, Pattern), thetwo sub-modes (Sampling and Utility), the Mixing mode (in Song and Pattern), and the Mastermode — have their own specific Job modes.To call up the Job mode, press the [JOB] button while one of the modes listed above is active.Since the [JOB] button does not have an indicator lamp, check the display to see whether the Jobmode is selected or not.
●Voice Edit mode ●Performance Edit mode ●Song Edit mode ●Pattern Edit modeMODE
V OI CE P ER FO RM M AS TE R
SEQUENCERSONG PAT TE RN F IL E
INTEGRATEDSAMPLING MIXING UTILITY
EDIT JOB STORE
COMPARE SCENE STORESET LOCATE
MODE
V OI CE P ER FO RM M AS TE R
SEQUENCERSONG PAT TER N F IL E
INTEGRATEDSAMPLING MIXING UTILITY
EDIT JOB STORE
COMPARE SCENE STORESET LOCATE
MODE
V OI CE P ER FO RM M AS TE R
SEQUENCERSONG PAT TE RN F IL E
INTEGRATEDSAMPLING MIXING UTILITY
EDIT JOB STORE
COMPARE SCENE STORESET LOCATE
MODE
V OI CE P ER FO RM M AS TE R
SEQUENCERSONG PAT TE RN F IL E
INTEGRATEDSAMPLING MIXING UTILITY
EDIT JOB STORE
COMPARE SCENE STORESET LOCATE
MODE
V OI CE P ER FO RM M AS TE R
SEQUENCERSONG PAT TER N F IL E
INTEGRATEDSAMPLING MIXING UTILITY
EDIT JOB STORE
COMPARE SCENE STORESET LOCATE
From the Voice mode From the Song modeMODE
V OI CE P ER FO RM M AS TE R
SEQUENCERSONG PAT TER N F IL E
INTEGRATEDSAMPLING MIXING UTILITY
EDIT JOB STORE
COMPARE SCENE STORESET LOCATE
MODE
V OI CE P ER FO RM M AS TE R
SEQUENCERSONG PAT TER N F IL E
INTEGRATEDSAMPLING MIXING UTILITY
EDIT JOB STORE
COMPARE SCENE STORESET LOCATE
From the Performance mode From the Pattern modeMODE
V OI CE P ER FO RM M AS TE R
SEQUENCERSONG PAT TER N F IL E
INTEGRATEDSAMPLING MIXING UTILITY
EDIT JOB STORE
COMPARE SCENE STORESET LOCATE
●Sampling Edit mode
●Master Edit mode ●Song MIxing Edit mode ●Pattern Mixing Edit modeMODE
V OI CE P ER FO RM M AS TE R
SEQUENCERSONG PAT TER N F IL E
INTEGRATEDSAMPLING MIXING UTILITY
EDIT JOB STORE
COMPARE SCENE STORESET LOCATE
MODE
V OI CE P ER FO RM M AS TE R
SEQUENCERSONG PAT TER N F IL E
INTEGRATEDSAMPLING MIXING UTILITY
EDIT JOB STORE
COMPARE SCENE STORESET LOCATE
MODE
V OI CE P ER FO RM M AS TE R
SEQUENCERSONG PAT TE RN F IL E
INTEGRATEDSAMPLING MIXING UTILITY
EDIT JOB STORE
COMPARE SCENE STORESET LOCATE
MODE
V OI CE P ER FO RM M AS TE R
SEQUENCERSONG PAT TER N F IL E
INTEGRATEDSAMPLING MIXING UTILITY
EDIT JOB STORE
COMPARE SCENE STORESET LOCATE

8/10/2019 motif_1(2)
http://slidepdf.com/reader/full/motif12 71/300
71 MOTIF Basic Operation
Calling up the Operation Disp
Store mode
The Voice Play mode, Performance Play mode, Song Mixing mode, Pattern Mixing mode, andMaster Play mode have their own specific Store modes.To call up the Store mode, press the [STORE] button while one of the modes listed above is active.Since the [STORE] button does not have an indicator lamp, check the display to see whether theStore mode is selected or not.
Selecting Functions and Parameters
Each mode described above contains various displays, with various functions and parameters. To navigate your waythrough these displays and select a desired function, use the [F1] - [F6] buttons and the [SF1] - [SF5] buttons.When you select a mode, the available displays or menus appear directly above the buttons at the bottom of thedisplay (as shown below).
Using the Function buttons [F1] - [F6]
Depending on the currently selected mode, up to six functions are available and can be called up with the [F1] - [F6] buttons. Keep in mind that the available functions differ depending on the selected mode.
Using the Sub-Function buttons [SF1] - [SF5]
Depending on the currently selected mode, up to five functions (sub-functions) are available and can be called upwith the [SF1] - [SF5] buttons. Keep in mind that the available functions differ depending on the selected mode.(Some displays may not have any sub-functions for these buttons.)
MODE
V OI CE P ER FO RM M AS TE R
SEQUENCERSONG PAT TER N F IL E
INTEGRATEDSAMPLING MIXING UTILITY
EDIT JOB STORE
COMPARE SCENE STORESET LOCATE
SONG SCENESF1 SF2 SF3 SF4 SF5
F1 F2 F3 F4 F6F5
INFORMATION
These functions can be selected via thecorresponding button ([F1] - [F6]).
In this example, press the [F5] button to goto the LFO display.
SONG SCENE SF1 SF2 SF3 SF4 SF5
F1 F2 F3 F4 F6F5
INFORMATION
These functions can be selected via thecorresponding button ([SF1]-[SF5]).
In this example, press the [SF5] buttonto go to the SCALE display.

8/10/2019 motif_1(2)
http://slidepdf.com/reader/full/motif12 72/300
72 MOTIF Basic Operation
Display-based Controls
B as i c
Oper at i on
How to leave the current display
For most operations (especially editing and Job- or Store-related), pressing the [EXIT] button will let you leave thecurrent display and return you to the next highest level or to the normal play mode display.
Display-based Controls
Data Entry
Confirmation Message
When you execute certain operations, such as those in the Job, Store, and File modes, the MOTIF shows aconfirmation message. This lets you actually execute the operation or cancel it if desired.
If a confirmation message (like the one illustrated above) appears, press the [INC/YES] button to execute theoperation or press the [DEC/NO] button to cancel it.
DEC/NO INC/YES
EXIT ENTER
EXECUTE
DEC/NO INC/YES
EXIT ENTER
EXECUTE
1Moving the cursorUse these four buttons to navigate the display,moving the cursor around the various selectableitems and parameters in the screen. Whenselected, the relevant item is highlighted(the cursor appears as a dark block with inversecharacters).
2Changing (editing) valuesRotating the data dial to the right (clockwise)increases the value, while rotating it to the left(counter-clockwise) decreases it.
For parameters with large value ranges, you canincrease the value by 10 by simultaneouslyholding down the [INC/YES] button and pressingthe [DEC/NO] button. To decrease by 10, do theopposite; simultaneously hold down the [DEC/NO]button and press the [INC/YES] button.

8/10/2019 motif_1(2)
http://slidepdf.com/reader/full/motif12 73/300
73 MOTIF Basic Operation
Display-based Con
Information Display
This convenient function lets you call up relevant details about the selected mode — simply by pressing the[INFORMATION] button. For example, when the Voice mode is active, you can quickly check information aboutwhich voice bank is selected, what Play mode (poly or mono) is being used, which effects are applied, and so on.
In the Song Play mode, you can instantly find out how much memory is being used and how much is left over foradditional recording.
Control Knobs and Sliders
This extremely versatile and powerful section on the panel gives you instant, real-time control over the sound andcertain functions of the MOTIF. For example, you can use these to shift the Pan position, adjust the Reverb orChorus effect, change the Tempo of a song or pattern, tweak the EQ, perform dynamic filter sweeps, alter the Volume balance of the elements in a voice or the tracks of a song, and do many other things as well — all in real time, as youperform. The Knobs are also assignable to various functions, letting you control virtually any aspect of the sound oroperation you desire (pages 254 and 256).
1 Select the row of functions you wish to control by pressing the [KNOB CONTROL FUNCTION] button.The corresponding indicator lights, showing you which row is active. For example if you want to use the Knobsto control Pan, Reverb, Chorus and Tempo, press the [KNOB CONTROL FUNCTION] button (repeatedly ifnecessary) until the top indicator is lit.
2 Turn the appropriate Knob ([KN1] - [KN4]) to adjust the desired function.
INFORMATION
INFORMATION
KNOBCONTROLFUNCTION
PAN REVERB CHORUS TEMPO
ATTACK RELEASECUTOFF RESONANCE
ASSIGN A ASSIGN B ASSIGN 1 ASSIGN 2
KN 1 KN 2 KN 3 KN 4
MEQ LOW MEQ HI MIDMEQLOWMID MEQ HIGH
KNOBCONTROLFUNCTION
PAN REVERB CHORUS TEMPO
ATTAC K RELEASECUTOFF RESONANCE
ASSIGN A ASSIGN B ASSIGN 1 ASSIGN 2
KN 1 KN 2 KN 3 KN 4
MEQ LOW MEQ HI MIDMEQLOWMID MEQ HIGH
1 Pan, Effect Send. and Tempo
2 Filter and EG
3 Assign
4 Master EQ
Press this repeatedly toselect each function row.
In this example display, the Pan, Effect Sendand Tempo controls have been called up.

8/10/2019 motif_1(2)
http://slidepdf.com/reader/full/motif12 74/300
74 MOTIF Basic Operation
Display-based Controls
B as i c
Oper at i on
The available functions are shown at the top of the display, and the value changes as you turn the correspondingKnob. For example, to change the amount of Reverb (in the top row), turn Knob 2. To change the Pan position,turn Knob 1.If the “Rev” knob in the display is dark, any tweaking you do to the Knob immediately affects the sound.However, if the knob in the display is light, turning the knob will not have any effect until you reach the currentsetting. Once you’ve adjusted the Knob to that setting point, the display knob turns dark, and you can tweak thesound.
3 Move the appropriate Sliders ([CS1] - [CS4]) as well.
The Sliders are generally for controlling levels, but they have different functions depending on the selected mode.For example, in the Voice mode, they are used to adjust the levels of the four elements in a voice. In thePerformance mode, they control the levels of the four parts. In the Song and Pattern modes, they are used tochange the levels of the sixteen tracks — four at a time. (In the last case, you can select different groups offour by pressing the appropriate [NUMBER] button, [1] - [16].)Please note that moving the slider will not have any effect until you reach the current setting.
For more information on the Knobs and Sliders, see page 48.
MASTERVOLUME V OL UME 1 V OL UME 2 V OL UME 3 V OL UME 4
CS 1 CS 2 CS 3 CS 4
ZONE1 ZONE2 ZONE3 ZONE4

8/10/2019 motif_1(2)
http://slidepdf.com/reader/full/motif12 75/300
75 MOTIF Basic Operation
Display-based Con
Note (Key) settings
Several MOTIF parameters let you set a key range for a function — for example, in setting up a keyboard split — byspecifying certain note values. You can use the [INC/YES] and [DEC/NO] buttons or data dial to set theseparameters, or you can directly enter the values from the keyboard by pressing the appropriate keys (as shown below). In the example display here, element 1 of a voice is being edited.
Naming
The MOTIF allows you to create your own original data such as voices, performances, songs, and styles. You can also
freely name the data as desired.The following data types can be named.
• User voices..............................................................................page 130• User performance .............................. .................................. ..page 166• User songs ............................... ................................. ..............page 204• User styles .............................. .................................. ..............page 232• User phrases................................. .................................. ........page 230• User masters...........................................................................page 271• User waveform ......................................................................page 247 • Files saved to memory card or SCSI storage device .............page 267
The example below applies when naming a User voice (page 130).
1Move the cursor to the first position of the name by using the Cursor button.
2 Select a character by using the [INC/YES] button, [DEC/NO] button or the data dial.
When Note Limit is selected, the [KBD] mark appears,indicating that you can use the keyboard to set the value.Simultaneously hold down the [INFORMATION] button andpress the appropriate key.
INFORMATION
DEC/NO INC/YES
EXIT ENTER
EXECUTE
DEC/NO INC/YES
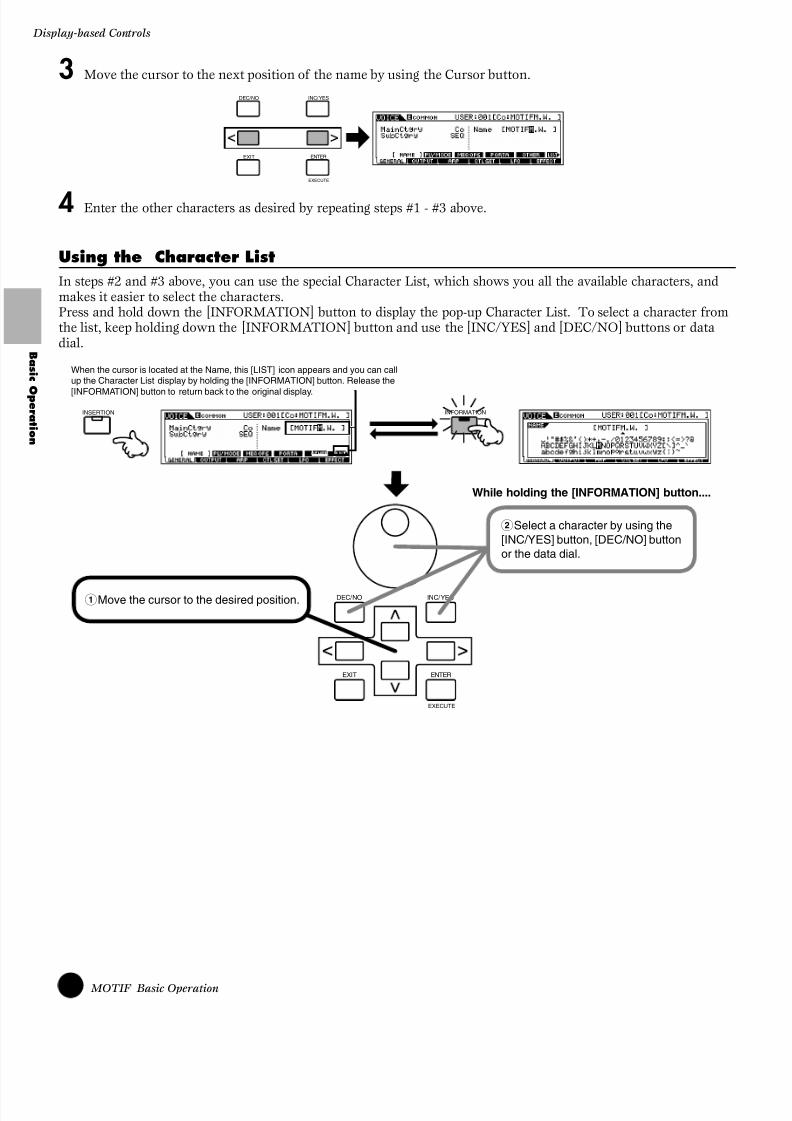
8/10/2019 motif_1(2)
http://slidepdf.com/reader/full/motif12 76/300
76 MOTIF Basic Operation
Display-based Controls
B as i c
Oper at i on
3 Move the cursor to the next position of the name by using the Cursor button.
4 Enter the other characters as desired by repeating steps #1 - #3 above.
Using the Character List
In steps #2 and #3 above, you can use the special Character List, which shows you all the available characters, andmakes it easier to select the characters.Press and hold down the [INFORMATION] button to display the pop-up Character List. To select a character fromthe list, keep holding down the [INFORMATION] button and use the [INC/YES] and [DEC/NO] buttons or datadial.
DEC/NO INC/YES
EXIT ENTER
EXECUTE
INFORMATIONINSERTION
When the cursor is located at the Name, this [LIST] icon appears and you can callup the Character List display by holding the [INFORMATION] button. Release the
[INFORMATION] button to return back to the original display.
DEC/NO INC/YES
EXIT ENTER
EXECUTE
1Move the cursor to the desired position.
2Select a character by using the[INC/YES] button, [DEC/NO] buttonor the data dial.
While holding the [INFORMATION] button....

8/10/2019 motif_1(2)
http://slidepdf.com/reader/full/motif12 77/300
77 MOTIF Quick Start Guide
Playing the D
Quick Start GuideThis helpful and informative section of the manual takes you on a guided tour of the MOTIF, explaining virtually allof the important functions by example and giving you important, hands-on experience as you actually start using theinstrument. Read through these practical instructions carefully — this is the best way to get to know thesophisticated functions of the MOTIF and to discover just how much it has to offer. Each set of instructions gives
you the basic tools you need to master the instrument. If you’re in need of more information or details, go straight tothe Reference section — the relevant page number is indicated here at the beginning of each topic.
Playing the Demos
Here’s the best place to start your explorations of the MOTIF. The Song and Master Demos have been speciallyprogrammed so you can hear just how amazing the sounds are, and find out just how powerful the instrument really is.
Auto Demo LoadReference (page 252)
The MOTIF features special Demo data (Song and Master programs) which is stored to ROM and can be loaded to DRAM byusing the Auto Demo Load function. When this parameter is set to “on,” the Demo song data is automatically loaded whenthe power is turned on. The Auto Demo Load parameter is set to off when the MOTIF is shipped from the factory. (Undernormal playing circumstances, you’ll want to use the full memory of the instrument and won’t want to have the Demoprograms automatically load.) Before you can play the Demos, you’ll need to turn this function on (as described below).
The Demo programs are now loaded to the MOTIF, and you can try them out in the instructions that follow.
2 Call up the OTHER display.
SF4
3 Move the cursor to “AutoDemoLoad.”DEC/NO INC/YES
EXIT ENTER
EXECUTE
4 Set “AutoDemoLoad” to ON.
DEC/NO INC/YES
1 Enter the Utility mode and call up the GENERAL display.
F1
SEQUENCERSONG PATTERN FILE
INTEGRATEDSAMPLING MIXING UTILITY
POWERON OFF
5
POWERON OFF
Turn the power off by pressingthe [POWER] switch.
6 Turn the power on again bypressing the [POWER] switch.

8/10/2019 motif_1(2)
http://slidepdf.com/reader/full/motif12 78/300
78 MOTIF Quick Start Guide
Playing the Demos
Qui c k S t ar t Gui d e
Playing the Song DemoA variety of Demo songs have been programmed to the MOTIF, showcasing its dynamic voices and giving you a tasteof the sophisticated sequencing functions inside.
To instantly return to the beginning of the song, press the [ ] (Top) button.For details about song control, see page 14.
P LG 2
A B C D E F G H
15
CATEGORYSEARCH
OCTAVED OWN U P
KNOBCONTROLFUNCTION
P AN R EV E RB C H OR U S T E MP O
ATTACK RELEASECUTOFF RESONANCE
A S S IGN A A S SI GN B A S SI GN 1 A S SI GN 2
KN 1 KN 2 KN 3 KN 4
MEQLOW MEQHIMIDM EQ LO WM ID M EQ H IG H
REMOTECONTROL
ON/OFF
EFFECTBYPASS ARPEGGIO
INSERTION S Y STE M ON / OFFMASTERVOLUME
V OL UM E 1 V OL U M E 2 V OL U M E 3 V OL U ME 4
CS1 CS 2 CS3 CS 4
Z ON E1 Z ON E2 Z ON E3 Z ON E4
SEQTRANSPORT
LOCATE 1 2
REC
MODE
VOICE PERFORMMASTER
SEQUENCERS ON G P A TTE R N FI L E
INTEGRATEDSAMPLING M I X IN G U TI L ITY
EDIT JOB STORE
C O MP A RE S C EN E ST O RESETLOCATE
SONGSCENESF1 SF2 SF3 SF4 SF5
F1 F2 F3 F4 F6F5
INFORMATION
D EC /NO I NC/ YES
EXIT ENTER
EXECUTE
MUSIC PRODUCTION SYNTHESIZERIntegratedSamplingSequencer
Real-timeExternalControlSurfaceModularSynthesisPlug-inSystem
DRUMKITS
FAVORITES
S L OT 1 S L OT 2 S L OT 3
PRE 1 PRE 2 PRE 3 GM USER PLG 1 PLG 3
A.PIANO KEYBOARD ORGAN GUITAR/ PLUCKED
B A S S S T RING S BRASS REED/PIPE
S Y NLE AD S Y NP A D/ CHOIR
SYNCOMPCHROMATICPERCUSSION
DRUM/ PERCUSSION
S E M U SI C AL F X C O MB I
1 2 3 4 5 6 7 8
9 10 11 12 13 14 16
SECTION
TRACKSELECT
MUTE
SOLO
BANK
GROUP
NUMBER
COMMON
ELEMENT/PERF.PART/ZONE
5 Start the selected song.
When playback of the selected song is finished,the song automatically stops.
SEQ TRANSPORT
LOCATE 1 2
REC
SEQ TRANSPORT
LOCATE 1 2
REC
Top button
You can stop the song anytime during playback by pressing the [■]button. This pauses the song at the current position. To resumeplayback of the song from that point, press the [F] again.
Stop song playback manually, if you want.6
Select a song.4
Decreasesnumber
Decreasesnumber
Increasesnumber
Increasesnumber
DEC/NO INC/YES
If it isn’t currently highlighted,move the cursor to the Songnumber/name.
3
DEC/NO INC/YES
EXIT ENTER
EXECUTE
2 Press the [SONG] mode button to enterthe Song mode.
SEQUENCERSONG PATTERN FILE
INTEGRATEDSAMPLING MIXING UTILITY
POWERON OFFTurn the power ON.1

8/10/2019 motif_1(2)
http://slidepdf.com/reader/full/motif12 79/300
79 MOTIF Quick Start Guide
Playing the D
Playing the Master DemoThe MOTIF has so many powerful features, functions, and modes, it may seem difficult to understand them all andgrasp how they work together. One good place to start learning about the various pieces in the MOTIF puzzle is theMaster mode.
Master programs are special setups that let you work across the mode boundaries of the MOTIF (Voice, Performance,Song, and Pattern), and let you instantly select a desired configuration for the entire instrument. We’ve programmeda variety of Master programs to show you how this powerful feature can be used. Try some of these out now. (You’ll be setting up your own Master programs later in this Guide.)
P LG 2
A B C D E F G H
15
CATEGORYSEARCH
OCTAVED OW N U P
KNOBCONTROLFUNCTION
PAN REVERB CHORUS TEMPO
ATTACK RELEASECUTOFF RESONANCE
A S SI GN A A S S IGN B A S S IGN 1 A S S IGN 2
KN 1 KN 2 KN 3 KN 4
MEQLOW MEQHIMIDM EQ LO WM ID M E QH IG H
REMOTECONTROLON/OFF
EFFECTBYPASS ARPEGGIO
INSERTION S Y STE M ON / OFFMASTERVOLUME
V OL UM E 1 V OL U M E 2 V OL U M E 3 V OL U M E4
CS 1 CS 2 CS 3 CS 4
Z ON E1 Z ON E2 Z ON E3 Z ON E4
SEQTRANSPORT
L OC ATE 1 2
REC
MODE
VOICE PERFORMMASTER
SEQUENCERS ON G P A TTE R N FI L E
INTEGRATEDSAMPLING M I X IN G U TI LI TY
E DI T J OB S TO RE
C O MP A RE S C EN E S TO R ESETLOCATE
SONGSCENESF1 SF2 SF3 SF4 SF5
F1 F2 F3 F4 F6F5
INFORMATION
DEC /NO IN C/ YES
EXIT ENTER
EXECUTE
MUSICPRODUCTION SYNTHESIZERIntegratedSampling Sequencer
Real-timeExternalControlSurfaceModularSynthesisPlug-inSystem
DRUMKITS
FAVORITES
S L OT 1 S L OT 2 S L OT 3
P RE 1 P RE 2 PRE 3 GM USER PLG 1 PLG 3
A.PIANO KEYBOARD ORGAN GUITAR/ PLUCKED
BASS S T RING S B RA S S REED/PIPE
S Y NLE AD S Y NP AD/ CHOIR
SYNCOMPCHROMATICPERCUSSION
DRUM/ PERCUSSION
S E M U SI C AL F X C O MB I
1 2 3 4 5 6 7 8
9 10 11 12 13 14 16
SECTION
TRACKSELECT
MUTE
SOLO
BANK
GROUP
NUMBER
COMMON
ELEMENT/PERF.PART/ZONE
Play the selected Master program.3
• When the Mode is set toVoice or Performance, playthe keyboard.
SEQ TRANSPORT
LOCATE 1 2
REC
• When the Mode is set toSong or Pattern, press the[F] (Play) button.
1 Enter the Master mode.
MODE
VOI CE PERF ORM M ASTER
2 Select a Master.
1 2 3 4 5 6 7 8
159 10 11 12 13 14 16
Decreasesnumber
Decreasesnumber
Increasesnumber
Increasesnumber
DEC/NO INC/YES
Mode

8/10/2019 motif_1(2)
http://slidepdf.com/reader/full/motif12 80/300
80 MOTIF Quick Start Guide
Playing Voices
Qui c k S t ar t Gui d e
Playing Voices
Reference (page 124)
The Voice Play mode is where you select and play the instrument sounds (voices) of the MOTIF.Thanks to an amazing 85MB of wave ROM and over 700 voices to choose from (even more when you install optional Plug-in boards!), the MOTIF has just about any sound you’ll ever need, no matter what kind of music you create — from lusciouspiano, strings, and other acoustic instruments to cutting-edge synth, dance, and electronica sounds.Plus, with the full 62-note polyphony, you can play fat chords and arpeggios — and sustain them without ever having toworry about the sound cutting out. The MOTIF provides several different voice banks: Preset 1 - 3, GM Preset, User, andPlug-in 1 - 3 (when optional Plug-in boards are installed). Select a bank and try out some of these different voices right now.
Selecting a voice
P LG 2
A B C D E F G H
15
CATEGORYSEARCH
OCTAVED OW N U P
KNOBCONTROLFUNCTION
P AN R E VE RB C H OR U S TEMPO
ATTACK RELEASECUTOFF RESONANCE
A S SI GN A A S S IGN B A S S IGN 1 A S SI GN 2
KN 1 KN 2 KN 3 KN 4
MEQLOW MEQHI MIDM EQ LO WM ID M E QH IG H
REMOTECONTROLON/OFF
EFFECTBYPASS ARPEGGIO
I N S ER TI ON S Y S TE M ON / OFFMASTERVOLUME V OL UM E 1 V OL U M E 2 V OL U M E 3 V OL U M E 4
CS 1 CS 2 CS 3 CS 4
Z ON E1 Z ON E2 Z ON E3 Z ON E4
SEQTRANSPORT
LOCATE 1 2
REC
MODE
VOICE PERFORMMASTER
SEQUENCERS ON G P A TTE R N FI L E
INTEGRATEDSAMPLING MIXING UTILITY
E DI T J OB S TO RE
COMPARE SCENESTORESETLOCATE
SONGSCENESF1 SF2 SF3 SF4 SF5
F1 F2 F3 F4 F6F5
INFORMATION
DEC /N O IN C/ YES
EXIT ENTER
EXECUTE
MUSICPRODUCTIONSYNTHESIZERIntegratedSamplingSequencer
Real-timeExternalControlSurfaceModular SynthesisPlug-in System
DRUMKITS
FAVORITES
S L OT 1 S L OT 2 S L OT 3
P RE 1 P RE 2 PRE 3 GM USER PLG 1 PLG 3
A . P I A NO K E Y BO A RD O RG AN G UI TA R/ PLUCKED
B A S S S T RING S B RA S S RE E D/ P I P E
S Y NLE AD S Y NP AD/ CHOIR
SYNCOMPCHROMATICPERCUSSION
DRUM/ PERCUSSION
S E M U SI C AL F X C O MB I
1 2 3 4 5 6 7 8
9 10 11 12 13 14 16
SECTION
TRACKSELECT
MUTE
SOLO
BANK
GROUP
NUMBER
COMMON
ELEMENT/PERF.PART/ZONE
4 Select a Voice number.3 Select a Voice Group.
Voices in each Bank are divided into Groups[A] ~ [H]. Select a Group to display the
voices that belong to the selected Group.Group
2
Select a Normal Voice Bank. Select a Plug-in Voice Bank.
Select a Voice Bank.
n When shipped from the factory,the MOTIF contains a full setof specially programmed Uservoices in the User bank.Naturally, you can edit theseand overwrite them if youwant. You can also restorethem to the original factory setby using the Utility Job (page260). For details about VoiceBanks and Groups, see page124.
• Normal Voice
• Drum Voice
PLG 2PRE 1 PRE 2 PRE 3 GM USER PLG 1 PLG 3
A. PIANO K EY BO AR D O RG AN GUITAR/ PLUCKED
BASS ST RI NG S BR ASS R EED /PI PE
PRE 1 PRE 2 PRE 3 GM USER
A. PIANO KEYBOARD ORGAN GUITAR/ PLUCKED
BASS
DRUM KITS
A B C D E F G H
S YN LEA D S YN P AD / CHOIR
SYN COMP CHROMATICPERCUSSION
DRUM/ PERCUSSION
SE MUSICAL FX COMBI
1 2 3 4 5 6 7 8
159 10 11 12 13 14 16
1 Enter the Voice Play mode.
When the Voice Play mode is active, thecurrently selected voice is shown in hugeletters — so you can easily check whichvoice you’re about to play.
MODE
V OI CE P ER FO RM M AS TE R Bank name
Bank name
Decreasesnumber
Decreasesnumber
Increasesnumber
Increasesnumber
DEC/NO INC/YES

8/10/2019 motif_1(2)
http://slidepdf.com/reader/full/motif12 81/300
81 MOTIF Quick Start Guide
Playing V
Using the Category Search functionReference (page 126)
The MOTIF features a powerful Category Search function that gives you quick access to the sounds you want,irrespective of their bank locations. Simply select a voice category, such as A. PIANO or SYN LEAD, and you can browse through all related voices one by one — and audition each of them, too. Plus, you can use the specialFavorites category to store the voices you use most.
P LG 2
A B C D E F G H
15
CATEGORYSEARCH
OCTAVEDOWN UP
KNOBCONTROLFUNCTION
P AN R E VE RB C H OR U S T EM P O
ATTACK RELEASECUTOFF RESONANCE
A S S IGN A A S SI GN B A S SI GN 1 A S S IGN 2
KN 1 KN 2 KN 3 KN 4
MEQLOW MEQHIMIDM EQ LO WM ID M E QH IG H
REMOTECONTROL
ON/OFF
EFFECTBYPASS ARPEGGIO
I N S ER TI ON S Y STE M ON / OFFMASTERVOLUME V OL UM E 1 V OL U M E 2 V OL U M E 3 V OL U ME 4
CS1 CS 2 CS 3 CS 4
Z ON E1 Z ON E2 Z ON E3 Z ON E4
SEQTRANSPORT
LOCATE 1 2
REC
MODE
VOICE PERFORMMASTER
SEQUENCERS ON G P A TTE R N FI L E
INTEGRATEDSAMPLING M I X IN G U TI L ITY
E DI T J OB S TO RE
C O MP A RE S C EN E S TO R ESETLOCATE
SONGSCENESF1 SF2 SF3 SF4 SF5
F1 F2 F3 F4 F6F5
INFORMATION
D EC /NO I NC/ YES
EXIT ENTER
EXECUTE
MUSIC PRODUCTIONSYNTHESIZERIntegratedSamplingSequencer
Real-timeExternalControlSurfaceModularSynthesisPlug-inSystem
DRUMKITS
FAVORITES
S L OT 1 S L OT 2 S L OT 3
PRE 1 PRE 2 PRE 3 GM USER PLG 1 PLG 3
A.PIANO K E Y BO A RD O RG AN G UI TA R/ PLUCKED
B A S S S T RING S B RA SS RE E D/P I P E
S Y NLE AD S Y NP AD/ CHOIR
SYNCOMPCHROMATICPERCUSSION
DRUM/ PERCUSSION
S E M U SI C AL F X C O MB I
1 2 3 4 5 6 7 8
9 10 11 12 13 14 16
SECTION
TRACKSELECT
MUTE
SOLO
BANK
GROUP
NUMBER
COMMON
ELEMENT/PERF.PART/ZONE
Favorite Category Use this convenient function to store all your favorite, often-used voices in a single, easy-to-access location — and call
them up by pressing the [FAVORITIES] button. Select any voice you want, from any desired category, and enter each
to the Favorites Category. In this way, you can go directly to all the voices you use the most, without having to hop
around other Categories — a great aid when playing live.
Select the desired Category, then move the cursor to your favorite voice in the Category list, and press the [F5] button
to checkmark the the box next to the voice name. (You can un-checkmark it by pressing the [F5] button again.) Go
on to other Categories and continue registering your favorites. After you’ve checkmarked all the voices you want, press
the [DRUMKIT/FAVORITE] button to store them to the Favorites Category. All the voices you’ve checkmarked — and
only those voices — will be shown in the list. To exit from the Favorites Category, simply press the
[DRUMKIT/FAVORITE] button again.
3 Select a voice.Step through the available voices by usingthe data dial. You can also use the[INC/YES] and [DEC/NO] buttons, or usethe cursor [ ]/[ ] buttons.
2 Select a Category.
• Select a Category.Press the Category buttons to display the Categoryname and the voice list. The first voice in thisCategory is selected.
Categorynames
PLG 2PRE 1 PRE 2 PRE 3 GM USER PLG 1 PLG 3
A. PIANO K EY BO AR D O RG AN G UI TA R/ PLUCKED
BASS S TR IN GS B RA SS R EE D/ PI PE
A B C D E F G H
S YN L EA D S YN P AD / CHOIR
SYNCOMP CHROMATICPERCUSSION
DRUM/ PERCUSSION
SE M US IC AL F X C OM BI
Category name Voice l ist
SF1 SF2 SF3
F1 F2 F3
SF1 SF2 SF3
F1 F2 F3
SF1 SF2 SF3 SF4 SF5
F1 F2 F3 F4 F6F5
DRUM KITS
FAVORITES
DEC/NO INC/YES
EXIT ENTER
EXECUTE
Pressing this togglesbetween the two settings:Checkmark onCheckmark off
• Select a Sub Category All Categories are divided intotwo or three Sub Categories forfurther ease in selection.The Sub Category names aredisplayed at the bottom of theCategory Search display. Pressthe [F1] - [F3] buttons to selectthe first voice in thecorresponding Sub Category.
1 Turn the Category Search function on by pressingthe [CATEGORY SEARCH] button.
n Press the [CATEGORY SEARCH] button again to turnthis function off.
CATEGORYSEARCHPLG 2PRE 1 PRE 2 PRE 3 GM USER PLG 1 PLG 3
A. PIANO KEYBOARD ORGAN GUITAR/ PLUCKED
BASS STRINGS BRASS REED/PIPE

8/10/2019 motif_1(2)
http://slidepdf.com/reader/full/motif12 82/300
82 MOTIF Quick Start Guide
Playing Voices
Qui c k S t ar t Gui d e
Keyboard Octave (MOTIF6/MOTIF7)Sometimes when playing a voice, you may wish to play in a lower or higher pitch range. For example, you may wantto shift the pitch down lower to get extra bass notes, or shift up to get higher notes for leads and solos. The OctaveUp/Down controls let you do this quickly and easily.Each time you press the [OCTAVE UP] button on the panel, the overall pitch of the voice goes up by one octave.Likewise, each press of the [OCTAVE DOWN] button takes the pitch down by one octave. The range is from -3 to+3, with 0 being standard pitch. When this is set to Octave Up, the lamp of the [OCTAVE UP] button lights, andwhen it is set to Octave Down, the [OCTAVE DOWN] button’s lamp lights. The current octave setting is shown at
the top right of the display. You can instantly restore standard pitch (0) by simultaneously pressing both the[OCTAVE UP] button and the [OCTAVE DOWN] button (both lamps turn off).
nOctave Up/Down works in conjuction with with the TUNE setting (in Voice Edit, page 138) and the Note Shift setting (in UtilityMode, page 250). This means that if the the pitch has already been shifted up or down with those settings, you may not be able touse Octave Up/Down to shift the full three octaves.
n If using Octave Up/Down results in pitches outside the note range of the voice (C-2 - G8), the invalid pitches are sounded at theprevious octave (down or up).
nThis function can be used also in the Performance mode or Master mode.
OCTAVE
DOWN UP

8/10/2019 motif_1(2)
http://slidepdf.com/reader/full/motif12 83/300
83 MOTIF Quick Start Guide
Editing V
Editing Voices
The Voice Play mode not only lets you play voices, it lets you perform a variety of basic, yet powerful editing operations onthem as well. For example, you can change the EG settings to give the voice a softer or harder attack, or change the releaseto make it sustain. You can also adjust similar settings for the filter, and change the tone of the voice. Moreover, a specialset of Control knobs on the panel let you tweak the sound — including pan, EG, effects, filter, and more — in real time asyou play. Naturally, you can also store your newly created voice for future recall (page 86).
Quick Voice editingReference (page 127)
The [ ] IndicatorIf you alter any parameters in the Voice Play mode, the [ ] indicator will appear in the
top left of the display. This indicates that the current voice has been modified but not yet
stored.
Edit indicator
1 Select the desired menu.
PORTA (Portamento) displayFrom this display you can select monophonic or polyphonic playbackand set the Portamento parameters. Portamento is used to create asmooth transition in pitch from the first note played on the keyboard tothe next.
F4
SF1 SF2 SF3 SF4 SF5
F1 F2 F3 F4 F6F5
2 Set the value of each parameter.Move the cursor to the desired parameter and change the value by usingthe [INC/YES] and [DEC/NO] buttons or the data dial.
DEC/NO INC/YES
EXIT ENTER
EXECUTE
DEC/NO INC/YES
P LG 2
A B C D E F G H
15
CATEGORYSEARCH
SONGSCENESF1 SF2 SF3 SF4 SF5
F1 F2 F3 F4 F6F5
INFORMATION
D EC/ NO I NC /YE S
EXIT ENTER
EXECUTE
MUSIC PRODUCTIONSYNTHESIZERIntegratedSamplingSequencer
Real-timeExternalControlSurfaceModularSynthesisPlug-inSystem
DRUMKITS
FAVORITES
S L OT 1 S L OT 2 S L OT 3
PRE 1 PRE 2 PRE 3 GM USER PLG 1 PLG 3
A.PIANO K E Y B OA RD O RG AN GUITAR/ PLUCKED
B A S S S T RING S B RA S S RE E D/P I P E
S Y NLE AD S Y NP A D/ CHOIR
SYNCOMPCHROMATICPERCUSSION
DRUM/ PERCUSSION
S E M U SI C AL F X C O MB I
1 2 3 4 5 6 7 8
9 10 11 12 13 14 16
SECTION
TRACKSELECT
MUTE
SOLO
BANK
GROUP
NUMBER
COMMON
ELEMENT/PERF.PART/ZONE
EG (Envelope Generator) display
F5
• AEG (Amplitude Envelope Generator)The AEG controls how the volume of the voice changes in time,from the instant you press a key to after you release it. For example,setting a small Attack value results in an instantaneous, sharp sound
when you press a key.• FEG (Filter Envelope Generator)The FEG controls how the tonal quality of the voice changes in time,as affected by the filter. Here, you can also set the Cutofffrequency and Resonance for the filter.
ARP (Arpeggio) display
The basic Arpeggio parameters (e.g., type, tempo) areprovided in this display.
F6
Basic Structure (page 46)
Cutoff Frequency (page 46)
Resonance (page 46)

8/10/2019 motif_1(2)
http://slidepdf.com/reader/full/motif12 84/300
84 MOTIF Quick Start Guide
Editing Voices
Qui c k S t ar t Gui d e
Voice editing with the Control knobsReference (page 132)
These knobs let you change various aspects of the Voice’s sound in real time — while you play. Turn a knob to theright to increase the value, and left to decrease it. If you want to keep the edits you make, you can store them to a newvoice (page 86).
nEach voice of the MOTIF has been programmed with a default or standard parameter value. Using these knobs offsets the defaultor standard parameter value. Regardless of the size of the offset, the minimum and maximum limits cannot be exceeded.
nUsing these knobs in the Performance mode affects the currently selected performance, and not the voices themselves.
P LG 2
A B C D E F G H
15
CATEGORYSEARCH
OCTAVED OW N U P
KNOBCONTROLFUNCTION
PAN REVERB CHORUS TEMPO
ATTACK RELEASECUTOFF RESONANCE
A S SI GN A A S S IGN B A S SI GN 1 A S SI GN 2
KN 1 KN 2 KN 3 KN 4
MEQLOW MEQHIMIDM EQ LO WM ID M E QH IG H
REMOTECONTROLON/OFF
EFFECTBYPASS ARPEGGIO
INSERTION S Y S TE M ON / OFFMASTERVOLUME
V OL UM E 1 V OL U M E 2 V OL U M E 3 V OL U M E 4
CS1 CS 2 CS 3 CS 4
Z ON E1 Z ON E2 Z ON E3 Z ON E4
SEQTRANSPORT
L OC AT E 1 2
REC
MODE
VOICE PERFORMMASTER
SEQUENCERS ON G P A TTE R N FI L E
INTEGRATEDSAMPLING M I X IN G U TI LI TY
E DI T J OB S TO RE
C O MP A RE S C EN E S TO R ESETLOCATE
SONGSCENESF1 SF2 SF3 SF4 SF5
F1 F2 F3 F4 F6F5
INFORMATION
DEC /N O IN C/ YES
EXIT ENTER
EXECUTE
MUSICPRODUCTION SYNTHESIZERIntegratedSampling Sequencer
Real-timeExternalControlSurfaceModularSynthesisPlug-inSystem
DRUMKITS
FAVORITES
S L OT 1 S L OT 2 S L OT 3
P RE 1 P RE 2 PRE 3 GM USER PLG 1 PLG 3
A.PIANO KEYBOARD ORGAN GUITAR/ PLUCKED
BASS STRINGS BRASS REED/PIPE
S Y NLE AD S Y NP AD/ CHOIR
SYNCOMPCHROMATICPERCUSSION
DRUM/ PERCUSSION
S E M U SI C AL F X C O MB I
1 2 3 4 5 6 7 8
9 10 11 12 13 14 16
SECTION
TRACKSELECT
MUTE
SOLO
BANK
GROUP
NUMBER
COMMON
ELEMENT/PERF.PART/ZONE
KNOBCONTROLFUNCTION
PAN REVERB CHORUS TEMPO
ATTACK RE LEASECUTOFF RESONANCE
ASSIGN A ASSIGN B ASSIGN 1 ASSIGN 2
KN 1 KN 2 KN 3 KN 4
MEQ LOW MEQ HI MIDMEQLOWMID MEQ HIGH
Press this repeatedly to select each function row.
Selecting the controllable functionsFunctions assigned to each knob can be selected among four types as illustrated below.Use the [KNOB CONTROL FUNCTION] button to change the parameter set for the knobs. The corresponding LED lightsto indicate which group of parameters are active and the Control of the available functions appear in the LCD display asshown below.Press the [EXIT] button to go back to the original display.
n If the “Rev” knob in the display is dark, any tweaking youdo to the Knob immediately affects the sound. However, ifthe knob in the display is light, turning the knob will nothave any effect until you reach the current setting. Once
you’ve adjusted the Knob to that setting point, the displayknob turns dark, and you can tweak the sound.
Pan, Effect Send, and Tempo
Assign
Filter and EG
Master EQ
1
2
3
4

8/10/2019 motif_1(2)
http://slidepdf.com/reader/full/motif12 85/300
85 MOTIF Quick Start Guide
Editing V
About each assigned function
ATTACK RELEASECUTOFF RESONANCE
KN 1 KN 2 KN 3 KN 4
Filter and EG2
Attack time
Key on
Releasetime
Key off
ATTACK Determines the attack time of the sound. For example, you canadjust a strings voice so that the sound gradually swells involume by setting a slow attack time — simply turn the
[ATTACK] knob to the right. For a more percussive attack, turnthe knob to the left.
RELEASEDetermines the release time of the sound. Turning the knob tothe right sets a long release t ime and (depending on theselected voice) lets the sound sustain after the key is released.To produce a sharp release, in which the sound abruptly cutsoff, set a short release time.
n When the Drum voice is selected, this is used as Decay time.
Pan, Effect Send, and Tempo1
L R
Signal
PAN REVERB CHORUS TEMPO
KN 1 KN 2 KN 3 KN 4
PANDetermines the stereo panposition of the voice.
TEMPODetermines the tempo of the Arpeggioassigned to the currently selected voice.In the Song/Pattern/Arpeggio mode,this determines the tempo of the selected
song or pattern.
AssignThese knobs can be assigned to a variety of functions, letting you create your own custom set of real-time controls.For details about Knobs A/B, see page 256. For details about Knobs 1/2, see page 254.
ASSIGN A ASSIGN B ASSIGN 1 ASSIGN 2
KN 1 KN 2 KN 3 KN 4
3
MEQ LOW MEQLOWMID MID MEQ HI MID MEQ HIGHGain
0
4 Master EQAdjusts the master (global) EQ settings for the entire voice. The settings made here are applied as offsets to the EQ settings (with the exceptionof “MID”) in the Utility mode, page 253.
REVERBDetermines the amount ofReverb effect that is appliedto the voice.
CHORUSDetermines the amount ofChorus effect that is appliedto the voice.
CUTOFFDetermines the Filtercutoff frequency.
RESONANCEBoosts the level of thesignal in the area of thecutoff frequency.Try using the Cutoff andResonance controls abovein tandem. For example,set Resonance to a certainlevel, then sweep theCutoff control.

8/10/2019 motif_1(2)
http://slidepdf.com/reader/full/motif12 86/300
86 MOTIF Quick Start Guide
Storing edited Voices
Qui c k S t ar t Gui d e
Storing edited Voices
Reference (page 160)
Once you’ve edited a voice, you can store it to the internal memory (SRAM). Up to 128 Normal Voices and up to 16Drum Voices can be stored.
nFor details about memory structure, see page 63.
When you execute this, the settings for the destination memory will be overwritten. Important data should always be backed upto computer, a separate Memory Card or some other storage device. (See page 64.)
A wider variety of detailed editing controls is also available in the Voice Edit mode.
P LG 2
A B C D E F G H
15
CATEGORYSEARCH
OCTAVED OW N U P
KNOBCONTROLFUNCTION
PAN REVERB CHORUS TEMPO
ATTACK RELEASECUTOFF RESONANCE
A S SI GN A A S SI GN B A S SI GN 1 A S SI GN 2
KN 1 KN 2 KN 3 KN 4
MEQLOW MEQHIMIDM EQ LO WM ID M EQ H IG H
REMOTECONTROL
ON/OFF
EFFECTBYPASS ARPEGGIO
I N S ER TI ON S Y STE M ON / OFFMASTERVOLUME
V OL UM E 1 V OL U M E 2 V OL U M E 3 V OL U ME 4
CS1 CS 2 CS3 CS4
Z ON E1 Z ON E2 Z ON E3 Z ON E4
SEQTRANSPORT
LOCATE 1 2
REC
MODE
VOICE PERFORMMASTER
SEQUENCERSONG P A TTE R N FI L E
INTEGRATEDSAMPLING M I X IN G U TI L ITY
E DI T J OB S TO RE
COMPARE SCENESTORESETLOCATE
SONGSCENESF1 SF2 SF3 SF4 SF5
F1 F2 F3 F4 F6F5
INFORMATION
D EC/ NO I NC/ YES
EXIT ENTER
EXECUTE
MUSICPRODUCTION SYNTHESIZERIntegratedSamplingSequencer
Real-timeExternalControlSurfaceModular SynthesisPlug-inSystem
DRUMKITS
FAVORITES
S L OT 1 S L OT 2 S L OT 3
PRE 1 PRE 2 PRE 3 GM USER PLG 1 PLG 3
A . P I ANO K E Y B OA RD O RG AN G UI TA R/ PLUCKED
B A S S S T RING S B RA S S RE E D/P I P E
S Y NLE AD S Y NP A D/ CHOIR
SYNCOMPCHROMATICPERCUSSION
DRUM/ PERCUSSION
S E M U SI C AL F X C O MB I
1 2 3 4 5 6 7 8
9 10 11 12 13 14 16
SECTION
TRACKSELECT
MUTE
SOLO
BANK
GROUP
NUMBER
COMMON
ELEMENT/PERF.PART/ZONE
1 Press the [STORE] button in the Voice mode. 2 Select the destination Voice Memory by using the [INC/YES] and[DEC/NO] buttons or the data dial.
DEC/NO INC/YES
EXIT ENTER
EXECUTE
EDIT JOB STORE
COMPARE SCENE STORESET LOCATE
3 Press the [ENTER] button. (The display prompts you for confirmation.)
4 To execute the Store operation, press the [INC/YES] button. After the voice has been stored, a“Completed” message appears and operation returns to the original display.
DEC/NO INC/YES
EXIT ENTER
EXECUTE
n To cancel the Store operation, press the [DEC/NO] button.
For Store operations that take longer to process, you will see the message "Executing..." during processing.off the power of the MOTIF while this message is displayed, you risk corrupting your data.
DestinationDecreasesnumber
Decreasesnumber
Increasesnumber
Increasesnumber
DEC/NO INC/YES

8/10/2019 motif_1(2)
http://slidepdf.com/reader/full/motif12 87/300
87 MOTIF Quick Start Guide
Storing edited V
About Plug-in VoicesBasic Structure (page 34)
Plug-in Boards give you an enormous amount of additional sonic flexibility and power. When installed, they workseamlessly and transparently within the system of the MOTIF — meaning that you can use their sounds andfunctions just as if they were built right into the MOTIF at the factory. Up to three Plug-in boards can be installed tothe MOTIF. If the Plug-in Board has been correctly installed, the corresponding SLOT lamp will light, the voice dataappropriate for the installed board is set up automatically as Plug-in voices and you can select the Plug-in bank aswell as the built-in Voice bank.
The Plug-in voices can be edited via the MOTIF’s panel operation in much the same way as User voices. Afterediting, up to 64 Plug-in voices for each Plug-in board can be stored.
Editing and saving Board voicesReference (page 159)
Included among the Board voices is a special set of voices — called Board Custom voices — which can be edited by acomputer connected to the MOTIF, using special editing software included with the Plug-in board.Because the Plug-in boards do not have SRAM and the edited voice data will be lost when turning the power off, theedited Board Custom voice data should be saved to the memory card or the SCSI device connected to the MOTIF. TheBoard Custom voice data saved to the memory card or SCSI device can be loaded automatically when turning thepower on by using the Auto Load function.
1 Edit the Board voice by using the Voice Editor.2 Transmit the edited data to the memory (DRAM) on the Plug-in board.
3 Save the data in the memory (DRAM) to the memory card.
4 Set Auto Load to on in the Utility mode (page 252).
5 When turning the power on next time, the Board Custom voice data saved to the memory card is automatically loaded to the memory on the Plug-in board.
PLG 2CATEGORY
SEARCH
MUSIC PRODUCTION SYNTHESIZERIntegratedSampling SequencerReal-timeExternalControlSurfaceModular Synthesis Plug-in System
SLOT 1 SLOT 2 SLOT 3
PRE 2 PRE 3 GM USER PLG 1 PLG 3
KEYBOARD ORGAN GUITAR/ PLUCKED
BASS STRINGS BRASS REED/PIPE
BANK
PLG 2
A B C D E F G H
15
CATEGORYSEARCH
OCTAVE
D O WN U P
KNOBCONTROLFUNCTION
P A N R E V ER B C H O R U S T E M P O
ATTACKRELEASECUTOFF RESONANCE
ASSIGN AASSIGN BASSIGN 1 ASSIGN 2
K N 1 K N 2 K N 3 K N 4MEQ LOW MEQ H I MIDMEQLOWMID MEQ H IGH
REMOTECONTROLON/OFF
EFFECTBYPASS ARPEGGIO
INSERTIONSYSTEM ON/OFFMASTERVOLUME VOLUME 1VOLUME 2VOLUME 3VOLUME 4
CS1 C S 2 CS 3 C S 4
Z O N E1 Z O N E2 Z O N E 3Z O N E 4
SEQTRANSPORT
LOCATE 1 2
REC
MODE
VOICEPERFORMMASTER
SEQUENCERS O N G P A T TE R N F I LE
IN TEGR ATEDSAMPLIN G MIXING UTILITY
EDIT J OB S TO RE
C O M PA R E S C E N E S T O R ESETLOC ATE
SONG SCENESF1 SF2 SF3 S F4 SF5
F1 F2 F3 F4 F6F5
INFORMATION
D EC /N O I NC /Y ES
E XI T E NT ER
EXEC U TE
MUSIC PRODUCTIONSYNTHESIZERIntegratedSampling Sequencer
R eal-timeExternalC ontrolSurfaceModularSynthesisPlug-inSystem
DRUMKITS
FAVORITES
S L O T 1 S L O T 2 S L O T 3
P RE 1 P R E2 P RE 3 G M U S ER P LG 1 P LG 3
A . P I A NO K E Y B O A R D O R G AN G U I TA R / PLU C KED
BASS S T R I NG S B R A S S R E E D / PI P E
SYN LEAD SYN PAD / C H OIR
SYN C OMPC H R OMATICPER C U SSION
D R U M/ PER C U SSION
S E M U S I CA L F X C O M B I
1 2 3 4 5 6 7 8
9 10 11 12 13 14 16
SECTION
TRACKSELECT
MUTE
SOLO
BANK
GROUP
NUMBER
COMMON
ELEMEN T/PER F.PAR T/ZON E
Computer with application software
MOTIF
Plug-in board
1 Edit
2 Transmit
Memory card
PLG 2
A B C D E F G H
15
CATEGORYSEARCH
OCTAVED O WN U P
KNOBCONTROLFUNCTION
PAN REVERB CHORUS TEMPO
ATTACKRELEASECUTOFFRESONANCE
ASSIGN AASSIGN BASSIGN 1 ASSIGN 2
K N 1 K N 2 K N 3 K N 4
MEQ LOW MEQ H I MIDMEQLOWMID MEQ H IGH
REMOTECONTROLON/OFF
EFFECTBYPASS ARPEGGIO
INSERTION SYSTEM ON/OFFMASTERVOLUME VOLUME 1VOLUME 2VOLUME 3VOLUME 4
CS1 C S 2 CS3 C S 4
Z O N E1 Z O N E2 Z O N E 3Z O N E 4
SEQTRANSPORT
LOCATE 1 2
REC
MODE
VOICEPERFORMMASTER
SEQUENCERS O N G P A T TE R N F I LE
IN TEGR ATEDSAMPLIN G MIXINGUTILITY
EDIT JOB STORE
C O M PA R E S C E N E S T O R E
SETLOC ATE
SONG SCENESF1 SF2 SF3 S F4 SF5
F1 F2 F3 F4 F6F5
INFORMATION
D EC /N O I NC /Y ES
E XI T E NT ER
EXEC U TE
MUSICPRODUCTIONSYNTHESIZERIntegratedSamplingSequencer
R eal-timeExternalC ontrolSurfaceModularSynthesisPlug-in System
DRUMKITS
FAVORITES
S L O T 1 S L O T 2 S L O T 3
P RE 1 P R E2 P RE 3 G M U S ER P LG 1 P LG 3
A . P I A NO K E Y B O A R D O R G AN G U I TA R / PLU C KED
B A S S S T R I NG S B R A S S R E E D / PI P E
SYN LEAD SYN PAD / C H OIR
SYN C OMPC H R OMATICPER C U SSION
D R U M/ PER C U SSION
S E M U S I CA L F X C O M B I
1 2 3 4 5 6 7 8
9 10 11 12 13 14 16
SECTION
TRACKSELECT
MUTE
SOLO
BANK
GROUP
NUMBER
COMMON
ELEMEN T/PER F.PAR T/ZON E
MOTIF
Plug-in board 3 Save
Set this to on.

8/10/2019 motif_1(2)
http://slidepdf.com/reader/full/motif12 88/300
88 MOTIF Quick Start Guide
Playing Performances
Qui c k S t ar t Gui d e
Playing Performances
Basic Structure (page 42) · Reference (page 162)
In the Performance mode, you can select and play individual User performances.In a performance, you can mix several different voices together in a layer, or split them across the keyboard, or evenset up a combination layer/split. Each Performance can contain up to four different Parts.
nFor details about the performances and their memory (bank) structure, see page 42.
Selecting a Performance
P LG 2
A B C D E F G H
15
CATEGORYSEARCH
OCTAVEDOWN UP
KNOBCONTROLFUNCTION
PAN REVERB CHORUS TEMPO
ATTACK RELEASECUTOFF RESONANCE
A S SI GN A A S SI GN B A S SI GN 1 A S SI GN 2
KN 1 KN 2 KN 3 KN 4
MEQLOW MEQHIMIDM EQ LO WM ID M EQ H IG H
REMOTECONTROLON/OFF
EFFECTBYPASS ARPEGGIO
I N S ER TI ON S Y STE M ON / OFFMASTERVOLUME
V OL UM E 1 V OL U M E 2 V OL U M E 3 V OL U M E 4
CS1 CS 2 CS 3 CS4
Z ON E1 Z ON E2 Z ON E3 Z ON E4
SEQTRANSPORT
LOCATE 1 2
REC
MODE
VOICE PERFORMMASTER
SEQUENCERS ON G P A TTE R N FI L E
INTEGRATEDSAMPLING M I X IN G U TI LI TY
E DI T J OB S TO RE
C O MP A RE S C EN E ST O RESETLOCATE
SONGSCENESF1 SF2 SF3 SF4 SF5
F1 F2 F3 F4 F6F5
INFORMATION
D EC/ NO I NC /YE S
EXIT ENTER
EXECUTE
MUSIC PRODUCTIONSYNTHESIZERIntegratedSamplingSequencer
Real-timeExternalControlSurfaceModularSynthesisPlug-inSystem
DRUMKITS
FAVORITES
S L OT 1 S L OT 2 S L OT 3
P RE 1 P RE 2 P RE 3 GM USER PLG 1 PLG 3
A . P I ANO K E Y B OA RD O RG AN G UI TA R/ PLUCKED
BASS S T RI NG S B RA S S RE E D/P I P E
S Y NLE AD S Y NP A D/ CHOIR
SYNCOMPCHROMATICPERCUSSION
DRUM/ PERCUSSION
S E M U SI C AL F X C O MB I
1 2 3 4 5 6 7 8
9 10 11 12 13 14 16
SECTION
TRACKSELECT
MUTE
SOLO
BANK
GROUP
NUMBER
COMMON
ELEMENT/PERF.PART/ZONE
4 Play the keyboard.
Select a Performance Group.Performances in each Bank are divided into Groups A~H. Select a Group to displaythe performances that belong to the selected Group.
n All performances are stored to a single bank, so you need not select a bank here.
2
Select a Performance number.3
A B C D E F G H
S YN LEA D S YN PA D/ CHOIR
SYN COMP CHROMATICPERCUSSION
DRUM/ PERCUSSION
SE MUS IC AL FX C OMBI
SECTION GROUP
Performance
Group
1 2 3 4 5 6 7 8
159 10 11 12 13 14 16
1 Enter the Performance Play mode.MODE
VO IC E P ER FO RM M AS TE R
When the Performance Play mode is act ive,the currently selected performance is shown inhuge letters — so you can easily check whichperformance you’re about to play.
Decreasesnumber
Decreasesnumber
Increasesnumber
Increasesnumber
DEC/NO INC/YES
1 2 3 4 5 6 7 8
159 10 11 12 13 14 16
TRACKSELECT
MUTE
SOLO
NUMBERELEMENT/PERF.PART/ZONE
Performance Part on/off
Each performance can contain a maximum of four parts, selected from a total of seven — internal Parts 1 - 4 and Plug-in Parts 1 - 3.
1 Press the [MUTE] button so that its indicator lights.
2 Press any of the [1] - [4] buttons you wish to mute. The part
corresponding to the unlit indicator is muted.
3 Press the [MUTE] button again so that its indicator goes out.
n The Category Searchfunction and Keyboard
Octave function can be usedalso in the Performance Playmode in the same way as inthe Voice Play mode.

8/10/2019 motif_1(2)
http://slidepdf.com/reader/full/motif12 89/300
89 MOTIF Quick Start Guide
Editing Performances (Layer/S
Editing Performances (Layer/Split)
Basic Structure (page 45) · Reference (page 170)
Performances can be made up of a maximum of four parts (voices), selected from the internal tone generator Parts 1 - 4and Plug-in board Parts 1 - 3.You can create a performance by layering several voices together, and by assigning different voices to separate rangesof the keyboard. You can then store up to 128 of your original, edited performances to internal User memory.
P LG 2
A B C D E F G H
15
CATEGORYSEARCH
OCTAVED OW N U P
KNOBCONTROLFUNCTION
P AN R EV ER B C H OR U S T E MP O
ATTACK RELEASECUTOFF RESONANCE
A S SI GN A A S SI GN B A S SI GN 1 A S SI GN 2
KN 1 KN 2 KN 3 KN 4
MEQLOW MEQHIMIDM EQ LO WM ID M EQ H IG H
REMOTECONTROLON/OFF
EFFECTBYPASS ARPEGGIO
INSERTION SYSTEM ON/OFFMASTERVOLUME V OL UM E 1 V OL U M E 2 V OL U M E 3 V OL U M E 4
CS1 CS 2 CS 3 CS 4
Z ON E1 Z ON E2 Z ON E3 Z ON E4
SEQTRANSPORT
LOCATE 1 2
REC
MODE
VOICE PERFORMMASTER
SEQUENCERS ON G P A TTE R N FI L E
INTEGRATEDSAMPLING M I X IN G U TI LI TY
EDIT JOB STORE
C O MP A RE S C EN E S TO R ESETLOCATE
SONGSCENESF1 SF2 SF3 SF4 SF5
F1 F2 F3 F4 F6F5
INFORMATION
DE C/ NO I NC /YE S
EXIT ENTER
EXECUTE
MUSIC PRODUCTION SYNTHESIZERIntegratedSamplingSequencer
Real-timeExternalControlSurfaceModularSynthesisPlug-inSystem
DRUMKITS
FAVORITES
S L OT 1 S L OT 2 S L OT 3
PRE 1 PRE 2 PRE 3 GM USER PLG 1 PLG 3
A.PIANO KEYBOARD ORGAN GUITAR/ PLUCKED
B A S S S T RI NG S BRASS REED/PIPE
S Y NLE AD S Y NP A D/ CHOIR
SYNCOMPCHROMATICPERCUSSION
DRUM/ PERCUSSION
S E M U SI C AL F X C O MB I
1 2 3 4 5 6 7 8
9 10 11 12 13 14 16
SECTION
TRACKSELECT
MUTE
SOLO
BANK
GROUP
NUMBER
COMMON
ELEMENT/PERF.PART/ZONE
PRE1 PRE2 PRE3 USER PL1
Built-in tone generator parts Plug-in parts
PL2 PL3
Layer Split
PRE1 PRE2 PRE3 USER PL1
Built-in tone generator parts Plug-in parts
PL2 PL3
SONG SCENESF 1 SF 2 SF 3 SF 4 SF 5
F1 F2 F3 F4 F6F5
INFORMATIONSONG SCENE
SF 1 SF 2 SF 3 SF 4 SF 5
F1 F2 F3 F4 F6F5
INFORMATION
Assign the built-in voiceto the selected part.
Delete the voice assignmentof the selected part.Assign the Plug-in voice
to the selected part.
DEC/NO INC/YES
1 Call up the VOICE display by pressing the
[F3] button in the Performance Play mode.
2 Assign the desired voice to each part.
Move the cursor to the desired part and select a voice by pressing the [F1] or[F2] button.
3 4Specify the note range of each part, as required.You can set the lowest note of the range over which the voice of the selected partsounds by pressing the desired key while holding the [SF4] button. To set thehighest note of the range, press the desired key while holding the [SF5] button.This lets you create a split keyboard, with up to four different parts (voices)sounding in four different ranges. You can also overlap parts to create layers.
Change the volume of each part and adjust therelative balance among the four parts by usingthe Control sliders.
MASTERVOLUME
VOL UM E 1 VOL UM E 2 VOL UM E 3 VOL UM E 4
CS 1 CS 2 CS 3 CS 4
KNOB
CONTROLFUNCTION
PAN REVERB CHORUS TEMPO
A TTA CK R EL EA SECUTOFF RESONANCE
A SS IG N A A SS IG N B A SS IG N 1 A SS IG N 2
KN 1 KN 2 KN 3 KN 4
MEQ LOW MEQ HI MIDMEQLOWMID MEQ HIGH
Note Limit Low Note Limit HighSF 4 SF 5
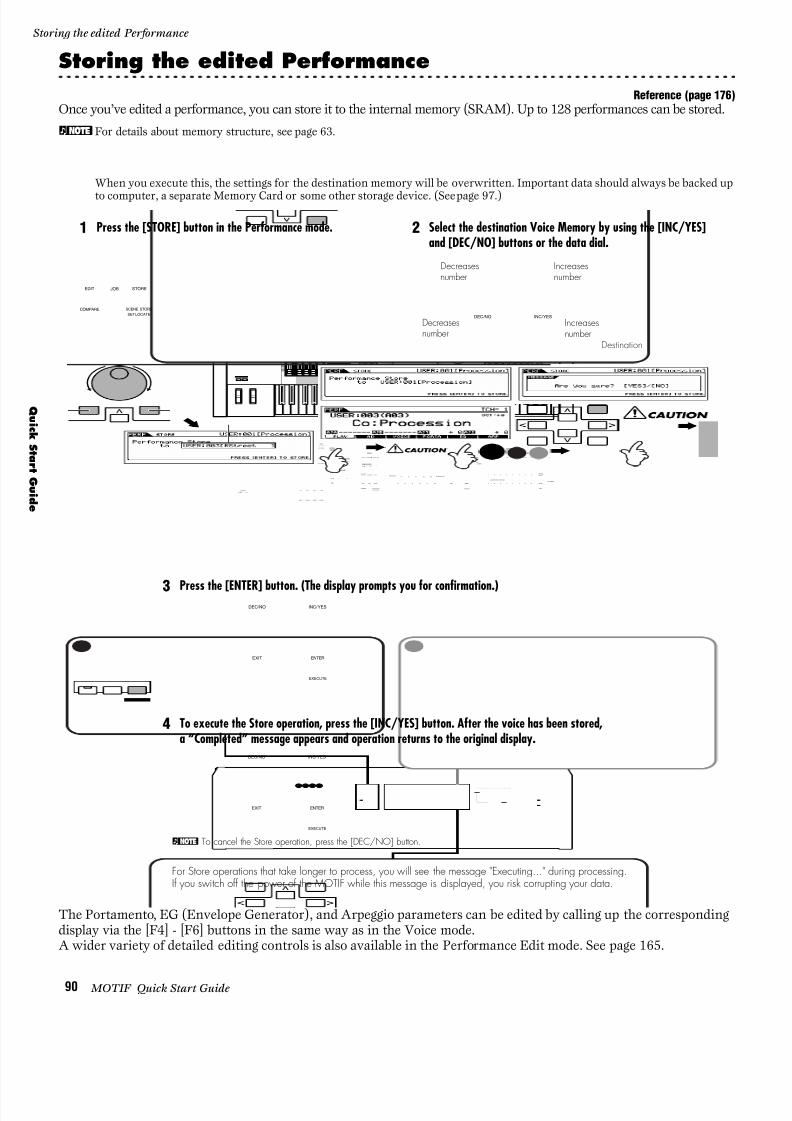
8/10/2019 motif_1(2)
http://slidepdf.com/reader/full/motif12 90/300
90 MOTIF Quick Start Guide
Storing the edited Performance
Qui c k S t ar t Gui d e
Storing the edited Performance
Reference (page 176)
Once you’ve edited a performance, you can store it to the internal memory (SRAM). Up to 128 performances can be stored.
nFor details about memory structure, see page 63.
When you execute this, the settings for the destination memory will be overwritten. Important data should always be backed up
to computer, a separate Memory Card or some other storage device. (See page 97 .)
The Portamento, EG (Envelope Generator), and Arpeggio parameters can be edited by calling up the correspondingdisplay via the [F4] - [F6] buttons in the same way as in the Voice mode.A wider variety of detailed editing controls is also available in the Performance Edit mode. See page 165.
P LG 2
A B C D E F G H
15
CATEGORYSEARCH
OCTAVE
D OW N U P
KNOBCONTROLFUNCTION
P AN R EV ER B C H OR U S TEMPO
A T T ACK RE LE A S ECUTOFF RESONANCE
A S S IG N A A S SI G N B A S S I G N 1 A S S I GN 2
KN 1 KN 2 K N 3 KN 4
M EQ LO W M EQ HI MI DM EQ LO WM ID M EQ H IG H
REMOTECONTROLON/OFF
EFFECTBYPASS ARPEGGIO
INSERTION S Y ST E M O N /O F FMASTERVOLUME V O LUM E 1V O LUM E 2 V O LUM E 3V O LUM E 4
CS 1 CS 2 CS 3 CS 4
Z ON E 1 Z ON E 2 Z ON E 3 Z ON E 4
SEQTRANSPORT
LOCATE 1 2
REC
MODE
V O I CE P E RF O RM M A S T E R
SEQUENCERS O NG P A TT E RN F I LE
INTEGRATEDSAMPLING M I X I NG UT I LI TY
EDIT JOB STORE
COMPARE SCENESTORESETLOCATE
SONGSCENESF1 SF2 SF3 SF4 SF5
F1 F2 F3 F4 F6F5
INFORMATION
DEC /NO I NC /YES
EXIT ENTER
EXECUTE
MUSIC PRODUCTIONSYNTHESIZERIntegratedSamplingSequencer
Real-timeExternalControlSurfaceModularSynthesisPlug-inSystem
DRUM KITS
FAVORITES
S L OT 1 S L OT 2 S L OT 3
PRE 1 PR E2 PRE 3 GM USER PLG 1 PL G 3
A.PIANO K E Y B OA RD O RG AN G UI TA R/ PLUCKED
B A S S S T RING S B RA SS RE E D/P I P E
S Y NLE AD S Y NP A D/ CHOIR
SYNCOMPCHROMATICPERCUSSION
DRUM/ PERCUSSION
S E M U SI C AL F X C O MB I
1 2 3 4 5 6 7 8
9 10 11 12 13 14 16
SECTION
TRACKSELECT
MUTE
SOLO
BANK
GROUP
NUMBER
COMMON
ELEMENT/PERF.PART/ZONE
1 Press the [STORE] button in the Performance mode. 2 Select the destination Voice Memory by using the [INC/YES]and [DEC/NO] buttons or the data dial.
DEC/NO INC/YES
EXIT ENTER
EXECUTE
EDIT JOB STORE
COMPARE SCENE STORESET LOCATE
3 Press the [ENTER] button. (The display prompts you for confirmation.)
4 To execute the Store operation, press the [INC/YES] button. After the voice has been stored,a “Completed” message appears and operation returns to the original display.
DEC/NO INC/YES
EXIT ENTER
EXECUTE
n To cancel the Store operation, press the [DEC/NO] button.
For Store operations that take longer to process, you will see the message "Executing..." during processing.If you switch off the power of the MOTIF while this message is displayed, you risk corrupting your data.
Destination
Decreasesnumber
Decreasesnumber
Increasesnumber
Increasesnumber
DEC/NO INC/YES

8/10/2019 motif_1(2)
http://slidepdf.com/reader/full/motif12 91/300
91 MOTIF Quick Start Guide
Using the Arpeggio fun
Using the Arpeggio function
Basic Structure (page 55) · Reference (pages 128, 165)
The MOTIF features a powerful and highly versatile arpeggiator that lets you automatically trigger preset arpeggios,phrases, rhythmic sequences and special “human” patterns — depending on the keys you play, or even the velocitywith which you play them. You can assign the desired Arpeggio type to each voice or performance, and adjust thetempo in real time as the Arpeggio plays. In the Song and Pattern modes, you can assign desired Arpeggio types toeach Mixing setup, for use in songs and patterns.
Arpeggio playback
P LG 2
A B C D E F G H
15
CATEGORYSEARCH
OCTAVEDOWN UP
KNOBCONTROLFUNCTION
P AN R EV ER B C H OR U S T E MP O
ATTACK RELEASECUTOFF RESONANCE
A S SI GN A A S SI GN B A S SI GN 1 A S SI GN 2
KN 1 KN 2 KN 3 KN 4
MEQLOW MEQHIMIDM EQ LO WM ID M EQ H IG H
REMOTECONTROL
ON/OFF
EFFECTBYPASS ARPEGGIO
INSERTION SYSTEM ON/OFFMASTERVOLUME V OL UM E 1 V OL U M E 2 V OL U M E 3 V OL U ME 4
CS1 CS 2 CS3 CS4
Z ON E1 Z ON E2 Z ON E3 Z ON E4
SEQTRANSPORT
LOCATE 1 2
REC
MODE
VOICE PERFORMMASTER
SEQUENCERS ON G P A TTE R N FI L E
INTEGRATEDSAMPLING M I X IN G U TI L ITY
E DI T J OB S TO RE
C O MP A RE S C EN E ST O RESETLOCATE
SONGSCENESF1 SF2 SF3 SF4 SF5
F1 F2 F3 F4 F6F5
INFORMATION
D EC/ NO I NC/ YES
EXIT ENTER
EXECUTE
MUSIC PRODUCTIONSYNTHESIZERIntegratedSamplingSequencer
Real-timeExternalControlSurfaceModularSynthesisPlug-inSystem
DRUMKITS
FAVORITES
S L OT 1 S L OT 2 S L OT 3
PRE 1 PRE 2 PRE 3 GM USER PLG 1 PLG 3
A.PIANO K E Y B OA RD O RG AN G UI TA R/ PLUCKED
B A S S S T RING S B RA S S RE E D/P I P E
S Y NLE AD S Y NP A D/ CHOIR
SYNCOMPCHROMATICPERCUSSION
DRUM/ PERCUSSION
S E M U SI C AL F X C O MB I
1 2 3 4 5 6 7 8
9 10 11 12 13 14 16
SECTION
TRACKSELECT
MUTE
SOLO
BANK
GROUP
NUMBER
COMMON
ELEMENT/PERF.PART/ZONE
1 Select a Voice/Performance.
CATEGORYSEARCHDRUM KITS
FAVORITES
PLG 2PRE 1 PRE 2 PRE 3 GM USER PLG 1 PLG 3
A. PIANO KEYBOARD ORGAN GUITAR/ PLUCKED
BASS STRINGS BRASS REED/PIPE
A B C D E F G H
S YN LEA D S YN P AD / CHOIR
SYN COMP CHROMATICPERCUSSION
DRUM/ PERCUSSION
SE MUS IC AL FX C OMBI
1 2 3 4 5 6 7 8
159 10 11 12 13 14 16
SECTION
TRACKSELECT
MUTE
SOLO
COMMON
ELEMENT/PERF.PART/ZONE
3 Play the keyboard.While holding the key(s), the Arpeggio is played back according tothe played note, Arpeggio type, tempo, note limit settings, and soon.
n In the Voice Play mode, the Arpeggio is played back via the selectedvoice.
n In the Performance/Song Mixing/Pattern Mixing mode, the Arpeggiois played back via the voice assigned to the selected part when the
Arpeggio Switch of the selected part is set to on.
Turn the Arpeggio on by pressing the ARPEGGIO [ON/OFF]button.
n When you select a voice or performance for which the ArpeggioSwitch is set to on, the ARPEGGIO [ON/OFF] button isautomatically turned on.
n The on/off status of the ARPEGGIO [ON/OFF] button can bestored to each voice, performance, or Mixing setup.
EFFECT BYPASS ARPEGGIO
INSERTION SYSTEM ON/OFF
2

8/10/2019 motif_1(2)
http://slidepdf.com/reader/full/motif12 92/300
92 MOTIF Quick Start Guide
Using the Arpeggio function
Qui c k S t ar t Gui d e
Arpeggio Type, Tempo, and Limit
A variety of Arpeggio types are provided with the MOTIF. You can change the tempo of Arpeggio as desired.The Arpeggio function is available in all modes.The explanation below applies to the Performance Play mode.
P LG 2
A B C D E F G H
15
CATEGORYSEARCH
OCTAVED OW N U P
KNOBCONTROLFUNCTION
P AN R EV ER B C H OR U S TEMPO
ATTACK RELEASECUTOFF RESONANCE
A S SI GN A A S SI GN B A S SI GN 1 A S SI GN 2
KN 1 KN 2 KN 3 KN 4
MEQLOW MEQHIMIDM EQ LO WM ID M EQ H IG H
REMOTECONTROLON/OFF
EFFECTBYPASS ARPEGGIO
INSERTION SYSTEM ON/OFFMASTERVOLUME V OL UM E 1 V OL U M E 2 V OL U M E 3 V OL U M E 4
CS1 CS2 CS 3 CS 4
Z ON E1 Z ON E2 Z ON E3 Z ON E4
SEQTRANSPORT
LOCATE 1 2
REC
MODE
VOICE PERFORMMASTER
SEQUENCERS ON G P A TTE R N FI L E
INTEGRATEDSAMPLING MIXING UTILITY
E DI T J OB S TO RE
COMPARE SCENESTORESETLOCATE
SONGSCENESF1 SF2 SF3 SF4 SF5
F1 F2 F3 F4 F6F5
INFORMATION
DE C/ NO I NC /YE S
EXIT ENTER
EXECUTE
MUSICPRODUCTION SYNTHESIZERIntegratedSamplingSequencer
Real-timeExternalControlSurfaceModular SynthesisPlug-in System
DRUMKITS
FAVORITES
S L OT 1 S L OT 2 S L OT 3
P RE 1 P RE 2 PRE 3 GM USER PLG 1 PLG 3
A . P I ANO K E Y B OA RD O RG AN G UI TA R/ PLUCKED
B A SS S T RI N GS B R AS S R E ED / PI P E
S Y NLE AD S Y NP A D/ CHOIR
SYNCOMPCHROMATICPERCUSSION
DRUM/ PERCUSSION
S E M U SI C AL F X C O MB I
1 2 3 4 5 6 7 8
9 10 11 12 13 14 16
SECTION
TRACKSELECT
MUTE
SOLO
BANK
GROUP
NUMBER
COMMON
ELEMENT/PERF.PART/ZONE
1 Call up the ARP (Arpeggio) display by pressing the[F6] button in the Performance Play mode.
5 Set the Velocity Limit for Arpeggio playback.Move the cursor to the Velocity Limitparameter and set.
The Arpeggio is played back only when the key isplayed at a velocity within this range.
6 Set the Arpeggio part switch.You can set the Arpeggio playbackon or off for each part. Move thecursor to the checkbox of thedesired part and checkmark thebox to on.
7 Store the Arpeggio settings to
the desired User Performance.The Arpeggio settings can bestored to a User Voice, a UserPerformance, or a Song/PatternMixing setup.
SF1 SF2 SF3 SF4 SF5
F1 F2 F3 F4 F6F5
INFORMATION
2 Select an Arpeggio Bank.Move the cursor to the Bank parameter and select.
DEC/NO INC/YES
3 Select an Arpeggio Type.Move the cursor to the Type parameter and select.
DEC/NO INC/YES
4 Set the Tempo for Arpeggio playback.Move the cursor to the Tempo parameter and set.
DEC/NO INC/YES
Low Limit High Limit
Low Limit
0
High
Limit
127
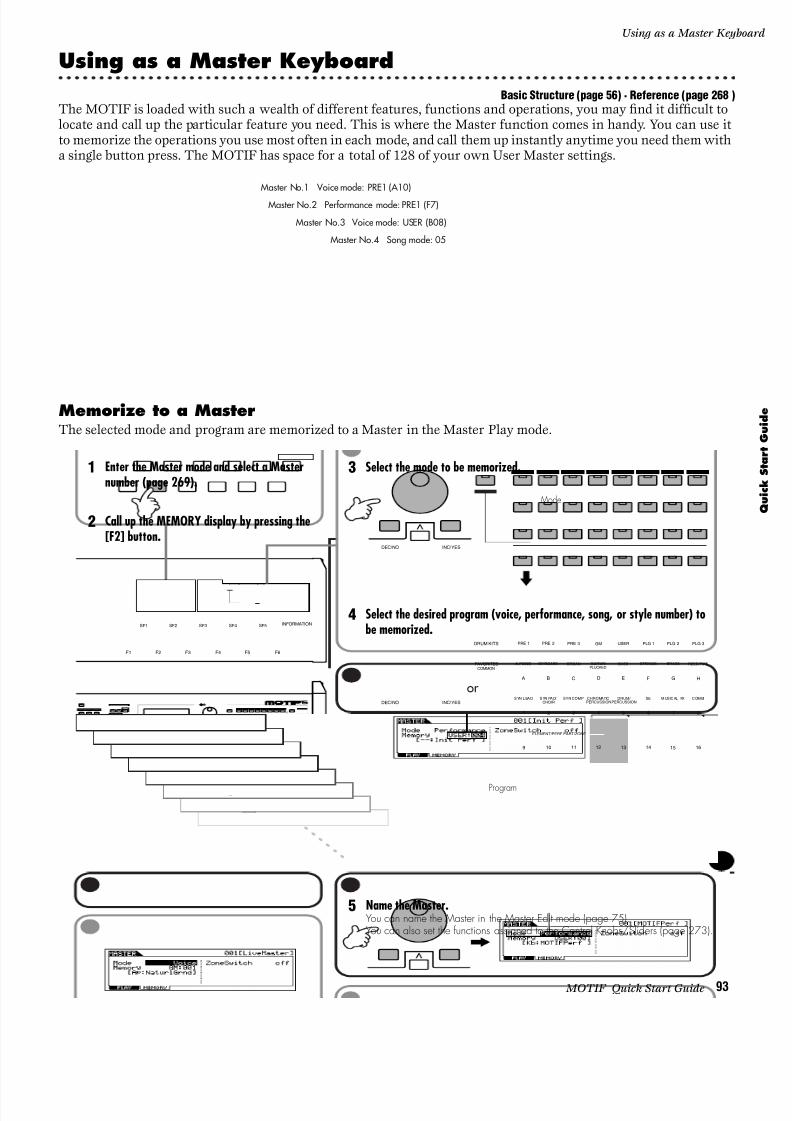
8/10/2019 motif_1(2)
http://slidepdf.com/reader/full/motif12 93/300
93 MOTIF Quick Start Guide
Using as a Master Keyb
Using as a Master Keyboard
Basic Structure (page 56) · Reference (page 268 )
The MOTIF is loaded with such a wealth of different features, functions and operations, you may find it difficult to locate and call up the particular feature you need. This is where the Master function comes in handy. You can use itto memorize the operations you use most often in each mode, and call them up instantly anytime you need them witha single button press. The MOTIF has space for a total of 128 of your own User Master settings.
Memorize to a MasterThe selected mode and program are memorized to a Master in the Master Play mode.
Master No.4 Song mode: 05
Master No.3 Voice mode: USER (B08)
Master No.1 Voice mode: PRE1 (A10)
Master No.2 Performance mode: PRE1 (F7)
P LG 2
A B C D E F G H
15
CATEGORYSEARCH
REMOTECONTROLON/OFF
EFFECTBYPASS ARPEGGIO
I N S ER TI ON S Y STE M ON / OFF
SEQTRANSPORT
LOCATE 1 2
REC
MODE
VOICE PERFORMMASTER
SEQUENCERS ON G P A TTE R N FI L E
INTEGRATEDSAMPLING MIXING UTILITY
E DI T J OB S TO RE
COMPARE SCENESTORESETLOCATE
SONGSCENESF1 SF2 SF3 SF4 SF5
F1 F2 F3 F4 F6F5
INFORMATION
D EC /NO IN C/ YES
EXIT ENTER
EXECUTE
MUSICPRODUCTION SYNTHESIZERIntegratedSamplingSequencer
Real-timeExternalControlSurfaceModular SynthesisPlug-inSystem
DRUMKITS
FAVORITES
S L OT 1 S L OT 2 S L OT 3
P RE 1 P RE 2 PRE 3 GM USER PLG 1 PLG 3
A . P I ANO K E Y BO A RD O RG AN G UI TA R/ PLUCKED
B A S S S T RING S B RA S S RE E D/ P I P E
S Y NLE AD S Y NP AD/ CHOIR
SYNCOMPCHROMATICPERCUSSION
DRUM/ PERCUSSION
S E M U SI C AL F X C O MB I
1 2 3 4 5 6 7 8
9 10 11 12 13 14 16
SECTION
TRACKSELECT
MUTE
SOLO
BANK
GROUP
NUMBER
COMMON
ELEMENT/PERF.PART/ZONE
1 Enter the Master mode and select a Masternumber (page 269).
5 Name the Master.You can name the Master in the Master Edit mode (page 75).You can also set the functions assigned to the Control Knobs/Sliders (page 273).
2 Call up the MEMORY display by pressing the[F2] button.
SF1 SF2 SF3 SF4 SF5
F1 F2 F3 F4 F6F5
INFORMATION
3 Select the mode to be memorized.
4 Select the desired program (voice, performance, song, or style number) tobe memorized.
DEC/NO INC/YES
Mode
DEC/NO INC/YES
DRUM KITS
FAVORITES
PLG 2PRE 1 PRE 2 PRE 3 GM USER PLG 1 PLG 3
A. PIANO KEYBOARD ORGAN GUITAR/ PLUCKED
BASS STRINGS BRASS REED/PIPE
A B C D E F G H
S YN LEA D S YN PA D/ CHOIR
SYN COMP CHROMATICPERCUSSION
DRUM/ PERCUSSION
SE MUS IC AL FX C OMBI
1 2 3 4 5 6 7 8
159 10 11 12 13 14 16
COMMON
ELEMENT/PERF.PART/ZONE
Program
or

8/10/2019 motif_1(2)
http://slidepdf.com/reader/full/motif12 94/300

8/10/2019 motif_1(2)
http://slidepdf.com/reader/full/motif12 95/300
95 MOTIF Quick Start Guide
Using as a Master Keyb
Master Keyboard settings● Layer/Split settings using an external tone generatorThe MOTIF can function as a comprehensive, versatile master keyboard, for both live and studio applications.When a Master is set to the Voice or Performance mode, you can make settings for four independent Zones. Thismakes it possible to control voices of an external MIDI device over several different channels — in addition to theinternal voices of the MOTIF itself. You can do this by setting the sound range of the keyboard for each Zone andassigning different MIDI channels to each range.For example, this lets you layer several voices together, including those of a connected MIDI tone generator. Plus,you can separate the voices into different keyboard ranges, and play completely different sounds with your left andright hands. In the example below, we’ll set up three Zones as shown below. We’ll program a split at the note C3. Inthe lower range (B2 and lower), a bass voice and cymbal voice will sound. In the upper range (C3 and above), we’ll layer piano and vibraphone voices — played from an external MIDI tone generator. Using this sophisticated setup,you can easily sound like an entire jazz group, with just your two hands.In the example instructions here, we’ll use the Voice mode for the Master.
P LG 2
A B C D E F G H
15
CATEGORYSEARCH
MODE
VOICE PERFORMMASTER
SEQUENCERSONG P A TTE R N FI L E
INTEGRATEDSAMPLING M I X IN G U TI L ITY
E DI T J OB S TO RE
C O MP A RE S C EN E S TO R ESETLOCATE
SONGSCENESF1 SF2 SF3 SF4 SF5
F1 F2 F3 F4 F6F5
INFORMATION
D EC /NO I NC/ YES
EXIT ENTER
EXECUTE
MUSICPRODUCTION SYNTHESIZERIntegratedSamplingSequencer
Real-timeExternalControlSurfaceModularSynthesisPlug-in System
DRUMKITS
FAVORITES
S L OT 1 S L OT 2 S L OT 3
P RE 1 P RE 2 P RE 3 GM USER PLG 1 PLG 3
A . P I ANO K E Y BO A RD O RG AN G UI TA R/ PLUCKED
B A S S S T RING S B RA SS RE E D/P I P E
S Y NLE AD S Y NP A D/ CHOIR
SYNCOMPCHROMATICPERCUSSION
DRUM/ PERCUSSION
S E M U SI C AL F X C O MB I
1 2 3 4 5 6 7 8
9 10 11 12 13 14 16
SECTION
TRACKSELECT
MUTE
SOLO
BANK
GROUP
NUMBER
COMMON
ELEMENT/PERF.PART/ZONE
3 Enter the Master Editmode.
EDIT JOB STORE
COMPARE SCENE STORESET LOCATE
1 Select a Voice in the Master Play mode.Set the Mode to Voice, then select the PRE1 bank and voice 123.
2 Set the Zone Switch to on.
DEC/NO INC/YES
DEC/NO INC/YES
EXIT ENTER
EXECUTE
C3
Zone 2(Piano)
Zone 3(Vibraphone)
Zone 1(Bass + Cymbal)

8/10/2019 motif_1(2)
http://slidepdf.com/reader/full/motif12 96/300
96 MOTIF Quick Start Guide
Using as a Master Keyboard
Qui c k S t ar t Gui d e
●
Control Number settingsHere in the KN/CS display of the Master Edit mode, you can set how the Control knobs and sliders will affect eachZone. This lets you specify a MIDI Control Change number for each knob and slider. In the example below, theControl knobs for all Zones have been set to 10 (Pan), and the sliders have been set to 11 (Expression). In this way,you can control the stereo position of each Zone with the appropriate knob, and use the sliders to adjust the relativevolume balance among the Zones.This setting is available only when the Zone Switch is set to on from the Memory display in the Master Play mode.
P LG 2
A B C D E F G H
15
CATEGORYSEARCH
MODE
VOICE PERFORMMASTER
SEQUENCERSONG P A TTE R N FI L E
INTEGRATEDSAMPLING M I X IN G U TI LI TY
E DI T J OB S TO RE
C O MP A RE S C EN E S TO R ESETLOCATE
SONGSCENESF 1 SF2 SF 3 SF 4 SF 5
F1 F2 F3 F4 F6F5
INFORMATION
DEC /NO I NC /Y ES
EXIT ENTER
EXECUTE
MUSICPRODUCTION SYNTHESIZERIntegratedSamplingSequencer
Real-timeExternalControlSurfaceModularSynthesisPlug-in System
DRUMKITS
FAVORITES
S L OT 1 S L OT 2 S L OT 3
P RE 1 P RE 2 P RE 3 G M U SE R P LG 1 P LG 3
A . P I A NO K E Y BO A RD O RG AN G UI TA R/ PLUCKED
B A S S S T RING S B RA S S RE E D/ P I P E
S Y NLE AD S Y NP AD/ CHOIR
SYNCOMPCHROMATICPERCUSSION
DRUM/ PERCUSSION
SE M US I CA LF X CO M BI
1 2 3 4 5 6 7 8
9 10 11 12 13 14 16
SECTION
TRACKSELECT
MUTE
SOLO
BANK
GROUP
NUMBER
COMMON
ELEMENT/PERF.PART/ZONE
7 Store the settings to a Master(page 94).
6 Call up the NOTE display.
Each Zone will sound the assigned voice within the note range set above.
1
2
Set the Note Limit H (High) of Zone 1 to B2. Set the Note Limit L (Low) of Zone 1 to C-2. Set the Note Limit H (High) of Zone 2 and 3 to G8. Set the Note Limit L (Low) of Zone 2and 3 to C3.
SF 1 SF 2 SF 3 SF 4 SF 5
F1 F2 F3 F6F5
4 Call up the display for Zone editing.Press any of the buttons.
1 2 3 4
5 Call up the TRANS display.
1
3
4
2
Set the TG Switch of Zone 1 to on andset those for all other Zones to off. This isfor transmitting the data played only inthe Zone 1 to the built-in tone generator.
Set the MIDI Switch of the Zone 2 and 3to on and set the ones of the other Zonesto off. This is for transmitting the data
played in the Zone 2 and 3 to theexternal tone generator.
Set the MIDI transmit channel of Zone 1to 1. Set the MIDI transmit channel ofZone 2 and 3 to match the Receivechannel of the external tone generator(slave).
Make sure the external tone generator isset to multi-timbral operation (differentvoices for each of the 16 MIDI channels),and select the appropriate voices on thetone generator, corresponding to theMIDI channels you set in above.
SF 1 SF 2 SF 3 SF 4 SF 5
F1 F2 F3 F6F5
3
SF1 SF2 SF3 SF4 SF5
F1 F2 F3 F4 F6F5
AT TA CK R EL EA SECUTOFF RESONANCE
A SS IG N A A SS IG N B A SS IG N 1 A SS IG N 2
KN 1 KN 2 KN 3 KN 4
MEQ LOW MEQ HI MIDMEQLOWMID MEQ HIGH

8/10/2019 motif_1(2)
http://slidepdf.com/reader/full/motif12 97/300
97 MOTIF Quick Start Guide
Saving/Loading
Saving/Loading data
Basic Structure (page 63) · Reference (page 266)
Many different types of data are created when using the MOTIF, and the following types are automaticallymaintained in memory, even if the power is turned off: Voice, Performance, Master, Arpeggio and System settings(parameters set in the Utility mode). Since the other data (e.g., wave data recorded via the Sampling function, Song,Pattern) is lost when turning the power off, you should save it to a memory card or SCSI device connected to theMOTIF. Data created on the MOTIF can be saved to Memory card or SCSI device in a variety of file types. Byselecting “All” as the file type to be saved, all your original MOTIF data can be saved to Memory card/SCSI device.However, when loading this “All” data back to the MOTIF, you can choose a specific data type to be loaded (e.g., onevoice or one song), as illustrated below.
nFor details about using Memory cards, see page 289. For details about using SCSI devices, see page 264 and page 290.
Saving datanBefore you can use a new Memory card or external SCSI device with the MOTIF, you’ll have to format it from the MOTIF.
See page 265 for details.
VoicePerformance
Master System
SongPattern Wave
Memory card
Save
SCSI device
All Memory card
Load
SCSI device
One song
One voice
P LG 2
A B C D E F G H
15
CATEGORYSEARCH
OCTAVED OWN U P
KNOBCONTROLFUNCTION
P AN R E VE RB C H OR U S TEMPO
ATTACK RELEASECUTOFF RESONANCE
A S S IGN A A S SI GN B A S S IGN 1 A S S IGN 2
KN 1 KN 2 KN 3 KN 4
MEQLOW MEQHIMIDM EQ LO WM ID M E QH IG H
REMOTECONTROL
ON/OFF
EFFECTBYPASS ARPEGGIO
INSERTION SYSTEM ON/OFFMASTERVOLUME V OL UM E 1 V OL U M E 2 V OL U M E 3 V OL U M E4
CS1 CS 2 CS 3 CS 4
Z ON E1 Z ON E2 Z ON E3 Z ON E4
SEQTRANSPORT
LOCATE 1 2
REC
MODE
VOICE PERFORMMASTER
SEQUENCERS ON G P A TTE R N FI L E
INTEGRATEDSAMPLING MIXING UTILITY
E DI T J OB S TO RE
C O MP A RE S C EN E S TO R ESETLOCATE
SONGSCENESF1 SF2 SF3 SF4 SF5
F1 F2 F3 F4 F6F5
INFORMATION
D EC /NO I NC/ YES
EXIT ENTER
EXECUTE
MUSICPRODUCTION SYNTHESIZERIntegratedSamplingSequencer
Real-timeExternalControlSurfaceModularSynthesisPlug-in System
DRUMKITS
FAVORITES
S L OT 1 S L OT 2 S L OT 3
P RE 1 P RE 2 P RE 3 GM USER PLG 1 PLG 3
A . P I A NO K E Y BO A RD O RG AN G UI TA R/ PLUCKED
B A S S S T RING S B RA SS RE E D/P I P E
S Y NLE AD S Y NP AD/ CHOIR
SYNCOMPCHROMATICPERCUSSION
DRUM/ PERCUSSION
S E M U SI C AL F X C O MB I
1 2 3 4 5 6 7 8
9 10 11 12 13 14 16
SECTION
TRACKSELECT
MUTE
SOLO
BANK
GROUP
NUMBER
COMMON
ELEMENT/PERF.PART/ZONE
1 Enter the Filemode by pressingthe [FILE] mode.
SEQUENCERSONG PATTERN FILE
INTEGRATEDSAMPLING MIXING UTILITY
SF1 SF2 SF3 SF4 SF5
F1 F2 F3 F4 F6F5
INFORMATION
5 Select a file type to be saved.Here, select “All.”
n For details about file type to be saved, seepage 262.
7 Press the [ENTER] button.
8 Press the [INC/YES] button toexecute the Save operation.6 Select a folder to which the data is to be
saved.
DEC/NO INC/YES
EXIT ENTER
EXECUTE
DEC/NO INC/YES
EXIT ENTER
EXECUTE
4 Call up the SAVE display.
3 Select a device to which the data is to be saved.Move the cursor to the Current parameter and select“CARD” or “SCSI.”
SF1 SF2 SF3 SF4 SF5
F1 F2 F3 F4 F6F5
INFORMATION
2 Call up the CONFIG display.
SF1 SF2 SF3 SF4 SF5
F1 F2 F3 F4 F6F5
INFORMATION
Device
Free space
n You can name the folder by using the [F4] buttonand create a new folder by using the [F6] button.

8/10/2019 motif_1(2)
http://slidepdf.com/reader/full/motif12 98/300
98 MOTIF Quick Start Guide
Saving/Loading data
Qui c k S t ar t Gui d e
Loading data
P LG 2
A B C D E F G H
15
CATEGORYSEARCH
OCTAVED OWN U P
KNOBCONTROLFUNCTION
P AN R E VE RB C H OR U S TEMPO
ATTACK RELEASECUTOFF RESONANCE
A S S IGN A A S SI GN B A S S IGN 1 A S S IGN 2
KN 1 KN 2 KN 3 KN 4
MEQLOW MEQHIMIDM EQ LO WM ID M E QH IG H
REMOTECONTROL
ON/OFF
EFFECTBYPASS ARPEGGIO
I N S ER TI ON S Y STE M ON / OFFMASTERVOLUME V OL UM E 1 V OL U M E 2 V OL U M E 3 V OL U M E4
CS1 CS 2 CS 3 CS 4
Z ON E1 Z ON E2 Z ON E3 Z ON E4
SEQTRANSPORT
LOCATE 1 2
REC
MODE
VOICE PERFORMMASTER
SEQUENCERS ON G P A TTE R N FI L E
INTEGRATEDSAMPLING MIXING UTILITY
E DI T J OB S TO RE
COMPARE SCENESTORESETLOCATE
SONGSCENESF1 SF2 SF3 SF4 SF5
F1 F2 F3 F4 F6F5
INFORMATION
D EC /NO I NC/ YES
EXIT ENTER
EXECUTE
MUSICPRODUCTION SYNTHESIZERIntegratedSamplingSequencer
Real-timeExternalControlSurfaceModular SynthesisPlug-in System
DRUMKITS
FAVORITES
S L OT 1 S L OT 2 S L OT 3
P RE 1 P RE 2 PRE 3 GM USER PLG 1 PLG 3
A . P I A NO K E Y BO A RD O RG AN G UI TA R/ PLUCKED
B A S S S T RING S B RA SS RE E D/P I P E
S Y NLE AD S Y NP AD/ CHOIR
SYNCOMPCHROMATICPERCUSSION
DRUM/ PERCUSSION
S E M U SI C AL F X C O MB I
1 2 3 4 5 6 7 8
9 10 11 12 13 14 16
SECTION
TRACKSELECT
MUTE
SOLO
BANK
GROUP
NUMBER
COMMON
ELEMENT/PERF.PART/ZONE
1 Enter the Filemode by pressingthe [FILE] button.
SEQUENCERSONG PATTERN FILE
INTEGRATEDSAMPLING MIXING UTILITY
SF1 SF2 SF3 SF4 SF5
F1 F2 F3 F4 F6F5
INFORMATION
5 Select a file type to be loaded.Here, select “Voice.”
n For details about the file types that can beloaded, see page 263.
8 Press the [ENTER] button toexecute the Load operation.
6 Select a file to be loaded.Here, select a file with the extension “.W2V,” press the [ENTER] button, and select the desiredvoice.
DEC/NO INC/YES
EXIT ENTER
EXECUTE
4 Call up the LOAD display.
3 Select the device from which the data isto be loaded.Move the cursor to the Current parameterand select “CARD” or “SCSI.”
2 Call up the CONFIG display.
SF1 SF2 SF3 SF4 SF5
F1 F2 F3 F4 F6F5
INFORMATION SF1 SF2 SF3 SF4 SF5
F1 F2 F3 F4 F6F5
INFORMATION
Device Free space
7 Select the destination User memory towhich the data is to be loaded.
n Loading data to the MOTIFautomatically erases and replacesany existing data in the Usermemory. Make sure to save anyimportant data to a Memorycard/SCSI device before
performing any Load operations.
[ENTER]button

8/10/2019 motif_1(2)
http://slidepdf.com/reader/full/motif12 99/300
99 MOTIF Quick Start Guide
Sampling with Song Playback (Integrated Sampling Sequen
Sampling with Song Playback (Integrated SamplingSequencer)
In this section, we’ll delve into one of the most important and powerful features of the MOTIF — the IntegratedSampling Sequencer.Today’s digital music producers and artists use a mutlitude of advanced tools to get the job done — including MIDI,sampling, audio editing and much more. Cutting and pasting beats, loops and patterns together is an integral part ofthe music making process. The MOTIF lets you work in the same way, fully integrating sampling with MIDI
sequencing — making it easier than ever before to produce great tracks.Below is a summary of the steps you’ll take as you create a new song.
■ Creating Rhythm track 1 Sampling to a Pattern Track2 Recording MIDI data to a Pattern Track3 Assigning a Preset Phrase to a Pattern Track (Patch function)4 Using the Groove function5 Pattern Mixing6 Creating the Pattern Chain
■ Creating a Song
7 Copy the Pattern Chain data to the Song8 MIDI recording to Song Tracks9 Sampling to Song Track10 Song Track Mute and Scene11 Song Mixing and storing the settings as a template12 Saving and Exporting the recorded song to external PC (File Utility)
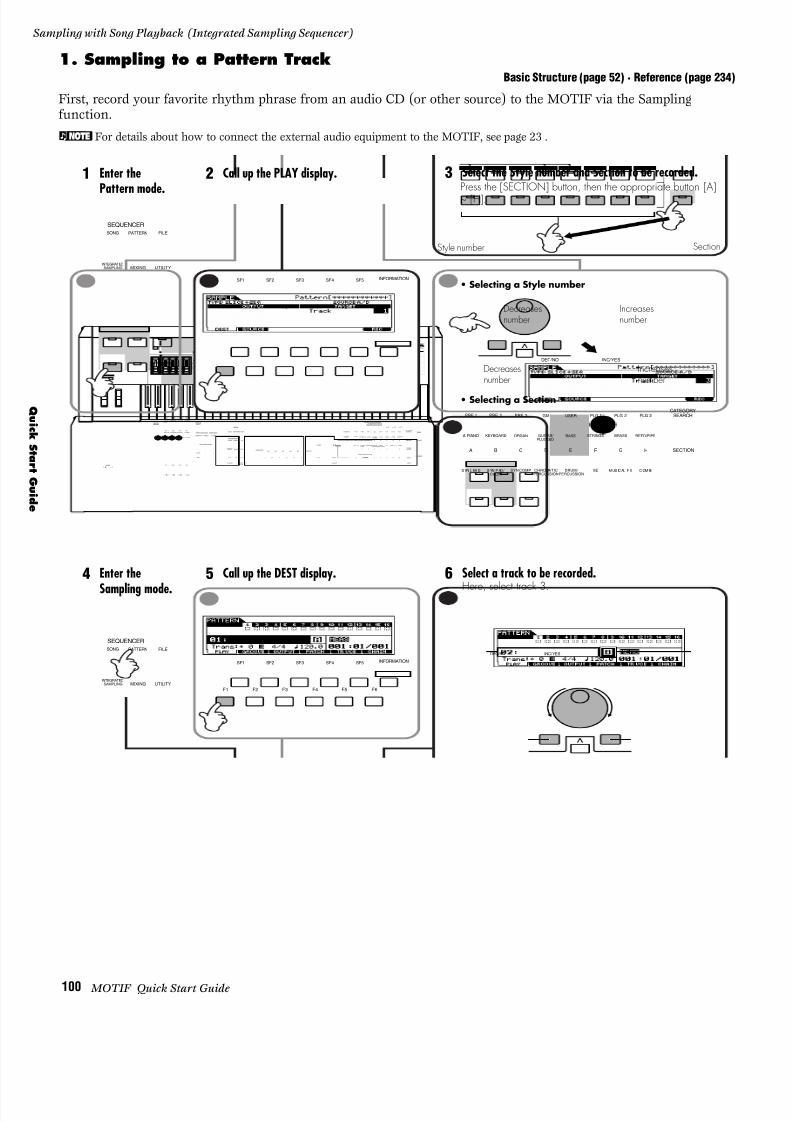
8/10/2019 motif_1(2)
http://slidepdf.com/reader/full/motif12 100/300
100 MOTIF Quick Start Guide
Sampling with Song Playback (Integrated Sampling Sequencer)
Qui c k S t ar t Gui d e
1. Sampling to a Pattern TrackBasic Structure (page 52) · Reference (page 234)
First, record your favorite rhythm phrase from an audio CD (or other source) to the MOTIF via the Samplingfunction.
nFor details about how to connect the external audio equipment to the MOTIF, see page 23 .
P LG 2
A B C D E F G H
15
CATEGORYSEARCH
OCTAVED OW N U P
KNOBCONTROLFUNCTION
P AN R E VE RB C H OR U S T EM P O
ATTACK RELEASECUTOFF RESONANCE
A S S IGN A A S SI GN B A S S IGN 1 A S S IGN 2
KN 1 KN 2 KN 3 KN 4
MEQLOW MEQHIMIDM EQ LO WM ID M E QH IG H
REMOTECONTROL
ON/OFF
EFFECTBYPASS ARPEGGIO
INSERTION S Y STE M ON / OFFMASTERVOLUME V OL UM E 1 V OL U M E 2 V OL U M E 3 V OL U M E4
CS1 CS 2 CS 3 CS 4
Z ON E1 Z ON E2 Z ON E3 Z ON E4
SEQTRANSPORT
LOCATE 1 2
REC
MODE
VOICE PERFORMMASTER
SEQUENCERS ON G P A TTE R N FI L E
INTEGRATEDSAMPLING M I XI N G U TI LI TY
E DI T J OB S TO RE
C O MP A RE S C EN E S TO R ESETLOCATE
SONGSCENESF1 SF2 SF3 SF4 SF5
F1 F2 F3 F4 F6F5
INFORMATION
D EC /NO I NC/ YES
EXIT ENTER
EXECUTE
MUSIC PRODUCTIONSYNTHESIZERIntegratedSamplingSequencer
Real-timeExternalControlSurfaceModularSynthesisPlug-inSystem
DRUMKITS
FAVORITES
S L OT 1 S L OT 2 S L OT 3
P RE 1 P RE 2 P RE 3 GM USER PLG 1 PLG 3
A.PIANO K E Y BO A RD O RG AN G UI TA R/ PLUCKED
B A S S S T RING S B RA SS RE E D/P I P E
S Y NLE AD S Y NP AD/ CHOIR
SYNCOMPCHROMATICPERCUSSION
DRUM/ PERCUSSION
SE M US ICA LF X CO M BI
1 2 3 4 5 6 7 8
9 10 11 12 13 14 16
SECTION
TRACKSELECT
MUTE
SOLO
BANK
GROUP
NUMBER
COMMON
ELEMENT/PERF.PART/ZONE
1 Enter the
Pattern mode.
SEQUENCERSONG PATTERN FILE
INTEGRATEDSAMPLING MIXING UTILITY
SF1 SF2 SF3 SF4 SF5
F1 F2 F3 F4 F6F5
INFORMATION
2 Call up the PLAY display. 3 Select the Style number and Section to be recorded.
Style number
• Selecting a Style number
• Selecting a Section
Section
CATEGORYSEARCHPLG 2PRE 1 PRE 2 PRE 3 GM USER PLG 1 PLG 3
A. PIANO KEYBOARD ORGAN GUITAR/ PLUCKED
BASS STRINGS BRASS REED/PIPE
A B C D E F G H
S YN LEA D S YN P AD / CHOIR
SYN COMP CHROMATICPERCUSSION
DRUM/ PERCUSSION
SE MUS IC AL FX C OMBI
SECTION
4 Enter the
Sampling mode.
SEQUENCERSONG PATTERN FILE
INTEGRATEDSAMPLING MIXING UTILITY
SF1 SF2 SF3 SF4 SF5
F1 F2 F3 F4 F6F5
INFORMATION
5 Call up the DEST display. 6 Select a track to be recorded.
Here, select track 3.
DEC/NO INC/YES
Press the [SECTION] button, then the appropriate button [A]~ [H].
Decreasesnumber
Decreasesnumber
Increasesnumber
Increasesnumber
DEC/NO INC/YES

8/10/2019 motif_1(2)
http://slidepdf.com/reader/full/motif12 101/300
101 MOTIF Quick Start Guide
Sampling with Song Playback (Integrated Sampling Sequen
P LG 2
A B C D E F G H
15
CATEGORYSEARCH
KNOBCONTROLFUNCTION
PAN REVERB CHORUS TEMPO
ATTACK RELEASECUTOFF RESONANCE
A S S IGN A A S SI GN B A S SI GN 1 A S SI GN 2
KN 1 KN 2 KN 3 KN 4
MEQLOW MEQHI MIDM EQ LO WM ID M EQ H IG H
REMOTECONTROL
ON/OFF
EFFECTBYPASS ARPEGGIO
INSERTION S Y STE M ON / OFFMASTERVOLUME
V OL UM E 1 V OL U M E 2 V OL U M E 3 V OL U ME 4
CS1 CS 2 CS3 CS 4
Z ON E1 Z ON E2 Z ON E3 Z ON E4
SEQTRANSPORT
L OC ATE 1 2
REC
MODE
VOICE PERFORMMASTER
SEQUENCERS O NG P AT T ER N F I LE
INTEGRATEDSAMPLING M I X IN G U TI L ITY
EDIT JOB STORE
C O MP A RE S C EN E S TO R ESETLOCATE
SONGSCENESF1 SF2 SF3 SF4 SF5
F1 F2 F3 F4 F6F5
INFORMATION
D EC /NO I NC/ YES
EXIT ENTER
EXECUTE
MUSICPRODUCTION SYNTHESIZERIntegratedSamplingSequencer
Real-timeExternalControlSurfaceModularSynthesisPlug-inSystem
DRUMKITS
FAVORITES
S L OT 1 S L OT 2 S L OT 3
P RE 1 P RE 2 PRE 3 GM USER PLG 1 PLG 3
A.PIANO KEYBOARD ORGAN GUITAR/ PLUCKED
BASS STRINGS BRASS REED/PIPE
S Y NLE AD S Y NP AD/ CHOIR
SYNCOMPCHROMATICPERCUSSION
DRUM/ PERCUSSION
S E M U SI C AL F X C O MB I
1 2 3 4 5 6 7 8
9 10 11 12 13 14 16
SECTION
TRACKSELECT
MUTE
SOLO
BANK
GROUP
NUMBER
COMMON
ELEMENT/PERF.PART/ZONE
2
1 Select a sampling type.For Type, select “slice+seq.”
Select a sampling source.For Source, select “A/D.”
Select "stereo" or "mono."
Samplingfrequency
SF1 SF2 SF3 SF4 SF5
F1 F2 F3 F4 F6F5
INFORMATION
12 Monitor levelTrigger mode
Input level
SF1 SF2 SF3 SF4 SF5
F1 F2 F3 F4 F6F5
INFORMATION
7 Call up the SOURCE display.
11 Set the Slice related parameters.
The following display appears after stopping sampling since thesampling type has been set to “slice+seq” in step #7. You’ll needto trim your sample of extraneous beats, so that it will loopproperly. Do this by using the Start, Loop, and End parametersin the display below. (For details, see page 237.) As you editthese parameters, press the [SF1] but ton (Audition) to hear thechanges you’ve made.
12 Execute the Slice operation.Once you’ve edited the sample so that it loops properly, call upthe SLICE display and set the parameters as needed. (For details,see page 238.)
8 Enter the Sampling Standby mode.From this display, set the Trigger mode. Here, select “manual.”Play back the external CD player to check the Input level. Youcan adjust the Input level for optimum level by using the GAINknob on the rear panel.
SF1 SF2 SF3 SF4 SF5
F1 F2 F3 F4 F6F5
INFORMATION
9 Start sampling.Press the [F6] button to start sampling. Also start the externalCD player to play back the rhythm phrase to be recorded.
10 Stop sampling by pressing the [F6] button again.
SF1 SF2 SF3 SF4 SF5
F1 F2 F3 F4 F6F5
INFORMATION
13 Go back to the Pattern play modeand play the Pattern to hear therecorded sample.
SEQUENCERSONG PATTERN FILE
INTEGRATEDSAMPLING M IX IN G U TI LI TY

8/10/2019 motif_1(2)
http://slidepdf.com/reader/full/motif12 102/300
102 MOTIF Quick Start Guide
Sampling with Song Playback (Integrated Sampling Sequencer)
Qui c k S t ar t Gui d e
2. Recording MIDI data to a Pattern TrackBasic Structure (page 53) · Reference (page 221)
Now that you’ve recorded a rhythm sample to a Pattern and sliced it, the next step is to record some MIDI parts andadd them to the Pattern. You can record MIDI in two ways: Realtime and Step.
P LG 2
A B C D E F G H
15
CATEGORYSEARCH
OCTAVED OW N U P
KNOBCONTROLFUNCTION
PAN REVERB CHORUS TEMPO
ATTACK RELEASECUTOFF RESONANCE
A S SI GN A A S S IGN B A S S IGN 1 A S SI GN 2
KN 1 KN 2 KN 3 KN 4
MEQLOW M E Q HI M I DM EQ LO WM ID M E QH IG H
REMOTECONTROLON/OFF
EFFECTBYPASS ARPEGGIO
I N S ER TI ON S Y S TE M ON / OFFMASTERVOLUME
V OL UM E 1 V OL U M E 2 V OL U M E 3 V OL U M E 4
CS 1 CS 2 CS 3 CS 4
Z ON E1 Z ON E2 Z ON E3 Z ON E4
SEQTRANSPORT
LOCATE 1 2
REC
MODE
VOICE PERFORMMASTER
SEQUENCERSONG P A TTE R N FI L E
INTEGRATEDSAMPLING M I X IN G U TI LI TY
EDIT JOB STORE
C O MP A RE S C EN E S TO R ESETLOCATE
SONGSCENESF1 SF2 SF3 SF4 SF5
F1 F2 F3 F4 F6F5
INFORMATION
DEC /N O IN C/ YES
EXIT ENTER
EXECUTE
MUSIC PRODUCTION SYNTHESIZERIntegratedSamplingSequencer
Real-timeExternalControlSurfaceModularSynthesisPlug-inSystem
DRUMKITS
FAVORITES
S L OT 1 S L OT 2 S L OT 3
P RE 1 P RE 2 P RE 3 GM USER PLG 1 PLG 3
A . P I A NO K E Y BO A RD O RG AN G UI TA R/ PLUCKED
B A S S S T RING S B RA S S RE E D/ P I P E
S Y NLE AD S Y NP AD/ CHOIR
SYNCOMPCHROMATICPERCUSSION
DRUM/ PERCUSSION
S E M U SI C AL F X C O MB I
1 2 3 4 5 6 7 8
9 10 11 12 13 14 16
SECTION
TRACKSELECT
MUTE
SOLO
BANK
GROUP
NUMBER
COMMON
ELEMENT/PERF.PART/ZONE
DEC/NO INC/YES
2 Select a Recording type.
ReplaceYou can use this method when you want to overwrite analready recorded track withnew data.
OverdubYou can use this method when you want to add more data to atrack that already contains data.
StepYou can compose yourperformance by “writing” itdown one event at a time.
To step on page 1043To step on page 1033
1 After setting the measure length andmeter (time signature), enter thePattern Record mode.
SEQ TRANSPORT
LOCATE 1 2
REC
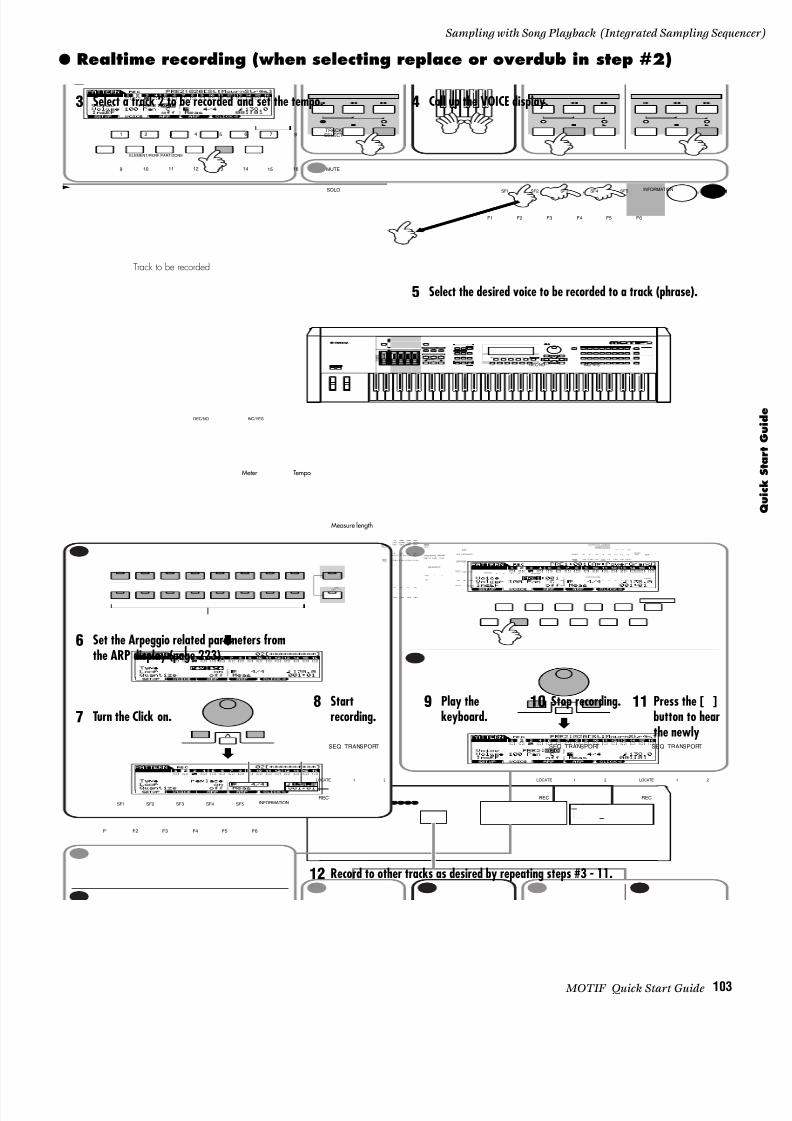
8/10/2019 motif_1(2)
http://slidepdf.com/reader/full/motif12 103/300
103 MOTIF Quick Start Guide
Sampling with Song Playback (Integrated Sampling Sequen
● Realtime recording (when selecting replace or overdub in step #2)
P LG 2
A B C D E F G H
15
CATEGORYSEARCH
OCTAVED OW N U P
KNOBCONTROLFUNCTION
PAN REVERB CHORUS TEMPO
ATTACK RELEASECUTOFF RESONANCE
A S SI GN A A S SI GN B A S SI GN 1 A S SI GN 2
KN 1 KN 2 KN 3 KN 4
MEQLOW MEQHIMIDM EQ LO WM ID M EQ H IG H
REMOTECONTROLON/OFF
EFFECTBYPASS ARPEGGIO
I N S ER TI ON S Y S TE M ON / OFFMASTERVOLUME
V OL UM E 1 V OL U M E 2 V OL U M E 3 V OL U M E 4
CS1 CS2 CS 3 CS 4
Z ON E1 Z ON E2 Z ON E3 Z ON E4
SEQTRANSPORT
LOCATE 1 2
REC
MODE
VOICE PERFORMMASTER
SEQUENCERSONG P A TTE R N FI L E
INTEGRATEDSAMPLING M I X IN G U TI LI TY
E DI T J OB S TO RE
COMPARE SCENESTORESETLOCATE
SONGSCENESF1 SF2 SF3 SF4 SF5
F1 F2 F3 F4 F6F5
INFORMATION
DE C/ NO I NC /YE S
EXIT ENTER
EXECUTE
MUSICPRODUCTION SYNTHESIZERIntegratedSamplingSequencer
Real-timeExternalControlSurfaceModular SynthesisPlug-inSystem
DRUMKITS
FAVORITES
S L OT 1 S L OT 2 S L OT 3
PRE 1 PRE 2 PRE 3 GM USER PLG 1 PLG 3
A . P I ANO K E Y B OA RD O RG AN G UI TA R/ PLUCKED
B A SS S T RI N GS B R AS S R E ED / PI P E
S Y NLE AD S Y NP A D/ CHOIR
SYNCOMPCHROMATICPERCUSSION
DRUM/ PERCUSSION
S E M U SI C AL F X C O MB I
1 2 3 4 5 6 7 8
9 10 11 12 13 14 16
SECTION
TRACKSELECT
MUTE
SOLO
BANK
GROUP
NUMBER
COMMON
ELEMENT/PERF.PART/ZONE
3 Select a track 2 to be recorded and set the tempo.
6 Set the Arpeggio related parameters fromthe ARP display (page 223).
12 Record to other tracks as desired by repeating steps #3 - 11.
7 Turn the Click on.
Track to be recorded
DEC/NO INC/YES
Meter Tempo
Measure length
4 Call up the VOICE display.
5 Select the desired voice to be recorded to a track (phrase).
DEC/NO INC/YES
SF1 SF2 SF3 SF4 SF5
F1 F2 F3 F4 F6F5
INFORMATION
SF1 SF2 SF3 SF4 SF5
F1 F2 F3 F4 F6F5
INFORMATION
9 Play thekeyboard.
8 Startrecording.
SEQ TRANSPORT
LOCATE 1 2
REC
10 Stop recording.
SEQ TRANSPORT
LOCATE 1 2
REC
11 Press the [ ]button to hearthe newly
SEQ TRANSPORT
LOCATE 1 2
REC
1 2 3 4 5 6 7 8
159 10 11 12 13 14 16
TRACKSELECT
MUTE
SOLO
ELEMENT/PERF.PART/ZONE
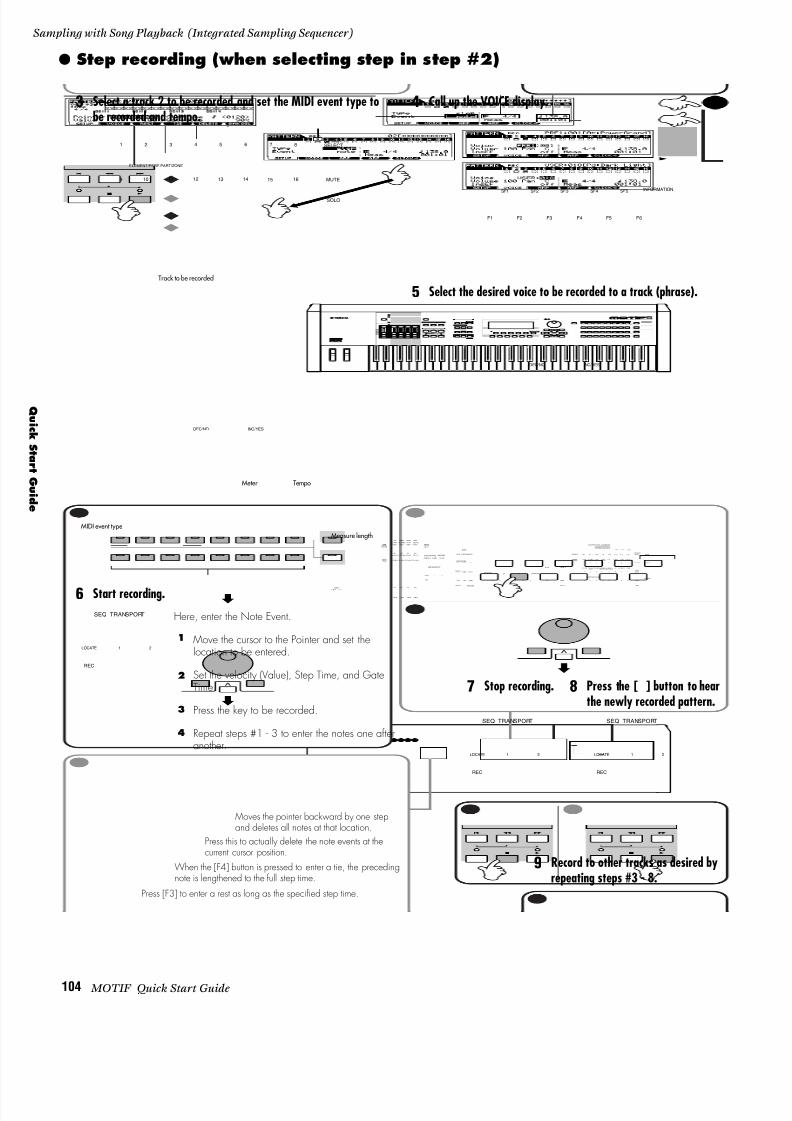
8/10/2019 motif_1(2)
http://slidepdf.com/reader/full/motif12 104/300
104 MOTIF Quick Start Guide
Sampling with Song Playback (Integrated Sampling Sequencer)
Qui c k S t ar t Gui d e
● Step recording (when selecting step in step #2)
P LG 2
A B C D E F G H
15
CATEGORYSEARCH
OCTAVED OW N U P
KNOBCONTROLFUNCTION
PAN REVERB CHORUS TEMPO
ATTACK RELEASECUTOFF RESONANCE
A S SI GN A A S SI GN B A S SI GN 1 A S SI GN 2
KN 1 KN 2 KN 3 KN 4
MEQLOW MEQHIMIDM EQ LO WM ID M EQ H IG H
REMOTECONTROLON/OFF
EFFECTBYPASS ARPEGGIO
I N S ER TI ON S Y S TE M ON / OFFMASTERVOLUME
V OL UM E 1 V OL U M E 2 V OL U M E 3 V OL U M E 4
CS1 CS2 CS 3 CS 4
Z ON E1 Z ON E2 Z ON E3 Z ON E4
SEQTRANSPORT
LOCATE 1 2
REC
MODE
VOICE PERFORMMASTER
SEQUENCERSONG P A TTE R N FI L E
INTEGRATEDSAMPLING M I X IN G U TI LI TY
E DI T J OB S TO RE
COMPARE SCENESTORESETLOCATE
SONGSCENESF1 SF2 SF3 SF4 SF5
F1 F2 F3 F4 F6F5
INFORMATION
DE C/ NO I NC /YE S
EXIT ENTER
EXECUTE
MUSICPRODUCTION SYNTHESIZERIntegratedSamplingSequencer
Real-timeExternalControlSurfaceModular SynthesisPlug-inSystem
DRUMKITS
FAVORITES
S L OT 1 S L OT 2 S L OT 3
PRE 1 PRE 2 PRE 3 GM USER PLG 1 PLG 3
A . P I ANO K E Y B OA RD O RG AN G UI TA R/ PLUCKED
B A SS S T RI N GS B R AS S R E ED / PI P E
S Y NLE AD S Y NP A D/ CHOIR
SYNCOMPCHROMATICPERCUSSION
DRUM/ PERCUSSION
S E M U SI C AL F X C O MB I
1 2 3 4 5 6 7 8
9 10 11 12 13 14 16
SECTION
TRACKSELECT
MUTE
SOLO
BANK
GROUP
NUMBER
COMMON
ELEMENT/PERF.PART/ZONE
3 Select a track 2 to be recorded and set the MIDI event type tobe recorded and tempo.
6 Start recording.
DEC/NO INC/YES
4 Call up the VOICE display.
5 Select the desired voice to be recorded to a track (phrase).
DEC/NO INC/YES
SF1 SF2 SF3 SF4 SF5
F1 F2 F3 F4 F6F5
INFORMATION
9 Record to other tracks as desired byrepeating steps #3 - 8.
7 Stop recording.
SEQ TRANSPORT
LOCATE 1 2
REC
8 Press the [ ] button to hearthe newly recorded pattern.
SEQ TRANSPORT
LOCATE 1 2
REC
1 2 3 4 5 6 7 8
159 10 11 12 13 14 16
TRACKSELECT
MUTE
SOLO
ELEMENT/PERF.PART/ZONE
Track to be recorded
Meter
MIDI event type
Tempo
Measure length
Here, enter the Note Event.
Move the cursor to the Pointer and set thelocation to be entered.
Set the velocity (Value), Step Time, and GateTime.
Press the key to be recorded.
Repeat steps #1 - 3 to enter the notes one afteranother.
SEQ TRANSPORT
LOCATE 1 2
REC
Press [F3] to enter a rest as long as the specified step time.
When the [F4] button is pressed to enter a tie, the precedingnote is lengthened to the full step time.
Press this to actually delete the note events at thecurrent cursor position.
Moves the pointer backward by one stepand deletes all notes at that location.
1
2
3
4
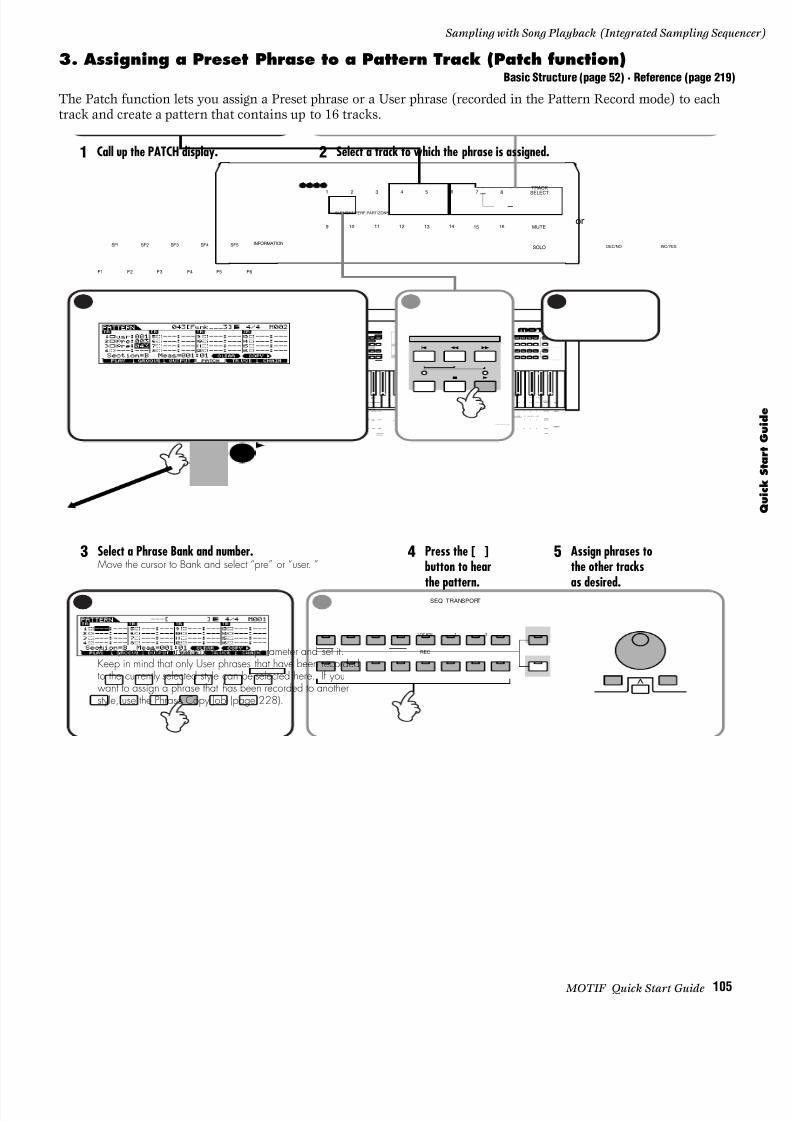
8/10/2019 motif_1(2)
http://slidepdf.com/reader/full/motif12 105/300
105 MOTIF Quick Start Guide
Sampling with Song Playback (Integrated Sampling Sequen
3. Assigning a Preset Phrase to a Pattern Track (Patch function)Basic Structure (page 52) · Reference (page 219)
The Patch function lets you assign a Preset phrase or a User phrase (recorded in the Pattern Record mode) to eachtrack and create a pattern that contains up to 16 tracks.
P LG 2
A B C D E F G H
15
CATEGORYSEARCH
OCTAVED OW N U P
KNOBCONTROLFUNCTION
P AN R EV ER B C H OR U S TEMPO
ATTACK RELEASECUTOFF RESONANCE
A S SI GN A A S SI GN B A S SI GN 1 A S SI GN 2
KN 1 KN 2 KN 3 KN 4
MEQLOW MEQHIMIDM EQ LO WM ID M E QH IG H
REMOTECONTROLON/OFF
EFFECTBYPASS ARPEGGIO
INSERTION SYSTEM ON/OFFMASTERVOLUME V OL UM E 1 V OL U M E 2 V OL U M E 3 V OL U M E 4
CS1 CS 2 CS 3 CS 4
Z ON E1 Z ON E2 Z ON E3 Z ON E4
SEQTRANSPORT
LOCATE 1 2
REC
MODE
VOICE PERFORMMASTER
SEQUENCERS ON G P A TTE R N FI L E
INTEGRATEDSAMPLING MIXING UTILITY
E DI T J OB S TO RE
C O MP A RE S C EN E S TO R ESETLOCATE
SONGSCENESF1 SF2 SF3 SF4 SF5
F1 F2 F3 F4 F6F5
INFORMATION
DE C/ NO I NC /YE S
EXIT ENTER
EXECUTE
MUSICPRODUCTION SYNTHESIZERIntegratedSamplingSequencer
Real-timeExternalControlSurfaceModularSynthesisPlug-in System
DRUMKITS
FAVORITES
S L OT 1 S L OT 2 S L OT 3
P RE 1 P RE 2 P RE 3 GM USER PLG 1 PLG 3
A . P I ANO K E Y B OA RD O RG AN G UI TA R/ PLUCKED
B A S S S T RI NG S B RA S S RE E D/ P I P E
S Y NLE AD S Y NP A D/ CHOIR
SYNCOMPCHROMATICPERCUSSION
DRUM/ PERCUSSION
S E M U SI C AL F X C O MB I
1 2 3 4 5 6 7 8
9 10 11 12 13 14 16
SECTION
TRACKSELECT
MUTE
SOLO
BANK
GROUP
NUMBER
COMMON
ELEMENT/PERF.PART/ZONE
1 Call up the PATCH display.
SF1 SF2 SF3 SF4 SF5
F1 F2 F3 F4 F6F5
INFORMATION
3 Select a Phrase Bank and number.Move the cursor to Bank and select “pre” or “user. ”
2 Select a track to which the phrase is assigned.
DEC/NO INC/YES
Then, move the cursor to the number parameter and set it.Keep in mind that only User phrases that have been recordedto the currently selected style can be selected here. If youwant to assign a phrase that has been recorded to anotherstyle, use the Phrase Copy Job (page 228).
4 Press the [ ]button to hear
the pattern.SEQ TRANSPORT
LOCATE 1 2
REC
5 Assign phrases tothe other tracks
as desired.
1 2 3 4 5 6 7 8
159 10 11 12 13 14 16
TRACKSELECT
MUTE
SOLO
ELEMENT/PERF.PART/ZONE
or

8/10/2019 motif_1(2)
http://slidepdf.com/reader/full/motif12 106/300
106 MOTIF Quick Start Guide
Sampling with Song Playback (Integrated Sampling Sequencer)
Qui c k S t ar t Gui d e
4. Using the Groove functionReference (page 218 )
The Grid Groove function makes it possible to adjust the pitch, timing, length, and velocity of notes in a specifiedtrack on a measure-long 16th-note grid. This lets you easily come up with a wide variety of rhythmic feels andgrooves that would be difficult or impossible to create using precise, yet rigid sequencer operations. Moreover, GridGroove is a playback-only operation, meaning that it leaves the original recorded data intact.
Grid Groove can also be applied to sample tracks that contain samples processed with the Slice function, as well as
normal MIDI tracks.
P LG 2
A B C D E F G H
15
CATEGORYSEARCH
OCTAVED OW N U P
KNOBCONTROLFUNCTION
PAN REVERB CHORUS TEMPO
ATTACK RELEASECUTOFF RESONANCE
A S SI GN A A S SI GN B A S SI GN 1 A S SI GN 2
KN 1 KN 2 KN 3 KN 4
MEQLOW M E Q HI M I DM EQ LO WM ID M EQ H IG H
REMOTECONTROL
ON/OFF
EFFECTBYPASS ARPEGGIO
I N S ER TI ON S Y STE M ON / OFFMASTERVOLUME
V OL UM E 1 V OL U M E 2 V OL U M E 3 V OL U ME 4
CS1 CS 2 CS 3 CS4
Z ON E 1 Z ON E 2 Z ON E3 Z ON E4
SEQTRANSPORT
LOCATE 1 2
REC
MODE
VOICE PERFORMMASTER
SEQUENCERSONG P A TTE R N FI L E
INTEGRATED
SAMPLING M I X IN G U TI L ITY
E DI T J OB S TO RE
COMPARE SCENESTORESETLOCATE
SONGSCENESF1 SF 2 SF3 SF4 SF5
F1 F2 F3 F4 F6F5
INFORMATION
D EC /N O I NC/ YES
EXIT ENTER
EXECUTE
MUSIC PRODUCTION SYNTHESIZERIntegratedSamplingSequencer
Real-timeExternalControlSurfaceModularSynthesisPlug-inSystem
DRUMKITS
FAVORITES
S L OT 1 S L OT 2 S L OT 3
P RE 1 P RE 2 P RE 3 GM USER PLG 1 PLG 3
A . P I A NO K E Y B OA RD O RG AN G UI TA R/ PLUCKED
B A S S S T RI NG S B RA S S RE E D/P I P E
S Y NLE AD S Y NP A D/ CHOIR
SYNCOMPCHROMATICPERCUSSION
DRUM/ PERCUSSION
S E M U SI C AL F X C O MB I
1 2 3 4 5 6 7 8
9 10 11 12 13 14 16
SECTION
TRACKSELECT
MUTE
SOLO
BANK
GROUP
NUMBER
COMMON
ELEMENT/PERF.PART/ZONE
1 Call up the GROOVE display.
SF 1 SF 2 SF 3 SF 4 SF 5
F1 F2 F3 F4 F6F5
2 Select a track.1 2 3 4 5 6 7 8
159 10 11 12 13 14 16
TRACKSELECT
MUTE
SOLO
4 Press the [ ] button tohear the edited pattern.
n Keep in mind that if you make anedit at a specific 16th note positionand there is no MIDI data at thatpoint, the track will not change.
SEQ TRANSPORT
LOCATE 1 2
REC
5 Make Grid Groove settingsfor other tracks as desired.
3 Set the parameters.Move the cursor to the desired parameter and grid point and set the offse t value.This affects song playback without actually changing the sequence data.
DEC/NO INC/YES
Each aspect of the track to be offset (pitch, time, length, velocity) is indicated bya different graphic.
plus
VELO OFFSET
GATE OFFSET
CLOCK SHIFT
NOTE OFFSET
0minus

8/10/2019 motif_1(2)
http://slidepdf.com/reader/full/motif12 107/300
107 MOTIF Quick Start Guide
Sampling with Song Playback (Integrated Sampling Sequen
5. Pattern MixingReference (page 232)
Now that you have a finished section and pattern, you can apply the Pattern Mixing controls to fine-tune it andenhance it — by adusting the levels of each track or part, selecting different voices, and tweaking the effect-related settings.
P LG 2
A B C D E F G H
15
CATEGORYSEARCH
OCTAVED OW N U P
KNOBCONTROLFUNCTION
PAN REVERB CHORUS TEMPO
ATTACK RELEASECUTOFF RESONANCE
A S SI GN A A S SI GN B A S SI GN 1 A S SI GN 2
KN 1 KN 2 KN 3 KN 4
MEQLOW MEQHIMIDM EQ LO WM ID M EQ H IG H
REMOTECONTROL
ON/OFF
EFFECTBYPASS ARPEGGIO
I N S ER TI ON S Y STE M ON / OFFMASTERVOLUME
V OL UM E 1 V OL U M E 2 V OL U M E 3 V OL U ME 4
CS1 CS 2 CS3 CS4
Z ON E1 Z ON E2 Z ON E3 Z ON E4
SEQTRANSPORT
LOCATE 1 2
REC
MODE
VOICE PERFORMMASTER
SEQUENCERS ON G P A TTE R N FI L E
INTEGRATEDSAMPLING M I X IN G U TI L ITY
E DI T J OB S TO RE
C O MP A RE S C EN E ST O RESETLOCATE
SONGSCENESF1 SF2 SF3 SF4 SF5
F1 F2 F3 F4 F6F5
INFORMATION
D EC/ NO I NC/ YES
EXIT ENTER
EXECUTE
MUSIC PRODUCTIONSYNTHESIZER
IntegratedSamplingSequencerReal-timeExternalControlSurfaceModularSynthesisPlug-inSystem
DRUMKITS
FAVORITES
S L OT 1 S L OT 2 S L OT 3
P RE 1 P RE 2 P RE 3 GM USER PLG 1 PLG 3
A.PIANO KEYBOARD ORGAN GUITAR/ PLUCKED
BASS S T RING S B RA S S RE E D/P I P E
S Y NLE AD S Y NP A D/ CHOIR
SYNCOMPCHROMATICPERCUSSION
DRUM/ PERCUSSION
S E M U SI C AL F X C O MB I
1 2 3 4 5 6 7 8
9 10 11 12 13 14 16
SECTION
TRACKSELECT
MUTE
SOLO
BANK
GROUP
NUMBER
COMMON
ELEMENT/PERF.PART/ZONE
1 Enter the PatternMixing mode.
SEQUENCERSONG PATTERN FILE
INTEGRATEDSAMPLING MIXING UTILITY
4 Highlight the desiredparameter and change the
value.
6 Store the Song Mixing setup to User Memory.
2 Call up the desired display.
SF1 SF2 SF3 SF4 SF5
F1 F2 F3 F4 F6F5
INFORMATION
3 Select a part to be edited.
DEC/NO INC/YES
5 Set the other parameters byrepeating steps #2 - 4.
EXIT ENTER
EXECUTE
DEC/NO INC/YES
EDIT JOB STORE
COMPARE SCENE STORESET LOCATE
1
2
3
7 Go back to the Pattern Playmode.
n Not each section but eachstyle has one Pattern Mixingsetting.
SEQUENCERSONG PATTERN FILE
INTEGRATEDSAMPLING MIXING UTILITY
1 2 3 4 56
7 8
159 10 11 12 13 14 16
TRACK
SELECT
MUTE
SOLO
ELEMENT/PERF.PART/ZONE

8/10/2019 motif_1(2)
http://slidepdf.com/reader/full/motif12 108/300
108 MOTIF Quick Start Guide
Sampling with Song Playback (Integrated Sampling Sequencer)
Qui c k S t ar t Gui d e
6. Creating a Pattern ChainBasic Structure (page 54) · Reference (page 219)
Now that you’ve got your audio samples, loops, MIDI data, and patterns in the MOTIF, here’s where the fun really begins. The Pattern Chain feature lets you arrange all of the pieces of your song in real time. As you record a PatternChain, play back your original patterns and sections, and switch among them on the fly. This intuitive, hands-onapproach to arranging lets you come up with great ideas and amazing songs — quickly and easily.
nFor details about Pattern Chain and its track and memory structure, see page 54.
P LG 2
A B C D E F G H
15
CATEGORYSEARCH
OCTAVE
D OW N U P
KNOBCONTROLFUNCTION
PAN REVERB CHORUS TEMPO
A T T ACK RE LE A S ECUT O F F RE S O NA NCE
A S S I GN A A S S I G N B A S S I GN 1 A S S I G N 2
KN 1 K N 2 KN 3 KN 4
M EQ L OW M EQ HI MI DM EQ LO WM ID M EQ H IG H
REMOTECONTROLON/OFF
EFFECT BYPASS ARPEGGIO
INSERTION S Y ST E M O N /O F FMASTERVOLUME V O LUM E 1 V O LUM E 2 V O LUM E 3 V O LUM E 4
CS 1 CS 2 CS 3 CS 4
Z ON E 1 Z ON E 2 Z ON E 3 Z ON E 4
SEQTRANSPORT
LOCATE 1 2
REC
MODE
V O I CE P E RF O RM M A S T ER
SEQUENCERS O N G P A T T ER N F I LE
INTEGRATEDSAMPLING M I X I NG UT I LIT Y
EDIT JOB STORE
C O MP A RE S C EN E S TO R ESETLOCATE
SONG SCENESF1 SF2 SF3 SF4 SF5
F1 F2 F3 F4 F6F5
INFORMATION
D EC/ NO I NC /YES
EXIT ENTER
EXECUTE
MUSICPRODUCTIONSYNTHESIZERIntegratedSamplingSequencer
Real-timeExternalControlSurfaceModularSynthesisPlug-inSystem
DRUMKITS
FAVORITES
S L OT 1 S L OT 2 S L OT 3
PRE 1 PRE 2 PRE 3 GM USER PLG 1 PLG 3
A.PIANO K E Y B OA RD O RG AN G UI TA R/ PLUCKED
B A S S S T RING S B RA S S RE E D/ P I P E
S Y NLE AD S Y NP AD/ CHOIR
SYNCOMPCHROMATICPERCUSSION
DRUM/ PERCUSSION
S E M US I CA LF X CO M BI
1 2 3 4 5 6 7 8
9 10 11 12 13 14 16
SECTION
TRACKSELECT
MUTE
SOLO
BANK
GROUP
NUMBER
COMMON
ELEMENT/PERF.PART/ZONE
5 Stop recording.
6 Press the [ ] button tohear your new patternchain.
SEQ TRANSPORT
LOCATE 1 2
REC
SEQ TRANSPORT
LOCATE 1 2
REC
Pattern Chain Track
Tempo
3 Select a track and tempo.
CATEGORYSEARCHPLG 2PRE 1 PRE 2 PRE 3 GM USER PLG 1 PLG 3
A.PIANO KEYBOARD ORGAN GUITAR/ PLUCKED
BASS S TR IN GS B RA SS REED/PIPE
A B C D E F G H
S YN L E AD S YN P AD / CHOIR
SYNCOMP CHROMATICPERCUSSION
DRUM/ PERCUSSION
SE M U SI CA L F X C OM BI
SECTION
4 Start recording.
SEQ TRANSPORT
LOCATE 1 2
REC
While recording, you can change the Sectionat the desired timing.
SF1 SF2 SF3 SF4 SF5
F1 F2 F3 F4 F6F5
1 Enter the Pattern Chain mode bypressing the [F6] button in the PatternPlay mode.
2 Enter the Pattern Chain Record modeby pressing the [REC] button.
SEQ TRANSPORT
LOCATE 1 2
REC
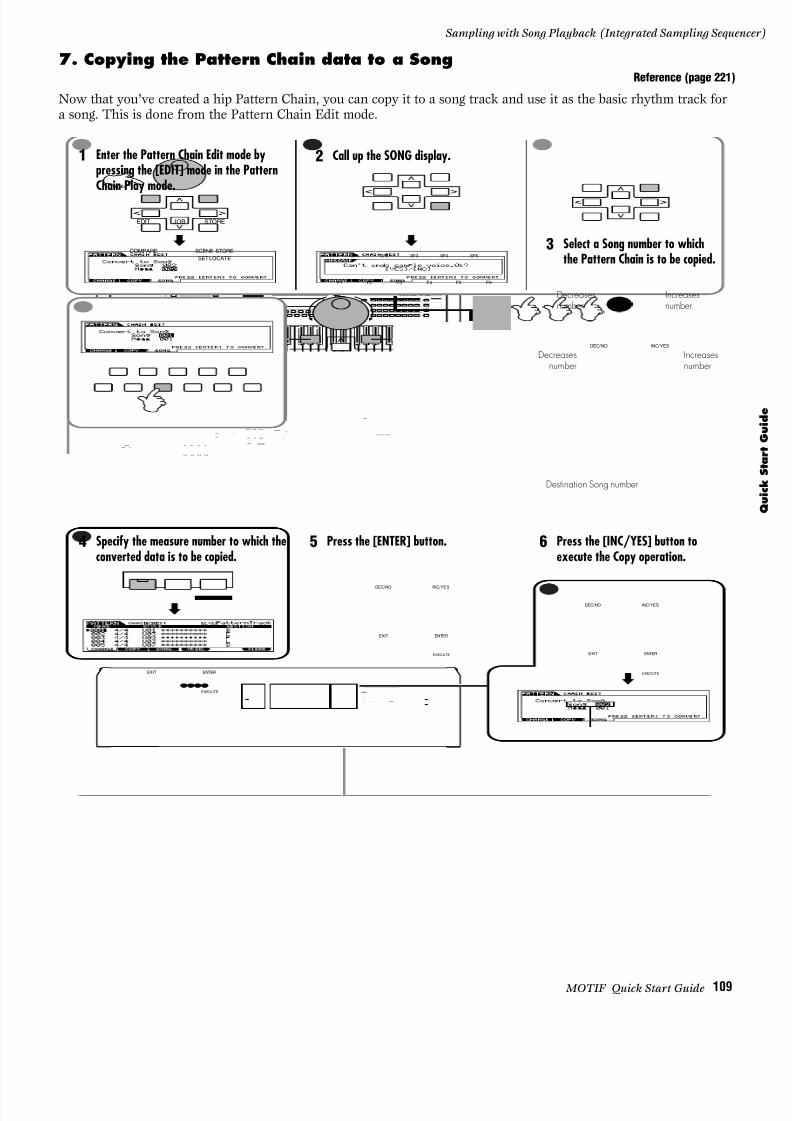
8/10/2019 motif_1(2)
http://slidepdf.com/reader/full/motif12 109/300
109 MOTIF Quick Start Guide
Sampling with Song Playback (Integrated Sampling Sequen
7. Copying the Pattern Chain data to a SongReference (page 221)
Now that you’ve created a hip Pattern Chain, you can copy it to a song track and use it as the basic rhythm track fora song. This is done from the Pattern Chain Edit mode.
P LG 2
A B C D E F G H
15
CATEGORYSEARCH
OCTAVEDOWN UP
KNOBCONTROLFUNCTION
P AN R EV E RB C H OR U S T E MP O
ATTACK RELEASECUTOFF RESONANCE
A S S IGN A A S SI GN B A S SI GN 1 A S SI GN 2
KN 1 KN 2 KN 3 KN 4
MEQLOW MEQHIMIDM EQ LO WM ID M EQ H IG H
REMOTECONTROL
ON/OFF
EFFECTBYPASS ARPEGGIO
INSERTION SYSTEM ON/OFFMASTERVOLUME V OL UM E 1 V OL U M E 2 V OL U M E 3 V OL U ME 4
CS1 CS 2 CS3 CS 4
Z ON E1 Z ON E2 Z ON E3 Z ON E4
SEQTRANSPORT
LOCATE 1 2
REC
MODE
VOICE PERFORMMASTER
SEQUENCERS O NG P AT T ER N F I LE
INTEGRATEDSAMPLING M I X IN G U TI L ITY
E DI T J OB S TO RE
C O MP A RE S C EN E S TO R ESETLOCATE
SONGSCENESF1 SF2 SF3 SF4 SF5
F1 F2 F3 F4 F6F5
INFORMATION
D EC /NO I NC/ YES
EXIT ENTER
EXECUTE
MUSIC PRODUCTIONSYNTHESIZERIntegratedSamplingSequencer
Real-timeExternalControlSurfaceModularSynthesisPlug-inSystem
DRUMKITS
FAVORITES
S L OT 1 S L OT 2 S L OT 3
PR E1 PR E2 PRE 3 GM USER PLG 1 PLG 3
A.PIANO K E Y BO A RD O RG AN GUITAR/ PLUCKED
B A S S S T RING S B RA SS RE E D/P I P E
S Y NLE AD S Y NP A D/ CHOIR
SYNCOMPCHROMATICPERCUSSION
DRUM/ PERCUSSION
S E M U SI C AL F X C O MB I
1 2 3 4 5 6 7 8
9 10 11 12 13 14 16
SECTION
TRACKSELECT
MUTE
SOLO
BANK
GROUP
NUMBER
COMMON
ELEMENT/PERF.PART/ZONE
3 Select a Song number to whichthe Pattern Chain is to be copied.
Destination Song number
EDIT JOB STORE
COMPARE SCENE STORESET LOCATE
1 Enter the Pattern Chain Edit mode bypressing the [EDIT] mode in the PatternChain Play mode.
SF1 SF2 SF3 SF4 SF5
F1 F2 F3 F4 F6F5
2 Call up the SONG display.
DEC/NO INC/YES
EXIT ENTER
EXECUTE
4 Specify the measure number to which theconverted data is to be copied.
DEC/NO INC/YES
EXIT ENTER
EXECUTE
5 Press the [ENTER] button.
DEC/NO INC/YES
EXIT ENTER
EXECUTE
6 Press the [INC/YES] button toexecute the Copy operation.
Decreasesnumber
Decreasesnumber
Increasesnumber
Increasesnumber
DEC/NO INC/YES

8/10/2019 motif_1(2)
http://slidepdf.com/reader/full/motif12 110/300
110 MOTIF Quick Start Guide
Sampling with Song Playback (Integrated Sampling Sequencer)
Qui c k S t ar t Gui d e
8. MIDI recording to Song TracksBasic Structure (page 51) · Reference (page 183)
Now, take your basic building blocks and move over to the Song mode to do some more work on your song. Let’s sayfor the sake of example that you’ve recorded MIDI data for nearly all the tracks — except for maybe some rhythmguitar parts and some solos on piano and organ. The MOTIF gives you two methods of recording these. Realtimerecording lets you record much as you would with a tape recorder, playing the parts in real time while you listen tothe backing rhythm tracks you created earlier. The other method, Step recording, lets you enter each noteindividually, much like writing down the notes on paper.
P LG 2
A B C D E F G H
15
CATEGORYSEARCH
OCTAVED OW N U P
KNOBCONTROLFUNCTION
PAN REVERB CHORUS TEMPO
ATTACK RELEASECUTOFF RESONANCE
A S SI GN A A S SI GN B A S SI GN 1 A S SI GN 2
KN 1 KN 2 KN 3 KN 4
MEQLOW MEQHIMIDM EQ LO WM ID M EQ H IG H
REMOTECONTROLON/OFF
EFFECTBYPASS ARPEGGIO
INSERTION S Y S TE M ON / OFFMASTERVOLUME
V OL UM E 1 V OL U M E 2 V OL U M E 3 V OL U M E 4
CS1 CS2 CS 3 CS 4
Z ON E1 Z ON E2 Z ON E3 Z ON E4
SEQTRANSPORT
L OC AT E 1 2
REC
MODE
VOICE PERFORMMASTER
SEQUENCERS ON G P A TTE R N FI L E
INTEGRATEDSAMPLING M I X IN G U TI LI TY
E DI T J OB S TO RE
C O MP A RE S C EN E S TO R ESETLOCATE
SONGSCENESF1 SF2 SF3 SF4 SF5
F1 F2 F3 F4 F6F5
INFORMATION
DE C/ NO I NC /YE S
EXIT ENTER
EXECUTE
MUSICPRODUCTION SYNTHESIZERIntegratedSamplingSequencer
Real-timeExternalControlSurfaceModularSynthesisPlug-inSystem
DRUMKITS
FAVORITES
S L OT 1 S L OT 2 S L OT 3
P RE 1 P RE 2 PRE 3 GM USER PLG 1 PLG 3
A.PIANO KEYBOARD ORGAN GUITAR/ PLUCKED
BASS S T RI NG S B RA S S REED/PIPE
S Y NLE AD S Y NP A D/ CHOIR
SYNCOMPCHROMATICPERCUSSION
DRUM/ PERCUSSION
S E M U SI C AL F X C O MB I
1 2 3 4 5 6 7 8
9 10 11 12 13 14 16
SECTION
TRACKSELECT
MUTE
SOLO
BANK
GROUP
NUMBER
COMMON
ELEMENT/PERF.PART/ZONE
4 Enter the Song Record
mode.
A B C D E F G H
S YN LEA D S YN P AD / CHOIR
SYN COMP CHROMATICPERCUSSION
DRUM/ PERCUSSION
SE MUSICAL FX COMBI
3 Select the song to which the Pattern Chain datahas been copied.
1 2 3 4 5 6 7 8
159 10 11 12 13 14 16
ELEMENT/PERF.PART/ZONE
SEQUENCERSONG PATTERN FILE
INTEGRATEDSAMPLING M IX IN G U TI LI TY
1 Enter the Songmode.
Song number
SF1 SF2 SF3 SF4 SF5
F1 F2 F3 F4 F6F5
2 Call up the PLAY display.
DEC/NO INC/YES
5 Select a Recording type.
ReplaceYou can use thismethod when youwant to overwritean alreadyrecorded track withnew data.
OverdubYou can use thismethod when youwant to add moredata to a track thatalready containsdata.
PunchYou can use this methodwhen you want to re-record only over a specificarea of the track. In thiscase, you must set the startand end points before youbegin the re-recording.
StepYou can compose your performanceby entering it oneevent at a time.
To step on page 1116 To step on page 1126
SEQ TRANSPORT
LOCATE 1 2
REC

8/10/2019 motif_1(2)
http://slidepdf.com/reader/full/motif12 111/300
111 MOTIF Quick Start Guide
Sampling with Song Playback (Integrated Sampling Sequen
● Realtime recording (when selecting “replace,” “overdub,” or “punch”in step #5)
P LG 2
A B C D E F G H
15
CATEGORYSEARCH
OCTAVED OW N U P
KNOBCONTROLFUNCTION
PAN REVERB CHORUS TEMPO
ATTACK RELEASECUTOFF RESONANCE
A S SI GN A A S S IGN B A S S IGN 1 A S S IGN 2
KN 1 KN 2 KN 3 KN 4
MEQLOW MEQHIMIDM EQ LO WM ID M E QH IG H
REMOTECONTROLON/OFF
EFFECTBYPASS ARPEGGIO
I N S ER TI ON S Y STE M ON / OFFMASTERVOLUME
V OL UM E 1 V OL U M E 2 V OL U M E 3 V OL U M E4
CS 1 CS 2 CS 3 CS 4
Z ON E1 Z ON E2 Z ON E3 Z ON E4
SEQTRANSPORT
LOCATE 1 2
REC
MODE
VOICE PERFORMMASTER
SEQUENCERSONG P A TTE R N FI L E
INTEGRATEDSAMPLING M I X IN G U TI LI TY
E DI T J OB S TO RE
COMPARE SCENESTORESETLOCATE
SONGSCENESF1 SF2 SF3 SF4 SF5
F1 F2 F3 F4 F6F5
INFORMATION
DEC /NO IN C/ YES
EXIT ENTER
EXECUTE
MUSICPRODUCTION SYNTHESIZERIntegratedSamplingSequencer
Real-timeExternalControlSurfaceModularSynthesisPlug-inSystem
DRUMKITS
FAVORITES
S L OT 1 S L OT 2 S L OT 3
PRE 1 PRE 2 PRE 3 GM USER PLG 1 PLG 3
A . P I A NO K E Y BO A RD O RG AN G UI TA R/ PLUCKED
B A S S S T RING S B RA S S RE E D/ P I P E
S Y NLE AD S Y NP AD/ CHOIR
SYNCOMPCHROMATICPERCUSSION
DRUM/ PERCUSSION
S E M U SI C AL F X C O MB I
1 2 3 4 5 6 7 8
9 10 11 12 13 14 16
SECTION
TRACKSELECT
MUTE
SOLO
BANK
GROUP
NUMBER
COMMON
ELEMENT/PERF.PART/ZONE
8 Select the desired voice to be recorded to a track.Bank
1~16
6 Select a track to be recorded and set the tempo.
DEC/NO INC/YES
1 2 3 4 5 6 7 8
159 10 11 12 13 14 16
TRACKSELECT
MUTE
SOLO
ELEMENT/PERF.PART/ZONE
or
DEC/NO INC/YES
1 2 3 4 5 6 7 8
159 10 11 12 13 14 16
TRACKSELECT
MUTE
SOLO
ELEMENT/PERF.PART/ZONE
or
SF 1 SF 2 SF 3 SF 4 SF 5
F1 F2 F3 F4 F6F5
7 Call up the VOICE display.
9 Set the Arpeggiorelatedparameters asdesired from theARP display
(page 189).
Tempo
Number
11 Start recording.Press the [ ] button.You will be givena one-measurecount-in prior tothe first measureactually recorded.
SEQ TRANSPORT
LOCATE 1 2
REC
13 Stop recording.
SEQ TRANSPORT
LOCATE 1 2
REC
14 Press the [ ]button to hearthe newlyrecorded song.
SEQ TRANSPORT
LOCATE 1 2
REC
SF1 SF2 SF3 SF4 SF5
F1 F2 F3 F4 F6F5
10 Turn the Click on.
12 Play thekeyboard.
15 Record to other tracks asdesired by repeating steps#6 - 14.
Scene track
Tempo track

8/10/2019 motif_1(2)
http://slidepdf.com/reader/full/motif12 112/300
112 MOTIF Quick Start Guide
Sampling with Song Playback (Integrated Sampling Sequencer)
Qui c k S t ar t Gui d e
● Step recording (when selecting “step” in step #5)
P LG 2
A B C D E F G H
15
CATEGORYSEARCH
OCTAVED OW N U P
KNOBCONTROLFUNCTION
P AN R EV ER B C H OR US TEMPO
ATTACK RELEASECUTOFF RESONANCE
A S SI GN A A S SI GN B A S SI GN 1 A S SI GN 2
KN 1 KN 2 KN 3 KN 4
MEQLOW MEQHIMIDM EQ LO WM ID M EQ H IG H
REMOTECONTROLON/OFF
EFFECTBYPASS ARPEGGIO
I N S ER TI ON S Y STE M ON / OFFMASTERVOLUME
V OL UM E 1 V OL U M E 2 V OL U M E 3 V OL U ME 4
CS1 CS 2 CS 3 CS4
Z ON E1 Z ON E2 Z ON E3 Z ON E4
SEQTRANSPORT
L OC ATE 1 2
REC
MODE
VOICE PERFORMMASTER
SEQUENCERS ON G P A TTE R N FI L E
INTEGRATEDSAMPLING MIXING UTILITY
EDIT JOB STORE
COMPARE SCENESTORESETLOCATE
SONGSCENESF1 SF2 SF3 SF4 SF5
F1 F2 F3 F4 F6F5
INFORMATION
D EC/ NO I NC/ YES
EXIT ENTER
EXECUTE
MUSIC PRODUCTION SYNTHESIZERIntegratedSamplingSequencer
Real-timeExternalControlSurfaceModularSynthesisPlug-inSystem
DRUMKITS
FAVORITES
S L OT 1 S L OT 2 S L OT 3
P RE 1 P RE 2 P RE 3 G M U SE R P LG 1 PLG 3
A . P I ANO K E Y B OA RD O RG AN G UI TA R/ PLUCKED
B A S S S T RING S B RA S S RE E D/P I P E
S Y NLE AD S Y NP A D/ CHOIR
SYNCOMPCHROMATICPERCUSSION
DRUM/ PERCUSSION
S E M U SI C AL F X C O MB I
1 2 3 4 5 6 7 8
9 10 11 12 13 14 16
SECTION
TRACKSELECT
MUTE
SOLO
BANK
GROUP
NUMBER
COMMON
ELEMENT/PERF.PART/ZONE
7 Call up the VOICE display.
6 Select a track to be recorded and set the MIDI event type to berecorded.
Select the desired voice to be recorded to the track.8
TempoMIDI event
Bank
or
DEC/NO INC/YES
or
Recordingtrack
DEC/NO INC/YES
SF1 SF2 SF3 SF4 SF5
F1 F2 F3 F4 F6F5
INFORMATION
1 2 3 4 5 6 7 8
159 10 11 12 13 14 16
TRACKSELECT
MUTE
SOLO
ELEMENT/PERF.PART/ZONE
CATEGORYSEARCHDRUMKITS
FAVORITES
P L G2PRE 1 PRE 2 PRE 3 GM USER PLG 1 PLG 3
A.PIANO KEYBOARD ORGAN GUITAR/ PLUCKED
B AS S S TR IN GS BRASS REED/PIPE
A B C D E F G H
SYNLEAD SYNPAD/ CHOIR
SYNCOMPCHROMATICPERCUSSION
DRUM/ PERCUSSION
S E M US IC AL F X C OM BI
1 2 3 4 5 6 7 8
159 10 11 12 13 14 16
SECTION
TRACKSELECT
MUTE
SOLO
COMMON
ELEMENT/PERF.PART/ZONE
Number
9 Start recording.
12 Record to other tracks as desiredby repeating steps #6 - 12.
10 Stop recording.
SEQ TRANSPORT
LOCATE 1 2
REC
11 Press the [ ] button to hear thenewly recorded song.
SEQ TRANSPORT
LOCATE 1 2
REC
Here, enter the Note Event.
Move the cursor to the Pointer and set thelocation to be entered (page 185).
Set the velocity (Value), Step Time, and GateTime (page 185).
Press the key to be recorded.
Repeat steps #1 - 3 to enter notes one afteranother.
SEQ TRANSPORT
LOCATE 1 2
REC
Press [F3] to enter a rest as long as the specified step time.
When the [F4] button is pressed to enter a tie, thepreceding note is lengthened to the full step time.
Press this to actually delete the note events at thecurrent cursor position.
Moves the pointer backward by one stepand deletes all notes at that location.
1
2
3
4
Tempo track
1-16

8/10/2019 motif_1(2)
http://slidepdf.com/reader/full/motif12 113/300
113 MOTIF Quick Start Guide
Sampling with Song Playback (Integrated Sampling Sequen
9. Sampling to a Song TrackBasic Structure (page 54) · Reference (page 234)
We’ll pay another visit to the sampling feature, and sweeten our song with some “ear candy” sound effects and background vocals. The sampling we did earlier was of a different variety; you sampled a rhythm in the Pattern modeand “sliced” it into separate pieces so that it would loop properly and automatically adjust to any tempo changes.Here, we’ll try a different type of sampling, where the Slice operation is unnecessary — since a short sound effectdoesn’t need to stay in tempo, and you can sing the background parts in time with the song as you sample them.
nFor details about how to connect external audio equipment or a microphone to the MOTIF, see page 23 .
P LG 2
A B C D E F G H
15
CATEGORYSEARCH
OCTAVED OW N U P
KNOBCONTROLFUNCTION
PAN REVERB CHORUS TEMPO
ATTACK RELEASECUTOFF RESONANCE
A S SI GN A A S SI GN B A S SI GN 1 A S SI GN 2
KN 1 KN 2 KN 3 KN 4
MEQLOW MEQHIMIDM EQ LO WM ID M EQ H IG H
REMOTECONTROLON/OFF
EFFECTBYPASS ARPEGGIO
I N S ER TI ON S Y STE M ON / OFFMASTERVOLUME
V OL UM E 1 V OL U M E 2 V OL U M E 3 V OL U M E 4
CS1 CS2 CS 3 CS4
Z ON E1 Z ON E2 Z ON E3 Z ON E4
SEQTRANSPORT
LOCATE 1 2
REC
MODE
VOICE PERFORMMASTER
SEQUENCERSONG P A TTE R N FI L E
INTEGRATEDSAMPLING M I X IN G U TI LI TY
E DI T J OB S TO RE
COMPARE SCENESTORESETLOCATE
SONGSCENESF1 SF2 SF3 SF4 SF5
F1 F2 F3 F4 F6F5
INFORMATION
D EC/ NO I NC /YE S
EXIT ENTER
EXECUTE
MUSIC PRODUCTION SYNTHESIZERIntegratedSamplingSequencer
Real-timeExternalControlSurfaceModularSynthesisPlug-inSystem
DRUMKITS
FAVORITES
S L OT 1 S L OT 2 S L OT 3
P RE 1 P RE 2 P RE 3 GM USER PLG 1 PLG 3
A . P I ANO K E Y B OA RD O RG A N G UI TA R/ PLUCKED
B A S S S T RI NG S B RA S S RE E D/P I P E
S Y NLE AD S Y NP A D/ CHOIR
SYNCOMPCHROMATICPERCUSSION
DRUM/ PERCUSSION
S E M U SI C AL F X C O MB I
1 2 3 4 5 6 7 8
9 10 11 12 13 14 16
SECTION
TRACKSELECT
MUTE
SOLO
BANK
GROUP
NUMBER
COMMON
ELEMENT/PERF.PART/ZONE
3 Call up the DEST display.
SF 1 SF 2 SF 3 SF 4 SF 5
F1 F2 F3 F4 F6F5
INFORMATION
2 Enter theSampling Recordmode.
SEQUENCERSONG PATTERN FILE
INTEGRATEDSAMPLING MIXING UTILITY
1 In the Song Play mode, specify the point(measure) in the song at which therecorded sample will start.
DEC/NO INC/YES
Select a track to be recoeded.4 5 Call up the SOURCE display.
SF 1 SF 2 SF 3 SF 4 SF 5
F1 F2 F3 F4 F6F5
INFORMATION
Select "stereo" or "mono."
Samplingfrequencyor
DEC/NO INC/YES
2
1
21
1 2 3 4 5 6 7 8
159 10 11 12 13 14 16
TRACKSELECT
MUTE
SOLO
ELEMENT/PERF.PART/ZONE
Select a sampling type.
For Type, select “sample+note.”
Select a sampling source.
For Source, select “A/D.”
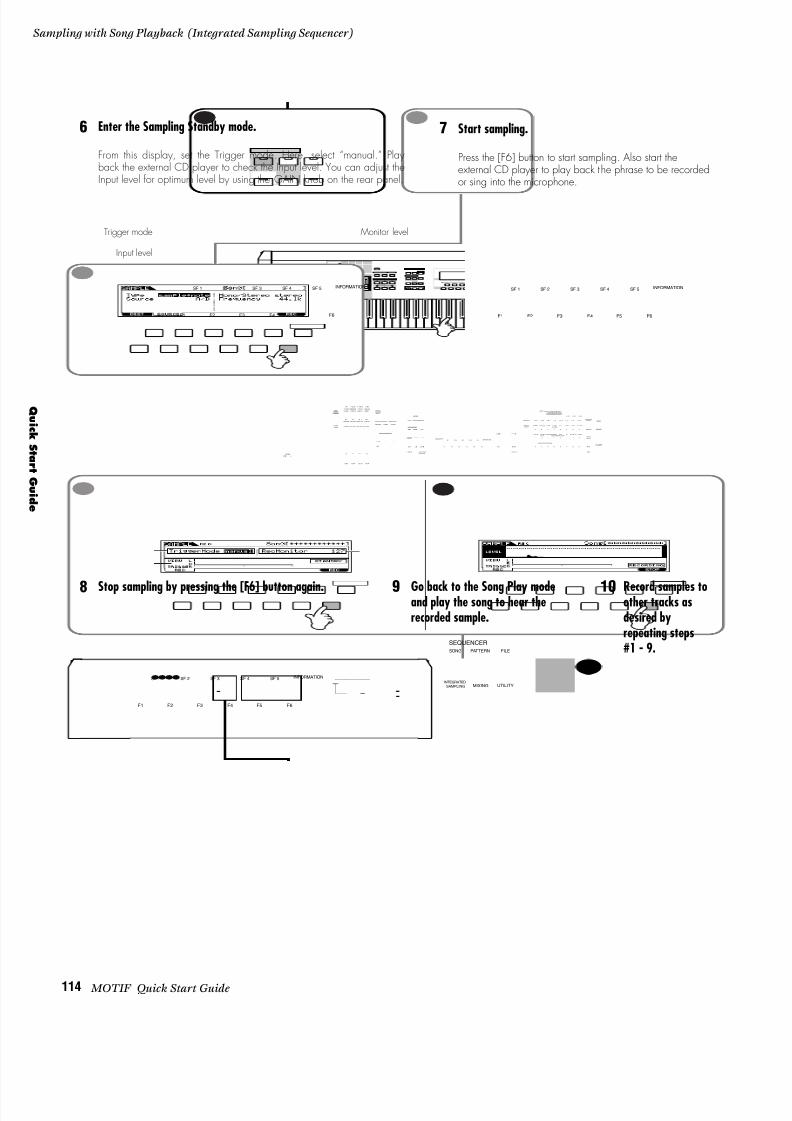
8/10/2019 motif_1(2)
http://slidepdf.com/reader/full/motif12 114/300
114 MOTIF Quick Start Guide
Sampling with Song Playback (Integrated Sampling Sequencer)
Qui c k S t ar t Gui d e
P LG 2
A B C D E F G H
15
CATEGORYSEARCH
OCTAVED OWN U P
KNOBCONTROLFUNCTION
P AN R EV E RB C H OR U S T E MP O
ATTACK RELEASECUTOFF RESONANCE
A S S IGN A A S SI GN B A S SI GN 1 A S S IGN 2
KN 1 KN 2 KN 3 KN 4
MEQLOW MEQHI MIDM EQ LO WM ID M EQ H IG H
REMOTECONTROL
ON/OFF
EFFECTBYPASS ARPEGGIO
INSERTION S Y STE M ON / OFFMASTERVOLUME
V OL UM E 1 V OL U M E 2 V OL U M E 3 V OL U ME 4
CS 1 CS 2 CS3 CS 4
Z ON E1 Z ON E2 Z ON E 3 Z ON E4
SEQTRANSPORT
LOCATE 1 2
REC
MODE
VOICE PERFORMMASTER
SEQUENCERSONG PATTERN FILE
INTEGRATEDSAMPLING M I X IN G U TI L ITY
E DI T J OB S TO RE
C O MP A RE S C EN E S TO R ESETLOCATE
SONGSCENESF 1 SF2 SF 3 SF 4 SF 5
F1 F2 F3 F4 F6F5
INFORMATION
D EC /NO IN C/Y ES
EXIT ENTER
EXECUTE
MUSIC PRODUCTIONSYNTHESIZERIntegratedSamplingSequencer
Real-timeExternalControlSurfaceModularSynthesisPlug-inSystem
DRUMKITS
FAVORITES
S L OT 1 S L OT 2 S L OT 3
P RE 1 P RE 2 P RE 3 G M U SE R P LG 1 P LG 3
A.PIANO K E Y BO A RD O RG AN G UI TA R/ PLUCKED
B A S S S T RING S B RA SS RE E D/P I P E
S Y NLE AD S Y NP AD/ CHOIR
SYNCOMPCHROMATICPERCUSSION
DRUM/ PERCUSSION
SE M US I CA LF X CO M BI
1 2 3 4 5 6 7 8
9 10 11 12 13 14 16
SECTION
TRACKSELECT
MUTE
SOLO
BANK
GROUP
NUMBER
COMMON
ELEMENT/PERF.PART/ZONE
9 Go back to the Song Play modeand play the song to hear therecorded sample.
10 Record samples toother tracks asdesired byrepeating steps#1 - 9.
SEQUENCERSONG PATTERN FILE
INTEGRATEDSAMPLING MIXING UTILITY
8 Stop sampling by pressing the [F6] button again.
SF 1 SF 2 SF 3 SF 4 SF 5
F1 F2 F3 F4 F6F5
INFORMATION
SF 1 SF 2 SF 3 SF 4 SF 5
F1 F2 F3 F4 F6F5
INFORMATION
Enter the Sampling Standby mode.
From this display, set the Trigger mode. Here, select “manual.” Playback the external CD player to check the Input level. You can adjust theInput level for optimum level by using the GAIN knob on the rear panel.
6
Trigger mode
Input level
Monitor level
7 Start sampling.
Press the [F6] button to start sampling. Also start theexternal CD player to play back the phrase to be recordedor sing into the microphone.
SF 1 SF 2 SF 3 SF 4 SF 5
F1 F2 F3 F4 F6F5
INFORMATION

8/10/2019 motif_1(2)
http://slidepdf.com/reader/full/motif12 115/300
115 MOTIF Quick Start Guide
Sampling with Song Playback (Integrated Sampling Sequen
10. Song Track Mute and SceneReference (pages 180, 181)
These two powerful features give you even greater real-time arranging control. You can turn tracks on and off andswitch among Song Scenes, as the song plays — and all your moves can be recorded to the special Scene track. This notonly lets you hear the various song arranging possiblities, it lets you record them on the spot.For example, sample an audio rhythm phrase to one of the tracks of your song, and turn on the Track Loop function(page 182). As the song is playing, you can fly the rhythm part in and out of the song by alternately un-muting andmuting the track. To do this, enable recording and select the Scene track (as described in step #3 of MIDI recording on
page 103), and record your track mutes in time with the music by pressing the Track number button, then the appropriatetrack number buttons. This hands-on approach really lets you feel the changes you make — since you perform them in timewith the rhythm — and gives you the power to improvise great musical arrangements on the fly.
In addition to Track Mute, the MOTIF also features a versatile Song Scene function. Song Scene lets you makevarious changes to the tracks (such as pan, volume, and others), and take a “snapshot” of those settings — which youcan recall at any time with a single button press.A maximum of five Scenes can be stored, to the five Scene buttons ([SF1] - [SF5]). To instantly call up a Scene andchange the tracks, simply press the appropriate button [SF1] - [SF5]. Just as with Track Mute, you can record theseScene changes as well, by “playing” your button presses along with the music.
You can use the Song Scene function from either the PLAY display in the Song Play mode or the SETUP display in theSong Record mode. In the example instructions below, the PLAY display in the Song Play mode has been called up.
Scene track Mute on Mute on Mute on Mute on
Track 1
1 2 3 4 5 6 7 8
Track 1
Song Playback
15
1 2 3 4 5 6 7 8
9 10 11 12 13 14 16
TRACKSELECT
MUTE
SOLO
15
1 2 3 4 5 6 7 8
9 10 11 12 13 14 16
TRACKSELECT
MUTE
SOLO
SF1 SF 2 SF3 SF4 SF5Store
StoreStore
Store
Setting 1
Setting 3
Setting 5
15
1 2 3 4 5 6 7 8
9 10 11 12 13 14 16
TRACKSELECT
MUTE
SOLO
Setting 2
Store
Setting 4
SONG SCENE

8/10/2019 motif_1(2)
http://slidepdf.com/reader/full/motif12 116/300
116 MOTIF Quick Start Guide
Sampling with Song Playback (Integrated Sampling Sequencer)
Qui c k S t ar t Gui d e P LG 2
A B C D E F G H
15
CATEGORYSEARCH
OCTAVED OWN U P
KNOBCONTROLFUNCTION
P AN R EV E RB C H OR U S TEMPO
ATTACK RELEASECUTOFF RESONANCE
A S S IGN A A S SI GN B A S SI GN 1 A S SI GN 2
KN 1 KN 2 KN 3 KN 4
MEQLOW MEQHIMIDM EQ LO WM ID M EQ H IG H
REMOTECONTROL
ON/OFF
EFFECTBYPASS ARPEGGIO
I N S ER TI ON S Y STE M ON / OFFMASTERVOLUME
V OL UM E 1 V OL U M E 2 V OL U M E 3 V OL U ME 4
CS1 CS 2 CS3 CS 4
Z ON E1 Z ON E2 Z ON E3 Z ON E4
SEQTRANSPORT
L OC ATE 1 2
REC
MODE
VOICE PERFORMMASTER
SEQUENCERS O NG P AT T ER N F I LE
INTEGRATEDSAMPLING MIXING UTILITY
EDIT JOB STORE
COMPARE SCENESTORESETLOCATE
SONGSCENESF1 SF2 SF3 SF4 SF5
F1 F2 F3 F4 F6F5
INFORMATION
D EC /NO I NC/ YES
EXIT ENTER
EXECUTE
MUSIC PRODUCTIONSYNTHESIZERIntegratedSamplingSequencer
Real-timeExternalControlSurfaceModularSynthesisPlug-inSystem
DRUMKITS
FAVORITES
S L OT 1 S L OT 2 S L OT 3
P RE 1 P RE 2 P RE 3 G M U SE R P LG 1 PLG 3
A . P I ANO K E Y BO A RD O RG AN G UI TA R/ PLUCKED
B A S S S T RING S B RA SS RE E D/P I P E
S Y NLE AD S Y NP A D/ CHOIR
SYNCOMPCHROMATICPERCUSSION
DRUM/ PERCUSSION
S E M U SI C AL F X C O MB I
1 2 3 4 5 6 7 8
9 10 11 12 13 14 16
SECTION
TRACKSELECT
MUTE
SOLO
BANK
GROUP
NUMBER
COMMON
ELEMENT/PERF.PART/ZONE
You can recall thedesired Song Scenesettings by simplypressing any of theSong Scene([SF1]~[SF5])
buttons.
When you call up a certainSong Scene, the values forthe Control knobs/slidersinstantly jump to the settingsmade for the Scene(regardless of the pysical
position of theknobs/sliders).
5 Save the Song data to amemory card or SCSI device(page 97).
4 Create other Song Scenes as desired.Change the settings again, as you did instep #2, and store the Song Scene to adifferent button, as you did in step #3.
Store the settings to a Song Scene.3
...and press the appropriate button ([SF1] ~ [SF5]).
Simultaneously hold down the [STORE] button...
Make the desired settings for the Song Scene.
• Select a track and set it up as you want with the desired voice, then changethe pan and volume settings by using the Control knobs and sliders. Each trackcan have its own independent settings.
• You can even mute/un-mute several track together at the same time — fordramatic arrangement tricks in which several instruments drop out or come ininstantaneously.
2
MASTERVOLUME
V O LUM E 1 V O LUM E 2 V OLUME 3 V O LUM E 4
CS 1 CS 2 CS 3 CS 4
ZONE 1 ZONE 2 ZONE 3 ZONE 4
KNOBCONTROLFUNCTION
PAN REVERB CHORUS TEMPO
A TT ACK RE LE AS ECUTOFF RESONANCE
A SS I GNA A SS I GNB A S SI G N1 A S SI G N2
KN 1 KN 2 KN 3 KN 4
MEQLOW MEQHIMIDMEQLOWMI D MEQ HIG H
Select a song in the Song Play mode.1
EDIT JOB STORE
COMPARE SCENE STORESET LOCATE
SF 1 SF 2 SF 3 SF 4 SF 5
SF 1 SF 2 SF 3 SF 4 SF 5
DEC/NO INC/YES
or
SOLO
1 2 3 4 5 6 7 8
159 10 11 12 13 14 16
TRACKSELECT
MUTE
SOLO
ELEMENT/PERF.PART/ZONE
A B C D
S YN LEA D S YN P AD / CHOIR
SYN COMP CHROMATICPERCUSSION
1 2 3 4 5 6 7 8
159 10 11 12 13 14 16
TRACKSELECT
MUTE
SOLO
ELEMENT/PERF.PART/ZONE
1 2 3 4 5 6 7 8
159 10 11 12 13 14 16
TRACKSELECT
MUTE
SOLO
ELEMENT/PERF.PART/ZONE

8/10/2019 motif_1(2)
http://slidepdf.com/reader/full/motif12 117/300
117 MOTIF Quick Start Guide
Sampling with Song Playback (Integrated Sampling Sequen
11. Song Mixing and storing the settings as a templateReference (page 205)
In this final step (other than saving your precious work, which we’ll cover next), you can mix down your tracks withthe Song Mixing function — adjusting the volume balance and pan setting of all the parts and tweaking the effect levels. Moreover, you can save your mixing settings as a template (up to sixteen templates can be saved), then call upthe appropriate template when mixing down a song that has a similar track structure.
P LG 2
A B C D E F G H
15
CATEGORYSEARCH
OCTAVED OWN U P
KNOBCONTROLFUNCTION
P AN R E VE RB C H OR U S T E MP O
ATTACK RELEASECUTOFF RESONANCE
A S S IGN A A S SI GN B A S SI GN 1 A S S IGN 2
KN 1 KN 2 KN 3 KN 4
MEQLOW MEQHIMIDM EQ LO WM ID M E QH IG H
REMOTECONTROL
ON/OFF
EFFECTBYPASS ARPEGGIO
INSERTION S Y STE M ON / OFFMASTERVOLUME
V OL UM E 1 V OL U M E 2 V OL U M E 3 V OL U ME 4
CS1 CS 2 CS3 CS 4
Z ON E1 Z ON E2 Z ON E3 Z ON E4
SEQTRANSPORT
LOCATE 1 2
REC
MODE
VOICE PERFORMMASTER
SEQUENCERS O NG P AT T ER N F I LE
INTEGRATEDSAMPLING M I X IN G U TI L ITY
EDIT JOB STORE
C O MP A RE S C EN E S TO R ESETLOCATE
SONGSCENESF1 SF2 SF3 SF4 SF5
F1 F2 F3 F4 F6F5
INFORMATION
D EC /NO I NC/ YES
EXIT ENTER
EXECUTE
MUSIC PRODUCTION SYNTHESIZERIntegratedSamplingSequencer
Real-timeExternalControlSurfaceModularSynthesisPlug-inSystem
DRUMKITS
FAVORITES
S L OT 1 S L OT 2 S L OT 3
PRE1 P RE 2 PRE 3 GM USER PLG 1 PLG 3
A.PIANO KEYBOARD ORGAN GUITAR/ PLUCKED
B A S S S T RING S BRASS REED/PIPE
S Y NLE AD S Y NP AD/ CHOIR
SYNCOMPCHROMATICPERCUSSION
DRUM/ PERCUSSION
S E M U SI C AL F X C O MB I
1 2 3 4 5 6 7 8
9 10 11 12 13 14 16
SECTION
TRACKSELECT
MUTE
SOLO
BANK
GROUP
NUMBER
COMMON
ELEMENT/PERF.PART/ZONE
Select the destination template number.Move the cursor to the template number and select the number towhich the settings are to be stored.
7
DEC/NO INC/YES
EXIT ENTER
EXECUTE
Name the template.8
DEC/NO INC/YES
EXIT ENTER
EXECUTE
5 Set the desired parametersfor the other parts, repeatingsteps #2 - 4 above.
2 Call up the desired display.
SF1 SF2 SF3 SF4 SF5
F1 F2 F3 F4 F6F5
INFORMATION
Select a part.3DEC/NO INC/YES
EXIT ENTER
EXECUTE
1 2 3 4 5 6 7 8
159 10 11 12 13 14 16
TRACKSELECT
MUTE
SOLO
ELEMENT/PERF.PART/ZONE
n When a Multi part Plug-in board (PLG-100XG) has been installed to slot 3, thedisplay for Parts 17 - 32 can be called up. When a Single part Plug-in board hasbeen installed to any of the three slots, the PLG 1~3 part display can be called up.
or
1 Enter the Song Mixing
mode.
SEQUENCERSONG PATTERN FILE
INTEGRATEDSAMPLING MIXING UTILITY
Select the
desiredparameterand adjust it.
4
DEC/NO INC/YES
EXIT ENTER
EXECUTE
n For details about naming, see page 75.
6 Call up the TEMPLATE display.
SF1 SF2 SF3 SF4 SF5
F1 F2 F3 F4 F6F5
INFORMATION
9 Execute the Store operation.
SF1 SF2 SF3 SF4 SF5
F1 F2 F3 F4 F6F5
INFORMATION
n The template stored above can be recalled by pressingthe [SF4] (GET) button from this display.
Template number
Template name
n A wider variety of detailed editingcontrols is also available in theSong Mixing Edit mode.

8/10/2019 motif_1(2)
http://slidepdf.com/reader/full/motif12 118/300
118 MOTIF Quick Start Guide
Sampling with Song Playback (Integrated Sampling Sequencer)
Qui c k S t ar t Gui d e
12. Saving and Exporting the recorded song to external PC (File Utility)Reference (page 262)
Now that you’ve created your masterpiece, you’ll want to save it. You can save song data to a Memory card or SCSIdevice in the File mode (page 261).However, for safekeeping and organizational/archival purposes, you may want to store your MOTIF data to acomputer. You may also want to use your computer to do further editing and recording to your MOTIF-createdsongs. The File Utility software (contained on the included CD-ROM) lets you do that and more — allowing you totransfer files back and forth between a computer and the MOTIF via a standard USB cable connection.
Here’s a practical example. Let’s say you want to add a long section of audio data to your song, such as a lead vocal oran extended guitar solo. Since recording that to the MOTIF may not be entirely practical or possible, you may wantto transfer your song to a computer, then record and edit the new audio tracks on the computer. First, you shouldsave the song data in Standard MIDI File (SMF) format to Memory card or a connected SCSI device, then transfer theMIDI file to the computer with the File Utility software. Once you’ve imported the MIDI file to sequencer softwareon your computer, match the MIDI send and receive channels (computer-to-MOTIF) so that each track of thesequencer song data plays the appropriate part on the MOTIF. Finally, play back the song and record the desiredaudio parts (vocals, solos, etc.) using your audio/MIDI sequencer.
nFor details about the File Utility software, refer to the electronic documentation contained in the included CD-ROM.
PLG 2
A B C D E F G H
15
CATEGORYSEARCH
OCTAVED O WN U P
KNOBCONTROLFUNCTION
P A N R E V ER B C H O R U S T E M P O
ATTACKRELEASECUTOFFRESONANCE
ASSIGN AASSIGN BASSIGN 1 ASSIGN 2
K N 1 K N 2 K N 3 K N 4
MEQ LOW MEQH I MIDMEQLOWMID MEQ H IGH
REMOTECONTROLON/OFF
EFFECTBYPASS ARPEGGIO
INSERTIONSYSTEM ON/OFFMASTERVOLUME VOLUME 1VOLUME 2VOLUME 3VOLUME 4
CS1 CS 2 CS 3 C S 4
Z O N E1 Z O N E2 Z O N E3 Z O N E4
SEQTRANSPORT
LOCATE 1 2
REC
MODE
VOICEPERFORMMASTER
SEQUENCER
SONG PATTERNFILE
IN TEGR ATEDSAMPLIN G MIXINGUTILITY
E DI T J O B S T O RE
C O M PA R E S C E N E S T O RESETLOC ATE
SONGSCENES F1 S F2 SF3 SF 4 SF5
F1 F2 F3 F4 F6F5
INFORMATION
D EC /N O I NC /Y ES
E XI T E NT ER
EXEC U TE
MUSICPRODUCTIONSYNTHESIZERIntegratedSamplingSequencer
R eal-timeExternalC ontrolSurfaceModularSynthesisPlug-inSystem
DRUMKITS
FAVORITES
S L O T 1 S L O T 2 S L O T 3
P RE 1 P R E2 P RE 3 G M U S ER P LG 1 P LG3
A.PIAN OKEYBOAR D OR GAN GU ITAR / PLU C KED
BASS STR IN GS BR ASS R EED /PIPE
SYN LEAD SYN PAD / C H OIR
SYN C OMPC H R OMATICPER C U SSION
D R U M/ PER C U SSION
S E M U S I CA L F X C O M B I
1 2 3 4 5 6 7 8
9 10 11 12 13 14 16
SECTION
TRACKSELECT
MUTE
SOLO
BANK
GROUP
NUMBER
COMMON
ELEMEN T/PER F.PAR T/ZON E
PC
Save
File Utility
Memory card SCSI device
Load

8/10/2019 motif_1(2)
http://slidepdf.com/reader/full/motif12 119/300
119 MOTIF Quick Start Guide
Remote Control for external sequencer (Real-time external control surf
Remote Control for external sequencer(Real-time external control surface)
Basic Structure (page 65) · Reference (page 256)
In the last section, you saw how a computer could be used conveniently to augment the features of the MOTIF. Here,we’ll look at a feature that turns the tables and lets you conveniently use the MOTIF to control your computer.The Remote Control function lets you use the hardware controls on the panel of the MOTIF to control a variety offundamental operations on the sequencing software of your computer. You can mute your tracks, control thesequencer transport (Play, Stop, Record, etc.), mix both MIDI and audio tracks (up to 16) with the MOTIF’s knobsand sliders, pan the tracks, control EQ, and tweak effect sends — all without ever touching the mouse. Not only isthis a more convenient and efficient way to work — since it gives you dedicated controls for the functions you usethe most — it also (with the knobs and sliders) gives you finer control over crucial level parameters. If you’ve everused a mixing console or a hardware sequencer, you’ll love being able to finally control your sequencing softwarewith buttons, knobs, and sliders.
Setting UpBefore you can use the Remote Control function, you’ll need to set up the system as described below.
PLG 2
A B C D E F G H
15
CATEGORYSEARCH
OCTAVE
DOWN UP
KNOBCONTROLFUNCTION
P AN R EV ER B C HO RU S TEMPO
A T TA C K R E LE A S ECUTOFF RESONANCE
A S S IG N A A S S IG N B A S SI G N 1 A S S IG N 2
KN 1 KN 2 KN 3 KN 4
MEQLOW MEQ HI MIDMEQLOWMID MEQ HIGH
REMOTECONTROLON/OFF
EFFECTBYPASS ARPEGGIO
INSERTION S YS TE M O N/ OF FMASTERVOLUME V O L UM E 1 V O L UM E 2 V O L UM E 3 V O L UM E 4
CS 1 CS 2 CS 3 CS 4
Z ON E1 ZO NE 2 Z ON E3 ZO NE 4
SEQ TRANSPORT
LOCATE 1 2
REC
MODE
V O IC E P E R FO R M M A ST E R
SEQUENCERS ON G P AT TE RN F IL E
INTEGRATEDSAMPLING M I XI N G U T IL I TY
E DIT JOB STORE
COMPARE SCENE STORESETLOCATE
SONGSCENESF1 SF2 SF3 SF4 SF5
F1 F2 F3 F4 F6F5
INFORMATION
DEC/NO INC/YES
EXIT ENTER
EXECUTE
MUSIC PRODUCTIONSYNTHESIZERIntegratedSamplingSequencer
Real-timeExternalControlSurfaceModularSynthesisPlug-inSystem
DRUM KITS
FAVORITES
S LO T1 S LO T2 S LO T3
P RE 1 P RE 2 P RE 3 GM USER PLG 1 PLG 3
A. PIANO KEYBOARD ORGAN GUITAR/ PLUCKED
BASS S T RI N GS B R AS S R E ED / P IP E
SYN LEAD SYN PAD/ CHOIR
SYN COMP CHROMATICPERCUSSION
DRUM/ PERCUSSION
SE MUSICALFX CO MBI
1 2 3 4 5 6 7 8
9 10 11 12 13 14 16
SECTION
TRACKSELECT
MUTE
SOLO
BANK
GROUP
NUMBER
COMMON
ELEMENT/PERF.PART/ZONE
3 1
3 3
3 2
3 Select the template for your particular sequence software in the Utility mode on the MOTIF (above).
1 Connect your computer to the MOTIF via USB cable. See page 25.
2 Install the USB MIDI driver and the setup file for the sequence software (contained in the included CD-ROM) to your computer.For details on how to install, see the Installation Guide manual.
Enter the Utility mode.1
Move the cursor to theMIDI IN/OUT parameterand set to USB.
3
Call up the OTHER displayin the MIDI menu.
2 Call up the REMOTE display inthe CTLASN menu.
4
Select the Template type.5
SEQUENCERSONG PATTERN FILE
INTEGRATEDSAMPLING MIXING UTILITY
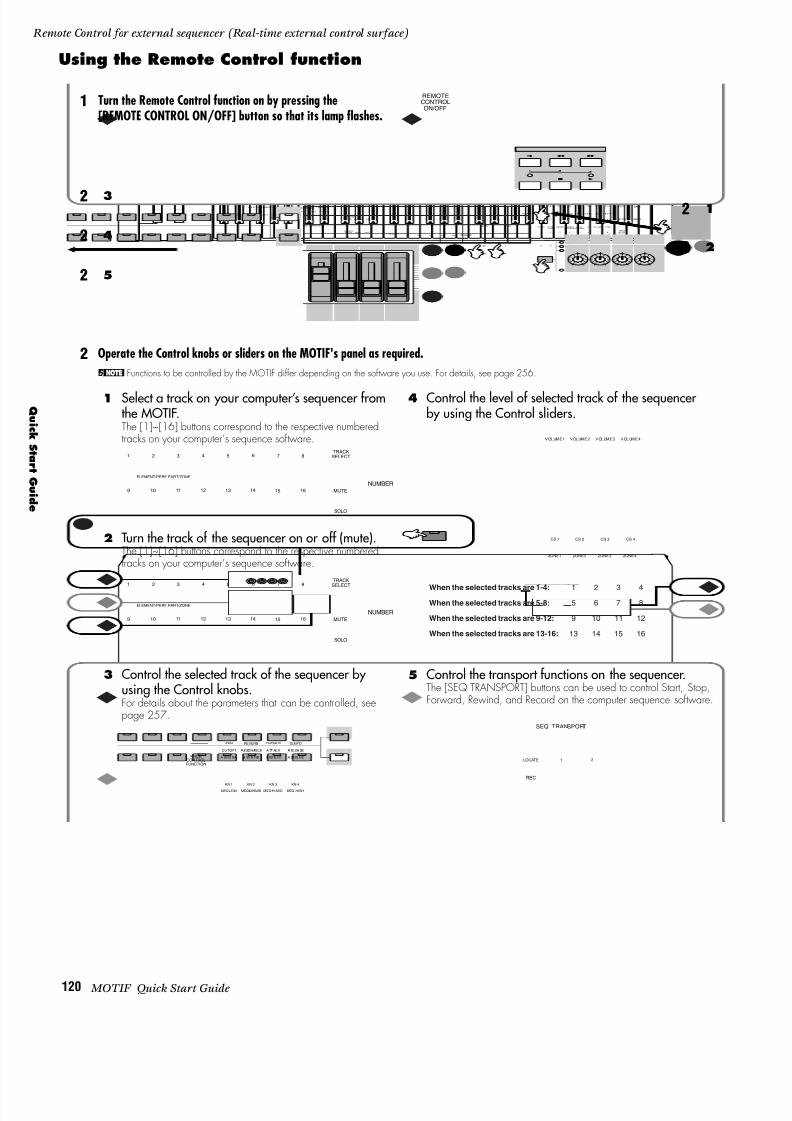
8/10/2019 motif_1(2)
http://slidepdf.com/reader/full/motif12 120/300
120 MOTIF Quick Start Guide
Remote Control for external sequencer (Real-time external control surface)
Qui c k S t ar t Gui d e
Using the Remote Control function
PLG 2
A B C D E F G H
15
CATEGORYSEARCH
OCTAVEDOWN UP
KNOBCONTROLFUNCTION
P AN R EV ER B C HO RU S T EM PO
A T TA C K R E LE A S ECUTOFF RESONANCE
A S S IG N A A S S IG N B A S SI G N 1 A S S IG N 2
KN 1 KN 2 KN 3 KN 4
MEQ LO W ME Q HI MIDMEQLOWMID MEQ HIGH
REMOTECONTROLON/OFF
EFFECTBYPASS ARPEGGIO
INSERTION S YS TE M O N/ OF FMASTERVOLUME V O L UM E 1 V O L UM E 2 V O L UM E 3 V O L UM E 4
CS 1 CS 2 CS 3 CS 4
Z ON E1 ZO NE 2 Z ON E3 ZO NE 4
SEQ TRANSPORT
LOCATE 1 2
REC
MODE
V O IC E P E R FO R M M A ST E R
SEQUENCERSONG P A TT E RN F I LE
INTEGRATEDSAMPLING MIXING UTILITY
E DIT JOB STORE
COMPARE SCENE STORESETLOCATE
SONGSCENESF1 SF2 SF3 SF4 SF5
F1 F2 F3 F4 F6F5
INFORMATION
DEC/NO INC/YES
EXIT ENTER
EXECUTE
MUSIC PRODUCTIONSYNTHESIZERIntegratedSamplingSequencer
Real-timeExternalControlSurfaceModularSynthesisPlug-inSystem
DRUM KITS
FAVORITES
S LO T1 S LO T2 S LO T3
P RE 1 P RE 2 PRE 3 GM USER PLG 1 PLG 3
A. PIANO K E YB O AR D O R GA N G U IT A R/ PLUCKED
B AS S S TR I NG S B RA SS R EE D/ PI PE
SYN LEAD SYN PAD/ CHOIR
SYN COMP CHROMATICPERCUSSION
DRUM/ PERCUSSION
SE MUSICALFX CO MBI
1 2 3 4 5 6 7 8
9 10 11 12 13 14 16
SECTION
TRACKSELECT
MUTE
SOLO
BANK
GROUP
NUMBER
COMMON
ELEMENT/PERF.PART/ZONE
1
2
3
5
4
1 Turn the Remote Control function on by pressing the[REMOTE CONTROL ON/OFF] button so that its lamp flashes.
REMOTECONTROLON/OFF
Control the selected track of the sequencer byusing the Control knobs.For details about the parameters that can be controlled, seepage 257.
3 Control the transport functions on the sequencer.The [SEQ TRANSPORT] buttons can be used to control Start, Stop,Forward, Rewind, and Record on the computer sequence software.
5
Select a track on your computer’s sequencer fromthe MOTIF.The [1]~[16] buttons correspond to the respective numberedtracks on your computer’s sequence software.
1 Control the level of selected track of the sequencerby using the Control sliders.
4
Turn the track of the sequencer on or off (mute).The [1]~[16] buttons correspond to the respective numberedtracks on your computer’s sequence software.
2
Operate the Control knobs or sliders on the MOTIF's panel as required.
n Functions to be controlled by the MOTIF differ depending on the software you use. For details, see page 256.
SEQ TRANSPORT
LOCATE 1 2
REC
1 2 3 4 5 6 7 8
159 10 11 12 13 14 16
TRACKSELECT
MUTE
SOLO
NUMBERELEMENT/PERF.PART/ZONE
1 2 3 4 5 6 7 8
159 10 11 12 13 14 16
TRACKSELECT
MUTE
SOLO
NUMBERELEMENT/PERF.PART/ZONE
KNOBCONTROLFUNCTION
PAN REVERB CHORUS TEMPO
A TT AC K R EL EA SECUTOFF RESONANCE
A SS IG N A A SS IG N B A SS IG N 1 A SS IG N 2
KN 1 KN 2 KN 3 KN 4MEQ LOW MEQ HI MIDMEQLOWMID MEQ HIGH
2
2
2
2
2
2
When the selected tracks are 1-4:
When the selected tracks are 5-8:
When the selected tracks are 9-12:
When the selected tracks are 13-16:
15
9
13
26
10
14
37
11
15
48
12
16
VOL UM E 1 VOL UM E 2 VOL UM E 3 VOL UM E 4
CS 1 CS 2 CS 3 CS 4
ZONE1 ZONE2 ZONE3 ZONE4

8/10/2019 motif_1(2)
http://slidepdf.com/reader/full/motif12 121/300

8/10/2019 motif_1(2)
http://slidepdf.com/reader/full/motif12 122/300
122 MOTIF Reference
Function Tree
Ref er enc e
V oi c emod e
[F6] NORMAL COMMON EFFECT
[SF1] EFFECT CONNECT
[SF2] INSERTION1
[SF3] INSERTION2
[SF4] REVERB
[SF5] CHORUS
[Element selection] NORMAL ELEMENT 1-4
[F1] NORMAL ELEMENT OSCILLATOR
[SF1] WAVE
[SF2] OUTPUT[SF3] LIMIT
[F2] NORMAL ELEMENT PITCH
[SF1] TUNE
[SF2] VELOCITY SENS
[SF3] PEG
[SF4] KEY FOLLOW
[F3] NORMAL ELEMENT FILETER
[SF1] TYPE
[SF2] VELOCITY SENS
[SF3] FEG
[SF4] KEY FOLLOW
[SF5] SCALING
[F4] NORMAL ELEMENT AMPLITUDE
[SF1] LEVEL/PAN
[SF2] VELOCITY SENS
[SF3] AEG
[SF4] KEY FOLLOW[SF5] SCALING
[F5] NORMAL ELEMENT LFO
[F6] NORMAL ELEMENT EQ
[EDIT] VOICE EDIT (DRUM)
[COMMON] DRUM COMMON
[F1] DRUM COMMON GENERAL
[SF1] NAME
[SF3] MEQ OFFSET
[SF5] OTHER
[F2] DRUM COMMON OUTPUT
OUTPUT
[F3] DRUM COMMON ARPEGGIO
[SF1] TYPE
[SF2] LIMIT
[SF3] PLAY FX
[SF5] CLEAR USER ARPEGGIO
[F4] DRUM COMMON CONTROLLER SET[SF1] SET1/2
[SF2] SET3/4
[SF3] SET5/6
[F6] DRUM COMMON EFFECT
[SF1] EFFECT CONNECT
[SF2] INSERTION1
[SF3] INSERTION2
[SF4] REVERB
[SF5] CHORUS
[Key selection] DRUM KEY C0-C6
[F1] DRUM KEY OSCILLATOR
[SF1] WAVE
[SF2] OUTPUT
[SF5] OTHER
[F2] DRUM KEY PITCH
[SF1] TUNE
[SF2] VELOCITY SENS[F3] DRUM KEY FILTER
[SF1] CUTOFF
[SF2] VELOCITY SENS
[F4] DRUM KEY AMPLITUDE
[SF1] LEVEL/PAN
[SF2] VELOCITY SENS
[SF3] AEG
[F6] DRUM KEY EQ
[VOICE]
. . . . . . . . . . . . . . . . . . . . . . . . . . . . . . . . . . . . . . . . . . . . . . P. 137
. . . . . . . . . . . . . . . . . . . . . . . . . . . . . . . . . P. 137
. . . . . . . . . . . . . . . . . . . . . . . . . . . . . . . . . . . . . . P. 137
. . . . . . . . . . . . . . . . . . . . . . . . . . . . . . . . . . . . P. 138
. . . . . . . . . . . . . . . . . . . . . . . . . . . . . . . . . . . . . . . P. 138
. . . . . . . . . . . . . . . . . . . . . . . . . . . . . . . . . . . . . . P. 138
. . . . . . . . . . . . . . . . . . . . . . . . . . . . . . . . . . . . . . P. 138
. . . . . . . . . . . . . . . . . . . . . . . . . . . . . P. 139
. . . . . . . . . . . . . . . . . . . . . . . . . . . . . . . . . . . . . . . P. 139
. . . . . . . . . . . . . . . . . . . . . . . . . . . . . . . P. 139
. . . . . . . . . . . . . . . . . . . . . . . . . . . . . . . . . . . . . P. 140
. . . . . . . . . . . . . . . . . . . . . . . . . . . . . . . . . . . . . . P. 140
. . . . . . . . . . . . . . . . . . . . . . . . . . . . P. 142
. . . . . . . . . . . . . . . . . . . . . . . . . . . . . . . . . . . . . . . P. 143
. . . . . . . . . . . . . . . . . . . . . . . . . . . . . . . P. 143
. . . . . . . . . . . . . . . . . . . . . . . . . . . . . . . . . . . P. 144
. . . . . . . . . . . . . . . . . . . . . . . . . . . . . . . . . . P. 145
. . . . . . . . . . . . . . . . . . . . . . . . . . . . . . . . . P. 145
. . . . . . . . . . . . . . . . . . . . . . . . . . . . . P. 145
. . . . . . . . . . . . . . . . . . . . . . . . . . . . . . . . . . . . . . . P. 145
. . . . . . . . . . . . . . . . . . . . . . . . . . . . . . . P. 146
. . . . . . . . . . . . . . . . . . . . . . . . . . . . . . . . . . . P. 146
. . . . . . . . . . . . . . . . . . . . . . . . . . . . . . . . . . . . . . . . . P. 147
. . . . . . . . . . . . . . . . . . . . . . . . . . . . . . . . . . . . . . . . . P. 148
. . . . . . . . . . . . . . . . . . . . . . . . . . . . . . . . . . . . . . . . . . . . . . . . . . . . . . . . . . . . . . . . . . . . . . . . . . . . P. 148
. . . . . . . . . . . . . . . . . . . . . . . . . . . . . . . . . . . . . . . . . . . . . . . . . . . . . . . . . P. 149
. . . . . . . . . . . . . . . . . . . . . . . . . . . . . . . . . . . . . . P. 149
. . . . . . . . . . . . . . . . . . . . . . . . . . . . . . . . . . . . . P. 149
. . . . . . . . . . . . . . . . . . . . . . . . . . . . . . . P. 149
. . . . . . . . . . . . . . . . . . . . . . . . . . . . . . . . . . . . . P. 149
. . . . . . . . . . . . . . . . . . . . . . . . . . . . . . . . . . . . . . . P. 149
. . . . . . . . . . . . . . . . . . . . . . . . . . . . . . . . . . . . . . . . . P. 149
. . . . . . . . . . . . . . . . . . . . . . . . . . . . . . . . . . . . . P. 149
. . . . . . . . . . . . . . . . . . . . . . . . . . . . . . . . . . . . . . P. 149
. . . . . . . . . . . . . . . . . . . . . . . . . . . . . . . . . . . . . . P. 149
. . . . . . . . . . . . . . . . . . . . . . . . . . . . . . . . . . . . P. 149
. . . . . . . . . . . . . . . . . . . . . P. 149
. . . . . . . . . . . . . . . . . . . . . . . . . . . . . . P. 149
. . . . . . . . . . . . . . . . . . . . . . . . . . . . . . . . . . . . . P. 149
. . . . . . . . . . . . . . . . . . . . . . . . . . . . . . . . . . . . . P. 149
. . . . . . . . . . . . . . . . . . . . . . . . . . . . . . . . . . . . . P. 149
. . . . . . . . . . . . . . . . . . . . . . . . . . . . . . . . . . . . . . . P. 149
. . . . . . . . . . . . . . . . . . . . . . . . . . . P. 149
. . . . . . . . . . . . . . . . . . . . . . . . . . . . . . . . P. 150
. . . . . . . . . . . . . . . . . . . . . . . . . . . . . . . . P. 150
. . . . . . . . . . . . . . . . . . . . . . . . . . . . . . . . . . . P. 150
. . . . . . . . . . . . . . . . . . . . . . . . . . . . . . . . . . . P. 150
. . . . . . . . . . . . . . . . . . . . . . . . . . . . . . . . . . . . . . . . . . . . . . . . . . . . . . P. 150
. . . . . . . . . . . . . . . . . . . . . . . . . . . . . . . . . . . . . . . . P. 150
. . . . . . . . . . . . . . . . . . . . . . . . . . . . . . . . . . . . . . P. 150
. . . . . . . . . . . . . . . . . . . . . . . . . . . . . . . . . . . P. 150
. . . . . . . . . . . . . . . . . . . . . . . . . . . . . . . . . . . . . P. 151
. . . . . . . . . . . . . . . . . . . . . . . . . . . . . . . . . . . . . . . . . . . . . . P. 151
. . . . . . . . . . . . . . . . . . . . . . . . . . . . . . . . . . . . . . P. 151
. . . . . . . . . . . . . . . . . . . . . . . . . . . . . P. 151
. . . . . . . . . . . . . . . . . . . . . . . . . . . . . . . . . . . . . . . . . . . . P. 151
. . . . . . . . . . . . . . . . . . . . . . . . . . . . . . . . . . . . P. 151
. . . . . . . . . . . . . . . . . . . . . . . . . . . . . P. 152
. . . . . . . . . . . . . . . . . . . . . . . . . . . . . . . . . . . . . . . . . P. 152
. . . . . . . . . . . . . . . . . . . . . . . . . . . . . . . . . P. 152
. . . . . . . . . . . . . . . . . . . . . . . . . . . . . P. 152
. . . . . . . . . . . . . . . . . . . . . . . . . . . . . . . . . . . . . . . P. 152
. . . . . . . . . . . . . . . . . . . . . . . . . . . . . . . . . . . . . . . . . . . . . . . . . P. 153
. . . . . . . . . . . . . . . . . . . . . . . . . . . . . . . . . . . . . P. 137
. . . . . . . . . . . . . . . . . . . . . . . . . . . P. 137
. . . . . . . . . . . . . . . . . . . . . . . . . . . . . . . . P. 137
. . . . . . . . . . . . . . . . . . . . . . . . . . . . . . . . P. 137
. . . . . . . . . . . . . . . . . . . . . . . . . . . . . . . . . . . P. 137
. . . . . . . . . . . . . . . . . . . . . . . . . . . . . . . . . . . P. 137

8/10/2019 motif_1(2)
http://slidepdf.com/reader/full/motif12 123/300
123 MOTIF Reference
Function
[EDIT] VOICE EDIT (PLUG-IN)
[COMMON] PLUG-IN COMMON
[F1] PLUG-IN COMMON GENERAL
[SF1] NAME
[SF2] PLYMODE
[SF3] MEQ OFFSET
[SF4] PORTAMENTO
[SF5] OTHER
[F2] PLUG-IN COMMON OUTPUT
OUTPUT
[F3] PLUG-IN COMMON ARPEGGIO
[SF1] TYPE
[SF2] LIMIT
[SF3] PLAY FX
[SF5] CLEAR USER ARPEGGIO
[F4] PLUG-IN COMMON CONTROLLER SET
[SF1] SET1/2
[SF2] MW
[SF3] AT
[SF4] AC
[F6] PLUG-IN COMMON EFFECT
[SF1] EFFECT CONNECT
[SF2] INSERTION1
[SF3] INSERTION2
[SF4] REVERB
[SF5] CHORUS
[Element selection] PLUG-IN ELEMENT
[F1] PLUG-IN ELEMENT OSCILLATOR
[SF1] WAVE
[SF5] OTHER
[F2] PLUG-IN ELEMENT PITCH
[F3] PLUG-IN ELEMENT FILETER
[F4] PLUG-IN ELEMENT NATIVE PARAMETER
[F5] PLUG-IN ELEMENT LFO
[F6] PLUG-IN ELEMENT EQ
[EDIT] VOICE COMPARE
[JOB] VOICE JOB
[F1] INITIALIZE
[F2] EDIT RECALL
[F3] COPY
[F4] BULK DUMP
[STORE] VOICE STORE
[VOICE]. . . . . . . . . . . . . . . . . . . . . . . . . . . . . . . . . . . . . . . . . . . . . . . . . . . . . . . . . . . . . . . . . . . . . . . . . . P. 153
. . . . . . . . . . . . . . . . . . . . . . . . . . . . . . . . . . . . . . . . . . . . . . . . . . . . . . . P. 154
. . . . . . . . . . . . . . . . . . . . . . . . . . . . . . . . . . . . P. 154
. . . . . . . . . . . . . . . . . . . . . . . . . . . . . . . . . . . . . . P. 154
. . . . . . . . . . . . . . . . . . . . . . . . . . . . . . . . . . P. 154
. . . . . . . . . . . . . . . . . . . . . . . . . . . . . . . P. 154
. . . . . . . . . . . . . . . . . . . . . . . . . . . . . . P. 154
. . . . . . . . . . . . . . . . . . . . . . . . . . . . . . . . . . . . P. 154
. . . . . . . . . . . . . . . . . . . . . . . . . . . . . . . . . . . . . P. 154
. . . . . . . . . . . . . . . . . . . . . . . . . . . . . . . . . . . . . . . . . P. 154
. . . . . . . . . . . . . . . . . . . . . . . . . . . . . . . . . . . P. 154 . . . . . . . . . . . . . . . . . . . . . . . . . . . . . . . . . . . . . . P. 154
. . . . . . . . . . . . . . . . . . . . . . . . . . . . . . . . . . . . . . P. 154
. . . . . . . . . . . . . . . . . . . . . . . . . . . . . . . . . . . . P. 154
. . . . . . . . . . . . . . . . . . . . . P. 154
. . . . . . . . . . . . . . . . . . . . . . . . . . . . P. 154
. . . . . . . . . . . . . . . . . . . . . . . . . . . . . . . . . . . . . P. 154
. . . . . . . . . . . . . . . . . . . . . . . . . . . . . . . . . . . . . . . . P. 154
. . . . . . . . . . . . . . . . . . . . . . . . . . . . . . . . . . . . . . . . . P. 155
. . . . . . . . . . . . . . . . . . . . . . . . . . . . . . . . . . . . . . . . P. 155
. . . . . . . . . . . . . . . . . . . . . . . . . . . . . . . . . . . . . P. 155
. . . . . . . . . . . . . . . . . . . . . . . . . . . P. 155
. . . . . . . . . . . . . . . . . . . . . . . . . . . . . . . . P. 155
. . . . . . . . . . . . . . . . . . . . . . . . . . . . . . . . P. 155
. . . . . . . . . . . . . . . . . . . . . . . . . . . . . . . . . . . P. 155
. . . . . . . . . . . . . . . . . . . . . . . . . . . . . . . . . . . P. 155
. . . . . . . . . . . . . . . . . . . . . . . . . . . . . . . . . . . . . . . . . . . . . . . . . . P. 156
. . . . . . . . . . . . . . . . . . . . . . . . . . . . . . . . . P. 156. . . . . . . . . . . . . . . . . . . . . . . . . . . . . . . . . . . . . . P. 156
. . . . . . . . . . . . . . . . . . . . . . . . . . . . . . . . . . . . . P. 156
. . . . . . . . . . . . . . . . . . . . . . . . . . . . . . . . . . . . . . P. 156
. . . . . . . . . . . . . . . . . . . . . . . . . . . . . . . . . . . . P. 156
. . . . . . . . . . . . . . . . . . . . . . . . . . P. 156
. . . . . . . . . . . . . . . . . . . . . . . . . . . . . . . . . . . . . . . . . P. 157
. . . . . . . . . . . . . . . . . . . . . . . . . . . . . . . . . . . . . . . . . P. 157
. . . . . . . . . . . . . . . . . . . . . . . . . . . . . . . . . . . . . . . . . . . . . . . . . . . . . . . . . . . . . . . . . . . . . . . . . . . . . . P. 129
. . . . . . . . . . . . . . . . . . . . . . . . . . . . . . . . . . . . . . . . . . . . . . . . . . . . . . . . . . . . . . . . . . . . . . . . . . . . . . . . . . . . P. 158
. . . . . . . . . . . . . . . . . . . . . . . . . . . . . . . . . . . . . . . . . . . . . . . . . . . . . . . . . . . . . . . . . . . . . P. 158
. . . . . . . . . . . . . . . . . . . . . . . . . . . . . . . . . . . . . . . . . . . . . . . . . . . . . . . . . . . . . . . . . . . P. 158
. . . . . . . . . . . . . . . . . . . . . . . . . . . . . . . . . . . . . . . . . . . . . . . . . . . . . . . . . . . . . . . . . . . . . . . . . P. 158
. . . . . . . . . . . . . . . . . . . . . . . . . . . . . . . . . . . . . . . . . . . . . . . . . . . . . . . . . . . . . . . . . . . P. 159
. . . . . . . . . . . . . . . . . . . . . . . . . . . . . . . . . . . . . . . . . . . . . . . . . . . . . . . . . . . . . . . . . . . . . . . . . . . . . . . P. 159
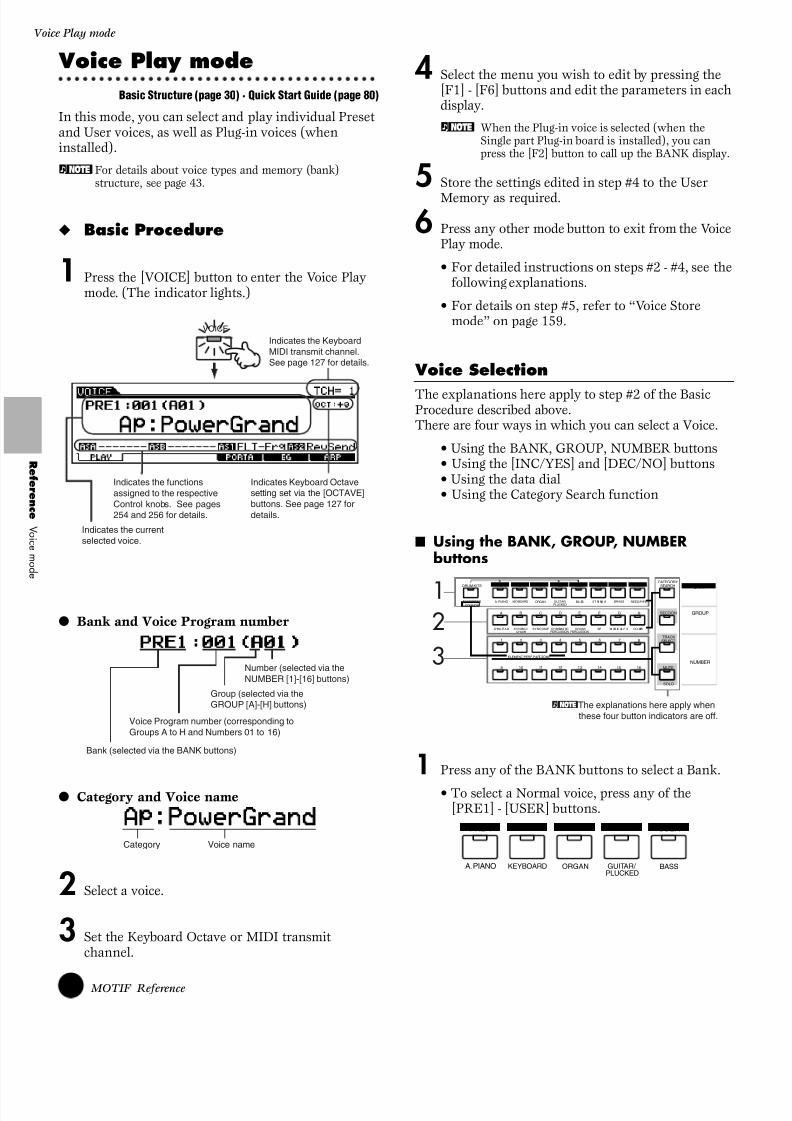
8/10/2019 motif_1(2)
http://slidepdf.com/reader/full/motif12 124/300
124 MOTIF Reference
Voice Play mode
Ref er enc e
V oi c emod e
Voice Play mode
Basic Structure (page 30) · Quick Start Guide (page 80)
In this mode, you can select and play individual Presetand User voices, as well as Plug-in voices (wheninstalled).
nFor details about voice types and memory (bank)structure, see page 43.
◆ Basic Procedure
1 Press the [VOICE] button to enter the Voice Playmode. (The indicator lights.)
● Bank and Voice Program number
● Category and Voice name
2 Select a voice.
3 Set the Keyboard Octave or MIDI transmitchannel.
4 Select the menu you wish to edit by pressing the[F1] - [F6] buttons and edit the parameters in eachdisplay.
n When the Plug-in voice is selected (when theSingle part Plug-in board is installed), you canpress the [F2] button to call up the BANK display.
5 Store the settings edited in step #4 to the User
Memory as required.
6 Press any other mode button to exit from the VoicePlay mode.
• For detailed instructions on steps #2 - #4, see thefollowing explanations.
• For details on step #5, refer to “Voice Storemode” on page 159.
Voice Selection
The explanations here apply to step #2 of the BasicProcedure described above.There are four ways in which you can select a Voice.
• Using the BANK, GROUP, NUMBER buttons• Using the [INC/YES] and [DEC/NO] buttons• Using the data dial• Using the Category Search function
■ Using the BANK, GROUP, NUMBERbuttons
1 Press any of the BANK buttons to select a Bank.
• To select a Normal voice, press any of the[PRE1] - [USER] buttons.
VOICE
Indicates the KeyboardMIDI transmit channel.See page 127 for details.
Indicates the functionsassigned to the respectiveControl knobs. See pages254 and 256 for details.
Indicates Keyboard Octavesetting set via the [OCTAVE]buttons. See page 127 fordetails.
Indicates the currentselected voice.
Number (selected via theNUMBER [1]-[16] buttons)
Group (selected via theGROUP [A]-[H] buttons)
Bank (selected via the BANK buttons)
Voice Program number (corresponding toGroups A to H and Numbers 01 to 16)
Voice nameCategory
nThe explanations here apply whenthese four button indicators are off.
1
3
2
PLG 2
A B C D E F G H
15
CATEGORYSEARCHDRUM KITS
FAVORITES
PRE 1 PRE 2 PRE 3 GM USER PLG 1 PLG 3
A. PIANO KEYBOARD ORGAN GUITAR/ PLUCKED
BA SS ST RI NG S BRASS REED/PIPE
SYN LEAD SYN PAD / CHOIR
SYNCOMP CHROMATICPERCUSSION
DRUM/ PERCUSSION
SE M US IC AL F X CO MBI
1 2 3 4 5 6 7 8
9 10 11 12 13 14 16
SECTION
TRACKSELECT
MUTE
SOLO
BANK
GROUP
NUMBER
COMMON
ELEMENT/PERF.PART/ZONE
PRE 1 PRE 2 PRE 3 GM USER
A. PIANO KEYBOARD ORGAN GUITAR/ PLUCKED
BASS

8/10/2019 motif_1(2)
http://slidepdf.com/reader/full/motif12 125/300
125 MOTIF Reference
Voice Play
• To select a Plug-in voice, press any of the[PLG1] - [PLG3] buttons.
• To select a Drum voice, simultaneously hold the
[DRUM KITS] button and press the [PRE1],[GM] or [USER] button.
The following display (or one similar) appears.
2 Press any of the GROUP [A] - [H] buttons to selecta Group.
3 Press any of the NUMBER [1] - [16] buttons toselect a Voice. The MOTIF returns back to theVoice Play display.
● Voice program numbers and the correspondingGroup/Numbers
PLG 2PLG 1 PLG 3
STRINGS BRASS REED/PIPE
PRE 1 PRE 2 PRE 3 GM USER
A. PIANO KEYBOARD ORGAN GUITAR/ PLUCKED
BASS
DRUM KITS
FAVORITESCOMMON
Voice ProgramNumber
Group Number Voice ProgramNumber
Group Number
001 A 1 065 E 1002 A 2 066 E 2003 A 3 067 E 3004 A 4 068 E 4005 A 5 069 E 5006 A 6 070 E 6007 A 7 071 E 7
008 A 8 072 E 8009 A 9 073 E 9010 A 10 074 E 10011 A 11 075 E 11012 A 12 076 E 12013 A 13 077 E 13014 A 14 078 E 14015 A 15 079 E 15016 A 16 080 E 16017 B 1 081 F 1018 B 2 082 F 2019 B 3 083 F 3020 B 4 084 F 4021 B 5 085 F 5022 B 6 086 F 6023 B 7 087 F 7024 B 8 088 F 8025 B 9 089 F 9
026 B 10 090 F 10027 B 11 091 F 11028 B 12 092 F 12029 B 13 093 F 13030 B 14 094 F 14031 B 15 095 F 15032 B 16 096 F 16033 C 1 097 G 1034 C 2 098 G 2035 C 3 099 G 3036 C 4 100 G 4037 C 5 101 G 5038 C 6 102 G 6039 C 7 103 G 7040 C 8 104 G 8041 C 9 105 G 9042 C 10 106 G 10043 C 11 107 G 11
044 C 12 108 G 12045 C 13 109 G 13046 C 14 110 G 14047 C 15 111 G 15048 C 16 112 G 16049 D 1 113 H 1050 D 2 114 H 2051 D 3 115 H 3052 D 4 116 H 4053 D 5 117 H 5054 D 6 118 H 6055 D 7 119 H 7056 D 8 120 H 8057 D 9 121 H 9058 D 10 122 H 10059 D 11 123 H 11060 D 12 124 H 12061 D 13 125 H 13
062 D 14 126 H 14063 D 15 127 H 15064 D 16 128 H 16

8/10/2019 motif_1(2)
http://slidepdf.com/reader/full/motif12 126/300
126 MOTIF Reference
Voice Play mode
Ref er enc e
V oi c emod e
■ Using the [INC/YES] and [DEC/NO]buttons
Pressing the [INC/YES] button increases the number by 1.Pressing the [DEC/NO] button decreases the number by 1.
Use the [INC/YES] and [DEC/NO] buttons to step upor down through the available voices. Naturally, thisalso lets you switch to the next available Group, up ordown. For example, if the currently selected voice isA16, pressing the [INC/YES] button selects Voice B01.Hold either button down to continuously scrollthrough the voices.
■ Using the data dialRotating the data dial to the right (clockwise) increasesvoice number, while rotating it to the left (counter-clock wise) decreases it. This control works in thesame way as the [INC/YES] and [DEC/NO] buttons, but lets you scroll through the voices more quickly.
This convenient feature lets you select voices accordingto their instrument type or application. The voices aredivided into sixteen different categories, and thesecategory keywords often give you a clear idea of thecharacteristics of a voice that might not be apparentfrom its name.
■ Using the Category Search functionCategory Search lets you quickly locate the type ofvoice you need, regardless of its bank location. For
example, by specifying the A. PIANO category, you caninstantly call up a list of all the available piano-typevoices contained in the MOTIF, and select the desiredpiano voice from the list.The MOTIF also features a “Favorites” category, towhich you can assign your favorite voices. This isconvenient especially in live performance situations,giving you quick access to often-used voices — nomatter what their particular category or bank.
1 Press the [CATEGORY SEARCH] button so thatits indicator lights. The following Voice categorydisplay appears.
2 Press any of the [PLG1] - [PLG3] and the [A] - [H] buttons to select a Category. The first voice in theselected category is called up by this operation.
n The voice categories are printed below the [PLG1] -[PLG3] and [A] - [H] buttons.
n Sub categories are listed at the bottom of the Voicecategory display. Pressing the [F1] - [F6] buttons
call up the first voice in the selected sub category.
3 Press the Cursor [F] button to move the cursorto the voice.
4 Select a voice by using the data dial.
DEC/NO INC/YES
Decreases number Increases number nThe explanations here apply whenthese four button indicators are off.
1
2
PLG 2
A B C D E F G H
15
CATEGORYSEARCHDRUM KITS
FAVORITES
PRE 1 PRE 2 PRE 3 GM USER PLG 1 PLG 3
A. PIANO K EY BO AR D O RG AN G UI TA R/ PLUCKED
BASS S TR IN GS B RA SS R EE D/ PI PE
SYN LEAD SYN PAD / CHOIR
SYNCOMP CHROMATICPERCUSSION
DRUM/ PERCUSSION
SE M US IC AL F X C OM BI
1 2 3 4 5 6 7 8
9 10 11 12 13 14 16
SECTION
TRACKSELECT
MUTE
SOLO
BANK
GROUP
NUMBER
COMMON
ELEMENT/PERF.PART/ZONE
Category Voice
Sub category
Category Voice
Sub category
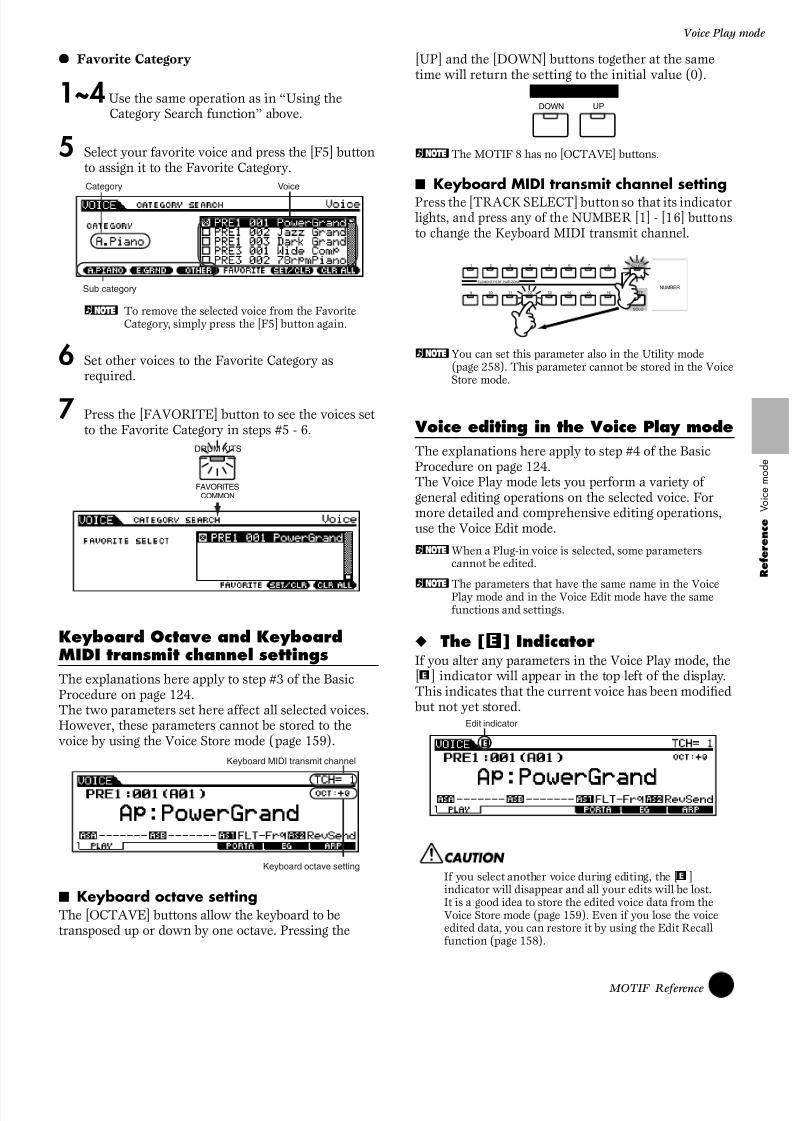
8/10/2019 motif_1(2)
http://slidepdf.com/reader/full/motif12 127/300
127 MOTIF Reference
Voice Play
● Favorite Category
1~4 Use the same operation as in “Using theCategory Search function” above.
5 Select your favorite voice and press the [F5] buttonto assign it to the Favorite Category.
n To remove the selected voice from the FavoriteCategory, simply press the [F5] button again.
6 Set other voices to the Favorite Category asrequired.
7 Press the [FAVORITE] button to see the voices setto the Favorite Category in steps #5 - 6.
Keyboard Octave and KeyboardMIDI transmit channel settings
The explanations here apply to step #3 of the BasicProcedure on page 124.The two parameters set here affect all selected voices.However, these parameters cannot be stored to thevoice by using the Voice Store mode (page 159).
■ Keyboard octave settingThe [OCTAVE] buttons allow the keyboard to betransposed up or down by one octave. Pressing the
[UP] and the [DOWN] buttons together at the sametime will return the setting to the initial value (0).
nThe MOTIF 8 has no [OCTAVE] buttons.
■ Keyboard MIDI transmit channel settingPress the [TRACK SELECT] button so that its indicator lights, and press any of the NUMBER [1] - [16] buttonsto change the Keyboard MIDI transmit channel.
nYou can set this parameter also in the Utility mode(page 258). This parameter cannot be stored in the VoiceStore mode.
Voice editing in the Voice Play mode
The explanations here apply to step #4 of the BasicProcedure on page 124.The Voice Play mode lets you perform a variety ofgeneral editing operations on the selected voice. Formore detailed and comprehensive editing operations,use the Voice Edit mode.
nWhen a Plug-in voice is selected, some parameterscannot be edited.
nThe parameters that have the same name in the VoicePlay mode and in the Voice Edit mode have the samefunctions and settings.
◆ The [ ] IndicatorIf you alter any parameters in the Voice Play mode, the[ ] indicator will appear in the top left of the display.This indicates that the current voice has been modified but not yet stored.
If you select another voice during editing, the [ ]indicator will disappear and all your edits will be lost.It is a good idea to store the edited voice data from theVoice Store mode (page 159). Even if you lose the voiceedited data, you can restore it by using the Edit Recallfunction (page 158).
Category Voice
Sub category
DRUM KITS
FAVORITESCOMMON
Keyboard MIDI transmit channel
Keyboard octave setting
OCTAVE
DOWN UP
15
1 2 3 4 5 6 7 8
9 10 11 12 13 14 16
TRACKSELECT
MUTE
SOLO
NUMBERELEMENT/PERF.PART/ZONE
Edit indicator

8/10/2019 motif_1(2)
http://slidepdf.com/reader/full/motif12 128/300
128 MOTIF Reference
Voice Play mode
Ref er enc e
V oi c emod e
● [F2] Voice Play Plug-in Bank
From this display you can select the particular bankon the Plug-in board, and determine whether youwill be using a Plug-in voice or a “Board” voice.Simply put, the difference between the two types ofvoices is this:
• Board voices are unprocessed, unaltered voicesof the Plug-in board — the “raw material” for
Plug-in voices.• Plug-in voices are edited Board voices — voices
that have been specially programmed andprocessed for optimum use with the MOTIF.
For more details, see page 153.
❏ Settings When a Plug-in voice using the Plug-in board installed to slot 1 is selected:
PLG1USR (User Plug-in voice), PLGPRE1(Preset Plug-in voice), 032/000 ... (Indicatesthe Bank Select MSB/LSB of the Boardvoice. These values differ depending on theinstalled Plug-in board)
n This display is available only when the Plug-in board is installed to the MOTIF and the Plug-invoice is selected.
● [F4] Voice Play Portamento
From this display you can select monophonic orpolyphonic playback and set the Portamentoparameters.Portamento is used to create a smooth transition inpitch from the first note played on the keyboard tothe next.
• Mono/Poly
Determines whether the Voice is played backmonophonically (single notes only) or polyphonically(multiple simultaneous notes).
❏ Settings Mono, Poly
• PortaSwDetermines whether Portamento is on or off.
❏ Settings off, on
• PortaTimeDetermines the pitch transition time. Higher values resultin longer transition times.
❏ Settings 0 ~127
• PortaModeDetermines the Portamento mode. The behavior of thePortamento varies depending on whether Mono/Poly is setto “mono” or “poly.”
❏ Settings fingered, fulltime
When Mono/Poly is set to “mono”:With the “fingered” setting, Portamento is only appliedwhen you play legato (playing the next note beforereleasing the previous one). With the “fulltime”setting, Portamento is always applied.
When Mono/Poly is set to “poly”:This is the same as for “mono,” except that Portamentois applied to multiple notes.
● [F5] Voice Play EG (Envelope Generator)
Basic Structure (page 46)
This display contains the basic EG settings, bothvolume and filter, for the voice, as well as the filter’scutoff frequency and resonance settings. Thesettings made here are applied as offsets to the AEGand FEG settings in the Voice Edit mode.
The full names of the available parameters areshown in the chart below, as they appear in thedisplay.
❏ Settings -64 ~ 0 ~ +63 (except --- above)
● [F6] Voice Play Arpeggio
Basic Structure (page 55)
This display contains the basic settings for Arpeggioplayback, including Type and Tempo.
• BankDetermines the Bank.
❏ Settings pre1, pre2, user
• TypeDetermines the Arpeggio type. The two-letter prefix beforethe name indicates the general Arpeggio category.
ATK DCY SUS REL DEPTH CUTOFF RESO
AEGAttack
time
Decay
time
Sustainlevel Releas
e Time
--- --- ---
FEG --- Depth Cutofffrequency
Resonance

8/10/2019 motif_1(2)
http://slidepdf.com/reader/full/motif12 129/300
129 MOTIF Reference
Voice Edit
• TempoDetermines the Arpeggio Tempo. When MIDI sync(page 258) is turned on, “MIDI” is displayed here andcannot be set.
❏ Settings 1 ~ 300
• Velocity LimitDetermines the lowest and highest velocity in theArpeggio’s velocity range. The Arpeggio plays when youplay the note with the velocity in this range.
❏ Settings 1 ~ 127
n Keys played outside the set limit sound normallywithout any Arpeggio.
• SwitchDetermines whether Arpeggio is on or off. You can alsoturn Arpeggio on/off from the front panel with the[ARPEGGIO ON/OFF] button.
❏ Settings off, on
• HoldDetermines whether the Arpeggio playback is “held” ornot. When this is set to “on,” the Arpeggio cycles
automatically, even if you release your fingers from thekeys, and it continues to cycle until the next key is pressed.
❏ Settings off, on
Voice Edit mode
In this mode, Normal Voices and Drum Voices can becreated and edited.There are three kinds of Voices: Normal Voices, DrumVoices and Plug-in Voices (if a Plug-in board has beeninstalled). The following section shows how to edit thedifferent kinds of voices and explains the parameters
available.
◆ The [ ] IndicatorIf you alter any parameters in Voice Edit Mode, the [ ]indicator will appear in the top left of the display. Thisindicates that the current voice has been modified butnot yet stored.
nEven if you exit to the Voice Play mode, your editedsettings for the current voice will be maintained — as long as you don’t select another voice.
nThe [ ] indicator is also displayed in the Voice Play
mode.
◆ The Compare FunctionThis convenient function lets you switch between theedited voice and its original, unedited condition —allowing you to listen to the difference between thetwo and better hear how your edits affect the sound.
1 In the Voice Edit mode, press the [COMPARE] button so that its indicator flashes.The [ ] indicator is shown at the top of the
display (in place of the [ ] indicator), and theoriginal, unedited voice is restored for monitoring.
2 Press the [EDIT] button again to disable the“Compare” function and restore the settings foryour edited Voice.
n While Compare is active, you cannot make edits tothe voice.
Normal Voice Edit
◆ Common edit and Element editA Voice can consist of up to four elements (page 42).Use Common Edit to edit the settings common to allfour elements. There are two types of Voice Editdisplays: those for Common Edit, and those for editingindividual elements.
EDIT
COMPARE

8/10/2019 motif_1(2)
http://slidepdf.com/reader/full/motif12 130/300
130 MOTIF Reference
Voice Edit mode
Ref er enc e
V oi c emod e
◆ Basic Procedure
1 Press the [VOICE] button to enter the Voice Playmode. (The indicator lights.)
2 Select a Normal voice to be edited.
3 Press the [EDIT] button to enter the Voice Editmode. (The indicator lights.)
4 Select an element to be edited.
• To edit parameters common to all four elements,press the [DRUM KITS] button (which serves asa “COMMON” button here).
• To edit parameters of the individual elements,select the desired element with the
corresponding NUMBER button ([1] - [4]).
You can mute other elements (those you aren’tediting and don’t wish to hear) by using theNUMBER [9] - [12] buttons. Sounded elementsare indicated by lit buttons; the indicator of the button corresponding to the sounded element lights.
5 Select the menu you wish to edit by pressing the
[F1] - [F6] and [SF1] - [SF5] buttons.
6 Edit the parameters for the selected voice.
7 Store the settings edited in step #6 to the UserMemory as required.
8 Press the [EXIT] button to exit from the Voice Editmode.
• For details on step #2, refer to “Voice Play mode”on page 124.
• For detailed instructions on steps #5 - #6, see theexplanations below.
• For details on step #7, refer to “Voice Storemode” on page 159.
■ Common edit
● [F1]-[SF1] Normal Common General Name
Basic operation (page 75)
From this display you can assign the category (suband main) of the selected voice, and create a namefor the voice. The voice name can contain up to 10characters. For detailed instructions on naming avoice, see “Basic Operation” on page 75.
● [F1]-[SF2] Normal Common GeneralPlay mode
From this display you can make various settings forthe tone generator of the MOTIF, and assigndifferent Micro Tuning settings.
COMMON
Element1
Element2
Element3
Element4
Indicates a display for editing Element 1.
Indicates a Common Edit display.
DRUM KITS
FAVORITESCOMMON
Element selection
Element mutesetting
1 2 3 4
9 10 11 12
ELEMENT/ PERF.PART/ ZONE

8/10/2019 motif_1(2)
http://slidepdf.com/reader/full/motif12 131/300
131 MOTIF Reference
Voice Edit
• Mono/PolyDetermines whether the Voice is played backmonophonically (single notes only) or polyphonically(multiple simultaneous notes).
❏ Settings Mono, Poly
• KeyAsgnModeWhen this is set to “single,” double playback of the samenote is prevented. This is useful when two or moreinstances of the same note are received nearly
simultaneously, or without a corresponding note offmessage. To allow playback of each instance of the samenote, set this to “multi.”
❏ Settings single, multi
• MicroTuningDetermines the tuning system for the voice. Normally, thisshould be set to 00 (Equal temperament); however thirty-one additional tuning systems are available for a variety oftuning applications and effects.
❏ Settings See below.
● [F1]-[SF3] Normal Common GeneralMaster EQ Offset
From this display you can adjust the master (global)EQ settings for the entire voice. The settings made here are applied as offsets to the EQ settings (withthe exception of “MID”) in the Utility mode,page 253.
❏ Settings -64 ~ 0 ~+63
● [F1]-[SF4] Normal Common GeneralPortamento
This display allows you to set the Portamentorelated parameters. Portamento is used to create asmooth transition in pitch from the first note played
on the keyboard to the next.
• SwitchDetermines whether Portamento is on or off.
❏ Settings off, on
• Time
Determines the pitch transition time. Higher values resultin a longer pitch change time, when Time Mode below isset to “Time.” (When Time Mode is set to “Rate,” highervalues result in a faster pitch change time.)
❏ Settings 0 ~127
• ModeDetermines the Portamento mode. With the “fingered”setting, Portamento is only applied when you play legato(playing the next note before releasing the previous one).With the “fulltime” setting, Portamento is always applied.
❏ Settings fulltime, fingered
• TimeMode
This determines how the Time parameter above affects thePortamento effect. Setting this to “Time” makes the aboveparameter a true time scale — the higher the value, the longer the time. The “Rate” setting simply reverses this,for a rate scale — the higher the value, the faster the rate(in other words, the shorter the time). Naturally, youshould set this to your own personal preference, dependingon whether you think of Portamento in terms of time orrate.
❏ Settings rate, time
rateSets the Time parameter range to reflect “rate”:0 (slow) - 127 (fast)
No. Type Key Comments
00 Equaltemperament
The “compromise” tuning used for most ofthe last 200 years of Western music, and
found on most electronic keyboards.Each half step is exactly 1/12 of anoctave, and music can be played in anykey with equal ease. However, none ofthe intervals are perfectly in tune.
01~12 Pure major C~B This tuning is designed so that most ofthe intervals (especially the major thirdand perfect fifth) in the major scale arepure. This means that other intervals willbe correspondingly out of tune. You needto specify the key (C~B) you will beplaying in.
13~24 Pure minor A~G# The same as Pure Major, but designedfor the minor scale.
25 Werckmeister Andreas Werckmeiser, a contemporar y ofBach, designed this tuning so thatkeyboard instruments could be played inany key. Each key has a uniquecharacter.
26 Kirnberger Johann Philipp Kirnberger was alsoconcerned with tempering the scale toallow performances in any key.
27 Vallotti & Young Francescatonio Vallotti and ThomasYoung (both mid-1700s) devised thisadjustment the Pythagorean tuning whichthe first six fifths are lower by the sameamount.
28 1/4 shifted This is the normal equal tempered scaleshifted up 50 cents.
29 1/4 tone Twenty-four equally spaced notes peroctave. (Play twenty-four notes to moveone octave.)
30 1/8 tone Forty-eight equally spaced notes peroctave. (Play forty-eight notes to moveone octave.)
31 Indian C~B Usually observed in the Indian music
(white keys [C~B] only).
KNOBCONTROL
FUNCTION
PAN REVERB CHORUS TEMPO
ATTACK RELEASECUTOFF RESONANCE
ASSIGN A ASSIGN B ASSIGN 1 ASSIGN 2
MEQ LOW MEQ HI MIDMEQLOWMID MEQ HIGH
KN 1 KN 2 KN 3 KN 4

8/10/2019 motif_1(2)
http://slidepdf.com/reader/full/motif12 132/300
132 MOTIF Reference
Voice Edit mode
Ref er enc e
V oi c emod e
timeSets the Time parameter range to reflect “time”:0 (fast) - 127 (slow)
● [F1]-[SF5] Normal Common General Other
From this display you can set the control functionsfor the Knobs, and determine the up/down rangefor the Pitch Bend wheel.
• Knob AssignDetermines the function for the assignable Knobs (1-4).Pressing the [KNOB CONTROL FUNCTION] button onthe panel sets the desired function row, which isautomatically stored to memory with the currentlyselected voice.
❏ Settings
• ChoCtrlDetermines the depth of the Chorus effect, as controlled bythe Knob assigned to Chorus Send.
❏ Settings -64 ~ 63
• PBUpper, PBLowerThese two parameters determine the pitch change range ofthe Pitch Bend wheel.
❏ Settings -48 ~ 24
• Assign A, Assign B, Assign 1, Assign 2This lets you directly set and memorize the value for eachAssign Knob (A, B, 1, and 2), from the Knob itself. Simplytweak the knob to the desired setting.
● [F2] Normal Common Output
• VolumeDetermines the output level of the Voice.
❏ Settings 0 ~ 127
• PanDetermines the stereo pan position of the Voice. You canalso adjust this parameter using the PAN knob on thefront panel.
❏ Settings L63 (Left) ~ C (Center) ~ R63 (Right)
• RevSendDetermines the Send level of the signal sent from InsertionEffect 1/2 (or the bypassed signal) to the Reverb effect.You can also adjust this parameter using the REVERBknob on the front panel.
❏ Settings 0 ~ 127
• ChoSendDetermines the Send level of the signal sent from InsertionEffect 1/2 (or the bypassed signal) to the Chorus effect.You can also adjust this parameter using the [CHORUS]knob on the front panel of the MOTIF.
❏ Settings 0 ~ 127
● [F3]-[SF1] Normal Common Arpeggio Arpeggio type
Basic Structure (page 55)
The basic parameters (e.g., type, tempo) of theArpeggio are provided in this display.When user arpeggio is selected, you can clear theselected arpeggio data by using the [SF5] button.
• BankDetermines the Bank.
❏ Settings pre1, pre2, user
• TypeDetermines the Arpeggio type. The two-letter prefix beforethe name indicates the general Arpeggio category.
• Tempo
Determines the Arpeggio Tempo. When MIDI sync(page 258) is turned on, “MIDI” is displayed here andcannot be set.
❏ Settings 1 ~ 300
• SwitchDetermines whether Arpeggio is on or off. You can alsoturn Arpeggio on/off from the front panel with the[ARPEGGIO ON/OFF] button.
❏ Settings off, on
KNOBCONTROLFUNCTION
PAN REVERB CHORUS TEMPO
ATTACK RELEASECUTOFF RESONANCE
ASSIGN A ASSIGN B ASSIGN 1 ASSIGN 2
KN 1 KN 2 KN 3 KN 4
MEQ LOW MEQ HI MIDMEQLOWMID MEQ HIGH
Pan & Send Tone
AssignMeqGain
This apppears only when user arpeggio isselected and cursor is located at Type.
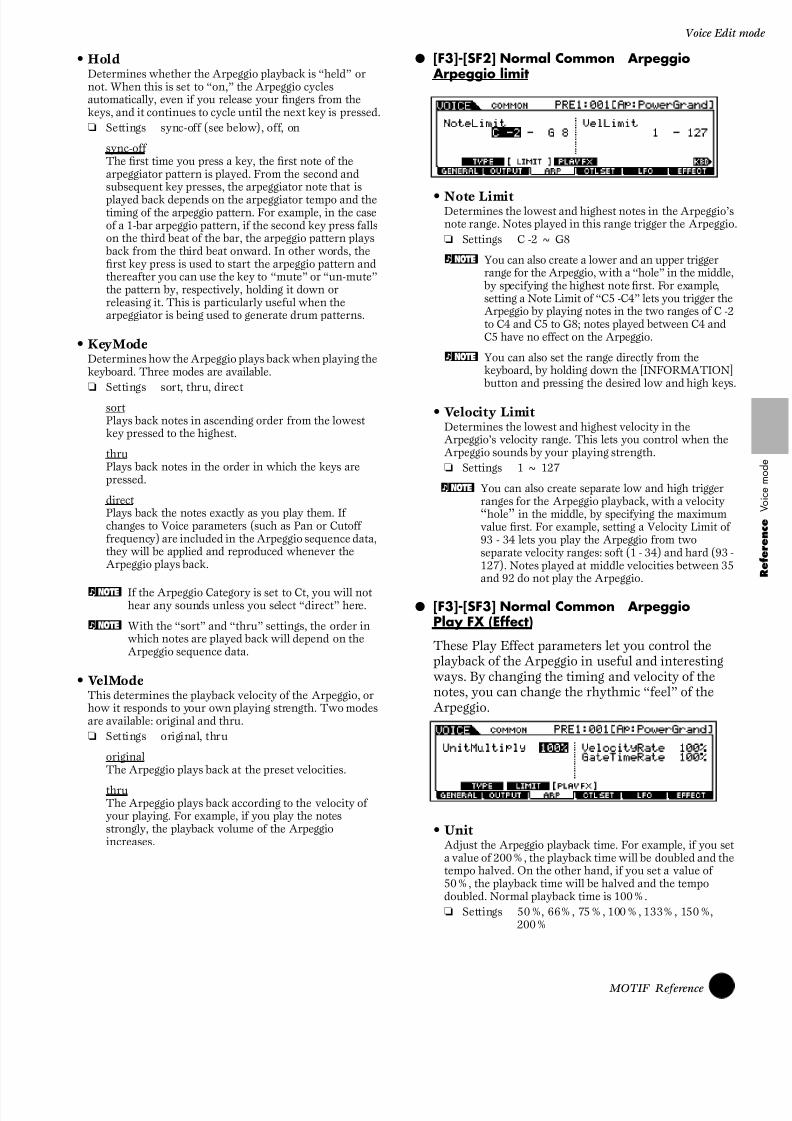
8/10/2019 motif_1(2)
http://slidepdf.com/reader/full/motif12 133/300
133 MOTIF Reference
Voice Edit
• HoldDetermines whether the Arpeggio playback is “held” ornot. When this is set to “on,” the Arpeggio cyclesautomatically, even if you release your fingers from thekeys, and it continues to cycle until the next key is pressed.
❏ Settings sync-off (see below), off, on
sync-off The first time you press a key, the first note of thearpeggiator pattern is played. From the second andsubsequent key presses, the arpeggiator note that is
played back depends on the arpeggiator tempo and thetiming of the arpeggio pattern. For example, in the caseof a 1-bar arpeggio pattern, if the second key press fallson the third beat of the bar, the arpeggio pattern plays back from the third beat onward. In other words, thefirst key press is used to start the arpeggio pattern andthereafter you can use the key to “mute” or “un-mute”the pattern by, respectively, holding it down orreleasing it. This is particularly useful when thearpeggiator is being used to generate drum patterns.
• KeyModeDetermines how the Arpeggio plays back when playing thekeyboard. Three modes are available.
❏
Settings sort, thru, direct sort Plays back notes in ascending order from the lowestkey pressed to the highest.
thruPlays back notes in the order in which the keys arepressed.
direct Plays back the notes exactly as you play them. Ifchanges to Voice parameters (such as Pan or Cutofffrequency) are included in the Arpeggio sequence data,they will be applied and reproduced whenever theArpeggio plays back.
n If the Arpeggio Category is set to Ct, you will not hear any sounds unless you select “direct” here.
n With the “sort” and “thru” settings, the order inwhich notes are played back will depend on theArpeggio sequence data.
• VelModeThis determines the playback velocity of the Arpeggio, or how it responds to your own playing strength. Two modesare available: original and thru.
❏ Settings original, thru
originalThe Arpeggio plays back at the preset velocities.
thruThe Arpeggio plays back according to the velocity ofyour playing. For example, if you play the notesstrongly, the playback volume of the Arpeggioincreases.
● [F3]-[SF2] Normal Common Arpeggio Arpeggio limit
• Note LimitDetermines the lowest and highest notes in the Arpeggio’snote range. Notes played in this range trigger the Arpeggio.
❏ Settings C -2 ~ G8
n You can also create a lower and an upper triggerrange for the Arpeggio, with a “hole” in the middle, by specifying the highest note first. For example,setting a Note Limit of “C5 -C4” lets you trigger theArpeggio by playing notes in the two ranges of C -2to C4 and C5 to G8; notes played between C4 andC5 have no effect on the Arpeggio.
n You can also set the range directly from thekeyboard, by holding down the [INFORMATION] button and pressing the desired low and high keys.
• Velocity LimitDetermines the lowest and highest velocity in theArpeggio’s velocity range. This lets you control when theArpeggio sounds by your playing strength.
❏ Settings 1 ~ 127
n You can also create separate low and high triggerranges for the Arpeggio playback, with a velocity“ hole” in the middle, by specifying the maximumvalue first. For example, setting a Velocity Limit of93 - 34 lets you play the Arpeggio from twoseparate velocity ranges: soft (1 - 34) and hard (93 -127). Notes played at middle velocities between 35and 92 do not play the Arpeggio.
● [F3]-[SF3] Normal Common ArpeggioPlay FX (Effect)
These Play Effect parameters let you control theplayback of the Arpeggio in useful and interestingways. By changing the timing and velocity of thenotes, you can change the rhythmic “feel” of theArpeggio.
• UnitAdjust the Arpeggio playback time. For example, if you seta value of 200%, the playback time will be doubled and thetempo halved. On the other hand, if you set a value of50%, the playback time will be halved and the tempodoubled. Normal playback time is 100%.
❏ Settings 50%, 66%, 75%, 100%, 133%, 150%,200%

8/10/2019 motif_1(2)
http://slidepdf.com/reader/full/motif12 134/300
134 MOTIF Reference
Voice Edit mode
Ref er enc e
V oi c emod e
• Velocity RateDetermines how much the Velocity of the Arpeggioplayback is offset from the original value. For example, asetting of 100% means the original values are used.Settings below 100% will reduce the velocity of theArpeggio notes, whereas settings above 100% will increasethe velocities.
❏ Settings 0% ~ 200%
n The Velocity cannot be decreased or increased beyond its normal range of 1 to 127; any values
outside that range will automatically be limited tothe minimum or maximum.
• Gate Time RateDetermines how much the Gate Time (length) of theArpeggio notes is offset from the original value. A settingof 100% means the original values are used.Settings below 100% will shorten the gate times of theArpeggio notes, whereas settings above 100% will lengthen them.
❏ Settings 0% ~ 200%
n The Gate Time cannot be decreased beyond itsnormal minimum of 1; any values outside thatrange will automatically be limited to the
minimum.
● [F4]-[SF1], [SF2], [SF3] Normal CommonControl Set Set1/2, Set3/4, Set5/6
Basic Structure (page 48)
The controllers and knobs on the front panel can beused to change and adjust a variety of parameters — inreal time, and simultaneously.For example, keyboard aftertouch can be used tocontrol vibrato and the Modulation Wheel could beused to control Resonance. They can even be used to
control parameters within individual Elements. Thesecontrol assignments are called “Control Sets.” You canassign up to six different Control Sets per Voice. Thesix individual Control Sets are divided into pairs in thedisplay: Sets 1/2, Sets 3/4 and Sets 5/6.
• ElementSwDetermines whether or not the selected controller affectseach individual element.
❏ Settings Elements 1 to 4 enabled (“1” to “4”) ordisabled (“-”)
n This parameter is disabled if the Destinationparameter below is set to a value from 00 to 33.
• SourceDetermines which panel controller is to be assigned andused for the selected Set. This controller then is used tocontrol the parameter set in Destination below.
❏ Settings PB (Pitch Bend Wheel), MW (ModulationWheel), AT (After Touch), FC1 (FootController 1), FC2 (Foot Controller2),FS (Footswitch), BC (Breath Controller),KN1 (Knob ASSIGN 1), KN2 (KnobASSIGN 2)
n Keep in mind that unlike the other controllers, theASSIGN A and B knobs can each be assigned toone common function for the entire Voice mode,and not to different functions for each individualvoice. Also see the Utility mode (page 256).
• Dest (Destination)Determines the parameter that is controlled by the Sourcecontroller (above).
❏ Settings For a complete list of the availableparameters/controls, refer to the separateData List booklet.
• Depth
Determines the degree to which the Source controlleraffects the Destination parameter. For negative values, thecontroller operation is reversed; maximum controllersettings produce minimum parameter changes.
❏ Settings -64 ~ 0 ~+63
Control Set 1~6
KeyboardModulation wheel
Knob
Controller
Set 1
Element 1
Element 2
Element 3
Element 4

8/10/2019 motif_1(2)
http://slidepdf.com/reader/full/motif12 135/300
135 MOTIF Reference
Voice Edit
● [F5]-[SF1] Normal Common LFO WaveBasic Structure (page 47)
From this display you can make a variety of LFO-related settings, including Wave, Speed, Tempo, andsync/phase settings.
• WaveDetermines the LFO Wave.
❏ Settings tri, tri+, sawup, sawdwn, squ1/4, squ1/3,squ, squ2/3, squ3/4, trpzp, S/H 1, S/H 2,user
• SpeedDetermines the speed of the LFO Wave modulation.Higher values result in faster modulation speeds.
❏ Settings 0 ~ 63
• Tempo SyncDetermines whether or not the LFO is synchronized to thetempo of the Arpeggio or sequencer (song or pattern).Setting this to “on” allows you to keep the LFO effects inperfect sync with the Arpeggio or sequencer playback.
❏ Settings off (not synchronized), on (synchronized)
• Tempo Speed
This parameter is available only when Tempo Sync above has been set to “on.” It allows you to make detailed notevalue settings that determine how the LFO pulses in syncwith the Arpeggio or sequencer.
❏ Settings 16th, 8th/3 (eighth-note triplets), 16th.(dotted sixteenth notes), 8th 4th/3 (quarter-note triplets), 8th. (dotted eighth notes), 4th(quarter notes), 2nd/3 (half-note triplets),4th. (dotted quarter notes),2nd (half notes), whole/3 (whole-notetriplets), 2nd. (dotted half notes), 4th x 4(quarter-note quadruplets; four quarter notesto the beat), 4th x 5 (quarter-note quintuplets;five quarter notes to the beat),4th x 6 (quarter-note sextuplets; six quarter
notes to the beat), 4th x 7 (quarter-noteseptuplets; seven quarter notes to the beat),4th x 8 (quarter-note octuplets; eight quarternotes to the beat)
n The actual length of the note depends on theinternal or external MIDI tempo setting.
• Key On ResetDetermines whether or not the LFO is reset each time anote is pressed. The following three settings are available.
❏ Settings off, each-on, 1st-on
offThe LFO cycles freely with no key synchronization.Pressing a key starts the LFO wave at whatever phasethe LFO happens to be at that point.
each-onThe LFO resets with each note you play and starts awaveform at the phase specified by the Phaseparameter (below).
1st-onThe LFO resets with every note you play and starts thewaveform at the phase specified by the Phase
parameter (below). However, if you play a second notewhile the first is being held, the LFO continues cyclingaccording to the same phase as triggered by the firstnote. In other words, the LFO only resets if the firstnote is released before the second is played.
.
• Phase
Determines the starting phase point for the LFO Wavewhen a note is played.
❏ Settings 0, 90, 120, 180, 240, 270
Speed = fast Speed = slow
TimeTime
Time
Key on
Key on(second note)
Time
Key on(first note)
Key on(second note)
Time
Key on(first note)
Time
0° 90°120° 240°
180° 270°Phase
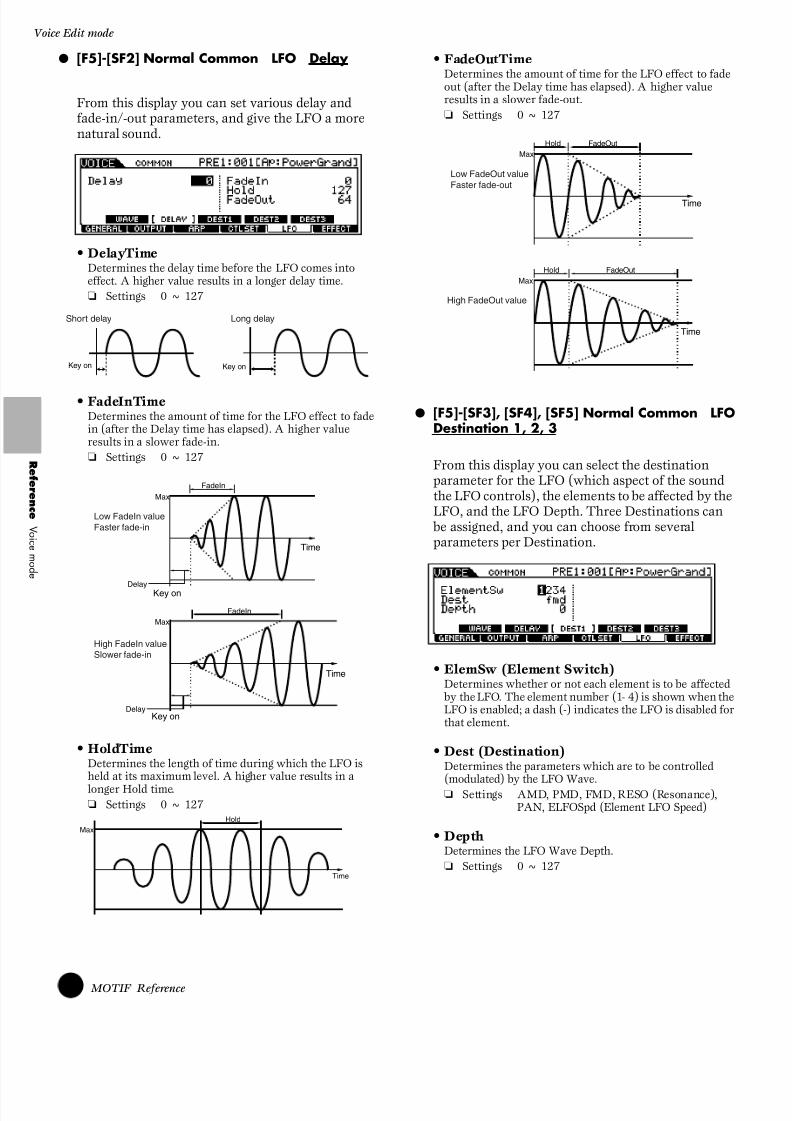
8/10/2019 motif_1(2)
http://slidepdf.com/reader/full/motif12 136/300
136 MOTIF Reference
Voice Edit mode
Ref er enc e
V oi c emod e
● [F5]-[SF2] Normal Common LFO Delay
From this display you can set various delay andfade-in/-out parameters, and give the LFO a morenatural sound.
• DelayTimeDetermines the delay time before the LFO comes intoeffect. A higher value results in a longer delay time.
❏ Settings 0 ~ 127
• FadeInTimeDetermines the amount of time for the LFO effect to fadein (after the Delay time has elapsed). A higher valueresults in a slower fade-in.
❏ Settings 0 ~ 127
• HoldTimeDetermines the length of time during which the LFO is held at its maximum level. A higher value results in a longer Hold time.❏ Settings 0 ~ 127
• FadeOutTimeDetermines the amount of time for the LFO effect to fadeout (after the Delay time has elapsed). A higher valueresults in a slower fade-out.
❏ Settings 0 ~ 127
● [F5]-[SF3], [SF4], [SF5] Normal Common LFODestination 1, 2, 3
From this display you can select the destinationparameter for the LFO (which aspect of the soundthe LFO controls), the elements to be affected by theLFO, and the LFO Depth. Three Destinations can be assigned, and you can choose from severalparameters per Destination.
• ElemSw (Element Switch)Determines whether or not each element is to be affected by the LFO. The element number (1- 4) is shown when theLFO is enabled; a dash (-) indicates the LFO is disabled forthat element.
• Dest (Destination)Determines the parameters which are to be controlled
(modulated) by the LFO Wave.❏ Settings AMD, PMD, FMD, RESO (Resonance),
PAN, ELFOSpd (Element LFO Speed)
• DepthDetermines the LFO Wave Depth.
❏ Settings 0 ~ 127
Short delay Long delay
Key onKey on
FadeIn
Max
Delay
Time
Key on
Low FadeIn valueFaster fade-in
High FadeIn valueSlower fade-in
FadeIn
Delay
Time
Key on
Max
Hold
Time
Max
FadeOutHoldMax
Time
Low FadeOut valueFaster fade-out
FadeOut
Time
HoldMax
High FadeOut value

8/10/2019 motif_1(2)
http://slidepdf.com/reader/full/motif12 137/300
137 MOTIF Reference
Voice Edit
● [F6]-[SF1] Normal Common EffectConnection
This display gives you comprehensive control overthe effects.
• EL: OUT 1-4 (Element 1-4 Effect Output)Determines which Insertion effect (1 or 2) is used toprocess each individual element. The “thru” setting letsyou bypass the Insertion effects for the specific element.(This parameter is the same as “InsEFOut” in NormalElement below. Making a setting here automaticallychanges the setting of that parameter as well.)
❏ Settings ins1, ins2, thru
• InsConnect (Insertion Effect Connect)Determines the effect routing for Insertion effects 1 and 2.
The setting changes are shown on the diagram in thedisplay, giving you a clear picture of how the signal isrouted.
❏ Settings parallel, 1 to 2, 2 to 1
• Ins1Category, Ins1TypeDetermines the effect type for Insertion 1.
❏ Settings Refer to the Effect Types list in the separateData List booklet.
• Ins2Category, Ins2TypeDetermines the effect type for Insertion 2.
❏ Settings Refer to the Effect Types list in the separateData List booklet.
• RevType (Reverb Effect Type)Determines the effect type for Reverb.
❏ Settings Refer to the Effect Types list in the separateData List booklet.
• ChoType (Chorus Effect Type)Determines the effect type for Chorus.
❏ Settings Refer to the Effect Types list in the separateData List booklet.
• RevSend (Reverb Send)Determines the level of the sound (from Insertion 1 or 2,
or the bypassed signal) that is sent to Reverb effect. Asetting of “0” results in no Reverb processing of the sound.
❏ Settings 0 ~ 127
• ChoSend (Chorus Send)Determines the level of the sound (from Insertion 1 or 2,or the bypassed signal) that is sent to Chorus effect. Asetting of “0” results in no Chorus processing of the sound.
❏ Settings 0 ~ 127
• RevRtn (Reverb Return Level)Determines the Return level of the Reverb Effect.
❏ Settings 0 ~ 127
• ChoRtn (Chorus Return Level)Determines the Return level of the Chorus Effect.
❏ Settings 0 ~ 127
• ChoToRev (Chorus to Reverb)Determines the Send level of the signal sent from theChorus Effect to the Reverb Effect.
❏ Settings 0 ~ 127
• RevPan (Reverb Pan)Determines the pan position setting for the Reverb effect.
❏ Settings L63 (far left)~cnt (center)~R63 (far right)
• ChoPan (Chorus Pan)Determines the pan position setting for the Chorus effect.
❏ Settings L63 (far left)~cnt (center)~R63 (far right)
● [F6]-[SF2], [SF3], [SF4], [SF5] NormalCommon Effect ParameterInsertion 1, 2, Reverb, Chorus
The number of parameters and values available
differs depending on the currently selected effecttype. For more information, see the Effect Type Listin the separate Data List booklet.
■ Element EditFor instructions on selecting and editing individualelements, refer to step #4 in the Basic Procedure onpage 124.
● [F1]-[SF1] Normal Element Oscillator Wave
Basic Structure (page 44)
From this display you can select the desired wave orsound used for the element.
• ElementSw (Element Switch)Determines whether the currently selected element is onor off.
❏Settings off (inactive), on (active)
• BankThis determines the specific bank of waves, from whichyou can select the desired sound. The Preset bank featuresthe factory programmed waves; the User bank containsany audio data you have created with the Samplingfunction (page 58).
❏ Settings preset, usr wav
• Wave No. (Wave Number), WaveCtgry (WaveCategory)
❏ Settings See the Wave list of the separate Data List.
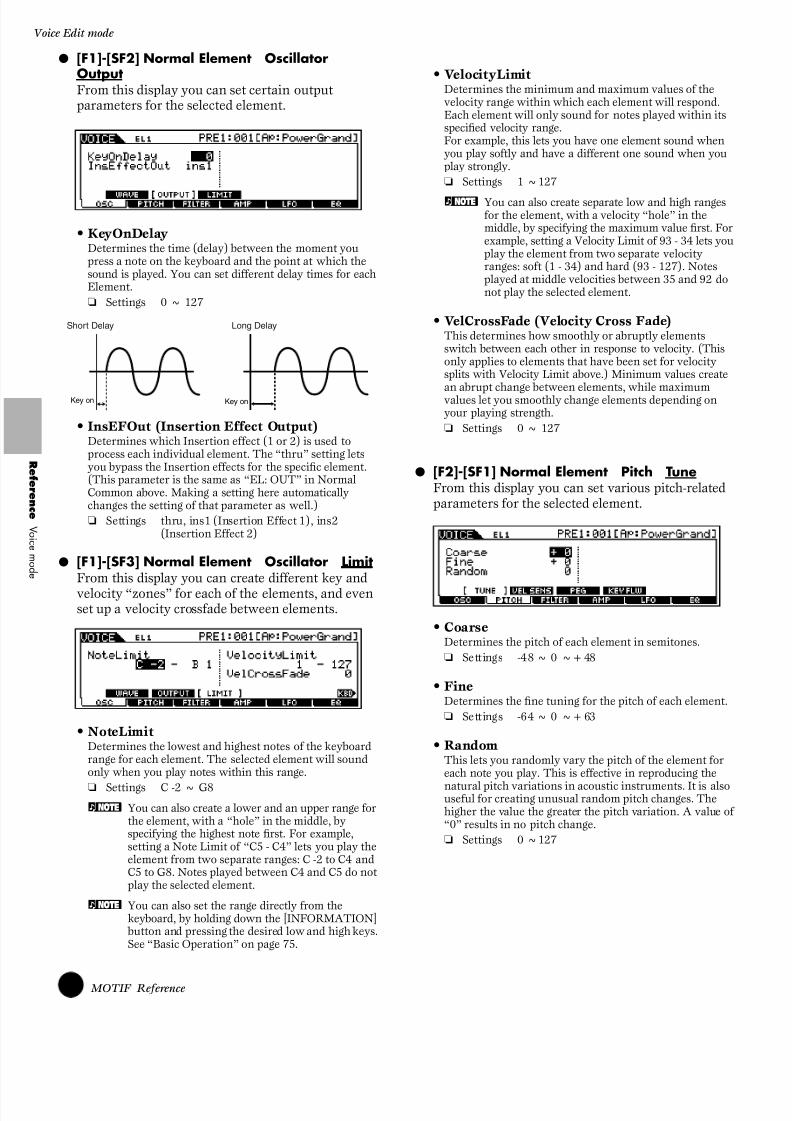
8/10/2019 motif_1(2)
http://slidepdf.com/reader/full/motif12 138/300
138 MOTIF Reference
Voice Edit mode
Ref er enc e
V oi c emod e
● [F1]-[SF2] Normal Element OscillatorOutputFrom this display you can set certain outputparameters for the selected element.
• KeyOnDelayDetermines the time (delay) between the moment youpress a note on the keyboard and the point at which thesound is played. You can set different delay times for eachElement.
❏ Settings 0 ~ 127
• InsEFOut (Insertion Effect Output)Determines which Insertion effect (1 or 2) is used toprocess each individual element. The “thru” setting letsyou bypass the Insertion effects for the specific element.(This parameter is the same as “EL: OUT” in NormalCommon above. Making a setting here automaticallychanges the setting of that parameter as well.)
❏ Settings thru, ins1 (Insertion Effect 1), ins2(Insertion Effect 2)
● [F1]-[SF3] Normal Element Oscillator LimitFrom this display you can create different key andvelocity “zones” for each of the elements, and evenset up a velocity crossfade between elements.
• NoteLimitDetermines the lowest and highest notes of the keyboardrange for each element. The selected element will soundonly when you play notes within this range.
❏ Settings C -2 ~ G8
n You can also create a lower and an upper range forthe element, with a “hole” in the middle, byspecifying the highest note first. For example,setting a Note Limit of “C5 - C4” lets you play theelement from two separate ranges: C -2 to C4 andC5 to G8. Notes played between C4 and C5 do notplay the selected element.
n You can also set the range directly from thekeyboard, by holding down the [INFORMATION] button and pressing the desired low and high keys.See “Basic Operation” on page 75.
• VelocityLimitDetermines the minimum and maximum values of thevelocity range within which each element will respond.Each element will only sound for notes played within itsspecified velocity range.For example, this lets you have one element sound whenyou play softly and have a different one sound when youplay strongly.
❏ Settings 1 ~127
n You can also create separate low and high rangesfor the element, with a velocity “hole” in themiddle, by specifying the maximum value first. Forexample, setting a Velocity Limit of 93 - 34 lets youplay the element from two separate velocityranges: soft (1 - 34) and hard (93 - 127). Notesplayed at middle velocities between 35 and 92 donot play the selected element.
• VelCrossFade (Velocity Cross Fade)This determines how smoothly or abruptly elementsswitch between each other in response to velocity. (Thisonly applies to elements that have been set for velocitysplits with Velocity Limit above.) Minimum values create
an abrupt change between elements, while maximumvalues let you smoothly change elements depending onyour playing strength.
❏ Settings 0 ~ 127
● [F2]-[SF1] Normal Element Pitch TuneFrom this display you can set various pitch-relatedparameters for the selected element.
• CoarseDetermines the pitch of each element in semitones.
❏ Settings -48 ~ 0 ~+48
• FineDetermines the fine tuning for the pitch of each element.
❏ Settings -64 ~ 0 ~+63
• RandomThis lets you randomly vary the pitch of the element foreach note you play. This is effective in reproducing the
natural pitch variations in acoustic instruments. It is alsouseful for creating unusual random pitch changes. The higher the value the greater the pitch variation. A value of“0” results in no pitch change.
❏ Settings 0 ~127
Short Delay Long Delay
Key onKey on

8/10/2019 motif_1(2)
http://slidepdf.com/reader/full/motif12 139/300
139 MOTIF Reference
Voice Edit
● [F2]-[SF2] Normal Element Pitch Velocity Sensitivity
From this display you can determine how the PitchEG responds to velocity. (For Pitch EG settings, see“PEG Time, Level” below.)
• EG Time, SegmentDetermines the velocity sensitivity of the PEG’s Timeparameters. Select the Segment, then set its Timeparameter. Positive Time settings will play back thespecified Segment faster and negative values will play it back slower.
❏ Settings Time -64 ~0 ~+63Segment ATK, ATK+DCY, DCY,
ATK+RLS, allATKEG Time Value affects Attack time.
ATK+DCYEG Time Value affects Attack/Decay1 time.
DCYEG Time Value affects Decay time.
ATK+RLSEG Time Value affects Attack/Release time.
allEG Time Value affects all PEG Time parameters.
• EG Level, CurveDetermines the velocity sensitivity of the PEG Level.Positive settings will cause the level to rise the harder you
play the keyboard, and negative values will cause it to fall.The Curve parameter lets you select from five differentpreset velocity curves (graphically indicated in thedisplay), that determine how velocity affects the Pitch EG.
❏ Settings EG Level -64 ~0 ~+63Curve 0~4
• PitchDetermines the degree to which velocity affects the pitchchange of the Pitch EG. Extreme values produce greatervariation in pitch change. For positive values, the harderyou play the keys, the greater the change in pitch. Fornegative values, the softer you play the keys, the greaterthe change in pitch.
❏ Settings -64 ~ 0 ~+63
● [F2]-[SF3] Normal Element PitchPEG Time, Level
Basic Structure (page 46)
From this display you can make all the time and level settings for the Pitch EG, which determine how the pitch of the sound changes over time.These can be used to control the change in pitchfrom the moment a note is pressed on the keyboardto the moment the sound stops.
The full names of the available parameters are
shown in the chart below, as they appear in thedisplay.
• TIME
❏ Settings 0 ~127
• LEVEL
❏ Settings -128 ~ 0 ~+127 (-4800cent ~ 0~+4800cent)
• DEPTH*
❏ Settings -64 ~ 0 ~+63
● [F2]-[SF4] Normal Element Pitch Key Follow
From this display you can set the Key Follow effect— in other words, how the pitch of the element andits Pitch EG respond to the particular notes (oroctave range) you play.
• PitchSens (Pitch Sensitivity)Determines the degree to which the notes (specifically,their position or octave range) affect the pitch of theselected element. The Center Key (next parameter) is usedas the basic pitch for this parameter.A positive setting will cause the pitch of lower notes tochange lower and that of higher notes to change higher.Negative values will have the opposite effect.
❏ Settings -200% ~ 0 ~ +200%
n For a setting of 100%, neighboring notes arepitched one semitone (100 cents) apart.
HOLD ATK DCY1 DCY2 REL DEPTH*
TIME Hold time Attack time Decay 1time
Decay 2time
Releasetime
LEVEL Hold level Attack level Decay 1level
Decay 2level
Releaselevel Depth
0
ReleaseLevel
AttackLevel
Hold level
AttackTime
HoldTime
Decay1Time
Decay2Time
ReleaseTime
Decay1Level
Decay2Level Key off
Time
Pitch

8/10/2019 motif_1(2)
http://slidepdf.com/reader/full/motif12 140/300
140 MOTIF Reference
Voice Edit mode
Ref er enc e
V oi c emod e
• Center KeyDetermines the central note or pitch for the Key Followeffect on pitch. Depending on the Pitch Sensitivityparameter above, the further away from the Center Key thekeys are played, the greater the degree of pitch change.
❏ Settings C -2 ~ G8
n You can also set the Center Key directly from thekeyboard, by holding down the [INFORMATION] button and pressing the desired key. See “BasicOperation” on page 75.
• EG Time Sens (EG Time Sensitivity)Determines the degree to which the notes (specifically,their position or octave range) affect the Pitch EG times ofthe selected element. The Center Key (next parameter) isused as the basic pitch for this parameter.A positive setting will cause the pitch of lower notes tochange slower and that of higher notes to change faster.Negative values will have the opposite effect.
❏ Settings -64 ~ 0 ~+63
• Center KeyDetermines the central note or pitch for the Key Followeffect on Pitch EG. Depending on the EG Time Sensitivityparameter above, the further away from the Center Key thekeys are played, the more the time of the Pitch EG deviatesfrom the norm.When the Center Key note is played, the PEG behavesaccording to its actual settings. The pitch changecharacteristics for other notes will vary in proportion to
the EG Time settings.❏ Settings C -2 ~ G8
n You can also set the Center Key directly from thekeyboard, by holding down the [INFORMATION] button and pressing the desired key.
● [F3]-[SF1] Normal Element Filter TypeBasic Structure (page 46)
From this display you can make comprehensivesettings for the Filter section. The availableparameters differ depending on which Filter type isselected here.
• TypeBasically, there are four different Filter types: an LPF(Low Pass Filter), an HPF (High Pass Filter), a BPF (BandPass Filter) and a BEF (Band Elimination Filter). Eachtype has a different frequency response and produces adifferent effect on the sound. The MOTIF also featuresspecial combination Filter types, for additional soniccontrol.
❏ Settings See below.
LPF24D (Low Pass Filter 24dB/oct Digital)A 4-pole (-24db/oct) dynamic LPF with a strongresonance.
LPF24A (Low Pass Filter 24dB/oct Analog)A 4-pole (-24db/oct) dynamic LPF with a charactersimilar to those found on analog synthesizers
LPF18 (Low Pass Filter18dB/oct)A 3-pole (-18db/oct) dynamic LPF.
LPF18s (Low Pass Filter [18dB/oct Staggered)Also a 3-pole (-18db/oct) dynamic LPF, but with ashallower frequency curve.
Center(basic pitch) Higher rangeLower range
Large
Small
—
+Amount ofpitch change
Basic pitch
Higher rangeLower range
Basic pitch
Higher rangeLower range
+
–
Speed of PEGpitch change
Speed of PEGpitch range
Positive value
Negative value+
–
Resonance
Resonance
LPF18
LPF18S
Resonance

8/10/2019 motif_1(2)
http://slidepdf.com/reader/full/motif12 141/300

8/10/2019 motif_1(2)
http://slidepdf.com/reader/full/motif12 142/300
142 MOTIF Reference
Voice Edit mode
Ref er enc e
V oi c emod e
Dual BEFA combination of two sets of –6dB/oct BEF in parallel.
LPF12 (Low Pass Filter 12dB/oct)+ HPF12 (HighPass Filter)A combination of a LPF and HPF.
LPF12 (Low Pass Filter 12dB/oct)+ BPF6 (Band PassFilter)A combination of a LPF and BPF.
HPF12 (High Pass Filter 12dB/oct)+ BPF6 (Band PassFilter)A combination of a HPF and BPF.
thruThe filters are bypassed and the entire signal is
unaffected.
• Cutoff Determines the cutoff frequency for the Filter, or thecentral frequency around which the Filter is applied.
❏ Settings 0 ~ 255
• GainDetermines the Gain (the amount of boost applied to thesignal sent to the Filter).
❏ Settings 0 ~ 255
• Reso/WidthThis parameter’s function varies according to the selectedFilter Type. If the selected filter is an LPF, HPF, BPF(excluding the BPFw), or BEF, this parameter is used to setthe Resonance. For the BPFw, it is used to adjust theWidth of the band.
ResonanceThis parameter is used to set the amount of Resonance(harmonic emphasis) applied to the signal at the cutofffrequency. This can be used in combination with the
cutoff frequency parameter to add further character to thesound.
WidthWith the BPFw, this parameter is used to adjust the widthof the band of signal frequencies passed by the filter.
❏ Settings 0 ~ 31
• DistanceDetermines the distance between the Cutoff frequencies,for the Dual Filter types. (The two filters in a combinationare connected in parallel fashion.)
❏ Settings 0 ~ 255
• HPF Cutoff Determines the central frequency for the Key Followparameter (below) of the HPF.When a filter type “LPF12” or “LPF6” is selected, thisparameter is available.
❏ Settings 0 ~ 255
• HPF KeyFlw (Key Follow)Determines the Key Follow setting for the HPF Cutofffrequency. This parameter varies the center frequencyaccording to the position of the notes played on thekeyboard. A positive setting will raise the center frequencyfor higher notes and lower it for lower notes. A negativesetting will have the opposite effect.When a filter type “LPF12” or “LPF6” is selected, this
parameter is available.❏ Settings -200% ~ 0 ~ +200%
● [F3]-[SF2] Normal Element Filter Velocity Sensitivity
Basic Structure (page 47)
From this display you can determine how the Filterand the FEG respond to velocity. (For Filter EGsettings, see “FEG” below.)
Level
FrequencyDistance
The cutoff frequency can be setdirectly on the display.
Level
Frequency
Distance
The cutoff frequency can be setdirectly on the display.
Level
Frequency
Level
Frequency

8/10/2019 motif_1(2)
http://slidepdf.com/reader/full/motif12 143/300
143 MOTIF Reference
Voice Edit
• EG Time, SegmentDetermines the velocity sensitivity of the FEG’s Timeparameters. Select the Segment, then set its Timeparameter.Positive Time settings will play back the specified Segmentfaster and negative values will play it back slower.
❏ Settings Time -64 ~ 0 ~ +63Segment ATK, ATK+DCY, DCY,
ATK+RLS, allATK
Affects the Attack Time.ATK+ DCYAffects the Attack Time and Decay1 Time.
DCYAffects the Decay Time.
ATK+ RLSAffects the Attack Time and Release Time.
allAffects all FEG Time parameters.
• EG Level, CurveDetermines the velocity sensitivity of the Filter EG Level.Positive settings cause greater Filter changes the harder
you play the keyboard. Negative settings do the opposite;the softer you play, the more the sound changes. TheCurve parameter lets you select from five different presetvelocity curves (graphically indicated in the display), thatdetermine how velocity affects the Filter EG.
❏ Settings EG Level -64 ~ 0 ~ +63Curve 0 ~ 4
• Cutoff Determines the degree to which velocity affects the Cutofffrequency of the Filter EG. Extreme values produce greatervariation in the Cutoff frequency. For positive values, the harder you play the keys, the greater the change in theCutoff frequency. Negative values do the opposite; the
frequency changes more the softer you play.❏ Settings -64 ~ 0 ~ +63
• ResonanceDetermines the degree to which velocity affects theResonance of the Filter EG. Extreme values producegreater variation in the Resonance. For positive values, the harder you play the keys, the greater the Resonancechange. Negative values do the opposite; the Resonancechanges more the softer you play.
❏ Settings -64 ~ 0 ~ +63
● [F3]-[SF3] Normal Element FilterFEG (Filter Envelope Generator)
Basic Structure (page 47)
From this display you can make all the time and level setting for the Filter EG, which determine howthe tonal quality of the sound changes over time.
The full names of the available parameters areshown in the chart below, as they appear in thedisplay.
• TIME
❏ Settings 0 ~ 127
• LEVEL
❏ Settings -128 ~ 0 ~ +127 (-9600cent ~ 0 ~+9600cent)
• DEPTH*
❏ Settings -64~ 0 ~ 63
● [F3]-[SF4] Normal Element FilterKey Follow
From this display you can set the Key Follow effectfor the Filter — in other words, how the tonalqualities of the element and its Filter EG respond to
the particular notes (or octave range) you play.n The availability of the Filter Key Follow parameter
depends on the Break Point and Offset settingsdescribed on page 144.
HOLD ATK DCY1 DCY2 REL DEPTH*
TIME Hold time Attack timeDecay 1
timeDecay 2
timeRelease
time
LEVEL Hold level Attack levelDecay 1
levelDecay 2
levelRelease
level Depth
0
Release
Level
Attack
Level
Hold level
AttackTime
HoldTime
Decay1Time
Decay2Time
ReleaseTime
Decay1
Level
Decay2
Level Key off
Time
Pitch

8/10/2019 motif_1(2)
http://slidepdf.com/reader/full/motif12 144/300
144 MOTIF Reference
Voice Edit mode
Ref er enc e
V oi c emod e
• CutoffSens (Cutoff Sensitivity)Determines the degree to which the notes (specifically,their position or octave range) affect the Filter of theselected element. A Center Key setting of C3 is used as the basic setting by the Cutoff parameter.A positive setting will lower the Cutoff frequency for lower notes and raise it for higher notes. A negative settingwill have the opposite effect.
❏ Settings -200% ~ 0 ~ +200%
• CenterKeyThis indicates that the central note for Cutoff Sensitivityabove is C3. At C3, the tone remains unchanged. For othernotes played, the Cutoff Frequency varies according to theparticular note and the Cutoff Sensitivity setting. Keep inmind that this is for display purposes only; the valuecannot be changed.
• EGTimeSens (EG Time Sensitivity)Determines the degree to which the notes (specifically,their position or octave range) affect the Filter EG times ofthe selected element.The basic speed of change for the FEG is at the notespecified in the Center Key (next parameter).A positive setting will cause slower changes for lowernotes and faster changes for higher notes. A negativesetting will have the opposite effect.
❏ Settings -64 ~ 0 ~ +63
• CenterKeyDetermines the central note or pitch for the Key Followeffect on Filter EG. Depending on the EG Time Sensitivityparameter above, the further away from the Center Key thekeys are played, the more the time of the Filter EG deviatesfrom the norm. When the Center Key note is played, theFEG behaves according to its actual settings. The Filterchange characteristics for other notes will vary inproportion to the EG Time settings.
❏ Settings C -2 ~ G8
n You can also set the Center Key directly from thekeyboard, by holding down the [INFORMATION] button and pressing the desired key. See “BasicOperation” on page 75.
● [F3]-[SF5] Normal Element Filter Scaling
Filter Scaling controls the filter cutoff frequencyaccording to the positions of the notes on thekeyboard. You can divide the entire keyboard byfour break points, and assign different offset valuesof Cutoff Frequency to them respectively.
• BREAK POINT 1 ~ 4
❏ Settings C -2 ~ G8
n You can also set the Break Point directly from theKeyboard, by holding down the [INFORMATION] button and pressing the desired key. See “BasicOperation” on page 75.
• OFFSET 1 ~ 4❏ Settings -128 ~ 0 ~ +127
The best way to understand Filter Scaling is byexample. For the settings shown in the exampledisplay above, the basic Cutoff frequency value is64, and the various Offset values at the selectedBreak point settings change that basic valueaccordingly. The specific changes to the Cutofffrequency are shown in the diagram below. TheCutoff frequency changes in a linear fashion between successive Break Points as shown.
n BP1 to BP4 will be automatically be arranged inascending order across the keyboard.
n Regardless of the size of these Offsets, theminimum and maximum Cutoff limits (values of 0and 127, respectively) cannot be exceeded.
n Any note played below the BP1 note results in theBP1 Level setting. Likewise, any note played abovethe BP4 note results in the BP4 Level setting.
Center(basic frequency) Higher rangeLower range
Large
Small
—
+Amount of cutofffrequency change
Basic frequency
Higher rangeLower range
Basic frequency
Higher rangeLower range
+
-
Speed of FEGlevel change
Speed of FEGlevel range
Positive value
Negative value+
-
C#1
60
74
81
68
Break Point 1 Break Point 2 Break Point 3 Break Point 4A4C3D#2
Note
CutoffFrequency

8/10/2019 motif_1(2)
http://slidepdf.com/reader/full/motif12 145/300
145 MOTIF Reference
Voice Edit
● [F4]-[SF1] Normal Element AmplitudeLevel/Pan
This display not only lets you make basic Level andPan settings for each individual element, it alsogives you some detailed and unusual parameters foraffecting Pan position.
• LevelDetermines the output level for the selected element.
❏ Settings 0 ~ 127
• PanDetermines the stereo Pan position for the selectedelement. This will also be used as the basic Pan positionfor the Alternate, Random and Scale settings.
❏ Settings L63 (Left) ~ C (Center) ~ R63 (Right)
• AlternatePanDetermines the amount by which the sound of the selectedelement is panned alternately left and right for each noteyou press. The Pan setting (above) is used as the basic Panposition.
❏ Settings L64 ~ 0 ~ R63
• RandomPanDetermines the amount by which the sound of the selectedelement is panned randomly left and right for each noteyou press. The Pan setting is used as the Center Panposition.
❏ Settings 0 ~ 127
• ScalingPanDetermines the degree to which the notes (specifically,their position or octave range) affect the Pan position, leftand right, of the selected element. At note C3, the mainPan setting (above) is used for the basic Pan position.
❏ Settings -64 ~ 0 ~ +63
● [F4]-[SF2] Normal Element Amplitude Velocity Sensitivity
From this display you can determine how theAmplitude (volume) EG responds to velocity. (ForAmplitude EG settings, see “AEG” below.)
• EG Time, SegmentDetermines the velocity sensitivity of the AEG’s Timeparameters. Select the Segment, then set its Timeparameter.Positive Time settings will play back the specified Segmentfaster and negative values will play it back slower.
❏ Settings Time -64 ~ 0 ~ +63Segment ATK, ATK+DCY, DCY,
ATK+RLS, allATK
Affects the Attack Time.ATK+DCYAffects the Attack Time and Decay1 Time.
DCYAffects the Decay Time.
ATK+RLSAffects the Attack Time and Release Time.
allAffects all AEG Time parameters.
• EG Level, CurveDetermines the velocity sensitivity of the Amplitude EGLevel. Positive settings cause greater volume changes the
harder you play the keyboard. Negative settings do theopposite; the softer you play, the more the volume changes.The Curve parameter lets you select from five differentpreset velocity curves (graphically indicated in thedisplay), that determine how velocity affects theAmplitude EG.
❏ Settings EG Level -64 ~ 0 ~ +63Curve 0 ~ 4
● [F4]-[SF3] Normal Element Amplitude AEG
Basic Structure (page 47)
From this display you can make all the time and
level settings for the Amplitude EG, whichdetermine how the volume of the sound changesover time.
The full names of the available parameters areshown in the chart below, as they appear in thedisplay.
INIT ATK DCY1 DCY2 REL DEPTH
TIME --- Attack time Decay 1time
Decay 2time
Releasetime
LEVEL Initial level --- Decay 1level
Decay 2level
--- ---

8/10/2019 motif_1(2)
http://slidepdf.com/reader/full/motif12 146/300
146 MOTIF Reference
Voice Edit mode
Ref er enc e
V oi c emod e
• TIME
❏ Settings 0 ~ 127 (excluding --- above)
• LEVEL
❏ Settings 0 ~127
● [F4]-[SF4] Normal Element AmplitudeKey Follow
From this display you can set the Key Follow effectfor Amplitude — in other words, how the volume ofthe element and its Amplitude EG respond to theparticular notes (or octave range) you play.
n The availability of the Amplitude Key Followparameter depends on the Break Point and Offsetsettings described on see below.
• LevelSens (Level Sensitivity)Determines the degree to which the notes (specifically,their position or octave range) affect the volume of theselected element. A Center Key setting of C3 is used as the basic setting.A positive setting will lower the output level for lowernotes and raise it for higher notes. A negative setting will have the opposite effect.
❏ Settings -200% ~ 0 ~+200%
• CenterKeyThis indicates that the central note for Level Sensitivityabove is C3. At C3, the volume (level) remains unchanged.
For other notes played, the volume varies according to theparticular note and the Level Sensitivity setting. Keep inmind that this is for display purposes only; the valuecannot be changed.
• EGTimeSens (EG Time Sensitivity)Determines the degree to which the notes (specifically, theirposition or octave range) affect the Amplitude EG times ofthe selected element. The Center Key (next parameter) isused as the basic amplitude for this parameter.A positive setting will cause the amplitude of lower notes tochange slower and that of higher notes to change faster.Negative values will have the opposite effect.
❏ Settings -64 ~ 0 ~ +63
• CenterKeyDetermines the central note or pitch for the Key Followeffect on Amplitude EG. Depending on the EG TimeSensitivity parameter above, the further away from theCenter Key the keys are played, the more the time of theAmplitude EG deviates from the norm.When the Center Key is played, the AEG behavesaccording to its actual settings. The amplitude changecharacteristics for other notes will vary in proportion tothe EGTime settings.
❏ Settings C -2 ~ G8
n You can also set the Center Key directly from thekeyboard, by holding down the [INFORMATION] button and pressing the desired key.
● [F4]-[SF5] Normal Element Amplitude Scaling
Amplitude Scaling controls the output level (set inthe [F4]-[SF1] display) according to the positions ofthe notes on the keyboard. You can divide the entirekeyboard by four break points, and assign differentoffset values of amplitude to them respectively.
• BREAK POINT 1 ~ 4
❏ Settings C -2 ~ G8
n You can also set the Break Point directly from theKeyboard, by holding down the [INFORMATION] button and pressing the desired key. See “BasicOperation” on page 75.
• OFFSET 1 ~ 4
❏ Settings -128 ~ 0 ~ +127
0
ReleaseLevel
AttackLevel
Attack
Time
Decay1
Time
Decay2
Time
Release
Time
Decay2Level Key off
Time
Decay1LevelLevel
InitLevel
Center(basic pitch) Higher rangeLower range
Large
Small
–
+Speed of AEGlevel change
Center (basic volume)
Higher rangeLower range
Center (basic volume)
Higher rangeLower range
+
—
Speed of AEGlevel change
Speed of AEGlevel range
Positive value
Negative value+
—

8/10/2019 motif_1(2)
http://slidepdf.com/reader/full/motif12 147/300
147 MOTIF Reference
Voice Edit
The best way to understand Amplitude Scaling is byexample. For the settings shown in the exampledisplay above, the basic Amplitude (volume) valuefor the selected element is 80, and the various Offsetvalues at the selected Break point settings changethat basic value accordingly. The specific changes tothe Amplitude are shown in the diagram below. TheAmplitude changes in a linear fashion betweensuccessive Break Points as shown.
n BP1 to BP4 will be automatically be arranged inascending order across the keyboard.
n Regardless of the size of these Offsets, theminimum and maximum Cutoff limits (values of 0and 127, respectively) cannot be exceeded.
n Any note played below the BP1 note results in theBP1 Level setting. Likewise, any note played abovethe BP4 note results in the BP4 Level setting.
● [F5] Normal Element LFOBasic Structure (page 47)
This display gives you a comprehensive set of
controls over the LFO for each individual element.The LFO can be used to create vibrato, wah,tremolo and other special effects, by applying it tothe pitch, filter and amplitude parameters.
• WaveDetermines the LFO waveform used to vary the sound.
❏ Settings saw, tri, squ
• SpeedDetermines the speed of the LFO waveform. The higherthe value, the faster the speed.
❏ Settings 0 ~ 63
• KeyOnSyncWhen this is set to on, the LFO waveform is reset everytime a note is played.
❏ Settings off, on
• KeyOnDelayDetermines the delay time before the LFO comes intoeffect. A higher value results in a longer delay time.
❏ Settings 0 ~ 127
• PMOD (Pitch Modulation Depth)Determines the amount (depth) by which the LFOwaveform varies (modulates) the pitch of the sound. The higher the value, the greater the amount of pitchmodulation.
❏ Settings 0 ~ 127
C1
76
90
97
84
Break Point 1 Break Point 2 Break Point 3 Break Point 4C4C3C2
Note
Amplitude
saw (sawtooth wave)
squ (square wave)
tri (triangle wave)
Speed = Fast Speed = Slow
TimeTime
Time
Key on
Time
Key on
Sync onSync off
Short delay Long delay
Key onKey on

8/10/2019 motif_1(2)
http://slidepdf.com/reader/full/motif12 148/300
148 MOTIF Reference
Voice Edit mode
Ref er enc e
V oi c emod e
• FMOD (Filter Modulation Depth)Determines the amount (depth) by which the LFOwaveform varies (modulates) the Filter Cutoff frequency.The higher the value, the greater the amount of filtermodulation.
❏ Settings 0 ~ 127
• AMOD (Amplitude Modulation Depth)Determines the amount (depth) by which the LFOwaveform varies (modulates) the amplitude or volume ofthe sound. The higher the value, the greater the amount ofamplitude modulation.
❏ Settings 0 ~ 127
● [F6] Normal Element EQ (Equalizer)
• TypeDetermines the Equalizer Type. The MOTIF features awide selection of various equalizer types, which can beused not only to enhance the original sound, but evencompletely change the character of the sound. Theparticular parameters and settings available depend on thespecific Equalizer Type that is selected.
❏ Settings EQ L/H, P.EQ, Boost6, Boost12, Boost18, thru
EQ L/H (Low/High)This is a “shelving” equalizer, which combinesseparate high and low frequency bands.
P.EQ (Parametric EQ)The Parametric EQ is used to attenuate or boost signal levels (gain) around the Frequency. This type features32 different “Q” settings, which determine thefrequency band width of the equalizer.
Boost6 (Boost 6dB)/Boost12 (Boost 12dB)/Boost18(Boost 18dB)These can be used to boost the level of the entire signal by 6dB, 12dB and 18dB, respectively.
thruIf you select this, the equalizers are bypassed and theentire signal is unaffected.
Drum Voice EditBasic Structure (page 45)
◆ Common edit and Drum Key editEach Drum voice consists of various Waves and/orNormal voices, each assigned to notes across thekeyboard, from C0 to C6 (page 45). Use DrumCommon Edit to edit the settings that apply to allDrum keys in the voice. There are two types of DrumVoice Edit displays: those for Common Edit, and thosefor editing individual keys (elements).
◆ Basic ProcedureBasic Structure (page 70)
1 Press the [VOICE] button to enter the Voice Playmode. (The indicator lights.)
2 Select a Drum voice to be edited.
3 Press the [EDIT] button to enter the Voice Editmode. (The indicator lights.)
Low FreqLow Gain
High FreqHigh Gain
Frequency
-
+
0
Gain
❏ Settings50.1Hz ~ 2.00kHz
❏ Settings503.8Hz ~ 10.1kHz
❏ Settings-32 ~ 0 ~ +32
❏ Settings-32 ~ 0 ~ +32
Gain❏ Settings-32 ~ 0 ~ +32
Freq❏ Settings 139.7Hz ~ 12.9kHz
Q (Frequency Characteristic)❏ Settings 0 ~ 31
Frequency
–
+
0 G a i n
Indicates a Common Edit display.
COMMON
Drum Key
Indicates a display for editing a single key
(in this case, C 0)

8/10/2019 motif_1(2)
http://slidepdf.com/reader/full/motif12 149/300
149 MOTIF Reference
Voice Edit
4 Select a key to be edited.
• To edit parameters common to the entire Drumvoice (all keys), press the [DRUM KITS] button.
• To edit parameters of an individual Drum key(element), first press the NUMBER [1] button,then press the appropriate key on the keyboard.
5 Select the menu you wish to edit by pressing the[F1]-[F6] and [SF1]-[SF5] buttons.
6 Edit the parameters for the selected voice.
7 Store the settings edited in step #6 to the UserMemory as required.
8 Press the [EXIT] button to exit from the Voice Editmode.
• For detailed instructions on steps #5 - #6, see theexplanations below.
• For details on step #7, refer to “Voice Storemode” on page 159.
■ Common (to all keys) edit
● [F1]-[SF1] Drum Common General Name
Same as in Normal Voice Common Edit. Seepage 130.
● [F1]-[SF3] Drum Common General
Master EQ OffsetSame as in Normal Voice Common Edit. Seepage 131.
● [F1]-[SF5] Drum Common General Other
Same as in Normal Voice Common Edit. Seepage 132.
● [F2] Drum Common Output
Same as in Normal Voice Common Edit. Seepage 132. In addition, the following two parametersare also available.
• InsRevSend (Insertion Reverb Send)Determines the Send level for the entire Drum voice (allkeys), sent from Insertion Effect 1/2 to the Reverb effect.
• InsChoSend (Insertion Chorus Send)Determines the Send level for the entire Drum voice (allkeys), sent from Insertion Effect 1/2 to the Chorus effect.
❏ Settings 0 ~ 127
n Send level (to Reverb and Chorus) cannot be setindependently for each Drum key; the value isfixed at 127 (maximum).
● [F3]-[SF1] Drum Common Arpeggio Arpeggio type
Same as in Normal Voice Common Edit. Seepage 132.
● [F3]-[SF2] Drum Common Arpeggio Arpeggio limit
Same as in Normal Voice Common Edit. Seepage 133.
● [F3]-[SF3] Drum Common ArpeggioPlay FX (Effect)
Same as in Normal Voice Common Edit. Seepage 133.
● [F4]-[SF1], [SF2], [SF3] Drum CommonControl Set Set1/2, Set3/4, Set5/6
Same as in Normal Voice Common Edit. See
page 134.Please note that the Element Switch parameter isnot available in Drum Voice Common edit.
● [F6]-[SF1] Drum Common Effect Connection
Same as in Normal Voice Common Edit. Seepage 137 .The only difference here is that “KEY: OUT”appears in the Drum Common Effect displayinstead of “EL: OUT” (in Normal Common Effect).
DRUM KITS
FAVORITESCOMMON

8/10/2019 motif_1(2)
http://slidepdf.com/reader/full/motif12 150/300

8/10/2019 motif_1(2)
http://slidepdf.com/reader/full/motif12 151/300
151 MOTIF Reference
Voice Edit
● [F1]-[SF5] Drum Key Oscillator Other
From this display you can set various parametersrelated to how the individual notes of the Drumvoice respond to the keyboard and MIDI data.
• AssignModeWhen this is set to “single,” double playback of the samenote is prevented. This is useful when two or moreinstances of the same note are received nearlysimultaneously, or without a corresponding note offmessage. To allow playback of each instance of the samenote, set this to “multi.”
❏ Settings single, multi
n When the Alternate Group (AltGrp) parameter isset to a setting other than “off,” this parameter isunavailable, and “---” is shown in the display.
• RcvNoteOff (Receive Note Off)Determines whether or not the selected Drum keyresponds to MIDI Note Off messages. Setting this to “off”can be useful for cymbal sounds and other sustainingsounds. This lets you have the selected sounds sustain tothe length of their natural decay — even if you release thenote, or a Note Off message is received.
❏ Settings off, on
n This parameter is effective for Waves selected inthe [F1] - [SF1] Drum Key Oscillator Wave display(page 150).
• AltGrp (Alternate Group)Set the Alternate Group to which the Wave is assigned. Ina real drum kit, some drum sounds cannot physically beplayed simultaneously, such as open and closed hi-hats.You can prevent Waves from playing back simultaneously by assigning them to the same Alternate Group. Up to 127Alternate Groups can be defined. You can also select “off” here if you wish to allow the simultaneous playback ofsounds.
❏ Settings off, 1 ~ 127
● [F2]-[SF1]Drum Key Pitch Tune
• CoarseDetermines the pitch of each Drum Key Wave (or NormalVoice) in semitones.
❏ Settings -48 ~+48
n If a Normal voice has been assigned to the key, thisparameter adjusts the position of its note (not itspitch) relative to note C3. For example, let’s assumethe original Voice consists of a two-Element piano- like sound up to note C3 and a two-Element string- like sound from note C#3 upwards. Adjusting thisCoarse setting by +1 would not change the pitch ofthe piano-like sound to C#3. Instead, note C#3 ofthe original Voice (i.e., the string-like sound) would be used.
• FineDetermines the fine tuning for the pitch of each Drum KeyWave (or Normal Voice).
❏ Settings -64 ~+63
● [F2]-[SF2] Drum Key Pitch Velocity Sensitivity
From this display you can determine how the pitchof the Drum key responds to velocity.
• PitchDetermines how the pitch of the selected Drum keyresponds to velocity. For positive values, the harder youplay the key, the higher the pitch becomes. For negativevalues, the harder you play the key, the lower the pitch.
❏ Settings -64 ~+63
● [F3]-[SF1] Drum Key Filter Cutoff
Basic Structure (page 46)
The MOTIF lets you apply a low pass filter and highpass filter to each individual Drum key — givingyou exceptionally detailed and comprehensive soniccontrol over the Drum voice.
n This parameter is effective for Waves selected inthe [F1] - [SF1] Drum Key Oscillator Wave display(page 150).
• LPF Cutoff Determines the Cutoff frequency of the Low Pass Filter.
❏ Settings 0 ~ 255
• LPF ResoDetermines the amount of Resonance (harmonicemphasis) applied to the signal at the Cutoff frequency.
❏ Settings 0 ~ 31
• HPF CutoffDetermines the Cutoff frequency of the High Pass Filter.
❏ Settings 0 ~ 255

8/10/2019 motif_1(2)
http://slidepdf.com/reader/full/motif12 152/300
152 MOTIF Reference
Voice Edit mode
Ref er enc e
V oi c emod e
● [F3]-[SF2] Drum Key Filter Velocity Sensitivity
• LPFCutoffDetermines the velocity sensitivity of the Low Pass FilterCutoff frequency. Positive settings will cause the cutofffrequency to rise the harder you play the keyboard andnegative settings will cause it to fall.
❏ Settings -64 ~ 0 ~ +63
● [F4]-[SF1] Drum Key Amplitude Level/Pan
This display not only lets you make basic Level andPan settings for the sound of each individual Drumkey, it also gives you some detailed and unusualparameters for affecting Pan position.
• LevelDetermines the output for the selected Drum key (Wave).This lets you make detailed balance adjustments amongthe various sounds of the Drum voice.
❏ Settings 0 ~ 127
• PanDetermines the stereo Pan position for the selected Drumkey (Wave). This will also be used as the basic Pan positionfor the Alternate and Random settings.
❏ Settings L63 (Left) ~ C (Center) ~ R63 (Right)
• AlternatePanDetermines the amount by which the sound of the selectedDrum key is panned alternately left and right for each noteyou press. The Pan setting (above) is used as the basic Panposition.
❏ Settings L64 ~ 0 ~ R63
n This parameter is effective for Drum keys whoseType parameter (in the Oscillator Wave display,
page 150) has been set to “Preset wave” or “Userwave.”
• RandomPanDetermines the amount by which the sound of the selectedDrum key is panned randomly left and right for each noteyou press. The Pan setting (above) is used as the CenterPan position.
❏ Settings 0 ~ 127
n This parameter is effective for Drum keys whoseType parameter (in the Oscillator Wave display,page 150) has been set to “Preset wave” or “Userwave.”
● [F4]-[SF2] Drum Key Amplitude AEG Velocity Sensitivity
• LevelDetermines the velocity sensitivity of the AmplitudeEnvelope Generator’s output level. Positive settings will causethe output level to rise the harder you play the keyboard and,conversely, negative values will cause it to fall.
❏ Settings -64 ~ 0 ~ +63
● [F4]-[SF3] Drum Key Amplitude AEGBasic Structure (page 47)
• AttackTime
❏ Settings 0 ~ 127
• Decay1Time
❏ Settings 0 ~ 127
• Decay1Lvl (Level)
❏ Settings 0 ~ 127
• Decay2Time
❏ Settings 0 ~ 126, hold
Decay2 Time = 0~126
Decay2 Time = hold
AttackLevel
Key on
AttackTime
Decay1Time
Decay2Time
Decay1Level
AttackLevel
Key on
AttackTime
Decay1Time
Decay2Time
Decay1Level
Time
Level
Time
Level

8/10/2019 motif_1(2)
http://slidepdf.com/reader/full/motif12 153/300
153 MOTIF Reference
Voice Edit
● [F6] Drum Key EQ (Equalizer)
Same as in Normal Voice Element Edit. Seepage 148.
n This parameter is effective for Drum keys whoseType parameter (in the Oscillator Wave display,page 150) has been set to “Preset wave” or “Userwave.”
Plug-in Voice Edit
Basic Structure (page 43)
◆ Common edit and Element editSame as Normal Voice Edit. See page 129.
Unlike with Normal voices, the Plug-in voices only have one element for editing.
◆ About Plug-in voices and Board voicesThe voices of a Plug-in Board installed to the MOTIFcan be divided into two types: Board voices and Plug-invoices. Board voices are unprocessed, unaltered voicesof the Plug-in board — the “raw material” used for thePlug-in voices. Plug-in voices, on the other hand, areedited Board voices — voices that have been speciallyprogrammed and processed for optimum use with theMOTIF.Included among the Board voices is a special set ofvoices — called Board Custom voices — which can beedited by a computer connected to the MOTIF, usingspecial editing software included with the Plug-in board. (See page 87 .)
nDepending on the particular Plug-in board you are using,some of the parameters described here may not beavailable. For details, refer to the relevant owner’smanual of the Plug-in board.
nFor details on the current lineup of available Plug-in boards, see page 35.
◆ Basic Procedure
Basic Structure (page 70)
1 Press the [VOICE] button to enter the Voice Playmode. (The indicator lights.)
2 Select a Plug-in voice to be edited.
3 Press the [EDIT] button to enter the Voice Editmode. (The indicator lights.)
4 Select an element to be edited.
• To edit the Common parameters, press the[DRUM KITS] button (which serves as a“COMMON” button here).
• To edit the Element parameters, press any one ofthe NUMBER buttons ([1] - [4]). (Editing is thesame, no matter which NUMBER button youpress.)
5 Select the menu you wish to edit by pressing the[F1] - [F6] and [SF1] -[SF5] buttons.
6 Edit the parameters for the selected voice.
7 Store the settings edited in step #6 to the UserMemory as required.
8 Press the [EXIT] button to exit from the Voice Editmode.
• For detailed instructions on steps #5 - #6, see theexplanations below.
• For details on step #7, refer to “Voice Storemode” on page 159.
Cannot be eited
Computer(Voice Editor in CD-ROM
supplied with the Plug-in board)
Copy
Store
Plug-inVoice Edit
Save
Bulk send/ edit
MOTIF voice parameter
Plug-in voice
Plug-in preset voice
Plug-in user voice
Board voice
Board preset voice
Board custom voice
DRUM KITS
FAVORITESCOMMON
1 2 3 4
ELEMENT/PERF.PART/ ZONE

8/10/2019 motif_1(2)
http://slidepdf.com/reader/full/motif12 154/300
154 MOTIF Reference
Voice Edit mode
Ref er enc e
V oi c emod e
■ Common edit
● [F1]-[SF1] Plug-in Common General Name
Same as in Normal Voice Common Edit. Seepage 130.
● [F1]-[SF2] Plug-in Common GeneralPlay mode
Same as in Normal Voice Common Edit. Seepage 130.Please note that Micro Tuning is not available inPlug-in Voice Common Edit.
● [F1]-[SF3] Plug-in Common GeneralMaster EQ Offset
Same as in Normal Voice Common Edit. Seepage 131.
● [F1]-[SF4] Plug-in Common General
PortamentoSame as in Normal Voice Common Edit. Seepage 131.Please note that Portamento Mode and PortamentoTime are not available in Plug-in Voice CommonEdit.
● [F1]-[SF5] Plug-in Common General Other
Same as in Normal Voice Common Edit. Seepage 132.Unlike with Normal Voice Edit, the Upper and
Lower ranges cannot be independently set here.
● [F2] Plug-in Common Output
Same as in Normal Voice Common Edit. Seepage 132.
● [F3]-[SF1] Plug-in Common Arpeggio Arpeggio type
Same as in Normal Voice Common Edit. Seepage 132.
● [F3]-[SF2] Plug-in Common Arpeggio Arpeggio limit
Same as in Normal Voice Common Edit. Seepage 133.
● [F3]-[SF3] Plug-in Common ArpeggioPlay FX (Effect)
Same as in Normal Voice Common Edit. Seepage 133.
● [F4]-[SF1] Plug-in Common Control SetSet1/2
Same as in Normal Voice Common Edit. Seepage 134.Please note that Element Switch is not available inPlug-in Voice Common Edit.
●
[F4]-[SF2] Plug-in Common Control SetModulation Wheel
From this display you can set how the Plug-in voiceresponds to the Modulation wheel, by changing thecontrol depth for the filter, pitch and amplitude(volume).
• FilterDetermines the depth of control of the Modulation Wheelover the filter cutoff frequency. Negative settings result inreversed Modulation wheel operation (i.e., moving thewheel up results in less modulation).
❏ Settings -64 ~ 0 ~ +63
• PMod (Pitch Modulation Depth)Determines the depth of control the Modulation Wheel has over pitch modulation. The higher the setting, thegreater the depth of control.
❏ Settings 0 ~ 127
• FMod (Filter Modulation Depth)Determines the depth of control the Modulation Wheel has over filter cutoff modulation. The higher the setting,the greater the depth of control.
❏ Settings 0 ~ 127
• AMod (Amplitude Modulation Depth)Determines the depth of control the Modulation Wheel has over amplitude modulation. The higher the setting, thegreater the depth of control.
❏ Settings 0 ~ 127

8/10/2019 motif_1(2)
http://slidepdf.com/reader/full/motif12 155/300
155 MOTIF Reference
Voice Edit
● [F4]-[SF3] Plug-in Common Control Set After Touch
The MOTIF gives you a comprehensive set of aftertouch controls for the Plug-in voice, allowing you tochange the pitch and filter settings, and producemodulation effects (pitch, filter and amplitude)-simply by pressing down hard on the keys.
• PitchDetermines the depth of control of keyboard aftertouchover pitch. You can set a value (in semitones) of up to twooctaves.
❏ Settings -24 ~ 0 ~ +24
• FilterDetermines the depth of control of keyboard aftertouch
over the filter cutoff frequency.❏ Settings -64 ~ 0 ~ +63
• PMod (Pitch Modulation Depth)Determines the depth of control that keyboard aftertouch has over pitch modulation. The higher the setting, thegreater the depth of control.
❏ Settings 0 ~ 127
• FMod (Filter Modulation Depth)Determines the depth of control that keyboard aftertouch has over filter cutoff modulation. The higher the setting,the greater the depth of control.
❏ Settings 0 ~ 127
• AMod (Amplitude Modulation Depth)Determines the depth of control that keyboard aftertouch has over amplitude modulation. The higher the setting, thegreater the depth of control.
❏ Settings 0 ~ 127
● [F4]-[SF4] Plug-in Common Control Set AC (Assignable Controls)From this display you can assign MIDI ControlChange numbers and determine the degree to whichthe assigned controllers affect the filter and themodulation effects (pitch, filter and amplitude). Fordetails on using Control Change numbers and theAssignable Controls, see page 191.
• SourceDetermines the MIDI Control Change number used tocontrol the filter, PMod, FMod, and Amod.
❏ Settings 0 ~ 95
• FilterDetermines the depth of control the Control Changenumbers (set in the Source parameter above) have over thefilter cutoff frequency.
❏ Settings -64 ~ 0 ~ +63
• PMod (Pitch Modulation Depth)Determines the depth of control the Control Changemessages (set in the Source parameter above) have overpitch modulation. The larger the setting, the greater thedepth of control.
❏ Settings 0 ~ 127
• FMod (Filter Modulation Depth)Determines the depth of control the Control Changemessages (set in the Source parameter above) have overfilter cutoff modulation. The larger the setting, the greaterthe depth of control.
❏ Settings 0 ~ 127
• AMod (Amplitude Modulation Depth)Determines the depth of control the Control Changemessages (set in the Source parameter above) have overamplitude modulation. The larger the setting, the greaterthe depth of control.
❏ Settings 0 ~ 127
● [F6]-[SF1] Plug-in Common EffectConnection
Basic Structure (page 40)
This is the same as in Normal Voice CommonEdit (page 137 ), with the exception of the followingpoints.
• EL: OUT settings are not available in Plug-inVoice Common Edit.
• The parallel setting (Insertion Connection) is
not available in Plug-in Voice Common Edit.
● [F6]-[SF2], [SF3], [SF4], [SF5] Plug-in CommonEffect Parameter Insertion 1, 2, Reverb,Chorus
The number of parameters and values availablediffers depending on the currently selected effecttype. For more information, see the Effect Type Listin the separate Data List booklet.
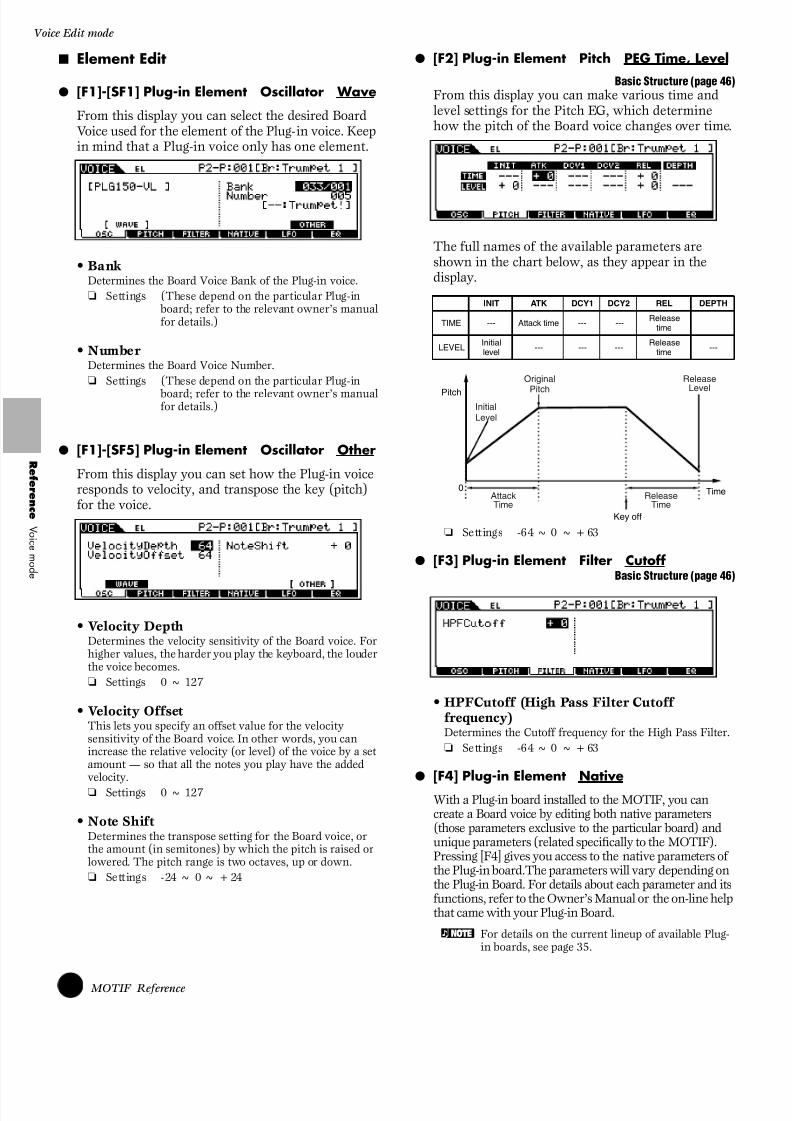
8/10/2019 motif_1(2)
http://slidepdf.com/reader/full/motif12 156/300
156 MOTIF Reference
Voice Edit mode
Ref er enc e
V oi c emod e
■ Element Edit
● [F1]-[SF1] Plug-in Element Oscillator Wave
From this display you can select the desired BoardVoice used for the element of the Plug-in voice. Keepin mind that a Plug-in voice only has one element.
• BankDetermines the Board Voice Bank of the Plug-in voice.
❏ Settings (These depend on the particular Plug-in board; refer to the relevant owner’s manualfor details.)
• NumberDetermines the Board Voice Number.
❏ Settings (These depend on the particular Plug-in
board; refer to the relevant owner’s manualfor details.)
● [F1]-[SF5] Plug-in Element Oscillator Other
From this display you can set how the Plug-in voiceresponds to velocity, and transpose the key (pitch)for the voice.
• Velocity DepthDetermines the velocity sensitivity of the Board voice. For higher values, the harder you play the keyboard, the louderthe voice becomes.
❏ Settings 0 ~ 127
• Velocity OffsetThis lets you specify an offset value for the velocitysensitivity of the Board voice. In other words, you canincrease the relative velocity (or level) of the voice by a setamount — so that all the notes you play have the addedvelocity.
❏ Settings 0 ~ 127
• Note ShiftDetermines the transpose setting for the Board voice, orthe amount (in semitones) by which the pitch is raised or lowered. The pitch range is two octaves, up or down.
❏ Settings -24 ~ 0 ~ +24
● [F2] Plug-in Element Pitch PEG Time, Level
Basic Structure (page 46)From this display you can make various time and level settings for the Pitch EG, which determine how the pitch of the Board voice changes over time.
The full names of the available parameters areshown in the chart below, as they appear in thedisplay.
❏ Settings -64 ~ 0 ~ +63
● [F3] Plug-in Element Filter CutoffBasic Structure (page 46)
• HPFCutoff (High Pass Filter Cutofffrequency)Determines the Cutoff frequency for the High Pass Filter.
❏ Settings -64 ~ 0 ~ +63
● [F4] Plug-in Element Native
With a Plug-in board installed to the MOTIF, you cancreate a Board voice by editing both native parameters(those parameters exclusive to the particular board) andunique parameters (related specifically to the MOTIF).Pressing [F4] gives you access to the native parameters ofthe Plug-in board.The parameters will vary depending onthe Plug-in Board. For details about each parameter and itsfunctions, refer to the Owner’s Manual or the on-line helpthat came with your Plug-in Board.
n For details on the current lineup of available Plug-in boards, see page 35.
INIT ATK DCY1 DCY2 REL DEPTH
TIME --- Attack time --- ---Release
time
LEVELInitiallevel --- --- ---
Releasetime ---
InitialLevel
0
Release
Level
Original
Pitch
AttackTime
ReleaseTime
Key off
Time
Pitch
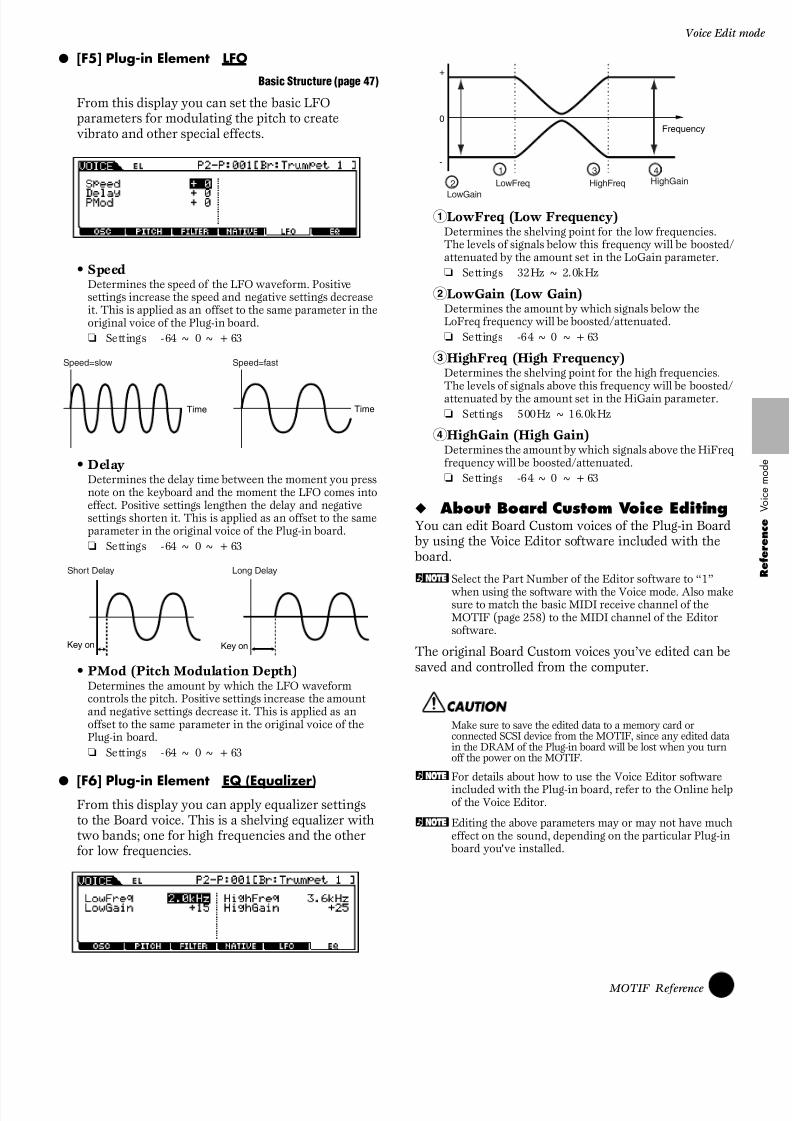
8/10/2019 motif_1(2)
http://slidepdf.com/reader/full/motif12 157/300
157 MOTIF Reference
Voice Edit
● [F5] Plug-in Element LFO
Basic Structure (page 47)
From this display you can set the basic LFOparameters for modulating the pitch to createvibrato and other special effects.
• SpeedDetermines the speed of the LFO waveform. Positivesettings increase the speed and negative settings decreaseit. This is applied as an offset to the same parameter in theoriginal voice of the Plug-in board.
❏ Settings -64 ~ 0 ~ +63
• DelayDetermines the delay time between the moment you pressnote on the keyboard and the moment the LFO comes intoeffect. Positive settings lengthen the delay and negativesettings shorten it. This is applied as an offset to the sameparameter in the original voice of the Plug-in board.
❏ Settings -64 ~ 0 ~ +63
• PMod (Pitch Modulation Depth)Determines the amount by which the LFO waveformcontrols the pitch. Positive settings increase the amountand negative settings decrease it. This is applied as anoffset to the same parameter in the original voice of thePlug-in board.
❏ Settings -64 ~ 0 ~ +63
● [F6] Plug-in Element EQ (Equalizer)From this display you can apply equalizer settingsto the Board voice. This is a shelving equalizer withtwo bands; one for high frequencies and the otherfor low frequencies.
1LowFreq (Low Frequency)Determines the shelving point for the low frequencies.The levels of signals below this frequency will be boosted/attenuated by the amount set in the LoGain parameter.
❏ Settings 32Hz ~ 2.0kHz
2LowGain (Low Gain)Determines the amount by which signals below theLoFreq frequency will be boosted/attenuated.
❏ Settings -64 ~ 0 ~ +63
3HighFreq (High Frequency)Determines the shelving point for the high frequencies.The levels of signals above this frequency will be boosted/attenuated by the amount set in the HiGain parameter.
❏ Settings 500Hz ~ 16.0kHz
4HighGain (High Gain)Determines the amount by which signals above the HiFreqfrequency will be boosted/attenuated.
❏ Settings -64 ~ 0 ~ +63
◆ About Board Custom Voice EditingYou can edit Board Custom voices of the Plug-in Board by using the Voice Editor software included with the board.
nSelect the Part Number of the Editor software to “1”
when using the software with the Voice mode. Also makesure to match the basic MIDI receive channel of theMOTIF (page 258) to the MIDI channel of the Editorsoftware.
The original Board Custom voices you’ve edited can besaved and controlled from the computer.
Make sure to save the edited data to a memory card orconnected SCSI device from the MOTIF, since any edited datain the DRAM of the Plug-in board will be lost when you turnoff the power on the MOTIF.
nFor details about how to use the Voice Editor softwareincluded with the Plug-in board, refer to the Online helpof the Voice Editor.
nEditing the above parameters may or may not have mucheffect on the sound, depending on the particular Plug-in board you've installed.
Speed=slow Speed=fast
TimeTime
Short Delay Long Delay
Key onKey on
LowFreq
LowGain
HighGainHighFreq
Frequency
-
+
0
12
3 4

8/10/2019 motif_1(2)
http://slidepdf.com/reader/full/motif12 158/300
158 MOTIF Reference
Voice Job mode
Ref er enc e
V oi c emod e
Voice Job mode
The Voice Job mode contains various convenientoperations (called “Jobs”), which are useful in editingand archiving your original voices.
◆ Basic Procedure
1 In the Voice Play mode, select a voice you wish toexecute the Job on.
2 Press the [JOB] button to enter the Voice JobMode.
3 Select the desired Job menu by pressing theappropriate button, [F1] - [F6].
4 Set the relevant Job parameters.
5 Press the [ENTER] button. (The display promptsyou for confirmation.)
6 Press the [INC/YES] button to execute the Job.After the Job has been completed, a “Completed”message appears and operation returns to theoriginal display.
n To cancel the Job, press the [DEC/NO] button.
For Jobs that take longer to process, you will see themessage “Executing…” during processing. If you switchoff the power of the MOTIF while this message isdisplayed, you risk corrupting your data.
7 Press the [VOICE] button to exit from Voice Jobmode and return to Voice Play mode.
• For detailed instructions on steps #3 - #4, see the
explanations below.
● [F1] Initialize
This function lets you reset (initialize) all voiceparameters to their default settings. It also allowsyou to selectively initialize certain parameters, suchas Common settings, settings for each Element/Drum key, and so on — very useful when creating acompletely new voice from scratch.
❏ Type of parameter to be initialized
When a Normal voice is selected:ALL, Common, EL1 ~ 4
When a Drum voice is selected:ALL, Common, EL
n If you turn the check mark on, you can select aDrum key. For details on selecting a key, see “BasicOperation” on page 75.
When a Plug-in voice is selected:ALL, Common, EL
● [F2] Edit Recall
If you are editing a voice and select a different voicewithout storing your edited one, all the edits you’vemade will be erased. If this happens, you can useEdit Recall to restore the voice with your latest editsintact.
● [F3] Copy
From this display you can copy Common andElement/Drum Key parameter settings from anyVoice to the Voice you are editing. This is useful ifyou are creating a Voice and wish to use someparameter settings from another Voice.
• Source voiceSelect a Voice and data type to be copied.
❏ Data type
When a Normal voice is selected:Common, Element 1 ~ 4
When a Drum voice is selected:Common, Drum key C0 ~ C6
When a Plug-in voice is selected:Common, Element
n If the source Voice type (Normal/Drum/Plug-in)differs from one of the Voice you are currentlyediting (destination), you will only be able to copyCommon parameters.

8/10/2019 motif_1(2)
http://slidepdf.com/reader/full/motif12 159/300
159 MOTIF Reference
Voice Store
• Data type of Destination voice (currentselected voice)If the source is a Normal or Drum Voice and data type isset to Element or Drum Key, you can set the data type ofthe destination Voice.
❏ Data type
When a Normal voice is selected:Element 1 ~ 4
When a Drum voice is selected:
Drum key C0 ~ C6
n If you choose to copy Common parameters fromthe source, this display will change to “Common.”
● [F4] Bulk Dump
This function lets you send all your editedparameter settings for the currently selected voiceto a computer or another MIDI device for dataarchiving.
n You must set the correct MIDI Device Number inorder to execute a Bulk Dump. For details, see
page 258.
Voice Store mode
Basic Structure (page 63)
This function lets you store your edited voice to Usermemory.
When you execute this, the settings for the destination
memory will be overwritten. Important data should always be backed up to computer, a separate Memory Card orsome other storage device.
◆ Basic Procedure
1 After editing the voice, press the [STORE] buttonto enter the Voice Store mode.
2 Select the destination Voice Memory.
3 Press the [ENTER] button. (The display promptsyou for confirmation.)
4 To execute the Store operation, press the [INC/YES] button. After the voice has been stored, a“Completed” message appears and operationreturns to the original display.
n To cancel the Store operation, press the [DEC/NO] button.
For Store operations that take longer to process, you willsee the message “Executing…” during processing. If youswitch off the power of the MOTIF while this message isdisplayed, you risk corrupting your data.

8/10/2019 motif_1(2)
http://slidepdf.com/reader/full/motif12 160/300
160 MOTIF Reference
Function Tree
Ref er enc e
P erf ormanc emod e
Performance ModeBasic Structure (page 42)
Function Tree
This section is devoted to the Performance mode. To see how the Performance mode relates to the entire structure ofthe MOTIF and its other modes and functions, see the simplified chart in “Basic Structure” on page 30.The following detailed chart shows all of the display menus and parameter groups of the Performance modes —
giving you a quick, easy-to-understand overview of the performance-related functions of the MOTIF.Brackets around a word or phrase (e.g., [F1]) indicate specific button names or panel operations.
[INFO] PERFORMANCE INFO
[PERFORM] PERFORMANCE PLAY
[F1] PERFORMANCE PLAY
[F2] PERFORMANCE AD
[F3] PERFORMANCE VOICE
[SF1] ADD INTERNAL VOICE
[SF2] ADD PLUG-IN VOICE
[SF3] DELETE
[SF4] SET NOTE LIMIT LOW
[SF5] SET NOTE LIMIT HIGH
[F4] PERFORMANCE PORTAMENTO[F5] PERFORMANCE EG
[F6] PERFORMANCE ARPEGGIO
[CATEGORY] PERFORMANCE CATEGORY SEARCH
[FAV] CATEGORY SEARCH
[F1] SUB CATEGORY1 SELECT
[F2] SUB CATEGORY2 SELECT
[F3] SUB CATEGORY3 SELECT
[F4] SET TO FAVORITE
[F5] CLEAR 1 FAVORITE
[F6] CLEAR ALL FAVORITE
[FAV] FAVORITE SELECT
[F5] CLEAR 1 FAVORITE
[F6] CLEAR ALL FAVORITE
[EDIT] PERFORMANCE EDIT
[COMMON] COMMON
[F1] COMMON
[SF1] NAME[SF3] MEQ OFFSET
[SF4] PORTA
[SF5] OTHER
[F2] COMMON OUTPUT/MASTER EQ
[SF1] OUTPUT
[SF2] MEQ
[F3] COMMON ARPEGGIO
[SF1] TYPE
[SF2] LIMIT
[SF3] PLAY
[SF4] OUTPUT CHANNEL
[SF5] CLEAR USER ARPEGGIO
[F4] COMMON CONTROLLER ASSIGN
CONTROLLER ASSIGN
[F6] COMMON EFFECT
[SF1] EFFECT CONNECT
[SF2] PLG-EF[SF3] VARIATION
[SF4] REVERB
[SF5] CHORUS
[PERFORMANCE] . . . . . . . . . . . . . . . . . . . . . . . . . . . . . . . . . . . . . . . . . . . . . . . . . . . . . . . . . . . . . . . . . . . . . . . . . . . . . . . P. 275
. . . . . . . . . . . . . . . . . . . . . . . . . . . . . . . . . . . . . . . . . . . . . . . . . . . . . . . . . . . . . . . . . . . . . . . . . . P. 162
. . . . . . . . . . . . . . . . . . . . . . . . . . . . . . . . . . . . . . . . . . . . . . . . . . . . . . . . . . . . . . . . P. 162
. . . . . . . . . . . . . . . . . . . . . . . . . . . . . . . . . . . . . . . . . . . . . . . . . . . . . . . . . . . . . . . . . . P. 163
. . . . . . . . . . . . . . . . . . . . . . . . . . . . . . . . . . . . . . . . . . . . . . . . . . . . . . . . . . . . . . . P. 164
. . . . . . . . . . . . . . . . . . . . . . . . . . . . . . . . . . . . . . . . . . . . . . P. 164
. . . . . . . . . . . . . . . . . . . . . . . . . . . . . . . . . . . . . . . . . . . . . . . . P. 164
. . . . . . . . . . . . . . . . . . . . . . . . . . . . . . . . . . . . . . . . . . . . . . . . . . . . . . . . . . . P. 164
. . . . . . . . . . . . . . . . . . . . . . . . . . . . . . . . . . . . . . . . . . . . . . P. 164
. . . . . . . . . . . . . . . . . . . . . . . . . . . . . . . . . . . . . . . . . . . . . . P. 164
. . . . . . . . . . . . . . . . . . . . . . . . . . . . . . . . . . . . . . . . . . . . . . . . . . . . . . . . . P. 164 . . . . . . . . . . . . . . . . . . . . . . . . . . . . . . . . . . . . . . . . . . . . . . . . . . . . . . . . . . . . . . . . . . . . P. 164
. . . . . . . . . . . . . . . . . . . . . . . . . . . . . . . . . . . . . . . . . . . . . . . . . . . . . . . . . . . . . P. 165
. . . . . . . . . . . . . . . . . . . . . . . . . . . . . . . . . . . . . . . . . . . P. 124
. . . . . . . . . . . . . . . . . . . . . . . . . . . . . . . . . . . . . . . . . . . . . . . P. 126
. . . . . . . . . . . . . . . . . . . . . . . . P. 126
. . . . . . . . . . . . . . . . . . . . . . . . P. 126
. . . . . . . . . . . . . . . . . . . . . . . . . P. 126
. . . . . . . . . . . . . . . . . . . . . . . . . . . . . . . . P. 126
. . . . . . . . . . . . . . . . . . . . . . . . . . . . . . . P. 126
. . . . . . . . . . . . . . . . . . . . . . . . . . . . P. 126
. . . . . . . . . . . . . . . . . . . . . . . . . . . . . . . . . . . . . . . . . . . . . . . . . P. 127
. . . . . . . . . . . . . . . . . . . . . . . . . . . . . . . P. 127
. . . . . . . . . . . . . . . . . . . . . . . . . . . . P. 127
. . . . . . . . . . . . . . . . . . . . . . . . . . . . . . . . . . . . . . . . . . . . . . . . . . . . . . . . . . . . . . . . . . . . . . . . . . . . . . . . P. 165
. . . . . . . . . . . . . . . . . . . . . . . . . . . . . . . . . . . . . . . . . . . . . . . . . . . . . . . . . . . . . . . . . . . . P. 165
. . . . . . . . . . . . . . . . . . . . . . . . . . . . . . . . . . . . . . . . . . . . . . . . . . . . . . . . . . P. 166
. . . . . . . . . . . . . . . . . . . . . . . . . . . . . . . . . . . . . . . . . . P. 166. . . . . . . . . . . . . . . . . . . . . . . . . . . . . . . . . . . P. 166
. . . . . . . . . . . . . . . . . . . . . . . . . . . . . . . . . . . . . . . . . P. 167
. . . . . . . . . . . . . . . . . . . . . . . . . . . . . . . . . . . . . . . . . P. 167
. . . . . . . . . . . . . . . . . . . . . . . . . . . . . . . . . . . . . . P. 167
. . . . . . . . . . . . . . . . . . . . . . . . . . . . . . . . . . . . . . . . P. 167
. . . . . . . . . . . . . . . . . . . . . . . . . . . . . . . . . . . . . . . . . . . . P. 168
. . . . . . . . . . . . . . . . . . . . . . . . . . . . . . . . . . . . . . . . . . . . . . . . P. 168
. . . . . . . . . . . . . . . . . . . . . . . . . . . . . . . . . . . . . . . . . . . P. 168
. . . . . . . . . . . . . . . . . . . . . . . . . . . . . . . . . . . . . . . . . . . P. 168
. . . . . . . . . . . . . . . . . . . . . . . . . . . . . . . . . . . . . . . . . . . P. 168
. . . . . . . . . . . . . . . . . . . . . . . . . . . . . . P. 168
. . . . . . . . . . . . . . . . . . . . . . . . P. 132
. . . . . . . . . . . . . . . . . . . . . . . . . . . . . . . . . . . . . P. 169
. . . . . . . . . . . . . . . . . . . . . . . . . . . . . . . . P. 169
. . . . . . . . . . . . . . . . . . . . . . . . . . . . . . . . . . . . . . . . . . . . . . . . . . . P. 169
. . . . . . . . . . . . . . . . . . . . . . . . . . . . . . P. 169
. . . . . . . . . . . . . . . . . . . . . . . . . . . . . . . . . . . . . . . . . P. 170. . . . . . . . . . . . . . . . . . . . . . . . . . . . . . . . . . . . . . P. 170
. . . . . . . . . . . . . . . . . . . . . . . . . . . . . . . . . . . . . . . . P. 170
. . . . . . . . . . . . . . . . . . . . . . . . . . . . . . . . . . . . . . . . P. 170

8/10/2019 motif_1(2)
http://slidepdf.com/reader/full/motif12 161/300
161 MOTIF Reference
Function
[PART SELECTION] PART 1-4
[F6]
[F1] PART VOICE
[SF1] VOICE
[SF2] PLYMODE
[SF3] LIMIT
[SF4] PORTAMENTO
[SF5] OTHER
[F2] PART OUTPUT
[SF1] VOLUME/PAN
[SF2] EFFECT SEND
[F3] PART OUTPUT SELECT
OUTPUT SELECT
[F4] PART TONE
[SF1] TUNE
[SF2] FILTER
[SF3] FEG
[SF4] AEG
[F5] PART RECEIVE SWITCH
[PART SELECTION] PART PLG1-PLG3
[F6]
[F1] PART VOICE
[SF1] VOICE
[SF2] PLYMODE
[SF3] LIMIT
[SF4] PORTAMENTO
[SF5] OTHER
[F2] PART OUTPUT
[SF1] VOLUME/PAN
[SF2] EFFECT SEND
[F3] PART OUTPUT SELECT
OUTPUT SELECT
[F4] PART TONE
[SF1] TUNE
[SF2] FILTER
[SF4] AEG
[F5] PART RECEIVE SWITCH
[EDIT] PERFORMANCE COMPARE
[JOB] PERFORMANCE JOB
[F1] INITIALIZE
[F2] EDIT RECALL
[F3] COPY
[F4] BULK DUMP
[STORE] PERFORMANCE STORE
. . . . . . . . . . . . . . . . . . . . . . . . . . . . . . . . . P. 170
. . . . . . . . . . . . . . . . . . . . P. 170 . . . . . . . . . . . . . . . . . P. 170
. . . . . . . . . . . . . . . . . . . . . P. 170
. . . . . . . . . . . . . P. 171
. . . . . . . . . . . . . . . . . . . . P. 171
. . . . . . . . . . . . . . . . . . . . . . . . . . . . . . . P. 172
. . . . . . . . . . . . . . P. 172
. . . . . . . . . . . . . P. 172
. . . . . . . . . . . . . . . . . . . . . . . . P. 173
. . . . . . . . . . . . . . . . P. 173
. . . . . . . . . . . . . . . . . . . . . . . . . . . . . . . . . . P. 173
. . . . . . . . . . . . . . . . . . . . . P. 173
. . . . . . . . . . . . . . . . . . . P. 173
. . . . . . . . . . . . . . . . . . . . . . P. 173
. . . . . . . . . . . . . . . . . . . . . . P. 174
. . . . . . . . . . . . . . . . . . . . . . . P. 174
. . . . . . . . . . . . . . . . . . . . . . . . . . . . . . . . . . . . . . . . . . . . . . . . . . P. 170
. . . . . . . . . . . . . . . . . . . . . . . . . . . . . . . . . P. 170
. . . . . . . . . . . . . . . . . . . . P. 170
. . . . . . . . . . . . . . . . . P. 170
. . . . . . . . . . . . . . . . . . . . . P. 170
. . . . . . . . . . . . . P. 171
. . . . . . . . . . . . . . . . . . . P. 171
. . . . . . . . . . . . . . . . . . . . . . . . . . . . . . . . P. 172
. . . . . . . . . . . . . . P. 172
. . . . . . . . . . . . . P. 172
. . . . . . . . . . . . . . . . . . . . . . . . P. 173
. . . . . . . . . . . . . . . . P. 173
. . . . . . . . . . . . . . . . . . . . . . . . . . . . . . . . . . P. 173
. . . . . . . . . . . . . . . . . . . . . P. 173
. . . . . . . . . . . . . . . . . . . . P. 173
. . . . . . . . . . . . . . . . . . . . . . P. 174
. . . . . . . . . . . . . . . . . . . . . . . P. 174
. . . . . . . . . . . . . . . . . . . . . . . . . . . . . . . . . . . . . . . . . . . . . . . . . . . . . . . . . . . . . . . . . . . . . P. 165 . . . . . . . . . . . . . . . . . . . . . . . . . . . . . . . . . . . . . . . . . . . . . . . . . . . . . . . . . . . . . . . . . . . . . . . . . . . P. 175
. . . . . . . . . . . . . . . . . . . . . . . . . . . . . . . . . . . . . . . . . . . . . . . . . . . . . . . . . . . . . . . . . . . . . P. 175
. . . . . . . . . . . . . . . . . . . . . . . . . . . . . . . . . . . . . . . . . . . . . . . . . . . . . . . . . . . . . . . . . . P. 175
. . . . . . . . . . . . . . . . . . . . . . . . . . . . . . . . . . . . . . . . . . . . . . . . . . . . . . . . . . . . . . . . . . . . . . . . . P. 175
. . . . . . . . . . . . . . . . . . . . . . . . . . . . . . . . . . . . . . . . . . . . . . . . . . . . . . . . . . . . . . . . . . . P. 176
. . . . . . . . . . . . . . . . . . . . . . . . . . . . . . . . . . . . . . . . . . . . . . . . . . . . . . . . . . . . . . . . . . . . . . P. 176
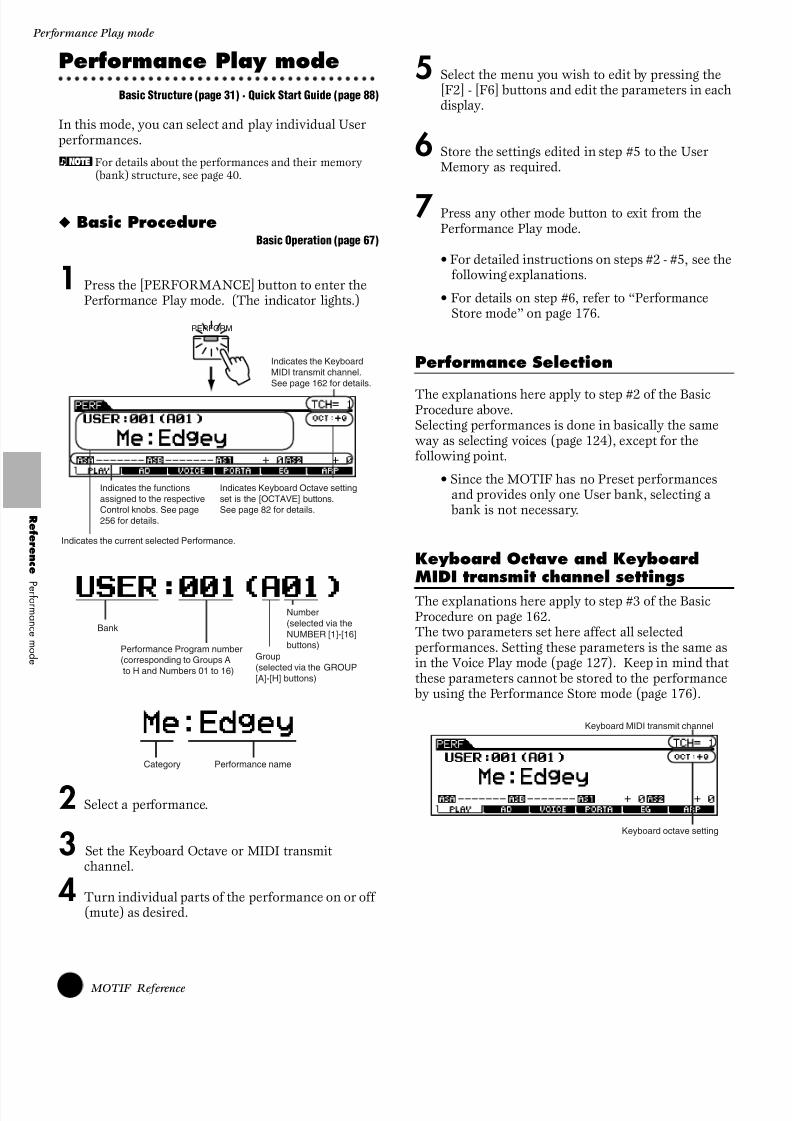
8/10/2019 motif_1(2)
http://slidepdf.com/reader/full/motif12 162/300
162 MOTIF Reference
Performance Play mode
Ref er enc e
P erf ormanc emod e
Performance Play mode
Basic Structure (page 31) · Quick Start Guide (page 88)
In this mode, you can select and play individual Userperformances.
nFor details about the performances and their memory(bank) structure, see page 40.
◆ Basic ProcedureBasic Operation (page 67)
1 Press the [PERFORMANCE] button to enter thePerformance Play mode. (The indicator lights.)
2 Select a performance.
3 Set the Keyboard Octave or MIDI transmitchannel.
4 Turn individual parts of the performance on or off(mute) as desired.
5 Select the menu you wish to edit by pressing the[F2] - [F6] buttons and edit the parameters in eachdisplay.
6 Store the settings edited in step #5 to the UserMemory as required.
7 Press any other mode button to exit from thePerformance Play mode.
• For detailed instructions on steps #2 - #5, see thefollowing explanations.
• For details on step #6, refer to “PerformanceStore mode” on page 176.
Performance Selection
The explanations here apply to step #2 of the BasicProcedure above.Selecting performances is done in basically the sameway as selecting voices (page 124), except for thefollowing point.
• Since the MOTIF has no Preset performancesand provides only one User bank, selecting a bank is not necessary.
Keyboard Octave and KeyboardMIDI transmit channel settings
The explanations here apply to step #3 of the BasicProcedure on page 162.The two parameters set here affect all selectedperformances. Setting these parameters is the same asin the Voice Play mode (page 127 ). Keep in mind thatthese parameters cannot be stored to the performance by using the Performance Store mode (page 176).
Indicates the KeyboardMIDI transmit channel.See page 162 for details.
Indicates the current selected Performance.
PERFORM
Indicates the functionsassigned to the respectiveControl knobs. See page256 for details.
Indicates Keyboard Octave settingset is the [OCTAVE] buttons.See page 82 for details.
Number(selected via theNUMBER [1]-[16]buttons)
Group(selected via the GROUP[A]-[H] buttons)
Performance Program number(corresponding to Groups A to H and Numbers 01 to 16)
Bank
Performance nameCategory
Keyboard MIDI transmit channel
Keyboard octave setting

8/10/2019 motif_1(2)
http://slidepdf.com/reader/full/motif12 163/300
163 MOTIF Reference
Performance Play
Performance Part on/off
The explanations here apply to step #4 of the BasicProcedure on page 162.
nThis operation is available also in the Performance Editmode.
Performance editing in thePerformance Play mode
The explanations here apply to step #5 of the BasicProcedure on page 162. The Performance Play mode lets you perform a varietyof general editing operations on the selectedperformance. For more detailed and comprehensiveediting operations, use the Performance Edit mode.
nThe parameters that have the same name in thePerformance Play mode and in the Performance Editmode have the same functions and settings.
◆ The [ ] IndicatorIf you alter any parameters in the Performance Playmode, the [ ] indicator will appear in the top left ofthe display. This indicates that the current
performance has been modified but not yet stored.
n If you select another performance during editing, the [ ]indicator will disappear and all your edits will be lost.It isa good idea to store the edited performance data from thePerformance Store mode (page 176). Even if you lose theperformance edited data, you can restore it by using theEdit Recall function (page 175).
● [F2] Performance Play A/DFrom this display you can make settings for the A/D input parts. The A/D input feature lets you inputexternal audio (such as from a microphone orguitar), then process and mix it with the othersounds of the MOTIF. The audio signal can beinput via the A/D INPUT jack or the mLANterminal (if an optional mLAN8E has beeninstalled).
n In the Utility mode, you can set whether you use the A/D INPUT jack or the mLAN8E jack as an input jack for
the A/D part. See page 252.• Volume
Determines the output level of the A/D part.
❏ Settings 0 ~ 127
• PanDetermines the stereo pan position of the A/D part.
❏ Settings L63 (Left) ~ C (Center) ~ R63 (Right)
• RevSendDetermines the Send level of the A/D part signal sent tothe Reverb effect. For details about effect connection, seepage 40.
❏ Settings 0 ~ 127
• ChoSendDetermines the Send level of the A/D part signal sent tothe Chorus effect. For details about effect connection, seepage 40.
❏ Settings 0 ~ 127
• VarSend(Variation Send)Determines the Send level of the A/D part signal sent tothe Variation effect. For details about effect connection,see page 40.
❏ Settings 0 ~ 127
• DryLevelDetermines the level of the A/D part which has not beenprocessed with the System Effects (Reverb, Chorus,Variation). See page 252.
❏ Settings 0 ~ 127
• Mono/StereoDetermines the signal configuration for the the A/D inputaudio, or how the signal or signals are routed (stereo ormono). When the mLAN terminal (with the optionalmLAN8E installed) is set as the input source for the A/Dpart, this parameter cannot be set.
❏ Settings stereo, L mono, R mono, L+R mono
stereo
Audio received via both A/D INPUT jacks is processed instereo.
L (left) monoAudio received via the L (left) A/D INPUT jack isprocessed in mono.
R (left) monoAudio received via the R (right) A/D INPUT jack isprocessed in mono.
L+R monoAudio received via both A/D INPUT jacks is mixed andprocessed in mono.
Press the [MUTE] button so thatits indicator lights.
Press any of the [1] - [4] buttonsyou wish to mute.
1 2 3 4
MUTE
SOLO
Edit indicator
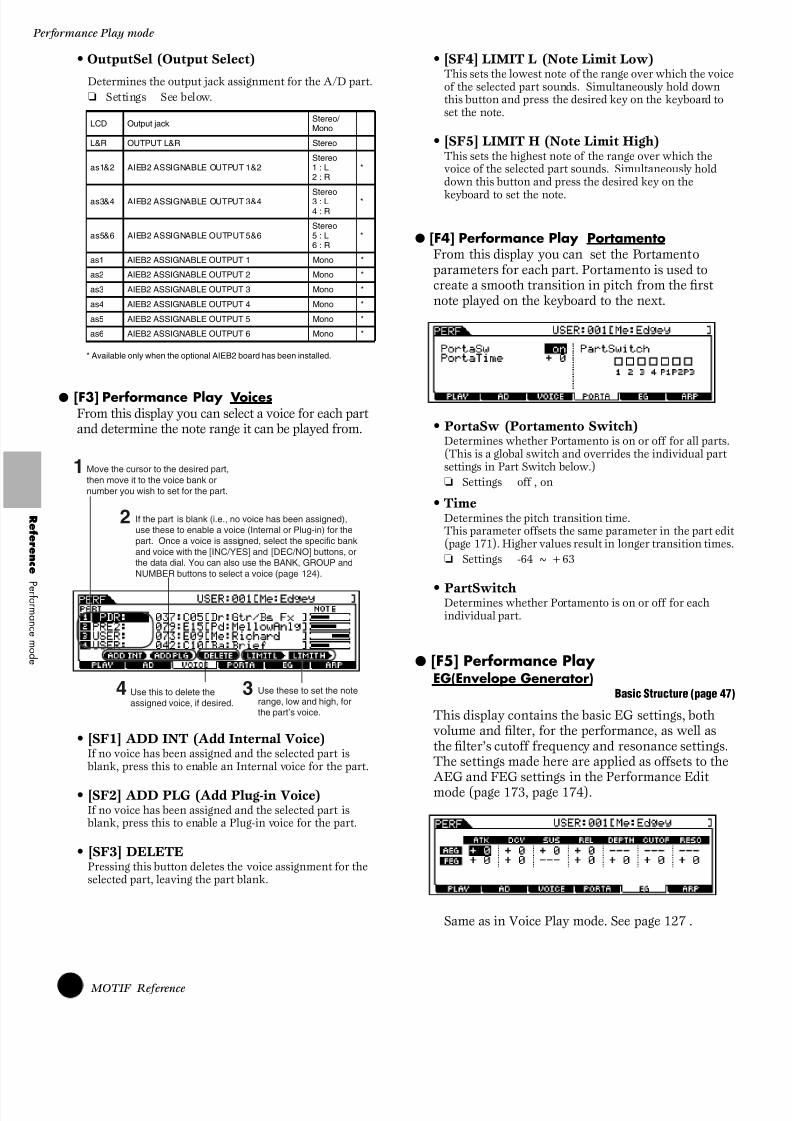
8/10/2019 motif_1(2)
http://slidepdf.com/reader/full/motif12 164/300
164 MOTIF Reference
Performance Play mode
Ref er enc e
P erf ormanc emod e
• OutputSel (Output Select)
Determines the output jack assignment for the A/D part.
❏ Settings See below.
* Available only when the optional AIEB2 board has been installed.
● [F3] Performance Play VoicesFrom this display you can select a voice for each partand determine the note range it can be played from.
• [SF1] ADD INT (Add Internal Voice)If no voice has been assigned and the selected part is blank, press this to enable an Internal voice for the part.
• [SF2] ADD PLG (Add Plug-in Voice)If no voice has been assigned and the selected part is blank, press this to enable a Plug-in voice for the part.
• [SF3] DELETEPressing this button deletes the voice assignment for theselected part, leaving the part blank.
• [SF4] LIMIT L (Note Limit Low)This sets the lowest note of the range over which the voiceof the selected part sounds. Simultaneously hold downthis button and press the desired key on the keyboard toset the note.
• [SF5] LIMIT H (Note Limit High)This sets the highest note of the range over which thevoice of the selected part sounds. Simultaneously holddown this button and press the desired key on the
keyboard to set the note.
● [F4] Performance Play PortamentoFrom this display you can set the Portamentoparameters for each part. Portamento is used tocreate a smooth transition in pitch from the firstnote played on the keyboard to the next.
• PortaSw (Portamento Switch)Determines whether Portamento is on or off for all parts.(This is a global switch and overrides the individual partsettings in Part Switch below.)
❏ Settings off , on
• TimeDetermines the pitch transition time.This parameter offsets the same parameter in the part edit(page 171). Higher values result in longer transition times.
❏ Settings -64 ~ +63
• PartSwitchDetermines whether Portamento is on or off for eachindividual part.
● [F5] Performance PlayEG(Envelope Generator)
Basic Structure (page 47)
This display contains the basic EG settings, bothvolume and filter, for the performance, as well asthe filter’s cutoff frequency and resonance settings.The settings made here are applied as offsets to theAEG and FEG settings in the Performance Editmode (page 173, page 174).
Same as in Voice Play mode. See page 127 .
LCD Output jackStereo/ Mono
L&R OUTPUT L&R Stereo
as1&2 AIEB2 ASSIGNABLE OUTPUT 1&2Stereo1 : L2 : R
*
as3&4 AIEB2 ASSIGNABLE OUTPUT 3&4 Stereo3 : L4 : R
*
as5&6 AIEB2 ASSIGNABLE OUTPUT 5&6Stereo5 : L6 : R
*
as1 AIEB2 ASSIGNABLE OUTPUT 1 Mono *
as2 AIEB2 ASSIGNABLE OUTPUT 2 Mono *
as3 AIEB2 ASSIGNABLE OUTPUT 3 Mono *
as4 AIEB2 ASSIGNABLE OUTPUT 4 Mono *
as5 AIEB2 ASSIGNABLE OUTPUT 5 Mono *
as6 AIEB2 ASSIGNABLE OUTPUT 6 Mono *
1 Move the cursor to the desired part,then move it to the voice bank ornumber you wish to set for the part.
2 If the part is blank (i.e., no voice has been assigned),use these to enable a voice (Internal or Plug-in) for thepart. Once a voice is assigned, select the specific bankand voice with the [INC/YES] and [DEC/NO] buttons, orthe data dial. You can also use the BANK, GROUP andNUMBER buttons to select a voice (page 124).
4 Use this to delete theassigned voice, if desired.
3 Use these to set the noterange, low and high, forthe part’s voice.

8/10/2019 motif_1(2)
http://slidepdf.com/reader/full/motif12 165/300
165 MOTIF Reference
Performance Edit
● [F6] Performance Play Arpeggio
Basic Structure (page 55)
This display contains the basic settings for Arpeggioplayback, including Type and Tempo.
The parameters are same as in the Voice Playmode (page 127 ) except for the following one.
• PartSwitchDetermines whether Arpeggio is on or off for the selectedpart.
Performance Edit mode
In this mode, Performances can be created and edited.
◆ The [ ] Indicator
If you alter any parameters in Performance Edit Mode,the [ ] indicator will appear in the top left of the
display. This indicates that the current performance has been modified but not yet stored.
nEven if you exit to the Performance Play mode, youredited settings for the current performance will bemaintained — as long as you don’t select anotherperformance.
nThe [ ] indicator is also displayed in the PerformancePlay mode.
◆ The Compare FunctionThis convenient function lets you switch between the
edited performance and its original, unedited condition— allowing you to listen to the difference between thetwo and better hear how your edits affect the sound.
1 In the Performance Edit mode, press the[COMPARE] button so that its indicator flashes.The [ ] indicator is shown at the top of thedisplay (in place of the [ ] indicator), and theoriginal, unedited performance is restored formonitoring.
2 Press the [EDIT] button again to disable the“Compare” function and restore the settings foryour edited Performance. While Compare is active,you cannot make edits to the performance.
◆ Common (to all parts) editand Part edit
Each performance can contain a maximum of fourparts, selected from a total seven parts — four partsfrom the Internal tone generator, and three from theinstalled Plug-in boards. Use Common Edit to edit thesettings for all of the parts. There are two types ofVoice Edit displays: those for Common Edit, and thosefor editing individual parts.
EDIT
COMPARE

8/10/2019 motif_1(2)
http://slidepdf.com/reader/full/motif12 166/300
166 MOTIF Reference
Performance Edit mode
Ref er enc e
P erf ormanc emod e
◆ Basic Procedure
1 Press the [PERFORMANCE] button to enter thePerformance Play mode. (The indicator lights.)
2 Select a Performance to be edited.
3 Press the [EDIT] button to enter the PerformanceEdit mode. (The indicator lights.)
4 Select a Part to be edited.
• To edit parameters common to all of the parts,press the [DRUM KITS] button (which serves asa “COMMON” button here).
• To edit parameters of the individual parts, selectthe desired part with the correspondingNUMBER button ([1] - [4], or in the case of thePlug-in parts, [1] - [3]).
To switch between the Part 1 - 4 display and thePlug-in Part 1 - 3 display, press the [F6] button.
5 Select the menu you wish to edit by pressing the[F1] - [F6] and [SF1] -[SF5] buttons.
6 Edit the parameters for the selected performance.
7 Store the settings edited in step #6 to the UserMemory as required.
8 Press the [EXIT] button to exit from thePerformance Edit mode.
• For details on step #2, refer to “Performance Playmode” on page 162.
• For detailed instructions on steps #5 - #6, see the
explanations below.• For details on step #7, refer to “PerformanceStore mode” on page 176.
■ Common edit
● [F1]-[SF1] Common General Name
From this display you can create a name for theperformance. The performance name can containup to 10 characters. For detailed instructions onnaming, see “Basic Operation” on page 75.
● [F1]-[SF3] Common GeneralMaster EQ Offset
From this display you can adjust the master (global)EQ settings for all parts of the selected performance.The level of each of the four bands (with theexception of “MID”) can be adjusted. Moreover,you can also tweak these settings directly from thefour Knobs on the front panel.
Parts to whichPlug-in voicesare assigned
Parts to whichInternal voices areassigned
Indicates a Common Edit display.
Indicates a display for editing Part 1.
Common
Part1
Part2
Part3
Part4
Plug-in part 1
Plug-in part 2
Plug-in part 3
DRUM KITS
FAVORITESCOMMON
1 2 3 4
ELEMENT/ PERF.PART/ ZONE
< Display for editing parts 1 - 4>
[F6] button< Display for editing Plug-in parts 1 - 3 >

8/10/2019 motif_1(2)
http://slidepdf.com/reader/full/motif12 167/300
167 MOTIF Reference
Performance Edit
❏ Settings -64 ~ +63
● [F1]-[SF4] Common General Portamento
From this display you can set the Portamentoparameters for all parts of the selected performance.Portamento is used to create a smooth transition in
pitch from the first note played on the keyboard tothe next.
• SwitchDetermines whether Portamento is on or off for the entireperformance. Keep in mind that this is a global control;you can also switch Portamento on and off for individual
parts in Part Switch below.❏ Settings off, on
• TimeDetermines the pitch transition time.This parameter offsets the same parameter in the part editsettings (page 170). Higher values result in longertransition times.
❏ Settings -64 ~ +63
• PartSwitchDetermines whether Portamento is on or off for eachindividual part.
● [F1]-[SF5] Common General OtherFrom this display you can set the control functionsfor the Knobs and related parameters.
With the exception of Pitch Bend, which cannot beset here, these parameters are the same as in theVoice Edit mode (page 132).
● [F2]-[SF1] Common Output
• VolumeDetermines the output level of the selected performance.You can adjust the overall volume, keeping the balance between all parts .
❏ Settings 0 ~ 127
• PanDetermines the stereo pan position of the selectedperformance.This parameter offsets the same parameter in the part edit
setting (page 163).You can also adjust this parameter using the PAN knob onthe front panel.
❏ Settings L63 (Left) ~ C (Center) ~ R63 (Right)
n A setting of “C” (center) maintains the individualPan settings of each Part.
• RevSendDetermines the Send level of the signal sent from InsertionEffect 1/2 (or the bypassed signal) to the Reverb effect.You can also adjust this parameter using the REVERBknob on the front panel.
❏ Settings 0 ~ 127
• ChoSendDetermines the Send level of the signal sent from InsertionEffect 1/2 (or the bypassed signal) to the Chorus effect.You can also adjust this parameter using the [CHORUS]knob on the front panel.
❏ Settings 0 ~127
KNOBCONTROLFUNCTION
PAN REVERB CHORUS TEMPO
ATTACK RELEASECUTOFF RESONANCE
ASSIGN A ASSIGN B ASSIGN 1 ASSIGN 2
MEQ LOW MEQ HI MIDMEQLOWMID MEQ HIGH
KN 1 KN 2 KN 3 KN 4

8/10/2019 motif_1(2)
http://slidepdf.com/reader/full/motif12 168/300
168 MOTIF Reference
Performance Edit mode
Ref er enc e
P erf ormanc emod e
● [F2]-[SF2] Common MEQ(Master Equalizer)
From this display you can apply five-bandequalization to all parts of the selected performance.
˙
• ShapeDetermines whether the equalizer type used is Shelving orPeaking. The Peaking type attenuates/boosts the signal atthe specified Frequency setting, whereas the Shelving typeattenuates/boosts the signal at frequencies above or belowthe specified Frequency setting.This parameter is available for LOW, MID, and HIGH.
❏ Settings shelv (Shelving type), peak (Peaking type)
• Freq (Frequency)Determines the center frequency. Frequencies around thispoint are attenuated/boosted by the Gain setting.
❏ SettingsLOW: Shelving 32Hz ~ 2.0kHz
Peaking 63Hz ~ 2.0kHzLOW MID, MID, HIGH MID: 100Hz ~ 10.0kHzHigh: 500Hz ~ 16.0kHz
• GainDetermines the level gain for the Frequency (set above), orthe amount the selected frequency band is attenuated or boosted.
❏ Settings -12dB ~ 0dB ~ +12dB
• Q (Frequency Characteristic)This varies the signal level at the Frequency setting tocreate various frequency curve characteristics.
❏ Settings 0.1 ~ 12.0
● [F3]-[SF1] Common Arpeggio
Arpeggio typeBasic Structure (page 55)
Same as in Normal Voice Common Edit. Seepage 132.
● [F3]-[SF2] Common Arpeggio Arpeggio limit
Same as in Normal Voice Common Edit. Seepage 133.
● [F3]-[SF3] Common ArpeggioPlay FX (Effect)
Same as in Normal Voice Common Edit. Seepage 133.
● [F3]-[SF4] Common ArpeggioOutput channel
From this display you can set a separate MIDIoutput channel for the Arpeggio playback data, letting you have the Arpeggio sound from anexternal tone generator or synthesizer.
LOW5 bands HIGHHIGHMIDMIDLOWMID
Q(Frequency Characteristic)Gain
Freq(Frequency )
0
Gain
Freq
Frequency
–
+
0
Frequency
–
+
0
EQ LowFreq1
EQ LowFreq2
shelv (Shelving)
peak (Peaking)
Frequency
0.1
12.0
Freq

8/10/2019 motif_1(2)
http://slidepdf.com/reader/full/motif12 169/300
169 MOTIF Reference
Performance Edit
• OutputSwitchWhen this is set to on, Arpeggio playback data is outputfrom the MIDI terminal.
❏ Settings on, off
• TransmitChDetermines the MIDI transmit channel for Arpeggioplayback data.
❏ Settings 1 ~ 16
● [F4] Common Controller Assign
The controllers and knobs on the front panel can beused to change and adjust a variety of parameters —in real time, and simultaneously.For example, you could use the ASSIGN 1 and 2knobs to control effect depth for two differenteffects, while using the Foot Controller to controlmodulation. These control assignments are called“Controller Assign.” You can have independentController Assign settings for each performance.
❏ Settings (See chart below)
Control Change Numbers
● [F6]-[SF1] Common Effect ConnectionBasic Structure (page 40)
This display gives you comprehensive control overthe effects.
• EF PART (Effect part) ➡ VCE INS (VoiceInsertion)Determines the part to which the Insertion effect isapplied. The Insertion connection type (page 40) dependson the voice of the selected part.
❏ Settings Part 1 ~ 4, Plug-in Part 1 ~ 3, off
• EF PART (Effect part) ➡ PLG-EF (Plug-inEfect)Determines the part to which the Insertion effect is
applied. This parameter is available only when a specialEffect Plug-in board (VH) has been installed.
❏ Settings Part 1~4, Plug-in Part 1~3, A/D, off
• Variation TypeDetermines the Variation effect type.
❏ Settings Refer to the Effect Types list in the separateData List booklet.
• Variation ReturnDetermines the Return level of the Variation Effect.
❏ Settings 0 ~ 127
• Variation Pan
Determines the pan position of the Variation effect sound.❏ Settings L64 (far left) ~cnt (center) ~ R63 (far
right)
• Variation To ReverbDetermines the Send level of the signal sent from theVariation Effect to the Reverb Effect.
❏ Settings 0 ~ 127
• Variation To ChorusDetermines the Send level of the signal sent from theVariation Effect to the Chorus Effect.
❏ Settings 0 ~ 127
• Chorus TypeDetermines the Chorus effect type.
❏ Settings Refer to the Effect Types list in the separateData List booklet.
• Chorus Return Level)Determines the Return level of the Chorus Effect.
❏ Settings 0 ~ 127
• Chorus PanDetermines the pan position of the Chorus effect sound.
❏ Settings L64 (far left) ~ cnt (center) ~ R63 (far right)
LCD LCD
00 off 32 off
01 ModWheel 64 Sustain
02 Breath 65 PortaSw
04 FootCtrl 66 Sostenut
05 PortTime 67 Soft
06 Data Ent 72 Release
07 MainVol 74 Bright
10 Panpot 75 Decay
11 Express 84 PortaCtl
16 General 1 91 Effect 1
17 General 2 92 Effect 2
18 General 3 93 Effect 3
19 General 4
Determines the Control Change numbersfor Foot Controllers 1 and 2. To controlthese functions, connect Foot Controllersto the FOOT CONTROLLER jacks on the
rear panel (page 28).
Determines the ControlChange numbers for theASSIGN 1 and 2 knobson the front panel.
Set the Control Change number for the Breath Controller.The function set here can be controlled by the Breath Controllerconnected to the BREATH CONTROLLER (page 28) jacks on therear panel.

8/10/2019 motif_1(2)
http://slidepdf.com/reader/full/motif12 170/300
170 MOTIF Reference
Performance Edit mode
Ref er enc e
P erf ormanc emod e
• Chorus to ReverbDetermines the Send level of the signal sent from theChorus Effect to the Reverb Effect.
❏ Settings 0 ~ 127
• Reverb TypeDetermines the Reverb effect type.
❏ Settings Refer to the Effect Types list in the separateData List booklet.
• Reverb ReturnDetermines the Return level of the Reverb Effect.
❏ Settings 0 ~ 127
• Reverb PanDetermines the pan position of the Reverb effect sound.
❏ Settings L64 (far left) ~ cnt (center) ~ R63 (far right)
● [F6]-[SF2], [SF3], [SF4], [SF5]Common Effect ParameterPlug-in Insertion, Reverb, Chorus,
VariationBasic Structure (page 39)
The number of parameters and values availablediffers depending on the currently selected effecttype. For more information, see the Effect Type Listin the separate Data List booklet.
■ Part edit
● [F1]-[SF1] Part Voice Voice
You can select a voice for each part. When the
cursor is located at the Bank, you can select a voice by using the BANK, GROUP, NUMBER buttonwith the [TRACK SELECT] indicator off (page 124 ~ page 125).
• Part Switch
Set each part to on or off.❏ Settings on, off
• BankSelect a Voice Bank (page 124) for each part. For detailsabout the Plug-in Voice Bank, refer to the Owner’s Manualfor your Plug-in Board.)
• NumberSelect a Voice Program number (page 124) for each part.For details about the Plug-in Voice Program number, referto the Owner’s Manual for your Plug-in Board.)
● [F1]-[SF2] Part Voice Play Mode
• Mono/PolySelect monophonic or polyphonic playback for each part.Select whether the Voice is played back monophonically(single notes only) or polyphonically (multiplesimultaneous notes).
❏ Settings Mono, Poly
n This parameter is not available for the part towhich the Drum Voice is assigned.
• ArpeggioSw (Arpeggio Switch)Switch the Arpeggio for the currently selected Part on or off.
❏ Settings on, off
● [F1]-[SF3] Part Voice Limit
• Note Limit H, L (High, Low)Set the lowest and highest notes of the keyboard range foreach Part. Each Part will only sound for notes playedwithin its specified range.
❏ Settings C -2~G8
n If you specify the highest note first and the lowestnote second, for example “C5 to C4,” then the noterange covered will be “C-2 to C4” and “C5 to G8.”
n You can set the note by pressing the keyboardwhile holding the [INFORMATION] button.
n When a Plug-in voice is assigned to a part of theselected Performance, some parameters may not be available depending on the installed Plug-in board.
• Velocity Limit H, L (High, Low)Set the minimum and maximum values of the velocityrange within which each Part will respond. Each Part willonly sound for notes played within its specified velocityrange.
❏ Settings 1~127
n If you specify the maximum value first and theminimum value second, for example “93 to 34,”then the velocity range covered will be “1 to 34”and “93 to 127.”

8/10/2019 motif_1(2)
http://slidepdf.com/reader/full/motif12 171/300
171 MOTIF Reference
Performance Edit
● [F1]-[SF4] Part Voice PortamentoSet the Portamento parameters for each part.Portamento is used to create a smooth transition inpitch from the first note played on the keyboard tothe next.
• SwitchSwitch Portamento on or off.
❏ Settings off,on
• TimeSet the pitch transition time. Higher values mean longertransition times.
❏ Settings 0 ~127
• ModeSet the Portamento mode.❏ Settings fingered, fulltime
fingeredPortamento is only applied when you play legato (playingthe next note before releasing the previous one).
fulltimePortamento is always applied.
n The Mode setting is not available for the Plug-inpart.
n These Portamento parameters above are notavailable for the part to which the Drum voice isassigned.
● [F1]-[SF5] Part Voice Other
• PB (Pitch Bend) Upper, Lower... When editing part s 1 - 4:
These two parameters determine the pitch change range(in semitones) of the Pitch Bend wheel for the part’s voice.For example, a Lower setting of -12 would result in thepitch being lowered up to a maximum of one octave (12semitones) when the Pitch Bend wheel is moveddownwards. Similarly, setting the Upper parameter to+12 would result in a maximum pitch rise of one octavewhen the wheel is moved upwards.
❏ Settings -48 ~0 ~+24
• PB (Pitch Bend) Range... When editing Plug-in parts 1 - 3, or when aDrum voice is selected:Determines the pitch change range (in semitones) of thePitch Bend wheel for the Plug-in part’s voice (or Drumvoice). Unlike the Pitch Bend setting for parts 1 - 4 above,the Upper and Lower ranges for the Plug-in parts cannot be set independently.
❏ Settings -24 ~ 0 ~ +24
• VelSensDpt (Velocity Sensitivity Depth)Determines the velocity sensitivity of the part’s voice, or how much the level of the voice changes in response toyour playing strength (velocity). The higher the value, themore the voice changes in response to changes in yourplaying strength.
❏ Settings 0~127
Changes to actual velocity for differentVelocity Sensitivity Depth settings
nThe settings here apply when Velocity Sensitivity Offset(below) is set to a median or neutral value of “64.”
• VelSensOfst (Velocity Sensitivity Offset)
Determines the amount by which received velocities areadjusted for the actual velocity effect. This lets you raiseor lower all velocities by the same amount — allowing youto automatically compensate for playing too strongly or toosoftly.
❏ Settings 0 ~ 127
Changes to actual velocity for different VelocitySensitivity Offset settings.
nThe settings here apply when Velocity Sensitivity Depth(above) is set to a median or neutral value of “64.”
offset=64 Received velocity
Actual resultingvelocity (affecting
he tone generator)
depth=64offset=64
depth=32offset=64
depth=0offset=64
depth=127offset=64

8/10/2019 motif_1(2)
http://slidepdf.com/reader/full/motif12 172/300
172 MOTIF Reference
Performance Edit mode
Ref er enc e
P erf ormanc emod e
In the first example, Offset is set to “0,” lowering allreceived velocities by 64. This creates a lower velocity“plateau” — all of your softer playing (up to a velocityof 64) results in the same actual velocity. Also no
matter how strongly you play, the actual velocity valuenever exceeds 64.In the second example, Offset is set to a neutral value of“64,” creating a linear relationship between receivedand actual velocity. In other words, the velocity atwhich you play is relayed to the tone generator as is —with no offset.In the third example, Offset is at the maximum of“127,” which raises all received velocities by 64. Thiscreates a “clipping” effect in the higher velocities — nomatter how strongly you play (past a velocity of 64),the actual velocity value will always be 127(maximum).
● [F2]-[SF1] Part Output Volume/Pan
• VolumeDetermines the volume for each part, giving you detailedcontrol over the level balance among the parts.
❏ Settings 0~127
• PanDetermines the stereo pan position for each part.
❏ Settings L64 (far left) ~ cnt (center) ~ R63 (farright)
• Voice PanDetermines whether the individual pan settings for eachvoice (made in the Voice Edit mode) are applied or not.Keep in mind that the settings made in Pan above areapplied as offsets to the Voice Edit settings. When this isset to “off,” the basic pan position for the selected part isset to center.
❏ Settings on, off
n This parameter is not available for the Plug-inparts.
● [F2]-[SF2] Part Output Effect Send
• RevSend (Reverb Send)Determines the send level for the Reverb effect of theselected part, giving you detailed control over the Reverb balance among the parts.
❏ Settings 0~127
• ChoSend (Chorus Send)Determines the send level for the Chorus effect of theselected part, giving you detailed control over the Chorus balance among the parts.
❏ Settings 0~127
• VarSend (Variation Send)Determines the send level for the Variation effect of theselected part, giving you detailed control over the Variation balance among the parts.
❏ Settings 0~127
• Dry LevelDetermines the level of the unprocessed (dry) sound of theselected part, letting you control the overall effect balanceamong the parts.
❏ Settings 0~127
When Offset=0
When Offset=64
When Offset=127
127
0 12764
127
0 12764
127
0 12764
Received velocity
Received velocity
Actual resultingvelocity (affecting
the tone generator)
Actual resultingvelocity (affecting
the tone generator)
Actual resultingvelocity (affecting
the tone generator)
Received velocity

8/10/2019 motif_1(2)
http://slidepdf.com/reader/full/motif12 173/300
173 MOTIF Reference
Performance Edit
● [F3] Part Output SelectFrom this display you can set certain outputparameters for the selected part.
• InsEF (Insertion Effect)This shows whether the Insertion effect is applied or notfor each part. This is for display purposes only and cannot be set here. To set this, see “EF PART” (Effect Part) onpage 40.
• OutputSel (Output Select)Determines the specific output(s) for the individual part.You can assign each individual part’s voice to be outputfrom a specific hardware output jack on the rear panel. Byinstalling the optional AIEB2 board, you can expand thenumber of assignable outputs.
❏ Settings See below.
*Available only when the optional AIEB2 board has been installed.
● [F4]-[SF1] Part Tone Tune
• NoteShiftDetermines the pitch (key transpose) setting for each partin semitones.
❏ Settings -24~+24
• DetuneDetermines the fine tuning for each part.
❏ Settings -12.8Hz ~+12.7Hz
● [F4]-[SF2] Part Tone FilterBasic Structure (page 46)
From this display you can set various Filter relatedsettings, to change the tonal qualities of the selected
part’s voice.
• Cutoff Determines the cutoff frequency for each part.This parameter is available for the LPF when the filterused by the part is a combination type of LPF and HPF.
❏ Settings -64 ~ 0 ~ +63
• ResonanceDetermines the amount of filter resonance or emphasis ofthe Cutoff Frequency for each part.
❏ Settings -64 ~ 0 ~ +63
• FEG DepthDetermines the Filter Envelope Generator depth (amountof Cuttoff frequency) for each part.
❏ Settings 0 ~ 127
n The FEG Depth setting is not available for thePlug-in parts.
● [F4]-[SF3] Part Tone FEGBasic Structure (page 47)
From this display you can set the FEG (Filter EnvelopeGenerator) parameters for each part. The followingparameters offset the same parameters in the Voice(Element) Edit mode (page 142).
• AttackDetermines the FEG Attack Time for each part.
❏ Settings -64 ~ 0 ~ +63
• DecayDetermines the FEG Decay Time for each part.
❏ Settings -64 ~ 0 ~ +63
• SustainDetermines the FEG Sustain Level for each part.
❏ Settings -64 ~ 0 ~ +63
LCD Output jacks Stereo/ Mono
L&R OUTPUT L and R Stereo
asL&R ASSIGNABLE OUTPUT L and R Stereo
as1&2 ASSIGNABLE OUTPUT 1 and 2 on the AIEB2Stereo1 : L2 : R
*
as3&4 ASSIGNABLE OUTPUT 3 and 4 on the AIEB2Stereo3 : L4 : R
*
as5&6 ASSIGNABLE OUTPUT 5 and 6 on the AIEB2Stereo5 : L6: R
*
asL ASSIGNABLE OUTPUT L Mono
asR ASSIGNABLE OUTPUT R Mono
as1 ASSIGNABLE OUTPUT 1 on the AIEB2 Mono *
as2 ASSIGNABLE OUTPUT 2 on the AIEB2 Mono *
as3 ASSIGNABLE OUTPUT 3 on the AIEB2 Mono *
as4 ASSIGNABLE OUTPUT 4 on the AIEB2 Mono *
as5 ASSIGNABLE OUTPUT 5 on the AIEB2 Mono *
as6 ASSIGNABLE OUTPUT 6 on the AIEB2 Mono *
drum
This setting is for Drum voice parts. When this isselected, the output destination settings for eachDrum key (made in Drum Key Oscillator Output,page 149) are enabled.
Mono

8/10/2019 motif_1(2)
http://slidepdf.com/reader/full/motif12 174/300
174 MOTIF Reference
Performance Edit mode
Ref er enc e
P erf ormanc emod e
• ReleaseDetermines the FEG Release Time for each part.
❏ Settings -64 ~ 0 ~ +63
n The FEG settings are not available for Plug-inparts or parts to which Drum voices have beenassigned.
● [F4]-[SF4] Part Tone AEG
Basic Structure (page 47)
From this display you can set the basic AEG(Amplitude Envelope Generator) parameters foreach part. The following parameters offset thesame parameters in the Voice (Element) Editmode (page 145).
• AttackDetermines the AEG Attack Time for each part.
❏ Settings -64~0~+63
• DecayDetermines the AEG Decay Time for each part.
❏ Settings -64~0~+63
• SustainDetermines the AEG Sustain Level for each part.
❏ Settings -64~0~+63
nThe Sustain level setting is not available for Plug-inparts or parts to which Drum voices have beenassigned.
• ReleaseDetermines the AEG Release Time for each part.
❏ Settings -64~0~+63
n The Release Time setting is not available for thepart to which the Drum Voice is assigned.
● [F5] Part Receive Switch
From this display you can set how each individualpart responds to various MIDI data, such as ControlChange and Program Change messages. When therelevant parameter is set to “on,” the correspondingpart responds to the appropriate MIDI data.Note that two different display types are provided(see below). Each display type features the same
settings in a different format; use the type you feelmost comfortable with.
[SF5]button
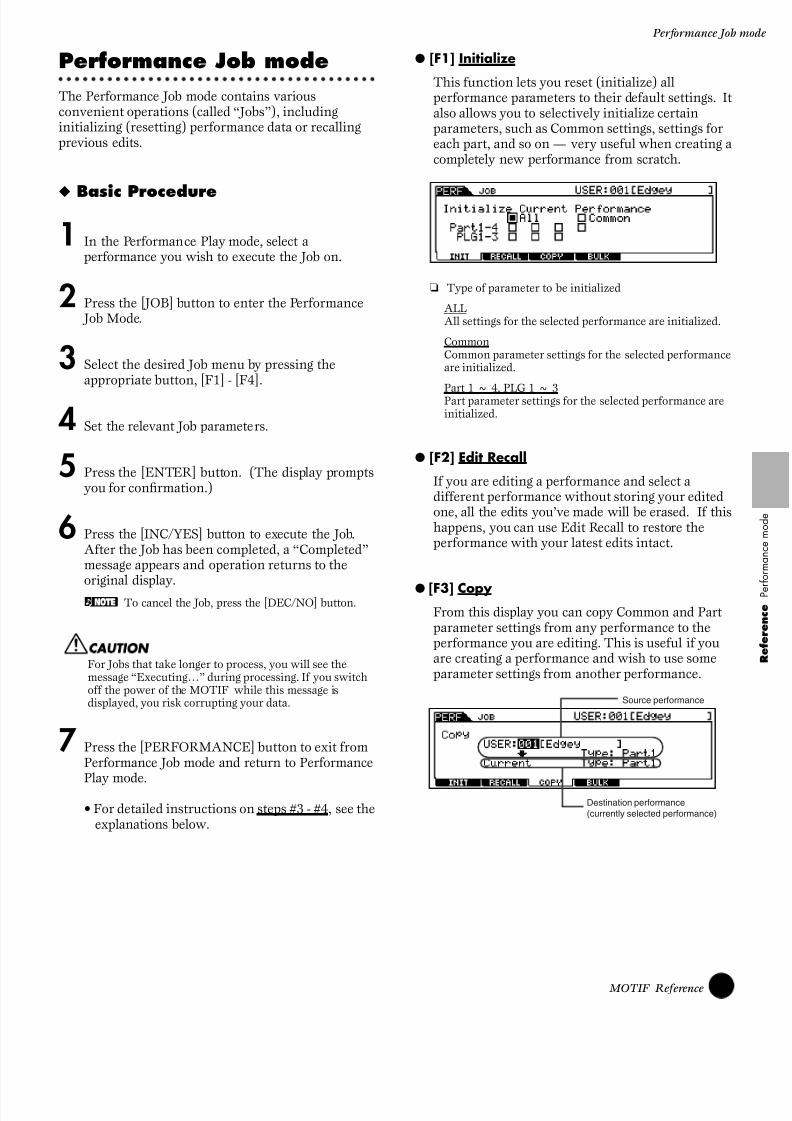
8/10/2019 motif_1(2)
http://slidepdf.com/reader/full/motif12 175/300
175 MOTIF Reference
Performance Job
Performance Job mode
The Performance Job mode contains variousconvenient operations (called “Jobs”), includinginitializing (resetting) performance data or recallingprevious edits.
◆ Basic Procedure
1 In the Performance Play mode, select aperformance you wish to execute the Job on.
2 Press the [JOB] button to enter the Performance Job Mode.
3 Select the desired Job menu by pressing theappropriate button, [F1] - [F4].
4 Set the relevant Job parameters.
5 Press the [ENTER] button. (The display promptsyou for confirmation.)
6 Press the [INC/YES] button to execute the Job.After the Job has been completed, a “Completed”message appears and operation returns to theoriginal display.
n To cancel the Job, press the [DEC/NO] button.
For Jobs that take longer to process, you will see themessage “Executing…” during processing. If you switchoff the power of the MOTIF while this message isdisplayed, you risk corrupting your data.
7 Press the [PERFORMANCE] button to exit fromPerformance Job mode and return to Performance
Play mode.
• For detailed instructions on steps #3 - #4, see theexplanations below.
● [F1] Initialize
This function lets you reset (initialize) allperformance parameters to their default settings. Italso allows you to selectively initialize certainparameters, such as Common settings, settings foreach part, and so on — very useful when creating acompletely new performance from scratch.
❏ Type of parameter to be initialized
ALLAll settings for the selected performance are initialized.
CommonCommon parameter settings for the selected performanceare initialized.
Part 1 ~ 4, PLG 1 ~ 3Part parameter settings for the selected performance areinitialized.
● [F2] Edit Recall
If you are editing a performance and select adifferent performance without storing your editedone, all the edits you’ve made will be erased. If this happens, you can use Edit Recall to restore theperformance with your latest edits intact.
● [F3] Copy From this display you can copy Common and Partparameter settings from any performance to theperformance you are editing. This is useful if youare creating a performance and wish to use someparameter settings from another performance.
Source performance
Destination performance(currently selected performance)
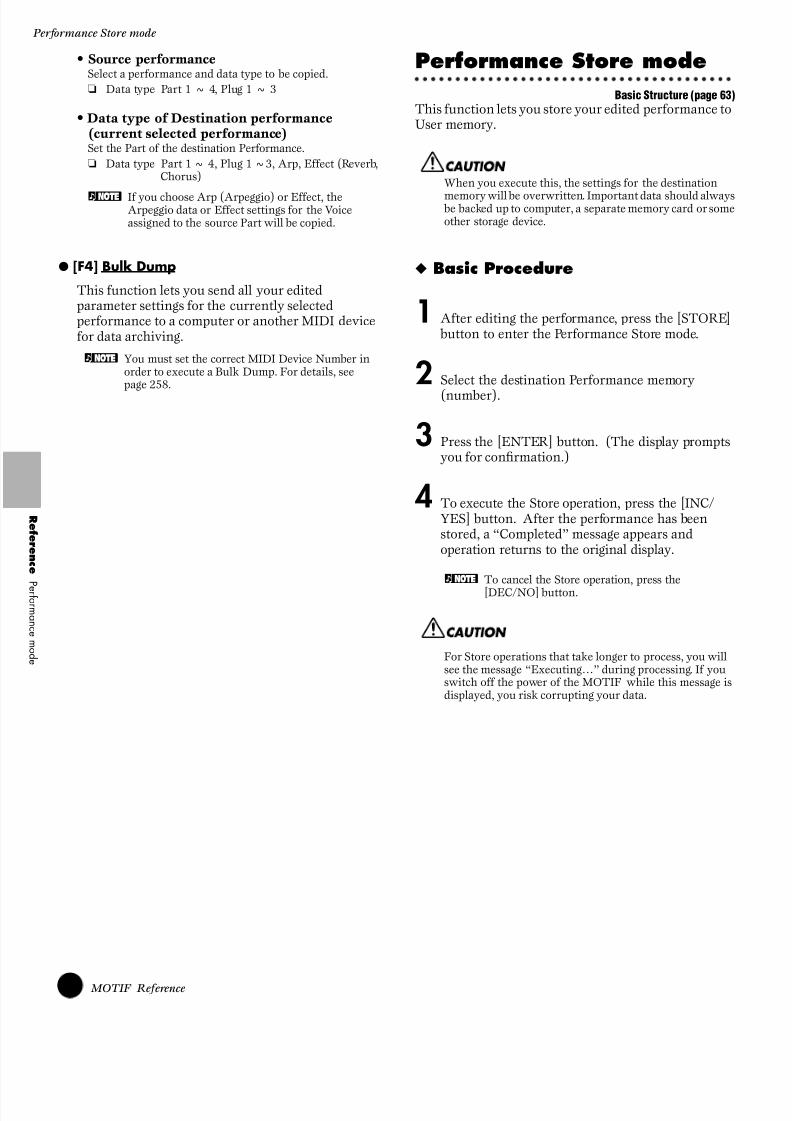
8/10/2019 motif_1(2)
http://slidepdf.com/reader/full/motif12 176/300
176 MOTIF Reference
Performance Store mode
Ref er enc e
P erf ormanc emod e
• Source performanceSelect a performance and data type to be copied.
❏ Data type Part 1 ~ 4, Plug 1 ~ 3
• Data type of Destination performance(current selected performance)Set the Part of the destination Performance.
❏ Data type Part 1 ~ 4, Plug 1 ~3, Arp, Effect (Reverb,Chorus)
n If you choose Arp (Arpeggio) or Effect, theArpeggio data or Effect settings for the Voiceassigned to the source Part will be copied.
● [F4] Bulk Dump
This function lets you send all your editedparameter settings for the currently selectedperformance to a computer or another MIDI devicefor data archiving.
n You must set the correct MIDI Device Number inorder to execute a Bulk Dump. For details, seepage 258.
Performance Store mode
Basic Structure (page 63)
This function lets you store your edited performance toUser memory.
When you execute this, the settings for the destination
memory will be overwritten. Important data should always be backed up to computer, a separate memory card or someother storage device.
◆ Basic Procedure
1 After editing the performance, press the [STORE] button to enter the Performance Store mode.
2 Select the destination Performance memory
(number).
3 Press the [ENTER] button. (The display promptsyou for confirmation.)
4 To execute the Store operation, press the [INC/YES] button. After the performance has beenstored, a “Completed” message appears andoperation returns to the original display.
n To cancel the Store operation, press the[DEC/NO] button.
For Store operations that take longer to process, you willsee the message “Executing…” during processing. If youswitch off the power of the MOTIF while this message isdisplayed, you risk corrupting your data.

8/10/2019 motif_1(2)
http://slidepdf.com/reader/full/motif12 177/300
177 MOTIF Reference
Function
Song ModeBasic Structure (page 30)
Function Tree
This section is devoted to the Song mode. To see how the Song mode relates to the entire structure of the MOTIFand its other modes and functions, see the simplified chart in “Basic Structure” on page 30.The following detailed chart shows all of the display menus and parameter groups of the Song modes — giving you a
quick, easy-to-understand overview of the song-related functions of the MOTIF.Brackets around a word or phrase (e.g., [F1]) indicate specific button names or panel operations.
[INFORMATION] SONG INFORMATION
[SONG] SONG PLAY
[F1] SONG PLAY
[F2] SONG GRID GROOVE
[F3] SONG TRACK OUTPUT CHANNEL
[F4] SONG TRACK LOOP ON/OFF
[F5] COPY PHRASE[F6] SONG CHAIN PLAY/EDIT
[REC] SONG RECORD
SONG REC SETUP
[F1] SETUP
[F2] VOICE
[F3] ARP
[PLAY] SONG RECORDING
[F1] SETUP
[F2] VOICE
[STOP] SONG PLAY
[EDIT] SONG EDIT
[F1] CHANGE
[F5] INSERT
[F6] DELETE
[F2] VIEW FILTER
[F5] CLEAR ALL
[F6] SET ALL[JOB] SONG JOB
[F1] UNDO/REDO
[F2] NOTE JOB LIST
QUANTIZE
MODIFY VELOCITY
MODIFY GATE TIME
CRESCENDO
TRANSPOSE
GLIDE
CREATE ROLL
SORT CHORD
SEPARATE CHORD
[F3] EVENT JOB LIST
SHIFT CLOCK
COPY EVENT
ERASE EVENT
EXTRACT EVENTCREATE CONTINUOUS DATA
THIN OUT
MODIFY CONTROL DATA
BEAT STRETCH
[F4] MEASURE JOB LIST
CREATE MEASURE
DELETE MEASURE
[SONG] . . . . . . . . . . . . . . . . . . . . . . . . . . . . . . . . . . . . . . . . . . . . . . . . . . . . . . . . . . . . . . . . . . . P. 275
. . . . . . . . . . . . . . . . . . . . . . . . . . . . . . . . . . . . . . . . . . . . . . . . . . . . . . . . . . . . . . . . . . . . . . . . . . . . . . . . . . P. 179
. . . . . . . . . . . . . . . . . . . . . . . . . . . . . . . . . . . . . . . . . . . . . . . . . . . . . . . . . . . . . . . . . . . . P. 179
. . . . . . . . . . . . . . . . . . . . . . . . . . . . . . . . . . . . . . . . . . . . . . . . . . . . . . . . . . . . P. 181
. . . . . . . . . . . . . . . . . . . . . . . . . . . . . . . . . . . . . . . . . . . . . . . . . . P. 182
. . . . . . . . . . . . . . . . . . . . . . . . . . . . . . . . . . . . . . . . . . . . . . . . . . . . . P. 182
. . . . . . . . . . . . . . . . . . . . . . . . . . . . . . . . . . . . . . . . . . . . . . . . . . . . . . . . . . . . . . . . . . P. 183. . . . . . . . . . . . . . . . . . . . . . . . . . . . . . . . . . . . . . . . . . . . . . . . . . . . . . . . . . P. 183
. . . . . . . . . . . . . . . . . . . . . . . . . . . . . . . . . . . . . . . . . . . . . . . . . . . . . . . . . . . . . . . . . . . . . . . . . . . . . . . . P. 183
. . . . . . . . . . . . . . . . . . . . . . . . . . . . . . . . . . . . . . . . . . . . . . . . . . . . . . . . . . . . . . . . . . . P. 184
. . . . . . . . . . . . . . . . . . . . . . . . . . . . . . . . . . . . . . . . . . . . . . . . . . . . . . . P. 184
. . . . . . . . . . . . . . . . . . . . . . . . . . . . . . . . . . . . . . . . . . . . . . . . . . . . . . . P. 188
. . . . . . . . . . . . . . . . . . . . . . . . . . . . . . . . . . . . . . . . . . . . . . . . . . . . . . . . . . P. 189
. . . . . . . . . . . . . . . . . . . . . . . . . . . . . . . . . . . . . . . . . . . . . . . . . . . . . . . . . . . P. 183
. . . . . . . . . . . . . . . . . . . . . . . . . . . . . . . . . . . . . . . . . . . . . . . . . . . . . . . . P. 184
. . . . . . . . . . . . . . . . . . . . . . . . . . . . . . . . . . . . . . . . . . . . . . . . . . . . . . . . P. 188
. . . . . . . . . . . . . . . . . . . . . . . . . . . . . . . . . . . . . . . . . . . . . . . . . P. 184
. . . . . . . . . . . . . . . . . . . . . . . . . . . . . . . . . . . . . . . . . . . . . . . . . . . . . . . . . . . . . . . . . . . . . . . . . . . . . . . . . . . . P. 189
. . . . . . . . . . . . . . . . . . . . . . . . . . . . . . . . . . . . . . . . . . . . . . . . . . . . . . . . . . . . . . . . . . . . . . . P. 189
. . . . . . . . . . . . . . . . . . . . . . . . . . . . . . . . . . . . . . . . . . . . . . . . . . . . . . . P. 190
. . . . . . . . . . . . . . . . . . . . . . . . . . . . . . . . . . . . . . . . . . . . . . . . . . . . . . . P. 190
. . . . . . . . . . . . . . . . . . . . . . . . . . . . . . . . . . . . . . . . . . . . . . . . . . . . . . . . . . . . . . . . . . . P. 192
. . . . . . . .. . . . . . . . . . . . . . . . . . . . . . . . . . . . . . . . . . . . . . . . . . . . . P. 192
. . . . . . . . . . . . . . . . . . . . . . . . . . . . . . . . . . . . . . . . . . . . . . . . . . . . . . . P. 192. . . . . . . . . . . . . . . . . . . . . . . . . . . . . . . . . . . . . . . . . . . . . . . . . . . . . . . . . . . . . . . . . . . . . . . . . . . . . . . . . . . . . P. 193
. . . . . . . . . . . . . . . . . . . . . . . . . . . . . . . . . . . . . . . . . . . . . . . . . . . . . . . . . . . . . . . . . . . . P. 193
. . . . . . . . . . . . . . . . . . . . . . . . . . . . . . . . . . . . . . . . . . . . . . . . . . . . . . . . . . . . . . . . . P. 193
. . . . . . . . . . . . . . . . . . . . . . . . . . . . . . . . . . . . . . . . . . . . . . . . . . . . . . . . P. 194
. . . . . . . . . . . . . . . . . . . . . . . . . . . . . . . . . . . . . . . . . . . . . . . . . P. 195
. . . . . . . . . . . . . . . . . . . . . . . . . . . . . . . . . . . . . . . . . . . . . . . . . P. 195
. . . . . . . . . . . . . . . . . . . . . . . . . . . . . . . . . . . . . . . . . . . . . . . . . . . . . . P. 196
. . . . . . . . . . . . . . . . . . . . . . . . . . . . . . . . . . . . . . . . . . . . . . . . . . . . . . P. 196
. . . . . . . . . . . . . . . . . . . . . . . . . . . . . . . . . . . . . . . . . . . . . . . . . . . . . . . . . . . . P. 196
. . . . . . . . . . . . . . . . . . . . . . . . . . . . . . . . . . . . . . . . . . . . . . . . . . . . . . P. 196
. . . . . . . . . . . . . . . . . . . . . . . . . . . . . . . . . . . . . . . . . . . . . . . . . . . . . . P. 197
. . . . . . . . . . . . . . . . . . . . . . . . . . . . . . . . . . . . . . . . . . . . . . . . . P. 198
. . . . . . . . . . . . . . . . . . . . . . . . . . . . . . . . . . . . . . . . . . . . . . . . . . . . . . . . . . . . . . . . . P. 198
. . . . . . . . . . . . . . . . . . . . . . . . . . . . . . . . . . . . . . . . . . . . . . . . . . . . . . P. 198
. . . . . . . . . . . . . . . . . . . . . . . . . . . . . . . . . . . . . . . . . . . . . . . . . . . . . . P. 198
. . . . . . . . . . . . . . . . . . . . . . . . . . . . . . . . . . . . . . . . . . . . . . . . . . . . . P. 199
. . . . . . . . . . . . . . . . . . . . . . . . . . . . . . . . . . . . . . . . . . . . . . . . . . . P. 199. . . . . . . . . . . . . . . . . . . . . . . . . . . . . . . . . . . . . . . . . P. 199
. . . . . . . . . . . . . . . . . . . . . . . . . . . . . . . . . . . . . . . . . . . . . . . . . . . . . . . . . P. 200
. . . . . . . . . . . . . . . . . . . . . . . . . . . . . . . . . . . . . . . . . . . . P. 200
. . . . . . . . . . . . . . . . . . . . . . . . . . . . . . . . . . . . . . . . . . . . . . . . . . . . P. 200
. . . . . . . . . . . . . . . . . . . . . . . . . . . . . . . . . . . . . . . . . . . . . . . . . . . . . . . . . . . . . . P. 201
. . . . . . . . . . . . . . . . . . . . . . . . . . . . . . . . . . . . . . . . . . . . . . . . . P. 201
. . . . . . . . . . . . . . . . . . . . . . . . . . . . . . . . . . . . . . . . . . . . . . . . . P. 201
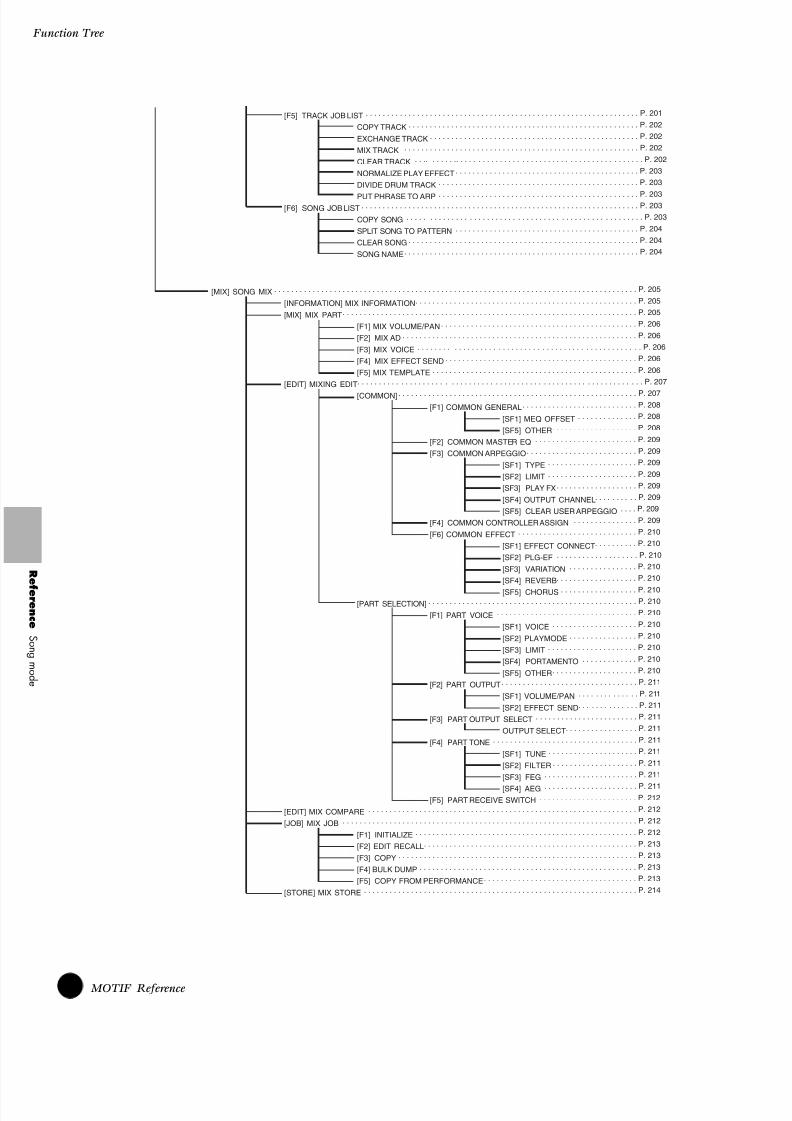
8/10/2019 motif_1(2)
http://slidepdf.com/reader/full/motif12 178/300
178 MOTIF Reference
Function Tree
Ref er enc e
S ongmod e
[MIX] SONG MIX
[INFORMATION] MIX INFORMATION
[MIX] MIX PART
[F1] MIX VOLUME/PAN
[F2] MIX AD
[F3] MIX VOICE
[F4] MIX EFFECT SEND
[F5] MIX TEMPLATE
[EDIT] MIXING EDIT
[COMMON][F1] COMMON GENERAL
[SF1] MEQ OFFSET
[SF5] OTHER
[F2] COMMON MASTER EQ
[F3] COMMON ARPEGGIO
[SF1] TYPE
[SF2] LIMIT
[SF3] PLAY FX
[SF4] OUTPUT CHANNEL
[SF5] CLEAR USER ARPEGGIO
[F4] COMMON CONTROLLER ASSIGN
[F6] COMMON EFFECT
[SF1] EFFECT CONNECT
[SF2] PLG-EF
[SF3] VARIATION
[SF4] REVERB
[SF5] CHORUS[PART SELECTION]
[F1] PART VOICE
[SF1] VOICE
[SF2] PLAYMODE
[SF3] LIMIT
[SF4] PORTAMENTO
[SF5] OTHER
[F2] PART OUTPUT
[SF1] VOLUME/PAN
[SF2] EFFECT SEND
[F3] PART OUTPUT SELECT
OUTPUT SELECT
[F4] PART TONE
[SF1] TUNE
[SF2] FILTER
[SF3] FEG
[SF4] AEG
[F5] PART RECEIVE SWITCH
[EDIT] MIX COMPARE
[JOB] MIX JOB
[F1] INITIALIZE
[F2] EDIT RECALL
[F3] COPY
[F4] BULK DUMP
[F5] COPY FROM PERFORMANCE
[STORE] MIX STORE
. . . . . . . . . . . . . . . . . . . . . . . . . . . . . . . . . . . . . . . . . . . . . . . . . . . . . . . . . . . . . . . . . . . . . . . . . . . . . . . . . . . . . P. 205
. . . . . . . . . . . . . . . . . . . . . . . . . . . . . . . . . . . . . . . . . . . . . . . . . . . . P. 205
. . . . . . . . . . . . . . . . . . . . . . . . . . . . . . . . . . . . . . . . . . . . . . . . . . . . . . . . . . . . . . . . . . . . . P. 205
. . . . . . . . . . . . . . . . . . . . . . . . . . . . . . . . . . . . . . . . . . . . . . P. 206
. . . . . . . . . . . . . . . . . . . . . . . . . . . . . . . . . . . . . . . . . . . . . . . . . . . . . . . P. 206
. . . . . . . . . . . . . . . . . . . . . . . . . . . . . . . . . . . . . . . . . . . . . . . . . . . P. 206
. . . . . . . . . . . . . . . . . . . . . . . . . . . . . . . . . . . . . . . . . . . . . P. 206
. . . . . . . . . . . . . . . . . . . . . . . . . . . . . . . . . . . . . . . . . . . . . . . . P. 206
. . . . . . . . . . . . . . . . . . . . . . . . . . . . . . . . . . . . . . . . . . . . . . . . . . . . . . . . . . . . . . . . . P. 207
. . . . . . . . . . . . . . . . . . . . . . . . . . . . . . . . . . . . . . . . . . . . . . . . . . . . . . . . P. 207 . . . . . . . . . . . . . . . . . . . . . . . . . . . P. 208
. . . . . . . . . . . . . . P. 208
. . . . . . . . . . . . . . . . . . . . P. 208
. . . . . . . . . . . . . . . . . . . . . . . . P. 209
. . . . . . . . . . . . . . . . . . . . . . . . . . P. 209
. . . . . . . . . . . . . . . . . . . . . P. 209
. . . . . . . . . . . . . . . . . . . . . P. 209
. . . . . . . . . . . . . . . . . . . P. 209
. . . . . . . . . . P. 209
. . . . P. 209
. . . . . . . . . . . . . . . P. 209
. . . . . . . . . . . . . . . . . . . . . . . . . . . . P. 210
. . . . . . . . . . P. 210
. . . . . . . . . . . . . . . . . . . . P. 210
. . . . . . . . . . . . . . . . P. 210
. . . . . . . . . . . . . . . . . . . P. 210
. . . . . . . . . . . . . . . . . . P. 210. . . . . . . . . . . . . . . . . . . . . . . . . . . . . . . . . . . . . . . . . . . . . . . . . P. 210
. . . . . . . . . . . . . . . . . . . . . . . . . . . . . . . . . P. 210
. . . . . . . . . . . . . . . . . . . . P. 210
. . . . . . . . . . . . . . . . P. 210
. . . . . . . . . . . . . . . . . . . . . P. 210
. . . . . . . . . . . . . P. 210
. . . . . . . . . . . . . . . . . . . . P. 210
. . . . . . . . . . . . . . . . . . . . . . . . . . . . . . . . P. 211
. . . . . . . . . . . . . . P. 211
. . . . . . . . . . . . . . P. 211
. . . . . . . . . . . . . . . . . . . . . . . . P. 211
. . . . . . . . . . . . . . . . . P. 211
. . . . . . . . . . . . . . . . . . . . . . . . . . . . . . . . . . P. 211
. . . . . . . . . . . . . . . . . . . . . P. 211
. . . . . . . . . . . . . . . . . . . . P. 211
. . . . . . . . . . . . . . . . . . . . . . P. 211
. . . . . . . . . . . . . . . . . . . . . . P. 211 . . . . . . . . . . . . . . . . . . . . . . . P. 212
. . . . . . . . . . . . . . . . . . . . . . . . . . . . . . . . . . . . . . . . . . . . . . . . . . . . . . . . . . . . . . . P. 212
. . . . . . . . . . . . . . . . . . . . . . . . . . . . . . . . . . . . . . . . . . . . . . . . . . . . . . . . . . . . . . . . . . . . . P. 212
. . . . . . . . . . . . . . . . . . . . . . . . . . . . . . . . . . . . . . . . . . . . . . . . . . . . P. 212
. . . . . . . . . . . . . . . . . . . . . . . . . . . . . . . . . . . . . . . . . . . . . . . . . . P. 213
. . . . . . . . . . . . . . . . . . . . . . . . . . . . . . . . . . . . . . . . . . . . . . . . . . . . . . . . P. 213
. . . . . . . . . . . . . . . . . . . . . . . . . . . . . . . . . . . . . . . . . . . . . . . . . . . P. 213
. . . . . . . . . . . . . . . . . . . . . . . . . . . . . . . . . . . . P. 213
. . . . . . . . . . . . . . . . . . . . . . . . . . . . . . . . . . . . . . . . . . . . . . . . . . . . . . . . . . . . . . . . P. 214
[F5] TRACK JOB LIST
COPY TRACK
EXCHANGE TRACK
MIX TRACK
CLEAR TRACK
NORMALIZE PLAY EFFECT
DIVIDE DRUM TRACK
PUT PHRASE TO ARP[F6] SONG JOB LIST
COPY SONG
SPLIT SONG TO PATTERN
CLEAR SONG
SONG NAME
. . . . . . . . . . . . . . . . . . . . . . . . . . . . . . . . . . . . . . . . . . . . . . . . . . . . . . . . . . . . . . . . P. 201
. . . . . . . . . . . . . . . . . . . . . . . . . . . . . . . . . . . . . . . . . . . . . . . . . . . . . . P. 202
. . . . . . . . . . . . . . . . . . . . . . . . . . . . . . . . . . . . . . . . . . . . . . . . . P. 202
. . . . . . . . . . . . . . . . . . . . . . . . . . . . . . . . . . . . . . . . . . . . . . . . . . . . . . . P. 202
. . .. . . . . . .. . . . . . . . . . . . . . . . . . . . . . . . . . . . . . . . . . . . . . . . . . . P. 202
. . . . . . . . . . . . . . . . . . . . . . . . . . . . . . . . . . . . . . . . . . . P. 203
. . . . . . . . . . . . . . . . . . . . . . . . . . . . . . . . . . . . . . . . . . . . . . . P. 203
. . . . . . . . . . . . . . . . . . . . . . . . . . . . . . . . . . . . . . . . . . . . . . . P. 203. . . . . . . . . . . . . . . . . . . . . . . . . . . . . . . . . . . . . . . . . . . . . . . . . . . . . . . . . . . . . . . . . P. 203
. . . . . . . . . . . . . . . . . . . . . . . . . . . . . . . . . . . . . . . . . . . . . . . . . . . . . . P. 203
. . . . . . . . . . . . . . . . . . . . . . . . . . . . . . . . . . . . . . . . . . . P. 204
. . . . . . . . . . . . . . . . . . . . . . . . . . . . . . . . . . . . . . . . . . . . . . . . . . . . . . P. 204
. . . . . . . . . . . . . . . . . . . . . . . . . . . . . . . . . . . . . . . . . . . . . . . . . . . . . . . P. 204

8/10/2019 motif_1(2)
http://slidepdf.com/reader/full/motif12 179/300

8/10/2019 motif_1(2)
http://slidepdf.com/reader/full/motif12 180/300
180 MOTIF Reference
Song Play mode
Ref er enc e
S ongmod e
1 Press any of the GROUP [A] - [D] buttons to selecta Group.
n Each letter group contains sixteen song numbers,and pressing the appropriate letter selects the firstsong in that letter’s group. For example, press button [A] to select song 01, press button [B] toselect song 17 and so on. (See chart below.)
2 Press any of the NUMBER [1] - [16] buttons toselect a Song and return to the Song Play display.
● Song numbers and the corresponding Group/Numbers
You can also select a song by moving the cursor to thesong number location and using the [INC/YES] and[DEC/NO] buttons or the data dial.
LocationThe explanations here apply to step #4 of the BasicProcedure on page 179. The Song Play mode has a convenient Locationfunction that lets you jump to user-specified parts of asong. This lets you assign a specific measure numberin the selected song, and instantly jump to the assignedmeasure — either during playback or when the song isstopped. Two Locations can be assigned.
■ Assigning LocationsSelect the desired measure in the recorded song for theLocation. (Highlight “MEAS” and use the [INC/YES]and [DEC/NO] buttons or data dial.) Then, to assignthe measure to Location 1, simultaneously hold downthe [SET LOCATE] button and press the [G] button.To assign Location 2, use the [H] button.
■ Jumping to an assigned LocationYou can instantly jump to the assigned Location 1 or 2 by simultaneously holding down the [LOCATE] buttonand pressing the [G] button (for Location 1) or the[H] button (for Location 2).
Song track on/off — Solo and Mute
The explanations here apply to step #4 of the BasicProcedure on page 179.
● To mute a track
Song Number Group Number Song Number Group Number001 A 1 033 C 1002 A 2 034 C 2003 A 3 035 C 3004 A 4 036 C 4005 A 5 037 C 5006 A 6 038 C 6007 A 7 039 C 7008 A 8 040 C 8009 A 9 041 C 9010 A 10 042 C 10011 A 11 043 C 11012 A 12 044 C 12013 A 13 045 C 13014 A 14 046 C 14015 A 15 047 C 15016 A 16 048 C 16017 B 1 049 D 1018 B 2 050 D 2019 B 3 051 D 3020 B 4 052 D 4021 B 5 053 D 5022 B 6 054 D 6023 B 7 055 D 7024 B 8 056 D 8025 B 9 057 D 9026 B 10 058 D 10027 B 11 059 D 11028 B 12 060 D 12029 B 13 061 D 13030 B 14 062 D 14031 B 15 063 D 15032 B 16 064 D 16
Specify a measure numberto be registered.
In this example, the selectedmeasure is assigned to Location1. The current settings forLocations 1 and 2 are shown atthe top right of the display.
SEQ TRANSPORT
LOCATE 1 2
REC
INTEGRATEDSAMPLING MIXING UTILITY
EDIT JOB STORE
COMPARE SCENE STORESET LOCATE
LOCATE 1 2
15
1 2 3 4 5 6 7 8
9 10 11 12 13 14 16
TRACKSELECT
MUTE
SOLO
NUMBERELEMENT/PERF.PART/ZONE

8/10/2019 motif_1(2)
http://slidepdf.com/reader/full/motif12 181/300
181 MOTIF Reference
Song Play m
1 Press the [MUTE] button so that its lamp lights.
2 Press any of the NUMBER [1] - [16] buttons toselect the track number to be muted.
● To solo a track
Simultaneously hold down the [MUTE] button andpress one of the NUMBER buttons [1] to [16] to solothe corresponding track.
Once you’ve selected a track for soloing, the [MUTE] button’s lamp flashes, indicating the Solo function is
active. While Solo is active, you can change the soloedtrack simply by pressing the corresponding NUMBER button [1] to [16].To exit from the Solo function, press the [MUTE] button again.
Song track selection
The explanations here apply to step #5 of the BasicProcedure on page 179. In order to edit the Song data, you’ll need to select atrack for editing.
Press the [TRACK SELECT] button so that itsindicator lights and press any of the NUMBER [1] -[16] buttons to select a track to be edited.
nSelecting another song resets the selected track to 1.
Song SceneThe explanations here apply to step #6 of the BasicProcedure on page 179. Song Scene is a powerful function that allows you tosave five different “snapshots” of important song-related parameters — including transpose, tempo,track mute status, and the basic sound/mixing controls(all parameter settings controllable from the Knobs andCS sliders).
nThe Song Scene settings can be set independently foreach song.
● Storing the Song Scene
● Recalling the Song SceneSimply press any of the [SF1] - [SF5] buttons to recallthe setting.
One of the convenient advantages of Song Scene is thatit lets you instantly and automatically executeparameter settings that normally require many buttonpresses or controller operations. Use it during songrecording or playback to make instantaneous settingchanges.
Song editing in the Song Play mode
The explanations here apply to step #5 of the BasicProcedure on page 179.The Song Play mode lets you perform a variety ofgeneral editing operations on the selected song. Formore detailed and comprehensive editing operations,use the Song Edit and Song Mixing modes.
● [F2] Song Play Groove
The Grid Groove function makes it possible toadjust the pitch, timing, length, and velocity ofnotes in a specified track via a 1-measure 16th-notegrid to create “grooves” that would not be possiblewith precise sequencer-like programming. The GridGroove function affects song playback without
actually changing the sequence data.
15
1 2 3 4 5 6 7 8
9 10 11 12 13 14 16
TRACKSELECT
MUTE
SOLO
NUMBERELEMENT/PERF.PART/ZONE
15
1 2 3 4 5 6 7 8
9 10 11 12 13 14 16
TRACKSELECT
MUTE
SOLO
NUMBERELEMENT/PERF.PART/ZONE
After making the desired settingsfor the Song Scene, simultaneouslyhold down the [STORE] button andpress one of the SONG SCENEbuttons [SF1] to [SF5].
STORE
SCENE STORESET LOCATE
SONG SCENESF1 SF 2 SF3 SF4 SF5
SONG SCENESF1 SF 2 SF3 SF4 SF5

8/10/2019 motif_1(2)
http://slidepdf.com/reader/full/motif12 182/300
182 MOTIF Reference
Song Play mode
Ref er enc e
S ongmod e
• NOTE OFFSETRaises or lowers the pitch of the note(s) on the selectedgrid in semitones.
❏ Settings 99 ~ +99
• CLOCK SHIFTShifts the timing of the note(s) on the selected gridforward or back ward in clock increments.
❏ Settings 120 ~ +120
• GATE OFFSET (Gate time Offset)Lengthens or shortens the note(s) on the selected grid inclock increments.
❏ Settings 120 ~ +120
• VELO OFFSET (Velocity Offset)Increases or decreases the velocity of the note(s) on theselected grid.
❏ Settings 127 ~ +127
● [F3] Song Play Output Channel
From this display you can set the MIDI outputchannel for each of the sixteen tracks, anddetermine which MIDI port the track data is sent to.
• OUT CH (Output Channel)Sets up channel transmission to the MIDI OUT terminal.Tracks set to “Off” will not sound.
❏ Settings off, 01 ~ 16
n In the Song/Pattern mode, the MIDI data created by
playing the keyboard/knobs/wheels is sent to the tonegenerator block or the external MIDI devices via theMIDI output channel of the currently selected track.
• PortDetermines the MIDI transmission port for thecorresponding track. This is useful for sending data toexternal tone generators over multiple MIDI ports in anextended MIDI setup. Keep in mind that this parameter canonly be set for tracks having assignments to Plug-in parts 1 - 3(for installed single-part boards) or Plug-in parts 17 -32 (forinstalled multi-part boards). Tracks using the internal tonegenerator parts of the MOTIF are automatically fixed at port 1.
❏ Settings off, 01 ~ 03
n Port data can be output only through the USBterminal. No port data is transmitted through theMIDI OUT terminal, even if the correspondingtrack is set to a specific port number.
● [F4] Song Play Track Loop
From this display you can determine whether thedata in the selected track loops or not in playback.
Using Loop can be an effective way to repeat shortpatterns and phrases throughout the song.
❏ Settings on, off
In the example below, a 40-measure song has beenrecorded and Track 1 is set to play back normally
over the 40 measures. Track 2 has been set to loop,and will repeat until the [■] button is pressed.
When set to on, you can specify the range to be looped. (Only the end point can be set, the start
point of looped playback is fixed to the beginning ofthe song.) Please note that the part that is not looped is deleted after setting to on.
1 Press [F1] to call up the Song Play display. Changethe current measure that is to be a last measure of looped playback.
2 Press [F4] to call up the Track Loop display andmove the cursor to the desired track.
plus
VELO OFST
GATE OFST
CLOCK SFT
NOTE OFST
0minus
Track 1(40 measures
of data)
Track 2(4 measures
of data)
Playback
The four-measure data is repeatedten times.
In this example, set to "004."

8/10/2019 motif_1(2)
http://slidepdf.com/reader/full/motif12 183/300
183 MOTIF Reference
Song Record
3 Set to on by using the [INC/YES] and [DEC/NO] buttons or the data dial. (The display prompts youfor confirmation.)
4 Press the [INC/YES] button. The Loop is set to onand the part that is not looped is deleted
● [F5] Song Play Copy Phrase
You can copy s Pattern track data (Phrase) to a Songtrack. You can also copy the preset phrase that doesnot assigned to the Pattern track by the Patchfunction (page 219).
● [F6] Song Play Chain Play/Edit
This function allows songs to be “chained” togetherfor automatic sequential playback.This is particularly convenient in live performancesituations, letting you have your song backing playautomatically in “jukebox” fashion while youperform over it. Highlight the desired point in thechain, then use the [INC/YES] and [DEC/NO] buttons or data dial to set the desired song numberor parameter below.The MOTIF allows you tocreate one Song Chain setting.
Parameters other than the song number are explained here.
• skipSkips past (ignores) the selected chain number andcontinues playback from the next chain number.
• stopStops the song chain playback at that chain number. Youcan restart the song chain playback from the next chainnumber by pressing the [F] button.
• endIndicates the end mark of the song chain data.
Song Record mode
Quick Start Guide (page 110)
In this mode, you can use the sequencer to record yourkeyboard performance in real time to each track of aUser Song.
nFor details about recording methods, see page 53.
◆ Basic ProcedureBasic Structure (page 53)
1 In the Song Play mode, select a User Song to berecorded.
2 If necessary, set a Song Scene (page 115).
3 Press the [REC] button to enter the Song Recordmode. (The indicator lights.) The Song Record
Setup display shown below appears.
4 Set basic parameters for recording (e.g., recordingtype, track, tempo, and so on).
n Please note that the time signature can be set in theSong Play display. See page 179.
5 Change the display by pressing the [F2] - [F3] buttons and set various parameters for recording.
n Your performance on the keyboard and thecontrollers (Knobs, Pitch Bend wheel, Modulation
wheel, and so on) is recorded to tracks 1 - 16. TheTempo (“TMP”) track is for recording tempochanges, while the Scene track is for changes to theSong Scene numbers and Track Mute settings.
6 Press the [F] button to start recording.•When any of the Realtime recording methods
(any setting other than “step”) is selected in step#4, your keyboard playing and controller movesare automatically recorded.
• When “step” is selected in step #4, composeyour performance by entering a note one by one.
Source Phrase
If sample data is included in the originalPhrase and you want to copy all of thedata, make sure to checkmark this box.
Specify the source track andmeasure of the current selectedsong.
After completing the settings,press the [ENTER]button to execute the CopyPhrase.
REC

8/10/2019 motif_1(2)
http://slidepdf.com/reader/full/motif12 184/300
184 MOTIF Reference
Song Record mode
Ref er enc e
S ongmod e
n MIDI events the external MIDI devices connectedto the MOTIF can be recorded to tracks 1~16.
7 After completing your performance (in Realtimerecording) or completing Step recording, press the[■] button to stop recording.
8 Record additional tracks as required. Repeatsteps #3 through #7 as desired.
9 Press the [F] button to hear your newlyrecorded performance.
10 Save the recorded data to the Memory Card orthe SCSI device connected to the MOTIF.
The recorded (edited) song data resides temporarily inDRAM (page 64). Because data contained in DRAM is lost when the power is turned off, you should always storeany data residing in DRAM to a memory card or anexternal SCSI device before turning off the power.
• For detailed instructions on steps #4 - #7, see thefollowing explanations.
• For details on step #10 refer to “File mode” onpage 266.
n The following explanations apply to MIDI datarecording (creating MIDI tracks). For instructionson recording audio data (creating sample tracks),see “Sampling mode” on page 233.
Setting up before recording
The explanations here apply to steps #4 - #5 of theBasic Procedure on page 183.
● [F1] Song Record SetupBasic Structure (page 51)
When recording type is set to something otherthan “step” :
n “Punch-in measure : beat” and “Punch-out measure : beat” are available when the Recording Type is set to“Punch.”
When recording type is set to “step” :
• Type (Recording type)Determines the recording method.
❏ Settings:
RecTrack is set to 1 ~ 16:replace, overdub, punch, step
RecTrack is set to “tempo” :replace, punch, step
RecTrack is set to “scene” :replace, punch
RecTrack is set to “multi” :replace , overdub, punch
n When “punch” is selected, “Punch-in measure : beat” and “Punch-out measure : beat” appear inthe display and should be set.
n When “step” is selected, you should specify theevent type to be enetered.
• QuantizeThis parameter is available when the Recording Type is setto something other than “step.” Record quantize alignsthe timing of notes which are not exactly on the beat on-the-fly as you record.
REC
Tempo
Punch-outmeasure : beat
Punch-inmeasure : beat
Time signature(set in the Song Play display)
This lets you switch between Single Trackrecording and All Track recording. (Pressthe [F6] button.)
This lets you turn the click sound(metronome) on/off for recording.(Press the [F5] button.)
Time signature(set in the Song Play display)
Tempo

8/10/2019 motif_1(2)
http://slidepdf.com/reader/full/motif12 185/300
185 MOTIF Reference
Song Record
❏ Settings: off, 60 (32nd note), 80 (16th note triplet), 120(16th note), 160 (8th note triplet), 240 (8thnote), 320 (1/4 note triplet), 480 (1/4 note)
• EventThis parameter is available when the Recording Type is setto “step.” This lets you specify the event type to beentered.
❏ Settings: note, p.bend (pitch bend), CC#000~#119(Control Change)
• RecTrackDetermines the track to be recorded.Pressing the [F6] button lets you switch between SingleTrack recording and All Track recording.
❏ Settings: tempo, scene, 1~16, multi
• TempoDetermines the Song tempo.
❏ Settings: 001.0 ~300.0
Song Recording
The explanations here apply to steps #6 - #7 of theBasic Procedure on page 183, page 184.
■ Realtime RecordingSee “Quick Start Guide” (page 110)
■ Step RecordingIf you press the [F] button in step #6 of the BasicProcedure on page 183, the following display appearsand you can input the specified events one by one.
● Entering the Note EventWhen the event to be entered is set to “note” , youcan input the note events one by one.
• Beat GraphThis is the display in which notes are “placed” during steprecording.When the meter is 4/4, the display is dividedinto four beats (one measure). Each diamond-shaped
marker in the display represents one 32nd beat (each 1/4note division is divided into eight 32nd beats).For example, if the following rhythmic pattern“ ” i s entered in 4/4 time, a display like the oneshown below will appear.
• PointerDetermines the data-entry position.The triangular pointer above the beat graph indicates thedata-entry position.To move the pointer right or left, use the [INC/YES] and[DEC/NO] buttons or the data dial.
• ValueWhen the event to be entered is set to “note” , this valuespecifies the velocity with which the note will be entered.
❏ Settings:001~127 The set value (1 ~ 127) corresponds to the MIDIvelocity value entered.
RND1 ~RND4When one of the random settings is selected, a randomvelocity value will be entered.
• StepTimeThe “size” of the current recording step time for the nextnote to be entered. This determines to what position thepointer will advance after a note has been entered.
❏ Settings:
• GateTimeSets the gate time to produce slurs, staccato notes, etc.“Gate time” refers to the actual length of time the notesounds. For the same 1/4 note, for example, a long gate
time will produce a slur while a short gate time willproduce a staccato effect.Gate time is indicated as a percent value of the step time.A setting of 50% produces a staccato sound, values between about 80% and 90% produce normal note length,and a value of 99% will produce a slur.
❏ Settings: 001%~200%
● [F3] RESTPress [F3] to enter a rest as long as the specified step time.The point will move ahead to the next data-entry position.Rests do not appear on the display.
n There is no actual data representing rests in theMIDI sequencer. When a “rest” is entered the
pointer simply moves ahead to the next data-entryposition, effectively leaving a rest.
● [F4] TIEWhen the [F4] button is pressed to enter a tie, thepreceding note is lengthened to the full step time. Forexample, in the following phrase, note is entered with1/4 note step time. If the step time is then changed to an8th note and [F4] is pressed, note is entered.
Pointer indicating the current note position.
Beat Graph
32nd note16th note triplet
16th note
8th note triplet
8th note
1/4 note triplet
1/4 note
half note
whole note
0001~0059
1
2

8/10/2019 motif_1(2)
http://slidepdf.com/reader/full/motif12 186/300
186 MOTIF Reference
Song Record mode
Ref er enc e
S ongmod e
Dotted notes can also be entered using the TIE function.To produce a dotted 1/4 note, for example, set the steptime to an 8th note, enter a note and then press [F4] twice.
● [F5] DELETEPress this to actually delete the note events at the currentcursor position.
● [F6] BCK DELMoves the pointer backward by one step and deletes allnotes at that location.
n Mistakenly entered notes can be erased by pressing[F6] immediately after they are entered (beforechanging the step time value).
● Entering other eventsWhen entering non-note events (such as controlchange data), the display is basically the same asthat for note data.
The following descriptions apply to non-noteevents.
• ValueWhen the event to be entered is something other than“note,” this determines the value of the specified non-noteevent.
❏ Settings:When event is set to to “p.bend” :- 8192 ~+8191
When event is set to “CC (Control Change) #001~119” :000 ~127
When event is set to “tempo” (RecTrack is set to “tempo” ):001 ~300
◆ Examples of Step RecordingThe explanations here apply to steps #6 - #7 of theBasic Procedure on page 183, page 184.This section explains how to step-record notes, usingthree specific examples.
1 Set the parameters as illustrated below.Here, we’ll set the Step Time to (480) so thatquarter notes will be entered, and set the GateTimeto 100% to have the notes play in legato.
2 Play the keys C, D, E, F, G, A, B and C in order.
Each time you press a key and release it, thepointer moves forward by one step and the playednote is recorded.
3 Move the pointer to the top (beginning) of thesong and press the [F] button to hear the notedata you just recorded in steps #1 and 2.
21
The TIE function is not available for non-note events.
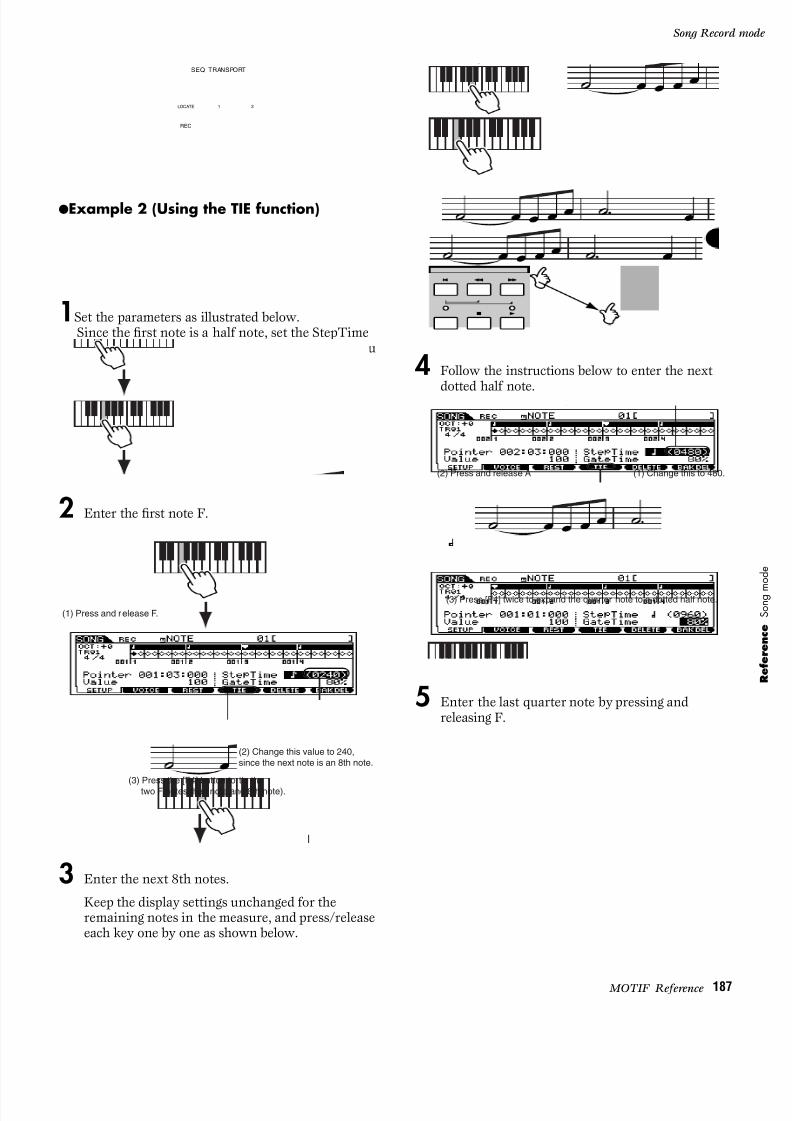
8/10/2019 motif_1(2)
http://slidepdf.com/reader/full/motif12 187/300
187 MOTIF Reference
Song Record
●Example 2 (Using the TIE function)
1Set the parameters as illustrated below.Since the first note is a half note, set the StepTimeto (960), and set the GateTime to 80%, since youdon’t want the notes to play in legato.
2 Enter the first note F.
3 Enter the next 8th notes.
Keep the display settings unchanged for theremaining notes in the measure, and press/releaseeach key one by one as shown below.
4 Follow the instructions below to enter the next
dotted half note.
5 Enter the last quarter note by pressing andreleasing F.
SEQ TRANSPORT
LOCATE 1 2
REC
(1) Press and release F.
(2) Change this value to 240,since the next note is an 8th note.
(3) Press the [F4] button to tie thetwo F notes (half note and 8th note).
(2) Press and release A
(3) Press [F4] twice to expand the quarter note to a dotted half note.
(1) Change this to 480.

8/10/2019 motif_1(2)
http://slidepdf.com/reader/full/motif12 188/300
188 MOTIF Reference
Song Record mode
Ref er enc e
S ongmod e
6 Move the pointer to the top (beginning) of thesong and press the [F] button to hear the notedata you just recorded in steps #1 - 5.
●Example 3 (Using the REST function)
1 Set the parameters as illustrated below.
Set the StepTime to (480) and the Gate Time to80%.
2 Enter the first note F.
3 Enter the next 8th rest by following theinstructions below.
4 Enter the next 8th note A.
5 Enter the next 4th note C by following theinstructions below.
6 Enter the next 8th rest via the same procedure asin step #3
7 Enter the last 8th note F.
8 Move the pointer to the top (beginning) of thesong and press the [F] button to hear the notedata you just recorded in steps #1 - 7.
● [F2] Song Record Voice
From this display you can set voice-relatedparameters for the selected track. The settingsmade here affect the tone generator parts whoseMIDI receive channels match the MIDI transmitchannel of the song track.
Press and release F.
Change this value to 240, sincethe rest value is the same as an8th note.
Enter an 8th note rest bypressing the [F3] button.
(1)(2)
Press and release A.
Press and release C.
Change this value to 480, since the next note isa quarter note.
(1)
(2)
Press and release F.
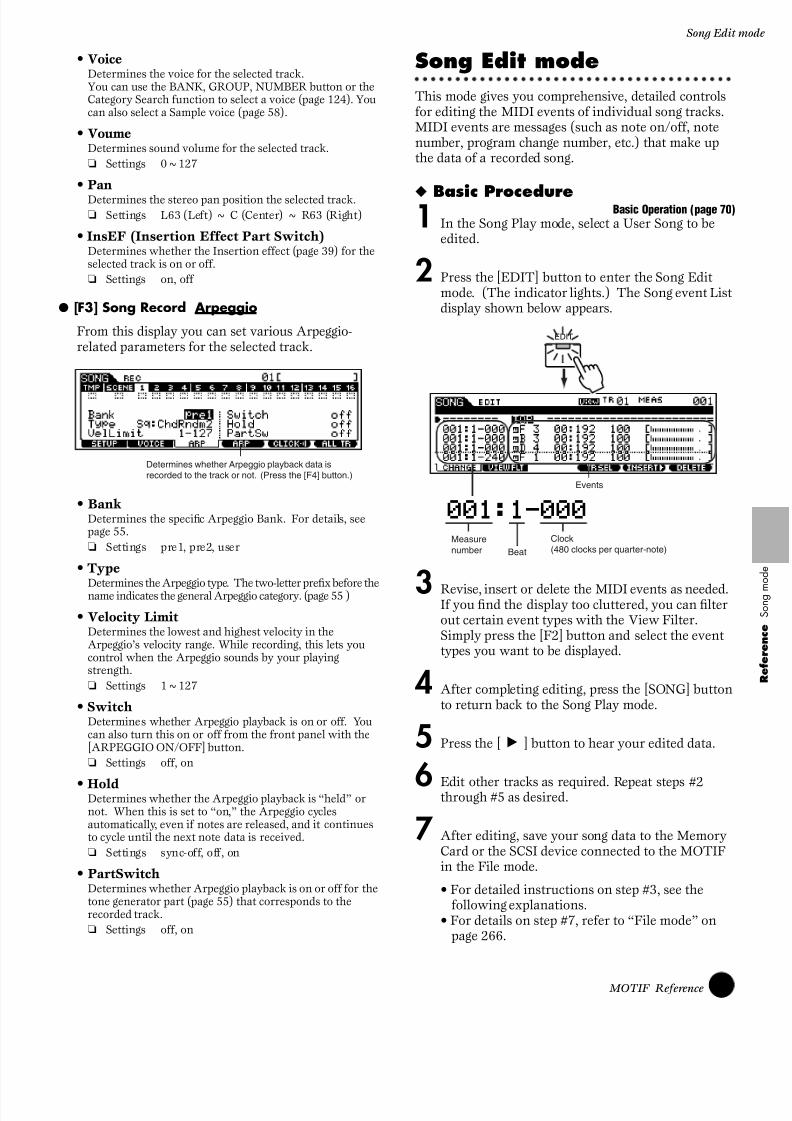
8/10/2019 motif_1(2)
http://slidepdf.com/reader/full/motif12 189/300
189 MOTIF Reference
Song Edit m
• VoiceDetermines the voice for the selected track.You can use the BANK, GROUP, NUMBER button or theCategory Search function to select a voice (page 124). Youcan also select a Sample voice (page 58).
• VoumeDetermines sound volume for the selected track.
❏ Settings 0~127
• PanDetermines the stereo pan position the selected track.❏ Settings L63 (Left) ~ C (Center) ~ R63 (Right)
• InsEF (Insertion Effect Part Switch)Determines whether the Insertion effect (page 39) for theselected track is on or off.
❏ Settings on, off
● [F3] Song Record Arpeggio
From this display you can set various Arpeggio-related parameters for the selected track.
• BankDetermines the specific Arpeggio Bank. For details, seepage 55.
❏ Settings pre1, pre2, user
• Type
Determines the Arpeggio type. The two-letter prefix before thename indicates the general Arpeggio category. (page 55 )
• Velocity LimitDetermines the lowest and highest velocity in theArpeggio’s velocity range. While recording, this lets youcontrol when the Arpeggio sounds by your playingstrength.
❏ Settings 1~127
• SwitchDetermines whether Arpeggio playback is on or off. Youcan also turn this on or off from the front panel with the[ARPEGGIO ON/OFF] button.
❏ Settings off, on
• HoldDetermines whether the Arpeggio playback is “held” ornot. When this is set to “on,” the Arpeggio cyclesautomatically, even if notes are released, and it continuesto cycle until the next note data is received.
❏ Settings sync-off, off, on
• PartSwitchDetermines whether Arpeggio playback is on or off for thetone generator part (page 55) that corresponds to therecorded track.
❏ Settings off, on
Song Edit mode
This mode gives you comprehensive, detailed controlsfor editing the MIDI events of individual song tracks.MIDI events are messages (such as note on/off, notenumber, program change number, etc.) that make upthe data of a recorded song.
◆ Basic Procedure Basic Operation (page 70)1 In the Song Play mode, select a User Song to be
edited.
2 Press the [EDIT] button to enter the Song Editmode. (The indicator lights.) The Song event Listdisplay shown below appears.
3 Revise, insert or delete the MIDI events as needed.
If you find the display too cluttered, you can filterout certain event types with the View Filter.Simply press the [F2] button and select the eventtypes you want to be displayed.
4 After completing editing, press the [SONG] buttonto return back to the Song Play mode.
5 Press the [F] button to hear your edited data.
6 Edit other tracks as required. Repeat steps #2through #5 as desired.
7 After editing, save your song data to the MemoryCard or the SCSI device connected to the MOTIFin the File mode.
• For detailed instructions on step #3, see thefollowing explanations.
• For details on step #7, refer to “File mode” onpage 266.
Determines whether Arpeggio playback data isrecorded to the track or not. (Press the [F4] button.)
EDIT
Events
Measurenumber
Clock(480 clocks per quarter-note)Beat

8/10/2019 motif_1(2)
http://slidepdf.com/reader/full/motif12 190/300
190 MOTIF Reference
Song Edit mode
Ref er enc e
S ongmod e
Event Editing/Inserting/Deleting
The explanations here apply to step #3 of the BasicProcedure on page 189.
■ Editing/Deleting Existing EventsTo edit data in the Event List, use the up/down cursor buttons to highlight the specific event you want to edit,and use the left/right cursor buttons to highlight the
data type or parameter to be edited. Then, change thevalue as needed by using the [INC/YES] and [DEC/NO] buttons or the data dial. The edited event will flash on the display. Press the[ENTER] button to actually enter the edited data (theevent will stop flashing). To abort an edit simply highlight to a new event location without pressing the[ENTER] button. Press the [F6] button to delete theevent at the current location.
■ Inserting New EventsTo insert an event, use the up/down cursor buttons to highlight an event at the desired point in the track(measure, beat, clock) — this is the location to whichthe new event will be inserted. Then, follow the steps
below.
MIDI events that can be inserted(edited)
The following explanations apply to the MIDI eventsthat can be inserted (edited) in step #3 of the BasicProcedure on page 189.The following displays are called up by pressing the[F5] button in step #3 of the Basic Procedure onpage 189.
■ NoteThis is the most common and prevalent type of data —the individual notes of a song.
• Note nameDetermines the note name or the specific keyboard pitch ofthe note.
❏ Settings C -2 ~ G8
• Gate time (beat : clock)Determines the length of time that a note actually soundsin beats and clocks.
❏ Settings 00:001 ~ 999:479
n On the MOTIF, one clock is 1/480th of a quarternote.
• Velocity
Determines how strongly the selected note sounds.❏ Settings 1 ~ 127
■ Pitch BendThese are the events that define continuous changes inpitch and these events are generated by pitch bendwheel operation.
• Data
❏ Settings -8192 ~ +8191
You can also move the selected event toanother location by specifying differentvalues for measure, beat, and clock.
Press the [F6] button todelete theevent at the currentlocation.
Press the [F1] button to abort andreturn to the main Event Listdisplay.
Press the [F5]button.
Press the [ENTER] button toactually insert the event.
ENTER
EXECUTE
Note name Gate time Velocity
Data

8/10/2019 motif_1(2)
http://slidepdf.com/reader/full/motif12 191/300
191 MOTIF Reference
Song Edit m
■ Program ChangeThese events determine the selected voice for the notedata. Keep in mind that Program Change events can beinserted at any point in a song track, letting you changevoices in the middle of a song.
• Bank Select MSB, LSBDetermines the voice bank.
❏ Settings ***~127
n Bank select MSB and LSB are actually part of theControl Change set of messages (below).However, since they apply specifically to voiceselection, they grouped and described here.
• Program number
Determines the specific voice (from the bank selected byMSB and LSB above).
❏ Settings 001~128
n For a complete list of the available voice banks andnumbers, refer to the Voice List in the separateData List booklet.
■ Control ChangeThese events control the sound and certain responsecharacteristics of the voice, and are usually generated/recorded by moving a controller (such as a modulationwheel, knob, slider or foot controller).
• Control numberDetermines the Control Change number. (See chart below.)
❏ Settings 000~127
n For details on using Control Change numbers(including those above), refer to the separate DataList booklet.
■ Channel Aftertouch (CAT)This event is generated when pressure is applied to akey after the note is played.
• DataThis represents the amount of pressure applied to the key.
❏ Settings 000~127
■ Polyphonic Aftertouch (PAT)
This event is generated when pressure is applied to akey after the note is played. Unlike Channel Aftertouchabove, this is recorded and applied independently foreach key pressed.
• Note name
Determines the key to which aftertouch is applied.❏ Settings C -2~G8
• DataThis represents the amount of pressure applied to the key.
❏ Settings 000~127
■ Registered Parameter Number (RPN)This event changes parameter values for each tonegenerator part.This event is used to set part settings such as PitchBend Sensitivity or Tuning.
For a complete list of the available RPN numbers andtheir corresponding controls, refer to the MIDI DataFormat in the separate Data List booklet.
ControlNumber
Function
001 Modulation Wheel005 Portamento Time
007 Volume
010 Pan (Stereo position)
011 Expression
064 Sustain (Hold 1)
065 Portamento on/off
066 Sostenuto pedal on/off
067 Soft Pedal on/off
071 Harmonic Content (controls Fi lter Resonance)
074 Brightness (controls Fi lter Cutoff Frequency)
084 Por tamento Source Note Number
120 All Sound Off
Bank Select MSBBank Select LSB
Program numberVoice name
Control number Data
Data
Note name Data
RPN MSB-LSB Data EntryMSB-LSB

8/10/2019 motif_1(2)
http://slidepdf.com/reader/full/motif12 192/300
192 MOTIF Reference
Song Edit mode
Ref er enc e
S ongmod e
• RPN MSB-LSB
❏ Settings 000~127
• Data Entry MSB-LSB
❏ Settings 000~127
n Normally three types of control change data aresent: RPN MSB (101), RPN LSB (100), and DataEntry MSB (6). In the MOTIF, Data Entry LSB(38) is added to this and the resulting group of
control change events is handled as one in thisdisplay. For a complete list of the available RPNand NRPN numbers and their correspondingcontrols, refer to the MIDI Data Format in theseparate Data List booklet.
■ Non Registered Parameter Number (NRPN)This event changes parameter values for each tonegenerator part.This event is used to edit sounds via MIDI, allowingyou to edit filter or EG settings, or adjust the pitch or level for each instrument of a drum voice.
For a complete list of the available NRPN numbers andtheir corresponding controls, refer to the MIDI DataFormat in the separate Data List booklet.
• NRPN MSB-LSB
❏ Settings 000~127
• Data Entry MSB-LSB
❏ Settings 000~127
n Normally three types of control change data aresent: NRPN MSB (99), NRPN LSB (98), and DataEntry MSB (6). In the MOTIF, this group ofcontrol change events is handled as one in thisdisplay. For a complete list of the available RPNand NRPN numbers and their correspondingcontrols, refer to the MIDI Data Format in theseparate Data List booklet.
■ System Exclusive (Exc)A type of MIDI message used to exchange data uniqueto a specific model or type of device.Unlike with other MIDI events, these events differdepending on the manufacturer/device, and areincompatible among different devices.
• Data
❏ Settings 00 ~7F, F7 (Data must be entered in hexadecimal format.
Event View Filter
The explanations here apply to step #3 of the Basic
Procedure on page 189.The MOTIF’s “Event View Filter” lets you select theevent types that appear on the Event List display. Forexample, if you wish to edit only note events, place acheckmark in the box next to “Note” as shown belowso that only the note events appear in the Event Listdisplay.
RPN MSB-LSB Data EntryMSB-LSB
Data
Press the [F6] buttonto set checkmarksinto all boxes.
When the Control Change box ischeckmarked, you can specify thedesired Control Change number.
Press the [F5] buttonto remove allcheckmarks at once.
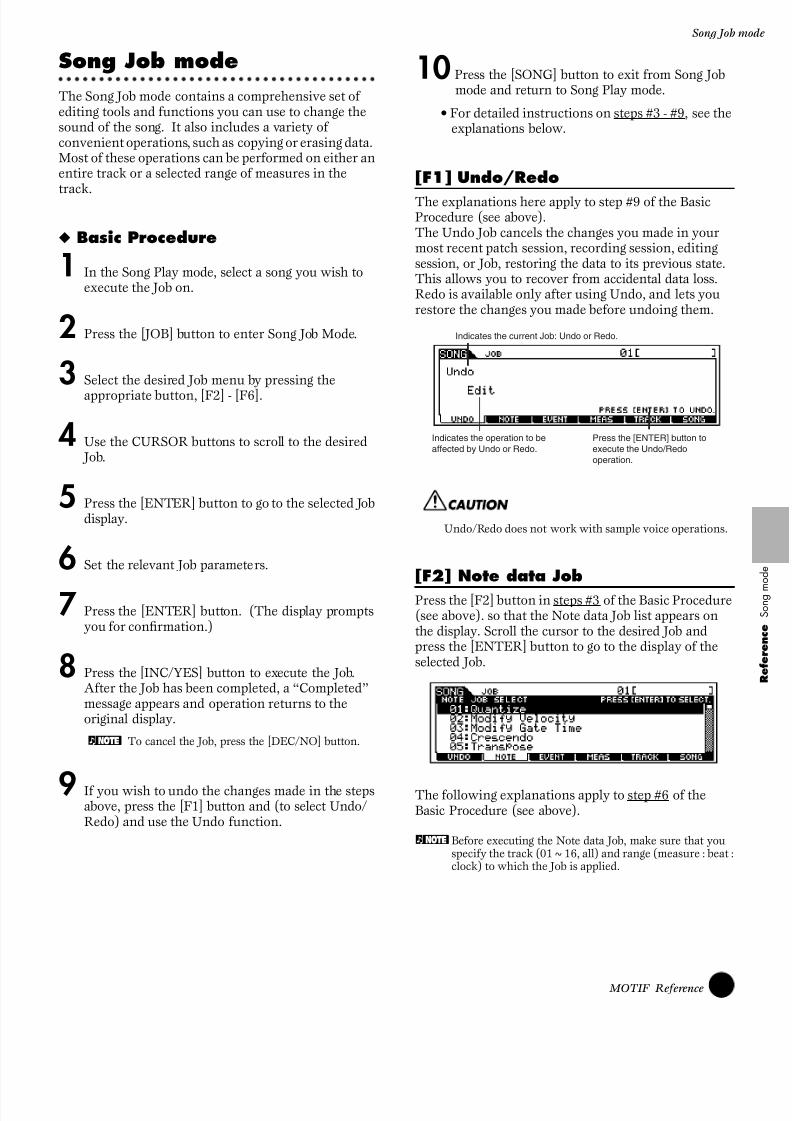
8/10/2019 motif_1(2)
http://slidepdf.com/reader/full/motif12 193/300
193 MOTIF Reference
Song Job m
Song Job mode
The Song Job mode contains a comprehensive set ofediting tools and functions you can use to change thesound of the song. It also includes a variety ofconvenient operations, such as copying or erasing data.Most of these operations can be performed on either anentire track or a selected range of measures in thetrack.
◆ Basic Procedure
1 In the Song Play mode, select a song you wish toexecute the Job on.
2 Press the [JOB] button to enter Song Job Mode.
3 Select the desired Job menu by pressing the
appropriate button, [F2] - [F6].
4 Use the CURSOR buttons to scroll to the desired Job.
5 Press the [ENTER] button to go to the selected Jobdisplay.
6 Set the relevant Job parameters.
7 Press the [ENTER] button. (The display promptsyou for confirmation.)
8 Press the [INC/YES] button to execute the Job.After the Job has been completed, a “Completed”message appears and operation returns to theoriginal display.
n To cancel the Job, press the [DEC/NO] button.
9 If you wish to undo the changes made in the steps
above, press the [F1] button and (to select Undo/Redo) and use the Undo function.
10 Press the [SONG] button to exit from Song Jobmode and return to Song Play mode.
• For detailed instructions on steps #3 - #9, see theexplanations below.
[F1] Undo/Redo
The explanations here apply to step #9 of the BasicProcedure (see above).The Undo Job cancels the changes you made in yourmost recent patch session, recording session, editingsession, or Job, restoring the data to its previous state.This allows you to recover from accidental data loss.Redo is available only after using Undo, and lets yourestore the changes you made before undoing them.
Undo/Redo does not work with sample voice operations.
[F2] Note data Job
Press the [F2] button in steps #3 of the Basic Procedure(see above). so that the Note data Job list appears onthe display. Scroll the cursor to the desired Job andpress the [ENTER] button to go to the display of theselected Job.
The following explanations apply to step #6 of theBasic Procedure (see above).
nBefore executing the Note data Job, make sure that youspecify the track (01~16, all) and range (measure : beat :clock) to which the Job is applied.
Indicates the current Job: Undo or Redo.
Indicates the operation to beaffected by Undo or Redo.
Press the [ENTER] button toexecute the Undo/Redooperation.

8/10/2019 motif_1(2)
http://slidepdf.com/reader/full/motif12 194/300
194 MOTIF Reference
Song Job mode
Ref er enc e
S ongmod e
● [F2]-01 Quantize
Quantization is the process of adjusting the timingof note events by moving them closer to the nearestexact beat. You can use this feature, for example, toimprove the timing of a performance recorded inreal time.
• Quantize Value (Resolution)Determines to what beats the note data in the specifiedtrack will be aligned.
❏ Settings
• StrengthThe Strength value sets the “strength” by which noteevents are pulled toward the nearest quantize beats.A setting of 100% produces exact timing. A setting of 0%results in no quantization.
❏ Settings 000 %~100 %
• SwingRateDelays notes on even-numbered beats (backbeats) toproduce a swing feel.For example, if the meter is 4/4 and the quantize value is
quarter notes, the 2nd and 4th beats of the measure will bedelayed.When a triplet quantize value is used, the last note of eachtriplet is delayed.When the quantize value is or , even-numbered
or beats will be delayed.
❏ Settings See below.
If the quantize value is :50%~75%A setting of 100% is equivalent to twice the length of thespecified quantize value. A setting of 50% produces exacttiming and therefore no swing feel. Settings above 51%increase the amount of swing, with 75% being equivalentto a dotted-note delay.
If the quantize value is :66%~83%A setting of 100% is equivalent to three times the length ofthe specified quantize value. A setting of 66% producesexact timing and therefore no swing feel. Settings above67% increase the amount of swing, with 83% beingequivalent to a sextuplet delay.
If the quantize value is :50%~66%A setting of 100% is equivalent to twice the length of a dor d note. A setting of 50% produces exact timing andtherefore no swing feel. Settings above 51% increase theamount of swing, with 66% being equivalent to a tripletdelay.
n If a swing value other than 100% results in notes being positioned after other non-swing notes, the latter notes are delayed accordingly.
• GateTimeDetermines the gate time (the length of time a notesounds) of the even-numbered backbeat notes to enhancethe swing feel.When a triplet quantize value is used, the gate time of the last note of each triplet is adjusted.When the quantize value is or , the gate time of theeven-numbered or beats will be adjusted.A setting of 100% leaves the original gate time unchanged.If an adjusted gate time value is less than 1, the MOTIFsets the value to 1.
❏ Settings 000%~200%
Track Range
32nd note
16th note triplet
16th note8th note triplet
8th note
1/4 note triplet
1/4 note
16th note + 16th note triplet
8th note + 8th note triplet
Quarter-note length
Original data(assuming 4/4 meter)
Quantizingstrength =100
Quantizingstrength =50
, , ,
50% 75% 100%0%
Specified range
Front beat Back beat
, ,
66% 83% 100%0% 33%
3
Front beat Back beat
Specified range
,
Front beat Back beat
Specified range
50% 66% 100%0% 33%
3

8/10/2019 motif_1(2)
http://slidepdf.com/reader/full/motif12 195/300
195 MOTIF Reference
Song Job m
● [F2]-02 Modify Velocity
This job alters the velocity values of the specifiedrange of notes, letting you selectively boost or cutthe volume of those notes.Velocity changes are calculated as follows:
Adjusted velocity= (original velocity x Rate) + Offset.
If the result is 0 or less, the value is set to 1. If theresult is higher than 127, the value is set to 127.
• Set AllSets the velocities of all target notes to the same fixed value(1 to 127). When set to “OFF” the Set All parameter hasno effect. When set to a value other than “OFF” the Rateand Offset parameters are unavailable and appear as “***”on the display.
❏ Settings OFF(0), 001~127
• RateDetermines the percentage by which the target notes will be shifted from their original velocities.Settings below 100% reduce the velocities, and settingsabove 100% increase the velocities proportionately. Whenthe Set All parameter is not “OFF” this parameter appearsas “***” and cannot be changed.
❏ Settings 000% ~ 200%, ***
• OffsetAdds a fixed value to the Rate-adjusted velocity values.A setting of 0 produces no change. Settings below 0 reducethe velocities, and settings above 0 increase the velocities.
When the Set All parameter is not “OFF” this parameterappears as “***” and cannot be changed.
❏ Settings -127 ~ +127, ***
● [F2]-03 Modify Gate Time
This job alters the gate times of the specified rangeof notes. Gate time changes are calculated asfollows:
Adjusted gate time= (original gate time x Rate) + Offset.
If the result is 0 or less, the value is set to 1.
• SetAllSets the gate times of all target notes to the same fixedvalue. When set to “OFF” the Set All parameter has noeffect. When set to a value other than “OFF” the Rate andOffset parameters are unavailable and appear as “***” on
the display.❏ Settings Off (0), 0001 ~ 9999
• RateDetermines the percentage by which the gate time of thetarget notes will be changed.Settings below 100% shorten the notes, and settings above100% lengthen the notes proportionately. When the SetAll parameter is not “OFF” this parameter appears as“***” and cannot be changed.
❏ Settings 000% ~ 200%, ***
• OffsetAdds a fixed value to the Rate-adjusted gate time values.A setting of 0 produces no change. Settings below 0shorten the gate time, and settings above 0 lengthen thegate time. When the Set All parameter is not “OFF” thisparameter appears as “***” and cannot be changed.
❏ Settings -9999 ~ +9999, ***
Track Range
Original velocity
Rate = 50%
Rate = 150%
(Vel)
(Vel)
(Vel)
96 64 48 32
48 32 24 16
127 96 72 48
Original velocity
Offset = -20
Offset = +20
(Vel)
(Vel)
(Vel)
96 64 48 32
76 44 28 12
116 84 68 52
Track Range
Original gate time
Gate time rate = 50%
Gate time rate = 150%
(Gate)
(Gate)
(Gate)
32 32 32 48
16 16 16 24
48 48 48 72
Original gate time
Offset = -20
Offset = +20
(Gate)
(Gate)
(Gate)
32 32 32 48
12 12 12 28
52 52 52 68
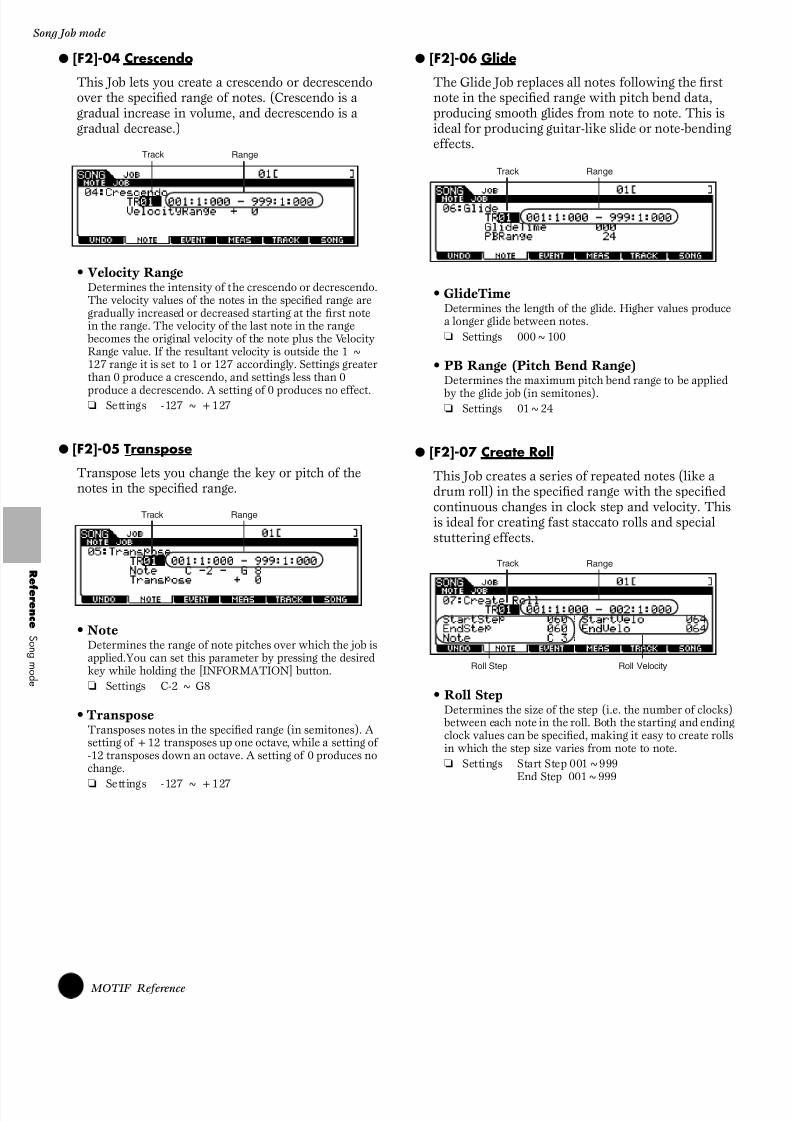
8/10/2019 motif_1(2)
http://slidepdf.com/reader/full/motif12 196/300
196 MOTIF Reference
Song Job mode
Ref er enc e
S ongmod e
● [F2]-04 Crescendo
This Job lets you create a crescendo or decrescendoover the specified range of notes. (Crescendo is agradual increase in volume, and decrescendo is agradual decrease.)
• Velocity RangeDetermines the intensity of the crescendo or decrescendo.The velocity values of the notes in the specified range aregradually increased or decreased starting at the first notein the range. The velocity of the last note in the range becomes the original velocity of the note plus the VelocityRange value. If the resultant velocity is outside the 1 ~127 range it is set to 1 or 127 accordingly. Settings greaterthan 0 produce a crescendo, and settings less than 0
produce a decrescendo. A setting of 0 produces no effect.❏ Settings -127 ~ +127
● [F2]-05 Transpose
Transpose lets you change the key or pitch of thenotes in the specified range.
• NoteDetermines the range of note pitches over which the job isapplied.You can set this parameter by pressing the desiredkey while holding the [INFORMATION] button.
❏ Settings C-2 ~ G8
• TransposeTransposes notes in the specified range (in semitones). Asetting of +12 transposes up one octave, while a setting of-12 transposes down an octave. A setting of 0 produces nochange.
❏ Settings -127 ~ +127
● [F2]-06 Glide
The Glide Job replaces all notes following the firstnote in the specified range with pitch bend data,producing smooth glides from note to note. This isideal for producing guitar-like slide or note-bendingeffects.
• GlideTimeDetermines the length of the glide. Higher values producea longer glide between notes.
❏ Settings 000~100
• PB Range (Pitch Bend Range)Determines the maximum pitch bend range to be applied
by the glide job (in semitones).❏ Settings 01~24
● [F2]-07 Create Roll
This Job creates a series of repeated notes (like adrum roll) in the specified range with the specifiedcontinuous changes in clock step and velocity. Thisis ideal for creating fast staccato rolls and specialstuttering effects.
• Roll StepDetermines the size of the step (i.e. the number of clocks) between each note in the roll. Both the starting and endingclock values can be specified, making it easy to create rollsin which the step size varies from note to note.
❏ Settings Start Step 001~999End Step 001~999
Track Range
Track Range
Track Range
Track Range
Roll VelocityRoll Step

8/10/2019 motif_1(2)
http://slidepdf.com/reader/full/motif12 197/300
197 MOTIF Reference
Song Job m
• Roll VelocityDetermines the velocity of the notes in the roll. Both thestarting and ending velocity values can be specified,making it easy to create rolls in which the velocityincreases or decreases.This lets you create rolls that gradually increase ordecrease in volume (crescendo/decrescendo) — atechnique often used in dance music.
❏ Settings Start Velo 001~127 End Velo 001~127
• NoteDetermines the specific note (or instrument in Drumvoices) for the roll effect.
❏ Settings C-2~G8
nYou can also set the Note directly from the Keyboard, by holding down the [INFORMATION] button andpressing the desired key. See “Basic Operation” onpage 75.
● [F2]-08 Sort Chord
This job sorts chord events (simultaneous noteevents) by order of pitch. The sort affects the orderof the notes in the Event List display (page 190), butdoes not change the timing of the notes.When used to pre-process chords before using theChord Separate job (described later), Chord Sort can be used to simulate the “stroke” or strumming
sound of guitars and similar instruments.
• TypeDetermines how the chord note data is sorted.
❏ Settings up, down, up&down, down&up
upThe notes are sorted in ascending order.
downThe notes are sorted in descending order.
up&downSorts chord notes on downbeats in ascending order andchord notes on up beats in descending order, based on theGrid setting, below.
down&upSorts chord notes on downbeats in descending order andchord notes on up beats in ascending order.
• Grid
Determines the type of note that will serve as the basis forthe Chord Sort job.
❏ Settings
StartStep
004:1:240 006:3:120
In this example, the spacebetween individual notesgradually becomes shorterover the time of the roll.
measure
EndStep
Roll Step (Clock)
StartStep
004:1:240 006:3:120
In this example, the space betweenindividual notes gradually becomeslonger over the time of the roll.
measure
EndStep
Roll Step (Clock)
StartVelo
004:1:240 006:3:120
Roll Crescendo
Roll Crescendo
measure
measure
EndVelo
Roll Velocity
StartVelo
004:1:240 006:3:120
EndVelo
Roll Velocity
Track Range
32nd note
16th note triplet
16th note
8th note triplet
8th note
1/4 note triplet
1/4 note
16th note + 16th note triplet
8th note + 8th note triplet

8/10/2019 motif_1(2)
http://slidepdf.com/reader/full/motif12 198/300
198 MOTIF Reference
Song Job mode
Ref er enc e
S ongmod e
● [F2]-09 Separate Chord
This job slightly separates notes in chords withinthe specified range, inserting a specified number ofclocks between each note. Use this job after theChord Sort Job above, to create guitar-like upstrokeor downstroke effects.
• ClockDetermines the number of clock cycles inserted betweenadjacent chord notes.
❏ Settings 000 ~999
n Note that there are 480 clock cycles per quarternote.
n It is not possible to separate chords so that they
cross the next measure boundary or chord.
[F3] Event Job
Press the [F3] button in step #3 of the Basic Procedureon page 193 so that the Event Job list appears on thedisplay. Scroll the cursor to the desired Job and pressthe [ENTER] button to go to the display of the selected Job.
The following explanations apply to step #6 of theBasic Procedure on page 193.
nBefore executing the Event Job, make sure that youspecify the track and range (measure : beat : clock) towhich the job is applied. Please note that the track to bespecified varies depending on the Job.
● [F3]-01 Shift Clock
This Job shifts all data events in the specified rangeforward or backward by the specified number ofclocks.One useful application for this would be to changethe rhythmic feel of a drum track or bass track,subtly shifting it in time relative to the other tracks— to create a rushed feel or a laid-back feel.
• ClockDetermines the amount by which the data will be delayedor advanced in measures, beats, and clocks.
❏ Settings 000:0:000 ~ 999:16:479
• DirectionDetermines the direction in which the data will be shifted.ADVANCE moves the data toward the beginning of thesequence, while DELAY shifts the data toward the end ofthe sequence.
❏ Settings Advance, Delay
● [F3]-02 Copy Event
This Job copies all data from a specified sourcerange to a specified destination location.
• Source track and range, Destination trackand range
❏ SettingsTrack 01~16, tmp (tempo), scn (scene), allRange 001:1:000 ~ 999:16:479
• NumberOfTimesDetermines the number of times the data is copied.
❏ Settings 01 ~ 99
When Copy Event is executed, any data already existing atthe Destination location will be overwritten.
Track RangeOriginal data
Clock=000:1:000Direction=Delay
Clock=000:1:000Direction=Advance
Quarter-note length
Track Range
Source track and range in measures, beats, and clocks
Destination track and range in measures, beats, and clocks

8/10/2019 motif_1(2)
http://slidepdf.com/reader/full/motif12 199/300
199 MOTIF Reference
Song Job m
● [F3]-03 Erase EventThis Job clears all specified events from thespecified range, effectively producing a segment ofsilence.
• Event TypeDetermines the event type to be erased.All events are cleared when ALL is selected.Individual control change numbers can be specified whenerasing control change events.
❏ SettingsWhen TR is set to 01~16:Note (Note events), PC (Program Change), PB (PitchBend), CC: 000-127, all (Control Change, ControlChange number), CAT (Channel Aftertouch), PAT(Polyphonic Aftertouch), EXC (System Exclusive), All(all events)
When TR is set to “tmp” (Tempo):tmp (tempo)
When TR is set to “scn” (Scene):Scene Memory (Scene change information), TrackMute (Track mute setting change information)
n Keep in mind that applying this Job to a track withsample voices erases the events that trigger thesamples, but it does not erase the actual samplesthemselves.
● [F3]-04 Extract Event
This Job moves all instances of specified event datafrom a specified range of a track to the same rangein a different track.One useful application for this would be to extractall instances of a certain note out of a track, andsend them to a new track for separate editing.
• Track and range in which data is extracted
❏ Settings Track 01~16Range 001:1:000~999:16:479
• Event TypeSelects the event type to be extracted.Specific note and control change numbers can also bespecified as required.
❏ Settings Note (Note : Note number), PC (ProgramChange), PB (Pitch Bend), CC: 000-127, all(Control Change, Control Change number),CAT (Channel Aftertouch), PAT(Polyphonic Aftertouch), EXC (SystemExclusive)
• Destination track
❏ Settings 01~16
● [F3]-05 Create Continuous Data
This Job creates continuous pitch bend or controlchange data over the specified range.
• Event TypeDetermines the event type to be created.
❏ Settings PB (Pitch Bend), CC: 000-127, all (ControlChange, Control Change number), CAT(Channel Aftertouch), EXC (SystemExclusive), tmp (Tempo)
• Data RangeDetermines the lower and upper limits for the data rangeto be created. The left value is the lower limit, and theright value is the upper limit.
❏ Settings When Event Type is set to PB -8192~+8191When Event Type is set to tmp:1.0~300.0When Event Type is set to other :0~127
• ClockDetermines the number of clocks to be inserted betweeneach created event.
❏ Settings 001~999
• CurveDetermines the “curve” of the continuous data.Refer to the graph below for approximate curve shapes.
❏ Settings -16 ~+16
Track Range
Track and range in which data is extracted
Destination track
Track Range
Startpoint
End point
This distance specifiedby Clock
Curve=+16 Curve=0((linear) Curve=-16

8/10/2019 motif_1(2)
http://slidepdf.com/reader/full/motif12 200/300
200 MOTIF Reference
Song Job mode
Ref er enc e
S ongmod e
• Number Of TimesDetermines the number of times the data creation is to berepeated.For example, if data is created in the range M001:1:000 ~M003:1:000 and this parameter is set to 03, the same datawill be created at M003:1:000 ~ M005:1:000 andM005:1:000 ~ M007:1:000.This Job lets you to insert continuous volume or filtercutoff variations to create tremolo or wow effects.
❏ Settings 01~99
● [F3]-06 Thin Out
This Job thins out the specified type of continuousdata in the specified range — allowing you to freeup memory space for other data or furtherrecording.
• Event TypeDetermines the event type to be thinned.
❏ Settings PB (Pitch Bend), CC: 000-127, all (ControlChange, Control Change number), CAT(Channel Aftertouch), PAT (PolyphonicAftertouch)
n The Thin Out Job will not work on continuousdata that has a clock interval of greater than 60clocks per event.
● [F3]-07 Modify Control Data
This Job lets you change the values of a specifiedtype of control change data — pitch bend, controlchange, aftertouch, etc. — in the specified range.Data changes are calculated as follows:
Modified value= (original value x Rate) + Offset.
The modified value cannot exceed the minimum/maximum limits of the parameter. Any result lowerthan the minimum is set to the minimum; any result higher than the maximum is set to the maximum.
• Event TypeDetermines the event type to be modified.
❏ Settings PB (Pitch Bend), CC: 000-127, all (ControlChange, Control Change number), CAT(Channel Aftertouch), PAT (PolyphonicAftertouch), tmp (Tempo)
• Set AllSets all target events to the same fixed value. When set to“OFF” the Set All parameter has no effect. When set to a
value other than “OFF” the Rate and Offset parametersare unavailable and appear as “***” on the display.
❏ Settings OFF, 000 ~127 (-8192 ~ +8191 for pitch bend, 0.1 ~ 300.0 for tempo)
• RateDetermines the percentage by which the target events will be shifted from their original values.When the Set All parameter is not “OFF” this parameterappears as “***” and cannot be changed.
❏ Settings 000% ~ 200%, ***
• OffsetAdds a fixed value to the Rate-adjusted event values.
When the Set All parameter is not “OFF” this parameterappears as “***” and cannot be changed.
❏ Settings -127~127, *** (-8192 ~ +8191 for pitch bend, ***)
● [F3]-08 Beat Stretch
This Job performs time-expansion or compressionover the selected range.Keep in mind that this operation affects all eventtiming, note step times, and note gate times.
• RateDetermines the amount of time expansion or compressionas a percentage.Settings higher than 100% produce expansion, andsettings below 100% produce compression.
❏ Settings 025%~400%
n Only MIDI data is affected by this job. Samplevoices are not expanded or compressed. However,for samples recorded using the Slice+Seq feature,the Beat Stretch job expands or compresses thetiming of the note data, step times, and gate timesthat control playback of the sliced samples. Thesample voice itself is not affected.
Track Range
Track Range
Track Range

8/10/2019 motif_1(2)
http://slidepdf.com/reader/full/motif12 201/300
201 MOTIF Reference
Song Job m
[F4] Measure Job
Press the [F4] button in step #3 of the Basic Procedureon page 193 so that the Measure Job list appears on thedisplay. Scroll the cursor to the desired Job and pressthe [ENTER] button to go to the display of the selected Job.
The following explanations apply to step #6 of theBasic Procedure on page 193.
● [F4]-01 Create Measure
This Job creates empty measures at the specified location in all tracks.
• Meter of measures to be insertedDetermines the meter or time signature of the measures to be created. You may find it convenient to use thisparameter when you need to create a song thatincorporates meter changes.
❏ Settings 1/16~16/16, 1/8~16/8, 1/4~8/4
• Insertion point (Measure number)Determines the insert point (measure number) at whichthe newly created blank measures will be inserted.
❏ Settings 001~999
• Number of measures to be insertedDetermines the number of empty measures to be createdand inserted.
❏ Settings 01~99
n When empty measures are inserted, measure andmeter data following the insert point are movedforward accordingly.
n If the insert point is set after the last measurecontaining data, only the meter data at that pointis set without actually inserting the measures.
● [F4]-02 Delete Measure
This Job deletes the specified measures.Measure and meter data following the deletedmeasures are moved backward accordingly.
• Delete Range
❏ Settings 001~999
n Keep in mind that applying this Job to a range ofmeasures with sample voices erases the events thattrigger the samples, but it does not erase the actualsamples themselves.
[F5] Track Job
Press the [F5] button in step #3 of the Basic Procedureon page 193 so that the Track Job list appears on thedisplay. Scroll the cursor to the desired Job and pressthe [ENTER] button to go to the display of the selected Job.
The following explanations apply to step #6 of theBasic Procedure on page 193.
8 measures inserted at measure 5
The inserted 8 measures
001~ 004 005 ~ 012 013 ~ 024
001~ 004 005 ~ 016
Original data
Meter (time signature) ofmeasures to be inserted
Insertion point (measure number)
Number of measuresto be inserted
Measures M005 ~ M012 deleted
001 ~ 004 005 ~ 012 013 ~ 024
001 ~ 004 005 ~ 016
Original data
Delete Range

8/10/2019 motif_1(2)
http://slidepdf.com/reader/full/motif12 202/300
202 MOTIF Reference
Song Job mode
Ref er enc e
S ongmod e
● [F5]-01 Copy Track
This Job copies all data from a specified source trackto the specified destination track.
• Source Song and Track
❏ Settings Song 01~64Track 01~16
• Destination Song and Track
❏ Settings Song 01~64Track 01~16
• Data Type to be copied
Determines the type(s) of data to be copied. Select thedesired type by checkmarking the appropriate box.
❏ Settings Seq Event (all events in the track), GridGroove (for the selected track), Mix PartParam (all Mixing Part parameters), Sample(all samples used by the track)
The copy operation overwrites any data previouslyexisting on the destination track.
Undo/Redo cannot be used to undo/redo a sample voicecopy operation.
n When there is no memory available in thedestination song for sample voice data, the alertmessage will appear on the display and the samplevoice data will not be copied. If this occurs, useSample Job 02 “Delete” to delete any unusedsamples, then try again.
● [F5]-02 Exchange Track
This Job exchanges or “swaps” the specified type of
data between two specified tracks in the currentsong.
• Target tracks for the Exchange operation
❏ Settings 01~16
• Data Type to be exchangedDetermines the type(s) of data to be exchanged. Select thedesired type by checkmarking the appropriate box.
❏ Settings Seq Event (all events in the track), GridGroove (for the selected track), Mix PartParam (all Mixing Part parameters)
● [F5]-03 Mix Track
This job mixes all data from two selected tracks(“A” and “B”), and places the result in track B. Oneuseful application for this would be to free up thedata in track A, letting you record new data to it.
• Target tracks for the Mix operation
❏ Settings 01~16
n Keep in mind that applying this Job to tracks withsample voices does not mix the sample voices.
● [F5]-04 Clear Track
This Job deletes all data of the selected type fromthe selected track, or from all tracks.
• Track for which data will be cleared
❏ Settings 01~16, tmp(tempo), scn(scene), all
• Data type to be clearedDetermines the type(s) of data to be cleared. Select thedesired type by checkmarking the appropriate box.
❏ Settings Seq Event (all events in the track), GridGroove (for the selected track), Mix PartParam (all Mixing Part parameters), Sample(all samples used by the track)
Source Song and Track Destination Song and Track
Data Type to be copied
Target tracks for the Exchange operation
Data Type to be exchanged
Track B
Mix TrackTrack B
Track A
Track a Track b
Track for which data will be cleared
Data type to be cleared
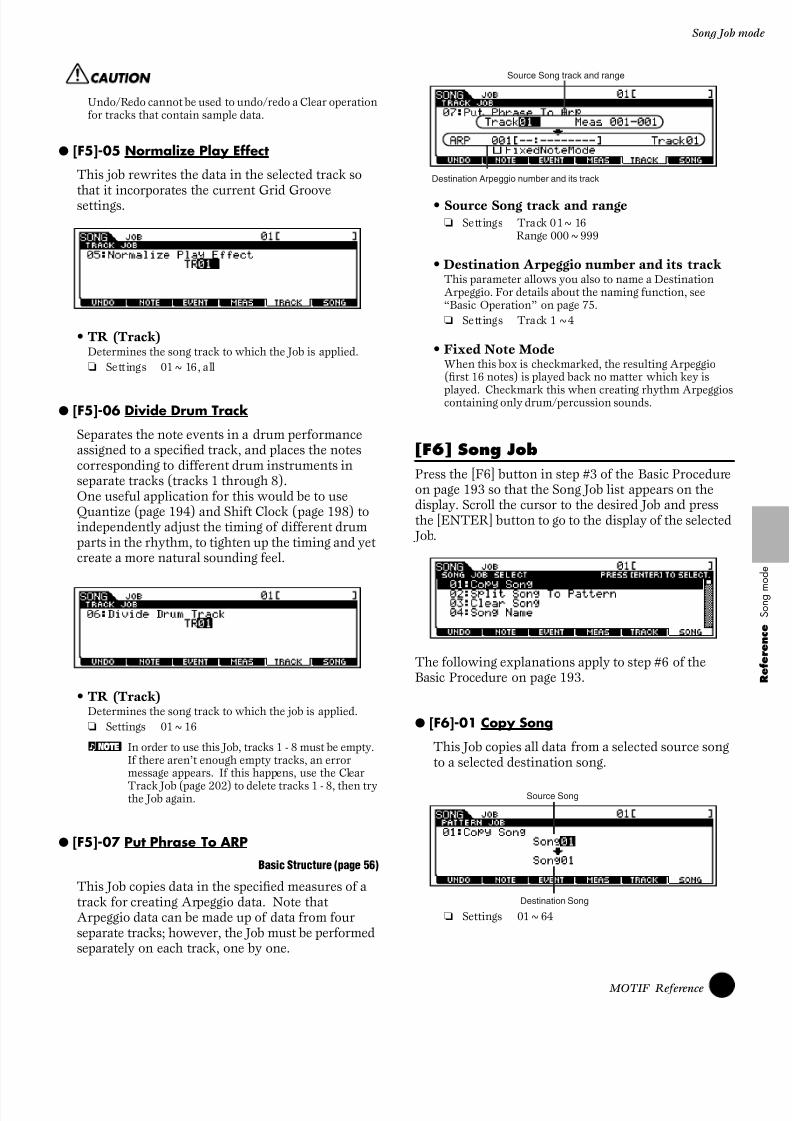
8/10/2019 motif_1(2)
http://slidepdf.com/reader/full/motif12 203/300
203 MOTIF Reference
Song Job m
Undo/Redo cannot be used to undo/redo a Clear operationfor tracks that contain sample data.
● [F5]-05 Normalize Play Effect
This job rewrites the data in the selected track so
that it incorporates the current Grid Groovesettings.
• TR (Track)Determines the song track to which the Job is applied.
❏ Settings 01~16, all
● [F5]-06 Divide Drum Track
Separates the note events in a drum performanceassigned to a specified track, and places the notescorresponding to different drum instruments inseparate tracks (tracks 1 through 8).One useful application for this would be to useQuantize (page 194) and Shift Clock (page 198) toindependently adjust the timing of different drumparts in the rhythm, to tighten up the timing and yetcreate a more natural sounding feel.
• TR (Track)Determines the song track to which the job is applied.
❏ Settings 01~16
n In order to use this Job, tracks 1 - 8 must be empty.If there aren’t enough empty tracks, an errormessage appears. If this happens, use the Clear
Track Job (page 202) to delete tracks 1 - 8, then trythe Job again.
● [F5]-07 Put Phrase To ARP
Basic Structure (page 56)
This Job copies data in the specified measures of atrack for creating Arpeggio data. Note thatArpeggio data can be made up of data from fourseparate tracks; however, the Job must be performedseparately on each track, one by one.
• Source Song track and range
❏ Settings Track 01~16 Range 000~999
• Destination Arpeggio number and its trackThis parameter allows you also to name a DestinationArpeggio. For details about the naming function, see“Basic Operation” on page 75.
❏ Settings Track 1~4
• Fixed Note ModeWhen this box is checkmarked, the resulting Arpeggio(first 16 notes) is played back no matter which key is
played. Checkmark this when creating rhythm Arpeggioscontaining only drum/percussion sounds.
[F6] Song Job
Press the [F6] button in step #3 of the Basic Procedureon page 193 so that the Song Job list appears on thedisplay. Scroll the cursor to the desired Job and pressthe [ENTER] button to go to the display of the selected Job.
The following explanations apply to step #6 of theBasic Procedure on page 193.
● [F6]-01 Copy Song
This Job copies all data from a selected source songto a selected destination song.
❏ Settings 01~64
Source Song track and range
Destination Arpeggio number and its track
Source Song
Destination Song

8/10/2019 motif_1(2)
http://slidepdf.com/reader/full/motif12 204/300
204 MOTIF Reference
Song Job mode
Ref er enc e
S ongmod e
• Source song
❏ Settings 01~64
• Destination Song
❏ Settings 01~64
● [F6]-02 Split Song To Pattern
This Job allows you to copy a part of the currentsong — all 16 tracks over a specific range ofmeasures — to a specific section and style, lettingyou use song data to create a pattern.
• Source song range (in measures)
❏ Settings 001~999
• Destination pattern (style and section)
❏ Settings Style 01~64Section A~H
• Copy SampleWhen this box is checkmarked, sample voices assigned toeach track in the source song are copied to the splitdestination style as sample voices and are assigned to thecorresponding tracks in that pattern. This checkbox hasno effect if no sample voices are assigned to the tracks in
the source song.
This Job overwrites any data already existing in thedestination pattern.
● [F6]-03 Clear Song
This job deletes all data from the selected song or allsongs.
• Song(s) from which data is to be cleared
❏ Settings 01~64, all
● [F6]-04 Song Name
Basic Operation (page 75)
This Job lets you assign a name to the selected song.
See “Basic Operation” on page 75.
Source song range (in measures)
Destination pattern (style and section)
Song(s) from which data is to be cleared

8/10/2019 motif_1(2)
http://slidepdf.com/reader/full/motif12 205/300
205 MOTIF Reference
Song Mixing m
Song Mixing mode
In this mode, you can set up and save mixing data foryour songs, and set various parameters for the tonegenerator parts — including the desired voice, as wellas its level, pan, EQ, effect and other settings.How the Song Mixing mode affects the tone generatorparts, and how it is affected by other elements is madeclear by the following diagram.
Song Mixing parameters are not actually part of the songdata, but rather are settings for the tone generator, as it isplayed back by the song data. As such, the Song Mixingparameter settings are not recorded to the song tracks.
nEven if the selected song has no sequence data, thisMixing data can be stored to User memory as song data.Playing back such song data transmits the mixing setupto the external MIDI instrument.
◆ The [ ] IndicatorIf you alter any parameters in the Song Mixing mode,the [ ] indicator will appear in the top left of thedisplay. This indicates that the current Song Mixingsettings have has been modified but not yet stored.
The [ ] indicator will disappear when you select anothersong and all edited data will be lost. It is a good idea tostore the edited song data in the Song Mixing Store mode(page 214). Even if you lose the Song Mixing edited data, youcan restore it by using the Edit Recall function (page 158).
n As shown above, the Song Mixing settings can beaffected or overridden by song playback andexternal MIDI data. Keep in mind that because ofthis, the [ ] indicator may appear in the display— even though you’ve made no changes or edits tothe Song Mixing settings yourself.
Song Mixing mode(Simple Mixer functions)
nThe parameters that have the same name in the SongMixing mode and in the Song Mixing Edit mode have thesame functions and settings.
◆ Basic Procedure
1 In the Song Play mode, select a User Song to bemixed.
2 Press the [MIXING] button to enter the SongMixing mode. (The indicator lights.)
3 Select a display for the parts you wish to mix byusing the [F6] button.
n Please note that the Muti-Part Plug-in Part(17~32) settings apply not to one individual song but to all 64 songs.
4 Select the menu you wish to edit by pressing the
[F1] - [F5] buttons, then edit parameters in eachdisplay.
n If you wish to edit more detailed Mixingparameters, you can enter the Song Mixing Editmode by pressing the [EDIT] button. For details,refer to “Song Mixing Edit mode” on page 207 .
5 Store the settings edited in step #4 to the UserMemory as required.
Sequencer block
Playback of song data affects theSong Mixing settings.
Tone Generatorblock
MIDI data from externaldevices affects the SongMixing settings.
Editing in the SongMixing modedetermines the Song
Mixing settings.
Song Data
Tone Generator
Song Mixing
Edit indicator
Internal Tone Generator Parts 1~16
Multi Part Plug-in Parts 17~32(When the Multi Part Plug-in board has been installed)
[F6]
[F6]
[F6]
Single Part Plug-in Parts 1~3When the Single Part Plug-in board has been installed)

8/10/2019 motif_1(2)
http://slidepdf.com/reader/full/motif12 206/300
206 MOTIF Reference
Song Mixing mode
Ref er enc e
S ongmod e
6 Press the [SONG] button to exit from the SongMixing mode and return to the Song Play mode.
• For detailed instructions on steps #4, see thefollowing explanations.
• For details on step #5, refer to “Song MixingStore mode” on page 214.
● [F1] VOL/PAN
From this display you can set the Pan and Volumefor each part (track).
n You can select a part by moving the cursor or byusing the NUMBER buttons while the [TRACKSELECT] indicator is on (page 181).
• PANDetermines the stereo pan position for each part.
❏ Settings L64 (far left)~C (center)~R63 (far right)
• VOLUMEDetermines the volume for each part.
❏ Settings 0~127
n You can also adjust the Volume by using theControl Sliders. See page 48 for details.
● [F2] AD
From this display you can set various mixingparameters for the A/D part, input via the A/DINPUT jack or the mLAN terminal (when theoptional mLAN8E has been installed).
Same as in the Performance Play mode. Seepage 160.
● [F3] VOICE
Basic Structure (page 43) · Reference (page 124)
From this display you can select a voice for eachpart.
Sample voices can also be selected (page 52).
n You can select a part by moving the cursor or byusing the NUMBER buttons while the [TRACKSELECT] indicator is on (page 181).
n The Category Search function can also be used toselect voices here (with the exception of the Multi-part Plug-in parts 17 - 32).
● [F4] SEND (Effect Send)Basic Structure (page 39)
From this display you can make basic effect settingsfor each track — the Reverb, Chorus and VariationSend levels, as well as the Dry Level.
❏ Settings 0~127
● [F5] TEMPLATE
This convenient function lets you store your mixingsettings as a template — allowing you to easily setup similar mixes by calling up the proper template,then tweaking it as needed. Templates are part ofthe System data (page 63) in the Utility mode andnot as data for each song.
n Since the Song Mixing templates are stored asSystem data (page 64) in the SRAM, the data ismaintained even when the power is turned off.
Press the [SF5] button lets your save thecurrent setting to the template selected at left.
Pressing the [SF4] button letsyou call up the templateselected at left.
Template Number
Template Name

8/10/2019 motif_1(2)
http://slidepdf.com/reader/full/motif12 207/300
207 MOTIF Reference
Song Mixing m
• Template numberDetermines the template number. Up to 16 templates can be created.
❏ Settings 1~16
• Template nameDetermines the name of the template. For details aboutnaming, see “Basic Operation” on page 75.
Song Mixing Edit mode(Detailed Mixer functions)
◆ The Compare FunctionThis convenient function lets you switch between theedited mixing setting and its original, uneditedcondition — allowing you to listen to the difference between the two and better hear how your edits affectthe song.
1 In the Song Mixing Edit mode, press the
[COMPARE] button so that its indicator flashes.The [ ] indicator is shown at the top of thedisplay (in place of the [ ] indicator), and theoriginal, unedited Song Mixing settings arerestored for monitoring.
2 Press the [EDIT] button again to disable the“Compare” function and restore the settings foryour edited Song.
n While Compare is active, you cannot make SongMixing edits.
◆ Common edit and Part editUse Common Edit to edit the settings common to allparts. There are two types of Song Mixing displays:those for Common Edit, and those for editingindividual parts.
n Common Edit operations cannot be performed onthe Multi-part Plug-in parts 17 - 32.
◆ Basic Procedure
1 In the Song Play mode, select a User Song to bemixed.
2 Press the [MIXING] button to enter the SongMixing mode. (The indicator lights.)
3 Press the [EDIT] button to enter the Song MixingEdit mode. (The indicator lights.)
4 Select a part to be edited.
• To edit parameters common to all parts, press the[DRUM KITS] button (which serves as a“COMMON” button here).
EDIT
COMPARE
Indicates a Common Edit display.
Indicates a display for editing Part(s).
COMMON
Part 1
Part 2
Part 3
Part 16
Plug-in Part 1
Plug-in Part 2
Plug-in Part 3
DRUM KITS
FAVORITESCOMMON

8/10/2019 motif_1(2)
http://slidepdf.com/reader/full/motif12 208/300
208 MOTIF Reference
Song Mixing mode
Ref er enc e
S ongmod e
• To edit parameters of the individual parts, selectthe desired part with the correspondingNUMBER button ([1] - [16]). You can selectparts for the Plug-in board by using the [F6] button (as shown below).
n Please note that the Muti-Part Plug-in Part(17~32) settings apply not to one individual song but to all 64 songs.
5 Select the menu you wish to edit by pressing the[F1] - [F5] buttons and edit parameters in eachdisplay.
6 Store the settings edited in step #5 to the UserMemory as required.
7 Press the [SONG] button to exit from the Song
Mixing mode and return to the Song Play mode.
• For detailed instructions on steps #5, see thefollowing explanations.
• For details on step #6, refer to “Song MixingStore mode” on page 214.
■ Common edit
● [F1]-[SF1] Song Mixing Common GeneralMaster EQ Offset
The Song Mixing parameters feature global EQsettings for all parts of the selected song (see“MEQ” , page 209). The settings made here in this
display are applied as offsets to those MEQ settings(with the exception of “MID”). You can set theparameters below by using the four Knobs on thepanel.
❏ Settings -64~+63
● [F1]-[SF5] Song Mixing Common GeneralOther
From this display you can set the control functionsfor the Knobs.
• Knob AssignDetermines the function for the assignable Knobs (1 - 4).Pressing the [KNOB CONTROL FUNCTION] button onthe panel sets the desired function row, which isautomatically stored to memory with the currentlyselected song.
❏ Settings pan, tone, assign, MEQofs
15
1 2 3 4 5 6 7 8
9 10 11 12 13 14 16
TRACKSELECT
MUTE
SOLO
NUMBERELEMENT/PERF.PART/ZONE
Internal Tone Generator Parts 1~16
Multi Part Plug-in Parts 17~32(When the Multi Part Plug-in board has been installed)
[F6]
[F6]
[F6]
Single Part Plug-in Parts 1~3(When the Single Part Plug-in board has been installed)
KNOB
CONTROLFUNCTION
PAN REVERB CHORUS TEMPO
ATTACK RELEASECUTOFF RESONANCE
ASSIGN A ASSIGN B ASSIGN 1 ASSIGN 2
KN 1 KN 2 KN 3 KN 4
MEQ LOW MEQ HI MIDMEQLOWMID MEQ HIGH

8/10/2019 motif_1(2)
http://slidepdf.com/reader/full/motif12 209/300
209 MOTIF Reference
Song Mixing m
• ChoCtrl (Chorus Control)Determines the depth of the Chorus effect, as controlled bythe Knob assigned to Chorus Send.
❏ Settings -64~+63
• Assign A, Assign B, Assign 1, Assign 2This lets you directly set and memorize the value for eachAssign Knob (A, B, 1, and 2), from the Knob itself. Simplytweak the knob to the desired setting.
❏ Settings -64~+63
● [F2] Song Mixing CommonMEQ (Master Equalizer)
From this display you can apply five-bandequalization to all parts of the selected song.
Same as in Performance Common Edit. See page 165.
● [F3]-[SF1] Song Mixing Common Arpeggio Arpeggio type
Basic Structure (page 55)
The basic parameters (e.g., type) of the Arpeggio areprovided in this display.When a User Arpeggio is selected, you can clear theselected Arpeggio data by using the [SF5] button.
This is the same as in Voice Normal Common Edit(page 132), except that the Tempo setting is notavailable here, since the Arpeggio plays according tothe song tempo.
● [F3]-[SF2] Song Mixing Common Arpeggio Arpeggio Limit
Same as in Voice Normal Common Edit. Seepage 133.
● [F3]-[SF3] Song Mixing Common ArpeggioPlay FX (Effect)
Same as in Voice Normal Common Edit. Seepage 133.
● [F3]-[SF4] Song Mixing Common ArpeggioOutput channel
Same as in Performance Common Edit. Seepage 168.
● [F4] Song Mixing CommonController Assign
The controllers and knobs on the front panel can beused to change and adjust a variety of parametersfor each song — in real time, and simultaneously.
Same as in Performance Common Edit. Seepage 169.
KNOBCONTROLFUNCTION
PAN REVERB CHORUS TEMPO
ATTACK RELEASECUTOFF RESONANCE
ASSIGN A ASSIGN B ASSIGN 1 ASSIGN 2
KN 1 KN 2 KN 3 KN 4MEQ LOW MEQ HI MIDMEQLOWMID MEQ HIGH
pantone
assignmeqofs
This appears only whenUser Arpeggio is selected.

8/10/2019 motif_1(2)
http://slidepdf.com/reader/full/motif12 210/300
210 MOTIF Reference
Song Mixing mode
Ref er enc e
S ongmod e
● [F6]-[SF1] Song Mixing Common EffectConnection
Basic Structure (page 41)
This display gives you comprehensive control overthe effect connections.
Same as in Performance Common Edit. Seepage 169.
● [F6]-[SF2], [SF3],[SF4],[SF5]Common Effect ParameterPlug-in Insertion, Reverb, Chorus, Variation
Basic Structure (page 39)
The number of parameters and values available
differs depending on the currently selected effecttype. For more information, see the Effect Type Listin the separate Data List booklet.
■ Part Edit
nPlease note that the Muti-Part Plug-in Part (17~32)settings apply not to one individual song but to all 64songs.
● [F1]-[SF1] Song Mixing Part Voice
From this display you can select the voice for eachpart. When the cursor is located at the Bankparameter, you can directly select a voice by usingthe appropriate BANK, GROUP and NUMBER buttons on the panel (as long as the [TRACKSELECT] indicator is off). (pages 124~125)
● [F1]-[SF2] Song Mixing Part VoicePlay Mode
• Mono/PolyDetermines whether the voice for the selected part isplayed back monophonically (single notes only) orpolyphonically (multiple simultaneous notes).
❏ Settings Mono, Poly
n This parameter is not available for the part towhich the Drum Voice is assigned.
• ArpeggioSw (Arpeggio Switch)
Determines whether Arpeggio is on or off for the selected part.❏ Settings on, off
n ArpeggioSw is not available for the Multi PartPlug-in Parts 17~32.
• ReceiveCh (Receive Channel)Determines the MIDI receive channel for the selected part.Since MIDI data may be coming from many channels atonce, you should set this to match the particular channelover which the desired controlling data is being sent.
❏ Settings 01~16, off
● [F1]-[SF3] Song Mixing Part Voice Limit
Same as in Performance Part Edit. See page 170.
● [F1]-[SF4] Song Mixing Part VoicePortamento
Same as in Performance Part Edit. See page 171.
n The Mode setting is not available for Plug-in voiceparts.
● [F1]-[SF5] Song Mixing Part Voice Other
Same as in Performance Part Edit. See page 171.
n For all Plug-in voice parts, Pitch Bend Upper andLower become a single parameter: PB Range.Upper and Lower values cannot be setindependently for Plug-in parts. (See page 171.)

8/10/2019 motif_1(2)
http://slidepdf.com/reader/full/motif12 211/300
211 MOTIF Reference
Song Mixing m
● [F2]-[SF1] Song Mixing Part Output Volume/Pan
Same as in Performance Part Edit. See page 172.
n The Voice Pan setting is not available for Plug-invoice parts.
● [F2]-[SF2] Song Mixing Part OutputEffect Send
Same as in Performance Part Edit. See page 172.
● [F3] Song Mixing Part Output Select
From this display you can determine the specific jack or terminal to which the selected part is to beoutput.
Same as in Performance Part Edit. See page 173.
● [F4]-[SF1] Song Mixing Part Tone Tune
Same as in Performance Part Edit. See page 173.
● [F4]-[SF2] Song Mixing Part Tone FilterBasic Structure (page 46)
From this display you can set various Filter relatedsettings, to change the tonal qualities of the selectedpart’s voice.
Same as in Performance Part Edit. See page 173.
n The FEG Depth setting is not available for Plug-invoice parts.
● [F4]-[SF3] Song Mixing Part Tone FEGBasic Structure (page 47)
From this display you can set the FEG (FilterEnvelope Generator) parameters for each part. Thefollowing parameters offset the same parameters inthe Voice (Element) Edit mode (page 143).
Same as in Performance Part Edit. See page 173.
n The FEG setting is not available for Plug-in voiceparts or parts to which Drum voices have been
assigned.
● [F4]-[SF4] Song Mixing Part Tone AEGBasic Structure (page 47)
From this display you can set AEG (AmplitudeEnvelope Generator) parameters for each part. Thefollowing parameters offset the same parameters inthe Voice (Element) Edit mode (page 145).
Same as in Performance Part Edit. See page 174.
n The Sustain setting is not available for Plug-invoice parts or parts to which Drum voices have been assigned.
n The Release setting is not available for parts towhich Drum voices have been assigned.

8/10/2019 motif_1(2)
http://slidepdf.com/reader/full/motif12 212/300
212 MOTIF Reference
Song Mixing Job mode
Ref er enc e
S ongmod e
● [F5] Song Mixing Part Receive Switch
From this display you can set how each individualpart responds to various MIDI data, such as ControlChange and Program Change messages. When therelevant parameter is set to “on,” the correspondingpart responds to the appropriate MIDI data. Notethat two different display types (below) areprovided.
• Display showing four partsThis display type shows the Receive Switch status for fourparts at a time. Set the desired part on or off, for thecorresponding MIDI data type. To view and edit anotherset of four parts, press the appropriate [NUMBER] button,[1] to [16].Keep in mind that since all the available parameters cannot be simultaneously displayed, you will need to use thecursor controls to scroll the display in order to see and setthe other parameters.
• Display showing all parameters for one partThis display type shows all of the Receive Switch settingsfor a single selected part. Set the desired MIDI data type
on or off for the selected part. To select other parts, usethe NUMBER [1] - [16] buttons (making sure that the[TRACK SELECT] button is on).The two display types are linked and feature the samesettings, only in different formats. Use the type you feelmost comfortable with.
Song Mixing Job mode
◆ Basic Procedure
1 In the Song Play mode, select a Song you wish toexecute the Job on.
2 Press the [MIXING] button to enter the SongMixing mode.
3 Press the [JOB] button to enter the Song Mixing Job mode.
4 Select the desired Job menu by pressing theappropriate button, [F1] - [F5].
5 Set the relevant Job parameters.
6 Press the [ENTER] button. (The display promptsyou for confirmation.)
7 Press the [INC/YES] button to execute the Job.After the Job has been completed, a “Completed”message appears and operation returns to theoriginal display.
n To cancel the Job, press the [DEC/NO] button.
For Jobs that take longer to process, you will see themessage “Executing…” during processing. If you switchoff the power of the MOTIF while this message isdisplayed, you risk corrupting your data.
8 Press the [MIXING] button to exit from SongMixing Job mode and return to Song Mixing mode.
• For detailed instructions on steps #3 - #5, see the
explanations below.
● [F1] Initialize
This function lets you reset (initialize) all SongMixing parameters to their default settings. It alsoallows you to selectively initialize certainparameters, such as Common settings, settings foreach part, and so on — very useful when creating acompletely new Song Mixing program from scratch.
[SF5] button
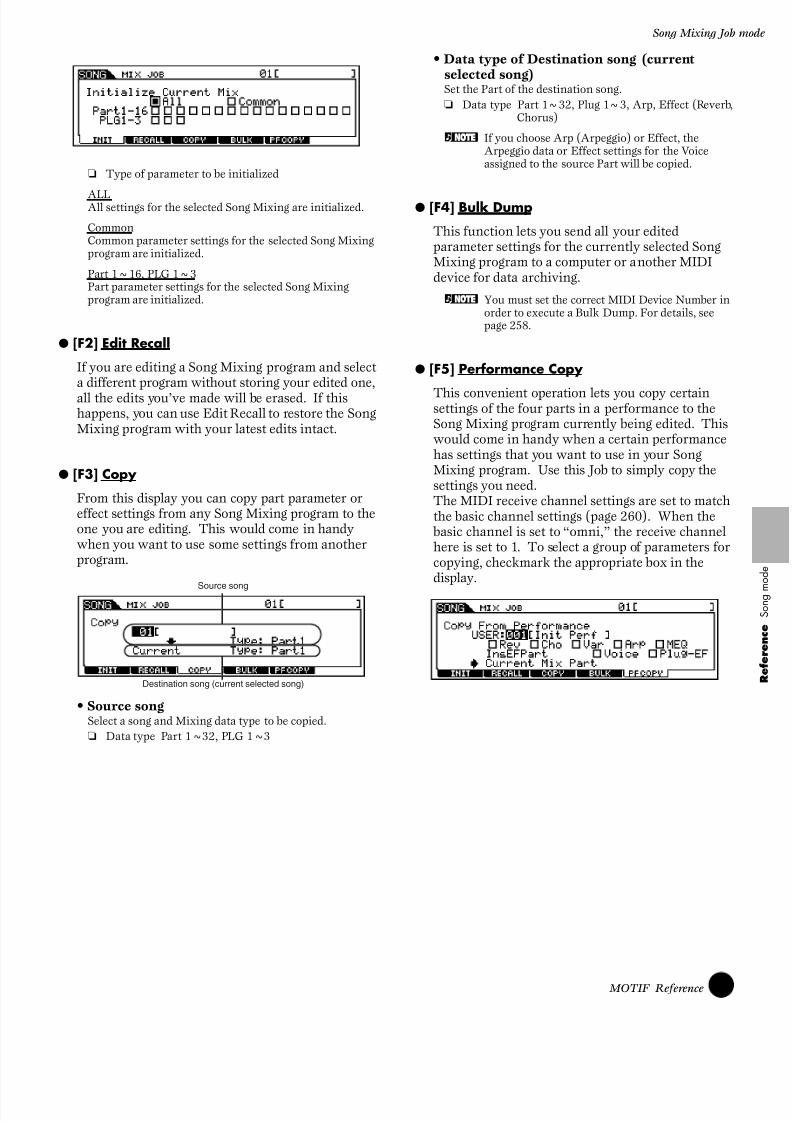
8/10/2019 motif_1(2)
http://slidepdf.com/reader/full/motif12 213/300
213 MOTIF Reference
Song Mixing Job
❏ Type of parameter to be initialized
ALLAll settings for the selected Song Mixing are initialized.
CommonCommon parameter settings for the selected Song Mixingprogram are initialized.
Part 1~16, PLG 1~3Part parameter settings for the selected Song Mixingprogram are initialized.
● [F2] Edit Recall
If you are editing a Song Mixing program and selecta different program without storing your edited one,all the edits you’ve made will be erased. If this happens, you can use Edit Recall to restore the SongMixing program with your latest edits intact.
● [F3] Copy
From this display you can copy part parameter oreffect settings from any Song Mixing program to theone you are editing. This would come in handywhen you want to use some settings from anotherprogram.
• Source songSelect a song and Mixing data type to be copied.
❏ Data type Part 1~32, PLG 1~3
• Data type of Destination song (currentselected song)Set the Part of the destination song.
❏ Data type Part 1~32, Plug 1~3, Arp, Effect (Reverb,Chorus)
n If you choose Arp (Arpeggio) or Effect, theArpeggio data or Effect settings for the Voiceassigned to the source Part will be copied.
● [F4] Bulk Dump
This function lets you send all your editedparameter settings for the currently selected SongMixing program to a computer or another MIDIdevice for data archiving.
n You must set the correct MIDI Device Number inorder to execute a Bulk Dump. For details, seepage 258.
● [F5] Performance Copy
This convenient operation lets you copy certainsettings of the four parts in a performance to theSong Mixing program currently being edited. Thiswould come in handy when a certain performance has settings that you want to use in your SongMixing program. Use this Job to simply copy thesettings you need.The MIDI receive channel settings are set to matchthe basic channel settings (page 260). When the basic channel is set to “omni,” the receive channel here is set to 1. To select a group of parameters forcopying, checkmark the appropriate box in thedisplay.
Source song
Destination song (current selected song)

8/10/2019 motif_1(2)
http://slidepdf.com/reader/full/motif12 214/300
214 MOTIF Reference
Song Mixing Store mode
Ref er enc e
S ongmod e
Song Mixing Store mode
Basic Structure (page 63)
This function lets you store your edited Song Mixingprogram to User memory.
When you execute this, the settings for the destinationmemory will be overwritten. Important data should always be backed up to a memory card or SCSI device.
◆ Basic Procedure
1 After editing the Song Mixing, press the [STORE] button to enter the Song Mixing Store mode.
2 Press the [ENTER] button. (The display promptsyou for confirmation.)
3 To execute the Store operation, press the [INC/YES] button. After the Song Mixing program has been stored, a “Completed” message appears andoperation returns to the original display.
n To cancel the Store operation, press the [DEC/NO] button.
For Store operations that take longer to process, you willsee the message “Executing…” during processing. If youswitch off the power of the MOTIF while this message isdisplayed, you risk corrupting your data.
n The stored settings are recalled automatically whenthe corresponding song is selected.
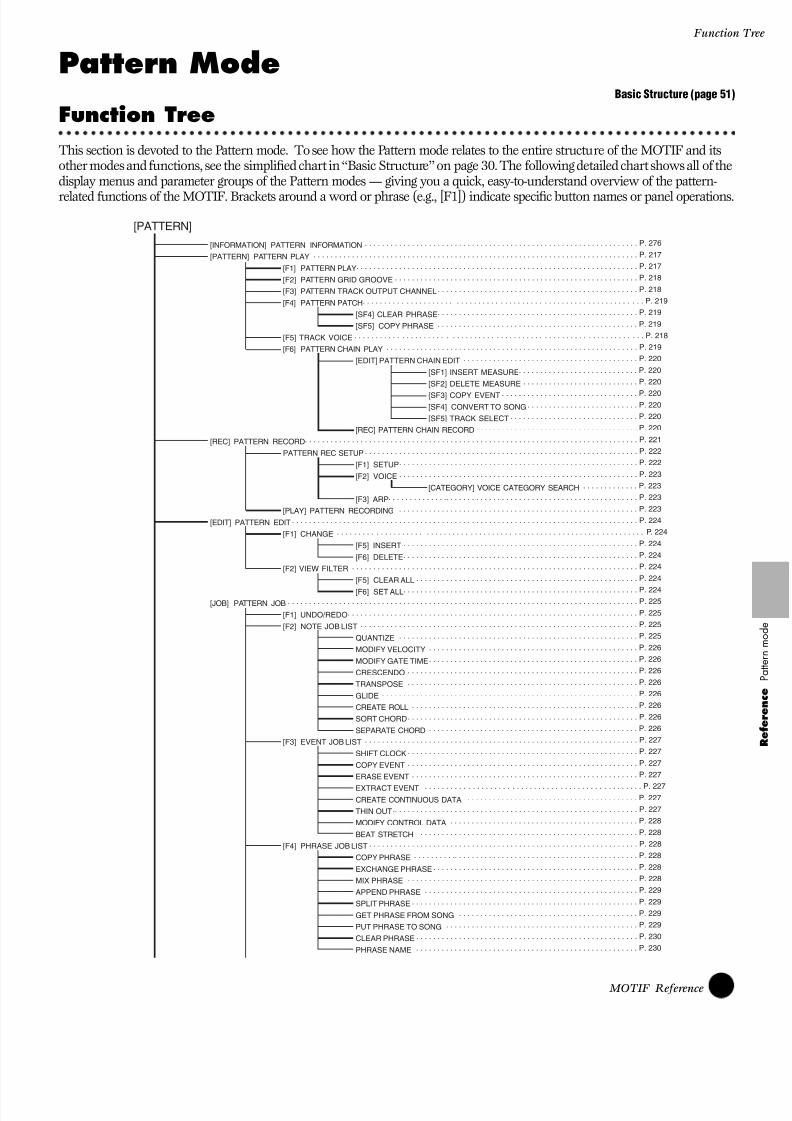
8/10/2019 motif_1(2)
http://slidepdf.com/reader/full/motif12 215/300
215 MOTIF Reference
Function
Pattern ModeBasic Structure (page 51)
Function Tree
This section is devoted to the Pattern mode. To see how the Pattern mode relates to the entire structure of the MOTIF and itsother modes and functions, see the simplified chart in “Basic Structure” onpage 30. The following detailed chart shows all of thedisplay menus and parameter groups of the Pattern modes — giving you a quick, easy-to-understand overview of the pattern-
related functions of the MOTIF. Brackets around a word or phrase (e.g., [F1]) indicate specific button names or panel operations.
[INFORMATION] PATTERN INFORMATION
[PATTERN] PATTERN PLAY
[F1] PATTERN PLAY
[F2] PATTERN GRID GROOVE
[F3] PATTERN TRACK OUTPUT CHANNEL
[F4] PATTERN PATCH
[SF4] CLEAR PHRASE
[SF5] COPY PHRASE
[F5] TRACK VOICE
[F6] PATTERN CHAIN PLAY
[EDIT] PATTERN CHAIN EDIT
[SF1] INSERT MEASURE
[SF2] DELETE MEASURE
[SF3] COPY EVENT[SF4] CONVERT TO SONG
[SF5] TRACK SELECT
[REC] PATTERN CHAIN RECORD
[REC] PATTERN RECORD
PATTERN REC SETUP
[F1] SETUP
[F2] VOICE
[CATEGORY] VOICE CATEGORY SEARCH
[F3] ARP
[PLAY] PATTERN RECORDING
[EDIT] PATTERN EDIT
[F1] CHANGE
[F5] INSERT
[F6] DELETE
[F2] VIEW FILTER
[F5] CLEAR ALL
[F6] SET ALL[JOB] PATTERN JOB
[F1] UNDO/REDO
[F2] NOTE JOB LIST
QUANTIZE
MODIFY VELOCITY
MODIFY GATE TIME
CRESCENDO
TRANSPOSE
GLIDE
CREATE ROLL
SORT CHORD
SEPARATE CHORD
[F3] EVENT JOB LIST
SHIFT CLOCK
COPY EVENT
ERASE EVENT
EXTRACT EVENTCREATE CONTINUOUS DATA
THIN OUT
MODIFY CONTROL DATA
BEAT STRETCH
[F4] PHRASE JOB LIST
COPY PHRASE
EXCHANGE PHRASE
MIX PHRASE
APPEND PHRASE
SPLIT PHRASE
GET PHRASE FROM SONG
PUT PHRASE TO SONG
CLEAR PHRASE
PHRASE NAME
[PATTERN] . . . . . . . . . . . . . . . . . . . . . . . . . . . . . . . . . . . . . . . . . . . . . . . . . . . . . . . . . . . . . . . . P. 276
. . . . . . . . . . . . . . . . . . . . . . . . . . . . . . . . . . . . . . . . . . . . . . . . . . . . . . . . . . . . . . . . . . . . . . . . . . . . P. 217
. . . . . . . . . . . . . . . . . . . . . . . . . . . . . . . . . . . . . . . . . . . . . . . . . . . . . . . . . . . . . . . . . . P. 217
. . . . . . . . . . . . . . . . . . . . . . . . . . . . . . . . . . . . . . . . . . . . . . . . . . . . . . . . . P. 218
. . . . . . . . . . . . . . . . . . . . . . . . . . . . . . . . . . . . . . . . . . . . . . . P. 218
. . . . . . . . . . . . . . . . . . . . . . . . . . . . . . . . . . . . . . . . . . . . . . . . . . . . . . . . . . . . . . . . P. 219
. . . . . . . . . . . . . . . . . . . . . . . . . . . . . . . . . . . . . . . . . . . . . . . P. 219
. . . . . . . . . . . . . . . . . . . . . . . . . . . . . . . . . . . . . . . . . . . . . . . P. 219
. . . . . . . . . . . . . . . . . . . . . . . . . . . . . . . . . . . . . . . . . . . . . . . . . . . . . . . . . . . . . . . . . . P. 218
. . . . . . . . . . . . . . . . . . . . . . . . . . . . . . . . . . . . . . . . . . . . . . . . . . . . . . . . . . . P. 219
. . . . . . . . . . . . . . . . . . . . . . . . . . . . . . . . . . . . . . . . . P. 220
. . . . . . . . . . . . . . . . . . . . . . . . . . . . P. 220
. . . . . . . . . . . . . . . . . . . . . . . . . . . P. 220
. . . . . . . . . . . . . . . . . . . . . . . . . . . . . . . . P. 220. . . . . . . . . . . . . . . . . . . . . . . . . . P. 220
. . . . . . . . . . . . . . . . . . . . . . . . . . . . . . P. 220
. . . . . . . . . . . . . . . . . . . . . . . . . . . . . . . . . . . . . . P. 220
. . . . . . . . . . . . . . . . . . . . . . . . . . . . . . . . . . . . . . . . . . . . . . . . . . . . . . . . . . . . . . . . . . . . . . . . . . . . . . P. 221
. . . . . . . . . . . . . . . . . . . . . . . . . . . . . . . . . . . . . . . . . . . . . . . . . . . . . . . . . . . . . . . . P. 222
. . . . . . . . . . . . . . . . . . . . . . . . . . . . . . . . . . . . . . . . . . . . . . . . . . . . . . . . P. 222
. . . . . . . . . . . . . . . . . . . . . . . . . . . . . . . . . . . . . . . . . . . . . . . . . . . . . . . . P. 223
. . . . . . . . . . . . . P. 223
. . . . . . . . . . . . . .. . . . . . . . . . . . . . . . . . . . . . . . . . . . . . . . . . . . . . . . . . . . . P. 223
. . . . . . . . . . . . . . . . . . . . . . . . . . . . . . . . . . . . . . . . . . . . . . . . . . . . . . . . P. 223
. . . . . . . . . . . . . . . . . . . . . . . . . . . . . . . . . . . . . . . . . . . . . . . . . . . . . . . . . . . . . . . . . . . . . . . . . . . . . . . . . P. 224
. . . . . . . . . . . . . . . . . . . . . . . . . . . . . . . . . . . . . . . . . . . . . . . . . . . . . . . . . . . . . . . . . . . . . . P. 224
. . . . . . . . . . . . . . . . . . . . . . . . . . . . . . . . . . . . . . . . . . . . . . . . . . . . . . . P. 224
. . . . . . . . . . . . . . . . . . . . . . . . . . . . . . . . . . . . . . . . . . . . . . . . . . . . . . . P. 224
. . . . . . . . . . . . . . . . . . . . . . . . . . . . . . . . . . . . . . . . . . . . . . . . . . . . . . . . . . . . . . . . . . . P. 224
. . . . . . . . . . . . . . . . . . . . . . . . . . . . . . . . . . . . . . . . . . . . . . . . . . . . P. 224
. . . . . . . . . . . . . . . . . . . . . . . . . . . . . . . . . . . . . . . . . . . . . . . . . . . . . . . P. 224 . . . . . . . . . . . . . . . . . . . . . . . . . . . . . . . . . . . . . . . . . . . . . . . . . . . . . . . . . . . . . . . . . . . . . . . . . . . . . . . . . . P. 225
. . . . . . . . . . . . . . . . . . . . . . . . . . . . . . . . . . . . . . . . . . . . . . . . . . . . . . . . . . . . . . . . . . . . P. 225
. . . . . . . . . . . . . . . . . . . . . . . . . . . . . . . . . . . . . . . . . . . . . . . . . . . . . . . . . . . . . . . . . P. 225
. . . . . . . . . . . . . . . . . . . . . . . . . . . . . . . . . . . . . . . . . . . . . . . . . . . . . . . . P. 225
. . . . . . . . . . . . . . . . . . . . . . . . . . . . . . . . . . . . . . . . . . . . . . . . . P. 226
. . . . . . . . . . . . . . . . . . . . . . . . . . . . . . . . . . . . . . . . . . . . . . . . . P. 226
. . . . . . . . . . . . . . . . . . . . . . . . . . . . . . . . . . . . . . . . . . . . . . . . . . . . . . P. 226
. . . . . . . . . . . . . . . . . . . . . . . . . . . . . . . . . . . . . . . . . . . . . . . . . . . . . . P. 226
. . . . . . . . . . . . . . . . . . . . . . . . . . . . . . . . . . . . . . . . . . . . . . . . . . . . . . . . . . . . P. 226
. . . . . . . . . . . . . . . . . . . . . . . . . . . . . . . . . . . . . . . . . . . . . . . . . . . . . P. 226
. . . . . . . . . . . . . . . . . . . . . . . . . . . . . . . . . . . . . . . . . . . . . . . . . . . . . . P. 226
. . . . . . . . . . . . . . . . . . . . . . . . . . . . . . . . . . . . . . . . . . . . . . . . . P. 226
. . . . . . . . . . . . . . . . . . . . . . . . . . . . . . . . . . . . . . . . . . . . . . . . . . . . . . . . . . . . . . . . P. 227
. . . . . . . . . . . . . . . . . . . . . . . . . . . . . . . . . . . . . . . . . . . . . . . . . . . . . . P. 227
. . . . . . . . . . . . . . . . . . . . . . . . . . . . . . . . . . . . . . . . . . . . . . . . . . . . . . P. 227
. . . . . . . . . . . . . . . . . . . . . . . . . . . . . . . . . . . . . . . . . . . . . . . . . . . . . P. 227
. . . . . . . . . . . . . . . . . . . . . . . . . . . . . . . . . . . . . . . . . . . . . . . . . . P. 227 . . . . . . . . . . . . . . . . . . . . . . . . . . . . . . . . . . . . . . . . P. 227
.. . . . . . . . . . . . . . . . . . . . . . . . . . . . . . . . . . . . . . . . . . . . . . . . . . . . . . . . . P. 227
. . . . . . . . . . . . . . . . . . . . . . . . . . . . . . . . . . . . . . . . . . . . P. 228
. . . . . . . . . . . . . . . . . . . . . . . . . . . . . . . . . . . . . . . . . . . . . . . . . . . P. 228
. . . . . . . . . . . . . . . . . . . . . . . . . . . . . . . . . . . . . . . . . . . . . . . . . . . . . . . . . . . . . . . P. 228
. . . . . . . . . .. . . . . . . . . . . . . . . . . . . . . . . . . . . . . . . . . . . . . . . . . . . P. 228
. . . . . . . . . . . . . . . . . . . . . . . . . . . . . . . . . . . . . . . . . . . . . . . . P. 228
. . . . . . . . . . . . . . . . . . . . . . . . . . . . . . . . . . . . . . . . . . . . . . . . . . . . . . P. 228
. . . . . . . . . . . . . . . . . . . . . . . . . . . . . . . . . . . . . . . . . . . . . . . . . . P. 229
. . . . . . . . . . . . . . . . . . . . . . . . . . . . . . . . . . . . . . . . . . . . . . . . . . . . . P. 229
. . . . . . . . . . . . . . . . . . . . . . . . . . . . . . . . . . . . . . . . . . P. 229
. . . . . . . . . . . . . . . . . . . . . . . . . . . . . . . . . . . . . . . . . . . . . P. 229
. . . . . . . . . . . . . . . . . . . . . . . . . . . . . . . . . . . . . . . . . . . . . . . . . . . . P. 230
. . . . . . . . . . . . . . . . . . . . . . . . . . . . . . . . . . . . . . . . . . . . . . . . . . . . P. 230

8/10/2019 motif_1(2)
http://slidepdf.com/reader/full/motif12 216/300
216 MOTIF Reference
Function Tree
Ref er enc e
P at t ernmod e
[MIXING] PATTERN MIXING
[INFORMATION] MIX INFORMATION
[MIX] MIXING PART
[F1] MIX VOLUME/PAN
[F2] MIX AD
[F3] MIX VOICE
[F4] EFFECT SEND
[F5] MIX TEMPLATE
[EDIT] MIXING EDIT
[COMMON][F1] COMMON GENERAL
[SF1] MEQ OFFSET
[SF5] OTHER
[F2] COMMON MASTER EQ
[F3] COMMON ARPEGGIO
[SF1] TYPE
[SF2] LIMIT
[SF3] PLAY FX
[SF4] OUTPUT CHANNEL
[SF5] CLEAR USER ARPEGGIO
[F4] COMMON CONTROLLER ASSIGN
CONTROLLER ASSIGN
[F6] COMMON EFFECT
[SF1] EFFECT CONNECT
[SF2] PLG-EF
[SF3] VARIATION
[SF4] REVERB[SF5] CHORUS
[PART SELECTION]
[F1] PART VOICE
[SF1] VOICE
[SF2] PLYMODE
[SF3] LIMIT
[SF4] PORTAMENTO
[SF5] OTHER
[F2] PART OUTPUT
[SF1] VOLUME/PAN
[SF2] EFFECT SEND
[F3] PART OUTPUT SELECT
OUTPUT SELECT
[F4] PART TONE
[SF1] TUNE
[SF2] FILTER
[SF3] FEG[SF4] AEG
[F5] PART RECEIVE SWITCH
[JOB] MIXING JOB
[F1] INITIALIZE
[F2] EDIT RECALL
[F3] COPY
[F4] BULK DUMP
[F5] COPY FROM PERFORMANCE
[STORE] MIX STORE
[SONG][F5] TRACK JOB LIST
COPY TRACK
EXCHANGE TRACK
CLEAR TRACK
NORMALIZE PLAY EFFECTDIVIDE DRUM TRACK
[F6] PATTERN JOB LIST
COPY PATTERN
APPEND PATTERN
SPLIT PATTERN
CLEAR PATTERN
STYLE NAME
. . . . . . . . . . . . . . . . . . . . . . . . . . . . . . . . . . . . . . . . . . . . . . . . . . . . . . . . . . . . . . . . P. 230
. . . . . . . . . . . . . . . . . . . . . . . . . . . . . . . . . . . . . . . . . . . . . . . . . . . . . P. 230
. . . . . . . . . . . . . . . . . . . . . . . . . . . . . . . . . . . . . . . . . . . . . . . . . P. 230
. . . . . . . . . . . . . . . . . . . . . . . . . . . . . . . . . . . . . . . . . . . . . . . . . . . . . . P. 230
. . . . . . . . . . . . . . . . . . . . . . . . . . . . . . . . . . . . . . . . . . . P. 230
. . . . . . . . . . . . . . . . . . . . . . . . . . . . . . . . . . . . . . . . . . . . . . P. 231
. . . . . . . . . . . . . . . . . . . . . . . . . . . . . . . . . . . . . . . . . . . . . . . . . . . . . . . . . . . . . . P. 231
. . . . . . . . . . . . . . . . . . . . . . . . . . . . . . . . . . . . . . . . . . . . . . . . . . . P. 231
. . . . . . . . . . . . . . . . . . . . . . . . . . . . . . . . . . . . . . . . . . . . . . . . . P. 231
. . . . . . . . . . . . . . . . . . . . . . . . . . . . . . . . . . . . . . . . . . . . . . . . . . . . P. 231
. . . . . . . . . . . . . . . . . . . . . . . . . . . . . . . . . . . . . . . . . . . . . . . . . . . P. 232
. . . . . . . . . . . . . . . . . . . . . . . . . . . . . . . . . . . . . . . . . . . . . . . . . . . . . . P. 232
. . . . . . . . . . . . . . . . . . . . . . . . . . . . . . . . . . . . . . . . . . . . . . . . . . . . . . . . . . . . . . . . . . . . . . . . . . . . P. 232
. . . . . . . . . . . . . . . . . . . . . . . . . . . . . . . . . . . . . . . . . . . . . . . . . . . P. 232
. . . . . . . . . . . . . . . . . . . . . . . . . . . . . . . . . . . . . . . . . . . . . . . . . . . . . . . . . . . . . . . . . P. 232
. . . . . . . . . . . . . . . . . . . . . . . . . . . . . . . . . . . . . . . . . . . . . . P. 232
. . . . . . . . . . . . . . . . . . . . . . . . . . . . . . . . . . . . . . . . . . . . . . . . . . . . . . P. 232
. . . . . . . . . . . . . . . . . . . . . . . . . . . . . . . . . . . . . . . . . . . . . . . . . . . P. 232
. . . . . . . . . . . . . . . . . . . . . . . . . . . . . . . . . . . . . . . . . . . . . . . . P. 232
. . . . . . . . . . . . . . . . . . . . . . . . . . . . . . . . . . . . . . . . . . . . . . . . P. 232
. . . . . . . . . . . . . . . . . . . . . . . . . . . . . . . . . . . . . . . . . . . . . . . . . . . . . . . . . . . . . . . . P. 232
. . . . . . . . . . . . . . . . . . . . . . . . . . . . . . . . . . . . . . . . . . . . . . . . . . . . . . . P. 232 . . . . . . . . . . . . . . . . . . . . . . . . . . P. 232
. . . . . . . . . . . . . . P. 232
. . . . . . . . . . . . . . . . . . . P. 232
. . . . . . . . . . . . . . . . . . . . . . . . P. 232
. . . . . . . . . . . . . . . . . . . . . . . . . . P. 232
. . . . . . . . . . . . . . . . . . . . . P. 232
. . . . . . . . . . . . . . . . . . . . . P. 232
. . . . . . . . . . . . . . . . . . P. 232
. . . . . . . . . P. 232
. . . . P. 232
. . . . . . . . . . . . . . . P. 232
. . . . . . . . . . . P. 232
. . . . . . . . . . . . . . . . . .. . . . . . . . . . . P. 232
. . . . . . . . . . P. 232
. . . . . . . . . . . . . . . . . . . P. 232
. . . . . . . . . . . . . . . . P. 232
. . . . . . . . . . . . . . . . . . P. 232. . . . . . . . . . . . . . . . . . P. 232
. . . . . . . . . . . . . . . . . . . . . . . . . . . . . . . . . . . . . . . . . . . . . . . . . P. 232
. . . . . . . . . . . . . . . . . . . . . . . . . . . . . . . . . P. 232
. . . . . . . . . . . . . . . . . . . . P. 232
. . . . . . . . . . . . . . . . . P. 232
. . . . . . . . . . . . . . . . . . . . . P. 232
. . . . . . . . . . . . . P. 232
. . . . . . . . . . . . . . . . . . . P. 232
. . . . . . . . . . . . . . . . . . . . . . . . . . . . . . . . P. 232
. . . . . . . . . . . . . . P. 232
. . . . . . . . . . . . . P. 232
. . . . . . . . . . . . . . . . . . . . . . . . P. 232
. . . . . . . . . . . . . . . . P. 232
. . . . . . . . . . . . . . . . . . . . . . . . . . . . . . . . . . P. 232
. . . . . . . . . . . . . . . . . . . . P. 232
. . . . . . . . . . . . . . . . . . . . P. 232
. . . . . . . . . . . . . . . . . . . . . . P. 232
. . . . . . . . . . . . . . . . . . . . . . P. 232
. . . . . . . . . . . . . . . . . . . . . . . P. 232
. . . . . . . . . . . . . . . . . . . . . . . . . . . . . . . . . . . . . . . . . . . . . . . . . . . . . . . . . . . . . . . . . . P. 232
. . . . . . . . . . . . . . . . . . . . . . . . . . . . . . . . . . . . . . . . . . . . . . . . . . . . P. 232
. . . . . . . . . . . . . . . . . . . . . . . . . . . . . . . . . . . . . . . . . . . . . . . . . . P. 232
. . . . . . . . . . . . . . . . . . . . . . . . . . . . . . . . . . . . . . . . . . . . . . . . . . . . . . . P. 232
. . . . . . . . . . . . . . . . . . . . . . . . . . . . . . . . . . . . . . . . . . . . . . . . . . P. 232
. . . . . . . . . . . . . . . . . . . . . . . . . . . . . . . . . . . P. 232
. . . . . . . . . . . . . . . . . . . . . . . . . . . . . . . . . . . . . . . . . . . . . . . . . . . . . . . . . . . . . . . P. 232
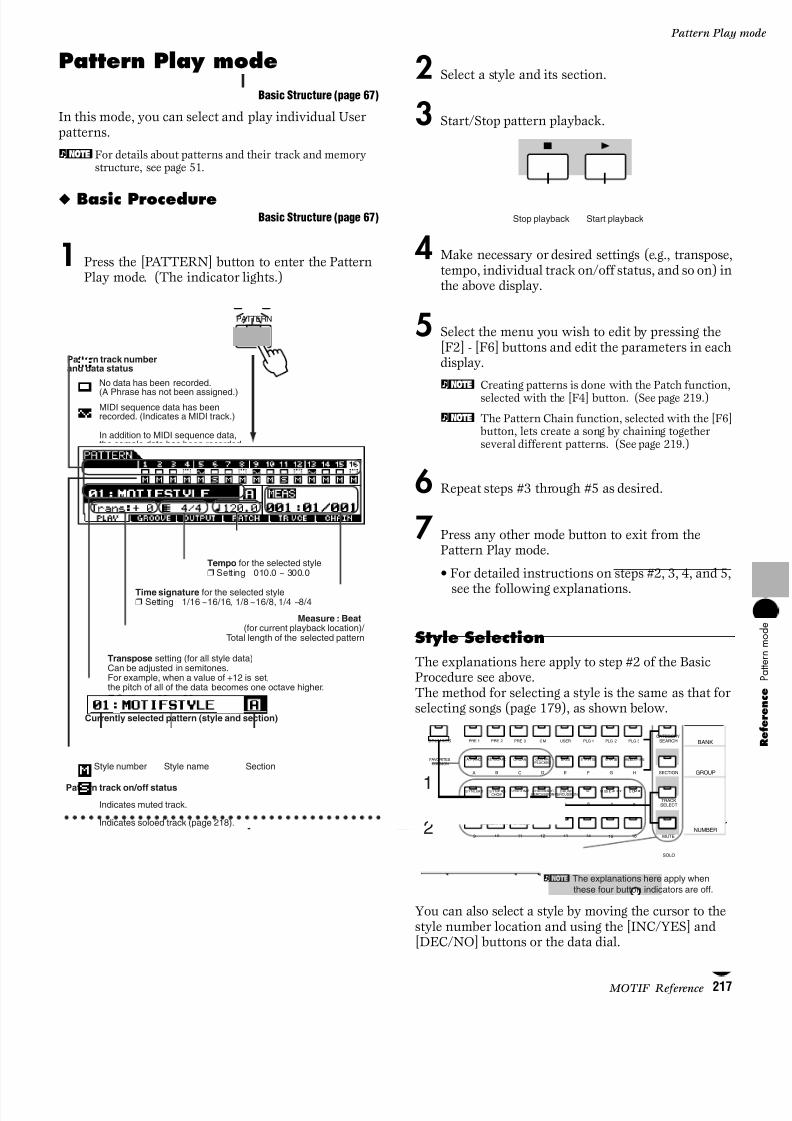
8/10/2019 motif_1(2)
http://slidepdf.com/reader/full/motif12 217/300
217 MOTIF Reference
Pattern Play
Pattern Play mode
Basic Structure (page 67)
In this mode, you can select and play individual Userpatterns.
nFor details about patterns and their track and memorystructure, see page 51.
◆ Basic ProcedureBasic Structure (page 67)
1 Press the [PATTERN] button to enter the PatternPlay mode. (The indicator lights.)
2 Select a style and its section.
3 Start/Stop pattern playback.
4 Make necessary or desired settings (e.g., transpose,tempo, individual track on/off status, and so on) inthe above display.
5 Select the menu you wish to edit by pressing the[F2] - [F6] buttons and edit the parameters in eachdisplay.
n Creating patterns is done with the Patch function,selected with the [F4] button. (See page 219.)
n The Pattern Chain function, selected with the [F6] button, lets create a song by chaining togetherseveral different patterns. (See page 219.)
6 Repeat steps #3 through #5 as desired.
7 Press any other mode button to exit from thePattern Play mode.
• For detailed instructions on steps #2, 3, 4, and 5,
see the following explanations.
Style Selection
The explanations here apply to step #2 of the BasicProcedure see above.The method for selecting a style is the same as that forselecting songs (page 179), as shown below.
You can also select a style by moving the cursor to thestyle number location and using the [INC/YES] and[DEC/NO] buttons or the data dial.
PATTERN
Pattern track numberand data status
In addition to MIDI sequence data,the sample data has been recorded.(Indicates an sample track.)
MIDI sequence data has beenrecorded. (Indicates a MIDI track.)
No data has been recorded.
(A Phrase has not been assigned.)
Tempo for the selected style❒ Setting 010.0 ~ 300.0
Measure : Beat(for current playback location)/
Total length of the selected pattern
Time signature for the selected style❒ Setting 1/16 ~16/16, 1/8 ~16/8, 1/4 ~8/4
Transpose setting (for all style data)Can be adjusted in semitones.For example, when a value of +12 is set,the pitch of all of the data becomes one octave higher.❒ Settings -36 ~ +36
Currently selected pattern (style and section)
Style name SectionStyle number
Indicates muted track.
Pattern track on/off status
Indicates soloed track (page 218).
Start playbackStop playback
n The explanations here apply when these four button indicators are off.
1
2
PLG 2
A B C D E F G H
15
CATEGORYSEARCHDRUM KITS
FAVORITES
PRE 1 PRE 2 PRE 3 GM USER PLG 1 PLG 3
A. PIANO KEYBOARD ORGAN GUITAR/ PLUCKED
BASS S TR IN GS B RA SS REED/PIPE
SYN L EAD SYN PAD/ CHOIR
SYN COMP CHROMATICPERCUSSION
DRUM/ PERCUSSION
SE M US IC AL F X C OM BI
1 2 3 4 5 6 7 8
9 10 11 12 13 14 16
SECTION
TRACKSELECT
MUTE
SOLO
BANK
GROUP
NUMBER
COMMON
ELEMENT/PERF.PART/ZONE
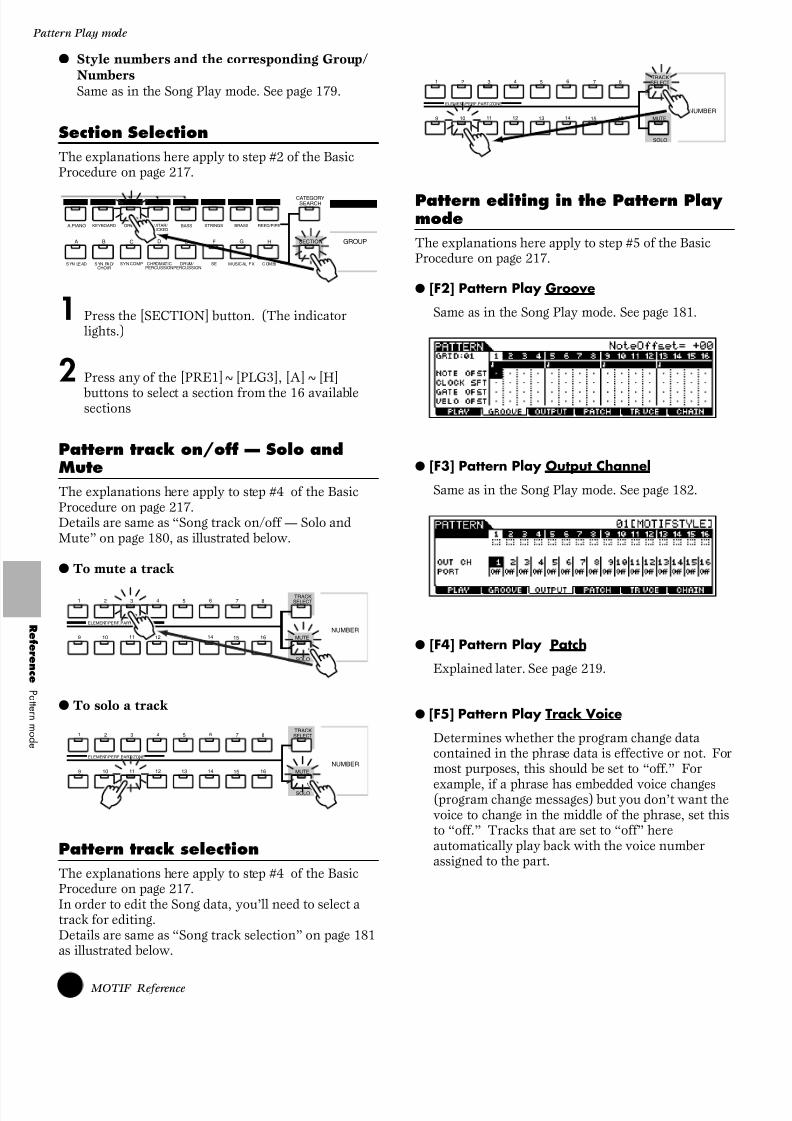
8/10/2019 motif_1(2)
http://slidepdf.com/reader/full/motif12 218/300
218 MOTIF Reference
Pattern Play mode
Ref er enc e
P at t ernmod e
● Style numbers and the corresponding Group/NumbersSame as in the Song Play mode. See page 179.
Section Selection
The explanations here apply to step #2 of the BasicProcedure on page 217 .
1 Press the [SECTION] button. (The indicator lights.)
2 Press any of the [PRE1]~[PLG3], [A]~[H]
buttons to select a section from the 16 availablesections
Pattern track on/off — Solo andMute
The explanations here apply to step #4 of the BasicProcedure on page 217 .Details are same as “Song track on/off — Solo andMute” on page 180, as illustrated below.
● To mute a track
● To solo a track
Pattern track selection
The explanations here apply to step #4 of the BasicProcedure on page 217 .In order to edit the Song data, you’ll need to select atrack for editing.Details are same as “Song track selection” on page 181 as illustrated below.
Pattern editing in the Pattern Playmode
The explanations here apply to step #5 of the BasicProcedure on page 217 .
● [F2] Pattern Play Groove
Same as in the Song Play mode. See page 181.
● [F3] Pattern Play Output Channel
Same as in the Song Play mode. See page 182.
● [F4] Pattern Play Patch
Explained later. See page 219.
● [F5] Pattern Play Track Voice
Determines whether the program change datacontained in the phrase data is effective or not. Formost purposes, this should be set to “off.” For
example, if a phrase has embedded voice changes(program change messages) but you don’t want thevoice to change in the middle of the phrase, set thisto “off.” Tracks that are set to “off” hereautomatically play back with the voice numberassigned to the part.
PLG 2
A B C D E F G H
CATEGORYSEARCHPRE 1 PRE 2 PRE 3 GM USER PLG 1 PLG 3
A. PIANO KEYBOARD ORGAN GUITAR/ PLUCKED
BASS STRINGS BRASS REED/PIPE
SYN LEAD SYN PAD/ CHOIR
SYN COMP CHROMATICPERCUSSION
DRUM/ PERCUSSION
SE MUSIC AL FX C OMBI
SECTION
BANK
GROUP
15
1 2 3 4 5 6 7 8
9 10 11 12 13 14 16
TRACKSELECT
MUTE
SOLO
NUMBERELEMENT/PERF.PART/ZONE
15
1 2 3 4 5 6 7 8
9 10 11 12 13 14 16
TRACKSELECT
MUTE
SOLO
NUMBERELEMENT/PERF.PART/ZONE
15
1 2 3 4 5 6 7 8
9 10 11 12 13 14 16
TRACKSELECT
MUTE
SOLO
NUMBERELEMENT/PERF.PART/ZONE

8/10/2019 motif_1(2)
http://slidepdf.com/reader/full/motif12 219/300
219 MOTIF Reference
Pattern Play
nThe Phrase Voice embedded in the Pattern phrase can bespecified from the Voice display in the Pattern Record
mode (page 223).
● [F6] Pattern Play Chain Play/Edit
Explained later. See below.
[F4] Patch Function
Basic Structure (page 52) · Quick Start Guide (page 105)
The explanations here apply to step #5 of the BasicProcedure on page 217 .In the following display, you can assign a Preset phraseor a User phrase (recorded in the Pattern Record mode)
to each track and create a pattern that contains up to16 tracks.
● Track number, Data status, Phrase bank/numberFor details about the Track number and Data status,see the illustration in step #1 of the Basic Procedureon page 217 .The phrase bank and number can be selected viathe data dial, [INC/YES] button, or [DEC/NO] button and assigned to the selected track. Theassigned phrase name, its time signature and lengthare indicated at the top right of the display.
n The Patch function allows you to use only Userphrases recorded to a track of the currently selectedstyle. If you wish to use User phrases recorded totracks of other styles, use the Phrase Data Copyfunction, selected with [SF5] button.
● SectionShows the current edited section. For details about how to change sections, refer to “Section selection”on page 218.
● Measure : Beat (for current playback location)The buttons can be used to change the location (inmeasures/beats), even during playback.
● [SF4] Patch Clear
You can clear the Phrase assignment to thecurrently selected track by pressing the [SF4] button. As a result, the track becomes empty.
● [SF5] Phrase Data Copy
The User phrases that can be assigned with thePatch function are limited to the ones contained inthe currently selected pattern style. This function lets you copy phrases on other pattern styles to theselected one.Press the [SF5] button to call up the followingdisplay. After setting the parameters as needed,press the [ENTER] button to copy the phrase data.
The copy operation overwrites any data previouslyexisting in the destination phrase.
[F6] Pattern Chain
Basic Structure (page 52) · Quick Start Guide (page 108)
The explanations here apply to step #5 of the BasicProcedure on page 217 .Pattern Chain allows you to string several differentPatterns (Style and Section) together to make a singleSong. The created Pattern Chain data can then beconverted into a Song.
nFor details about Pattern Chain and its track and memorystructure, see page 54.
Track number, Data status (page 217),Phrase bank : number
Section
[SF5] Phrase Data Copy
[SF4] Patch Clear
Measure : Beat (for currentplayback location)/Total
length of the selected pattern
Phrase name, Time Signature,and length of the Phrase assignedto the selected track
Source style number, phrase number
After setting, press the [ENTER]button to copy the phrase.
When this box is checkmarked,sample voices assigned to thesource phrase are copied to thedestination phrase as samplevoices, and are assigne to thecorresponding tracks in theselected pattern.
Destination phrase and track ofthe current edited style.

8/10/2019 motif_1(2)
http://slidepdf.com/reader/full/motif12 220/300
220 MOTIF Reference
Pattern Play mode
Ref er enc e
P at t ernmod e
■ Creating Pattern Chains with RealtimePlayback (Pattern Chain Recording)This function makes it possible to specify asequence of patterns for pattern chain playback.Switching of styles/sections, track muting, scene/mute changes, and tempo changes can all berecorded in real time.
1 In the Pattern Play mode, press the [F6] button toenter the Pattern Chain Play mode as shown below. Details about parameters in this display aresame as in step #1 of the Basic Procedure onpage 217 .
2 Press the [REC] button to enter the Pattern ChainRecord mode. The indicator lights and the RecordSetup Display appears.
3 Set basic parameters for recording (e.g., Stylenumber/Section, Recording Type, Track, Tempoand so on).
• The Recording Type, Time Signature and Temposettings are same as in the Song Record mode.
• To record a track, select the desired track from“TMP” (Tempo), “SCN” (Scene), and “PTN”(Pattern). For details about the Pattern Chain
track structure, see page 54.
4 Press the [F] button to start recording and playthe pattern as you like.
• When a Pattern track (1 - 16) is selected, you canrecord style and section changes.
• When the Tempo track is selected, you canrecord tempo changes.
• When the Scene track is selected, you can recordtrack muting settings.
5 Press the [■] button to stop recording.
■ Pattern Chain EditingThe Pattern Chain Edit mode makes it possible to edit theorder of the patterns in a chain as well as inserting tempo,and scene/mute event data.Call up the desired display by following the instructions
below and edit the events (Style/Section changes, Scene/Mute changes, and Tempo changes) in each display.
REC
REC
Pattern Chain Edit mode
[EDIT] button[PATTERN]button
Pattern Track Edit
[F4] button
[F4] button
[F4] buttonScene Track Edit
Tempo Track Edit
Pattern Chain Edit mode

8/10/2019 motif_1(2)
http://slidepdf.com/reader/full/motif12 221/300
221 MOTIF Reference
Pattern Record
The methods for editing each event in the displayabove and for inserting/deleting events (by using the[F5]/[F6] buttons) are the same as in the Song Editmode. See page 190.
● [F6]-[EDIT]-[F2] Copy
Pressing the [SF3] button in the Pattern Chain Edit
mode calls up the Copy display below, letting youcopy all pattern chain events from a specified rangeof measures (source) to a destination location. Keepin mind that this overwrites any existing events atthe destination.
• Source range, Destination range (Measure)❏ Settings 001~999
• NumberOfTimes Specifies the number of times the data is copied.
❏ Settings 01~99
This operation overwrites any events already existing atthe destination.
● [F6]-[EDIT]-[F3] Convert
This function converts the pattern chain data tosong data (standard MIDI format) and places theresults in the normal song tracks.Pressing the [SF4] button in the Pattern Chain Editmode calls up the Convert display below. Specifythe desired destination song and measure numberto which the converted data is to be copied, thenpress the [SF5] button to execute.
This operation overwrites any data already existing at thedestination range.
Pattern Record mode
Quick Start Guide (page 102)
The MOTIF features a wealth of preset phrases in avariety of music genres. It also features comprehensivephrase recording functions, that let you create yourown phrases and use them to build your own originalpatterns.
nFor details about recording methods, see page 53 .
◆ About the recording trackWhen recording patterns, you’ll need to specify thetrack to be recorded — just as is done in Songrecording. The operations differ depending on thespecific phrase assignments, as described below.
• If the preset phrase is assigned to the track...You cannot record. Even if you specify the track to whichthe preset phrase is assigned and try to record, an errormessage will appear.
• If the user phrase is assigned to the track...The data of the user phrase assigned to the specified trackis overwitten by recording.
• If the phrase is not assigned to the track...Recording is donw to an empty user phrase. The newlycreated phrase is automatically assigned to the recordingtrack.
◆ Basic Procedure
1 In the Pattern Play mode, select a pattern (styleand section) to be recorded.
2 Press the [REC] button to enter the Pattern Recordmode. (The indicator lights.) The Pattern RecordSetup display shown below appears.
3 Set basic parameters for recording (e.g., recordingtrack, type, tempo, and so on).
Source range
Destination range
REC

8/10/2019 motif_1(2)
http://slidepdf.com/reader/full/motif12 222/300
222 MOTIF Reference
Pattern Record mode
Ref er enc e
P at t ernmod e
n Please note that the time signature can be set in thePattern Play display. See page 217 .
n The method for selecting the recording track is thesame as in Pattern track selection (page 218).
4 Change the display by pressing the [F2] - [F3] buttons and set various parameters for recording.
5 Press the [F] button to start recording.• When any of the Realtime recording methods
(any setting other than “step”) is selected in step#3, your keyboard playing and controller movesare automatically recorded.
• When “step” is selected in step #3, compose yourrecording by entering each note individually.
6 After completing your performance (in Realtime
recording) or completing step recording, press the[■] button to stop recording.
7 Press the [F] button to hear your newlyrecorded phrase.
8 Save the recorded phrase data to a memory card ora SCSI device connected to the MOTIF.
The recorded (edited) phrase data resides temporarily inDRAM (page 64). Because data contained in DRAM is lost when the power is turned off, you should always storeany data residing in DRAM to a memory card or anexternal SCSI device before turning off the power.
• For detailed instructions on steps #3 - #4, see thefollowing explanations.
• For details on steps #5 - #6, refer to “Quick StartGuide” on page 102.
• For details on step #8, refer to “File mode” onpage 266.
n The following explanations apply to MIDI datarecording (creating MIDI tracks). For instructionson recording audio data (creating sample tracks),
see “Sampling mode” on page 233.
Setting up before recording
The explanations here apply to steps #3 - #4 of theBasic Procedure on page 221, page 222.
● [F1] Pattern Record Setup
Basic Structure (page 51)
When recording type is set to something otherthan “step”:
When recording type is set to “step”:
• Type (Recording type)Determines the recording method.❏ Settings: replace, overdub, step
n Unlike in the Song Record mode, Punch recordingis not available for pattern recording.
• LoopTurns loop recording ON or OFF.When ON, the phrase will play repeatedly during real-timerecording. This can be handy when recording drum parts,allowing you to add different instruments on each pass.When OFF recording stops after one pass through thephrase.
❏ Settings: on, off
REC
To erase specific notes from the recording, simultaneouslyhold down the [F6] button and press the note you wish todelete. This is especially convenient when erasing specificinstruments in a selected Drum voice.
Tempo
Time signature (set in the Pattern Play display)
This lets you determine whether the Arpeggioplayback data is recorded to the Pattern track ornot. (Press the [F4] button.) When is indicated,the Arpeggio playback data is recorded to theSong track.
This lets you turn the click sound(metronome) on/off for recording.(Press the [F5] button.) Whenis indicated, the click sounds.
TempoTime signature(set in the Pattern Play display).

8/10/2019 motif_1(2)
http://slidepdf.com/reader/full/motif12 223/300
223 MOTIF Reference
Pattern Record
• QuantizeThis convenient feature lets you automatically quantizethe notes in real time, as you record. Quantize aligns thetiming of note events to the nearest beat. This parameterdetermines whether real-time Quantize is on or not, andthe resolution to which the notes will be aligned.
❏ Settings: off, 60 (32nd note), 80 (16th note triplet), 120(16th note), 160 (8th note triplet), 240 (8thnote), 320 (1/4 note triplet), 480 (1/4 note)
• EventThis parameter is available when the Recording Type is setto “step.” This lets you specify the event type to beentered.
❏ Settings: note, p.bend (pitch bend), CC#000~#119(Control Change)
• TempoDetermines the Pattern tempo.
❏ Settings: 001.0 ~300.0
● [F2] Pattern Record Voice
From this display you can set voice-relatedparameters for the selected track. The settingsmade here affect the tone generator parts whoseMIDI receive channels match the MIDI transmitchannel of the song track. The voice set here becomes the phrase voice (page 52).
Parameters are the same as in the Song Recordmode. See page 188.
● [F3] Pattern Record Arpeggio
From this display you can set various Arpeggio-related parameters for the selected track.
Parameters are the same as in the Song Record mode.See page 189.
Pattern Recording
The explanations here apply to steps #5 - #6 of theBasic Procedure on page 222.
■ Realtime RecordingSee “Quick Start Guide” on page 103.
■ Step RecordingIf you press the [F] button in step #5 of the BasicProcedure on page 222 , the Event display appears andyou can input individual events one by one. Themethod for inputting events is the same as in Steprecording in the Song mode. See pages 183 ~ 186.
Determines whether Arpeggio playbackdata is recorded to the track or not.(Press the [F4] button.)

8/10/2019 motif_1(2)
http://slidepdf.com/reader/full/motif12 224/300
224 MOTIF Reference
Pattern Edit mode
Ref er enc e
P at t ernmod e
Pattern Edit mode
This mode gives you comprehensive, detailed controlsfor editing the MIDI events of each phrase of therecorded pattern. MIDI events are messages (such asnote on/off, note number, program change number,etc.) that make up the data of a recorded pattern.
◆ Basic ProcedureBasic Operation (page 70)
1 In the Pattern Play mode, select a style and phraseto be edited.
2 Press the [EDIT] button to enter the Pattern Editmode. (The indicator lights.) The Pattern EventList display shown below appears.
3 Revise, insert or delete the MIDI events as needed.If you find the display too cluttered, you can filterout certain event types with the View Filter.Simply press the [F2] button and select the eventtypes you want to be displayed.
4 After completing editing, press the [PATTERN] button to return back to the Pattern Play mode.
5 Press the [F] button to hear your edited data.
6 Edit other Phrases as required. Repeat steps #2
through #5 as desired.
7 After editing, save your pattern data to a memorycard or a SCSI device connected to the MOTIF inthe File mode.
• For detailed instructions on step #3, see thefollowing explanations.
• For details on step #7, refer to “File mode” onpage 266.
MIDI events that can be edited
All MIDI events and parameters (edited in step #3 ofthe Basic Procedure above) are the same as those in theSong Edit mode. For details, see page 190.
Event Editing/Inserting/Deleting
All event editing operations and parameters (done instep #3 of the Basic Procedure above) are the same asthose in the Song Edit mode. For details, see page 190.
Event View Filter
All Event View Filter operations and settings (done instep #3 of the Basic Procedure above) are the same asthose in the Song Edit mode. For details, see page 192.
EventsMeasurenumber
Clock(480 clocks
per quarter-note)
Beat
EDIT

8/10/2019 motif_1(2)
http://slidepdf.com/reader/full/motif12 225/300
225 MOTIF Reference
Pattern Job
Pattern Job mode
The Pattern Job mode contains a comprehensive set ofediting tools and functions you can use to change thesound of your original pattern, as created by thePattern Patch function or from the Pattern Recordmode. It also includes a variety of convenientoperations, such as copying or erasing data. Most ofthese operations can be performed on either an entiretrack or a selected range of measures in the track.
◆ Basic Procedure
1 In the Pattern Play mode, select a style and sectionyou wish to execute the Job on.
2 Press the [JOB] button to enter Pattern Job Mode.
3 Select the desired Job menu by pressing the
appropriate button, [F2] - [F6].
4 Use the CURSOR buttons to scroll to the desired Job.
5 Press the [ENTER] button to go to the selected Jobdisplay.
6 Set the relevant Job parameters.
7 Press the [ENTER] button. (The display promptsyou for confirmation.)
8 Press the [INC/YES] button to execute the Job.After the Job has been completed, a “Completed”message appears and operation returns to theoriginal display.
n To cancel the Job, press the [DEC/NO] button.
For Jobs that take longer to process, you will see themessage “Executing…” during processing. If you switchoff the power of the MOTIF while this message isdisplayed, you risk corrupting your data.
9 If you wish to undo the changes made in the stepsabove, press the [F1] button and (to select Undo/Redo) and use the Undo function.
10Press the [PATTERN] button to exit from thePattern Job mode and return to the Pattern Playmode.
• For detailed instructions on steps #3 - #9, see theexplanations below.
[F1] Undo/RedoThe explanations here apply to step #9 of the BasicProcedure on see below.The operations are the same as in the Song Job mode.See page 193.
Undo/Redo does not work with sample voice operations.
[F2] Note data Job
Press the [F2] button in step #3 of the Basic Procedure(see below), so that the Note data Job list appears onthe display. Scroll the cursor to the desired Job andpress the [ENTER] button to go to the display of theselected Job.
The following explanations apply to step #6 of theBasic Procedure see above.
nThe Note data Jobs in the Pattern mode are basicallysame as in the Song Job mode. However, unlike in theSong Job mode, Pattern Note data Jobs are applied to thephrases (001 - 256) and a selected range in the phrase(measure : beat : clock).
● [F2]-01 Quantize
Same as in the Song Job mode. See page 194.
Specify the phrase and the range (in measures/ beats/clocks) over which the Job is applied.

8/10/2019 motif_1(2)
http://slidepdf.com/reader/full/motif12 226/300
226 MOTIF Reference
Pattern Job mode
Ref er enc e
P at t ernmod e
● [F2]-02 Modify Velocity
Same as in the Song Job mode. See page 195.
● [F2]-03 Modify Gate Time
Same as in the Song Job mode. See page 195.
● [F2]-04 Crescendo
Same as in the Song Job mode. See page 196.
● [F2]-05 Transpose
Same as in the Song Job mode. See page 196.
● [F2]-06 Glide
Same as in the Song Job mode. See page 196.
● [F2]-07 Create Roll
Same as in the Song Job mode. See page 196.
● [F2]-08 Sort Chord
Same as in the Song Job mode. See page 197 .
● [F2]-09 Separate Chord
Same as in the Song Job mode. See page 198.
Specify the phrase and the range (in measures/ beats/clocks) over which the Job is applied.
Specify the phrase and the range (in measures/ beats/clocks) over which the Job is applied.
Specify the phrase and the range (in measures/ beats/clocks) over which the Job is applied.
Specify the phrase and the range (in measures/ beats/clocks) over which the Job is applied.
Specify the phrase and the range (in measures/ beats/clocks) over which the Job is applied.
Specify the phrase and the range (in measures/ beats/clocks) over which the Job is applied.
Specify the phrase and the range (in measures/ beats/clocks) over which the Job is applied.
Specify the phrase and the range (in measures/ beats/clocks) over which the Job is applied.

8/10/2019 motif_1(2)
http://slidepdf.com/reader/full/motif12 227/300
227 MOTIF Reference
Pattern Job
[F3] Event Job
Press the [F3] button in step #3 of the Basic Procedureon page 225 so that the Event Job list appears on thedisplay. Scroll the cursor to the desired Job and press the[ENTER] button to go to the display of the selected Job.
The following explanations apply to step #6 of theBasic Procedure on page 225.
nThe Event Jobs in the Pattern mode are basically same asin the Song Job mode. However, unlike in the Song Jobmode, Pattern Event Jobs are applied to the phrases (001 -256) and a selected range in the phrase (measure : beat :clock).
● [F3]-01 Shift Clock Same as in the Song Job mode. See page 198.
● [F3]-02 Copy EventThis job copies all data from a specified sourcerange to a specified destination location.
• Number Of TimesSpecifies the number of times the data is copied.
❏ Settings 01~99
When Copy Event is executed any data already existing atthe Destination location will be overwritten.
● [F3]-03 Erase Event
Same as in the Song Job mode. See page 199.
n Unlike in the Song Job mode, you cannot select“Tempo,” “Scene Memory,” or “Track Mute” asEvent Types.
● [F3]-04 Extract Event
Same as in the Song Job mode. See page 199.
● [F3]-05 Create Continuous Data
Same as in the Song Job mode. See page 199.
n Unlike in the Song Job mode, you cannot select“Tempo” as an Event Type.
● [F3]-06 Thin Out
Same as in the Song Job mode. See page 200.
n Unlike in the Song Job mode, you cannot select“All” as an Event Type.
Specify the phrase and the range (in measures/ beats/clocks) over which the Job is applied.
Specify the phrase to whichthe job is applied.
Set the range (in measures/beats/ clocks) from which the data will be copied.
Specify the location to whichthe data will be copied.
Specify the phrase and the range (in measures/ beats/clocks) over which the Job is applied.
Specify the phrase and the range (in measures/ eats/clocks) over which the Job is applied.
Select the destination phrase.
Specify the phrase and the range (in measures/ beats/clocks) over which the Job is applied.
Specify the phrase and the range (in measures/ beats/clocks) over which the Job is applied.

8/10/2019 motif_1(2)
http://slidepdf.com/reader/full/motif12 228/300
228 MOTIF Reference
Pattern Job mode
Ref er enc e
P at t ernmod e
● [F3]-07 Modify Control Data
Same as in the Song Job mode. See page 200.
n Unlike in the Song Job mode, you cannot select“Tempo” as an Event Type.
● [F3]-08 Beat Stretch
Same as in the Song Job mode. See page 200.
[F4] Phrase Job
Press the [F4] button in step #3 of the Basic Procedureon page 225 so that the Phrase Job list appears on thedisplay. Scroll the cursor to the desired Job and press the[ENTER] button to go to the display of the selected Job.
The following explanations apply to step #6 of theBasic Procedure on page 225.
● [F4]-01 Copy Phrase
This Job copies a selected phrase to the designateddestination phrase.
Any previous data in the copy destination will beoverwritten.
Undo/Redo (page 225) cannot be used to undo/redo asample voice copy operation.
n When there is no memory available in thedestination style for sample voice data, an errormessage will appear on the display and the samplevoice data will not be copied. If this occurs, useSample Job 02 “Delete” to delete any unusedsample voices, then try again.
● [F4]-02 Exchange Phrase
This Job exchanges or “swaps” the contents of twospecified phrases.
n If this Job is applied to phrases which use samplevoices, the sample voices will not be exchanged.
● [F4]-03 Mix Phrase
This Job mixes all data from two selected userphrases (“A” and “B”), and places the result inphrase B. One useful application for this would be
to free up the data in phrase A, letting you recordnew data to it.
n Keep in mind that applying this Job to phrases withsample voices does not mix the sample voices.
Specify the phrase and the range (in measures/ beats/clocks) over which the Job is applied.
Specify the phrase and the range (in measures/ beats/clocks) over which the Job is applied.
Selects the style and phrase to be copied.(Preset phrase also can be selected.)
Specify the destinationstyle and phrase.
When this box is checkmarked, sample voices used by thesource phrase are copied to the destination style assample voices, and are assigned to the destination phrase.
Target phrases for the Exchange operation
Phrase B
Mix Phrase
Phrase B
Phrase A
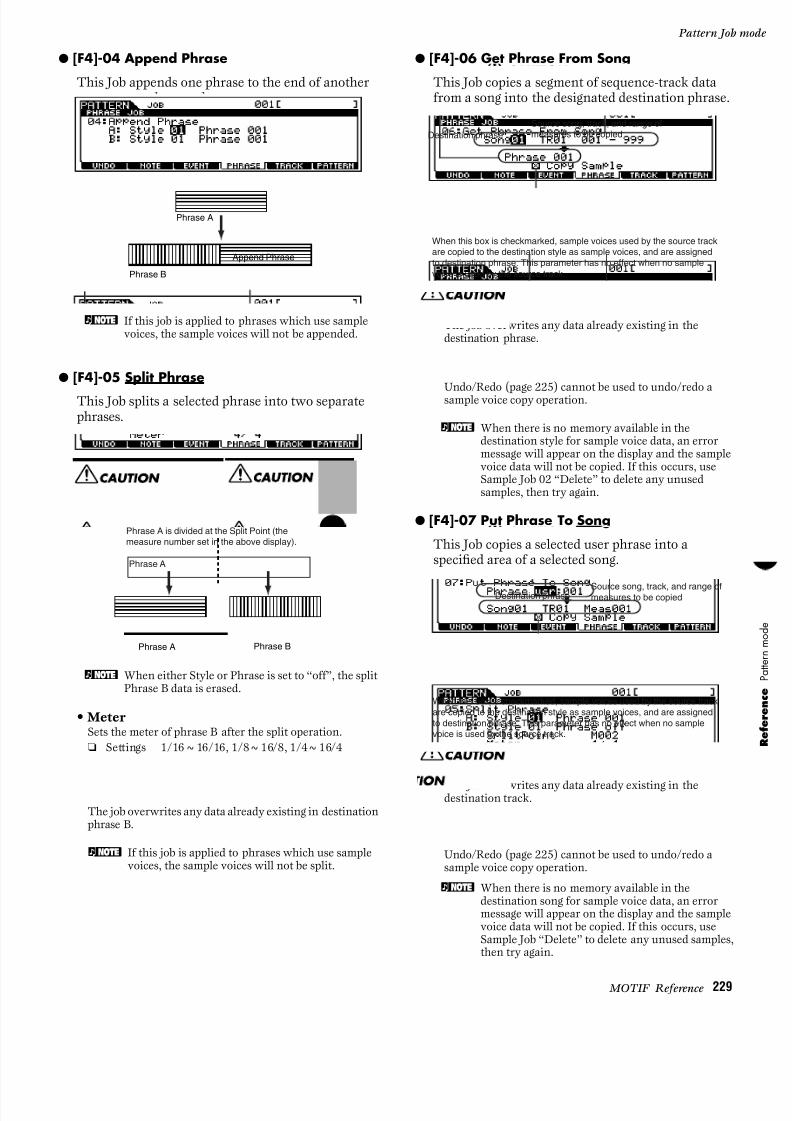
8/10/2019 motif_1(2)
http://slidepdf.com/reader/full/motif12 229/300
229 MOTIF Reference
Pattern Job
● [F4]-04 Append Phrase
This Job appends one phrase to the end of anotherto create one longer phrase.
n If this job is applied to phrases which use samplevoices, the sample voices will not be appended.
● [F4]-05 Split Phrase
This Job splits a selected phrase into two separatephrases.
n When either Style or Phrase is set to “off”, the splitPhrase B data is erased.
• MeterSets the meter of phrase B after the split operation.
❏ Settings 1/16~16/16, 1/8~16/8, 1/4~16/4
The job overwrites any data already existing in destinationphrase B.
n If this job is applied to phrases which use samplevoices, the sample voices will not be split.
● [F4]-06 Get Phrase From Song
This Job copies a segment of sequence-track datafrom a song into the designated destination phrase.
The job overwrites any data already existing in thedestination phrase.
Undo/Redo (page 225) cannot be used to undo/redo asample voice copy operation.
n When there is no memory available in thedestination style for sample voice data, an errormessage will appear on the display and the samplevoice data will not be copied. If this occurs, useSample Job 02 “Delete” to delete any unusedsamples, then try again.
● [F4]-07 Put Phrase To Song
This Job copies a selected user phrase into aspecified area of a selected song.
The job overwrites any data already existing in thedestination track.
Undo/Redo (page 225) cannot be used to undo/redo asample voice copy operation.
n When there is no memory available in thedestination song for sample voice data, an errormessage will appear on the display and the samplevoice data will not be copied. If this occurs, useSample Job “Delete” to delete any unused samples,then try again.
Phrase B
Append Phrase
Phrase A
Phrase A is divided at the Split Point (themeasure number set in the above display).
Phrase A
Phrase BPhrase A
When this box is checkmarked, sample voices used by the source trackare copied to the destination style as sample voices, and are assignedto destination phrase. This parameter has no effect when no samplevoice is used by the source track.
Source song, track, and range ofmeasures to be copiedDestination phrase
Destination phrase
When this box is checkmarked, sample voices used by the source trackare copied to the destination style as sample voices, and are assignedto destination phrase. This parameter has no effect when no samplevoice is used by the source track.
Source song, track, and range ofmeasures to be copied

8/10/2019 motif_1(2)
http://slidepdf.com/reader/full/motif12 230/300
230 MOTIF Reference
Pattern Job mode
Ref er enc e
P at t ernmod e
● [F4]-08 Clear Phrase
This Job deletes all data from the selected phrase.
Undo/Redo (page 225) cannot be used to undo/redo aDelete Sample operation.
● [F4]-09 Phrase NameBasic Operation (page 75)
This Job lets you assign a name (of up to eightcharacters) to the selected phrase.
See “Basic Operation” on page 75.
[F5] Track JobPress the [F5] button in step #3 of the Basic Procedureon page 225 so that the Track Job list appears on thedisplay. Scroll the cursor to the desired Job and pressthe [ENTER] button to go to the display of the selected Job.
The following explanations apply to step #6 of theBasic Procedure on page 225.
● [F5]-01 Copy Track
This Job copies all data of the selected type fromspecified source track to specified destination track.
Same as in the Song Job mode. See page 202.
● [F5]-02 Exchange Track
This Job exchanges or “swaps” the specified type ofdata between two specified tracks in the currentstyle and section.
Same as in the Song Job mode. See page 202.
● [F5]-03 Clear Track
This Job deletes all data of the selected type fromthe selected pattern track.
Same as in the Song Job mode. See page 202.
● [F5]-04 Normalize Play Effect
This job rewrites the data in the selected track so
that it incorporates the current Grid Groovesettings.
Same as in the Song Job mode. See page 203.
Phrase to be cleared
When this box is checkmarked, sample dataassigned to the selected phrase will be deleted.This parameter has no effect when no samplevoice is used by the selected phrase.
Types of data to be copied
Source style, ection, and track
Destination style, section, and track
Target tracks for the Exchange operation
Types of data to be exchanged
Types of data to be cleared
Section and track from which data is to be cleared

8/10/2019 motif_1(2)
http://slidepdf.com/reader/full/motif12 231/300

8/10/2019 motif_1(2)
http://slidepdf.com/reader/full/motif12 232/300

8/10/2019 motif_1(2)
http://slidepdf.com/reader/full/motif12 233/300
233 MOTIF Reference
Function
Sampling ModeBasic Structure (page 58)
Function Tree
This section is devoted to the Sampling mode. To see how the Sampling mode relates to the entire structure of theMOTIF and its other modes and functions, see the simplified chart in “Basic Structure” on page 30.The following detailed chart shows all of the display menus and parameter groups of the Sampling modes — giving
you a quick, easy-to-understand overview of the sampling-related functions of the MOTIF.Brackets around a word or phrase (e.g., [F1]) indicate specific button names or panel operations.
[INFORMATION] SAMPLE
[SAMPLE] SAMPLE REC SETUP
[F1] DESTINATION
[F2] SOURCE
[F6] SAMPLE RECORD
[F6] SAMPLE RECORDING
RECORDING (Slice+Seq)
[AFTER COMPLETING RECORDING]
[F1] TRIM
[INFO] TRIM INFORMATION
[SF1] AUDITION
[SF2] START-LOOP
[SF3] GET TEMPO
[SF4] EXTRACT
[F5] ZOOM OUT
[F6] ZOOM IN
[F2] SLICE
RECORDING (Sample, Sample+Note)
[F6] SAMPLE REC SETUP
[EDIT] SAMPLE EDIT
[F1] KEYBANK SELECT
[F2] TRIM
[INFO] TRIM INFO
[SF1] AUDITION
[SF2] START-LOOP
[SF3] GET TEMPO
[SF4] EXTRACT
[F5] ZOOM OUT
[F6] ZOOM IN
[F3] PARAMETER
[F4] RANGE
[JOB] SAMPLE JOB
[F1] KEYBANK JOB LIST
COPY
DELETE
EXTRACT
MOVE
NORMALIZE
TIME-STRETCH
CONVERT PITCH
FADE IN/OUT
CONVERT FREQUENCY
STEREO TO MONO
LOOP-REMIX
SLICE
[F2] WAVEFORM JOB LIST
COPY
DELETE
TRANSPOSE
NAME
[F3] OTHER JOB LIST
CLEAN UP MEMORY
OPTIMIZE MEMORY
DELETE ALL
CONVERT TO DRUM VOICE (User Drum Voice Number, Name)
[SAMPLE]. . . . . . . . . . . . . . . . . . . . . . . . . . . . . . . . . . . . . . . . . . . . . . . . . . . . . . . . . . . . . . . . . . . . . . . . . . . . . . P. 276
. . . . . . . . . . . . . . . . . . . . . . . . . . . . . . . . . . . . . . . . . . . . . . . . . . . . . . . . . . . . . . . . . . . . . . . . P. 235
. . . . . . . . . . . . . . . . . . . . . . . . . . . . . . . . . . . . . . . . . . . . . . . . . . . . . . . . . . . . . . . . . . P. 235
. . . . . . . . . . . . . . . . . . . . . . . . . . . . . . . . . . . . . . . . . . . . . . . . . . . . . . . . . . . . . . . . . . . . . . . P. 236
. . . . . . . . . . . . . . . . . . . . . . . . . . . . . . . . . . . . . . . . . . . . . . . . . . . . . . . . . . . . . . . . . . . . . . . . . . . . . . . . P. 234
. . . . . . . . . . . . . . . . . . . . . . . . . . . . . . . . . . . . . . . . . . . . . . . . . . . . . . . . . . . P. 234
. . . . . . . . . . . . . . . . . . . . . . . . . . . . . . . . . . . . . . . . . . . . . P. 236
. . . . . . . . . . . . . . . . . . . . . . . . . . . . . . . . . . . P. 237
. . . . . . . . . . . . . . . . . . . . . . . . . . . . . . . . . . . . . . . . P. 237
. . . . . . . . P. 276
. . . . . . . . . . . . . . . . . . P. 238
. . . . . . . . . . . . . . . P. 238 . . . . . . . . . . . . . . . . P. 238
. . . . . . . . . . . . . . . . . . P. 238
. . . . . . . . . . . . . . . . . . P. 238
. . . . . . . . . . . . . . . . . . . . P. 238
. . . . . . . . . . . . . . . . . . . . . . . . . . . . . . . . . . . . . . . P. 238
. . . . . . . . . . . . . . . . . . . . . . . . . . . . . . . . . . . P. 236
. . . . . . . . . . . . . . . . . . . . . . . . . . . . . . . . . . . . . . . . . . . . . . . . . . . . . . . . . . . . P. 237
. . . . . . . . . . . . . . . . . . . . . . . . . . . . . . . . . . . . . . . . . . . . . . . . . . . . . . . . . . . . . . . . . . . . . . . . . . . . . . . . . . P. 240
. . . . . . . . . . . . . . . . . . . . . . . . . . . . . . . . . . . . . . . . . . . . . . . . . . . . . . . . . . . . . . . P. 240
. . . . . . . . . . . . . . . . . . . . . . . . . . . . . . . . . . . . . . . . . . . . . . . . . . . . . . . . . . . . . . . . . . . . . . . . . . P. 241
. . . . . .. . . . . . . . . . . . . . . . . . . . . . . . . . . . . . . . . . . . . . . . . . . . . P. 241
. . . . . . . . . . . . . . . . . . . . . . . . . . . . . . . . . . . . . . . . . . . . . . . . . . . . P. 241
. . . . . . . . . . . . . . . . . . . . . . . . . . . . . . . . . . . . . . . . . . . . . . . . P. 241
. . . . . . . . . . . . . . . . . . . . . . . . . . . . . . . . . . . . . . . . . . . . . . . . . . P. 241
. . . . . . . . . . . . . . . . . . . . . . . . . . . . . . . . . . . . . . . . . . . . . . . . . . . . P. 241
. . . . . . . . . . . . . . . . . . . . . . . . . . . . . . . . . . . . . . . . . . . . . . . . . . . . P. 241
. . . . . . . . . . . . . . . . . . . . . . . . . . . . . . . . . . . . . . . . . . . . . . . . . . . . . . P. 241. . . . . . . . . . . . . . . . . . . . . . . . . . . . . . . . . . . . . . . . . . . . . . . . . . . . . . . . . . . . . . . . . . . . P. 241
. . . . . . . . . . . . . . . . . . . . . . . . . . . . . . . . . . . . . . . . . . . . . . . . . . . . . . . . . . . . . . . . . . . . . . . . P. 241
. . . . . . . . . . . . . . . . . . . . . . . . . . . . . . . . . . . . . . . . . . . . . . . . . . . . . . . . . . . . . . . . . . . . . . . . . . . . . . . . . . . P. 241
. . . . . . . . . . . . . . . . . . . . . . . . . . . . . . . . . . . . . . . . . . . . . . . . . . . . . . . . . . . . . . P. 242
. . . . . . . . . . . . . . . . . . . . . . . . . . . . . . . . . . . . . . . . . . . . . . . . . . . . . . . . . . . . . P. 242
. . . . . . . . . . . . . . . . . . . . . . . . . . . . . . . . . . . . . . . . . . . . . . . . . . . . . . . . . . . P. 242
. . . . . . . . . . . . . . . . . . . . . . . . . . . . . . . . . . . . . . . . . . . . . . . . . . . . . . . . . P. 243
. . . . . . . . . . . . . . . . . . . . . . . . . . . . . . . . . . . . . . . . . . . . . . . . . . . . . . . . . . . . P. 243
. . . . . . . . . . . . . . . . . . . . . . . . . . . . . . . . . . . . . . . . . . . . . . . . . . . . . . . P. 243
. . . . . . . . . . . . . . . . . . . . . . . . . . . . . . . . . . . . . . . . . . . . . . . . . . . . P. 244
. . . . . . . . . . . . . . . . . . . . . . . . . . . . . . . . . . . . . . . . . . . . . . . . . . . P. 244
. . . . . . . . . . . . . . . . . . . . . . . . . . . . . . . . . . . . . . . . . . . . . . . . . . . . . . P. 245
. . . . . . . . . . . . . . . . . . . . . . . . . . . . . . . . . . . . . . . . . . . . . P. 245
. . . . . . . . . . . . . . . . . . . . . . . . . . . . . . . . . . . . . . . . . . . . . . . . . P. 245
. . . . . . . . . . . . . . . . . . . . . . . . . . . . . . . . . . . . . . . . . . . . . . . . . . . . . . P. 246
. . . . . . . . . . . . . . . . . . . . . . . . . . . . . . . . . . . . . . . . . . . . . . . . . . . . . . . . . . . . P. 246
. . . . . . . . . . . . . . . . . . . . . . . . . . . . . . . . . . . . . . . . . . . . . . . . . . . . . . . . . . . . P. 247
. . . . . . . . . . . . . . . . . . . . . . . . . . . . . . . . . . . . . . . . . . . . . . . . . . . . . . . . . . . . . P. 247
. . . . . . . . . . . . . . . . . . . . . . . . . . . . . . . . . . . . . . . . . . . . . . . . . . . . . . . . . . . P. 247
. . . . . . . . . . . . . . . . . . . . . . . . . . . . . . . . . . . . . . . . . . . . . . . . . . . . . . P. 247
. . . . . . . . . . . . . . . . . . . . . . . . . . . . . . . . . . . . . . . . . . . . . . . . . . . . . . . . . . . . P. 247
. . . . . . . . . . . . . . . . . . . . . . . . . . . . . . . . . . . . . . . . . . . . . . . . . . . . . . . . . . . . . . . . P. 247
. . . . . . . . . . . . . . . . . . . . . . . . . . . . . . . . . . . . . . . . . . . . . . . . P. 247
. . . . . .. . . . . . . . . . . . . . . . . . . . . . . . . . . . . . . . . . . . . . . . . . . P. 248
. . . . . . . . . . . . . . . . . . . . . . . . . . . . . . . . . . . . . . . . . . . . . . . . . . . . . . . P. 248
. . . . . . . . . . . . . . P. 248

8/10/2019 motif_1(2)
http://slidepdf.com/reader/full/motif12 234/300
234 MOTIF Reference
Sampling Record mode
Ref er enc e
S ampl i ngmod e
Sampling Record mode
Basic Operation (page 58)
In this mode, you can record sounds to the MOTIF (forexample, your voice, a guitar, or sounds from a CD),edit them, and use them to create special Sample voicesyou can play from the keyboard. Or, if you enter thismode from the Song or Pattern mode, the sounds you
record can be assigned to the tracks and played backautomatically with the song or pattern. What’s more, by using the Resampling function, you can create newsamples from your edits, or make samples from thesounds of the MOTIF itself.
◆ Data created by SamplingRegardless of the mode, the raw Sampled data is thesame, of course. However, various parameters aredifferent, depending on the particular mode or settings.See page 59 for details on the kinds of data that are
created in the Sampling function.
◆ Basic Procedure
1 To use a microphone or external audio source,make all the appropriate connections. For details,see “Analog input” and “Digital input” on page 23.
n If you want to use the sound of the MOTIF as arecording source (with the Resampling function),step #1 above is unnecessary.
2 Depending on how you want to use your createdsample, there are two ways you should proceed:
• To create a normal (User) voice —Enter the Voice or Performance mode. To use the sound ofthe MOTIF as a recording source (with the Resamplingfunction), select the desired voice or performance.
• To create a Sample track in a songor pattern —Enter the Song or Pattern mode and select the desired songor pattern.
3 Press the [INTEGRATED SAMPLING] button tocall up the Setup display in the Sampling Recordmode. (The indicator lights.)
n Even when you enter the Sampling Record mode,the indicator of the previous mode’s buttonremains lit, allowing you to confirm which modeyou entered from.
4 Press the [F1] button and set the destination-related parameters for the sample. (Thesedetermine the memory location to which thesample will be recorded and assigned.)
n When entering the Sampling Record mode from theVoice/Performance mode, the recorded sample isautomatically stored to the Waveform and Uservoice set in this display.
n When entering the Sampling Record mode from theSong/Pattern mode, the recorded sample isautomatically stored to the track set in this displayas a Sample voice.
5 Press the [F2] button and set the source-relatedparameters for the audio input.
6 Press the [F6] button to go to the Sampling standbydisplay and set the Trigger mode in this display.
7 Press the [F6] button again to start sampling, andplay the input source at the proper time. How andwhen you should play the source depends on thesettings made in step #5 above (and describedon page 236), and the process you use (described briefly below).
• When the Source is set to “A/D” or “digital”:Any of the following audio input jacks/terminals on theMOTIF can be used for sample recording:
- A/D INPUT jacks- mLAN terminals (when the optional mLAN8E has been
installed)- DIGITAL IN jack (when the optional AIEB2 has beeninstalled)- OPTICAL IN jack (when the optional AIEB2 has beeninstalled)
• When the Source is set to “resample”:The sound generated by the MOTIF itself (Song/Patternplayback, keyboard performance) can be recorded as asample.
How sampling actually starts depends on theTrigger mode setting made in step #6 above (anddescribed on page 237 ), and the process you use
(described briefly below).
When Trigger mode isset to “Manual”:
When Trigger mode isset to “Level”:
Sampling Standby Sampling Standby
Sampling Start
Sampling Start
Trigger Waiting
Press the [F6] button. Press the [F6] button.
When the level of the inputsignal exceeds the Triggerlevel, sampling starts.

8/10/2019 motif_1(2)
http://slidepdf.com/reader/full/motif12 235/300

8/10/2019 motif_1(2)
http://slidepdf.com/reader/full/motif12 236/300

8/10/2019 motif_1(2)
http://slidepdf.com/reader/full/motif12 237/300

8/10/2019 motif_1(2)
http://slidepdf.com/reader/full/motif12 238/300
238 MOTIF Reference
Sampling Record mode
Ref er enc e
S ampl i ngmod e
• Start (Start Point)Determines the Start point for the sample playback.
• Loop (Loop Start Point)Determines the Top point of the loop playback (the pointwhere the loop begins) within the range of the entiresample.
• End (End Point)Determines the End point of the loop playback within therange of the entire sample.
• BeatThe Beat of the range from the Loop Start Point to the EndPoint is automatically displayed according to the Tempo(below). This is displayed only and cannot be changed.If you use the GET TMP (Get Tempo) function bypressing the [SF4] button, this Beat value is automatically
changed to match the extracted tempo.
• (Tempo)Execute the GET TMP (Get Tempo) operation by pressingthe [SF4] button to calculate the tempo when the Sampledata playback of the range from the Loop Start Point to theEnd Point is treated as one measure. The result of thecalculation appears here.You can also change the tempo by using the [INC/YES]and [DEC/NO] buttons, or the data dial.
■ [F2] SliceThis powerful feature lets you automatically divide the
recorded sample into separate “slices.” These slices arethen assigned to successive notes and arranged assequence data. This effectively lets you recreate theoriginal sample by playing back its slices in order, inany tempo — perfect for matching samples of differentoriginal tempos. This is also useful for melodicsamples, such as bass parts, since it lets you play backthe sample at any tempo without changing the overallpitch.
n It is necessary to accurately adjust the length of thesample before executing the slice operation. Use
the [SF1] (AUDITION) button in the Trim displayto loop the sample and precisely set the Start andEnd points as required.
• Type (Slice Type)Specifies how the sample is sliced, and to some extentdetermines the resulting sound quality. Select the type that best suits the original phrase.
❏ Settings beat1~3This slice type is suited for percussive phrases such asdrums or bass with a fast attack and short decay. Threevariations are provided.
phrase1~4Ideal for phrases containing cymbals or other instrumentswith a long decay. Four variations are provided.
quickRegardless of the phrase content, the sample is divided atthe specified note sub-divisions. The number of slices permeasure is calculated by multiplying the top number of theMeter (time signature) parameter by the bottom numberof the SubDivide parameter.
n For helpful hints on getting the Slice Typeparameter to work for different samples, see “Tipsfor using the Slice Types” on page 239.
• MeasureDetermines the number of measures in the sample to besliced.When the slice operation is executed, sequence datacorresponding to the specified number of measures is
created. The sequence data is created from the beginningof the current measure at the point at which sampling isstarted.
❏ Settings 1~8
• MeterSpecifies the meter (time signature) of the sample. Thesetting here is the basic slice unit.
❏ Settings 1/16 ~ 16/16, 1/8 ~ 16/8, 1/4 ~ 8/4
Press the [F5] and [F6]buttons to zoom in andout of the wave display.
Tempo
Press the [SF1] button tosound the recordedsample according to thesettings in this display.
Delete all unnecessary sample dat(located ahead of the Start pointand located after the End point) bypressing the [SF4] button.
Press the [SF2] button so thatthe address of the Start Pointis changed to the one of theLoop Start Point.
Press the [SF3] button to calculate thetempo/beat when the Sample data playback ofthe range from the Loop Start Point to the EndPoint is treated as one measure. The result ofthe calculation appears at the left in this display.
Press the [F5] button to go back tothe Sampling Setup display withoutstoring the result.
Press the [F6] button to store the result of the Sliceoperation and go back to the Sampling Setup display.
You can hear and confirmthe slicedamples by pressing the[SF1] button.
Press the [ENTER] button. (The displayprompts you for confirmation.) Press the[INC/YES] button to execute the Slice.

8/10/2019 motif_1(2)
http://slidepdf.com/reader/full/motif12 239/300
239 MOTIF Reference
Sampling Record
• SubDivideThe Meter parameter sets the basic slice unit, andSubDivide specifies even finer resolution for phrasescontaining regions with shorter notes.For the following phrase, for example, the Meter should beset to 4/4 and SubDivide to 1/2.
❏ SettingsWhen Meter is set to 1 ~ 8/4:quarter note (1/1), 8th note (1/2), 4th note triplet (1/3),16th note (1/4), 8th note triplet (1/6), 16th note 1/8),32nd note triplet (1/12)
When Meter is set to 1 ~ 16/8:8th note (1/1), 16th note (1/2), 8th note triplet (1/3),32nd note 1/4), 16th note triplet (1/6)
When Meter is set to 1 ~ 16/16:
16th note (1/1), 32nd note 1/2), 16th note triplet (1/3)
n This parameter has no effect when the Slice Typeparameter is set to beat 1~2.
n The maximum slice resolution for stereo samplesis 64 slices, and for mono samples 128 slices.
• Sens (Envelope Sensitivity)Further adjusts the sub-divisions specified by theSubDivide parameter. Higher values result in higherresolution, allowing even finer notes and smaller sounds to be detected and sliced.Use the Audition function (press [SF1]) to hear theresults, and if you’re not satisfied with them, change thesetting and try again.
❏ Settings 1~5
n This parameter has no effect when the “quick”slice type is selected.
◆ Tips for using the Slice Types
● Slicing percussive phrases having short decays
• First, try slicing using “beat1.”
• If the result has a weak attack or the release portionsof the phrase seem to overlap, try again using “beat2.”
Try adjusting the envelope sensitivity for finercontrol.
• If after using “beat1” the attack portions overlap orthe overall rhythmic feel is degraded, try again using“beat3.” Use the SubDivide parameter to adust theslice resolution, and make final adjustments with theEnvelope Sensitivity parameter.
● Slicing phrases having long decays
• First, try slicing using “phrase1.”
• If the result has a weak attack or the release portionsof the phrase seem to overlap, try again using“phrase2.” Use the SubDivide parameter to adust theslice resolution, and make final adjustments with theEnvelope Sensitivity parameter.
• If after using “phrase1” the points between the slices
sounds rough and the overall feel is choppy, try againusing “phrase3” and set SubDivide to a finerresolution. Make final adjustments with theEnvelope Sensitivity parameter. The “phrase3”setting is generally best for sustained strings or brasstype sounds with no vibrato — in other words, thepitch remains constant. It can also produce echo-likeeffects when applied to percussive phrases with shortdecay.
• If after using “phrase1” the points between the slicessounds rough and the overall feel is choppy, try againusing “phrase4” and set SubDivide to a finerresolution. Make final adjustments with the
Envelope Sensitivity parameter. The “phrase4”setting is generally best for sustained strings or brasstype sounds with vibrato, as well as vocal phrases.
◆ Wave Memory Required for SliceOperations
Individual wave data slices created through sliceoperations require approximately 1.5 times the originalmemory because a tail section is automatically addedand fade-in and fade-out sections are automaticallycreated at the beginning and end of the wave data. This helps to maintain maximum sound quality when the
BPM is increased, and results in smoother connections between slices (no tail section is created when theQUICK slice type is selected).
A memory work area is required for the synthesiscalculations carried out for each slice operation, as wellas sufficient memory to hold the completed waveforms.When the sampling frequency is 44.1 kHz, theapproximate amount of memory (expressed inkilobytes) required for each slice type is listed below.
Originalwaveform
Slicedwaveform
Tail section
Fade section

8/10/2019 motif_1(2)
http://slidepdf.com/reader/full/motif12 240/300
240 MOTIF Reference
Sampling Edit mode
Ref er enc e
S ampl i ngmod e
BEAT1 : Original wave size X N + (0.3 X number of slices)BEAT2 : Original wave size X N + (0.2 X number of slices)BEAT3 : Original wave size X N + (0.3 X number of slices)PHRASE1 : Original wave size X N + (5.8 X number of slices)PHRASE2 : Original wave size X N + (1.4 X number of slices)PHRASE3 : Original wave size X N + (0.4 X number of slices)PHRASE4 : Original wave size X N + (1.4 X number of slices)QUICK : Original wave size X 3 + (0.7 X number of slices)
For monaural samples N = 5.5, and for stereo samplesN = 8. Also, the number of slices is doubled for stereosamples.With the memory expanded to the maximum 64megabytes, for example, if the entire memory is emptyand a 44.1 kHz sample is sliced to 32 slices, the longestpossible sampling time will beapproximately:BEAT1~3, PHRASE1~4: approx. 138 seconds(mono), 47 seconds (stereo.) QUICK: approx. 253seconds (mono), 126 seconds (stereo).
Sampling Edit mode
Basic Structure (page 59)
This mode gives you a variety of sample eding tools,with which you can change the samples you’verecorded in the Sampling Record mode, and customizethem for your applications as needed.
◆ Editing Stereo SamplesFor samples that have been recorded in stereo (withStereo Sampling), both the left and right waves of thesample are edited together by the MOTIF. in the actual
process, any edits made to the left channel wave areduplicated exactly in the right channel. The exceptionto this, of course, is Pan — since the sample already isin stereo.
◆ Basic Procedure
1 Press the [INTEGRATED SAMPLING] button toenter the Sampling mode. (The indicator lights.)
n Unlike in the Sampling Record mode, all
parameters and functions of the Sampling Editmode are the same, no matter which mode waspreviously selected.
n All Sampling Edit operations apply to theWaveform (actual sample), not the voice.
2 Press the [EDIT] button to enter the Sampling Editmode. (The indicator lights.)
3 Select the desired sample for editing from the KeyBank display. (Press the [F1] button.)
4 Select the menu you wish to edit by pressing the[F2] - [F6] buttons.
5 Edit parameters for the selected sample.
6 Press the [EXIT] button to exit from the SamplingEdit mode.
• The operations corresponding to steps #3 - 4 arecovered in the following explanations.
Sample selection and Auditionfunction
The explanations here apply to step #3 of the BasicProcedure see above.For details about the relationship between theparameters below, see page 241.
1 Select a Waveform that contains a Sample you wishto edit. Move the cursor to the Waveform numberand select the desired number by using the [INC/YES] button, [DEC/NO] button, or the data dial.
2 To select the desired Key Bank, simultaneously hold down the [INFORMATION] button andpress the appropriate key on the keyboard. Theinformation about the selected Key Bank appearson the display and the sample assigned to the KeyBank is called up.
3
1
2You can hear the selected sample by pressingthe [SF1] button. (Audition function)
Indicates information about theselected Key Bank.

8/10/2019 motif_1(2)
http://slidepdf.com/reader/full/motif12 241/300
241 MOTIF Reference
Sampling Job m
3 Press the [SF2] button to call up the Samplesassigned to the selected Key Bank in order.
n Step #3 above as well as the Audition function can be used with any of the displays called up via the[F2] - [F4] buttons.
Sample Edit
The explanations here apply to step #5 of the BasicProcedure on page 59.
● [F2] Sample Edit TrimThis operation is the same as in the SamplingRecord mode (when Sampling Type is set to“slice+seq”). See page 237 .
● [F3] Sample Edit Parameter
• LevelDetermines the output level of the selected sample.
❏ Settings -94.5dB~0dB
• PanDetermines the stereo position of the selected sample.
❏ Settings L63 (far left) ~ C (center) ~ R63 (far right)
• PlayModeDetermines how the selected sample is to be played back.
❏ SettingsforwardThe Sample playback begins from the Start point to theEnd point.
reverseThe Sample playback begins from the End point to theStart point in reverse.
loopThe Sample playback begins from the Start point, moves tothe Loop point and then repeats continuously from theLoop point to the End point.
n For details about these settings above, see page 61.
• Original KeyDetermines the base key for the sample. Since the samplewill be pitched shifted for keys played around this basekey, this should be set as close as possible to the originalpitch or note value of the actual sample.
❏ Settings C - 2 ~ G8
• Fine TuneDetermines the fine tuning for the pitch of the sample.
❏ Settings -100 ~99 cents
● [F4] Sample Edit Range
From this display you can set the Key Range and theVelocity Range for the sample assigned to theselected Key Bank. Note that both the Key rangeand Velocity range values are graphically indicatedin the display.
n When the cursor is at one of the Key Range values,you can directly set the Key Range parameter fromthe keyboard. (Simultaneously hold down the[INFORMATION] button and press theappropriate key on the keyboard.)
Sampling Job mode
The Sampling Job mode contains a comprehensive setof editing tools and functions you can use to change thesound of the sample you’ve created and edited in theSampling Edit mode. It also includes a variety ofconvenient operations, such as copying or erasing data.
◆ Basic Procedure
1 Press the [INTEGRATED SAMPLING] button toenter the Sampling mode. (The indicator lights.)
n Unlike in the Sampling Record mode, allparameters and functions of the Sampling Jobmode are the same, no matter which mode waspreviously selected. The only exception to this isthe Slice Job ([F1]-12 below), which variesdepending on whether the previously selectedmode was Voice/Performance or Song/Pattern.
n All Sampling Job operations apply to the Waveform(actual sample), not the voice.
2 Press the [JOB] button to enter the Sampling Jobmode.
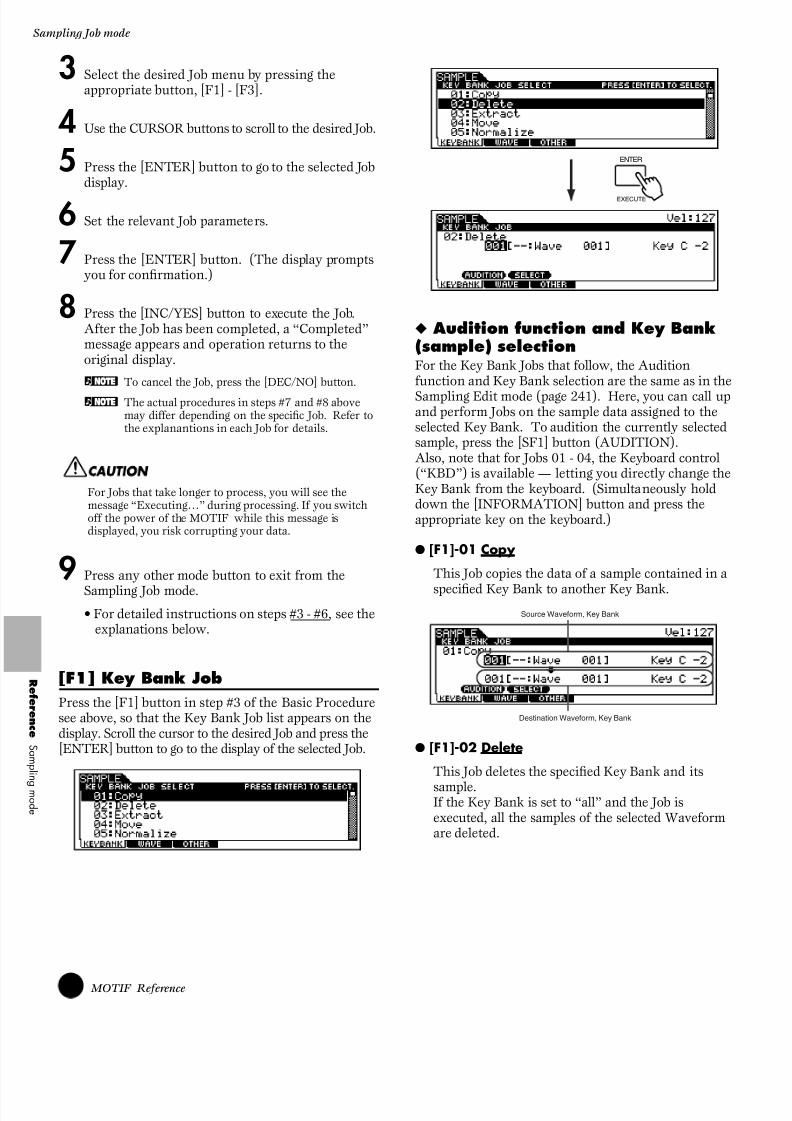
8/10/2019 motif_1(2)
http://slidepdf.com/reader/full/motif12 242/300
242 MOTIF Reference
Sampling Job mode
Ref er enc e
S ampl i ngmod e
3 Select the desired Job menu by pressing theappropriate button, [F1] - [F3].
4 Use the CURSOR buttons to scroll to the desired Job.
5 Press the [ENTER] button to go to the selected Jobdisplay.
6 Set the relevant Job parameters.
7 Press the [ENTER] button. (The display promptsyou for confirmation.)
8 Press the [INC/YES] button to execute the Job.After the Job has been completed, a “Completed”message appears and operation returns to theoriginal display.
n To cancel the Job, press the [DEC/NO] button.
n The actual procedures in steps #7 and #8 abovemay differ depending on the specific Job. Refer tothe explanantions in each Job for details.
For Jobs that take longer to process, you will see themessage “Executing…” during processing. If you switchoff the power of the MOTIF while this message isdisplayed, you risk corrupting your data.
9 Press any other mode button to exit from the
Sampling Job mode.
• For detailed instructions on steps #3 - #6, see theexplanations below.
[F1] Key Bank Job
Press the [F1] button in step #3 of the Basic Proceduresee above, so that the Key Bank Job list appears on thedisplay. Scroll the cursor to the desired Job and press the[ENTER] button to go to the display of the selected Job.
◆ Audition function and Key Bank(sample) selectionFor the Key Bank Jobs that follow, the Auditionfunction and Key Bank selection are the same as in the
Sampling Edit mode (page 241). Here, you can call upand perform Jobs on the sample data assigned to theselected Key Bank. To audition the currently selectedsample, press the [SF1] button (AUDITION).Also, note that for Jobs 01 - 04, the Keyboard control(“KBD”) is available — letting you directly change theKey Bank from the keyboard. (Simultaneously holddown the [INFORMATION] button and press theappropriate key on the keyboard.)
● [F1]-01 Copy
This Job copies the data of a sample contained in a
specified Key Bank to another Key Bank.
● [F1]-02 Delete
This Job deletes the specified Key Bank and its
sample.If the Key Bank is set to “all” and the Job isexecuted, all the samples of the selected Waveformare deleted.
ENTER
EXECUTE
Source Waveform, Key Bank
Destination Waveform, Key Bank

8/10/2019 motif_1(2)
http://slidepdf.com/reader/full/motif12 243/300
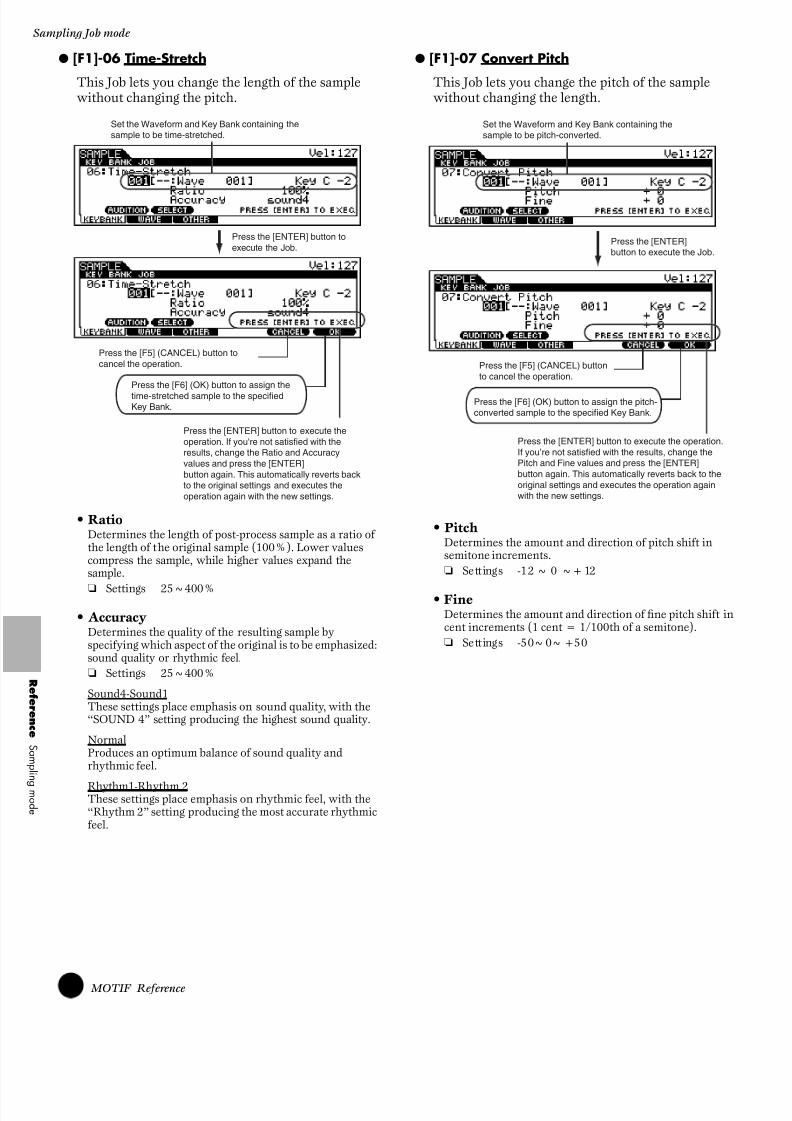
8/10/2019 motif_1(2)
http://slidepdf.com/reader/full/motif12 244/300
244 MOTIF Reference
Sampling Job mode
Ref er enc e
S ampl i ngmod e
● [F1]-06 Time-Stretch
This Job lets you change the length of the samplewithout changing the pitch.
• RatioDetermines the length of post-process sample as a ratio ofthe length of the original sample (100%). Lower valuescompress the sample, while higher values expand thesample.
❏ Settings 25~400%
• AccuracyDetermines the quality of the resulting sample byspecifying which aspect of the original is to be emphasized:sound quality or rhythmic feel.
❏ Settings 25~400%
Sound4-Sound1These settings place emphasis on sound quality, with the“SOUND 4” setting producing the highest sound quality.
NormalProduces an optimum balance of sound quality andrhythmic feel.
Rhythm1-Rhythm 2These settings place emphasis on rhythmic feel, with the“Rhythm 2” setting producing the most accurate rhythmicfeel.
● [F1]-07 Convert Pitch
This Job lets you change the pitch of the samplewithout changing the length.
• PitchDetermines the amount and direction of pitch shift insemitone increments.
❏ Settings -12 ~ 0 ~+12
• FineDetermines the amount and direction of fine pitch shift incent increments (1 cent = 1/100th of a semitone).
❏ Settings -50~0~+50
Set the Waveform and Key Bank containing thesample to be time-stretched.
Press the [ENTER] button toexecute the Job.
Press the [F6] (OK) button to assign thetime-stretched sample to the specifiedKey Bank.
Press the [ENTER] button to execute theoperation. If you're not satisfied with theresults, change the Ratio and Accuracyvalues and press the [ENTER]button again. This automatically reverts backto the original settings and executes theoperation again with the new settings.
Press the [F5] (CANCEL) button tocancel the operation.
Set the Waveform and Key Bank containing thesample to be pitch-converted.
Press the [ENTER]button to execute the Job.
Press the [F6] (OK) button to assign the pitch-converted sample to the specified Key Bank.
Press the [ENTER] button to execute the operation.If you’re not satisfied with the results, change thePitch and Fine values and press the [ENTER]button again. This automatically reverts back to theoriginal settings and executes the operation againwith the new settings.
Press the [F5] (CANCEL) buttonto cancel the operation.

8/10/2019 motif_1(2)
http://slidepdf.com/reader/full/motif12 245/300
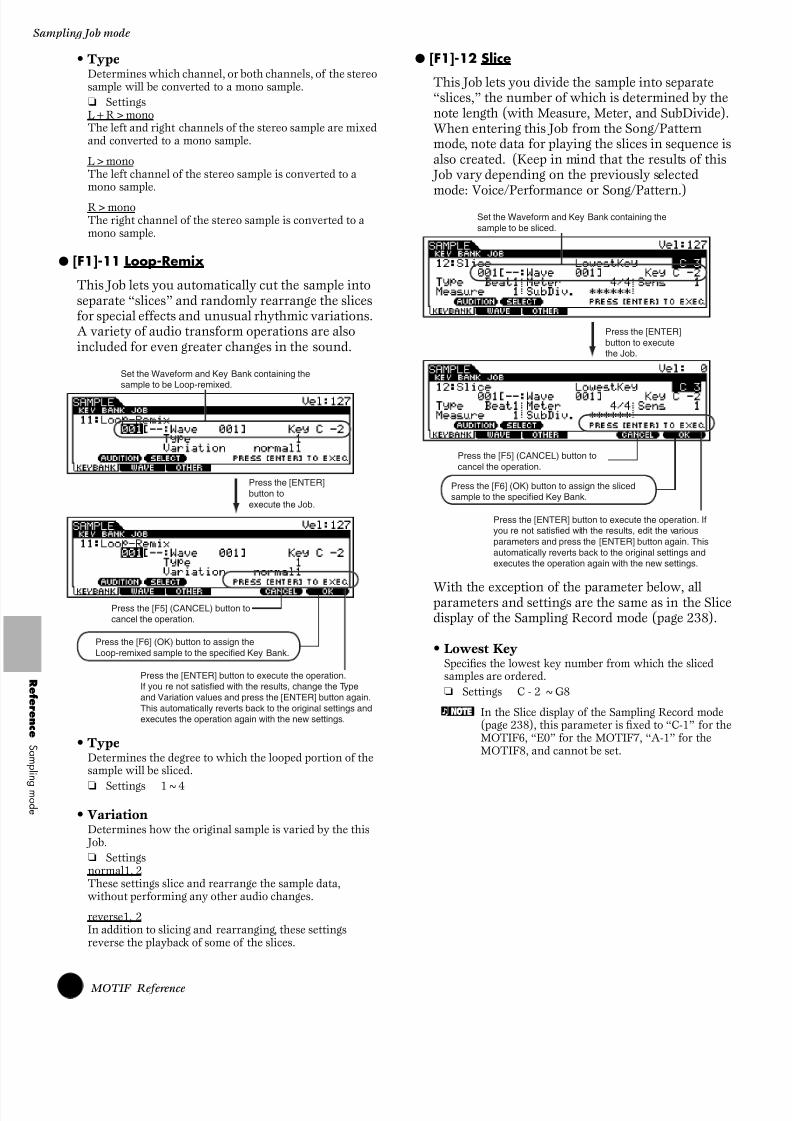
8/10/2019 motif_1(2)
http://slidepdf.com/reader/full/motif12 246/300

8/10/2019 motif_1(2)
http://slidepdf.com/reader/full/motif12 247/300
247 MOTIF Reference
Sampling Job m
[F2] Waveform Job
Press the [F2] button in step #3 of the Basic Procedureon page 240 so that the Waveform Job list appears onthe display. Scroll the cursor to the desired Job andpress the [ENTER] button to go to the display of theselected Job.
● [F2]-01 Copy
This Job lets you copy the data of one waveform toanother.
● [F2]-02 Delete
This Job lets you delete a specific waveform frommemory.
● [F2]-03 Transpose
This Job lets you transpose the Key bank setting of aspecified waveform.
• OctaveDetermines the amount in octaves by which the Key Bankis transposed. When you want to transpose by less thanone octave, set this to “0” and use the Note parameter below.
❏ Settings -3~ 0 ~+3
• NoteDetermines the amount in semitones by which the KeyBank is transposed. When you want to transpose by exact
octaves, set this to “0” and use the Octave parameterabove.
❏ Settings -11~ 0 ~+11
● [F2]-04 Name
This Job lets you assign a name to the selectedwaveform.
For specific instructions on naming, see “BasicOperation” on page 75.
[F3] Other Jobs
Press the [F3] button in step #3 of the Basic Procedureon page 240 so that the following Job list appears onthe display. Scroll the cursor to the desired Job and press
the [ENTER] button to go to the display of the selected Job.
● [F3]-01 Clean Up Memory
This Job deletes all the waveforms to which User
voices or Sample voices are not assigned.
Select the source waveform.
Select the destination waveform.
Select the waveform to be deleted.
Select the desired waveform for which the
Key Bank setting is to be transposed.
Select a waveform to be named.

8/10/2019 motif_1(2)
http://slidepdf.com/reader/full/motif12 248/300

8/10/2019 motif_1(2)
http://slidepdf.com/reader/full/motif12 249/300

8/10/2019 motif_1(2)
http://slidepdf.com/reader/full/motif12 250/300
250 MOTIF Reference
Utility mode
Ref er enc e
U t i l i t ymod e
Utility mode
In this mode, you can set parameters that apply to theentire system of the MOTIF. These include MIDIsettings and global setup parameters.This mode is actually a sub-mode of the Voice/Performance/ Song/Pattern mode. Press the [UTILITY] button in each mode to enter the Utility mode and
press the [EXIT] button after making settings to go back to the previous mode.
◆ Basic Procedure
1 Press the [UTILITY] button to enter the Utilitymode. (The indicator lights.)
n For example, if you press the [UTILITY] buttonwhile in the Performance mode, you enter theUtility mode as a sub-mode of the Performance
mode — allowing you to select and playperformances while in the Utility mode.
n Even after you enter the Utility mode, the indicatorof the previous mode’s button remains lit, lettingyou see at-a-glance which mode you’ve enteredfrom.
2 Select the desired menu by pressing the [F1] - [F6] buttons and set the parameters in each display.
n The display called up via the [F3] button variesaccording the previous mode (before entering theUtility mode).
3 Press the [EXIT] button to exit from the Utilitymode back to the previous mode.
• For detailed instructions on steps #2, see theexplanations below.
[F1] System settings
● [F1]-[SF1] General TG (Tone Generator)
From this display you can make overall settings forthe MOTIF’s tone generator, including volume andpitch, as well as Breath Control response.
• VolumeDetermines the MOTIF’s overall volume.
❏ Settings 0~127
• NoteShiftDetermines the amount (in semitones) by which the notepitch is shifted. This parameter only affects the MOTIF’sinternal tone generator block. It does not affectinformation transmitted via the MIDI terminal.
❏ Settings 24~0~+24
• TuneDetermines the fine tuning (in 0.1 cent steps) of theMOTIF’s overall sound.
❏ Settings 102.4~+102.3
• BCCurve (Breath Controller Curve)These four curves determine how the sound of the MOTIFresponds to use of a Breath Controller.The specific aspect of the sound that is affected by BreathControl and the selected curve is set in the Controller Setdisplay (page 134) in the Normal Voice Element Edit mode.
❏ Settings thru, soft, hard , wide
thruThis linear “curve” produces one-to-one correspondence between the power of your breath and the actual soundchange.
softThis curve provides increased response, especially for lower breath power. In other words, soft blowing results
in higher response than the “thru” curve. Use this curve ifyou want greater control in the soft breath range.
hardThis curve effectively lessens the overall responsecompared to the “thru” curve. Use this curve if you tendto blow strongly and want the controller effect to be lesssensitive.
wideThis setting provides opposite response curves for lowerand higher breath powers. It widens the apparentdynamic range of the controller, producing softer responsein the lower breath range and harder response in the higher range.
Actual response
Received Breath Control
Received Breath Control
Actual response
Actual response
Received Breath Control

8/10/2019 motif_1(2)
http://slidepdf.com/reader/full/motif12 251/300

8/10/2019 motif_1(2)
http://slidepdf.com/reader/full/motif12 252/300
252 MOTIF Reference
Utility mode
Ref er enc e
U t i l i t ymod e
● [F1]-[SF3] General Effect BypassFrom this display you can select the specificeffect(s) to be bypassed when the [EFFECTBYPASS] button (page 13) is turned on.
❏ Settings on (bypassed), off
● [F1]-[SF4] General Other
n For details, see page 264.
• Auto LoadDetermines whether the Auto Load function is on or off.When this is on, the MOTIF will automatically load thespecified files (from memory card or SCSI storage device)to User memory — whenever the power is turned on. (Seeabove illustration for additional explanations.)❏ Settings on, off
• Auto DemoLoadThe MOTIF features special Demo song data, which isstored to ROM and should be loaded to DRAM for properoperation (page 64). When this parameter is set to “on,”the Demo song data is automatically loaded when thepower os turned on. This parameter determines whetherthe Demo song data is automatically loaded (on) or not(off) when turning the power on.
❏ Settings on, off
n When Auto Load is set to on, the Auto Demo Loadparameter cannot be set.
If this parameter is set to on, all User Voice, Performance,Master, and System settings will be initialized to theFactory settings when switching the power on the nexttime. Important data should always be backed up to aseparate Memory Card or some other storage device.
• PowerOnModeThis determines the default power-on mode (and memory bank) for the MOTIF — letting you select which conditionis automatically called up when you turn the power on.
❏ Settings See below.
PerformanceWhen you switch the MOTIF on, the Performance Playmode is entered and the first program number (USER:001) is selected automatically.
Voice (User)When you switch the MOTIF on, the Voice Play mode isentered and the first program number of the User Voices(USER: 001) is selected automatically.
Voice (PRE1)When you switch the MOTIF on, the Voice Play mode isentered and the first program number of the Preset Voices(PRE 1: 001) is selected automatically.
GMWhen you switch the MOTIF on, the Voice Play mode isentered and the first program number of the GM Voices(GM: 001) is selected automatically.
last When you switch the MOTIF on, the Voice/PerformanceProgram Number selected before you switched the poweroff is recalled.
MasterWhen you switch the MOTIF on, the Master Play mode isentered and the first program number (001) is selected
automatically.
• CtrlReset (Controller Reset)Determines the status of the controllers (ModulationWheel, Aftertouch, Knobs, etc.) when switching betweenvoices. When this is set to “off,” the controllers are kept atthe current setting. When this is set to “on,” thecontrollers are reset to the default states (below).
❏ Settings on, off
If you select “on,” the controllers will be reset to thefollowing states/positions:
Pitch Bend CenterModulation Wheel MinimumAftertouch Minimum
Foot Controller MaximumBreath Controller MaximumFoot Switch Off Expression MaximumFoot Volume MaximumSustain Off
[F2] Interface settings
● [F2]-[SF1] I/O Input
From this display you can set parameters related toaudio input.
• A/DSourceThe MOTIF features two different input connections fortransferring analog audio from an external device: the A/D INPUT jacks or the mLAN terminal (when an optionalmLAN8E is installed). One or the other must be set; thetwo cannot be used at the same time.
❏ Settings analog (A/D INPUT jack), mLAN
EFFECT BYPASS
INSERTION SYSTEM

8/10/2019 motif_1(2)
http://slidepdf.com/reader/full/motif12 253/300
253 MOTIF Reference
Utility m
• Mic/LineWhen using the A/D INPUT jacks, this determines theinput source, microphone (mic) or line.
❏ Settings mic, line
• DigitalWhen the optional AIEB2 board is installed, the MOTIFfeatures two different input connections for transferringdigital audio from an external device: coaxial or optical.One or the other must be set; the two cannot be used at the
same time.❏ Settings coaxial, optical
● [F2]-[SF2] I/O Output
From this display you can set parameters related toaudio output.
n The digital output resolution of the MOTIF itself isset to 16 bit (fixed).
● [F2]-[SF3] I/O mLAN connectionFrom this display you can set parameters related toconnection of an optional mLAN8E (page 18). Thefollowing display is available only when theoptional mLAN8E has been installed.
n All mLAN8E-related settings in the Utility modeare stored only to the memory on the mLAN8Eitself, and not to the User memory of the MOTIF.
To initialize all the mLAN settings above, use thefollowing procedure.
[F3] Voice settings
These special voice-related settings are available onlywhen entering the Utility mode from the Voice mode.
● [F3]-[SF1] Voice Master Equalizer
From this display you can apply five-bandequalization to all parts of the selected voice.
• ShapeDetermines whether the equalizer type used is Shelving orPeaking. The Peaking type attenuates/boosts the signal atthe specified Frequency setting, whereas the Shelving typeattenuates/boosts the signal at frequencies above or belowthe specified Frequency setting.
❏ Settings shelv (Shelving), peak (Peaking)
n For details about the shapes of the Shelving andPeaking types, see page 168.
Specify the digital output resolution of theoptionally installed AIEB2 board (page 19).❒ Settings 20bit, 24bit
Set the output gain of each jack.❒ Settings 0dB, +6dB, +12dB, +18dB
Vendor NameFor details on this parameter,refer to the owner’s manual ofthe mLAN8E.
Nickname
[SF4] button[EXIT] button
Assign a nickname for the connection. For specificinstructions on naming, see Basic Operation on page 75.For details about the Nickname parameter, refer tothe owner’s manual of the mLAN8E.
Press the [ENTER] button toactually set the value.
Set the Word Clock. Fordetails, refer to the owner’smanual of the mLAN8E.
[SF5] button[EXIT] button
Press the [ENTER] button toactually initialize the mLAN settings.
Q (Frequency Characteristic)Gain
Freq(Frequency)
0

8/10/2019 motif_1(2)
http://slidepdf.com/reader/full/motif12 254/300
254 MOTIF Reference
Utility mode
Ref er enc e
U t i l i t ymod e
• Freq (Frequency)Set the center frequency. Frequencies around this pointare attenuated/boosted by the Gain setting.
❏ Settings LOW (Low range) Peaking 63Hz ~ 2.0kHzShelving 32Hz ~ 2.0kHz
LOW MID (Low middle range)100Hz~10kHzMID (Middle range)100Hz~10kHzHIGH MID (High middle range)100Hz ~10kHzHIGH (High range)500Hz~16kHz
• GainDetermines the level gain for the Frequency (set above), orthe amount the selected frequency band is attenuated or boosted.
❏ Settings -12dB~0dB~+12dB
• Q (Frequency Characteristic)This varies the signal level at the Frequency setting tocreate various frequency curve characteristics.
❏ Settings 0.1~12.0
● [F3]-[SF2] Voice Arpeggio Channel
From this display you can set parameters related to
output of the Arpeggio MIDI data.
• OutputSwitchThis enables or disables MIDI data output for theArpeggio function. When this is set to “on,” Arpeggiodata is sent via MIDI — allowing you to send the Arpeggiodata to an external sequencer or play back the Arpeggios
on connected MIDI tone generators.❏ Settings on (enable), off (disable)
• TransmitCh (Transmit channel)Determines the MIDI channel through which Arpeggioplayback data will be sent (when Output Switch above ison).
❏ Settings 1~16
● [F3]-[SF3] Voice Controller Assign
Sets the parameters related to the controllers in theVoice mode.
Details about each parameter are same as inPerformance Common Edit. See page 169 .
❏ Settings off, 0~95
[F3] Sequencer settings
These special song- and pattern-related settings areavailable only when entering the Utility mode from theSong or Pattern mode.
● [F3]-[SF1] Sequencer Click (MIDI Click)
From this display you can set the parameters related
to the click sound (metronome) that is used duringrecording or playback in the Song/Pattern mode.
• ModeDetermines whether and when the metronome click willsound.
❏ Settings off, rec, rec/play, all
off The click will not sound.
recThe click will sound during recording only.
rec/playThe click will sound during recording and playback.
allThe click will always sound.
• BeatDetermines on which beats the metronome click will
sound.❏ Settings 16 (16th notes), 08 (8th notes), 04 (quarternotes), 02 (half notes), 01 (whole notes)
• VolumeDetermines the click sound volume.
❏ Settings 0~127
• Rec CountSets the number of count-in measures provided beforeactually recording starts after pressing the [F] button inthe Record standby mode .
❏ Settings off (Recording starts as soon as the [F] button is pressed ), 1meas~8meas
n Since the click sound is created with the internaltone generator, using click playback affects theoverall polyphony of the MOTIF.
Knob Assign 1, 2 Foot Controller 1, 2
Breath Controller

8/10/2019 motif_1(2)
http://slidepdf.com/reader/full/motif12 255/300

8/10/2019 motif_1(2)
http://slidepdf.com/reader/full/motif12 256/300
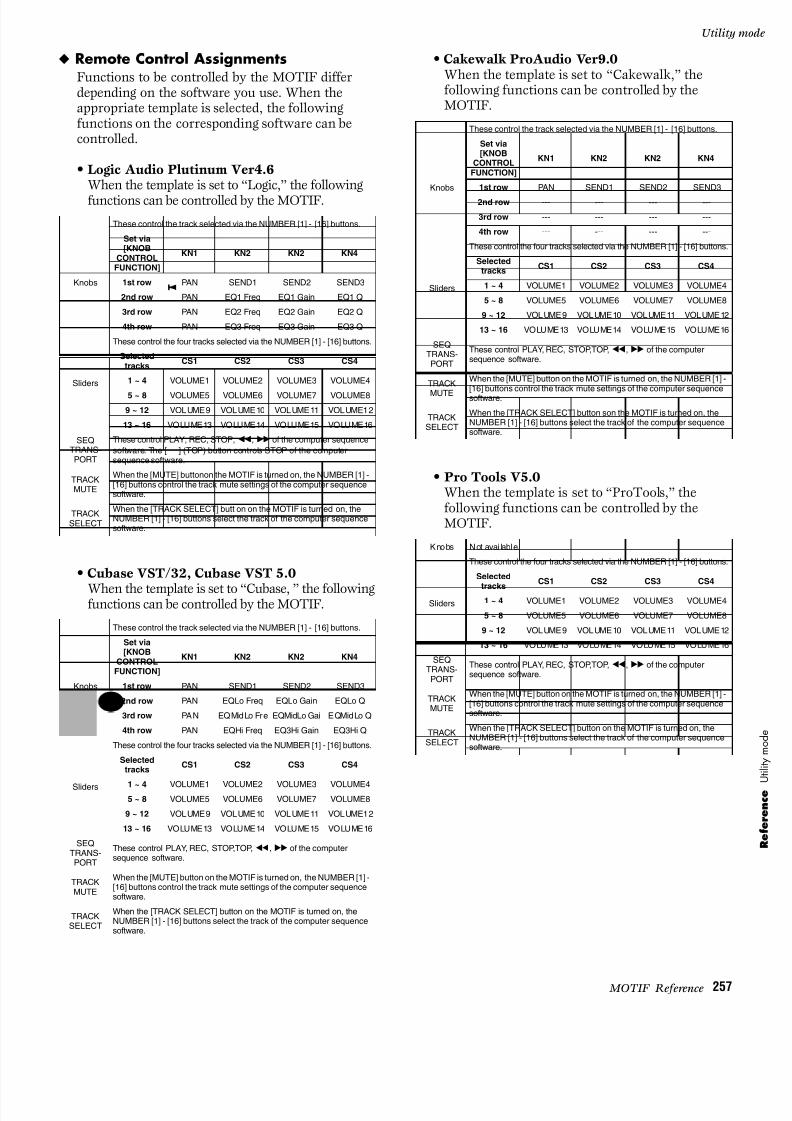
8/10/2019 motif_1(2)
http://slidepdf.com/reader/full/motif12 257/300
257 MOTIF Reference
Utility m
◆ Remote Control AssignmentsFunctions to be controlled by the MOTIF differdepending on the software you use. When theappropriate template is selected, the followingfunctions on the corresponding software can becontrolled.
• Logic Audio Plutinum Ver4.6When the template is set to “Logic,” the following
functions can be controlled by the MOTIF.
• Cubase VST/32, Cubase VST 5.0
When the template is set to “Cubase, ” the followingfunctions can be controlled by the MOTIF.
• Cakewalk ProAudio Ver9.0When the template is set to “Cakewalk,” thefollowing functions can be controlled by theMOTIF.
• Pro Tools V5.0When the template is set to “ProTools,” thefollowing functions can be controlled by theMOTIF.
These control the track selected via the NUMBER [1] - [16] buttons.
Knobs
Set via[KNOB
CONTROLFUNCTION]
KN1 KN2 KN2 KN4
1st row PAN SEND1 SEND2 SEND3
2nd row PAN EQ1 Freq EQ1 Gain EQ1 Q
3rd row PAN EQ2 Freq EQ2 Gain EQ2 Q
4th row PAN EQ3 Freq EQ3 Gain EQ3 Q
Sliders
These control the four tracks selected via the NUMBER [1] - [16] buttons.
Selectedtracks
CS1 CS2 CS3 CS4
1 ~ 4 VOLUME1 VOLUME2 VOLUME3 VOLUME4
5 ~ 8 VOLUME5 VOLUME6 VOLUME7 VOLUME8
9 ~ 12 VOLUME9 VOLUME10 VOLUME11 VOLUME12
13 ~ 16 VOLUME13 VOLUME14 VOLUME15 VOLUME16
SEQTRANS-PORT
These control PLAY, REC, STOP,G,H of the computer sequencesoftware. The [ ] (TOP) button controls STOP of the computersequence software.
TRACKMUTE
When the [MUTE] buttonon the MOTIF is turned on, the NUMBER [1] -[16] buttons control the track mute settings of the computer sequencesoftware.
TRACKSELECT
When the [TRACK SELECT] butt on on the MOTIF is turned on, theNUMBER [1] - [16] buttons select the track of the computer sequencesoftware.
These control the track selected via the NUMBER [1] - [16] buttons.
Knobs
Set via[KNOB
CONTROLFUNCTION]
KN1 KN2 KN2 KN4
1st row PAN SEND1 SEND2 SEND3
2nd row PAN EQLo Freq EQLo Gain EQLo Q
3rd row PAN EQMidLo Fre EQMidLo Gai EQMidLo Q
4th row PAN EQHi Freq EQ3Hi Gain EQ3Hi Q
Sliders
These control the four tracks selected via the NUMBER [1] - [16] buttons.
Selectedtracks
CS1 CS2 CS3 CS4
1 ~ 4 VOLUME1 VOLUME2 VOLUME3 VOLUME45 ~ 8 VOLUME5 VOLUME6 VOLUME7 VOLUME8
9 ~ 12 VOLUME9 VOLUME10 VOLUME11 VOLUME12
13 ~ 16 VOLUME13 VOLUME14 VOLUME15 VOLUME16
SEQTRANS-PORT
These control PLAY, REC, STOP,TOP,G,H of the computersequence software.
TRACKMUTE
When the [MUTE] button on the MOTIF is turned on, the NUMBER [1] -[16] buttons control the track mute settings of the computer sequencesoftware.
TRACKSELECT
When the [TRACK SELECT] button on the MOTIF is turned on, theNUMBER [1] - [16] buttons select the track of the computer sequencesoftware.
These control the track selected via the NUMBER [1] - [16] buttons.
Knobs
Set via[KNOB
CONTROLFUNCTION]
KN1 KN2 KN2 KN4
1st row PAN SEND1 SEND2 SEND3
2nd row --- --- --- ---
3rd row --- --- --- ---
4th row --- --- --- ---
Sliders
These control the four tracks selected via the NUMBER [1] - [16] buttons.
Selectedtracks
CS1 CS2 CS3 CS4
1 ~ 4 VOLUME1 VOLUME2 VOLUME3 VOLUME4
5 ~ 8 VOLUME5 VOLUME6 VOLUME7 VOLUME8
9 ~ 12 VOLUME9 VOLUME10 VOLUME11 VOLUME12
13 ~ 16 VOLUME13 VOLUME14 VOLUME15 VOLUME16
SEQTRANS-PORT
These control PLAY, REC, STOP,TOP,G,H of the computersequence software.
TRACK
MUTE
When the [MUTE] button on the MOTIF is turned on, the NUMBER [1] -
[16] buttons control the track mute settings of the computer sequencesoftware.
TRACKSELECT
When the [TRACK SELECT] button son the MOTIF is turned on, theNUMBER [1] - [16] buttons select the track of the computer sequencesoftware.
Knobs Not avai lable.
Sliders
These control the four tracks selected via the NUMBER [1] - [16] buttons.
Selected
tracks
CS1 CS2 CS3 CS4
1 ~ 4 VOLUME1 VOLUME2 VOLUME3 VOLUME4
5 ~ 8 VOLUME5 VOLUME6 VOLUME7 VOLUME8
9 ~ 12 VOLUME9 VOLUME10 VOLUME11 VOLUME12
13 ~ 16 VOLUME13 VOLUME14 VOLUME15 VOLUME16
SEQTRANS-PORT
These control PLAY, REC, STOP,TOP,G,H of the computersequence software.
TRACKMUTE
When the [MUTE] button on the MOTIF is turned on, the NUMBER [1] -[16] buttons control the track mute settings of the computer sequencesoftware.
TRACKSELECT
When the [TRACK SELECT] button on the MOTIF is turned on, theNUMBER [1] - [16] buttons select the track of the computer sequencesoftware.

8/10/2019 motif_1(2)
http://slidepdf.com/reader/full/motif12 258/300
258 MOTIF Reference
Utility mode
Ref er enc e
U t i l i t ymod e
[F5] MIDI settings
● [F5]-[SF1] MIDI ChannelFrom this display you can make basic MIDI settings.
• BasicRcvCh (Basic Receive Channel)Determines the MIDI channel over which the MOTIFreceives MIDI data (from an external sequencer, MIDIcontroller, or other device). This parameter is available forthe Voice / Performance mode.
❏ Settings 1~16, omni (all channels), off
• KBDTransCh (Keyboard Transmit Channel)Determines the MIDI channel over which the MOTIFsends MIDI data (to an external sequencer, tone generator,or other device). This parameter is available for the Voice /Performance mode.
❏ Settings 1~16, off
n In the Song/Pattern mode, the MIDI data created by playingthe keyboard/knobs/wheels is sent to the tone generator block or the external MIDI devices via the MIDI outputchannel of the currently selected track (page 38).
• DeviceNo. (Device Number)Determines the device number used by the MOTIF inreceiving or transmitting data. This number must matchthe Device Number of the external MIDI device whentransmitting/receiving bulk data, parameter changes orother system exclusive messages to/from it.
❏ Settings 1~16, all, off
• FileUtilID (File Utility ID)This determines the ID number used in conjunction withfile transfers using the special File Utility software in theincluded CD-ROM. This File Utility ID number and theDevice Number (above) must match the ones of the theFile Utility software in order to properly transfer files between the MOTIF and a connected computer.
❏ Settings: 1~128
● [F5]-[SF2] MIDI Switch
From this display you can determine which types ofMIDI data the MOTIF transmits and responds to.
• BankSelThis switch enables or disables Bank Select messages, bothin transmission and reception. When this is set to “on,”the MOTIF responds to incoming Bank Select messages,and it also transmits appropriate Bank Select messages(when using the panel).
❏ Settings off, on
• PgmChange (Program Change)This switch enables or disables Program Change messages, both in transmission and reception. When this is set to“on,” the MOTIF responds to incoming Program Changemessages, and it also transmits appropriate ProgramChange messages (when using the panel).
❏ Settings off, on
• CtrlChange (Control Change mode)This parameter lets you set the MOTIF to properly
respond to either type of GM System data, Level 1 or Level2 — particularly regarding AEG Sustain. When using GMLevel 2, set this to Mode 1, and the MOTIF responds to themessages as parameter change data. When using GMLevel 1, set this to Mode 2, and the MOTIF responds to themessages as control change data.
❏ Settings mode1, mode2
• LocalCtrl (Local Control On/Off)This determines whether or not the tone generator of theMOTIF responds to your keyboard playing. Normally, thisshould be set to “on” — since you’ll want to hear thesound of the MOTIF as you play it. However, for externalsequencer applications, you may need to set this to “off” toavoid getting “double” notes, in which the tone generatorof the MOTIF is played twice — once by the keyboard andonce again by the keyboard data routed through thesequencer.Even if this is set to “off,” the data will be transmittedthrough the MIDI OUT or USB terminal. Also, theMOTIF’s tone generator block will respond to messagesreceived via the MIDI IN or USB terminal.
❏ Settings off, on
• RcvBulk (Receive Bulk)Determines whether or not Bulk Dump data can bereceived.
❏ Settings protect (not received), on (received)
● [F5]-[SF3] MIDI Sync
From this display you can set various parametersrelated to MIDI clock and synchronization.
• MIDI SyncDetermines whether Song/Pattern/Arpeggio playback will be synchronized to the MOTIF’s internal clock or anexternal MIDI clock.
❏ Settings internal, MIDI, MTCinternalSynchronization to internal clock. Use this setting whenthe MOTIF is to be used alone or as the master clocksource for other equipment.
MIDIThe MOTIF is synchronized to a MIDI clock receivedfrom an external MIDI device via the MIDI IN or USBterminal.
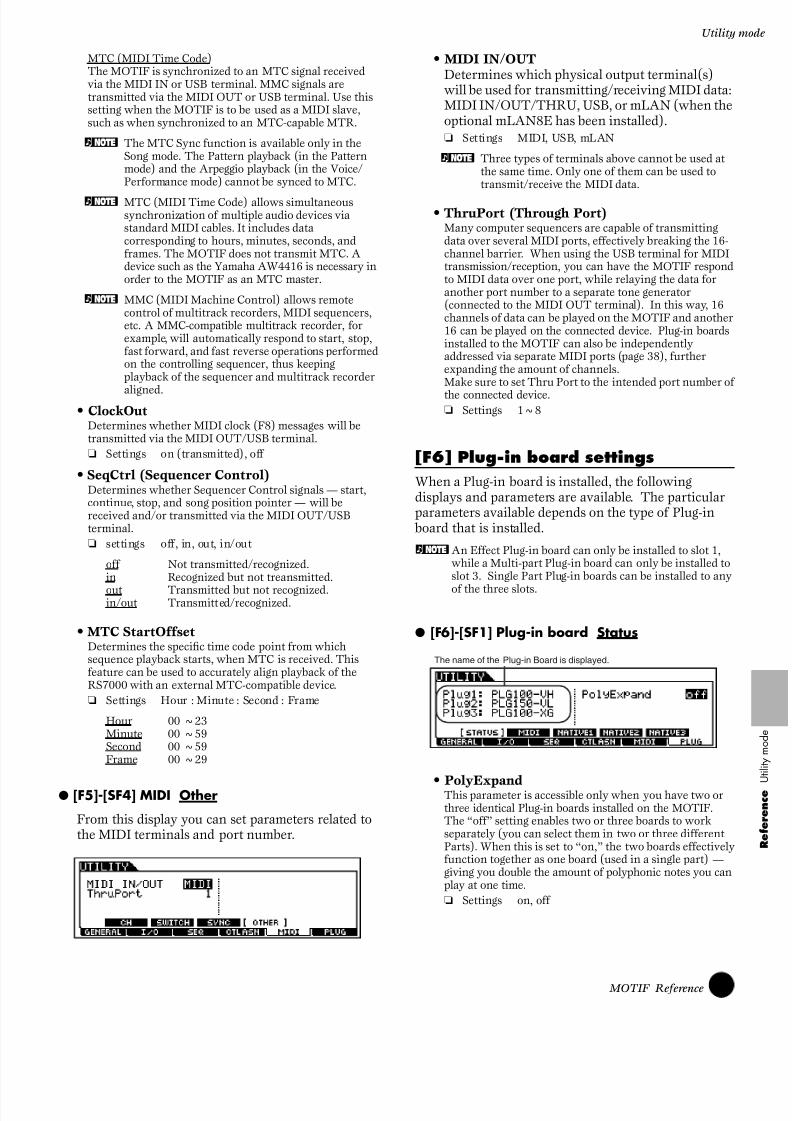
8/10/2019 motif_1(2)
http://slidepdf.com/reader/full/motif12 259/300
259 MOTIF Reference
Utility m
MTC (MIDI Time Code)The MOTIF is synchronized to an MTC signal receivedvia the MIDI IN or USB terminal. MMC signals aretransmitted via the MIDI OUT or USB terminal. Use thissetting when the MOTIF is to be used as a MIDI slave,such as when synchronized to an MTC-capable MTR.
n The MTC Sync function is available only in theSong mode. The Pattern playback (in the Patternmode) and the Arpeggio playback (in the Voice/Performance mode) cannot be synced to MTC.
n MTC (MIDI Time Code) allows simultaneoussynchronization of multiple audio devices viastandard MIDI cables. It includes datacorresponding to hours, minutes, seconds, andframes. The MOTIF does not transmit MTC. Adevice such as the Yamaha AW4416 is necessary inorder to the MOTIF as an MTC master.
n MMC (MIDI Machine Control) allows remotecontrol of multitrack recorders, MIDI sequencers,etc. A MMC-compatible multitrack recorder, forexample, will automatically respond to start, stop,fast forward, and fast reverse operations performedon the controlling sequencer, thus keepingplayback of the sequencer and multitrack recorder
aligned.• ClockOut
Determines whether MIDI clock (F8) messages will betransmitted via the MIDI OUT/USB terminal.
❏ Settings on (transmitted), off
• SeqCtrl (Sequencer Control)Determines whether Sequencer Control signals — start,continue, stop, and song position pointer — will bereceived and/or transmitted via the MIDI OUT/USBterminal.
❏ settings off, in, out, in/out
off Not transmitted/recognized.in Recognized but not treansmitted.
out Transmitted but not recognized.in/out Transmitted/recognized.
• MTC StartOffsetDetermines the specific time code point from whichsequence playback starts, when MTC is received. Thisfeature can be used to accurately align playback of theRS7000 with an external MTC-compatible device.
❏ Settings Hour : Minute : Second : Frame
Hour 00 ~23Minute 00 ~59Second 00 ~59Frame 00 ~29
● [F5]-[SF4] MIDI Other
From this display you can set parameters related tothe MIDI terminals and port number.
• MIDI IN/OUTDetermines which physical output terminal(s)will be used for transmitting/receiving MIDI data:MIDI IN/OUT/THRU, USB, or mLAN (when theoptional mLAN8E has been installed).❏ Settings MIDI, USB, mLAN
n Three types of terminals above cannot be used atthe same time. Only one of them can be used totransmit/receive the MIDI data.
• ThruPort (Through Port)Many computer sequencers are capable of transmittingdata over several MIDI ports, effectively breaking the 16-channel barrier. When using the USB terminal for MIDItransmission/reception, you can have the MOTIF respondto MIDI data over one port, while relaying the data foranother port number to a separate tone generator(connected to the MIDI OUT terminal). In this way, 16channels of data can be played on the MOTIF and another16 can be played on the connected device. Plug-in boardsinstalled to the MOTIF can also be independentlyaddressed via separate MIDI ports (page 38), furtherexpanding the amount of channels.Make sure to set Thru Port to the intended port number of
the connected device.❏ Settings 1~8
[F6] Plug-in board settings
When a Plug-in board is installed, the followingdisplays and parameters are available. The particularparameters available depends on the type of Plug-in board that is installed.
nAn Effect Plug-in board can only be installed to slot 1,while a Multi-part Plug-in board can only be installed toslot 3. Single Part Plug-in boards can be installed to any
of the three slots.
● [F6]-[SF1] Plug-in board Status
• PolyExpandThis parameter is accessible only when you have two orthree identical Plug-in boards installed on the MOTIF.The “off” setting enables two or three boards to workseparately (you can select them in two or three differentParts). When this is set to “on,” the two boards effectivelyfunction together as one board (used in a single part) —giving you double the amount of polyphonic notes you canplay at one time.
❏ Settings on, off
The name of the Plug-in Board is displayed.
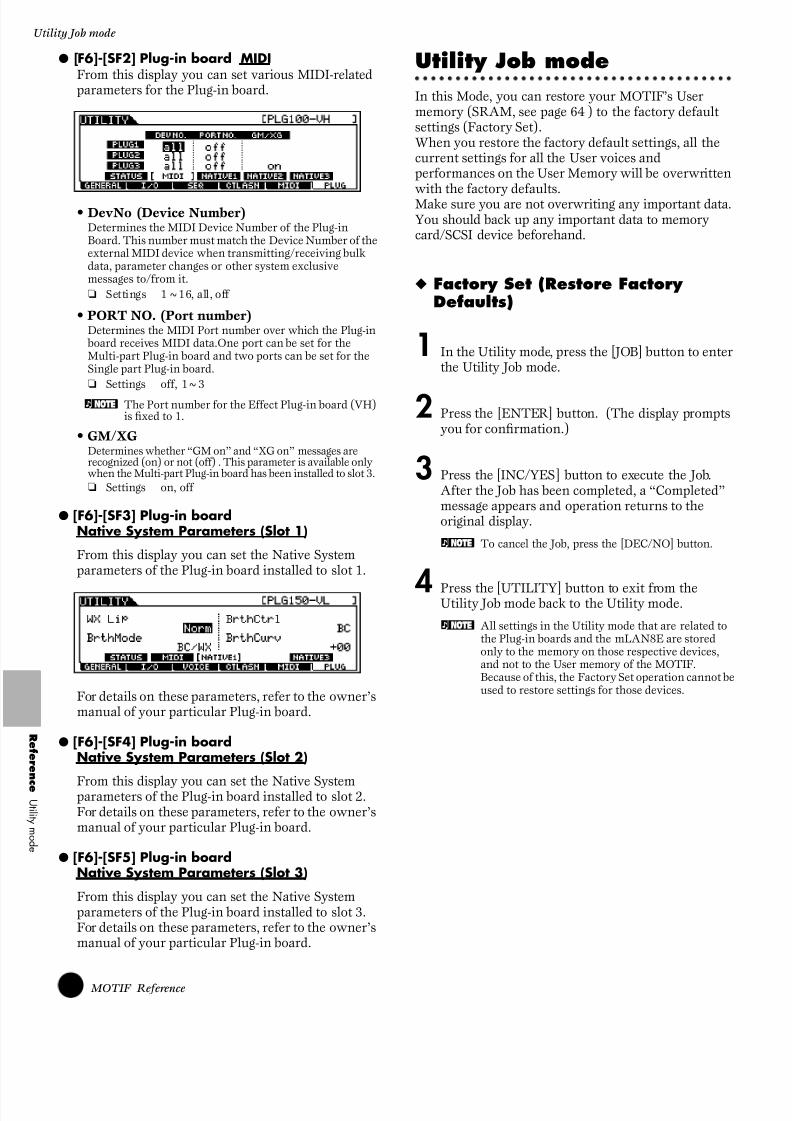
8/10/2019 motif_1(2)
http://slidepdf.com/reader/full/motif12 260/300

8/10/2019 motif_1(2)
http://slidepdf.com/reader/full/motif12 261/300
261 MOTIF Reference
Function
File ModeBasic Structure (page 63)
Function Tree
This section is devoted to the File mode. To see how the File mode relates to the entire structure of the MOTIF andits other modes and functions, see the simplified chart in “Basic Structure” on page 30. The following detailed chart shows all of the display menus and parameter groups of the File mode — giving you a
quick, easy-to-understand overview of the data storage and file-related functions of the MOTIF.Brackets around a word or phrase (e.g., [F1]) indicate specific button names or panel operations.
[INFORMATION] FILE INFORMATION
[F1] CONFIGURATION
[SF1] CURRENT DRIVE
[SF2] SCSI ID
[SF3] MOUNT
[SF4] FORMAT
[F2] SAVE
[F6] MAKEDIR
[ENTER] WAV/AIFF
[ENTER] MID
[F3] LOAD
[ENTER] VOICE
[ENTER] SONG
[ENTER] PATTERN
[ENTER] WAVEFORM
[F4] RENAME
[F6] MAKEDIR
[F5] DELETE
[FILE]
. . . . . . . . . . . . . . . . . . . . . . . . . . . . . . . . . . . . . . . . . . . . . . . . . . . . . . . . . . . . . . . . . . . . P. 276
. . . . . . . . . . . . . . . . . . . . . . . . . . . . . . . . . . . . . . . . . . . . . . . . . . . . . . . . . . . . . . . . . . . . . . . . . . . . . . . . P. 264
. . . . . . . . . . . . . . . . . . . . . . . . . . . . . . . . . . . . . . . . . . . . . . . . . . . . . . . . . . . . . . P. 264
. . . . . . . . . . . . . . . . . . . . . . . . . . . . . . . . . . . . . . . . . . . . . . . . . . . . . . . . . . . . . . . . . . . . . . . P. 265
. . . . . . . . . . . . . . . . . . . . . . . . . . . . . . . . . . . . . . . . . . . . . . . . . . . . . . . . . . . . . . . . . . . . . . . P. 265
. . . . . . . . . . . . . . . . . . . . . . . . . . . . . . . . . . . . . . . . . . . . . . . . . . . . . . . . . . . . . . . . . . . . . P. 265
. . . . . . . . . . . . . . . . . . . . . . . . . . . . . . . . . . . . . . . . . . . . . . . . . . . . . . . . . . . . . . . . . . . . . . . . . . . . . . . . . . . . . . . . . . P. 266
. . . . . . . . . . . . . . . . . . . . . . . . . . . . . . . . . . . . . . . . . . . . . . . . . . . . . . . . . . . . . . . . . . . . . . P. 266
. . . . . . . . . . . . . . . . . . . . . . . . . . . . . . . . . . . . . . . . . . . . . . . . . . . . . . . . . . . . . . . . . P. 266
. . . . . . . . . . . . . . . . . . . . . . . . . . . . . . . . . . . . . . . . . . . . . . . . . . . . . . . . . . . . . . . . . . . . . . . P. 266
. . . . . . . . . . . . . . . . . . . . . . . . . . . . . . . . . . . . . . . . . . . . . . . . . . . . . . . . . . . . . . . . . . . . . . . . . . . . . . . . . . . . . . . . . . . P. 266
. . . . . . . . . . . . . . . . . . . . . . . . . . . . . . . . . . . . . . . . . . . . . . . . . . . . . . . . . . . . . . . . . . . . . P. 266
. . . . . . . . . . . . . . . . . . . . . . . . . . . . . . . . . . . . . . . . . . . . . . . . . . . . . . . . . . . . . . . . . . . . . P. 266
. . . . . . . . . . . . . . . . . . . . . . . . . . . . . . . . . . . . . . . . . . . . . . . . . . . . . . . . . . . . . . . . . . P. 266
. . . . . . . . . . . . . . . . . . . . . . . . . . . . . . . . . . . . . . . . . . . . . . . . . . . . . . . . . . . . . . . . P. 266
. . . . . . . . . . . . . . . . . . . . . . . . . . . . . . . . . . . . . . . . . . . . . . . . . . . . . . . . . . . . . . . . . . . . . . . . . . . . . . . . . . . . . . . . P. 267
. . . . . . . . . . . . . . . . . . . . . . . . . . . . . . . . . . . . . . . . . . . . . . . . . . . . . . . . . . . . . . . . . . . . . . P. 267
. . . . . . . . . . . . . . . . . . . . . . . . . . . . . . . . . . . . . . . . . . . . . . . . . . . . . . . . . . . . . . . . . . . . . . . . . . . . . . . . . . . . . . . . P. 267

8/10/2019 motif_1(2)
http://slidepdf.com/reader/full/motif12 262/300
262 MOTIF Reference
File mode
Ref er enc e
F i l emod e
File mode
Basic Structure (page 63)
In this mode, you can save data to and load data frommemory cards and SCSI storage devices, such as harddisks and removable cartridges. The File mode alsoprovides various functions for managing your data andSCSI devices.
With the File Utility software (on the included CD-ROM), you can use a computer to manage data storedto memory cards or SCSI devices — even use it totransfer data between the computer and the memorycard/SCSI device.
◆ Basic Procedure
1 Press the [FILE] button to enter the File mode.(The indicator lights.)
2 Select the desired menu by pressing the [F1] - [F6] buttons and execute each operation (Save, Load,and so on).
3 Press any other mode button to exit from the Filemode.
• For detailed instructions on step #2, see theexplanations below.
File/Folder selection
The illustrations and instructions below show you howto select files and folders on the memory card or SCSIdevices within the File mode.
New Folder Creation
From the Save display (called up via the [F2] button)and the Rename display (called up via the [F4] button),you can create new folders. This function lets youconveniently and easily organize the numerousimportant data files you create on the MOTIF.
File types that can be handled bythe MOTIF
■
File types that can be saved from theMOTIF to the memory card/SCSI storagedeviceWhen you save your original data to User memory(page 63), the MOTIF organizes your data accordingto its type (as listed below), and automatically assignsa special three-letter extension to the file namecorresponding to the type.
SCSI device (harddisk, removablecartridge, etc.)
Memory card
SCSI connector
REC
SON GSC EN E
MUSICPRODUCTIONSYNTHESIZERIntegratedSamplingSequencer
R eal-timeExternalC ontrolSurfaceModularSynthesisPlug-inSystem
MOTIF
Move the cursor to the desired file or folder by using the[INC/YES] and [DEC/NO] buttons or the data dial.
To return to the nexthighest level, press the[EXIT] button.
To go to the next lowest level,highlight the desired folderand press the [ENTER]button.
Move the cursor to the desired file or folder by using the[INC/YES] and [DEC/NO] buttons or the data dial.
You can create the new folder by pressingthe [F6] button and naming.

8/10/2019 motif_1(2)
http://slidepdf.com/reader/full/motif12 263/300
263 MOTIF Reference
File m
• All Extension: .W2AAll data in the MOTIF’s internal User Memory are treatedas a single file, and can be saved to the memory card/SCSIstorage device.
• All Voice Extension: .W2VAll the User Voice data in the MOTIF's internal UserMemory are treated as a single file, and can be saved to thememory card/SCSI storage device.
• All Song Extension: .W2VAll the User Song data in the MOTIF's internal UserMemory are treated as a single file, and can be saved to thememory card/SCSI storage device.
• All Pattern Extension: .W2PAll the User Pattern data in the MOTIF's internal UserMemory are treated as a single file, and can be saved to thememory card/SCSI storage device.
• All Waveform Extension: .W2WAll the User Wave and Sample data in the MOTIF'sinternal User Memory are treated as a single file, and can be saved to the memory card/SCSI storage device.
• Usr ARP (User Arpeggio) Extension: .W2GAll the User Arpeggio data in the MOTIF's internal UserMemory are treated as a single file, and can be saved to thememory card/SCSI storage device.
• Plugin All Bulk 1, 2, 3 Extension: .W2BAll the data in a Plug-in board are treated as a single file,and can be saved to the memory card/SCSI storage device.
• SMF Extension: .MIDSequence track (1 - 16) and Tempo track data of songs orpatterns created in the Song/Pattern mode can be saved tothe memory card/SCSI storage device as Standard MIDIFile (format 0) data.
• Wav Extension: .WAVSample data created in the Sampling mode can be saved tothe memory card/SCSI storage device as a WAV file(Windows audio format).
• Aif (AIFF file) Extension: .AIFSample data created in the Sampling mode can be saved tothe memory card/SCSI storage device as an AIFF file(Macintosh audio format).
• all voice without waveform (Voice data forVoice Editor) Extension: .W2EAll the User Voice data (with the exception of waveformdata) can be treated as a single file and saved to the
memory card/SCSI storage device. The saved file can be loaded to the Voice Editor software (included in the CD-ROM) on your computer.
■ File types that can be loaded from the MemoryCard/SCSI storage device to the MOTIFAny data saved to a memory card/SCSI device from theUser memory of the MOTIF can be loaded back to theMOTIF. Naturally, all the file types that can be saved(listed above) can be loaded; however, there are someadditional types available for loading. (Refer to the list below.)
• All Extension: .W2AA file that is saved to the Memory Card/SCSI storagedevice as “All” type can be loaded and restored to theMOTIF.
• All Voice Extension: .W2VA file that is saved to the Memory Card/SCSI storagedevice as “All Voice” type can be loaded and restored to theMOTIF.
• Voice Extension: .W2VA specified voice in a file that is saved to the MemoryCard/SCSI storage device as “All” or “All Voice” type can be individually selected and loaded to the MOTIF.
• Plugin All Bulk 1, 2, 3 Extension: .W2BA file that is saved to the Memory Card/SCSI storagedevice as “Plugin All Bulk 1, 2, 3” type can be loaded andrestored to the Plug-in board installed to the MOTIF.
• Usr ARP (User Arpeggio) Extension: .W2GA file that is saved to the Memory Card/SCSI storagedevice as “Usr ARP” type can be loaded and restored tothe MOTIF.
• All Song Extension: .W2SA file that is saved to the Memory Card/SCSI storagedevice as “All Song” type can be loaded and restored to theMOTIF.
• Song Extension: .W2SA specified song in a file that is saved to the Memory Card/SCSI storage device as “All” or “All Song” type can beindividually selected and loaded to the MOTIF.
• All Pattern Extension: .W2PA file that is saved to the Memory Card/SCSI storagedevice as “All Pattern” type can be loaded and restored to
the MOTIF.
• Pattern Extension: .W2PA specified pattern in a file that is saved to the MemoryCard/SCSI storage device as “All” or “All Pattern” typecan be individually selected and loaded to the MOTIF.
• All Waveform Extension: .W2WA file that is saved to the Memory Card/SCSI storagedevice as “All” or “All Waveform” type can be loaded andrestored to the MOTIF.
• Waveform Extension: .W2WA specified waveform in a file that is saved to the Memory
Card/SCSI storage device as “All” or “All Waveform” typecan be individually selected and loaded to the MOTIF.
• All Voice for Editor Extension: .W2EThe Voice data edited via the included Voice Editorsoftware on your computer can be loaded to the MOTIF.
• SMF (Standard MIDI file) Extension: .MIDThe Standard MIDI file (format 0, 1) can be loaded to theMOTIF and can be played back in the Song/Pattern mode.

8/10/2019 motif_1(2)
http://slidepdf.com/reader/full/motif12 264/300
264 MOTIF Reference
File mode
Ref er enc e
F i l emod e
• Wav Extension: .WAVA WAV file (Windows audio format) can be loaded to theMOTIF and can be used as a User Wave.
• Aif (AIFF file) Extension: .AIFAn AIFF file (Macintosh audio format) can be loaded tothe MOTIF and can be used as a User Wave.
n In addition to the file types above, Yamaha A5000/A4000/A3000/SU700 files and AKAI S1000/S3000 files can be loaded to the MOTIF.
■ File types that can be loaded from theMemory Card/SCSI storage device to theMOTIF when turning the power on (AutoLoad file)Among the file types described on page 262, “All”,“Plugin All Bulk 1”, “Plugin All Bulk 2” and“Plugin All Bulk 3” can be loaded from the Memorycard/SCSI storage device to the MOTIF's UserMemory automatically when turning the power on.
1 Name the files you wish to have load automaticallywhen the power is turned on as described below,and save them together in a single folder.
n After you’ve finished naming the appropriate files,
keep the corresponding folder selected in thedisplay and go to step #2.
2 Press the [UTILITY] button to enter the Utilitymode.
3 Press the [F1] button, then press the [SF4] buttonto show the Auto Load file display.
4 Set “Auto Load” to on, and press the [SF5] button.
5 Turn the power off.
6 Before turning the power on next time, make surethat the appropriate data is available to theMOTIF. In other words, make sure memory cardspecified in step #1 is properly inserted, or that theSCSI device specified in step #1 is properlyconnected.
7 Turn the power on. The MOTIF searches thedevice and specified folder for the auto-load files(the files you named and saved in step #1), andautomatically loads them to User memory.
n Any files in the device and folder registered in step#4 that do not have appropriate auto-load namesare ignored.
■ File names
Files are named according to the MS-DOS namingconvention. If the file name contains spaces and othercharacters unrecognized in MS-DOS, these characterswill automatically be replaced by “_” (underscore)characters when saving.For specific instructions on naming files, see page 267 .
[F1] Configuration
The explanations here apply to step #2 of the BasicProcedure on page 262.
●
[F1]-[SF1] CONFIG Currently recognizeddevice
• CurrentIn this display you can select the device to be recognized by
the MOTIF — a memory card inserted to the Card slot or aproperly connected SCSI device.
❏ Settings Card, SCSI
File type File name
All AUTOLOAD.W2A
Plugin All Bulk 1(for slot 1) AUTOLD1.W2B
Plugin All Bulk 2(for slot 2) AUTOLD2.W2B
Plugin All Bulk 3(for slot 3) AUTOLD3.W2B
Set this to on.
Press the [SF5] button to register the device andfolder selected in step #1 (the folder containing thedesired files for auto loading).
Volume label of the device
Amount of total memory on the device
Amount of unused (free) memory on the device

8/10/2019 motif_1(2)
http://slidepdf.com/reader/full/motif12 265/300
265 MOTIF Reference
File m
● [F1]-[SF2] CONFIG SCSI ID
From this display you can specify the ID number forall the devices in the SCSI chain, including the host(the MOTIF itself).
• SELFDetermines the ID number (0 - 7) for the MOTIF, as theSCSI host. If you change this setting, you’ll need to turnthe power off and on again for the new setting to takeeffect.
• SCANThis control lets you mount each device in the SCSI chain,
making sure that the MOTIF properly recognizes it. Movethe cursor to the appropriate SCAN circle in the display,and press the [INC/YES] button to mark the circle andmount the corresponding device.
● [F1]-[SF3] CONFIG Mount
From this display you can select specific partitionsfor saving/loading data, within the device mountedin the SCSI ID display (above).
● [F1]-[SF4] CONFIG Format
Before you can use a new Memory Card/SCSIdevice with the MOTIF, you will need to format it.Use this operation to format the memory card orSCSI device and assign a Volume Label to it.
• TypeDetermines the type of the device to be formatted.
❏ Settings See below.
cardWhen this is set, the Memory card inserted to the Card slotis formatted.
all (SCSI)When this is set, all the SCSI devices connected to theMOTIF are formatted.
partition 1 ~ 4 (SCSI)When this is set, one partition (specified at the bottom ofthe display) of the SCSI device connected to the MOTIF isformatted.
• FormatThis parameter is available when the Type is set to “all(SCSI).” A hard disk (or any similar storage media) must be physically formatted before it can be logicallyformatted. Physical formatting (also called “low-level”formatting) arranges the disk into physical elements suchas tracks and sectors.Physical formatting is usually done by the manufacturer;you may not need to do it yourself. Logical formatting
places a file system on the disk, allowing the MOTIF toaccess the disk.You’ll need to logically format any media you use beforeyou can use it with the MOTIF.
❏ Settings physical, logical
• Volume LabelNames the Volume Label. Refer to “Basic Operation” forinstructions on naming on page 73.
n Make sure to enter the Volume Label. An errormessage appears if you press the [ENTER] buttonwithout entering the Volume Label.
1 After setting the relevant parameters above, pressthe [ENTER] button. (The display prompts youfor confirmation.)
2 After formatting has been completed, a“Completed” message appears and operationreturns to the original display.
n To cancel the Format operation, press the[DEC/NO] button.
While formatting is in progress, never eject the Memorycard or turn off the power to the MOTIF.
If data is already saved on the memory card/SCSI device, be careful not to format it. If you format the memory card/SCSI device, all the previously recorded data will bedeleted.
The SCSI devices connected to and in use bythe MOTIF are shown at the corresponding IDnumbers, set on the devices themselves.
Volume label of the selected partition

8/10/2019 motif_1(2)
http://slidepdf.com/reader/full/motif12 266/300
266 MOTIF Reference
File mode
Ref er enc e
F i l emod e
[F2] Save
This operation lets you save files to a memory card orSCSI device.The explanations here apply to step #2 ofthe Basic Procedure on page 262.
1 Select the file type to be saved in the Save display.
• When the file type “SMF” (Standard MIDI file)is selected, press the [ENTER] button to showthe following display and select a Song or aStyle/Section to be saved.
• When the file type “Wav” (WAV file) or “Aif”(AIFF format) is selected, press the [ENTER]
button to show the following display and select aWave to be saved.
2 If you wish to overwrite the existing file, move thecursor to the desired file to which the data is saved by using the Cursor buttons or the data dial.
3 Press the [ENTER] button to execute the Saveoperation.
• If you are about to overwrite an existing file, thedisplay prompts you for confirmation. Press the[INC/YES] button to execute the Save operation,or press the [DEC/NO] button to cancel it.
• After the data has been saved, a “Completed”message appears and operation returns to theoriginal display.
While the data is being saved, never eject the Memory cardor turn off the power to the SCSI device or MOTIF itself.
n Waveform data is not saved when the file type “All
Voice for Editor” is selected.
[F3] Load
This operation lets you load files from a memorycard or SCSI device to the MOTIF.The explanations here apply to step #2 of the BasicProcedure on page 262.
1 Select a file type (page 264) and a file to be loaded.
• When the file type is set to All, All Voice,Plugin All Bank 1~3, Usr ARP, All Song, AllPattern, All Waveform or All Voice for Editor,go to step #3. For any other file types, go tostep #2.
2 Specify the data to be loaded and the destination location in the User memory of the MOTIF.When the file (data) type is set to Voice, forexample, follow the instructions as shown below.
If you wish to create a new file, move thecursor to this position and enter the desiredname. For instructions on naming, see "BasicOperation" on page 75.
If you wish to create a new folder on the desitinationdevice (to which the data is saved), press the [SF6]button to name a new folder. For instructions onnaming, see "Basic Operation" on page 75.
When Key Bank is highlighted, you canselect successive Key Banks by pressing the [SF2] button.
To hear the selected wave, press the [SF1] button.
This is an imaginary folder, shown in thedisplay to contain the file(s) you ll be loading.
[ENTER] button
Specify the destinationlocation in the User memoryof the MOTIF.
Select a voice numberto be loaded.

8/10/2019 motif_1(2)
http://slidepdf.com/reader/full/motif12 267/300
267 MOTIF Reference
File m
When the file (data) type is set to Song,Pattern, Waveform or All Voice for Editor, an“imaginary” file appears — just as with Voiceabove. Select the imaginary file and press the[ENTER] button to call up the list of songs,styles, or waveforms. Then select the desiredsong, style, or waveform and specify thedestination User memory location.
n If several Key Banks (comprised of waveform/WAV/AIFF files or recorded samples) are assignedto the same key/velocity range, only the first twoassigned Key Banks will be used.
n When files of the Yamaha A series samplers(A5000/4000/3000) are loaded, an “S” mark bythe file name indicates the file contains only sampledata and a “P” mark indicates program data (voice-related parameters and so on). When entering theFile mode from the Voice/Performance mode, the“P” marked file can be loaded and the followingtwo types can be selected instead of Waveform orKey Bank.
• Type 1 :Only one sample is imported to a certainwaveform. This type utilizes the various settingsof the MOTIF, and the parameters correspondingto the four elements are also loaded. Extrasamples are not loaded.
• Type 2 :Several samples are imported to a certainwaveform. Parameters corresponding to the fourelements are not loaded to the MOTIF. Extrasamples are not loaded.
n When “All” is selected as a file type to be loaded,“ without System” appears in the display. If this box is checked and the Load is executed, all datawith the exception of the system settings in the
Utility mode are loaded.
3 Press the [ENTER] button to execute the Loadoperation. After the data has been loaded, a“Completed” message appears and operationreturns to the original display.
While the data is being loaded, never eject the Memory cardor turn off the power to the SCSI device or MOTIF itself.
Loading data to the MOTIF automatically erases andreplaces any existing data in the User memory. Make sureto save any important data to a memory card/SCSI deviceBEFORE performing any Load operations.
n The MOTIF features a convenient Auto-load functionthat automatically loads user-specified files when youturn the power on. For details, see page 264.
[F4] Rename
From this display you can rename files in theselected memory card/SCSI device, using up to eightalphabetic and numeric characters.
nFiles are named according to the MS-DOS namingconvention. If the file name contains spaces and othercharacters unrecognized in MS-DOS, these characterswill automatically be replaced by “_” (underscore)characters when saving.
[F5] Delete
From this display you can delete files from theselected memory card/SCSI device. Select thedesired file as shown below, then press the [ENTER] button.
Select the desired file type.
Rename the selected file here. See"Basic Operation" on page 75.
Select the fileto be renamed.
If you wish to create a new folder on the desitinationdevice (to which the data is saved), press the [F6]button to name a new folder. For instructions onnaming, see "Basic Operation" on page 75.
Select the desired file type.
Select the file to be deleted.

8/10/2019 motif_1(2)
http://slidepdf.com/reader/full/motif12 268/300
268 MOTIF Reference
Function Tree
Master ModeBasic Structure (page 56)
Function Tree
This section is devoted to the Master mode. To see how the Master mode relates to the entire structure of the MOTIFand its other modes and functions, see the simplified chart in “Basic Structure” on page 30.The following detailed chart shows all of the display menus and parameter groups of the Master mode — giving you
a quick, easy-to-understand overview of the Master-related functions of the MOTIF.Brackets around a word or phrase (e.g., [F1]) indicate specific button names or panel operations.
[INFORMATION] MASTER INFORMATION
[MASTER] MASTER PLAY
[F1] MASTER PLAY
[F2] MASTER MEMORY
[EDIT] MASTER EDIT
[COMMON] COMMON
[F1] NAME
[F2] OTHER
[1]-[4] ZONE 1-4 (Performance Mode only)
[F1] ZONE TRANSMIT
[F2] ZONE NOTE
[F3] ZONE TRANSMIT SWITCH
[F4] ZONE PRESET
[F5] ZONE KNOB/SLIDER ASSIGN
[JOB] MASTER JOB
[F1] INITIALIZE
[F4] BULK DUMP
[STORE] MASTER STORE
[MASTER]. . . . . . . . . . . . . . . . . . . . . . . . . . . . . . . . . . . . . . . . . . . . . . . . . . . . . . . . . . . . . . . . . P. 276
. . . . . . . . . . . . . . . . . . . . . . . . . . . . . . . . . . . . . . . . . . . . . . . . . . . . . . . . . . . . . . . . . . . . . . . . . . . . . . P. 269
. . . . . . . . . . . . . . . . . . . . . . . . . . . . . . . . . . . . . . . . . . . . . . . . . . . . . . . . . . . . . . . . . . P. 269
. . . . . . . . . . . . . . . . . . . . . . . . . . . . . . . . . . . . . . . . . . . . . . . . . . . . . . . . . . . . . . . P. 270
. . . . . . . . . . . . . . . . . . . . . . . . . . . . . . . . . . . . . . . . . . . . . . . . . . . . . . . . . . . . . . . . . . . . . . . . . . . . . . . . . . P. 270
. . . . . . . . . . . . . . . . . . . . . . . . . . . . . . . . . . . . . . . . . . . . . . . . . . . . . . . . . . . . . . . P. 271
. . . . . . . . . . . . . . . . . . . . . . . . . . . . . . . . . . . . . . . . . . . . . . . . . . . . . . . . P. 271
. . . . . . . . . . . . . . . . . . . . . . . . . . . . . . . . . . . . . . . . . . . . . . . . . . . . . . . P. 271
. . . . . . . . . . . . . . . . . . . . . . . . . . . . . . . . . . . . . . . . . . . . . . . . P. 271
. . . . . . . . . . . . . . . . . . . . . . . . . . . . . . . . . . . . . . . . . . . . . . . P. 271 . . . . . . . . . . . . . . . . . . . . . . . . . . . . . . . . . . . . . . . . . . . . . . . . . . . P. 272
. . . . . . . . . . . . . . . . . . . . . . . . . . . . . . . . . . . . . . . P. 272
. . . . . . . . . . . . . . . . . . . . . . . . . . . . . . . . . . . . . . . . . . . . . . . . . P. 272
. . . . . . . . . . . . . . . . . . . . . . . . . . . . . . . . . . . . . P. 273
. . . . . . . . . . . . . . . . . . . . . . . . . . . . . . . . . . . . . . . . . . . . . . . . . . . . . . . . . . . . . . . . . . . . . . . . . . . . . . . . . . . P. 273
. . . . . . . . . . . . . . . . . . . . . . . . . . . . . . . . . . . . . . . . . . . . . . . . . . . . . . . . . . . . . . . . . . . . . . P. 274
. . . . . . . . . . . . . . . . . . . . . . . . . . . . . . . . . . . . . . . . . . . . . . . . . . . . . . . . . . . . . . . . . . . . P. 274
. . . . . . . . . . . . . . . . . . . . . . . . . . . . . . . . . . . . . . . . . . . . . . . . . . . . . . . . . . . . . . . . . . . . . . . . . . . . . P. 274

8/10/2019 motif_1(2)
http://slidepdf.com/reader/full/motif12 269/300
269 MOTIF Reference
Master Play
Master Play mode
Basic Structure (page 56) · Quick Start Guide (page 93)
In this mode, you can select and play individualMasters.
nFor more information on Masters, their structure, and how they are used, see page 56.
◆ Basic Procedure
1 Press the [MASTER] button to enter the MasterPlay mode. (The indicator lights.)
2 Select a Master.
3 Set the Keyboard Octave or MIDI transmitchannel.
4 Press the [F2] button to show the Memory displayand set the basic parameters for Master play.
n Zone edit is available only when the Zone Switch isset to on in the [F2] MEMORY display in theMaster Play mode.
5 Store the settings edited in step #4 to the User
memory as required.
n If the Zone Switch is not set to on in the [F2]MEMORY display in the Master Play mode, theNumber buttons [1]~[4] are not available.
6 Press any other mode button to exit from theMaster Play mode.
• For detailed instructions on steps #2 - #4, see thefollowing explanations.
• For details on step #5, refer to “Master Storemode” on page 274.
Master Selection
The explanations here apply to step #2 of the BasicProcedure, see above.Selecting Masters is done in basically the same way asselecting voices (page 124), except for the followingpoint.
• Since the MOTIF has no Preset Masters andprovides only one User bank, selecting a bank is
not necessary.
Keyboard Octave and KeyboardMIDI transmit channel setting
The explanations here apply to step #3 of the BasicProcedure on page 269.These two parameters can be set for the selectedMaster. Setting these parameters is the same as in theVoice Play mode (page 124). Keep in mind that theseparameters cannot be stored to the Master by using theMaster Store mode (page 274).
Master editing in the Master Playmode
The explanations here apply to step #4 of the BasicProcedure, see above.The Master Play mode lets you perform a variety ofgeneral editing operations on the selected Master. Formore detailed and comprehensive editing operations,use the Master Edit mode.
Indicates Keyboard Octave setting set via the[OCTAVE] buttons. See page 127 for details.
Indicates the functions assigned to theespective Control knobs (page 48).
Indicates the currently selected Master.
MASTER

8/10/2019 motif_1(2)
http://slidepdf.com/reader/full/motif12 270/300
270 MOTIF Reference
Master Edit mode
Ref er enc e
Mas t ermod e
● [F2] Master Play Memory
From this display you can set basic parameters forthe Master, including the mode that is called upwith the Master and the program number.
• ModeDetermines the mode that is called up when the Masternumber is selected. Setting to Off here means that themode is not changed even if the Master is selected.
❏ Settings Off, Voice, Performance, Pattern, Song
• MemoryDetermines the Program number that is called up whenthe Master is selected.
❏ Settings: See below.
• Zone SwitchThis is available only when the Mode is set toPerformance.This parameter determines whether the Zone function isused (on) or not (off). See page 272 for details about theZone function.
❏ Settings on, off
Master Edit mode
Basic Structure (page 56) · Quick Start Guide (page 95)
In this mode, you can create and edit Masters.
◆ Common edit and Zone edit(Voice Performance mode)When memorizing Voice or Performance mode settingsto a Master, you can add the zone-related settings to theexisting voice or performance settings. For details onthe zone features, see page 57 .The Master Edit functions can be divided into twotypes: Common Edit (settings for all four of the zones),and Zone Edit (settings for each individual zone).
n For details about recording methods, see page 57 .
When the Mode is set to VoiceSelect a voice bank and number. Refer tothe instructions page 124
When the Mode is set toPerformance
Select a performance bank and number.Refer to the instructions on page 162
When the Mode is set to PatternSelect a style and section. Refer to theinstructions on page 217
When the Mode is set to SongSelect a song number. Refer to theinstructions on page 179
This parameter is available only when the Mode is set to Performance.
Zone 1Parameters commonto all modes
Voice Performance mode
Common
Zone 4
Zone 3
Zone 2
Indicates a Common Edit display.
Indicates a Zone Edit display.(Performance mode only)

8/10/2019 motif_1(2)
http://slidepdf.com/reader/full/motif12 271/300
271 MOTIF Reference
Master Edit
◆ Basic Procedure
1 Press the [MASTER] button to enter the MasterPlay mode. (The indicator lights.)
2 Select a Master to be edited.
3 Press the [EDIT] button to enter the Master Editmode. (The indicator lights.)
• When the Mode parameter in the Master PlayMemory display is set to Song or Pattern, go tostep #5.
• When the Mode parameter in the Master PlayMemory display is set to Voice or Performance,go to step #4.
4 Select a zone to be edited.
• To edit parameters common to all of the zones,press the [DRUM KITS] button (which serves asa “COMMON” button here).
• To edit parameters of the individual zones, selectthe desired zone with the correspondingNUMBER button, [1] - [4].
5 Select the menu you wish to edit by pressing the[F1] - [F6] buttons.
6 Edit the parameters for the selected Master.
7 Store the settings edited in step #6 to the User
Memory as required.
8 Press the [EXIT] button to exit from the MasterEdit mode.
• For details on step #2, refer to “Master Playmode” on page 269.
• For detailed instructions on steps #5 - #6, see theexplanations below.
• For details on step #7, refer to “Master Storemode” on page 274.
■ Common edit
● [F1] Common Name
From this display you can create a name for theMaster. For detailed instructions on naming, see“Basic Operation” on page 75.
● [F2] Common Other
From this display you can set which row of Knob/Slider functions will be lit and selected.
❏ Settings pan, tone, assign, MEQofs, zone
n The setting “zone” above is available only whenthe Zone Switch is set to on in the [F2] MEMORYdisplay in the Master Play mode.
■ Zone Edit (Voice/Performance mode only)
nUse the following Zone Edit functions to create your ownsophisticated four-way splits and layers.
● [F1] Zone TransmitBasic Structure (page 57)
From this display you can set how each zonetransmits MIDI data when you play the keyboard.
DRUM KITS
FAVORITESCOMMON
1 2 3 4
ELEMENT/ PERF.PART/ ZONE
When set to pan, callingup the Master lights andselects this row.
When set to MEQofs,calling up the Master lightsand selects this row.
When set to tone, callingup the Master lights andselects this row.
When set to assign, callingup the Master lights andselects this row.
When set to zone,calling up the Masterautomatically calls upthe Knob/Sliderfunctions specifically setfor each respective zone(page 57).
KNOBCONTROLFUNCTION
PAN REVERB CHORUS TEMPO
AT TA CK R ELEA SECUTOFF RESONANCE
ASSI GN A ASSIGN B ASSI GN 1 ASSI GN 2
MEQ LOW MEQ HI MIDMEQLOWMID MEQ HIGH
MASTERVOLUME
V OLUME 1 V OLUME 2 V OLUME 3 V OLUME 4
CS 1 CS 2 CS 3 CS 4
ZONE1 ZONE2 ZONE3 ZONE4
KN 1 KN 2 KN 3 KN 4

8/10/2019 motif_1(2)
http://slidepdf.com/reader/full/motif12 272/300
272 MOTIF Reference
Master Edit mode
Ref er enc e
Mas t ermod e
• TransmitCh (Transmit Channel)Determines the MIDI Transmit Channel for each zone.
❏ Settings 1~16
• TGSwitch (Tone Generator Switch)Determines whether or not to transmit MIDI messages foreach zone to each Part’s tone generator block.
❏ Settings on, off
• MIDISwitchDetermines whether or not to transmit MIDI messages foreach zone to an external MIDI device via the MIDI or USBterminal.
❏ Settings on, off
● [F2] Zone Note
From this display you can set the pitch- andkeyboard-related parameters for each zone —allowing you to set up zone splits and determine thepitch range for each zone.
• OctaveDetermines the amount in octaves by which the range ofthe zone is shifted up or down.
❏ Settings -3~0 (Default)~+3
• TransposeDetermines the amount in semitones by by which the
range of the zone is shifted up or down.❏ Settings -11 ~ 0 (Default) ~ +11
• NoteLimit H, L (High, Low)Determines the lowest and highest notes of the range foreach zone. The selected zone will sound only when youplay notes within this range.
❏ Settings C -2 ~G8
n You can also set the range directly from thekeyboard, by holding down the [INFORMATION] button and pressing the desired low and high keys.
● [F3] Zone Transmit Switch
From this display you can set how the playing ofeach individual zone affects transmission of variousMIDI data, such as Control Change and ProgramChange messages. When the relevant parameter isset to “on,” playing the selected zone will transmitthe corresponding MIDI data.Note that two different display types are provided(see below). Each display type features the samesettings in a different format; use the type you feelmost comfortable with.
• This display type shows the Transmit Switchstatus for all of the zones.Set the desired zone on or off, for the corresponding MIDIdata type. Keep in mind that since all the availableparameters cannot be simultaneously displayed, you willneed to use the cursor controls to scroll the display inorder to see and set the other parameters.
• This display type shows all of the TransmitSwitch settings for a single selected zone.Set the desired MIDI data type on or off for the selectedzone. To select other zone, use the NUMBER [1] - [4] buttons(making sure that the [TRACK SELECT] button is on).
● [F4] Zone Preset
From this display you can make the voice-relatedsettings for each zone, in the selected Master programnumber. In this way, selecting a different Masterautomatically calls up a completely different set ofvoices and voice-related setttings for the four zones.
• BankMSB, BankLSB, PgmChange (ProgramChange)Determines the voice assignment for each zone in theselected Master.
❏ Settings Refer to the Voice List in the separate DataList booklet.
• VolumeDetermines the output level of each zone.
❏ Settings 0~127
• PanDetermines the stereo pan position of each zone.
❏ Settings L64 (Left) ~ C (Center) ~ R63 (Right)
[SF5] button [SF5] button

8/10/2019 motif_1(2)
http://slidepdf.com/reader/full/motif12 273/300
273 MOTIF Reference
Master Job
● [F5] Zone Knob/Slider
From this display you can determine which ControlChange numbers are used for the Knobs and Slidersfor each zone. These settings are available onlywhen the Knob/Slider parameter (in Common EditOther; page 271) is set to “zone.”
❏ Settings off, 1~95
Master Job mode
The Master Job mode contains two convenientoperations (called “Jobs”) — one letting you initialize(reset) the Master data, and the other letting youtransmit your edited Master data to an external MIDIdevice or computer.
◆ Basic Procedure
1 In the Master Play mode, select a Master you wishto execute the Job on.
2 Press the [JOB] button to enter Master Job Mode.
3 Select the Job menu you wish to execute bypressing the [F1] or [F4] button.
4 Set the parameters for executing the Job.
5 Press the [ENTER] button. (The display promptsyou for confirmation.)
6 Press the [INC/YES] button to execute the Job.After the Job has been completed, a “Completed”message appears and operation returns to theoriginal display.
n To cancel the Job, press the [DEC/NO] button.
For Jobs that take longer to process, you will see themessage “Executing…” during processing. If you switchoff the power of the MOTIF while this message isdisplayed, you risk corrupting your data.
7 Press the [MASTER] button to exit from Master Job mode and return to Master Play mode.
• For detailed instructions on steps #3 - #4, see theexplanations below.
KNOBCONTROLFUNCTION
PAN REVERB CHORUS TEMPO
AT TA CK R ELEA SECUTOFF RESONANCE
ASSIG N A ASSI GN B ASS IGN 1 ASSIGN 2
KN 1 KN 2 KN 3 KN 4
MEQ LOW MEQ HI MIDMEQLOWMID MEQ HIGH
MASTERVOLUME
V OLUME 1 V OLUME 2 V OLUME 3 V OLUME 4
CS 1 CS 2 CS 3 CS 4
ZONE1 ZONE2 ZONE3 ZONE4
Above settings arevailable only if theseindicators are all unlit (inthe Master mode).
KN 1 KN 2 KN 3 KN 4

8/10/2019 motif_1(2)
http://slidepdf.com/reader/full/motif12 274/300
274 MOTIF Reference
Master Store mode
Ref er enc e
Mas t ermod e
● [F1] Initialize
This function lets you reset (initialize) all Masterparameters to their default settings. It also allowsyou to selectively initialize certain parameters, suchas Common settings, settings for each zone, and soon — very useful when creating a completely newMaster from scratch.
❏ Parameter Type (for Initializing)ALLAll settings for the selected Master are initialized.
CommonCommon parameter settings for the selected Master areinitialized.
Zone
You can initialize the zone setting to one of the followingthree types.
• Split . . . . . . . . . page 57
• 4 Zones . . . . . . page 57
• Layer . . . . . . . . page 57
❏ Parameters available when the Type parameter to be Initialized is set to Split or Layer.
UpperCh, LowerChWhen the Parameter Type above is set to “Zone - Split,”you can set separate MIDI transmit channels for the upper
and lower keyboard sections (right of Split Point and left ofSplit Point, respectively).When the Parameter Type aboveis set to “Zone - Layer,” you can set separate MIDItransmit channels for two layers.
SplitPoint This is available when the Type of parameter to beInitialized is set to Split. The range is C - 2~G8.
● [F4] Bulk Dump
This function lets you send all your editedparameter settings for the currently selected Masterto a computer or another MIDI device for data
archiving.n You must set the correct MIDI Device Number in
order to execute a Bulk Dump. For details, seepage 258.
Master Store mode
Basic Structure (page 56)
This function lets you store your edited performance toUser memory.
When you execute this, the settings for the destinationmemory will be overwritten. Important data should always be backed up to computer, a separate memory card or SCSIstorage device.
◆ Basic Procedure
1 After editing the Master, press the [STORE] button to enter the Master Store mode.
2 Select the destination Master memory (number).
3 Press the [ENTER] button. (The display promptsyou for confirmation.)
4 To execute the Store operation, press the [INC/YES] button. After the Master has been stored,a “Completed” message appears and operationreturns to the original display.
n To cancel the Store operation, press the [DEC/NO] button.
For Store operations that take longer to process, you willsee the message “Executing…” during processing. If youswitch off the power of the MOTIF while this message isdisplayed, you risk corrupting your data.

8/10/2019 motif_1(2)
http://slidepdf.com/reader/full/motif12 275/300
275 MOTIF Appendix
Information Disp
AppendixInformation DisplaysThe convenient Information displays let you see at-a-glance some of the more important settings relevant to
each mode. Select the desired mode, then press the[INFORMATION] button to call up the Informationdisplay for that mode. To exit from the display, pressthe button again (or any other panel button).
■ Voice mode
• BankIndicates the Bank/Number (page 124) of the currentlyselected Voice.
• EL 1234Indicates the currently selected voice, on/off status of fourelements and mono/poly (page 128) status.
• Porta (Portamento)Indicates the Portamento switch on/off status of thecurrently selected voice.
• PB (Pitch Bend)
Indicates the Upper/Lower setting of the Pitch Bend range.• Ins1 (Insertion 1), Ins2 (Insertion 2), Rev
(Reverb), Cho (Chorus)Indicates the currently selected effect type for each effect block (page 137 ).
■ Performance mode
• BankIndicates the Bank/Number (page 162) of the currentlyselected Performance.
• 1 (Plug-in board 1), 2 (Plug-in board 2), 3(Plug-in board 3)Indicates the installation status of the respective Plug-in board. The Plug-in board name is displayed at the right ofthe corresponding slot number. When PolyExpand(page 259) is set to on in the Utility mode, “P” isindicated at the left of the slot number.
• InsPart (Insertion part), PLG (Plug-in Insertionpart)Indicates the part number to which the Insertion effect isapplied and the part number to which the Plug-in Insertion
effect is applied (when the PLG100-VH is installed).
• Rev (Reverb), Cho (Chorus), Var (Variation)Indicates the currently selected effect type for each effect block (page 169).
■ Song mode
● Song Play mode
Indicates the amount of currently unused (available)memory (DRAM) for song recording.
● Song Mixing mode
• PlugInfo/Port (Plug-in board installationstatus)Indicates the Plug-in board name and its MIDI portnumber (page 260) at the right of the slot number. WhenPolyExpand (page 259) is set to on in the Utility mode,“P” is indicated at the left of the slot number.
• InsPart (Insertion part), PLG (Plug-inInsertion part)Indicates the part number to which the Insertion effect isapplied and the part number to which the Plug-inInsertion effect is applied (when the PLG100-VH isinstalled).
• Rev (Reverb), Cho (Chorus), Var(+Variation)Indicates the currently selected effect type for each effect block (page 210).

8/10/2019 motif_1(2)
http://slidepdf.com/reader/full/motif12 276/300
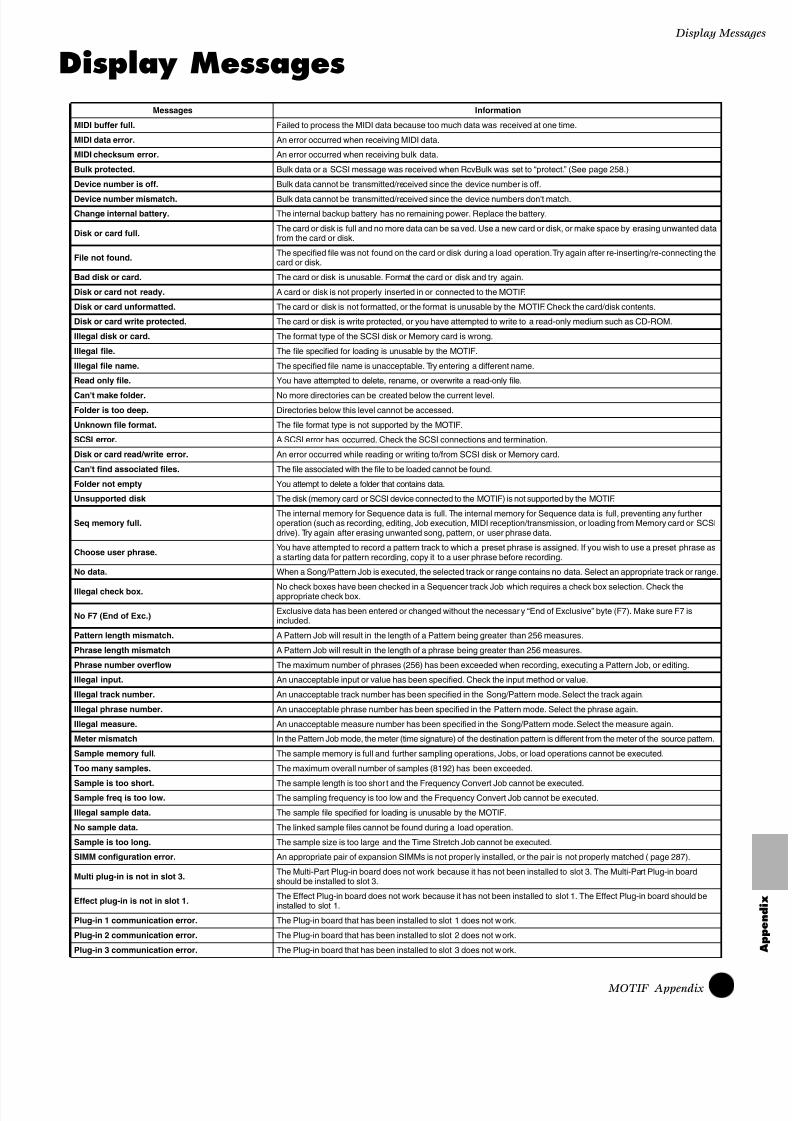
8/10/2019 motif_1(2)
http://slidepdf.com/reader/full/motif12 277/300
277 MOTIF Appendix
Display Mes
Display Messages
Messages Information
MIDI buffer full. Failed to process the MIDI data because too much data was received at one time.
MIDI data error. An error occurred when receiving MIDI data.
MIDI checksum error. An error occurred when receiving bulk data.
Bulk protected. Bulk data or a SCSI message was received when RcvBulk was set to “protect.” (See page 258.)
Device number is off. Bulk data cannot be transmitted/received since the device number is off.
Device number mismatch. Bulk data cannot be transmitted/received since the device numbers don't match.
Change internal battery. The internal backup battery has no remaining power. Replace the battery.
Disk or card full.The card or disk is full and no more data can be saved. Use a new card or disk, or make space by erasing unwanted datafrom the card or disk.
File not found.The specified file was not found on the card or disk during a load operation. Try again after re-inserting/re-connecting thecard or disk.
Bad disk or card. The card or disk is unusable. Format the card or disk and try again.
Disk or card not ready. A card or disk is not properly inserted in or connected to the MOTIF.
Disk or card unformatted. The card or disk is not formatted, or the format is unusable by the MOTIF. Check the card/disk contents.
Disk or card write protected. The card or disk is write protected, or you have attempted to write to a read-only medium such as CD-ROM.
Illegal disk or card. The format type of the SCSI disk or Memory card is wrong.
Illegal file. The file specified for loading is unusable by the MOTIF.
Illegal file name. The specified file name is unacceptable. Try entering a different name.
Read only file. You have attempted to delete, rename, or overwrite a read-only file.
Can't make folder. No more directories can be created below the current level.
Folder is too deep. Directories below this level cannot be accessed.
Unknown file format. The file format type is not supported by the MOTIF.
SCSI error. A SCSI error has occurred. Check the SCSI connections and termination.
Disk or card read/write error. An error occurred while reading or writing to/from SCSI disk or Memory card.
Can't find associated files. The file associated with the file to be loaded cannot be found.
Folder not empty You attempt to delete a folder that contains data.
Unsupported disk The disk (memory card or SCSI device connected to the MOTIF) is not supported by the MOTIF.
Seq memory full.The internal memory for Sequence data is full. The internal memory for Sequence data is full, preventing any furtheroperation (such as recording, editing, Job execution, MIDI reception/transmission, or loading from Memory card or SCSIdrive). Try again after erasing unwanted song, pattern, or user phrase data.
Choose user phrase.You have attempted to record a pattern track to which a preset phrase is assigned. If you wish to use a preset phrase asa starting data for pattern recording, copy it to a user phrase before recording.
No data. When a Song/Pattern Job is executed, the selected track or range contains no data. Select an appropriate track or range.
Illegal check box. No check boxes have been checked in a Sequencer track Job which requires a check box selection. Check theappropriate check box.
No F7 (End of Exc.)Exclusive data has been entered or changed without the necessar y “End of Exclusive” byte (F7). Make sure F7 isincluded.
Pattern length mismatch. A Pattern Job will result in the length of a Pattern being greater than 256 measures.
Phrase length mismatch A Pattern Job will result in the length of a phrase being greater than 256 measures.
Phrase number overflow The maximum number of phrases (256) has been exceeded when recording, executing a Pattern Job, or editing.
Illegal input. An unacceptable input or value has been specified. Check the input method or value.
Illegal track number. An unacceptable track number has been specified in the Song/Pattern mode. Select the track again.
Illegal phrase number. An unacceptable phrase number has been specified in the Pattern mode. Select the phrase again.
Illegal measure. An unacceptable measure number has been specified in the Song/Pattern mode. Select the measure again.
Meter mismatch In the Pattern Job mode, the meter (time signature) of the destination pattern is different from the meter of the source pattern.
Sample memory full. The sample memory is full and further sampling operations, Jobs, or load operations cannot be executed.
Too many samples. The maximum overall number of samples (8192) has been exceeded.
Sample is too short. The sample length is too shor t and the Frequency Convert Job cannot be executed.Sample freq is too low. The sampling frequency is too low and the Frequency Convert Job cannot be executed.
Illegal sample data. The sample file specified for loading is unusable by the MOTIF.
No sample data. The linked sample files cannot be found during a load operation.
Sample is too long. The sample size is too large and the Time Stretch Job cannot be executed.
SIMM configuration error. An appropriate pair of expansion SIMMs is not proper ly installed, or the pair is not properly matched (page 287).
Multi plug-in is not in slot 3.The Multi-Part Plug-in board does not work because it has not been installed to slot 3. The Multi-Part Plug-in boardshould be installed to slot 3.
Effect plug-in is not in slot 1.The Effect Plug-in board does not work because it has not been installed to slot 1. The Effect Plug-in board should beinstalled to slot 1.
Plug-in 1 communication error. The Plug-in board that has been installed to slot 1 does not work.
Plug-in 2 communication error. The Plug-in board that has been installed to slot 2 does not work.
Plug-in 3 communication error. The Plug-in board that has been installed to slot 3 does not work.

8/10/2019 motif_1(2)
http://slidepdf.com/reader/full/motif12 278/300

8/10/2019 motif_1(2)
http://slidepdf.com/reader/full/motif12 279/300
279 MOTIF Appendix
Troublesho
TroubleshootingNo sound? Wrong sound? When a problem like this occurs, please check the following points before assuming thatthe product is faulty. In many cases you’ll find the solution to your problem here. If the problem persists, then contactyour Yamaha dealer or service center (page 299).
No sound.
• Is the power of the MOTIF and any external equipment connected to the MOTIF turned on? page 29
• Have you made all the appropriate level settings — including the Master Volume on the MOTIFand the volume settings on any connected external equipment? page 29
• Is the Foot Controller pressed down (when it is connected to the FOOT CONTROLLER jack)? page 28• Is the MOTIF properly connected to related external equipment (e.g., amplifier or speaker) via audio cables? page 21• When the voice produces no sound, is the volume in the Voice common edit set appropriately? page 132• When the voice produces little or no sound, have you changed any of the CS slider settings?
(The CS 1 - 4 sliders control the element levels in the voice. If all these are set to “0,” the voice will not sound.) page 48• When the voice produces no sound, are the parameters in the Voice element edit
(e.g., element switch, note limit, velocity limit) set appropriately in the Voice common edit? pages 137 , 138• When the voice produces no sound, are the effect and filter settings appropriate?
(Inappropriate filter cutoff frequency settings can result in no sound.) pages 137 , 140• When the performance produces no sound, has a voice been assigned to each part? page 166• When the performance produces no sound, is the note limit of each part set appropriately? page 170• When the performance produces no sound, is the volume of each part set appropriately? page 172• When the performance produces little or no sound, have you changed any of the CS slider settings?
(The CS 1 - 4 sliders control the part levels in the performance. If all these are set to “0,” the performance will not sound.) page 48• When the performance produces no sound, is the output select of each part set appropriately? page 173• When the song/pattern playback produces no sound, are any or all of the tracks muted? pages 180, 218• When the song/pattern playback produces no sound, are the output channel of each track in the play mode
and the receive channel of each part in the Mixing mode set appropriately? pages 210, 232• When the song/pattern playback produces no sound,
is the volume of each part in the Mixing mode set appropriately? pages 211, 232• When the song/pattern playback produces no sound,
is the output select of each part in the Mixing mode set appropriately? pages 211, 232• When the song/pattern playback produces no sound,
is the MIDI filter set so that note-on messages are blocked in the Utility mode? page 255• When the arpeggio produces no sound, is the switch set to on? page 132• When the arpeggio produces no sound, are the note limit and velocity limit set appropriately? page 133• When the arpeggio produces no sound and the assigned arpeggio is a user one, does it have data? page 132• Isn't MIDI Local set to off in the Utility mode? page 258
Distorted sound.
• Are the effect settings appropriate? page 172• Are the filter settings appropriate? (Excessively high filter resonance settings can cause distortion.) pages 140, 173• Is the MASTER VOLUME set so high that clipping is occurring? page 29• Is the volume of each element in the Voice mode or the volume of each part in the Performance mode
or the volume of each track/part in the Song/Pattern mode set too high? pages 145, 172, 211, 232
Sound level is too low.
• Are the MIDI volume or MIDI expression settings too low (by using the Foot Controller)? page 28• Is the cutoff frequency of the filters set too high/low? pages 140, 173• When the song/pattern playback produces the small sound,
is the velocity offset in the Groove display set too low? pages 181, 218
Sound is cut off.
• Are you exceeding the maximum polyphony of the MOTIF? page 36

8/10/2019 motif_1(2)
http://slidepdf.com/reader/full/motif12 280/300

8/10/2019 motif_1(2)
http://slidepdf.com/reader/full/motif12 281/300
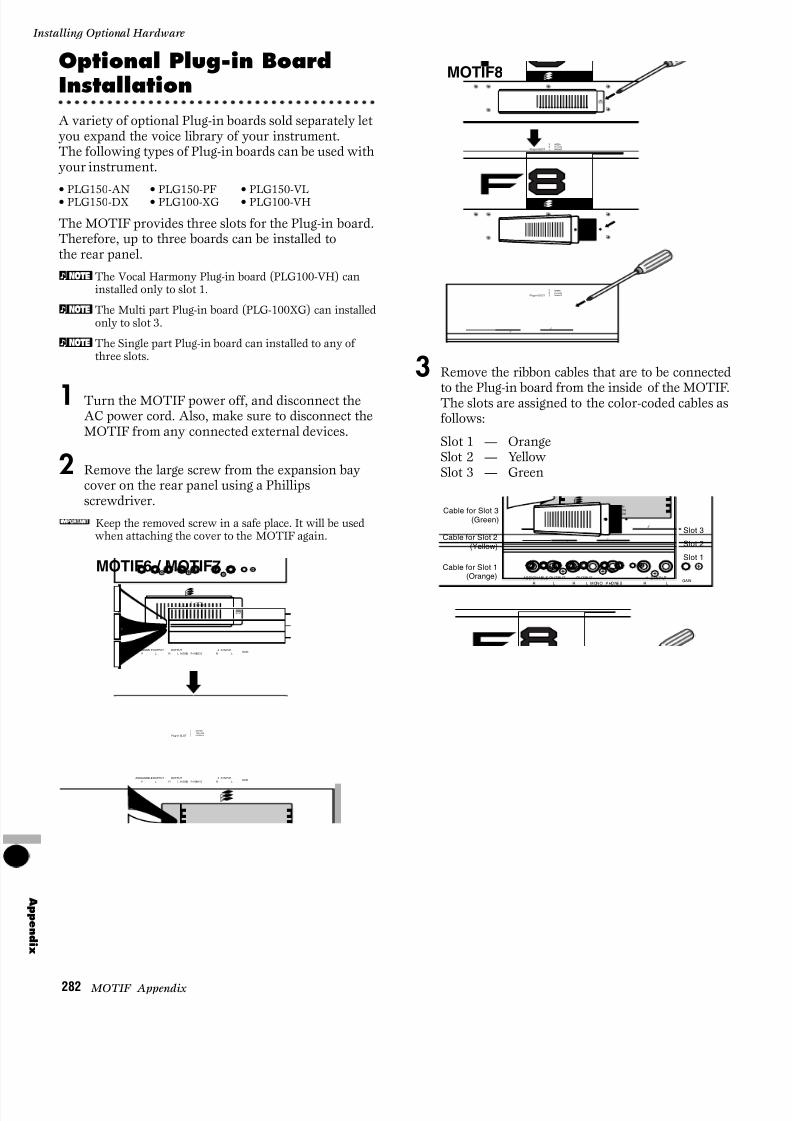
8/10/2019 motif_1(2)
http://slidepdf.com/reader/full/motif12 282/300
282 MOTIF Appendix
Installing Optional Hardware
Append i x
Optional Plug-in BoardInstallation
A variety of optional Plug-in boards sold separately letyou expand the voice library of your instrument.The following types of Plug-in boards can be used withyour instrument.
• PLG150-AN • PLG150-PF • PLG150-VL• PLG150-DX • PLG100-XG • PLG100-VH
The MOTIF provides three slots for the Plug-in board.Therefore, up to three boards can be installed tothe rear panel.
nThe Vocal Harmony Plug-in board (PLG100-VH) caninstalled only to slot 1.
nThe Multi part Plug-in board (PLG-100XG) can installedonly to slot 3.
nThe Single part Plug-in board can installed to any ofthree slots.
1 Turn the MOTIF power off, and disconnect theAC power cord. Also, make sure to disconnect theMOTIF from any connected external devices.
2 Remove the large screw from the expansion baycover on the rear panel using a Phillipsscrewdriver.
Keep the removed screw in a safe place. It will be usedwhen attaching the cover to the MOTIF again.
3 Remove the ribbon cables that are to be connected
to the Plug-in board from the inside of the MOTIF.The slots are assigned to the color-coded cables asfollows:
Slot 1 — OrangeSlot 2 — YellowSlot 3 — Green
GREENYELLOWORANGE
321Plug-in SLOT
OUTPUTASSIGNABLEOUTPUTL MO NO P H ON E S
A D IN P UTGAIN
L RR R L
GREENYELLOWORANGE
321Plug-in SLOT
OUTPUTASSIGNABLE OUTPUTL MO NO P H ON E S
A D IN P UTGAIN
L RR R L
MOTIF6 / MOTIF7
GREENYELLOWORANGE
321Plug-in SLOT
MOTIF8
GREENYELLOWORANGE
321Plug-in SLOT
OUTPUTASSIGNABLE OUTPUTL M ONO PHO NES
A DINPUTGAIN
R L R R L
GREENYELLOWORANGE
321Plug-in SLOT
Slot 3
Slot 2
Slot 1
Cable for Slot 3(Green)
Cable for Slot 2(Yellow)
Cable for Slot 1(Orange)

8/10/2019 motif_1(2)
http://slidepdf.com/reader/full/motif12 283/300

8/10/2019 motif_1(2)
http://slidepdf.com/reader/full/motif12 284/300
284 MOTIF Appendix
Installing Optional Hardware
Append i x
Either the mLAN expansion board (mLAN8E) or theI/O expansion board (AIEB 2) sold separately can be installed to the MOTIF.With the mLAN8E board, you can conveniently andeasily hook up your MOTIF to other mLAN-compatible instruments or devices. The AIEB 2 boardgives you additional digital I/O options, featuring bothoptical and coaxial connectors. Moreover, the boardalso includes three stereo ASSIGNABLE
OUTPUT pairs (six analog jacks).
Installing the AIEB2
1 Turn the MOTIF power off, and disconnect theAC power cord. Also, make sure to disconnect theMOTIF from any connected external devices.
2 Turn over the MOTIF so you can have directaccess to the underside. To protect the Knobs andWheels, place the keyboard so the four corners are
supported by something that provides sufficientsupport like magazines or cushions.
Be careful not to drop or bump the keyboard and makesure that it is well balanced before proceeding.
3 Remove the cover of the bottom. Unscrew thescrews on the bottom using the driver by placingthe back sides of the ripped over body facing to you(MOTIF6/ MOTIF7 has 7 screws and MOTIF 8 has 7 yellow screws.). Remove the cover from the body after unscrewing all the screws. ForMOTIF6/MOTIF7 place the back side facing toyou and slide the over toward front to remove thecover.
Keep the removed screws in a safe place. They will beused when attaching the cover to the MOTIF again afterinstalling the AIEB2.
4 Remove the three screws from the rear cover while holding it from inside the MOTIF with your left hand.
Keep the removed screws in a safe place. They will beused when attaching the cover to the MOTIF againwhen the AIEB2 is removed in the future.
View of the keyboardfrom the bottom.
PLG2
A B C D E F G H
15
CATEGORYSEARCH
OCTAVED O WN U P
KNOBCONTROLFUNCTION
P A N R E V E R B C H O R US T E M P O
A T T A CK R E L E A SEC U TOFFR ESON AN C E
A S S I G NA A S S I G N B A S S I G N 1 A S S I G N 2
K N1 K N2 K N3 K N4
M E QL O W M E QH I MI DM E Q LO W M I D M E Q H IG H
REMOTECONTROLON/OFF
EFFECTBYPASSARPEGGIOI N S E RT I O N S Y S T E M O N / O FF
MASTERVOLU ME
VOLU ME1VOLU ME2 VOLU ME3VOLU ME4
C S1 C S2 C S3 C S4
Z O N E 1 Z O N E 2 Z O N E 3 Z O N E 4
SEQTRANSPORT
L OCA TE 1 2
REC
MODE
VOIC EPER FOR M MASTER
SEQUENCERS O N G P A T T E R N F I L E
IN TEGR ATEDSAMPLIN G M I X I N G U T ILITY
E D IT J O B S T O R E
C O M P AR E S C E NE S T O R ESETLOC ATE
SON GSC EN ES F1 S F2 S F3 S F4 S F5
F1 F2 F3 F4 F6F5
IN FOR MATION
D EC /N O I NC /Y E S
E XI T E NT ER
EXEC U TE
MUSICPRODUCTIONSYNTHESIZERIntegratedSamplingSequencer
R eal-timeExternalC ontrolSurfaceModularSynthesisPlug-inSystem
D R U MKITS
FAVOR ITES
S L O T 1 S L O T 2 S L O T 3
P RE 1 P R E 2 P R E 3 G M U S E R P L G1 P LG 3
A.PIAN O KEYBOAR D OR GAN GU ITAR / PLU C KED
B A S S S T R I N G S B R A S S R E E D / P IPE
SYN LEAD SYN PAD / CHOIR
SYN C OMPC H R OMATICPER C U SSION
D R U M/ PER C U SSION
S E M U S IC A L F X C O M BI
1 2 3 4 5 6 7 8
9 10 11 12 13 14 16
SECTION
TRACKSELECT
MUTE
SOLO
BANK
GROUP
NUMBER
COMMON
ELEMEN T/PER F.PAR T/ZON E
Please the supports at all four cornerswithout touching the Knobs and the Wheels.
Underside of the MOTIF
Slide the coveraway to remove.
Bottom
Underside of the MOTIF
Bottom
MOTIF6 / MOTIF7
Do not removethis black screw.
MOTIF8
Underside of the MOTIF
Bottom
Underside of the MOTIFBottom
Underside of the MOTIF
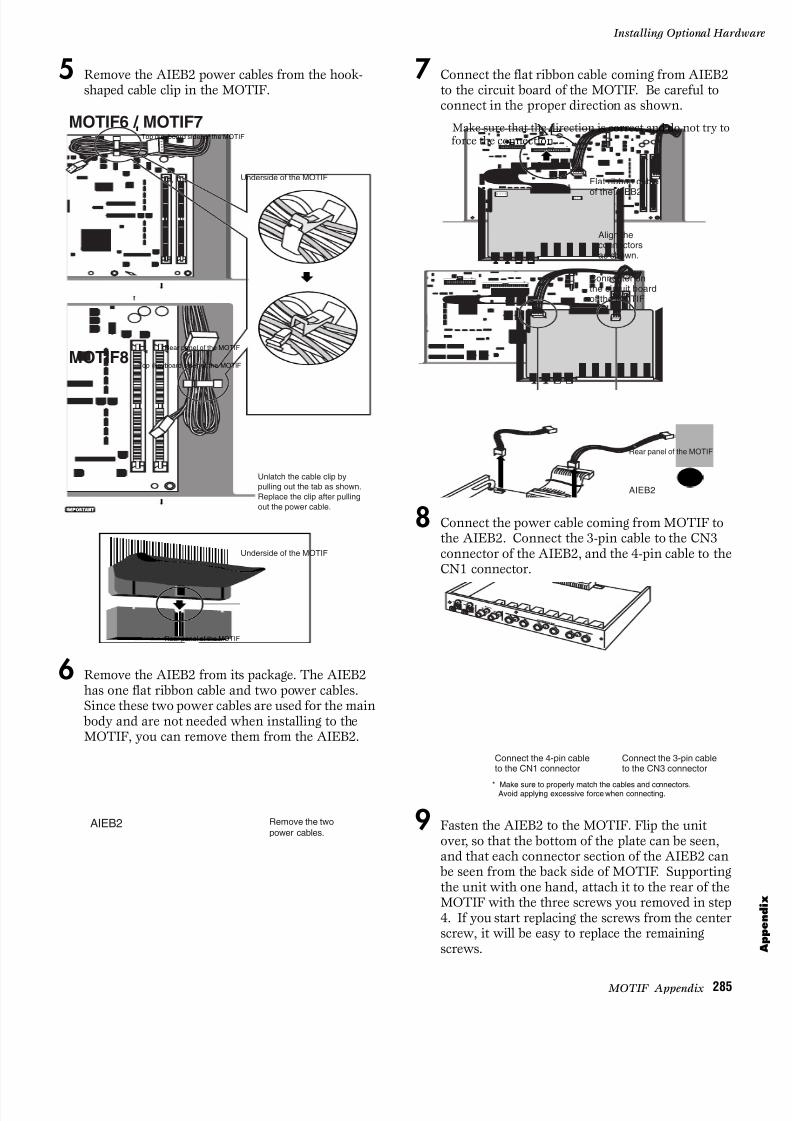
8/10/2019 motif_1(2)
http://slidepdf.com/reader/full/motif12 285/300
285 MOTIF Appendix
Installing Optional Hard
5 Remove the AIEB2 power cables from the hook-shaped cable clip in the MOTIF.
6 Remove the AIEB2 from its package. The AIEB2 has one flat ribbon cable and two power cables.Since these two power cables are used for the main body and are not needed when installing to theMOTIF, you can remove them from the AIEB2.
7 Connect the flat ribbon cable coming from AIEB2to the circuit board of the MOTIF. Be careful toconnect in the proper direction as shown.
Make sure that the direction is correct and do not try toforce the connection.
8 Connect the power cable coming from MOTIF tothe AIEB2. Connect the 3-pin cable to the CN3connector of the AIEB2, and the 4-pin cable to theCN1 connector.
9 Fasten the AIEB2 to the MOTIF. Flip the unitover, so that the bottom of the plate can be seen,and that each connector section of the AIEB2 can be seen from the back side of MOTIF. Supportingthe unit with one hand, attach it to the rear of theMOTIF with the three screws you removed in step4. If you start replacing the screws from the centerscrew, it will be easy to replace the remainingscrews.
Underside of the MOTIF
Underside of the MOTIF
MOTIF6 / MOTIF7
MOTIF8
Unlatch the cable clip bypulling out the tab as shown.Replace the clip after pullingout the power cable.
Rear panel of the MOTIF
Rear panel of the MOTIF
Top (keyboard side) of the MOTIF
Top (keyboard side) of the MOTIF
AIEB2 Remove the twopower cables.
CN5m-LAN
Rear panel of the MOTIF
AIEB2
Align theconnectorsas shown.
Flat ribbon cable
of the AIEB2
Connector onthe circuit boardof the MOTIF
CN5m-LAN
Connect the 4-pin cableto the CN1 connector
Connect the 3-pin cableto the CN3 connector
* Make sure to properly match the cables and connectors. Avoid applying excessive force when connecting.

8/10/2019 motif_1(2)
http://slidepdf.com/reader/full/motif12 286/300
286 MOTIF Appendix
Installing Optional Hardware
Append i x
10 Let the ribbon cable fall into place between the
AIEB2 and the circuit board of the MOTIF.
11Re-install the cover you removed in earlier steps,
in reverse order.
Installing the mLAN8E
1 Using the same procedure as in steps 1 - 4 of“Installing the AIEB2” above, remove the cover onthe underside of the MOTIF, then remove thecover of the mLAN/I/O expansion bay.
2 Remove the mLAN8E from its package andconnect the included flat ribbon cable. Securelyfasten the flat ribbon cable to the rear panel of themLAN8E. Make sure that the ribbon is at the bottom, as shown.
3 Hold the mLAN8E upside down, and insert theconnector on the other end of the flat ribbon cable,to the circuit board of the MOTIF.
Flip over the AIEB2 taking care not to bendor damage the flat ribbon cable.
AIEB2
CN5m-LAN
Underside of the MOTIF
Underside of the MOTIF
CN5m-LAN
AIEB2
Slide the flat ribbon cablein the space between the MOTIFand the AIEB2.
AIEB2
Rear panel of the MOTIF
Rear panel of the MOTIF
Make sure that flat ribbon cable is
at bottom of connector. Rear panel of mLAN8E
Make sure the flat ribbon cable sticks out fromthe bottom and that the panel printing "mLAN8E"can be seen.
Front panel of mLAN8E
Top of mLAN8E
CN5m-LAN
Underside of the MOTIF
Rear panel of the MOTIF
Front panel of mLAN8E
Align the connectors as shown.
Underside of mLAN8E
(This example illustration shows the MOTIF6/MOTIF7.)

8/10/2019 motif_1(2)
http://slidepdf.com/reader/full/motif12 287/300
287 MOTIF Appendix
Installing Optional Hard
4 Fasten the mLAN8E to the MOTIF. Flip the unitover, so that each connector section of themLAN8E can be seen from the back side ofMOTIF. Supporting the unit with one hand,attach it to the rear of the MOTIF with the threescrews you removed earlier. If you start replacingthe screws from the center screw, it will be easy toreplace the remaining screws.
5 Let the ribbon cable fall into place between themLAN8E and the circuit board of the MOTIF.
6 Re-install the cover you removed in earlier steps,in reverse order.
Optional SIMM Installation
You can increase the MOTIF’s sampling memory byinstalling commercially available SIMMs (singlein-line memory modules). This section explains how tocarry out the installation.
Important Information aboutPurchase of Expansion SIMMs forthe MOTIF
The MOTIF does not necessarily support allcommercially available SIMMs. Before purchasingSIMMs, please consult your Yamaha dealer or anauthorized Yamaha distributor (see list at end of theOwner’s Manual) for advice.Note that Yamaha cannot assume responsibility forSIMM malfunctions.
SIMM Type and SIMM Configuration• You need to use 72-pin SIMMs with access time of70ns or less. The SIMM module size may be 4MB,8MB, 16MB, or 32MB. The MOTIF is designed for usewith 32-bit (parity non-type) SIMMs, but can alsoaccept installation of 36-bit (parity-type) SIMMs.
• When purchasing SIMMs, make sure that the SIMMdesign does not utilize more than 18 memory chips permodule. (SIMMs comprised of more than 18 chips donot operate correctly on the MOTIF.)
• SIMMs must be installed in pairs: you can install two
SIMMs.• The MOTIF ships with 4MB of sampling memoryinstalled, and is capable of accessing up to 64MB. Seethe following illustrations for details. For example, ifyou add a pair of 16MB SIMMs, for example, youincrease the available sampling memory to a total of(4 + 16 x 2 =) 36MB. If you install a pair of 32MBSIMMs, however, the sampling memory size becomes64MB (and the original 4MB are effectively disabled).
Rear panel of the MOTIF
Underside of the MOTIF
CN5m-LAN
mLAN8E
Slide the flat ribbon cable in the spacebetween the MOTIF and the mLAN8E.
Underside of the MOTIF
Rear panel of the MOTIF
(This example illustration shows the MOTIF6/MOTIF7.)

8/10/2019 motif_1(2)
http://slidepdf.com/reader/full/motif12 288/300
288 MOTIF Appendix
Installing Optional Hardware
Append i x
• Yamaha recommends that you purchase SIMMs thatconform to the JEDEC* standard. Please be aware, however, that conformance to this standard does not
constitute a guarantee that the SIMMs will operatecorrectly on the MOTIF.
• JEDEC (Joint Electron Device Engineering Council) setsstandards for terminal configurations within electronicdevices.
SIMM Installation
1 Use the same operation as in “Installing the AIEB2.”
2 On the SIMM, there is a cut in the board next to
the 1PIN. Insert the board into the socket so thatthe 1PIN lines up with the 1PIN mark (▲) printedon the board.
nMake sure that the SIMM is securely inserted in thesocket of the MOTIF. Inserting the SIMM improperly orincompletely may result in faulty operation.
* To remove the SIMM, gently but firmly pull the fasteningclips open, then tilt the SIMM back and pull it out.
3 Set the SIMM into the socket at an angle as shownin the illustration above (1). Then push the SIMMupright until it clicks into the position shown infigure
4 Insert the remaining SIMM into the remainingsocket.
5 Re-install the cover you removed in earlier steps,in reverse order.
6 Check that the installed SIMMs are functioningproperly. Set the MOTIF right-side up, and connectthe power cord to the rear-panel AC INLET jack andan AC outlet. Turn on the power, go to theSAMPLING display, and press the[INFORMATION] button (page 276). If the SIMMs have been installed properly, the appropriateavailable memory size is indicated in the display.
4MB X 2
Internal memory4MB
12MB can be used for sampling.
8MB X 2
Internal memory4MB
20MB can be used for sampling.
16MB X 2
Internal memory4MB
36MB can be used for sampling.
32MB X 2
Internal memory4MB
64MB can be used for sampling.
Cutout
72PIN SIMM
to PNA to JK
CN25CN24 114
to PS
CN234
SIMM sockets
1PIN mark
Rear panel of the MOTIF
Underside of the MOTIF
Location for SIMM Installation
Tilt the SIMM and insert it into the socket.
Push the SIMM up vertically.Cutout
Installing the SIMM modules to the sockets
Pull open these clips.
Pull open these clips.
Tilt the SIMM module and pull it out.

8/10/2019 motif_1(2)
http://slidepdf.com/reader/full/motif12 289/300
289 MOTIF Appendix
Handling the Memory Card (SmartMedi
Handling theMemory Card (SmartMedia™*)
Be sure to handle Memory Cards with care. Follow theimportant precautions below.
* SmartMedia is a trademark of Toshiba Corporation.
■ Compatible Memory Card Type3.3V(3V) Memory Cards can be used. 5V type MemoryCards are not compatible with this instrument.
■ Memory Capacity There are five types of Memory Cards: 2MB/4MB/8MB/16MB/32MB. A Memory Card with the memorycapacity exceeding 32MB can also be used if itconforms to the standards of SSFDC (Solid StateFloppy Disk Card: another name of SmartMedia)Forum.
■ Inserting/Removing Memory Cards
• To insert a Memory Card:Hold the Memory Card so that the connectorsection (gold) of the Memory Card is facingdownward and forward, towards the MemoryCard slot. Carefully insert the Memory Card intothe slot, slowly pushing it all the way in until it isfitted in place.
n Don’t insert the Memory Card in wrong direction.
Don’t insert anything other than a Memory Card inthe slot.
• To remove a Memory Card:Before removing the Memory Card, be sure toconfirm that the Memory Card is not in use, or itis not being accessed by the instrument. Then pullthe Memory Card out slowly by hand. If theMemory Card is being accessed*, a messageindicating that it is in use appears on theinstrument's display.
* It includes saving, loading, formatting, deleting andmaking directory. Also, be aware that the instrument will
automatically access the Memory Card to check themedia type when it is inserted while the instrument isturned on.
Never attempt to remove the Memory Card or turn thepower off during accessing. Doing so can damage thedata on the instrument/Memory Card and possibly theMemory Card itself.
■ Formatting Memory CardsBefore using a Memory Card with your instrument itmust first be formatted. Once it is formatted all data onit will be erased. Be sure to check if the data isunnecessary for you or not, beforehand.
nThe Memory Cards formatted with this instrument may become unusable with other instruments.
■
About the Memory Cards• To handle Memory Cards with care:
There are times when static electricity affectsMemory Cards. Before you handle Memory Cards,to reduce the possibility of static electricity, touchthe metal parts such as a door knob and aluminumsash. Be sure to remove the Memory Card from theMemory Card slot when it is not in use for a long time.Do not expose the Memory Card to directsunlight, extremely high or low temperatures, orexcessive humidity, dust or liquids.Do not place heavy objects on a Memory Card or bendor apply pressure to the Memory Card in any way.Do not touch the metal part (gold) of the MemoryCard or put any metallic plate onto the metal part.Do not expose the Memory Card to magneticfields, such as those produced by televisions,speakers, motors, etc., since magnetic fields canpartially or completely erase data on the MemoryCard, rendering it unreadable.Do not attach anything other than the provided labels to a Memory Card. Also make sure that labels are attached in the proper location.
• To protect your data (Write-protect):
To prevent inadvertent erasure of important data,stick the write-protect seal (provided in theMemory Card package) onto the designated area(within a circle) of the Memory Card. Converselyspeaking, to save data on the Memory Card, makesure to remove the write-protect seal from the Card.Do not reuse the seal that is peeled off.
■ Data BackupFor maximum data security Yamaha recommends thatyou keep two copies of important data on separateMemory Cards. This gives you a backup if one MemoryCard is lost or damaged.
■ Burglarproof Lock This instrument is equipped with a burglarproof lockfor the Memory Card. If necessity arises, mount the burglarproof lock onto the instrument.
To mount the burglarproof lock:
1 Remove the metallic part using a Phillipsscrewdriver.
2 Turn the metallic part upside down and thenmount it again.

8/10/2019 motif_1(2)
http://slidepdf.com/reader/full/motif12 290/300

8/10/2019 motif_1(2)
http://slidepdf.com/reader/full/motif12 291/300
291 MOTIF Appendix
Connecting external SCSI de
4 Attach the terminator to the SCSI connector (whichever one of the two is not connected) of the lastdevice in the daisy-chain. Alternatively, turn on the terminator switch of that device.
5 Make sure that the terminator switch is turned OFF for all other devices in the daisy-chain (i.e., alldevices other than the last device).
6Turn on the power of the external SCSI device(s), and after waiting several seconds, turn on thepower of the MOTIF.
NOTE
Many articles and books concerning SCSI are available. However most of them discuss only the concepts or thespecification, and do not tell you what to do if the system does not work when connected as described. The followingparagraphs will provide more information about SCSI that will help you correct problems which may occur whenSCSI devices are connected. Please read this material if you experience problems. Please be aware that whenconnecting SCSI devices, problems with termination and cabling can cause valuable data to be damaged. We regretthat Yamaha can take no responsibility regarding any data which is lost.
■ Realities of terminator installationAlthough we have said that a terminator is required at the beginning and end of the SCSI bus, this is a generalprinciple and not a requirement. For example if the bus is extremely short (45 cm or less), there are cases in which itis best for there to be a terminator only on one or the other end. However if other drives are connected in addition tothese drives, the situation will again be different.Also, if the SCSI devices are separated by more than 3 meters, it is said that using a terminator at the 3 meter point ispreferable. In this case, three or more terminators will exist within the SCSI bus.In this way, the theory and practice of SCSI connections can differ widely. Simply changing a drive in a system that had been working correctly can cause operation to become unreliable, or adding a drive to an unreliable system cancause it to start working correctly. In practice, a certain amount of trial and error is necessary.
■ Reasons for SCSI errorsA SCSI bus operates stably only if all the connected SCSI devices are operating correctly. If any of the devices areproducing noise, the other devices will also produce errors, and in the worst case, the boot block of a drive can bedestroyed. (All data in that drive will be lost.)Also, there are cases in which a system on which data appears to have saved may not have actually saved the data,resulting in data loss.The following paragraphs will discuss the reasons for such errors, and will provide a sequence for yourtroubleshooting.
• Check the SCSI IDMake sure that there is no conflict between the SCSI ID of each SCSI device including the MOTIF. When shipped from the factory,the MOTIF's SCSI ID is set to 6. Be sure to turn off the power before changing the SCSI ID setting.
• Check the terminatorAs discussed above, check the location where the terminator is attached.
• Check the SCSI cablesLow-quality SCSI cables will almost always create problems. Always use double-shielded cables. It is also important that the shield be grounded inside the connector. Long SCSI cables frequently cause problems, so use as short a SCSI cable as possible. Bending ortwisting a SCSI cable in a confined space can cause conductors to break or pins to be broken, so be careful to avoid this.
Yamaha cannot guarantee operation if the SCSI connector of the MOTIF is connected via a converter to any external device otherthan a 50-pin SCSI device, such as a Wide SCSI, ATA (IDE), USB, or IEEE 1394 device.

8/10/2019 motif_1(2)
http://slidepdf.com/reader/full/motif12 292/300
292 MOTIF Appendix
Notes on musical copyright
Append i x
Notes on musical copyrightThe MOTIF supports SCMS (Serial Copy Management System) to protect the copyrights of music software. Datathat was digitally sampled from a CD or other source cannot be saved on a memory card or SCSI disc in WAV/AIFFformat, and cannot be transmitted by using the TWE software. If you wish to save this data, you must save it in theMOTIF’s own format.
It is prohibited to use copyrighted songs and sound data (that can be recorded via the MOTIF) for commercialpurposes. It is also prohibited to reproduce, transfer, or distribute the data, or play the data for a commercial audience
without permission from the owners of the copyright, except for personal use or application that does not infringethe copyright. If you wish to use such data for occasions other than personal use, consult a copyright expert. Yamahais not responsible for any data created, reproduced, or edited using the MOTIF, nor for any reproduction or use ofsuch data.

8/10/2019 motif_1(2)
http://slidepdf.com/reader/full/motif12 293/300
293 MOTIF Appendix
SpecificationsKeyboards MOTIF8 88 keys, Balanced Hammer Effect Keyboard (Initial Touch/Aftertouch)
MOTIF7 76 keys, FS Keyboard (Initial Touch/Aftertouch)MOTIF6 61 keys, FS Keyboard (Initial Touch/Aftertouch)
Tone Generator block Tone Generator AWM2 (complying with the Modular Synthesis Plug-in System)
Polyphony 62 notes + the polyphony of the Plug-in Board (if installed)
Multi Timbral Capacity 16 parts (internal) + 3 or more Plug-in Board parts (1 for each Single Plug-in Board;16 for Multi Plug-in Board), A/D Input
Wave 84MB (when converted to 16- bit linear format), 1309 waveforms
Voice Preset: 384 normal voices + 48 drum kitsGM : 128 normal voices + 1 drum kit User: 128 normal voices + 16 drum kits
Plug-in Voice Preset for the PLG150-AN/PF/DX: 64Preset for the PLG-150VL: 192User: 64 for each Plug-in slot
Performance User: 128 (up to 4 parts)
Filter 21 types
Effect System Reverb x 12 types, Chorus x 25 types, Insertion 1 x 25 types, Insertion 2 x 10⁴ types, Variation x 25 types(available for Performance/Song), Master Equalizer (5 bands), Plug-in Insertion (available when the PLG100-VH
has been installed to slot 1)
Expandabi lity 3 Slots for Modular Synthesis Plug-in Boards
Sampling block Samples Up to 256 Waveforms (Multi Samples)Up to 128 Key Banks per WaveformUp to 8192 Key Banks
Sampling Source Analog input L/R, Stereo output (Resampling), Digital/Optical (available when the AIEB2 has been installed),mLAN (available when the mLAN8E has been installed)
A/D Conversion 20-bit, 64 x oversampling
D/A Conversion 24-bit, 128 x oversampling
Sample Data Bits 16
Sampling Frequency 44.1kHz, 22.05kHz, 11.025kHz, 5.5125kHz (Stereo/Mono)
• Digital Sampling Frequency (when the AIEB2 has been installed) 48kHz, 44.1kHz, 32kHz
* Can be input, with converted to the Sampling Frequency of the MOTIF.
• Sampling Frequency via the mLAN (when the mLAN8E has been installed) 44.1kHz (fixed)
Sampling Memory 4MB, expandable to 64MB (32MB SIMM x 2 slots)* The original 4MB are disabled when a pair of 32MB SIMMs have been installed.
Sample Length Mono: 32 MBStereo: 64 MB
Sampling Time (when a pair of 32MB SIMMs have been installed)44.1kHz: 6 min. 20 sec., 22.05kHz: 12 min. 40 sec., 11.025kHz: 25 min. 20 sec., 5.0125kHz: 55 min. 40 sec.* Mono/Stereo
Sample Format Original format, WAV, AIFF, A3000/4000/5000/SU700 format (loadable only via SCSI),
AKAI S1000/S3000 format (loadable only via SCSI)

8/10/2019 motif_1(2)
http://slidepdf.com/reader/full/motif12 294/300
294 MOTIF Appendix
Specifications
Append i x
Sequencer block Note Capacity Approx. 111,000 notes
Note Resolution 480 ppq (parts per quarter note)
Maximum Polyphony 124 notes
Tempo 1 - 300
Recording type Real time replace, Real time overdub (with the exception of the Pattern Chain),Real time punch (Song only), Step (with the exception of the Pattern Chain)
Tracks Pattern Mode : 16 phrase tracksPattern Chain Mode : Pattern track, Tempo track, Scene trackSong Mode : 16 sequence tracks (Loop on/off can be set for each track), Tempo track, Scene track
Patterns User Patterns : 1024 (64 styles x 16 sections)Measures : 256 maximum
Phrases Preset Phrases : 128 Drum PhrasesUser Phrases : 256 per style
Songs 64 songs
Arpeggio Preset 1 x 128 typesPreset 2 x 128 typesUser x 128 types* MIDI Sync, MIDI transmit/receive channel, Velocity Limit, and Note Limit can be set.
Scene Memory 5 per Song
Scequence Format Original format, SMF format 0, 1 (Format 1 load only)
Others Master User: 128
Sequence Software controlled via the Remote Control function• For Windows ®
Cubase VST™ V5.0, Logic Audio ® Platinum Ver4.6, Cakewalk Pro Audio™ Ver9.0, Pro Tools ® V5.0• For Macintosh ®
Cubase VST™ V5.0, Logic Audio ® Platinum Ver4.6, Pro Tools ® V5.0
Controllers Pitch Bend wheel, Modulation wheel, Assignable Control Slider x 4, Assignable Knob x 4, Rotary Encoder
Display 240 x 64 dot graphic backlit LCD
External Memory Smart Media™ (3.3V)* Up to 128MB can be used.
Connectors OUTPUT L/MONO, R (standard phone jack)ASSIGNABLE OUTPUT L, R (standard phone jack)AD INPUT L, R (standard phone jack)PHONES (standard stereo phone jack)FOOT CONTROLLER 1, 2FOOT SWITCH x 2 (SUSTAIN, ASSIGNABLE)BREATH, MIDI IN/OUT/THRU, SCSI, USB, OPTICAL OUTPUT, AC INLET
Dimensions, Weight MOTIF8: 1,458(W) x 465(D) x 166(H)mm, 28.0kgMOTIF7: 1,255(W) x 397(D) x 135(H)mm, 18.1kgMOTIF6: 1,048(W) x 397(D) x 135(H)mm, 15.8kg
Supplied Accessories Power cord, Owner's Manual Set TOOLS for MOTIF6/MOTIF7/MOTIF8 CD-ROM
Specifications and descriptions in this owner's manual are for information purposes only. Yamaha Corp. reserves the right to change or modify products or specifications at anytime without prior notice. Since specifications, equipment or options may not be the same in every locale, please check with your Yamaha dealer.

8/10/2019 motif_1(2)
http://slidepdf.com/reader/full/motif12 295/300

8/10/2019 motif_1(2)
http://slidepdf.com/reader/full/motif12 296/300
Append i x
296 MOTIF Appendix
DRUM ...................................................................................42Drum Key Edit .............................................................148, 150Drum Pattern ..........................................................................55Drum Voice Edit ..................................................................148DryLevel ......................................................................163, 172Dual BEF .............................................................................142Dual BPF ..............................................................................141Dual HPF .............................................................................141Dual LPF ..............................................................................141DumpExIntrval ....................................................................255
E[E] indicator ....................83, 127, 129, 163, 165, 205, 269, 270each-on .................................................................................135Echo .......................................................................................27Edit Buffer .............................................................................64Edit mode ...............................................................................70Edit Recall ............................................................158, 175, 213Editing and saving Board voices ...........................................87Editing Performances (Layer/Split) .......................................89Editing Stereo Samples ........................................................240Editing/Deleting Existing Events......................................... 190Effect ......................................................39, 137, 149, 155, 169Effect block ............................................................................39[EFFECT BYPASS] buttons ................................................. 13Effect Bypass .................................................................13, 252Effect connection .......................... 40, 137, 149, 155, 169, 210Effect Plug-in Board ..............................................................35Effect Send .....................................................85, 172, 206, 211Effect structure .......................................................................39EF PART ..............................................................................169EG (=Envelope Generator).................................... 83, 128, 164EG Level ......................................................................139, 143
EG Time ...............................................................................139EG Time Sens ......................................................................140Element ..................................................................................44Element edit .................................................129, 137, 153, 156ElementSw................................................... 134, 136, 137, 150EL:OUT ............................................................................... 137end ........................................................................................183End .......................................................................................238End point ........................................................................62, 238[ENTER] button..................................................................... 15Entering other events ...........................................................186Entering the Note Event .......................................................185Envelope Generator (EG) ......................................................47EQ (Equalizer) .....................................................148, 153, 157Equalizer ................................39, 148, 153, 157, 168, 209, 253Erase Event ..................................................................199, 227Event ....................................................................185, 190, 224Event Editing/Inserting/Deleting .................................190, 224Event Job ......................................................................198, 227Event Type ...................................................................199, 200
Event View Filter .........................................................192, 224Exchange Phrase ..................................................................228Exchange Track ........................................................... 202, 230[EXIT] button ........................................................................14Extract ..................................................................................243Extract Event ................................................................199, 227
F[F1] - [F6] (Function) buttons.......................................... 14, 71Factory Set (Restore Factory Defaults) ...............................260Fade In/Out ..........................................................................245FadeInTime ..........................................................................136FadeOutTime .......................................................................136Favorite Category ..........................................................81, 127FEG (Filter Envelope Generator) ....47, 83, 143, 152, 173, 211FEGDepth ............................................................................173File ...............................................................................262, 263File/Folder selection ............................................................262File mode ................................................. 32, 68, 261, 262, 276
File names ............................................................................264File types that can be handled by the MOTIF .....................262File Utility ............................................................................118FileUtilID .............................................................................258Filter ...............................46, 140, 154, 155, 156, 173, 211, 255Filter Envelope Generator ................47, 83, 143, 152, 173, 211Filter type .......................................................................46, 140Fine ......................................................................138, 151, 244Fine Tune .............................................................................241fingered ........................................................................128, 131FixedNoteMode ...................................................................203Fixed Velocity ......................................................................251FMod ....................................................................148, 154, 155Folder ................................................................................... 262Foot Controller....................................................................... 49FOOT CONTROLLER jacks ................................................ 18FOOT SWITCH jacks ........................................................... 18Footswitch ................................................................18, 49, 256
Format ................................................................................. 265Formatting Memory Cards .................................................. 289Forward button ...................................................................... 14Front Panel ............................................................................ 10Freq ............................................................................. 168, 254fulltime ........................................................................ 128, 131Function ................................................................................ 71Function Tree (File Mode) .................................................. 261Function Tree (Master Mode)............................................. 268Function Tree (Pattern Mode) ............................................. 215Function Tree (Performance Mode) .................................... 160Function Tree (Sampling) ................................................... 233Function Tree (Utility Mode) .............................................. 249
GGain ..................................................................... 142, 168, 254GAIN knob ............................................................................ 18GATE OFST ....................................................................... 182GateTime ............................................................................. 194Gate Time Rate ................................................................... 134Get Phrase From Song ........................................................ 229Glide ............................................................................ 196, 226GlideTime ........................................................................... 196GM voice ............................................................................... 45Grid ..................................................................................... 197Groove ................................................................. 106, 181, 218GROUP ............................................................................... 124GROUP [A] - [H] buttons ..................................................... 15
HHighFreq ............................................................................. 157HighGain ............................................................................. 157
High Pass Filter ..................................................................... 46Hold ............................................................................. 189, 255HoldTime ............................................................................ 136How to leave the current display ........................................... 72HPFCutoff ........................................................................... 156HPF Cutoff .......................................................................... 142HPF KeyFlw ....................................................................... 142HPF12 ................................................................................. 141HPF12BPF6 ........................................................................ 142HPF24D .............................................................................. 141
IIEEE1394 interface ............................................................... 26[INC/YES] button ......................................................... 14, 126[INFORMATION] button..................................................... 14Information Display ...................................................... 73, 275Initialize ...................................................... 158, 175, 212, 274Input .................................................................................... 252
InsConnect .......................................................................... 137Ins1Category ....................................................................... 137Ins1Type .............................................................................. 137Ins2Category ....................................................................... 137Ins2Type .............................................................................. 137InsChoSend ......................................................................... 149InsEF ................................................................................... 173InsEffectOut ........................................................................ 138Inserting New Events .......................................................... 190Inserting/Removing Memory Cards .................................... 289Insertion ........................................................ 39, 137, 150, 155Insertion Effects .................................................................... 39InsRevSend ......................................................................... 149Installation Precautions ....................................................... 281Installing Optional Hardware .............................................. 281Interface settings ................................................................. 252Internal AWM2 Tone Generator ........................................... 34Internal Memory ................................................................... 64Internal Memory and File Management ................................ 63
JJob mode ............................................................................... 70Jumping to an assigned Location ........................................ 180
KKBDTransCh ...................................................................... 258KeyAsgnMode .................................................................... 131Key Bank ............................................................... 59, 235, 242Key Bank Job ...................................................................... 242Keyboard ............................................................................. 251Keyboard Octave ........................................... 82, 127, 162, 269Keyboard MIDI Transmit Channel ..................... 127, 162, 269Keyboard Transmit Channel ............................................... 258Key follow ................................................... 139, 142, 143, 146KeyMode ............................................................................. 133
KeyOnSync ......................................................................... 147Key OnDelay................................................................ 138, 147Key On Reset ...................................................................... 135Knob ...................................................................................... 65KnobAssign ......................................................................... 132Knob/Slider ......................................................................... 273[KNOB CONTROL FUNCTION] button ............................. 12
LLayer ...................................................................................... 57LCD Contrast Control ........................................................... 14LCD Display ......................................................................... 14Level ...................................... 61, 139, 143, 145, 146, 152, 241Level/Pan ..................................................................... 145, 152LevelSens ............................................................................ 146LFO (Low Frequency Oscillator) .......... 47, 135, 136, 147, 157Limit ...................................................................... 92, 170, 210LIMIT H .............................................................................. 164LIMIT L .............................................................................. 164Load ............................................................................... 98, 266LoadMix .............................................................................. 255Local On/Off ......................................................................... 26Local Ctrl (Local Control) ................................................... 258Location ............................................................................... 180Locations to which the optional units are installed ............. 281Logic Audio Plutinum Ver4.6 ............................................. 257Loop .............................................................. 62, 222, 238, 241Loop Recording (Pattern) ...................................................... 53Loop-Remix ........................................................................ 246Low Frequency Oscillator ..................................................... 47Low Pass Filter ...................................................................... 46LowFreq .............................................................................. 157Lowest Key ......................................................................... 246
LowGain .............................................................................. 157LPFCutoff.................................................................... 151, 152LPF Reso ............................................................................. 151LPF12 .................................................................................. 141LPF12BPF6 ......................................................................... 142LPF12HPF12 ....................................................................... 142LPF18 .................................................................................. 140LPF18s ................................................................................ 140LPF24A ............................................................................... 140LPF24D ............................................................................... 140LPF6 .................................................................................... 141
MMain functions....................................................................... 42manual ................................................................................... 61Master.................................................................................... 56Master Edit mode .................................................... 32, 70, 270Master editing in the Master Play mode ..............................269
Master EQ ............................................................................. 85Master EQ Offset ................................ 131, 149, 154, 166, 208Master Equalizer ........................................... 39, 168, 209, 253Master Job mode ........................................................... 32, 273Master mode .................................................................... 32, 56Master Keyboard ............................................................. 93, 95Master Play mode .................................................... 32, 68, 269Master Selection .................................................................. 269Master Store mode ........................................................ 32, 274MASTER VOLUME............................................................. 12Maximum Polyphony ............................................................ 36meas....................................................................................... 61Measure ............................................................................... 238Measure Job......................................................................... 201Memorize to a Master ........................................................... 93Memory ............................................................................... 270Memory Card ...................................................................... 289Memory Card/External SCSI storage device ........................ 64Memory Structure ................................................................. 63Meter ................................................................................... 238Mic/Line .............................................................................. 253
MIDI.................................................................................... 260MIDI bulk data transmission/reception won’t work properly. ..280MIDI Channel ..................................................................... 258MIDI events that can be edited ............................................224MIDI events that can be inserted (edited) ........................... 190MIDI IN/OUT/THRU connectors......................................... 18MIDI interface ....................................................................... 26MIDI recording to Song Tracks .......................................... 110MIDI settings....................................................................... 258MIDISwitch......................................................................... 272MIDI track recording method................................................ 53MIDI tracks ........................................................................... 52MicroTuning........................................................................ 131Mix Phrase........................................................................... 228Mix Track ............................................................................ 202Mixing mode (in the Song/Pattern mode)............................. 68mLAN connection ............................................................... 253mLAN (IEEE1394) connector1, 2, 3..................................... 19

8/10/2019 motif_1(2)
http://slidepdf.com/reader/full/motif12 297/300
297 MOTIF Appendix
mLAN expansion board (mLAN8E) or I/O expansion board(AIEB2) cover........................................................................ 18mLAN interface ..................................................................... 24mLAN8E.......................................................... 24, 26, 284, 286mLAN-compatible audio equipment ..................................... 23Mode ................................................ 30, 67, 131, 171, 254, 270MODE buttons....................................................................... 14Modify Control Data.................................................... 200, 228Modify Gate Time ....................................................... 195, 226Modify Velocity........................................................... 195, 226MODULAR SYNTHESIS PLUG-IN SYSTEM................... 35MODULATION wheel.......................................................... 12Modulation Wheel ......................................................... 48, 154Mono/Poly ................................................... 128, 131, 170, 210
Mono/Stereo................................................................. 163, 236Mount................................................................................... 265Move .................................................................................... 243Moving the cursor.................................................................. 72MTC..................................................................................... 259MTC StartOffset.................................................................. 259Multi-Part Plug-in Board....................................................... 35[MUTE] button ......................................................................15Mute................................................................. 65, 88, 180, 218
NName............................................ 130, 149, 154, 166, 247, 271Naming................................................................................... 75Native................................................................................... 156Native System Parameter..................................................... 260New Folder Creation............................................................ 262No effect is applied.............................................................. 280No sound.............................................................................. 279Normal Common ................................................................. 137
Normal Voice......................................................................... 45Normal Voice Edit............................................................... 129Normalize............................................................................. 243Normalize Play Effect.................................................. 203, 230Non Registered Parameter Number (NRPN)....................... 192Note...................................................... 190, 196, 197, 247, 272Note Data(when the Sample type is set to “Sample + Note” ) .....59Note data Job ............................................................... 193, 225Note limit............................................................................. 133Note name.................................................................... 190, 191Note (Key) settings ................................................................ 75Number ........................................................ 124, 150, 156, 170NUMBER [1] - [16] buttons.................................................. 15Note...................................................................... 196, 197, 247Note Limit............................................................................ 133NOTE OFST........................................................................ 182NoteShift.............................................................. 156, 173, 250NumberOfTimes.......................................................... 198, 221NumberOfTimes.................................................................. 200NRPN MSB-LSB................................................................. 192
OOctave .................................................................. 247, 251, 272OCTAVE [UP] and [DOWN] buttons................................... 12Offset ........................................................................... 195, 200OFFSET 1 ~ 4.............................................................. 144, 146One Shot ................................................................................61Oneshot ................................................................................241Only one note sounds at a time............................................ 280OPTICAL IN, OUT connectors............................................. 19OPTICAL OUT connectors ................................................... 18OPTICAL OUTPUT connector ............................................. 22Optimize Memory................................................................ 248Optional units that can be installed to the MOTIF .............. 281Original Key ........................................................................ 241Oscillator........................................ 45, 137, 138, 150, 151, 156Other ........................................................................................... 132, 149, 151, 154, 156, 167, 171, 208, 210, 252, 255, 259, 271Other Jobs............................................................................ 247
Output .................. 132, 138, 149, 150, 154, 167, 172, 211, 253Output channel............................................. 168, 182, 209, 218OUTPUT L/MONO and R jacks ........................................... 18Output Select.................................................150, 164, 173, 211OutputSwitch ............................................................... 169, 254Overdub ................................................................................. 53
PPan ......... 85, 132, 145, 152, 163, 167, 172, 189, 211, 241, 272Parameter ............................................................................. 241Part........................................................................... 36, 37, 235Part Edit ....................................................... 165, 170, 207, 210Part structure of the Tone Generator block............................ 36PartSwitch............................................................ 164, 165, 167Patch....................................................................... 52, 105, 219Patch Clear........................................................................... 219
Pattern ................................................................................... 51Pattern Chain................................................................. 54, 219Pattern Chain Editing .......................................................... 220Pattern Chain mode............................................................. 108Pattern Chain Record mode ................................................ 108Pattern creation by the Patch function (Pattern) ................... 52Pattern Edit mode.................................................... 31, 70, 224Pattern editing in the Pattern Play mode............................. 218Pattern Job........................................................................... 231Pattern Job mode........................................................... 31, 225Pattern Mixing..................................................................... 107Pattern Mixing Edit mode..................................................... 70Pattern Mixing mode....................................... 31, 68, 232, 276Pattern mode ......................................................... 31, 215, 276
Pattern Play mode ........................................... 31, 67, 217, 276Pattern Record mode............................................... 31, 69, 221Pattern Recording................................................................ 223Pattern track on/off — Solo and Mute................................ 218Pattern track selection ......................................................... 218PB Range............................................................................. 171PBRange.............................................................................. 196PB Upper, Lower ................................................................ 171PBUpper.............................................................................. 132PBLower ............................................................................. 132PEG (Pitch Envelope Generator) .......................... 46, 139, 156Performances......................................................................... 42Performance Copy............................................................... 213Performance Edit mode........................................... 31, 70, 165Performance editing in the Performance Play mode........... 163Performance Job mode.................................................. 31, 175Performance mode ................................................ 31, 160, 275Performance Part on/off ................................................ 88, 163Performance Play mode .......................................... 31, 67, 162Performance Selection ........................................................ 162Performance Store mode............................................... 31, 176
PgmChange ................................................................. 258, 272Phase ................................................................................... 135PHONES jack ....................................................................... 18Phrase.............................................................................. 52, 55Phrase Data Copy................................................................ 219Phrase Job ........................................................................... 228Phrase Name ....................................................................... 230Piano Plug-in Board .............................................................. 35Pitch ...................................................... 46, 139, 151, 155, 244Pitch Bend ........................................................................... 190PITCH bend wheel................................................................ 12Pitch Bend Wheel.................................................................. 48Pitch Envelope Generator ..................................................... 46Pitch or intervals are wrong. ............................................... 280PitchSens............................................................................. 139Play button ............................................................................ 14Play FX (Effect) .................................. 133, 149, 154, 168, 209Playing Performances ........................................................... 88PlayMode ............................................................................ 241Play mode .............................................. 67, 130, 154, 170, 210
PLG100-VH.......................................................................... 35PLG100-XG.......................................................................... 35PLG150-AN.......................................................................... 35PLG150-DX.......................................................................... 35PLG150-PF ........................................................................... 35PLG150-VL .......................................................................... 35Plugin All Bulk ................................................................... 263Plug-in Bank ....................................................................... 128Plug-in board......................................................................... 34Plug-in board cover............................................................... 19Plug-in board does not work. .............................................. 280Plug-in board line-up ............................................................ 35Plug-in board settings.......................................................... 259Plug-in Insertion.................................................... 39, 170, 210Plug-in Voice ................................................................ 87, 153Plug-in Voice Edit............................................................... 153PMod........................................................... 147, 154, 155, 157Pointer ................................................................................. 185PolyExpand ......................................................................... 259Polyphonic Aftertouch (PAT)............................................. 191Port.......................................................................... 36, 37, 182Portamento............ 83, 128, 131, 154, 164, 167, 171, 210, 275Port Number........................................................................ 260PortaSw ....................................................................... 128, 164Porta Time................................................................... 128, 164PortaMode........................................................................... 128PowerOnMode .................................................................... 252Power Supply ........................................................................ 20POWER Switch..................................................................... 18Powering Up ......................................................................... 29Power-on Procedure.............................................................. 29Preset................................................................................... 272Preset Phrase ................................................................. 52, 105pre wave (preset wave) ....................................................... 150Pro Tools V5.0.................................................................... 257Procedure (Connecting ex. SCSI)....................................... 290Program Change.................................................................. 191Punch In/Out (Song) ............................................................. 54Punch-in Waiting ................................................................ 237
Put Phrase To ARP.............................................................. 203Put Phrase To Song ............................................................. 229
QQ .......................................................................... 148, 168, 254Quantize ...................................................................... 194, 225Quick Voice editing .............................................................. 83
RRAM...................................................................................... 64Range................................................................................... 241
Rate.............................................................................. 195, 200Ratio ............................................................................ 243, 244RcvBulk............................................................................... 258Realtime Recording............................... 53, 103, 111, 185, 223Realities of terminator installation ...................................... 291Recall Buffer ......................................................................... 64RecGain ............................................................................... 237RecMonitor.......................................................................... 237Random ............................................................................... 138RandomPan ................................................................. 145, 152RcvNoteOff ......................................................................... 151Rear Panel ............................................................................. 16Receive Switch ............................................................ 174, 212[REC] (Record) button .......................................................... 14Record button ........................................................................ 14Record mode ......................................................................... 69Recording Arpeggios to a Song/Pattern ................................ 55Recording MIDI data to a Pattern Track............................. 102Recording Track .......................................................... 185, 221Recording type ............................................................ 184, 222
RecTrack ............................................................................. 185Registered Parameter Number (RPN)................................. 191RELEASE ............................................................................. 85Release ................................................................................ 174Remote Control ..................................... 65, 119, 120, 256, 257[REMOTE CONTROL ON/OFF] button ............................. 13Rename................................................................................ 267Replace .................................................................................. 53resample ...................................................................... 234, 236Resonance................................................ 46, 85, 142, 143, 173REST ........................................................................... 185, 188Reverb ............................. 39, 85, 137, 150, 155, 170, 210, 275Reverb Pan .................................................................. 137, 170Reverb Return ............................................................. 137, 170Reverse .......................................................................... 62, 241Reverse button....................................................................... 14RevSend .............................................................. 163, 167, 172Reverb Send ........................................................................ 137Reverb Type ................................................................ 137, 170ROM...................................................................................... 64RPN MSB-LSB................................................................... 192
SSample................................................................................. 236Sample Edit ......................................................................... 241Sample playback types .......................................................... 61Sample selection.................................................................. 240Sample track recording method (Sampling).......................... 54Sample tracks — with Sample Voices.................................. 52Sample Voice ........................................................................ 59sample + note ...................................................................... 236Sampling.......................................................... 58, 99, 100, 113Sampling data common to all modes .................................... 59Sampling Destination settings ............................................. 235Sampling Edit mode ................................................ 31, 70, 240Sampling Job mode ....................................................... 31, 241Sampling mode................................................ 31, 67, 233, 276Sampling Record mode ........................................... 31, 69, 234Sampling Setup ................................................................... 235
Sampling Source settings .................................................... 236Sampling Standby ............................................................... 237Sampling to a Pattern Track ................................................ 100Sampling to a Song Track ................................................... 113Save ....................................................................... 97, 262, 266Saving and Exporting the recorded song to external PC(File Utility)......................................................................... 118Scaling ......................................................................... 144, 146Scaling Pan .................................................................. 145, 146SCAN .................................................................................. 265Scaling Pan .......................................................................... 145Scene ........................................................................... 115, 181SCSI ............................................................................ 291, 292SCSI connectors .................................................................... 18SCSI device ..................................................................... 27, 64SCSI error............................................................................ 291SCSI ID ............................................................................... 265[SECTION] button ................................................................ 15

8/10/2019 motif_1(2)
http://slidepdf.com/reader/full/motif12 298/300
Append i x
298 MOTIF Appendix
Section ................................................................................... 52Section Selection.................................................................. 218Segment ............................................................... 139, 143, 145Selecting a Performance ........................................................ 88Selecting Functions and Parameters ...................................... 71Selecting Modes..................................................................... 67Selecting the controllable functions....................................... 84SELF.................................................................................... 265SEND (Effect Send)............................................................. 206SendXGon............................................................................ 255Sens...................................................................................... 239Separate Chord............................................................. 198, 226SEQ TRANSPORT buttons................................................... 14[SEQ TRANSPORT] buttons ................................................ 65
Sequence ................................................................................ 55Sequencer block..................................................................... 33Sequencer settings................................................................ 254SERIAL I/O connector .......................................................... 19Set ................................................................................ 149, 154SetAll ........................................................................... 195, 200Setting up before recording.......................................... 184, 222Setup ............................................................................ 184, 222SeqCtrl ................................................................................. 259[SF1] - [SF5] (Sub Function) buttons .................................... 14Shape............................................................................ 168, 253Shift Clock................................................................... 198, 227SIMM Installation................................................................ 288SIMM Type and SIMM Configuration................................ 287Single Part Plug-in Boards..................................................... 35skip....................................................................................... 183Slice ..................................................................... 237, 238, 246slice + seq ............................................................................ 236SLOT 1-3 lamps..................................................................... 15SMF ..................................................................................... 263Solo .............................................................................. 181, 218
Song ....................................................................................... 51Song Chain............................................................................. 54Song Edit mode........................................................ 31, 70, 189Song editing in the Song Play mode.................................... 181SongEventChase .................................................................. 255Song Job............................................................................... 203Song Job mode............................................................... 31, 193Song Mixing and storing the settings as a template............. 117Song Mixing Edit mode......................................................... 70Song Mixing Job mode........................................................ 212Song Mixing mode................................................... 31, 68, 205Song Mixing Store mode ..................................................... 214Song mode ............................................................. 31, 177, 275Song Name........................................................................... 204Song Play mode ............................................... 31, 67, 179, 275Song Record mode................................................... 31, 69, 183Song Recording.................................................................... 185Song Scene........................................................................... 181Song Selection ..................................................................... 179Song Track Mute ................................................................. 115
Song track on/off — Solo and Mute.................................... 180Song track selection............................................................. 181Song/Pattern (Phrase) cannot be recorded. .......................... 280Song/Pattern and Arpeggio.................................................... 55Song/Pattern cannot be started............................................. 280sort ....................................................................................... 133Sort Chord.................................................................... 197, 226Sound is cut off.................................................................... 279Sound level is too low.......................................................... 279Source ......................................................49, 50, 134, 155, 236Specifications....................................................................... 293Speed.................................................................... 135, 147, 157Split.................................................................................. 57, 95Split Pattern.......................................................................... 231Split Phrase.......................................................................... 229Split Song To Pattern........................................................... 204SRAM .............................................................................. 42, 64Start...................................................................................... 238StepTime.............................................................................. 185Start point............................................................................. 238Standard MIDI file............................................................... 263Status.................................................................................... 259Step Recording....................................... 53, 104, 112, 185, 223Stereo to Mono..................................................................... 245stop....................................................................................... 183Stop button............................................................................. 14Store mode............................................................................. 71Storing edited Voices............................................................. 86Storing the edited Performance.............................................. 90Storing the Song Scene ........................................................181Strength................................................................................ 194Style ....................................................................................... 52Style Name........................................................................... 232Style Selection ..................................................................... 217SubDivide ............................................................................ 239Sub Function ..........................................................................71Sustain............................................................................ 49, 174SwingRate............................................................................ 194Switch .......................... 129, 131, 132, 167, 171, 189, 255, 258
Switching the MOTIF On ..................................................... 29Sync..................................................................................... 258System Effects....................................................................... 39System Exclusive (Exc) ...................................................... 192System Overview .................................................................. 33System settings.................................................................... 250
TTEMPLATE........................................................................ 206Tempo ..................................... 85, 92, 129, 132, 185, 223, 238Tempo Speed....................................................................... 135Tempo Sync ................................................................ 135, 147TG (Tone Generator) .......................................................... 250
TGSwitch ............................................................................ 272Thin Out ...................................................................... 200, 227ThruPort .............................................................................. 259TIE .............................................................................. 185, 187Time .................................................................... 131, 167, 171TIME ................................................................... 139, 143, 146TimeMode........................................................................... 131Time-Stretch........................................................................ 244Tips for using the Slice Types............................................. 239Tone Generator block............................................................ 34Top button ............................................................................. 14TR........................................................................................ 203Track ................................................................................... 235Track Job..................................................................... 201, 230Track Loop.......................................................................... 182[TRACK SELECT] button .............................................. 15, 65Track structure of Pattern...................................................... 52Track structure of Song......................................................... 51Track Voice......................................................................... 218Transmit .............................................................................. 271
TransmitCh.......................................................... 169, 254, 272Transmit switch................................................................... 272Transpose ............................................ 196, 226, 247, 251, 272Trigger mode................................................................. 61, 237Trigger Waiting................................................................... 237Trim............................................................................. 237, 241Troubleshooting .................................................................. 279Tune .................................................... 138, 151, 173, 211, 250Type .. 129, 132, 140, 148, 150, 184, 189, 236, 238, 245, 246, 265
UUndo/Redo .................................................................. 193, 225Unit...................................................................................... 133USB................................................................................. 18, 25User Arpeggio ....................................................................... 56User Memory ........................................................................ 64User Phrase ........................................................................... 52User Voice............................................................................. 59User Waves – Samples.......................................................... 44
Usr ARP .............................................................................. 263usr wave (user wave)........................................................... 150Utility Job mode............................................................ 32, 260Utility mode ............................................ 32, 68, 249, 250, 276
VValue ........................................................................... 185, 186Variation................................................ 39, 170, 210, 246, 275Variation Pan ....................................................................... 169Variation Return .................................................................. 169Variation To Chorus ............................................................ 169Variation To Reverb............................................................ 169Variation Type .................................................................... 169VarSend (Variation Send) ........................................... 163, 172VelCurve (Velocity Curve)................................................. 251VelocityDepth ..................................................................... 156VelCrossFade...................................................................... 138Velocity Limit....................................... 92, 129, 133, 138, 189Velocity Limit H, L............................................................. 170
VelocityOffset..................................................................... 156Velocity Rate....................................................................... 133Velocity Range.................................................................... 196Velocity Sensitivity............................. 139, 142, 145, 151, 152VelMode .............................................................................. 133VelSensDpt ......................................................................... 171VelSensOfs.......................................................................... 171VELO OFST ....................................................................... 182Virtual Acoustic Plug-in Board............................................. 35Vocal Harmony Plug-in Board ............................................. 35Voice.. 42, 150, 164, 170, 171, 188, 189, 206, 210, 223, 235, 263Voice Edit ............................................................................. 83Voice Edit mode...................................................... 30, 70, 129Voice editing in the Voice Play mode ................................ 127Voice editing with the Control knobs ................................... 84Voice Editor ........................................................................ 263VoiceELPan ........................................................................ 172
Voice Job mode............................................................. 30, 158Voice Master Equalizer ....................................................... 253Voice mode ........................................................... 30, 121, 275Voice Play mode ..................................................... 30, 67, 124Voice program numbersand the corresponding Group/Numbers .............................. 125Voice Selection ................................................................... 124Voice settings ...................................................................... 253Voice Store mode .......................................................... 30, 159Voice structure ...................................................................... 45Volume ........ 132, 163, 167, 172, 189, 206, 211, 250, 254, 272Volume Label ...................................................................... 265VOICE................................................................................. 206VOL/PAN............................................................................ 206
WWav ..................................................................................... 263Wave.............................................. 44, 135, 137, 147, 150, 156WaveCtgry .......................................................................... 137Waveform........................................................ 59, 60, 235, 263Waveform Job ..................................................................... 247Wave Memory Required for Slice Operations.................... 239Wave No.............................................................................. 137Width................................................................................... 142
XXG Plug-in Board.................................................................. 35
ZZone............................................................................... 57, 270
Zone Edit ..................................................................... 270, 271Zone Switch......................................................................... 270

8/10/2019 motif_1(2)
http://slidepdf.com/reader/full/motif12 299/300
For details of products, please contact your nearest Yamaha or theauthorized distributor listed below.
Pour plus de détails sur les produits, veuillez-vous adresser à Yamaha ouau distributeur le plus proche de vous figurant dans la liste suivante.
Die Einzelheiten zu Produkten sind bei Ihrer unten aufgeführtenNiederlassung und bei Yamaha Vertragshändlern in den jeweiligenBestimmungsländern erhältlich.
Para detalles sobre productos, contacte su tienda Yamaha más cercanao el distribuidor autorizado que se lista debajo.
CANADA
Yamaha Canada Music Ltd.135 Milner Avenue, Scarborough, Ontario,M1S 3R1, CanadaTel: 416-298-1311
U.S.A.Yamaha Corporation of America6600 Orangethorpe Ave., Buena Park, Calif. 90620,U.S.A.Tel: 714-522-9011
MEXICOYamaha de Mexico S.A. De C.V.,Departamento de ventasJavier Rojo Gomez No.1149, Col. Gpe DelMoral, Deleg. Iztapalapa, 09300 Mexico, D.F.Tel: 686-00-33
BRAZILYamaha Musical do Brasil LTDA.Av. Rebouças 2636, São Paulo, BrasilTel: 011-853-1377
ARGENTINAYamaha de Panamá S.A. Sucursal de ArgentinaViamonte 1145 Piso2-B 1053,Buenos Aires, ArgentinaTel: 1-4371-7021
PANAMA AND OTHER LATINAMERICAN COUNTRIES/ CARIBBEAN COUNTRIES
Yamaha de Panamá S.A.Torre Banco General, Piso 7, Urbanización Marbella,Calle 47 y Aquilino de la Guardia,Ciudad de Panamá, PanamáTel: 507-269-5311
THE UNITED KINGDOMYamaha-Kemble Music (U.K.) Ltd.Sherbourne Drive, Tilbrook, Milton Keynes,MK7 8BL, EnglandTel: 01908-366700
IRELANDDanfay Ltd.61D, Sallynoggin Road, Dun Laoghaire, Co. DublinTel: 01-2859177
GERMANY/SWITZERLANDYamaha Europa GmbH.Siemensstraße 22-34, 25462 Rellingen,F.R. of GermanyTel: 04101-3030
AUSTRIAYamaha Music AustriaSchleiergasse 20, A-1100 Wien Austria
Tel: 01-60203900THE NETHERLANDS
Yamaha Music NederlandKanaalweg 18G, 3526KL, Utrecht, The NetherlandsTel: 030-2828411
BELGIUMYamaha Music BelgiumKeiberg Imperiastraat 8, 1930 Zaventem, BelgiumTel: 02-7258220
FRANCEYamaha Musique France,Division ProfessionnelleBP 70-77312 Marne-la-Vallée Cedex 2, FranceTel: 01-64-61-4000
ITALYYamaha Musica Italia S.P.A.,
Combo DivisionViale Italia 88, 20020 Lainate (Milano), ItalyTel: 02-935-771
SPAIN/PORTUGALYamaha-Hazen Electronica Musical, S.A.Ctra. de la Coruna km. 17, 200, 28230Las Rozas (Madrid) SpainTel: 91-201-0700
GREECEPhilippe Nakas S.A.Navarinou Street 13, P.Code 10680, Athens, GreeceTel: 01-364-7111
SWEDENYamaha Scandinavia ABJ. A. Wettergrens Gata 1Box 30053S-400 43 Göteborg, SwedenTel: 031 89 34 00
DENMARKYS Copenhagen Liaison OfficeGeneratorvej 8BDK-2730 Herlev, Denmark Tel: 44 92 49 00
FINLANDF-Musiikki OyKluuvikatu 6, P.O. Box 260,SF-00101 Helsinki, FinlandTel: 09 618511
NORWAYNorsk filial av Yamaha Scandinavia ABGrini Næringspark 1N-1345 Østerås, NorwayTel: 67 16 77 70
ICELANDSkifan HFSkeifan 17 P.O. Box 8120
IS-128 Reykjavik, IcelandTel: 525 5000
OTHER EUROPEAN COUNTRIESYamaha Europa GmbH.Siemensstraße 22-34, 25462 Rellingen,F.R. of GermanyTel: 04101-3030
Yamaha Corporation,Asia-Pacific Music Marketing GroupNakazawa-cho 10-1, Hamamatsu, Japan 430-8650Tel: 053-460-2312
TURKEY/CYPRUSYamaha Europa GmbH.
Siemensstraße 22-34, 25462 Rellingen,F.R. of GermanyTel: 04101-3030
OTHER COUNTRIESYamaha Music Gulf FZELB21-128 Jebel Ali FreezoneP.O.Box 17328, Dubai, U.A.E.Tel: 971-4-881-5868
HONG KONG
Tom Lee Music Co., Ltd.11/F., Silvercord Tower 1, 30 Canton Road,Tsimshatsui, Kowloon, Hong KongTel: 2737-7688
INDONESIAPT. Yamaha Music Indonesia (Distributor)PT. NusantikGedung Yamaha Music Center, Jalan Jend. GatotSubroto Kav. 4, Jakarta 12930, IndonesiaTel: 21-520-2577
KOREAYamaha Music Korea Ltd.Tong-Yang Securities Bldg. 16F 23-8 Yoido-dong,Youngdungpo-ku, Seoul, KoreaTel: 02-3770-0661
MALAYSIAYamaha Music Malaysia, Sdn., Bhd.Lot 8, Jalan Perbandaran, 47301 Kelana Jaya,
Petaling Jaya, Selangor, MalaysiaTel: 3-703-0900
PHILIPPINESYupangco Music Corporation339 Gil J. Puyat Avenue, P.O. Box 885 MCPO,Makati, Metro Manila, PhilippinesTel: 819-7551
SINGAPOREYamaha Music Asia Pte., Ltd.11 Ubi Road #06-00, Meiban Industrial Building,SingaporeTel: 65-747-4374
TAIWANYamaha KHS Music Co., Ltd.10F, 150, Tun-Hwa Northroad,Taipei, Taiwan, R.O.C.Tel: 02-2713-8999
THAILAND
Siam Music Yamaha Co., Ltd.121/60-61 RS Tower 17th Floor,Ratchadaphisek RD., Dindaeng,Bangkok 10320, ThailandTel: 02-641-2951
THE PEOPLE’S REPUBLIC OF CHINAAND OTHER ASIAN COUNTRIES
Yamaha Corporation,Asia-Pacific Music Marketing GroupNakazawa-cho 10-1, Hamamatsu, Japan 430-8650Tel: 053-460-2317
AUSTRALIAYamaha Music Australia Pty. Ltd.Level 1, 99 Queensbridge Street, Southbank, Victoria3006, AustraliaTel: 3-9693-5111
NEW ZEALANDMusic Houses of N.Z. Ltd.146/148 Captain Springs Road, Te Papapa,Auckland, New ZealandTel: 9-634-0099
COUNTRIES AND TRUSTTERRITORIES IN PACIFIC OCEAN
Yamaha Corporation,Asia-Pacific Music Marketing GroupNakazawa-cho 10-1, Hamamatsu, Japan 430-8650Tel: 053-460-2312
NORTH AMERICA
CENTRAL & SOUTH AMERICA
EUROPE
AFRICA
MIDDLE EAST
ASIA
OCEANIA
HEAD OFFICE Yamaha Corporation, Pro Audio & Digital Musical Instrument DivisionNakazawa-cho 10-1, Hamamatsu, Japan 430-8650
Tel: 053-460-2445SY23
8/10/2019 motif_1(2)
http://slidepdf.com/reader/full/motif12 300/300