motor fuel electronic tax filing system - welcome ... the tax types gd, sf and ep are connected. if...
TRANSCRIPT

Motor Fuel Electronic Tax Filing System Taxpayer User Guide
Commonwealth of Kentucky Department of Revenue
November 2013

©2013 Xerox Corporation. All rights reserved. Xerox® and Xerox and Design® are trademarks of Xerox Corporation in the United States and/or other countries.
Other company trademarks are also acknowledged.
Document Version: 1.1 (November 2013).

i | Taxpayer User Guide
Private Data
This document contains proprietary information concerning the design and system requirements of the Motor Fuel Electronic Tax Filing System provided to the Commonwealth of Kentucky by Xerox State & Local Solutions, Inc. This document and its contents are not to be disclosed to persons other than authorized employees of the jurisdiction or users who are reviewing or utilizing this document. This document may not be reproduced or disclosed without the express written consent of Xerox State and Local Solutions, Inc.

ii | Taxpayer User Guide
Table of Contents
Introduction ............................................................................... 1
Signing In.................................................................................. 2 Sign In View ................................................................................................ 2
Returns & Claims ...................................................................... 3 Tax Return Queue ...................................................................................... 3
Features of the Tax Return Queue ..................................................... 3 Create a Return.................................................................................. 6 Filter ................................................................................................... 8 Open Return ...................................................................................... 8 Tax Return Features .......................................................................... 8 Schedule Detail Information ............................................................. 10 Add Schedule Detail ......................................................................... 13 Print Schedule Detail ........................................................................ 16 Print Return ...................................................................................... 23 View Detail ....................................................................................... 26
Bank Account Maintenance ...................................................................... 27 ACH Debit Payment Information ...................................................... 27
Payment Voucher List ............................................................................... 29 Printing the Payment Voucher .......................................................... 30 Payment Voucher ............................................................................. 31
File Submission ...................................................................... 32 EDI Review Queue ................................................................................... 32
Features of the EDI Review Queue .................................................. 32 EDI Error Screen Features ............................................................... 33 Correct Errors .................................................................................. 34
Remove EDI Information ........................................................................... 38 Taxpayer File Submission ......................................................................... 39

1 | Taxpayer User Guide
Introduction
The Kentucky Motor Fuel Electronic Tax Filing System is a Motor Fuel Audit Compliance System designed to significantly reduce tax-filing errors, provide the tools required to reduce or eliminate tax avoidance and improve customer service by streamlining tax return processing through electronic filing. Reporting errors are reduced and compliance is enhanced – providing significant increases in the state’s motor fuel tax revenues.
The newly-designed iteration of this tax filing system offers highly intuitive, user friendly screens and streamlined functionality that will make all of the tax filing functions required straightforward and easy to manage.
2 | Taxpayer User Guide
Signing In
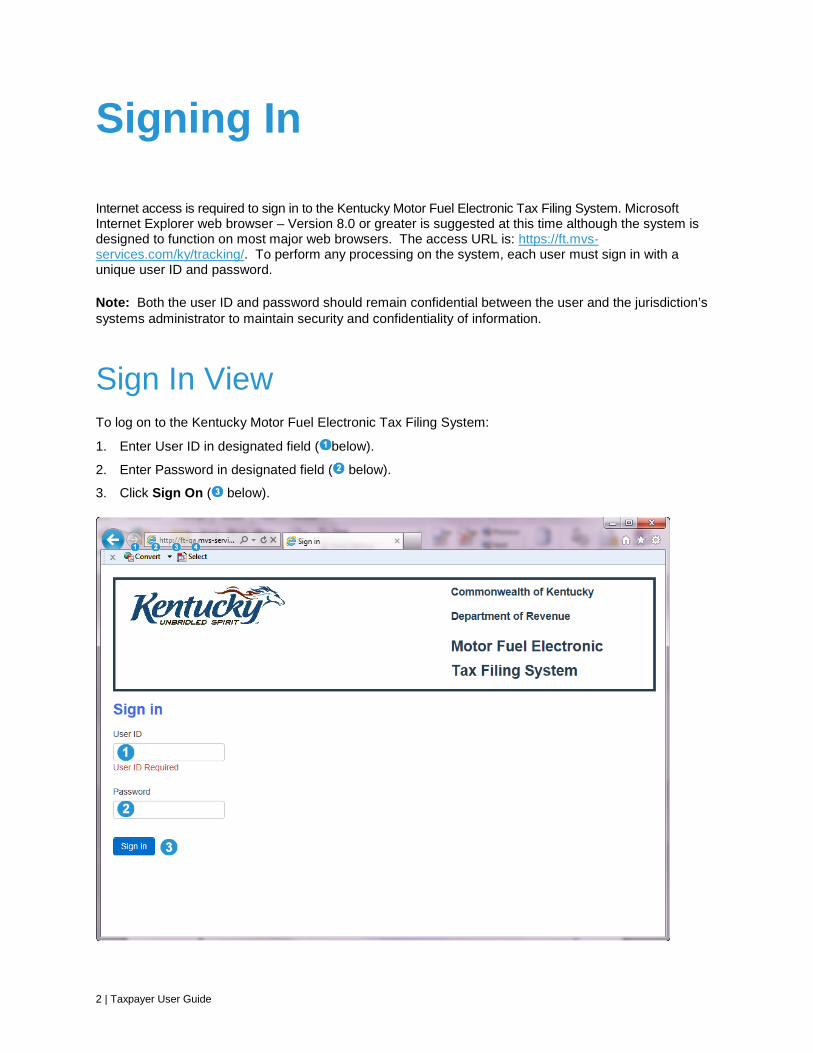
Internet access is required to sign in to the Kentucky Motor Fuel Electronic Tax Filing System. Microsoft Internet Explorer web browser – Version 8.0 or greater is suggested at this time although the system is designed to function on most major web browsers. The access URL is: https://ft.mvs-services.com/ky/tracking/. To perform any processing on the system, each user must sign in with a unique user ID and password.
Note: Both the user ID and password should remain confidential between the user and the jurisdiction’s systems administrator to maintain security and confidentiality of information.
Sign In View To log on to the Kentucky Motor Fuel Electronic Tax Filing System:
1. Enter User ID in designated field ( below).
2. Enter Password in designated field ( below).
3. Click Sign On ( below).

3 | Taxpayer User Guide
Returns & Claims
Tax Return Queue The Tax Return Queue is the first screen (landing page) seen after successful log in to the Motor Fuel Electronic Tax Filing system if the user’s system access allows viewing and/or creating returns. The landing page will differ depending on the user’s access. From this screen all processes and functions of the system can be accessed. The Tax Return Queue displays all of the tax returns related to user’s account.
Features of the Tax Return Queue

4 | Taxpayer User Guide
Elements
Element Description
Returns & Claims Menu Click the pull down menu arrow to reveal the menu of available options for returns and claims that system user-level security allows. If this menu option is unavailable but should be, user security settings will have to be adjusted by the State.
File Submission Click the pull down menu arrow to reveal the menu of available options for file submission that the system user-level security allows. If this menu option is unavailable but should be, user security settings will have to be adjusted by the State.
User Click the pull down menu arrow to reveal the menu of available options for user activities.
Click the Create Tax Return icon (shown here with roll over text present) to proceed to Account Selection. (See the Account Selection section below for more information.)
Click the Filter icon (shown here with roll over text present) to open the filter pane, revealing additional filtering options. (See the Filter Pane section below for more information.)
Click the Show Page icon (shown here with roll over text present) to show 10 records on the screen.

5 | Taxpayer User Guide
Elements
Element Description
Click the Show All Records icon (shown here with roll over text present) to show all records available.
Action Icons: Click the Open Return icon (shown here with roll over text present) to open the selected tax return. See more detailed information below.
Action Icons: Click the Print icon (shown here with roll over text present) to print selected tax return.
Action Icons: Click the View Detail icon (shown here with roll over text present) to view general tax return information.
Indicates the total number of records for the selected account as well as the page currently displayed/total number of pages available for display.
ption
Tracking ID Auto-filled with the system-assigned identification number. This number is used to locate the filing as it progresses through the system.
Company Name Auto-filled with the legal name for the selected account.
License Auto-filled with the license number for the selected account.
Location Auto-filled with the filing location for the selected account.
Tax Type Auto-filled with the license type code of the selected return.
Period Auto-filled with the tax reporting period for the selected return.
Return Type Auto-filled with either original or amendment for the selected return.
Sequence Auto-filled with a number used to show the order in which the filings were received.

6 | Taxpayer User Guide
ption
Status Auto-filled with the current filing status of the selected return.
Action This column contains action icons ( , , and above) that allow opening the filing, printing a soft or hard copy for the filing, and viewing of general filing information.
Create a Return
To create a return, click the Create tax return icon on the Tax Return Queue.
This will advance the user to the Account Selection screen. To step through creation of a tax return:
1. Click the pull down menu arrow next to the field for Tax Type | License | Location | Status.
2. Select the desired tax type and license for the return being created.
3. Click the pull down menu arrow next to the field for Return Period.

7 | Taxpayer User Guide
4. Select the desired tax return period.
5. Select a Return Type by clicking the radio button for either Original or Amendment.
6. Click Create Tax Return.
7. A confirmation window will appear. Click Cancel to cancel the operation. Click Create tax return to complete creation of tax return.
Note: The tax types GD, SF and EP are connected. If you have a GD/EP license combination, a SF/EP license combination, or a GD/SF/EP license combination, the GD and/or SF filings must be signed prior to submitting the EP filing. When the EP filing is signed the payment process automatically follows and must be completed in order to file the returns with the Kentucky DOR. Tax types LP, TR, and TO are independent of each other and the GD/SF/EP combination. When they are submitted they move forward in the processing.

8 | Taxpayer User Guide
Filter Click the Filter icon to reveal a window that will allow user to filter by any of the parameters shown.
Filter parameters for Tax Return Queue: Tracking ID , Tax Type , Period , Return Type , and Status .
Open Return
Click the Open Return icon in the Actions column to open the selected tax return to view the selected tax return.
Tax Return Features All Tax Types Return Information
A sample tax return is shown below. Icons and information displayed in the header portion on returns for all types of taxes are shown in the table that follows the illustration. Please note that different returns may include different combinations of icons.

9 | Taxpayer User Guide
Tax Return Features
Icon Description/Function
Click the Schedule Detail icon to create schedule detail for the tax return just created. (See detailed information below on creating schedule detail to accompany the tax return just created.)
Click the Delete icon to delete the tax return just created.
Click the Save icon to save the tax return just created.
Click the Print icon to print the tax return just created.
Click the Submit icon to submit the tax return just created.
Click the Close icon to close the tax return just created and return to the Tax Return Queue.
Note: Different tax returns and tax types may display different combinations of icons depending on particular situations.
Fields
Field Description
Company Name Displays the company name of the selected account
TIN Displays the Taxpayer Identification Number of the selected account
License Displays the license number for the selected account
Location Displays the location for the selected account
Tax Type Displays the tax type for the selected return
Year-Month Displays the year and month of the return period for which the selected return was filed
Filing Tracking ID Displays the system-assigned filing identification

10 | Taxpayer User Guide
Fields
Field Description number
Return Type Displays the return type for the selected return
Access Displays the access level for the selected return
Postmark Date Displays the postmark date for the selected return
Status Displays the status of the selected return
Return Seq Displays the position of the selected return
Schedule Detail Information
Click the Schedule Detail icon selected tax return to proceed to the Schedule Detail List. From the Schedule Detail List new schedule details can be added; schedule details also can be copied and/or printed.
Schedule Detail List Information

11 | Taxpayer User Guide
Schedule Detail List Information -- Fields
Fields Description
Company Name Displays the company name of the selected account
TIN Displays the Taxpayer Identification Number of the selected account
Tax Type Displays the tax type for the selected account
License Displays the license number for the selected account
Location Displays the location for the selected return
Return Period Displays the year and month of the return period for which the selected return was filed
Tax Return Status Displays the status of the selected return
Filter Fields The following fields are revealed only when the Filter icon ( above) is clicked. One or more of these fields may be completed to perform filter. Once the desired field(s) have been filled in, press the <Enter> key on the keyboard to perform filter operation.
Seq Enter the position of the tax return on which to filter results
Schd Enter the schedule on which to filter results
Fuel Enter the fuel type on which to filter results
Buyer / Seller Name Enter the buyer or seller name on which to filter results
Carrier Name Enter the name of the carrier on which to filter results
BOL Date Enter the bill of lading date on which to filter results
Bill of Lading Enter the number of the bill of lading on which to filter results
Net Gallons Enter the number of net gallons on which to filter results
Results Fields
Seq Displays the position of the displayed return
Sched Displays the number of the user-selected schedule.
Fuel Displays the fuel type
Buyer/Seller Name Displays the name of the buyer or the seller
Carrier Name Displays the carrier name
BOL Date Displays the date of the bill of lading
Bill of Lading Displays the bill of lading number
Net Gallons Displays net gallons reported
Gross Gallons Displays gross gallons reported
Billed Gallons Displays billed gallons reported
Update Indicator Displays the update indicator

12 | Taxpayer User Guide
Schedule Detail List Information -- Icons
Icon Description/Function
Click the Add icon to create new schedule detail. (See more detailed information below.)
Click the Filter icon to toggle the filter fields on and off.
Click the Print icon to print the schedule detail list report. (Please see more detailed information below.)
Click the Show Page icon to show
Click the Show All Records icon to show all records on a single screen.
Click the Close icon to close the Schedule Detail List and return to the selected return.
Click the Detail icon to view selected schedule detail.
Click the Update icon to update the selected schedule detail.
Click the Copy icon to copy and save the selected schedule detail.
Click the Delete icon to delete the selected schedule detail.
This displays the total number of records as well as the number of the current screen displayed and the total number of screens for the selected account. Click the

13 | Taxpayer User Guide
Schedule Detail List Information -- Icons
Icon Description/Function arrows to move between the screens for the selected account.
Add Schedule Detail
To add schedule detail, click the designated icon on the Schedule Detail List.
This will open a fillable schedule detail screen. Complete required blank fields (in red type on the screen) plus any optional information desired. Click the Save push button to save the schedule detail or the Cancel push button to close the schedule detail without saving the information.

14 | Taxpayer User Guide
Icons
Icon Description
Click the Save icon to save new schedule detail information.
Click the Cancel icon to close the schedule detail without saving the information.
Fields
Field Description
Note: * denotes required fields (designated by red type on the screen)
Company Name Company name for selected return is displayed.
TIN Taxpayer Identification Number associated with selected return is displayed.
Tax Type Tax type for selected return is displayed.
License License number for selected return is displayed.
Location Location code for the selected return is displayed.
Return Period Return period for selected return is displayed.
Tax Return Status Status of selected return is displayed
Schedule Code* Click the pull down menu arrow to select the appropriate code for the schedule detail being added.
Fuel Code* Click the pull down menu arrow to select the appropriate code for the schedule detail being added.
Buyer / Seller Name Enter the name of either the buyer or seller associated with the schedule detail being added.
Buyer / Seller TIN* Enter the TIN of either the buyer or seller associated with the schedule detail being added.
Carrier Name Enter the name of the carrier associated with the schedule detail being added.
Carrier TIN* Enter the taxpayer identification number for the carrier associated with the schedule detail being added.
Bill of Lading Number* Enter the bill of lading number associated with the schedule detail being added.
Bill of Lading Date* Enter the bill of lading date associated with the schedule detail being added.
Mode* Click the pull down menu arrow to select the appropriate mode of transport.

15 | Taxpayer User Guide
Fields
Field Description
Note: * denotes required fields (designated by red type on the screen)
Net Gallons* Enter the net gallons associated with the schedule detail being added.
Gross Gallons Enter the gross gallons associated with the schedule detail being added.
Billed Gallons Enter the billed gallons associated with the schedule detail being added.
Origin TCN* Enter the TCN for the origination point associated with the schedule detail being added. (Not a required field of the Origin City and Origin Jurisdiction are provided.)
Origin City* Enter the city for the origination point associated with the schedule detail being added. (Not a required field of Origin TCN is provided.)
Origin Jurisdiction* Click the pull down menu arrow to select the correct jurisdiction for the origination point associated with the schedule detail being added. (Not a required field of Origin TCN is provided.)
Origin Address Enter the address for the origination point associated with the schedule detail being added.
Origin Zip Code Enter the zip code for the origination point associated with the schedule detail being added.
Origin County Enter the county for the origination point associated with the schedule detail being added.
Origin Country Enter the country for the origination point associated with the schedule detail being added.
Destination TCN* Enter the TCN for the destination associated with the schedule detail being added. (Not a required field of the Destination City and Destination Jurisdiction are provided.)
Destination City* Enter the destination city for either the destination associated with the schedule detail being added. (Not a required field of the Destination City and Destination Jurisdiction are provided.)
Destination Jurisdiction* Click the pull down menu arrow to select the correct jurisdiction for the destination associated with the schedule detail being added. (Not a required field of Origin TCN is provided.)
Destination Address Enter the address for the destination associated with the schedule detail being added.
Destination Zip Code Enter the zip code for the origination point associated with the schedule detail being added.
Destination County Enter the county for the destination associated with the schedule detail being added.
Destination Country Enter the country for the origination point associated with the schedule detail being added.

16 | Taxpayer User Guide
Print Schedule Detail
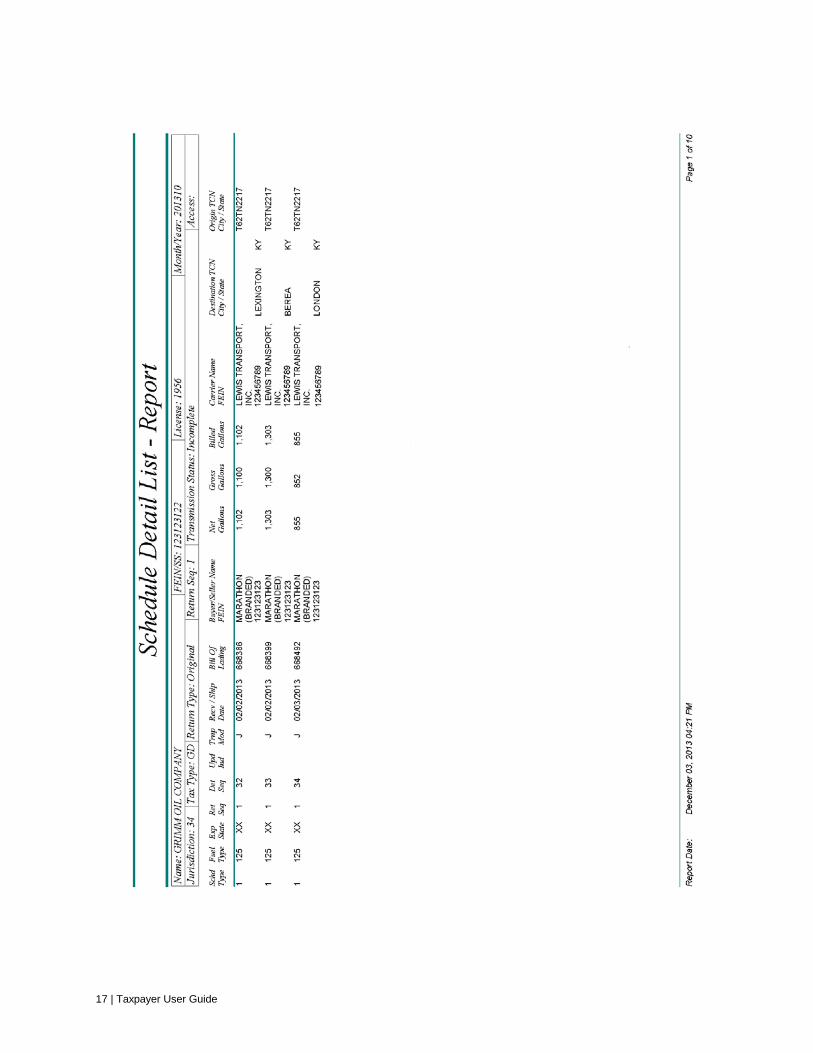
To print schedule detail click the print icon on the Schedule Detail List.
The security notification shown below will appear. Click Open to open the PDF file; click Save (or the pull down menu arrow to reveal other save options) to save the schedule detail without opening; or click Cancel to exit without opening or saving the document. To print, open the saved file and follow usual print procedures.
An example of the Schedule Detail Report that opens is included on the following page.
17 | Taxpayer User Guide
18 | Taxpayer User Guide
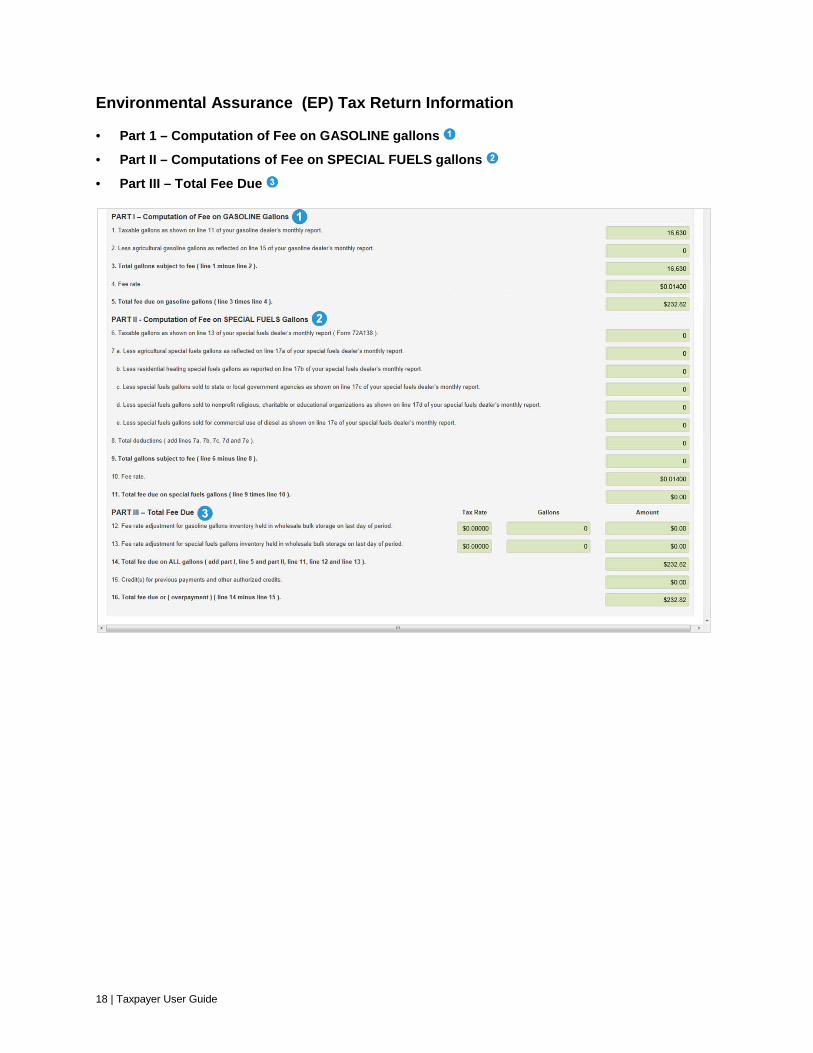
Environmental Assurance (EP) Tax Return Information
• Part 1 – Computation of Fee on GASOLINE gallons
• Part II – Computations of Fee on SPECIAL FUELS gallons
• Part III – Total Fee Due

19 | Taxpayer User Guide
Gasoline Dealer (GD) Return Information • Part I -- Computation of Gasoline Gallons Subject to Tax
o Receipts
o Deductions
• Part II -- Tax Computation
• Part III – Statistical Gallons

20 | Taxpayer User Guide
Liquid Petroleum (LP) Return Information
• Taxable gallons (Form 72A178) (Schedule 5)
• Tax-exempt gallons (Form 72A178) (Schedule 10)
• Total gallons of liquified petroleum gas motor fuel
• Gross tax liability
• Less: Allowance for handling and reporting
• Net Tax Due
• Credit(s) for previous payments and other authorized credits
• Total tax due or (overpayment)

21 | Taxpayer User Guide
Special Fuels (SF) Return Information • Part 1 – Computation of Special Fuels Gallons Subject to Tax
o Receipts
o Deductions
• Part II – Tax Computation
• Part III – Statistical Gallons
-

22 | Taxpayer User Guide
Terminal Operator (TO) Return Information • Beginning Inventory
• Total receipts (Form 72A180)
• Total gallons available
• Total disbursements (Form 72A181)
• Gallons available (less disbursements)
• Stock (gains) and losses
• Actual Ending Inventory
• Allowance for actual loss
• Excessive actual loss not allowed

23 | Taxpayer User Guide
Transporter (TR) Return Information • Total of gallons transported (net gallons) (Schedule 14) , and the gasoline gallons total and
the special fuel gallons total.
Print Return
Click the Print icon in the Actions column to print the selected tax return.
Prompt appears at the bottom of the screen offering user several options :
• Open – opens the return to be viewed
• Save – Click the pull down menu arrow to select:
– Save – saves the return to a default location
– Save As – allows user to select the location to which the return will be saved
– Save and Open – saves the return to a default location and opens it to be viewed
• Cancel – closes the prompt without further action

24 | Taxpayer User Guide
An example of the report that opens is located on the next page of this document.

25 | Taxpayer User Guide

26 | Taxpayer User Guide
View Detail Click the View Detail icon to view the filing details for the selected tax return. (More detailed information on schedule detail can be found earlier in this user guide.)
The Tax Return Detail information appears above the list of available returns for the selected filer in the Tax Return Queue. It shows all the general filing information not displayed on the standard view of the tax return queue for the selected record. Tax Return Detail information includes the following:
• Tracking ID for the selected tax return • Company Name for the selected account • TIN (Taxpayer Identification Number) for the selected account • License number for the selected account • Location for the selected account • Tax Type for the selected tax return • Return Period for the selected tax return • Return Type for the selected tax return • Return Sequence for the selected tax return • Status of the selected tax return • Status Date – date on which the displayed status was achieved for the selected tax return • Create User ID for the user creating the selected tax return • Mode for creation of the selected tax return • Create Date – date on which the selected return was created • Postmark Date – date on which return information was postmarked • Source – indicates how return was created, that is by Web, file upload (813 or ASCII), or Jurisdiction
User
Click the Close Detail icon to hide the tax return detail information for the selected return.

27 | Taxpayer User Guide
Bank Account Maintenance To access the Bank Account Maintenance module of the system, click the pull down menu arrow next to Returns & Claims. Click on Bank Account Maintenance on the menu that drops down to reveal the ACH Debit Payment Information screen.
ACH Debit Payment Information
The ACH Debit Payment Information screen allows recording of bank information for ACH debit payments of amounts due. This screen is auto-filled with the name of the company and the TIN (Taxpayer Identification Number) of the selected company. To enter and save banking information:
1. Click either the radio button next to “Yes” or next to “No” to answer the question “Will the funds for payment come from an account outside the territorial United States?” The screen defaults to “No.” Enter the 9-digit Routing/Transit Number from the desired bank for financial transactions.
2. Re-enter the 9-digit Routing/Transit Number from the desired bank for financial transactions to confirm accuracy.
3. Enter the checking account number for the bank account to be used for financial transactions.
4. Re-enter the checking account number for the bank account to be used for financial transactions to confirm accuracy.
5. Click Save Bank Account Information to save the entered bank account information
6. Click the red exit icon on the upper right hand side of the screen to exit the Motor Fuel Electronic Tax Filing System.

28 | Taxpayer User Guide

29 | Taxpayer User Guide
Payment Voucher List The Payment Voucher List screen shows payments made through the system.
Screen Elements
Element Description
Payment Confirmation Auto-filled with the payment confirmation number for each record displayed.
Category Auto-filled with the type of payment for each record displayed
Return Period Auto-filled with the return period for each record displayed.
Tax Type Auto-filled with the tax type for each record displayed.
Payment Date Auto-filled with the payment date for each record displayed.
Amount Auto-filled with the payment amount for each record displayed
Click the Print icon (shown here with roll over text present) to print detailed payment information for the selected record (see below for more detail).
Indicates the total number of payment records displayed for the selected account as well as the page currently displayed/total number of pages available for display.

30 | Taxpayer User Guide
Printing the Payment Voucher
To print detailed information for a selected payment record, click the Print icon (above) in the Action column on the Payment Voucher List screen.
Prompt appears at the bottom of the screen offering user several options :
• Open – opens the payment voucher report to be viewed
• Save – Click the pull down menu arrow to select:
– Save – saves the report to a default location
– Save As – allows user to select the location to which the report will be saved
– Save and Open -- saves the report to a default location and opens it to be viewed
• Cancel – closes the prompt without further action

31 | Taxpayer User Guide
Payment Voucher The Payment Voucher includes the following information:
• Entity to be paid
• FEIN (Federal Employer Identification Number) for the account associated with the payment
• Payment Confirmation number for the selected payment
• Company Name associated with the payment
• Return Period for the selected payment
• Postmark Date for the selected payment
• Confirmation # (Original Tracking ID assigned) for each filing line item in the selected payment
• Tax Type for each filing line item in the selected payment
• License Number for each filing line item in the selected payment
• Check Number for each filing line item in the selected payment
• Total by Tax Type -- Total payment amount for each line item on the payment voucher
• Total – Total amount paid for all line items combined
• Date and time payment voucher was printed
32 | Taxpayer User Guide
File Submission
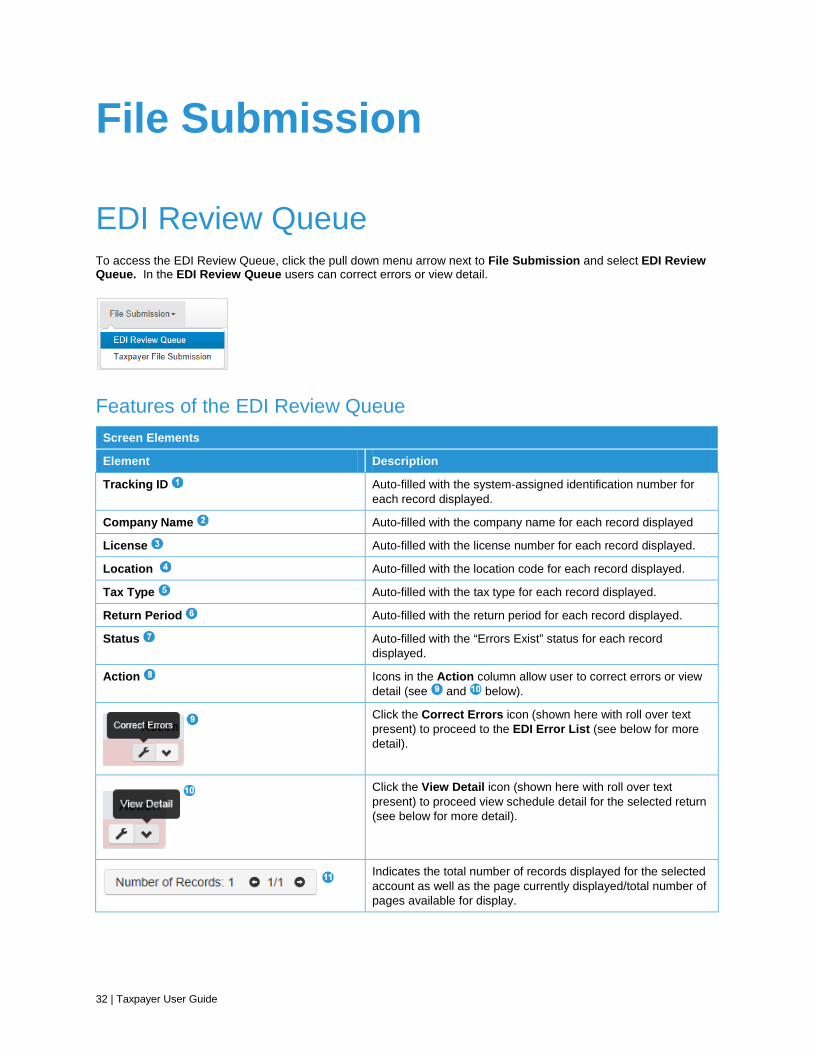
EDI Review Queue To access the EDI Review Queue, click the pull down menu arrow next to File Submission and select EDI Review Queue. In the EDI Review Queue users can correct errors or view detail.
Features of the EDI Review Queue Screen Elements
Element Description
Tracking ID Auto-filled with the system-assigned identification number for each record displayed.
Company Name Auto-filled with the company name for each record displayed
License Auto-filled with the license number for each record displayed.
Location Auto-filled with the location code for each record displayed.
Tax Type Auto-filled with the tax type for each record displayed.
Return Period Auto-filled with the return period for each record displayed.
Status Auto-filled with the “Errors Exist” status for each record displayed.
Action Icons in the Action column allow user to correct errors or view detail (see and below).
Click the Correct Errors icon (shown here with roll over text present) to proceed to the EDI Error List (see below for more detail).
Click the View Detail icon (shown here with roll over text present) to proceed view schedule detail for the selected return (see below for more detail).
Indicates the total number of records displayed for the selected account as well as the page currently displayed/total number of pages available for display.

33 | Taxpayer User Guide
EDI Error Screen Features • Error Description • Error Value • Error Count • Action : Edit or Delete • Number of Records/Total Number of Records

34 | Taxpayer User Guide
Correct Errors
Actions available on the EDI Review Queue are accessed by clicking the corresponding icon(s) in the Action column (above) on the queue.
To advance to the EDI Error List (see below) and correct an error on a return, click the Correct Error icon (above) in the Action column of the EDI Review Queue.
EDI Error List
Screen Elements
Element Description
Error Description Auto-filled with the description of the type of error(s) found for the tax return record selected.
Error Value Auto-filled with additional information about the error and/or specific item(s) to be corrected.
Error Count Auto-filled with the number of instances for each error displayed.
Action Icons in the Action column allow user to correct errors or remove EDI data (see and below).
Click the Correct Error icon to expand the EDI Error List to display the Correct EDI Error window (see below for more information).
Click the Remove EDI Data icon to delete the selected EDI data (see below for more information).
Indicates the total number of records displayed for the selected account as well as the page currently displayed/total number of pages to be displayed.

35 | Taxpayer User Guide
Correct Errors
To correct errors in EDI files, click the Correct Error icon in the Action column on the EDI Error List. This will open up the EDI Error List to reveal the error(s) to be corrected and the value or information in error, as well as a field in which correct value or information can be entered.
Screen Elements
Element Description
Click the Cancel icon to close the Correct EDI Error window on the EDI Error List.
Resolution Mode: Click the pull down menu arrow to select the desired type of error resolution. Options include: • Change Error Value • Delete Associated Detail Records (See below for more information.)
Error Value Submitted: Auto-filled with the error to be corrected
Change Value To: Click the pull down menu arrow and select the correct value or information from the displayed menu options. (See below for more information.)

36 | Taxpayer User Guide
Change Value To To change the value deemed to be in error:
1. Leave the Resolution Mode at the default selection of Change Error Value (above).
2. Click the pull down menu arrow next to the Change Value To field (below) and select the desired value from the menu that appears.

37 | Taxpayer User Guide
Delete Associated Detail Records
To delete associated detail records:
1. Click the pull down menu arrow in the Resolution mode field and select Delete Associated Detail Records .
2. Click the Correct Error icon that becomes available in the upper right corner of the Correct EDI Error window.

38 | Taxpayer User Guide
Remove EDI Information Click Cancel to close window without removing selected EDI file. Click OK to continue removing selected EDI file.

39 | Taxpayer User Guide
Taxpayer File Submission To upload a tax return file to the tax filing system, click the pull down menu arrow next to File Submission on the Tax Return Queue and select Taxpayer File Submission from the menu that drops down.
This will advance the user to the Taxpayer File Submission screen.

40 | Taxpayer User Guide
To upload a file, click Select File . This will access the file directory on the user’s computer and allow the user to find and select the desired file to upload. Once the file to upload is selected, click Submit Select File to send the file to the system for processing. User will receive a confirmation number once the selected file has been submitted.
Click (Close) to return to the Tax Return Queue.