motor insight overload and monitoring relay effective september
TRANSCRIPT

Motor Insight� Overload and Monitoring Relay
An Intelligent Power Control Solution
User Manual
Effective September 2009Supersedes April 2009
Cover_Back.indd 1Cover_Back.indd 1 9/30/09 3:28 PM9/30/09 3:28 PM


Motor Insight User Manual
MN04209001E
For more information visit:
www.eaton.com
i
September 2009
Disclaimer of Warranties and Limitation of Liability
The information, recommendations, descriptions and safety notations in this document are based on Eaton Corporation’s (“Eaton”) experience and judgment and may not cover all contingencies. If further information is required, an Eaton sales office should be consulted.
Sale of the product shown in this literature is subject to the terms and conditions outlined in appropriate Eaton selling policies or other contractual agreement between Eaton and the purchaser.
THERE ARE NO UNDERSTANDINGS, AGREEMENTS, WARRANTIES, EXPRESSED OR IMPLIED, INCLUDING WARRANTIES OF FITNESS FOR A PARTICULAR PURPOSE OR MERCHANTABILITY, OTHER THAN THOSE SPECIFICALLY SET OUT IN ANY EXISTING CONTRACT BETWEEN THE PARTIES. ANY SUCH CONTRACT STATES THE ENTIRE OBLIGATION OF EATON. THE CONTENTS OF THIS DOCUMENT SHALL NOT BECOME PART OF OR MODIFY ANY CONTRACT BETWEEN THE PARTIES. In no event will Eaton be responsible to the purchaser or user in contract, in tort (including negligence), strict liability or otherwise for any special, indirect, incidental or consequential damage or loss whatsoever, including but not limited to damage or loss of use of equipment, plant or power system, cost of capital, loss of power, additional expenses in the use of existing power facilities, or claims against the purchaser or user by its customers resulting from the use of the information, recommendations and descriptions contained herein.
The information contained in this manual is subject to change without notice.
MN04209001E.book Page i Wednesday, September 30, 2009 3:44 PM

Motor Insight User Manual
ii
For more information visit:
www.eaton.com
MN04209001E
September 2009
Support Services
Eaton’s goal is to ensure your greatest possible satisfaction with the operation of ourproducts. We are dedicated to providing fast, friendly and accurate assistance. That is whywe offer you many ways to get the support you need. Whether it’s by phone, fax or e-mail,you can access Eaton’s support information 24 hours a day, seven days a week. Our widerange of services is listed below.
You should contact your local distributor for product pricing, availability, ordering, expeditingand repairs.
Website
Use the Eaton website to find product information. You can also find information on localdistributors or Eaton’s sales offices.
Website Address
www.eaton.com/electrical
EatonCare Customer Support Center
Call the EatonCare Support Center if you need assistance with placing an order, stockavailability or proof of shipment, expediting an existing order, emergency shipments,product price information, returns other than warranty returns, and information on localdistributors or sales offices.
Voice: 877-ETN-CARE (386-2273) (8:00 am – 6:00 pm EST)FAX: 800-752-8602
After-Hours Emergency: 800-543-7038(6:00 pm – 8:00 am EST)
Technical Resource Center
Voice: 877-ETN-CARE (386-2273) (8:00 am – 5:00 pm EST)
FAX: 828-651-0549
e-mail: [email protected]
MN04209001E.book Page ii Wednesday, September 30, 2009 3:44 PM

Motor Insight User Manual
MN04209001E
For more information visit:
www.eaton.com
iii
September 2009
Table of Contents
LIST OF FIGURES
. . . . . . . . . . . . . . . . . . . . . . . . . . . . . . . . . . . . . . . . . . . . . . . . . . . . . . . . . iv
LIST OF TABLES
. . . . . . . . . . . . . . . . . . . . . . . . . . . . . . . . . . . . . . . . . . . . . . . . . . . . . . . . . . v
SAFETY
. . . . . . . . . . . . . . . . . . . . . . . . . . . . . . . . . . . . . . . . . . . . . . . . . . . . . . . . . . . . . . . . . viiDefinitions and Symbols. . . . . . . . . . . . . . . . . . . . . . . . . . . . . . . . . . . . . . . . . . . . . . . . viiHazardous High Voltage . . . . . . . . . . . . . . . . . . . . . . . . . . . . . . . . . . . . . . . . . . . . . . . . vii
CHAPTER 1 — INTRODUCTION
. . . . . . . . . . . . . . . . . . . . . . . . . . . . . . . . . . . . . . . . . . . . . . 1-11.1 - System Overview . . . . . . . . . . . . . . . . . . . . . . . . . . . . . . . . . . . . . . . . . . . . . . . . . 1-1
CHAPTER 2 — RATINGS AND SPECIFICATIONS
. . . . . . . . . . . . . . . . . . . . . . . . . . . . . . . . 2-12.1 - Environmental . . . . . . . . . . . . . . . . . . . . . . . . . . . . . . . . . . . . . . . . . . . . . . . . . . . . 2-12.2 - EMC/EMI. . . . . . . . . . . . . . . . . . . . . . . . . . . . . . . . . . . . . . . . . . . . . . . . . . . . . . . . . 2-12.3 - Short Circuit Ratings . . . . . . . . . . . . . . . . . . . . . . . . . . . . . . . . . . . . . . . . . . . . . . . 2-22.4 - Electrical Ratings . . . . . . . . . . . . . . . . . . . . . . . . . . . . . . . . . . . . . . . . . . . . . . . . . . 2-32.5 - Current Ratings . . . . . . . . . . . . . . . . . . . . . . . . . . . . . . . . . . . . . . . . . . . . . . . . . . . 2-3
CHAPTER 3 — RECEIPT/UNPACKING
. . . . . . . . . . . . . . . . . . . . . . . . . . . . . . . . . . . . . . . . . 3-13.1 - General. . . . . . . . . . . . . . . . . . . . . . . . . . . . . . . . . . . . . . . . . . . . . . . . . . . . . . . . . . 3-13.2 - Unpacking . . . . . . . . . . . . . . . . . . . . . . . . . . . . . . . . . . . . . . . . . . . . . . . . . . . . . . . 3-13.3 - Storage. . . . . . . . . . . . . . . . . . . . . . . . . . . . . . . . . . . . . . . . . . . . . . . . . . . . . . . . . . 3-1
CHAPTER 4 — INSTALLATION AND CONNECTIONS
. . . . . . . . . . . . . . . . . . . . . . . . . . . . 4-14.1 - Mounting . . . . . . . . . . . . . . . . . . . . . . . . . . . . . . . . . . . . . . . . . . . . . . . . . . . . . . . . 4-14.2 - Connections . . . . . . . . . . . . . . . . . . . . . . . . . . . . . . . . . . . . . . . . . . . . . . . . . . . . . . 4-2
CHAPTER 5 — USER INTERFACE (UI)
. . . . . . . . . . . . . . . . . . . . . . . . . . . . . . . . . . . . . . . . . 5-15.1 - Introduction . . . . . . . . . . . . . . . . . . . . . . . . . . . . . . . . . . . . . . . . . . . . . . . . . . . . . . 5-15.2 - Overview . . . . . . . . . . . . . . . . . . . . . . . . . . . . . . . . . . . . . . . . . . . . . . . . . . . . . . . . 5-15.3 - Monitoring . . . . . . . . . . . . . . . . . . . . . . . . . . . . . . . . . . . . . . . . . . . . . . . . . . . . . . . 5-45.4 - Motor Protection/Basic Programming Set Points. . . . . . . . . . . . . . . . . . . . . . . . 5-65.5 - Motor Protection/Advance Programming Set Points. . . . . . . . . . . . . . . . . . . . . 5-75.6 - Fault Display . . . . . . . . . . . . . . . . . . . . . . . . . . . . . . . . . . . . . . . . . . . . . . . . . . . . . 5-85.7 - Locking the User Interface . . . . . . . . . . . . . . . . . . . . . . . . . . . . . . . . . . . . . . . . . . 5-9
CHAPTER 6 — FUNCTIONAL DESCRIPTION
. . . . . . . . . . . . . . . . . . . . . . . . . . . . . . . . . . . 6-16.1 - Factory Defaults. . . . . . . . . . . . . . . . . . . . . . . . . . . . . . . . . . . . . . . . . . . . . . . . . . . 6-16.2 - Application Configuration . . . . . . . . . . . . . . . . . . . . . . . . . . . . . . . . . . . . . . . . . . 6-16.2 - Motor Cycle Operation . . . . . . . . . . . . . . . . . . . . . . . . . . . . . . . . . . . . . . . . . . . . . 6-26.3 - Thermal Overload . . . . . . . . . . . . . . . . . . . . . . . . . . . . . . . . . . . . . . . . . . . . . . . . . 6-36.4 - Protection. . . . . . . . . . . . . . . . . . . . . . . . . . . . . . . . . . . . . . . . . . . . . . . . . . . . . . . . 6-56.5 - Power Tables . . . . . . . . . . . . . . . . . . . . . . . . . . . . . . . . . . . . . . . . . . . . . . . . . . . . . 6-126.6 - Advanced Parameters. . . . . . . . . . . . . . . . . . . . . . . . . . . . . . . . . . . . . . . . . . . . . . 6-13
CHAPTER 7 — COMMUNICATION MODULE C441M
. . . . . . . . . . . . . . . . . . . . . . . . . . . . . 7-17.1 - Overview . . . . . . . . . . . . . . . . . . . . . . . . . . . . . . . . . . . . . . . . . . . . . . . . . . . . . . . . 7-17.2 - Mounting . . . . . . . . . . . . . . . . . . . . . . . . . . . . . . . . . . . . . . . . . . . . . . . . . . . . . . . . 7-17.3 - Quick Start . . . . . . . . . . . . . . . . . . . . . . . . . . . . . . . . . . . . . . . . . . . . . . . . . . . . . . . 7-27.4 - Modbus Field Wiring. . . . . . . . . . . . . . . . . . . . . . . . . . . . . . . . . . . . . . . . . . . . . . . 7-47.5 - Modbus Addressing . . . . . . . . . . . . . . . . . . . . . . . . . . . . . . . . . . . . . . . . . . . . . . . 7-4
MN04209001E.book Page iii Wednesday, September 30, 2009 3:44 PM

Motor Insight User Manual
iv
For more information visit:
www.eaton.com
MN04209001E
September 2009
Table of Contents (Continued)
CHAPTER 7 — COMMUNICATION MODULE C441M (CONTINUED)
7.6 - Modbus Baud Rate and Parity . . . . . . . . . . . . . . . . . . . . . . . . . . . . . . . . . . . . . . 7-57.7 - 0x2B/0x0E Read Device Identification Get Device Identity (43/14) Details . . . 7-57.8 - Modbus Command Register (400) . . . . . . . . . . . . . . . . . . . . . . . . . . . . . . . . . . . 7-57.9 - Configuration Reset Register (402). . . . . . . . . . . . . . . . . . . . . . . . . . . . . . . . . . . 7-67.10 - Range Checking . . . . . . . . . . . . . . . . . . . . . . . . . . . . . . . . . . . . . . . . . . . . . . . . . 7-67.11 - Comm Loss Timeout (Reg 440). . . . . . . . . . . . . . . . . . . . . . . . . . . . . . . . . . . . . 7-67.12 - Comm Loss Behavior (Reg 441) . . . . . . . . . . . . . . . . . . . . . . . . . . . . . . . . . . . . 7-67.13 - Modbus Register Map . . . . . . . . . . . . . . . . . . . . . . . . . . . . . . . . . . . . . . . . . . . . 7-7
CHAPTER 8 — DEVICENET MODULE
. . . . . . . . . . . . . . . . . . . . . . . . . . . . . . . . . . . . . . . . . 8-18.1 - Overview. . . . . . . . . . . . . . . . . . . . . . . . . . . . . . . . . . . . . . . . . . . . . . . . . . . . . . . . 8-18.2 - Mounting . . . . . . . . . . . . . . . . . . . . . . . . . . . . . . . . . . . . . . . . . . . . . . . . . . . . . . . 8-48.3 - Input Behavior . . . . . . . . . . . . . . . . . . . . . . . . . . . . . . . . . . . . . . . . . . . . . . . . . . . 8-58.4 - Relay Output Behavior. . . . . . . . . . . . . . . . . . . . . . . . . . . . . . . . . . . . . . . . . . . . . 8-98.5 - Communication Behavior . . . . . . . . . . . . . . . . . . . . . . . . . . . . . . . . . . . . . . . . . . 8-10
CHAPTER 9 — MODBUS WITH IO BEHAVIOR
. . . . . . . . . . . . . . . . . . . . . . . . . . . . . . . . . . 9-19.1 - Additional Modbus Registers . . . . . . . . . . . . . . . . . . . . . . . . . . . . . . . . . . . . . . . 9-3
APPENDIX A — MODBUS MAP BY PROTECTION
. . . . . . . . . . . . . . . . . . . . . . . . . . . . . . A-1UI Group . . . . . . . . . . . . . . . . . . . . . . . . . . . . . . . . . . . . . . . . . . . . . . . . . . . . . . . . . . . . A-1Comm Group . . . . . . . . . . . . . . . . . . . . . . . . . . . . . . . . . . . . . . . . . . . . . . . . . . . . . . . . A-2
List of Figures
Figure 4-1: Motor Insight Overload (B10-9112) DimensionsApproximate Dimensions in Inches (mm) . . . . . . . . . . . . . . . . . . . . . . . . . . . . . . . . . . 4-1
Figure 4-2: Motor Insight With DeviceNet
�
/Modbus
�
(B10-9113) DimensionsApproximate Dimensions in Inches (mm) . . . . . . . . . . . . . . . . . . . . . . . . . . . . . . . . . . 4-2
Figure 4-3: Motor Insight Base Connections . . . . . . . . . . . . . . . . . . . . . . . . . . . . . . . . . . . 4-3Figure 4-4: Terminal Block . . . . . . . . . . . . . . . . . . . . . . . . . . . . . . . . . . . . . . . . . . . . . . . . . . 4-4Figure 4-5: Typical Starter Application . . . . . . . . . . . . . . . . . . . . . . . . . . . . . . . . . . . . . . . . 4-5Figure 5-1: Overview of Interface LEDs. . . . . . . . . . . . . . . . . . . . . . . . . . . . . . . . . . . . . . . . 5-1Figure 5-2: Motor Protection/Basic Programming Set Points . . . . . . . . . . . . . . . . . . . . . . 5-6Figure 5-3: Motor Protection/Advance Programming Set Points . . . . . . . . . . . . . . . . . . . 5-7Figure 5-4: Fault History . . . . . . . . . . . . . . . . . . . . . . . . . . . . . . . . . . . . . . . . . . . . . . . . . . . . 5-9Figure 6-1: Transition Time Current Curve . . . . . . . . . . . . . . . . . . . . . . . . . . . . . . . . . . . . . 6-3Figure 6-2: Overload Trip Curve . . . . . . . . . . . . . . . . . . . . . . . . . . . . . . . . . . . . . . . . . . . . . 6-4Figure 7-1: Dimensional Drawing . . . . . . . . . . . . . . . . . . . . . . . . . . . . . . . . . . . . . . . . . . . . 7-1Figure 7-2: Terminal Drawing . . . . . . . . . . . . . . . . . . . . . . . . . . . . . . . . . . . . . . . . . . . . . . . 7-4Figure 8-1: DeviceNet Module . . . . . . . . . . . . . . . . . . . . . . . . . . . . . . . . . . . . . . . . . . . . . . . 8-3Figure 8-2: Installation Diagram . . . . . . . . . . . . . . . . . . . . . . . . . . . . . . . . . . . . . . . . . . . . . 8-4Figure 8-3: 120 Vac Input Diagram . . . . . . . . . . . . . . . . . . . . . . . . . . . . . . . . . . . . . . . . . . . 8-5Figure 8-4: 120 Vac IO Module . . . . . . . . . . . . . . . . . . . . . . . . . . . . . . . . . . . . . . . . . . . . . . . 8-6Figure 8-5: 24 Vdc Input Internal Circuit Diagram . . . . . . . . . . . . . . . . . . . . . . . . . . . . . . . 8-7Figure 8-6: 24 Vdc IO Module. . . . . . . . . . . . . . . . . . . . . . . . . . . . . . . . . . . . . . . . . . . . . . . . 8-8Figure 8-7: Relay Output Module Diagrams . . . . . . . . . . . . . . . . . . . . . . . . . . . . . . . . . . . . 8-9Figure 9-1: Modbus RS485 and Power Connection . . . . . . . . . . . . . . . . . . . . . . . . . . . . . . 9-2
MN04209001E.book Page iv Wednesday, September 30, 2009 3:44 PM

Motor Insight User Manual
MN04209001E
For more information visit:
www.eaton.com
v
September 2009
List of Tables
Table 1-1: Sizes and Ratings . . . . . . . . . . . . . . . . . . . . . . . . . . . . . . . . . . . . . . . . . . . . . . . . . 1-1Table 1-2: Motor Protection Features . . . . . . . . . . . . . . . . . . . . . . . . . . . . . . . . . . . . . . . . . . 1-2Table 1-3: Control Features . . . . . . . . . . . . . . . . . . . . . . . . . . . . . . . . . . . . . . . . . . . . . . . . . . 1-3Table 1-4: Monitoring Features . . . . . . . . . . . . . . . . . . . . . . . . . . . . . . . . . . . . . . . . . . . . . . . 1-3Table 2-1: Environmental. . . . . . . . . . . . . . . . . . . . . . . . . . . . . . . . . . . . . . . . . . . . . . . . . . . . 2-1Table 2-2: EMC/EMI . . . . . . . . . . . . . . . . . . . . . . . . . . . . . . . . . . . . . . . . . . . . . . . . . . . . . . . . 2-1 Table 2-3: Motor Insight Short Circuit Ratings (North America CSA-UL) . . . . . . . . . . . . . 2-2 Table 2-4: IEC 60947-4-1 Type 1 Short Circuit Ratings . . . . . . . . . . . . . . . . . . . . . . . . . . . . 2-2Table 2-5: Electrical Ratings. . . . . . . . . . . . . . . . . . . . . . . . . . . . . . . . . . . . . . . . . . . . . . . . . . 2-3 Table 2-6: Model 90 Amp. . . . . . . . . . . . . . . . . . . . . . . . . . . . . . . . . . . . . . . . . . . . . . . . . . . . 2-3 Table 2-7: Model 9 Amp. . . . . . . . . . . . . . . . . . . . . . . . . . . . . . . . . . . . . . . . . . . . . . . . . . . . . 2-3 Table 4-1: Terminal Block Connections. . . . . . . . . . . . . . . . . . . . . . . . . . . . . . . . . . . . . . . . . 4-4Table 5-1: User Interface Components . . . . . . . . . . . . . . . . . . . . . . . . . . . . . . . . . . . . . . . . . 5-2Table 5-2: Interface Mode Keys . . . . . . . . . . . . . . . . . . . . . . . . . . . . . . . . . . . . . . . . . . . . . . . 5-3 Table 5-3: Operation of the Monitoring Mode . . . . . . . . . . . . . . . . . . . . . . . . . . . . . . . . . . . 5-4 Table 6-1: Application Parameters . . . . . . . . . . . . . . . . . . . . . . . . . . . . . . . . . . . . . . . . . . . . 6-1Table 6-2: 20 – 90 Amp Model . . . . . . . . . . . . . . . . . . . . . . . . . . . . . . . . . . . . . . . . . . . . . . . . 6-1Table 6-3: 2 – 9 Amp Model . . . . . . . . . . . . . . . . . . . . . . . . . . . . . . . . . . . . . . . . . . . . . . . . . . 6-2Table 6-4: Start Cycle and Transition Timing . . . . . . . . . . . . . . . . . . . . . . . . . . . . . . . . . . . . 6-2Table 6-5: Motor Protection Features . . . . . . . . . . . . . . . . . . . . . . . . . . . . . . . . . . . . . . . . . . 6-6Table 6-6: Jam/Over Current . . . . . . . . . . . . . . . . . . . . . . . . . . . . . . . . . . . . . . . . . . . . . . . . . 6-6Table 6-7: Current Unbalance . . . . . . . . . . . . . . . . . . . . . . . . . . . . . . . . . . . . . . . . . . . . . . . . 6-7Table 6-8: Current Phase Loss . . . . . . . . . . . . . . . . . . . . . . . . . . . . . . . . . . . . . . . . . . . . . . . . 6-7Table 6-9: Ground Fault . . . . . . . . . . . . . . . . . . . . . . . . . . . . . . . . . . . . . . . . . . . . . . . . . . . . . 6-8Table 6-10: Power-up Restart Delay . . . . . . . . . . . . . . . . . . . . . . . . . . . . . . . . . . . . . . . . . . . 6-8Table 6-11: Alarm-No-Trip Operation . . . . . . . . . . . . . . . . . . . . . . . . . . . . . . . . . . . . . . . . . . 6-9Table 6-12: Undervoltage. . . . . . . . . . . . . . . . . . . . . . . . . . . . . . . . . . . . . . . . . . . . . . . . . . . . 6-9Table 6-13: Overvoltage . . . . . . . . . . . . . . . . . . . . . . . . . . . . . . . . . . . . . . . . . . . . . . . . . . . . . 6-9Table 6-14: Voltage Unbalance . . . . . . . . . . . . . . . . . . . . . . . . . . . . . . . . . . . . . . . . . . . . . . . 6-10Table 6-15: Phase Rotation . . . . . . . . . . . . . . . . . . . . . . . . . . . . . . . . . . . . . . . . . . . . . . . . . . 6-10Table 6-16: Load Protection . . . . . . . . . . . . . . . . . . . . . . . . . . . . . . . . . . . . . . . . . . . . . . . . . . 6-10Table 6-17: Run Time/Load Fault. . . . . . . . . . . . . . . . . . . . . . . . . . . . . . . . . . . . . . . . . . . . . . 6-11Table 6-18: Undercurrent . . . . . . . . . . . . . . . . . . . . . . . . . . . . . . . . . . . . . . . . . . . . . . . . . . . . 6-11Table 6-19: Low Power. . . . . . . . . . . . . . . . . . . . . . . . . . . . . . . . . . . . . . . . . . . . . . . . . . . . . . 6-11Table 6-20: High Power . . . . . . . . . . . . . . . . . . . . . . . . . . . . . . . . . . . . . . . . . . . . . . . . . . . . . 6-12Table 6-21: C441BB — 240 Vac, 20 – 90 Amperes . . . . . . . . . . . . . . . . . . . . . . . . . . . . . . . . 6-12Table 6-22: C441CB — 480 Vac, 20 – 90 Amperes . . . . . . . . . . . . . . . . . . . . . . . . . . . . . . . . 6-12 Table 6-23: C441DB — 600 Vac, 20 – 90 Amperes . . . . . . . . . . . . . . . . . . . . . . . . . . . . . . . . 6-12 Table 6-24: C441BA — 240 Vac, 2 – 9 Amperes . . . . . . . . . . . . . . . . . . . . . . . . . . . . . . . . . . 6-13 Table 6-25: C441CA — 480 Vac, 2 – 9 Amperes . . . . . . . . . . . . . . . . . . . . . . . . . . . . . . . . . . 6-13 Table 6-26: C441DA — 600 Vac, 2 – 9 Amperes . . . . . . . . . . . . . . . . . . . . . . . . . . . . . . . . . . 6-13 Table 6-27: Advanced Parameters . . . . . . . . . . . . . . . . . . . . . . . . . . . . . . . . . . . . . . . . . . . . 6-13 Table 7-1: Modbus Parameters . . . . . . . . . . . . . . . . . . . . . . . . . . . . . . . . . . . . . . . . . . . . . . . 7-2Table 7-2: Parameters and Values. . . . . . . . . . . . . . . . . . . . . . . . . . . . . . . . . . . . . . . . . . . . . 7-3Table 7-3: Field Wiring . . . . . . . . . . . . . . . . . . . . . . . . . . . . . . . . . . . . . . . . . . . . . . . . . . . . . . 7-4Table 7-4: Command Codes . . . . . . . . . . . . . . . . . . . . . . . . . . . . . . . . . . . . . . . . . . . . . . . . . 7-5Table 7-5: Reset Codes. . . . . . . . . . . . . . . . . . . . . . . . . . . . . . . . . . . . . . . . . . . . . . . . . . . . . . 7-6Table 7-6: Comm Loss Behavior . . . . . . . . . . . . . . . . . . . . . . . . . . . . . . . . . . . . . . . . . . . . . . 7-6Table 7-7: Modbus Register Map . . . . . . . . . . . . . . . . . . . . . . . . . . . . . . . . . . . . . . . . . . . . . 7-7Table 7-8: Current Scaling Table . . . . . . . . . . . . . . . . . . . . . . . . . . . . . . . . . . . . . . . . . . . . . . 7-13Table 8-1: Indicator LEDS. . . . . . . . . . . . . . . . . . . . . . . . . . . . . . . . . . . . . . . . . . . . . . . . . . . . 8-1Table 8-2: Environmental Ratings of the Module . . . . . . . . . . . . . . . . . . . . . . . . . . . . . . . . 8-2 Table 8-3: Approvals/Certifications . . . . . . . . . . . . . . . . . . . . . . . . . . . . . . . . . . . . . . . . . . . . 8-2 Table 8-4: Module Electrical Requirements . . . . . . . . . . . . . . . . . . . . . . . . . . . . . . . . . . . . . 8-3
MN04209001E.book Page v Wednesday, September 30, 2009 3:44 PM

Motor Insight User Manual
vi
For more information visit:
www.eaton.com
MN04209001E
September 2009
List of Tables (Continued)
Table 8-5: Product Selection. . . . . . . . . . . . . . . . . . . . . . . . . . . . . . . . . . . . . . . . . . . . . . . . . 8-3Table 8-6: Field Terminal Wire Capability . . . . . . . . . . . . . . . . . . . . . . . . . . . . . . . . . . . . . . 8-5 Table 8-7: 120 Vac Input Specification. . . . . . . . . . . . . . . . . . . . . . . . . . . . . . . . . . . . . . . . . 8-5 Table 8-8: 24 Vdc Input Specification . . . . . . . . . . . . . . . . . . . . . . . . . . . . . . . . . . . . . . . . . 8-7 Table 8-9: Relay Specification . . . . . . . . . . . . . . . . . . . . . . . . . . . . . . . . . . . . . . . . . . . . . . . 8-9 Table 8-10: Pilot Duty Relay Requirements. . . . . . . . . . . . . . . . . . . . . . . . . . . . . . . . . . . . . 8-10 Table 8-11: TDIP Switch Baud Rate Selection. . . . . . . . . . . . . . . . . . . . . . . . . . . . . . . . . . . 8-10 Table 8-12: DIP Switch Behavior . . . . . . . . . . . . . . . . . . . . . . . . . . . . . . . . . . . . . . . . . . . . . 8-10 Table 8-13: Standard Objects . . . . . . . . . . . . . . . . . . . . . . . . . . . . . . . . . . . . . . . . . . . . . . . . 8-11 Table 8-14: Instance Services . . . . . . . . . . . . . . . . . . . . . . . . . . . . . . . . . . . . . . . . . . . . . . . . 8-12 Table 8-15: Indentity Instance Attributes. . . . . . . . . . . . . . . . . . . . . . . . . . . . . . . . . . . . . . . 8-12 Table 8-16: Bit Definitions for Instance #1, Status Attribute of Identity Object . . . . . . . . 8-14 Table 8-17: Defined States . . . . . . . . . . . . . . . . . . . . . . . . . . . . . . . . . . . . . . . . . . . . . . . . . . 8-14 Table 8-18: Instance Services . . . . . . . . . . . . . . . . . . . . . . . . . . . . . . . . . . . . . . . . . . . . . . . . 8-16 Table 8-19: DeviceNet Instance Attributes . . . . . . . . . . . . . . . . . . . . . . . . . . . . . . . . . . . . . 8-16 Table 8-20: Instance Services . . . . . . . . . . . . . . . . . . . . . . . . . . . . . . . . . . . . . . . . . . . . . . . . 8-18 Table 8-21: Instance Attributes. . . . . . . . . . . . . . . . . . . . . . . . . . . . . . . . . . . . . . . . . . . . . . . 8-18 Table 8-22: Assembly Instances. . . . . . . . . . . . . . . . . . . . . . . . . . . . . . . . . . . . . . . . . . . . . . 8-18 Table 8-23: Input Assembly 50 . . . . . . . . . . . . . . . . . . . . . . . . . . . . . . . . . . . . . . . . . . . . . . . 8-18 Table 8-24: Input Assembly 51 . . . . . . . . . . . . . . . . . . . . . . . . . . . . . . . . . . . . . . . . . . . . . . . 8-18 Table 8-25: Input Assembly 107 . . . . . . . . . . . . . . . . . . . . . . . . . . . . . . . . . . . . . . . . . . . . . . 8-18 Table 8-26: Input Assembly 100 . . . . . . . . . . . . . . . . . . . . . . . . . . . . . . . . . . . . . . . . . . . . . . 8-19 Table 8-27: Input Assembly 110 . . . . . . . . . . . . . . . . . . . . . . . . . . . . . . . . . . . . . . . . . . . . . . 8-19 Table 8-28: Input Assembly 100 and 110 Selection List. . . . . . . . . . . . . . . . . . . . . . . . . . . 8-20 Table 8-29: Output Assembly 2 . . . . . . . . . . . . . . . . . . . . . . . . . . . . . . . . . . . . . . . . . . . . . . 8-20 Table 8-30: Output Assembly 105 . . . . . . . . . . . . . . . . . . . . . . . . . . . . . . . . . . . . . . . . . . . . 8-20 Table 8-31: Instance Services . . . . . . . . . . . . . . . . . . . . . . . . . . . . . . . . . . . . . . . . . . . . . . . . 8-21 Table 8-32: Connection Instance #1 Attributes (Explicit Messaging) . . . . . . . . . . . . . . . . 8-21 Table 8-33: Connection Instance #2 Attributes (Polled I/O) . . . . . . . . . . . . . . . . . . . . . . . . 8-23 Table 8-34: Connection Instance #3 Attributes (Bit Strobe I/O) . . . . . . . . . . . . . . . . . . . . . 8-24 Table 8-35: Instance Services . . . . . . . . . . . . . . . . . . . . . . . . . . . . . . . . . . . . . . . . . . . . . . . . 8-25 Table 8-36: Discrete Input Point Instance Attributes . . . . . . . . . . . . . . . . . . . . . . . . . . . . . 8-25 Table 8-37: Instance Services . . . . . . . . . . . . . . . . . . . . . . . . . . . . . . . . . . . . . . . . . . . . . . . . 8-25 Table 8-38: Discrete Output Point Instance Attributes . . . . . . . . . . . . . . . . . . . . . . . . . . . . 8-25 Table 8-39: Control Supervisor Instance Services . . . . . . . . . . . . . . . . . . . . . . . . . . . . . . . 8-26 Table 8-40: Control Supervisor Instance Attributes . . . . . . . . . . . . . . . . . . . . . . . . . . . . . . 8-27 Table 8-41: Fault Reset . . . . . . . . . . . . . . . . . . . . . . . . . . . . . . . . . . . . . . . . . . . . . . . . . . . . . 8-29 Table 8-42: Instance Services . . . . . . . . . . . . . . . . . . . . . . . . . . . . . . . . . . . . . . . . . . . . . . . . 8-30 Table 8-43: Overload Instance Attributes . . . . . . . . . . . . . . . . . . . . . . . . . . . . . . . . . . . . . . 8-30 Table 8-44: Instance Services . . . . . . . . . . . . . . . . . . . . . . . . . . . . . . . . . . . . . . . . . . . . . . . . 8-32 Table 8-45: Voltage Monitor Instance Attributes . . . . . . . . . . . . . . . . . . . . . . . . . . . . . . . . 8-32 Table 8-46: Instance Services . . . . . . . . . . . . . . . . . . . . . . . . . . . . . . . . . . . . . . . . . . . . . . . . 8-33 Table 8-47: DeviceNet Interface Instance Attributes . . . . . . . . . . . . . . . . . . . . . . . . . . . . . 8-33 Table 9-1: Modbus with IO Functionality . . . . . . . . . . . . . . . . . . . . . . . . . . . . . . . . . . . . . . 9-1 Table 9-2: Circuit Descriptions . . . . . . . . . . . . . . . . . . . . . . . . . . . . . . . . . . . . . . . . . . . . . . . 9-2 Table 9-3: Modbus Registers . . . . . . . . . . . . . . . . . . . . . . . . . . . . . . . . . . . . . . . . . . . . . . . . 9-3 Table A-1: UI Group . . . . . . . . . . . . . . . . . . . . . . . . . . . . . . . . . . . . . . . . . . . . . . . . . . . . . . . A-1Table A-2: Comm Group. . . . . . . . . . . . . . . . . . . . . . . . . . . . . . . . . . . . . . . . . . . . . . . . . . . . A-2
MN04209001E.book Page vi Wednesday, September 30, 2009 3:44 PM

Motor Insight User Manual
MN04209001E
For more information visit:
www.eaton.com
vii
September 2009
Safety
Definitions and Symbols
WARNING
This symbol indicates high voltage. It calls your attention to itemsor operations that could be dangerous to you and other personsoperating this equipment. Read the message and follow theinstructions carefully.
This symbol is the "Safety Alert Symbol." It occurs with either oftwo signal words: CAUTION or WARNING, as described below.
WARNING
Indicates a potentially hazardous situation which, if not avoided,can result in serious injury or death.
CAUTION
Indicates a potentially hazardous situation which, if not avoided,can result in minor to moderate injury, or serious damage to theproduct. The situation described in the CAUTION may, if notavoided, lead to serious results. Important safety measures aredescribed in CAUTION (as well as WARNING).
Hazardous High Voltage
WARNING
Motor control equipment and electronic controllers are connectedto hazardous line voltages. When servicing drives and electroniccontrollers, there may be exposed components with housings orprotrusions at or above line potential. Extreme care should be takento protect against shock.
Stand on an insulating pad and make it a habit to use only onehand when checking components. Always work with anotherperson in case an emergency occurs. Disconnect power beforechecking controllers or performing maintenance. Be sureequipment is properly grounded. Wear safety glasses wheneverworking on electronic controllers or rotating machinery.
MN04209001E.book Page vii Wednesday, September 30, 2009 3:44 PM

Motor Insight User Manual
viii
For more information visit:
www.eaton.com
MN04209001E
September 2009
Index
6.4.3.2 – 150 – 400% of FLA (400%) — Jam Trip %
Protection
Operation
6.4.3.3 – 1 – 30% (15%) — Current Unbalance %
6.4.3.4 – 60% (Fixed) — Current Phase Loss
6.4.3.5 – Reference Table 6-9 — Ground Fault (A)
6.4.4.6 – Reference Table 6-15 — Phase Rotation
6.4.5.2 – 10 – 90% of FLA (50%) — Under Current %
6.4.5.3 – Reference Table 6-19 — Low Power (kW)
6.4.5.4 – Reference Table 6-20 — High Power (kW)
6.4.4.4 – Reference Table 6-12 — Over Voltage
6.4.4.3 – Reference Table 6-13 — Under Voltage
6.4.4.5 – 1 – 20% (6%) — Voltage Imbalance
6.2 – Reference Tables 6-2, 6-3(Minimum for Configuration) — Motor FLA (A)
6.2 – 5-30s (20) — Trip Class
6.4.3.1 – 2-500 Mins (8) — Fault-Reset Dly (m)
6.4.3.1 – Reference Table 6-5 — Fault-Resets (#)
6.4.5.3 – 1-60s (5) — Low kW Trip Dly (s)
6.4.5.1 – 2-500 Min (20 Mins) — Load-Reset Dly (m)
6.4.5.1 – Reference Table 6-16 — Load-Resets (#)
6.4.4.1 – 0-500 S (10) — Restart Delay (s)
7.3 – Reference Table 7-2 — Device Address
6.2 – Reference Tables 6-2, 6-3 — CT Multiplier
6.6 – Reference Table 6-27 — Advanced Config
Monitoring
5.3.1 Reference Table 5-3 — Current per Phase andAverage RMS
5.3.1 Reference Table 5-3 — Voltage per Phase andAverage RMS
6.6 Reference Table 6-27, P.03 — Current Imbalance Percent
5.3.1 Reference Table 5-3 — Power
5.3.1 Reference Table 5-3 — Thermal Capacity/Utilization
6.6 Reference Table 6-27, P.03 — Power Factor
6.6 Reference Table 6-27, P.03 — Voltage Imbalance Percent
6.6 Reference Table 6-27, P.03 — Ground Fault Current
6.6 Reference Table 6-27, P.03 — Motor Run Hours
6.6 Reference Table 6-27, P.03 — Frequency
MN04209001E.book Page viii Wednesday, September 30, 2009 3:44 PM

Motor Insight User Manual
MN04209001E For more information visit:
www.eaton.com
1-1
September 2009
Chapter 1 — Introduction
1.1 - System Overview
Motor Insight is an advanced motor protective relay with thermal motor overload, supply and load protection, configurable ground fault detection, power monitoring, an intuitive user interface and optional communications. Motor Insight also provides fault-type logic that enables the user to configure reset behavior based on fault type.
1.1.1 - Sizes and Ratings
The following base units are available. Note that currents other than those listed can be accommodated following the motor lead wrap schedule shown in
Table 2-6
and
Table 2-7
.
Table 1-1: Sizes and Ratings
Catalog Number Configuration Description
C441BA
Motor protection relay with thermal overload, power measurements, ground fault detection, and communications capability. 2 – 9 A; 240 Vac (170 – 264 Vac) (50/60 Hz)
C441BB
Motor protection relay with thermal overload, power measurements, ground fault detection, and communications capability. 20 – 90 A; 240 Vac (170 – 264 Vac) (50/60 Hz)
C441CA
Motor protection relay with thermal overload, power measurements, ground fault detection, and communications capability. 2 – 9 A; 480 Vac (323 – 528 Vac) (50/60 Hz)
C441CB
Motor protection relay with thermal overload, power measurements, ground fault detection, and communications capability. 20 – 90 A; 480 Vac (323 – 528 Vac) (50/60 Hz)
C441DA
Motor protection relay with thermal overload, power measurements, ground fault detection, and communications capability. 2 – 9 A; 600 Vac (489 – 660 Vac) (50/60 Hz)
C441DB
Motor protection relay with thermal overload, power measurements, ground fault detection, and communications capability. 20 – 90 A; 600 Vac (489 – 660 Vac) (50/60 Hz)
MN04209001E.book Page 1 Wednesday, September 30, 2009 3:44 PM

Motor Insight User Manual
1-2
For more information visit:
www.eaton.com
MN04209001E
September 2009
1.1.2 - Motor Protection Features
Table 1-2: Motor Protection Features
Feature Description
Motor Protection
Thermal Overload
The overload relay models the thermal characteristics of a motor and trips when the motor is overloaded to prevent motor damage. The overload has the following attributes:
●
Adjustable Trip Class setting
●
Adjustable Motor FLA setting
●
The thermal capacity of the motor is stored during power cycles to the device
●
The unit has multiple reset modes (manual and automatic). The device cannot be reset until the thermal capacity in the motor is low enough for a successful restart.
Additional Motor Protection Features
●
Jam
●
Current Unbalance
●
Phase Loss
●
Ground Fault (alarm-no-trip setting available)
Motor Protection Reset Modes
●
Motor Fault Reset Number of Attempts
●
Motor Fault Reset Time: Time duration between a motor fault event and the next auto restart attempt. This time allows the motor to cool down before a reset is allowed.
Supply (Voltage) Protection
●
Over Voltage
●
Under Voltage
●
Voltage Phase Loss
●
Phase Reversal
Supply Protection Auto Reset Modes
By default, the Motor Insight will alarm but not trip on voltage faults when the motor is running, however; the device will inhibit a start into a voltage fault. The alarm-no-trip mode can be disabled through the user interface or over the network. When disabled, the Motor Insight will trip on a voltage fault according to the settings for each line protection parameter. In this mode, the Motor Insight will auto-reset when the voltage or line fault clears.
Load Protection
●
Under Current
●
Low Power (kW)
●
High Power (kW)
Load Protection Auto Reset Modes
●
Load Fault Reset Attempts
●
Load Fault Reset Time: Time duration between a load fault event and the next auto reset attempt. This time allows the load to recycle prior to allowing a restart.
MN04209001E.book Page 2 Wednesday, September 30, 2009 3:44 PM

Motor Insight User Manual
MN04209001E For more information visit:
www.eaton.com
1-3
September 2009
1.1.3 - Control Features
Table 1-3: Control Features
1.1.4 - Monitoring Features
Table 1-4: Monitoring Features
Feature Description
Motor Control 2 Output Relays —1 Form 1C (SPDT) Fault Relay1 Form A (SPST) Ground Fault Relay
1 External remote reset terminal
Reset Timers
Power-on Restart Timer
— Following a power outage event, this timer will start when power is restored to the device. The timer will delay the closure of the fault relay for the set point number of seconds.
Motor Fault Cool-Down Timer
— This timer inhibits a restart after a Motor Protection Fault. The time-out period is set in minutes.
Load Fault Timer
— Following a Load fault, this timer inhibits a restart attempt. The time-out period is set in minutes. An automatic mode is available that calculates the reset inhibit period based on the run time of the last motor start.
Feature Description
Current Monitoring Per Phase rmsAverage rmsCurrent Unbalance PercentageGround Fault Current
Voltage Monitoring Per Phase rmsAverage rmsVoltage Unbalance PercentageFrequency
Power Monitoring Motor kWMotor Power Factor (Inductive)
Timers/CountersOther
Run TimersThermal CapacityTime to RestartStart CountMotor Run Time
MN04209001E.book Page 3 Wednesday, September 30, 2009 3:44 PM

Motor Insight User Manual
1-4
For more information visit:
www.eaton.com
MN04209001E
September 2009
MN04209001E.book Page 4 Wednesday, September 30, 2009 3:44 PM

Motor Insight User Manual
MN04209001E For more information visit:
www.eaton.com
2-1
September 2009
Chapter 2 — Ratings and Specifications
2.1 - Environmental
Table 2-1: Environmental
2.2 - EMC/EMI
Table 2-2: EMC/EMI
Description Specifications
Ambient Operating Temperature -20°C to 50°C
Storage Temperature -40°C to 85°C
Operating Humidity 5% to 95% non-condensing
Pollution Degree per IEC 60947-1 3
Overvoltage Category per UL 508 III
Altitude 2000 m
Vibration 3g in any direction
Shock 15g in any direction
Description Specifications
Radiated Emissions IEC 60947-4-1 — Table 15, EN 55011 (CISPIR 11) Group 1, Class A, ISM Equipment for Industrial, Scientific, and Medical Equipment. 30 MHz to 1000 MHz.
Conducted Emissions IEC 60947-4-1 — Table 14, EN 55011 (CISPIR 11) Group 1, Class A, ISM Equipment for Industrial, Scientific, and Medical Equipment. 0.15 MHz to 30 MHz.
ESD Immunity IEC 60947-4-1 (Table 13), +/-8 kV air, +/-4 kV contact
Radiated Immunity IEC 60947-4-110V/m 80 MHz – 1000 MHz80% Amplitude Modulated 1 kHz sine wave.
Conducted Immunity IEC 60947-4-1140 dBuV (10V rms) 150 kHz – 80 MHz
Fast Transient Immunity IEC 60947-4-1 (Table 13) IEC 6100-4-4+/-2 kV using direct method.
Surge Immunity IEC 60947-4-1 (Table 13)IEC 61000-4-5 Class 4.3-Phase Power Inputs: +/-2 kV line-to-line (DM) +/-4 kV line-to-ground (CM)User IO and Communication Lines: +/-1 kV line-to-line (DM) +/-2 kV line-to-ground (CM)
Voltage Variations Immunity IEC 60947-4-130% dip, @10 ms60% dip @ 100 ms>95% interrupt @ 5 ms
Power Frequency Magnetic Field Immunity
IEC 60947-4-130 A/m, 50 Hz
Electromagnetic Field IEC 60947-4-1 Table 13, IEC 61000-4-3. 10V/m
MN04209001E.book Page 1 Wednesday, September 30, 2009 3:44 PM

Motor Insight User Manual
2-2
For more information visit:
www.eaton.com
MN04209001E
September 2009
2.3 - Short Circuit Ratings
Table 2-3: Motor Insight Short Circuit Ratings (North America CSA -UL)
Table 2-4: IEC 60947-4-1 Type 1 Short Circuit Ratings
Catalog No.
Overload FLA Range
Max. Operating Voltage
Standard-Fault Short Circuit Data
Maximum Withstand Rating
Max.Fuse (RK5)
EatonT/M Circuit Breaker
Withstand Rating
Max. Fuse (K5)
Max. T/M Circuit Breaker
C441BA
2 to 9 240 Vac 5,000 A @ 240 Vac
35 A 35 A 100 kA @ 240 Vac100 kA @ 240 Vac
35 A–
–FDC3035L
C441CA
2 to 9 480 Vac 5,000 A @ 480 Vac
35 A 35 A 100 kA @ 480 Vac100 kA @ 480 Vac
35 A–
–FDC3035L
C441DA
2 to 9 600 Vac 5,000 A @ 600 Vac
35 A 35 A 100 kA @ 600 Vac 35 kA @ 600 Vac
35 A–
–FDC3035L
C441BB
20 to 90 240 Vac 10,000 A @ 240 Vac
350 A 350 A 100 kA @ 240 Vac100 kA @ 240 Vac
350 A–
–KDC3350
C441CB
20 to 90 480 Vac 10,000 A @ 480 Vac
350 A 350 A 100 kA @ 480 Vac100 kA @ 480 Vac
350 A–
–KDC3350
C441DB
20 to 90 600 Vac 10,000 A @ 600 Vac
350 A 350 A 100 kA @ 600 Vac 65 kA @ 600 Vac
350 A–
–KDC3350
Catalog No.Overload FLA Range
Max. Operating Voltage
Standard-Fault “r” Short Circuit Data
Withstand Rating
gG/gT Fuse
Eaton T/M Circuit Breaker
C441BA
2 to 9 240 Vac 1,000 A @ 240 Vac
35 A EGH3030FFG
C441CA
2 to 9 480 Vac 1,000 A @ 480 Vac
35 A EGH3030FFG
C441DA
2 to 9 600 Vac 1,000 A @ 600 Vac
35 A EGH3030FFG
C441BB
20 to 90 240 Vac 5,000 A @ 240 Vac
315 A LGH3300FAG
C441CB
20 to 90 480 Vac 5,000 A @ 480 Vac
315 A LGH3300FAG
C441DB
20 to 90 600 Vac 5,000 A @ 600 Vac
315 A LGH3300FAG
MN04209001E.book Page 2 Wednesday, September 30, 2009 3:44 PM

Motor Insight User Manual
MN04209001E For more information visit:
www.eaton.com
2-3
September 2009
2.4 - Electrical Ratings
Table 2-5: Electrical Ratings
2.5 - Current Ratings
For the 20 – 90 amp current range, the following wire wrap schedule lists the maximum number of wraps needed to retain accuracy of current measurements.
Table 2-6: Model 90 Amp
The low range model is ideally suited for use with low HP motors or with motor NEMA size 3 to 5 with the use of external CTs. When using external CTs, pass the 5 ampere secondary through the Motor Insight internal CTs.
Table 2-7: Model 9 Amp
Type Rating Description
Rated Input Voltage — 240 V Unit 200 – 240 Vac; (50/60 Hz) Voltage Tolerance: +10%/-15%Frequency Tolerance: +/-5%Bandwidth: 540 HzAccuracy: 2%
Rated Input Voltage — 480 V Unit 380 – 415 Vac; (50/60 Hz) & 440 – 480 Vac; (60 Hz)
Rated Input Voltage — 600 V Unit 575 – 600 Vac; (60 Hz)
Rated Current (100% FLA)90 A Unit
20 – 90 A rms Accuracy: 2%
Rated Current (100% FLA)9 A Unit
2 – 9 A rms
Overload Current Range90 A Unit
20 A – 720 A rms Overload protection up to 8 x FLA.
Overload Current Range9 A Unit
2 A – 72 A rms
Line Frequency 47 – 63 Hz —
2 Output Relays B300 Pilot Duty 5A Thermal Continuous Current30A Make, 3.00 A Break @ 120 Vac15A Make, 1.50 A Break @ 240 Vac
Motor FLA
Number of Loops
Number of Conductors Through CT Primary
CT Multiplier Setting
5 – 22.5 3 4 4
6.67 – 30 2 3 3
10 – 45 1 2 2
20 – 90 0 1 1
Motor FLA
Number of Loops
Number of Conductors Through CT Primary
CT Multiplier Setting
1 – 5 1 2 2
2 – 9 0 1 1
60 – 135 0 1 150 – (150:5)
120 – 270 0 1 300 – (300:5)
240 – 540 0 1 600 – (600:5)
MN04209001E.book Page 3 Wednesday, September 30, 2009 3:44 PM

Motor Insight User Manual
2-4
For more information visit:
www.eaton.com
MN04209001E
September 2009
MN04209001E.book Page 4 Wednesday, September 30, 2009 3:44 PM

Motor Insight User Manual
MN04209001E For more information visit:
www.eaton.com
3-1
September 2009
Chapter 3 — Receipt/Unpacking
WARNING
Do not service with voltage applied — Lock-out Tags.
3.1 - General
Upon receipt of the unit, verify that the catalog number and unit options stated on the shipping container match those stated on the order/purchase form.
Inspect the equipment upon delivery. Report any crate or carton damage to the carrier prior to accepting the delivery. Have this information noted on the freight bill. Eaton is not responsible for damage incurred in shipping.
3.2 - Unpacking
Remove all packing material from the unit. Check the unit for any signs of shipping damage. If damage is found after unpacking, report it to the freight company. Retain the packaging materials for carrier to review.
Verify that the unit’s catalog number and options match those stated on the order/purchase form.
3.3 - Storage
It is recommended that the unit be stored in its original shipping box/crate until it is to be installed.
The unit should be stored in a location where:
●
The ambient temperature is -40ºC – 85ºC.
● The relative humidity is 0% – 95%, non-condensing.
● The environment is dry, clean and non-corrosive.
● The unit will not be subjected to high shock or vibration conditions.
MN04209001E.book Page 1 Wednesday, September 30, 2009 3:44 PM

Motor Insight User Manual
3-2 For more information visit: www.eaton.com MN04209001E
September 2009
MN04209001E.book Page 2 Wednesday, September 30, 2009 3:44 PM

Motor Insight User Manual
MN04209001E For more information visit: www.eaton.com 4-1
September 2009
Chapter 4 — Installation and Connections
4.1 - Mounting
Motor Insight does not require any special tools for mounting. Drill and tap holes per mounting hole location as shown.
4.1.1 - Dimensions
Figure 4-1: Motor Insight Overload (B10-9112) DimensionsApproximate Dimensions in Inches (mm)
3.31(84.1)
3.90(99.1)
0.20(5.1)
4 Places
ø0.69(17.5)
3 Places
3.50(88.9)
3.90(99.1)
Mounting Dimension(4) 10 – 32
4.00(101.6)
4.90(124.5)
Motor Insight
Terminal Ref3.80
(96.5)
3.90(99.1)
Jam Trip %Current Unbal %Ground Fault (A)
Phase RotationUnder Current %Low Power (kW)High Power (kW)
Under Voltage (V)Over Voltage (V)Voltage Unbal %
Motor FLA (A)Trip Class%Fault-Reset Dly (m)Fault-Resets (#)Low kW Trip Dly (s)Load-Reset Dly (m)Load-Resets (#)Restart Delay (s)CT MultiplierDevice AddressAdvanced Config.
Mode/ Cancel
Edit/ Save
ResetTrip
MN04209001E.book Page 1 Wednesday, September 30, 2009 3:44 PM

Motor Insight User Manual
4-2 For more information visit: www.eaton.com MN04209001E
September 2009
Figure 4-2: Motor Insight With DeviceNet�/Modbus� (B10-9113) DimensionsApproximate Dimensions in Inches (mm)
4.1.2 - Required Mounting Hardware
Motor Insight can be mounted using #10 – 32 screws, standard #10 Lockwasher and Flat Washer. The required torque is 22 in-lb (2.5 Nm).
4.2 - Connections
Note: All wires must be sized according to applicable standards.
0.20(5.1)
4 Places
3.31(84.1)
3.90(99.1)
3.50(88.9)
3.90(99.1)
Mounting Dimensions(4) 10 – 32
4.50(114.3)
4.90(124.5)
ø0.69(17.5)
3 Places
0.60(15.2)
4.00(101.6)
Motor Insight With DeviceNet/Modbus
Terminal Ref3.80
(96.5)
1.90(48.3)
3.90(99.1)
4.90(124.5)
Jam Trip %Current Unbal %Ground Fault (A)
Phase RotationUnder Current %Low Power (kW)High Power (kW)
Under Voltage (V)Over Voltage (V)Voltage Unbal %
Motor FLA (A)Trip Class%Fault-Reset Dly (m)Fault-Resets (#)Low kW Trip Dly (s)Load-Reset Dly (m)Load-Resets (#)Restart Delay (s)CT MultiplierDevice AddressAdvanced Config.
Mode/ Cancel
Edit/ Save
ResetTrip
MN04209001E.book Page 2 Wednesday, September 30, 2009 3:44 PM

Motor Insight User Manual
MN04209001E For more information visit: www.eaton.com 4-3
September 2009
4.2.1 - Overview
The following connections are made to the Motor Insight base unit.
Figure 4-3: Motor Insight Base Connections
L1 L2 L3
Form C FaultRelayN.C. N.O.
ShuntRelayG.F.
120 VResetInput
Ia Ib Ic
CT MultiplierDevice Address
Mode/
Cancel
Operation Monitor
Edit/
Save
IB | L2-L3
A kW TC/UserV
AVG
IC | L3-L1IA | L1-L2
Ready
Fault ResetTrip
Under Current %Load-Resets (#)Load-Reset Dly (m)
Low kW Trip Dly (s)
Restart Delay (s)
Phase RotationGround Fault (A)Jam Trip % Motor FLA (A)
Fault-Resets (#)Fault-Reset Dly (m)
Trip Class
Over Voltage (V)Under Voltage (V)
Advanced Config.
Protection
Low Power (kW)
High Power (kW)
Current Unbalance %
Voltage Unbalance %
Motor Insight
MN04209001E.book Page 3 Wednesday, September 30, 2009 3:44 PM

Motor Insight User Manual
4-4 For more information visit: www.eaton.com MN04209001E
September 2009
4.2.2 - Terminals
Terminal block wiring capacity and torque requirements are 18 – 12 AWG and 5.3 in-lb (0.6 Nm) respectively.
Figure 4-4: Terminal Block
Table 4-1: Terminal Block Connections
By factory default, Motor Insight is to be connected with ABC phase rotation on the incoming line voltage wiring. If the motor turns in the correct direction upon energization, but Motor Insight trips on a voltage phase reversal fault, change the setting of the phase rotation parameter as described in Section 6.4.4.6.
4.2.3 - Motor Power
Motor power connections are passed through Motor Insight. For power measurement accuracy, make sure to match Motor Power and Line Power connections as shown in Figure 4-3.
For use on low amperage applications, multiple wraps of the motor power conductors should be made according to Section 2.5.
For use on large amperage applications, pass the secondary of external CTs through thefeed-through power conductor holes. Refer to Section 2.5.
Name Designation Input Description
Line Voltage
L1, L2, L3 Rated Voltage Three-Phase Line Voltage Input:• L1, L2, L3 connections must correspond to the
respective CT1, CT2, CT3 current leads.• * Terminal provided for wiring control power
transformer (9 A max. capacity).
Overload State
95/96 UL 508 B300 Form 1C Contact:95/96 Contact opens when the unit is faulted, or unpowered.
96 & 97 (Common) 96 & 97 are common
97/98 97/98 Contact closes when the unit is faulted or unpowered.
GF Shunt
15/16 UL 508 B300 Form A Contact:Contact closes when a ground fault is active.
Reset Input
R1/R2 120 Vac +10%/-15%
Fault Reset Input:IEC 61131-2 Type 1 digital input.
L1 L2 L3 * * *
NC NO GF SHUNT RESET
B300 PILOT DUTY ONLY
95 96 97 98 15 16 R1
18-12 AWG Torque 0.6 Nm/5.3 lb-in.USE 75°C CU WIRE ONLY
120VAC
R2
* No Motor Loads, 9A Max
MN04209001E.book Page 4 Wednesday, September 30, 2009 3:44 PM

Motor Insight User Manual
MN04209001E For more information visit: www.eaton.com 4-5
September 2009
4.2.4 - Typical Wiring Diagram
Figure 4-5: Typical Starter Application
MN04209001E.book Page 5 Wednesday, September 30, 2009 3:44 PM

Motor Insight User Manual
4-6 For more information visit: www.eaton.com MN04209001E
September 2009
MN04209001E.book Page 6 Wednesday, September 30, 2009 3:44 PM

Motor Insight User Manual
MN04209001E For more information visit: www.eaton.com 5-1
September 2009
Chapter 5 — User Interface (UI)
5.1 - Introduction
The Motor Insight has a wide range of set points to enable coordinated motor and load protection. Commonly used set points are directly accessible through the user interface; advanced configuration of the device must be performed through the Advanced Config operation or over the network.
The unit comes out of the box with default settings that accommodate general induction motor applications that provide very basic motor protection. The user should fine-tune the parameters to their application.
Note: The Motor FLA and CT Multiplier parameters must be configured for the intended application.
5.2 - Overview
The User Interface on the Motor Insight has been designed to allow intuitive configuration of typically used parameters without constant need for references to this manual.
Figure 5-1: Overview of Interface LEDs
Mode LEDs
P/O LEDs
Units LEDs
Phase LEDs
Status LEDs
MN04209001E.book Page 1 Wednesday, September 30, 2009 3:44 PM

Motor Insight User Manual
5-2 For more information visit: www.eaton.com MN04209001E
September 2009
The following table describes the discrete components that make up the user interface.
Table 5-1: User Interface Components
Component Interface Description
Buttons Mode • Used to navigate the three operational modes (“Protection”, “Operation”, “Monitor”).
• Pressing this button when editing a parameter exits the editing mode WITHOUT saving the new parameter value.
Up (�) • In “Protection” and “Operation” modes, this key is used to navigate up the P/O LED list. After the “Edit/Save” button is pressed in either of these modes, the up button is used to increment the parameter value.
• In the “Monitor” mode, this button navigates up through the display parameter list.
Down (�) • In “Protection” and “Operation” modes, this key is used to navigate down the P/O LED list. After the “Edit/Save” button is pressed in either of these modes, the up button is used to decrement the parameter value.
• In the “Monitor” mode, this button navigates down through the display parameter list.
Edit/Save • In “Protection” and “Operation” modes, the first press of this button enables modification of the selected parameter value. The second press of the button saves the modified parameter value.
• When the Advanced Config parameter is selected, the first press enables parameter selection. The second press enables editing of the parameter value. The third press saves the edited value.
• This button has no effect in the “Monitor” mode.
Trip • Used as a relay test button. One press causes the Form C fault relay to open the N.O. and close the N.C. contact. Holding the button for 5 seconds causes the Ground Fault relay to go to close.
• Once pressed, the unit will display the relay off message “rOF.” This setting will be retained through a power cycle.
Reset • Trip reset button — the active fault is cleared and the Motor Insight returns to the “Ready” state. Note that both the Fault and GF Shunt Relays are reset when this button is pressed.
Mode and Trip • When the Motor Insight is faulted, the fault history can be accessed by simultaneously pressing the Mode and Trip buttons.
MN04209001E.book Page 2 Wednesday, September 30, 2009 3:44 PM

Motor Insight User Manual
MN04209001E For more information visit: www.eaton.com 5-3
September 2009
Table 5-1: User Interface Components (Continued)
Operation of the user interface is broken into three modes listed across the top of the device. Pressing the Mode Key enables mode navigation.
Table 5-2: Interface Mode Keys
The Mode and P/O LED are used in conjunction to identify a selected parameter.
Component Interface Description
Discrete LEDs
Status Ready FaultOn Off — indicates that the Motor Insight is not tripped and “Ready”
to run.Flash On — indicates that the device is tripped, but will attempt an
auto-reset.Off On — indicates that the device is tripped and requires a
manual reset.
Mode Indicates the active mode. Used in conjunction with the P/O LEDS to select a parameter for editing or to indicate the reason for trip.
P/O Indicates the selected Protection or Operation (P/O) parameter. Used in conjunction with the Mode LED to select a parameter for display/editing or to indicate the reason for trip.
Units Indicate the units of the displayed parameters. Used in conjunction with the Phase parameters to identify the displayed parameters.• A = amps• V = volts• kW = kilowatts• TC/User = By default the thermal capacity is shown,
the user can also configure this parameter. See Table 6-27.
Phase Indicates the selected phase. Used in conjunction with the Unit LEDs to identify the display parameter. • AVG = average of all phases• IA | L1-L2 — phase A current or L1-L2 voltage• IB | L2-L3 — phase B current or L2-L3 voltage• IC | L3-L1 — phase C current or L3-L1 voltage
Display Alphanumeric Display
3 digits, 7-segment alphanumeric display for numeric parameter display and editing (flashing) and fault codes.
Mode Description
Protection Used to set motor protection thresholds and/or disable protection parameters.
Operation Used to set operational parameters, including auto reset modes.
Monitoring Used to display run-time data parameters.
MN04209001E.book Page 3 Wednesday, September 30, 2009 3:44 PM

Motor Insight User Manual
5-4 For more information visit: www.eaton.com MN04209001E
September 2009
5.3 - Monitoring
5.3.1 - Values
In the monitoring mode, the up-button (�) and down-button (�) are used to scroll through the parameters that are available for display. When the end of the parameter list is reached (from either direction), the next button press wraps to the beginning or end of the list. The following table describes the operation of the monitoring mode.
Table 5-3: Operation of the Monitoring Mode
Action Display Parameter Format (Example) LEDs ON
Default Average RMS Current x.xx if Avg < 10xx.x if Avg < 100xxx if Avg ≥ 100
Mode – MonitorUnits – APhase – AVGStatus – Ready
Down – (�) Phase A RMS Current x.xx if Ia < 10xx.x if Ia < 100xxx if Ia ≥ 100
Mode – MonitorUnits – APhase – IA | LI-L2Status – Ready
Down – (�) Phase B RMS Current x.xx if Ib < 10xx.x if Ib < 100xxx if Ib ≥ 100
Mode – MonitorUnits – APhase – IB | L2-L3Status – Ready
Down – (�) Phase C RMS Current x.xx if Ic < 10xx.x if Ic < 100xxx if Ic ≥ 100
Mode – MonitorUnits – APhase – IC | L3-L1Status – Ready
Down – (�) Average RMS Voltage 480 Mode – MonitorUnits – VPhase – AVGStatus – Ready
Down – (�) Phase A RMS Voltage 480 Mode – MonitorUnits – VPhase – IA | LI-L2Status – Ready
Down – (�) Phase B RMS Voltage 480 Mode – MonitorUnits – VPhase – IB | L2-L3Status – Ready
Down – (�) Phase C RMS Voltage 480 Mode – MonitorUnits – VPhase – IC | L3-L1Status – Ready
Down – (�) Total Motor Power (kW) X.XX if kW < 10XX.X if kW < 100XXX if kW ≥ 100
Mode – MonitorUnits – kWPhase – AVGStatus – Ready
Down – (�) Motor Thermal Capacity/User Selected (see Section 6.5)
0 – 250 Mode – MonitorUnits – TCPhase – NoneStatus – Ready
MN04209001E.book Page 4 Wednesday, September 30, 2009 3:44 PM

Motor Insight User Manual
MN04209001E For more information visit: www.eaton.com 5-5
September 2009
5.3.2 - Display Messages
The following display messages may appear on the Motor Insight user interface to indicate status.
Message Description
rOF The relay has been turned off.
rSt The Restart Delay is timing down. Caution — an auto-reset attempt is pending.
rEt The number of auto-resets attempts has been exceeded. A manual reset is required.
ub A voltage imbalance has been detected. This message will flash with the displayed parameter in the alarm-no-trip mode.
HI A high voltage condition has been detected. This message will flash with the displayed parameter in the alarm-no-trip mode.
LO A low voltage condition has been detected. This message will flash with the displayed parameter in the alarm-no-trip mode.
1PH A voltage phase loss condition has been detected. This message will flash with the displayed parameter in the alarm-no-trip mode.
gnd A ground fault condition has been detected. This message will flash with the displayed parameter in the alarm-no-trip mode.
OFF The protection parameter is disabled.
999 The display parameter exceeds the display range.
F.XX Fault Codes — see Section 5.6
E0X Error Code — see Section 5.6
MN04209001E.book Page 5 Wednesday, September 30, 2009 3:44 PM

Motor Insight User Manual
5-6 For more information visit: www.eaton.com MN04209001E
September 2009
5.4 - Motor Protection/Basic Programming Set Points
Motor Insight is capable of advanced, intelligent motor protection. Programming the basic protection parameters can be accomplished directly through the user interface. More advanced control and protection parameters can be also programmed using the UI or over network communications.
Viewing and editing protection set points can be performed in the Protection and Operation Mode. The following diagram outlines the procedure for modifying any of the set points.
Note: The editing mode can be exited (without saving the parameter value) by pressing the Mode button.
Figure 5-2: Motor Protection/Basic Programming Set Points
Step 1: Press Mode button until Protection or Operation Mode LED is lit.
Step 2: Press Up or Down button until the desire P/O LED is lit. Display shows the current parameter value.
Step 3: Press the Edit/Save button. The Display shows the parameter value but it is now flashing.
Step 5: Press the Edit/Save button. The Display now shows the new parameter value that has been saved by the device.
Mode
120
Step 4: Use the Up/Down buttons to adjust the parameter to the desired value.
110
110
120
Edit/Save
Edit/Save
MN04209001E.book Page 6 Wednesday, September 30, 2009 3:44 PM

Motor Insight User Manual
MN04209001E For more information visit: www.eaton.com 5-7
September 2009
5.5 - Motor Protection/Advance Programming Set Points
The basic operation of Motor Insight is fully programmable through dedicated Protection and Operation LEDs (P/O LEDs). More advanced settings are available indirectly (through parameter codes) by selecting the Operation Mode and the Advanced Config Parameter. The following diagram outlines the procedure for editing the advanced set points of Motor Insight. See Table 6-5 for a table of advanced parameters.
Note: The editing mode can be exited at any time (without saving the parameter value) using the Mode button.
Figure 5-3: Motor Protection/Advance Programming Set Points
Step 1: Press Mode button until Operation Mode LED is lit.
Step 2: Press Up or Down button until Advanced Param P/O LED is lit. Display shows the current parameter code.
Step 3: Press the Edit/Save button. The Display now shows the parameter code but it is now flashing.
Step 5: Press the Edit/Save button. The Display now shows the parameter value corresponding to the selected parameter code. The value will be flashing as editing is enabled.
Mode
Step 4: Use the Up/Down buttons to select the desired parameter.
P. 10
P. 10
P. 20
Edit/Save
Edit/Save
Step 6: Use the Up/Down buttons to select the desired parameter value.
Step 7: Press the Edit/Save button to store the new parameter value.
140
120
MN04209001E.book Page 7 Wednesday, September 30, 2009 3:44 PM

Motor Insight User Manual
5-8 For more information visit: www.eaton.com MN04209001E
September 2009
5.6 - Fault Display
5.6.1 - Fault Indication
The Motor Insight indicates most faults with a Fault Code and by illuminating the corresponding Mode and P/O LEDs. In addition, the dedicated Fault LED will be illuminated when the device is faulted.
WARNING
If the Motor Insight is faulted and the Ready LED is flashing, anauto-reset is pending. The motor may start unexpectedly at anytime.
Fault #
User Interface
NotesMode LED P/O LED Display
Number of Restarts Exceeded
1 Operation Fault Reset Tries & Load Reset Tries
rEt Could result from excessive motor or load faults
Remote Off 2 None None rOF Relay turned off (network or UI)
Contactor Failure 3 Protection Current Unbalance %
F.03 Voltage and current phase loss
Under Current 4 Protection Under Current % F.04
Motor Overload 5 Operation Trip Class F.05
Ground Fault 6 Protection Ground Fault (A) F.06
Current Unbalance 7 Protection Current Unbalance %
F.07
Current Phase Loss 8 Protection Current Unbalance %
F.08
Reserved 9
High Power (kW) 10 Protection High Power (kW) F.10
Over Voltage 11 Protection Over Voltage (V) F.11
Under Voltage 12 Protection Under Voltage (V) F.12
Voltage Unbalance 13 Protection Voltage Unbalance %
F.13
Jam 14 Protection Jam Trip % F.14
Low Power (kW) 15 Protection Low Power (kW) F.15
Phase Rotation 16 Protection Phase Rotation F.16
Device Memory Fault
17 None None F.17 Contact factory
Internal Comm Failure
18 None None F.18 Contact factory
Line Frequency Out-of-Range
24 None None F.24 Line voltage frequency must be within 47-63 Hz range
Calibration Error 27 None None F.27 Contact factory
Other N/A None None F.XX Contact factory
MN04209001E.book Page 8 Wednesday, September 30, 2009 3:44 PM

Motor Insight User Manual
MN04209001E For more information visit: www.eaton.com 5-9
September 2009
5.6.2 - Fault History
Motor Insight stores the last 10 fault codes in a queue stored in non-volatile memory. This fault queue can be traversed using the following sequence of button presses.
Note: The Fault history can only be viewed when the device is in the tripped (or OFF) state.
Figure 5-4: Fault History
5.6.3 - Error Codes
The following table describes error messages and codes that can be generated by the Motor Insight. If these error codes cannot be cleared by a reset or power cycle, contact the factory for service.
5.7 - Locking the User Interface
The ability to modify set-point values from the user interface can be disabled by setting the User Interface Edit Lock parameter (P.02) to one in the Advanced Config parameter. See Section 6.6 for more information.
Step 1: Simultaneously press the Mode and Trip buttons when the Fault LED is lit. The display shows the last fault code and illuminates the corresponding P/O LEDsto identify the fault.
Step 2: Press Down button to view older fault codes or the Up button to view more recent fault codes.
Step 3: Press the Mode or Trip button to exit the Fault History mode. The Display now shows the last fault and is not flashing. Pressing Reset will reset the device and exit the Fault History mode.
Mode F. 10Tripand
F. 04
Mode F. 10Tripor
Error Code Description
NC Communication between the main microprocessor and user interface has been lost.
E01 The user interface clock has failed. The Motor Insight is still functional but performance will be degraded.
E02 A “stuck ON” switch has been detected by the Motor Insight.
E03 The user interface controller has detected an internal error.
MN04209001E.book Page 9 Wednesday, September 30, 2009 3:44 PM

Motor Insight User Manual
5-10 For more information visit: www.eaton.com MN04209001E
September 2009
MN04209001E.book Page 10 Wednesday, September 30, 2009 3:44 PM
Motor Insight User Manual
MN04209001E For more information visit: www.eaton.com 6-1
September 2009
Chapter 6 — Functional Description
WARNING
The Motor Insight may reset at any time enabling a motor start.When faulted (FAULT LED is ON) the READY LED will flash when anauto reset is pending.
Motor Insight monitors motor current and line voltage to provide advanced motor protection. The power and monitoring software contained in Motor Insight is the heart of the product. This software allows you to monitor a wide range of motor, load and line parameters. In this section, various features and protection options are described.
6.1 - Factory Defaults
The default settings for all parameters can be restored following Table 6-27 or over network communications. See Table 7-7.
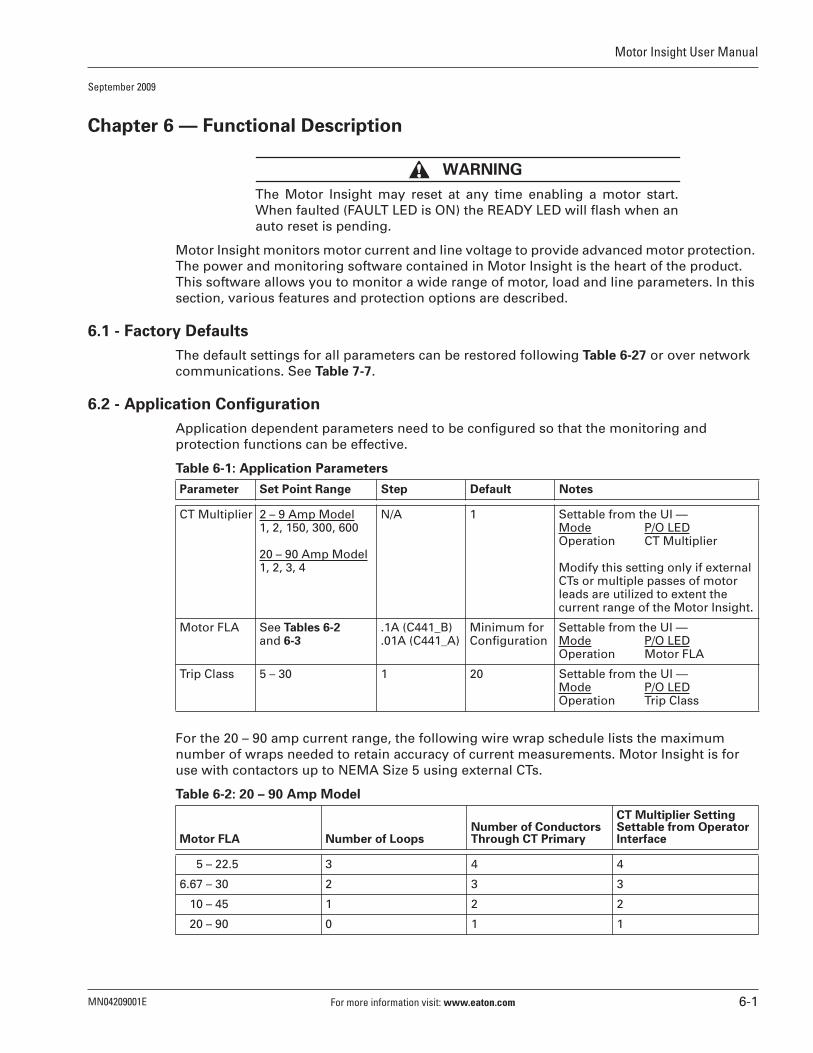
6.2 - Application Configuration
Application dependent parameters need to be configured so that the monitoring and protection functions can be effective.
Table 6-1: Application Parameters
For the 20 – 90 amp current range, the following wire wrap schedule lists the maximum number of wraps needed to retain accuracy of current measurements. Motor Insight is for use with contactors up to NEMA Size 5 using external CTs.
Table 6-2: 20 – 90 Amp Model
Parameter Set Point Range Step Default Notes
CT Multiplier 2 – 9 Amp Model1, 2, 150, 300, 600
20 – 90 Amp Model1, 2, 3, 4
N/A 1 Settable from the UI —Mode P/O LEDOperation CT Multiplier
Modify this setting only if external CTs or multiple passes of motor leads are utilized to extent the current range of the Motor Insight.
Motor FLA See Tables 6-2 and 6-3
.1A (C441_B)
.01A (C441_A)Minimum for Configuration
Settable from the UI —Mode P/O LEDOperation Motor FLA
Trip Class 5 – 30 1 20 Settable from the UI —Mode P/O LEDOperation Trip Class
Motor FLA Number of LoopsNumber of Conductors Through CT Primary
CT Multiplier SettingSettable from OperatorInterface
5 – 22.5 3 4 4
6.67 – 30 2 3 3
10 – 45 1 2 2
20 – 90 0 1 1
MN04209001E.book Page 1 Wednesday, September 30, 2009 3:44 PM

Motor Insight User Manual
6-2 For more information visit: www.eaton.com MN04209001E
September 2009
Table 6-3: 2 – 9 Amp Model
6.2 - Motor Cycle Operation
Motor Insight monitors the motor during periods of normal operation (see Figure 6-1). Normal operation includes the start cycle, run cycle and stop cycle. In general, faults may occur at any time; however, the device will trip during the motor run cycle. For example, in some applications, a normal voltage dip that occurs during a motor start will not cause a trip if the dip is only present during the start cycle.
Note: The thermal overload and ground fault functions are active at all times.
6.2.1 - Start Cycle and Transition Timing
Figure 6-1 shows an example of how Motor Insight reacts to a normal operating-cycle current profile. Initially, the motor is stopped and the current is zero. As long as Motor Insight is not in a trip state, it will permit contactor energization by closing its trip contact in series with the contactor coil. Motor Insight declares a motor start when it measures motor current exceeding 30% of the FLA setting. A motor stop is declared when the current falls below 5% of FLA. Also, Motor Insight detects a transition point, detecting when the large starting currents have fallen below a transition level. The following parameters are defined that control the transition behavior.
Note: Motor Insight will transition to run based on time or current level, whichever comes first.
Table 6-4: Start Cycle and Transition Timing
Motor FLA Number of LoopsNumber of Conductors Through CT Primary CT Multiplier Setting
1 – 5 1 2 2
2 – 9 0 1 1
60 – 135 0 1 150 – (150:5)
120 – 270 0 1 300 – (300:5)
240 – 540 0 1 600 – (600:5)
Parameter Set Point Range Step Default Notes
RunTransitionPercent
25 – 125% 1% 115% Settable from the UI —Mode P/O LEDOperation Advanced Config (P.17)
RunTransitionTime
1 – 180 Seconds 1 Second 10 Seconds Settable from the UI —Mode P/O LEDOperation Advanced Config (P.18)
MN04209001E.book Page 2 Wednesday, September 30, 2009 3:44 PM

Motor Insight User Manual
MN04209001E For more information visit: www.eaton.com 6-3
September 2009
Figure 6-1: Transition Time Current Curve
6.3 - Thermal Overload
Motor Insight’s overload function models the thermal characteristics of a motor and faults before motor damage will occur. Trip curves are defined by applicable agency standards. The trip class for any particular overload is adjustable. A thermal capacity value will be calculated to model the motor temperature.
The following items are associated with the electronic overload function of Motor Insight.
● An overload fault will occur when the calculated thermal capacity reaches 100%.
● An overload fault will not be cleared by power cycling the device — the thermal capacity is stored in the device’s non-volatile memory.
● Two thermal cool-down models are used. One for cool-down while the coil is energized (motor is running) and a second while the coil is de-energized. The second model has a longer time constant.
● A manual reset button is located on the faceplate of the unit. Depressing this button will clear any overload fault that has been latched, but is no longer present (thermal capacity must be less than 100%). Resets can also be initiated through the communication port.
● An auto-reset option is included. In the auto-reset mode, the Motor Insight’s overload will “automatically” reset when the fault has cleared.
● The device meets the “trip-free” requirements of UL 508 Paragraph 141.2.
StartCycle
RunCycle
StopCycle
30%of FLA
Run Transition% of FLA
TransitionPoint
Contactor Opens
CURRENT IN% OF FLA
TIME
StopCycle
MN04209001E.book Page 3 Wednesday, September 30, 2009 3:44 PM

Motor Insight User Manual
6-4 For more information visit: www.eaton.com MN04209001E
September 2009
6.3.1 - Trip Curves
Figure 6-2: Overload Trip Curve
Tim
e (
Se
co
nd
s)
Percent FLAPercent FLA
10000.0
1000.0
100.0
10.0
1.00
Class 5
Class 20
Class 10
Class 30
100 200 300 400 500 600 700 800 900
%120%
Class 20
Class 30
Class 10
5Class 5
MN04209001E.book Page 4 Wednesday, September 30, 2009 3:44 PM

Motor Insight User Manual
MN04209001E For more information visit: www.eaton.com 6-5
September 2009
6.4 - Protection
6.4.1 - Overview
In general, motor protection features will be controlled by five user-settable parameters. The parameters are:
● Enable — trips can be turned on or off
● Trip/Pickup Level — Level of a measurement element that will begin the timing of the delay
● Trip Delay — Also known as pickup delays. These delays prevent momentary disturbances in the system from causing nuisance trips
● Auto Restart Inhibit Time — Time delay after a trip before the motor is allowed to auto-restart
● Number of Restarts Tries — Number of auto restarts
These parameters are settable on the user interface and/or accessible over the network interface.
Voltage and ground fault protection can be set to run in an Alarm-no-trip mode. In this mode, an alarm will be generated as soon as the fault is detected, however; no trip will occur.
On Motor Insight, the protection features are broken out into the following three categories. This enables advanced protection while minimizing the number of set point parameters. Each category has separate controls for auto reset enables, number of restart tries and restart inhibit delays as described in the following seconds.
● Motor protection
● Supply protection
● Load protection
6.4.2 - Protection Element Enable/Disable
All of the protection elements described can be enabled or disabled from either the user interface or the network.
When setting a protection parameter from the user interface, an OFF option is encountered at the top or bottom of the trip level parameter range. Select this option to disable the parameter. The OFF option is not available if the Alarm-no-trip mode is selected for a given parameter. When the OFF option is selected, the Motor Insight retains the last set-point value.
When using the network, use the TRIP ENABLE/DISABLE register. Setting a trip threshold out-of-range does not disable a parameter.
6.4.3 - Motor Protection
The motor protection features that are listed in this section monitor motor current (average, minimum, or maximum phase currents) to detect various motor running faults. These protections are disabled during a start. These protections are also disabled if the maximum phase current is less that 50% of the Motor FLA set point.
Note: For motor protection features to function appropriately, the motor FLA must be configured for the application.
6.4.3.1 - Motor Protection Auto Reset Operation
The following parameters are used in conjunction with the motor protection features.
MN04209001E.book Page 5 Wednesday, September 30, 2009 3:44 PM

Motor Insight User Manual
6-6 For more information visit: www.eaton.com MN04209001E
September 2009
Table 6-5: Motor Protection Features
6.4.3.2 - Jam
Motor Insight monitors the average rms value of the three-phase currents. If the rms value rises above the threshold for the required length of time, a fault is detected and the unit will trip. The Jam settings will only be active during the Motor Running state. The Jam protection feature can be disabled by setting the Jam trip level to OFF on the UI or modifying the TRIP ENABLE/DISABLE register over the network. The following table describes the set points related to the Jam feature.
Table 6-6: Jam/Over Current
6.4.3.3 - Current Unbalance
Current unbalance is defined using the following equation:
Motor Insight monitors the current unbalance. If the value exceeds the threshold for the required length of time, a fault is detected and the unit will trip. The current unbalance protection is enabled only in the Motor Running state. Setting the current unbalance trip level to OFF (UI) or modifying the TRIP ENABLE/DISABLE register will disable the current unbalance protection feature. The following table describes the set points relatedto the current unbalance feature.
Parameter Set Point Range Step Default Notes
Motor Fault Reset Time
2 – 500 Minutes 1 Minute 8 Minutes Settable from the UI —Mode P/O LEDOperation Fault Reset Dly (m)
Reset is inhibited for this period of time to allow the motor to cool-down after a serious fault.
Motor Fault Reset Attempts
0, 1 – 4, A0L.1 – 0L.4*, 0L.A
1 0 = Manual Mode
Settable from the UI —Mode P/O LEDOperation Fault Resets (#)
Auto reset number of attempts:0 = Manual reset required.1 – 4 = Attempt desired number of auto resets (semi-automatic mode).A = Automatic Reset Mode.
The Fault Reset (#) will reset after the motor has been running for 15 minutes. *The OL. Prefix indicates that the setting applies to Overload trips only and not the other motor faults.
Parameter Set Point Range Step Default Notes
Jam Trip Pickup Level
150 – 400% of FLA, OFF
1% 400% of FLA Settable from the UI —Mode P/O LEDProtection Jam Trip %
Jam Trip Delay
1 – 20 Seconds 1 Second 2 Seconds Settable from the UI —Mode P/O LEDOperation Advanced Config (P.08)
% Current Unbalance 100 x max. (Phase Irms) min. (Phase Irms)–avg. (Phase Irms)----------------------------------------------------------------------------------------------------------
=
MN04209001E.book Page 6 Wednesday, September 30, 2009 3:44 PM

Motor Insight User Manual
MN04209001E For more information visit: www.eaton.com 6-7
September 2009
Table 6-7: Current Unbalance
6.4.3.4 - Current Phase Loss
Motor Insight monitors the current unbalance percent for extreme values to detect a current phase loss condition. The current phase loss detection can only be disabled by modifying the TRIP ENABLE/DISABLE register over the communication network. The following table describes the set points related to the current phase loss feature.
Table 6-8: Current Phase Loss
6.4.3.5 - Ground Fault
Motor Insight monitors the vector sum of the three-phase currents. If the rms value of the sum goes above the threshold for the required length of time, a fault is detected and the unit will trip. The ground fault protection will only be enabled in the Motor Running state. Setting the trip threshold to OFF or setting the TRIP ENABLE/DISABLE register will disable this protection feature.
Note: A ground fault cannot be auto reset — a manual reset is required.
Parameter Set Point Range Step Default Notes
Current Unbalance Trip Pickup Level
1 – 30%, OFF 1% 15% Settable from the UI —Mode P/O LEDProtection Current Unbalance %
Current Unbalance Trip Delay
1 – 20 Seconds 1 Second 10 Seconds Settable from the UI —Mode P/O LEDOperation Advanced Config (P.09)
Parameter Set Point Range Step Default Notes
Current Phase Loss Trip Pickup Level
60% Unbalance (Fixed)
N/A N/A The minimum phase current must also be less than 50% of the FLA setting.
Current Phase Loss Trip Delay
1 – 20 Seconds 1 Second 5 Seconds Settable from the UI —Mode P/O LEDOperation Advanced Config (P.10)
MN04209001E.book Page 7 Wednesday, September 30, 2009 3:44 PM

Motor Insight User Manual
6-8 For more information visit: www.eaton.com MN04209001E
September 2009
The following table describes the set points related to the ground fault feature.
Table 6-9: Ground Fault
6.4.4 - Supply Protection
Motor Insight monitors the supply voltage to the motor for the faults described below.
6.4.4.1 - Power-up Restart Delay
The Motor Insight can be configured to delay closing the fault relay on power-up using the following setting. This may be useful when multiple motors are brought on-line at the same time following a loss of power.
Table 6-10: Power-up Restart Delay
6.4.4.2 - Alarm-no-Trip Operation
By default, Motor Insight supply faults are set in the alarm-no-trip mode; that is, when the motor is running, a fault condition will generate an alarm, but the device will not trip. LEDs and display on the user interface will indicate condition, but fault contacts 95 – 98 will not change state. In this mode, a start will be inhibited if the fault condition is present. Starts will be allowed as soon as the fault condition is cleared.
Note: Even though a fault code is displayed when a start is inhibited, the fault code is not entered into the fault queue.
When the alarm-no-trip mode is disabled, Motor Insight will trip if a voltage fault is detected when the motor is running. The fault relay will be automatically reset when the fault condition is cleared. In this mode, a start will be inhibited if the fault condition is present. Starts will be allowed as soon as the fault condition is cleared.
Parameter Set Point Range Step Default Notes
Ground Fault Trip Pickup Level
2 – 9 Amp Model0.3 – 2.0 A (1 Pass)*0.15 – 1.0 (2 Pass)*9 – 60 (150:5 Ext)18 – 120 (300:5 Ext)36 – 240 (600:5 Ext)OFF20 – 90 Amp Model3 – 20 A (1 Pass)*1.5 – 10 (2 Pass)*1 – 6.66 (3 Pass)*0.75 – 5 (4 Pass)*OFF
Range Dependent
2 – 9 Amp Model1.00 A20 – 90 Amp Model10.0 A
Settable from the UI —Mode P/O LEDProtection Ground Fault (A)
*(Pass) is explained in detail in Tables 6-2 & 6-3
Ground Fault Trip Delay
1 – 60 Seconds 1 Second 30 Seconds <150% of setting, 1 – 60 seconds≥150% of setting, 2 seconds≥250% of setting, 1 second
Settable from the UI —Mode P/O LEDOperation Advanced Config (P.11)
Ground Fault Alarm-No-TripMode
0, 1 1 0 0 = Alarm-No-Trip Disabled1 = Alarm-No-Trip Enabled
Settable from the UI —Mode P/O LEDOperation Advanced Config (P.07)
Parameter Set Point Range Step Default Notes
Power-up Restart Delay 0 – 500 Seconds 1 10 Settable from the UI —Mode P/O LEDOperation Restart Delay(s)
MN04209001E.book Page 8 Wednesday, September 30, 2009 3:44 PM

Motor Insight User Manual
MN04209001E For more information visit: www.eaton.com 6-9
September 2009
Table 6-11: Alarm-No-Trip Operation
6.4.4.3 - Undervoltage
Motor Insight monitors the minimum rms value of the three-phase voltages. If the rms value drops below the threshold for the required length of time, a fault is detected. The under-voltage protection feature can be disabled by setting the undervoltage trip level to OFF on the UI or by appropriately setting the TRIP ENABLE/DISABLE register. The following table describes the set points related to the undervoltage feature.
Table 6-12: Undervoltage
6.4.4.4 - Overvoltage
Motor Insight monitors the maximum rms value of the three-phase voltages. If the rms value rises above the threshold for the required length of time, a fault is detected. The overvoltage protection can be disabled by setting the threshold to OFF or by appropriately setting the TRIP ENABLE/DISABLE register. The following table describes the set points related to the overvoltage feature.
Table 6-13: Overvoltage
6.4.4.5 - Voltage Unbalance
Voltage unbalance is estimated using the following equation.
Motor Insight monitors the voltage unbalance. If the value exceeds the threshold for the required length of time, a fault is detected. The voltage unbalance protection will be enabled only in the Motor Running state. The following table describes the set points related to the voltage unbalance feature.
Parameter Set Point Range Step Default Notes
Voltage Fault Alarm-No-Trip Mode
0, 1 1 1 0 = Alarm-No-Trip Disabled1 = Alarm-No-Trip Enabled
Mode P/O LEDProtection Advanced Config (P.06)
Parameter Set Point Range Step Default Notes
Undervoltage Trip Pickup Level
170 – 264 (240 Vac)323 – 528 (480 Vac)489 – 660 (600 Vac)
1 Volt 216 Volts432 Volts540 Volts
Settable from the UI —Mode P/O LEDProtection Undervoltage
Undervoltage Trip Delay
1 – 20 Seconds 1 Second 10 Seconds Settable from the UI —Mode P/O LEDOperation Advanced Config (P.14)
Parameter Set Point Range Step Default Notes
Overvoltage Trip Pickup Level
170 – 264 (240 Vac)323 – 528 (480 Vac)489 – 660 (600 Vac)
1 Volt 264 Volts528 Volts632 Volts
Settable from the UI —Mode P/O LEDProtection Overvoltage
Overvoltage Trip Delay
1 – 20 Seconds 1 Second 10 Seconds Settable from the UI —Mode P/O LEDOperation Advanced Config (P.15)
% Voltage Unbalance 100 x max. (Phase Vrms min. (Phase Vrms)–avg. (Phase Vrms)-------------------------------------------------------------------------------------------------------------
=
MN04209001E.book Page 9 Wednesday, September 30, 2009 3:44 PM

Motor Insight User Manual
6-10 For more information visit: www.eaton.com MN04209001E
September 2009
Table 6-14: Voltage Unbalance
6.4.4.6 - Phase Rotation
Motor Insight monitors for voltage phase sequence for a reversal in direction.
Table 6-15: Phase Rotation
6.4.5 - Load Protection
6.4.5.1 - Load Protection Auto Reset Operation
The following parameters are used in conjunction with the load protection features unless otherwise noted.
Table 6-16: Load Protection
Parameter Set Point Range Step Default Notes
Voltage Unbalance Trip Pickup Level
1 – 20% 1% 6% Settable from the UI —Mode P/O LEDProtection Voltage Unbalance %
Voltage Unbalance Trip Delay
1 – 20 Seconds 1 Second 10 Seconds Settable from the UI —Mode P/O LEDOperation Advanced Config (P.16)
Parameter Set Point Range Step Default Notes
Phase Rotation
OFF, 1, 2 1 1 Settable from the UI —Mode P/O LEDProtection Phase Rotation
The settings are mapped to the following:OFF = Ignore Sequencing — No Trip or Warning1 = ABC2 = ACB
Phase Rotation Trip Delay
N/A N/A 1 Second Not User Settable
Parameter Set Point Range Step Default Notes
Load Fault Reset Time
2 – 500 MinutesA (Auto)
1 Minute 20 Minutes Settable from the UI —Mode P/O LEDOperation Load Reset Dly (m)
2 – 500 minutes = An auto reset may be attempted the set number of minutes after a load fault.A = Auto load fault reset delay calculation mode (See Table 6-17)
Load Fault Reset Attempts
0 – 4, A (Auto) 1 1 Settable from the UI —Mode P/O LEDOperation Load Reset Tries
Auto restart number of attempts:0 = Manual reset required.1 – 4 = Attempt desired number of auto restarts (semi-automatic mode).A = Auto mode
MN04209001E.book Page 10 Wednesday, September 30, 2009 3:44 PM

Motor Insight User Manual
MN04209001E For more information visit: www.eaton.com 6-11
September 2009
Table 6-17: Run Time/Load Fault
6.4.5.2 - Undercurrent
Motor Insight monitors the average rms value of the three-phase currents. If the rms value drops below the threshold for the required length of time, a fault is detected and the unit will trip. The following table describes the set points related to the undercurrent feature.
Table 6-18: Undercurrent
6.4.5.3 - Low Power
Motor Insight monitors the three-phase real power (kW). If the real power value drops below the threshold for the required length of time, a fault is detected and the unit will trip. This protection feature is only enabled in the Motor Running state. Trip thresholds depends on the motor FLA setting, rated voltage of the model and the CT Multiplier setting.
Table 6-19: Low Power
Run Time Load Fault Reset Time
Greater than or equal to 60 Minutes 6 Minutes
Greater than or equal to 30 Minutes 15 Minutes
Greater than or equal to 15 Minutes 30 Minutes
Less than 15 Minutes 60 Minutes
Parameter Set Point Range Step Default Notes
Undercurrent Trip Pickup Level
10 – 90% of Motor FLA,OFF
1% 50% Settable from the UI —Mode P/O LEDProtection Undercurrent %
Undercurrent Trip Delay
1 – 60 Seconds 1 Second 5 Seconds Settable from the UI —Mode P/O LEDOperation Advanced Config (P.13)
Parameter Set Point Range Step Default Notes
Low Power Trip Pickup Level
See Tables 6-21 through 6-26, OFF
— Minimum Value for Range
Settable from the UI —Mode P/O LEDProtection Low Power (kW)
Low Power Trip Delay
1 – 60 Seconds 1 Second 5 Seconds Settable from the UI —Mode P/O LEDOperation Low kW Trip Delay
MN04209001E.book Page 11 Wednesday, September 30, 2009 3:44 PM

Motor Insight User Manual
6-12 For more information visit: www.eaton.com MN04209001E
September 2009
6.4.5.4 - High Power
Motor Insight monitors the three-phase real power. If the real power value is estimated above the threshold for the required length of time, a fault is detected and the unit will trip. This protection feature is only enabled in the Motor Running state. Trip thresholds depends on the motor FLA setting, rated voltage of the model and the CT Multiplier setting.
Table 6-20: High Power
6.5 - Power Tables
Table 6-21: C441BB — 240 Vac, 20 – 90 Amperes
Table 6-22: C441CB — 480 Vac, 20 – 90 Amperes
Table 6-23: C441DB — 600 Vac, 20 – 90 Amperes
Parameter Set Point Range Step Default Notes
High Power Trip Pickup Level
See Tables 6-21 through 6-26
— Maximum Value in Range
Settable from the UI —Mode P/O LEDProtection High Power (kW)
High Power Trip Delay
1 – 60 Seconds 1 5 Settable from the UI —Mode P/O LEDOperation Advanced Config (P.10)
CT MultiplierLow Power Minimum (kW)
Low Power Maximum (kW)
High PowerMinimum (kW)
High PowerMaximum (kW)
1 1.6 28.7 4.0 39.4
2 0.8 14.3 2.0 19.7
3 0.5 9.6 1.3 13.1
4 0.4 7.2 1.0 9.9
CT MultiplierLow Power Minimum (kW)
Low Power Maximum (kW)
High Power Minimum (kW)
High Power Maximum (kW)
1 3.3 59.9 8.3 82.3
2 1.7 29.9 4.2 41.2
3 1.1 20.0 2.8 27.4
4 0.8 15.0 2.1 20.6
CT MultiplierLow Power Minimum (kW)
Low Power Maximum (kW)
High Power Minimum (kW)
High Power Maximum (kW)
1 4.0 71.7 10.0 98.6
2 2.0 35.9 5.0 49.3
3 1.3 23.9 3.3 32.9
4 1.0 17.9 2.5 24.6
MN04209001E.book Page 12 Wednesday, September 30, 2009 3:44 PM

Motor Insight User Manual
MN04209001E For more information visit: www.eaton.com 6-13
September 2009
Table 6-24: C441BA — 240 Vac, 2 – 9 Amperes
Table 6-25: C441CA — 480 Vac, 2 – 9 Amperes
Table 6-26: C441DA — 600 Vac, 2 – 9 Amperes
6.6 - Advanced Parameters
The following table summarizes all advanced parameters.
Table 6-27: Advanced Parameters
CT MultiplierLow Power Minimum (kW)
Low Power Maximum (kW)
High Power Minimum (kW)
High Power Maximum (kW)
1 0.2 2.9 0.4 3.9
2 0.1 1.4 0.2 2.0
150 (:5) 4.8 43.0 12.0 59.2
300 (:5) 9.6 86.0 23.9 118.3
600 (:5) 19.1 172.1 47.8 236.6
CT MultiplierLow Power Minimum (kW)
Low Power Maximum (kW)
High Power Minimum (kW)
High Power Maximum (kW)
1 0.3 6.0 0.8 8.2
2 0.2 3.0 0.4 4.1
150 (:5) 10.0 89.8 24.9 123.5
300 (:5) 20.0 179.6 49.9 246.9
600 (:5) 39.9 359.2 99.8 493.8
CT MultiplierLow Power Minimum (kW)
Low Power Maximum (kW)
High Power Minimum (kW)
High Power Maximum (kW)
1 0.4 7.2 1.0 9.9
2 0.2 3.6 0.5 4.9
150 (:5) 12.0 107.6 29.9 147.9
300 (:5) 23.9 215.1 59.8 295.8
600 (:5) 47.8 430.2 119.5 591.6
ParameterCode
ParameterDescription
Set Point Range Default Notes
P.00 Modbus Baud Rate 0 – 7 4 0 = 1,2001 = 2,4002 = 4,8003 = 9,6004 = 19,2005 = 38,4006 = 57,6007 = 115,200
P.01 Modbus Parity 0 – 2 0 0 = Even (1 Stop Bit)1 = Odd (1 Dtop Bit)2 = No Parity (2 Stop Bits)
MN04209001E.book Page 13 Wednesday, September 30, 2009 3:44 PM

Motor Insight User Manual
6-14 For more information visit: www.eaton.com MN04209001E
September 2009
Table 6-27: Advanced Parameters (Continued)
ParameterCode
ParameterDescription
Set Point Range Default Notes
P.02 User Interface Edit Lock
0 –1 0 0 = UI Editing Enabled (Unlocked)1 = UI Editing Disabled (Locked)This is the only parameter that can be altered when the UI editing is locked.
P.03 User Display Parameter
0 – 6 0 Changes the value displayed in TC/USER LED in the monitoring menu0 = Thermal Capacity (%)1 = Power Factor (0.0 – 1.0)2 = Voltage Unbalance %3 = Current Unbalance %4 = Ground Current 5 = Motor Run Hours6 = Frequency
P.04 Comm LossBehavior
1 – 2 1 1 = Fault On Comm Loss2 = Hold Last State on a Comm Loss
P.05 ConfigurationReset
0, 1, 2 N/A 0 = No Change1 = Power Cycle2 = Restore Factory Default Parameters
P.06 Voltage TripMode
0 – 1 1 0 = Trip On Fault (Each voltage fault can be individually enabled or disabled)1 = Alarm-No-Trip
P.07 Ground FaultTrip Mode
0 – 1 0 0 = Trip On Fault1 = Alarm-No-Trip
P.08 Jam Trip Delay 1 – 20 Seconds
2 Seconds
—
P.09 Current UnbalanceTrip Delay
1 – 20 Seconds
10 Seconds
—
P.10 Current Phase Loss Trip Delay
1 – 20 Seconds
5 Seconds
—
P.11 Ground FaultTrip Delay
1 – 60 Seconds
30 Seconds
—
P.12 High PowerTrip Delay
1 – 60 Seconds
5 Seconds
—
P.13 UndercurrentTrip Delay
1 – 60 Seconds
5 Seconds
—
P.14 UndervoltageTrip Delay
1 – 20 Seconds
10 Seconds
Trip delay is only used when alarm-no-trip mode is disabled. Alarm will be generated as soon as the fault is detected.
P.15 OvervoltageTrip Delay
1-20 Seconds
10Seconds
Trip delay is only used when alarm-no-trip mode is disabled. Alarm will be generated as soon as the fault is detected.
P.16 Voltage UnbalanceTrip Delay
1-20 Seconds
10 Seconds
Trip delay is only used when alarm-no-trip mode is disabled. Alarm will be generated as soon as the fault is detected.
P.17 Run TransitionLevel
25 – 125% 115% See Figure 6-1
P.18 Run TransitionTime
1 – 180 Seconds
10 Seconds
See Figure 6-1
MN04209001E.book Page 14 Wednesday, September 30, 2009 3:44 PM

Motor Insight User Manual
MN04209001E For more information visit: www.eaton.com 7-1
September 2009
Chapter 7 — Communication Module C441M
7.1 - Overview
Figure 7-1: Dimensional Drawing
7.2 - Mounting
To mount the Modbus communication module to the Motor Insight base unit, first make sure power is disconnected from the base unit. Next, align the communication module with the base unit, using the 10-pin header as reference for the correct orientation. Hook the lower tabs (furthest from the 10-pin header) into the base unit, and then rotate the communication module into position until a click is heard.
MN04209001E.book Page 1 Wednesday, September 30, 2009 3:44 PM

Motor Insight User Manual
7-2 For more information visit: www.eaton.com MN04209001E
September 2009
7.3 - Quick Start
The following parameters configure the Modbus communication interface. Parameters may be set either with the user interface or through the Modbus port. For more information on setting the parameters via the user interface, please reference Chapter 5.
Table 7-1: Modbus Parameters
� To enable comm. loss behavior, write 0X0088 to register 400.
Modbus Parameter UI Interface Modbus Register Default Notes
Modbus Address Operation Param
431 1 Must be unique and between 1 and 247.
Modbus Baud Rate Advanced Param P.00
432 19.2k Requires power cycle reset to take effect.
Modbus Parity Advanced Param P.01
442 8,e,1 8 data bits, even parity, 1 stop bit. Requires power cycle reset to take effect.
Comm. Loss Behavior
Advanced Param P.04
441 1 Default is 1, for fault on comm. loss. �
Comm. Loss Timeout — 440 2000 2 seconds.
Configuration Reset Advanced Param P.05
402 0, no reset asserted
Set to 1 to give power cycle reset (soft reset). Clears after reset.asserted.
MN04209001E.book Page 2 Wednesday, September 30, 2009 3:44 PM
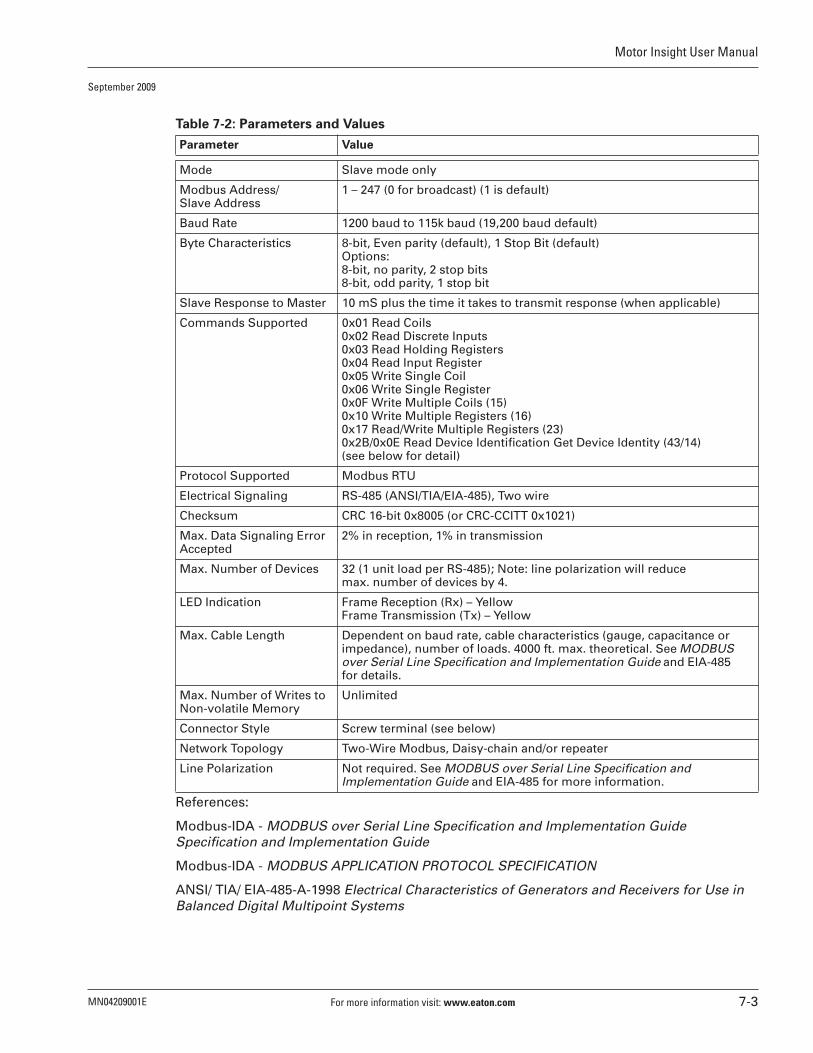
Motor Insight User Manual
MN04209001E For more information visit: www.eaton.com 7-3
September 2009
Table 7-2: Parameters and Values
References:
Modbus-IDA - MODBUS over Serial Line Specification and Implementation Guide Specification and Implementation Guide
Modbus-IDA - MODBUS APPLICATION PROTOCOL SPECIFICATION
ANSI/ TIA/ EIA-485-A-1998 Electrical Characteristics of Generators and Receivers for Use in Balanced Digital Multipoint Systems
Parameter Value
Mode Slave mode only
Modbus Address/Slave Address
1 – 247 (0 for broadcast) (1 is default)
Baud Rate 1200 baud to 115k baud (19,200 baud default)
Byte Characteristics 8-bit, Even parity (default), 1 Stop Bit (default)Options: 8-bit, no parity, 2 stop bits8-bit, odd parity, 1 stop bit
Slave Response to Master 10 mS plus the time it takes to transmit response (when applicable)
Commands Supported 0x01 Read Coils 0x02 Read Discrete Inputs 0x03 Read Holding Registers 0x04 Read Input Register0x05 Write Single Coil0x06 Write Single Register 0x0F Write Multiple Coils (15)0x10 Write Multiple Registers (16)0x17 Read/Write Multiple Registers (23)0x2B/0x0E Read Device Identification Get Device Identity (43/14) (see below for detail)
Protocol Supported Modbus RTU
Electrical Signaling RS-485 (ANSI/TIA/EIA-485), Two wire
Checksum CRC 16-bit 0x8005 (or CRC-CCITT 0x1021)
Max. Data Signaling Error Accepted
2% in reception, 1% in transmission
Max. Number of Devices 32 (1 unit load per RS-485); Note: line polarization will reduce max. number of devices by 4.
LED Indication Frame Reception (Rx) – YellowFrame Transmission (Tx) – Yellow
Max. Cable Length Dependent on baud rate, cable characteristics (gauge, capacitance or impedance), number of loads. 4000 ft. max. theoretical. See MODBUS over Serial Line Specification and Implementation Guide and EIA-485 for details.
Max. Number of Writes to Non-volatile Memory
Unlimited
Connector Style Screw terminal (see below)
Network Topology Two-Wire Modbus, Daisy-chain and/or repeater
Line Polarization Not required. See MODBUS over Serial Line Specification and Implementation Guide and EIA-485 for more information.
MN04209001E.book Page 3 Wednesday, September 30, 2009 3:44 PM

Motor Insight User Manual
7-4 For more information visit: www.eaton.com MN04209001E
September 2009
7.4 - Modbus Field Wiring
Modbus field wiring is accomplished with a 5-pin, 3.5 mm pitch, removable screw terminal plug. Terminal block wiring capacity and torque requirements are 28-14 AWG and 2.25 in-lb (0.25 Nm) respectively.
Table 7-3: Field Wiring
� Per figure 28, MODBUS over Serial Line Specification and Implementation Guide Specification and Implementation Guide.
Figure 7-2: Terminal Drawing
Shielded cable must be used and one end of the shield must be connected to protective ground. Wire gauge must be chosen sufficiently large enough to permit the maximum length of 1,000 m. AWG 24 is always sufficient for Modbus data lines.
7.5 - Modbus Addressing
The default Modbus slave address is 1. Care must be taken to ensure that there are not two devices with the same address. In such a case, an abnormal behavior of the whole serial bus can occur. The Master may not be able to communicate with all present slaves on the bus. A change to the Modbus address will take effect immediately.
Pin # Circuit EIA-485 NameRecommended Wire Color � Description
1 Common C/C’ Grey Signal and optional power supply comm.
2 D1 B/B’ Yellow Transceiver terminal 1, V1 Voltage, Data + (V1 > V0 for binary 1 [OFF] state)
3 N/C No connection
4 DO A/A’ Brown Transceiver terminal 0, V0 Voltage, Data - (V0 > V1 for binary 0 [ON] state)
5 N/C No connection
MN04209001E.book Page 4 Wednesday, September 30, 2009 3:44 PM

Motor Insight User Manual
MN04209001E For more information visit: www.eaton.com 7-5
September 2009
7.6 - Modbus Baud Rate and Parity
Baud rate and parity can be set through both the user interface and the Modbus port. The changes do not take effect until the next power cycle reset or soft reset, but they will be reported via their respective registers, or on the user interface. A soft reset can be requested by writing a 1 to the Configuration Reset Register 402.
For example, assume that the unit is configured to communicate at 19.2k. A read of register 432, Modbus Baud Rate Code, will return a “4” for 19.2k baud. If a subsequent write of “7” is made to register 432, to change the baud rate to 115.2k, the unit will return “7” when register 432 is read, but continue to communicate at 19.2k baud until either power cycle reset or soft reset is asserted. Once the unit receives either a power cycle reset, or a soft reset is asserted, the unit will communicate at 115.2k baud and will return “7” on reads to register 432. The same behaviors apply to the parity settings as well.
7.7 - 0x2B/0x0E Read Device Identification Get Device Identity (43/14) Details
Device ID Codes 1, 2 and 4 are implemented. Device ID code 3 (extended info) is not implemented.
Object IDs
0 VendorName
1 ProductCode
2 MajorMinorRevision
3 VendorURL
4 ProductName
5 ModelName
6 UserApplicationName
7.8 - Modbus Command Register (400)
Table 7-4: Command Codes
Command register will clear after being written to.
Command Code (Hex)
Clear Motor Run Hours 66H
Delete Last Fault From Queue 77H
Comm Watch Dog Enable 88H
Comm Watch Dog Disable 99H
Fault Reset AAH
Clear Motor Start Count BBH
Force Ground Fault CCH
Remote Off DDH
MN04209001E.book Page 5 Wednesday, September 30, 2009 3:44 PM

Motor Insight User Manual
7-6 For more information visit: www.eaton.com MN04209001E
September 2009
7.9 - Configuration Reset Register (402)
Table 7-5: Reset Codes
7.10 - Range Checking
Many configuration parameters are range checked. When implemented, if value is greater than the maximum allowed value, the parameter is set to its maximum. Likewise, if a parameter is set to a value less than its minimum value, the parameter will be set to its minimum value. For function code 0x06, when the range checking causes a value to be different from what is requested to be written, the Modbus response to the 0x06 command returns the requested value, not what was actually written. A subsequent read of this parameter will return the actual value that it was set to.
7.11 - Comm Loss Timeout (Reg 440)
Default = 2 seconds
Comm Loss Timeout is the delay between loss of communication (between a comm. module and the base unit) and implemented the comm. loss behavior.
Range is 1 – 65 seconds, in 1 millisecond increments. For example, to set the comm. loss timeout to 3 seconds, send 3000 to this register.
7.12 - Comm Loss Behavior (Reg 441)
Comm Loss Behavior determines what the device should do in the event that communication is lost. If the behavior is enabled, the behavior is implemented after an amount of time equal to the Comm Loss Timeout (Reg 440). Comm Loss Behavior is enabled by writing 88H (Comm Watch Dog Enable) to the Command Register (see Modbus Command Register). Comm Loss Behavior is disabled by writing 99H (Comm Watch Dog Disable) to the Command Register.
Table 7-6: Comm Loss Behavior
Action Reset Code
Power Cycle Reset 1
Factory Reset 2
Behavior Reset Code Notes
Fault 1 Default, if enabled
Hold Last State 2
MN04209001E.book Page 6 Wednesday, September 30, 2009 3:44 PM

Motor Insight User Manual
MN04209001E For more information visit: www.eaton.com 7-7
September 2009
7.13 - Modbus Register Map
Table 7-7: Modbus Register Map
Modbus Coil No.
Modbus Reg. No. R/W ? Parameter Name Notes
300 R Phase A RMS Current *See current scaling table (7-8)
301 R Phase B RMS Current *See current scaling table (7-8)
302 R Phase C RMS Current *See current scaling table (7-8)
303 R Average RMS Current *See current scaling table (7-8)
304 R Phase A RMS Voltage (L1-L2) Volts
305 R Phase B RMS Voltage (L2-L3) Volts
306 R Phase C RMS Voltage (L3-L1) Volts
307 R Average RMS Voltage Volts
308 R Motor Power (kW) kW x100
309 R Voltage Unbalance %
310 R Current Unbalance %
311 R Power Factor Power Factor x100 (inductive 0 – 100)
312 R Ground Fault Current Amps x100
313 R Frequency Hz x100
314 R Motor Thermal Capacity (Thermal Overload)
Displayed in percentage — 0% cold motor, 100% will cause and overload trip (0 – 255)
315 R Fault Queue 1 The fault queue can be cleared using register 400
316 R Fault Queue 2
317 R Fault Queue 3
318 R Fault Queue 4
319 R Fault Queue 5
320 R Fault Queue 6
321 R Fault Queue 7
322 R Fault Queue 8
323 R Fault Queue 9
324 R Fault Queue 10
325 R Supply Fault — Time To Restart Seconds remaining
326 R Motor Fault — Time to Restart Seconds remaining
327 R Load Fault — Time to Restart Seconds remaining
328 R/W Motor Run Time Hours — can be reset using register 400
329 R Start Count Can be reset using register 400
330 R Trip Reason
5265 R Fault Lockout 0x0001 — Number of restarts attempts exceeded – manual reset is required
5266 R Relay Off Command 0x0002 — Relay was turned off over network or through UI
MN04209001E.book Page 7 Wednesday, September 30, 2009 3:44 PM

Motor Insight User Manual
7-8 For more information visit: www.eaton.com MN04209001E
September 2009
Table 7-7: Modbus Register Map (Continued)
Modbus Coil No.
Modbus Reg. No. R/W ? Parameter Name Notes
5267 R Contactor Failure 0x0004 — Current phase loss without voltage phase loss
5268 R Under Current 0x0008
5269 R Overload 0x0010
5270 R Ground Fault 0x0020
5271 R Current Unbalance 0x0040
5272 R Current Single-Phase 0x0080 — Current phase loss with voltage phase loss
5273 R Reserved Will report zero
5274 R High Power (kW) 0x0200
5275 R Over Voltage 0x0400
5276 R Under Voltage 0x0800
5277 R Voltage Unbalance 0x1000
5278 R Over Current 0x2000
5279 R Low Power (kW) 0x4000
5280 R Phase Reversal 0x8000
331 R Over Load Status
5281 R Overload 0x0001 — Overload Tripped
5282 R Ground Fault 0x0002 — Ground Fault Tripped
5283 R High Power 0x0004 — High Power Tripped
5284 R Reserved
5285 R Reserved
5286 R Reserved
5287 R Reserved
5288 R Running 0x0080 — Relay Status
332 R Error Status Warning/Alarm Indications
5297 R Low Voltage 0x0001
5298 R High Voltage 0x0002
5299 R Voltage Unbalance 0x0004
5300 R Low Power 0x0010
5301 R Reverse Phase 0x0020
5302 R Current Unbalance 0x0040
5303 R Voltage Single-Phase 0x0080
5304 R Current Single-Phase 0x0100
5305 R Ground Fault 0x0200
333 R Overload Firmware Version
334 R UI Firmware Version
MN04209001E.book Page 8 Wednesday, September 30, 2009 3:44 PM

Motor Insight User Manual
MN04209001E For more information visit: www.eaton.com 7-9
September 2009
Table 7-7: Modbus Register Map (Continued)
Modbus Coil No.
Modbus Reg. No. R/W ? Parameter Name Notes
335 R Unit ID Unit ID Cat No.0x00BA (186) — C441BA0x00BB (187) — C441BB0x00CA (202) — C441CA0x00CB (203) — C441CB0x00DA (218) — C441DA0x00DB (219) — C441DB
400 R/W Command Register 0x0066 — Clear Motor Run Hours0x0077 — Clear Fault Queue 10x0078 — Clear Fault Queue0x0088 — Network watchdog enable0x0099 — Network watchdog disable0x00AA — Reset Relay0x00BB — Clear Motor Start Count0x00CC — Force Ground Fault0x00DD — Relay OFFNote: command register will clear after write
401 Reserved
402 R/W Configuration Reset 1 = Soft Reset (equivalent to a power cycle)2 = Factory ResetNote: register will clear after write
403 R/W CT Multiplier Cat No C441BB, C441CB, C441DB1-4Cat No C441BA, C441CA, C441DA1, 2, 3 (150:5), 4 (300:5), 5 (600:5)
404 R/W Ground Fault Trip Pickup Level
Setting in Amps x 100Cat No C441BB, C441CB, C441DB3 – 20 A (CT Multiplier = 1) 1.5 – 10 (CT Multiplier = 2)1 – 6.66 (CT Multiplier = 3)0.75 – 5 (CT Multiplier = 4)
Default setting is 10ACat No C441BA, C441CA, C441DA0.3 – 2.0 A (CT Multiplier = 1) 0.15 – 1.0 (CT Multiplier = 2)9 – 60 (CT Multiplier = 3)18 – 120 (CT Multiplier = 4)36 – 240 (CT Multiplier = 5)
Default setting is 1AUse Register 433 to enable/disableUse Register 421 to set trip delay
405 R/W Under Current Trip Pickup Level
10 – 90% (50%) of Motor FLA (register 407)Use Register 433 to enable/disableUse Register 422 to set trip delay
MN04209001E.book Page 9 Wednesday, September 30, 2009 3:44 PM

Motor Insight User Manual
7-10 For more information visit: www.eaton.com MN04209001E
September 2009
Table 7-7: Modbus Register Map (Continued)
Modbus Coil No.
Modbus Reg. No. R/W ? Parameter Name Notes (Default)
406 R/W Low kW Trip Level Setting is in kW x 100See Section 6.5 for ranges. Default value is the minimum value in the range. Registers 407, Motor FLA, and 403, CT Multiplier, control the range of this parameter.Use Register 433 to enable/disableUse Register 423 to set trip delay
407 R/W Motor FLA Setting is in Amps x 100Cat No C441BB, C441CB, C441DB5 – 22.5 Amps (CT Multiplier = 4)6.67 – 30 Amps (CT Multiplier = 3)10 – 45 Amps (CT Multiplier = 2)20 – 90 Amps (CT Multiplier =1)
Cat No C441BA, C441CA, C441DA1 – 5 Amps (CT Multiplier = 2)2 – 9 Amps (CT Multiplier = 1)60 – 135 Amps (CT Multiplier = 3)120 – 270 Amps (CT Multiplier = 4)240 – 540 Amps (CT Multiplier = 5)
408 R/W Current Unbalance Trip Pickup Level
1 – 30% (15%)Use Register 433 to enable/disableUse Register 425 to set trip delay
409 R/W Trip Class 5 – 30
410 R/W Under Voltage Trip Pickup Level
170 – 264 V (216 V) CC441BA, C441BB323 – 528 V (432 V) C441CA, C441CB489 – 660 V (540 V) C441DA, C441DBUse Register 433 to enable/disableUse Register 426 to set trip delayUse Register 435 to configure supply fault alarm behavior
411 R/W Over Voltage Trip Pickup Level
170 – 264 V (264 V) C441BA, C441BB323 – 528 V (528 V) C441CA, C441CB489 – 660 V (540 V) C441DA, C441DBUse Register 433 to enable/disableUse Register 427 to set trip delayUse Register 435 to configure supply fault alarm behavior
412 R/W Voltage Unbalance Trip Pickup Level
1 – 20% (6%)Use Register 433 to enable/disableUse Register 428 to set trip delayUse Register 435 to configure supply fault alarm behavior
413 R/W Jam Trip Pickup Level 150 – 400% of Motor FLA (register 407)Use Register 433 to enable/disableUse Register 424 to set trip delay
MN04209001E.book Page 10 Wednesday, September 30, 2009 3:44 PM

Motor Insight User Manual
MN04209001E For more information visit: www.eaton.com 7-11
September 2009
Table 7-7: Modbus Register Map (Continued)
Modbus Coil No.
Modbus Reg. No. R/W ? Parameter Name Notes
414 R/W High Power Trip Level See Section 6.5 for ranges. Default value is the maximum value in the range. Registers 407 (Motor FLA) and 403 (CT Multiplier) control the range of this parameter.Use Register 433 to enable/disableUse Register 429 to set trip delay
415 R/W Phase Rotation 0 = Trip Disabled, 1 = ABC, 2 = ACB (1)
416 R/W Restart Delay 0 – 500 (10) Seconds
417 R/W Motor Fault Reset Delay 2 – 500 (8) Minutes See Register 434 for application to Overload Fault
418 R/W Load Fault Reset Delay 2 – 500 (20) MinutesSee Register 443 to enable Automatic Load Fault Reset Delay calculator
419 R/W Load Fault Number of Reset Attempts
0 = Manual Mode, 1 – 4, 5 = Auto reset mode
420 R/W Motor Fault Number of Attempts
0 = Manual, 1 – 4, 5 = Auto reset mode See Register 434 for application to Overload Fault
421 R/W Ground Fault Trip Delay 1 – 60 (30) Seconds
422 R/W Under Current Trip Delay 1 – 60 (5) Seconds
423 R/W Low Power Trip Delay 1 – 60 (5) Seconds
424 R/W Jam Trip Delay 1 – 20 (2) Seconds
425 R/W Current Unbalance Trip Delay 1 – 20 (10) Seconds
426 R/W Under Voltage Trip Delay 1 – 20 (10) Seconds
427 R/W Over Voltage Trip Delay 1 – 20 (10) Seconds
428 R/W Voltage Unbalance Trip Delay 1 – 20 (10) Seconds
429 R/W High Power Trip Delay 1 – 60 (5) Seconds
430 R/W Current Phase Loss Trip Delay 1 – 20 (10) Seconds
431 R/W Modbus Address/Slave Address
1 – 247 (1)Change takes effect immediately
432 R/W Modbus Baud Rate Code 0 = 12001 = 24002 = 48003 = 96004 = 19200 — default value5 = 384006 = 576007 = 1152008 = ReservedChange takes effect upon next power cycle reset. Unit will report “new” value immediately, before being implemented by a power cycle reset.
433 R/W Trip Enable/Disable 0 – 65535 (1815)
6913 R/W Enable Ground Fault Trip (1)
MN04209001E.book Page 11 Wednesday, September 30, 2009 3:44 PM

Motor Insight User Manual
7-12 For more information visit: www.eaton.com MN04209001E
September 2009
Table 7-7: Modbus Register Map (Continued)
Modbus Coil No.
Modbus Reg. No. R/W ? Parameter Name Notes
6914 R/W Enable Voltage Unbalance Trip (1)
6915 R/W Enable Current Unbalance Trip (1)
6916 R/W Enable Under Current Trip (0)
6917 R/W Enable Phase Loss Trip (1)
6918 R/W Enable Jam (0)
6919 R/W Enable Low Power Trip (0)
6920 R/W Enable High Power Trip (0)
6921 R/W Enable Over Voltage Trip (1)
6922 R/W Enable Under Voltage Trip (1)
6923 R/W Enable Phase Order Trip (1)
434 R/W Overload Reset Mode 0 = manual reset mode — default1 = apply register 417 and 420 to overload fault
435 R/W Voltage Trip Mode 0 = Trip on supply fault1 = Alarm-no-trip (inhibit start) — default
436 R/W Ground Fault Trip Mode 0 = Trip on ground fault — default1 = Alarm-no-trip
437 R/W Run Transition Percent (of FLA)
25 – 125% (see Section 6.2.1)
438 R/W Run Transition Time 1 – 180 seconds (see Section 6.2.1)
439 R Network Status
7009 R/W Watchdog enabled 0x0001
7010 R Reserved
7011 R Front Panel Locked 0x0004
7012 Reserved
7013 Reserved
440 R/W Comm Loss Timeout 1 – 65,000 (2000) milliseconds
441 R/W Comm Loss Behavior 1 = Fault — default2 = Hold Last StateUse Register 400 to enable or disable the network watchdog
442 R/W Modbus Parity 0 = Even (1 stop bit) — default1 = odd (1 stop bit), 2 = no parity (2 stop bits); Requires power cycle reset to take effect. Unit will report “new” value immediately, before being implemented by a power cycle reset.
443 R/W Load FaultReset DelayCalculator
0 = disabled — default1 = enabled (See Table 6-17)
MN04209001E.book Page 12 Wednesday, September 30, 2009 3:44 PM

Motor Insight User Manual
MN04209001E For more information visit: www.eaton.com 7-13
September 2009
Table 7-8: Current Scaling Table
Current RangeCatalog Number Motor FLA
CT Multiplier Setting Scaling
2 – 9 Amperes C441BAC441CAC441DA
2 – 9 Amps1 – 5 Amps60 – 135 Amps120 – 270 Amps240 – 540 Amps
123 (150:5)4 (300:5)5 (600:5)
Amps x 100Amps x 100Amps x 10Amps x 10Amps x 10
20 – 90 Amperes C441BBC441CBC441DB
20 – 90 Amps10 – 45 Amps6.67 – 30 Amps5 – 22.5 Amps
1234
Amps x 10 for all settings
MN04209001E.book Page 13 Wednesday, September 30, 2009 3:44 PM

Motor Insight User Manual
7-14 For more information visit: www.eaton.com MN04209001E
September 2009
MN04209001E.book Page 14 Wednesday, September 30, 2009 3:44 PM

Motor Insight User Manual
MN04209001E For more information visit: www.eaton.com 8-1
September 2009
Chapter 8 — DeviceNet Module
8.1 - Overview
The Motor Insight DeviceNet Modules provide DeviceNet communication to the Motor Insight overload and monitoring relay. The DeviceNet module with 24VIO (C441L) and the DeviceNet module with 120VIO (C441K) provide four inputs and two B300 relay outputs.
Conformance
The Motor Insight DeviceNet adapter will conform to the ODVA DeviceNet and CIP specification.
The Motor Insight DeviceNet adapter only supports a single bi-color green/red Module/Network status LED.
Table 8-1: Indicator LEDS
Assemblies
I/O Assemblies
There are multiple input and output assemblies available for use to suit the need of specific users. The assemblies to be active are user selectable via the vendor-specific DeviceNet interface object (0x94).
Status Assembly
The production of a status assembly will be triggered by the receipt of a status trigger. The trigger contains no data.
Configuration By Software Tool
The Motor Insight DeviceNet adapter will be configurable by CH Studio and any other tool that does explicit messaging based on the provided EDS file.
Usage
Module/Network status
Off Device is not online.- The device has not completed the Dup_MAC_ID test yet.- The device may not be powered.
Flashing Green The device is operating in a normal condition and the device is online with no connections in the established state.- The device has passed the Dup_MAC_ID test, is online, but has not established connections to other nodes.- The device is not allocated to a master.
Green The device is operating in a normal condition and the device is online with connections in the established state.- The device is allocated to a master.
Flashing Red Any one or more of the following conditions:- Recoverable fault- One or more I/O Connections are in the Timed-Out state- No network power present
Solid Red The device has an unrecoverable fault; may need replacing.Failed communication device. The device has detected an error that has rendered it incapable of communicating on the network (Duplicate MAC ID, or Bus-off)
MN04209001E.book Page 1 Wednesday, September 30, 2009 3:44 PM

Motor Insight User Manual
8-2 For more information visit: www.eaton.com MN04209001E
September 2009
The DeviceNet Module includes the following significant features:
● Control and monitoring of the Motor Insight
● No special software application required for normal setup. MAC ID and baud rate are set with DIP switches
● Four isolated or unisolated 24 Vdc inputs or four isolated 120 Vac inputs
● Two B300 relay outputs controllable from DeviceNet
Table 8-2: Environmental Ratings of the Module
Table 8-3: Approvals/Certifications
Description Rating
Transportation and Storage
Temperature -50°C – 80°C (-58°F – 176°F)
Humidity 5 – 95% non-condensing
Operating Temperature -40°C – 55°C (-40°F – 131°F)
Humidity 5 – 95% non-condensing
Altitude Above 2000 meters (6600 feet), consult factory
ShockIEC 60068-2-27
15G any direction for 11 milliseconds
VibrationIEC 60068-2-6
5 – 150 Hz, 5G, 0.7 mm maximum peak-to-peak
Pollution Degree 2
Electrical/EMC Rating
ESD Immunity (IEC61000-4-2) +/- 8 kV Air, +/- 4 kV contact
Radiated Immunity (IEC61000-4-3) 10 V/m 80 – 1000 MHz, 80% amplitude modulation @ 1 kHz
Fast Transient (IEC61000-4-4) +/- 1 kV communications
Surge (IEC61000-4-5) +/- 1 kV shield-to-ground
RF Conducted (IEC61000-4-6) 10 V, 0.15 – 80 MHz
Ingress Protection Code IP20
Radiated and Conducted Emissions EN55011 Class A
Agency Certifications UL� 508
cUL� (CSAT C22.2 No. 14)
CE (Low Voltage Directive)
DeviceNet Conformance Tested
MN04209001E.book Page 2 Wednesday, September 30, 2009 3:44 PM

Motor Insight User Manual
MN04209001E For more information visit: www.eaton.com 8-3
September 2009
Table 8-4: Module Electrical Requirements
Table 8-5: Product Selection
Physical Description and Dimensions
Figure 8-1: DeviceNet Module
Power Source
The Motor Insight DeviceNet Module is powered off the 24 Vdc DeviceNet subnet. The Motor Insight base unit is powered by the system line voltage. The DeviceNet communication module does not power the Motor Insight base unit and therefore will remain active when the line voltage is disconnected.
This device is for use with an Eaton UL Listed Power Supply, Catalog Nos. PSS55A, PSS55B, PSS55C, or PS160E.
Note: Any UL Listed power supply with an isolated 30 Vdc voltage output may be used, provided that a UL Listed or Recognized Fuse rated no more than 4 A. maximum be installed.
Description Requirement
Voltage Range 18 – 30 Vdc
Current Draw Approx. 18 mA
Description Catalog Number
Motor Insight DeviceNet Module with 24 Vdc Inputs and 120 Vac/24 Vdc Relay Outputs
C441L
Motor Insight DeviceNet Module with 120 Vac Inputs and 120 Vac/24 Vdc Relay Outputs
C441K
3.94 (100)
0.20 (5.1)
3.31 (84)
3.50 (89)
3.94 (100)
Mounting Dimensions (4) 10-32
4.84 (123)
4.92 (125)3.98
(101)0.63 (16)
Dia. 0.69
(17.5) 3 Places
Terminal Ref.3.82 (97)
3.94 (100)
3.27 (83)
MN04209001E.book Page 3 Wednesday, September 30, 2009 3:44 PM

Motor Insight User Manual
8-4 For more information visit: www.eaton.com MN04209001E
September 2009
Power Requirements
18 mA steady state at 24 Vdc.
WARNING
Only apply 24V dc to the Motor Insight Communication modulefieldbus connection. Use of any other voltage may result inpersonal injury, property damage and damage to the module.
8.2 - Mounting
Attachment instructions
The Motor Insight DeviceNet modules are designed to be installed on the right side of the Motor Insight base unit.
Figure 8-2: Installation Diagram
1. Align module with side of Motor Insight base unit.
2. Slide module bottom pegs into appropriate slots.
3. Rotate module up and gently click the base unit and module together.
4. Connect DeviceNet cable and IO connector if desired.
MN04209001E.book Page 4 Wednesday, September 30, 2009 3:44 PM

Motor Insight User Manual
MN04209001E For more information visit: www.eaton.com 8-5
September 2009
8.3 - Input Behavior
Each terminal of the field connection accepts two wires of the following size:
Table 8-6: Field Terminal Wire Capability
120 Vac Input Requirements
The 120 Vac input is an isolated input. It requires an external AC supply to drive the inputs. There are three common tie points provided for the four inputs.
Figure 8-3: 120 Vac Input Diagram
Table 8-7: 120 Vac Input Specification
Wire Type Wire Size Terminal Torque
Solid Cu – 90C #14 – #22 4.5 in-lbs
Stranded Cu – 90C #16 – #22 4.5 in-lbs
Specification Value
Number of Inputs 4
Nominal Voltage 120 Vac
Nominal Current 7mA
Operating Range 80-140 Vac
Operating Frequency 50/60 Hz
Signal Delay Max 30 ms
Input Type IEC 61131-2, type 1 digital
MN04209001E.book Page 5 Wednesday, September 30, 2009 3:44 PM

Motor Insight User Manual
8-6 For more information visit: www.eaton.com MN04209001E
September 2009
Figure 8-4: 120 Vac IO Module
Example 120 Vac IO Module- All inputs are isolated.- Pins 5, 6, 7 are all shared common.
NET
1
2
3
4
5
6
7
8
9
10
11
12
120 Vac
AC/DC
AC/DC
MN04209001E.book Page 6 Wednesday, September 30, 2009 3:44 PM

Motor Insight User Manual
MN04209001E For more information visit: www.eaton.com 8-7
September 2009
24 Vdc Input Requirements
The 24 Vdc input circuit is capable of both isolated and unisolated behavior. The isolated inputs share a single common tie point. A 24 Vdc current limited source/ground is provided in situations that require locally supplied input signal voltage. To use the unisolated inputs tie the 24 Vdc ground/common to the isolated common.
Figure 8-5: 24 Vdc Input Internal Circuit Diagram
Note: Do not connect a 24 Vdc source to pins 6 and 7. The “I/O Power: 24 Vdc” is to be used only in conjunction with the inputs. It is a 24 Vdc output intended to only supply signal power for the inputs. When using the 24 Vdc input supply, Pin 6 should only be connected to Pin 5 (24 Vdc input supply common to input common). See example wiring diagrams Figures 8-5 and 8-6. Any device using the provided 24 Vdc input supply must have 500 V isolation from ground. Example devices include pushbuttons and auxiliary contacts.
Table 8-8: 24 Vdc Input Specification
Specification Value
Number of Inputs 4
Nominal Voltage 24 Vdc
Nominal Current 5 mA
Type Current sinking
Input Type IEC 61131-2, type 1 digital
Max 24 Vdc Source Current 50 mA
Isolation Voltage 250 Vac
MN04209001E.book Page 7 Wednesday, September 30, 2009 3:44 PM

Motor Insight User Manual
8-8 For more information visit: www.eaton.com MN04209001E
September 2009
Figure 8-6: 24 Vdc IO Module
Example 24 Vdc IO Module- Using isolated DC inputs with provided 24 Vdc, 50mA Sourcing Output.- Pin 6 is connected to Pin 5 for the common connection. Pin 7 is the 24 Vdc Source.
NET
1
2
3
4
5
6
7
8
9
10
11
12
AC/DC
AC/DC
–+
–
+24 Vdc
I/O Power
Example 24 Vdc IO Module- Using isolated DC inputs.- Pins 6 and 7 should be no connects. NET
1
2
3
4
5
6
7
8
9
10
11
12
AC/DC
AC/DC
–+
–
+24 Vdc
External24 Vdc
+ –
MN04209001E.book Page 8 Wednesday, September 30, 2009 3:44 PM

Motor Insight User Manual
MN04209001E For more information visit: www.eaton.com 8-9
September 2009
8.4 - Relay Output Behavior
Relay Outputs
Two relay outputs are provided, one Form A (NO) and one Form C (NO, NC). See wiring guide below.
Figure 8-7: Relay Output Module Diagrams
Table 8-9: Relay Specification
Specification Value
Num Contacts 2 independent relays (1 Form C, 1 Form A)
Thermal Contact 5 A
Rated Insulation Voltage 300 Vac
Max Operating Voltage 120 Vac
Max Operating Current 5 A
Electrical Life 1 x 10⁵ operations
Mechanical Life 1 x 10⁷ operations
Output
123456789
101112
Input 1Input 2Input 3Input 4Input CommonInput CommonInput CommonRelay 1 - NO RelayRelay 1 - NO RelayRelay 2 - NO OutputRelay 2 - CommonRelay 2 - NC Output
1
2
3
4
5
6
7
8
9
10
11
12
MN04209001E.book Page 9 Wednesday, September 30, 2009 3:44 PM
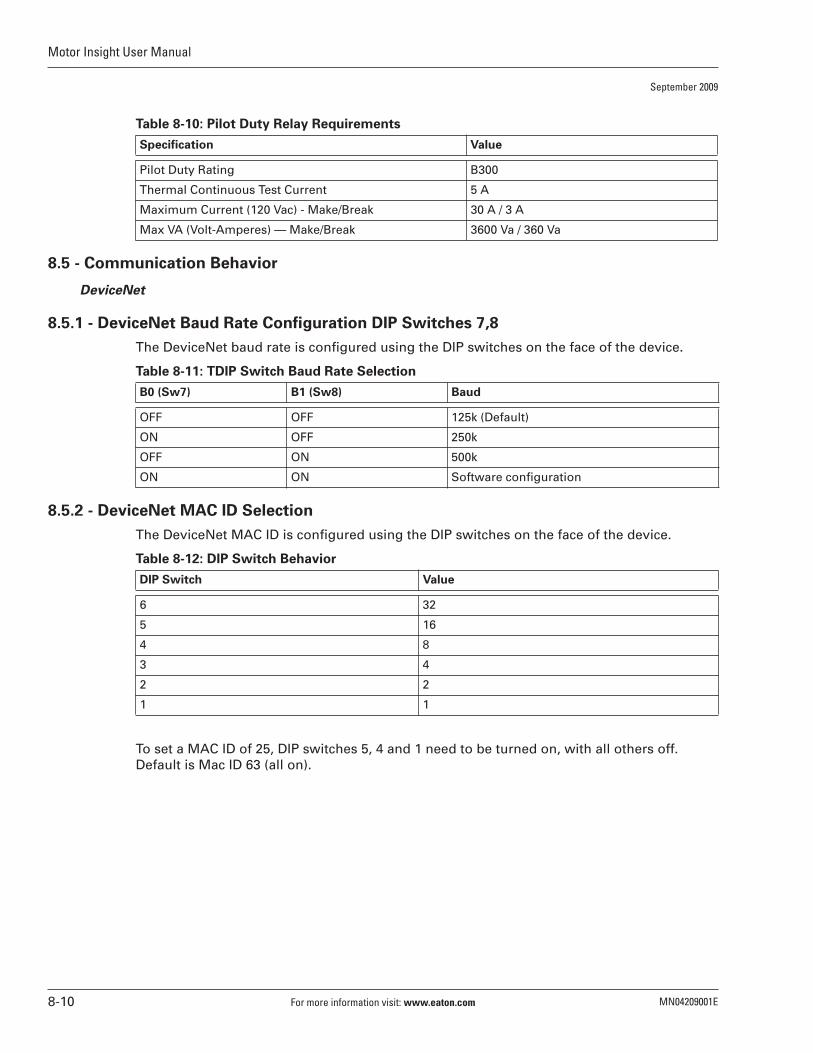
Motor Insight User Manual
8-10 For more information visit: www.eaton.com MN04209001E
September 2009
Table 8-10: Pilot Duty Relay Requirements
8.5 - Communication Behavior
DeviceNet
8.5.1 - DeviceNet Baud Rate Configuration DIP Switches 7,8
The DeviceNet baud rate is configured using the DIP switches on the face of the device.
Table 8-11: TDIP Switch Baud Rate Selection
8.5.2 - DeviceNet MAC ID Selection
The DeviceNet MAC ID is configured using the DIP switches on the face of the device.
Table 8-12: DIP Switch Behavior
To set a MAC ID of 25, DIP switches 5, 4 and 1 need to be turned on, with all others off. Default is Mac ID 63 (all on).
Specification Value
Pilot Duty Rating B300
Thermal Continuous Test Current 5 A
Maximum Current (120 Vac) - Make/Break 30 A / 3 A
Max VA (Volt-Amperes) — Make/Break 3600 Va / 360 Va
B0 (Sw7) B1 (Sw8) Baud
OFF OFF 125k (Default)
ON OFF 250k
OFF ON 500k
ON ON Software configuration
DIP Switch Value
6 32
5 16
4 8
3 4
2 2
1 1
MN04209001E.book Page 10 Wednesday, September 30, 2009 3:44 PM

Motor Insight User Manual
MN04209001E For more information visit: www.eaton.com 8-11
September 2009
8.5.3 - DeviceNet Profile
Full Profile
The device is composed of a collection of standard objects and Eaton-specific objects. The “standard” objects are those that are defined by the ODVA. These standard objects always exhibit the same behavior and basic content regardless of the source of the device containing the object.
Table 8-13: Standard Objects
Class Object Number of Instances
0x01 Identity 1
0x02 Message Router 1
0x03 DeviceNet 1
0x04 Assembly (See assembly object details)
0x05 Connection 3
0x08 Discrete Input Point 4
0x09 Discrete Output Point 2
0x29 Control Supervisor 1
0x2C Overload 1
0x93 Voltage Monitor 1
0x94 DeviceNet Interface 1
MN04209001E.book Page 11 Wednesday, September 30, 2009 3:44 PM

Motor Insight User Manual
8-12 For more information visit: www.eaton.com MN04209001E
September 2009
Object Details
Identity Object
Class: 0x01
Table 8-14: Instance Services
Table 8-15: Identity Instance Attributes
Service Code
Service Name
Service Data Description
0x05 Reset 0 Instance 1: Initializes adapter to the Power-up state
0x05 Reset 1 Instance 1: Writes default values to all instance attributes AND then saves all non-volatile attributes to FLASH memory AND then performs the equivalent of a Reset(0)
0x0E Get_Attribute_Single
n/a Returns the value of the specified attribute
0x10 Set_Attribute_Single
value Sets the “value” into the specified attribute
Attribute ID NV
Access Rule Name
Data Type
Description of Attribute
Semantics of Values
1 Get Vendor ID UINT Identification of each vendor by number
The constant 68.
2 Get Device Type UINT Indication of general type of product
The constant 3 for overload.
3 Get Product Code UINT Identification of a particular product of an individual vendor
The constant 0x1101 or 0x1102
4 Get Revision STRUCT of: Revision of the item the Identity Object represents
Major Revision
USINT The constant 0x01
Minor Revision
USINT The constant 0x01
5 Get Status WORD Summary status of device
See Page 8-14 for definitions
6 Get Serial Number
UDINT Serial number of device See Page 8-14 for definitions
7 Get Product Name
SHORT_STRING
Human readable identification
See Page 8-14 for definitions
MN04209001E.book Page 12 Wednesday, September 30, 2009 3:44 PM

Motor Insight User Manual
MN04209001E For more information visit: www.eaton.com 8-13
September 2009
Table 8-15: Identity Instance Attributes (Continued) Attribute ID NV
Access Rule Name
Data Type
Description of Attribute
Semantics of Values
8 Get State USINT Present state of the device as represented by the state transition diagram
0 = Nonexistent1 = Device Self Testing2 = Standby3 = Operational4 = Major Recoverable Fault5 = Major Unrecoverable Fault
176 (0xB0) NV Get/Set User Label(Tag Name)
SHORT_STRING
User Assigned ASCII string of 16 characters or less
177 (0xB1) NV Get DSP Firmware Version
UINT Version of MI base unit DSP firmware
178 (0xB2) NV Get PIC Firmware Version
UINT Version of MI PIC board version
179 (0xB3) NV Get Unit ID UINT See Table 7-7, register 335
MN04209001E.book Page 13 Wednesday, September 30, 2009 3:44 PM

Motor Insight User Manual
8-14 For more information visit: www.eaton.com MN04209001E
September 2009
Status
This attribute represents the current status of the entire device. Its value changes as the state of the device changes. The Status attribute is a WORD, with the following bit definitions:
Table 8-16: Bit Definitions for Instance #1, Status Attribute of Identity Object
Serial Number
This attribute is a number used in conjunction with the Vendor ID to form a unique identifier for each device on Ethernet. Each vendor is responsible for guaranteeing the uniqueness of the serial number across all of its devices.
Product Name
This text string should represent a short description of the product/product family represented by the product code in attribute 3. The same product code may have a variety of product name strings. The maximum number of characters in this string is 32.
Bit(s) Called Definition
0 Owned
1 Reserved, set to zero.
2 Configured TRUE indicates that the application of the device has been configured to do something different than the “out-of-box” default. This does not include configuration of the communications.
3 Reserved, set to zero.
4 – 7 Reserved, set to zero.
8 Minor Recoverable Fault
TRUE indicates that the device detected a problem with itself, which is thought to be recoverable. The problem does not cause the device to go into one of the faulted states.
9 Minor Unrecoverable Fault
TRUE indicates that the device detected a problem with itself, which is thought to be unrecoverable. The problem does not cause the device to go into one of the faulted states.
10 Major Recoverable Fault
TRUE indicates that the device detected a problem with itself, which caused the device to go into the “Major Recoverable Fault” state.
11 Major Unrecoverable Fault
TRUE indicates that the device detected a problem with itself, which caused the device to go into the “Major Unrecoverable Fault” state. See Behavior section.
12, 13 Reserved, set to zero.
14, 15 Reserved, set to zero.
MN04209001E.book Page 14 Wednesday, September 30, 2009 3:44 PM

Motor Insight User Manual
MN04209001E For more information visit: www.eaton.com 8-15
September 2009
State
This attribute is an indication of the present state of the device. Note that the nature of a Major Unrecoverable Fault could be such that it may not be accurately reflected by the State attribute.
This attribute reflects the dynamic status of the adapter. The defined states are:
Table 8-17: Defined States
Message Router Object
Class: 0x02
No class or instance attributes are supported.
Value State Name Description
0 Non-existent This state will never be visible from within a device. This state is principally intended for a tool to be able to represent the lack of an instance in a physical device.
1 Device Self Testing
Power-up or Reset operation. Will not be visible from within a device because communications are not active in this state.
2 Standby This state is reported while needs commissioning due to an incorrect or incomplete configuration
3 Operational This state is reported when the adapter is powered up, configured and operating normally.
4 Major Recoverable Fault
5 Major Unrecoverable Fault
MN04209001E.book Page 15 Wednesday, September 30, 2009 3:44 PM

Motor Insight User Manual
8-16 For more information visit: www.eaton.com MN04209001E
September 2009
DeviceNet Object
Class: 0x03
Table 8-18: Instance Services
Table 8-19: DeviceNet Instance Attributes
Service Code
Service Name
Service Data Description
0x0E Get_Attribute_Single n/a Returns the value of the specified attribute
0x4B Allocate values Allocate_Master/Slave_Connection_Set
0x4C Release value Release_Group_2_Identifier_Set
Attr ID NV
Access Rule Name
Data Type
Brief Description of Attribute
Semantics of Values
5 Get AllocationInformation
STRUCT of:
AllocationChoice Byte
BYTE Indicates which connections are active
Bit 0 - ExplicitBit 1 - PollBit 2 - Bit Strobe
Master’sMAC ID
USINT MAC ID of Master (from Allocate)
Range 0 – 63, 255Modified via Allocate only
8 Get MAC ID SwitchValue
USINT Actual value of NodeAddress switches
Range 0 – 63
9 Get Baud Rate SwitchValue
USINT Actual value of BaudRate switches
Range 0 – 3
MN04209001E.book Page 16 Wednesday, September 30, 2009 3:44 PM

Motor Insight User Manual
MN04209001E For more information visit: www.eaton.com 8-17
September 2009
Assembly Object
Class: 0x04
The Assembly Object binds attributes of multiple objects, which allows data to or from each object to be sent or received over a single connection. Assembly objects can be used to bind input data or output data. The terms ”input” and ”output” are defined from the network’s point of view. An input will produce data on the network and an output will consume data from the network. Various data sets can be exchanged using I/O messaging. The data set to be exchanged is determined by selecting an input and an output assembly.
The adapter is designed with 2 I/O connections (poll and bit strobe). These connections use the assemblies selected in the vendor specific DeviceNet Interface object (0x94).
MN04209001E.book Page 17 Wednesday, September 30, 2009 3:44 PM

Motor Insight User Manual
8-18 For more information visit: www.eaton.com MN04209001E
September 2009
Table 8-20: Instance Services
Table 8-21: Instance Attributes
Table 8-22: Assembly Instances
The following assemblies are defined for the Motor Insight DeviceNet Adapter.
� Indicates default assembly instances used in poll connection� Indicates default assembly instances used in bit strobe connection
Table 8-23: Input Assembly 50
Table 8-24: Input Assembly 51
Table 8-25: Input Assembly 107
Service Code
Service Name
Service Data Description
0x0E Get_Attribute_Single n/a Returns the value of the specified attribute
0x10 Set_Attribute_Single value Sets the “value” into the specified attribute
Attr ID NVAccess Rule Name
DataType
Description of Attribute
Semantics of Values
3 Set Data ARRAY of BYTE
Type Instance Usage Name
Input 50 Poll, Bit Strobe Basic Overload (ODVA Overload Profile)
Input 51 Poll, Bit Strobe Extended Overload (ODVA Overload Profile)
Input 107 � Poll, Bit Strobe Extended Overload with Discrete Input and Output Points
Input 100 � Poll User Defined Input Assembly Short
Input 110 Poll User Defined Input Assembly Long
Output 2 Poll Basic Overload (ODVA Overload Profile)
Output 105 � Poll Basic Overload with Discrete Output Points
Output 111 � Bit Strobe Accepts 8 bytes of bit strobe command to trigger bit strobe response
Byte Bit 7 Bit 6 Bit 5 Bit 4 Bit 3 Bit 2 Bit 1 Bit 0
0 Faulted
Byte Bit 7 Bit 6 Bit 5 Bit 4 Bit 3 Bit 2 Bit 1 Bit 0
0 Warning Faulted
Byte Bit 7 Bit 6 Bit 5 Bit 4 Bit 3 Bit 2 Bit 1 Bit 0
0 Input 4 Input 3 Input 2 Input 1 Output 2 Output 1 Warning Faulted
MN04209001E.book Page 18 Wednesday, September 30, 2009 3:44 PM

Motor Insight User Manual
MN04209001E For more information visit: www.eaton.com 8-19
September 2009
Table 8-26: Input Assembly 100
Values are selected from the list defined below.
Table 8-27: Input Assembly 110
Values are selected from the list defined below.
Byte Word Value Default Value
0 0 Value selected by DeviceNet interface object, attribute 9
Device Status (Low Byte)(See Control Supervisor Object)
1 Device Status (High Byte)
2 1 Value selected by DeviceNet interface object, attribute 8
L1 Current (Low Byte)
3 L1 Current (High Byte)
4 2 Value selected by DeviceNet interface object, attribute 9
L2 Current (Low Byte)
5 L2 Current (High Byte)
6 3 Value selected by DeviceNet interface object, attribute 10
L3 Current (Low Byte)
7 L3 Current (High Byte)
Byte Word Value Default Value
0 0 Value selected by DeviceNet interface object, attribute 12
Device Status (Low Byte)(See Control Supervisor Object)
1 Device Status (High Byte)
2 1 Value selected by DeviceNet interface object, attribute 13
L1 Current (Low Byte)
3 L1 Current (High Byte)
4 2 Value selected by DeviceNet interface object, attribute 14
L2 Current (Low Byte)
5 L2 Current (High Byte)
6 3 Value selected by DeviceNet interface object, attribute 15
L3 Current (Low Byte)
7 L3 Current (High Byte)
8 4 Value selected by DeviceNet interface object, attribute 16
Field Inputs (Low Byte)
9 Field Inputs (High Byte)
10 5 Value selected by DeviceNet interface object, attribute 17
RMS Current Ave (Low Byte)
11 RMS Current Ave (High Byte)
12 6 Value selected by DeviceNet interface object, attribute 18
RMS Voltage VAB (Low Byte)
13 RMS Voltage VAB (High Byte)
14 7 Value selected by DeviceNet interface object, attribute 19
RMS Voltage VBC (Low Byte)
15 RMS Voltage VBC (High Byte)
16 8 Value selected by DeviceNet interface object, attribute 20
RMS Voltage VCA (Low Byte)
17 RMS Voltage VCA (High Byte)
18 9 Value selected by DeviceNet interface object, attribute 21
RMS Voltage Ave (Low Byte)
19 RMS Voltage Ave (High Byte)
MN04209001E.book Page 19 Wednesday, September 30, 2009 3:44 PM

Motor Insight User Manual
8-20 For more information visit: www.eaton.com MN04209001E
September 2009
Table 8-28: Input Assembly 100 and 110 Selection List
Table 8-29: Output Assembly 2
Table 8-30: Output Assembly 105
Output Assembly 111 – Bit Strobe command
Sixty-four bits of strobe data, one per MAC ID. The data is ignored by the Motor Insight DeviceNet adapter.
Value Description
0 Assembly Terminator
1 Device Status Data — See control supervisor object)
2 RMS Current IA
3 RMS Current IB
4 RMS Current IC
5 RMS Current Average
6 RMS Voltage VAB
7 RMS Voltage VBC
8 RMS Voltage VCA
9 RMS Voltage Average
10 Total KW
11 Voltage Unbalance Percent
12 Current Percent
13 Apparent Power Factor
14 Residual Ground Current Deciamps
15 Frequency
16 Overload Thermal Pile
17 Trip Reason
18 Overload Status
19 Error Code
20 Field Inputs
Byte Bit 7 Bit 6 Bit 5 Bit 4 Bit 3 Bit 2 Bit 1 Bit 0
0 Fault Reset
Byte Bit 7 Bit 6 Bit 5 Bit 4 Bit 3 Bit 2 Bit 1 Bit 0
0 Remote Trip
Fault Reset
Out 2 Out 1
MN04209001E.book Page 20 Wednesday, September 30, 2009 3:44 PM

Motor Insight User Manual
MN04209001E For more information visit: www.eaton.com 8-21
September 2009
Connection Object
Class: 0x05
Common Instance Information
Table 8-31: Instance Services
Table 8-32: Connection Instance #1 Attributes (Explicit Messaging)
The Predefined Master/Slave Connection Set requires the explicit messaging connection be the instance numbered one.
Service Code
Service Name
Service Data Description
0x05 Reset n/a Resets the Inactivity/Watchdog timerTransitions from Timed Out or Deferred Delete state to established
0x0E Get_Attribute_Single n/a Returns the value of the specified attribute
0x10 Set_Attribute_Single value Sets the “value” into the specified attribute
Attr ID Access NV
Attribute Name
Data Type
Brief Description of Attribute
1 Get state USINT State of the objectDefault = 0x03
2 Get instance_type USINT Indicates either I/O or Messaging ConnectionDefault = 0x00
3 Get transportClass_trigger BYTE Defines behavior of the ConnectionDefault= 0x83
4 Get produced_connection_id UINT Placed in CAN Identifier Field when the Connection transmitsDefault = 0x0000(Although this default will never be visible)
5 Get consumed_connection_id UINT CAN Identifier Field value that denotes message to be receivedDefault = 0x0000(Although this default will never be visible)
6 Get initial_comm_characteristics BYTE Defines the Message Group(s) across which productions and consumptions associated with this Connection occurDefault = 0x21This indicates that the Slave’s Explicit Messaging connection produces and consumes across Message Group 2. Additionally, this value indicates that the Slave’s MAC ID appears in the CAN Identifier Fields of the Group 2 messages that the slave consumes and produces.
MN04209001E.book Page 21 Wednesday, September 30, 2009 3:44 PM
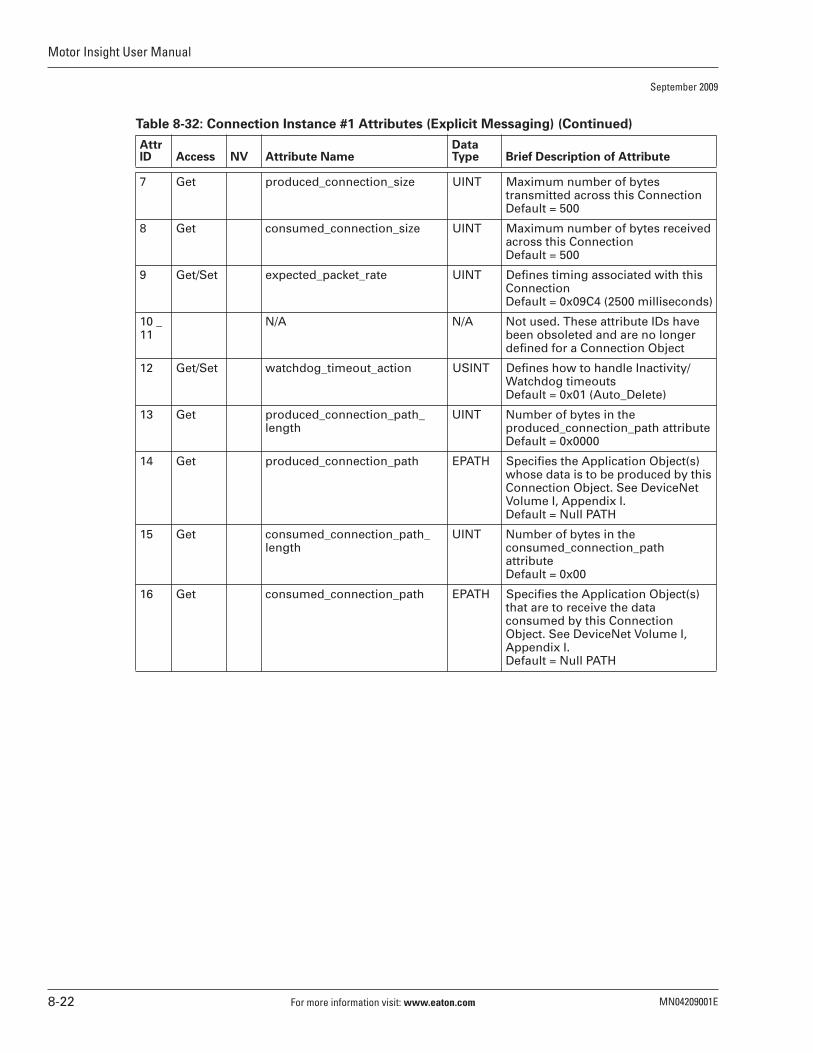
Motor Insight User Manual
8-22 For more information visit: www.eaton.com MN04209001E
September 2009
Table 8-32: Connection Instance #1 Attributes (Explicit Messaging) (Continued)
Attr ID Access NV Attribute Name
Data Type Brief Description of Attribute
7 Get produced_connection_size UINT Maximum number of bytes transmitted across this ConnectionDefault = 500
8 Get consumed_connection_size UINT Maximum number of bytes received across this ConnectionDefault = 500
9 Get/Set expected_packet_rate UINT Defines timing associated with this ConnectionDefault = 0x09C4 (2500 milliseconds)
10 _ 11
N/A N/A Not used. These attribute IDs have been obsoleted and are no longer defined for a Connection Object
12 Get/Set watchdog_timeout_action USINT Defines how to handle Inactivity/Watchdog timeoutsDefault = 0x01 (Auto_Delete)
13 Get produced_connection_path_length
UINT Number of bytes in the produced_connection_path attributeDefault = 0x0000
14 Get produced_connection_path EPATH Specifies the Application Object(s) whose data is to be produced by this Connection Object. See DeviceNet Volume I, Appendix I.Default = Null PATH
15 Get consumed_connection_path_ length
UINT Number of bytes in the consumed_connection_path attributeDefault = 0x00
16 Get consumed_connection_path EPATH Specifies the Application Object(s) that are to receive the data consumed by this Connection Object. See DeviceNet Volume I, Appendix I.Default = Null PATH
MN04209001E.book Page 22 Wednesday, September 30, 2009 3:44 PM

Motor Insight User Manual
MN04209001E For more information visit: www.eaton.com 8-23
September 2009
Table 8-33: Connection Instance #2 Attributes (Polled I/O)
Attr ID Access NV Attribute Name
Data Type Brief Description of Attribute
1 Get state USINT State of the objectDefault = 0x01
2 Get instance_type USINT Indicates either I/O or Messaging ConnectionDefault = 0x01
3 Get transportClass_trigger BYTE Defines behavior of the ConnectionDefault = 0x83
4 Get produced_connection_id UINT Placed in CAN Identifier Field when the Connection transmits
5 Get consumed_connection_id UINT CAN Identifier Field value that denotes message to be received
6 Get initial_comm_characteristics BYTE Defines the Message Group(s) across which productions and consumptions associated with this Connection occurDefault = 0x01
7 Get produced_connection_size UINT Maximum number of bytes transmitted across this Connection
8 Get consumed_connection_size UINT Maximum number of bytes received across this Connection
9 Get/Set expected_packet_rate UINT Defines timing associated with this ConnectionDefault = 0x0000
10 _ 11
N/A N/A Not used. These attribute IDs have been obsoleted and are no longer defined for a Connection Object
12 Get/Set watchdog_timeout_action USINT Defines how to handle Inactivity/Watchdog timeoutsDefault = 0x00
13 Get produced_connection_path_ length
UINT Number of bytes in the produced_connection_path attributeDefault and Fixed as 0x03
14 Get/Set NV produced_connection_path EPATH Specifies the Application Object(s) whose data is to be produced by this Connection ObjectDefault assembly instance 100 “0x62 0x36 0x34”
15 Get consumed_connection_path_ length
UINT Number of bytes in the consumed_connection_path attributeDefault and Fixed as 0x03
16 Get/Set NV consumed_connection_path EPATH Specifies the Application Object(s) that are to receive the data consumed by this Connection ObjectDefault assembly instance 105“0x62 0x36 0x39”
MN04209001E.book Page 23 Wednesday, September 30, 2009 3:44 PM

Motor Insight User Manual
8-24 For more information visit: www.eaton.com MN04209001E
September 2009
Table 8-34: Connection Instance #3 Attributes (Bit Strobe I/O)
Attr ID Access NV Attribute Name
Data Type Brief Description of Attribute
1 Get state USINT State of the objectDefault = 0x01
2 Get instance_type USINT Indicates either I/O or Messaging ConnectionDefault = 0x01
3 Get transportClass_trigger BYTE Defines behavior of the ConnectionDefault = 0x83
4 Get produced_connection_id UINT Placed in CAN Identifier Field when the Connection transmits
5 Get consumed_connection_id UINT CAN Identifier Field value that denotes message to be received
6 Get initial_comm_characteristics BYTE Defines the Message Group(s) across which productions and consumptions associated with this Connection occurDefault = 0x02
7 Get produced_connection_size UINT Maximum number of bytes transmitted across this ConnectionDefault and Fixed as 0x08
8 Get consumed_connection_size UINT Maximum number of bytes received across this ConnectionDefault and Fixed as 0x08
9 Get/Set expected_packet_rate UINT Defines timing associated with this ConnectionDefault = 0x0000
10 _ 11
N/A N/A Not used. These attribute IDs have been obsoleted and are no longer defined for a Connection Object
12 Get/Set watchdog_timeout_action USINT Defines how to handle Inactivity/Watchdog timeoutsDefault = 0x00
13 Get produced_connection_path_ length
UINT Number of bytes in the produced_connection_path attributeDefault and Fixed as 0x03
14 Get/Set produced_connection_path EPATH Specifies the assembly instance whose data is to be produced by this Connection Object Default assembly instance 107“0x62 0x36 0x4B”
15 Get consumed_connection_path_ length
UINT Number of bytes in the consumed_connection_path attributeDefault and Fixed as 0x03
16 Get/Set consumed_connection_path EPATH Specifies the Application Object(s) that are to receive the data consumed by this Connection ObjectDefault and Fixed as assembly instance 121“0x62 0x37 0x39”
MN04209001E.book Page 24 Wednesday, September 30, 2009 3:44 PM

Motor Insight User Manual
MN04209001E For more information visit: www.eaton.com 8-25
September 2009
Discrete Input Point Object
Class: 0x08
The Discrete Input Point (DIP) Object models discrete inputs in a product. Note that the term ”input” is defined from the network’s point of view. An input will produce data on the network. The input is sampled from the input terminal (e.g., screw terminal) and the data is stored in this object’s VALUE attribute.
Table 8-35: Instance Services
Table 8-36: Discrete Input Point Instance Attributes
Input point value
The input point value shall reflect the current state of the associated input terminal.
Discrete Output Point Object
Class: 0x09
The Discrete Output Point (DOP) Object models discrete outputs in a product. Note that the term ”output” is defined from the network’s point of view. An output will consume data from the network. The output is read from this object’s VALUE attribute and applied to the output terminal.
Table 8-37: Instance Services
Table 8-38: Discrete Output Point Instance Attributes
Service Code Service Name Service Data Description
0x0E Get_Attribute_Single n/a Returns the value of the specified attribute
0x10 Set_Attribute_Single value Sets the “value” into the specified attribute
Attr ID NV Access Rule Name Data TypeBrief Description of Attribute Semantics of Values
3 Get Value BOOL Input point value 0 = off; 1 = on
101 Set Debounce UDINT Debounce time Milliseconds
Service Code
Service Name
Service Data Description
0x0E Get_Attribute_Single n/a Returns the value of the specified attribute
0x10 Set_Attribute_Single value Sets the “value” into the specified attribute
Attr ID NV
Access Rule Name
Data Type Brief Description of Attribute Semantics of Values
3 Set Value BOOL Output point value 0 = off; 1 = on
5 NV Set Fault Action
BOOL Action taken on output’s value in Communication Fault state
0 = Fault Value attribute; 1 = no change
6 NV Set Fault Value
BOOL User-defined value for use with Fault Action attribute
0 = off; 1 = on
7 NV Set Idle Action
BOOL Action taken on output’s value in Communication Idle state
0 = Idle Value attribute; 1 = no change
8 NV Set Idle Value
BOOL User-defined value for use with Idle Action attribute
0 = off; 1 = on
MN04209001E.book Page 25 Wednesday, September 30, 2009 3:44 PM

Motor Insight User Manual
8-26 For more information visit: www.eaton.com MN04209001E
September 2009
Output point value
The output is read from this object’s VALUE attribute and applied to the output terminal.
Communication fault action
Determines the action to be taken at the output terminal when a communications fault occurs.
If this attribute is set to “0,” then output terminal will be set to the state determined by attribute “Communications fault value.”
If the attribute is set to “1,” then the output terminal is not changed due to a communications fault.
Default: “0”
Communication fault value
Determines the value to be applied to the output terminal if a communications fault occurs AND the “Communication fault action” attribute is set to “0.”
Default: 0.
Idle action
Determines the action to be taken at the output terminal when communications idle occurs.
If this attribute is set to "0," then output terminal will be set to the state determined by attribute "Idle value."
If the attribute is set to "1," then the output terminal is not changed due to a communications idle event.
Default: "0"
Idle value
Determines the value to be applied to the output terminal if a communications idle event occurs AND the "Idle action" attribute is set to "0."
Default: 0.
Class: 0x29
This object models all the management functions for devices within the “Hierarchy of Motor Control Devices.”
Control Supervisor Object
Table 8-39: Control Supervisor Instance Services
Service CodeService Name
Service Data Description
0x0E Get_Attribute_Single n/a Returns the value of the specified attribute
0x10 Set_Attribute_Single value Sets the “value” into the specified attribute
0x05 Reset n/a Resets the overload to the start-up state.
MN04209001E.book Page 26 Wednesday, September 30, 2009 3:44 PM

Motor Insight User Manual
MN04209001E For more information visit: www.eaton.com 8-27
September 2009
Table 8-40: Control Supervisor Instance Attributes
Attr ID NVAccess Rule Name
Data Type
Semantics of Values
10 Get Faulted/Tripped BOOL 1 = Fault Occurred (latched)0 = No Faults present
11 Get Warning BOOL 1 = Warning (not latched)0 = No Warnings present
12 Set FaultRst BOOL 0 ≥ 1 = Fault Reset0 = No action(Overload Reset)
13 Get FaultCode UINT If in Faulted state, FaultCode indicates the fault that caused the transition to Faulted state.If not in Faulted state, FaultCode indicates the fault that caused the last transition to the Faulted state.
17 Set ForceFault BOOL 0 ≥ 1 = Force Fault0 = No action
101 Get Device Status WORD Device Bit ArrayBit 0: TripBit1: WarnBit2: Output #1Bit3: Output #2Bit4: Input #1Bit5: Input #2Bit6: Input #3 Bit7: Input #4Bit8: Overload Power Lost Bit 9-15: reserved
102 Get Trip Reason WORD Fault (Trip) Reason Bit ArrayBit 0: Fault LockoutBit1: Relay Off CommandBit2: Contactor FailureBit3: Under CurrentBit4: OverloadBit5: Ground FaultBit6: Current UnbalanceBit7: Current Single PhaseBit8: ReservedBit9: High Power (kW)Bit10: Over VoltageBit11: Under VoltageBit12: Voltage UnbalanceBit13: Over CurrentBit14: Low Power (kW)Bit15: Phase Reversal
103 Get Overload Status WORD Overload Status Bit ArrayBit 0: Overload TripBit1: Ground Fault TripBit2: High Power TripBit3: reservedBit4: reservedBit5: reservedBit6: reserved Bit7: Relay ClosedBit 8-15: reserved
MN04209001E.book Page 27 Wednesday, September 30, 2009 3:44 PM

Motor Insight User Manual
8-28 For more information visit: www.eaton.com MN04209001E
September 2009
Table 8-40: Control Supervisor Instance Attributes (Continued)
Attr ID NV Access Rule Name Data Type Semantics of Values
104 Get Warning Status WORD Warning Bit ArrayBit 0: Low VoltageBit1: High VoltageBit2: Voltage UnbalanceBit3: Low PowerBit4: Reverse PhaseBit5: Current UnbalanceBit6: Voltage Single PhaseBit7: Current Single PhaseBit8: Ground Fault Phase Bit9-15: reserved
105 NV Set Comm Fault Trip Action
BOOL Action taken on trip state in Comm Fault state0 = Use Comm Fault Trip Value attribute1 = no affect
106 NV Set Comm Fault Trip Value
BOOL User-defined value for use with Comm Fault Trip Action attribute0 = no affect;1 = trip
107 NV Set Idle Trip Action BOOL Action taken on trip state in Communication Idle state0=Use Idle Trip Value attribute;1=no change
108 NV Set Idle Trip Value BOOL User-defined value for use with Idle Trip Action attribute0 = no affect;1 = trip
109 Get Fault Log 0 UINT
110 Get Fault Log 1 UINT
111 Get Fault Log 2 UINT
112 Get Fault Log 3 UINT
113 Get Fault Log 4 UINT
114 Get Fault Log 5 UINT
115 Get Fault Log 6 UINT
116 Get Fault Log 7 UINT
117 Get Fault Log 8 UINT
118 Get Fault Log 9 UINT
119 Set Clear Last Fault Log Entry
BOOL 0 ≥ 1 = Fault Entry Cleared 0 = No action
120 NV Set Enable Trip WORD Trip Enable/Disable bit arrayBit 0: Enable Ground Fault TripBit 1: Enable Voltage Unbalance TripBit 2: Enable Current Unbalance TripBit 3: Enable Under Current TripBit 4: Enable Phase Loss TripBit 5: Enable JamBit 6: Enable LKW TripBit 7: Enable HKW TripBit 8: Enable Overvoltage TripBit 9: Enable Undervoltage TripBit 10: Enable Phase Order Trip
MN04209001E.book Page 28 Wednesday, September 30, 2009 3:44 PM

Motor Insight User Manual
MN04209001E For more information visit: www.eaton.com 8-29
September 2009
Faulted/Tripped
A condition exists that is out of the normal operating range of the device. This condition has been configured to cause the device to enter the faulted or tripped state.
Warning
A condition exists that is out of the normal operating range of the device. This condition has been configured to provide a warning.
Table 8-41: Fault Reset
Commands the device out of the faulted state. A transition from 0 to 1 will cause the fault reset.
Fault Code
Indicates the condition that caused the most recent transition to the faulted state. The fault code is not cleared by Fault reset.
The fault codes used are the Abbreviated 8-bit code as specified by the default Fault/Warning Code Style attribute in the control supervisor.
Warning Code
Indicates the presence of a warning condition. This is not latched and only displays while the warning state is active. If multiple warning conditions exist, then only the lowest number warning code is displayed.
The warning codes used are the Abbreviated 8-bit code as specified by the default Fault/Warning Code Style attribute in the control supervisor.
Fault Status
Displays the Motor Insight fault status register.
Warning Status
Displays the Motor Insight warning status register.
Device Status
Displays the Motor Insight status as described in the instance attributes table.
Initial Value Commanded Value Result
0 0 No Action
0 1 Reset Fault
1 0 No Action
1 1 No Action
MN04209001E.book Page 29 Wednesday, September 30, 2009 3:44 PM

Motor Insight User Manual
8-30 For more information visit: www.eaton.com MN04209001E
September 2009
Overload Object
Class: 0x2C
This object models the functions specific to an AC motor overload protection device.
Table 8-42: Instance Services
Table 8-43: Overload Instance Attributes
Service Code
Service Name
Service Data Description
0x0E Get_Attribute_Single n/a Returns the value of the specified attribute
0x10 Set_Attribute_Single value Sets the “value” into the specified attribute
Attr ID NV
Access Rule Name
Data Type
Semantics of Values Value
4 NV Set TripClass USINT Trip Class Setting5 to 30
5 Get AvgCurrent INT Average of the three phase currentsUnits: See Table 7-8
6 Get %PhImbal USINT % Phase Imbalance
7 Get %Thermal USINT % Thermal Capacity
8 Get Current Ll INT Actual motor phase current L1Units: See Table 7-8
9 Get Current L2 INT Actual motor phase current L2Units: 1See Table 7-8
10 Get Current L3 INT Actual motor phase current L3Units: See Table 7-8
11 Get GroundCurrent
INT Ground CurrentUnits: 100ma
101 NV Set Motor Run Time
UINT Reset by writing zero
102 NV Set Start Count UINT Reset by writing zero
103 NV Set CT Multiplier UINT See MI DSP User Guide.doc
104 Reserved
105 NV Set Motor FLA UINT Table 6-1
106 Get Power Factor UINT PFX100
107 Get Motor Power (kW)
UINT KWX100
108 Get Motor FaultTime to restart
UINT Seconds remaining
109 Get Load FaultTime to restart
UINT Seconds remaining
110 NV Set Load FaultReset Delay
UINT Table 6-16
MN04209001E.book Page 30 Wednesday, September 30, 2009 3:44 PM

Motor Insight User Manual
MN04209001E For more information visit: www.eaton.com 8-31
September 2009
Table 8-43: Overload Instance Attributes (Continued)
Output point value
The output is read from this object’s VALUE attribute and applied to the output terminal.
Attr ID NV
Access Rule Name
Data Type
Semantics of Values Value
111 NV Set Load Fault Num Restart Attempts
UINT Table 6-16
112 NV Set Motor FaultReset Delay
UINT Table 6-5
113 NV Set Motor Fault Num Restarts Attempts
UINT Table 6-5
114 NV Set Run Transition Time Seconds
UINT Table 6-4
115 NV Set Run Transition Percent of FLA
UINT Table 6-4
116 NV Set Ground Fault Trip Mode UINT Table 6-9
117 NV Set Ground Fault Pickup Delay Seconds
UINT Table 6-9
118 NV Set Ground Fault Pickup Level
UINT Table 6-9
119 NV Set Current Unbalance Run Delay Seconds
UINT Table 6-7
120 NV Set Current Unbalance Pickup Level Percent FLA
UINT Table 6-7
121 NV Set Jam Pickup Delay Seconds
UINT Table 6-6
122 NV Set Jam Pickup Level UINT Table 6-6
123 NV Set Current Phase Loss Pickup Delay
UINT Table 6-8
124 NV Set High Kw Trip Time UINT Table 6-20
125 NV Set High Kw Trip Limit UINT Table 6-20
126 NV Set Low Power Pickup Delay Seconds
UINT Table 6-19
127 NV Set Low Power Pickup Level
UINT Table 6-19
128 NV Set Under Current Pickup Delay Seconds
UINT Table 6-18
129 NV Set Under Current Pickup Level
UINT Table 6-18
130 NV Set Overload Reset Mode UINT Table 7-7, Reg 434
131 NV Set Load Fault Reset Delay Calculator
BOOL 0=disable - default1=enabled (Table 6-17)
MN04209001E.book Page 31 Wednesday, September 30, 2009 3:44 PM

Motor Insight User Manual
8-32 For more information visit: www.eaton.com MN04209001E
September 2009
Voltage Monitor Object
Class: 0x93
The Voltage Monitor object.
Table 8-44: Instance Services
Table 8-45: Voltage Monitor Instance Attributes
Service Code
Service Name
Service Data Description
0x0E Get_Attribute_Single n/a Returns the value of the specified attribute
0x10 Set_Attribute_Single value Sets the “value” into the specified attribute
Attr ID NVAccess Rule Name Data Type Semantics of Values Value
1 Get Rms Voltage Vab UINT L1-L2 RMS Voltage
2 Get Rms Voltage Vbc UINT L2-L3 RMS Voltage
3 Get Rms Voltage Vca UINT L3-L1 RMS Voltage
4 Get Rms Voltage Avg UINT Average RMS Voltage
5 Get Voltage Unbalance Percent
UINT
6 Get Frequency UINT HZ x 100
7 NV Set Voltage Faults Trip Mode
UINT 0 = Trip on fault (each voltage fault can be individually enabled or disabled)1 = Alarm-no-trip
8 NV Set Under Voltage Pickup Level
UINT Table 6-13
9 NV Set Under Voltage Pickup Delay Seconds
UINT Table 6-13
10 NV Set Over Voltage Pickup Level
UINT Table 6-12
11 NV Set Over Voltage Pickup Delay Seconds
UINT Table 6-12
12 NV Set V Unbalance Pickup Level
UINT Table 6-14
13 NV Set V Unbalance Pickup Delay Seconds
UINT Table 6-14
14 NV Set Phase Order UINT Table 6-15
15 NV Set Restart Delay UINT Table 6-10
16 NV Get Supply FaultTime to Restart
UINT Seconds remaining
MN04209001E.book Page 32 Wednesday, September 30, 2009 3:44 PM

Motor Insight User Manual
MN04209001E For more information visit: www.eaton.com 8-33
September 2009
DeviceNet Interface Object
Class: 0x94
The DeviceNet Interface object is used to advertise and configure attributes that will affect the DeviceNet interface of the Motor Insight adapter.
Table 8-46: Instance Services
Table 8-47: DeviceNet Interface Instance Attributes
Service Code
Service Name
Service Data Description
0x0E Get_Attribute_Single n/a Returns the value of the specified attribute
0x10 Set_Attribute_Single value Sets the “value” into the specified attribute
Attr ID NV
Access Rule Name
Data Type Semantics of Values Value
1 NV Set MAC ID USINT MAC ID in use when baud rate switch is set to 3 (B0: on, B1: on)
Range: 0 – 63 Default = 63
2 NV Set Baud Rate USINT Baud rate in use when baud rate switch is set to 3 (B0: on, B1: on)
0 = 125k, 1 = 250k, 2 = 500kDefault = 0
3 NV Set Poll Input Assembly Select
USINT Poll Connection Input Assembly instance that is active
Default = 100
4 NV Set Bit Strobe Input Assembly Select
USINT Bit Strobe Connection Input Assembly instance that is active
Default = 107
5 NV Set Poll Output Assembly Select
USINT Poll Connection Output Assembly instance that is active
Default = 105
6 Get Short Assembly User Input, Size
USINT Total size of assembly 100 as determined by user selected input list items
Determined by the placement of the “0” below
7 NV Set Short Assembly User Input, Word 0 Param
USINT Data item assigned to Word 0 of short user input assembly
Default = 1; Device Status (Control Supervisor Attr 101)
8 NV Set Short Assembly User Input, Word 1 Param
USINT Data item assigned to Word 1 of short user input assembly
Default = 2;L1 Current
9 NV Set Short Assembly User Input, Word 2 Param
USINT Data item assigned to Word 2 of short user input assembly
Default = 3; L2 Current
10 NV Set Short Assembly User Input, Word 3 Param
USINT Data item assigned to Word 3 of short user input assembly
Default = 4; L3 Current
MN04209001E.book Page 33 Wednesday, September 30, 2009 3:44 PM

Motor Insight User Manual
8-34 For more information visit: www.eaton.com MN04209001E
September 2009
Table 8-47: DeviceNet Interface Instance Attributes (Continued)
MAC ID
The MAC ID is to be used in combination with Baud Rate (below) when the baud rate switches are set to value 3 (B0 = ON & B1 = ON).
Baud Rate
The Baud Rate is to be used in combination with MAC ID (above) when the baud rate switches are set to value 3 (B0 = ON & B1 = ON).
Attr ID NV
Access Rule Name
Data Type Semantics of Values Value
11 Get Long Assembly User Input, Size
USINT Total size of assembly 110 as determined by user selected input list items
Determined by the placement of the “0” below
12 NV Set Long Assembly User Input, Word 0 Param
USINT Data item assigned to Word 0 of long user input assembly
Default = 1;Device Status (Control Supervisor Attr 101)
13 NV Set Long Assembly User Input, Word 1 Param
USINT Data item assigned to Word 1 of long user input assembly
Default = 2;L1 Current
14 NV Set Long Assembly User Input, Word 2 Param
USINT Data item assigned to Word 2 of long user input assembly
Default = 3;L2 Current
15 NV Set Long Assembly User Input, Word 3 Param
USINT Data item assigned to Word 3 of long user input assembly
Default = 4;L3 Current
16 NV Set Long Assembly User Input, Word 4 Param
USINT Data item assigned to Word 4 of long user input assembly
Default = 20Field Inputs
17 NV Set Long Assembly User Input, Word 5 Param
USINT Data item assigned to Word 5 of long user input assembly
Default = 5Current Ave
18 NV Set Long Assembly User Input, Word 6 Param
USINT Data item assigned to Word 6 of long user input assembly
Default = 6Voltage VAB
19 NV Set Long Assembly User Input, Word 7 Param
USINT Data item assigned to Word 7 of long user input assembly
Default = 7Voltage VBC
20 NV Set Long Assembly User Input, Word 8 Param
USINT Data item assigned to Word 8 of long user input assembly
Default = 8Voltage VCA
21 NV Set Long Assembly User Input, Word 9 Param
USINT Data item assigned to Word 9 of long user input assembly
Default = 9Voltage Ave
MN04209001E.book Page 34 Wednesday, September 30, 2009 3:44 PM

Motor Insight User Manual
MN04209001E For more information visit: www.eaton.com 9-1
September 2009
Chapter 9 — Modbus with IO Behavior
The Modbus with IQ Module Provides Expanded IQ Functionality to the Base Motor.
Table 9-1: Modbus with IO Functionality
Parameter Value
Mode Slave mode only
Byte Characteristics RTU: 8Bit, Even Parity, 1 stop bitASCII: 7Bit, Even Parity, 1 stop bit
Slave Response to Master 10 ms plus the time it takes to transmit response (when applicable)
Commands Supported 0x01 Read Coils0x02 Read Discrete Inputs0x03 Read Holding Registers0x04 Read Input Register0x05 Write Single Coil0x06 Write Single Register0x0F Write Multiple Coils (15)0x10 Write Multiple Registers (16)0x17 Read/Write Multiple Registers (23)0x2B/0x0E Read Device Identification Get Device Identity (43/14)
Protocol Supported ASCII or RTU
Electrical Signaling RS-485 (ANSI/TIA/EIA-485), Two-wire
Checksum CRC 16bit 0x8005 (or CRC-CCITT 0x1021)
Max. Data Signaling Error Accepted
2% in reception, 1% in transmission
Max. Number of Devices 32 (1 unit load per RS-485): Note: Line polarization will reduce max. # of devices by 4.
LED Indication Device Busy
Max. Cable Length Dependent on baud rate, cable characteristics (gauge, capacitance or impedance), number of loads, 4000 ft. max. theoretical. Reference MODBUS-IDA over Serial Line Specification and Implementation Guide and EIA-485 for details
Max. Number of Writes to Non-volatile Memory
Unlimited
Connector Style Screw terminal
Network Topology Two-wire Modbus, Daisy-chain and/or repeater
Line Polarization Not required. Reference MODBUS over Serial Line Specification and Implementation Guide and EIA-485 for more information.
MN04209001E.book Page 1 Wednesday, September 30, 2009 3:44 PM

Motor Insight User Manual
9-2 For more information visit: www.eaton.com MN04209001E
September 2009
Table 9-2: Circuit Descriptions
Figure 9-1: Modbus RS485 and Power Connection
Pin # Circuit EIA-485 NameRecommended Wire Color Description
1 Common C/C Grey Power Supply Common
2 D1 B/B Yellow Transceiver terminal 1, V1Voltage, Data + (V1 > VO for binary 1 [OFF] state)
3 N/C
4 DO A/A Brown Transceiver terminal 0, VO Voltage, Data - (VO > V1 for binary 0 [ON] state)
5 24 Vdc — Red Power supply Positive
MN04209001E.book Page 2 Wednesday, September 30, 2009 3:44 PM

Motor Insight User Manual
MN04209001E For more information visit: www.eaton.com 9-3
September 2009
9.1 - Additional Modbus Registers
The following Modbus data is provided in addition to the previously listed Modbus registers.
Note: The Modbus Register Address is -1 of the Modbus Register Number.
Note: All 32bit values are Low word first LLLLHHHH. Example: Register 7 = Low Word of Serial Number; Register 8 = High Word of Serial Number.
Table 9-3: Modbus Registers
ModbusCoilNumber
ModbusRegisterNumber R/W Parameter Name Description
1 R Field Inputs This is a bitfield of inputs. Bit 0 corresponds with input 1, bit1 corresponds with input 2, etc.
1 Field Input 1
2 Field Input 2
3 Field Input 3
4 Field Input 4
2 R Control Voltage (24 Vdc) The control voltage register is displayed in millivolts.
3 R Ambient Board Temperature
Temperature is displayed in degrees celsius.
4 R Maximum PC Board Temperature
The maximum ambient temperature seen by the PCB.
5 R Dip Switch Value Present value of the configuration dip switch.
6 R Configuration CRC A CRC is calculated on the non-volatile configuration values. The CRC value is intended to provide a quick assessment of configuration state.
7 R Communication Module Serial Number
The serial number of the communication module.
9 R Communication Module Firmware Revision
Present firmware revision of the communication adapter.
11 R Communication Module Hardware Revision
Present hardware revision for the communication adapter PCB.
101 R/W Field Relay Outputs The relay output register is a bitfield. Bit 0 corresponds to relay out 1 and bit 1 corresponds to relay out 2.
1601 Field Relay Output 1
MN04209001E.book Page 3 Wednesday, September 30, 2009 3:44 PM

Motor Insight User Manual
9-4 For more information visit: www.eaton.com MN04209001E
September 2009
Table 9-3: Modbus Registers (Continued)
ModbusCoilNumber
ModbusRegisterNumber R/W Parameter Name Description
1602 Field Relay Output 2
102 R/W Field Input 1 Debounce Time
The input debounce can be set for each input point. The debounce value is set in milliseconds. Minimum time is 1 ms. Maximum debounce time is 1000 ms.104 R/W Field Input 2
Debounce Time
106 R/W Field Input 3 Debounce Time
108 R/W Field Input 4 Debounce Time
110 R/W Modbus Comm Loss Timeout Value (ms)
Modbus communication loss timeout. The timeout can be set from 0 ms (disabled) to 65535 ms.
1000 R/W Modbus Production List The Production and Consumption registers can be used to create custom Modbus interface ranges. An example: If field inputs register address 0 is put into the first slot of the production list, the field inputs register value will be available in the first slot of the Modbus Production Data Register range. Production data is data provided by the device and Consumption data is for data provided (written) to the device. Note that the values must be Modbus Register Address (i.e., Register Number - 1) not Register Number.
2000 R Modbus Production Data
3000 R/W Modbus Consumption List
4000 R/W Modbus Consumption Data
MN04209001E.book Page 4 Wednesday, September 30, 2009 3:44 PM
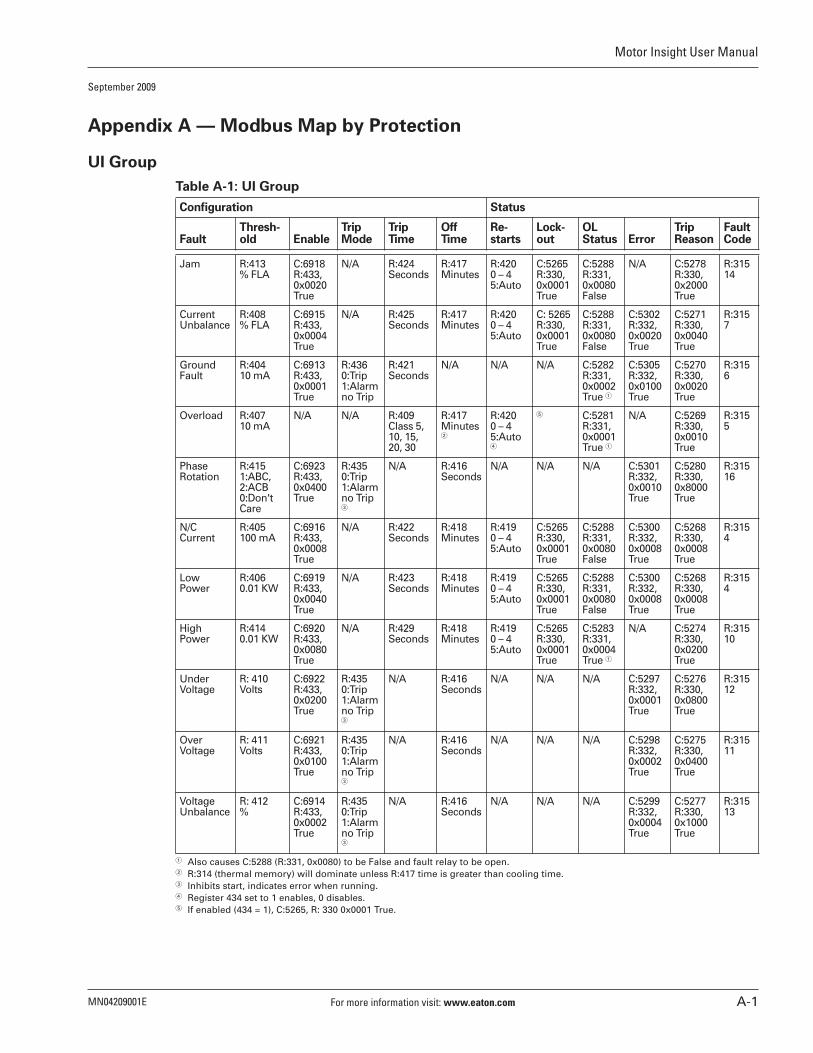
Motor Insight User Manual
MN04209001E For more information visit: www.eaton.com A-1
September 2009
Appendix A — Modbus Map by Protection
UI Group
Table A-1: UI Group
� Also causes C:5288 (R:331, 0x0080) to be False and fault relay to be open.� R:314 (thermal memory) will dominate unless R:417 time is greater than cooling time.� Inhibits start, indicates error when running.� Register 434 set to 1 enables, 0 disables.� If enabled (434 = 1), C:5265, R: 330 0x0001 True.
Configuration Status
FaultThresh-old Enable
Trip Mode
Trip Time
Off Time
Re-starts
Lock-out
OL Status Error
TripReason
Fault Code
Jam R:413% FLA
C:6918R:433, 0x0020True
N/A R:424Seconds
R:417Minutes
R:4200 – 45:Auto
C:5265R:330, 0x0001True
C:5288R:331, 0x0080False
N/A C:5278R:330, 0x2000True
R:31514
CurrentUnbalance
R:408% FLA
C:6915R:433, 0x0004True
N/A R:425Seconds
R:417Minutes
R:4200 – 45:Auto
C: 5265R:330, 0x0001True
C:5288R:331, 0x0080False
C:5302R:332, 0x0020True
C:5271R:330, 0x0040True
R:3157
GroundFault
R:40410 mA
C:6913R:433, 0x0001True
R:4360:Trip1:Alarm no Trip
R:421Seconds
N/A N/A N/A C:5282R:331, 0x0002True �
C:5305R:332, 0x0100True
C:5270R:330, 0x0020True
R:3156
Overload R:40710 mA
N/A N/A R:409Class 5,10, 15, 20, 30
R:417Minutes�
R:4200 – 45:Auto �
� C:5281R:331, 0x0001True �
N/A C:5269R:330, 0x0010True
R:3155
PhaseRotation
R:4151:ABC,2:ACB0:Don't Care
C:6923R:433, 0x0400True
R:4350:Trip1:Alarm no Trip �
N/A R:416Seconds
N/A N/A N/A C:5301R:332, 0x0010True
C:5280R:330, 0x8000True
R:31516
N/CCurrent
R:405100 mA
C:6916R:433, 0x0008True
N/A R:422Seconds
R:418Minutes
R:4190 – 45:Auto
C:5265R:330, 0x0001True
C:5288R:331, 0x0080False
C:5300R:332, 0x0008True
C:5268R:330, 0x0008True
R:3154
LowPower
R:4060.01 KW
C:6919R:433, 0x0040True
N/A R:423Seconds
R:418Minutes
R:4190 – 45:Auto
C:5265R:330, 0x0001True
C:5288R:331, 0x0080False
C:5300R:332, 0x0008True
C:5268R:330, 0x0008True
R:3154
HighPower
R:4140.01 KW
C:6920R:433, 0x0080True
N/A R:429Seconds
R:418Minutes
R:4190 – 45:Auto
C:5265R:330, 0x0001True
C:5283R:331, 0x0004True �
N/A C:5274R:330, 0x0200True
R:31510
UnderVoltage
R: 410Volts
C:6922R:433, 0x0200True
R:4350:Trip1:Alarm no Trip �
N/A R:416Seconds
N/A N/A N/A C:5297R:332, 0x0001True
C:5276R:330, 0x0800True
R:31512
OverVoltage
R: 411Volts
C:6921R:433, 0x0100True
R:4350:Trip1:Alarm no Trip �
N/A R:416Seconds
N/A N/A N/A C:5298R:332, 0x0002True
C:5275R:330, 0x0400True
R:31511
VoltageUnbalance
R: 412%
C:6914R:433, 0x0002True
R:4350:Trip1:Alarm no Trip �
N/A R:416Seconds
N/A N/A N/A C:5299R:332, 0x0004True
C:5277R:330, 0x1000True
R:31513
MN04209001E.book Page 1 Wednesday, September 30, 2009 3:44 PM

Motor Insight User Manual
A-2 For more information visit: www.eaton.com MN04209001E
September 2009
Comm Group
Table A-2: Comm Group
� Inhibits start, indicates error when running.
Configuration Status
FaultThresh-old Enable
TripMode
TripTime
OffTime
Re-starts
Lock-out
OLStatus Error
TripReason
FaultCode
VoltagePhaseLoss
— — R:4350:Trip1:Alarmno Trip �
N/A N/A N/A — C:5288R:331,0x0080False
C:5303R:332,0x0040True
N/A R:31515
RelayOff
N/A N/A N/A N/A N/A N/A — C:5288R:331,0x0080False
N/A C:5266R:330,0x0002True
R:3152
ContactorFailure
N/A — N/A N/A N/A N/A — C:5288R:331, 0x0080False
N/A C:5267R:330,0x0004True
R:3153
CurrentSinglePhase
N/A N/A N/A N/A N/A N/A — C:5288R:331,0x0080False
C:5304R:332,0x0080True
C:5272R:330,0x0080True
R:3158
MN04209001E.book Page 2 Wednesday, September 30, 2009 3:44 PM

Motor Insight User Manual
MN04209001E For more information visit: www.eaton.com A-3
September 2009
MN04209001E.book Page 3 Wednesday, September 30, 2009 3:44 PM

Motor Insight User Manual
A-4 For more information visit: www.eaton.com MN04209001E
September 2009
MN04209001E.book Page 4 Wednesday, September 30, 2009 3:44 PM


Eaton Corporation
Electrical Sector1111 Superior Ave.Cleveland, OH 44114United States877-ETN-CARE (877-386-2273)Eaton.com
© 2009 Eaton CorporationAll Rights ReservedPrinted in USAPublication No. MN04209001E / Z9168September 2009
PowerChain Management is a registered trademark of Eaton Corporation.
All other trademarks are property of their respective owners.
Eaton’s Electrical Sector is a global leader in power distribution, power quality, control & automation and monitoring products. When combined with Eaton’s full-scale engineering services, these products provide customer-driven PowerChain Management� solutions to serve the power system needs of the data center, industrial, institutional, government, utility, commercial, residential, IT, mission critical and OEM markets worldwide.
PowerChain Management solutions help enterprises achieve sustainable and competitive advantages through proactive management of the power system as a strategic, integrated asset throughout its life cycle, resulting in enhanced safety, greater reliability and energy efficiency. For more information, visit www.eaton.com/electrical.
Cover_Back.indd 4Cover_Back.indd 4 9/30/09 3:28 PM9/30/09 3:28 PM