motorcycle troubleshooting manual - classic cycles...motorcycle troubleshooting every motorcycle...
TRANSCRIPT

Diagnosing mechanical problems is relativelysimple if you use orderly procedures and keep a fewbasic principles in mind.The troubleshooting procedures in this chapter
analyze typical symptoms and show logical methodsof isolating causes. These are not the only methods.There may be several ways to solve a problem, butonly a systematic approach can guarantee success.Never assume anything. Do not overlook the ob-
vious. If you are riding along and the bike suddenlyquits, check the easiest, most accessible problemspots first. Is there gasoline in the tank? Has a sparkplug wire fallen off?If nothing obvious turns up in a quick check, look
a little further. Learning (0 recognize and describesymptoms will make repairs easier for you or amechanic at the shop. Describe problems accuratelyand fully. Saying "it won't run" isn't the same thingas saying "it quit at high speed and won't stan." or,"it sat in my garage for 3 months and then wouldn'tstart ."Gather as many symptoms as possible to aid in
diagnosis. Note whether the engine lost powergradually or aJI at once. Remember that the more
complicated a machine is the easier it is to trou-bleshoot because symptoms point to specific prob-lems.After the symptoms are defined, areas which
could cause problems are tested and analyzed.Guessing at the cause of a problem may provide thesolution, but it can easily lead to frustration, wastedtime and a series of expensive, unnecessary partSreplacements.You do not need fancy equipment or complicated
test gear to determine whether repairs can be at-tempted at bome. A few simple checks could save alarge repair bill and lost time while the bike sits in adealer's service department. On the other hand, berealistic and don't attempt repairs beyond your abili-ties. Service departments tend to charge heavily forputting together a disassembled engine that mayhave been abused. Some won't even take on such ajob--so use common sense and don't get in overyour head.
An engine has 3 basic needs to run properly:correct fuel/air mixture, compression and a spark atthe correct lime. If one or more are missing, theengine will not run. Four-stroke engine operatingprinciples are illustrated in Figure 1. The electrical
MOTORCYCLETROUBLESHOOTING
Every motorcycle engine requires an uninter-rupted supply of fuel and air, proper ignition andadequate compression. If any of these are lacking,the engine will not run.
OPERATING REQUIREMENTS

4-STROKE PRINCIPLES

system is the weakest link of the 3 basics. Moreproblems result from electrical breakdowns thanfrom any other source. Keep that in mind before youbegin tampering with carburetor adjustments and thelike.
air passages. Gasoline tends to lose its potency afterstanding for long periods. Condensation may con-taminate the fuel with water. Drain the old fuel fromthe fuel tank, fuel lines and carburetors and trystarting with a fresh tankful.
TROUBLESHOOTING INSTRUMENTS
Chapter One lists the instruments needed andinstruction on their use.
When the bike is difficult to start, or won't start atall, it doesn't help to wear down the battery using theelectric starter. Check for obvious problems evenbefore gelting out your tools. Go down the followinglist step by step. Do each one; you may be embar-rassed to find the kill switch off, but that is betterthan wearing down the battery. If the bike still willnot start, refer to the appropriate troubleshootingprocedures which follow in this chapter.
WARNINGDuring Step 1, do not use an open flame(0 check in the tank. A serious explosionis certain to result.
1. Is there fuel in the tank? Open the filler cap androck the bike. Listen for fuel slosbing around.2. Is the fuel supply valve in the ON position? Turnthe valve to the RESERVE position to be sure youget the last remaining gas.3. Make sure the kill switch (Figure 2) is not stuckin the OFF position or that the wire is not broken andshorting out.4. Are the spark plug wires on tight? Push both sparkplug wires on (Figure 3) and slightly rotate them to
clean the electrical connection between the plug andthe spark plug wire connector.5. Is the choke in the right position?
An engine that refuses to start or is difficult to startis very frustrating. More often than not, the problemis very minor and can be found with a simple andlogical troubleshooting approach.
The following items will help isolate engine start-ing problems.
Engine Fails to Start
Perform the following spark test to determine ifthe ignition system is operating properly.1. Remove one of the spark plugs.2. Connect the spark plug wire and connector to thespark plug and touch the spark plug base to a goodground like the engine cylinder head. Position thespark plug so you can see the electrodes.
If the machine has been sitting for any length oftime and refuses to start, check and clean the sparkplugs and then look to the gasoline delivery system.This includes the fuel tank, fuel shutoff valve andfuel line to the carburetor. Gasoline deposits mayhave formed and gummed up the carburetor jets and
EMERGENCY TROUBLESHOOTING
ENGINE STARTING

WARNINGDuring the next step, do not hold thespark plug, spark plug wire or connee-tor with fingers. The high voltage gen-erated by the ignition system couldproduce serious or fatal shocks. Use apair of insulated pliers to hold the sparkplug or wire.
3. Crank the engine over with the starter. A fat bluespark should be evident across the spark plug elec-trodes.4. If the spark is good. check for one or more of thefollowing possible malfunctions:
a. Obstructed fuel line or fuel filter.b. Leaking head gasketc. Low compression.
5. If the spark: is not good, check for one or more ofthe foUowing:
a. Loose electrical connections.b. Dirty electrical connections.c. Loose or broken ignition coil ground wire.d. Broken or shorted high tension lead to the
spark plug (Figure 3).e. Discharged battery.f. Disconnected or damaged battery connection.g. Neutral, starter lockout or side stand switch
trouble.
Engine is Difficult to Start
Check for one or more of the following possiblemalfunctions:
a. Fouled spark plug(s).b. Improperly adjusted choke.c. Intake manifold air leak.d. Contaminated fuel system.c. Improperly adjusted carburetor.f. Weak ignition unit.g. Weak ignition coils.h. Poor compression.i. Engine and transmission oil too beavy.
Engine Will Not Crank
Check for one or more of the following possiblemalfunctions:
a. Blown fuse.b. Discharged bartery,c. Defective starter motor.d. Seized piston(s).
e. Seized crankshaft bearings.f. Broken connecting rod.
In the following checklist, it is assumed that theengine runs, but is not operating at peak perform-ance. This will serve as a starting point from whichto isolate a performance malfunction.
The possible causes for each malfunction arelisted in a logical sequence and in order of prob-ability.
Engine Will Not Idle
a. Carburetor incorrectly adjusted.b. Fouled or improperly gapped spark pIug(s).c. Leaking bead gasket.d. Obstructed fuel line or fuel shutoff valve.e. Obstructed fuel filter.f. Ignition timing incorrect due to defective igni-
tion component(s).g. Valve clearance incorrect.
Engine Misses at High Speed
a. Fouled or improperly gapped spark plugs.b. Improper carburetor main jet selection.c. Ignition timing incorrect due to defective ig-
nition component(s).d. Weak ignition coil(s).e. Obstructed fuel line or fuel shutoff valve.f. Obstructed fuel filler.g. Clogged carburetor jets.
Engine Overheating
a. Incorrect carburetor adjustment or jet selec-tion.
b. Ignition timing incorrect due to improper ad-justment or defective ignition compooent(s).
c. Improper spark plug beat range.d. Damaged or blocked cooling fins.e. Oil level low.f. OH not circulating properly.g. Valves leaking.b. Heavy engine carbon deposits.
ENGINE PERFORMANCE

ENGINE NOISESEngine Overheating(Water-cooling problems)
a. Clogged radiator.b. Damaged thermostat.c. Worn or damaged radiator cap.d. Water pump worn or damaged.e. Fan relay damaged.f. Thermostatic fan switch damaged.g. Damaged fan blade(s)
Excessive Exhaust Smoke and Engine RunsRoughly
a. Clogged air filter element.b. Carburetor adjustment incorrect-mixture
too rich. .c. Choke not operating properly.d. Water or other contaminants in fuel.e. Clogged fuel line.f. Ignition coil defective.g. Spark plugs fouled.h. IC igniter or pickup coil defective.i. Loose or defective ignition circuit wire.j. Short circuit from damaged wire insulation.k. Loose battery cable connection.l. Valve liming incorrect.m. Intake manifold or air cleaner air leak.
Engine Loses Power at Normal Riding Speed
a. Carburetor incorrectly adjusted.b. Engine overheating.c. Ignition timing incorrect due to defective ig-
nition component(s).d. Incorrectly gapped spark plugs.e. Obstructed muffler.f. Dragging brakes(s).
Engine Lacks Acceleration
a. Carburetor mixture tOOlean.b. Clogged fuel line.c. Ignition timing incorrect due to defecrive ig-
nition component(s).d. Dragging brakes(s).
Often the first evidence of an internal engineproblem is a strange noise. That knocking. clickingor tapping sound which you never heard before maybe warning you of impending trouble.
While engine noises can indicate problems. theyare difficult to interpret correctly; inexperienced me-chanics can be seriously misled by them.
Professional mechanics often use a special stetho-scope (which looks like a doctor's stethoscope) forisolating engine noises. You can do nearly as wellwith a "sounding stick" which can be an ordinarypiece of dowling, a length of broom handle or asection of small hose. By placing one end incontactwith the area 10 which you want to listen and theother end near your ear, you can hear sounds ema-nating from that area. The first time you do this. youmay be horrified at the strange sounds coming fromeven a normal engine. If possible, have an experi-enced friend or mechanic help you sort out thenoises. Consider the following when troubleshoot-ing engine noises:1. Knocking or pinging during acceleration-caused by using a lower octane fuel than recom-mended. May also be caused by poor fuel. Pingingcan also be caused by a spark plug of the wrong heatrange. Refer to Correct Spark Plug Heat Range inChapter Three.2. Slapping or rattling noises at low speed or duringacceleration-may be caused by piston slap. i.e.,excessive piston-cylinder wall clearance.3. Knocking or rapping while decelerating-usu-ally caused by excessive rod bearing clearance.4. Persistent knocking and vibration-usuallycaused by worn main bearing(s).5. Rapid on-off squeai--compression leak aroundcylinder head gasket or spark plug(s).6. Valve traillnoise-check for the following:
a. Valves adjusted incorrectly.b. Loose valve adjuster.c. Valve Slicking in guide.d. Low oil pressure.e. Damaged rocker arm or shaft. Rocker ann
may be binding on shaft.
ENGINE LUBRICATION
An improperly operating engine lubrication sys-tem will quickly lead to engine seizure. The engine

CLUTCH TROUBLESHOOTING
• Weak clutch springs• Worn clutch plates• Damaged pressure plate• Clutch release mechanism damage
• Clutch spring tension uneven• Warped clutch plates• excessive clutch lever play• Clutch housing damage
oil level should be checked weekly and the tankrefilled, as described in Chapter Three. Oil pumpservice is described in Chapter Four.
Oil Consumption High or Engine SmokesExcessively
a. Worn valve guides.b. Worn or damaged piston rings.
Excessive Engine Oil Leaks
a. Clogged air cleaner breather hose.b. Loose engine parts.c. Damaged gasket sealing surfaces.
CLUTCH
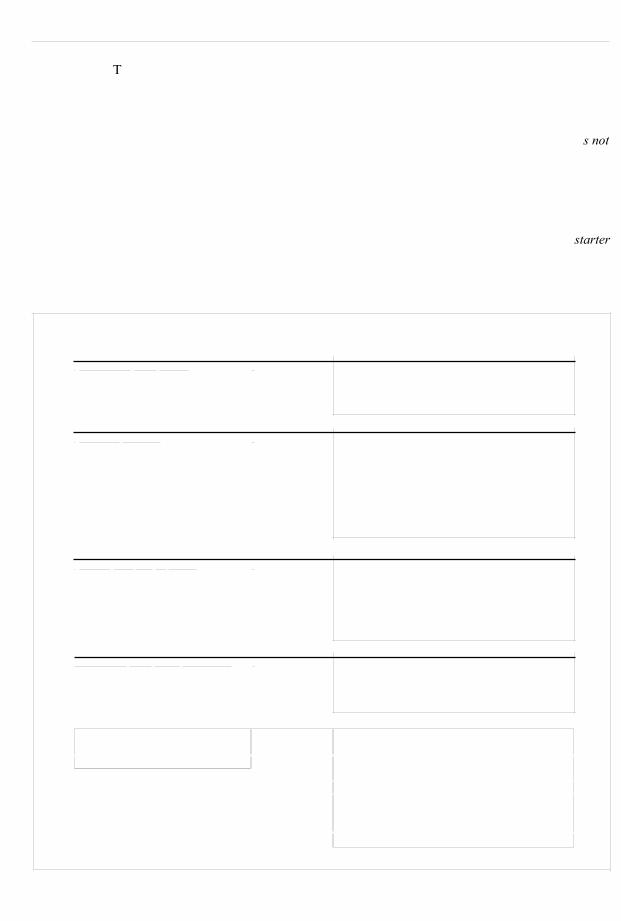
The three basic clutch troubles are:a. Clutch noise.b. Clutch slipping.c. Improper clutch disengagement or dragging.
All clutch troubles, except adjustments. requirepartiaJ clutch disassembly to identify and cure the
problem. The troubleshooting chart in Figure 4 listsclutch troubles and checks to make. Refer to ChapterFive for clutch service procedures.
ITRANSMISSION
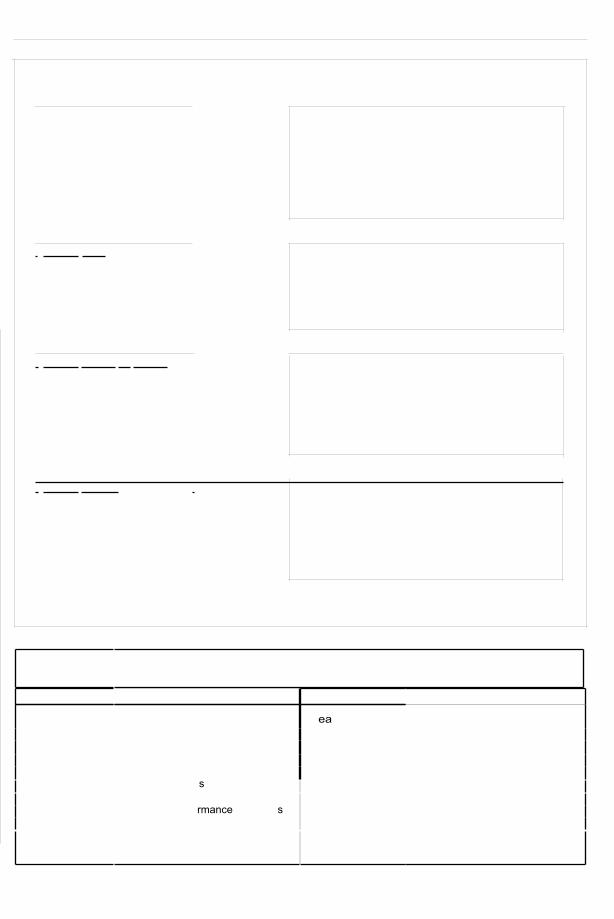
The basic transmission troubles are:a. Excessive gear noise.
b. Difficult shifting.
c. Gears pop out of mesh.
d. Incorrect shift lever operation.Transmission symptoms are sometimes hard to
distinguish from clutch symptoms. The trou-bleshooting chan in Figure 5 lists transmission trou-bles and checks to make. Refer to Chapter Six fortransmission service procedures. Be sure that theclutch is not causing the trouble before working onthe transmission.
CHARGING SYSTEM
Charging system testing procedures are describedin Chapter Eight.
Check:• Damaged clutch gear teeth• Worn or warped clutch plates
IClutch slipping Check:
IClutch dragging Check:L-- -' • Incorrect clutch adjustment
Iexcessive clutch noise
The basic starter-related troubles are:
a. The starter does not crank.b. The starter cranks, but the engine does not
start.
1. Turn on the headlight and push the starter button.Check for one of the following conditions.
come on: The battery is dead or there is a loosebanery connection. Check the battery charge as de-scribed in Chapter Three. If the battery is okay, checkthe starter connections at the battery. solenoid and atthe starter switch. Clean and tighten all connections.
Testing
Starting system problems are relatively easy tofind. In most cases, the trouble is a loose or dirtyelectrical connection. Use the troubleshooting chartin Figure 6 with the following tests.
TRANSMISSION TROUBLESHOOTING
, excessive gear noise I Check:• Worn bearings* Worn or damaged gears• excessive gear backlash
, Difficult shifting I Check:• Damaged gears• Damaged shift forks• Damaged shift drum• Damaged shift lever assembly• Incorrect main shaft and countershaftengagement
• Incorrect clutch disengagement
, Gears pop out of mesh I Check:• Worn gear or transmission shaft splines• Shift forks worn or bent• Worn dog holes In gears• Insufficient shift lever sprIng tensIon• Damaged shift lever linkage
'Incorrect shift lever operation I Check:• Bent shift lever• Bent or damaged shift lever shaft• Damaged shift lever linkage or gears
Incorrect shifting after Check:engine reassembly • MIssing transmission shaft shims
• Incorrectly Installed parts• Shift forks bent during reassembly• Incorrectly assembled crankceseassembly
• Incorrect clutch adjustment• Incorrectly assembled shiftlinkage assembly
STARTING SYSTEM Starter does not crank
2. STarter does not crank and headlight does not
3. Headlight comes on. but goes out when starterbutton is pushed: There may be a bad connection atthe battery. Wiggle the battery terminals and re-check. If the starter starts cranking, you 've found the

problem. Remove and clean the battery terminalclamps. Clean the battery posts also. Reinstall theterminal clamps and tighten securely.
4. Headlight comes on. but dims slightly when thestarter button is pushed: The problem is probably inthe starter. Remove and test the starter as describedinChapter Eight
5. Headlight comes on, but dims severely when thestarter button is pushed: Either the battery is nearlydead or the starter or engine is partially seized.Check the battery as described in Chapter Three.Check the starter as described in Chapter Eightbefore checking for partial engine seizure.
6. Headlight comes on and stays bright when thestarter button is pushed: The problem is in the starterbutton. side stand switch, starter button-to-solenoidwiring or in the starter itself. Check the starterswitch, kill switch, side stand switch. starter relayand the starter circuit relay. Check each switch bybypassing itwith a jumper wire. Check the starter asdescribed in Chapter Eight.
NOTEDepending upon battery condition, thebattery will eventually run down as thestarter buuon is continually pressed.Remember that if the starter cranks nor-mally, but the engine fails to start, thestoner is working properly. It s time tostan checking other engine systems.Don't wear the battery down.
ELECTRICAL PROBLEMS
H bulbs bum out frequently, the cause may beexcessive vibration, loose connections that permitsudden current surges or the installation of thewrong type of bulb.Most light and ignition problems are caused by
loose or corroded ground connections. Check tbesebefore replacing a bulb or electrical component.
'The ignition system is of the breakerless inductivedischarge type. See Chapter Eight. Most problemsinvolving failure to start, poor driveability or roughrunning are caused by trouble in the ignition system.
Note the following symptoms:a. Engine misses.b. Stumbles on acceleration (misfiring).c. Loss of power at high speed (misfiring).
SJarler spins but engine does not crank
If the starter spins at normal or high speed but theengine fails to crank, the problem is in the starterdrive mechanism.
IGNITION SYSTEM
Starter does not work Low batteryWorn brushesDefective relayDefective awltchDefective wiring or connectionIntemal short circuit
Starter runs continuously Stuck relay
Defective starter clutchStarterturns; does not tum engine Replace starter clutch
Recharge batteryReplace brushesRepair or replaceRepaIr or replaceRepair wire or clean connecUonRepair or replace defective
component
Recharge batteryClean or replaceReplace brushesClean and tightenReplace annature
Replace relay
STARTER TROUBLESHOOTING
Starter action is weak Low batteryPitted relay contactsWornbrushesDefectiveconnectionShort circuit Incommutator

d. Hard starting (or failure to start).e. Rough idle.Most of the symptoms can also be caused by a
carburetor that is worn or improperly adjusted. Con-sidering the law of averages, however, the odds arefar better that the source of the problem will be foundin the ignition system rather than the fuel system.
ELECTRONIC IGNITIONTROUBLESHOOTING
The following basic tests are designed to pinpointand isolate problems quickly in the primary circuitof the breakerless inductive discharge ignition sys-tem.
Spark Test
Perform the following test to determine if theignition system is operating properly.1. Remove one of the spark plugs.2. Connect the spark plug wire and connector to thespark plug and touch the spark plug base to a goodground like the engine cylinder head. Position thespark plug so you can see the electrodes.
WARNINGDuring the next step, do not hold thespark plug, spark plug wire or connec-tor. The high voltage generated by theignition system could produce seriousor fatal shocks. If necessary, use a pairof insulated pliers to hold the spark plugor wire.
3. Crank the engine over with the starter. A fat bluespark should be evident across the spark plug elec-trodes.4A. If a spark is obtained in Step 3, the problem isnot in the ignition or coil. Check the fuel system andspark plugs.4B. If no spark is obtained, proceed with the follow-ing tests.
Testing
Test procedures for troubleshooting the ignitionsystem are found in the diagnostic chart in Figure 7.A multimeter; as described in Chapter One, is re-quired to perform the lest procedures.
Before beginning actual troubleshooting, read theentire [est procedure (Figure 7). When required, thediagnostic chart will refer you to a certain chapterfor Lestprocedures.
EXCESSIVE VIBRATION
Usually this is caused by loose engine mountinghardware. If not, it can be difficult to find withoutdisassembling the engine. High speed vibration maybe due to a bent axle shaft or loose or faulty suspen-sion components. Vibration can also be caused bythe following conditions:
a. Broken frame.b. Severely worn primary chain.c. Worn drive chain.d. Primary chain links tight due to improper
lubrication.e. Improperly balanced wheels.f. Defective or damaged wheels.g. Defective or damaged tires.h. Internal engine wear or damage.
FRONT SUSPENSION AND STEERING
Poor handling may be caused by improper tirepressure, a damaged or bent frame or front steeringcomponents, worn wheel bearings or draggingbrakes. Possible causes of suspension and steeringmalfunctions are listed below.
Irregular or Wobbly Steering
a. Loose wheel axle nuts.b. Loose or worn steering head bearings.c. Excessive wheel hub bearing play.d. Damaged cast wheel.e. Unbalanced wheel assembly.f. Worn hub bearings.g. Incorrect wheel alignment.h. Bent or damaged steering stem or frame (at
steering neck).i, Tire incorrectly seated on rim.j. Excessive front end loading from non-stand-
ard equipment.
Stiff'Steering
a. Low front tire air pressure.

IIGNITION SYSTEM DIAGNOSISPROBLEM: WEAK OR NO SPARK AT ALL
TEST 1: Perfonn the troubleshootingprocedures In this chapter to Isolatethe system or systems which arecausing engine malfunction.
TEST 2: Perfonn the Ignition sparktest as described In this chapter.
TEST 3: Perfonn Stator Test asdescribed In Chapter Eight. •
(continued)
Stator winding resis-tance not In specifiedrange

• Check wiring and connections that lead to components.
(]) (continued)
IOK j-- TEST 4: Measure pickup coli r- Resistance between
I resistance as described In Chapter leads not within speclfl-
I Perform TEST 5 I Eight. • cation.:l
Replace pickup colis.
IOK ~ TEST 5: Measure Ignition coli r-- Primary andlor .. con-
I primary and secondary resistance a. dary resistance not
I Perform TEST 6 I
described In Chapter Eight. within specification.
IReplace ignition COU(8).
TEST 6: Remove IC Igniter and have aKawasaki dealer test It.·

b. Bent or damaged steering stem or frame (atsteering neck).
c. Loose or worn steering head bearings.d. Steering stem nut too tight.
Stiff or Heavy Fork Operation
a. Incorrect fork springs.b. Incorrect fork oil viscosity.c. Excessive amount of fork oil.d. Bent fork rubes.
Poor Fork Operation
a. Worn or damaged fork tubes.b. Fork oil level low due to leaking fork seals.c. Bent or damaged fork tubes.d. Contaminated fork oil.e. Incorrect fork springs.f. Heavy front end loading from non-standard
equipment.
Poor Rear Shock Absorber Operation
a. Weak or worn spring.b. Damper unit leaking.
c. Shock shaft worn or bent.d. Incorrect rear shock spring.e. Rear shock adjusted incorrectly.f. Heavy rear end loading from non-standard I
equipment.g. Incorrect loading.
BRAKE PROBLEMS
Sticking disc brakes may be caused by a stuckpiston(s) in a caliper assembly or warped padshim(s). See Figure 8 for disc brake troubles andchecks to make.
A sticking drum brake may be caused by worn orweak return springs, dry pivot and cam bushings orimproper adjustment. Grabbing brakes may becaused by greasy linings which must be replaced.Brake grab may also be due to an out-of-round drum.Glazed linings will cause loss of stopping power: SeeFigure 9 for drum brake troubles and checks tomake.
CARBURETOR TROUBLESHOOTING
Basic carburetor troubleshooting procedures arefound in Figure 10.

DISC BRAKE TROUBLESHOOTING
I Disc brake fluid leakage 11--------1 Check:* Loose or damaged line fittings• Worn caliper piston seels* Scored caliper piston andlor bore• Loose banjo bolts* Damaged all line washers• Leaking master cylinder diaphragm* Leaking master cylinder secondary seal• Cracked master cylinder housing• Too high brake fluid level• Loose master cylinder cover
I Brake overheatlngl-- I-----~C::jh:;:ec:;k-:: --------------1• Warped brake disc• Incorrect brake fluid• Caliper piston andlor brake pads hanging up• Riding brakes during riding
I Brake chatter 1 Check:• Warped brake disc• Loose brake disc• Incorrect caliper alignment• Loose caliper mounting bolts• Loose front axle nut and/or clamps• Worn wheel bearings• Damaged front hub• Restricted brake hydraulic line• Contaminated brake pads
I Brake locking 11--------1 Check:• Incorrect brake fluid• Plugged passages In master cylinder• Incorrect front brake adjustment• Caliper piston andlor brake pads hanging up• Warped brake disc
I Insufficient brakes 1r--------1 Check:• Air In brake lines• Worn brake pads• Low brake fluid level• Incorrect brake fluid• Worn brake disc• Worn caliper piston seals• Glazed brake pads* Leaking primary cup seal In master cylinder* Contaminated brake pads and/or disc
I Brake squeal 11---------1Check:• Contaminated brake pads andlor disc• Dust or dirt collected behind brake pads• Loose parts
DRUM BRAKE TROUBLESHOOTING
Check:• Brake drum out-of·round• Brake linings worn unevenly• Warped brake lining web• Incorrect brake adjustment• Loose or worn wheel bearing• Worn or damaged brake return springs
• Glazed brake linings• Worn brake drum• Glazed brake drum• Incorrect brake adjustment• Worn or damaged brake cable• Worn or defective brake return springs
I
• Incorrect brake adjustment• Brake drum out-ct-rcund• Warped brake lining web• Loose or worn wheel bearings
• Worn brake linings• Brake drum out-of·round• Contaminated brake linings andlor drum• Broken, loose or damaged brake component• Loose or worn wheel bearing• Loose brake drum·ta-wheel mounting bolta
I Brakes chatter I
CARBURETOR TROUBLESHOOTING
CONDITION SYMPTOM CONDITION SYMPTOM
RIch mixture Rough IdleBlack exhauat smoke Rough IdleHard starting, especially Overheating
warms up InsulatorPoor acceleration
Lean mixture Backfiring
when hot Hesitation upon accelerationGas-fouled spark plugs Engine speed varies at fixedBlack deposits In exhaust pipe throttlePoor gas mileage Loss of powerEngine performance worse as It White color on spark plug
I Brakes squeal or scrape Check:
I Brakes grab Check:• Worn or damaged brake return springs
I Brakes do not hold Check:' ·Worn brake linings