mptc... · web viewaed should be applied to the front of the chest. right pad, right upper chest...
TRANSCRIPT

MPTCFirst Responder Protocols
I. Initial medical approach
II. MEDICAL
1. Cardio – Cerebral Resuscitation2. AHA CPR3. Automatic External Defibrillator4. Choking5. Nasal Naloxone6. Epinephrine Auto Injector7. Seizure8. Diabetic Emergency (Low Blood Sugar)9. Respiratory Distress10. Hyperthermia11. Hypothermia12. Obstetrical Emergencies13. New Born Resuscitation14. Stroke15. Chest Pain16. Congestive Heart Failure
III. TRAUMA
1. Bleeding Control2. Tourniquet3. Quik Clot4. Burns5. Drowning6. Eye Injuries7. Head Trauma8. Musculoskeletal Injuries9. Soft Tissue Injuries10. Spinal Cord Injuries11. Chest Trauma
IV. ADVANCED TRAUMA SUPPORT1. Chest Needle Decompression2. Needle Cricothyrotomy3. Supraglottic King Tube Advanced Airway
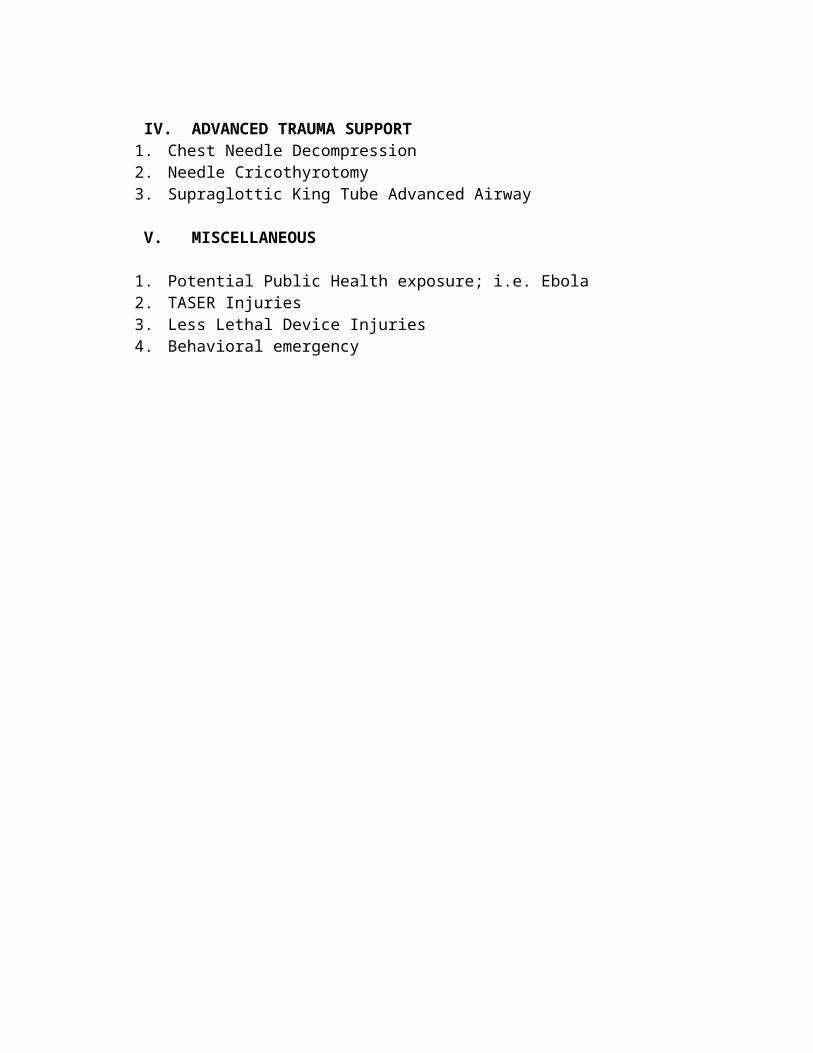
V. MISCELLANEOUS
1. Potential Public Health exposure; i.e. Ebola2. TASER Injuries3. Less Lethal Device Injuries4. Behavioral emergency

FIRST RESPONDER PROTOCOLS
I. INITIAL MEDICAL APPROACH
Initial patient approach is done with every medical encounter.
RESPOND TO SCENE IN A SAFE MANNER
UPON ARRIVAL: Always assure scene safety Always use universal precautions (BSI), wear gown and mask when
appropriate. Check for Environmental hazards How many patients are there? Determine need for additional resources. Determine mechanism of injury/illness.
MAKE INITIAL ASSESSMENT:VISUAL ASSESSMENT
Is the patient verbalizing and moving? Does the patient have skin changes such as rash or cyanosis (turning blue)? Is there disfigurement: swelling, broken bones? Is the patient’s airway open? Is the patient breathing? Does the patient have a pulse? Is there severe bleeding? Is there a potential for a cervical spine injury?
PHYSICAL ASSESSMENT Begin assessment by talking to the patient. Check for responsiveness using the acronym AVPU.
A – AlertV – Responds to verbal stimuliP – Responds to Painful stimuliU – Unresponsive
Check for pulse. Check for breathing. Check skin color? Check pupils? Check Capillary refill? Complete a medical assessment utilizing SAMPLE
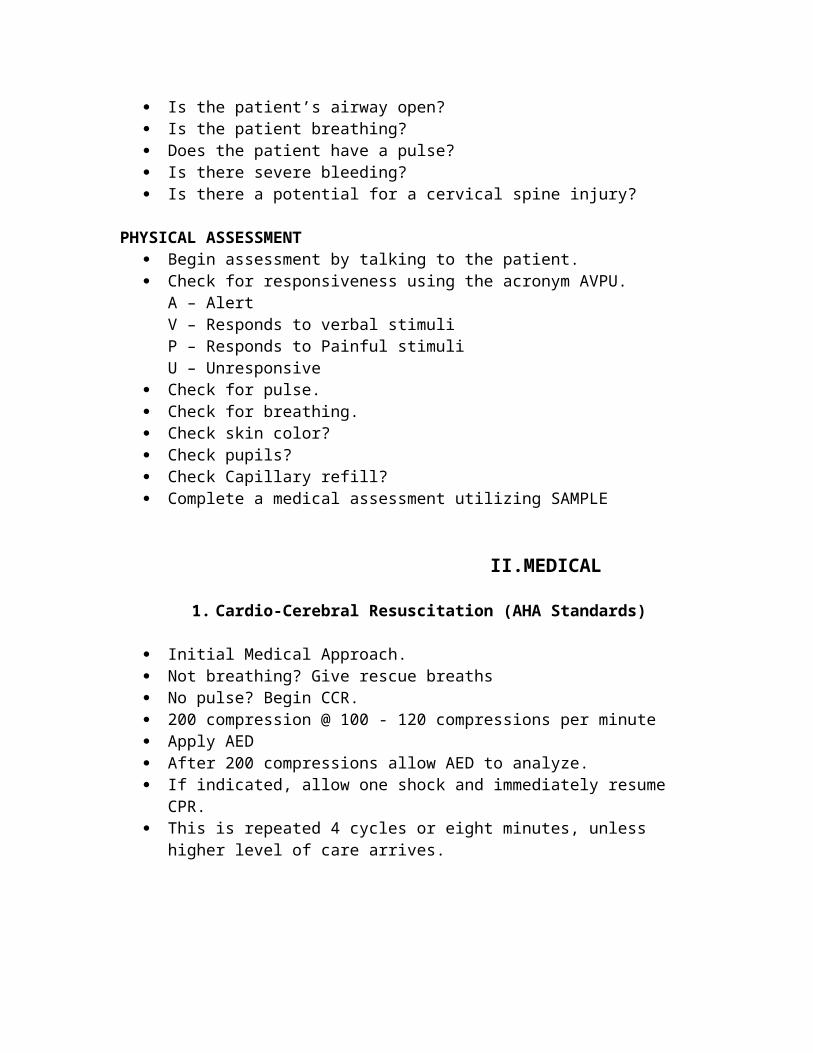
II.MEDICAL
1. Cardio-Cerebral Resuscitation (AHA Standards)
Initial Medical Approach. Not breathing? Give rescue breaths No pulse? Begin CCR. 200 compression @ 100 - 120 compressions per minute Apply AED After 200 compressions allow AED to analyze. If indicated, allow one shock and immediately resume CPR. This is repeated 4 cycles or eight minutes, unless higher level of care arrives.
CARDIOCEREBRAL RESUSCITATION IS PERFORMED ONLY ON CARIAC ARRESTS AND OVER THE AGE OF 18. IT IS NOT APPROVED FOR RESPIRATORY ARRESTS, DROWNINGS OR TRAUMA.
2. AHA STANDARD CPR

Initial Medical Approach. No pulse? Begin CPR Not breathing but has a pulse? Give rescue breaths. 1 breath every 5 seconds. Initiate compressions at 100 - 120 compression per minute and at least 2
inches deep. Do 30 compressions and 2 breaths for 5 cycles (2minutes). If second person is available continue 30 compressions and 2 ventilations but
change roles every 2 minutes. Compressions shall be at a rate of at 100 - 120 compressions per minute.
If an AED becomes available, apply the AED and turn it on.
3. AUTOMATIC EXTERNAL DEFIBRILLATOR

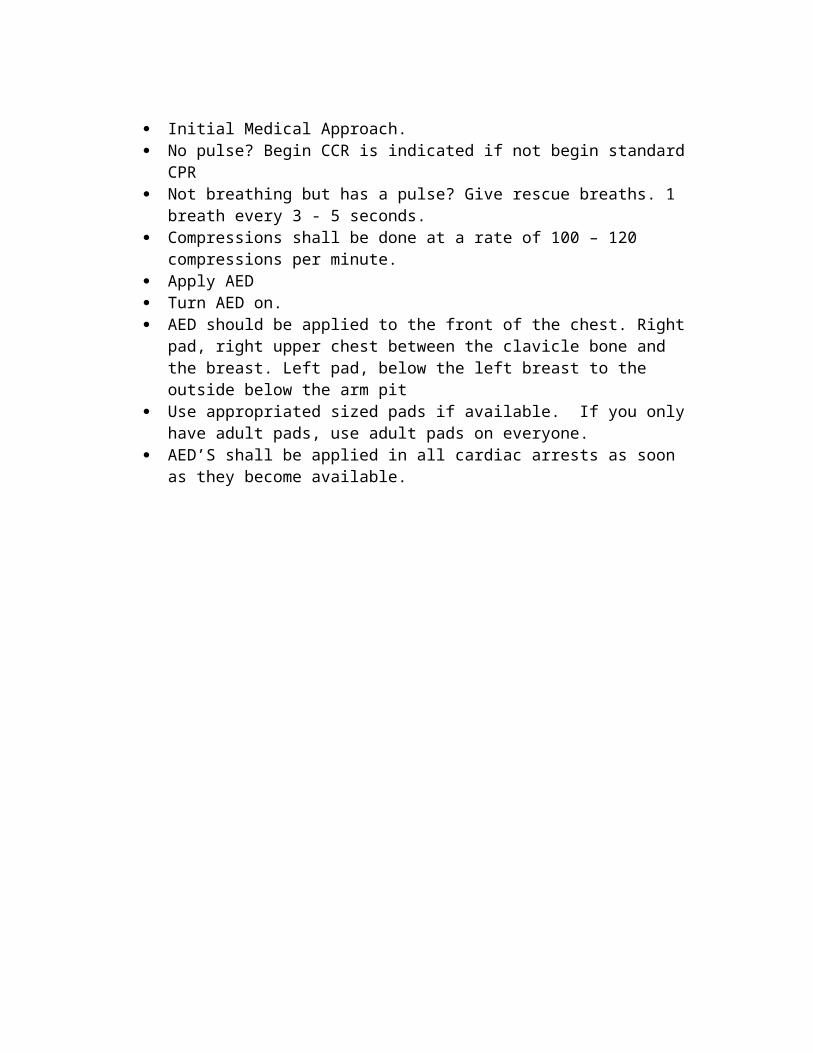
Initial Medical Approach. No pulse? Begin CCR is indicated if not begin standard CPR Not breathing but has a pulse? Give rescue breaths. 1 breath every 3 - 5
seconds. Compressions shall be done at a rate of 100 – 120 compressions per minute. Apply AED Turn AED on. AED should be applied to the front of the chest. Right pad, right upper chest
between the clavicle bone and the breast. Left pad, below the left breast to the outside below the arm pit
Use appropriated sized pads if available. If you only have adult pads, use adult pads on everyone.
AED’S shall be applied in all cardiac arrests as soon as they become available.
4. CHOKING
Initial Medical Approach Recognize signs of choking Choking but able to still breath and cough; observe the person Severe choking with airway obstruction
o Inability to talk.o Difficulty breathing and or gaspingo Unable to cougho Signs of hypoxia; blue lips and fingerso Loss of consciousness
CONSCIOUS CHILDREN ONE YEARS OF AGE AND OLDER:o Perform abdominal thrust (Heimlich Maneuver) in rapid succession
until obstruction is resolved. UNCONSCIOUS CHILDREN ONE YEARS OF AGEAND OLDER:
o Lay the person on their back. o Check their mouth for any foreign objects. o Begin CPR at a rate of 100 – 120 compressions per minute and at least
2 inches deep. o Do 30 compressions and 2 breaths for 5 cycles (2minutes). Check the
mouth every 2 minutes for any foreign objects. o If second person is available continue 30 compressions and 2
ventilations but change roles every 2 minutes. Compressions shall be at a rate of at 100 - 120 compressions per minute.
o Continue this sequence until successful After obstruction is removed, check for pulse. If no pulse continue CPR.
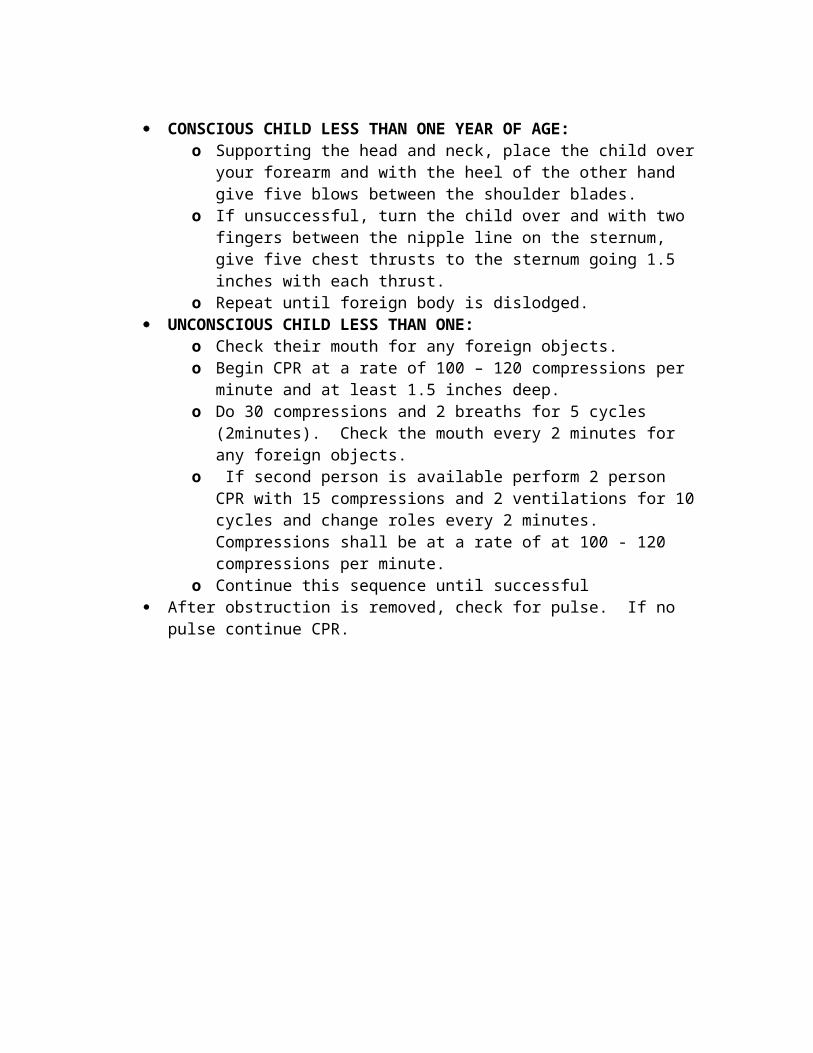
CONSCIOUS CHILD LESS THAN ONE YEAR OF AGE:o Supporting the head and neck, place the child over your forearm and
with the heel of the other hand give five blows between the shoulder blades.
o If unsuccessful, turn the child over and with two fingers between the nipple line on the sternum, give five chest thrusts to the sternum going 1.5 inches with each thrust.
o Repeat until foreign body is dislodged. UNCONSCIOUS CHILD LESS THAN ONE:
o Check their mouth for any foreign objects. o Begin CPR at a rate of 100 – 120 compressions per minute and at least
1.5 inches deep. o Do 30 compressions and 2 breaths for 5 cycles (2minutes). Check the
mouth every 2 minutes for any foreign objects. o If second person is available perform 2 person CPR with 15
compressions and 2 ventilations for 10 cycles and change roles every 2 minutes. Compressions shall be at a rate of at 100 - 120 compressions per minute.
o Continue this sequence until successful

After obstruction is removed, check for pulse. If no pulse continue CPR.
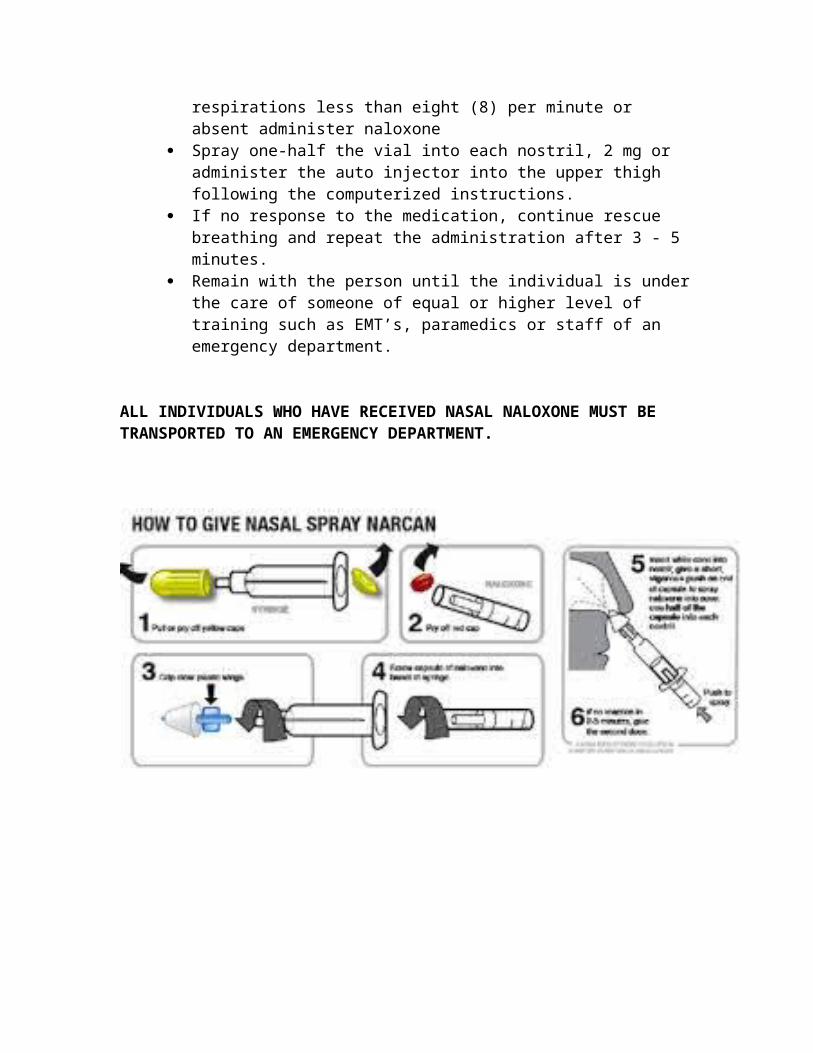
5. NALOXONE:
Initial Medical Approach. Check for Environmental Clues
Drugs, Drug Paraphernalia, Signs and Symptoms (Pin Point Pupils) Not breathing? Give rescue breaths No pulse? Begin CPR. Unresponsive with pulse and shallow breathing, respirations less than
eight (8) per minute or absent administer naloxone Spray one-half the vial into each nostril, 2 mg or administer the auto
injector into the upper thigh following the computerized instructions. If no response to the medication, continue rescue breathing and repeat
the administration after 3 - 5 minutes. Remain with the person until the individual is under the care of someone
of equal or higher level of training such as EMT’s, paramedics or staff of an emergency department.
ALL INDIVIDUALS WHO HAVE RECEIVED NASAL NALOXONE MUST BE TRANSPORTED TO AN EMERGENCY DEPARTMENT.

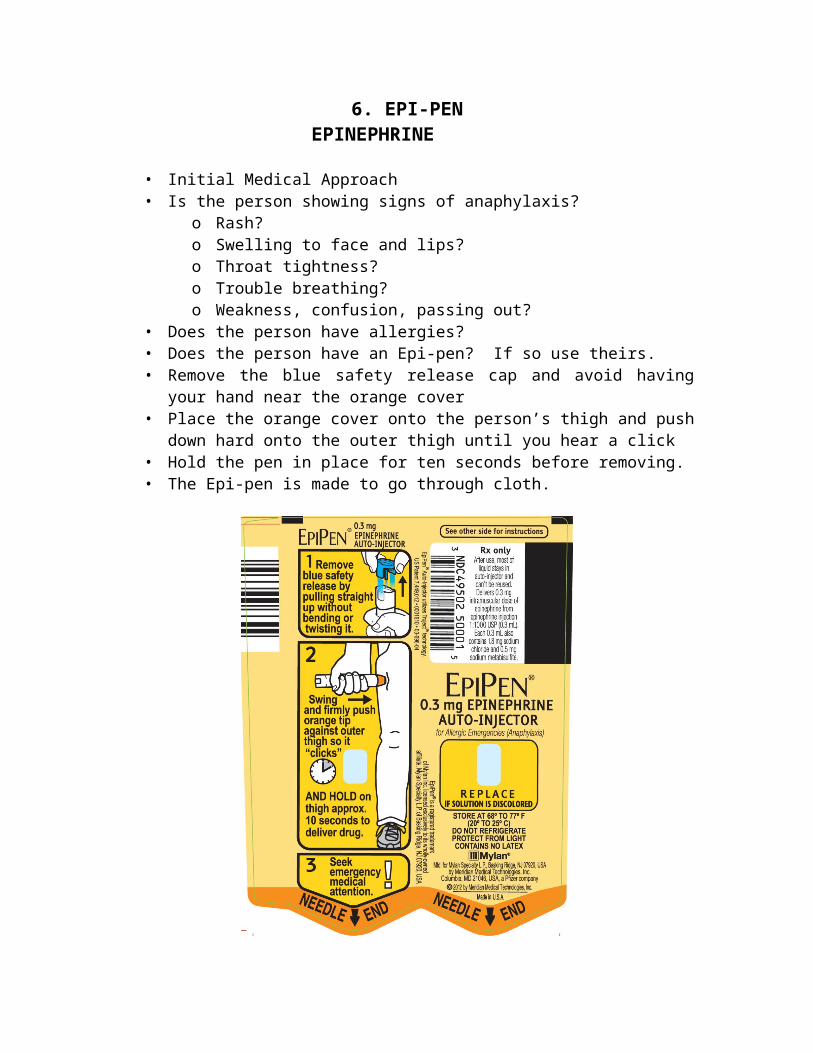
6. EPI-PENEPINEPHRINE
• Initial Medical Approach• Is the person showing signs of anaphylaxis?
o Rash?o Swelling to face and lips?o Throat tightness?o Trouble breathing?o Weakness, confusion, passing out?
• Does the person have allergies?• Does the person have an Epi-pen? If so use theirs.• Remove the blue safety release cap and avoid having your hand near the
orange cover• Place the orange cover onto the person’s thigh and push down hard onto the
outer thigh until you hear a click• Hold the pen in place for ten seconds before removing.• The Epi-pen is made to go through cloth.
7. SEIZURE
• Initial Medical Approach.• Clear the area around the person.• Do not touch the person and never put anything in the mouth.• When the seizure stops, check for breathing and a pulse.• If pulseless, begin Standard CPR.• If not breathing, begin rescue breathing, 1 breath every 3 – 5 seconds
8. DIABETIC EMERGENCY(Low Blood Sugar)
Initial Medical Approach Recognize that diabetics with low blood sugar will be confused and even
combative Look for a medical alert tag that identifies the person as a diabetic. If the person is thought to be, or confirmed to be a diabetic and is still
speaking and can swallow without difficulty, attempt to give a liquid with sugar.
If oral glucose is available, give one tube orally as tolerated. DO NOT FORCE AN INGESTION IN A PERSON WHO IS UNRESPONSIVE. Lay an unconscious diabetic on their side (recovery position).
Foods for hypoglycemia: Juice with or without added sugar Hard candy or candy bar Ice cream Cake frosting Glucose tablets or paste
9. Respiratory Distress
• Initial Medical Approach.• If patient has not taken the prescribed maximum dose of their own inhaler
prior to your arrival and the inhaler is present.• Encourage and/or assist patient to self-administer their own prescribed
inhaler medication if indicated.• If not breathing, begin rescue breathing, 1 breath every 3 – 5 seconds.• The administration of the inhaler is contraindicated if:
o The maximum dose has been administered prior to your arrivalo The patient cannot physically use the device properly.o The device has not specifically been prescribed for the patient.
10. HYPERTHERMIA

• Initial Medical Approach.• Provide rapid cooling as soon as possible.• Remove patient to cool area and lay the patient of their back.• Loosen or remove all unnecessary clothing, while protecting privacy.• Apply cool packs to armpits, neck and groin if available.• Keep skin wet by applying water with wet towels or sponges.• If pulseless, begin Standard CPR.• If not breathing, begin rescue breathing, 1 breath every 3 – 5 seconds
For Heat Cramps and/or Heat Exhaustion: administer water if patient is alert and has a normal gag reflex and can swallow easily. Elevate legs of supine patient with heat exhaustion.
11. HYPOTHERMIA

• Initial Medical Approach.• Avoid rough movement and prevent further heat loss.• Move to a warm environment as soon as practical.• Remove any wet clothing.• Cover with warm blankets.• If pulseless, begin Standard CPR.• If not breathing, begin rescue breathing, 1 breath every 3 – 5 seconds
12. OBSTETRICAL EMERGENCIES

• Initial Medical Approach.• Expose as necessary to assess for bleeding/discharge, crowning, prolapsed
cord, breech or limb presentation.• Do not digitally examine or insert anything into the vagina.• EXCEPTION – fingers may be inserted to manage the baby’s airway in breech
presentation or to treat for prolapsed cord.• If prolapsed cord – place mother in knee-chest position or trendelenburg
position ( lying the mother on her back with her feet elevated higher than her head).
• If only the cord has prolapsed and the presenting part has yet to go through the cervix, gently elevate the presenting part to remove pressure on the umbilical vessels to permit blood flow through the cord.
13. NEW BORN CARE
• Initial Medical Approach.• Care – dry, warm, position and stimulate.• If pulseless or pulses less than 60 bpm, begin Standard CPR.• If not breathing, begin rescue breathing, 1 breath every 3 – 5 seconds.• Clear secretions if necessary.• Clamp and cut the umbilical cord after your initial assessment and after the
cord stops pulsating. Leave a minimum of six inches of cord from the baby.• Prevent heat loss by rapidly drying and warming. Remove wet linen and
wrap the newborn in blankets and cover the newborn’s head• Continuously assess pulses, breathing and central skin color. Peripheral
cyanosis is common.
14. STROKE
• Initial Medical Approach.• Keep patient calm and in a comfortable position.• Note time that signs and symptoms began.• Perform a Massachusetts Stroke Scale.• Facial Droop – Have patient look at you and smile – look for asymmetry – one
side of face does not move as the other side• Arm Drift – Have patient extend arms in front of themselves with palms up
then close eyes – See if one arm drifts down or is noticeably weaker than the other arms.
• Speech – Have the patient speak the phrase “The Sky Is Blue In Boston” – look for slurred words or unable to speak.
• Note any other associated signs and symptoms such as confusion, headache, paralysis, blurred vision, loss of balance and coordination.
• If pulseless, begin Standard CPR.• If not breathing, begin rescue breathing, 1 breath every 3 – 5 seconds
15. CHEST PAIN
• Initial Medical Approach.• Keep patient calm, warm and in a comfortable position.• Note when signs and symptoms began and what the patient was doing at that
time.• Note any other associated signs and symptoms such as cool clammy wet skin,
anxiety, restlessness, nausea, vomiting, shortness of breath.• If pulseless, begin Standard CPR.• If not breathing, begin rescue breathing, 1 breath every 3 – 5 seconds
16. CONGESTIVE HEART FAILURE (CHF)
• Initial Medical Approach.• Place patient in a seated position with feet lower than the heart.• Keep patient calm, warm and comfortable.• Note ant other associated signs and symptoms such as cool clammy wet skin,
shortness of breath, anxiety, restlessness, swelling of the ankles.• If pulseless, begin Standard CPR.• If not breathing, begin rescue breathing, 1 breath every 3 – 5 seconds

III.TRAUMA
1. BLEEDING CONTROL
• Initial Medical Approach.• Always assure scene safety• Always use universal precautions (BSI), wear gown and mask when appropriate.
DIRECT PRESSURE DRESSING Never remove objects from the body. When logistically possible, apply direct pressure. If bleeding soaks through the gauze, apply more over the soaked gauze and
increase the pressure.
ELEVATION If direct pressure does not control the bleeding, elevate the extremity above
the heart.. When logistically possible, apply direct pressure. If bleeding soaks through the gauze, apply more over the soaked gauze and
increase the pressure.
PRESSURE POINT Never remove objects from the body. When logistically possible, apply direct pressure. If bleeding soaks through the gauze, apply more over the soaked gauze and
increase the pressure.
2. TOURNIQUET

• Use of tourniquets is limited to the extremities.• Apply the tourniquet above the wound but not over a joint• Increase the pressure until the bleeding stops.• A second tourniquet can be applied above the first if needed.• Additional direct pressure dressing may stop any oozing and help form a clot.
3. QUIK CLOT (HEMOSTATIC GAUZE)

• Apply pressure to wound for at least one minute.• If significant bleeding continues, apply pressure to a pressure point to slow or
stop the bleeding• Try to wipe excess blood out of the wound.• Slightly release the pressure to identify where the bleeding is from.• Once identified, make a slight knot or ball with the end of the quik clot gauze and
apply directly into the site of the bleed.• Then pack the entire package of gauze attempting to firmly fill the whole cavity.• Continue to apply pressure to the wound after it is packed for 2 – 3 minutes.• If the gauze is completely soaked through, remove the packing and repack with a
new dressing.
4. BURNS

• Initial Medical Approach.
THERMAL• Stop the burning process.• Remove smoldering, non-adherent clothing and jewelry. DO NOT remove
skin or tissue.• Cover burns with a CLEAN, DRY, STERILE DRESSING.• Reduce heat loss in burn injuries as they are susceptible to hypothermia.CHEMICAL• Determine offending agent(s) and consider if HAZMAT.• Wash with copious amounts of clean water for 10-15 minutes unless
contraindicated by chemical agent.• Dry powders should be brushed off prior to flushing with large amounts of
water.• If pulseless, begin Standard CPR.• If not breathing, begin rescue breathing, 1 breath every 3 – 5 seconds
5. DROWNING
• Initial Medical Approach.• Begin resuscitation efforts while removing the patient from the water.• Consider hypothermia• Ensure cervical spine immobilization.• If pulseless, begin Standard CPR.• If not breathing, begin rescue breathing, 1 breath every 3 – 5 seconds
6. EYE INJURIES

• Initial Medical Approach.• Obtain visual history.• Assist patient with the removal of contact lens, if applicable.• CHEMICAL IRRITANTS, including pepper spray, flush with copious amounts
of water.• THERMAL BURNS to EYELIDS, patch both eyes with cool saline compress.• IMPALED OBJECT, immobilize object and patch both eyes.• PUNCTURE WOUND, place rigid protective device over both eyes. Do not
apply pressure.• FOREIGN BODY, patch both eyes.• If patient cannot close their eyelids. Keep their eyes moist with a sterile
dressing.• If pulseless, begin Standard CPR.• If not breathing, begin rescue breathing, 1 breath every 3 – 5 seconds

7. HEAD TRAUMA
• Initial Medical Approach.• Ensure cervical spine immobilization• Stop the bleeding and dress wounds• If pulseless, begin Standard CPR.• If not breathing, begin rescue breathing, 1 breath every 3 – 5 seconds

8. MUSCULOSKELETAL INJURIES
• Initial Medical Approach.• Manually stabilize the injury as it lies. Do not straighten out angulated
extremities.• Control bleeding and treat for shock.• Cover wounds with a CLEAN, DRY, STERILE DRESSING.• Assess for circulation, sensation and motor function of all extremities.• Splint extremity as required.• If pulseless, begin Standard CPR.• If not breathing, begin rescue breathing, 1 breath every 3 – 5 seconds

9. SOFT TISSUE INJURIES
• Initial Medical Approach.• Control/stop bleeding.• Cover wounds with a CLEAN, DRY, STERILE DRESSING.• Stabilize all impaled objects.• Splint/immobilize injured area as required.• If pulseless, begin Standard CPR.• If not breathing, begin rescue breathing, 1 breath every 3 – 5 seconds
10. SPINAL CORD INJURIES
• Initial Medical Approach.• Ensure cervical spine immobilization. • Control bleeding.• Determine presence or absence of motor and sensory functions of
extremities.• If pulseless, begin Standard CPR.• If not breathing, begin rescue breathing, 1 breath every 3 – 5 seconds

11. CHEST TRAUMA
• Initial Medical Approach.• Control/stop bleeding.OPEN PNEUMOTHORAX• Immediately apply OCCLUSIVE dressing, sealing 3 sides.TENSION PNEUMOTHORAX• Release occlusive dressing temporarily..FLAIL CHEST• Position patient with injured side down• Provide stabilization of the flail segment.• If pulseless, begin Standard CPR.• If not breathing, begin rescue breathing, 1 breath every 3 – 5 seconds

IV. ADVANCE TRAUMA SUPPORT
1. NEEDLE THORACOSTOMY (Chest Decompression)
Initial Medical Approach Assess for respiratory distress
o Rapid respiration and difficulty speakingo Rapid pulseo Shift of tracheao Unable to concentrate and focus.o Unconscious
Locate the landmark for insertion by going down two ribs from the middle of the clavicle on the side you are to decompress.
Insert the needle by penetrating the skin right over the rib. A “swish” of air should be released. Remove the needle from the catheter Secure the catheter.
2. NEEDLE CRICOTHYROTOMY

• Initial Medical Approach• Assess for respiratory distress
o Not breathing; no pulseo Rapid respiration and difficulty speakingo Unable to concentrate and focus.o Unconscious
• Unable to use an advanced airway like a King Tube• Place the person level and flat on their back.• Palpate the cricothyroid membrane. This is the shallow space below the
thyroid.• Insert the needle so that it is pointing toward the feet.• Slide the catheter through the skin and secure in place.• Oxygenate the person
3. SUPRAGLOTTIC TUBEKING TUBE

• Initial Medical Approach• Assess for respiratory distress
o Not breathing; no pulseo Unconscious and will allow you to insert the King Tubeo Facial trauma and bleeding
• Use size 4 or 5 King Tube and insert into the back of the throat.• Insert until the base of the connector is aligned with the lips.• Inflate the balloon.• Begin to ventilate the person at a rate of 10-12 breaths per minute.
V.MISCELLANEOUS

I. INFECTION CONTROL
Initial Medical Approach Always assure scene safety Always use universal precautions (BSI), wear gown and mask when
appropriate. If unresponsive check for a pulse and respiration. No pulse or respirations; begin CPR Poor respirations; less than eight and a pulse, assist the breathing Struggling to breathe but able to talk; keep the person in a seated position. Immediately wash your hands with soap or sanitizer after caring for anyone
with an infection.
INFECTION CONTROL FOR POTENTIALLY HIGHLY CONTAGIOUS INFECTIONS
International travel and delayed manifestations of symptoms have resulted in the emergence of highly contagious and lethal infections entering our communities.
Initial Medical Approach Always wear gloves and mask when approaching a person with a suspected
infection. During times when there is a threat for highly contagious infections a history
of the illness should be obtained in an open area and away from the ill person.
Find out if the person or any other contacts have been to an area where the contagious infection could be present.
If no potential exposure, continue with INFECTION CONTROL protocol. IF YES: REMOVE YOURSELF FROM THE SCENE AND ASSUME THE ROLE
OF MANAGING SCENCE SAFETY. DO NOT MAKE CONTACT WITH THE INFECTED PERSON UNDER ANY
CIRCUMSTANCE.
INFECTION CONTROL AND DECONTAMINATION
Routine decontamination is best performed by washing the hands with soap and water for at least 30 seconds.
For highly contagious infections, bleach or specific agents should be used immediately on exposed body parts.
Further decontamination should than occur at an appropriate facility.
2. TASER: Thomas A.Swift Electric Rifle Injuries.
TASER’s do not cause electric shocks through the body. The effects are to spasm the muscles and incapacitate the person.
Assure the person is appropriately restrained. Initial Medical Approach Assess the person for any injuries from the fall to the ground. Remove the barbs, EXCEPT THOSE IN THE EYES, NECK, FEMALE BREASTS
AND GENITALIA. Watch for delayed issues such as trouble breathing or delayed effects from
the fall.

3. LESS LETHAL DEVICE INJURIESLess lethal devices can prevent catastrophic injuries and deter assailants. They however may result in injuries and law enforcement agents who use such devices need to assess anyone who has been restrained with the use of these devices for potential medical complications.
Assure the person is appropriately restrained. Initial Medical Approach Assess the person for any injuries from the fall to the ground. Search for and assess for any injuries where contact with the device was
made. Activate EMS for any injuries beside bruising, abrasions and superficial
bleeding.

4.FORCEFUL RESTRAINT FOR MEDICAL TRANSPORT Initial Medical Approach Persons should always be placed with their back on the stretcher. NEVER
RESTRAIN FACE DOWN. The use of handcuffs is allowed but cannot be applied with the arms
restrained behind the back. Patients who are handcuffed must have handcuffs in the front or handcuffed to the stretcher. A handcuff key must be readily available during the transport to the hospital.
Use of handcuffs requires the officer to remain with the person until the cuffs are removed. The officer can accompany the patient in the back of the ambulance or can follow behind the ambulance in their cruiser to the hospital but a handcuff key must be provided to the transporting EMT’s.
Only a medical mask or a “spit sock” while in sole care of law enforcement may be placed over the face if the person is spitting.