mra-664 speakercraft training guide
TRANSCRIPT

SpeakerCraft MRA
Training Guide Version 1.4

Copyright Copyright © SpeakerCraft, LLC. All Rights Reserved.
All brand or product names used in this document are trademarks, registered trademarks, trade names, or service marks of their respective holders.
Material in this document is subject to change without notice: contact SpeakerCraft if you would like to confirm that you have the most recent version. SpeakerCraft, LLC. CORE Brands 1800 S McDowell Blvd Petaluma, CA. 94954
Document Revision: 3/11/2015

Contents Lesson 1: Software Setup ...................................................... 1-1
Exercise 1: Install SpeakerCraft Software ...................................................... 1-2 Exercise 2: Install SpeakerCraft App (iOS & Android) ................................... 1-4
Lesson 2: System Wizard Overview ....................................... 2-1 About the SpeakerCraft MRA System Configuration Wizard ......................... 2-2 Exercise 1: Installer Access ........................................................................... 2-7
Lesson 3: Configure Chassis .................................................. 3-1 About the Configure Chassis Node ................................................................ 3-2 Exercise 1: Changing the Turn-On Mode ....................................................... 3-5 Exercise 2: Setting a Static IP Address .......................................................... 3-8 Exercise 3: Reset MRA-664 to DHCP .......................................................... 3-11
Lesson 4: Configure Sources ................................................. 4-1 Distributed Audio Integration Overview ......................................................... 4-2 About the Configure Sources Node ............................................................... 4-3 Exercise 1: Adding an IR Source ................................................................... 4-6 Exercise 2: Renaming Sources ...................................................................... 4-9 Exercise 3: Assigning an IR Output to the Source Device ........................... 4-11 Exercise 4: Adding an IP Source ................................................................. 4-13 Exercise 5: Assigning Sources in the SpeakerCraft Software ...................... 4-17 Exercise 6: Load TV Channel Icon Groups .................................................. 4-22 Exercise 7: Add Favorite TV Channel Icons................................................. 4-26 Exercise 8: Check the Auriel Viewer ............................................................ 4-29

Lesson 5: Integrating a Home Theater .................................. 5-1
Home Theater Integration Overview .............................................................. 5-2 Exercise 1: Add the Audio/Video Receiver .................................................... 5-3 Exercise 2: Assign Sources to the Theater Receiver Interface ...................... 5-6 Configure Home Theater TV Node ................................................................ 5-9 Exercise 3: Add a Home Theater TV ........................................................... 5-10 Exercise 4: Check the SpeakerCraft Viewer ................................................ 5-16 Configure Handheld Remote ........................................................................ 5-18 Exercise 5: Add the sHR200 Handheld Remote .......................................... 5-20 Exercise 6: sHR200 Network Settings ......................................................... 5-22 Exercise 7: Assigning Zones to the sHR200 ................................................ 5-28
Lesson 6: Configure Zones .................................................... 6-1
About the Configure Zones Node ................................................................... 6-2 Exercise 1: Rename a Zone ........................................................................... 6-6 Exercise 2: Setting the Tone Defaults ............................................................ 6-8 Exercise 3: Setting Volume Defaults ............................................................ 6-10 Exercise 4: Whole House Mode (WHM) & Paging Configuration ................. 6-12 Exercise 5: Check the SpeakerCraft Viewer ................................................ 6-15
Lesson 7: Configure User Interfaces ..................................... 7-1
About the Configure User Interfaces Node .................................................... 7-2 Exercise 1: Rename the User Interface ......................................................... 7-5 Exercise 2: Assigning Primary Zone .............................................................. 7-8 Exercise 3: Assigning Other Zones .............................................................. 7-10 Exercise 4: Change the UI Language .......................................................... 7-14 Exercise 5: Check the SpeakerCraft Viewer ................................................ 7-17
Lesson 8: Configure Keypads ................................................ 8-1
About the Configure Keypads Node ............................................................... 8-2 Exercise 1: Adding a Keypad Interface .......................................................... 8-4 Exercise 2: Assigning a Zone to the sKP7 ..................................................... 8-6 Exercise 3: Assigning Sources to the sKP7 ................................................... 8-8 Exercise 4: Assigning Favorites ................................................................... 8-10 Exercise 5: Setting Audio Presets ................................................................ 8-12

Your Resources at SpeakerCraft In addition to the information in this Training Guide, be sure to check out SpeakerCraft’s website at www.speakercraft.com/techsupport. The website provides access to a wealth of documentation including training videos. Our Technical Support staff can assist you Monday through Friday from 9:00 a.m. to 7:00 p.m. EST and 6:00 a.m.to 4 p.m. Pacific at 800-289-4434. Email: [email protected]

Lesson 1 Training Setup
Overview
This lesson prepares your computer for the programming the MRA-664 as detailed in the lessons to follow.
You will:
Install the SpeakerCraft Software, which allows
you to View and Configure your customers
system.
Check the installation of the SpeakerCraft
Software.
Requirements
A computer - Windows® or MAC based
OR
A iOS/Android tablet with a 7” or larger screen
(The software may be found at www.speakercraft.com/techsupport, the iTunes App Store, or the Android Market Place)

Software Setup 1-2
Exercise 1: Install SpeakerCraft Software PC
Overview
The SpeakerCraft Software is a valuable resource for the dealer setting up a
SpeakerCraft MRA-664.
The SpeakerCraft Software allows dealers to easily and quickly configure a multi-
zone audio system and a single home theater area. The SpeakerCraft Viewer
allows the end user an easy and consistent user interface experience.
How-to 1. Navigate to www.speakercraft.com/techsupport to download the
SpeakerCraft Software. Save the file to an easy to remember location on
your Windows, or MAC, PC. Run the installer to begin the installation.
Note: If you are using Windows Vista/7, right-click the installer and select Run as
Administrator.
2. The SpeakerCraft Software Splash Screen pops up for a moment.

Software Setup 1-3
3. Once the installation is complete, the SpeakerCraft Viewer appears and
the SpeakerCraft Icon is placed on the PC’s desktop.
Note: The MRA-664 must be powered On and on the same network as the
PC/Tablet running the SpeakerCraft Software.

Software Setup 1-4
Exercise 2: Installing SpeakerCraft Software iOS/Android Device
Overview The same SpeakerCraft Software ran on PCs may also be run on iOS and
Android based devices, including mobile phones.
When configuring a SpeakerCraft MRA-664 with the SpeakerCraft Software it is
recommended to use a tablet device with a 7” or larger screen.
How-to 1. Go to the iTunes App Store or Android Market Place.
2. Search for SpeakerCraft App.
3. Download the app to your mobile device.
4. With the mobile device connected to the same network as the MRA-
664, open the SpeakerCraft App to access the SpeakerCraft Viewer.

Software Setup 1-5
Notes: ________________________________________________________________________
________________________________________________________________________
________________________________________________________________________
________________________________________________________________________
________________________________________________________________________
________________________________________________________________________
________________________________________________________________________
________________________________________________________________________
________________________________________________________________________
________________________________________________________________________
________________________________________________________________________
________________________________________________________________________
________________________________________________________________________
________________________________________________________________________
________________________________________________________________________
________________________________________________________________________
________________________________________________________________________
________________________________________________________________________
________________________________________________________________________
________________________________________________________________________
________________________________________________________________________
________________________________________________________________________
________________________________________________________________________
________________________________________________________________________
________________________________________________________________________
________________________________________________________________________
________________________________________________________________________
________________________________________________________________________
________________________________________________________________________

Lesson 2 System Configuration Wizard Overview
Overview
This lesson provides information on how to access the System Configuration Wizard. In this lesson you will:
Learn about the System Configuration Wizard
Learn how to navigate the System Configuration Wizard
Learn how to access the Installer Access interface.
Learn how to verify the software and MCU version on the MRA-664.
Learn the Passcode needed to proceed to the System Configuration Wizard.
Requirements
SpeakerCraft MRA-664 powered on and
connected to a local area network (same
network the programming device will be
connected to).
A PC running SpeakerCraft Software.
-or-
Tablet running the SpeakerCraft Software App.

SpeakerCraft System Configuration Wizard Overview 2-2
About the System Configuration Wizard Overview The SpeakerCraft Software allows for controlling the MRA-664 and the sources
connected to the MRA-664. The SpeakerCraft Software allows control of a single home theater zone. The setup for the MRA-664 and control of all devices is done thru the System Configuration Wizard.
The System Configuration Wizard provides a simple point and click interface to allow you to configure, or edit, items easily. Like the SpeakerCraft Viewer, the System Configuration Wizard requires an active connection to an MRA-664 and makes real-time changes to the system. The SpeakerCraft Software cannot be used for off-line system configuration.
Before starting the System Configuration Wizard make sure the Project Documentation Worksheet, included in the MRA-664 box, is filled out and nearby.

SpeakerCraft System Configuration Wizard Overview 2-3
Navigating the Configurator
The System Configuration Wizard Main Page is comprised of two sections:
Configure Option Nodes: These options pertain to specific parts of the SpeakerCraft system and allow for step-by-step setup.
Progress Boxes: These boxes are blank when a node has not been setup. After a node has been configured a check mark appears in the box. This indicates that the node has been properly configured.
Configuration takes place from top to bottom. When configuring each node the information flows to the right of the screen. When you select a Configuration Option Node the SpeakerCraft Viewer displays information pertinent to that node on a page-by-page basis.
Configuration Option Nodes
Progress Boxes. Check mark
means node has been configured,

SpeakerCraft System Configuration Wizard Overview 2-4
Configuration Option Nodes
The Configuration Option Nodes on the screen are your primary navigation elements. The nodes include the following:
Configure Chassis: includes on-mode settings, IP settings, extender settings, & home theater chassis settings. See Lesson 3, Configure Chassis, for more information
Configure Sources: adding, removing, and configuring IP and IR Controlled source devices, including managing favorite TV channel icons. See Lesson 4, Configure Sources, for more information.
Configure Zones: name zones, set turn on Tone settings, set Volume Defaults, and configure Whole House Mode, WHM, and Paging/Door Bell information. See Lesson 6, Configure Zones, for more information.
Configure User Interfaces: setup each user interface for default zones and customize which zones are displayed on which user interfaces. See Lesson 7, Configuring User Interfaces, for more information.
Configure Home Theater TV: configure a TV for control by SpeakerCraft Software in a Home Theater zone. See Lesson 5, Configure a Home Theater Zone, for more information.
Configure Handheld Remote: add and setup a SpeakerCraft sHR200 Wi-Fi Remote Control for a home theater zone in a SpeakerCraft System. See Lessons 5, Configure Home Theater Zone, for more information.
Configure Keypads: allows for configuring each sKP7, 7 button keypad, to control of a zone. See Lesson 8, Configure Keypads, for more information.

SpeakerCraft System Configuration Wizard Overview 2-5
Configure Node Layout: Identification: Shows which Configure Node was selected and the name of the page currently being shown.
Navigation Arrows: Allows you to navigate between pages for the selected node and to return to the System Configuration Main Menu.

SpeakerCraft System Configuration Wizard Overview 2-6
Configuration Options: This area is where the available configuration options for the selected page are displayed.
Confirmation Button: Applies the changes on a page to the system.

SpeakerCraft System Configuration Wizard Overview 2-7
Add & Remove Button: Adds or removes items from the selected node. Items include, IR or IP controlled source devices.
Finish Button: Displayed when the last page of a selected node is reached. Press Finish to complete the setup of the selected node and return to the main page of System Configuration Wizard.

SpeakerCraft System Configuration Wizard Overview 2-8
Exercise 1: Installer Access
Overview Exercise 1 demonstrates how to access the Installer Access screen.
How-to 1. From the Main Menu (All Media page) of the SpeakerCraft Viewer, press
and hold the Menu Title Bar for 5 seconds.
2. The Installer Access page appears. On the bottom left of the screen is the
software version, MCU version, and build date information.

SpeakerCraft System Configuration Wizard Overview 2-9
3. Enter the passcode 3 – 5 – 2 – 6 to access the System Configuration
Wizard.
Note: The MRA-664 MUST be powered on and connected to the same network
as the devices being used to setup the SpeakerCraft system.

SpeakerCraft System Configuration Wizard Overview 2-10
Notes: ____________________________________________________________________________
____________________________________________________________________________
____________________________________________________________________________
____________________________________________________________________________
____________________________________________________________________________
____________________________________________________________________________
____________________________________________________________________________
____________________________________________________________________________
____________________________________________________________________________
____________________________________________________________________________
____________________________________________________________________________
____________________________________________________________________________
____________________________________________________________________________
____________________________________________________________________________
____________________________________________________________________________
____________________________________________________________________________
____________________________________________________________________________
____________________________________________________________________________
____________________________________________________________________________
____________________________________________________________________________
____________________________________________________________________________
____________________________________________________________________________
____________________________________________________________________________
____________________________________________________________________________
____________________________________________________________________________
____________________________________________________________________________
____________________________________________________________________________
____________________________________________________________________________
____________________________________________________________________________
____________________________________________________________________________
____________________________________________________________________________
____________________________________________________________________________
____________________________________________________________________________
____________________________________________________________________________
____________________________________________________________________________
____________________________________________________________________________

Lesson 3 Configure Chassis Node
Overview
This lesson provides an overview of how to setup the Configure Chassis node. In this lesson you will:
Learn about the Configure Chassis node.
Learn about each page of the Configure Chassis node.
Learn how to set the Turn-On Mode.
Requirements
SpeakerCraft MRA-664 powered on and
connected to a local area network (same
network the programming device will be
connected to).
A PC running SpeakerCraft Software.
-or-
Tablet running the SpeakerCraft App.

Configure Chassis 3-2
About the Configure Chassis Node Overview The Configure Chassis node sets up how the MRA-664 behaves. This node is used to
setup how the unit will remain powered on, how it will connect to a network, if it is used as an extender, and if there is a home theater receiver being controlled by the SpeakerCraft interface.
The Configure Chassis node has a simple point and click interface to allow you to make changes easily to the system. Like the SpeakerCraft Viewer, the System Configuration Wizard requires an active connection to an MRA-664 and makes real-time changes to the system. The system cannot be used for off-line system configuration.
Navigating the Configure Chassis Node
The Configure Chassis node is comprised of four pages:
Chassis Turn-On Mode: Sets how the MRA-664 will remain powered on. The factory default is Audio Sense. Audio Sense means the controller will power off after 15 minutes if no audio is detected on any of the audio inputs of the MRA-664. SpeakerCraft recommends setting this to Constant. Constant means the controller will always remain powered on.

Configure Chassis 3-3
Chassis Ethernet Configuration: This page allows a static IP address to be assigned to the MRA-664. A static IP address will be necessary if using the SpeakerCraft sHR200 Wi-Fi remote control. The factory default setting is Dynamic Host Configuration Protocol, or DHCP. DHCP means the controller will automatically pull an IP address from the DHCP server on the network, typically the DHCP server is part of the router.
Extender Chassis Configuration: Allows for adding a second MRA-664 chassis to a system for adding zones 7-12. Selecting Add will scan the network for the additional MRA-664 chassis on the network. When available select the additional MRA-664 to place it in Extender Mode. Note each MRA-664s MAC Address for identification of each chassis.

Configure Chassis 3-4
Home Theater Chassis Configuration: This page allows adding of a compatible IP controllable home theater receiver. This will allow the SpeakerCraft interface to control a home theater zone. Select Add to view IP drivers for the compatible home theater receivers.

Configure Chassis 3-5
Exercise 1: Changing the Turn-On Mode
Overview Exercise 1 demonstrates how to change the chassis Turn-On mode for the MRA-
664.
How-to 1. From the System Configuration main page, select the Configure Chassis
node. The Chassis Turn-On Mode page will display as follows, showing the
Turn-On Mode options.
2. Select Constant and select Apply to save changes.

Configure Chassis 3-6
3. Select the Right Arrow to proceed to the next page.
4. See Exercise 2 for setting a static IP address. If setting the Chassis Turn-
On mode was all that needed to be configured select the Right Arrow to
advance pages until Finish is shown. Select Finish, to complete the
Configure Chassis node.

Configure Chassis 3-7
5. Note that after you select Finish you are returned to the System
Configuration Wizard main page and there is a check mark in the
Progress Box for the Configure Chassis node.

Configure Chassis 3-8
Exercise 2: Setting a Static IP Address Overview Exercise 2 explains how assign a static IP address to the MRA-664.
Terms The following terms are important to know for this exercise:
DHCP: Dynamic Host Configuration Protocol. Allows devices to automatically
receive an IP address when connected to a network from a DHCP server,
typically included in the router.
IP Address: A numerical label assigned to a device on a network. Since IP
address numbers are unique per device, an IP address allows us to know
where a specific device is located at in a network.
Subnet: A portion of a network that shares a common address component.
Typically, all devices with addresses that start with 192.168.0 would be part
of the same subnet. A typical Class C Subnet would be 255.255.255.0.
However it is important to note that some networks may use different
subnets.
Gateway: A node on a network that serves as an entrance to another
network. In a residential installation a router is the gateway for devices on the
local area network, LAN, to access the internet, or wide area network, WAN.
DNS: Domain Name Server is an internet service that translates domain
names into IP addresses. This may be the IP address of the router in a
residential installation.
How-to 1. Access the Chassis Ethernet Configuration page.

Configure Chassis 3-9
2. Click on No to assign a static IP address to the MRA-664.
Note: All fields must be filled out with the correct network information or you may
have to perform a DHCP Reset on the MRA-664.
3. Enter the desired IP address into the Address field.
Note: Ensure that the IP address entered does not conflict with the IP addresses
available in the DHCP range. If the IP Address field is filled out with incorrect network
information you may have to perform a DHCP Reset on the MRA-664.
4. Enter the desired address into the Subnet field.
Note: Ensure that the subnet address entered matches the subnet structure being
used. If the Subnet field is filled out with incorrect network information you may have
to perform a DHCP Reset on the MRA-664.

Configure Chassis 3-10
5. The Gateway and DNS fields should populate with the IP address of the router
being used on the network. When finished assigning a static IP address to the
MRA-664 your screen should look similar to this.
6. Select Apply to save the changes to the MRA-664.
7. A message pops up reminding you to reboot the MRA-664 for the network
changes to take effect. Select OK.

Configure Chassis 3-11
8. Select the Right Arrow to advance to the next page, or until Finish is shown.
Select Finish, to complete the Configure Chassis node and return to the
System Configuration Wizard main page.
9. Re-boot the MRA-664 using the Power Button for the Ethernet Configuration
changes to take effect.
Configure Chassis 3-12
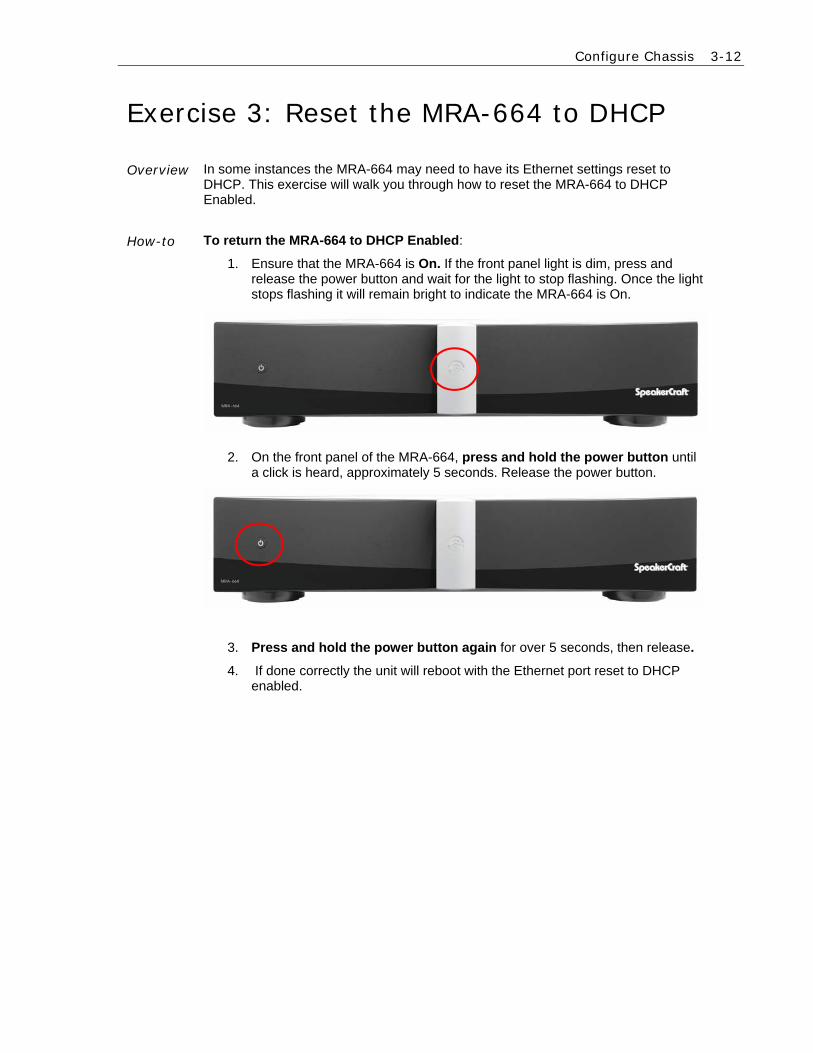
Exercise 3: Reset the MRA-664 to DHCP
Overview In some instances the MRA-664 may need to have its Ethernet settings reset to DHCP. This exercise will walk you through how to reset the MRA-664 to DHCP Enabled.
How-to To return the MRA-664 to DHCP Enabled:
1. Ensure that the MRA-664 is On. If the front panel light is dim, press and release the power button and wait for the light to stop flashing. Once the light stops flashing it will remain bright to indicate the MRA-664 is On.
2. On the front panel of the MRA-664, press and hold the power button until a click is heard, approximately 5 seconds. Release the power button.
3. Press and hold the power button again for over 5 seconds, then release.
4. If done correctly the unit will reboot with the Ethernet port reset to DHCP enabled.

Configure Chassis 3-13
Notes: ____________________________________________________________________________
____________________________________________________________________________
____________________________________________________________________________
____________________________________________________________________________
____________________________________________________________________________
____________________________________________________________________________
____________________________________________________________________________
____________________________________________________________________________
____________________________________________________________________________
____________________________________________________________________________
____________________________________________________________________________
____________________________________________________________________________
____________________________________________________________________________
____________________________________________________________________________
____________________________________________________________________________
____________________________________________________________________________
____________________________________________________________________________
____________________________________________________________________________
____________________________________________________________________________
____________________________________________________________________________
____________________________________________________________________________
____________________________________________________________________________
____________________________________________________________________________
____________________________________________________________________________
____________________________________________________________________________
____________________________________________________________________________
____________________________________________________________________________
____________________________________________________________________________
____________________________________________________________________________
____________________________________________________________________________
____________________________________________________________________________
____________________________________________________________________________
____________________________________________________________________________
____________________________________________________________________________
____________________________________________________________________________
____________________________________________________________________________

Lesson 4 Configure Sources Node
Overview
This lesson shows you how to add and set up sources for use in the SpeakerCraft Viewer. You will:
Learn about the Configure Sources node.
Learn about each page of the Configure Sources node.
Configure an IR controlled device.
Setup favorite TV channel icons.
Configure an IP controlled device.
Assign source inputs to source devices.
Requirements
SpeakerCraft MRA-664 powered on and
connected to a local area network (same network
the programming device will be connected to).
A PC running SpeakerCraft software.
-or-
Tablet running the SpeakerCraft App.

Configure Sources 4-2
0BDistributed Audio Integration Overview Overview The following diagram shows the equipment in a two source / four zone distributed
Audio system, illustrating the components that are important to the SpeakerCraft MRA-664 system controller.
The MRA-664 provides the end user with high-quality sound of their favorite sources. The SpeakerCraft Viewer gives the end user a proven, easy-to-use interface compatible with many of today’s popular mobile devices and tablets, PCs, and SpeakerCraft-branded interfaces. For each audio zone the end user can:
Turn the zone on and off
Select and control a source for the zone
Adjust the audio volume in the zone
Change the zone settings, such as bass and treble

Configure Sources 4-3
About the Configure Sources Node Overview The Configure Sources node sets up the source for access and control using
the SpeakerCraft software. Please note, it is recommended that all connectivity to the MRA-664 be completed before beginning this lesson.
The Configure Sources node has a simple point and click interface to allow you to make changes easily to the system. Like the SpeakerCraft Viewer, the System Configuration Wizard requires an active connection to an MRA-664 and makes real-time changes to the system. The system cannot be used for off-line system configuration.
Navigating the Configure Chassis Node
The Configure Sources node is comprised of three pages:
Source Configuration: This page allows you to Add IR and IP controlled source devices to the SpeakerCraft system.
Note: Sources must be physically connected to the MRA-664 for audio playback and for IR control. IP control is done thru the LAN.
Quick Reference: Source Configuration page
Source Name Allows for personalization of the Name of the source displayed in the SpeakerCraft Viewer.
IR 1-6 IR routing matrix. This matrix allows configuration of IR routing through the MRA-664 chassis.
Select the IR output jack the source is physically connected to for each source device.
IR Repeat Adjusts the amount of times the IR command is sent from a user interface to the device.
Enable Power Management
Provides power On/Off IR commands to an IR Device depending on source and zone status. The IR device must have Discreet Power On and Power Off commands.

Configure Sources 4-4
Master Chassis Source Assignment: From here you can assign source
interfaces to their physically connected location on the MRA-664. The source
Input Level may be adjusted from +/- 6dB to ensure the volume is consistent
when switching between sources.
Quick Reference: Master Chassis Source Assignment page
Source Name Assigns a source to the source input on the MRA-664.
Input Level The source volume level. Use these to adjust from +, or –, 6 dB on each source to maintain equivalent source volumes when switching between sources.

Configure Sources 4-5
Favorites Configuration: This page allows you to setup the channel number for
favorite TV channel icons. Only icons with a channel number will be displayed in
the SpeakerCraft Viewer.
Note: The Favorites Configuration page is only available in the Configure Sources
node when Show Favorites is set to Yes. Show Favorites is not available on all
sources.
Quick Reference: Favorites Configuration page
Channel The numeric value used to access the TV channel.
Finish Used to complete the configuration of a node and return to the System Configuration Wizard main page. Use the Left Arrow to navigate to previous pages if node configuration is not complete.

Configure Sources 4-6
1BExercise 1: Adding an IR Source Overview In Exercise 1, we will add an IR Controlled source to the system. This source may
be a cable, or satellite box, a DVD, or Blu-Ray player, or many other IR controlled devices. This exercise will show you how to add a DirecTV box to the SpeakerCraft interface.
How-to 1. Access the Source Configuration Page in the SpeakerCraft Viewer and select
Add.
2. Select IR Controlled Source in the Add New Source window and select the
Right Arrow.

Configure Sources 4-7
3. Select the IR Output that the IR controlled device is connected to and select the
Right Arrow.
Note: The IR Output assigned to the source MUST be the IR Output that the source
device is physically connected to on the rear panel of the MRC-6430. If the IR
Output assigned to the IR device does not match the physical connection then the
IR device cannot be controlled from the Auriel Viewer.
4. This page shows all available interface template types for IR controlled devices.
Select Set Top Box when using cable, or satellite, boxes and the select the
Right Arrow. Use the scroll bar on the right to view all available template types.

Configure Sources 4-8
5. This page shows all available manufacturers of Set Top Boxes in the
SpeakerCraft database. Use the scroll bar to the right to scroll down until you find
DirecTV. Select DirecTV and the select the Right Arrow.
6. The available IR code sets in the SpeakerCraft MRA database are shown, select
the correct IR code set for the device being used.
Note: Some IR devices have multiple IR Code Sets available to them. Please
choose the correct IR Code Set for the device being used.
a. Verify the selected IR code set is correct by selecting the Test
button.

Configure Sources 4-9
b. In the Test IR window, select an IR command on the right to test.
Note: Before testing an IR command ensure the IR device is physically connected to
the assigned IR output on the MRA-664. If a discreet power On/Off is not available,
power On the device before testing an IR command. If the IR device is a video
source it is recommended that the device be connected to a video display to ensure
that it is operating properly.
7. When finished select OK to return to the Source Configuration page.
8. Repeat steps 1 – 7 to add additional IR Source Devices.

Configure Sources 4-10
Exercise 2: Renaming Sources
Overview In Exercise 3, you will rename the IR source added in exercise 1. The Source Name is the name that will be displayed in the SpeakerCraft Viewer for the source. SpeakerCraft recommends renaming the source something that the user will easily recognize and remember.
How-to 1. On the Source Configuration page locate and select the Source Name field.
2. The Set Source Name window appears. Use the keyboard on the device
configuring the SpeakerCraft system to enter a name for the source, in the
exercise we will enter SAT TV.

Configure Sources 4-11
3. When finished naming the source device, press Enter on the keyboard to
return to the Source Configuration main page and verify the new source
name.
4. Repeat this process to rename additional source devices.

Configure Sources 4-12
2BExercise 3: Enabling Power Management Overview In Exercise 3, you will learn how Power Management of IR devices works on the
MRA-664. This exercise will use the IR source device added in exercise 1.
Power Management works using a Source Devices discreet Power On and Off
commands allowing the SpeakerCraft MRA Software to manage the power status of
the source device depending on source selection in a zone and zone power status.
When enabled; When a source is selected in a zone, the SpeakerCraft MRA
Software will send the discreet On command for the selected source device. When a
zone is powered Off the SpeakerCraft MRA Software will send the discreet Off
command for all source devices assigned to the MRA-664.
When Power Management is disabled the SpeakerCraft MRA Software will not issue
any Power On or Off commands to the source device.
Note: The Source Device MUST have discreet Power On/Off commands in order
for Power Management to work.

Configure Sources 4-13
How-to 1. On the main page of the Source Configuration node, select the Enable Power Management drop-down.
2. The Power Management Yes/No window pops up. Select the Yes to enable
Power Management (Factory Default) or select No to dis-able Power
Management. This exercise we are leaving Power Management enabled,
select Yes.
Note: Selecting No disables the Power Management feature. It is recommended to
disable Power Management for Source Devices that do not have discreet Power
On/Off commands.
Configure Sources 4-14
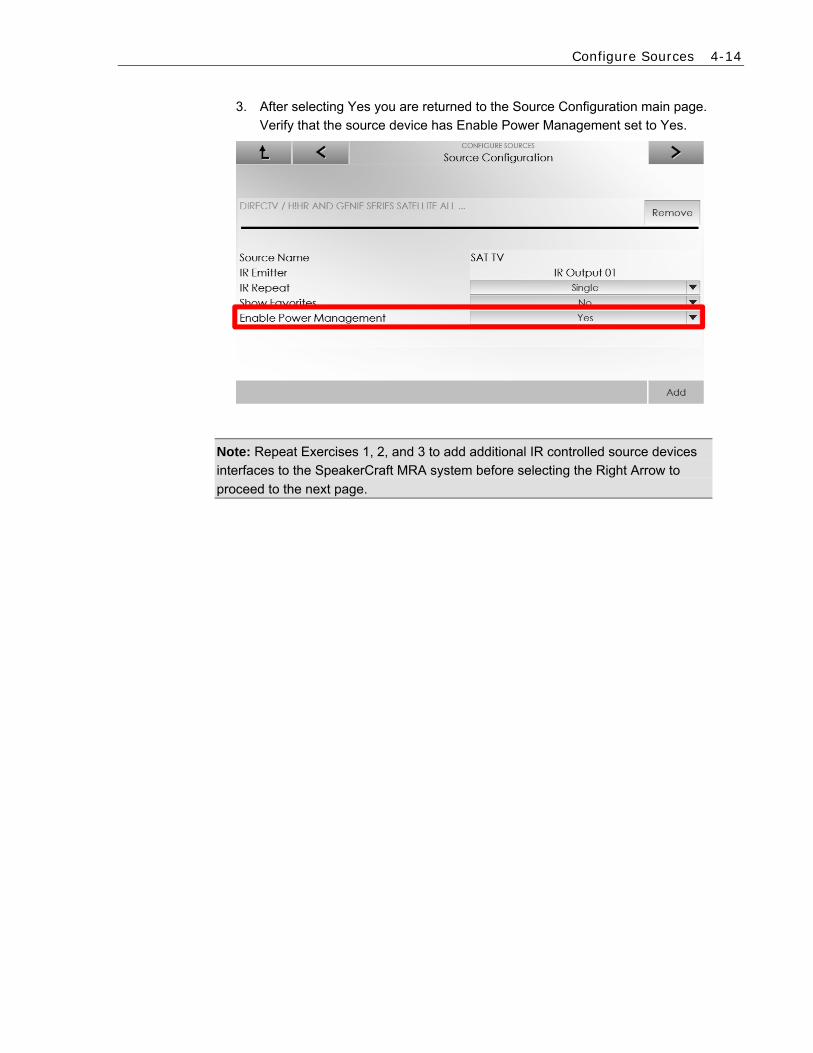
3. After selecting Yes you are returned to the Source Configuration main page.
Verify that the source device has Enable Power Management set to Yes.
Note: Repeat Exercises 1, 2, and 3 to add additional IR controlled source devices
interfaces to the SpeakerCraft MRA system before selecting the Right Arrow to
proceed to the next page.

Configure Sources 4-15
1BExercise 4: Adding an IP Source Overview In Exercises 1, 2, & 3 we added renamed, and assigned an IR Emitter output to
an IR Controlled source. In exercise 4 we will add an IP Controlled source to the system. IP controlled sources include the ELAN DT11, or DT22, AM/FM/Sirius Ready Tuner, Sonos Connect media players, Fusion Ovation series media players, Autonomics Mirage media player, or streaming services from Yamaha audio/video receivers that support the YNCA protocol. This exercise will show you how to add a Sonos Connect media play to the SpeakerCraft interface. Before adding IP sources make sure they are completely setup as per the manufacturer’s instructions, operating correctly, and connected to the same network as the MRA-664. Note all network settings for the device in the Project Documentation Worksheet, included with the MRA-664.
How-to 1. Access the Source Configuration Page in the SpeakerCraft Viewer and select
Add.
2. Select IP Controlled Source in the Add New Source window and select the
Right Arrow.

Configure Sources 4-16
3. This page shows the available interface template types for IP controlled devices.
Select Media Server when using supported devices for streaming media and
then select the Right Arrow.
4. This page shows the available options for streaming media players in the
SpeakerCraft database. Select Sonos and then select OK.

Configure Sources 4-17
5. The Source Configuration page will update with the available Sonos Connect
units discovered on the network. Sonos is automatically added to the Source
Configuration page.
Note: Some media servers, such as Autonomic, should be assigned a static IP
address for reliable communication between the SpeakerCraft MRA and the media
server.
6. The Sonos Connect will populate with the name assigned during the Sonos setup
process. Rename each Sonos Connect as desired. When finished select the
Right Arrow to proceed to the next page.
Note: The SpeakerCraft MRA-664 supports up to 6 Sonos Connect units.

Configure Sources 4-18
4BExercise 5: Assigning Sources in the SpeakerCraft Software to inputs on the MRA-664 Overview In a typical installation, sources are assigned to specific inputs on the zone
controller. The SpeakerCraft software needs to know which sources are physically
connected to each input so that the correct signals can be sent to the zone controller
based on source selection from the Viewer interface.
For Exercise 5, you will assign the source input on the MRA-664 to the source device
added in exercise 1.
Note: Typically all sources are added first and then all source inputs are assigned
to the source device.
How-to 1. Access the Configure Sources node and navigate to the Master Chassis
Source Assignment page. Select the Source 1 Name field for a list of available sources.

Configure Sources 4-19
2. The Assign Source 1 window appears. Select the desired source (SAT TV) to assign the source interface to the Source 1 input and then select OK.
3. The Master Chassis Source Assignment main page appears and Source 1 displays the chosen source. This exercise is using the SAT TV source previously added in this lesson.

Configure Sources 4-20
4. Repeat steps 1 thru 3 of this exercise to assign additional source interfaces to source inputs on the MRA-664.
5. Use the Input Level drop down to adjust each source input +/- 6 dB, in 3 dB increments, to allow for a consistent volume when switching between source inputs.
Note: The source Input Level may be adjusted after completion of the System
Configuration Wizard.
6. If done setting up the Configure Sources node select Finish to complete the set up and return to the System Configuration Wizard main page. If additional set up is required for the Configure Sources node, select the Left Arrow to return to previous setup pages.
Quick Reference: Master Chassis Source Assignment
Input Level The source volume level. Use these to adjust from +, or –, 6 dB on each source to maintain equivalent source volumes when switching between sources.
Finish Used to complete the configuration of a node and return to the System Configuration Wizard main page. Use the Left Arrow to navigate to previous pages if node configuration is not complete.

Configure Sources 4-21
3BExercise 6: Load TV Channel Icon Groups Overview Exercise 6 describes how to load favorite TV channel icons for source devices that
support favorite TV channel icons in to the MRA-664.
Favorite TV channel icons are used to enable one-touch, easy access, to the end
user’s favorite TV channels. Discuss with your client to determine their favorite TV
channels.
How-to 1. Access the Source Configuration main page and locate the Set Top Box
source, SAT TV.
2. Select the Show Favorite Drop Down arrow. The Yes/No option pops up.
Select Yes to enable access to the Favorites Icons page.

Configure Sources 4-22
3. Select the Right Arrow to navigate to the Favorites Icons page.
4. On the Favorites Icons page select Add to begin adding and downloading
TV Channel Icons to the system.

Configure Sources 4-23
5. In the Add Favorites Icons window select the country you are in and then
select the Right Arrow.
6. You will be prompted to download the amount of available channels to the
system, select Ok to begin.

Configure Sources 4-24
7. Select the Right Arrow to navigate to the Favorites Configuration page.

Configure Sources 4-25
Exercise 7: Favorite TV Channel Icons Overview Exercise 7 describes how to set up favorite TV channel icons loaded in the previous
exercise for accessing the favorite TV channel at the press of a button.
Favorite TV channel icons are used to enable one-touch, easy access, to the end user’s favorite TV channels. Discuss with your client to determine their favorite TV channels.
How-to 1. On the Favorites Configuration page use the scroll bar on the right to
navigate to the desired Channel icon. Select the Channel field to assign a
channel number to a channel icon.
2. The Set Channel Number window appears. Use the number keypad to
enter the channel number.

Configure Sources 4-26
3. Use the Pause button to enter a 250ms delay between numbers. Once the
channel number has been entered select OK.

Configure Sources 4-27
7. Repeat to enter additional TV channel numbers for each desired favorite TV channel icon. When finished select Finish to complete the set up and return to the System Configuration Wizard main page. If additional set up is required for the Configure Sources node, select the Left Arrow to return to previous setup pages.
Quick Reference: Favorites Configuration
Channel The numeric value used to access the TV channel.
Finish Used to complete the configuration of a node and return to the System Configuration Wizard main page. Use the Left Arrow to navigate to previous pages if node configuration is not complete.

Configure Sources 4-28
Exercise 8: Check the SpeakerCraft Viewer Overview In the previous exercises we added source devices for use in the SpeakerCraft
Viewer. In this exercise you will finally check your configuration in the Viewer.
How-to 1. Click the SpeakerCraft Logo button in the upper-left corner of the System
Configuration window to exit the wizard and return to the All Media main page.
2. On the All Media page, select Zone 1. Zone 1 will be displayed showing
available sources.

Configure Sources 4-29
3. Select SAT TV to view the SAT TV interface. Verify IR control of SAT TV.
4. Click the ♥ button in the upper right to access the Favorite TV Channel Icons.
Verify the TV icons operate properly.

Configure Sources 4-30
5. Verify the Volume Control buttons operate properly.
6. Bring up the source selection page by selecting the Source Drop Down
Menu.

Configure Sources 4-31
7. Select a Streaming Media source and verify its operation.
8. Select My Services and select a streaming source. For this exercise select
Pandora.
Note: Streaming service providers should be setup prior to integration with
SpeakerCraft and according to the Streaming Media Player’s owner’s manual.
9. Choose from one of the Pandora Favorite stations associated with the
Pandora account used on the Sonos Connect.

Configure Sources 4-32
10. You may also search available stations. Select the Search button to search by
Artists, Genres, or Tracks.
11. Select the desired search type, use the keyboard associated to the
SpeakerCraft interface, enter the desired search word(s), and press Enter
when finished.

Configure Sources 4-33
12. Choose the desired station and select Play Now.
13. Repeat checking additional sources in the SpeakerCraft Viewer and verifying
their operation.
14. When finished verifying operation of the sources return to the System
Configuration Wizard and proceed to Lesson 5, Configure a Home Theater
Zone, or Lesson 6, Configure Zones, in the training guide.

Configure Sources 4-34
Notes: ________________________________________________________________________
________________________________________________________________________
________________________________________________________________________
________________________________________________________________________
________________________________________________________________________
________________________________________________________________________
________________________________________________________________________
________________________________________________________________________
________________________________________________________________________
________________________________________________________________________
________________________________________________________________________
________________________________________________________________________
________________________________________________________________________
________________________________________________________________________
________________________________________________________________________
________________________________________________________________________
________________________________________________________________________
________________________________________________________________________
________________________________________________________________________
________________________________________________________________________
________________________________________________________________________
________________________________________________________________________
________________________________________________________________________
________________________________________________________________________
________________________________________________________________________
________________________________________________________________________
________________________________________________________________________
________________________________________________________________________
________________________________________________________________________
________________________________________________________________________

Lesson 5 Integrating a Home Theater System
Overview
This lesson shows you how to add a basic Home Theater system to the SpeakerCraft Viewer. You will:
Learn how a home theater system is organized in the Configurator.
Configure a receiver for the home theater.
Add the internal tuner as a source.
Configure sources for the home theater receiver, including the pre-out from another zone controller.
Add the Video Display to the home theater and configure its behavior.
Check the Viewer interface to confirm proper configuration.
Understand the various features available in the Viewer.
Sample House
Our sample house will be configured with one home theater zone that includes 1 AVR, 1 Video Display, and three sources. Requirements
SpeakerCraft MRA-664 powered on and
connected to a local area network (same network
the programming device will be connected to).
A PC running SpeakerCraft software.
-or-
Tablet running the SpeakerCraft App.

Integrating A Home Theater System 5-2
0BHome Theater Integration Overview Overview The following diagram shows how the equipment in a home theater system may be
connected to allow the SpeakerCraft Viewer to control the home theater system. The AVR is communicating using TCP/IP and the TV and source components are communicating using IR.
Integrating a home theater system with the SpeakerCraft MRA-664 provides the end user with control of their home theater system through the SpeakerCraft Viewer. Using the SpeakerCraft Software, they can:
Experience the simple, consistent, easy to use interface of their multi-room audio system in their Home Theater.
Turn a single zone, or all zones, on and off with the push of a button
Select and control a source for the zone
Adjust the audio volume in the zone
Change the zone settings, such as bass and treble

Integrating A Home Theater System 5-3
1BExercise 1: Add the Audio/Video Receiver Chassis to the SpeakerCraft Viewer
Overview This lesson will guide you through how to add a compatible IP-controlled Audio/Video Receiver in a home theater zone to the SpeakerCraft Viewer.
Note: SpeakerCraft only supports integration of compatible IP controlled
audio/video receivers. The audio/video receiver should be setup with a static IP
address as per the manufacturer’s instructions before integrating with the
SpeakerCraft software. Note all network settings for this device in the Project
Documentation Worksheet, included with the MRA-664. Visit
www.speakercraft.com/techsupport for a complete list of compatible IP controlled
audio/video receivers.
How-to Adding the Home Theater Chassis driver:
1. Access the System Configuration Wizard and select the Configure Chassis
node.

Integrating A Home Theater System 5-4
2. Use the Right Arrow to navigate to the Home Theater Chassis
Configuration page.
3. Click Add. The Install Home Theater Receiver page appears.

Integrating A Home Theater System 5-5
4. Use the scroll bar on the right to locate the desired Home Theater Receiver
IP driver. Select the Home Theater Receiver IP driver and then select OK.
5. Select the IP Address field.
6. The Set Chassis IP Address window appears. Enter the IP Address of the
Home Theater Receiver and select OK.

Integrating A Home Theater System 5-6
7. Verify the IP Address entered was correct and select Finish to return to the
System Configuration Wizard main page.
8. Proceed to add the home theater source devices in the Configure Sources
node. See Lesson 4, Configure Sources, for more information.

Integrating A Home Theater System 5-7
3BExercise 2: Assigning sources to the Home Theater Receiver Interface
Overview In Exercise 2, you will assign the sources added for the Home Theater zone to
the Home Theater Receiver for viewing and control in the SpeakerCraft Viewer.
In this exercise we will reference two sources: Theater TV and a Blu-ray player,
called Theater Movie. Please add the necessary sources for the Home
Theater Zone as illustrated in Lesson 4.
How-To
Assigning sources to the SpeakerCraft Viewer for the Home Theater:
1. Navigate to the Configure Sources node.
2. Use the Right Arrow to navigate to the Home Theater Source
Assignment page.

Integrating A Home Theater System 5-8
3. Select the Source Name field to view available sources.
4. The Assign Source X window appears. Select the source device to be
assigned to the selected input and select OK.
Note: The source interface assigned to the selected Home Theater Receiver
input should be physically connected to the selected input of the Home Theater
Receiver in order for audio and video to be active when the source is selected in
the home theater zone.

Integrating A Home Theater System 5-9
5. Repeat Steps 3 & 4 to assign additional source interfaces to source inputs
on the Home Theater Receiver. Shown below are sources added for use in
this exercise to give you an idea of how the interface should look with
sources assigned to the Home Theater Receiver.
6. Select the Right Arrow until Finish appears and then select Finish to return
to the System Configuration Wizard main page.

Integrating A Home Theater System 5-10
Configure Home Theater TV Node
Overview Here we will give you an overview of the Configure Home Theater TV node in the
System Configuration Wizard. The Configure Home Theater TV node is only
available when a Home Theater Receiver has been added in the Configure
Chassis node.
The Configure Home Theater TV node is made up of two pages to allow you to
add a TV for IR control by the SpeakerCraft system. This node allows you to set
up how a TV behaves when sources are selected in the Home Theater Zone.
Configure Home Theater TV Node page:
TV Configuration Page: This page is used to Add or Remove IR code sets used to control the TV in a home theater zone.
TV Control Configuration page: This page is used to define how the TV behaves when a source is selected in the home theater zone. The TV may be set to change power status and switch input modes depending on which source is selected in the home theater.

Integrating A Home Theater System 5-11
4BExercise 3: Add a Home Theater TV Overview In Exercise 3, a TV will be added for IR control by the SpeakerCraft System. This
exercise will use LG as the TV example.
How-to Add a Home Theater Zone TV for control by the MRA:
1. From the System Configuration Wizard main page, select the Configure Home Theater TV node.
2. The TV Configuration page appears. Select Add.

Integrating A Home Theater System 5-12
3. The Configure TV window appears with the list of IR Outputs. Assign the IR Output on the MRA-664 being used to send the IR commands to the Home Theater Zone by selecting the IR Emitter field.
4. The Select IR Emitter window appears. Select the IR Output being used and select Right Arrow. This exercise uses IR Output 6 as an example.
Note: The IR Output chosen should match the IR Output being used to control
all IR devices in the Home Theater Zone. A Powered IR Connecting Block
should be used to accommodate all IR devices in the theater zone.

Integrating A Home Theater System 5-13
5. The Configure TV window appears. Use the scroll bar on the right to locate the manufacturer of the TV being used and select the TV Manufacturer.
6. Select the Arrow Box.

Integrating A Home Theater System 5-14
7. Select the IR code set for the TV being used.
Note: Some TVs have multiple IR Code Sets available to them. Please choose
the correct IR Code Set for the TV being used.
a. Verify the selected IR code set is correct by selecting the Test button.
b. In the Test IR window, select an IR command on the right to test.
Note: Before testing an IR command ensure the TV is physically connected to
the assigned IR output on the MRA-664. Power On the TV before testing an IR
command.

Integrating A Home Theater System 5-15
8. When finished select OK to return to the TV Configuration main page.
9. The TV Configuration page appears. Select the Right Arrow to proceed to the TV Control Configuration page.

Integrating A Home Theater System 5-16
10. Note the following on the TV Control Configuration page:
a. Source Column: Names of the sources assigned to the inputs on the Home Theater Receiver.
b. TV Power Column: Lets you set the Power status of the TV depending on source selection.
c. TV Source Column: Lets you set the Input on the TV depending on source selection.
11. Start with the first source and select a Don’t Change in the TV Power column to set the Power status.

Integrating A Home Theater System 5-17
12. The Power Control window appears. Select the appropriate Power state for the chosen source and select OK.
13. Confirm the TV Power setting and select Don’t Change in the TV Source column to the right.
14. The Source Control window appears. Use the scroll bar on the right to locate the TV input being used for the chosen source.

Integrating A Home Theater System 5-18
15. Select the TV input being used and select OK.
16. Confirm the TV Source setting and repeat steps 10 thru 14 for each additional source in the Home Theater Zone. Select Finish when done to return to the System Configuration Wizard main page.

Integrating A Home Theater System 5-19
10BExercise 4: Check the Viewer Interface
Overview In Exercise 4, you will check your work in the Viewer. Before beginning, be sure
you have completed all of the previous exercises in this lesson.
How-To Check the SpeakerCraft Viewer
1. Access the SpeakerCraft Viewer. If you are in the setup wizard press the
SpeakerCraft Logo in the upper left corner.
2. Move the Scroll Bar at the bottom of the screen to the right to view additional
zones.

Integrating A Home Theater System 5-20
3. Select the Main Theater Zone and select a Source from the sources page.
4. Verify each of the following for the Theater Zone:
Source Selection for each source is correct on the Theater Receiver
TV Operates as setup in Exercise 3
Source Control of each source performs as expected
Volume Control of the Theater Receiver performs as expected
5. If you have a SpeakerCraft sHR200 Handheld Remote proceed to the
Configure Handheld Remote Node, otherwise proceed to Lesson 6, Configure Zones Node.

Integrating A Home Theater System 5-21
Configure Handheld Remote Node Overview
SpeakerCraft allows you to offer your clients the best-in-class sHR200 Wi-Fi
Remote Control. By adding the Home Theater Zone in the SpeakerCraft software
you are able to add the SpeakerCraft sHR200. The sHR200 controls the theater
zone and can be setup to control other zones throughout the whole house audio
system. The sHR200 delivers the same consistent user experience as from a
SpeakerCraft Touch Panel or from a SpeakerCraft interface on a mobile device,
but with the added benefit of having instant access to control via hard buttons.
The Configure Handheld Remote node is made up of two pages to allow you to
add and configure a sHR200.
Configure Handheld Remote pages:
Handheld Remote Enrollment: This page allows you to setup a sHR200 for use with the SpeakerCraft system. See the sHR200 Quick Install Guide for sHR200 setup information.
Note: The sHR200 must be powered off when connected to the MRA-664.
When powered On the sHR200 will ask for a passkey. Enter 3 5 2 6 to connect
the sHR200 to the MRA-664 to add it to the SpeakerCraft software.

Integrating A Home Theater System 5-22
Handheld Remote Enrollment Continued: After the sHR200 connects to the MRA-664 the Handheld Remote Enrollment page displays the sHR200 and the fields that are required to be set before the sHR200 can be used with the system.
Note: The IP Address entered must not conflict with another IP address on the
network. The SSID, Encryption Type, and Passphrase must match the network
the SpeakerCraft MRA is on. Note all network settings for this device in the
Project Documentation Worksheet, included with the MRA-664. To ensure proper
control, it is recommended that a Wi-Fi network be properly mapped out and
installed before installation of the sHR200. If you are not familiar with networking
or wireless networks please see the assistance of network professional to help
ensure optimal operation.
Handheld Remote Configuration Page: This page allows you to assign primary and secondary zones for control by the sHR200. The Primary Locations are the Theater Receiver zones and the Secondary Locations are the MRA-664 zones.

Integrating A Home Theater System 5-23
7BExercise 5: Add the sHR200 Remote
Overview In Exercise 5, you will add the SpeakerCraft sHR200 Wi-Fi Remote Control.
By adding SpeakerCraft sHR200 Wi-Fi remote control to control the theater zone
you are giving your client’s one of the best control interfaces on the market today,
and we’re not biased… Ok, we are a little biased, but the sHR200 is still one of
the best remote controls on the market today. The sHR200 delivers best-in-class
performance and the same consistent user experience as from a SpeakerCraft
Touch Panel or from a SpeakerCraft interface on a mobile device, but with the
added benefit of having instant access to control via hard buttons.
How-To Add the sHR200 Wi-Fi Remote Control
1. Unbox the sHR200 and remove the Endcap to access the On/Off swtich
and the Mini-USB port.
2. Before powering the sHR200 on connect the sHR200 to the USB port on
the rear panel of the MRA-664 using the USB cable included with the
sHR200.

Integrating A Home Theater System 5-24
3. Power on the sHR200.
Note: The sHR200 may come out of the box with a charge. SpeakerCraft
recommends giving the remote a charge for at least 45 minutes before beginning
setup.
4. The sHR200 will ask for a password before connecting to the MRA-664.
Use the number pad on the sHR200 to enter 3, 5, 2, 6 and then press
Enter. The sHR200 will connect to the MRA-664.
5. In the SpeakerCraft software navigate to the System Configuration Wizard
and select the Configure Handheld Remote node. The Handheld Remote
Enrollment page appears showing the sHR200’s default network settings.
6. Proceed to Exercise 5, sHR200 Network Settings, before disconnecting
the sHR200 from the MRA-664.

Integrating A Home Theater System 5-25
6BExercise 6: sHR200 Network Settings Overview Terms
In this exercise we will setup the sHR200s network settings. This will allow the sHR200 to connect to the wireless network for communication with the MRA-664 and control of the Home Theater Zone system.
The following terms are important to know for this exercise:
IP Address: A numerical label assigned to a device on a network. Since IP
address numbers are unique per device, an IP address allows us to know where a
specific device is located at in a network.
Subnet: A portion of a network that shares a common address component.
Typically, all devices with addresses that start with 192.168.0 would be part of the
same subnet. A typical Class C Subnet would be 255.255.255.0. However it is
important to note that some networks may use different subnets.
Gateway: A node on a network that serves as an entrance to another network. In
a residential installation a router is the gateway for devices on the local area
network, LAN, to access the internet, or wide area network, WAN.
Controller: The controller field is the IP address of the MRA-664. The MRA-664 MUST have a static IP address assigned to it in order for the sHR200 to work.
SSID: Service Set Identifier, SSID, is a case sensitive, alphanumeric character unique identifier used to differentiate one wireless network from another. All access points and wireless devices use the same SSID as part of the process to be permitted to join the wireless network.
Encryption Type: wireless network encryption is used to secure a wireless network using one of two types of wireless network encryption:
1. WEP: Wired Equivalent Privacy is the oldest and least secure method.
2. WPA/PSK: Wi-Fi Protected Access/Pre-Shared Key uses a passphrase for authentication to allow access to the wireless network. The passphrase is case sensitive and should contain a mix of alphanumeric characters.
3. None: None means that the wireless network is not secure and open to anyone who wishes to connect. This is the least secure option.
Passphrase: The case sensitive, alphanumeric character unique identifier used to access the wireless network.

Integrating A Home Theater System 5-26
How-to Set the sHR200 up for connection to the Wireless Network
1. On the Handheld Remote Enrollment page, select the sHR200 Address field.
2. The Set sHR200 Address window appears. Enter the desired static IP address for the sHR200.
Please remember to use an IP address that does not conflict with the IP addresses in the DHCP range.
Select OK when finished.
3. Verify the NetMask, Gateway, and Controller fields are correct.

Integrating A Home Theater System 5-27
4. Select the SSID field and enter the SSID of the wireless network the sHR200 will connect to.
Remember that the SSID is case sensitive. When finished press enter on the keyboard.
5. Verify the SSID is correct and select the Encryption Type field.
6. The Set sHR200 Encryption Type window appears. Note that the Wireless Access Point, WAP, or Wi-Fi
Router’s encryption type must be set to one of the two options shown in order for the sHR200 to
connect. Choose the encryption type being used by the wireless network, if no encryption type is
being used select none. Select OK when finished.
Integrating A Home Theater System 5-28
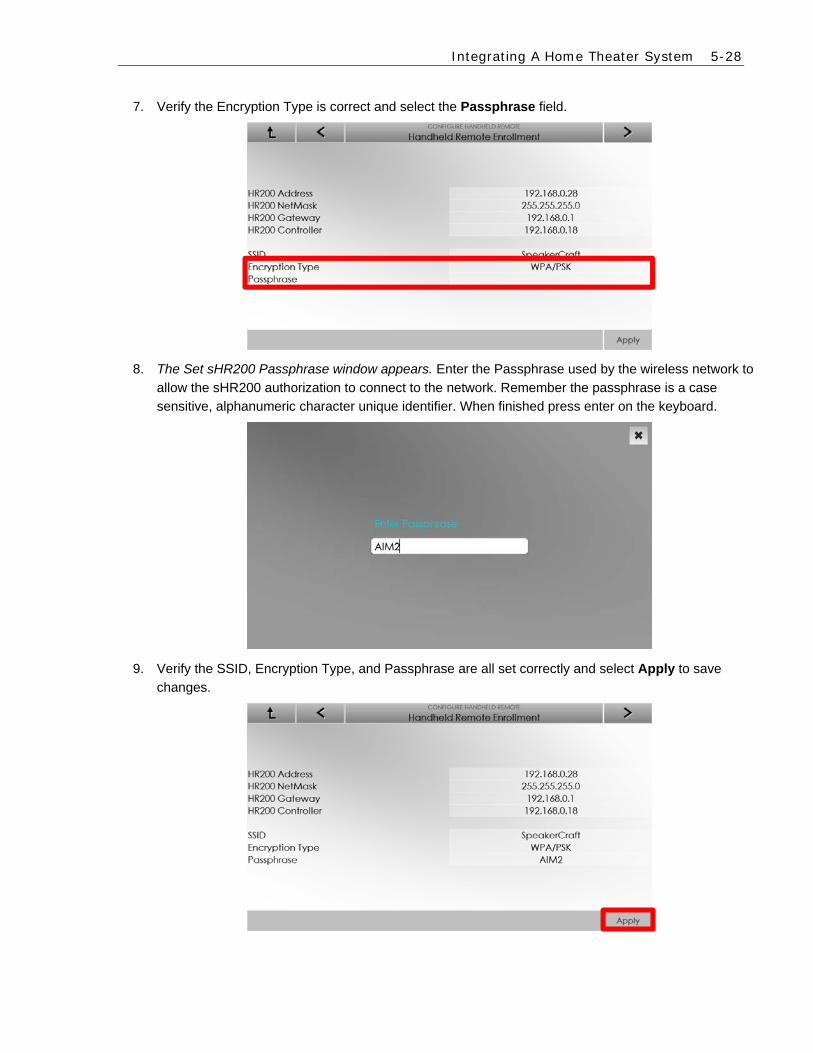
7. Verify the Encryption Type is correct and select the Passphrase field.
8. The Set sHR200 Passphrase window appears. Enter the Passphrase used by the wireless network to
allow the sHR200 authorization to connect to the network. Remember the passphrase is a case
sensitive, alphanumeric character unique identifier. When finished press enter on the keyboard.
9. Verify the SSID, Encryption Type, and Passphrase are all set correctly and select Apply to save
changes.

Integrating A Home Theater System 5-29
10. Disconnect the sHR200 from the MRA-664 and select OK.
11. Wait for the sHR200 to connect to the wireless network, this may take several minutes, and then
select the Right Arrow to proceed.
Proceed to Exercise 7, Assigning Zones to the sHR200 for more information on setting up the
sHR200.

Integrating A Home Theater System 5-30
9BExercise 7: Assigning Zones sHR200 Overview This exercise will show you how to assign a single, or multiple zones to the
sHR200. See Lesson 6 for renaming zones in the system.
How-to Assign zones to the sHR200
1. Navigate to the Handheld Remote Configuration page and select the
Primary Location field.
2. The Select sHR200 Primary Location window appears. Select the sHR200’s
primary default zone, Main Zone in this exercise. The Main Zone will be the
main zone of the home theater receiver for this exercise. Select OK when
finished.

Integrating A Home Theater System 5-31
3. Verify the Primary Location is the desired zone on the home theater receiver.
Now add zones from the MRA-664 by selecting the plus sign to the right of
Secondary Locations.
4. The Select sHR200 Secondary Location window appears. Select the
secondary zone to add to the sHR200 and select OK when finished.
5. Verify the Secondary Location.

Integrating A Home Theater System 5-32
6. Repeat steps 3 and 4 to add additional Secondary Locations.
7. Verify operation of the sHR200.

Integrating A Home Theater System 5-33
Notes: ________________________________________________________________________
________________________________________________________________________
________________________________________________________________________
________________________________________________________________________
________________________________________________________________________
________________________________________________________________________
________________________________________________________________________
________________________________________________________________________
________________________________________________________________________
________________________________________________________________________
________________________________________________________________________
________________________________________________________________________
________________________________________________________________________
________________________________________________________________________
________________________________________________________________________
________________________________________________________________________
________________________________________________________________________
________________________________________________________________________
________________________________________________________________________
________________________________________________________________________
________________________________________________________________________
________________________________________________________________________
________________________________________________________________________
________________________________________________________________________
________________________________________________________________________
________________________________________________________________________
________________________________________________________________________
________________________________________________________________________
________________________________________________________________________

Integrating A Home Theater System 5-34
Notes: ________________________________________________________________________
________________________________________________________________________
________________________________________________________________________
________________________________________________________________________
________________________________________________________________________
________________________________________________________________________
________________________________________________________________________
________________________________________________________________________
________________________________________________________________________
________________________________________________________________________
________________________________________________________________________
________________________________________________________________________
________________________________________________________________________
________________________________________________________________________
________________________________________________________________________
________________________________________________________________________
________________________________________________________________________
________________________________________________________________________
________________________________________________________________________
________________________________________________________________________
________________________________________________________________________
________________________________________________________________________
________________________________________________________________________
________________________________________________________________________
________________________________________________________________________
________________________________________________________________________
________________________________________________________________________
________________________________________________________________________
________________________________________________________________________

Lesson 6 Configure Zones Node
Overview
This lesson gives you an overview of how to set up the Configure Zones node. In this lesson you will learn:
About each page of the Configure Zones node.
How to rename zones.
How to set each zone’s turn on behavior.
How to set each zone’s Pre-Amp outputs.
How to enable Whole House Mode (WHM) and Door Chime/Paging per zone.
Sample House
Our sample house will be configured with two distributed A/V zones and a Home Theater Zone:
Living Room Kitchen Theater
Requirements
SpeakerCraft MRA-664 powered on and
connected to a local area network (same network
the programming device will be connected to).
A PC running SpeakerCraft software.
-or-
Tablet running the SpeakerCraft App.

Configure Zones 6-2
About the Configure Zones Node Overview The Configure Zones node allows you to set up how each zone is named in the
SpeakerCraft Viewer, tone default settings per zone, volume control settings, and whether a zone is included in the WHM and door chime/paging feature. Note that door chime/paging features require the use of the Niles DBI-2 Door Bell Interface.
Terms The following terms are used in the Configure Zones node:
WHM: This refers to Whole House Mode. When enabled WHM will turn on all zones to the source currently being played.
Do Not Disturb: Do Not Disturb, or DND, is a setting in the SpeakerCraft Viewer for each zone that the end user can turn on or off. When On the zone will not respond to WHM, door chime, or paging events.
Navigating the Configure Zones Node
The Configure Zones node is comprised of 4 pages:
Zone Name: This page allows for to renaming each zone. SpeakerCraft
recommends working with the end user to determine zone names that are easily
recognizable.
Zone Name The name of a zone that is shown in the SpeakerCraft Viewer. See Exercise 1 for more details.

Configure Zones 6-3
Tone Defaults: This page allows for setting the MRA-664’s Power On Behavior
for each zone’s Tone adjustments.
Bass Low frequency adjustment. -12dB to +12dB in 1dB increments. Default = 0 dB
Treble High frequency adjustment. -12dB to +12dB in 1dB increments. Default = 0 dB
Loudness Increases the level of high and low frequencies. Loudness is intended for use a low listening levels to compensate for the ears lower sensitivity to extreme high and low frequencies. Default = Off
Power On Behavior Determines how a zone’s Tone settings will respond when the zone is powered On. When the Power On Behavior is set to Default, powering on a zone resets the Bass/Treble/Loudness contours to the settings made on this page. When the Power On Behavior is set to Last, powering on a zone resets the Bass/Treble/Loudness contours to the settings made in the SpeakerCraft Viewer before the zone was powered off.

Configure Zones 6-4
Volume Defaults: This page is used for setting the MRA-664 Line Out (Pre-Amp)
Volume, Zone On Volume, and Max Zone Volume.
Line Out Volume Settings for the Pre-Amp Output on the MRA-664. The Variable (factory default) setting should be used when the volume control of the pre-amp output is from a SpeakerCraft Interface. The Fixed setting should be used when a volume control is used in between the power amplifier and the speakers to adjust the volume.
Zone On Volume This setting determines the volume level a zone is set to when powered On. 0 – 100% are available to ensure the power On volume level for each zone is set to a comfortable level.
Max Volume The maximum volume a zone can be set to from a SpeakerCraft Interface.
WHM & Paging Configuration: This page allows for setting zones up on the
MRA-664 for WHM and Doorbell/Paging events.
WHM Enabled Enables a zone to be a part of Whole House Mode, WHM, when activated from the SpeakerCraft Viewer. The default setting is Yes. Set to No to remove a zone from WHM participation.
Paging Enabled Enables a zone to pass thru door chime and/or paging (requires DBI-2) through the speakers in the whole house audio system. Set to No to remove a zone from Paging/Door Chime access.
Paging Volume Sets the volume level heard over the whole house audio speakers for door chime and paging.

Configure Zones 6-5
1BExercise 1: Rename a Zone Overview In this exercise you will rename a zone on the MRA-664 to be easily
recognizable in the SpeakerCraft Viewer.
How-to Rename a Zone
1. Access the Configure Zones node in the System Configuration Wizard. The
Zone Name page appears.
2. Select a Zone to rename. This exercise will use Zones 1, 2, and Home Theater Zone. The Set Zone Name appears.

Configure Zones 6-6
3. Use the keyboard on the device configuring the SpeakerCraft system to enter a
name for zone 1. In the exercise we will enter Living Room.
4. When finished naming the zone, press Enter on the keyboard to return to the
Zone Name main page and verify the new zone name.
5. Repeat this process to rename additional Zones. Zone 2 and Home Theater
Zone in this lesson. Below is a 3-zone example of how the Zone Name page might appear when finished.

Configure Zones 6-7
1BExercise 2: Setting the Tone Defaults Overview In Exercise 2, you will learn how to set the Tone defaults for each zone on the
MRA-664. Please note this page only applies to a zone on the MRA-664.
How-to Set the Tone Defaults per zone.
1. Access Tone Defaults page.
2. Set Bass & Treble accordingly per zone:
a. +/- 12dB Range
b. Adjustments in 1 dB increments
3. Set Loudness per zone:
a. Off – (Factory Default) Turns off loudness when the selected zone is
powered On
b. On – Turns on loudness when the selected zone is powered On
Note: Setting Bass, Treble, and Loudness should be done while in the zone with
reference material playing. These settings only apply to zones on the MRA-664.
4. Set the Power On Behavior:
a. Default – (Factory Default) when a zone is powered on the bass,
treble, and loudness settings will return to their default setting.
b. Last – when a zone is powered on the bass, treble, and loudness
settings will remain at their last setting from the SpeakerCraft Viewer.

Configure Zones 6-8
5. When finished select Apply to save changes and then select the Right Arrow to
proceed to the next page.

Configure Zones 6-9
Exercise 3: Setting Volume Defaults
Overview In Exercise 3, you will setup the Volume Default settings for Pre-Amp output level, Zone On Volume, and Max volume for each MRA-664 zone.
How-to Set the Volume Defaults per zone
1. Access the Volume Defaults page.
2. Set Line Out Volume per zone:
a. Variable – (Factory Default) allows SpeakerCraft Interfaces to adjust
the volume level when using the Pre-Amp Outputs on the MRA-664.
b. Fixed – Use when a separate Volume Control will be used to adjust
volume in an area, such as in a sub-zone configuration.
3. Set the Zone On Volume per zone:
a. 0 to 100% available for ensuring a zone is powered on to a
comfortable listening level.
4. Set the Max Volume per zone:
a. 0 to 100% available for determining the maximum volume level a
zone may be set to from a SpeakerCraft Interface.
5. When finished select Apply to save changes and then select the Right Arrow
to proceed to the next page.

Configure Zones 6-10
2BExercise 4: WHM & Paging Configuration Overview In Exercise 4, you will configure each zone for Whole House Mode, WHM, and
Paging/Door Bell features.
In a distributed audio installation, the zone controller is the heart of the whole house
audio system. When WHM is activated all MRA-664 zones are turned on to the
currently selected source.
Door chime and paging features require the use of the Niles DBI-2, Door Bell
Interface (FG01613). The DBI-2 allows for door chime and paging information to be
played through the whole house audio system speakers.
How-to Setup each zone for WHM and Door Bell/Paging
1. Access the WHM & Paging Configuration page.

Configure Zones 6-11
2. If certain zones are not needed in WHM, select the zone(s) to remove by
pressing the drop down arrow and selecting No.
3. If certain zones are not needed to pass through door chime and paging
information then select the zone(s) to remove by pressing the drop down
arrow and selecting No.
4. Select Apply to save changes to the MRA-664 before proceeding.

Configure Zones 6-12
5. Set the Paging Volume for each zone. This will also apply to the door chime
volume.
6. When finished select Apply and then select Finish.
7. The System Configuration Wizard main page appears. Exit the Configuration
Wizard by selecting the SpeakerCraft Logo. See Lesson 7, Configure User
Interfaces for information on how to assign zones to SpeakerCraft Viewers.

Configure Zones 6-13
3BExercise 5: Check the Viewer Interface Overview In Exercise 5 you will check your work in the Viewer. This exercise is goes over
verifying zone names, testing turn one settings, WHM, and doorbell/paging settings performed during previous exercises in this lesson.
Note: This exercise will refer to these zone names: Zone 1 = Living Room; Zone 2
= Kitchen; Home Theater Zone = Theater
How-to Check the SpeakerCraft Viewer
1. Access the SpeakerCraft Viewer. If you are in the setup wizard press the
SpeakerCraft Logo in the upper left corner.
2. The All Media page appears. Verify each zone is labelled correctly and select
Living Room (Zone 1).

Configure Zones 6-14
3. Move the Scroll Bar at the bottom of the screen to the right to verify
additional renamed zones.
4. Verify Zone Turn On settings for each zone. Start with the first zone by
selecting the Living Room zone.
5. The Living Room Source page appears. Select an active source.

Configure Zones 6-15
6. In this case the streaming media source now playing page appears. If there
are selections in the queue select Play, otherwise select the desired media to
begin playing.
7. Select the Gear Icon in the upper right corner to access the Settings page for
the active zone. Verify settings match what was set in the Turn On Defaults
page.
8. Select the Gear Icon again to exit the Settings page.
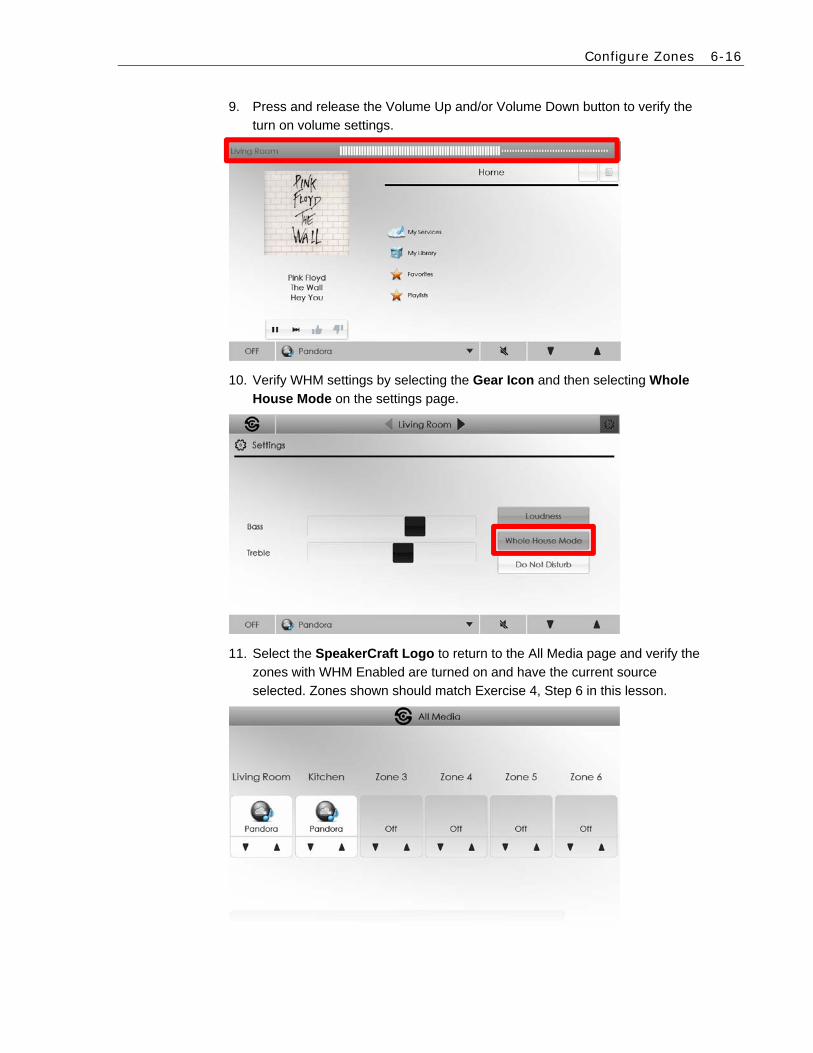
Configure Zones 6-16
9. Press and release the Volume Up and/or Volume Down button to verify the
turn on volume settings.
10. Verify WHM settings by selecting the Gear Icon and then selecting Whole
House Mode on the settings page.
11. Select the SpeakerCraft Logo to return to the All Media page and verify the
zones with WHM Enabled are turned on and have the current source
selected. Zones shown should match Exercise 4, Step 6 in this lesson.

Configure Zones 6-17
12. Repeat steps 1 – 11 for each additional MRA-664 zone to verify settings
made in the Configure Zones node.
13. If using the DBI-2 for doorbell or paging features:
a. Press a doorbell to test door chime volume in each zone.
b. Initiate a page to test paging volume in each zone.
14. Repeat Step 13A and 13B for each zone with Paging Enabled set to Yes.
Additional Information for Zone Settings Page.
Do Not Disturb When enabled, Do Not Disturb will remove a zone from WHM and paging/door chime features. Do Not Disturb is accessed from the Zone Settings Page in each zone.

Configure Zones 6-18
Notes: ________________________________________________________________________
________________________________________________________________________
________________________________________________________________________
________________________________________________________________________
________________________________________________________________________
________________________________________________________________________
________________________________________________________________________
________________________________________________________________________
________________________________________________________________________
________________________________________________________________________
________________________________________________________________________
________________________________________________________________________
________________________________________________________________________
________________________________________________________________________
________________________________________________________________________
________________________________________________________________________
________________________________________________________________________
________________________________________________________________________
________________________________________________________________________
________________________________________________________________________
________________________________________________________________________
________________________________________________________________________
________________________________________________________________________
________________________________________________________________________
________________________________________________________________________
________________________________________________________________________
________________________________________________________________________
________________________________________________________________________
________________________________________________________________________
________________________________________________________________________

Lesson 7 Configure User Interfaces Node
Overview
This lesson goes over how to assign zones to each compatible SpeakerCraft Viewer.
You will learn how to:
Navigate the User Interface Configuration page
Rename a User Interface
Assign a Primary Zone
Assign additional Zones to the UI
Change the MRA Viewer language type
Requirements
SpeakerCraft MRA-664 powered on and
connected to a local area network (same
network the programming device will be
connected to).
A PC running SpeakerCraft software.
-or-
Tablet running the SpeakerCraft App.

Interfaces 7-2
About the Configure User Interfaces Node Overview This lesson explores the Configure User Interfaces node and how to assign zones
to the various compatible user interfaces. The SpeakerCraft compatible user interfaces include:
In-Wall Touch Screens – sTP7
In-Wall Keypads – sKP7
Computers in the home (on the local network)
iOS Devices
Android Devices
sHR200 Remote (see Integrating A Home Theater System, Lesson 5-19, for sHR200 set up information)
Terms
The following terms are used in the Configurator Interface tab when setting
up the interfaces for a system:
MAC Address: Media Access Control address, sometimes referred to as a
hardware address or physical address, is a unique ID code assigned by the
manufacturer to a network adaptor, or any device with built-in networking
capability. While an IP address can potentially be assigned to any device, a MAC
address is a static ID code that is unique to each device on the network.
Primary Zone: The Primary Zone is the zone a compatible user interface is mainly
used in, or physically installed in. When the Primary Zone is set for a UI the
interface will automatically show the Primary Zone when the SpeakerCraft Viewer
is first started.
Other Zones: Other Zones are zones that a compatible user interface is not
mainly used in, or physically installed in, but still has access to. SpeakerCraft
interfaces can have all zones, or specific zones, assigned to them.

Interfaces 7-3
Navigating the Configure User Interfaces Node
The Configure User Interfaces node is made up of 1 page:
User Interface Configuration: This page displays all the available
user interfaces connected to the SpeakerCraft MRA-664. Each viewer
may have the zone availability customized.
Default Viewer: The Default interface is used for assigning primary
and other zones to a compatible SpeakerCraft Interface. When a
compatible SpeakerCraft interface is first connected to the system the
interface looks at the Default interface for zone assignment. The zones
assigned to the Default interfaces are the zones shown on all newly
added interfaces. Each interface may be customized at any time. The
Default interface may not be renamed.

Interfaces 7-4
Other Viewers: Other compatible viewers may be renamed and have
zones assignments changed.
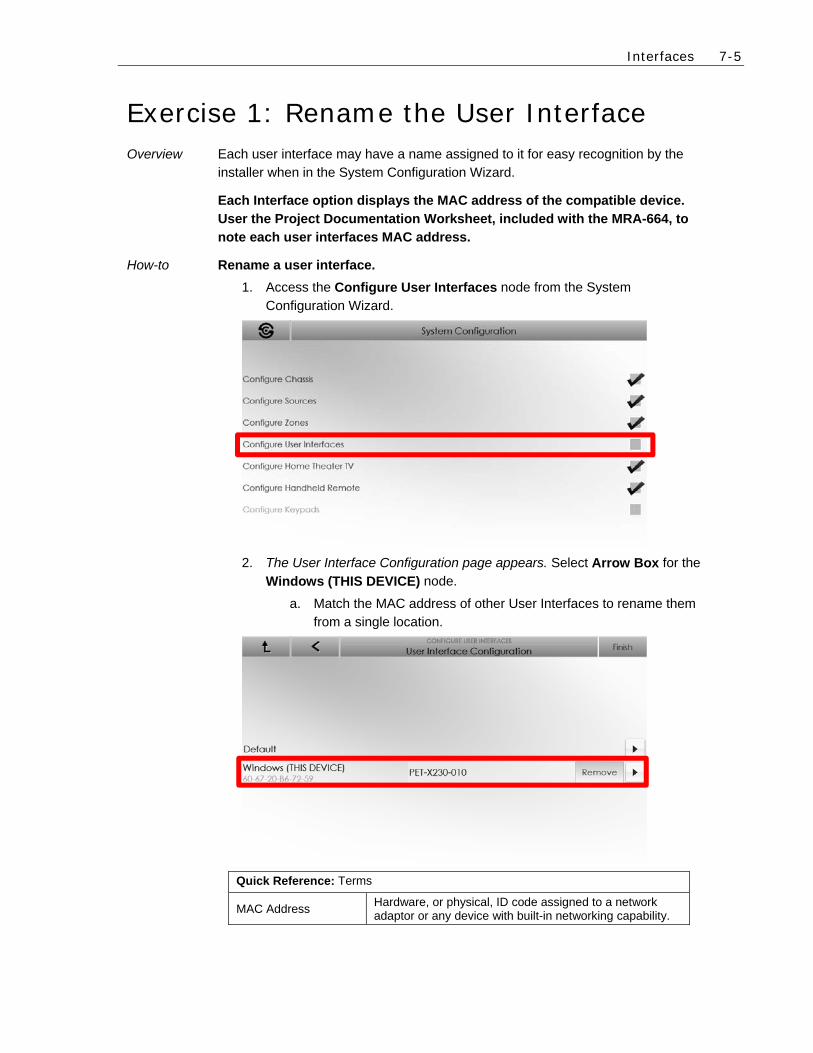
Interfaces 7-5
Exercise 1: Rename the User Interface Overview Each user interface may have a name assigned to it for easy recognition by the
installer when in the System Configuration Wizard.
Each Interface option displays the MAC address of the compatible device. User the Project Documentation Worksheet, included with the MRA-664, to note each user interfaces MAC address.
How-to Rename a user interface.
1. Access the Configure User Interfaces node from the System Configuration Wizard.
2. The User Interface Configuration page appears. Select Arrow Box for the Windows (THIS DEVICE) node.
a. Match the MAC address of other User Interfaces to rename them from a single location.
Quick Reference: Terms
MAC Address Hardware, or physical, ID code assigned to a network adaptor or any device with built-in networking capability.

Interfaces 7-6
3. Select the Windows (THIS DEVICE) Name field. This may be the name of the device as it appears on the network for the selected user interface.
4. The Set Device Name window appears. Use the keyboard on the device configuring the SpeakerCraft system to enter a name for the selected User Interface.
5. When finished naming the zone, press Enter on the keyboard to return to the User Interface Configuration page and verify the new interface name.

Interfaces 7-7
6. Repeat steps 1 – 5 for renaming additional use interfaces.

Interfaces 7-8
Exercise 2: Assigning the Primary Zone Overview A Primary Zone may need to be assigned to a user interface for navigating
directly into the primary zone when the SpeakerCraft Viewer is started. This eliminates having to manually select the zone. All zones assigned to the user interface are still available for viewing by selecting the SpeakerCraft Logo. If manually accessing a zone from a list of all zones that are assigned to the user interface is desired then leave, or set, the Primary Zone field to <NONE>.
How-to Assign a Primary Zone to a user interface.
1. Access the desired interface’s configuration options by selecting the Arrow Box to the right of the user interface.
2. Locate and select the Primary Zone field.

Interfaces 7-9
3. The Set Primary Zone window appears. Select the zone to be the primary zone and select OK.
4. Verify the Primary Zone was set as desired.
5. Repeat steps 1 – 4 to assign a Primary Zone to additional user interfaces.
Note: The images below show the Primary Zone set to Living Room and Other
Zones set to <NONE> for one user interface. The SpeakerCraft Viewer for the
selected user interface will not display the SpeakerCraft Logo in the upper left
corner when only 1 zone is assigned to the selected user interface.

Interfaces 7-10
Exercise 3: Assigning Other Zones Overview Other Zones are zones that a user interface has access to on the All Media page.
Access the All Media page by selecting the SpeakerCraft Logo.
How-to Assign Other Zones to a user interface.
1. Access the desired interface’s configuration options by selecting the Arrow Box to the right of the user interface.
2. Locate and select the Arrow Box for Other Zones.

Interfaces 7-11
3. The Set Other Zones window appears. Select the zone check boxes to remove the zone for the User Interface.
4. Once the zones have been removed from the user interface, select OK to save the setting.
5. Verify the Other Zones are set as desired for the selected User Interface.

Interfaces 7-12
6. Repeat steps 1 – 5 to assign Other Zones to additional user interfaces.
7. When finished assigning zones to user interfaces select Finish.
8. The System Configuration Wizard main page appears. Exit the Configuration
Wizard by selecting the SpeakerCraft Logo and verify each user interface has
the correct zones assigned.
Note: The images below show the Primary Zone set to <NONE> and Other Zones
set to Living Room for one user interface. The SpeakerCraft Viewer for the
selected user interface will not display the SpeakerCraft Logo in the upper left
corner when only 1 zone is assigned to the selected user interface.

Interfaces 7-13
Exercise 4: Change the UI Language Overview The SpeakerCraft MRA Software allows for changing portions of the text
displayed in the viewer to another language. The language choices, asides from English, are Italian, French, Chinese, Swedish, Spanish, or Russian. Once selected portions of the text in the SpeakerCraft Viewer will be displayed as the chosen language.
Note: Some two-device interfaces are only available in English.
Proceed to Exercise 5 if the default English language will be used in the SpeakerCraft Viewer.
How-to Change the Language for the User Interface
1. From the User Interface Configuration page select the Right Arrow to navigate to the User Interface Language Selection page.

Interfaces 7-14
2. On the User Inteface Language Selection page select a desired
language for the SpeakerCraft Viewer’s to display. This exercise will use
Italian as an example.
3. Select Apply to commit changes.
Note: Source and Zone names should be spelled in the native language. Some
device interfaces provide two-way metadata and are only available in English.

Interfaces 7-15
4. When finished assigning a language select Finish.
5. The System Configuration Wizard main page appears. Exit the
Configuration Wizard by selecting the SpeakerCraft Logo and verify
each user interface is correctly configured.

Interfaces 7-16
Exercise 5: Check the Viewer Interface Overview Once all user interfaces have zones assigned to them the SpeakerCraft viewer on
each interface should be checked to verify the settings.
How-to Check the SpeakerCraft Viewer
6. Access the SpeakerCraft Viewer. If you are in the setup wizard press the
SpeakerCraft Logo in the upper left corner.
7. If a Primary Zone was set then the source selection page, or currently
playing source page, will be displayed. Verify the Primary Zone is correct
in the Title Bar.

Interfaces 7-17
8. Press the SpeakerCraft Logo to navigate to the All Media page and verify
the Other Zones are set correctly.
9. Repeat Steps 1 – 3 to verify zone assignment for additional user
interfaces.

Interfaces 7-18
Notes: ________________________________________________________________________
________________________________________________________________________
________________________________________________________________________
________________________________________________________________________
________________________________________________________________________
________________________________________________________________________
________________________________________________________________________
________________________________________________________________________
________________________________________________________________________
________________________________________________________________________
________________________________________________________________________
________________________________________________________________________
________________________________________________________________________
________________________________________________________________________
________________________________________________________________________
________________________________________________________________________
________________________________________________________________________
________________________________________________________________________
________________________________________________________________________
________________________________________________________________________
________________________________________________________________________
________________________________________________________________________
________________________________________________________________________
________________________________________________________________________
________________________________________________________________________
________________________________________________________________________
________________________________________________________________________
________________________________________________________________________
________________________________________________________________________

Lesson 8 Configure Keypads Node
Overview
This lesson goes over how to configure sKP7s for use in a SpeakerCraft system.
You will learn how to:
Navigate the Keypad Configuration page
Rename the Keypad
Assign a Zone
Assign Sources
Assign Favorite Channel to Set Top Box Source
Assign an Audio Scene
Requirements
SpeakerCraft MRA-664 powered on and
connected to a local area network (same
network the programming device will be
connected to).
SpeakerCraft sKP7 connected to the same
network as the MRA-664. (sKP7 is powered
thru PoE, using PoE injectors or a PoE
injecting network switch)
A PC running SpeakerCraft software.
-or-
Tablet running the SpeakerCraft App.

Interfaces 8-2
About the Configure User Interfaces Node Overview This lesson explores the Configure Keypads node and how to assign zones and
source access to the hard buttons on a SpeakerCraft sKP7. The SpeakerCraft sKP7 is a single gang hard button keypad that communicates to the MRA-664 thru the local area network. The sKP7 requires a connection to a PoE, Power over Ethernet, switch or to a PoE injector. The SpeakerCraft sKP7 features include:
Single-gang hard button keypad.
4 configurable hard buttons.
Volume Up, Volume Down, & Zone Off buttons are automatically configured when the sKP7 is assigned to a zone.
Buttons are back lit.
Press & hold to create Audio Presets on the fly.

Interfaces 8-3
Terms Navigating the Configure Keypads Node
The following terms are used in the Configure Keypads lesson:
MAC Address: Media Access Control address, sometimes referred to as a
hardware address or physical address, is a unique ID code assigned by the
manufacturer to a network adaptor, or any device with built-in networking
capability. While an IP address can potentially be assigned to any device, a MAC
address is a static ID code that is unique to each device on the network.
The Configure Keypads node is made up of 1 page:
Keypad Configuration (collapsed): This page displays all the
available sKP7s connected to the same network as the MRA-664. Each
sKP7 lists a MAC address for identification. The sKP7 automatically
appears in the Configure Keypads node when connected to the
network. Select Remove to delete an sKP7 from a system.
Keypad Configuration (expanded): From this page the sKP7 is
renamed for easy identification, a zone is assigned to the sKP7, and
sources are assigned to one of the four configurable buttons on the
sKP7. Some source types may also have additional actions assigned to
them in the Favorite column.

Interfaces 8-4
Exercise 1: Rename the User Interface Overview Each sKP7 is automatically added to the system and displays its MAC address.
The sKP7 may have a name assigned to it for easier recognition by the installer when in the System Configuration Wizard.
Each sKP7 has its MAC address on the front of the device. Use the Project Documentation Worksheet, included with the MRA-664, and note each sKP7 MAC address for easy identification of the sKP7 in the Auirel software.
How-to Rename an sKP7.
1. Access the Configure Keypads node from the System Configuration Wizard.
2. The Keypad Configuration page appears. Select the Arrow Box to the right of the desired sKP7.
a. Match the MAC address of other sKP7s to rename them from a single location.
Quick Reference: Terms
MAC Address Hardware, or physical, ID code assigned to a network adaptor or any device with built-in networking capability.

Interfaces 8-5
3. Select the KP7@MACAddress Name field. Each sKP7 will have a unique MAC address.
4. The Set Device Name window appears. Use the keyboard on the device configuring the SpeakerCraft system to enter a name for the selected sKP7.
5. When finished naming the sKP7, press Enter on the keyboard to return to the Keypad Configuration page and verify the new name.
6. Repeat steps 1 – 5 for renaming additional sKP7s.

Interfaces 8-6
Exercise 2: Assigning a Zone to the sKP7 Overview A zone will need to be assigned to the sKP7 to activate the keypad in the system.
Once a zone is assigned to the sKP7 the volume up, volume down, and Off buttons are automatically configured to control the assigned zone.
How-to Assign a Zone to a sKP7.
1. Access the desired sKP7’s configuration options by selecting the Arrow Box to the right.
2. Locate and select the Zone field.

Interfaces 8-7
3. The Select KP7 Zone window appears. Select the zone to be assigned to the sKP7 and select OK.
4. Verify the Zone was set as desired.
5. Repeat steps 1 – 4 to assign Zones to additional sKP7s.
Note: When a zone is assigned to an sKP7 the volume up, volume down, and off
buttons are automatically configured to control the assigned zone.

Interfaces 8-8
Exercise 3: Assigning Sources Overview The sKP7 may be used to access pre-determined sources in a zone. When a
source is assigned to a source button on the sKP7 the Press & Hold feature cannot be used for that specific source button. Use pre-determined sources when the source setting is to remain the same, such as when custom engraved buttons are being used. SpeakerCraft recommends working with the end user to determine the desired sources to be accessed by the sKP7. When using a source button’s Press & Hold feature on the sKP7 do not configure the desired source button(s) in the SpeakerCraft software. See Exercise 5: Setting Audio Presets for more information.
How-to Assign Sources to a sKP7.
1. Access the desired sKP7’s configuration options by selecting the Arrow Box to the right.
2. Locate and select the Source 1 Field.
Note: Each source field represents one of the four buttons on the sKP7. Some
source types, such as Set Top Box, have additional control options on the sKP7.

Interfaces 8-9
3. The Select KP7 Source 1 window appears. Choose the desired source and select OK.
4. Verify the source was assigned to the desired source field.
5. Repeat steps 1 thru 4 to assign additional sources to the sKP7.
Note: Sources with Favorites, Set Top Boxes, Media Servers, and AM/FM tuners,
have additional functionality. These additional options may not be available until
the source has a favorite added. See exercise 4 for more information.
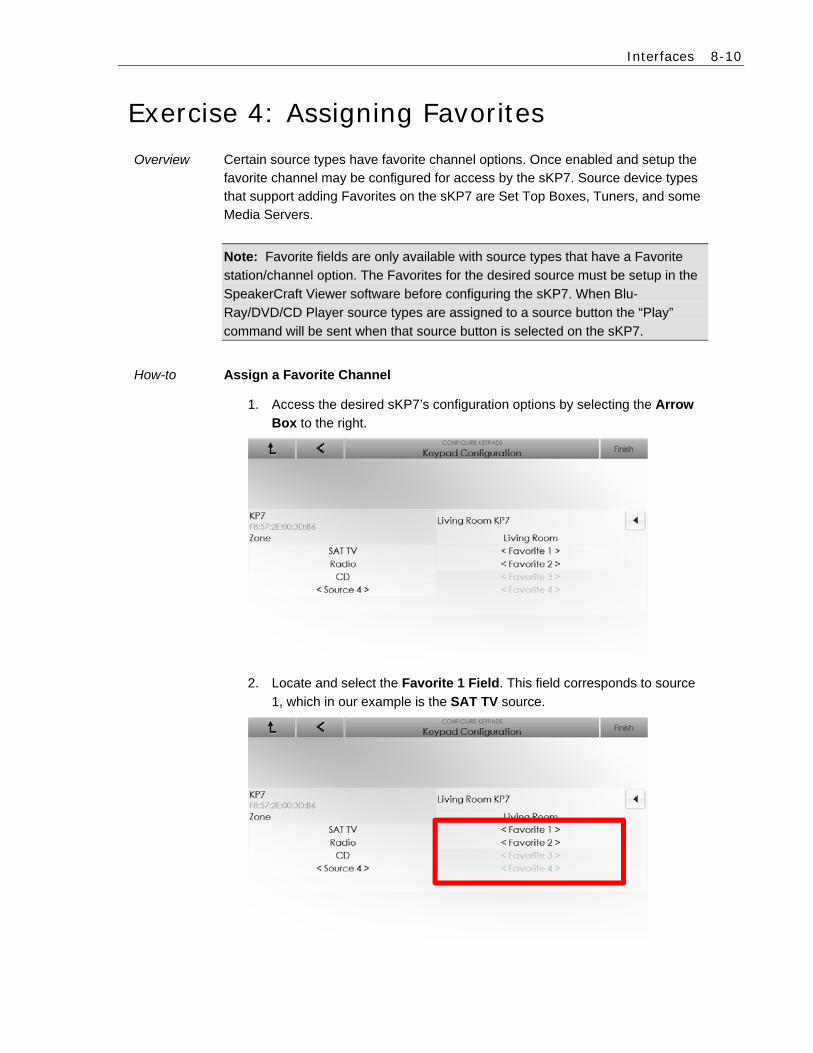
Interfaces 8-10
Exercise 4: Assigning Favorites Overview Certain source types have favorite channel options. Once enabled and setup the
favorite channel may be configured for access by the sKP7. Source device types that support adding Favorites on the sKP7 are Set Top Boxes, Tuners, and some Media Servers.
Note: Favorite fields are only available with source types that have a Favorite
station/channel option. The Favorites for the desired source must be setup in the
SpeakerCraft Viewer software before configuring the sKP7. When Blu-
Ray/DVD/CD Player source types are assigned to a source button the “Play”
command will be sent when that source button is selected on the sKP7.
How-to Assign a Favorite Channel
1. Access the desired sKP7’s configuration options by selecting the Arrow
Box to the right.
2. Locate and select the Favorite 1 Field. This field corresponds to source
1, which in our example is the SAT TV source.

Interfaces 8-11
3. The Select KP7 Favorite 1 window appears. Choose the desired favorite
TV channel and select OK.
4. Verify the desired Favorite channel was added correctly.
5. Repeat Steps 1 – 4 to assign additional favorite stations/channels for
Tuner, Media Server, and additional Set Top Box source types. Select
Finish after all sKP7s have been configured.

Interfaces 8-12
Exercise 5: Setting Audio Presets Overview The sKP7 features a press and hold function for each of the 4 source buttons.
This feature allows an end user to capture an audio source selection and station setting in a zone for quick access any time after being set. The audio preset will need to be setup from a user interface running the SpeakerCraft Viewer software before setting the Audio Preset on the sKP7.
Quick Reference: Press & Hold function for different Source Types
Selected Source: Will Store:
Media Server Source & currently playing streaming service (See Note)
Tuners Source & currently selected AM/FM station from a Two-Way Tuner
CD/DVD/Blu-Ray Source & Play command
Note: When the selected media server’s streaming service is saved a unique
favorite is created in the My Favorites section of the Media Server User Interface.
This unique favorite will include the keypad name and source button as the
favorite name. Do not delete these favorites as the buttons will no longer work.
How-to Save the audio preset
1. Setup a zone with the desired source and station using a compatible
SpeakerCraft viewer, such as an nTP7, mobile device, or PC.
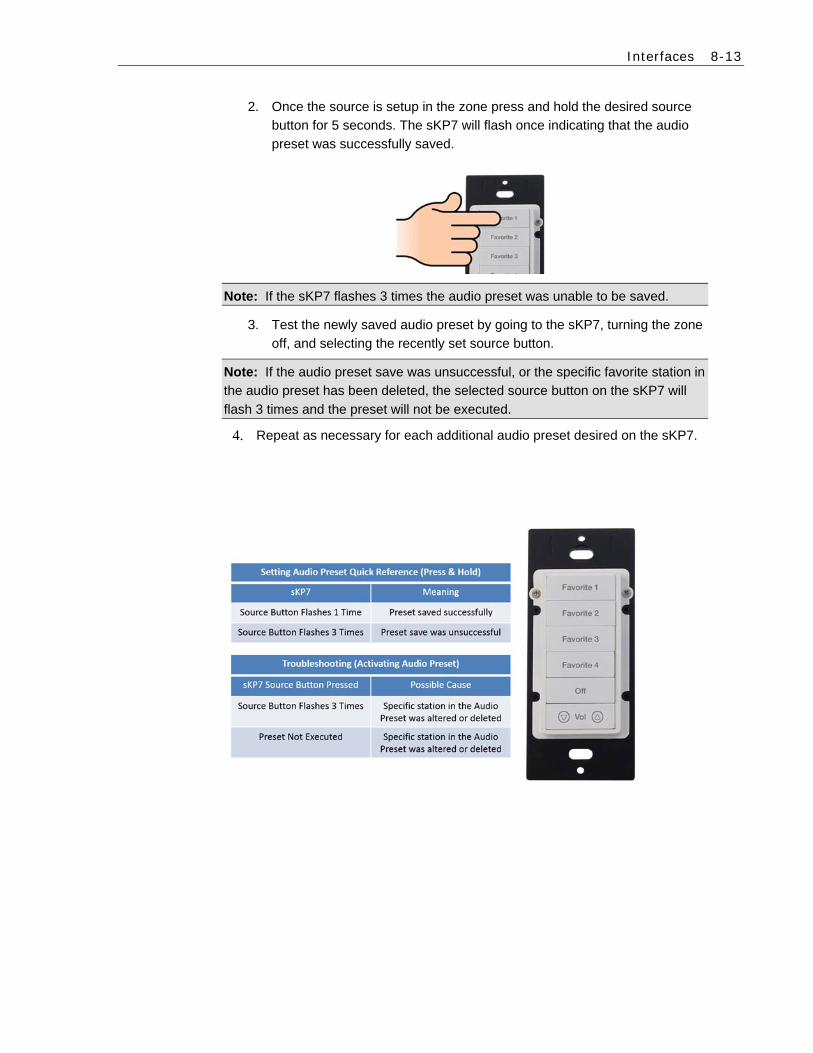
Interfaces 8-13
2. Once the source is setup in the zone press and hold the desired source
button for 5 seconds. The sKP7 will flash once indicating that the audio
preset was successfully saved.
Note: If the sKP7 flashes 3 times the audio preset was unable to be saved.
3. Test the newly saved audio preset by going to the sKP7, turning the zone
off, and selecting the recently set source button.
Note: If the audio preset save was unsuccessful, or the specific favorite station in
the audio preset has been deleted, the selected source button on the sKP7 will
flash 3 times and the preset will not be executed.
4. Repeat as necessary for each additional audio preset desired on the sKP7.

Interfaces 8-14
Notes: ________________________________________________________________________
________________________________________________________________________
________________________________________________________________________
________________________________________________________________________
________________________________________________________________________
________________________________________________________________________
________________________________________________________________________
________________________________________________________________________
________________________________________________________________________
________________________________________________________________________
________________________________________________________________________
________________________________________________________________________
________________________________________________________________________
________________________________________________________________________
________________________________________________________________________
________________________________________________________________________
________________________________________________________________________
________________________________________________________________________
________________________________________________________________________
________________________________________________________________________
________________________________________________________________________
________________________________________________________________________
________________________________________________________________________
________________________________________________________________________
________________________________________________________________________
________________________________________________________________________
________________________________________________________________________
________________________________________________________________________
________________________________________________________________________