ms sql server installation 2008r2
TRANSCRIPT

Harshad Patel: 09328756628
Date: 01‐11‐2013 Page No. :‐ 1
SQL SERVER – 2008 – Step By Step Installation Guide With Images.
(1) STEP 1: Download Microsoft® SQL Server® 2008 Management Studio Express and select either SQLManagementStudio_x64_ENU.exe or SQLManagementStudio_x86_ENU.exe depending on your machine’s OS bit-ness. I’m running Windows 7-64bit so I’ll be detailing the steps as it pertains to that OS.
(2) STEP 2: Make sure you’re logged in as an administrator of the machine then right-click on the exe you downloaded and select “Run as Administrator”. If you’re on Windows 7 then you’ll get a compatibility warning. Click past it for now to continue with the install. Later you’ll need to apply SQL 2008 Service Pack 2.
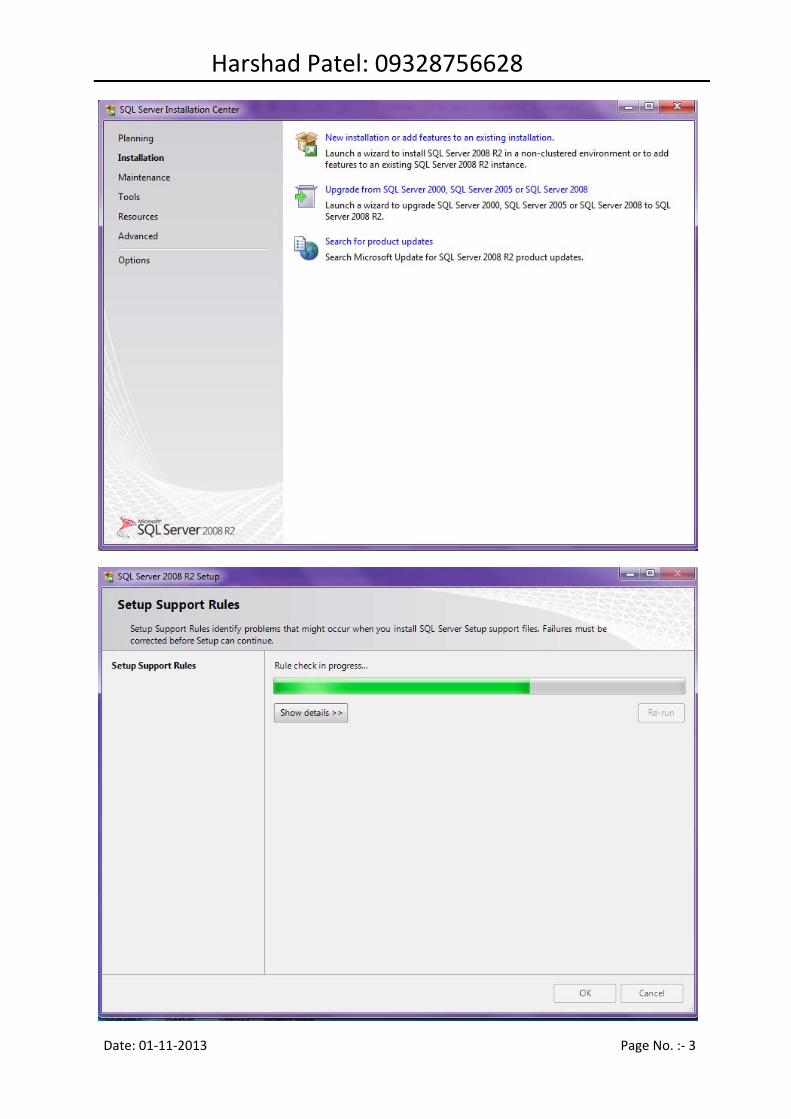
(3) STEP 3: You should now see the “SQL Server Installation Center” window. Yes it looks scary. Select the “Installation” tab.

Harshad Patel: 09328756628
Date: 01‐11‐2013 Page No. :‐ 2
Installation MICROSOFT SQL SERVER 2008 R2 (SQLEXPRWT_x86_ENU)
STEP 1:‐ Click on New Installation or add features to an existing installation.
Harshad Patel: 09328756628
Date: 01‐11‐2013 Page No. :‐ 3

H
Date:
Harshad Pate
01‐11‐2013
l: 0932
875662
28
0
Pagee No. :‐ 4
Harshad Patel: 09328756628
Date: 01‐11‐2013 Page No. :‐ 5
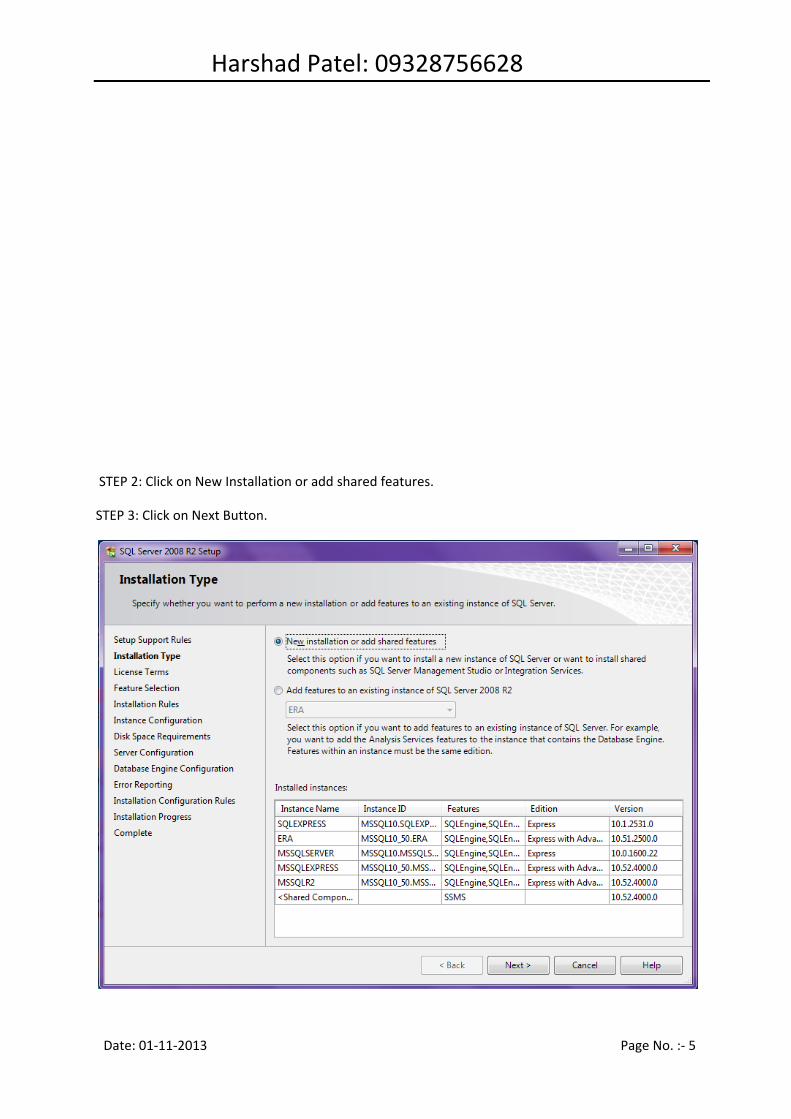
STEP 2: Click on New Installation or add shared features.
STEP 3: Click on Next Button.

Harshad Patel: 09328756628
Date: 01‐11‐2013 Page No. :‐ 6
STEP 4: Mark Check Box
STEP 5: Click on Next Button.

Harshad Patel: 09328756628
Date: 01‐11‐2013 Page No. :‐ 7
STEP 6: Click on Select All Button.
Step 7: Click on Next Button.

Harshad Patel: 09328756628
Date: 01‐11‐2013 Page No. :‐ 8
STEP 8: Select Named Instance button, and type SQLEXPRESS.
STEP 9: Click on Next Button.

Harshad Patel: 09328756628
Date: 01‐11‐2013 Page No. :‐ 9
Step 10: Click on Startup Type of SQL Server Database Enginee will be Automatic and also SQL Server Browser will be Automatic.
STEP 11: Click on Next Button.

Harshad Patel: 09328756628
Date: 01‐11‐2013 Page No. :‐ 10
STEP 12: After Choose Mixed Mode (SQL Server authentication and windows authentication).
STEP 13: Enter Password: You can type password is admin@123, that is optional, you can type another also.
STEP 14: Confirm Password: Same Password type here.
STEP 15: After that Click on Add Current User Button.
STEP 16 : Click on Next Button.

Harshad Patel: 09328756628
Date: 01‐11‐2013 Page No. :‐ 11
STEP 17: Select Check Mark.
STEP 18: Click on Next Button.

Harshad Patel: 09328756628
Date: 01‐11‐2013 Page No. :‐ 12
STEP 19: Click on Close Button.

Harshad Patel: 09328756628
Date: 01‐11‐2013 Page No. :‐ 13
Step 20: Completed installation process. You can click on start button, Go to All Programs, after click on Microsoft SQL Server 2008 R2, Click on SQL Server Management Studio.
OR

Harshad Patel: 09328756628
Date: 01‐11‐2013 Page No. :‐ 14
Step 20: Short Way for open the SQL Server 2008 R2.
Click on Start Button, Type SSMS and press Enter Button.
STEP 21: How to open Microsoft SQL Server 2008 R2 Database. Please follow Step by Step Images.

Harshad Patel: 09328756628
Date: 01‐11‐2013 Page No. :‐ 15
STEP 22: Select Server Name first, Enter the Login and Password.
Login is by default sa. This is Fixed.

Harshad Patel: 09328756628
Date: 01‐11‐2013 Page No. :‐ 16
Login: sa
Password: admin@123 [Type password whatever, When you given Password]

Harshad Patel: 09328756628
Date: 01‐11‐2013 Page No. :‐ 17
STEP 23: Connect databse.
STEP 24: How to Restore Database.
Right click on Databases, Choose Restore Database.

Harshad Patel: 09328756628
Date: 01‐11‐2013 Page No. :‐ 18
STEP 25: After clicked on Restore Database, Select the From Device. You get Specify Database Dialog Box.

Harshad Patel: 09328756628
Date: 01‐11‐2013 Page No. :‐ 19
STEP 26: Click on Add Button.

Harshad Patel: 09328756628
Date: 01‐11‐2013 Page No. :‐ 20
STEP 27: Please select your Database [Backup File] in your specific Hard Drive like F Drive.
In this dialog box have my backup file is bckp_14102013.bak

Harshad Patel: 09328756628
Date: 01‐11‐2013 Page No. :‐ 21
STEP 28: Select Check Mark, and Choose To Database like SPMS [Name of Database], You can see in below image. And Click on Ok Button.

Harshad Patel: 09328756628
Date: 01‐11‐2013 Page No. :‐ 22
STEP 29: Restore Database Successfully.

Harshad Patel: 09328756628
Date: 01‐11‐2013 Page No. :‐ 23
STEP 30: You can access your Database.

Harshad Patel: 09328756628
Date: 01‐11‐2013 Page No. :‐ 24
STEP 31: How to make a Back Up of your Database.
Right Click on your database ‐> Click on Tasks ‐> Again click on Back Up.

Harshad Patel: 09328756628
Date: 01‐11‐2013 Page No. :‐ 25
STEP 32: First Click on Remove Button. After click on Add Button.
Harshad Patel: 09328756628
Date: 01‐11‐2013 Page No. :‐ 26
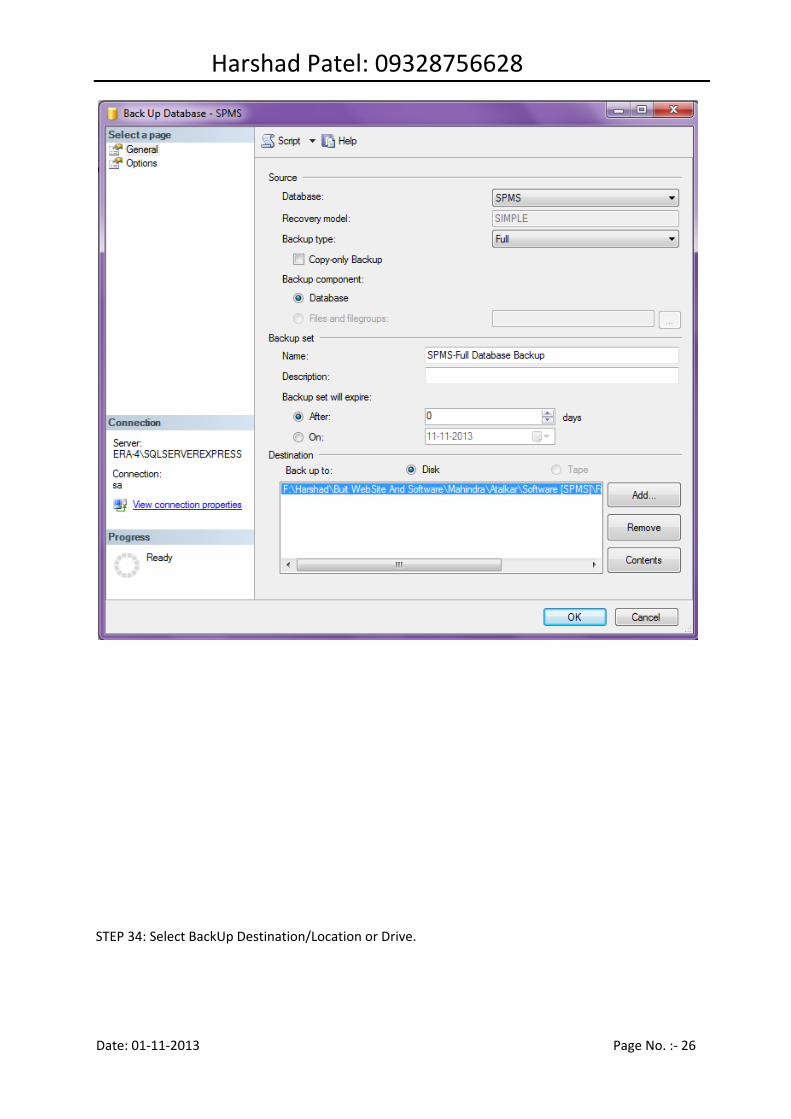
STEP 34: Select BackUp Destination/Location or Drive.

Harshad Patel: 09328756628
Date: 01‐11‐2013 Page No. :‐ 27
STEP 35: Select the Location of Database where you want to keep. After give the File Name.

Harshad Patel: 09328756628
Date: 01‐11‐2013 Page No. :‐ 28
STEP 36: Click on Ok Button.

Harshad Patel: 09328756628
Date: 01‐11‐2013 Page No. :‐ 29
STEP 37: Click on Ok Button.

Harshad Patel: 09328756628
Date: 01‐11‐2013 Page No. :‐ 30
Step 38 : Back Up Database Successfully.

Harshad Patel: 09328756628
Date: 01‐11‐2013 Page No. :‐ 31