mt canvus 2.0 server installation manual...mt canvus 2.0 server installation manual | 5 contents ...
TRANSCRIPT
Revision 14, for MT Canvus 2.0.1 April 2018
MT CANVUS 2.0
SERVER INSTALLATION MANUAL

MT CANVUS 2.0 SERVER INSTALLATION MANUAL | 2
www.multitaction.com
Copyright © 2018 MultiTaction. All rights reserved.
This manual is intended for the owners and operators of MT Canvus. It contains guidelines for the proper
usage of the product. Information in this manual is subject to change without prior notice to product owners.
For the latest product details and guidelines please visit the product website.
Trademarks
MultiTaction, Cornerstone, Codice, MT Canvus and MT Canvus are trademarks or registered trademarks of
MultiTaction.
Intel, Core and Xeon are trademarks of Intel Corporation or its subsidiaries in the U.S. and/or other countries.
All other trademarks are the property of their respective owners.
MT CANVUS 2.0 SERVER INSTALLATION MANUAL | 3 CONTENTS
www.multitaction.com
Contents
MT Canvus 2.0 Server Installation Manual ....................................................................... 1
Contents ...................................................................................................................... 3
1 Introduction .............................................................................................................. 6
1.1 MultiTaction support ................................................................................................ 6
1.2 Standalone and connected deployments ................................................................. 7
1.3 Shared canvases and local canvases ......................................................................... 8
1.4 MT Canvus components in a connected deployment .............................................. 8
2 Server requirements ................................................................................................... 9
3 Deployment overview ................................................................................................ 10
4 Set up a proxy server ................................................................................................. 11
4.1 Set up a proxy connection for MT Canvus .............................................................. 11
4.2 Set up a proxy connection for apt .......................................................................... 11
4.3 Set up a proxy connection for OpenVPN ................................................................ 12
5 Create an MT Canvus server database ......................................................................... 14
5.1 Ubuntu host computers ......................................................................................... 14
5.1.1 Verify the requirements .............................................................................. 14 5.1.2 Install PostgreSQL ....................................................................................... 14 5.1.3 Set up an MT Canvus database and user .................................................... 14 5.1.4 Optimize database performance ................................................................ 14
5.2 Windows host computers....................................................................................... 15
5.2.1 Verify the requirements .............................................................................. 15 5.2.2 Install PostgreSQL ....................................................................................... 15 5.2.3 Set up the Canvus Connect database.......................................................... 15 5.2.4 Optimize database performance ................................................................ 15
6 Install an MT Canvus server ........................................................................................ 16
6.1 Ubuntu host computers ......................................................................................... 16
6.1.1 Install from an installation package ............................................................ 16 6.1.2 Install using the apt command .................................................................... 16
6.2 Windows host computer ........................................................................................ 17
7 Where are my files?................................................................................................... 18
7.1 Where is the root folder? ....................................................................................... 18
7.2 Where is mt-canvus-server.ini? .............................................................................. 18
7.2.1 Where is mt-canvus-server.ini on Ubuntu computers? .............................. 18 7.2.2 Where is mt-canvus-server.ini on Windows computers? ........................... 19

MT CANVUS 2.0 SERVER INSTALLATION MANUAL | 4 CONTENTS
www.multitaction.com
7.3 Where are the log files? ......................................................................................... 19
7.3.1 MT Canvus server........................................................................................ 19 7.3.2 MT Canvus dashboard................................................................................. 19
7.4 Where is my server license? ................................................................................... 20
8 Licensing .................................................................................................................. 21
8.1 Obtain an activation key ......................................................................................... 21
8.2 Activate your license .............................................................................................. 21
8.2.1 Ubuntu servers............................................................................................ 21 8.2.2 Windows servers ......................................................................................... 22
8.3 Generate a license request while offline ................................................................ 22
8.3.1 Ubuntu servers............................................................................................ 22 8.3.2 Windows servers ......................................................................................... 23
8.4 Obtain a signed license while offline ...................................................................... 23
8.5 Activate your license while offline .......................................................................... 24
8.5.1 Ubuntu servers............................................................................................ 24 8.5.2 Windows servers ......................................................................................... 24
8.6 If users cannot open shared canvases because of a server license problem ......... 25
9 Configure the MT Canvus server ................................................................................. 26
9.1 About mt-canvus-server.ini .................................................................................... 26
9.1.1 Example versions and working versions...................................................... 26 9.1.2 Where is mt-canvus.in? .............................................................................. 26 9.1.3 Backslashes in mt-canvus-server.ini ............................................................ 26
9.2 Identify the server database ................................................................................... 27
9.3 Define which types of connection are accepted .................................................... 28
9.4 Set up password-protected connections ................................................................ 29
9.4.1 Define a connection password on the MT Canvus server ........................... 29 9.4.2 Add the connection password to your MT Canvus clients .......................... 29
9.5 Set up certificates for encrypted connections ........................................................ 30
9.5.1 Self-signed certificates ................................................................................ 31
9.6 Pin inactive widgets automatically ......................................................................... 32
9.7 Advanced configuration settings ............................................................................ 32
9.8 Server log files ........................................................................................................ 32
10 Start or stop the MT Canvus server ............................................................................ 33
10.1 Windows servers .................................................................................................. 33
10.1.1 Manually install the service....................................................................... 33
10.2 Ubuntu servers ..................................................................................................... 34
10.3 Confirm the database tables have been created.................................................. 34
11 Dashboard .............................................................................................................. 36
11.1 About the dashboard ............................................................................................ 36
11.2 Configure the dashboard ...................................................................................... 37
MT CANVUS 2.0 SERVER INSTALLATION MANUAL | 5 CONTENTS
www.multitaction.com
11.3 Start or stop the dashboard ................................................................................. 38
11.3.1 Ubuntu servers.......................................................................................... 38 11.3.2 Windows servers ....................................................................................... 39
11.4 Dashboard log files ............................................................................................... 39
11.5 Log in to the dashboard ........................................................................................ 39
11.6 Manage canvas passwords ................................................................................... 41
11.6.1 About password protection ...................................................................... 41 11.6.2 Set or remove canvas passwords .............................................................. 41
11.7 Set the canvas state .............................................................................................. 43
12 Back up and restore the MT Canvus server ................................................................. 44
12.1 Create a server backup ......................................................................................... 44
12.1.1 Ubuntu server example............................................................................. 44 12.1.2 Windows server example .......................................................................... 44
12.2 Restore a server backup ....................................................................................... 45
12.2.1 Ubuntu server example............................................................................. 45 12.2.2 Windows server example .......................................................................... 45
13 Upgrade the MT Canvus server ................................................................................. 46
13.1 Ubuntu servers ..................................................................................................... 46
13.2 Windows servers .................................................................................................. 46
14 Shared canvas sessions ............................................................................................ 47
MT CANVUS 2.0 SERVER INSTALLATION MANUAL | 6 1. INTRODUCTION
www.multitaction.com
1 Introduction
This manual describes how to install an MT Canvus 2.0 server.
MT Canvus is an engaging and intuitive software solution for interactive video walls. It
helps organizations to visualize big data, socialize ideas, educate clients and work
collaboratively.
Multiple users can work on a video wall at the same time, using hands, fingers, mice and
infrared pens to interact with screen content. MT Canvus also allows users to share
content from their smart devices onto the video wall and, conversely, to share content
from the video wall onto external monitors, projectors, or virtual webcams.
MT Canvus servers allow connected deployments. With a connected MT Canvus
deployment, geographically dispersed MT Canvus users can collaborate on shared
canvases. For example, teams in separate offices can simultaneously work on the same
canvas, with each team able to see updates made by other teams in real time.
For a summary of connected deployments and standalone deployments, see section 1.1.
MT Canvus on an interactive video wall
Note: For a connected MT Canvus deployment, you must install an MT Canvus server plus
two or more MT Canvus clients. For details, see the MT Canvus Client Installation Manual
Registered users can download this manual from:
https://cornerstone.multitouch.fi/mt-canvus-manuals.
1.1 MultiTaction support
If you need technical assistance, please contact MultiTaction Support:
https://www.multitaction.com/support-services
MT CANVUS 2.0 SERVER INSTALLATION MANUAL | 7 1. INTRODUCTION
www.multitaction.com
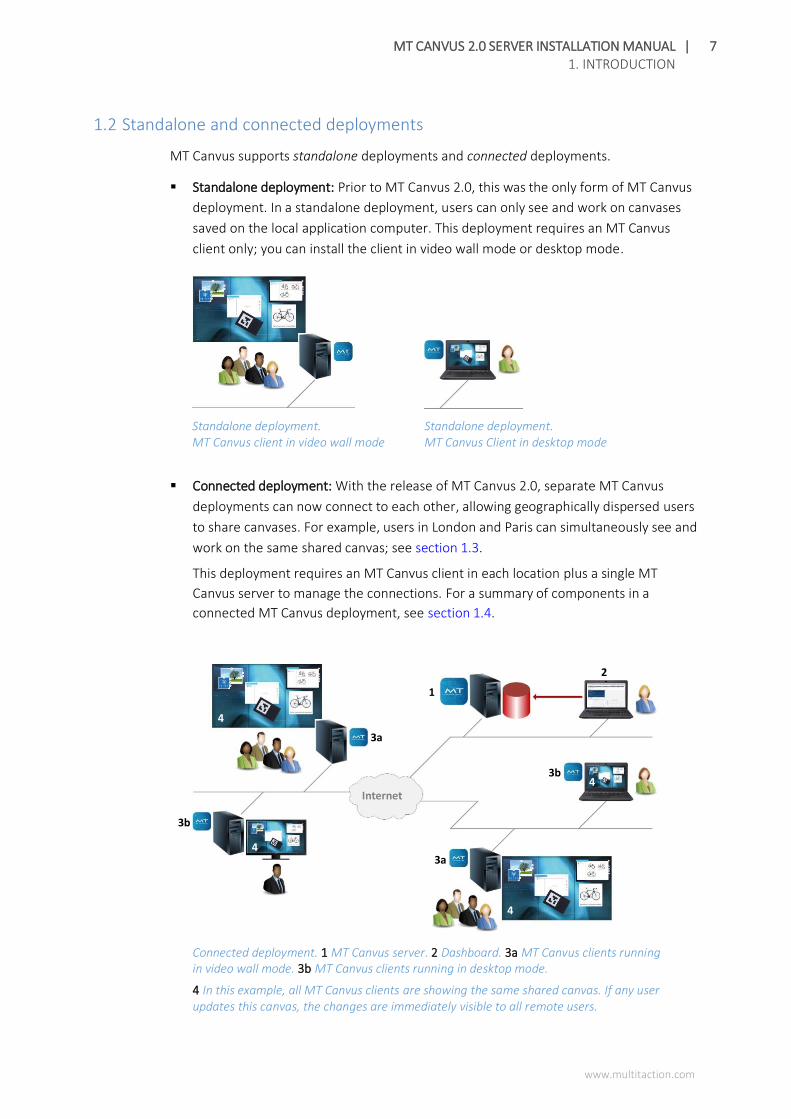
1.2 Standalone and connected deployments
MT Canvus supports standalone deployments and connected deployments.
▪ Standalone deployment: Prior to MT Canvus 2.0, this was the only form of MT Canvus
deployment. In a standalone deployment, users can only see and work on canvases
saved on the local application computer. This deployment requires an MT Canvus
client only; you can install the client in video wall mode or desktop mode.
Standalone deployment. MT Canvus client in video wall mode
Standalone deployment. MT Canvus Client in desktop mode
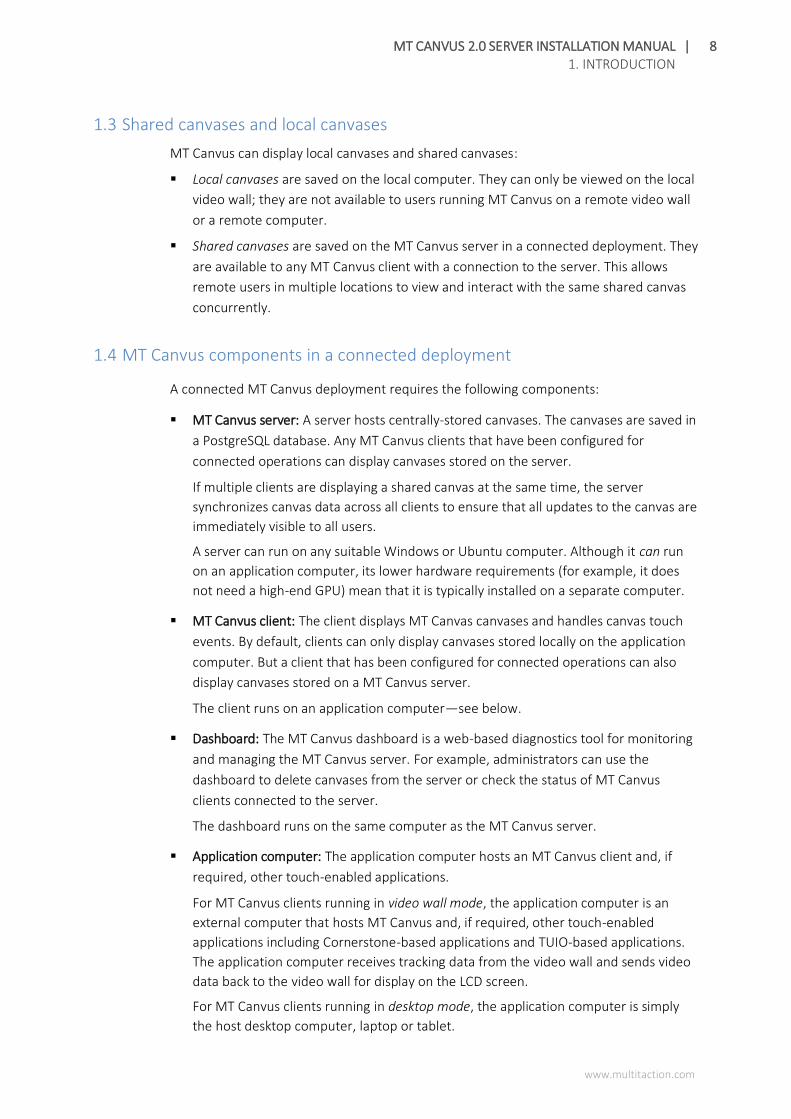
▪ Connected deployment: With the release of MT Canvus 2.0, separate MT Canvus
deployments can now connect to each other, allowing geographically dispersed users
to share canvases. For example, users in London and Paris can simultaneously see and
work on the same shared canvas; see section 1.3.
This deployment requires an MT Canvus client in each location plus a single MT
Canvus server to manage the connections. For a summary of components in a
connected MT Canvus deployment, see section 1.4.
Connected deployment. 1 MT Canvus server. 2 Dashboard. 3a MT Canvus clients running in video wall mode. 3b MT Canvus clients running in desktop mode.
4 In this example, all MT Canvus clients are showing the same shared canvas. If any user updates this canvas, the changes are immediately visible to all remote users.
1
3a
3b
3b
3a
Internet
2
4
4
4
4
MT CANVUS 2.0 SERVER INSTALLATION MANUAL | 8 1. INTRODUCTION
www.multitaction.com
1.3 Shared canvases and local canvases
MT Canvus can display local canvases and shared canvases:
▪ Local canvases are saved on the local computer. They can only be viewed on the local
video wall; they are not available to users running MT Canvus on a remote video wall
or a remote computer.
▪ Shared canvases are saved on the MT Canvus server in a connected deployment. They
are available to any MT Canvus client with a connection to the server. This allows
remote users in multiple locations to view and interact with the same shared canvas
concurrently.
1.4 MT Canvus components in a connected deployment
A connected MT Canvus deployment requires the following components:
▪ MT Canvus server: A server hosts centrally-stored canvases. The canvases are saved in
a PostgreSQL database. Any MT Canvus clients that have been configured for
connected operations can display canvases stored on the server.
If multiple clients are displaying a shared canvas at the same time, the server
synchronizes canvas data across all clients to ensure that all updates to the canvas are
immediately visible to all users.
A server can run on any suitable Windows or Ubuntu computer. Although it can run
on an application computer, its lower hardware requirements (for example, it does
not need a high-end GPU) mean that it is typically installed on a separate computer.
▪ MT Canvus client: The client displays MT Canvas canvases and handles canvas touch
events. By default, clients can only display canvases stored locally on the application
computer. But a client that has been configured for connected operations can also
display canvases stored on a MT Canvus server.
The client runs on an application computer—see below.
▪ Dashboard: The MT Canvus dashboard is a web-based diagnostics tool for monitoring
and managing the MT Canvus server. For example, administrators can use the
dashboard to delete canvases from the server or check the status of MT Canvus
clients connected to the server.
The dashboard runs on the same computer as the MT Canvus server.
▪ Application computer: The application computer hosts an MT Canvus client and, if
required, other touch-enabled applications.
For MT Canvus clients running in video wall mode, the application computer is an
external computer that hosts MT Canvus and, if required, other touch-enabled
applications including Cornerstone-based applications and TUIO-based applications.
The application computer receives tracking data from the video wall and sends video
data back to the video wall for display on the LCD screen.
For MT Canvus clients running in desktop mode, the application computer is simply
the host desktop computer, laptop or tablet.
MT CANVUS 2.0 SERVER INSTALLATION MANUAL | 9 2. SERVER REQUIREMENTS
www.multitaction.com
2 Server requirements
An MT Canvus server requires the following hardware:
▪ CPU: Quad-core Intel i7 or Xeon CPU. Minimum 3.0 GHz.
▪ RAM: 16GB
▪ GPU: The server has no graphics requirements.
▪ Hard drive: Server grade SSD, 1TB. Actual disk space requirements will depend on the
assets (videos, images and so on) in the shared canvases.
▪ Network connection: Gigabit Ethernet. We recommend Intel chipsets.
The server also requires the following software:
▪ OS: The MT Canvus 2.0 server supports:
- Linux: Ubuntu 16.04 LTS distribution only
You can find installation instructions and OS images at www.ubuntu.com.
- Windows: Windows 10 Professional and Windows Server 2016
▪ Database: The host computer must be running PostgreSQL. We recommend:
- Linux: PostgreSQL 9.5
- Windows: PostgreSQL 9.6
Note: MT Canvus servers have been tested using the PostgreSQL versions listed above.
Servers may deploy successfully using other PostgreSQL versions, but these have not
been tested.
▪ MultiTaction Cornerstone: The host computer requires the Cornerstone runtime.
Cornerstone is installed automatically when you install MT Canvus 2.0. You do not
need to manually install Cornerstone.

MT CANVUS 2.0 SERVER INSTALLATION MANUAL | 10 3. DEPLOYMENT OVERVIEW
www.multitaction.com
3 Deployment overview
Briefly, setting up an MT Canvus server involves the following steps:
1. (Optional) Set up a proxy server: If your office uses a proxy server for internet
connections, you must configure MT Canvus and, optionally, OpenVPN and apt to use
the proxy server. See section 4.
2. Create an MT Canvus server database: First, you must install PostgreSQL. Then you
must set up the required database and DB user. Finally, you must optimize MT
Canvus server performance. See section 5.
3. Install the MT Canvus server: You can install an MT Canvus server on an Ubuntu or
Windows host computer. For Ubuntu servers, you can download and manually run an
installation package, or you install the server using apt. For Windows servers, you
must download and run the appropriate server installer. See section 6.
4. Activate your license: After installing your MT Canvus server, you must obtain a
license activation key from MultiTaction and activate your license. See section 7.
5. Configure the MT Canvus server: You must create and edit a working version of the
configuration file, mt-canvus-server.ini. Specifically, you must provide details about
the PostgreSQL database and specify connection types are accepted by the server
(TCP, Web Socket and Secure Web Socket). See section 9.
6. Set up the MT Canvus dashboard: The dashboard is a web-based tool for monitoring
and managing the MT Canvus server. To set up the dashboard, you edit the
configuration file, mt-canvus-server.ini. See section 10.
7. Start the MT Canvus server. See section 10.

MT CANVUS 2.0 SERVER INSTALLATION MANUAL | 11 4. SET UP A PROXY SERVER
www.multitaction.com
4 Set up a proxy server
If your office uses a proxy server for internet connections, you must configure
MT Canvus and, optionally, OpenVPN and apt to use the proxy server.
4.1 Set up a proxy connection for MT Canvus
Follow these steps on the host computer designated as your MT Canvus server.
▪ Ubuntu computers
a. Right-click the desktop and launch a terminal emulator.
b. Edit the /etc/environment configuration file using an editor such as nano or vim.
For example: $ sudo vim /etc/environment
c. Append the following lines to this file:
http_proxy=http://<proxy_name>:<proxy_port>
https_proxy=https://<proxy_name>:<proxy_port>
Where:
<proxy_name> is the name or IP address of your proxy server
<proxy_port> is the port for the proxy server.
d. Save the file and exit the editor.
e. Restart the application computer.
▪ Windows computers
a. Go to the Network & Internet applet in Windows Settings.
b. Go to the Proxy page. Then go to the Manual proxy setup section.
c. Set ‘Use a proxy server’ to On.
d. Save the new settings and close Windows Settings.
4.2 Set up a proxy connection for apt
(Supported on Ubuntu computers only)
You will need apt to install OpenVPN and the MultiTaction tool for configuring OpenVPN,
mt-canvus-setup; see section 4.3
To permanently configure apt to use a proxy server, we recommend specifying the proxy
server in a separate file under /etc/apt/apt.conf.d/ ie, we do not recommend specifying
the proxy server in apt.conf.
Follow these steps on the host computer.
1. Right-click the desktop and launch a terminal emulator.
2. Create the /etc/apt/apt.conf.d/30proxy configuration file using an editor such as nano
or vim. For example:
$ sudo vim /etc/apt/apt.conf.d/30proxy
MT CANVUS 2.0 SERVER INSTALLATION MANUAL | 12 4. SET UP A PROXY SERVER
www.multitaction.com
3. Add the following line to this file: acquire::http::Proxy
"http://[<user>:<password>@]<proxy_name>:<proxy_port>/";
Where:
[<user>:<password>@] specify the name and password of a valid user
account for accessing the proxy server. If your proxy server does not require
authentication, you can omit these details
<proxy_name> is the name of your proxy server
<proxy_port> is the port for the proxy server. For example, 8080.
For example: acquire::http::Proxy
"http://srimmel:[email protected]:8080/";
4. Save the file and exit the editor.
5. Restart the application computer.
4.3 Set up a proxy connection for OpenVPN
(Supported on Ubuntu computers only)
MultiTaction support staff use OpenVPN to remotely collect diagnostic data (log files,
crash dumps, and so on) if issues arise on your MT Canvus installation. From the
OpenVPN article on Wikipedia:
“OpenVPN is an open-source software application that implements virtual private
network (VPN) techniques for creating secure point-to-point or site-to-site
connections in routed or bridged configurations and remote access facilities.”
To allow MultiTaction support staff to remotely access your MT Canvus server, we
recommend that you install OpenVPN and enable it for remote access.
If you want to enable remote access and your office uses a proxy server for internet
connections, you must configure OpenVPN to use the proxy server. MultiTaction provide
the mt-canvus-setup tool for configuring OpenVPN.
Follow these steps on the host computer:
1. Run this command to install OpenVPN and mt-canvus-setup: $ sudo apt-get install mt-canvus-setup
2. Run this mt-canvus-setup command to enable remote access for OpenVPN: $ sudo mt-canvus-setup --enable-remote-access
Note: If you subsequently want to disable remote access, run: $ sudo mt-canvus-setup --disable-remote-access.
3. Locate the OpenVPN configuration file:
/etc/openvpn/mt-canvus.conf.available
4. Using your preferred editor, edit mt-canvus.conf.available:
a. Delete the following lines:
remote nexus.multitouch.fi 443

MT CANVUS 2.0 SERVER INSTALLATION MANUAL | 13 4. SET UP A PROXY SERVER
www.multitaction.com
resolv-retry infinite
nobind
b. Add the following lines, including the <connection> tags:
<connection>
remote nexus.multitouch.fi 443
nobind
</connection>
<connection>
remote nexus.multitouch.fi 443 tcp
http-proxy <proxy name> <proxy port>
http-proxy-retry
nobind
</connection>
Where:
<proxy_name> is the name or IP address of your proxy server
<proxy_port> is the port for the proxy server. (This is typically 2138.)
Tip: The OpenVPN <connection> tag defines a client connection profile ie, a group
of options that collectively define a connection to a specific OpenVPN server. If an
OpenVPN configuration file contains multiple connection profiles, an OpenVPN client
will try each profile sequentially until it successfully connects to a server. Full details
are in the OpenVPN 2.4 manual:
https://community.openvpn.net/openvpn/wiki/Openvpn24ManPage
5. Do one of the following:
- Run this command to restart Open VPN:
$ sudo service openvpn restart
- Run these commands to re-enable remote access: $ sudo mt-canvus-setup --disable-remote-access
$ sudo mt-canvus-setup --enable-remote-access
MT CANVUS 2.0 SERVER INSTALLATION MANUAL | 14 5. CREATE AN MT CANVUS SERVER DATABASE
www.multitaction.com
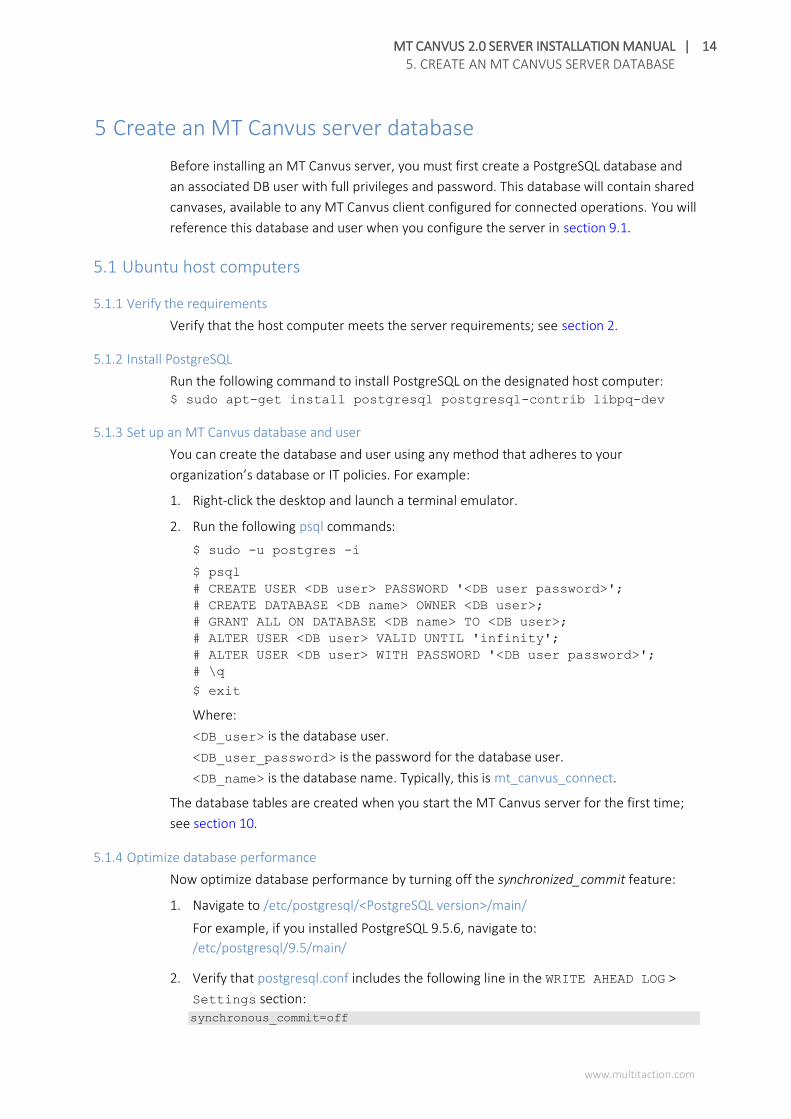
5 Create an MT Canvus server database
Before installing an MT Canvus server, you must first create a PostgreSQL database and
an associated DB user with full privileges and password. This database will contain shared
canvases, available to any MT Canvus client configured for connected operations. You will
reference this database and user when you configure the server in section 9.1.
5.1 Ubuntu host computers
5.1.1 Verify the requirements
Verify that the host computer meets the server requirements; see section 2.
5.1.2 Install PostgreSQL
Run the following command to install PostgreSQL on the designated host computer: $ sudo apt-get install postgresql postgresql-contrib libpq-dev
5.1.3 Set up an MT Canvus database and user
You can create the database and user using any method that adheres to your
organization’s database or IT policies. For example:
1. Right-click the desktop and launch a terminal emulator.
2. Run the following psql commands:
$ sudo -u postgres -i
$ psql
# CREATE USER <DB user> PASSWORD '<DB user password>';
# CREATE DATABASE <DB name> OWNER <DB user>;
# GRANT ALL ON DATABASE <DB name> TO <DB user>;
# ALTER USER <DB user> VALID UNTIL 'infinity';
# ALTER USER <DB user> WITH PASSWORD '<DB user password>';
# \q
$ exit
Where:
<DB_user> is the database user.
<DB_user_password> is the password for the database user.
<DB_name> is the database name. Typically, this is mt_canvus_connect.
The database tables are created when you start the MT Canvus server for the first time;
see section 10.
5.1.4 Optimize database performance
Now optimize database performance by turning off the synchronized_commit feature:
1. Navigate to /etc/postgresql/<PostgreSQL version>/main/
For example, if you installed PostgreSQL 9.5.6, navigate to:
/etc/postgresql/9.5/main/
2. Verify that postgresql.conf includes the following line in the WRITE AHEAD LOG >
Settings section: synchronous_commit=off
MT CANVUS 2.0 SERVER INSTALLATION MANUAL | 15 5. CREATE AN MT CANVUS SERVER DATABASE
www.multitaction.com
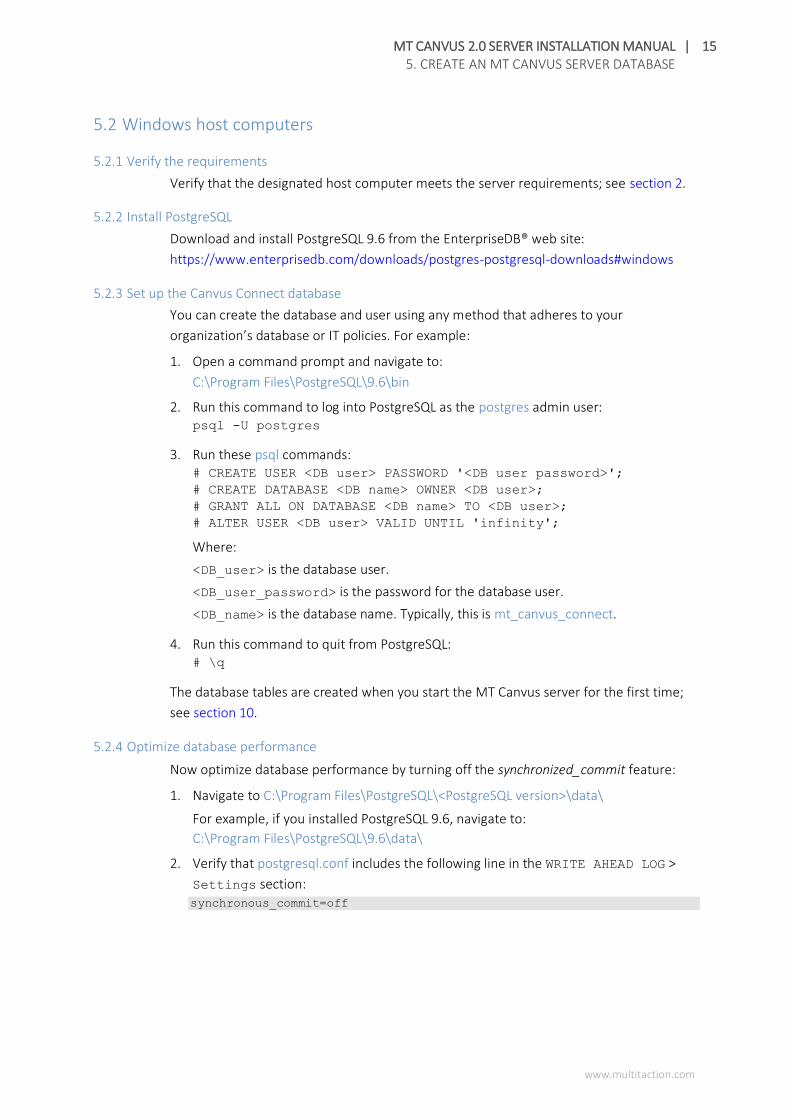
5.2 Windows host computers
5.2.1 Verify the requirements
Verify that the designated host computer meets the server requirements; see section 2.
5.2.2 Install PostgreSQL
Download and install PostgreSQL 9.6 from the EnterpriseDB® web site:
https://www.enterprisedb.com/downloads/postgres-postgresql-downloads#windows
5.2.3 Set up the Canvus Connect database
You can create the database and user using any method that adheres to your
organization’s database or IT policies. For example:
1. Open a command prompt and navigate to:
C:\Program Files\PostgreSQL\9.6\bin
2. Run this command to log into PostgreSQL as the postgres admin user: psql -U postgres
3. Run these psql commands: # CREATE USER <DB user> PASSWORD '<DB user password>';
# CREATE DATABASE <DB name> OWNER <DB user>;
# GRANT ALL ON DATABASE <DB name> TO <DB user>;
# ALTER USER <DB user> VALID UNTIL 'infinity';
Where:
<DB_user> is the database user.
<DB_user_password> is the password for the database user.
<DB_name> is the database name. Typically, this is mt_canvus_connect.
4. Run this command to quit from PostgreSQL: # \q
The database tables are created when you start the MT Canvus server for the first time;
see section 10.
5.2.4 Optimize database performance
Now optimize database performance by turning off the synchronized_commit feature:
1. Navigate to C:\Program Files\PostgreSQL\<PostgreSQL version>\data\
For example, if you installed PostgreSQL 9.6, navigate to:
C:\Program Files\PostgreSQL\9.6\data\
2. Verify that postgresql.conf includes the following line in the WRITE AHEAD LOG >
Settings section: synchronous_commit=off
MT CANVUS 2.0 SERVER INSTALLATION MANUAL | 16 6. INSTALL AN MT CANVUS SERVER
www.multitaction.com
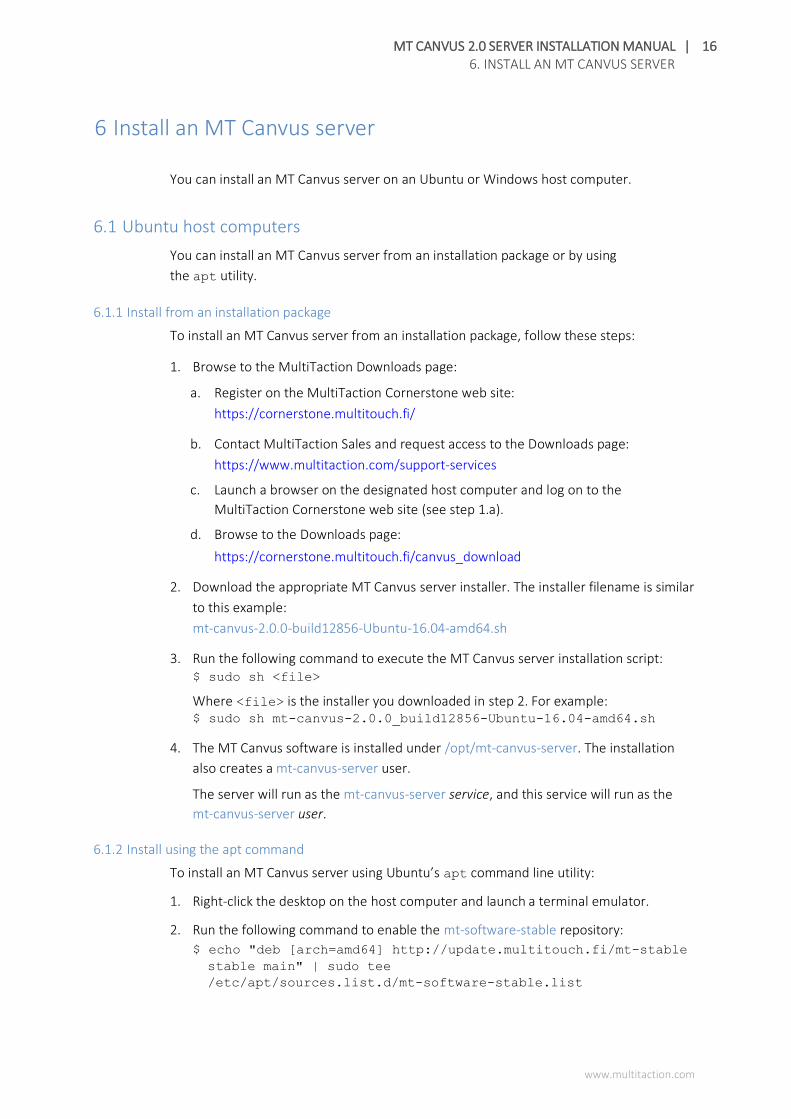
6 Install an MT Canvus server
You can install an MT Canvus server on an Ubuntu or Windows host computer.
6.1 Ubuntu host computers
You can install an MT Canvus server from an installation package or by using
the apt utility.
6.1.1 Install from an installation package
To install an MT Canvus server from an installation package, follow these steps:
1. Browse to the MultiTaction Downloads page:
a. Register on the MultiTaction Cornerstone web site:
https://cornerstone.multitouch.fi/
b. Contact MultiTaction Sales and request access to the Downloads page:
https://www.multitaction.com/support-services
c. Launch a browser on the designated host computer and log on to the
MultiTaction Cornerstone web site (see step 1.a).
d. Browse to the Downloads page:
https://cornerstone.multitouch.fi/canvus_download
2. Download the appropriate MT Canvus server installer. The installer filename is similar
to this example:
mt-canvus-2.0.0-build12856-Ubuntu-16.04-amd64.sh
3. Run the following command to execute the MT Canvus server installation script: $ sudo sh <file>
Where <file> is the installer you downloaded in step 2. For example: $ sudo sh mt-canvus-2.0.0_build12856-Ubuntu-16.04-amd64.sh
4. The MT Canvus software is installed under /opt/mt-canvus-server. The installation
also creates a mt-canvus-server user.
The server will run as the mt-canvus-server service, and this service will run as the
mt-canvus-server user.
6.1.2 Install using the apt command
To install an MT Canvus server using Ubuntu’s apt command line utility:
1. Right-click the desktop on the host computer and launch a terminal emulator.
2. Run the following command to enable the mt-software-stable repository:
$ echo "deb [arch=amd64] http://update.multitouch.fi/mt-stable
stable main" | sudo tee
/etc/apt/sources.list.d/mt-software-stable.list
MT CANVUS 2.0 SERVER INSTALLATION MANUAL | 17 6. INSTALL AN MT CANVUS SERVER
www.multitaction.com
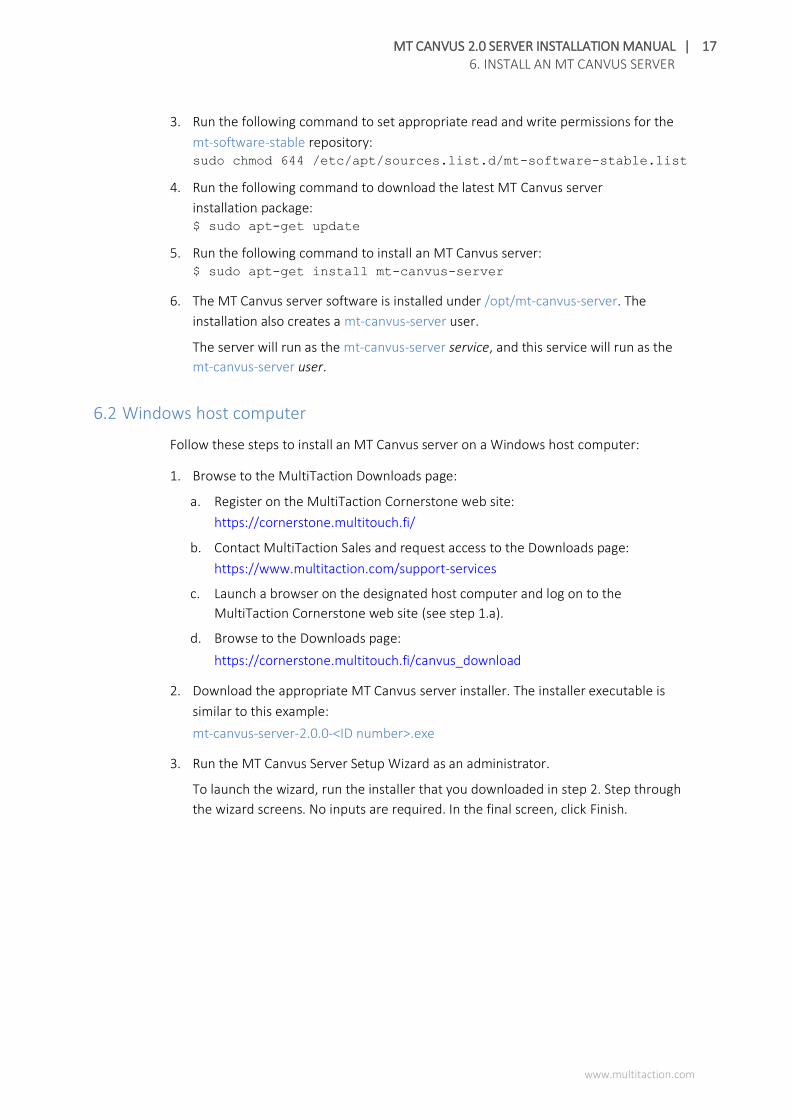
3. Run the following command to set appropriate read and write permissions for the
mt-software-stable repository: sudo chmod 644 /etc/apt/sources.list.d/mt-software-stable.list
4. Run the following command to download the latest MT Canvus server
installation package: $ sudo apt-get update
5. Run the following command to install an MT Canvus server: $ sudo apt-get install mt-canvus-server
6. The MT Canvus server software is installed under /opt/mt-canvus-server. The
installation also creates a mt-canvus-server user.
The server will run as the mt-canvus-server service, and this service will run as the
mt-canvus-server user.
6.2 Windows host computer
Follow these steps to install an MT Canvus server on a Windows host computer:
1. Browse to the MultiTaction Downloads page:
a. Register on the MultiTaction Cornerstone web site:
https://cornerstone.multitouch.fi/
b. Contact MultiTaction Sales and request access to the Downloads page:
https://www.multitaction.com/support-services
c. Launch a browser on the designated host computer and log on to the
MultiTaction Cornerstone web site (see step 1.a).
d. Browse to the Downloads page:
https://cornerstone.multitouch.fi/canvus_download
2. Download the appropriate MT Canvus server installer. The installer executable is
similar to this example:
mt-canvus-server-2.0.0-<ID number>.exe
3. Run the MT Canvus Server Setup Wizard as an administrator.
To launch the wizard, run the installer that you downloaded in step 2. Step through
the wizard screens. No inputs are required. In the final screen, click Finish.
MT CANVUS 2.0 SERVER INSTALLATION MANUAL | 18 7. WHERE ARE MY FILES?
www.multitaction.com
7 Where are my files?
On an MT Canvus server, files are organized across multiple folders:
▪ Data files: These files contain the content for shared canvases. They include files
('assets') in the media library. Data files are stored in the MT Canvus 'root' folder.
To find the root folder, see section 7.1.
▪ Configuration files: The MT Canvus server configuration file is mt-canvus-server.ini.
There are example and working versions of this file on your server.
To find mt-canvus-server.ini, see section 7.2.
▪ Log files: To find the MT Canvus server and dashboard logs, see section 7.3.
▪ License files: To find your license file, see section 7.4.
7.1 Where is the root folder?
The root folder contains the data files for shared canvases. The default root folder
depends on the operating system:
▪ Ubuntu servers: /var/lib/mt-canvus-server/assets/
▪ Windows servers:
C:\Windows\system32\config\systemprofile\AppData\Local\MultiTaction\canvus\assets
7.2 Where is mt-canvus-server.ini?
The configuration file for MT Canvus servers is mt-canvus-server.ini. There are two
versions of mt-canvus-server.ini on each MT Canvus server, an example version and
a working version. Full details about mt-canvus-server.ini are in section 9.1.
7.2.1 Where is mt-canvus-server.ini on Ubuntu computers?
Note the following locations of mt-canvus-server.ini:
▪ Example version: Find an example version of mt-canvus-server.ini here:
/opt/mt-canvus-server/Examples/
▪ Working version: A working version of mt-canvus-server.ini is created automatically by
copying the example version into the folder below.
/etc/MultiTaction/canvus/
If you edit mt-canvus-server.ini, make sure you edit the working version!
MT CANVUS 2.0 SERVER INSTALLATION MANUAL | 19 7. WHERE ARE MY FILES?
www.multitaction.com
7.2.2 Where is mt-canvus-server.ini on Windows computers?
Note the following locations of mt-canvus-server.ini:
▪ Example version: Find an example version of mt-canvus-server.ini here:
C:\Program Files\MT Canvus Server\Examples
▪ Working version: A working version of mt-canvus-server.ini is created automatically by
copying the example version into the folder below:
C:\ProgramData\MultiTaction\canvus
If you edit mt-canvus-server.ini, make sure you edit the working version!
7.3 Where are the log files?
7.3.1 MT Canvus server
The server logs take this file name format: mt-canvus-server-<date>.log. Find these log
files in the following folders.
▪ Ubuntu computers: /var/lib/mt-canvus-server/logs/
▪ Windows computers: Logs are saved to %LOCALAPPDATA%\MultiTaction\canvus\logs
Where %LOCALAPPDATA% is the user profile for the account that the MT Canvus
Server service runs as. By default, this service runs as Local System (the system profile
user), so the expanded path is:
C:\Windows\System32\config\systemprofile\AppData\Local\MultiTaction\canvus\logs
7.3.2 MT Canvus dashboard
Find the dashboard log files in the following folders.
▪ Ubuntu computers
Dashboard logs take this file name format: mt-canvus-dashboard.log
Logs are saved to /var/lib/mt-canvus-server/logs/
▪ Windows computers
Dashboard logs take this file name format: dashboard_log_<timestamp>.log
Logs are saved to %LOCALAPPDATA%\MultiTaction\canvus\logs
Where %LOCALAPPDATA% is the user profile for the dashboard runtime user.
For example, if the user 'multi' is logged on to the host server while the dashboard
runs, the expanded path is:
C:\Users\multi\AppData\Local\MultiTaction\ canvus\logs
MT CANVUS 2.0 SERVER INSTALLATION MANUAL | 20 7. WHERE ARE MY FILES?
www.multitaction.com
7.4 Where is my server license?
Note: For full details about licensing, see section 8.
The location for an activated server license depends on the server's operating system.
Find the server license in the following folders.
▪ Ubuntu computers: /etc/MultiTaction/Licenses
You must manually copy your license file into this folder. If activating a license while:
- Online, see section 8.2.1.
- Offline, see section 8.5.1.
▪ Windows computers: C:\ProgramData\MultiTaction\Licenses
You must manually copy your license file into this folder. If activating a license while:
- Online, see section 8.2.2.
- Offline, see section 8.5.2.
MT CANVUS 2.0 SERVER INSTALLATION MANUAL | 21 8. LICENSING
www.multitaction.com
8 Licensing
Your MT Canvus server must have an up-to-date license. The license defines the scope of
your deployment. For example, it specifies the maximum number of shared canvases
than can be used simultaneously, and the maximum number of clients that can open a
single shared canvas at the same time, and the license expiry date.
You must obtain an activation key from your MultiTaction representative. You can then
use this key to generate and activate your MT Canvus server license. Alternatively, if your
host server cannot connect to the internet, you can the activation key to generate a
license request.
For details about where activated licenses are saved, see section 7.4.
8.1 Obtain an activation key
Your MultiTaction representative will provide you with a 16-character activation key for
your MT Canvus server license. After receiving your activation key, you can:
▪ Activate your license. Choose this option if your server is currently connected to the
internet; see section 8.2.
▪ Request a license. Choose this option if your server is not connected to the internet;
see section; see section 8.3.
8.2 Activate your license
Your server must be connected to the internet to use this method.
If your server is connected to the internet, you can submit your activation key to
automatically request, receive and activate a license for the current computer.
8.2.1 Ubuntu servers
Follow these steps:
1. Right-click the desktop and launch a terminal emulator.
2. Change to the /opt/mt-canvus-server/bin folder.
3. Run this command to generate a license file: $ mt-canvus-server --activate <key>
Where <key> is your 16-character license activation key. When you enter the key,
include hyphens between each four-character group. For example: $ mt-canvus-server --activate ABCD-AC2D-HGF6-HVD2
4. Run this command to create an /etc/MultiTaction/Licenses folder: $ sudo install –d /etc/MultiTaction/Licenses
5. Run this command to copy the license key to the new /Licenses folder: $ sudo cp ~/MultiTaction/Licenses/*.cslicense
/etc/MultiTaction/Licenses
6. Start the MT Canvus server; see section 10.
MT CANVUS 2.0 SERVER INSTALLATION MANUAL | 22 8. LICENSING
www.multitaction.com
8.2.2 Windows servers
Follow these steps:
1. Open a command prompt and change to the following folder:
C:\Program Files\MT Canvus Server\bin
2. Run this command to generate a license file: mt-canvus-server.exe --activate <key>
Where <key> is your 16-character license activation key. When you enter the key,
include hyphens between each four-character group. For example: mt-canvus-server.exe --activate ABCD-AC2D-HGF6-HVD2
3. The license file, MT-Canvus-Connect-server-<timestamp>.cslicense, is saved to a
subfolder in the user profile of the runtime user (that is, the user logged on when you
generated the license file):
C:\Users\<username>\AppData\Local\MultiTaction\Licenses
4. Run this command as an administrator to create this \Licenses folder:
mkdir C:\ProgramData\MultiTaction\Licenses
5. Copy the license file from the runtime user profile to the new \Licenses folder.
That is, copy the license from here:
C:\Users\<username>\AppData\Local\MultiTaction\Licenses
To here:
C:\ProgramData\MultiTaction\Licenses
6. Start the MT Canvus server; see section 10.
8.3 Generate a license request while offline
If your host server cannot connect to the internet, you can generate a license request file
for your MT Canvus server.
8.3.1 Ubuntu servers
Follow these steps:
1. Right-click the desktop and launch a terminal emulator.
2. Change to the /opt/mt-canvus-server/bin folder.
3. Run this command: $ mt-canvus-server --create-license-request <key>
4. The license request is saved to home folder of the runtime user (the user logged on
when you generated the license request):
/home/<runtime user>/MT-Canvus-Connect-server.cslicensereq
Now send the license request to MultiTaction for processing; continue to section 8.4.

MT CANVUS 2.0 SERVER INSTALLATION MANUAL | 23 8. LICENSING
www.multitaction.com
8.3.2 Windows servers
Follow these steps:
1. Open a command prompt and change to the following folder:
C:\Program Files\MT Canvus Server\bin
2. Run this command to generate a license request: mt-canvus-server.exe --create-license-request <key>
Where <key> is your 16-character license activation key plus hyphen separators.
For example, ABCD-AC2D-HGF6-HVD2.
3. Your server license request file is automatically saved to the \Documents folder for
the runtime user (that is, the user logged on when you generated the
license request):
C:\Users\<username>\Documents\MT-Canvus-Connect-server.cslicensereq
Now send the license request to MultiTaction for processing; continue to section 8.4.
8.4 Obtain a signed license while offline
Applicable to both Ubuntu and Windows servers.
Follow these steps:
1. Send your license request file to [email protected].
2. After MultiTaction Support have processed your license request, they will send you
a signed license file, MT-Canvus-Connect-server.cslicense.
(The license filename may also include a timestamp, depending on the method used
to generate the license file.)
3. When you receive the license file, save it to the following folder:
Ubuntu servers: /home/<runtime user>
Windows servers: C:\Users\<runtime user>\Documents
Where <runtime user> is the user currently logged on.
Now activate your license; continue to section 8.5.
MT CANVUS 2.0 SERVER INSTALLATION MANUAL | 24 8. LICENSING
www.multitaction.com
8.5 Activate your license while offline
Applicable to both Ubuntu and Windows servers. Applies only if you received a license file
from MultiTaction in section 8.4.
Now activate the server license that you received from MultiTaction.
8.5.1 Ubuntu servers
Follow these steps:
1. Run this command to create an /etc/MultiTaction/Licenses folder:
$ sudo install –d /etc/MultiTaction/Licenses
2. Run this command to copy the license file from the runtime user's home folder to
the new /Licenses subfolder:
$ sudo cp ~/MT-Canvus-Connect-server.cslicense
/etc/MultiTaction/Licenses
Where ~/ refers to the home folder of the runtime user (see step 3 of section 8.4).
3. Start the MT Canvus server; see section 10.
8.5.2 Windows servers
Follow these steps:
1. Run this command as an administrator to create this \Licenses folder:
mkdir C:\ProgramData\MultiTaction\Licenses
2. Copy the license file from the \Documents folder of the runtime user (see step 3 of
section 8.4). That is, copy the license from here:
C:\Users\<runtime user>\Documents
To here:
C:\ProgramData\MultiTaction\Licenses
3. Start the MT Canvus server; see section 10.
MT CANVUS 2.0 SERVER INSTALLATION MANUAL | 25 8. LICENSING
www.multitaction.com
8.6 If users cannot open shared canvases because of a server license problem
In very rare situations, users of MT Canvus clients may see a server license warning when
they try to open a shared canvas. This can happen despite successfully opening shared
canvases on previous occasions. The problem arises if, during the intervening period, the
network interface used by your MT Canvus server has changed.
Multitaction licenses use a computer's Host ID (or hostid) to tie a license to a specific
computer. The Host ID is a unique identifier. It is the physical address, or MAC address, of
the computer's network interface (NIC). When you activate your server license for the
first time, the license is permanently tied to the current Host ID of the host computer.
If the Host ID subsequently changes and no longer matches the licensed Host ID,
MT Canvus infers that the server is unlicensed and blocks attempts by clients to open
shared canvases stored on the server.
If your users are unable to open shared canvases and see a server license warning for a
previously-licensed server, follow these steps:
1. Applies to Ubuntu servers only. For Windows servers, see step 2.
Discover the 'target' Host ID used by MultiTaction licensing software. On the server
host computer:
a. Right-click the desktop and launch a terminal emulator.
b. Run the following command:
$ /opt/mt-canvus-server/bin/LicenseTool --hostid
Note: On Ubuntu systems, LicenseTool is case-sensitive. Do not type licensetool!
2. Applies to Windows servers only. For Ubuntu servers, see step 1.
Discover the 'target' Host ID used by MultiTaction licensing software. On the server
host computer:
a. Open a command prompt and change to the following folder:
C:\Program Files\MT Canvus Server\bin
b. Run the following command: LicenseTool --hostid
Note: On Windows systems, LicenseTool is not case-sensitive.
3. Discover the licensed Host ID.
a. Open your license file in a text editor. To find your license file, see section 7.4.
b. Locate the line containing the Host ID. For example:
"host_id": "b6ae2be4aed9",
4. Compare the target Host ID with the licensed Host ID. If you discover a mismatch,
contact MultiTaction Support; see section 1.1.

MT CANVUS 2.0 SERVER INSTALLATION MANUAL | 26 9. CONFIGURE THE MT CANVUS SERVER
www.multitaction.com
9 Configure the MT Canvus server
This section describes how to configure the MT Canvus server. To do this, you must edit
the configuration file, mt-canvus-server.ini.
9.1 About mt-canvus-server.ini
9.1.1 Example versions and working versions
There are two versions of mt-canvus-server.ini on each MT Canvus server:
▪ An example version of mt-canvus-server.ini is provided for reference purposes only.
It contains all configuration settings currently supported by the MT Canvus server.
If you upgrade the MT Canvus server, the existing example version is overwritten by a
new example version.
▪ A working version of mt-canvus-server.ini is used to configure MT Canvus server
operations. When you configure the MT Canvus server, you must always edit the
working version!
Note that the working version is retained if you upgrade the MT Canvus server. After
upgrading, you will need to manually add any new settings to the existing working
version of mt-canvus-server.ini (or copy them from the new example version).
9.1.2 Where is mt-canvus.in?
The default locations of mt-canvus-server.ini on Ubuntu and Windows servers are
described in section 7.2.
9.1.3 Backslashes in mt-canvus-server.ini
Applies to Windows servers only
On Windows servers, the \ backslash character is interpreted as an escape character
in system configuration files. Consequently, any backslashes in mt-canvus-server.ini
require special handling.
If you must include literal backslashes when you edit a setting, you must either replace
backslashes with / forward slashes or prefix each backslash with another backslash ie,
use \\ double backslashes. This particularly affects settings that specify a file path.
For example, the log-path setting specifies where to save log files on the server.
For example, if you store logs in C:\Users\multi\AppData\Local\mt-canvus-server\logs,
then add either of these entries to mt-canvus-server.ini:
▪ Using / forward slashes [system]
log-path=C:/Users/multi/AppData/Local/mt-canvus-server/logs
▪ Using \\ double backslashes [system]
log-path=C:\\Users\\multi\\AppData\\Local\\mt-canvus-server\logs
MT CANVUS 2.0 SERVER INSTALLATION MANUAL | 27 9. CONFIGURE THE MT CANVUS SERVER
www.multitaction.com
9.2 Identify the server database
First, you must provide the server with details about the mt-canvus-connect database
and DB user that you set up in section 5.1.3 or section 5.2.3.
Note: The mt-canvus-connect database must be hosted on the local server. It is not
possible to specify a remote host server.
Follow these steps:
1. Go to the computer designated as your MT Canvus server.
2. On the MT Canvus server, edit the working version of mt-canvus-server.ini.
See section 7.2.
3. Go to the [sql] section and edit the following settings.
[sql]
databasename=<database name> username=<DB user> password=<DB user password>
Where:
- databasename specifies the name of the database that you created previously.
This database name is typically mt-canvus-connect.
- username specifies the DB user that you created previously.
- password specifies the password for the DB user.
4. Restart the MT Canvus server for these changes to take effect; see section 10.
Alternatively, continue to section 9.3 to define which types of connection are
accepted by the server.
MT CANVUS 2.0 SERVER INSTALLATION MANUAL | 28 9. CONFIGURE THE MT CANVUS SERVER
www.multitaction.com
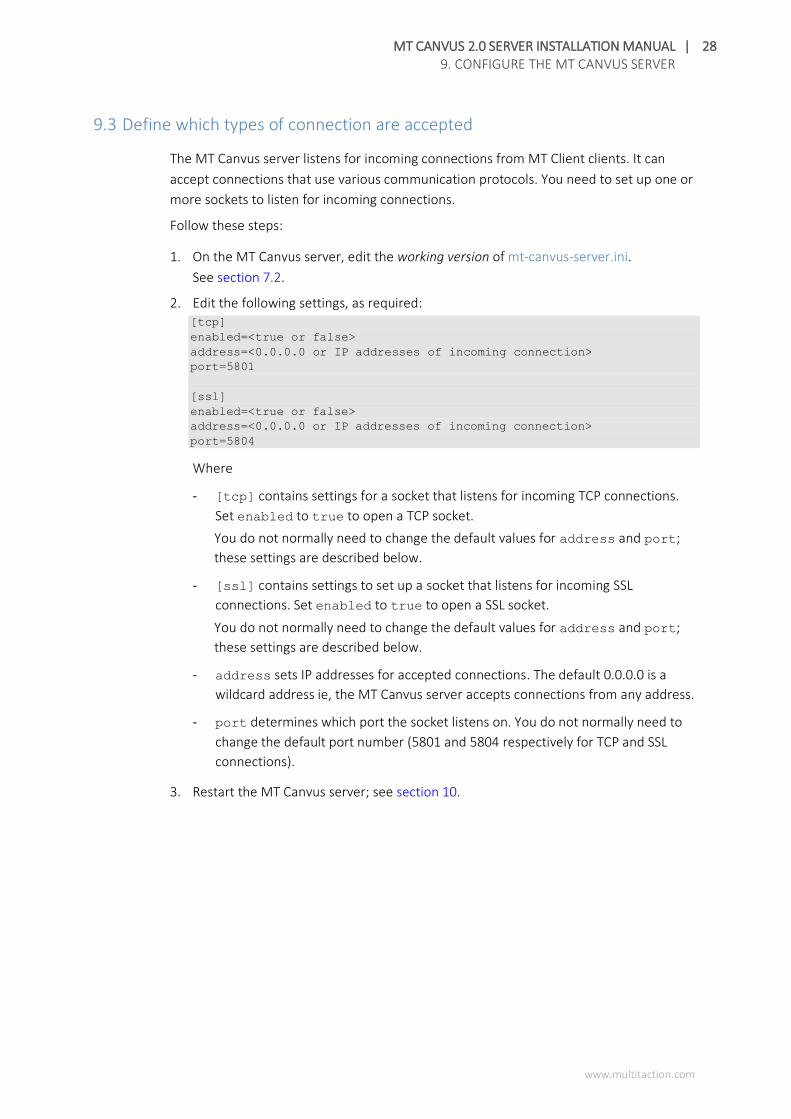
9.3 Define which types of connection are accepted
The MT Canvus server listens for incoming connections from MT Client clients. It can
accept connections that use various communication protocols. You need to set up one or
more sockets to listen for incoming connections.
Follow these steps:
1. On the MT Canvus server, edit the working version of mt-canvus-server.ini.
See section 7.2.
2. Edit the following settings, as required: [tcp]
enabled=<true or false>
address=<0.0.0.0 or IP addresses of incoming connection>
port=5801
[ssl]
enabled=<true or false>
address=<0.0.0.0 or IP addresses of incoming connection>
port=5804
Where
- [tcp] contains settings for a socket that listens for incoming TCP connections.
Set enabled to true to open a TCP socket.
You do not normally need to change the default values for address and port;
these settings are described below.
- [ssl] contains settings to set up a socket that listens for incoming SSL
connections. Set enabled to true to open a SSL socket.
You do not normally need to change the default values for address and port;
these settings are described below.
- address sets IP addresses for accepted connections. The default 0.0.0.0 is a
wildcard address ie, the MT Canvus server accepts connections from any address.
- port determines which port the socket listens on. You do not normally need to
change the default port number (5801 and 5804 respectively for TCP and SSL
connections).
3. Restart the MT Canvus server; see section 10.
MT CANVUS 2.0 SERVER INSTALLATION MANUAL | 29 9. CONFIGURE THE MT CANVUS SERVER
www.multitaction.com
9.4 Set up password-protected connections
If required, you can set up a connection password for your MT Canvus server. Only
MT Canvus clients with this password can connect to the server.
This feature provides an additional level of security if you store canvases with sensitive
information on your MT Canvus server and the server is publicly accessible over the
internet (ie, clients do not need a VPN to connect to the server).
If a client does not hold the connection password, it cannot connect to the server, even if
the other server connection details are correctly specified in the client configuration file.
To set up password-protected connections to the server, you must define the connection
password in the server configuration file (mt-canvus-server.ini). You must then add the
same connection password to the configuration file (mt-canvus.ini) on each client.
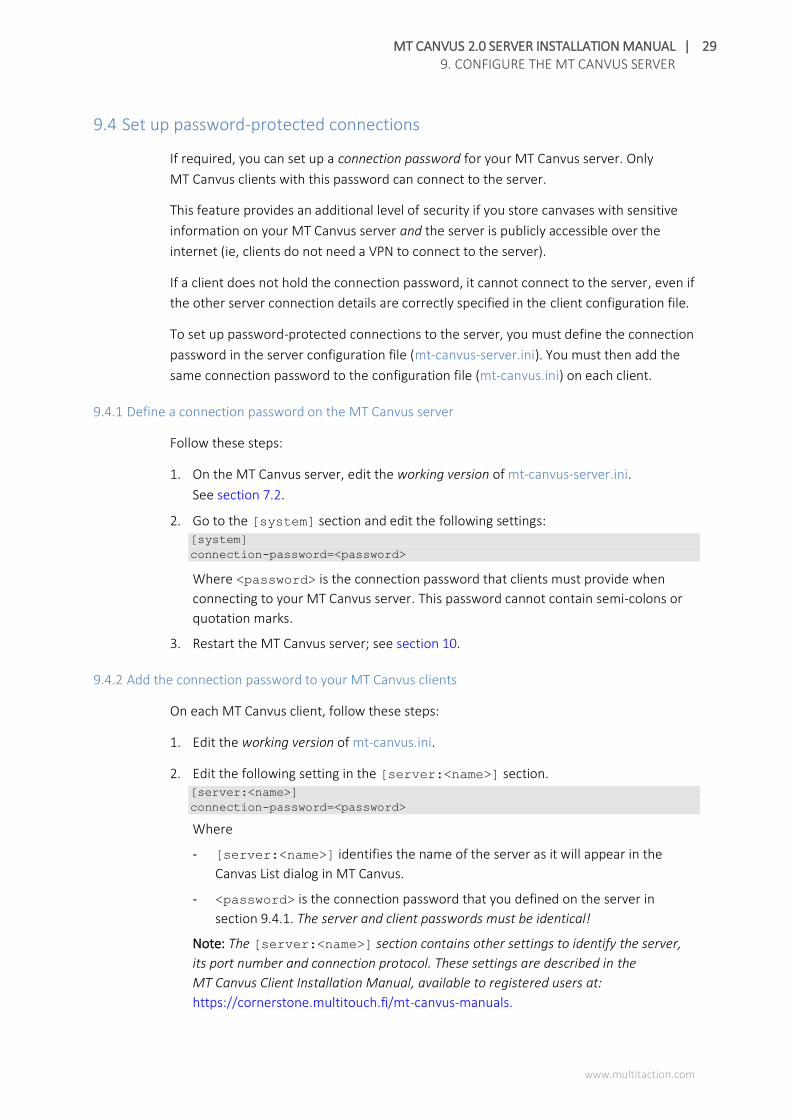
9.4.1 Define a connection password on the MT Canvus server
Follow these steps:
1. On the MT Canvus server, edit the working version of mt-canvus-server.ini.
See section 7.2.
2. Go to the [system] section and edit the following settings: [system]
connection-password=<password>
Where <password> is the connection password that clients must provide when
connecting to your MT Canvus server. This password cannot contain semi-colons or
quotation marks.
3. Restart the MT Canvus server; see section 10.
9.4.2 Add the connection password to your MT Canvus clients
On each MT Canvus client, follow these steps:
1. Edit the working version of mt-canvus.ini.
2. Edit the following setting in the [server:<name>] section. [server:<name>]
connection-password=<password>
Where
- [server:<name>] identifies the name of the server as it will appear in the
Canvas List dialog in MT Canvus.
- <password> is the connection password that you defined on the server in
section 9.4.1. The server and client passwords must be identical!
Note: The [server:<name>] section contains other settings to identify the server,
its port number and connection protocol. These settings are described in the
MT Canvus Client Installation Manual, available to registered users at:
https://cornerstone.multitouch.fi/mt-canvus-manuals.
MT CANVUS 2.0 SERVER INSTALLATION MANUAL | 30 9. CONFIGURE THE MT CANVUS SERVER
www.multitaction.com
9.5 Set up certificates for encrypted connections
If you want to encrypt connections between MT Canvus clients and the server, or
between browsers and the MT Canvus dashboard, you need to generate a digital
certificate (plus a private key and intermediate certificate) and specify its location on
the MT Canvus server.
Specifically, you need to use a digital certificate if you enable:
▪ Secure Socket Layer (SSL) connections between MT Canvus clients and the server.
Edit the certificate settings below if you set enabled=true in the [ssl] section of
mt-canvus-server.ini; see section 9.3.
▪ HTTPS connections between browsers and the MT Canvus dashboard.
Edit the certificate settings below if you set enable-https=true in the
[dashboard] section of mt-canvus-server.ini; section 11.2.
Follow these steps:
1. On the MT Canvus server, edit the working version of mt-canvus-server.ini.
See section 7.2.
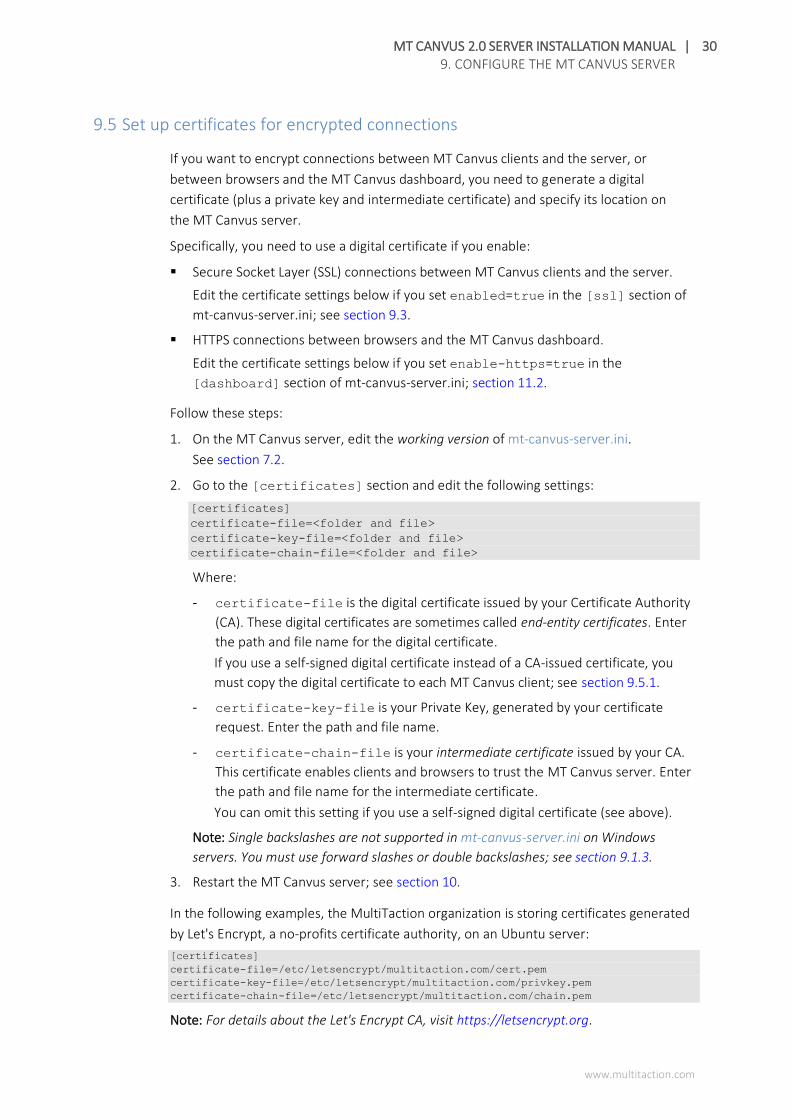
2. Go to the [certificates] section and edit the following settings:
[certificates]
certificate-file=<folder and file>
certificate-key-file=<folder and file>
certificate-chain-file=<folder and file>
Where:
- certificate-file is the digital certificate issued by your Certificate Authority
(CA). These digital certificates are sometimes called end-entity certificates. Enter
the path and file name for the digital certificate.
If you use a self-signed digital certificate instead of a CA-issued certificate, you
must copy the digital certificate to each MT Canvus client; see section 9.5.1.
- certificate-key-file is your Private Key, generated by your certificate
request. Enter the path and file name.
- certificate-chain-file is your intermediate certificate issued by your CA.
This certificate enables clients and browsers to trust the MT Canvus server. Enter
the path and file name for the intermediate certificate.
You can omit this setting if you use a self-signed digital certificate (see above).
Note: Single backslashes are not supported in mt-canvus-server.ini on Windows
servers. You must use forward slashes or double backslashes; see section 9.1.3.
3. Restart the MT Canvus server; see section 10.
In the following examples, the MultiTaction organization is storing certificates generated
by Let's Encrypt, a no-profits certificate authority, on an Ubuntu server:
[certificates]
certificate-file=/etc/letsencrypt/multitaction.com/cert.pem
certificate-key-file=/etc/letsencrypt/multitaction.com/privkey.pem
certificate-chain-file=/etc/letsencrypt/multitaction.com/chain.pem
Note: For details about the Let's Encrypt CA, visit https://letsencrypt.org.

MT CANVUS 2.0 SERVER INSTALLATION MANUAL | 31 9. CONFIGURE THE MT CANVUS SERVER
www.multitaction.com
9.5.1 Self-signed certificates
If required, you can use a self-signed certificate to encrypt connections between the MT
Canvus server and clients. In this situation, you must:
1. Generate your own digital certificate and private key.
The file name format for self-signed digital certificates must match this pattern:
<server name.domain>.cert
Where <server name.domain> identifies your MT Canvus server. For example, if you
generate a self-signed certificate for the UX- HELSINKI-WS12 server on the
uniprax.com domain, the certificate file name is:
ux-helsinki-ws12.unipraxis.com.cert
2. Specify the digital certificate and private key in mt-canvus-server.ini, as
described above.
3. Copy this digital certificate to each client and specify its location in the client
configuration file, mt-canvus.ini. For details, see the MT Canvus Client Installation
Manual, available to registered users at:
https://cornerstone.multitouch.fi/mt-canvus-manuals
MT CANVUS 2.0 SERVER INSTALLATION MANUAL | 32 9. CONFIGURE THE MT CANVUS SERVER
www.multitaction.com
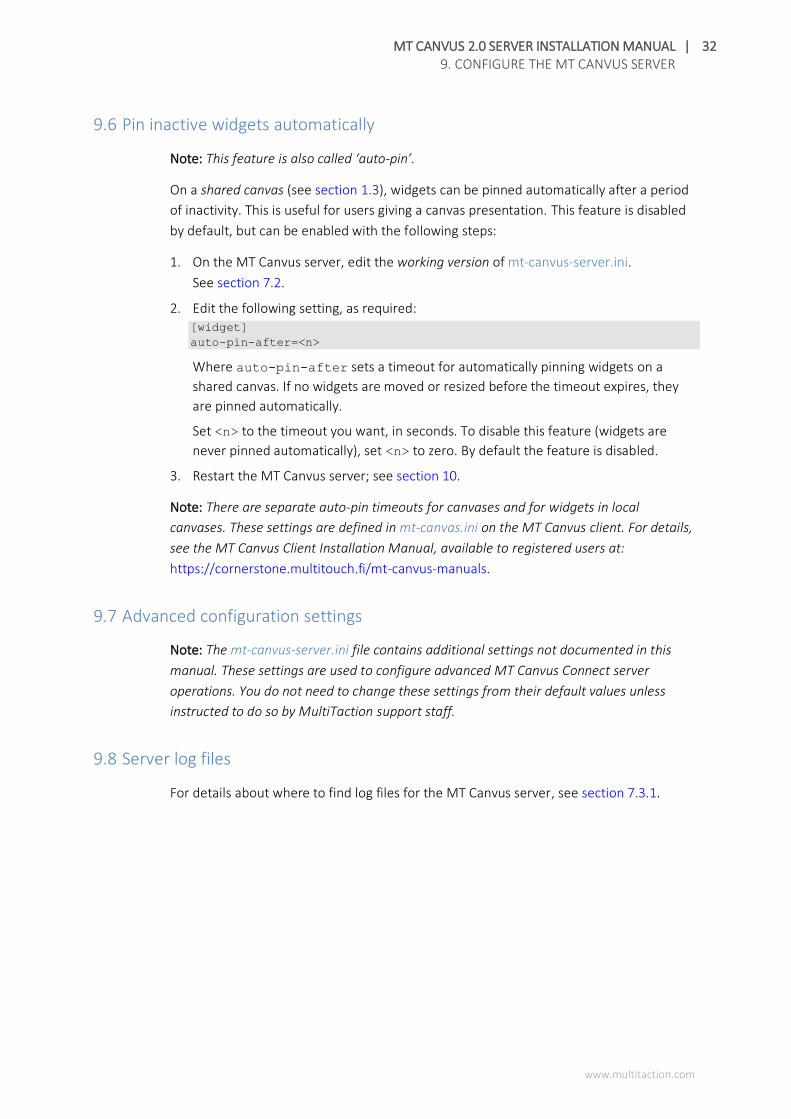
9.6 Pin inactive widgets automatically
Note: This feature is also called ‘auto-pin’.
On a shared canvas (see section 1.3), widgets can be pinned automatically after a period
of inactivity. This is useful for users giving a canvas presentation. This feature is disabled
by default, but can be enabled with the following steps:
1. On the MT Canvus server, edit the working version of mt-canvus-server.ini.
See section 7.2.
2. Edit the following setting, as required: [widget]
auto-pin-after=<n>
Where auto-pin-after sets a timeout for automatically pinning widgets on a
shared canvas. If no widgets are moved or resized before the timeout expires, they
are pinned automatically.
Set <n> to the timeout you want, in seconds. To disable this feature (widgets are
never pinned automatically), set <n> to zero. By default the feature is disabled.
3. Restart the MT Canvus server; see section 10.
Note: There are separate auto-pin timeouts for canvases and for widgets in local
canvases. These settings are defined in mt-canvas.ini on the MT Canvus client. For details,
see the MT Canvus Client Installation Manual, available to registered users at:
https://cornerstone.multitouch.fi/mt-canvus-manuals.
9.7 Advanced configuration settings
Note: The mt-canvus-server.ini file contains additional settings not documented in this
manual. These settings are used to configure advanced MT Canvus Connect server
operations. You do not need to change these settings from their default values unless
instructed to do so by MultiTaction support staff.
9.8 Server log files
For details about where to find log files for the MT Canvus server, see section 7.3.1.

MT CANVUS 2.0 SERVER INSTALLATION MANUAL | 33 10. START OR STOP THE MT CANVUS SERVER
www.multitaction.com
10 Start or stop the MT Canvus server
This section describes how to start, restart and stop the MT Canvus server.
10.1 Windows servers
The server runs as the MT Canvus Server service. To start or stop the service:
1. Open the Windows Services applet as an administrator.
2. Double-click MT Canvus Server in the service list.
3. In the Properties dialog, click the Start or Stop buttons, as required.
After the service has started, log entries record server activity. For details about where to
find the log files, see section 7.3.1.
Note: By default, the server service runs as Local System. If you prefer to run the server
service as a named user, please contact MultiTaction Support; see section 1.1.
1 Services applet. 2 MT Canvus Server service. 3 Properties dialog. 4 Start and Stop buttons.
10.1.1 Manually install the service
If you need to manually re-install the MT Canvus Server service (say, for maintenance or
troubleshooting reasons), follow these steps:
1. Open a command prompt as an administrator
2. Run the following command:
"C:\Program Files\MT Canvus Server\bin
\mt-canvus-server-ctl.exe" -–install
1
3
2
4
MT CANVUS 2.0 SERVER INSTALLATION MANUAL | 34 10. START OR STOP THE MT CANVUS SERVER
www.multitaction.com
10.2 Ubuntu servers
On Ubuntu servers, the mt-canvus-server service starts automatically. You will need to
restart the server after activating the license and configuring the server.
Follow these steps to restart or stop the server, or to check the service status:
1. Right-click the desktop and launch a terminal emulator.
2. Run the following commands, as required:
- Start the server: $ sudo systemctl start mt-canvus-server
- Stop the server: $ sudo systemctl stop mt-canvus-server
- Stop and restart the server: $ sudo systemctl restart mt-canvus-server
- Check the status of the server service: $ sudo systemctl status mt-canvus-server
After the service has started, log entries record server activity. For details about where to
find the log files, see section 7.3.1.
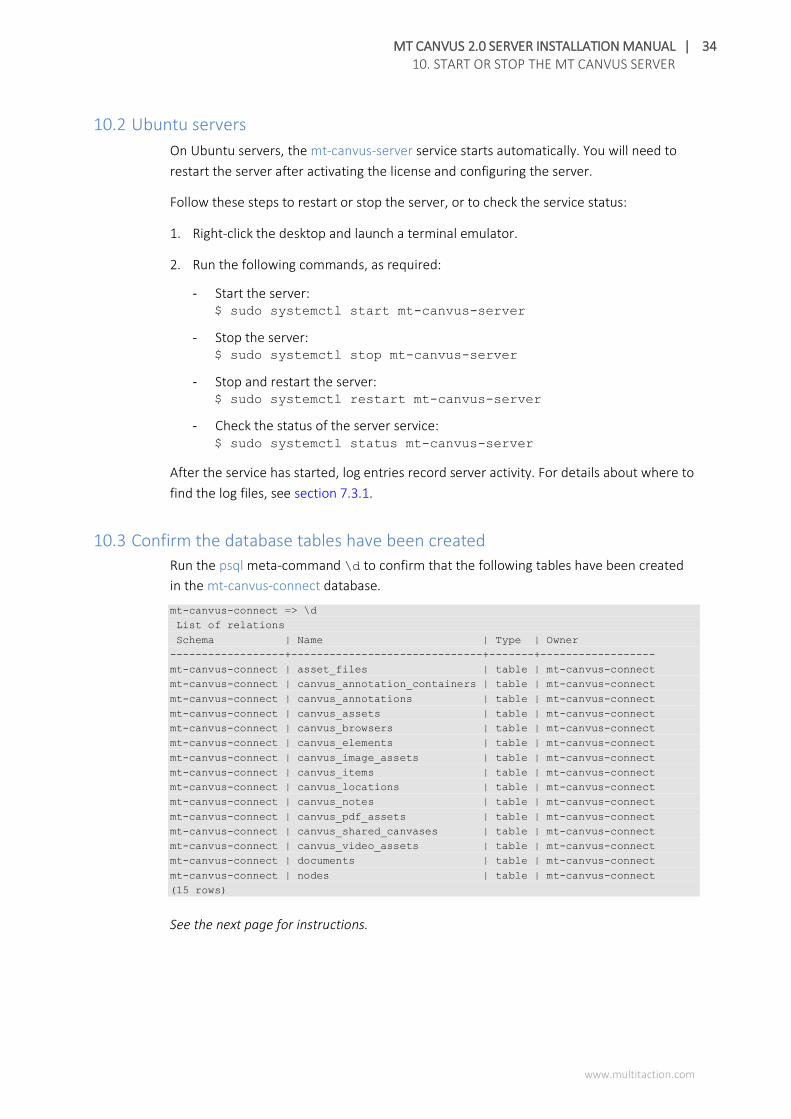
10.3 Confirm the database tables have been created
Run the psql meta-command \d to confirm that the following tables have been created
in the mt-canvus-connect database.
mt-canvus-connect => \d
List of relations
Schema | Name | Type | Owner
------------------+------------------------------+-------+------------------
mt-canvus-connect | asset_files | table | mt-canvus-connect
mt-canvus-connect | canvus_annotation_containers | table | mt-canvus-connect
mt-canvus-connect | canvus_annotations | table | mt-canvus-connect
mt-canvus-connect | canvus_assets | table | mt-canvus-connect
mt-canvus-connect | canvus_browsers | table | mt-canvus-connect
mt-canvus-connect | canvus_elements | table | mt-canvus-connect
mt-canvus-connect | canvus_image_assets | table | mt-canvus-connect
mt-canvus-connect | canvus_items | table | mt-canvus-connect
mt-canvus-connect | canvus_locations | table | mt-canvus-connect
mt-canvus-connect | canvus_notes | table | mt-canvus-connect
mt-canvus-connect | canvus_pdf_assets | table | mt-canvus-connect
mt-canvus-connect | canvus_shared_canvases | table | mt-canvus-connect
mt-canvus-connect | canvus_video_assets | table | mt-canvus-connect
mt-canvus-connect | documents | table | mt-canvus-connect
mt-canvus-connect | nodes | table | mt-canvus-connect
(15 rows)
See the next page for instructions.

MT CANVUS 2.0 SERVER INSTALLATION MANUAL | 35 10. START OR STOP THE MT CANVUS SERVER
www.multitaction.com
Follow these steps:
1. On Ubuntu servers, right-click the desktop and launch a terminal emulator.
On Windows servers, open a command prompt and navigate to:
C:\Program Files\PostgreSQL\9.6\bin
2. Run the following psql commands: psql -u <DB user>
# \d
Where <DB_user> is the database user you created in section 5.1.3 or section 5.2.3
3. Run this command to quit from PostgreSQL: # \q
MT CANVUS 2.0 SERVER INSTALLATION MANUAL | 36 11. DASHBOARD
www.multitaction.com
11 Dashboard
The MT Canvus dashboard is a web-based tool for monitoring and managing the
MT Canvus server, connections from MT Canvus clients, and individual canvases. The
dashboard runs on the same host computer as the server. You can start using the
dashboard after setting up the MT Canvus server and clients.
11.1 About the dashboard
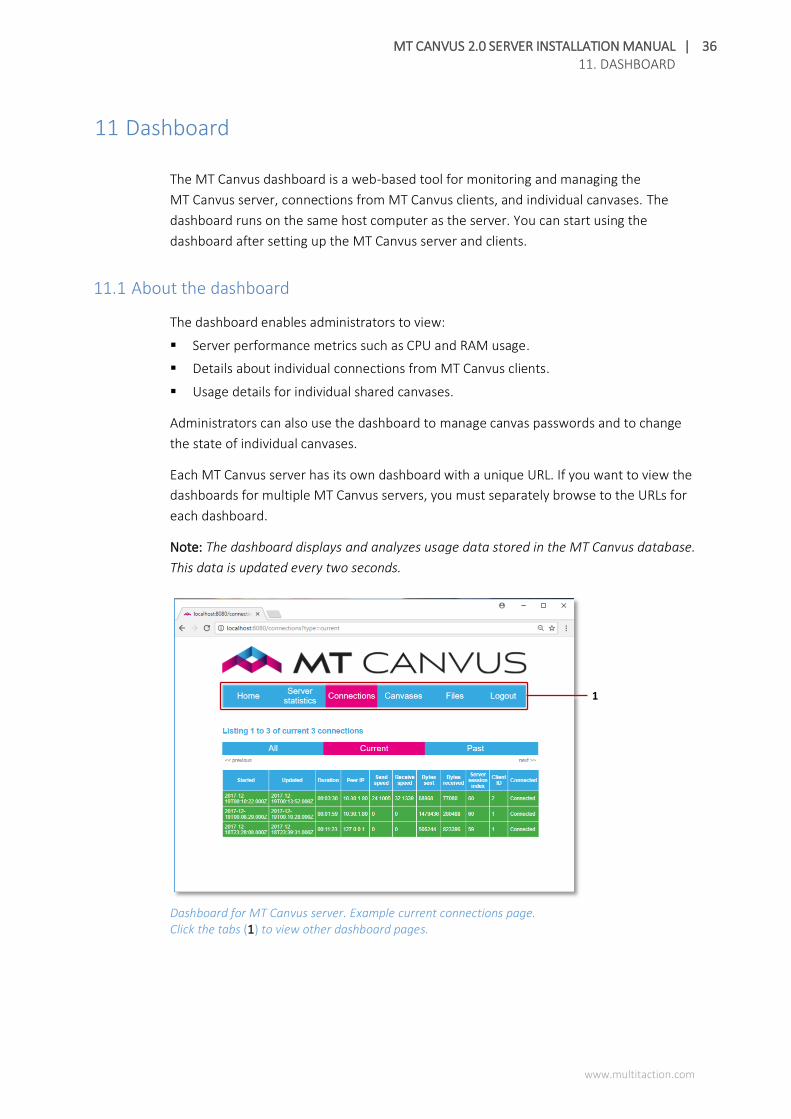
The dashboard enables administrators to view:
▪ Server performance metrics such as CPU and RAM usage.
▪ Details about individual connections from MT Canvus clients.
▪ Usage details for individual shared canvases.
Administrators can also use the dashboard to manage canvas passwords and to change
the state of individual canvases.
Each MT Canvus server has its own dashboard with a unique URL. If you want to view the
dashboards for multiple MT Canvus servers, you must separately browse to the URLs for
each dashboard.
Note: The dashboard displays and analyzes usage data stored in the MT Canvus database.
This data is updated every two seconds.
Dashboard for MT Canvus server. Example current connections page. Click the tabs (1) to view other dashboard pages.
1

MT CANVUS 2.0 SERVER INSTALLATION MANUAL | 37 11. DASHBOARD
www.multitaction.com
11.2 Configure the dashboard
Communication between the dashboard and the MT Canvus server is handled by the
dashboard server. This is installed automatically as part of an MT Canvus server
installation, but it is disabled by default. The following instructions describe how to
enable the dashboard server and set up a dashboard user account for use by MT Canvus
administrators.
Follow these steps:
1. On the MT Canvus server, edit the working version of mt-canvus-server.ini.
See section 7.2.
2. Set up a dashboard connection to the MT Canvus server and a dashboard user
account.
Edit the following settings:
[dashboard]
admin_username=<user name>
admin_password=<user password>
json-api-enabled=true
address=<socket name or IP address>
port=<port>
enable-http=<true or false>
http-port=8080
enable-https=<true or false>
https-port=3001
Where:
- admin_username and admin_password specify the name and password for
the dashboard user account. Users will use this account to log in to the
dashboard; see section 11.4.
- json-api-enabled=true enables the dashboard to extract data from the
MT Canvus database on the server. Specifically, it enables JSON connections over
TCP to the MT Canvus server.
- address specifies the socket addresses that the dashboard will listen on for
incoming connections. You can enter the host server's fully qualified domain
name (FQDN) or an IP address.
This setting defaults to address=0.0.0.0, meaning that the dashboard listens
on all available IP addresses. For example, if the host server has two network
interface cards (NICs), the dashboard will listen on the IP addresses of both cards.
If you want to restrict connections to the dashboard, enter a specific IP address.
The following examples both restrict connections to local browsers running on
the host server itself:
address=127.0.0.1
address=localhost
- port specifies which port number the MT Canvus server listens on for incoming
dashboard connections. By default, the server uses a TCP socket and listens on
port 5811.
MT CANVUS 2.0 SERVER INSTALLATION MANUAL | 38 11. DASHBOARD
www.multitaction.com
- enable-http specifies whether HTTP connections from the browser to the
dashboard are enabled.
- http-port specifies which port number the dashboard listens on for HTTP
connections, if enabled. The default is 8080.
- enable-https specifies whether HTTPS connections from the browser to the
dashboard are enabled. See also step 3.
- https-port specifies which port number the dashboard listens on for HTTPS
connections, if enabled. The default is 3001.
3. (Applicable only if HTTPS connections are enabled) Specify the name and locations
of the SSL certificates used for encrypted connections between the browser and
dashboard; see section 9.4.
4. Restart the MT Canvus server.
Changes to mt-canvus-server.ini only take effect when the MT Canvus server restarts.
For restart instructions, see section 10.
5. Start the dashboard service; see section 11.3.
11.3 Start or stop the dashboard
This section describes how to start, restart and stop the MT Canvus dashboard.
11.3.1 Ubuntu servers
On Ubuntu servers, the dashboard runs as a service. It starts automatically when the host
computer starts. The service runs as the mt-canvus-server user.
If required, you can manually stop, start and restart the service, or check the service
status. Follow these steps on the MT Canvus server:
1. Right-click the desktop and launch a terminal emulator.
2. Run the following commands, as required:
- Start the dashboard service if it is currently stopped: $ sudo systemctl start mt-canvus-dashboard
- Restart the dashboard service if it is currently running: $ sudo systemctl restart mt-canvus-dashboard
- Stop the dashboard service: $ sudo systemctl stop mt-canvus-dashboard
- View the dashboard service log: $ sudo journalctl -u mt-canvus-dashboard
Note: Alternatively, you can view dashboard log messages here:
/var/lib/mt-canvus-server/logs/mt-canvus-dashboard.log
MT CANVUS 2.0 SERVER INSTALLATION MANUAL | 39 11. DASHBOARD
www.multitaction.com
11.3.2 Windows servers
On Windows servers, the dashboard runs as a user process. By default, it does not start
automatically. To start and stop the dashboard, or to make it start automatically, follow
these steps on the MT Canvus server:
▪ Start the dashboard
Run the launch script:
C:\Program Files\MT Canvus Server\bin\mt-canvus-dashboard.bat
Tip: We recommend you copy this launch script to a Windows Startup folder so it runs
automatically; see below.
▪ Stop the dashboard
Click the Command Prompt in which mt-canvus-dashboard.bat is running and
press Ctrl+C to cancel the launch script.
▪ Add the dashboard to a Startup folder
To start the dashboard automatically when a user logs in to Windows, copy
the launch script (see above) into the Windows Common Startup folder. To open
the Common Startup folder:
a. Open the Run command box.
Tip: Press the Windows key + R.
b. Type shell: common startup and click OK.
11.4 Dashboard log files
For details about where to find the dashboard log files, see section 7.3.2.
11.5 Log in to the dashboard
Terminology: For simplicity, this section refers to ‘your laptop’ when describing the
computer that you use to view the dashboard. In practice, this computer could be any
compatible device including desktop computers, tablets, and cell phones.
The MT Canvus dashboard is a web-based tool for monitoring and managing the
MT Canvus server. To view the dashboard on your laptop, you browse to the server URL
and log in using the dashboard user account that you set up in section 11.2.
You can start using the dashboard after starting the MT Canvus server and clients. Follow
these steps:
1. Browse to http://<server>:8080/
Where <server> is the IP address or name of the MT Canvus server.
MT CANVUS 2.0 SERVER INSTALLATION MANUAL | 40 11. DASHBOARD
www.multitaction.com
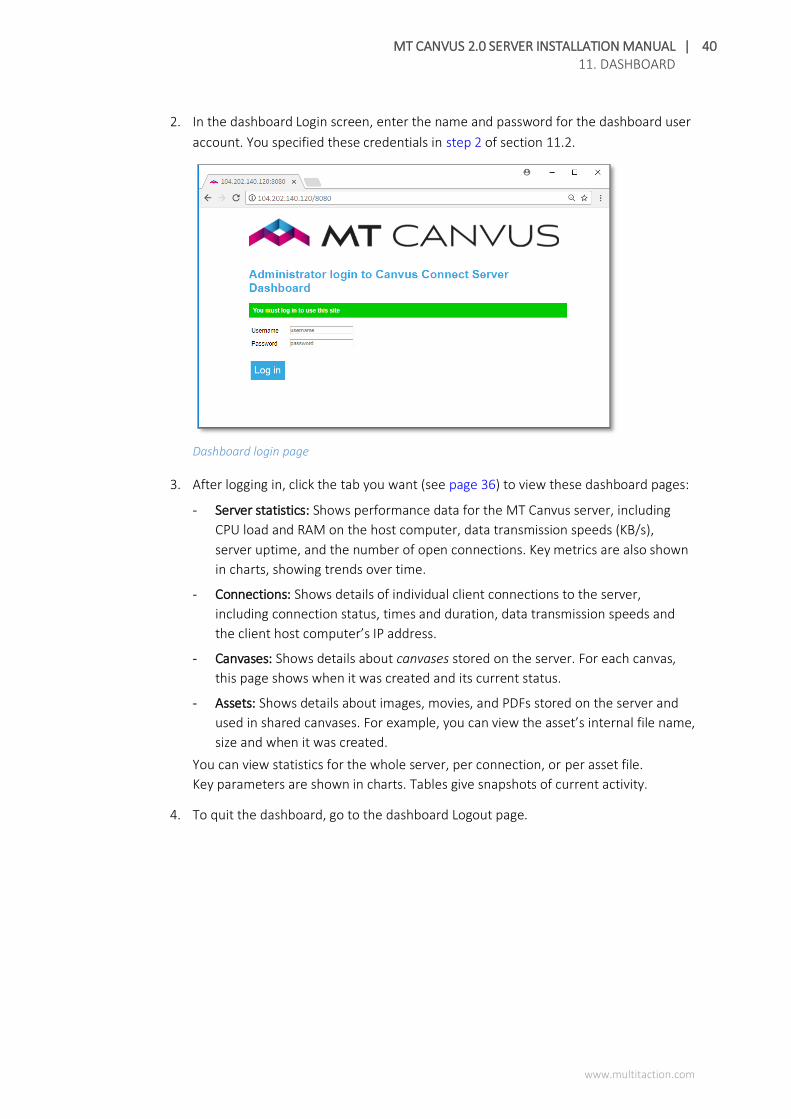
2. In the dashboard Login screen, enter the name and password for the dashboard user
account. You specified these credentials in step 2 of section 11.2.
Dashboard login page
3. After logging in, click the tab you want (see page 36) to view these dashboard pages:
- Server statistics: Shows performance data for the MT Canvus server, including
CPU load and RAM on the host computer, data transmission speeds (KB/s),
server uptime, and the number of open connections. Key metrics are also shown
in charts, showing trends over time.
- Connections: Shows details of individual client connections to the server,
including connection status, times and duration, data transmission speeds and
the client host computer’s IP address.
- Canvases: Shows details about canvases stored on the server. For each canvas,
this page shows when it was created and its current status.
- Assets: Shows details about images, movies, and PDFs stored on the server and
used in shared canvases. For example, you can view the asset’s internal file name,
size and when it was created.
You can view statistics for the whole server, per connection, or per asset file.
Key parameters are shown in charts. Tables give snapshots of current activity.
4. To quit the dashboard, go to the dashboard Logout page.
MT CANVUS 2.0 SERVER INSTALLATION MANUAL | 41 11. DASHBOARD
www.multitaction.com
11.6 Manage canvas passwords
You can use the dashboard to change or remove the passwords associated with a canvas.
This particularly important if nobody can remember the owner password. Indeed, the
dashboard provides the only way to unlock a password-protected canvas.
11.6.1 About password protection
A user can password-protect their canvas to prevent unauthorized changes. MT Canvus
supports two levels of password protection. An owner password allows users to open and
edit a canvas and perform all administrative tasks; an access password only allows users
to open and edit a canvas.
Password protection is optional. Users can choose whether to protect their canvases or
not. Instructions for setting and removing passwords are in the MT Canvus User Manual.
As an administrator, you can: define password complexity rules; set an inactivity timeout
for password protected canvases; and define the contact details that are displayed in an
advisory when users forget their password. Setup instructions for these features are in
the MT Canvus Client Installation Manual.
Registered users can download these MT Canvus manuals from:
https://cornerstone.multitouch.fi/mt-canvus-manuals
11.6.2 Set or remove canvas passwords
Follow these steps:
1. Log in to the dashboard; see section 11.4.
2. Go to the Canvases page.
3. Click the name of the canvas you want to manage.
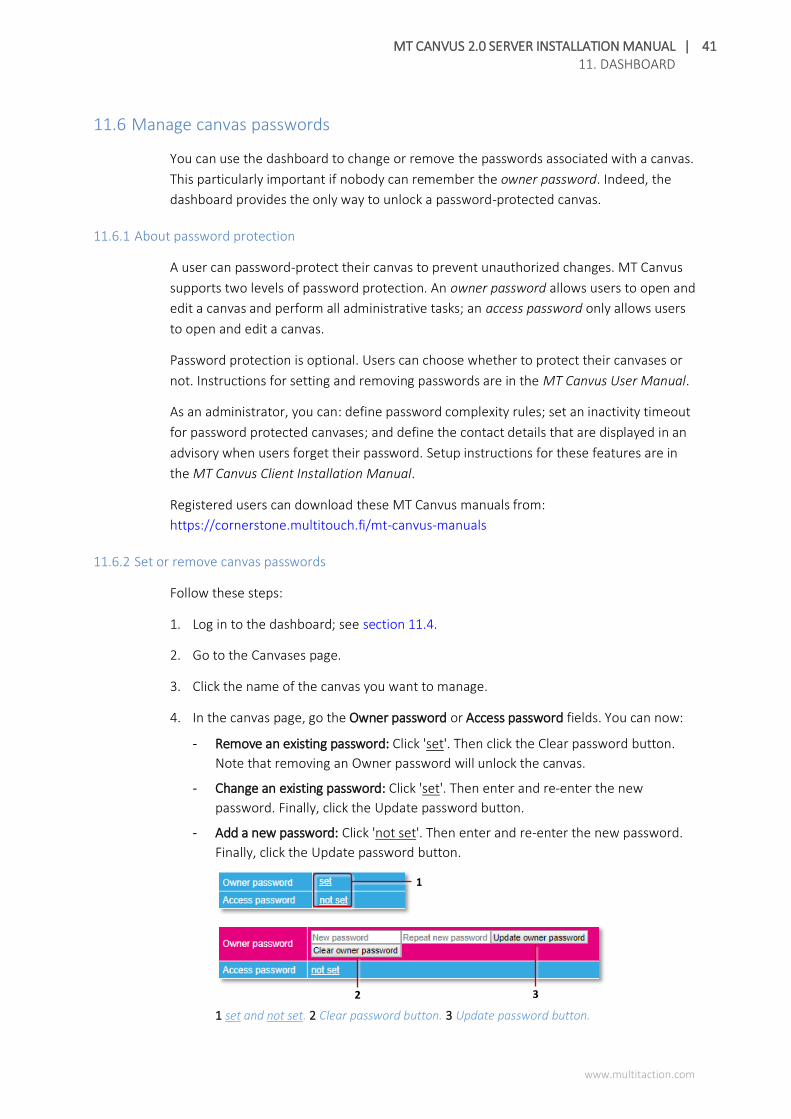
4. In the canvas page, go the Owner password or Access password fields. You can now:
- Remove an existing password: Click 'set'. Then click the Clear password button.
Note that removing an Owner password will unlock the canvas.
- Change an existing password: Click 'set'. Then enter and re-enter the new
password. Finally, click the Update password button.
- Add a new password: Click 'not set'. Then enter and re-enter the new password.
Finally, click the Update password button.
1 set and not set. 2 Clear password button. 3 Update password button.
1
2 3
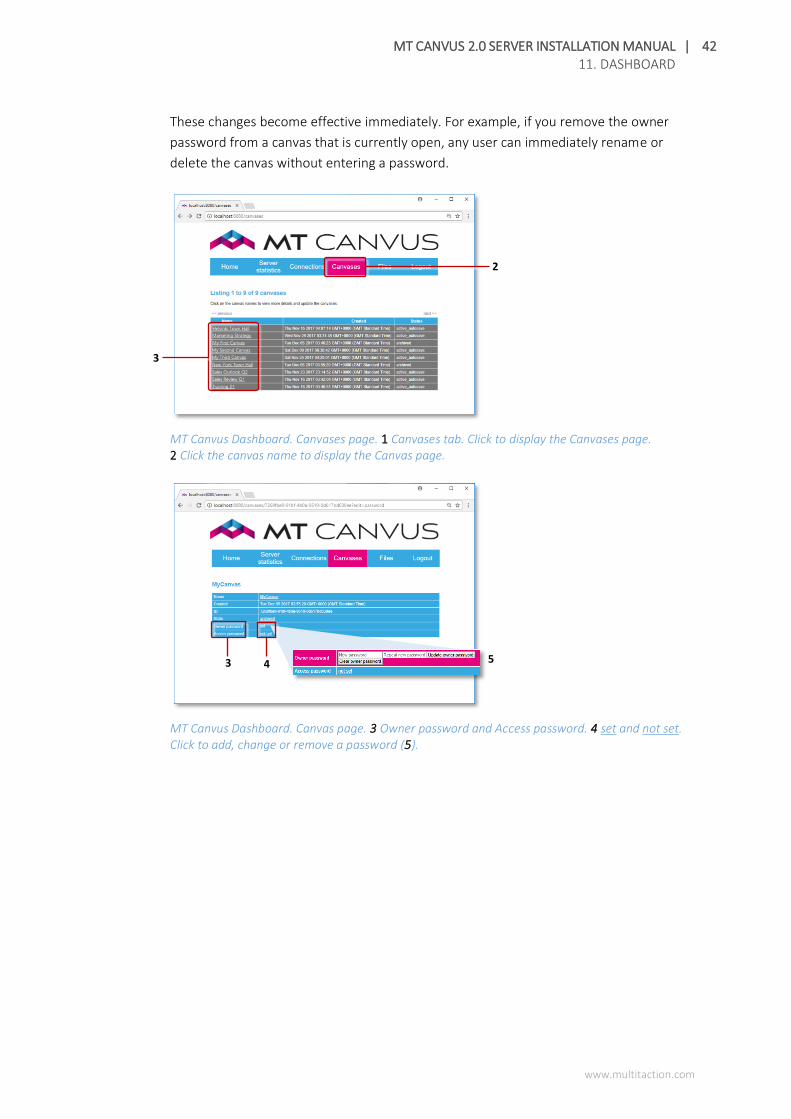
MT CANVUS 2.0 SERVER INSTALLATION MANUAL | 42 11. DASHBOARD
www.multitaction.com
These changes become effective immediately. For example, if you remove the owner
password from a canvas that is currently open, any user can immediately rename or
delete the canvas without entering a password.
MT Canvus Dashboard. Canvases page. 1 Canvases tab. Click to display the Canvases page. 2 Click the canvas name to display the Canvas page.
MT Canvus Dashboard. Canvas page. 3 Owner password and Access password. 4 set and not set. Click to add, change or remove a password (5).
2
3
3
4 5

MT CANVUS 2.0 SERVER INSTALLATION MANUAL | 43 11. DASHBOARD
www.multitaction.com
11.7 Set the canvas state
You can use the dashboard to manage canvas states. For any canvas, you can set its
state to:
▪ active_autosave: This is the default state for a normal canvas.
▪ disabled_autosave: This start converts a normal or archived canvas to a demo canvas.
A demo canvas is typically used for demonstration or training purposes. Unlike a
normal canvas, a demo canvas is automatically restored to its original state when the
session ends. Any changes made by users to the demo canvas are discarded, leaving
the demo canvas restored and ready for the next session.
▪ archived: An archived canvas is retained on the server, but not listed in the Canvas
List widget. (To display the Canvas List widget, users tap the Canvas List button in
the System menu.)
To change the canvas state, follow these steps:
1. Log in to the dashboard; see section 11.4.
2. Go to the Canvases page.
3. Click the name of the canvas you want to manage.
4. In the canvas page, go the State field.
5. Click the current state to display a drop-down menu. Choose the state you want and
then click the Update button.
Canvas page. 1 Canvases tab. Click to display the Canvases page. 2 State field with drop-down menu and Update button.
2
MT CANVUS 2.0 SERVER INSTALLATION MANUAL | 44 12. BACK UP AND RESTORE THE MT CANVUS SERVER
www.multitaction.com
12 Back up and restore the MT Canvus server
We recommend that you back up the MT Canvus server before upgrading.
12.1 Create a server backup
The MT Canvus server backup procedure copies the SQL database and media library
assets into a backup folder on the host computer. It does not overwrite existing backups.
Briefly, to back up the server follow these steps:
1. Stop the mt-canvus-server service; see section 10.
2. Run a backup command: mt-canvus-server --backup <backup folder>
Where <backup folder> is an empty folder.
Note: You will need admin rights to access the data. In the following examples,
the backup command is run as an administrator.
3. Restart the MT Canvus server; see section 10.
12.1.1 Ubuntu server example
To save a server backup to this folder:
/var/lib/mt-canvus-server/backups/backup-1
Run this command: sudo -u mt-canvus-server -H \
/opt/mt-canvus-server/bin/mt-canvus-server \
--backup /var/lib/mt-canvus-server/backups/backup-1
12.1.2 Windows server example
To save a server backup to this folder:
C:\Windows\System32\config\systemprofile\AppData\Local
\mt-canvus-server\backups\backup-1
Run this command as an administrator: "C:\Program Files\MT Canvus Server\bin\mt-canvus-server.exe"
--backup C:\Windows\System32\config\systemprofile\AppData
\Local\mt-canvus-server\backups\backup-1
MT CANVUS 2.0 SERVER INSTALLATION MANUAL | 45 12. BACK UP AND RESTORE THE MT CANVUS SERVER
www.multitaction.com
12.2 Restore a server backup
When you restore a server backup, the restore process first validates the backup data.
It then overwrites all existing SQL database entries and media library assets with data
from the backup data.
Follow these steps:
1. Stop the mt-canvus-server service; see section 10.
2. Run a restore command: mt-canvus-server --restore <backup folder>
Where <backup folder> contains the backup you want to restore.
You must run this command as the runtime user (the user logged on while the
MT Canvus server runs).
3. Restart the MT Canvus server; see section 10.
12.2.1 Ubuntu server example
To restore a backup from this folder:
/var/lib/mt-canvus-server/backups/backup-1
Run this command: sudo -u mt-canvus-server -H \
/opt/mt-canvus-server/bin/mt-canvus-server \
--restore /var/lib/mt-canvus-server/backups/backup-1
12.2.2 Windows server example
To restore backup from this folder:
C:\Windows\System32\config\systemprofile\AppData\Local
\mt-canvus-server\backups\backup-1
Run this command as an administrator: "C:\Program Files\MT Canvus Server\bin\mt-canvus-server.exe"
--restore C:\Windows\System32\config\systemprofile\AppData
\Local\mt-canvus-server\backups\backup-1
MT CANVUS 2.0 SERVER INSTALLATION MANUAL | 46 13. UPGRADE THE MT CANVUS SERVER
www.multitaction.com
13 Upgrade the MT Canvus server
To upgrade an MT Canvus server, you simply download and install the new version.
For Ubuntu servers, you run apt commands. For Windows servers, you download and run
a new installer.
13.1 Ubuntu servers
Follow these steps:
1. Run this command to update the list of packages available for download: $ sudo apt-get update
2. Run this command to download and install the latest MT Canvus server package: $ sudo apt-get install mt-canvus-server
3. The MT Canvus server software is installed under /opt/mt-canvus-server. The
installation also creates a mt-canvus-server user.
The server will run as the mt-canvus-server service. In turn, this service runs as
the mt-canvus-server user.
13.2 Windows servers
Follow these steps:
1. Browse to the MultiTaction Downloads page:
a. Register on the MultiTaction Cornerstone web site:
https://cornerstone.multitouch.fi/
b. Contact MultiTaction Sales and request access to the Downloads page:
https://www.multitaction.com/support-services
c. Launch a browser on the host computer and log on to the MultiTaction
Cornerstone web site (see step 1.a).
d. Browse to the Downloads page:
https://cornerstone.multitouch.fi/canvus_download
2. Download the appropriate MT Canvus server installer. The installer executable is
similar to this example:
mt-canvus-server-2.0.1-<ID number>.exe
3. Run the MT Canvus Server Setup Wizard as an administrator.
To launch the wizard, run the installer that you downloaded in step 2. Step through
the wizard screens. No inputs are required. In the final screen, click Finish.
MT CANVUS 2.0 SERVER INSTALLATION MANUAL | 47 14. SHARED CANVAS SESSIONS
www.multitaction.com
14 Shared canvas sessions
We recommend that users are aware of the following issues that can arise when viewing
a shared canvas:
▪ Synchronization delay when a shared canvas first opens
When a user opens a shared canvas for the first time, there is delay before the canvas
can be used and a ‘downloading’ animation runs on the local video wall or computer
screen.
This delay occurs while the MT Canvus server synchronizes assets (images, videos and
PDFs) with the client. These assets must be downloaded from the server to the client.
If the assets include large video files, the downloads can potentially take several
minutes to complete.
Note that when the user next opens the shared canvas, asset synchronization is much
faster and runs in the background.
▪ Reconnecting after a lost connection
If an MT Canvus client loses its connection to the server, the client displays a warning
on the local video wall or computer screen.
Typically, lost connections are not fatal and the server automatically restarts and
reloads the current canvas. Clients attempt to reconnect to the server after
60 seconds.
If the reconnection is successful, users must manually activate the connection by
closing and then re-opening the shared canvas.