multi vendor marketplace - magento · multi vendor marketplace module works very fine in a...
TRANSCRIPT

On - October 3, 2013
Multi Vendor Marketplacewebkul.com/blog/magento-multi-seller-marketplace/
Multi Vendor Marketplace Extension converts your basic e-commerce store into a complete online marketplaceshop. Using Multi Vendor Marketplace Module, the sellers can manage their Products, Orders, Shipment, SplitPayment, Returns and every standard marketplace features (using add-ons for marketplace).
Current version of Multi Vendor Marketplace module works in the Responsive theme which is very convenient forusers. Multi Vendor Marketplace module works very fine in a community ( free ) and enterprise version ofMagento. Multi Vendor Marketplace extension works very fine with all languages (including LTR and RTL ).Marketplace module has multilingual support. Marketplace Support all templates and themes including latestRWD, Ultimo (responsive web design).
As in base Magento all the payment from the customer goes to the admin first and then admin can manuallytransfer the payment to sellers, keeping this in mind we have designed several payment modules where in the payment from the customers is automatically split among the admin and the sellers involved. Admin gets hiscommission and the sellers get their payment.
To further enhance the capability & functionality of Multi Vendor Marketplace module, please view variousmarketplace add-ons.
Features
Any buyer can become seller and can sell their products on Marketplace.
A special and attractive design to manage the Products, Sellers, and Commission.
Separate Seller Profile with Company Banner and Company Logo.
Different Product type for Seller (Simple, Downloadable, Virtual, Configurable).
Admin can configure the Multi Vendor Marketplace Module.
Allow admin to create custom templates.
Admin can assign or unassign product to any particular Seller.
Using seller dashboard seller can track his income, latest order, comment and reviews, recentorders and recent comments with total sales matrix.
Buyer can give their reviews about sellers.
This module provides an attractive landing page with top 4 sellers with their top 3 products.
Allow to seller to edit shop URL for Profile page, collection page, review page, Location page.
Option to view the list of all the sellers of the marketplace at one place.
Allow the seller to select Check boxes for enabling the social media fields on Seller’s Profile page.
Admin can deny/approve/disapprove seller.
Admin can view, approve, disapprove, update, deny and delete seller requested product.
Buyer can view all the details about the product is given by the seller.
Option to configure products with available attributes-key features.
Ajax check for vendor/seller shop URL.
Work with all the themes and templates including responsive templates.
Contact to seller with captcha support.
1/71

Separate seller’s product collection page.
Different seller commission for every seller.
Seller can manage the order from the front-end.
Product Preview for product approval at admin.
Admin can do the Landing page setting.
Admin can manage the Seller profile page setting.
Admin will allow Product Image Type for the product image when seller adds the product.
Admin can manage the inventory setting.
The seller will be notified by mail when product inventory reaches to the specified minimum levelset by the admin.
Seller can change their profile page background color.
Allow seller to add Carrier and Tracking numbers for orders.
Allow seller to create duplicate product from seller panel.
Automatically generate seller product URL’s like- Profile, Collection, Location & feedback URL.
Admin can choose and customize 3 different layouts for Landing Page.
Marketplace sell page (in case of layout 2 and layout 3) works as seller central where user canseparately create his account.
Admin can choose to auto-approve orders or not.
The seller can manage the order from the front-end when approved by admin.
Admin can allow seller to add related products, up-sell products and cross-sell products fromseller’s panel.
Admin can allow seller to add product limit for customer on product purchase.
Multi-lingual support, all language working including RTL (Hebrew and Arabic)
Module Configuration
After the successful installation of the Multi Vendor Marketplace module, the admin will be able to view themarketplace configuration setting under System > Configuration.
Options
2/71

As per the above screenshot, you can see many admin configuration parameters for Marketplace. Let’s explainone by one.
Percent per product sale
Percent per product sale is the global commission which admin need to enter, this commission mechanism willbe applicable for all the sellers. Let’s say as an example there is a seller S1 and his/her product(P1) price is 100USD so on the sale of product P1 seller will get 80 USD and admin will get 20 USD as commission.commissionwhich admin need to enter, this commission mechanism will be applicable for all the sellers. Let’s say as an
3/71

example there is a seller S1 and his/her product(P1) price is 100 USD so on the sale of product P1 seller will get80 USD and admin will get 20 USD as commission.
Attribute Set ID
Attribute Set ID is the default ID for your global catalog. Admin can select multiple attributes set from Multi-Selectlist.
Allow Seller to Manage Orders
By enabling “YES”, admin allows the sellers to manage the orders from front-end. Now the seller can generateinvoices for their ordered products, generate the tracking number and shipment for the orders of their products.Even the seller can notify the customers by sending them emails, cancel/refund the order and even print theorder.front-end. Now the seller can generate invoices for their ordered products, generate the tracking numberand shipment for the orders of their products. Even the seller can notify the customers by sending them emails,cancel/refund the order and even print the order.
Move Product Tax to Seller Account
If move product tax to seller account is disabled or set as no then product Tax amount will forward into Adminaccount otherwise, it will go into Seller account.Admin account otherwise, it will go into Seller account.
Seller Approval Required
Partner or seller approval is the same as product approval, during sign up of the seller if admin allows this optionthen the user who will sign up in the store as a seller will convert into seller automatically. The store owner canset option then the user who will sign up in the store as a seller will convert into seller automatically. The storeowner can set YES or NO.
Product Approval Required
With the help of this option admin can restrict automatic approval of the product e.g If seller adds a product,every time product will be moderated by admin, the store owner can set e.g If seller adds a product, every timeproduct will be moderated by admin, the store owner can set YES or NO.
Set Captcha Enabled
Admin can enable/disable the captcha from the backend. Captcha is used at the time of contacting a seller asshown below in the screenshot. After clicking on “Contact Us” option, this pop up comes up where the buyerneeds to fill in the required information and the captcha to send the message to the seller as shownbelow.captcha from the backend. Captcha is used at the time of contacting a seller as shown below in thescreenshot. After clicking on “Contact Us” option, this pop up comes up where the buyer needs to fill in therequired information and the captcha to send the message to the seller as shown below.
4/71

Product Update Approval Required
By this option, admin can restrict automatic approval when the seller tries to update any parameter of the producte.g If seller edit a product, every time product will be moderated by admin, the store owner can set admin canrestrict automatic approval when the seller tries to update any parameter of the product e.g If seller edit aproduct, every time product will be moderated by admin, the store owner can set YES or NO.
Allowed Categories for seller to add productsseller to add products
Using this field admin can restrict seller to use only some selected categories to add products. Those categorieswhich are not selected by admin will not appear.
Allowed Product Image Type
Here admin will enter the “file extension” of the image of the product and these extensions will be commaseparated. Seller while adding new products can add images for the products having the extension mentioned bythe admin from the backend.backend.
Inventory Settings
Enable Low Notification– If “Enable Low Notification” is selected as “Yes”, then seller get notified throughemails when their inventory decreases with subsequent orders. As soon as the inventory reaches to the specifiedminimum level set by the admin, a low stock notification mail will be sent to the seller, if enabled from the adminpanel.seller get notified through emails when their inventory decreases with subsequent orders. As soon as the
5/71

inventory reaches to the specified minimum level set by the admin, a low stock notification mail will be sent tothe seller, if enabled from the admin panel.
Low Stock Quantity– Enter low stock quantity, which will allow sending low stock notification mail to sellerswhen product quantity will be equal or less than this quantity.
Order Settings
When Order Approval Required is set as ‘Yes’, admin have to approve each order manually and only after thatseller will get notified about the order. If set ‘No’, order notification will automatically be sent to the seller.have toapprove each order manually and only after that seller will get notified about the order. If set ‘No’, ordernotification will automatically be sent to the seller.
Admin can approve an order by going to Sales > Orders and then seller will receive a notification email and thenseller will be able to manage and view the order from his seller’s panel.seller will receive a notification email andthen seller will be able to manage and view the order from his seller’s panel.
6/71

Seller Product’s Settings
Allow Seller to Add Related Products
Admin can allow sellers to add ‘Related Products’ while creating or editing products from the seller’s panel.
Allow Seller to Add Up-Sell Products
Admin can allow sellers to add ‘Up-Sell Products’ while creating or editing products from the seller’s panel.
Allow Seller to Add Cross-Sell Products
Admin can allow sellers to add ‘Cross-Sell Products’ while creating or editing products from the seller’s panel.
Allow Seller to Add Limit on Product Purchase for Customer7/71

Admin can allow the seller to set product purchase quantity limit for buyers.
Allowed Product Qty on Product Purchase for Customer
Here admin can enter the default value that will use when the seller has not set any product purchase limit.
For example, if the admin has set default 3 product purchase quantity and the seller has not set any limit then thecustomer can only buy 3 product quantity. If the seller has set some product quantity limit then that limit will beused.
Seller Profile Page Setting
Display Seller Profile
If admin sets this option as “Yes”, then the seller info. will be visible under the Marketplace Dashboard menu, onthe product and the landing page. If this option is set to “No”, then the seller info. will be hidden from theMarketplace Dashboard, product, and the Marketplace landing page.
Enable Color Picker
If this option is set to “Yes”, then seller can change their profile page background color as per their need.
Rewrite Seller’s Shop URL
8/71

When this option is set “Yes”, then the seller can change the URL to any name they want and then that newname will appear. Seller can change the URL of Profile page, Review page, Collection page & Location page.Like this seller can manage the custom URL for their shop.
Seller Policies Enable at front end
There is an option for Seller policies Enable or Disable at front end. Seller can enable their policies like returnpolicy, shipping policy.
Allow to automatic create seller public URL on Seller registration
If the admin has selected “Yes” for this field then when a new customer creates a new account it automaticallycreates the seller public URL at the time of registration. If the admin has set this option as “No“, then the sellerwill have to manually add his rewrite URLs.
Landing Page Setting
From here admin can enable or disable the Seller registration from Customer Registration Page. Admin can alsochoose from the 3 layouts and customize them as per their need.
Display Seller Registration Block on Customer Registration Page
From here admin can enable or disable the seller registration from the customer registration page.
When selected ‘No’
9/71

When set as No, and if Layout 2 or 3 is selected then it will work as a Seller Central.
When selected ‘Yes’
10/71

Layout Configuration
Case 1: When Layout1 is selected
Admin Panel
11/71

Marketplace Landing Page Head Title
Here admin will enter the Head title of the Marketplace landing page and that name will appear on the front-end.
Marketplace Landing Page Layout
Here admin can choose from various layouts that will be shown on the front-end.
Display Banner, Banner Image & Banner Content
Here admin will enable the option “Display Banner” so that the banner will be displayed on the front-end. In“Banner Image” section, the admin will choose and upload the banner image. For the “Banner Content”, theadmin will write the content which will be displayed over the banner image in the Marketplace.
12/71

MarketPlace Landing Page Label 1
Here admin will enter some catchy lines and it will be displayed above all feature’s icons.
Marketplace Landing Page Label 2
Here admin will enter some content which will be displayed above top 4 seller blocks.
Marketplace Landing Page Label 3
Here, Admin will enter the content for displaying above “View All Seller” button.
Marketplace Landing Page Label 4
Here admin will enter the content for displaying above marketplace content.
Marketplace Landing Page Button Label
Here admin will enter the label for the landing page button label and it will get displayed on banners.
Display Icons-
Admin can set this as “Yes or No” and then anyone can see Feature icon and Feature label. Likewise, the adminwill select for all the Feature icons 1,2,3,4 and Feature Label and it will be displayed as per the admin setting.
Admin will explain the overall workflow of the Marketplace through the four icons as shown in the image below.Any Seller can register themselves in the Marketplace, then add products for their shops. After adding theproducts into their shops, selling will be done and then revenue will be generated for the sale.
About Marketplace
Here admin will enter the content inside the box provided.
13/71

Marketplace Seller List Page Top Label
Here admin will enter the label which will be displayed at the top of the Marketplace Seller List Page.
Marketplace Seller List Page Bottom Label
Here admin will enter the label which will be displayed at the bottom of the Marketplace Seller List Page.
Front-end
14/71

Case 2: When Layout2 is selected
Admin Panel
15/71

Marketplace Landing Page Layout
Here admin can choose from various layouts that will be shown on the front-end.
Marketplace Landing Page Head Title
Here admin will enter the Head title of the Marketplace landing page and that name will appear on the front-end.
Display Banner, Banner Image & Banner Content
Here admin will enable the option “Display Banner” so that the banner will be displayed on the front-end. In“Banner Image” section, the admin will choose and upload the banner image. For the “Banner Content”, theadmin will write the content which will be displayed over the banner image in the Marketplace.
Marketplace Landing Page Button Label
Here admin will enter the label for the landing page button label and it will get displayed on banners.
Terms and Conditions URL
Here admin has to enter the Terms & Conditions Page link address.
Front-end
16/71

17/71

Case 3: When Layout3 is selected
Admin Panel
18/71

19/71

Marketplace Landing Page Layout
Here admin can choose from various layouts that will be shown on the front-end.
Marketplace Landing Page Head Title
Here admin will enter the Head title of the Marketplace landing page and that name will appear on the front-end.
Display Banner, Banner Image & Banner Content
Here admin will enable the option “Display Banner” so that the banner will be displayed on the front-end. In“Banner Image” section, the admin will choose and upload the banner image. For the “Banner Content”, theadmin will write the content which will be displayed over the banner image in the Marketplace.
Marketplace Landing Page Button Label
Here admin will enter the label for the landing page button label and it will get displayed on banners.
MarketPlace Landing Page Label 1
Here admin will enter some catchy lines and it will be displayed above all feature’s icons.
Marketplace Landing Page Label 2
Here admin will enter some content which will be displayed above top 4 seller blocks.
Marketplace Landing Page Label 3
Here, Admin will enter the content for displaying above “View All Seller” button.
Display Icons-
Admin can set this as “Yes or No” and then anyone can see Feature icon and Feature label. Likewise, the adminwill select for all the Feature icons 1,2,3,4,5 and Feature Label and it will be displayed as per the admin setting.
Admin will explain the overall workflow of the Marketplace through the five icons. Any Seller can registerthemselves in the Marketplace, they can customize their profile and add details, then add products for theirshops. After adding the products into their shops, selling will be done and they will generate profit from sales.
Terms and Conditions URL
Here admin has to enter the Terms & Conditions Page link address.
Front-end
20/71

Marketplace Product Hint
This field is responsible for Enable or Disable product hint for product category, name, price, special price, quality,stock, tax, and image.
Marketplace Profile Hints
Using this field admin can Enable or Disable the profile hints including shop URL, profile id, and many more.
21/71

Marketplace Seller Review Setting
When Marketplace Seller Review is set to “YES”, then customer can make review only after the purchase and if“NO” is selected then customer can make review before the product purchase.
Marketplace Transactional Emails
Now admin can select the custom templates from drop down. Created custom templates will be added in dropdown and admin can use desire template.
22/71

Marketplace Landing Page
The module is based upon responsive theme which makes the marketplace landing page more beautiful thanbefore, incorporating an alluring banner with its content. The page is divided into 4 different labels, between theBanner Image and Footer links, showing icons like Registering Yourself, Adding products, Start Selling and forGenerating Revenues.
The second label will display the top 4 sellers of the marketplace, with their top three selling products, Sellerlogo, Shop Title, and a button to redirect to view the full collection of the seller.The label also contains the optionto ‘view the list of all the sellers’ of the marketplace at one place.
You can see there are four icons which display the overall working of the Marketplace in a gist. Any customer canregister themselves in the Marketplace, then add products for their shops. After adding the products into theirshops selling will be done and then revenue will be generated for the sale.
23/71

After clicking on View All, you will redirected to a new page, where customer can search seller by shop and allthe seller’s information will be there along with the seller’s logo. There will be a “View All” button which willdisplay all the products of the seller.
24/71

Marketplace Vendor Sign-up
When Display Seller Registration Block on Customer Registration Page is selected as “Yes”, the seller canregister from the customer registration page only.
Seller signup is very easy, user can signup for seller using marketplace landing page button or from store MyAccount link and during signup they need to choose “Do You Want To Become A Seller / Vendor?”. If they want tosignup as a seller then they need to choose YES else NO. If they choose YES then they need to put their shopURL which will be unique as per the screenshot.
25/71

The shop URL input field is Ajax driven by which seller can see that particular URL exist or not as below screens.As per the screen that URL does exist.
26/71

As per the below screen that URL does not exist.
When Display Seller Registration Block on Customer Registration Page is selected as ‘No’, the Customerwill be able to register themselves using the separate registration page form for Sellers. Landing Page Layout 2& 3 will work as Seller Central.
27/71

Seller can go to Account > Sell to visit seller registration page.
Marketplace Seller Panel Management
If the user has been approved as a seller then the marketplace block will display in Account section of user asper the image. From here Seller can edit his / her profile, add new products, delete their products, view theirtransaction list and order history.
You can see there are many links for Multi Vendor Marketplace module to manage seller profile and to addproduct in the store let’s proceed one by one.
28/71

Seller Profile Management By Seller
Using this menu seller have shop information like shop name, location of his/her shop, banner image, shop logo,shop meta description and meta data and many more parameters, as per the below image screenshot. In theSeller profile panel, the seller can add his various social media links, contact number, Background color, Shoptitle, Company Banner, Company Logo, Policy details, etc. If there are multi-lingual stores then seller can providedifferent information for different store views.
29/71

The company logo uploaded here on the seller profile page will be visible on the Invoice & Shipment slips asshown below in the snapshot.
30/71

Edit Seller’s Shop URL Rewrite
One can now edit the different Shop page’s URL as required for Profile Page, Collection Page, Review page &Location Page,then he can set accordingly, as shown in the screenshot, which will be displayed in the URL of theparticular page requested. The seller can manage the custom URL for the shop.
31/71

Payment details under payment details seller can add their bank account or paypal id or any kind of paymentinformation.
After entering all the information you will get an amazing page for your shop as below. In profile menu you cansee Reviews by customers, Contact Us Information, Return policy and Shipping policy as set for the company.
32/71
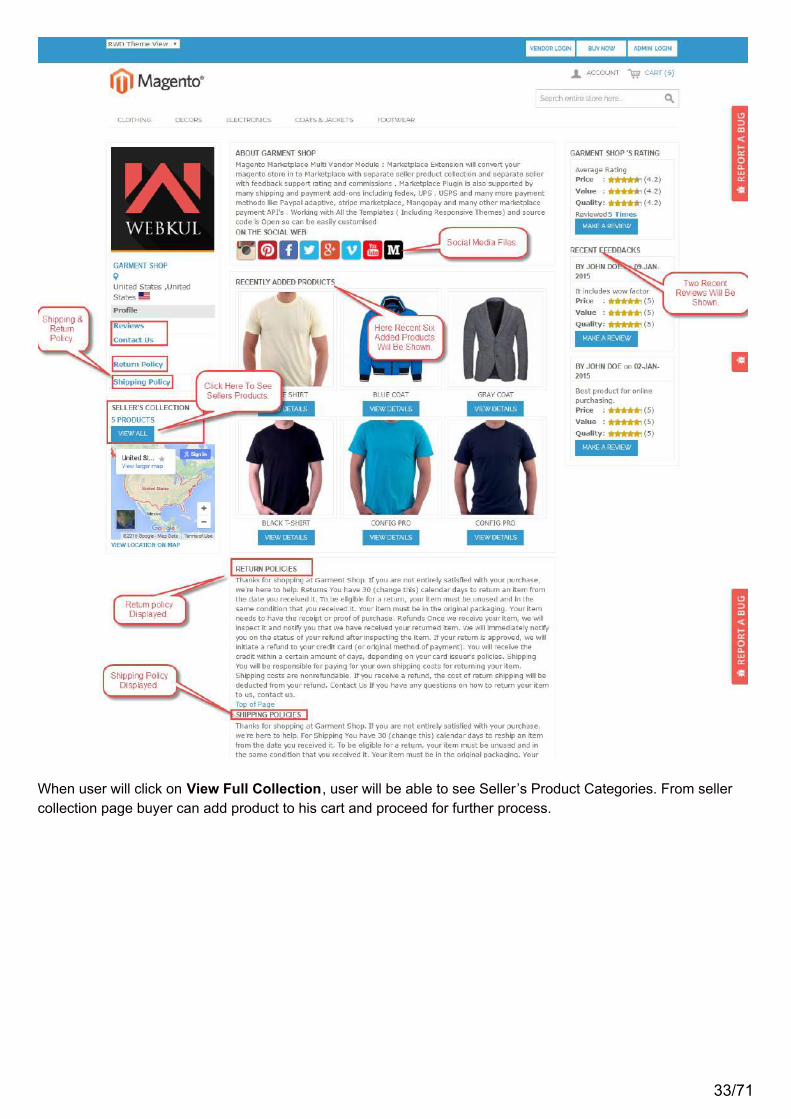
When user will click on View Full Collection, user will be able to see Seller’s Product Categories. From sellercollection page buyer can add product to his cart and proceed for further process.
33/71

34/71

In the product page, customer can view the review for the seller along with the shop link for that seller as shownin the below image.
Marketplace Feedback and Rating system
Buyer can rate the seller according to his/ her opinion under their profile with star rate vote and feedbackmessage as shown below.
35/71

From above screen, you can see user can put their review about seller, these reviews will be moderated by Storeadmin.
Marketplace New Products Addition By Seller
Under this menu seller can add new product with any Attribute Set allowed by admin. Seller can input the productname, description, short description, price, stock, weight and multiple images. Seller can add custom attributesand custom options as well but to use custom attributes and custom option you need to install:
Custom Attribute addon for marketplace
Custom Option addon for marketplace
Note:
Above two plugin does not come with marketplace base plugin, admin need to purchase both the add-ons to usethem.
36/71

After selecting Attribute Set and Product type new product page will be open, in which you have to enter wholeinformation about the product and save it.
Admin Backend Setting For Allowed Attribute Set & Product Type For The Seller
Well, the admin can set the functionality for not showing the select dropdown for selecting the attribute set andproduct type for adding products at the seller end as per the below cases-
Case 1 :
If the admin has set only one “Attribute set” and one “Product type” then – in this case, the seller will be directlytaken to the “add product page” without being prompted to select the Attribute Set and the Product Type for thenew product. This will cut the selection of these two options for the sellers where the admin has set only oneAttribute set and only one Product type for the sellers.
Admin Panel
37/71

Seller Panel
38/71

Case 2 :
If the admin has set more than one “Attribute Set” and “Product Type” then – in this case, the seller will have tofirst set the Attribute set and the Product type for the new product and then the seller will be taken to the Add NewProduct form page.
Admin Panel
39/71

Seller Panel
Case 3 :
40/71

If the admin has set only one “Attribute Set” and more than one “Product type” then – in this case, the seller willfirst have to set the Product Type for the new product and then the seller will be taken to the Add New Productform page.
Admin Panel
Seller Panel
41/71

Case 4 :
If the admin has set more than one “Attribute Set” and only one “Product type” then – in this case, the seller willfirst have to set the Attribute Set for the new product and then the seller will be taken to the Add New Productform page as per the below screenshot.
Admin Panel
42/71

Seller Panel
Note-The seller cannot upload image from the WYSIWYG editor provided in the Description & Short Description
43/71

text box in the Add Product page.
Simple Product
Seller have to fill up all the details for adding the product. Seller can also duplicate an existing product. To createa duplicate product using an existing product, seller has to provide the SKU, Stock quantity and Stock Availability.Seller can also select the Related Products, Up-sells products and Cross-sells products if the admin has enabledthis option.
44/71

Marketplace Downloadable Products Addition By Seller
Seller can add Downloadable Product also using Multi Vendor Marketplace module. Software, e-books,images, music or video, or any type of content that can be packaged into files and downloaded can be addedusing this product type. Seller can also duplicate a configurable product they just to select the attributes and theproduct will be duplicated and then seller can add associated products for that duplicated product.
Adding up a downloadable product will create an additional field to enter the URL or upload File, as mentioned inscreenshot.
45/71

Marketplace Virtual Product Addition By Seller
Seller can add Virtual Product which do not have physical presence.
Marketplace Configurable Product Addition By Seller
Seller have an option for configurable product as well. Seller can add Configurable product as shown below.You must create attribute for Configurable products.
Create Attributes
You need to create attribute for Configurable Products including attribute set, group, code, label and more.
46/71

Here you will select the configurable attributes for which combination of associated product will be created. Nowenter all the fields value to create a configurable product.
47/71

After adding Configurable product page, seller will edit that particular product and then seller can see the optionfor adding “Associated product” for the same product.
48/71
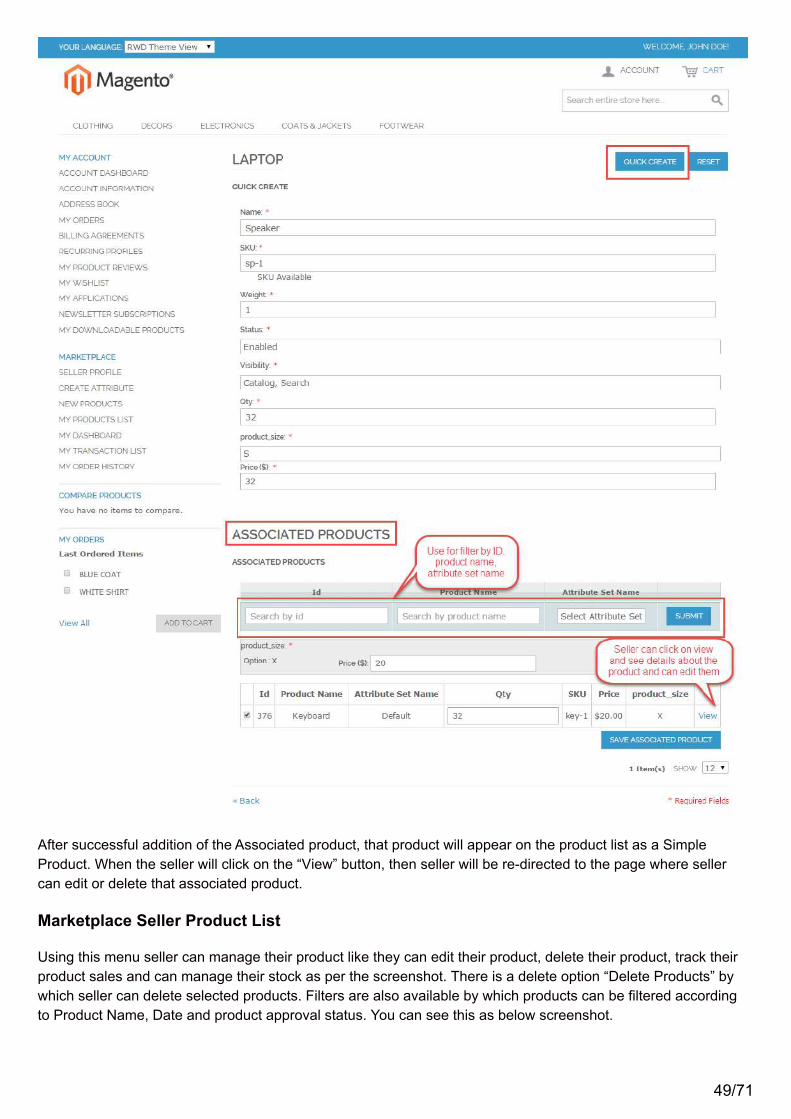
After successful addition of the Associated product, that product will appear on the product list as a SimpleProduct. When the seller will click on the “View” button, then seller will be re-directed to the page where sellercan edit or delete that associated product.
Marketplace Seller Product List
Using this menu seller can manage their product like they can edit their product, delete their product, track theirproduct sales and can manage their stock as per the screenshot. There is a delete option “Delete Products” bywhich seller can delete selected products. Filters are also available by which products can be filtered accordingto Product Name, Date and product approval status. You can see this as below screenshot.
49/71

Quantity Confirmed
Quantity Confirmed denotes that the order has been completed.
Quantity Pending
Quantity Pending status shows that order is not completed yet.
Quantity Sold
Quantity sold denotes that buyer have placed orders whether it is confirmed or not.
Marketplace Seller Dashboard
Using seller Dashboard seller can track his income, latest order, comment and reviews, recent orders andrecent comments with total sales matrix. Seller can also track Total Payout and Remaining Amount from MyDashboard.
50/71

If Seller have any doubts or query then they can ask from the admin by click-in on the “Ask Question To Admin”button provided on their dashboard. The communication here is via emails and there will be no record of thiscommunication in the back end. This is a way of communication between Seller and Admin.
51/71
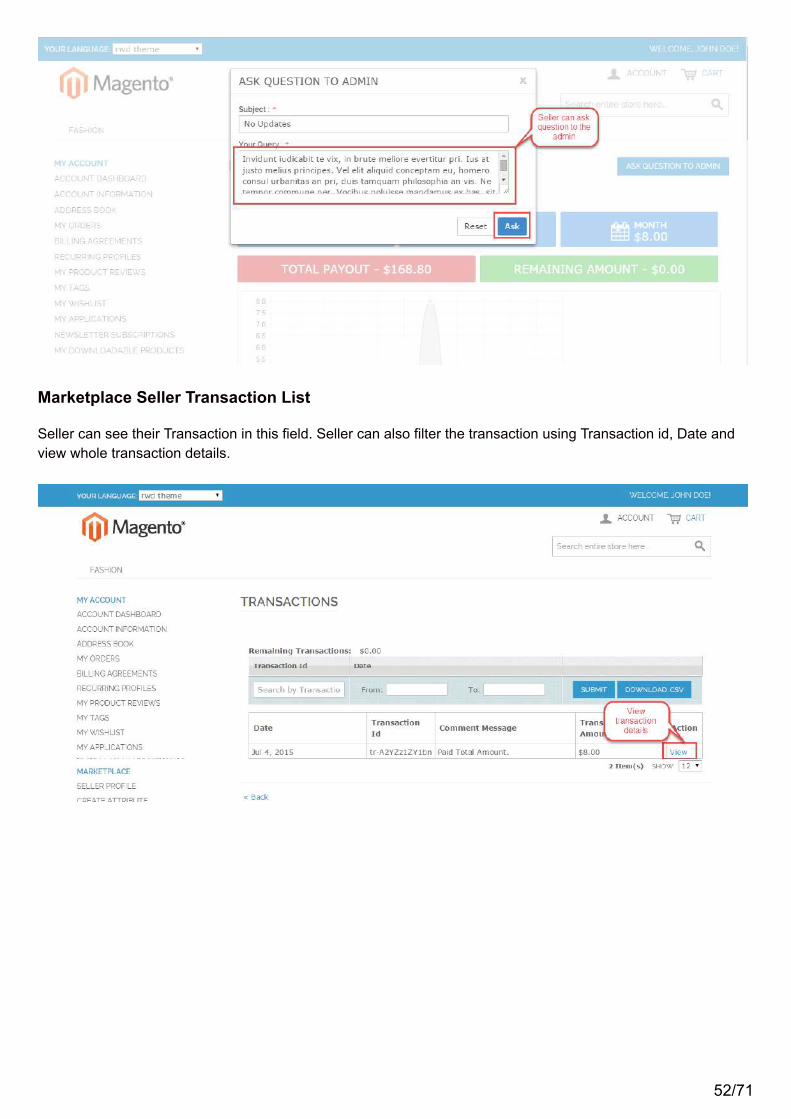
Marketplace Seller Transaction List
Seller can see their Transaction in this field. Seller can also filter the transaction using Transaction id, Date andview whole transaction details.
52/71

Manage Shipping/Vendor Shipping Management
The sellers of the Marketplace can manage shipping from their end and can generate invoice and shipping labelswhen you have installed any of the Marketplace Shipping Modules.
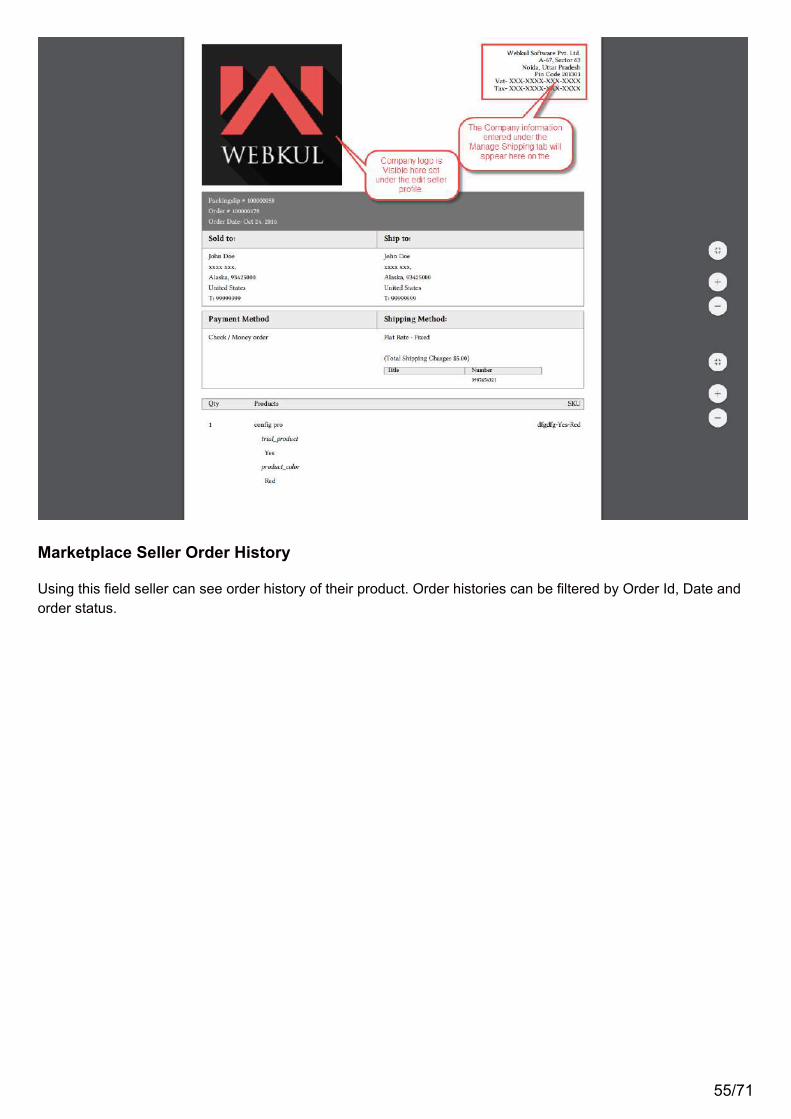
Here the sellers can save their Invoice and Packaging/VAT/TAX Information that will be visible on the Invoiceand Shipping labels as shown below in the snapshot.
The company logo can be uploaded under the seller edit profile and will be visible on the Invoice andShipping slip as shown below in the snapshot.
53/71

The information entered above for the company logo and the Invoice and PackagingSlip/Address/VAT/TAX/Information will be visible on the Invoice and Shipping slips as shown below in thesnapshot.
Invoice Slip
Shipping Slip –
54/71
Marketplace Seller Order History
Using this field seller can see order history of their product. Order histories can be filtered by Order Id, Date andorder status.
55/71

After clicking on View Order, Order Details will display with Buyer information, Shipping address, shippingmethod, Billing address, Payment method, Items ordered as shown below along with that, a seller can manageshipment, add tracking number, creation of credit memo, sending emails, printing of invoices etc. Just by viewingorder in ‘My order history’.
56/71

Seller Order Notification Mail Template
In the Multi Vendor Marketplace module, if an order is placed and it’s invoice has been created then seller willreceive product sold notification mail with their product details. For an example, if an order is placed with threeproducts (A,B,C) of Seller (x,y,z) respectively. So when order invoice will be created then sellers (X,Y,Z) will
57/71

receive an email for their products (A,B,C respectively) with order details.
Admin Management
After the successful set up of the Multi Vendor Marketplace module admin will be able to see “MarketplaceManagement” as per the below screen.
58/71

Marketplace Product Management By Admin
This menu is responsible for managing Seller’s Product from Marketplace configuration panel (System>Configuration) product approval is required then in this case every product added by seller need to be approvedby admin. Product approval will happen from Manage Product menu as per the screenshot. There is also aDeny option by which admin can deny the Seller’s product for a valid reason.
As you can see there is a prev button which will show the preview screen for product added by seller as per theimage.
59/71

This is an option by which admin can Deny the product.
Marketplace Seller Management By Admin
This menu is responsible for Seller Management from marketplace configuration panel(System>Configuration). If partner approval is required then in this case every seller need to be approved byadmin as per the image.
60/71

There is an option by which admin can Deny the Seller.
To pay the seller, admin will go to Marketplace Management->Manage Sellers and from the list of Sellers youcan select the seller by clicking on the “Order” under the Order column in the seller row line as shown below.
After that you will be able to see complete orders of the seller and you need to look for “Pay seller” button asshown below.
61/71

Then you can click the “Pay Seller “Button and a pop up will appear where you can add a comment and click payto pay the outstanding amount to the seller.
The product name field will display the order details relating to the specific product like the products ordered,invoiced, shipped & refunded. The Quantity to be paid field shows the amount for the particular quantity on whichamount is still to be made.
62/71

Also under view column admin can see the order of the seller including Account Information, Billing Address, andShipping address and many more.
63/71

Marketplace Commission Management By Admin
Manage commission menu is responsible for all the commission management despite of global commission.There is an individual seller commission by which admin can set different commission for different sellers.
Admin can Manage the Customer under Customer > Manage Customer. In Manage Customer section admincan edit the Customer information.
64/71

Under Edit action this page will be open and from here Admin can perform following action.
Payment Information
Payment information is payment details entered by a Seller during account creation under Customer>Manage Customers> Edit. This payment details will be used by admin to pay the sellers.
65/71

Seller Account Information
Admin can View and change the Seller account information of different stores using this field. This field will alsohelp to Create new order and delete customer through admin.
66/71

Seller Commission
Admin can set the commission in percentage for particular seller. To set the commission navigate to Customer >Manage Customers > Seller Commission.
67/71

Add Product
Admin can add and assign product to any seller by navigating through Manage Sellers, then Select the customerand under menu “Customer Information” select “Add Product” menu item. Admin need to enter the “Product ID”that is associated with the product in the “Product ID “field and click save after that to assign product to theparticular seller.
Remove Product
Admin will navigate through Manage Sellers, select the customer for whom he wants to unassign the product andthen from the menu “Customer Information” select the “Remove Product” menu item. Admin will provide the“Product Id” of the product to be removed and will click “Save Customer” to save the settings.
Want To Remove Seller
68/71

Using this field admin can remove any seller from the Marketplace and make him a normal customer.
Marketplace Feedback Management By Admin
This menu is responsible for all the reviews. Admin can approve, unapproved, and delete the reviews.Unapproved or deleted reviews will not appear in Seller’s account. Admin can also see the ratings for price, valueand quality in terms of star.
Marketplace Customer Product Purchase
A customer can add products of multiple sellers in the cart and process checkout.
69/71

The customer can check out with the products of multiple sellers at the same time. The customer can selectshipping and payment method and process checkout.
Now the customer can see the order under the order history page like this.
70/71

That’s all for the Multi Vendor Marketplace module and if you wanna have more features in your marketplacestore then find out our marketplace add-ons , still have any issue feel free to add a ticket and let us know yourviews to make this module better http://webkul.uvdesk.com/
71/71