murphy bed cabinetry installation instructionsmurphybedframe.com/ibedinstructions2_gray.pdf ·...
TRANSCRIPT
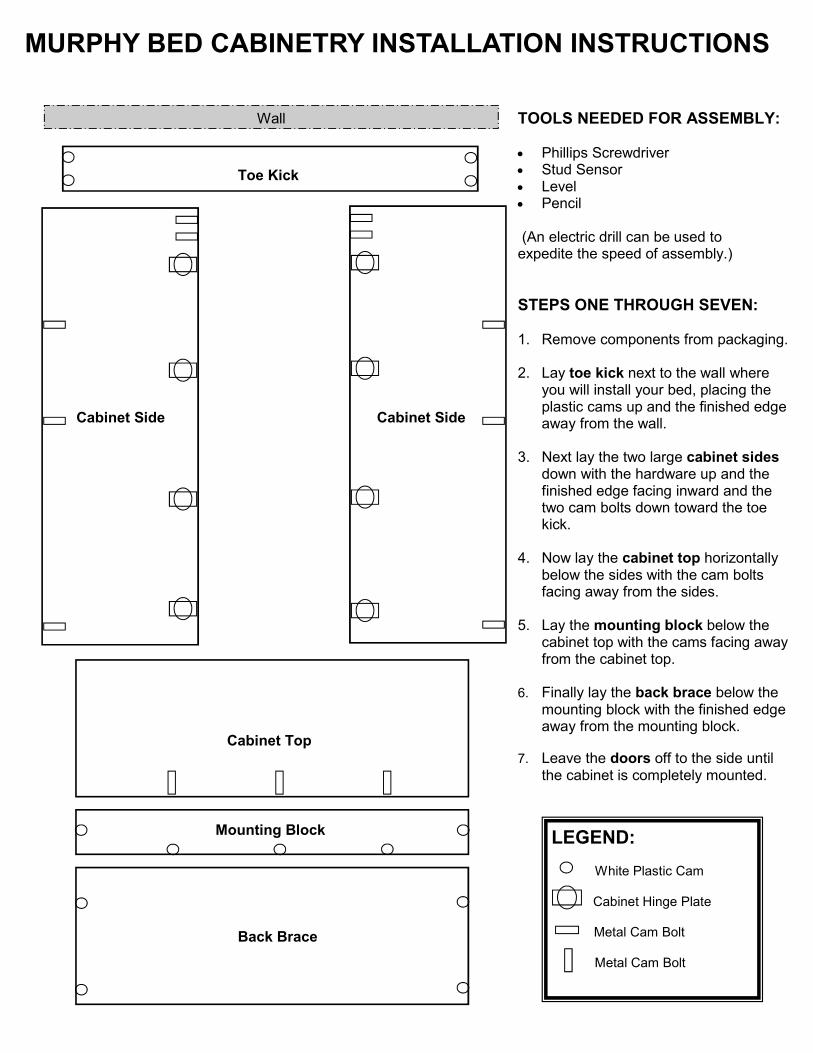
TOOLS NEEDED FOR ASSEMBLY: • Phillips Screwdriver • Stud Sensor • Level • Pencil (An electric drill can be used to expedite the speed of assembly.)
STEPS ONE THROUGH SEVEN: 1. Remove components from packaging.
2. Lay toe kick next to the wall where
you will install your bed, placing the plastic cams up and the finished edge away from the wall.
3. Next lay the two large cabinet sides down with the hardware up and the finished edge facing inward and the two cam bolts down toward the toe kick.
4. Now lay the cabinet top horizontally below the sides with the cam bolts facing away from the sides.
5. Lay the mounting block below the cabinet top with the cams facing away from the cabinet top.
6. Finally lay the back brace below the
mounting block with the finished edge away from the mounting block.
7. Leave the doors off to the side until the cabinet is completely mounted.
MURPHY BED CABINETRY INSTALLATION INSTRUCTIONS
LEGEND: White Plastic Cam Cabinet Hinge Plate
Metal Cam Bolt Metal Cam Bolt
Toe Kick
Cabinet Side Cabinet Side
Cabinet Top
Back Brace
Wall
Mounting Block

STEP 8: Close-Up
Photograph
8. Assemble the mounting block to the cabinet top by placing the mounting block’s plastic cams over the preinstalled cam bolts on the top. Be certain the cams are facing to the outside of the angle created. Turn the cams (that align to the top) with a Phillips screwdriver clockwise about 1/4 turn until snug.
9. This next step is easier with two people but one person can do it, if you are careful. Lift one of the cabinet sides on its edge with the finished edge down. Then lift the assembled top piece up so that the cams are facing toward the ceiling. Slide your top flush with the cabinet side and lock the plastic cam 1/4 turn into the installed bolt. 10. Repeat step nine with the second cabinet side being careful to keep all parts from twisting and perpendicular.
STEPS EIGHT THROUGH ELEVEN: ASSEMBLING THE CABINET
STEP 9 & 10: Close-Up Photograph
11. Go to where the cabinet sides sit next to the toe kick and slide the toe kick into the cams. Tighten cams and repeat on other side.
STEP 11: Close-Up Photograph
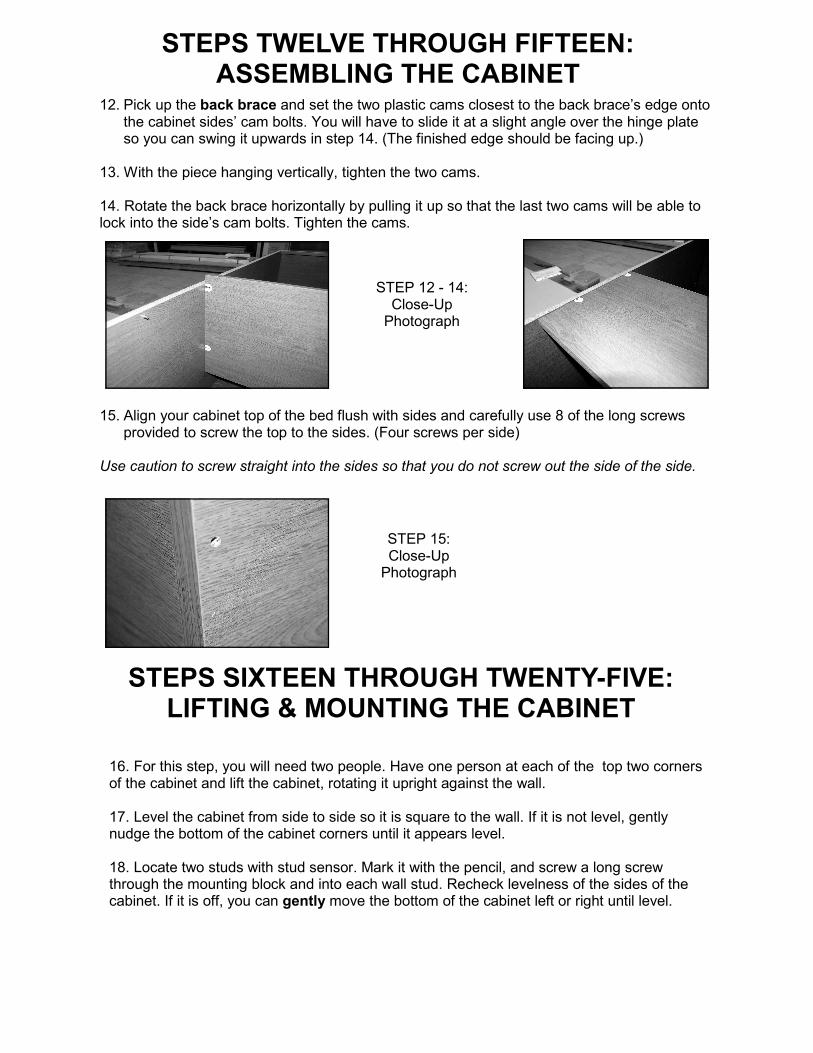
12. Pick up the back brace and set the two plastic cams closest to the back brace’s edge onto the cabinet sides’ cam bolts. You will have to slide it at a slight angle over the hinge plate so you can swing it upwards in step 14. (The finished edge should be facing up.)
13. With the piece hanging vertically, tighten the two cams. 14. Rotate the back brace horizontally by pulling it up so that the last two cams will be able to lock into the side’s cam bolts. Tighten the cams.
15. Align your cabinet top of the bed flush with sides and carefully use 8 of the long screws provided to screw the top to the sides. (Four screws per side)
Use caution to screw straight into the sides so that you do not screw out the side of the side.
STEP 12 - 14: Close-Up
Photograph
STEPS TWELVE THROUGH FIFTEEN: ASSEMBLING THE CABINET
STEP 15: Close-Up
Photograph
STEPS SIXTEEN THROUGH TWENTY-FIVE: LIFTING & MOUNTING THE CABINET
16. For this step, you will need two people. Have one person at each of the top two corners of the cabinet and lift the cabinet, rotating it upright against the wall. 17. Level the cabinet from side to side so it is square to the wall. If it is not level, gently nudge the bottom of the cabinet corners until it appears level. 18. Locate two studs with stud sensor. Mark it with the pencil, and screw a long screw through the mounting block and into each wall stud. Recheck levelness of the sides of the cabinet. If it is off, you can gently move the bottom of the cabinet left or right until level.

21. For this step, it may be helpful for one person to lift the door while the other person secures the hinges to the cabinet. Lift one door assembly upright. Position hinges with the hinge plate and snap hinges onto the plate. Make certain the hinge completely engages the hinge plate and snaps into position. If it doesn’t secure properly, you could severely damage the doors. Repeat procedure on second door assembly. 22. Close your doors and check the alignment. If your doors need adjusted, you can do so by turning the bolt on the mounting plate to move the doors up and down; you can adjust your doors left and right using the screw in center of hinge. 23. Install top magnet into predrilled holes using the provided screws found in the magnet pack. Adjust magnet by loosing the screws until the door closes completely. 24. Close the left door. Place magnet against the magnet strike plate on the bottom of the door. Center over the top of the toe kick and install using the screws. 25. Install your handles or knobs (not provided). 26. Now you are ready to install your frame.
19. Before installing the hinges on the doors, you may wish to dry fit a hinge to the hinge mount plate on the cabinet. This will familiarize you with how the hinge will snap into place once applied to the door.
FAMILIARIZING YOURSELF WITH HÄFELE’s SALICE HINGE:
Hinge Plate
Hinge
Attaches to Door
When dry fitting the hinge, you will take the hinge and align the notch on its arm to the hinge plate as directed by the arrows. It should snap into place with slight pressure. To release the hinge, you will press down the hinge plate’s clip.
Clip
20. Lay the doors onto the ground open, with the drilled holes facing up. Install the 8 hinges into the doors using the 16 small silver screws. Be certain that the stem of the hinge points out away from the door.
Adjust doors left to right
Adjust doors up and down
STEP 21-23: Close-Up
Photograph