mypal a730w - asusdlcdnet.asus.com/pub/asus/ia/mypal a730w/e1810_mypal_a730w.pdfmicrosoft,...
TRANSCRIPT
MyPal A730W
Handbook

ii
Copyright © 2004 ASUSTeK COMPUTER INC. All Rights Reserved.No part of this manual, including the products and software described in it, may bereproduced, transmitted, transcribed, stored in a retrieval system, or translated into anylanguage in any form or by any means, except documentation kept by the purchaser forbackup purposes, without the express written permission of ASUSTeK COMPUTER INC.(“ASUS”).
Product warranty or service will not be extended if: (1) the product is repaired, modified oraltered, unless such repair, modification of alteration is authorized in writing by ASUS; or (2)the serial number of the product is defaced or missing.
ASUS PROVIDES THIS MANUAL “AS IS” WITHOUT WARRANTY OF ANY KIND, EITHEREXPRESS OR IMPLIED, INCLUDING BUT NOT LIMITED TO THE IMPLIED WARRANTIESOR CONDITIONS OF MERCHANTABILITY OR FITNESS FOR A PARTICULAR PURPOSE.IN NO EVENT SHALL ASUS, ITS DIRECTORS, OFFICERS, EMPLOYEES OR AGENTS BELIABLE FOR ANY INDIRECT, SPECIAL, INCIDENTAL, OR CONSEQUENTIAL DAMAGES(INCLUDING DAMAGES FOR LOSS OF PROFITS, LOSS OF BUSINESS, LOSS OF USEOR DATA, INTERRUPTION OF BUSINESS AND THE LIKE), EVEN IF ASUS HAS BEENADVISED OF THE POSSIBILITY OF SUCH DAMAGES ARISING FROM ANY DEFECT ORERROR IN THIS MANUAL OR PRODUCT.
SPECIFICATIONS AND INFORMATION CONTAINED IN THIS MANUAL ARE FURNISHEDFOR INFORMATIONAL USE ONLY, AND ARE SUBJECT TO CHANGE AT ANY TIMEWITHOUT NOTICE, AND SHOULD NOT BE CONSTRUED AS A COMMITMENT BY ASUS.ASUS ASSUMES NO RESPONSIBILITY OR LIABILITY FOR ANY ERRORS ORINACCURACIES THAT MAY APPEAR IN THIS MANUAL, INCLUDING THE PRODUCTSAND SOFTWARE DESCRIBED IN IT.
Microsoft, Activesync, Outlook, Pocket Outlook, Windows, and the Windows logo are eitherregistered trademarks or trademarks of Microsoft Corporation in the United States and/or inother countries. Microsoft products are licensed to OEMs by Microsoft Lincensing, Inc., awholly owned subsidiary of Microsoft Corporation.
E1810
First edition V1
November 2004
iii
Contents at a glanceThis handbook contains the information you need to efficiently use ASUS®
MyPal A730W Pocket PC.
• Chapter 1 - Get started! .............................................1-1
This chapter introduces the ASUS MyPal A730W Pocket PC,how to set and power it up, and basic screens that willfamiliarize you with its many features.
• Chapter 2 - Learn the basics .....................................2-1
This chapter will teach you the basic functions in MyPalA730W. You will learn how to enter, find, and organizeinformation, customize the device, and use the bundled simpleapplications.
• Chapter 3 - Synchronize and enhance .....................3-1
This chapter tells you how to use the Microsoft® ActiveSync® tosynchronize your device with your desktop computer. Tofurther enhance your device, refer to the instructions on how toinstall other applications from the Companion CD.
• Chapter 4 - ASUS® Programs ....................................4-1
This chapter introduces the ASUS proprietary programs thatcame with your device.
• Chapter 5 - Microsoft® Pocket Outlook .....................5-1
This chapter details the procedures for the Microsoft® PocketOutlook Calendar, Contacts, Tasks, Notes, and Messaging.
• Chapter 6 - Companion programs ............................6-1
This chapter includes information on Pocket Word, PocketExcel, MSN Messenger, and Windows Media Player forPocket PC.

iv
• Chapter 7 - Pocket Internet Explorer ........................7-1
This chapter gives information on using Pocket InternetExplorer, Mobile Favorites folder, and AvantGo interactiveservice.
• Chapter 8 - Get connected ........................................8-1
This chapter provides the procedures for connecting to theInternet, and for transferring data using infrared (IR).
• Chapter 9 - Bluetooth® ........................................................................ 9-1
This chapter provides information on using the Bluetoothfeature built-in the device.
• Chapter 10 - Using Wi-Fi® ............................................................. 10-1
This chapter provides information on using the Wi-Fi® featurebuilt-in the device.
• Appendix - Notices ................................................... A-1
This part includes the safety notices and regulations.

v
MyPal A730W specifications
Processor
Operatingsystem
Memory
Display
Battery
Card slot
Connection
Audio
Camera
Size
Weight
Intel® PXA270 520 MHz
Microsoft® Windows Mobile™ 2003 SecondEdition
64 MB Flash ROM128 MB SDRAM (107 MB user accessible)
3.7-inch, brilliant transflective LCD65,536 colors, 16-bit displayVGA 640 x 480 resolution
1100 mAh Lithium IonBuilt-in backup battery 20mAh
CompactFlash Type II card slot (3.3V)SD card slot (3.3V) (for SD memory cards and
SDIO interface cards)
Wi-Fi® (IEEE 802.11b)Bluetooth® v1.1Infrared 115.2 Kbps
3.5 mm stereo headphone jackBuilt-in microphone and speaker
Built-in 1.3 Megapixel resolutionASUS Camera interface program
117.5 mm x 72.8 mm x 16.9 mm (L x W x H)4.63 in. x 2.87 in. x 0.66 in. (L x W x H)
170 g

vi
Package contentsYour package includes several accessories for the Pocket PC. Afterunpacking, check the items against the list below and make sure that theyare in good condition. If any item is missing or damaged, contact yourdealer or retailer immediately.
Standard items
• ASUS MyPal A730W
• Cradle
• USB sync cable
• AC adapter/power cableInput : 100V ~ 240VOutput : 5V 2.4A 10W
• 1100 mAh Lithium Ion battery
• Stylus
• Protection case
• Microsoft® Companion CD
• Bonus CD
• Handbook
• Quick Start Guide
• Warranty card
Optional accessories
• Stylus
• Car charger
• Leather protection case
• Traveling USB sync cable
• Traveling USB host cable
• Traveling serial cable
• AC adapter/power cable (UL/CEE/UK/SAA/CCEE)
• GPS solution kit
• Bluetooth® GPS solution kit
• Extension battery (1800 mAh)
Get started! 1-1
Chapter 1
Get started!
♦♦♦♦♦ Introducing MyPal ................................................ 1-2Front features ........................................................................... 1-2Back features ........................................................................... 1-4Side features ............................................................................ 1-5Top features ............................................................................. 1-6Bottom features ........................................................................ 1-6The stylus ................................................................................. 1-7The cradle ................................................................................ 1-7
♦♦♦♦♦ Setting up MyPal ................................................... 1-8Removing and replacing the back cover .................................. 1-8Installing and removing the battery ........................................ 1-10Placing on the cradle ..............................................................1-11Connecting the AC adapter .................................................... 1-12
♦♦♦♦♦ Additional storage .............................................. 1-13Installing and removing an SD card ....................................... 1-13Installing and removing a CF card ......................................... 1-14
♦♦♦♦♦ Activating MyPal ................................................. 1-15
♦♦♦♦♦ Basic screens on MyPal ..................................... 1-16Today screen .......................................................................... 1-16Start menu ............................................................................. 1-17Command bar ........................................................................ 1-17Pop-up menus ........................................................................ 1-18

1-2 Chapter 1
Introducing MyPalThe ASUS® MyPal A730W is truly a good companion wherever you go.Powered by a 520 MHz Intel® PXA270 processor, equipped with 128 MBSDRAM and 64 MB Flash ROM, and bundled with the Microsoft® WindowsMobile® 2003 Second Edition plus a host of useful utilities, you haveeverything you need in your pocket!
Front features
• Power LED - blinks green when the battery is charging; steady greenwhen the battery is fully charged and the device is connected to an ACpower source.
• Bluetooth LED - lights up blue when the Bluetooth® feature is ON.
• Wi-Fi LED - lights up blue when the Wi-Fi feature is ON.
• LCD touch screen - allows you to enter, read, send, receive, or edit databy tapping on it. The screen lumination is increased or decreased bychanging the backlight settings.
• Microphone - magnifies your sound recording.
LCD touch screen
4-way Navigation button
Tasks buttonContacts button
ASUS Launcher button
Calendar button
Bluetooth LED Power LED
Microphone
Launch button
Wi-Fi LED

Get started! 1-3
• ASUS Launcher button
- While in the main screen (Today screen), press once to start theASUS Launcher program
- While in the main screen (Today screen), press and hold for severalseconds to launch the ASUS Camera program
- While recording a video (ASUS Camera recorder mode), press onceto stop recording. See the section “Recorder functions” on page 4-13for more information on video recording.
• Calendar button- While in the main screen (Today screen), press once to launch the
calendar program
- While in camera preview (ASUS Camera photo mode), press once toturn on the photo frame selection feature and display the firstavailable frame. A different frame appears whenever you press thebutton. The feature is turned off after the last available frame isdisplayed. See the section “Photo menus” on page 4-16 for details onchanging photo settings.
• Contacts button- While in the main screen (Today screen), press once to launch your
contacts list
- While in camera preview (ASUS Camera photo/recorder mode),press once to change the capture mode (lighting effects). Thecapture mode changes whenever you press the button. See thesection “Photo menus” on page 4-16 for details on changing photosettings.
• Tasks button- While in the main screen (Today screen), press once to launch your
tasks list
- While in camera preview (ASUS Camera photo/recorder mode),press once to change the image capture resolution (default is640*480 pixels). The resolution changes whenever you press thebutton. See the section “Photo menus” on page 4-16 for details onchanging photo settings.
• 4-way navigation button - functions like the four arrow keys on akeyboard. This button allows you to move through the program icons,folders, or files in a menu by scrolling up or down, left or right.
1-4 Chapter 1
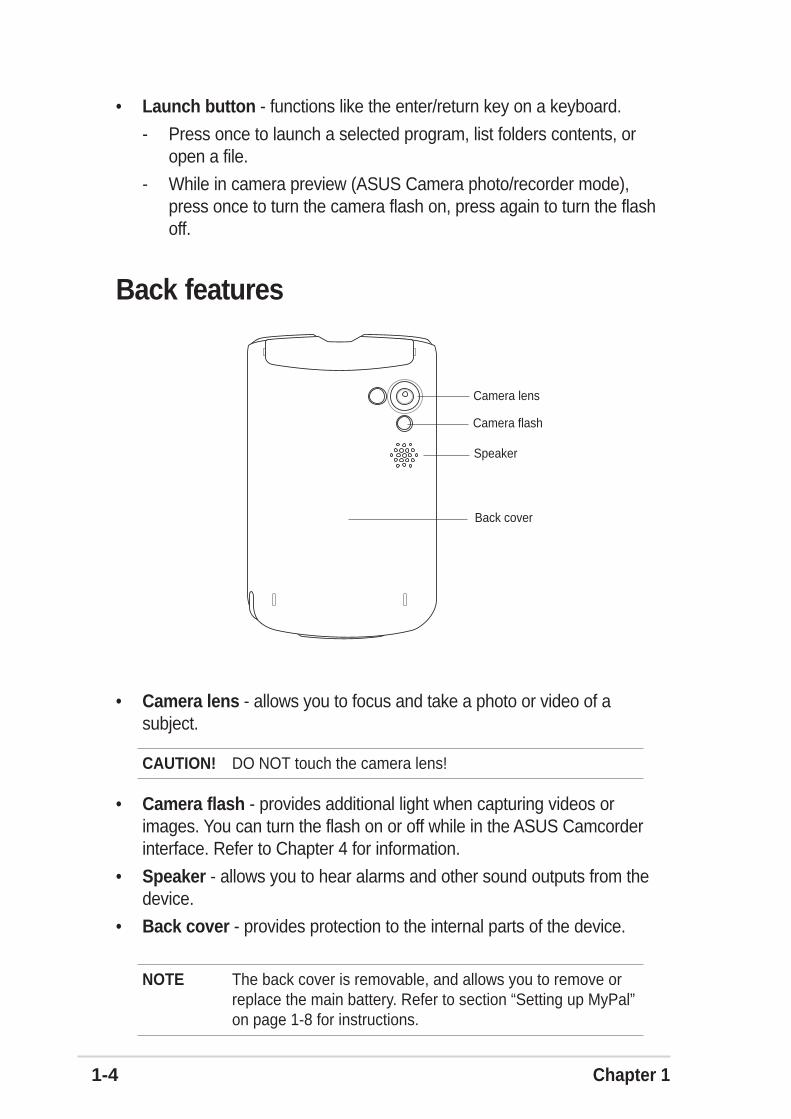
Back features
NOTE The back cover is removable, and allows you to remove orreplace the main battery. Refer to section “Setting up MyPal”on page 1-8 for instructions.
• Camera lens - allows you to focus and take a photo or video of asubject.
CAUTION! DO NOT touch the camera lens!
• Camera flash - provides additional light when capturing videos orimages. You can turn the flash on or off while in the ASUS Camcorderinterface. Refer to Chapter 4 for information.
• Speaker - allows you to hear alarms and other sound outputs from thedevice.
• Back cover - provides protection to the internal parts of the device.
Camera lens
Speaker
Camera flash
Back cover
• Launch button - functions like the enter/return key on a keyboard.
- Press once to launch a selected program, list folders contents, oropen a file.
- While in camera preview (ASUS Camera photo/recorder mode),press once to turn the camera flash on, press again to turn the flashoff.

Get started! 1-5
Side features
• Power/Backlight button - turns the device power on or off if you pressthe button quickly. Press and hold the button for a few seconds to turnthe backlight on or off. Turning off the backlight saves battery power.
NOTE Press the Power button and the Tasks button simultaneouslyif you wish to launch the Align Screen function.
• Camera / Notes /Record button- While in the main screen (Today screen), press once to launch the
Notes program.
- While in the Notes program, press and hold to start recording,release to stop recording.
- While in the ASUS Camcorder program, press once to take a photoshot (Photo capture mode); or press once to start recording a video,press again to stop recording (Video recorder mode)
• Back cover latch - secures the back cover to the main unit.
NOTE As a precaution, the power button is automatically disabledwhen you remove the back cover. You can only turn on thepower when the back cover is installed to the unit.
Right side
Back cover latch
Left side
Camera/Notes/Record button
Power button/Backlight button

1-6 Chapter 1
Top features
Bottom features
• Headphone jack - connects a headphone.
• CF card slot - accommodates a CompactFlash (CF) card.
• SD card slot - accommodates an SD memory card or an SDIO interfacecard (e.g. 802.11b, Bluetooth®, GPS, camera, barcode scanner, etc.)
• Infrared (IR) port - allows you to copy or send data to another devicewith an IR port.
• Cradle connector / Sync cable connector - connects to the 26-pinfemale connector on the cradle. If you are not using the cradle, connectthe 26-pin USB sync cable directly to this connector to synchronize yourdevice with your computer.
• Reset switch - allows you to perform a soft reset in case the devicemalfunctions, or when an application hangs. Press the tip of the stylus onthis switch to reset the system.
NOTE To perform a hard reset, press and hold the power buttonwhile you press the tip of the stylus on the reset switch. Ahard reset restores the original configuration of your deviceand erases all data. Back up your data before performinga hard reset!
• Stylus - used for tapping or writing on the LCD touch screen.
Cradle connector /Sync cable connector
Reset switch
Stylus
CF card slotHeadphone jack
SD card slotInfrared (IR) port

Get started! 1-7
The cradleThe cradle has four key parts.
• Device connector - holds the device on the cradle, and functions as asynchronization interface. This is a 26-pin connector that matches theconnector on the bottom of the device.
• Stylus holder - provides a convenient place for the stylus when thedevice is on the cradle.
• USB connector - synchronizes the device with your PC.
• Power connector - connects the bundled AC adapter.
The stylusThe stylus functions on a Pocket PC the same way amouse functions on a standard PC. Use the stylus to tapor drag on the LCD touch screen to open programs orexecute commands.
• Tap. Touch the screen once with the stylus to openprograms and select options.
• Drag. Hold the stylus on the screen and drag acrossthe screen to select text and images. Drag in a list toselect multiple items.
• Tap and hold. Tap and hold the stylus on an item tosee a list of actions available for that item. From thepop-up menu, tap the action that you wish to perform.
Device connector USB connector
Power connectorStylus holder
Slide out thestylus from thecompartment
1-8 Chapter 1
Setting up MyPal
Removing and replacing the back cover
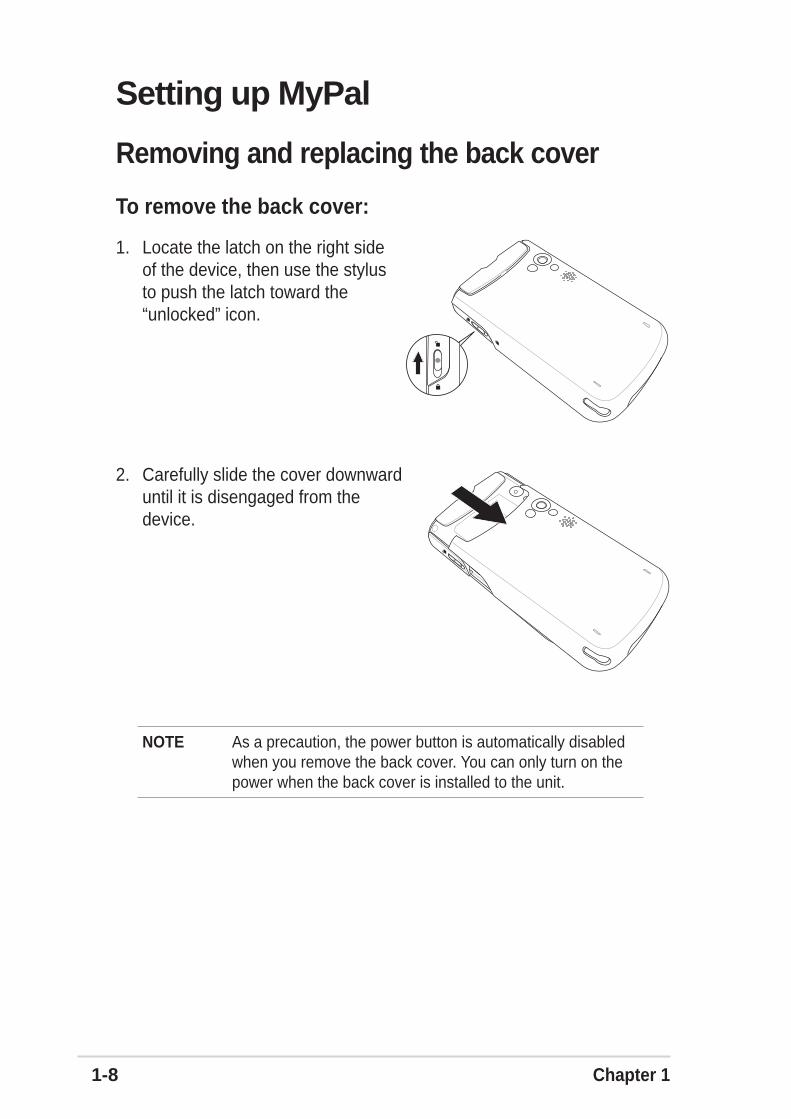
To remove the back cover:
1. Locate the latch on the right sideof the device, then use the stylusto push the latch toward the“unlocked” icon.
2. Carefully slide the cover downwarduntil it is disengaged from thedevice.
NOTE As a precaution, the power button is automatically disabledwhen you remove the back cover. You can only turn on thepower when the back cover is installed to the unit.

Get started! 1-9
To replace the back cover:
1. Carefully slide the coverfrom the bottom of thedevice making sure thatthe side rails match thegrooves on the side ofthe device.
2. Use the stylus to push the latchtoward the “locked” icon.
Groove
Rail(on inner side)

1-10 Chapter 1
Installing and removing the battery
3. Push the battery upward until youhear the battery latch click,indicating that the battery is lockedin place and the battery contactsmatched the 4-pin connector on thecompartment.
NOTE You need to remove the back cover to access the batterycompartment. Refer to the section “Removing and replacingthe back cover” on page 1-8 for instructions.
To install the battery:
1. Position and insert the right sideof the battery with its notchesmatching the tabs on the rightside of the compartment.
2. Press the left side of the batteryto completely fit it into thecompartment.
NOTE In addition to the external battery, the device includes a20 mAh built-in backup battery. The backup battery containsthe original configuration of your device.
Battery latch locked
Battery contacts
Tabs on the batterycompartment
RESET
NOTE At this point, the bottom edge of the battery should fit thebottom edge of the compartment.
Get started! 1-11
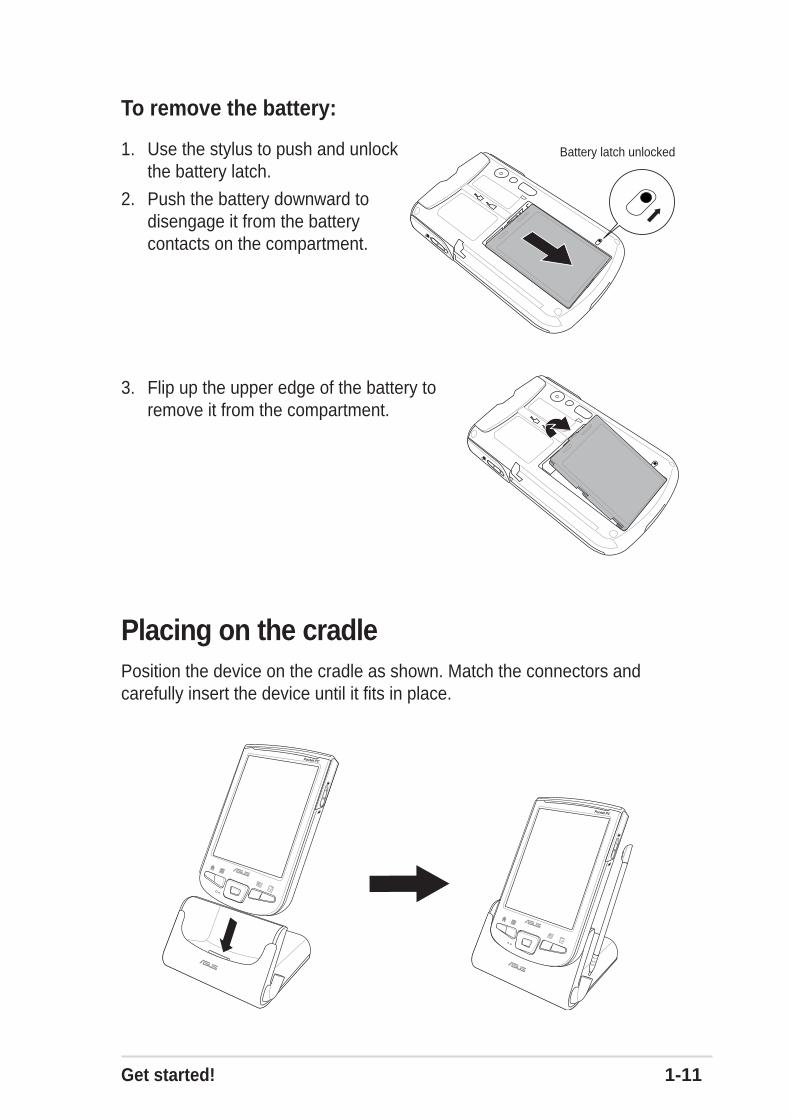
To remove the battery:
1. Use the stylus to push and unlockthe battery latch.
2. Push the battery downward todisengage it from the batterycontacts on the compartment.
3. Flip up the upper edge of the battery toremove it from the compartment.
Placing on the cradlePosition the device on the cradle as shown. Match the connectors andcarefully insert the device until it fits in place.
Battery latch unlocked

1-12 Chapter 1
Connecting the AC adapter
IMPORTANT You need to charge the battery before using the device forthe first time.
To connect the AC adapter without the cradle:
1. Connect the power cable to the jack on the sync cable adapter.
2. Connect the 26-pin device plug of the sync cable to the 26-pinconnector on the bottom of the device.
3. Connect the power plug to a grounded wall socket.
To connect the AC adapter with the cradle:
1. Connect the powercable to theconnector at the backof the cradle.
2. Connect the powerplug to a groundedwall socket.
NOTE The power LED (green) blinks and starts charging the batteryas soon as you connect the power cable to a power source.See page 2-25 on how to display the battery power status.
1
2
RESET
Pocket PC
AC adapter/ Power cable
USB sync cable
Sync cable adapter
26-pin device plug
1
2
3

Get started! 1-13
Additional storageYour device comes with two kinds of memory card slots for additionalstorage. The CF card slot supports multimedia cards. The SD card slotsupports SD (SecureDigital) memory card and SDIO cards of variousfunctionalities including 802.11b, Bluetooth®, GPS, camera, etc.
NOTE You need to install an SD memory card or CF card if you wishto use the ASUS backup features.
NOTE An SD/SDIO card fits only in one orientation, and slidessmoothly into the slot if inserted correctly. DO NOT force thecard into the slot!
Installing and removing an SD/SDIO card
To install an SD/SDIO card:
1. With the label side (usually theside with the card manufacturer’sname) face up, and the barcode/serial number side face down,insert the card into the SD cardslot.
To remove an SD/SDIO card:
Press the card slightly until it ejects.
Label side
2. Push the card all the way into the slot until it fits completely. If properlyinstalled, the SD card edge aligns with the top edge of the device.SDIO cards usually have an extended part that protrude over the slotedge.

1-14 Chapter 1
NOTE A CF card fits only in one orientation, and slides smoothly intothe slot if inserted correctly. DO NOT force the card into theslot!
Installing and removing a CF card
To install a CF card:
1. With the label side (usually the side with the card manufacturer’sname) face up, and the barcode/serial number side face down, insertthe 50-pin female connector of the card into the CF card slot.
2. Push the card all the way into the slot until it fits completely. If properlyinstalled, the CF card edge aligns with the top edge of the device.
To remove a CF card:
Simply pull out the card from the slot.
Label side

Get started! 1-15
Activating MyPalYou need to properly calibrate and activate your device before using it.This process ensures accurate positioning when entering text andselecting menus.
To calibrate and activate your device:
1. Press the power button.
The Align screen appears when you turn on thedevice for the first time, or after performing a hardreset.
Power button
2. Use the stylus to tap the center of thecross to perform the align screenprocess. You may have to do this step afew times to properly calibrate.
5. When prompted, select your time zone.
6. When the Today screen appears, youare ready to use your device. Proceed tothe next section for information on thebasic screens on your device.
NOTE To perform a hard reset, press and holdthe power button while you press the tipof the stylus on the reset switch.
NOTE To launch the Align Screenfunction at any time, tap , tapSettings, then the System tab.Tap the Screen icon, then theAlign Screen button.
4. Follow the screen instructions until setupis complete.
1-16 Chapter 1
Basic screens on MyPal
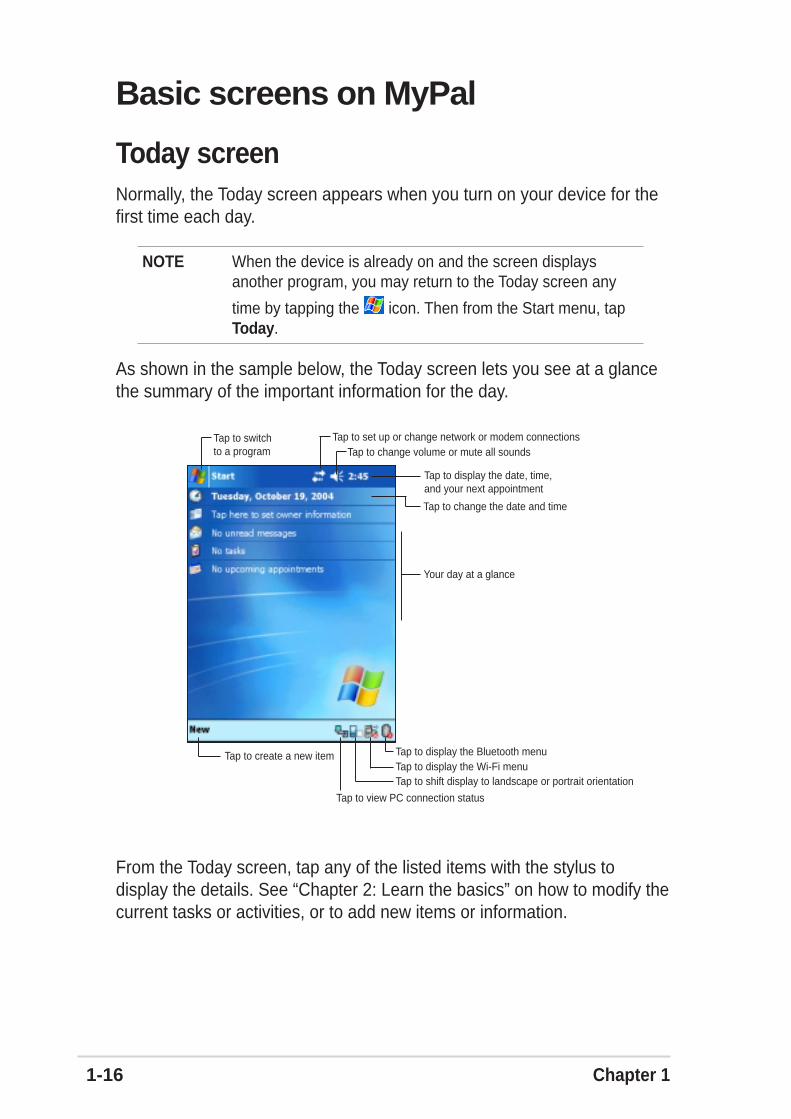
Today screenNormally, the Today screen appears when you turn on your device for thefirst time each day.
NOTE When the device is already on and the screen displaysanother program, you may return to the Today screen any
time by tapping the icon. Then from the Start menu, tapToday.
As shown in the sample below, the Today screen lets you see at a glancethe summary of the important information for the day.
From the Today screen, tap any of the listed items with the stylus todisplay the details. See “Chapter 2: Learn the basics” on how to modify thecurrent tasks or activities, or to add new items or information.
Tap to switchto a program
Tap to set up or change network or modem connectionsTap to change volume or mute all sounds
Tap to display the date, time,and your next appointment
Tap to change the date and time
Your day at a glance
Tap to display the Wi-Fi menuTap to create a new item
Tap to view PC connection status
Tap to shift display to landscape or portrait orientation
Tap to display the Bluetooth menu
Get started! 1-17
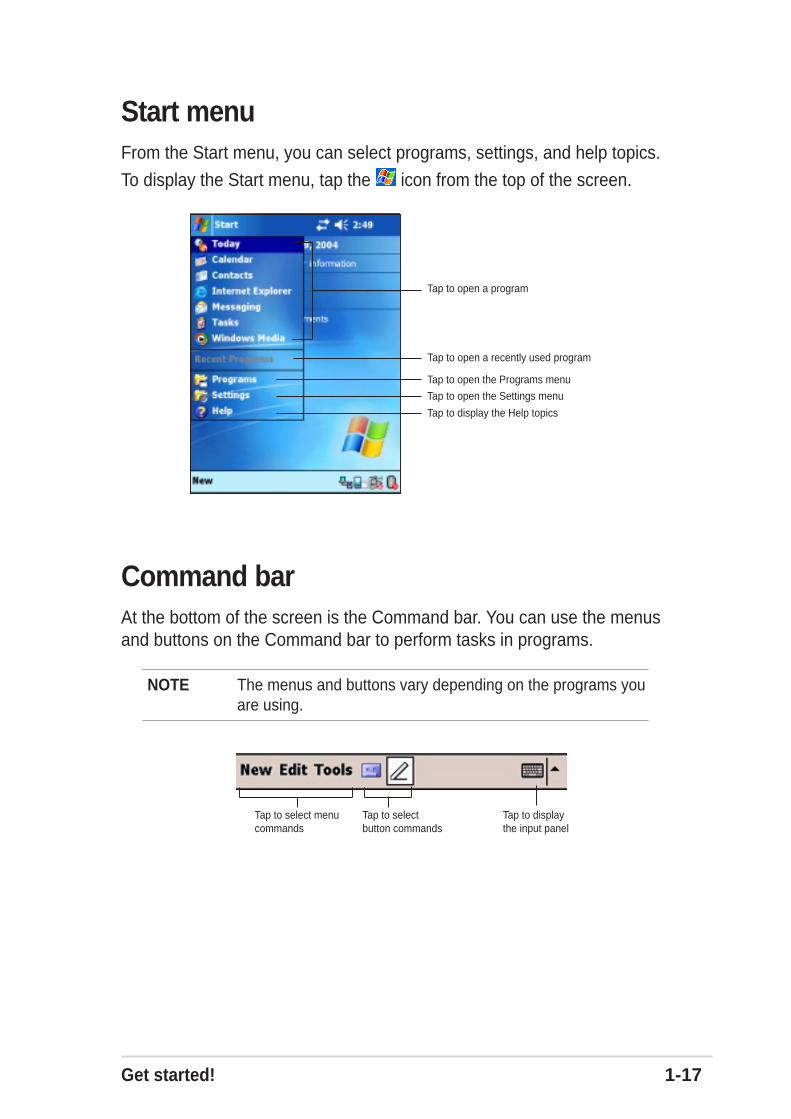
Command barAt the bottom of the screen is the Command bar. You can use the menusand buttons on the Command bar to perform tasks in programs.
NOTE The menus and buttons vary depending on the programs youare using.
Start menuFrom the Start menu, you can select programs, settings, and help topics.
To display the Start menu, tap the icon from the top of the screen.
Tap to select menucommands
Tap to selectbutton commands
Tap to displaythe input panel
Tap to open a recently used program
Tap to open a program
Tap to open the Programs menu
Tap to open the Settings menu
Tap to display the Help topics
1-18 Chapter 1
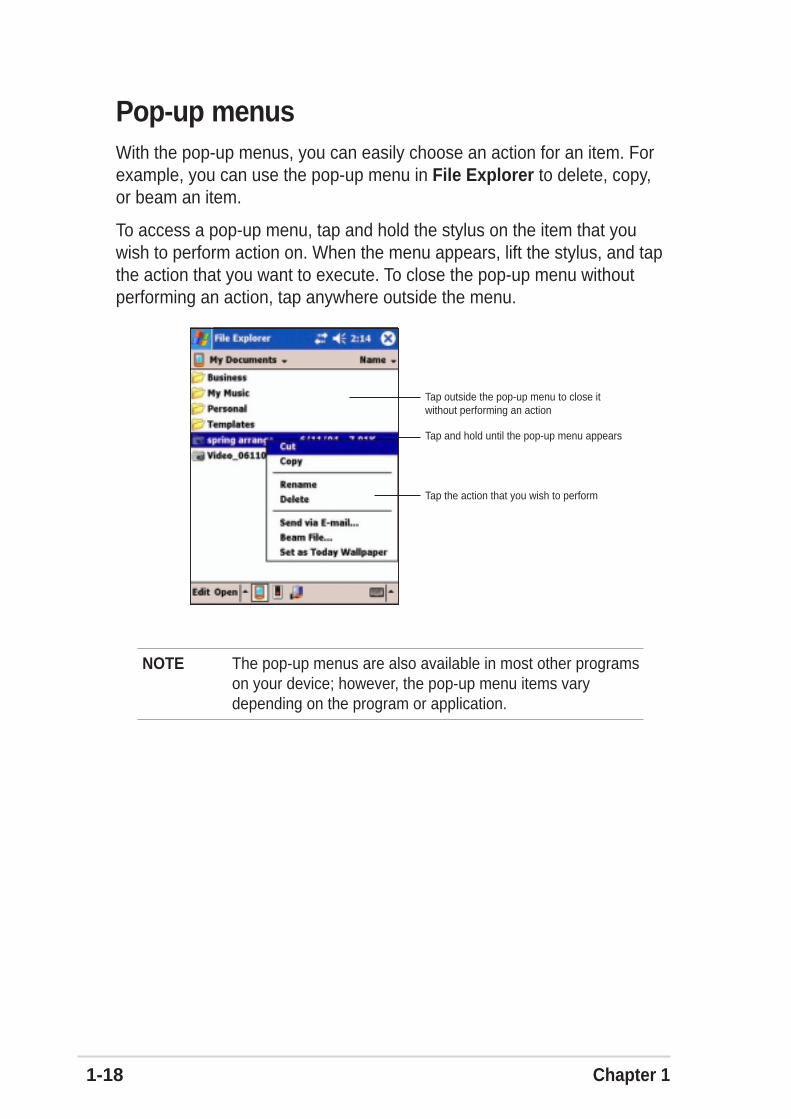
Pop-up menusWith the pop-up menus, you can easily choose an action for an item. Forexample, you can use the pop-up menu in File Explorer to delete, copy,or beam an item.
To access a pop-up menu, tap and hold the stylus on the item that youwish to perform action on. When the menu appears, lift the stylus, and tapthe action that you want to execute. To close the pop-up menu withoutperforming an action, tap anywhere outside the menu.
Tap and hold until the pop-up menu appears
Tap the action that you wish to perform
Tap outside the pop-up menu to close itwithout performing an action
NOTE The pop-up menus are also available in most other programson your device; however, the pop-up menu items varydepending on the program or application.
Learn the basics 2-1
Chapter 2
Learn the basics
♦♦♦♦♦ Viewing system information ................................ 2-2
♦♦♦♦♦ Entering information ............................................ 2-3Entering text using the Input Panel .......................................... 2-3Writing on the screen ............................................................... 2-6Drawing on the screen ............................................................. 2-9Recording a message ............................................................ 2-10
♦♦♦♦♦ Finding and organizing information ................. 2-12Using the Find function .......................................................... 2-12Using the File Explorer ........................................................... 2-13
♦♦♦♦♦ Customizing your device ................................... 2-14Changing the date and time ................................................... 2-15Changing the Start menus ..................................................... 2-16Changing the owner information ............................................ 2-17Setting a password ................................................................ 2-18Changing the screen display orientation ................................ 2-19Changing the screen theme ................................................... 2-22Changing the button assignments ......................................... 2-23Setting the backlight ............................................................... 2-24Changing the battery power settings ..................................... 2-25Selecting sounds and notifications ......................................... 2-26Changing the audio settings .................................................. 2-27Changing the system operation settings ................................ 2-28Changing the memory settings .............................................. 2-30
♦♦♦♦♦ Using simple applications ................................. 2-32Calculator ............................................................................... 2-32Games ................................................................................... 2-33Pictures .................................................................................. 2-36

2-2 Chapter 2
Viewing system informationYour device allows you to easily display the built-in specifications.
NOTE You can not change the information you see in the systeminformation screens.
To display the system information:
1. Tap , then tap Settings.
2. Tap the System tab on the bottom ofthe Settings screen.
3. Tap the System Information icon todisplay the device specifications. Thisscreen is displayed whenever you tapthe Device Info tab.
4. Tap the Memory tab to display the device memory information.
5. Tap the Wireless LAN tab to display the wireless LAN information.
6. Tap the Others tab to display additional device information.

Learn the basics 2-3
Entering informationYou can enter information in your device in any of the following ways:
• Use the input panel to enter text using the soft keyboard or the LetterRecognizer
• Write directly on the screen with the stylus
• Draw pictures on the screen
• Speak into the device microphone to record a message
• Use the Microsoft® ActiveSync® to synchronize or copy information fromyour desktop computer to your device
Entering text using the Input PanelUse the Input Panel to enter information in any program on your device.You can either type using the soft keyboard or write using the LetterRecognizer, Block Recognizer, or Transcriber. In either case, thecharacters appear as typed text on the screen.
To show or hide the input panel, tap the Input Panel button. Tap the arrownext to the Input Panel button to see your options.
To type with the soft keyboard:
1. Tap the arrow next to the Input Panel button, then tap Keyboard.
NOTE For a demonstration, open Notes.
2. Tap the keys with the stylus to enter information.
Select an input method
Tap to show or hide the input panel
Tap to display the input method options
2-4 Chapter 2
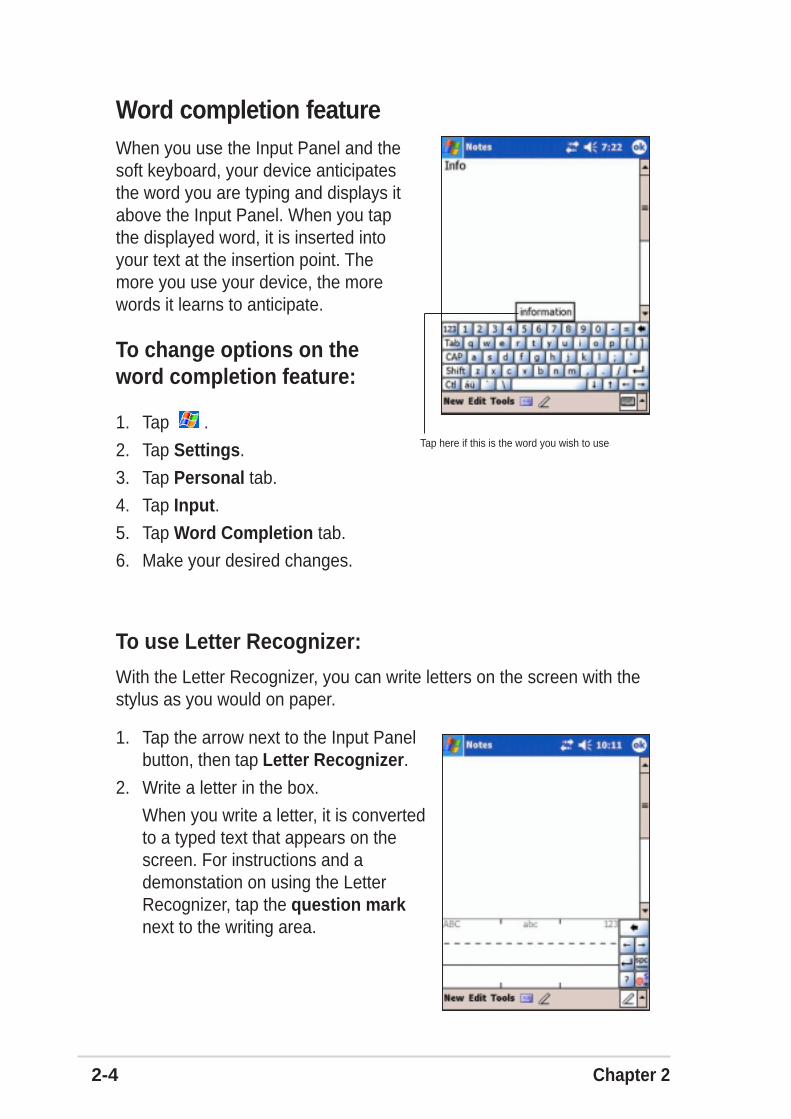
Word completion featureWhen you use the Input Panel and thesoft keyboard, your device anticipatesthe word you are typing and displays itabove the Input Panel. When you tapthe displayed word, it is inserted intoyour text at the insertion point. Themore you use your device, the morewords it learns to anticipate.
To change options on theword completion feature:
1. Tap .
2. Tap Settings.
3. Tap Personal tab.
4. Tap Input.5. Tap Word Completion tab.
6. Make your desired changes.
To use Letter Recognizer:
With the Letter Recognizer, you can write letters on the screen with thestylus as you would on paper.
1. Tap the arrow next to the Input Panelbutton, then tap Letter Recognizer.
2. Write a letter in the box.
When you write a letter, it is convertedto a typed text that appears on thescreen. For instructions and ademonstation on using the LetterRecognizer, tap the question marknext to the writing area.
Tap here if this is the word you wish to use

Learn the basics 2-5
To use Block Recognizer:
With the Block Recognizer, you can inputcharacter strokes that are similar to thoseused on other devices.
1. Tap the arrow next to the Input Panelbutton, then tap Block Recognizer.
2. Write a letter in the box.
When you write a letter, it is convertedto a typed text that appears on thescreen. For instructions and ademonstration on using the BlockRecognizer, tap the question marknext to the writing area.
To use Transcriber:
With Transcriber, you can use the stylusto write anywhere on the screen as youwould on paper. Unlike Letter Recognizerand Block Recognizer, you can write asentence or additional information. Pauseafter writing and let Transcriber convertthe written characters to typed characters.
1. Tap the arrow next to the Input Panelbutton, then tap Transcriber.
2. Write anywhere on the screen.
For instructions and demonstration onusing Transcriber, with Transcriberopen, tap the question mark in the lower right corner of the screen.
To edit typed text:
1. Select the text that you wish to edit using either one of the following:
• drag the stylus over the text• tap twice to select a word• tap three times to select a paragraph
2. Tap Edit on the Command bar and select an action, or use one of thetools in the Input Panel to enter a new text.

2-6 Chapter 2
Writing on the screenIn any program that accepts writing, such as the Notes program, and in theNotes tab in Calendar, Contacts, and Tasks, you can use the stylus towrite directly on the screen. Write the way you do on paper. You can editand format what you have written and convert the writing to text at a latertime.
To write on the screen:
1. Open the Notes program.
2. Tap the Pen button to switch to the writing mode. The screen displaysblank space with lines to help you write.
3. Write your text.
NOTE Some programs that accept writing may not have the Penbutton. See the documentation for that program to find outhow to switch to writing mode.
Tap the Pen button and useyour stylus like a pen
Write your text here

Learn the basics 2-7
To edit your writing:
1. Tap and hold the stylus next to the text that you wish to select until theinsertion point appears.
2. Without lifting, drag the stylus across the text to select it.
If you accidentally write on the screen, tap Tools, then Undo and tryagain. You can also select text by tapping the Pen button to deselect it,then dragging the stylus across the screen.
3. Tap Edit on the Command bar and select an action, or use one of thetools in the Input Panel to enter a new text.
To convert writing to text:
• Tap Tools, then Recognize.
To select a zoom level:
• Tap Tools, then tap a zoom percentage from the options.
The writing is turned into text

2-8 Chapter 2
If the conversion is incorrect, you can select different words from a list ofalternates or return to the original writing.
1. Tap and hold the incorrect word.
2. When the pop-up menu appears, tap Alternates to display a list ofalternate words for the selection.
3. Tap the word that you want to use, or tap the writing at the top of themenu to return to the original writing.
Tips for getting good writing recognition• Write neatly.
• Write on the line and draw descenders below the line. Write the cross ofthe “t” and apostrophes below the top line so that they are not confusedwith the word above. Write periods and commas above the line.
• For better recognition, try increasing the zoom level to 300% using theTools menu.
• Write the letters of a word closely and leave big gaps between words sothat the device can easily tell where the words begin and end.
• Hyphenated words, foreign words that use special characters such asaccents, and some punctuation cannot be converted.
• If you add writing to a word to change it after the word has beenrecognized, the writing that you added will be included when you try torecognize the writing again.
Tap to return to youroriginal writing
Or, tap the word thatyou want to use

Learn the basics 2-9
Drawing on the screenYou can draw on the screen in the same way that you write on the screen.The difference between writing and drawing on the screen is how youselect items and how they can be edited. For example, selected drawingscan be resized, while writing cannot.
To create a drawing:
1. Use the stylus to make a stroke that extends over three lines on thescreen. A drawing box appears around the stroke.
NOTE If the drawing does not cross over three lines, the drawingbox does not appear.
2. Continue drawing. If your subsequentstrokes extend outside the box, youwill notice that the drawing boxexpands to enclose all the strokes.
NOTE To easily work on or view your drawing, change the zoomlevel by tapping Tools and selecting your desired zoom.
To edit your drawing:
1. Tap and hold the stylus on the drawing until the selection handleappears. To select multiple drawings, deselect the Pen button, thendrag to select the drawings you want.
2. Tap and hold the selected drawing, then tap an editing command onthe pop-up menu or tap a command on the Edit menu.
3. Resize the drawing by deselecting the Pen button (if selected) anddragging a selection handle to your desired size.
The drawing box indicates theboundaries of the drawing
Pen button

2-10 Chapter 2
Recording a messageIn any program where you can write or draw on the screen, you can alsoquickly capture thoughts, reminders, and phone numbers by recording amessage. In Calendar, Tasks, and Contacts, you can include a recordingin the Notes tab. In the Notes program, you can either create a standalonerecording or include a recording in a written note. If you want to include therecording in a note, open the note first. In the Inbox program, you can adda recording to an e-mail message.
To create a recording:
1. Tap , tap Programs, then tap Notes.
or
Tap New, then tap Note.
2. Tap the Record icon from the command bar to display the recordingtoolbar.
3. Hold your device with the microphone near your mouth or other sourceof sound.
4. Tap the Record button (red button) to begin recording. To stoprecording, tap the Stop button. You will hear two beeps when you stoprecording.
NOTE To record, you may also press and hold the Record buttonon the left side of the device. To stop recording, release theRecord button.
Indicates an embedded recording
Tap to show or hide theRecording toolbar
Tap to begin recording
Tap to stop recording

Learn the basics 2-11
To change the recording format:
1. In the note list, tap Tools thenOptions.
2. Tap the Global Input Options link.
3. Tap the Options tab.
4. Tap the down arrow on the Voicerecording format box to display theavailable options.
5. Select your desired format then tapOK when done.
NOTE Compared to other settings, the Pulse Code Modulation(PCM) provides slightly better sound quality but takes up 50times more storage space tham Mobile Voice recordings.
6. The new recording appears in theNotes list, or as an embedded icon. Toplay the recording, tap it from the list,or if embedded in a note, tap thespeaker icon.

2-12 Chapter 2
Finding and organizing informationThe Find and Help features on your device helps you quickly locateinformation.
Using the Find function
To find information:
1. Tap , tap Help, then tap Find.
2. Enter the text that you want to find,select a data type, then tap Go to startthe search. To quickly find informationthat is taking up space on your device,select Larger than 64 KB in Type.
To use the Help feature:
1. Tap , then tap Help.
2. Tap a link to the topic that you wish todisplay.
Type a word to findTap to search for the word
Topics found containingthe searched word

Learn the basics 2-13
Using the File Explorer
To use the File Explorer to find and organize files:
1. Tap , then tap Programs.
2. In the Program screen, tap the File Explorer icon to display the files inyour device.
Tap to select a sort order
Tap to display sort options
Tap to display the contents of My Documents folder
Tap to display the contents of theFlash disk or the storage card
Tap to open a path to a network

2-14 Chapter 2
Customizing your deviceYou can customize your device by adjusting the settings, using the built-inprograms, and installing additional software.
To see the available options:
1. Tap , then tap Settings to display the Settings screen.
2. Tap the Personal or System tab on the bottom of the screen.
NOTE Tap and hold the slider on the right side of the screen todisplay other Settings icons.

Learn the basics 2-15
Changing the date and time
To change the date and time settings:
1. Tap , tap Settings, then tap the System tab.
2. Tap the Clock & Alarms icon.
3. Make your desired settings.
To change the alarm settings:
1. Tap , tap Settings, then tap the System tab.
2. Tap the Clock & Alarms icon, then tap the Alarm tab.
3. Make your desired settings.
Tap to select a time zone
Highlight a Time item thentap up or down arrow to set
Tap this down arrow todisplay the Calendar
Tap a day of the week for the alarm
Tap and type a description for the alarm
Tap to display the clock andspecify a time for the alarm

2-16 Chapter 2
Changing the Start menus
To change the menu items:
1. Tap , tap Settings, then tap theMenus icon.
2. Check the box opposite the items thatyou wish to appear on the Start Menu.
3. Tap the New Menu tab.
4. Select the items that you wish toappear on the New menu (located onthe lower left corner of the mainscreen).

Learn the basics 2-17
Changing the owner information
To change the owner information:
1. Tap , tap Settings, then tap the Owner Information icon.
2. Key-in the data that you wish to appear on the Today screen.
3. Add notes to the owner information by tapping the Notes tab.
4. Key-in your desired text.
5. Tap the Options tab, then select the items that you wish to appearonscreen whenever you turn on the device. Tap OK when done.
2-18 Chapter 2
Setting a password
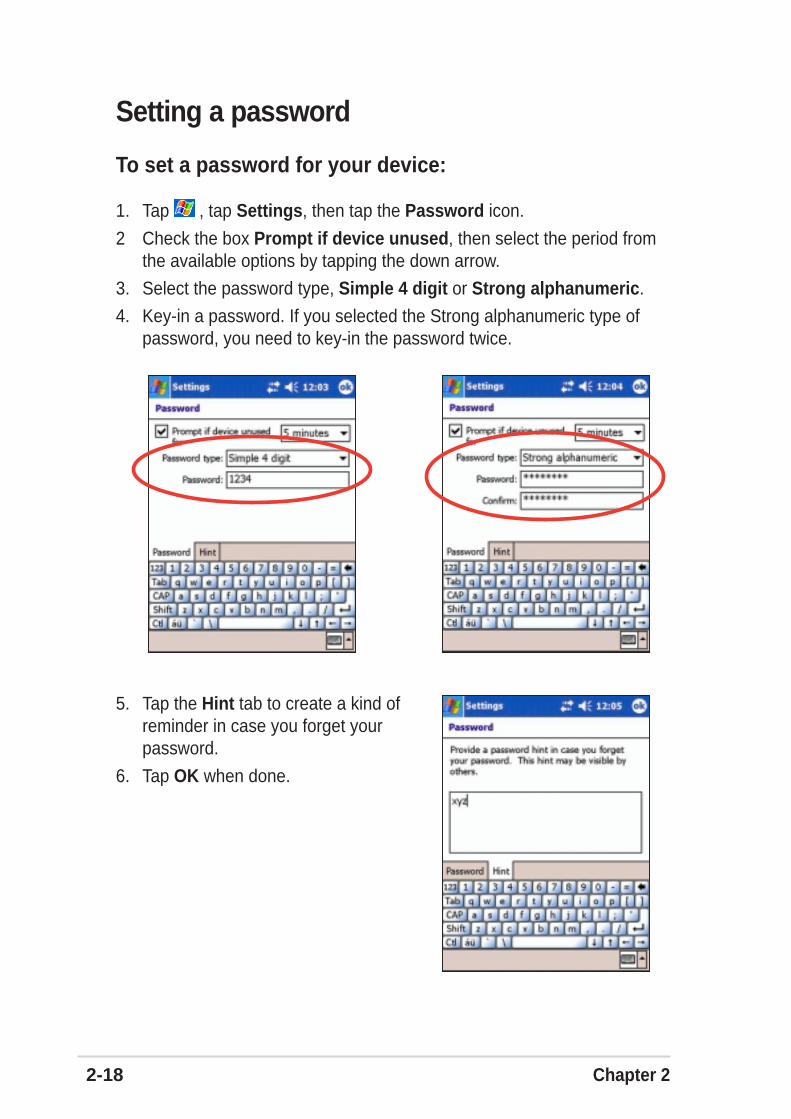
To set a password for your device:
1. Tap , tap Settings, then tap the Password icon.
2 Check the box Prompt if device unused, then select the period fromthe available options by tapping the down arrow.
3. Select the password type, Simple 4 digit or Strong alphanumeric.
4. Key-in a password. If you selected the Strong alphanumeric type ofpassword, you need to key-in the password twice.
5. Tap the Hint tab to create a kind ofreminder in case you forget yourpassword.
6. Tap OK when done.

Learn the basics 2-19
Changing the screen display orientation
To change the screen display orientation:
1. Tap , tap Settings, then tap the System tab.
2. Tap the Screen icon to show the screen options.
3. Select your desired orientation, then tap OK.
NOTE To quickly change the screen display orientation, simply tapthe icon on the lower right corner of the screen.
Portrait orientation
This setting Shows this screen
Sets the screen displayto portrait or landscapeorientation

2-20 Chapter 2
Landscape orientation (right-handed)
Landscape orientation (left-handed)
This setting Shows this screen
This setting Shows this screen

Learn the basics 2-21
To enable the ClearType feature:
1. Tap , tap Settings, then tap theSystem tab.
2. Tap the Screen icon to show thescreen options.
3. Tap the Clear Type tab.
4. Check the Enable Clear Type box,then tap OK.
To change the screen text size:
1. Tap , tap Settings, then tap theSystem tab.
2. Tap the Screen icon to show thescreen options.
3. Tap the Text Size tab.
4. Move the slider toward the Smallestor Largest until you attain yourdesired text size. Tap OK.
Smaller text Larger text
NOTE The slider is on the center ofthe line by default.

2-22 Chapter 2
Changing the screen theme
To change the screen theme:
1. Tap , tap Settings, then tap the Today icon.
2. Select your desired theme from the available options.
or
Check the box Use this picture as the background, then tap Browseto select an image from your picture files.
3. Tap OK when done.
To specify the items to appear on the Today screen:
1. Tap , tap Settings, then tap theToday icon.
2. Tap the Items tab.
3. Check the box opposite your desireditems. Tap OK when done.
Learn the basics 2-23
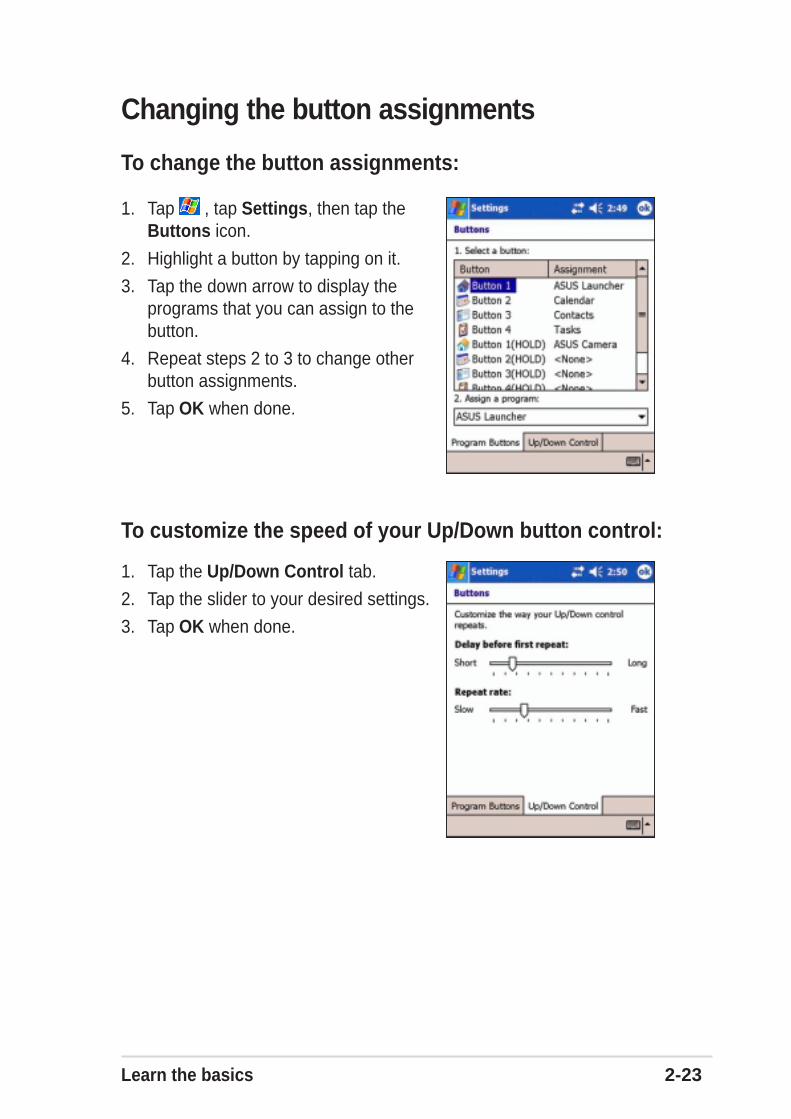
Changing the button assignments
To change the button assignments:
1. Tap , tap Settings, then tap theButtons icon.
2. Highlight a button by tapping on it.
3. Tap the down arrow to display theprograms that you can assign to thebutton.
4. Repeat steps 2 to 3 to change otherbutton assignments.
5. Tap OK when done.
To customize the speed of your Up/Down button control:
1. Tap the Up/Down Control tab.
2. Tap the slider to your desired settings.
3. Tap OK when done.

2-24 Chapter 2
Setting the backlight
To set the backlight:
1. Tap , then tap Settings.
2. Tap the System tab, then tap theBacklight icon.
3. Adjust the display brightness bydragging the slider towards Dark orBright until you achieve your desiredscreen brightness.
4. Tap the Battery Power tab and customize the backlight settings whenusing battery power.
5. Tap the External Power tab and customize the backlight settings whenusing AC power.
6. Tap OK when done.

Learn the basics 2-25
Changing the battery power settings
To change the battery power settings:
1. Tap , then tap Settings.
2. Tap the System tab.
3. Tap the Power icon to display thebattery power status. This screenshows the detected percentages of theremaining battery power. You may notchange the information on this screen.
4. Tap the Advanced tab to customizethe settings for the battery to conservepower.
5. Tap OK when done.
2-26 Chapter 2
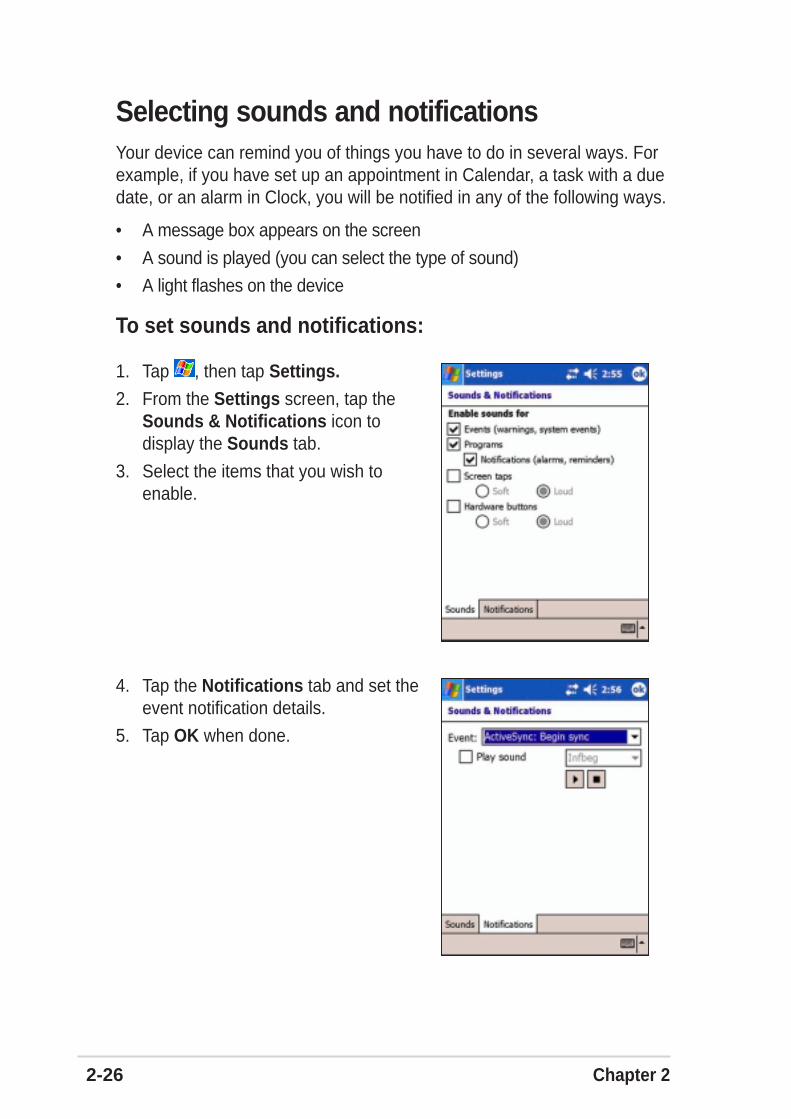
Selecting sounds and notificationsYour device can remind you of things you have to do in several ways. Forexample, if you have set up an appointment in Calendar, a task with a duedate, or an alarm in Clock, you will be notified in any of the following ways.
• A message box appears on the screen
• A sound is played (you can select the type of sound)
• A light flashes on the device
To set sounds and notifications:
1. Tap , then tap Settings.2. From the Settings screen, tap the
Sounds & Notifications icon todisplay the Sounds tab.
3. Select the items that you wish toenable.
4. Tap the Notifications tab and set theevent notification details.
5. Tap OK when done.
Learn the basics 2-27
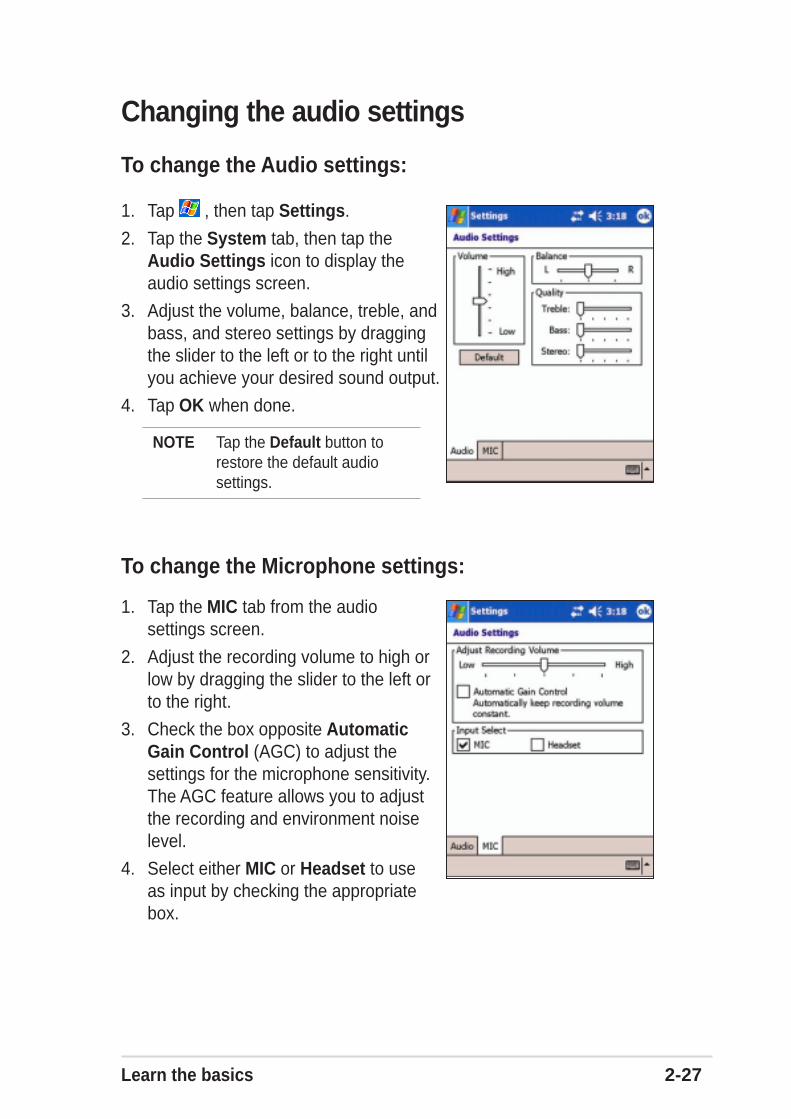
Changing the audio settings
To change the Audio settings:
1. Tap , then tap Settings.
2. Tap the System tab, then tap theAudio Settings icon to display theaudio settings screen.
3. Adjust the volume, balance, treble, andbass, and stereo settings by draggingthe slider to the left or to the right untilyou achieve your desired sound output.
4. Tap OK when done.
To change the Microphone settings:
1. Tap the MIC tab from the audiosettings screen.
2. Adjust the recording volume to high orlow by dragging the slider to the left orto the right.
3. Check the box opposite AutomaticGain Control (AGC) to adjust thesettings for the microphone sensitivity.The AGC feature allows you to adjustthe recording and environment noiselevel.
4. Select either MIC or Headset to useas input by checking the appropriatebox.
NOTE Tap the Default button torestore the default audiosettings.

2-28 Chapter 2
Changing the system operation settings
To change the system operation settings:
1. Tap , then tap Settings.
2. Tap the System tab, then tap theSystem Settings icon to display thesystem operation mode options.
3. Make your desired changes.
The Turbo Mode allows better CPUperformance. Set to this mode whenplaying games or playing video.However, setting to Turbo mode mayreduce the battery life.
The Standard Mode allows for anormal CPU speed and more stableperformance. Set to this mode when listening to MP3 audio files or forapplications that do not require very fast CPU speed.
The Power Saving Mode sets the CPU to a lower speed. This modehas a lower CPU performance but extends the battery life. Set to thismode when using text based applications such as Word, Excel, etc.
For automatic power saving, check the box opposite EnableAutomatic Mode. This mode adjusts the CPU speed depending on theprogram that you are running.
4. Tap OK when done.

Learn the basics 2-29
To change the Wakeup settings:
1. Tap , then tap Settings.
2. Tap the System tab, then tap theSystem Settings icon.
3. Tap the Wakeup tab to display thewakeup options.
4. Check the box opposite Turn on PDApower when a program button ispressed to enable the feature.Pressing any one of the functionbuttons on the front panel wakes upthe device.
5. Tap OK when done.
To change the Autorun settings:
1. Tap , then tap Settings.
2. Tap the System tab, then tap theSystem Settings icon.
3. Tap the Autorun tab to display theoptions.
4. Tap either CF Card or SD Card fromwhich to start to automatically run anapplication.
5. Tap OK when done.

2-30 Chapter 2
To change the USB Host settings:
1. Tap , then tap Settings.
2. Tap the System tab, then tap theSystem Settings icon.
3. Tap the USB Host tab to display theoptions.
4. Enable or disable the USB hostfeature by selecting the appropriatebox.
5. Tap OK when done.
Changing the memory settings
To change the memory allocation:
1. Tap , then tap Settings.
2. Tap the System tab, then tap theMemory icon to display the memoryallocation screen.
3. Drag the slider to change the memoryallocation for data storage andprogram depending on your need.
4. Tap OK when done.

Learn the basics 2-31
To view the running programs:
1. Tap , tap Settings, then tap theSystem tab.
2. Tap the Memory icon, then tap theRunning Programs tab to display alist of currently running programs.
3. If you wish to free some systemmemory currently used by the runningprograms, select a program then tapStop.
To stop all running programs, tap StopAll.
To check the storage card memory:
1. Tap , tap Settings, then tap the System tab.
2. Tap the Memory icon, then tap the Storage Card tab to display thememory information for the selected storage card.
3. If you wish to free storage card memory, delete some files from thestorage card. Use the File Explorer to delete files. See page 2-13 forinformation.

2-32 Chapter 2
Using simple applicationsYour device includes several simple application that are useful in your day-to-day use of your device.
NOTE The major applications that came with the Microsoft®
Windows Mobile® 2003 Second Edition are discussed in otherchapters.
To access the applications:
1. Tap , then tap Programs.
2. Tap an icon to launch a specificapplication program.
CalculatorTap the Calculator icon to use basiccalculator functions.
Learn the basics 2-33
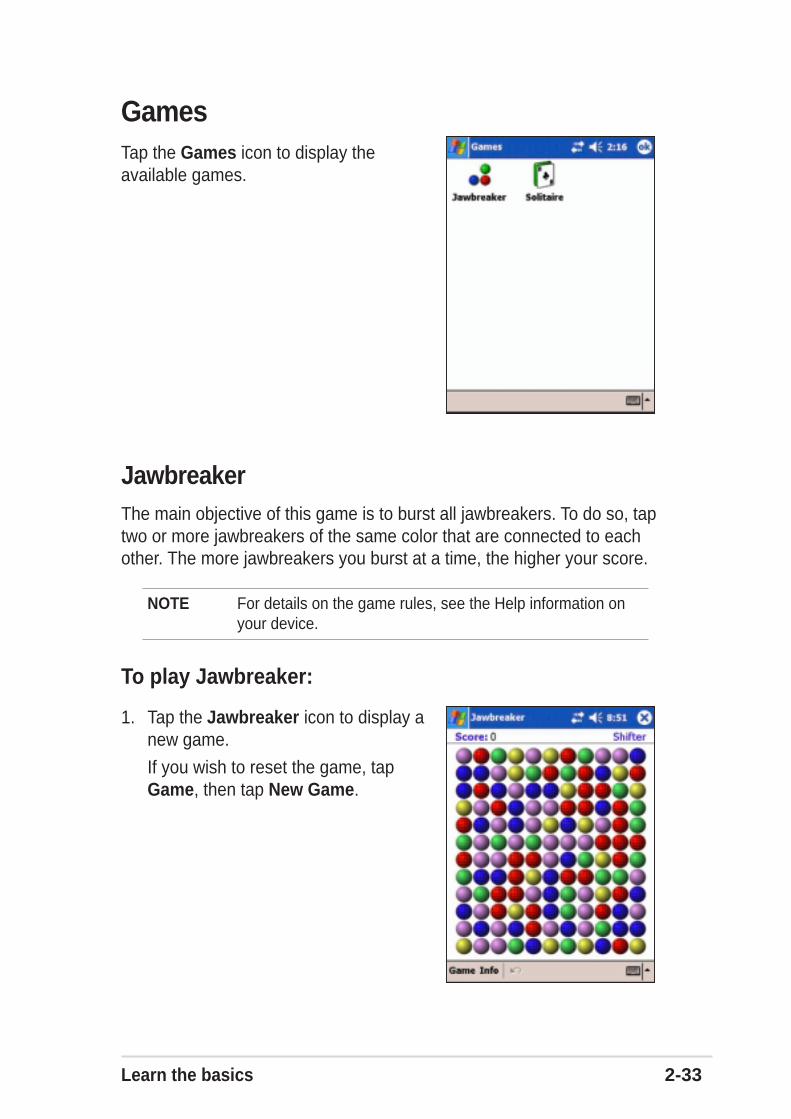
GamesTap the Games icon to display theavailable games.
JawbreakerThe main objective of this game is to burst all jawbreakers. To do so, taptwo or more jawbreakers of the same color that are connected to eachother. The more jawbreakers you burst at a time, the higher your score.
NOTE For details on the game rules, see the Help information onyour device.
To play Jawbreaker:
1. Tap the Jawbreaker icon to display anew game.
If you wish to reset the game, tapGame, then tap New Game.
2-34 Chapter 2
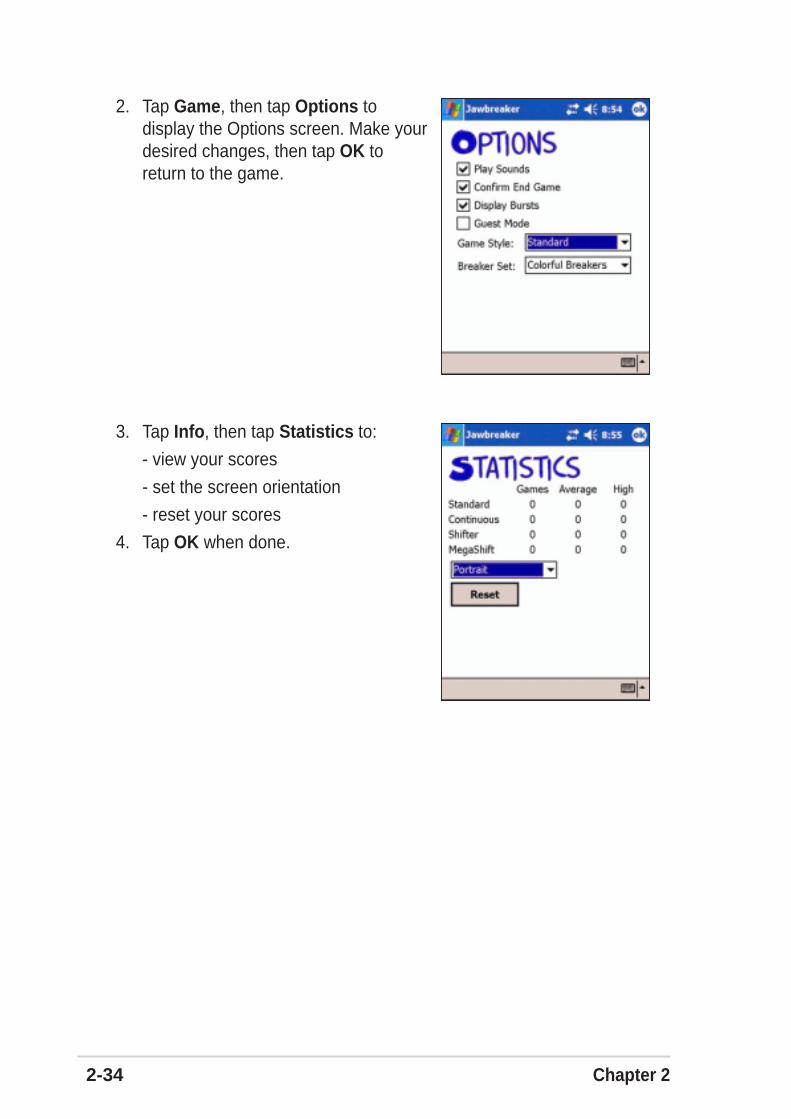
2. Tap Game, then tap Options todisplay the Options screen. Make yourdesired changes, then tap OK toreturn to the game.
3. Tap Info, then tap Statistics to:
- view your scores
- set the screen orientation
- reset your scores
4. Tap OK when done.

Learn the basics 2-35
SolitaireThe main objective of this game is to use all the cards in the deck to buildup four suit stacks in ascending order, beginning with the aces.
NOTE For details on the game rules, see the Help information onyour device.
To play Solitaire:
Tap the Solitaire icon to display a newgame. If you wish to reset the game, tapNew.
To change Solitaire options:
1. Tap Tools to display the game options. Make your desired changes.
2. Tap the Card Back tab to select a card design.
3. Tap OK when done.

2-36 Chapter 2
PicturesUse Pictures to view .jpg pictures stored on your device or on a storagecard, send pictures to your friends, view a slideshow of your pictures, orset a picture as background on the Today screen.
Refer also to the online help on your device for more information on usingthis feature.
To use Pictures:
1. Tap , then tap Programs.
2. Tap the Pictures icon to launch theapplication.
3. Tap the thumbnail of the picture thatyou wish to open.
4. When the picture appears on thescreen, use the menus and tools onthe command bar to edit your picture.
Learn the basics 2-37
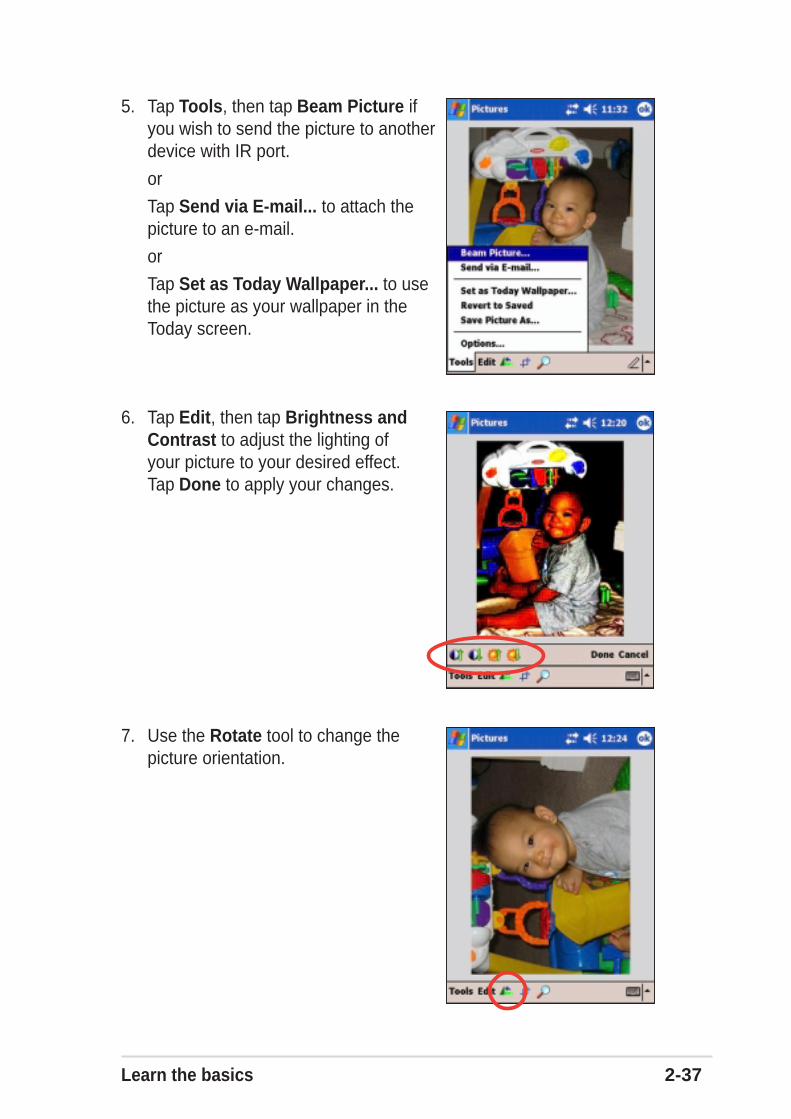
5. Tap Tools, then tap Beam Picture ifyou wish to send the picture to anotherdevice with IR port.
or
Tap Send via E-mail... to attach thepicture to an e-mail.
or
Tap Set as Today Wallpaper... to usethe picture as your wallpaper in theToday screen.
6. Tap Edit, then tap Brightness andContrast to adjust the lighting ofyour picture to your desired effect.Tap Done to apply your changes.
7. Use the Rotate tool to change thepicture orientation.
2-38 Chapter 2
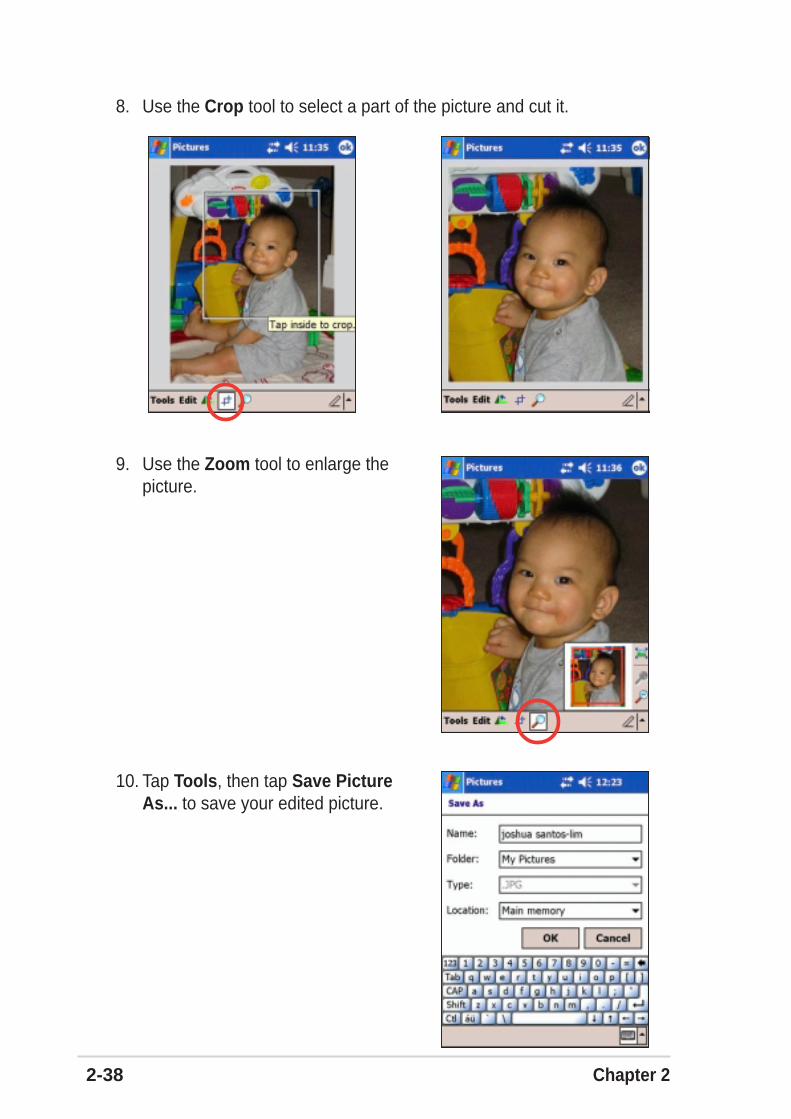
8. Use the Crop tool to select a part of the picture and cut it.
9. Use the Zoom tool to enlarge thepicture.
10. Tap Tools, then tap Save PictureAs... to save your edited picture.
Synchronize and enhance 3-1
Chapter 3
Synchronize and enhance
♦♦♦♦♦ Microsoft® ActiveSync® ...................................................................... 3-2What is ActiveSync®? ............................................................... 3-2Installing ActiveSync® on your computer .................................. 3-3
♦♦♦♦♦ Synchronizing your device .................................. 3-6Connecting your device to a computer .................................... 3-6Setting up a partnership ........................................................... 3-7Checking synchronized information ......................................... 3-9Manually initiating synchronization ........................................ 3-10Synchronization options ..........................................................3-11
♦♦♦♦♦ Installing other applications .............................. 3-13

3-2 Chapter 3
Microsoft® ActiveSync®
What is ActiveSync®?The Microsoft® ActiveSync® is one of the important bundled programs inMyPal. With ActiveSync, you can synchronize the information on yourdesktop computer with the information on your device. Synchronizationcompares the data on your device with your desktop computer andupdates both computers with the most recent information.
For example:
• Keep Pocket Outlook data up-to-date by synchronizing your device withMicrosoft Outlook data on your desktop computer.
• Synchronize Microsoft Word and Microsoft Excel files between yourdevice and desktop computer. Your files are automatically converted tothe correct format.
NOTE By default, ActiveSync does not automatically synchronize alltypes of information. Use the ActiveSync options to turnsynchronization on or off for specific information types.
With ActiveSync, you can also:
• Back up and restore your device data
• Copy (rather than synchronize) files between your device and desktopcomputer
• Control when synchronization occurs by selecting a synchronizationmode. For example, you can synchronize continually while connected toyour desktop computer or only when you choose to synchronize.
• Select which information types are synchronized and control how muchdata is synchronized. For example, you can choose to synchronize yourappointments of the past two weeks only, appointments older than twoweeks are not synchronized.
For more information about using ActiveSync:
1. Start ActiveSync on your desktop computer.
2. From the Activesync menu bar, click Help then on MicrosoftActiveSync Help.

Synchronize and enhance 3-3
Installing ActiveSync® on your computerThe ActiveSync program is already installed on your device. Tosynchronize information on your device with your computer, you must alsoinstall ActiveSync on your computer. Install ActiveSync from theCompanion CD that came with your product package.
NOTE Before starting the ActiveSync installation, make sure thatyou have Microsoft® Outlook® installed on your computer. Ifyou do not have Outlook, install the Microsoft® Outlook® 2002from the Companion CD. Even if you have Outlook 98 orOutlook 2000 installed, you are encouraged to update toOutlook 2002.
To install ActiveSync on your computer:
1. Turn on your computer and monitor.
IMPORTANT Do not connect your device to your computer until youhave finished installing ActiveSync.
3. Click on Start Here from the MainMenu.
2. Place the Companion CD into theoptical drive of your computer. TheCD autoruns and displays the initialscreen, then the Main Menu fromwhich you can start the installation.

3-4 Chapter 3
4. Read the Overview before installingActiveSync 3.7.1 to make sure thatyou perform the installation sequencecorrectly.
5. If you have not installed Outlook,install it now. Click Install Outlook2002 and follow the screeninstructions to complete theinstallation.
6. Click Download Connection Wizardand read the overview to see if yourequire the wizard. Follow the screeninstructions to install the wizard onyour computer. Return to the MainMenu when done.
7. Click Install ActiveSync 3.7.1, thenclick Install.
8. When prompted, select Run thisprogram from its current location thenclick OK.
or
Click Open to launch the wizard that willguide you through the installation .
9. Follow the instructions on thesucceeding screens.

Synchronize and enhance 3-5
If you have previously installedMicrosoft® ActiveSync® in yourcomputer, the installation wizarddetects it and prompts you with amessage.
Click Next to continue installing andreplace the current version.
Click Cancel to quit and keep thecurrent version.
10. Wait until the wizard finishes copying all thenecessary files, and updates your system.
NOTE You may connect your Pocket PC to your computer right afterinstalling ActiveSync. Proceed to the section “Synchronizingyour device” on page 3-6 for instructions.

3-6 Chapter 3
Synchronizing your device
Connecting your device to a computer
To connect your device with the cradle:
1. Place the device on the cradle.
2. Connect the 26-pin device plug of the sync cable to the 26-pinconnector at the back of the cradle.
3. Connect the other end of the sync cable to a USB port on yourcomputer.
To connect your device without the cradle:
1. Connect the 26-pin device plug of the sync cable to the 26-pinconnector on the bottom of your device.
2. Connect the other end of the sync cable to a USB port on yourcomputer.
23
1 2
1
RESET
Pocket PC

Synchronize and enhance 3-7
Setting up a partnershipImmediately after you have completed the installation, the NewPartnership wizard will start automatically to help you establish apartnership and customize your synchronization settings. At this point, youcan decide exactly which types of information you would like tosynchronize with your computer.
A partnership is a file that allows you to synchronize your devicewith your desktop computer. This file is stored on your desktopcomputer. An additional file that enables your desktop computer torecognize your device is stored on your device.
2. On the next screen, selectSynchronize with the desktopcomputer. Click Next.
3. Select the type of information thatyou wish to synchronize. ClickNext.
or
If you wish to customize asynchronized item, highlight theitem then click Settings.
To set up a partnership:
1. When the New Partnershipscreen appears, select Standardpartnership for the type ofpartnership to establsih betweenyour device and your computer.Click Next.

3-8 Chapter 3
On the CalendarSynchronization Settingswindow, for example, select fromthe options how you wish tosynchronize the appointments onyour device with your computer.Click OK.
4. Click Finish to complete setting apartnership.
Immediately after you set up apartnership, ActiveSync startsautomatically and initiates the firstsynchronization between yourdevice and your computer.
Refer to the succeeding sectionsfor more details onsynchronization.

Synchronize and enhance 3-9
Checking synchronized informationAfter your first synchronization, take a look at Calendar, Contacts, andTasks on your device. You will notice that the calendar information inMicrosoft Outlook on your computer was copied to your device, and theinformation that you have on your device was copied to your computer.
NOTE Open Microsoft Outlook on your desktop computer to see thedetails of copied information from your device.
3-10 Chapter 3
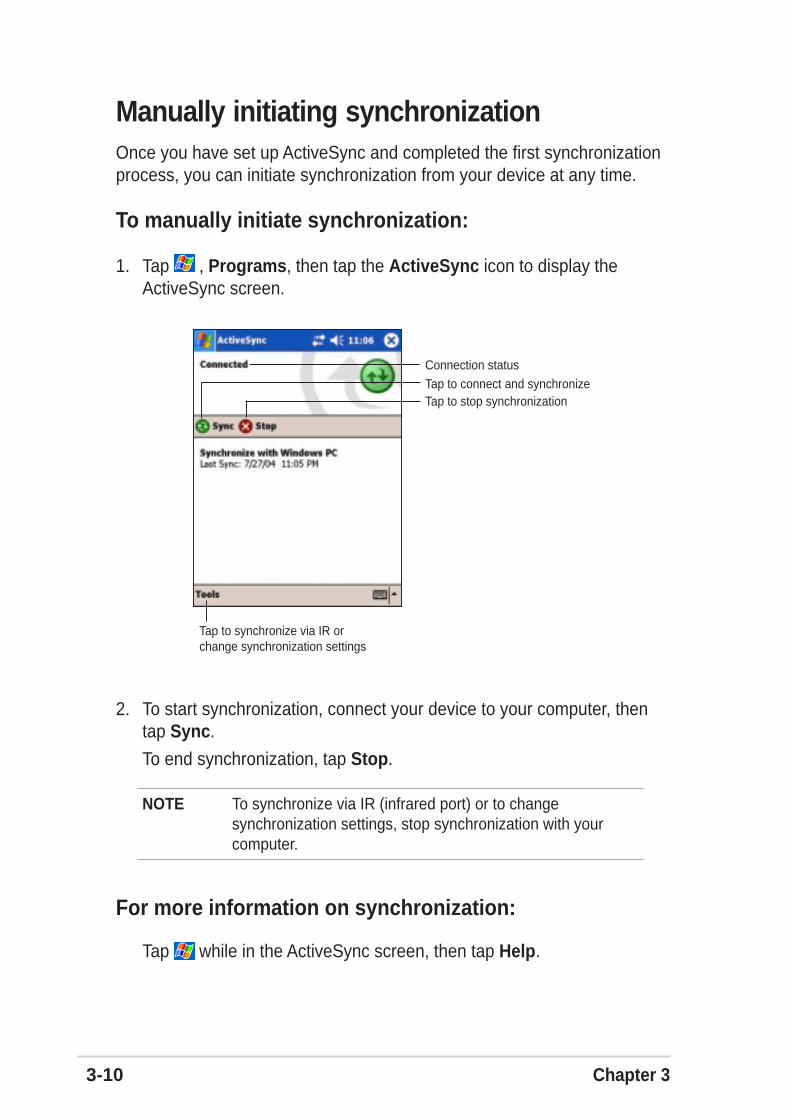
Manually initiating synchronizationOnce you have set up ActiveSync and completed the first synchronizationprocess, you can initiate synchronization from your device at any time.
To manually initiate synchronization:
1. Tap , Programs, then tap the ActiveSync icon to display theActiveSync screen.
2. To start synchronization, connect your device to your computer, thentap Sync.
To end synchronization, tap Stop.
NOTE To synchronize via IR (infrared port) or to changesynchronization settings, stop synchronization with yourcomputer.
For more information on synchronization:
Tap while in the ActiveSync screen, then tap Help.
Connection statusTap to connect and synchronizeTap to stop synchronization
Tap to synchronize via IR orchange synchronization settings

Synchronize and enhance 3-11
Synchronization optionsThe Microsoft ActiveSync program allows you to customize yoursynchronization settings at any time. You can select the items tosynchronize, set the synchronization schedule, and specify thesynchronization rules.
To display the synchronization options:
• From the ActiveSync window on your desktop computer, click on theOptions icon, or
• From the menu bar, click on Tools, then Options.
1. Check the box opposite the itemthat you wish to synchronize.
2. Highlight a checked item thenclick on Settings to specifysynchronization options for theitem.
For example, highlight Calendarthen click on Settings to displaythe Calendar SynchronizationSettings window. Customize theavailable settings, then click OKwhen done.
3. Do the same for the otherchecked items.
To select items to synchronize:
4. Click OK when done.
NOTE You cannot set the optionsfor unchecked items.
3-12 Chapter 3
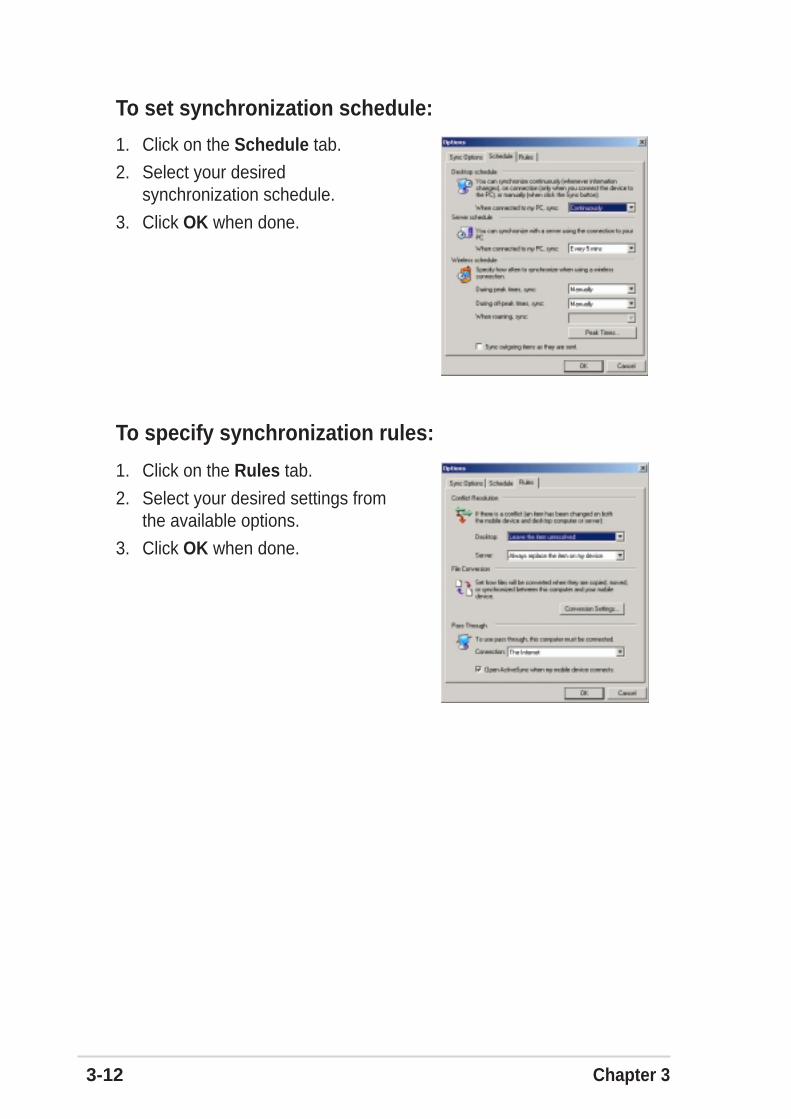
To set synchronization schedule:
1. Click on the Schedule tab.
2. Select your desiredsynchronization schedule.
3. Click OK when done.
To specify synchronization rules:
1. Click on the Rules tab.
2. Select your desired settings fromthe available options.
3. Click OK when done.

Synchronize and enhance 3-13
Installing other applicationsThe Companion CD packs a variety of useful applications. You may installsome of the applications directly from the CD and download otheravailable applications from the Internet.
To install applications from the Companion CD:
1. Place the Companion CD into theoptical drive of your computer.
2. From the Main Menu, click EnhanceYour Experience.
3. Read the Overview for the importantnotes.
4. Click Mobility to display the availableitems.
5. Click Pocket PC Applications todisplay the mobility programs that youcan install on your device, then clickDetails for installation instructions.
6. Click Entertainment to display theavailable items.

3-14 Chapter 3
7. Click Pocket PC Applications todisplay the entertainment programsthat you can install on your device,then click Details for installationinstructions.
8. Click Desktop Applications to displaythe entertainment programs that youcan install on your computer, thenclick Details for installationinstructions.

ASUS programs 4-1
Chapter 4
ASUS programs♦♦♦♦♦ ASUS Camera ....................................................... 4-2
Specifications ........................................................................... 4-2ASUS Camcorder .................................................................... 4-3
Playback mode ................................................................ 4-3Playback menus ............................................................... 4-4Playback functions ........................................................... 4-6Recorder mode ................................................................ 4-9Recorder menus ............................................................ 4-10Recorder functions ......................................................... 4-13Photo mode .................................................................... 4-15Photo menus .................................................................. 4-16Photo functions .............................................................. 4-19Saving and viewing photos ............................................ 4-20
Photo Viewer .................................................................... 4-21Photo Viewer functions .................................................. 4-22
Photo Editor ...................................................................... 4-25Photo Editor functions .................................................... 4-26
Photo Album ..................................................................... 4-29
♦♦♦♦♦ ASUS Launcher .................................................. 4-30Accessing ASUS Launcher .............................................. 4-30Changing the name of a default category ........................ 4-32Customizing an existing category ..................................... 4-33Removing programs in a category ................................... 4-34Adding a category ............................................................ 4-34
♦♦♦♦♦ ASUS Backup...................................................... 4-35Accessing ASUS backup .................................................. 4-35Backing up all data ........................................................... 4-36Backing up PIM data ........................................................ 4-37Restoring all data ............................................................. 4-39Restoring PIM data ........................................................... 4-40
♦♦♦♦♦ ASUS SmartKeeper ............................................ 4-41Automatic backup ............................................................. 4-41Manual backup ................................................................. 4-46Manual restore ................................................................. 4-48

4-2 Chapter 4
ASUS CameraThe ASUS Camera is a convenient interface program that allows you torecord videos with synchronized audio and capture digital images. Usingthe integrated playback capability and photo editing feature, this programmakes creating simple videos and enhancing pictures right at yourfingertips!
To launch the ASUS Camera:
1. Tap , then Programs.
2. Tap ASUS Programs, then ASUSCamera to display the main screen.
ASUS Camera consists of fourapplications:
• ASUS Camcorder
• Photo Viewer
• Photo Editor
• Photo Album
Specifications
Video • MPEG 4 Simple profile levels 0-3• Single video object• Video sizes: CIF, QVGA, QQVGA, QQQVGA, QCIF• File formats: 3gpp, AVI• 128/256/384 kbps bit rate• 15/25/max frame rate
Photo • Resolutions: 1280*960, 640*480, 352*288, 320*240, 176*144, 160*120,
80*60 pixels• File formats: BMP, JPG
Audio • AMR speech encoding and decoding• 4.7 kbps to 12.2 kbps bit rate• 8 KHz sampling rate• 16-bit mono

ASUS programs 4-3
ASUS CamcorderTap the ASUS Camcorder icon to launch theapplication and record video with synchronizedaudio clips or take still photo images. Use theintegrated playback function in the program towatch your video, or launch the Photo Viewer orPhoto Album to display images.
The ASUS Camcorder has three modes: playback, recorder, and photo.The default is playback mode.
Playback mode
Display area
In recorder mode, moves forwardto indicate recording in progress
Tap and slide right or left toadjust the recording volume
Tap and slide right or left toadjust the image brightness
Indicates the elapsedrecording time
Playback function buttons(see descriptions below)
Indicates the camera status
Tap to display a list of media files
Tap to display settings screen forplayback/video image/photo image
Tap to display playback, video,or photo statistics
Tap to display information onASUS Camera functions
Photo Viewer buttonIn playback mode (camera off), tap tolaunch the Photo Viewer application
Photo Album buttonIn playback mode (camera off), tap tolaunch the Photo Album application
Playback buttonTap to shift to eitherrecorder mode or photo mode
Play/pause buttonTap to play a media file;while playing, tap to pause
Stop buttonTap to stop playing a media file
Rotate buttonTap to rotate the image 90 degreesclockwise or counterclockwise
4-4 Chapter 4
Playback menus
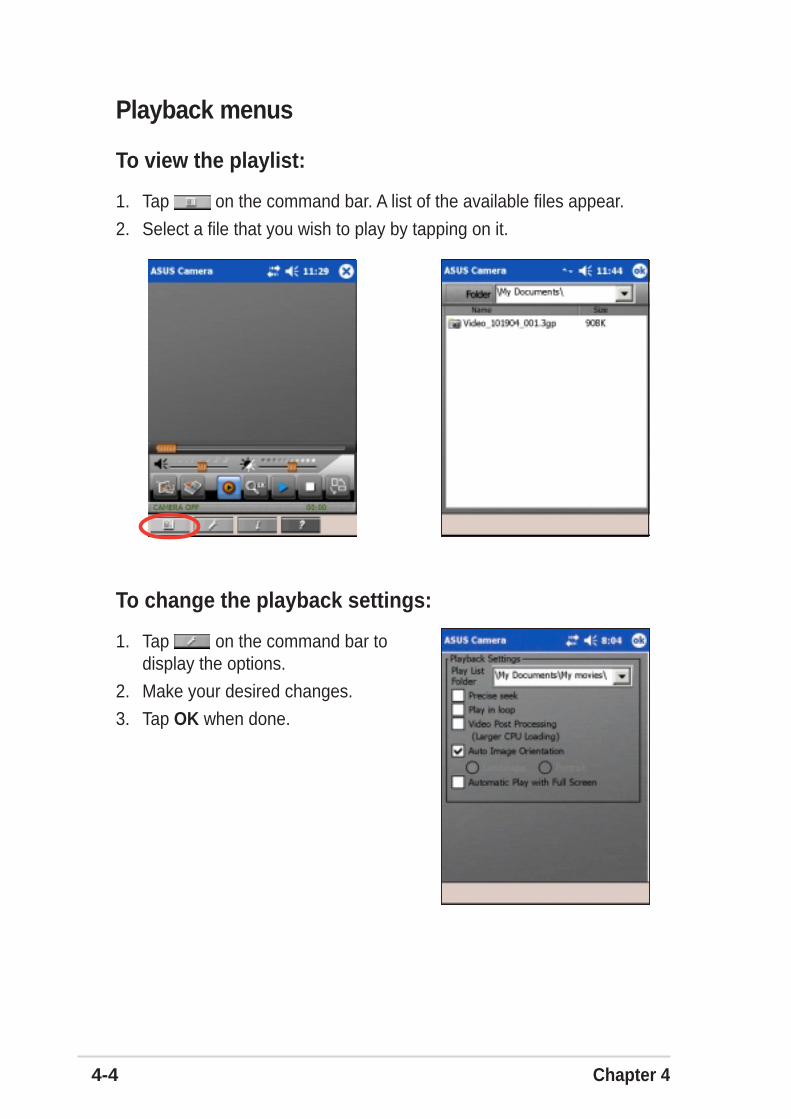
To view the playlist:
1. Tap on the command bar. A list of the available files appear.
2. Select a file that you wish to play by tapping on it.
To change the playback settings:
1. Tap on the command bar todisplay the options.
2. Make your desired changes.
3. Tap OK when done.

ASUS programs 4-5
To change the default folder for playlist:
1. Tap the down arrow on the Play ListFolder box to change the defaultfolder.
The contents of your folder appearwhenever you tap PlayList on thecommand bar.
2. Tap OK when done.
To view playback information:
1. Tap on the command bar.
2. Tap OK when done.
To view information about ASUS Camera:
1. Tap Help on the command bar.
2. Tap and hold the slider on the rightside of the screen to page down.
3. Tap OK to close the Help screen.
4-6 Chapter 4
Playback functions
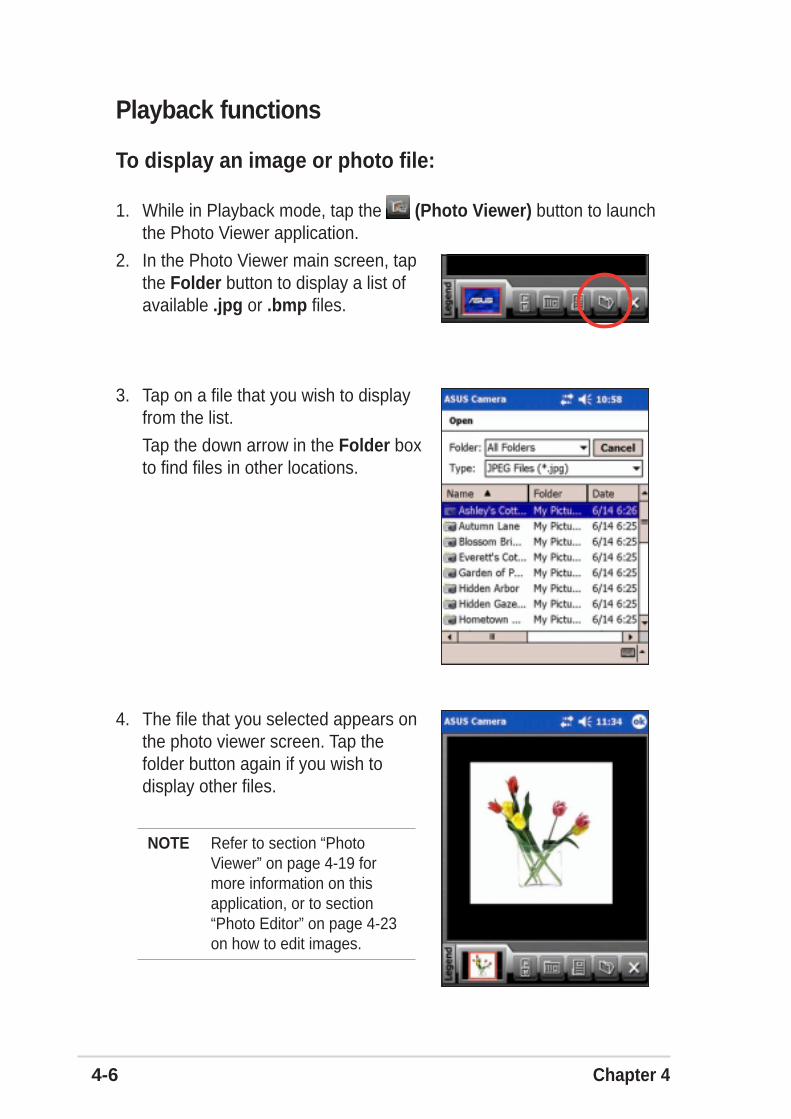
To display an image or photo file:
1. While in Playback mode, tap the (Photo Viewer) button to launchthe Photo Viewer application.
2. In the Photo Viewer main screen, tapthe Folder button to display a list ofavailable .jpg or .bmp files.
3. Tap on a file that you wish to displayfrom the list.
Tap the down arrow in the Folder boxto find files in other locations.
4. The file that you selected appears onthe photo viewer screen. Tap thefolder button again if you wish todisplay other files.
NOTE Refer to section “PhotoViewer” on page 4-19 formore information on thisapplication, or to section“Photo Editor” on page 4-23on how to edit images.

ASUS programs 4-7
To play a video file:
1. While in Playback mode, tap the (Photo Album) button to display thethumbnails of the available files in yourselected folder.
2. Select the file (.3gp or .avi file format)that you wish to play by tapping itsthumbnail twice.
Tap Format on the command bar todisplay and select other file formats.
3. While playing the video, tap the (Play/Pause) button to pause play.Tap the button again to resume play.
4. After playing a video file, the screendisplays the thumbnails of availablefiles. Select another video file to play,
or tap to exit Photo Album andreturn to camera playback mode.
Thumbnail

4-8 Chapter 4
To change the display size of the video you are playing:
1. Tap on the video image to enlarge tothe size of display area.
3. From the full screen mode, keep tapping the image until it returns tothe default size.
2. Tap a second time to zoom to full screen. While in full screen mode,tapping the image rotates it 45° counterclockwise.

ASUS programs 4-9
Recorder mode
Display area
In recorder mode, moves forwardto indicate recording in progress
Tap and slide right or left toadjust the recording volume
Tap and slide right or left toadjust the image brightness
Indicates the elapsedrecording time
Recorder function buttons(see descriptions below)
Indicates the camera status
Tap to display a list of media files
Tap to display settings screen forplayback/video image/photo image
Tap to display playback, video,or photo statistics
Tap to display information onASUS Camera functions
Tap to turn the camera flash on or off
Photo Viewer buttonno function in this mode
Photo Album buttonno function in this mode
Mode button-RecorderTap to shift to photo mode
Zoom buttonTap to change from 1X/2X/4X magnification
Play/Pause buttonTap to play a media file;while playing, tap to pause
Stop buttonTap to stop recording
Record buttonTap to start recording

4-10 Chapter 4
Recorder menus
To view the playlist:
Tap on the command bar. A list ofthe available files from your defaultfolder appears.
If you have previously played video,
photo, or slideshow files, tapping the (Play) button launches the last file youplayed.
To change the video image settings:
1. Tap on the command bar todisplay the video image options.
2. Make your desired changes.
Capture Mode - Auto, Incandescent,Fluorescent, Twilight, Cloudy, Sunny,Night
Special Effect - Normal, Portrait,Scenes, Ancient, Black & White,Negative Photo, Special Color-Blue,Special Color-Red, Special Color-Green
Tap and hold the slider for Contrast,Brightness, and Shutter Volume to adjust to low or high.
Tap the Default button any time to revert to the default settings.
3. Tap OK when done.
ASUS programs 4-11
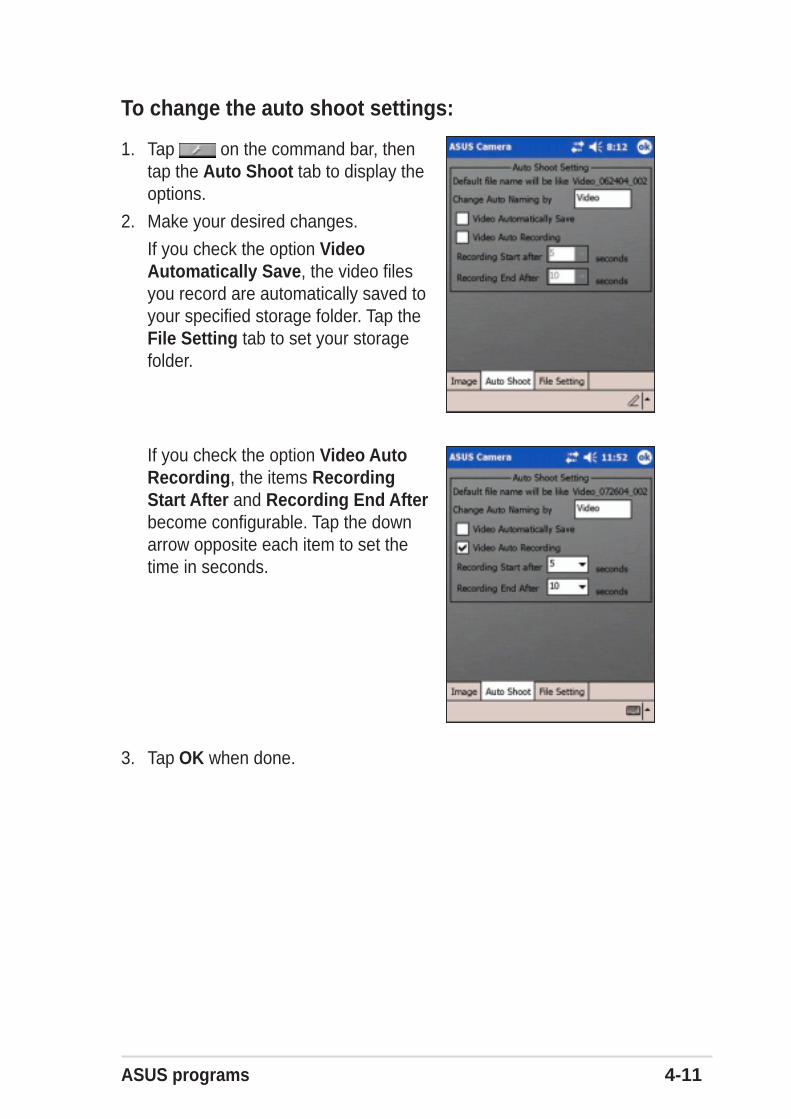
To change the auto shoot settings:
1. Tap on the command bar, thentap the Auto Shoot tab to display theoptions.
2. Make your desired changes.
If you check the option VideoAutomatically Save, the video filesyou record are automatically saved toyour specified storage folder. Tap theFile Setting tab to set your storagefolder.
If you check the option Video AutoRecording, the items RecordingStart After and Recording End Afterbecome configurable. Tap the downarrow opposite each item to set thetime in seconds.
3. Tap OK when done.
4-12 Chapter 4
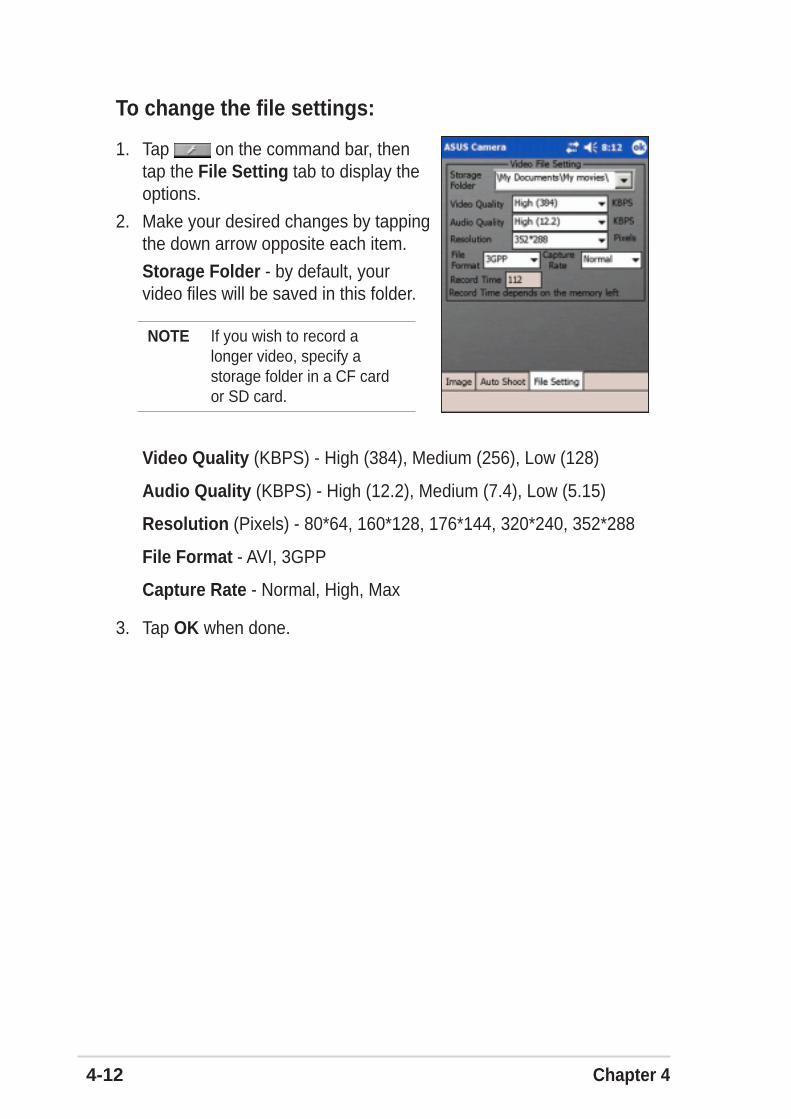
To change the file settings:
1. Tap on the command bar, thentap the File Setting tab to display theoptions.
2. Make your desired changes by tappingthe down arrow opposite each item.
Storage Folder - by default, yourvideo files will be saved in this folder.
Video Quality (KBPS) - High (384), Medium (256), Low (128)
Audio Quality (KBPS) - High (12.2), Medium (7.4), Low (5.15)
Resolution (Pixels) - 80*64, 160*128, 176*144, 320*240, 352*288
File Format - AVI, 3GPP
Capture Rate - Normal, High, Max
3. Tap OK when done.
NOTE If you wish to record alonger video, specify astorage folder in a CF cardor SD card.

ASUS programs 4-13
Recorder functions
To record video:
1. Tap the Mode button to shift toRecorder mode.
Notice that the (Playback) button
becomes (Recorder) button, the
rotate button becomes (Record)button, and the camera statusindicator shows “CAMERA ON”.
2. Focus the camera lens (located atthe back of the device) to yoursubject.
3. Tap the (Record) button to startrecording your video.
4. Tap the (Stop) button to end yourrecording.
Camera status
Recorder mode button
Record button
If the lighting is not enough, tap Flash onthe command bar to turn on the cameraflash. The “Flash On” message brieflyappears on the status bar.
Flash options:
Flash Off - no flash
Flash On - flash is always on
NOTE Return to playback mode to play your recorded video. Seesection “Playback mode” on page 4-3 on how to play thevideo.

4-14 Chapter 4
To save the video:
1. After recording, a save windowappears. From the left window pane,select and tap the folder where youwant to save the video file.
2. If desired, tap the media file name fieldto change the video file name.
3. Tap and drag over the default filename to highlight.
4. Tap the input panel icon to display thesoft keyboard.
5. Key-in the new name for the video file,then press Save. The display returnsto the recorder mode.

ASUS programs 4-15
Photo mode
Display area
In recorder mode, moves forwardto indicate recording in progress
Tap and slide right or left toadjust the recording volume
Tap and slide right or left toadjust the image contrastand brightness
Indicates the elapsedrecording time
Photo function buttons(see descriptions below)
Indicates the camera status
Tap to display a list of media files
Tap to display settings screen forplayback/video image/photo image
Tap to display playback, video,or photo statistics
Tap to display information onASUS Camera functions
Tap to turn the camera flash on or off
Photo Viewer buttonno function in this mode
Photo Album buttonno function in this mode
Photo buttonTap to shift to playback mode
Zoom buttonTap to change from 1X/2X/4X magnification
[Play/Pause button)Tap to play a media file;while playing, tap to pause
Stop buttonTap to stop recording
Record buttonTap to take a photo
NOTE When capturing photos, the ideal distance between thecamera and the subject is 60 cm to infinity.

4-16 Chapter 4
Photo menus
To view the playlist:
Tap on the command bar. A list ofthe available files from your defaultfolder appears.
To change the photo image settings:
1. Tap on the command bar todisplay the photo image options.
2. Make your desired changes.
Tap the Default button any time torevert to the default settings.
3. Tap OK when done.

ASUS programs 4-17
To change the auto shoot settings:
1. Tap on the command bar, thentap the Auto Shoot tab to display theoptions.
2. Make your desired changes.
3. Tap OK when done.
If you check the option SpecialCapture, the items ContinuouslyCapture (selected by default) andPhoto Auto Capturing becomeconfigurable.
If you select the item Photo AutoCapturing, you can set the timeperiod (in seconds) for automaticphoto capturing. Tap the down arrowto display the time options.
NOTE In Continuously Capturemode, you can continuouslycapture 72 photos.
4-18 Chapter 4
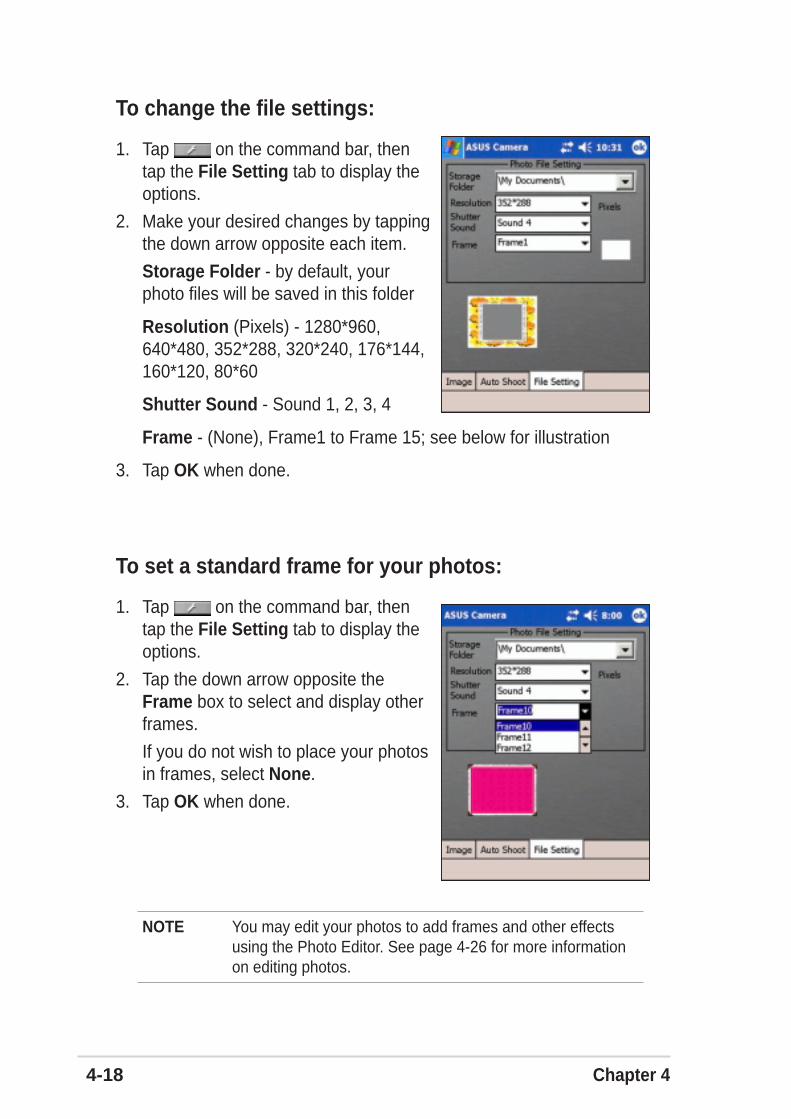
To change the file settings:
1. Tap on the command bar, thentap the File Setting tab to display theoptions.
2. Make your desired changes by tappingthe down arrow opposite each item.
Storage Folder - by default, yourphoto files will be saved in this folder
Resolution (Pixels) - 1280*960,640*480, 352*288, 320*240, 176*144,160*120, 80*60
Shutter Sound - Sound 1, 2, 3, 4
Frame - (None), Frame1 to Frame 15; see below for illustration
3. Tap OK when done.
To set a standard frame for your photos:
1. Tap on the command bar, thentap the File Setting tab to display theoptions.
2. Tap the down arrow opposite theFrame box to select and display otherframes.
If you do not wish to place your photosin frames, select None.
3. Tap OK when done.
NOTE You may edit your photos to add frames and other effectsusing the Photo Editor. See page 4-26 for more informationon editing photos.
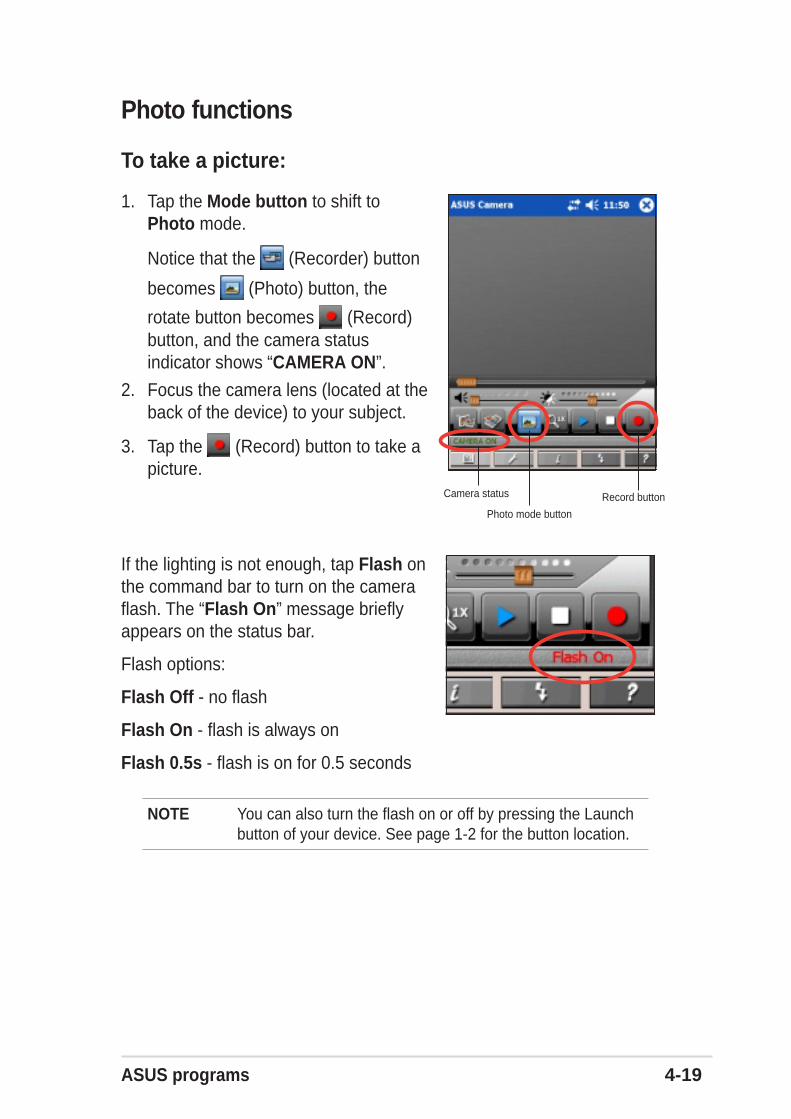
ASUS programs 4-19
Photo functions
To take a picture:
1. Tap the Mode button to shift toPhoto mode.
Notice that the (Recorder) button
becomes (Photo) button, the
rotate button becomes (Record)button, and the camera statusindicator shows “CAMERA ON”.
2. Focus the camera lens (located at theback of the device) to your subject.
3. Tap the (Record) button to take apicture.
Camera status
Photo mode button
Record button
If the lighting is not enough, tap Flash onthe command bar to turn on the cameraflash. The “Flash On” message brieflyappears on the status bar.
Flash options:
Flash Off - no flash
Flash On - flash is always on
Flash 0.5s - flash is on for 0.5 seconds
NOTE You can also turn the flash on or off by pressing the Launchbutton of your device. See page 1-2 for the button location.
4-20 Chapter 4
Saving and viewing photos
To save photos:
By default, the ASUS Camera saves all captured photos in the MyDocuments folder of the Pocket PC. A file name, which is a combinationof the date the photo was taken and a number sequence, is automaticallyassigned to each photo.
To view the picture:
Return to playback mode to display the photo image that you took. Seesection “Playback mode” on page 4-3 on how to display the image.
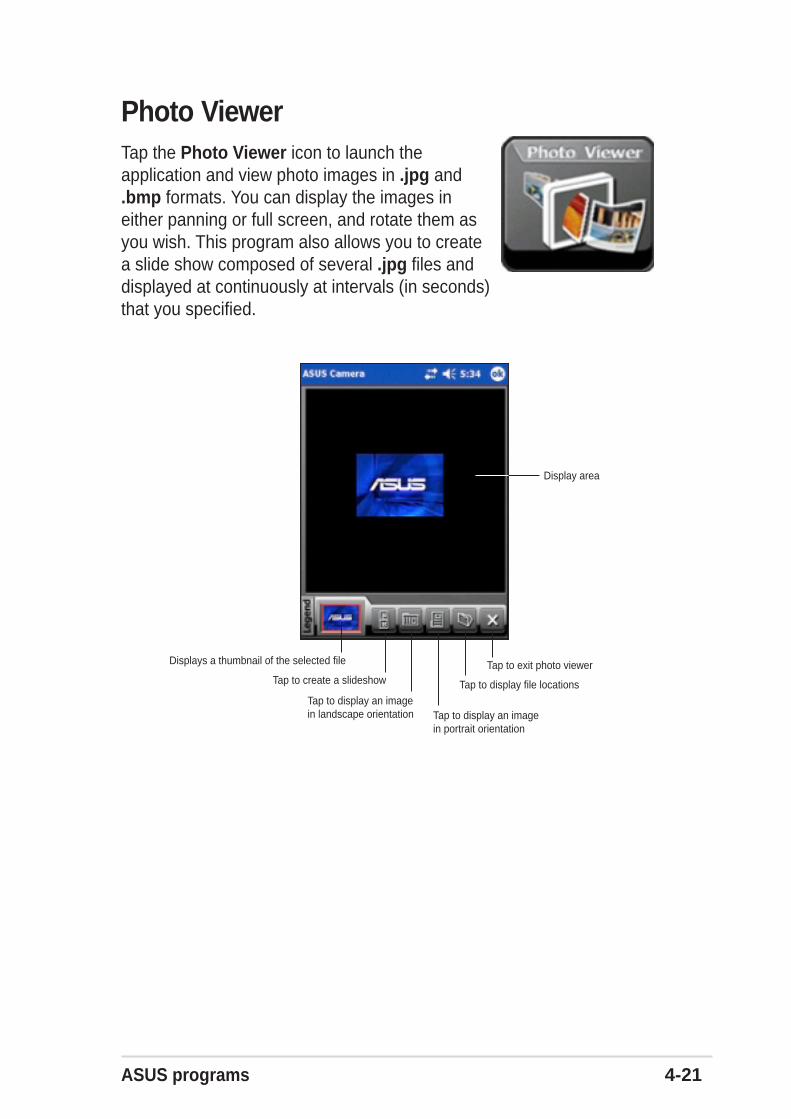
ASUS programs 4-21
Photo ViewerTap the Photo Viewer icon to launch theapplication and view photo images in .jpg and.bmp formats. You can display the images ineither panning or full screen, and rotate them asyou wish. This program also allows you to createa slide show composed of several .jpg files anddisplayed at continuously at intervals (in seconds)that you specified.
Display area
Tap to exit photo viewerDisplays a thumbnail of the selected file
Tap to display an imagein landscape orientation
Tap to display file locations
Tap to display an imagein portrait orientation
Tap to create a slideshow

4-22 Chapter 4
Photo Viewer functions
To open a file:
1. Tap the (Folder) button to display a list of image files.
2. Tap the image file (.jpg or .bmp format) that you wish to open.
3. Tap the again to open another file, or the (Exit) button to closethe Photo Viewer application.
To find files in another location:
1. Tap the down arrow opposite theFolder box to display a list of existingfolders.
2. Tap the name of a folder to display anew list of files.
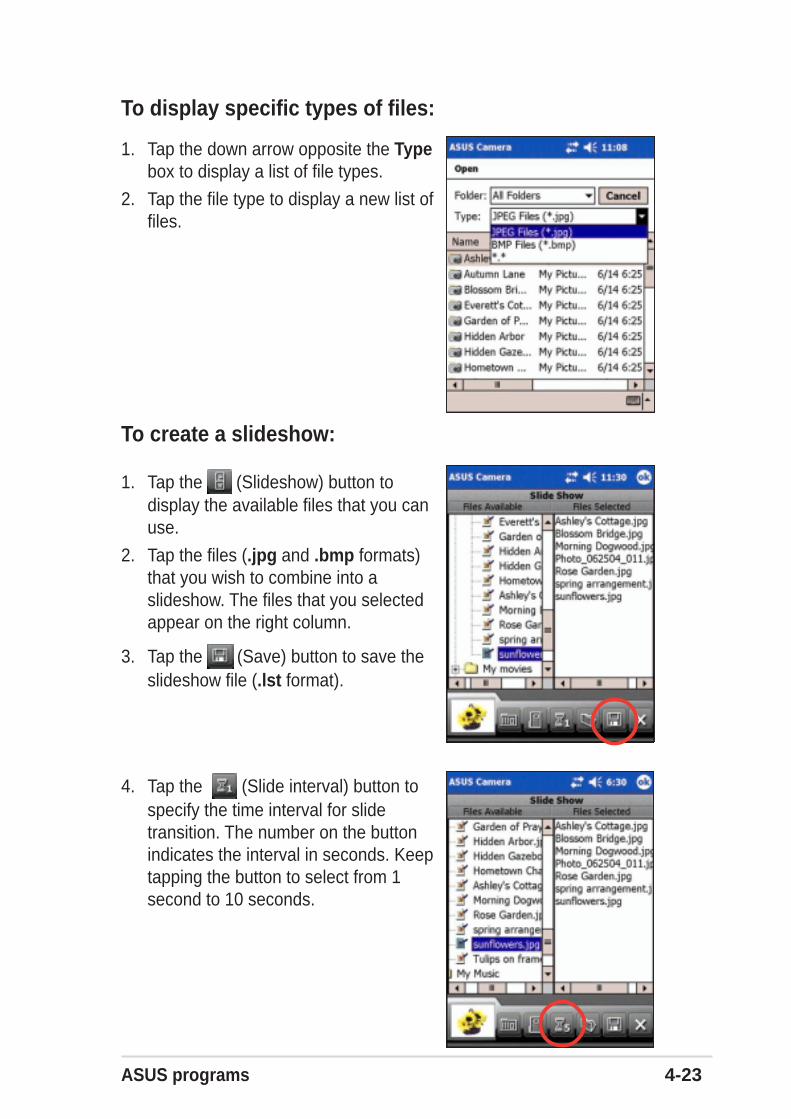
ASUS programs 4-23
To create a slideshow:
1. Tap the (Slideshow) button todisplay the available files that you canuse.
2. Tap the files (.jpg and .bmp formats)that you wish to combine into aslideshow. The files that you selectedappear on the right column.
3. Tap the (Save) button to save theslideshow file (.lst format).
To display specific types of files:
1. Tap the down arrow opposite the Typebox to display a list of file types.
2. Tap the file type to display a new list offiles.
4. Tap the (Slide interval) button tospecify the time interval for slidetransition. The number on the buttonindicates the interval in seconds. Keeptapping the button to select from 1second to 10 seconds.

4-24 Chapter 4
6. A message appears indicating thatyour slideshow file is saved. Tap OK.
5. Tap the (Landscape) button or the (Portrait) button to specifythe orientation of the images in your slideshow. Tapping any of thebuttons shows a preview of your selected image files in eitherlandscape or portrait orientation.
Landscape orientation Portrait orientation

ASUS programs 4-25
Photo EditorTap the Photo Editor icon to launch theapplication and customize images to yourpreference. You can add special effects likeblurring, sepia, negative, neon, and even placephotots in a frame. You can even add text orcaption to the image to make it more descriptive.
The initial screen of the photo editor application does not show anyspecific file. The screen appears as shown.
NOTE If no image is displayed on the screen, the editing buttons are
grayed out and and not selectable. Only the (Exit)buttons are activated.
Tap to display the File menu
Tap to display the Tools menu
Display area
Editing buttons
Tap to display the zoom options

4-26 Chapter 4
Photo Editor functions
To open and edit a file:
1. Tap File, then Open to display yourdefault folder and file type.
If you wish to find files from otherfolders, tap the down arrow oppositethe Folder box to display your folderselection, then tap your desired folder.
If you wish to display only a certaintype of file, tap the down arrowopposite the Type box to display yourfile selection, then tap a file type. Anew list of files then appears.
Advanced toolbar
Basic toolbar
Thumbnails
2. Tap the file that you wish to open and edit.
By default, the screen displays the image file that you selected, threethumbnails of other image files, activated editing buttons on thetoolbars, command bar, and the zoom options box.
NOTE If you wish to open another image, simply tap any of theimage thumbnails. Tap and hold the slider, or tap left/rightarrows to display other thumbnails.

ASUS programs 4-27
3. To change the file view size, tap the zoom options box, then selectyour desired magnification. The file appears in the size you specified.
4. To remove the thumbnails of other files and view your selected file100%, tap Tools from the command bar then tap (uncheck) theThumbnail View item.

4-28 Chapter 4
6. Tap your desired frame twice toautomatically place your image in it.
7. Tap the Frame button to exit frameediting mode, and re-activate otherediting buttons and command barmenus.
8. Tap other editing buttons to add moreeffects to your image.
NOTE You need to exit one editingmode before you can go toanother mode or use thecommand bar menus.
9. Tap File, then tap Save.
10. Key-in a name, then specify a folder,type, and location for yourcustomized file. Tap OK.
11. When prompted, specify the size foryour file. Tap OK.
5. Tap the Frame button to display theavailable frames that you can use.Use the slider or the left/right arrowsto see other frames.

ASUS programs 4-29
Photo AlbumTap the Photo Album icon to launch theapplication and display the available media files(.3gpp, .avi, .jpg, .bmp) represented in smallthumbnails.
To find files from other locations:
1. Tap the down arrow in the Folder boxto display the folders on your device.
2. Select the folder where you wish tolocate files. A new group of thumbnailsappear on the screen.
Tap to display the supported file formats
Tap to display sort options
Tap a thumbnail twice toopen or play

4-30 Chapter 4
ASUS LauncherThis program allows you the convenience of classifying your frequentlyused programs, and quickly launching them with just a few taps.
Accessing ASUS Launcher
To access ASUS Launcher:
1. Tap , then Programs.
2. Tap ASUS Programs, then ASUS Launcher.
NOTE To quickly access ASUS Launcher, press the button(leftmost) on your device.
3. From the command bar, tapName to display the names of theexisting categories.
The default categories areFavorites, Start Menu, andPrograms.
4. Tap a category to display theprograms it contains.
By default, the Favorites categorycontains the ASUS Launcher andASUS Backup program icons.

ASUS programs 4-31
5. Tap Start Menu or Programs to display the default programs in them.
NOTE Whatever category is selected, that category will be launchedthe next time you tap the ASUS Launcher icon.

4-32 Chapter 4
Changing the name of a default category
To edit the name of a default category:
1. Tap Name, and select a category that you wish to rename. Forexample, Programs.
2. Tap Category, then Edit Title.
3. In the Edit Current Category screen, revise the name.
4. Tap OK.
NOTE You cannot delete the default categories. However, you mayedit the default titles, and add or delete programs containedin these categories.
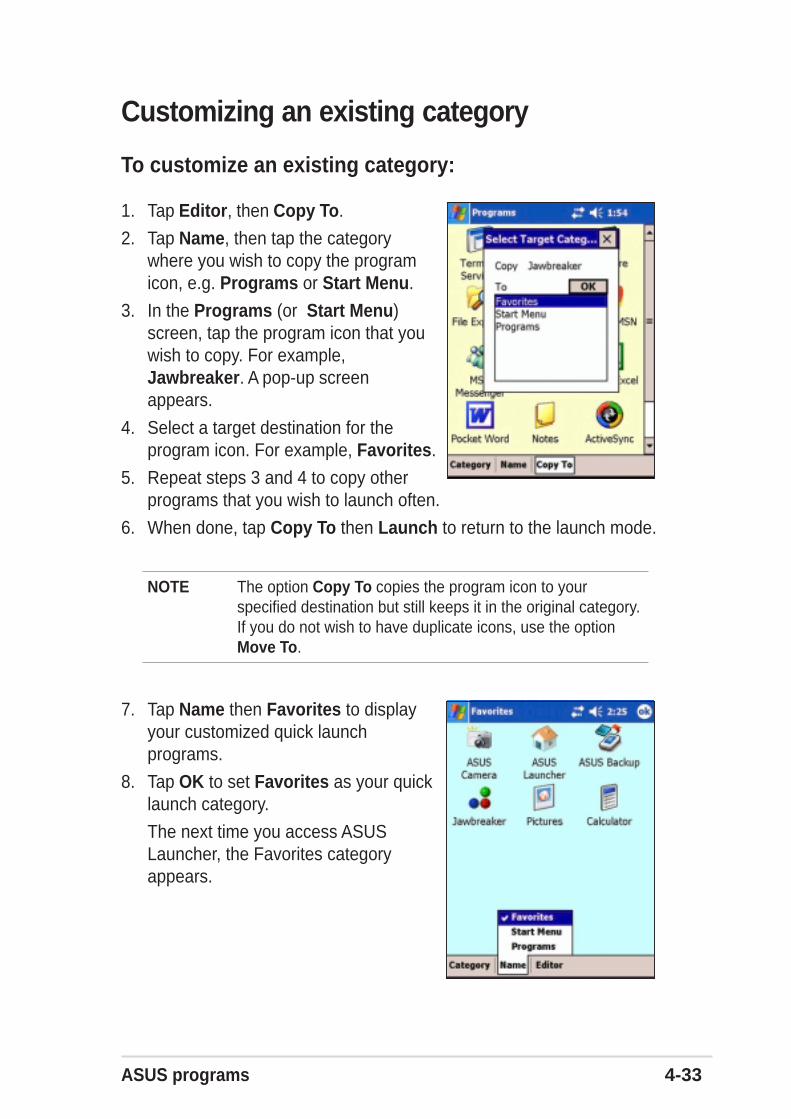
ASUS programs 4-33
Customizing an existing category
To customize an existing category:
1. Tap Editor, then Copy To.
2. Tap Name, then tap the categorywhere you wish to copy the programicon, e.g. Programs or Start Menu.
3. In the Programs (or Start Menu)screen, tap the program icon that youwish to copy. For example,Jawbreaker. A pop-up screenappears.
4. Select a target destination for theprogram icon. For example, Favorites.
5. Repeat steps 3 and 4 to copy otherprograms that you wish to launch often.
6. When done, tap Copy To then Launch to return to the launch mode.
NOTE The option Copy To copies the program icon to yourspecified destination but still keeps it in the original category.If you do not wish to have duplicate icons, use the optionMove To.
7. Tap Name then Favorites to displayyour customized quick launchprograms.
8. Tap OK to set Favorites as your quicklaunch category.
The next time you access ASUSLauncher, the Favorites categoryappears.
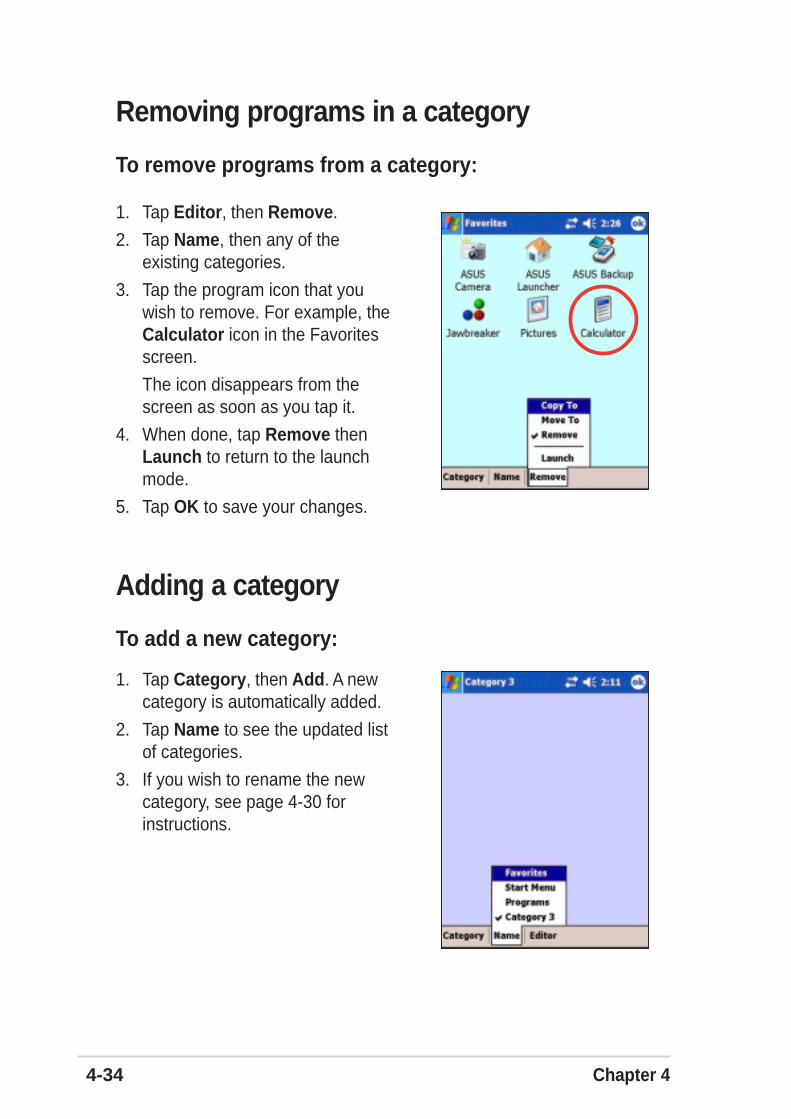
4-34 Chapter 4
Removing programs in a category
To remove programs from a category:
1. Tap Editor, then Remove.
2. Tap Name, then any of theexisting categories.
3. Tap the program icon that youwish to remove. For example, theCalculator icon in the Favoritesscreen.
The icon disappears from thescreen as soon as you tap it.
4. When done, tap Remove thenLaunch to return to the launchmode.
5. Tap OK to save your changes.
Adding a category
To add a new category:
1. Tap Category, then Add. A newcategory is automatically added.
2. Tap Name to see the updated listof categories.
3. If you wish to rename the newcategory, see page 4-30 forinstructions.

ASUS programs 4-35
To stop all running programs:
1. Tap , then tap Settings.
2. Tap the System tab, then tap theMemory icon.
3. On the Memory screen, tap theRunning Programs tab.
4. Tap the Stop All button, then tap OK.
ASUS BackupThe ASUS Backup utility lets you back up your system files and/or datacontained in the main system memory. Unlike the ASUS SmartKeeperautomatic backup feature that backs up the entire system status (systemand data) into one backup file, this utility allows you to manually createseparate backup files for your system files and data files. You may evencategorize the data files and place them into different folders.
Accessing ASUS backup
To access the ASUS backup utility:
1. Tap , then tap Programs.
2. Tap ASUS Programs, then tap ASUSBackup.
A message appears asking you to stopother programs before running thebackup utility.
3. Tap OK and stop all running programs.

4-36 Chapter 4
Backing up all data
To back up all data on your device:
1. Return to the ASUS programs screenand tap the ASUS Backup icon.
2. Tap the Backup tab on the ASUSBackup screen.
3. Tap All Data button to back up all dataon your device.
4. In the Backup File screen:
• specify a file name for the backup
• specify the folder in which to storethe backup file (optional)
• select the storage device (FlashDisk , SD Card, or CF card) whereyou wish to save your backup file
5. Tap OK to start the backup process.
NOTE You need to insert a CF memory card or an SD card if youwish to save your backup file into a removable storagedevice; otherwise, you can save the backup file into the FlashDisk.
NOTE See the online help on your device for online instructions toback up or restore data.

ASUS programs 4-37
6. The screen shows the status of the backup process. When done, amessage appears indicating that the backup is complete, and showsthe total size of the backed up files.
In case the program fails to back up any items, it will show the items onthe screen.
7. Tap OK.
Backing up PIM data
To back up only PIM data on your device:
1. On the ASUS Backup screen, tap PIMData button to back up only thepersonal information management(PIM) data on your device.
2. Select the storage device (Flash Disk,SD Card, or CF card) where you wishto save your backup file.
Tapping Cancel returns you to theprevious screen.
3. Tap the Backup tab.

4-38 Chapter 4
If you checked the box User DefinedFolders, tap Define to specify thefolders that you wish to include in thebackup file, then tap OK.
6. Tap Start to begin the backupprocess.
7. When the backup process is complete,the screen displays the message“Complete” and a list of all the backedup items.
8. Tap OK.
4. Type a name for your backup file andthe folder where you wish to place it.You may opt not to specify a folder.
5. Check the boxes opposite the itemsthat you wish to back up, or tap SelectAll to select all listed items.
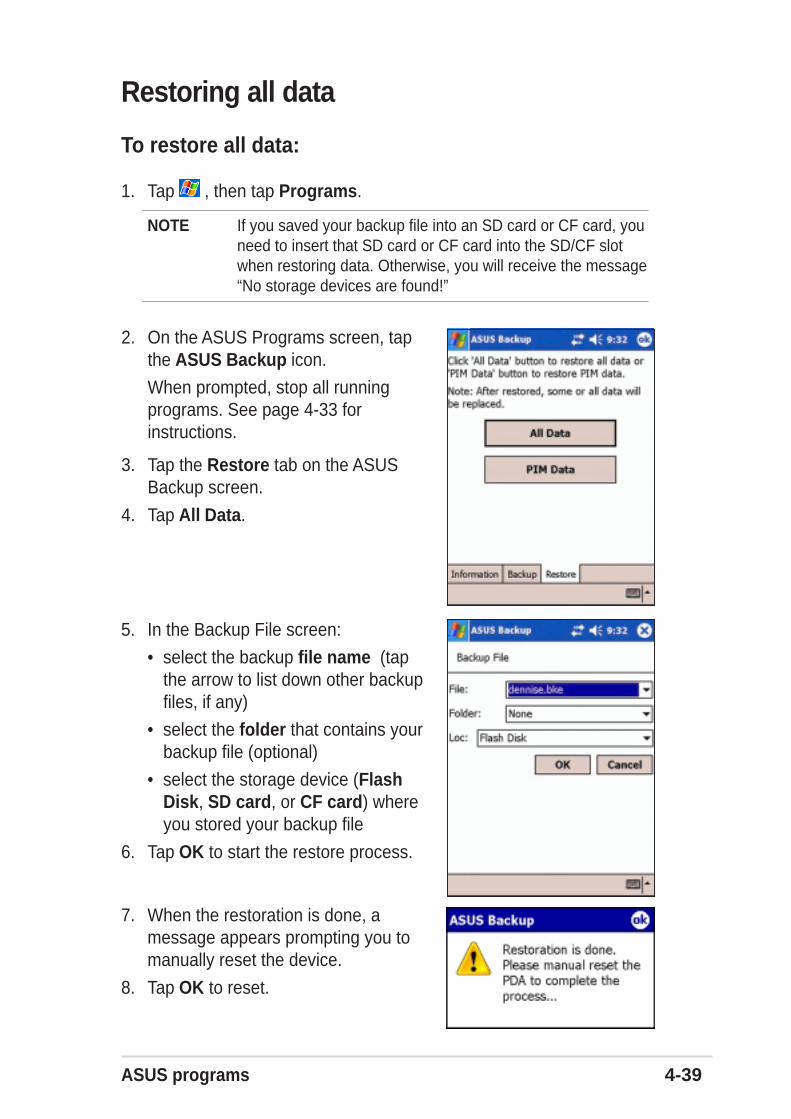
ASUS programs 4-39
Restoring all data
To restore all data:
1. Tap , then tap Programs.
NOTE If you saved your backup file into an SD card or CF card, youneed to insert that SD card or CF card into the SD/CF slotwhen restoring data. Otherwise, you will receive the message“No storage devices are found!”
2. On the ASUS Programs screen, tapthe ASUS Backup icon.
When prompted, stop all runningprograms. See page 4-33 forinstructions.
3. Tap the Restore tab on the ASUSBackup screen.
4. Tap All Data.
5. In the Backup File screen:
• select the backup file name (tapthe arrow to list down other backupfiles, if any)
• select the folder that contains yourbackup file (optional)
• select the storage device (FlashDisk, SD card, or CF card) whereyou stored your backup file
6. Tap OK to start the restore process.
7. When the restoration is done, amessage appears prompting you tomanually reset the device.
8. Tap OK to reset.
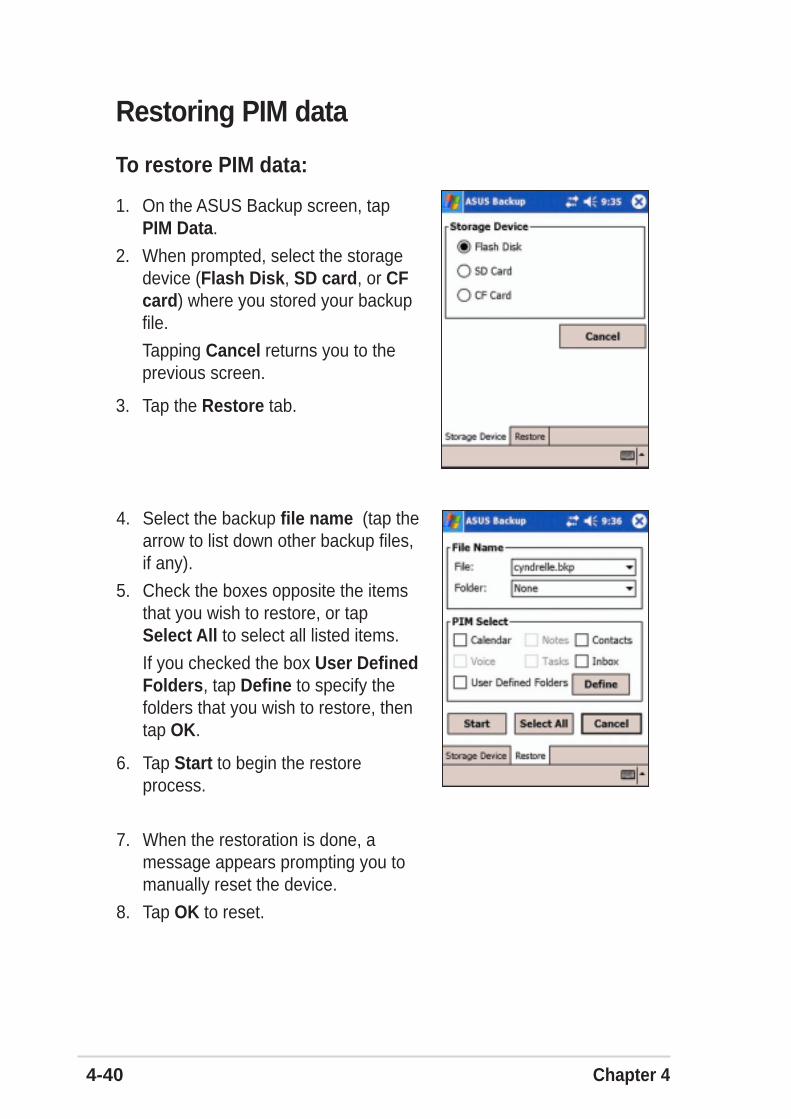
4-40 Chapter 4
Restoring PIM data
To restore PIM data:
1. On the ASUS Backup screen, tapPIM Data.
2. When prompted, select the storagedevice (Flash Disk, SD card, or CFcard) where you stored your backupfile.
Tapping Cancel returns you to theprevious screen.
3. Tap the Restore tab.
4. Select the backup file name (tap thearrow to list down other backup files,if any).
5. Check the boxes opposite the itemsthat you wish to restore, or tapSelect All to select all listed items.
If you checked the box User DefinedFolders, tap Define to specify thefolders that you wish to restore, thentap OK.
6. Tap Start to begin the restoreprocess.
7. When the restoration is done, amessage appears prompting you tomanually reset the device.
8. Tap OK to reset.

ASUS programs 4-41
ASUS SmartKeeperThe ASUS SmartKeeper is an automatic backup feature that prompts youto backup the current system status in a CF card or SD card whenever theremaining battery power reaches a certain level. With the automaticoption, the backup process is done whether the device is ON or OFF aslong as a CF card, or an SD card, is present in its slot.
Automatic backup
Requirements for automatic backup• SmartKeeper is enabled
• a CF card or SD card in the card slot (64MB free space recommended)
• the remaining battery power in the device reaches a low level
Enabling automatic backup
To enable automatic backup:
1. Tap , then tap Settings.
2. Tap the System tab on the bottom of the Settings screen.
3. Tap the SmartKeeper icon to launch SmartKeeper.
4. Select the available storage device (SD card or CF card) to use forbackup, then tap Apply.
5. Tap the Automatic tab.
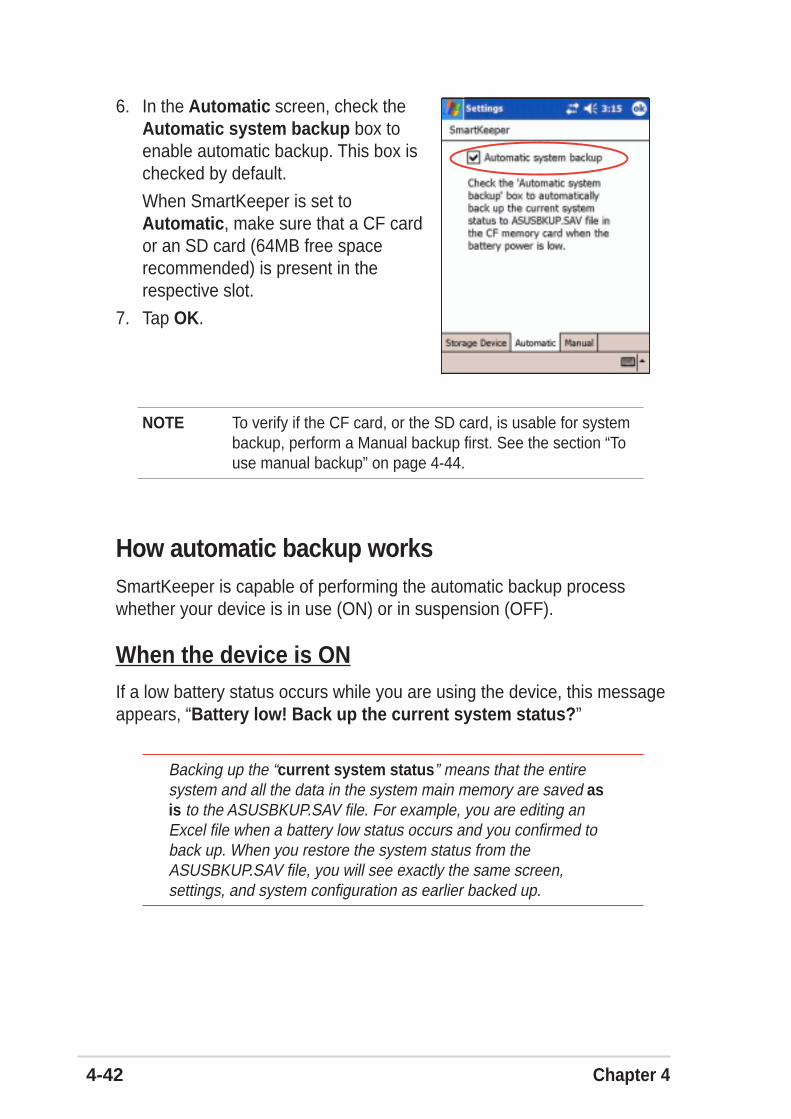
4-42 Chapter 4
6. In the Automatic screen, check theAutomatic system backup box toenable automatic backup. This box ischecked by default.
When SmartKeeper is set toAutomatic, make sure that a CF cardor an SD card (64MB free spacerecommended) is present in therespective slot.
7. Tap OK.
NOTE To verify if the CF card, or the SD card, is usable for systembackup, perform a Manual backup first. See the section “Touse manual backup” on page 4-44.
How automatic backup worksSmartKeeper is capable of performing the automatic backup processwhether your device is in use (ON) or in suspension (OFF).
When the device is ONIf a low battery status occurs while you are using the device, this messageappears, “Battery low! Back up the current system status?”
Backing up the “current system status” means that the entiresystem and all the data in the system main memory are saved asis to the ASUSBKUP.SAV file. For example, you are editing anExcel file when a battery low status occurs and you confirmed toback up. When you restore the system status from theASUSBKUP.SAV file, you will see exactly the same screen,settings, and system configuration as earlier backed up.
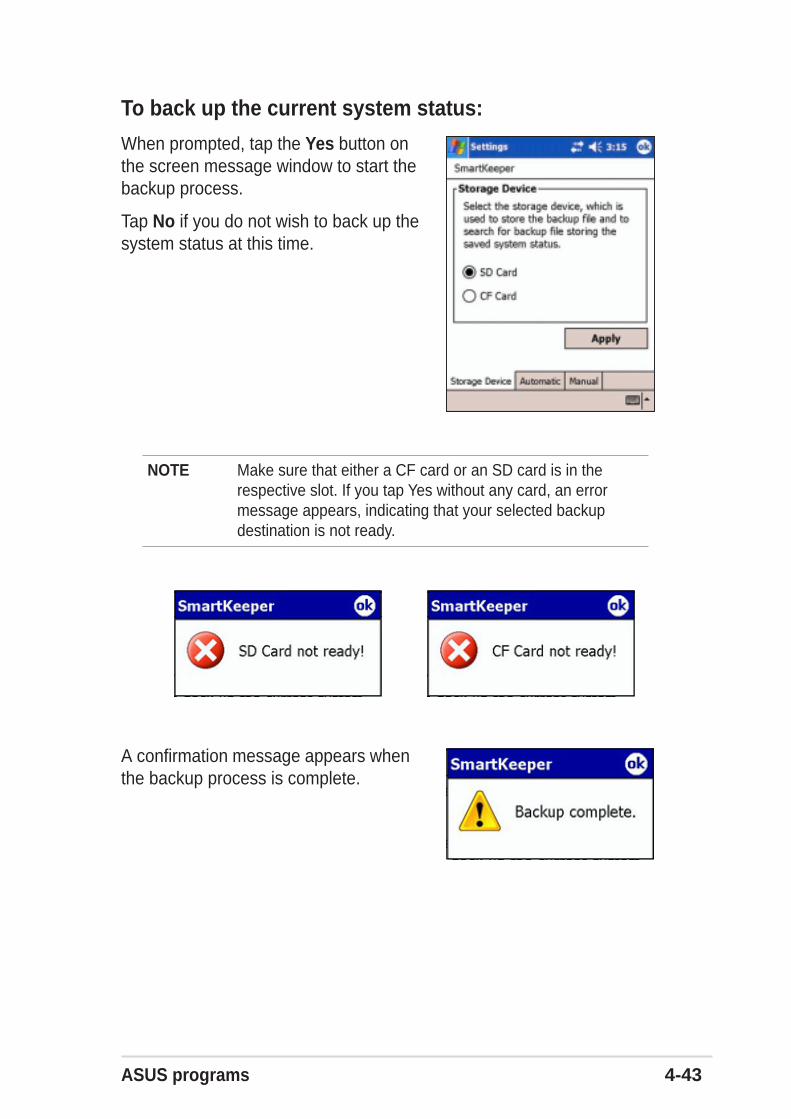
ASUS programs 4-43
To back up the current system status:
When prompted, tap the Yes button onthe screen message window to start thebackup process.
Tap No if you do not wish to back up thesystem status at this time.
A confirmation message appears whenthe backup process is complete.
NOTE Make sure that either a CF card or an SD card is in therespective slot. If you tap Yes without any card, an errormessage appears, indicating that your selected backupdestination is not ready.
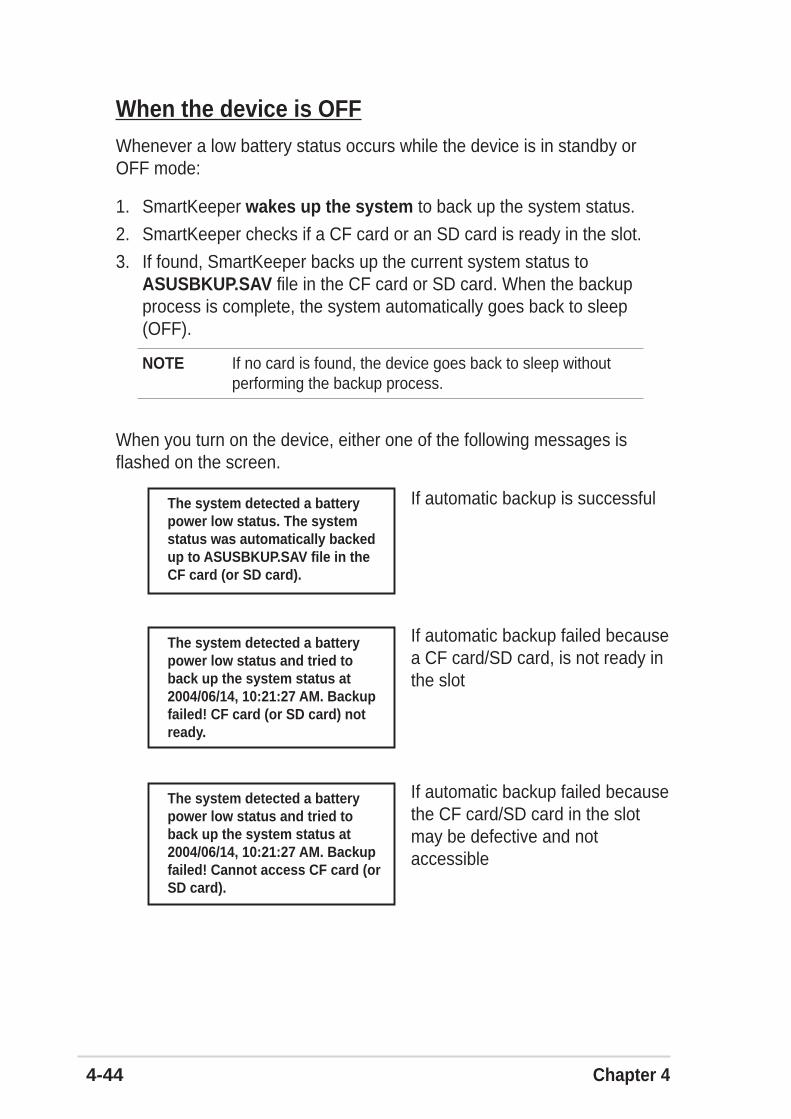
4-44 Chapter 4
When the device is OFFWhenever a low battery status occurs while the device is in standby orOFF mode:
1. SmartKeeper wakes up the system to back up the system status.
2. SmartKeeper checks if a CF card or an SD card is ready in the slot.
3. If found, SmartKeeper backs up the current system status toASUSBKUP.SAV file in the CF card or SD card. When the backupprocess is complete, the system automatically goes back to sleep(OFF).
NOTE If no card is found, the device goes back to sleep withoutperforming the backup process.
When you turn on the device, either one of the following messages isflashed on the screen.
If automatic backup is successfulThe system detected a batterypower low status. The systemstatus was automatically backedup to ASUSBKUP.SAV file in theCF card (or SD card).
If automatic backup failed becausea CF card/SD card, is not ready inthe slot
The system detected a batterypower low status and tried toback up the system status at2004/06/14, 10:21:27 AM. Backupfailed! Cannot access CF card (orSD card).
If automatic backup failed becausethe CF card/SD card in the slotmay be defective and notaccessible
The system detected a batterypower low status and tried toback up the system status at2004/06/14, 10:21:27 AM. Backupfailed! CF card (or SD card) notready.

ASUS programs 4-45
The system detected a batterypower low status and tried toback up the system status at2004/06/14, 10:21:27 AM. Backupfailed! System error.
If automatic backup failed becausea system error occurred
The system detected a batterypower low status and tried toback up the system status at2004/06/14, 10:21:27 AM. Backupfailed! Insufficient space in theCF card (or SD card).
If automatic backup failed becausethe available space in the CF card/SD card is not enough to back upthe current system status

4-46 Chapter 4
Manual backup
To use manual backup:
1. Tap , then tap Settings.
2. Tap the System tab on the bottom ofthe Settings screen.
3. Tap the SmartKeeper icon, then theManual tab.
4. Tap the Back up system button toback up the current system status tothe CF card or SD card.
A message appears to confirm that thebackup process is complete.
NOTE While backing up, the screen blacks out and shows themessage “Backup in progress” and the percentage ofbacked up data.
If a CF card or an SD card is notpresent, an error message appearsafter you tap the back up button.

ASUS programs 4-47
The screen displays the backup fileinformation after the backup process.

4-48 Chapter 4
Manual restore
To restore the system status:
1. Tap , then tap Settings.
2. Tap the System tab on the bottom of the Settings screen.
3. Tap the SmartKeeper icon, then the Manual tab.
4. Tap the Restore system button to restore the saved system statusfrom the CF card or SD card.
During the Restore process, the screenblacks out and displays only the followingdetails:
• file date
• file time
• percentage of restored data
File Date: 2004/06/15File Time: 09:27/48 PMRestore in progress: %
NOTE The Owner Information screen appears after the restoreprocess is complete. Tap the screen to return to the previousstatus before you initiated the restore process.
Microsoft® Pocket Outlook 5-1
Chapter 5
Microsoft® Pocket Outlook
♦♦♦♦♦ Introduction........................................................... 5-2
♦♦♦♦♦ Calendar ................................................................ 5-2Creating appointments ............................................................. 5-3Using the summary screen ...................................................... 5-4Creating meeting requests ....................................................... 5-4
♦♦♦♦♦ Contacts ................................................................ 5-5Creating contacts ..................................................................... 5-6Using the summary screen ...................................................... 5-6Finding a contact ...................................................................... 5-7
♦♦♦♦♦ Tasks ...................................................................... 5-8Creating tasks .......................................................................... 5-8Using the summary screen ...................................................... 5-9
♦♦♦♦♦ Notes.................................................................... 5-10Creating notes .........................................................................5-11
♦♦♦♦♦ Messaging ........................................................... 5-12Synchronizing e-mail messages ............................................ 5-12Connecting directly to an e-mail server .................................. 5-13Reading messages in Inbox ................................................... 5-15Composing messages ........................................................... 5-16Managing e-mail messages and folders ................................ 5-20
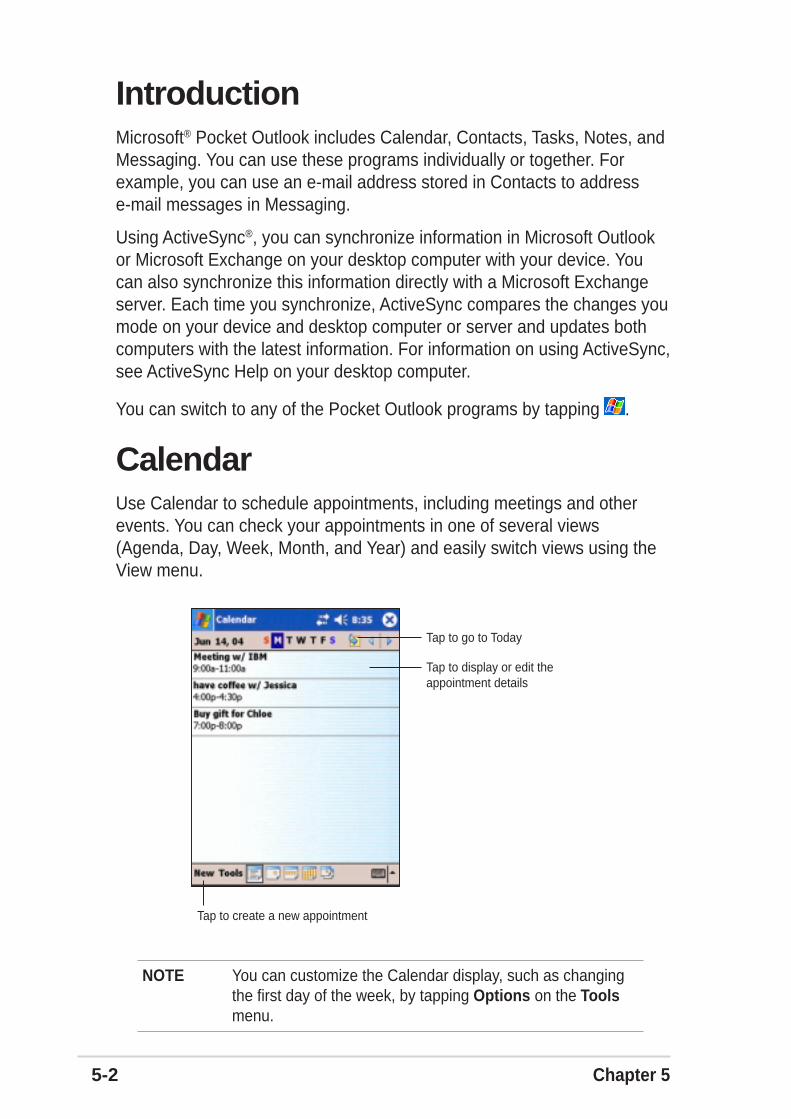
5-2 Chapter 5
IntroductionMicrosoft® Pocket Outlook includes Calendar, Contacts, Tasks, Notes, andMessaging. You can use these programs individually or together. Forexample, you can use an e-mail address stored in Contacts to addresse-mail messages in Messaging.
Using ActiveSync®, you can synchronize information in Microsoft Outlookor Microsoft Exchange on your desktop computer with your device. Youcan also synchronize this information directly with a Microsoft Exchangeserver. Each time you synchronize, ActiveSync compares the changes youmode on your device and desktop computer or server and updates bothcomputers with the latest information. For information on using ActiveSync,see ActiveSync Help on your desktop computer.
You can switch to any of the Pocket Outlook programs by tapping .
CalendarUse Calendar to schedule appointments, including meetings and otherevents. You can check your appointments in one of several views(Agenda, Day, Week, Month, and Year) and easily switch views using theView menu.
NOTE You can customize the Calendar display, such as changingthe first day of the week, by tapping Options on the Toolsmenu.
Tap to go to Today
Tap to display or edit theappointment details
Tap to create a new appointment

Microsoft® Pocket Outlook 5-3
Creating appointments
To create an appointment:
1. If you are in Day or Week view, tap your desired date for theappointment,
2. Tap New.
3. Using the input panel, enter a description and a location. Tap to selectthe field.
4. If needed, tap the date and time to change them.
5. Enter other desired information. You will need to hide the input panel tosee all available fields.
6. To add notes, tap the Notes tab. You can enter text, draw, or create arecording. For more information on creating notes, see the section“Notes” later in this chapter.
7. When done, tap OK to return to Calendar.
Tap to select from a predefined textTap to select from previouslyentered locationsTap to specify the time of appointmentTap to specify the date of appointment
Tap to add notes to the appointment
NOTE If you select Remind me in an appointment, your device will
remind you according to the options set in , Settings,Personal tab, Sounds & Notifications.
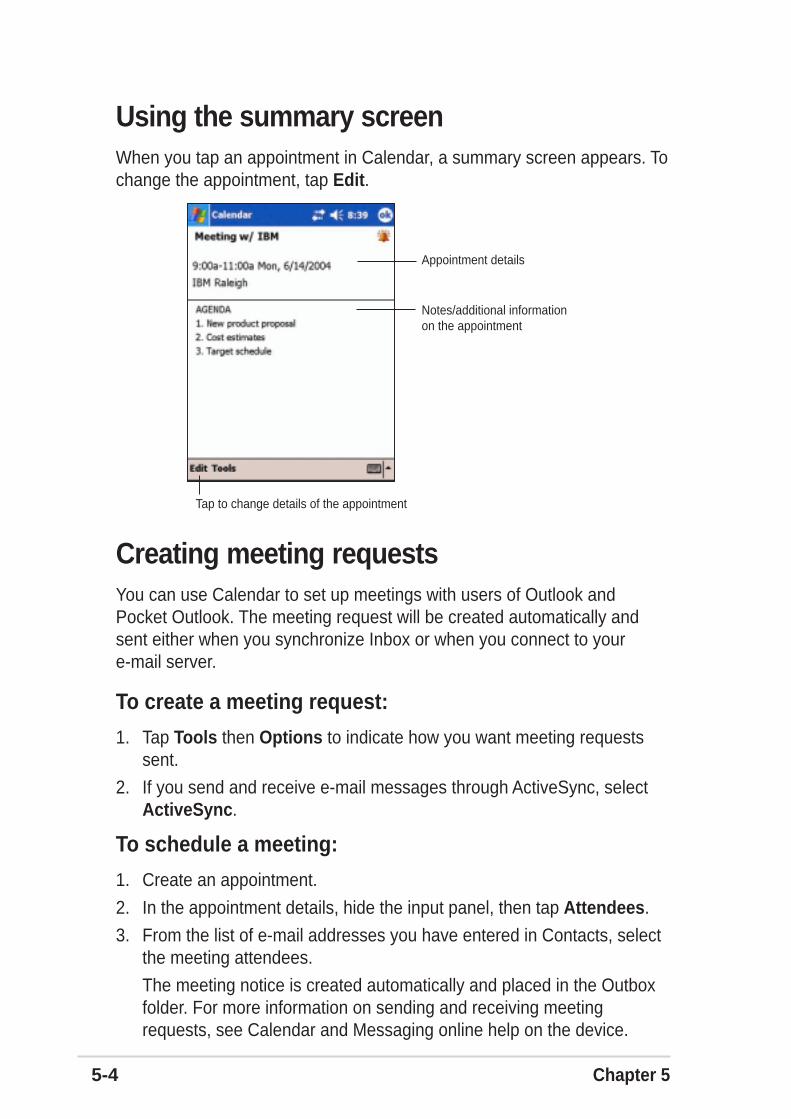
5-4 Chapter 5
Using the summary screenWhen you tap an appointment in Calendar, a summary screen appears. Tochange the appointment, tap Edit.
Creating meeting requestsYou can use Calendar to set up meetings with users of Outlook andPocket Outlook. The meeting request will be created automatically andsent either when you synchronize Inbox or when you connect to youre-mail server.
To create a meeting request:
1. Tap Tools then Options to indicate how you want meeting requestssent.
2. If you send and receive e-mail messages through ActiveSync, selectActiveSync.
To schedule a meeting:
1. Create an appointment.
2. In the appointment details, hide the input panel, then tap Attendees.
3. From the list of e-mail addresses you have entered in Contacts, selectthe meeting attendees.
The meeting notice is created automatically and placed in the Outboxfolder. For more information on sending and receiving meetingrequests, see Calendar and Messaging online help on the device.
Appointment details
Notes/additional informationon the appointment
Tap to change details of the appointment

Microsoft® Pocket Outlook 5-5
ContactsContacts maintains a list of your friends and colleagues so that you caneasily find the information you look for, whether you are at home or on theroad. Using the infrared port (IR) on the device, you can quickly shareContacts information with other device users.
NOTE To change the way information is displayed in the list, tapTools then Options.
Tap and enter part of a nameto quickly find it on the list
Tap to select the category ofcontacts you want to display
Tap to display additional phonenumbers and email addresses
Tap to display or edit the contact details
Tap to create a new contact
Tap to sort contacts by name or company
Tap an action for a selected contact

5-6 Chapter 5
Creating contacts
To create a contact:
1. Tap , then tap Contacts.
2. Tap New to display a blankcontact form.
3. Using the input panel, enter aname and other contactinformation. You will need to scrolldown to see all available fields.
4. To assign the contact a category,scroll to and tap Categories, thenselect a category from the list. Onthe contact list, you can displaythe contacts by category.
Using the summary screenTapping a contact on the contact list displays a summary screen. Tochange the contact information, tap Edit.
5. To add notes, tap the Notes tab. You can enter text, draw, or create arecording. For more information on creating notes, see the section“Notes” later in this chapter.
6. Tap OK to return to the contact list when done.
Contact details
Tap to display notes
Tap to change contact information

Microsoft® Pocket Outlook 5-7
Finding a contactThere are four ways to find a contact.
1. In the contact list, enter a contactname in the box under thenavigation bar. To show all contactsagain, clear text from the box or tapthe button to the right of the box.
2. In the contact list, tap the categorylist (labeled All Contacts bydefault) and select the type ofcontact that you wish to display. Toshow all contacts again, select AllContacts. To view a contact notassigned to a category, selectNone.
3. To view the names of companiesyour contacts work for, in thecontact list, tap View > ByCompany. The number of contactsthat work for that company will bedisplayed to the right of thecompany name.
4. Tap > Help, then tap Find.Enter the contact name, selectContacts for the type, and tap Go.
1
2
3
4

5-8 Chapter 5
TasksUse Tasks to keep track of what you have to do.
Creating tasks
To create a task:
1. Tap , then tap Tasks.
2. Tap New to display a blank taskform.
3. Using the input panel, enter adescription.
4. Enter a start date and due date,or enter other information bytapping the field first. If the inputpanel is open, you will need tohide it to see all available fields.
Tap to select a sortorder of the task list
Tap to select the category oftasks you want to display
Indicates high priority
Tap to display or editthe task details
Tap and hold to display apop-up menu of actions
Tap an action for the task
Tap to create a new task

Microsoft® Pocket Outlook 5-9
5. To assign the task to a category, tap Categories and select a categoryfrom the list. On the task list, you can display tasks by category.
6. To add notes, tap the Notes tab. You can enter text, draw, or create arecording. For more information on creating notes, see the section“Notes” later in this chapter.
7. Tap OK to return to the task list when done.
Using the summary screenTapping a task on the task list displays a summary screen. To change thetask details, tap Edit.
TIP To quickly create a task withonly a subject, tap Entry Bar onthe Tools menu. Tap Tap hereto add a new task and enteryour task information.
Task details
Tap to show or hide the task details
Notes/additional information on the task
Tap to change the task details

5-10 Chapter 5
NotesQuickly capture thoughts, reminders, ideas, and phone numbers withNotes. You can create a written note or a recording. You can also include arecording in a note. If a note is open when you create the recording, it willbe included in the note as an icon. If the note is displayed, it will becreated as a standalone recording.
You may change the default Notes options including the writing mode,template, file storage, and record button action.
To change the Notes options:
1. Tap , tap Programs, then tapNotes.
2. Tap Tools, then Options... todisplay the options screen.
3. Make your desired changes.
4. Click OK.
Tap to change the sort order of the list
Tap to open a note or play a recording
Tap to record
Tap to show or hide the recording toolbar
Tap to create a new note or recording
Tap and hold to display apop-up menu of actions
Tap an action for the item

Microsoft® Pocket Outlook 5-11
Creating notes
To create a note:
1. Tap , then tap Notes.
2. Tap New to display a blank note.
3. Create your note by writing, drawing, typing, or recording. For moreinformation about using the input panel, writing and drawing on thescreen, and creating recordings, see Chapter 2.
Tap to show or hidethe input panel
Tap to save the note andreturn to the Notes list
Tap to write on the screen
Tap to add a recording to the note
5-12 Chapter 5
MessagingUse Messaging to send and receive e-mail messages in one of theseways:
• Synchronize e-mail messages with Microsoft Exchange or MicrosoftOutlook on your desktop computer
• Send and receive e-mail messages by connecting directly to an e-mailserver through an Internet service provider (ISP) or a network
Synchronizing e-mail messagesYou can e-mail messages as part of the general synchronization process.You will need to enable mail synchronization in ActiveSync. For moreinformation on enabling mail synchronization, see the ActiveSync onlinehelp on your desktop computer.
During synchronization:
• Messages are copied from the mail folders of Exchange or Outlook onyour desktop computer to the ActiveSync folder in Inbox on your device.By default, you will receive messages from the past five days only andthe first 100 lines of each message.
• E-mail messages in the Outbox folder on your device are transferred toExchange or Outlook, then send from those programs.
• E-mail messages in subfolder must be selected in ActiveSync on yourdesktop computer in order to be transferred.
NOTE You can also synchronize e-mail messages with your desktopcomputer from a remote location. For more information onconnecting your device, see Chapter 8.
Microsoft® Pocket Outlook 5-13
Connecting directly to an e-mail serverIn addition to synchronizing e-mail messages with your desktop computer,you can send and receive e-mail messages by connecting to an e-mailserver using a modem or network card connected to your device. Youneed to set up a remote connection to a network or an ISP, and aconnection to your e-mail server. For more information, see Chapter 8.
When you connect to the e-mail server, new messages are downloaded tothe device Inbox folder, messages in the device Outbox folders are sent,and messages that have been deleted on the e-mail server are removedfrom the device Inbox folder.
Messages that you receive directly from an e-mail server are linked to youre-mail server rather than your desktop computer. When you delete amessage on your device, it is also deleted from the e-mail server the nexttime you connect based on the settings you selected in ActiveSync.
You can work online or offline. When working online, you read andrespond to messages while connected to the e-mail server. Messages aresent as soon as you tap Send, which saves space in your device.
When working offline, once you have downloaded new message headersor partial messages, you can disconnect from the e-mail server and decidewhich messages to download completely. The next time you connect,Inbox downloads the complete messages you have marked for retrievaland sends the messages you have composed.

5-14 Chapter 5
When you connect to your e-mail server or synchronize with your desktopcomputer, by default, you will receive messages from the last five daysonly, the first 100 lines of each new messages, and file attachments of lessthan 100KB in size. The original messages remain on the e-mail server oryour desktop computer.
You can mark the messages that you want to retrieve in full during yournext synchronization or e-mail server connection. In the message list, tapand hold the message that you want to retrieve. On the pop-up menu, tapMark for Download. The icons in the Inbox message list give you visualindications of message status.
You can specify your downloading preferences when you set up theservice or select your synchronization options. You can change them atany time.
• Change options for Inbox synchronization using ActiveSync options. Formore information, see ActiveSync Help on your desktop computer.
• Change options for direct e-mail server connections in Inbox on yourdevice. Tap Tools then Options. On the Service tab, tap the service thatyou wish to change. Tap and hold the service and select Delete toremove a service.

Microsoft® Pocket Outlook 5-15
Reading messages in InboxThe messages you receive appear in your Inbox folder. By default, themost recently received messages appear on top of the list. Unreadmessages appear in boldface.
Tap an e-mail message from your Inbox to display it.
Tap to select the sort orderfor the messages
Tap and hold to display apop-up menu of actions
Tap to connect, and to send/receive e-mail
Tap to connect to the selected service
Tap to select the service, and thefolder that you wish to display
Tap to return to the message list
Tap to delete this message
Tap to reply to or forward this message
Tap to view the next message
Tap to view the previous message
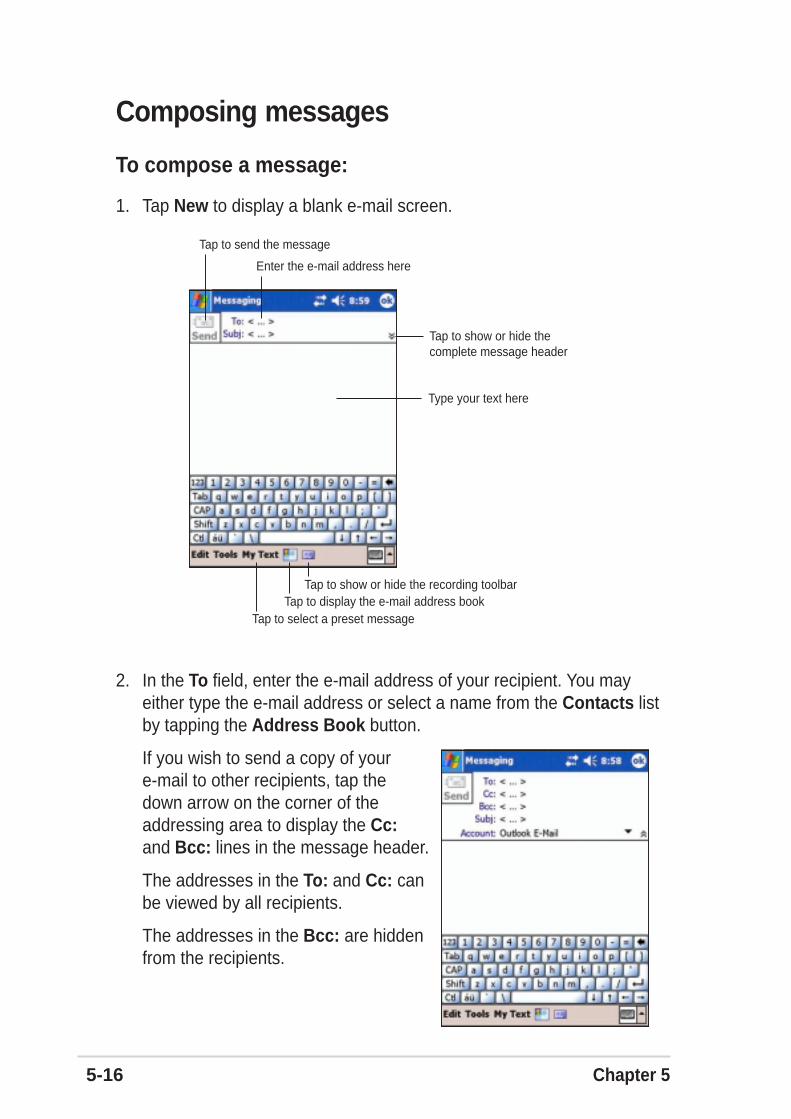
5-16 Chapter 5
Composing messages
To compose a message:
1. Tap New to display a blank e-mail screen.
Tap to show or hide thecomplete message header
Tap to send the message
Tap to select a preset messageTap to display the e-mail address book
Tap to show or hide the recording toolbar
Enter the e-mail address here
Type your text here
2. In the To field, enter the e-mail address of your recipient. You mayeither type the e-mail address or select a name from the Contacts listby tapping the Address Book button.
If you wish to send a copy of youre-mail to other recipients, tap thedown arrow on the corner of theaddressing area to display the Cc:and Bcc: lines in the message header.
The addresses in the To: and Cc: canbe viewed by all recipients.
The addresses in the Bcc: are hiddenfrom the recipients.

Microsoft® Pocket Outlook 5-17
3. Compose your message.
To address your e-mail to severalrecipients, type the e-mail addressesseparated by a semicolon. Asemicolon is automatically addedbetween e-mail addresses if youselect from your Contacts list.
All the names in the Contacts list withe-mail addresses appear in the e-mailaddress book.
4. Tap Send when you have finished the message.

5-18 Chapter 5
Using preset messagesTo enter preset or frequently usedmessages, tap My Text from thecommand bar and select your desiredmessage.
Editing or adding preset messages
To edit or add preset messages:
1. Tap Tools from the command bar todisplay the menu.
2. Tap Edit My Text... to display a list ofpreset messages.
3. Select a message to change.
or
Select a blank line from the bottom ofthe list, then type your customizedmessage.
4. Tap OK when done.
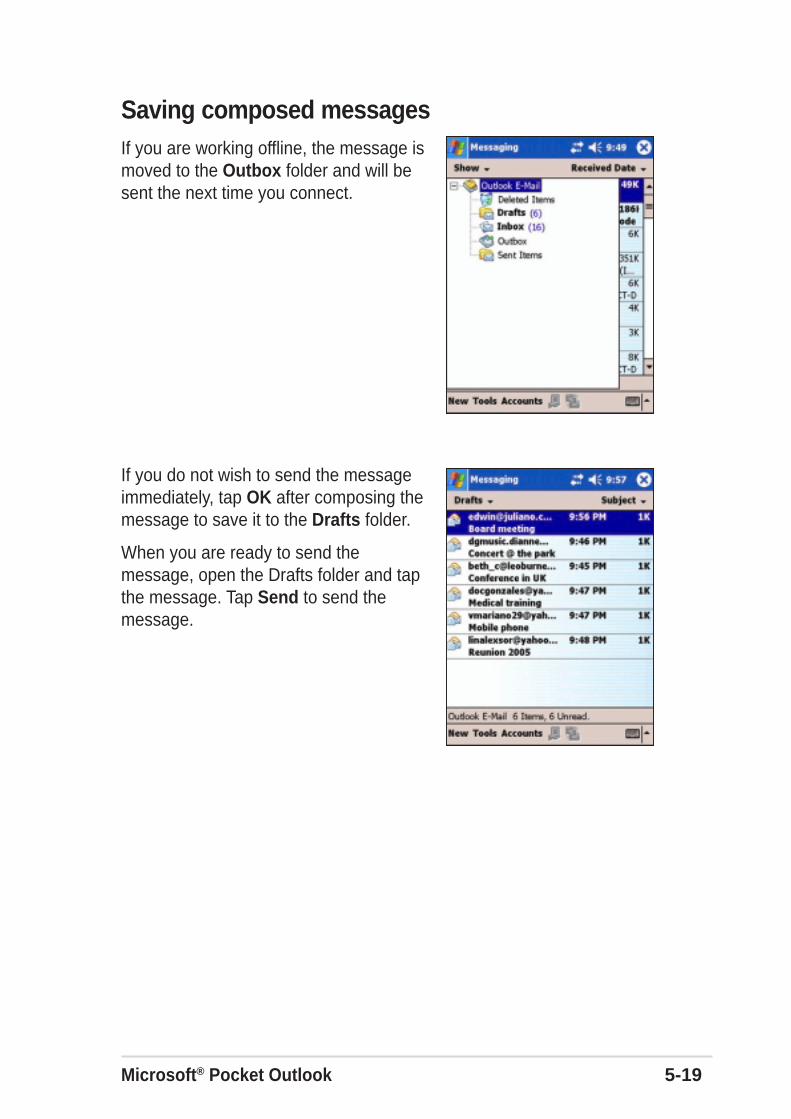
Microsoft® Pocket Outlook 5-19
Saving composed messagesIf you are working offline, the message ismoved to the Outbox folder and will besent the next time you connect.
If you do not wish to send the messageimmediately, tap OK after composing themessage to save it to the Drafts folder.
When you are ready to send themessage, open the Drafts folder and tapthe message. Tap Send to send themessage.
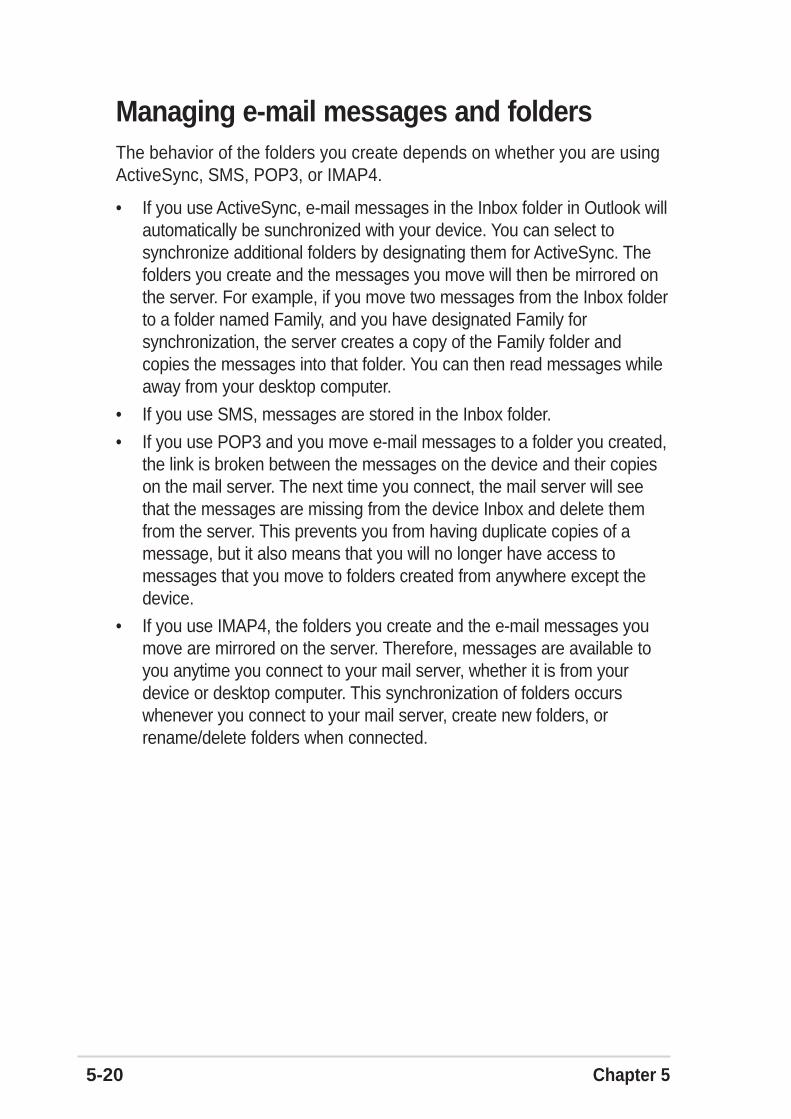
5-20 Chapter 5
Managing e-mail messages and foldersThe behavior of the folders you create depends on whether you are usingActiveSync, SMS, POP3, or IMAP4.
• If you use ActiveSync, e-mail messages in the Inbox folder in Outlook willautomatically be sunchronized with your device. You can select tosynchronize additional folders by designating them for ActiveSync. Thefolders you create and the messages you move will then be mirrored onthe server. For example, if you move two messages from the Inbox folderto a folder named Family, and you have designated Family forsynchronization, the server creates a copy of the Family folder andcopies the messages into that folder. You can then read messages whileaway from your desktop computer.
• If you use SMS, messages are stored in the Inbox folder.
• If you use POP3 and you move e-mail messages to a folder you created,the link is broken between the messages on the device and their copieson the mail server. The next time you connect, the mail server will seethat the messages are missing from the device Inbox and delete themfrom the server. This prevents you from having duplicate copies of amessage, but it also means that you will no longer have access tomessages that you move to folders created from anywhere except thedevice.
• If you use IMAP4, the folders you create and the e-mail messages youmove are mirrored on the server. Therefore, messages are available toyou anytime you connect to your mail server, whether it is from yourdevice or desktop computer. This synchronization of folders occurswhenever you connect to your mail server, create new folders, orrename/delete folders when connected.
Companion programs 6-1
Chapter 6
Companion programs
♦♦♦♦♦ Pocket Word .......................................................... 6-2Creating Pocket Word documents ........................................... 6-2Saving Pocket Word documents .............................................. 6-3Opening an existing Pocket Word document ........................... 6-5Modes of entering information ................................................. 6-6
♦♦♦♦♦ Pocket Excel ......................................................... 6-9Creating Pocket Excel documents ......................................... 6-10Opening an existing Pocket Excel document ..........................6-11Saving Pocket Excel documents .............................................6-11Securing your Excel document .............................................. 6-13Tips for working in Pocket Excel ............................................ 6-14
♦♦♦♦♦ MSN Messenger .................................................. 6-15Signing up .............................................................................. 6-16Working with contacts ............................................................ 6-17Chatting with contacts ............................................................ 6-18
♦♦♦♦♦ Windows Media Player for Pocket PC .............. 6-19

6-2 Chapter 6
The companion programs consist of Microsoft® Pocket Word, Microsoft®
Pocket Excel, MSN Messenger, and Windows Media™ Player for PocketPC.
To switch to a companion program on your device, tap Programs on the menu, then tap the program that you wish to open.
Pocket WordPocket Word works with Microsoft Word on your desktop computer to giveyou easy access to copies of your documents. You can create newdocuments on your device, or you can copy documents from your desktopcomputer to your device. Synchronize documents between your desktopcomputer and your device so that you have the most up-to-date content inboth locations.
Use Pocket Word to create documents, such as letters, meeting minutes,or trip reports.
1. Tap , tap Programs, tapPocket Word to launch theapplication.
If you have existing MicrosoftWord or Pocket Word documentsin your device, a list of thedocuments appears.
Creating Pocket Word documents
To create a new Word document:
NOTE If you selected a template for new documents in the Optionsdialog box, that template appears with the appropriate textand formatting already provided.

Companion programs 6-3
2. Tap New to display a blank document.
3. Use any of the tools in the input panel to type your text.
Saving Pocket Word documents
To save a Pocket Word document:
When you have finished editing your document, tap OK.
The document is saved using the first line as file name if you did notspecify a file name. For example, if your first line in the document has thewords Bits-n-Pieces, these words appear in your Word documents list.
Type your text here
Tap to select an input method
Tap to show or hide the input panel
Tap to show or hide the formatting toolbar
Tap to save and close your document
Formatting toolbar

6-4 Chapter 6
To specify save options:
1. With the document open, tapTools.
2. From the pop-up menu, tap File,then tap Save Document As... todisplay the Save As screen.
3. Change the file name by simplytyping a new one in the Namefield.
4. Tap the down arrow in the Folderfield to select a folder where youwish to place the file.
NOTE If you do not wish to change the document format, but wouldlike to change the file name, folder, and location of yourdocument, tap Tools then tap File from the command bar.Tap Rename/Move... from the pop-up menu to make yourchanges.
5. Tap the down arrow in the Type field to select a file format.
6. Tap the down arrow in the Location field to indicate the location ofyour saved file, either in the main memory of your device, or in astorage card, if available.
7. Tap OK when done.
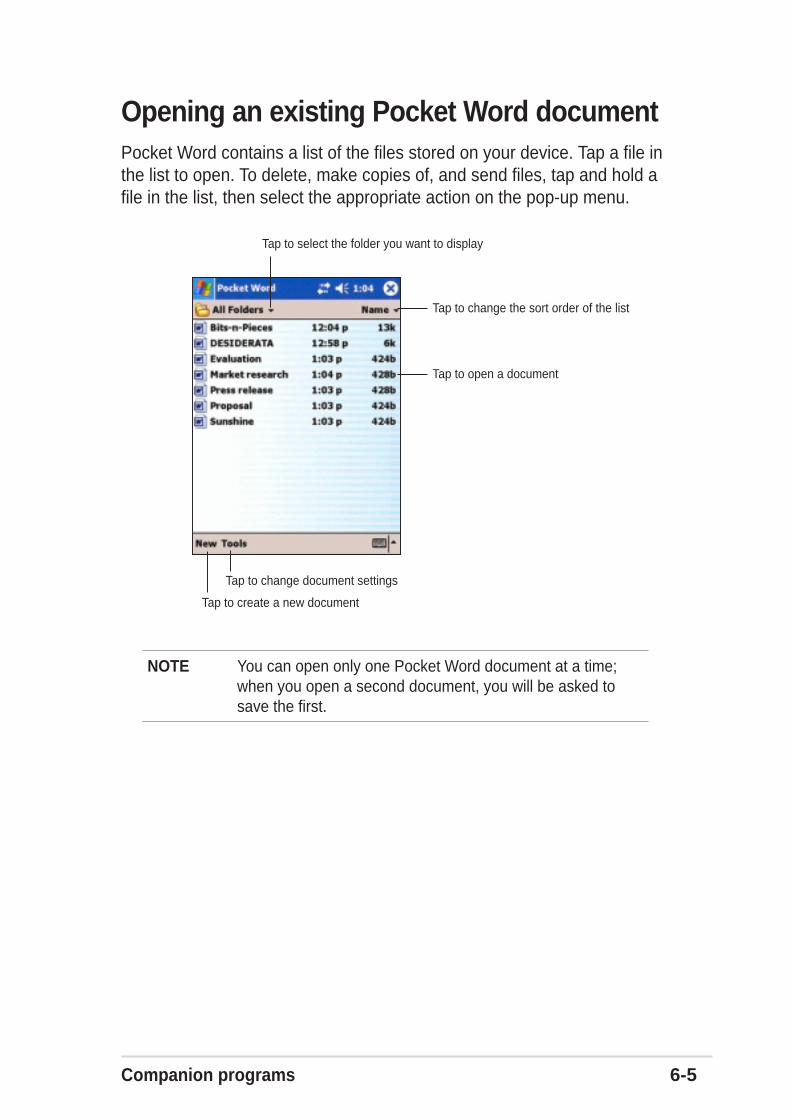
Companion programs 6-5
Opening an existing Pocket Word documentPocket Word contains a list of the files stored on your device. Tap a file inthe list to open. To delete, make copies of, and send files, tap and hold afile in the list, then select the appropriate action on the pop-up menu.
NOTE You can open only one Pocket Word document at a time;when you open a second document, you will be asked tosave the first.
Tap to select the folder you want to display
Tap to change the sort order of the list
Tap to open a document
Tap to create a new document
Tap to change document settings

6-6 Chapter 6
Modes of entering informationYou can enter information in Pocket Word in one of four modes (typing,writing, drawing, or recording), which are displayed on the View menu.Each mode has its own toolbar that you can show or hide by tapping theShow/Hide Toolbar button on the command bar.
If you are opening a Word document created on a desktop computer,select Wrap to Window on the View menu so that you can see the entiredocument.
To change the zoom option:
1. Tap View, then tap Zoom.
2. Select your desired percentage.
Select a higher percentage to enter text and lower one to see more ofyour document.
Typing ModeUsing the input panel, enter typed text into the document. For moreinformation on entering typed text, see Chapter 2.
To format existing text and to edit text, first select the text. You can selecttext as you do in a Word document, using your stylus instead of the mouseto drag through the text you want to select. You can search a document tofind text by tapping Edit and Find/Replace.

Companion programs 6-7
Writing modeIn writing mode, use your stylus to write directly on the screen. Ruled linesare displayed as a guide, and the zoom magnification is greater than intyping mode to allow you to write more easily. For more information onwriting and selecting writing, see Chapter 2.
NOTE If you cross over three ruled lines with a single stroke, thewriting becomes a drawing that you can edit as described inthe next section.
Written words are converted to graphics (metafiles) when aPocket Word document is converted to a Word document onyour desktop computer.
Write your text here
With the Space button selected,drag to insert space. An arrowappears showing the spacedirection direction and size.
Tap to show or hide the writing/formatting toolbarPen button
Space button
Tap to display the menu
Tap to display zoom percentages
Tap to wrap text to screen

6-8 Chapter 6
Drawing modeIn drawing mode, use your stylus to draw on the screen. Gridlines appearas guides. When you lift your stylus off the screen after ther first stroke,you will see a drawing box indicating the boundaries of the drawing. Everysubsequent stroke within or touching the drawing box becomes part of thedrawing. For more information on drawing and selecting drawings, seeChapter 2.
Recording modeIn recording mode, embed arecording into your document.Recordings are saved as .wav files.For more information on recording,see Chapter 2.
Resize an object by draggingthe selection handles
Tap an arrow to display the optionsPen button
Drawing toolbar
Tap to show or hide the drawing toolbar
Tap to select the formatting options
Embedded recording
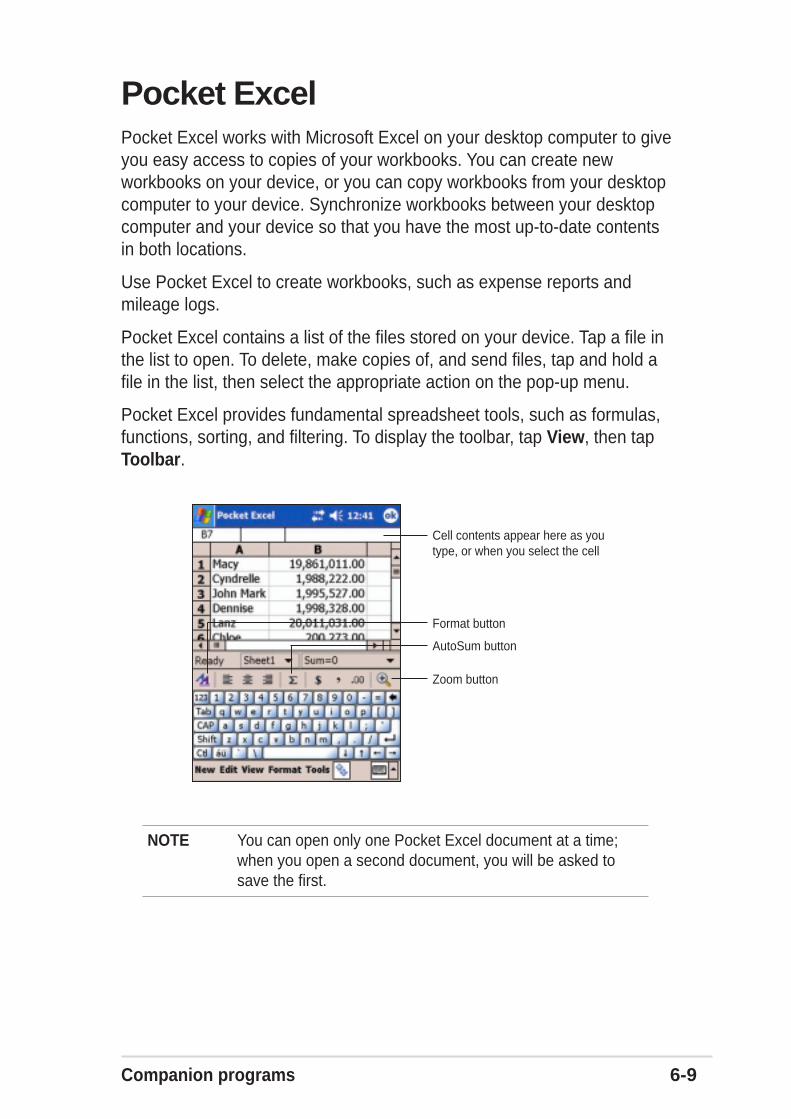
Companion programs 6-9
Pocket ExcelPocket Excel works with Microsoft Excel on your desktop computer to giveyou easy access to copies of your workbooks. You can create newworkbooks on your device, or you can copy workbooks from your desktopcomputer to your device. Synchronize workbooks between your desktopcomputer and your device so that you have the most up-to-date contentsin both locations.
Use Pocket Excel to create workbooks, such as expense reports andmileage logs.
Pocket Excel contains a list of the files stored on your device. Tap a file inthe list to open. To delete, make copies of, and send files, tap and hold afile in the list, then select the appropriate action on the pop-up menu.
Pocket Excel provides fundamental spreadsheet tools, such as formulas,functions, sorting, and filtering. To display the toolbar, tap View, then tapToolbar.
NOTE You can open only one Pocket Excel document at a time;when you open a second document, you will be asked tosave the first.
Cell contents appear here as youtype, or when you select the cell
Zoom button
Format button
AutoSum button
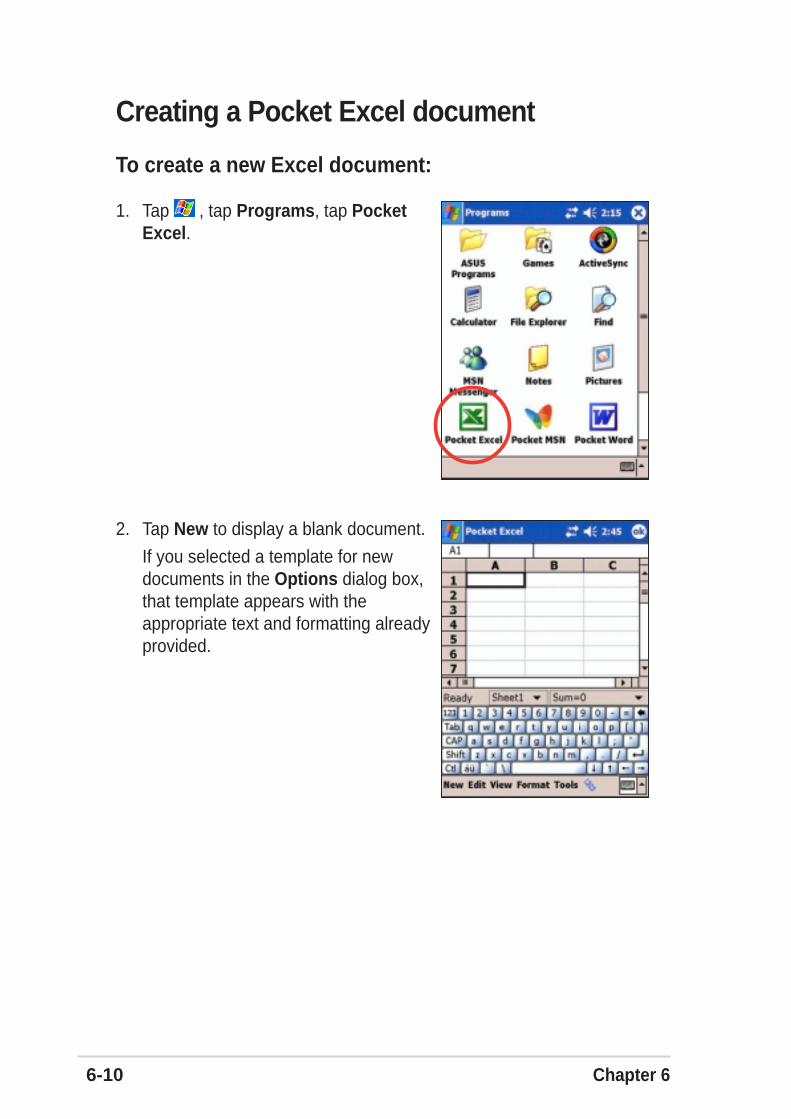
6-10 Chapter 6
Creating a Pocket Excel document
To create a new Excel document:
1. Tap , tap Programs, tap PocketExcel.
2. Tap New to display a blank document.
If you selected a template for newdocuments in the Options dialog box,that template appears with theappropriate text and formatting alreadyprovided.
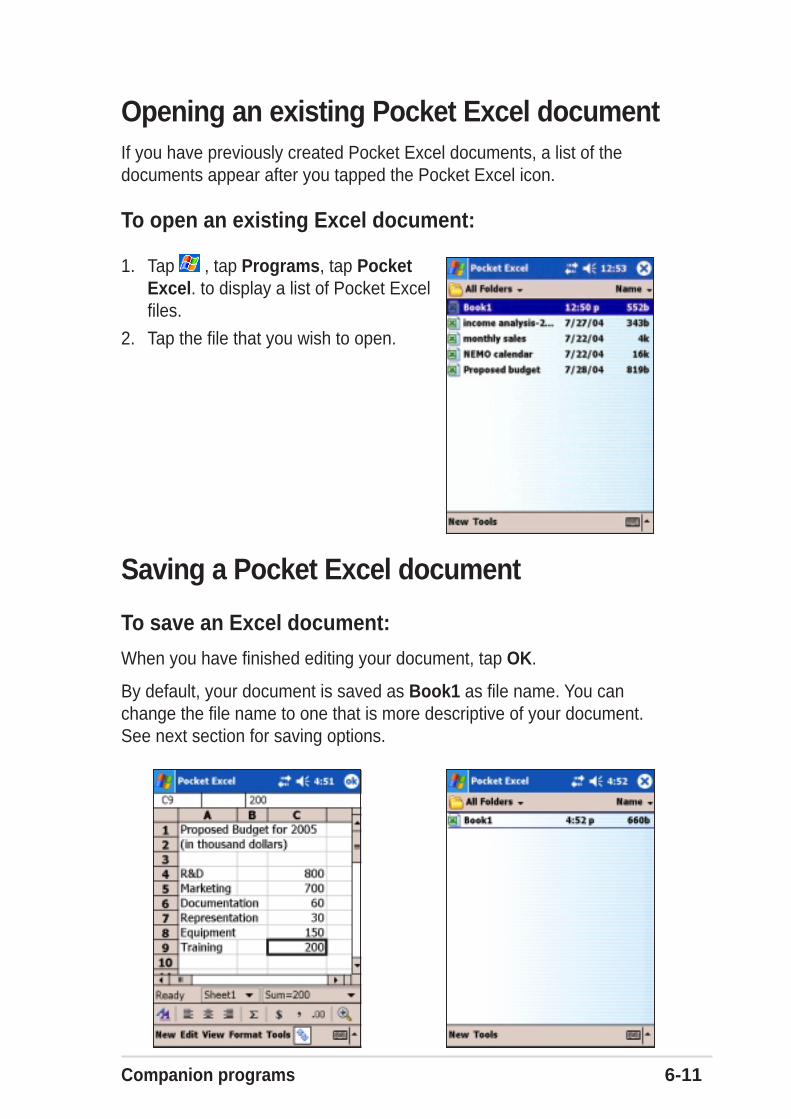
Companion programs 6-11
Saving a Pocket Excel document
To save an Excel document:
When you have finished editing your document, tap OK.
By default, your document is saved as Book1 as file name. You canchange the file name to one that is more descriptive of your document.See next section for saving options.
Opening an existing Pocket Excel documentIf you have previously created Pocket Excel documents, a list of thedocuments appear after you tapped the Pocket Excel icon.
To open an existing Excel document:
1. Tap , tap Programs, tap PocketExcel. to display a list of Pocket Excelfiles.
2. Tap the file that you wish to open.

6-12 Chapter 6
To specify save options:
1. With the document open, tap Tools,then tap File.
2. From the pop-up menu, tap SaveWorkbook As... to display the SaveAs screen.
3. Change the file name by simply typinga new one in the Name field.
4. Tap the down arrow in the Folder fieldto select a folder where you wish toplace the file.
5. Tap the down arrow in the Type fieldto select a file format.
You can save the document youcreate or edit in a variety of formats.
6. Tap the down arrow in the Location field to indicate the location ofyour saved file, e.g. main memory, flash disk, or storage card, ifavailable.
7. Tap OK when done.
To rename/move a file:
1. With the document open, tap Tools,then tap File.
2. From the second pop-up menu, tapRename/Move... to display theRename/Move screen.
3. Change the file name in the Namefield.
4. Tap the down arrow in the Folder fieldto select a folder where you wish tomove the file.
5. Tap the down arrow in the Locationbox to select the folder location.
6. Tap OK when done.

Companion programs 6-13
Securing your Excel documentIf your workbook contains sensitive or confidental information, you canprotect it with a password.
To set a password for your workbook:1. Open the workbook.
2. Tap Tools from the command bar,then tap Password... to displaythe password setting screen.
3. Type a password in thePassword field.
4. Re-type the password in theVerify Password field.
5. Tap OK when done.
If you have set a password for yourworkbook, a password screenappears asking you to type yourpassword whenever you try to openthe workbook.
Type your password, then tap OK. Ifyou type in a wrong password, amessage appears telling you so.
NOTE DO NOT forget your password! You can not open yourworkbook unless you type in the correct password.
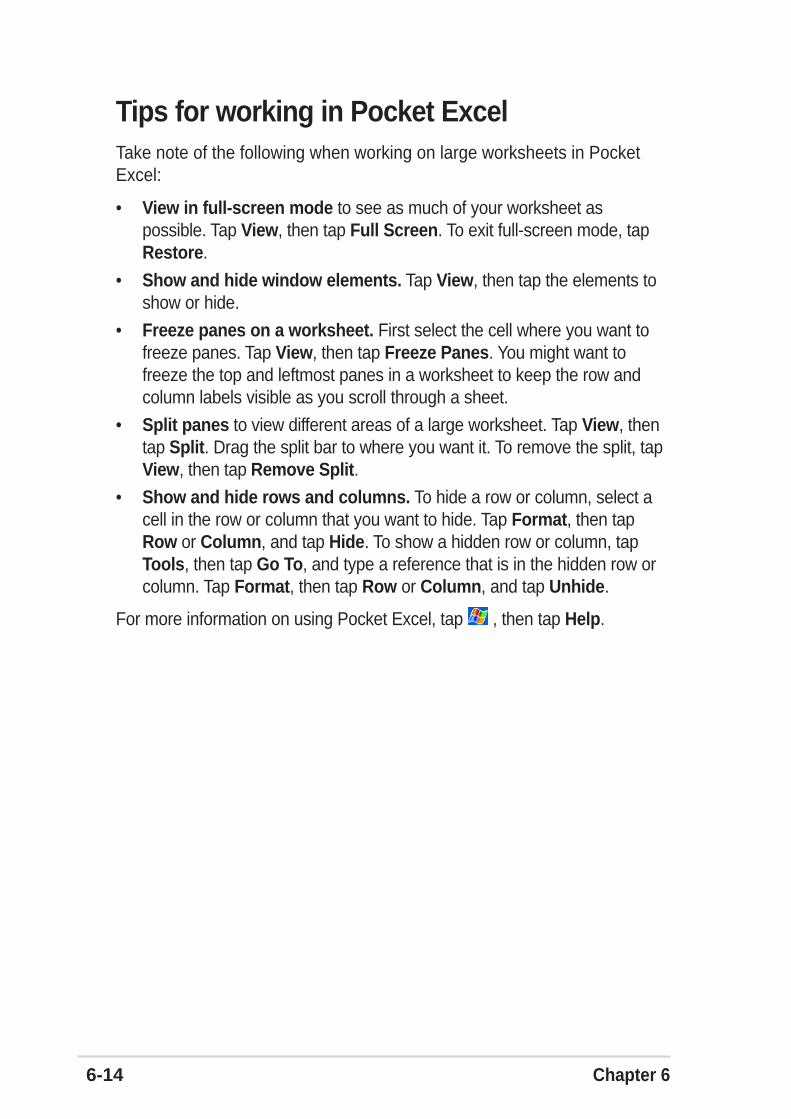
6-14 Chapter 6
Tips for working in Pocket ExcelTake note of the following when working on large worksheets in PocketExcel:
• View in full-screen mode to see as much of your worksheet aspossible. Tap View, then tap Full Screen. To exit full-screen mode, tapRestore.
• Show and hide window elements. Tap View, then tap the elements toshow or hide.
• Freeze panes on a worksheet. First select the cell where you want tofreeze panes. Tap View, then tap Freeze Panes. You might want tofreeze the top and leftmost panes in a worksheet to keep the row andcolumn labels visible as you scroll through a sheet.
• Split panes to view different areas of a large worksheet. Tap View, thentap Split. Drag the split bar to where you want it. To remove the split, tapView, then tap Remove Split.
• Show and hide rows and columns. To hide a row or column, select acell in the row or column that you want to hide. Tap Format, then tapRow or Column, and tap Hide. To show a hidden row or column, tapTools, then tap Go To, and type a reference that is in the hidden row orcolumn. Tap Format, then tap Row or Column, and tap Unhide.
For more information on using Pocket Excel, tap , then tap Help.

Companion programs 6-15
MSN MessengerMSN Messenger on your device is an instant messaging program thatallows you to:
• See who among your contacts is online
• Send and receive instant messages
• Have instant message conversations with groups of contacts
To use MSN Messenger:
You must have a Microsoft Passport™ account or a MicrosoftExchange e-mail account.
You must have a Passport to use the MSN Messenger Service. If youhave a Hotmail® or MSN account, you already have a Passport. Once youhave obtained either a Microsoft Passport or Microsoft Exchange account,you are ready to set up your account.
Sign up for a Microsoft Passport account at http://www.passport.com.
Get a free Microsoft Hotmail e-mail address at http://www.hotmail.com.
To launch MSN Messenger:
1. Tap , then tap Programs.
2. Tap MSN Messenger.

6-16 Chapter 6
Signing up
To sign in to MSN Mesenger service:
NOTE If you already use MSN Messenger on your desktopcomputer, your contacts will show up on your device.
1. Tap Tools then tap Sign in... fromthe menu.
OR
Simply tap the Tap here to signin area.
2. In the sign-in screen, enter youre-mail address and password.Tap Sign In.

Companion programs 6-17
Working with contactsThe MSN Messenger window shows all of your messenger contacts at aglance, divided into Online and Not Online categories. From this view,while connected, you can chat, send an e-mail, block the contact fromchatting with you, or delete contacts from your list using the pop-up menu.
To see others online without being seen, tap My Status in the Tools menuand select Appear Offline.
If you block a contact, you will appear offline but will remain on the blockedcontact’s list. To unblock a contact, tap and hold the contact, then tapUnblock on the pop-up menu.
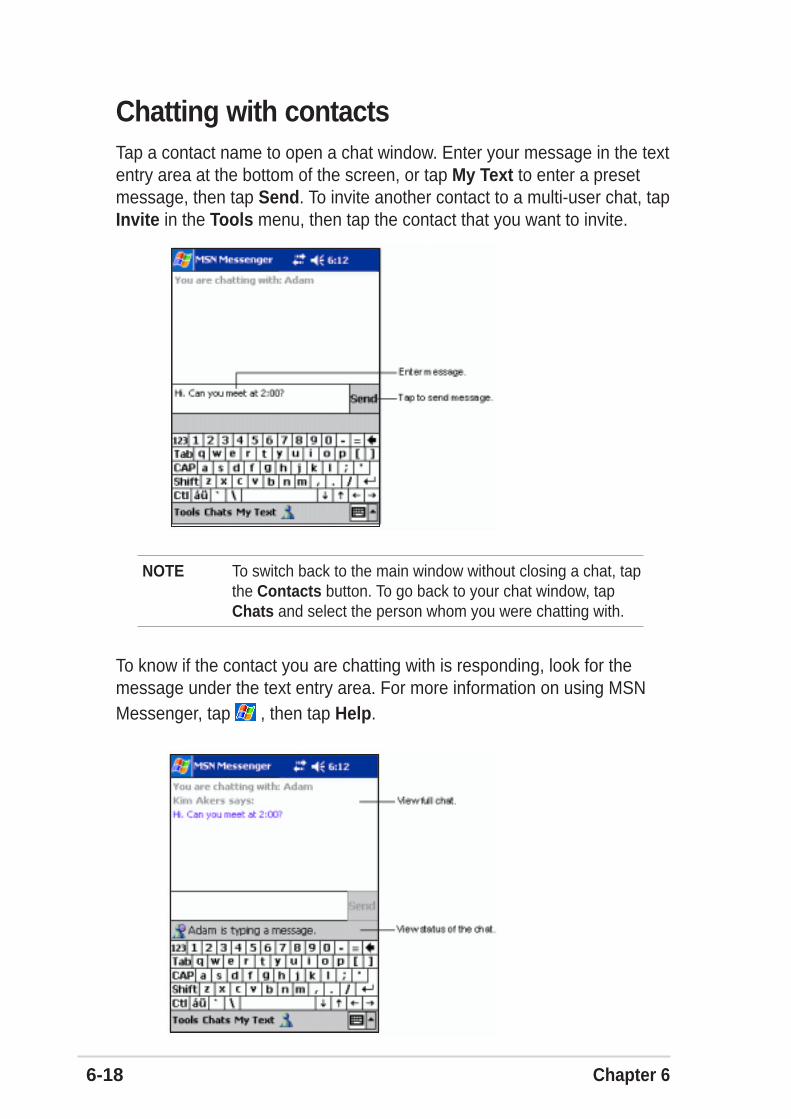
6-18 Chapter 6
Chatting with contactsTap a contact name to open a chat window. Enter your message in the textentry area at the bottom of the screen, or tap My Text to enter a presetmessage, then tap Send. To invite another contact to a multi-user chat, tapInvite in the Tools menu, then tap the contact that you want to invite.
NOTE To switch back to the main window without closing a chat, tapthe Contacts button. To go back to your chat window, tapChats and select the person whom you were chatting with.
To know if the contact you are chatting with is responding, look for themessage under the text entry area. For more information on using MSNMessenger, tap , then tap Help.

Companion programs 6-19
Windows Media Player for Pocket PCUse Microsoft® Windows Media Player for Pocket PC to play digital audioand video files that are stored on your device or on a network. To switch to
Windows Media Player for Pocket PC, tap , then tap Windows Media.
Use Microsoft Windows Media Player on your desktop computer to copydigital audio and video to your Pocket PC. You can play Windows Mediaand MP3 files on your Pocket PC.
For more information on using Windows Media Player for Pocket PC, tap , then tap Help.
Indicates the progressof the current track
Tap to play or pause
Tap to stopTap to play the previous track
Tap to play the next track
Slide to adjust volume
Tap to mute sound

6-20 Chapter 6
Pocket Internet Explorer 7-1
Chapter 7
Pocket Internet Explorer
♦♦♦♦♦ Introduction........................................................... 7-2
♦♦♦♦♦ Using Pocket Internet Explorer ........................... 7-2Changing View settings ...................................................... 7-3Browsing the Internet ......................................................... 7-3
♦♦♦♦♦ AvantGo Channels................................................ 7-4
♦♦♦♦♦ Mobile Favorites folder ........................................ 7-5Favorite links ...................................................................... 7-5Mobile Favorites ................................................................. 7-5Viewing mobile favorites and channels .............................. 7-7Adding/Deleting mobile favorites and folders ..................... 7-8

7-2 Chapter 7
IntroductionUse Microsoft Pocket Internet Explorer to view Web or WAP pages in anyof these ways.
• During synchronization with your desktop computer, download yourfavorite links and mobile favorites that are stored in the Mobile Favoritessub-folder in the Internet Explorer on the desktop computer.
• Connect to an Internet service provider (ISP) or network and browse theWeb. To do this, you need to create the connection first. See Chapter 8for information on creating a connection.
When connected to an ISP or network, you can also download files andprograms from the Internet or intranet.
Using Pocket Internet ExplorerYou can use Pocket Internet Explorer to browse mobile favorites andchannels that have been downloaded to your device without connecting tothe Internet. You can also connect to the Internet through an ISP or anetwork connection to browse the Web.
To launch Pocket Internet Explorer:
1. Tap , then Internet Explorerto display the Pocket MSNservices.
Tap to launch FavoritesTap to go to Pocket Internet Explorer home
Tap to stop/refresh
Tap to go back to previous page
New Pocket MSN services

Pocket Internet Explorer 7-3
2. Tap the Home button to displaythe Pocket Internet Explorerwelcome screen with links tosome useful Web sites.
3. Tap any of the Web site buttons togo to a specific site.
Changing View settings
To change View settings:
1. Tap View to display a pop-up menu.
2. Tap Layout to select a view option.
3. Tap Address Bar to display the Website address bar.
4. Tap and hold Text Size to displayanother pop-up menu with a text sizeselection. Select your desired text sizefor the screen.
Browsing the InternetTo browse the Internet:
1. Set up a connection to your ISP or corporate network usingConnections. See Chapter 8 for details.
2. Do one of the following to connect and start browsing:
• Tap the Favorites button, then tap the favorite that you wish to view.
• Tap View, then Address Bar. Enter the Web address that you wantto visit then tap Go.

7-4 Chapter 7
AvantGo ChannelsAvantGo is a free interactive service that gives you access to personalizedcontent and thousands of popular Web sites. You subscribe to AvantGochannels directly from your device. Then, synchronize your device anddesktop computer, or connect to the Internet to download the content.
For more information, visit the AvantGo web site at http://avantgo.com/
To activate AvantGo:
1. In the ActiveSync window on yourdesktop computer, click Options.
2. In the Sync Options tab, checkthe box beside the AvantGo item.Click OK.
ActiveSync automatically updatesthe settings and synchronizeswith your device.
NOTE Make sure that your computer is connected to the Internet.
3. When synchronization iscomplete, the AvantGo homepage appears on your device.
To launch AvantGo:
1. In Pocket Internet Explorer onyour device, tap the Favoritesbutton to display your list offavorites.
2. Tap the AvantGo Channels linkto go directly to the AvantGohome page and see a few of themost popular channels.
To add or remove channels:
Tap the Add or Remove link.

Pocket Internet Explorer 7-5
Mobile Favorites folderOnly the items stored in the Mobile Favorites sub-folder on your desktopcomputer will be synchronized with your device. This folder was createdautomatically when you installed ActiveSync.
Favorite linksDuring synchronization, the list of favorite links in the Mobile Favoritesfolder on your desktop computer is synchronized with Pocket InternetExplorer on your device. Both computers are updated with changes madeto either list each time you synchronize. Unless you mark the favorite linkas a mobile favorite, only the link will be downloaded to your device, andyou will need to connect to your ISP or network to view the content. Formore information on synchronization, see ActiveSync Help on the desktopcomputer.
Mobile FavoritesIf you are using Microsoft Internet Explorer 5.0 or later on your desktopcomputer, you can download mobile favorites to your device.Synchronizing mobile favorites downloads Web content to your device sothat you can view pages while you are disconnected from your ISP anddesktop computer.
Use the Internet Explorer plug-in installed with ActiveSync to create mobilefavorites quickly.

7-6 Chapter 7
To create a mobile favorite:
1. In Internet Explorer on your desktopcomputer, click Tools then CreateMobile Favorite.
2. To change the link name, enter a newname in the Name box.
3. Select your desired update schedulein Update. This is optional.
4. Click OK. Internet Explorer downloadsthe latest version of the page to yourdesktop computer.
5. If you want to download the pages thatare linked to the mobile favorite youjust created, in Internet Explorer on thedesktop computer, right-click themobile favorite, then click Properties.In the Download tab, specify thenumber of links deep you want todownload. To conserve devicememory, go only one level deep.
6. Synchronize your device and yourdesktop computer. Mobile favorites thatare stored in the Mobile Favoritesfolder in Internet Explorer aredownloaded to your device.
NOTE If you did not specify an update schedule in step 3, you willneed to manually download content to keep the informationupdated on your desktop computer and device. Beforesynchronizing with your device, in Internet Explorer on yourdesktop computer, click Tools then Synchronize. You willsee the last time content was downloaded to the desktopcomputer, and you can manually download content if needed.
You can add a button to the Internet Explorer toolbar forcreating mobile favorites. In Internet Explorer on your desktopcomputer, click View, Toolbars, and Customize.
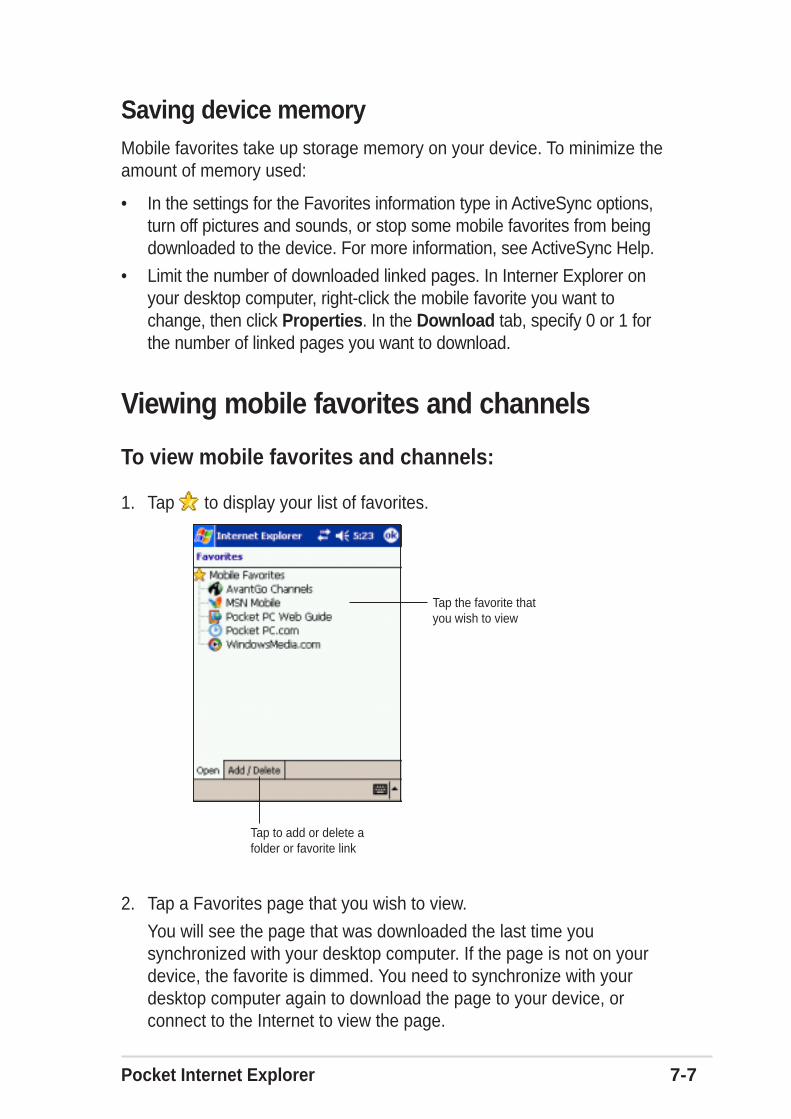
Pocket Internet Explorer 7-7
Viewing mobile favorites and channels
To view mobile favorites and channels:
1. Tap to display your list of favorites.
2. Tap a Favorites page that you wish to view.
You will see the page that was downloaded the last time yousynchronized with your desktop computer. If the page is not on yourdevice, the favorite is dimmed. You need to synchronize with yourdesktop computer again to download the page to your device, orconnect to the Internet to view the page.
Tap the favorite thatyou wish to view
Tap to add or delete afolder or favorite link
Saving device memoryMobile favorites take up storage memory on your device. To minimize theamount of memory used:
• In the settings for the Favorites information type in ActiveSync options,turn off pictures and sounds, or stop some mobile favorites from beingdownloaded to the device. For more information, see ActiveSync Help.
• Limit the number of downloaded linked pages. In Interner Explorer onyour desktop computer, right-click the mobile favorite you want tochange, then click Properties. In the Download tab, specify 0 or 1 forthe number of linked pages you want to download.

7-8 Chapter 7
Adding/Deleting mobile favorites and folders
To add a favorite:1. Tap to display your list of
favorites.
2. Tap the Add/Delete button todisplay the Favorites screen.
3. Tap the Add... button to show theAdd Favorite screen.
4. Type a name for the favorite thatyou wish to add in the Name field.
5. Type in the URL address in theAddress (URL) field.
6. Select a folder to place thefavorite from the Create in: box.
7. Tap Add to return to the Favoritesscreen, which now shows thefavorite that you added.
To delete a favorite:
1. Tap to display your list offavorites.
2. Tap the Add/Delete button todisplay the Favorites screen.
3. Select the favorite that you wishto delete, then tap Delete.
4. When prompted to permanentlydelete the favorite, tap Yes.

Pocket Internet Explorer 7-9
To add a folder:
1. Tap to display your list offavorites.
2. Tap the Add/Delete button todisplay the Favorites screen.
3. Tap the New Folder button.
4. Type a name for the folder thatyou wish to create.
5. Tap Add to return to the Favoritesscreen, which now shows thefolder that you added.
To delete a folder:
1. Tap to display your list offavorites.
2. Tap the Add/Delete button todisplay the Favorites screen.
3. Select the folder that you wish todelete, then tap Delete.
4. When prompted to permanentlydelete the folder, tap Yes.

7-10 Chapter 7

Get connected 8-1
Chapter 8
Get connected
♦♦♦♦♦ Introduction........................................................... 8-2
♦♦♦♦♦ Connect to the Internet ........................................ 8-2
♦♦♦♦♦ Connect to Work ................................................... 8-3
♦♦♦♦♦ Set up connections .............................................. 8-3Modem connections ................................................................. 8-3VPN server connections .......................................................... 8-4Proxy server settings ............................................................... 8-4Network card connections ........................................................ 8-5
♦♦♦♦♦ End a connection.................................................. 8-6
♦♦♦♦♦ Set up a WAP gateway ......................................... 8-6
♦♦♦♦♦ Use dialing rules ................................................... 8-7
♦♦♦♦♦ Infrared (IR) connection ....................................... 8-8Setting beam options ............................................................... 8-8Receiving infrared beams ........................................................ 8-9Sending infrared beams ......................................................... 8-10

8-2 Chapter 8
IntroductionYou can set up connections to the Internet and corporate network at workto do such activities as browse the Internet or intranet, send and receive e-mail and instant messages, and synchronize information using ActiveSync.
Connections can be made using a modem, wireless network, ornetwork (Ethernet) card. A modem connection can be used to set upconnections with an external modem, or through your mobile phonenetwork using a cellular line.
Your device has two groups of connection settings: My ISP and My WorkNetwork. My ISP settings are used to connect to the Internet, and MyWork Network settings can be used to connect to any private network,such as a corporate network you use at work. Simply fill in the settings andget ready to start connecting. For more information, see the sections“Connect to the Internet” or “Connect to Work.”
You may also establish connection to another device with infrared (IR) orBluetooth features. For more information, see the section “Infrared (IR)connection” later in this chapter, or “Chapter 9 Bluetooth® connection.”
Connect to the Internet
To connect to the Internet:
1. Obtain the following information from your ISP: ISP server phonenumber, user name, and password.
2. Tap > Settings > Connections tab > Connections.
3. In My ISP, tap Add a new modem connection.
4. Create a modem connection. For more information, see section “Setup modem connections.”
5. To start the connection, begin using the desired program. For example,switch to Pocket Internet Explorer and browse a Web page. Yourdevice automatically connects.
NOTE To set up a network card or wireless network connection toyour ISP, add a new connection under My Work Network.
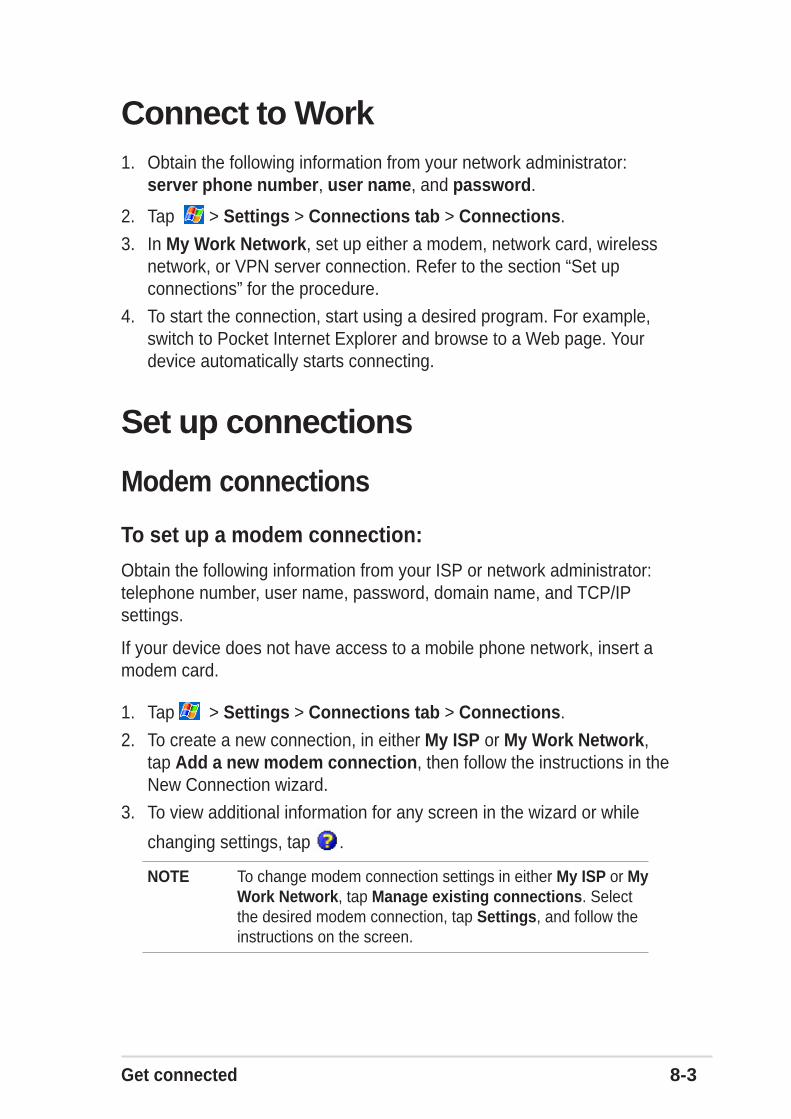
Get connected 8-3
Connect to Work1. Obtain the following information from your network administrator:
server phone number, user name, and password.
2. Tap > Settings > Connections tab > Connections.
3. In My Work Network, set up either a modem, network card, wirelessnetwork, or VPN server connection. Refer to the section “Set upconnections” for the procedure.
4. To start the connection, start using a desired program. For example,switch to Pocket Internet Explorer and browse to a Web page. Yourdevice automatically starts connecting.
Set up connections
Modem connections
To set up a modem connection:
Obtain the following information from your ISP or network administrator:telephone number, user name, password, domain name, and TCP/IPsettings.
If your device does not have access to a mobile phone network, insert amodem card.
1. Tap > Settings > Connections tab > Connections.
2. To create a new connection, in either My ISP or My Work Network,tap Add a new modem connection, then follow the instructions in theNew Connection wizard.
3. To view additional information for any screen in the wizard or while
changing settings, tap .
NOTE To change modem connection settings in either My ISP or MyWork Network, tap Manage existing connections. Selectthe desired modem connection, tap Settings, and follow theinstructions on the screen.
8-4 Chapter 8
VPN server connectionsA VPN connection helps you to securely connect to servers, such as acorporate network, via the Internet. Ask your network administrator for youruser name, password, domain name, TCP/IP settings, and host name orIP address of the VPN server.
To set up a VPN server connection:
1. Tap > Settings > Connections tab > Connections.
2. To create a new VPN server connection, in My Work Network, tap Adda new VPN server connection, then follow the screen instructions.
3. To view additional information for any screen in the wizard or while
changing settings, tap .
NOTE To change existing settings, in My Work Network, tapManage existing connections > VPN tab. Select yourdesired VPN connection, tap Settings, then follow theinstructions on the screen.
Proxy server settingsIf you are connected to your ISP or private network during synchronization,your mobile device should download the proper proxy settings from yourPC. If these settings are not on your PC or need to be changed, ask yourISP or network administrator for the proxy server name, server type, port,type of Socks protocol used, and your user name and password.
To change proxy server settings:
1. Tap > Settings > Connections tab, then tap the Connectionsicon.
2. Under My Work Network category, tap Edit my proxy server.3. Check the boxes beside This network connects to the Internet and
This network uses a proxy server to connect to the Internet.4. In the Proxy server box, enter the proxy server name.
5. To change the server and port settings for HTTP, WAP, Secure WAP,and Socks, tap Advanced.
6. Tap OK when done.
Get connected 8-5
Network card connectionsUse a network (Ethernet) card to connect directly to a network. Onceconnected, you can view the Internet or intranet, or download e-mail. Youdo not need to create a new connection on your device. For moreinformation, see your network administrator. Make sure to purchase andconfigure a network card that is compatible with your device.
To set up a network card:
1. Obtain the following information from your network administrator: username, password, and domain name.
2. Insert the network card into your device.
3. The first time you insert the card, Network Settings appearsautomatically so that you can configure the network card. If it does notappear, or to change settings later, tap > Settings > Connectionstab > Network Cards.
4. If you need to enter specific server information, tap the appropriateadapter, and then tap Properties. Most networks use DHCP, so youshould not have to change these settings unless your networkadministrator instructs you to do so.
5. If necessary, connect the network card to the network by using anetwork cable. For information, refer to the documentation that camewith your network card.
6. To start a connection, insert the network card, and begin using adesired program. For example, switch to Pocket Internet Explorerand browse a Web page. Your device automatically starts connecting.
If you use your network card with two networks, such as a privatenetwork at work and one at home for the Internet, you need to changethe network to which the network card connects.
NOTE You may need proxy server and VPN connection settings.For more information, see your network administrator.
8-6 Chapter 8
End a connection• When connected via modem or VPN, tap on the navigation bar,
then tap Disconnect.
• When connected via cable or cradle, detach your device from the cableor cradle.
• When connected via Infrared, move the device away from the othercomputer or device.
• When connected via a network (Ethernet) card, remove the card fromyour device.
• When connected via a wireless network, switch off the connection.
Set up a WAP gatewayTo access WAP sites through Pocket Internet Explorer, configure yourdevice to use a WAP gateway. Use the following steps to create a new setof connections to the Internet with WAP gateway settings.
NOTE Some device models do not support the WAP sites viewingfeature.
1. Get the following information from your ISP: ISP server phone number,user name, and password. Also, contact your mobile phone serviceprovider and ask for your WAP gateway server name and port number.
2. Tap > Settings > Connections tab > Connections > Tasks tab.
3. Tap Edit my proxy server. If a proxy server has not been set up, tapSet up my proxy server.
4. In Programs that automatically connect to the Internet shouldconnect using, tap New and enter a name for the ISP connection.
5. On the Proxy Settings tab, select This network connects to theInternet and This network uses a proxy server to connect to theInternet.
6. If necessary, in the Proxy server box, enter the proxy server name.
7. Tap Advanced.
8. In the WAP box, enter the WAP gateway server name. Under Port,enter the port number. The most common WAP port number is 9201.

Get connected 8-7
Use dialing rulesAdditional numbers may need to be dialed depending on your givenlocation when connecting. For example, if you want to dial from work, a 9prefix must often be dialed, or an area code is needed.
To avoid creating a new modem connection for each situation, set dialingrules for the locations from which you connect often. Three dialinglocations, Home, Mobile, and Work, have been created for you, and youcan create more. If a connection cannot be made, your device gives youan opportunity to change the dialing location.
1. Tap > Settings > Connections tab > Connections > Advancedtab.
2. Tap Dialing Rules...3. Tap the box beside Use dialing rules.
4. Select a location.
• Home - Dials the number as a local call without the prefix 9.
• Work - Dials the number as local call with the prefix 9.
NOTE To create a new location, tap New and follow the directionson the screen. To view additional information at any time,
tap .
9. Create a modem connection. See section “Set up connections.”
If necessary, set dialing rules. See section “Use dialing rules.”
10. If your device does not have a connection to a mobile phone network,insert a modem card.
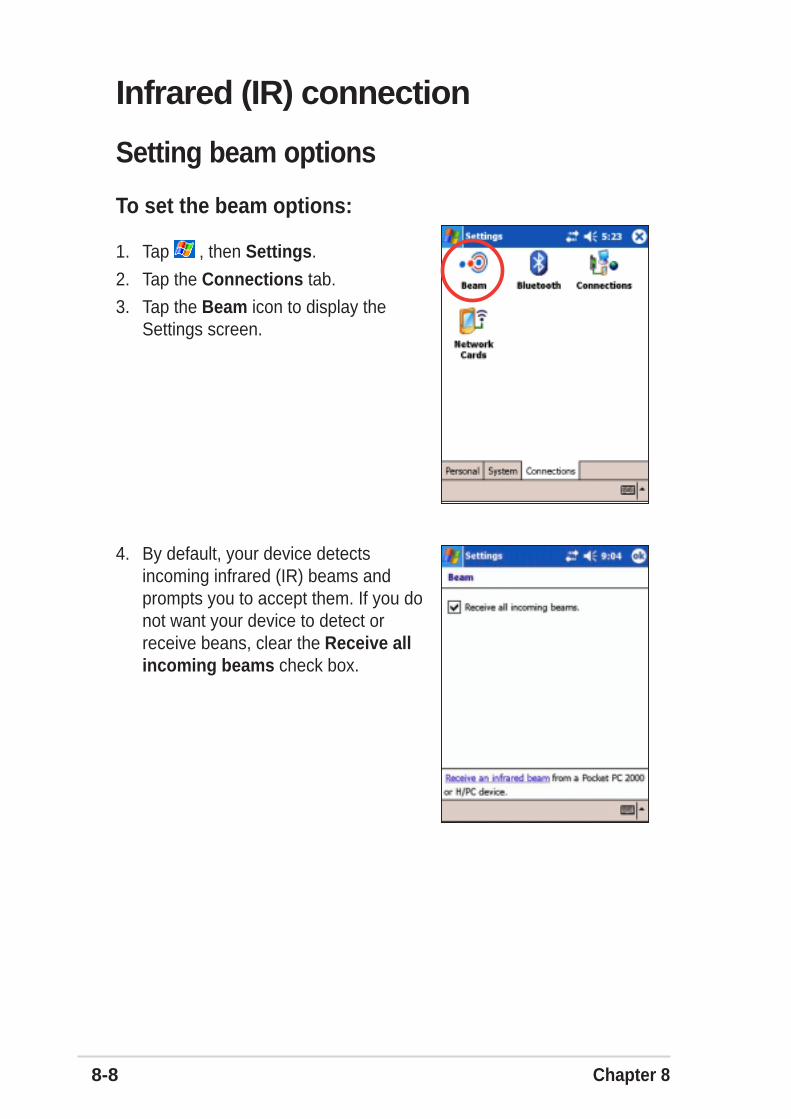
8-8 Chapter 8
Infrared (IR) connection
Setting beam options
To set the beam options:
1. Tap , then Settings.
2. Tap the Connections tab.
3. Tap the Beam icon to display theSettings screen.
4. By default, your device detectsincoming infrared (IR) beams andprompts you to accept them. If you donot want your device to detect orreceive beans, clear the Receive allincoming beams check box.
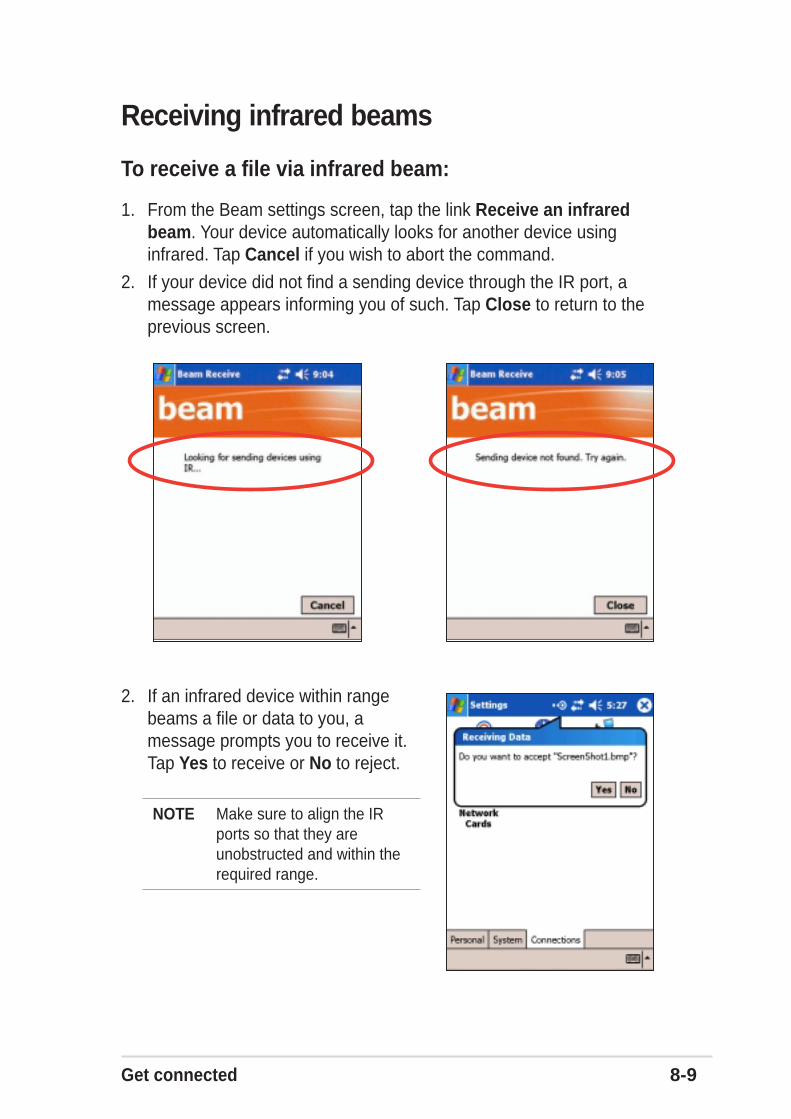
Get connected 8-9
Receiving infrared beams
To receive a file via infrared beam:
1. From the Beam settings screen, tap the link Receive an infraredbeam. Your device automatically looks for another device usinginfrared. Tap Cancel if you wish to abort the command.
2. If your device did not find a sending device through the IR port, amessage appears informing you of such. Tap Close to return to theprevious screen.
2. If an infrared device within rangebeams a file or data to you, amessage prompts you to receive it.Tap Yes to receive or No to reject.
NOTE Make sure to align the IRports so that they areunobstructed and within therequired range.

8-10 Chapter 8
Sending infrared beams
To send a file via infrared beam:
1. Tap and hold a file to beam, then tap Beam File... from the pop-upmenu.
2. Align the IR ports of the devices so that they are unobstructed andwithin a close range. If the ports are not aligned, a message appearsasking you to do so.
When an IR port is found, a screen message appears indicating thesending process.
The message Done appears when the file transfer is complete.
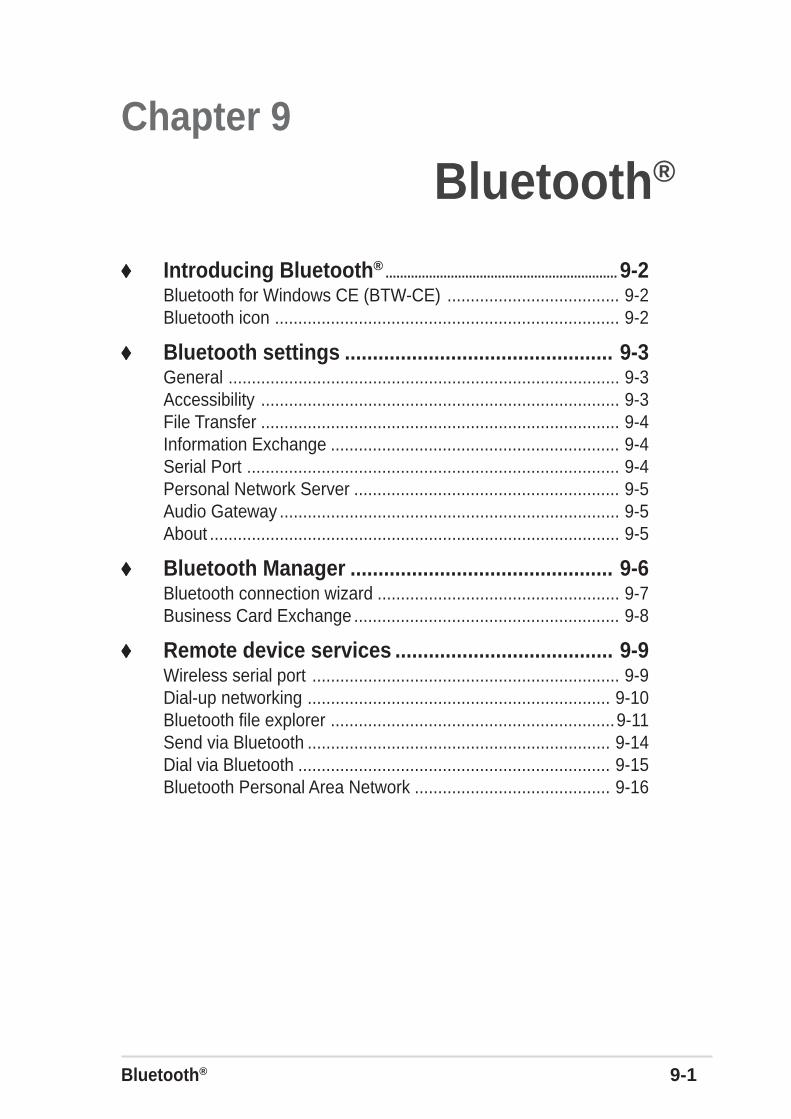
Bluetooth® 9-1
Chapter 9
Bluetooth®
♦♦♦♦♦ Introducing Bluetooth® ................................................................ 9-2Bluetooth for Windows CE (BTW-CE) ..................................... 9-2Bluetooth icon .......................................................................... 9-2
♦♦♦♦♦ Bluetooth settings ................................................ 9-3General .................................................................................... 9-3Accessibility ............................................................................. 9-3File Transfer ............................................................................. 9-4Information Exchange .............................................................. 9-4Serial Port ................................................................................ 9-4Personal Network Server ......................................................... 9-5Audio Gateway ......................................................................... 9-5About ........................................................................................ 9-5
♦♦♦♦♦ Bluetooth Manager ............................................... 9-6Bluetooth connection wizard .................................................... 9-7Business Card Exchange ......................................................... 9-8
♦♦♦♦♦ Remote device services ....................................... 9-9Wireless serial port .................................................................. 9-9Dial-up networking ................................................................. 9-10Bluetooth file explorer .............................................................9-11Send via Bluetooth ................................................................. 9-14Dial via Bluetooth ................................................................... 9-15Bluetooth Personal Area Network .......................................... 9-16

9-2 Chapter 9
Introducing Bluetooth®
Bluetooth is a short-range wireless communications technology. Deviceswith Bluetooth capabilities can exchange information over a distance ofabout 10 meters (30 feet) without requiring a physical connection.
Unlike infrared, you do not need to line up the devices to beam informationwith Bluetooth. The devices only need to be within a range of about 10meters. You can even beam information to a device in a different room, aslong as it is within the specified range.
NOTE If you experienced problems using Bluetooth® in a landscapedisplay orientation, revert to portrait. See page 2-19 for details.
Bluetooth® for Windows® CE (BTW-CE)BTW-CE is the solution to smoothly integrate the Bluetooth technology intodevices that use the Pocket PC operating system.
The Bluetooth technology allows your Pocket PC to:
• Locate other Bluetooth devices within the vicinity• Discover the services that those devices offer• Connect to, use, and disconnect from those services• Enable or disable individual services• Use security features including authentication, authorization, and
encryption
Bluetooth iconThe Bluetooth icon is located on the lowerright corner of the Today screen.
When Bluetooth is enabled (turned ON),the icon is blue , and the Bluetooth LEDon the left side of the device blinks blue.
When Bluetooth is disabled (turned OFF),the icon is grayed with a red X on its lowerright corner .
Tapping the icon displays a menu thatallows you to:
• turn Bluetooth on or off• launch the Bluetooth Manager• change the Bluetooth Settings
Bluetooth icon

Bluetooth® 9-3
Bluetooth settings
To configure the Bluetooth settings:
1. Tap from the lower right corner ofthe Today screen to display theBluetooth menu.
2. Tap Bluetooth Settings.
3. Tap one of the tabs at the bottom ofthe Settings screen to make yourdesired changes.
GeneralAllows you to:
• select the user profile
• see the Bluetooth status (ON/OFF)
• turn Bluetooth ON or OFF
• tap a link to the Bluetooth Manager
AccessibilityAllows you to:
• set the device name
• see the Bluetooth Device Address (BDA)
• select the remote devices you wish toconnect
• set whether to allow remote devices tosee your device
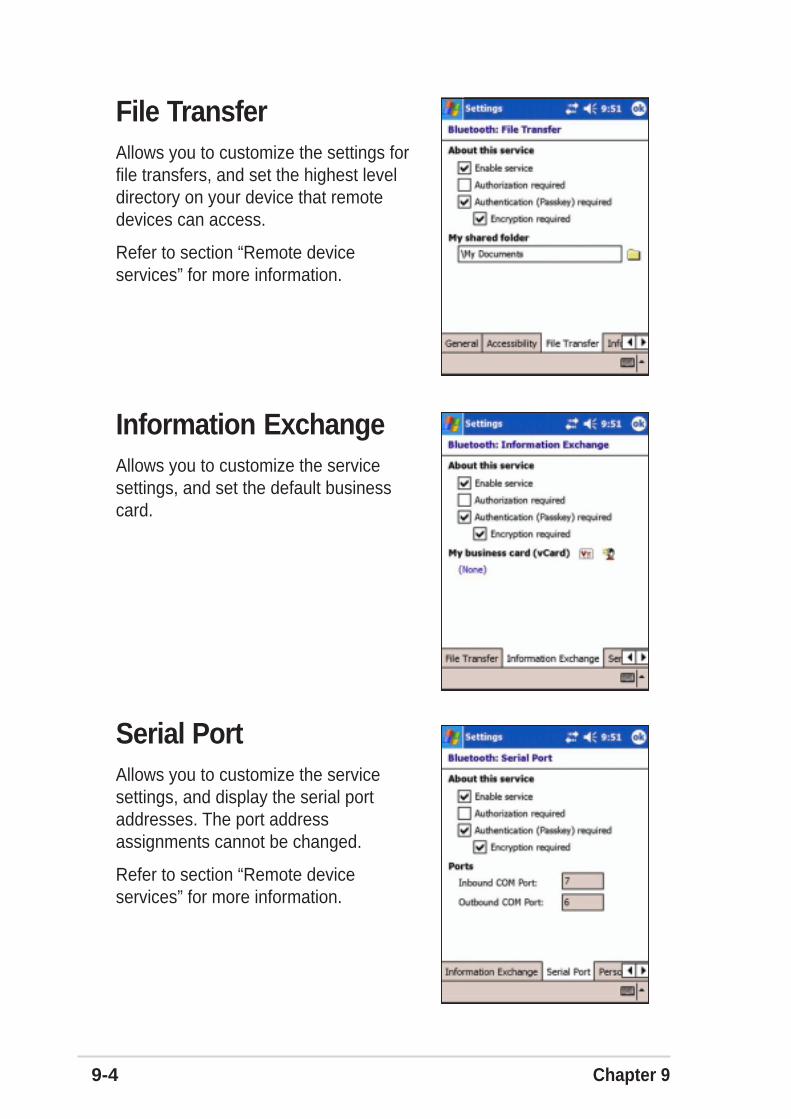
9-4 Chapter 9
File TransferAllows you to customize the settings forfile transfers, and set the highest leveldirectory on your device that remotedevices can access.
Refer to section “Remote deviceservices” for more information.
Information ExchangeAllows you to customize the servicesettings, and set the default businesscard.
Serial PortAllows you to customize the servicesettings, and display the serial portaddresses. The port addressassignments cannot be changed.
Refer to section “Remote deviceservices” for more information.

Bluetooth® 9-5
Personal Network ServerAllows you to customize the servicesettings for your personal networkserver.
Refer to section “Remote deviceservices” for more information.
Audio GatewayAllows you to customize the servicesettings for the Audio Gateway.
AboutDisplays the Bluetooth™ for Windows®
CE (BTW-CE) information including therelease version, copyright notice,website address, technical supportemail, and the Advanced button. TheAdvanced buttons contains the versioninformation about the individual softwaremodules that make up BTW-CE.
The information on this screen is notconfigurable.

9-6 Chapter 9
Bluetooth ManagerThe Bluetooth Manager allows you to create, manage, and use Bluetoothto connect to remote devices.
To launch the Bluetooth Manager:
1. Tap from the lower right corner ofthe Today screen to display theBluetooth menu.
2. Tap Bluetooth Manager.
The My Shortcuts screen displays a list of pre-configured connections, ifany. Tap New > Connect to connect to other devices via Bluetooth.
The Active Connections screen displays the active incoming and outgoingconnections.
Tap to make a new connectionTap to add or remove paired devices
Tap to set view optionsTap to launch the Bluetooth connection wizard
Tap to set Business Card exchange options

Bluetooth® 9-7
Bluetooth connection wizardThe Bluetooth connection wizard helps you set up connections withremote Bluetooth devices.
To launch the Bluetooth connection wizard:
1. Tap from the Bluetooth Managercommand bar. The BluetoothConnection Wizard screen appears.
2. Select a type of connection that youwish set up. Tap Next.
Tap Cancel if you do not wish tocontinue the connection process.
NOTE Refer to the device online help for other information onBluetooth.

9-8 Chapter 9
Business Card ExchangeThe Business Card Exchange function allows you to:
• send your business card to a remote device
• receive a business card from a remote device
• exchange business cards with one or more remote devices
To launch the Business Card Exchange screen:
1. Tap from the Bluetooth Managercommand bar.
2. Select the action that you wish tomake.
NOTE From this screen, tap the link Select the business card togo to the Information Exchange settings.
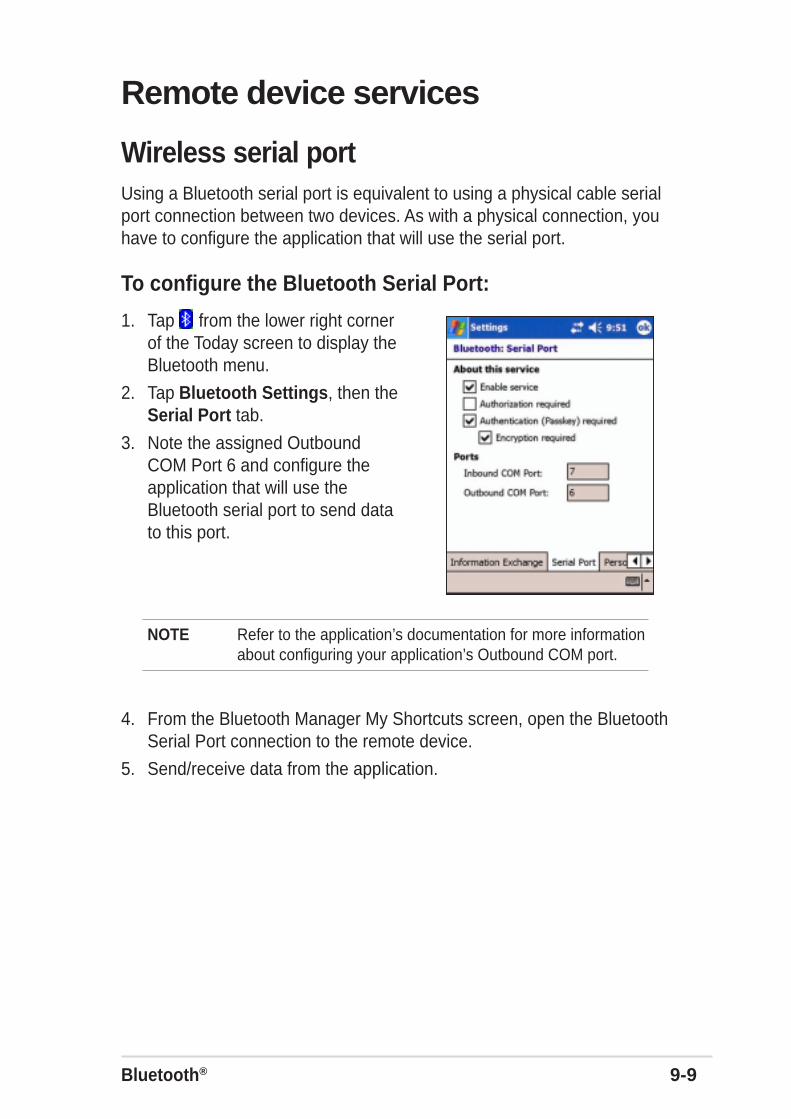
Bluetooth® 9-9
Remote device services
Wireless serial portUsing a Bluetooth serial port is equivalent to using a physical cable serialport connection between two devices. As with a physical connection, youhave to configure the application that will use the serial port.
To configure the Bluetooth Serial Port:
1. Tap from the lower right cornerof the Today screen to display theBluetooth menu.
2. Tap Bluetooth Settings, then theSerial Port tab.
3. Note the assigned OutboundCOM Port 6 and configure theapplication that will use theBluetooth serial port to send datato this port.
NOTE Refer to the application’s documentation for more informationabout configuring your application’s Outbound COM port.
4. From the Bluetooth Manager My Shortcuts screen, open the BluetoothSerial Port connection to the remote device.
5. Send/receive data from the application.

9-10 Chapter 9
Dial-up networkingThe Dial-up Networking feature allows you to connect to a remotecomputer through a phone line. Once connected, you can browse theInternet, check/read emails, etc.
NOTE The remote Bluetooth device that will provide the Dial-upNetworking service should have access to a telephonesystem, either a hard-wired or a cellular connection, andcapable of answering a call.
Devices that may provide a Dial-up Networking service:
• Bluetooth-enabled cellular telephones
• Bluetooth-enabled desktop computers attached to a telephone system
• Bluetooth modems
To use Dial-up Networking:
1. Create a connection to the device that will provide telephone access.See the section “Bluetooth connection wizard” on page 9-7.
2. Tap , then the Bluetooth Manager from the Start menu.
3. In My Shortcuts screen, tap and hold the Dial-up NetworkingConnection shortcut, then select Connect from the pop-up menu.
4. On the first Bluetooth: Dial-up Connection screen, double-tap NewConnection... OR select New Connection then tap OK.
5. Key-in the following informatin on the second Bluetooth: Dial-upConnection screen:
• Name for a connection
• Country code (if dialing outside the default country setting)
• Area code (if dialing outside the default area code setting)
• Phone number to be dialed
6. Tap OK.
7. Enter the required information on the succeeding screens to completethe connection process.
8. When the connection is active, open a web browser from the device.

Bluetooth® 9-11
Bluetooth file explorerThe Bluetooth File Explorer appears automatically after a file transferconnection is established.
This service feature allows you to do the following operations:
• Navigate the directory structure of the remote device
• View the files and folders on the remote device
• Create new folders on the remote device
• Send files to, and copy or get files from the remote device
• Delete files from the remote device
NOTE The file operations on the remote device are limited to theconfigured FTP root directory and sub-directories of theremote device.
The Bluetooth File Explorer also allows you to set a folder in your devicefor receiving inbound files. You may configure this folder for each of yourconnection shortcuts. See the section “To set a local folder” on page 8-13.
Bluetooth File Explorer menus
File Send a File...Create a FolderGetDelete
Tools Set Local FolderRefresh
To change the remote device folder:
1. To move down in the directory structure of the remote device, tap theNew Folder from the main window of Bluetooth File Explorer.
2. To move up in the directory structure of the remote device, tap thedown-arrow to the right of the currently selected folder and select theNew Folder from the drop-down list.

9-12 Chapter 9
To create a folder on the remote device:
1. Select the folder in which you wish to place the new folder.
2. From the File menu, tap Create a Folder.3. Enter a name for the new folder while the default name New Folder is
highlighted.
To send a file to the remote device:
1. From the File menu, tap Send a File... to display the Open screen.
The Open screen includes the following:
Folder - tap the down-arrow and select the folder that contains the fileyou wish to send
Type - default and only option is “All Files (*.*)
A list of files in the selected folder - tap a file that you wish to send
Cancel button - abort the Send a File... operation
2. Tap your desired operation.
The file that you selected is automatically sent when tapped, afterwhich the Bluetooth File Explorer re-appears.
To get a file from the remote device:
1. Select the folder containing the file.
2. Tap the file that you wish to get or copy.
3. From the File menu, tap Get.
OR
Tap and hold the desired file and select Get from the pop-up menu.
The file is copied to the local folder listed in the Local Folder field at thebottom of the screen.
To delete a file from the remote device:
1. Tap the file that you wish to delete.
2. From the File menu, tap Delete.
3. Tap OK in the confirmation dialog box.
OR
Tap and hold the desired file and select Delete from the po-up menu.

Bluetooth® 9-13
To set a local folder for incoming files:
1. From the Tools menu, tap Set Local Folder.2. Use the drop-down menu at the top of the screen to go to your desired
folder.
3. Tap OK to return to the main screen of Bluetooth File Explorer. You willsee the Local Folder field is updated to reflect the new folder selection.
NOTE The Local Folder information is associated with the currentlyopen shortcut and is saved with the active profile. You canseparately configure your Local Folder for each connectionshortcut.
To refresh the list of displayed files and folders on the remote device,simply tap Refresh from the Tools menu.
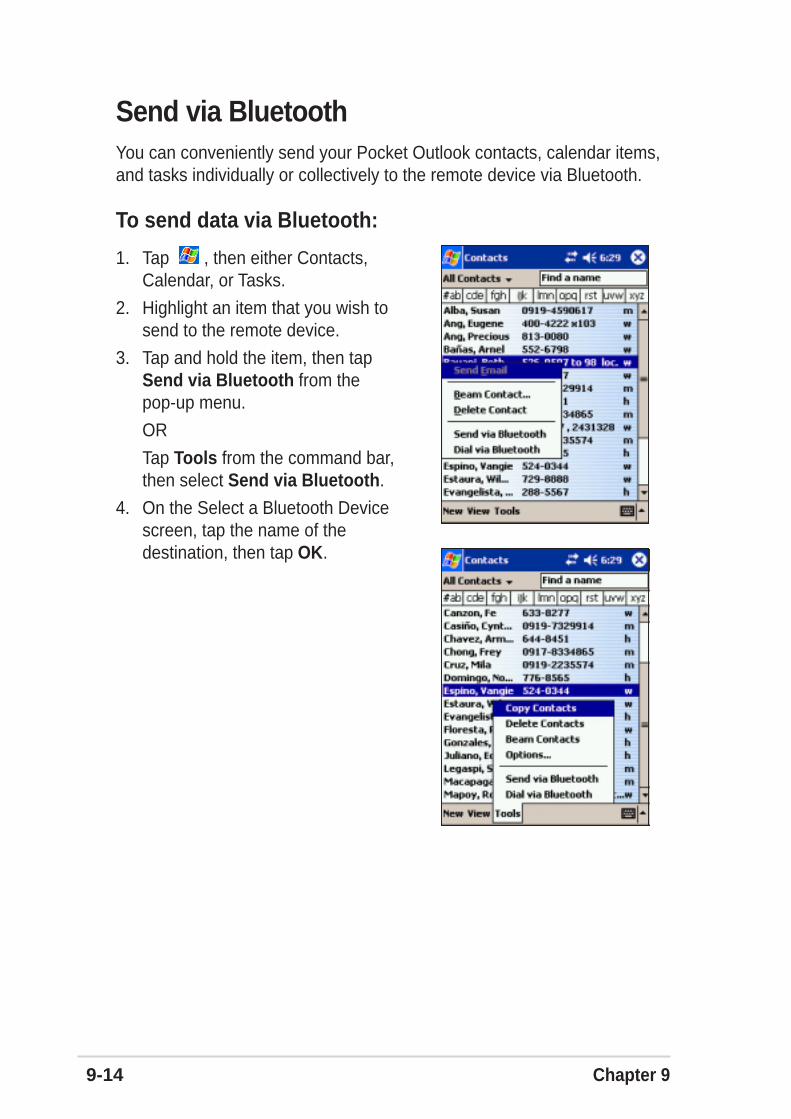
9-14 Chapter 9
Send via BluetoothYou can conveniently send your Pocket Outlook contacts, calendar items,and tasks individually or collectively to the remote device via Bluetooth.
To send data via Bluetooth:
1. Tap , then either Contacts,Calendar, or Tasks.
2. Highlight an item that you wish tosend to the remote device.
3. Tap and hold the item, then tapSend via Bluetooth from thepop-up menu.
OR
Tap Tools from the command bar,then select Send via Bluetooth.
4. On the Select a Bluetooth Devicescreen, tap the name of thedestination, then tap OK.

Bluetooth® 9-15
Dial via BluetoothThe Dial via Bluetooth option allows you to select a contact from thePocket Outlook contacts list, and have your paired cell phone dial thecontact’s phone number. If a contact has more than one phone number,select the number that you wish to dial. You may also modify a phonenumber before you dial.
To dial via Bluetooth:
1. From the Pocket Outlook Contacts screen, tap and hold a contact andselect Dial via Bluetooth.
2. If your device is paired with more than one cell phone, or if a phone isnot yet selected, tap the phone icon next to Select a phone, andchoose the phone that you wish to use.
3. Select the number that you wish to dial, then tap Dial Number.4. To modify the number, tap Edit Number and make your desired
changes. Tap OK to return to the previous screen.
NOTE If you modify a phone number, a dialog box appears with anoption to save or to discard the modification.
5. Tap Dial Number.After the number is sent to the cell phone, the connection on thedevice is closed.
After the cell phone completes the dialing process, you can use theuse the phone the normal way.
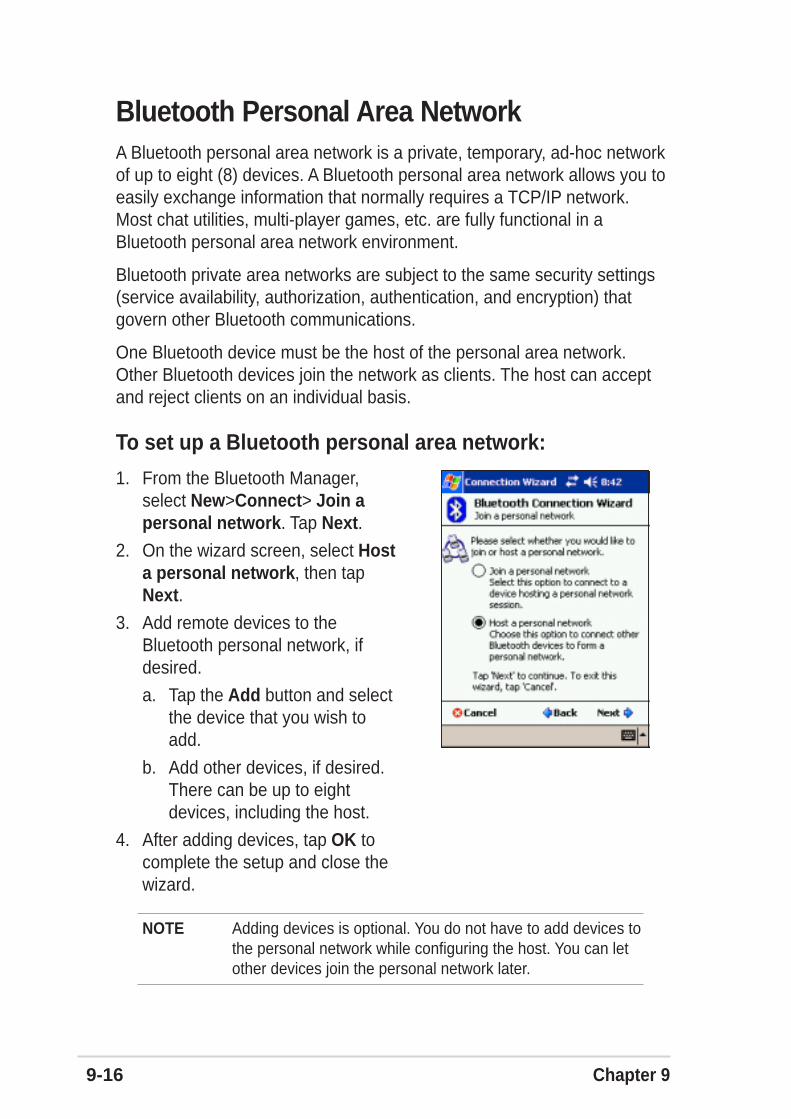
9-16 Chapter 9
Bluetooth Personal Area NetworkA Bluetooth personal area network is a private, temporary, ad-hoc networkof up to eight (8) devices. A Bluetooth personal area network allows you toeasily exchange information that normally requires a TCP/IP network.Most chat utilities, multi-player games, etc. are fully functional in aBluetooth personal area network environment.
Bluetooth private area networks are subject to the same security settings(service availability, authorization, authentication, and encryption) thatgovern other Bluetooth communications.
One Bluetooth device must be the host of the personal area network.Other Bluetooth devices join the network as clients. The host can acceptand reject clients on an individual basis.
To set up a Bluetooth personal area network:
1. From the Bluetooth Manager,select New>Connect> Join apersonal network. Tap Next.
2. On the wizard screen, select Hosta personal network, then tapNext.
3. Add remote devices to theBluetooth personal network, ifdesired.
a. Tap the Add button and selectthe device that you wish toadd.
b. Add other devices, if desired.There can be up to eightdevices, including the host.
4. After adding devices, tap OK tocomplete the setup and close thewizard.
NOTE Adding devices is optional. You do not have to add devices tothe personal network while configuring the host. You can letother devices join the personal network later.

Bluetooth® 9-17
To join a personal network:
1. From the Bluetooth Manager,select New>Connect>Join apersonal network. Tap Next.
2. On the wizard screen, select Joina personal network, then tapNext. The Bluetooth browserappears.
3. Select the host of the personalnetwork, then tap Next toestablish a connection to thepersonal area network.
If you are asked to enter the IPnetwork settings, select Useserver-assigned IP address,then tap OK.

9-18 Chapter 9

Using Wi-Fi® 10-1
Chapter 10
Using Wi-Fi®
♦♦♦♦♦ Introducing Wi-Fi® .............................................. 10-2
♦♦♦♦♦ Accessing the Wi-Fi feature .............................. 10-2
♦♦♦♦♦ Using Wi-Fi .......................................................... 10-2Turning on Wi-Fi ..................................................................... 10-2Configuring Wireless Networks .............................................. 10-3Adding a wireless network ..................................................... 10-4Network association ............................................................... 10-6
♦♦♦♦♦ Wi-Fi information ................................................ 10-7Wi-Fi Status ........................................................................... 10-7Site Survey ............................................................................. 10-9IP Info ................................................................................... 10-10About .....................................................................................10-11

10-2 Chapter 10
Introducing Wi-Fi®
MyPal comes with a built-in Wireless Fidelity (Wi-Fi®) feature that allowsyou to connect to wireless local area networks and the Internet. Using theIEEE 802.11b standard for wireless LAN, MyPal can connect at speeds ofup to 11 Mbps to an access point (Infrastructure mode) or to anotherwireless device (Ad-hoc mode).
Accessing the Wi-Fi featureThe Wi-Fi icon on your Today screen allows you easy access to the Wi-Fi(Wireless Fidelity) feature on your device. Tapping the icon displays amenu that allows you to:
• turn Wireless LAN on or off
• show the Wi-Fi information
• configure the Wi-Fi Settings
NOTE You can use the Bluetooth®
and Wi-Fi featuressimultaneously.
Wireless LAN icon
Using Wi-Fi
Turning on Wi-Fi
To turn on the Wi-Fi:
1. Tap the icon on the command bar.
2. Tap the option Turn Wi-Fi On. Thesystem automatically scans for allavailable wireless networks within theWi-Fi range.
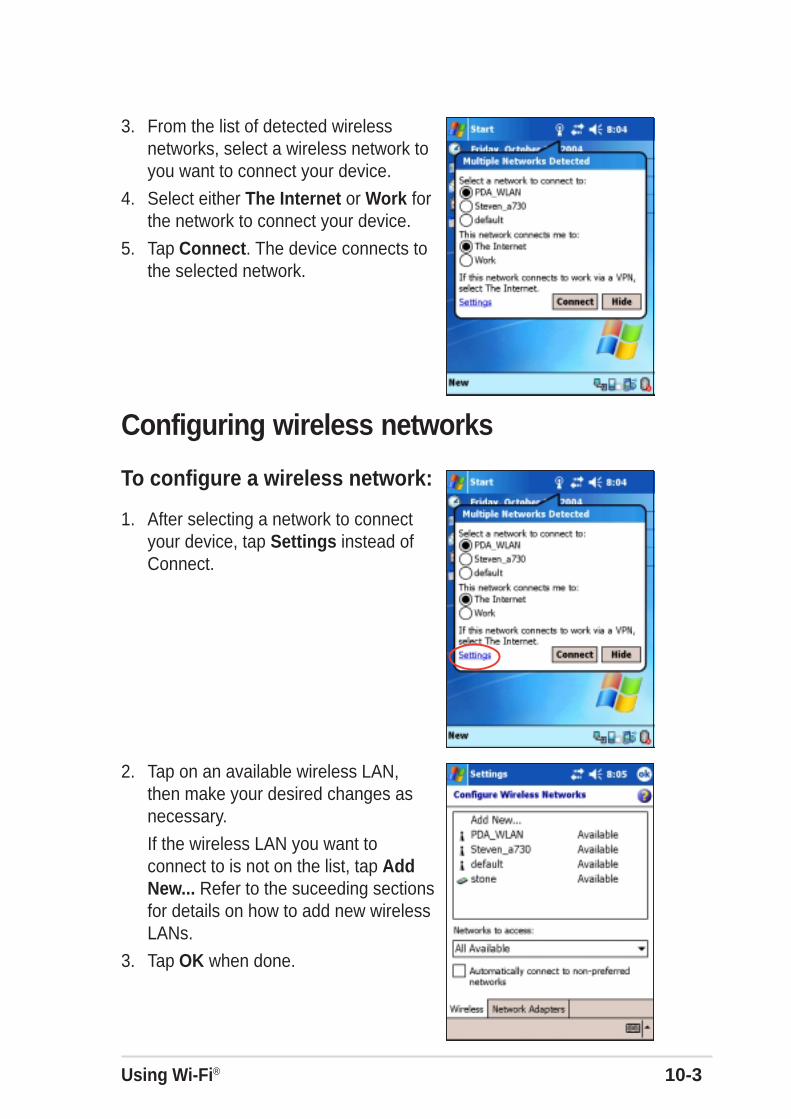
Using Wi-Fi® 10-3
3. From the list of detected wirelessnetworks, select a wireless network toyou want to connect your device.
4. Select either The Internet or Work forthe network to connect your device.
5. Tap Connect. The device connects tothe selected network.
Configuring wireless networks
To configure a wireless network:
1. After selecting a network to connectyour device, tap Settings instead ofConnect.
2. Tap on an available wireless LAN,then make your desired changes asnecessary.
If the wireless LAN you want toconnect to is not on the list, tap AddNew... Refer to the suceeding sectionsfor details on how to add new wirelessLANs.
3. Tap OK when done.
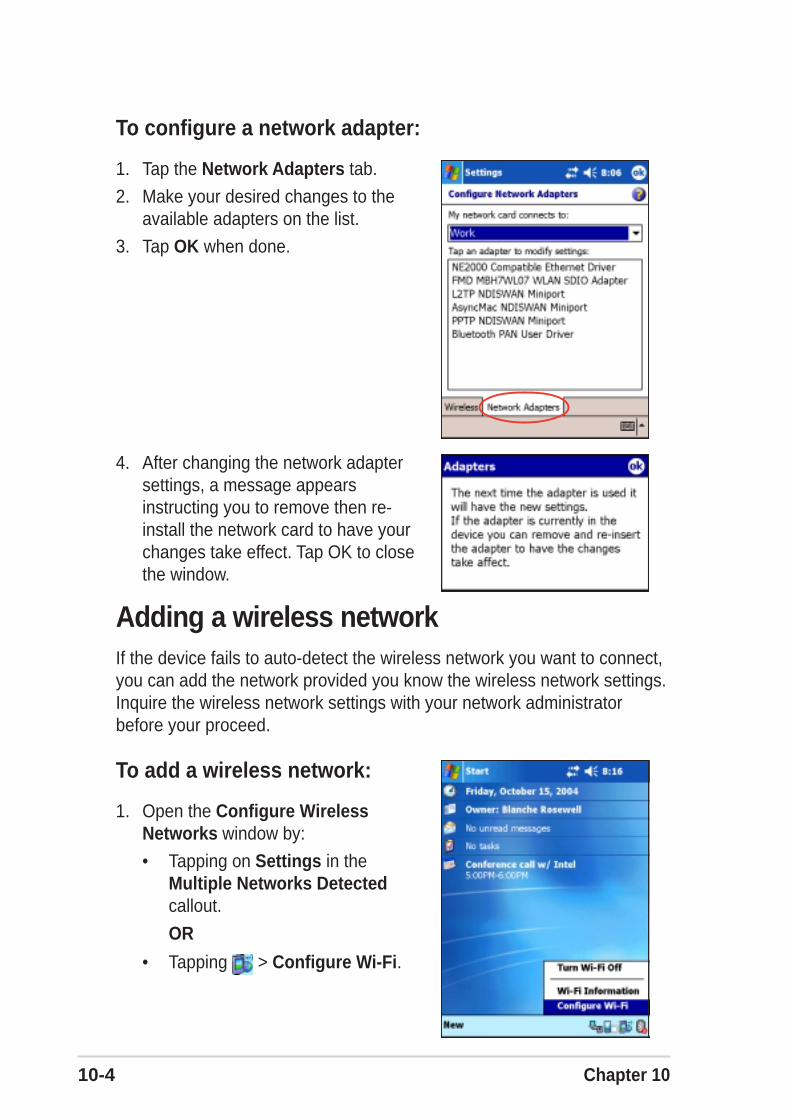
10-4 Chapter 10
To configure a network adapter:
1. Tap the Network Adapters tab.
2. Make your desired changes to theavailable adapters on the list.
3. Tap OK when done.
Adding a wireless networkIf the device fails to auto-detect the wireless network you want to connect,you can add the network provided you know the wireless network settings.Inquire the wireless network settings with your network administratorbefore your proceed.
To add a wireless network:
1. Open the Configure WirelessNetworks window by:
• Tapping on Settings in theMultiple Networks Detectedcallout.
OR
• Tapping > Configure Wi-Fi.
4. After changing the network adaptersettings, a message appearsinstructing you to remove then re-install the network card to have yourchanges take effect. Tap OK to closethe window.

Using Wi-Fi® 10-5
2. Tap Add New... from the wirelessnetworks field.
3. Use the input panel to key-in theNetwork name.
4. Select The Internet or Work networkyou wish to connect to through thewireless network.
5. If you want to connect to anotherwireless device (Ad-hoc mode), checkthe option This is a device-to-device(ad-hoc) connection.
Otherwise, tap the Network Key tabto configure the wireless LAN networksecurity settings.
3
4
5
6. In the Network Key tab, select theAuthentication and Data Encryptionsettings of the wireless LAN you wantto add.
NOTE Inquire the network securitysettings with the networkadministrator.
7. Tap the 802.1x tab to configure othernetwork security settings.
Otherwise, tap OK to add the wirelessnetwork.

10-6 Chapter 10
8. The created wireless network isdisplayed in the list of wirelessnetworks.
Tap the wireless network to connect.
Network associationTo associate with one of the detected wireless networks:
1. Tap and hold on a wireless network, then tap Connect from the pop-upmenu.
NOTE Another way to connect to a wireless network is to tap thenetwork entry twice.
2. If the wireless network that you selected is on the profile, the devicetries to connect to the wireless network automatically without asking foradditional information. Otherwise, key-in the required networkinformation.
3. After you have entered the required network information, tap OK. Thewireless network is then added to the profile, and your device will try toconnect to it.

Using Wi-Fi® 10-7
Wi-Fi informationYou can view the Wi-Fi information bytapping , and selecting Wi-FiInformation from the menu.
NOTE You can view the Wi-Fiinformation even when thedevice is disconnected froma wireless network.
Wi-Fi StatusThis tab displays the current state and linkinformation of your Wi-Fi device, andallows you to re-scan the availablewireless networks when necessary bytapping the Rescan button.
The Rescan button allows you to searchfor all available access points andwireless devices (ad-hoc networks) inyour location.
If your signal strength is poor, you can usere-scanning to push the radio off a weakAP and search for a better link withanother AP. The re-scanning process maytake several seconds.
See the next page for a description of each Wi-Fi information displayed inthe Wi-Fi Status tab.
10-8 Chapter 10
StatusThis field shows the Wi-Fi connection status.
• Connected - the station is associated with one wireless LANdevice. This status also indicates the MAC addressof the device.
• Disconnected - a previous link existed but no beacon was received.The connection to the adapter is terminated.
ESSIDThis field shows the Extended Service Set Indenfier (ESSID) to which thewireless device is connected. The text on this field is usually anunreadable alphanumeric string.
BSSIDThis field shows the Basic Service Set ID (BSSID) to which the wirelessdevice is connected. In ESS mode, this is the MAC address of the accesspoint to which your device is connected.
BSS ModeThis field tells you whether the device is connected to an access point(Infrastructure mode) or to another wireless device (Ad-hoc mode).
EncryptionThis field tells you whether or not the wireless network uses dataencryption.
Signal StrengthThis field shows the signal strength level between the Wi-Fi device and theaccess point (or another wireless device) to which it is currently connected.

Using Wi-Fi® 10-9
ESSIDThis column shows the Extended Service Set Indenfier (ESSID) of thewireless network found in the search.
CHThis column shows the channel used by the wireless device.
Table of icon indications
Icon Indicates that the wireless network is
an Access Point with disabled Wired Equivalent Privacy (WEP) encryption
an Access Point with enabled WEP encryption
an Access Point with disabled WEP encryption and MyPal is currentlyconnected to this network
an Access Point with enabled WEP encryption and MyPal is currentlyconnected to this network
a wireless device with disabled WEP encryption
a wireless device with enabled WEP encryption
a wireless device with disabled WEP encryption and MyPal is currentlyconnected to this network
a wireless device with enabled WEP encryption and MyPal is currentlyconnected to this network
Site SurveyThis tab allows you to search for availablewireless networks within your location.Tap the Search button to scan allavailable wireless networks and displaythe results on the screen.
Each wireless network is preceded by anicon for easy identification. The networkchannel, RSSI, and BSSID are alsodisplayed in columns. Refer to the table oficon indications and column descriptionsbelow.
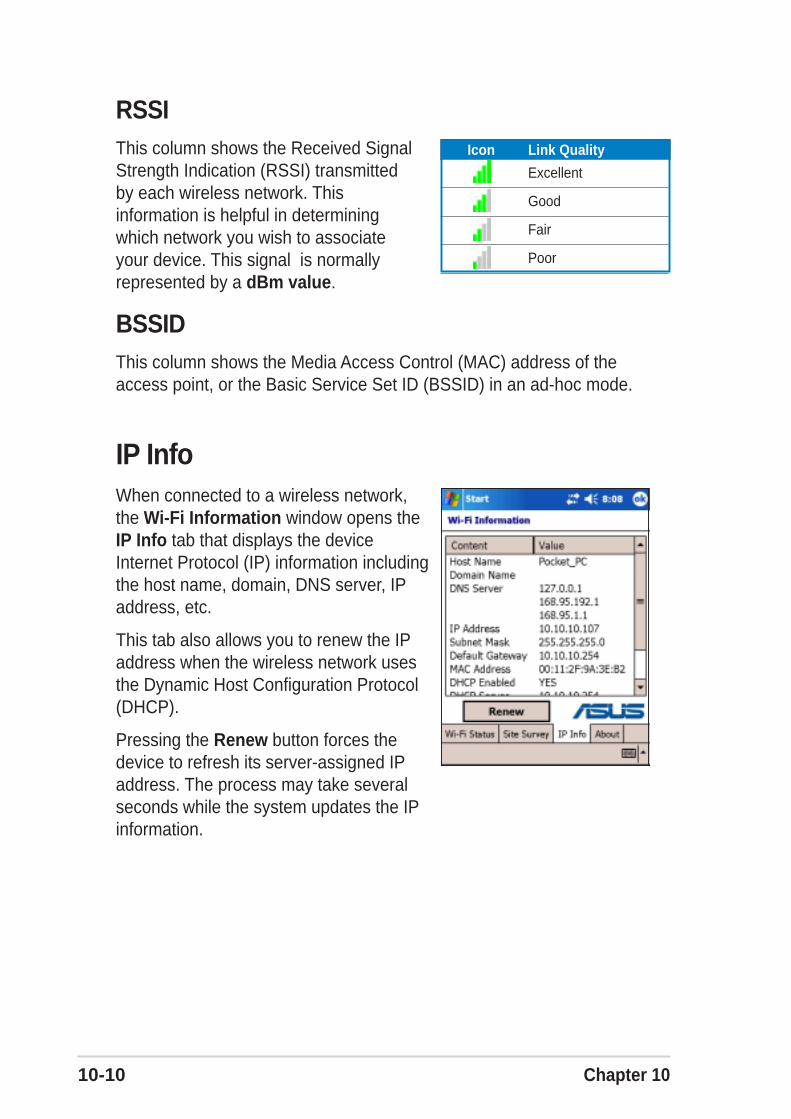
10-10 Chapter 10
RSSIThis column shows the Received SignalStrength Indication (RSSI) transmittedby each wireless network. Thisinformation is helpful in determiningwhich network you wish to associateyour device. This signal is normallyrepresented by a dBm value.
BSSIDThis column shows the Media Access Control (MAC) address of theaccess point, or the Basic Service Set ID (BSSID) in an ad-hoc mode.
Icon Link Quality
Excellent
Good
Fair
Poor
IP InfoWhen connected to a wireless network,the Wi-Fi Information window opens theIP Info tab that displays the deviceInternet Protocol (IP) information includingthe host name, domain, DNS server, IPaddress, etc.
This tab also allows you to renew the IPaddress when the wireless network usesthe Dynamic Host Configuration Protocol(DHCP).
Pressing the Renew button forces thedevice to refresh its server-assigned IPaddress. The process may take severalseconds while the system updates the IPinformation.

Using Wi-Fi® 10-11
AboutThis page displays the Wi-Fi utility anddriver version information of your Wi-Fidevice.
For updated product information, technicalsupport, and downloads, visit the ASUSweb site at http://www.asus.com.

10-12 Chapter 10

Notices A-1
Appendix
Notices
♦♦♦♦♦ Federal Communications CommissionStatement .............................................................. A-2
♦♦♦♦♦ Canadian Department of CommunicationsStatement .............................................................. A-2
♦♦♦♦♦ UL Safety Notices ................................................. A-3
A-2 Appendix
Federal Communications Commission Statement
This device complies with Part 15 of the FCC Rules. Operation is subject to the following twoconditions:
1) This device may not cause harmful interference, and
2) This device must accept any interference received, including interference that may causeundesired operation.
This device and its antenna must not be co-located or operating in conjunction with any otherantenna or transmitter.
This equipment has been tested and found to comply with the limits for a Class B digitaldevice, pursuant to Part 15 of the FCC Rules. These limits are designed to provide reasonableprotection against harmful interference in a residential installation. This equipment generates,uses and can radiate radio frequency energy and, if not installed and used in accordance withmanufacturer’s instructions, may cause harmful interference to radio communications.However, there is no guarantee that interference will not occur in a particular installation. If thisequipment does cause harmful interference to radio or television reception, which can bedetermined by turning the equipment off and on, the user is encouraged to try to correct theinterference by one or more of the following measures:
• Reorient or relocate the receiving antenna.
• Increase the separation between the equipment and receiver.
• Connect the equipment to an outlet on a circuit different from that to which the receiver isconnected.
• Consult the dealer or an experienced radio/TV technician for help.
Canadian Department of Communications Statement
This digital apparatus does not exceed the Class B limits for radio noise emissions from digitalapparatus set out in the Radio Interference Regulations of the Canadian Department ofCommunications.
This class B digital apparatus complies with Canadian ICES-003.
WARNING! The use of shielded cables for connection of the monitor to thegraphics card is required to assure compliance with FCC regulations.Changes or modifications to this unit not expressly approved by theparty responsible for compliance could void the user’s authority tooperate this equipment.

Notices A-3
UL Safety NoticesRequired for UL 1459 covering telecommunications (telephone) equipment intended to beelectrically connected to a telecommunication network that has an operating voltage to ground thatdoes not exceed 200V peak, 300V peak-to-peak, and 105V rms, and installed or used inaccordance with the National Electrical Code (NFPA 70).
When using the Pocket PC, basic safety precautions should always be followed to reduce the riskof fire, electric shock, and injury to persons, including the following:
• Do not use the Pocket PC near water, for example, near a bath tub, wash bowl, kitchen sinkor laundry tub, in a wet basement or near a swimming pool.
• Do not use the Pocket PC during an electrical storm. There may be a remote risk of electricshock from lightning.
• Do not use the Pocket PC in the vicinity of a gas leak.
Required for UL 1642 covering primary (non-rechargeable) and secondary (rechargeable) lithiumbatteries for use as power sources in products. These batteries contain metallic lithium, or a lithiumalloy, or a lithium ion, and may consist of a single electrochemical cell or two or more cellsconnected in series, parallel, or both, that convert chemical energy into electrical energy by anirreversible or reversible chemical reaction.
• Do not dispose the Pocket PC battery pack in a fire, as they may explode. Check with localcodes for possible special disposal instructions to reduce the risk of injury to persons due to fireor explosion.
• Do not use power adapters or batteries from other devices to reduce the risk of injury topersons due to fire or explosion. Use only UL certified power adapters or batteries supplied bythe manufacturer or authorized retailers.
Replaceable batteriesIf an equipment is provided with a replaceable battery and if replacement by an incorrect type couldresult in an explosion (e.g. with some lithium batteries), the following applies:
– if the battery is placed in an OPERATOR ACCESS AREA, there shall be a marking closeto the battery or a statement in both the operating and the servicing instructions;
– if the battery is placed elsewhere in the equipmen, there shall be a marking close to thebattery or a statement in the servicing instructions.
The marking or statement shall include the following or similar text:CAUTION
RISK OF EXPLOSION IF BATTERY IS REPLACEDBY AN INCORRECT TYPE.
DISPOSE OF USED BATTERIES ACCORDINGTHE INSTRUCTIONS
Compliance is checked by inspection.
Operator access with a toolIf a TOOL is necessary to gain access to an OPERATOR ACCESS AREA, either all othercompartments within that area containing a hazard shall be inaccessible to the OPERATOR by theuse of the same TOOL, or such compartments shall be marked to discourage OPERATOR access.
An acceptable marking for an electric shock hazard is (ISO 3864, No. 5036)
Equipment for restricted access locationsFor equipment intended only for installation in a RESTRICTED ACCESS LOCATION, theinstalation instructions shall contain a statement to this effect.

A-4 Appendix