n mm l digital photo protocol
TRANSCRIPT

7/30/2019 n Mm l Digital Photo Protocol
http://slidepdf.com/reader/full/n-mm-l-digital-photo-protocol 1/13
NMML Digital Photo Protocol, 15 Oct 2007, Sally Mizroch ([email protected]), Page 1 of 13
Whale photo-identification: Digital photography techniques,using EXIF data, and photo editing tools
Introduction
When whale photo-identification studies first began in the 1960s and 1970s, researchers used either35mm slide film or high resolution black and white film to document individual whales. Some photo-IDprograms evaluated negatives magnified with dissecting microscope to look for matches and otherprograms made custom black and white prints in a photo darkroom, carefully enlarging, rotating andadjusting each image to bring out all the fine detail on the negative.
Today's digital photography equivalent of a film negative is the RAW format image file. RAW images arethe most accurate photo record that your camera can produce. Because RAW files c an’t be modified,they are akin to a negative and must be processed to use them effectively (see Appendix I for adescription of some common image file types).
JPEG format files should not be used in the field for photo-ID photos. The JPEG format does not capturethe reality of the image nearly as well as the RAW format. It does not contain detail that can be edited if the lighting is poor or the animal is distant, and JPEG compression algorithms can tend to add digitalartifacts (erroneous markings) that show when the image has been enlarged (see Appendix II).
Recent advances in photo editing tools allow us to work directly (and efficiently) with RAW files ratherthan having to pre-process RAW files using the digital camera’s software tools. Photo editing tools nowallow users to view, edit and “Batch Convert File F ormat” to convert RAW files (7-15 Mbytes on average)to “best compressed” JPEG files (about 300 -600 Kbytes on average). These compressed JPEG files show
an amazing amount of detail even when enlarged over 200%. And if the quality of the compressed JPEGis not sufficient, the RAW file can be edited and re-converted to compressed JPEG.
The examples in this document are based on tools available in ACDSee Pro (http://www.acdsee.com ),but there are other photo editing programs that can do similar things.
Here are some guidelines to follow when using digital photography for photo-identification studies:
Always shoot at the highest resolution of the camera, e.g., RAW. Use fast flash cards (>80x writespeed).
Think of RAW as your original negative and archive the RAW files the same way you’d archive
your negativesConvert the RAW images to compressed JPEG to use as your working images. If you need to edityour compressed JPEG image, go back and edit the RAW file and then save a new, editedcompressed JPEG file.
Researchers working with your image data long after you’re retired will thank you for this. In the NorthPacific, we are still encountering humpback whales that were first photographed in the early-mid 1970s.

7/30/2019 n Mm l Digital Photo Protocol
http://slidepdf.com/reader/full/n-mm-l-digital-photo-protocol 2/13
NMML Digital Photo Protocol, 15 Oct 2007, Sally Mizroch ([email protected]), Page 2 of 13
Using EXIF metadata fields to store additional data with each image
Digital cameras automatically store some useful data each time a photograph is taken. This informationis called EXIF (Exchangeable Image File) metadata. EXIF metadata includes date, time, camera modelshutter speed, focal length, and exposure settings.
Think of each photo a data record as well as an image and take advantage of the EXIF fields to adddescriptive data to each of your photos. Photo tools such as ACDSee let you “Batch Set Information” into the EXIF fields. You can select a number of photos, put in descriptive information, and then importthese data directly into a database ( see “Protocol for exporting E XIF metadata:http://nmml.afsc.noaa.gov/pdf/NMMLPhotoMetaDataProtocol.pdf ). Even if you don’t plan to importthe data into a database, the EXIF data can be read by anyone you send your photos to who if they havephoto software that show EXIF data.
The EXIF fields, “Image Description”, “Artist”, “Copyright” and “User Comment” are useful to store dataabout our whale encounters. These fields can be individually edited or “Batch Set” all at once.
For my own photo-ID surveys, I “Batch Set Information” including a descriptive encounter number for allimages taken with a specific whale or group of whales. In the example shown later , I used the “ImageDescription” field for my encoun ter number (7Feb2007_Uganik_Enc4 ), the “Copyright” field for imagetype (tail, left or right dorsal), the “Artist” field for the whale’s field nickname and “User Comment” forbiopsy info.
Using EXIF data for transmitting photo information when distributing opportunisticdataIf you have opportunistic photos that you plan to send to others on an occasional basis , I’d recommend
including the latitude/longitude and/or a descriptive place name in one of the editable EXIF fields andyour name and affiliation i n another. It doesn’t matter which fields you choose to use for yourdescriptive information as long as you’re consistent. The data will be readable with any EXIF viewer andcan be imported into any database and renamed.
Working with RAW files
Batch renameAfter copying the RAW files to your computer’s hard drive, you can “Batch rename” the files using somesort of descriptive name. Each research group seems to have their own file naming protocol. Whateverdescriptive naming convention you choose, make sure you change the filename of the RAW photosbefore converting them to compressed JPEG. Because the RAW file is equivalent of a negative, it’s
important to ensure that you can connect the RAW file to the JPEG file in case you need examine theRAW image to do any edits to the original file.

7/30/2019 n Mm l Digital Photo Protocol
http://slidepdf.com/reader/full/n-mm-l-digital-photo-protocol 3/13
NMML Digital Photo Protocol, 15 Oct 2007, Sally Mizroch ([email protected]), Page 3 of 13
Batch RAW process (if your camera settings were off)If you’ve had some sort of camera glitch that affected all your images (wrong meter settings, etc), this isthe time to do some “Batch RAW processing” to adjust light levels in the photos to compensate for anycamera problems. If your camera has behaved appropriately, you can skip this step.
Batch convert RAW files to compressed JPEGPut all the images you want to batch convert from RAW to JPEG in one folder, then:
Select all images (“Control I” is the keyboard shortcut for this)
Under Tools, choose Batch Convert File Format
Select JPEG, then click on Format Settings
Under JPEG options, slide the compression bar to “ best compression ” and save this as yo urdefault setting
Choose a file folder
Finish
Set the JPEG options to “Best compression”. There is no need to save a larger JPEG file. These small

7/30/2019 n Mm l Digital Photo Protocol
http://slidepdf.com/reader/full/n-mm-l-digital-photo-protocol 4/13
NMML Digital Photo Protocol, 15 Oct 2007, Sally Mizroch ([email protected]), Page 4 of 13
JPEGs enlarge very well , and if you need more detail, it’s best to go back to the RAW file .
Select a folder for your JPEG files.

7/30/2019 n Mm l Digital Photo Protocol
http://slidepdf.com/reader/full/n-mm-l-digital-photo-protocol 5/13
NMML Digital Photo Protocol, 15 Oct 2007, Sally Mizroch ([email protected]), Page 5 of 13
Editing RAW files
If your compressed JPEG working file image is too distant, at an odd angle, or too dark or light, go backand edit the RAW file and save the edited image as a “best compressed” JPEG.
For humpback whale tail photos, if we need to edit the image at all, we typically
rotate the image, if necessary
crop it to fill the frame and center the tail flukesadjust the exposure using contrast and gamma (see definition below).
We do not adjust brightness, because it lightens the entire image. Gamma adjustments bring out detailin the mid-tones (shadow areas) of the image, and we adjust contrast to fine-tune the appearance of small marks and gray areas.
The simple editing capabilities of a program like ACDSee are preferable to some of the moresophisticated (and more expensive) editing packages. For example, after extensive testing we foundthat “Sharpening” images actually degraded one’s ability to interpret the finest scratches and marks on adigital image. A “sharpened” image looks better from a distance, but when magnified, the pixel edgesappear to be fuzzy, not sharp, which makes it hard to interpret the fine marks.
We don’t Resize during editing. If we need to resize or compress the photo into a smaller JPEG format inorder to reduce its size for e- mail or web distribution, we use “Convert file format” or “Resize…” for anumber of photos at once, using the “Modify” tools. If you need to save file space, you can converthumpback tail photos to 256 grays before editing. Color can be distracting when matching whale tailsand takes up more file space than is necessary
Modify, Edit Mode Tools
RotateWe rotate humpback whale tail flukes to a standardized horizontal plane in order to help us have aconsistent image for comparing photos while matching. To rotate, select Custom angle, horizontal, anddraw a line (drag the mouse) from fluke tip to fluke tip. This will automatically rotate the flukes to thehorizontal plane. In this case, the rotationalangle was 377.39º
7/30/2019 n Mm l Digital Photo Protocol
http://slidepdf.com/reader/full/n-mm-l-digital-photo-protocol 6/13
NMML Digital Photo Protocol, 15 Oct 2007, Sally Mizroch ([email protected]), Page 6 of 13
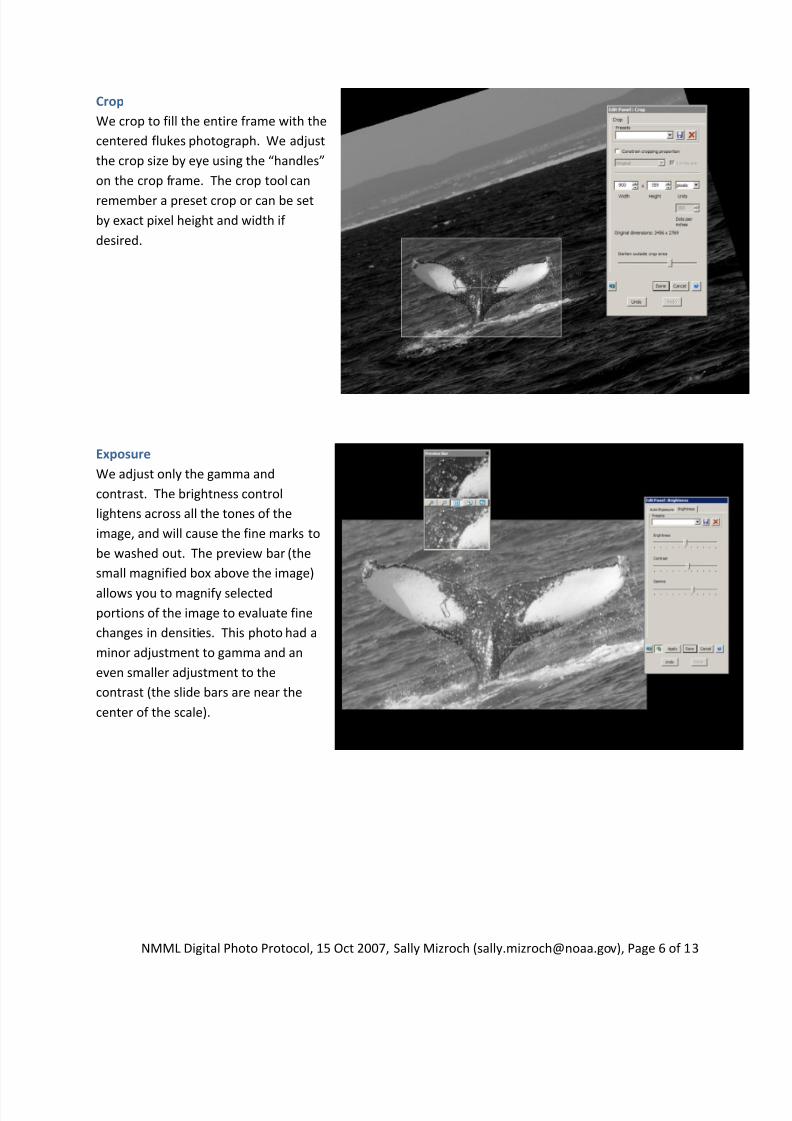
CropWe crop to fill the entire frame with thecentered flukes photograph. We adjustthe crop size by eye using the “handles”on the crop frame. The crop tool can
remember a preset crop or can be setby exact pixel height and width if desired.
ExposureWe adjust only the gamma andcontrast. The brightness controllightens across all the tones of theimage, and will cause the fine marks tobe washed out. The preview bar (thesmall magnified box above the image)
allows you to magnify selectedportions of the image to evaluate finechanges in densities. This photo had aminor adjustment to gamma and aneven smaller adjustment to thecontrast (the slide bars are near thecenter of the scale).

7/30/2019 n Mm l Digital Photo Protocol
http://slidepdf.com/reader/full/n-mm-l-digital-photo-protocol 7/13
NMML Digital Photo Protocol, 15 Oct 2007, Sally Mizroch ([email protected]), Page 7 of 13
Example
Gamma adjustments arevery useful to bring outsmall details in very dark
underexposedphotographs. Thisphotograph was shot just after sunset using aCanon 10D camera set atthe Canon RAW highresolution setting. If wehad been shooting at theJPEG setting, therewould have been no fine
detail at all, because thecompression algorithmwould have “decided”that the whale wascompletely black.
Even though thephotograph looked verydark to the eye, afteradjusting the gamma, wewere able to see manyfine marks on the dorsalfin. We were able toconfirm the marks thenext day when weapproached andphotographed the samemother and calf.

7/30/2019 n Mm l Digital Photo Protocol
http://slidepdf.com/reader/full/n-mm-l-digital-photo-protocol 8/13
NMML Digital Photo Protocol, 15 Oct 2007, Sally Mizroch ([email protected]), Page 8 of 13
Batch set EXIF metadata fields
Once the files have been converted to JPEG, you can edit data into the EXIF metadata fields. In thisexample we are inputting the encounter number information for our whales “Hook” and “Stairstep”,photographed in Uganik Bay, Kodiak in February 2007. I used the “Image Description” field for my
encounter number (7Feb2007_Uganik_Enc4
7/30/2019 n Mm l Digital Photo Protocol
http://slidepdf.com/reader/full/n-mm-l-digital-photo-protocol 9/13
NMML Digital Photo Protocol, 15 Oct 2007, Sally Mizroch ([email protected]), Page 9 of 13
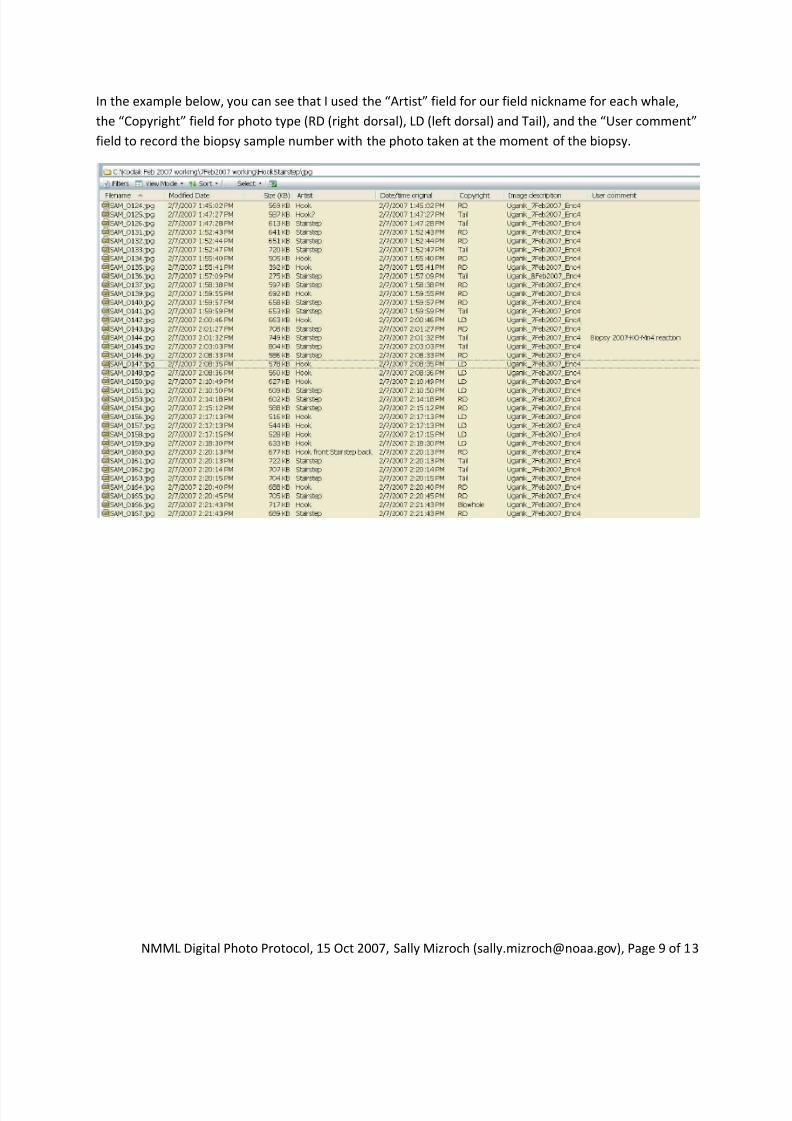
In the example below, you can see that I used the “Artist” field for our field nickname for each whale,the “Copyright” field for photo type (RD (right dorsal), LD (left dorsal) and Tail), and the “User comment”field to record the biopsy sample number with the photo taken at the moment of the biopsy.
7/30/2019 n Mm l Digital Photo Protocol
http://slidepdf.com/reader/full/n-mm-l-digital-photo-protocol 10/13
NMML Digital Photo Protocol, 15 Oct 2007, Sally Mizroch ([email protected]), Page 10 of 13
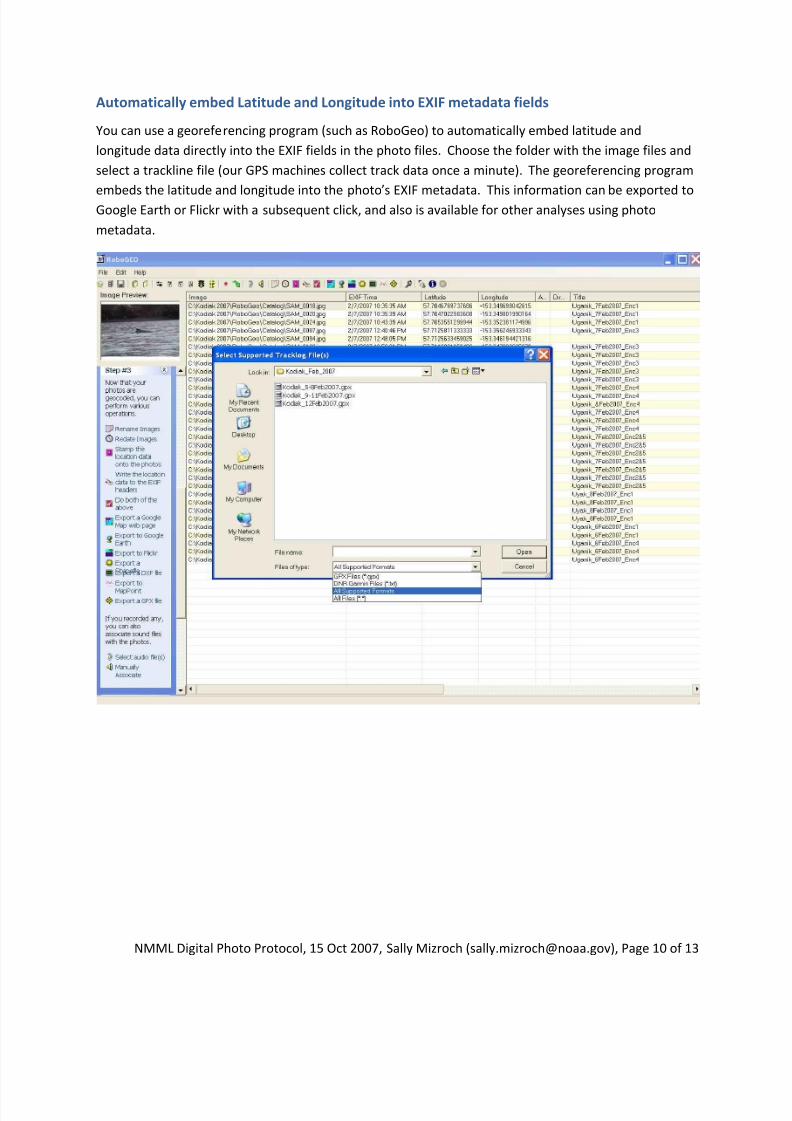
Automatically embed Latitude and Longitude into EXIF metadata fields
You can use a georeferencing program (such as RoboGeo) to automatically embed latitude andlongitude data directly into the EXIF fields in the photo files. Choose the folder with the image files andselect a trackline file (our GPS machines collect track data once a minute). The georeferencing program
embeds the latitude and longitude into the photo ’s EXIF metadata. This information can be exported toGoogle Earth or Flickr with a subsequent click, and also is available for other analyses using photometadata.

7/30/2019 n Mm l Digital Photo Protocol
http://slidepdf.com/reader/full/n-mm-l-digital-photo-protocol 11/13
NMML Digital Photo Protocol, 15 Oct 2007, Sally Mizroch ([email protected]), Page 11 of 13
The example photo below has the latitude and longitude information embedded both on the image(optional) and also available in the EXIF metadata.
Exporting photo metadata into a database
Once we’ve edited all the information into the metadata, we can then select specific EXIF and fileinformation and import it directly into our Access database (see Protocol for Exporting EXIF Metadatainto an MS Access Database, developed by Christy Sims and Sally Mizroch,http://nmml.afsc.noaa.gov/pdf/NMMLPhotoMetaDataProtocol.pdf )

7/30/2019 n Mm l Digital Photo Protocol
http://slidepdf.com/reader/full/n-mm-l-digital-photo-protocol 12/13
NMML Digital Photo Protocol, 15 Oct 2007, Sally Mizroch ([email protected]), Page 12 of 13
Appendix I: Digital Photo File formats
RAWHighest resolution of a digital cameraCan be converted JPEG using batch conversion software
Usually stores in smaller file on compact flash card than TIFF
JPEG (Joint Photo Experts Group)Compressed, small files
“Lossy” format, “guesses” or predicts patterns, so can give false i nformation (see example inAppendix II)
Each time JPEG file is saved, it’s compressed again and loses additional information.
If you need to edit original JPEG files, same the edited version as a TIFF file, then compress backto JPEG from TIFF.
TIFF (Tag Image File Format)Uncompressed, large filesGood as intermediate step when editing files that were originally JPEGs

7/30/2019 n Mm l Digital Photo Protocol
http://slidepdf.com/reader/full/n-mm-l-digital-photo-protocol 13/13
NMML Digital Photo Protocol, 15 Oct 2007, Sally Mizroch ([email protected]), Page 13 of 13
Appendix II: Disadvantages of JPEG for photo-ID
Accurate matching requires accurate presentation of fine marks and scars.
JPEG files d on’t show fine marks well if the image is too dark or too light
JPEG files can show pixel edges when enlarged
JPEG images can be totally inaccurate! (see below)
False Mark in JPEG photo
Enlarged JPEG Enlarged Film Scan
Full-frame JPEG Full frame Film Scan
Distant Photo
Close Photo