name period date - oakland...
TRANSCRIPT
Investigation • Mathematical Models
Name Period Date
Discovering Geometry Investigation Worksheets LESSON 1.1 1
©2009 Michael Serra
In this lesson, you encountered many new geometry terms. In this investigation you will work as a group to identify models from the real world that represent these terms and to identify how they are represented in diagrams.
Step 1 Look around your classroom and identify examples of each of these terms: point, line, plane, line segment, congruent segments, midpoint of a segment, and ray.
Step 2 Identify examples of these terms in the photograph on page 32 in your textbook.
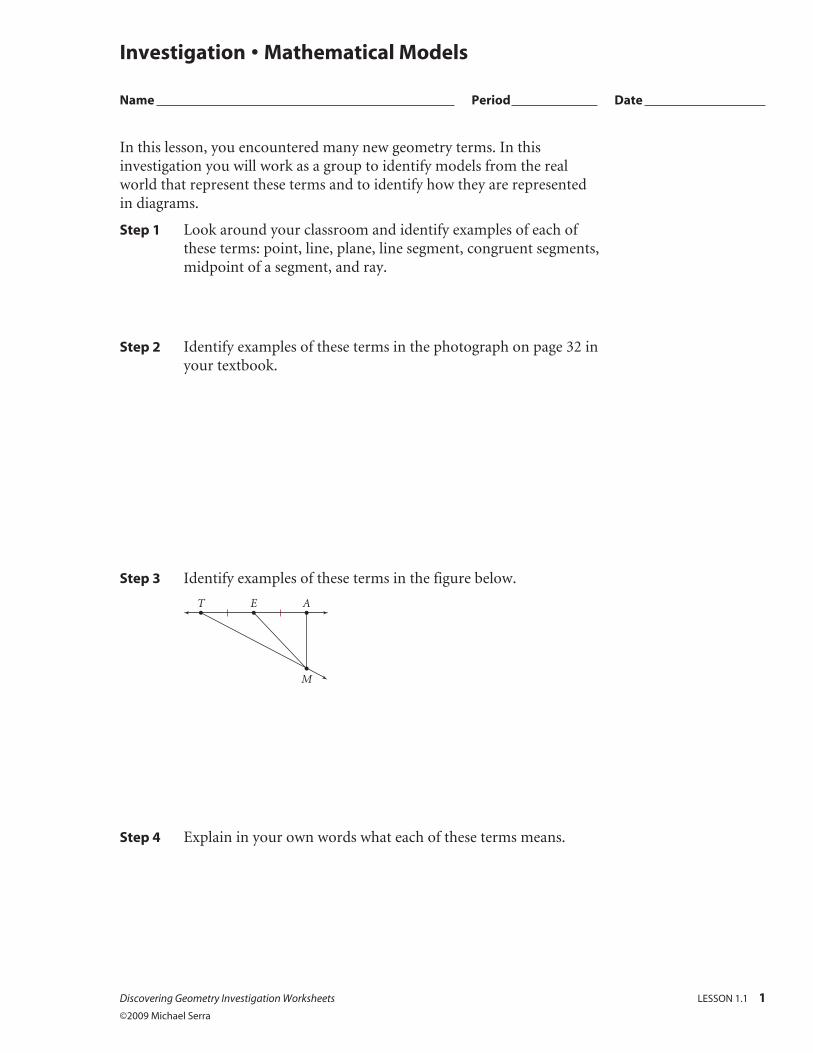
Step 3 Identify examples of these terms in the figure below.
T E A
M
Step 4 Explain in your own words what each of these terms means.
Investigation • Virtual Pool
Name Period Date
Discovering Geometry Investigation Worksheets LESSON 1.2 1
©2009 Michael Serra
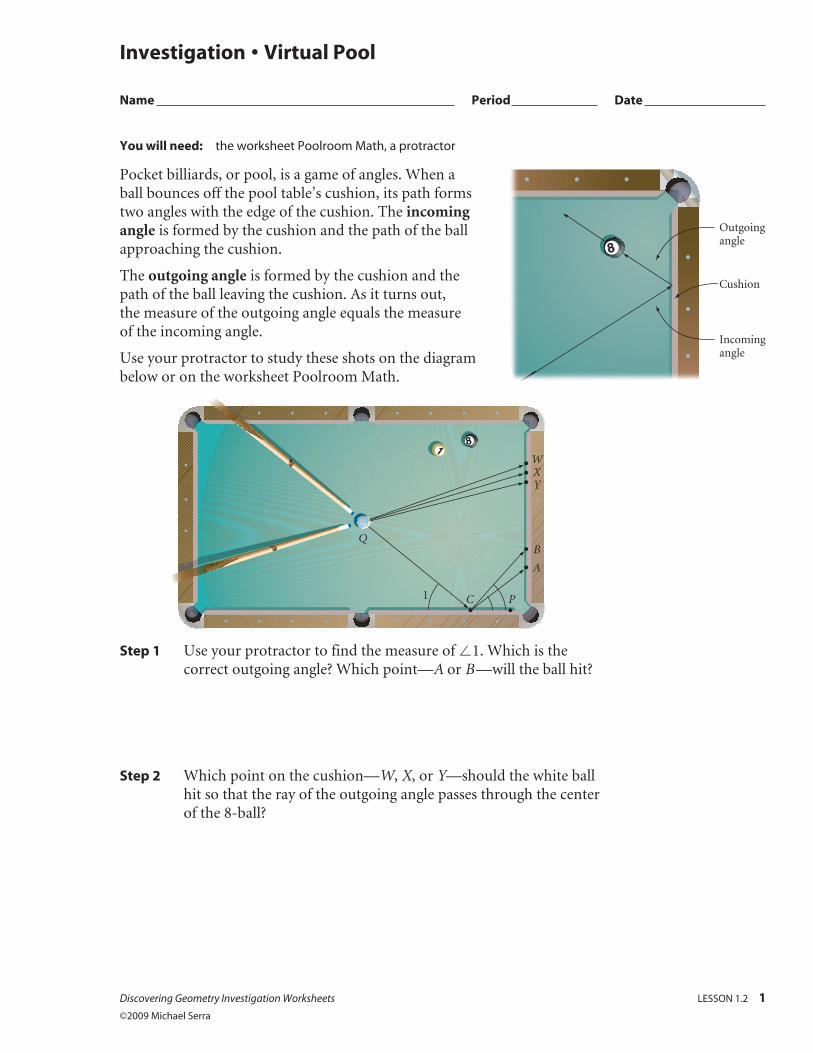
You will need: the worksheet Poolroom Math, a protractor
Pocket billiards, or pool, is a game of angles. When a ball bounces off the pool table’s cushion, its path forms two angles with the edge of the cushion. The incoming angle is formed by the cushion and the path of the ball approaching the cushion.
The outgoing angle is formed by the cushion and the path of the ball leaving the cushion. As it turns out, the measure of the outgoing angle equals the measure of the incoming angle.
Use your protractor to study these shots on the diagram below or on the worksheet Poolroom Math.
1
Q
A
WXY
C P
B
Step 1 Use your protractor to find the measure of 1. Which is the correct outgoing angle? Which point—A or B —will the ball hit?
Step 2 Which point on the cushion—W, X, or Y—should the white ball hit so that the ray of the outgoing angle passes through the center of the 8-ball?
Outgoingangle
Cushion
Incomingangle
Investigation • Virtual Pool (continued)
2 LESSON 1.2 Discovering Geometry Investigation Worksheets ©2009 Michael Serra
Step 3 Compare your results with your group members’ results. Does everyone agree?
Step 4 How would you hit the white ball against the cushion so that the ball passes over the same spot on the way back?
Step 5 How would you hit the ball so that it bounces off three different points on the cushions without ever touching cushion CP?
Investigation • Defining Angles
Name Period Date
Discovering Geometry Investigation Worksheets LESSON 1.3 1
©2009 Michael Serra
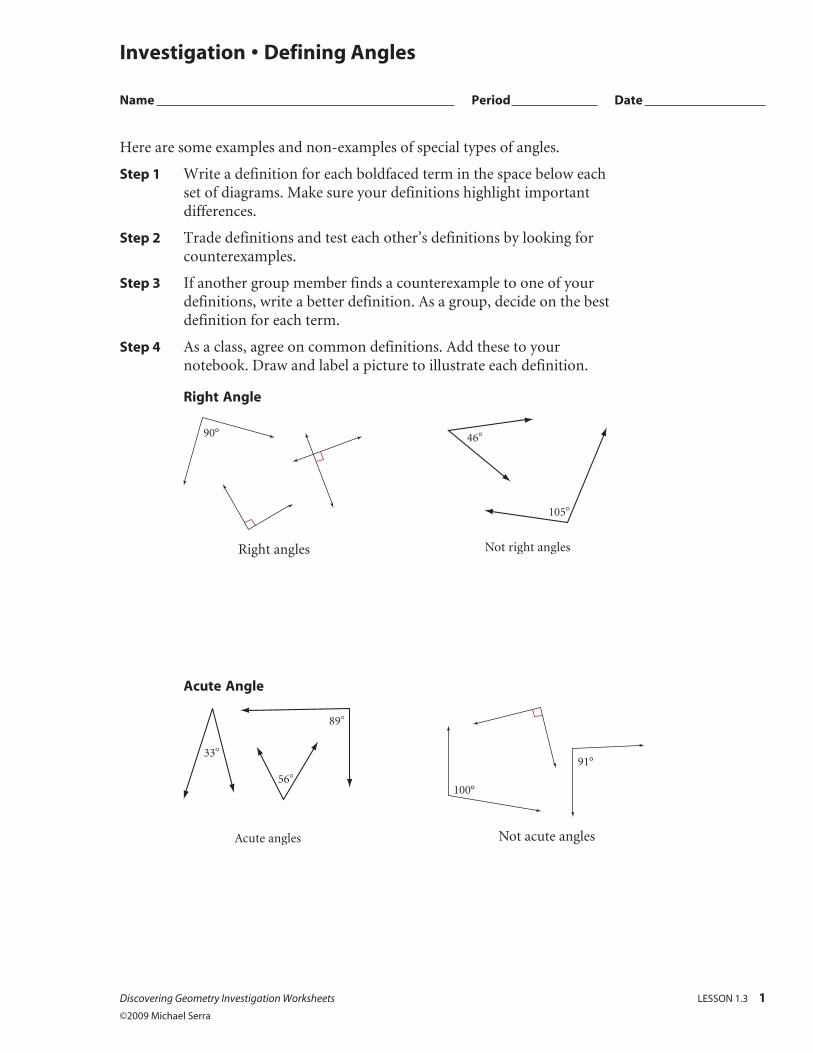
Here are some examples and non-examples of special types of angles.
Step 1 Write a definition for each boldfaced term in the space below each set of diagrams. Make sure your definitions highlight important differences.
Step 2 Trade definitions and test each other’s definitions by looking for counterexamples.
Step 3 If another group member finds a counterexample to one of your definitions, write a better definition. As a group, decide on the best definition for each term.
Step 4 As a class, agree on common definitions. Add these to your notebook. Draw and label a picture to illustrate each definition.
Right Angle
Right angles
90°
46�
105�
Not right angles
Acute Angle
89�
33�
56�
Acute angles Not acute angles
100°
91°
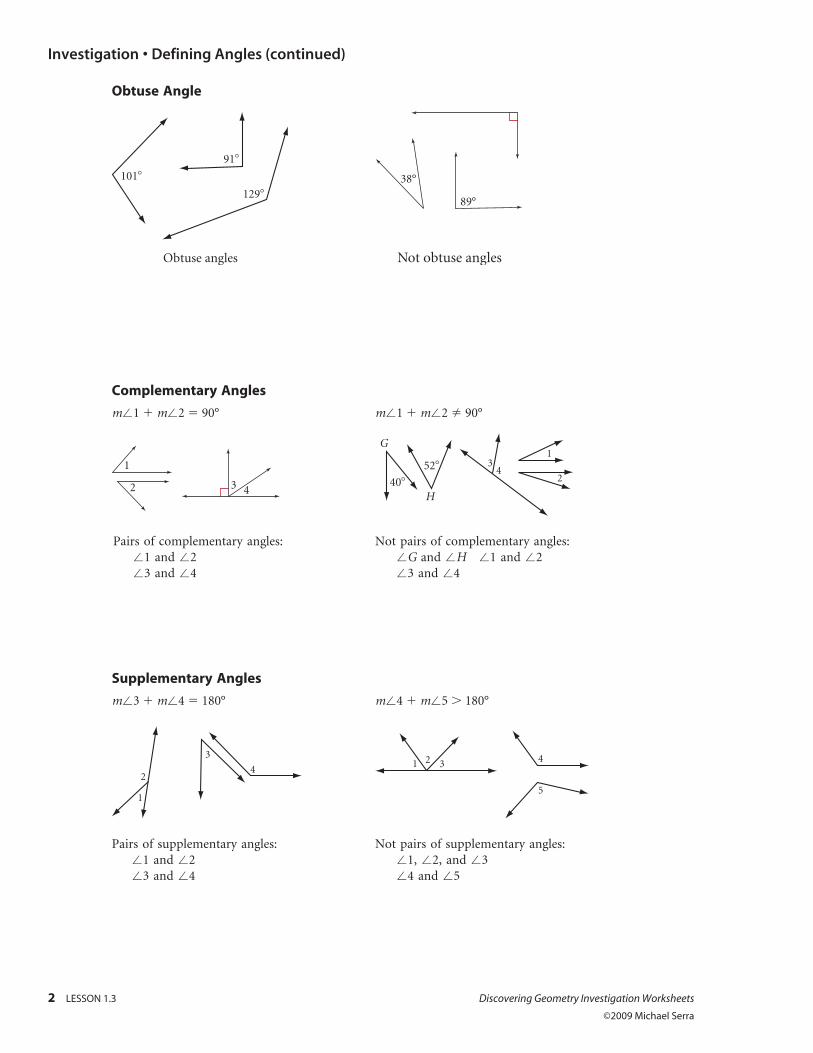
Investigation • Defining Angles (continued)
2 LESSON 1.3 Discovering Geometry Investigation Worksheets
©2009 Michael Serra
Obtuse Angle
91�
101�
129�
Obtuse angles Not obtuse angles
38°
89°
Complementary Angles
m1 1 m2 5 90° m1 1 m2 90°
3 42
1
3 4
1
2 40�
G
H
52�
Pairs of complementary angles: Not pairs of complementary angles: 1 and 2 G and H 1 and 2 3 and 4 3 and 4
Supplementary Angles
m3 1 m4 5 180° m4 1 m5 . 180°
3
2
1
4
1 2 3 4
5
Pairs of supplementary angles: Not pairs of supplementary angles: 1 and 2 1, 2, and 3 3 and 4 4 and 5
Investigation • Defining Angles (continued)
Discovering Geometry Investigation Worksheets LESSON 1.3 3
©2009 Michael Serra
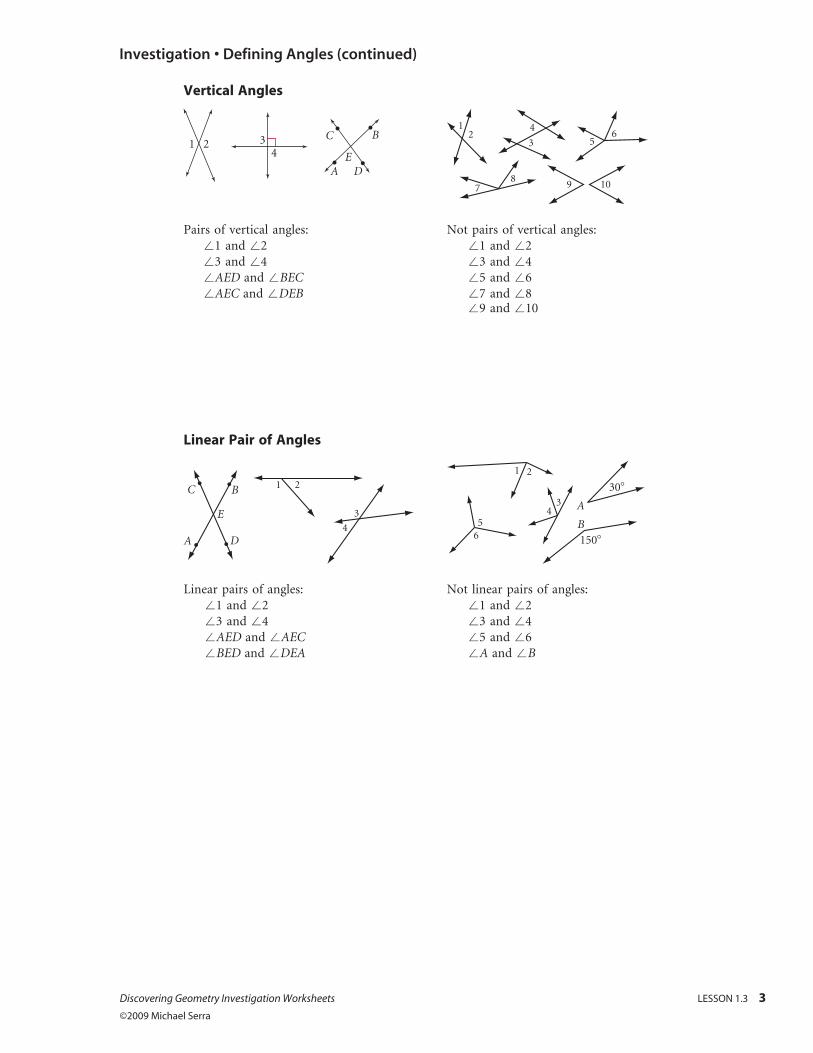
Vertical Angles
34
1 2
AE
D
BC
1 2
3
4
7 8
5 6
9 10
Pairs of vertical angles: Not pairs of vertical angles: 1 and 2 1 and 2 3 and 4 3 and 4 AED and BEC 5 and 6 AEC and DEB 7 and 8 9 and 10
Linear Pair of Angles
1 2
A D
BC
E 3
4
1 2
56
3
30�
150�
4 A
B
Linear pairs of angles: Not linear pairs of angles: 1 and 2 1 and 2 3 and 4 3 and 4 AED and AEC 5 and 6 BED and DEA A and B
Investigation • Special Polygons
Name Period Date
Discovering Geometry Investigation Worksheets LESSON 1.4 1
©2009 Michael Serra
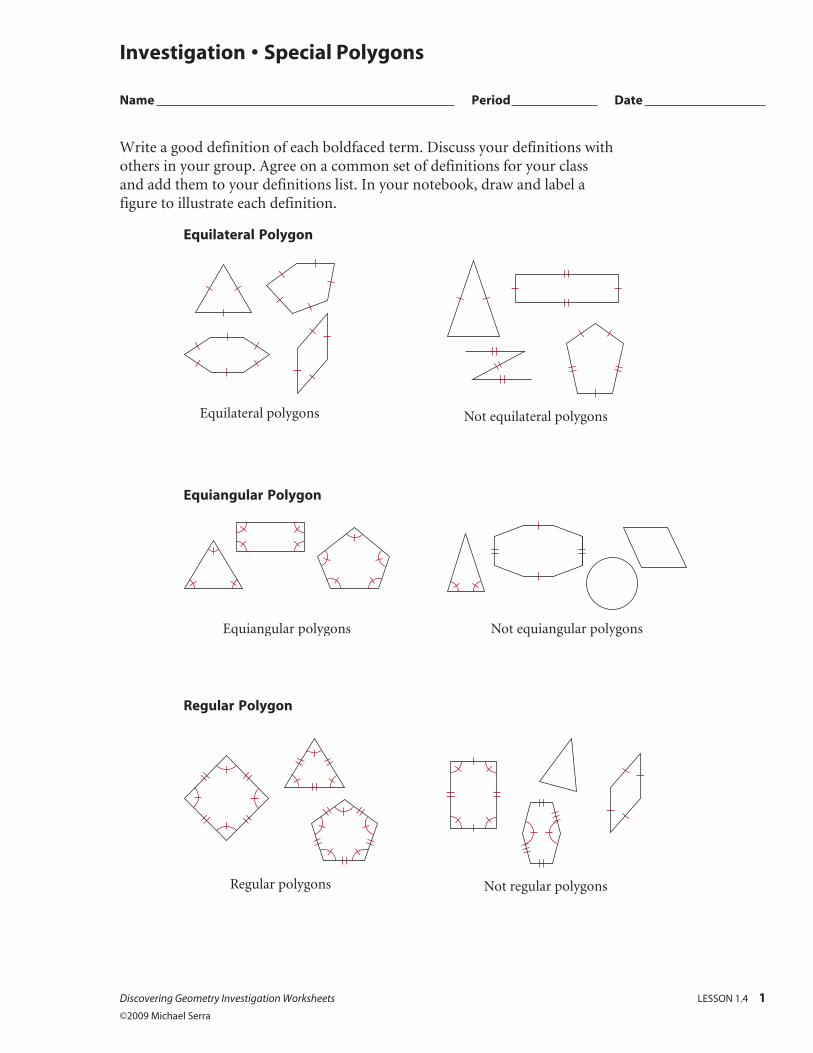
Write a good definition of each boldfaced term. Discuss your definitions with others in your group. Agree on a common set of definitions for your class and add them to your definitions list. In your notebook, draw and label a figure to illustrate each definition.
Equilateral Polygon
Equilateral polygons Not equilateral polygons
Equiangular Polygon
Equiangular polygons Not equiangular polygons
Regular Polygon
Regular polygons Not regular polygons
Investigation • Triangles
Name Period Date
Discovering Geometry Investigation Worksheets LESSON 1.5 1
©2009 Michael Serra
Write a good definition of each boldfaced term in the space below each set of diagrams. Discuss your definitions with others in your group. Agree on a common set of definitions for your class and add them to your definitions list. In your notebook, draw and label a figure to illustrate each definition.
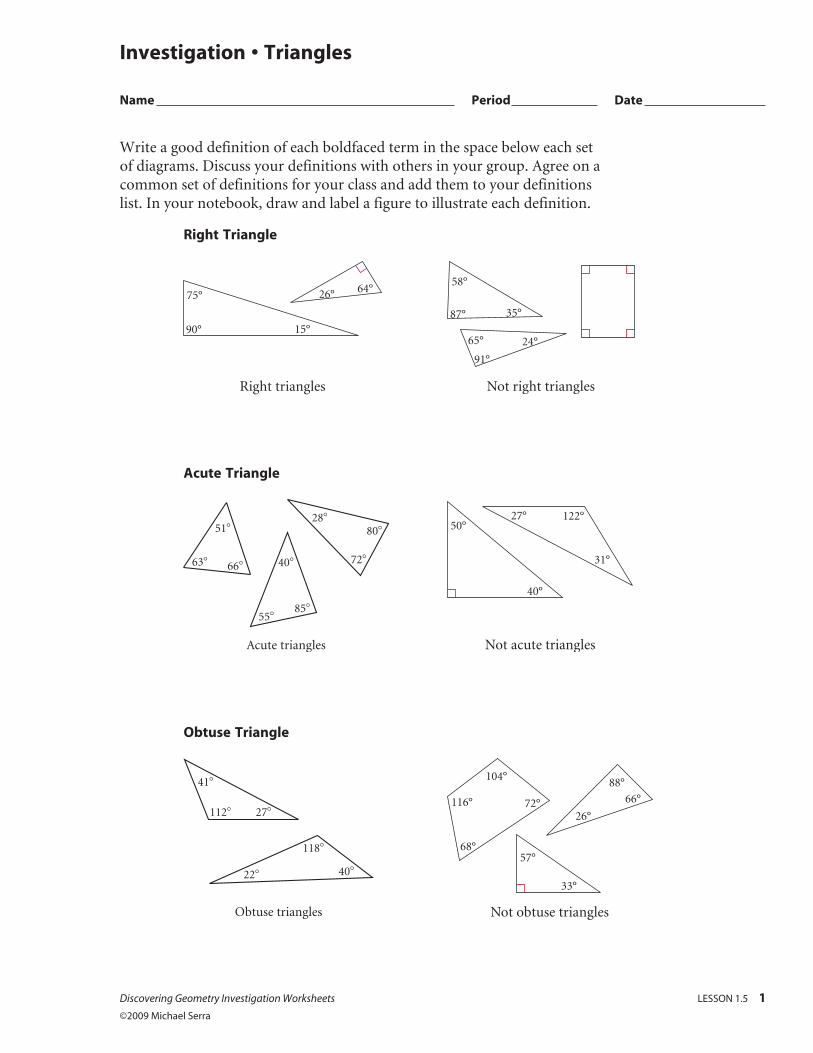
Right Triangle
Right triangles
75°
90° 15°
26° 64°
Not right triangles
58°
87° 35°
65°
91°
24°
Acute Triangle
85
80
55
40 72
28
63
51
66
Acute triangles Not acute triangles
50°
40°
27° 122°
31°
Obtuse Triangle
41
112
22
118
40
27
Obtuse triangles Not obtuse triangles
33°
57°
26°72°
104°
116°
68°
66°
88°

Investigation • Triangles (continued)
2 LESSON 1.5 Discovering Geometry Investigation Worksheets
©2009 Michael Serra
Scalene Triangle
Scalene triangles
15
17
28 20
11
8 7
6
8
Not scalene triangles
11
4
8
65
Equilateral Triangle
8
8 8
Equilateral triangles Not equilateral triangles
11
11
10
Isosceles Triangle
Isosceles triangles
14
14
17
Not isosceles triangles
12
13
5
30
22 23
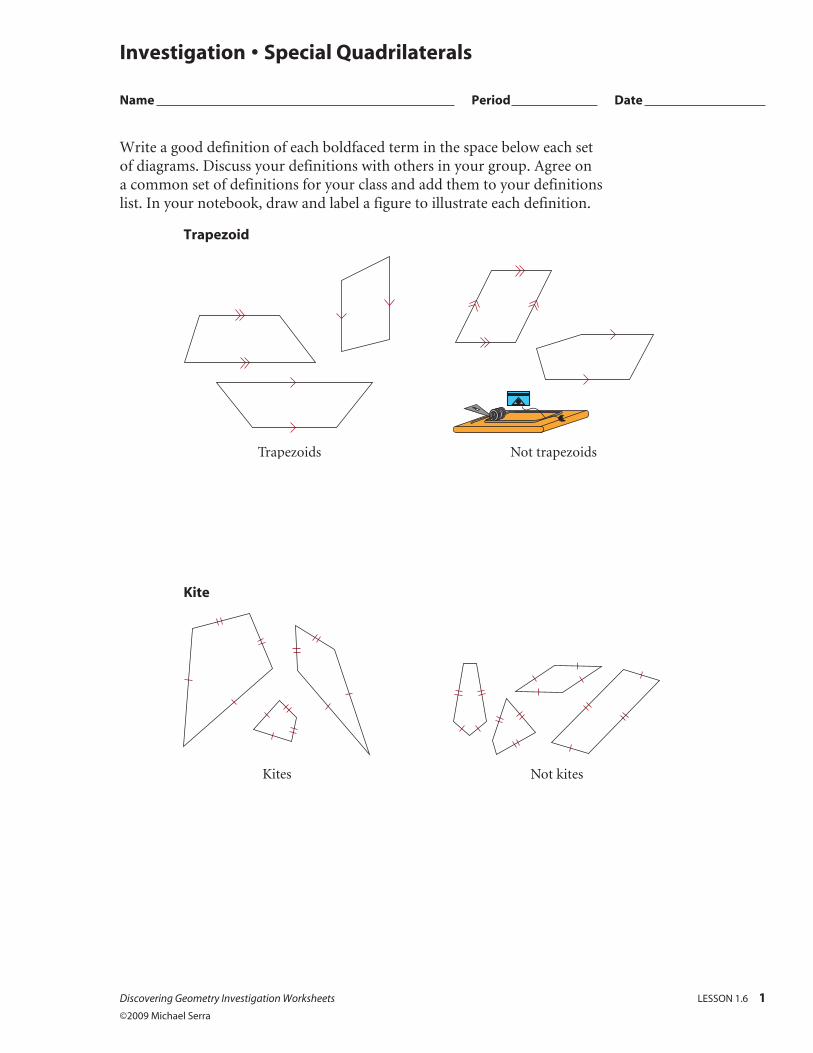
Investigation • Special Quadrilaterals
Name Period Date
Discovering Geometry Investigation Worksheets LESSON 1.6 1
©2009 Michael Serra
Write a good definition of each boldfaced term in the space below each set of diagrams. Discuss your definitions with others in your group. Agree on a common set of definitions for your class and add them to your definitions list. In your notebook, draw and label a figure to illustrate each definition.
Trapezoid
Trapezoids Not trapezoids
Kite
Kites Not kites
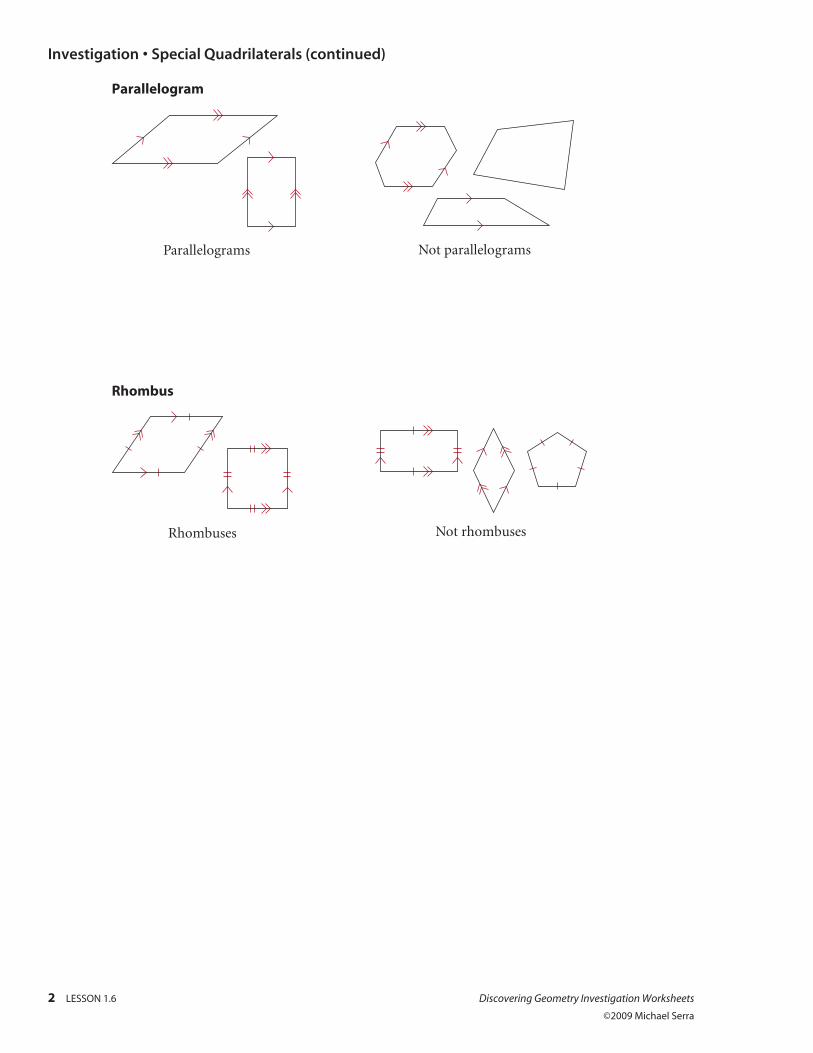
Investigation • Special Quadrilaterals (continued)
2 LESSON 1.6 Discovering Geometry Investigation Worksheets
©2009 Michael Serra
Parallelogram
Parallelograms Not parallelograms
Rhombus
Rhombuses Not rhombuses
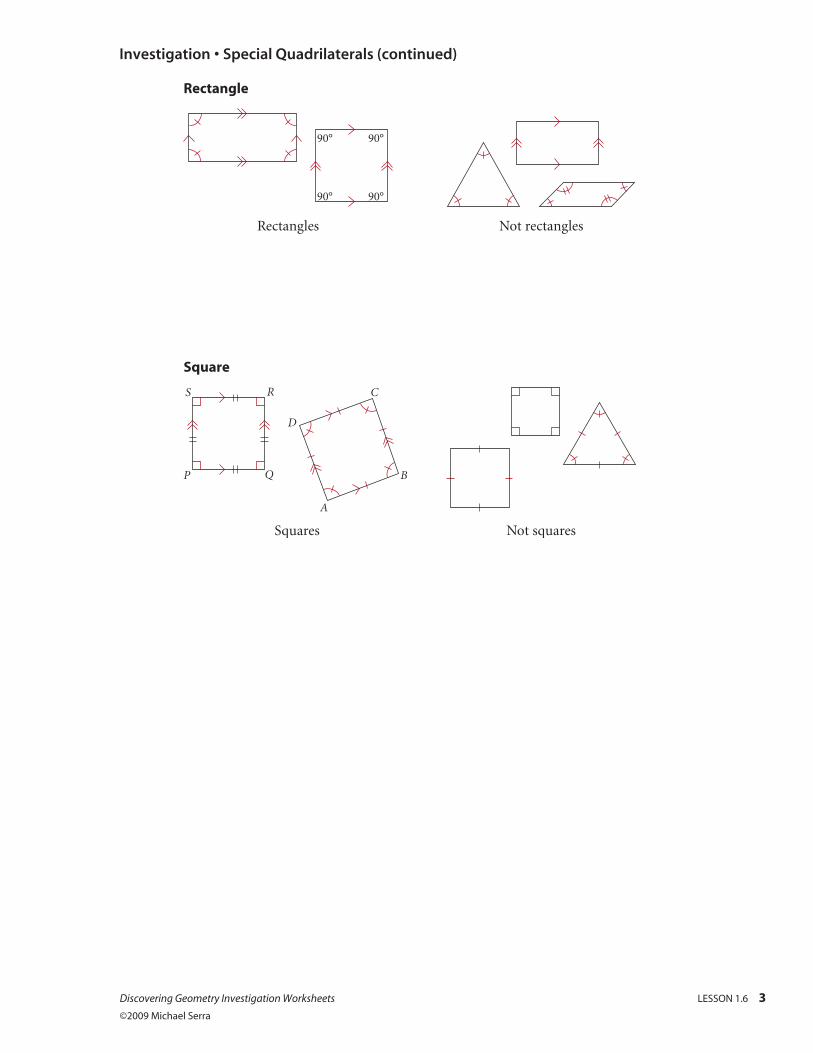
Investigation • Special Quadrilaterals (continued)
Discovering Geometry Investigation Worksheets LESSON 1.6 3
©2009 Michael Serra
Rectangle
Rectangles
90° 90°
90°90°
Not rectangles
Square
S R
P Q
A
B
C
D
Squares Not squares

Investigation • Defining Circle Terms
Name Period Date
Step 1 Write a good definition of each boldfaced term in the space below each set of diagrams. Discuss your definitions with others in your group. Agree on a common set of definitions as a class and add them to your definitions list. In your notebook, draw and label a figure to illustrate each definition.
Chord
A
B
D
CE
F
H
G
IJ
T
UV
W
P
QR
S
Chords: Not chords:
AB, CD, EF, GH, and IJ PQ, RS, T
U, and VW
Diameter
E
C
A
F
D
B
O
W
R
S
P VT
U
Q
Diameters: Not diameters:
AB, CD, and EF PQ, RS, TU, and VW
Discovering Geometry Investigation Worksheets LESSON 1.7 1
©2009 Michael Serra

Investigation • Defining Circle Terms (continued)
Tangent
F E
A
B C
D
P Q
T
U S
R
V
W
Tangents: Not tangents:
AB, CD, and EF PQ, RS, TU, and VW
Note: You can say AB is a tangent, or you can say AB is tangent to circle O. The point where the tangent touches the circle is called the point of tangency.
Step 2 Can a chord of a circle also be a diameter of the circle? Can it be a tangent? Explain why or why not.
Step 3 Can two circles be tangent to the same line at the same point? Draw a sketch and explain.
2 LESSON 1.7 Discovering Geometry Investigation Worksheets
©2009 Michael Serra
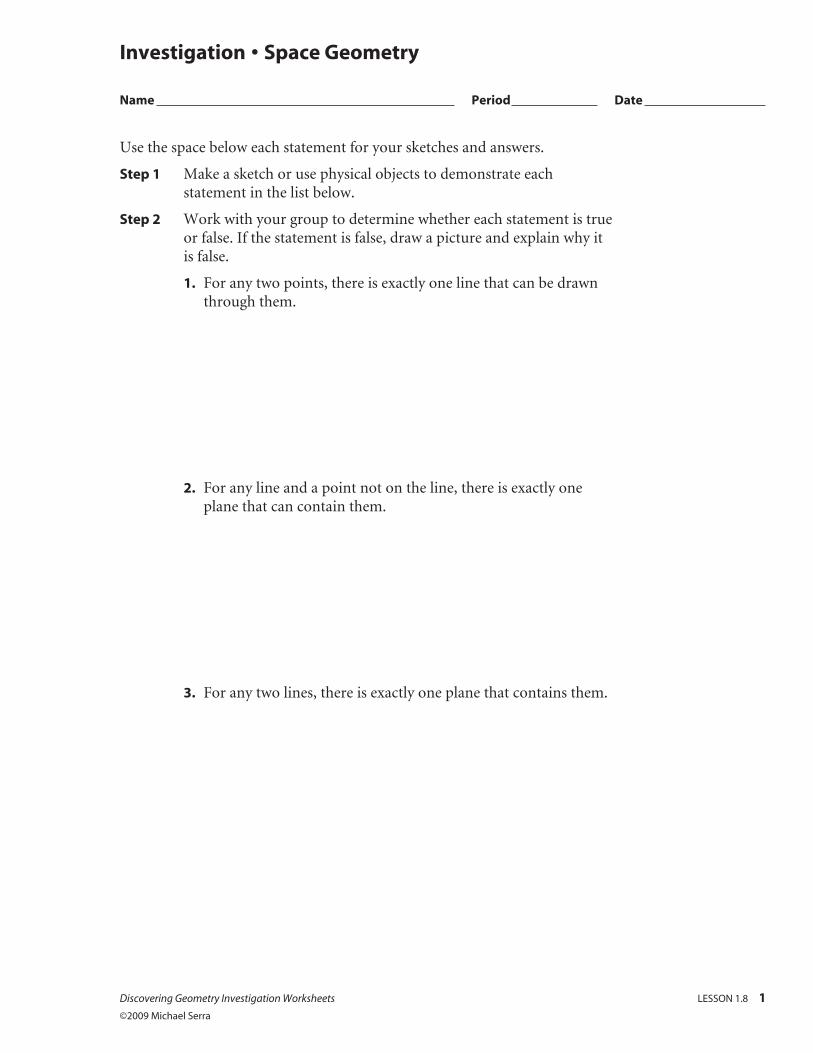
Investigation • Space Geometry
Name Period Date
Use the space below each statement for your sketches and answers.
Step 1 Make a sketch or use physical objects to demonstrate each statement in the list below.
Step 2 Work with your group to determine whether each statement is true or false. If the statement is false, draw a picture and explain why it is false.
1. For any two points, there is exactly one line that can be drawn through them.
2. For any line and a point not on the line, there is exactly one plane that can contain them.
3. For any two lines, there is exactly one plane that contains them.
Discovering Geometry Investigation Worksheets LESSON 1.8 1
©2009 Michael Serra

Investigation • Space Geometry (continued)
4. If two coplanar lines are both perpendicular to a third line in the same plane, then the two lines are parallel.
5. If two planes do not intersect, then they are parallel.
6. If two lines do not intersect, then they are parallel.
7. If a line is perpendicular to two lines in a plane, and the line is not contained in the plane, then the line is perpendicular to the plane.
2 LESSON 1.8 Discovering Geometry Investigation Worksheets ©2009 Michael Serra