national infrastructure guidelines for elementary ... · department of education issued free to...
TRANSCRIPT

Department of Education
ISSUED FREE TO SCHOOLS IN PNG Revised 2010
NATIONAL INFRASTRUCTURE GUIDELINES FOR ELEMENTARY
COMMUNITY & PRIMARY SCHOOLS

National Infrastructure Guidelines for Elementary, Community and Primary Schools (November 2009)
Acknowledgments The Department of Education acknowledges the work of the School Infrastructure Management Office (SIMO) of the Co-ordination, Communication and Legal Services Division; the Curriculum Development Division; and the Health Promotion Section of the Department of Health in the development of these guidelines.
The National Infrastructure Guidelines (NIG) were developed following national workshops in August and September 2004 during which a wide range of views were sought from stakeholders at national, provincial and local levels of government, school communities, NGOs, churches and the private sector. These views formed the basis of the principles that support the Guidelines and the practices that make for appropriate and sustainable infrastructure for schools of all sizes, locations and developmental contexts. The draft Guidelines were advertised for public comment and the National Department of Education (NDOE) acknowledges the responses received. In March 2009 the practical application of the Guidelines was reviewed by NDOE, BEDP Project Managers, sample schools and Boards of Management (BOMs) and Basic Education Development Project (BEDP) staff. These revised Guidelines are the result of that review. This document was developed with the support of the Australian Government through the Basic Education Development Project.
Copyright
All rights reserved

National Infrastructure Guidelines for Elementary, Community and Primary Schools (November 2009)
CONTENTS SECRETARY’S MESSAGE 1. INTRODUCTION …………………………………………………………………………..….1 2. PLANNING SCHOOL INFRASTRUCTURE.............................…...................................2 3. CONSTRUCTION TYPES..............................................................................................4 4. SELECTING AND PREPARING THE BUILDING SITE..................................................8 5. LIGHT AND VENTILATION……………………………………………………………….….8 6. DESIGNING FOR THE DISABLED……………………………………………….…….…...9 7. ELEMENTARY CLASSROOMS………………………………………………………...…...9 . 8. PRIMARY CLASSROOMS..................................................…......................................11 9. LIBRARIES, ADMINISTRATION OFFICES, STAFFROOMS AND STOREROOMS…14 10. SPECIALIST CLASSROOMS.....................................................................................15 11. SCHOOL FURNITURE...............................................................................................16 12. TEACHER HOUSING………………………………………………………………………18 13. WATER SUPPLY .…..................................................................................................20 14. SANITATION .............................................................................................................24 15. POWER .....................................................................................................................31 16. CONCLUSION..................................................…......................................................32

National Infrastructure Guidelines for Elementary, Community and Primary Schools (November 2009)
SECRETARY’S MESSAGE The National Department of Education establishes and monitors national policy and guidelines for the delivery of basic education. These include guidelines on basic standards for school infrastructure. The Organic Law makes Boards of Management and Local Level Governments responsible for the maintenance and construction of basic education infrastructure. The National Department of Education has developed these National Infrastructure Guidelines to ensure that schools are aware of the best infrastructure options available. These Guidelines provide schools, Boards of Management, Local Level Governments, Districts and Provinces with achievable standards and targets for basic education facilities that cater for all elementary and primary schools in PNG. When used with the School Infrastructure Management Manual (SIMM) they will help schools to prioritise their infrastructure needs and obtain appropriate technical assistance to design, procure and build their school facilities. The National Department of Education has established a School Infrastructure Management Office to monitor the implementation of these Guidelines and to provide schools with ongoing technical assistance. These Guidelines are expected to be a significant means of raising education standards through the provision of appropriate and sustainable education infrastructure throughout PNG. I expect all school communities to commit themselves to ensuring that the Guidelines are implemented effectively. Dr Joseph Pagelio Secretary for Education November 2009

National Infrastructure Guidelines for Elementary, Community and Primary Schools (November 2009)
1
1. INTRODUCTION The purpose of these Guidelines is to help all elementary, primary and community schools in PNG have good infrastructure and a healthy physical environment. The Guidelines provide schools with information with which they can decide the: • most appropriate type of construction for their school buildings; • selecting and preparing building sites, and • the most appropriate designs for the school infrastructure and furniture. In these Guidelines ‘infrastructure’ is defined as buildings, water supplies, sanitation (toilets) and power. A School Infrastructure Management Office (SIMO) has been established within the National Department of Education (NDOE). SIMO monitors school infrastructure standards, assists with the distribution of annual Maintenance Grants and provides baseline information for the prioritisation of annual Infrastructure Grants. The focus of the SIMO is to provide support to Boards of Management (BOMs) and school administrations through capacity building, training and the delivery of maintenance and infrastructure grants. Schools can contact SIMO through their Provincial Education Office Maintenance of school infrastructure is a major issue throughout PNG and is outside the scope of these Guidelines. Strategies to maintain school infrastructure are covered separately in the School Infrastructure Management Manual (SIMM) which was issued to all schools when they received their first Maintenance Grant under the Basic Education Development Project (BEDP). Additional copies of the SIMM and these National Infrastructure Guidelines are available from SIMO. Another important document that schools should refer to when planning to build new infrastructure is the PNG Building Code. The purpose of the Building Code is to ensure that buildings have been properly designed and sensibly located to ensure the safety of the students and teachers and to protect them from natural hazards such as earthquakes, floods, cyclones, landslides and bushfires. Departments of Works and Building Design

National Infrastructure Guidelines for Elementary, Community and Primary Schools (November 2009)
2
Professionals know these requirements and can work with the school BOM to ensure that any new buildings comply with the Building Code. Schools in urban areas may need to obtain a Building Permit. This requires lodging an application to be approved by the provincial Building Board. Schools need to consult with their LLG or local Department of Works to determine whether they need to obtain a building permit.
2. PLANNING SCHOOL INFRASTRUCTURE Before Board of Managements (BOMs) commit money to building new infrastructure they should prepare a school infrastructure plan that considers and prioritises all the school infrastructure, maintenance, furniture and equipment needs for the next few years. Smaller schools may only have one or two classrooms while larger schools would include multiple classrooms, offices, staffrooms, a library (resource centre), specialist classrooms and teachers’ houses. Urban schools may have the majority of their buildings constructed from materials purchased from a hardware store (permanent materials). Remote schools may have most buildings constructed from traditional (bush) materials. BOMs need to make decisions on their school’s infrastructure requirements based on the school’s size, location and funds available.

National Infrastructure Guidelines for Elementary, Community and Primary Schools (November 2009)
3
These guidelines recommend that when communities are making the decisions on what is to be included in the school infrastructure plan they follow the strength based five “Ds” decision making process illustrated below. Better infrastructure decisions are always made when everyone in the community, both women and men, are involved in this process.
Once a BOM has developed a school infrastructure plan they will then need to consider:
• The type of construction for the buildings • How to select and prepare the best place to locate the new infrastructure • How to maximise light and ventilation into the buildings • How to design the building so that people with disabilities can use them • The best plans for the classrooms, library, staffroom, storerooms,
administration and any specialist buildings • The type of furniture the school requires • Housing for teachers • The best way to provide water, sanitation and power
The following chapters outline infrastructure designs and targets for the various facilities that make up an elementary or primary school. The designs illustrated can be built using traditional (bush) materials, building materials purchased from a hardware store (permanent materials) or a mixture of both bush and hardware store building materials (semi-permanent).

National Infrastructure Guidelines for Elementary, Community and Primary Schools (November 2009)
4
3. CONSTRUCTION TYPES There is no one best construction type: all have advantages and disadvantages. Funds available, school enrolment, school location and environment determine whether school BOMs construct buildings from traditional (bush) materials or materials purchased from a hardware store. A description of the construction types to be considered when deciding to commit funds to building new infrastructure are described below. Building with Traditional (Bush) Materials: Traditional or ‘Bush’ material buildings are constructed by local tradesmen from local materials either donated by or purchased from the community and built to the same standard as other buildings in the surrounding villages. The BOM should ensure only the most experienced tradesmen are used to construct school buildings. The buildings constructed should show visitors the pride the community has in the local building culture.

National Infrastructure Guidelines for Elementary, Community and Primary Schools (November 2009)
5
Examples of traditional materials could include: • gravel/sand/karanas; • posts and round poles (long lasting species only); • thatch:- morota/kunai/sago leaves; • woven blinds:-pangal/mambu/pitpit/sago palm/bamboo; • bark:-limbung, marita, high mountain podocarp; • timber shingles (long lasting timber only); and • sawn-timber (long lasting species only). Older women and men in the school community should be consulted about the most appropriate traditional materials to use. They will know which local species are long lasting and the best way to use them. They can advise when parts of the building, such as thatch, woven blinds, barks etc, will need to be replaced. Some advantages of using traditional materials to construct all or some of the buildings in a school are: • traditional materials can be provided to the school by the community free of
charge or at minimal cost; • building construction employs local labour and skills and reinforces the value of
local culture and beliefs which are an important part of the school curriculum; • it ensures all the community participates and it strengthens the partnership
between the school and the community; and • the buildings can reflect the local character and customs of the community the
school serves. Traditional material buildings are not permitted in Urban Areas where the Provincial Building Boards require all buildings constructed to meet the PNG Building Code. Buildings Built From Materials Purchased at a Hardware Store (Permanent Buildings) Hardware store materials are building materials such as: • treated plantation timber; • cement; • roofing iron; • steel posts; and • metal wall cladding.

National Infrastructure Guidelines for Elementary, Community and Primary Schools (November 2009)
6
Buildings built from materials purchased at a hardware store can be constructed in kit-set form or can be made up from materials available from a reputable and reliable hardware store using plans supplied by government or other architects. Kit-set buildings have the advantage that they can be quickly erected and, as all the elements are factory manufactured, there is usually better quality control. However, for remote schools the cost of transporting the kit-sets can outweigh the advantages. SIMO can provide detailed drawings for schools to get prices from builders. If schools wish to use their own designs or appoint local architects to draw up their plans then the building dimensions should be equivalent to the target building plans shown in the relevant chapters of these Guidelines. Some advantages of constructing buildings using building materials purchased at a hardware store are: • the materials are usually more durable; • the roof can be used to collect rainwater; and • the building can be constructed more securely. The main disadvantage is that materials bought at a hardware store are usually more expensive than traditional materials.
Buildings Built From a Mixture Of Traditional (Bush ) Materials and Materials Purchased From a Hardware Store (Semi Permanent Buildings) At a minimum, these types of buildings should have footings, structural supports, roof trusses and framing and roofing purchased from hardware stores. Locally milled timber can be used for framing and trusses as long as the species of timber used are termite resistant or have been treated with appropriate chemicals. SIMO can advise on treatment procedures and termite resistant timbers in any particular locality. Buildings

National Infrastructure Guidelines for Elementary, Community and Primary Schools (November 2009)
7
using untreated timber will deteriorate faster than buildings using treated timber. Where structural timber is in contact with the ground only Copper Chromate Arsenate (CCA) treated, Alkaline Copper Quaternary (ACQ) treated or very durable timber such as Kwila, Malas or Garamit should be used.
Buildings which use hardware store materials for key construction elements are sometimes called ‘Core Structures’. Such structures are erected by experienced carpenters and then infilled using traditional materials and methods. Core structures can be purchased from manufacturers in kit-set form or can be made up from materials available from a reputable and reliable hardware store. Some advantages of using this “mixed materials” building approach to construct all or some school buildings are: • the overall cost of materials is cheaper as traditional materials can be provided to
the school by the community free of charge or at minimal cost; • the buildings are cheaper to construct than buildings using all hardware store
materials; • participatory construction processes can be used for some or all of the building;
and • rain water can be collected from metal roofing areas.

National Infrastructure Guidelines for Elementary, Community and Primary Schools (November 2009)
8
4. SELECTING AND PREPARING THE BUILDING SITE The proper preparation of the land on which a building is to be built is critical to ensure the building has a long life. This applies whether the building is constructed using traditional (Bush) building materials, building materials purchased from a hardware store or a mixture of hardware store and traditional materials. Some good principles that schools should follow when selecting and preparing a building site are: • the site should be dry all year and away from any swampy ground; • the site should not be filled with earth imported from somewhere else; • the site should be flat or follow a contour to minimise excavation and reduce the
possibility of the buildings being damaged by landslides; • the site excavation should have a slight fall to allow water to run off during
construction and there should be drains around the perimeter to direct surface water away from the building;
• all ditches and excavations around the building site should have gentle slopes so that erosion is avoided; and
• there should be no trees within 3 metres of the building to minimise any damage from roots or falling branches.
These guidelines recommend that schools should prepare site plans or “School Maps” of all the school facilities and “Master Plan” where they think future buildings should be located. This will ensure that the school makes the best use of the land that it has available.
5. LIGHT AND VENTILATION It is important that all buildings have good natural lighting and good airflow in and around them to ensure comfortable learning and living environments.

National Infrastructure Guidelines for Elementary, Community and Primary Schools (November 2009)
9
For buildings that have iron roofs it is a good idea to provide a light opening in the gable ends or install a strip of translucent roof sheeting in the roof at the front of the classroom. This will provide good lighting onto the blackboard and assists students who have poor eyesight. However, care needs to be taken to ensure the translucent sheet is ‘solar protected’ to avoid heat build up in the room. Ventilation and window opening requirements will vary depending on location:
• Large windows with shutters in coastal areas, where the buildings can catch sea breezes;
• Large open windows in lowland areas, where it is usually hot and humid with little or no breeze, or
• Small windows with shutters in highland areas, where it can get quite cold. In areas where there is volcanic activity, such as around Rabual, Kokopo and the Gazelle peninsula, roofs need to be designed so that volcanic ash does not build up on the roof. To allow this to happen roofs should have a minimum 25 degree pitch.
6. DESIGNING FOR THE DISABLED Many people with a disability, such as people in wheelchairs, people using crutches deaf and blind people, have difficulty using school buildings because of poorly designed steps, tight entry ways, uneven paths, inaccessible toilets and poor natural lighting. Sometimes this stops them from going to school and so they become even more disadvantaged as they cannot get an education. When deciding to build a new school building the BOM should think about how to make it easy for a person with a disability, to get into and out of the building and access other school facilities. This could include:
• Providing a ramp as well as a stair into the building. The ramp would ideally have a grade of 1:14.
• Ensuring that doors, corridors and paths have wide openings. 900mm for doors and 1200mm for paths and corridors.
• Building wide smooth paths, without bumps or steps, between buildings and to the toilet areas.
• Ensuring that at least one toilet has sufficient space around the toilet bowl so that a person in a wheelchair can get on and off the toilet. Ideally the size of the room housing the toilet bowl should be at least 2000mm x 1600mm and have a grab rail next to the toilet bowl.
• Considering the layout of classrooms to allow students with poor eye sight or are slightly deaf to be closer to the blackboard and teacher.
7. ELEMENTARY CLASSROOMS The Curriculum Development Division of the National Department of Education bases the teaching of the elementary curriculum on classes of 40 students. Classes can be either single grade or multigrade. Multigrade classes can have two or three elementary grades in one room. On this basis classrooms should be designed for 40 students and have a minimum total floor area of 42 square metres with a minimum width of 4.7 metres.

National Infrastructure Guidelines for Elementary, Community and Primary Schools (November 2009)
10
Illustrated below are some suggested layouts for elementary classrooms.
LAYOUT 1 LAYOUT 2 LAYOUT 3 LAYOUT 4 Many other floor plan layouts are possible. A typical cross section for an elementary classroom is illustrated below.

National Infrastructure Guidelines for Elementary, Community and Primary Schools (November 2009)
11
When constructing elementary classrooms the following principles should be noted: • Concrete floors are preferred. Floors should be a maximum of 500mm and a
minimum of 150mm above ground level. • Window cills should be 1200mm high to reduce children being distracted by
outside activities. • Windows should be protected by extended eaves and/or shutters. • End walls should not have windows and be used for wall displays. • Library shelving should be built and students provided with pigeon holes for
their belongings and school work. Shelves should be no more than 900mm high.
• Teachers should be provided with a full height lockable storage cupboard. • Translucent roof sheet should be installed over the blackboard area.
8. PRIMARY CLASSROOMS The Curriculum Development Division bases the teaching in both lower and upper primary curriculum on classes of 40 students. Classes can be either single grade or multigrade. Multigrade can comprise up to three grades. On this basis one classroom is required for every 40 students. (Where multigrade is being taught one classroom is required for every multigrade teacher.) The best classroom configuration is one that allows a maximum of 40 grade 7/8 students to be taught under multigrade conditions. This type of classroom will allow any subject in the curriculum to be taught to both single grade or multigrade and at either lower or upper primary levels. For 40 students the minimum floor area is 64 square metres with an ideal width of 7.8 metres. Where a library or reading space is included this area should be increased to 74 square metres. Classroom dimensions can be reduced for schools with smaller classes but, ideally, should not be less than 54 square metres with a minimum width of 6 metres. (6 metres is the maximum span for simple collar tie trusses which can be easily built and erected by local workers)

National Infrastructure Guidelines for Elementary, Community and Primary Schools (November 2009)
12
Sizes for target primary classroom floor layouts based on 2 seater desks are shown in the layouts 1, 2, 3 and 4 above. Desks or tables should be available for all primary school students. Many other floor plan layout options are available. The most popular way for classrooms to be built is in pairs with a storeroom/office in between. This design provides good security for the storeroom/office. SIMO, the Department of Works, and Kit-Set building manufacturers have classroom plans that are similar to this design. A typical example is shown above:

National Infrastructure Guidelines for Elementary, Community and Primary Schools (November 2009)
13
The diagram below shows a layout that has two adjacent classrooms with a removable wall in-between and the office at the end. This arrangement can support the management of large single or multigrade classes. It also caters for large indoor meetings.
A typical cross section for a single storey primary classroom with timber floor is illustrated below. In some urban areas or where the school site has limited room for expansion it may be necessary to consider two storey buildings for classrooms or teachers houses. SIMO can provide drawings of two storey classroom options.

National Infrastructure Guidelines for Elementary, Community and Primary Schools (November 2009)
14
9. LIBRARIES, ADMINISTRATION OFFICES,
STAFFROOMS AND STOREROOMS
All primary schools need to allow space for libraries (resource centres), administration offices, staffrooms and storerooms. How this space will be constructed depends on the enrolment of the school. This table shows minimum requirements for various school enrolments: SCHOOL ENROLMENT
LIBRARY STOREROOM ADMINISTRATION OFFICE
STAFFROOM
SMALL Up to 80 students
Located in a section of the classroom or storeroom
Secure room at end or between classrooms or one of the rooms in the Head Teacher’s house
Use classroom or convert part of the storeroom as an office.
Not essential
MEDIUM Up to 300 students
Located in a section of the classroom, a room in another building or a designated library building
Secure room at end or between classrooms
Use classroom or convert part of the storeroom as an office.
Separate room with toilet facilities incorporated into the Administration building
LARGE Over 300 students
Designated library building either stand alone or as part of the Administration Building
Secure room at end or between classrooms and/or as part of the Administration building
Designated room between classrooms, or incorporated into an Administration building
Separate room with toilet facilities incorporated into the Administration building
The previous classroom diagrams show how a storeroom/office can be integrated with classrooms. Storerooms need to be of a sufficient size to include shelving. If the store is to double as an office, side benches should be included. Plans for libraries, offices, staffrooms and resource centres depend on the number of students and teachers at the school. Some suitable floor plan options for these facilities are shown overleaf. Note the incorporation of a verandah along one side of the building. This provides a useful meeting area for students, staff and public which is protected from the weather.

National Infrastructure Guidelines for Elementary, Community and Primary Schools (November 2009)
15
10. SPECIALIST CLASSROOMS Although the current primary school curriculum can be taught in a general classroom some schools, particularly large schools in urban areas, may want to erect specialist classrooms for the teaching of science, practical skills, home economics or computer studies. These classrooms require special joinery and services that are beyond the scope of these guidelines. However, SIMO and the DOW have designs for these types of classrooms that can be provided to schools on request. These designs can be adapted by a local architect employed by the school BOM to suit the school’s specific requirements. If a school decides to construct a specialist classroom they need to make sure that they have properly qualified teachers that can teach the specialist subjects.
National Infrastructure Guidelines for Elementary, Community and Primary Schools (November 2009)
16
11. SCHOOL FURNITURE Elementary School desks and seats The teaching of the elementary curriculum is best taught if children are seated on floor mats and around tables suitable for up to eight children. Seating arrangements are typically as follows: • Elementary Preparatory Class – Children sit on mats for most indoor lessons.
Working shelves or tables should be organised alongside the walls with the blackboard and the teacher’s desk area cleared (i.e. without any children’s work benches or tables).
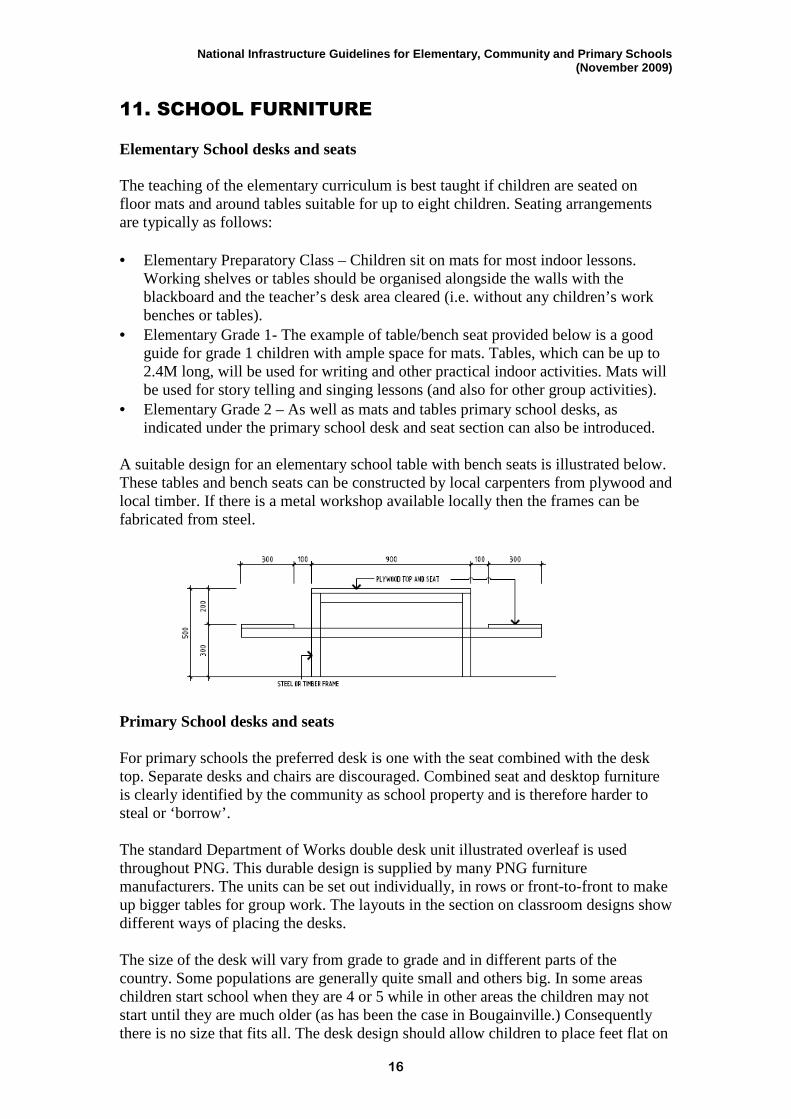
• Elementary Grade 1- The example of table/bench seat provided below is a good guide for grade 1 children with ample space for mats. Tables, which can be up to 2.4M long, will be used for writing and other practical indoor activities. Mats will be used for story telling and singing lessons (and also for other group activities).
• Elementary Grade 2 – As well as mats and tables primary school desks, as indicated under the primary school desk and seat section can also be introduced.
A suitable design for an elementary school table with bench seats is illustrated below. These tables and bench seats can be constructed by local carpenters from plywood and local timber. If there is a metal workshop available locally then the frames can be fabricated from steel. Primary School desks and seats For primary schools the preferred desk is one with the seat combined with the desk top. Separate desks and chairs are discouraged. Combined seat and desktop furniture is clearly identified by the community as school property and is therefore harder to steal or ‘borrow’. The standard Department of Works double desk unit illustrated overleaf is used throughout PNG. This durable design is supplied by many PNG furniture manufacturers. The units can be set out individually, in rows or front-to-front to make up bigger tables for group work. The layouts in the section on classroom designs show different ways of placing the desks. The size of the desk will vary from grade to grade and in different parts of the country. Some populations are generally quite small and others big. In some areas children start school when they are 4 or 5 while in other areas the children may not start until they are much older (as has been the case in Bougainville.) Consequently there is no size that fits all. The desk design should allow children to place feet flat on

National Infrastructure Guidelines for Elementary, Community and Primary Schools (November 2009)
17
the floor and elbows comfortably on the desktop. In an ideal school two or three desk sizes may be needed to cater for all. The different sized desks should be painted in different colours so that they can be easily identified. The table below, used by commercial manufacturers in Australia, gives an indication of appropriate dimensions to suit different heights of children. Child’s Height (mm) 1080-1250 1200-1380 1260-1430 1400-1600 1450-1650 1600-1790
H2 (mm) 300 335 350 395 405 450
H1(mm) 490 545 570 635 650 720
D1 (mm) 350 370 400 450 470 500
Schools need to remember that boys and girls develop at different rates and will need to monitor children’s development regularly to ensure that they continue to have the right desk size.
Other Furniture A teacher’s desk and chair should be provided for each classroom and built in shelves for libraries and storerooms. It is also a good idea to incorporate shelves around the perimeter of classroom walls and provide pigeon holes for students to store their school work and belongings. All classrooms should be provided with a chalkboard having a minimum dimension of 3.6 metres long (4.8M is preferred) by 1.2 metres deep and pin-boards having a dimension of 2.4 metres by 1.2 metres. Ideally chalkboards should be factory made on 15mm ply, however, where this is not available masonite can be painted with chalkboard paint and fixed to 15mm ply can be used. Pinboards can be either ‘caneite’ or traditional soft walling in a timber frame. Where separate administration buildings, libraries or specialist classrooms are planned then purpose built furniture will need to be provided.

National Infrastructure Guidelines for Elementary, Community and Primary Schools (November 2009)
18
12. TEACHER HOUSING The current situation on teacher housing in PNG is as follows: • It is a legal responsibility of BOMs to maintain teacher housing; • in general, housing is not provided for the majority of teachers at urban schools; • some form of housing is generally provided for the majority of teachers at rural or
remote schools, (though much of this housing is in poor condition); • housing is not provided to teachers at elementary schools as teachers are from the
local community; and • rent from housing owned by the government is deducted from teachers pay by the
NDOE. There is a large variety of housing types which can be built from bush materials, materials purchased from a hardware store or a combination of bush and hardware store materials. The decision on whether BOMs should allocate resources to teacher housing instead of other priorities is difficult for most schools. These guidelines recommend that BOMs are to only allocate funding for teacher housing where: • the ability to attract and retain teachers is frustrated because of the lack or poor
condition of teacher housing; • rental accommodation to an acceptable standard is not available within a
reasonable distance from the school; • land that formally belongs to or is leased by the school is available for housing;
and • a school map or Master Plan has been prepared and indicates that there is
sufficient land and that the future development of the school will not be compromised by allocating land to housing.
Where housing is owned by the BOM or community, schools should charge teachers a base rent that will cover the maintenance of the house. Ideally, this money should be kept separate from other funds and used only for staff housing maintenance. Whether constructed from bush or hardware store materials, teacher housing should be of the very best quality to attract and retain good teachers. Costs of houses built from hardware store materials can vary considerably: from basic kit-set houses with no internal services to the Department of Works L40 types that include internal bathroom, kitchen, laundry and cupboards. Ideally, the house plans should reflect good design principles and comfortable living conditions. Houses in highland and lowland or coastal areas should be different to take account of the different climatic conditions. Lowland houses should be more open and have more windows and verandah areas than highland houses. Houses near volcanic areas (such as Rabaul), should have roofs with a minimum 25 degree slope. Where there is a shortage of land, duplex or apartment type housing may need to be considered. All houses must have access to clean water and toilet facilities. These guidelines recommend that wet areas such as toilets and showers should be made from durable materials such as concrete block walls with concrete or fibre cement flooring, and be isolated from dry areas such as bedrooms.

National Infrastructure Guidelines for Elementary, Community and Primary Schools (November 2009)
19
Two good examples of high set and low set primary school teacher housing for both rural and urban environments are illustrated on the following pages. HIGH SET HOUSE GROUND FLOOR (URBAN) HIGH SET HOUSE FIRST FLOOR (only suitable where there is a reliable water supply)
HIGH SET HOUSE GROUND FLOOR RURAL CROSS SECTION

National Infrastructure Guidelines for Elementary, Community and Primary Schools (November 2009)
20
13. WATER SUPPLY A good quality, easy to use water supply is important for protecting people’s health. Poor quality drinking water can cause diseases like diarrhoea, typhoid and dysentery. Water is also needed for washing and cleaning. Insufficient water can lead to poor hygiene, and can result in skin infections and other diseases. What types of water sources are there? Schools can get their water supply from a number of sources: • rainwater tanks; • springs, creeks and dams; • wells; • bore holes; and • town supply. What is the best type of water sources for a school? A reliable water supply of clean drinkable water is a major problem for many schools in PNG. Where a piped water supply is not available, schools depend on water tanks, wells, bore holes, streams or students bringing bottled water to school. Sometimes water from wells, boreholes or streams is contaminated or dries up. Often even piped water is unreliable and is not available for parts of the day or even for many weeks. It is common for schools to be closed during long dry spells or when the school’s water supplies are depleted or cut off. Such closures can severely disrupt students’

National Infrastructure Guidelines for Elementary, Community and Primary Schools (November 2009)
21
education. Consequently, it is important that all schools have a backup water supply such as rainwater tanks. The location of the school will determine what is the best type of water source. The provincial town engineer can help the school make a decision. A local builder or the school maintenance staff can set up rainwater tanks and dig wells. However, for some of the other supply sources, schools will have to get help from building professionals and qualified tradesmen. RAIN WATER TANKS What type of rainwater tank? The most common types of tanks available are galvanised steel, fibreglass and “tuffa” (plastic). Of these, galvanised steel is the cheapest, but it does not last as long as fibreglass or polyethylene (“tuffa’). There are also Fibre cement tanks, but these need to be built by persons with specialist skills and are not very common in PNG. Water tanks come in a variety of sizes and materials. The most common sizes in PNG are 2,000 gal (9,000 litres) and 3,000 gal (13,500 litres). Advantages and disadvantages of the most popular types of tanks are: TANK TYPE ADVANTAGES DISADVANTAGES
Corrugated steel Least expensive of the tank types available Can be easily transported in sections to remote locations.
Subject to corrosion, especially in coastal areas, reducing life span of the tank. Requires a plumber with soldering skills to rivet sections together.
Fibreglass Is constructed in two halves so is relatively easy to transport to remote locations.
If not manufactured under strict quality control conditions the resins and epoxies can break down from ultra violet radiation and allow fibres to contaminate the water. The gaskets that secure the tank halves may deteriorate over time and have to be replaced to prevent tanks from leaking.
Polyethylene (‘Tuffa’)
Is the most robust of the tanks currently available and is very easy to install.
Difficult to transport to remote locations. Yet to be tested over a long time period (15 years or more) in PNG conditions. Can be too tall for some buildings.
Fibre cement ‘in-situ’
Long lasting. Can be built relatively cheaply if built in numbers (20 or more) using community labour.
Quality control is critical to ensure tanks don’t crack. Because community workers have to be trained it is uneconomic to build these tanks in small quantities. Unless proper moulds are used the tanks can look ugly.

National Infrastructure Guidelines for Elementary, Community and Primary Schools (November 2009)
22
How many rainwater tanks should a school have and where should they be located? All school communities should install rain water tanks, either as their main water supply or as a backup supply. Ideally, at least one water tank should be connected to the roof of every substantial building in the school. One should also be located near to each of the boys’ and girls’ toilets for hand washing. To help you calculate more exactly how many tanks are needed, a single 9,000 litre tank is enough for a typical class of 35 children for 35 days (7 litres per child per day). This is if the tank is full at the start of the 35 days, and no rain falls in that time. The 35 children would have enough water for drinking (minimum 3 litres per day) and for washing their hands after visiting the toilet (minimum 4 litres per day). These calculations can be upset if the community also uses the tank and the tank tap is left open. Building a rainwater collection system If schools have buildings with a suitable roof (galvanised iron, colorbond, etc.) they can set up a rainwater collection system. A typical design for a system is shown below. Rainwater tanks usually stand on a structure made of either a concrete slab (as shown above) or a raised deck of timber, steel or concrete. The deck will need to be designed specifically for the size of the tank and for the ground conditions. If you use timber for the deck, it needs to be treated and constructed above the ground. The best place for a tap is on a standpipe, a minimum of 1.5 metres away from the tank. If the tap is put directly onto the tank, the tank can be damaged if someone tries to pull the tap off. The tap needs to be high enough for a bucket to fit under it. There is a need for a system for the spilt water and overflow water to be taken away from the tank location. If there is no town supply electricity at the school site (even if diesel generators are available) then the use of tank systems that rely on electric motors to pump water to a header tank should be avoided. Manual pumps will require continual care and maintenance to keep them operational.

National Infrastructure Guidelines for Elementary, Community and Primary Schools (November 2009)
23
SPRINGS, CREEKS AND DAMS What is the best way for schools to get water from springs, creeks and dams? Water from these sources is usually shared with the community. Some infrastructure, such as pipes and a storage system, is needed. Chlorination should be considered, as well as a pump. If the school chooses to collect water from springs, creeks and dams, the school and the community should engage a building professional to look at the water source, suggest a design and get quotations. Springs, creeks and dams can become contaminated. Hence, it is good practice to establish a separate supply for drinking water such as a rainwater tank. WELLS AND BORE HOLES When should a school build a well? A well with a hand pump can be installed if the ground water is within 8 metres of the ground surface. A typical well installation is drawn below.

National Infrastructure Guidelines for Elementary, Community and Primary Schools (November 2009)
24
If the school thinks a well is the best option, quotations are needed and it will be necessary to engage a local builder to follow the drawings and construct the well. The water will need to be chlorinated, if it is used for drinking. Chlorinating tablets may be available from a building supplier or from the provincial Department of Health. When should a school build a Bore Hole? Sometimes the ground water is too deep for a well. In this case a bore can be used. Bores need to be located and installed by a specialist. He or she will find a source, bore the hole and establish a pumping system. Bores cost a lot, both to set up and to maintain, so this option should only be used when there is no other water source available. The school can contact their LLG for the names and contact details of Drilling and Boring Contractors in their area. Contact details can also be found in PNG Yellow Pages. TOWN WATER If the school is in or near a town that has piped (reticulated) water, schools are usually connected to the town supply. If the school is not on the town supply, but wants to be connected, it will be necessary to consult with the LLG or town authority. Schools may need to seek advice from a building professional about how and where to connect to the town supply. The actual installation must be done by a qualified plumber.
14. SANITATION
The best type of toilet option for any school will depend on the availability of water at the school.
• If there is a reliable 24 hour town water supply then flushing toilets can be used. These could be connected to either a septic system or the town sewerage system.
• If there is no reliable water supply, ventilated improved pit (VIP) toilets are recommended.
• Where the school is next to the sea or a river or there is a high water table it is often impractical to construct VIP or flushing toilets. These schools should provide toilet facilities that are at least in keeping with local practice, such as solwara toilets.

National Infrastructure Guidelines for Elementary, Community and Primary Schools (November 2009)
25
• Other toilet options include composting toilets. However, these types of toilets are not widely used in PNG and can create problems if not properly used and maintained.
Why use a Ventilated Improved Pit (VIP) Latrine? The pit latrine is the most common kind of toilet in rural schools. However, many pit latrines are poorly built and are health hazards due to flies and bad smells. A better alternative is the VIP latrine which has been used successfully in PNG for more than 20 years. A drawing of a VIP toilet is illustrated below. The difference between the common pit latrine and the VIP latrine is in the ventilation. The VIP latrine has a properly placed vent pipe, painted black. The vent pipe serves two purposes: • firstly, the black colour means that the air in the pipe is heated by the sun’s rays,
and the heated air rises sucking up the smells away from the pit by convection; and • secondly, the vent pipe acts as an insect trap, and traps flies once they are in the
pipe, so that they cannot escape and spread disease. There is a piece of fly screen over the top of the pipe for this purpose.
A further improvement is to use a pedestal seat constructed from a fibreglass mould or timber rather than a “squat hole”. Pedestal seats have the advantage that they prevent the cubicle becoming fouled with excrement.

National Infrastructure Guidelines for Elementary, Community and Primary Schools (November 2009)
26
Pedestal seats constructed from fibreglass moulds have the following additional advantages:
• Because of the conical shape, the pedestal does not get fouled and needs only occasional cleaning inside.
• The smooth concrete finish off the fibreglass moulds makes the cubicle easy to clean.
Constructing a VIP toilet Pits are usually between 0.9m and 1.2m in diameter and between 2.0m and 5.0m in depth. Pits in unstable soil must be lined to prevent collapse of the sides. Standard designs often use bricks, galvanised steel culvert pipes, concrete pipe rings or mass concrete but locally available materials such as rocks, discarded metal drums and old tyres also work well. When pits are 80% full they should be covered over with soil and a new pit dug. Pits should be sized to last between 3 and 5 years. The size of the hole required can be determined as follows.
An average adult person is estimated to produce 65 litres of sludge per year in a dry pit. Elementary and primary school children will produce 40 litres of sludge per year of which 60% or 24 litres may be deposited in school latrines. The formula to find out how long a dry pit latrine should be used before it is covered given below: Pit life in years = 0.80 x Volume of pit (in cubic metres) Annual sludge production per person (in cubic metres) x
Number of persons Note: there are 1,000 litres to a cubic metre
Using the formula above you will find that a pit latrine for 30 pupils that is 1.0m in diameter x 4.0m deep will last approximately 4 years.
The easiest construction for the VIP latrine is to have a squat hole. However, experience has shown that often the floor around these squat holes become fouled with excrement. These guidelines recommend that a proper seat be used. If a proper seat is preferred, a complete fibreglass unit can be purchased, or the seat can be made out of timber. They can have a seat and a lid for a cover as in a flush toilet. If a squat hole is used there should be raised footpads on the concrete slab. For men’s toilets, it is useful to have a separate urinal.
National Infrastructure Guidelines for Elementary, Community and Primary Schools (November 2009)
27
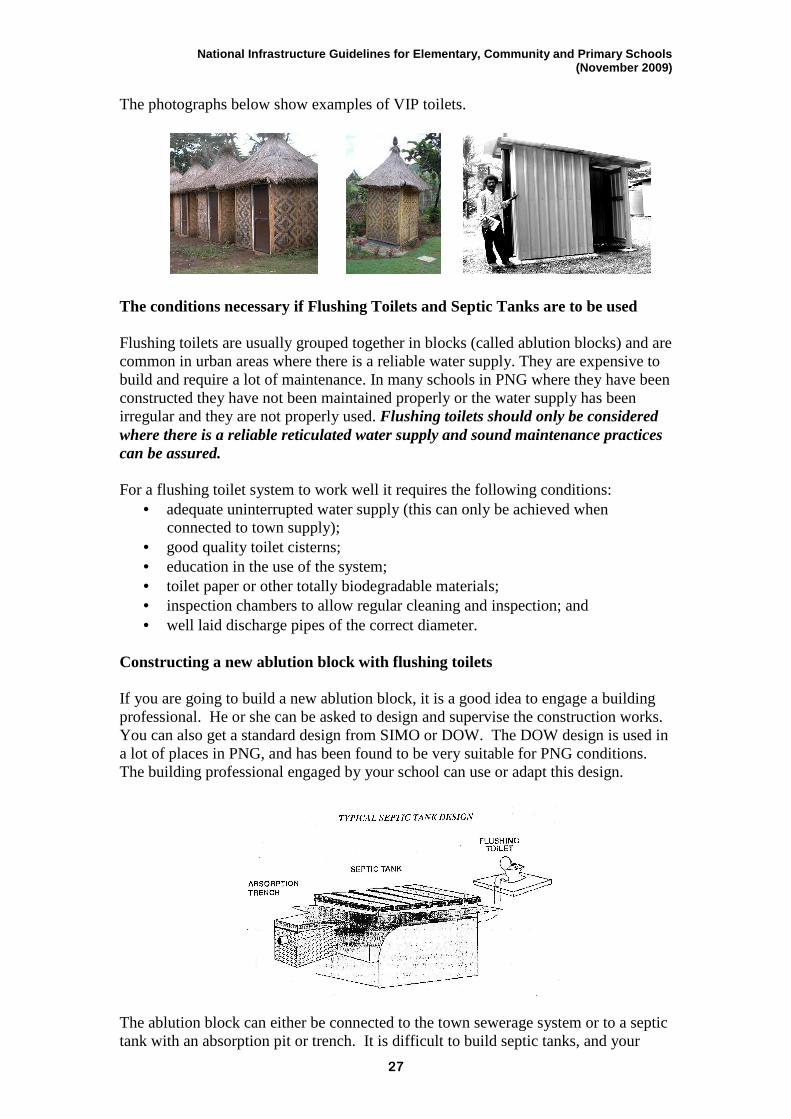
The photographs below show examples of VIP toilets. The conditions necessary if Flushing Toilets and Septic Tanks are to be used Flushing toilets are usually grouped together in blocks (called ablution blocks) and are common in urban areas where there is a reliable water supply. They are expensive to build and require a lot of maintenance. In many schools in PNG where they have been constructed they have not been maintained properly or the water supply has been irregular and they are not properly used. Flushing toilets should only be considered where there is a reliable reticulated water supply and sound maintenance practices can be assured. For a flushing toilet system to work well it requires the following conditions:
• adequate uninterrupted water supply (this can only be achieved when connected to town supply);
• good quality toilet cisterns; • education in the use of the system; • toilet paper or other totally biodegradable materials; • inspection chambers to allow regular cleaning and inspection; and • well laid discharge pipes of the correct diameter.
Constructing a new ablution block with flushing toilets If you are going to build a new ablution block, it is a good idea to engage a building professional. He or she can be asked to design and supervise the construction works. You can also get a standard design from SIMO or DOW. The DOW design is used in a lot of places in PNG, and has been found to be very suitable for PNG conditions. The building professional engaged by your school can use or adapt this design.
The ablution block can either be connected to the town sewerage system or to a septic tank with an absorption pit or trench. It is difficult to build septic tanks, and your

National Infrastructure Guidelines for Elementary, Community and Primary Schools (November 2009)
28
school will need some professional help. On the standard DOW plan, there is a suggested length and depth of these pits and trenches, but all this depends on how porous the soil at the site is, and on how fast the water moves through the soil. A building professional can do a geotechnical study and suggest a location and design the length and depth of the pits and trenches required. Common reasons for the failure of flushing toilets and septic tanks
• The water supply is irregular or of a very low pressure. This means that the toilet cannot be flushed after each use which is unhygienic and can cause blockage.
• Cheap plastic cisterns may be used that do not stand up to the constant use. Only high quality commercial cisterns should be installed.
• Toilet paper is not always available which results in other materials being used, most of which block up the system.
• Toilet blocks are not inspected and cleaned on a regular basis, i.e. daily. • Students are unfamiliar with the operation of flush toilets leading to
unhygienic conditions or system blockages. • The disposal system lacks an inspection or access chamber to allow cleaning
and un-blocking of pipes. • The solids level of septic tanks is allowed to build up to high levels resulting
in carry over and blocking up of absorption trenches. Septic tanks require to be pumped out regularly. This will depend upon their capacity and use and will vary between 2 to 5 years.
• Septic tanks are undersized resulting in solids carrying over and blocking up of absorption trenches.
Any of these failures can cause serious health issues and may even result in the closure of the school. Where should toilets be located? Schools need to plan the location of all toilets and ablution blocks carefully, considering health, security and privacy. In particular the issues of security and privacy, in respect of the use of female toilets, are of great concern. BOMs can help to resolve these requirements by the careful location of toilets on the school site and, where necessary, the provision of privacy screens and security fencing. Special needs for female students The BOM must consult female staff members and mothers on the location of all toilet areas and ensure that their security and privacy concerns are incorporated into both the toilet design and locations. In addition, the special needs of older girls and female staff must be considered. This will include for the discrete disposal of sanitary waste and provision of good washing facilities, including a shower. Sanitary napkins and other personal hygiene items should not be flushed or washed down septic toilets, as they block the system. They should be put into small rubbish bins with close fitting lids and a plastic bag inside. The bins should be emptied and cleaned daily, and the waste burned. Schools should keep a small supply of sanitary napkins available for girls who may need them unexpectedly. A female teacher should be given the responsibility of looking after the female toilets and the sanitary napkins.

National Infrastructure Guidelines for Elementary, Community and Primary Schools (November 2009)
29
Environmental considerations There are some other environmental considerations as well. If the water table is very high, it could cause some problems about where to site the latrines. One way to cope with a high water table is to build an earth mound around a 44 gallon drum, old vehicle tires or stone pitching, so that the latrine is above ground level, otherwise toilet facilities that are at least in keeping with local practice, such as solwara toilets, should be provided. Good and bad practices for locating toilets The following table provides some good and bad practice pointers when deciding on the location of toilets.
Good Practice Bad Practice
To improve the security of female toilets
• Toilets are centrally located within reasonable distance of other school facilities,
• In urban areas it may be necessary to erect a security fence if, because of land constraints, the toilets need to be located close to boundaries.
• Toilets located on school boundaries, • Toilets located in public areas or where strangers gather or pass by.
To improve the privacy of female toilets
• Female and male toilets are separate blocks located in different areas of the school site,
• Entrances to toilets are screened from access and view by general public,
• Where it is necessary to locate female and male toilets in the same block for reasons of cost or land use then there needs to be a full height wall separating the toilets and entry to the toilets should be at each end of the building.
• Female and male toilets are located in the same block back to back,
• Doors to toilets open directly into public view.
To maintain a healthy school environment
• New toilets are located at least 25 metres from a well, bore, creek or spring and at least 50 metres from a coastal shoreline,
• On sloping ground toilets should be located at a lower elevation than a ground water supply,
• On level ground the area around latrines and the water supply should be mounded with earth,
• Locate hand washing facilities close to toilets.
• Toilets located on the banks of creeks,
• Toilets located above or near (within 25 metres) wells,
• No hand washing facilities close to toilets.
BOMs should think about these things when locating

National Infrastructure Guidelines for Elementary, Community and Primary Schools (November 2009)
30
How many toilets should be provided? It is a legal requirement that all schools are provided with good toilet facilities. The PNG Department of Health has regulations which determine the ratio of pupils per toilet at 1 toilet to every 25 girls and 1 for every 25 boys for schools of up to 100 students and 1 toilet for every 40 for schools of over 400 students. Based on experiments carried out by AT Projects Inc. in Goroka, a minimum ratio of 1:40 for girls and 1:60 for boys is recommended. All teacher housing should have access to its own toilet and water supply (a water tank should be provided to every teacher’s house). A separate toilet should be provided for day staff. In schools that have children with physical disabilities BOMs also need to consider disabled access to the toilet facilities. This would normally require that there be at least 1 male and 1 female toilet, or a unisex toilet, that has a pedestal seat and wash hand basin located in a room at least 2M x 1.6M. All toilets must have hand washing facilities nearby. School BOMs must emphasis the importance of washing hands straight after going to the toilet. All primary schools should be provided with a shower room for young women students. Where there is no running water, an enclosed cubicle with a concrete floor, bucket and drain, similar to the diagram below, should be provided in a secure and private location near the girls toilet and close to the girls hand washing water supply.

National Infrastructure Guidelines for Elementary, Community and Primary Schools (November 2009)
31
Use and maintenance of toilets Students need to be properly trained to use flush toilets as many will be unfamiliar with them. Some VIP toilet manufacturers also offer training courses in the use of VIP toilets. Many schools have found these to be valuable. Whatever toilets are used the school must include routine cleaning and maintenance as part of their work parade program and class teachers should ensure soap and toilet paper are available for students when they go to the toilet. The school BOM should ensure that the schools’ infrastructure plan takes account of water and sanitation requirements as recommended in these guidelines. Checking of toilets should be included as part of the NDOE school inspectors check list
15. POWER Urban schools and some rural schools will have the option of connecting to a town supply power grid. Many rural schools can connect to a diesel generator supply or a mini hydro. All schools have the option of including solar or wind generator kits for some or all of their power supply. Whatever power option a school connects to it is important that the school’s electrical system, wiring, lighting and power points, is installed by a licensed electrician who understands electrical safety and can ensure that the installation satisfies the PNG electrical codes and so prevent the possibility of fire or serious injury. If choosing a diesel generator supply, schools need to budget for the ongoing cost of fuel and maintenance. If choosing a solar or wind generator supply, schools need to ensure that they can easily get parts from the kit supplier, as the components that make up the kits are easily damaged. The school will also need to ensure that there is a local person in the community that knows how to maintain the kits. For example, to ensure that only distilled water is used to keep the storage batteries working properly. They will also need to have good security to prevent any vandalism or theft.

National Infrastructure Guidelines for Elementary, Community and Primary Schools (November 2009)
32
16. CONCLUSION The application of these Guidelines will ensure that all schools have a good learning environment, no matter what the school size, where the school is located or the type of community the school serves. Schools should commit themselves to implementing these guidelines so that appropriate and sustainable school infrastructure is built. Good education infrastructure will help raise education standards throughout PNG.
