national program of cancer registries (npcr)mcr.umh.edu/mcr-arc new site/downloads/web plus...
TRANSCRIPT
National Program of Cancer Registries
Registry Plus Software for Cancer Registries
Web Plus Training Manual for Facility Abstractors
Version 2.0 (Based on Web Plus Version 2.0)
Web Plus Abstractor Training Manual Contents
Contents
Chapter 1: Introduction....................................................................................................1
Overall Learning Objectives............................................................................................1Overview of the Web Plus Training Manual...................................................................1Web Plus Features...........................................................................................................1Web Plus Users................................................................................................................2Requirements for Web Access.........................................................................................2
Chapter 2: The Basics.......................................................................................................3
Learning Objectives.........................................................................................................3Overview..........................................................................................................................3Log In...............................................................................................................................3Abstracting Process.........................................................................................................5Data Entry Page...............................................................................................................6Changing Your Password................................................................................................8Web Plus Version Information........................................................................................9Logging Out.....................................................................................................................9Questions.........................................................................................................................9
Chapter 3: Creating an Abstract...................................................................................10
Learning Objectives.......................................................................................................10Overview........................................................................................................................10Entering Information into Fields...................................................................................10Questions.......................................................................................................................13Activity – Creating an Abstract.....................................................................................13
Chapter 4: Adding Data to an Abstract........................................................................14
Learning Objectives.......................................................................................................14Overview........................................................................................................................14Opening and Updating an Abstract................................................................................14Activity – Activity – Adding Data, Part One................................................................17Adding Data, Part Two..................................................................................................17Text Fields.....................................................................................................................17Activity – Using Text Fields..........................................................................................18Adding Comments to an Abstract..................................................................................19Print Preview.................................................................................................................20Deleting an Abstract......................................................................................................20
ii Version 1.0 May 2023
Contents Web Plus Abstractor Training Manual
Questions.......................................................................................................................21Activity – Adding Information and Deleting.................................................................22
Chapter 5: Correcting Errors.........................................................................................23
Learning Objectives.......................................................................................................23Overview........................................................................................................................23Understanding Edit Sets................................................................................................23Edit Errors Tab..............................................................................................................23Correcting Errors Continued..........................................................................................24Activity – Correcting Errors..........................................................................................25Releasing the Abstract...................................................................................................27Questions.......................................................................................................................28
Chapter 6: Follow-Back Abstracts.................................................................................29
Learning Objectives.......................................................................................................29Overview........................................................................................................................29The Follow-back Process...............................................................................................29Rejecting Follow-back Abstracts...................................................................................32Questions.......................................................................................................................34
Chapter 7: Running Reports..........................................................................................35
Learning Objectives.......................................................................................................35Overview........................................................................................................................35Opening and Printing Reports.......................................................................................35Available Reports..........................................................................................................36Changing the Date Range of a Report...........................................................................38Local Reports.................................................................................................................38Abstracts Submitted Sorted by Abstractor Report........................................................38Abstracts Accessed Sorted by Patient Name Report.....................................................40Descriptive Statistics on Released Abstracts Report.....................................................42Activity Report..............................................................................................................46Facility Outstanding Follow-back Abstract Listing Report..........................................47HIPAA Accounting of Disclosure Report.....................................................................49Audit Reports.................................................................................................................51Activity – Finding Report Information..........................................................................52
Chapter 8: Final Learner Activity.................................................................................53
Overview........................................................................................................................53Medical Record..............................................................................................................53Hints...............................................................................................................................53
Appendix A: Answers......................................................................................................54
Chapter 2: The Basics...................................................................................................54Chapter 3: Creating an Abstract...................................................................................54Chapter 4: Adding Data to an Abstract........................................................................54Chapter 5: Correcting Errors........................................................................................54Chapter 6: Follow-back Abstracts................................................................................54
Version 2.0 March 2008 iii
Web Plus Abstractor Training Manual Contents
iv Version 1.0 May 2023
Web Plus Abstractor Training Manual Final Learner Activity
Chapter 1: IntroductionOverall Learning Objectives
These are the overall learning objectives for the Web Plus Facility Abstractor training manual:
Learn the major functions of Web Plus
Create abstracts in compliance with cancer registry standards
Correct errors so that the abstract is error-free and complete
Release abstracts
Complete and release, or reject, follow-back abstracts
View and modify the reports of Web Plus
Overview of the Web Plus Training ManualThe Web Plus Facility Abstractor Training Manual provides you with the information to understand and use this web application. In this manual you not only learn about the tools in Web Plus, you also create an abstract and follow the process of updating and correcting the abstract until it is complete and released to the central registry. You will also learn about completing follow-back abstracts that have been partially-filled by your central registry and posted for you to complete. Also, each chapter contains questions that test your knowledge of Web Plus and activities that allow you to practice your new skills on your own.
Although Web Plus can use any edit set, this manual uses the edit set “Central: Vs11 State Ex-Incoming Abstracts.” The edit set you use at your facility may differ.
Web Plus FeaturesWeb Plus is a web-based application that collects cancer data securely over the public Internet. It is ideal for use by central cancer registries for all electronic reporting needs. Web Plus supports three main functions; online abstracting (which is addressed in this training manual), file upload, and follow-back efforts. The online abstracting capability of Web Plus is ideal for reporting from physicians’ offices and other low-volume reporting sources, while the file upload feature can be used for electronic submission of data from all other reporting sources to the central cancer registry.
The Web Plus follow-back features enable your central cancer registry to upload partially-filled abstracts generated from death certificate and pathology lab files, and to notify you via e-mail to log in and update the abstracts.
All records are saved in a database at the hosting central cancer registry and cases entered by one facility or office are not visible to other facilities. Data entered are validated by the CDC EDITS Engine running on a web server. Users, display types, and edit
Version 2.0 March 2008 1

Creating an Abstract Web Plus Abstractor Training Manual
configurations are managed at the hosting central registry. Web Plus is hosted on a secure web server that has a digital certificate installed; the communication between the client and the server is encrypted with Secure Socket Layer (SSL) technology.
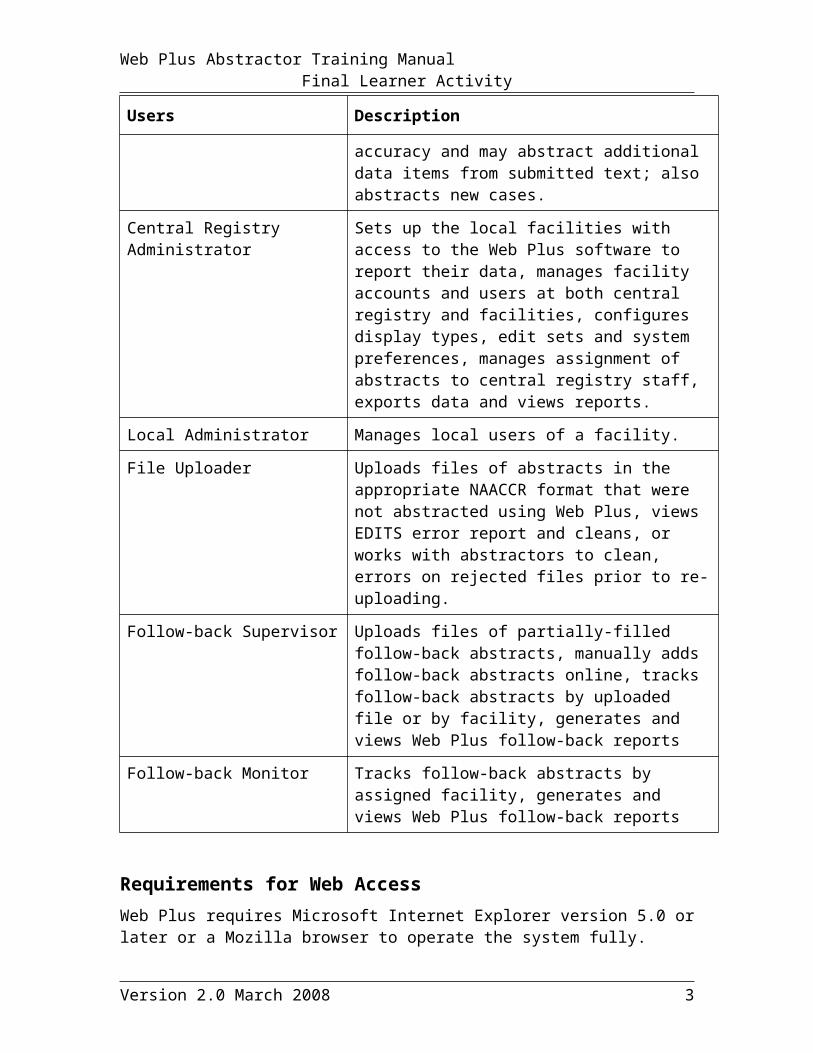
Web Plus UsersThe results from the design staff and usability testing have identified these types of Web Plus users:
Users Description
Facility Abstractor Works in a local facility or doctor’s office and handles patients’ medical records and paperwork. When a patient is diagnosed with cancer, the facility abstractor reports the case to the state’s central cancer registry.
Central Registry Abstractor/Reviewer
Reviews abstracts submitted to the central registry for completeness and accuracy and may abstract additional data items from submitted text; also abstracts new cases.
Central Registry Administrator Sets up the local facilities with access to the Web Plus software to report their data, manages facility accounts and users at both central registry and facilities, configures display types, edit sets and system preferences, manages assignment of abstracts to central registry staff, exports data and views reports.
Local Administrator Manages local users of a facility.
File Uploader Uploads files of abstracts in the appropriate NAACCR format that were not abstracted using Web Plus, views EDITS error report and cleans, or works with abstractors to clean, errors on rejected files prior to re-uploading.
Follow-back Supervisor Uploads files of partially-filled follow-back abstracts, manually adds follow-back abstracts online, tracks follow-back abstracts by uploaded file or by facility, generates and views Web Plus follow-back reports
Follow-back Monitor Tracks follow-back abstracts by assigned facility, generates and views Web Plus follow-back reports
Requirements for Web AccessWeb Plus requires Microsoft Internet Explorer version 5.0 or later or a Mozilla browser to operate the system fully. Although Web Plus works at 800 X 600 resolution, it can be
2 Version 2.0 May 2023
Web Plus Abstractor Training Manual Final Learner Activity
best viewed at 1024 X 768 or higher resolution. It is highly recommended that you change your resolution to 1024 X 768 or higher when using the Web Plus application.
Version 2.0 March 2008 3
Creating an Abstract Web Plus Abstractor Training Manual
Chapter 2: The Basics Learning ObjectivesIn this chapter, you will learn to:
Identify the menu options of Web Plus
Understand the process of working on an abstract
Log in and out of Web Plus
Change your password
OverviewThis lesson covers the basics of Web Plus. You’ll learn about logging in and out of Web Plus and the key elements of Web Plus.
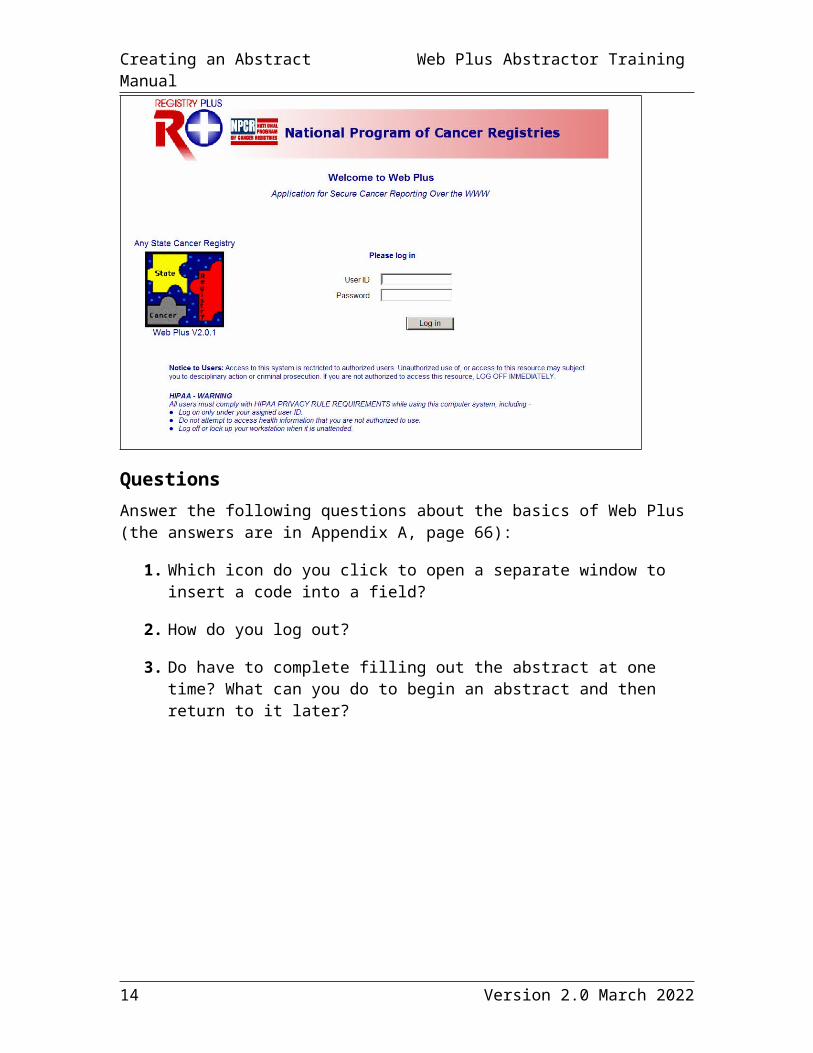
Log InTo log in, complete these steps:
1. Open your Internet browser and type the Internet address for the Web Plus in the Address field.
2. Press Enter.
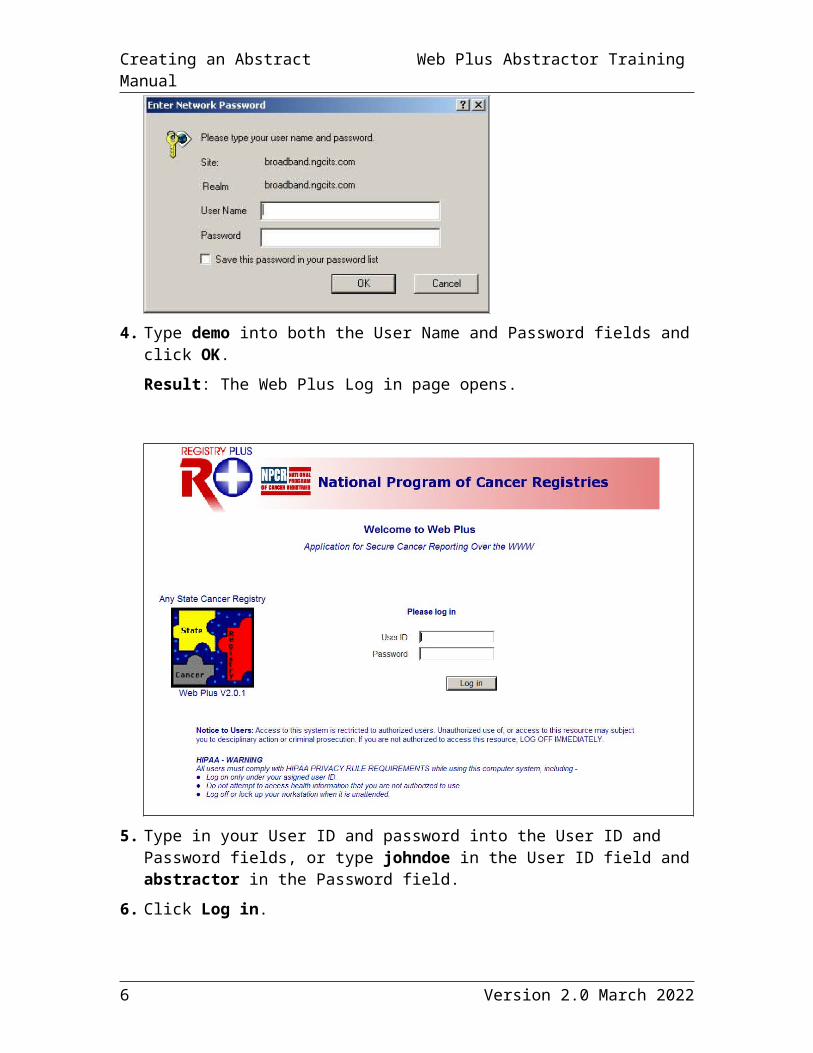
Result: Either the network password window or the Web Plus window opens.
If the Enter Network Password window opens, go to step 3.
If the Web Plus window opens, go to step 5.
3. Click within the User ID field to place your cursor there.
4. Type demo into both the User Name and Password fields and click OK.
Result: The Web Plus Log in page opens.
4 Version 2.0 May 2023
Web Plus Abstractor Training Manual Final Learner Activity
5. Type in your User ID and password into the User ID and Password fields, or type johndoe in the User ID field and abstractor in the Password field.
6. Click Log in.
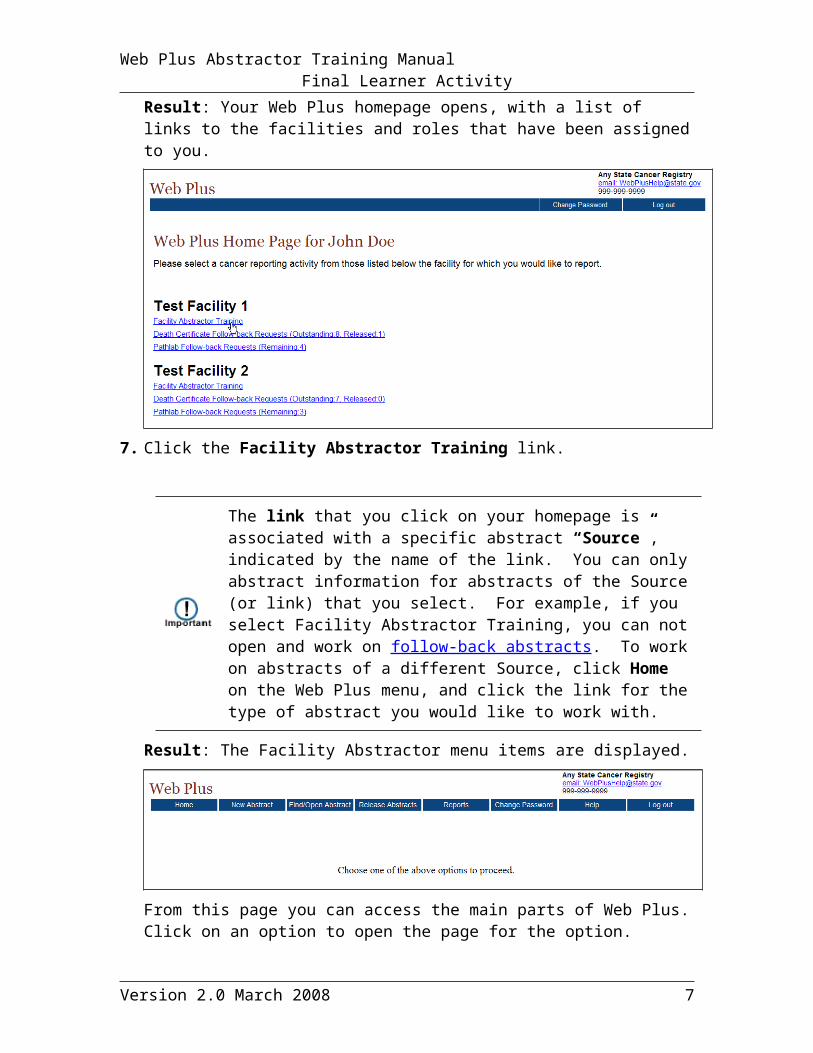
Result: Your Web Plus homepage opens, with a list of links to the facilities and roles that have been assigned to you.
7. Click the Facility Abstractor Training link.
Version 2.0 March 2008 5
Creating an Abstract Web Plus Abstractor Training Manual
The link that you click on your homepage is associated with a specific abstract “Source”, indicated by the name of the link. You can only abstract information for abstracts of the Source (or link) that you select. For example, if you select Facility Abstractor Training, you can not open and work on follow-back abstracts. To work on abstracts of a different Source, click Home on the Web Plus menu, and click the link for the type of abstract you would like to work with.
Result: The Facility Abstractor menu items are displayed.
From this page you can access the main parts of Web Plus. Click on an option to open the page for the option.
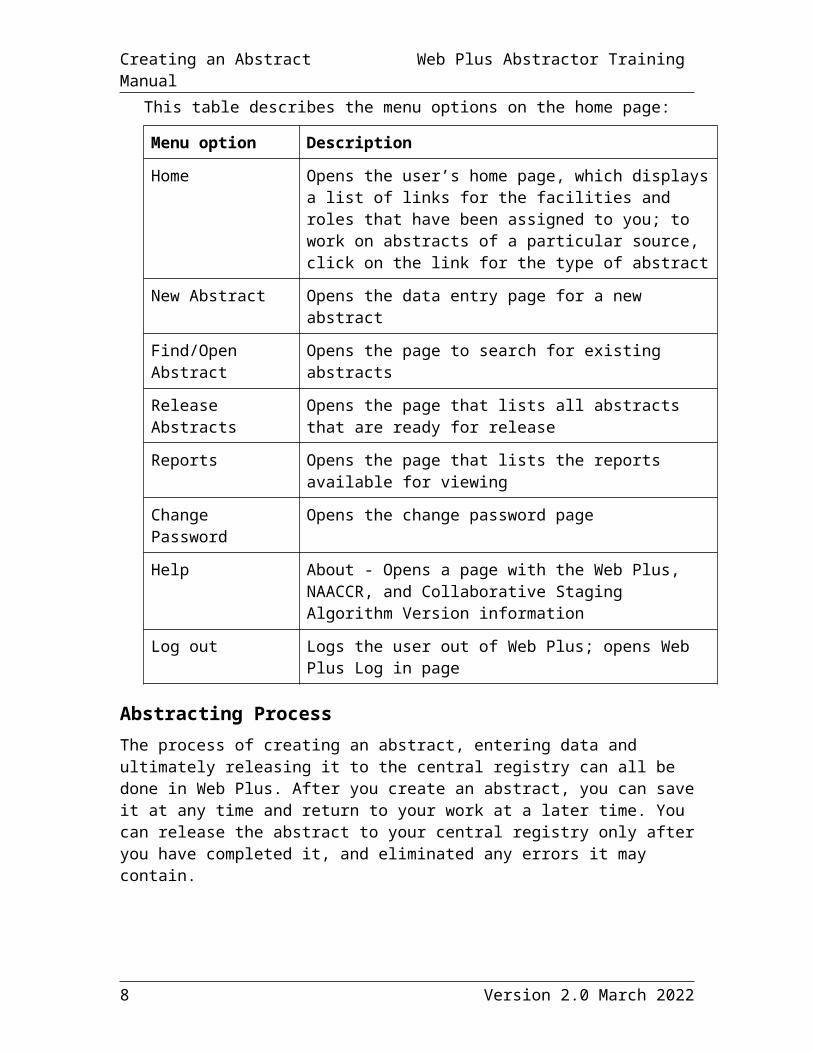
This table describes the menu options on the home page:
Menu option Description
Home Opens the user’s home page, which displays a list of links for the facilities and roles that have been assigned to you; to work on abstracts of a particular source, click on the link for the type of abstract
New Abstract Opens the data entry page for a new abstract
Find/Open Abstract Opens the page to search for existing abstracts
Release Abstracts Opens the page that lists all abstracts that are ready for release
Reports Opens the page that lists the reports available for viewing
Change Password Opens the change password page
Help About - Opens a page with the Web Plus, NAACCR, and Collaborative Staging Algorithm Version information
Log out Logs the user out of Web Plus; opens Web Plus Log in page
Abstracting ProcessThe process of creating an abstract, entering data and ultimately releasing it to the central registry can all be done in Web Plus. After you create an abstract, you can save it at any time and return to your work at a later time. You can release the abstract to your central registry only after you have completed it, and eliminated any errors it may contain.
6 Version 2.0 May 2023
Web Plus Abstractor Training Manual Final Learner Activity
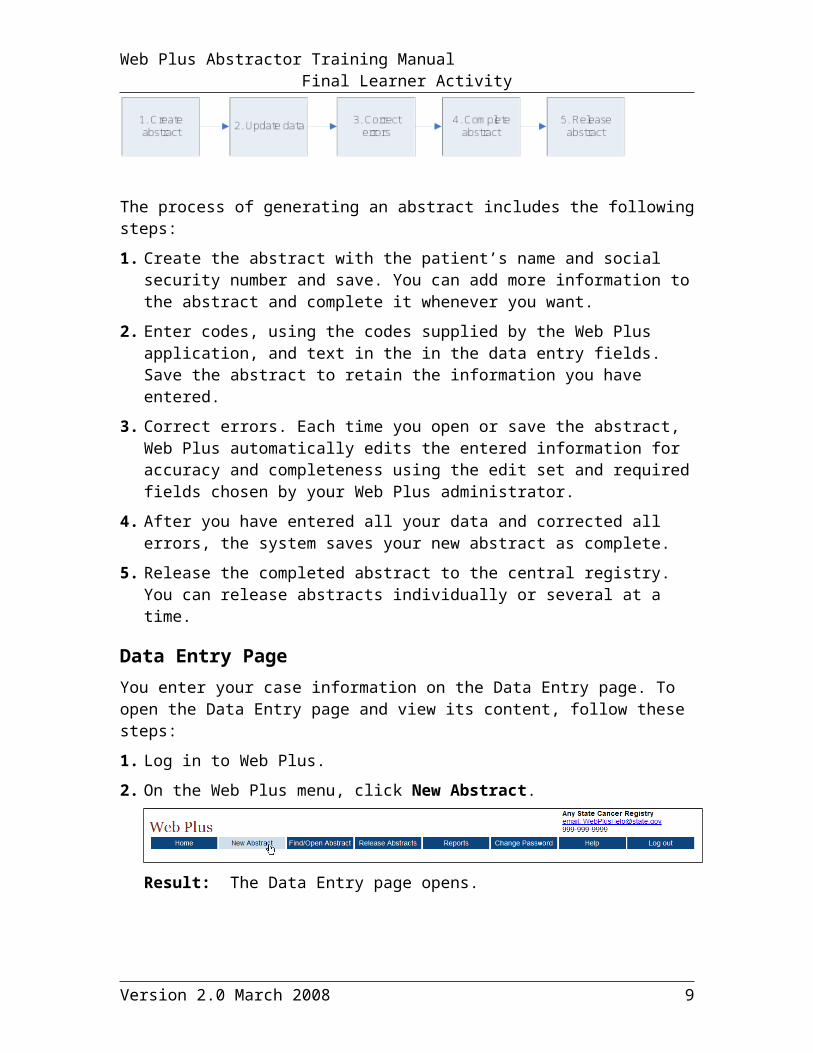
The process of generating an abstract includes the following steps:
1. Create the abstract with the patient’s name and social security number and save. You can add more information to the abstract and complete it whenever you want.
2. Enter codes, using the codes supplied by the Web Plus application, and text in the in the data entry fields. Save the abstract to retain the information you have entered.
3. Correct errors. Each time you open or save the abstract, Web Plus automatically edits the entered information for accuracy and completeness using the edit set and required fields chosen by your Web Plus administrator.
4. After you have entered all your data and corrected all errors, the system saves your new abstract as complete.
5. Release the completed abstract to the central registry. You can release abstracts individually or several at a time.
Data Entry PageYou enter your case information on the Data Entry page. To open the Data Entry page and view its content, follow these steps:
1. Log in to Web Plus.
2. On the Web Plus menu, click New Abstract.
Result: The Data Entry page opens.
Version 2.0 March 2008 7
Creating an Abstract Web Plus Abstractor Training Manual
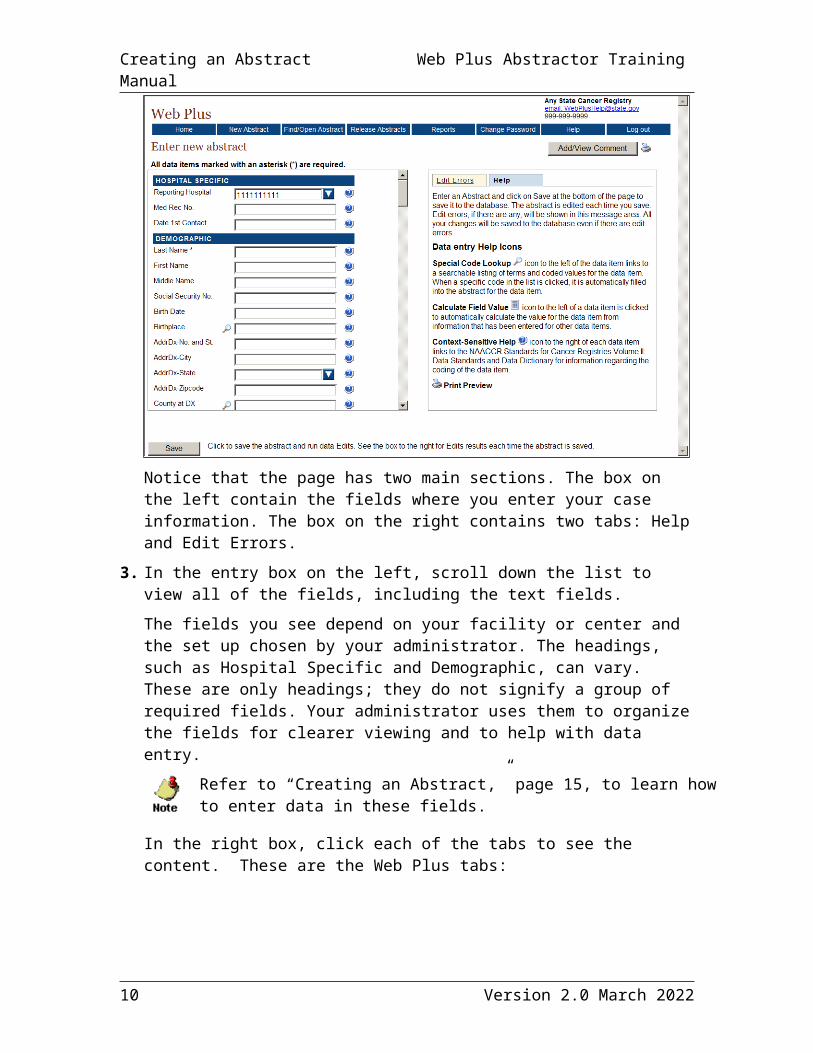
Notice that the page has two main sections. The box on the left contain the fields where you enter your case information. The box on the right contains two tabs: Help and Edit Errors.
3. In the entry box on the left, scroll down the list to view all of the fields, including the text fields.
The fields you see depend on your facility or center and the set up chosen by your administrator. The headings, such as Hospital Specific and Demographic, can vary. These are only headings; they do not signify a group of required fields. Your administrator uses them to organize the fields for clearer viewing and to help with data entry.
Refer to “Creating an Abstract,” page 12, to learn how to enter data in these fields.
In the right box, click each of the tabs to see the content. These are the Web Plus tabs:
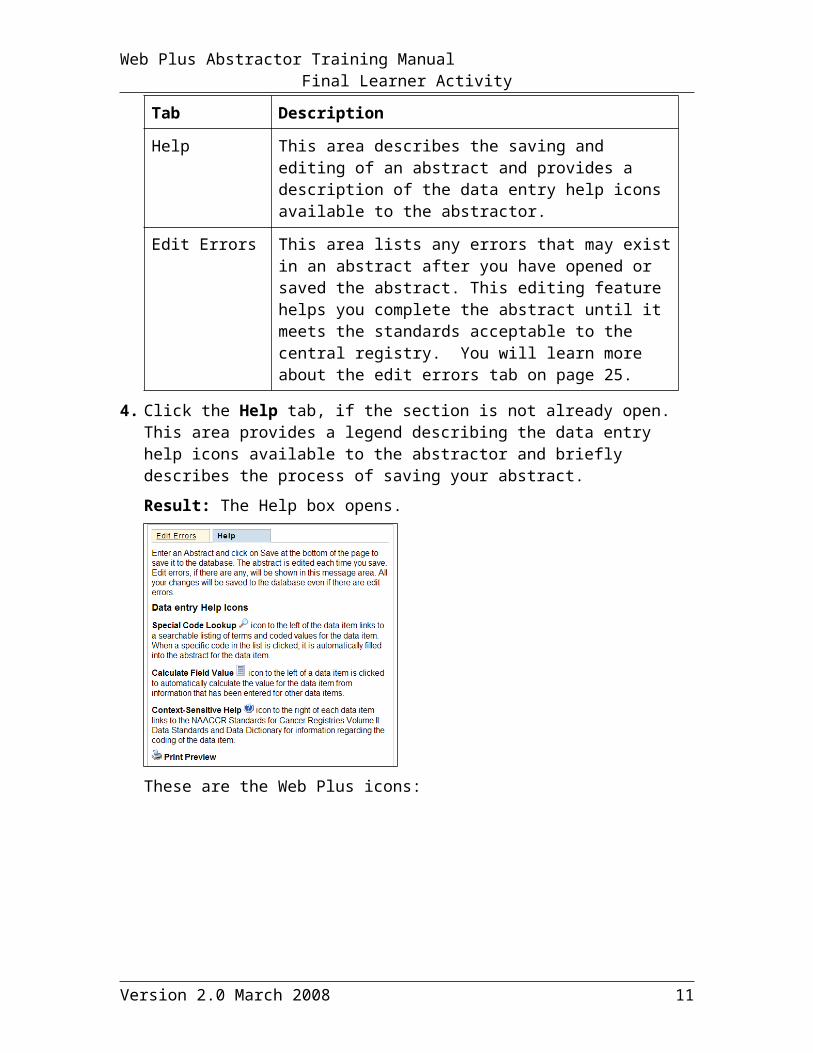
Tab Description
Help This area describes the saving and editing of an abstract and provides a description of the data entry help icons available to the abstractor.
8 Version 2.0 May 2023
Web Plus Abstractor Training Manual Final Learner Activity
Tab Description
Edit Errors This area lists any errors that may exist in an abstract after you have opened or saved the abstract. This editing feature helps you complete the abstract until it meets the standards acceptable to the central registry. You will learn more about the edit errors tab on page 22.
4. Click the Help tab, if the section is not already open. This area provides a legend describing the data entry help icons available to the abstractor and briefly describes the process of saving your abstract.
Result: The Help box opens.
These are the Web Plus icons:
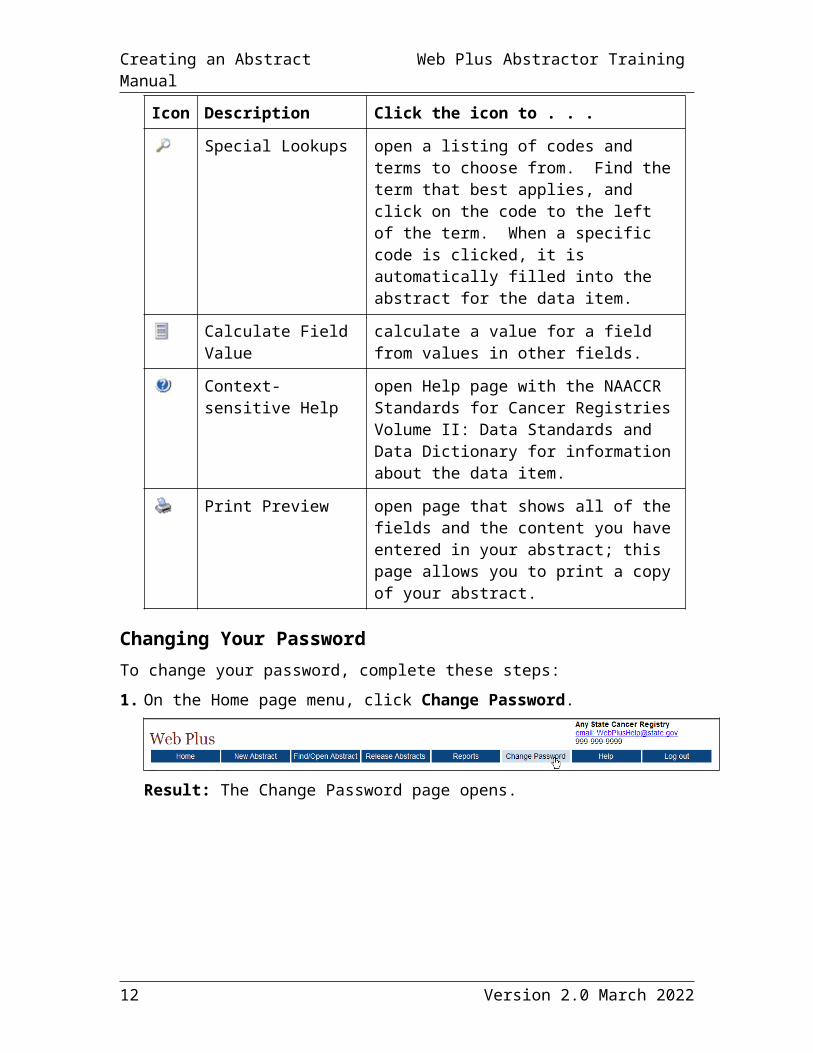
Icon Description Click the icon to . . .
Special Lookups open a listing of codes and terms to choose from. Find the term that best applies, and click on the code to the left of the term. When a specific code is clicked, it is automatically filled into the abstract for the data item.
Calculate Field Value calculate a value for a field from values in other fields.
Context-sensitive Help open Help page with the NAACCR Standards for Cancer Registries Volume II: Data Standards and Data Dictionary for information about the data item.
Print Preview open page that shows all of the fields and the content you have entered in your abstract; this page allows you to print a copy of your abstract.
Version 2.0 March 2008 9
Creating an Abstract Web Plus Abstractor Training Manual
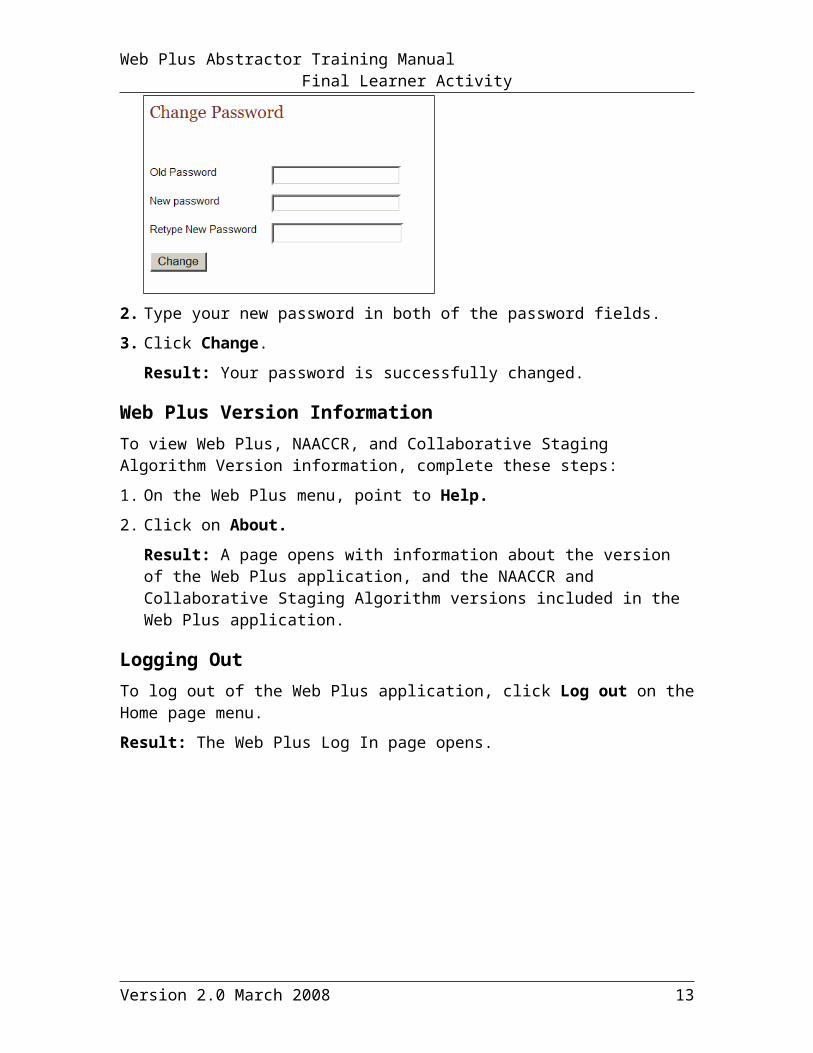
Changing Your PasswordTo change your password, complete these steps:
1. On the Home page menu, click Change Password.
Result: The Change Password page opens.
2. Type your new password in both of the password fields.
3. Click Change.
Result: Your password is successfully changed.
Web Plus Version InformationTo view Web Plus, NAACCR, and Collaborative Staging Algorithm Version information, complete these steps:
1. On the Web Plus menu, point to Help.
2. Click on About.
Result: A page opens with information about the version of the Web Plus application, and the NAACCR and Collaborative Staging Algorithm versions included in the Web Plus application.
Logging OutTo log out of the Web Plus application, click Log out on the Home page menu.
Result: The Web Plus Log In page opens.
10 Version 2.0 May 2023
Web Plus Abstractor Training Manual Final Learner Activity
QuestionsAnswer the following questions about the basics of Web Plus (the answers are in Appendix A, page 53):
1. Which icon do you click to open a separate window to insert a code into a field?
2. How do you log out?
3. Do have to complete filling out the abstract at one time? What can you do to begin an abstract and then return to it later?
Version 2.0 March 2008 11
Creating an Abstract Web Plus Abstractor Training Manual
Chapter 3: Creating an AbstractLearning ObjectivesIn this chapter, you will learn to:
Enter information into the data entry fields
Understand the process for completing an abstract
Use these data entry tools: drop-down lists, Help, and Special Lookups
OverviewIn this chapter you create an abstract that you use throughout this manual. In succeeding chapters you will complete and release this abstract. This chapter also introduces you to some basic entry tools to help you enter information in Web Plus.
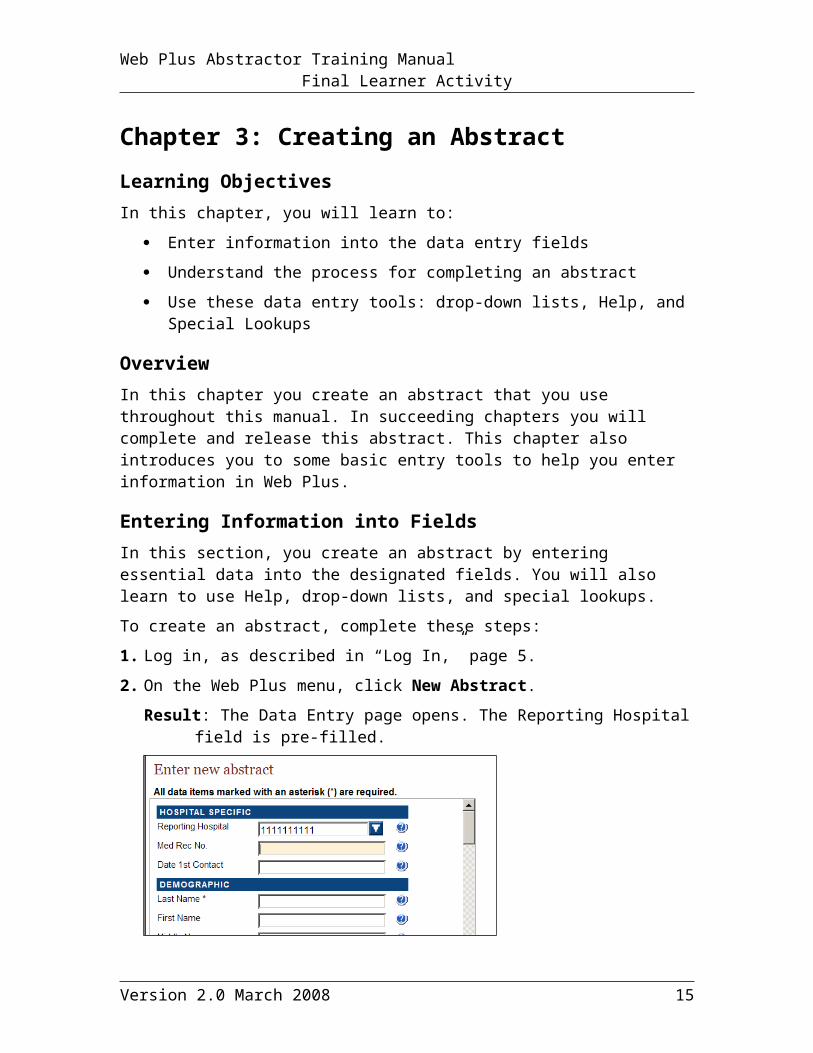
Entering Information into FieldsIn this section, you create an abstract by entering essential data into the designated fields. You will also learn to use Help, drop-down lists, and special lookups.
To create an abstract, complete these steps:
1. Log in, as described in “Log In,” page 4.
2. On the Web Plus menu, click New Abstract.
Result: The Data Entry page opens. The Reporting Hospital field is pre-filled.
3. In the Med Rec No. field, type 162305. (This is the medical record number used by the facility to identify the patient.)
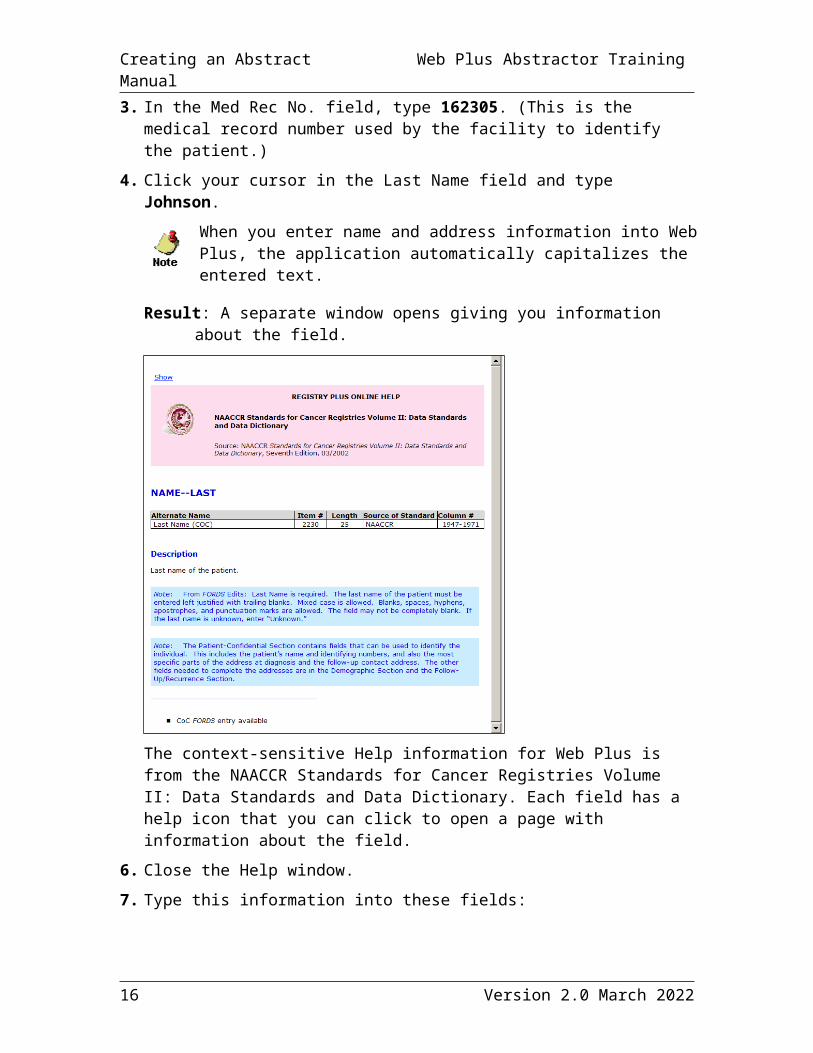
4. Click your cursor in the Last Name field and type Johnson.
When you enter name and address information into Web Plus, the application automatically capitalizes the entered text.
5. Click the Help icon beside the Last Name field.
Result: A separate window opens giving you information about the field.
12 Version 2.0 May 2023
Web Plus Abstractor Training Manual Final Learner Activity
The context-sensitive Help information for Web Plus is from the NAACCR Standards for Cancer Registries Volume II: Data Standards and Data Dictionary. Each field has a help icon that you can click to open a page with information about the field.
6. Close the Help window.
7. Type this information into these fields:
Field Value
First Name Samuel
Social Security No. 111222333
AddrDx–City Decatur
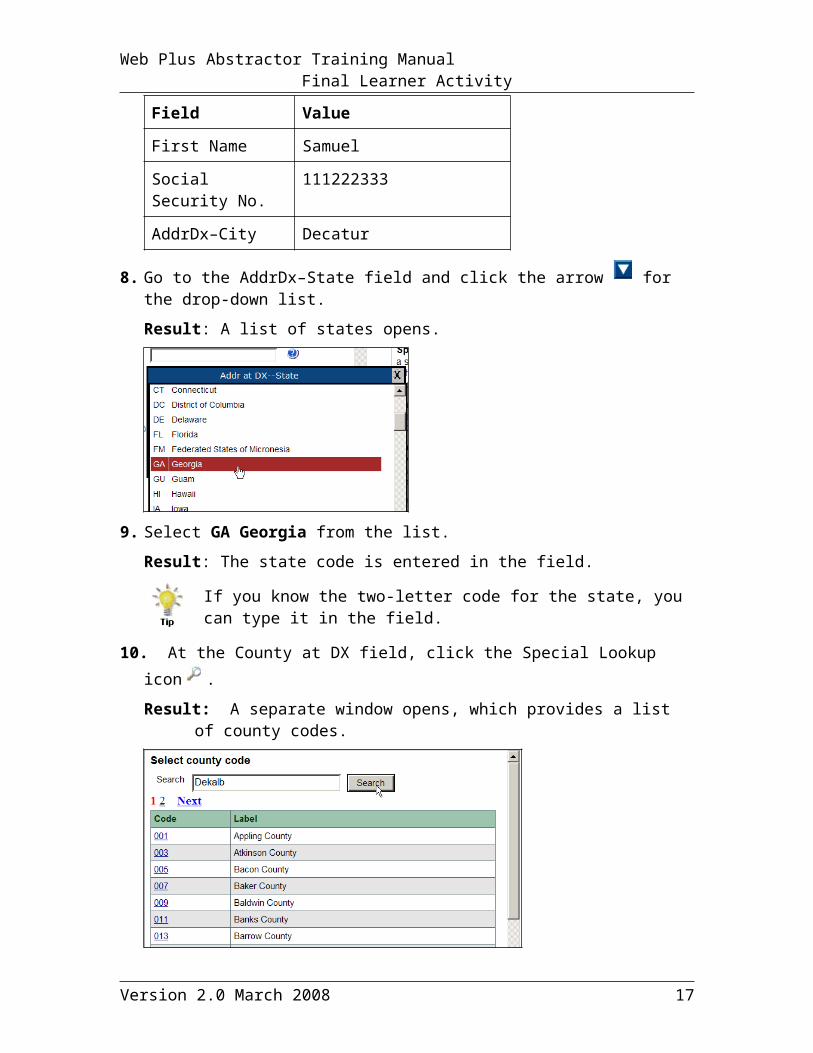
8. Go to the AddrDx–State field and click the arrow for the drop-down list.
Result: A list of states opens.
Version 2.0 March 2008 13
Creating an Abstract Web Plus Abstractor Training Manual
9. Select GA Georgia from the list.
Result: The state code is entered in the field.
If you know the two-letter code for the state, you can type it in the field.
10. At the County at DX field, click the Special Lookup icon .
Result: A separate window opens, which provides a list of county codes.
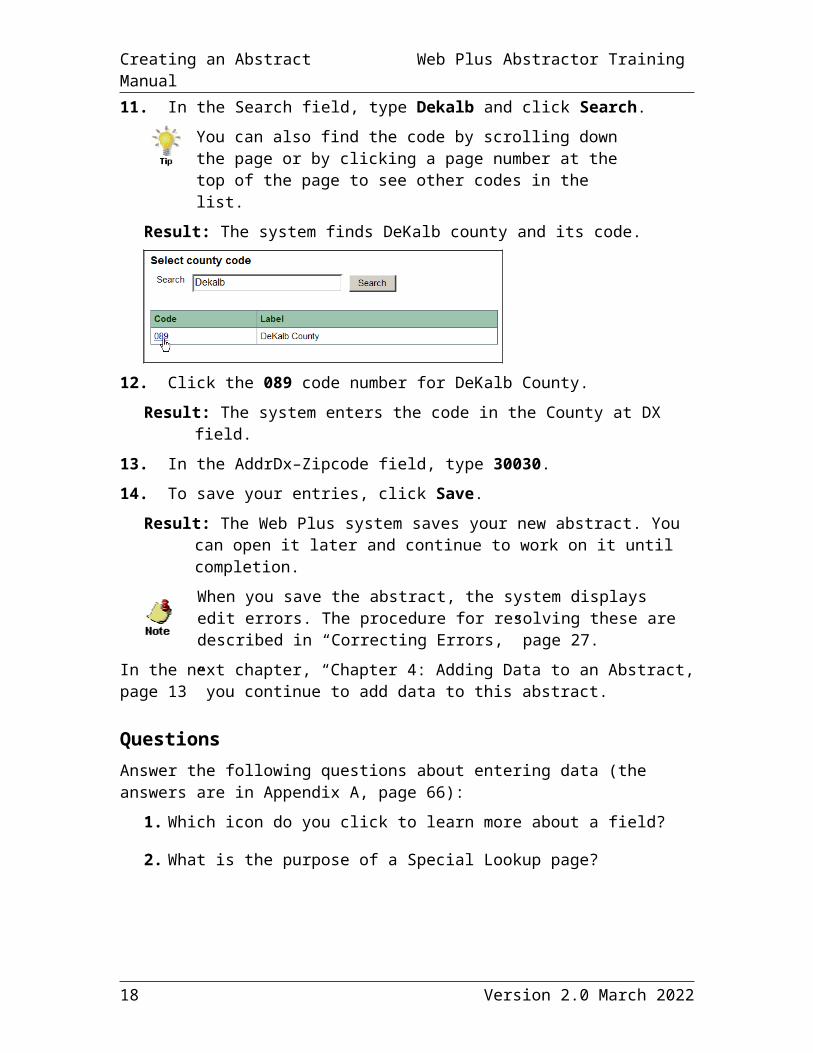
11. In the Search field, type Dekalb and click Search.
You can also find the code by scrolling down the page or by clicking a page number at the top of the page to see other codes in the list.
Result: The system finds DeKalb county and its code.
12. Click the 089 code number for DeKalb County.
Result: The system enters the code in the County at DX field.
13. In the AddrDx–Zipcode field, type 30030.
14. To save your entries, click Save.
Result: The Web Plus system saves your new abstract. You can open it later and continue to work on it until completion.
When you save the abstract, the system displays edit errors. The procedure for resolving these are described in “Correcting Errors,” page 23.
In the next chapter, “Chapter 4: Adding Data to an Abstract, page 13” you continue to add data to this abstract.
14 Version 2.0 May 2023
Web Plus Abstractor Training Manual Final Learner Activity
QuestionsAnswer the following questions about entering data (the answers are in Appendix A, page 53):
1. Which icon do you click to learn more about a field?
2. What is the purpose of a Special Lookup page?
Activity – Creating an AbstractCreate a new abstract of your own. Provide this information and then save your new abstract:
Patient name Social Security number Medical Record number City
State County Zip Code
Remember this abstract name because you will use this information in another activity, “,” page 21.
Version 2.0 March 2008 15
Chapter 4: Adding Data to an Abstract
Learning ObjectivesIn this chapter, you will learn to:
Find a specific abstract
Enter information into text fields
Identify and use tools necessary for entering an abstract
Add comments to an abstract
Preview an abstract for printing
Delete an unreleased abstract
OverviewIn this chapter you continue to enter data in the abstract you have already started. This chapter does not address correcting edits; this will be done in the next chapter, “Correcting Errors,” page 22.
First you will find and open your abstract and then add data to the abstract.
Opening and Updating an AbstractIn this section, you learn to find an existing abstract and open it, use a calculator field, and use pop-up window information.
To update an abstract, follow these steps:
1. Log in, if you are not already, as described in “Log In,” page 4.
2. On the Web Plus menu, click Find/Open Abstract.
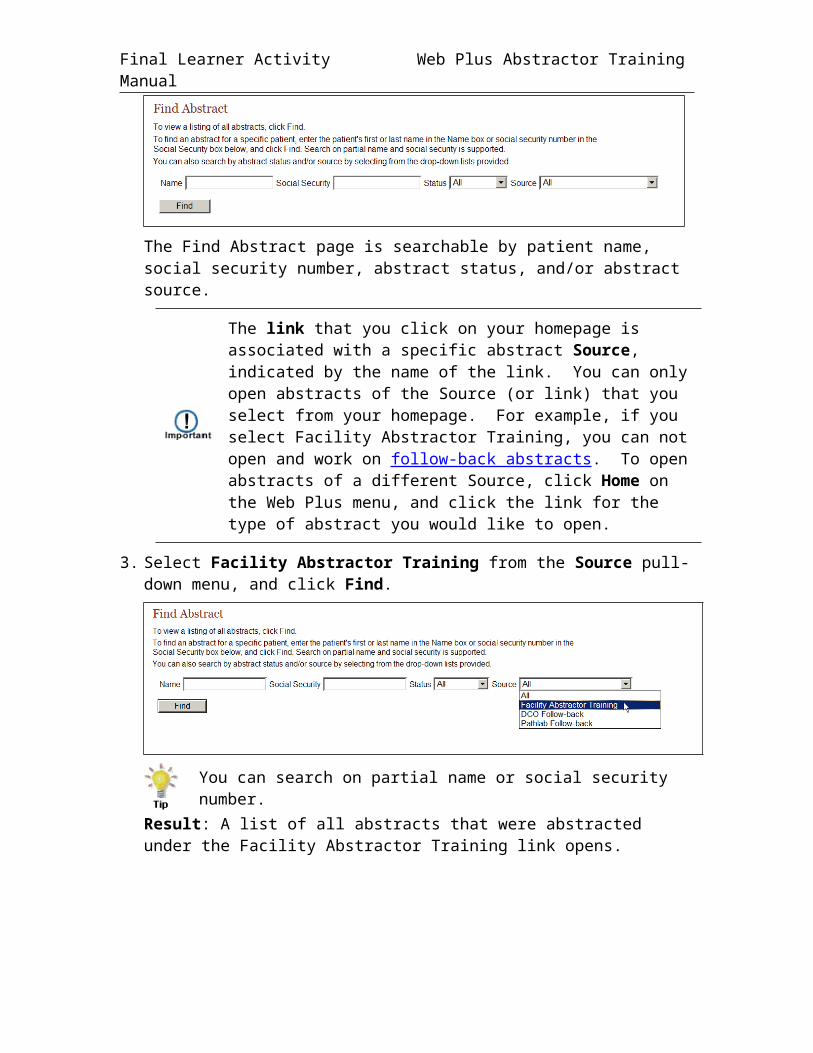
Result: The Find Abstract page opens.
The Find Abstract page is searchable by patient name, social security number, abstract status, and/or abstract source.
Final Learner Activity Web Plus Abstractor Training Manual
The link that you click on your homepage is associated with a specific abstract Source, indicated by the name of the link. You can only open abstracts of the Source (or link) that you select from your homepage. For example, if you select Facility Abstractor Training, you can not open and work on follow-back abstracts. To open abstracts of a different Source, click Home on the Web Plus menu, and click the link for the type of abstract you would like to open.
3. Select Facility Abstractor Training from the Source pull-down menu, and click Find.
You can search on partial name or social security number.
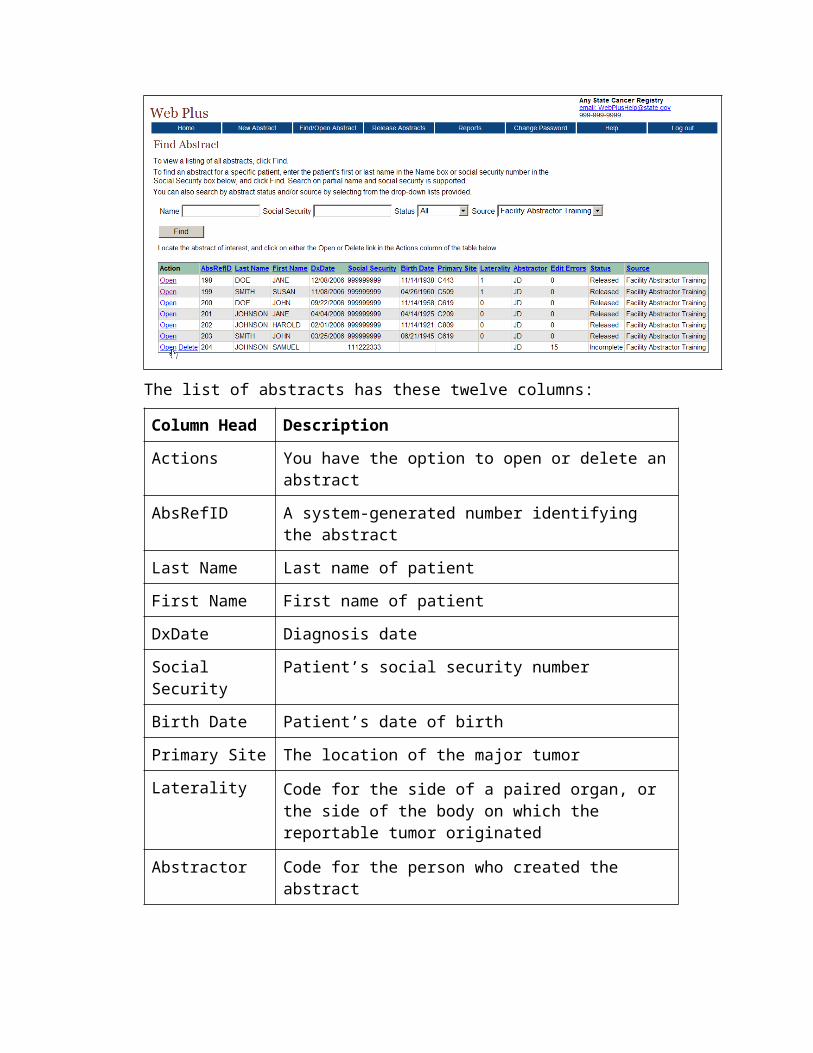
Result: A list of all abstracts that were abstracted under the Facility Abstractor Training link opens.
The list of abstracts has these twelve columns:
Column Head Description
Actions You have the option to open or delete an abstract
AbsRefID A system-generated number identifying the abstract
Column Head Description
Last Name Last name of patient
First Name First name of patient
DxDate Diagnosis date
Social Security Patient’s social security number
Birth Date Patient’s date of birth
Primary Site The location of the major tumor
Laterality Code for the side of a paired organ, or the side of the body on which the reportable tumor originated
Abstractor Code for the person who created the abstract
Edit Errors The number of errors found in the edit process after an abstract has been saved
Status Web Plus has three types of statuses: incomplete (not all data have been entered) complete (all errors have been addressed) released (sent to the central registry)
Source The type of Web Plus abstract; this is the name of the link that you clicked on your home page
4. Click Open in the Action column of the incomplete abstract you started for Samuel Johnson.
Result: The Data Entry page opens and displays the previously entered data for the abstract. The heading above the entry fields now is “Update Abstract” because the abstract already contains some information.
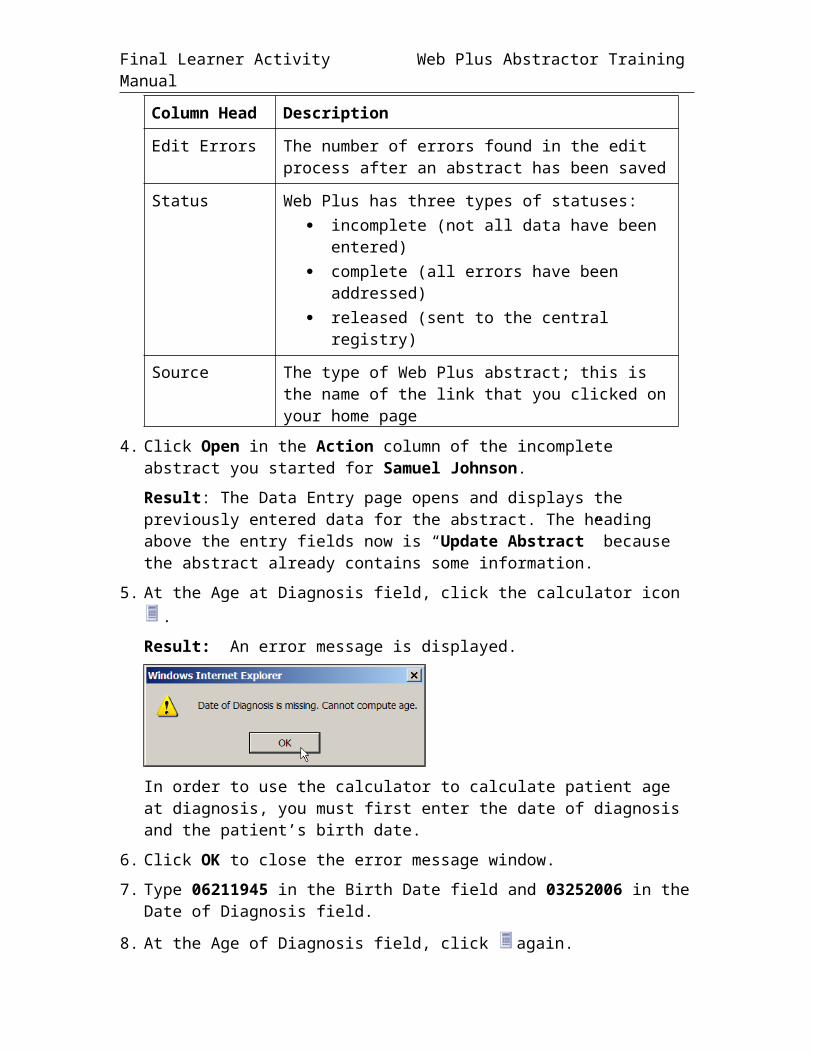
5. At the Age at Diagnosis field, click the calculator icon .
Result: An error message is displayed.
In order to use the calculator to calculate patient age at diagnosis, you must first enter the date of diagnosis and the patient’s birth date.
6. Click OK to close the error message window.
7. Type 06211945 in the Birth Date field and 03252006 in the Date of Diagnosis field.

Final Learner Activity Web Plus Abstractor Training Manual
8. At the Age of Diagnosis field, click again.
Result: The age of the patient is automatically computed and entered into the field.
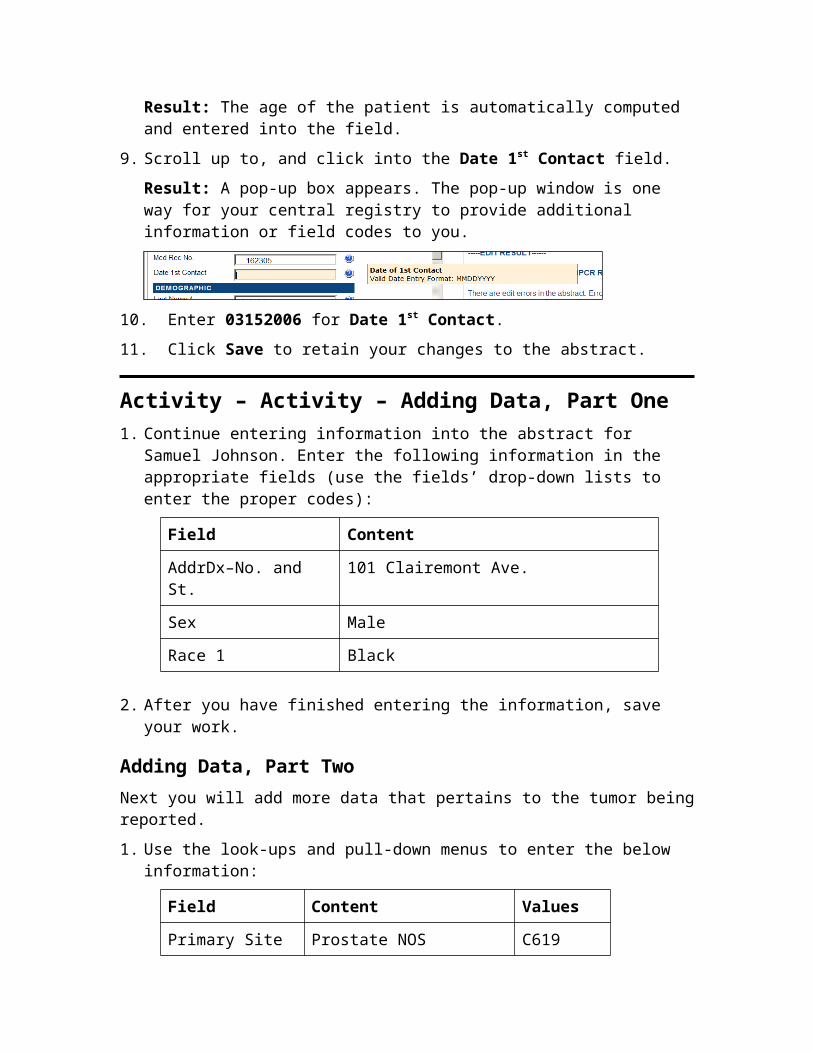
9. Scroll up to, and click into the Date 1st Contact field.
Result: A pop-up box appears. The pop-up window is one way for your central registry to provide additional information or field codes to you.
10. Enter 03152006 for Date 1st Contact.
11. Click Save to retain your changes to the abstract.
Activity – Activity – Adding Data, Part One1. Continue entering information into the abstract for Samuel Johnson. Enter the
following information in the appropriate fields (use the fields’ drop-down lists to enter the proper codes):
Field Content
AddrDx–No. and St. 101 Clairemont Ave.
Sex Male
Race 1 Black
2. After you have finished entering the information, save your work.
Adding Data, Part TwoNext you will add more data that pertains to the tumor being reported.
1. Use the look-ups and pull-down menus to enter the below information:
Field Content Values
Primary Site Prostate NOS C619
Laterality Not a paired site 0
Histology ICDO3 Carcinoma, acinar 8550
Behavior ICDO3 Malignant 3
Grade Grade 3, poorly differentiated 3
2. Click Save.

Text FieldsText Fields are another type of data entry field. This is an area where you enter text to describe diagnostic and treatment information such as X-rays or surgery. The text fields displayed depend on those collected by your central registry.
You can use text fields to document supplemental information not contained within the coded values. You can also provide information that you are uncertain how to code so that a central abstractor/reviewer may code it properly in the data fields when the abstract is released to the central registry. The text is limited only by the maximum number of characters indicated for each field.
The information in text fields are not subject to Web Plus edits. However, some text fields can be designated as critical and are required to have information submitted in them. In this case, the system does not read the information; it only requires the field to have text.
Critical (required) fields are labeled with an asterisk (*).
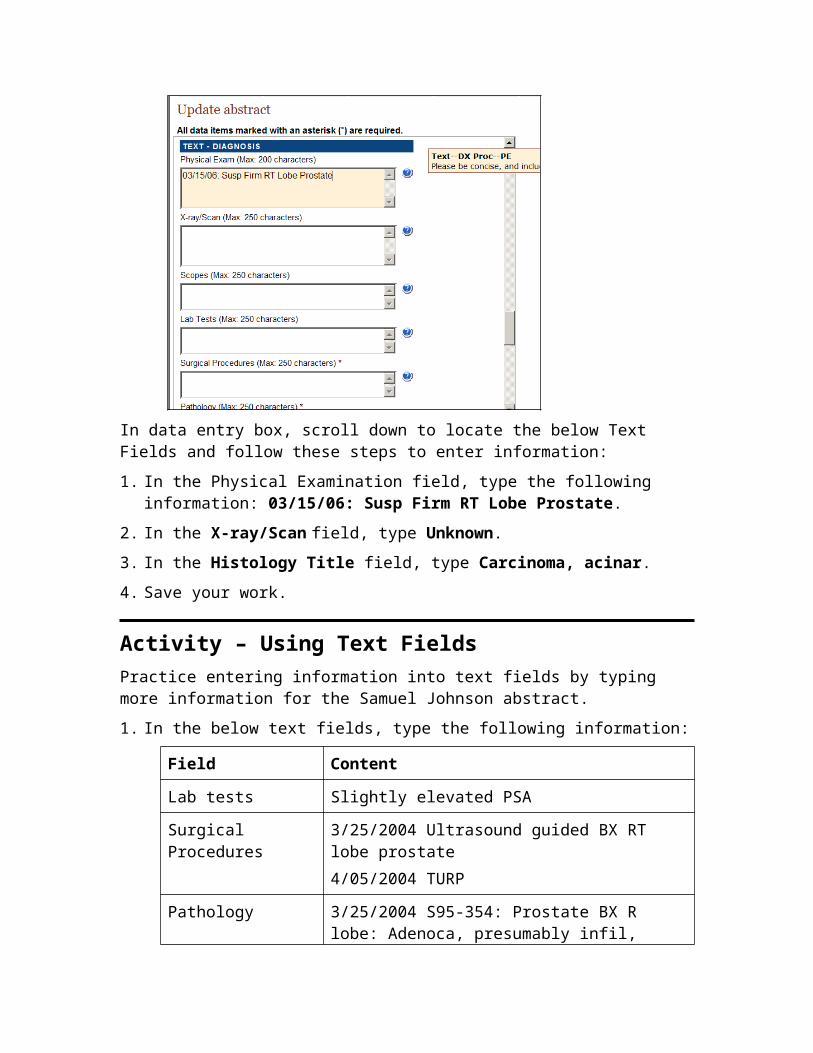
In data entry box, scroll down to locate the below Text Fields and follow these steps to enter information:
1. In the Physical Examination field, type the following information: 03/15/06: Susp Firm RT Lobe Prostate.
2. In the X-ray/Scan field, type Unknown.
3. In the Histology Title field, type Carcinoma, acinar.
4. Save your work.
Final Learner Activity Web Plus Abstractor Training Manual
Activity – Using Text FieldsPractice entering information into text fields by typing more information for the Samuel Johnson abstract.
1. In the below text fields, type the following information:
Field Content
Lab tests Slightly elevated PSA
Surgical Procedures 3/25/2004 Ultrasound guided BX RT lobe prostate4/05/2004 TURP
Pathology 3/25/2004 S95-354: Prostate BX R lobe: Adenoca, presumably infil, acinar type, GR2
2. Click Save and check that the data you entered in the fields have been saved.
Work on correcting abstract errors begins in the next chapter, “Correcting Errors,” page 22. Critical (required) text field errors will be addressed in “Edit Errors Tab,” page 22.
Adding Comments to an AbstractIt may be helpful to save notes about an abstract while you are in the process of abstracting it, or to relate supplemental information about the abstract to the central registry. Comments may be added to the abstract while abstracting it so that you can reference the information at a later time.
To add a comment to an abstract, complete these steps:
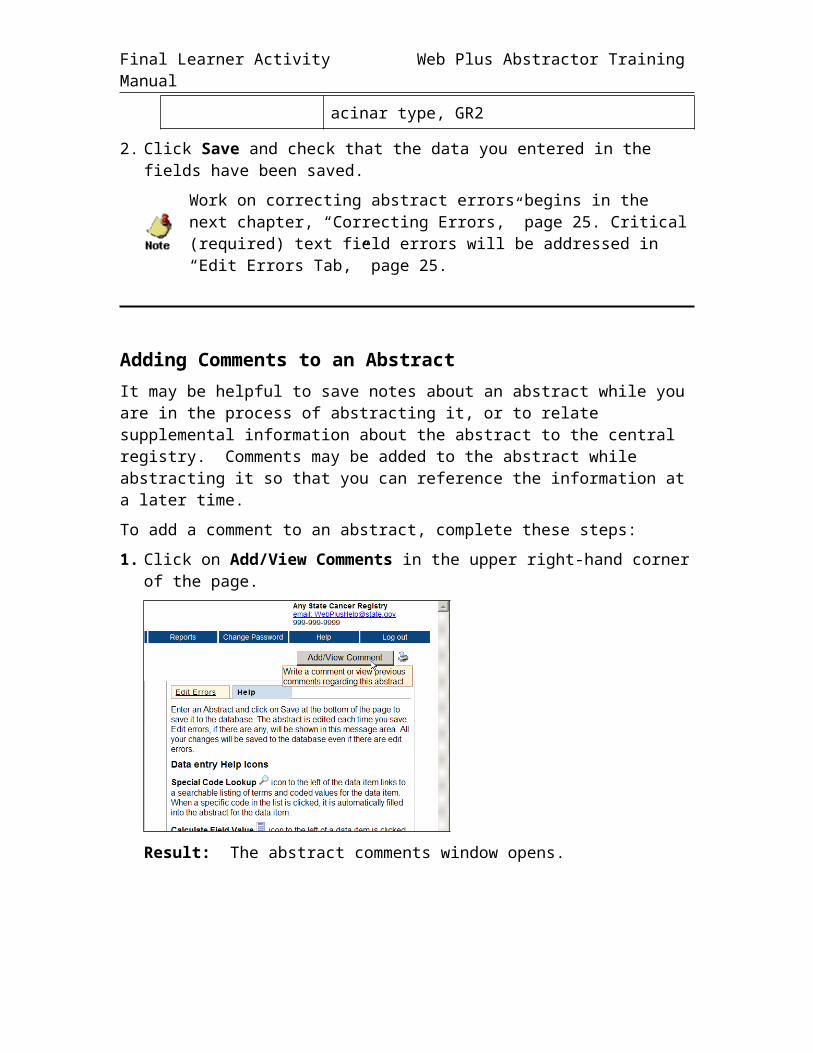
1. Click on Add/View Comments in the upper right-hand corner of the page.
Result: The abstract comments window opens.
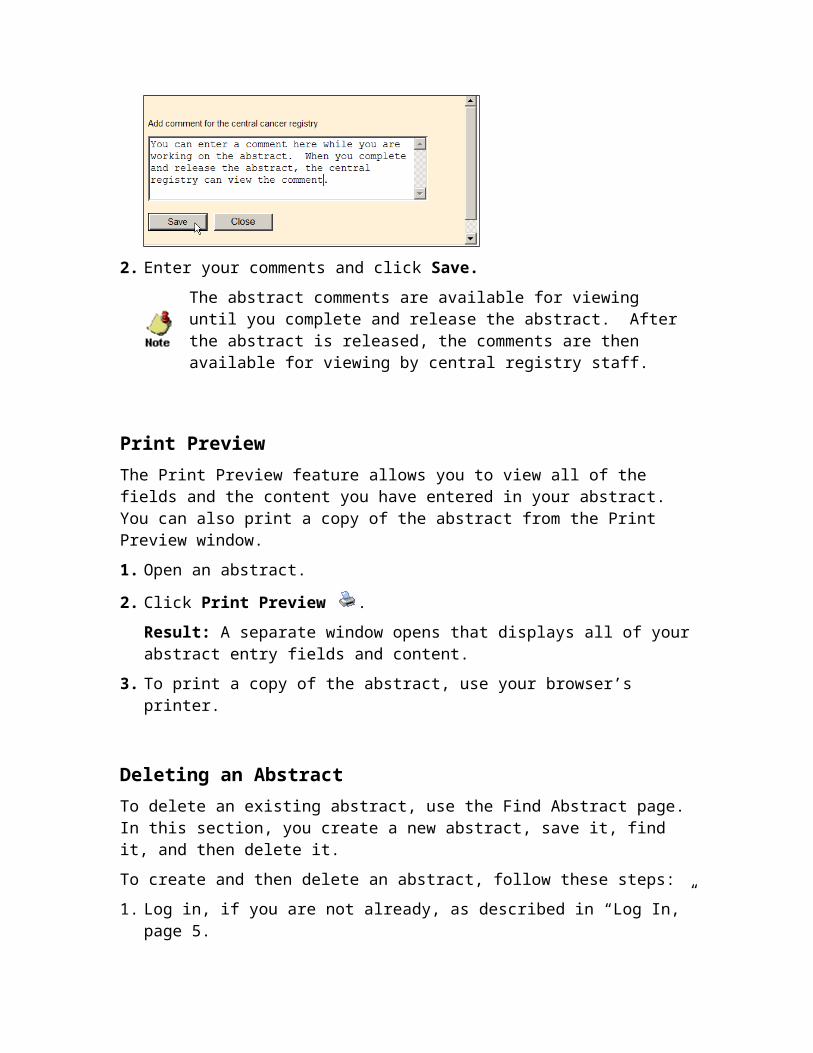
2. Enter your comments and click Save.
The abstract comments are available for viewing until you complete and release the abstract. After the abstract is released, the comments are then available for viewing by central registry staff.
Print PreviewThe Print Preview feature allows you to view all of the fields and the content you have entered in your abstract. You can also print a copy of the abstract from the Print Preview window.
1. Open an abstract.
2. Click Print Preview .
Result: A separate window opens that displays all of your abstract entry fields and content.
3. To print a copy of the abstract, use your browser’s printer.
Deleting an AbstractTo delete an existing abstract, use the Find Abstract page. In this section, you create a new abstract, save it, find it, and then delete it.
To create and then delete an abstract, follow these steps:
1. Log in, if you are not already, as described in “Log In,” page 4.
2. On the Web Plus menu, click New Abstract.
Result: The Data Entry page opens.
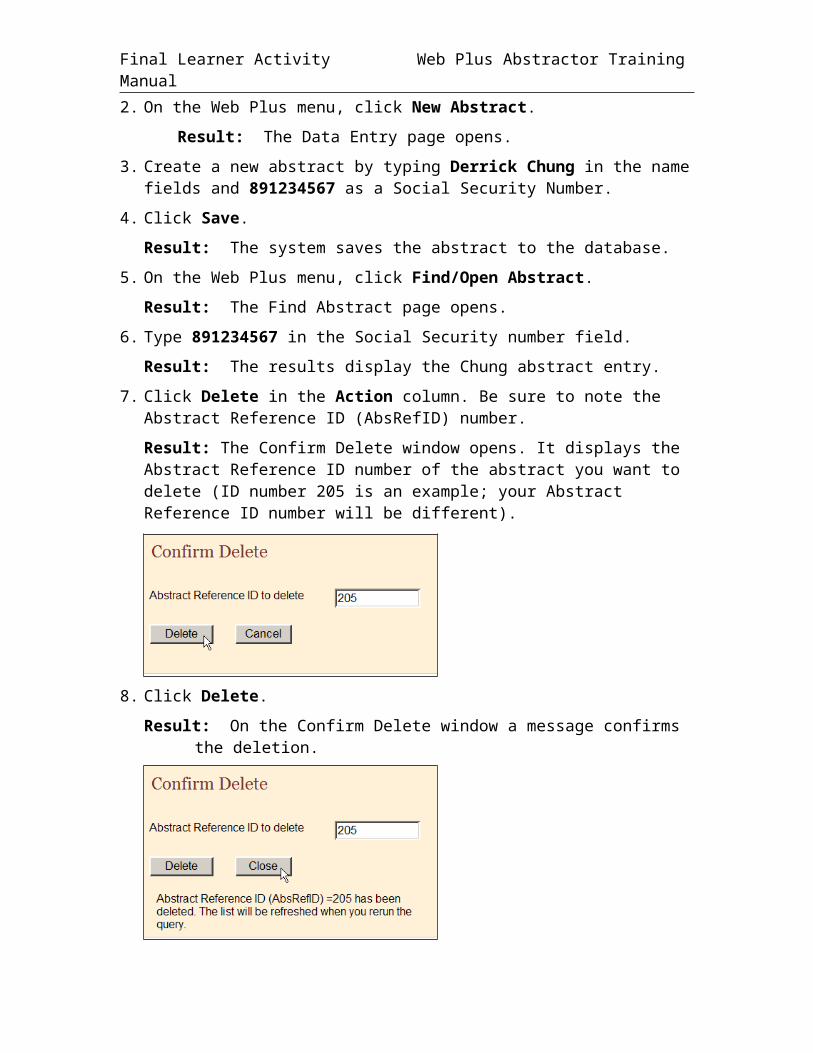
3. Create a new abstract by typing Derrick Chung in the name fields and 891234567 as a Social Security Number.
4. Click Save.
Result: The system saves the abstract to the database.
5. On the Web Plus menu, click Find/Open Abstract.
Final Learner Activity Web Plus Abstractor Training Manual
Result: The Find Abstract page opens.
6. Type 891234567 in the Social Security number field.
Result: The results display the Chung abstract entry.
7. Click Delete in the Action column. Be sure to note the Abstract Reference ID (AbsRefID) number.
Result: The Confirm Delete window opens. It displays the Abstract Reference ID number of the abstract you want to delete (ID number 205 is an example; your Abstract Reference ID number will be different).
8. Click Delete.
Result: On the Confirm Delete window a message confirms the deletion.
9. Click Close.
10. On the Find Abstract window, click Find and confirm in the results window that the system has deleted the abstract.
QuestionsAnswer these questions about adding data to an abstract (the answers are in Appendix A, page 53):
1. What is the purpose of the text fields?
2. How can you print your abstract and what does the printed copy contain?
3. Which menu option do you click to open the page where you can delete an abstract?
Activity – Adding Information and DeletingIn this activity you continue with the abstract you created on page 15, view a print preview, and delete the abstract.
1. Find and open the abstract you created and add this information into the text fields:
Field Content
Physical Exam No information available.
X-ray/Scan 9/11/06 CT Neck showed no def abnormalities noted.
2. Calculate the Age at Diagnosis, by first entering the patient’s birth date and diagnosis date---you can make up dates for this purpose. Then click the
3. View a print preview of your abstract.
4. Delete the abstract.

Final Learner Activity Web Plus Abstractor Training Manual
Chapter 5: Correcting ErrorsLearning ObjectivesIn this chapter, you will learn to:
Correct errors to complete an abstract
Understand how edit sets affect the completion of an abstract
Understand the edit error messages
OverviewIn this chapter you continue working on your abstract, and will use the Edit Errors feature of Web Plus to find errors or blank required fields and work toward the completion of your abstract. You can only release completed abstracts, which have no errors.
Understanding Edit SetsEach abstract is edited for data quality and completeness whenever you save or open it. The edits applied to the information depend on the edit set selected for your facility by your Web Plus administrator at your central registry. The edit set used for this training guide is “Central: Vs11 State Ex-Incoming Abstracts.”
As an abstractor you must correct all identified errors to complete your abstract before you release it to the central registry.
Edit Errors TabThe edit errors pane lists edits in the abstract. The edit set runs each time the abstract is saved or re-opened. To correct your abstract errors, complete these steps:
1. Find and open the Samuel Johnson abstract.
2. On the Data Entry page, view the Edit Errors tab in the information pane.
3. In the Edit Errors list, click the Primary Site Title (Max: 40 characters) link.
Result: The system moves your cursor to the Primary Site Title field.
4. Type Prostate in the field.
5. In the Edit Errors list, click the AddrDx--City = link.
Result: The system moves your cursor to the AddrDx--City field.
6. Type ATLANTA in the field.
7. In the Edit Errors list, click the Date1stCrsRXCOC link.
Result: The system moves your cursor to the Date1stCrsRXCOC field.
8. In the Date1stCrsRXCOC field type: 04052006.
9. In the Edit Errors list, click the Date Last Contact link.
Result: The system moves your cursor to the Date Last Contact field.
10. In the Date Last Contact field type: 07152006.
11. Click Save and check the errors box to ensure that the Primary Site Title, AddrDx—City, Date1stCrsRXCOC and the Date Last Contact errors have been eliminated.
Correcting Errors ContinuedTo continue correcting errors, complete these steps:
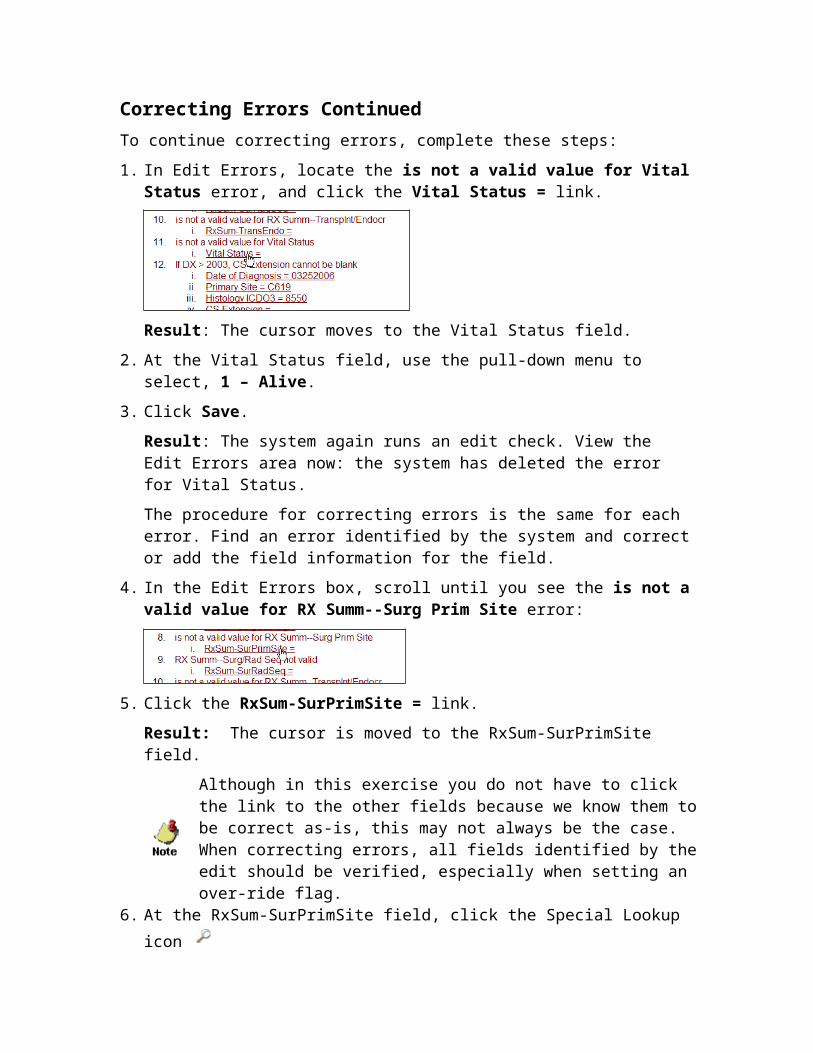
1. In Edit Errors, locate the is not a valid value for Vital Status error, and click the Vital Status = link.
Result: The cursor moves to the Vital Status field.
2. At the Vital Status field, use the pull-down menu to select, 1 – Alive.
3. Click Save.
Result: The system again runs an edit check. View the Edit Errors area now: the system has deleted the error for Vital Status.
The procedure for correcting errors is the same for each error. Find an error identified by the system and correct or add the field information for the field.
4. In the Edit Errors box, scroll until you see the is not a valid value for RX Summ--Surg Prim Site error:
Final Learner Activity Web Plus Abstractor Training Manual
5. Click the RxSum-SurPrimSite = link.
Result: The cursor is moved to the RxSum-SurPrimSite field.
Although in this exercise you do not have to click the link to the other fields because we know them to be correct as-is, this may not always be the case. When correcting errors, all fields identified by the edit should be verified, especially when setting an over-ride flag.
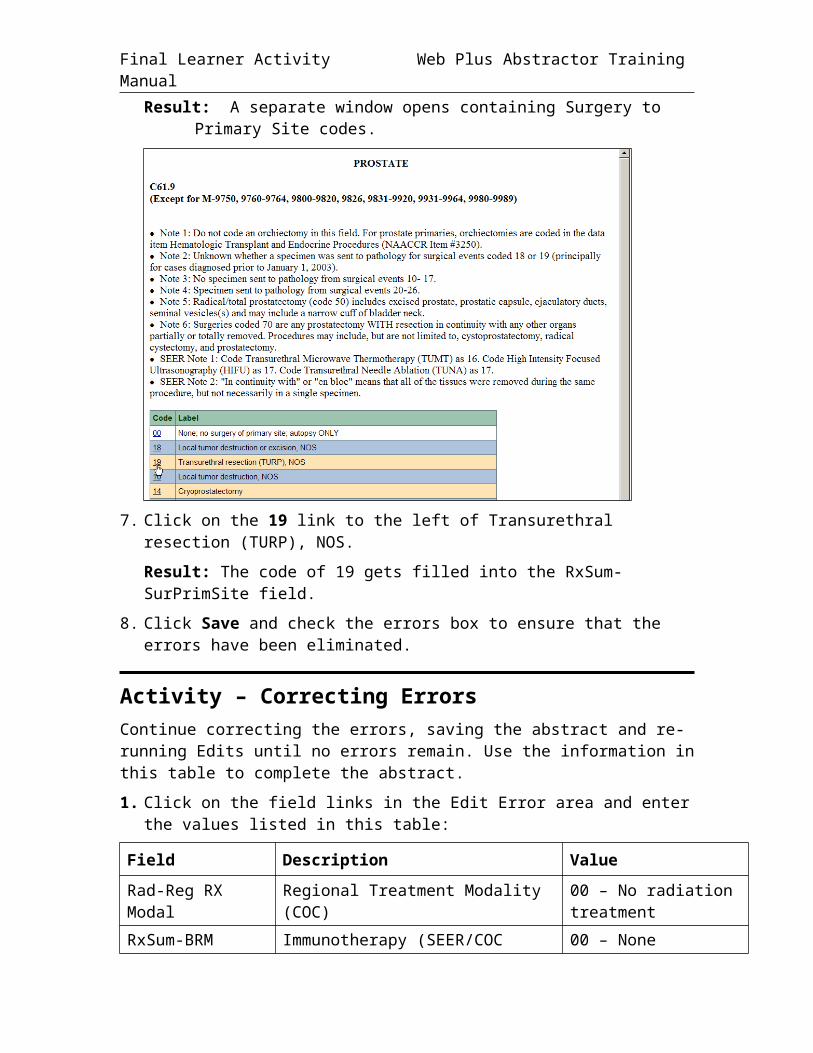
6. At the RxSum-SurPrimSite field, click the Special Lookup icon
Result: A separate window opens containing Surgery to Primary Site codes.
7. Click on the 19 link to the left of Transurethral resection (TURP), NOS.
Result: The code of 19 gets filled into the RxSum-SurPrimSite field.
8. Click Save and check the errors box to ensure that the errors have been eliminated.
Activity – Correcting ErrorsContinue correcting the errors, saving the abstract and re-running Edits until no errors remain. Use the information in this table to complete the abstract.
1. Click on the field links in the Edit Error area and enter the values listed in this table:
Field Description Value
Rad-Reg RX Modal Regional Treatment Modality (COC) 00 – No radiation treatment
RxSum-BRM Immunotherapy (SEER/COC 00 – None
Field Description ValueRxSum-Chemo Chemotherapy (SEER/COC) 00 – NoneRxSum-Horm Hormone Therapy (SEER/COC) 00 – None
RxSum-Other Other Treatment (COC), Other Cancer-Directed Therapy (SEER/pre-96 COC) 0 – None
RxSum-ScpeRegLN Scope of Regional Lymph Node Surgery 0 – No regional lymph nodes removed
RxSum-SurgOthRegSurgery of Other Regional Site(s), Distant Site(s) or Distant Lymph Nodes (SEER/COC)
0 – None
RX Summ--Surg/Rad Seq
Radiation Sequence with Surgery (pre-96SEER/COC), Radiation/Surgery Sequence (COC)
0 – No radiation and/or no cancer-directed surgery
RX Summ--Transplnt/Endocr
Hematologic Transplant and EndocrineProcedures
0 – No transplant or endocrine therapy
CS Extension —20 – Involvement in one lobe, NOS (clinically apparent only)
CS Lymph Nodes — 99 – Unknown; not statedCS Mets at DX CS Metastasis at Diagnosis 00 – No; None
Site-Specific Factor1 — 000 – Unknown or no information
Site-Specific Factor3 —097 – No prostatectomy done within first course of treatment
Derived SSS2000 Derived Summary Stage 2000Once CS items have been coded, click to the left of the field to derive
Race 2 – 5 — 88 – No further race documented
2. If necessary, correct any other errors that may appear until you have completed all the required fields.
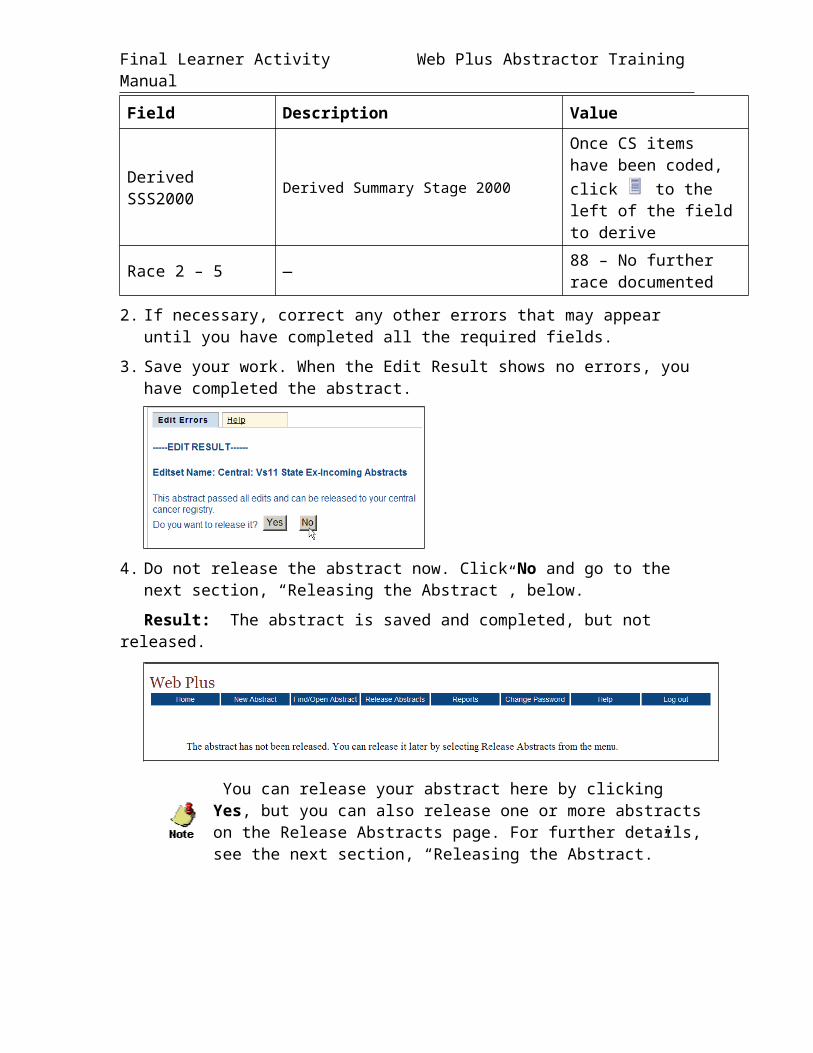
3. Save your work. When the Edit Result shows no errors, you have completed the abstract.
Final Learner Activity Web Plus Abstractor Training Manual
4. Do not release the abstract now. Click No and go to the next section, “Releasing the Abstract”, below.
Result: The abstract is saved and completed, but not released.
You can release your abstract here by clicking Yes, but you can also release one or more abstracts on the Release Abstracts page. For further details, see the next section, “Releasing the Abstract.”
Releasing the AbstractOnce your abstract has no errors, it is completed, and you can release it to the central registry.
Follow these steps to release an abstract:
1. On the Web Plus menu, click Release Abstracts.
Result: The system displays a list of completed abstracts.
2. Click the box in the Release column for the Samuel Johnson abstract.
To select all of the abstracts listed, click the Select All button.
3. Click Release Selected Abstracts.
Result: The system releases the selected abstracts to your designated central registry and changes the status of the abstracts to Released. Use the Find/Open page to view the released abstracts. You can view them but cannot amend them.
QuestionsAnswer these questions about correcting and releasing abstracts (the answers are in Appendix A, page 53):
1. How can you release more than one abstract at a time?
2. What are two ways to release a single abstract?
3. Where do you find the errors list?
Final Learner Activity Web Plus Abstractor Training Manual
Chapter 6: Follow-Back AbstractsLearning ObjectivesIn this chapter, you will learn:
To understand the basic steps of the follow-back process in Web Plus
How to open, complete, and release a follow-back abstract
How to reject a follow-back abstract
OverviewYour central cancer registry may receive information about a tumor for a patient that you have diagnosed and/or treated (or that was diagnosed/and or treated at your facility) from other reporting sources, such as death certificates or pathology laboratory reports. If the central registry obtains this information before you have reported the tumor to them, they may choose to use the information that they have received to generate a request for more information from you. They do this by creating a follow-back abstract, which they fill with what information they have, and post to Web Plus for you to add to and complete.
The Follow-back ProcessThe Web Plus follow-back process allows central registries to electronically collect follow-back information in an organized and efficient manner. Central registries generally conduct death certificate follow-back by mailing out a cancer reporting form to a physician for the reporting of a tumor identified solely by death certificate (Death Certificate Only, or DCO), having the physician complete the form and mail it back, and then having central registry staff abstract the information returned on the form into some sort of abstraction software to get the information in electronic form so that it may then be processed by the central registry. Pathology lab follow-back may be conducted in a similar manner to physicians, or may involve mailing a facility a list of tumors identified via pathology lab not yet reported by the facility, and having the facility abstract the tumors from scratch to report the tumors. These efforts are frequently tracked by central registries via paper lists, or via manually checking reported tumors off of some sort electronic listing.
Web Plus death certificate and pathology lab follow-back features enable a central registry to pre-fill online abstracts with known information from death certificates or pathology lab reports, and have the reporter log on to update the information and complete the abstract. The end result is a completed abstract in NAACCR file format, an electronic report of a previously unreported tumor, without the use of paper forms or redundant recording of information. In addition, the follow-back tracking features of Web Plus allow the central registry to closely and electronically track the status of each follow-back abstract to ensure that it gets completed.
Basically, the follow-back process in Web Plus takes advantage of the existing online abstracting feature to enable physicians and facility abstractors to complete partially-
filled abstracts online. The abstractor can save their work at any time and return their work at a later time. They release an abstract to the central registry only after they have completed it, and eliminated any errors it may contain.
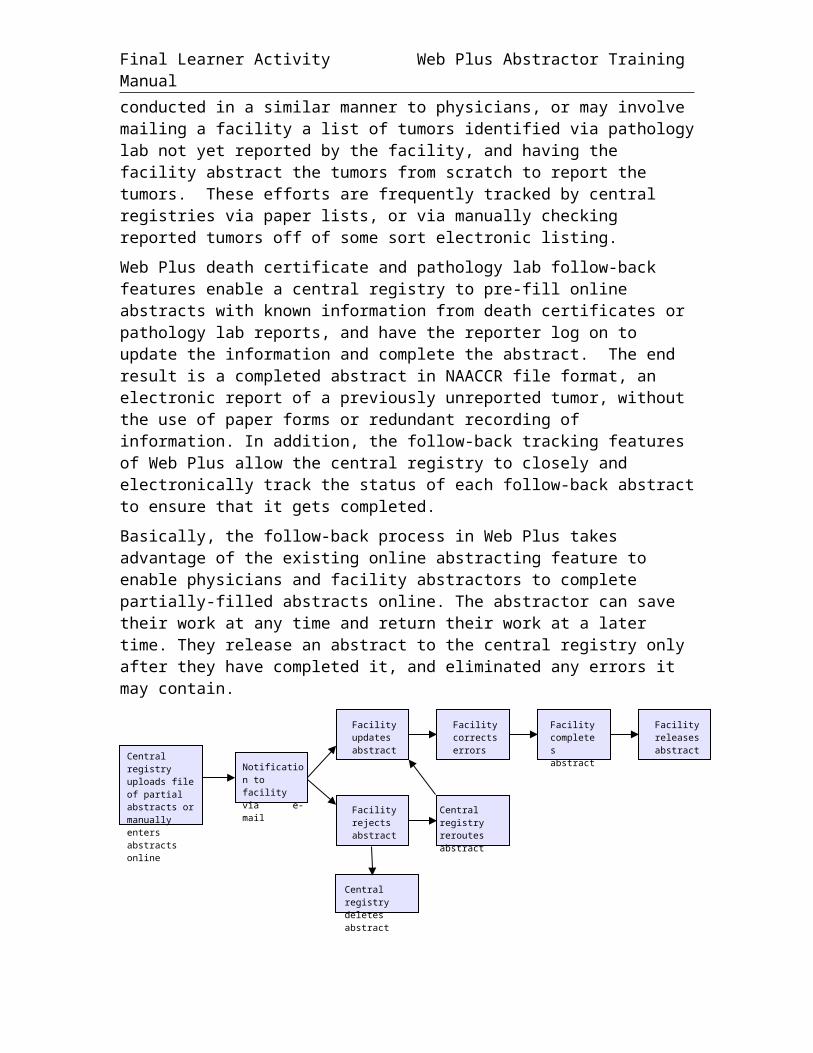
The Web Plus follow-back process includes the following steps:
1. The Follow-back Supervisor at your central cancer registry uploads files of partially-filled abstracts generated with information from death certificate and pathology lab files into Web Plus, or manually begins the individual abstracts online.
2. Your central registry notifies you via e-mail to log into Web Plus and update the follow-back abstracts.
3. Once posted for you to complete, follow-back abstracts are processed via the regular Web Plus record flow; with the exception that you can reject follow-back abstracts with a justifying comment back to the central registry, where the Follow-back Supervisor or Monitor can either re-route the abstract to a new facility/physician, or delete the abstract from the follow-back process.
4. Once completed, you release the follow-back abstracts to your central registry.
Throughout the follow-back process, the Follow-back Supervisor and Follow-back Monitors use Web Plus follow-back reports and tracking features to communicate with you via e-mail, and track follow-back abstracts to ensure that they are completed and released.
A nice feature of the follow-back system is that if your central registry has posted follow-back abstracts to Web Plus for you to complete, the system places a link to these abstracts on your homepage. The follow-back request links include running outstanding and released follow-back abstract totals that are updated as you complete and release, or reject the follow-back abstracts.
To open and work with a follow-back abstract, complete these steps:
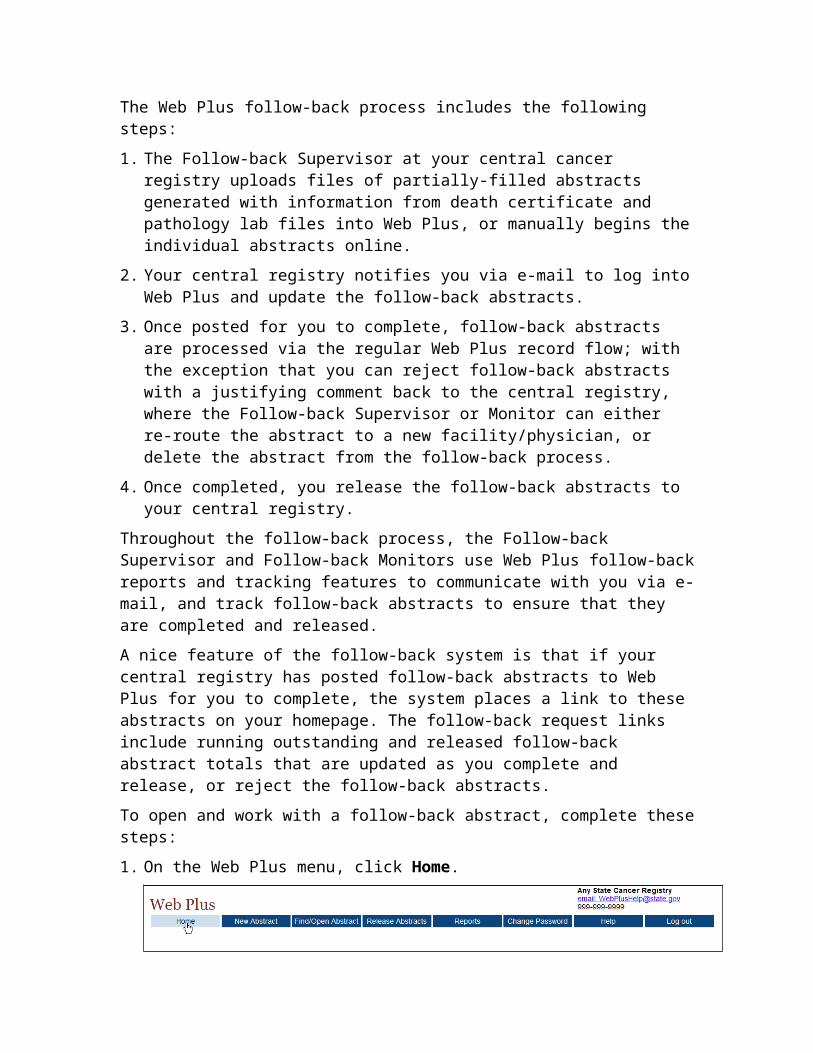
1. On the Web Plus menu, click Home.
Notification to facility via e-mail
Facility corrects errors
Facility completes abstract
Facility releases abstract
Facility updates abstract
Facility rejects abstract
Central registry reroutes abstract
Central registry deletes abstract
Central registry uploads file of partial abstracts or manually enters abstracts online

Final Learner Activity Web Plus Abstractor Training Manual
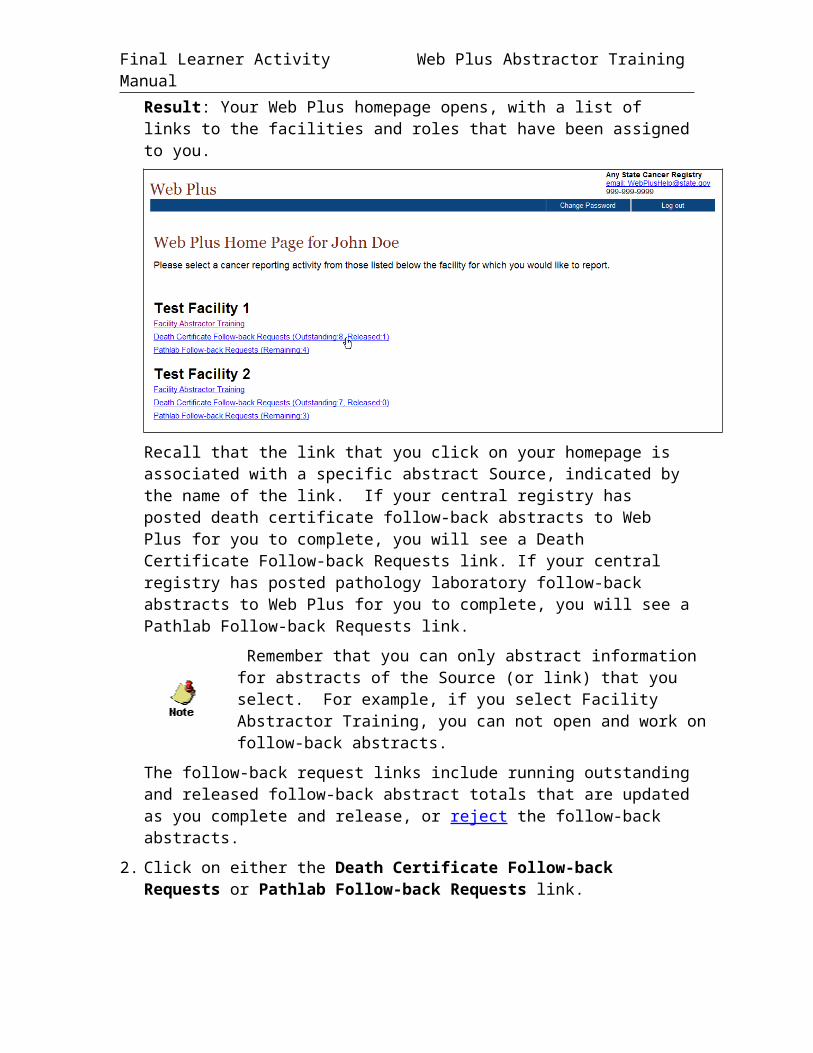
Result: Your Web Plus homepage opens, with a list of links to the facilities and roles that have been assigned to you.
Recall that the link that you click on your homepage is associated with a specific abstract Source, indicated by the name of the link. If your central registry has posted death certificate follow-back abstracts to Web Plus for you to complete, you will see a Death Certificate Follow-back Requests link. If your central registry has posted pathology laboratory follow-back abstracts to Web Plus for you to complete, you will see a Pathlab Follow-back Requests link.
Remember that you can only abstract information for abstracts of the Source (or link) that you select. For example, if you select Facility Abstractor Training, you can not open and work on follow-back abstracts.
The follow-back request links include running outstanding and released follow-back abstract totals that are updated as you complete and release, or reject the follow-back abstracts.
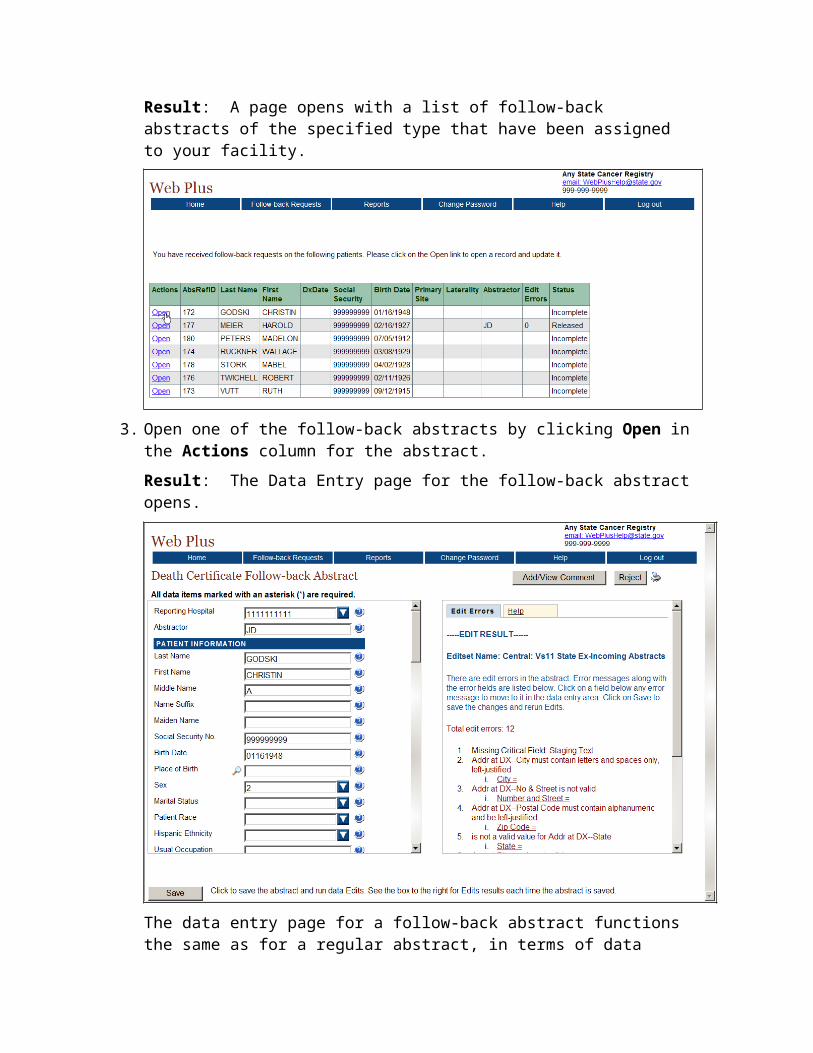
2. Click on either the Death Certificate Follow-back Requests or Pathlab Follow-back Requests link.
Result: A page opens with a list of follow-back abstracts of the specified type that have been assigned to your facility.
3. Open one of the follow-back abstracts by clicking Open in the Actions column for the abstract.
Result: The Data Entry page for the follow-back abstract opens.
The data entry page for a follow-back abstract functions the same as for a regular abstract, in terms of data entry, the running of data quality edits and the cleaning of edit errors, completion, and release of abstracts. However, your central registry may have different reporting requirements for regular reports of tumors and follow-back abstracts. As a result, you may see different data fields, required fields, and edits for your follow-back abstracts than you do for your regular reporting. In addition, you have also have the added ability to reject a follow-back abstract.
Final Learner Activity Web Plus Abstractor Training Manual
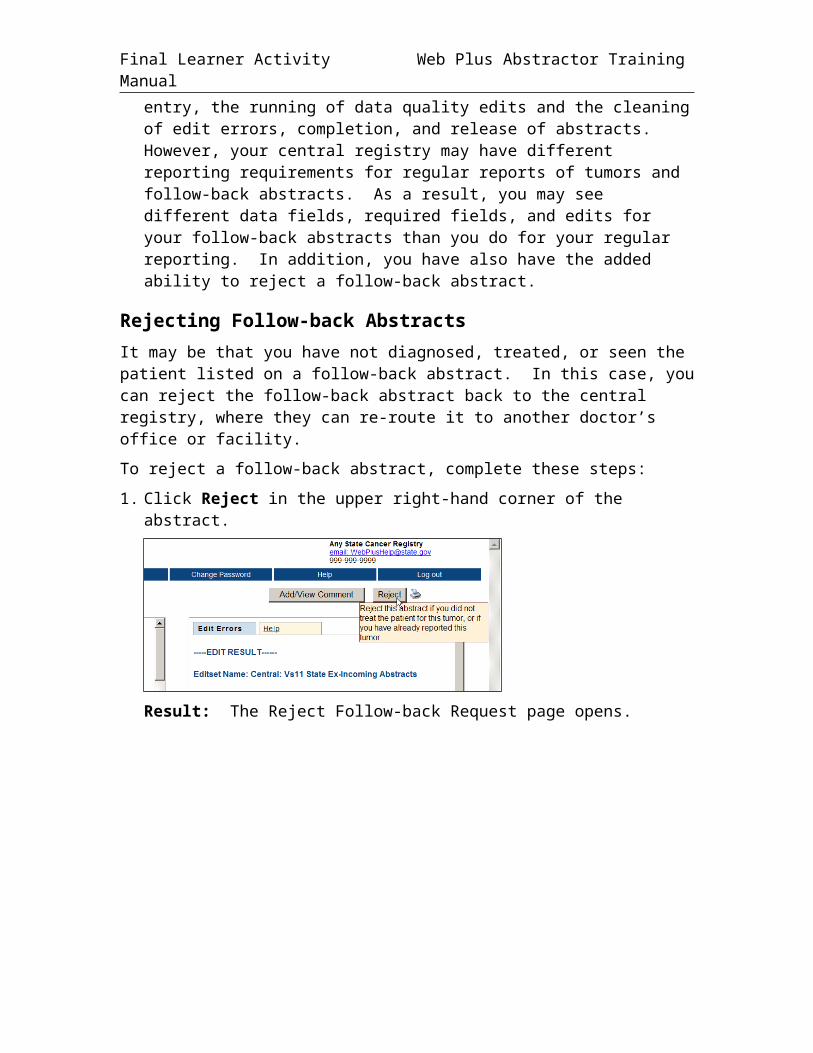
Rejecting Follow-back AbstractsIt may be that you have not diagnosed, treated, or seen the patient listed on a follow-back abstract. In this case, you can reject the follow-back abstract back to the central registry, where they can re-route it to another doctor’s office or facility.
To reject a follow-back abstract, complete these steps:
1. Click Reject in the upper right-hand corner of the abstract.
Result: The Reject Follow-back Request page opens.
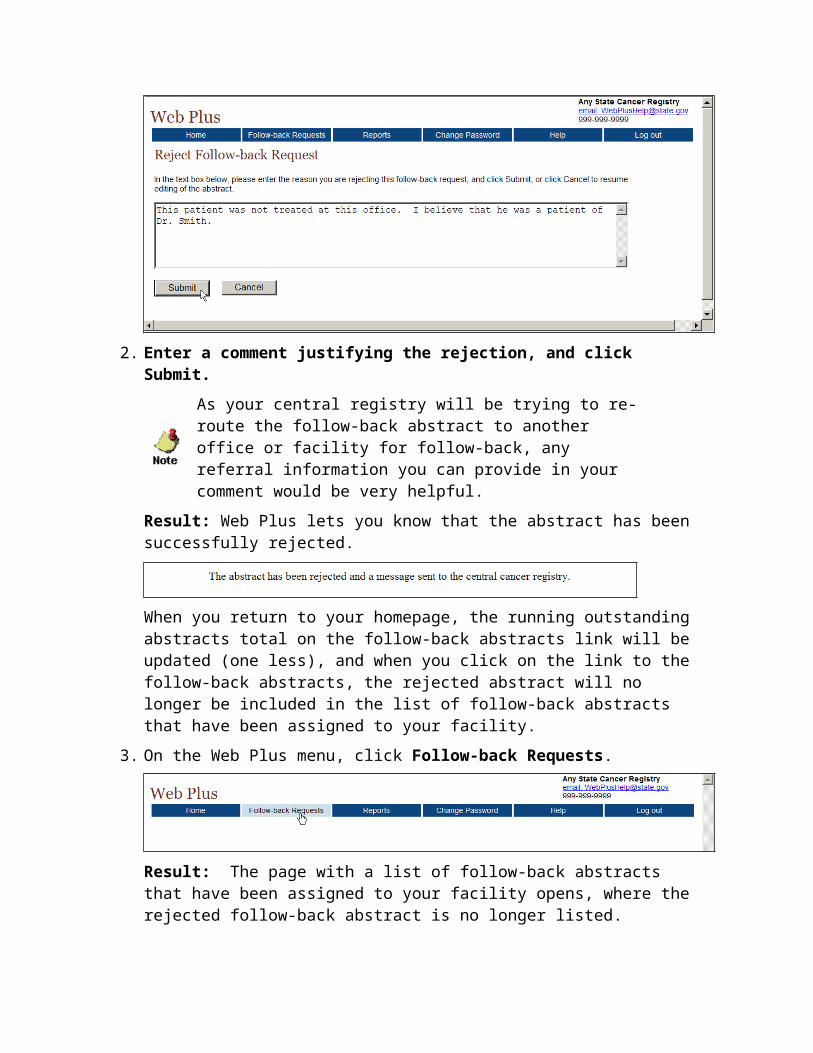
2. Enter a comment justifying the rejection, and click Submit.
As your central registry will be trying to re-route the follow-back abstract to another office or facility for follow-back, any referral information you can provide in your comment would be very helpful.
Result: Web Plus lets you know that the abstract has been successfully rejected.
When you return to your homepage, the running outstanding abstracts total on the follow-back abstracts link will be updated (one less), and when you click on the link to the follow-back abstracts, the rejected abstract will no longer be included in the list of follow-back abstracts that have been assigned to your facility.
3. On the Web Plus menu, click Follow-back Requests.

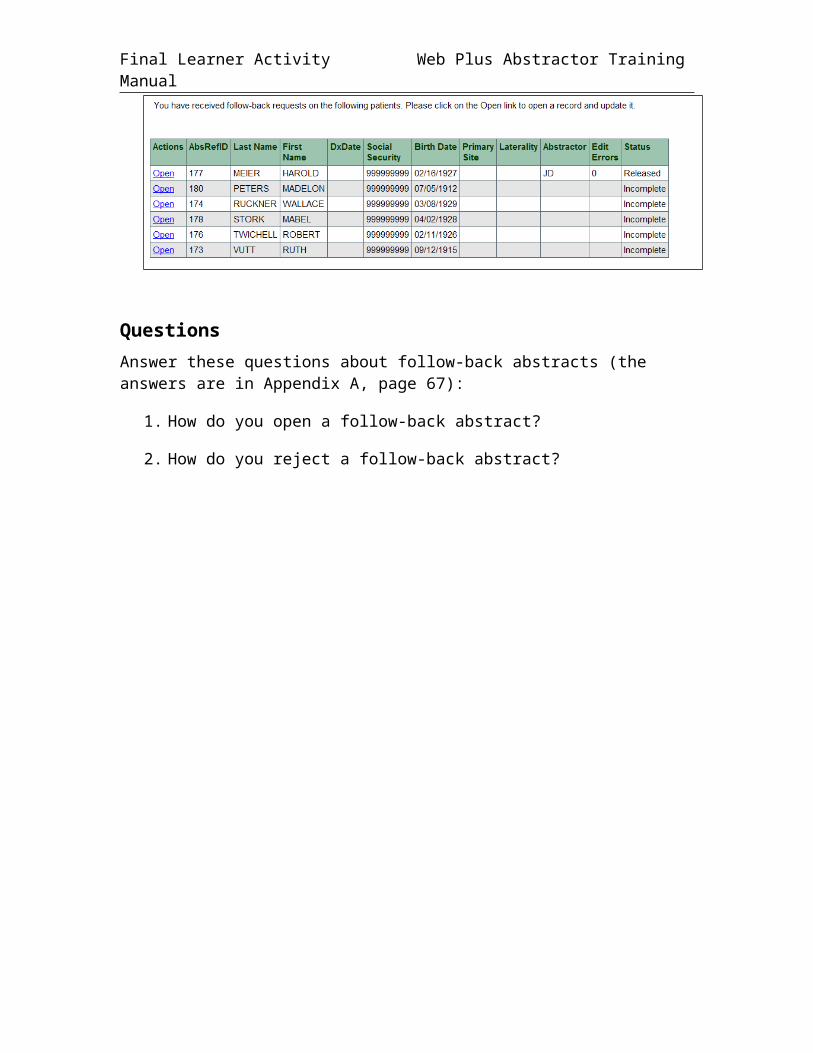
Result: The page with a list of follow-back abstracts that have been assigned to your facility opens, where the rejected follow-back abstract is no longer listed.
QuestionsAnswer these questions about follow-back abstracts (the answers are in Appendix A, page 53):
1. How do you open a follow-back abstract?
2. How do you reject a follow-back abstract?
Final Learner Activity Web Plus Abstractor Training Manual
Chapter 7: Running ReportsLearning ObjectivesIn this chapter, you will learn:
How to open and print a report
How to set a date range for a report
About the reports available in Web Plus
OverviewWeb Plus provides reports for monitoring abstract reporting and system activity. You can view and print several types of reports. You can also set the date ranges for the information in the reports.
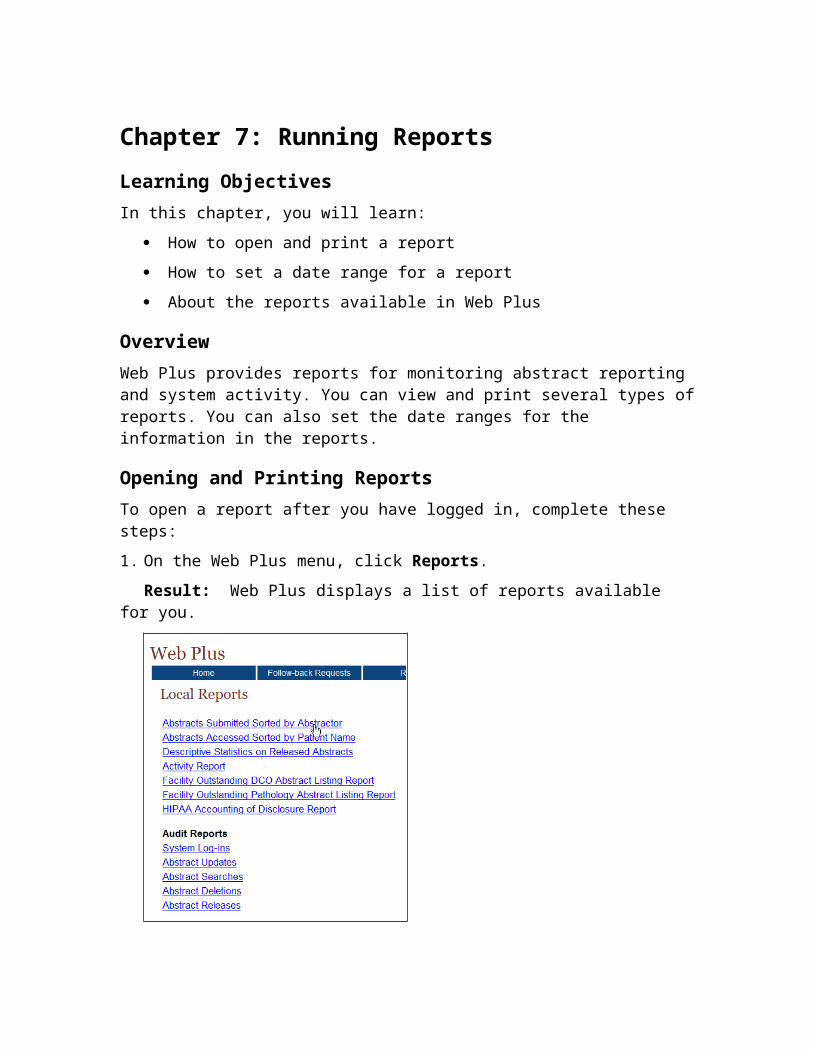
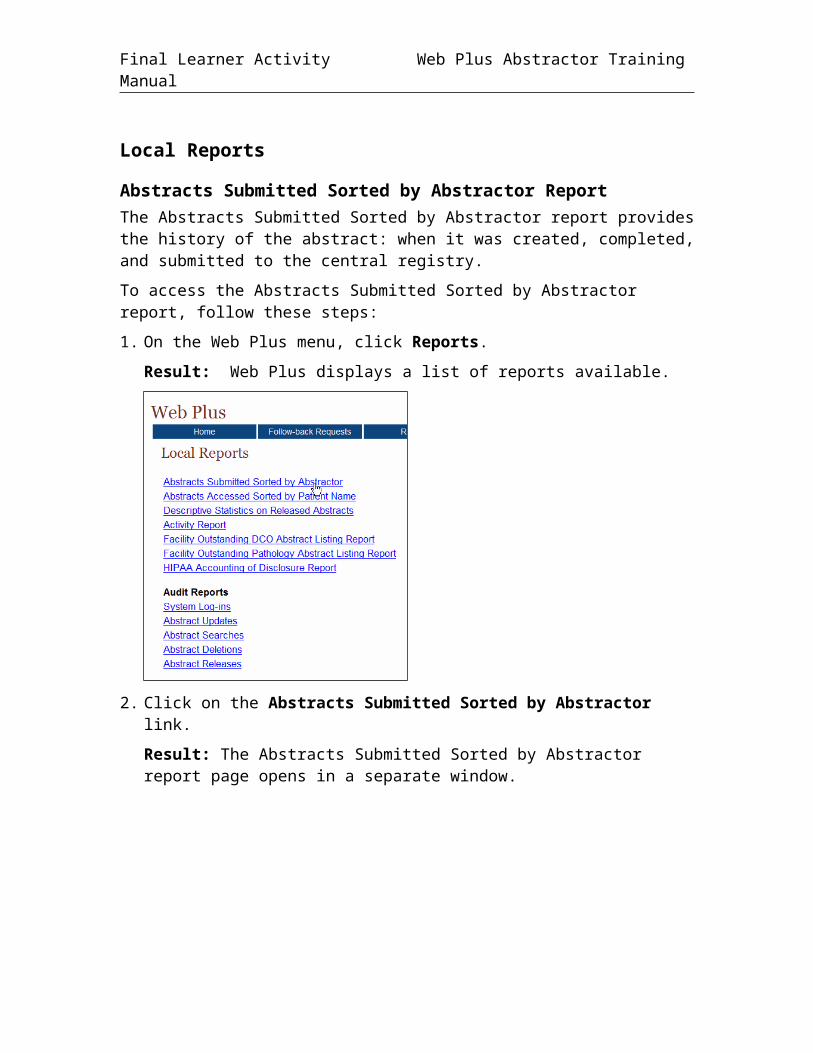
Opening and Printing ReportsTo open a report after you have logged in, complete these steps:
1. On the Web Plus menu, click Reports.
Result: Web Plus displays a list of reports available for you.
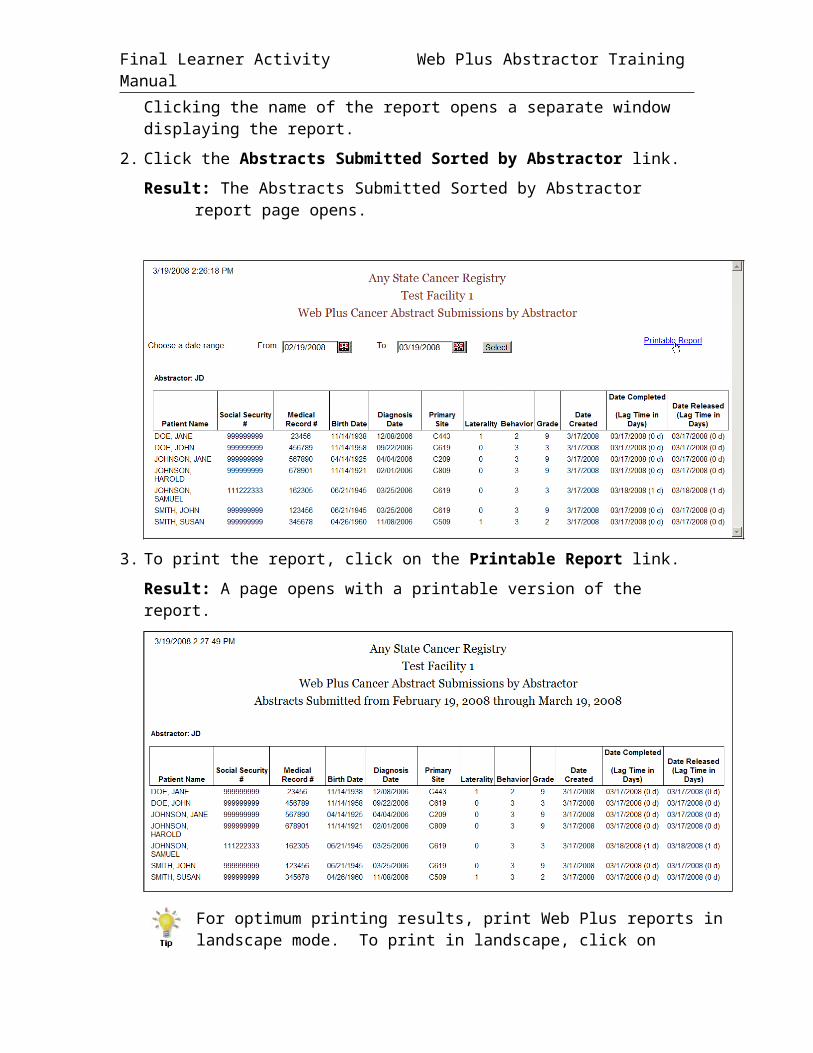
Clicking the name of the report opens a separate window displaying the report.
2. Click the Abstracts Submitted Sorted by Abstractor link.
Result: The Abstracts Submitted Sorted by Abstractor report page opens.

3. To print the report, click on the Printable Report link.
Result: A page opens with a printable version of the report.
For optimum printing results, print Web Plus reports in landscape mode. To print in landscape, click on FilePage Setup, and click on Landscape.
In addition, if you wish to remove the internal report name from the upper left-hand corner of the printed report, remove the &w&b from the header field. If you wish to remove the URL listing from the bottom of the report, remove the information in the footer field (the date prints on the report already).
Available ReportsThe below table describes reports that are available for viewing by a Web Plus abstractor. Click the name of the report to open a separate window displaying the report.
Final Learner Activity Web Plus Abstractor Training Manual
This report . . . Lists . . .Local Reports
Abstracts Submitted Sorted by Abstractor
all abstracts that a facility has released within a given time period. The abstracts are sorted first by the name of the abstractor and then by patient name.
Abstracts Accessed Sorted by Patient Name
all abstracts that a facility has released within a given time period sorted by patient name.
Descriptive Statistics on Released Abstracts
descriptive statistics on released abstracts such as demographics and site group.
Activity Report the number of released and unreleased abstracts for each month of the selected date range.
Facility Outstanding DCO Abstract Listing Report
a line listing of all death certificate follow-back abstracts assigned to your facility that have not yet been released to the central registry
Facility Outstanding Pathology Abstract Listing Report
a line listing of all pathology laboratory follow-back abstracts assigned to your facility that have not yet been released to the central registry
HIPPA Accounting of Disclosure report
a user-generated HIPPA-compliant report of information disclosure (via abstracts) to your central registry using Web Plus
Audit Reports
System Logins the users from your facility and their times for logging in and out of Web Plus within a selected date range.
Abstract Updates the dates and times that abstracts from your facility have been updated.
Abstract Searches the abstractor and the date and time for all searches for abstracts at your facility.
Abstract Deletions the dates and times that abstracts have been deleted at your facility.
Abstract Releases information about abstracts released from your facility including release time and date and abstractor.
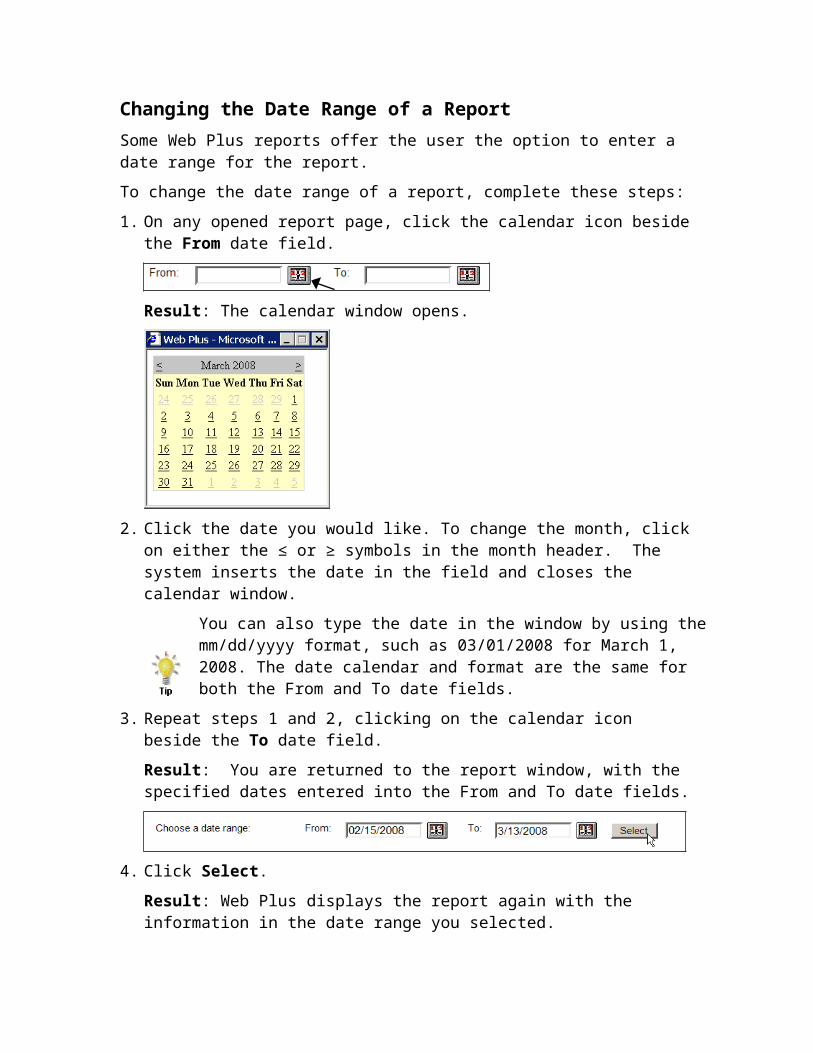
Changing the Date Range of a ReportSome Web Plus reports offer the user the option to enter a date range for the report.
To change the date range of a report, complete these steps:
1. On any opened report page, click the calendar icon beside the From date field.
Result: The calendar window opens.
2. Click the date you would like. To change the month, click on either the ≤ or ≥ symbols in the month header. The system inserts the date in the field and closes the calendar window.
You can also type the date in the window by using the mm/dd/yyyy format, such as 03/01/2008 for March 1, 2008. The date calendar and format are the same for both the From and To date fields.
3. Repeat steps 1 and 2, clicking on the calendar icon beside the To date field.
Result: You are returned to the report window, with the specified dates entered into the From and To date fields.
4. Click Select.
Result: Web Plus displays the report again with the information in the date range you selected.
Local Reports
Abstracts Submitted Sorted by Abstractor ReportThe Abstracts Submitted Sorted by Abstractor report provides the history of the abstract: when it was created, completed, and submitted to the central registry.
To access the Abstracts Submitted Sorted by Abstractor report, follow these steps:
Final Learner Activity Web Plus Abstractor Training Manual
1. On the Web Plus menu, click Reports.
Result: Web Plus displays a list of reports available.
2. Click on the Abstracts Submitted Sorted by Abstractor link.
Result: The Abstracts Submitted Sorted by Abstractor report page opens in a separate window.
The report contains these columns for each abstract, and the abstracts are grouped by abstractor:
Column Heading Description
Patient Name Name of patient on abstract
Social Security Number Patient’s social security number
Column Heading Description
Medical Record Number Patient’s medical record number
Birth Date Patient’s birth date
Diagnosis Date Diagnosis date of the tumor being reported
Primary Site ICD-O-3 topography code for the primary site of the tumor being reported
Laterality Laterality code for the tumor being reported
Behavior ICD-O-3 behavior code for the tumor being reported
Grade ICD-O-3 grade/differentiation code for the tumor being reported
Date Created Date the abstract was created
Date Completed Date the abstract was completed, with the lag time (in days) between date of creation and completion in parentheses
Date Released Date the abstract was released to the central registry, with the lag time (in days) between date of completion and release in parentheses
The date range can be modified for the Abstracts Submitted Sorted by Abstractor report.
If you would like to print the report, click on the Printable Report link, and print the report in landscape mode using your browser’s printer.
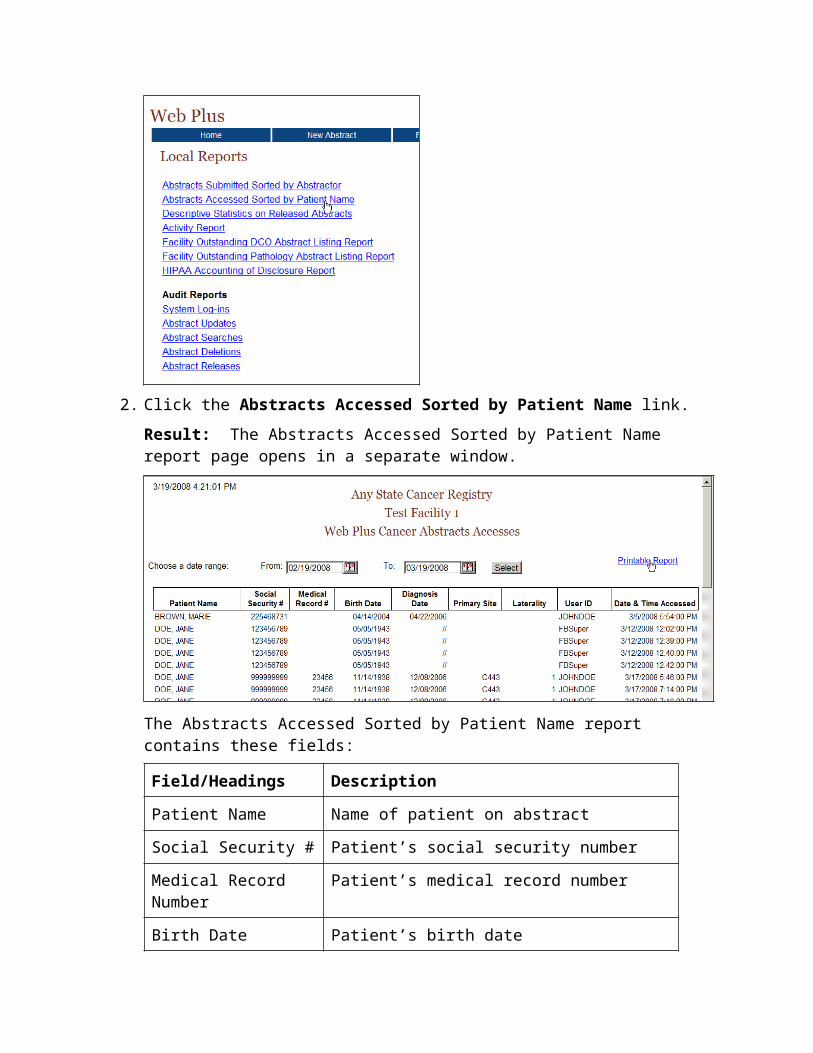
Abstracts Accessed Sorted by Patient Name ReportThe Abstracts Accessed Sorted by Patient Name report provides the dates and times that an abstract is opened and the reason why it was opened.
To access the Abstracts Accessed Sorted by Patient Name report, follow these steps
1. On the Web Plus menu, click Reports.
Result: Web Plus displays a list of reports available.
Final Learner Activity Web Plus Abstractor Training Manual
2. Click the Abstracts Accessed Sorted by Patient Name link.
Result: The Abstracts Accessed Sorted by Patient Name report page opens in a separate window.
The Abstracts Accessed Sorted by Patient Name report contains these fields:
Field/Headings Description
Patient Name Name of patient on abstract
Social Security # Patient’s social security number
Medical Record Number Patient’s medical record number
Birth Date Patient’s birth date
Diagnosis Date Diagnosis date of the tumor being reported
Primary Site ICD-O-3 topography code for the primary site of the tumor being reported
Field/Headings Description
Laterality Laterality code for the tumor being reported
User ID User ID of the abstractor
Date & Time Accessed Date and time that the abstractor opened the abstract
The date range can be modified for the Abstracts Accessed Sorted by Patient Name report.If you would like to print the report, click on the Printable Report link, and print the report in landscape mode using your browser’s printer.
Descriptive Statistics on Released Abstracts ReportThe Descriptive Statistics on Released Abstracts report includes a series of tables consisting of the number and percent of released abstracts broken down by the following: county of residence, zip code of residence, sex and race, age group, site group, and treatment group.
To run and/or modify the report for Descriptive Statistics on Released Abstracts complete these steps:
1. On the Web Plus menu, click Reports.
Result: Web Plus displays a list of reports available.
2. Click the Descriptive Statistics on Released Abstracts link.
Result: The Descriptive Statistics on Released Abstracts report page opens.
Final Learner Activity Web Plus Abstractor Training Manual
The descriptive statistics provided are broken down as follows:
Grouping Variable(s) Groupings by…
County of Residence individual county of residence at diagnosis
Zip Code of Residence individual zip code of residence at diagnosis
Sex and Race patient sex (male/female) by race (white/black/other)
Age Group ten age groups (0-9, 10-19,….90+)
Site Group three levels of primary site grouping:
Grouping Level Description
Aggregate 18 categories
Subaggregate 60 categories
Recode 78 groups
Grouping Variable(s) Groupings by…
Treatment Group type of summary treatment (RX Summ) recorded:Surgery of Primary Site Chemotherapy Hormone BRM Other Rad-Regional RX Modality Transplant/Endocrine
The following options are available to modify the Descriptive Statistics on Released Abstracts report:
Option Description
Date Range Includes only those abstracts that were released within the specified date range
Select all released When clicked, all abstracts released by the facility will be included, regardless of date released
Select Level of Site Group Detail
Specifies what level of primary site grouping to use for the report; the default grouping is 18 categories
Include site groups with no cases
When Yes is clicked, the primary site distribution will show all site groups for the level of detail chosen, whether or not abstracts were released containing each of the site groupsWhen No is clicked, only those primary site groups contained in the released abstracts released will appear on the report
Group by managing physician
When Yes is clicked, the records in the report will be grouped into sections by managing physician, displaying the descriptive statistics for abstracts released by each managing physician
3. Next to Include Site Groups with no cases, click on Yes.
Click Run.
Result: Web Plus displays the report again with all 18 site groupings displayed.
4. Click on the Printable Form link.
Result: A separate window opens with the report formatted for printing.
Final Learner Activity Web Plus Abstractor Training Manual
Activity ReportThe Activity report provides information on the abstracting activity at your facility, in terms of the number of released and unreleased abstracts.
To open the Activity report:
1. On the Web Plus menu, click Reports.
Result: Web Plus displays a list of reports available.
2. Click the Activity Report link.
Result: The Activity Report window opens.
3. If desired, enter a date range for the Activity report. The default From date is January 1 of the current year, and the default To date is the current day. If the specified date range spans more than one year, the report will display the number of released and unreleased cases for each year rather than each month.
4. You can also group the information in the Activity report by managing physician; just click on Yes next to Group by managing physician, and click Run.
Final Learner Activity Web Plus Abstractor Training Manual
5. If you would like to print the report, click on the Printable Report link, and print the report in landscape mode using your browser’s printer.
Facility Outstanding Follow-back Abstract Listing ReportThe Facility Outstanding Follow-back Abstract Listing report includes a line listing of all follow-back abstracts assigned to your facility that you have not yet released. You can print this report for your records, or if you need to go somewhere away from your computer to look up patient records.
To open the Facility Outstanding Follow-back Abstract Listing report, complete these steps:
1. On the Web Plus menu, click Reports.
Result: Web Plus displays a list of available follow-back reports.
or
2. Click on either the Facility Outstanding DCO Follow-back Abstract Listing Report or the Facility Outstanding Pathology Follow-back Abstract Listing Report link. In the example shown the Facility Outstanding DCO Follow-back Abstract Listing Report is opened.
Result: The Facility Outstanding Follow-back Abstract Listing Report for the particular follow-back type opens in a separate window.
The Facility Outstanding Follow-back Abstract Listing Reports contain these fields:
Field/Headings Description
Last Name Last name of patient
First Name First name of patient
MI Middle initial of patient
AbsRefID A unique, system-generated number identifying the abstract
Sex Patient’s sex
SSN Patient’s social security number
DTHCRT# Death certificate number from death certificate (for death certificate follow-back only)
DOB Patient’s birth date
DOD Date of patient’s death from death certificate (for death certificate follow-back only)
COD ICD-10 Cause of Death (for death certificate follow-back only)
Site ICD-O-3 topography code for the primary site of the tumor being reported
Status Current status of the outstanding follow-back abstract: Incomplete, E-mail sent, Rejected, or Rerouted
3. If you would like to print the report, click on the Printable Report link, and print the report in landscape mode using your browser’s printer.
Final Learner Activity Web Plus Abstractor Training Manual
HIPAA Accounting of Disclosure ReportWhen a physician or hospital submits information to a central cancer registry, an accounting of disclosures of protected health information is required. The Web Plus HIPAA Accounting of Disclosure Report is a HIPAA-compliant report that includes the date of the disclosure, the name and address of the central cancer registry (entity who received the protected health information), a brief description of the protected health information disclosed, and a brief statement of the purpose of the disclosure. The HIPAA Accounting of Disclosure Report can be generated for all released abstracts and abstracts released within a specified date range, as well as for individual released abstracts.
To open the HIPAA Accounting of Disclosure Report, complete these steps:
1. On the Web Plus menu, click Reports.
Result: Web Plus displays a list of available follow-back reports.
2. Click on the HIPAA Accounting of Disclosure Report link.
Result: The HIPAA Accounting of Disclosure Report page opens in a separate window.
3. Enter a date range for the report. The default From date is April 14, 2003, the date HIPAA went into effect, and the default To date is the current date.
4. Click Run.
Result: You are returned to the HIPAA Accounting of Disclosure Report window, with the information displayed restricted to the date range you selected.
5. If you would like to print the report, click on the Printable Report link, and print the report in landscape mode using your browser’s printer.
6. To generate a report for an individual disclosure, click on the patient name link for the patient of interest. In the example shown, the report is opened for Jane Doe.
Result: A printable HIPAA Accounting of Disclosure Report for the individual opens.
Final Learner Activity Web Plus Abstractor Training Manual
Audit ReportsThis table describes the audit reports available for viewing by the Web Plus facility abstractor. Clicking the name of the report opens a separate window displaying the report.
This Report . . . Lists . . .
System Log-ins the user, date, and time of all Web Plus system log-ins and log outs at your facility within a selected date range
Abstract Updates the user, date, and time of all abstract updates at your facility
Abstract Searches the user, date, and time of all abstract searches at your facility
Abstract Deletions the user, date, and time of all abstract deletions at your facility
Abstract Releases information about abstract releases from your facility including release time and date, and abstractor
1. Click the System Log-ins link.
Result: The Login Audit report page opens.
The report contains these column headings:
Column Heading Description
Facility Facility ID Number of your facility
UserID User ID of the user
Date-Time Date and time of the log in/out
Action Indicates the user activity being logged: Logged in Logged out Invalid log in attempt
2. Close the report window.
3. On the Reports page under Audit Reports, click Abstract Updates.
Result: The Abstract Update Log Opens.
The Abstract Update Log contains these column headings:
Column Heading Description
AbsRefID A unique, system-generated number identifying the abstract
UserID User ID of the abstractor
Facility Number of facility that sent the abstract
Date-Time Date and time of the action
The remaining audit reports contain the same column headings and information as the Abstract Update Log for their specific user activities:
Abstract Searches Abstract Deletions Abstract Exports Abstract Releases
Activity – Finding Report InformationLook at the list of reports and find this information:
The case you abstracted earlier
The number of updates done to abstracts in the last month
The last user to update the Samuel Johnson abstract
Final Learner Activity Web Plus Abstractor Training Manual
Chapter 8: Final Learner ActivityOverviewFor your final activity you will create an abstract from a medical record. Enter the information into the appropriate fields, save it, correct errors, and release the abstract.
Medical RecordTest Facility 1
Discharge Summary
Reporting Physician: Anne Bobula
Patient InformationMedical Record Number: 67234Last Name: OrvisFirst Name: JohnMiddle Name: WayneAddress: 2276 Waverly St., Philadelphia, PA 19101. County: Philadelphia Race: BlackSex: MaleDate of Birth: February 28, 1925Social Security Number: 456456456
Admission: June 12, 2004Discharge: June 18, 2004
Notes:Mr. Orvis was admitted for follow-up of prostate biopsy positive for cancer performed May 30 in Doctor’s Clinic. Radical prostatectomy was performed on 6/13/04. Findings included a 1.5cm adenocarcinoma in prostate, grade 1. All nodes negative. Patient was discharged in good condition. No further treatment is contemplated.
HintsThese are a few hints to help you complete your abstract:
Fill in what you know at first and then save your work. Web Plus will run the edit check and show the entry fields’ blanks or errors.
Look at the Help page for a field if you need to interpret the field name.
Use the Search feature on the Lookup page to find the proper code.
Appendix A: AnswersChapter 2: The BasicsThese are the answers to the questions (page 11) about the basics of Web Plus:1. Click the Special Lookups icon to open a separate window to insert a code into a
field.
2. To log out, click Log Out on the Web Plus menu.
3. You do not have to complete filling out the abstract at one time. Begin an abstract and save it. Then you can return to it later by using the Find/Open Abstract tool.
Chapter 3: Creating an AbstractThese are the answers to the questions (page 15) about entering data:
1. You click the Help icon to learn more about a field.
2. The Special Lookup page provides codes for specific field information.
Chapter 4: Adding Data to an AbstractThese are the answers to the questions (page 20) about adding data to an abstract:
1. Text fields provide an area to enter written information about a patient’s medical history.
2. Click the Print Preview link to open a copy of an abstract in a separate window. This preview displays all of the fields and entered data for the abstract. Use your browser’s printer to print out a copy.
3. Click Delete in the Action column of the Find Abstract page to open the page where you can delete your abstract.
Chapter 5: Correcting ErrorsThese are the answers to the questions (page 27) about correcting and releasing abstracts:
1. To release more than one abstract at a time, click Release Abstracts on the Web Plus menu and select the abstracts you want to release.
2. You can release an abstract by clicking the Yes button in the Edit Result box after you have completed it or by releasing it from the Release Abstract page.
3. The errors list is in the Edit Errors box on the right side of the Data Entry page.
Chapter 6: Follow-back AbstractsThese are the answers to the questions (page 33) about follow-back abstracts:
1. To open a follow-back abstract, click on the follow-back link on your home page, and click open, to open the follow-back abstract of interest.
Final Learner Activity Web Plus Abstractor Training Manual
2. To reject a follow-back abstract, open the abstract and click Reject in the upper right-hand corner of the abstract.