national youth fitness survey (nyfs)- treadmill examination
TRANSCRIPT
National Youth Fitness Survey (NYFS) Treadmill Examination Manual
January 2012
iii
TABLE OF CONTENTS
Chapter Page
1 OVERVIEW OF THE TREADMILL EXAM................................................. 1-1
1.1 Overview ............................................................................................. 1-1 1.2 Role of the Treadmill Examiners ........................................................ 1-1 1.3 Integrated Survey Information System (ISIS) .................................... 1-2
References ........................................................................................................ 1-3
2 EQUIPMENT/SUPPLIES/MATERIALS ....................................................... 2-1
2.1 Quinton TM55 .................................................................................... 2-1
2.1.1 Q-Stress System .................................................................. 2-1 2.1.2 Maintenance of the Treadmill ............................................. 2-3 2.1.3 Calibration of the Treadmill ................................................ 2-6
2.2 Description of Supplies ....................................................................... 2-9
2.2.1 ECG Electrodes/Alcohol Pads/Abrasive Cream ................. 2-9 2.2.2 Running Shoes .................................................................... 2-9
2.3 Repair of Equipment ........................................................................... 2-10 2.4 Equipment Manuals ............................................................................ 2-10 2.5 Troubleshooting .................................................................................. 2-10
2.5.1 Quinton TM55 Treadmill .................................................... 2-10 2.5.2 Q-Stress System .................................................................. 2-12 2.5.3 ECG Electrodes and Preamp ............................................... 2-13
2.6 Teardown Procedures ......................................................................... 2-14
2.6.1 Treadmill ............................................................................. 2-14 2.6.2 Q-Stress System .................................................................. 2-14 2.6.3 Supplies ............................................................................... 2-14
3 PROTOCOL .................................................................................................... 3-1
3.1 Exclusions to the Treadmill Component............................................. 3-1
3.1.1 Shared Exclusion Questions ................................................ 3-1 3.1.2 Medical History ................................................................... 3-2 3.1.3 Medications ......................................................................... 3-3
iv
TABLE OF CONTENTS (continued)
Chapter Page
3.2 Introduction to the Treadmill Component .......................................... 3-4
3.2.1 SP Parents or Guardians ...................................................... 3-5
3.3 Checking SP’s Footwear ..................................................................... 3-5 3.4 Preparation for Treadmill Test ............................................................ 3-5
3.4.1 Preparation of Skin and Placement of Electrodes ............... 3-5 3.4.2 Connection Test .................................................................. 3-8
3.5 Room Temperature ............................................................................. 3-9 3.6 Endurance Performance Test (6-11 years). ......................................... 3-9
3.6.1 Introduction to the Endurance Performance Test (6-11 years) ................................................................................... 3-9
3.6.2 Demonstrating How to Walk on a Treadmill ...................... 3-10 3.6.3 Endurance Performance Test for Ages 6-7 ......................... 3-11 3.6.4 Endurance Performance Test for Ages 8-9 ......................... 3-12 3.6.5 Endurance Performance Test for Ages 9-10 ....................... 3-12 3.6.6 Setup of the Q-Stress System (Exhibit 3-3) ........................ 3-14 3.6.7 Stage 1 - Warm-up (00:00 - 01:00 Minute) ......................... 3-16 3.6.8 Stage 2-11 (00:00 - 17:00 Minutes) .................................... 3-16 3.6.9 Recovery Stage (00:00 - 02:00 Minutes) ............................ 3-16 3.6.10 End of Test .......................................................................... 3-17 3.6.11 Report of Findings............................................................... 3-17
3.7 Cardiovascular Fitness Test (12-15 years) .......................................... 3-17
3.7.1 Determination of Physical Activity Readiness Code .......... 3-18 3.7.2 Questions to Determine PAR Code ..................................... 3-19 3.7.3 Determination of Body Mass Index (BMI) ......................... 3-21 3.7.4 Determination of Predicted VO2 Max ................................ 3-21 3.7.5 Determination of Exercise Protocol .................................... 3-22 3.7.6 Introduction to the Cardiovascular Fitness Test .................. 3-22 3.7.7 Demonstrating How to Walk on a Treadmill ...................... 3-23 3.7.8 Setup of the Q-Stress system ............................................... 3-24 3.7.9 Stage 1 - Warm-up (00:00 - 02:00 Minutes) ....................... 3-25 3.7.10 RPE Explanation and Assessment....................................... 3-26 3.7.11 Stage 2 (00:00 - 03:00 Minutes) .......................................... 3-27 3.7.12 Stage 3 (00:00 - 03:00 Minutes) .......................................... 3-28 3.7.13 Recovery Stage (00:00 - 02:00 Minutes) ............................ 3-29 3.7.14 End of Test .......................................................................... 3-29 3.7.15 Procedure if Values Exceed Criteria ................................... 3-30 3.7.16 Exception for RPE Greater Than 17 at End of Stage 3 ....... 3-30 3.7.17 Procedure if SP is Unable to Adhere to the Protocol .......... 3-31
v
TABLE OF CONTENTS (continued)
Chapter Page
3.7.18 Procedure to Change Predicted Exercise Protocol .............. 3-32 3.7.19 Report of Findings for CV Fitness ...................................... 3-35
3.8 Procedure to Stop Treadmill Test Early.............................................. 3-36
3.8.1 Priority 1 Stopping Criteria (for both the Endurance Performance Test [6-11 years] and the Cardiovascular Fitness Test [12-15 years]) .................................................. 3-36
3.8.2 Priority 2 Stopping Criteria for the Endurance Test (Ages 6-11).......................................................................... 3-38
3.8.3 Priority 2 Stopping Criteria for the Cardiovascular Fitness Test (12-15 years) ................................................... 3-39
3.9 Procedure to Recover/Restart an Exam .............................................. 3-40 3.10 Component Status ............................................................................... 3-41
4 INTEGRATED SURVEY INFORMATION SYSTEM (ISIS) DATA ENTRY ............................................................................................................ 4-1
4.1 General Screen Information ................................................................ 4-1
4.1.1 Asthma Medication Screen ................................................. 4-2
4.2 Endurance Performance Test .............................................................. 4-3
4.2.1 Pre-exam Phase ................................................................... 4-4 4.2.2 SP Selection ........................................................................ 4-6 4.2.3 Impedance Check ................................................................ 4-8 4.2.4 Functions on the Q-Stress test window for the
Endurance Test .................................................................... 4-10 4.2.5 Rest Phase ........................................................................... 4-11 4.2.6 Exercise Phase ..................................................................... 4-12 4.2.7 Recovery Phase ................................................................... 4-13 4.2.8 Review Mode ...................................................................... 4-13 4.2.9 Post-exam ............................................................................ 4-15 4.2.10 Priority 2 Stopping Criteria ................................................. 4-16 4.2.11 Priority 1 Stopping Criteria ................................................. 4-17
4.3 Cardiovascular Fitness Test ................................................................ 4-18
4.3.1 Pre-exam Phase ................................................................... 4-18 4.3.2 SP Selection ........................................................................ 4-29 4.3.3 Rest Phase ........................................................................... 4-34 4.3.4 Exercise Phase ..................................................................... 4-35 4.3.5 Recovery Phase ................................................................... 4-38
vi
TABLE OF CONTENTS (continued)
Chapter Page
4.3.6 Review Mode ...................................................................... 4-38 4.3.7 Post-exam ............................................................................ 4-39 4.3.8 Priority 2 Stopping Criteria ................................................. 4-41 4.3.9 Priority 1 Stopping Criteria ................................................. 4-41
4.4 Component Status Categories ............................................................. 4-43
4.4.1 Complete ............................................................................. 4-43 4.4.2 Partial .................................................................................. 4-43 4.4.3 Not Done ............................................................................. 4-45
5 QUALITY CONTROL .................................................................................... 5-1
5.1 Introduction to Quality Control .......................................................... 5-1 5.2 Training ............................................................................................... 5-1 5.3 Monitoring and Maintenance of Equipment and Supplies. ................. 5-1
5.3.1 Daily .................................................................................... 5-2 5.3.2 Weekly ................................................................................ 5-2 5.3.3 Stand .................................................................................... 5-3 5.3.4 Data Entry Screens for QC on Equipment .......................... 5-3 5.3.5 Utilities Menu to Select Quality Control ............................. 5-4 5.3.6 Quality Control Logon Box ................................................ 5-4 5.3.7 Data Entry Screen for QC Daily Checks ............................. 5-5 5.3.8 Data Entry Screen for QC Weekly Checks ......................... 5-6 5.3.9 Data Entry Screen for QC Start of Stand Checks ................ 5-8 5.3.10 Incomplete Entry of Quality Control Data .......................... 5-9
5.4 Observational Visits ............................................................................ 5-9
5.4.1 Examiner Competency Evaluation Form ............................ 5-10 5.4.2 Site Visit Report Form ........................................................ 5-10
List of Appendixes
Appendix
A Scripts (English and Spanish) .......................................................................... A-1
B Endurance Performance Test Protocols ........................................................... B-1
C Determination of Exercise Protocol ................................................................. C-1
D Physical Activity Readiness Code ................................................................... D-1
vii
TABLE OF CONTENTS (continued)
List of Appendixes (continued)
Appendix Page
E Review of Edit Criteria for The CV Fitness Test............................................. E-1
F Calculation of Predicted VO2 Max .................................................................. F-1
G Calculation of Estimated VO2 Max ................................................................. G-1
H Reference Ranges for VO2 Max ...................................................................... H-1
I Examiner Competency Evaluation Form ......................................................... I-1
List of Tables
Tables
2-1 Troubleshooting problems with the Quinton TM55 ........................................ 2-11
2-2 Troubleshooting problems with the Quinton Q-Stress System ........................ 2-12
2-3 Troubleshooting problems with the ECG electrodes and the Preamp ............. 2-13
3-1 Key points ........................................................................................................ 3-4
3-2 Meaning of display colors ................................................................................ 3-8
3-3 Treadmill Protocol for Ages 6-7 ...................................................................... 3-11
3-4 Treadmill Protocol for Ages 8-9 ...................................................................... 3-12
3-5 Treadmill Protocol for Ages 10-11 .................................................................. 3-13
3-6 Cardiovascular Fitness Test Protocols ............................................................. 3-18
List of Exhibits
Exhibits
2-1 Quinton TM55 Treadmill ................................................................................. 2-1
2-2 Front view of Q-Stress cart and computer components ................................... 2-2

viii
TABLE OF CONTENTS (continued)
List of Exhibits (continued)
Exhibits Page
2-3 Back image of Q-stress cart with connections ................................................. 2-2
2-4 Adjustment bolts .............................................................................................. 2-4
2-5 Roller Guards ................................................................................................... 2-5
2-6 Calibration of the Treadmill............................................................................. 2-6
2-7 Calibration of elevation ................................................................................... 2-8
3-1 Site for placement of electrodes ....................................................................... 3-6
3-2 Example of the impedance check window ....................................................... 3-7
3-3 Endurance performance test screen ................................................................. 3-15
3-4 Cardiovascular fitness test screen .................................................................... 3-25
3-5 Rating of perceived exertion ............................................................................ 3-26
4-1 Logon SP screen .............................................................................................. 4-1
4-1A ISIS screen characteristics ............................................................................... 4-2
4-2 Pre-exam Asthma Medication screen .............................................................. 4-3
4-3 Pre-exam Treadmill Data Capture screen ........................................................ 4-4
4-4 New SP test icon .............................................................................................. 4-6
4-5 SP Selection Screen (1) .................................................................................... 4-7
4-6 Patient Selection Screen (2) ............................................................................. 4-7
4-7 Selection of Protocol and Procedure ................................................................ 4-8
4-8 Impedance Check icon ..................................................................................... 4-9
4-9 Example of the impedance check window ....................................................... 4-9
4-10 Rest Phase Test Window Screen ...................................................................... 4-10
ix
TABLE OF CONTENTS (continued)
List of Exhibits (continued)
Exhibits Page
4-11 Start Rest icon .................................................................................................. 4-11
4-12 Change Displayed Leads.................................................................................. 4-11
4-13 Start Exercise icon ........................................................................................... 4-12
4-14 End of Stage warning ....................................................................................... 4-12
4-15 Start Recovery icon ......................................................................................... 4-13
4-16 End Recovery Phase warning .......................................................................... 4-13
4-17 Review Mode icon ........................................................................................... 4-13
4-18 Confirmation Dialog Box ................................................................................ 4-14
4-19 Exit/Save icon .................................................................................................. 4-14
4-20 Exit Confirmation Box ..................................................................................... 4-14
4-21 Post-exam Treadmill Data Capture screen....................................................... 4-15
4-22 Pre-exam Height/Weight BMI ......................................................................... 4-19
4-23 Pre-exam BMI hard edit .................................................................................. 4-19
4-24 Component Status Not Done – Unable to calculate protocol .......................... 4-20
4-25 First level questions to determine exercise protocol ........................................ 4-21
4-26 Little or No Regular Physical Activity (second level questions) ..................... 4-22
4-27 Regular modest physical activity (second level questions) ............................. 4-23
4-28 Regular heavy physical activity (second level questions) ............................... 4-24
4-29 Component Status Not Done – Unable to calculate protocol .......................... 4-26
4-30 Pre-exam Treadmill Data Capture screen ........................................................ 4-26
4-31 New SP test icon .............................................................................................. 4-29
x
TABLE OF CONTENTS (continued)
List of Exhibits (continued)
Exhibits Page
4-32 SP Selection screen (1) .................................................................................... 4-30
4-33 Patient Selection screen (2) .............................................................................. 4-30
4-34 Selection of Protocol and Procedure ................................................................ 4-31
4-35 Impedance Check icon ..................................................................................... 4-32
4-36 Example of the impedance check window ....................................................... 4-32
4-37 Rest Phase Test Window Screen ...................................................................... 4-33
4-38 Start Rest icon .................................................................................................. 4-34
4-39 Change displayed leads .................................................................................... 4-34
4-40 Start Exercise icon ........................................................................................... 4-35
4-41 Explain RPE warning ....................................................................................... 4-35
4-42 Get RPE warning ............................................................................................. 4-36
4-43 Record RPE...................................................................................................... 4-36
4-44 End of Stage warning (1) ................................................................................. 4-36
4-45 Selecting a different protocol based on %HRmax ........................................... 4-37
4-46 Start Recovery icon ......................................................................................... 4-38
4-47 End Recovery Phase warning .......................................................................... 4-38
4-48 Review Mode icon ........................................................................................... 4-38
4-49 Confirmation Dialog Box ................................................................................ 4-39
4-50 Exit/Save icon .................................................................................................. 4-39
4-51 Exit Confirmation Box ..................................................................................... 4-39
4-52 Post-exam Treadmill Data Capture screen....................................................... 4-40
xi
TABLE OF CONTENTS (continued)
List of Exhibits (continued)
Exhibits Page
4-53 Priority 2 stopping criteria ............................................................................... 4-41
4-54 Component status – complete .......................................................................... 4-43
4-55 Component status – partial............................................................................... 4-43
4-56 Component status - partial - required comments ............................................. 4-44
4-57 Component status - not done............................................................................ 4-45
5-1 Quality control reminder message box ............................................................ 5-3
5-2 Utilities menu to select quality control ............................................................ 5-4
5-3 Quality control logon ....................................................................................... 5-5
5-4 Quality control daily checks (1) ....................................................................... 5-5
5-5 Quality control daily checks (2) ....................................................................... 5-6
5-6 Quality control weekly checks (1) ................................................................... 5-7
5-7 Quality control weekly checks (2) ................................................................... 5-8
5.8 Quality control “start of stand” checks ............................................................ 5-8
5-9 Quality control incomplete entry ..................................................................... 5-9
5-10 Site Visit Report form ...................................................................................... 5-10

1-1
1. OVERVIEW OF THE TREADMILL EXAM
1.1 Overview
The treadmill examination has been used to measure aerobic capacity in children as young as 4 years of age.1-4 In the National Health and Nutrition Examination Surveys (NHANES) Children’s Physical Activity Feasibility Study (CPAFS), endurance performance was measured successfully in children ages 6-11 years. In NHANES 1999-2006, it was used to measure aerobic capacity and cardiovascular fitness in youth and adults ages 12-49 years.5, 6
Two treadmill protocols will be used in the National Youth Fitness Survey (NYFS): the protocol for ages 6-11 years will test endurance performance and the protocol for ages 12-15 years will estimate cardiovascular fitness levels. The Cardiac Science Quinton TM-55 treadmill, designed specifically for exercise testing, will be used. Four leads with electrodes will be attached to the chest of the participant to measure heart rate. Evaluation of the endurance performance and cardiovascular fitness will:
1. Provide nationally representative data on endurance performance for ages 6-11 years;
2. Provide nationally representative data on cardiovascular fitness for ages 12-15 years;
3. Estimate the prevalence of children and adolescents at risk due to poor physical fitness; and
4. Provide data to study the association between cardiovascular fitness and other health conditions and risk factors, such as obesity and dietary patterns.
1.2 Role of the Treadmill Examiners
Two examiners will be present during the endurance performance test, one operating the treadmill software and monitoring the heart rate data (operator) and the other (coach) encouraging and monitoring the participant. When the endurance performance test starts, the coach stands next to the participant with his or her arm behind the participant to protect against potential falls or backward movement. As the test proceeds, both the coach and operator continually assess how the participant is doing by direct observation and reviewing heart rate readings.
1-2
There will be two examiners present at the beginning of the cardiovascular fitness test, one operating the treadmill software and monitoring the heart rate (operator) and the other (coach) monitoring and encouraging the participant. At the end of the warm-up stage, the operator may leave the room if the coach feels comfortable completing the test by his or herself.
Maximizing safety and obtaining meaningful data are the two primary goals of the examiners with regard to the treadmill test. The demeanor of the examiners should be one of relaxed confidence so as to immediately put the sample person (SP) at ease. Although there are time constraints to be aware of, treadmill testing procedures should not be rushed, and all procedures must be clearly explained prior to initiating the process. Examiners are expected to pay close attention to the data and the SP at all times, and to also be sensitive to the confidentiality of the data. Knowledge of normal vs. abnormal responses to exercise is essential, as well as knowing when a test should be terminated early. Since the treadmill test is not a diagnostic test, and since examiners are not licensed physicians, no diagnoses will be attempted or made by examiners at any time. Although the treadmill test is very safe, all examiners must be CPR certified.
1.3 Integrated Survey Information System (ISIS)
The Integrated Survey Information System (ISIS) is a computer-based infrastructure designed to support all survey operations including sample management, data collection, data editing, quality control, analysis, and delivery of NYFS data. Each component in NYFS such as the Treadmill Exam (TM) has a computer application for direct data entry. Data collected in the exam room of the mobile center (MC) is directly entered in the ISIS system computers. In addition, data from biomedical equipment such as heart rate is directly downloaded to the ISIS system where it is stored in the system database.

1-3
REFERENCES
1. Chatrath, R, Shenoy, R, Serratto, M, and Thoele, D.G. Physical fitness of urban American children. Pediatr Cardiol. 2002;23:608-12.
2. Cumming, G.R., Everatt, D., and Hastman, L. Bruce treadmill test in children: normal values in a clinic population. Am J Cardiol. 1978;41:69-75
3. Wäffler-Kammermann, N., Lacorcia, R.S., Wettstein, M., Radlinger, L., and Frey, U. A new standardized treadmill walking test requiring low motor skills in children aged 4-10 years. Pediatr Pulmonol. 2008;43:187-95.
4. Aerobic capacity in black adolescent girls. Pivarnik JM, Fulton JE, Taylor WC, Snider SA. Res Q Exerc Sport. 1993;64:202-7.
5. Pate, R.R., Wang, C.Y., Dowda, M., Farrell, S.W., and O'Neill, J.R. Cardiorespiratory fitness levels among US youth 12 to 19 years of age: findings from the 1999-2002 National Health and Nutrition Examination Survey. Arch Pediatr Adolesc Med. 2006;160:1005-12.
6. Wang, C.Y., Haskell, W.L., Farrell, S.W., Lamonte, M.J., Blair, S.N., Curtin, L.R., Hughes, J.P., and Burt, V.L. Cardiorespiratory fitness levels among US adults 20-49 years of age: findings from the 1999-2004 National Health and Nutrition Examination Survey. Am J Epidemiol. 2010;171:426-35.

2-1
2. EQUIPMENT/SUPPLIES/MATERIALS
Below you will find descriptions of the equipment necessary to complete the treadmill test of the NYFS.
2.1 Quinton TM55
The Quinton TM55 treadmill is a heavy-duty treadmill designed specifically for stress test applications. The Quinton TM55 features variable speed and grade and a 20-inch wide walking surface. See Exhibit 2-1.
Exhibit 2-1. Quinton TM55 Treadmill
2.1.1 Q-Stress System
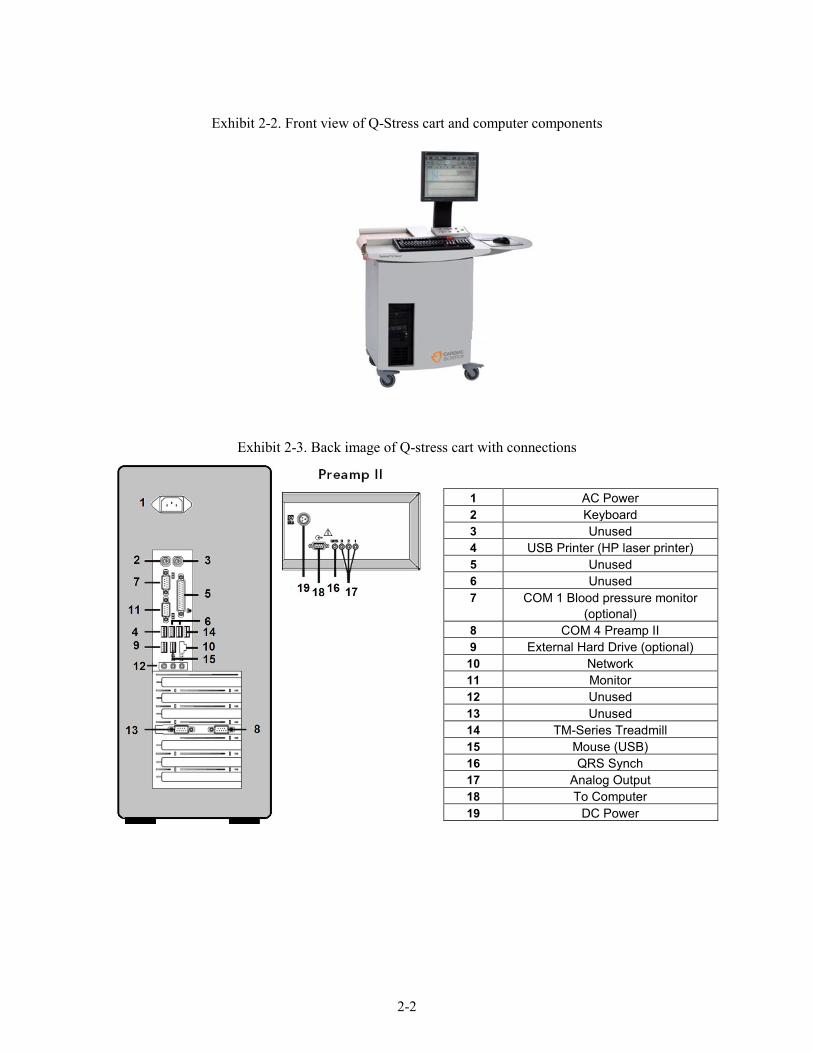
The Q-Stress System includes the Q-Stress computer, keyboard, and mouse which are positioned on a cart that enables electrical connections between this equipment and the treadmill. See Exhibits 2-2 and 2-3.
2-2
Exhibit 2-2. Front view of Q-Stress cart and computer components
Exhibit 2-3. Back image of Q-stress cart with connections
1 AC Power 2 Keyboard 3 Unused 4 USB Printer (HP laser printer) 5 Unused 6 Unused 7 COM 1 Blood pressure monitor
(optional) 8 COM 4 Preamp II 9 External Hard Drive (optional)
10 Network 11 Monitor 12 Unused 13 Unused 14 TM-Series Treadmill 15 Mouse (USB) 16 QRS Synch 17 Analog Output 18 To Computer 19 DC Power
2-3
2.1.2 Maintenance of the Treadmill
Routine maintenance for the Quinton TM55 Treadmill involves:
Confirming that the cable from the treadmill is securely connected to the front of the hood of the treadmill.
Daily visual inspection of the walking belt for wear and to confirm that the belt is centered on rollers. Always check for potential hazards on treadmill.
Daily visual inspection of the handle bar to be sure it is fastened securely.
Cleaning surfaces after each test with disinfectant and towel. Make sure the treadmill connections do not get wet. Do not use liquids on the deck surface.
NOTE: Never wipe the deck beneath the belt, even when changing the belt. Wiping can damage the wax finish,
A weekly check of speed and grade to ensure accuracy of treadmill calibration (see section on calibration).
Weekly inspections of the treadmill belt tracking and tension (see instructions below).
2.1.2.1 Belt Tension - Weekly Check
The belt tension should be adjusted whenever the belt slips or moves unsteadily during operation. Notify the coordinator if the belt tension needs adjustment. Belt tension is adjusted as follows:
Use the controls on the Q-Stress system to start the treadmill at minimum speed and grade, then increase speed to 2.5 mph.
Hold onto handrail for balance and walk heavily on the treadmill by marching flat-footed. If the belt hesitates or lags noticeably, tighten the belt as described in the following steps.
NOTE: Do not use all your weight to resist the belt movement. Too much resistance applied too long (more than 2 seconds) will shut down the system. If this should occur, recycle power to resume normal operation.
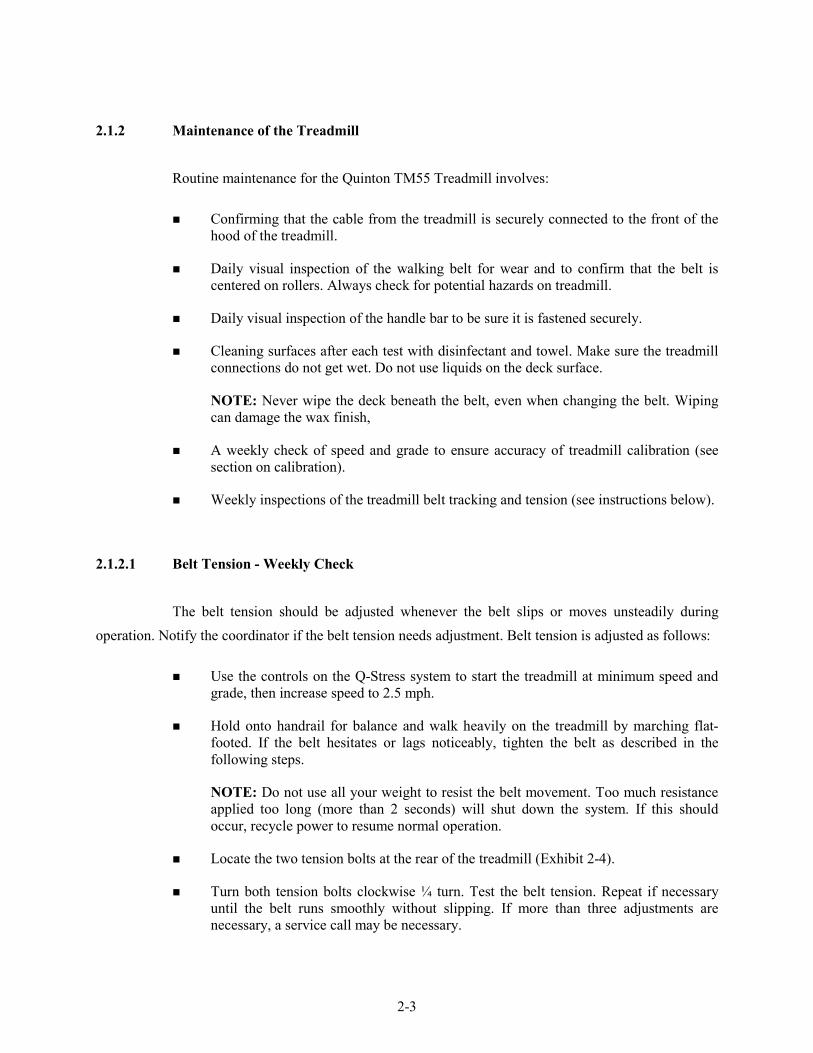
Locate the two tension bolts at the rear of the treadmill (Exhibit 2-4).
Turn both tension bolts clockwise ¼ turn. Test the belt tension. Repeat if necessary until the belt runs smoothly without slipping. If more than three adjustments are necessary, a service call may be necessary.
2-4
Stop the treadmill.
Check the position of the rear roller guards and adjust if necessary. (See Section 2.1.1.3 on rear roller guards.)
Exhibit 2-4. Adjustment bolts
2.1.2.2 Belt Tracking – Weekly Check
Notify the coordinator whenever the belt moves to one side or the other (off center).
Stay off the belt when adjusting tracking.
From the main Q-Stress system screen, select Tools/Service/System Devices
Click the Treadmill Calibration tab.
Click Start to begin the calibration.
Press and hold, then release the arrows to change the speed or grade of the treadmill.
Increase speed to 6.0 mph to make adjustments.
If the belt moves to the right, turn the right tension bolt a quarter turn clockwise.
If the belt moves to the left, turn the left tension bolt a quarter turn clockwise.
After making an initial adjustment, run the treadmill for several minutes and observe how the belt tracks. Adjustments to the belt tracking take several minutes to become apparent. If the belt continues to move off center, adjust accordingly until it is
2-5
properly centered. Do not tighten the belt too much as this will cause accelerated wear on the roller bearings.
Click Stop, the treadmill will return to zero grade and speed.
Check the position of the roller guards. (See Section 2.1.1.3 on rear roller guards).
2.1.2.3 Rear Roller Guards - Weekly Check
See Exhibit 2-5. Check the position of the rear roller guards each time you readjust the belt tracking or belt tension. The roller guards are located at the rear of the treadmill between the rear roller and the deck.
If the gap between the roller and the guard exceeds 3/8 of an inch, adjust the guards when the gap between the roller and the guard exceeds 3/8 of an inch.
Disconnect the treadmill power cord from the receptacle (outlet).
Loosen, but do not remove, the two screws attaching the rear roller guard to the deck (hold nuts underside with your finger).
Slide the rear roller guard towards the rear until the gap between the two is approximately 0.1 inch (the thickness of two quarters).
Tighten the two mounting screws on the rear roller guards.
Connect the power cord.
Exhibit 2-5. Roller Guards
Adjustment screws
Roller guards
2-6
2.1.3 Calibration of the Treadmill
Treadmill calibration should be checked weekly to ensure accuracy of testing results. However, if the treadmill is not within calibration specifications, a service technologist should be consulted.
Exhibit 2-6. Calibration of the Treadmill
FRONT
BACK Tension Bolts (+)
Tracking Bolts
Roller Roller
Guard
Mounting Screws & Nuts
2.1.3.1 Speed – Weekly Check
Use two pieces of masking tape to mark one spot on the belt and the second on the edge of the treadmill next to the belt.
Make sure the belt is free of objects.
From the main Q-Stress system screen, select Tools/Service/System Devices.
Click the Treadmill Calibration tab.
2-7
Click Start to begin the calibration.
Press and hold, then release the arrows to change the speed or grade of the treadmill.
Increase the speed to 2.5 mph.
Set a timer for 3 minutes.
Start the timer and begin counting the number of times the two pieces of tape meet (starting with zero).
Divide the number of revolutions by the time (3 minutes) to obtain revolutions per minute.
Multiply the revolutions per min. by 10.25 the belt length and divide the product by 88 ft/min to obtain belt speed.
– [# revs/min.* 10.25)/88 ft/min = belt speed (mph)]
If speed readout on the Q-Stress system exceeds + 0.2 mph of actual speed, repeat the previous steps.
See Section 6.4.5 for data entry of these results in the equipment Quality Control screens.
If treadmill still exceeds range, follow the steps below.
Determination of belt length is essential to calculate belt speed. Use two pieces of masking tape to mark one spot on the belt and the second on the edge of the treadmill next to the belt.
Measure the length of the belt in feet. (Belt length should be determined following any adjustment to the belt.)
Make sure the belt is free of objects.
From the main Q-Stress system screen, select Tools/Service/System Devices
Click the Treadmill Calibration tab
Click Start to begin the calibration
Press and hold, then release the arrows to change the speed or grade of the treadmill
Increase the speed to 2.5 mph.
Set a timer for 3 minutes.
2-8
Start the timer and begin counting the number of times the two pieces of tape meet (starting with zero).
Divide the number of revolutions by the time (3 minutes) to obtain revolutions per minute.
Multiply the revolutions per min. by the belt length and divide the product by 88 ft/min to obtain belt speed.
– [# revs/min.* belt length)/88 ft/min = belt speed (mph)]
If speed readout on the Q-Stress system exceeds + 0.2 mph of actual speed, call a service representative.
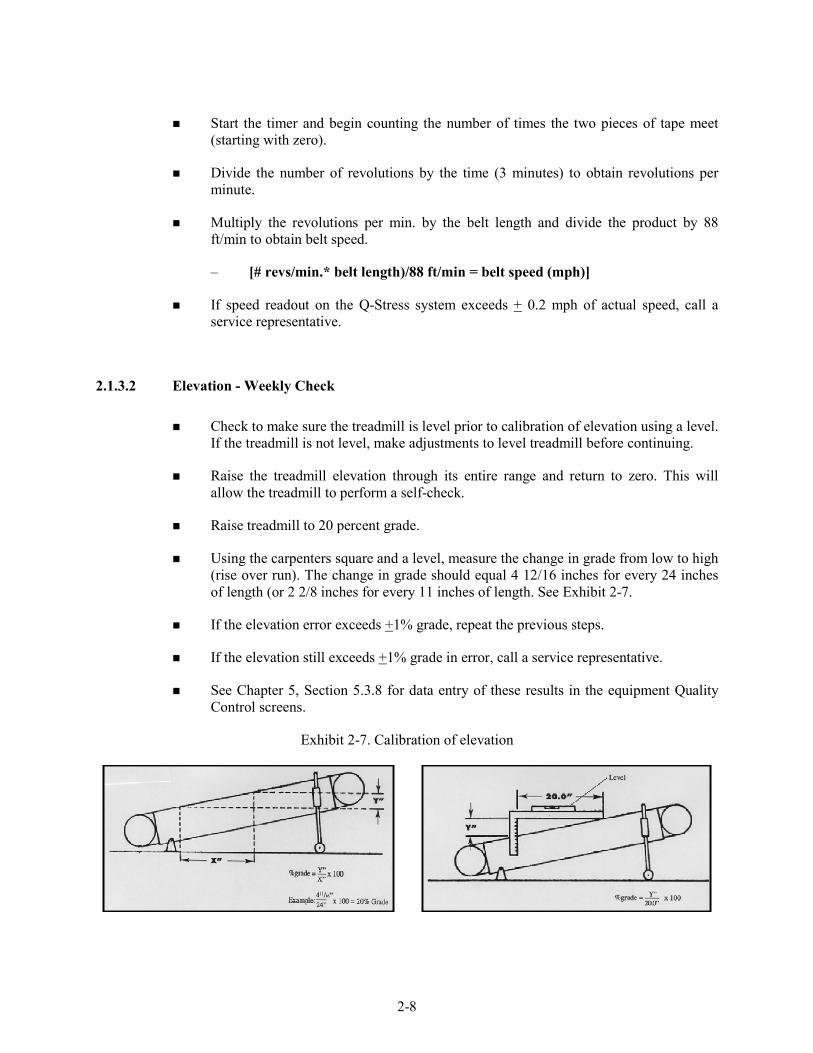
2.1.3.2 Elevation - Weekly Check
Check to make sure the treadmill is level prior to calibration of elevation using a level. If the treadmill is not level, make adjustments to level treadmill before continuing.
Raise the treadmill elevation through its entire range and return to zero. This will allow the treadmill to perform a self-check.
Raise treadmill to 20 percent grade.
Using the carpenters square and a level, measure the change in grade from low to high (rise over run). The change in grade should equal 4 12/16 inches for every 24 inches of length (or 2 2/8 inches for every 11 inches of length. See Exhibit 2-7.
If the elevation error exceeds +1% grade, repeat the previous steps.
If the elevation still exceeds +1% grade in error, call a service representative.
See Chapter 5, Section 5.3.8 for data entry of these results in the equipment Quality Control screens.
Exhibit 2-7. Calibration of elevation
2-9
2.1.3.3 Heart Rate – Weekly Check
Click the New Patient icon and select NYFS CV Fitness as the procedure and A3 CV #3 as the protocol.
Attach the electrodes RA, LA, RL, and LL to the ECG simulator.
On the Q-Stress test window, select Tools, ASVV Selection, and click in the box in front of I, II, and III.
Set the ECG simulator to 30 bpm.
Verify that heart rate displayed on the info tool bar is 30 bpm.
Set the ECG simulator to 60 bpm, 90 bpm, 120 bpm, 240 bpm.
If any of the heart rates readings do not match the ECG simulator settings, call a service representative.
See Section 6.4.5 for data entry of these results in the equipment Quality Control screens.
2.2 Description of Supplies
2.2.1 ECG Electrodes/Alcohol Pads/Abrasive Cream
Blue Max disposable monitoring electrodes (1.5”) from Cardiac Center will be used with the ECG chest leads to monitor the heart rate during the exam. Alcohol pads will be used to prepare the site for attachment of electrodes. Nuprep skin preparation gel and gauze will be used to remove old cells from the skin surface to improve adherence of the chest electrodes.
2.2.2 Running Shoes
The criteria that are important to consider when assessing whether or not the SP’s footwear is appropriate for the treadmill test are the presence of arch supports, heel cushions, traction, and the ability to tighten the shoe so that the heels will not come out of the shoe during exercise. If the SP does not bring footwear that is appropriate and safe for this test, acceptable footwear will be provided. Supplies of running shoes are kept in a shoe rack in the exam room in each examination center.
2-10
Examples of appropriate footwear are running shoes, casual or leisure style shoes, and modern athletic hiking boots. Some examples of inappropriate footwear include pumps, sandals, dress shoes, hard sole boots or shoes (work boots, traditional hiking boots), or any boot or shoe that has a heel for aesthetic purposes, and any shoe with cleats (soccer, golf, baseball, etc.).
2.3 Repair of Equipment
Contact for Repair or Replacement of Parts
Quinton Treadmill and Cardiac Science Quinton Q-stress System
Phone: (425)402-2000 Toll Free: (800) 426-0337 Fax: (425)402-2022 Email (US only): [email protected] Agreement # M000011653
2.4 Equipment Manuals
The following equipment manuals are kept in the exam room.
Quinton TM55 Cardiac Stress Treadmills User’s Guide; and
Quinton Q-Stress 4.5 User’s Guide and Service Manual.
2.5 Troubleshooting
2.5.1 Quinton TM55 Treadmill
The following table (2-1) may be used to troubleshoot some common problems with the treadmill and programmable controller.
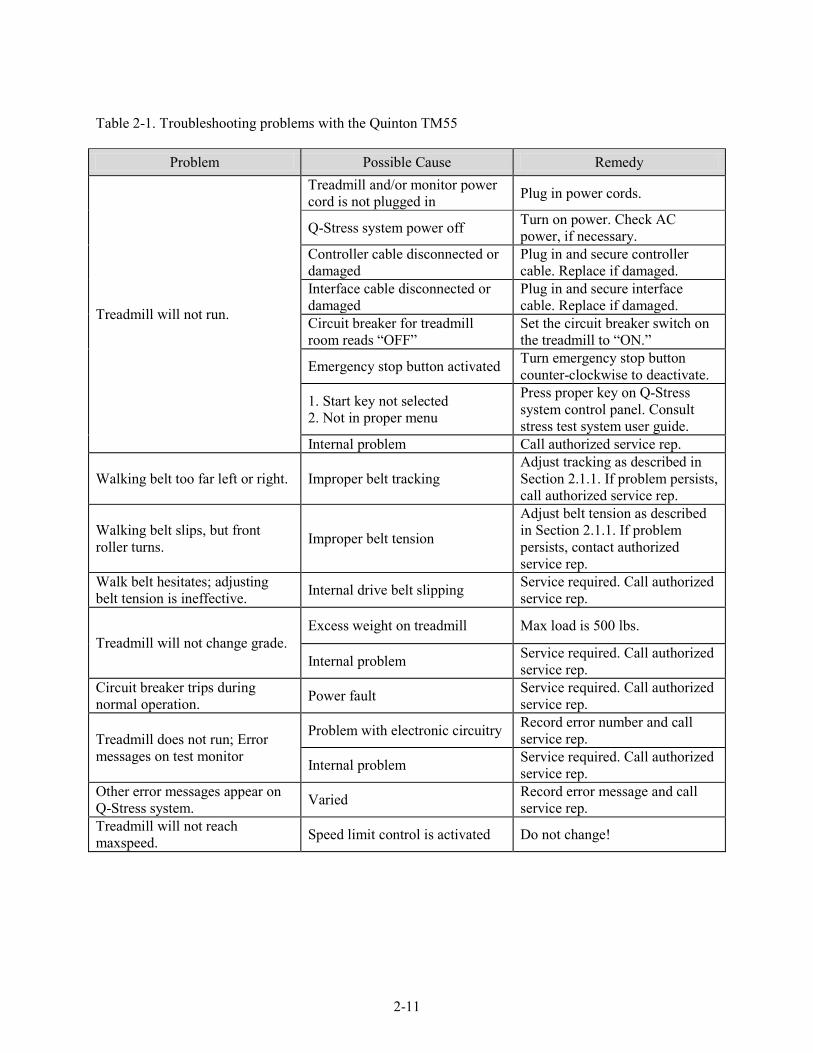
2-11
Table 2-1. Troubleshooting problems with the Quinton TM55
Problem Possible Cause Remedy
Treadmill will not run.
Treadmill and/or monitor power cord is not plugged in Plug in power cords.
Q-Stress system power off Turn on power. Check AC power, if necessary.
Controller cable disconnected or damaged
Plug in and secure controller cable. Replace if damaged.
Interface cable disconnected or damaged
Plug in and secure interface cable. Replace if damaged.
Circuit breaker for treadmill room reads “OFF”
Set the circuit breaker switch on the treadmill to “ON.”
Emergency stop button activated Turn emergency stop button counter-clockwise to deactivate.
1. Start key not selected 2. Not in proper menu
Press proper key on Q-Stress system control panel. Consult stress test system user guide.
Internal problem Call authorized service rep.
Walking belt too far left or right. Improper belt tracking Adjust tracking as described in Section 2.1.1. If problem persists, call authorized service rep.
Walking belt slips, but front roller turns. Improper belt tension
Adjust belt tension as described in Section 2.1.1. If problem persists, contact authorized service rep.
Walk belt hesitates; adjusting belt tension is ineffective. Internal drive belt slipping Service required. Call authorized
service rep.
Treadmill will not change grade. Excess weight on treadmill Max load is 500 lbs.
Internal problem Service required. Call authorized service rep.
Circuit breaker trips during normal operation. Power fault Service required. Call authorized
service rep.
Treadmill does not run; Error messages on test monitor
Problem with electronic circuitry Record error number and call service rep.
Internal problem Service required. Call authorized service rep.
Other error messages appear on Q-Stress system. Varied Record error message and call
service rep. Treadmill will not reach maxspeed. Speed limit control is activated Do not change!
2-12
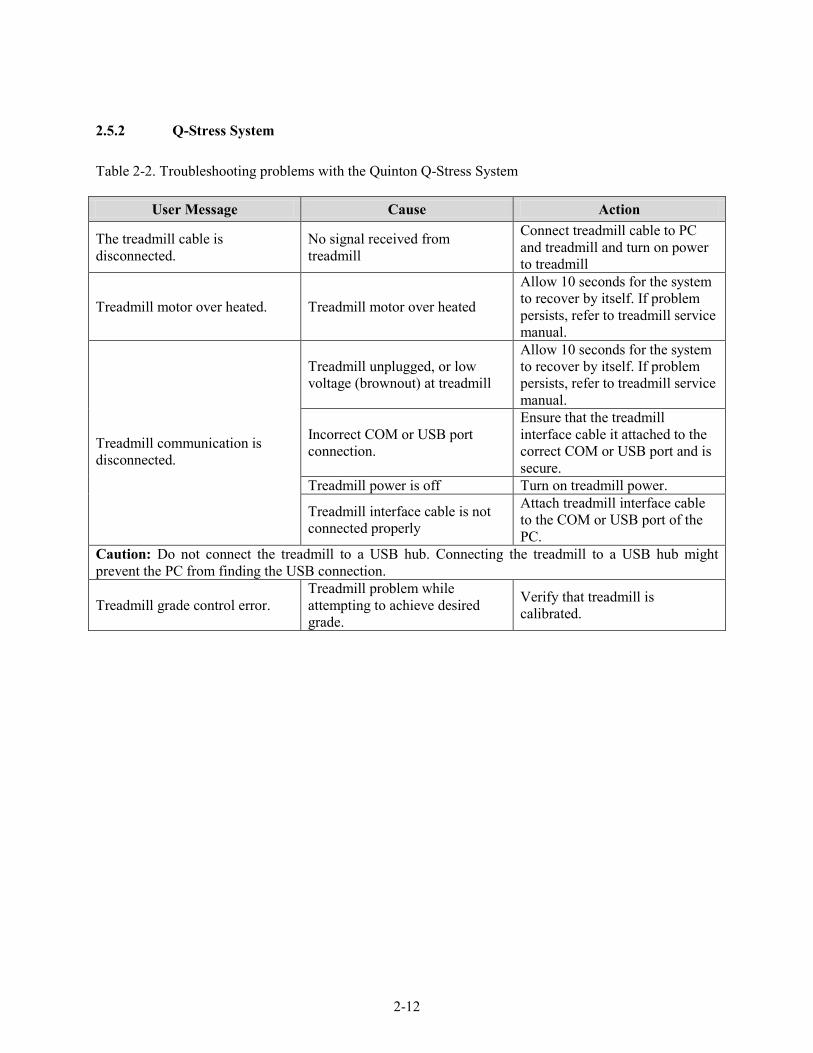
2.5.2 Q-Stress System
Table 2-2. Troubleshooting problems with the Quinton Q-Stress System
User Message Cause Action
The treadmill cable is disconnected.
No signal received from treadmill
Connect treadmill cable to PC and treadmill and turn on power to treadmill
Treadmill motor over heated. Treadmill motor over heated
Allow 10 seconds for the system to recover by itself. If problem persists, refer to treadmill service manual.
Treadmill communication is disconnected.
Treadmill unplugged, or low voltage (brownout) at treadmill
Allow 10 seconds for the system to recover by itself. If problem persists, refer to treadmill service manual.
Incorrect COM or USB port connection.
Ensure that the treadmill interface cable it attached to the correct COM or USB port and is secure.
Treadmill power is off Turn on treadmill power.
Treadmill interface cable is not connected properly
Attach treadmill interface cable to the COM or USB port of the PC.
Caution: Do not connect the treadmill to a USB hub. Connecting the treadmill to a USB hub might prevent the PC from finding the USB connection.
Treadmill grade control error. Treadmill problem while attempting to achieve desired grade.
Verify that treadmill is calibrated.
2-13
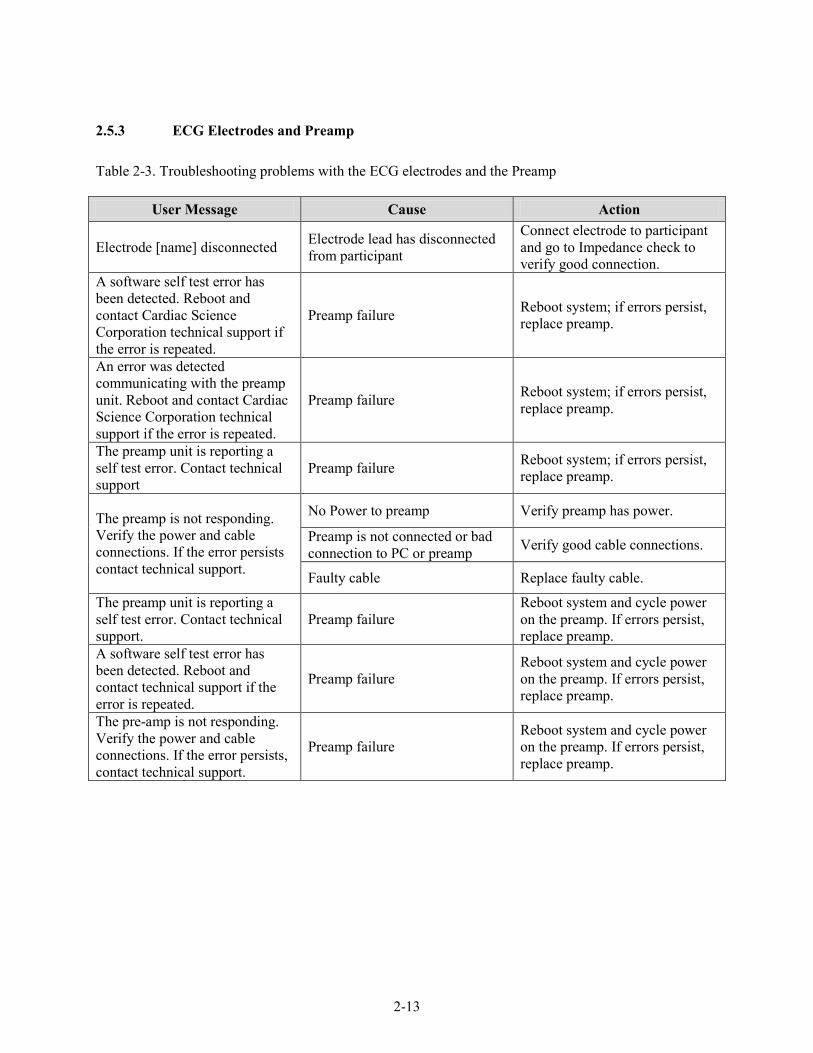
2.5.3 ECG Electrodes and Preamp
Table 2-3. Troubleshooting problems with the ECG electrodes and the Preamp
User Message Cause Action
Electrode [name] disconnected Electrode lead has disconnected from participant
Connect electrode to participant and go to Impedance check to verify good connection.
A software self test error has been detected. Reboot and contact Cardiac Science Corporation technical support if the error is repeated.
Preamp failure Reboot system; if errors persist, replace preamp.
An error was detected communicating with the preamp unit. Reboot and contact Cardiac Science Corporation technical support if the error is repeated.
Preamp failure Reboot system; if errors persist, replace preamp.
The preamp unit is reporting a self test error. Contact technical support
Preamp failure Reboot system; if errors persist, replace preamp.
The preamp is not responding. Verify the power and cable connections. If the error persists contact technical support.
No Power to preamp Verify preamp has power.
Preamp is not connected or bad connection to PC or preamp Verify good cable connections.
Faulty cable Replace faulty cable.
The preamp unit is reporting a self test error. Contact technical support.
Preamp failure Reboot system and cycle power on the preamp. If errors persist, replace preamp.
A software self test error has been detected. Reboot and contact technical support if the error is repeated.
Preamp failure Reboot system and cycle power on the preamp. If errors persist, replace preamp.
The pre-amp is not responding. Verify the power and cable connections. If the error persists, contact technical support.
Preamp failure Reboot system and cycle power on the preamp. If errors persist, replace preamp.
2-14
2.6 Teardown Procedures
At the end of the stand, follow the procedures described below to pack up the treadmill equipment for travel to the next stand. The treadmill storage container will need to be retrieved from the belly compartment and brought to the exam room.
2.6.1 Treadmill
Turn off the treadmill circuit breaker.
Remove the power cord from the power source.
Cover the treadmill with a dust cover.
2.6.2 Q-Stress System
Shut down the computer.
Disconnect the power cord.
Disconnect the lead cables from the preamp and store them in the treadmill storage container.
Enclose the computer monitor in the designated soft padding and strap a bungee cord loosely around this to hold it in place without stressing the hardware.
Secure the computer keyboard and mouse (with cables still attached) to the top of the Q-stress cart.
Remove two bungee cords from the treadmill storage container and secure the Q-Stress cart to the designated wall hooks.
2.6.3 Supplies
Place the following supplies in the treadmill storage containers: electrodes, gauze pads, baby wipes, Purell, and alcohol wipes.
3-1
3. PROTOCOL
The treadmill component is composed of two protocols: the first will test endurance performance in participants 6–11 years old and the second will estimate cardiovascular fitness levels in participants 12-15 years old.
3.1 Exclusions to the Treadmill Component
SPs are excluded from the treadmill component based on selected medical history, medications, and physical limitations. These exclusions will be asked of the parent or guardian during the Nurse’s Review at the mobile center to identify children who cannot participate in the treadmill component. Review of medications and medical exclusions are determined based on questions asked in the Household Interview and then subsequently reviewed by the nurse practitioner. The procedures for each of these exclusions are outlined below.
3.1.1 Shared Exclusion Questions
Shared exclusion questions are safety exclusions that are shared with other components in the MC. These questions will be asked of the parent or guardian during the Nurse’s Review at the MC to identify children who cannot participate in various components. A response that indicates exclusion will send a flag to the Coordinator System and the SP will be blocked from doing that component. The shared exclusion questions that block SPs from the treadmill exam are listed below:
1. Does your child have any amputations other than toes? If Yes, where is the amputation?
2. Weight of participant (≥500 lbs. excluded).
3. Is the participant in a wheelchair (observation only)?
4. Parents or guardians of girls ages 8-11 years who are menstruating and all girls 12-15 years will be asked: Is your child pregnant? Are you currently pregnant (12-15)?
SPs are excluded from the treadmill exam if they have an amputation of one or both legs based on physical limitation. A weight of more than 500 pounds will exclude the SP due to a weight
3-2
limitation of the treadmill. SPs are excluded for safety reasons if they have a pacemaker or automatic defibrillator or if females are pregnant. See the Nurse Review Procedures Manual for specific details on these exclusions.
3.1.2 Medical History
SPs are asked specific questions about their medical history and physical limitations. The medical history questions associated with the treadmill exam are listed below:
Do you have a pacemaker or automatic defibrillator?
Has a doctor ever said (SP’s name) should not participate in sports or other activities because of a health condition? (If the participant has a heart condition, he or she will be excluded from the treadmill component. The nurse practitioner will determine if the participant will be excluded from any other components based upon the condition.)
Has a doctor ever said that (SP’s name) should only do sports or other physical activities recommended by a doctor?
Have any of (SP’s name)’s close biological relatives, that is, blood relatives including grandparents, father, mother, sisters or brothers, died of heart problems or sudden death before the age of 35?
Does (SP’s name) have any amputations other than toes? Where is the amputation? (If Yes and the amputation is of a leg or foot, exclude from the treadmill component.)
Has (SP’s name) lost his/her balance because of dizziness two or more times during exercise?
Has (SP’s name) lost consciousness two or more times during exercise?
Has a doctor or other health professional ever told you that (SP’s name) has asthma?
Does (SP’s name) currently take medication prescribed by a doctor or other health professional for asthma before participating in exercise or sports? (If the participant answers “Yes,” then they are asked if they brought the medicine with them.)
In the past 12 months has (SP’s name)’s chest sounded wheezy during or after exercise or physical activity?
Does (SP’s name) currently limit exercise or physical activity due to wheezing or whistling?
Since the interview in your home on date of household interview, is (SP’s name) taking any additional prescription medications?
3-3
Does (SP’s name) have a bone or joint problem that could be made worse by walking?
Do you know of any reason why (SP’s name) should not walk or run on a treadmill? “Run” should only be for youth ages 6-11 years.
Has SP NAME ever had an allergic reaction to any skin creams or gels? (If the participant answers “Yes,” then NuPrep will not be used on the skin.)
If the answer is “Yes,” “Don’t Know,” or “Refused,” to any of the questions above, the nurse practitioner will review the question with the parent or guardian to determine if the participant should be excluded from the treadmill test based on the response to the question. If the nurse practitioner determines that there is no indication for exclusion to the treadmill test, the child will be included in the test. If all other reasons for exclusion are negative, the SP will be cleared for the treadmill test. If the participant currently takes medication for asthma before participating in exercise or sports and he or she has brought the inhalant to the examination center, the participant will be asked if he or she wants to take the inhalant before participating in the treadmill component. If the participant currently takes medication for asthma before participating in exercise or sports, but has not brought the inhalant to the examination center, the participant will be excluded from the treadmill component
In addition, SPs who are pregnant will be excluded. The system will record the component status as “Not Done” with the comment “safety exclusion.”
3.1.3 Medications
SPs are excluded from the treadmill component if they are taking medications that may indicate the SP is being treated for a medical condition that would be a contraindication to performing a treadmill test in the NYFS setting. In addition, SPs are also excluded if a medication they are taking may affect the validity of the test results (i.e., beta blockers). Exclusionary medications include anti-arrhythmics, nitrates, beta-blockers, cardiac glycosides, ophthalmic beta-blockers, and antihypertensive/betablocker/diuretic combinations.
Information on medications is collected in the Household Interview and the nurse practitioner will review the list with the parent or guardian to determine if the participant should be excluded from the treadmill test. If the nurse practitioner determines that there is no indication for exclusion to the treadmill test, the child will be included in the test.
3-4
3.2 Introduction to the Treadmill Component
Two examiners will be present during the treadmill endurance performance test, one operating the treadmill software and monitoring the heart rate data (operator) and the other (coach) encouraging and monitoring the participant. There will be two examiners present at the beginning of the cardiovascular fitness test, one operating the treadmill software and monitoring the heart rate (operator) and the other (coach) monitoring and encouraging the participant.
At the end of the warm-up stage the operator may leave the room if the coach feels comfortable completing the test by his or herself. As soon as the room is entered with the SP, the operator will log onto the computer data entry system. The coach will provide the SPs with an explanation of the treadmill test. Many SPs may never have walked or ran on a treadmill and will need the coach to explain the component clearly and alleviate any of the SP’s concerns. It is important that the coach (or operator) make frequent eye contact with the SP when explaining the test, while also making sure the SP is listening and understands what is being said.
Table 3-1 lists the key points that will need to be conveyed very clearly to the SP. When the treadmill test is started, the coach will stand next to the participant with his or her arm behind the participant to protect against potential falls or backward movement. As the test proceeds, the coach will continually assess how the participant is doing by direct observation and reviewing heart rate readings.
Table 3-1. Key points
Youth ages 6-11 years maximal exercise test Youth ages 12-15 years submaximal exercise test
Will be asked to walk, go up a hill, and run on a treadmill.
Will be asked to walk on the treadmill at different speeds and grades.
Will be asked to exercise for as long as possible, until exhaustion.
This is not a test to exhaustion; test will be stopped if heart rate reaches a certain level.
Nothing should hurt during the test; notify examiners immediately if any pain, dizziness, or nausea.
Nothing should hurt during the test; notify examiners immediately if any pain, dizziness, or nausea.
Will be monitoring how fast heart is beating with four electrode stickers.
Will be monitoring how fast heart is beating with four electrode stickers.
3-5
3.2.1 SP Parents or Guardians
While we encourage parents or guardians to remain in the waiting area, if they prefer to be with their child during the exam, it’s important that the examiners convey these points:
Your child’s safety is very important to us, so talking and distractions need to be avoided.
It’s safest for your child if you stay seated during the test and don’t talk to him/her. It’s natural to turn towards someone who talks to you and we want SP’s name to be looking forward to ensure they have good balance during the entire exam.
3.3 Checking SP’s Footwear
SPs are asked to bring comfortable walking shoes to the examination center; checking the SP’s footwear is an important part of the preparations for the treadmill test. See Chapter 2, Section 2.2.2 for a description of appropriate and inappropriate footwear for this test. If the SP does not have appropriate footwear, select a pair of running shoes from the stock supply in the exam room. Do not begin the introduction to the exam while the SP is putting on his or her shoes or engaged in any other activity. You should have the SP’s full attention to ensure that he or she is listening and understands what you are saying.
3.4 Preparation for Treadmill Test
Prior to beginning the treadmill test, electrodes for monitoring the heart rate will be attached to the SP. The SP’s footwear should be checked once again before starting the test to confirm that laces are tied or shoes are on properly.
3.4.1 Preparation of Skin and Placement of Electrodes
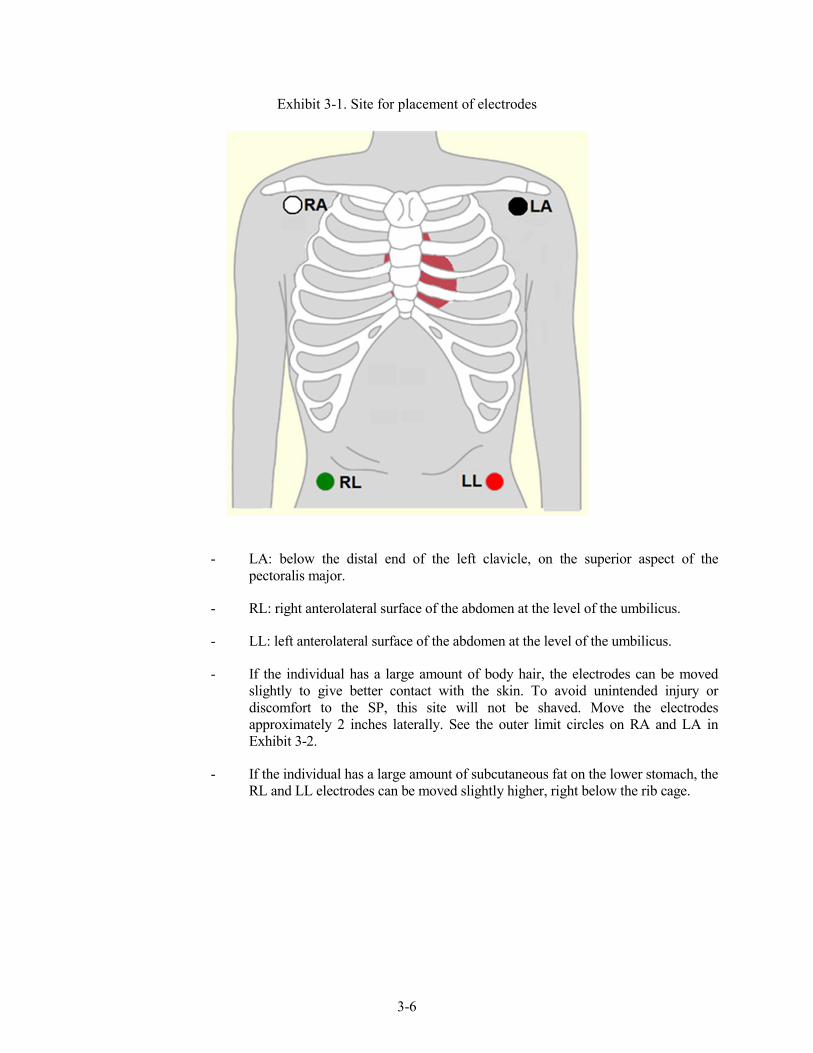
The following sites will be used for electrode placement. See Exhibit 3-1.
- RA: below the distal end of the right clavicle, on the superior aspect of the pectoralis major.
3-6
Exhibit 3-1. Site for placement of electrodes
-
-
-
-
-
LA: below the distal end of the left clavicle, on the superior aspect of the pectoralis major.
RL: right anterolateral surface of the abdomen at the level of the umbilicus.
LL: left anterolateral surface of the abdomen at the level of the umbilicus.
If the individual has a large amount of body hair, the electrodes can be moved slightly to give better contact with the skin. To avoid unintended injury or discomfort to the SP, this site will not be shaved. Move the electrodes approximately 2 inches laterally. See the outer limit circles on RA and LA in Exhibit 3-2.
If the individual has a large amount of subcutaneous fat on the lower stomach, the RL and LL electrodes can be moved slightly higher, right below the rib cage.
3-7
Exhibit 3-2. Example of the impedance check window
Preparation of the sites for attachment of electrodes:
-
-
-
Briskly wipe the skin at placement site of electrode with an alcohol pad skin preparation swab to remove any oils or lotions on the skin.
Apply enough Nuprep gel to moisten about 1/4th of a gauze pad.
Apply gel sparingly by rubbing in a circular motion at each electrode site with 6 or 7 strokes. Remove any excess gel with a dry part of the gauze pad.
Attach electrode to the four sites by pressing around the outer edges of electrode first to maximize adherence and then press gently on the center of the electrode to enhance the contact of the electrode gel to the skin surface.
Clip the RA, LA, RL, and LL leads to the appropriate electrodes.
For female SPs, hand them the two top electrodes (RA and LA) and ask them to thread the leads up underneath their shirt and hand them to you. After the SP has done this, take the leads and attach them to the appropriate electrodes.

3-8
3.4.2 Connection Test
After attaching the electrodes to the SP, and before you begin the exam, you must verify that they are connected satisfactorily. The Q-Stress software checks the quality of each electrode connection using the Impedance Check.
Click the Impedance Check icon in the top center of the screen.
NOTE: Use Impedance Check before beginning the exam. Once the exam starts, you cannot perform an Impedance Check. The button will be grayed out.
NOTE: If you need to do an Impedance Check after starting the exam, you must abort the test. Click the “Exit” button and select “Abort.” This cancels the test without saving the test data, and reactivates the Impedance Check icon.
A window appears, showing the electrode connections (Exhibit 3-2).
Click the Lead Set drop-down menu and select the appropriate lead set.
Check the impedance manually.
Click Manual in the Test Mode box. Select the electrode to be checked (RA, LA, and LL) by clicking on it on the torso or in the site (lead Wire Label section).
Click Start to begin the Impedance Check. The message “Checking lead set, please wait” appears.
Refer to Table 3-2 for details on the meaning of the display colors.
NOTE: If RL is not connected or fails, all other electrode positions will show white.
Click Exit when you have finished checking the electrodes.
Table 3-2. Meaning of display colors
Color Impedance (kΩ) Connection quality Green Less than 75 Good Yellow 75-250 Fair Red Greater than 250 Poor White or no color Greater than 1000 Open
3-9
3.5 Room Temperature
Ideal room temperature for the treadmill test should be 68-72 degrees Fahrenheit. Perspiration on the skin will interfere with the adherence of the electrodes to the skin and higher temperatures may increase the effort needed by the SP to perform the test.
The room temperature will be automatically recorded by integration with a temperature sensor. The room should be kept within the ideal temperature noted above. If necessary, adjust the thermostat.
3.6 Endurance Performance Test (6-11 years).
There are three protocols based on the participant’s age––protocols for ages 6-7, 8-9, and 10-11. The main goals of the protocols are that: (1) the child will be able to perform the test for 5-12 minutes, and (2) the maximum incline will not exceed 12.5 percent. To ensure that most children will be able to perform the test, each protocol will start slowly with walking and then increase in speed at the later stages for very fit children. The protocols include seven stages, each stage being 2 minutes in duration, as well as warm up and recovery/cool down stages. After a 1-minute warm-up walk, 6-7-year-old children walk at an average speed of 3.0 mph, then increase to a light jog of up to 4.5 mph in the last two stages, with an increasing incline; 8-9-year-old children walk at an average speed of 3.2 mph, then increase to a run of up to 4.5 mph at the last three stages, with an increasing incline; and 10-11-year-old children walk at an average speed of 3.3 mph, increase to a run at stage 5 with a speed of 5.0 mph, with an increasing incline.
3.6.1 Introduction to the Endurance Performance Test (6-11 years).
Do not begin the introduction while the SP is putting on his or her shoes or engaged in any other activity. You should have the SP’s full attention to ensure that he or she is listening and understands what you are saying. Below is a standard script that should be read exactly as written to ensure that each SP is given the same explanation for this test. Refer to Appendix A for the Spanish version of the script.
3-10
Today we are going to see how long you can go on this treadmill. At first you are going to just walk on the treadmill, then we are going to let you know when the treadmill is going to get a little higher and you will feel like you are going up a hill. After that, the treadmill is going to get faster and we are going to ask you to run. We will let you know before the treadmill gets faster or the hill gets a little higher. We want you to go for as long as you can, until you are so tired and cannot go any longer. While you are on the treadmill, we are going to be monitoring how fast your heart is beating. We do that by placing these four stickers on your chest and belly (show participant where the stickers go using coach’s body as an example) and attaching them to these wires (show wires). Is that okay with you?
First I would like to put the stickers on, then I am going to demonstrate the test, and then you are going to do the test.
3.6.2 Demonstrating How to Walk on a Treadmill
The coach should give a brief demonstration of how to walk on a treadmill. The SP should be asked to stand on the side of the treadmill toward the front so that they can get a clear view of the demonstration. The treadmill belt will be started by the operator who will increase the speed to 2.0 mph. The coach will begin a brief demonstration of how to walk on the treadmill. The coach should hold onto the handrails, straddle the belt, and then gently “paw” the belt with one foot to get a feel for the movement, then step onto the belt and start walking slowly. The demonstration and explanation should include the importance of standing up straight, taking long steps, relaxing, holding the head up and looking forward. The coach should demonstrate removing one hand at a time from the handrail and then walking comfortably on the belt. The coach should also demonstrate and explain the procedures for stopping the treadmill and getting off.
Below is a standard script that should be read exactly as written to ensure that each SP is given the same explanation for this test. Refer to Attachment A for the Spanish version of the script.
I am going to ask you to step onto the treadmill, hold on to the front handrail with both hands, and place your feet on either side of the grey belt. When you are ready to start the test, <operator name> is going to let you know that he or she is starting the treadmill operator starts the belt for the demo. You can take one foot first and “paw” the belt like this to get a feel for both the belt and the speed. When you are ready, you can add the other foot. Then when you are comfortable you can drop your hands like this. During the test, the treadmill is going to get faster, you are going to go up a hill and eventually you will run. I will let you know anytime the treadmill is going to get faster or the hill is going to get steeper. It is important that you stand up straight, take long steps, hold your head up and look straight ahead and remember to stay relaxed. I will be standing next
3-11
to you the whole time to keep you safe. We want you to tell us if something bothers you or if you get dizzy or just do not feel well. We want you to go for as long as you can. When you are really tired and cannot continue any longer, you are going to tell me “stop” and I am going to ask you to hold on again to the front handrail and <operator name> is going to immediately slow down the treadmill. You are going to keep walking until <operator name> lets you know we are stopping the treadmill. operator stops belt and demo is over. Please do not jump to the side or jump off the treadmill.
When the treadmill stops I will help you off and remove the wires and stickers. Does that sound like fun? Do you have any questions? Okay, let’s begin the test.
3.6.3 Endurance Performance Test for Ages 6-7
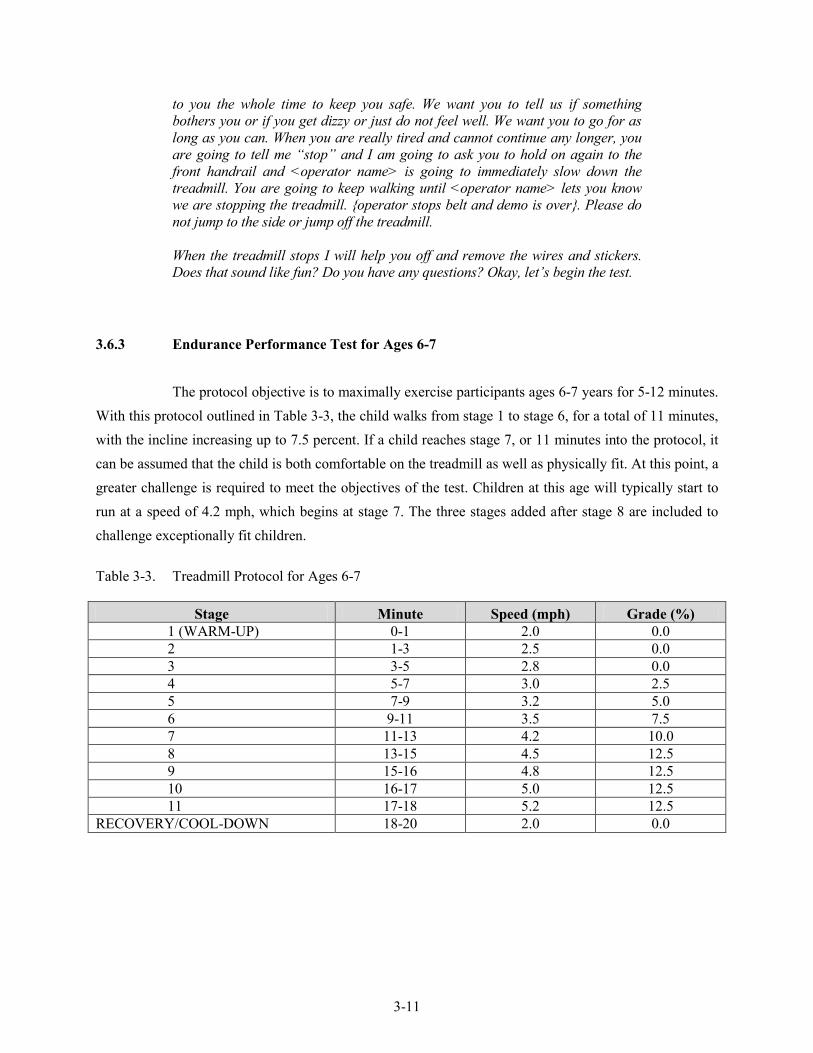
The protocol objective is to maximally exercise participants ages 6-7 years for 5-12 minutes. With this protocol outlined in Table 3-3, the child walks from stage 1 to stage 6, for a total of 11 minutes, with the incline increasing up to 7.5 percent. If a child reaches stage 7, or 11 minutes into the protocol, it can be assumed that the child is both comfortable on the treadmill as well as physically fit. At this point, a greater challenge is required to meet the objectives of the test. Children at this age will typically start to run at a speed of 4.2 mph, which begins at stage 7. The three stages added after stage 8 are included to challenge exceptionally fit children.
Table 3-3. Treadmill Protocol for Ages 6-7
Stage Minute Speed (mph) Grade (%) 1 (WARM-UP) 0-1 2.0 0.0 2 1-3 2.5 0.0 3 3-5 2.8 0.0 4 5-7 3.0 2.5 5 7-9 3.2 5.0 6 9-11 3.5 7.5 7 11-13 4.2 10.0 8 13-15 4.5 12.5 9 15-16 4.8 12.5 10 16-17 5.0 12.5 11 17-18 5.2 12.5
RECOVERY/COOL-DOWN 18-20 2.0 0.0
3-12
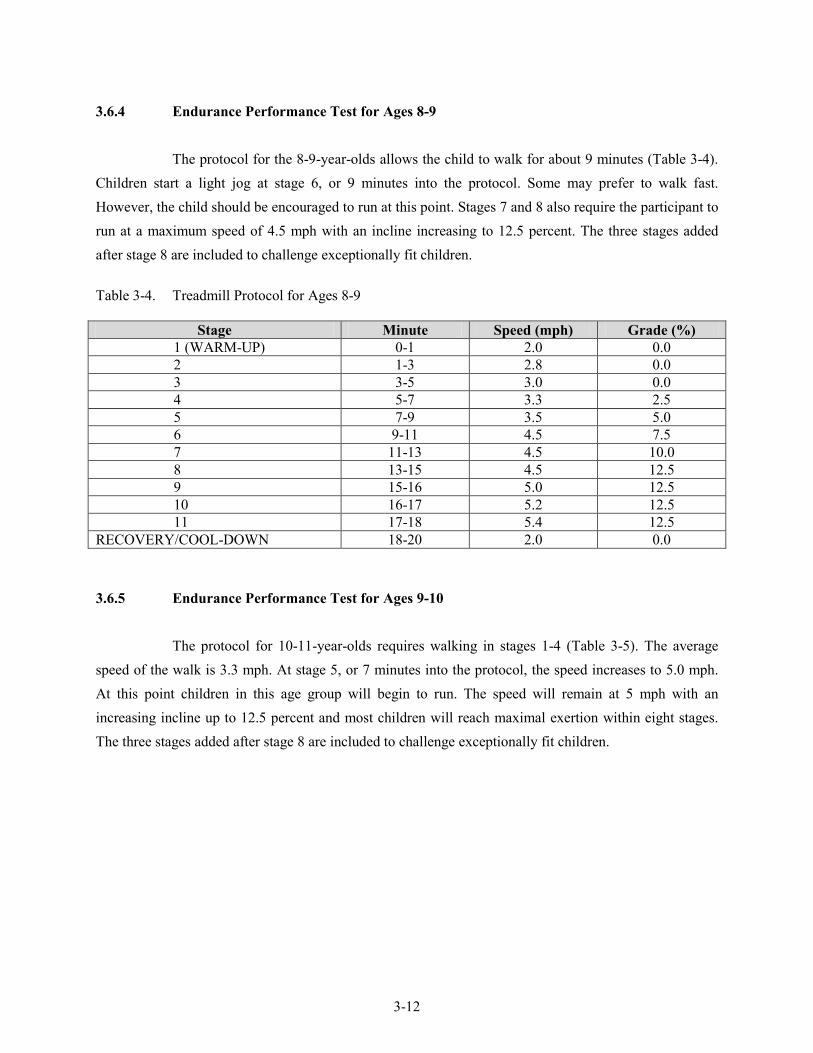
3.6.4 Endurance Performance Test for Ages 8-9
The protocol for the 8-9-year-olds allows the child to walk for about 9 minutes (Table 3-4). Children start a light jog at stage 6, or 9 minutes into the protocol. Some may prefer to walk fast. However, the child should be encouraged to run at this point. Stages 7 and 8 also require the participant to run at a maximum speed of 4.5 mph with an incline increasing to 12.5 percent. The three stages added after stage 8 are included to challenge exceptionally fit children.
Table 3-4. Treadmill Protocol for Ages 8-9
Stage Minute Speed (mph) Grade (%) 1 (WARM-UP) 0-1 2.0 0.0 2 1-3 2.8 0.0 3 3-5 3.0 0.0 4 5-7 3.3 2.5 5 7-9 3.5 5.0 6 9-11 4.5 7.5 7 11-13 4.5 10.0 8 13-15 4.5 12.5 9 15-16 5.0 12.5 10 16-17 5.2 12.5 11 17-18 5.4 12.5
RECOVERY/COOL-DOWN 18-20 2.0 0.0
3.6.5 Endurance Performance Test for Ages 9-10
The protocol for 10-11-year-olds requires walking in stages 1-4 (Table 3-5). The average speed of the walk is 3.3 mph. At stage 5, or 7 minutes into the protocol, the speed increases to 5.0 mph. At this point children in this age group will begin to run. The speed will remain at 5 mph with an increasing incline up to 12.5 percent and most children will reach maximal exertion within eight stages. The three stages added after stage 8 are included to challenge exceptionally fit children.

3-13
Table 3-5. Treadmill Protocol for Ages 10-11
Stage Minute Speed (mph) Grade (%) 1 (WARM-UP) 0-1 2.5 0.0 2 1-3 3.0 0.0 3 3-5 3.3 0.0 4 5-7 3.5 2.5 5 7-9 5.0 5.0 6 9-11 5.0 7.5 7 11-13 5.0 10.0 8 13-15 5.0 12.5 9 15-16 5.2 12.5 10 16-17 5.4 12.5 11 17-18 5.6 12.5
RECOVERY/COOL-DOWN 18-20 2.0 0.0
During the exercise stages it is very important that both the coach and operator monitor the SP closely. Below are instructions to follow during the testing.
1. Coach: Continually watch the SP to make sure that he or she is relaxed, looking straight ahead, and keeping a constant distance from the handrail. If the SP is holding onto the handrail, tell the SP to drop one arm down by his or her side, then the other one. But allow the SP to hold onto the handrails for a little while during the Warm-up stage. Work with the SP to try to get both hands off the handrail by the end of the first minute in Warm-up if possible. If SP walks erratically (common) with short quick steps, coach them on backing up a little and walking with long strides or long legs.
-
-
-
-
Coach: monitors the SP closely for signs of unsteadiness, fatigue, difficulty breathing or change in color. If the SP is unable or unwilling to walk or run properly on the treadmill and is considered at risk for injury, terminate the test.
The coach motivates the SP by providing positive reinforcement. The coach asks the SP how he or she is doing and if he or she can keep walking.
As the SPs progress to later stages, exerting greater effort, the coach regularly asks the SP how he or she feels and if he or she can keep going; this serves two purposes: those children who are not communicative may verbalize their discomfort, which will help you determine if you should stop the test; and, it’s another opportunity to motivate the SPs to continue the test. The child should not be in pain, so it is important to ask the child if anything is bothering him or her. Children do not communicate well on the treadmill, so it is important to keep checking on them and asking them how they are doing. Pain is different than being tired.
Encourage the SPs to continue walking/running to reach a target heart rate of at least 185 bpm. The maximum heart rate is the same for all children in our age group (6-11) with the average maximum heart rate being 190 – 195 bpm (±5%) We will stop the test if the SP says he or she wants to stop or if the SP experiences at least one of the Priority 1 Stopping Criteria. However, if the SP complains of feeling tired, but his or her heart rate is only 135
3-14
bpm, strongly encourage the SP to keep going by using motivational techniques. This test will depend heavily on the examiners coaching and encouraging the child.
- If an electrode falls off, this is not a reason to immediately stop the test. Try and put it back on while the child is still exercising, with one technician holding on to the child and the other placing the electrode.
2. Operator: Ten seconds before a new stage, tell the SP that the speed and/or grade will increase. (“Soon you will start walking faster”; or, “Soon you will feel that you are walking up a small hill.” or, “In about 10 seconds the hill is going to get higher.”
- Throughout each stage, the operator monitors the heart rate on the computer screen. The coach also monitors heart rate by periodically asking the operator for the SP heart rate.
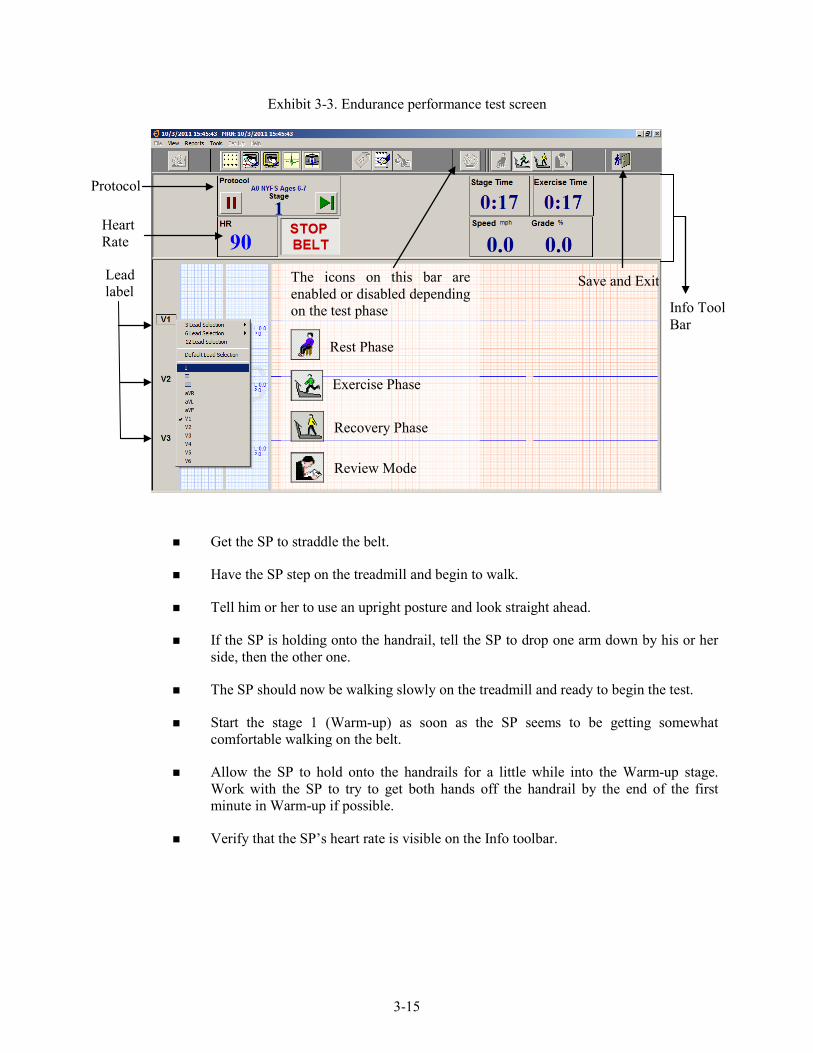
3.6.6 Setup of the Q-Stress System (Exhibit 3-3)
Click the Start Rest icon or press F12 to begin the Rest phase.
Make sure the test electrodes are attached correctly. See Section 3.4.1, Connection Test.
Click the first lead label and select 1, verify that a ECG waveforms is traveling across the display.
NOTE: Electrodes must be applied and the Impedance Check run before you start the Rest phase of the test.
Click the first lead label and select V1.
Verify the predetermined protocol.
Click Start Belt on the Info Toolbar to start the treadmill belt.
3-15
Exhibit 3-3. Endurance performance test screen
Get the SP to straddle the belt.
Have the SP step on the treadmill and begin to walk.
Tell him or her to use an upright posture and look straight ahead.
If the SP is holding onto the handrail, tell the SP to drop one arm down by his or her side, then the other one.
The SP should now be walking slowly on the treadmill and ready to begin the test.
Start the stage 1 (Warm-up) as soon as the SP seems to be getting somewhat comfortable walking on the belt.
Allow the SP to hold onto the handrails for a little while into the Warm-up stage. Work with the SP to try to get both hands off the handrail by the end of the first minute in Warm-up if possible.
Verify that the SP’s heart rate is visible on the Info toolbar.
Protocol
Heart Rate
Lead label
The icons on this bar are enabled or disabled depending on the test phase
Info Tool Bar
Rest Phase
Exercise Phase
Recovery Phase
Review Mode
Save and Exit
3-16
3.6.7 Stage 1 - Warm-up (00:00 - 01:00 Minute)
Treadmill will increase to the speed and grade for the predetermined Warm-up stage for the selected protocol. The system will send an audio notification 10 seconds prior to advancing to the next stage.
Throughout the Warm-up stage, monitor the SP’s HR.
3.6.8 Stage 2-11 (00:00 - 17:00 Minutes)
After 1 minute in stage 1, the speed and grade move to the values preprogrammed into the second stage for the selected protocol.
Throughout the stages, monitor the SP’s HR.
Monitor very closely for signs of exhaustion and stop the test if the SP’s symptoms warrant ending the test.
Ten seconds before the stage ends, the system will alert the operator that the speed and grade will change.
Five seconds before the stage ends, alert the SP that the speed and grade will change soon.
After 1 minute in stage 11, click the Start Recovery icon or press F12. The exam will move to the Recovery phase and the speed and grade will change to the level programmed for the selected protocol.
NOTE: If you do not press Start Recovery at the end of stage 11 it will continue running. Completion of stage 11 does not automatically start the Recovery Phase of the selected protocol.
3.6.9 Recovery Stage (00:00 - 02:00 Minutes)
Click the Start Recovery icon.
After 2 minutes, tell SP to grasp the front handrail and warn that the treadmill is about to stop.
Click the STOP BELT icon.
Click the Review Mode icon.
Click Yes to the confirmation dialog box.
3-17
Click the Exit button, a confirmation box will appear.
Click OK to save the test and return to the Q-Stress main screen.
Import data into ISIS.
Let the SP know that they have completed the test.
3.6.10 End of Test
Assist the SP off the treadmill. It is normal to feel as if you are still moving, especially if you are not accustomed to walking on a treadmill. Disconnect the leads, and ask the SP to remove and dispose of the electrodes.
3.6.11 Report of Findings
The objective of the treadmill test for ages 6-11 years is to measure endurance performance based on duration on the treadmill. However, values will not be provided to participants since there are no established standards against which to evaluate endurance performance in children. Measurement of VO2 max in this age group was not considered to be appropriate by the consultant for the treadmill, a pediatric cardiologist.
3.7 Cardiovascular Fitness Test (12-15 years)
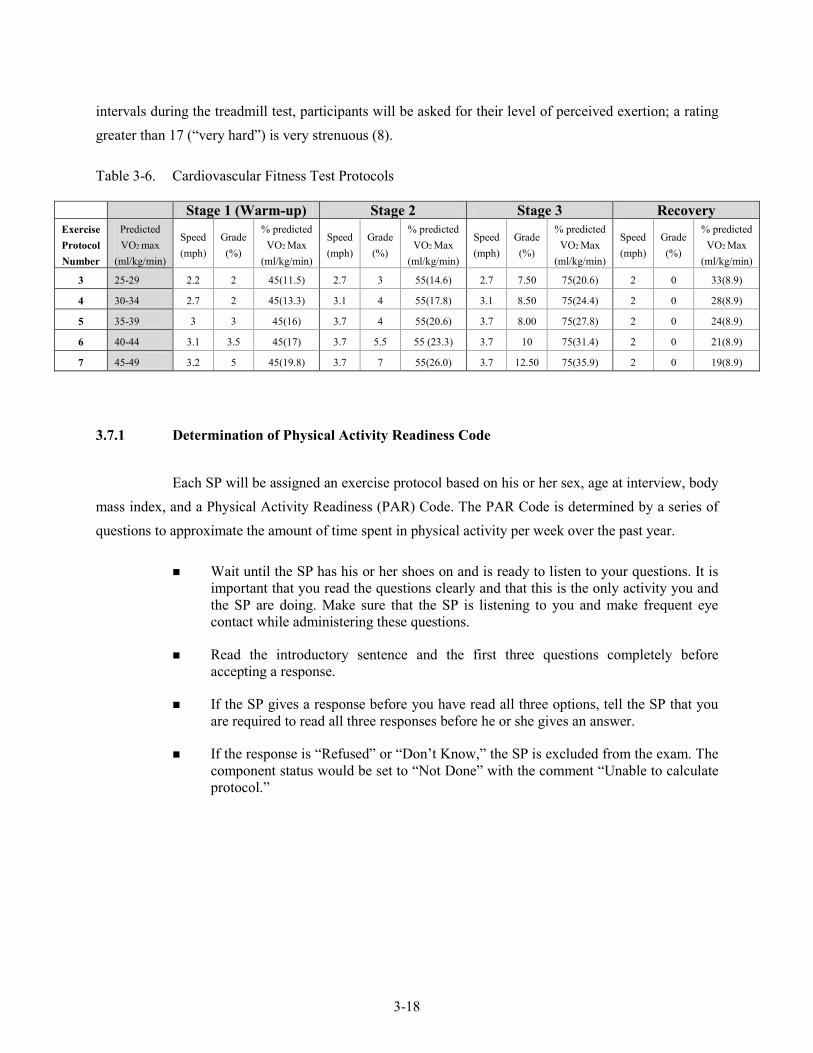
The treadmill protocol proposed for the NYFS for ages 12-15 years was conducted previously in NHANES 1999-2006 to measure aerobic capacity. The protocol is a submaximal exercise test. Participants will be assigned to one of five treadmill test protocols (Numbers 3-7) varying in grade and speed based on gender, age, BMI, and self-reported level of physical activity (Table 3-6). Previously in NHANES, there were eight protocols that could be assigned; however, protocols 1, 2, and 8 are not assigned to this specific age group. Each of the protocols was designed so that the participant will walk at all times. The test consists of a 2-minute warm up, two 3-minute exercise periods, and a 2-minute recovery period. The goal of each protocol is to elicit a heart rate that is approximately 75 percent of the predicted maximum (220 minus age) by the end of the test. During the second stage of the exercise period, the participant should attain approximately 60-75 percent of age-predicted maximal heart rate (APMHR). During the third stage, the participant should attain approximately 70-80 percent APMHR. At
3-18
intervals during the treadmill test, participants will be asked for their level of perceived exertion; a rating greater than 17 (“very hard”) is very strenuous (8).
Table 3-6. Cardiovascular Fitness Test Protocols
Stage 1 (Warm-up) Stage 2 Stage 3 Recovery Exercise Protocol Number
Predicted VO2 max
(ml/kg/min)
Speed (mph)
Grade (%)
% predicted VO2 Max
(ml/kg/min)
Speed (mph)
Grade (%)
% predicted VO2 Max
(ml/kg/min)
Speed (mph)
Grade (%)
% predicted VO2 Max
(ml/kg/min)
Speed (mph)
Grade (%)
% predicted VO2 Max
(ml/kg/min)
3 25-29 2.2 2 45(11.5) 2.7 3 55(14.6) 2.7 7.50 75(20.6) 2 0 33(8.9)
4 30-34 2.7 2 45(13.3) 3.1 4 55(17.8) 3.1 8.50 75(24.4) 2 0 28(8.9)
5 35-39 3 3 45(16) 3.7 4 55(20.6) 3.7 8.00 75(27.8) 2 0 24(8.9)
6 40-44 3.1 3.5 45(17) 3.7 5.5 55 (23.3) 3.7 10 75(31.4) 2 0 21(8.9)
7 45-49 3.2 5 45(19.8) 3.7 7 55(26.0) 3.7 12.50 75(35.9) 2 0 19(8.9)
3.7.1 Determination of Physical Activity Readiness Code
Each SP will be assigned an exercise protocol based on his or her sex, age at interview, body mass index, and a Physical Activity Readiness (PAR) Code. The PAR Code is determined by a series of questions to approximate the amount of time spent in physical activity per week over the past year.
Wait until the SP has his or her shoes on and is ready to listen to your questions. It is important that you read the questions clearly and that this is the only activity you and the SP are doing. Make sure that the SP is listening to you and make frequent eye contact while administering these questions.
Read the introductory sentence and the first three questions completely before accepting a response.
If the SP gives a response before you have read all three options, tell the SP that you are required to read all three responses before he or she gives an answer.
If the response is “Refused” or “Don’t Know,” the SP is excluded from the exam. The component status would be set to “Not Done” with the comment “Unable to calculate protocol.”
3-19
3.7.2 Questions to Determine PAR Code
First Level of Questions
I am going to ask you several questions to describe your typical physical activity level. Please try to answer as accurately as possible. Please wait until I read all three questions before you give me your answer.
1. Would you say that you did little or no regular recreation, sport, or physical activity?
OR
2. Would you say that you participated regularly in recreation or work requiring modest physical activity?
OR
3. Would you say that you participated regularly in heavy physical exercise?
If the SP needs further clarification on the meaning of modest versus heavy, use the following examples:
1. Modest physical activities include: walking, bowling, weight lifting, yard work.
2. Heavy physical activities include: jogging, swimming, cycling, rowing, tennis, and basketball.
3. Enter 1, 2, or 3 in the system.
Second Level of Questions for Little or No Regular Activity
If the response to the first set of questions is 1 (little or no regular activity), the system will go to a set of questions to further classify the SP’s physical activity level. A PAR code will then be assigned based on the response and be used to determine predicted VO2 max.
Read both questions before accepting a response.
1. Would you say that you avoid walking or exertion, for example always use the elevator, drive whenever possible instead of walking?
OR
2. Would you say that you walk for pleasure, routinely use stairs or occasionally exercise sufficiently to cause heavy breathing or perspiration?
3-20
A PAR code will then be assigned as outlined below:
-
-
If response is 1 (avoid walking), the PAR Code will be assigned as 0.
If response is 2 (walk for pleasure), the PAR Code will be assigned as 1.
Second Level of Questions for Regular Participation in Modest Physical Activity
If the response to the first set of questions is 2 (participated regularly in modest physical activity), the system will go to a set of questions to further classify the SP’s physical activity level. A PAR code will then be assigned based on the response and be used to determine predicted VO2 max.
Read both options before accepting a response.
Would you say that you participate regularly in recreation or modest physical activity for:
1. 10 to 60 minutes per week?
OR
2. More than 60 minutes per week?
A PAR code will then be assigned as outlined below:
-
-
If response is 1 (10 - 60 minutes per week), the PAR Code will be assigned as 2.
If response is 2 (more than 60 minutes per week), the PAR Code will be assigned as 3.
Second Level of Questions for Participated Regularly in Heavy Physical Activity
If the response to the first set of questions is 3 (participate regularly in heavy physical exercise), the system will go to a set of questions to further classify the SP’s physical activity level. A PAR code will then be assigned based on the response and be used to determine predicted VO2 max.
Read all options before accepting a response.
Now I am going to ask for some more detail on the amount of heavy physical exercise you did. I am going to give you four options.
Would you say that you participated regularly in heavy physical activity for:
1. Less than 30 minutes per week
OR

3-21
2. 30 to 60 minutes per week
OR
3. 1 to 3 hours per week
OR
4. More than 3 hours per week
The PAR Code will be assigned as outlined below:
-
-
-
-
If response is 1 (less than 30 minutes per week), the PAR Code will be assigned as 4.
If response is 2 (30-60 minutes per week), the PAR Code will be assigned as 5.
If response is 3 (1-3 hours per week), the PAR Code will be assigned as 6.
If response is 4 (more than 3 hours per week), the PAR Code will be assigned as 7.
3.7.3 Determination of Body Mass Index (BMI)
The system will use the height and weight measurements obtained in the anthropometry component to calculate the body mass index. After the operator has logged onto the system, he or she needs to check the first screen to determine if the height and weight information is displayed on the screen. If the information is not displayed, the examiners will need to open the anthropometry component and measure the SP’s height and weight. The examiners must follow the procedures outlined in the anthropometry manual to obtain and record the height and weight.
3.7.4 Determination of Predicted VO2 Max
The system will use the following formula based on the PAR Code: age of SP at interview, body mass index, and sex of SP to calculate the predicted maximal oxygen consumption (VO2 max).
Predicted VO2 max = 56.363 + [1.921 * (PAR)] - [0.38 * (Age at interview)] – [0.754 * (BMI)] + [10.987 * (F=0, M=1)]
3-22
Physical Activity Readiness (PAR) Code = 0-7 (see Section 3.7.2)
Body Mass Index (BMI) = body weight(kg) / height squared (m2 ) (see Section 3.7.3)
Age predicted maximal heart rate (HRmax = 220 - Age)
3.7.5 Determination of Exercise Protocol
The system will use the predicted maximal oxygen consumption (see Section 3.7.4 shown earlier) to determine the predicted exercise protocol to use for the SP. Table 3-6 on page 3-18 is used to determine the predicted exercise protocol for each individual SP. This table has eight exercise protocols. Some modifications have been made to the predicted exercise protocol to modify the workload assigned to specific age groups. The rationale for this is to facilitate a better prediction of the workload for these specific groups.
The system will subtract the predicted protocol of all SPs by 2. Exercise protocols 1, 2, and 8 will not be used. SPs with a predicted exercise protocol of 1 or 2 will be reassigned as protocol 3. SPs with a predicted exercise protocol of 8 will be reassigned a protocol 7.
This assigned protocol will be displayed on the treadmill test screen. The assigned protocol may be adjusted up or down one level based on the SP’s response (see Section 3.7.18) with the following exceptions. SPs cannot be increased to protocol 8 or decreased to protocol 1 or 2.
3.7.6 Introduction to the Cardiovascular Fitness Test
Do not begin the introduction while the SP is putting on his or her shoes or engaged in any other activity. You should have the SP’s full attention to ensure that he or she is listening and understands what you are saying. Below is a standard script that should be read exactly as written to ensure that each SP is given the same explanation for this test. Refer to Appendix A for the Spanish version of the script.
The purpose of the treadmill test is to estimate how physically fit you are. You will be walking on the treadmill at different speeds and up a small hill. We will stop when your heart beat reaches a certain level. While this is a very safe test, it is important that you let us know how you feel during the test. We want you to tell us if something bothers you during the test such as chest pain, dizziness, or if you just do not feel well. While you are on the treadmill, we are going to be monitoring how fast your heart is beating. We do that by placing these four stickers on your chest and stomach (show participant where the stickers go
3-23
using coach’s body as an example) and attaching them to these wires (show wires). Is that okay with you?
First I would like to put the stickers on, then I am going to demonstrate the test, and then you are going to do the test.
3.7.7 Demonstrating How to Walk on a Treadmill
The coach should give a brief demonstration of how to walk on a treadmill. The SP should stand on the side of the treadmill toward the front so that he or she can get a clear view of the demonstration. The treadmill belt will be started by the operator who will increase the speed to 2.0 mph. The coach will begin a brief demonstration of how to walk on the treadmill. The coach should hold onto the handrails, straddle the belt, and then gently “paw” the belt with one foot to get a feel for the movement, then step onto the belt and start walking slowly. The demonstration and explanation should include the importance of standing up straight, taking long steps, relaxing, holding the head up, and looking forward. The coach should demonstrate removing one hand at a time from the handrail and then walking comfortably on the belt. The coach should also demonstrate and explain the procedures for stopping the treadmill and getting off. Below is a standard script that should be read exactly as written to ensure that each SP is given the same explanation for this test. Refer to Appendix A for the Spanish version of the script.
I am going to ask you to step onto the treadmill, hold on to the front handrail with both hands, and place your feet on either side of the grey belt. When you are ready to start the test, <operator name> is going to let you know that he or she is starting the treadmill operator starts the belt for the demo. You can take one foot first and “paw” the belt like this to get a feel for both the belt and the speed. When you are ready, you can add the other foot. Then, when you are comfortable you can drop your hands like this. During the test, it is important that you stand up straight, take long steps, hold your head up and look straight ahead, and remember to stay relaxed. I will be standing next to you the whole time to keep you safe. We want you to tell us if something bothers you or if you get dizzy or just do not feel well. When the test is over, I am going to ask you to hold on again to the front handrail and <operator name> is going to slow down and stop the treadmill operator stops belt and demo is over. When it stops I will help you off and remove the wires and stickers. Do you have any questions? Okay, let’s begin the test.
3-24
3.7.8 Setup of the Q-Stress system
Click the Start Rest icon or press F12 to begin the Rest phase.
Make sure the test electrodes are attached correctly. See Section 3.4.1, Connection Test.
Click the first lead label and select 1, verify that a ECK waveforms is traveling across the display.
NOTE: Electrodes must be applied and the Impedance Check run before you start the Rest phase of the test.
Click the first lead label and select V1.
Verify the predetermined protocol.
Click Start Belt on the Info Toolbar to start the treadmill belt.
Get the SP to straddle the belt.
Have the SP step on the treadmill and begin to walk.
Tell him or her to use an upright posture and look straight ahead.
If the SP is holding onto the handrail, tell the SP to drop one arm down by his or her side, then the other one.
The SP should now be walking slowly on the treadmill and ready to begin the test.
Start the stage 1 (Warm-up) as soon as the SP seems to be getting somewhat comfortable walking on the belt.
Allow the SP to hold onto the handrails for a little while into the Warm-up Stage. Work with the SP to try to get both hands off the handrail by the end of the first minute in Warm-up if possible.
Verify that the SP’s heart rate, PMHR, and % HRmax are visible on the Info Toolbar (Exhibit 3-4).
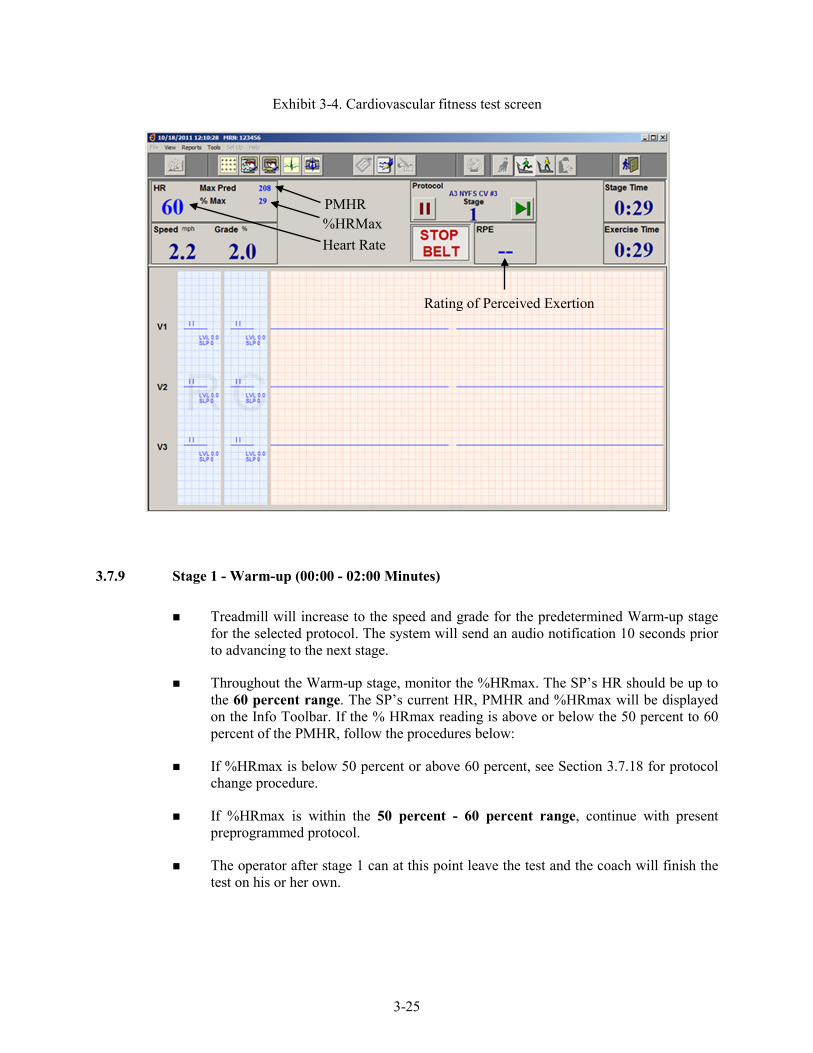
3-25
Exhibit 3-4. Cardiovascular fitness test screen
3.7.9 Stage 1 - Warm-up (00:00 - 02:00 Minutes)
Treadmill will increase to the speed and grade for the predetermined Warm-up stage for the selected protocol. The system will send an audio notification 10 seconds prior to advancing to the next stage.
Throughout the Warm-up stage, monitor the %HRmax. The SP’s HR should be up to the 60 percent range. The SP’s current HR, PMHR and %HRmax will be displayed on the Info Toolbar. If the % HRmax reading is above or below the 50 percent to 60 percent of the PMHR, follow the procedures below:
If %HRmax is below 50 percent or above 60 percent, see Section 3.7.18 for protocol change procedure.
If %HRmax is within the 50 percent - 60 percent range, continue with present preprogrammed protocol.
The operator after stage 1 can at this point leave the test and the coach will finish the test on his or her own.
Heart Rate
PMHR %HRMax
Rating of Perceived Exertion
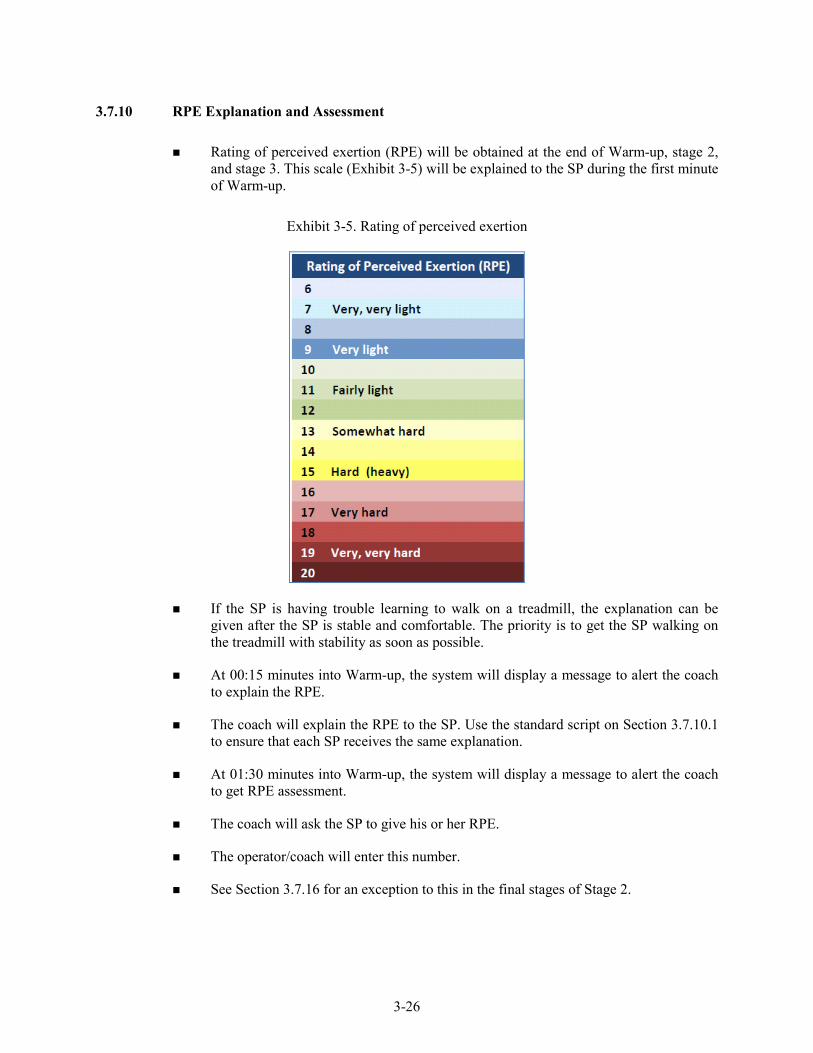
3-26
3.7.10 RPE Explanation and Assessment
Rating of perceived exertion (RPE) will be obtained at the end of Warm-up, stage 2, and stage 3. This scale (Exhibit 3-5) will be explained to the SP during the first minute of Warm-up.
Exhibit 3-5. Rating of perceived exertion
If the SP is having trouble learning to walk on a treadmill, the explanation can be given after the SP is stable and comfortable. The priority is to get the SP walking on the treadmill with stability as soon as possible.
At 00:15 minutes into Warm-up, the system will display a message to alert the coach to explain the RPE.
The coach will explain the RPE to the SP. Use the standard script on Section 3.7.10.1 to ensure that each SP receives the same explanation.
At 01:30 minutes into Warm-up, the system will display a message to alert the coach to get RPE assessment.
The coach will ask the SP to give his or her RPE.
The operator/coach will enter this number.
See Section 3.7.16 for an exception to this in the final stages of Stage 2.
3-27
3.7.10.1 Explanation of Rating of Perceived Exertion (RPE) - Standard Script
Below is a standard script for the explanation of the RPE that should be read exactly as written. Refer to Appendix A for the Spanish version of the script.
Please look at the chart on the wall in front of you. Every couple of minutes during the test, I will ask you to rate how hard you feel you are working overall. Please respond with a number from the scale. For example, if you feel that you are working at a very low level of effort, you might reply with a 6 or 7 (very, very light). On the other hand, if you feel you are working at a very high level of effort and cannot continue, you might reply with a 20 (maximal exertion). There is no right or wrong answer, simply rate your perceived level of exertion at the time I ask the question.
3.7.11 Stage 2 (00:00 - 03:00 Minutes)
The system will reset the stage time to zero for stage 2.
Throughout the stage 2, monitor the %HRmax. Indicator should be within 60 percent - 80 percent of the PMHR.
If the SPs HR goes above 80 percent:
-
-
-
-
-
Determine if the SP is OK by observing his or her color, breathing and gait for signs of severe fatigue and ask how he or she is doing.
Ask for the RPE. You do not have to record the RPE unless it is at the end of the stage.
If the SP looks OK, does not ask to stop, and RPE is not greater than 17, continue with the test.
Continue to monitor very closely for signs of exhaustion and stop the test if the SP’s symptoms warrant ending the test.
If the SP is not OK, the RPE is greater than 17, or the SP asks to stop, confirm that the SP understands what he or she is rating and if he or she still gives a rating of greater than 17, go to the Recovery stage by clicking the Start Recovery icon or press F12. See Section 3.7.12 for detailed procedures.
At 02:30 minutes into Stage 2, the system will display a message to alert the operator/coach to get a RPE assessment.
The coach will ask the SP to give his or her rating of perceived exertion.
The operator/coach will enter this number.
3-28
Ten seconds before the stage ends, the system will alert the operator/coach that the speed and grade will change.
Five seconds before the stage ends, alert the SP that the speed and grade will change soon.
The treadmill will automatically change to the speed and grade for stage 3.
3.7.12 Stage 3 (00:00 - 03:00 Minutes)
After 3 minutes in stage 2, the speed and grade move to the values preprogrammed into the second stage for the selected protocol.
Throughout stage 3, monitor %HRmax. The heart rate should be below 90 percent of the PMHR.
If the %HRmax is above 90 percent:
-
-
-
-
Determine if the SP is OK by observing his or her color, breathing, and gait for signs of severe fatigue and ask how he or she is doing.
Ask for the RPE. You do not have to record the RPE unless it is at the end of the stage.
If the SP looks OK, does not ask to stop, and RPE is not greater than 17, continue with the test.
Continue to monitor very closely for signs of exhaustion and stop the test if the SP’s symptoms warrant ending the test.
During the third minute of Stage 3, if %HRmax is above 100 percent, click the Start Recovery icon or press F12 to go to the Recovery Stage. See Section 3.8 for Stopping Procedures. Select ‘Other’ with comment ‘%HRmax > 100%’ for Priority 2 Stopping Criteria.
At 02:30 minutes into stage 3, the system will display a message to alert the operator/coach to get a RPE assessment.
The coach will ask the SP to give his or her rating of perceived exertion.
- If the RPE is greater than 17 confirm that the SP understands what he or she is rating and ask if the SP can continue for another 30 seconds. If the SP is not okay and asks to stop, then click the Start Recovery icon or press F12 to go to the Recovery Stage. Otherwise, continue to the end of the exam.
The operator/coach will enter this number.

3-29
Ten seconds before the stage ends, the system will alert the operator/coach that the speed and grade will change.
Five seconds before the stage ends, alert the SP that the speed and grade will change soon.
After 3 minutes in stage 3, click the Start Recovery icon or press F12. The exam will move to the Recovery phase and the speed and grade will change to the level programmed for the selected protocol.
NOTE: If you do not press Start Recovery at the end of stage 3 it will continue running. Completion of stage 3 does not automatically start the Recovery Phase of the selected protocol.
3.7.13 Recovery Stage (00:00 - 02:00 Minutes)
Click the Start Recovery icon.
After 2 minutes, the system will display a message:
“END OF RECOVERY”
Tell SP to grasp the front handrail and warn that the treadmill is about to stop.
Click the STOP BELT icon.
Click the Review Mode icon.
Click Yes to the confirmation dialog box.
Click the Exit button, a confirmation box will appear.
Click OK to save the test and return to the Q-Stress main screen.
Import data into ISIS.
Let the SP know that they have completed the test.
3.7.14 End of Test
Assist the SP off the treadmill. It is normal to feel as if you are still moving, especially if you are not accustomed to walking on a treadmill. Disconnect the leads, and ask the SP to remove and dispose of the electrodes.
3-30
3.7.15 Procedure if Values Exceed Criteria
If one or more of the following measurements are above the acceptable criteria, (1) click the Start Recovery icon; (2) Tell SP to grasp the front handrail and warn that the treadmill is about to stop; and (3) click the STOP BELT icon.
HR stage 1 > 80 percent PMHR AND SP is exhausted and unable to continue.
HR stage 2 > 90 percent PMHR AND SP is exhausted and unable to continue.
HR Warm-up, stage 1 or stage 2 > 100%.
RPE > 17 (See below “Exception for RPE greater than 17 at end of stage 3.”)
3.7.16 Exception for RPE Greater Than 17 at End of Stage 3
If the RPE is greater than 17 in Warm-up, or stage 2, go to Recovery. There is no exception at these two stages but you should confirm that the SP understands the concept. Confirm that the SP understands what he or she is rating and if he or she still gives a rating of greater than 17, go to Recovery.
If the SP answers with a number greater than 17 AND the SP’s heart rate is within the acceptable limits for the end of stage 3:
-
-
-
-
-
-
Determine if he or she is able to continue for another 15 to 30 seconds.
Check for signs of distress by looking at the SP’s face, color, gait, respiratory rate.
Ask if he or she is able to continue for another 15 to 30 seconds.
Tell the SP the test is almost finished.
An example of a script is:
“Do you think you can continue for another 15 to 30 seconds? The test will be over then and the treadmill will be slowing down in speed and the incline will become level. Are you sure you can continue?”
If the SP says he or she can continue for another 15-30 seconds, monitor continuously and allow the test to continue.
If you think the SP can continue for another 15-30 seconds, allow the test to finish normally.

3-31
If you think the SP cannot continue for another 15-30 seconds then:
-
-
-
-
-
-
-
-
-
-
Click the Start Recovery icon.
After 2 minutes the system will display a message:
“END OF RECOVERY”
Tell SP to grasp the front handrail and warn that the treadmill is about to stop.
Click the STOP BELT icon.
Click the Review Mode icon.
Click Yes to the confirmation dialog box.
Click the Exit button, a confirmation box will appear.
Click OK to save the test and return to the Q-Stress main screen.
Import data into ISIS.
Let the SP know that they have completed the test.
3.7.17 Procedure if SP is Unable to Adhere to the Protocol
Some people may not be able to walk on the treadmill without holding onto the handrails. The coach should give the SP further instructions and encouragement. SPs are allowed to hold onto the handrail during Warm-up until they get accustomed to walking on the treadmill. The coach should encourage SPs to remove their hands one at a time. During the treadmill test they are allowed to lightly touch the handrail with a finger, but they should not be grasping the handrail with their fingers or hands. If they are unable to do this, the test will not be valid.
Some of the instructions that you may give to help the SP get accustomed to walking on the treadmill include reminding him or her to stand up straight, to keep his or her head up and look straight ahead, and to take longer steps.
If the SP is still unable to adhere to the protocol, go to Recovery.
After the Recovery stage is completed, select in ISIS Priority 2 Stopping Criteria.
Select “Unable to adhere to the Protocol.”
System will then go to Component Status screen. The component status will be set at “Partial.” Select “Unable to follow protocol” as the comment.
3-32
3.7.18 Procedure to Change Predicted Exercise Protocol
The goal of the predetermined exercise protocol is to elicit a heart rate that is approximately 75 percent of the predicted maximum heart rate (PMHR) by the end of the CV fitness test. This goal is expected to be achieved gradually by stages: to elicit a HR response that is approximately 50 to 60 percent of PMHR during the Warm-up stage, then to elicit a HR response that is approximately 60 to 75 percent of PMHR during stage 1, and last, to elicit a HR response that is approximately 70 to 80 percent of PMHR during stage 2. There will be times where the selected protocol results in a HR response that is higher or lower than expected. When this occurs, the operator will need to change to either an easier or more difficult protocol to help reach the goal. The decision to change the exercise protocol should be made during the beginning of the Warm-up stage. No decision in changing the protocol should be made after the Warm-up stage.
Throughout the Warm-up stage, monitor the %HRmax scale on the screen. The SP’s HR should be within the 50 to 60 percent range. The %HRmax scale on the computer screen displays the HR in beats per minute of PMHR for the SP. If this reading is above or below the 50 to 60 percent range, follow the procedures in 3.7.18.1 or 3.7.18.2 for changing the protocol. The decision to change the protocol must be made by 1 minute 30 seconds into the Warm-up stage to allow time to make all the necessary adjustments. If the protocol needs to be changed, the new protocol should be changed right before the treadmill automatically moves to the next stage. The treadmill is programmed to move to the next stage at specific times. If it is advanced to a new protocol during one stage, it will advance again to the next stage when the preset time is reached for the next stage.
3.7.18.1 Increasing the Exercise Protocol During Stage 1 (Warm-up)
If %HRmax is below 50 percent PMHR in stage 1, go to the next higher protocol at the beginning of stage 2.
Click the word Protocol on the test screen. A drop-down box will be displayed.
Click the down arrow next to the box and select the new protocol.
Note: If protocol is 7, then protocol cannot be increased.
3-33
3.7.18.2 Decreasing the Exercise Protocol During Stage 1 (Warm-up)
If %HRmax is above 60 percent PMHR in stage 1, go to the next lower protocol at the beginning of stage 2.
Click the word Protocol on the test screen. A drop-down box will be displayed.
Click the down arrow next to the box and select the new protocol.
Note: If protocol is 3, then protocol cannot be decreased.
3.7.18.3 Monitoring the Heart Rate During Stage 1
As discussed in Section 3.7.18, the only stage where a decision to change the exercise protocol should be made is during stage 1 (Warm-up). If an increase or decrease in the protocol is necessary, the change is made in the computer system during immediately after the treadmill controller advances to the next stage (first few seconds of stage 2).
A decision to increase or decrease the exercise protocol should not be made during stage 2. Throughout stage 2, monitor the % HRmax on the test screen. The SP’s HR should be within the 60 percent to 80 percent range. The %HRmax displays the HR percent of PMHR for the SP. If this reading is above or below the 60 percent to 80 percent range, follow these procedures.
If %HRmax is < 60 percent continue with the current protocol.
If %HRmax is above 80 percent of PMHR at any time in stage 2, determine if the SP is OK by observing his or her color, breathing and gait for signs of severe fatigue, and ask the SP how he or she is feeling with a question such as:
“How are you doing? We have approximately 4 minutes left in this part of the test. Do you think you can continue?”
If the SP looks OK and does not ask to stop, continue with the test. Continue to monitor very closely for signs of exhaustion.
If the SP is exhausted and wants or needs to stop, click the Start Recovery icon.
After 2 minutes the system will display a message:
“END OF RECOVERY”
Tell SP to grasp the front handrail and warn that the treadmill is about to stop.
3-34
Click the STOP BELT icon.
Click the Review Mode icon.
Click Yes to the confirmation dialog box.
Click the Exit button, a confirmation box will appear.
Click OK to save the test and return to the Q-Stress main screen.
Import data into ISIS.
Let the SP know that they have completed the test.
3.7.18.4 Monitoring the Heart Rate during Stage 3
The protocol should not be increased or decreased during stage 3.
If % HR max is >90percent PMHT, determine if the SP is OK by observing the SP’s color, breathing, and gait for signs of severe fatigue and ask the SP how he or she is doing with a question such as :
“How are you doing? We have approximately 4 minutes left in the test. Do you think you can continue?”
If the SP looks OK and does not ask to stop, continue with the test. Continue to monitor very closely for signs of exhaustion.
If the SP is exhausted and wants or needs to stop, click the Start Recovery icon.
If the SP is exhausted and wants or needs to stop, click the Start Recovery icon.
After 2 minutes the system will display a message:
“END OF RECOVERY”
Tell SP to grasp the front handrail and warn that the treadmill is about to stop.
Click the STOP BELT icon.
Click the Review Mode icon.
Click Yes to the confirmation dialog box.
Click the Exit button, a confirmation box will appear.
Click OK to save the test and return to the Q-Stress main screen.
3-35
Import data into ISIS.
Let the SP know that they have completed the test.
If the SP’s heart rate goes above 100 percent at any time during the exam go to Recovery.
3.7.19 Report of Findings for CV Fitness
Each SP will be given a report of the results or findings for the exams performed. The Report of Findings for the cardiovascular fitness exam will include a report on the SP’s level of cardiovascular fitness. The level of cardiovascular fitness will be based on the estimated maximal oxygen consumption achieved by the SP in the treadmill test. SPs will be categorized in the “Healthy Fitness Zone” or “Needs Improvement” compared to other people of their age and sex.
The level of cardiovascular fitness is categorized based on gender-age specific cut-points of estimated VO2 max. These reference standards are from the FITNESSGRAM program for youth fitness reporting. Refer to Appendix H for more details.
General Statement
“Your fitness test was done on a treadmill. The test consisted of a warm-up, two exercise periods (stage 1 and stage 2), and a recovery period. The table below shows your test results.
Stage Required time Your time Your heart rate Warm-up 2 min. Stage 1 3 min. Stage 2 3 min. Recovery 2-3 min.
During this exercise your maximum incline on the treadmill was ___ percent and your
maximum speed was _____ mph.
Compared with other people of your age and sex, your cardiovascular fitness level is ______ (in the Healthy Fitness Zone; Needs Improvement).”
3-36
Text for Needs Improvement: “Research shows that aerobic exercise is good for your heart and body composition, and helps to prevent health problems. Aerobic capacity can be improved by doing 60 minutes of physical activity a day. This includes activities that make you breathe hard, like playing active games, sports, hiking, dancing, or running.”
In addition to the general statement, the report will include the speed and grade of the treadmill at each of the stages in the treadmill test, the length of time spent in each of the stages, and the heart rate at the end of these stages. SPs will be given this report just before they leave the examination center. The report includes a phone number to call if they have any questions about this or any part of the exam.
3.8 Procedure to Stop Treadmill Test Early
Examiners must be aware that not all SPs will be able to complete the treadmill test due to various reasons. From a safety perspective, it is critical that the coach and the operator be very attentive to SPs regarding any signs/symptoms that may occur. There are two sets of stopping criteria and a different procedure will be used for each.
3.8.1 Priority 1 Stopping Criteria (for both the Endurance Performance Test [6-11 years] and the Cardiovascular Fitness Test [12-15 years])
Pain or pressure in the chest.
Pain in neck, jaw, or teeth.
Pain in the shoulder or between the shoulder blades.
Pain radiating down one or both arms.
Moderate/severe leg pain or cramping.
Lightheadedness, dizziness.
Severe shortness of breath/wheezing.
Change in skin color to bluish/grayish.
Severe headache.
Subject appears confused or agitated.
3-37
Nausea.
Unstable gait.
Visual problems.
If one or more of the above criteria are present, the examiners will terminate the test, stop the treadmill, and initiate the following emergency action plan.
Operator:
Click the STOP BELT icon.
Click the Start Recovery icon.
Click the Review Mode icon.
Assist the coach.
When the SP has stabilized, complete the information in the system.
Click Yes to the confirmation dialog (Review Mode).
Click the Exit button, a confirmation box will appear.
Click OK to save the test and return to the Q-Stress main screen.
Import data into ISIS.
The system will go to the Priority 1 Stopping Criteria (listed above).
Enter the appropriate response. Check all that apply.
The remaining stages and Recovery will not be completed.
The Exam Status will be set to “Partial Complete” with the comment “Priority 1 Stopping Criteria.”
Press the Finish button to exit this test.
Coach:
Click the EMERGENCY STOP button on the treadmill.
Assist the SP off the treadmill.
3-38
Place SP in the supine position on the floor if necessary.
Remain with the participant and call the nurse practitioner/physician’s assistant.
When the SP has stabilized, complete the information in the system.
3.8.2 Priority 2 Stopping Criteria for the Endurance Test (Ages 6-11)
SP requests to stop
Technologist discretion (technologist notices signs of severe exertion)
Subjective indicators of maximal exertion
-
-
-
-
Unsteady gait
Breathlessness
Inability to keep up with treadmill speed
Other
Failure of testing equipment
Unable to Adhere to the Protocol
If one or more of the above criteria are present, terminate test and allow SP to actively cool down:
Click the Start Recovery icon or press F12.
The system will go to Recovery.
After 2 minutes the system will display a message: “END OF RECOVERY.”
Tell SP to grasp the front handrail and warn that the treadmill is about to stop.
Click the STOP BELT icon.
Click the Review Mode icon.
Click Yes to the confirmation dialog box.
Click the Exit button, a confirmation box will appear.
Click OK to save the test and return to the Q-Stress main screen.
Import data into ISIS.
3-39
Let the SP know that they have completed the test.
Enter the appropriate response in ISIS. Check all that apply.
After the Stopping Criteria have been entered, press NEXT to go to the Component Status screen.
-
-
If the technician selects “SP requests to stop” and or “Technologist discretion” the Status will be set to “Complete.”
If the technician selects “failure of testing equipment” and or “Unable to Adhere to the Protocol,” the Status will be set to “Partial” with the comment “Priority 2 Stopping Criteria.”
3.8.3 Priority 2 Stopping Criteria for the Cardiovascular Fitness Test (12-15 years)
SP HR during Warm-up, stage 1 or stage 2 exceeds 90 percent and SP is unable to continue.
SP HR exceeds 80 percent PMHR during stage 1.
SP HR exceeds 100% during Warm-up, stage 1 or stage 2.
SP reports RPE > 17 during Warm-up or stage 1.
Failure of heart rate to increase by more than 5 beats/minute during a given workload compared to the previous workload.
Repeated noticed variability during a stage (sudden changes of + 30 beats/minute) after checking electrode connections.
SP requests to stop test, or reports severe fatigue.
Failure of testing equipment.
SP is unable to stop gripping handrails (lightly touching handrails for balance purposes is allowed, but only if absolutely necessary). This criterion should cause the system to set the component status to “Partial” with the comment “unable to follow protocol”.
Technologist discretion (technologist notices signs of severe exertion).
If one or more of the above criteria are present, terminate test and allow SP to actively cool down:
Click the Start Recovery icon or press F12.
The system will go to Recovery.
3-40
After 2 minutes the system will display a message: “END OF RECOVERY.”
Tell SP to grasp the front handrail and warn that the treadmill is about to stop.
Click the STOP BELT icon.
Click the Review Mode icon.
Click Yes to the confirmation dialog box.
Click the Exit button, a confirmation box will appear.
Click OK to save the test and return to the Q-Stress main screen.
Import data into ISIS.
Let the SP know that they have completed the test.
Enter the appropriate response in ISIS. Check all that apply.
After the Stopping Criteria have been entered, press NEXT to go to the Component Status screen.
The Exam Status will be set to “Partial” with the comment “Priority 2 Stopping Criteria.”
3.9 Procedure to Recover/Restart an Exam
If the treadmill test has not gone past the first 15 seconds in stage 2, you can restart the test. This might occur in the following situations:
The SP is not used to walking on a treadmill and jumps off. The SP may be able to continue the test if the instructions are repeated and the test is restarted;
If the treadmill is mistakenly advanced; or
Other problems selecting the protocol on the Q-Stress system.
In these situations the treadmill test may be restarted. The restart procedures are listed below
Press Stop Belt to stop the treadmill.
Confirm that the SP is willing to restart the treadmill test.
Tell the SP that you are going to repeat the instructions step by step.
Reset the Q-Stress system to the appropriate exercise protocol.

3-41
Repeat the instructions for getting on the treadmill.
Have SP straddle the belt, press Start Belt.
Have the SP start walking on the belt.
Continue the test as per protocol.
3.10 Component Status
The component status is set by the system based on predetermined criteria. If all the data were obtained and captured, the status is set to Complete. If the test was stopped early or some of the data were not obtained or captured, the status will be set to Partial. If the SP was excluded prior to the exam due to safety/exclusion reasons or refusal, the status will be set to Not Done. If the status is set to Partial or Not Done, a comment is required. Some comments are set by the system based on predetermined criteria.
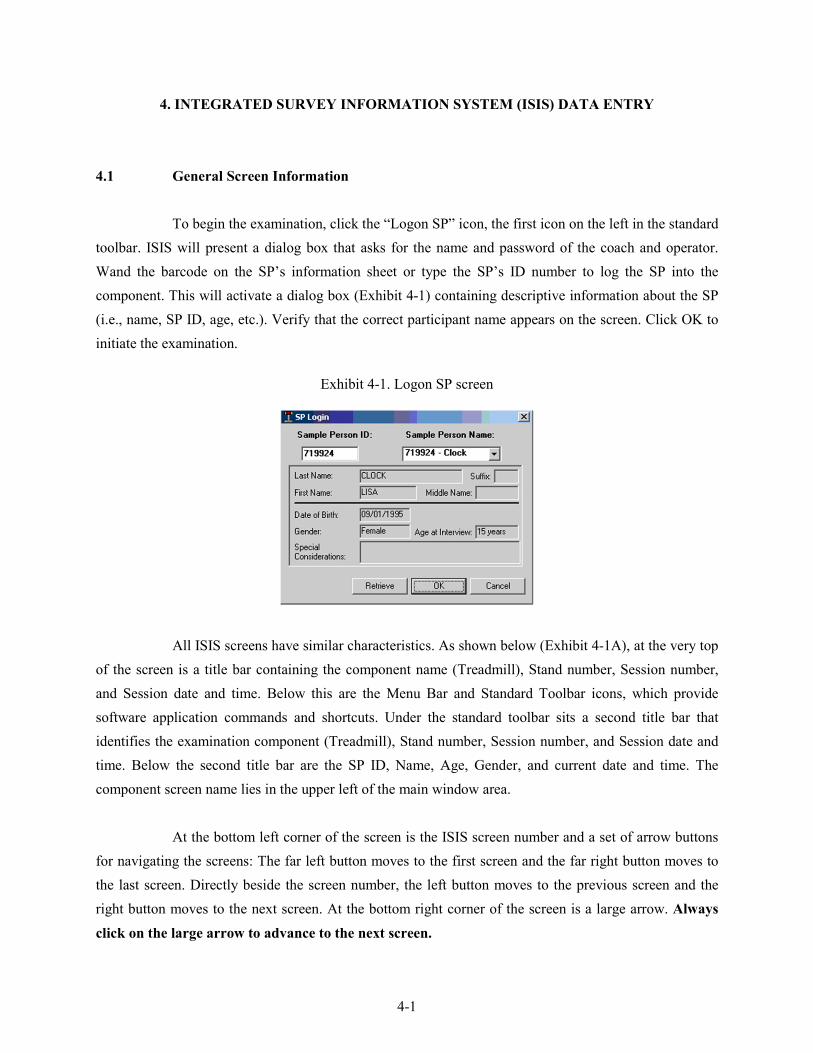
4-1
4. INTEGRATED SURVEY INFORMATION SYSTEM (ISIS) DATA ENTRY
4.1 General Screen Information
To begin the examination, click the “Logon SP” icon, the first icon on the left in the standard toolbar. ISIS will present a dialog box that asks for the name and password of the coach and operator. Wand the barcode on the SP’s information sheet or type the SP’s ID number to log the SP into the component. This will activate a dialog box (Exhibit 4-1) containing descriptive information about the SP (i.e., name, SP ID, age, etc.). Verify that the correct participant name appears on the screen. Click OK to initiate the examination.
Exhibit 4-1. Logon SP screen
All ISIS screens have similar characteristics. As shown below (Exhibit 4-1A), at the very top of the screen is a title bar containing the component name (Treadmill), Stand number, Session number, and Session date and time. Below this are the Menu Bar and Standard Toolbar icons, which provide software application commands and shortcuts. Under the standard toolbar sits a second title bar that identifies the examination component (Treadmill), Stand number, Session number, and Session date and time. Below the second title bar are the SP ID, Name, Age, Gender, and current date and time. The component screen name lies in the upper left of the main window area.
At the bottom left corner of the screen is the ISIS screen number and a set of arrow buttons for navigating the screens: The far left button moves to the first screen and the far right button moves to the last screen. Directly beside the screen number, the left button moves to the previous screen and the right button moves to the next screen. At the bottom right corner of the screen is a large arrow. Always click on the large arrow to advance to the next screen.
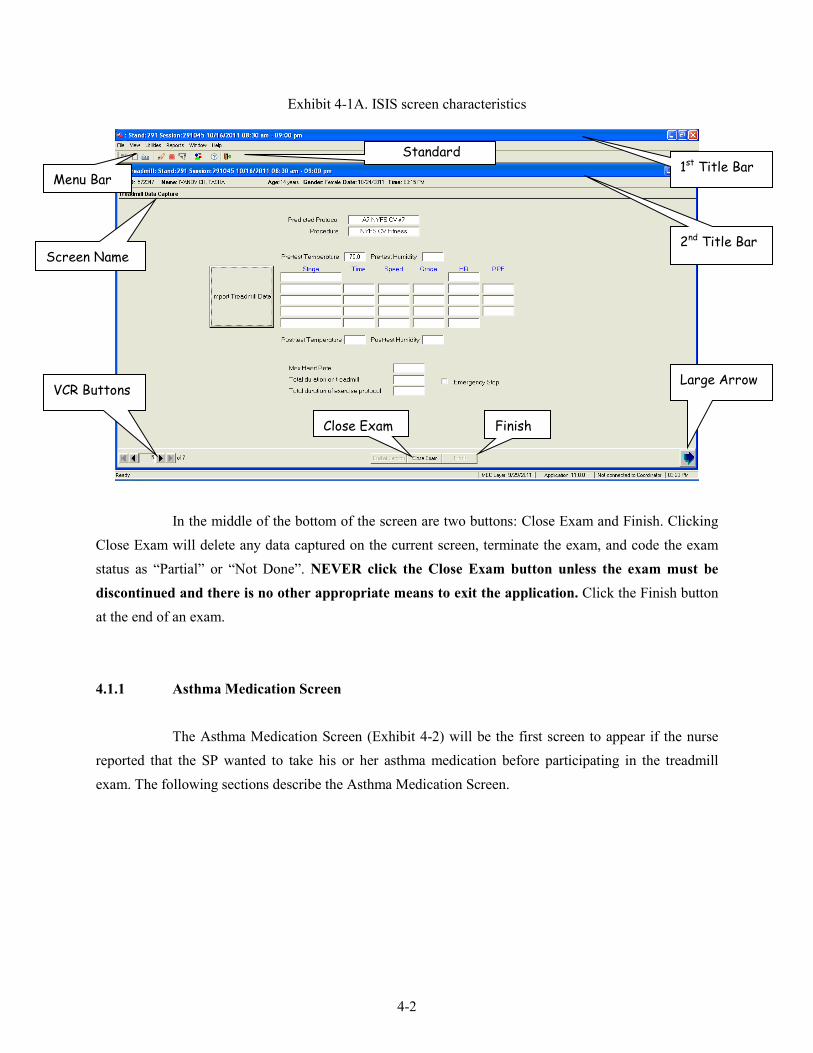
4-2
Exhibit 4-1A. ISIS screen characteristics
In the middle of the bottom of the screen are two buttons: Close Exam and Finish. Clicking Close Exam will delete any data captured on the current screen, terminate the exam, and code the exam status as “Partial” or “Not Done”. NEVER click the Close Exam button unless the exam must be discontinued and there is no other appropriate means to exit the application. Click the Finish button at the end of an exam.
4.1.1 Asthma Medication Screen
The Asthma Medication Screen (Exhibit 4-2) will be the first screen to appear if the nurse reported that the SP wanted to take his or her asthma medication before participating in the treadmill exam. The following sections describe the Asthma Medication Screen.
1st Title Bar Menu Bar
Standard
Screen Name 2nd Title Bar
VCR Buttons Large Arrow
Close Exam Finish
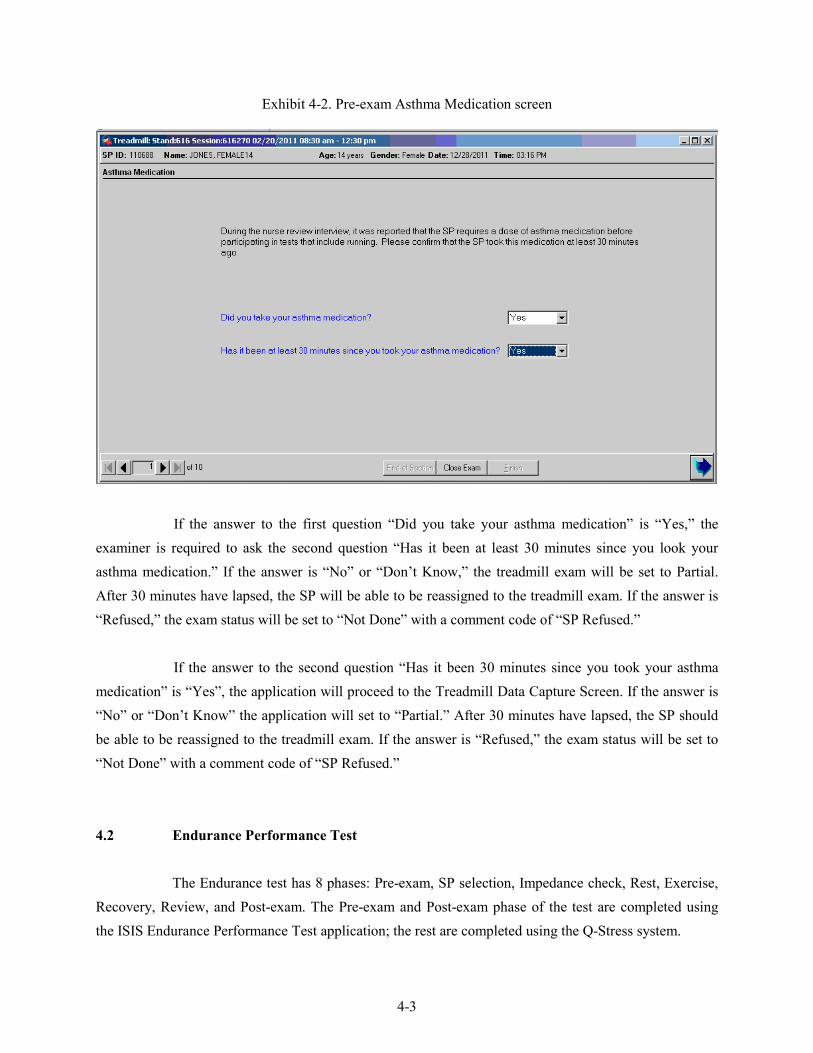
4-3
Exhibit 4-2. Pre-exam Asthma Medication screen
If the answer to the first question “Did you take your asthma medication” is “Yes,” the examiner is required to ask the second question “Has it been at least 30 minutes since you look your asthma medication.” If the answer is “No” or “Don’t Know,” the treadmill exam will be set to Partial. After 30 minutes have lapsed, the SP will be able to be reassigned to the treadmill exam. If the answer is “Refused,” the exam status will be set to “Not Done” with a comment code of “SP Refused.”
If the answer to the second question “Has it been 30 minutes since you took your asthma medication” is “Yes”, the application will proceed to the Treadmill Data Capture Screen. If the answer is “No” or “Don’t Know” the application will set to “Partial.” After 30 minutes have lapsed, the SP should be able to be reassigned to the treadmill exam. If the answer is “Refused,” the exam status will be set to “Not Done” with a comment code of “SP Refused.”
4.2 Endurance Performance Test
The Endurance test has 8 phases: Pre-exam, SP selection, Impedance check, Rest, Exercise, Recovery, Review, and Post-exam. The Pre-exam and Post-exam phase of the test are completed using the ISIS Endurance Performance Test application; the rest are completed using the Q-Stress system.
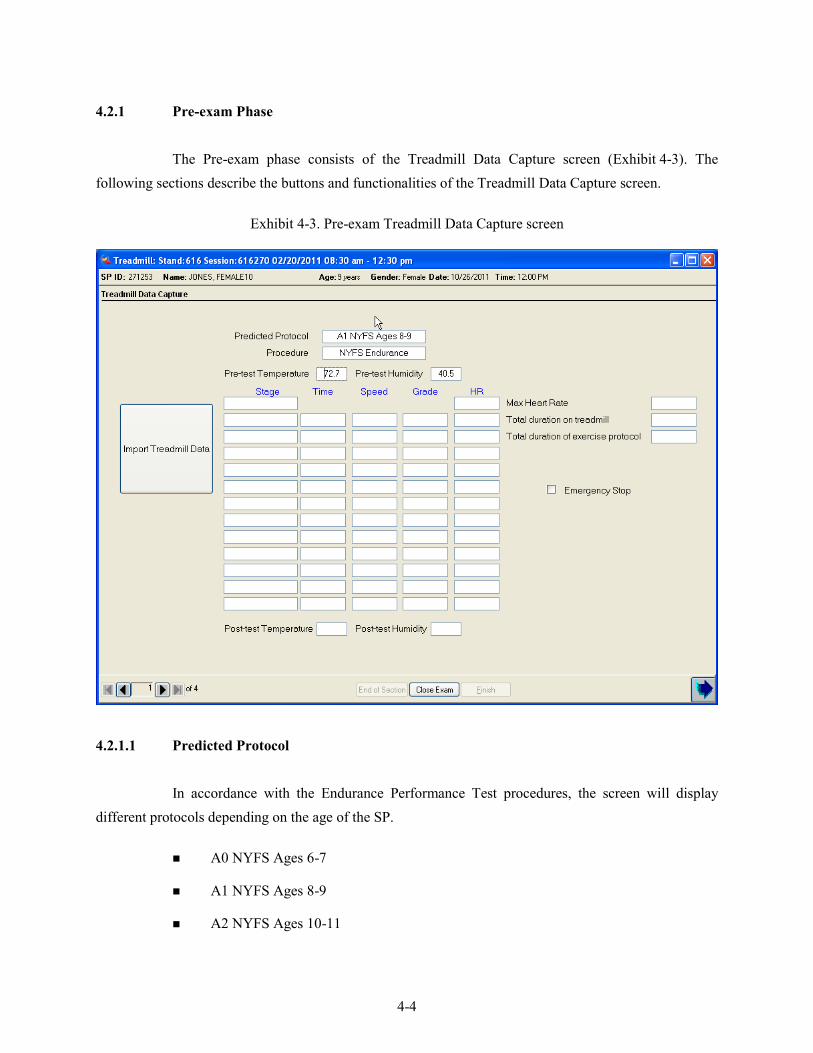
4-4
4.2.1 Pre-exam Phase
The Pre-exam phase consists of the Treadmill Data Capture screen (Exhibit 4-3). The following sections describe the buttons and functionalities of the Treadmill Data Capture screen.
Exhibit 4-3. Pre-exam Treadmill Data Capture screen
4.2.1.1 Predicted Protocol
In accordance with the Endurance Performance Test procedures, the screen will display different protocols depending on the age of the SP.
A0 NYFS Ages 6-7
A1 NYFS Ages 8-9
A2 NYFS Ages 10-11
4-5
4.2.1.2 Procedure
This field will display “NYFS Endurance” as the predetermined procedure for the Endurance Performance Test.
4.2.1.3 Import Treadmill Data Button
The “Import Treadmill Data” button is used to import data from the Q-Stress system to ISIS. This button should only be used after completing the Review phase of the test.
4.2.1.4 Pre-test Temperature/Humidity
A temperature probe is directly integrated with the ISIS system. The system will capture the pre-test room temperature and relative humidity and display them on the screen.
4.2.1.5 Endurance Test Import Data Fields
This area is located next to the Import Treadmill Data button and it includes the following fields:
Stage
Time – Duration of each stage
Speed – Speed of the treadmill at each stage
Grade – Elevation of the treadmill at each stage
HR – Heart rate at the end of each stage
4.2.1.6 Post-test Temperature
A temperature probe is directly integrated with the ISIS system. The system will capture the post-test room temperature and relative humidity and display them on the screen.
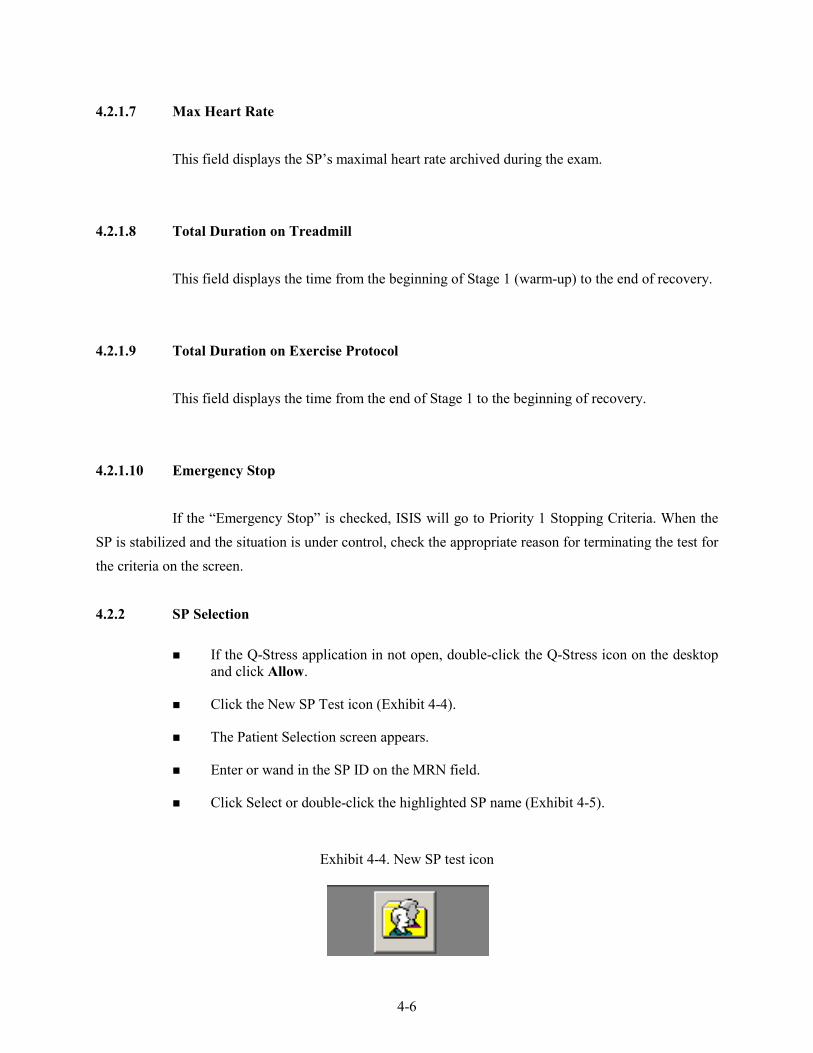
4-6
4.2.1.7 Max Heart Rate
This field displays the SP’s maximal heart rate archived during the exam.
4.2.1.8 Total Duration on Treadmill
This field displays the time from the beginning of Stage 1 (warm-up) to the end of recovery.
4.2.1.9 Total Duration on Exercise Protocol
This field displays the time from the end of Stage 1 to the beginning of recovery.
4.2.1.10 Emergency Stop
If the “Emergency Stop” is checked, ISIS will go to Priority 1 Stopping Criteria. When the SP is stabilized and the situation is under control, check the appropriate reason for terminating the test for the criteria on the screen.
4.2.2 SP Selection
If the Q-Stress application in not open, double-click the Q-Stress icon on the desktop and click Allow.
Click the New SP Test icon (Exhibit 4-4).
The Patient Selection screen appears.
Enter or wand in the SP ID on the MRN field.
Click Select or double-click the highlighted SP name (Exhibit 4-5).
Exhibit 4-4. New SP test icon
4-7
Exhibit 4-5. SP Selection Screen (1)
Verify the following SP Demographic Information (Exhibit 4-6).
-
-
-
Date of Birth – Date of birth will be imported from the ISIS treadmill application.
Age – Age is automatically calculated from the date of birth.
Max Predicted HR – The Max Predicted Heart Rate is calculated from the SP’s age based on the formula 220-Age.
Exhibit 4-6. Patient Selection Screen (2)
4-8
Verify the following Test Parameters, click OK to continue.
-
-
-
Exercise Device (required) – Select “Treadmill” as the exercise device the SP will be using for the test.
Protocol (required) – An exercise stress test is controlled by a protocol that defines the speed and grade sequence for a treadmill. A protocol is divided into a number of stages, each having a specified exercise control and duration. The protocols listed below have been programmed for the Endurance Test. To make a selection, click the down arrow next to the box and select the protocol indicated by ISIS (Exhibit 4-7).
Procedure (required) – The procedure is a set of parameters that defines how an exercise test will be performed. The procedure includes such items as the ECG lead set, notification settings, formula, screen and Info Toolbar layout, analog output configurations, and prompts. To make a selection, click the down arrow next to the box and select “NYFS Endurance Test” (Exhibit 4-6).
NOTE: Unless otherwise selected, the system will use the default procedure “SELECT PROCEDURE” and protocol “SELECT PROTOCOL” which will not allow you to continue with the test.
Exhibit 4-7. Selection of Protocol and Procedure
4.2.3 Impedance Check
Before you begin the Endurance Test, you must attach the electrodes to the SP and verify that they are connected satisfactorily. For detailed instructions on how to use the Impedance Check refer to Chapter 3, Section 3.4.1.
After attaching the electrodes to the SP, and before you begin the exam, you must verify that they are connected satisfactorily. The Q-Stress software checks the quality of each electrode connection using the Impedance Check.
Click the Impedance Check icon in the top center of the screen (Exhibit 4-8).
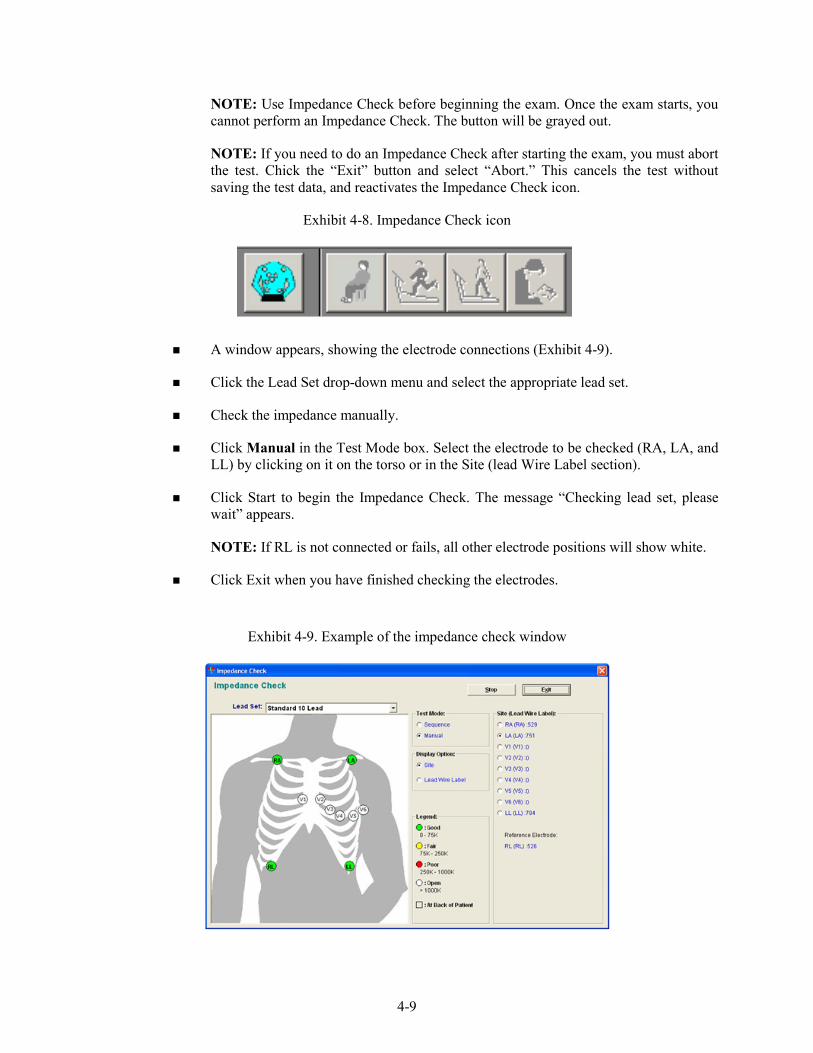
4-9
NOTE: Use Impedance Check before beginning the exam. Once the exam starts, you cannot perform an Impedance Check. The button will be grayed out.
NOTE: If you need to do an Impedance Check after starting the exam, you must abort the test. Chick the “Exit” button and select “Abort.” This cancels the test without saving the test data, and reactivates the Impedance Check icon.
Exhibit 4-8. Impedance Check icon
A window appears, showing the electrode connections (Exhibit 4-9).
Click the Lead Set drop-down menu and select the appropriate lead set.
Check the impedance manually.
Click Manual in the Test Mode box. Select the electrode to be checked (RA, LA, and LL) by clicking on it on the torso or in the Site (lead Wire Label section).
Click Start to begin the Impedance Check. The message “Checking lead set, please wait” appears.
NOTE: If RL is not connected or fails, all other electrode positions will show white.
Click Exit when you have finished checking the electrodes.
Exhibit 4-9. Example of the impedance check window
4-10
4.2.4 Functions on the Q-Stress Test Window for the Endurance Test
Exhibit 4-10 shows a window representative of an Endurance Test. In each phase of the test, different items will be active. Items that are inactive are grayed out.
Exhibit 4-10. Rest Phase Test Window Screen
1 2 3 Toolbar Info Toolbar ECG Info
SP ID
Impedance Check icon
Rest phase icon
Exercise phase icon
Recovery icon
Review Mode icon
Save and Exit Test icon
Protocol
Stage
Heart rate (HR)
START/STOP BELT
Stage time
Exercise time
Speed (mph)
Grade (%)
Lead Labels
Average Beats
Current ECG Waveforms
1
2
3

4-11
4.2.5 Rest Phase
After you have completed the Impedance check, click the Start Rest icon to begin the Rest phase (Exhibit 4-11).
Exhibit 4-11. Start Rest icon
The Rest phase begins after you have prepared the SP for testing. During this phase the coach will demonstrate and explain how to walk on a treadmill, the operator will verify that the electrodes are connected properly and that the system is capturing heart rate.
Click the first lead label and select I, verify that a ECG waveform is traveling across the display (Exhibit 4-12).
Click the first lead label and select V or “Default Lead Selection” to hide the ECG waveform.
Press “START BELT.”
Exhibit 4-12. Change Displayed Leads
Once the coach has finished demonstrating and explaining the exam to the SP, press the STOP BELT button.
Have the SP step on the treadmill.
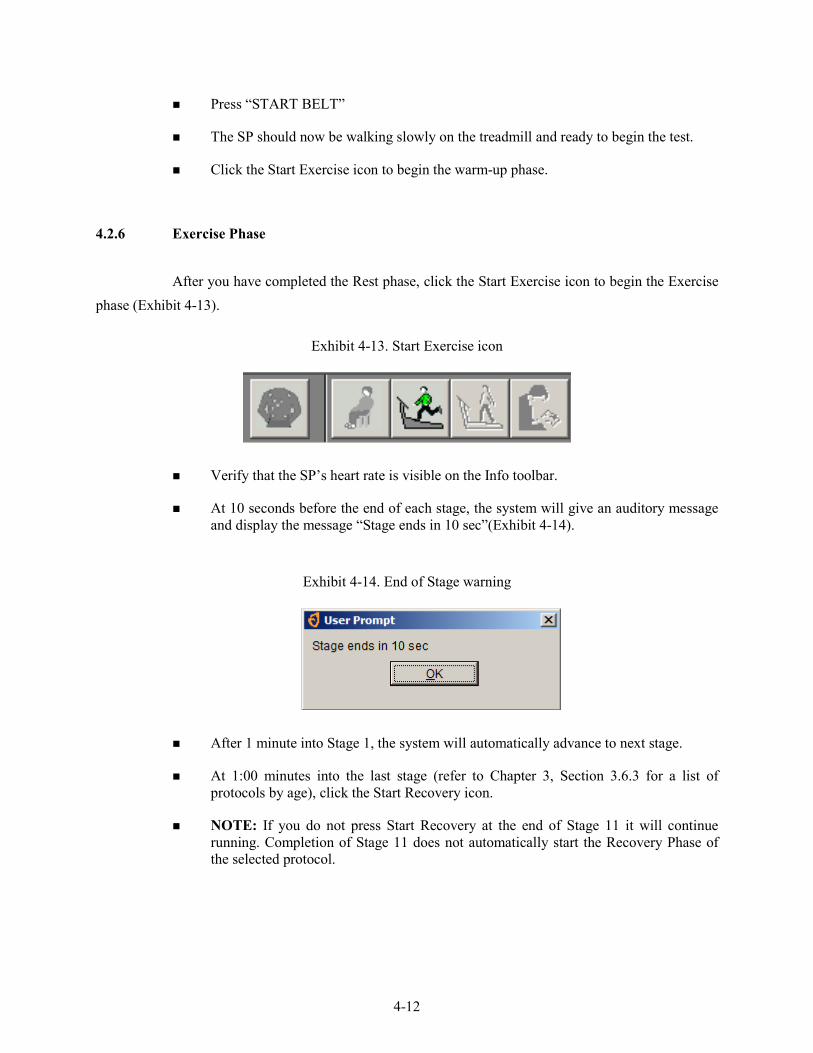
4-12
Press “START BELT”
The SP should now be walking slowly on the treadmill and ready to begin the test.
Click the Start Exercise icon to begin the warm-up phase.
4.2.6 Exercise Phase
After you have completed the Rest phase, click the Start Exercise icon to begin the Exercise phase (Exhibit 4-13).
Exhibit 4-13. Start Exercise icon
Verify that the SP’s heart rate is visible on the Info toolbar.
At 10 seconds before the end of each stage, the system will give an auditory message and display the message “Stage ends in 10 sec”(Exhibit 4-14).
Exhibit 4-14. End of Stage warning
After 1 minute into Stage 1, the system will automatically advance to next stage.
At 1:00 minutes into the last stage (refer to Chapter 3, Section 3.6.3 for a list of protocols by age), click the Start Recovery icon.
NOTE: If you do not press Start Recovery at the end of Stage 11 it will continue running. Completion of Stage 11 does not automatically start the Recovery Phase of the selected protocol.
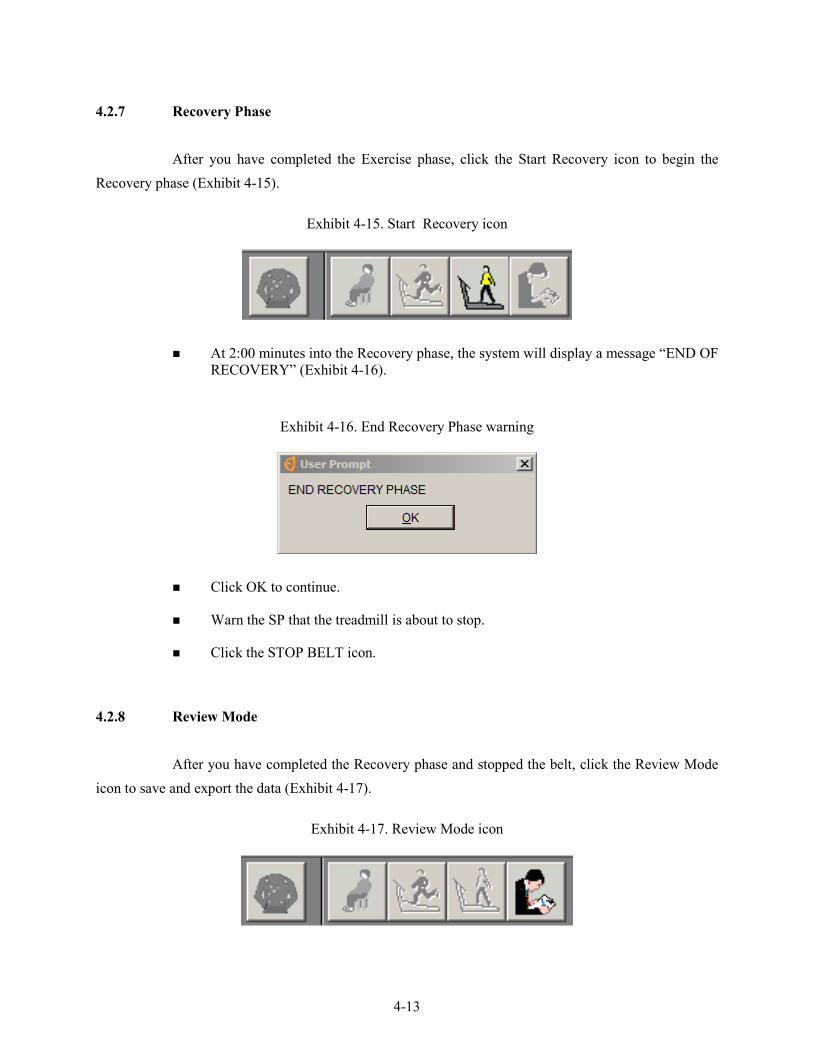
4-13
4.2.7 Recovery Phase
After you have completed the Exercise phase, click the Start Recovery icon to begin the Recovery phase (Exhibit 4-15).
Exhibit 4-15. Start Recovery icon
At 2:00 minutes into the Recovery phase, the system will display a message “END OF RECOVERY” (Exhibit 4-16).
Exhibit 4-16. End Recovery Phase warning
Click OK to continue.
Warn the SP that the treadmill is about to stop.
Click the STOP BELT icon.
4.2.8 Review Mode
After you have completed the Recovery phase and stopped the belt, click the Review Mode icon to save and export the data (Exhibit 4-17).
Exhibit 4-17. Review Mode icon
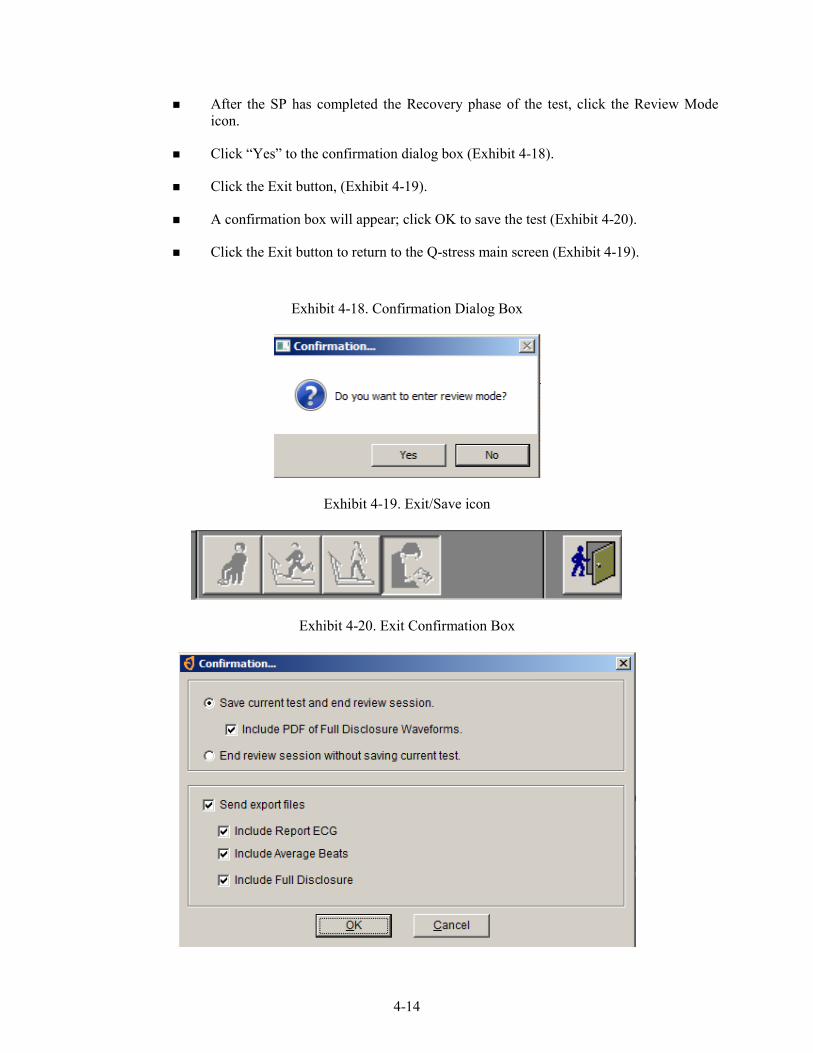
4-14
After the SP has completed the Recovery phase of the test, click the Review Mode icon.
Click “Yes” to the confirmation dialog box (Exhibit 4-18).
Click the Exit button, (Exhibit 4-19).
A confirmation box will appear; click OK to save the test (Exhibit 4-20).
Click the Exit button to return to the Q-stress main screen (Exhibit 4-19).
Exhibit 4-18. Confirmation Dialog Box
Exhibit 4-19. Exit/Save icon
Exhibit 4-20. Exit Confirmation Box

4-15
4.2.9 Post-exam
The Post-exam phase of the exam will be completed on the ISIS Treadmill Data Capture screen (Exhibit 4-21).
Exhibit 4-21. Post-exam Treadmill Data Capture screen
Click the “Import Treadmill Data” button to import the exam data from the Q-Stress system.
Verify that the following fields are populated:
-
-
-
-
-
Stage – Stage 1-11 and recovery
Time – Duration of each stage
Speed – Speed of the treadmill at each stage
Grade – Elevation of the treadmill at each stage
HR – Heart rate at the end of each stage

4-16
Click the Large Arrow at the bottom of the screen or press Enter; the ISIS system will advance to the Component Status screen.
The Component Status will be set to “Complete.”
Press the ‘Finish’ button to close the exam.
4.2.10 Priority 2 Stopping Criteria
If any data are missing from the Endurance Test Import Data Field, the ISIS system will advance to the Priority 2 Stopping Criteria screen.
Check the appropriate reason for terminating the test for the criteria on the screen.
The Priority 2 Stopping Criteria are:
1. SP requests to stop
2. Technologist discretion (technologist notices signs of severe exertion)
-
-
-
-
Unsteady gait
Breathlessness
Inability to keep up with treadmill speed
Other
3. Failure of testing equipment
4. Unable to Adhere to the Protocol
5. Other
If “Other” is checked, the technician is required to enter a comment to specify the reason for other
If you select 1 or 2, the ISIS system will require you to select at least one reason or indicators of maximal exertion. If the SP did not have any indicators of maximal exertion, leave a comment in “Other.”
If you do not select a criterion and the Next button is pressed, the ISIS system will display a message: “You must select a stopping criterion.”
Click OK to this message. Select one or more criteria as appropriate and press the Next button to advance to the Component Status screen.
4-17
If you have selected 1 or 2, the Component status will be set to “Complete,” otherwise the Component status will be set to “Partial” with a comment, “Priority 2 Stopping Criteria.”
Press the Finish button to close the exam.
4.2.11 Priority 1 Stopping Criteria
If the “Emergency Stop” box is checked, the ISIS system will go to the Priority 1 Stopping Criteria screen. When the SP is stabilized and the situation is under control, check the appropriate reason(s) for terminating the test from the criteria on the screen.
The Priority 1 Stopping Criteria are:
-
-
-
-
-
-
-
-
-
-
-
-
-
-
Pain or pressure in the chest
Pain in neck, jaw, or teeth
Pain in the shoulder or between the shoulder blades
Pain radiating down one or both arms
Moderate/severe leg pain or cramping
Lightheadedness, dizziness
Severe shortness of breath/wheezing
Change in skin color to bluish/grayish
Severe headache
Subject appears confused or agitated
Nausea
Unstable gait
Visual problems
Other
If “Other” is checked, the technician is required to enter a comment to specify the reason for Other.
If you notice any or the above criteria or if the SP complains of any of the above, follow the procedures for “Emergency Stop” and terminate the test immediately.
4-18
If the “Emergency Stop” box is checked, the Priority 1 Stopping Criteria screen appears. You are required to select one or more criteria.
If you do not select a criterion and the Next button is pressed, the ISIS system will display a message: “You must select a stopping criterion.”
Click OK to this message. Select one or more criteria as appropriate and press the Next button to advance to the Component Status screen.
The Component status will be set to “Partial” with the comment “Priority 1 Stopping Criteria.”
Press the Finish button to close the exam.
4.3 Cardiovascular Fitness Test
The Cardiovascular Fitness test has eight phases: Pre-exam, SP selection, Impedance check, Rest, Exercise, Recovery, Review, and Post-exam. The Pre-exam and Post-exam phase of the test are completed using the ISIS CV Fitness Test application, the rest are completed using the Q-Stress system.
4.3.1 Pre-exam Phase
If the SP completed the Body Measures component prior to starting the CV Fitness exam, the height and weight measurements from that component will be pulled from the database and used to determine Body Mass Index (BMI) which in turn will be used in the calculation of the VO2 max. If the SP didn’t complete the body measures component prior to entering the CV Fitness exam, complete the following steps:
Open the Body Measures Application
Measure the SP’s Height and Weight
Exit the Body Measures Application
Click the “Get BMI” button (Exhibit 4-22)
4-19
Exhibit 4-22. Pre-exam Height/Weight BMI
If the BMI was imported and the Next button is pressed, the ISIS system will display a message (Exhibit 4-23).
Exhibit 4-23. Pre-exam BMI hard edit
If the SP refuses to answer or you cannot obtain the height and weight for some other reason check the box “Refused Height and Weight” (See Exhibit 4-22). If the “Refused Height and Weight” box is checked, the SP will be excluded from the exam. The SP will be excluded from the exam and the Component status will be set to “Not Done” with the comment “Unable to calculate protocol” (Exhibit 4-24).
4-20
Exhibit 4-24. Component Status Not Done – Unable to calculate protocol
4.3.1.1 Questions to Determine Exercise Protocol (PAR Code Questions)
The questions on the next few screens are designed to determine the exercise protocol that will be assigned to the SP.
These questions are based on the Physical Activity Readiness (PAR) Questionnaire and will be used to determine a PAR Code that is used to calculate the predicted VO2 max.
The predicted VO2 max is used to determine the exercise protocol for each individual SP. See Appendix F for more details.
Exhibit 4-25 shows the first level questions used to determine the SP’s regular physical activity level. These questions should be read exactly as written.
If the SP interrupts and gives an answer before you have completed asking the question, tell the SP that you are required to read the entire set of options before you accept a response.
Read the options clearly and slowly enough for the SP to understand what the options are. Put special emphasis on the words in capital letters.
If the SP is not sure about the difference between heavy and modest activities, use the examples listed for these activities.
If the SP’s activity level over the last few months is different from his or her activity level in general, use the activity level which bests describes the activity level over the last year.
If the SP is still not sure in which category they fall, (little or modest, modest, or heavy), select the lower category.
Encourage the SP to answer as honestly as possible to obtain the exercise protocol that will get valid information about their fitness level.

4-21
Select 1, 2, or 3 from the drop-down menu.
If the SP refuses to answer or is unable to give an answer, select Refused or Don’t Know. If “Refused” or “Don’t Know” are selected, the SP will be excluded from the exam.
First Level Questions
Exhibit 4-25. First level questions to determine exercise protocol
Little or no recreation, sport, or physical activity: If the SP is not regularly involved in recreation, sport, or physical activity, select 1 from the drop-down menu. If 1(little or no regular physical activity) is selected from the first level activity questions in Exhibit 4-25 above, the ISIS system will advance to the screen for the second level activity questions for “little or no regular physical activity.” See Exhibit 4-26.
Regular modest physical activity: If the SP participates regularly in modest physical activity from recreation or work, select 2 from the drop-down menu. The activity should be typical physical activity and should be done on a regular basis rather than sporadically or in an earlier time period. Emphasize the words in capital letters when reading the choices. If 2 (regular, modest physical activity) is selected from the first level activity questions in Exhibit 4-25 above, the ISIS system will

4-22
advance to the screen for the second level activity questions for “regular modest physical activity.” See Exhibit 4-47.
Heavy physical activity: If 3 (regular, heavy physical activity) is selected from the first level activity questions in Exhibit 4-25 above, the ISIS system will advance to the screen for the second level activity questions for “regular, heavy physical activity.” See Exhibit 4-28 on page 4-24.
Second Level Questions (Little or No Regular Physical Activity)
Exhibit 4-26. Little or No Regular Physical Activity (second level questions)
If 1 is selected from the first level activity questions (see Exhibit 4-25 shown earlier), the ISIS system will advance to the second level activity questions for “little or no regular activity.” The second level questions for this category will be highlighted.
Read both highlighted options entirely before accepting the SP’s response. As with the previous options, if the SP interrupts with an answer before you have completed reading the options, remind them that you are required to read the options entirely before accepting their response.
These questions are used to determine if the SP avoids walking or exertion such as always using an elevator or driving whenever possible instead of walking. The other option is if he or she walks for pleasure, routinely uses stairs, or occasionally exercises sufficiently to cause heavy breathing or perspiration.
If the SP is having difficulty choosing between the options, read the options again to give him or her time to decide. Do not answer the question for the SP. Ask him or her

4-23
to choose the option that is closest to the usual activity level. If the SP refuses to select an answer or is unable to give a response, select “Refused” or “Don’t Know” from the drop-down menu. If “Refused” or “Don’t Know” is selected, the SP is excluded.
The ISIS system will go to the Component Status screen. The status will be set to “Not Done” with the comment “Unable to calculate protocol.” Most SP’s will be able to select one of the options. Select 1 or 2 from the drop-down menu. Press the Next button to advance to the next screen.
Second Level Questions (Regular Modest Physical Activity)
Exhibit 4-27. Regular modest physical activity (second level questions)
If 2 is selected from the first level activity questions (see Exhibit 4-25 shown earlier), the ISIS system will advance to the second level activity questions for regular, modest activity. The second level questions for this category will be highlighted.
Read both highlighted options entirely before accepting the SP’s response. As with the previous options, if the SP interrupts with an answer before you have completed reading the options, remind them that you are required to read the options entirely before accepting their response.
These questions are used to determine the amount of time the SP spends in regular, modest physical activity per week.
If they spend 10 to 60 minutes per week in regular, modest physical activity, select 1 from the drop-down menu.
4-24
If they spend more than 60 minutes per week in regular, modest physical activity, select 2 from the drop-down menu.
If the SP is having difficulty choosing between the options, read the options again to give them time to decide. Do not answer the question for them. Ask them to choose the option that is closest to their usual activity level.
If the SP refuses to select an answer or is unable to give a response, select “Refused” or “Don’t Know” from the drop-down menu. If “Refused” or “Don’t Know” is selected, the SP is excluded.
The ISIS system will go to the Component Status screen. The status will be set to “Not Done” with the comment “Unable to calculate protocol.” Most SP’s will be able to select one of the options. Select 1 or 2 from the drop-down menu. Press the Next button to advance to the next screen.
Second Level Questions (Regular Heavy Physical Activity)
Exhibit 4-28. Regular heavy physical activity (second level questions)
If 3 is selected from the first level activity questions (see Exhibit 4-25 shown earlier), the ISIS system will advance to the second level questions for regular, heavy physical activity.
The second level questions for regular, heavy physical activity have four options to determine the amount of time per week spent in this type of activity.
4-25
These options are used to determine the amount or degree of regular, heavy physical activity the SP does.
Read all four highlighted options before accepting the SP’s response. Read the options carefully and slowly enough for the SP to understand the time period associated with each response.
If they spend less than 30 minutes/week in regular, heavy physical activity, select 1.
If they spend 30-60 minutes per week in regular, heavy physical activity, select 2.
If they spend 1-3 hours per week in regular, heavy physical activity, select 3.
If they spend more than 3 hours per week in regular, heavy physical activity, select 4.
If the SP is having difficulty choosing between the options, read the options again to give them time to decide. Do not answer the question for them. Ask them to choose the option that is closest to their usual activity level.
If the SP refuses to select an answer or is unable to give a response, select “Refused” or “Don’t Know” from the drop-down menu. If “Refused” or “Don’t Know” is selected, the SP is excluded. The ISIS system will go to the Component Status screen. The status will be set to “Not Done” with the comment “Unable to calculate protocol.” Most SP’s will be able to select one of the options. Select 1, 2, 3, or 4 from the drop-down menu.
If a response is not selected for the physical activity questions and the Next button is pressed, the ISIS system will display a reminder message ‘You must enter selection to proceed to the next slide.
If the SP refuses to answer or is unable to give an answer, select Refused or Don’t Know.
If “Refused” or “Don’t Know” are selected, the SP will be excluded from the exam. The Status will be set to “Not Done” with the comment “Unable to calculate protocol.”

4-26
Exhibit 4-29. Component Status Not Done – Unable to calculate protocol
Following the PAR code questions ISIS will display the Treadmill Data Capture screen. The following sections describe the buttons and functionalities of this screen.
Exhibit 4-30. Pre-exam Treadmill Data Capture screen
4-27
4.3.1.2 Predicted Protocol
In accordance with the CV Fitness Test procedures, the screen will display different protocols based on the SPs predicted VO2 max.
A3 NYFS CV #3
A4 NYFS CV #4
A5 NYFS CV #5
A6 NYFS CV #6
A7 NYFS CV #7
4.3.1.3 Procedure
This field will display “NYFS CV Fitness” as the predetermined procedure for the CV Fitness Test.
4.3.1.4 Import Treadmill Data Button
The “Import Treadmill Data” button is used to import data from the Q-Stress system to ISIS. This button should only be used after completing the Review phase of the test.
4.3.1.5 Pre-test Temperature/Humidity
A temperature probe is directly integrated with the ISIS system. The system will capture the pre test room temperature and relative humidity and display them on the screen.
4-28
4.3.1.6 CV Fitness Test Import Data Fields
This area is located next to the Import Treadmill Data button and it includes the following fields:
Stage
Time – Duration of each stage
Speed – Speed of the treadmill at each stage
Grade – Elevation of the treadmill at each stage
HR – Heart rate at the end of each stage
RPE - Rating of Perceived Exertion
4.3.1.7 Post-test Temperature
A temperature probe is directly integrated with the ISIS system. The system will capture the post test room temperature and relative humidity and display them on the screen.
4.3.1.8 Max Heart Rate
This field displays the SP’s maximal heart rate archived during the exam.
4.3.1.9 Total Duration on Treadmill
This field displays the time from the beginning of stage 1 (warm-up) to the end of recovery.
4.3.1.10 Total Duration on Exercise Protocol
This field displays the time from the end of stage 1 to the beginning of recovery.

4-29
4.3.1.11 Rating of Perceived Exertion
This field displays the rating of perceived exertion obtained at the end of Warm-up, stage 2, and stage 3.
4.3.1.12 Emergency Stop
If the “Emergency Stop” is checked, ISIS will go to Priority 1 Stopping Criteria. When the SP is stabilized and the situation is under control, check the appropriate reason for terminating the test for the criteria on the screen.
4.3.2 SP Selection
If the Q-Stress application in not open, double-click the Q-Stress icon on the desktop and click Allow.
Click the New SP Test icon (Exhibit 4-31).
The Patient Selection screen appears
Enter or wand in the SP ID on the MRN field
Click Select or double-click the highlighted SP name (Exhibit 4-32).
Exhibit 4-31. New SP test icon
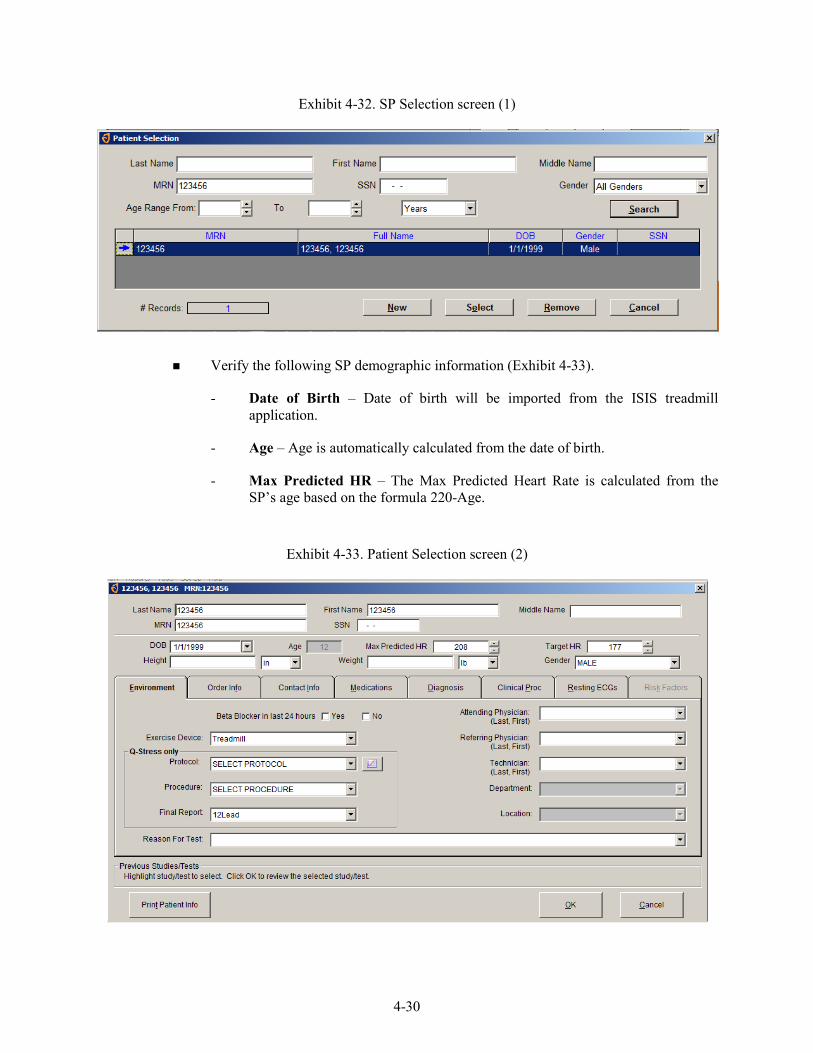
4-30
Exhibit 4-32. SP Selection screen (1)
Verify the following SP demographic information (Exhibit 4-33).
-
-
-
Date of Birth – Date of birth will be imported from the ISIS treadmill application.
Age – Age is automatically calculated from the date of birth.
Max Predicted HR – The Max Predicted Heart Rate is calculated from the SP’s age based on the formula 220-Age.
Exhibit 4-33. Patient Selection screen (2)
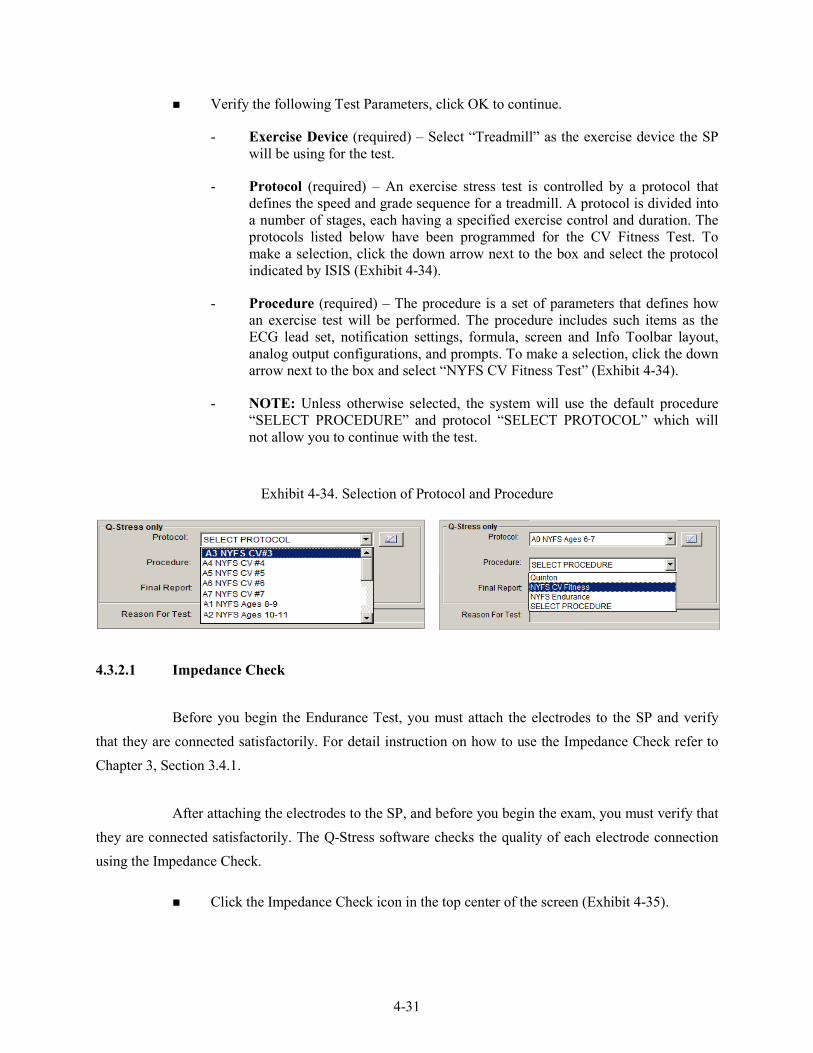
4-31
Verify the following Test Parameters, click OK to continue.
-
-
-
-
Exercise Device (required) – Select “Treadmill” as the exercise device the SP will be using for the test.
Protocol (required) – An exercise stress test is controlled by a protocol that defines the speed and grade sequence for a treadmill. A protocol is divided into a number of stages, each having a specified exercise control and duration. The protocols listed below have been programmed for the CV Fitness Test. To make a selection, click the down arrow next to the box and select the protocol indicated by ISIS (Exhibit 4-34).
Procedure (required) – The procedure is a set of parameters that defines how an exercise test will be performed. The procedure includes such items as the ECG lead set, notification settings, formula, screen and Info Toolbar layout, analog output configurations, and prompts. To make a selection, click the down arrow next to the box and select “NYFS CV Fitness Test” (Exhibit 4-34).
NOTE: Unless otherwise selected, the system will use the default procedure “SELECT PROCEDURE” and protocol “SELECT PROTOCOL” which will not allow you to continue with the test.
Exhibit 4-34. Selection of Protocol and Procedure
4.3.2.1 Impedance Check
Before you begin the Endurance Test, you must attach the electrodes to the SP and verify that they are connected satisfactorily. For detail instruction on how to use the Impedance Check refer to Chapter 3, Section 3.4.1.
After attaching the electrodes to the SP, and before you begin the exam, you must verify that they are connected satisfactorily. The Q-Stress software checks the quality of each electrode connection using the Impedance Check.
Click the Impedance Check icon in the top center of the screen (Exhibit 4-35).
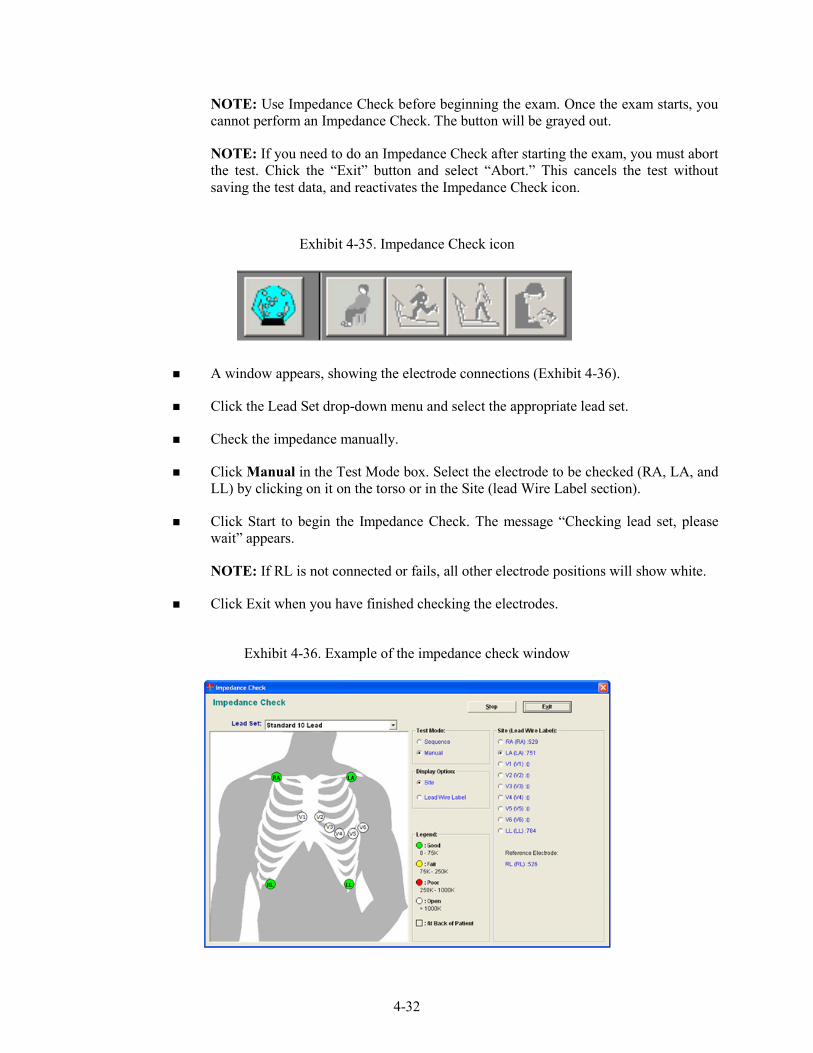
4-32
NOTE: Use Impedance Check before beginning the exam. Once the exam starts, you cannot perform an Impedance Check. The button will be grayed out.
NOTE: If you need to do an Impedance Check after starting the exam, you must abort the test. Chick the “Exit” button and select “Abort.” This cancels the test without saving the test data, and reactivates the Impedance Check icon.
Exhibit 4-35. Impedance Check icon
A window appears, showing the electrode connections (Exhibit 4-36).
Click the Lead Set drop-down menu and select the appropriate lead set.
Check the impedance manually.
Click Manual in the Test Mode box. Select the electrode to be checked (RA, LA, and LL) by clicking on it on the torso or in the Site (lead Wire Label section).
Click Start to begin the Impedance Check. The message “Checking lead set, please wait” appears.
NOTE: If RL is not connected or fails, all other electrode positions will show white.
Click Exit when you have finished checking the electrodes.
Exhibit 4-36. Example of the impedance check window
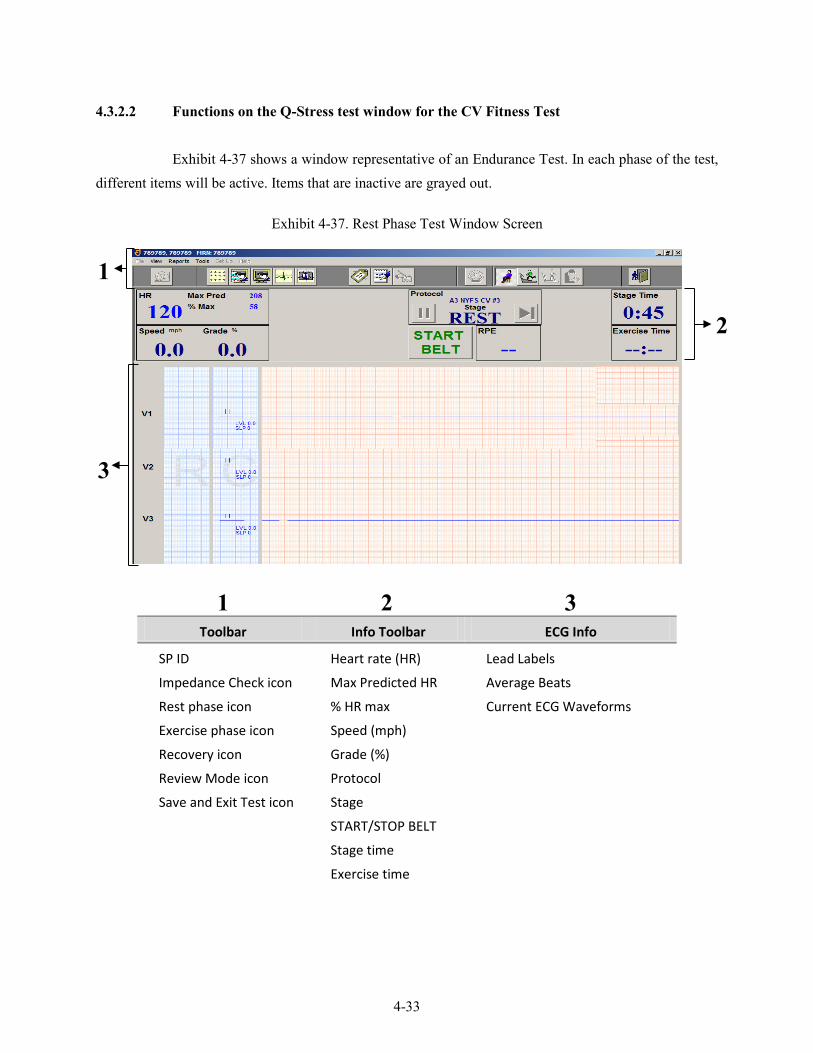
4-33
4.3.2.2 Functions on the Q-Stress test window for the CV Fitness Test
Exhibit 4-37 shows a window representative of an Endurance Test. In each phase of the test, different items will be active. Items that are inactive are grayed out.
Exhibit 4-37. Rest Phase Test Window Screen
1 2 3 Toolbar Info Toolbar ECG Info
SP ID
Impedance Check icon
Rest phase icon
Exercise phase icon
Recovery icon
Review Mode icon
Save and Exit Test icon
Heart rate (HR)
Max Predicted HR
% HR max
Speed (mph)
Grade (%)
Protocol
Stage
START/STOP BELT
Stage time
Exercise time
Lead Labels
Average Beats
Current ECG Waveforms
1
2
3
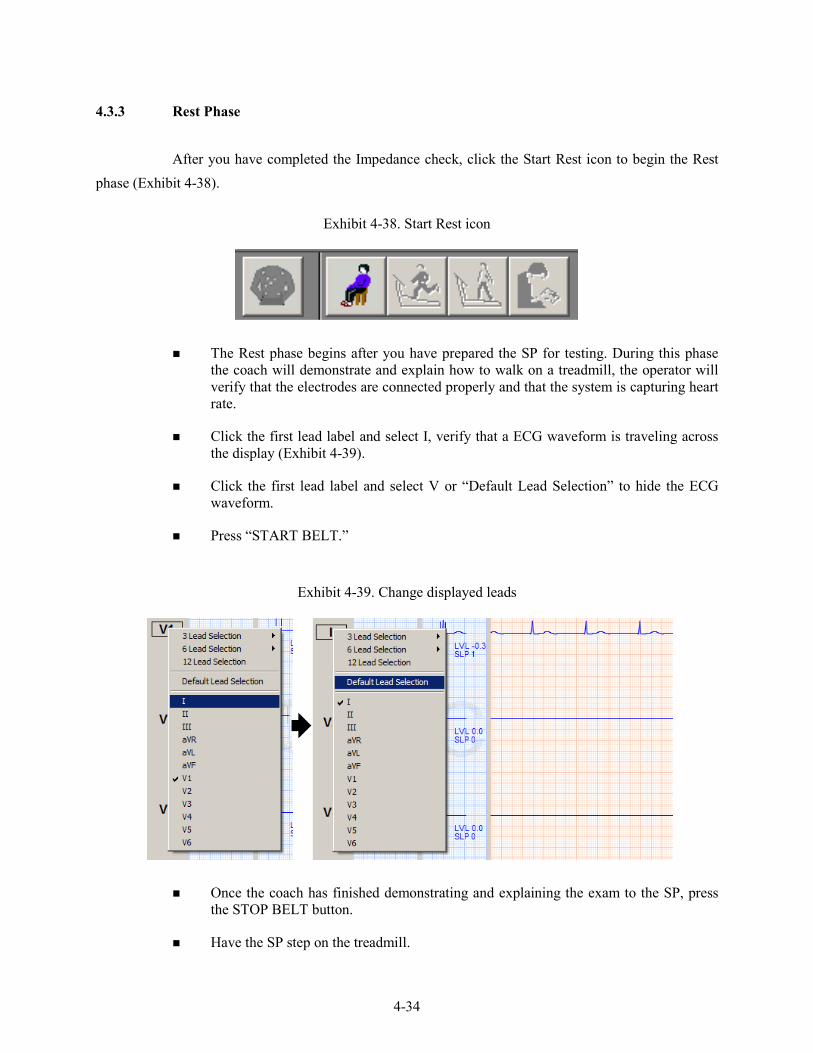
4-34
4.3.3 Rest Phase
After you have completed the Impedance check, click the Start Rest icon to begin the Rest phase (Exhibit 4-38).
Exhibit 4-38. Start Rest icon
The Rest phase begins after you have prepared the SP for testing. During this phase the coach will demonstrate and explain how to walk on a treadmill, the operator will verify that the electrodes are connected properly and that the system is capturing heart rate.
Click the first lead label and select I, verify that a ECG waveform is traveling across the display (Exhibit 4-39).
Click the first lead label and select V or “Default Lead Selection” to hide the ECG waveform.
Press “START BELT.”
Exhibit 4-39. Change displayed leads
Once the coach has finished demonstrating and explaining the exam to the SP, press the STOP BELT button.
Have the SP step on the treadmill.
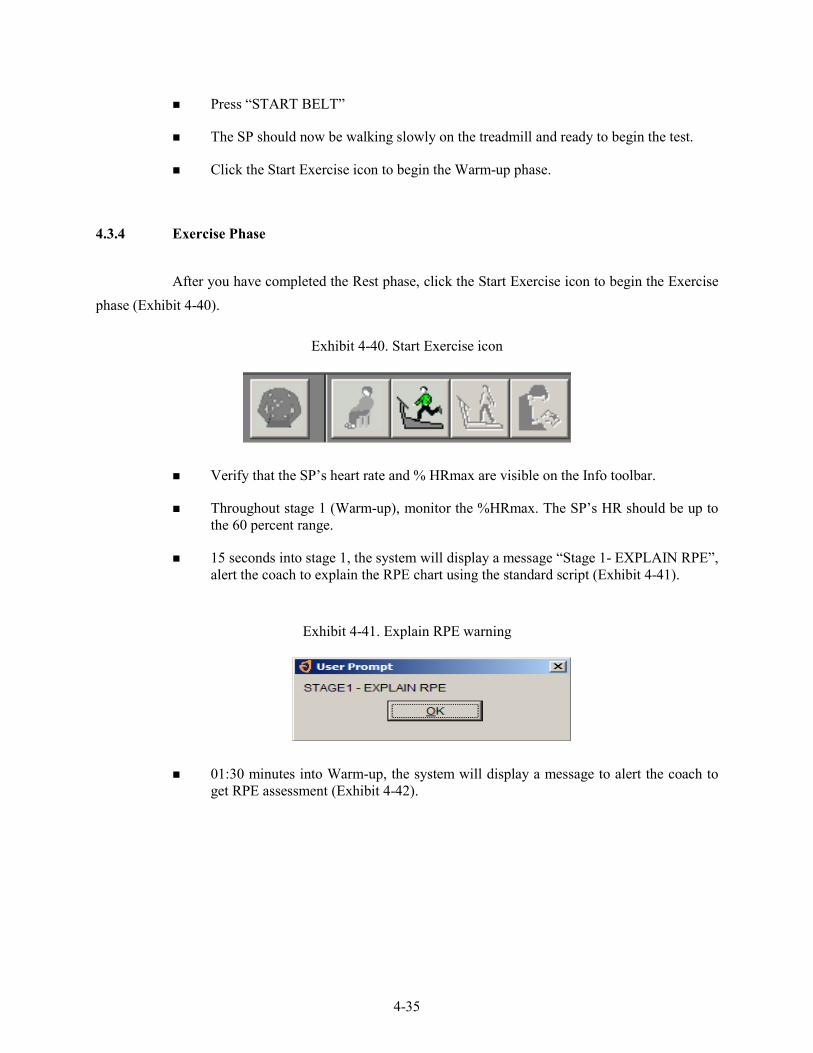
4-35
Press “START BELT”
The SP should now be walking slowly on the treadmill and ready to begin the test.
Click the Start Exercise icon to begin the Warm-up phase.
4.3.4 Exercise Phase
After you have completed the Rest phase, click the Start Exercise icon to begin the Exercise phase (Exhibit 4-40).
Exhibit 4-40. Start Exercise icon
Verify that the SP’s heart rate and % HRmax are visible on the Info toolbar.
Throughout stage 1 (Warm-up), monitor the %HRmax. The SP’s HR should be up to the 60 percent range.
15 seconds into stage 1, the system will display a message “Stage 1- EXPLAIN RPE”, alert the coach to explain the RPE chart using the standard script (Exhibit 4-41).
Exhibit 4-41. Explain RPE warning
01:30 minutes into Warm-up, the system will display a message to alert the coach to get RPE assessment (Exhibit 4-42).
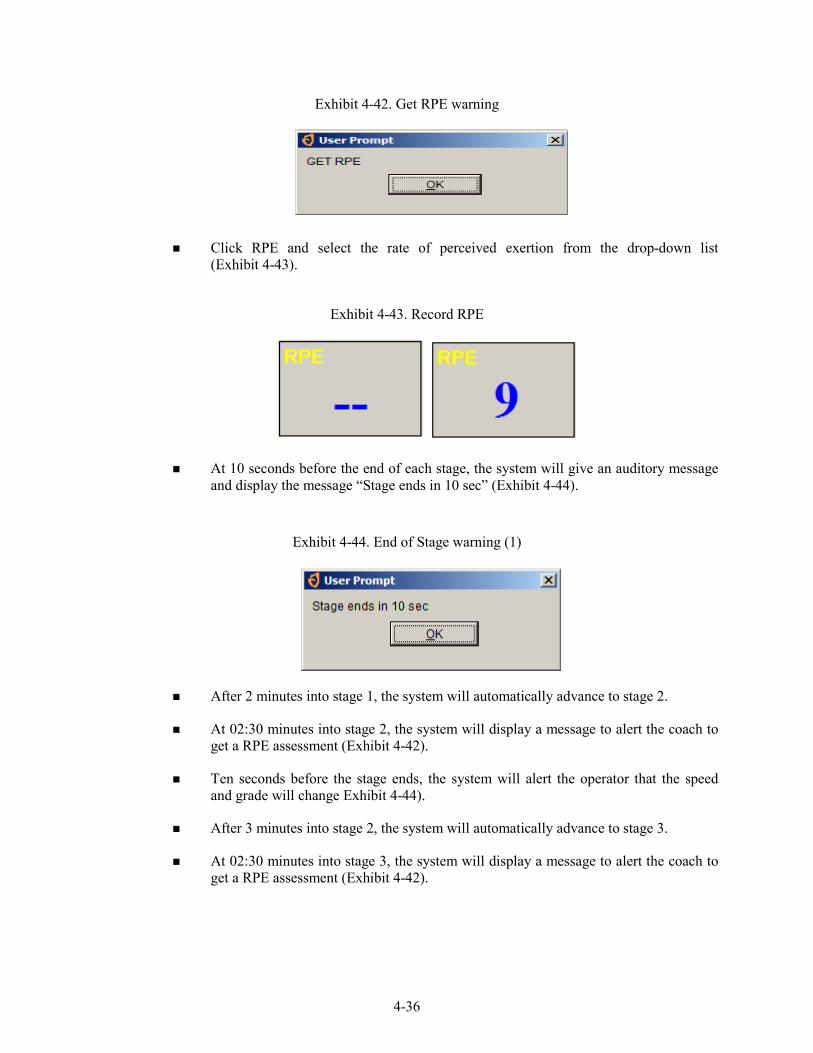
4-36
Exhibit 4-42. Get RPE warning
Click RPE and select the rate of perceived exertion from the drop-down list (Exhibit 4-43).
Exhibit 4-43. Record RPE
At 10 seconds before the end of each stage, the system will give an auditory message and display the message “Stage ends in 10 sec” (Exhibit 4-44).
Exhibit 4-44. End of Stage warning (1)
After 2 minutes into stage 1, the system will automatically advance to stage 2.
At 02:30 minutes into stage 2, the system will display a message to alert the coach to get a RPE assessment (Exhibit 4-42).
Ten seconds before the stage ends, the system will alert the operator that the speed and grade will change Exhibit 4-44).
After 3 minutes into stage 2, the system will automatically advance to stage 3.
At 02:30 minutes into stage 3, the system will display a message to alert the coach to get a RPE assessment (Exhibit 4-42).
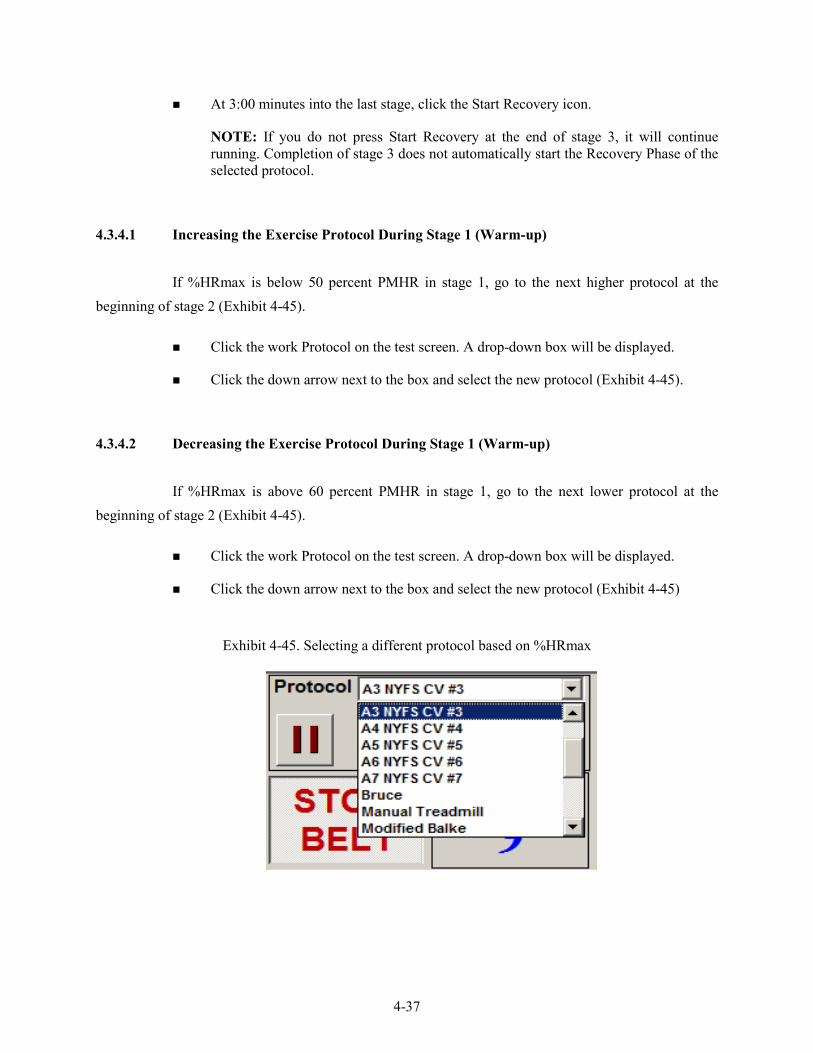
4-37
At 3:00 minutes into the last stage, click the Start Recovery icon.
NOTE: If you do not press Start Recovery at the end of stage 3, it will continue running. Completion of stage 3 does not automatically start the Recovery Phase of the selected protocol.
4.3.4.1 Increasing the Exercise Protocol During Stage 1 (Warm-up)
If %HRmax is below 50 percent PMHR in stage 1, go to the next higher protocol at the beginning of stage 2 (Exhibit 4-45).
Click the work Protocol on the test screen. A drop-down box will be displayed.
Click the down arrow next to the box and select the new protocol (Exhibit 4-45).
4.3.4.2 Decreasing the Exercise Protocol During Stage 1 (Warm-up)
If %HRmax is above 60 percent PMHR in stage 1, go to the next lower protocol at the beginning of stage 2 (Exhibit 4-45).
Click the work Protocol on the test screen. A drop-down box will be displayed.
Click the down arrow next to the box and select the new protocol (Exhibit 4-45)
Exhibit 4-45. Selecting a different protocol based on %HRmax
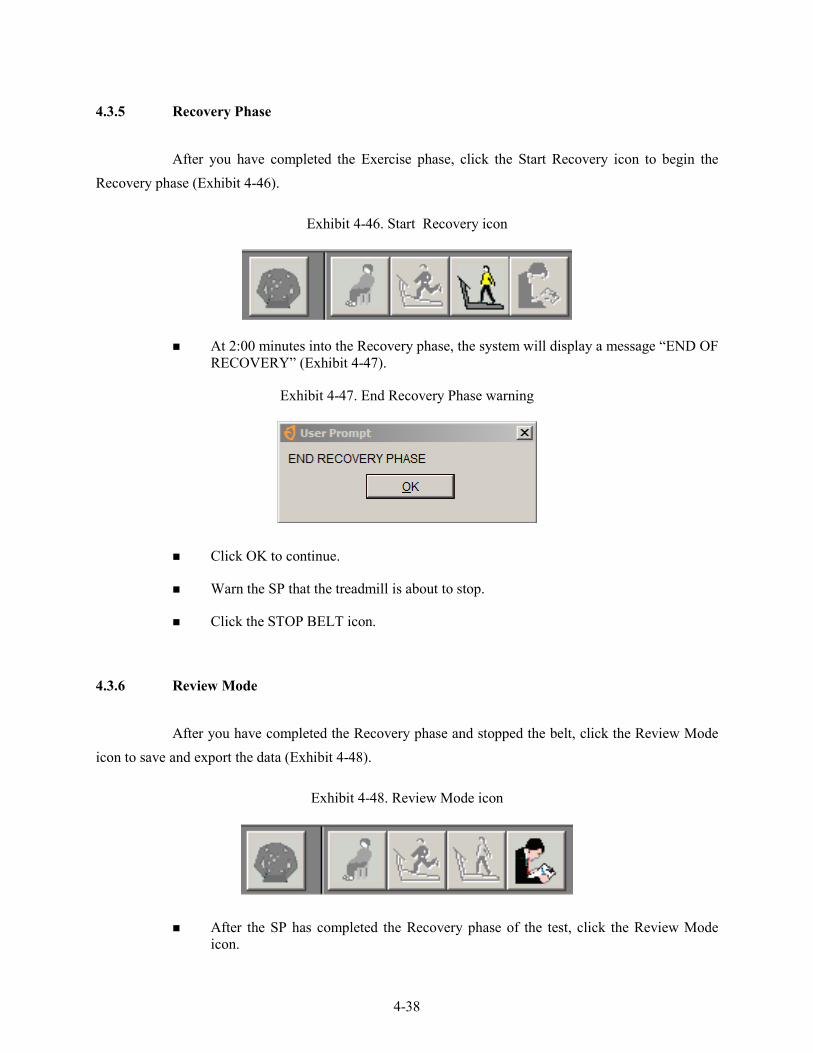
4-38
4.3.5 Recovery Phase
After you have completed the Exercise phase, click the Start Recovery icon to begin the Recovery phase (Exhibit 4-46).
Exhibit 4-46. Start Recovery icon
At 2:00 minutes into the Recovery phase, the system will display a message “END OF RECOVERY” (Exhibit 4-47).
Exhibit 4-47. End Recovery Phase warning
Click OK to continue.
Warn the SP that the treadmill is about to stop.
Click the STOP BELT icon.
4.3.6 Review Mode
After you have completed the Recovery phase and stopped the belt, click the Review Mode icon to save and export the data (Exhibit 4-48).
Exhibit 4-48. Review Mode icon
After the SP has completed the Recovery phase of the test, click the Review Mode icon.
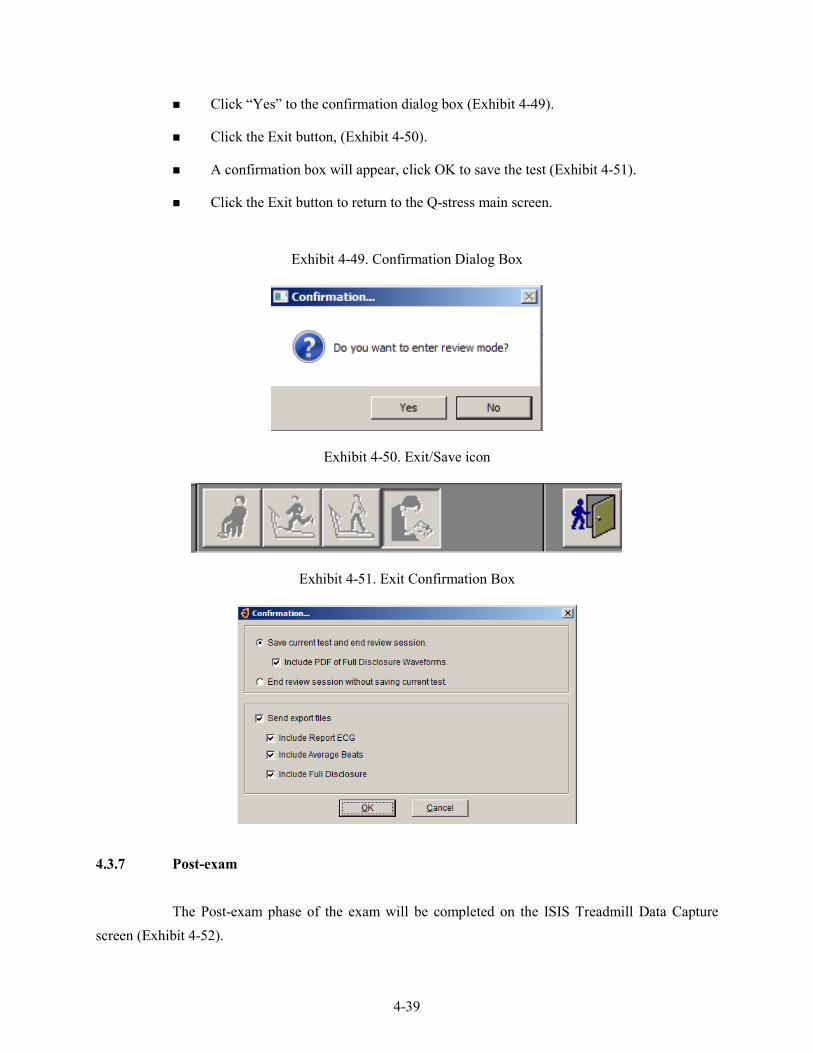
4-39
Click “Yes” to the confirmation dialog box (Exhibit 4-49).
Click the Exit button, (Exhibit 4-50).
A confirmation box will appear, click OK to save the test (Exhibit 4-51).
Click the Exit button to return to the Q-stress main screen.
Exhibit 4-49. Confirmation Dialog Box
Exhibit 4-50. Exit/Save icon
Exhibit 4-51. Exit Confirmation Box
4.3.7 Post-exam
The Post-exam phase of the exam will be completed on the ISIS Treadmill Data Capture screen (Exhibit 4-52).
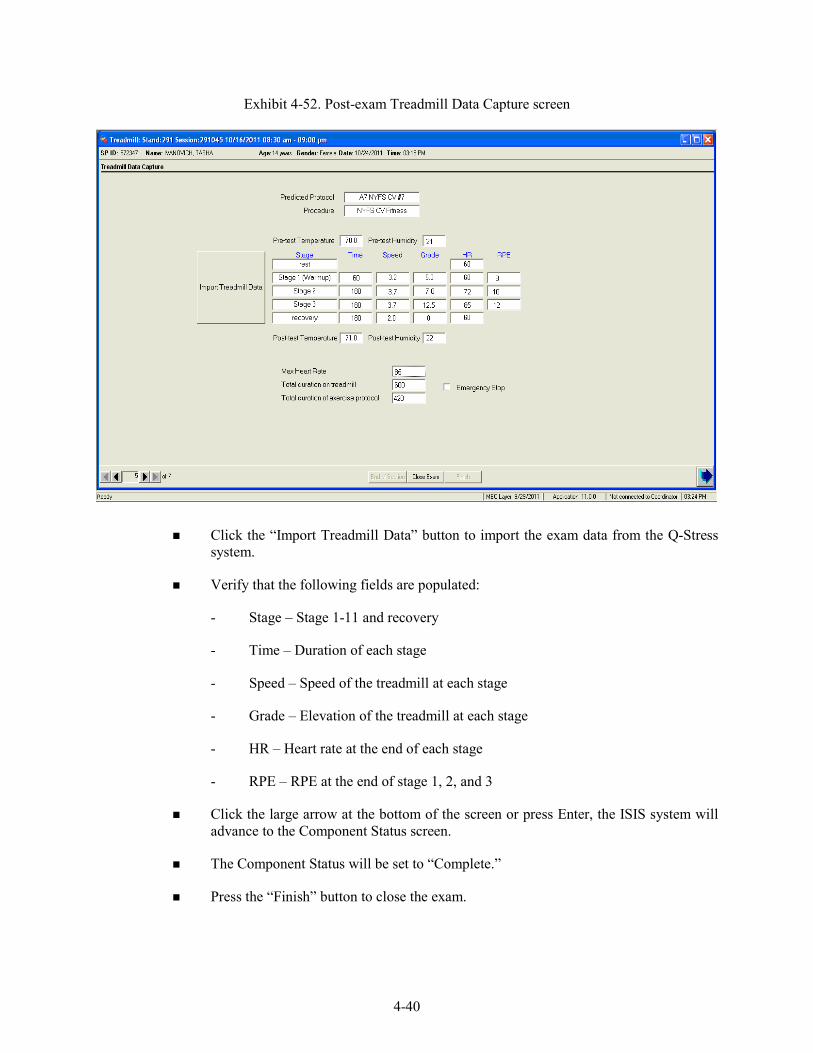
4-40
Exhibit 4-52. Post-exam Treadmill Data Capture screen
Click the “Import Treadmill Data” button to import the exam data from the Q-Stress system.
Verify that the following fields are populated:
-
-
-
-
-
-
Stage – Stage 1-11 and recovery
Time – Duration of each stage
Speed – Speed of the treadmill at each stage
Grade – Elevation of the treadmill at each stage
HR – Heart rate at the end of each stage
RPE – RPE at the end of stage 1, 2, and 3
Click the large arrow at the bottom of the screen or press Enter, the ISIS system will advance to the Component Status screen.
The Component Status will be set to “Complete.”
Press the “Finish” button to close the exam.

4-41
4.3.8 Priority 2 Stopping Criteria
Exhibit 4-53. Priority 2 stopping criteria
If the treadmill test is terminated early due to one or more of the Priority 2 Stopping Criteria, the SP will go to the Recovery Stage of the current protocol.
After importing the CV fitness data ISIS system will advance to the Priority 2 Stopping Criteria screen.
Select one or more of the appropriate stopping criteria.
You are required to select one or more of these.
If you do not select a criterion, the ISIS system will display a message when the Next button is selected: “You must select a stopping criterion.”
Click OK. Select one or more of the criteria and press the Next button to advance to the next screen.
4.3.9 Priority 1 Stopping Criteria
If the “Emergency Stop” box is checked, the ISIS system will go to Priority 1 Stopping Criteria screen. When the SP is stabilized and the situation is under control, check the appropriate reason(s) for terminating the test from the criteria on the screen.

4-42
The Priority 1 Stopping Criteria are:
-
-
-
-
-
-
-
-
-
-
-
-
-
-
Pain or pressure in the chest
Pain in neck, jaw, or teeth
Pain in the shoulder or between the shoulder blades
Pain radiating down one or both arms
Moderate/severe leg pain or cramping
Lightheadedness, dizziness
Severe shortness of breath/wheezing
Change in skin color to bluish/grayish
Severe headache
Subject appears confused or agitated
Nausea
Unstable gait
Visual problems
Other:
If “Other” is checked, the technician is required to enter a comment to specify the reason for other.
If you notice any or the above criteria or if the SP complains of any of the above, follow the procedures for “Emergency Stop” and terminate the test immediately.
If the “Emergency Stop” box is checked, the Priority 1 Stopping Criteria screen appears. You are required to select one or more criteria.
If you do not select a criterion and the Next button is pressed, the ISIS system will display a message: “You must select a stopping criterion.”
Click OK to this message. Select one or more criteria as appropriate and press the Next button to advance to the Component Status screen.
The Component status will be set to “Partial” with the comment “Priority 1 Stopping Criteria.”
Press the Finish button to close the exam.
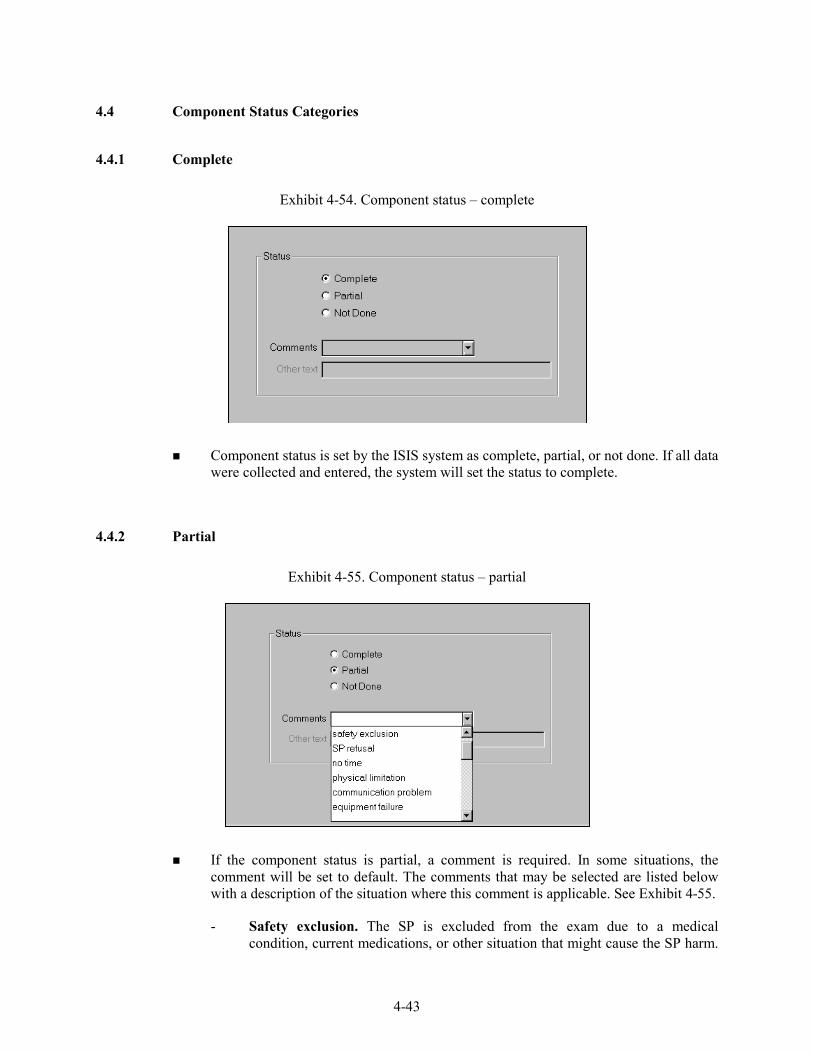
4-43
4.4 Component Status Categories
4.4.1 Complete
Exhibit 4-54. Component status – complete
Component status is set by the ISIS system as complete, partial, or not done. If all data were collected and entered, the system will set the status to complete.
4.4.2 Partial
Exhibit 4-55. Component status – partial
If the component status is partial, a comment is required. In some situations, the comment will be set to default. The comments that may be selected are listed below with a description of the situation where this comment is applicable. See Exhibit 4-55.
- Safety exclusion. The SP is excluded from the exam due to a medical condition, current medications, or other situation that might cause the SP harm.

4-44
The technician should not have to select this comment after the SP is in the CV Room because all the safety exclusion checks are completed prior to being assigned to this component. This would be set by the coordinator or physician applications.
-
-
-
-
-
-
-
-
-
-
-
SP refusal. The SP refused to do the exam.
No time. There was not sufficient time in the session to complete this exam.
Physical limitation. The SP has a physical limitation that would prevent him or her from doing the exam. The technician should not have to select this comment after the SP is in the CV Room because all the physical limitation checks are completed prior to being assigned to this component. This would be set as default by the coordinator or physician applications.
Equipment failure. The equipment malfunctioned making it impossible to complete the exam. This will not be selected because more specific information will be collected from the data acquisition screen.
Interrupted. The exam or session had to be interrupted due to an emergency in this room or other area in the MEC making it impossible to complete the exam.
Priority 1 stopping criteria. The treadmill test was stopped early due to one or more of these criteria.
Priority 2 stopping criteria. The treadmill test was stopped early due to one or more of these criteria. (Recovery Stages completed).
Protocol change. The protocol was increased or decreased.
Unable to calculate protocol. The ISIS system was unable to calculate the protocol because the data for height and weight for PAR Code data were not entered.
Other. Other situations that cause the SP to be excluded from this exam at some point during the exam should be noted.
If a comment is not selected from the drop-down menu, a message will be displayed: “Please select comments (Exhibit 4-56).
Exhibit 4-56. Component status - partial - required comments

4-45
4.4.3 Not Done
The comments for “Not Done” are the same as for “partial” (Exhibit 4-57)
Exhibit 4-57. Component status - not done
5-1
5. QUALITY CONTROL
5.1 Introduction to Quality Control
Quality control procedures ensure the collection and documentation of accurate and reliable data. The procedures were developed to reduce inter-examiner variability, reduce error, and ensure data quality. The quality control program for this component will take place in mobile centers and will consist of the following major elements:
Training
Monitoring and maintenance of equipment and supplies
Site visit observations by NCHS and Westat
5.2 Training
Training will be provided by NCHS personnel, Westat, and an independent expert consultant. This training process includes didactic presentations and practice session with volunteers. Ongoing training needs as identified by NCHS and Westat will be assessed and scheduled. Retraining sessions will be arranged by the Westat component specialist in coordination with the NCHS project officer and the independent consultant when major protocol changes are introduced, or when a lack of standardization is observed among the examiners.
5.3 Monitoring and Maintenance of Equipment and Supplies.
Routine monitoring and maintenance of the equipment is an essential quality control measure in order to ensure optimal operation. The equipment, room supplies, and room setup need to be checked on a regular basis. Some checks are completed daily and others need only be completed on a weekly basis or at the beginning of each stand. These checks include calibration checks, maintenance inspection of equipment and supplies, and preparation of the room and equipment for the session exams.
5-2
Each time you log on to the application, the system will remind you to do Quality Control (QC) checks if the checks have not been completed for that time period. The checks are to be completed daily, weekly, and/or every stand. If you do not have time to do the checks when you log on, you can bypass this message and complete the checks at a later time. However, this message will be displayed each time you log on until you have completed the checks for that time period. Once you have completed the checks and entered this in the system, the message box with the reminder will not be displayed again until the appropriate time period has passed.
The daily, weekly, and once-a-stand checks are listed in the following sections.
5.3.1 Daily
Confirm that the daily equipment checks are complete.
-
-
-
-
-
-
-
-
Turn the treadmill switch to On.
Check that there are no obstructions near the treadmill.
Confirm that the cable from the treadmill is securely connected to the back of the treadmill controller.
Confirm that the treadmill power cord is securely plugged into the power source.
Check that the treadmill belt is centered in the roller.
Visually inspect walking belt for hazards.
Check that all shoes are in the shoe rack.
Confirm that supplies (electrodes, alcohol, and abrasive cream) are stocked for today’s session.
5.3.2 Weekly
Complete all daily checks.
Check speed of treadmill, see Section 2.1.2.1 in Chapter 2
Check grade of treadmill, see Section 2.1.2.2 in Chapter 2.
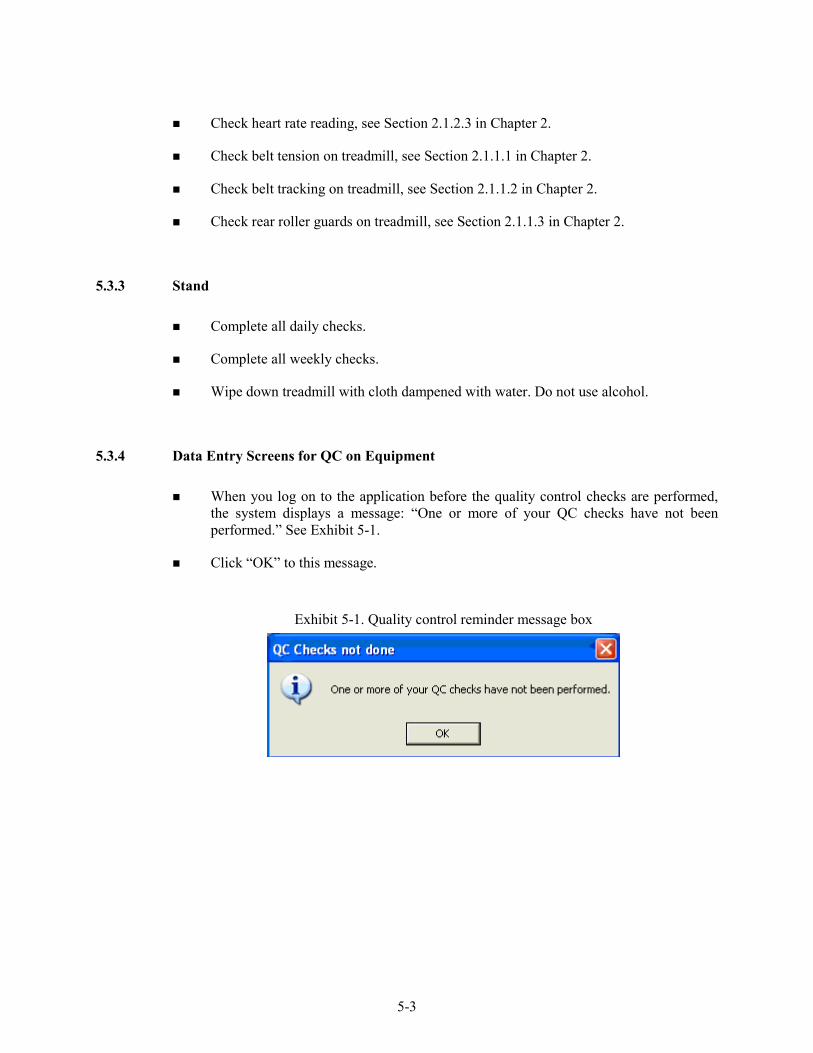
5-3
Check heart rate reading, see Section 2.1.2.3 in Chapter 2.
Check belt tension on treadmill, see Section 2.1.1.1 in Chapter 2.
Check belt tracking on treadmill, see Section 2.1.1.2 in Chapter 2.
Check rear roller guards on treadmill, see Section 2.1.1.3 in Chapter 2.
5.3.3 Stand
Complete all daily checks.
Complete all weekly checks.
Wipe down treadmill with cloth dampened with water. Do not use alcohol.
5.3.4 Data Entry Screens for QC on Equipment
When you log on to the application before the quality control checks are performed, the system displays a message: “One or more of your QC checks have not been performed.” See Exhibit 5-1.
Click “OK” to this message.
Exhibit 5-1. Quality control reminder message box
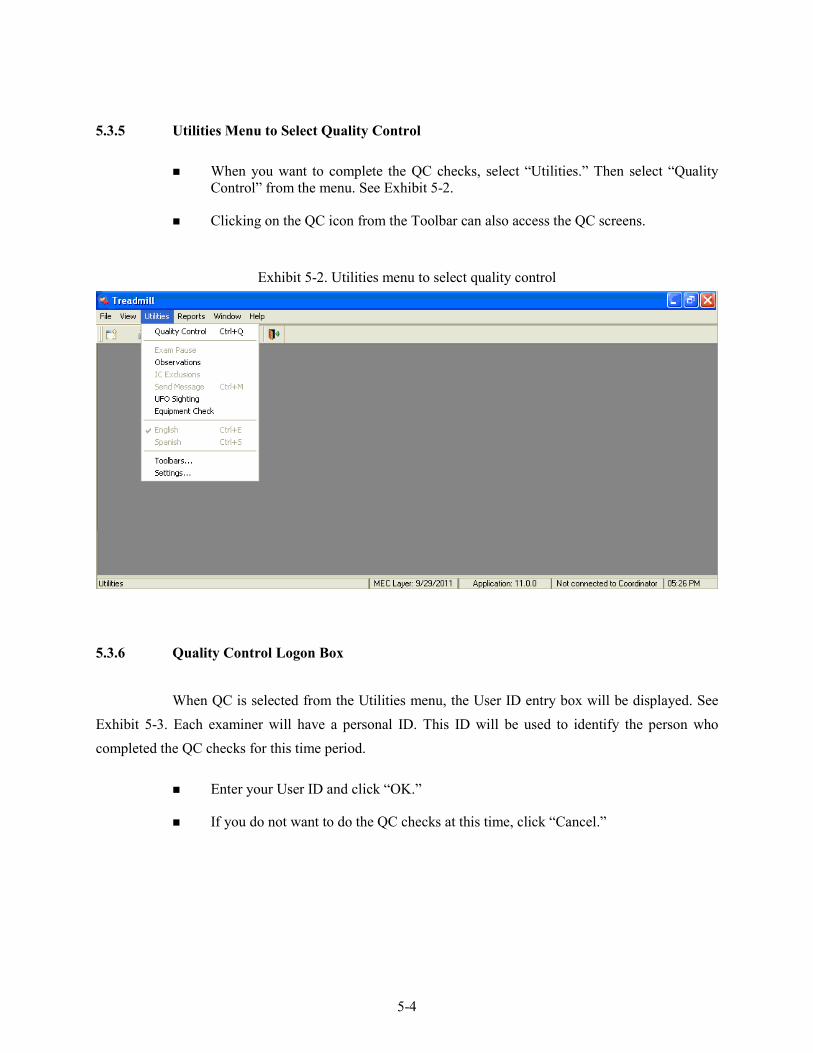
5-4
5.3.5 Utilities Menu to Select Quality Control
When you want to complete the QC checks, select “Utilities.” Then select “Quality Control” from the menu. See Exhibit 5-2.
Clicking on the QC icon from the Toolbar can also access the QC screens.
Exhibit 5-2. Utilities menu to select quality control
5.3.6 Quality Control Logon Box
When QC is selected from the Utilities menu, the User ID entry box will be displayed. See Exhibit 5-3. Each examiner will have a personal ID. This ID will be used to identify the person who completed the QC checks for this time period.
Enter your User ID and click “OK.”
If you do not want to do the QC checks at this time, click “Cancel.”
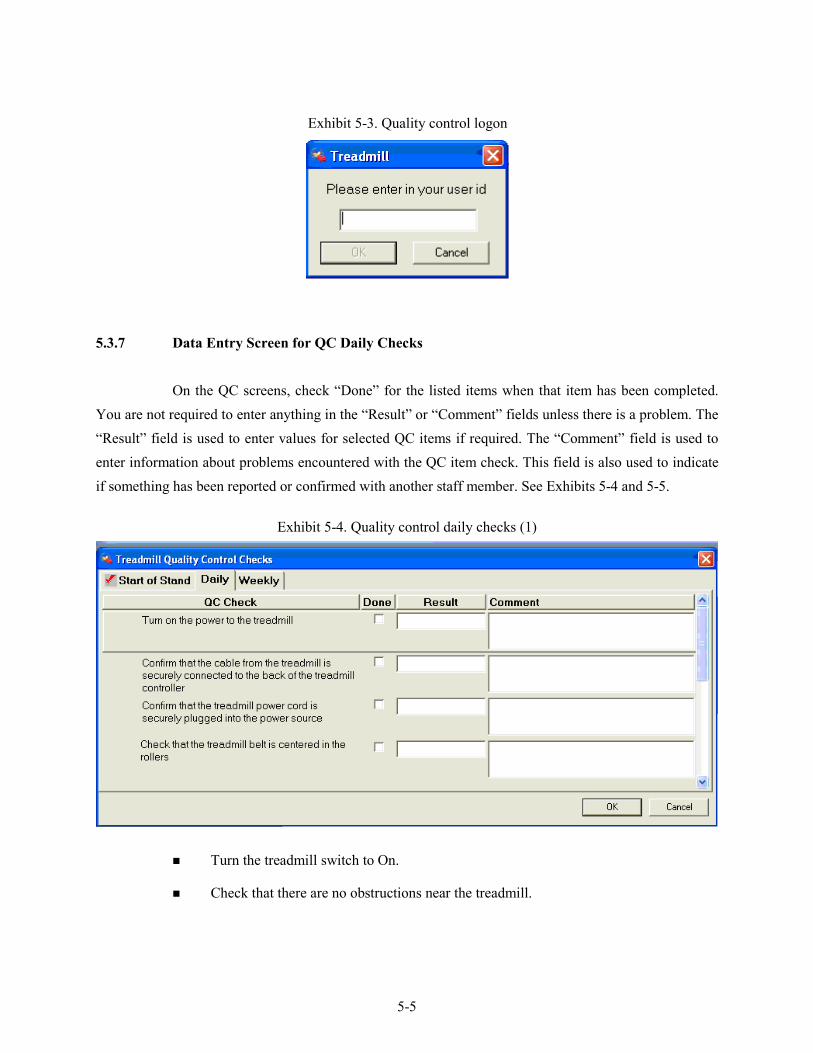
5-5
Exhibit 5-3. Quality control logon
5.3.7 Data Entry Screen for QC Daily Checks
On the QC screens, check “Done” for the listed items when that item has been completed. You are not required to enter anything in the “Result” or “Comment” fields unless there is a problem. The “Result” field is used to enter values for selected QC items if required. The “Comment” field is used to enter information about problems encountered with the QC item check. This field is also used to indicate if something has been reported or confirmed with another staff member. See Exhibits 5-4 and 5-5.
Exhibit 5-4. Quality control daily checks (1)
Turn the treadmill switch to On.
Check that there are no obstructions near the treadmill.
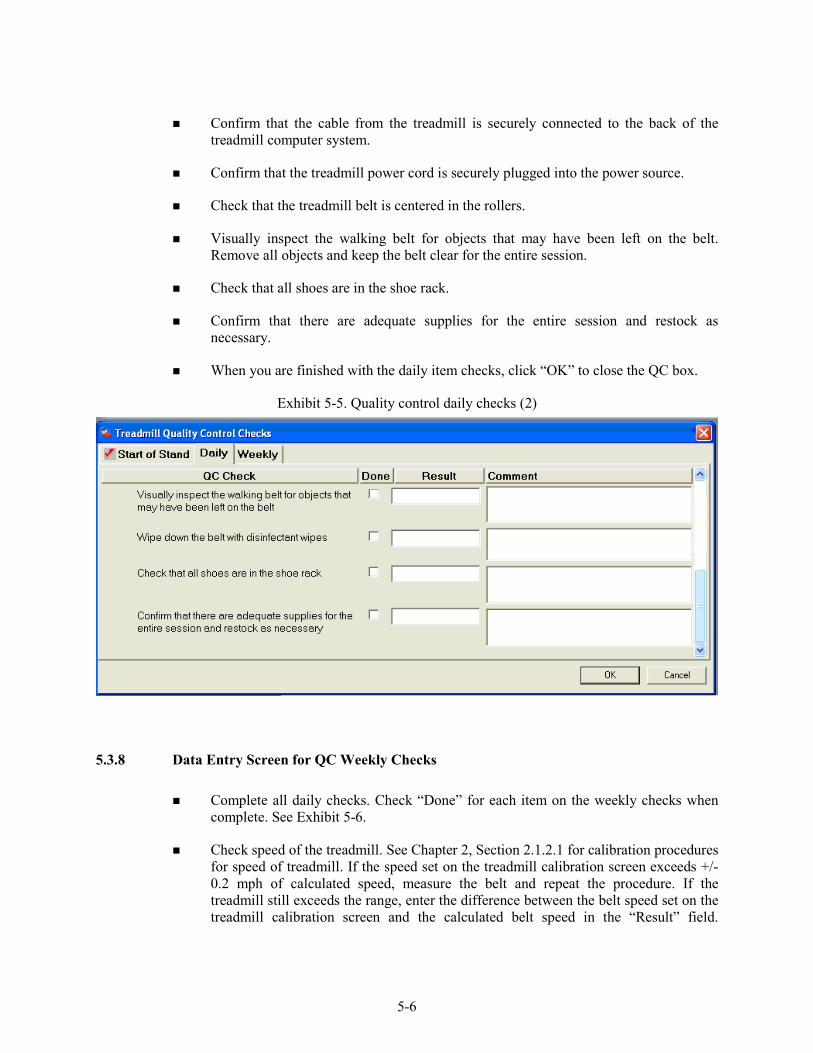
5-6
Confirm that the cable from the treadmill is securely connected to the back of the treadmill computer system.
Confirm that the treadmill power cord is securely plugged into the power source.
Check that the treadmill belt is centered in the rollers.
Visually inspect the walking belt for objects that may have been left on the belt. Remove all objects and keep the belt clear for the entire session.
Check that all shoes are in the shoe rack.
Confirm that there are adequate supplies for the entire session and restock as necessary.
When you are finished with the daily item checks, click “OK” to close the QC box.
Exhibit 5-5. Quality control daily checks (2)
5.3.8 Data Entry Screen for QC Weekly Checks
Complete all daily checks. Check “Done” for each item on the weekly checks when complete. See Exhibit 5-6.
Check speed of the treadmill. See Chapter 2, Section 2.1.2.1 for calibration procedures for speed of treadmill. If the speed set on the treadmill calibration screen exceeds +/- 0.2 mph of calculated speed, measure the belt and repeat the procedure. If the treadmill still exceeds the range, enter the difference between the belt speed set on the treadmill calibration screen and the calculated belt speed in the “Result” field.
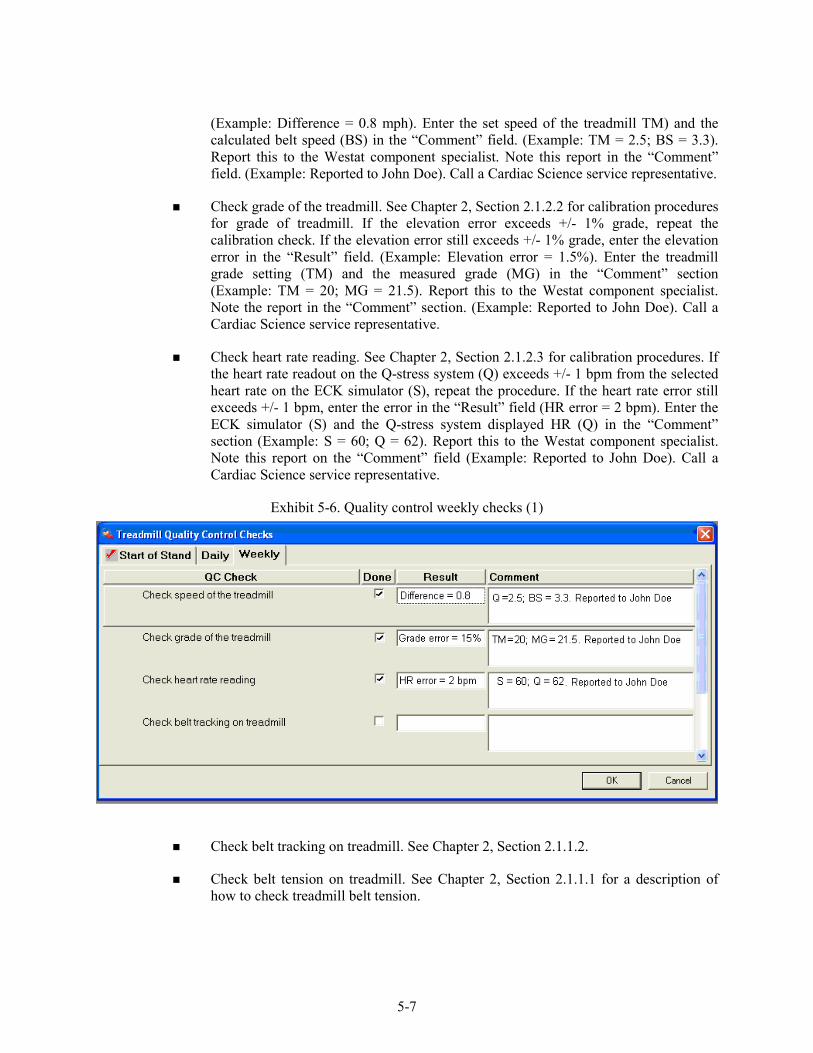
5-7
(Example: Difference = 0.8 mph). Enter the set speed of the treadmill TM) and the calculated belt speed (BS) in the “Comment” field. (Example: TM = 2.5; BS = 3.3). Report this to the Westat component specialist. Note this report in the “Comment” field. (Example: Reported to John Doe). Call a Cardiac Science service representative.
Check grade of the treadmill. See Chapter 2, Section 2.1.2.2 for calibration procedures for grade of treadmill. If the elevation error exceeds +/- 1% grade, repeat the calibration check. If the elevation error still exceeds +/- 1% grade, enter the elevation error in the “Result” field. (Example: Elevation error = 1.5%). Enter the treadmill grade setting (TM) and the measured grade (MG) in the “Comment” section (Example: TM = 20; MG = 21.5). Report this to the Westat component specialist. Note the report in the “Comment” section. (Example: Reported to John Doe). Call a Cardiac Science service representative.
Check heart rate reading. See Chapter 2, Section 2.1.2.3 for calibration procedures. If the heart rate readout on the Q-stress system (Q) exceeds +/- 1 bpm from the selected heart rate on the ECK simulator (S), repeat the procedure. If the heart rate error still exceeds +/- 1 bpm, enter the error in the “Result” field (HR error = 2 bpm). Enter the ECK simulator (S) and the Q-stress system displayed HR (Q) in the “Comment” section (Example: S = 60; Q = 62). Report this to the Westat component specialist. Note this report on the “Comment” field (Example: Reported to John Doe). Call a Cardiac Science service representative.
Exhibit 5-6. Quality control weekly checks (1)
Check belt tracking on treadmill. See Chapter 2, Section 2.1.1.2.
Check belt tension on treadmill. See Chapter 2, Section 2.1.1.1 for a description of how to check treadmill belt tension.

5-8
Check rear roller guards. See Chapter 2, Section 2.1.1.3 for a description of how to check rear roller guards.
Complete all daily checks.
Complete all weekly checks (Exhibit 5-7).
Wipe down treadmill with cloth dampened with water. Do not use alcohol.
When the “Start of Stand” checks are complete, click “OK” to close the QC checks (Exhibit 5-8).
Exhibit 5-7. Quality control weekly checks (2)
5.3.9 Data Entry Screen for QC Start of Stand Checks
Exhibit 5-8. Quality control “start of stand” checks
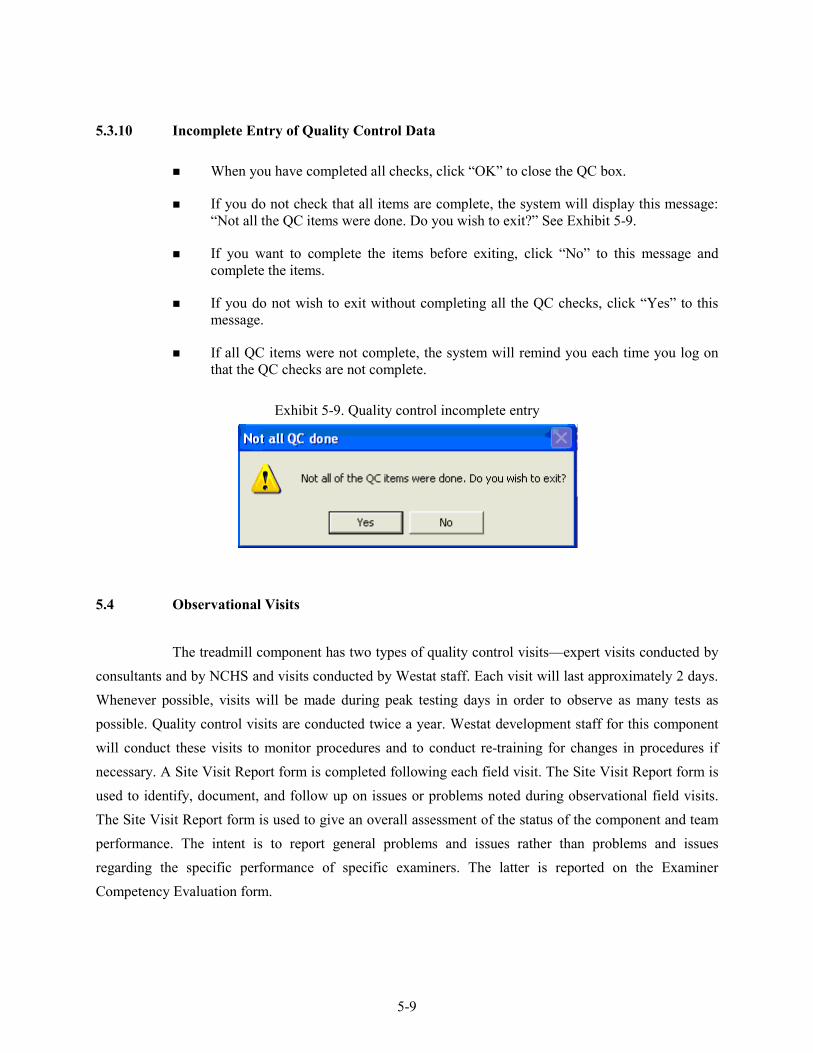
5-9
5.3.10 Incomplete Entry of Quality Control Data
When you have completed all checks, click “OK” to close the QC box.
If you do not check that all items are complete, the system will display this message: “Not all the QC items were done. Do you wish to exit?” See Exhibit 5-9.
If you want to complete the items before exiting, click “No” to this message and complete the items.
If you do not wish to exit without completing all the QC checks, click “Yes” to this message.
If all QC items were not complete, the system will remind you each time you log on that the QC checks are not complete.
Exhibit 5-9. Quality control incomplete entry
5.4 Observational Visits
The treadmill component has two types of quality control visits—expert visits conducted by consultants and by NCHS and visits conducted by Westat staff. Each visit will last approximately 2 days. Whenever possible, visits will be made during peak testing days in order to observe as many tests as possible. Quality control visits are conducted twice a year. Westat development staff for this component will conduct these visits to monitor procedures and to conduct re-training for changes in procedures if necessary. A Site Visit Report form is completed following each field visit. The Site Visit Report form is used to identify, document, and follow up on issues or problems noted during observational field visits. The Site Visit Report form is used to give an overall assessment of the status of the component and team performance. The intent is to report general problems and issues rather than problems and issues regarding the specific performance of specific examiners. The latter is reported on the Examiner Competency Evaluation form.
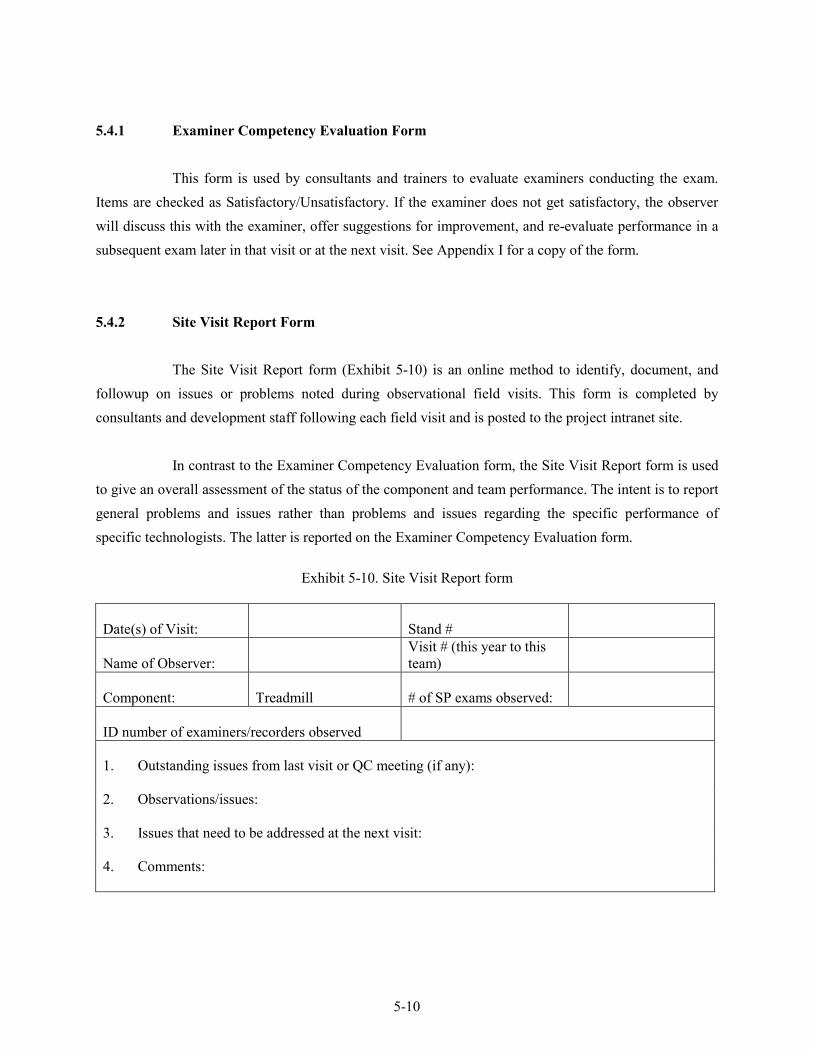
5-10
5.4.1 Examiner Competency Evaluation Form
This form is used by consultants and trainers to evaluate examiners conducting the exam. Items are checked as Satisfactory/Unsatisfactory. If the examiner does not get satisfactory, the observer will discuss this with the examiner, offer suggestions for improvement, and re-evaluate performance in a subsequent exam later in that visit or at the next visit. See Appendix I for a copy of the form.
5.4.2 Site Visit Report Form
The Site Visit Report form (Exhibit 5-10) is an online method to identify, document, and followup on issues or problems noted during observational field visits. This form is completed by consultants and development staff following each field visit and is posted to the project intranet site.
In contrast to the Examiner Competency Evaluation form, the Site Visit Report form is used to give an overall assessment of the status of the component and team performance. The intent is to report general problems and issues rather than problems and issues regarding the specific performance of specific technologists. The latter is reported on the Examiner Competency Evaluation form.
Exhibit 5-10. Site Visit Report form
Date(s) of Visit: Stand #
Name of Observer:
Visit # (this year to this team)
Component: Treadmill
# of SP exams observed:
ID number of examiners/recorders observed
1. Outstanding issues from last visit or QC meeting (if any): 2. Observations/issues: 3. Issues that need to be addressed at the next visit: 4. Comments:

APPENDIX A
SCRIPTS
(English and Spanish)
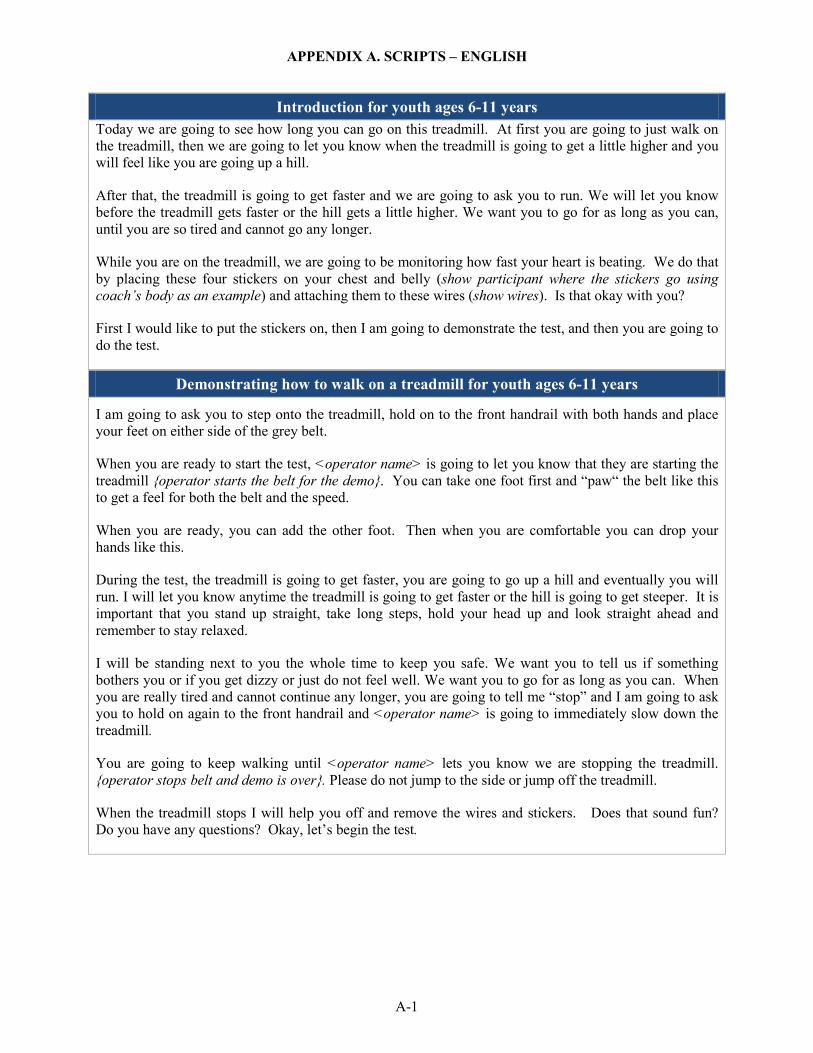
APPENDIX A. SCRIPTS – ENGLISH
A-1
Introduction for youth ages 6-11 years Today we are going to see how long you can go on this treadmill. At first you are going to just walk on the treadmill, then we are going to let you know when the treadmill is going to get a little higher and you will feel like you are going up a hill.
After that, the treadmill is going to get faster and we are going to ask you to run. We will let you know before the treadmill gets faster or the hill gets a little higher. We want you to go for as long as you can, until you are so tired and cannot go any longer.
While you are on the treadmill, we are going to be monitoring how fast your heart is beating. We do that by placing these four stickers on your chest and belly (show participant where the stickers go using coach’s body as an example) and attaching them to these wires (show wires). Is that okay with you?
First I would like to put the stickers on, then I am going to demonstrate the test, and then you are going to do the test.
Demonstrating how to walk on a treadmill for youth ages 6-11 years
I am going to ask you to step onto the treadmill, hold on to the front handrail with both hands and place your feet on either side of the grey belt.
When you are ready to start the test, <operator name> is going to let you know that they are starting the treadmill operator starts the belt for the demo. You can take one foot first and “paw“ the belt like this to get a feel for both the belt and the speed.
When you are ready, you can add the other foot. Then when you are comfortable you can drop your hands like this.
During the test, the treadmill is going to get faster, you are going to go up a hill and eventually you will run. I will let you know anytime the treadmill is going to get faster or the hill is going to get steeper. It is important that you stand up straight, take long steps, hold your head up and look straight ahead and remember to stay relaxed.
I will be standing next to you the whole time to keep you safe. We want you to tell us if something bothers you or if you get dizzy or just do not feel well. We want you to go for as long as you can. When you are really tired and cannot continue any longer, you are going to tell me “stop” and I am going to ask you to hold on again to the front handrail and <operator name> is going to immediately slow down the treadmill.
You are going to keep walking until <operator name> lets you know we are stopping the treadmill. operator stops belt and demo is over. Please do not jump to the side or jump off the treadmill.
When the treadmill stops I will help you off and remove the wires and stickers. Does that sound fun? Do you have any questions? Okay, let’s begin the test.
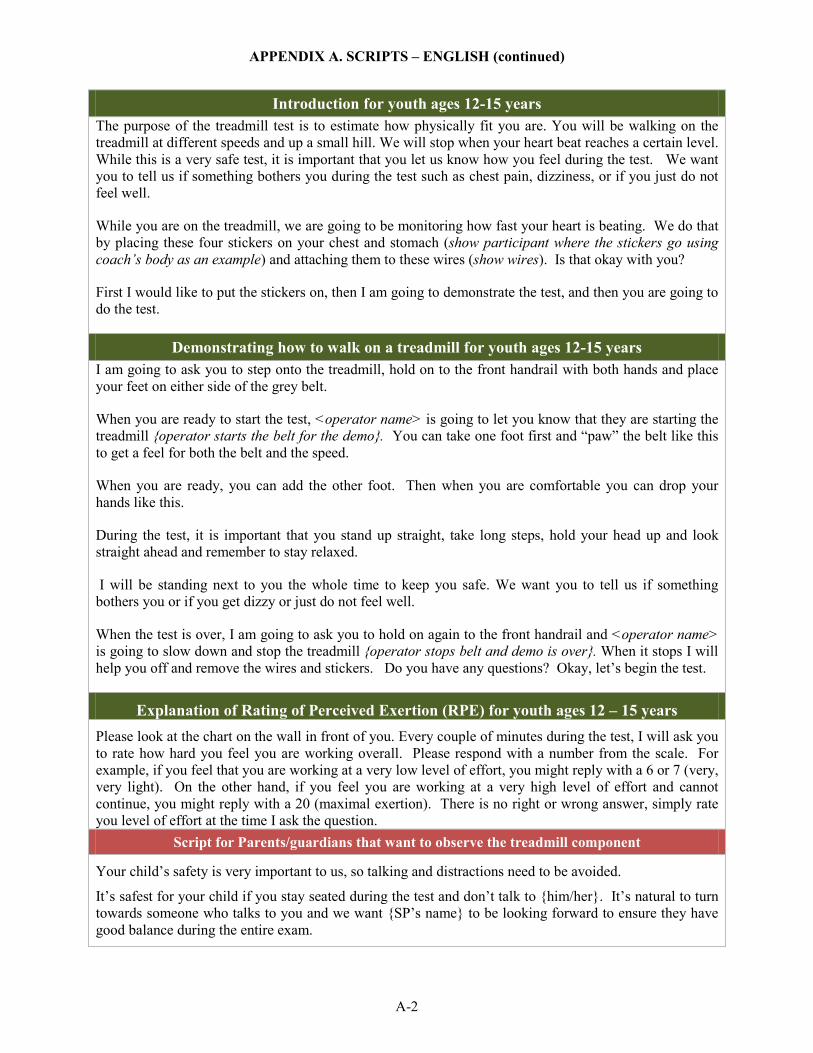
APPENDIX A. SCRIPTS – ENGLISH (continued)
A-2
Introduction for youth ages 12-15 years The purpose of the treadmill test is to estimate how physically fit you are. You will be walking on the treadmill at different speeds and up a small hill. We will stop when your heart beat reaches a certain level. While this is a very safe test, it is important that you let us know how you feel during the test. We want you to tell us if something bothers you during the test such as chest pain, dizziness, or if you just do not feel well.
While you are on the treadmill, we are going to be monitoring how fast your heart is beating. We do that by placing these four stickers on your chest and stomach (show participant where the stickers go using coach’s body as an example) and attaching them to these wires (show wires). Is that okay with you?
First I would like to put the stickers on, then I am going to demonstrate the test, and then you are going to do the test.
Demonstrating how to walk on a treadmill for youth ages 12-15 years I am going to ask you to step onto the treadmill, hold on to the front handrail with both hands and place your feet on either side of the grey belt.
When you are ready to start the test, <operator name> is going to let you know that they are starting the treadmill operator starts the belt for the demo. You can take one foot first and “paw” the belt like this to get a feel for both the belt and the speed.
When you are ready, you can add the other foot. Then when you are comfortable you can drop your hands like this.
During the test, it is important that you stand up straight, take long steps, hold your head up and look straight ahead and remember to stay relaxed.
I will be standing next to you the whole time to keep you safe. We want you to tell us if something bothers you or if you get dizzy or just do not feel well.
When the test is over, I am going to ask you to hold on again to the front handrail and <operator name> is going to slow down and stop the treadmill operator stops belt and demo is over. When it stops I will help you off and remove the wires and stickers. Do you have any questions? Okay, let’s begin the test.
Explanation of Rating of Perceived Exertion (RPE) for youth ages 12 – 15 years Please look at the chart on the wall in front of you. Every couple of minutes during the test, I will ask you to rate how hard you feel you are working overall. Please respond with a number from the scale. For example, if you feel that you are working at a very low level of effort, you might reply with a 6 or 7 (very, very light). On the other hand, if you feel you are working at a very high level of effort and cannot continue, you might reply with a 20 (maximal exertion). There is no right or wrong answer, simply rate you level of effort at the time I ask the question.
Script for Parents/guardians that want to observe the treadmill component
Your child’s safety is very important to us, so talking and distractions need to be avoided.
It’s safest for your child if you stay seated during the test and don’t talk to him/her. It’s natural to turn towards someone who talks to you and we want SP’s name to be looking forward to ensure they have good balance during the entire exam.
APPENDIX A. SCRIPTS – SPANISH
A-3
Introduction for youth ages 6-11 years (Spanish) Hoy vamos a ver cuánto tiempo puedes caminar en la máquina de caminar. Al principio, simplemente vas a caminar en la máquina de caminar, después te vamos a decir cuando la máquina esté un poco más inclinada y sentirás como si estuvieras subiendo una cuesta.
Después de eso, la máquina de caminar va a ir más rápido y te vamos a pedir que corras. Te avisaremos antes de que la máquina vaya más rápido o que la cuesta se haga más alta. Queremos que corras por tanto tiempo como puedas, hasta que estés tan cansado(a) que ya no puedes correr.
Mientras estás en la máquina de caminar, vamos a monitorear qué tan rápido te palpita el corazón. Esto se hace poniéndote cuatro etiquetas que se pegan sobre el pecho y el estómago (show participant where the stickers go using coach’s body as an example) y uniéndolas a estos cables (show wires). ¿Te parece bien?
Primero, quiero ponerte las etiquetas adhesivas, después te voy a hacer una demostración de la prueba y después tu harás la prueba.
Demonstrating how to walk on a treadmill for youth ages 6-11 years (Spanish)
Te voy a pedir que subas a la máquina de caminar, que agarres con las dos manos la barra del frente de la máquina y que pongas un pie a cada lado de la banda gris.
Cuando estés listo(a) para empezar la prueba, <operator name> te va a avisar que va a empezar la máquina operator starts the belt for the demo. Puedes pasar un pie suavemente sobre la banda, así, para que sientas cómo son la banda y la velocidad.
Cuando estés listo(a) puedes poner el otro pie. Después cuando estés cómodo(a) puedes soltar las manos, así.
Durante la prueba, la máquina empezará a ir más rápido, subirás la cuesta y finalmente correrás. Te avisaré cada vez que la máquina de caminar vaya más rápido o que la cuesta se haga más empinada. Es importante que te pares derecho(a), que des pasos largos, que mantengas la cabeza levantada mirando hacia adelante y que recuerdes mantenerte relajado(a).
Estaré parado(a) a tu lado todo el tiempo para mantenerte seguro(a). Queremos que nos digas si algo te molesta, si te mareas o simplemente si no te sientes bien. Queremos que continúes con la prueba tanto tiempo como puedas. Cuando estés muy cansado(a) y no puedas continuar, dime “pare” y yo te pediré que agarres nuevamente con las dos manos la barra del frente de la máquina y <operator name> va a reducir inmediatamente la velocidad de la máquina. Tú vas a seguir caminando hasta que <operator name> te avise que estamos parando la máquina. operator stops belt and demo is over. Por favor no saltes al lado ni saltes para bajar de la máquina.
Cuando la máquina se detenga, yo te ayudaré a bajar de la máquina y te quitaré los cables y las etiquetas adhesivas. ¿Te parece divertido? ¿Tienes alguna pregunta? Bien, entonces empecemos la prueba.
APPENDIX A. SCRIPTS – SPANISH (continued)
A-4
Introduction for youth ages 12-15 years (Spanish) El propósito de la prueba en la máquina de caminar es calcular cómo está tu estado físico. Caminarás en la máquina a diferentes velocidades y subirás una pequeña cuesta. Suspenderemos la prueba cuando la frecuencia cardíaca (los latidos del corazón) alcance cierto nivel. Aunque es una prueba muy segura, es importante que nos digas cómo te sientes durante la prueba. Queremos que nos digas si te molesta algo durante la prueba, tal como dolor en el pecho, mareo o simplemente si no te sientes bien.
Mientras estás en la máquina de caminar, vamos a monitorear qué tan rápido te palpita el corazón. Esto se hace poniéndote cuatro etiquetas que se pegan sobre el pecho y el estómago (show participant where the stickers go using coach’s body as an example) y uniéndolas a estos cables (show wires). ¿Te parece bien?
Primero, quiero ponerte las etiquetas adhesivas, después te voy a hacer una demostración de la prueba y después tu harás la prueba.
Demonstrating how to walk on a treadmill for youth ages 12-15 years (Spanish) Te voy a pedir que subas a la máquina de caminar, que agarres con las dos manos la barra del frente de la máquina y que pongas un pie a cada lado de la banda gris.
Cuando estés listo(a) para empezar la prueba, <operator name> te va a avisar que va a empezar la máquina operator starts the belt for the demo. Puedes pasar un pie suavemente sobre la banda, así, para que sientas cómo son la banda y la velocidad.
Cuando estés listo(a) puedes poner el otro pie. Después, cuando estés cómodo(a), puedes soltar las manos, así.
Durante la prueba, es importante que te pares derecho(a), que des pasos largos, que mantengas la cabeza levantada mirando hacia adelante y que recuerdes mantenerte relajado(a).
Estaré parado(a) a tu lado todo el tiempo para mantenerte seguro(a). Queremos que nos digas si algo te molesta, si te mareas o simplemente si no te sientes bien.
Cuando termine la prueba, te pediré nuevamente que agarres con las dos manos la barra del frente de la máquina y <operator name> va a reducir la velocidad y a detener la máquina operator stops belt and demo is over. Cuando se detenga, yo te ayudaré a bajar de la máquina y te quitaré los cables y las etiquetas adhesivas. ¿Tienes alguna pregunta? Bien, entonces empecemos la prueba.
Explanation of Rating of Perceived Exertion (RPE) for youth ages 12 – 15 years (Spanish)
Por favor mira el gráfico en la pared frente a ti. Cada dos minutos durante la prueba, te pediré que califiques qué tan fuerte sientes que estás trabajando en general. Por favor contesta con un número de la escala. Por ejemplo, si sientes que estás trabajando a un nivel de esfuerzo muy bajo, puedes responder un 6 o 7 (muy, muy liviano). Por otra parte, si sientes que estás trabajando a un nivel de esfuerzo muy alto y no puedes continuar, puedes contestar con un 20 (máximo esfuerzo). No hay respuesta correcta o errónea, simplemente califica tu nivel de esfuerzo en el momento en que yo te haga la pregunta.
Script for Parents/guardians that want to observe the treadmill component (Spanish)
La seguridad de su niño es muy importante para nosotros, por eso necesitamos evitar la conversación y las distracciones. Para la mayor seguridad de su niño necesitamos que usted permanezca sentado(a) durante la prueba y no le hable. Es natural mirar a la persona que nos habla y nosotros queremos que SP’s name esté mirando hacia adelante durante toda la prueba para asegurarnos de que tiene un buen equilibrio.
APPENDIX B
ENDURANCE PERFORMANCE
TEST PROTOCOLS
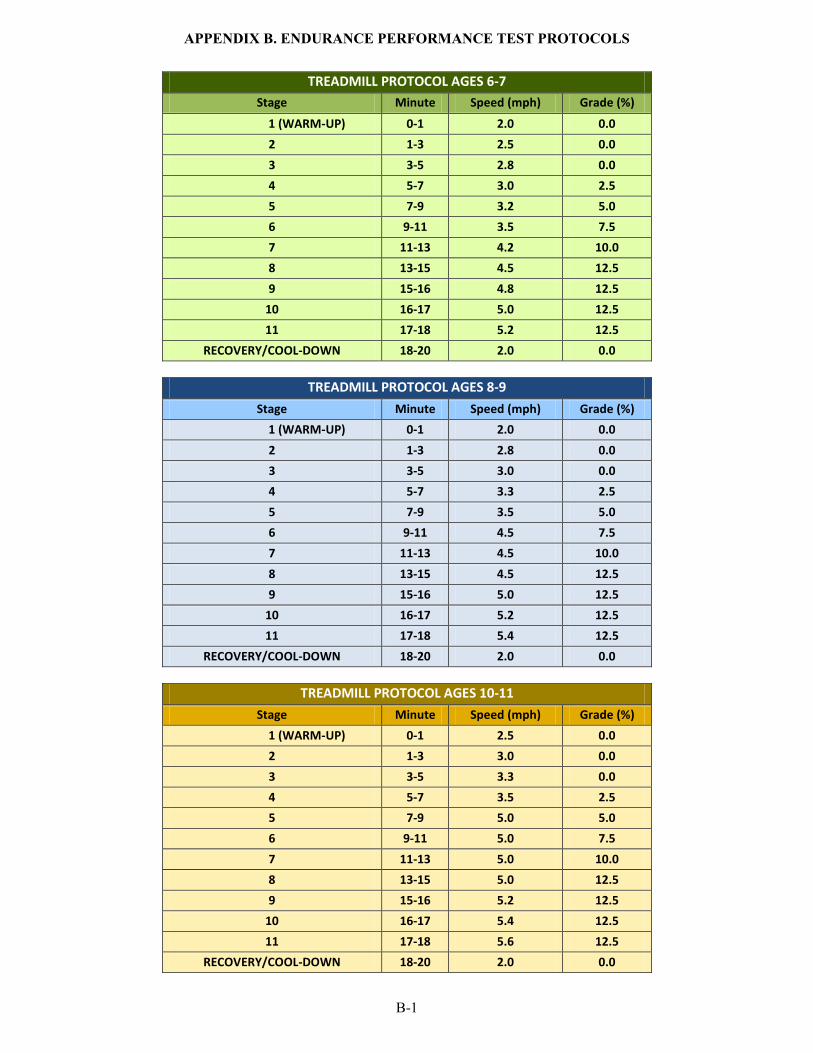
APPENDIX B. ENDURANCE PERFORMANCE TEST PROTOCOLS
B-1
TREADMILL PROTOCOL AGES 6-7 Stage Minute Speed (mph) Grade (%)
1 (WARM-UP) 0-1 2.0 0.0 2 1-3 2.5 0.0 3 3-5 2.8 0.0 4 5-7 3.0 2.5 5 7-9 3.2 5.0 6 9-11 3.5 7.5 7 11-13 4.2 10.0 8 13-15 4.5 12.5 9 15-16 4.8 12.5
10 16-17 5.0 12.5 11 17-18 5.2 12.5
RECOVERY/COOL-DOWN 18-20 2.0 0.0
TREADMILL PROTOCOL AGES 8-9Stage Minute Speed (mph) Grade (%)
1 (WARM-UP) 0-1 2.0 0.0 2 1-3 2.8 0.0 3 3-5 3.0 0.0 4 5-7 3.3 2.5 5 7-9 3.5 5.0 6 9-11 4.5 7.5 7 11-13 4.5 10.0 8 13-15 4.5 12.5 9 15-16 5.0 12.5
10 16-17 5.2 12.5 11 17-18 5.4 12.5
RECOVERY/COOL-DOWN 18-20 2.0 0.0
TREADMILL PROTOCOL AGES 10-11 Stage Minute Speed (mph) Grade (%)
1 (WARM-UP) 0-1 2.5 0.0 2 1-3 3.0 0.0 3 3-5 3.3 0.0 4 5-7 3.5 2.5 5 7-9 5.0 5.0 6 9-11 5.0 7.5 7 11-13 5.0 10.0 8 13-15 5.0 12.5 9 15-16 5.2 12.5
10 16-17 5.4 12.5 11 17-18 5.6 12.5
RECOVERY/COOL-DOWN 18-20 2.0 0.0
APPENDIX C
DETERMINATION OF
EXERCISE PROTOCOL
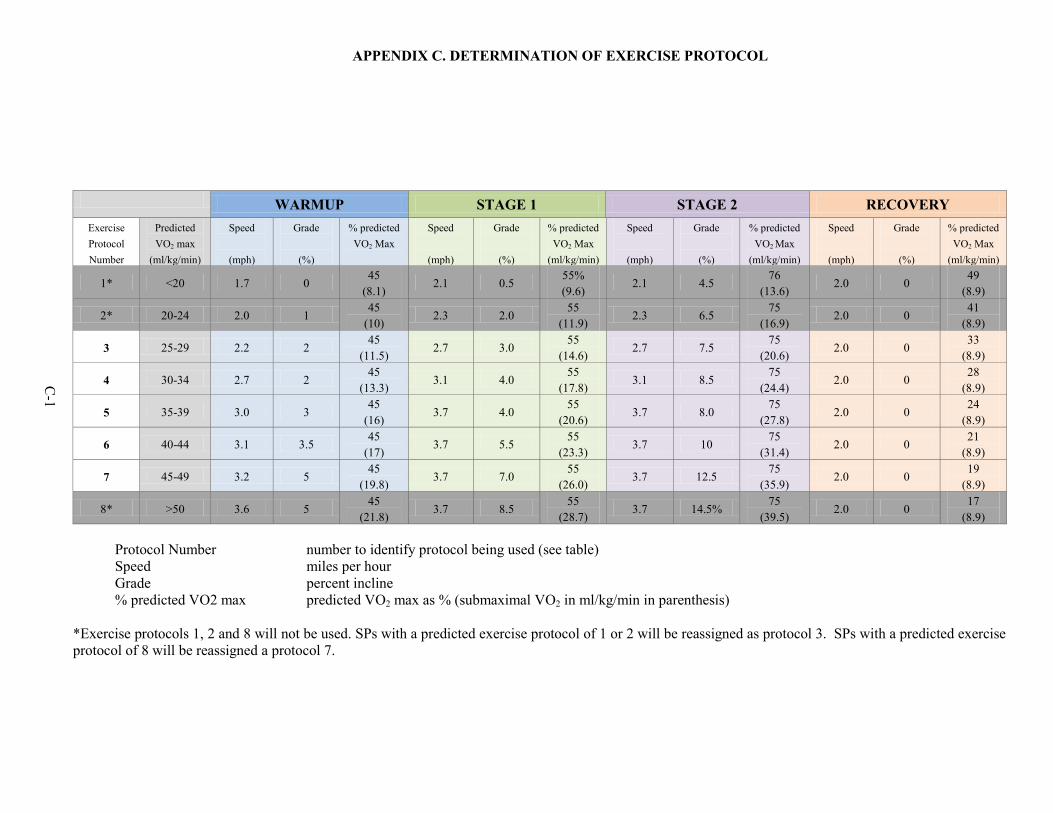
APPENDIX C. DETERMINATION OF EXERCISE PROTOCOL
C-1
WARMUP STAGE 1 STAGE 2 RECOVERY Exercise Protocol Number
Predicted VO2 max
(ml/kg/min)
Speed
(mph)
Grade
(%)
% predicted VO2 Max
Speed
(mph)
Grade
(%)
% predicted VO2 Max
(ml/kg/min)
Speed
(mph)
Grade
(%)
% predicted VO2 Max
(ml/kg/min)
Speed
(mph)
Grade
(%)
% predicted VO2 Max
(ml/kg/min)
1* <20 1.7 0 45
(8.1) 2.1 0.5
55% (9.6)
2.1 4.5 76
(13.6) 2.0 0
49 (8.9)
2* 20-24 2.0 1 45
(10) 2.3 2.0
55 (11.9)
2.3 6.5 75
(16.9) 2.0 0
41 (8.9)
3 25-29 2.2 2 45
(11.5) 2.7 3.0
55 (14.6)
2.7 7.5 75
(20.6) 2.0 0
33 (8.9)
4 30-34 2.7 2 45
(13.3) 3.1 4.0
55 (17.8)
3.1 8.5 75
(24.4) 2.0 0
28 (8.9)
5 35-39 3.0 3 45
(16) 3.7 4.0
55 (20.6)
3.7 8.0 75
(27.8) 2.0 0
24 (8.9)
6 40-44 3.1 3.5 45
(17) 3.7 5.5
55 (23.3)
3.7 10 75
(31.4) 2.0 0
21 (8.9)
7 45-49 3.2 5 45
(19.8) 3.7 7.0
55 (26.0)
3.7 12.5 75
(35.9) 2.0 0
19 (8.9)
8* >50 3.6 5 45
(21.8) 3.7 8.5
55 (28.7)
3.7 14.5% 75
(39.5) 2.0 0
17 (8.9)
Protocol Number number to identify protocol being used (see table) Speed miles per hour Grade percent incline % predicted VO2 max predicted VO2 max as % (submaximal VO2 in ml/kg/min in parenthesis)
*Exercise protocols 1, 2 and 8 will not be used. SPs with a predicted exercise protocol of 1 or 2 will be reassigned as protocol 3. SPs with a predicted exercise protocol of 8 will be reassigned a protocol 7.
APPENDIX D
PHYSICAL ACTIVITY
READINESS CODE
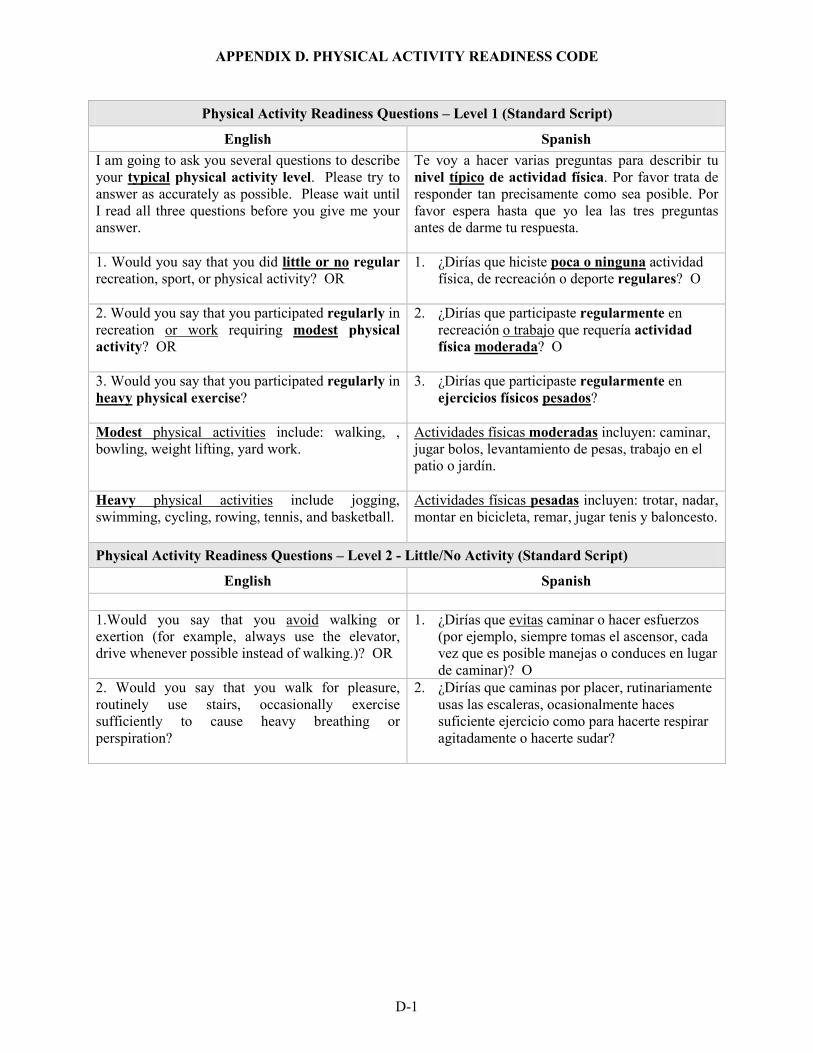
APPENDIX D. PHYSICAL ACTIVITY READINESS CODE
D-1
Physical Activity Readiness Questions – Level 1 (Standard Script)
English Spanish I am going to ask you several questions to describe your typical physical activity level. Please try to answer as accurately as possible. Please wait until I read all three questions before you give me your answer.
Te voy a hacer varias preguntas para describir tu nivel típico de actividad física. Por favor trata de responder tan precisamente como sea posible. Por favor espera hasta que yo lea las tres preguntas antes de darme tu respuesta.
1. Would you say that you did little or no regular recreation, sport, or physical activity? OR
1. ¿Dirías que hiciste poca o ninguna actividad física, de recreación o deporte regulares? O
2. Would you say that you participated regularly in recreation or work requiring modest physical activity? OR
2. ¿Dirías que participaste regularmente en recreación o trabajo que requería actividad física moderada? O
3. Would you say that you participated regularly in heavy physical exercise?
3. ¿Dirías que participaste regularmente en ejercicios físicos pesados?
Modest physical activities include: walking, , bowling, weight lifting, yard work.
Actividades físicas moderadas incluyen: caminar, jugar bolos, levantamiento de pesas, trabajo en el patio o jardín.
Heavy physical activities include jogging, swimming, cycling, rowing, tennis, and basketball.
Actividades físicas pesadas incluyen: trotar, nadar, montar en bicicleta, remar, jugar tenis y baloncesto.
Physical Activity Readiness Questions – Level 2 - Little/No Activity (Standard Script)
English Spanish
1.Would you say that you avoid walking or exertion (for example, always use the elevator, drive whenever possible instead of walking.)? OR
1. ¿Dirías que evitas caminar o hacer esfuerzos (por ejemplo, siempre tomas el ascensor, cada vez que es posible manejas o conduces en lugar de caminar)? O
2. Would you say that you walk for pleasure, routinely use stairs, occasionally exercise sufficiently to cause heavy breathing or perspiration?
2. ¿Dirías que caminas por placer, rutinariamente usas las escaleras, ocasionalmente haces suficiente ejercicio como para hacerte respirar agitadamente o hacerte sudar?
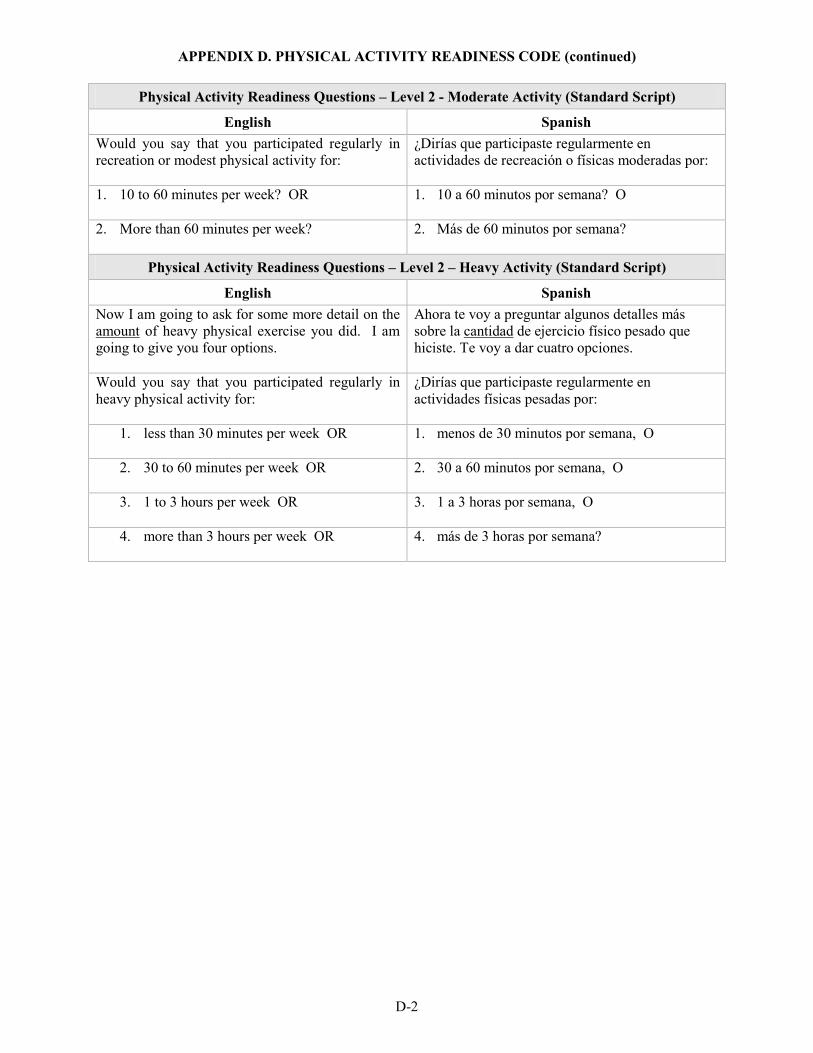
APPENDIX D. PHYSICAL ACTIVITY READINESS CODE (continued)
D-2
Physical Activity Readiness Questions – Level 2 - Moderate Activity (Standard Script)
English Spanish Would you say that you participated regularly in recreation or modest physical activity for:
¿Dirías que participaste regularmente en actividades de recreación o físicas moderadas por:
1. 10 to 60 minutes per week? OR
1. 10 a 60 minutos por semana? O
2. More than 60 minutes per week?
2. Más de 60 minutos por semana?
Physical Activity Readiness Questions – Level 2 – Heavy Activity (Standard Script)
English Spanish Now I am going to ask for some more detail on the amount of heavy physical exercise you did. I am going to give you four options.
Ahora te voy a preguntar algunos detalles más sobre la cantidad de ejercicio físico pesado que hiciste. Te voy a dar cuatro opciones.
Would you say that you participated regularly in heavy physical activity for:
¿Dirías que participaste regularmente en actividades físicas pesadas por:
1. less than 30 minutes per week OR
1. menos de 30 minutos por semana, O
2. 30 to 60 minutes per week OR
2. 30 a 60 minutos por semana, O
3. 1 to 3 hours per week OR
3. 1 a 3 horas por semana, O
4. more than 3 hours per week OR
4. más de 3 horas por semana?
APPENDIX E
REVIEW OF EDIT CRITERIA
FOR THE
CV FITNESS TEST
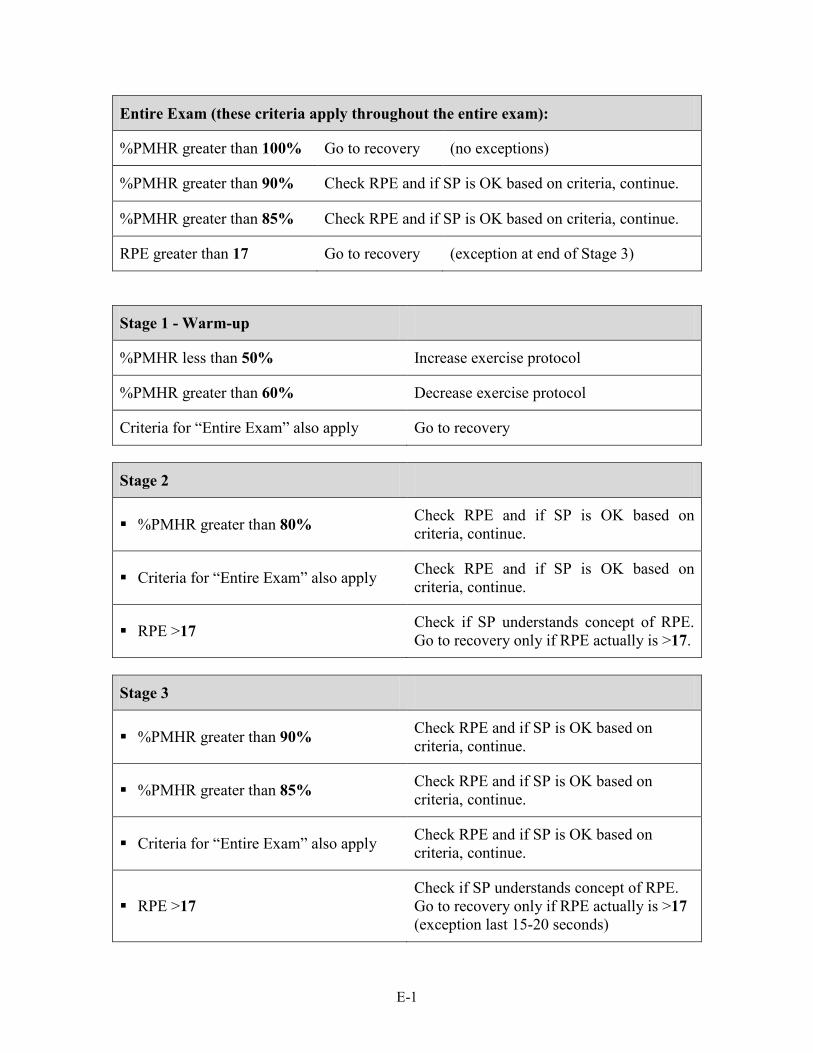
E-1
Entire Exam (these criteria apply throughout the entire exam):
%PMHR greater than 100% Go to recovery (no exceptions)
%PMHR greater than 90% Check RPE and if SP is OK based on criteria, continue.
%PMHR greater than 85% Check RPE and if SP is OK based on criteria, continue.
RPE greater than 17 Go to recovery (exception at end of Stage 3)
Stage 1 - Warm-up
%PMHR less than 50% Increase exercise protocol
%PMHR greater than 60% Decrease exercise protocol
Criteria for “Entire Exam” also apply Go to recovery
Stage 2
%PMHR greater than 80% Check RPE and if SP is OK based on criteria, continue.
Criteria for “Entire Exam” also apply Check RPE and if SP is OK based on criteria, continue.
RPE >17 Check if SP understands concept of RPE. Go to recovery only if RPE actually is >17.
Stage 3
%PMHR greater than 90% Check RPE and if SP is OK based on criteria, continue.
%PMHR greater than 85% Check RPE and if SP is OK based on criteria, continue.
Criteria for “Entire Exam” also apply Check RPE and if SP is OK based on criteria, continue.
RPE >17 Check if SP understands concept of RPE. Go to recovery only if RPE actually is >17 (exception last 15-20 seconds)

APPENDIX E. REVIEW OF EDIT CRITERIA (CV FITNESS TEST) (continued)
E-2
RPE Exception:
Stage 1 and Stage 2 No Exception, if RPE is greater than 17 in Stage 1 or Stage 2, go to Recovery BUT confirm that SP understands RPE. If RPE is still greater than 17, go to recovery.
Stage 3 EXCEPTION, if RPE >17 in Stage 3, ask SP if he/she can continue for another 15-20 seconds until the exam is completed.

APPENDIX F
CALCULATION OF PREDICTED
VO2 MAX

APPENDIX F. CALCULATION OF PREDICTED VO2 MAX
F-1
Predicted VO2 max =
56.363 + [1.921 * (PA-R)] – [0.381 * (Age at interview)] – [0.754 * (BMI)] + [10.987 * (F=0, M=1)]
PAR Code (as determined from Appendix E) Code 0-7
Use Age at Interview years
Measured body weight Kg.
Measured body height cm.
BMI (body mass index) = body weight (kg)/height squared (meters) (kg/m2 )
Use Table in Appendix C to determine protocol based on predicted VO2 max calculated above.

APPENDIX G
CALCULATION OF ESTIMATED
VO2 MAX

APPENDIX G. CALCULATION OF ESTIMATED VO2 MAX
G-1
Because the relation between heart rate and oxygen consumption is linear during exercise, we can estimate maximal oxygen consumption (V02 max) by measuring the heart rate response to known levels of submaximal work. This relation can be summed up by the equation for a line: y = mx + b, where y is heart rate, m is slope, x is V02, and b is the intercept. By rearranging these terms, we can derive the following equation:
Estimated VO2max = PMHR – Intercept Slope
Slope = n (Σ xi yi ) slope – (Σ xi ) (Σ yi) / n Σ xi 2 - (Σxi)2
PMHR = 220 - Age at interview Intercept = Y - b X
Y = mean of End of Stage 2 Heart Rate + End of Stage 3 Heart Rate X = mean of End of Stage 2 VO2 + End of Stage 3 VO2 b = slope
∑∑∑∑∑ −−= 22 )(/))(()( iiiiii xxnyxyxnSlope
n = 2 xi = x1, x2 x1 = submax VO2 at end of Stage 2 x2 = submax VO2 at end of Stage 3
yi = y1, y2 y1 = end of Stage 1 HR y2 = end of Stage 2 HR
Get end of stage V02 from Appendix H.
Example: A 15 year old boy was assigned Protocol 6. Looking in Appendix C, we see that the corresponding submax V02 values for these stages are 23.3 and 31.4 ml/kg/min respectively. His heart rate at the end of Stage 2 is 120 and at the end of Stage 3 is 140 beats/min respectively. Plugging these numbers into the formulas above, we then solve our equation.
Estimated V02 max = 205 – 62.47 = 57.7 ml/kg/min 2.469

APPENDIX H
REFERENCE RANGES
FOR VO2 MAX
APPENDIX H. REFERENCE RANGES FOR VO2 MAX
H-1
Males
Age Needs Improvement
Healthy Fitness Zone
12 ≤ 40.2 ≥40.3 13 ≤ 41.0 ≥41.1 14 ≤ 42.4 ≥42.5 15 ≤ 43.5 ≥43.6
Females
Age Needs Improvement
Healthy Fitness Zone
12 ≤ 40.0 ≥40.1 13 ≤ 39.6 ≥39.7 14 ≤ 39.3 ≥39.4 15 ≤ 39.0 ≥39.1
The level of cardiovascular fitness is categorized based on gender-age specific cut-points of estimated VO2 max. The reference standards used for adolescents and young adults 12-15 years are based on the criteria used in the FITNESSGRAM program.1.
Report of Findings statement: “Compared with other people of your age and sex, your cardiovascular fitness level is _____________ (in the Healthy Fitness Zone; Needs Improvement).”
Text for Needs Improvement: “Research shows that aerobic exercise is good for your heart and body composition, and helps to prevent health problems. Aerobic capacity can be improved by doing 60 minutes of physical activity a day. This includes activities that make you breathe hard, like playing active games, sports, hiking, dancing, or running.”

APPENDIX H. REFERENCE RANGES FOR VO2 MAX (continued)
H-2
References
1. Cooper Institute, FITNESSGRAM/ACTIVITYGRAM Test Administration Manual, Updated 4th Edition, Champaign, IL: Human Kinetics, 2010.
APPENDIX I
EXAMINER COMPETENCY EVALUATION
FORM
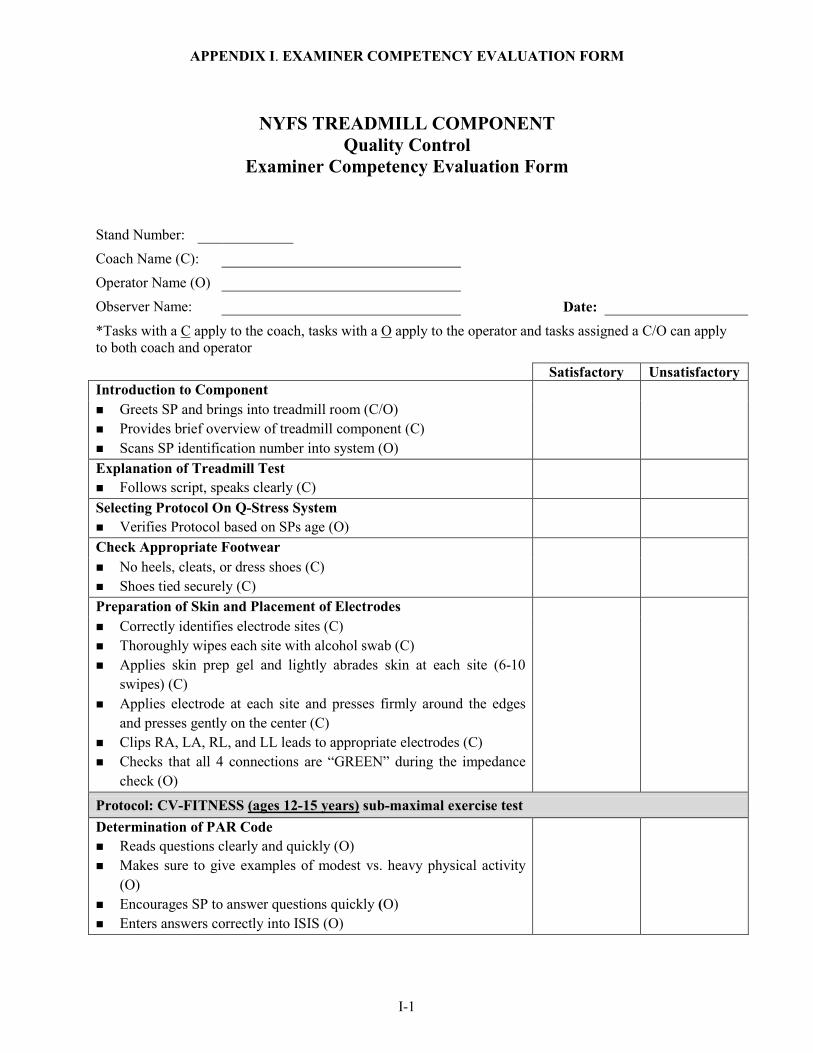
APPENDIX I. EXAMINER COMPETENCY EVALUATION FORM
I-1
NYFS TREADMILL COMPONENT Quality Control
Examiner Competency Evaluation Form
Stand Number: Coach Name (C): Operator Name (O) Observer Name: Date: *Tasks with a C apply to the coach, tasks with a O apply to the operator and tasks assigned a C/O can apply to both coach and operator Satisfactory Unsatisfactory Introduction to Component
Greets SP and brings into treadmill room (C/O) Provides brief overview of treadmill component (C) Scans SP identification number into system (O)
Explanation of Treadmill Test Follows script, speaks clearly (C)
Selecting Protocol On Q-Stress System Verifies Protocol based on SPs age (O)
Check Appropriate Footwear
No heels, cleats, or dress shoes (C) Shoes tied securely (C)
Preparation of Skin and Placement of Electrodes
Correctly identifies electrode sites (C) Thoroughly wipes each site with alcohol swab (C) Applies skin prep gel and lightly abrades skin at each site (6-10 swipes) (C) Applies electrode at each site and presses firmly around the edges and presses gently on the center (C) Clips RA, LA, RL, and LL leads to appropriate electrodes (C) Checks that all 4 connections are “GREEN” during the impedance check (O)
Protocol: CV-FITNESS (ages 12-15 years) sub-maximal exercise test Determination of PAR Code
Reads questions clearly and quickly (O) Makes sure to give examples of modest vs. heavy physical activity (O) Encourages SP to answer questions quickly (O) Enters answers correctly into ISIS (O)
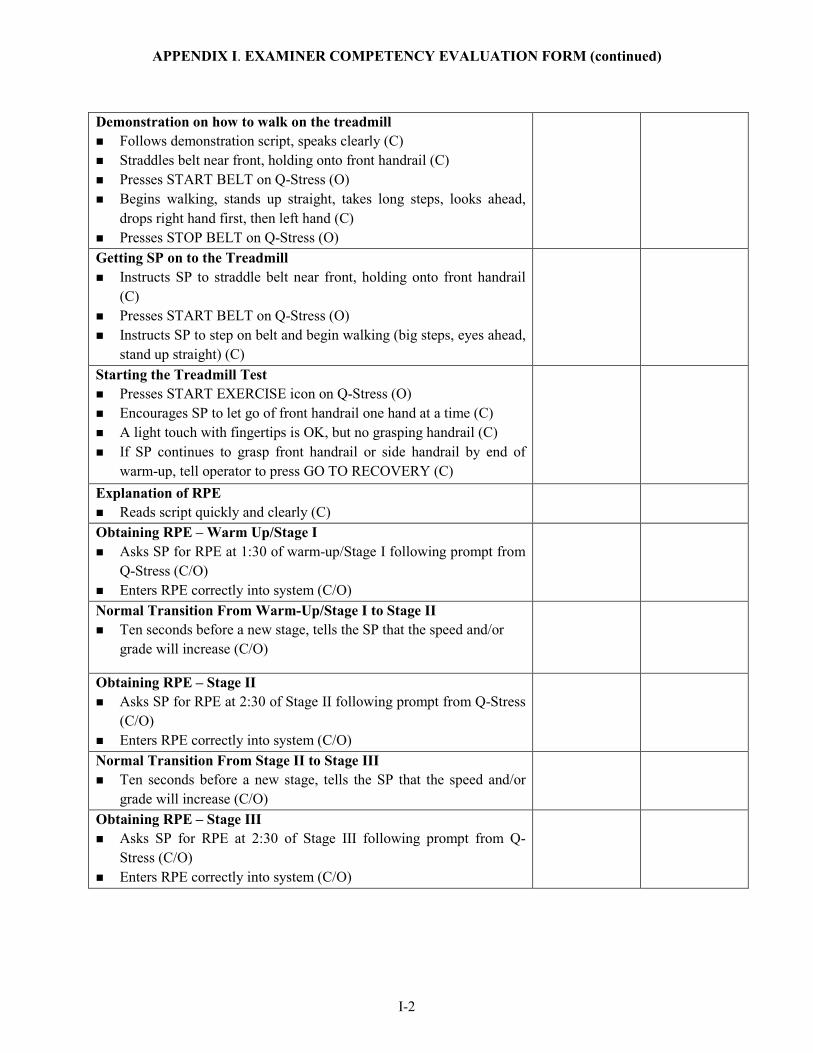
APPENDIX I. EXAMINER COMPETENCY EVALUATION FORM (continued)
I-2
Demonstration on how to walk on the treadmill
Follows demonstration script, speaks clearly (C) Straddles belt near front, holding onto front handrail (C) Presses START BELT on Q-Stress (O) Begins walking, stands up straight, takes long steps, looks ahead, drops right hand first, then left hand (C)
Presses STOP BELT on Q-Stress (O)
Getting SP on to the Treadmill
Instructs SP to straddle belt near front, holding onto front handrail (C) Presses START BELT on Q-Stress (O) Instructs SP to step on belt and begin walking (big steps, eyes ahead, stand up straight) (C)
Starting the Treadmill Test
Presses START EXERCISE icon on Q-Stress (O) Encourages SP to let go of front handrail one hand at a time (C) A light touch with fingertips is OK, but no grasping handrail (C) If SP continues to grasp front handrail or side handrail by end of warm-up, tell operator to press GO TO RECOVERY (C)
Explanation of RPE Reads script quickly and clearly (C)
Obtaining RPE – Warm Up/Stage I
Asks SP for RPE at 1:30 of warm-up/Stage I following prompt from Q-Stress (C/O) Enters RPE correctly into system (C/O)
Normal Transition From Warm-Up/Stage I to Stage II Ten seconds before a new stage, tells the SP that the speed and/or
grade will increase (C/O)
Obtaining RPE – Stage II
Asks SP for RPE at 2:30 of Stage II following prompt from Q-Stress (C/O) Enters RPE correctly into system (C/O)
Normal Transition From Stage II to Stage III Ten seconds before a new stage, tells the SP that the speed and/or
grade will increase (C/O)
Obtaining RPE – Stage III
Asks SP for RPE at 2:30 of Stage III following prompt from Q-Stress (C/O) Enters RPE correctly into system (C/O)
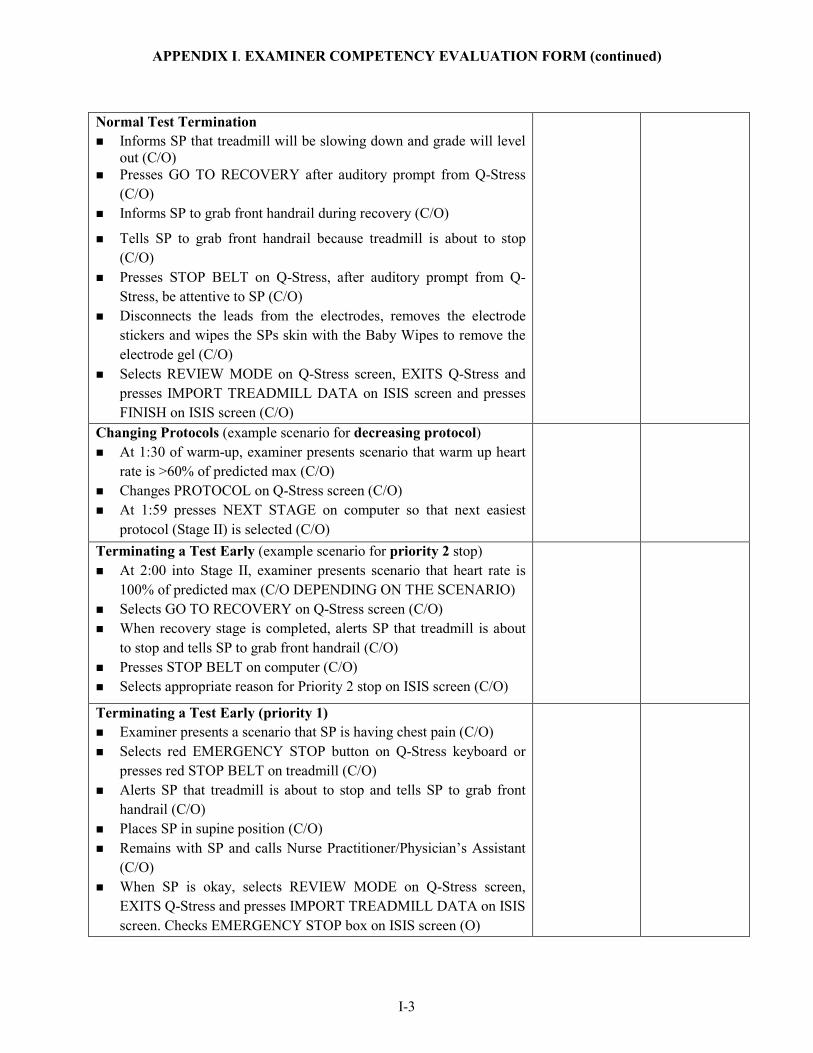
APPENDIX I. EXAMINER COMPETENCY EVALUATION FORM (continued)
I-3
Normal Test Termination
Informs SP that treadmill will be slowing down and grade will level out (C/O) Presses GO TO RECOVERY after auditory prompt from Q-Stress (C/O) Informs SP to grab front handrail during recovery (C/O)
Tells SP to grab front handrail because treadmill is about to stop (C/O) Presses STOP BELT on Q-Stress, after auditory prompt from Q-Stress, be attentive to SP (C/O) Disconnects the leads from the electrodes, removes the electrode stickers and wipes the SPs skin with the Baby Wipes to remove the electrode gel (C/O) Selects REVIEW MODE on Q-Stress screen, EXITS Q-Stress and presses IMPORT TREADMILL DATA on ISIS screen and presses FINISH on ISIS screen (C/O)
Changing Protocols (example scenario for decreasing protocol)
At 1:30 of warm-up, examiner presents scenario that warm up heart rate is >60% of predicted max (C/O) Changes PROTOCOL on Q-Stress screen (C/O) At 1:59 presses NEXT STAGE on computer so that next easiest protocol (Stage II) is selected (C/O)
Terminating a Test Early (example scenario for priority 2 stop)
At 2:00 into Stage II, examiner presents scenario that heart rate is 100% of predicted max (C/O DEPENDING ON THE SCENARIO) Selects GO TO RECOVERY on Q-Stress screen (C/O) When recovery stage is completed, alerts SP that treadmill is about to stop and tells SP to grab front handrail (C/O) Presses STOP BELT on computer (C/O) Selects appropriate reason for Priority 2 stop on ISIS screen (C/O)
Terminating a Test Early (priority 1)
Examiner presents a scenario that SP is having chest pain (C/O) Selects red EMERGENCY STOP button on Q-Stress keyboard or presses red STOP BELT on treadmill (C/O) Alerts SP that treadmill is about to stop and tells SP to grab front handrail (C/O) Places SP in supine position (C/O)
Remains with SP and calls Nurse Practitioner/Physician’s Assistant (C/O) When SP is okay, selects REVIEW MODE on Q-Stress screen, EXITS Q-Stress and presses IMPORT TREADMILL DATA on ISIS screen. Checks EMERGENCY STOP box on ISIS screen (O)
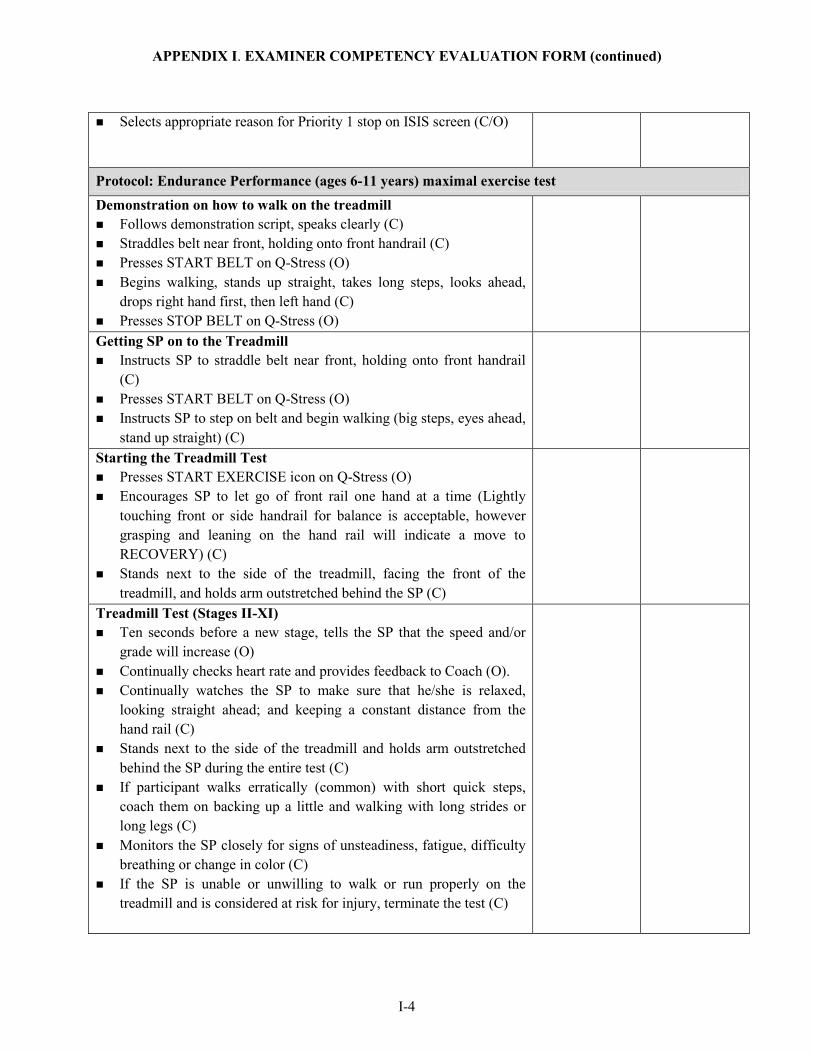
APPENDIX I. EXAMINER COMPETENCY EVALUATION FORM (continued)
I-4
Selects appropriate reason for Priority 1 stop on ISIS screen (C/O)
Protocol: Endurance Performance (ages 6-11 years) maximal exercise test Demonstration on how to walk on the treadmill
Follows demonstration script, speaks clearly (C) Straddles belt near front, holding onto front handrail (C) Presses START BELT on Q-Stress (O) Begins walking, stands up straight, takes long steps, looks ahead, drops right hand first, then left hand (C) Presses STOP BELT on Q-Stress (O)
Getting SP on to the Treadmill
Instructs SP to straddle belt near front, holding onto front handrail (C) Presses START BELT on Q-Stress (O) Instructs SP to step on belt and begin walking (big steps, eyes ahead, stand up straight) (C)
Starting the Treadmill Test
Presses START EXERCISE icon on Q-Stress (O) Encourages SP to let go of front rail one hand at a time (Lightly touching front or side handrail for balance is acceptable, however grasping and leaning on the hand rail will indicate a move to RECOVERY) (C) Stands next to the side of the treadmill, facing the front of the treadmill, and holds arm outstretched behind the SP (C)
Treadmill Test (Stages II-XI)
Ten seconds before a new stage, tells the SP that the speed and/or grade will increase (O) Continually checks heart rate and provides feedback to Coach (O). Continually watches the SP to make sure that he/she is relaxed, looking straight ahead; and keeping a constant distance from the hand rail (C)
Stands next to the side of the treadmill and holds arm outstretched behind the SP during the entire test (C) If participant walks erratically (common) with short quick steps, coach them on backing up a little and walking with long strides or long legs (C) Monitors the SP closely for signs of unsteadiness, fatigue, difficulty breathing or change in color (C) If the SP is unable or unwilling to walk or run properly on the treadmill and is considered at risk for injury, terminate the test (C)
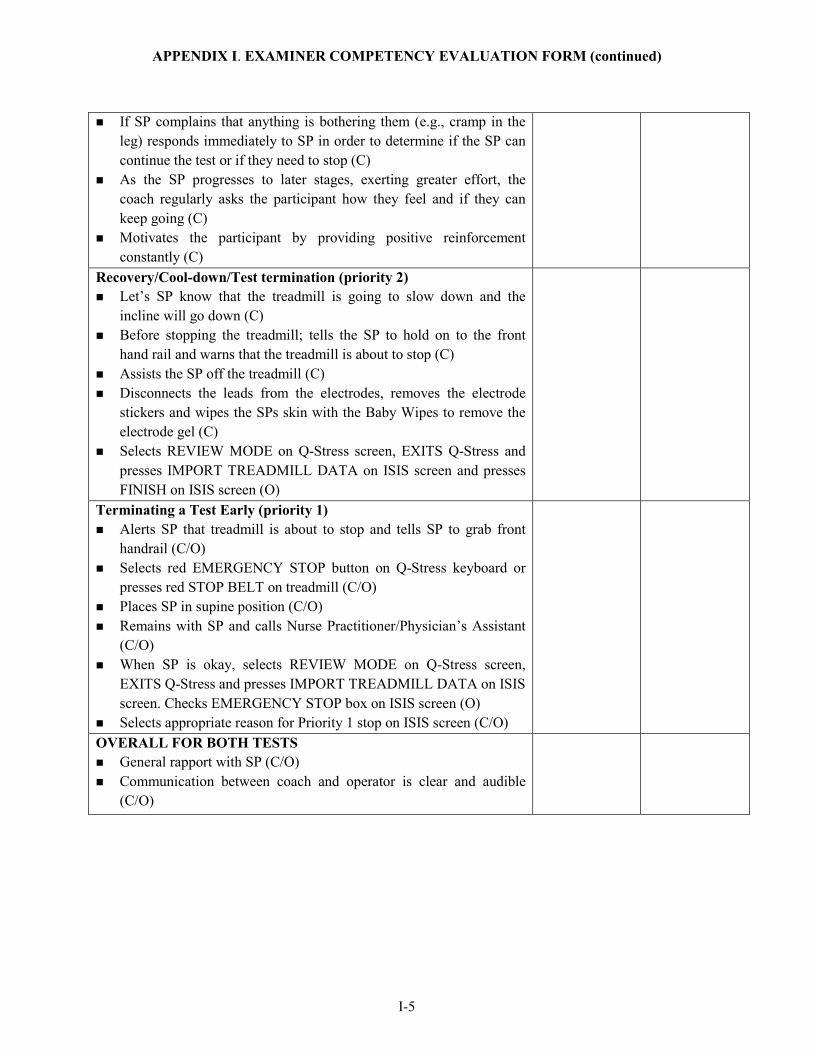
APPENDIX I. EXAMINER COMPETENCY EVALUATION FORM (continued)
I-5
If SP complains that anything is bothering them (e.g., cramp in the leg) responds immediately to SP in order to determine if the SP can continue the test or if they need to stop (C)
As the SP progresses to later stages, exerting greater effort, the coach regularly asks the participant how they feel and if they can keep going (C) Motivates the participant by providing positive reinforcement constantly (C)
Recovery/Cool-down/Test termination (priority 2)
Let’s SP know that the treadmill is going to slow down and the incline will go down (C) Before stopping the treadmill; tells the SP to hold on to the front hand rail and warns that the treadmill is about to stop (C) Assists the SP off the treadmill (C) Disconnects the leads from the electrodes, removes the electrode stickers and wipes the SPs skin with the Baby Wipes to remove the electrode gel (C) Selects REVIEW MODE on Q-Stress screen, EXITS Q-Stress and presses IMPORT TREADMILL DATA on ISIS screen and presses FINISH on ISIS screen (O)
Terminating a Test Early (priority 1)
Alerts SP that treadmill is about to stop and tells SP to grab front handrail (C/O) Selects red EMERGENCY STOP button on Q-Stress keyboard or presses red STOP BELT on treadmill (C/O) Places SP in supine position (C/O) Remains with SP and calls Nurse Practitioner/Physician’s Assistant (C/O) When SP is okay, selects REVIEW MODE on Q-Stress screen, EXITS Q-Stress and presses IMPORT TREADMILL DATA on ISIS screen. Checks EMERGENCY STOP box on ISIS screen (O)
Selects appropriate reason for Priority 1 stop on ISIS screen (C/O)
OVERALL FOR BOTH TESTS
General rapport with SP (C/O) Communication between coach and operator is clear and audible (C/O)

APPENDIX I. EXAMINER COMPETENCY EVALUATION FORM (continued)
I-6
Examiner Comments: My signature below confirms that NCHS/WESTAT staff has reviewed this completed document with me, and made me aware of any and all treadmill component procedures that I need to improve upon.
____________________________________________ ___________________ Signature Date