navigating your financial responsibilities - aurora … your financial responsibilities . ... “my...
TRANSCRIPT

1
Navigating Your Financial Responsibilities
Logging on to WebAdvisor
Understanding your Financial Aid
Understanding your Bill
Paying your Bill
Setting Up an Authorized User

2
A: Logging on to WebAdvisor
Step A1: Click on “WebAdvisor” on the AU
home page at www.aurora.edu.
Step A2: Click on
“Log In.”
Step A3: Enter username and
password (provided to the student today for email, etc.) and click
“Submit.”

3
B: FERPA
Step A4: Click on “Students” menu.
Step B1: Log on to WebAdvisor. Click on “FERPA Release
Information” to view needed items.
Step B2: Select which form you would like to fill out. FERPA
Online Form or FERPA PDF File.
4
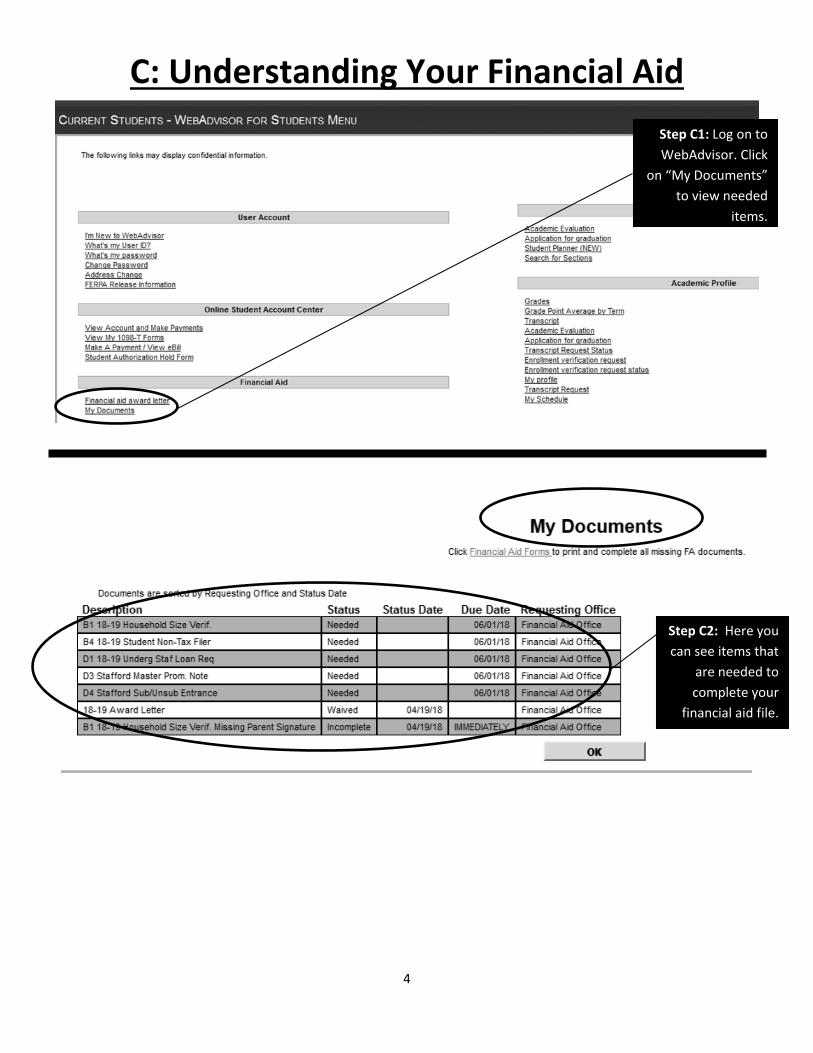
C: Understanding Your Financial Aid
Step C1: Log on to WebAdvisor. Click
on “My Documents” to view needed
items.
Step C2: Here you can see items that
are needed to complete your
financial aid file.

5
D: Understanding your Bill
Step D1: Log on to WebAdvisor. Click
on “Make a Payment/
View E-Bill.”
Step D2: Enter the WebAdvisor
username and password and click
“Login.” This is also where Authorized Users may sign in.
NOTE: Once you are signed in to the “Online Student Account Center,” you will see the main page with your balance and eBill amount (aka eStatements).
NOTE: Balance Including Estimated Aid
NOTE: The Online Student Account Center is the only section of WebAdvisor available to Authorized Users.

6
Step D3: To view eBill, click on the
“view” in the statements box.
NOTE: In the upper right-hand corner is the amount due, including completed financial aid. This amount is also located in the lower right hand corner of the bill.
Step D4: Click “View” to view eBill.
Your eBill will now “pop up” in a new
window. (Please be sure the “pop-
up blocker” is disabled on the computer.)

7
E: Paying your Bill
Step E1: Log on to the Online Student Accounts
Center via WebAdvisor on the AU home page.
Click “Make a payment” tab at the top of the
page or click Make a Payment below student
account information.
Step E2: Select the term you are paying for and
click “Continue.”
Step E3: Enter payment method.

8
HOW TO ENROLL IN A PAYMENT PLAN
To Enroll in the Monthly Payment Plan (MPP)
Step MPP1: Click on “Payment Plans.”
Step MPP2: Click on “Enroll Now.”
Step MPP3: Use the drop down to select the term for which you are planning to set up a payment plan.
Step MPP4: You may click on “Details” to receive details of the plan and click “Select”
Step MPP5: You may also click “Select”, to move forward and see other details.

9
Step MPP6: The payment schedule automatically provides dates for five monthly payments per semester. You can choose the auto-pay option or you can select to log in and make your payments manually every month. Click “Continue” after you make your selection.
Step MPP7: Enter payment information. The $30 enrollment fee is due upon sign up.

10
F: Setting Up an Authorized User
Step F2: Type in the email of the “Authorized User” you have chosen, choose your options and click “continue.”
Step F1: Log on to WebAdvisor. Log on to the Online Student Accounts Center. Click on “Authorized Users.”

11
STEPS FOR AUTHORIZED USERS
Once your student has authorized you as an authorized user you will receive 2 emails. The first email will have a subject of “You have been established as an Authorized User.” The second email will have a subject of “Your access information,” which will include your password. Follow the steps below to log in as an Authorized User.
Step F3: An agreement will appear where you will need to click “I Agree” and “Continue” in order to complete the authorization.
Step F4: You will see a confirmation page confirming the authorized user. Once the Authorized User completes their profile, return to Section D for information on how to make a payment.

12
To log into the Online Student Account Center as an Authorized User
Step 1: Click on “WebAdvisor” on the AU home page at www.aurora.edu.
Step 2: Click on “Make a Payment/View eBill.”

13
If you have any additional questions, please contact the Office of Student Accounts at 630-844-5470.
This guide is available online at www.aurora.edu/student-accounts/OSACguide
Step 3: Under “Authorized User,” enter your email address and password given to you in the second email and click “Login.”
Step 4: Set up Authorized User Profile and click “Save.” You will then be logged in to the “Online Student Account Center.”