navigation software navitel navigatordl2.navitel.cz/manuals/manual_navitelnavigator_9_eng.pdf ·...
TRANSCRIPT

© 2015 NAVITEL s.r.o. All rights reserved.The contents of this User Guide, as well as any attached demo materials, are the sole proprietary of the NAVITEL s.r.o. Any commercial use of this User Guide may be carried out only with written permission from NAVITEL s.r.o. The information contained in this document shall not be changed without prior notice given to NAVITEL s.r.o.
275m240m
11:40Arrival time
15 kmDistance
00:57Time left
Navigation Software
Navitel NavigatorUser Guide
© 2019 NAVITEL s.r.o. All rights reserved.
The contents of this User Guide, as well as any attached demo materials, are the sole proprietary of the NAVITEL s.r.o. Any commercial use of this User Guide may be carried out only with written permission from NAVITEL s.r.o. The information contained in this document shall not be changed without prior notice given to NAVITEL s.r.o.
2
User Guide - Navitel Navigator
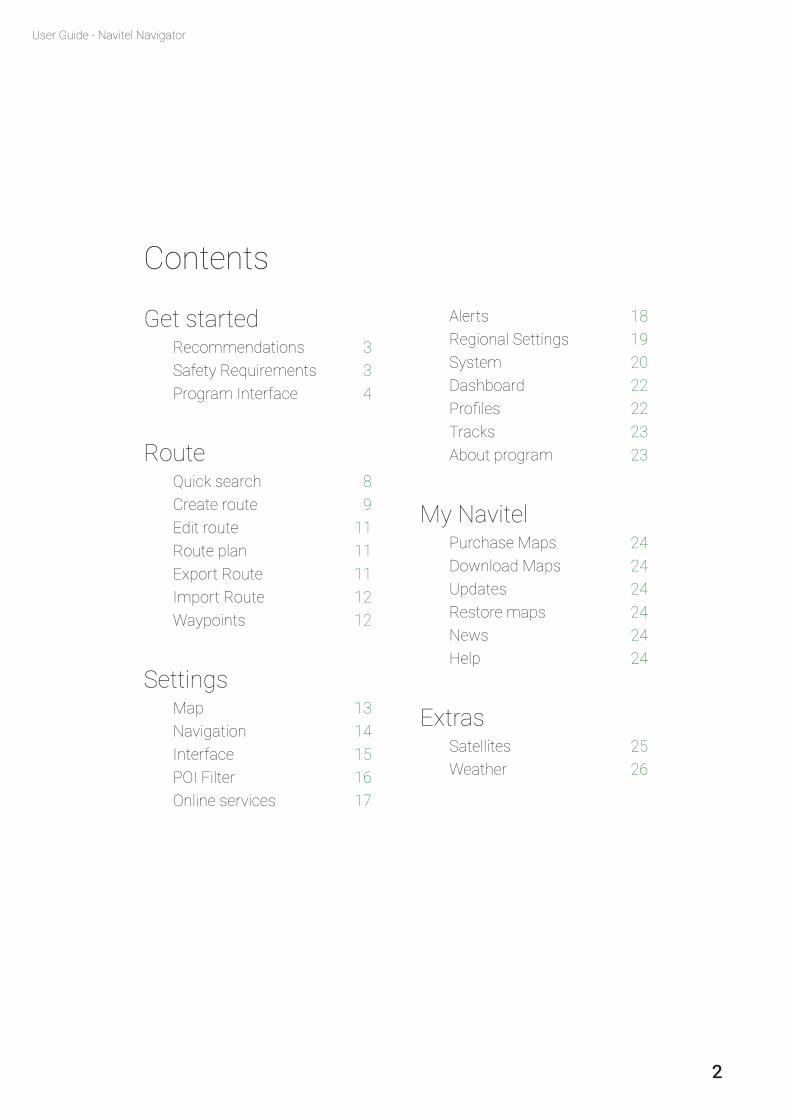
Contents
Get startedRecommendations 3Safety Requirements 3Program Interface 4
RouteQuick search 8Create route 9Edit route 11Route plan 11Export Route 11Import Route 12Waypoints 12
SettingsMap 13Navigation 14Interface 15POI Filter 16Online services 17
Alerts 18Regional Settings 19System 20Dashboard 22Profiles� 22Tracks 23About program 23
My NavitelPurchase Maps 24Download Maps 24Updates 24Restore maps 24News 24Help 24
ExtrasSatellites 25Weather 26

3
User Guide - Navitel Navigator
Get startedNavitel Navigator is an offline multifunctional navigation application used for efficient route search and planning.
This document is the user manual that aims at helping the novice users of the program to learn how to use its primary functions, as well as to familiarize themselves with all the special features of the program.
Please take notice that this manual also contains information on online services of the program. If there is no Internet connection on your device, the appearance of the program and its function set can be slightly different than that described in the document.
To ease the use of the manual we have organized this document in a way that you can read it from the top downward to learn all the program tricks, as well as use it as a quick reference guide where you may always find a fine and precise description of a function you are interested in, or follow a simple and friendly instruction on how to perform a particular operation in the application.
We thank you for using our application and sincerely hope you enjoy it!
Best wishes,
NAVITEL Team
If Navitel Navigator is installed on a built-in or portable navigation device, we strongly recommend you to study the user guide of the device before starting the program.
Instruction for installing the program on a tablet/smartphone/phone is available at www.navitel.cz/en/support/instructions/nn-install.
You can find the instruction on program registration at www.navitel.cz/en/support/instructions/nn-registration/.
The instruction on purchasing the program and maps you can see at www.navitel.cz/en/support/instructions/buy-a-map/.
Safety Requirements• Adjust the program settings and plan the route before starting the vehicle.
• Changing program settings or editing the route must be done only after fully stopping the vehicle in a proper place.
• We recommend not to get distracted from driving by looking at the screen of your navigation device, but to follow voice promts. Remember to set up the voice promts settings beforehand.
• You must observe driving regulations, including speed limits and lanes, and maneuver only where allowed and safe.
Remember! Road safety is of prior importance!
Recommendations

4
User Guide - Navitel Navigator
1 Current speed If location is determined the current speed is displayed; if location is not determined, the satellite icon is displayed.
2 Point on the map
Short tapping on the map marks the point for further operations with it, namely, reveals the Cursor and Save WP buttons.
3 Return to current position
If the map was shifted this button returns to the current cursor position on the map. The GPS cursor is displayed in the center of the screen.
4 SPEEDCAM Speedcams are the data about speed cameras, radars, dangerous crossroads, speed bumps, and other types of potential obstacles on the road (for more details, see Alerts).Note: objects are displayed only along the route (no more than 20 km ahead); if there is no route – along the current move direction; 6 objects maximum.
5 Map buttons These are the buttons for controlling the map view types (2D/3D) and map scaling. It is possible to hide these buttons from the map. Use the / buttons to zoom the map in or out. Short tapping a zoom button changes the scale by a set value, whereas holding them will change the scale gradually (for more details, see Interface).
6 Main menu Tapping this button will open the main menu of the program.
7 Cursor This button becomes available only when a point is selected on the map. Tapping this button will open the My route screen, where you can carry out various operation with the selected point (for more details, see Route).
8 POI POI are points of interest which displayed in the program. Different categories of POI have different icons, as well as there is a vast variety of icons for specific points of interest, such as shopping centers, brand shops, gas stations etc. It is possible to define which POI should be displayed or hidden on the map (for more details, see POI Filter).
9 Save WP This button becomes available only when a point is selected on the map. Tapping this button will cause the selected point to be saved in the form of a waypoint (for more details, see Waypoints).
10 Upcoming maneuver
The indication of the distance to the next two upcoming maneuvers. Tapping the sign opens a dialog box with a number of configuration settings (for more details, see Edit route).
Program InterfaceThe figures below represent main elements of the interface. Their description is provided in the table below. The device in the pictures is shown only as an example. The model of the user’s device and orientation of the screen may differ from those shown on the picture.

5
User Guide - Navitel Navigator
11 Progress bar This bar indicates the elapsed and the remaining part of the route.
12 Street after maneuver
The name of a street following the maneuver. Please note that if certain conditions are met, there will be displayed the upcoming traffic lanes instead of street after maneuver panel. The upcoming traffic lanes are displayed only before crossroads and when not all traffic lanes can be used to pass the crossroad.
13 Route Active route. If the traffic information is on, the route is colored in different colors, which correspond to different traffic density levels. Otherwise, the route is always blue (for more details, see the Navitel.Traffic).
14 Time The device system time is used.
15 Speed Road speed limit is displayed next to the current car speed. The program will notify the driver in case any traffic violations are taking place – orange colour block for set overspeeding level (by default its 10 km/h), red one for over the set overspeeding. It is possible to set the speeding level for orange notification up to 30 km/h in the Alerts section of Settings.
16 Information panel
By default, displays a set of gauges that provide information on remaining travel time, distance to the point of destination, and estimated arrival time. It is possible to change the selection of gauges (for more details, see Dashboard).
17 Current street The name of the current street (active only when connection with satellites is established). If the map does not contain information about the active street name, the direction of movement is displayed instead (North, South, West, and East).
18 Road lanes This panel displays road lanes with possible maneuvers.
19 GPS cursor Indicates the current position of the device when the GPS receiver is turned on. The cursor location of the on the map depends on the map orientation settings. The sharp end of the cursor points at the direction of movement.
20 Road regulations
System signals when the car is approaching speed cameras, high-risk road sections, service points and POI. The program indicates the distance left to the closest driving regulations in the right side of the display. When the vehicle is approaching them the program starts the countdown to the closest camera, hazardous area or service point.

6
User Guide - Navitel Navigator
21 Back Return to the previous screen.
22 Go! Tapping on the button gives a command to the program to calculate a route from the current position or the set initial point to the selected point.
23 Set Start Tapping on the button determines the selected point as a starting point of the route (GPS-receiver must be switched off).
24 Map Back to map.The Map screen is meant to display the acquired electronic map and track there your current location. Also, it contains a large amount of road information. The Map screen is used to assist in working with routes and waypoints, object search, etc. To view the map, tap and hold a point on the map and by keeping the finger on the screen move the map to the necessary direction.
25 Set Finish The button is active only when there is an existing route. Pressing the button continues the route up to the selected point making it the destination point of the route.
26 Route through The button is active only when there is an existing route. Pressing the button marks the selected point as a point to be included in the route. The last added point becomes the first one in the route after the starting point.
27 Compass Tapping on the button opens the context menu, which controls options of map orientation («North up» – the map will always be oriented northwards, «Track up» – the map will always be oriented in the direction of movement along the route), type of map view (Plain view «2D», Panoramic view «3D») and skins («Night skin», «Day skin», «Auto»).
28 Sound Tapping on the button opens the sound menu.
29 Navitel.Friends*
The icon of the “Navitel.Friends” service, tapping on which opens its menu. The service is intended for adding friends, viewing their location and exchanging messages with them.
30 GPS connection
GPS-connection indicator. Grey indicator – GPS/GLONASS-receiver is off; red – receiver is turned on, but there is no connection with satellites; yellow – bad connection; green – connection is established. The number in the icon indicates the number of satellites.
31 Navitel.Cloud* Navitel.Cloud service allows you to save your settings, waypoints, and search history in the cloud data storage.
32 Navitel.Traffic* This service provides real-time information about density of traffic on the map.
33 Battery The icon indicates the level of battery charge.
34 Track recording
Button for track recording: red dot – recording is on, grey dot – recording is stopped.
35 Updates* Provides access to the program and map update menu screen.

7
User Guide - Navitel Navigator
* - functionality is available only for devices, having access to the Internet
36 Navitel.News* With the help of the Navitel.News service we deliver to you important update and program news and announce special offers and discounts.
37 Navitel.Weather*
Navitel.Weather service shows weather forecast for 4 days for any place on Earth.
38 Toolbar When the map screen is active, the toolbar is displayed in the very top of the screen, containing a number of icons. Some icons on the toolbar may change their look depending on the current status of the function that they represent. It is possible to change the set of icons to be displayed on the toolbar (for more details, see Map buttons).Note that the number of icons displayed on the toolbar can vary depending on the screen orientation of your device.
39 Event* The sign of a road event marked by other users of the Navitel.Events service.
40 Navitel.Events* Button for controlling the Navitel.Events service.

8
User Guide - Navitel Navigator
RouteThis section of the guide contains information on how to create or edit routes in the program and explains other possibilities of working with routes.
Quick search
Route to the point in the list:1 Select > Find.
2 In the Find window, select the suitable search option.
3 Select the point to which you would like to lay the route by tapping it in the list.The My route page opens.
If you have selected the By coordinates or By address search option, after entering the corresponding data, in the top-right corner of the screen, tap the Result button. If you have selected the Nearest places search option, first you will be prompted to select a reference point and then a category of the sought point. After you have finished this, a list of nearest places in regard to the reference point and the selected POI category will be displayed.
4 In the bottom-left corner of the display tap Go!The route is planned from your position to the given point. The program will offer 3 alternative routes, indicating the distance and estimated time to the finish point.
5 Tap Go! again to start a route.
Learn to create or edit your route with the help of the quick search function:
Route to the point on the map:1 On the Map screen, select a place or a POI, which you want to add to your route.
2 On the information panel, in the bottom part of the screen, tap the Cursor button.The My Route screen opens.
3 In the bottom-left corner of the display tap Go!The route is planned from your position to the given point. The program will offer 3 alternative routes, indicating the distance and estimated time to the finish point.
4 Tap Go! again to start a route.

9
User Guide - Navitel Navigator
Create routeTo plan a route from your current position up to a specific destination point, follow the steps:
1 Select > Route > Create route.
2 In the Find window, select one of the search options:
By addressSearch of a point by using its address
Nearest placesSearch of a point nearby a specific place
WaypointsSearch of a point among the waypoints
HistorySearch of a point from the history list
FavoritesSearch of a point among the most visited addresses or POIs
By coordinatesSearch of a point by coordinates
On the mapSearch of a point manually, the map search
3 If you have selected the By coordinates or By address search option, after entering the corresponding data, in the top-right corner of the screen, tap the Result button. If you have selected the Nearest places search option, first you will be suggested to select a reference point and then a category of the sought point. After you have finished this, a list of nearest places in regard to the reference point and the selected POI category will be displayed.
4 If you have selected the On the map option, the current map will open. Select the point to which you would like to plan the route by tapping it.
The My route page opens.
5 Alternatively, tap the address field of the selected point in order to open the Properties page, where you can select other options for working with the point, such as:
• Go!The route is planned from your position to the given point. If the current position is not defined, the last known position is the start of the route. The program will offer 3 alternative routes, indicating the distance and estimated time to the finish point.
• Set startThe selected point becomes the starting point of the route. Please note that to set up the starting point manually, you do not need the GPS connection. Thus, the program will request you to turn the GPS receiver off.
The Properties screen also contains more detailed information about the selected point, for example, coordinates of the point, the exact address data, distance from this point to your location, and any other available information.
6 In the bottom-left corner of the display tap Go! (if you missed previos item).

10
User Guide - Navitel Navigator
7 Alternatively, in the bottom-right corner of the My route page, tap vehicle / bicycle / pedestrian to select the vehicle types.
A Dialog box will openSelect the vehicle type.
After selecting some of the vehicle types, you can also indicate weight and size of your vehicle. After indicating all the vehicle parameters the program will take them into consideration when planning routes.
8 Alternatively, in the bottom-right corner of the My route page, tap on the appropriate button to quickly plan a route around the toll roads, dirt roads or ferry crossings.
9 Tap Go! again to start a route.
Edit routeIf you want to change your route, please use one of the two methods described in this chapter.
With the help of the upcoming maneuver:
1 In the top-left corner of the map, tap the sign of the upcoming maneuver.The Route dialog box opens.
2 In the newly opened dialog box, select the appropriate option:
Stop Route GuidanceIt’ll delete the route. If the Demo Route is active, you will see the Stop Demo button instead
AvoidPlan a new route saving all the route through points to avoid obstacles on the way
Demo routeBegin the simulation movement along the route you have planned
Go Next Via PointDeletion of the next route point
Show routeAdjusting the map scale so that the entire route is visible on the map
SettingsDisplay of the Navigation screen
CancelClosing the dialog box

11
User Guide - Navitel Navigator
If you have selected the By coordinates or By address search option, after entering the corresponding data, in the top-right corner of the screen, tap the Result button. If you have selected the Nearest places search option, first you will be prompted to select a reference point and then a category of the sought point. After you have finished this, a list of nearest places in regard to the reference point and the selected POI category will be displayed.
1 Select > Route > Edit route.
2 In the Find menu, select the suitable search option.
3 Select the point to which you would like to plan the route by tapping it.The My route page opens.
4 Alternatively, tap the address field of the selected point in order to open the Properties page, where you can select other options for working with the point, such as:
• Go!The route is planned from an existing starting point to the given point. All other route points (if available) will be deleted. The program will offer 3 alternative routes, indicating the distance and estimated time to the finish point.
• Set startThe selected point becomes the starting point of the route. All other route points (if available) will be maintained. Please note that to set up the starting point manually, you do not need the GPS connection. Thus, the program will request you to turn the GPS receiver off.
• Route throughThe selected point becomes the one after starting (or current) point of the route. All other route points (if available) will be maintained.
• Set finishThe route continues to the selected point. All other route points (if available) will be maintained. The former finish point will become an intermediate point.
The Properties screen also contains more detailed information about the selected point, for example, coordinates of the point, the exact address data, distance from this point to your location, as well as any available information.
5 In the bottom-left corner of the display tap Go! (if you missed previos item).
6 Alternatively, tap Go! again to start a route.
With the help of the program menu:
Export RouteTo export a created route to another device:
1 Select > Route > Export.
2 Select the directory, to which you would like to save the route file, and then indicate the type of the file.
3 Type a name to the file of the route.
4 Tap .The route file will be created in the selected folder.
5 Copy the route file to another device.
Route planTo open information about upcoming maneuvers along your route, select > Route > Route plan.The Route screen containing the detailed information about all the maneuvers along the road opens.

12
User Guide - Navitel Navigator
Import RouteTo import a route:
1 Select > Route > Import.
2 Select the file directory, where the route file is stored, and then select the type of the file.
3 Tap .
Waypoints
Although the imported route contains all route points of the original one, it may differ from it due to possible differences in program or map versions as well as routing settings.
In Navitel Navigator it is possible to save coordinates or an address of a particular place in the form of a waypoint. Waypoints are marked on the map with a special icon and can be used for quick route planning. To plan a route using a waypoint, select the appropriate point from the Waypoints category of the Search function.
To create a waypoint:
1 Mark a point on the map by either selecting a place on the map or finding a place using one of the available search options.
2 Tap Save WP in the bottom right corner of the screen.
3 In the Waypoint window, assign a name to the point, fill in the description, and specify its type. If the name of a point is not set, the program will assign a three-digit number to it.
It is also possible to create a waypoint using the program menu. To do that, follow these steps:
1 Select > Find > Waypoint.
2 In the newly opened window, in the bottom left corner of the screen, press the Add waypoint button.
Please note that the coordinates of the given point on the map are used; if no point is selected, the coordinates of the GPS cursor are used; if GPS is disabled in the program the coordinates of the map displayed area center are used.

13
User Guide - Navitel Navigator
SettingsThis part of the instruction explains the use of all possible settings and program configurations. All functions are described in the order of their appearance in the interface of the program.
MapNavitel Navigator allows you to easily customize the settings of map display. In order to proceed to the map configuration menu, select > Settings > Map. In this menu, you will find a number of settings that can help you to change the properties of the map display.
Map’s north is on top — applies the north-oriented map view. The GPS cursor is displayed in the center of the screen.
Rotate map with movement — the map will be oriented in accordance to the direction of the movement. The GPS cursor is displayed in the bottom of screen.
Same options are available on the toolbar by tapping the Compass icon.
Automatic Zoom — enables automatic map scaling during route following. The parameters for automatic scaling adjustment are:
• Used scalesDefining the range within which the automatic zooming will be scaled.
• Preferred zoomThis configuration allows setting up the preferred zooming scale value, so that the program will always attempt to fit the automatic zoom within the range of this value.
Navitel Navigator allows you to configure a number of visual settings. Please note that use of visual effects may increase time to map rendering.
Draw models from — enables setting of the minimum map scale at which the 3D models must be displayed.
Map tilt — sets the map tilt parameters. Minimum tilt makes the map look more like a 2D map, whereas at greater tilt the 3D elements of the map are more prominent.
Reset position — enables automated return back to your original position after you move the map elsewhere. You can set up the time that has to pass after your last action before the map position is reset. The minimal time is 5 seconds, the maximum time is 40 seconds.
Draw passed route — displays the passed part of the route on the map in the form of a transparent line.
Show two following maneuvers — displays 2 following maneuvers insead of only one on the upcoming maneuver sign.

14
User Guide - Navitel Navigator
Navigation
Route on roads — plans a route between 2 points on the map on roads.
Route on direct line — connects 2 points on the map with a direct line.
When planning routes in Navitel Navigator, you can set up the “avoid” conditions. When such conditions are set, the program will try to avoid the specified road types when planning routes.
Note that the Route on direct line option is used only for measuring distance between two points. Do not use this option to plan a route for navigation.
If there is no way the program can plan a route with the selected conditions, the program will ignore some of them.
Guidance prompt — specify the time estimated to an upcoming maneuver when the program must inform you of it.
Rerouting — determine circumstances when the program should try to automatically re-plan the created route. Navitel Navigator provides 2 possible conditions for route recalculation:
• When off-routeHere you can set the distance of deviation from the current route, at which the program must start replanning the active route from the current position.
• When found a route fasterAnd here you can set the time by which the potentially new route must be faster than the current one in order for the program to start replanning the route. The work of this function is heavily based on information received when Navitel.Traffic service is updated.
Vehicle — select your type of the vehicle and the program will consider it when planning routes, and propose you the most comfrotable route for your particular vehicle.
Tap the Vehicle dropdown listbox to see the types, and then select the appropriate type.
In this settings menu you can configure the specifics of route planning on your device. To proceed to the Navigation settings menu, select > Settings > Navigation.
Please note that for the proper work of this function the map must contain the corresponding data.
After selecting some of the vehicle types, you can also indicate weight and size of your vehicle. After indicating all the vehicle parameters the program will take them into consideration when planning routes.
You also can select the vehicle types when create the route (for more details, see Route).
15
User Guide - Navitel Navigator
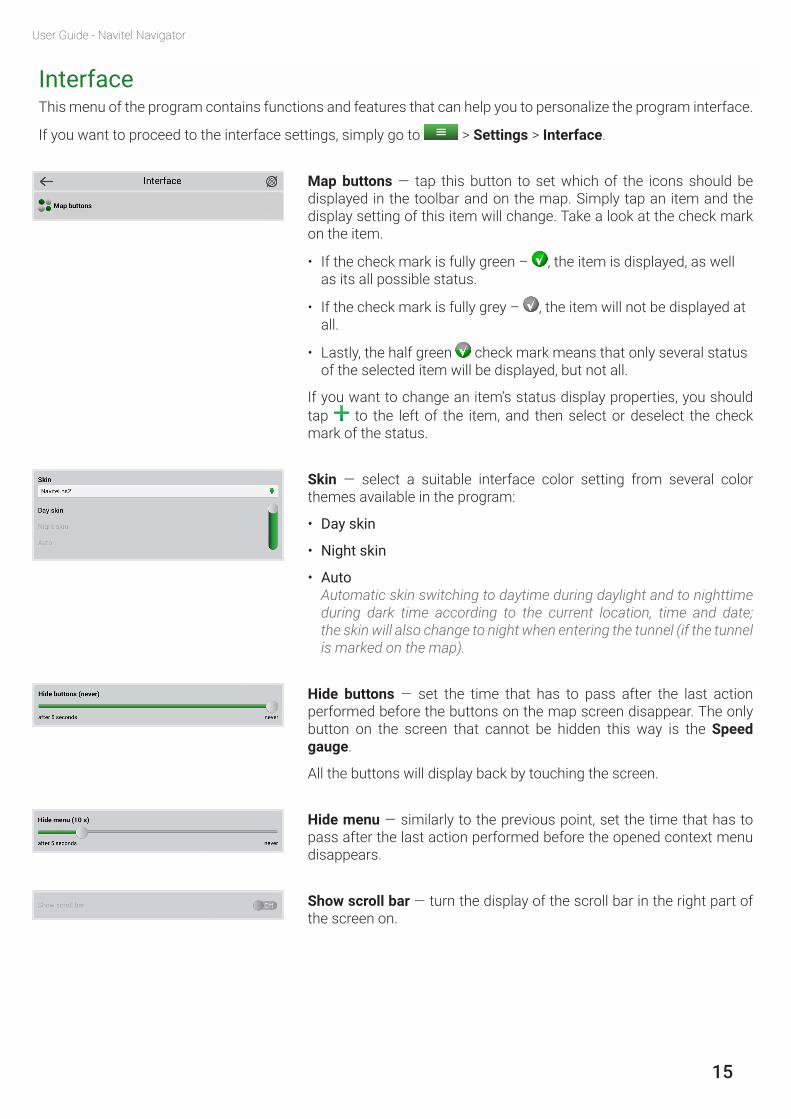
InterfaceThis menu of the program contains functions and features that can help you to personalize the program interface.
If you want to proceed to the interface settings, simply go to > Settings > Interface.
Map buttons — tap this button to set which of the icons should be displayed in the toolbar and on the map. Simply tap an item and the display setting of this item will change. Take a look at the check mark on the item.
• If the check mark is fully green – , the item is displayed, as well as its all possible status.
• If the check mark is fully grey – , the item will not be displayed at all.
• Lastly, the half green check mark means that only several status of the selected item will be displayed, but not all.
If you want to change an item’s status display properties, you should tap to the left of the item, and then select or deselect the check mark of the status.
Skin — select a suitable interface color setting from several color themes available in the program:
• Day skin
• Night skin
• AutoAutomatic skin switching to daytime during daylight and to nighttime during dark time according to the current location, time and date; the skin will also change to night when entering the tunnel (if the tunnel is marked on the map).
Hide buttons — set the time that has to pass after the last action performed before the buttons on the map screen disappear. The only button on the screen that cannot be hidden this way is the Speed gauge.
All the buttons will display back by touching the screen.
Hide menu — similarly to the previous point, set the time that has to pass after the last action performed before the opened context menu disappears.
Show scroll bar — turn the display of the scroll bar in the right part of the screen on.

16
User Guide - Navitel Navigator
POI FilterIn this menu option you can manage the POI display properties.
To proceed to the POI filter settings menu, select > Settings > POI filter.
The POI filter window contains a list of POIs divided into categories. If you want to change display settings of an entire POI category, simply tap this category. The display settings of this category will change. Take a look at the check marks on the POI icons.
• If the check mark is fully green – , the entire category is displayed.
• If the check mark is fully grey – , none of the category’s POIs are displayed.
• Lastly, the half green check mark means that only part of the POIs in the category are displayed, but not all of them.
Tap to the left of the POI category whose display properties you want to change and then select or deselect the check mark on the icon of a subcategory of POIs or a specific POI.
There is also the All types category, with the help of which you can apply same display parameters to all POI categories at once. It is further possible to set individual values for each category/subcategory/POI type.
For more detailed display settings, tap the button to the right of the corresponding category or POI type. A new window will open, containing several options:
• Turn on/off allSwitching on/off display of all POI of the category.
• Edit allAdditional display settings of the selected item.
• Restore defaultsRestoring the default settings of the given item.
Select the Edit all option to open the menu of additional display properties. There you can find the following display parameters:
• Seen on scalesSet the minimum and maximum values of the map zoom, within the boundaries of which the category/POI icon(s) should be visible on the map.
• Labels seen on scalesSet the minimum and maximum values of the map zoom, within the boundaries of which the category/POI name(s) should be visible on the map.
• Show POI namesDefine the map scale at which object names of the selected category/POI type should be displayed.
To apply, tap .
Each category of objects has their own visibility scope that cannot be neglected by the program settings. For example, traffic lights are not visible at the scale of 120m and less.

17
User Guide - Navitel Navigator
Online servicesIn this menu you can turn the online Navitel services on and off as well as configure parameters of some of them. These services are available only for those devices that have access to the Internet.
To proceed to the Online services settings menu, select > Settings> Online services. Items of the Online services settings menu are described below.
Internet connection — specify the application rights to access the Internet. Online services require connection to the Internet to be able to function.
Use jams for automatic routing — the program will consider traffic density when planning the route. The route will be planned with due account to the data received from the Navitel.Traffic service.
Show jams on map – turns the traffic display on the map on or off.
Update weather manually (for more details, see Weather) — disables auto update.
Update weather automatically — enables auto update.
Show weather on map — displays weather information on the map, in the direction to the center of the current city.
Turn this function on if you would like to receive notifications through the Navitel.News service about updates and changes in the application.
Allow events displaying — displays events on the map. Events are marked by other users of the Navitel.Events service.
Enable downloading up to date POI information via the Internet? —enables automatic download of the up-to-date POI information. You can find out more about Dynamic POI on our website.
Enable receiving data from Booking.com — turning this option on will enable the hotels supporting booking through the Booking.com service to be visible on the map (for more details, see Booking.com in Navitel Navigator).
Check for updates automatically — enables automatic check for available application and map updates.
Turn on Navitel.Friends — switches the Navitel.Friends service on and off.
Navitel.Friends Settings — opens the Navitel.Friends Settings menu, where you can configure functionality of this service (for more details, see Navitel.Friends).

18
User Guide - Navitel Navigator
Turn on Navitel.Cloud — switches the Navitel.Cloud service on and off.
Navitel.Cloud Settings — select this menu entry if you want to configure parameters of the Navitel.Cloud function.
Update SPEEDCAM — specifies whether the SPEEDCAM information should be updated automatically.
AlertsWith the help of the Alerts settings menu you can configure the movement alert parameters of the system.
To open this settings menu, go to > Setting > Alerts.
Speed limit — in this settings box you can configure type of the speed alerts and make conditions for alerts to trigger.
The sound and visual alerts are available in the program. You can select both of them as well as only one or none of them. The program will alert when there is a speed limit on part of the road along which you are moving.
When you switch the sound alert on, you can select the sound alert type. The sound alert is ready to alert you with special signals or with a voice.
Please pay attention that the voice alert always triggers only once: when the speed limit on the current part of the road is different than that of before, and when you exceed the speed limit. If you keep driving at the speed exceeding the speed limit, the alert will not trigger anymore.
Similarly to the previous setting, in SPEEDCAM settings box you can configure alerts for speed cameras, radars, dangerous crossroads, speed bumps, and pedestrian crossing.
The alert settings are fully identical to those of the Speed limit.
Selecting SPEEDCAM types — select the SPEEDCAM objects of which you would like to be alerted by the program.
Show traffic lanes — when passing the roads with two or more lanes this indicator displays information about the permitted maneuver at the nearest intersection or turning point; progress bar under the indicator displays the distance left to the described maneuver.

19
User Guide - Navitel Navigator
Regional SettingsThis settings menu will help you to configure the language settings of the program. Additionally, here you can set the units of measurement used by the program.
To open this settings menu, go to > Settings> Regional settings.
Interface language — setting language of the program interface.
Map language — selecting language for display of street and other objects names on the map.
Voice — Navitel Navigator provides you a large number of voice packages for voice guidance to choose from. In the Voice list, you can listen through them and select the one you like the most.
To download a voice package, click the button to the right of the voice package, or click the to listen to its voice. In order to select a voice package, tap it; to apply, tap ..
Keyboard layout — setting the keyboard layout.
Vibrate on key press — switches the vibration of the device in response to use of the program keyboard on/off.
Keyboard languages — select the languages which will be available in the keyboard.
Several languages can be selected at a time.
Qwerty v1 - it is a standard keyboard layout used on most desktop PCs. Additional keys are located on the right side of the screen.
Qwerty v2 - this layout is similar to that of the above, except that the screen orientation is vertical.
Qwerty v3 - same layout of letters as the first one, but with additional symbols located at the bottom of the screen.
Abcd - this is a layout of the alphabetical left to right order of letters.
Metrics — configure which units of measurement will be used in the program, including: length/speed (metric, nautical, statute), coordinates, address, azimuth, elevation/altitude, depth, and area.
20
User Guide - Navitel Navigator
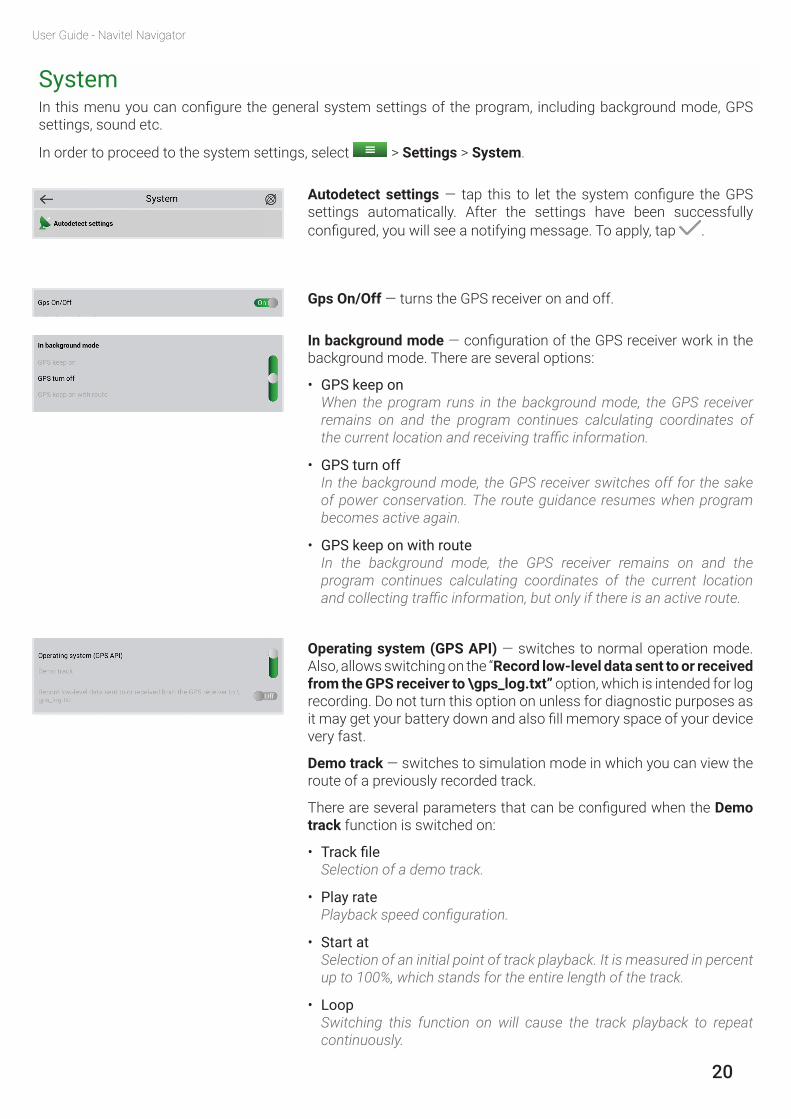
SystemIn this menu you can configure the general system settings of the program, including background mode, GPS settings, sound etc.
In order to proceed to the system settings, select > Settings > System.
Autodetect settings — tap this to let the system configure the GPS settings automatically. After the settings have been successfully configured, you will see a notifying message. To apply, tap .
Gps On/Off — turns the GPS receiver on and off.
In background mode — configuration of the GPS receiver work in the background mode. There are several options:
• GPS keep onWhen the program runs in the background mode, the GPS receiver remains on and the program continues calculating coordinates of the current location and receiving traffic information.
• GPS turn offIn the background mode, the GPS receiver switches off for the sake of power conservation. The route guidance resumes when program becomes active again.
• GPS keep on with routeIn the background mode, the GPS receiver remains on and the program continues calculating coordinates of the current location and collecting traffic information, but only if there is an active route.
Operating system (GPS API) — switches to normal operation mode. Also, allows switching on the “Record low-level data sent to or received from the GPS receiver to \gps_log.txt” option, which is intended for log recording. Do not turn this option on unless for diagnostic purposes as it may get your battery down and also fill memory space of your device very fast.
Demo track — switches to simulation mode in which you can view the route of a previously recorded track.
There are several parameters that can be configured when the Demo track function is switched on:
• Track fileSelection of a demo track.
• Play ratePlayback speed configuration.
• Start atSelection of an initial point of track playback. It is measured in percent up to 100%, which stands for the entire length of the track.
• LoopSwitching this function on will cause the track playback to repeat continuously.

21
User Guide - Navitel Navigator
Update time zone automatically — enables automatic time zone update.
Keep power on while the application is active — disables the device from switching to the standby mode regardless of the device system settings.
Keep screen backlight on while the appliaction is active — keeps the backlight switched on regardless of the device system settings.
Turn off sound — switches sound in the program on or off.
Keep volume — applies volume settings of the device to the volume settings of the program.
Paused sound — pauses any other playbacks on the device whenever voice prompts are played.
Sound stream (only for Android devices) — with this function you can select an audio stream on your device, whose volume settings you would like to apply to the sound settings in the program.
Muffle sound — tunes down the volume of any other sound on the device whenever voice prompts are played.
Quit prompts: Don’t ask — disables exit confirmation button. It means that you will be able to exit the program instantaneously upon tapping the exit button, without having to confirm it (this function is not applicable for iOS devices).
Download folder (only for Android devices) — select path to the folder, in which all the temporary program update files will be stored. By default, the folder directory for storing those files is \NavitelContent\Download.

22
User Guide - Navitel Navigator
To save the current settings of the program as a profile, in the Profiles window, in the bottom left corner of the screen tap Add, type in the name of the profile, to apply, tap .
To reset settings of a selected profile, in the Profiles window, in the bottom right corner of the screen tap Reset, to apply, tap . The program will restart.
Create profile
DashboardNavitel Navigator includes a big variety of gauges and indicators. To open the Dashboard window, where you can work with the gauges, select > Settings > Dashboard.
On the Dashboard screen you see values of several gauges. To open settings menu of a specific gauge, tap on it. A dialog box will open, containing the options:
• Select gaugeSelection of a gauge from the list of gauges. The new gauge will replace the one which was selected.
• Reset gaugeClears a gauge’s indications (indications of odometer cannot be nullified).
• Reset all gaugesClears indications of all gauges. Confirmation will be requested.
• Default gaugesDisplays default gauges on the Dashboard screen. Confirmation will be requested.
• Big/small dashboardChanges the number of gauges shown on the Dashboard screen by altering their size.
ProfilesNavitel Navigator gives you the possibility to save your settings in profiles. To proceed the Profiles menu, select
> Settings > Profiles.
In the Profiles menu you can switch between you profiles, create new, and delete old ones.
The number of gauges displayed on the screen may depend on the screen orientation of the device.
Any changes you make in the settings of the program are saved in the active profile automatically. You should create new profile only when you need a new set of settings. The newly created profile becomes the active profile automatically (the active profile is highlighted green).
Edit profileTo change a settings profile, in the Profiles window, in the right top corner of the screen, tap , and then tap the Edit button against the profile you want to edit. Change the name of the profile, to apply, tap ..

23
User Guide - Navitel Navigator
Delete profileTo delete a settings profile, in the Profiles window, in the right top corner of the screen, tap , and then tap the button to the left of the name of a profile that you want to delete. Confirm by pressing Delete.
It is not possible to delete an active profile.
TracksTrack record — begins or stops track recording.
You can also turn the Track record on and off by tapping the Track record button on the toolbar. When the icon on the toolbar is red the recording is on, and when the icon is grey the recording is off.
To show the Track icon on the toolbar, select > Settings > Interface > Map buttons > Track recording (the icon must be green ). See Map buttons for more information.
Format Mapsource — select this option if you want your tracks to be saved in the *.mps format.
Format GPS — select this option if you want your tracks to be saved in the *.gps format.
Show latests 10 000 points — highlights purple the last 10 000 seconds of the recorded tracks on the map.
Keep GPS positions — when this function is on, the track file stores the history of change of coordinates over a specified period of time (from 5 and up to 30 mins) before the start of the track recording. The stored data will be added to the beginning of the track file once the track recording starts. It may help to ensure you do not lose valuable data if you forgot to start track recording in time.
Track’s folder — tap this option to select a folder for storing track files, to apply, tap . The track files will be named by the time of the start of their recording..
About programTo open this menu, go to > Settings > About.
In this menu you can see:• License key
License key is a unique code, confirming the User’s right to use the Software and/or digital product, or to receive updates of a Digital product.
• Serial number• Version and compatibility of the program
(as a N.NN.NNNN for android)• SPEEDCAM’s version (as a date month year)
24
User Guide - Navitel Navigator
My NavitelIn this chapter you will find a detailed explanation of every menu option in the My Navitel menu. To open the My Navitel menu, select > My Navitel.
Purchase MapsBefore you begin work with the program, you need to acquire the maps for your region:
1 Select > My Navitel > Purchase maps.
2 In the opened window, select the map you need and then purchase the map (for more details, see Program and map purchase).
Download Maps1 Select > My Navitel > Download maps.
2 In the opened window, select the purchased map from the list and then tap Download. Setup will begin automatically.
In addition, the Download Maps screen contains the Navitel Navigator field, which, when tapped, shows information about the current version of the program, license key, and the serial number of the device when selected.
UpdatesWhen you select this option, the program connects to the update center of Navitel and determines whether or not the program and maps installed on your device are up-to-date. If the program or maps are missing some updates, it will be proposed to you to update them. It is not possible to update maps without updating the program. If it is proposed to update only the program, update it and check updates once again. To proceed to the Updates screen, select > My Navitel > Updates.
You can also update the maps from the menu of the program:
1 Select > My Navitel > Download maps.
2 From the list of categories, select the map that you want to update and then tap Update.
For more details, see Updating maps for Navitel Navigator.
Restore purchasesUse this menu option to restore products (maps or program) that you purchased in past. To open the Restore screen, select > My Navitel > Restore.
NewsUpon selecting this menu option, the Navitel.News service opens. Through this service you can receive information about updates in the program and other information that may be relevant, such as sale announcements, information about events, etc. To open the News screen, select > My Navitel > News.
On PND that have no Internet connection, tapping My Navitel will open the My products section.
This function is available only on iOS, Android, and Windows Phone 8.x –based devices.
HelpTo open the program instruction, select > My Navitel > Help.
25
User Guide - Navitel Navigator
ExtrasThis section of the guide contains information about various features of the program that can be useful to know when using the program for navigation.
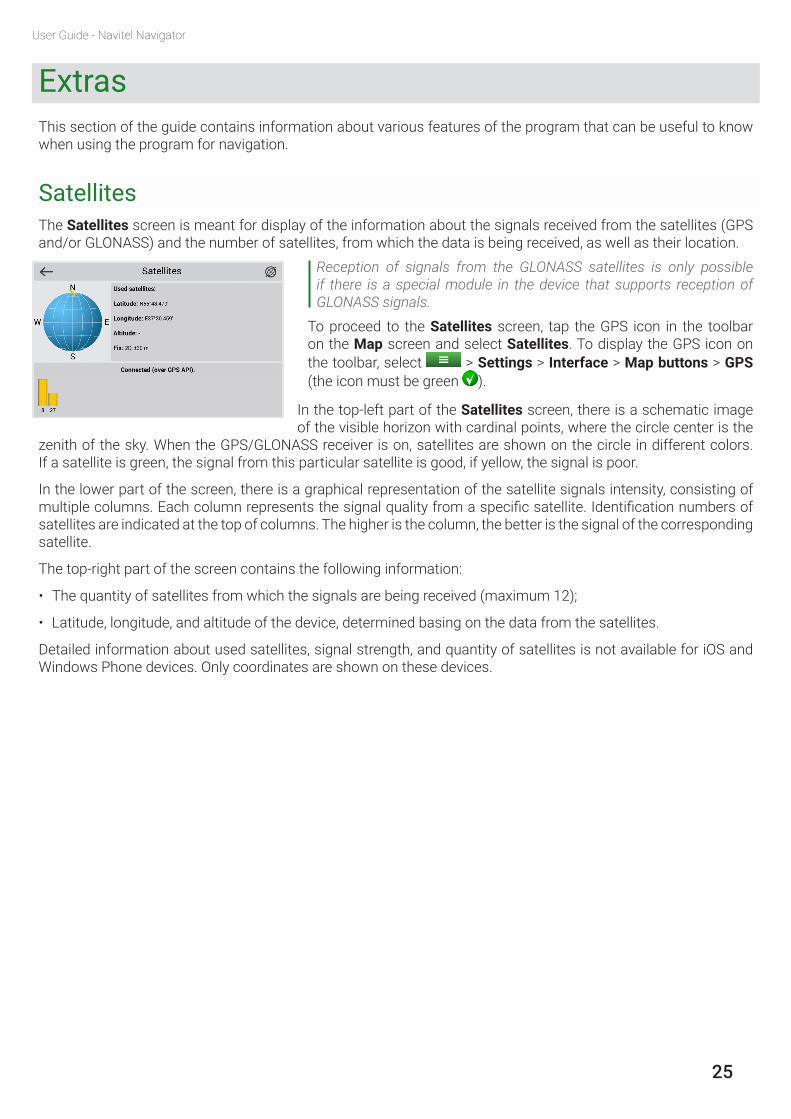
SatellitesThe Satellites screen is meant for display of the information about the signals received from the satellites (GPS and/or GLONASS) and the number of satellites, from which the data is being received, as well as their location.
To proceed to the Satellites screen, tap the GPS icon in the toolbar on the Map screen and select Satellites. To display the GPS icon on the toolbar, select > Settings > Interface > Map buttons > GPS (the icon must be green ).
In the top-left part of the Satellites screen, there is a schematic image of the visible horizon with cardinal points, where the circle center is the
zenith of the sky. When the GPS/GLONASS receiver is on, satellites are shown on the circle in different colors. If a satellite is green, the signal from this particular satellite is good, if yellow, the signal is poor.
In the lower part of the screen, there is a graphical representation of the satellite signals intensity, consisting of multiple columns. Each column represents the signal quality from a specific satellite. Identification numbers of satellites are indicated at the top of columns. The higher is the column, the better is the signal of the corresponding satellite.
The top-right part of the screen contains the following information:
• The quantity of satellites from which the signals are being received (maximum 12);
• Latitude, longitude, and altitude of the device, determined basing on the data from the satellites.
Detailed information about used satellites, signal strength, and quantity of satellites is not available for iOS and Windows Phone devices. Only coordinates are shown on these devices.
Reception of signals from the GLONASS satellites is only possible if there is a special module in the device that supports reception of GLONASS signals.

26
User Guide - Navitel Navigator
WeatherThis screen displays the weather forecast for the next several days as well as detailed weather information for the present moment.
To proceed to the Weather screen, click the weather icon on the toolbar. To display the weather icon on the toolbar, select > Settings > Interface > Map buttons > Weather (the icon must be green ).
The upper part of the Weather screen shows current temperature, pressure, wind direction, and speed. The weather forecast for the following 4 days is located in the bottom part of the screen. Tapping the More button in the bottom-right part of the screen will open the www.gismeteo.ru website in a browser.
Tapping the Update button in the lower part of the screen updates weather data. It is also possible to set automatic weather data update by selecting > Settings> Online services and setting the switcher to the Update weather automatically position.
The number of icons displayed on the toolbar in horizontal and vertical screen orientations is different. If you cannot find an icon on the toolbar after you have activated it in the Map buttons menu, the icon is perhaps hidden due to insufficient screen orientation or size. Try changing screen orientation or deactivate some of the icons.
Update weather data
By default, weather forecast is displayed for the city nearest to the current position of the device. In case the current position of the device cannot be found, the weather forecast of the nearest city to the current central point of the map will be displayed.

© 2019 NAVITEL s.r.o. All rights reserved.
The contents of this User Guide, as well as any attached demo materials, are the sole proprietary of the NAVITEL s.r.o. Any commercial use of this User Guide may be carried out only with written permission from NAVITEL s.r.o. The information contained in this document shall not be changed without prior notice given to NAVITEL s.r.o.