nee n gggg iii n nee e rrrr ii nn gg
TRANSCRIPT

Compusoft Engineering Limited, PO Box 9493, Newmarket, Auckland, New Zealand. Telephone: +64 9 522 1456 www.compusoftengineering.com
CTV Building
Non-Linear Seismic Analysis Report
Ref: 11033-00
Revision 0
February 2012
Prepared by: Derek Bradley
Tony Stuart
Reviewed by: Dr. Barry Davidson
For: StructureSmith Ltd and
The Department of Building & Housing
CCOOMMPPUUSSOOFFTT EE NN GG II NN EE EE RR II NN GG
CCOOMMPPUUSSOOFFTT EE NN GG II NN EE EE RR II NN GG

CTV Building Non-linear Analysis February 2012
Compusoft Engineering Limited Page i
Revision History
Revision number Date of Issue Report status
0 9 February 2011 Formal Issue
Limitations
This report has been prepared for StructureSmith Ltd and the Department of Building &
Housing, and the findings presented within the report are for their sole use. The findings are
not intended for use by other parties, and may not contain sufficient information for the
purposes of other parties or other uses. The client will place no reliance on any draft reports,
incomplete documents, and/or verbal advice.
Compusoft Engineering Limited undertakes professional services using a degree of care and
skill normally exercised, under similar circumstances, by reputable consultants practicing in
this field at the current time. No other warranty, expressed or implied, is made as to the
professional advice presented in this report.

CTV Building Non-linear Analysis February 2012
Compusoft Engineering Limited Page ii
Contents
Revision History ...................................................................................................................................... i
Limitations ............................................................................................................................................... i
List of figures ......................................................................................................................................... iv
List of Tables ......................................................................................................................................... vi
1. Introduction .................................................................................................................................... 1
2. Building description ...................................................................................................................... 2
3. Analysis Procedure Overview ...................................................................................................... 5
4. Material Properties ........................................................................................................................ 7
4.1. Concrete .................................................................................................................................. 7
4.2. Reinforcement ........................................................................................................................ 8
5. Structural Elements ..................................................................................................................... 10
5.1. Soil Structure Interaction ..................................................................................................... 10
5.2. Foundation Elements............................................................................................................ 10
5.3. Reinforced Concrete Frames ............................................................................................... 12
5.3.1. Column Hinges ............................................................................................................. 13
5.3.2. Beam Hinges ................................................................................................................ 15
5.3.3. Beam-Column Joints .................................................................................................... 16
5.4. Reinforced Concrete Shear Walls ....................................................................................... 17
5.5. Masonry Infill Panels. .......................................................................................................... 18
5.6. Precast Concrete Cladding Spandrels ................................................................................. 20
5.7. Floors .................................................................................................................................... 21
6. Loadings ....................................................................................................................................... 23
6.1. Gravity Loadings .................................................................................................................. 23
6.2. Dynamic Mass ...................................................................................................................... 24
7. Seismic Analyses ......................................................................................................................... 26
7.1. Modal Analysis .................................................................................................................... 26
7.2. Non-Linear Static (Pushover) Analysis .............................................................................. 27
7.3. Nonlinear Dynamic (Time History) Analysis ..................................................................... 28
7.3.1. Analysis Ground Motions ............................................................................................ 28
7.3.2. Damping ....................................................................................................................... 32

CTV Building Non-linear Analysis February 2012
Compusoft Engineering Limited Page iii
8. Non-Linear Pushover Results ..................................................................................................... 35
8.1. Model A ................................................................................................................................ 35
8.2. Model B ................................................................................................................................ 39
8.3. Model C. ............................................................................................................................... 40
8.4. Building Displacement Ductility Capacity. ........................................................................ 41
9. Non Linear Time History Darfield Results ................................................................................ 44
9.1. Model A ................................................................................................................................ 44
9.1.1. Drifts and Displacements ............................................................................................. 44
9.1.2. Diaphragm Connection Forces. ................................................................................... 46
9.1.3. Inelastic Wall Demands. .............................................................................................. 51
9.1.4. Inelastic Column Actions. ............................................................................................ 52
9.1.5. Base shears.................................................................................................................... 54
10. Non Linear Time History: Lyttelton Results .......................................................................... 56
10.1.1. Drifts and Displacements ......................................................................................... 56
10.1.2. Diaphragm Connection Forces. ............................................................................... 58
10.1.3. Inelastic Column Actions. ........................................................................................ 64
10.1.4. Beam-Column Joints. ............................................................................................... 65
10.1.5. Base Shears. .............................................................................................................. 66
10.1.6. L6 Core Slab Out Of Plane Actions. ....................................................................... 66
11. Vertical Earthquake Effects ..................................................................................................... 68
11.1. Axial Load Effects ........................................................................................................... 68
11.2. Bending Effects ................................................................................................................ 71
11.3. Sensitivity Study ............................................................................................................... 71
12. References ................................................................................................................................ 74
List of appendices ................................................................................................................................. 77
Appendix A :Nonlinear analysis of diagonally reinforced coupling beams ........................... 79
Appendix B :Assessment of beam-column joint capacity ....................................................... 85
Appendix C :Foundation Modelling Properties ....................................................................... 90
Appendix D :Acceleration Time History Records. .................................................................. 91
Appendix E :Analysis Results - Darfield Event: CBGS Record ............................................ 95
Appendix F :Analysis Results - Lyttelton Aftershock: Model A: CBGS record ................. 102

CTV Building Non-linear Analysis February 2012
Compusoft Engineering Limited Page iv
Appendix G :Analysis Results - Lyttelton Aftershock: Model A: CCCC record ................ 112
Appendix H :Analysis Results - Lyttelton Aftershock: Model A: CHHC record ................ 122
Appendix I :Analysis Results - Lyttelton Event: CBGS Record Model A & Model B ..... 132
Appendix J :Analysis Results - Lyttelton: CBGS, Model A - No Diaphragm Disconnection 140
List of figures
Figure 1: Overall view of the CTV structural model (viewed from SW & SE respectively) ............ 3
Figure 2: CTV structural model viewed from the east (slabs omitted for clarity) .............................. 3
Figure 3: CTV foundation arrangement viewed from the south-west. ................................................ 4
Figure 4: Building Grid System. ........................................................................................................... 4
Figure 5: Concrete stress-strain curve ................................................................................................... 7
Figure 6: Reinforcing steel stress-strain curve ...................................................................................... 9
Figure 7: CTV foundation element location plan [1] ......................................................................... 11
Figure 8: Effective column stiffness relationship. .............................................................................. 12
Figure 9: Typical column reinforcement. [1] ...................................................................................... 14
Figure 10: Column at GL 4 D/E (C18) to wall connection detailing at roof level. [1] ..................... 15
Figure 11: Reinforcement anchorage in Grid A beam column joint zone [1] .................................. 16
Figure 12: Typical bottom reinforcement anchorage in interior beam column joint zone [1] ......... 16
Figure 13: Effective wall stiffness relationship .................................................................................. 17
Figure 14: Southern shear wall typical coupling beam reinforcement arrangement [1] ............ 18
Figure 15: Record structural elevation of masonry infill panels [1] .................................................. 19
Figure 16: Masonry panel force displacement relationship. .............................................................. 20
Figure 17: Typical spandrel panel section .......................................................................................... 20
Figure 18: Model C screenshot showing spandrel panels. ................................................................. 21
Figure 19: Seismic mass distribution .................................................................................................. 25
Figure 20: Site spectral displacements. ............................................................................................... 28
Figure 21: Darfield N00E 5% damped response spectra (north/south) ............................................. 30
Figure 22: Darfield N90E 5% damped response spectra (east/west) ................................................ 30
Figure 23: Darfield Vertical 5% damped response spectra ................................................................ 30
Figure 24: Lyttelton N00E 5% damped response spectra (north/south) ........................................... 31

CTV Building Non-linear Analysis February 2012
Compusoft Engineering Limited Page v
Figure 25: Lyttelton N90E 5% damped response spectra (east/west) ............................................... 31
Figure 26: Lyttelton Vertical 5% damped response spectra .............................................................. 31
Figure 27: Equivalent viscous damping vs structure period - Lyttelton ............................................ 34
Figure 28: Model A force-displacement relationship. ........................................................................ 35
Figure 29: Model A base shear components - east/west direction..................................................... 36
Figure 30: Model A base shear components - north/south direction. ................................................ 36
Figure 31: Model A Level 6 western pushover displacement profile. ............................................. 37
Figure 32: Model A Level 6 eastern pushover displacement profile. ............................................... 38
Figure 33: Model A Level 6 northern pushover displacement profile. ............................................ 38
Figure 34: Model A Level 6 southern pushover displacement profile. ............................................ 39
Figure 35: Model A & Model B pushover force displacement comparison. .................................... 40
Figure 36: Pushover force displacement variations for north and east directions. ............................ 41
Figure 37: Bi-linear pushover plots ..................................................................................................... 42
Figure 38: Frame A north/south storey drifts - Darfield. ................................................................... 44
Figure 39: Frame F north/south storey drifts - Darfield. .................................................................... 45
Figure 40: Frame 1 east/west storey drifts - Darfield. ........................................................................ 45
Figure 41: Frame 4 east/west storey drifts - Darfield. ........................................................................ 46
Figure 42: Slab 4 C-C/D section cut line. ........................................................................................... 49
Figure 43: Column hinge progression - Darfield, Model A. .............................................................. 53
Figure 44: Column hinge progression - Darfield, Model B. .............................................................. 53
Figure 45: Frame A north/south storey drifts - Lyttelton. .................................................................. 56
Figure 46: Frame F north/south storey drifts - Lyttelton. ................................................................... 57
Figure 47: Frame 1 east/west storey drifts - Lyttelton. ....................................................................... 57
Figure 48: Frame 4 east/west storey drifts - Lyttelton. ....................................................................... 58
Figure 49: Column hinge progression - CBGS, Lyttelton. ................................................................ 65
Figure 50: North core wall C & C/D vertical displacements at GL 4. .............................................. 67
Figure 51: GL 4 slab C to C/D out of plane moments. ...................................................................... 67
Figure 52: Column D2 axial load variation - CBGS (left) & CCCC (right), Lyttelton .................... 68
Figure 53: Column F2 axial load variation - CBGS (left) & CCCC (right), Lyttelton..................... 68
Figure 54: Column F1 axial load variation - CBGS (left) & CCCC (right), Lyttelton..................... 69
Figure 55: Column 4 D/E axial load variation - CBGS (left) & CCCC (right), Lyttelton ............... 69

CTV Building Non-linear Analysis February 2012
Compusoft Engineering Limited Page vi
Figure 56: Column D2 Level 1 axial load and drift plot - CBGS, Lyttelton ..................................... 70
Figure 57: Column D2 axial load variation with time - CBGS, Lyttelton. ....................................... 73
Figure 58: North core axial load variation with time - CBGS, Lyttelton. ......................................... 73
List of Tables
Table 1: Concrete stress-stain parameters ............................................................................................. 8
Table 2: Reinforcing steel stress-strain parameters. ............................................................................. 9
Table 3: Expected soil stiffness ........................................................................................................... 11
Table 4: Stiffness modifiers for elastically responding beam elements. ........................................... 13
Table 5: Modelled diaphragm (drag bar) connection capacities ........................................................ 22
Table 6: Basic load pattern definitions ................................................................................................ 23
Table 7: Global base reactions for basic load patterns (linear) .......................................................... 24
Table 8: Imposed loading allowances (for derivation of dynamic mass) .......................................... 24
Table 9: Modal participating mass ratios : „MODEL A‟ .................................................................... 26
Table 10: Modal participating mass ratios : „MODEL B‟ .................................................................. 27
Table 11: Seismic event information .................................................................................................. 28
Table 12: Adopted earthquake record information............................................................................. 29
Table 13: Adopted record start and finish times ................................................................................. 32
Table 14: Rayleigh damping parameters - Darfield ........................................................................... 33
Table 15: Rayleigh damping parameters - Lyttelton .......................................................................... 34
Table 16: Pushover drifts initiating column hinging (% of storey height). ....................................... 43
Table 17: Wall C diaphragm connection forces - Darfield. ............................................................... 46
Table 18: Wall C/D diaphragm connection forces - Darfield. ........................................................... 47
Table 19: Wall D diaphragm connection forces - Darfield. ............................................................... 47
Table 20: Wall D/E diaphragm connection forces - Darfield. ........................................................... 47
Table 21: Wall 5 (C to C/D) diaphragm connection forces - Darfield. ............................................. 48
Table 22: North core total diaphragm connection forces - Darfield. ................................................. 48
Table 23: North core total diaphragm connection forces - Darfield. ................................................. 49
Table 24: Slab 4 C to C/D diaphragm N/S actions - Darfield ............................................................ 50
Table 25: Slab 4 C to C/D diaphragm E/W actions - Darfield .......................................................... 50

CTV Building Non-linear Analysis February 2012
Compusoft Engineering Limited Page vii
Table 26: South wall diaphragm connection forces - Darfield .......................................................... 51
Table 27: Wall strains - Darfield ......................................................................................................... 52
Table 28: Column hinge plastic rotations - Darfield .......................................................................... 54
Table 29: Darfield base shears ............................................................................................................. 55
Table 30: Wall C diaphragm connection forces - Lyttelton. .............................................................. 59
Table 31: Wall C/D diaphragm connection forces - Lyttelton........................................................... 59
Table 32: Wall D diaphragm connection forces - Lyttelton. ............................................................. 60
Table 33: Wall D/E diaphragm connection forces - Lyttelton. .......................................................... 60
Table 34: Wall 5 (C to C/D) diaphragm connection forces - Lyttelton. ............................................ 61
Table 35: North core total diaphragm connection E/W forces - Lyttelton. ....................................... 61
Table 36: North core total diaphragm connection N/S forces - Lyttelton. ........................................ 62
Table 37: North core total diaphragm connection forces - Lyttelton. ................................................ 62
Table 38: Slab 4 C to C/D diaphragm E/W actions - Lyttelton. ........................................................ 63
Table 39: Slab 4 C to C/D diaphragm N/S actions - Lyttelton. ......................................................... 63
Table 40: Slab 4 C to C/D diaphragm connection forces - Lyttelton. ............................................... 64
Table 41: South wall diaphragm connection forces - Lyttelton. ........................................................ 64
Table 42: Lyttelton base shear ............................................................................................................. 66
Table 43: Level 1 axial force demands - CBGS and CCCC vertical earthquake components. ....... 70
Table 44: Induced column moments - CBGS and CCCC vertical earthquake components. ........... 71
Table 45: Range of Level 1 axial force due to vertical earthquake. .................................................. 72

CTV Non-Linear Seismic Analysis Report February 2012
Compusoft Engineering Limited Page 1
1. Introduction
Compusoft Engineering Limited was engaged by StructureSmith Ltd to undertake a non-
linear seismic analysis of the CTV building which collapsed as a consequence of the 22nd
February 2011 Lyttelton aftershock. It is the intent that the analyses outlined within this
report further enhance the understanding of the CTV performance during the 4th September
2010 Darfield earthquake, and the February 2011 Lyttelton aftershock.
The non-linear analyses outlined in this report are intended to;
Assist with the identification of the probable sequence of failure.
Report displacement and storey drift demands, identifying the onset and
progression of damage throughout the structure.
Monitor seismic demands on critical structural elements.
Determine whether column hinging is expected, and if so, to what extent.
Investigate the significance and effect of vertical accelerations on the
performance of the structure.
Investigate the variances in structural form i.e. the contribution of the masonry
infill panels, and precast spandrel panels to the seismic response and
performance of the structure.
The models used for all analyses have been based on building geometry, record structural
drawings [1], material tests [2], along with published guidance on the hysteretic behaviour of
detailing present within the CTV building.

CTV Non-Linear Seismic Analysis Report Compusoft Engineering Limited
Compusoft Engineering Limited Page 2
2. Building description
The CTV building was a 6 storey structure of reinforced concrete construction with plan
dimensions of approximately 31 m by 23 m. An overall impression of the complete structure
is shown in Figure 1. Construction consisted of 200 mm thick in situ composite concrete Hi-
Bond floors supported by precast concrete half-beams, shell beams and in situ concrete
columns. A lightweight roof was supported from concrete columns that cantilever off the
level 6 floor plate. At the north of the building a series of 300 mm thick reinforced concrete
walls were used to support a stair and lift core that projects two storeys above the upper floor
plate. A 400 mm thick reinforced concrete coupled shear wall system was situated on the
south face of the building. These walls were considered to form the primary seismic resisting
system. Frame action was engaged through stiffness compatibility with the walls and
contributed to the overall lateral resistance of the structure, particularly the torsional
resistance. Figure 2 below indicates the reinforced concrete framing and wall elements that
were present (note that the model is presented with north oriented to the right). Foundations
were comprised of pads supporting the internal columns, with a series of in situ concrete
inverted 'tee' beams supporting the perimeter columns and walls as shown in Figure 3. Inter-
storey height was typically 3.24 m with 3.70 m for the bottom storey (3.825 m to top of
foundations).
The lower 3 levels of the western perimeter frame were in-filled with reinforced concrete
masonry panels. An additional feature was a series of precast concrete spandrel panels that
were present on the north, east, and south perimeter frames.
Terminology used to describe floor levels within this report has been selected to match that
used in the record structural drawings and ongoing investigation reports, with ground floor
referred to as level 1, and the level 1 columns spanning between levels 1 and 2.
Figure 4 presents the building grid system used in both the original design and the analysis
model.

CTV Non-Linear Seismic Analysis Report Compusoft Engineering Limited
Compusoft Engineering Limited Page 3
Figure 1: Overall view of the CTV structural model (viewed from SW & SE respectively)
Figure 2: CTV structural model viewed from the east (slabs omitted for clarity)

CTV Non-Linear Seismic Analysis Report Compusoft Engineering Limited
Compusoft Engineering Limited Page 4
Figure 3: CTV foundation arrangement viewed from the south-west.
Figure 4: Building Grid System.

CTV Non-Linear Seismic Analysis Report Compusoft Engineering Limited
Compusoft Engineering Limited Page 5
3. Analysis Procedure Overview
Three dimensional models of the building were formed using the SAP2000 Advanced
(v14.2.4) [3] finite element program. These models were used to evaluate the seismic actions
using non-linear pushover, and non-linear time history methods in accordance with accepted
good practice, and recent advances in the understanding of the seismic performance of
structures.
As requested by StructureSmith the analysis of the CTV building has investigated/considered
three different structural configurations denoted „MODEL A‟, „MODEL B‟, and „MODEL C‟
as outlined below;
MODEL A - Concrete walls and frames only
Reinforced concrete frames and shear walls are considered to be the only
structural elements that resist seismic actions. Masonry infill panels and
precast concrete spandrel elements are assumed to be effectively isolated such
that that they cannot influence the seismic response and performance of the
building.
MODEL B - Model A with masonry infill
The structural form described in MODEL A above except the masonry infill
panels are not effectively isolated from the frame elements and will contribute
to the seismic response.
MODEL C - Model A with precast spandrel panels
The structural form described in MODEL A above except the precast spandrel
panels are assumed to interact with the frame elements and will contribute to
the seismic response.
The overall seismic analysis procedure for the CTV building consisted of the following
stages:
1. Undertake a non-linear gravity analysis on the structure using suitable
imposed loadings and allowing for deformations of the foundation system.
2. Undertake a nonlinear static pushover analysis of the structure for the two
primary directions starting from the end state of the gravity analysis. This

CTV Non-Linear Seismic Analysis Report Compusoft Engineering Limited
Compusoft Engineering Limited Page 6
enables a better understanding of the non-linear performance of the
structure to be developed, and helps to partially verify assumptions of the
adopted analysis parameters. Pushover analyses results to be reviewed and
the model adjusted as necessary.
3. Align the axes of the ground acceleration records from the September 2010
and February 2011 events to the principle axes of the CTV Building. Note
that the three ground acceleration records used have been assessed by
Tonkin & Taylor [4] as the most appropriate for the CTV site from the
nearby records that are available.
4. Undertake non-linear time history analyses using a selected time history
record for the September 2010 event. Initially undertake analyses for each
of the primary directions separately and then perform an analysis that
incorporates all directions of the acceleration time history record including
the vertical component. Analyses to assume that there is no pre-existing
structural damage.
5. Post-process results, and check results for the selected earthquake record
versus observed performance and damage level following the September
2010 earthquake.
6. Review appropriateness of the record with regard to matching reported
damage to that observed and re-assess assumptions on non-linear input data
as necessary.
7. Undertake a non-linear time history analysis using the three adopted time
history records for the February 2011 event. Analyses to assume no pre-
existing structural damage.
8. Process results and review performance.
Note that this process was performed for MODEL A and MODEL B as identified above,
although MODEL B was subject to fewer earthquake records. Only steps 1 and 2 were
undertaken for MODEL C.

CTV Non-Linear Seismic Analysis Report Compusoft Engineering Limited
Compusoft Engineering Limited Page 7
4. Material Properties
4.1. Concrete
The mean in situ unconfined compressive strengths of the concrete elements have been
evaluated via two methods as below:
1. Testing of core samples taken from structural components of the structure
[2].
2. NZSEE guidelines [5] which recommend that the mean strength of in situ
concrete can be taken as 1.5 times the specified lower characteristic design
strength. Ground beams properties have been assessed using this method.
Where not demonstrated through testing, the elastic stiffness of the concrete has been derived
following the provisions of NZS3101:2006, Cl5.2.3 [6] as below:
)
Where „f’c‟ is taken as the mean in situ unconfined strength of concrete (in MPa).
Where the nonlinear behaviour of concrete material is included in the analyses the stress-
strain properties as presented in Figure 5 and Table 1 below have been adopted. These
relationships have been used in the determination of capacities and element stiffness
throughout.
Figure 5: Concrete stress-strain curve
stress
strain
1 E c
0
f c '
CTV Non-Linear Seismic Analysis Report Compusoft Engineering Limited
Compusoft Engineering Limited Page 8
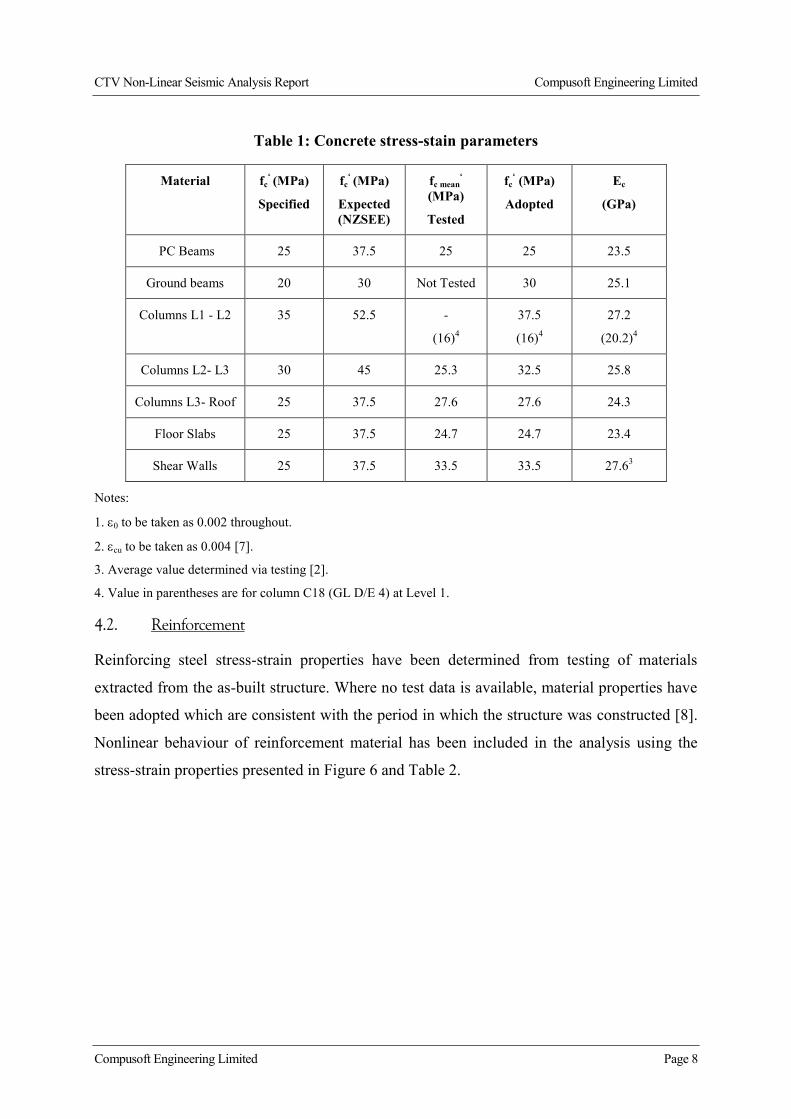
Table 1: Concrete stress-stain parameters
Material fc‘ (MPa)
Specified
fc‘ (MPa)
Expected (NZSEE)
fc mean‘
(MPa)
Tested
fc‘ (MPa)
Adopted
Ec
(GPa)
PC Beams 25 37.5 25 25 23.5
Ground beams 20 30 Not Tested 30 25.1
Columns L1 - L2 35 52.5 -
(16)4
37.5
(16)4
27.2
(20.2)4
Columns L2- L3 30 45 25.3 32.5 25.8
Columns L3- Roof 25 37.5 27.6 27.6 24.3
Floor Slabs 25 37.5 24.7 24.7 23.4
Shear Walls 25 37.5 33.5 33.5 27.63
Notes:
1. 0 to be taken as 0.002 throughout.
2. cu to be taken as 0.004 [7].
3. Average value determined via testing [2].
4. Value in parentheses are for column C18 (GL D/E 4) at Level 1.
4.2. Reinforcement
Reinforcing steel stress-strain properties have been determined from testing of materials
extracted from the as-built structure. Where no test data is available, material properties have
been adopted which are consistent with the period in which the structure was constructed [8].
Nonlinear behaviour of reinforcement material has been included in the analysis using the
stress-strain properties presented in Figure 6 and Table 2.

CTV Non-Linear Seismic Analysis Report Compusoft Engineering Limited
Compusoft Engineering Limited Page 9
Figure 6: Reinforcing steel stress-strain curve
Table 2: Reinforcing steel stress-strain parameters.
Grade Es (GPa) fy (MPa) sh su fu (MPa)
G275 205 321.3 0.0220 0.202 451.0
G380 205 4481 0.0097 0.1681 603 1
664 Mesh 205 6151 0.01 0.0421 6651
Notes:
1. Mean values obtained via testing [2]
stress
strain
f y
1 E s
sh su
f u

CTV Non-Linear Seismic Analysis Report Compusoft Engineering Limited
Compusoft Engineering Limited Page 10
5. Structural Elements
5.1. Soil Structure Interaction
In order to incorporate the potential lift-off of foundation elements in the model, non-linear
link elements have been incorporated that represent the gapping behaviour of the foundations.
Soil stiffness was considered to behave in a linear manner for compressive strains, with
applied soil stiffness as determined by Tonkin and Taylor as being most likely for the soil
conditions at the site [4].
It is expected that modelling the effects of any period shift due to foundation flexibility
through gapping would outweigh the potential benefits of modelling the plastic behaviour of
the soil [9]. No allowance was made for any suction that may be present between the soil and
underside of the foundation beams. Table 3 and Figure 7 present the soil stiffness and
foundation designation used in the analysis, with additional information presented in
Appendix C. Based upon post earthquake inspections of the site it has been considered that
the level of liquefaction observed would not have had a significantly adverse affect on the
performance of the building and as such the effects of liquefaction have not been considered
[4].
5.2. Foundation Elements
The foundation system consists of a series of large reinforced concrete pads and flanged
ground beams. The pads are modelled using shell objects with suitable thickness. The
ground beams are typically modelled as an assemblage of shell objects to form the overall
section and provide the necessary bearing area. Effects of backfill present on top of the
foundations has been considered assuming that only the soil contained within vertical planes
bounding the foundation width is able to be mobilised, and has a soil density of 18 kN/m3.

CTV Non-Linear Seismic Analysis Report Compusoft Engineering Limited
Compusoft Engineering Limited Page 11
Table 3: Expected soil stiffness
Foundation Element Compressive Stiffness (MN/m3)
1 122.7
1a 130.89
1b 65.98
2 85.4
2a 53.14
3 117.22
3a 78.59
4 159.69
4a 73.94
5 104.35
6 185.42
Figure 7: CTV foundation element location plan [1]

CTV Non-Linear Seismic Analysis Report Compusoft Engineering Limited
Compusoft Engineering Limited Page 12
5.3. Reinforced Concrete Frames
Reinforced concrete frames consisting of beam and column elements are incorporated in the
analysis model as elastically responding frame elements. To account for the effects of
concrete cracking, the effective elastic stiffness of the reinforced concrete frame sections has
been determined based upon the moment-curvature relationship [7] as below:
where „My‟ is the first yield bending moment, and „ϕy'‟ is the curvature at first yield using
material strengths as per Section 4, member geometry and reinforcement as specified in the
record drawings. Figure 8 below presents the effective stiffness relationships used for the
columns in the analysis model, with the effective stiffness properties from NZS 3101:2006 [6]
shown for comparison. Table 4 presents the stiffness modifiers used for a selection of beams.
Figure 8: Effective column stiffness relationship.
0.00
0.10
0.20
0.30
0.40
0.50
0.60
0.70
0.80
0.90
0.000 0.100 0.200 0.300 0.400 0.500 0.600 0.700 0.800 0.900 1.000
Ie/I
g
P/Agfc'
400dia Lvl1-Lvl2
400dia Lvl2-Lvl3
400dia L3-Roof
400x300 Lvl1-Lvl2
400x300 Lvl2-Lvl3
400x300 Lvl3-Roof
400x400 Lvl1-Lvl2
NZS3101 fy=500MPa
NZS3101 fy=300MPa

CTV Non-Linear Seismic Analysis Report Compusoft Engineering Limited
Compusoft Engineering Limited Page 13
Table 4: Stiffness modifiers for elastically responding beam elements.
Structural Component Effective Section Property, Ie
GL C Core Ground Beam (rect) 0.64 Ig
GL C/D Core Ground Beam (rect) 0.25 Ig
GL D/E Core Ground Beam (rect) 0.39 Ig
GL 1 2m Ground Beam (tee) 0.31-0.39 Ig
GL 3 Ground Beam (rect) 0.22-0.49 Ig
Typical 550x400 Beam (tee) 0.43 Ig
Typical 550x960 Beam (L) 0.20 Ig
Inelastic material behaviour for the beams and columns is incorporated by way of discrete
hinges that are defined as appropriate for the section properties and expected hysteretic
behaviour. This is discussed in the following sections.
5.3.1. Column Hinges
Column hinges are incorporated to represent the non-linear flexural behaviour of the columns.
These hinges have been defined as rigid plastic, isotropic interacting M-M hinges i.e. hinges
that yield based upon the interaction of biaxial bending moments at the hinge location. This
approach has been undertaken in order to improve speed of solution, efficiency, and analysis
stability. It should be noted that these hinges do not incorporate strength degradation during
hysteretic cycling, and have no plastic rotation limitations applied. As a consequence of this
the analysis will progress past the point at which theoretical column failure would occur. The
benefit of this approach is that trends in the building performance can be better examined, as
the analysis will not be terminated upon reaching the first instability. Column hinge
performance will therefore be required to be assessed post-analysis.
Hinge capacity has been determined using the interaction surface for each column section
using material properties outlined in Section 4 and the gravity axial action present at the time
of the earthquake as detailed in Section 6. Moment-curvature analyses incorporating the
identified gravity load has been used to determine hinge moment rotation behaviour.

CTV Non-Linear Seismic Analysis Report Compusoft Engineering Limited
Compusoft Engineering Limited Page 14
The adopted column plastic hinge length (Lp) considers strain penetration (Lsp) into the beam-
column joint zone and has been determined using the following relationship [7]:
where,
and Lc is the length between the critical section and the point of contra-flexure in the member
under consideration.
Hinges are located at the top and bottom of the column section adjacent to the beam face.
Figure 9 below indicates the typical reinforcement arrangement for a 400 mm diameter and a
400 mm x 300 mm column.
Figure 9: Typical column reinforcement. [1]
Examination of the eccentric column connection between the top of the column located at grid
4 D/E (referenced as C18 on the structural drawings) and the north core wall as seen in Figure
10, has indicated that the detailing present is not capable of transferring the significant axial
forces that would result from moderate seismic demands. As such, this connection has not
been included in the analysis model, with column C18 assumed to behave as a cantilever
above Level 6.

CTV Non-Linear Seismic Analysis Report Compusoft Engineering Limited
Compusoft Engineering Limited Page 15
Figure 10: Column at GL 4 D/E (C18) to wall connection detailing at roof level. [1]
5.3.2. Beam Hinges
Beam hinges are incorporated in the analysis model as discrete non linear link elements
located where inelastic demand is shown to occur. Hinges have been positioned at the
location of the highest flexural demand which typically occurs at the column face for each
beam. Plastic hinge lengths have been determined in a similar manner to that used for the
columns (refer Section 5.3.1).
Beam flexural strength and rotational capacity was determined via moment-curvature analysis
of the section including the contribution of the slab acting in flexure. It has been assumed for
analysis purposes that beam hinge formation is not limited by the capacity of bar anchorages.
A Takeda hysteresis model [10] was used to consider the degradation of hinge stiffness under
cyclic loading.
For all precast beams, anchorage of positive (bottom) reinforcement occurs via hooks into the
beam-column joint zone which can be seen in Figure 11 and Figure 12 below. Top steel
anchorage in exterior beam column joints is via hooked bars similar to the typical bottom
steel anchorage (as seen in Figure 11).

CTV Non-Linear Seismic Analysis Report Compusoft Engineering Limited
Compusoft Engineering Limited Page 16
Figure 11: Reinforcement anchorage in Grid A beam column joint zone [1]
Figure 12: Typical bottom reinforcement anchorage in interior beam column joint zone [1]
Physical evidence has indicated that the positive reinforcement of the beam along gridline 4
between grids B and C was not effectively anchored into the wall on grid C at levels 3 and 4
[2]. To reflect this finding no positive moment capacity has been provided in the model at
these locations 1.
5.3.3. Beam-Column Joints
Beam-column joint performance and capacity may have been influenced by the detailing of
reinforcement used in the construction. Potential non-linearity in the beam column joints has
not been explicitly modelled. Appendix B contains a discussion on the expected performance
of the detailing present and the assessment approach undertaken. Joint demand/capacity
ratios were assessed post analysis.
1 Note that post analyses it has been confirmed that in addition to levels 3 and 4, beam bottom steel (between grids B and C) was not effectively anchored at levels 1, 5, and 6 into the wall at grid C

CTV Non-Linear Seismic Analysis Report Compusoft Engineering Limited
Compusoft Engineering Limited Page 17
5.4. Reinforced Concrete Shear Walls
The building contains two reinforced concrete shear wall systems. Each of these systems was
modelled using nonlinear layered shell elements which incorporate inelastic material effects at
a fibre level. Where significant inelastic demands were not expected, the wall was modelled
using linear elastic shell elements with stiffness modifiers determined from moment curvature
analyses similar to those undertaken in Section 5.3. The stiffness modifiers determined via
these analyses along with those determined following the provisions of NZS3101:2006 [6] are
presented in Figure 13 below based on the gravity axial load.
Figure 13: Effective wall stiffness relationship
Confining reinforcement was detailed for the boundary regions of all reinforced concrete
shear walls in the lower two storeys. It was considered appropriate to model the nonlinear
stress strain behaviour of the concrete fibres in these regions based on the Mander [11]
confined concrete model. Between boundary regions, and for wall elements above the level 3
floor plate, concrete material in the layered shell element was assumed to be unconfined.
On the south shear wall diagonally reinforced coupling beams connected the two portions of
wall (as seen in Figure 14 below). Typical span to depth aspect ratio of the coupling beams
was 0.76 but varied from 0.55 at the bottom to 1.2 at the top of the wall. Modelling of the
diagonally reinforced coupling beams has been based upon the approach documented in
0.00
0.10
0.20
0.30
0.40
0.50
0.60
0.000 0.020 0.040 0.060 0.080 0.100 0.120 0.140 0.160 0.180 0.200
Ie/I
g
P/Agfc'
Sth Wall Lvl2-Lvl3
South Wall Lvl4
South Wall Lvl5
South Wall Lvl6
Nth Core Lvl6
Nth Core Lvl3
NZS3101 (500MPa)
NZS3101 (300MPa)

CTV Non-Linear Seismic Analysis Report Compusoft Engineering Limited
Compusoft Engineering Limited Page 18
Appendix A, with non linear links substituted for the fibre elements to reduce computation
time.
Figure 14: Southern shear wall typical coupling beam reinforcement arrangement [1]
5.5. Masonry Infill Panels.
Masonry infill panels were constructed on the western side of the CTV building between
ground and level 4. Although detailed as having 25mm separation joints to columns (refer
Figure 15 below) there is some uncertainty about the effectiveness of the separation. It has
therefore been deemed appropriate to model the potential effect of the masonry on the
building response in Model B. As such masonry has been assumed to be integral with the
primary structure and is therefore 'active' in resisting seismic shears from the commencement
of the earthquake.

CTV Non-Linear Seismic Analysis Report Compusoft Engineering Limited
Compusoft Engineering Limited Page 19
Figure 15: Record structural elevation of masonry infill panels [1]
Calculations by the DBH Technical Review Committee based on cantilever flexural capacity
of the 2.3 m wide masonry panels indicated that the maximum shear contribution of each
7.5 m masonry bay is between 210 kN and 300 kN at yield, with strength degradation likely
to commence at approximately 20 mm displacement. As such, masonry behaviour has been
modelled using stiff elastic shell elements to mimic the stiffness contribution the walls
provide to the supporting beams, with a tri-linear link connecting the masonry to the
underside of the floor/beam above to replicate the inelastic behaviour. Hysterestic behaviour
of the masonry link has been based upon the Takeda model. Figure 16 below shows the
inelastic force displacement 'backbone' relationship that has been adopted for masonry.

CTV Non-Linear Seismic Analysis Report Compusoft Engineering Limited
Compusoft Engineering Limited Page 20
Figure 16: Masonry panel force displacement relationship.
5.6. Precast Concrete Cladding Spandrels
Precast concrete cladding spandrel units were located on the perimeter of the building. Figure
17 shows a cross section of a typical panel taken from the record structural drawings.
Figure 17: Typical spandrel panel section
A potential mechanism in this system is the column interaction with the precast spandrel
elements. Should seismic drifts exceed the separation gap provided between the two
elements, there is potential for the column to bear directly against the top edge of the
spandrel.
In Model C, spandrels have been modelled as planar linear elastic shell elements located
along the column centre lines as shown in Figure 18. Spandrel-column interaction was
achieved through the use of a gapping link element situated between the column element and
the spandrel panel. Links were located at the top level of the spandrel and are shown in green
in Figure 18. In order to obtain an upper bound on the influence of the spandrels, it was
assumed that there is no gap present between the column and spandrel elements i.e. the
spandrel bears against the column. An additional flexural hinge has been included in the
0
50
100
150
200
250
300
350
0 0.01 0.02 0.03 0.04
Forc
e (k
N)
Displacement (m)

CTV Non-Linear Seismic Analysis Report Compusoft Engineering Limited
Compusoft Engineering Limited Page 21
column above the gapping link element to accommodate any potential hinging caused through
spandrel interaction.
Figure 18: Model C screenshot showing spandrel panels.
The potential effects of the spandrels have only been considered for non-linear pushover
analyses to provide a sensitivity analysis on results. As spandrels were not included in the
time history analyses, consideration of this should be made during the assessment of the
columns.
5.7. Floors
Review of the lateral load paths has indicated that diaphragm integrity at the interface with
shear walls may have been an important consideration in the determination of the seismic
performance of the structure. As such, the flexibility of each floor level has been modelled
with in-plane stiffness based on the average thickness of the concrete slab (173 mm). For the
purposes of the analysis the stiffness of the slab elements have been considered to have
0.5Agross for in-plane actions. Diaphragms were assumed to behave in a linear-elastic manner,
with diaphragm actions monitored at interfaces with shear walls.
The floor diaphragm connections to the north core lift shaft walls on grids D and D/E have
been identified as an area of potential connection failure. As a consequence of a lack of
specific tie reinforcement it was assumed that there is no tensile or gravity connection
between the slab and these walls at levels 2 and 3. At levels 4 to 6 a retrofitted steel angle tie
(or 'drag bar') provided limited tensile and gravity connection to the slab at the tips of walls D
and D/E. Multi-linear links have been used to provide a 'fuse' that will transfer the expected
upper bound tensile capacity of the retrofitted connection only with no limitation on the

CTV Non-Linear Seismic Analysis Report Compusoft Engineering Limited
Compusoft Engineering Limited Page 22
compressive load transfer capability. Nominal tensile connection capacities for the drag bar
and it's connections, and the corresponding ultimate displacements have been provided by
Hyland Fatigue & Earthquake Engineering and StructureSmith, and are listed in Table 5
below. Gravity transfer at this interface is expected to be limited by slab reinforcement
yielding so has been taken as zero for the purposes of seismic analysis.
Table 5: Modelled diaphragm (drag bar) connection capacities
Wall Level Tensile Capacity (kN)
Displacement at Disconnection
(mm)
Compressive Capacity (kN)
D 2 0 0 Not limited
3 0 0 Not limited
4 320 2.3 Not limited
5 420 2.4 Not limited
6 603 2.6 Not limited
D/E 2 0 0 Not limited
3 0 0 Not limited
4 403 2.8 Not limited
5 503 3.0 Not limited
6 540 3.0 Not limited
Floor diaphragm connections to the other north core walls on grids 5, C and C/D, and to the
south wall on grid 1 were assumed to remain connected for the purposes of the seismic
analysis. Maximum diaphragm actions at these locations are reported (in Sections 9 and 10)
at these locations for assessment by others.
For out-of-plane demands (i.e. plate action) the floors have been considered to have stiffness
corresponding to 0.5Igross at mid-span, with the effective stiffness adjacent to beam lines and
columns taken as the average positive and negative bending stiffness determined by moment-
curvature analysis considering the reinforcement present. In the determination of the slab
flexural stiffness the contribution of the metal decking has been ignored as the decking would
not have been effectively anchored at the beam support where the positive (sagging) flexural
demands are greatest.

CTV Non-Linear Seismic Analysis Report Compusoft Engineering Limited
Compusoft Engineering Limited Page 23
6. Loadings
6.1. Gravity Loadings
For combination with seismic loads a gravity load combination has been developed following
the requirements of NZS1170.0:2002 Section 4 [12]. This gravity load combination also
formed the basis for consideration of P-delta effects in the seismic analyses. In this
combination live load allowances have been combined with the initial staged dead load
analysis as a separate loading step as follows,
Taking „G‟ as the sum of all dead type loadings incorporating element self weights, plus any
superimposed dead load (SDL) allowances that are required to be considered, and
„∑ΨC,iΨA,iQi‟ given as sum product of all individual components of imposed loading as
presented in Table 6 below.
Table 6: Basic load pattern definitions
Gravity load component
Load allowance (kPa)
C A
DL Self weight 1.0 1.0
SDL 0.55 1.0 1.0
Plant LL 5.0 0.6 1.0
Toilet LL 2.0 0.4 1.0
Office LL 3.0 0.4 1.0
Roof LL 0.25 0 1.0
Note that the use of A equal to 1.0 for office live load could slightly over-estimate column
compression demand in lower levels of the structure by between 2 and 7 percent. For the
purpose of determining gravity actions in the upper levels of the structure it is believed that a
A equal to 1.0 suitably represents the gravity actions.
It should be noted that level 3 and the east side of level 6 of the CTV structure are understood
to have been untenanted at the time of the earthquake. No live load allowance has been
included at these locations.

CTV Non-Linear Seismic Analysis Report Compusoft Engineering Limited
Compusoft Engineering Limited Page 24
Table 7 below presents the global base reaction reported at the model origin (i.e.
{x,y,z}={0,0,0}= Level 1 at grid reference F/1) for each load type arising from a linear
analysis.
Table 7: Global base reactions for basic load patterns (linear)
Gravity load case FZ (kN) MX (kNm) MY (kNm)
DL 35458 492755 482464
SDL 4647 65608 59200
Plant LL 364 5014 8951
Toilet LL 135 2220 3307
Office LL 7437 119468 87223
Roof LL 0 0 0
6.2. Dynamic Mass
The dynamic mass used in the seismic analyses was determined following the provisions of
NZS1170.5:2004, Cl 4.2 [13] where,
taking „G‟ based on all dead loads (plus superimposed dead loads), „∑Ψc,iΨA,iQi ‟ as the sum
product of the individual imposed loadings as per Table 8 below.
Table 8: Imposed loading allowances (for derivation of dynamic mass)
Gravity load component
Load allowance (kPa)
E A
DL Self weight NA NA
SDL 0.55 NA NA
Plant LL 5.0 0.6 0.74
Toilet LL 2.0 0.3 0.5
Office LL 3.0 0.3 0.5
Roof LL 0.25 0.0 0.0

CTV Non-Linear Seismic Analysis Report Compusoft Engineering Limited
Compusoft Engineering Limited Page 25
Seismic mass associated with the load component „DL‟ has been obtained through explicit
modelling of the structural elements. All other tributary masses outlined in Table 8 have been
incorporated via distributed loads applied to the floor/roof elements in order to accurately
proportion mass for slabs and beams etc. Note that as for Section 6.1 no live load has been
included in the development of the dynamic mass for the untenanted levels. The distribution
of seismic mass in the analysis model is as presented in Figure 19 below.
Figure 19: Seismic mass distribution
-2
0
2
4
6
8
10
12
14
16
18
20
22
24
0 500 1000 1500 2000 2500 3000 3500 4000
He
igh
t (m
)
Seismic Mass (t)
Level 1
Level 2
Level 3
Level 4
Level 5
Level 6
Level 7
Level 8

CTV Non-Linear Seismic Analysis Report Compusoft Engineering Limited
Compusoft Engineering Limited Page 26
7. Seismic Analyses
7.1. Modal Analysis
Modal analysis has been carried out for Model A and Model B considering dynamic mass as
outlined in Section 6.2. The results of this analysis are presented in Table 9 and Table 10
below (showing modes with more than 5% mass participating only), with X, Y, and Z
representing the north, west, and vertical axes respectively.
Table 9: Modal participating mass ratios : ‘MODEL A’
Mode Period (sec)
UX UY UZ ∑UX ∑UY ∑UZ RZ ∑RZ
1 1.29 0.61 0.01 0.00 0.61 0.00 0.00 0.19 0.19
2 1.02 0.00 0.37 0.00 0.61 0.38 0.00 0.01 0.20
3 0.43 0.00 0.25 0.00 0.61 0.63 0.00 0.40 0.60
21 0.25 0.00 0.00 0.07 0.64 0.69 0.14 0.00 0.63
45 0.21 0.00 0.00 0.11 0.76 0.72 0.34 0.00 0.66
78 0.09 0.00 0.01 0.07 0.78 0.81 0.71 0.01 0.78
92 0.04 0.06 0.02 0.00 0.94 0.91 0.86 0.06 0.90
95 0.02 0.00 0.00 0.05 0.95 0.94 0.96 0.00 0.91

CTV Non-Linear Seismic Analysis Report Compusoft Engineering Limited
Compusoft Engineering Limited Page 27
Table 10: Modal participating mass ratios : ‘MODEL B’
Mode Period (sec)
UX UY UZ ∑UX ∑UY ∑UZ RZ ∑RZ
1 1.15 0.43 0.09 0.00 0.43 0.09 0.00 0.16 0.16
2 0.83 0.16 0.33 0.00 0.59 0.42 0.00 0.01 0.17
3 0.41 0.01 0.21 0.00 0.59 0.63 0.00 0.40 0.57
21 0.25 0.00 0.00 0.06 0.63 0.68 0.14 0.00 0.62
42 0.21 0.06 0.01 0.01 0.75 0.72 0.22 0.01 0.65
45 0.21 0.00 0.00 0.09 0.75 0.72 0.34 0.00 0.65
78 0.09 0.00 0.01 0.08 0.78 0.81 0.70 0.01 0.76
100 0.01 0.02 0.01 0.00 0.98 0.99 1.00 0.02 0.93
7.2. Non-Linear Static (Pushover) Analysis
In order to gain an initial view of the anticipated seismic performance of the building a
nonlinear static analysis (often referred to as a “Pushover”) was undertaken for each of the
analysis models described in Section 3. This pushover was used to verify that the finite
elements employed for each of the structural mechanisms outlined in Section 5 were
performing as expected.
Pushover analyses were undertaken in each of the two orthogonal directions i.e. north/south
(N/S) & east/west (E/W) independently. The pushover cases consist of a displacement
controlled, force based analysis with the load vector based upon a triangular load distribution,
and inertia force applied to each mass degree of freedom in the model. Based upon the
fundamental periods of vibration obtained from section 7.1 a building centre of mass target
displacement of 200 mm has been taken for the N/S direction and 150 mm has been taken as
the target displacement for the E/W direction. These values are approximately equivalent to
the current Building Code [14] elastic displacement demand considering, subsoil type D,
Z=0.30, and Sp=1 as can be seen in Figure 20 below. It has been assumed that the level 6
displacement demand is approximately 1.5 times greater than the building centre of mass
demand.

CTV Non-Linear Seismic Analysis Report Compusoft Engineering Limited
Compusoft Engineering Limited Page 28
Figure 20: Site spectral displacements.
7.3. Nonlinear Dynamic (Time History) Analysis
Non-linear time history analyses have been undertaken incorporating inelastic behaviour for
the two analysis models as outlined in Section 3. Two seismic event scenarios are considered
in these analyses which are denoted as the „Darfield‟ event, and the „Lyttelton‟ event in this
report. The details of these events as obtained from GNS Science [15, 16] are presented in
Table 11 below.
Table 11: Seismic event information
Event Name Reference Number
Local Date & Time Epicenter Location
Magnitude Focal Depth
Darfield 3366146 04Sept2010, 0435hrs 43.55°S, 172.17°E ML 7.1 11 km
Lyttelton 3468575 22Feb2011, 1251hrs 43.60°S, 172.71°E ML 6.3 5 km
7.3.1. Analysis Ground Motions
In an attempt to approximate the ground shaking that was experienced at the CTV site for
each of the two events, a suite of three acceleration time history records were adopted
following the recommendations of Tonkin and Taylor [4]. These were records recorded at
other locations in the Christchurch CBD, with (according to Tonkin & Taylor) similar
geologic profiles to that present at the CTV site. The adopted records are presented in Table
12 below.
0.000
0.100
0.200
0.300
0.400
0.500
0.600
0.000
0.100
0.200
0.300
0.400
0.500
0.600
0.700
0.800
0.900
1.000
0 0.5 1 1.5 2 2.5 3 3.5 4 4.5
Sit
e S
pectr
al
Dis
pla
cem
en
t, S
d(T
) (m
)
Sit
e S
pectr
al
Accele
rati
on
, S
a(T
) (g
)
Period, T (sec)
Site Spectra
C(Ti) MRSA ESA Sd(Ti) Displ N/S Displ E/W

CTV Non-Linear Seismic Analysis Report Compusoft Engineering Limited
Compusoft Engineering Limited Page 29
Table 12: Adopted earthquake record information
Station Name Station ID Station Location
Christchurch Cathedral College
CCCC 43.53°S, 172.65°E
Christchurch Hospital CHHC 43.53°S, 172.63°E
Christchurch Botanic Gardens
CBGS 43.53°S, 172.62°E
The acceleration time histories were obtained from GNS Science [17, 18] and have been
processed in order to align the axes of the recorded motions to purely north/south (denoted as
component N00E) and east/west (denoted as component N90E) components to coincide with
the principle axis of the CTV building. No processing has been undertaken on the vertical
components of the records.
Figure 21 through Figure 26 below present the site 5% damped response spectra for the three
(processed) components of the Darfield and Lyttelton events respectively. Also presented for
reference is the mean of the recorded components and the elastic spectra used for design
purposes at the site derived in accordance with NZS1170.5:2004 [13] considering site subsoil
class D, Z=0.22 (i.e. that applicable for a new building design in Christchurch during
February 2011), and Sp=1.0.

CTV Non-Linear Seismic Analysis Report Compusoft Engineering Limited
Compusoft Engineering Limited Page 30
Figure 21: Darfield N00E 5% damped response spectra (north/south)
Figure 22: Darfield N90E 5% damped response spectra (east/west)
Figure 23: Darfield Vertical 5% damped response spectra

CTV Non-Linear Seismic Analysis Report Compusoft Engineering Limited
Compusoft Engineering Limited Page 31
Figure 24: Lyttelton N00E 5% damped response spectra (north/south)
Figure 25: Lyttelton N90E 5% damped response spectra (east/west)
Figure 26: Lyttelton Vertical 5% damped response spectra

CTV Non-Linear Seismic Analysis Report Compusoft Engineering Limited
Compusoft Engineering Limited Page 32
The records as supplied by GNS have arbitrary stop and start times that encompass many
seconds of very small ground vibration. Incorporation of the entire record into the analysis
would add no benefit to the understanding of the structural response or performance, and
would only add considerable analysis time. For the purposes of the non linear time history
analysis runs, reduced length records have been used to reduce computation times. Record
start and finish times have been selected to ensure that all significant shaking is captured by
the analysis and are presented in Table 13. All results contained with this document have been
presented relative to the adopted start time of each acceleration time history record. Appendix
D contains the acceleration time history records used for these analyses.
Acceleration time history records for the Darfield event were much longer in duration than for
the Lyttelton event. To reduce analysis time only the CBGS record was analysed for Darfield.
The CBGS record was chosen as the spectral accelerations were the closest to the mean of the
three time history records for the period ranges of interest i.e. 0.8 to 1.5 seconds, and as such
was likely to provide a reasonable understanding of the building demands.
Table 13: Adopted record start and finish times
Station Name Event Start Time (sec)
Finish Time (sec)
Christchurch Botanic Gardens (CBGS)
Darfield 28.90 40.90
Christchurch Cathedral College (CCCC)
Lyttelton 15.04 23.90
Christchurch Hospital (CHHC)
Lyttelton 16.00 27.20
Christchurch Botanic Gardens (CBGS)
Lyttelton 16.50 25.50
7.3.2. Damping
Elastic Structural Damping
Elastic damping for the structure has been incorporated in the time history analyses by way of
mass () and stiffness () proportional damping coefficients, commonly referred to as
Rayleigh damping. A common criticism of the Rayleigh damping method is that it considers
only the initial stiffness in its determination of level of damping. In order to consider the

CTV Non-Linear Seismic Analysis Report Compusoft Engineering Limited
Compusoft Engineering Limited Page 33
reduced level of damping appropriate during inelastic cycling of structural elements a tangent
stiffness damping model is often considered as being preferable [7]. To address this issue a
reduced damping coefficient, „*„, for the fundamental period has been specified for use in
determining the damping coefficients. This adopted method more closely approximates the
tangent stiffness approach.
Observed damage of the CTV building after the Darfield event indicated that the ductility
demand of the structure was nominal. On this basis, unmodified Rayleigh damping was
adopted for Darfield analysis runs. Table 14 below presents the input parameters adopted in
determining the Rayleigh damping coefficients for analyses of the Darfield event.
Table 14: Rayleigh damping parameters - Darfield
Period, T
(sec)
Damping, ξ*(%)
First 1.29 5
Second 0.05 5
Using the parameters presented in Table 14 the mass and stiffness proportional damping
coefficients are determined as follows:
Mass Proportional Coefficient, 0.4689
Stiffness Proportional Coefficient, 7.661x10⁻⁴
For the Lyttelton event it was necessary to estimate the building displacement ductility
capacity in order to select an appropriate level of damping. From the bi-linearised pushover
plot in Figure 37 of Section 8 the approximate ductility capacity of the structure is between
1.5 and 2.4 depending on the direction of demand. For the purpose of the non linear time
history analyses a ductility of 2.5 was assumed for the structure. Table 15 below presents the
input parameters adopted in determining the Rayleigh damping coefficients for analyses of
the Lyttelton event.

CTV Non-Linear Seismic Analysis Report Compusoft Engineering Limited
Compusoft Engineering Limited Page 34
Table 15: Rayleigh damping parameters - Lyttelton
Period, T
(sec)
Damping, ξ*(%)
First 1.29 2.8
Second 0.05 2.8
Using the parameters presented in Table 15 the mass and stiffness proportional damping
coefficients are determined as follows:
Mass Proportional Coefficient, 0.2606
Stiffness Proportional Coefficient, 4.291x10⁻⁴
Figure 27 below presents a plot of equivalent viscous damping vs structure period obtained
using the above coefficients.
Figure 27: Equivalent viscous damping vs structure period - Lyttelton
Radiation Damping
It has been considered that the adopted acceleration time histories inherently contain a
component of radiation damping and given the uncertainties over the actual site accelerations,
and material properties, the incorporation of additional radiation damping is expected to be
insignificant and as such has not been incorporated.
0%
2%
4%
6%
0.00 0.50 1.00 1.50 2.00
Eq
uiv
ale
nt V
isco
us D
am
pin
g,
Period, T (sec)
Equivalent Viscous Damping () vs Structure Period (Ti)
Total Damping
Mass Damping
Stiffness Damping
2.8%

CTV Non-Linear Seismic Analysis Report Compusoft Engineering Limited
Compusoft Engineering Limited Page 35
8. Non-Linear Pushover Results
8.1. Model A
Force displacement plots for the push-over analyses are presented in Figure 28 for Model A.
Displacements have been recorded at a node located at approximately the centre of mass of
level 6. Figure 29 and Figure 30 present the base shear components recorded at the top of the
foundation beams for each of the primary structural elements.
Figure 28: Model A force-displacement relationship.
It can be seen from the pushover plots that the building responds to the imposed lateral
loading in a highly non-linear manner.
The east/west base shear displacement plots are curved in shape. Plot profiles for both the
east and west directions are almost identical indicating a similar building response in each of
these directions.
North/south response appears to have more localised sections of non-linearity and can be
characterised by a tri-linear and bi-linear plots respectively. Initial response of the building in
0
1000
2000
3000
4000
5000
6000
7000
8000
9000
10000
11000
0 0.05 0.1 0.15 0.2 0.25 0.3 0.35
Ba
se S
he
ar (
kN
)
Displacement (m)
Northward Push
Southward Push
Westward Push
Eastward Push

CTV Non-Linear Seismic Analysis Report Compusoft Engineering Limited
Compusoft Engineering Limited Page 36
the northward direction is stiffer than in the southward direction, which can be attributed to
the differences in the foundation behaviour under the north core for these directions.
Figure 29: Model A base shear components - east/west direction.
Figure 30: Model A base shear components - north/south direction.
Components of base shear are similar in each of the directions of loading with the exception
of the north core in the north/south direction. As can be seen in Figure 30, more base shear is
0
1000
2000
3000
4000
5000
6000
7000
8000
9000
10000
11000
0 0.05 0.1 0.15 0.2 0.25 0.3
Ba
se S
hea
r (k
N)
Displacement (m)
Total Base Shear (Westward)
North Core Shear (Westward)
Column Shear (Westward)
South Wall Shear (Westward)
Total Base Shear (Eastward)
North Core Shear (Eastward)
Column Shear (Eastward)
South Wall Shear (Eastward)
0
1000
2000
3000
4000
5000
6000
7000
0 0.05 0.1 0.15 0.2 0.25 0.3
Ba
se S
he
ar (k
N)
Displacement (m)
Total Base Shear (Northward)
North Core Shear (Northward)
Column Shear (Northward)
South Wall Shear (Northward)
Total Base Shear (Southward)
North Core Shear (Southward)
Column Shear (Southward)
South Wall Shear (Southward)

CTV Non-Linear Seismic Analysis Report Compusoft Engineering Limited
Compusoft Engineering Limited Page 37
carried by the core for an applied northward load than for a loading direction toward the
south. This is due to the mobilisation of additional gravity from the beams and slab along
gridline 4 as the southern edge of the core wall webs move upwards with core rotation to the
north. These shears provide a restoring force that restrains the wall rotation, requiring higher
shears to generate the same centre of mass displacement at level 6.
Pushover analyses have indicated that the response of the building in the east/west direction to
be significantly torsional. Figure 31 to Figure 34 present the variation in displacement profile
between the approximate centre of mass (at Level 6) and the building perimeter gridlines for
each direction under consideration. East/west displacement on gridline 1 is approximately
three times greater than that on grid 4, and can be seen in Figure 31 and Figure 32. This is a
consequence of the difference in relative stiffness between the north core and the coupled
shear wall on grid 1. As the coupled shear wall on gridline 1 yields the torsional response of
the building is further exacerbated.
Figure 31: Model A Level 6 western pushover displacement profile.
0
1000
2000
3000
4000
5000
6000
7000
8000
9000
10000
11000
0 0.1 0.2 0.3 0.4 0.5
Bas
e Sh
ear
(kN
)
Displacement (m)
C.O.M Displacement
GL 4 Level 6 Displacement
GL 1 Level 6
Displacement

CTV Non-Linear Seismic Analysis Report Compusoft Engineering Limited
Compusoft Engineering Limited Page 38
Figure 32: Model A Level 6 eastern pushover displacement profile.
Little torsional behaviour is exhibited through loading in the north/south direction. As can be
seen in Figure 33 and Figure 34 there is almost no difference in displacement between grid A
and grid F under north/south loading.
Figure 33: Model A Level 6 northern pushover displacement profile.
0
1000
2000
3000
4000
5000
6000
7000
8000
9000
10000
11000
0 0.1 0.2 0.3 0.4 0.5
Ba
se S
hea
r (k
N)
Displacement (m)
GL 1 Level 6 DisplacementC.O.M
DisplacementGL 4 Level 6 Displacement
0
1000
2000
3000
4000
5000
6000
7000
0 0.05 0.1 0.15 0.2 0.25 0.3 0.35
Bas
e Sh
ear
(kN
)
Displacement (m)
GL A Level 6 DisplacementC.O.M
DisplacementGL F Level 6 Displacement

CTV Non-Linear Seismic Analysis Report Compusoft Engineering Limited
Compusoft Engineering Limited Page 39
Figure 34: Model A Level 6 southern pushover displacement profile.
8.2. Model B
Figure 35 presents the force versus displacement pushover plots for Models A and B for the
centre of mass displacement range expected for the Darfield earthquake. From this it is
apparent that the addition of masonry stiffens the initial response of the structure. As the
masonry degrades in strength and stiffness the pushover plots converge to that of Model A,
with building response expected to match that of Model A once the masonry has fully
degraded
0
1000
2000
3000
4000
5000
6000
0 0.05 0.1 0.15 0.2 0.25
Bas
e Sh
ear
(kN
)
Displacement (m)
GL A Level 6
Displacement
C.O.M Displacement

CTV Non-Linear Seismic Analysis Report Compusoft Engineering Limited
Compusoft Engineering Limited Page 40
Figure 35: Model A & Model B pushover force displacement comparison.
8.3. Model C.
Figure 36 presents the effect spandrel interaction has on the pushover plots for indicative
northward and eastward directions of loading. For the purpose of comparison the pushover
plots for Model A and Model B have also been included.
0
1000
2000
3000
4000
5000
6000
7000
8000
9000
10000
0 0.01 0.02 0.03 0.04 0.05 0.06 0.07 0.08 0.09 0.1 0.11 0.12 0.13 0.14 0.15 0.16
Bas
e S
he
ar (k
N)
Displacement (m)
Northward Push (Model B)
Southward Push (Model B)
Westward Push (Model B)
Eastward Push (Model B)
Northward Push (Model A)
Southward Push (Model A)
Westward Push (Model A)
Eastward Push (Model A)

CTV Non-Linear Seismic Analysis Report Compusoft Engineering Limited
Compusoft Engineering Limited Page 41
Figure 36: Pushover force displacement variations for north and east directions.
As can be seen in Figure 36, the addition of spandrels increases the building stiffness in each
of the directions under consideration. Spandrel interaction has a more significant effect on
building response in the east/west direction than for the north/south direction. Note that
column shear and spandrel connection strength limitations have not been incorporated so the
effect of the spandrels is likely to have been overestimated at moderate to high displacements
in the pushover analysis.
8.4. Building Displacement Ductility Capacity.
Figure 37 presents the Model A pushover plots that have been bi-linearised in order to obtain
an estimate on the building displacement ductility capacity. The building displacement
capacity being defined as the point at which at least three column hinges have exceeded their
ultimate plastic rotation limit i.e. the rotation at which a concrete strain of 0.004 would have
been reached. Included in the plots are the level 6 c.o.m displacements at which the pushover
predicts that three column plastic hinges have rotated past their plastic limit. Three hinges
have been selected to account for variability in material strengths, and demands. From the bi-
linearised plots the ductility displacement capacity can be estimated for the building.
0
1000
2000
3000
4000
5000
6000
7000
8000
9000
10000
11000
12000
13000
0 0.05 0.1 0.15 0.2 0.25 0.3
Bas
e Sh
ear
(kN
)
Displacement (m)
Northward Push (Model C)
Eastward Push (Model C)
Northward Push (Model B)
Eastward Push (Model B)
Northward Push (Model A)
Eastward Push (Model A)

CTV Non-Linear Seismic Analysis Report Compusoft Engineering Limited
Compusoft Engineering Limited Page 42
Figure 37: Bi-linear pushover plots
From Figure 37 the ductility capacity can be estimated as being 1.9 to 2.1 in the east/west
direction, and between 2.2 and 2.4 for the north/south direction. It should be noted that given
the shape of the pushover plots it is difficult to approximate the building performance as a bi-
linear plot for the purpose of determining the ductility capacity for the building as a whole. A
likely range of ductility capacity for the structure at the point where column hinge rotations
become excessive is 1.5 to 2.5.
Table 16 below contains a summary of the storey drifts required to initiate hinging i.e. the
drift at which the nominal section capacity has been reached, using the Model A pushover
results. Drifts have been calculated using interstorey displacement in the direction of loading
at the onset of hinging in the columns i.e. Frame 1 and 2 drifts have been calculated using the
interstorey displacements from a westward loading and, Frame F drifts have been determined
using displacements from a northward loading. For the purposes of this report the drift that
initiates column hinging has been defined as the average of the storey drifts that cause the first
and second hinges to form on a given frame line. Also included is a comparison of the Frame
1 and Frame F drifts that initiate hinging assuming spandrels were installed against the
columns with no gap present i.e. for Model C.
0
1000
2000
3000
4000
5000
6000
7000
8000
9000
10000
11000
0 0.05 0.1 0.15 0.2 0.25 0.3 0.35
Ba
se S
hea
r (k
N)
Displacement (m)
Northward Push
Southward Push
Westward Push
Eastward Push
North Bi-Linearisation
West Bi-Linearisation
South Bi-Linearisation
Excessive Hinging N
Excessive Hinging W

CTV Non-Linear Seismic Analysis Report Compusoft Engineering Limited
Compusoft Engineering Limited Page 43
Table 16: Pushover drifts initiating column hinging (% of storey height).
Level Frame
1 2 F 1 spandrels F spandrels
5 0.75 0.85 0.88 0.53 0.73
4 0.82 0.91 0.97 0.58 0.77
3 0.90 0.94 1.01 0.64 0.81
2 0.94 0.94 1.04 0.66 0.88
1 0.99 0.93 - 0.85 0.94
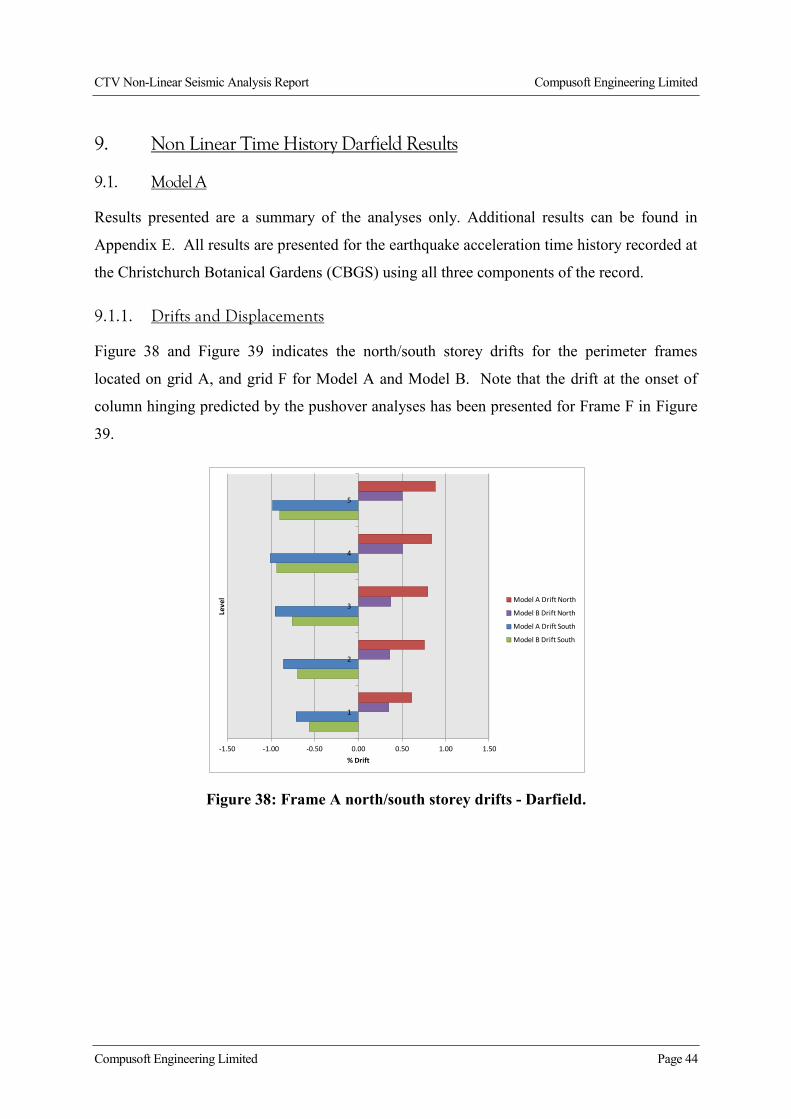
CTV Non-Linear Seismic Analysis Report Compusoft Engineering Limited
Compusoft Engineering Limited Page 44
9. Non Linear Time History Darfield Results
9.1. Model A
Results presented are a summary of the analyses only. Additional results can be found in
Appendix E. All results are presented for the earthquake acceleration time history recorded at
the Christchurch Botanical Gardens (CBGS) using all three components of the record.
9.1.1. Drifts and Displacements
Figure 38 and Figure 39 indicates the north/south storey drifts for the perimeter frames
located on grid A, and grid F for Model A and Model B. Note that the drift at the onset of
column hinging predicted by the pushover analyses has been presented for Frame F in Figure
39.
Figure 38: Frame A north/south storey drifts - Darfield.
-1.50 -1.00 -0.50 0.00 0.50 1.00 1.50
1
2
3
4
5
% Drift
Leve
l Model A Drift North
Model B Drift North
Model A Drift South
Model B Drift South

CTV Non-Linear Seismic Analysis Report Compusoft Engineering Limited
Compusoft Engineering Limited Page 45
Figure 39: Frame F north/south storey drifts - Darfield.
Figure 40 and Figure 41 indicates the east/west storey drifts for the perimeter frames located
on grid 1, and grid 4 for Model A and Model B. Note that the drift at the onset of hinging
predicted by the pushover analyses has been presented for Frame 1 in Figure 40.
Figure 40: Frame 1 east/west storey drifts - Darfield.
-1.50 -1.00 -0.50 0.00 0.50 1.00 1.50
1
2
3
4
5
% Drift
Leve
lPredicted Drift Initiating Column Hinging
Model A Drift North
Model B Drift North
Model A Drift South
Model B Drift South
-1.50 -1.00 -0.50 0.00 0.50 1.00 1.50
1
2
3
4
5
% Drift
Leve
l
Predicted Drift Initiating Column Hinging
Model A Drift West
Model B Drift West
Model A Drift East
Model B Drift East

CTV Non-Linear Seismic Analysis Report Compusoft Engineering Limited
Compusoft Engineering Limited Page 46
Figure 41: Frame 4 east/west storey drifts - Darfield.
The figures above indicate that based upon the static analyses results hinging is predicted to
have occurred in the gridline F columns at levels 3, 4, and 5.
9.1.2. Diaphragm Connection Forces.
Table 17 to Table 21 present the diaphragm connection forces acting at each of the north core
individual wall interfaces. Results presented are the enveloped maxima recorded over the
duration of the time-history record analysed.
Table 17: Wall C diaphragm connection forces - Darfield.
Level
North/South Actions
Model A Model B
Maximum Northward (kN)
Maximum Southward (kN)
Maximum Northward (kN)
Maximum Southward (kN)
Level 6 828 -919 1561 -1094
Level 5 619 -482 516 -342
Level 4 531 -329 701 -321
Level 3 504 -441 450 -538
Level 2 452 -746 467 -844
-1.50 -1.00 -0.50 0.00 0.50 1.00 1.50
1
2
3
4
5
% Drift
Leve
l Model A Drift West
Model B Drift West
Model A Drift East
Model B Drift East

CTV Non-Linear Seismic Analysis Report Compusoft Engineering Limited
Compusoft Engineering Limited Page 47
Table 18: Wall C/D diaphragm connection forces - Darfield.
Level
North/South Actions
Model A Model B
Maximum Northward (kN)
Maximum Southward (kN)
Maximum Northward (kN)
Maximum Southward (kN)
Level 6 948 -471 885 -1345
Level 5 392 -511 504 -611
Level 4 370 -527 560 -573
Level 3 326 -486 358 -522
Level 2 538 -580 498 -574
Table 19: Wall D diaphragm connection forces - Darfield.
Level
North/South Actions
Model A Model B
Maximum Northward (kN)
Maximum Southward (kN)
Maximum Northward (kN)
Maximum Southward (kN)
Level 6 352 -261 399 -6031
Level 5 356 -274 348 -353
Level 4 338 -300 353 -302
Level 3 335 0 279 0
Level 2 359 0 292 0
Notes: 1. Tensile limit of connection was exceeded.
Table 20: Wall D/E diaphragm connection forces - Darfield.
Level
North/South Actions
Model A Model B
Maximum Northward (kN)
Maximum Southward (kN)
Maximum Northward (kN)
Maximum Southward (kN)
Level 6 374 -412 519 -5401
Level 5 218 -5031 250 -5031
Level 4 261 -4031 180 -4031
Level 3 461 0 357 0
Level 2 635 0 592 0
Notes: 1. Tensile limit of connection was exceeded.

CTV Non-Linear Seismic Analysis Report Compusoft Engineering Limited
Compusoft Engineering Limited Page 48
Table 21: Wall 5 (C to C/D) diaphragm connection forces - Darfield.
Level
East/West Actions
Model A Model B
Maximum Westward (kN)
Maximum Eastward (kN)
Maximum Westward (kN)
Maximum Eastward (kN)
Level 6 900 -999 888 -1117
Level 5 604 -800 679 -864
Level 4 528 -729 847 -1094
Level 3 351 -660 363 -666
Level 2 298 -666 363 -666
It can be seen from Table 19 and Table 20 that the addition of the masonry results in an
increased number of diaphragm drag bar disconnections on walls D and D/E. Once the
diaphragms have disconnected at these wall lines any torsion on the north core must be
resisted by a couple between walls C and C/D. This can be observed in Table 17 and Table
18 where the increase in wall C and C/D actions at level 6 from Model A to Model B is the
result of the diaphragm disconnection in Model B at this level that does not occur in Model A.
Table 22 and Table 23 present the diaphragm connection actions summarised for the entire
north core at each floor level. Results presented are the enveloped maxima recorded over the
duration of the time-history record analysed.
Table 22: North core total diaphragm connection forces - Darfield.
Level
East/West Actions
Model A Model B
Maximum Westward
(kN)
Maximum Eastward
(kN)
Maximum In-Plane Moment (kNm)
Maximum Westward
(kN)
Maximum Eastward
(kN)
Maximum In-Plane Moment (kNm)
Level 6 1111 -1175 7696 1090 -1296 9410
Level 5 991 -1060 2656 1139 -994 3101
Level 4 886 -936 2345 1390 -1264 3644
Level 3 676 -752 4686 991 -871 5152
Level 2 504 -801 7227 591 -847 7775

CTV Non-Linear Seismic Analysis Report Compusoft Engineering Limited
Compusoft Engineering Limited Page 49
Table 23: North core total diaphragm connection forces - Darfield.
Level
North/South Actions
Model A Model B
Maximum Northward
(kN)
Maximum Southward
(kN)
Minimum In-Plane Moment (kNm)
Maximum Northward
(kN)
Maximum Southward
(kN)
Minimum In-Plane Moment (kNm)
Level 6 1315 -930 -7414 1348 -1124 -8805
Level 5 1333 -1195 -4486 1071 -1158 -4963
Level 4 1196 -1014 -4815 1319 -865 -6352
Level 3 1174 -824 -2425 1264 -911 -2226
Level 2 778 -997 -2180 898 -1027 -2412
Table 24 and Table 25 present the actions acting along the slab interface along gridline 4
between grids C and C/D. Figure 42 indicates (in dark blue) the location of slab elements
used to determine the actions presented. Results presented are the enveloped maxima recorded
over the duration of the time-history record analysed.
Figure 42: Slab 4 C-C/D section cut line.
It can be seen from these tables that the largest variation in demand between the two models
occurs at levels 4 and 6. At level 6 there is a significant increase in in-plane moment which is
the result of disconnection of the diaphragm drag bar ties at wall D and D/E at level 6. At
level 4, the stiffening effect of the masonry (which terminates at level 4) creates a 'kick-back'
effect resulting in higher N/S diaphragm forces at this level.

CTV Non-Linear Seismic Analysis Report Compusoft Engineering Limited
Compusoft Engineering Limited Page 50
Table 24: Slab 4 C to C/D diaphragm N/S actions - Darfield
Level
East/West Actions
Model A Model B
Maximum Westward
(kN)
Maximum Eastward
(kN)
Maximum In-Plane Moment (kNm)
Maximum Westward
(kN)
Maximum Eastward
(kN)
Maximum In-Plane Moment (kNm)
Level 6 1045 -952 5127 1166 -930 7930
Level 5 913 -879 3842 854 -984 4137
Level 4 793 -801 3317 1096 -1246 4540
Level 3 659 -575 3096 775 -869 2910
Level 2 729 -427 2356 755 -503 3186
Table 25: Slab 4 C to C/D diaphragm E/W actions - Darfield
Level
North/South Actions
Model A Model B
Maximum Northward
(kN)
Maximum Southward
(kN)
Minimum In-Plane Moment (kNm)
Maximum Northward
(kN)
Maximum Southward
(kN)
Minimum In-Plane Moment (kNm)
Level 6 1126 -1272 -3802 1550 -1363 -4683
Level 5 906 -963 -2719 757 -860 -3336
Level 4 690 -705 -2518 900 -991 -4033
Level 3 803 -792 -1890 871 -694 -2988
Level 2 1113 -532 -2451 1121 -482 -2369
Table 26 presents the diaphragm connection actions at each floor level of the South wall
located on grid 1. Results presented are the enveloped maxima recorded over the duration of
the time-history record analysed.

CTV Non-Linear Seismic Analysis Report Compusoft Engineering Limited
Compusoft Engineering Limited Page 51
Table 26: South wall diaphragm connection forces - Darfield
Level
East/West Actions
Model A Model B
Maximum Westward (kN)
Maximum Eastward (kN)
Maximum Westward (kN)
Maximum Eastward (kN)
Level 6 522 -499 584 -653
Level 5 599 -707 628 -681
Level 4 596 -705 741 -678
Level 3 646 -628 641 -594
Level 2 615 -544 713 -583
9.1.3. Inelastic Wall Demands.
Results have shown that inelastic demand for the cantilever bending of the north core and the
south wall only occurs in the lower part of level 1. Table 27 below presents the peak strains
that occur during the Darfield CBGS event. Strains listed have been taken from the bottom
shell elements at the extremities of each wall, and have been averaged over the height of the
shell (998mm for the north core walls, and 1150 mm for the south wall piers). Note that y =
0.00219 for the wall longitudinal reinforcement.

CTV Non-Linear Seismic Analysis Report Compusoft Engineering Limited
Compusoft Engineering Limited Page 52
Table 27: Wall strains - Darfield
Location Wall Element Model A Model B
Maximum Strain
Minimum Strain
Maximum Strain
Minimum Strain
North Core
Wall C gl 4 0.00960 -0.00191 0.00248 -0.00149
Wall C gl 5 0.00682 -0.00062 0.00420 -0.00031
Wall C/D gl 4 0.00942 -0.00192 0.00266 -0.00153
Wall C/D gl 5 0.00485 -0.00021 0.00300 -0.00011
Wall D gl 4 0.00974 -0.00181 0.00249 -0.00150
Wall D gl 5 0.00381 -0.00019 0.00239 -0.00011
Wall D/E gl 4 0.00938 -0.00102 0.00287 -0.00099
Wall D/E gl 5 0.00214 -0.00047 0.00133 -0.00033
South Wall
Pier D gl D 0.00571 -0.00162 0.00628 -0.00138
Pier D gl E 0.00251 -0.00012 0.00177 -0.00018
Pier E gl D 0.00189 -0.00016 0.00223 -0.00025
Pier E gl E 0.00672 -0.00143 0.00465 -0.00142
The analysis results indicate that only one of the diagonally reinforced coupling beams is
subject to inelastic demand for Model A and Model B. A single set of diagonal bars, located
in the level 1 coupling beam are predicted to yield, with a maximum strain of 0.00352 (which
corresponds to 2.25y) reported for Model A, and 0.00255 (1.63y) reported for Model B.
9.1.4. Inelastic Column Actions.
Analysis results indicate that minor column hinging occurs for both Model A and Model B
with the number of hinges, and plastic rotation demand smaller for Model B. Hinges are
predominantly located in the eastern perimeter frame (Frame F), with hinge formation
initiated in the level 5 columns. Hinge formation progresses to lower levels as the
displacement demand on the frame increases.
Figure 43 presents the progression of hinges forming in the Levels 5 to 1 columns for Model
A, whilst Figure 44 presents the progression of column hinging occurring in Model B.

CTV Non-Linear Seismic Analysis Report Compusoft Engineering Limited
Compusoft Engineering Limited Page 53
Figure 43: Column hinge progression - Darfield, Model A.
Figure 44: Column hinge progression - Darfield, Model B.
Hinge plastic rotation demand predicted by the analysis model are presented in Table 28
below.
0
1
2
3
4
5
6
7
8
9
10
11
Nu
mb
er
of
Co
lum
nsH
ingi
ng
Time (s)
Level 2 Column
Level 3 Column
Level 4 Column
Level 5 Column
0
1
2
3
4
5
6
7
8
9
10
11
Nu
mb
er
of
Co
lum
ns
Hin
gin
g
Time (s)
Level 4 Column
Level 5 Column

CTV Non-Linear Seismic Analysis Report Compusoft Engineering Limited
Compusoft Engineering Limited Page 54
Table 28: Column hinge plastic rotations - Darfield
Column Level Model A Maximum (rad)
Model B maximum (rad)
F1 5 0.00109 _
F2 5 0.00231 0.00047
4 0.00131 _
3 0.00057 _
2 0.00024 _
F3 5 0.00502 0.00139
4 0.00269 0.00036
3 0.00149 _
2 0.00033 _
F4 5 0.00010 _
9.1.5. Base shears.
Peak seismic base shear recorded during the time history analysis are shown in Table 29
below for Model A and Model B. Results presented have been recorded at the top of the
foundation beams.
With the exception of the southward direction, maximum base shears are larger for Model B
although displacement demands are typically smaller for this model (as seen in the storey drift
plots of Section 9.1.1). This can be attributed to a combination of higher mode effects and the
period shift caused by the masonry stiffening the structure, resulting in the structure being
subject to higher spectral accelerations. Table 9 and Table 10 indicate that the addition of
masonry to the structure reduces the first mode of vibration by approximately 0.15 seconds,
which results in an increase in acceleration demand for the CBGS record (refer Figure 21 and
Figure 22 of Section 7.3.1).

CTV Non-Linear Seismic Analysis Report Compusoft Engineering Limited
Compusoft Engineering Limited Page 55
Table 29: Darfield base shears
Direction Model A Base Shear (kN) Model B Base Shear (kN)
Maximum Northward 4229 4790
Maximum Southward -5392 -4987
Maximum Westward 6934 7195
Maximum Eastward -7298 -7409
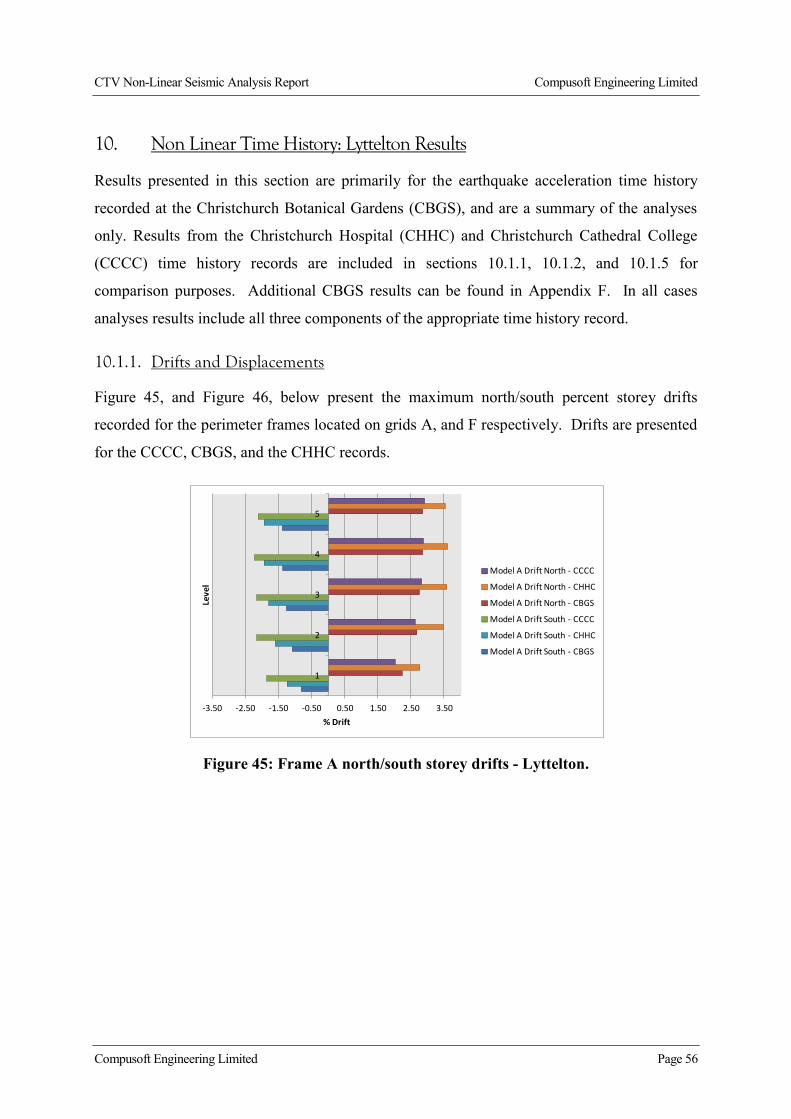
CTV Non-Linear Seismic Analysis Report Compusoft Engineering Limited
Compusoft Engineering Limited Page 56
10. Non Linear Time History: Lyttelton Results
Results presented in this section are primarily for the earthquake acceleration time history
recorded at the Christchurch Botanical Gardens (CBGS), and are a summary of the analyses
only. Results from the Christchurch Hospital (CHHC) and Christchurch Cathedral College
(CCCC) time history records are included in sections 10.1.1, 10.1.2, and 10.1.5 for
comparison purposes. Additional CBGS results can be found in Appendix F. In all cases
analyses results include all three components of the appropriate time history record.
10.1.1. Drifts and Displacements
Figure 45, and Figure 46, below present the maximum north/south percent storey drifts
recorded for the perimeter frames located on grids A, and F respectively. Drifts are presented
for the CCCC, CBGS, and the CHHC records.
Figure 45: Frame A north/south storey drifts - Lyttelton.
-3.50 -2.50 -1.50 -0.50 0.50 1.50 2.50 3.50
1
2
3
4
5
% Drift
Leve
l
Model A Drift North - CCCC
Model A Drift North - CHHC
Model A Drift North - CBGS
Model A Drift South - CCCC
Model A Drift South - CHHC
Model A Drift South - CBGS

CTV Non-Linear Seismic Analysis Report Compusoft Engineering Limited
Compusoft Engineering Limited Page 57
Figure 46: Frame F north/south storey drifts - Lyttelton.
Figure 47, and Figure 48, below present the maximum east/west percentage storey drifts
recorded for the perimeter frames located on grids 1, and 4 respectively. Drifts are presented
for the CCCC, CBGS, and the CHHC records.
Figure 47: Frame 1 east/west storey drifts - Lyttelton.
-3.50 -2.50 -1.50 -0.50 0.50 1.50 2.50 3.50
1
2
3
4
5
% Drift
Leve
l
Model A Drift North - CCCC
Model A Drift North - CHHC
Model A Drift North - CBGS
Model A Drift South - CCCC
Model A Drift South - CHHC
Model A Drift South - CBGS
-3.50 -2.50 -1.50 -0.50 0.50 1.50 2.50 3.50
1
2
3
4
5
% Drift
Leve
l
Model A Drift West - CCCC
Model A Drift West - CHHC
Model A Drift West - CBGS
Model A Drift East - CCCC
Model A Drift East - CHHC
Model A Drift East - CBGS

CTV Non-Linear Seismic Analysis Report Compusoft Engineering Limited
Compusoft Engineering Limited Page 58
Figure 48: Frame 4 east/west storey drifts - Lyttelton.
It can be seen from the storey drift plots above that the CCCC record has larger displacement
demands in the E/W direction than the other records. Drift variations of up to 1.7% are
predicted in the easterly direction with the CHHC record producing the smallest drifts. In the
westerly direction drifts are similar for Frame 4, although variations of 0.8% are observed
between the CCCC (highest drift) the CBGS (lowest drift) records.
North/south drifts are relatively similar between the records, with Frame F drifts within 0.4%
over the three records for northerly and southerly directions of drift. Frame A drifts exhibit
more variation between records in the southward direction (up to 1% difference), with the
CBGS record producing the smallest southward drifts. In the northerly direction the drifts are
more closely matched with the CBGS and the CCCC records producing similar drifts, with
the CHHC record producing drifts up to 0.8% higher.
10.1.2. Diaphragm Connection Forces.
Table 30 to Table 34 present the diaphragm connection forces acting at each of the north core
individual wall interfaces. Results presented are the enveloped maxima recorded over the
duration of the time-history record analysed.
-3.50 -2.50 -1.50 -0.50 0.50 1.50 2.50 3.50
1
2
3
4
5
% Drift
Leve
l
Model A Drift West - CCCC
Model A Drift West - CHHC
Model A Drift West - CBGS
Model A Drift East - CCCC
Model A Drift East - CHHC
Model A Drift East - CBGS

CTV Non-Linear Seismic Analysis Report Compusoft Engineering Limited
Compusoft Engineering Limited Page 59
Table 30: Wall C diaphragm connection forces - Lyttelton.
Level
North/South Actions
CCCC CHHC CBGS
Maximum Northward
(kN)
Maximum Southward
(kN)
Maximum Northward
(kN)
Maximum Southward
(kN)
Maximum Northward
(kN)
Maximum Southward
(kN)
Level 6 4186 -2747 2845 -2552 3235 -2642
Level 5 1133 -1004 1326 -930 1009 -906
Level 4 1214 -1548 1301 -1392 1276 -1644
Level 3 1252 -1580 1260 -1456 1305 -1756
Level 2 1452 -1452 1292 -2002 1007 -2070
Table 31: Wall C/D diaphragm connection forces - Lyttelton.
Level
North/South Actions
CCCC CHHC CBGS
Maximum Northward
(kN)
Maximum Southward
(kN)
Maximum Northward
(kN)
Maximum Southward
(kN)
Maximum Northward
(kN)
Maximum Southward
(kN)
Level 6 1477 -3886 1350 -2663 1252 -2497
Level 5 730 -956 884 -955 792 -1026
Level 4 1301 -913 1102 -1346 745 -1399
Level 3 1385 -1316 1221 -1260 1220 -1840
Level 2 1076 -1470 1226 -1233 1536 -1381

CTV Non-Linear Seismic Analysis Report Compusoft Engineering Limited
Compusoft Engineering Limited Page 60
Table 32: Wall D diaphragm connection forces - Lyttelton.
Level
North/South Actions
CCCC CHHC CBGS
Maximum Northward
(kN)
Maximum Southward
(kN)
Maximum Northward
(kN)
Maximum Southward
(kN)
Maximum Northward
(kN)
Maximum Southward
(kN)
Level 6 854 -6031 907 -6031 1075 -6031
Level 5 723 -4201 552 -4201 662 -4201
Level 4 680 -3201 666 -3201 772 -3201
Level 3 648 0 722 0 621 0
Level 2 874 0 710 0 685 0
Notes: 1. Tensile limit of connection was exceeded.
Table 33: Wall D/E diaphragm connection forces - Lyttelton.
Level
North/South Actions
CCCC CHHC CBGS
Maximum Northward
(kN)
Maximum Southward
(kN)
Maximum Northward
(kN)
Maximum Southward
(kN)
Maximum Northward
(kN)
Maximum Southward
(kN)
Level 6 1054 -5401 1084 -5401 1640 -5401
Level 5 362 -5031 939 -5031 660 -5031
Level 4 352 -4031 718 -4031 772 -4031
Level 3 606 0 830 0 740 0
Level 2 925 0 880 0 932 0
Notes: 1. Tensile limit of connection was exceeded.

CTV Non-Linear Seismic Analysis Report Compusoft Engineering Limited
Compusoft Engineering Limited Page 61
Table 34: Wall 5 (C to C/D) diaphragm connection forces - Lyttelton.
Level
East/West Actions
CCCC CHHC CBGS
Maximum Westward
(kN)
Maximum Eastward
(kN)
Maximum Westward
(kN)
Maximum Eastward
(kN)
Maximum Westward
(kN)
Maximum Eastward
(kN)
Level 6 2023 -2405 1718 -2007 1985 -2203
Level 5 1675 -2315 1357 -1813 1429 -1957
Level 4 1379 -2328 1055 -1413 1430 -2142
Level 3 1233 -1620 1053 -1226 1009 -1630
Level 2 825 -1373 1147 -1036 1134 -1194
Table 35, Table 36 and Table 37 present the diaphragm connection actions summarised for
the entire north core at each floor level. Results presented are the enveloped maxima
recorded over the duration of the time-history record analysed.
Table 35: North core total diaphragm connection E/W forces - Lyttelton.
Level
East/West Actions
CCCC CHHC CBGS
Maximum Westward
(kN)
Maximum Eastward
(kN)
Maximum Westward
(kN)
Maximum Eastward
(kN)
Maximum Westward
(kN)
Maximum Eastward
(kN)
Level 6 2481 -2895 2111 -2359 2392 -2451
Level 5 2697 -2054 2131 -1813 2154 -2198
Level 4 2262 -2299 1673 -1543 2337 -1861
Level 3 1928 -1958 1755 -1322 1849 -1957
Level 2 1243 -1735 1538 -1325 1573 -1534

CTV Non-Linear Seismic Analysis Report Compusoft Engineering Limited
Compusoft Engineering Limited Page 62
Table 36: North core total diaphragm connection N/S forces - Lyttelton.
Level
North/South Actions
CCCC CHHC CBGS
Maximum Northward
(kN)
Maximum Southward
(kN)
Maximum Northward
(kN)
Maximum Southward
(kN)
Maximum Northward
(kN)
Maximum Southward
(kN)
Level 6 2352 -1641 2503 -2108 2220 -2268
Level 5 1875 -1585 2328 -2045 1877 -1718
Level 4 1897 -2039 2678 -2145 2195 -2896
Level 3 2472 -2565 3316 -2455 2665 -3818
Level 2 2779 -3155 2796 -2402 3062 -2924
Table 37: North core total diaphragm connection forces - Lyttelton.
Level
In Plane Moments
CCCC CHHC CBGS
Maximum + Moment
(kNm)
Maximum -Moment
(kNm)
Maximum + Moment
(kNm)
Maximum -Moment
(kNm)
Maximum + Moment
(kNm)
Maximum -Moment
(kNm)
Level 6 20055 -19638 20846 -14015 24478 -14897
Level 5 8167 -9937 8023 -8483 6550 -6326
Level 4 7420 -7986 8318 -6685 7258 -7301
Level 3 8331 -7072 8798 -6851 8443 -5890
Level 2 16099 -7591 13841 -7267 14548 -7217
Table 38, Table 39, and Table 40 present the actions acting along the slab interface along
gridline 4 between grids C and C/D. Results presented are the enveloped maxima recorded
over the duration of the time-history record analysed.

CTV Non-Linear Seismic Analysis Report Compusoft Engineering Limited
Compusoft Engineering Limited Page 63
Table 38: Slab 4 C to C/D diaphragm E/W actions - Lyttelton.
Level
East/West Actions
CCCC CHHC CBGS
Maximum Westward
(kN)
Maximum Eastward
(kN)
Maximum Westward
(kN)
Maximum Eastward
(kN)
Maximum Westward
(kN)
Maximum Eastward
(kN)
Level 6 2550 -2307 2090 -1900 2295 -2076
Level 5 1635 -2544 1547 -1909 1843 -1926
Level 4 2050 -2007 1362 -1493 1612 -2002
Level 3 1554 -1737 1152 -1555 1698 -1626
Level 2 1575 -1026 1267 -1382 1427 -1474
Table 39: Slab 4 C to C/D diaphragm N/S actions - Lyttelton.
Level
North/South Actions
CCCC CHHC CBGS
Maximum Northward
(kN)
Maximum Southward
(kN)
Maximum Northward
(kN)
Maximum Southward
(kN)
Maximum Northward
(kN)
Maximum Southward
(kN)
Level 6 2862 -2259 2834 -1631 2895 -2018
Level 5 1410 -1612 1773 -1833 1517 -1347
Level 4 1781 -1772 2058 -2084 2854 -1993
Level 3 2382 -2144 2311 -2358 3645 -2317
Level 2 2966 -2110 2372 -2276 2781 -2024

CTV Non-Linear Seismic Analysis Report Compusoft Engineering Limited
Compusoft Engineering Limited Page 64
Table 40: Slab 4 C to C/D diaphragm connection forces - Lyttelton.
Level
In-Plane Moments
CCCC CHHC CBGS
Maximum + Moment
(kNm)
Maximum -Moment
(kNm)
Maximum + Moment
(kNm)
Maximum -Moment
(kNm)
Maximum + Moment
(kNm)
Maximum -Moment
(kNm)
Level 6 20656 -12495 15717 -8151 14397 -11083
Level 5 9522 -9433 9143 -5553 8251 -6248
Level 4 19450 -7883 5777 -5948 8732 -6194
Level 3 28094 -5834 4523 -5789 7138 -5077
Level 2 26354 -6134 4152 -5611 7343 -5190
Table 40 presents the diaphragm connection actions at each floor level of the south wall
located on grid 1. Results presented are the enveloped maxima recorded over the duration of
the time-history record analysed.
Table 41: South wall diaphragm connection forces - Lyttelton.
Level
East/West Actions
CCCC CHHC CBGS
Maximum Westward
(kN)
Maximum Eastward
(kN)
Maximum Westward
(kN)
Maximum Eastward
(kN)
Maximum Westward
(kN)
Maximum Eastward
(kN)
Level 6 970 -929 1017 -1401 1076 -1200
Level 5 1168 -1245 1163 -1153 1092 -1097
Level 4 1083 -1228 1098 -1164 1145 -1331
Level 3 1138 -1063 1328 -1462 1080 -1681
Level 2 1313 -1388 1480 -1315 1347 -2042
10.1.3. Inelastic Column Actions.
Results presented in this section are for the CBGS record only.
Analysis results indicate that the onset of column hinging commences at 2.25 seconds of the
run time history record with minor column hinging occurring in up to 15 columns after 4.75
seconds has been run. During this time frame hinges are predominantly located in the eastern
perimeter frame (Frame F), with hinge formation initiated in the level 5 columns. Hinge
formation progresses to lower levels as the displacement demand on the frame increases.
Between 4.75 and 5 seconds an additional 61 columns (61% of the total number of structural

CTV Non-Linear Seismic Analysis Report Compusoft Engineering Limited
Compusoft Engineering Limited Page 65
columns) undergo plastic rotational demand. This increase in hinge numbers corresponds with
a large increase in inter-storey drifts that occur during the same time period (as shown in
Figure F.3 in Appendix F).
Figure 49 presents the progression of hinges forming in the levels 1 to 5 columns.
Figure 49: Column hinge progression - CBGS, Lyttelton.
10.1.4. Beam-Column Joints.
Post processing of the beam column joint results has indicated that the limiting capacity for
most joints is via joint shear failure rather than bar anchorage pullout. There is the potential
for bar pullout to limit the capacity in the joints located at F1 & F4 at level 6, F1 at level 5
and A1 at level 2.
Results show that the joint shear was exceeded in the column lines F2 and F3 first, closely
followed by column line F1. Approximately 18 joint capacities are close to, or slightly
exceed capacity between 2.3 to 3.6 seconds with a further 26 joints being becoming
overstressed between 4.5 to 5.7 seconds. The trends shown for the demand/capacity vs time
of the beam column joints is similar to that exhibited by the hinge formation detailed in
Section 10.1.3 above. It should be noted that the capacity of the beam-column joints is
0
10
20
30
40
50
60
70
80
90
100
Nu
mb
er
of
Co
lum
n H
inge
s
Time (s)
Level 1 Column
Level 2 Column
Level 3 Column
Level 4 Column
Level 5 Column

CTV Non-Linear Seismic Analysis Report Compusoft Engineering Limited
Compusoft Engineering Limited Page 66
sensitive to variances in material strength, and axial load and the ductility demand of adjacent
beam hinges.
10.1.5. Base Shears.
Peak seismic base shear recorded during the time history analysis are shown in Table 42
below for the three records investigated. Results presented have been recorded at the top of
the foundation beams.
Maximum base shear for the time history analyses exceed those predicted by the pushover
analyses (refer Figure 28 of Section 8.1). This can be attributed to higher mode effects, and
approximations made in the distribution of load in the pushover analyses.
Table 42: Lyttelton base shear
Direction CCCC Base Shear (kN) CHHC Base Shear (kN) CBGS Base Shear (kN)
Maximum Northward 9479 6570 8796
Maximum Southward -5827 -6959 -7269
Maximum Westward 12659 10447 11277
Maximum Eastward -13348 -12873 -13022
10.1.6. L6 Core Slab Out Of Plane Actions.
In addition to the in-plane actions detailed in section 10.1.2 the floor slab around each shear
walls would have been subject to out of plane demands due to the vertical movement of the
wall when subject to seismic actions. Of particular interest is the bending demands of the
section of floor slab located along gridline 4 between the north core walls C and C/D.
Figure 50 presents the vertical displacements at the tips of the core walls located on grids C
and C/D at level 6. Out of plane slab moments that occur between these walls are presented
in Figure 51 with positive (sagging) moments shown as negative in sign. Moments have been
presented for two locations. Firstly (referenced as GL4 C to C/D Slab) is located along a plane
joining the tips of wall C and wall C/D i.e. 250 mm from gridline 4. The second is located
along a parallel plane located 1.75 m to the south of gridline 4, which roughly corresponds
with the termination location of the saddle bars that straddle gridline 4. Note that as an
average of the positive and negative slab out of plane stiffness was used in the analysis model,

CTV Non-Linear Seismic Analysis Report Compusoft Engineering Limited
Compusoft Engineering Limited Page 67
negative (hogging) moments presented are likely to be underestimated as the negative
bending stiffness at gridline 4 would be stiffer than the average used in this location. In
addition, as elastic shell elements have been used peak moments presented may exceed
bending capacity. As such moments should be viewed as indicative only.
Figure 50: North core wall C & C/D vertical displacements at GL 4.
Figure 51: GL 4 slab C to C/D out of plane moments.
-0.04
-0.02
0
0.02
0.04
0.06
0.08
0.1
0.12
0 1 2 3 4 5 6 7 8 9 10 11
Ve
rtic
al D
isp
lace
men
t (m
)
Time (s)
GL C/D 4
GL C 4
-40
-20
0
20
40
60
80
0 1 2 3 4 5 6 7 8 9 10 11
Ou
t o
f P
lan
e M
om
en
t (k
Nm
)
Time (s)
GL4 C to C/D Slab
GL4 - 1.5m C to C/D

CTV Non-Linear Seismic Analysis Report Compusoft Engineering Limited
Compusoft Engineering Limited Page 68
11. Vertical Earthquake Effects
To quantify and assess the effect of vertical accelerations on the building response and
performance separate inelastic time history analyses were undertaken using only the vertical
components of the CBGS and CCCC Lyttelton records, the results of which are contained
within the following section. Further to this a sensitivity analysis was undertaken to
investigate the effect slab flexibility has on the vertical earthquake response using the CBGS
record only.
11.1. Axial Load Effects
Figure 52 through Figure 55 present the maximum variation in axial force obtained during the
analysis for a selection of columns under the CBGS and CCCC record demands.
Figure 52: Column D2 axial load variation - CBGS (left) & CCCC (right), Lyttelton
Figure 53: Column F2 axial load variation - CBGS (left) & CCCC (right), Lyttelton
0
500
1000
1500
2000
2500
3000
3500
1 2 3 4 5
Forc
e (k
N)
Level
Max Axial Force
G+Qu Axial Force
Min Axial Force
0
500
1000
1500
2000
2500
3000
3500
1 2 3 4 5
Forc
e (k
N)
Level
Max Axial Force
G+Qu Axial Force
Min Axial Force
0
500
1000
1500
2000
1 2 3 4 5
Forc
e (k
N)
Level
Max Axial Force
G+Qu Axial Force
Min Axial Force
0
500
1000
1500
2000
1 2 3 4 5
Forc
e (k
N)
Level
Max Axial Force
G+Qu Axial Force
Min Axial Force

CTV Non-Linear Seismic Analysis Report Compusoft Engineering Limited
Compusoft Engineering Limited Page 69
Figure 54: Column F1 axial load variation - CBGS (left) & CCCC (right), Lyttelton
Figure 55: Column 4 D/E axial load variation - CBGS (left) & CCCC (right), Lyttelton
Columns with a larger tributary area of floor slab such as column D2 exhibit a larger variation
in axial force than columns with a smaller axial load contribution from the slabs e.g. column
F2. In addition to the slab component some of the axial load variation can be attributed to the
stiffness of the beams spanning onto the column. Table 43 presents a comparison of the
Level 1 axial force maxima and minima for selected elements between each record.
It can be seen that the CCCC record produces a much larger variation in axial load in the
elements considered than the CBGS record. This can be attributed to the difference in
frequency components between the two records and the magnitude of the vertical
accelerations present in each. Figure D.2 and Figure D.3 contain the vertical acceleration
time history records for the CBGS and the CCCC stations. From these it can be seen that the
vertical accelerations were considerably higher at the CCCC station than for the CBGS
station.
0
400
800
1200
1600
1 2 3 4 5
Forc
e (k
N)
Level
Max Axial Force
G+Qu Axial Force
Min Axial Force
0
400
800
1200
1600
1 2 3 4 5
Forc
e (k
N)
Level
Max Axial Force
G+Qu Axial Force
Min Axial Force
0
400
800
1200
1600
2000
2400
2800
1 2 3 4 5
Forc
e (k
N)
Level
Max Axial Force
G+Qu Axial Force
Min Axial Force
-400
0
400
800
1200
1600
2000
2400
2800
1 2 3 4 5
Forc
e (k
N)
Level
Max Axial Force
G+Qu Axial Force
Min Axial Force

CTV Non-Linear Seismic Analysis Report Compusoft Engineering Limited
Compusoft Engineering Limited Page 70
Table 43: Level 1 axial force demands - CBGS and CCCC vertical earthquake components.
Element CGBS Record CCCC Record
Maximum (kN)
Minimum (kN)
Maximum (kN)
Minimum (kN)
Column D2 2629 666 3239 308
Column F2 1572 736 1738 496
North Core 10679 2591 15891 -325
South Wall 3608 1499 4770 741
It should also be noted that the peak axial demands may not be concurrent with the peak
bending actions that occur as a result of building drift. Consequently when assessing vertical
earthquake demands, consideration should be given to the concurrency of actions. An
example of the concurrency effect can be seen in Figure 56 in which it can be seen that the
peak axial column demands do not occur at the same time as peak column drift for column D2
at level 1.
Figure 56: Column D2 Level 1 axial load and drift plot - CBGS, Lyttelton
0
400
800
1200
1600
2000
2400
2800
3200
-1.50
-1.00
-0.50
0.00
0.50
1.00
1.50
0 1 2 3 4 5 6 7 8 9 10 11
Axi
al L
oad
(kN
)
% D
rift
Time (s)
N/S Drift
E/W Drift
Resultant Drift
Axial Column Load

CTV Non-Linear Seismic Analysis Report Compusoft Engineering Limited
Compusoft Engineering Limited Page 71
11.2. Bending Effects
Vertical excitation of the beams induces bending in both the beam elements and the
supporting columns. A selection of column bending actions induced by the vertical
component of the CBGS and the CCCC records are presented in Table 44 for information.
Column moments presented have been recorded at the column head, and column capacities
correspond to the moment at which concrete strain of 0.004 is reached and have been based
upon the initial G + Qu axial gravity force in the column. It should be noted that the actions
presented will be an upper bound as the demands from the horizontal components of the
earthquake record may result in beam hinging, if so concurrent actions from the vertical
component may not increase column bending actions significantly (but could influence hinge
rotations).
Table 44: Induced column moments - CBGS and CCCC vertical earthquake components.
Level Column D2 Column F2
CBGS Moment (kNm)
CCCC Moment (kNm)
Moment Capacity
(kNm)
CBGS Moment (kNm)
CCCC Moment (kNm)
Moment Capacity
(kNm)
5 24 38 140 15 27 137
4 24 50 162 15 21 150
3 20 45 173 10 18 169
2 25 36 192 10 18 184
1 15 24 211 9 16 204
11.3. Sensitivity Study
A sensitivity study has been undertaken to determine the influence slab stiffness has on the
vertical excitation of structural elements and the associated design actions. To investigate this
two additional models were investigated to provide a basis of comparison with the analysis
model used to determine the structural actions documented in this report. Sensitivity model
characteristics were as follows;

CTV Non-Linear Seismic Analysis Report Compusoft Engineering Limited
Compusoft Engineering Limited Page 72
1) Stiff Slab: This model used double the slab plate stiffness used in the main analysis
model.
2) Flexible Slab: This model used half the plate stiffness of the slabs used in the main
analysis model.
It is expected that the stiffness of the slab have been more closely represented in the main
analysis model, with the two additional models providing an upper and lower bound on the
slab response. Beam hinging from concurrent horizontal actions may also influence the
vertical response, however this has not been examined in this study.
Numerical differences in axial load are presented in Table 45 for selected structural elements
recorded at level 1. Figure 57 and Figure 58 below indicate the axial load variation with time
for Column D2 and the North Core for Level 1 of the structure.
Table 45: Range of Level 1 axial force due to vertical earthquake.
Element Half Slab Stiffness Main Model Double Slab Stiffness
Maximum (kN)
Minimum (kN)
Maximum (kN)
Minimum (kN)
Maximum (kN)
Minimum (kN)
Column D2 2156 1274 2629 666 2450 794
Column F2 1546 702 1572 736 1611 633
North Core 9575 3788 10679 2591 10138 2988
South Wall 3483 1886 3608 1499 3754 1023
From Table 45 it can be seen that the axial actions for column F2 and the north core are
relatively insensitive to slab stiffness with only a 7% to 18% difference in the range of actions
respectively. The south wall and column D2 exhibit more variation in the range axial load
(27% to 34% respectively).

CTV Non-Linear Seismic Analysis Report Compusoft Engineering Limited
Compusoft Engineering Limited Page 73
Figure 57: Column D2 axial load variation with time - CBGS, Lyttelton.
Figure 58: North core axial load variation with time - CBGS, Lyttelton.
0
500
1000
1500
2000
2500
3000
1 2 3 4 5 6 7 8 9 10 11
Forc
e (k
N)
Time (s)
Main Model
Double Slab Stiffness
Half Slab Stiffness
0
2000
4000
6000
8000
10000
12000
1 2 3 4 5 6 7 8 9 10 11
Forc
e (k
N)
Time (s)
Main Model
Double Slab Stiffness
Half Slab Stiffness

CTV Non-Linear Seismic Analysis Report Compusoft Engineering Limited
Compusoft Engineering Limited Page 74
12. References
1. Design Engineer (1986) Structural Drawings: Office Building - 249 Madras Street. Set No. 7, Issued 30 September. 39p.
2. Hyland, C (2011) CTV Building Site Examination and Materials Tests. Hyland Fatigue and Earthquake Engineering, Auckland, New Zealand. 158p.
3. CSI Berkeley (2011) Computer program SAP2000 v14.2.4. Computers and Structures Inc., Berkeley, California.
4. Sinclair, T (2011) Ref. 52118: CTV Geotechnical Advice (11 July). Tonkin & Taylor, Auckland, New Zealand. 14p.
5. NZSEE (2006) Assessment and Improvement of the Structural Performance of Buildings in Earthquakes. New Zealand Society for Earthquake Engineering, Wellington, New Zealand. ~400p.
6. NZS 3101 (2006) Concrete Structures Standard. Standards New Zealand, Wellington, New Zealand. 646p.
7. Priestley, M J N, Calvi, G M, and Kowalsky, M J (2007) Displacement-Based Seismic Design of Structures. IUSS Press, Pavia, Italy. 721p.
8. Andriono, T and Park, R (1986) Seismic Design Considerations of the Properties of New Zealand Manufactured Steel Reinforcing Bars. Bulletin of the New Zealand National Society for Earthquake Engineering. 19(3): pp.213-246.
9. Carr, A J (1994) Dynamic Analysis of Structures. Bulletin of the New Zealand Society for Earthquake Engineering. 27(2).
10. Takeda, T, Sozen, M A, and Nielsen, N N (1970) Reinforced Concrete Response to Simulated Earthquakes. Journal of Structural Engineering. 96(12): pp.2257-2273.
11. Mander, J B, Priestley, M J N, and Park, R (1988) Theoretical Stress-Strain Model for Confined Concrete. ASCE Journal of Structural Engineering. 114(8): pp.1804-1826.
12. NZS 1170.0 (2002) Structural design actions, Part 0: General Principles. Standards New Zealand, Wellington, New Zealand. 36p.
13. NZS 1170.5 (2004) Structural design actions, Part 5: Earthquake Actions - New Zealand. Standards New Zealand, Wellington, New Zealand. 154p.
14. DBH (2011) Changes for Christchurch Seismicity: Changes to Verification Method B1/VM1 - Hazard Factor for Christchurch. accessed 22 August 2011; Available from: http://www.dbh.govt.nz/UserFiles/File/Publications/Building/Guidance-information /pdf/information-sheet-on-seismicity-changes.pdf.
15. Geonet (2010) M 7.1, Darfield (Canterbury), September 4 2010. Webpage; accessed 05 August 2011; Available from: www.geonet.org.nz/earthquake/historic-earthquakes/top-nz/quake-13.html.
16. Geonet (2011) M 6.3, Christchurch, February 22 2011. Webpage; accessed 05 August 2011; Available from: www.geonet.org.nz/earthquake/historic-earthquakes/top-nz/quake-14.html.
17. Geonet (2010) Darfield Mainshock Records. FTP Site; accessed 05 August 2011; Available from: ftp.geonet.org.nz/strong/processed/Proc/2010/09_Darfield_ mainshock_extended_pass_band/Vol2/data/.
18. Geonet (2011) Christchurch Mainshock Records. FTP Site; accessed 05 August 2011; Available from: ftp.geonet.org.nz/strong/processed/Proc/2011/02_Christchurch_ mainshock_extended_pass_band/Vol2/data/.
19. Hindi, R A and Hassan, M A (2004) Shear Capacity of Diagonally Reinforced Coupling Beams. Engineering Structures. 26(10): pp.1437-1446.

CTV Non-Linear Seismic Analysis Report Compusoft Engineering Limited
Compusoft Engineering Limited Page 75
20. Priestley, M J N (1997) Displacement-Based Seismic Assessment of Reinforced Concrete Buildings. Journal of Earthquake Engineering. 1(1): pp.157-192.
21. Joh, O and Shibata, T (1996) Anchorage Behaviour of 90-Degree Hooked Beams in Reinforced Concrete Beam-Column Joints. in Proc. Eleventh World Conference on Earthquake Engineering. Acapulco, Mexico.
22. Joh, O, Goto, Y, and Shibata, T (1993) Anchorage of Beam Bars with 90-Degree Bend in Reinforced Concrete Beam-Column Joints. in Proc. Tom Paulay Symposium "Recent Developments in Lateral Force Transfer in Buildings". La Jolla, California: University of California, San Diego.

CTV Non-Linear Seismic Analysis Report February 2012
Compusoft Engineering Limited Page 77
List of appendices
Appendix A :Nonlinear analysis of diagonally reinforced coupling beams ................................... 79
A.1 Considered model ................................................................................................................. 79
A.2 Example structure ................................................................................................................. 79
A.3 Analysis model definition .................................................................................................... 80
A.4 Analysis results ..................................................................................................................... 82
A.5 Strain penetrations ................................................................................................................ 83
Appendix B :Assessment of beam-column joint capacity ............................................................... 85
B.1 Beam-column joint shear capacity ...................................................................................... 85
B.2 Hook anchor capacity........................................................................................................... 86
B.3 Joint region capacity hierarchy ............................................................................................ 88
Appendix C :Foundation Modelling Properties ............................................................................... 90
Appendix D :Acceleration Time History Records. .......................................................................... 91
D.1 Darfield CBGS ..................................................................................................................... 91
D.2 Lyttelton CBGS .................................................................................................................... 92
D.3 Lyttelton CCCC.................................................................................................................... 93
D.4 Lyttelton CHHC ................................................................................................................... 94
Appendix E :Analysis Results - Darfield Event: CBGS Record .................................................... 95
E.1 Building Displacements and Drifts. .................................................................................... 95
E.2 Diaphragm Connection Forces ............................................................................................ 98
Appendix F :Analysis Results - Lyttelton Aftershock: Model A: CBGS record......................... 102
F.1 Building Displacements and Drifts. .................................................................................. 102
F.2 Diaphragm Connection Forces .......................................................................................... 105
Appendix G :Analysis Results - Lyttelton Aftershock: Model A: CCCC record ........................ 112
G.1 Building Displacements and Drifts. .................................................................................. 112
G.2 Diaphragm Connection Forces .......................................................................................... 115
Appendix H :Analysis Results - Lyttelton Aftershock: Model A: CHHC record ........................ 122
H.1 Building Displacements and Drifts. .................................................................................. 122
H.2 Diaphragm Connection Forces .......................................................................................... 125
Appendix I :Analysis Results - Lyttelton Event: CBGS Record Model A & Model B ............. 132

CTV Non-Linear Seismic Analysis Report Compusoft Engineering Limited
Compusoft Engineering Limited Page 78
I.1 Building Displacements and Drifts. .................................................................................. 132
I.2 Column Hinge Progression. ............................................................................................... 135
I.3 Diaphragm Connection Forces .......................................................................................... 136
Appendix J :Analysis Results - Lyttelton: CBGS, Model A - No Diaphragm Disconnection .. 140
J.1 Building Displacements and Drifts. .................................................................................. 140
J.2 Diaphragm Connection Forces .......................................................................................... 144

CTV Non-Linear Seismic Analysis Report February 2012
Compusoft Engineering Limited Page 79
Appendix A :Nonlinear analysis of diagonally reinforced coupling beams
A.1 Considered model
A method for considering the nonlinear load-deformation behaviour of diagonally reinforced
coupling beams is proposed in [19]. In this method a simple truss mechanism is considered to
provide all strength and stiffness to the system. When the system is subjected to sway actions
the resulting shear force and bending moment is carried via two diagonal members with one
in compression and one in tension. The compression member includes the confined concrete
core and the diagonal reinforcing bars whereas the tension member includes only the diagonal
reinforcing bars. It is considered that the concrete core provides sufficient stiffness to ensure
that the member cannot buckle in compression. The proposed truss model is as presented in
Figure A.1 below.
Figure A.1: Proposed model (from [19])
A.2 Example structure
The proposed model has been implemented for an example structure as presented in Figure
A.2 below. In this structure two 2050 m long reinforced concrete walls are joined by a
coupling beam measuring 900 m long by 1650 m high. The wall thickness is 400 mm
throughout.

CTV Non-Linear Seismic Analysis Report Compusoft Engineering Limited
Compusoft Engineering Limited Page 80
Figure A.2: Example wall reinforcement
A.3 Analysis model definition
The example structure has been analysed considering the proposed model using SAP2000
(v14). In this model axially “stiff” diagonal struts (oriented at 54° to the horizontal from
Figure A.2) are included to consider the behaviour of the coupling beam following the model
presented in Section A.1. The strut dimensions are taken as 150 mm square. Axial
deformation in the struts is provided via fibre type hinge element which incorporates both
concrete and reinforcement fibres. The walls are modelled using membrane elements that
have sufficient stiffness to ensure that deformation is restricted to the coupling beam. As the
conventional beam reinforcement also present in the coupling beam is not included, this
modelling analogy will underestimate the stiffness of the coupling beam for elastic response,
but will provide a reasonable representation of the wall response in the inelastic range. The
analysis model is presented in Figure A.3 below.

CTV Non-Linear Seismic Analysis Report Compusoft Engineering Limited
Compusoft Engineering Limited Page 81
Figure A.3: SAP2000 analysis model
The reinforcement in the diagonal struts is included as a fibre type element with stress-strain
behaviour as defined by Park and is presented in Figure A.4 below. The hysteretic form of
the reinforcing is taken as kinematic type. The area of the reinforcing steel is taken as the
sum of all longitudinal reinforcement present in the strut (i.e. As=4-D28=2463 mm2). Strain
penetration of the diagonal reinforcement into the walls have been excluded in this model.
Figure A.4: Reinforcing nonlinear steel stress-strain plot
The concrete core of the diagonal strut elements is included fibre type element with material
behaviour based on a Mander confined concrete model [11] with an unconfined compressive
strength, fc‟=33.5 MPa, ɛc0=0.002, ultimate unconfined strain capacity given as 0.004, and
confining reinforcing as presented in Figure A.4 above (i.e. R6@75crs confining hoops). The
hysteretic form of the concrete fibre is considered exhibit Takeda type behaviour. The area of
the concrete is taken as the total concrete core area (i.e. Ac=Ag-As=1502-2,464=20,036 mm2).
-500,000
-400,000
-300,000
-200,000
-100,000
0
100,000
200,000
300,000
400,000
500,000
-0.3 -0.2 -0.1 0 0.1 0.2 0.3Stre
ss (k
Pa)
Strain (m/m)

CTV Non-Linear Seismic Analysis Report Compusoft Engineering Limited
Compusoft Engineering Limited Page 82
The nonlinear stress-strain behaviour for the concrete is as presented in Figure A.5 below
(note that the tensile capacity has been taken as zero).
Figure A.5: Concrete nonlinear stress-strain plot
A.4 Analysis results
A nonlinear analysis has been undertaken to derive the force-deformation behaviour of the
system. The backbone curve for the coupling beam system plotted as wall rotation (=drift) vs
coupling beam shear force is presented in Figure A.6 below.
Figure A.6: Nonlinear backbone curve
A qualitative comparison of the resulting backbone curve and those presented in [19]
indicates that the model adequately predicts the force-displacement behaviour for monotonic
loading.
In order to assess the hysteretic form, a nonlinear displacement time history analysis has been
undertaken. Figure A.7 below plots the wall rotation (=drift) vs coupling beam shear force
for the cyclic analysis.
-40,000
-35,000
-30,000
-25,000
-20,000
-15,000
-10,000
-5,000
0
-0.1 -0.08 -0.06 -0.04 -0.02 0
Stre
ss (k
Pa)
Strain (m/m)
-2,500
-2,000
-1,500
-1,000
-500
0
500
1,000
1,500
2,000
2,500
-0.02 -0.01 0 0.01 0.02
Co
up
ling
be
am s
he
ar f
orc
e,
V (
kN)
Drift

CTV Non-Linear Seismic Analysis Report Compusoft Engineering Limited
Compusoft Engineering Limited Page 83
Figure A.7: Coupling beam hysteretic response
It can be seen that for the level of drift considered the analysis model behaves essentially in an
elastic-perfectly plastic manner due to the reinforcing with additional strength enhancement as
a result of the concrete. A limitation of the analysis undertaken is that the hysteretic
behaviour does not reflect the softening that would normally be expected under cyclic loading
due to the Bauschinger effect, and other mechanisms such as concrete spalling etc.
In an attempt to approximate these effects an additional analysis model has been developed
whereby the hysteresis type for the reinforcement has been changed from the default
kinematic type to instead be a Takeda type. The resulting hysteretic response is presented in
Figure A.8 below which plots the wall rotation (=drift) vs coupling beam shear force.
Figure A.8: Coupling beam hysteretic response (Takeda reinforcement)
It can be seen that whilst the hysteretic behaviour is not perfect, the total amount of energy
dissipated for the considered loading history is reduced by approximately 50%.
A.5 Strain penetrations
-2,500
-2,000
-1,500
-1,000
-500
0
500
1,000
1,500
2,000
2,500
-0.02 -0.015 -0.01 -0.005 0 0.005 0.01 0.015 0.02
Co
up
ling
be
am s
he
ar f
orc
e,
V (
kN)
Drift
-2,500
-2,000
-1,500
-1,000
-500
0
500
1,000
1,500
2,000
2,500
-0.02 -0.015 -0.01 -0.005 0 0.005 0.01 0.015 0.02
Co
up
ling
be
am s
he
ar f
orc
e,
V (
kN)
Drift

CTV Non-Linear Seismic Analysis Report Compusoft Engineering Limited
Compusoft Engineering Limited Page 84
The effects of strain penetration of the diagonal reinforcement into the wall has not been
incorporated into the analysis models. In order to incorporate these the nonlinear stress-strain
curve for the reinforcing steel element as presented in Figure A.4 has been scaled in the strain
domain based on the following:
Where ɛs‟ is the scaled strain, ɛs is the material strain obtained from Figure A.4, L is the length
of the element as considered in the model, and LSP is given as the strain penetration length
which has been adapted from [20] as below:
Where fs and db are the stress and diameter of the longitudinal reinforcement respectively.
For the example structure the modelled length of the strut is given as 1531 mm and the
diagonal bar is given as 28 mm diameter which then gives a modified nonlinear stress-strain
curve for the reinforcing fibre as presented in Figure A.9 below.
Figure A.9: Reinforcing nonlinear stress-strain plot (modified for strain penetrations)
-500,000
-400,000
-300,000
-200,000
-100,000
0
100,000
200,000
300,000
400,000
500,000
-0.3 -0.2 -0.1 0 0.1 0.2 0.3Stre
ss (k
Pa)
Strain (m/m)

CTV Non-Linear Seismic Analysis Report Compusoft Engineering Limited
Compusoft Engineering Limited Page 85
Appendix B :Assessment of beam-column joint capacity
This appendix describes the methods used to assess the capacity of the beam-column joints in
the CTV Building. Two aspects of the joints were considered possible causes of premature
failure, these being the joint shear capacity and the potential pullout of inadequate hook
anchorages.
B.1 Beam-column joint shear capacity
The beam-column joints of the CTV building do not meet the requirements of
NZS 3101:2006 [6] due to their small size and lack of joint core reinforcement. Joint shear
capacities have therefore been assessed using published procedures for deficient beam-
column joints [5, 20]. The approach taken has been based on determining appropriate limits
for joint core principal tension and principal compression stresses. The limit value for the
principal tension stress was calculated as 'cmaxtp, fkf [5], with the value of k dependent on
whether the joint was an interior or exterior joint and on the curvature ductility developed in
the adjacent beam plastic hinge (see Figure B.1). The limiting value for the principal
compression stress in the joint core was taken as 'cmaxcp, f0.5f based on a recommendation
made by Priestley [20].
The principal tension and compression stresses existing in the joint core were calculated as
2jh2
aa vf0.5f0.5 , where fa is the column axial stress and vjh is the horizontal joint
shear stress. For circular columns, the joint shear stress was calculated assuming a square
cross section with width and depth equal to the column diameter, while the column axial
stress fa was calculated based on the gross cross sectional area of the column. Consideration
of the principal stresses shows that the joint shear stress required to cause tensile failure
increases as the column axial compressive stress increases, while the joint shear stress
required to cause compression failure in the joint decreases as the column axial compressive
stress increases.

CTV Non-Linear Seismic Analysis Report Compusoft Engineering Limited
Compusoft Engineering Limited Page 86
Figure B.1: Relationship of factor K to curvature ductility for different joint types (after [5])
B.2 Hook anchor capacity
The method of construction used for the CTV building required that the bottom reinforcement
of the beams typically be terminated at each column, with reinforcement being hooked into
the joint at these locations. Based on engineering drawings (see Figure B.2) the hook length
for either H28 or H24 bars from the column face was approximately 275 mm (although
175 mm was also detailed as anchorage lengths into columns F2 and F3). Similar conditions
applied for anchorage of top steel into corner columns. The hook length provided is not
adequate to develop the full strength of the reinforcement according to the provisions of
NZS 3101:2006 [6]. Assuming the joint core concrete strength was 25 MPa (i.e. that the
beam-column joint was poured at the same time as the floor slab and the upper parts of the
beams) and the yield strength of the HD28 reinforcing bars was 448 MPa, the hooked
development length required by NZS 3101:2006 would be Ldh = 602 mm (cl. 8.6.10.3.1) if the
beam was to be designed with a ductile hinge adjacent to the columns face. This hook length
would be required to be placed the lesser of 8db or 0.5hc from the column face (cl. 9.4.3.2),
which in this case is 200 mm from the face. Thus the total anchor length inside the joint
would need to be at least 800 mm to sustain ductile yielding of the beam steel.
0.0
0.2
0.4
0.6
0.8
1.0
0 2 4 6 8 10
k
Curvature ductility Φu/Φy
Interior
Exterior - hooks in
Exterior - hooks out

CTV Non-Linear Seismic Analysis Report Compusoft Engineering Limited
Compusoft Engineering Limited Page 87
Figure B.2: CTV building hook detail for interior beam
Joh and Shibata [21, 22] identified three failure modes for hooked anchorages, namely side
splitting, local compression failure at the bar bend, and “raking-out” failure or pullout of the
entire bar group (see Figure B.3). Based on experimental tests they suggest a method for
determining the capacity of hooks based on raking-out failure. According to their method the
anchor strength is dependent on the column axial force, the embedment length, and the
amount of joint core reinforcement. The design method suggests significant bar anchorage
can be expected even when hook lengths are severely deficient according to NZS 3101:2006.
For example, calculation for a 275 mm anchorage indicates that the CTV beam bar
anchorages could develop the yield strength of the beam reinforcement providing the column
axial load on a circular column exceeded 265 kN compression.
Consideration has not been given to the potential for “side split” failure in the CTV Building
joints. Preliminary calculations have been undertaken to determine whether local
compression failure at the inside of the hooked anchor would be expected. The procedures of
NZS 3101:2006 cl.8.4.2.1 indicate that prevention of local crushing at the inside of the hook
would require a bend radius of approximately 250 mm, which is smaller than the bend radius
provided. It therefore seems reasonable to assume localised crushing at the inside of the
hooks was not likely.

CTV Non-Linear Seismic Analysis Report Compusoft Engineering Limited
Compusoft Engineering Limited Page 88
Figure B.3: Hooked anchorage failure modes (from [21])
B.3 Joint region capacity hierarchy
A useful method of assessing beam-column joint performance is to plot a graph showing the
joint capacities based on failure loads of the various mechanisms. This allows a failure
hierarchy to be established and thus identifies the probable failure mechanism at the joint.
This type of plot is shown in Figure B.4 for an interior joint of the CTV building.
Figure B.4 was developed by calculating the beam moment that would coincide with
development of the capacity of joint tension failure, joint compression failure, and beam
reinforcement anchor failure. For each failure type a range of column axial loads were
considered. Comparison of the resulting curves with the approximate beam yield and ultimate
moment capacities indicates that joint tension or anchorage failure are likely to occur before
beam yielding when the column axial load is small. However, for moderate column axial
loads the plot indicates that plastic hinges would be able to form in the beams without joint
failure occurring.
The data shown in Figure B.4 should be considered indicative only. The data was developed
treating the beam-column joint as if it were an isolated subassembly subjected to a simple
moment pattern with inflection points at the beam and column midpoints (see Figure B.5).
This simplification allows joint shear forces to be directly related to beam moments, and thus
makes presentation of the relative strengths more simple. However, the assumed moment
distribution was not used during assessment of the performance of the CTV building. Instead,
beam and column moments, shears, and axial forces were tabulated directly from the analysis

CTV Non-Linear Seismic Analysis Report Compusoft Engineering Limited
Compusoft Engineering Limited Page 89
and used to assess the joint core demands at each time step for a selection of critical beam
column joints.
Figure B.4: Failure hierarchy plot for interior joint, 2-HD28 beam reinforcing bars, 25 MPa concrete strength, circular column, 275 mm anchorage.
Figure B.5: Moment diagram assumed for development of Figure B.4
0
100
200
300
400
500
600
-2000 -1500 -1000 -500 0 500
Ap
pro
x b
eam
mo
men
t ca
pac
ity
(kN
m)
Column axial load (kN)
Beam yield capacity (As.fy.jd)
Beam overstrength capacity (As.fu.jd)
Bar pullout capacity
Joint tension failure, μφ = 0
Joint tension failure, μφ = 4
Joint tension failure, μφ = 8
Joint compression failure

CTV Non-Linear Seismic Analysis Report Compusoft Engineering Limited
Compusoft Engineering Limited Page 90
Appendix C :Foundation Modelling Properties
Figure C.1: Expected Soil Stiffness [4]

CTV Non-Linear Seismic Analysis Report Compusoft Engineering Limited
Compusoft Engineering Limited Page 91
Appendix D :Acceleration Time History Records.
D.1 Darfield CBGS
Christchurch Botanical Gardens (CBGS) time history records [17] used to determine the
structural response for the Darfield event are presented in Figure D.1 below.
Figure D.1: Darfield 20100903_163541_CBGS N00E (top), N90E (middle), and Vertical (bottom) acceleration time history record plots.
-0.25
-0.2
-0.15
-0.1
-0.05
0
0.05
0.1
0.15
0.2
0 20 40 60 80 100 120 140 160
Acc
eler
atio
n (g
)
Time (s)
-0.2
-0.15
-0.1
-0.05
0
0.05
0.1
0.15
0.2
0 20 40 60 80 100 120 140 160
Acc
eler
atio
n (g
)
Time (s)
-0.15
-0.1
-0.05
0
0.05
0.1
0.15
0 20 40 60 80 100 120 140 160
Acc
eler
atio
n (g
)
Time (s)

CTV Non-Linear Seismic Analysis Report Compusoft Engineering Limited
Compusoft Engineering Limited Page 92
D.2 Lyttelton CBGS
Christchurch Botanical Gardens (CBGS) time history records [18] used to determine the
structural response for the Lyttelton aftershock are presented in Figure D.2 below.
Figure D.2: Lyttelton 20110221_235142_CBGS N00E (top), N90E (middle), and Vertical (bottom) acceleration time history record plots.
-0.5
-0.4
-0.3
-0.2
-0.1
0
0.1
0.2
0.3
0.4
0.5
0 10 20 30 40 50 60 70 80 90 100
Acc
ele
rati
on
(g)
Time (s)
-0.6
-0.4
-0.2
0
0.2
0.4
0.6
0 10 20 30 40 50 60 70 80 90 100
Acc
eler
atio
n (g
)
Time (s)
-0.3
-0.2
-0.1
0
0.1
0.2
0.3
0 10 20 30 40 50 60 70 80 90 100
Acc
eler
atio
n (g
)
Time (s)

CTV Non-Linear Seismic Analysis Report Compusoft Engineering Limited
Compusoft Engineering Limited Page 93
D.3 Lyttelton CCCC
Christchurch Cathedral College (CCCC) time history records [18] used to determine the
structural response for the Lyttelton aftershock are presented in Figure D.3 below.
Figure D.3: Lyttelton 20110221_235142_CCCC N00E (top), N90E (middle), and Vertical (bottom) acceleration time history record plots.
-0.4
-0.3
-0.2
-0.1
0
0.1
0.2
0.3
0.4
0.5
0 10 20 30 40 50 60
Acc
eler
atio
n (g
)
Time (s)
-0.5
-0.4
-0.3
-0.2
-0.1
0
0.1
0.2
0.3
0.4
0 10 20 30 40 50 60
Acc
eler
atio
n (g
)
Time (s)
-0.6
-0.4
-0.2
0
0.2
0.4
0.6
0.8
0 10 20 30 40 50 60
Acc
eler
atio
n (g
)
Time (s)

CTV Non-Linear Seismic Analysis Report Compusoft Engineering Limited
Compusoft Engineering Limited Page 94
D.4 Lyttelton CHHC
Christchurch Hospital (CHHC) time history records [18] used to determine the structural
response for the Lyttelton aftershock are presented in Figure D.4 below.
Figure D.4: Lyttelton 20110221_235142_CHHC N00E (top), N90E (middle), and Vertical (bottom) acceleration time history record plots.
-0.4
-0.3
-0.2
-0.1
0
0.1
0.2
0.3
0 10 20 30 40 50 60 70
Acc
eler
atio
n (g
)
Time (s)
-0.4
-0.3
-0.2
-0.1
0
0.1
0.2
0.3
0.4
0 10 20 30 40 50 60 70
Acc
eler
atio
n (g
)
Time (s)
-0.6
-0.4
-0.2
0
0.2
0.4
0.6
0 10 20 30 40 50 60 70
Acc
eler
atio
n (g
)
Time (s)

CTV Non-Linear Seismic Analysis Report Compusoft Engineering Limited
Compusoft Engineering Limited Page 95
Appendix E :Analysis Results - Darfield Event: CBGS Record
The following details the structural actions reported by the analysis as a function of time, for
the Darfield event using the acceleration time history recorded at the CBGS station using all
components of the record.
E.1 Building Displacements and Drifts.
Building Level 6 displacements are presented in Figure E.1 and Figure E.2 below for the
Southeast and Northwest corners of the building respectively.
Figure E.1: Level 6 Southeast corner displacements.
Figure E.2: Level 6 Northwest corner displacements.
-0.2
-0.15
-0.1
-0.05
0
0.05
0.1
0.15
0 1 2 3 4 5 6 7 8 9 10 11 12
Dis
pla
cem
ent
(m)
Time (s)
N/S Displacement: Model A
N/S Displacement: Model B
E/W Displacement: Model A
E/W Displacement: Model B
-0.2
-0.15
-0.1
-0.05
0
0.05
0.1
0.15
0 1 2 3 4 5 6 7 8 9 10 11 12
Dis
pla
cem
ent
(m)
Time (s)
N/S Displacement:
Model A
N/S Displacement:
Model B
E/W Displacement:
Model A
E/W Displacement:
Model B

CTV Non-Linear Seismic Analysis Report Compusoft Engineering Limited
Compusoft Engineering Limited Page 96
Inter-storey displacements for the perimeter frame lines A and F in the north/south direction
are presented in Figure E.3, and Figure E.4 below. For the purposes of comparison, plots
contain both Model A and Model B inter-storey displacements.
Figure E.3: Frame A north/south inter-storey displacements.
Figure E.4: Frame F north/south inter-storey displacements.
-0.04
-0.03
-0.02
-0.01
0
0.01
0.02
0.03
0 1 2 3 4 5 6 7 8 9 10 11 12
Dis
pla
cem
en
t (m
)
Time (s)
L5 N/S drift: Model A
L4 N/S drift: Model A
L3 N/S drift: Model A
L2 N/S drift: Model A
L1 N/S drift: Model A
L5 N/S drift: Model B
L4 N/S drift: Model B
L3 N/S drift: Model B
L2 N/S drift: Model B
L1 N/S drift: Model B
-0.04
-0.03
-0.02
-0.01
0
0.01
0.02
0.03
0.04
0 1 2 3 4 5 6 7 8 9 10 11 12
Dis
pla
cem
ent
(m)
Time (s)
L5 N/S drift: Model A
L4 N/S drift: Model A
L3 N/S drift: Model A
L2 N/S drift: Model A
L1 N/S drift: Model A
L5 N/S drift: Model B
L4 N/S drift: Model B
L3 N/S drift: Model B
L2 N/S drift: Model B
L1 N/S drift: Model B

CTV Non-Linear Seismic Analysis Report Compusoft Engineering Limited
Compusoft Engineering Limited Page 97
Inter-storey displacements for the perimeter frame lines 1 and 4 in the east/west direction are
presented in Figure E.5, and Figure E.6 below. For the purposes of comparison, plots contain
both Model A and Model B inter-storey displacements.
Figure E.5: Frame 1 east/west inter-storey displacements.
Figure E.6: Frame 4 east/west inter-storey displacements.
-0.025
-0.02
-0.015
-0.01
-0.005
1E-17
0.005
0.01
0.015
0.02
0 1 2 3 4 5 6 7 8 9 10 11 12
Dis
pla
cem
ent
(m)
Time (s)
L5 E/W drift: Model A
L4 E/W drift: Model A
L3 E/W drift: Model A
L2 E/W drift: Model A
L1 E/W drift: Model A
L5 E/W drift: Model B
L4 E/W drift: Model B
L3 E/W drift: Model B
L2 E/W drift: Model B
L1 E/W drift: Model B
-0.02
-0.015
-0.01
-0.005
0
0.005
0.01
0.015
0.02
0 1 2 3 4 5 6 7 8 9 10 11 12
Dis
pla
cem
ent
(m)
Time (s)
L5 E/W drift: Model A
L4 E/W drift: Model A
L3 E/W drift: Model A
L2 E/W drift: Model A
L1 E/W drift: Model A
L5 E/W drift: Model B
L4 E/W drift: Model B
L3 E/W drift: Model B
L2 E/W drift: Model B
L1 E/W drift: Model B

CTV Non-Linear Seismic Analysis Report Compusoft Engineering Limited
Compusoft Engineering Limited Page 98
E.2 Diaphragm Connection Forces
Diaphragm connection forces are presented in Figure E.7 to Figure E.18 below. Note that
moments are reported about the geometric centroid of the element being considered.
Figure E.7: North core total diaphragm north/south actions (no masonry left, with masonry right)
Figure E.8: North core total diaphragm east/west actions (no masonry left, with masonry right)
Figure E.9: North core total diaphragm in-plane moments (no masonry left, with masonry right)
-1500
-1000
-500
0
500
1000
1500
0 1 2 3 4 5 6 7 8 9 10 11 12
Forc
e (k
N)
Time (s)
Level 6
Level 5
Level 4
Level 3
Level 2
-1500
-1000
-500
0
500
1000
1500
0 1 2 3 4 5 6 7 8 9 10 11 12Forc
e (k
N)
Time (s)
Level 6
Level 5
Level 4
Level 3
Level 2
-1500
-1000
-500
0
500
1000
1500
2000
0 1 2 3 4 5 6 7 8 9 10 11 12
Forc
e (k
N)
Time (s)
Level 6
Level 5
Level 4
Level 3
Level 2
-1500
-1000
-500
0
500
1000
1500
2000
0 1 2 3 4 5 6 7 8 9 10 11 12
Forc
e (k
N)
Time (s)
Level 6
Level 5
Level 4
Level 3
Level 2
-10000
-8000
-6000
-4000
-2000
0
2000
4000
6000
8000
10000
0 1 2 3 4 5 6 7 8 9 10 11 12
Mo
me
nt
(kN
m)
Time (s)
Level 6
Level 5
Level 4
Level 3
Level 2
-10000
-8000
-6000
-4000
-2000
0
2000
4000
6000
8000
10000
0 1 2 3 4 5 6 7 8 9 10 11 12
Mo
me
nt
(kN
m)
Time (s)
Level 6
Level 5
Level 4
Level 3
Level 2

CTV Non-Linear Seismic Analysis Report Compusoft Engineering Limited
Compusoft Engineering Limited Page 99
Figure E.10: North core Wall C diaphragm north/south actions (no masonry left, with masonry right)
Figure E.11: North core Wall C/D diaphragm north/south actions (no masonry left, with masonry right).
Figure E.12: North core Wall D diaphragm north/south actions (no masonry left, with masonry right).
-1200
-800
-400
0
400
800
1200
1600
0 1 2 3 4 5 6 7 8 9 10 11 12
Forc
e (k
N)
Time (s)
Level 6
Level 5
Level 4
Level 3
Level 2
-1200
-800
-400
0
400
800
1200
1600
0 1 2 3 4 5 6 7 8 9 10 11 12
Forc
e (
kN
)
Time (s)
Level 6
Level 5
Level 4
Level 3
Level 2
-1500
-1000
-500
0
500
1000
0 1 2 3 4 5 6 7 8 9 10 11 12
Forc
e (k
N)
Time (s)
Level 6
Level 5
Level 4
Level 3
Level 2
-1500
-1000
-500
0
500
1000
0 1 2 3 4 5 6 7 8 9 10 11 12
Forc
e (k
N)
Time (s)
Level 6
Level 5
Level 4
Level 3
Level 2
-800
-600
-400
-200
0
200
400
600
0 1 2 3 4 5 6 7 8 9 10 11 12
Forc
e (
kN
)
Time (s)
Level 6
Level 5
Level 4
Level 3
Level 2
Connection Capacity L4
Connection Capacity L5
Connection Capacity L6
-800
-600
-400
-200
0
200
400
600
0 1 2 3 4 5 6 7 8 9 10 11 12
Forc
e (
kN
)
Time (s)
Level 6
Level 5
Level 4
Level 3
Level 2
Connection Capacity L4
Connection Capacity L5
Connection Capacity L6

CTV Non-Linear Seismic Analysis Report Compusoft Engineering Limited
Compusoft Engineering Limited Page 100
Figure E.13: North core Wall D/E diaphragm north/south actions (no masonry left, with masonry right).
Figure E.14: North core Slab 4/C to C/D diaphragm north/south actions (no masonry left, with masonry right).
Figure E.15: North core Slab 4/C to C/D diaphragm east/west actions (no masonry left, with masonry right).
-600
-400
-200
0
200
400
600
800
0 1 2 3 4 5 6 7 8 9 10 11 12
Forc
e (k
N)
Time(s)
Level 6
Level 5
Level 4
Level 3
Level 2
Connection Capacity L4
Connection Capacity L5
Connection Capacity L6
-600
-400
-200
0
200
400
600
800
0 1 2 3 4 5 6 7 8 9 10 11 12
Forc
e (
kN
)
Time (s)
Level 6
Level 5
Level 4
Level 3
Level 2
Connection Capacity L4
Connection Capacity L5
Connection Capacity L6
-1500
-1000
-500
0
500
1000
1500
2000
0 1 2 3 4 5 6 7 8 9 10 11 12
Forc
e (k
N)
Time (s)
Level 6
Level 5
Level 4
Level 3
Level 2
-1500
-1000
-500
0
500
1000
1500
2000
0 1 2 3 4 5 6 7 8 9 10 11 12
Forc
e (k
N)
Time (s)
Level 6
Level 5
Level 4
Level 3
Level 2
-1200
-800
-400
0
400
800
1200
0 1 2 3 4 5 6 7 8 9 10 11 12Forc
e (k
N)
Time (s)
Level 6
Level 5
Level 4
Level 3
Level 2
-1200
-800
-400
0
400
800
1200
0 1 2 3 4 5 6 7 8 9 10 11 12
Forc
e (k
N)
Time (s)
Level 6
Level 5
Level 4
Level 3
Level 2

CTV Non-Linear Seismic Analysis Report Compusoft Engineering Limited
Compusoft Engineering Limited Page 101
Figure E.16: North core Slab 4/C to C/D diaphragm in-plane moments (no masonry left, with masonry right).
Figure E.17: North core Wall 5 diaphragm east/west actions (no masonry left, with masonry right).
Figure E.18: South wall diaphragm east/west actions (no masonry left, with masonry right).
-6000
-4000
-2000
0
2000
4000
6000
8000
0 1 2 3 4 5 6 7 8 9 10 11 12Mo
me
nt
(kN
m)
Time (s)
Level 6
Level 5
Level 4
Level 3
Level 2
-6000
-4000
-2000
0
2000
4000
6000
8000
0 1 2 3 4 5 6 7 8 9 10 11 12
Mo
me
nt
(kN
m)
Time (s)
Level 6
Level 5
Level 4
Level 3
Level 2
-1500
-1000
-500
0
500
1000
0 1 2 3 4 5 6 7 8 9 10 11 12
Forc
e (k
N)
Time(s)
Level 6
Level 5
Level 4
Level 3
Level 2
-1500
-1000
-500
0
500
1000
0 1 2 3 4 5 6 7 8 9 10 11 12
Forc
e (
kN
)
Time (s)
Level 6
Level 5
Level 4
Level 3
Level 2
-800
-600
-400
-200
0
200
400
600
800
1000
0 1 2 3 4 5 6 7 8 9 10 11 12
Forc
e (
kN
)
Time (s)
Level 6
Level 5
Level 4
Level 3
Level 2
-800
-600
-400
-200
0
200
400
600
800
1000
0 1 2 3 4 5 6 7 8 9 10 11 12
Forc
e (k
N)
Time (s)
Level 6
Level 5
Level 4
Level 3
Level 2

CTV Non-Linear Seismic Analysis Report Compusoft Engineering Limited
Compusoft Engineering Limited Page 102
Appendix F :Analysis Results - Lyttelton Aftershock: Model A: CBGS record
The following details the structural actions reported by the analysis as a function of time, for
the Lyttelton aftershock using the acceleration time history recorded at the CBGS station
using all components of the record.
F.1 Building Displacements and Drifts.
Building Level 6 displacements are presented in Figure F.1 and Figure F.2 below for the
southeast and northwest corners of the building respectively.
Figure F.1: Level 6 Southeast corner displacements.
Figure F.2: Level 6 Northwest corner displacements.
-0.4
-0.3
-0.2
-0.1
0
0.1
0.2
0.3
0.4
0 1 2 3 4 5 6 7 8 9 10 11
Dis
pla
cem
ent
(m)
Time (s)
North/South Displacement
East/West
Displacement
-0.3
-0.2
-0.1
0
0.1
0.2
0.3
0.4
0.5
0 1 2 3 4 5 6 7 8 9 10 11
Dis
pla
cem
ent
(m)
Time (s)
North/South
Displacement
East/West Displacement

CTV Non-Linear Seismic Analysis Report Compusoft Engineering Limited
Compusoft Engineering Limited Page 103
As can be seen in Figure F.2 above a significant increase in the northward building
displacement is observed in the northwest corner of the building between 5 and 5.5 seconds of
the record. This occurs after the tension ties capacities on levels 4 to 6 of the core are
exceeded allowing increased building rotation clockwise from west to north. The peak
displacement corresponds to a clockwise rotation in conjunction with a net northward
building translation. Table F.1 presents the sequence of failure of the north core wall ties
throughout the record.
Table F.1: Wall D and D/E diaphragm disconnection times.
Level Wall D Failure (sec)
Wall D/E Failure (sec)
6 2.56 2.48
5 2.54 2.46
4 2.50 2.38
Inter-storey displacements for the perimeter frame lines A and F in the north/south direction
are presented in Figure E.3, and Figure F.4 below. North core tie tensile failure is identified
on the plots for reference.
Figure F.3: Frame A north/south inter-storey displacements.
-0.06
-0.04
-0.02
0
0.02
0.04
0.06
0.08
0.1
0 1 2 3 4 5 6 7 8 9 10 11
Dis
pla
cem
en
t (m
)
Time (s)
Level 6 N/S drift
Level 5 N/S drift
Level 4 N/S drift
Level 3 N/S drift
Level 2 N/S drift
First Core Connection FailureLast Core Connection
Failure

CTV Non-Linear Seismic Analysis Report Compusoft Engineering Limited
Compusoft Engineering Limited Page 104
Figure F.4: Frame F north/south inter-storey displacements.
Inter-storey displacements for the perimeter frame lines 1 and 4 in the East/West direction are
presented in Figure F.5, and Figure F.6 below.
Figure F.5: Frame 1 east/west inter-storey displacements.
-0.08
-0.06
-0.04
-0.02
0
0.02
0.04
0.06
0.08
0 1 2 3 4 5 6 7 8 9 10 11
Dis
pla
cem
ent
(m)
Time (s)
Level 5 N/S drift
Level 4 N/S drift
Level 3 N/S drift
Level 2 N/S drift
Level 1 N/S drift
First Core Connection
FailureLast Core Connection Failure
-0.08
-0.06
-0.04
-0.02
0
0.02
0.04
0.06
0.08
0 1 2 3 4 5 6 7 8 9 10 11
Dis
pla
cem
en
t (m
)
Time (s)
Level 5 E/W drift
Level 4 E/W drift
Level 3 E/W drift
Level 2 E/W drift
Level 1 E/W drift
First Core Connection FailureLast Core Connection Failure

CTV Non-Linear Seismic Analysis Report Compusoft Engineering Limited
Compusoft Engineering Limited Page 105
Figure F.6: Frame 4 east/west inter-storey displacements.
F.2 Diaphragm Connection Forces
Diaphragm connection forces are presented in Figure F.7 to Figure F.18 below. Note that
moments are reported about the geometric centroid of the element being considered.
Figure F.7: North core total diaphragm north/south actions
-0.04
-0.03
-0.02
-0.01
0
0.01
0.02
0.03
0.04
0 1 2 3 4 5 6 7 8 9 10 11
Dis
pla
cem
en
t (m
)
Time (s)
Level 6 E/W drift
Level 5 E/W drift
Level 4 E/W drift
Level 3 E/W drift
Level 2 E/W drift
First Core Connection FailureLast Core Connection
Failure
-5000
-4000
-3000
-2000
-1000
0
1000
2000
3000
4000
0 1 2 3 4 5 6 7 8 9 10 11
Forc
e (k
N)
Time (s)
Level 6
Level 5
Level 4
Level 3
Level 2

CTV Non-Linear Seismic Analysis Report Compusoft Engineering Limited
Compusoft Engineering Limited Page 106
Figure F.8: North core total diaphragm east/west actions
Figure F.9: North core total diaphragm in-plane moments
-3000
-2000
-1000
0
1000
2000
3000
0 1 2 3 4 5 6 7 8 9 10 11
Forc
e (k
N)
Time (s)
Level 6
Level 5
Level 4
Level 3
Level 2
-20000
-15000
-10000
-5000
0
5000
10000
15000
20000
25000
0 1 2 3 4 5 6 7 8 9 10 11
Mo
me
nt
(kN
m)
Time (s)
Level 6
Level 5
Level 4
Level 3
Level 2

CTV Non-Linear Seismic Analysis Report Compusoft Engineering Limited
Compusoft Engineering Limited Page 107
Figure F.10: North core Wall C diaphragm north/south actions
Figure F.11: North core Wall C/D diaphragm north/south actions.
-3000
-2000
-1000
0
1000
2000
3000
4000
0 1 2 3 4 5 6 7 8 9 10 11
Forc
e (k
N)
Time (s)
Level 6
Level 5
Level 4
Level 3
Level 2
-3000
-2500
-2000
-1500
-1000
-500
0
500
1000
1500
2000
0 1 2 3 4 5 6 7 8 9 10 11
Forc
e (k
N)
Time (s)
Level 6
Level 5
Level 4
Level 3
Level 2

CTV Non-Linear Seismic Analysis Report Compusoft Engineering Limited
Compusoft Engineering Limited Page 108
Figure F.12: North core Wall D diaphragm north/south actions.
Figure F.13: North core Wall D/E diaphragm north/south actions.
-1000
-500
0
500
1000
1500
0 1 2 3 4 5 6 7 8 9 10 11
Forc
e (k
N)
Time (s)
Level 6
Level 5
Level 4
Level 3
Level 2
Connection Capacity L4
Connection Capacity L5
Connection Capacity L6
-1000
-500
0
500
1000
1500
2000
0 1 2 3 4 5 6 7 8 9 10 11
Forc
e (k
N)
Time (s)
Level 6
Level 5
Level 4
Level 3
Level 2
Connection Capacity L4
Connection Capacity L5
Connection Capacity L6

CTV Non-Linear Seismic Analysis Report Compusoft Engineering Limited
Compusoft Engineering Limited Page 109
Figure F.14: North core Slab 4/C to C/D diaphragm north/south actions.
Figure F.15: North core Slab 4/C to C/D diaphragm east/west actions.
-3000
-2000
-1000
0
1000
2000
3000
4000
0 1 2 3 4 5 6 7 8 9 10 11
Forc
e (k
N)
Time (s)
Level 6
Level 5
Level 4
Level 3
Level 2
-3000
-2000
-1000
0
1000
2000
3000
0 1 2 3 4 5 6 7 8 9 10 11
Forc
e (
kN
)
Time (s)
Level 6
Level 5
Level 4
Level 3
Level 2

CTV Non-Linear Seismic Analysis Report Compusoft Engineering Limited
Compusoft Engineering Limited Page 110
Figure F.16: North core Slab 4/C to C/D diaphragm in-plane moments.
Figure F.17: North core Wall 5 diaphragm east/west actions.
-15000
-10000
-5000
0
5000
10000
15000
0 1 2 3 4 5 6 7 8 9 10 11
Mo
me
nt
(kN
m)
Time (s)
Level 6
Level 5
Level 4
Level 3
Level 2
-3000
-2000
-1000
0
1000
2000
3000
0 1 2 3 4 5 6 7 8 9 10 11
Forc
e (
kN
)
Time (s)
Level 6
Level 5
Level 4
Level 3
Level 2

CTV Non-Linear Seismic Analysis Report Compusoft Engineering Limited
Compusoft Engineering Limited Page 111
Figure F.18: South wall diaphragm east/west actions.
-3000
-2000
-1000
0
1000
2000
0 1 2 3 4 5 6 7 8 9 10 11
Forc
e (k
N)
Time (s)
Level 6
Level 5
Level 4
Level 3
Level 2

CTV Non-Linear Seismic Analysis Report Compusoft Engineering Limited
Compusoft Engineering Limited Page 112
Appendix G :Analysis Results - Lyttelton Aftershock: Model A: CCCC record
The following details the structural actions reported by the analysis as a function of time, for
the Lyttelton aftershock using the acceleration time history recorded at the CCCC station
using all components of the record.
G.1 Building Displacements and Drifts.
Building Level 6 displacements are presented in Figure G.1 and Figure G.2 below for the
southeast and northwest corners of the building respectively.
Figure G.1: Level 6 Southeast corner displacements.
Figure G.2: Level 6 Northwest corner displacements.
-0.6
-0.4
-0.2
0
0.2
0.4
0.6
0 1 2 3 4 5 6 7 8 9
Dis
pla
cem
en
t (m
)
Time (s)
North/South Displacement
East/West Displacement
-0.4
-0.3
-0.2
-0.1
1E-15
0.1
0.2
0.3
0.4
0.5
0.6
0 1 2 3 4 5 6 7 8 9
Dis
pla
cem
en
t (m
)
Time (s)
North/South Displacement
East/West Displacement

CTV Non-Linear Seismic Analysis Report Compusoft Engineering Limited
Compusoft Engineering Limited Page 113
As can be seen in Figure G.2 above a significant increase in the northward building
displacement is observed in the northwest corner of the building between 5.5 and 6 seconds of
the record. This occurs after the tension ties capacities on levels 4 to 6 of the core are
exceeded allowing increased building rotation clockwise from west to north. The peak
displacement corresponds to a clockwise rotation in conjunction with a net northward
building translation. Table G.1 presents the sequence of failure of the north core wall ties
throughout the record.
Table G.1: Wall D and D/E diaphragm disconnection times.
Level Wall D Failure (sec)
Wall D/E Failure (sec)
6 3.10 1.44
5 3.10 1.54
4 1.58 1.46
Inter-storey displacements for the perimeter frame lines A and F in the north/south direction
are presented in Figure G.3, and Figure G.4 below. North core tie tensile failure is identified
on the plots for reference.
Figure G.3: Frame A north/south inter-storey displacements.
-0.08
-0.06
-0.04
-0.02
0
0.02
0.04
0.06
0.08
0.1
0.12
0 1 2 3 4 5 6 7 8 9
Dis
pla
cem
ent
(m)
Time (s)
Level 6 N/S drift
Level 5 N/S drift
Level 4 N/S drift
Level 3 N/S drift
Level 2 N/S drift
First Core Connection FailureLast Core Connection
Failure

CTV Non-Linear Seismic Analysis Report Compusoft Engineering Limited
Compusoft Engineering Limited Page 114
Figure G.4: Frame F north/south inter-storey displacements.
Inter-storey displacements for the perimeter frame lines 1 and 4 in the East/West direction are
presented in Figure G.5, and Figure G.6 below.
Figure G.5: Frame 1 east/west inter-storey displacements.
-0.08
-0.06
-0.04
-0.02
0
0.02
0.04
0.06
0.08
0 1 2 3 4 5 6 7 8 9
Dis
pla
cem
ent
(m)
Time (s)
Level 6 N/S drift
Level 5 N/S drift
Level 4 N/S drift
Level 3 N/S drift
Level 2 N/S drift
First Core Connection FailureLast Core Connection
Failure
-0.125
-0.1
-0.075
-0.05
-0.025
0
0.025
0.05
0.075
0.1
0.125
0 1 2 3 4 5 6 7 8 9
Dis
pla
cem
en
t (m
)
Time (s)
Level 6 E/W drift
Level 5 E/W drift
Level 4 E/W drift
Level 3 E/W drift
Level 2 E/W drift
First Core Connection FailureLast Core Connection Failure

CTV Non-Linear Seismic Analysis Report Compusoft Engineering Limited
Compusoft Engineering Limited Page 115
Figure G.6: Frame 4 east/west inter-storey displacements.
G.2 Diaphragm Connection Forces
Diaphragm connection forces are presented in Figure G.7 to Figure G.18 below. Note that
moments are reported about the geometric centroid of the element being considered.
-0.04
-0.03
-0.02
-0.01
0
0.01
0.02
0.03
0.04
0 1 2 3 4 5 6 7 8 9
Dis
pla
cem
en
t (m
)
Time (s)
Level 6 E/W drift
Level 5 E/W drift
Level 4 E/W drift
Level 3 E/W drift
Level 2 E/W drift
First Core Connection FailureLast Core Connection Failure

CTV Non-Linear Seismic Analysis Report Compusoft Engineering Limited
Compusoft Engineering Limited Page 116
Figure G.7: North core total diaphragm north/south actions
Figure G.8: North core total diaphragm east/west actions
-4000
-3000
-2000
-1000
0
1000
2000
3000
4000
0 1 2 3 4 5 6 7 8 9
Forc
e (k
N)
Time (s)
Level 6
Level 5
Level 4
Level 3
Level 2
-4000
-3000
-2000
-1000
0
1000
2000
3000
0 1 2 3 4 5 6 7 8 9
Forc
e (k
N)
Time (s)
Level 6
Level 5
Level 4
Level 3
Level 2

CTV Non-Linear Seismic Analysis Report Compusoft Engineering Limited
Compusoft Engineering Limited Page 117
Figure G.9: North core total diaphragm in-plane moments
Figure G.10: North core Wall C diaphragm north/south actions
-25000
-20000
-15000
-10000
-5000
0
5000
10000
15000
20000
25000
0 1 2 3 4 5 6 7 8 9
Forc
e (k
N)
Time (s)
Level 6
Level 5
Level 4
Level 3
Level 2
-4000
-3000
-2000
-1000
0
1000
2000
3000
4000
5000
0 1 2 3 4 5 6 7 8 9
Forc
e (k
N)
Time (s)
Level 6
Level 5
Level 4
Level 3
Level 2

CTV Non-Linear Seismic Analysis Report Compusoft Engineering Limited
Compusoft Engineering Limited Page 118
Figure G.11: North core Wall C/D diaphragm north/south actions.
Figure G.12: North core Wall D diaphragm north/south actions.
-5000
-4000
-3000
-2000
-1000
0
1000
2000
0 1 2 3 4 5 6 7 8 9
Forc
e (k
N)
Time (s)
Level 6
Level 5
Level 4
Level 3
Level 2
-800
-600
-400
-200
0
200
400
600
800
1000
0 1 2 3 4 5 6 7 8 9
Forc
e (k
N)
Time (s)
Level 6
Level 5
Level 4
Level 3
Level 2
Connection Capacity L4
Connection Capacity L5
Connection Capacity L6

CTV Non-Linear Seismic Analysis Report Compusoft Engineering Limited
Compusoft Engineering Limited Page 119
Figure G.13: North core Wall D/E diaphragm north/south actions.
Figure G.14: North core Slab 4/C to C/D diaphragm north/south actions.
-800
-600
-400
-200
0
200
400
600
800
1000
1200
0 1 2 3 4 5 6 7 8 9
Forc
e (k
N)
Time (s)
Level 6
Level 5
Level 4
Level 3
Level 2
Connection Capacity L4
Connection Capacity L5
Connection Capacity L6
-3000
-2000
-1000
0
1000
2000
3000
4000
0 1 2 3 4 5 6 7 8 9
Forc
e (k
N)
Time (s)
Level 6
Level 5
Level 4
Level 3
Level 2

CTV Non-Linear Seismic Analysis Report Compusoft Engineering Limited
Compusoft Engineering Limited Page 120
Figure G.15: North core Slab 4/C to C/D diaphragm east/west actions.
Figure G.16: North core Slab 4/C to C/D diaphragm in-plane moments.
-3000
-2000
-1000
0
1000
2000
3000
0 1 2 3 4 5 6 7 8 9Forc
e (k
N)
Time (s)
Level 6
Level 5
Level 4
Level 3
Level 2
-15000
-10000
-5000
0
5000
10000
15000
20000
25000
0 1 2 3 4 5 6 7 8 9
Mo
me
nt
(kN
m)
Time (s)
Level 6
Level 5
Level 4
Level 3
Level 2

CTV Non-Linear Seismic Analysis Report Compusoft Engineering Limited
Compusoft Engineering Limited Page 121
Figure G.17: North core Wall 5 diaphragm east/west actions.
Figure G.18: South wall diaphragm east/west actions.
-3000
-2500
-2000
-1500
-1000
-500
0
500
1000
1500
2000
2500
0 1 2 3 4 5 6 7 8 9
Forc
e (k
N)
Time (s)
Level 6
Level 5
Level 4
Level 3
Level 2
-2500
-2000
-1500
-1000
-500
0
500
1000
1500
2000
0 1 2 3 4 5 6 7 8 9
Forc
e (k
N)
Time (s)
Level 6
Level 5
Level 4
Level 3
Level 2

CTV Non-Linear Seismic Analysis Report Compusoft Engineering Limited
Compusoft Engineering Limited Page 122
Appendix H :Analysis Results - Lyttelton Aftershock: Model A: CHHC record
The following details the structural actions reported by the analysis as a function of time, for
the Lyttelton aftershock using the acceleration time history recorded at the CHHC station
using all components of the record.
H.1 Building Displacements and Drifts.
Building Level 6 displacements are presented in Figure H.1 and Figure H.2 below for the
southeast and northwest corners of the building respectively.
Figure H.1: Level 6 Southeast corner displacements.
Figure H.2: Level 6 Northwest corner displacements.
-0.6
-0.4
-0.2
-1E-15
0.2
0.4
0.6
0 1 2 3 4 5 6 7 8 9 10 11
Dis
pla
cem
en
t (m
)
Time (s)
North/South Displacement
East/West Displacement
-0.4
-0.2
0
0.2
0.4
0.6
0 1 2 3 4 5 6 7 8 9 10 11
Dis
pla
cem
ent
(m)
Time (s)
North/South Displacement
East/West Displacement

CTV Non-Linear Seismic Analysis Report Compusoft Engineering Limited
Compusoft Engineering Limited Page 123
As can be seen in Figure H.2 above a significant increase in the northward building
displacement is observed in the northwest corner of the building between 5.2 and 6.1 seconds
of the record. This occurs after the tension ties capacities on levels 4 to 6 of the core are
exceeded allowing increased building rotation clockwise from west to north. The peak
displacement corresponds to a clockwise rotation in conjunction with a net northward
building translation Table H.1 presents the sequence of failure of the north core wall ties
throughout the record.
Table H.1: Wall D and D/E diaphragm disconnection times.
Level Wall D Failure (sec)
Wall D/E Failure (sec)
6 1.96 1.52
5 2.90 1.54
4 1.60 1.52
Inter-storey displacements for the perimeter frame lines A and F in the north/south direction
are presented in Figure H.3 and Figure H.4 below. North core tie tensile failure is identified
on the plots for reference.
Figure H.3: Frame A north/south inter-storey displacements.
-0.08
-0.06
-0.04
-0.02
0
0.02
0.04
0.06
0.08
0.1
0.12
0 1 2 3 4 5 6 7 8 9 10 11
Dis
pla
cem
ent
(m)
Time (s)
Level 6 N/S drift
Level 5 N/S drift
Level 4 N/S drift
Level 3 N/S drift
Level 2 N/S drift
First Core Connection
FailureLast Core Connection
Failure

CTV Non-Linear Seismic Analysis Report Compusoft Engineering Limited
Compusoft Engineering Limited Page 124
Figure H.4: Frame F north/south inter-storey displacements.
Inter-storey displacements for the perimeter frame lines 1 and 4 in the East/West direction are
presented in Figure H.5, and Figure H.6 below.
Figure H.5: Frame 1 east/west inter-storey displacements.
-0.08
-0.06
-0.04
-0.02
0
0.02
0.04
0.06
0.08
0 1 2 3 4 5 6 7 8 9 10 11
Dis
pla
cem
ent
(m)
Time (s)
Level 6 N/S drift
Level 5 N/S drift
Level 4 N/S drift
Level 3 N/S drift
Level 2 N/S drift
First Core Connection FailureLast Core Connection Failure
-0.08
-0.06
-0.04
-0.02
0
0.02
0.04
0.06
0.08
0.1
0 1 2 3 4 5 6 7 8 9 10 11
Dis
pla
cem
ent
(m)
Time (s)
Level 6 E/W drift
Level 5 E/W drift
Level 4 E/W drift
Level 3 E/W drift
Level 2 E/W drift
First Core Connection
FailureLast Core Connection Failure

CTV Non-Linear Seismic Analysis Report Compusoft Engineering Limited
Compusoft Engineering Limited Page 125
Figure H.6: Frame 4 east/west inter-storey displacements.
H.2 Diaphragm Connection Forces
Diaphragm connection forces are presented in Figure H.7 to Figure H.18 below. Note that
moments are reported about the geometric centroid of the element being considered.
Figure H.7: North core total diaphragm north/south actions
-0.04
-0.02
0
0.02
0.04
0 1 2 3 4 5 6 7 8 9 10 11
Dis
pla
cem
en
t (m
)
Time (s)
Level 6 E/W drift
Level 5 E/W drift
Level 4 E/W drift
Level 3 E/W drift
Level 2 E/W drift
First Core Connection FailureLast Core
Connection Failure
-3000
-2000
-1000
0
1000
2000
3000
4000
0 1 2 3 4 5 6 7 8 9 10 11
Forc
e (k
N)
Time (s)
Level 6
Level 5
Level 4
Level 3
Level 2

CTV Non-Linear Seismic Analysis Report Compusoft Engineering Limited
Compusoft Engineering Limited Page 126
Figure H.8: North core total diaphragm east/west actions
Figure H.9: North core total diaphragm in-plane moments
-3000
-2000
-1000
0
1000
2000
3000
0 1 2 3 4 5 6 7 8 9 10 11
Forc
e (k
N)
Time (s)
Level 6
Level 5
Level 4
Level 3
Level 2
-20000
-15000
-10000
-5000
0
5000
10000
15000
20000
25000
0 1 2 3 4 5 6 7 8 9 10 11Forc
e (k
N)
Time (s)
Level 6
Level 5
Level 4
Level 3
Level 2

CTV Non-Linear Seismic Analysis Report Compusoft Engineering Limited
Compusoft Engineering Limited Page 127
Figure H.10: North core Wall C diaphragm north/south actions
Figure H.11: North core Wall C/D diaphragm north/south actions.
-3000
-2000
-1000
0
1000
2000
3000
4000
0 1 2 3 4 5 6 7 8 9 10 11
Forc
e (k
N)
Time (s)
Level 6
Level 5
Level 4
Level 3
Level 2
-3000
-2500
-2000
-1500
-1000
-500
0
500
1000
1500
2000
0 1 2 3 4 5 6 7 8 9 10 11
Forc
e (k
N)
Time (s)
Level 6
Level 5
Level 4
Level 3
Level 2

CTV Non-Linear Seismic Analysis Report Compusoft Engineering Limited
Compusoft Engineering Limited Page 128
Figure H.12: North core Wall D diaphragm north/south actions.
Figure H.13: North core Wall D/E diaphragm north/south actions.
-800
-600
-400
-200
0
200
400
600
800
1000
0 1 2 3 4 5 6 7 8 9 10 11
Forc
e (k
N)
Time (s)
Level 6
Level 5
Level 4
Level 3
Level 2
Connection Capacity L4
Connection Capacity L5
Connection Capacity L6
-800
-600
-400
-200
0
200
400
600
800
1000
1200
0 1 2 3 4 5 6 7 8 9 10 11
Forc
e (k
N)
Time (s)
Level 6
Level 5
Level 4
Level 3
Level 2
Connection Capacity L4
Connection Capacity L5
Connection Capacity L6

CTV Non-Linear Seismic Analysis Report Compusoft Engineering Limited
Compusoft Engineering Limited Page 129
Figure H.14: North core Slab 4/C to C/D diaphragm north/south actions.
Figure H.15: North core Slab 4/C to C/D diaphragm east/west actions.
-3000
-2000
-1000
0
1000
2000
3000
4000
0 1 2 3 4 5 6 7 8 9 10 11
Forc
e (k
N)
Time (s)
Level 6
Level 5
Level 4
Level 3
Level 2
-2500
-2000
-1500
-1000
-500
0
500
1000
1500
2000
2500
0 1 2 3 4 5 6 7 8 9 10 11
Forc
e (
kN
)
Time (s)
Level 6
Level 5
Level 4
Level 3
Level 2

CTV Non-Linear Seismic Analysis Report Compusoft Engineering Limited
Compusoft Engineering Limited Page 130
Figure H.16: North core Slab 4/C to C/D diaphragm in-plane moments.
Figure H.17: North core Wall 5 diaphragm east/west actions.
-10000
-5000
0
5000
10000
15000
20000
0 1 2 3 4 5 6 7 8 9 10 11
Forc
e (k
N)
Time (s)
Level 6
Level 5
Level 4
Level 3
Level 2
-2500
-2000
-1500
-1000
-500
0
500
1000
1500
2000
0 1 2 3 4 5 6 7 8 9 10 11
Forc
e (
kN
)
Time (s)
Level 6
Level 5
Level 4
Level 3
Level 2

CTV Non-Linear Seismic Analysis Report Compusoft Engineering Limited
Compusoft Engineering Limited Page 131
Figure H.18: South wall diaphragm east/west actions.
-2500
-2000
-1500
-1000
-500
0
500
1000
1500
2000
0 1 2 3 4 5 6 7 8 9 10 11
Forc
e (
kN
)
Time (s)
Level 6
Level 5
Level 4
Level 3
Level 2

CTV Non-Linear Seismic Analysis Report Compusoft Engineering Limited
Compusoft Engineering Limited Page 132
Appendix I :Analysis Results - Lyttelton Event: CBGS Record Model A & Model B
The following shows a comparison in the structural actions between Model A and Model B
reported by the analysis as a function of time, for the Lyttelton event using the acceleration
time history recorded at the CBGS station (using all components of the record). Note that to
reduce analysis time only 4.84 seconds of Model B has been run, however the results are
suitable for the purposes of comparison. At the end of the recorded time steps the masonry has
degraded in strength and stiffness significantly (to approximately 40% of its initial strength at
level 3, 60% at level 2, and 67% at level 1). It is expected that the performance of the building
would converge to that predicted for Model A (no masonry) upon further degradation of the
masonry strength and stiffness.
I.1 Building Displacements and Drifts.
Building Level 6 displacements are presented in Figure I.1 and Figure I.2 below for the
Southeast and Northwest corners of the building respectively.
Figure I.1: Level 6 Southeast corner displacements.
-0.2
-0.15
-0.1
-0.05
0
0.05
0.1
0.15
0.2
0.25
0 1 2 3 4 5
Dis
pla
cem
en
t (m
)
Time (s)
N/S Displacement
Model A
N/S Displacement
Model B
E/W Displacement
Model A
E/W Displacement Model B

CTV Non-Linear Seismic Analysis Report Compusoft Engineering Limited
Compusoft Engineering Limited Page 133
Figure I.2: Level 6 Northwest corner displacements.
Inter-storey displacements for the perimeter frame lines A and F in the north/south direction
are presented in Figure I.3, and Figure I.4 below. For the purposes of comparison, plots
contain both Model A and Model B inter-storey displacements.
Figure I.3: Frame A north/south inter-storey displacements.
-0.2
-0.15
-0.1
-0.05
0
0.05
0.1
0.15
0.2
0 1 2 3 4 5
Dis
pla
cem
en
t (m
)
Time (s)
N/S Displacement
Model A
N/S Displacement Model B
E/W Displacement Model A
E/W Displacement Model B
-0.06
-0.04
-0.02
0
0.02
0.04
0 1 2 3 4 5
Dis
pla
cem
ent
(m)
Time (s)
Level 5 N/S drift Model A
Level 4 N/S drift Model A
Level 3 N/S drift Model A
Level 2 N/S drift Model A
Level 1 N/S drift Model A
Level 5 N/S drift Model B
Level 4 N/S drift Model B
Level 3 N/S drift Model B
Level 2 N/S drift Model B
Level 1 N/S drift Model B

CTV Non-Linear Seismic Analysis Report Compusoft Engineering Limited
Compusoft Engineering Limited Page 134
Figure I.4: Frame F north/south inter-storey displacements.
Inter-storey displacements for the perimeter frame lines 1 and 4 in the east/west direction are
presented in Figure I.5, and Figure I.6 below. For the purposes of comparison, plots contain
both Model A and Model B inter-storey displacements.
Figure I.5: Frame 1 east/west inter-storey displacements.
-0.04
-0.03
-0.02
-0.01
0
0.01
0.02
0.03
0.04
0 1 2 3 4 5
Dis
pla
cem
ent
(m)
Time (s)
Level 5 N/S drift Model A
Level 4 N/S drift Model A
Level 3 N/S drift Model A
Level 2 N/S drift Model A
Level 1 N/S drift Model A
Level 5 N/S drift Model B
Level 4 N/S drift Model B
Level 4 N/S drift Model B
Level 3 N/S drift Model B
Level 1 N/S drift Model B
-0.03
-0.015
0
0.015
0.03
0.045
0 1 2 3 4 5
Dis
pla
cem
ent
(m)
Time (s)
Level 5 E/W drift Model A
Level 4 E/W drift Model A
Level 3 E/W drift Model A
Level 2 E/W drift Model A
Level 1 E/W drift Model A
Level 5 E/W drift Model B
Level 4 E/W drift Model B
Level 3 E/W drift Model B
Level 2 E/W drift Model B
Level 1 E/W drift Model B

CTV Non-Linear Seismic Analysis Report Compusoft Engineering Limited
Compusoft Engineering Limited Page 135
Figure I.6: Frame 4 east/west inter-storey displacements.
I.2 Column Hinge Progression.
Figure I.7 highlights the hinge progression in the columns for the two models considered. As
can be seen the two models predict similar numbers of columns hinging, with Model A
predicting slightly more hinges prior to 4.5 seconds and Model B predicting slightly more
after 4.5 seconds.
Figure I.7: Column hinge progression - Model A left, Model B right.
-0.02
-0.01
0
0.01
0.02
0.03
0.04
0 1 2 3 4 5
Dis
pla
cem
ent
(m)
Time (s)
Level 5 E/W drift Model A
Level 4 E/W drift Model A
Level 3 E/W drift Model A
Level 2 E/W drift Model A
Level 1 E/W drift Model A
Level 5 E/W drift Model B
Level 4 E/W drift Model B
Level 3 E/W drift Model B
Level 2 E/W drift Model B
Level 1 E/W drift Model B
0
10
20
30
40
50
60
70
Nu
mb
er
of
Co
lum
ns
Hin
gin
g
Time (s)
Level 1 Column
Level 2 Column
Level 3 Column
Level 4 Column
Level 5 Column
0
10
20
30
40
50
60
70
Nu
mb
er
of
Co
lum
ns
Hin
gin
g
Time (s)
Level 1 Column
Level 2 Column
Level 3 Column
Level 4 Column
Level 5 Column

CTV Non-Linear Seismic Analysis Report Compusoft Engineering Limited
Compusoft Engineering Limited Page 136
I.3 Diaphragm Connection Forces
Diaphragm connection forces are presented in Figure I.8 to Figure I.19 below. Note that
moments are reported about the geometric centroid of the element being considered.
Figure I.8: North core total diaphragm north/south actions (no masonry left, with masonry right)
Figure I.9: North core total diaphragm east/west actions (no masonry left, with masonry right)
Figure I.10: North core total diaphragm in-plane moments (no masonry left, with masonry right)
-4000
-3000
-2000
-1000
0
1000
2000
3000
4000
0 0.5 1 1.5 2 2.5 3 3.5 4 4.5
Fo
rce
(k
N)
Time (s)
Level 6
Level 5
Level 4
Level 3
Level 2
-4000
-3000
-2000
-1000
0
1000
2000
3000
4000
0 0.5 1 1.5 2 2.5 3 3.5 4 4.5 5
Forc
e (
kN
)Time (s)
Level 6
Level 5
Level 4
Level 3
Level 2
-3000
-2000
-1000
0
1000
2000
3000
0 0.5 1 1.5 2 2.5 3 3.5 4 4.5
Fo
rce
(k
N)
Time (s)
Level 6
Level 5
Level 4
Level 3
Level 2
-3000
-2000
-1000
0
1000
2000
3000
0 0.5 1 1.5 2 2.5 3 3.5 4 4.5 5Forc
e (
kN
)
Time (s)
Level 6
Level 5
Level 4
Level 3
Level 2
-15000
-10000
-5000
0
5000
10000
15000
20000
25000
30000
0 1 2 3 4
Mom
ent (
kNm
)
Time (s)
Level 6
Level 5
Level 4
Level 3
Level 2
-15000
-10000
-5000
0
5000
10000
15000
20000
25000
30000
0 0.5 1 1.5 2 2.5 3 3.5 4 4.5 5
Mo
me
nt
(kN
m)
Time (s)
Level 6
Level 5
Level 4
Level 3
Level 2

CTV Non-Linear Seismic Analysis Report Compusoft Engineering Limited
Compusoft Engineering Limited Page 137
Figure I.11: North core Wall C diaphragm north/south actions (no masonry left, with masonry right)
Figure I.12: North core Wall C/D diaphragm north/south actions (no masonry left, with masonry right).
Figure I.13: North core Wall D diaphragm north/south actions (no masonry left, with masonry right).
-3000
-2000
-1000
0
1000
2000
3000
4000
0 1 2 3 4
Forc
e (
kN
)
Time (s)
Level 6
Level 5
Level 4
Level 3
Level 2
-3000
-2000
-1000
0
1000
2000
3000
4000
0 0.5 1 1.5 2 2.5 3 3.5 4 4.5 5
Forc
e (k
N)
Time (s)
Level 6
Level 5
Level 4
Level 3
Level 2
-3000
-2000
-1000
0
1000
2000
0 1 2 3 4
Forc
e (
kN
)
Time (s)
Level 6
Level 5
Level 4
Level 3
Level 2
-3000
-2000
-1000
0
1000
2000
0 0.5 1 1.5 2 2.5 3 3.5 4 4.5 5
Forc
e (k
N)
Time (s)
Level 6
Level 5
Level 4
Level 3
Level 2
-800
-400
0
400
800
1200
0 1 2 3 4
Forc
e (
kN
)
Time (s)
Level 6
Level 5
Level 4
Level 3
Level 2
Connection Capacity L4
Connection Capacity L5
Connection Capacity L6
-800
-400
0
400
800
1200
0 0.5 1 1.5 2 2.5 3 3.5 4 4.5 5
Forc
e (k
N)
Time (s)
Level 6
Level 5
Level 4
Level 3
Level 2
Connection Capacity L4
Connection Capacity L5
Connection Capacity L6

CTV Non-Linear Seismic Analysis Report Compusoft Engineering Limited
Compusoft Engineering Limited Page 138
Figure I.14: North core Wall D/E diaphragm north/south actions (no masonry left, with masonry right).
Figure I.15: North core Slab 4/C to C/D diaphragm north/south actions (no masonry left, with masonry right).
Figure I.16: North core Slab 4/C to C/D diaphragm east/west actions (no masonry left, with masonry right).
-1000
-500
0
500
1000
1500
2000
0 1 2 3 4
Forc
e (
kN
)
Time (s)
Level 6
Level 5
Level 4
Level 3
Level 2
Connection Capacity L4
Connection Capacity L5
Connection Capacity L6
-1000
-500
0
500
1000
1500
2000
0 0.5 1 1.5 2 2.5 3 3.5 4 4.5 5
Forc
e (
kN
)
Time (s)
Level 6
Level 5
Level 4
Level 3
Level 2
Connection Capacity L4
Connection Capacity L5
Connection Capacity L6
-3000
-2000
-1000
0
1000
2000
3000
4000
0 0.5 1 1.5 2 2.5 3 3.5 4 4.5
Forc
e (
kN
)
Time (s)
Level 6
Level 5
Level 4
Level 3
Level 2
-3000
-2000
-1000
0
1000
2000
3000
4000
0 0.5 1 1.5 2 2.5 3 3.5 4 4.5 5
Forc
e (
kN
)
Time (s)
Level 6
Level 5
Level 4
Level 3
Level 2
-2500
-2000
-1500
-1000
-500
0
500
1000
1500
2000
2500
0 0.5 1 1.5 2 2.5 3 3.5 4 4.5
Forc
e (k
N)
Time (s)
Level 6
Level 5
Level 4
Level 3
Level 2
-2500
-2000
-1500
-1000
-500
0
500
1000
1500
2000
2500
0 0.5 1 1.5 2 2.5 3 3.5 4 4.5 5
Forc
e (k
N)
Time (s)
Level 6
Level 5
Level 4
Level 3
Level 2

CTV Non-Linear Seismic Analysis Report Compusoft Engineering Limited
Compusoft Engineering Limited Page 139
Figure I.17: North core Slab 4/C to C/D diaphragm in-plane moments (no masonry left, with masonry right).
Figure I.18: North core Wall 5 diaphragm east/west actions (no masonry left, with masonry right).
Figure I.19: South wall diaphragm east/west actions (no masonry left, with masonry right).
-15000
-10000
-5000
0
5000
10000
15000
20000
0 1 2 3 4
Mom
ent (
kNm
)
Time (s)
Level 6
Level 5
Level 4
Level 3
Level 2
-15000
-10000
-5000
0
5000
10000
15000
20000
0 0.5 1 1.5 2 2.5 3 3.5 4 4.5 5
Mo
me
nt
(kN
m)
Time (s)
Level 6
Level 5
Level 4
Level 3
Level 2
-2500
-2000
-1500
-1000
-500
0
500
1000
1500
2000
0 0.5 1 1.5 2 2.5 3 3.5 4 4.5Forc
e (k
N)
Time (s)
Level 6
Level 5
Level 4
Level 3
Level 2
-2500
-2000
-1500
-1000
-500
0
500
1000
1500
2000
0 0.5 1 1.5 2 2.5 3 3.5 4 4.5 5Forc
e (k
N)
Time (s)
Level 6
Level 5
Level 4
Level 3
Level 2
-2500
-2000
-1500
-1000
-500
0
500
1000
1500
2000
0 0.5 1 1.5 2 2.5 3 3.5 4 4.5Forc
e (k
N)
Time (s)
Level 6
Level 5
Level 4
Level 3
Level 2
-2500
-2000
-1500
-1000
-500
0
500
1000
1500
2000
0 0.5 1 1.5 2 2.5 3 3.5 4 4.5 5
Forc
e (k
N)
Time (s)
Level 6
Level 5
Level 4
Level 3
Level 2

CTV Non-Linear Seismic Analysis Report Compusoft Engineering Limited
Compusoft Engineering Limited Page 140
Appendix J :Analysis Results - Lyttelton: CBGS, Model A - No Diaphragm Disconnection
The following details the structural actions reported by the analysis as a function of time, for
the Lyttelton event using the acceleration time history recorded at the CBGS station,
assuming the diaphragm connections to the north core walls D and D/E cannot fail. Results
for the case where disconnection can occur (as presented in Appendix F) have been included
for the purposes of comparison.
J.1 Building Displacements and Drifts.
Building Level 6 displacements are presented in Figure J.1and Figure J.2 below for the
Southeast and Northwest corners of the building respectively.
Figure J.1: Level 6 Southeast corner displacements.
-0.4
-0.3
-0.2
-0.1
0
0.1
0.2
0.3
0.4
0 1 2 3 4 5 6 7 8 9 10 11
Dis
pla
cem
ent
(m)
Time (s)
N/S Displacement Model A
N/S Displacement - no
disconnection
E/W Displacement Model A
E/W Displacement - no
disconnection

CTV Non-Linear Seismic Analysis Report Compusoft Engineering Limited
Compusoft Engineering Limited Page 141
Figure J.2: Level 6 Northwest corner displacements.
Inter-storey displacements for the perimeter frame lines A and F in the north/south direction
are presented in Figure J.3, and Figure I.4 below. For the purposes of comparison, plots
contain both Model A inter-storey displacements and those obtained when the diaphragm
connections are not permitted to disconnect.
Figure J.3: Frame A north/south inter-storey displacements.
-0.3
-0.2
-0.1
0
0.1
0.2
0.3
0.4
0.5
0 1 2 3 4 5 6 7 8 9 10 11
Dis
pla
cem
ent
(m)
Time (s)
N/S Displacement Model A
N/S Displacement - no disconnection
E/W Displacement Model A
E/W Displacement - no disconnection
-0.06
-0.04
-0.02
0
0.02
0.04
0.06
0.08
0.1
0 1 2 3 4 5 6 7 8 9 10 11
Dis
pla
cem
en
t (m
)
Time (s)
Level 5 N/S drift Model A
Level 4 N/S drift Model A
Level 3 N/S drift Model A
Level 2 N/S drift Model A
Level 1 N/S drift Model A
Level 5 N/S drift - no
disconnectionLevel 4 N/S drift - no disconnectionLevel 3 N/S drift - no disconnectionLevel 2 N/S drift - no
disconnectionLevel 1 N/S drift - no
disconnection

CTV Non-Linear Seismic Analysis Report Compusoft Engineering Limited
Compusoft Engineering Limited Page 142
Figure J.4: Frame F north/south inter-storey displacements.
Inter-storey displacements for the perimeter frame lines 1 and 4 in the east/west direction are
presented in Figure J.5, and Figure J.6 below. For the purposes of comparison, plots contain
both Model A inter-storey displacements and those obtained when the diaphragm connections
are not permitted to disconnect.
-0.08
-0.06
-0.04
-0.02
0
0.02
0.04
0.06
0.08
0 1 2 3 4 5 6 7 8 9 10 11
Dis
pla
cem
en
t (m
)
Time (s)
Level 5 N/S drift Model A
Level 4 N/S drift Model A
Level 3 N/S drift Model A
Level 2 N/S drift Model A
Level 1 N/S drift Model A
Level 5 N/S drift - no
disconnectionLevel 4 N/S drift - no disconnectionLevel 3 N/S drift - no
disconnectionLevel 2 N/S drift - no disconnectionLevel 1 N/S drift - no
disconnection

CTV Non-Linear Seismic Analysis Report Compusoft Engineering Limited
Compusoft Engineering Limited Page 143
Figure J.5: Frame 1 east/west inter-storey displacements.
Figure J.6: Frame 4 east/west inter-storey displacements.
-0.075
-0.06
-0.045
-0.03
-0.015
0
0.015
0.03
0.045
0.06
0.075
0 1 2 3 4 5 6 7 8 9 10 11
Dis
pla
cem
ent
(m)
Time (s)
Level 5 E/W drift Model A
Level 4 E/W drift Model A
Level 3 E/W drift Model A
Level 2 E/W drift Model A
Level 1 E/W drift Model A
Level 5 E/W drift - no
disconnectionLevel 4 E/W drift - no
disconnectionLevel 3 E/W drift - no disconnectionLevel 2 E/W drift - no disconnectionLevel 1 E/W drift - no disconnection
-0.03
-0.02
-0.01
0
0.01
0.02
0.03
0.04
0 1 2 3 4 5 6 7 8 9 10 11
Dis
pla
cem
en
t (m
)
Time (s)
Level 5 E/W drift Model A
Level 4 E/W drift Model A
Level 3 E/W drift Model A
Level 2 E/W drift Model A
Level 1 E/W drift Model A
Level 5 E/W drift - no
disconnectionLevel 4 E/W drift - no disconnectionLevel 3 E/W drift - no
disconnectionLevel 2 E/W drift - no disconnectionLevel 1 E/W drift - no
disconnection

CTV Non-Linear Seismic Analysis Report Compusoft Engineering Limited
Compusoft Engineering Limited Page 144
J.2 Diaphragm Connection Forces
Diaphragm connection forces are presented in Figure J.7 to Figure J.18 below. Note that
moments are reported about the geometric centroid of the element being considered.
Figure J.7: North core total diaphragm north/south actions (disconnection on left, no disconnection on right).
Figure J.8: North core total diaphragm east/west actions (disconnection on left, no disconnection on right).
Figure J.9: North core total diaphragm in-plane moments (disconnection left, no disconnection right).
-4000
-3000
-2000
-1000
0
1000
2000
3000
4000
0 1 2 3 4 5 6 7 8 9 10 11
Fo
rce
(k
N)
Time (s)
Level 6
Level 5
Level 4
Level 3
Level 2
-4000
-3000
-2000
-1000
0
1000
2000
3000
4000
0 1 2 3 4 5 6 7 8 9 10 11
Forc
e (
kN
)
Time (s)
Level 6
Level 5
Level 4
Level 3
Level 2
-3000
-2000
-1000
0
1000
2000
3000
0 1 2 3 4 5 6 7 8 9 10 11
Fo
rce
(k
N)
Time (s)
Level 6
Level 5
Level 4
Level 3
Level 2
-3000
-2000
-1000
0
1000
2000
3000
0 1 2 3 4 5 6 7 8 9 10 11
Forc
e (
kN
)
Time (s)
Level 6
Level 5
Level 4
Level 3
Level 2
-20000
-15000
-10000
-5000
0
5000
10000
15000
20000
25000
0 1 2 3 4 5 6 7 8 9 10 11
Mom
ent (
kNm
)
Time (s)
Level 6
Level 5
Level 4
Level 3
Level 2
-20000
-15000
-10000
-5000
0
5000
10000
15000
20000
25000
0 1 2 3 4 5 6 7 8 9 10 11
Mom
ent (
kNm
)
Time (s)
Level 6
Level 5
Level 4
Level 3
Level 2

CTV Non-Linear Seismic Analysis Report Compusoft Engineering Limited
Compusoft Engineering Limited Page 145
Figure J.10: North core Wall C diaphragm north/south actions (disconnection on left, no disconnection on right).
Figure J.11: North core Wall C/D diaphragm north/south actions (disconnection on left, no disconnection on right).
Figure J.12: North core Wall D diaphragm north/south actions (disconnection on left, no disconnection on right).
-3000
-2000
-1000
0
1000
2000
3000
4000
0 1 2 3 4 5 6 7 8 9 10 11
Forc
e (k
N)
Time (s)
Level 6
Level 5
Level 4
Level 3
Level 2
-3000
-2000
-1000
0
1000
2000
3000
4000
0 1 2 3 4 5 6 7 8 9 10 11
Forc
e (k
N)
Time (s)
Level 6
Level 5
Level 4
Level 3
Level 2
-3000
-2500
-2000
-1500
-1000
-500
0
500
1000
1500
2000
0 1 2 3 4 5 6 7 8 9 10 11
Forc
e (k
N)
Time (s)
Level 6
Level 5
Level 4
Level 3
Level 2
-3000
-2500
-2000
-1500
-1000
-500
0
500
1000
1500
2000
0 1 2 3 4 5 6 7 8 9 10 11
Forc
e (k
N)
Time (s)
Level 6
Level 5
Level 4
Level 3
Level 2
-1000
-500
0
500
1000
1500
0 1 2 3 4 5 6 7 8 9 10 11
Forc
e (k
N)
Time (s)
Level 6
Level 5
Level 4
Level 3
Level 2
Connection Capacity L4
Connection Capacity L5
Connection Capacity L6
-1000
-500
0
500
1000
1500
0 1 2 3 4 5 6 7 8 9 10 11
Forc
e (k
N)
Time (s)
Level 6
Level 5
Level 4
Level 3
Level 2
Connection Capacity L4
Connection Capacity L5
Connection Capacity L6

CTV Non-Linear Seismic Analysis Report Compusoft Engineering Limited
Compusoft Engineering Limited Page 146
Figure J.13: North core Wall D/E diaphragm north/south actions (disconnection left, no disconnection right).
Figure J.14: North core Slab 4/C to C/D diaphragm north/south actions (disconnection on left, no disconnection on right).
Figure J.15: North core Slab 4/C to C/D diaphragm east/west actions (disconnection on left, no disconnection on right).
-1500
-1000
-500
0
500
1000
1500
2000
0 1 2 3 4 5 6 7 8 9 10 11
Forc
e (k
N)
Time (s)
Level 6
Level 5
Level 4
Level 3
Level 2
Connection Capacity L4
Connection Capacity L5
Connection Capacity L6
-1500
-1000
-500
0
500
1000
1500
2000
0 1 2 3 4 5 6 7 8 9 10 11
Forc
e (k
N)
Time (s)
Level 6
Level 5
Level 4
Level 3
Level 2
Connection Capacity L4
Connection Capacity L5
Connection Capacity L6
-3000
-2000
-1000
0
1000
2000
3000
4000
0 1 2 3 4 5 6 7 8 9 10 11
Forc
e (k
N)
Time (s)
Level 6
Level 5
Level 4
Level 3
Level 2
-3000
-2000
-1000
0
1000
2000
3000
4000
0 1 2 3 4 5 6 7 8 9 10 11
Forc
e (k
N)
Time (s)
Level 6
Level 5
Level 4
Level 3
Level 2
-2500
-2000
-1500
-1000
-500
0
500
1000
1500
2000
2500
0 1 2 3 4 5 6 7 8 9 10 11
Forc
e (k
N)
Time (s)
Level 6
Level 5
Level 4
Level 3
Level 2
-2500
-2000
-1500
-1000
-500
0
500
1000
1500
2000
2500
0 1 2 3 4 5 6 7 8 9 10 11
Forc
e (k
N)
Time (s)
Level 6
Level 5
Level 4
Level 3
Level 2

CTV Non-Linear Seismic Analysis Report Compusoft Engineering Limited
Compusoft Engineering Limited Page 147
Figure J.16: North core Slab 4/C to C/D diaphragm in-plane moments (disconnection on left, no disconnection on right).
Figure J.17: North core Wall 5 diaphragm east/west actions (disconnection on left, no disconnection on right).
Figure J.18: South wall diaphragm east/west actions (disconnection on left, no disconnection on right).
-15000
-10000
-5000
0
5000
10000
15000
0 1 2 3 4 5 6 7 8 9 10 11
Mom
ent (
kNm
)
Time (s)
Level 6
Level 5
Level 4
Level 3
Level 2
-15000
-10000
-5000
0
5000
10000
15000
0 1 2 3 4 5 6 7 8 9 10 11
Mom
ent (
kNm
)
Time (s)
Level 6
Level 5
Level 4
Level 3
Level 2
-2500
-2000
-1500
-1000
-500
0
500
1000
1500
2000
0 1 2 3 4 5 6 7 8 9 10 11Forc
e (k
N)
Time (s)
Level 6
Level 5
Level 4
Level 3
Level 2
-2500
-2000
-1500
-1000
-500
0
500
1000
1500
2000
0 1 2 3 4 5 6 7 8 9 10 11Forc
e (k
N)
Time (s)
Level 6
Level 5
Level 4
Level 3
Level 2
-2500
-2000
-1500
-1000
-500
0
500
1000
1500
0 1 2 3 4 5 6 7 8 9 10 11
Forc
e (k
N)
Time (s)
Level 6
Level 5
Level 4
Level 3
Level 2
-2500
-2000
-1500
-1000
-500
0
500
1000
1500
0 1 2 3 4 5 6 7 8 9 10 11
Forc
e (k
N)
Time (s)
Level 6
Level 5
Level 4
Level 3
Level 2