nell’s flower shop - united · pdf fileconstruction nell’s flower shop is built as...
TRANSCRIPT
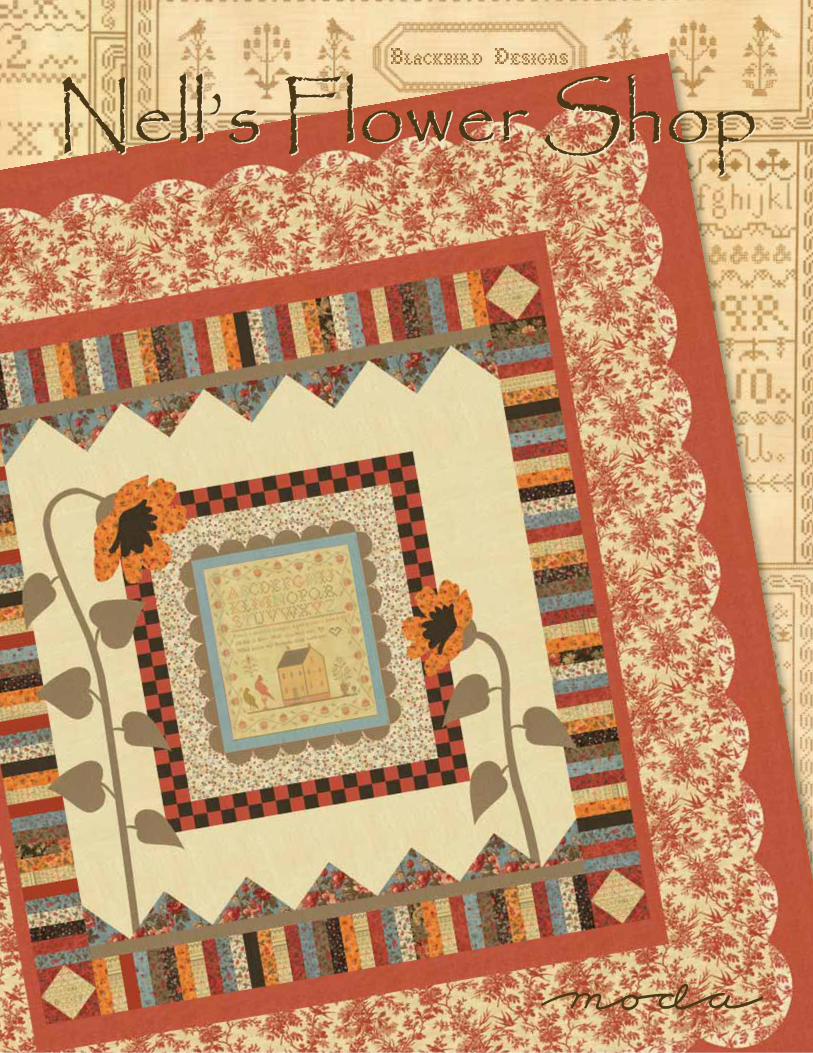
Nell’s Flower ShopNell’s Flower ShopBLACKBIRD DESIGNS
Large Sampler
Nell’s Flower ShopNell’s Flower ShopNell’s Flower ShopBLACKBIRD DESIGNS
68"x74"
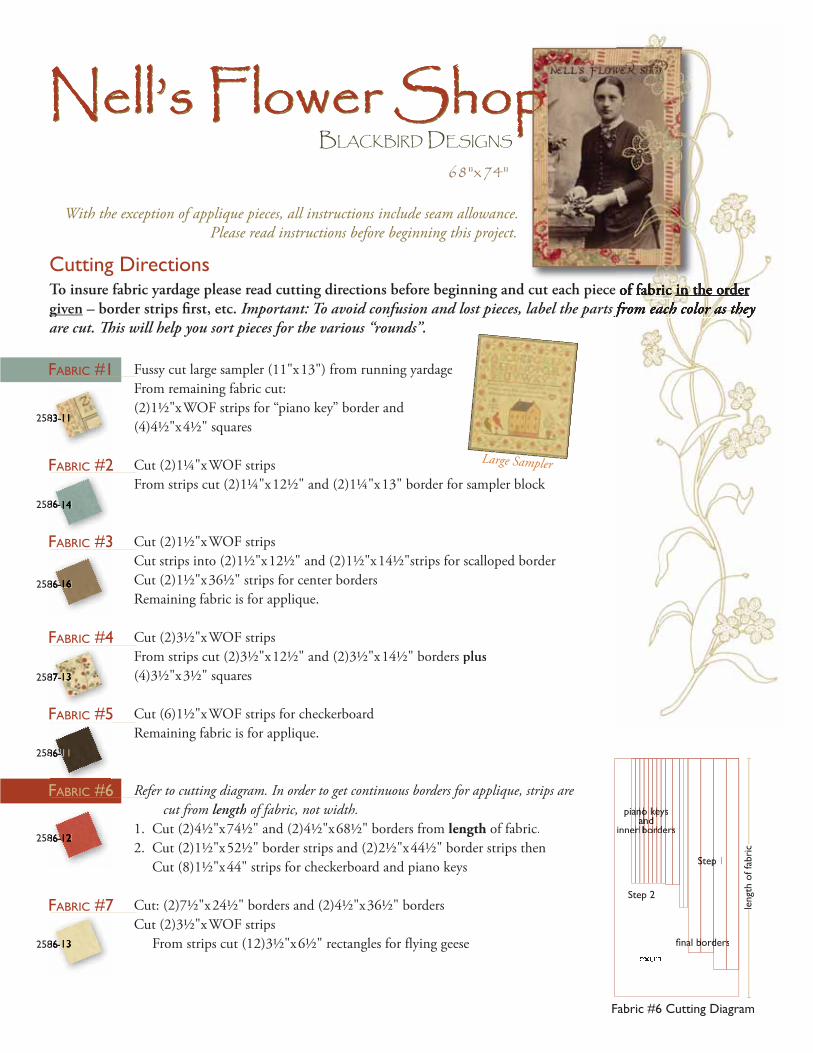
Cutting DirectionsTo insure fabric yardage please read cutting directions before beginning and cut each piece giveng – border strips first, etc. Important: To avoid confusion and lost pieces, label the parts fare cut. This will help you sort pieces for the various “rounds”.
With the exception of applique pieces, all instructions include seam allowance. Please read instructions before beginning this project.
Fussy cut large sampler (11"x13") from running yardageFrom remaining fabric cut:(2)1½"xWOF strips for “piano key” border and(4)4½"x4½" squares
Cut (2)1¼"xWOF stripsFrom strips cut (2)1¼"x12½" and (2)1¼"x13" border for sampler block
Cut (2)1½"xWOF stripsCut strips into (2)1½"x12½" and (2)1½"x14½"strips for scalloped borderCut (2)1½"x36½" strips for center bordersRemaining fabric is for applique.
Cut (2)3½"xWOF stripsFrom strips cut (2)3½"x12½" and (2)3½"x14½" borders plus(4)3½"x3½" squares
Cut (6)1½"xWOF strips for checkerboardRemaining fabric is for applique.
Refer to cutting diagram. In order to get continuous borders for applique, strips are cut from length of fabric, not width.h
1. Cut (2)4½"x74½" and (2)4½"x68½" borders from length of fabric.2. Cut (2)1½"x52½" border strips and (2)2½"x44½" border strips then Cut (8)1½"x44" strips for checkerboard and piano keys
Cut: (2)7½"x24½" borders and (2)4½"x36½" bordersCut (2)3½"xWOF strips From strips cut (12)3½"x6½" rectangles for flying geese
FABRIC #1
FABRIC #2
FABRIC #3
FABRIC #4
FABRIC #5
FABRIC #6
FABRIC #7
258
258
258
258
258
258
258 11
Fabric #6 Cutting Diagram
o keyssyseykeko nonoanpiaa
Step 1pStepS
Step 2
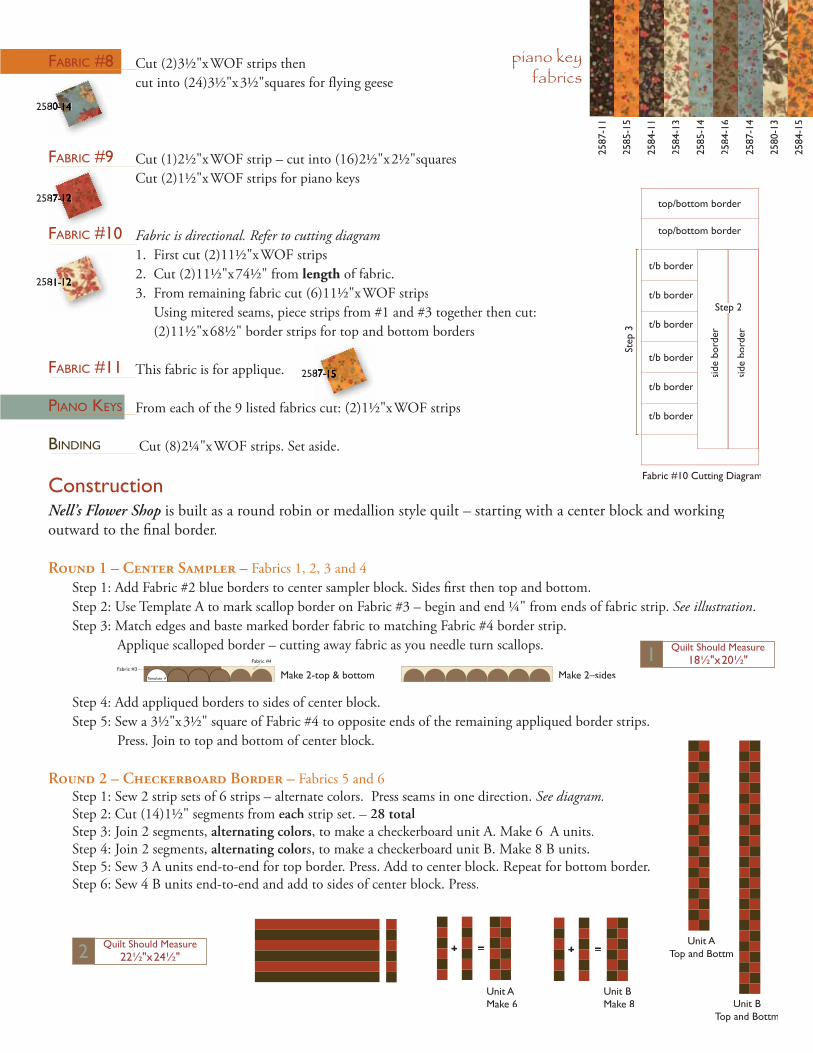
ConstructionNell’s Flower Shop is built as a round robin or medallion style quilt – starting with a center block and working outward to the final border.
Round 1 – Center Sampler – Fabrics 1, 2, 3 and 4Step 1: Add Fabric #2 blue borders to center sampler block. Sides first then top and bottom.Step 2: Use Template A to mark scallop border on Fabric #3 – begin and end ¼" from ends of fabric strip. See illustration.Step 3: Match edges and baste marked border fabric to matching Fabric #4 border strip.
Applique scalloped border – cutting away fabric as you needle turn scallops.
Step 4: Add appliqued borders to sides of center block. Step 5: Sew a 3½"x3½" square of Fabric #4 to opposite ends of the remaining appliqued border strips.
Press. Join to top and bottom of center block.
Round 2 – Checkerboard Border – Fabrics 5 and 6Step 1: Sew 2 strip sets of 6 strips – alternate colors. Press seams in one direction. See diagram.Step 2: Cut (14)1½" segments from each strip set. – 28 totalStep 3: Join 2 segments, alternating colors, to make a checkerboard unit A. Make 6 A units.Step 4: Join 2 segments, alternating colors, to make a checkerboard unit B. Make 8 B units.Step 5: Sew 3 A units end-to-end for top border. Press. Add to center block. Repeat for bottom border. Step 6: Sew 4 B units end-to-end and add to sides of center block. Press.
Cut (2)3½"xWOF strips thencut into (24)3½"x3½"squares for flying geese
Cut (1)2½"xWOF strip – cut into (16)2½"x2½"squaresCut (2)1½"xWOF strips for piano keys
Fabric is directional. Refer to cutting diagram1. First cut (2)11½"xWOF strips 2. Cut (2)11½"x74½" from length of fabric.3. From remaining fabric cut (6)11½"xWOF strips Using mitered seams, piece strips from #1 and #3 together then cut: (2)11½"x68½" border strips for top and bottom borders
This fabric is for applique.
From each of the 9 listed fabrics cut: (2)1½"xWOF strips
Cut (8)2¼"xWOF strips. Set aside.
FABRIC #8
FABRIC #9
FABRIC #10
FABRIC #11
PIANO KEYS
BINDING
+ =
258
258
258
258
2587
-11
2585
-15
2584
-11
2584
-13
2585
-14
2584
-16
2587
-14
2580
-13
2584
-15
piano key fabrics
Fabric #10 Cutting Diagram
S 2pStep 2
Step
3
Unit A Unit B
+ =Unit A
Unit B
18½"x20½"1
22½"x24½"2
Fabric #3Fabric #4
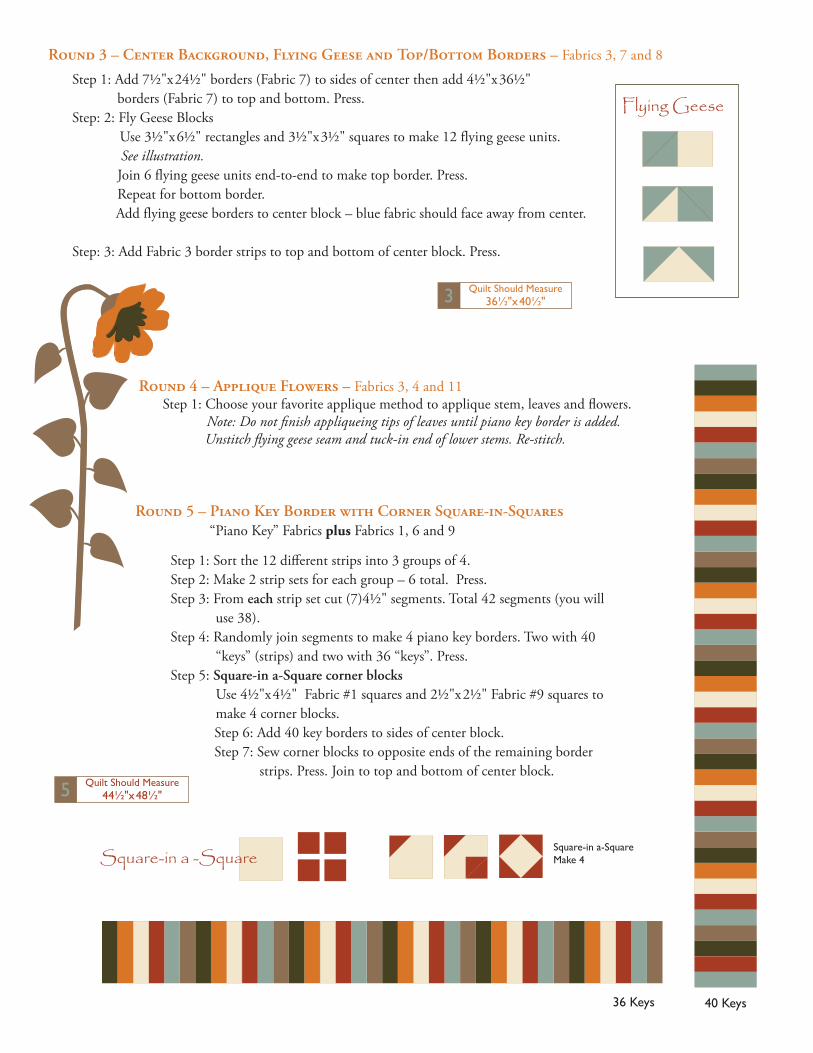
Round 3 – Center Background, Flying Geese and Top/Bottom Borders – Fabrics 3, 7 and 8
Step 1: Add 7½"x24½" borders (Fabric 7) to sides of center then add 4½"x36½" borders (Fabric 7) to top and bottom. Press.
Step: 2: Fly Geese Blocks Use 3½"x6½" rectangles and 3½"x3½" squares to make 12 flying geese units.
See illustration. Join 6 flying geese units end-to-end to make top border. Press.
Repeat for bottom border. Add flying geese borders to center block – blue fabric should face away from center.
Step: 3: Add Fabric 3 border strips to top and bottom of center block. Press.
Round 4 – Applique Flowers – Fabrics 3, 4 and 11Step 1: Choose your favorite applique method to applique stem, leaves and flowers.
Note: Do not finish appliqueing tips of leaves until piano key border is added. Unstitch flying geese seam and tuck-in end of lower stems. Re-stitch.
Round 5 – Piano Key Border with Corner Square-in-Squares “Piano Key” Fabrics plus Fabrics 1, 6 and 9
Step 1: Sort the 12 different strips into 3 groups of 4.Step 2: Make 2 strip sets for each group – 6 total. Press. Step 3: From each strip set cut (7)4½" segments. Total 42 segments (you will
use 38).Step 4: Randomly join segments to make 4 piano key borders. Two with 40
“keys” (strips) and two with 36 “keys”. Press.Step 5: Square-in a-Square corner blocks
Use 4½"x4½" Fabric #1 squares and 2½"x2½" Fabric #9 squares to make 4 corner blocks.
Step 6: Add 40 key borders to sides of center block. Step 7: Sew corner blocks to opposite ends of the remaining border
strips. Press. Join to top and bottom of center block.
Flying Geese
Square-in a-SquareSquare-in a -Square
36 Keys 40 Keys
36½"x40½"3
44½"x48½"5
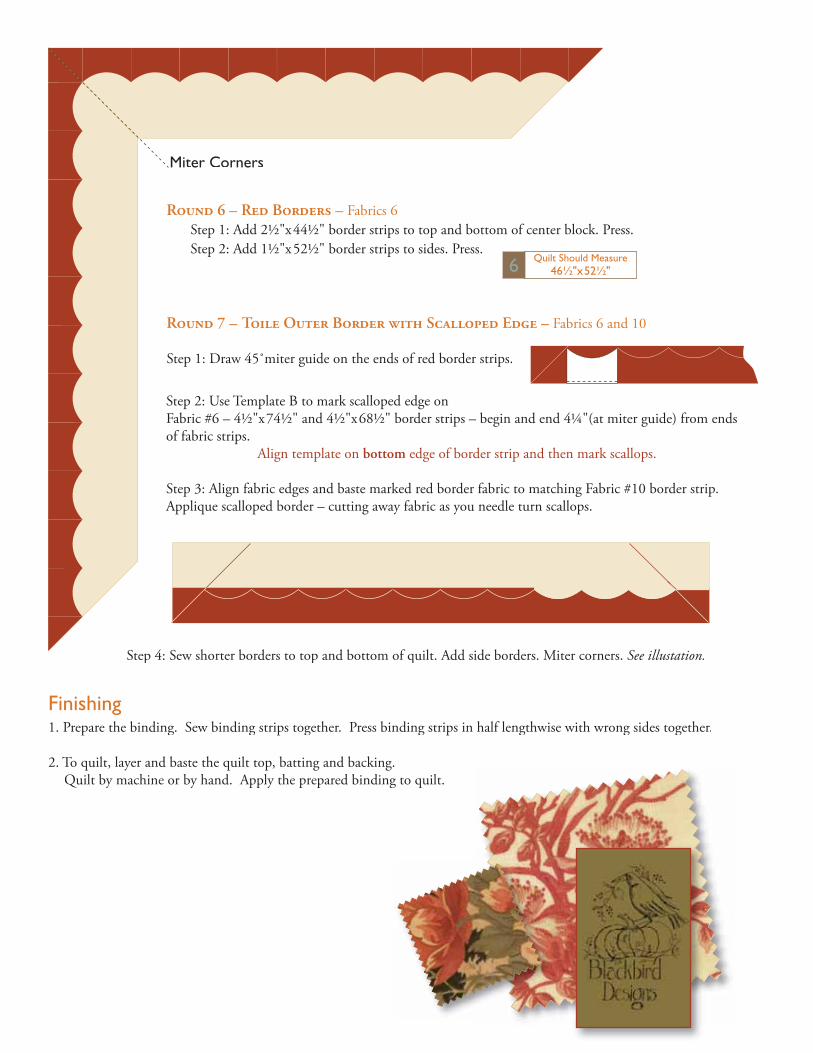
Round 7 – Toile Outer Border with Scalloped Edge – Fabrics 6 and 10
Step 1: Draw 45˚miter guide on the ends of red border strips.
Step 2: Use Template B to mark scalloped edge onFabric #6 – 4½"x74½" and 4½"x68½" border strips – begin and end 4¼"(at miter guide) from endsof fabric strips. Align template on bottom edge of border strip and then mark scallops.
Step 3: Align fabric edges and baste marked red border fabric to matching Fabric #10 border strip. Applique scalloped border – cutting away fabric as you needle turn scallops.
Round 6 – Red Borders – Fabrics 6Step 1: Add 2½"x44½" border strips to top and bottom of center block. Press.Step 2: Add 1½"x52½" border strips to sides. Press.
46½"x52½"6
Step 4: Sew shorter borders to top and bottom of quilt. Add side borders. Miter corners. See illustation.
1. Prepare the binding. Sew binding strips together. Press binding strips in half lengthwise with wrong sides together.
2. To quilt, layer and baste the quilt top, batting and backing. Quilt by machine or by hand. Apply the prepared binding to quilt.
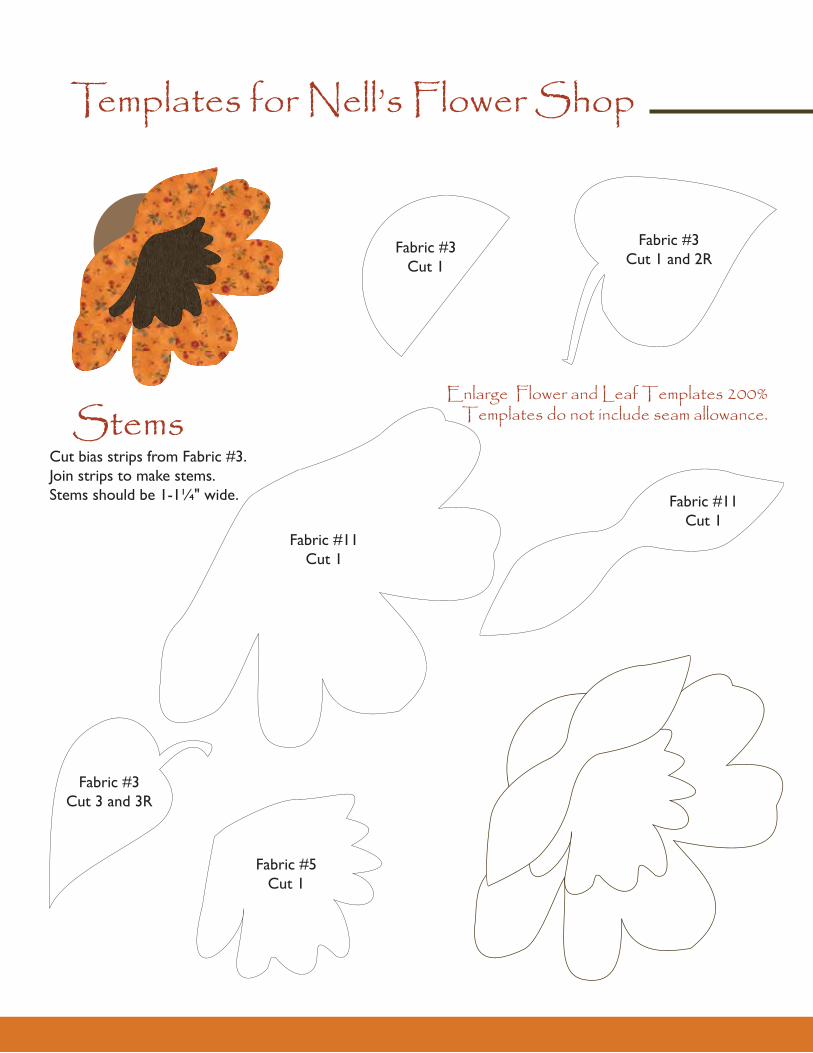
Templates for Nell’s Flower Shop
StemsEnlarge Flower and Leaf Templates 200%
Templates do not include seam allowance.
Fabric #3Cut 1
Fabric #3
Fabric #3
Fabric #11Cut 1
Fabric #11Cut 1
Fabric #5Cut 1
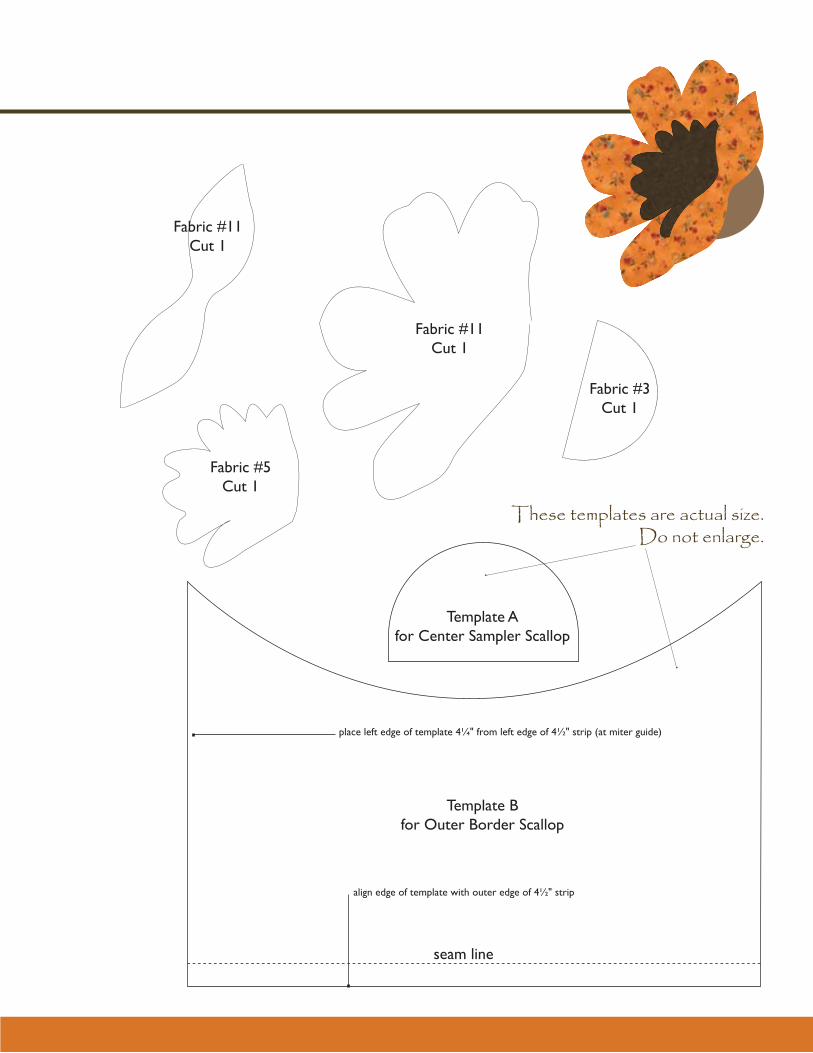
These templates are actual size.Do not enlarge.
Fabric #11Cut 1
Fabric #5Cut 1
Fabric #11Cut 1
Fabric #3Cut 1
BLACKBIRD DESIGNS
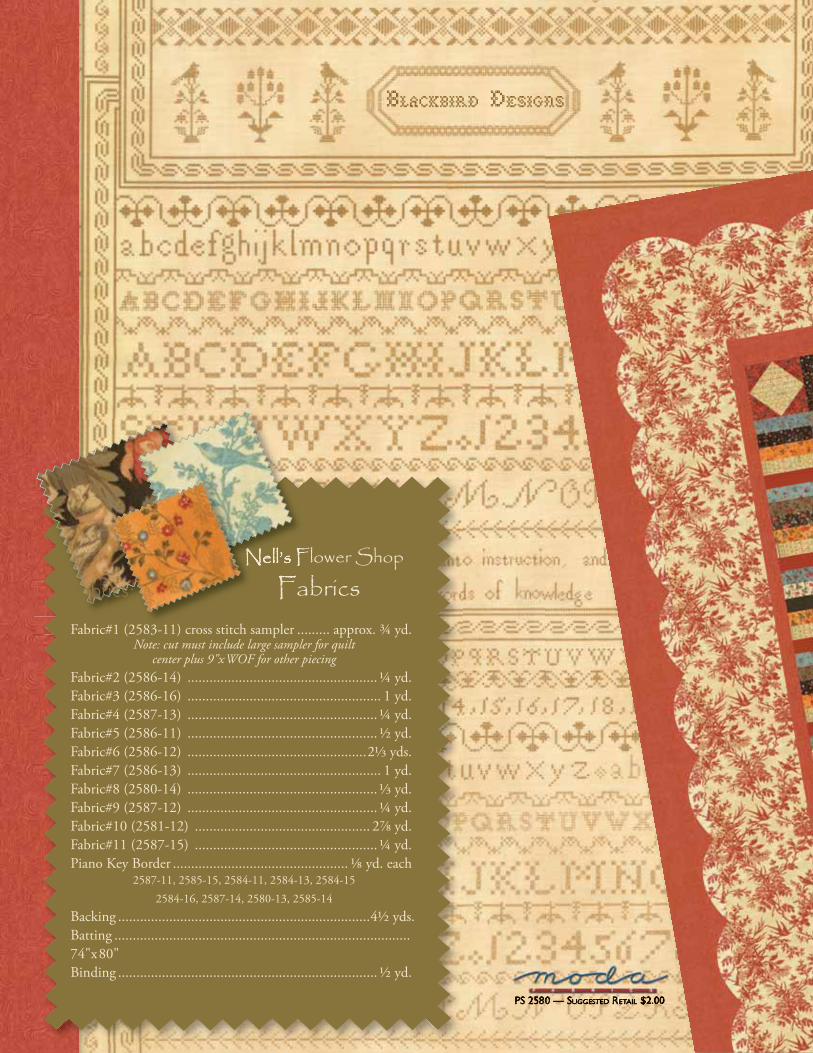
Nell’s Flower Shop FabricsFabrics:
Fabric#1 (2583-11) cross stitch sampler ......... approx. ¾ yd.Note: cut must include large sampler for quilt
center plus 9"xWOF for other piecingFabric#2 (2586-14) .................................................... ¼ yd.Fabric#3 (2586-16) ..................................................... 1 yd.Fabric#4 (2587-13) .................................................... ¼ yd.Fabric#5 (2586-11) .................................................... ½ yd.Fabric#6 (2586-12) .................................................2⅓ yds.Fabric#7 (2586-13) ..................................................... 1 yd.Fabric#8 (2580-14) .................................................... ⅓ yd.Fabric#9 (2587-12) .................................................... ¼ yd.Fabric#10 (2581-12) ................................................ 2⅞ yd. Fabric#11 (2587-15) .................................................. ¼ yd.Piano Key Border ................................................ ⅛ yd. each
2587-11, 2585-15, 2584-11, 2584-13, 2584-152584-16, 2587-14, 2580-13, 2585-14
Backing .....................................................................4½ yds.Batting .................................................................................74"x80"Binding ....................................................................... ½ yd.