neos cms documentation - read the docs · chapter 2 integrator guide this guide explains how to...
TRANSCRIPT

Neos CMS DocumentationRelease 1.0.2
The Neos Team
September 02, 2015

Contents
1 Getting Started 31.1 Installation . . . . . . . . . . . . . . . . . . . . . . . . . . . . . . . . . . . . . . . . . . . . . . 31.2 User Interface Basics . . . . . . . . . . . . . . . . . . . . . . . . . . . . . . . . . . . . . . . . . 4
2 Integrator Guide 112.1 The TYPO3 Content Structure . . . . . . . . . . . . . . . . . . . . . . . . . . . . . . . . . . . . 112.2 Rendering A Page . . . . . . . . . . . . . . . . . . . . . . . . . . . . . . . . . . . . . . . . . . 172.3 Inside TypoScript . . . . . . . . . . . . . . . . . . . . . . . . . . . . . . . . . . . . . . . . . . . 192.4 Eel, FlowQuery and Fizzle . . . . . . . . . . . . . . . . . . . . . . . . . . . . . . . . . . . . . . 252.5 Adjusting Neos Output . . . . . . . . . . . . . . . . . . . . . . . . . . . . . . . . . . . . . . . . 282.6 Creating Custom Content Elements . . . . . . . . . . . . . . . . . . . . . . . . . . . . . . . . . 332.7 Creating a TYPO3 Neos plugin . . . . . . . . . . . . . . . . . . . . . . . . . . . . . . . . . . . 402.8 Interaction with the Neos backend . . . . . . . . . . . . . . . . . . . . . . . . . . . . . . . . . . 42
3 Integrators Cookbook 453.1 Wrapping a List of Content Elements . . . . . . . . . . . . . . . . . . . . . . . . . . . . . . . . 453.2 Creating a simple Content Element . . . . . . . . . . . . . . . . . . . . . . . . . . . . . . . . . 463.3 Customizing the Inspector . . . . . . . . . . . . . . . . . . . . . . . . . . . . . . . . . . . . . . 483.4 Selecting a Page Layout . . . . . . . . . . . . . . . . . . . . . . . . . . . . . . . . . . . . . . . 503.5 Changing the Body Class with a condition . . . . . . . . . . . . . . . . . . . . . . . . . . . . . 513.6 Rendering a Menu . . . . . . . . . . . . . . . . . . . . . . . . . . . . . . . . . . . . . . . . . . 523.7 Integrating a JavaScript-based slider . . . . . . . . . . . . . . . . . . . . . . . . . . . . . . . . . 533.8 Rendering a Meta-Navigation . . . . . . . . . . . . . . . . . . . . . . . . . . . . . . . . . . . . 553.9 Editing a shared footer across all pages . . . . . . . . . . . . . . . . . . . . . . . . . . . . . . . 563.10 Extending the Page . . . . . . . . . . . . . . . . . . . . . . . . . . . . . . . . . . . . . . . . . . 573.11 Adding A Simple Contact Form . . . . . . . . . . . . . . . . . . . . . . . . . . . . . . . . . . . 573.12 Creating a Plugin . . . . . . . . . . . . . . . . . . . . . . . . . . . . . . . . . . . . . . . . . . . 59
4 Developer Guide 614.1 User Interface Development . . . . . . . . . . . . . . . . . . . . . . . . . . . . . . . . . . . . . 614.2 Testing . . . . . . . . . . . . . . . . . . . . . . . . . . . . . . . . . . . . . . . . . . . . . . . . 70
5 Appendixes 735.1 TYPO3 Neos Command Reference . . . . . . . . . . . . . . . . . . . . . . . . . . . . . . . . . 735.2 FlowQuery Operation Reference . . . . . . . . . . . . . . . . . . . . . . . . . . . . . . . . . . . 775.3 Neos TypoScript Reference . . . . . . . . . . . . . . . . . . . . . . . . . . . . . . . . . . . . . 81
6 Contributors 89
i

ii

Neos CMS Documentation, Release 1.0.2
Neos is a free enterprise web content management system licensed under the GPL.
This version of the documentation covering Neos 1.0.2 has been rendered at: September 02, 2015
Contents 1

Neos CMS Documentation, Release 1.0.2
2 Contents
CHAPTER 1
Getting Started
1.1 Installation
Tip: Neos is built on top of the Flow framework. If you run into technical problems, keep in mind to check theFlow documentation for possible hints as well.
1.1.1 Requirements
Neos has at least the same system requirements as Flow. You can find them in the Flow Requirements Documen-tation.
1.1.2 Fundamental Installation
1. First you need to install the dependency manager Composer (if you don’t have it already):
curl -sS https://getcomposer.org/installer | php
By issuing this command Composer will get downloaded as composer.phar to your working directory. Ifyou like to have composer installed globally, you can simply move it to a directory within your $PATHenvironment.
mv composer.phar /usr/local/bin/composer
Note: If you are on Windows please refer to the offical documentation on how to install Composer onWindows
2. Go to your htdocs directory and create a new project based on the Neos base distribution:
cd /your/htdocs/php /path/to/composer.phar create-project typo3/neos-base-distribution Neos
Composer will take care of downloading all dependencies for running your Neos installation to the directoryNeos. You can safely delete the vcs files by answering ‘Y’ to the question ‘Do you want to remove theexisting VCS (.git, .svn..) history? [Y,n]?’.
3. Next set up a virtual host inside your Apache configuration. Set the DocumentRoot to the Web directoryinside the Neos installation.
NameVirtualHost *:80 # if needed
<VirtualHost *:80>DocumentRoot "/your/htdocs/Neos/Web/"# enable the following line for production context
3
Neos CMS Documentation, Release 1.0.2
#SetEnv FLOW_CONTEXT ProductionServerName neos.demo
</VirtualHost>
Make sure that the mod_rewrite module is loaded and restart apache. For further information on how toset up a virtual host with apache please refer to the Apache Virtual Host documentation.
4. Add an entry to /etc/hosts to make your virtual host reachable:
127.0.0.1 neos.demo
Make sure to use the same name you defined in ServerName in the virtual host configuration above.
5. Set file permissions as needed so that the installation is read- and writeable by the webserver’s user andgroup:
sudo ./flow core:setfilepermissions john www-data www-data
Replace john with your current username and www-data with the webserver’s user and group.
For detailed instructions on setting the needed permissions see Flow File Permissions
Note: Setting file permissions is not necessary and not possible on Windows machines. For Apache tobe able to create symlinks, you need to use Windows Vista (or newer) and Apache needs to be started withAdministrator privileges.
6. Now go to http://neos.demo/setup and follow the on-screen instructions.
1.1.3 The Neos Setup Tool
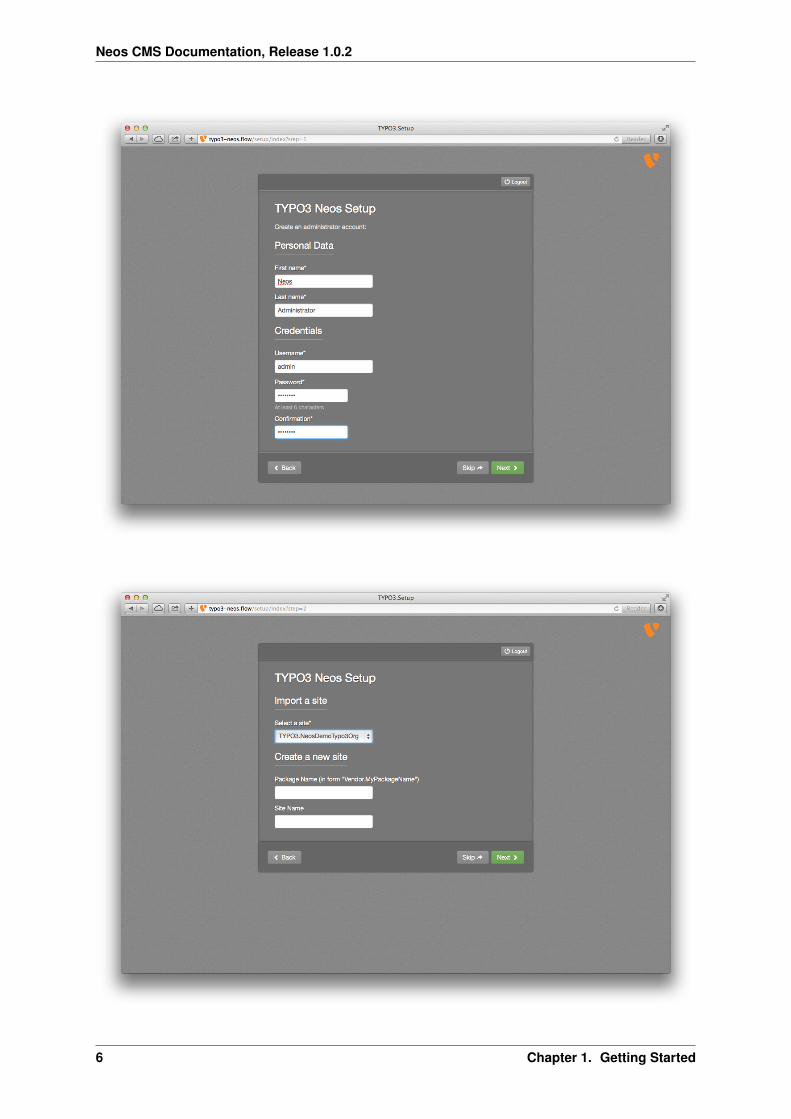
1. A check for the basic requirements of Flow and Neos will be run. If all is well, you will see a login screen.If a check failed, hints on solving the issue will be shown and you should fix what needs to be fixed. Thenjust reload the page, until all requirements are met.
2. The login screen will tell you the location of a file with a generated password. Keep that password in somesecure place, the generated file will be removed upon login! It is possible to have a new password renderedif you lost it, so don’t worry too much.
3. Fill in the database credentials in the first step. The selector box will be updated with accessible databasesto choose from, or you can create a new one.
Tip: Configure your MySQL server to use the utf8_unicode_ci collation by default if possible!
4. In the next step a user with administrator privileges for editing with Neos is created.
5. The following step allows you to import an existing site or kickstart a new site. To import the demo site,just make sure it is selected in the selector box and go to the next step.
To kickstart a new site, enter a package and site name in the form before going to the next step.
If you are new to Neos, we recommend to import the existing demo site so you can follow the next sectiongiving you a basic tour of the user interface.
6. If all went well you’ll get a confirmation the setup is completed, and you can enter the frontend or backendof your Neos website.
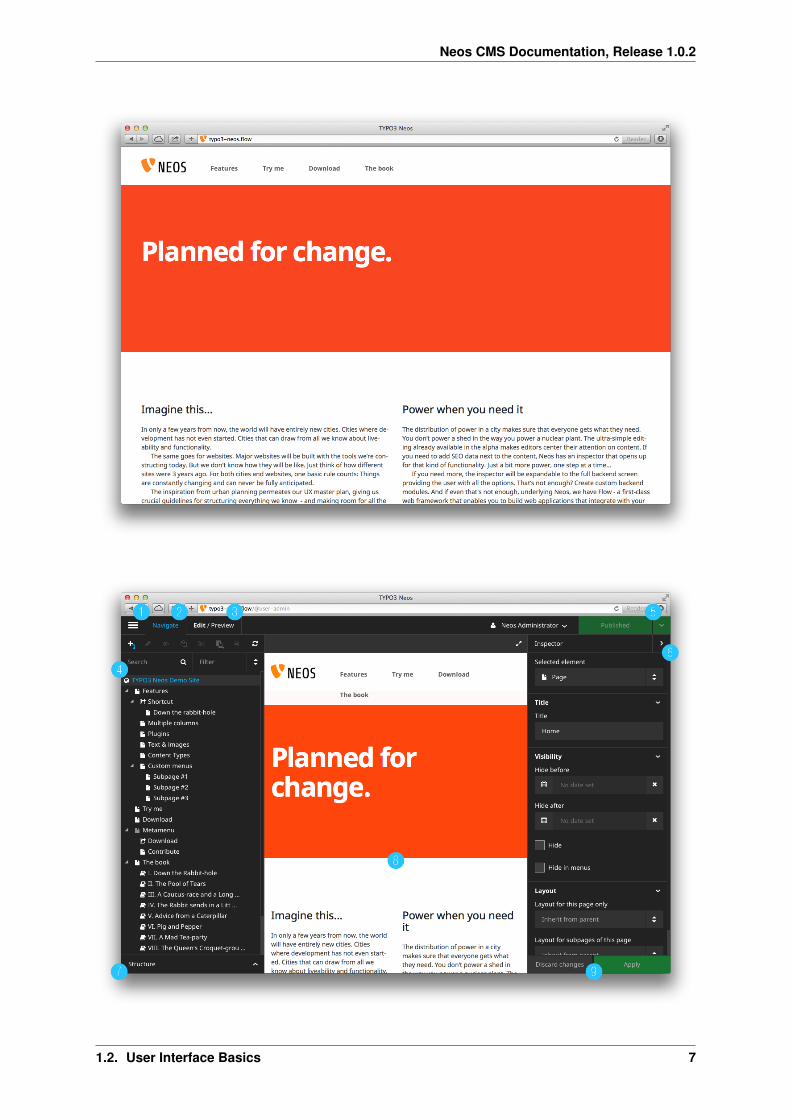
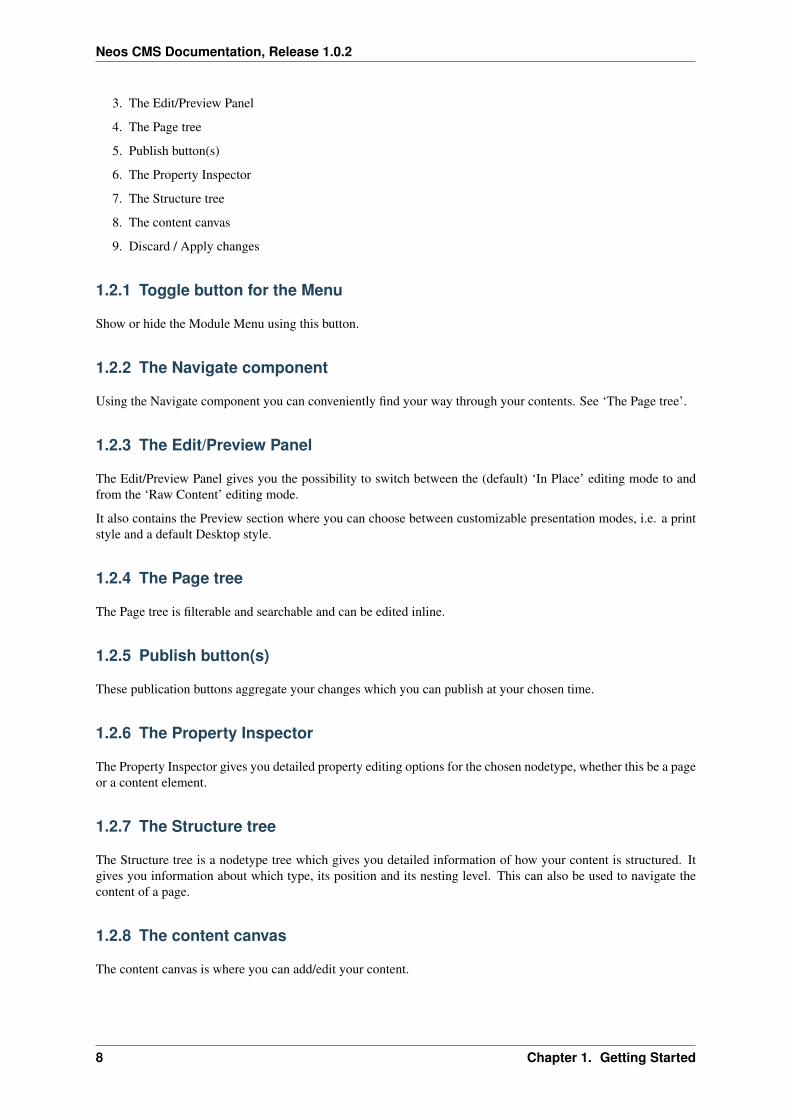
1.2 User Interface Basics
1. Toggle button for the Menu
2. The Navigate component
4 Chapter 1. Getting Started

Neos CMS Documentation, Release 1.0.2
1.2. User Interface Basics 5
Neos CMS Documentation, Release 1.0.2
6 Chapter 1. Getting Started
Neos CMS Documentation, Release 1.0.2
1.2. User Interface Basics 7
Neos CMS Documentation, Release 1.0.2
3. The Edit/Preview Panel
4. The Page tree
5. Publish button(s)
6. The Property Inspector
7. The Structure tree
8. The content canvas
9. Discard / Apply changes
1.2.1 Toggle button for the Menu
Show or hide the Module Menu using this button.
1.2.2 The Navigate component
Using the Navigate component you can conveniently find your way through your contents. See ‘The Page tree’.
1.2.3 The Edit/Preview Panel
The Edit/Preview Panel gives you the possibility to switch between the (default) ‘In Place’ editing mode to andfrom the ‘Raw Content’ editing mode.
It also contains the Preview section where you can choose between customizable presentation modes, i.e. a printstyle and a default Desktop style.
1.2.4 The Page tree
The Page tree is filterable and searchable and can be edited inline.
1.2.5 Publish button(s)
These publication buttons aggregate your changes which you can publish at your chosen time.
1.2.6 The Property Inspector
The Property Inspector gives you detailed property editing options for the chosen nodetype, whether this be a pageor a content element.
1.2.7 The Structure tree
The Structure tree is a nodetype tree which gives you detailed information of how your content is structured. Itgives you information about which type, its position and its nesting level. This can also be used to navigate thecontent of a page.
1.2.8 The content canvas
The content canvas is where you can add/edit your content.
8 Chapter 1. Getting Started

Neos CMS Documentation, Release 1.0.2
1.2.9 Discard / Apply changes
Neos saves your changes on the fly as much as possible. When editing properties you must apply or discard thechanges you made.
1.2. User Interface Basics 9

Neos CMS Documentation, Release 1.0.2
10 Chapter 1. Getting Started

CHAPTER 2
Integrator Guide
This guide explains how to implement websites with Neos. It specifically covers the structuring of content usingthe TYPO3 Content Repository (TYPO3CR), and how the content is rendered using TypoScript and Fluid.
2.1 The TYPO3 Content Structure
Before we can understand how content is rendered, we have to see how it is structured and organized. These basicsare explained in this section.
2.1.1 Nodes inside the TYPO3 Content Repository
The content in Neos is stored not inside tables of a relational database, but inside a tree-based structure: theso-called TYPO3 Content Repository.
To a certain extent, it is comparable to files in a file-system: They are also structured as a tree, and are identifieduniquely by the complete path towards the file.
Note: Internally, the TYPO3CR currently stores the nodes inside database tables as well, but you do not need toworry about that as you’ll never deal with the database directly. This high-level abstraction helps to decouple thedata modelling layer from the data persistence layer.
Each element in this tree is called a Node, and is structured as follows:
• It has a node name which identifies the node, in the same way as a file or folder name identifies an elementin your local file system.
• It has a node type which determines which properties a node has. Think of it as the type of a file in your filesystem.
• Furthermore, it has properties which store the actual data of the node. The node type determines whichproperties exist for a node. As an example, a Text node might have a headline and a text property.
• Of course, nodes may have sub nodes underneath them.
If we imagine a classical website with a hierarchical menu structure, then each of the pages is represented by aTYPO3CR Node of type Document. However, not only the pages themselves are represented as tree: Imaginea page has two columns, with different content elements inside each of them. The columns are stored as Nodesof type ContentCollection, and they contain nodes of type Text, Image, or whatever structure is needed.This nesting can be done indefinitely: Inside a ContentCollection, there could be another three-columnelement which again contains ContentCollection elements with arbitrary content inside.
Comparison to TYPO3 CMSIn TYPO3 CMS, the page tree is the central data structure, and the content of a page is stored in a more-or-lessflat manner in a separate database table.
11
Neos CMS Documentation, Release 1.0.2
Because this was too limited for complex content, TemplaVoila was invented. It allows to create an arbitrarynesting of content elements, but is still plugged into the classical table-based architecture.
Basically, Neos generalizes the tree-based concept found in TYPO3 CMS and TemplaVoila and implements it ina consistent manner, where we do not have to distinguish between pages and other content.
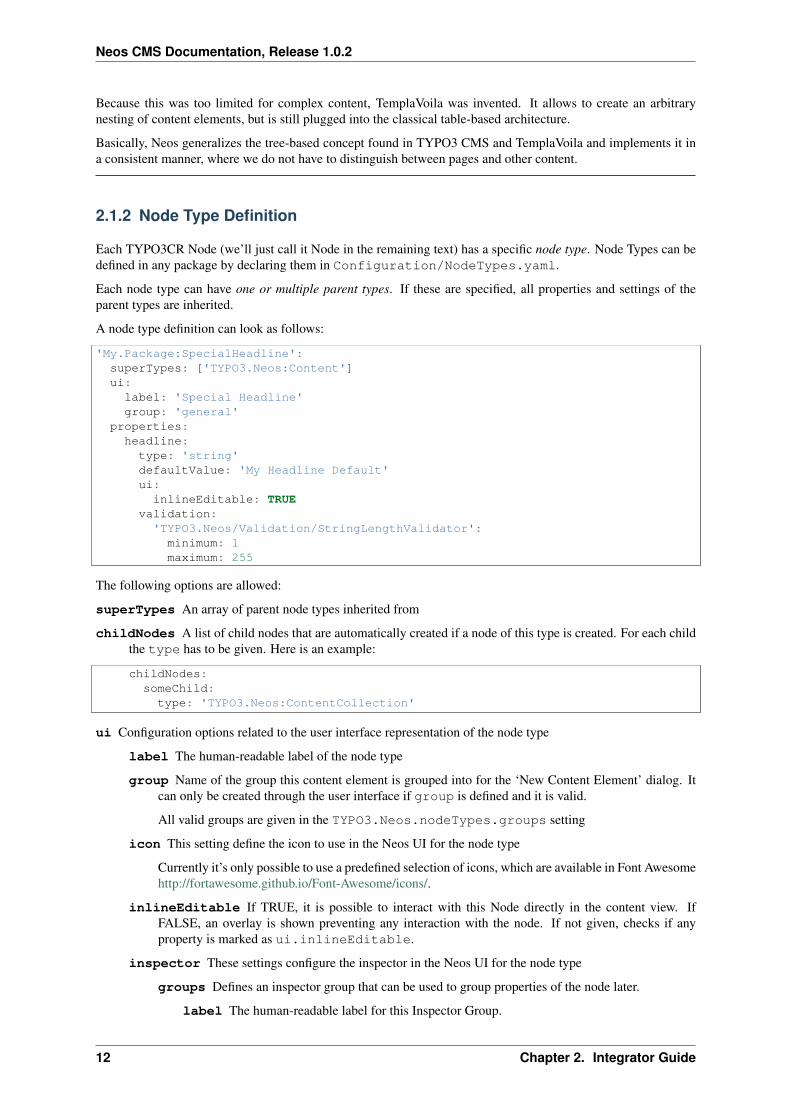
2.1.2 Node Type Definition
Each TYPO3CR Node (we’ll just call it Node in the remaining text) has a specific node type. Node Types can bedefined in any package by declaring them in Configuration/NodeTypes.yaml.
Each node type can have one or multiple parent types. If these are specified, all properties and settings of theparent types are inherited.
A node type definition can look as follows:
'My.Package:SpecialHeadline':superTypes: ['TYPO3.Neos:Content']ui:label: 'Special Headline'group: 'general'
properties:headline:
type: 'string'defaultValue: 'My Headline Default'ui:
inlineEditable: TRUEvalidation:
'TYPO3.Neos/Validation/StringLengthValidator':minimum: 1maximum: 255
The following options are allowed:
superTypes An array of parent node types inherited from
childNodes A list of child nodes that are automatically created if a node of this type is created. For each childthe type has to be given. Here is an example:
childNodes:someChild:
type: 'TYPO3.Neos:ContentCollection'
ui Configuration options related to the user interface representation of the node type
label The human-readable label of the node type
group Name of the group this content element is grouped into for the ‘New Content Element’ dialog. Itcan only be created through the user interface if group is defined and it is valid.
All valid groups are given in the TYPO3.Neos.nodeTypes.groups setting
icon This setting define the icon to use in the Neos UI for the node type
Currently it’s only possible to use a predefined selection of icons, which are available in Font Awesomehttp://fortawesome.github.io/Font-Awesome/icons/.
inlineEditable If TRUE, it is possible to interact with this Node directly in the content view. IfFALSE, an overlay is shown preventing any interaction with the node. If not given, checks if anyproperty is marked as ui.inlineEditable.
inspector These settings configure the inspector in the Neos UI for the node type
groups Defines an inspector group that can be used to group properties of the node later.
label The human-readable label for this Inspector Group.
12 Chapter 2. Integrator Guide

Neos CMS Documentation, Release 1.0.2
position Position of the inspector group, small numbers are sorted on top
properties A list of named properties for this node type. For each property the following settings are avail-able.
type Data type of this property. This may be a simple type (like in PHP), a fully qualified PHP class name,or one of these three special types: date, references, or reference. Use date to store dates/ time as a DateTime object. Use reference and references to store references that point toother nodes. reference only accepts a single node or node identifier, while references acceptsan array of nodes or node identifiers.
defaultValue Default value of this property. Used at node creation time. Type must match specified‘type’.
ui Configuration options related to the user interface representation of the property
label The human-readable label of the property
reloadIfChanged If TRUE, the whole content element needs to be re-rendered on the server sideif the value changes. This only works for properties which are displayed inside the propertyinspector, i.e. for properties which have a group set.
inlineEditable If TRUE, this property is inline editable, i.e. edited directly on the page throughAloha.
aloha This section controls the text formatting options the user has available for this property. Ex-ample:
aloha:'format':'sub': TRUE'sup': TRUE'p': TRUE'h1': TRUE'h2': TRUE'h3': TRUE'removeFormat': TRUE
'link':'a': TRUE
inspector These settings configure the inspector in the Neos UI for the property.
group Identifier of the inspector group this property is categorized into in the content editinguser interface. If none is given, the property is not editable through the property inspector ofthe user interface.
The value here must reference a groups configured in the ui.inspector.groups ele-ment of the node type this property belongs to.
position Position inside the inspector group, small numbers are sorted on top.
editor Name of the JavaScript Editor Class which is instantiated to edit this element in theinspector.
editorOptions A set of options for the given editor
validation A list of validators to use on the property. Below each validator type any options for thevalidator can be given. See below for more information.
Here is one of the standard Neos node types (slightly shortened):
'TYPO3.Neos.NodeTypes:Image':superTypes: ['TYPO3.Neos:Content']ui:label: 'Image'icon: 'icon-picture'inspector:
2.1. The TYPO3 Content Structure 13

Neos CMS Documentation, Release 1.0.2
groups:image:label: 'Image'position: 5
properties:image:
type: TYPO3\Media\Domain\Model\ImageVariantui:
label: 'Image'reloadIfChanged: TRUEinspector:group: 'image'
alignment:type: stringdefaultValue: ''ui:
label: 'Alignment'reloadIfChanged: TRUEinspector:group: 'image'editor: 'TYPO3.Neos/Inspector/Editors/SelectBoxEditor'editorOptions:placeholder: 'Default'values:'':label: ''
center:label: 'Center'
left:label: 'Left'
right:label: 'Right'
alternativeText:type: stringui:
label: 'Alternative text'reloadIfChanged: TRUEinspector:group: 'image'
validation:'TYPO3.Neos/Validation/StringLengthValidator':minimum: 1maximum: 255
hasCaption:type: booleanui:
label: 'Enable caption'reloadIfChanged: TRUEinspector:group: 'image'
caption:type: stringdefaultValue: '<p>Enter caption here</p>'ui:
inlineEditable: TRUE
Property Validation
The validators that can be assigned to properties in the node type configuration are used on properties that areedited via the inspector and are applied on the client-side only. The available validators can be found in the Neospackage in Resources/Public/JavaScript/Shared/Validation:
14 Chapter 2. Integrator Guide
Neos CMS Documentation, Release 1.0.2
• AlphanumericValidator
• CountValidator
• DateTimeRangeValidator
• DateTimeValidator
• EmailAddressValidator
• FloatValidator
• IntegerValidator
• LabelValidator
• NotEmptyValidator
• NumberRangeValidator
• RegularExpressionValidator
• StringLengthValidator
• StringValidator
• TextValidator
• UuidValidator
The options are in sync with the Flow validators, so feel free to check the Flow documentation for details.
To apply options, just specify them like this:
someProperty:validation:'TYPO3.Neos/Validation/StringLengthValidator':
minimum: 1maximum: 255
Custom Validators
It is possible to register paths into RequireJS (the JavaScript file and module loader used by Neos, seehttp://requirejs.org) and by this custom validators into Neos. Validators should be named ‘<SomeType>Validator’,and can be referenced by My.Package/Public/Scripts/Validators/FooValidator for example.
Namespaces can be registered like this in Settings.yaml:
TYPO3:Neos:userInterface:
requireJsPathMapping:'My.Package/Validation': 'resource://My.Package/Public/Scripts/Validators'
Registering specific validators is also possible like this:
TYPO3:Neos:userInterface:
validators:'My.Package/AlphanumericValidator':path: 'resource://My.Package/Public/Scripts/Validators/FooValidator'
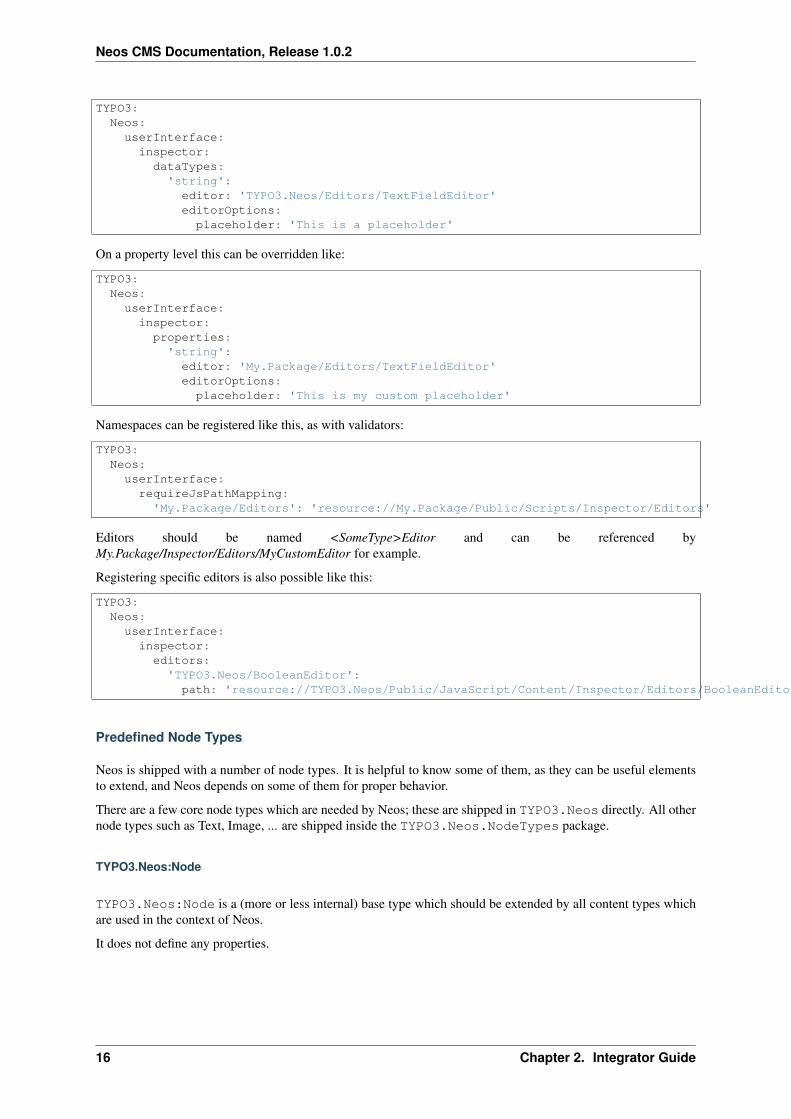
Custom Editors
Like with validators, using custom editors is possible as well. Every dataType has it’s default editor set, which canhave options applied like:
2.1. The TYPO3 Content Structure 15
Neos CMS Documentation, Release 1.0.2
TYPO3:Neos:userInterface:
inspector:dataTypes:'string':
editor: 'TYPO3.Neos/Editors/TextFieldEditor'editorOptions:placeholder: 'This is a placeholder'
On a property level this can be overridden like:
TYPO3:Neos:userInterface:
inspector:properties:'string':
editor: 'My.Package/Editors/TextFieldEditor'editorOptions:placeholder: 'This is my custom placeholder'
Namespaces can be registered like this, as with validators:
TYPO3:Neos:userInterface:
requireJsPathMapping:'My.Package/Editors': 'resource://My.Package/Public/Scripts/Inspector/Editors'
Editors should be named <SomeType>Editor and can be referenced byMy.Package/Inspector/Editors/MyCustomEditor for example.
Registering specific editors is also possible like this:
TYPO3:Neos:userInterface:
inspector:editors:'TYPO3.Neos/BooleanEditor':
path: 'resource://TYPO3.Neos/Public/JavaScript/Content/Inspector/Editors/BooleanEditor'
Predefined Node Types
Neos is shipped with a number of node types. It is helpful to know some of them, as they can be useful elementsto extend, and Neos depends on some of them for proper behavior.
There are a few core node types which are needed by Neos; these are shipped in TYPO3.Neos directly. All othernode types such as Text, Image, ... are shipped inside the TYPO3.Neos.NodeTypes package.
TYPO3.Neos:Node
TYPO3.Neos:Node is a (more or less internal) base type which should be extended by all content types whichare used in the context of Neos.
It does not define any properties.
16 Chapter 2. Integrator Guide

Neos CMS Documentation, Release 1.0.2
TYPO3.Neos:Document
An important distinction is between nodes which look and behave like pages and “normal content” such as text,which is rendered inside a page. Nodes which behave like pages are called Document Nodes in Neos. This meansthey have a unique, externally visible URL by which they can be rendered.
The standard page in Neos is implemented by TYPO3.Neos.NodeTypes:Page which directly extends fromTYPO3.Neos:Document.
TYPO3.Neos:ContentCollection and TYPO3.Neos:Content
All content which does not behave like pages, but which lives inside them, is implemented by two different nodetypes:
First, there is the TYPO3.Neos:ContentCollection type: A TYPO3.Neos:ContentCollection hasa structural purpose. It usually does not contain any properties itself, but it contains an ordered list of child nodeswhich are rendered inside.
Currently, TYPO3.Neos:ContentCollection should not be extended by custom types.
Second, the node type for all standard elements (such as text, image, youtube, ...) is TYPO3.Neos:Content.This is–by far–the most often extended node type.
2.2 Rendering A Page
This section shows how content is rendered on a page as a rough overview.
More precisely we show how to render a TYPO3.Neos:Document node, as everything which happens hereworks for all Document nodes, and not just for Page nodes.
First, the requested URL is resolved to a Node of type TYPO3.Neos:Document. This happens by translatingthe URL path to a node path, and finding the node with this path then.
The node is passed straight away to TypoScript, which is the rendering mechanism. TypoScript renders the nodeby traversing to sub-nodes and rendering them as well. The arguments which are passed to TypoScript are storedinside the so-called context, which contains all variables which are accessible by the TypoScript rendering engine.
Internally, TypoScript then asks Fluid to render certain snippets of the page, which can, in turn, ask TypoScriptagain. This can go back and forth multiple times, even recursively.
2.2.1 The Page TypoScript Object and -Template
The rendering of a page by default starts at a Case matcher at the TypoScript path root, which will usuallyselect the TypoScript path page. The minimally needed TypoScript for rendering looks as follows:
page = Pagepage.body.templatePath = 'resource://My.Package/Private/Templates/PageTemplate.html'
Here, the Page TypoScript object is assigned to the path page, telling the system that the TypoScript objectPage is responsible for further rendering. Page expects one parameter to be set: The path of the Fluid templatewhich is rendered inside the <body> of the resulting HTML page.
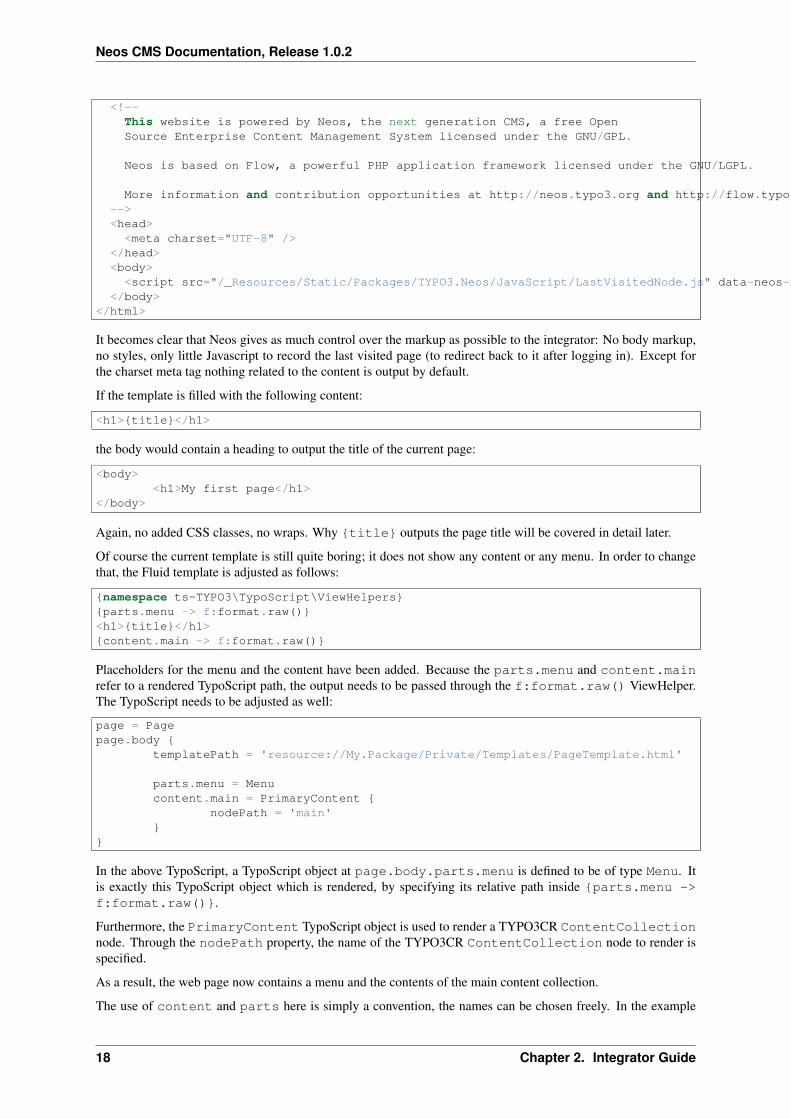
If this is an empty file, the output shows how minimal Neos impacts the generated markup:
<!DOCTYPE html><html version="HTML+RDFa 1.1"
xmlns="http://www.w3.org/1999/xhtml"xmlns:typo3="http://www.typo3.org/ns/2012/Flow/Packages/Neos/Content/"xmlns:xsd="http://www.w3.org/2001/XMLSchema#">
2.2. Rendering A Page 17
Neos CMS Documentation, Release 1.0.2
<!--This website is powered by Neos, the next generation CMS, a free OpenSource Enterprise Content Management System licensed under the GNU/GPL.
Neos is based on Flow, a powerful PHP application framework licensed under the GNU/LGPL.
More information and contribution opportunities at http://neos.typo3.org and http://flow.typo3.org--><head><meta charset="UTF-8" />
</head><body><script src="/_Resources/Static/Packages/TYPO3.Neos/JavaScript/LastVisitedNode.js" data-neos-node="a319a653-ef38-448d-9d19-0894299068aa"></script>
</body></html>
It becomes clear that Neos gives as much control over the markup as possible to the integrator: No body markup,no styles, only little Javascript to record the last visited page (to redirect back to it after logging in). Except forthe charset meta tag nothing related to the content is output by default.
If the template is filled with the following content:
<h1>{title}</h1>
the body would contain a heading to output the title of the current page:
<body><h1>My first page</h1>
</body>
Again, no added CSS classes, no wraps. Why {title} outputs the page title will be covered in detail later.
Of course the current template is still quite boring; it does not show any content or any menu. In order to changethat, the Fluid template is adjusted as follows:
{namespace ts=TYPO3\TypoScript\ViewHelpers}{parts.menu -> f:format.raw()}<h1>{title}</h1>{content.main -> f:format.raw()}
Placeholders for the menu and the content have been added. Because the parts.menu and content.mainrefer to a rendered TypoScript path, the output needs to be passed through the f:format.raw() ViewHelper.The TypoScript needs to be adjusted as well:
page = Pagepage.body {
templatePath = 'resource://My.Package/Private/Templates/PageTemplate.html'
parts.menu = Menucontent.main = PrimaryContent {
nodePath = 'main'}
}
In the above TypoScript, a TypoScript object at page.body.parts.menu is defined to be of type Menu. Itis exactly this TypoScript object which is rendered, by specifying its relative path inside {parts.menu ->f:format.raw()}.
Furthermore, the PrimaryContent TypoScript object is used to render a TYPO3CR ContentCollectionnode. Through the nodePath property, the name of the TYPO3CR ContentCollection node to render isspecified.
As a result, the web page now contains a menu and the contents of the main content collection.
The use of content and parts here is simply a convention, the names can be chosen freely. In the example
18 Chapter 2. Integrator Guide
Neos CMS Documentation, Release 1.0.2
content is used for anything that content is later placed in but parts is for anything that is not content in thesense that it will directly be edited in the content module of Neos.
2.2.2 Further Reading
Details on how TypoScript works and can be used can be found in the section Inside TypoScript. Adjusting NeosOutput shows how page, menu and content markup can be adjusted freely.
2.3 Inside TypoScript
In this chapter, TypoScript will be explained in a step-by-step fashion, focusing on the different internal parts, thesyntax of these and the semantics.
TypoScript is fundamentally a hierarchical, prototype based processing language:
• It is hierarchical because the content it should render is also hierarchically structured.
• It is prototype based because it allows to define properties for all instances of a certain TypoScript objecttype. It is also possible to define properties not for all instances, but only for instances inside a certainhierarchy. Thus, the prototype definitions are hierarchically-scoped as well.
• It is a processing language because it processes the values in the context into a single output value.
In the first part of this chapter, the syntactic and semantic features of the TypoScript, Eel and FlowQuery languagesare explained. Then, the focus will be on the design decisions and goals of TypoScript, to provide a betterunderstanding of the main objectives while designing the language.
2.3.1 Goals of TypoScript
TypoScript should cater to both planned and unplanned extensibility. This means it should provide ways toadjust and extend its behavior in places where this is to be expected. At the same time it should also be possibleto adjust and extend in any other place without having to apply dirty hacks.
TypoScript should be usable in standalone, extensible applications outside of Neos. The use of a flexiblelanguage for configuration of (rendering) behavior is beneficial for most complex applications.
TypoScript should make out-of-band rendering easy to do. This should ease content generation for technologieslike AJAX or edge-side includes (ESI).
TypoScript should make multiple renderings of the same content possible. It should allow placement of thesame content (but possibly in different representations) on the same page multiple times.
TypoScript’s syntax should be familiar to the user, so that existing knowledge can be leveraged. To achievethis, TypoScript takes inspiration from CSS selectors, jQuery and other technologies that are in widespread use inmodern frontend development.
2.3.2 TypoScript Objects
TypoScript is a language to describe TypoScript objects. A TypoScript object has some properties which are usedto configure the object. Additionally, a TypoScript object has access to a context, which is a list of variables. Thegoal of a TypoScript object is to take the variables from the context, and transform them to the desired output,using its properties for configuration as needed.
Thus, TypoScript objects take some input which is given through the context and the properties, and produce asingle output value. Internally, they can modify the context, and trigger rendering of nested TypoScript objects:This way, a big task (like rendering a whole web page) can be split into many smaller tasks (render a single image,render some text, ...): The results of the small tasks are then put together again, forming the final end result.
2.3. Inside TypoScript 19

Neos CMS Documentation, Release 1.0.2
TypoScript object nesting is a fundamental principle of TypoScript. As TypoScript objects call nested TypoScriptobjects, the rendering process forms a tree of TypoScript objects.
TypoScript objects are implemented by a PHP class, which is instantiated at runtime. A single PHP class is thebasis for many TypoScript objects. We will highlight the exact connection between TypoScript objects and theirPHP implementations later.
A TypoScript object can be instantiated by assigning it to a TypoScript path, such as:
foo = Page# or:my.object = Text# or:my.image = TYPO3.Neos.ContentTypes:Image
The name of the to-be-instantiated TypoScript prototype is listed without quotes.
By convention, TypoScript paths (such as my.object) are written in lowerCamelCase, while TypoScriptprototypes (such as TYPO3.Neos.ContentTypes:Image) are written in UpperCamelCase.
It is possible to set properties on the newly created TypoScript objects:
foo.myProperty1 = 'Some Property which Page can access'my.object.myProperty1 = "Some other property"my.image.width = ${q(node).property('foo')}
Property values that are strings have to be quoted (with either single or double quotes). A property can also be anEel expression (which are explained in Eel, FlowQuery and Fizzle.)
To reduce typing overhead, curly braces can be used to “abbreviate” long TypoScript paths:
my {image = Imageimage.width = 200
object {myProperty1 = 'some property'
}}
Instantiating a TypoScript object and setting properties on it in a single pass is also possible. All three examplesmean exactly the same:
someImage = ImagesomeImage.foo = 'bar'
# Instantiate object, set property one after each othersomeImage = ImagesomeImage {
foo = 'bar'}
# Instantiate an object and set properties directlysomeImage = Image {
foo = 'bar'}
TypoScript Objects are Side-Effect Free
When TypoScript objects are rendered, they are allowed to modify the TypoScript context (they can add or overridevariables); and can invoke other TypoScript objects. After rendering, however, the parent TypoScript object mustmake sure to clean up the context, so that it contains exactly the state it had before the rendering.
20 Chapter 2. Integrator Guide

Neos CMS Documentation, Release 1.0.2
The API helps to enforce this, as the TypoScript context is a stack: The only thing the developer of a TypoScriptobject needs to make sure is that if he adds some variable to the stack, effectively creating a new stack frame, heneeds to remove exactly this stack frame after rendering again.
This means that a TypoScript object can only manipulate TypoScript objects below it, but not following or preced-ing it.
In order to enforce this, TypoScript objects are furthermore only allowed to communicate through the TypoScriptContext; and they are never allowed to be invoked directly: Instead, all invocations need to be done through theTypoScript Runtime.
All these constraints make sure that a TypoScript object is side-effect free, leading to an important benefit: Ifsomebody knows the exact path towards a TypoScript object together with its context, it can be rendered in astand-alone manner, exactly as if it was embedded in a bigger element. This enables, for example, rendering partsof pages with different cache life- times, or the effective implementation of AJAX or ESI handlers reloading onlyparts of a website.
2.3.3 TypoScript Prototypes
When a TypoScript object is instantiated (i.e. when you type someImage = Image) the TypoScript Prototypefor this object is copied and is used as a basis for the new object. The prototype is defined using the followingsyntax:
prototype(MyImage) {width = '500px'height = '600px'
}
When the above prototype is instantiated, the instantiated object will have all the properties of the copied prototype.This is illustrated through the following example:
someImage = MyImage# now, someImage will have a width of 500px and a height of 600px
someImage.width = '100px'# now, we have overridden the height of "someImage" to be 100px.
Prototype- vs. class-based languagesThere are generally two major “flavours” of object-oriented languages. Most languages (such as PHP, Ruby, Perl,Java, C++) are class-based, meaning that they explicitly distinguish between the place where behavior for a givenobject is defined (the “class”) and the runtime representation which contains the data (the “instance”).
Other languages such as JavaScript are prototype-based, meaning that there is no distinction between classes andinstances: At object creation time, all properties and methods of the object’s prototype (which roughly correspondsto a “class”) are copied (or otherwise referenced) to the instance.
TypoScript is a prototype-based language because it copies the TypoScript Prototype to the instance when anobject is evaluated.
Prototypes in TypoScript are mutable, which means that they can easily be modified:
prototype(MyYouTube) {width = '100px'height = '500px'
}
# you can change the width/heightprototype(MyYouTube).width = '400px'# or define new properties:prototype(MyYouTube).showFullScreen = ${true}
2.3. Inside TypoScript 21

Neos CMS Documentation, Release 1.0.2
Defining and instantiating a prototype from scratch is not the only way to define and instantiate them. You canalso use an existing TypoScript prototype as basis for a new one when needed. This can be done by inheriting froma TypoScript prototype using the < operator:
prototype(MyImage) < prototype(TYPO3.Neos:Content)
# now, the MyImage prototype contains all properties of the Template# prototype, and can be further customized.
This implements prototype inheritance, meaning that the “subclass” (MyImage in the example above) and the“parent class (Content) are still attached to each other: If a property is added to the parent class, this alsoapplies to the subclass, as in the following example:
prototype(TYPO3.Neos:Content).fruit = 'apple'prototype(TYPO3.Neos:Content).meal = 'dinner'
prototype(MyImage) < prototype(TYPO3.Neos:Content)# now, MyImage also has the properties "fruit = apple" and "meal = dinner"
prototype(TYPO3.Neos:Content).fruit = 'Banana'# because MyImage *extends* Content, MyImage.fruit equals 'Banana' as well.
prototype(MyImage).meal = 'breakfast'prototype(TYPO3.TypoScript:Content).meal = 'supper'# because MyImage now has an *overridden* property "meal", the change of# the parent class' property is not reflected in the MyImage class
Prototype inheritance can only be defined globally, i.e. with a statement of the following form:
prototype(Foo) < prototype(Bar)
It is not allowed to nest prototypes when defining prototype inheritance, so the following examples are not validTypoScript and will result in an exception:
prototype(Foo) < some.prototype(Bar)other.prototype(Foo) < prototype(Bar)prototype(Foo).prototype(Bar) < prototype(Baz)
While it would be theoretically possible to support this, we have chosen not to do so in order to reduce complexityand to keep the rendering process more understandable. We have not yet seen a TypoScript example where aconstruct such as the above would be needed.
Hierarchical TypoScript Prototypes
One way to flexibly adjust the rendering of a TypoScript object is done through modifying its Prototype in cer-tain parts of the rendering tree. This is possible because TypoScript prototypes are hierarchical, meaning thatprototype(...) can be part of any TypoScript path in an assignment; even multiple times:
prototype(Foo).bar = 'baz'prototype(Foo).some.thing = 'baz2'
some.path.prototype(Foo).some = 'baz2'
prototype(Foo).prototype(Bar).some = 'baz2'prototype(Foo).left.prototype(Bar).some = 'baz2'
• prototype(Foo).bar is a simple, top-level prototype property assignment. It means: For all objectsof type Foo, set property bar. The second example is another variant of this pattern, just with more nestinglevels inside the property assignment.
• some.path.prototype(Foo).some is a prototype property assignment inside some.path. It means:For all objects of type Foo which occur inside the TypoScript path some.path, the property some is set.
22 Chapter 2. Integrator Guide

Neos CMS Documentation, Release 1.0.2
• prototype(Foo).prototype(Bar).some is a prototype property assignment inside another pro-totype. It means: For all objects of type Bar which occur somewhere inside an object of type Foo, theproperty some is set.
• This can both be combined, as in the last example inside prototype(Foo).left.prototype(Bar).some.
Internals of hierarchical prototypesA TypoScript object is side-effect free, which means that it can be rendered deterministically knowing only itsTypoScript path and the context. In order to make this work with hierarchical prototypes, we need to encode thetypes of all TypoScript objects above the current one into the current path. This is done using angular brackets:
a1/a2<Foo>/a3/a4<Bar>
When this path is rendered, a1/a2 is rendered as a TypoScript object of type Foo – which is needed to apply theprototype inheritance rules correctly.
Those paths are rarely visible on the “outside” of the rendering process, but might at times appear in exceptionmessages if rendering fails. For those cases it is helpful to know their semantics.
Bottom line: It is not important to know exactly how the a rendering TypoScript object’s TypoScript path isconstructed. Just pass it on, without modification to render a single element out of band.
2.3.4 Namespaces of TypoScript objects
The benefits of namespacing apply just as well to TypoScript objects as they apply to other languages. Namespac-ing helps to organize the code and avoid name clashes.
In TypoScript the namespace of a prototype is given when the prototype is declared. The following declares aYouTube prototype in the Acme.Demo namespace:
prototype(Acme.Demo:YouTube) {width = '100px'height = '500px'
}
The namespace is, by convention, the package key of the package in which the TypoScript resides.
Fully qualified identifiers can be used everywhere an identifier is used:
prototype(TYPO3.Neos:ContentCollection) < prototype(TYPO3.Neos:Collection)
In Neos TypoScript a default namespace of TYPO3.Neos is set. So whenever Page is used in TypoScriptwithin Neos, it is a shortcut for TYPO3.Neos:Page.
Custom namespace aliases can be defined for the scope of the current TypoScript file using the following syntax:
namespace Foo = Acme.Demo
# the following two lines are equivalent nowvideo = Acme.Demo:YouTubevideo = Foo:YouTube
Warning: These declarations are not scoped to the file they are in, but apply globally (at least currently, weplan to change that in the future). So you should be careful there!
2.3.5 Setting Properties On a TypoScript Object
Although the TypoScript object can read its context directly, it is good practice to instead use properties forconfiguration:
2.3. Inside TypoScript 23

Neos CMS Documentation, Release 1.0.2
# imagine there is a property "foo=bar" inside the TypoScript context at this pointmyObject = MyObject
# explicitly take the "foo" variable's value from the context and pass it into the "foo"# property of myObject. This way, the flow of data is more visible.myObject.foo = ${foo}
While myObject could rely on the assumption that there is a foo variable inside the TypoScript context, it hasno way (besides written documentation) to communicate this to the outside world.
Therefore, a TypoScript object’s implementation should only use properties of itself to determine its output, andbe independent of what is stored in the context.
However, in the prototype of a TypoScript object it is perfectly legal to store the mapping between the contextvariables and TypoScript properties, such as in the following example:
# this way, an explicit default mapping between a context variable and a property of the# TypoScript object is created.prototype(MyObject).foo = ${foo}
To sum it up: When implementing a TypoScript object, it should not access its context variables directly, butinstead use a property. In the TypoScript object’s prototype, a default mapping between a context variable and theprototype can be set up.
Manipulating the TypoScript Context
The TypoScript context can be manipulated directly through the use of the @override meta-property:
myObject = [email protected] = ${foo * 2}
In the above example, there is now an additional context variable bar with twice the value of foo.
This functionality is especially helpful if there are strong conventions regarding the TypoScript context variables.This is often the case in standalone TypoScript applications, but for Neos, this functionality is hardly ever used.
2.3.6 Processors
Processors allow the manipulation of values in TypoScript properties. A processor is applied to a property usingthe @process meta-property:
myObject = MyObject {property = 'some value'[email protected] = ${'before ' + value + ' after'}
}# results in 'before some value after'
Multiple processors can be used, their execution order is defined by the numeric position given in the TypoScriptafter @process. In the example above a @process.2 would run on the results of @process.1.
Additionally, an extended syntax can be used as well:
myObject = MyObject {property = 'some value'[email protected] {
expression = ${'before ' + value + ' after'}@position = 'start'
}}
This allows to use string keys for the processor name, and support @position arguments as explained forArrays.
24 Chapter 2. Integrator Guide

Neos CMS Documentation, Release 1.0.2
Processors are Eel Expressions or TypoScript objects operating on the value property of the context. Addition-ally, they can access the current TypoScript object they are operating on as this.
2.4 Eel, FlowQuery and Fizzle
2.4.1 Eel - Embedded Expression Language
Besides simple TypoScript assignments such as myObject.foo = ’bar’, it is possible to write expressionsusing the Eel language such as myObject.foo = ${q(node).property(’bar’)}.
The Embedded Expression Language (Eel) is a building block for creating Domain Specific Languages. It providesa rich syntax for arbitrary expressions, such that the author of the DSL can focus on its Semantics.
In this section, the focus lies on the use of Eel inside TypoScript.
Syntax
Every Eel expression in TypoScript is surrounded by ${...}, which is the delimiter for Eel expressions. Basi-cally, the Eel syntax and semantics is like a condensed version of JavaScript:
• Most things you can write as a single JavaScript expression (that is, without a ;) can also be written as Eelexpression.
• Eel does not throw an error if null values are dereferenced, i.e. inside ${foo.bar} with foo beingnull. Instead, null is returned. This also works for calling undefined functions.
• Eel does not support control structures or variable declarations.
• Eel supports the common JavaScript arithmetic and comparison operators, such as +-*/% for arithmetic and== != > >= < <= for comparison operators. Operator precedence is as expected, with multiplicationbinding higher than addition. This can be adjusted by using brackets. Boolean operators && and || aresupported.
• Eel supports the ternary operator to allow for conditions <condition> ? <ifTrue> :<ifFalse>.
• When object access is done (such as foo.bar.baz) on PHP objects, getters are called automatically.
• Object access with the offset notation is supported as well: foo[’bar’]
This means the following expressions are all valid Eel expressions:
${foo.bar} // Traversal${foo.bar()} // Method call${foo.bar().baz()} // Chained method call
${foo.bar("arg1", true, 42)} // Method call with arguments
${12 + 18.5} // Calculations are possible${foo == bar} // ... and comparisons
${foo.bar(12+18.5, foo == bar)} // and of course also use it inside arguments
${[foo, bar]} // Array Literal${{foo: bar, baz: test}} // Object Literal
Semantics inside TypoScript
Eel does not define any functions or variables by itself. Instead, it exposes the Eel context array, meaning thatfunctions and objects which should be accessible can be defined there.
2.4. Eel, FlowQuery and Fizzle 25

Neos CMS Documentation, Release 1.0.2
Because of that, Eel is perfectly usable as a “domain-specific language construction kit”, which provides thesyntax, but not the semantics of a given language.
For Eel inside TypoScript, the semantics are as follows:
• All variables of the TypoScript context are made available inside the Eel context.
• The special variable this always points to the current TypoScript object implementation.
• The function q() is available, which wraps its argument into a FlowQuery object. FlowQuery is explainedbelow.
2.4.2 FlowQuery
FlowQuery, as the name might suggest, is like jQuery for Flow. It’s syntax has been heavily influenced by jQuery.
FlowQuery is a way to process the content (being a TYPO3CR node within Neos) of the Eel context. FlowQueryoperations are implemented in PHP classes. For any FlowQuery operation to be available, the package containingthe operation must be installed. Any package can add their own FlowQuery operations. A set of basic operationsis always available as part of the TYPO3.Eel package itself.
In TYPO3.Neos, the following FlowQuery operations are defined:
property Adjusted to access properties of a TYPO3CR node. If property names are prefixed with an under-score, internal node properties like start time, end time, and hidden are accessed.
filter Used to check a value against a given constraint. The filters expressions are given in Fizzle, a languageinspired by CSS selectors. The Neos-specific filter changes instanceof to work on node types insteadof PHP classes.
children Returns the children of a TYPO3CR node. They are optionally filtered with a filter operation tolimit the returned result set.
parents Returns the parents of a TYPO3CR node. They are optionally filtered with a filter operation tolimit the returned result set.
A reference of all FlowQuery operations defined in TYPO3.Eel and TYPO3.Neos can be found in the FlowQueryOperation Reference.
Operation Resolving
When multiple packages define an operation with the same short name, they are resolved using the priority eachimplementation defines, higher priorities have higher precedence when operations are resolved.
The OperationResolver loops over the implementations sorted by order and asks them if they can evaluatethe current context. The first operation that answers this check positively is used.
FlowQuery by Example
Any context variable can be accessed directly:
${myContextVariable}
and the current node is available as well:
${node}
There are various ways to access its properties. Direct access is possible, but should be avoided. It is better to useFlowQuery instead:
${q(node).getProperty('foo')} // Possible, but discouraged${q(node).property('foo')} // Better: use FlowQuery instead
26 Chapter 2. Integrator Guide
Neos CMS Documentation, Release 1.0.2
Through this a node property can be fetched and assigned to a variable:
text = ${q(node).property('text')}
Fetching all parent nodes of the current node:
${q(node).parents()}
Here are two equivalent ways to fetch the first node below the left child node:
${q(node).children('left').first()}${q(node).children().filter('left').first()}
Fetch all parent nodes and add the current node to the selected set:
${node.parents().add(node)}
The next example combines multiple operations. First it fetches all children of the current node that have thename comments. Then it fetches all children of those nodes that have a property spam with a value of false.The result of that is then passed to the count() method and the count of found nodes is assigned to the variable‘numberOfComments’:
numberOfComments = ${q(node).children('comments').children("[spam = false]").count()}
The following expands a little more on that. It assigns a set of nodes to the collection property of thecomments object. This set of nodes is either fetched from different places, depending on whether the current nodeis a ContentCollection node or not. If it is, the children of the current node are used directly. If not, theresult of this.getNodePath() is used to fetch a node below the current node and those children are used. Inboth cases the nodes are again filtered by a check for their property spam being false.
comments.collection = ${q(node).is('[instanceof TYPO3.Neos:ContentCollection]') ?q(node).children("[spam = false]") : q(node).children(this.getNodePath()).children("[spam = false]")}
2.4.3 Fizzle
Filter operations as already shown are written in Fizzle. It has been inspired by the selector syntax known fromCSS.
Property Name Filters
The first component of a filter query can be a Property Name filter. It is given as a simple string. Checksagainst property paths are not currently possible:
foo //worksfoo.bar //does not workfoo.bar.baz //does not work
In the context of Neos the property name is rarely used, as FlowQuery operates on TYPO3CR nodes and thechildren operation has a clear scope. If generic PHP objects are used, the property name filter is essential todefine which property actually contains the children.
Attribute Filters
The next component are Attribute filters. They can check for the presence and against the values of attributesof context elements:
baz[foo]baz[answer = 42]baz[foo = "Bar"]baz[foo = 'Bar']
2.4. Eel, FlowQuery and Fizzle 27
Neos CMS Documentation, Release 1.0.2
baz[foo ^= "Bar"]baz[foo $= "Bar"]baz[foo *= "Bar"]
As the above examples show, string values can be quoted using double or single quotes.
Available Operators
The operators for checking against attribute are as follows:
= Strict equality of value and operand
$= Value ends with operand (string-based)
^= Value starts with operand (string-based)
\*= Value contains operand (string-based)
instanceof Checks if the value is an instance of the operand
For the latter the behavior is as follows: if the operand is one of the strings object, array, int(eger), float, double,bool(ean) or string the value is checked for being of the specified type. For any other strings the value is used asclass name with the PHP instanceof operation to check if the value matches.
2.5 Adjusting Neos Output
2.5.1 Page Template
The page template defines the overall structure of the generated markup: what is rendered in the body and head ofthe resulting document.
The Body
As briefly explained in Rendering A Page the path to your own template for the body of a generated page can beset using TypoScript:
page = Pagepage.body.templatePath = 'resource://My.Package/Private/Templates/PageTemplate.html'
The file will the be used to render the body content and any Fluid placeholders will be substituted, ViewHelperswill be executed. Since no further information is given to the rendering process, the full content of the templatewill be used for the body.
If the template contains a full HTML page, this will lead to invalid markup. But in most cases having the templateas a full HTML document is desired, as it allows easy handling by the developer and can be previewed as is in abrowser.
To use just a part of the document for the body, that part can simply be enclosed in a Fluid section:
<!DOCTYPE html><html><head>
...</head><body><f:section name="body">
<h1>{title}</h1></f:section></body></html>
28 Chapter 2. Integrator Guide

Neos CMS Documentation, Release 1.0.2
The TypoScript is then amended with the declaration of the section to use:
page = Pagepage.body {
templatePath = 'resource://My.Package/Private/Templates/PageTemplate.html'sectionName = 'body'
}
This results in only the part inside the template’s “body” section to be used for rendering the body of the generatedpage.
To add actual content from Neos to the desired places in the markup, a special ViewHelper to turn control back toTypoScript is used. This has been mentioned in Rendering A Page already.
This template uses the render ViewHelper twice, once to render the path parts/menu and once to render the pathcontent.main:
<f:section name="body"><ts:render path="parts.menu" /><h1>{title}</h1><ts:render path="content.main" />
</f:section>
Those paths are relative to the current path. Since that part of the template is rendered by the TypoScript object atpage.body, this is the starting point for the relative paths. This means the Menu and the ContentCollectionin this TypoScript are used for rendering the output:
page = Pagepage.body {
templatePath = 'resource://My.Package/Private/Templates/PageTemplate.html'sectionName = 'body'parts.menu = Menucontent.main = ContentCollectioncontent.main.nodePath = 'main'
}
The Head
The head of a page generated by Neos contains only minimal content by default. Apart from the meta tagdeclaring the character set it is empty:
<head><meta charset="UTF-8" />
</head>
To fill this with life, it is recommended to add sections to the head of your HTML template that group the neededparts. Additional TypoScript Template objects are then used to include them into the generated page. Here is anexample:
Page/Default.html
<head><f:section name="meta">
<title>{title}</title></f:section>
<f:section name="stylesheets"><!-- put your stylesheet inclusions here, they will be included in your website by TypoScript -->
</f:section>
<f:section name="scripts"><!-- put your javascript inclusions here, they will be included in your website by TypoScript -->
</f:section></head>
2.5. Adjusting Neos Output 29
Neos CMS Documentation, Release 1.0.2
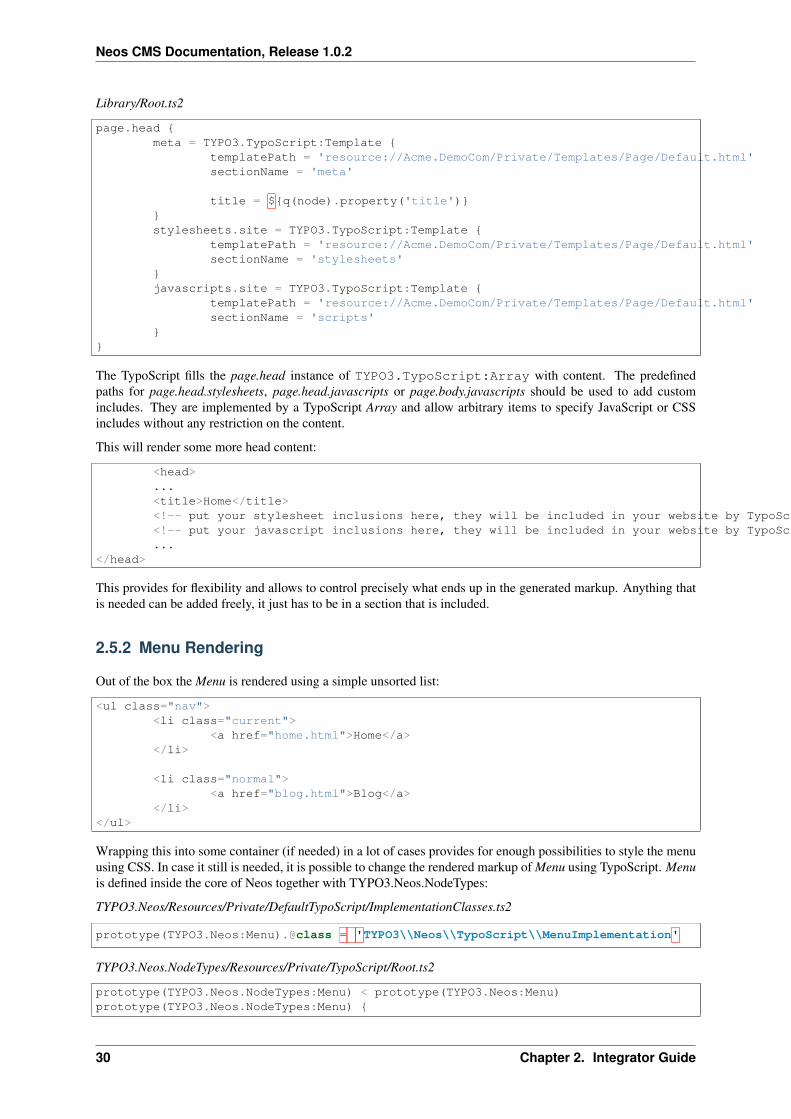
Library/Root.ts2
page.head {meta = TYPO3.TypoScript:Template {
templatePath = 'resource://Acme.DemoCom/Private/Templates/Page/Default.html'sectionName = 'meta'
title = ${q(node).property('title')}}stylesheets.site = TYPO3.TypoScript:Template {
templatePath = 'resource://Acme.DemoCom/Private/Templates/Page/Default.html'sectionName = 'stylesheets'
}javascripts.site = TYPO3.TypoScript:Template {
templatePath = 'resource://Acme.DemoCom/Private/Templates/Page/Default.html'sectionName = 'scripts'
}}
The TypoScript fills the page.head instance of TYPO3.TypoScript:Array with content. The predefinedpaths for page.head.stylesheets, page.head.javascripts or page.body.javascripts should be used to add customincludes. They are implemented by a TypoScript Array and allow arbitrary items to specify JavaScript or CSSincludes without any restriction on the content.
This will render some more head content:
<head>...<title>Home</title><!-- put your stylesheet inclusions here, they will be included in your website by TypoScript --><!-- put your javascript inclusions here, they will be included in your website by TypoScript -->...
</head>
This provides for flexibility and allows to control precisely what ends up in the generated markup. Anything thatis needed can be added freely, it just has to be in a section that is included.
2.5.2 Menu Rendering
Out of the box the Menu is rendered using a simple unsorted list:
<ul class="nav"><li class="current">
<a href="home.html">Home</a></li>
<li class="normal"><a href="blog.html">Blog</a>
</li></ul>
Wrapping this into some container (if needed) in a lot of cases provides for enough possibilities to style the menuusing CSS. In case it still is needed, it is possible to change the rendered markup of Menu using TypoScript. Menuis defined inside the core of Neos together with TYPO3.Neos.NodeTypes:
TYPO3.Neos/Resources/Private/DefaultTypoScript/ImplementationClasses.ts2
prototype(TYPO3.Neos:Menu).@class = 'TYPO3\\Neos\\TypoScript\\MenuImplementation'
TYPO3.Neos.NodeTypes/Resources/Private/TypoScript/Root.ts2
prototype(TYPO3.Neos.NodeTypes:Menu) < prototype(TYPO3.Neos:Menu)prototype(TYPO3.Neos.NodeTypes:Menu) {
30 Chapter 2. Integrator Guide

Neos CMS Documentation, Release 1.0.2
templatePath = 'resource://TYPO3.Neos.NodeTypes/Private/Templates/TypoScriptObjects/Menu.html'entryLevel = ${String.toInteger(q(node).property('startLevel'))}
maximumLevels = ${String.toInteger(q(node).property('maximumLevels'))}
node = ${node}}
The above code defines the prototype of Menu with the prototype(Menu) syntax. This prototype is the “blueprint”of all Menu objects which are instantiated. All properties which are defined on the prototype (such as @class ortemplatePath) are automatically active on all Menu instances, if they are not explicitly overridden.
One way to adjust the menu rendering is to override the templatePath property, which points to a Fluid template.To achieve that, we have two possibilities.
First, the templatePath for the menu at page.body.parts.menu can be set:
page.body.parts.menu.templatePath = 'resource://My.Package/Private/Templates/MyMenuTemplate.html'
This overrides the templatePath which was defined in prototype(Menu) for this single menu.
Second, the templatePath inside the Menu prototype itself can be changed:
prototype(Menu).templatePath = 'resource://My.Package/Private/Templates/MyMenuTemplate.html'
In this case, the changed template path is used for all menus which do not override the templatePath explicitly.Every time prototype(...) is used, this can be understood as: “For all objects of type ..., define something“
After setting the path, changing the menu is simply a job of copying the default Menu template into MyMenuTem-plate.html and adjusting the markup as needed.
Menu states
The default Menu implementation assigns CSS classes to the li tags depending on their state:
current A menu item pointing to the page that is currently shown
active Any menu item that is on the path to the current page
normal Any menu item that is neither current nor active
2.5.3 Content Element Rendering
The rendering of content elements follows the same principle as shown for the Menu. The default TypoScript isdefined in the Neos.NodeTypes package and the content elements all have default Fluid templates.
Combined with the possibility to define custom templates per instance or on the prototype level, this alreadyprovides a lot of flexibility. Another possibility is to inherit from the existing TypoScript and adjust as neededusing TypoScript.
The available properties and settings that the TypoScript objects in Neos provide are described in Neos TypoScriptReference.
2.5.4 Including CSS and JavaScript in a Neos Site
Including CSS and JavaScript should happen through one of the predefined places of the Page object. Dependingon the desired position one of the page.head.javascripts, page.head.stylesheets or page.body.javascripts Arraysshould be extended with an item that renders script or stylesheet includes:
page.head {
stylesheets {bootstrap = '<link href="//netdna.bootstrapcdn.com/bootstrap/3.0.3/css/bootstrap.min.css" rel="stylesheet">'
}
2.5. Adjusting Neos Output 31

Neos CMS Documentation, Release 1.0.2
javascripts {jquery = '<script src="//code.jquery.com/jquery-1.10.1.min.js"></script>'
}
}
page.body {
javascripts {bootstrap = '<script src="//netdna.bootstrapcdn.com/bootstrap/3.0.3/js/bootstrap.min.js"></script>'
}
}
The page.body.javascripts content will be appended to the rendered page template so the included scripts shouldbe placed before the closing body tag. As always in TypoScript the elements can be a simple string value, aTypoScript object like Template or an expression:
page.head {# Add a simple value as an item to the javascripts Arrayjavascripts.jquery = '<script src="//code.jquery.com/jquery-1.10.1.min.js"></script>'
# Use an expression to render a CSS include (this is just an example, bootstrapVersion is not defined by Neos)stylesheets.bootstrap = ${'<link href="//netdna.bootstrapcdn.com/bootstrap/' + bootstrapVersion + '/css/bootstrap.min.css" rel="stylesheet">'}
}
page.body {# Use a Template object to access a special section of the site templatejavascripts.site = TYPO3.TypoScript:Template {
templatePath = 'resource://Acme.DemoCom/Private/Templates/Page/Default.html'sectionName = 'bodyScripts'
}}
The order of the includes can be specified with the @position property inside the Array object. This is especiallyhandy for including JavaScript libraries and plugins in the correct order:
page.head {jquery = '<script src="//code.jquery.com/jquery-1.10.1.min.js"></script>'
javascripts.jquery-ui = '<script src="path-to-jquery-ui"></script>'javascripts.jquery-ui.@position = 'after jquery'
}
2.5.5 CSS and JavaScript restrictions in a Neos Site
Very little constraints are imposed through Neos for including JavaScripts or stylesheets. But since the Neos userinterface itself is built with HTML, CSS and JavaScript itself, some caveats exist.
Since the generated markup contains no stylesheets by default and the generated JS is minimal, those restrictionsaffect only the display of the page to the editor when logged in to the Neos editing interface.
In this case, the Neos styles are included and a number of JavaScript libraries are loaded, among them jQuery,Ember JS and VIE. The styles are all confined to a single root selector and for JavaScript the impact is kept as lowas possible through careful scoping.
CSS Requirements
• the <body> tag is not allowed to have a CSS style with position:relative, as this breaks the positions ofmodal dialogs we show at various places. Zurb Foundation is one well-known framework which sets this asdefault, so if you use it, then fix the error with body { position: static }.
32 Chapter 2. Integrator Guide
Neos CMS Documentation, Release 1.0.2
TODO check if this is still true
JavaScript Requirements
TODO “what about the UI below a single DOM element idea”
2.6 Creating Custom Content Elements
Neos ships with commonly used, predefined content elements, but it is easily possible to amend and even com-pletely replace them.
Defining new content elements is usually a three-step process:
1. Defining a TYPO3CR Node Type, listing the properties and types of the node.
2. Defining a TypoScript object which is responsible for rendering this content type. Usually, this is a wrapperfor a Fluid Template which then defines the rendered markup.
3. Add a Fluid Template which contains the markup being rendered
2.6.1 Creating a Simple Content Element
The following example creates a new content element Acme.Demo:YouTube which needs the YouTube URL andthen renders the video player.
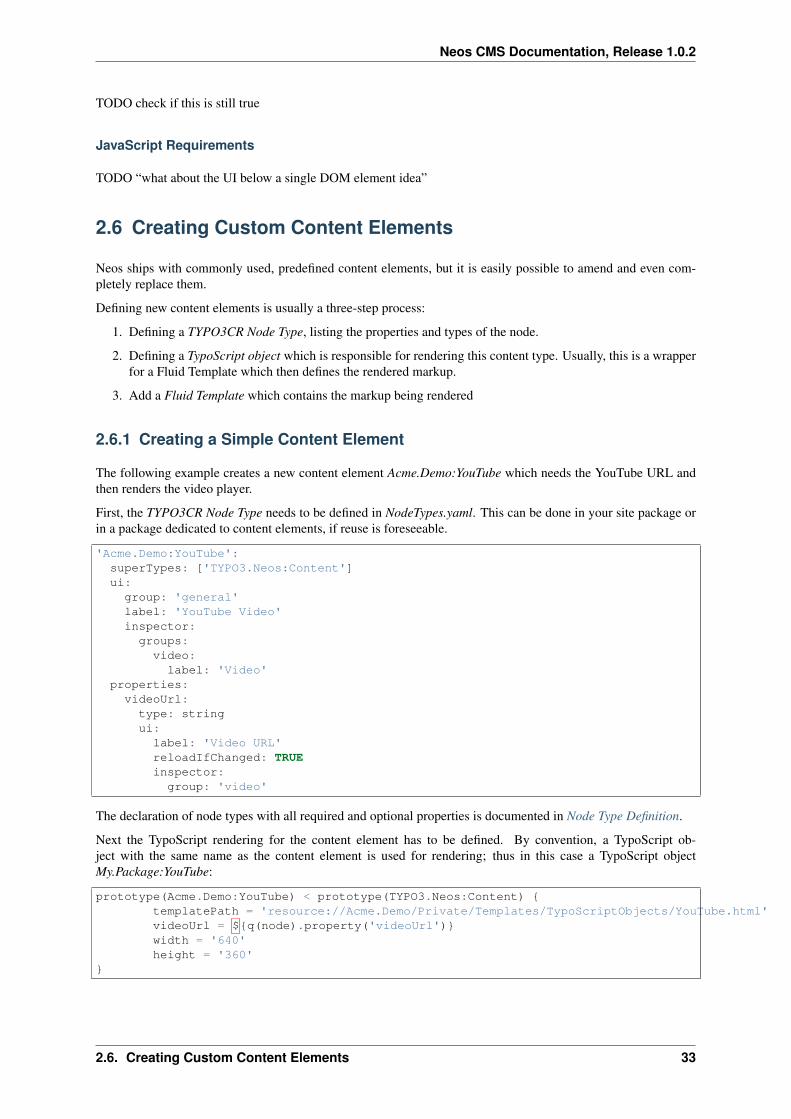
First, the TYPO3CR Node Type needs to be defined in NodeTypes.yaml. This can be done in your site package orin a package dedicated to content elements, if reuse is foreseeable.
'Acme.Demo:YouTube':superTypes: ['TYPO3.Neos:Content']ui:group: 'general'label: 'YouTube Video'inspector:
groups:video:label: 'Video'
properties:videoUrl:
type: stringui:
label: 'Video URL'reloadIfChanged: TRUEinspector:group: 'video'
The declaration of node types with all required and optional properties is documented in Node Type Definition.
Next the TypoScript rendering for the content element has to be defined. By convention, a TypoScript ob-ject with the same name as the content element is used for rendering; thus in this case a TypoScript objectMy.Package:YouTube:
prototype(Acme.Demo:YouTube) < prototype(TYPO3.Neos:Content) {templatePath = 'resource://Acme.Demo/Private/Templates/TypoScriptObjects/YouTube.html'videoUrl = ${q(node).property('videoUrl')}width = '640'height = '360'
}
2.6. Creating Custom Content Elements 33

Neos CMS Documentation, Release 1.0.2
A new TypoScript object prototype with the name My.Package:YouTube is declared, inheriting from the pre-defined Template TypoScript object which provides rendering through Fluid.
The templatePath property of the YouTube TypoScript object is set to point to the Fluid template to use for ren-dering. All (other) properties which are set on the Template TypoScript object are directly made available insideFluid as variables – and because the YouTube TypoScript object extends the Template TypoScript object, this rulealso applies there.
Thus, the last line defines a videoUrl variable to be available inside Fluid, which is set to the result of the Eelexpression ${q(node).property(‘videoUrl’)}. Eel is explained in depth in Eel, FlowQuery and Fizzle, but this is aclose look at the used expression q(node).property(‘videoUrl’):
• The q() function wraps its argument, in this case the TYPO3CR Node which is currently rendered, intoFlowQuery.
• FlowQuery defines the property(...) operation used to access the property of a node.
To sum it up: The expression ${q(node).property(‘videoUrl’)} is an Eel expression, in which FlowQuery is calledto return the property videoUrl of the current node.
The final step in creating the YouTube content element is defining the YouTube.html Fluid template, f.e. with thefollowing content:
<iframe width="{width}" height="{height}" src="{videoUrl}" frameborder="0" allowfullscreen></iframe>
In the template the {videoUrl} variable which has been defined in TypoScript is used as we need it.
What are the benefits of indirection through TypoScript?
In the above example the videoUrl property of the Node is not directly rendered inside the Fluid template. InsteadTypoScript is used to pass the videoUrl from the Node into the Fluid template.
While this indirection might look superfluous at first sight, it has important benefits:
• The Fluid Template does not need to know anything about Nodes. It just needs to know that it outputs acertain property, but not where it came from.
• Because the rendering is decoupled from the data storage this way, the TypoScript object can be instantiateddirectly, manually setting a videoUrl:
page.body.parts.teaserVideo = My.Package:YouTube {videoUrl = 'http://youtube.com/.....'
}
• If a property needs to be modified just slightly, a processor can be used for declarative modification of thisproperty in TypoScript; not even touching the Fluid template. This is helpful for smaller adjustments toforeign packages.
2.6.2 Creating Editable Content Elements
The simple content element created in Creating a Simple Content Element exposes the video URL only throughthe property inspector in the editing interface. Since the URL is not directly visible this is the only viable way.
In case of content that is directly visible in the output, inline editing can be enabled by slight adjustments to theprocess already explained.
The node type definition must define which properties are inline editable through setting the inlineEditable prop-erty:
'Acme.Demo:Quote':superTypes: ['TYPO3.Neos:Content']ui:group: 'general'label: 'Quote'
34 Chapter 2. Integrator Guide

Neos CMS Documentation, Release 1.0.2
properties:quote:
type: stringdefaultValue: 'Use the force, Luke!'ui:
label: 'Quote'inlineEditable: TRUE
The TypoScript for the content element is the same as for a non-inline-editable content element:
prototype(Acme.Demo:Quote) < prototype(TYPO3.Neos:Content) {templatePath = 'resource://Acme.Demo/Private/Templates/TypoScriptObjects/Quote.html'quote = ${q(node).property('quote')}
}
The Fluid template again needs some small adjustment in form of the contentElement.editable ViewHelper todeclare the property that is editable. This may seem like duplication, since the node type already declares theeditable properties. But since in a template multiple editable properties might be used, this still is needed.
{namespace neos=TYPO3\Neos\ViewHelpers}<blockquote>
{neos:contentElement.editable(property: 'quote')}</blockquote>
The blockquote is wrapped around the contentElement.editable and not the other way because that wouldmean the blockquote becomes a part of the editable content, which is not desired in this case.
Using the tag attribute to make the ViewHelper use the blockquote tag needed for the element avoids thenesting in an additional container div and thus cleans up the generated markup:
{namespace neos=TYPO3\Neos\ViewHelpers}{neos:contentElement.editable(property: 'quote', tag: 'blockquote')}
A property can be inline editable and appear in the property inspector if configured accordingly. In such a casereloadIfChanged should be enabled to make changes in the property editor visible in the content area.
2.6.3 Creating Nested Content Elements
In case content elements do not only contain simple properties, but arbitrary sub-elements, the process again isroughly the same. To demonstrate this, a Video Grid content element will be created, which can contain two textsand two videos.
1. A TYPO3CR Node Type definition is created. It makes use of the childNodes property to define (andautomatically create) sub-nodes when a node of this type is created. In the example the two video and textelements will be created directly upon element creation:
'Acme.Demo:VideoGrid':superTypes: ['TYPO3.Neos.NodeTypes:AbstractNode']ui:
group: 'structure'label: 'Video Grid'
childNodes:video0:
type: 'Acme.Demo:YouTube'video1:
type: 'Acme.Demo:YouTube'text0:
type: 'TYPO3.Neos.NodeTypes:Text'text1:
type: 'TYPO3.Neos.NodeTypes:Text'
2. The needed TypoScript is created:
2.6. Creating Custom Content Elements 35

Neos CMS Documentation, Release 1.0.2
prototype(Acme.Demo:VideoGrid) < prototype(TYPO3.Neos:Content) {templatePath = 'resource://Acme.Demo/Private/Templates/TypoScriptObjects/VideoGrid.html'
videoRenderer = Acme.Demo:YouTubetextRenderer = TYPO3.Neos.NodeTypes:Text
video0 = ${q(node).children('video0').get(0)}
video1 = ${q(node).children('video1').get(0)}
text0 = ${q(node).children('text0').get(0)}
text1 = ${q(node).children('text1').get(0)}}
Instead of assigning variables to the Fluid template, additional TypoScript objects responsible for the videoand the text rendering are instantiated. Furthermore, the video and text nodes are fetched using Eel and thenpassed to the Fluid template.
3. The Fluid template is created. Instead of outputting the content directly using object access on the passednodes, the <ts:render> ViewHelper is used to defer rendering to TypoScript again. The needed TYPO3CRNode is passed as context to TypoScript:
{namespace ts=TYPO3\TypoScript\ViewHelpers}<ts:render path="videoRenderer" context="{node: video0}" /><ts:render path="textRenderer" context="{node: text0}" /><br /><ts:render path="videoRenderer" context="{node: video1}" /><ts:render path="textRenderer" context="{node: text1}" />
Instead of referencing specific content types directly the use of the generic ContentCollection contentelement allows to insert arbitrary content inside other elements. An example can be found in theTYPO3.Neos.NodeTypes:MultiColumn and TYPO3.Neos.NodeTypes:MultiColumnItem content elements.
As explained earlier (in What are the benefits of indirection through TypoScript?) the major benefit if usingTypoScript to decouple the rendering of items this way is flexibility. In the video grid it shows how this enablescomposability, other TypoScript objects can be re-used for rendering smaller parts of the element.
2.6.4 Content Element Group
In Neos content elements are grouped by type. By default the following groups are available:
general Basic content elements, like text and image.
structure Elements defining a structure. This group contains for example the 2 column element.
plugins Available plugins in the site installation.
It is possible to create new groups by using the TYPO3.Neos.nodeTypes.groups settings. Registering 2 new groupscould look like:
TYPO3:Neos:nodeTypes:
groups:form:label: 'Form elements'
special:position: 50label: 'Special elements'
The groups are ordered by the position argument.
36 Chapter 2. Integrator Guide

Neos CMS Documentation, Release 1.0.2
2.6.5 Extending The Inspector
Warning: Adding editors and validators is no fixed API yet, keep an eye on the changelogs if you use this.
It is possible to extend the inspector for adding new editors and validators to edit the properties of your nodetypes.
Editors
By default the following list of editors is available in Neos:
• TYPO3.Neos/Inspector/Editors/BooleanEditor
A checkbox, by default configured for properties of type boolean.
• TYPO3.Neos/Inspector/Editors/DateTimeEditor
A datepicker with support for time selection too. By default configured for properties of type date.
• TYPO3.Neos/Inspector/Editors/HtmlEditor
An HTML editor with syntax highlighting.
• TYPO3.Neos/Inspector/Editors/ImageEditor
An image editor with cropping and size support. By default configured for properties of typeTYPO3MediaDomainModelImageVariant.
• TYPO3.Neos/Inspector/Editors/ReferenceEditor
A selector with autocomplete to reference to another node. By default configured for properties of typereference.
• TYPO3.Neos/Inspector/Editors/ReferencesEditor
A selector with autocomplete to reference to multiple nodes. By default configured for properties of typereferences.
• TYPO3.Neos/Inspector/Editors/SelectBoxEditor
A selectbox.
• TYPO3.Neos/Inspector/Editors/TextFieldEditor
A simple textfield. By default configured for properties of type string and integer
The following editors are also available, but will most likely only be used internally in Neos:
• TYPO3.Neos/Inspector/Editors/MasterPluginEditor
• TYPO3.Neos/Inspector/Editors/PluginViewEditor
• TYPO3.Neos/Inspector/Editors/PluginViewsEditor
Register Custom Editors
There are 2 ways to register custom editors. Either by registering a namespace for a group of editors, or byselecting the direct path to an editor specifically.
Registering a namespace pointing to a folder containing editors works as follows:
• Create a folder containing the JavaScript sources for the editors
• Name your files PropertyTypeEditor
• Configure the path as a requirejs path mapping using the following Settings.yaml
2.6. Creating Custom Content Elements 37
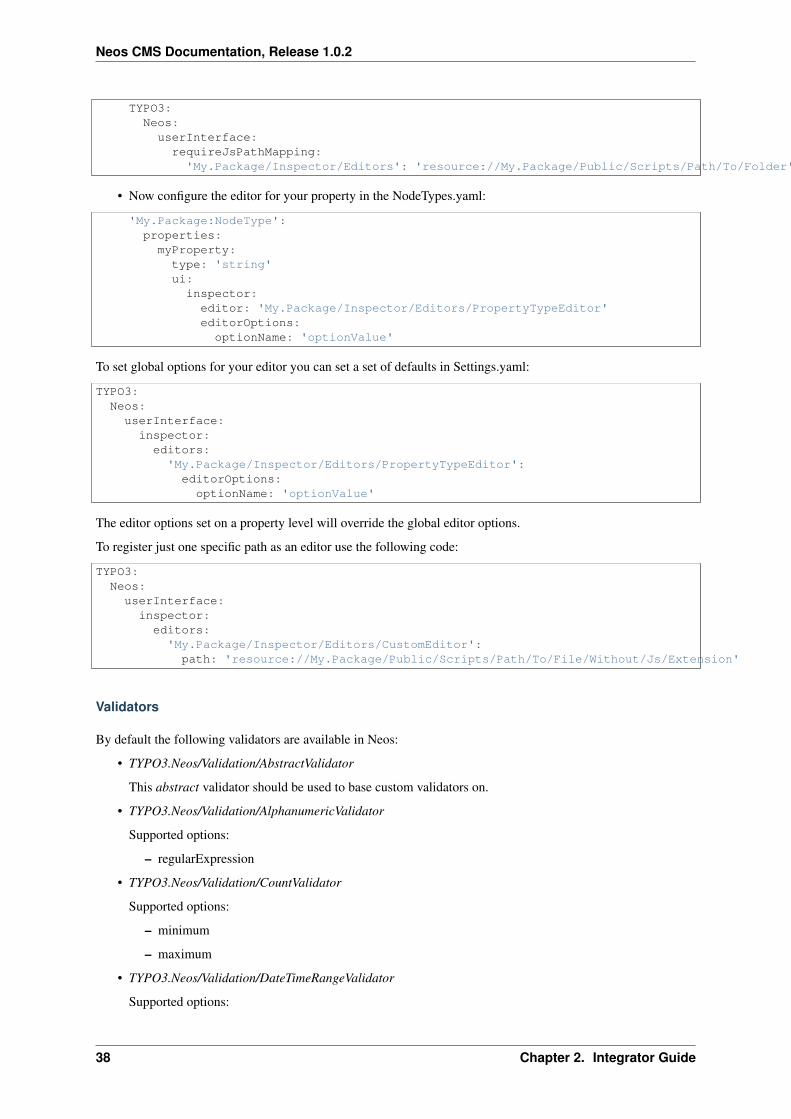
Neos CMS Documentation, Release 1.0.2
TYPO3:Neos:
userInterface:requireJsPathMapping:'My.Package/Inspector/Editors': 'resource://My.Package/Public/Scripts/Path/To/Folder'
• Now configure the editor for your property in the NodeTypes.yaml:
'My.Package:NodeType':properties:
myProperty:type: 'string'ui:inspector:editor: 'My.Package/Inspector/Editors/PropertyTypeEditor'editorOptions:optionName: 'optionValue'
To set global options for your editor you can set a set of defaults in Settings.yaml:
TYPO3:Neos:userInterface:
inspector:editors:'My.Package/Inspector/Editors/PropertyTypeEditor':
editorOptions:optionName: 'optionValue'
The editor options set on a property level will override the global editor options.
To register just one specific path as an editor use the following code:
TYPO3:Neos:userInterface:
inspector:editors:'My.Package/Inspector/Editors/CustomEditor':
path: 'resource://My.Package/Public/Scripts/Path/To/File/Without/Js/Extension'
Validators
By default the following validators are available in Neos:
• TYPO3.Neos/Validation/AbstractValidator
This abstract validator should be used to base custom validators on.
• TYPO3.Neos/Validation/AlphanumericValidator
Supported options:
– regularExpression
• TYPO3.Neos/Validation/CountValidator
Supported options:
– minimum
– maximum
• TYPO3.Neos/Validation/DateTimeRangeValidator
Supported options:
38 Chapter 2. Integrator Guide

Neos CMS Documentation, Release 1.0.2
– latestDate
– earliestDate
• TYPO3.Neos/Validation/DateTimeValidator
• TYPO3.Neos/Validation/EmailAddressValidator
Supported options:
– regularExpression
• TYPO3.Neos/Validation/FloatValidator
• TYPO3.Neos/Validation/IntegerValidator
• TYPO3.Neos/Validation/LabelValidator
Supported options:
– regularExpression
• TYPO3.Neos/Validation/NumberRangeValidator
Supported options:
– minimum
– maximum
• TYPO3.Neos/Validation/RegularExpressionValidator
Supported options:
– regularExpression
• TYPO3.Neos/Validation/StringLengthValidator
Supported options:
– minimum
– maximum
• TYPO3.Neos/Validation/StringValidator
• TYPO3.Neos/Validation/TextValidator
• TYPO3.Neos/Validation/UuidValidator
Supported options:
– regularExpression
Register Custom Validators
There are 2 ways to register custom validators. Either by registering a namespace for a group of validators, or byselecting the direct path to an validator specifically.
Registering a namespace pointing to a folder containing validators works as follows:
• Create a folder containing the JavaScript sources for the validators
• Name your files DataTypeValidator
• Configure the path as a requirejs path mapping using the following Settings.yaml
TYPO3:Neos:
userInterface:requireJsPathMapping:'My.Package/Validation': 'resource://My.Package/Public/Scripts/Path/To/Folder'
2.6. Creating Custom Content Elements 39

Neos CMS Documentation, Release 1.0.2
• Now configure the validator for your property in the NodeTypes.yaml:
'My.Package:NodeType':properties:
myProperty:type: 'string'validation:'My.Package/Validation/DataTypeValidator': []
To register just one specific path as a validator use the following code:
TYPO3:Neos:userInterface:
validators:'My.Package/Validation/CustomValidator':path: 'resource://My.Package/Public/Scripts/Path/To/File/Without/Js/Extension'
2.7 Creating a TYPO3 Neos plugin
Any Flow package can be used as a plugin with a little effort. This section will guide you through a simpleexample. First, we will create a really basic Flow package. Second, we’ll expose this Flow package as a Neosplugin.
2.7.1 Creating a Flow package
First we will create a very simple Flow package to use for integrating it as a plugin.
Note: When developing sites the need for simple plugins will often arise. And those small plugins will be verysite-specific most of the time. In these cases it makes sense to create the needed code inside the site package,instead of in a separate package.
For the sake of simplicity we will create a seperate package now.
If you do not have the Kickstart package installed, you must do this now:
cd /your/htdocs/Neosphp /path/to/composer.phar require typo3/kickstart \*
Now create a package with a model, so we have something to show in the plugin:
./flow kickstart:package Sarkosh.CdCollection
./flow kickstart:model Sarkosh.CdCollection Album title:string year:integer description:string rating:integer
./flow kickstart:repository Sarkosh.CdCollection Album
Then generate a migration to create the needed DB schema:
./flow doctrine:migrationgeneratemkdir -p Packages/Application/Sarkosh.CdCollection/Migrations/Mysqlmv Data/DoctrineMigrations/Version<timestamp>.php Packages/Application/Sarkosh.CdCollection/Migrations/Mysql/# check the generated migration./flow doctrine:migrate
You should now have a package with a default controller and templates created.
In order to view them you can call the frontend like http://neos.demo/sarkosh.cdcollection, butyou need to include the Flow default routes first (add them before the Neos routes):
Configuration/Routes.yaml
40 Chapter 2. Integrator Guide

Neos CMS Documentation, Release 1.0.2
-name: 'Flow'uriPattern: '<FlowSubroutes>'defaults:'@format': 'html'
subRoutes:FlowSubroutes:
package: TYPO3.Flow
Now you can add some entries for your CD collection in the database:
INSERT INTO sarkosh_cdcollection_domain_model_album (persistence_object_identifier, title, year, description, rating
) VALUES (uuid(), 'Jesus Christ Superstar', '1970','Jesus Christ Superstar is a rock opera by Andrew Lloyd Webber, with lyrics by Tim Rice.','5'
);
(or using your database tool of choice) and adjust the templates so a list of CDs is shown. When you are donewith that, you can make a plugin out of that.
As an optional step you can move the generated package from it’s default location Packages/Application/ toPackages/Plugins. This is purely a convention and at times it might be hard to tell an “application package” froma “plugin”, but it helps to keep things organized. Technically it has no relevance.
mkdir Packages/Pluginsmv Packages/Application/Sarkosh.CdCollection Packages/Plugins/Sarkosh.CdCollection
2.7.2 Converting a Flow Package Into a Neos Plugin
To activate a Flow package as a Neos plugin, you only need to provide two configuration blocks. First, you needto add a new node type for the plugin, such that the user can choose the plugin from the list of content elements:
Add the following to Configuration/NodeTypes.yaml of your package:
'Sarkosh.CdCollection:Plugin':superTypes: ['TYPO3.Neos:Plugin']ui:label: 'CD Collection'group: 'plugins'
This will add a new entry labeled “CD Collection” to the “Plugins” group in the content element selector (existinggroups are General, Structure and Plugins).
Second, the rendering of the plugin needs to be specified using TypoScript, so the following TypoScript needs tobe added to your package.
Resources/Private/TypoScripts/Library/Plugin.ts2:
prototype(Sarkosh.CdCollection:Plugin) < prototype(TYPO3.Neos:Plugin)prototype(Sarkosh.CdCollection:Plugin) {
package = 'Sarkosh.CdCollection'controller = 'Standard'action = 'index'
}
Finally tweak your site package’s Root.ts2 and include the newly created TypoScript file:
include: resource://Sarkosh.CdCollection/Private/TypoScripts/Library/Plugin.ts2
Now log in to your Neos backend (you must remove the Flow routes again), and you will be able to add yourplugin just like any other content element.
2.7. Creating a TYPO3 Neos plugin 41
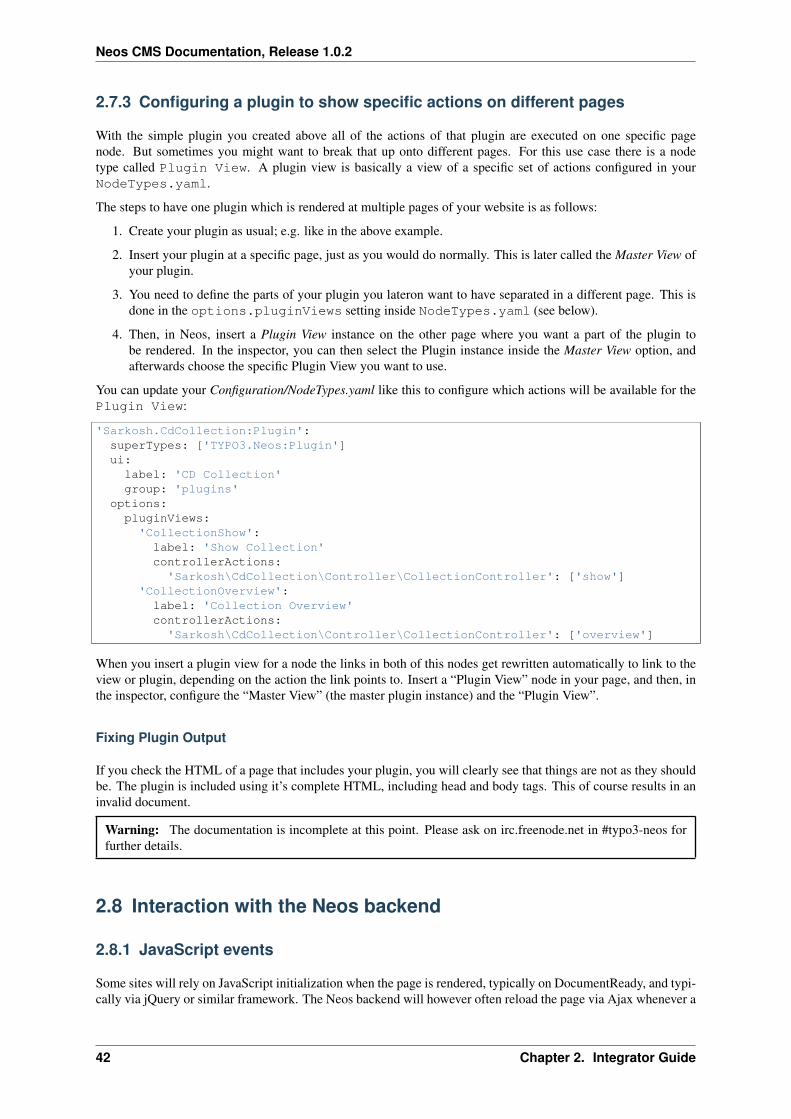
Neos CMS Documentation, Release 1.0.2
2.7.3 Configuring a plugin to show specific actions on different pages
With the simple plugin you created above all of the actions of that plugin are executed on one specific pagenode. But sometimes you might want to break that up onto different pages. For this use case there is a nodetype called Plugin View. A plugin view is basically a view of a specific set of actions configured in yourNodeTypes.yaml.
The steps to have one plugin which is rendered at multiple pages of your website is as follows:
1. Create your plugin as usual; e.g. like in the above example.
2. Insert your plugin at a specific page, just as you would do normally. This is later called the Master View ofyour plugin.
3. You need to define the parts of your plugin you lateron want to have separated in a different page. This isdone in the options.pluginViews setting inside NodeTypes.yaml (see below).
4. Then, in Neos, insert a Plugin View instance on the other page where you want a part of the plugin tobe rendered. In the inspector, you can then select the Plugin instance inside the Master View option, andafterwards choose the specific Plugin View you want to use.
You can update your Configuration/NodeTypes.yaml like this to configure which actions will be available for thePlugin View:
'Sarkosh.CdCollection:Plugin':superTypes: ['TYPO3.Neos:Plugin']ui:label: 'CD Collection'group: 'plugins'
options:pluginViews:
'CollectionShow':label: 'Show Collection'controllerActions:'Sarkosh\CdCollection\Controller\CollectionController': ['show']
'CollectionOverview':label: 'Collection Overview'controllerActions:'Sarkosh\CdCollection\Controller\CollectionController': ['overview']
When you insert a plugin view for a node the links in both of this nodes get rewritten automatically to link to theview or plugin, depending on the action the link points to. Insert a “Plugin View” node in your page, and then, inthe inspector, configure the “Master View” (the master plugin instance) and the “Plugin View”.
Fixing Plugin Output
If you check the HTML of a page that includes your plugin, you will clearly see that things are not as they shouldbe. The plugin is included using it’s complete HTML, including head and body tags. This of course results in aninvalid document.
Warning: The documentation is incomplete at this point. Please ask on irc.freenode.net in #typo3-neos forfurther details.
2.8 Interaction with the Neos backend
2.8.1 JavaScript events
Some sites will rely on JavaScript initialization when the page is rendered, typically on DocumentReady, and typi-cally via jQuery or similar framework. The Neos backend will however often reload the page via Ajax whenever a
42 Chapter 2. Integrator Guide

Neos CMS Documentation, Release 1.0.2
node property is changed, and this might break functionality on sites relying on custom JavaScript being executedon DocumentReady.
To fix this, the Neos backend will dispatch an event when the page is reloaded via ajax, and site specific JavaScriptcan listen on this event to trigger whatever code is needed to render the content correctly.
if (typeof document.addEventListener === 'function') {document.addEventListener('Neos.PageLoaded', function(event) {
// Do your stuff!}, false);
}
The event object given, will always have the message and time set on event.detail. Some events might have moreattributes set.
Note that this only works in IE9+, Safari, Firefox and Chrome. For earlier IE versions the events are not triggered.
The Neos backend will dispatch events that can be listened on when the following events occur:
• Neos.PageLoaded Whenever the page reloads by Ajax.
• Neos.PreviewModeActivated When the backend switches from edit to preview mode.
• Neos.PreviewModeDeactivated When the backend switches from preview to edit mode.
• Neos.ContentModuleLoaded When the content module is loaded (i.e. when a user is logged in).
2.8. Interaction with the Neos backend 43

Neos CMS Documentation, Release 1.0.2
44 Chapter 2. Integrator Guide

CHAPTER 3
Integrators Cookbook
3.1 Wrapping a List of Content Elements
Create a simple Wrapper that can contain multiple content Elements.
Yaml (Sites/Vendor.Site/Configuration/NodeTypes.yaml)
'Vendor:Box':superTypes:- 'TYPO3.Neos:Content'
ui:group: Structurelabel: Boxicon: icon-columnsinlineEditable: true
childNodes:column0:
type: 'TYPO3.Neos:ContentCollection'
TypoScript (Sites/Vendor.Site/Resources/Private/TypoScripts/Library/NodeTypes.ts2)
prototype(Vendor:Box) < prototype(TYPO3.Neos:Content) {templatePath = 'resource://Vendor.Site/Private/Templates/TypoScriptObjects/Box.html'columnContent = TYPO3.Neos:ContentCollectioncolumnContent {
nodePath = 'column0'}
}
Html (Sites/Vendor.Site/Private/Templates/TypoScriptObjects/Box.html)
{namespace ts=TYPO3\TypoScript\ViewHelpers}
<div class="container box"><div class="column">
<ts:render path="columnContent" /></div>
</div>
3.1.1 Extending it to use an option
You can even simply extend the box to provide a checkbox for different properties.
Yaml (Sites/Vendor.Site/Configuration/NodeTypes.yaml)
'Vendor:Box':superTypes:
45

Neos CMS Documentation, Release 1.0.2
- 'TYPO3.Neos:Content'ui:group: Structurelabel: Boxicon: icon-columnsinlineEditable: trueinspector:
groups:display:label: Displayposition: 5
properties:collapsed:
type: booleanui:
label: CollapsedreloadIfChanged: trueinspector:group: display
childNodes:column0:
type: 'TYPO3.Neos:ContentCollection'
TypoScript (Sites/Vendor.Site/Resources/Private/TypoScripts/Library/NodeTypes.ts2)
prototype(Vendor:Box) < prototype(TYPO3.Neos:Content) {templatePath = 'resource://Vendor.Site/Private/Templates/TypoScriptObjects/Box.html'columnContent = TYPO3.Neos:ContentCollectioncolumnContent {
nodePath = 'column0'}collapsed = ${q(node).property('collapsed')}
}
Html (Sites/Vendor.Site/Private/Templates/TypoScriptObjects/Box.html)
{namespace ts=TYPO3\TypoScript\ViewHelpers}
<f:if condition="{collapsed}"><button>open the collapsed box via js</button>
</f:if><div class="container box {f:if(condition: collapsed, then: 'collapsed', else: '')}">
<div class="column"><ts:render path="columnContent" />
</div></div>
3.2 Creating a simple Content Element
If you need some specific content element, you can easly create a new Node Type with an attached HTML tem-plate. To add a new Node Type, follow this exemple, just replace “Vendor” by your own vendor prefix:
Yaml (Sites/Vendor.Site/Configuration/NodeTypes.yaml):
'Vendor:YourContentElementName':superTypes:- 'TYPO3.Neos:Content'
ui:label: 'My first custom content element'group: 'general'inspector:
46 Chapter 3. Integrators Cookbook
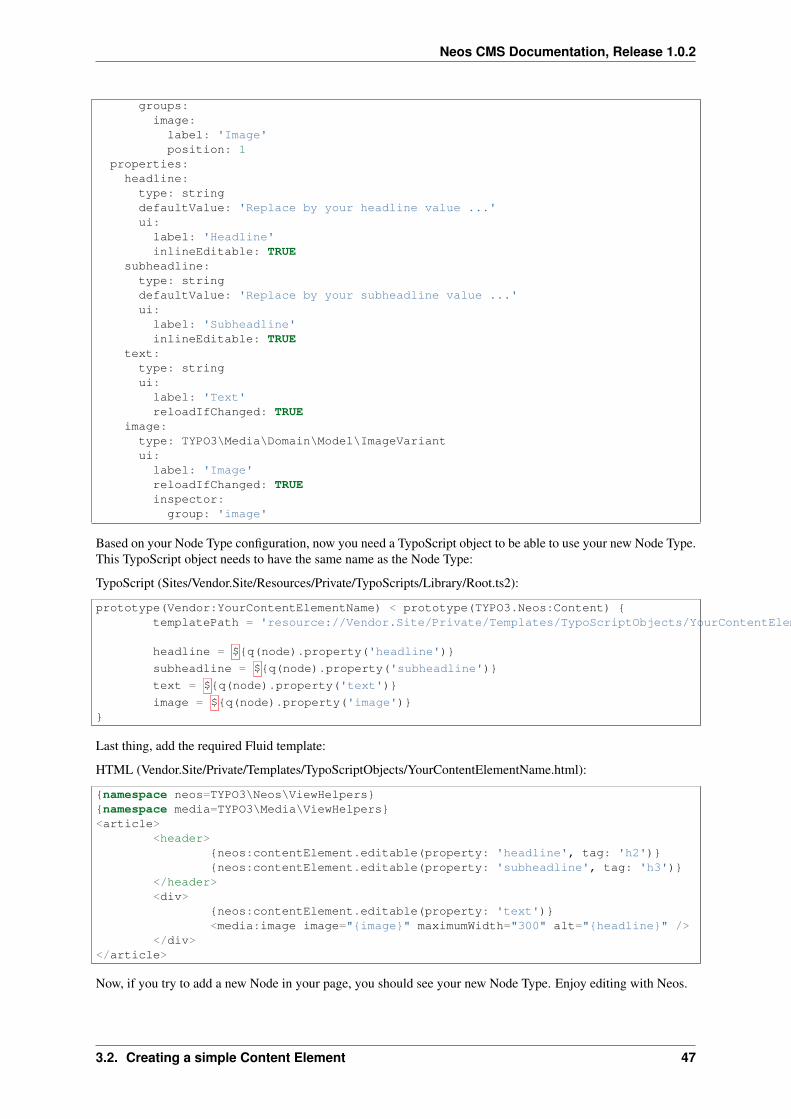
Neos CMS Documentation, Release 1.0.2
groups:image:label: 'Image'position: 1
properties:headline:
type: stringdefaultValue: 'Replace by your headline value ...'ui:
label: 'Headline'inlineEditable: TRUE
subheadline:type: stringdefaultValue: 'Replace by your subheadline value ...'ui:
label: 'Subheadline'inlineEditable: TRUE
text:type: stringui:
label: 'Text'reloadIfChanged: TRUE
image:type: TYPO3\Media\Domain\Model\ImageVariantui:
label: 'Image'reloadIfChanged: TRUEinspector:group: 'image'
Based on your Node Type configuration, now you need a TypoScript object to be able to use your new Node Type.This TypoScript object needs to have the same name as the Node Type:
TypoScript (Sites/Vendor.Site/Resources/Private/TypoScripts/Library/Root.ts2):
prototype(Vendor:YourContentElementName) < prototype(TYPO3.Neos:Content) {templatePath = 'resource://Vendor.Site/Private/Templates/TypoScriptObjects/YourContentElementName.html'
headline = ${q(node).property('headline')}
subheadline = ${q(node).property('subheadline')}
text = ${q(node).property('text')}
image = ${q(node).property('image')}}
Last thing, add the required Fluid template:
HTML (Vendor.Site/Private/Templates/TypoScriptObjects/YourContentElementName.html):
{namespace neos=TYPO3\Neos\ViewHelpers}{namespace media=TYPO3\Media\ViewHelpers}<article>
<header>{neos:contentElement.editable(property: 'headline', tag: 'h2')}{neos:contentElement.editable(property: 'subheadline', tag: 'h3')}
</header><div>
{neos:contentElement.editable(property: 'text')}<media:image image="{image}" maximumWidth="300" alt="{headline}" />
</div></article>
Now, if you try to add a new Node in your page, you should see your new Node Type. Enjoy editing with Neos.
3.2. Creating a simple Content Element 47

Neos CMS Documentation, Release 1.0.2
3.3 Customizing the Inspector
When you add a new node type, you can customize the rendering of the inspector. Based on the first node that wecreated in the “CreatingContentElement” cookbook, we can add some properties in the inspector.
3.3.1 Add a simple checkbox element
This first example adds a checkbox, in a dedicated inspector section, to define if we need to hide the Subheadlineproperty.
You can just add the following configuration to your NodesType.yaml, based on the previous cookbook example:
Yaml (Sites/Vendor.Site/Configuration/NodeTypes.yaml)
'Vendor.Site:YourContentElementName':ui:inspector:
groups:advanced:label: 'Advanced'position: 2
properties:hideSubheadline:
type: booleandefaultValue: TRUEui:
label: 'Hide Subheadline ?'reloadIfChanged: TRUEinspector:group: 'advanced'
You can add this property to your TypoScript:
TypoScript (Sites/Vendor.Site/Resources/Private/TypoScripts/Library/Root.ts2)
prototype(Vendor.Site:YourContentElementName) < prototype(TYPO3.Neos:Content) {templatePath = 'resource://Vendor.Site/Private/Templates/TypoScriptObjects/YourContentElementName.html'headline = ${q(node).property('headline')}
subheadline = ${q(node).property('subheadline')}
hideSubheadline = ${q(node).property('hideSubheadline')}
text = ${q(node).property('text')}
image = ${q(node).property('image')}}
And you can use it in your Fluid template:
HTML (Vendor.Site/Private/Templates/TypoScriptObjects/YourContentElementName.html)
{namespace neos=TYPO3\Neos\ViewHelpers}<neos:contentElement node="{node}">
<article><header>
<h2><neos:contentElement.editable property="headline">{headline -> f:format.raw()}</neos:contentElement></h2><f:if condition="{hideSubheadline}">
<f:else><h3><neos:contentElement.editable property="subheadline">{subheadline -> f:format.raw()}</neos:contentElement></h3>
</f:else></f:if>
</header>...
</article></neos:contentElement>
48 Chapter 3. Integrators Cookbook

Neos CMS Documentation, Release 1.0.2
3.3.2 Add a simple selectbox element
The second example is about adding a selector to change the class of the article element:
Yaml (Sites/Vendor.Site/Configuration/NodeTypes.yaml)
'Vendor.Site:YourContentElementName':ui:inspector:
groups:advanced:label: 'Advanced'position: 2
properties:articleType:
type: stringdefaultValue: ''ui:
label: 'Article Type'reloadIfChanged: TRUEinspector:group: 'advanced'editor: Content/Inspector/Editors/SelectBoxEditoreditorOptions:placeholder: 'What kind of article ...'values:'':label: ''
announcement:label: 'Announcement'
casestudy:label: 'Case Study'
event:label: 'Event'
TypoScript (Sites/Vendor.Site/Resources/Private/TypoScripts/Library/Root.ts2)
prototype(Vendor.Site:YourContentElementName) < prototype(TYPO3.Neos:Template) {templatePath = 'resource://Vendor.Site/Private/Templates/TypoScriptObjects/YourContentElementName.html'headline = ${q(node).property('headline')}
subheadline = ${q(node).property('subheadline')}
articleType = ${q(node).property('articleType')}
text = ${q(node).property('text')}
image = ${q(node).property('image')}}
HTML (Vendor.Site/Private/Templates/TypoScriptObjects/YourContentElementName.html)
{namespace neos=TYPO3\Neos\ViewHelpers}<neos:contentElement node="{node}">
<article{f:if(condition:articleType,then:' class="{articleType}"')}>...
</article></neos:contentElement>
3.3.3 Remove fields from an existing Node Type
Yaml (Sites/Vendor.Site/Configuration/NodeTypes.yaml)
'TYPO3.Neos:Plugin':properties:package: [ ]
3.3. Customizing the Inspector 49
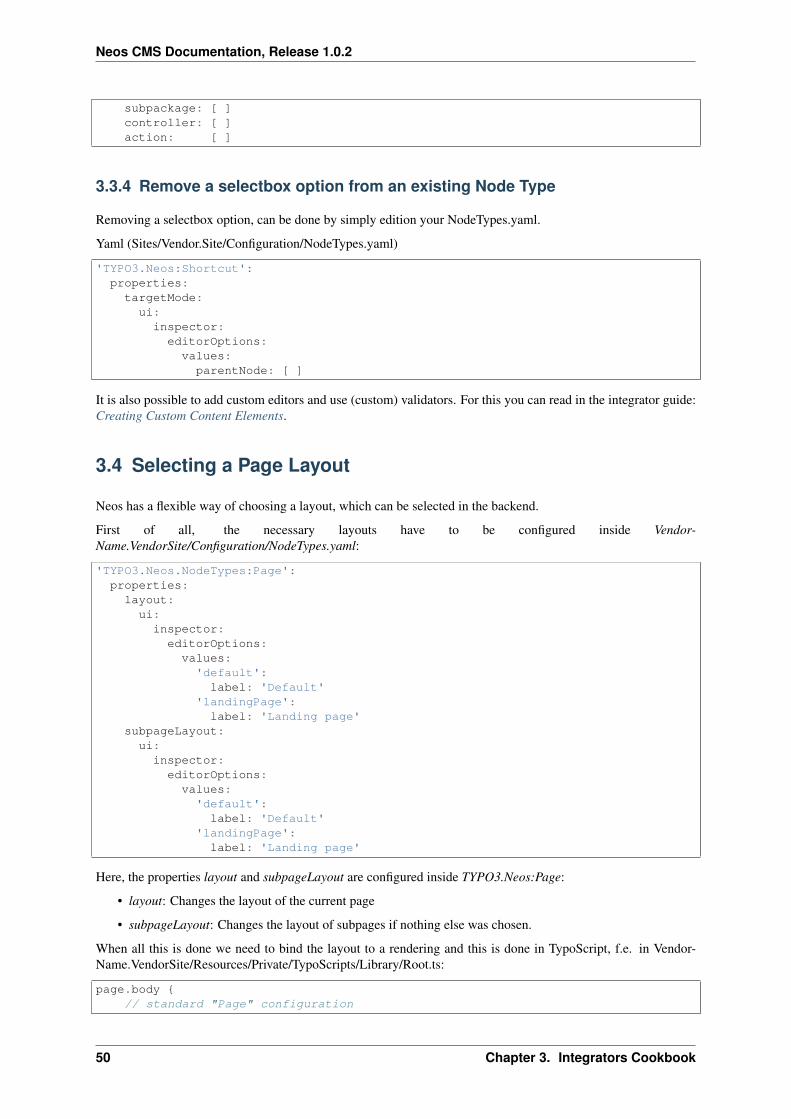
Neos CMS Documentation, Release 1.0.2
subpackage: [ ]controller: [ ]action: [ ]
3.3.4 Remove a selectbox option from an existing Node Type
Removing a selectbox option, can be done by simply edition your NodeTypes.yaml.
Yaml (Sites/Vendor.Site/Configuration/NodeTypes.yaml)
'TYPO3.Neos:Shortcut':properties:targetMode:
ui:inspector:editorOptions:
values:parentNode: [ ]
It is also possible to add custom editors and use (custom) validators. For this you can read in the integrator guide:Creating Custom Content Elements.
3.4 Selecting a Page Layout
Neos has a flexible way of choosing a layout, which can be selected in the backend.
First of all, the necessary layouts have to be configured inside Vendor-Name.VendorSite/Configuration/NodeTypes.yaml:
'TYPO3.Neos.NodeTypes:Page':properties:layout:
ui:inspector:editorOptions:
values:'default':label: 'Default'
'landingPage':label: 'Landing page'
subpageLayout:ui:
inspector:editorOptions:values:'default':label: 'Default'
'landingPage':label: 'Landing page'
Here, the properties layout and subpageLayout are configured inside TYPO3.Neos:Page:
• layout: Changes the layout of the current page
• subpageLayout: Changes the layout of subpages if nothing else was chosen.
When all this is done we need to bind the layout to a rendering and this is done in TypoScript, f.e. in Vendor-Name.VendorSite/Resources/Private/TypoScripts/Library/Root.ts:
page.body {// standard "Page" configuration
50 Chapter 3. Integrators Cookbook

Neos CMS Documentation, Release 1.0.2
}
default < page
landingPage < pagelandingPage.body {
templatePath = 'resource://VendorName.VendorSite/Private/Templates/Page/LandingPage.html'}
If a page layout was chosen, that is the TypoScript object path where rendering starts. For example, if the land-ingPage was chosen, a different template can be used.
The implementation internal of the layout rendering can be found in the file:
TYPO3.Neos/Resources/Private/TypoScript/DefaultTypoScript.ts2
The element root.layout is the one responsible for handling the layout. So when trying to change the layouthandling this is the TypoScript object to manipulate.
3.4.1 Select Template based on NodeType
It is also possible to select the page rendering configuration based on the node type of the page. Let’s say you havea node type named VendorName.VendorSite:Employee which has TYPO3.Neos.NodeTypes:Page as a supertype.This node type is used for displaying a personal page of employees working in your company. This page will havea different structure compared to your basic page.
The right approach would be to create a TypoScript prototype for your default page and employee page like:
prototype(VendorName.VendorSite:Page) < prototype(TYPO3.Neos:Page) {body.templatePath = 'resource//VendorName.VendorSite/Private/Templates/Page/Default.html'# Your further page configuration here
}
prototype(VendorName.VendorSite:EmployeePage) < prototype(VendorName.VendorSite:Page) {body.templatePath = 'resource//VendorName.VendorSite/Private/Templates/Page/Employee.html'# Your further employee page configuration here
}
But now how to link this TypoScript path to your node type? For this we can have a look at the TypoScript rootpath. This root path is a TYPO3.TypoScript:Case object, which will render the page path by default. But you canadd your own conditions to render a different path.
In our case we will add a condition on the first position of the condition:
root.employeePage {condition = ${q(node).is('[instanceof VendorName.VendorSite:Employee]')}renderPath = '/employeePage'
}
page = VendorName.VendorSite:PageemployeePage = VendorName.VendorSite:EmployeePage
This will now render the employeePage TypoScript path if a page of type VendorName.VendorSite:Employee isrendered on your website.
3.5 Changing the Body Class with a condition
In some cases there is the need to define different body classes based on a certain condition.
It can for example be that if a page has sub pages then we want to add a body class tag for this.
TypoScript code:
3.5. Changing the Body Class with a condition 51

Neos CMS Documentation, Release 1.0.2
page {bodyTag {
attributes.class = ${q(node).children().count() > 1 ? 'has-subpages' : ''}}
}
First of all we add the part called bodyTag to the TypoScript page object. Then inside we add the attributes.class.
Then we add a FlowQuery that checks if the current node has any children. If the condition is true then the class“has-subpages” is added to the body tag on all pages that have any children.
An other example could be that we want to check if the current page is of type page.
TypoScript code:
page {bodyTag {
attributes.class = ${q(node).filter('[instanceof TYPO3.Neos:Page]') != '' ? 'is-page' : ''}}
}
3.6 Rendering a Menu
The implementation of a menu is done in TypoScript and HTML, this gives an flexibility in what can be rendered.
First of all you have to add a new element (with a name) in TypoScript that is of type Menu. Then inside theTypoScript object you can set what kind of rendering (templatePath) to use, an entryLevel and a maximumLevelsproperties.
TypoScript code:
mainMenu = MenumainMenu {
templatePath = 'resource://VendorName.VendorSite/Private/Templates/TypoScriptObjects/MainMenu.html'entryLevel = 1maximumLevels = 0
}
The example above sets first a templatePath for the mainMenu object, then the level to start finding nodes from isset to level 1. It will only take nodes on the current level because of the property maximumLevels is set to 0.
If you want a custom rendering of my menu items then you need to add a template. This template renders a ul listthat has a link to a node.
Full HTML code:
{namespace neos=TYPO3\Neos\ViewHelpers}<ul class="nav">
<f:for each="{items}" as="item"><li class="menu-item">
<neos:link.node node="{item.node}">{item.label}</neos:link.node></li>
</f:for></ul>
What is done is first to include a viewhelper to being able to link my nodes inside the HTML. The namespace inthe example is neos to clarify from where the viewhelper is taken.
Viewhelper include:
{namespace neos=TYPO3\Neos\ViewHelpers}
The next thing is to iterate through the nodes found by TypoScript.
Iterating through nodes:
52 Chapter 3. Integrators Cookbook

Neos CMS Documentation, Release 1.0.2
<f:for each=”{items}” as=”item”> ...
</f:for>
What then is done inside the iteration is that first we wrap our node with a li tag with a class called menu-item.Then we use our viewhelper to (which namespace is neos in this example) link it to a node in Neos. The linkingis set in the parameter node, the you can chose what should be shown as a text for the link. In this case the label(default) of the node is the text.
Wrapping and linking of node:
<li class="menu-item"><neos:link.node node="{item.node}">{item.label}</neos:link.node>
</li>
3.7 Integrating a JavaScript-based slider
If you want to integrate a Slider into your page as content element or as part of your template and want edit it inthe backend you have do some simple steps.
First you have to use a slider javscript plugin which initializes itself when added to the page after page load.Or you write your own initialization code into a javascript function which you then add as callback for the neosbackend events.
For this example the carousel plugin and styling from bootstrap 3.0 has been used:http://getbootstrap.com/javascript/#carousel
To create the basic content element you have to add it to your node types.
Yaml (Sites/Vendor.Site/Configuration/NodeTypes.yaml):
'Vendor.Site:Carousel':superTypes: ['TYPO3.Neos:Content']childNodes:carouselItems:
type: 'TYPO3.Neos:ContentCollection'ui:label: 'Carousel'group: 'plugins'icon: 'icon-picture'inlineEditable: TRUE
Next you need to define the prototype for the slider in typoscript.
TypoScript (Sites/Vendor.Site/Resources/Private/TypoScripts/Library/NodeTypes/Carousel.ts2):
prototype(Vendor.Site:Carousel) {carouselItems = TYPO3.Neos:ContentCollection {
nodePath = 'carouselItems'iterationName = 'carouselItemsIteration'attributes.class = 'carousel-inner'
}
// Collect the carousels children but only imagescarouselItemArray = ${q(node).children('carouselItems').children('[instanceof TYPO3.Neos.NodeTypes:Image]')}
// Enhance image prototype when inside the carouselprototype(TYPO3.Neos.NodeTypes:Image) {
// Render images in the carousel with a special template.templatePath = 'resource://Vendor.Site/Private/Templates/TypoScriptObjects/CarouselItem.html'
// The first item should later be marked as activeattributes.class = ${'item' + (carouselItemsIteration.isFirst ? ' active' : '')}
3.7. Integrating a JavaScript-based slider 53

Neos CMS Documentation, Release 1.0.2
// We want to use the item iterator in fluid so we have to store it as variable.iteration = ${carouselItemsIteration}
}}
For rendering you need the fluid templates for the slider.
Html (Sites/Vendor.Site/Private/Templates/NodeTypes/Carousel.html)
{namespace neos=TYPO3\Neos\ViewHelpers}{namespace ts=TYPO3\TypoScript\ViewHelpers}<div{attributes -> f:format.raw()}>
<div class="carousel slide" id="{node.identifier}"><!-- Indicators --><ol class="carousel-indicators">
<f:for each="{carouselItemArray}" as="item" iteration="itemIterator"><li data-target="#{node.identifier}" data-slide-to="{itemIterator.index}" class="{f:if(condition: itemIterator.isFirst, then: 'active')}"></li>
</f:for></ol>
<!-- Wrapper for slides -->{carouselItems -> f:format.raw()}
<!-- Controls --><a class="left carousel-control" href="#{node.identifier}" data-slide="prev">
<span class="icon-prev"></span></a><a class="right carousel-control" href="#{node.identifier}" data-slide="next">
<span class="icon-next"></span></a>
</div></div>
And now the fluid template for the slider items.
Html (Sites/Vendor.Site/Private/Templates/TypoScriptObjects/CarouselItem.html)
{namespace neos=TYPO3\Neos\ViewHelpers}{namespace media=TYPO3\Media\ViewHelpers}<div{attributes -> f:format.raw()}>
<f:if condition="{image}"><f:then>
<media:image image="{image}" alt="{alternativeText}" title="{title}" maximumWidth="{maximumWidth}" maximumHeight="{maximumHeight}" /></f:then><f:else>
<img src="{f:uri.resource(package: 'TYPO3.Neos', path: 'Images/dummy-image.png')}" title="Dummy image" alt="Dummy image" /></f:else>
</f:if><div class="carousel-caption">
<f:if condition="{hasCaption}">{neos:contentElement.editable(property: 'caption')}
</f:if></div>
</div>
For styling you can simply include the styles provided in bootstrap into your page template.
Html
<link rel="stylesheet" href="{f:uri.resource(path: '3/css/bootstrap.min.css', package: 'TYPO3.Twitter.Bootstrap')}" media="all" />
If you want to hide specific parts of a plugin while in backend you can use the provided neos-backend class.
Css
54 Chapter 3. Integrators Cookbook
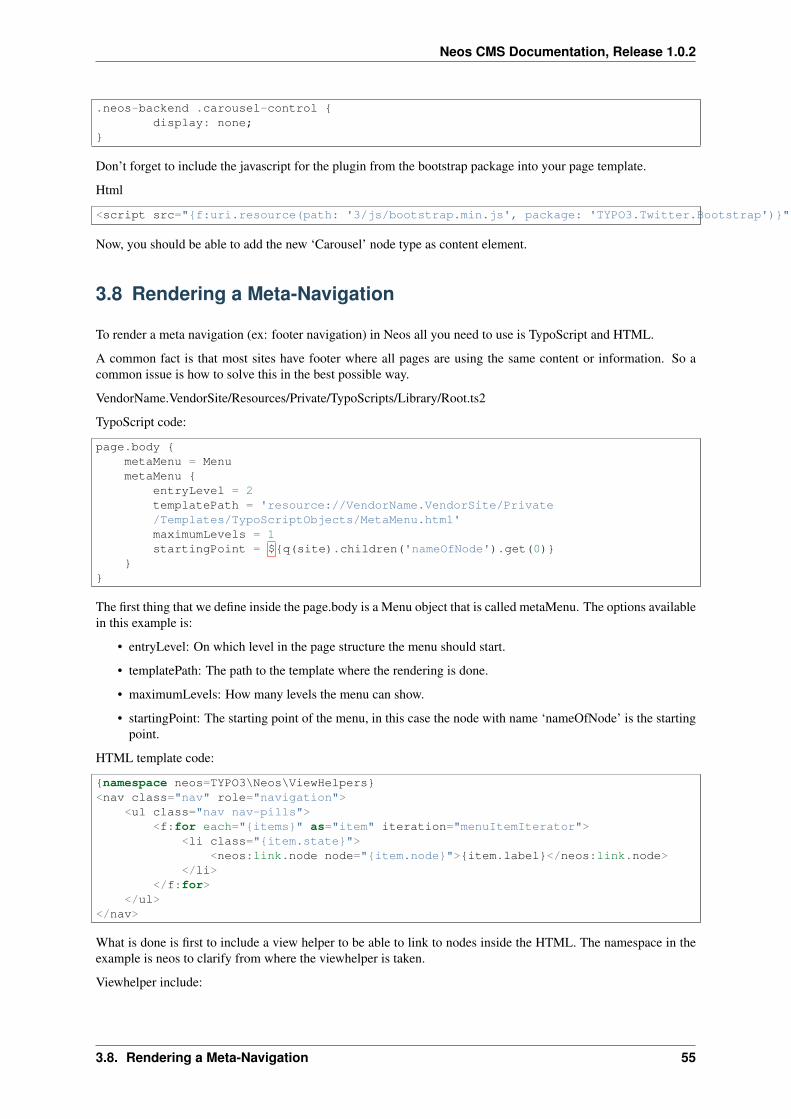
Neos CMS Documentation, Release 1.0.2
.neos-backend .carousel-control {display: none;
}
Don’t forget to include the javascript for the plugin from the bootstrap package into your page template.
Html
<script src="{f:uri.resource(path: '3/js/bootstrap.min.js', package: 'TYPO3.Twitter.Bootstrap')}"></script>
Now, you should be able to add the new ‘Carousel’ node type as content element.
3.8 Rendering a Meta-Navigation
To render a meta navigation (ex: footer navigation) in Neos all you need to use is TypoScript and HTML.
A common fact is that most sites have footer where all pages are using the same content or information. So acommon issue is how to solve this in the best possible way.
VendorName.VendorSite/Resources/Private/TypoScripts/Library/Root.ts2
TypoScript code:
page.body {metaMenu = MenumetaMenu {
entryLevel = 2templatePath = 'resource://VendorName.VendorSite/Private/Templates/TypoScriptObjects/MetaMenu.html'maximumLevels = 1startingPoint = ${q(site).children('nameOfNode').get(0)}
}}
The first thing that we define inside the page.body is a Menu object that is called metaMenu. The options availablein this example is:
• entryLevel: On which level in the page structure the menu should start.
• templatePath: The path to the template where the rendering is done.
• maximumLevels: How many levels the menu can show.
• startingPoint: The starting point of the menu, in this case the node with name ‘nameOfNode’ is the startingpoint.
HTML template code:
{namespace neos=TYPO3\Neos\ViewHelpers}<nav class="nav" role="navigation">
<ul class="nav nav-pills"><f:for each="{items}" as="item" iteration="menuItemIterator">
<li class="{item.state}"><neos:link.node node="{item.node}">{item.label}</neos:link.node>
</li></f:for>
</ul></nav>
What is done is first to include a view helper to be able to link to nodes inside the HTML. The namespace in theexample is neos to clarify from where the viewhelper is taken.
Viewhelper include:
3.8. Rendering a Meta-Navigation 55
Neos CMS Documentation, Release 1.0.2
{namespace neos=TYPO3\Neos\ViewHelpers}
The next thing is to iterate through the nodes found by TypoScript.
Iterating through nodes:
<f:for each=”{items}” as=”item”> ...
</f:for>
What then is done inside the iteration is that first we wrap our node with a li tag with a class called menu-item.Then we use our view helper to (which namespace is neos that is clarified) link it to a node in Neos. The linkingis set in the parameter node, the you can choose what should be shown as a text for the link. In this case the label(default) of the node is the text.
Wrapping and linking of node:
<li class="{item.state}"><neos:link.node node="{item.node}">{item.label}</neos:link.node>
</li>
The last thing to do is to include the meta menu to our page layout(s).
Include meta menu:
{parts.metaMenu -> f:format.raw()}
3.9 Editing a shared footer across all pages
A shared footer in Neos works as follows:
• The homepage contains a collection of content elements
• The same collection is rendered on all other pages
This enables you to edit the footer on all pages.
To add the footer to the page you use the ContentCollection with a static node path.
To have the collection on the homepage you need to configure the childNodes structure of the homepage. For thisyou create a homepage node type with for example the following configuration in NodeTypes.yaml:
'My.Package:HomePage':superTypes: ['TYPO3.Neos.NodeTypes:Page']ui:label: 'Homepage'
childNodes:footer:
type: 'TYPO3.Neos:ContentCollection'
Note: If you run into the situation that the child nodes for your page are missing (for example if you manuallyupdated the node type in the database) you might have to create the missing child nodes using:
./flow node:autocreatechildnodes –node-type TYPO3.Neos.NodeTypes:Page
TypoScript code:
footer = TYPO3.Neos:ContentCollection {nodePath = ${q(site).find('footer').property('_path')}
collection = ${q(site).children('footer').children()}}
Of course you have to update the selection in the example if your footer is not stored on the siteroot, but for example on a page named ‘my-page’. The selection would then be: ${q(site).find(‘my-page’).children(‘footer’).children()}.
56 Chapter 3. Integrators Cookbook

Neos CMS Documentation, Release 1.0.2
3.10 Extending the Page
In Neos the page is a simple Node Type named TYPO3.Neos:Page, you can directly extend this Node Type to addspecific properties. Below you will find a simple example for adding a page background image:
Yaml (Sites/Vendor.Site/Configuration/NodeTypes.yaml)
'TYPO3.Neos:Page':ui:inspector:
groups:background:label: 'Background'position: 900
properties:backgroundImage:
type: TYPO3\Media\Domain\Model\ImageVariantui:
label: 'Image'reloadIfChanged: TRUEinspector:group: 'background'
With this configuration, when you click on the page, you will see the Image editor in the Inspector.
To access the backgroundImage in your page template you can also modify the TYPO3.Neos:Page TypoScriptobject, like in the below example:
TypoScript (Sites/Vendor.Site/Resources/Private/TypoScripts/Library/Root.ts2)
prototype(TYPO3.Neos:Page) {backgroundImage = ${q(node).property('backgroundImage')}
}
With TYPO3.Media ViewHelper you can display the Image with the follwing HTML snippet:
HTML
{namespace media=TYPO3\Media\ViewHelpers}<style>html {
margin:0;padding:0;background: url({media:uri.image(image:backgroundImage)}) no-repeat center fixed;-webkit-background-size: cover;-moz-background-size: cover;-o-background-size: cover;background-size: cover;
}</style>
3.11 Adding A Simple Contact Form
Using the TYPO3.Form package you can easily create and adopt simple to very complex forms. For it to workproperly you just have to define where it should find its form configurations.
Yaml (Sites/Vendor.Site/Configuration/Settings.yaml)
TYPO3:Form:yamlPersistenceManager:
savePath: 'resource://Vendor.Site/Private/Form/'
3.10. Extending the Page 57

Neos CMS Documentation, Release 1.0.2
Yaml (Sites/Vendor.Site/Configuration/NodeTypes.yaml)
'TYPO3.Neos.NodeTypes:Form':properties:formIdentifier:
ui:inspector:editorOptions:
values:'': ~# Maps to the file Sites/Vendor.Site/Resources/Private/Form/contact-form.yaml'contact-form':label: 'contact-form'
Now place a valid TYPO3.Form Yaml configuration the Private/Form folder. Then add a Form Element whereyou wish the form to be displayed and select it from the dropdown in the Inspector.
Yaml (Sites/Vendor.Site/Resources/Private/Form/contact-form.yaml)
type: 'TYPO3.Form:Form'identifier: contact-formlabel: ContactrenderingOptions:
submitButtonLabel: Sendrenderables:
-type: 'TYPO3.Form:Page'identifier: page-onelabel: Contactrenderables:
-type: 'TYPO3.Form:SingleLineText'identifier: namelabel: Namevalidators:- identifier: 'TYPO3.Flow:NotEmpty'
properties:placeholder: Name
defaultValue: ''-
type: 'TYPO3.Form:SingleLineText'identifier: emaillabel: E-Mailvalidators:- identifier: 'TYPO3.Flow:NotEmpty'- identifier: 'TYPO3.Flow:EmailAddress'
properties:placeholder: 'E-Mail'
defaultValue: ''-
type: 'TYPO3.Form:MultiLineText'identifier: messagelabel: Messagevalidators:- identifier: 'TYPO3.Flow:NotEmpty'
properties:placeholder: 'Your Message'
defaultValue: ''finishers:
-identifier: 'TYPO3.Form:Email'options:
templatePathAndFilename: resource://Vendor.Site/Private/Templates/Email/Message.txtsubject: Contact from example.net
58 Chapter 3. Integrators Cookbook

Neos CMS Documentation, Release 1.0.2
recipientAddress: [email protected]: 'Office of Company'senderAddress: [email protected]: Server example.netreplyToAddress: [email protected]: plaintext
-identifier: 'TYPO3.Form:Confirmation'options:
message: ><h3>Thank you for your feedback</h3><p>We will process it as soon as possible.</p>
In this example we are using the TYPO3.Form:Email Finisher. The Email Finisher requires theTYPO3.SwiftMailer package to be installed. It sends an E-Mail using the defined template and settings. Bythe second Finisher a confirmation is displayed.
Html (Sites/Vendor.Site/Resources/Private/Templates/Email/Message.txt)
Hello,
<f:for each="{form.formState.formValues}" as="value" key="label">{label}: {value}
</f:for>
Thanks
To find out more about how to create forms see the TYPO3.Form package. There is even a Click Form Builderthat exports the Yaml settings files.
Warning: Make sure the TYPO3.NeosDemoTypo3Org package (or other) is deactivated. Otherwise the set-ting TYPO3.Form.yamlPersistenceManager.savePath may be overwritten by another package.You can deactivate a package with the command ./flow package:deactivate <PackageKey>.
3.12 Creating a Plugin
A plugin is a special content element which is implemented by PHP code through an ActionController of Flow.
3.12.1 Kickstarter
A minimal plugin can be kickstarted as follows:
./flow kickstart:plugin Vendor.FancyPlugin "Vendor's fancy plugin"
The command outputs a list of generated files and instructions how to integrate the plugin on existing Neos-Sites.Afterwards you can insert the plugin as content elements in the Neos-Site.
You can then use the standard kickstart:* commands to f.e. create Domain Models or Repositories:
./flow kickstart:model Vendor.FancyPlugin Friend name:string nickname:string age:integer
./flow kickstart:repository Vendor.FancyPlugin Friend
3.12. Creating a Plugin 59

Neos CMS Documentation, Release 1.0.2
60 Chapter 3. Integrators Cookbook
CHAPTER 4
Developer Guide
These are the development guidelines of Neos.
4.1 User Interface Development
These are the user interface development guidelines of Neos.
4.1.1 General User Interface Principles
The following principles serve as general guiding concepts throughout the whole Neos product.
Overall User Interface Goals
We have set up the following goals to strive for UI-wise:
• Reliable editing
• Predictable UI Behavior
• Immediate feedback for the user
• Built with the web - for the web
UI concepts should be evaluated against the above goals.
Technical guidelines / Goals
When implementing the user interface, we should follow these guidelines on a technical side:
• Take the pragmatic approach
• Augment the frontend website
• No iFrame in the content module, generally no iFrames except for bigger modal dialogs
• Browser support >= IE9; in the prototyping phase focus on Chrome / Firefox
• No polling of data from the server!
• A reload should always take you back to a safe state
61
Neos CMS Documentation, Release 1.0.2
CSS Guidelines
Overall Goal:
• Be pragmatic! We strive for solutions which work out-of-the-box in 95% of the cases; and tell the integratorhow to solve the other 5%. Thus, the integrator has to care to make his CSS work with Neos; we do not usea sandbox.
Implementation notes:
• All CSS selectors should be fully lowercase, with - as separator. Example: neos-menu,neos-inspector
• We use the neos- prefix
• The integrator is never allowed to override neos-, typo3- and aloha-
• The main UI elements have an ID, and a partial reset is used to give us predictable behavior inside them.
• We use sass. To install, use +gem install sass compass+. Then, before modifying CSS, go to css/ and run+sass –compass –watch style.scss:style.css+. This will update style.css at every modification of style.scss.
• We use r.js for generating the Includes-built.css file. The command used by the built server is r.js -ocssIn=Includes.css out=Includes-built.css
Z-Indexes
The Neos UI uses Z-Indexes starting at 10000.
Warning: TODO: Formulate some more about the usage of z-indexes.
4.1.2 Content Module Principles
In the Content Module, we directly render the frontend of the website, and then augment it with the Neos ContentEditing User Interface.
Because of this, we do not control all CSS or javaScript which is included on the page; so we need some specialguidelines to deal with that. These are listed on this page.
Naming of main UI parts
The following image shows the main UI parts of the content module and the names we use for them.
Content Module Architecture
The whole Content Module is built around the Aloha Blocks. Blocks are un-editable elements of a website, whichare managed by Aloha. They can appear inside or outside editables, can be nested, and can appear either as inlineelement (<span>) or as block-level element(<div>).
Only one block is active at any given time. When a block is active, then all its parent blocks are selected. Theblock selection contains the active block as first element and all other selected blocks from innermost to outermost.
Most of the UI changes depending on the current block selection.
62 Chapter 4. Developer Guide

Neos CMS Documentation, Release 1.0.2
Fig. 4.1: UI parts of the content module
Fig. 4.2: UI Updates on selection change
4.1. User Interface Development 63

Neos CMS Documentation, Release 1.0.2
User Interface Updates on Selection Change
The following diagram shows how the UI is changing when the block selection changes:
1. The neosintegration Aloha Plugin (located in alohaplugins/neosintegration/lib/neosintegration-plugin.js)hooks into the Aloha event which is triggered whenever the block selection changes. Whenever this eventis triggered, it calls T3.Content.Model.BlockSelection.updateSelection().
2. We need to wrap each Aloha Block with a Ember.js Block (later only called Block), so we can attach eventlisteners to it. This wrapping is done by the BlockManager
3. The BlockManager either returns existing Ember.js Blocks (if the given Aloha Block has already beenwrapped), or creates a new one.
4. Then, the BlockSelection sets its content property, which the UI is bound to. Thus, all UI elementswhich depend on the current block selection are refreshed.
User Interface Updates updates on property change
When an attribute is modified through the property panel, the following happens:
Fig. 4.3: How attributes are modified
WARNING: TODO: Document what happens when an editable is modified
Node Property Naming Conventions
TODO write some intro text
1. Normal properties
Those properties contain normal values like a title, date or other value. Serverside setting of the property isdone using TYPO3CR Node::setProperty()
64 Chapter 4. Developer Guide
Neos CMS Documentation, Release 1.0.2
2. Visibility / lifecycle properties
These properties are prefixed using an underscore, like ‘_hidden’. Serverside setting of the property is doneusing TYPO3CR Node::set<UpperCamelCasePropertyname>()
3. Neos internal properties
These properties are prefixed with a double underscore, like __workspacename TODO: internal
Saving content
Saving is triggered using T3.Content.Model.Changes.save() and is very straight-forward. For now, weuse ExtDirect to send things back to the server.
Displaying Modal Dialogs
WARNING: TODO - write this
• REST architectural style
• HTML snippets loaded via fixed URLs from server side
• Return Commands (<a rel="typo3-...." />)
REST Server Side API
URL /neos/content/new
• +referenceNode+ - Context node path
• +position+ - if @above@, new node will be inserted above @referenceNode@, if @below@, otherwise.
URL /neos/content/create
• all options from @/neos/content/new@
• +type+ - TYPO3CR Node Type to be created
Return Commands
Command created-new-content:
<html><a rel="typo3-created-new-content"
data-page="/sites/neosdemotypo3org/homepage@user-admin"href="/sites/neosdemotypo3org/homepage/main/4e1ef025442f5@user-admin">Goto New Content
</a></html>
• +href+ Context node path of newly created content
• +data-page+ Context node path of enclosing page
WARNING: TODO: should also include the URL of the nearest page, maybe even in HREF?
4.1.3 Backend Module Principles
For backend modules (that is, every module except the content area), we use the following guiding principles inaddition to the already-existing principles:
• It should be possible to write backend modules only with PHP, without JavaScript involved
4.1. User Interface Development 65
Neos CMS Documentation, Release 1.0.2
• Some features might be only available to the user if he has JavaScript enabled
• In order to introduce rich behavior, use the technique of progressive enhancement
Progressive Enhancement
As we want to use progressive enhancement heavily, we need to define some rules as a basis for that.
First, you should always think about the non-javascript functionality, and develop the feature without JavaScriptenabled. This helps to get the client-server communication function correctly.
For most parts, you should not rely at all on any server state, but instead use URI parameters to encode requiredstate. This makes the server-side code a lot easier and progressive enhancement more predictable.
Furthermore, if you reload certain parts of the user interface using AJAX, make sure to always update thebrowser’s URI using History Management: In case there is an error, the user can just re-load the page and will getpretty much the same User Interface state. This fulfills our UI goal of “predictable UI behavior”.
Connecting JavaScript code to the HTML content
In order to connect JavaScript code to HTML content, we (of course) rely on CSS selectors for finding the correctDOM nodes. However, we do not want to use CSS class attributes, as they change more frequently. Instead, we’dlike to use special data-attributes to connect the JavaScript code to the user interface.
Note: In a nutshell:
• CSS classes are used for the visible styling only
• HTML5 Data Attributes are used for connecting the JavaScript code to HTML
We use the following data attributes for that:
• data-area is used to search for DOM nodes, for later usage in JavaScript.
As an example, use <div class="foo" data-area="actionBar"></div> in the HTML andmatch it using $(’[data-area=actionBar]’) in JavaScript.
• data-json is used for transferring server-side state to the JavaScript as JSON.
Example: We need the full URI parameters which have been used for the current rendering as ar-ray/object on the client side. Thus, the server side stores them inside <div style="display:none"data-json="uriParameters">{foo: ’bar’}</div>.
The JavaScript code then accesses them at a central place usingJSON.parse($(’[data-json=uriParameters]’).text()) and makes them availableusing some public API.
• data-type is used to mark that certain parts of the website contain a client-side template language likehandlebars.
As an example for the action bar, we use the following code here:
<button>Edit<span class="js" data-type="handlebars">
{{#if multipleSelectionActive}} {{numberOfSelectedElements}} elements{{/if}}</span>
</button>
Then, on the client side in JavaScript, we use the handlebars template accordingly.
66 Chapter 4. Developer Guide
Neos CMS Documentation, Release 1.0.2
Adjusting the UI if JavaScript is (in-)active
Often, you want to hide or show some controls depending on whether JavaScript is enabled or disabled. Bydefault, every DOM element is visible no matter whether JavaScript is enabled or not.
If you want to show a DOM element only if JavaScript is enabled, use the CSS class js.
If you want to show a DOM element only if JavaScript is disabled, use the CSS class nojs.
4.1.4 JavaScript Style Guide
Code Conventions
• We use only the TAB character for indentation.
• We use UpperCamelCase for class names, and lowerCamelCase for method and property names.
• Methods and properties that begin with an underscore (_) are private.
• Variables which contain jQuery elements should be named like $element, starting with a $. If it is aprivate jQuery element, prefix it with _$
• We use that as a name for a closure reference to this, but try to avoid it if there’s the possibility of scopebinding. Unfortunately jQuery’s event handlers do not allow easy scope binding.
Code Documentation
TODO: still determine this.
RequireJS module skeleton
All JavaScript files are RequireJS modules. They should follow this structure:
WARNING: still has to be done and discussed
<javascript> TODO </javascript>
Public API, Private methods and attributes
All methods and properties which are public API are marked with @api. The public API is supported for a longerperiod, and when a public API changes, this is clearly communicated in the Release Notes of a version.
On the contrary, we prefix private methods and attributes with an underscore. The user of an API should neveroverride or call methods private methods as they are not meant for him to be overridden.
There’s also a type in between: methods which are not private but do not have a @api annotation. Theycan be safely overridden by the user, and he should not experience any unwanted behavior. Still, the names orfunctionality of these methods can change without notice between releases. In the long run, all of these methodsshould become part of the public API, as soon as they are proven in real life.
To sum it up, we have three types of methods/properties:
• @api methods: Public API, the user of the object can rely on the functionality to be stable, changes in @apiare clearly communicated
• non-@api but also not private: The user can use it, but needs to be aware the method might still change.
• private (prefixed with _): The user should never ever call or access this. Very strange things might happen.
4.1. User Interface Development 67

Neos CMS Documentation, Release 1.0.2
Note: It is allowed to observe or bind to private properties within the Neos javascript code. This is because theproperty is not just meant as private object property, but as a non-api property.
When to use a new file
JavaScript files can become pretty large, so there should be a point to create a new file. Having just one class perfile would be too much though, as this would end up in possibly hundreds of files, from which a lot will just have20 lines of code.
As we use requirejs for loading dependencies we came up with the following guidelines for creating a new file:
• Classes using a template include using the !text plugin should be in a separate file
• If a class is extended by another class, then it should be in a separate file so it can be easily loaded asdependency
• If a class is huge, and affecting readability of the definition file, then it should be moved to a single file
• It has preference to keep classes grouped together, so classes with just a few lines stay grouped together, soif none of the above is true the classes stays in the main file.
4.1.5 Ember.JS Tips & Tricks
Dealing with classes and objects
• Always extend from Ember.Object (or a subclass)
• Extension is done using Ember.Object.extend({...})
• Never use new to instantiate new objects. Instead, use TheObject.create(...)
• All objects have generic set(key, value) and get(key) methods, which should be used under allcircumstances!
The following example shows this:
var Foo = Ember.Object.extend({someValue: 'hello',myMethod: function() {
alert(this.get('someValue'));}
});
var fooInstance = Foo.create({someValue: 'world'
});fooInstance.myMethod(); // outputs "world"
Inheritance can be used just as in PHP, since Emberjs binds a special ._super() function for every methodcall (in fact the function is wrapped to create this special _super method). So calling the current method of thesuperclass can be done without specifying the superclass and method name.
var Foo = Ember.Object.extend({greet: function(name) {
return 'Hello, ' + name;}
});var Bar = Foo.extend({
greet: function(name) {return 'Aloha and ' + this._super(name);
}
68 Chapter 4. Developer Guide
Neos CMS Documentation, Release 1.0.2
});
Bar.create().greet('Neos'); // outputs "Aloha and Hello, Neos"
Data Binding tips and tricks
To create a computed property, implement it as function and append +.property()+:
var Foo = Ember.Object.extend({someComputedValue: function() {
return "myMethod";}.property()
});
If your computed property reads other values, specify the dependent values as parameters to property(). If thecomputed property is deterministic and depends only on the dependant values, it should be marked further with.cacheable().
var Foo = Ember.Object.extend({name: 'world',greeting: function() {
return "Hello " + this.attr('name');}.property('name').cacheable()
});
Now, every time name changes, the system re-evaluates greeting.
Note: Forgetting .cacheable() can have severe performance penalties and result in circular loops, in worstcase freezing the browser completely.
You can also use a getter / setter on a property, if you do this it’s extremely important to return the value of theproperty in the setter method.
var Foo = Ember.Object.extend({firstName: null,lastName: null,
fullName: function(key, value) {if (arguments.length === 1) {
return this.get('firstName') + ' ' + this.get('lastName');} else {
var parts = value.split(' ');this.set('firstName', parts[0]);this.set('lastName', parts[1]);
return value;}
}.property('firstName', 'lastName').cacheable()});
Observe changes
To react on changes of properties in models or views (or any other class extending Ember.Observable), amethod marked as an observer can be used. Call .observes(’propertyName’) on a private method to benotified whenever a property changes.
var Foo = Ember.Object.extend({name: 'world',_nameDidChange: function() {
4.1. User Interface Development 69
Neos CMS Documentation, Release 1.0.2
console.log('name changed to', this.get('name'));}.observes('name')
});
4.2 Testing
Testing and quality assurance documentation for Neos.
4.2.1 Behat tests for Neos
Setting up Neos for running Behat tests
Install Behat for the base distribution
Behat is installed in a separate folder and has a custom composer root file. To install Behat run the followingcomposer command in FLOW_ROOT/Build/Behat:
cd Build/Behatcomposer install
A special package Flowpack.Behat is used to integrate Flow with Behat and is installed if the base distributionwas installed with composer install –dev.
Create configuration for subcontexts
Behat needs two special Flow contexts, Development/Behat and Testing/Behat.
• The context Development/Behat should be mounted as a separate virtual host and is used by Behat to do theactual HTTP requests.
• The context Testing/Behat is used inside the Behat feature context to set up test data and reset the databaseafter each scenario.
These contexts should share the same database to work properly. Make sure to create a new database for the Behattests since all the data will be removed after each scenario.
FLOW_ROOT/Configuration/Development/Behat/Settings.yaml:
TYPO3:Flow:persistence:
backendOptions:dbname: 'neos_testing_behat'
FLOW_ROOT/Configuration/Testing/Behat/Settings.yaml:
TYPO3:Flow:persistence:
backendOptions:dbname: 'neos_testing_behat'driver: pdo_mysqluser: ''password: ''
Example virtual host configuration for Apache:
70 Chapter 4. Developer Guide

Neos CMS Documentation, Release 1.0.2
<VirtualHost *:80>DocumentRoot "FLOW_ROOT/Web"ServerName neos.behat.testSetEnv FLOW_CONTEXT Development/Behat
</VirtualHost>
Configure Behat
The Behat tests for Neos are shipped inside the TYPO3.Neos package in the folder Tests/Behavior. Behat uses aconfiguration file distributed with Neos, behat.yml.dist, or a local version, behat.yml. To run the tests, Behat needsa base URI pointing to the special virtual host running with the Development/Behat context. To set a custom baseURI the default file should be copied and customized:
cd Packages/Application/TYPO3.Neos/Tests/Behaviorcp behat.yml.dist behat.yml# Edit file behat.yml
Customized behat.yml:
default:paths:features: Featuresbootstrap: %behat.paths.features%/Bootstrap
extensions:Behat\MinkExtension\Extension:
files_path: features/Resourcesshow_cmd: 'open %s'goutte: ~selenium2: ~
base_url: http://neos.behat.test/
Selenium
Some tests require a running Selenium server for testing browser advanced interaction and JavaScript. SeleniumServer can be downloaded at http://docs.seleniumhq.org/download/ and started with:
java -jar selenium-server-standalone-2.x.0.jar
Running Behat tests
Behat tests can be run from the Flow root folder with the bin/behat command by specifying the Behat configurationfile:
bin/behat -c Packages/Application/TYPO3.Neos/Tests/Behavior/behat.yml
Tip: You might want to warmup the cache before you start the test. Otherwise the tests might fail due to atimeout. You can do that with FLOW_CONTEXT=Development/Behat ./flow flow:cache:warmup.
Debugging
• Make sure to use a new database and configure the same databse for Development/Behat and Testing/Behat
• Run Behat with the -v option to get more information about errors and failed tests
• A failed step can be inspected by inserting “Then show last response” in the .feature definition
4.2. Testing 71

Neos CMS Documentation, Release 1.0.2
72 Chapter 4. Developer Guide

CHAPTER 5
Appendixes
5.1 TYPO3 Neos Command Reference
The commands in this reference are shown with their full command identifiers. On your system you can useshorter identifiers, whose availability depends on the commands available in total (to avoid overlap the shortestpossible identifier is determined during runtime).
To see the shortest possible identifiers on your system as well as further commands that may be available, use:
./flow help
The following reference was automatically generated from code on 2014-03-03
5.1.1 Package TYPO3.NEOS
typo3.neos:domain:add
Add a domain record
Arguments
--site-node-name The nodeName of the site rootNode, e.g. “neostypo3org
--host-pattern The host pattern to match on, e.g. “neos.typo3.org
typo3.neos:domain:delete
Delete a domain record
Arguments
--host-pattern The host pattern of the domain to remove
typo3.neos:domain:list
Display a list of available domain records
Options
--host-pattern An optional host pattern to search for
73

Neos CMS Documentation, Release 1.0.2
typo3.neos:node:autocreatechildnodes
Create missing childNodes for a node type
This command automatically creates missing child nodes for a node type based on the structure defined in theNodeTypes configuration.
Example for creating child nodes for the TYPO3.Neos.NodeTypes:Page node type in the live workspace:
./flow node:autocreatechildnodes –node-type TYPO3.Neos.NodeTypes:Page
Arguments
--node-type Node type name
Options
--workspace Workspace name, default is ‘live’
typo3.neos:site:export
Export sites content
This command exports all or one specific site with all its content into an XML format.
If the filename option is given, any resources will be exported to files in a folder named “Resources” alongside theXML file.
If not given, the XML will be printed to standard output and assets will be embedded into the XML in base64encoded form.
Options
--site-node the node name of the site to be exported; if none given will export all sites
--tidy Whether to export formatted XML
--filename relative path and filename to the XML file to create. Any resource will be stored in a sub folder“Resources”. If omitted the export will be printed to standard output
typo3.neos:site:import
Import sites content
This command allows for importing one or more sites or partial content from an XML source. The format mustbe identical to that produced by the export command.
If a filename is specified, this command expects the corresponding file to contain the XML structure
If a package key is specified, this command expects a Sites.xml file to be located in the private resources directoryof the given package: .../Resources/Private/Content/Sites.xml
Options
--package-key Package key specifying the package containing the sites content
--filename relative path and filename to the XML file containing the sites content
74 Chapter 5. Appendixes

Neos CMS Documentation, Release 1.0.2
typo3.neos:site:list
Display a list of available sites
typo3.neos:site:prune
Remove all content and related data - for now. In the future we need some more sophisticated cleanup.
Options
--confirmation
typo3.neos:user:addrole
Add a role to a user
This command allows for adding a specific role to an existing user. Currently supported roles:“TYPO3.Neos:Editor”, “TYPO3.Neos:Administrator”
Arguments
--username The username of the user
--role Role ot be added to the user
typo3.neos:user:create
Create a new user
This command creates a new user which has access to the backend user interface. It is recommended to user theemail address as a username.
Arguments
--username The username of the user to be created.
--password Password of the user to be created
--first-name First name of the user to be created
--last-name Last name of the user to be created
Options
--roles A comma separated list of roles to assign
typo3.neos:user:remove
Remove a user which has access to the backend user interface.
Arguments
--username The username of the user to be removed.
5.1. TYPO3 Neos Command Reference 75

Neos CMS Documentation, Release 1.0.2
Options
--confirmation
typo3.neos:user:removerole
Remove a role from a user
Arguments
--username The username of the user
--role Role ot be removed from the user
typo3.neos:user:setpassword
Set a new password for the given user
This allows for setting a new password for an existing user account.
Arguments
--username Username of the account to modify
--password The new password
typo3.neos:workspace:discardall
Discard everything in the workspace with the given workspace name.
Arguments
--workspace-name
Options
--verbose
typo3.neos:workspace:publishall
Publish everything in the workspace with the given workspace name.
Arguments
--workspace-name
Options
--verbose
76 Chapter 5. Appendixes

Neos CMS Documentation, Release 1.0.2
5.2 FlowQuery Operation Reference
This reference was automatically generated from code on 2014-03-03
5.2.1 add
Add another $flowQuery object to the current one.
Implementation TYPO3\Eel\FlowQuery\Operations\AddOperation
Priority 1
Final No
Returns void
5.2.2 children
“children” operation working on generic objects. It iterates over all context elements and returns the values of theproperties given in the filter expression that has to be specified as argument or in a following filter operation.
Implementation TYPO3\Eel\FlowQuery\Operations\Object\ChildrenOperation
Priority 1
Final No
Returns void
5.2.3 children
“children” operation working on TYPO3CR nodes. It iterates over all context elements and returns all child nodesor only those matching the filter expression specified as optional argument.
Implementation TYPO3\Neos\TypoScript\FlowQueryOperations\ChildrenOperation
Priority 100
Final No
Returns void
5.2.4 closest
“closest” operation working on TYPO3CR nodes. For each node in the context, get the first node that matches theselector by testing the node itself and traversing up through its ancestors.
Implementation TYPO3\Neos\TypoScript\FlowQueryOperations\ClosestOperation
Priority 100
Final No
Returns void
5.2.5 count
Count the number of elements in the context.
If arguments are given, these are used to filter the elements before counting.
Implementation TYPO3\Eel\FlowQuery\Operations\CountOperation
5.2. FlowQuery Operation Reference 77

Neos CMS Documentation, Release 1.0.2
Priority 1
Final Yes
Returns integer with the number of elements
5.2.6 filter
This filter implementation contains specific behavior for use on TYPO3CR nodes. It will not evaluate any elementsthat are not instances of the NodeInterface.
The implementation changes the behavior of the instanceof operator to work on node types instead of PHP objecttypes, so that:
[instanceof TYPO3.Neos.NodeTypes:Page]
will in fact use isOfType() on the NodeType of context elements to filter. This filter allow also to filter the currentcontext by a given node. Anything else remains unchanged.
Implementation TYPO3\Neos\TypoScript\FlowQueryOperations\FilterOperation
Priority 100
Final No
Returns void
5.2.7 filter
Filter operation, limiting the set of objects. The filter expression is expected as string argument and used to reducethe context to matching elements by checking each value against the filter.
A filter expression is written in Fizzle, a grammar inspired by CSS selectors. It has the form “[” [<value>]<operator> <operand> “]” and supports the following operators:
= Strict equality of value and operand
$= Value ends with operand (string-based)
^= Value starts with operand (string-based)
*= Value contains operand (string-based)
instanceof Checks if the value is an instance of the operand
For the latter the behavior is as follows: if the operand is one of the strings object, array, int(eger), float, double,bool(ean) or string the value is checked for being of the specified type. For any other strings the value is used asclassname with the PHP instanceof operation to check if the value matches.
Implementation TYPO3\Eel\FlowQuery\Operations\Object\FilterOperation
Priority 1
Final No
Returns void
5.2.8 find
“find” operation working on TYPO3CR nodes. This operation allows for retrieval of nodes specified by a path.The current context node is also used as a context for evaluating relative paths.
Implementation TYPO3\Neos\TypoScript\FlowQueryOperations\FindOperation
Priority 100
Final No
78 Chapter 5. Appendixes

Neos CMS Documentation, Release 1.0.2
Returns void
5.2.9 first
Get the first element inside the context.
Implementation TYPO3\Eel\FlowQuery\Operations\FirstOperation
Priority 1
Final No
Returns void
5.2.10 get
Get a (non-wrapped) element from the context.
If FlowQuery is used, the result is always another FlowQuery. In case you need to pass a FlowQuery result (andlazy evaluation does not work out) you can use get() to unwrap the result from the “FlowQuery envelope”.
If no arguments are given, the full context is returned. Otherwise the value contained in the context at the indexgiven as argument is returned. If no such index exists, NULL is returned.
Implementation TYPO3\Eel\FlowQuery\Operations\GetOperation
Priority 1
Final Yes
Returns mixed
5.2.11 is
Check whether the at least one of the context elements match the given filter.
Without arguments is evaluates to TRUE if the context is not empty. If arguments are given, they are used to filterthe context before evaluation.
Implementation TYPO3\Eel\FlowQuery\Operations\IsOperation
Priority 1
Final Yes
Returns boolean
5.2.12 last
Get the last element inside the context.
Implementation TYPO3\Eel\FlowQuery\Operations\LastOperation
Priority 1
Final No
Returns void
5.2. FlowQuery Operation Reference 79

Neos CMS Documentation, Release 1.0.2
5.2.13 next
“next” operation working on TYPO3CR nodes. It iterates over all context elements and returns each followingsibling or only those matching the filter expression specified as optional argument.
Implementation TYPO3\Neos\TypoScript\FlowQueryOperations\NextOperation
Priority 100
Final No
Returns void
5.2.14 parent
“parent” operation working on TYPO3CR nodes. It iterates over all context elements and returns each directparent nodes or only those matching the filter expression specified as optional argument.
Implementation TYPO3\Neos\TypoScript\FlowQueryOperations\ParentOperation
Priority 100
Final No
Returns void
5.2.15 parents
“parents” operation working on TYPO3CR nodes. It iterates over all context elements and returns the parent nodesor only those matching the filter expression specified as optional argument.
Implementation TYPO3\Neos\TypoScript\FlowQueryOperations\ParentsOperation
Priority 100
Final No
Returns void
5.2.16 prev
“prev” operation working on TYPO3CR nodes. It iterates over all context elements and returns each precedingsibling or only those matching the filter expression specified as optional argument
Implementation TYPO3\Neos\TypoScript\FlowQueryOperations\PrevOperation
Priority 100
Final No
Returns void
5.2.17 property
Used to access properties of a TYPO3CR Node. If the property mame is prefixed with _, internal node propertieslike start time, end time, hidden are accessed.
Implementation TYPO3\Neos\TypoScript\FlowQueryOperations\PropertyOperation
Priority 100
Final Yes
Returns mixed
80 Chapter 5. Appendixes

Neos CMS Documentation, Release 1.0.2
5.2.18 property
Access properties of an object using ObjectAccess.
Expects the name of a property as argument. If the context is empty, NULL is returned. Otherwise the value ofthe property on the first context element is returned.
Implementation TYPO3\Eel\FlowQuery\Operations\Object\PropertyOperation
Priority 1
Final Yes
Returns mixed
5.2.19 siblings
“siblings” operation working on TYPO3CR nodes. It iterates over all context elements and returns all siblingnodes or only those matching the filter expression specified as optional argument.
Implementation TYPO3\Neos\TypoScript\FlowQueryOperations\SiblingsOperation
Priority 100
Final No
Returns void
5.2.20 slice
Slice the current context
If no arguments are given, the full context is returned. Otherwise the value contained in the context are sliced withoffset and length.
Implementation TYPO3\Eel\FlowQuery\Operations\SliceOperation
Priority 1
Final No
Returns void
5.3 Neos TypoScript Reference
5.3.1 TYPO3.TypoScript
This package contains general-purpose TypoScript Objects, which are usable both within Neos and standalone.Often, these TypoScript objects are subclassed and enhanced by TYPO3.Neos, to provide tailored CMS function-ality.
TYPO3.TypoScript:Array
Render the nested TypoScript objects and concatenate their results.
[any] (Any) the nested TypoScript objects
The order in which nested TypoScript objects are evaluated are specified using their @position argument. Forthis argument, the following sort order applies:
• start [priority] positions. The higher the priority, the earlier the object is added. If no priority isgiven, the element is sorted after all start elements with a priority.
5.3. Neos TypoScript Reference 81

Neos CMS Documentation, Release 1.0.2
• [numeric ordering] positions, ordered ascending.
• end [priority] positions. The higher the priority, the later the object is added. If no priority is given,the element is sorted before all end elements with a priority.
Furthermore, you can specify that an element should be inserted before or after a given other named element,using before and after syntax as follows:
• before [namedElement] [optionalPriority]: add this element before namedElement;the higher the priority the more in front of namedElement we will add it if multiple before[namedElement] statements exist. Statements without [optionalPriority] are added the far-thest before the element.
If [namedElement] does not exist, the element is added after all start positions.
• after [namedElement] [optionalPriority]: add this element after namedElement; thehigher the priority the more closely after namedElement we will add it if multiple after[namedElement] statements exist. Statements without [optionalPriority] are added farthestafter the element.
If [namedElement] does not exist, the element is added before all all end positions.
Example Ordering:
# in this example, we would not need to use any @position statement;# as the default (document order) would then be used. However, the# order (o1 ... o9) is *always* fixed, no matter in which order the# individual statements are defined.
myArray = TYPO3.TypoScript:Array {o1 = TYPO3.Neos.NodeTypes:Texto1.@position = 'start 12'o2 = TYPO3.Neos.NodeTypes:Texto2.@position = 'start 5'o2 = TYPO3.Neos.NodeTypes:Texto2.@position = 'start'
o3 = TYPO3.Neos.NodeTypes:Texto3.@position = '10'o4 = TYPO3.Neos.NodeTypes:Texto4.@position = '20'
o5 = TYPO3.Neos.NodeTypes:Texto5.@position = 'before o6'
o6 = TYPO3.Neos.NodeTypes:Texto6.@position = 'end'o7 = TYPO3.Neos.NodeTypes:Texto7.@position = 'end 20'o8 = TYPO3.Neos.NodeTypes:Texto8.@position = 'end 30'
o9 = TYPO3.Neos.NodeTypes:Texto9.@position = 'after o8'
}
If no @position argument is given, the array key is used. However, we suggest to use @position andmeaningful keys in your application, and not numeric ones.
Example of numeric keys (discouraged):
myArray = TYPO3.TypoScript:Array {10 = TYPO3.Neos.NodeTypes:Text20 = TYPO3.Neos.NodeTypes:Text
}
82 Chapter 5. Appendixes

Neos CMS Documentation, Release 1.0.2
TYPO3.TypoScript:Collection
Loop through the array-like inside collection and render each element using itemRenderer.
collection (array/Iterable, required) the array or iterable to iterate over
itemName (String, required) the variable name as which each collection element is made availableinside the TypoScript context
iterationName (String) if set, a variable name under which some collection information is madeavailable inside the TypoScript context: index (zero-based), cycle (1-based), isFirst,isLast.
itemRenderer (nested TypoScript object). This TypoScript object will be called once for every col-lection element, and its results will be concatenated.
Example:
myCollection = TYPO3.TypoScript:Collection {collection = ${[1, 2, 3]}itemName = 'element'itemRenderer = TYPO3.TypoScript:TemplateitemRenderer.templatePath = '...'itemRenderer.element = ${element}
}
TYPO3.TypoScript:Case
Evaluate all nested conditions in order until the first condition is TRUE. For this one, continue rendering thespecified type.
Simple Example:
myCase = TYPO3.TypoScript:CasemyCase {
someCondition {condition = ${... some eel expression evaluating to TRUE or FALSE ... }type = 'MyNamespace:My.Special.Type'
}
fallback {condition = ${true}type = 'MyNamespace:My.Default.Type'
}}
The order of conditions is specified with the @position syntax defined in TYPO3.TypoScript:Array. Thus, eachcondition can be deterministically ordered independently from the order it is defined inside TypoScript.
Note: Internally, a single branch inside the conditions is implemented using TYPO3.TypoScript:Matcher,which is, hoverver, not yet public API.
TYPO3.TypoScript:Template
Render a Fluid Template specified by templatePath.
templatePath (String, required) the path towards the template to be rendered, often aresource:// URI
partialRootPath (String) path where partials are found on the file system
layoutRootPath (String) path where layouts are found on the file system
5.3. Neos TypoScript Reference 83

Neos CMS Documentation, Release 1.0.2
sectionName (String) the Fluid <f:section> to be rendered, if any.
[remaining] (Any) all remaining variables are directly passed through into the Fluid template
Example:
myTemplate = TYPO3.TypoScript:Template {templatePath = 'resource://My.Package/Private/path/to/Template.html'someDataAvailableInsideFluid = 'my data'
}
TYPO3.TypoScript:Value
A TypoScript object wrapper for an arbitrary (simple) value.
value (mixed, required) the value itself
Example:
myValue = Value {myValue.value = 'Hello World'
}
Note: Most of the time this can be simplified by directly assigning the value instead of using the Value object.
TYPO3.TypoScript:Tag
A TypoScript object to render an HTML tag with attributes and optional content.
tagName (String) The tag name of the HTML element, defaults to div
omitClosingTag (boolean) Whether to render the element content and the closing tag, defaults toFALSE
selfClosingTag (boolean) Whether the tag is a self-closing tag with no closing tag. Will be resolvedfrom tagName by default, so default HTML tags are treated correctly.
content (String) The inner content of the element, will only be rendered if the tag is not self-closingand the closing tag is not omitted
attributes (TYPO3__TypoScript__Attributes) Tag attributes
Example:
htmlTag = TYPO3.TypoScript:Tag {tagName = 'html'omitClosingTag = TRUE
attributes {version = 'HTML+RDFa 1.1'xmlns = 'http://www.w3.org/1999/xhtml'
}}
Evaluates to:
<html version="HTML+RDFa 1.1" xmlns="http://www.w3.org/1999/xhtml">
84 Chapter 5. Appendixes

Neos CMS Documentation, Release 1.0.2
TYPO3.TypoScript:Attributes
A TypoScript object to render HTML tag attributes. This object is used by the TYPO3.TypoScript:Tag object torender the attributes of a tag. But it’s also useful standalone to render extensible attributes in a Fluid template.
* (String) A single attribute, array values are joined with whitespace
Example:
attributes = TYPO3.TypoScript:Attributes {foo = 'bar'class = TYPO3.TypoScript:RawArray {
class1 = 'class1'class2 = 'class2'
}}
Evaluates to:
foo="bar" class="class1 class2"
5.3.2 TYPO3.Neos TypoScript Objects
The TypoScript objects defined in TYPO3 Neos contain all TypoScript objects which are needed to integrate asimple site. Often, it contains generic TypoScript objects which do not need a particular node type to work on.
As TYPO3.Neos is the default namespace, the TypoScript objects do not need to be prefixed with TYPO3.Neos.
Template
Subclass of TYPO3.TypoScript:Template, only making the current node available inside the template because itis used very often.
For a reference of all properties, see TYPO3.TypoScript:Template.
Example:
// While this example demonstrates Template, it overrides all Neos default// templates. That's why in production, you should rather start with the// TYPO3.Neos:Page TypoScript object.page = Templatepage.templatePath = ...// inside the template, you could access "Node"
Page
Subclass of TYPO3.TypoScript:Array. Main entry point into rendering a page; responsible for rendering the<html> tag and everything inside.
doctype (String) Defaults to <!DOCTYPE html>
htmlTag (TYPO3.TypoScript:Tag) The opening <html> tag
htmlTag.attributes.* (array of String) attributes to be added to the outermost <html> tag
headTag (TYPO3.TypoScript:Tag) The opening <head> tag
head (TYPO3.TypoScript:Array) HTML markup to be added to the <head> of the website
head.titleTag (TYPO3.TypoScript:Tag) The <title> tag of the website
head.javascripts (TYPO3.TypoScript:Array) Script includes in the head should go here
5.3. Neos TypoScript Reference 85

Neos CMS Documentation, Release 1.0.2
head.stylesheets (TYPO3.TypoScript:Array) Link tags for stylesheets in the head should go here
body.templatePath (String) path to a fluid template to be used in the page body
bodyTag (TYPO3.TypoScript:Tag) The opening <body> tag
bodyTag.attributes.* (array of String) attributes to be added to be <body> tag of the website.
body (TYPO3.TypoScript:Template) HTML markup of the <body> of the website
body.javascripts (TYPO3.TypoScript:Array) Script includes before the closing body tag should gohere
body.* body defaults to a TYPO3.TypoScript:Template, so you can set all properties on it as well(like sectionName)
Examples
Rendering a simple page:page = Pagepage.body.templatePath = 'resource://My.Package/Private/MyTemplate.html'// the following line is optional, but recommended for base CSS inclusions etcpage.body.sectionName = 'main'
Rendering content in the body: TypoScript:
page.body {sectionName = 'body'content.main = PrimaryContent {
nodePath = 'main'}
}
Fluid:
<html><body>
<f:section name="body"><div class="container">
{content.main -> f:format.raw()}</div>
</f:section></body>
</html
Including stylesheets from a template section in the head:page.head.stylesheets.mySite = TYPO3.TypoScript:Template {
templatePath = 'resource://My.Package/Private/MyTemplate.html'sectionName = 'stylesheets'
}
Adding body attributes with bodyTag.attributes:
page.bodyTag.attributes.class = 'body-css-class1 body-css-class2'
ContentCollection
Subclass of TYPO3_TypoScript__Case with a nested TYPO3.TypoScript:Collection, which in turn contains theContentCase for rendering single elements.
86 Chapter 5. Appendixes
Neos CMS Documentation, Release 1.0.2
PrimaryContentCollection
Subclass of ContentCollection, to indicate the primary area of a website. Only to be used by the integrator whowrites the Page template. Is a marker to indicate the primary content area of the website.
ContentCase
Render a single Node. Used inside ContentCollection.
Plugin
Generic extension point for custom code inside the page rendering (what we call a “plugin”).
Menu
Breadcrumb
5.3.3 TYPO3.Neos.NodeTypes
The TYPO3.Neos.NodeTypes package contains most node types inheriting from content, like Text, HTML, Image,TextWithImage, TwoColumn. It contains the TYPO3CR Node Type Definition and the corresponding TypoScriptobjects.
If wanted, this package could be removed to completely start from scratch with custom node types.
Note: A few node types like Plugin or ContentCollection are not defined inside this package, but insideTYPO3.Neos. This is because these are core types: Neos itself depends on them at various places in the code, andNeos would not be of much use if any of these types was removed. That’s why Plugin (a generic extension pointtowards custom code) and ContentCollection (a generic list of content) is implemented inside Neos.
5.3.4 TYPO3.Neos.NodeTypes:Html
5.3.5 TYPO3.Neos.NodeTypes:Headline
5.3.6 TYPO3.Neos.NodeTypes:Image
5.3.7 TYPO3.Neos.NodeTypes:Text
5.3.8 TYPO3.Neos.NodeTypes:TextWithImage
5.3.9 TYPO3.Neos.NodeTypes:Menu (!!!!?!?!?)
5.3.10 TYPO3.Neos.NodeTypes:MultiColumn
5.3.11 TYPO3.Neos.NodeTypes:TwoColumn
5.3. Neos TypoScript Reference 87

Neos CMS Documentation, Release 1.0.2
88 Chapter 5. Appendixes

CHAPTER 6
Contributors
The following is a list of contributors generated from version control information (see below). As such it is neitherclaiming to be complete nor is the ordering anything but alphabetic.
• Adrian Föder
• Alexander Berl
• Andreas Förthner
• Aske Ertmann
• Bastian Waidelich
• Benno Weinzierl
• Berit Jensen
• Christian Jul Jensen
• Christian Müller
• Christopher Hlubek
• Henjo Hoeksma
• Ingmar Schlecht
• Jacob Floyd
• Karsten Dambekalns
• Marc Neuhaus
• Mario Rimann
• Markus Goldbeck
• Mattias Nilsson
• Michael Feinbier
• Nils Dehl
• Rens Admiraal
• Robert Lemke
• Sebastian Kurfürst
• Søren Malling
• Stephan Schuler
• Tobias Liebig
The list has been generated with some manual tweaking of the output of this:
89

Neos CMS Documentation, Release 1.0.2
rm contributors.txtfor REPO in `ls` ; docd $REPOgit log --format='%aN' >> ../contributors.txtcd ..
donesort -u < contributors.txt > contributors-sorted.txtmv contributors-sorted.txt contributors.txt
90 Chapter 6. Contributors