new floating license - innovyzeapp1.innovyze.com/.../updates/newlicense_floatinglicense.pdfinnovyze...
TRANSCRIPT

Important Facts About Your New Floating Seat License 1
IMPORTANT FACTS ABOUT YOUR NEW
FLOATING SEAT LICENSE

Important Facts About Your New Floating Seat License 2
Copyright © 1996-2017 Innovyze. All Rights Reserved.
Innovyze
605 E. Huntington Drive, Suite 205
Monrovia, California 91016 USA
Sales: (626) 568-6868
Support: (626) 568-6869
Fax: (626) 568-6870
E-Mail: [email protected] : [email protected] : [email protected]
Internet: http://www.innovyze.com

Important Facts About Your New Floating Seat License 3
TABLE OF CONTENTS
HOW TO USE THIS GUIDE 4
SECTION 1 – WHAT IS THE FLOATING SEAT LICENSE ............................................................... 4
SECTION 2 – INSTALLING INNOVYZE FLOATING SEAT LICENSE SERVER ..................................... 4
SECTION 3 – ACTIVATING YOUR NEW LICENSE ........................................................................ 4
SECTION 4 – SHARING THE FLOATING SEAT LICENSE ............................................................... 4
SECTION 5 – TRANSFERRING LICENSE FROM ONE SERVER TO ANOTHER .................................. 4
SECTION 6 – UNDERSTANDING THE LICENSE RENEWAL PROCESS ............................................ 5
SECTION 7 – UNDERSTANDING THE LICENSE DEACTIVATION PROCESS .................................... 5
SECTION 8 – UNDERSTANDING THE LICENSE UPGRADE OPTION AND PROCESS ......................... 5
CONVENTIONS 5
SECTION 1 – WHAT IS THE FLOATING SEAT LICENSE 6
1.1 WHAT IS THE FLOATING SEAT LICENSE 6
SECTION 2 – INSTALLING INNOVYZE FLOATING SEAT LICENSE SERVER 7
2.1 INSTALLING INNOVYZE FLOATING SEAT LICENSE SERVER 7
SECTION 3 – ACTIVATING YOUR NEW LICENSE 10
3.1 ACTIVATING YOUR NEW LICENSE 10
3.2 SCENARIO: ACTIVATING YOUR NEW LICENSE 11
SECTION 4 – SHARING THE FLOATING SEAT LICENSE 12
4.1 SHARING THE FLOATING SEAT LICENSE 12
4.2 SCENARIO: SHARING THE FLOATING SEAT LICENSE 12
4.2.1 TO INSTALL THE INNOVYZE PRODUCT(S) ON YOUR CLIENT COMPUTER, PERFORM THE FOLLOWING PROCEDURES: 12
4.2.2 TO CHECK-OUT A LICENSE, PERFORM THE FOLLOWING PROCEDURES: 15
4.2.3 TO CHECK-IN A LICENSE, PERFORM THE FOLLOWING PROCEDURES: 16
SECTION 5 – TRANSFERRING LICENSE FROM ONE SERVER TO ANOTHER 17
5.1 TRANSFERRING LICENSE FROM ONE SERVER TO ANOTHER 17
SECTION 6 – UNDERSTANDING THE LICENSE RENEWAL PROCESS 18
6.1 UNDERSTANDING THE LICENSE RENEWAL PROCESS 18
6.2 SCENARIO: RENEWING YOUR LICENSE 19
SECTION 7 – UNDERSTANDING THE LICENSE DEACTIVATION PROCESS 20
7.1 UNDERSTANDING THE LICENSE DEACTIVATION PROCESS 20
7.2 SCENARIO: DEACTIVATING YOUR EXISTING FLOATING SEAT LICENSE 21
SECTION 8 – UNDERSTANDING THE LICENSE UPGRADE OPTION AND PROCESS 23
8.1 UNDERSTANDING THE LICENSE UPDATE OPTION AND PROCESS 23
8.2 SCENARIO: UPGRADING YOUR LICENSE ON THE SAME LICENSE SERVER 25
8.3 SCENARIO: UPGRADING YOUR LICENSE ON ANOTHER LICENSE SERVER 28
8.3.1 DEACTIVATE YOUR EXISTING FLOATING SEAT LICENSE 28
8.3.2 ACTIVATE YOUR NEW UPGRADE FLOATING SEAT LICENSE 32
Important Facts About Your New Floating Seat License 4
HOW TO USE THIS GUIDE
The goal of this guide is to lead you through the process of activating, sharing,
transferring, renewing, deactivating, and upgrading your new floating license. It also
contains installation instructions for the INNOVYZE FLOATING SEAT LICENSE
SERVER as well.
SECTION 1 – WHAT IS THE FLOATING SEAT LICENSE
The Floating Seat License means that you are allowed to install the software on more
computers than floating licenses purchased via the Server/Client installation process as
long as no more than the number of purchased floating licenses were operating
concurrently.
SECTION 2 – INSTALLING INNOVYZE FLOATING SEAT LICENSE SERVER
In order to maximize the usage of your floating license(s), you need to insert floating
license(s) into INNOVYZE FLOATING SEAT LICENSE SERVER. This section illustrates
how to install and activate the INNOVYZE FLOATING SEAT LICENSE SERVER
SECTION 3 – ACTIVATING YOUR NEW LICENSE
Activating your new license is a very simple process and can be done through our user-
friendly online licensing system. This section illustrates the license activation process.
SECTION 4 – SHARING THE FLOATING SEAT LICENSE
Once you activate your floating license(s) on your Domain Server, your client computers
that have our software can “see” the same Domain Server and are able to check the
license(s) out and in. It also allows your organization and users to maximize the use of
our software based on project needs and irrespective of physical location.
SECTION 5 – TRANSFERRING LICENSE FROM ONE SERVER TO ANOTHER
Your Floating Seat License can be transferred from one server (INNOVYZE FLOATING
SEAT LICENSE SERVER) to another if the floating license is removed from the server on
which it was originally installed. If you would like to use the legally licensed software
through Innovyze, you should generate a Deactivation Key from the existing licensed
server before you transfer it to another server.

Important Facts About Your New Floating Seat License 5
SECTION 6 – UNDERSTANDING THE LICENSE RENEWAL PROCESS
Innovyze would like to encourage our customers to renew their Annual Maintenance
Agreement (subscription program). The major benefit of renewing your license is the
upgrades to the software. The license renewal process is a very simple process and can be
done through our user-friendly online licensing system. This section explains the benefit
of renewing your license(s) and the license renewal process in detail.
SECTION 7 – UNDERSTANDING THE LICENSE DEACTIVATION PROCESS
Section 7 of this guide contains instructions for the software license deactivation process.
On some occasions (e.g. license transfers) you will need to deactivate your license for a
server no longer in use. This will generate a Deactivation Key which you will need to
supply to Innovyze in order to receive the appropriate support and re-activate the
deactivated license on another server. Without the appropriate “deactivation” process, it
will prevent your license from being transferred and your license may not be reactivated.
SECTION 8 – UNDERSTANDING THE LICENSE UPGRADE OPTION AND PROCESS
Our Innovyze license upgrading process works differently from other companies. As part
of the licensing upgrade process, you are required to generate a Deactivation Key of the
license, which is being upgraded, from your existing licensed server (INNOVYZE
FLOATING SEAT LICENSE SERVER) and submit it online if you are trying to activate
your upgrade license on another licensed server instead of upgrading it on the existing
licensed server. Other than the deactivation process for this case, it is a very simple
process and can be done through our user-friendly online licensing system. This section
explains the license upgrade option and process in detail.
CONVENTIONS
This guide uses the following typographic conventions:
ITALIC CAPS H2ONET menu titles, menu choices, and commands:
Select the ABOUT command from the HELP menu.
Dialog box and window titles, and specific areas within a dialog
box or window:
Choose “H2OMAP Water” from the INSTALLED
PRODUCT drop-down list on the INNOVYZE PRODUCT
LICENSE dialog box.

Important Facts About Your New Floating Seat License 6
SECTION 1 – WHAT IS THE FLOATING SEAT LICENSE
1.1 What is The Floating Seat License
As stated in our license agreement, The Floating Seat License means that you are
allowed to install the software on more computers than floating licenses purchased via
the Server/Client installation process as long as no more than the number of purchased
floating licenses was operating concurrently.
Important Facts About Your New Floating Seat License 7
SECTION 2 – INSTALLING INNOVYZE FLOATING SEAT LICENSE SERVER
2.1 Installing Innovyze Floating Seat License Server
In order to maximize the usage of your floating license(s), you need to insert the floating
license(s) into the INNOVYZE FLOATING SEAT LICENSE SERVER on your Domain
Server. This will enable your client computer(s) that have our software to “see” the same
Domain Server and be able to check the license out and back in. To install the Floating
Seat License Manager, perform the following procedures:
STEP 1. Turn on your computer and start Windows. Close any other applications that
are currently running. This installations REQUIRES A SYSTEM REBOOT
at the end of the installation process in order for this software to work
properly. Please be prepared to do so at the end of the installation wizard.
STEP 2. Insert the INNOVYZE FLOATING SEAT LICENSE MANAGER CD into the
CD-ROM drive.
STEP 3. From the START menu, choose the RUN command, designate the CD-ROM
drive, and enter the path name and setup. For example, type “d:\Launch.exe”
into the COMMAND LINE box and then click on the OK button (or press
ENTER key).
STEP 4. Follow the on-screen instructions for system specific information.
STEP 5. You MUST REBOOT YOUR SYSTEM immediately following the
installation program. Failure to do so will prevent certain clients from being
able to access the system.
STEP 6. After reboot, from the START menu, navigate to PROGRAMS and then go to
INNOVYZE FLOATING LICENSE SERVER and launch FLOATING
LICENSE SERVER MANAGER.
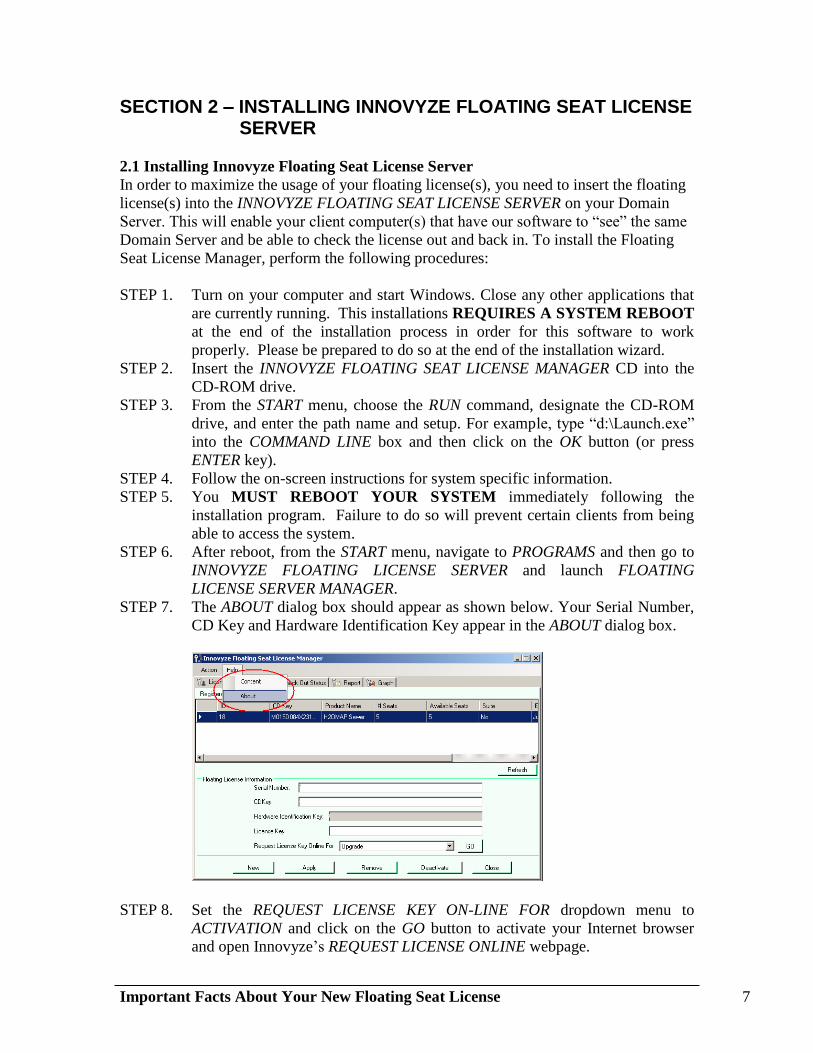
STEP 7. The ABOUT dialog box should appear as shown below. Your Serial Number,
CD Key and Hardware Identification Key appear in the ABOUT dialog box.
STEP 8. Set the REQUEST LICENSE KEY ON-LINE FOR dropdown menu to
ACTIVATION and click on the GO button to activate your Internet browser
and open Innovyze’s REQUEST LICENSE ONLINE webpage.
Important Facts About Your New Floating Seat License 8
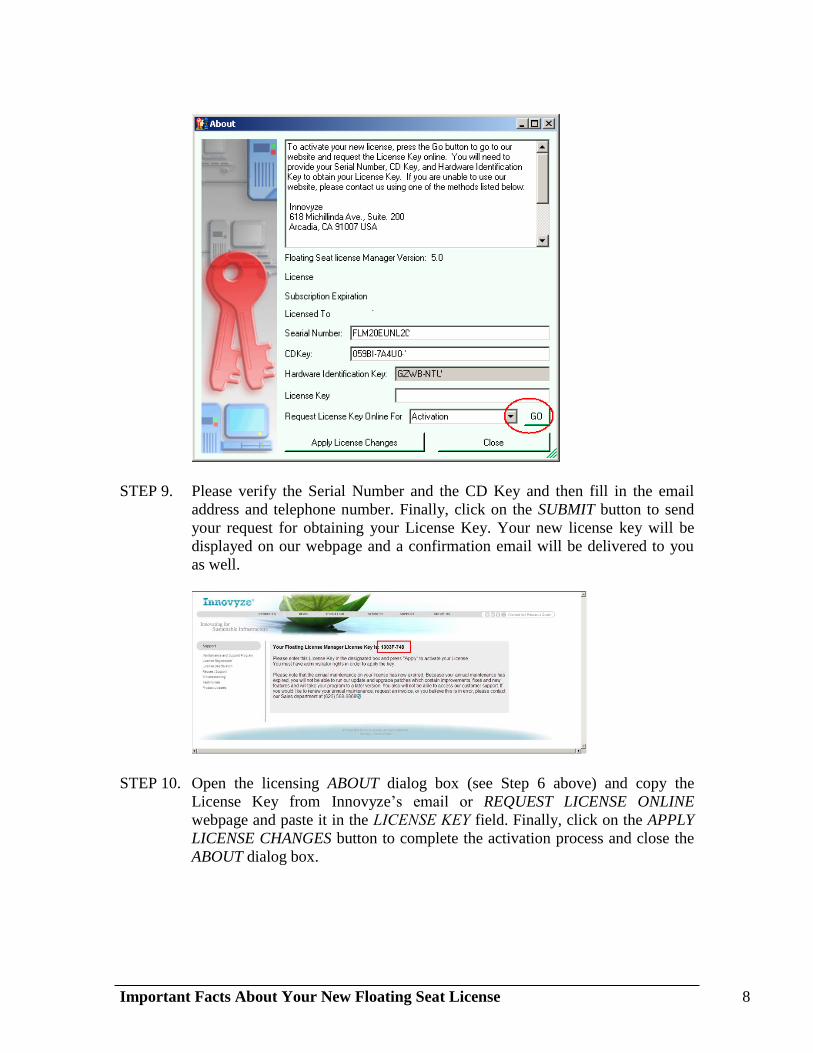
STEP 9. Please verify the Serial Number and the CD Key and then fill in the email
address and telephone number. Finally, click on the SUBMIT button to send
your request for obtaining your License Key. Your new license key will be
displayed on our webpage and a confirmation email will be delivered to you
as well.
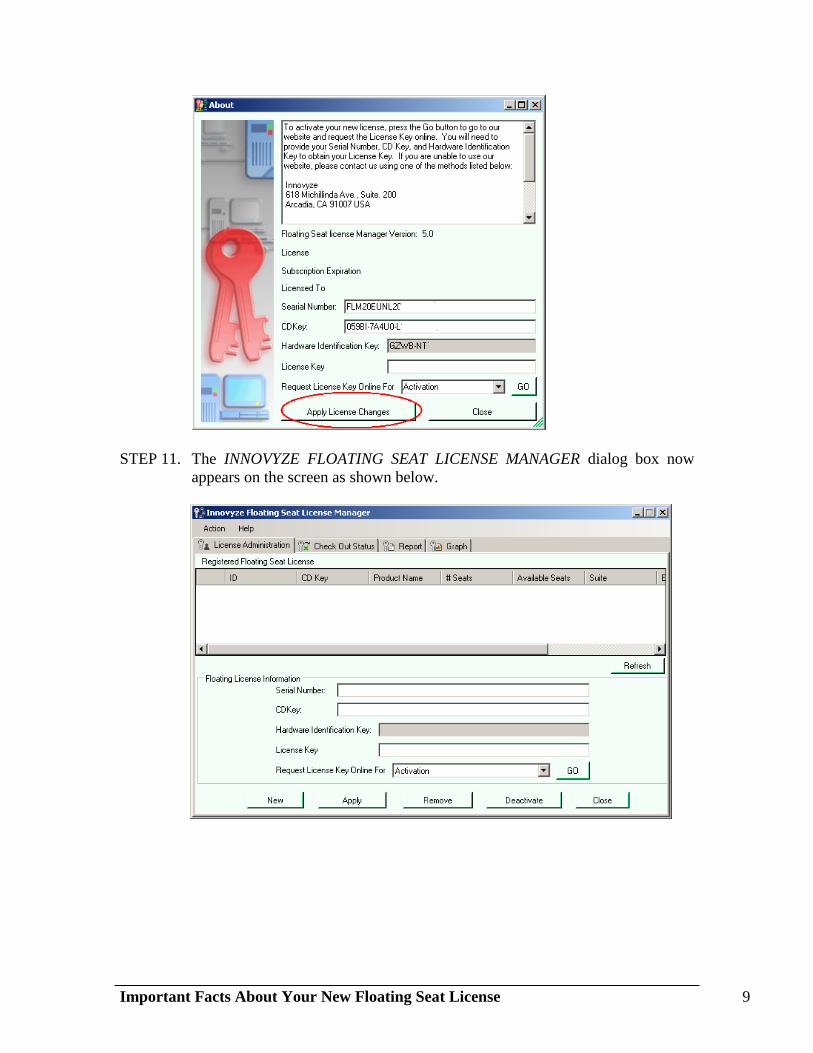
STEP 10. Open the licensing ABOUT dialog box (see Step 6 above) and copy the
License Key from Innovyze’s email or REQUEST LICENSE ONLINE
webpage and paste it in the LICENSE KEY field. Finally, click on the APPLY
LICENSE CHANGES button to complete the activation process and close the
ABOUT dialog box.
Important Facts About Your New Floating Seat License 9
STEP 11. The INNOVYZE FLOATING SEAT LICENSE MANAGER dialog box now
appears on the screen as shown below.

Important Facts About Your New Floating Seat License 10
SECTION 3 – ACTIVATING YOUR NEW LICENSE
3.1 Activating Your New License
The license activation process is a very simple process and can be done through our user-
friendly online licensing system as shown in Figure 3.1. Activation through the Internet
takes about a minute. Hardware key is requested to activate your new license and
activation does require that you submit your name, e-mail address, and other contact
information. To activate your license, please follow the step-by-step instructions on the
3.2 Scenario of this section.
Figure 3.1 Activating a new Floating Seat License
Innovyze Online
Licensing System
Innovyze Sales Department
1. Purchase a new license
2. Send a new serial & CD key
3. Apply the new serial & CD key (HI key generated by your system)
4. Submit license activation request via online
5. Send a new license key
6. Apply the new license key
CUSTOMER INNOVYZE
NOTE: If you have not installed INNOVYZE FLOATING SERVER
MANAGER on your server, you must do it before STEP 3 (see
Section 2). You are required to perform steps 3, 4, and 6 the
existing license server. Figure 3.1
Server with INNOVYZE
FLOATING SEAT
LICENSE SERVER

Important Facts About Your New Floating Seat License 11
3.2 Scenario: Activating Your New License
To activate your new floating seat license, perform the following procedure:
STEP 1. From the INNOVYZE FLOATING SEAT LICENSE MANAGER, click on the
NEW button to clear the FLOATING LICENSE INFORMATION area. Fill in
the new Serial Number and CD key.
STEP 2. Set the REQUEST LICENSE KEY ON-LINE FOR dropdown menu to
“Activation” and click on the GO button to activate your Internet browser and
open Innovyze’s REQUEST LICENSE ONLINE webpage.
STEP 3. After you have received the License Key, click on the APPLY button of the
INNOVYZE FLOATING SEAT LICENSE MANAGER dialog box to activate
the product. Repeat STEP 4 and STEP 5 to add additional Innovyze products.

Important Facts About Your New Floating Seat License 12
SECTION 4 – SHARING THE FLOATING SEAT LICENSE
4.1 Sharing the Floating Seat License
The intent of our Floating Seat License is to allow an Entity (Consulting Firm, Water
Agency, Sewer Agency, or other) to install our software on any number of computers in
the same network and to be able to check license(s) out and in by any network users as
long as no more than the number of purchased floating licenses were operating
concurrently. It allows your organization and users to maximize the use of our software
based on project needs and irrespective of physical location.
Once a license is “checked out”, the License Manager will check each computer every 15
minutes to ensure that the checked out license is still valid. Once a license is “checked in”
it is immediately available for use by anyone else with the software installed in the
Entity. If there is a server or communication failure such that license validity can not be
checked, the “Run” function of our software will be disabled but the user will not lose
any data.
4.2 Scenario: Sharing the Floating Seat License
In order to share the Floating Seat License amongst the users, you need to first install the
Innovyze product(s) using the provided software download from the Innovyze Website
on your client computer(s) if necessary. After the installation has been completed, Users
have the capability of checking-in and checking-out a floating seat license from the
server up to the maximum number of concurrent users permitted by the license. To find
out more information about how to check out the license(s), please read the Floating
License Server Users Guide and Help.
4.2.1 To install the Innovyze product(s) using the provided software download
from the Innovyze Website, perform the following procedures:
STEP 1. From your client computer, login with administrator rights.
STEP 2. If the Innovyze product needs to be reinstalled (we recommend you to
uninstall the previous installation) or installed on your client computer using
the provided software download from the Innovyze Website, please do so
now.
STEP 3. From the LICENSE OPTIONS dialog box as shown below, check on the
“Floating License” radio button.

Important Facts About Your New Floating Seat License 13
STEP 4. From the FLOATING LICENSE SERVER ENTRY dialog box, specify the
location of your Innovyze Floating License Server by clicking on the
“Browse” button or typing the name or IP address of your server where the
Innovyze Floating License Server is installed.
STEP 5. From the SETUP OPTIONS dialog box, check on the “Local Stand-alone
installation (standard)” radio button. Local Stand-alone basically puts both the
shared files and the client machine specific files in the client computer. It is
the recommended option since the Central Repository option installs the
example files and client computer specific files into the client computer and
also installs the common files to a central location. If the administrator
updated the central repository but forgot to update the client computer, it
would cause the program not to work. Also if a particular user wants to use a
different version than the one in the Central Repository, you will have to
manage the version differences amongst users. The majority of our customers
use the Local Stand-alone option.

Important Facts About Your New Floating Seat License 14
STEP 6. Finally, the INNOVYZE PRODUCT LICENSE dialog box will appear on the
screen as shown below.
STEP 7. After you have completed the installation, check to see if the client computer
is correctly configured: 1) if the client machine uses Windows XP SP 2, you
need to either disable the Windows Firewall or open the port 5367. This port
needs to be open for the client machine and the server to communicate. 2)
your users need to have read/write/modify permissions to C:\Documents and
Settings\All Users\Application Data\INNOVYZE directory or the ini files
(H2OSM.ini, H2OSW.ini, H2OWR.ini, HNET400.ini, INFOSM.ini,
INFOSW.ini, or INFOWR.ini) on the client machine.

Important Facts About Your New Floating Seat License 15
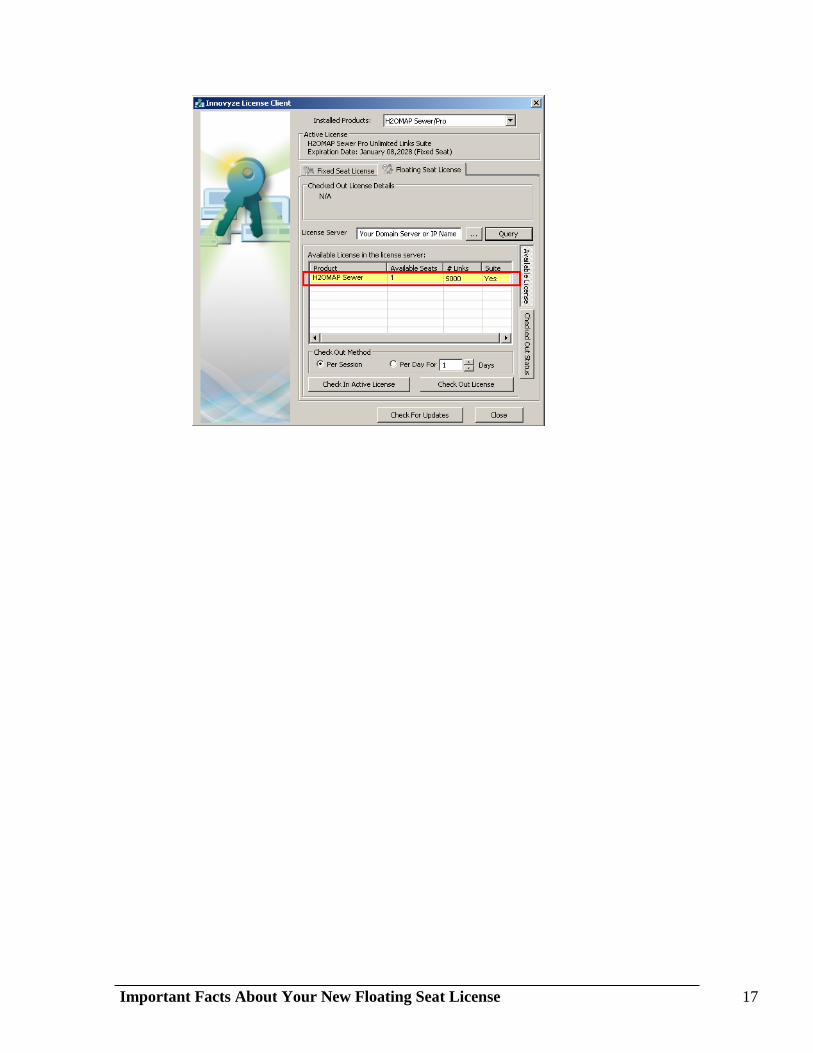
4.2.2 To Check-Out a License, perform the following procedures:
STEP 1. Choose the Server where the software is stored and query that server. By
clicking on the “Query” button you will be able to observe all the available
software licenses, size and seats available for the license in the "Available
License in the License Server:" section of this dialog box.
STEP 2. Highlight the license you wish to check out. If the Number of Available Seats
is zero, you will not be able to check out a license until someone else checks a
license in or more licenses are added by the server administrator.
STEP 3. Choose to check-out the license Per Session or Per Day.
STEP 4. If you choose “Per Day For”, specify for how many days in the box to the
right.
STEP 5. Click the “Check Out License” button.

Important Facts About Your New Floating Seat License 16
4.2.3 To Check-In a License, perform the following procedures:
STEP 1. Click the “Check In Active License” button. (The details of your license
currently in use are listed in the “Checked Out License Detail” section of this
dialog box.)
STEP 2. The user can only check-in license that has been checked out Per Day. The
license will be automatically checked-in with the Per Session option.
Important Facts About Your New Floating Seat License 17

Important Facts About Your New Floating Seat License 18
SECTION 5 – TRANSFERRING LICENSE FROM ONE SERVER TO ANOTHER
5.1 Transferring License from One Server to Another
If you need to transfer a license from one server to another, you have to first deactivate
the existing license by generating a deactivation key. You will need to supply to
Innovyze a Deactivation Key in order to reactivate the license on another server.
Figure 5.1 Transferring a Floating Seat License to Another Server
Innovyze Online
Licensing System
1. Generate and submit the Deactivate Code via online (see Section 7)
2. Submit license activation request via online
(see Section 3)
3. Send a new license key
4. Apply the new license key
CUSTOMER INNOVYZE
NOTE: If you have not installed INNOVYZE FLOATING SERVER
MANAGER on your new server, you must do it before STEP 2 (see Section
2). You are required to perform step 1 on the existing license server and
then follow steps 2 and 4 on the new license server. Figure 5.1
Server with INNOVYZE
SEAT LICENSE SERVER
Server with New
INNOVYZE FLOATING
SEAT LICENSE SERVER

Important Facts About Your New Floating Seat License 19
SECTION 6 – UNDERSTANDING THE LICENSE RENEWAL PROCESS
6.1 Understanding the License Renewal Process
Innovyze provides updates, upgrades and product support with no additional fees for the
period of one year. During the first year, customers are entitled to: 1) Access to technical
support. 2) Product updates (approximate time of release once a month) 3) Version
upgrades (major updates such as when ESRI updates ArcGIS or when Autodesk updates
AutoCAD) 4) the ability to transfer a license from one computer to another computer (or
from one server to another server for a floating license). After your first year with
Innovyze, you will have the opportunity to renew your Annual Maintenance Agreement
(subscription program). We encourage our customers to renew their subscription
program. The major benefit of renewing your license is the upgrades to the software. The
cost of purchasing the software every time a new version is released can get very
expensive. Innovyze is trying to reduce the burden of upgrading the software by offering
upgrades to license holders without fluctuating costs throughout the year. The second
major benefit of renewing your license is the updates to the software. We occasionally
create interim updates that contain fixes and/or new features that are available as patches
on our Internet Web site (www.innovyze.com) with complete instructions for how to
apply them. To get to our download page, just point your Web browser to our Internet
address: www.innovyze.com/page/p_download/down_main.htm
The license renewal process is a very simple process and can be done through our user-
friendly online licensing system as shown in Figure 6.1 and 6.2 Scenario of this section.
Figure 6.1 Floating Seat License Renewal Process
Innovyze Online
Licensing System
Innovyze Sales Department
1. Pay annual subscription fee
2. Submit license activation request via online
3. Send a renewal CD and license key
4. Apply the renewal CD and license key
CUSTOMER INNOVYZE
NOTE: You are required to perform steps 2,
3, and 4 on the existing license server Figure 6.1
Server with INNOVYZE
FLOATING SEAT
LICENSE SERVER
Important Facts About Your New Floating Seat License 20
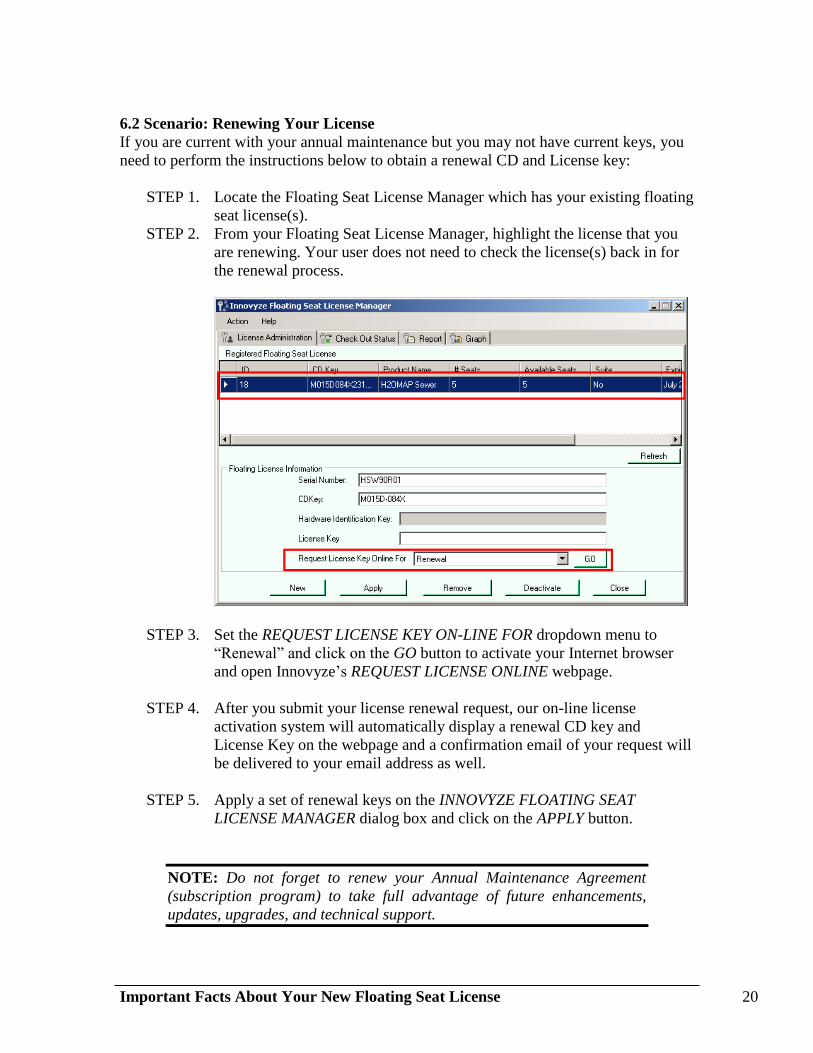
6.2 Scenario: Renewing Your License
If you are current with your annual maintenance but you may not have current keys, you
need to perform the instructions below to obtain a renewal CD and License key:
STEP 1. Locate the Floating Seat License Manager which has your existing floating
seat license(s).
STEP 2. From your Floating Seat License Manager, highlight the license that you
are renewing. Your user does not need to check the license(s) back in for
the renewal process.
STEP 3. Set the REQUEST LICENSE KEY ON-LINE FOR dropdown menu to
“Renewal” and click on the GO button to activate your Internet browser
and open Innovyze’s REQUEST LICENSE ONLINE webpage.
STEP 4. After you submit your license renewal request, our on-line license
activation system will automatically display a renewal CD key and
License Key on the webpage and a confirmation email of your request will
be delivered to your email address as well.
STEP 5. Apply a set of renewal keys on the INNOVYZE FLOATING SEAT
LICENSE MANAGER dialog box and click on the APPLY button.
NOTE: Do not forget to renew your Annual Maintenance Agreement
(subscription program) to take full advantage of future enhancements,
updates, upgrades, and technical support.
Important Facts About Your New Floating Seat License 21
SECTION 7 – UNDERSTANDING THE LICENSE DEACTIVATION
PROCESS
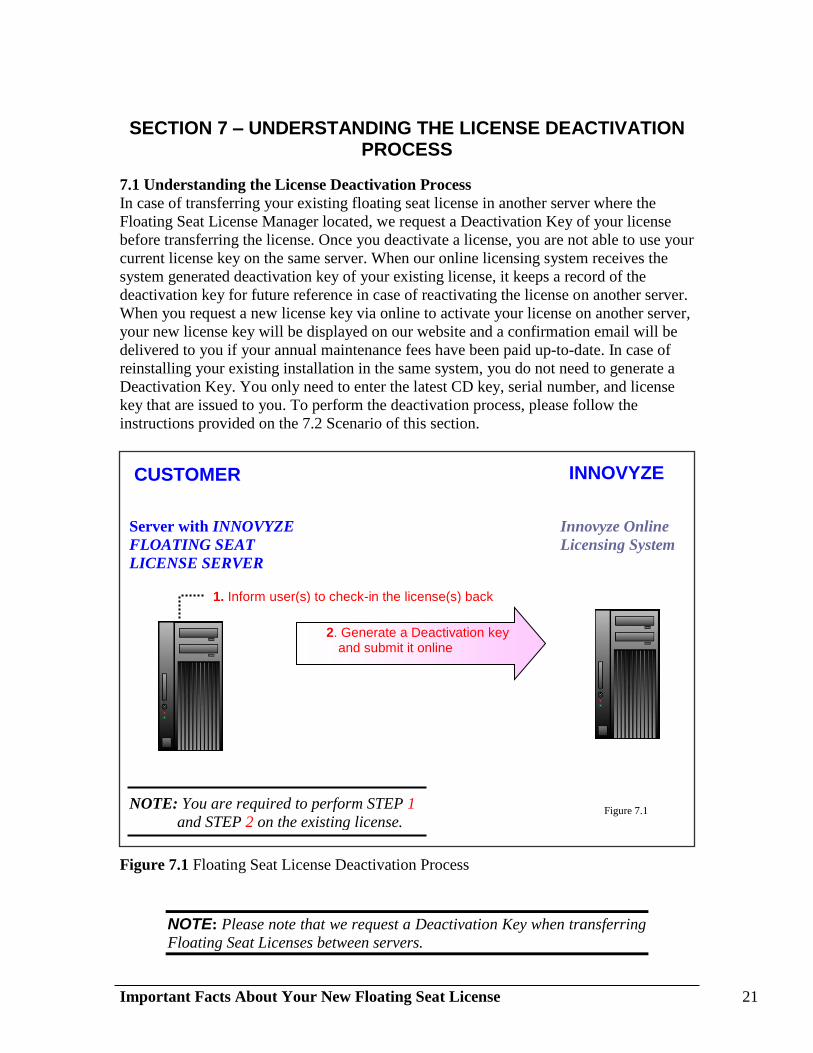
7.1 Understanding the License Deactivation Process
In case of transferring your existing floating seat license in another server where the
Floating Seat License Manager located, we request a Deactivation Key of your license
before transferring the license. Once you deactivate a license, you are not able to use your
current license key on the same server. When our online licensing system receives the
system generated deactivation key of your existing license, it keeps a record of the
deactivation key for future reference in case of reactivating the license on another server.
When you request a new license key via online to activate your license on another server,
your new license key will be displayed on our website and a confirmation email will be
delivered to you if your annual maintenance fees have been paid up-to-date. In case of
reinstalling your existing installation in the same system, you do not need to generate a
Deactivation Key. You only need to enter the latest CD key, serial number, and license
key that are issued to you. To perform the deactivation process, please follow the
instructions provided on the 7.2 Scenario of this section.
Figure 7.1 Floating Seat License Deactivation Process
NOTE: Please note that we request a Deactivation Key when transferring
Floating Seat Licenses between servers.
Innovyze Online
Licensing System
2. Generate a Deactivation key and submit it online
CUSTOMER INNOVYZE
NOTE: You are required to perform STEP 1
and STEP 2 on the existing license.
server
Figure 7.1
Server with INNOVYZE
FLOATING SEAT
LICENSE SERVER
1. Inform user(s) to check-in the license(s) back

Important Facts About Your New Floating Seat License 22
7.2 Scenario: Deactivating Your Existing Floating Seat License
NOTE: The following installation needs to be done on your server. If you
are a server administrator follows the instructions below. Otherwise, you
must contact your server administrator in order to perform the following
installation and/or deactivate your existing floating license from the
INNOVYZE FLOATING SEAT LICENSE MANAGER on your server.
STEP 1. Locate the Floating Seat License Manager which has your existing
floating seat license(s).
STEP 2. Deactivate your existing floating seat license by generating a Deactivation
Key:
STEP 2a. From your Floating Seat License Manager, highlight the license
that you are deactivating. Make sure that the number of seats
matches with the number of available seats for the license. If not,
you need to contact your user(s) to check the license(s) back in.
STEP 2b. Click on the Deactivation button at the bottom of the Floating Seat
License Manager to get to the Deactivation dialog.
STEP 2c. Once you are sure you want to deactivate, click on the “Deactivate
License” button. You will be prompted one last time before your
license is deactivated on the current machine.

Important Facts About Your New Floating Seat License 23
STEP 2d. Submit the Deactivation Key via online.
Important Facts About Your New Floating Seat License 24
SECTION 8 – UNDERSTANDING THE LICENSE UPGRADE OPTION AND PROCESS
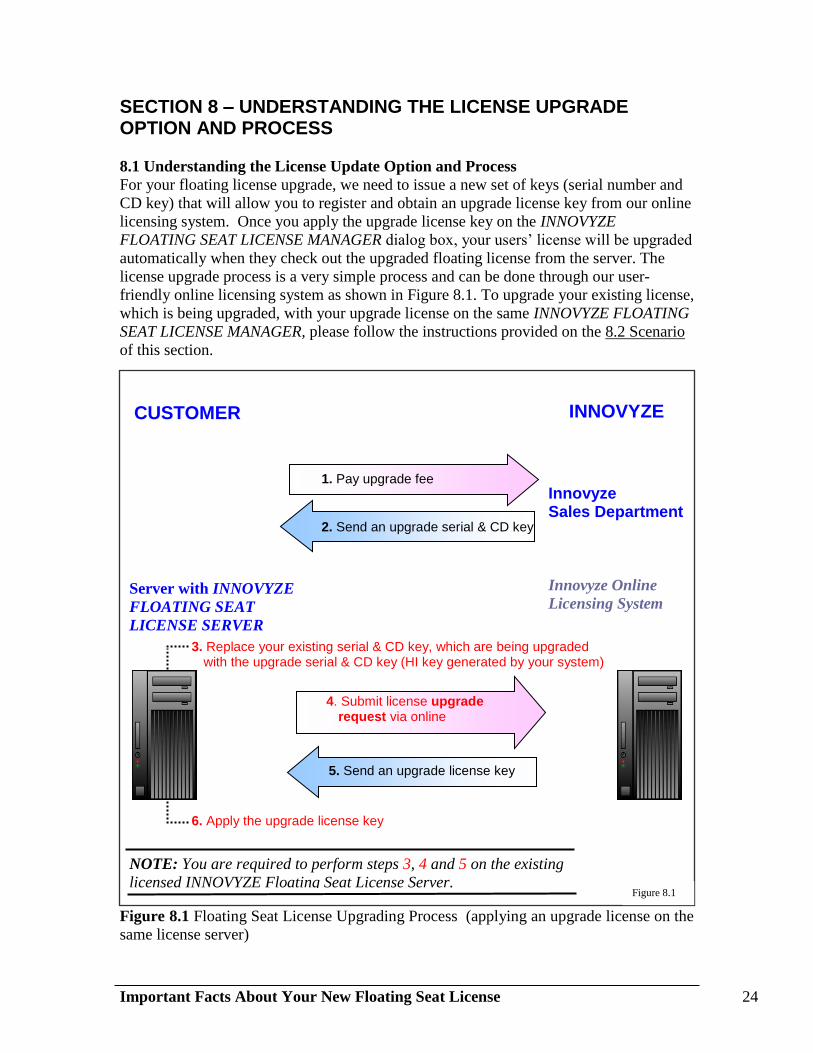
8.1 Understanding the License Update Option and Process
For your floating license upgrade, we need to issue a new set of keys (serial number and
CD key) that will allow you to register and obtain an upgrade license key from our online
licensing system. Once you apply the upgrade license key on the INNOVYZE
FLOATING SEAT LICENSE MANAGER dialog box, your users’ license will be upgraded
automatically when they check out the upgraded floating license from the server. The
license upgrade process is a very simple process and can be done through our user-
friendly online licensing system as shown in Figure 8.1. To upgrade your existing license,
which is being upgraded, with your upgrade license on the same INNOVYZE FLOATING
SEAT LICENSE MANAGER, please follow the instructions provided on the 8.2 Scenario
of this section.
Figure 8.1 Floating Seat License Upgrading Process (applying an upgrade license on the
same license server)
Innovyze Online
Licensing System
Innovyze Sales Department
1. Pay upgrade fee
2. Send an upgrade serial & CD key
3. Replace your existing serial & CD key, which are being upgraded with the upgrade serial & CD key (HI key generated by your system)
4. Submit license upgrade request via online
5. Send an upgrade license key
6. Apply the upgrade license key
CUSTOMER INNOVYZE
NOTE: You are required to perform steps 3, 4 and 5 on the existing
licensed INNOVYZE Floating Seat License Server. Figure 8.1
Server with INNOVYZE
FLOATING SEAT
LICENSE SERVER
Important Facts About Your New Floating Seat License 25
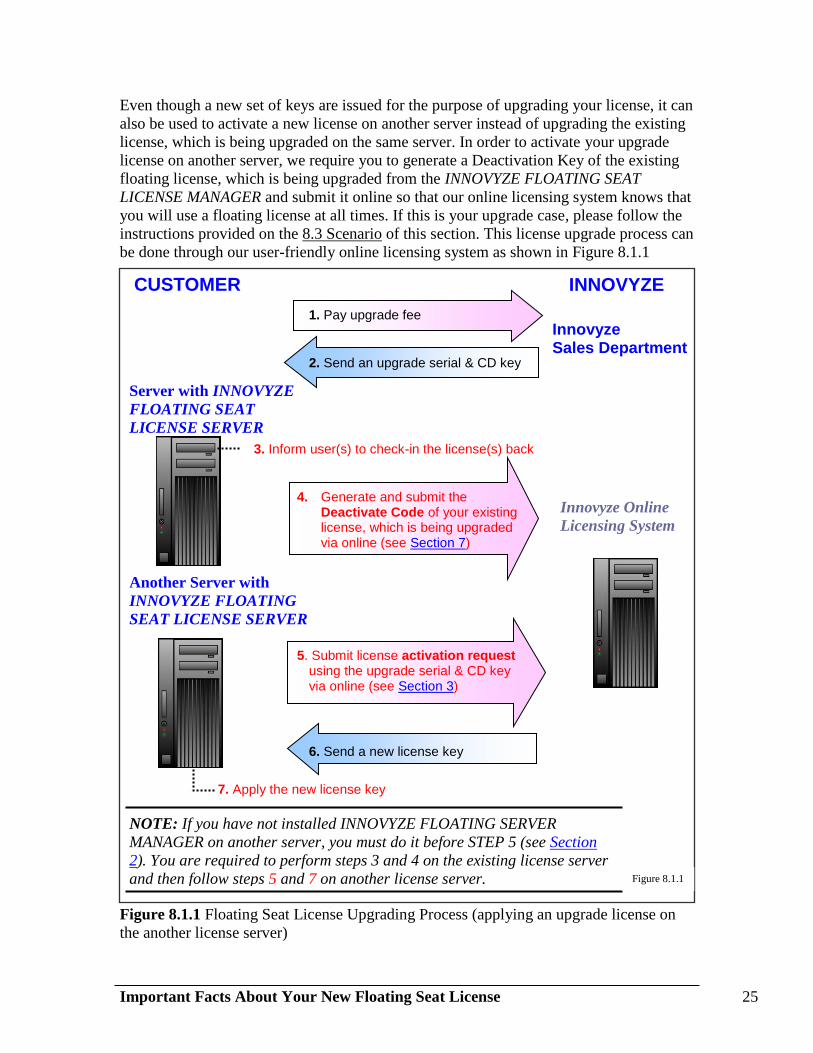
Even though a new set of keys are issued for the purpose of upgrading your license, it can
also be used to activate a new license on another server instead of upgrading the existing
license, which is being upgraded on the same server. In order to activate your upgrade
license on another server, we require you to generate a Deactivation Key of the existing
floating license, which is being upgraded from the INNOVYZE FLOATING SEAT
LICENSE MANAGER and submit it online so that our online licensing system knows that
you will use a floating license at all times. If this is your upgrade case, please follow the
instructions provided on the 8.3 Scenario of this section. This license upgrade process can
be done through our user-friendly online licensing system as shown in Figure 8.1.1
Figure 8.1.1 Floating Seat License Upgrading Process (applying an upgrade license on
the another license server)
Innovyze Online
Licensing System
4. Generate and submit the Deactivate Code of your existing license, which is being upgraded via online (see Section 7)
5. Submit license activation request using the upgrade serial & CD key via online (see Section 3)
6. Send a new license key
7. Apply the new license key
CUSTOMER INNOVYZE
NOTE: If you have not installed INNOVYZE FLOATING SERVER
MANAGER on another server, you must do it before STEP 5 (see Section
2). You are required to perform steps 3 and 4 on the existing license server
and then follow steps 5 and 7 on another license server. Figure 8.1.1
Server with INNOVYZE
FLOATING SEAT
LICENSE SERVER
Another Server with
INNOVYZE FLOATING
SEAT LICENSE SERVER
Innovyze Sales Department
1. Pay upgrade fee
2. Send an upgrade serial & CD key
3. Inform user(s) to check-in the license(s) back

Important Facts About Your New Floating Seat License 26
8.2 Scenario: Upgrading Your License on the Same License Server
In order to upgrade your existing license, which is being upgraded from your existing
INNOVYZE FLOATING LICENSE MANAGE, please follow the instructions below.
NOTE: The following installation needs to be done on your server. If you
are a server administrator follows the instructions below. Otherwise, you
must contact your server administrator in order to perform the following
installation and/or upgrade your existing floating license from the
INNOVYZE FLOATING SEAT LICENSE MANAGER on your server.
STEP 1. Locate the Floating Seat License Manager, which has your existing
floating seat license(s).
STEP 2. From your Floating Seat License Manager, highlight the license that needs
to be upgraded. Your user does not need to check the license(s) back in for
the upgrade process.
STEP 3. Replace the existing serial number and CD key with the upgrade serial
number and CD key.
STEP 4. Set the REQUEST LICENSE KEY ON-LINE FOR dropdown menu to
“Upgrade” and click on the GO button to activate your Internet browser
and open Innovyze’s REQUEST LICENSE ONLINE webpage.

Important Facts About Your New Floating Seat License 27
STEP 5. After you submit your license upgrade request, our on-line license
activation system will automatically display a renewal CD key and
License Key on the webpage and a confirmation email of your request will
be delivered to your email address as well.
STEP 6. Apply an upgrade license key on the INNOVYZE FLOATING SEAT
LICENSE MANAGER dialog box and click on the APPLY button.
STEP 7. Finally, install the Innovyze product(s) using the provided software
download from the Innovyze Website. After the installation has been
completed, Users have the capability of checking-in and checking-out a
floating seat license from the server up to the maximum number of
concurrent users permitted by the license. To find out more information
about how to check out the license(s), please read the Floating License
Server Users Guide. To install the Innovyze product(s), perform the
following procedure:
STEP 7a. From your client computer, login with administrator rights.
Important Facts About Your New Floating Seat License 28
STEP 7b. If the Innovyze product needs to be reinstalled (we recommend you
to uninstall the previous installation) or installed on your client
computer using the provided software download from the Innovyze
Website, please do so now.
STEP 7c. From the LICENSE OPTIONS dialog box as shown below, check on
the “Floating License” radio button.
STEP 7d. From the FLOATING LICENSE SERVER ENTRY dialog box,
specify the location of your Innovyze Floating License Server by
clicking on the “Browse” button or typing the name or IP address of
your server where the Innovyze Floating License Server is installed.
STEP 7e. From the SETUP OPTIONS dialog box, check on the “Local Stand-
alone installation (standard)” radio button. Local Stand-alone
basically puts both the shared files and the client machine specific
files in the client computer. It is the recommended option since the
Central Repository option installs the example files and client
computer specific files into the client computer and also installs the
common files to a central location. If the administrator updated the
central repository but forgot to update the client computer, it would
cause the program not to work. Also if a particular user wants to use
a different version than the one in the Central Repository, you will
have to manage the version differences amongst users. The majority
of our customers use the Local Stand-alone option.
STEP 7f. After you have completed the installation, check to see if the client
computer is correctly configured: 1) if the client machine uses
Windows XP SP 2, you need to either disable the Windows Firewall
or open the port 5367. This port needs to be open for the client
machine and the server to communicate. 2) your users need to have
read/write/modify permissions to C:\Windows directory or the ini
files (H2OSM.ini, H2OSW.ini, H2OWR.ini, HNET400.ini,
INFOSM.ini, INFOSW.ini, or INFOWR.ini) on the client machine.
Important Facts About Your New Floating Seat License 29
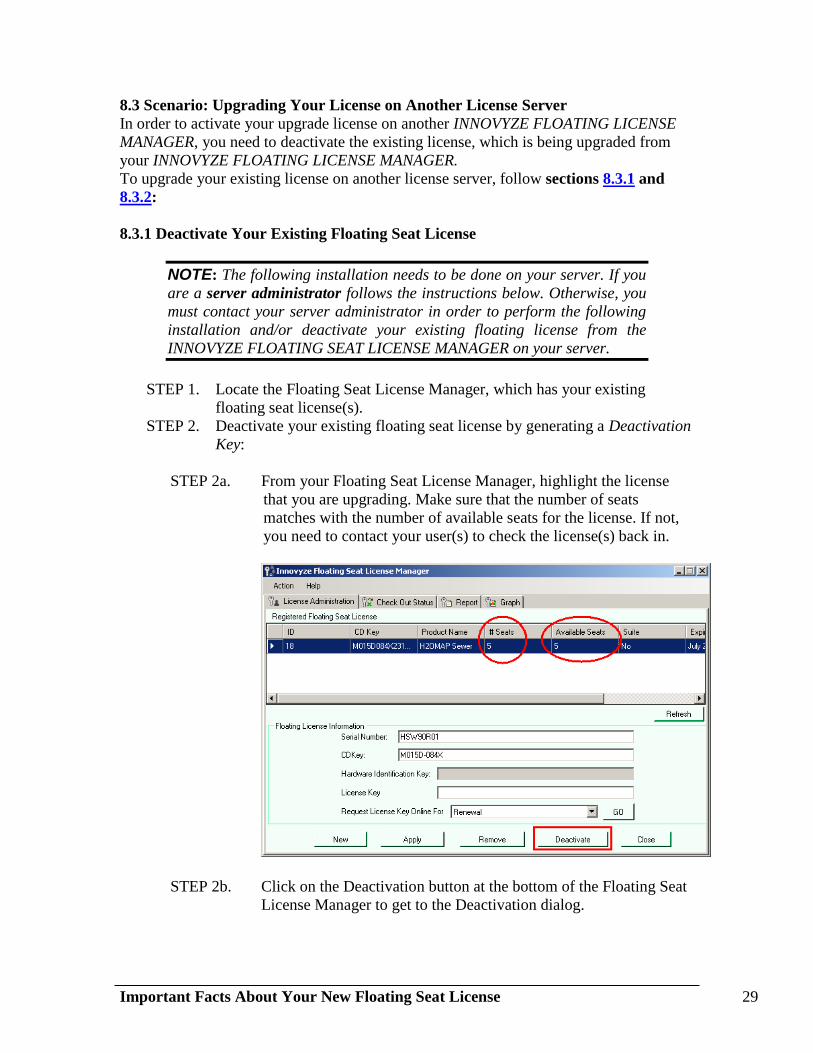
8.3 Scenario: Upgrading Your License on Another License Server
In order to activate your upgrade license on another INNOVYZE FLOATING LICENSE
MANAGER, you need to deactivate the existing license, which is being upgraded from
your INNOVYZE FLOATING LICENSE MANAGER.
To upgrade your existing license on another license server, follow sections 8.3.1 and
8.3.2:
8.3.1 Deactivate Your Existing Floating Seat License
NOTE: The following installation needs to be done on your server. If you
are a server administrator follows the instructions below. Otherwise, you
must contact your server administrator in order to perform the following
installation and/or deactivate your existing floating license from the
INNOVYZE FLOATING SEAT LICENSE MANAGER on your server.
STEP 1. Locate the Floating Seat License Manager, which has your existing
floating seat license(s).
STEP 2. Deactivate your existing floating seat license by generating a Deactivation
Key:
STEP 2a. From your Floating Seat License Manager, highlight the license
that you are upgrading. Make sure that the number of seats
matches with the number of available seats for the license. If not,
you need to contact your user(s) to check the license(s) back in.
STEP 2b. Click on the Deactivation button at the bottom of the Floating Seat
License Manager to get to the Deactivation dialog.

Important Facts About Your New Floating Seat License 30
STEP 2c. Once you are sure you want to deactivate, click on the “Deactivate
License” button. You will be prompted one last time before your
license is deactivated on the current machine.
STEP 2d. Submit the Deactivation Key via online.
STEP 3. If you have installed the FLOATING SEAT LICENSE MANAGER on your
server, you may now launch it and go to STEP 5. If you have not launched
the FLOATING LICENSE SERVER MANAGER on your server yet, you

Important Facts About Your New Floating Seat License 31
must launch it properly. To find out more information about how to install
the FLOATING SEAT LICENSE MANAGER, please read the Floating
License Server Users Guide. To install the FLOATING SEAT LICENSE
MANAGER on your server, perform the following procedure:
STEP 3a. Turn on your computer and start Windows. Close any other
applications that are currently running. This installation
REQUIRES A SYSTEM REBOOT at the end of the installation
process in order to make this software work properly. Please be
prepared to do so at the end of the installation wizard.
STEP 3b. Insert the FLOATING SEAT LICENSE MANAGER CD into the
CD-ROM drive.
STEP 3c. From the START menu, choose the RUN command, designate the
CD-ROM drive, and enter the path name and setup. For example,
type “d:launch.exe” into the COMMAND LINE box and then click
on the OK button (or press ENTER key).
STEP 3d. Follow the on-screen instructions for system specific information.
STEP 3e. You MUST REBOOT YOUR SYSTEM immediately following
the installation program. Failure to do so will prevent certain
clients from being able to access the system.
STEP 3f. After reboot, from the START menu navigate to PROGRAMS and
then to INNOVYZE FLOATING LICENSE SERVER and launch
FLOATING LICENSE SERVER MANAGER. Click on the Help
menu and select About.
STEP 3g. The ABOUT dialog box should appear as shown below Your Serial
Number, CD key, and Hardware Identification Key appear in the
ABOUT dialog box.
STEP 3h. Set the REQUEST LICENSE KEY ON-LINE FOR dropdown menu
to “Activation” and click on the GO button to activate your Internet
browser and open Innovyze’s REQUEST LICENSE ONLINE
webpage.

Important Facts About Your New Floating Seat License 32
STEP 3i. After you submit your license activation request, our on-line license
activation system will automatically display a new License Key on
the webpage and a confirmation email of your request will be
delivered to your email address as well.
STEP 3j. Finally, click on the APPLY LICENSE CHANGES button to
complete the activation process and close the ABOUT dialog box.

Important Facts About Your New Floating Seat License 33
8.3.2 Activate Your New Upgrade Floating Seat License
NOTE: The following installation needs to be done on your server. If you
are a server administrator follow the instructions below. Otherwise, you
must contact your server administrator in order to perform the following
installation and/or insert the new upgrade floating license into the
FLOATING SEAT LICENSE MANAGER on your server.
STEP 1. From the INNOVYZE FLOATING SEAT LICENSE MANAGER, click on
the NEW button to clear the FLOATING LICENSE INFORMATION area.
Fill in the new Serial Number and CD key.

Important Facts About Your New Floating Seat License 34
STEP 2. Set the REQUEST LICENSE KEY ON-LINE FOR dropdown menu to
“Activation” and click on the GO button to activate your Internet browser
and open Innovyze’s REQUEST LICENSE ONLINE webpage.
STEP 3. After you have received the License Key, click on the APPLY button of
the INNOVYZE FLOATING SEAT LICENSE MANAGER dialog box to
activate the product. Repeat STEP 4 and STEP 5 to add additional
Innovyze products.
STEP 4. Finally, install the Innovyze product(s) using the provided software
download from the Innovyze Website on your client computer. After the
installation has been completed, Users have the capability of checking-in
and checking-out a floating seat license from the server up to the

Important Facts About Your New Floating Seat License 35
maximum number of concurrent users permitted by the license. To find
out more information about how to check out the license(s), please read
the Floating License Server Users Guide. To install the Innovyze
product(s), perform the following procedure:
STEP 4a. From your client computer, login with administrator rights.
STEP 4b. If the Innovyze product needs to be reinstalled (we recommend
you to uninstall the previous installation) or installed on your client
computer using the provided software download from the Innovyze
Website, please do so now.
STEP 4c. From the LICENSE OPTIONS dialog box as shown below, check
on the “Floating License” radio button.
STEP 4d. From the FLOATING LICENSE SERVER ENTRY dialog box,
specify the location of your Innovyze Floating License Server by
clicking on the “Browse” button or typing the name or IP address
of your server where the Innovyze Floating License Server is
installed.
STEP 4e. From the SETUP OPTIONS dialog box, check on the “Local
Stand-alone installation (standard)” radio button. Local Stand-
alone basically puts both the shared files and the client machine
specific files in the client computer. It is the recommended option
since the Central Repository option installs the example files and
client computer specific files into the client computer and also
installs the common files to a central location. If the administrator
updated the central repository but forgot to update the client
computer, it would cause the program not to work. Also if a
particular user wants to use a different version than the one in the
Central Repository, you will have to manage the version
differences amongst users. The majority of our customers use the
Local Stand-alone option.
STEP 4f. After you have completed the installation, check to see if the client
computer is correctly configured: 1) if the client machine uses
Windows XP SP 2, you need to either disable the Windows
Firewall or open the port 5367. This port needs to be open for the
client machine and the server to communicate. 2) your users need
to have read/write/modify permissions to C:\Windows directory or
the ini files (H2OSM.ini, H2OSW.ini, H2OWR.ini, HNET400.ini,
INFOSM.ini, INFOSW.ini, or INFOWR.ini) on the client machine.