new toolkit - section 3 - behaviour support plan_ rids web viewnew toolkit – section 3,...
TRANSCRIPT

Behaviour support plan toolkitSection 3
Reporting within the restrictive intervention data system – electronic behaviour support plan(RIDS-eBSP)


Behaviour support plan toolkitSection 3
To receive this publication in an accessible format phone 9096 8427, using the National Relay Service 13 36 77 if required, or email [email protected]
Authorised and published by the Victorian Government, 1 Treasury Place, Melbourne.
© State of Victoria, Department of Health and Human Services April, 2017
Except where otherwise indicated, the images in this publication show models and illustrative settings only, and do not necessarily depict actual services, facilities or recipients of services. This publication may contain images of deceased Aboriginal and Torres Strait Islander peoples.
Available at <http://www.dhs.vic.gov.au/about-the-department/documents-and-resources/policies,-guidelines-and-legislation/behaviour-support-planning-practice-guide-senior-practitioner>
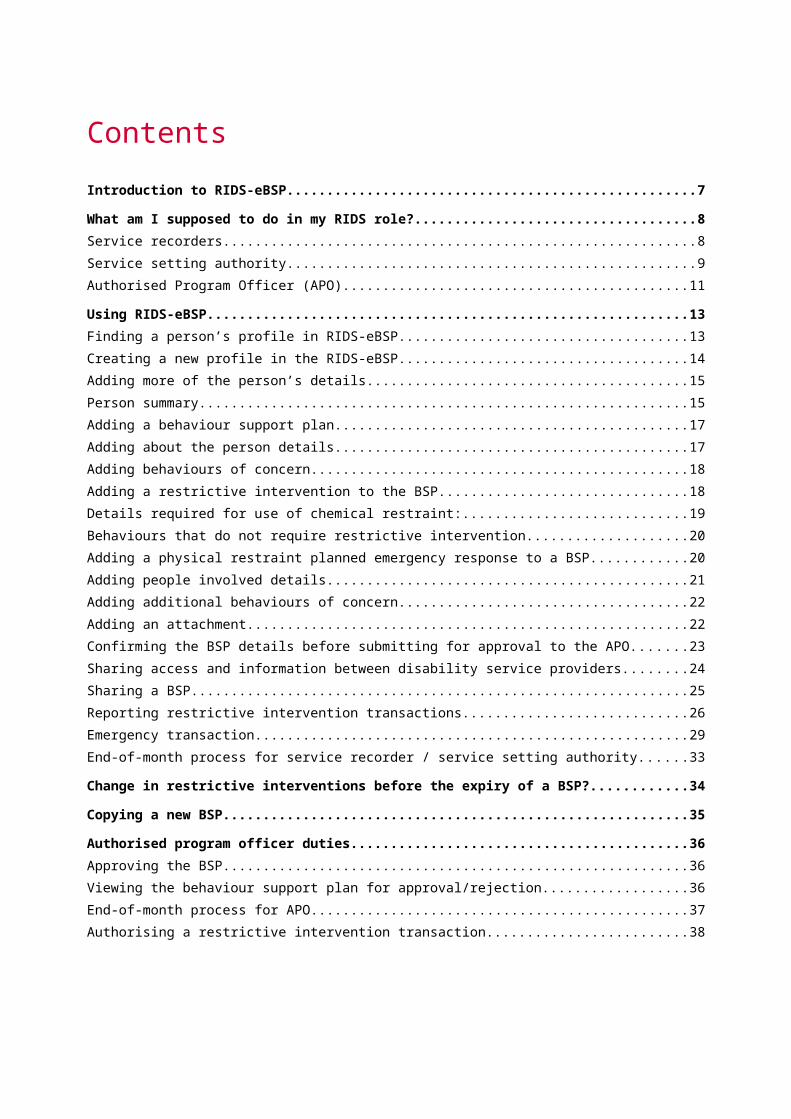
Contents
Introduction to RIDS-eBSP......................................................................................................................7
What am I supposed to do in my RIDS role?..........................................................................................8Service recorders........................................................................................................................................ 8
Service setting authority............................................................................................................................. 9
Authorised Program Officer (APO)...........................................................................................................11
Using RIDS-eBSP.................................................................................................................................... 13Finding a person’s profile in RIDS-eBSP..................................................................................................13
Creating a new profile in the RIDS-eBSP.................................................................................................14
Adding more of the person’s details..........................................................................................................15
Person summary....................................................................................................................................... 15
Adding a behaviour support plan..............................................................................................................17
Adding about the person details...............................................................................................................17
Adding behaviours of concern.................................................................................................................. 18
Adding a restrictive intervention to the BSP..............................................................................................18
Details required for use of chemical restraint:...........................................................................................19
Behaviours that do not require restrictive intervention..............................................................................20
Adding a physical restraint planned emergency response to a BSP.........................................................20
Adding people involved details................................................................................................................. 21
Adding additional behaviours of concern..................................................................................................22
Adding an attachment............................................................................................................................... 22
Confirming the BSP details before submitting for approval to the APO....................................................23
Sharing access and information between disability service providers......................................................24
Sharing a BSP.......................................................................................................................................... 25
Reporting restrictive intervention transactions..........................................................................................26
Emergency transaction............................................................................................................................. 29
End-of-month process for service recorder / service setting authority......................................................33
Change in restrictive interventions before the expiry of a BSP?.......................................................34
Copying a new BSP................................................................................................................................ 35
Authorised program officer duties........................................................................................................36Approving the BSP................................................................................................................................... 36
Viewing the behaviour support plan for approval/rejection.......................................................................36
End-of-month process for APO................................................................................................................. 37
Authorising a restrictive intervention transaction.......................................................................................38

New Toolkit – Section 3, Behaviour support plan Page 5

Introduction to RIDS-eBSP
This guide has been developed to support you to use the new online RIDS interface called RIDS-eBSP.
The intended audience for this guide is:
• disability support professionals – including support workers, team leaders and behaviour specialists• Authorised Program Officers (APOs).
Please contact the system administrator at the Office of Professional Practice for further assistance in using RIDS-eBSP on (03) 9096 0223.
We would like to acknowledge the RIDS user reference group and the disability service providers that contributed to this process for all their assistance and feedback in the development of RIDS-eBSP.
Page 6 New Toolkit – Section 3, Behaviour support plan

What am I supposed to do in my RIDS role?
Service recordersReport restrictive interventions
• Go to the ‘RI Transaction’ tab.• Search for a person with a disability’s profile.• Select the administration type such as ‘Routine’ or ‘PRN’.• Follow the prompts to report one or multiple restrictive intervention events.• Submit the change to the service setting authority for endorsement.• If all interventions are entered for the month or there is a ‘nil report’ – go to ‘End of Month Process’ to
complete the monthly report.
End-of-month process
If all interventions are entered for the month and authorised, or there is a ‘nil report’ for your service:
• Go to the ‘Reporting’ tab.• Select ‘End of Month Process’.• Select ‘Complete Monthly Reports’.
Report a BSP
• Go to the ‘Person Profile’ tab.• Search for a person with a disability’s profile.
– Require access? See Person Summary Section .– ‘Add BSP’ or select from the ‘BSP Summary’ to edit.
• Enter the BSP details (dates and independent person).• Use the information from an existing BSP (or create new information) to fill in all fields that relate to
behaviours of concern such as Function or De-escalation.• Add restrictive interventions per the behaviour to the BSP.• Add any additional behaviours of concern as required.• Add any attachments.• ‘Save as draft’ for further editing later or ‘Submit’ to the service setting authority for endorsement.
Sharing a BSP – request access to a profile
• Go to the ‘Person Profile’ tab.• Search for a person with a disability’s profile.• Request access.• Once approved by the relevant authorities, you will have access to the person’s profile.
Create a new profile for a person with a disability in RIDS Go to the ‘person profile’ tab.
• Select ‘New Person’.• Select the service setting.• Complete all details.• Save.
New Toolkit – Section 3, Behaviour support plan Page 7
Service setting authorityReport restrictive interventions
• Go to the ‘RI Transaction’ tab.• Search for a person with a disability’s profile.• Select the administration type such as ‘Routine’ or ‘PRN’.• Follow the prompts to report one or multiple restrictive intervention events.• Your submission will be endorsed and submitted to an APO for authorisation.
Endorse restrictive intervention transactions
• Go to ‘To Do Items’.• Go to ‘RI Transactions’.• Review and endorse the use of restrictive interventions.
End-of-month process
If all interventions are entered for the month and authorised, or there is a ‘nil report’ for your service:
• Go to the ‘Reporting’ tab.• Select ‘End of Month Process’.• Select ‘Complete monthly reports’.
Report a BSP
• Go to the ‘Person Profile’ tab.• Search for a person with a disability’s profile.
– Require access? See Person Summary Section.– ‘Add BSP’ or select from ‘BSP Summary’ to edit.
• Enter the BSP details (dates and independent person).• Use the information from an existing BSP (or create new information) to fill in all fields that relate to
behaviours of concern such as Function and De-escalation.• Add restrictive interventions per the behaviour to the BSP.• Add any additional behaviours of concern as required.• Add any attachments.• ‘Save as Draft’ for further editing later or ‘Submit’ to the service setting authority for endorsement.
Sharing a BSP – request access to a profile
• Go to the ‘Person Profile’ tab.• Search for a person with a disability’s profile.• Request access.• Once approved by the relevant authorities, you will have access to the person’s profile.
Grant access to a service setting
• Go to ‘To Do Items’.• Go to ‘System Access Requests’.• Review the request and approve access.
Page 8 New Toolkit – Section 3, Behaviour support plan
Create a new profile for a person with a disability in RIDS
• Go to the ‘Person Profile’ tab.• Select ‘New Person’.• Select the service setting.• Complete all details.• Save.
New Toolkit – Section 3, Behaviour support plan Page 9
Authorised Program Officer (APO)Report restrictive interventions
• Go to the ‘RI Transaction’ tab.• Search for a person with a disability’s profile.• Select the administration type such as ‘Routine’ or ‘PRN’.• Follow the prompts to report one or multiple restrictive intervention events.• The submission will be authorised.
Authorising restrictive intervention transactions
• Go to ‘To Do Items’.• Go to ‘RI Transactions’.• Review and approve the use of restrictive interventions.
End-of-month process
If all interventions are entered for the month and authorised, or there is a ‘nil report’ for your service:
• Go to ‘Reporting’.• Select ‘End of Month Process’.• Select ‘Complete Reports to Senior Practitioner’.• Select ‘Submit’ to complete monthly reporting.
Report a BSP
• Go to the ‘Person Profile’ tab.• Search for a person with a disability’s profile.
– Require access? See request access below.– ‘Add BSP’ or select from ‘BSP Summary’ to edit.
• Enter the BSP details (dates and independent person).• Use the information from an existing BSP (or create new information) to fill in all fields that relate to
behaviours of concern such as Function and De-escalation.• Add restrictive interventions per the behaviour to the BSP.• Add any additional behaviours of concern as required.• Add any attachments.• ‘Save as Draft’ for further editing later or ‘Submit’ to the service setting authority for endorsement.
Approve a BSP
• Go to ‘To Do Items’.• Go to ‘BSP’.• Review, approve and report the BSP.
Grant access to a profile
• Go to ‘To Do Items’.• Go to ‘Person Access’.• Review the request and approve access.
Grant access to a service setting
• Go to ‘To Do Items’.• Go to ‘System Access Requests’.
Page 10 New Toolkit – Section 3, Behaviour support plan
• Review the request and approve access.
Create a new profile for a person with a disability in RIDS
• Go to the ‘Person Profile’ tab.• Select ‘New Person’.• Select the service setting.• Complete all details.• Save.
New Toolkit – Section 3, Behaviour support plan Page 11
Using RIDS-eBSP
Finding a person’s profile in RIDS-eBSPGo to the ‘Person Profile’ tab:
Dropdown selection lists for Service Setting produces a list of people associated with that service setting.
By clicking the
Detailed Search… option you can search for people you wish to find or share access to.
Detailed search
(a) Enter the search data (ensuring correct spelling) into ‘First Name’ and ‘Last Name’. ‘CRIS Number’. ‘Date of Birth’ is optional.
(b) Select ‘Search’ and if the person is in RIDS, their name will appear below the search criteria.
(c) Click ‘Select’ to go into the person’s profile. Basic Search takes you back to a search by service setting
If the person is not in RIDS-eBSP then click on ‘New Person’ (see creating a new profile in the RIDS-eBSP next).
Page 12 New Toolkit – Section 3, Behaviour support plan
Creating a new profile in the RIDS-eBSP(a) Select the service setting and click ‘OK’.
(b) Fill out the personal details. All fields are mandatory except ‘CRIS Reference’ and ‘Middle Name’.
(c) You can attach a photo of the person by clicking ‘Attach Photo’. If you are going to attach a photo of the person then you need to gain the person’s consent.
(d) Click ‘Next’ to check for a duplicate profile in RIDS-eBSP.
If a similar profile appears then confirm whether it is the same person or not by clicking ‘Duplicate’ or ‘Not Duplicate’.
If you are unsure contact the RIDS System Administrator to check for correct spelling and confirmation that you are not creating a duplicate person which will be deleted.
New Toolkit – Section 3, Behaviour support plan Page 13

Adding more of the person’s details(a) Select and enter the person’s details as necessary.
(b) All details are mandatory except for ‘CRIS Reference’, ‘Middle Name’ and ‘Cultural and Linguistic Diverse?’.
(c) If the person has an intellectual disability as their primary disability and does not have a secondary disability then ‘None’ must be selected for ‘Disability Group Other’.
(d) Click ‘Save’ to save this information.
Person summary(a) If you have access to the person’s profile there are three to five options depending on services you
access:
• ‘View Person’ – view personal details• ‘Edit Person’ – to edit personal details or attach a photo• ‘Cancel Access’ – used if the person is no longer active in RIDS-eBSP due to being deceased,
no longer receiving restrictive interventions or no longer receiving services from your organisation• Request Access – share access to the person where the BSP is created by the Primary service
setting• Request Transfer – to become the Primary Service Setting and create the BSP
Page 14 New Toolkit – Section 3, Behaviour support plan

(b) Further down on the screen are two options to select from. Beside each option is a ‘+’ sign. When clicking on either of these options, the information below these sections is expanded. The ‘+’ then turns into a ‘–’ (see screen next page) Click on the option again and the title will collapse back to one line with a ‘+’ sign beside it. Note: This concept is used throughout RIDS-eBSP.
(c) Beside each of these three options is a number in brackets. These indicate:
• BSP Summary – the total number of BSPs entered • Status History – shows if the person is active in RIDS-eBSP.
(d) ‘BSP Summary’ details:
• Ref No a reference number • Type-- a BSP type (Normal/Emergency Transaction/Treatment Order)• Start and End date of each BSP• Shared By - service providers who share that BSP.• Status – What stage of approval is the BSP at
(e) You can click ‘Edit’ and change the data in a BSP if there is already a BSP for the person at your organisation in RIDS-eBSP.
• If the BSP has been submitted for approval to the APO you can either select ‘View’ to look at the BSP or modify the restrictive intervention, for example, if there is a change in medication dosage or to eliminate a restrictive intervention that is no longer used.
• You can click ‘Delete’ if you wish to delete a BSP. This can only be used before you submit a BSP.
(f) ‘Status History’ shows whether the person’s status is ‘Active’ or ‘Inactive’, the date last changed, who this change was made by and the reason for making them inactive. For example, the person may be deceased, no longer receiving restrictive interventions or no longer accessing disability services.
(g) ‘BSP Summary’ Indicates the number of Current, Authorised and Archived BSPs
• Current – Will display the all of the last Normal Type BSPs up to 23 months and Emergency Transaction Type BSPs up to 6 months
• Authorised - Will display the all authorised BSPs for the last Normal Type BSPs up to 23 months and Emergency Transaction Type BSPs up to 6 months
• Archived - Will display the all of the Normal Type BSPs greater than 23 months old and Emergency Transaction Type BSPs over 6 months old
(h) ‘PV’ on the BSP indicates the BSP has had previous versions i.e. change to medications and by viewing the BSP you can drill down to view the older BSP.
New Toolkit – Section 3, Behaviour support plan Page 15

Adding a behaviour support plan(a) On the previous page, the image screen shows an ‘Add BSP’ button on the right-hand side of the
screen to add a new BSP.
(b) After clicking this you will see the screen below. The BSP type will default to ‘Normal’ (unless reporting emergency use of restrictive interventions; in this case it would come up as ‘Emergency’).
(c) Enter the start and end dates of the BSP – the duration must be no longer than 12 months. Dates should not be entered for example 23/4/2013 to 23/4/2014 is out of date on 23/4/2014, the end date should be 22/4/2014. RIDS will no longer accept these dates.
(d) The primary agency and service setting will self-populate from the person’s personal details. If there is a shared BSP (more than one disability service provider involved), these will show as well.
(e) Enter the name of the independent person who was made available to assist the person with a disability and this person’s contact phone number (in line with s. 143 of the Disability Act).
(f) It is important to indicate whether the person with a disability or guardian was consulted in planning the BSP (s. 141(3b) of the Act). This box must be ticked.
(g) Tick the box if you have completed a functional behaviour assessment.
Adding about the person detailsProvide a brief description in the mandatory categories – ‘History’, ‘Health’ and ‘Communication’. Other categories are optional as they may not apply to everyone.
Page 16 New Toolkit – Section 3, Behaviour support plan

Adding behaviours of concern(a) Select a ‘Behaviour’ from the drop-down menu and determine the justification for use of restraint as
per the Act:
• to prevent the person from causing physical harm to themselves or any other person, or• to prevent the person from destroying property where to do so could involve the risk of harm to
themselves or any other person.
(b) Underneath ‘Behaviour’, fill out a description of the behaviour. The description of a behaviour of concern needs to be clear, specific, easily understood by others and one that can then be used to gain reliable documentation on when the behaviour does and does not occur.
(c) There are five tabs to fill in: Trigger, Function, Positive Behaviour Support, De-escalation and Restrictive Intervention (see section 2 of toolkit)
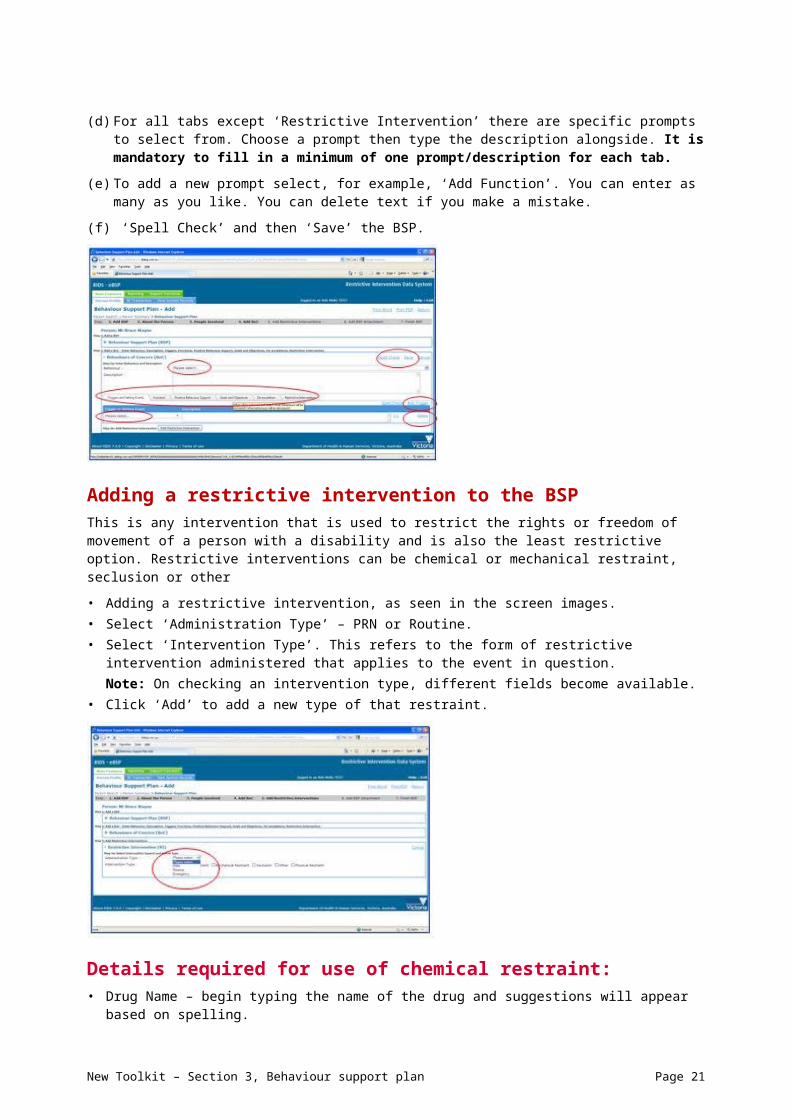
(d) For all tabs except ‘Restrictive Intervention’ there are specific prompts to select from. Choose a prompt then type the description alongside. It is mandatory to fill in a minimum of one prompt/description for each tab.
(e) To add a new prompt select, for example, ‘Add Function’. You can enter as many as you like. You can delete text if you make a mistake.
(f) ‘Spell Check’ and then ‘Save’ the BSP.
Adding a restrictive intervention to the BSPThis is any intervention that is used to restrict the rights or freedom of movement of a person with a disability and is also the least restrictive option. Restrictive interventions can be chemical or mechanical restraint, seclusion or other
• Adding a restrictive intervention, as seen in the screen images.• Select ‘Administration Type’ – PRN or Routine.• Select ‘Intervention Type’. This refers to the form of restrictive intervention administered that applies
to the event in question.Note: On checking an intervention type, different fields become available.
• Click ‘Add’ to add a new type of that restraint.
New Toolkit – Section 3, Behaviour support plan Page 17

Details required for use of chemical restraint:• Drug Name – begin typing the name of the drug and suggestions will appear based on spelling.• Dosage – individual dose of drug.• Measurement – the options of g, mcg, mg and ml will appear in a drop-down menu.• Frequency – how many times per day, week, month and so on.• Route – drop-down options of Implant, Injection, Oral, PEG, PV (per vagina), Rectal.• Prescriber – General Practitioner, Gynaecologist, Neurologist, Paediatrician, Psychiatrist.• Prescriber’s Name – free text fields for first and last name.• Click ‘Save’.
Details required for use of mechanical restraint:• Type – if ‘Other’ is selected, you are required to describe what the proposed restrictive intervention is.• Fill in the start and end times.
Details required for use of seclusion:• Describe the seclusion method.• Fill in the start and end times.
Page 18 New Toolkit – Section 3, Behaviour support plan

Behaviours that do not require restrictive interventionIf the person has several different behaviours of concern and some don’t require the use of restrictive interventions to support the person, then you must select ‘Add Restrictive Intervention’, then select ‘Other’ and ‘Routine’ from the administration type. Select ‘Add’ and then tick the box that says ‘None’.
Adding a physical restraint planned emergency response to a BSPIf you feel you have a requirement for Planned Emergency Response for a physical restraint, please contact a Practice Leader or Practice Advisor from Senior Practitioner – Disability, before you add ths to the BSP.
(a) In the Restrictive Intervention Tab click on Add Restrictive Interventions.
(b) Click on the ‘Emergency’ option from the Administration type drop down.
(c) This will automatically select the Emergency option of intervention type and display a check list that is required to be read and a question check box to confirm this.
New Toolkit – Section 3, Behaviour support plan Page 19

On checking this box a detailed template will be displayed of the mandatory requirements of the Planned Emergency response.
Adding people involved detailsComplete the People involved table using the ‘Select Agency Staff’, ‘Enter External Person’ and ‘Add Non System User’. There must be at least one person involved in the BSP.
Provide a description in the mandatory categories of the Team Co-ordination and Review section – ‘Team Co-ordination’ and ‘Communication and Review’.
Page 20 New Toolkit – Section 3, Behaviour support plan
Adding additional behaviours of concern(a) ‘Add Next BoC’ – there may be one or multiple behaviours of concern. You need to record each
behaviour of concern separately; for example, a person may display harm-to-self behaviours and also property damage with harm to others.
(b) ‘Add Attachment’ – used to attach documents to the BSP such as a person-centred plan, referrals, medical/psychiatric reports, BIST reports and other documentation.
(c) ‘Save as Draft’ – this button allows you to come back and finish the report at a later date. (Note: The BSP/restrictive intervention is not approved for use until submitted and confirmation of approval is received.)
(d) ‘Save and Submit’ – submit for APO approval.
Adding an attachment(a) When adding an attachment, scroll to the bottom of the screen and select add then, click ‘Browse’ to
find the file and type a description such as Person-centred plan or Psychiatric report. Include detail such as the name of the document, author and date.
(b) Click ‘Save’.
New Toolkit – Section 3, Behaviour support plan Page 21

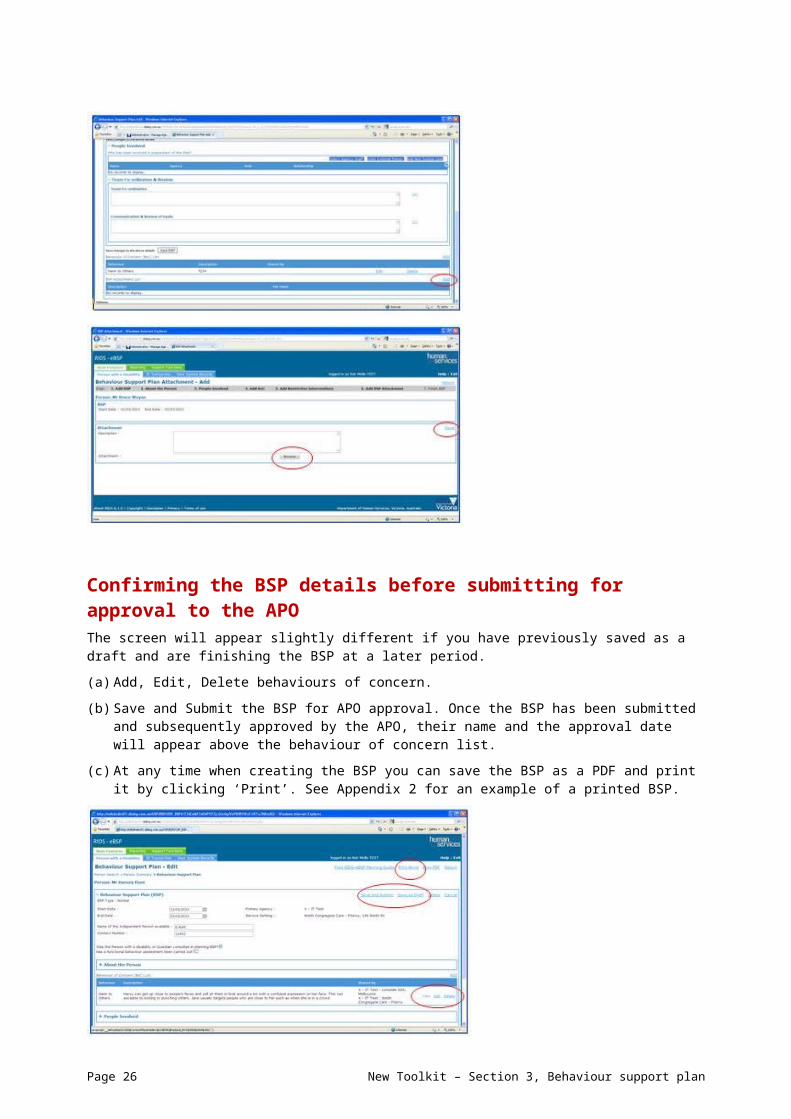
Confirming the BSP details before submitting for approval to the APOThe screen will appear slightly different if you have previously saved as a draft and are finishing the BSP at a later period.
(a) Add, Edit, Delete behaviours of concern.
(b) Save and Submit the BSP for APO approval. Once the BSP has been submitted and subsequently approved by the APO, their name and the approval date will appear above the behaviour of concern list.
(c) At any time when creating the BSP you can save the BSP as a PDF and print it by clicking ‘Print’. See Appendix 2 for an example of a printed BSP.
Page 22 New Toolkit – Section 3, Behaviour support plan

Sharing access and information between disability service providersFind a person with a disability’s profile (refer back to page 12) and select it.
(a) Beneath the person’s demographic details are two options.
• ‘Request Access’ – an email is automatically generated to your APO to approve the request and (where applicable) to the other agency for APO approval. In the event that the APO is absent or unable to approve access, you can contact the RIDS System Administrator who may grant emergency access until the APO is able to approve access.
• ‘Request Transfer’ – when clicking on this option you can request the transfer of the lead APO responsibilities from one APO or organisation to another. For example, this may be needed in the event that the person has moved accommodation to another organisation or region.
(b) After requesting access to the person’s profile, you are asked to make sure you want access to that person for that service setting. Click ‘Yes’ or ‘No’.
(c) A message will appear notifying you that an email has been automatically generated to both your APO and the other service’s APO requesting access.
(d) The APO from your disability service provider must first approve that you are requesting access to the profile of a person from another service.
(e) Once this is complete, the APO from the disability service provider where the person currently accesses services must approve your access to the person’s profile.
(f) When this is complete, both agencies will have access to that person’s profile.
New Toolkit – Section 3, Behaviour support plan Page 23

Sharing a BSPSharing means when there is more than one disability service provider or service setting providing disability support to the person; these services must be involved in preparing the BSP and sharing this information to effectively support the person.
In the event that neither the disability service provider nor the service setting has developed a BSP in RIDS-eBSP:
(a) All disability service providers should collaborate / be consulted in planning the person’s BSP.
(b) The lead agency (the disability service provider where the person accesses disability services the majority of the time or otherwise mutually agreed) enters the BSP using the information from all parties.
(c) This BSP can be submitted for approval (it will automatically be cancelled once the other disability service provider(s) submits the same BSP and an approval application will be sent to both APOs).
(d) After gaining access to the person’s profile, the second (and so on) disability service provider can view the BSP, and make changes by clicking ‘Join and Share BSP’. You will then have to confirm that you want to create a new ‘shared’ BSP by clicking ‘OK’.
(e) Record additional behaviours of concern that might only occur by selecting Copy and Edit or Add, or select Use for behaviours that might occur at both settings and submit these for approval. This submission goes to both APOs to approve the sharing of a BSP.
Page 24 New Toolkit – Section 3, Behaviour support plan

NOTE:
1. When an e-BSP is shared then all APOs have to approve it.
2. Where a BSP was previously shared it will need to be re-joined when the new BSP has been created. Notifications will go out to all the services where the BSP was previously shared so that if the sharing is still required the BSP can be reviewed and shared and/or modified by the sharing service.
This will ensure that if the access is no longer require the access can be cancelled by the service. This should not stop the consultation that should go on as per Section 142(3)(c) of the Disability Act.
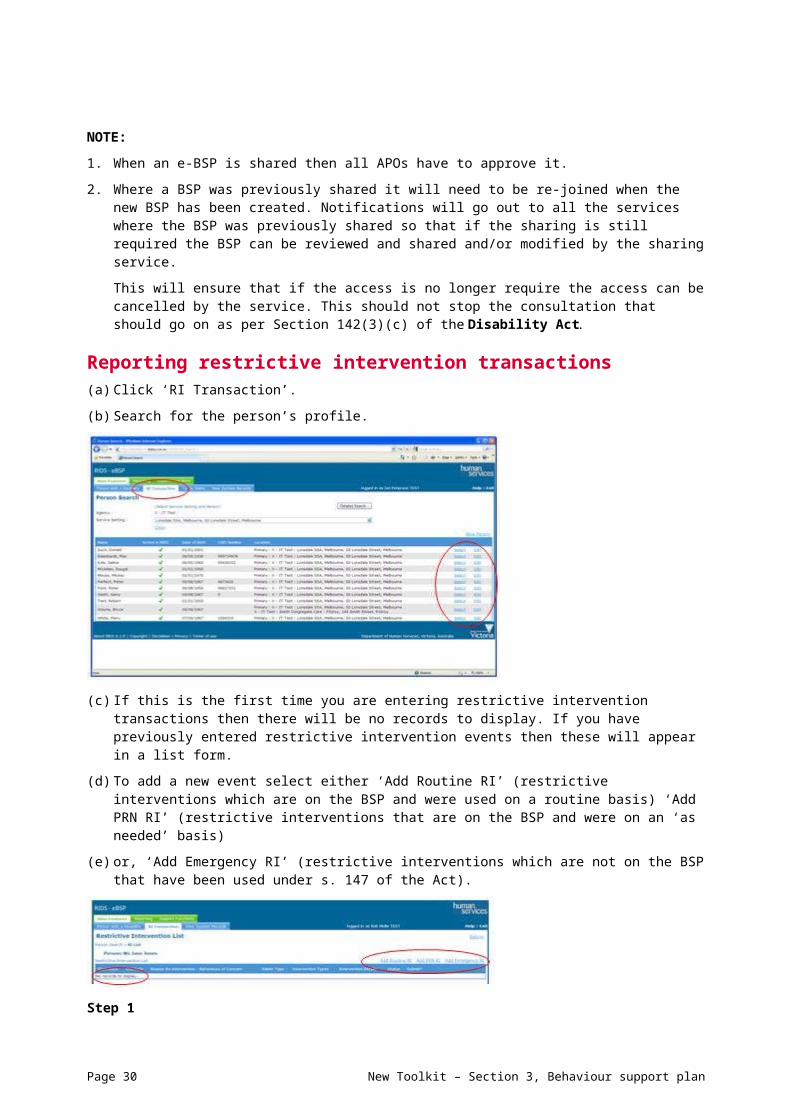
Reporting restrictive intervention transactions(a) Click ‘RI Transaction’.
(b) Search for the person’s profile.
(c) If this is the first time you are entering restrictive intervention transactions then there will be no records to display. If you have previously entered restrictive intervention events then these will appear in a list form.
(d) To add a new event select either ‘Add Routine RI’ (restrictive interventions which are on the BSP and were used on a routine basis) ‘Add PRN RI’ (restrictive interventions that are on the BSP and were on an ‘as needed’ basis)
(e) or, ‘Add Emergency RI’ (restrictive interventions which are not on the BSP that have been used under s. 147 of the Act).
Step 1
• Do you want to reuse the person’s previous reporting period’s RI transactions? • Click ‘Yes’ or ‘No’.
If this is the first time you are entering restrictive intervention transactions then click ‘No’.• If ‘Add PRN RI’ was selected then you are taken straight to Step 2 – Reporting Period.
New Toolkit – Section 3, Behaviour support plan Page 25
Step 2
• Select the reporting period – month and year.• Click ‘Apply Dates’.
Step 3
• Select a BSP from the BSP list.• You can add a new BSP here if you wish.
Step 4
• Select the restrictive interventions you need to report – you can select one or many by ticking/un-ticking the tick box.
• Click ‘Apply Template’.
Step 5
• A list of either chemical, mechanical and seclusion restrictive interventions appear based on what was previously entered into the BSP.
• You can edit or remove restrictive interventions here.• Click ‘Complete Transactions’.
Page 26 New Toolkit – Section 3, Behaviour support plan

Step 6
• Select RI transaction dates (start and end dates) by clicking the calendar icons.• Select the effectiveness of the intervention from the drop-down menu.• You can delete transactions if you have made a mistake.• You can add multiple RI transactions, for example, if a person has attended respite twice in one
month at two different periods and is on restrictive interventions. Do this by clicking ‘Add RI Dates’.
• Select ‘Save as Draft’ to come back at a later time to add other restrictive intervention transactions or select ‘Save and Submit’ to finish these transactions for submission.
Note: The start and end dates must be within the reporting month selected earlier and must also be within the BSP start and end dates.
New Toolkit – Section 3, Behaviour support plan Page 27

Emergency transactionClick ‘RI Transaction’.
Search for the person’s profile (refer back to page 12 if needed).
If this is the first time you are entering restrictive intervention transactions then there will be no records to display. If you have previously entered restrictive intervention events then these will appear in a list form.Entering of Emergency events has changed there is no longer a requirement for the entry of an Emergency Transaction BSP.
Note: Any Emergency Transaction BSPs on the Person summary page will be archived unless they are in a status of Draft, Submitted or Endorsed you will need to either action the Submitted or Endorsed Emergency Transaction BSPs or Delete or action any existing Draft Emergency Transaction BSPs. Please contact the RIDS helpdesk if you are unsure.
Entering of Emergency will have 3 categories. Details are as follows:
2. Emergency Transaction for actual Emergency interventions
3. Emergency Transaction for ‘Routine’ restrictive intervention – no BSP
4. Emergency Transaction for ‘PRN’ – no BSP
Emergency Transaction for actual Emergencies intervention such as Physical Restraint or where the intervention applied was not covered by a current BSP. This will go into an emergency entry. You will need the behaviour and description and the details of the restraint.
• Go to the ‘RI Tranasaction’ tab• Find and select the person• Click Add Emergency RI• Fill out details to define if transaction is related to a Planned Emergency Response to a Physical
Restraint.
Page 28 New Toolkit – Section 3, Behaviour support plan

Complete Transaction month.
You will need the behaviour and description and the details of the restraint.
Complete Transaction.
New Toolkit – Section 3, Behaviour support plan Page 29
Emergency transaction for ‘routine’ restrictive intervention Emergency Transaction for ‘Routine’ restrictive intervention where there is no Authorised BSP i.e. the BSP has expired and there is no BSP in place for the restrictive intervention or there is no Authorised BSP for the Person with a disability at the time of the administration of the restrictive intervention.
NOTE: Where these Emergency Transactions have been reported for two consecutive reporting periods they will be identified as not having a current BSP and the Divisional Directors will informed as a part of their KPIs for failing to meet their targets.
If there is no BSP for that period there will be a prompt for entry. You will need to click the Add Emergency RI option to complete the entry for the month. (this option will also be available if the BSP has expired mid-month)
• Go to the ‘RI Tranasaction’ tab• Find and select the person• Click Add Routine RI• BSP not available for reporting period • Click Add Emergency RI• Complete Transaction.
You will need the behaviour and description
Page 30 New Toolkit – Section 3, Behaviour support plan

Details of restraintThen click OK to complete or add additional medications.
You can add multple medications. Then click the Complete Transaction to finailise entry with the dates of the restraint.
Emergency transaction for ‘PRN’ restrictive intervention where there is no Authorised BSP i.e. the BSP has expired and there is no BSP in place for the restrictive intervention or there is no Authorised BSP for the Person with a disability at the time of the administration of the restrictive intervention. This similar to the what happens with the ‘Routine’ but entered is the information is the same as normal ‘PRN’
• Go to the ‘RI Tranasaction’ tab• Find and select the person• Click Add PRN RI• BSP not available for reporting period?• Click Add Emergency RI• Complete Transaction.
New Toolkit – Section 3, Behaviour support plan Page 31

End-of-month process for service recorder / service setting authority(a) Go to the ‘Reporting’ tab.
(b) Select ‘End of Month Process’.
(c) Select ‘Complete Monthly Reports’.
(d) Select the reporting month and year and click ‘Search’.
(e) Tick the box to complete selected services and then click ‘Complete Selected’ – you will be asked if all the restrictive interventions have been entered for that month – click ‘OK’. Please note if there is a red cross then this report cannot be submitted – please go back and check all transactions have been authorised.
Page 32 New Toolkit – Section 3, Behaviour support plan

Change in restrictive interventions before the expiry of a BSP?
If you have submitted a BSP and it has been authorised by your APO, you can edit the restrictive interventions.
(a) ‘Edit/Modify Restrictive Intervention’ the BSP.
(b) A message will appear to remind you that the BSP will need to be re-submitted for approval to become active. Click ‘OK’.
(c) View the behaviours of concern.
(d) ‘Edit’ the restrictive intervention(s).
(e) Go through the process to edit/add restrictive interventions by viewing the behaviours of concern and restrictive interventions.
(f) ‘Save and Submit’ the BSP.
If you wish to add other behaviours of concern, triggers, positive behaviour support strategies and so on, then you will need to create a new BSP. A BSP can be copied or edited once it has been Authorised, by selecting the View option associated the BSP.
New Toolkit – Section 3, Behaviour support plan Page 33

Copying a new BSP
Copy: To create a new version of an old BSP, select the Create and Copy option. This will copy the whole BSP but not the dates or the Independent Person because it will need new dates for a new period. It is important to review and modify the BSP information where necessary and delete and or attach the relevant documents associated with the new BSP. For example, if a new medication with increased restrictive effects is added this would indicate that the BSP needs to be reviewed. This would then trigger the ‘copy’ option and also require that the independent person needs to be consulted as this would be an increase in restriction. See Section 61 of the Disability Amendment Act 2012 for changes to the role of the Independent Person in the review of a BSP.
Only use Create and Copy when:
• you want to create a new version of an old BSP or• you need to change the BSP (due to a material change)
Please note: If the restrictive intervention has been changed because of a change in behaviour of concern you will need a new BSP and select Copy to be able to make changes to the behaviours of concern for a new period.
Edit: Use the Edit/Modify Restrictive Intervention option to update the restrictive interventions during the BSP period, but only if the change is not something significant. This will copy the whole BSP including the dates (which cannot be changed) and the Independent Person as it will be an edit of the existing BSP for a same period. For example, if a medication change is a reduction this would trigger the ‘Edit’ option and would not necessitate the independent person being involved. Only use edit to update an existing BSP
The RIDS-eBSP planning guideThe RIDS-eBSP Planning guide has been developed for behaviour support teams to assist them to write behaviour support plans that both comply with the legislation (Disability Act 2006) and are of a high quality. Our recent research (see Webber, Richardson, Lambrick and Fester, 2012) has shown that quality behaviour support plans result in less use of PRN. Other research (see McClean and Grey, 2012) has found that the single most important thing to implementing a support plan is that all members of the support team believe the plan will work, so it is critical to include all members in the planning stage. The RIDS-eBSP Planning guide is paper based so that it can be taken to a meeting and get input from all members of the team. The link to the copy of the RIDS-eBSP Planning guide can be found at the top of the BSP.
Page 34 New Toolkit – Section 3, Behaviour support plan

Authorised program officer duties
Approving the BSP(a) Select ‘To Do Items’. There are six tabs where there may be items that need to be reviewed and,
where appropriate, approval or rejection is required.
(b) ‘RI Transactions’ – approving and providing feedback or follow-up where necessary on the use of restrictive interventions.
(c) ‘BSP’ – approving a BSP and the use of the proposed restrictive intervention(s).
(d) ‘System Access Request’ – approving access to the RIDS-(eBSP) from either a service recorder or service setting authority.
(e) ‘Person Access’ – another service requires access to a person because they may be receiving more than one disability service.
(f) ‘Person Transfer’ – when a person who accesses disability services at your service moves to another disability service provider.
(g) ‘Person Access Cancel’ – when a person is no longer accessing disability services or is no longer receiving restrictive interventions or is deceased.
Viewing the behaviour support plan for approval/rejection(a) Go to the ‘BSP’ tab in the To Do List.
(b) Select the BSP that you are wishing to view to determine whether it is appropriate for approval.
(c) When selecting ‘View’ next to a behaviour of concern (see screen image below), you can then select the different tabs (About the Person, Triggers and Setting, Function, Positive Behaviour Support, De-escalation and Restrictive Intervention).
(d) Select ‘Return’ to go back to the previous screen to view more behaviours of concern or attachments.
(e) After viewing the whole BSP, you can approve or reject it. You can also review the BSP by clicking Print Word or Print PDF. If you are rejecting the BSP then you need to fill in the ‘Rejection Reason’ box. You will not be able to proceed with the rejection unless you fill in this box with text, for example, This is a duplicate BSP.
(f) If the dates of the BSP need to be adjusted this can be done at this point also.
New Toolkit – Section 3, Behaviour support plan Page 35

Note: Before rejecting a BSP, we encourage you to attempt to resolve issues in an alternative way such as discussing it over the phone with the author. If you reject a BSP then this will delete the BSP from RIDS and the whole BSP will have to be re-entered. Modifications cannot be made after a rejection.
End-of-month process for APO
(a) Go to the ‘Reporting’ tab.
(b) Select ‘End of Month Process’.
(c) Select ‘Monthly Reports to Senior Practitioner > Submit’.
(d) Select the reporting month and year and click ‘Generate Reports’.
(e) Select your reports to be submitted by ticking the box on the left-hand side (or select all).
(f) If there is a red cross under the Can Be Submitted column then there is a problem in the reporting line.
(g) Click your service setting to view further.
Page 36 New Toolkit – Section 3, Behaviour support plan

(h) As you can see in this case there are five outstanding restrictive intervention transactions that are submitted and need to be authorised.
(i) The appropriate person would then have to go back to their To Do List and ensure they are correctly authorised.
(j) Enter your total number of people at that service setting with a disability and then click ‘Save’.
Once you are back to the original page, click ‘Submit’.
Authorising a restrictive intervention transaction(a) Select the ‘To Do Items’.
(b) You will already be on the first tab, ‘RI Transactions’.
(c) You will see a list of the transactions that need to be viewed and authorised.
(d) Tick one or multiple transactions and click ‘Select’ to view the transaction or cancel.
For adding or creating a new compulsory treatment entry see the eTreatment plan guide
New Toolkit – Section 3, Behaviour support plan Page 37