new york city college of technology - city...
TRANSCRIPT

New York City College of Technology
Microsoft Word 2016
Contact Information: 718-254-8565 [email protected]
Opening Word 2016
Begin by clicking on the bottom left corner icon on the desktop.
From All Programs, click on Microsoft Office 2016 → Word 2016
You have the option of selecting a blank document, opening a recent document, or choosing from a
template.
Blank document is generally selected.
Office 2016 “Ribbon”
There are three parts in the Ribbon: Tabs, Groups, and Commands/Buttons. The ribbon is the
work bar located at the top of the document.
Hiding and unhiding the ribbon is optional by clicking on the upper right hand corner of the page.
1

File Tab
From the file tab you can open, save or create a new document.
Templates are available for multiple purposes such as: creating Letters, Resumes, Fax,
Labels, Cards and Calendars.
To open a template go into →
You can open existing documents by clicking on Open and browsing for your document.
Save As
Save As is used to save your document in a specific location. It can be saved anywhere within your
computer or USB drive.
If you want to save the document with a previous version of Word so that the document is fully compatible
with that version, go to Save As and select Word 97 – 2003 Document.
2

Bullet, Number
ont and Paragraph Group
Font Type
Bolden
Italicize Underline
Text
Left, Center, Right, Justified
Alignment
Line
F
Home Tab
Mini Toolbar
The easiest way to change the font of specific information is by using the Mini Toolbar. Highlight
Copying Text
There are various ways to copy text:
o Select the text, right click and select copy.
o Select text and press Ctrl + C
o Select text and press Copy from the home tab.
Format Painter
You can copy the format from a text to another.
Select the text whose format such as font, and style you want to copy.
Click on Format Painter button.
Drag the painter across the text you want to copy the format to.
Styles
You have several styles to choose from.
Select the text and click on the style you would like to add such as a heading, title or subtitle.
the text, right-click for the Mini Toolbar to appear and change the font.
3

Activity 1
1. Open up a blank Microsoft Word 2016 Workbook.
2. Type in the following sentence:
“Welcome to Microsoft Word 2016.”
3. Change the font face of the following sentence to Arial Black:
4. Select “Microsoft Word”, click the B button to change the text into bold.
5. Align the text to center.
6. Save this document as Practice Document on the desktop.
Insert Tab
Inserting a Page Break
A page break places text on to a new page.
To put a Page Break into a document, click Page Break under the Pages group
Inserting a Table
To insert a table click on Table, under Tables group and hover the mouse over the boxes to get
the number of rows and columns you want to insert into the table.
4

Inserting a Symbol
Click on the small arrow under the Symbols group and select the symbol you want to insert.
If the symbol you are looking for is not display, select More Symbols…
To add a header, go to INSERT →
Choose the type of header you desire.
The design tab will appear as soon as you begin to type your text into the header.
Inserting a Header and Footer
To add a footer, click on the footer button in the design tab.
Once you are done click on:
Adding Page N umbers
Click on → →
Inserting and Formatting an Image.
Click on Pictures from the Insert Tab.
Browse for the image you want to insert into the document and select Insert.
The image will appear on the document.
5

Column
A Format Tab to edit the image appears after you click on the image.
The images’ position can be specifically defined: Arrange Group.
o Position: Multiple options as per the images’ location on the document is available. Any text
around i t will automatically wrap around the image.
o Wrap Text: Feature used to set up how text wraps around the image.
o You can align the image on the page or rotate it.
Cropping is also an option.
Page Layout
Layout was renamed after Page Layout in Word 2013.
Use to set up margin size, paper size, or document Orientation.
Click on the small diagonal arrow in the lower right-hand corner of the Page Setup group, and the
Page Setup dialog box will appear to make necessary changes.
The column feature allows you to split the page into two, three, left and right columns.
Breaks
Adding several types of breaks is available.
Adding a Page Break marks the beginning of a new page.
6
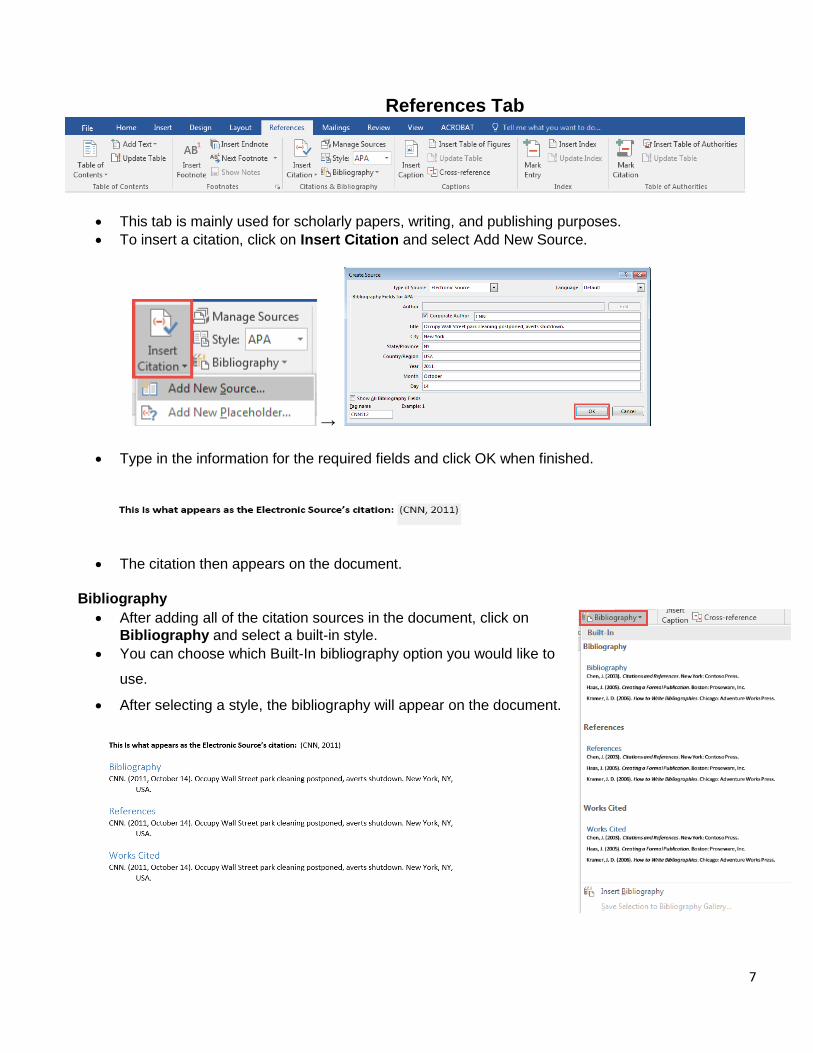
References Tab
This tab is mainly used for scholarly papers, writing, and publishing purposes.
To insert a citation, click on Insert Citation and select Add New Source.
→
Type in the information for the required fields and click OK when finished.
The citation then appears on the document.
Bibliography
After adding all of the citation sources in the document, click on
Bibliography and select a built-in style.
You can choose which Built-In bibliography option you would like to
use.
After selecting a style, the bibliography will appear on the document.
7

Mailings Tab
This tab is used for creating envelopes and labels and to do the mail merge.
Step 1: Click Start Mail merge.
Step 2: Select Step-by-Step Mail Merge Wizard…
Step 3: Select the document type. Click on Next: starting document.
Step 4: Select the document from current document, template or existing document to
begin mail merge. Click on Next: select recipients.
Step 5: Select Type a new list and click Create.
Step 6: Type in the names to create a new address list.
Step 7: Save the List to your files.
8

Step 8: The recipient list will appear. You can
sort or filter the list from here. Click OK when
you are done. Continue to step 4 of 6.
Step 9: Write your letter, position your cursor in front of the name of the recipients and click on
Greeting Line. The Insert Greeting Line will pop up. Make any necessary formatting changes and
click OK.
→
Step 10: You can preview the name of the recipients on your letter by clicking on the ribbon:
Step 11: Select Finish & Merge from the ribbon → Print Documents to print your merged
letters. Merging letters to Adobe PDF is also available.
9

Review Tab
Spelling and grammar can be checked from the Review tab, click Spelling & Grammar from the
Proofing group.
Comments can be added to proof-read a document and make notes to share
with others. To add a comment on a document, highlight the area where you
want to add a comment. Click New Comment from the Comments group.
Type the comment within the shaded comment area on the right-hand side.
You can hide or show the comments by clicking on Show Comments.
Tracking changes made to a document is available.
10

Activity 2
1. Type a sentence into the document: This is the o riginal sentence.
2. Click on Track Changes.
3. Delete the sentence and add: This is a revision. A r ed Cursor appears in the beginning of the
sentence.
4. To view the changes, click on the red cursor. The original sentence appears along with the
revised sentence.
5. Changes made to the document can either be accepted or rejected. Click on Accept to accept the changes or click on Reject to reject the changes.
6. After the changes are made to the document, they can either be accepted or rejected. Click Accept.
11

View Tab
The view tab allows you to customize the way in which you view your document.
Views Group
There are three ways to view the screen:
o Read Mode: Splits the screen in order for the document to be viewed in two pages.
o Print Layout: This is the default screen in which documents are viewed on the screen.
Documents are printed as shown.
o Web Layout: This screen allows you to view your document as a web page.
To show the ruler on the document, check Ruler on Show/Hide group.
Zoom Group
By selecting on Zoom, a window pops up with a variety of sizes to zoom in or
out of.
To see two documents side-by-side just click on View Side by Side icon and
two documents will split on the screen.
12

The “Quick Access” Toolbar
Located on the upper left hand corner of the page. Used to save changes made to a file, undo or
redo any changes made to the document.
Can be customize to facilitate the quick access to other buttons.
Activity 3 1. Open Word 2016.
2. Type the following =rand(10,2) (this generates 10 paragraphs of text with two
sentence in each paragraph.)
3. Select the entire text by clicking on Ctrl + A.
4. Change the font of the entire document to size 14 and the font face to Times New
Roman.
5. Save this document as Practice Document on the desktop.
6. From the insert tab, add a table to your document with two rows and two columns.
7. Enter your name in the first cell.
8. Change the page orientation to Landscape from the Page Layout Tab.
9. Check the spelling and Grammar.
Short Cuts
Ctrl + A: Selects all of the text.
Ctrl + C: Copies selected text.
Ctrl + V: Pastes the text.
Ctrl + B: Makes selected text bold.
Ctrl + I: Italicizes the selected text.
Ctrl + U: Underlines selected text.
13

New Features: Microsoft Word 2016
Tell me what you want to do….
You can now type in what you want to do quickly.
Type insert a header into the search box. Options for various headers appear to choose from.
Ink Equation
You can write an equation using your mouse or a special device which converts your equation
into text.
Microsoft Word 2016 was designed to work better with devices like tablets and smart phones.
From the Insert select Equation → Ink Equation.
Write your equation using your mouse. Insert when done.
→
14

Smart Lookup
Enables text written in Word 2016 to be searched through Bing
providing insights related to the text.
Type Microsoft Office 2016. Highlight the text.
From the Review tab select Smart Lookup.
Insights will appear on the right hand side.
15