new zealand bird atlas handbook › assets › 038995b1b5 › new-zealand...of bird distribution in...
TRANSCRIPT

New Zealand Bird Atlas Handbook Samantha Ray, Nikki McArthur & Dan Burgin
Version Three: 28-02-2020
New Zealand Bird Atlas Handbook
2
Samantha Ray, Nikki McArthur & Dan Burgin
Wildlife Management International Ltd
PO Box 607
Blenheim 7240
New Zealand
www.wmil.co.nz
This publication has been prepared by Wildlife Management International Limited on behalf of Birds New
Zealand (The Ornithological Society of New Zealand).
Version Three: 28th February 2020
Citation:
This publication should be cited as:
Ray, S., McArthur, N., & Burgin, D. 2020. New Zealand Bird Atlas Handbook. Wildlife Management
International Ltd, Blenheim.
All photographs in this publication are copyright © WMIL unless otherwise credited, in which case the
person or organization credited is the copyright holder.
This handbook is a living document that will be updated as required, so we welcome your
feedback on the content of this handbook. Should you notice any errors or omissions, or have
any suggestions on how this handbook could be improved, please contact us at:
3
Contents
Aims and design of the New Zealand Bird Atlas ................................................................................... 5
Background and history of bird Atlases in New Zealand .................................................................. 5
Aims and objectives of the New Zealand Bird Atlas ......................................................................... 6
New Zealand Bird Atlas sampling design and field methodology .................................................... 6
Collecting Atlas data ............................................................................................................................. 12
Before you start… .............................................................................................................................. 12
Atlas field methods ............................................................................................................................ 13
Data required for a complete checklist ............................................................................................ 14
The Atlas effort map .......................................................................................................................... 15
Planning where to go ‘Atlasing’......................................................................................................... 16
Handy tips for planning your survey method and effort ..................................................................... 24
Nocturnal surveys ............................................................................................................................. 25
Using call-playback or ‘squeekers’ to detect birds ......................................................................... 26
“Zero species” checklists ................................................................................................................. 27
Accessing private land ...................................................................................................................... 27
Entering checklist data ......................................................................................................................... 28
1. Entering data in the field using the eBird mobile app .............................................................. 29
Registering as an eBird user through the eBird website ................................................................... 29
Registering as an eBird user using the mobile app ........................................................................... 31
Setting up your eBird mobile app for the New Zealand Bird Atlas ..................................................... 33
Completing checklists using the mobile app in areas with mobile reception...................................... 35
Completing checklists using the mobile app in areas without mobile reception ................................. 41
2. Recording data on a datasheet or in your notebook, then entering it via the eBird website 42
Entering your checklists on the New Zealand Bird Atlas eBird website ............................................. 43
A note on rarities and high counts .................................................................................................... 48
3 Collecting data in the field using a datasheet or notebook, then entering your data into an
Excel spreadsheet ............................................................................................................................. 49
Entering data into an excel spreadsheet ........................................................................................... 49
4 Filling out and sending in hardcopy field datasheets .............................................................. 50
How to fill in the New Zealand Bird Atlas Datasheet ......................................................................... 51
Additional information .......................................................................................................................... 55
Atlas ethics ........................................................................................................................................ 55

4
Respect for birds: ............................................................................................................................. 55
Respect for habitat: .......................................................................................................................... 55
Respect for people: .......................................................................................................................... 55
Field safety ......................................................................................................................................... 56
Biosecurity ......................................................................................................................................... 57
Mycoplasma bovis ............................................................................................................................ 57
Kauri die-back .................................................................................................................................. 57
Didymo ............................................................................................................................................. 58
Further information ............................................................................................................................ 58
References ............................................................................................................................................. 59

5
Aims and design of the New Zealand Bird Atlas
Background and history of bird Atlases in New Zealand
Birds New Zealand (the Ornithological Society of New Zealand) has run two previous national-scale Atlas
of Bird Distribution in New Zealand schemes between 1969-1979 and 1999-2004 (Bull et al. 1985;
Robertson et al. 2007). The aim of these Atlas schemes was to map the distribution of New Zealand birds,
to provide baselines against which future changes in bird distribution could be measured. Both schemes
involved over 800 volunteer observers completing 19,000 and 31,817 survey sheets respectively,
providing data describing the distribution of birds from over 96% of the country.
The results from these two schemes have recently played a key role in a major report produced by the
Parliamentary Commissioner for the Environment, entitled Taonga of an island nation: saving New
Zealand's birds (Parliamentary Commissioner for the Environment 2017). This report highlighted in
unprecedented breadth and detail the desperate state that many of our unique and iconic bird species are
now in, and provided a list of recommended actions required to deliver on the vision of restoring
“abundant, resilient and diverse birdlife on the New Zealand mainland”.
The Atlas data which underpinned this landmark work is now 20 years old however, meaning that as a
nation, we have no up-to-date, representative and unbiased national-scale measure of how our native
birdlife has fared since the early 2000s. However, we do know that the past two decades have seen
catastrophic population declines of previously common birds in a number of other developed countries
around the world, detected through similar national-scale and volunteer-driven Atlas schemes now
underway in those countries. For this reason, there is an increasingly urgent need to fill the 20-year gap in
our knowledge of the state of our nation’s birdlife, to inform future bird conservation management priorities
at national and regional scales.
Therefore, from the 1st June 2019, Birds New Zealand will be embarking on a third Atlas scheme called
the New Zealand Bird Atlas. This scheme is a five-year initiative, running until the 1st June 2024, to map
nationwide patterns in the distribution of all New Zealand’s bird species. The New Zealand Bird Atlas will
be one of the largest citizen science projects ever attempted in New Zealand and will involve mobilising
several thousand citizen scientists including skilled volunteer birdwatchers recruited from the Society’s
own membership, and from other groups and organisations including Forest & Bird, Fish & Game, local
iwi, local community conservation groups and tramping clubs – to undertake a systematic survey of the
distribution of New Zealand’s bird species across the entire country.

6
Aims and objectives of the New Zealand Bird Atlas
Based on priorities identified by the Council of Birds New Zealand, together with input received from
future end users of the New Zealand Bird Atlas datasets including Manaaki Whenua – Landcare
Research, the Department of Conservation and regional councils, a set of objectives has been developed
to inform the sampling design and survey methodology for the New Zealand Bird Atlas.
The objectives of the New Zealand Bird Atlas are as follows:
Objective 1: To create accurate, representative and unbiased estimates of bird occupancy at both national
and regional scales for as many of New Zealand’s breeding bird species as possible.
Objective 2: To create a project that will provide an opportunity for Birds New Zealand members and
‘citizen scientists’ in the wider community to improve their knowledge of New Zealand’s birds.
Objective 3: To create a large, high-profile and national scale project that will provide marketing
opportunities for both Birds New Zealand and for the scheme’s sponsors and project partners.
Objective 4: To provide Birds New Zealand with an opportunity to develop a closer working relationship
with other agencies, including the Department of Conservation, regional councils and Manaaki Whenua
Landcare Research by working together to monitor the state and trends in bird occupancy at national and
regional scales.
New Zealand Bird Atlas sampling design and field methodology
The sampling design and field methodology for the New Zealand Bird Atlas has been developed by Birds
New Zealand in consultation with science staff from Manaaki Whenua – Landcare Research, the
Department of Conservation and regional councils.
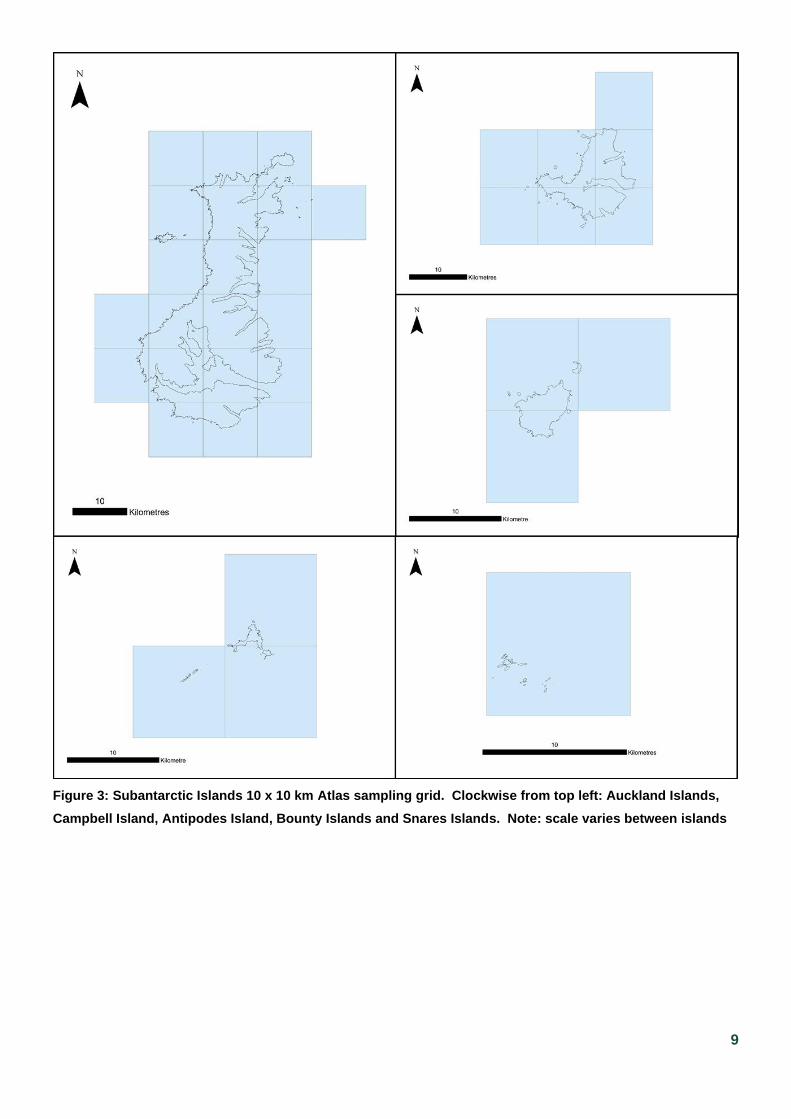
The New Zealand Bird Atlas will involve volunteers collecting bird observation data describing the
presence of all of New Zealand’s bird species across the entire country, including the North, South,
Stewart and Chatham Islands and all associated inshore islands, as well as the Subantarctic and
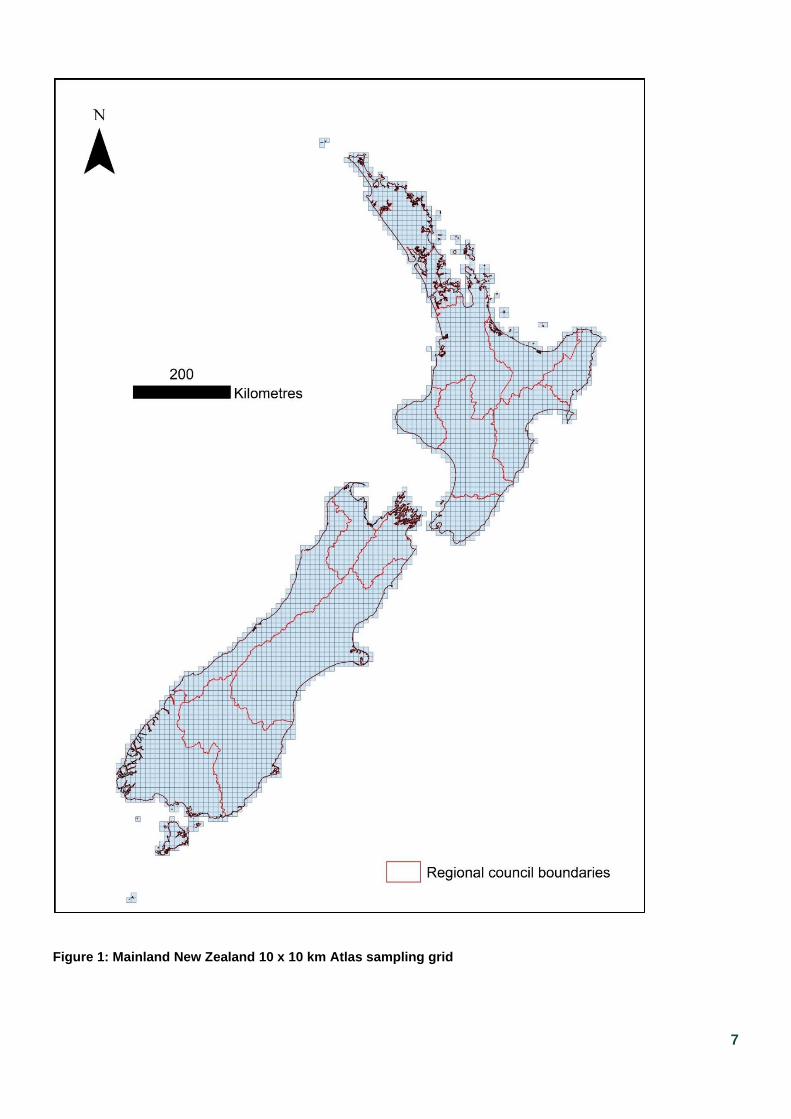
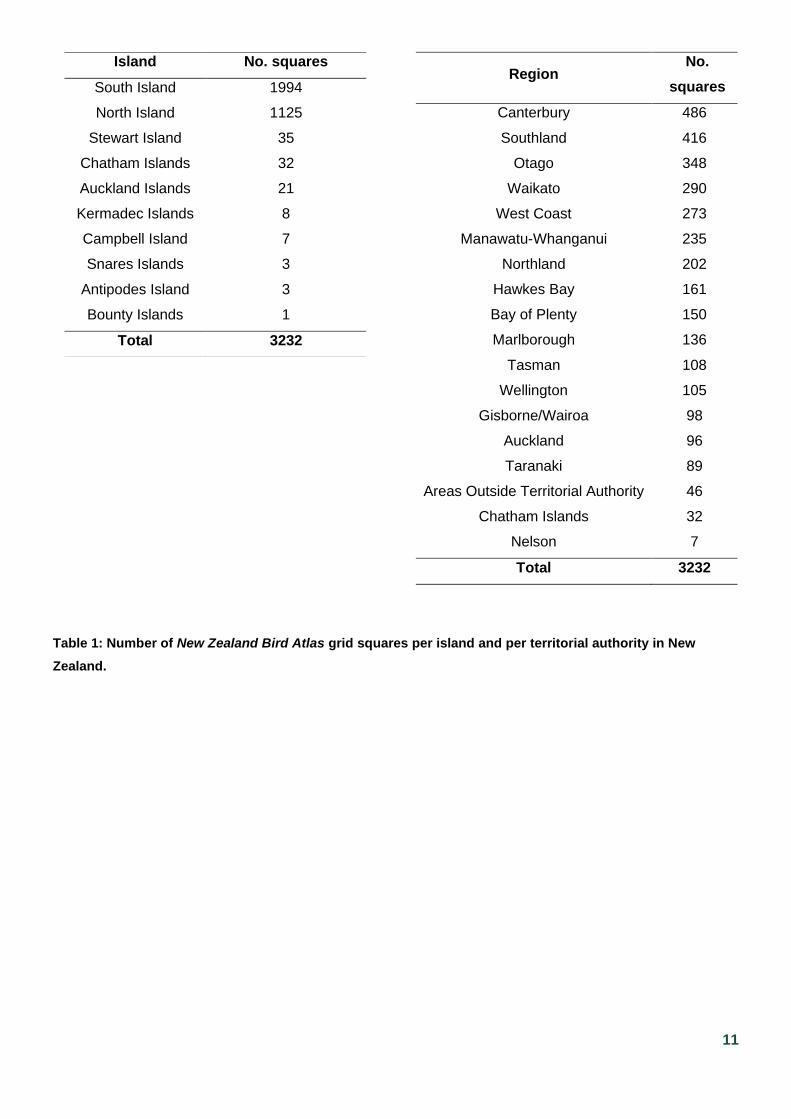
Kermadec Islands. To do this, the country has been divided up into 3,232 10 x 10 km grid squares (see
Figures 1-4 and Table 1). Over the next five years, the goal is to record the presence of all bird species
that occur within each square, during each of the four seasons. To do this, observers should aim to
survey as many of the different vegetation or habitat types within each grid square as possible,
and to submit a minimum of one complete bird checklist for each location surveyed. Atlas checklists
need to be entered into the New Zealand Bird Atlas eBird database via either the eBird app, the NZ Bird
Atlas eBird webpage (http://ebird.org/atlasnz), or by sending your field datasheets or Microsoft Excel
spreadsheets in to the National Atlas Office.
7
Figure 1: Mainland New Zealand 10 x 10 km Atlas sampling grid
8
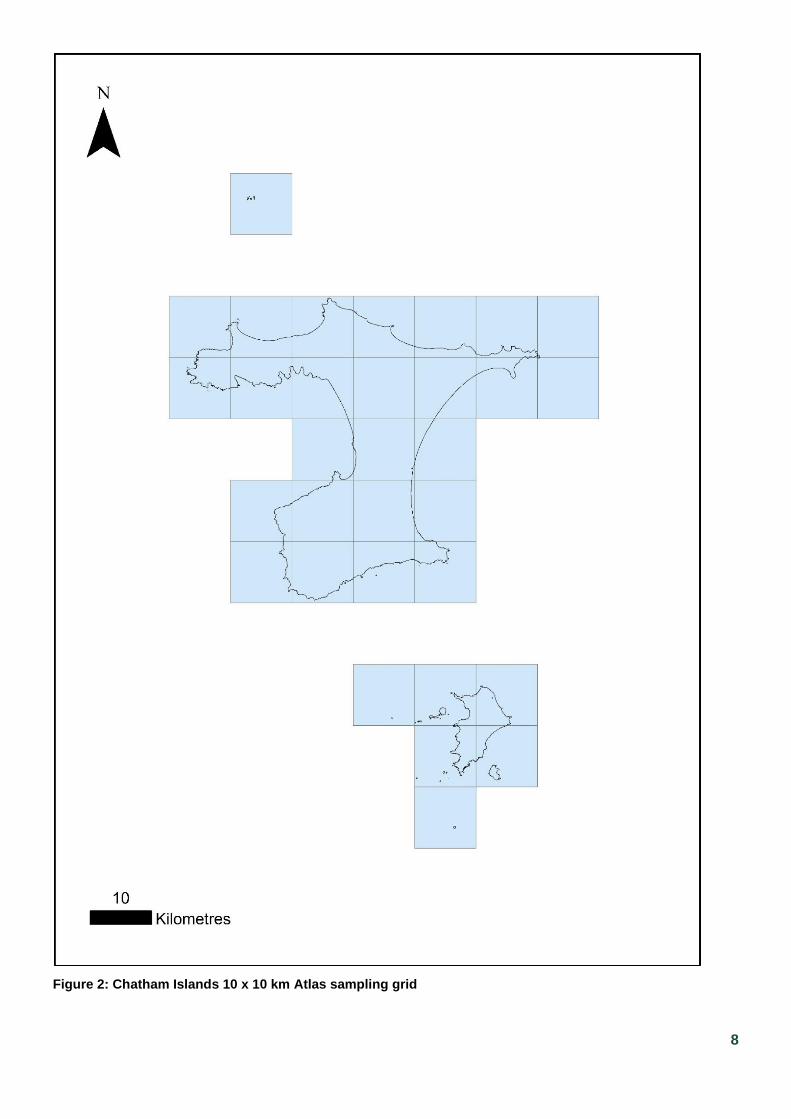
Figure 2: Chatham Islands 10 x 10 km Atlas sampling grid
9
Figure 3: Subantarctic Islands 10 x 10 km Atlas sampling grid. Clockwise from top left: Auckland Islands,
Campbell Island, Antipodes Island, Bounty Islands and Snares Islands. Note: scale varies between islands
10
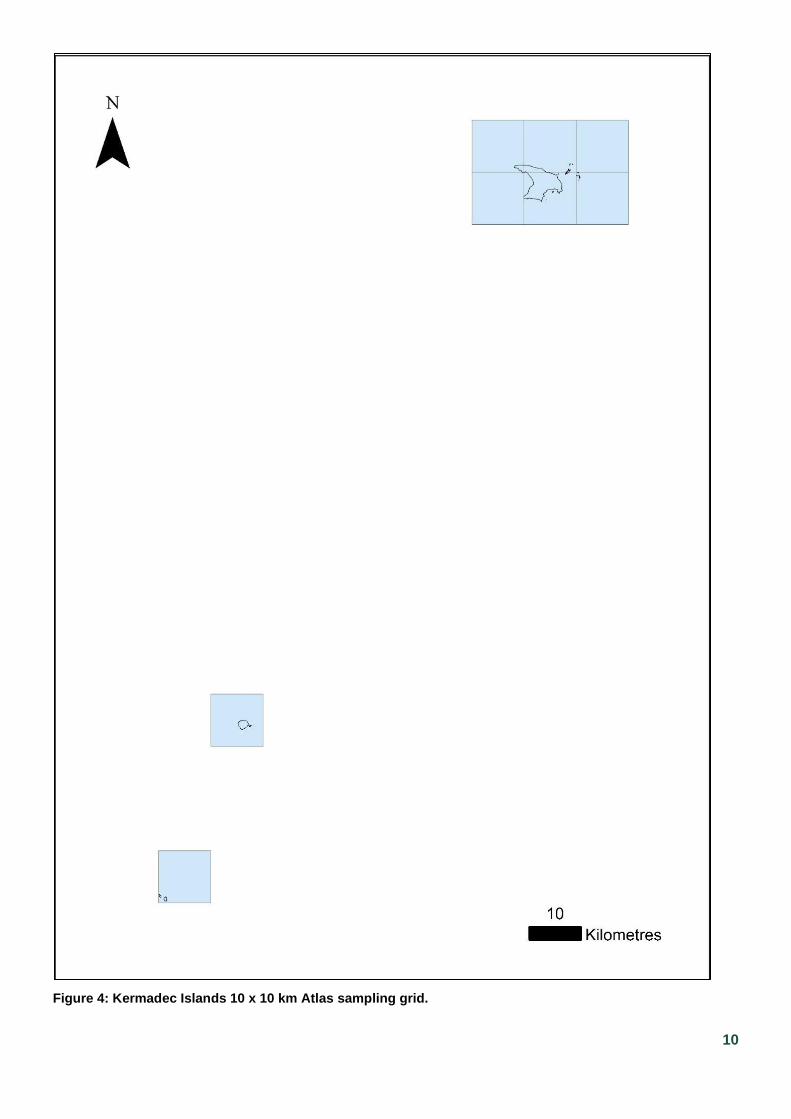
Figure 4: Kermadec Islands 10 x 10 km Atlas sampling grid.
11
Region No.
squares
Canterbury 486
Southland 416
Otago 348
Waikato 290
West Coast 273
Manawatu-Whanganui 235
Northland 202
Hawkes Bay 161
Bay of Plenty 150
Marlborough 136
Tasman 108
Wellington 105
Gisborne/Wairoa 98
Auckland 96
Taranaki 89
Areas Outside Territorial Authority 46
Chatham Islands 32
Nelson 7
Total 3232
Table 1: Number of New Zealand Bird Atlas grid squares per island and per territorial authority in New
Zealand.
Island No. squares
South Island 1994
North Island 1125
Stewart Island 35
Chatham Islands 32
Auckland Islands 21
Kermadec Islands 8
Campbell Island 7
Snares Islands 3
Antipodes Island 3
Bounty Islands 1
Total 3232
12
Collecting Atlas data
Before you start…
Before you head out into the field to collect Atlas data, we recommend that you go through these steps
first, both to help you plan where to go ‘Atlasing’ and to also have a good understanding of how to collect
Atlas data to then enter it into the eBird database.
1. Take time to familiarise yourself with this handbook, including this section on Collecting Atlas Data
and the following Entering Atlas data section, which describes how to enter your checklist data into
eBird. If you are new to eBird, we recommend that you create an eBird account and submit
several ‘practice’ checklists before you begin ‘Atlasing’. To help you get started with eBird, we’ve
created a series of tutorial videos which are available via the Help Centre on the New Zealand Bird
Atlas webpage (www.birdatlas.co.nz). These videos take you through how to set up an account,
how to download the eBird mobile app and how to submit checklists.
2. Once you’ve familiarised yourself with how to collect Atlas data and how to enter it into eBird, the
next step is to decide where to go ‘Atlasing’. This is where the fun starts! Atlas participants are
completely free to choose where they go birding – you could collect Atlas data in your own
backyard, your local park, or from your favourite national park or island reserve. Every checklist
will make an equally important contribution to the New Zealand Bird Atlas, regardless of where it is
collected. To choose where to go ‘Atlasing’, we recommend that you visit the “Atlas effort map” on
the New Zealand Bird Atlas eBird website: https://ebird.org/atlasnz/effortmap. This map provides
real time updates of which grid squares have been surveyed and which still require surveying.
Participants should ideally aim to survey grid squares or habitat types within grid squares which
haven’t already been completed. See the Atlas Map section for more detailed information.
3. Familiarise yourself with the grid square that you’ve chosen to survey, including identifying all the
major habitat types (e.g. beech forest, plantation forest, manuka shrubland, rivers, wetlands,
suburban habitats, sandy beaches, rocky shorelines, etc) within the grid square. Ideally, you’ll
need to visit each major habitat type within a square, to have a good chance of detecting all of the
bird species present in a grid square (see Maps for checklists). When doing this, you’ll also need
to decide whether these habitats are publicly accessible, or whether you’re going to need to ask
for permission to access private land. Note, Atlas participants should always seek landowner
permission before accessing private land. See accessing private land for more information on how
to go about doing this.
13
Atlas field methods
New Zealand and its outlying islands have been divided into sampling units of 10 x 10 km grid squares.
The aim is to carry out a complete survey of each grid square at least once during each season (summer,
autumn, winter and spring; see Table 1), over a five-year period between the 1st June 2019 and 1st June
2024.
Season Start Date End date
Summer 1st December 28th or 29th February
Autumn 1st March 31st May
Winter 1st June 31st August
Spring 1st September 30th November
Table 2: Delimitation of the seasons used in the New Zealand Bird Atlas
To completely survey each grid square, you should aim to record the presence of all bird species that
occur in each square. To do this, you should aim to survey as many of the different vegetation or
habitat types within each square as possible, and to submit a minimum of one complete bird
checklist from each location surveyed. A complete checklist is one in which all of the bird species
that were encountered and identified in the field are recorded, along with the date, time of day,
location and time spent searching (see Box 1). Observers are free to not only choose which grid squares
to survey, but also to choose how they go about surveying habitats within squares. Checklists can either
be submitted as stationary or travelling counts, and the observer is free to choose how long to spend
surveying any particular habitat. Some tips and hints for choosing your survey method and deciding on
how long to spend searching particular habitat types are described in the guidelines section below.
Box 1: What is a complete Checklist? A complete checklist in eBird is when an observer is reporting all the
birds they were able to identify to the best of their ability. When submitting a complete checklist, eBird also
requires you to specify your “start time” (the time of day at which you began your checklist), and your
“duration” (how long you spent compiling your checklist). By submitting a complete checklist, you are not
only reporting the birds that you encountered, but you’re also reporting the birds you did NOT observe. This
“negative data” allows us to realise the full potential of eBird data, and better inform bird occupancy models
and the resulting species distribution maps that we produce as part of the New Zealand Bird Atlas. For more
information on complete checklists visit this eBird help page Are you reporting all species, complete
checklists vs. incomplete checklists.
14
Data required for a complete checklist
Observer: Record the first and last name of the observer completing the checklist, this is automatically
done when submitting a checklist via eBird online or through the mobile app. If more than one observer is
working together to compile a checklist, record the names of all observers in the “checklist comments”
field, or use eBird’s checklist sharing tool to “share” the checklist with all observers.
Start Easting and Northing: Record map coordinates for the location the checklist was started. This can
be done automatically when using the eBird mobile app to collect data in the field, or by manually plotting
your location on the submit map tool on the eBird website, or by recording a set of coordinates on the
New Zealand Bird Atlas datasheet. Note: It’s vital that you record the location at which you
collected your checklist as accurately and precisely as you possibly can.
Location Name: Provide a brief name to describe the area where the checklist was completed within the
square. Please provide as much detail as you can and use unambiguous place names.
Some examples of good location names include:
• 80 Rarangi Beach Road, Rarangi Beach, Marlborough.
• Coastline from Cape Campbell to Marfell’s Beach.
• Lake Chalice circuit track, Mt Richmond Forest Park
Some examples of bad location names include:
• My house, Blenheim
• Wellington Harbour
• Grid square CA60
Date: The date the checklist was carried out (dd/mm/yyyy).
Survey protocol: Record whether you completed a Stationary count or a Travelling count for each
checklist. A stationary count is one where you completed your list from a fixed location, whereas a
travelling checklist is where observations were collected while travelling over a specified distance. For
each travelling checklist the total distance travelled should be recorded in kilometres, to the nearest 0.1
km. Some guidelines for selecting your survey method are described below.
Start and finish time: Record the time you started your checklist and the time you finished your checklist
in 24-hour clock time. It is up to the observer to decide how much time they put into each checklist, but
some guidelines for this are described below. This will all be done automatically in the eBird mobile app
when you start and stop a checklist.
15
Species: The common names of all the individual species you see and hear while completing your
checklist need to be recorded. As the Atlas requires data to be structured into complete checklists, it is
important that you record all of the bird species that you were able to identify in your checklist, this
includes introduced species such as feral rock pigeons and house sparrows!
Number: For each checklist record the total number of individuals encountered for each species.
Observers don’t need to differentiate between birds seen or heard. For large clusters or flocks of birds, a
best estimate of the number of birds seen or heard will be adequate. Visit this ebird help page for more
information on recording total number of individuals and estimating counts.
Additional Notes:
• The New Zealand Bird Atlas is not specifically recording information on breeding activity or
age/sex class data, but these data can be recorded, if observed. We particularly encourage
participants to record observations of breeding activity (e.g. nest building, incubating eggs, feeding
young etc), if observed.
• Observers do not need to routinely collect habitat data when out ‘Atlasing’. Instead, pre-existing
datasets, such as the New Zealand Land Cover Database, will be used to generate the habitat data
required for the analysis of Atlas data. However, it would be helpful for observers to note any
“ephemeral” or temporary habitats or vegetation types that they find themselves surveying. These
are habitat types which only last for a very short time: e.g. annual crops, ploughed fields or recently-
harvested plantation forests. These “temporary” habitats tend not to be very easily captured in
national- and regional-scale habitat datasets, and so taking note on them in your checklist comments
will help capture this information.
• Not all checklists within a grid square need to be collected out on the same day, and we actively
encourage participants to be collecting data at different times of day as well as compiling nocturnal
checklists.
• Seabirds at sea will only be included in checklists if they are within 10 km of land.
The Atlas effort map
An Atlas “effort” map is available online on the ‘Explore’ page of the New Zealand Bird Atlas eBird website
(https://ebird.org/atlasnz/effortmap). This map will show you the boundaries of each grid square (note,
you’ll need to zoom in a little before the grid square boundaries appear), against background satellite or
aerial imagery showing major habitats, or a terrain map showing topography (Figure 5).
This map also provides a summary of the total survey effort accumulated within each grid square
including the hours of effort, the number of bird species encountered and the status of the square (Figure
5). The status informs you whether surveying for the square is incomplete or complete. For each grid
16
square observers can also view all grid square data which provides detailed information about the
species observed and checklists submitted. The Atlas effort map updates in real time as participants enter
their data into eBird, so this map will become a key resource to keep observers informed on which
squares have been surveyed. Observers will ideally prioritise surveying any grid squares with an
incomplete status, however, should not be discouraged from inputting data into complete squares. Each
grid square has a unique code made up of two letters and digits (e.g. CB60) which is displayed when you
click on a grid square (Figure 5).
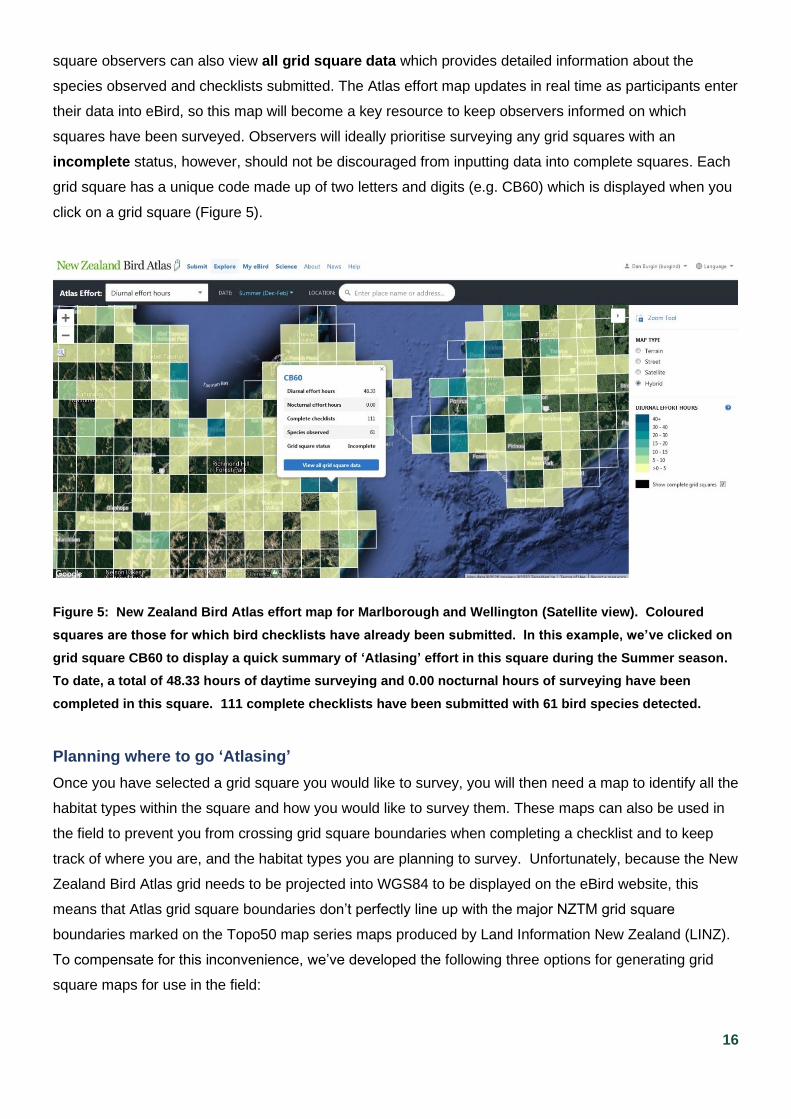
Figure 5: New Zealand Bird Atlas effort map for Marlborough and Wellington (Satellite view). Coloured
squares are those for which bird checklists have already been submitted. In this example, we’ve clicked on
grid square CB60 to display a quick summary of ‘Atlasing’ effort in this square during the Summer season.
To date, a total of 48.33 hours of daytime surveying and 0.00 nocturnal hours of surveying have been
completed in this square. 111 complete checklists have been submitted with 61 bird species detected.
Planning where to go ‘Atlasing’
Once you have selected a grid square you would like to survey, you will then need a map to identify all the
habitat types within the square and how you would like to survey them. These maps can also be used in
the field to prevent you from crossing grid square boundaries when completing a checklist and to keep
track of where you are, and the habitat types you are planning to survey. Unfortunately, because the New
Zealand Bird Atlas grid needs to be projected into WGS84 to be displayed on the eBird website, this
means that Atlas grid square boundaries don’t perfectly line up with the major NZTM grid square
boundaries marked on the Topo50 map series maps produced by Land Information New Zealand (LINZ).
To compensate for this inconvenience, we’ve developed the following three options for generating grid
square maps for use in the field:
17
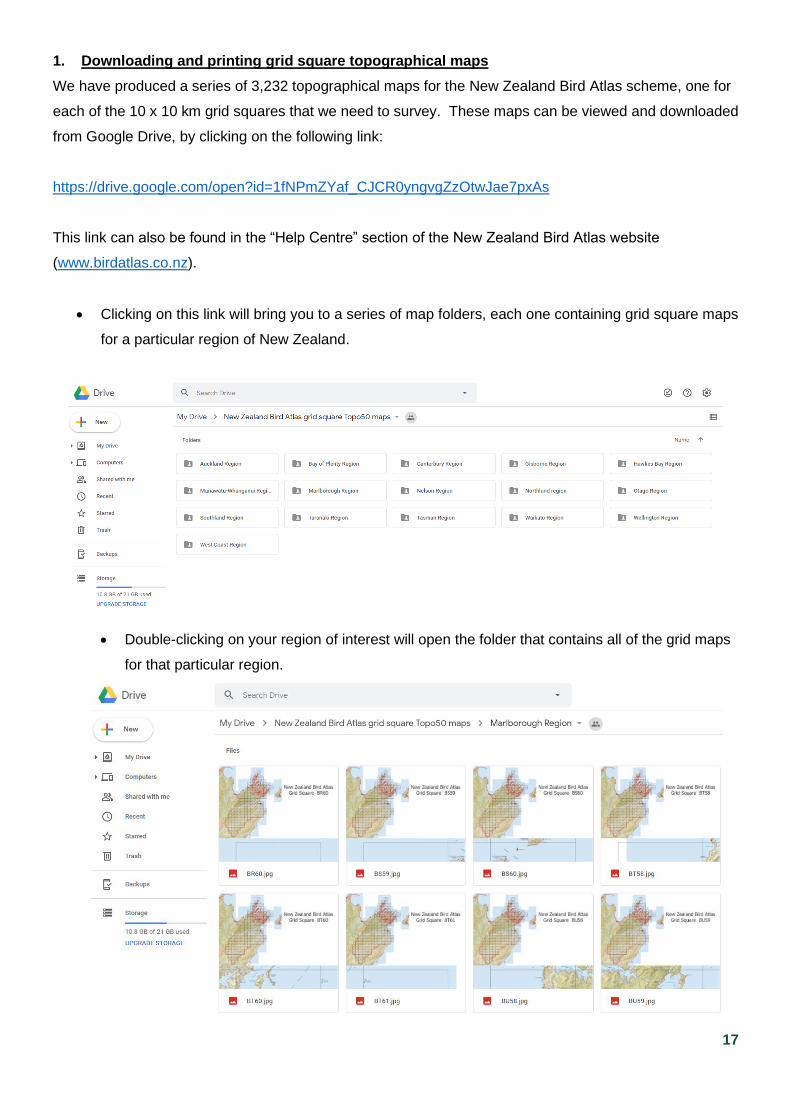
1. Downloading and printing grid square topographical maps
We have produced a series of 3,232 topographical maps for the New Zealand Bird Atlas scheme, one for
each of the 10 x 10 km grid squares that we need to survey. These maps can be viewed and downloaded
from Google Drive, by clicking on the following link:
https://drive.google.com/open?id=1fNPmZYaf_CJCR0yngvgZzOtwJae7pxAs
This link can also be found in the “Help Centre” section of the New Zealand Bird Atlas website
(www.birdatlas.co.nz).
• Clicking on this link will bring you to a series of map folders, each one containing grid square maps
for a particular region of New Zealand.
• Double-clicking on your region of interest will open the folder that contains all of the grid maps
for that particular region.
18
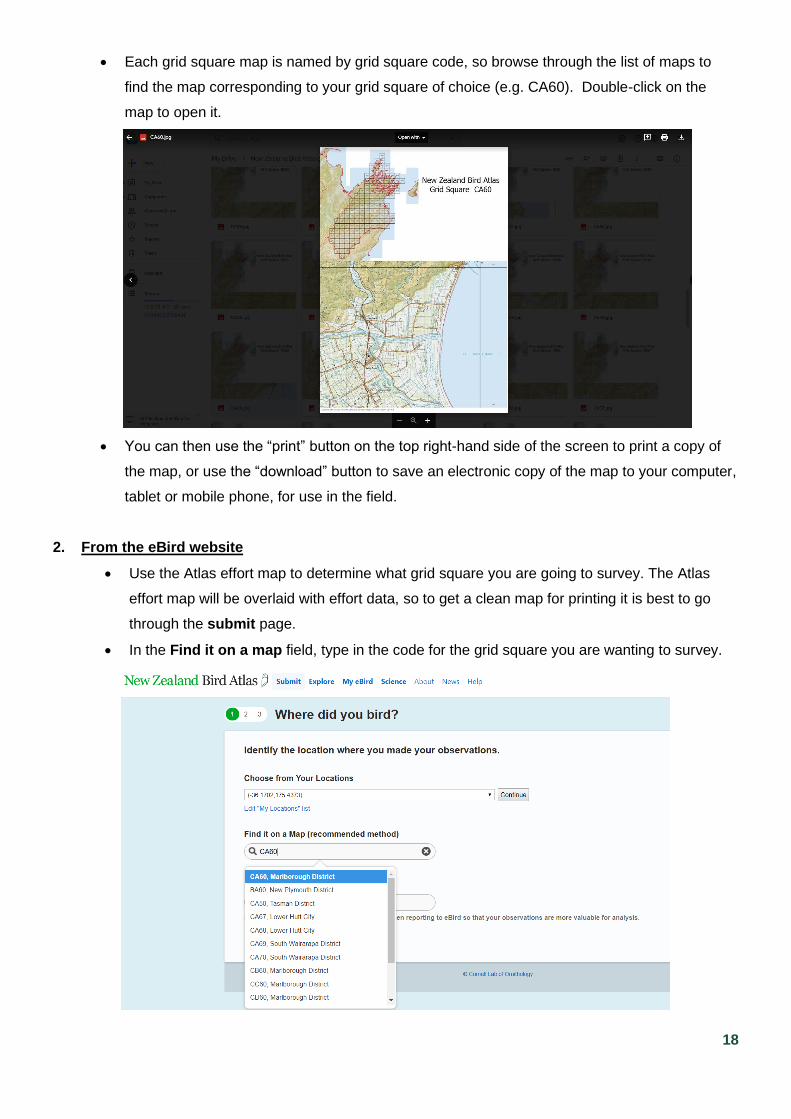
• Each grid square map is named by grid square code, so browse through the list of maps to
find the map corresponding to your grid square of choice (e.g. CA60). Double-click on the
map to open it.
• You can then use the “print” button on the top right-hand side of the screen to print a copy of
the map, or use the “download” button to save an electronic copy of the map to your computer,
tablet or mobile phone, for use in the field.
2. From the eBird website
• Use the Atlas effort map to determine what grid square you are going to survey. The Atlas
effort map will be overlaid with effort data, so to get a clean map for printing it is best to go
through the submit page.
• In the Find it on a map field, type in the code for the grid square you are wanting to survey.
19
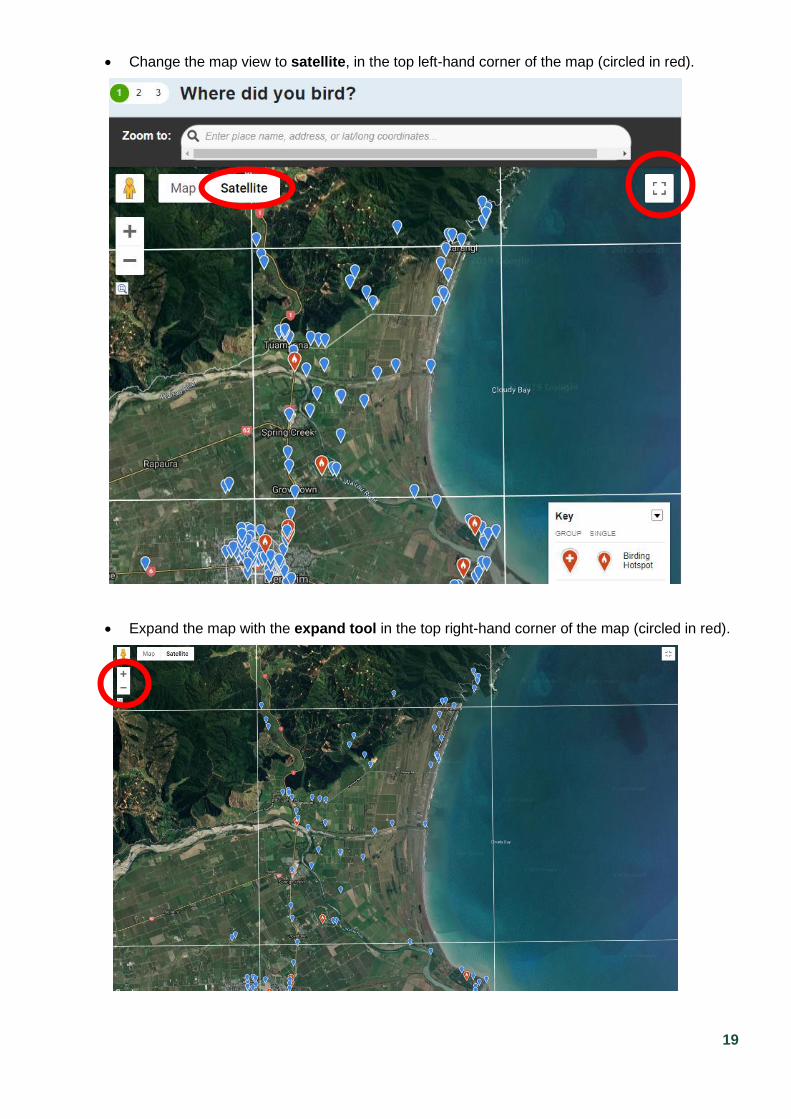
• Change the map view to satellite, in the top left-hand corner of the map (circled in red).
• Expand the map with the expand tool in the top right-hand corner of the map (circled in red).
20
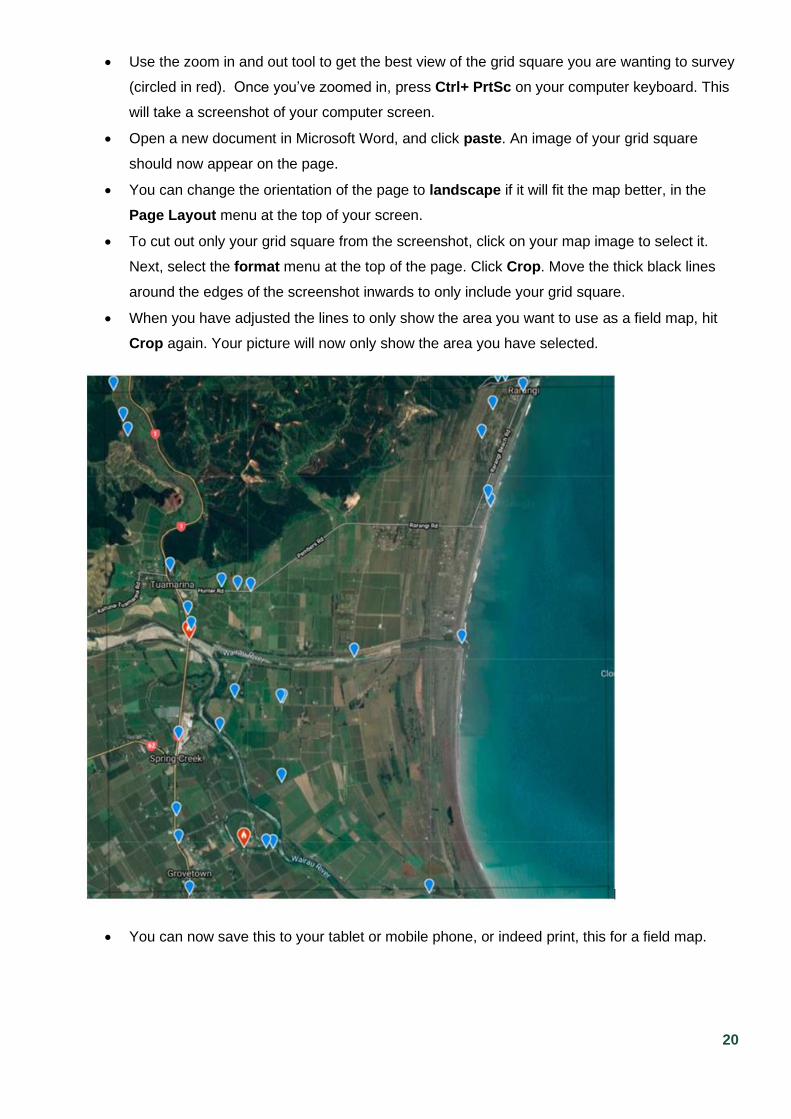
• Use the zoom in and out tool to get the best view of the grid square you are wanting to survey
(circled in red). Once you’ve zoomed in, press Ctrl+ PrtSc on your computer keyboard. This
will take a screenshot of your computer screen.
• Open a new document in Microsoft Word, and click paste. An image of your grid square
should now appear on the page.
• You can change the orientation of the page to landscape if it will fit the map better, in the
Page Layout menu at the top of your screen.
• To cut out only your grid square from the screenshot, click on your map image to select it.
Next, select the format menu at the top of the page. Click Crop. Move the thick black lines
around the edges of the screenshot inwards to only include your grid square.
• When you have adjusted the lines to only show the area you want to use as a field map, hit
Crop again. Your picture will now only show the area you have selected.
• You can now save this to your tablet or mobile phone, or indeed print, this for a field map.
21
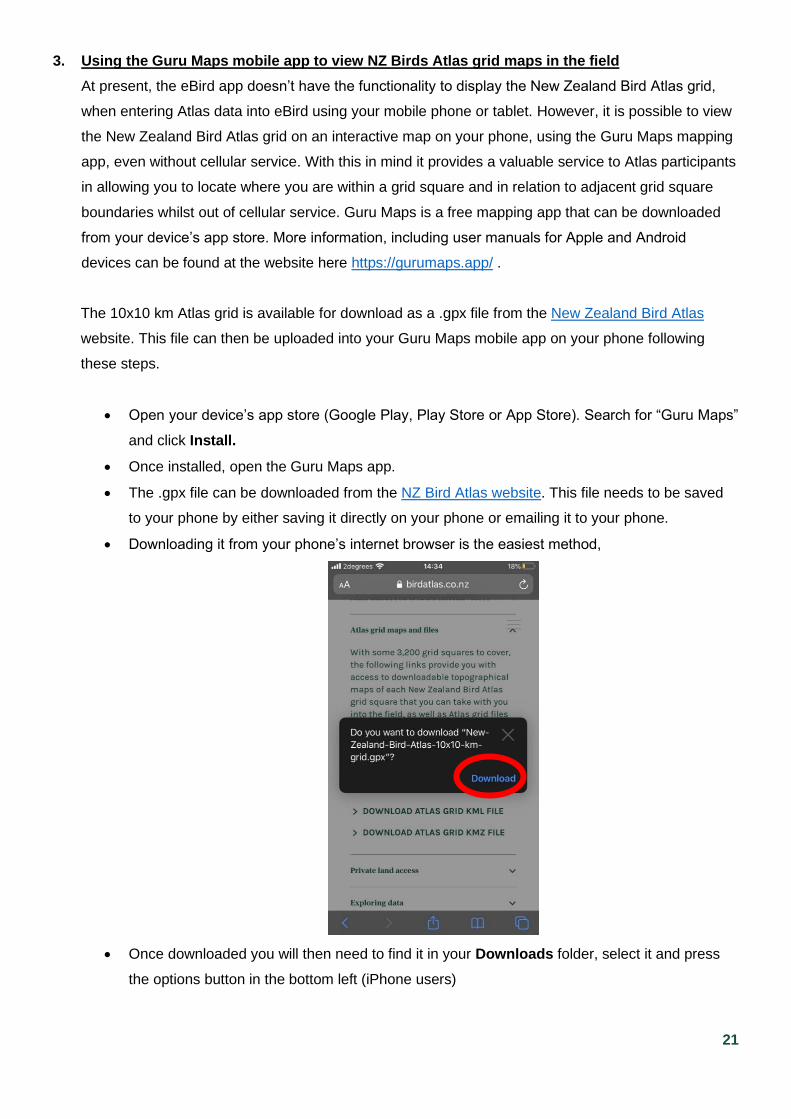
3. Using the Guru Maps mobile app to view NZ Birds Atlas grid maps in the field
At present, the eBird app doesn’t have the functionality to display the New Zealand Bird Atlas grid,
when entering Atlas data into eBird using your mobile phone or tablet. However, it is possible to view
the New Zealand Bird Atlas grid on an interactive map on your phone, using the Guru Maps mapping
app, even without cellular service. With this in mind it provides a valuable service to Atlas participants
in allowing you to locate where you are within a grid square and in relation to adjacent grid square
boundaries whilst out of cellular service. Guru Maps is a free mapping app that can be downloaded
from your device’s app store. More information, including user manuals for Apple and Android
devices can be found at the website here https://gurumaps.app/ .
The 10x10 km Atlas grid is available for download as a .gpx file from the New Zealand Bird Atlas
website. This file can then be uploaded into your Guru Maps mobile app on your phone following
these steps.
• Open your device’s app store (Google Play, Play Store or App Store). Search for “Guru Maps”
and click Install.
• Once installed, open the Guru Maps app.
• The .gpx file can be downloaded from the NZ Bird Atlas website. This file needs to be saved
to your phone by either saving it directly on your phone or emailing it to your phone.
• Downloading it from your phone’s internet browser is the easiest method,
• Once downloaded you will then need to find it in your Downloads folder, select it and press
the options button in the bottom left (iPhone users)
22
.
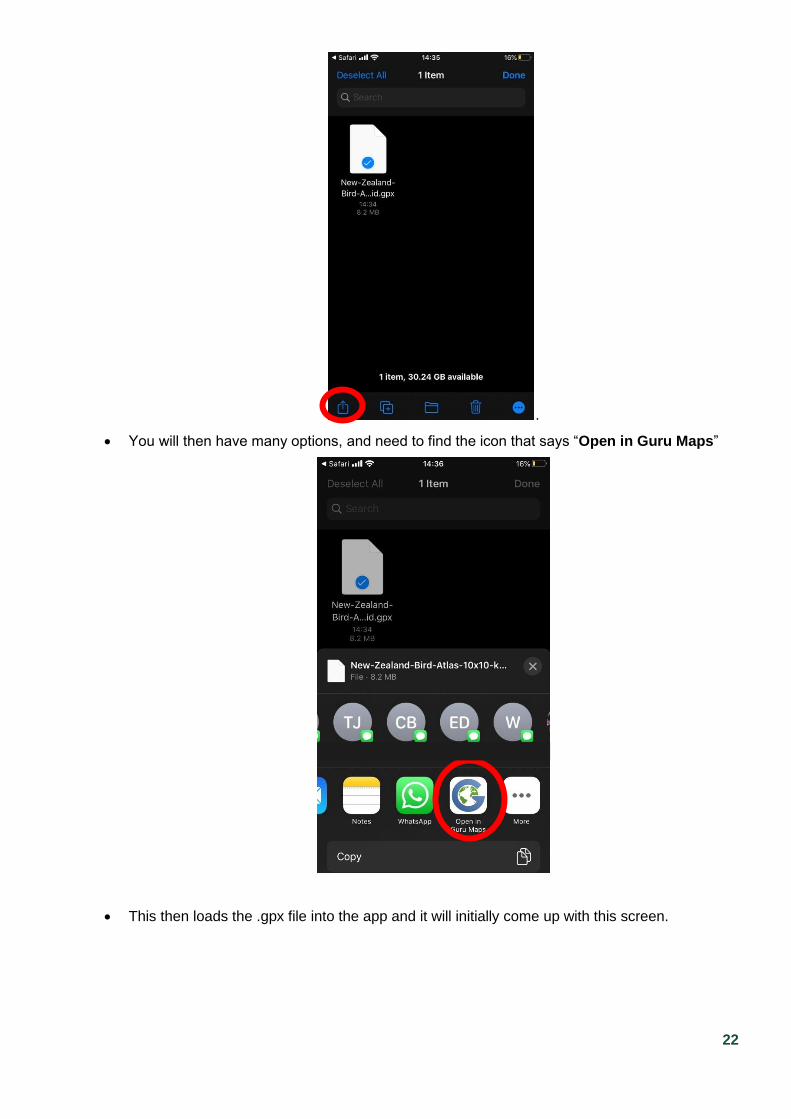
• You will then have many options, and need to find the icon that says “Open in Guru Maps”
• This then loads the .gpx file into the app and it will initially come up with this screen.
23
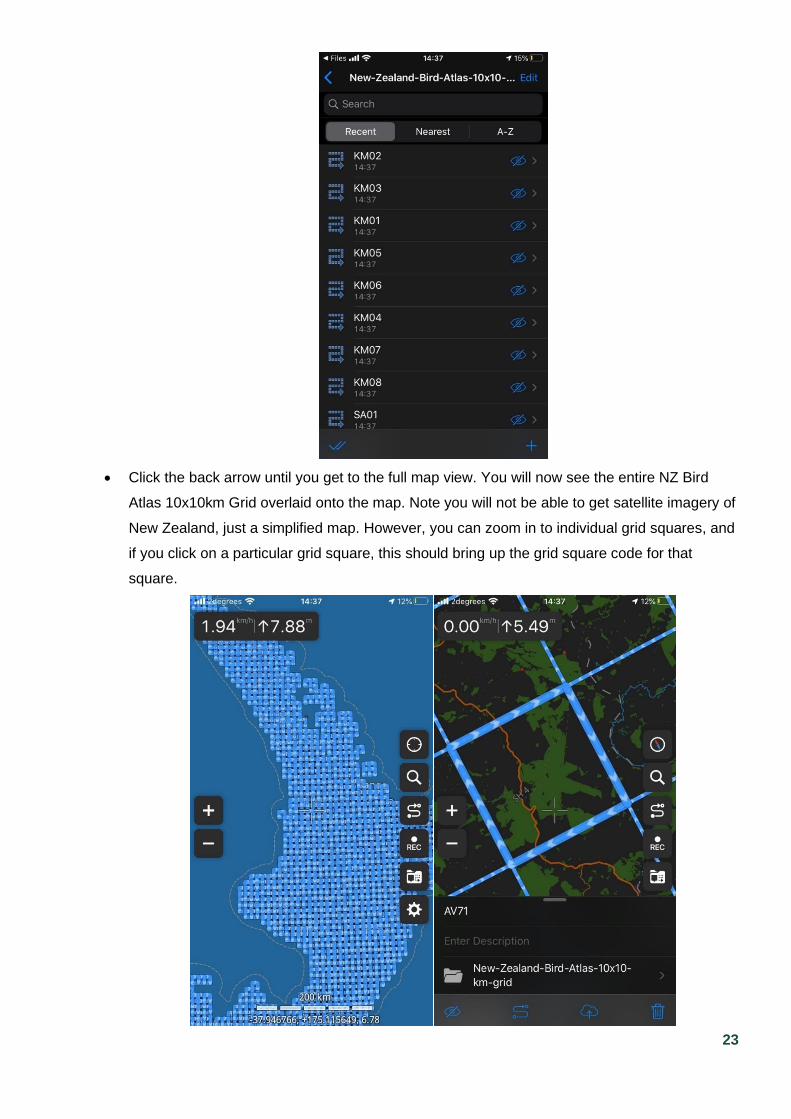
• Click the back arrow until you get to the full map view. You will now see the entire NZ Bird
Atlas 10x10km Grid overlaid onto the map. Note you will not be able to get satellite imagery of
New Zealand, just a simplified map. However, you can zoom in to individual grid squares, and
if you click on a particular grid square, this should bring up the grid square code for that
square.
24
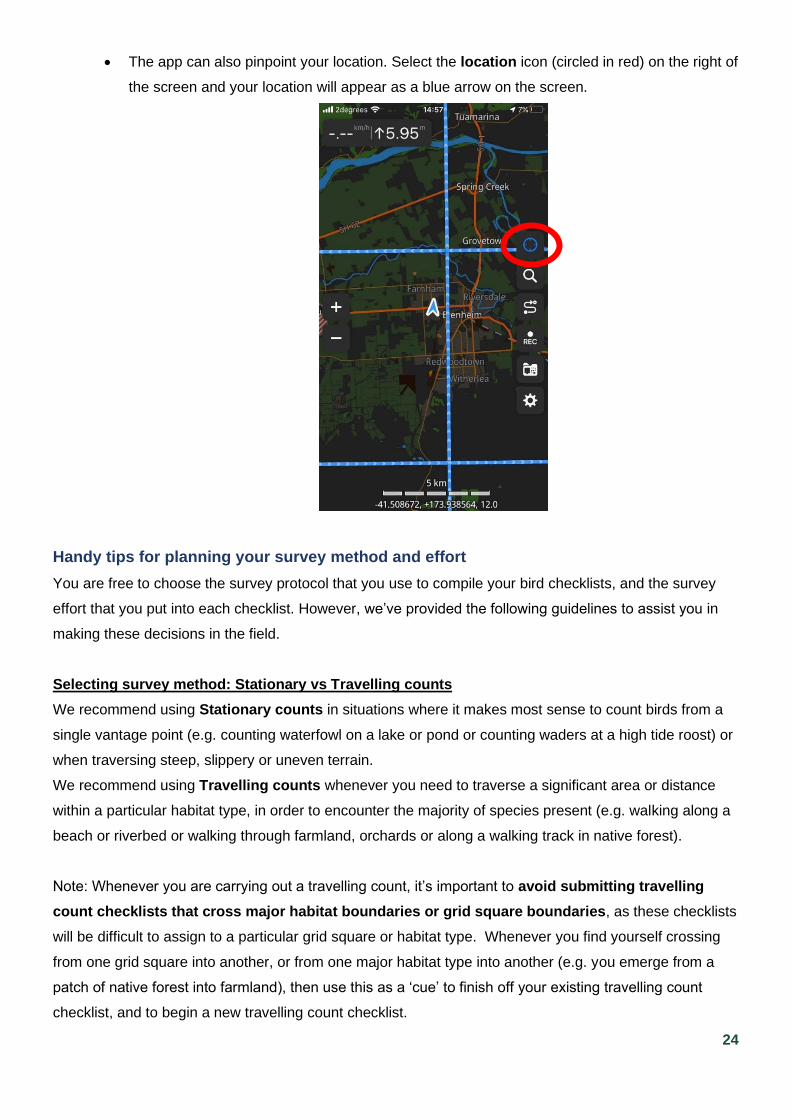
• The app can also pinpoint your location. Select the location icon (circled in red) on the right of
the screen and your location will appear as a blue arrow on the screen.
Handy tips for planning your survey method and effort
You are free to choose the survey protocol that you use to compile your bird checklists, and the survey
effort that you put into each checklist. However, we’ve provided the following guidelines to assist you in
making these decisions in the field.
Selecting survey method: Stationary vs Travelling counts
We recommend using Stationary counts in situations where it makes most sense to count birds from a
single vantage point (e.g. counting waterfowl on a lake or pond or counting waders at a high tide roost) or
when traversing steep, slippery or uneven terrain.
We recommend using Travelling counts whenever you need to traverse a significant area or distance
within a particular habitat type, in order to encounter the majority of species present (e.g. walking along a
beach or riverbed or walking through farmland, orchards or along a walking track in native forest).
Note: Whenever you are carrying out a travelling count, it’s important to avoid submitting travelling
count checklists that cross major habitat boundaries or grid square boundaries, as these checklists
will be difficult to assign to a particular grid square or habitat type. Whenever you find yourself crossing
from one grid square into another, or from one major habitat type into another (e.g. you emerge from a
patch of native forest into farmland), then use this as a ‘cue’ to finish off your existing travelling count
checklist, and to begin a new travelling count checklist.

25
Deciding on search effort
We recommend that you continue investing “search effort” into an individual checklist until either you’re
satisfied that you’ve encountered the majority of species you think are likely to be present in that habitat,
or the rate at which you’ve been adding new species to your checklist slows to zero. At this point, we
recommend that you finish your checklist and relocate to another habitat type within your grid square of
choice to begin your next checklist.
We recommend that you aim for a minimum duration of 5 minutes for any Stationary count checklist, to
give yourself a reasonable chance of detecting the majority of birds present in your vicinity.
We also recommend that you limit your Travelling count checklists to a maximum of 1 km in length. This
is because travelling counts carried over larger distances have less precision when it comes to mapping
the relationship between the birds you encounter and the habitats or locations at which you found them,
and they have a higher likelihood of accidentally crossing habitat or grid square boundaries. If you are out
for a 5km birding walk and wish to survey the birds along the entire length of this, then we encourage you
to split this into five 1km sections.
An example of how you could go about surveying a particular grid square is shown below in Figure 5. In
this grid square, we’ve identified the major habitat types present (farmland, river, urban and native forest
habitats, and have marked out a series of travelling count routes (marked in yellow) along public roads or
walking tracks that traverse each of the identified habitat types.
Nocturnal surveys
Most New Zealand bird species are diurnal, therefore the majority of Atlas survey effort should be carried
out during daylight hours. However, we encourage Atlas participants to carry out nocturnal counts in as
many grid squares and habitats as possible to record the presence of nocturnal species such as
morepork, little owl and kiwi spp. Note, an Atlas checklist is automatically flagged as nocturnal by eBird
based on the start time – a nocturnal checklist is defined as one that starts earlier than 40 minutes
before sunrise, or later than 20 minutes after sunset.
You should always take care to record diurnal and nocturnal surveys on separate checklists. More
information regarding what a nocturnal checklist is can be found on the eBird website: what is a nocturnal
checklist.
26
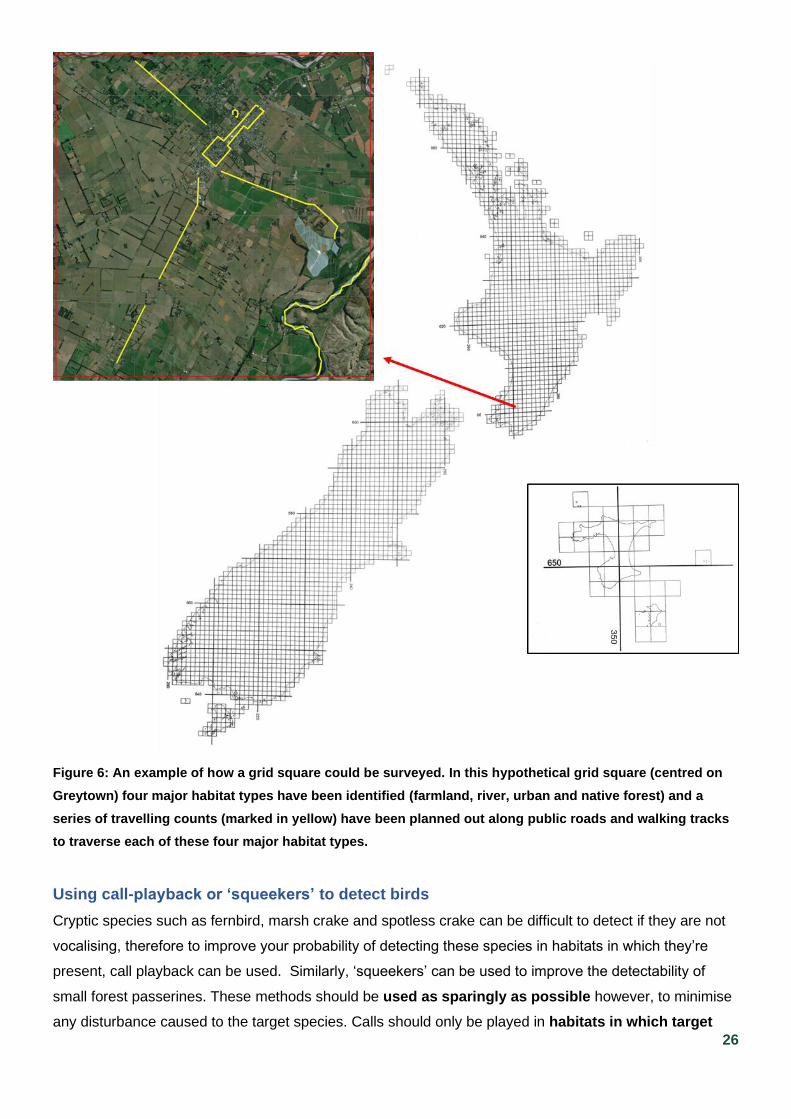
Figure 6: An example of how a grid square could be surveyed. In this hypothetical grid square (centred on
Greytown) four major habitat types have been identified (farmland, river, urban and native forest) and a
series of travelling counts (marked in yellow) have been planned out along public roads and walking tracks
to traverse each of these four major habitat types.
Using call-playback or ‘squeekers’ to detect birds
Cryptic species such as fernbird, marsh crake and spotless crake can be difficult to detect if they are not
vocalising, therefore to improve your probability of detecting these species in habitats in which they’re
present, call playback can be used. Similarly, ‘squeekers’ can be used to improve the detectability of
small forest passerines. These methods should be used as sparingly as possible however, to minimise
any disturbance caused to the target species. Calls should only be played in habitats in which target
27
species could be present, and once the target species has been detected playback should be
stopped. Continuing to use ‘squeekers’ or call-playback after a species has been detected is not only
unnecessary, but it can also be detrimental to the target birds as it disrupts normal behaviours and causes
the bird to expend extra energy in trying to defend their territory. To minimise any disturbance or stress to
the target birds, we recommend limiting the length and frequency of playing calls, by only playing calls
for less than 30 secs, with long pauses between playing calls. We recommend that you limit the use
of call playback in any given location to a maximum period of 3-5mins, if the target species isn’t detected
sooner. We recommend that you play calls at a ‘natural’ volume, and allow long pauses between playing
calls to allow target birds time to respond. Birds have good hearing, may be long distances away and
may take some time to appear or vocalise in response. It is important you do not play calls continuously or
at loud volumes. For more guidance on how to use call playback in an ethical manner, visit:
(https://www.sibleyguides.com/2011/04/the-proper-use-of-playback-in-birding/).
Bird calls for call playback can be sourced from New Zealand Birds Online, the RNZ website or the
Macaulay Library.
“Zero species” checklists
Occasionally, you’ll complete a stationary or travelling count in a particular location and encounter
absolutely no birds whatsoever! Don’t be discouraged though. A common question we get asked is
whether it is worth submitting a checklist with absolutely no birds on it, and whether this can be counted
as a “complete” checklist. The answer to both questions is “yes”. As well as wanting to know where you
are encountering birds, we also want to know where you aren’t encountering birds, so a checklist with
zero species is just as useful to us as a checklist with many species. And yes, a zero-species checklist is
“complete”, provided that you really hadn’t detected any birds that you could identify nor left out common
introduced species such as feral rock pigeons or house sparrows. So, to sum up, “zero species”
checklists may not be particularly exciting for you as a birder, but they are still really useful to the New
Zealand Bird Atlas.
Accessing private land
In many grid squares, it will be possible to access examples of all major habitat types from publicly
accessible locations such as roads, walking tracks, parks and reserves. In some cases, however, the only
examples of particular habitats within a grid square may be on private land. If this is the case, you must
always seek access permission from the landowner before attempting to access that habitat. Once you
have carried out a survey on private property, we highly recommend that you contact the landowner again
afterwards to thank them for their cooperation, and even offer a list of the bird species that you detected
on their land.
To help with this, template landowner letters are available for download from the ‘Help Centre’ on
www.birdatlas.co.nz, together with a vehicle dashboard card for you to display, whenever you park your

28
vehicle on private land. The purpose of this card is to provide a visual reminder to landowners of who you
are and what you are doing on their land. If you need further assistance with identifying or contacting
particular landowners, consider getting in touch with your local RR, or contact the National Atlas Team at
Please remember that when you are interacting with landowners, you will be representing Birds New
Zealand and the New Zealand Bird Atlas scheme. For this reason, it is vital that you remain courteous
and respectful in all of your communication, and that you comply with any requests or requirements that
landowners may have. If you have any questions, issues or concerns that arise as a result of an
interaction you’ve had with a local landowner, please let the National Atlas Team know at
Entering checklist data
The New Zealand Bird Atlas will utilise eBird (https://ebird.org/atlasnz/home) for both data entry and
storage, so we encourage all Atlas participants to sign up to eBird and become familiar with its use. The
eBird database has a number of built-in features that make it an ideal tool for the New Zealand Bird Atlas,
including:
• eBird is already set up to receive bird observations that are structured into complete checklists,
which is a key requirement of the New Zealand Bird Atlas.
• eBird has a user-friendly mobile app, which enables you to enter and submit your Atlas data
directly from the field.
• eBird has a sophisticated system of automated data filters and a national network of volunteer
data reviewers which serves to minimise data entry errors.
• The eBird website can provides us with a ‘real time’ map of Atlas survey coverage, allowing
observers to see which squares and habitat types have been surveyed and focusing their efforts
on those which haven’t been covered.
Although we encourage all Atlas participants to enter their data directly into eBird, either via the mobile
app or the eBird website, we have also provided two other alternative data entry methods for those who
have limited access to computers, mobile devices or internet-based databases. In total therefore, there
are four methods that Atlas participants can use to submit their Atlas data:
1. Directly entering bird checklist data into eBird using the eBird mobile app (our preferred option)
2. Recording bird checklist data into a notebook or field datasheet, then entering this into eBird via
the New Zealand Bird Atlas eBird website: https://ebird.org/atlasnz/home
29
3. Recording bird checklist data into a notebook or field datasheet, then entering these data into a
Microsoft Excel spreadsheet and emailing this to the National Atlas Team so that they can upload
this to eBird on your behalf.
4. Recording bird checklist data into a paper-copy field datasheet, then posting these datasheets to
the National Atlas Team, PO Box 607, Blenheim 7240 so that they can manually enter these
checklists into eBird on your behalf.
For tutorials on how to register and enter data using eBird, both the mobile app and online database, we
have created video guidance which can be found here. We are in the process of updating these videos to
show the new updated app and portal. The following section of the Atlas handbook provides a detailed,
step-by-step guide on how to submit your Atlas data, using each of these four options.
1. Entering data in the field using the eBird mobile app
A major advantage that eBird offers to the New Zealand Bird Atlas is that a free mobile app has been
developed for both Apple and Android mobile devices, which enables Atlas participants to enter their bird
checklists directly into the eBird database while in the field. This eliminates the need to double-handle
your Atlas data, which not only saves you time, but also reduces the potential risk of data transcription
errors occurring. Furthermore, on most mobile devices, the eBird app auto-fills a number of the key data
fields for the observer, including date, time and location. Whilst further reducing the potential for data
errors to occur, this also increases the accuracy of the data being inputted into the Atlas database. For
these reasons, we highly recommend that all Atlas participants who possess a smartphone or tablet to
use the eBird mobile app for their Atlas data entry.
In order to use eBird, and the eBird mobile app, you first need to register for free as a user. This can be
done either through the eBird website (https://ebird.org/atlasnz/home) or through the mobile app, by
following the steps below, and as shown in this video. We are in the process of updating these videos to
show the new updated eBird app, as well as highlighting the need to submit data to the NZ Bird Atlas
Portal instead of New Zealand eBird.
Registering as an eBird user through the eBird website
1. Open your favourite internet browser (Internet Explorer, Google Chrome, Mozilla Firefox etc.) and
navigate to the New Zealand Bird Atlas eBird homepage: https://ebird.org/atlasnz/home
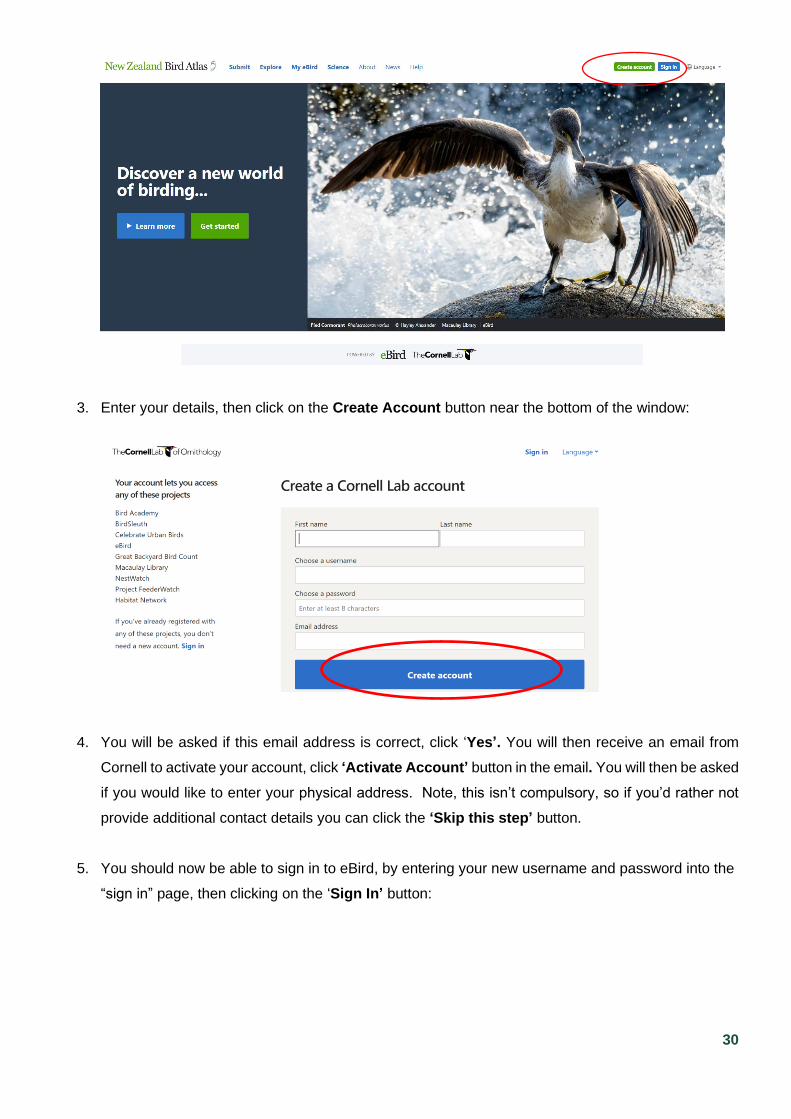
2. Click on the Create account button near the top right-hand corner of the window:
30
3. Enter your details, then click on the Create Account button near the bottom of the window:
4. You will be asked if this email address is correct, click ‘Yes’. You will then receive an email from
Cornell to activate your account, click ‘Activate Account’ button in the email. You will then be asked
if you would like to enter your physical address. Note, this isn’t compulsory, so if you’d rather not
provide additional contact details you can click the ‘Skip this step’ button.
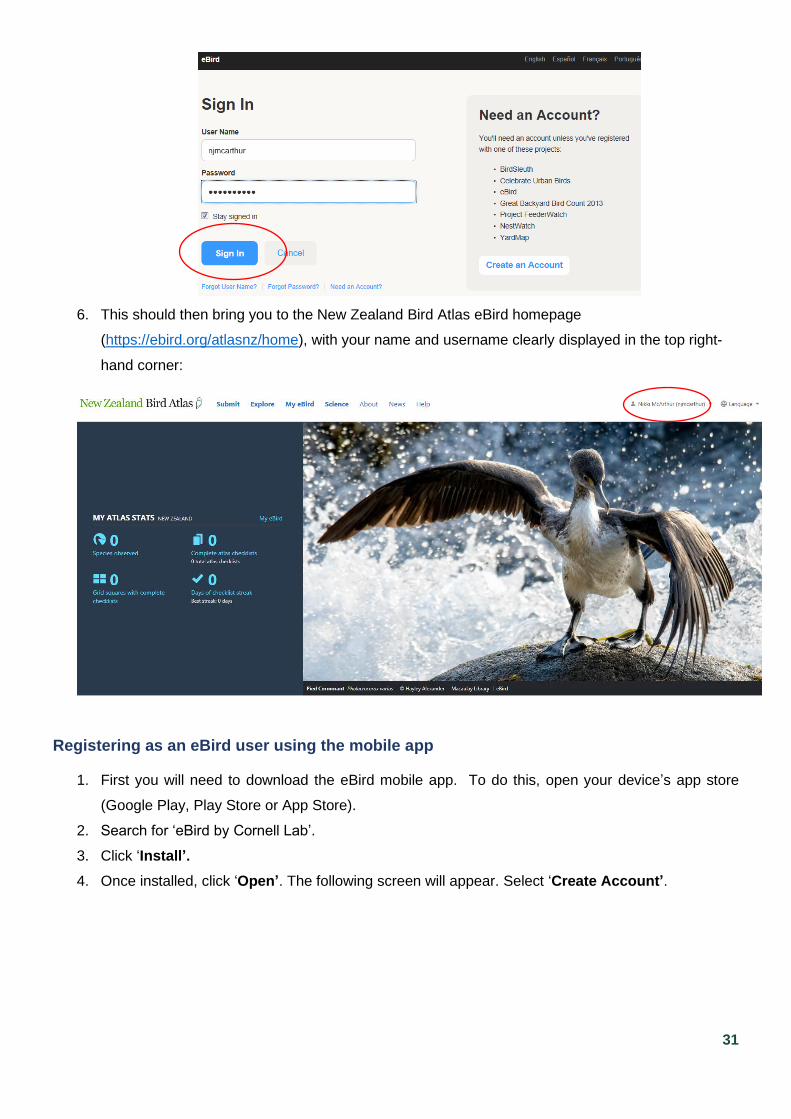
5. You should now be able to sign in to eBird, by entering your new username and password into the
“sign in” page, then clicking on the ‘Sign In’ button:
31
6. This should then bring you to the New Zealand Bird Atlas eBird homepage
(https://ebird.org/atlasnz/home), with your name and username clearly displayed in the top right-
hand corner:
Registering as an eBird user using the mobile app
1. First you will need to download the eBird mobile app. To do this, open your device’s app store
(Google Play, Play Store or App Store).
2. Search for ‘eBird by Cornell Lab’.
3. Click ‘Install’.
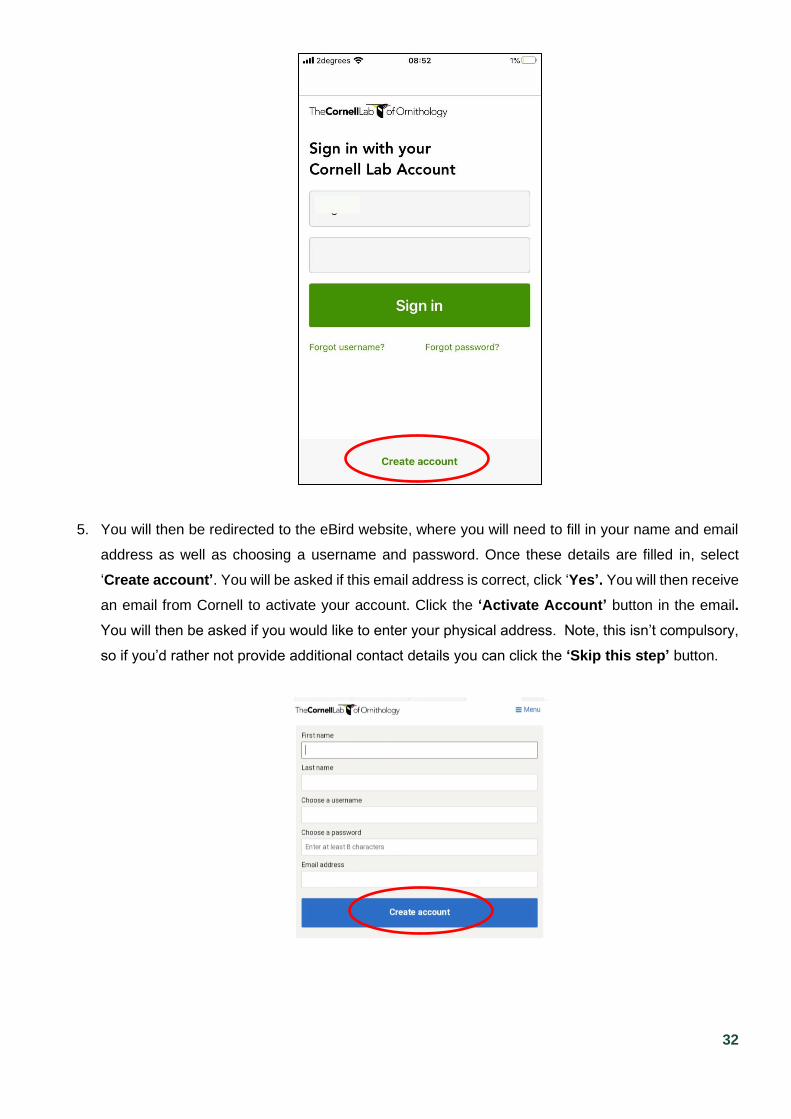
4. Once installed, click ‘Open’. The following screen will appear. Select ‘Create Account’.
32
5. You will then be redirected to the eBird website, where you will need to fill in your name and email
address as well as choosing a username and password. Once these details are filled in, select
‘Create account’. You will be asked if this email address is correct, click ‘Yes’. You will then receive
an email from Cornell to activate your account. Click the ‘Activate Account’ button in the email.
You will then be asked if you would like to enter your physical address. Note, this isn’t compulsory,
so if you’d rather not provide additional contact details you can click the ‘Skip this step’ button.
33
Setting up your eBird mobile app for the New Zealand Bird Atlas
Before submitting any checklists for the New Zealand Bird Atlas you will need to change a couple of
settings on your app to make it as user-friendly as possible:
1. Open the eBird app. The first time you open the app, you will be prompted to sign in using your
registered eBird name and password. After you have signed in once, the app will keep you logged
in under your username each time you open and use the app.
2. The first time you log in to the app it will review several key components (these can be accessed
later by clicking on the ‘More’ tab in the bottom right hand corner of your screen, and then clicking
the cog icon for ‘Settings and Account’):
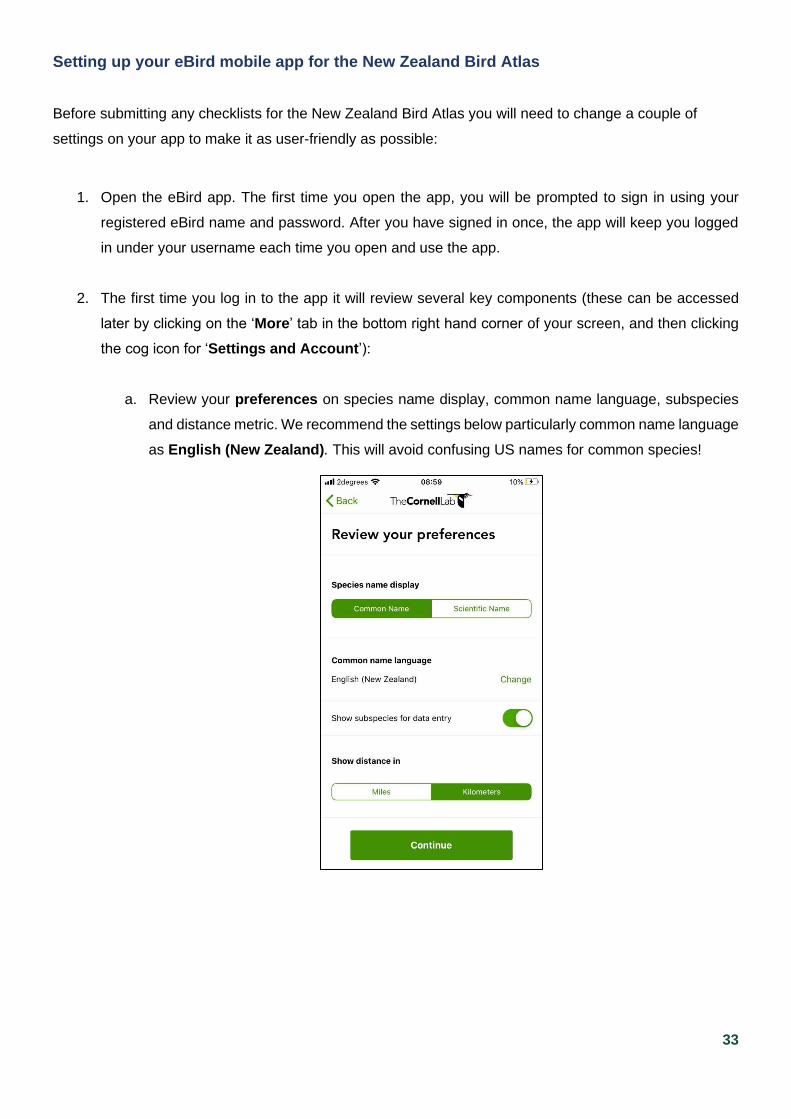
a. Review your preferences on species name display, common name language, subspecies
and distance metric. We recommend the settings below particularly common name language
as English (New Zealand). This will avoid confusing US names for common species!
34
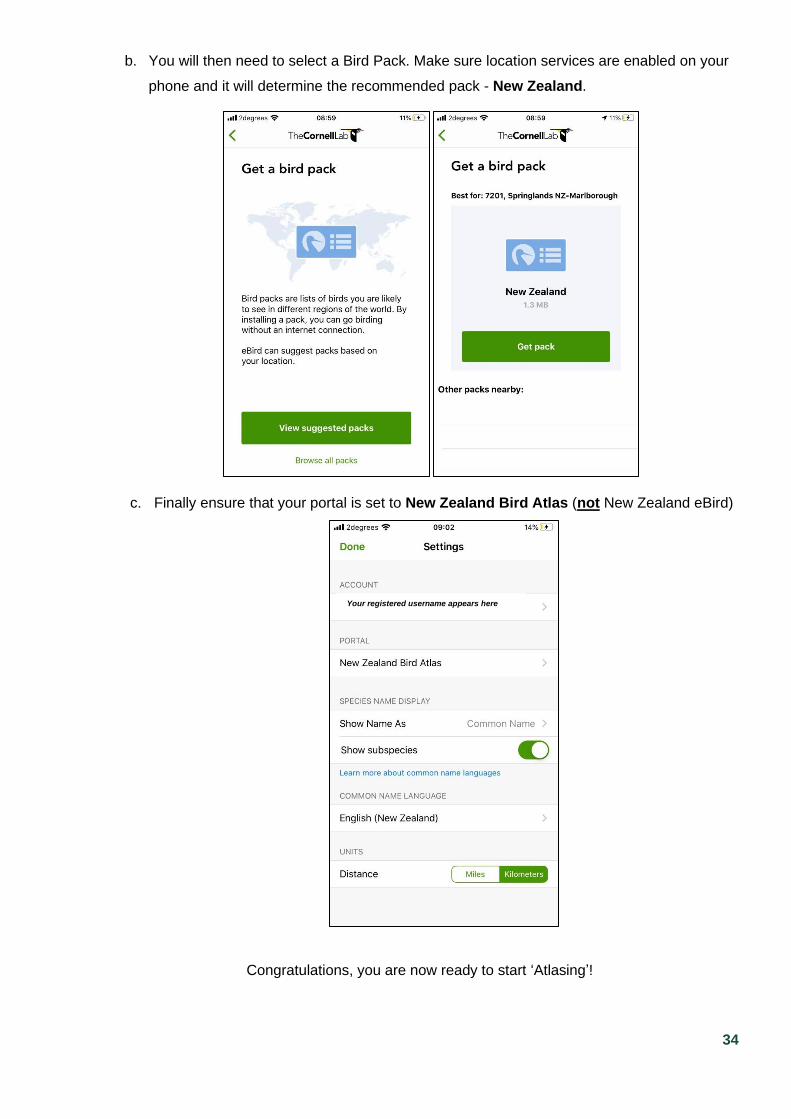
b. You will then need to select a Bird Pack. Make sure location services are enabled on your
phone and it will determine the recommended pack - New Zealand.
c. Finally ensure that your portal is set to New Zealand Bird Atlas (not New Zealand eBird)
Congratulations, you are now ready to start ‘Atlasing’!
Your registered username appears here

35
Completing checklists using the mobile app in areas with mobile reception
1. Open the eBird mobile app by clicking on the eBird icon on your phone’s home screen.
2. You will need to ensure that ‘Location Services’ are permitted for the eBird app so that it can
locate where you are. Ensure ‘Record Track’ is set to green as this will allow the most accurate
distance measurement for your checklist.
3. Date and time will be auto-filled by the app with the current date and time. Check these are correct,
and click on each one to edit, if needs be. Once you’re satisfied that the date and time have been
recorded correctly, click ‘Start Checklist’.
4. Your checklist has now started and the eBird app has automatically selected a location using the
GPS in your phone. You will review this at the end. The eBird app will have loaded a list of birds you
will likely find in the area where you are completing your checklist.
36
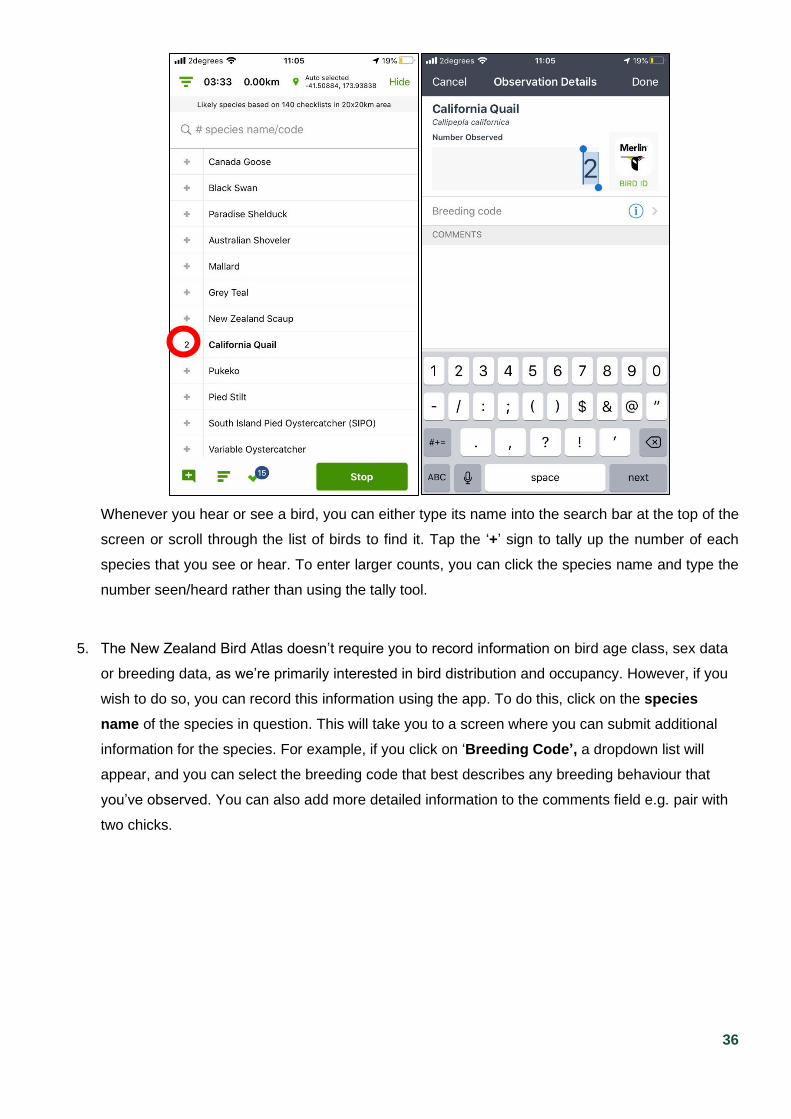
Whenever you hear or see a bird, you can either type its name into the search bar at the top of the
screen or scroll through the list of birds to find it. Tap the ‘+’ sign to tally up the number of each
species that you see or hear. To enter larger counts, you can click the species name and type the
number seen/heard rather than using the tally tool.
5. The New Zealand Bird Atlas doesn’t require you to record information on bird age class, sex data
or breeding data, as we’re primarily interested in bird distribution and occupancy. However, if you
wish to do so, you can record this information using the app. To do this, click on the species
name of the species in question. This will take you to a screen where you can submit additional
information for the species. For example, if you click on ‘Breeding Code’, a dropdown list will
appear, and you can select the breeding code that best describes any breeding behaviour that
you’ve observed. You can also add more detailed information to the comments field e.g. pair with
two chicks.
37
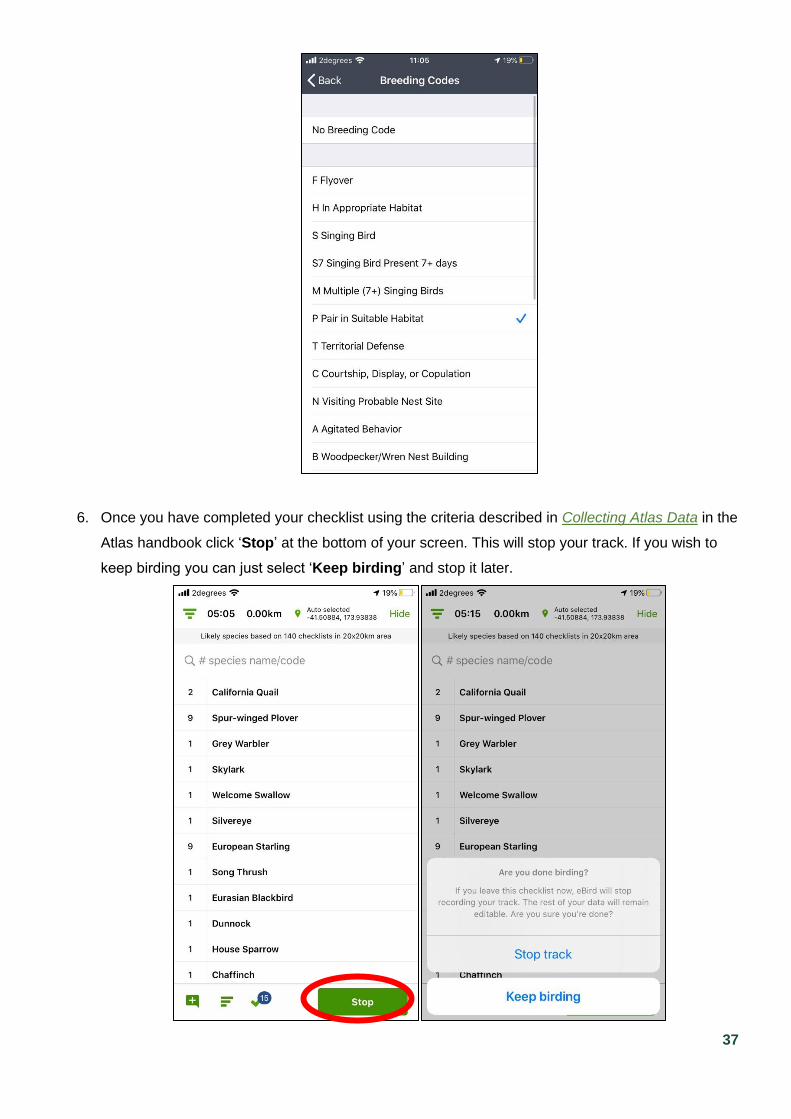
6. Once you have completed your checklist using the criteria described in Collecting Atlas Data in the
Atlas handbook click ‘Stop’ at the bottom of your screen. This will stop your track. If you wish to
keep birding you can just select ‘Keep birding’ and stop it later.
38
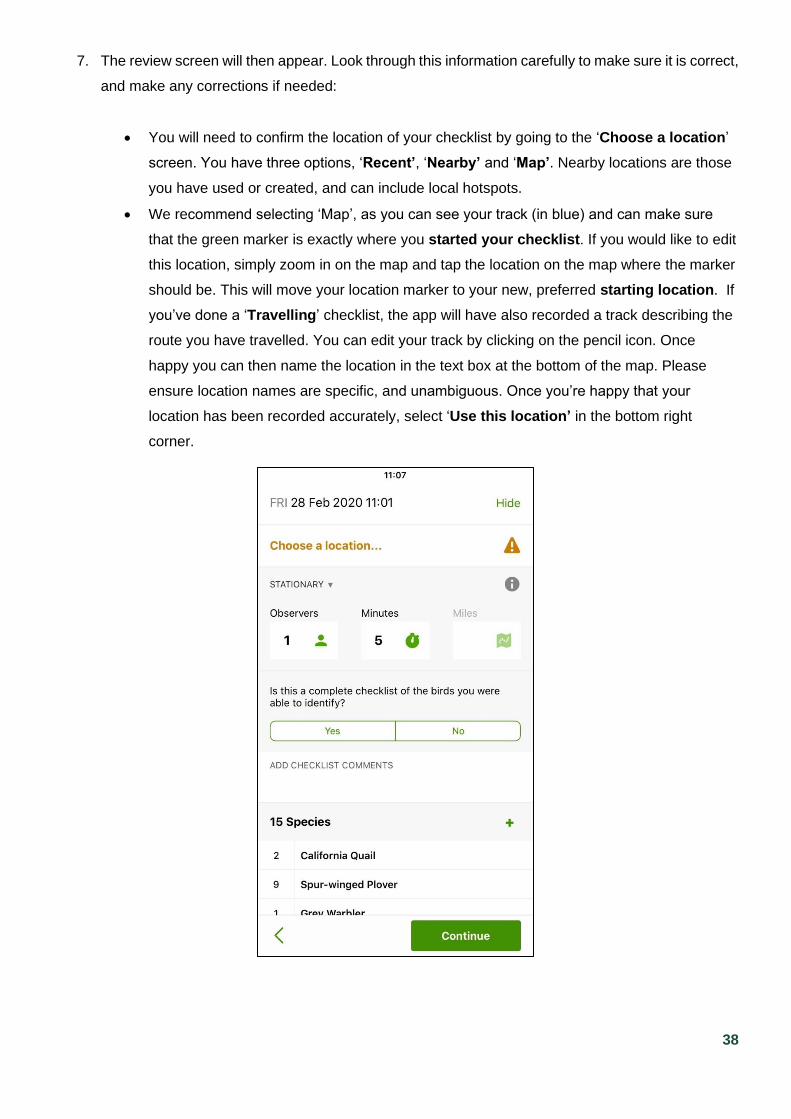
7. The review screen will then appear. Look through this information carefully to make sure it is correct,
and make any corrections if needed:
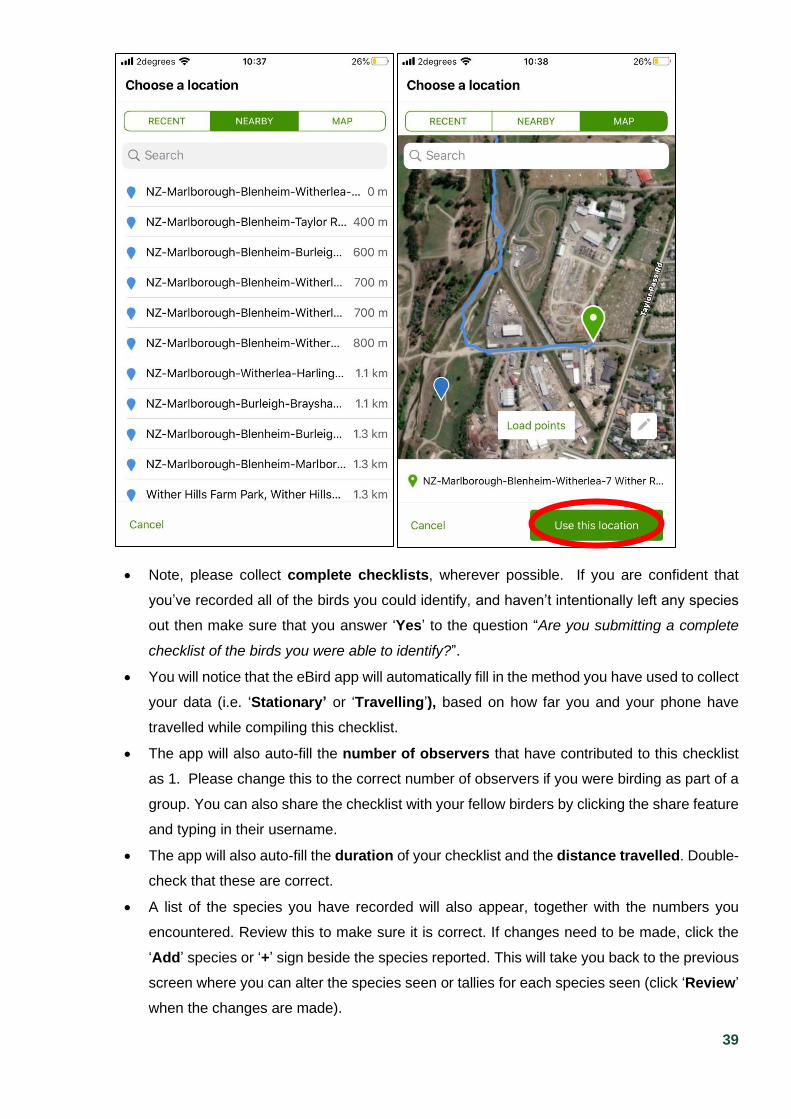
• You will need to confirm the location of your checklist by going to the ‘Choose a location’
screen. You have three options, ‘Recent’, ‘Nearby’ and ‘Map’. Nearby locations are those
you have used or created, and can include local hotspots.
• We recommend selecting ‘Map’, as you can see your track (in blue) and can make sure
that the green marker is exactly where you started your checklist. If you would like to edit
this location, simply zoom in on the map and tap the location on the map where the marker
should be. This will move your location marker to your new, preferred starting location. If
you’ve done a ‘Travelling’ checklist, the app will have also recorded a track describing the
route you have travelled. You can edit your track by clicking on the pencil icon. Once
happy you can then name the location in the text box at the bottom of the map. Please
ensure location names are specific, and unambiguous. Once you’re happy that your
location has been recorded accurately, select ‘Use this location’ in the bottom right
corner.
39
• Note, please collect complete checklists, wherever possible. If you are confident that
you’ve recorded all of the birds you could identify, and haven’t intentionally left any species
out then make sure that you answer ‘Yes’ to the question “Are you submitting a complete
checklist of the birds you were able to identify?”.
• You will notice that the eBird app will automatically fill in the method you have used to collect
your data (i.e. ‘Stationary’ or ‘Travelling’), based on how far you and your phone have
travelled while compiling this checklist.
• The app will also auto-fill the number of observers that have contributed to this checklist
as 1. Please change this to the correct number of observers if you were birding as part of a
group. You can also share the checklist with your fellow birders by clicking the share feature
and typing in their username.
• The app will also auto-fill the duration of your checklist and the distance travelled. Double-
check that these are correct.
• A list of the species you have recorded will also appear, together with the numbers you
encountered. Review this to make sure it is correct. If changes need to be made, click the
‘Add’ species or ‘+’ sign beside the species reported. This will take you back to the previous
screen where you can alter the species seen or tallies for each species seen (click ‘Review’
when the changes are made).
40
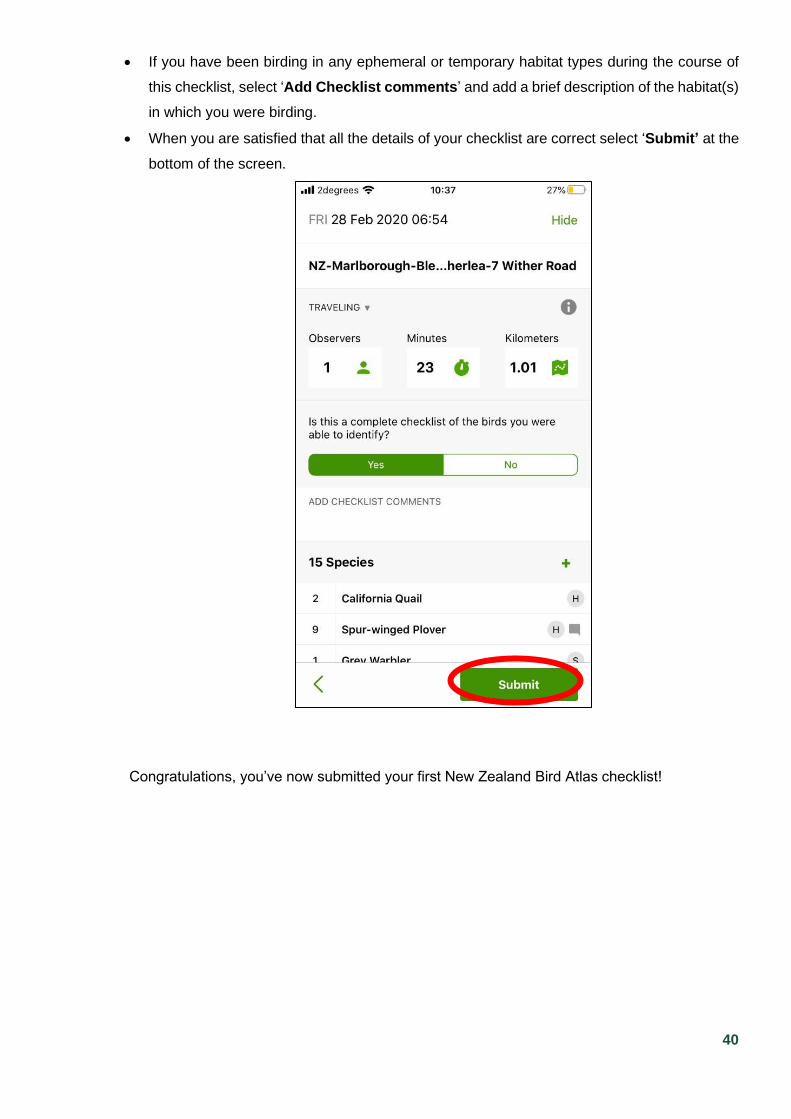
• If you have been birding in any ephemeral or temporary habitat types during the course of
this checklist, select ‘Add Checklist comments’ and add a brief description of the habitat(s)
in which you were birding.
• When you are satisfied that all the details of your checklist are correct select ‘Submit’ at the
bottom of the screen.
Congratulations, you’ve now submitted your first New Zealand Bird Atlas checklist!
41
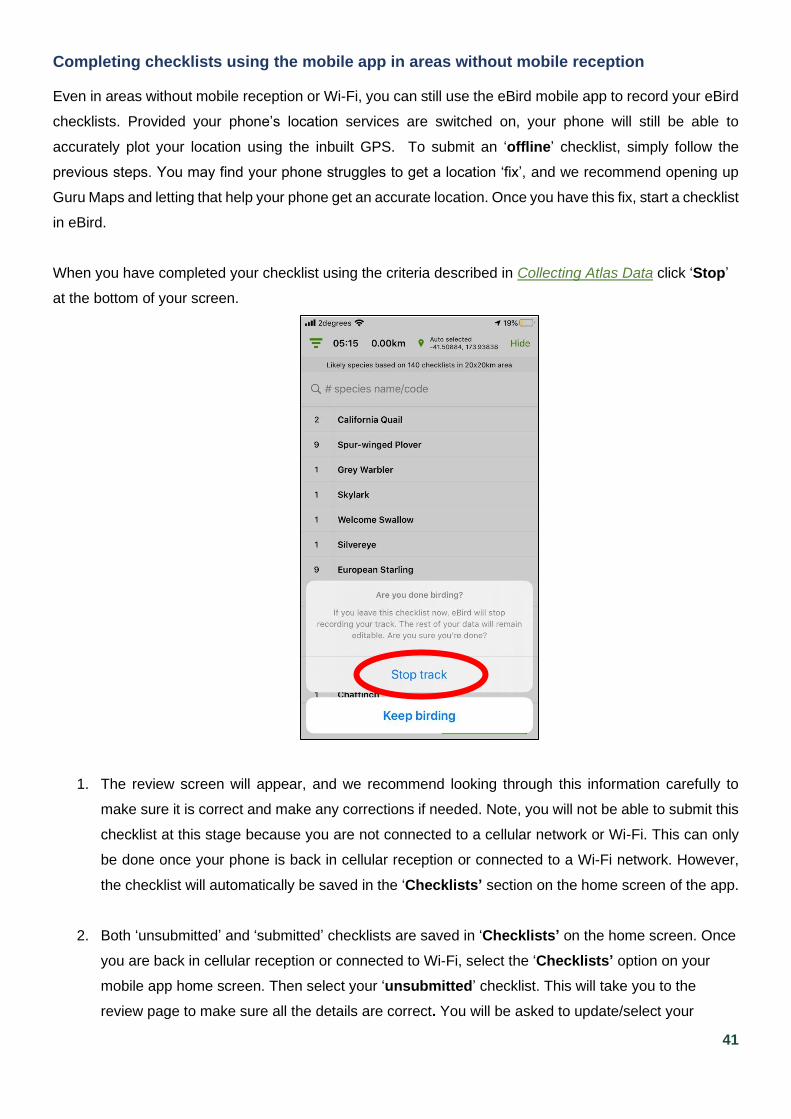
Completing checklists using the mobile app in areas without mobile reception
Even in areas without mobile reception or Wi-Fi, you can still use the eBird mobile app to record your eBird
checklists. Provided your phone’s location services are switched on, your phone will still be able to
accurately plot your location using the inbuilt GPS. To submit an ‘offline’ checklist, simply follow the
previous steps. You may find your phone struggles to get a location ‘fix’, and we recommend opening up
Guru Maps and letting that help your phone get an accurate location. Once you have this fix, start a checklist
in eBird.
When you have completed your checklist using the criteria described in Collecting Atlas Data click ‘Stop’
at the bottom of your screen.
1. The review screen will appear, and we recommend looking through this information carefully to
make sure it is correct and make any corrections if needed. Note, you will not be able to submit this
checklist at this stage because you are not connected to a cellular network or Wi-Fi. This can only
be done once your phone is back in cellular reception or connected to a Wi-Fi network. However,
the checklist will automatically be saved in the ‘Checklists’ section on the home screen of the app.
2. Both ‘unsubmitted’ and ‘submitted’ checklists are saved in ‘Checklists’ on the home screen. Once
you are back in cellular reception or connected to Wi-Fi, select the ‘Checklists’ option on your
mobile app home screen. Then select your ‘unsubmitted’ checklist. This will take you to the
review page to make sure all the details are correct. You will be asked to update/select your
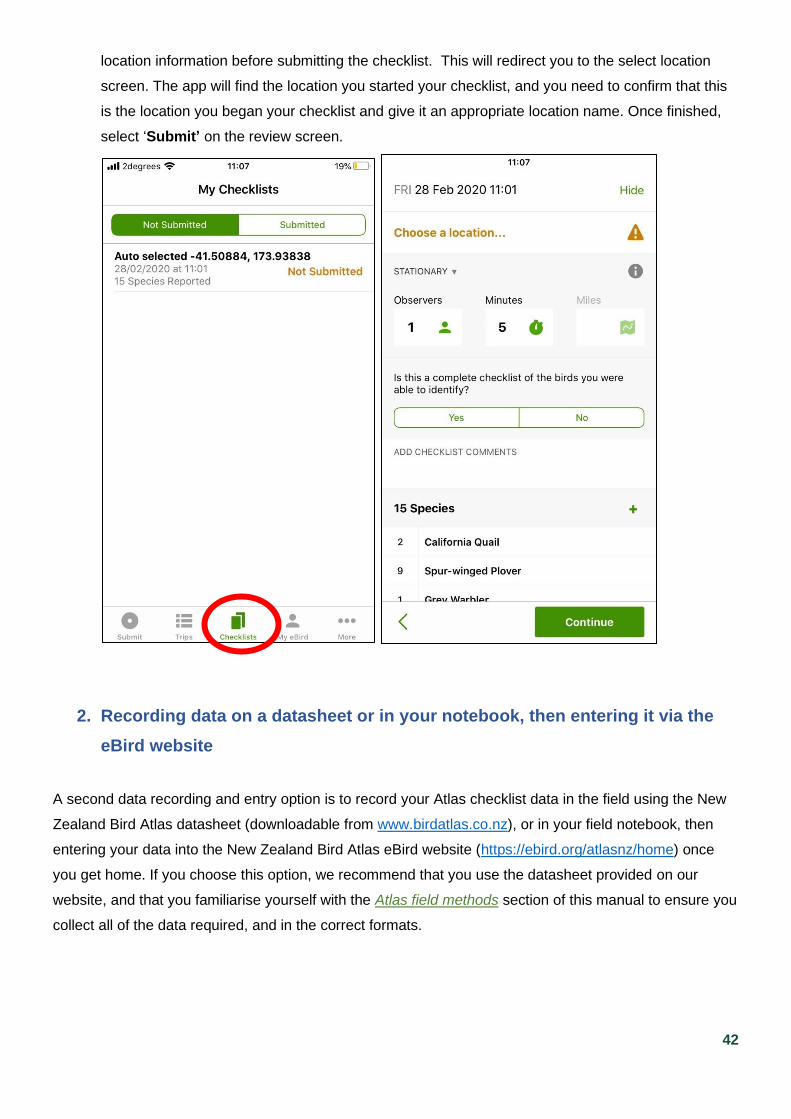
42
location information before submitting the checklist. This will redirect you to the select location
screen. The app will find the location you started your checklist, and you need to confirm that this
is the location you began your checklist and give it an appropriate location name. Once finished,
select ‘Submit’ on the review screen.
2. Recording data on a datasheet or in your notebook, then entering it via the
eBird website
A second data recording and entry option is to record your Atlas checklist data in the field using the New
Zealand Bird Atlas datasheet (downloadable from www.birdatlas.co.nz), or in your field notebook, then
entering your data into the New Zealand Bird Atlas eBird website (https://ebird.org/atlasnz/home) once
you get home. If you choose this option, we recommend that you use the datasheet provided on our
website, and that you familiarise yourself with the Atlas field methods section of this manual to ensure you
collect all of the data required, and in the correct formats.
43
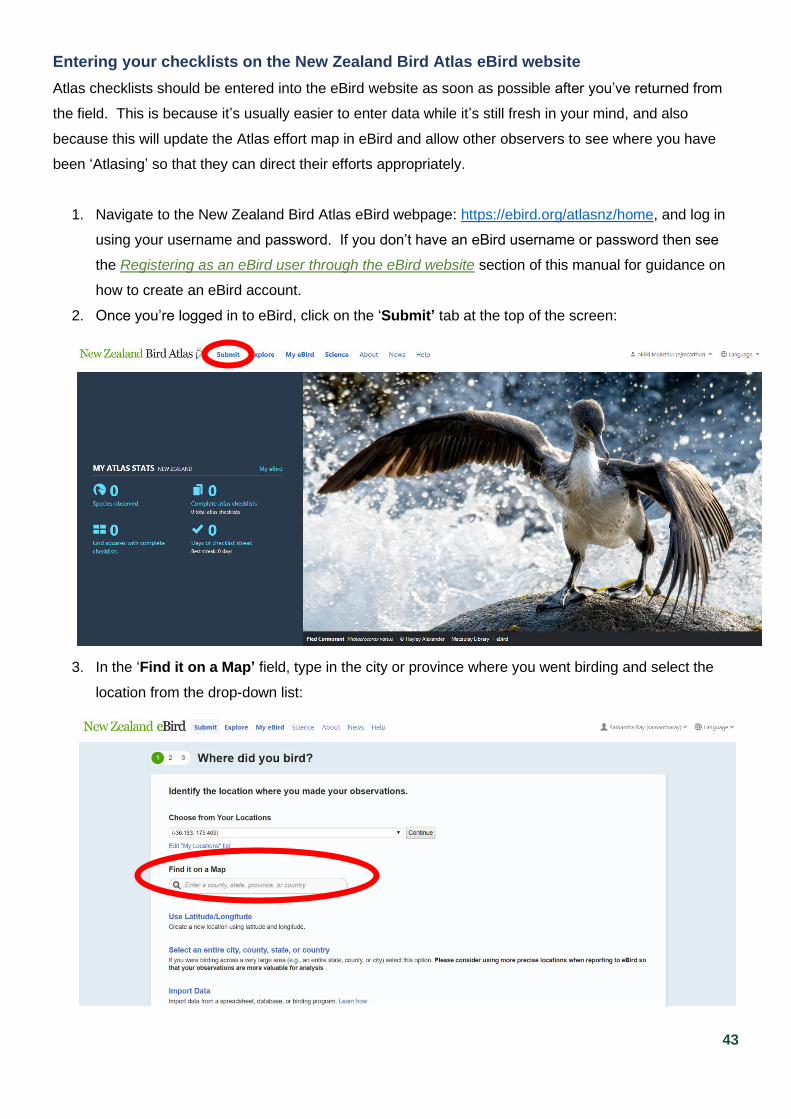
Entering your checklists on the New Zealand Bird Atlas eBird website
Atlas checklists should be entered into the eBird website as soon as possible after you’ve returned from
the field. This is because it’s usually easier to enter data while it’s still fresh in your mind, and also
because this will update the Atlas effort map in eBird and allow other observers to see where you have
been ‘Atlasing’ so that they can direct their efforts appropriately.
1. Navigate to the New Zealand Bird Atlas eBird webpage: https://ebird.org/atlasnz/home, and log in
using your username and password. If you don’t have an eBird username or password then see
the Registering as an eBird user through the eBird website section of this manual for guidance on
how to create an eBird account.
2. Once you’re logged in to eBird, click on the ‘Submit’ tab at the top of the screen:
3. In the ‘Find it on a Map’ field, type in the city or province where you went birding and select the
location from the drop-down list:

44
4. Use the zoom tools to zoom in on the map as far as you need to in order to pinpoint the location
where you went birding. Either: press the ‘+’ button repeatedly and click and drag the curser
across the map to position it correctly. Or: click on the magnifying glass button, then click and drag
a rectangle across the map to quickly select a smaller area. Alternatively, you can type a street
address or geographic coordinates (latitude/longitude; decimal degrees) into the ‘Zoom to” box
and press enter – this will cause the map to quickly zoom in to the corresponding location.
5. Switch between the map and satellite options to ensure you have navigated to the correct location
on the map.
45
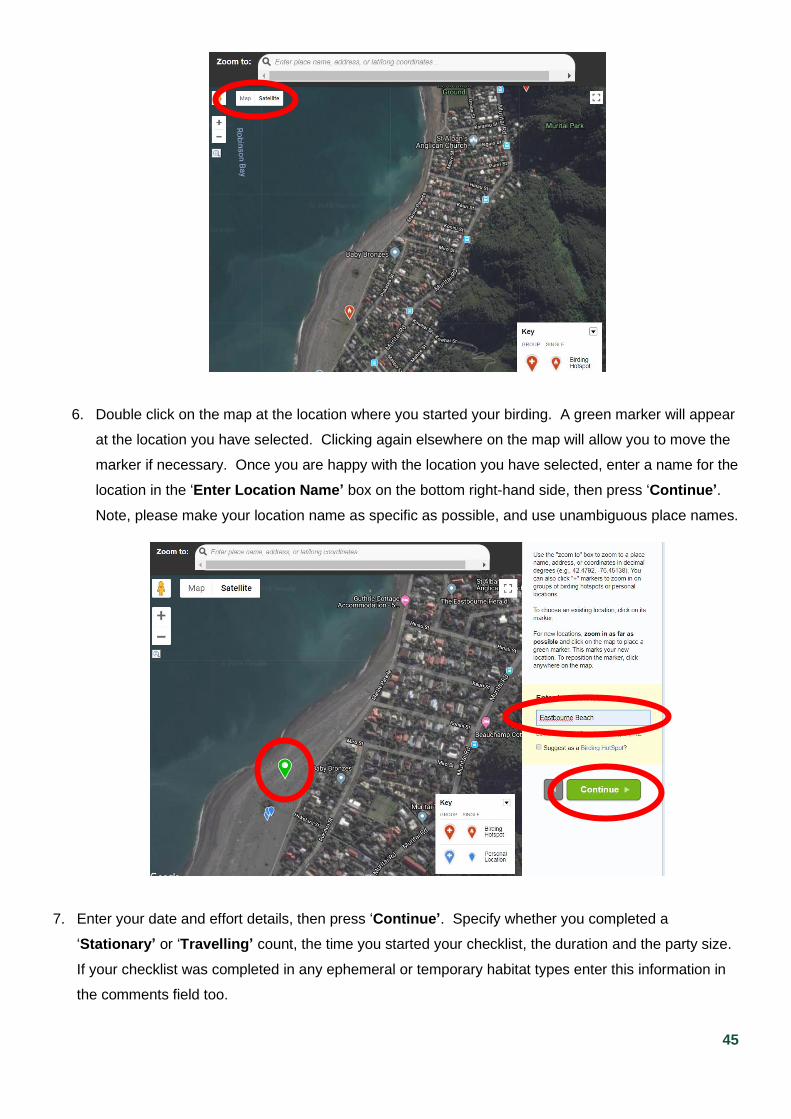
6. Double click on the map at the location where you started your birding. A green marker will appear
at the location you have selected. Clicking again elsewhere on the map will allow you to move the
marker if necessary. Once you are happy with the location you have selected, enter a name for the
location in the ‘Enter Location Name’ box on the bottom right-hand side, then press ‘Continue’.
Note, please make your location name as specific as possible, and use unambiguous place names.
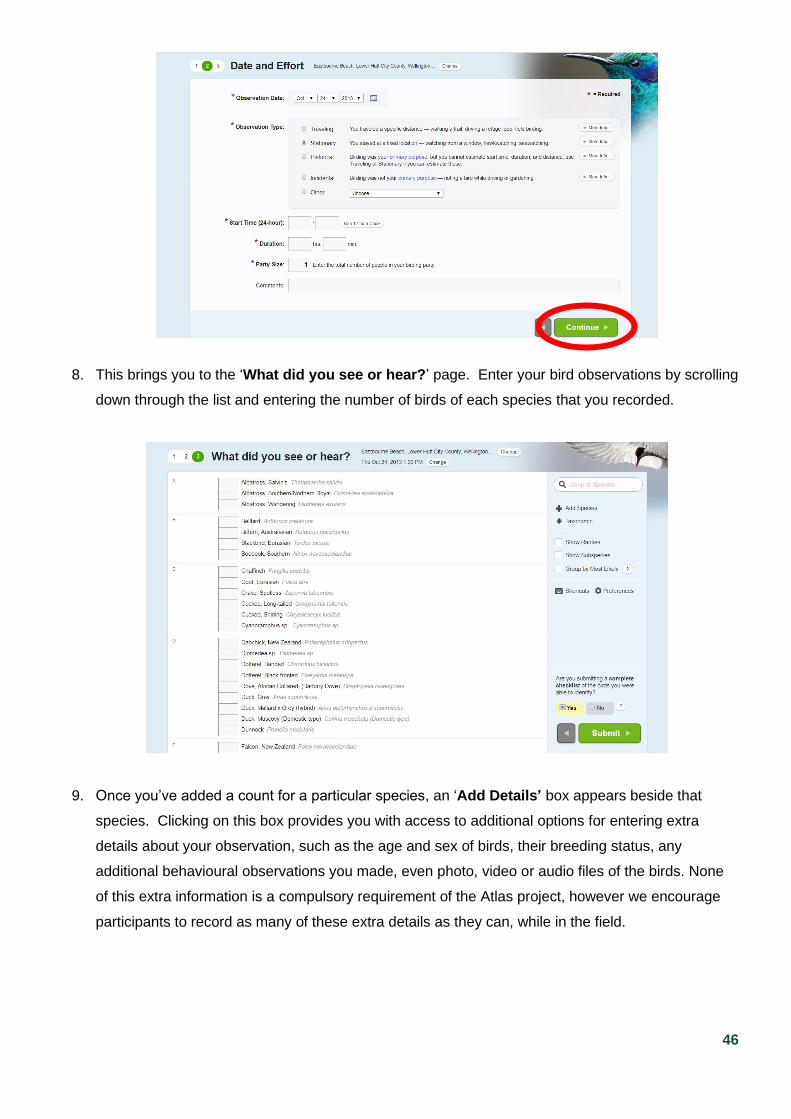
7. Enter your date and effort details, then press ‘Continue’. Specify whether you completed a
‘Stationary’ or ‘Travelling’ count, the time you started your checklist, the duration and the party size.
If your checklist was completed in any ephemeral or temporary habitat types enter this information in
the comments field too.
46
8. This brings you to the ‘What did you see or hear?’ page. Enter your bird observations by scrolling
down through the list and entering the number of birds of each species that you recorded.
9. Once you’ve added a count for a particular species, an ‘Add Details’ box appears beside that
species. Clicking on this box provides you with access to additional options for entering extra
details about your observation, such as the age and sex of birds, their breeding status, any
additional behavioural observations you made, even photo, video or audio files of the birds. None
of this extra information is a compulsory requirement of the Atlas project, however we encourage
participants to record as many of these extra details as they can, while in the field.
47
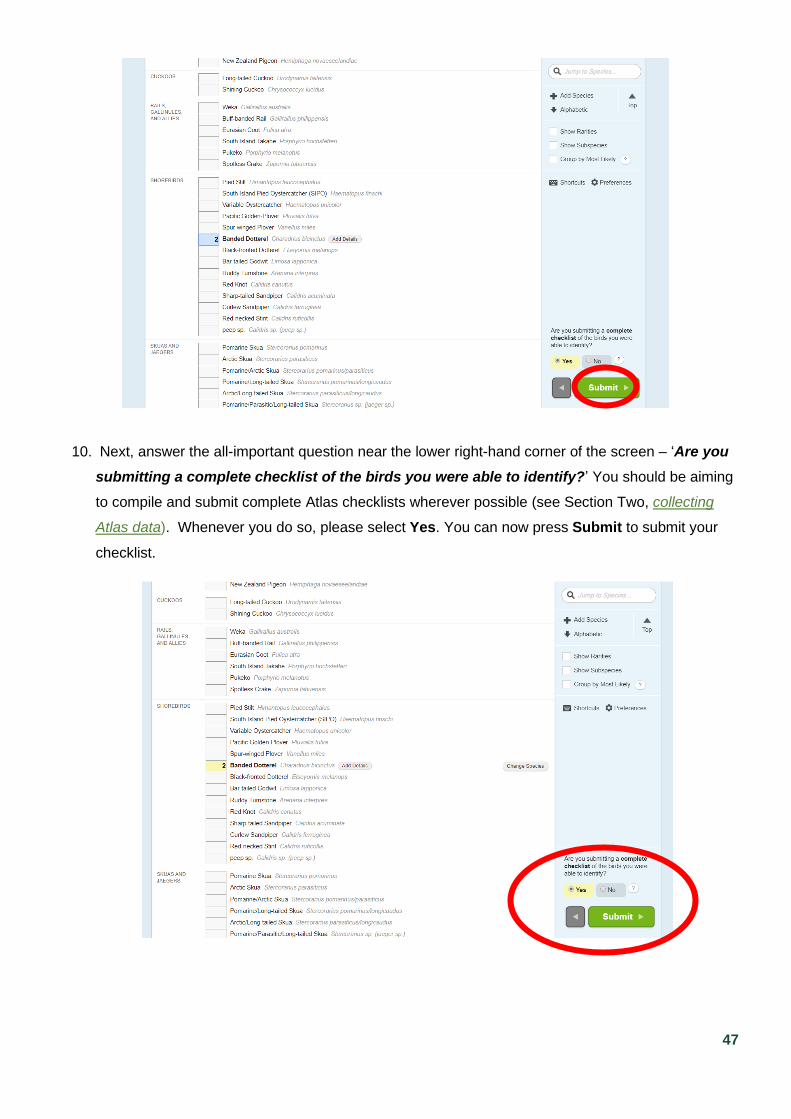
10. Next, answer the all-important question near the lower right-hand corner of the screen – ‘Are you
submitting a complete checklist of the birds you were able to identify?’ You should be aiming
to compile and submit complete Atlas checklists wherever possible (see Section Two, collecting
Atlas data). Whenever you do so, please select Yes. You can now press Submit to submit your
checklist.

48
11. Provided everything has worked correctly, and you haven’t just tried to submit a record for a rare or
unusual species, nor put in an unusually high count, your job is now complete. You should now be
looking at a screen confirming that your checklist has been successfully submitted to eBird.
12. The next step is to carefully check all of the details are correct. If you find any mistakes, you can
correct them by clicking on the relevant ‘Edit’ buttons on the right-hand side of the list, making the
appropriate changes then clicking on the ‘Save’ button.
A note on rarities and high counts
Built into eBird are a series of data filters that automatically pick up records that are submitted for birds
that are rare for a particular date or location, or for species counts that are unusually high. These filters
are in place to ensure the data being submitted to eBird are as accurate as possible. When these filters
are triggered, the following screen will appear when you hit the ‘Submit’ button after you’ve entered your
checklist:
This screen shows the two types of unusual records that the eBird filters are designed to catch. The first
one (the record of 100 dabchick) has been “caught” because this is a rather high count for this species.
The second record (of three black-fronted dotterels) has been caught because this species is apparently
rare at this location. In both instances, you will be required to check these records and correct them if you
have made a mistake. If you are confident your observations are correct on the other hand, you will need
to add some explanatory comments or indeed photographs, e.g. “We counted the dabchick flock 3 times
and got 100 birds each time” or “clearly black-fronted dotterels – the black mask and single black chest-
band that was visible on each bird allowed us to differentiate them from banded dotterels”. Once you’ve
inputted these, you can then check the ‘Complete’ box then press ‘Submit’.
49
Once you’ve submitted these “confirmed” observations that is not the end of the story! Given that these
records are still rather unusual, they then get sent to a volunteer data reviewer for verification. Most of the
time, your photo(s) and comments, plus the knowledge of the reviewer, will be sufficient to give them the
confidence to accept your observation and allow it to be incorporated into the eBird database. On rare
occasions though, they may need to contact you to ask you for further details before they make their
decision. Because this step is relatively labour-intensive, you can help the reviewer by making your
supporting comments as clear and as detailed as possible, and uploading a photo of the bird(s) if you took
one. As a general rule, the more unusual your observation, the more detailed description you will need to
provide.
Sometimes the eBird filters aren’t quite right. Black-fronted dotterels are an excellent example of this as
they are considered a rare species anywhere in the country, including the Wairarapa, despite the fact that
they are increasingly common locally on our rivers and lake margins! When you strike this issue, it’s
acceptable to write a comment such as “BF-dotterels are actually not unusual at this location” or
something similar. This will help alert the reviewer that the relevant eBird filter may need to be changed.
3 Collecting data in the field using a datasheet or notebook, then entering your data into an Excel spreadsheet
This third data entry option has been developed for participants who would prefer not to enter their own
data directly into eBird. Please note, it’s our preference that as many Atlas participants as possible enter
their own data into eBird, as this not only greatly improves the quality of the data collected, but minimises
the labour associated with data entry. However, for those who are unable to access eBird, we have
provided the option of collecting data in the field using a datasheet or notebook, then entering your data
into a Microsoft Excel spreadsheet and emailing this in to the National Atlas Team for upload to eBird.
To collect your data in the field, we highly recommend you download and print off copies of the New
Zealand Bird Atlas datasheet and instructions, from the ‘Help Centre’ section of the New Zealand Bird
Atlas website: www.birdatlas.co.nz. Using this datasheet, rather than your notebook will ensure that you
collect all of the data required for a complete Atlas checklist.
Entering data into an excel spreadsheet
Once you have collected some Atlas data, the next step is to enter this data into a Microsoft Excel
spreadsheet. We will only accept data using the template spreadsheet that we have created, which is
available for download from the ‘Help Centre’ section of the New Zealand Bird Atlas website:
www.birdatlas.co.nz. In this spreadsheet, your data is arranged in rows, with each individual species
observation occupying one row. eBird automatically groups these individual species observations back
into complete checklists, by matching up the location, date and time information entered into each row
50
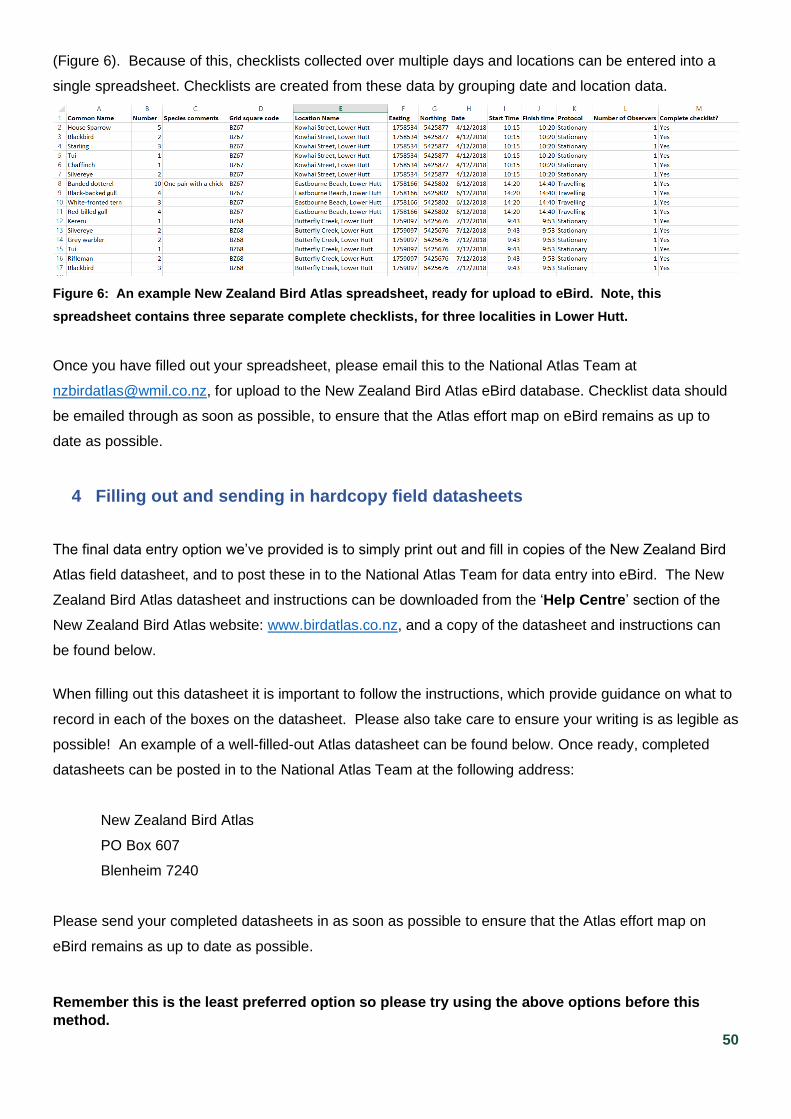
(Figure 6). Because of this, checklists collected over multiple days and locations can be entered into a
single spreadsheet. Checklists are created from these data by grouping date and location data.
Figure 6: An example New Zealand Bird Atlas spreadsheet, ready for upload to eBird. Note, this
spreadsheet contains three separate complete checklists, for three localities in Lower Hutt.
Once you have filled out your spreadsheet, please email this to the National Atlas Team at
[email protected], for upload to the New Zealand Bird Atlas eBird database. Checklist data should
be emailed through as soon as possible, to ensure that the Atlas effort map on eBird remains as up to
date as possible.
4 Filling out and sending in hardcopy field datasheets
The final data entry option we’ve provided is to simply print out and fill in copies of the New Zealand Bird
Atlas field datasheet, and to post these in to the National Atlas Team for data entry into eBird. The New
Zealand Bird Atlas datasheet and instructions can be downloaded from the ‘Help Centre’ section of the
New Zealand Bird Atlas website: www.birdatlas.co.nz, and a copy of the datasheet and instructions can
be found below.
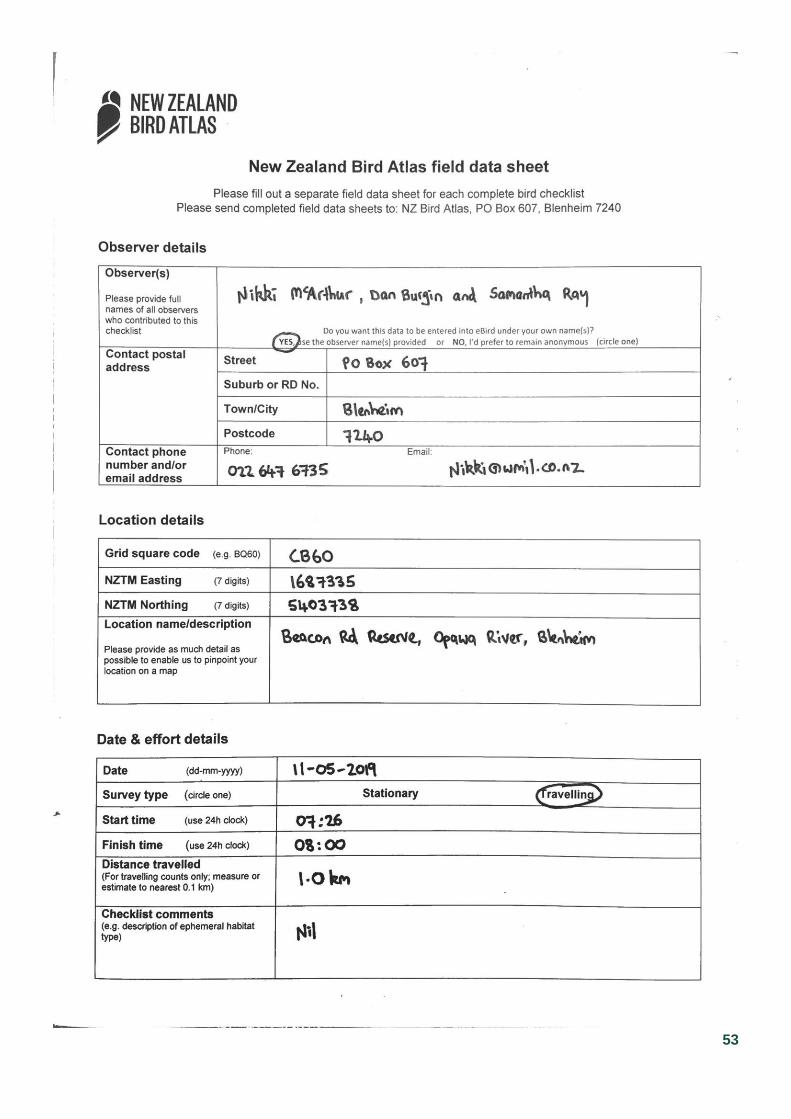
When filling out this datasheet it is important to follow the instructions, which provide guidance on what to
record in each of the boxes on the datasheet. Please also take care to ensure your writing is as legible as
possible! An example of a well-filled-out Atlas datasheet can be found below. Once ready, completed
datasheets can be posted in to the National Atlas Team at the following address:
New Zealand Bird Atlas
PO Box 607
Blenheim 7240
Please send your completed datasheets in as soon as possible to ensure that the Atlas effort map on
eBird remains as up to date as possible.
Remember this is the least preferred option so please try using the above options before this
method.
51
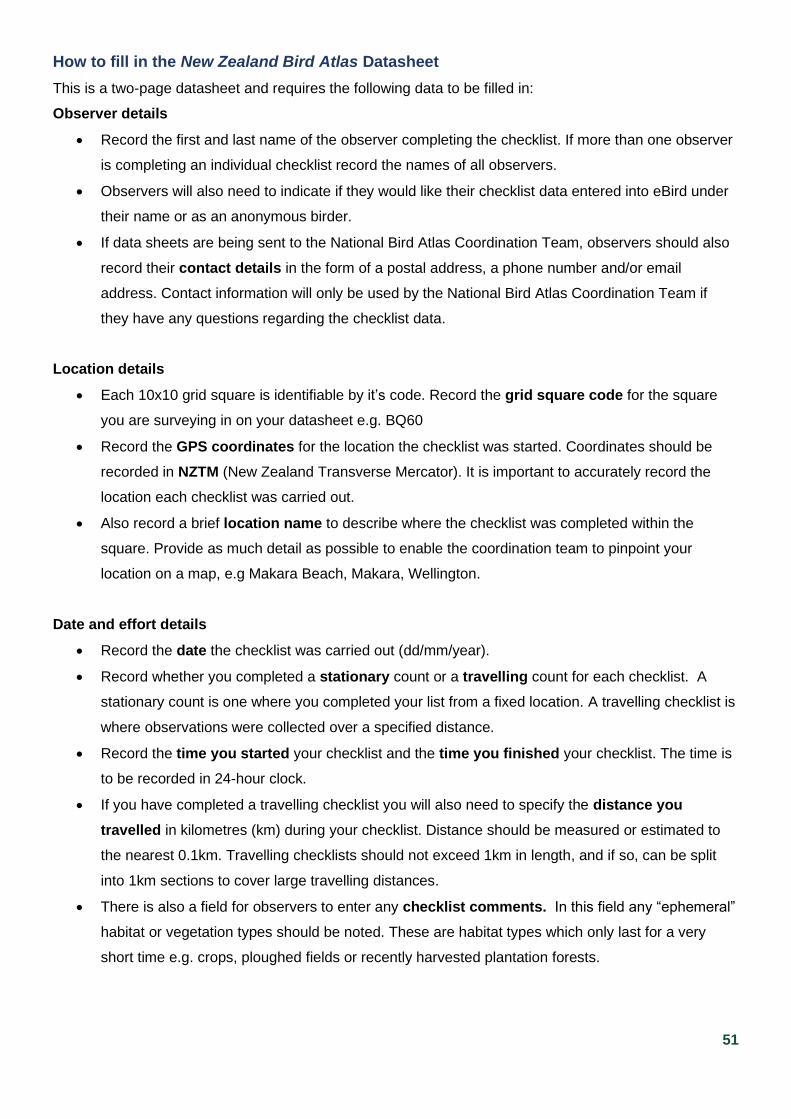
How to fill in the New Zealand Bird Atlas Datasheet
This is a two-page datasheet and requires the following data to be filled in:
Observer details
• Record the first and last name of the observer completing the checklist. If more than one observer
is completing an individual checklist record the names of all observers.
• Observers will also need to indicate if they would like their checklist data entered into eBird under
their name or as an anonymous birder.
• If data sheets are being sent to the National Bird Atlas Coordination Team, observers should also
record their contact details in the form of a postal address, a phone number and/or email
address. Contact information will only be used by the National Bird Atlas Coordination Team if
they have any questions regarding the checklist data.
Location details
• Each 10x10 grid square is identifiable by it’s code. Record the grid square code for the square
you are surveying in on your datasheet e.g. BQ60
• Record the GPS coordinates for the location the checklist was started. Coordinates should be
recorded in NZTM (New Zealand Transverse Mercator). It is important to accurately record the
location each checklist was carried out.
• Also record a brief location name to describe where the checklist was completed within the
square. Provide as much detail as possible to enable the coordination team to pinpoint your
location on a map, e.g Makara Beach, Makara, Wellington.
Date and effort details
• Record the date the checklist was carried out (dd/mm/year).
• Record whether you completed a stationary count or a travelling count for each checklist. A
stationary count is one where you completed your list from a fixed location. A travelling checklist is
where observations were collected over a specified distance.
• Record the time you started your checklist and the time you finished your checklist. The time is
to be recorded in 24-hour clock.
• If you have completed a travelling checklist you will also need to specify the distance you
travelled in kilometres (km) during your checklist. Distance should be measured or estimated to
the nearest 0.1km. Travelling checklists should not exceed 1km in length, and if so, can be split
into 1km sections to cover large travelling distances.
• There is also a field for observers to enter any checklist comments. In this field any “ephemeral”
habitat or vegetation types should be noted. These are habitat types which only last for a very
short time e.g. crops, ploughed fields or recently harvested plantation forests.
52
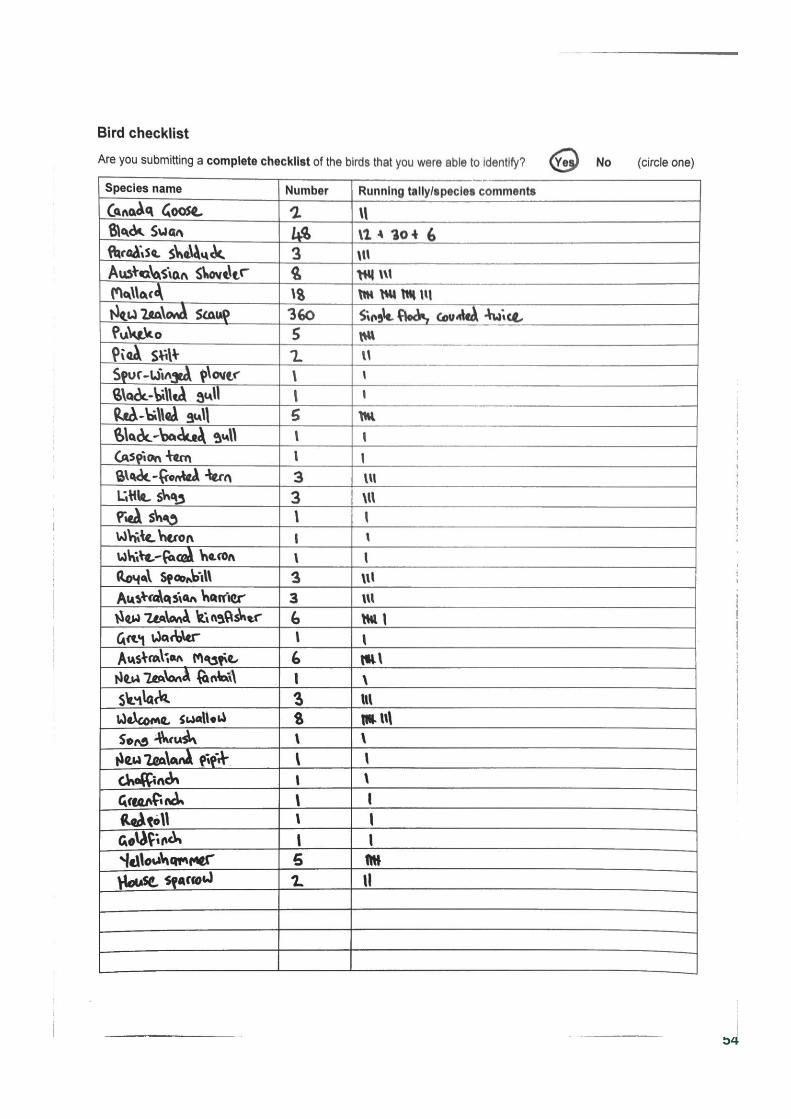
Bird checklist
• Specify whether you are completing a complete checklist or not. Remember a complete checklist
is one which all bird species that were encountered and identified in the field are recorded, along
with date, time, location and search effort data.
• Record the common name of all the individual species you see and hear while completing your
checklist in the species name column. This needs to be written in full, not in shorthand.
• The number column is where you record the total number of individuals of each species you
encountered while completing your checklist. Observers don’t need to differentiate between
whether they were seen or heard. For large clusters of birds or colonies an estimated count can be
recorded.
• The running tally/species comments field allows you to keep a tally of individuals you see for
each species and any additional comments. This tally is then entered into the number column as
described above. The Atlas is not specifically recording bird age class, sex data or breeding data,
but this information can be recorded if it is observed while completing checklists (e.g banded
dotterel pair with two chicks) and added to this same column for the corresponding species.
An example ‘gold standard’ data sheet filled in is shown below.
53
54
55
Additional information
Atlas ethics
Respect for birds:
Birds are living creatures that deserve our respect. Their welfare is always of paramount importance.
When we are out collecting Atlas data, it’s important that we all remain mindful of the need to minimise
any disturbance we cause to the birds we are observing.
• Be quiet and unobtrusive. Try to observe the birds so they are unaware of your presence and
behave normally. Avoid quick movements, unnecessary noise, running, continuous chasing of the
same individual, throwing things, tree-whacking for cavity nesters, excessive “pishing,” etc. Ideally,
the birds should behave normally and not be aware of your presence during the observation
periods. The quiet observer sees more!
• Approaching a nest too closely or repeatedly flushing adults during certain stages of the nesting
cycle may cause nest abandonment. Visiting a nest site may also attract predators (avoid leaving
a single, dead-end scent trail to a nest). Please do NOT handle the young or eggs.
• Playback should only be used to detect cryptic species and only by following the guidelines
described in playback for cryptic species. In all other instances do NOT use playback.
• Use discretion in divulging information on the location of particularly vulnerable species, or the
location of nests. Use the ‘Hide’ function in eBird (found on the bottom right of the checklist as
soon as you submit it) to hide any such observations from public eBird outputs.
Respect for habitat:
Causing damage to a habitat affects all species in the ecosystem so it is very important to keep habitat
disturbance to an absolute minimum.
• Do not disturb vegetation near a nest and avoid trampling sensitive habitats.
• Carry out your litter. If possible, also carry out any litter left by others.
• Keep vehicles on established roads and parking areas. Leaving one set of tracks tends to invite
others to follow the same path.
Respect for people:
Given that some of our Atlas fieldwork will be conducted on private property, it will be necessary to exhibit
certain courtesies.
• Always obtain permission to enter private lands before doing so. For additional information, see
the Accessing Private Land section of the handbook.
• Do not block rights-of-way and always leave gates as you found them.
• When birding near a private residence, be considerate of your host’s time, property, and privacy.
• Behave in a manner that reflects favourably on the organization and project that you represent.
56
• Respond to questions about your activities with courtesy and respect, and offer to provide
landowners a copy of the bird checklist(s) that you compile on their land.
Field safety
Carrying out Atlas fieldwork will take many of us into remote parts of New Zealand and expose us to a
number of risks. Your safety is of paramount importance, so whenever you’re in the field please remain
alert, be prepared, and exercise common sense at all times. When planning and carrying out Atlas
fieldwork, we recommend that all participants take the following precautions:
• Always let someone know where you’ll be going and when you should be expected back.
• Always check the weather forecast before heading into the field. This can prevent you wasting
your effort by heading out on a windy or rainy day, as well as ensure you are not caught out in
dangerous or uncomfortable conditions. If you are ‘Atlasing’ along the coast, or on rivers, also
check tide times and river flows before you go. Many of New Zealand’s major rivers have
permanent flow gauges installed, with flow data available online via regional council or NIWA
websites. Googling the name of your river and “flow data” will often lead you to the flow gauge
website you need.
• Dress appropriately. Always carry spare warm clothing and a raincoat, and dress in layers for
flexibility. Having an extra change of clothes in your vehicle can also be a help if you happen to
become wet on a cold day.
• Carry plenty of food and water with you. Having extra food and water in the car can be handy if
you find yourself out longer than you anticipated.
• Store a first-aid kit in your vehicle, and always carry a personal first aid kit with you.
• Carry a mobile phone, but don’t assume it will work in all locations. Make sure you have important
phone numbers with you. If you plan to go ‘Atlasing’ in very remote terrain, consider purchasing or
hiring a Personal Locator Beacon.
• Protect yourself from sandflies, mosquitoes, and other biting insects. Also be aware of wasps and
wasp nests.
• Always carry an adequate level of sun protection – sunscreen, sunglasses and a sunhat.
• Carry a handheld GPS unit, if you have one. GPS units can be great for recording bird locations,
as well as keeping track of where you are (and how to get home). We recommend setting yours to
NZTM format. Carry extra batteries. Never depend on your GPS unit alone; always carry a spare
map and compass in case your GPS unit stops working.
57
• Be safe while driving and parking. Don’t attempt to Atlas and drive at the same time! Do not
attempt to use your mobile phone whilst driving either, if you need to use it for navigation or to call
someone, please stop safely before using your device. When parking, park your vehicle well off
the road, and display a vehicle dashboard card (downloadable from www.birdatlas.co.nz)
whenever you’re parked on private land. If you are walking or cycling along a public road, make
sure you’re highly visible to approaching traffic by wearing bright, or hi-viz clothing.
• Beware of dump sites and marijuana plots. If you notice anything suspicious do not touch anything
and leave immediately.
Biosecurity
Please be mindful of any biosecurity risks associated with your ‘Atlasing’ activities. When visiting offshore
island nature reserves, or mainland predator-free sanctuaries, always adhere to the biosecurity
requirements of the site that you’re visiting. In many cases, all clothing and equipment needs to be
checked for stowaways (mice, rats, mustelids, insects and seeds) before entering. If any of your clothing
or equipment has been in recent contact with wildlife, disinfection using Trigene or Sterigene is usually
required, to minimise the risk of spreading pathogenic organisms such as bacteria, fungi or viruses.
Mycoplasma bovis
Mycoplasma bovis is a bacterium that can cause a range of serious conditions in cattle, with the potential
to have a serious economic impact on New Zealand. M. bovis has recently arrived in New Zealand and
has been detected in over 170 rural properties throughout the North and South Islands to date. The
Ministry for Primary Industries is leading a programme to eradicate M. bovis from New Zealand and has
placed quarantines and restrictions on a number of affected properties throughout the North and South
Islands. When negotiating with landowners for access to private land, it is essential that you adhere to
any biosecurity instructions or requirements requested by the landowner or MPI, to prevent any further
spread of this pathogen. Further information regarding M. bovis, and MPI’s response can be found on the
Biosecurity website: https://www.biosecurity.govt.nz/protection-and-response/mycoplasma-bovis/.
Kauri die-back
Kauri die-back is an incurable, infectious disease which is threatening New Zealand’s iconic kauri (Agathis
australis) with extinction. Kauri-dieback is caused by a fungus-like pathogen that can be spread through
the transfer of small amounts of soil from one location to another, including on the footwear, clothing or
equipment of people. For this reason, it’s vital that all Atlas participants respect any access restrictions or
forest closures in effect in the Waikato, Auckland, Coromandel or Northland regions, and to follow any
instructions or requirements to check and clean footwear when entering and leaving kauri forests. Further
58
information regarding kauri die-back can be found on the Keep Kauri Standing website:
https://www.kauridieback.co.nz/.
Didymo
Didymo is a species of diatom native to the northern hemisphere that was accidentally introduced to
South Island rivers in the early 2000s. Didymo forms unsightly, slippery mats that can cover the beds of
active river channels, reducing recreational values of the rivers and adversely impacting aquatic
invertebrate and algae communities. Didymo has not yet been detected in the North Island, or in all
South Island rivers, so if you are ‘Atlasing’ in South Island riverbeds, it’s essential that you check, clean
and dry any footwear, clothing or equipment that comes into contact with water, before you move from
one catchment to another. For more information on how to follow MPI’s “check clean and dry” guidelines,
visit the Biosecurity New Zealand website: https://www.mpi.govt.nz/travel-and-recreation/outdoor-
activities/check-clean-dry/
Further information
For all enquiries regarding the New Zealand Bird Atlas please contact the National Atlas Team at the
following email address: [email protected]
For further information regarding the New Zealand Bird Atlas scheme and to access resources such as
eBird tutorial videos, this handbook, field datasheets etc, visit the New Zealand Bird Atlas website:
www.birdatlas.co.nz.
To view news and updates regarding the New Zealand Bird Atlas scheme, visit the New Zealand Bird
Atlas Facebook and Instagram pages, and sign up to for the e-newsletter at www.birdatlas.co.nz.
To view the Atlas effort map, which displays the New Zealand Bird Atlas grid together with a real-time
view of search effort invested to date, you can visit: https://ebird.org/atlasnz/effortmap.

59
References
Bull, P.C.; Gaze, P.D. and Robertson, C.J.R. 1985. The Atlas of bird distribution in New Zealand. The
Ornithological Society of New Zealand, Inc., Wellington.
Parliamentary Commissioner for the Environment (2017). Taonga of an island nation: Saving New
Zealand’s Birds. Wellington, New Zealand.
Robertson, C.J.R.; Hyvönen, P.; Fraser, M.J. and Pickard, C.R. 2007. Atlas of bird distribution in New
Zealand 1999-2004. The Ornithological Society of New Zealand, Inc., Wellington