newsletter of e.j. peiker, nature photographer and www ... pdf/quack spring 2013.pdf · newsletter...
TRANSCRIPT

Newsletter of E.J. Peiker, Nature Photographer and www.EJPhoto.com
All contents ©2013 E.J. Peiker
Spring 2013 (Vol. 11, Issue 1)
Welcome to the 11th year of the quarterly newsletter from E.J. Peiker, Nature Photographer and www.EJPhoto.com. In this publication, I keep subscribers posted on upcoming workshops as well as sharing photos and experiences with you. I will also give you brief impressions on any new equipment that I get the opportunity to use and any other general information in the world of digital Nature Photography. Finally, I strive to bring Photoshop processing techniques to you that you may not have thought of. Please feel free to forward this to other photographers and interested parties but please do so only by forwarding this newsletter in its entirety. All content is copyrighted by E.J. Peiker and may not be reproduced. If you would like to be added to the mailing list, unsubscribe, or access back issues, please visit: www.ejphoto.com/newsletter.htm
Gullfoss - Iceland

Using Photoshop's Lighten Blend Mode To Deal With M oving Shadows Landscape photographers love puffy white cumulous clouds to liven up the skies in their photographs. However, these clouds can pose a problem since they project moving shadows onto the scene. Borrowing from my knowledge of Photoshop and multiple-exposure night-time photography, I have developed a method to deal with this phenomenon. We start by taking several photos of the scene over a period of seconds to minutes, depending on how fast the clouds are moving. The idea is to capture enough frames so that all areas of the scene have at least one frame where every area in the photo does not have a cloud shadow on it. We then combine these photos using Photoshop's Lighten blend mode. This mode simply reveals the lightest tone in a stack of images. It is easiest to illustrate this method with an example. Last summer, I visited a very remote part of the Grand Canyon called Toroweap. This is a narrow part of the Canyon where one can walk right to the edge and look straight down for 3000 feet and see the Colorado River directly below. A high clearance 4WD vehicle with off-road tires is needed to safely traverse the last 10 miles of the 60 mile off-road trek to get here. If you want to photograph it with light down inside the canyon all the way to the river, one has to photograph it while the sun is relatively high. On this day, I was blessed with some very nice fast moving cumulous clouds but, since this was a mid afternoon shot, the clouds always cast strong shadows in parts of the canyon. I took a number of shots over a couple of minutes in an attempt to get enough shots that I had every area in sunlight at least once:
After applying identical RAW processing settings for every shot, I brought them into Photoshop as layers in a single document. I do this by selecting all five shots in Adobe Bridge and then selecting the "Load Files Into Photoshop Layers" option under Tools > Photoshop. Alternately you can just load all of the files into Photoshop as individual documents and then drag each Background Layer onto another while holding the Shift Key until you have them all in a single document. To be safe, at this point, selecting all of the layers and auto-aligning them will insure that any slight camera shift between photos is taken care of - select Edit > Auto-align layers. Next simply select all layers and change the Blend Mode from Normal to Lighten for every shot. This reveals only the lightest pixel of the five layers in the Photoshop document. The result is that you get an image, in this case the canyon, with no cloud shadows. If the clouds are moving fast, this could leave you with an undefined mess in the sky. If that happens, simply choose the sky you like best from the 5 shots and paint the layer mask white in the sky areas for that shot (white
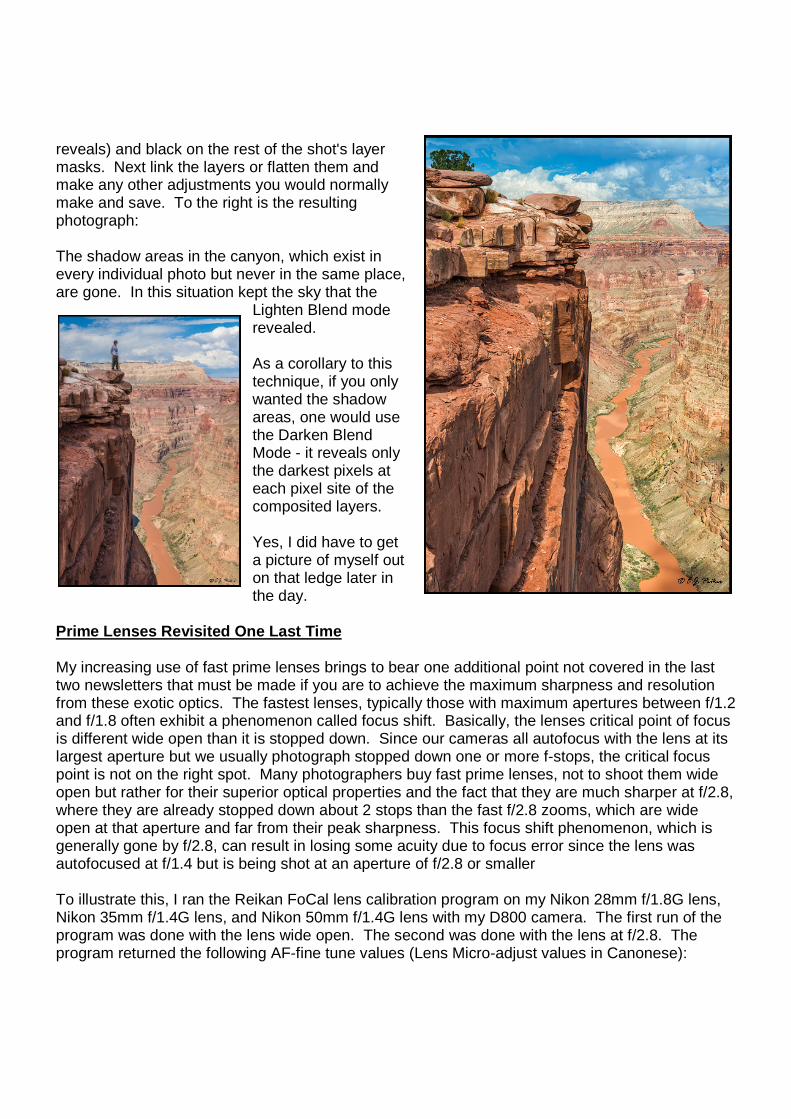
reveals) and black on the rest of the shot's layer masks. Next link the layers or flatten them and make any other adjustments you would normally make and save. To the right is the resulting photograph: The shadow areas in the canyon, which exist in every individual photo but never in the same place, are gone. In this situation kept the sky that the
Lighten Blend mode revealed. As a corollary to this technique, if you only wanted the shadow areas, one would use the Darken Blend Mode - it reveals only the darkest pixels at each pixel site of the composited layers. Yes, I did have to get a picture of myself out on that ledge later in the day.
Prime Lenses Revisited One Last Time My increasing use of fast prime lenses brings to bear one additional point not covered in the last two newsletters that must be made if you are to achieve the maximum sharpness and resolution from these exotic optics. The fastest lenses, typically those with maximum apertures between f/1.2 and f/1.8 often exhibit a phenomenon called focus shift. Basically, the lenses critical point of focus is different wide open than it is stopped down. Since our cameras all autofocus with the lens at its largest aperture but we usually photograph stopped down one or more f-stops, the critical focus point is not on the right spot. Many photographers buy fast prime lenses, not to shoot them wide open but rather for their superior optical properties and the fact that they are much sharper at f/2.8, where they are already stopped down about 2 stops than the fast f/2.8 zooms, which are wide open at that aperture and far from their peak sharpness. This focus shift phenomenon, which is generally gone by f/2.8, can result in losing some acuity due to focus error since the lens was autofocused at f/1.4 but is being shot at an aperture of f/2.8 or smaller To illustrate this, I ran the Reikan FoCal lens calibration program on my Nikon 28mm f/1.8G lens, Nikon 35mm f/1.4G lens, and Nikon 50mm f/1.4G lens with my D800 camera. The first run of the program was done with the lens wide open. The second was done with the lens at f/2.8. The program returned the following AF-fine tune values (Lens Micro-adjust values in Canonese):

Lens Test aperture = wide open Test aperture = f/2.8 28mm f/1.8G +1 -4 35mm f/1.4G -1 -10 50mm f/1.4G -5 -9
As you can see, there is a significant difference in the focus adjustment needed for maximum sharpness between the lenses maximum aperture and when it is stopped down a bit. So what is a photographer to do? Well it depends! If you shoot these lenses wide open most of the time, I would recommend doing the focus adjustment wide open and then counting on the increasing depth of field as you stop down to cover you for situations where you are shooting with a smaller aperture (large f-stop number). But for me, and I suspect most nature photographers, running the lens calibration at f/2.8 makes more sense. By the time these fast prime lenses are stopped down to f/2.8, they no longer exhibit significant focus shift at smaller apertures. Finally, a word about zoom lenses. Most photographers use zoom lenses extensively. These tend to have much smaller maximum apertures. The very best lenses are typically f/2.8 lenses. These lenses do not tend to show much focus shift at various apertures but they do exhibit it to varying degrees at different zoom settings. My recommendation for the 24-70 class lenses is to calibrate them at approximately 50mm since these lenses are generally used extensively throughout their zoom range. On the 70-200 class lenses, I recommend calibrating them at 200mm since we nature photographers tend to use them more on the long end of the zoom range. Canon EOS 1Dx and EOS 5D Mark III users have the capability built in to their camera to calibrate zoom lenses at both the widest and longest zoom setting and the camera then interpolates in between settings. For owners of these cameras, using 50mm and 200mm respectively in the examples above is not necessary.

Recommended Books To keep up with the rapidly changing world of photography I am always reading one or more books on technique, hardware, post-processing, or artistry as it relates to photography. Back in 2010 I published my own eBook on Duck Photography but I also read many books by my fellow photographers, especially those that I have a great deal of respect and admiration for. This quarter I would like to share with you some recent eBooks that are superlative in their content. Seeing The Unseen - How to Photograph Landscapes at Night by Alister Benn: One of my goals for 2013 is to do more night photography. While I have done a lot of this in the past and even published one of the earliest articles on Start Trail photography with digital cameras years ago, I felt I needed to brush up my skills and learn some new techniques. When I think of night photography, I immediately think of the amazing work that Alister Benn has done in China and Spain. Fortunately in 2012 Alister published his comprehensive eBook on the subject. Alister is Scottish so the writing style is quite different from photography books written by Americans; it took me a few pages to get in sync with Alister but once that was accomplished I found an incredible wealth of information that is helpful to even the most seasoned photographer. All of the topics, from preparation, to focusing in the dark, obtaining proper exposures, composition, equipment and much more are covered extensively. Even the subjects of light painting, light pollution, and using available light from the moon and stars is covered in depth. The book is indispensable for anyone wanting to do serious night landscape photography: http://harvestinglight.net/seeing-the-unseen/ The Photographer's Guide To Attracting Birds Book by Alan Murphy - Alan Murphy followed up his
outstanding Guide to Songbird Set-ups book with an even better book on attracting birds. As always, Alan leaves no stone unturned in this very complete guide. Everything is included - from camouflage and blinds, to food and water sources, to audio playback and much, much more. Techniques for attracting birds and the hardware required to attract birds for photography is detailed. There are even sections on specific families of birds and how best to get them to come to a great perch. I have been doing bird photography for a long time now but Alan always comes up with something I hadn't thought of before. More about this
book here: http://www.alanmurphyphotography.com/ebook.htm The Guide To Tropical Nature Photography by Greg Basco and Glenn Bartley: The tropics can be among the most challenging places to photograph. Not only are you dealing with extreme temperatures, humidity, and rain, you have to deal with low light, subject obscuration and many other challenges. The Guide to Tropical Nature Photography is one of the largest and most comprehensive eBooks I have ever read. The format is stunning as are the photographs. At a

whopping 377 pages, absolutely nothing is left out. Natural light, artificial light, wildlife, habitat, and macro techniques are covered extensively. Additionally Equipment and the post processing techniques required to get the most from the sometimes difficult tropical environments are covered in detail. Specific instruction for the various types of subjects are detailed. If you plan on a trip in the tropics, and even the subtropical environments such as those found in south Florida, this book is indispensable. More details here: http://www.theguidetotropicalnaturephotography.com/ See It by Ellen and Josh Anon: This is a paper book. Ellen and Josh Anon are widely known for their excellent Photoshop for
nature Photographer’s books. This book is a departure from that formula for the Mother son writing duo. In See It, a history of composition as well as modern compositional techniques are covered in detail. The scientific aspects that lead us to preferring some compositions over others are explained. Our visual system and how it is influenced by different elements are written about in detail. Overall, this is by far the most comprehensive text on composition that I have ever seen. See It is available on paper: http://tinyurl.com/byp4mbh
New Photo Accessories Occasionally, I run across great photo accessories that enhance my capabilities or just make life as a photographer easier. Here are three for this quarter: LensCoat FilterPouch 8 - Since I have recently moved towards prime lenses and away from zooms for my most critical photography and to get the most out of the amazing nikon D800e sensor, I now have to carry more filters since the lenses have a range of front filter sizes. Gone are the days where a single 77mm Polarizer and neutral Density filter could get me through just about any shoot. To accomodate this varying size array of filters, I went on a search for a better filter wallet and much to my surprise, long time friend Scott Elowitz and his great LensCoat company had exactly what I needed. It's called the FilterPouch 8 and for just $20 it holds 8 filters, of which 6 can be as big as 82mm: http://www.lenscoat.com/filter-pouch-c-30_35.html TriggerTrap - I recently started playing with Time Lapse Photography. Even though Nikon builds an Intervalometer into the cameras, I was looking for something that is a bit more flexible and something that allows me to vary exposure in very tiny increments to capture sunrise or sunset time-lapse sequences without visible exposure steps since the minimum 1/3 stop exposure steps are very visible in a video. An online search revealed an iPhone and Android app called TriggerTrap. The app itself is free from the iTunes and Android app-stores but you do have to buy the interface cable that goes from the phone to your specific camera. At $30 this is a bargain. TriggerTrap acts as the most sophisticated cable release ever. Since it uses a phone which has a

microphone, GPS and motion sensor in it, it can trigger a camera in ways that previously required very expensive and sophisticated devices. Currently there are 17 different ways of triggering your camera including: Time-lapse Mode, Sound sensor Mode, Shock & Vibration sensor Mode, Magnetism Mode, HDR Mode, Distance Mode, Motion detection Mode, Standard Cable Release Mode, Star trail Mode, Bulb Ramping Time-lapse, Wi-Fi Slave Mode, Sunset & Sunrise Calculator
and others. Since these phones are WiFi enabled, you can even trigger a camera remotely over WiFi with another iOS or Android device. It is simply an amazing array of capability for the cost of a $30 cable: https://triggertrap.com/products/triggertrap-mobile/ Vixen Optics Polarie - The Polarie is a star tracker. It allows you to take long exposures of the night sky without creating star trails. In the Northern Hemisphere, you align the device to the North Star (Polaris) and it will track precisely with the rotation of the Earth allowing very long exposures. The device runs on AA batteries or external power. You mount the device on a tripod, align it, and mount another ballhead on the tracker itself. You then attach the camera to that and compose. Turn the Polarie on and you are ready to shoot - the Polarie now tracks the camear with the movement of the stars due to the Earth's rotation allowing very long exposures with no star trails. In addition to star tracking mode it also has moon and sun tracking modes which can be useful for
photographing eclipse sequences: http://www.vixenoptics.com/mounts/polarie.html Vintage Camera Collection Several months ago, my father sent me two vintage cameras that have been in the family for a long time and had gotten lost in storage. I had a vague recollection of the Leica and asked my dad about it which started a two month long search and the cameras were finally found. The first, a 1936 Leica 3a 35mm camera and the second a late 1940's Zeiss Ikonta 521/16 120 film camera. The Leica came with 3 Leica lenses (28mm, 50mm, 135mm) and the Zeiss with a 75mm Zeiss Tessar Lens. The Leica camera wasn't in good shape with lots of corrosion and lubricant leakage and some seizure of moving parts. The Leica 50mm lens was pretty much a write-off due to front element damage, the

135mm lens was usable but badly corroded. But the 28mm, which had been kept in a hermetically sealed plastic case was in almost new condition and had obviously seen very little use. I spent several days cleaning, removing corrosion and re-lubricating the camera and got it back to 100% functional and looking great. I mounted the 28mm lens and now have a fully functional 1936 Leica 3a in excellent condition. The Zeiss Ikonta fared much better during it's years of storage and required little work and clean-up to get everything working like new. I plan on
keeping these cameras in top shape and passing them down through the generations. This exercise started my quest to find two other vintage cameras that meant a lot to me. My first "serious" camera was a Yashica 35GSN Rangefinder with 45mm f/1.7 lens. I bought one of these in 1973. I tracked one in great shape down on eBay for a good price and it even shipped with all of the accessories including a flash and tele and wide converters. Cost for the entire system was just $70. I have cleaned and fully restored this camera.
The second camera I searched for was a good condition Minolta XD-11. The XD-11 was my first 35mm SLR which I first bought in 1977. It was the first camera in the world to offer a Shutter Priority automatic exposure function. I had this camera for many years and was a main camera for me until the dawn of Autofocus. eBay once again was put to great use to track down a good condition version of this camera along with a 45mm f/2 Rokkor lens. The camera came to me in essentially new condition for just $55 and I picked up the Rokkor lens, also like new, for just $40. Handling this camera, I had forgotten how good this camera really was. Upcoming Workshops I continue to offer workshops in some fantastic destinations through NatureScapes Certified Workshops. Click on the Workshops below for all of the info. For the complete schedule of Workshops offered by NatureScapes, please click HERE: Ultimate Iceland Adventure : (July 8-20, 2013 - SOLD OUT) (July 7-19, 2014 - a vailable) Navajo Country and North Rim Grand Canyon : (Aug 25-30, 2013) Downeast Maine : (Sep 29-Oct 4, 2013) Banff and Jasper National Parks : (Oct 19-26, 2013)

Private Photography Instruction and Consulting Services In addition to the DuckShop photo workshops that I launched 10 years, I also offer private instruction in Wildlife and Landscape photography at the place of your choosing within the USA and Canada. These private workshops are of the one on one variety (or two on one). Clients may schedule time in 4-hour time blocks for either classroom or field sessions. With just two people, a number of shooting locations become possible that aren’t possible for larger groups and
thereby making it possible to photograph some species or locations that are not attainable with larger groups. More specific instruction, based on the client’s specific needs, can be given using this delivery method in either the classroom or in the field. For more information please see the following link: www.ejphoto.com/duckshop_private.htm I also offer both photo equipment and computer workstation/digital darkroom consulting services as well as SD and CF card recovery services. This allows me to combine my 27 years of work in the computer industry with my lifetime of photographic experience and provide services at a technical level that are hard to find elsewhere. Contact me for rates and specifics or visit my rate sheet: www.ejphoto.com/Quack%20PDF/Rate%20Schedule.pdf Two eBooks Now Available Be ready for Duck Photography with my eBook “Ducks of North America – The Photographer’s Guide.” It is an essential text that covers all of the techniques needed to get the best shots of waterfowl and birds in general. It covers every species in the wild and in captivity in North America and gives species specific tips on how best to capture them and where to find them. Eleven years in the making, this book is a great tool for the beginning, intermediate or advanced

waterfowl photographer. The tips in it are easily applied to all birds and most other subjects too. It sells for $30. While this is expensive for an eBook due to the incredible amount of time and money it took to create it, it will easily save you 10 times that in aggravation, time, and failed attempts. I have also released my previously privately published paper book "West – A Collection of Photographs From The Western United States" in a fully updated and revised eBook version. It is available for $10. Both books can be ordered from the fine outlets you will find at this link: http://www.ejphoto.com/ebook_page.htm Facebook Page On my Facebook Fan Page, I am keeping those interested up to date on what photo excursions I go on as well as short commentaries on a variety of photo related subjects and tools. I also have nearly 100 galleries accessible through there. Please visit: http://www.facebook.com/pages/EJ-Peiker-Nature-Photographer/150804446733 and if you like what you see, please click the "Like" button. Image Recovery from CF and CD Cards Let someone that worked as a professional in the computer industry for more than a quarter century and has a multitude of tools available attempt to recover images from your damaged, formatted, or corrupted media cards. There is a basic $25 charge for the analysis. If I determine that I can recover images, I will recover them, with the card holder’s approval, for an additional $75. Disclaimers: E.J. Peiker conducts consulting services and product design services for a number of photographic product companies. The companies change from time to time: E.J. Peiker writes for and is supported by Singh-Ray Filters and receives non-monetary compensation from Singh-Ray Filters. www.singh-ray.com E.J. Peiker is a Wimberley Professional Services featured photographer and receives non-monetary compensation from Wimberley. Visit Wimberley at www.tripodhead.com E.J. Peiker is a member of Nikon Professional Services and receives some services free of charge from Nikon Corp. www.nikonpro.com E.J. Peiker is a consultant for LensCoat and receives compensation from LensCoat. www.lenscoat.com E.J. Peiker is sponsored by Hunt's Photo and Video - New England's largest photography retailer. Visit them at www.huntsphotoandvideo.com/

E.J. Peiker is a founding partner in www.Naturescapes.net Those that know me, know I would not endorse a product even for compensation if I did not feel it were a superior product. Legal Notice: Written and Photographic Content © E.J. Peiker, Nature Photographer. The text and photographs contained herein may not be copied or reproduced without written consent. This newsletter may be forwarded without restriction unaltered and in its entirety only.