ngm'/ owner's manual - sears parts direct · product registration please fill out the...
TRANSCRIPT

nGm'/ /"n In r '-/-'17 ILJL Jtlq
Owner's Manual

Product RegistrationPlease fill out the product registration card andreturn it immediately. Returning this card allows us
to contact you if needed.
Keep your sales receipt to obtain warranty parts andservice and lot proof of purchase. Attach it here and
record the serial and model numbers in case you
every need them. The numbers are located on thebottom Of your camcorder.
Model No. Pro808
Serial No.
Purchase Date:
Purchased From:
AC Adapter/ChargerBefore using the AC adapter/charger, read all
instructions and cautionary markings on (1) AC
adapter/charger, (2) battery, and (3) product using
battery.
Caution: To reduce risk of injury, charge only
rechargeable batteries type AV608 or AV8MM.
Other types of batteries may burst causing personal
injury and damage.
Do not expose the adapter/charger tO moisture of
any kind.
Use of an attachment not recommended or sold by
the battery charger manufacturer may result in a risk
of.fire, electric shock, or injury to persons..
To reduce risk of damage to electric plug and cord,
pull out the cord with the plug rather than the cordwhen disconnecting the adapter/charger from thewall outlet.
Make sure the cord is located so that it will not be
stepped on, tripped over, or otherwise subjected todamage or stress.
Use of an improper extension cord could result in arisk of fire and electric shock. If an extension cord
must be used, make sure that:
1. Pins on the plug of the extension cord are the
same number, size, and shape as those of the plugon the adapter/charger.
2. Extension cord is properly wired and in good
electrical condition, and
3. Wire size below is met:
Minimum Length of Extension
AWG Size Cord (Feet)
18 Equal to or lessthan 100
16 Equal to or lessthan 150
Do not operate adapter/charger with a damaged cord
or plug. Replace it immediately.
Do not operate adapter/charger if it has received a
sharp blow, been dropped, or otherwise damaged in
any way. Take it to an Authorized RCA CompactCamcorder Servicenter.
Do not disassemble the adapter/charger. Take it to
an Authorized RCA Compact Camcorder
Servicenter when service or repair is required.
Incorrect reassembly may result in a risk of electricshock.
To reduce risk of electric shock, unplug charger
from outlet before attempting any maintenance or
cleaning.
Be sure to save these operating instructions forfuture reference.

SAFETY PRECAUTIONSYour video camcorder's AC adapter/charger will operate on 120-240 volts AC, 50/60 Hz, and has apolarized plug. Because one blade of the plug is wider than the other, the plug fits in thc wall socket onlyone way. Do not defeat the safety feature of this plug. If you need an extension cord, use a polarizedextension cord.
CAUTION: TO PREVENT ELECTRIC SHOCK, MATCH WIDE BLADE OF PLUG TO
WIDE SLOT, FULLY INSERT.
MISE EN GARDE: POUR PR_VENIR LES CHOCS _LECTRIQUES,INTRODU1RE LA LAME IrA PLUS LARGE DE LA FICHE DANS LA BORNECORRESPONDANTE DE LA PRISE ET POUSSER JUSQU'AU FOND.
CAUTION: TO REDUCE THE RISK OF ELECTRIC SHOCK, DO NOT REMOVE THE COVER (OR
BACK). NO USER-SERVICEABLE PARTS ARE INSIDE. IF YOU SPILL LIQUID ON THE CAMCORDER ORADAPTER/CHARGER, DISCONNECT THE AC ADAPTER/CHARGER'S POWER CORD TO PREVENTPOSSIBLE FIRE OR SHOCK HAZARD AND CONSULT AUTHORIZED SERVICE PERSONNEL. MOISTURE
CAN DAMAGE INTERNAL PARTS. REFER ALL SERVICE TO AUTHORIZED RCA COMPACTCAMCORDER SERVICENTER PERSONNEL ONLY.
CAUTION: READ "IMPORTANT SAFETY INSTRUCTIONS FOR AC ADAPTER/CHARGER" ON THEPREVIOUS PAGE BEFORE USING THE AC ADAPTER/CHARGER.
CAUTION: MAINTAIN ELECTRICAL SAFETY. POWERLINE-OPERATED EQUIPMENT ORACCESSORIES CONNECTED TO THIS UNIT SHOULD BEAR THE UL LISTING MARK OR, IFPURCHASED IN CANADA, THE CSA CERTIFICATION MARK ON THE ACCESSORIES THEMSELVESAND SHOULD NOT HAVE BEEN MODIFIED SO AS TO DEFEAT THE SAFETY FEATURES. THIS WILL
HELP AVOID ANY POTENTIAL HAZARD FROM ELECTRIC SHOCK OR FIRE. IF IN DOUBT, CONTACT
QUALIFIED SERVICE PERSONNEL.
WARNING: TO PREVENT FIRE OR SHOCK HAZARD, DO NOT EXPOSE CAMCORDER ORAC ADAPTER/CHARGER TO RAIN OR MOISTURE.
:CAUTION:-- AVOID oPeRATING !_C)OR CAMCORDER i_DIATELY _ MOVING IT FROMA COLD LOCATION TO A WARM LOCATION, GIVE THE CAMCORDER I-I/2 TO2 HOURS TO .........REACH A STABLE TEMPERATURE BEFORE INSERTING A VIDEO CASSETTE, WHEN MOVED
CAUTION
DO NOT OPEN
MISE EN GARDE
!:::i._;i.... NE PAS OUVRIR
The symbol of a lightning flash within
a triangle is intended to alert the userto the presence of uninsulated
"dangerous voltage" within theproduct's enclosure and which may be
of sufficient magnitude to constitute arisk of electric shock.
An exclamation point within a triangle is
intended to alert the user to the presence
of important operating and maintenance(service) instructions in the literature
accompanying the product.
CAUTION: FCC REGULATIONS STATE THAT ANY UNAUTHORIZED CHANGES OR MODIFICATIONS
TO THIS EQUIPMENT MAY VOID THE USER'S AUTHORITY TO OPERATE IT.

IMPORTANT SAFEGUARDSIn addition to the careful attention devoted to quality
standards in the manufacture of your video product,
safety is a major factor in the design of every instru-ment. However, safety is your responsibility too.
Thesepages list important information that wil! helpto assure your enjoyment and proper use of acamcorder, adapter/charger, and accessoryequipment. Please read them carefully before
operating your video products.Installation
1. Read and Follow InstructionsmAll the safety
and operating instructions should be read beforethe video product is operated. Follow alloperating instructions.
2. Retain Instructions--,-. The safety and operatinginstructions should be retained for futurereference.
3. Heed Warnings--Comply with all warnings on
the video product and in the operatinginstructions.
4. Polarization--This video product is equipped
with a polarized alternating-current line plug (aplug having one blade wider than the other). Thisplug will fit into the power outlet only one way.This is a safety feature. If you are unable to insertthe plug fully into the outlet, try reversing theplug. If the plug still fails to fit, contact yourelectrician tO replace your obsolete outlet. Toprevent electric shock, do not use this polarizedplug with an extension cord, receptacle, or otheroutlet unless the blades can be fully insertedwithout blade exposure. If you need an extensioncord, use one with a polarized plug.
5. Power SourcesmThis video product should be
operated only from the type of power sourceindicated on the marking label. If you are not sureof the type of power supply to your home, consultyour video dealer or local power company. Forvideo products intended to operate from batterypower, or other sources, refer to the operatinginstructions.
6. Overloading--Do not overload wall outlets orextension cords as this can result in a risk of fire
or electric shock. Overloaded AC outlets,
extension cords, frayed power cords, damaged orcracked wire insulation, and broken plugs are
dangerous. They may result in a shock or firehazard. Periodically examine the cord, and if itsappearance indicates damage or deterioratedinsulation, have it replaced by your servicetechnician.
7. Power-Cord Protection_Power-supply cordsshould be routed so that they are not likely to bewalked on or pinched by items placed upon or
°
o
against them, paying particular attention tocords at plugs, convenience receptacles, and thepoint where they exit from the video product.
Ventilation--Slots and openings in the video
products are provided for ventilation to ensurereliable operation of the video product and to
protect them from overheating. These openingsmust not be blocked or covered. The openingsshould never be blocked by placing the video
product on a bed, sofa, rug, or other similarsurface. This video product should never be
placed near or over a radiator or heat register.This video product should not be placed in abuilt-in installation such as a bookcase or rack
unless proper ventilation is provided or thevideo product manufacturer's instructions havebeen followed.
Attachments--Do not use attachments unless
recommended by the video productmanufacturer as they may cause hazards.
Caution: Maintain elec_cal Safety
Powerline operated equipment or accessoriesconnected to this unit should bear the UL
listing mark or CSA certification mark on theaccessory itsel.f and should not be modified soas to defeat the safety features. This will helpavoid any potential hazard from electricalshoekor fire. If in doubt, contact qualified
service personnel ...........
10. Water and Moisture---Do not use this video
product near water--for example, near a bath •tub, wash bowl, kitchen sink or laundry tub, ina wet basement, or near a swimming pool andthe like.
11. Accessories--Do not plac e this video productOn an unstable cart, stand, tripod, bracket, ortable. The video product may fall, causing
serious injury to a child or adult as well asserious damage to the video product. Use thisvideo product only with a cart, stand, tripod,bracket, or table recommended by themanufacturer or sold with the video product.Any mounting of the product should follow themanufacturer's instructions and use a mounting
accessory recommended by the manufacturer.
llA A video product and cartcombination should bemoved with care. Quick
stops, excessive force, anduneven surfaces may causethe video product and cartcombination to overturn.
2

IMPORTANT SAFEGUARDS12. Outdoor Antenna Grounding--If an outside
antenna or cable system is connected to thevideo product, be sure the antenna or cable
system is grounded so as to provide someprotection against voltage surges and built-upstatic charges. Section 810 of the NationalElectrical Code, ANSI/NFPA No. 70-1984
(Section 54 of Canadian Electrical Code, Part 1)provides information with respect to propergrounding of the mast and supporting structure,grounding of the lead-in wire to an antenna-discharge unit, size of grounding conductors,location of antenna-discharge unit, connectionto grounding electrodes, and requirements forthe grounding electrode. See example below.
Example of Antenna Grounding
WIRE
ROUND CLAMP
ANTENNADISCHARGE UNIT
(NEC.SECTION 810-20)
GROUNDING CONDUCTORS
(NEC SECTION R10-21)
ELECTRIC S POWER SERVICE GROUNDINGEQUIPMENT . ELECTRODE SYSTEM
(NEC ART 250, PART H)
13. Power Lines--An outside antenna systemshould not be located in the vicinity of overhead
power lines, other electric light or powercircuits, or where it can fall into such power
lines or circuits. When installing an outsideantenna system, extreme care should be taken tokeep from touching or approaching such powerlines or circuits as contact with them might befatal. Installing an outdoor antenna can behazardous and should be left to a professionalantenna installer.
Use
14.
15.
Cleaning--Unplug this video product from thewall outlet before cleaning. Do not use liquidcleaners or aerosol cleaners. Use a damp cloth
for cleaning.
Object and Liquid Entry--Never push objectsof any kind into this video product throughopenings as they may touch dangerous voltagepoints or "short-out" parts that could result in afire or electric shock. Never spill liquid of any
kind on the video product.
16. Lightning--For added protection for this videoproduct during a lightning storm, or when it isleft unattended and unused for long periods of
time, unplug it from the wall outlet anddisconnect the antenna or cable system. Thiswill prevent damage to the video product due tolightning and power line surges.
Service
17.
18.
Servicing--Do not attempt to service this videoproduct yourself as opening or removing coversmay expose you to dangerous voltage or otherhazards. Refer all servicing to qualified service
personnel.
Conditions Requiring ServiceMUnplug thisvideo product from the wall outlet and refer
servicing to qualified service personnel underthe following conditions.
A. When the power-supply cord or plug isdamaged.
B. If liquid has been spilled, or objects havefallen into the video product.
C. If the video product has been exposed to rainor water.
D. If the video product does not operatenormally by following the operating
instructions. Adjust only those controls thatare covered by the operating instructions.Improper adjustment of other controls mayresult in damage and will often requireextensive work by a qualified technician torestore the video product to its normaloperation.
E. If the video product has been dropped or thecase has been damaged.
F. When the video product exhibits a distinctchange in performance--this indicates a needfor service.
19. Replacement PartsEWhen replacement partsare required, have the service technician verifythat the replacements he uses have the samesafety characteristics as the original parts. Useof replacements specified by the video productmanufacturer can prevent fire, electric shock, orother hazards.
20. Safety Check--Upon completion of anyservice or repairs to this video product, ask theservice technician to perform safety checksrecommended by the manufacturer to determinethat the video product is in safe operatingcondition.
3

Opti Accessories i: ...... :onal .........." ..........................................:...........................................................
To order accessories, contact your local dealer, call
toll-free, or use the order form on the next page.
AC025A Soft Carrying Case
Custom compact soft
case designed
especially to provide
protection and utility
for your RCA 8ramcamcorder and most
accessories. Ruggedfabric lined with soft
non-abrasive material and generous padding. Has
three outside pockets with storage for lens filters,
adapters, batteries, and tapes.
Rechargeable Batteries
AV608 AV8MM
These rechargeablenickel-cadmium
batteries are
specifically designed
for long life. The
AV608 can power
your camcorder up to
one hour, and the
AVSMM up to two hours (depending on how much
you use zoom and pause). Both can be recharged
with the AC adapter/charger that came with yourcamcorder.
DCC05 Car Cord Adapter/Charger
This car cord
adapter/charger enables
you to operate yourcamcorder from your car,
truck, or RV .by plugging
the car cord directly into
the vehicle's cigarette lighter socket. It will also
charge the AV608 battery supplied with the
camcorder or the AV8MM long play battery. The
DCC05 is specially designed to convert power from
a 24-volt or 12-volt battery to a 6-volt output.
Caution: Do not use any other car cord with this
camcorder. It may damage the camcorder.
VDC88 Color Enhancement Light
This uRra compact 15-watt
video light is cordless, light in
weight, and includes a
rechargeable battery. It
inounts on the top of the
camcorder and fits on a standard accessory shoe.
The VDC88 provides excellent soft, lush fill light.
It uses one 15-wat((VDC090) replacement bulb.
The rechargeable battery BP 1000 can be charged
with the VDC085 battery charger.
VCC1000 Video Color Control Center
The VCC1000 is actually two...._-_>'" _" accessories in one. The color
""-_'__ '_g_--_--£_-control center allows you to__ adjust the color intensity, tint,
white balance, and sharpness of tapes being dubbed.
This is especially helpful when the original tape was
produced in poor lighting conditions or poor color
settings. The second feature, the character generator,
lets you create titles that can be recorded on yourtapes. This lets you add a professional and/or
personal touch to your home videos.
CRF800 RF Output Adapter
._ This adapter is used with coaxial RFcable (AH065G or AH066G) to
connect your camcorder to a standard
TV (one without audio/video input
jacks) for playback. If your antenna cable is the flat
twin-lead type attached by two screws, you will alsoneed a 300-75 ohm transformer such as 193983. If
your TV has 300 ohm VHS screw terminals, you
will need an optional 75-300 ohm transformer suchas AH011.
Coaxial RF Cables
'_-_-_ :_ AH065G (6-ft)
":- AH066G (10-ft)
These RF cables are used with the CRF800 RF
output adapter to connect your camcorder to astandard TV (one without audio/video input jacks)
for playback.
If your antenna cable is the fiat twin-lead typeattached by two screws, you will also need a 300-75ohm transformer such as 193983.
If your TV has 300 ohm VHS screw terminals, youwill need an optional 75-300 ohm transformer suchas AH011.
4

193983 Cable Transformer
This 300-to-75 ohmtransfoimer is used
to connect a standard
300-ohm antenna
twin-lead to a standard round 75-
ohm connector.
AH011 Cable Transformer
This 75-to-300
ohm trans-former is used
to connect a standard 75-ohm
antenna cable, such as AH065G or
AH066G, to the 300-ohm screwterminals on a TV.
Audio/Video Cables
AH069G (3-ft)AH070G (5-ft)
These cables are shielded for
connecting A UDIO and VIDEO
jacks. They have RCA-type phono
plugs on each end.
Monaural VCR Dubbing Cable
AH075G (6-ft)
This is a double cable that lets youconnect the AUDIO and VIDEO
jacks of monaural components. It
can be used to connect yourcamcorder to a TV monitor
(or VCR). The cable is color coded
and shielded with RCA-type phono
plugs on each end.
All specifications and
descriptions of accessories are
subject to change without notice.
Order Form for Pro808
Description • Part No. Price Qty. Total
Soft Camcorder Case AC025A $ 59.95
Super Lightweight Tripod AC035 $ 69.95
Monopod AC036 $ 39.95
Cable Transformer AH011 $ 1.90
RF Coaxial Cable (6-ft.) AH065G $ 6.99
RF Coaxial Cable (10-ft.) AH066G $ 8.99
Audio/Video Cable (3-ft.) AH069G $ 5.99
Audio/Video Cable (5-ft.) AH070G $ 7.99
Dubbing.Cable(6-ft.) AH075G $ 10.99
Rechargeable Battery AV608 $ 49.95
Rechargeable Battery AV8MM $ 59.95
AC Adapter/Charger CPS08 $189.95
RF Output Adapter CRF800 $ 49.95
Car Cord Adapter/Charger DCC05 $169.95
DC Cable for Adapter/Charger DCC100 $ 14.95
Video Control Center VCC100C $349.90
Color Enhancement Light VDC88 $ 79.95
Replacement Bulb (15 watt)for VDC88 VDC090 $ 12.95
Extra Battery for VDC88 BP1000 $ 29.95
Charger for BP1000 VDC085 $ 18.95
Cable Transformer 193983 $ 6.95
Replacement Remote Control 217495 $ 49.95
Shoulder Strap 213004 $ 13.95
Audio/Video Cable 217496 $ 7.99
Prices are subject to change without notice.
Total Merchandise ($10 Minimum Order) .......... $
Sales Tax .................................... $
We _ire required by law to collect the appropriatesales tax for each ihdividual state, county, andlocality to which the merchandise is being sent.
Shipping, Handling, and Insurance ................ $
Total Amount Enclosed ....................... $Use VISA or MasterCard preferably. Money orderor check must be in U.S. currency only. No CODor CASH.
5.00
• Allow eight weeks for delivery.
• All accessories are subject to availability.
• Where applicable, we will ship a superseding model.
al ! i!i! ii!i!!i!i!iiiiiiiii!iiiiiiiiiiiii!iiiiiiiiiiii iiiii 5

• __':_" '_ii ...._'_':"_'_'_'_'*:_':'_':_'_:_ii!_iii:'i_i_ !!i_!_ii!ii_iiii!iii!iii!i!i?'_!_,_i!ii,!i!!_;_i!,%,i;_i_/,,_!il',,ii!,'i_,,_i,,i_ii_:iii?ili_ii!_iiiiiiii_i!ii_'_,__ii,_!ii!i_!!i!i_!!iiiiiiiiiiii_ili_i!i!i!iiii'_!ii!iii!i,ii!ili!iiiiil,iii!,!i_iiiiil;!!,i.i,_i!i!i_)i2!ilili?_i!!iii!il!!i_iil;_i_ii!iiii_il_i_,_!_Accessory Order Form : .......
Charge your order on your VISAor MasterCard by
filling in below
USE YOUR CREDIT CARD
IMI'ORTANT: Copy complctc account ntnnberfrom your VISA card
I lll j7r--I-q7-r--V-1r--T--T'q
My card expires: f-T'-]
IMPORTANT: Copy complete account numberfrom your MasterCard
IIII Il--l--l-q--q[---I---1---_VT--[---_
My card I--T--1 I--T- ]C°P'N°mb" [ I I II_bo,,eyour expires:i_alne oll
MasterCard
AUTHORIZED SIGNATURE
Prices arc subject to change without notice.
PLEASE Print or type your name andaddress clearly. This will be yourmailing label.
A complete and correct order will
save you days of waiting.
Nallle:
Street:
City:
State:
Apt:
Zip:
Please make surc that both sides of this form have
been filled out completely.
¢..)
X
To order accessories, contact yourlocal Dealer.
If a dealer is not nearby, you can alsofollow the directions below to order by
telephone or direct-by-mail.
United States and Canada Orders
To place your order by phone, have yourVisa or MasterCard ready and call thetoll-free number listed below between
8AM and 8PM Eastern Standard Time.
Use this number only to place an
order for accessory items listed on thisorder form.
1 - 800 - 338 •- 0376
Most times your order will be shipped
UPS within 72 hours of receipt. If ever
it is not possible to ship within 30 days,
we will notify you with an update on
your order and an option to cancel.
To place your order by mail, detach and
mail the completed order form with
credit card information, money order, or
check in U.S. currency (made payable toThomson Consumer Electronics, Inc.) to
the following address:
RCA Video Accessories
PO Box 8419
Ronks, PA 17573
For more information on these
accessories (or current prices), write
to the following address:Video Accessories Customer Service
Thomson Consumer Electronics, Inc.
Distributor & Special Products
2000 Clements Bridge Rd
Deptford, NJ 08096-2088
International Orders
This offer is valid only in the 50 United
States. For international orders, please
send your request for a price quotation
(not an order) to:
International Customer Service
Thomson Consumer Electronics, Inc.
Distributor & Special Products
2000 Ciements Bridge Rd
Deptford, NJ USA 08096-2088
6

AC035 Super I,ightweight Tripod
This tripod's fluid-effect head provides smooth
camera pan and tilt. The quick-release mount makes
it easy to attach or remove the camcorder. The
grooved, tubular 3-section leg design folds down to
23-1/2" when not in use and weighs only 3-1/2 lbs.
Rubber feet allow for sure footing.
AC036 Monopod
This monopod gives a flexible alternative to using a
traditional tripod. It is ideal for all camcorders and
photo cameras. It has a quick release shoe, three-
section leg, handstrap, foot step, and weighs only 35ounces.
Cautions: Before using a tripod, make sure it is stable enough to hold the camcorder without falling over.
When attaching your camcorder to a tripod or monopod, be careful not to force their screw into the
camcorder's mounting hole.
The tripod or monopod screw should not protrude into the e_eorder more than approximately three-eighth
(318) inch. Forcing the screw could damage the mounting hole on the bottom of the camcorder.
......... : :
7

1. Unpack the camcorder and accessories.
• Save the packing materials and box in case you ever need to ship or store your camcorder.
• The items shown below are packed with your camcorder. If any are missing or appear damaged,
contact your RCA dealer immediately.
Camcorder
Model Pro808
1£,% :" l'/
• 1
Remote Control
Part No. 217495
Remote Control Batteries
(Two "AA" 1.5 Volt)
Shoulder Strap
Part No. 213004Rechargeable Battery
Part No. AV608
WARNING: NICKEl,CADMIUM BATTERYMUST BE DISPOSEDOF PROPERLY.
AC Adapter/ChargerPart No. CPS081
Caution:Do not use this
adapter/charger _
for any otherpurpose other thancharging theAV608 or
AV8MM batterypack or supplyingpower to the l)C Connecting Cord Audio/Video Output Cablecamcorder. Part No. DCCI00 Part No. 217496
QClock Battery: 3-Volt Micro
Lithium Cell Battery.
Replace only with - Maxell
No. CR2025 available from
most local drug stores. Use
of another cell may present a
risk of fire or explosion.
8
Cautions. Lithium cell batte_. Must be disposed of properly. Never handlepunctured or leaking cells. May cause burns or personal mjt_ry,Keep out of the hands of children. Can cause death or injury if swaiio_ed. Ifswallowed, consult a physician immediately for emergency treatment.
The lithium cell used in this device may explode resulting in a fire or chemical burnif mistreated. Do not recharge, disassemble, heat above 212°F (100 ° C), orincinerate.
Never use metallic tweezers to hold the cell, and never short circuit the + and - sidesof the battery.

2. Attach a Power Supply: Adapter/Charger or Charged Battery.
A. Adapter/Charger
DC PowerCord
OUTJack
jack
I.
.
Connect one end of the DC power cord
to the DC OUT jack on the adapter/
charger and the other end to the DC IN
6.5V jack on the camcorder.
Plug in the adapter/charger. The
adapter/charger's POWER indicator
will light.
Details are on page 16.
To AC 100-240V,50160 Hz POWER
Indicator
B. Charged Battery*
Match lanes
Slide Battery
1. Make sure the camcorder's POWER
switch is OFF'.
2. Match the lines on the battery andcamcorder.
3. Hold the battery flush against thecamcorder, and slide it in the direction
of the arrow until it locks into place.
* The battery ,nust be charged before it can be used.
Details are on page 17.
3. Attach the shoulder strap.
A. Unfasten one end of the shoulder strap from
the buckle. Leave the buckle on the strap.
B. Thread one end of the shoulder strap through
one of the shoulder strap rings.
Shoulder
Strap Rings
C. Thread the strap back into the buckle. Pull on
the strap and make sure it is securely fastened
before using it to support the camcorder.
D. Repeat steps A-C for the other end of the
shoulder strap.
(continued on next page)
9

Fi
4. Attach lens cap to the lens cap holder.
A. Pull tab on side of the lens cap to remove itfrom lens on camcorder.
Tab on
Lens Cap
B. Pull tab end of the lens cap straight out androtate it down.
C. Attach it to the lens cap holder on the side ofthe camcorder.
Lens Cap
on Holder
5. Adjust the hand strap.
40
f
A. Unsnap the flap and open the adjustment strap.
B. Put your hand in the hand strap.
C. Pull the adjustment strap to tighten.
D. Snap the flap closed.
6. Insert a cassette in the camcorder.
OPEN ButtonCassette
_ CompartmentCover
Cassette
nt
A. Slide the OPEN button, and completely open
the cassette compartment cover.
B. Press the EJECT button to open the cassette
compartment.
C. Insert a cassette with the safety tab facing up
and the tape window facing out.
D. Gently press on the compartment where it is
labeled PUSH until it locks into place.
E. After the cassette compartment is fully
retracted, close the compartment cover.
10

7. Turn on the camcorder and place the ON/POWER SAVE lever ON*.
POWER (CAM/OFbTPLA Y) Switch
\
ON/POWERSAVE Lever
A. Press and hold the small button on the POWER switch
while placing it in CAM (camera).
The position of the POWER switch tells the camcorder
whether you want to record (CAM), play back tapes
(PLAY), or turn off the camcorder's power (OFF).
B.Place the ON/POWER SAVE lever ON. This lever must
be ON for the camcorder to record.
Place the ON/POWER SAVE lever in the POWER SAVE
position during recording breaks to conserve battery
power. The camcorder will enter record-pause.
* If the dew indicator _ appears in the viewfinder, there is excessive moisture in the camcorder.
Remove the cassette from the camcorder, and let it dry naturally.
Viewfinder in OperatingPosition (PULL out here.)
EyepieceFocusControl
EarphoneJack C)
Tally Light
A UTO LOCK Switch
ON/POWERSAVE Lever
REC START/STOPButton (Thumb Trigger)
.
.
Set A UTO LOCK switch to A UTOLOCK.
Adjust viewfinder and eyepiece focuscontrol.
A. Pull the viewfinder into operating position.
B. If the viewfinder picture is blurry, adjust the
eyepiece focus control for your vision.
Details are on page 23.
10. Start and stop recording.
A. Press and release the REC START/STOP
button (thumb trigger) to start and stop
recording. REC appears in the viewfinder
during recording.
B. To monitor the audio being recorded, attach
an optional earphone to the earphone jack.
If you do not record within five minutes, thecamcorder will automatically turn off.
The tally light flashes during record-pauseand turns off when the camcorder is
recording or the ON/POWER SAVE lever isin POWER SAVE.
11

11. Play back what you have recorded.
A. Press the thumb trigger to stop recording.
B. Place the POWER switch in PLAY.
C. Press the REW button to rewind the tape.
D. Press the PLAY button to play back the tape in the viewfinder.
E. Press the STOP button when you are finished playing back the tape.
Details on viewfinder playback are on page 31.
12. Review the camcorder controls.
Power Zoom Buttons (W and T)Eyepiece Focus Control
POWER (CAM (camera)/OFF/PLA Y) Switch
Accessory ShoeRemote Control Sensor
Micro[
Tally
Electronic Viewfinder(PULL here to extend)
ect Lever
Lens
FOCUS ON/OFF ButtonAlso Still (ll) Button
MANUAL FOCUS + and - Button
STOP ButtonAlso MODE SEL. (Select) Button
F.FWD. (Fast Forward) Button
REW (Rewind) Button
Clock Cell Compartment
Output Jacks (Yellow Video,DC, and White Audio)(Located behind cover)
PLAY Button
AUTO LOCK Switch
12

12. Review the camcorder controls. (continued)
DA TE/TIME Button
COUNTER RESET andMEM (Memory) Buttons
EJECT Button(Located under the cassettecompartment cover)
ADJ. (Adjust) Button
CassetteCompartmentCover
Button
Lens Cap
Lens Cap Holder
Shoulder StrapAttachment Rings
CassetteCompartment
(_)
Strap
ON/POWER SAVE Lever
REC START/STOP Button(Thumb Trigger)
Attach chargedbattery here DC IN 6.5 V Jack (Attach DC power cord here
for adapter/charger or optional car cord)
13

Install Remote Batteries
1. Turn the remote over and slide the battery
compartment cover off.
2. Insert the batteries so their positive (+) ends
contact the positive terminals in the battery
compartment.
3. Replace the cover.
Notes: Never place anything heavy on top of the remotecontrol or lay it upside-down.
Replace the batteries when the camcorder fails to respondto the remote control.
Remove the batteries from the remote control if it will notbe used for a month or more. This will prevent possibledamage from battery leakage. If leakage occurs, wipe upthe liquid inside the compartment, and replace thebatteries with new ones.
Do not use new and used batteries together. Different
brands and types of batteries have different voltages andshould not be used together.
Remote Control Sensor
RemoteControl
The remote control operates the camcorder byinfrared light, so it is protected from electrical and
sound interference. Aim the remote directly at thecamcorder's remote control sensor. There cannot be
any obstructions between them.
The remote should operate the camcorder up to
approximately 16 feet away. Replace the remote
batteries if the operation distance decreases.
Note: The camcorder may not respond to the remote ifthe camcorder's remote sensor is exposed to directsunlight or strong artificial light.
14
Remote Buttons
Most of the remote control buttons perform the
same function as the corresponding controls onthe camcorder. You can use whichever are more
convenient at the time.
(i)@® ®
®
K,..._ j
Note: An RCA VCR that responds to thc VCR 2 buttonon the VCR's remote may respond to this remotecontrol.
(continued on the next page)

Remote Buttons (continued)
(_ RECORD START/STOP Button
• Press and release the RECORD START/STOP
button when the POWER switch is in CAM to
start and stop recording.
• The tally light will light continuously during
recording.
(_REW (Rewind) Button
• Press the REW button when the camcorder's
POWER switch is in PLAY to rewind the tape.
• During playback or rewind, press and hold the
REW button to visually search the tape in
reverse. Release the REW button to return to
normal playback or rewind.
(_ SCENE SEARCH + and - Buttons
• During record-pause, press and hold SCENESEARCH + or - to visually search the tape in
forward or reverse.
• Release the button to return to record-pause.
_PLA Y Button
Press the PLAY button when the camcorder's
POWER switch is in PLAY to begin playback.
7(7(7_F.FWD Forward) Button(Fast
• Press the F.FWD button when the camcorder's
POWER switch is in PLAY to fast forward the
tape.
• During playback or fast-forward operation, press
and hold the F.FWD button to visually search
forward on the tape. Release the F.FWD button
to return to normal playback or fast-forward
operation.
(_STILL Button
• During playback, press the STILL button to
produce a stop-action picture.
• Press the STILL button again to return to normal
playback.
• This button has the same function as the still
( ! ! ) button on the camcorder.
_ DISPLA Y Button• Press the DISPLAY button when the camcorder
is connected to a TV to see the viewfinder's
displays on the TV screen.
• Press the DISPLAY button again to remove
them.
9(9(9(_COUNTERRESET and MEMORY Buttons
• Press COUNTER RESET to reset the time
counter to "'0:00:00".
• Press COUNTER MEMORY to turn the
memory-stop feature on and off.
• Details are on page 28.
(_ STOP Button
• Press this button when the camcorder's POWER
switch is in PLAY to stop playback, rewind, or
fast forward.
• The STOP button has no effect when the
camcorder's POWER switch is in CAM. To stop
recording, press the RECORD START/STOP
button 0.
15

PoWering
Adapter/Charger
The adapter/charger lets you power your camcorder directly from standard household power.It operates on 100-240 volts, 50/60 Hz, so it can be used virtually anywhere in the world to
power the camcorder or recharge the battery. You may need a plug adapter in some countries.
Consult your RCA dealer.
DC OUT Jack
Jack
_DC Power Cord
To AC 100-240V, 50/60 Hz POWER Indicator
Use the Adapter/Charger
1. Plug one end of the DC power cord into the
DC OUT jack on the adapter/charger and the
other end to the DC IN6.5Vjack on the back ofthe camcorder.
2. Plug the adapter/charger's plug into the nearestAC outlet ( 100-240V, 50/60Hz). The POWER
indicator will light.
Remove the Adapter/Charger
I. Unplug the adapter/charger from the wall outlet.
2. Disconnect the DC power cord from the
camcorder and adapter/charger.
Using an Optional Plug Adapter
An optional plug adapter may be required in somecountries.
,4
Optional AC /" AC 100-240V
Plug Adapter
1. Plug the adapter/charger's plug into the AC plug
adapter.
2. Plug the AC plug adapter into an AC outlet.
16
Powering Your Camcorder(continued)_:i_!:i!_i:zii!_i!i_!iiii_:_:_i:¸ :
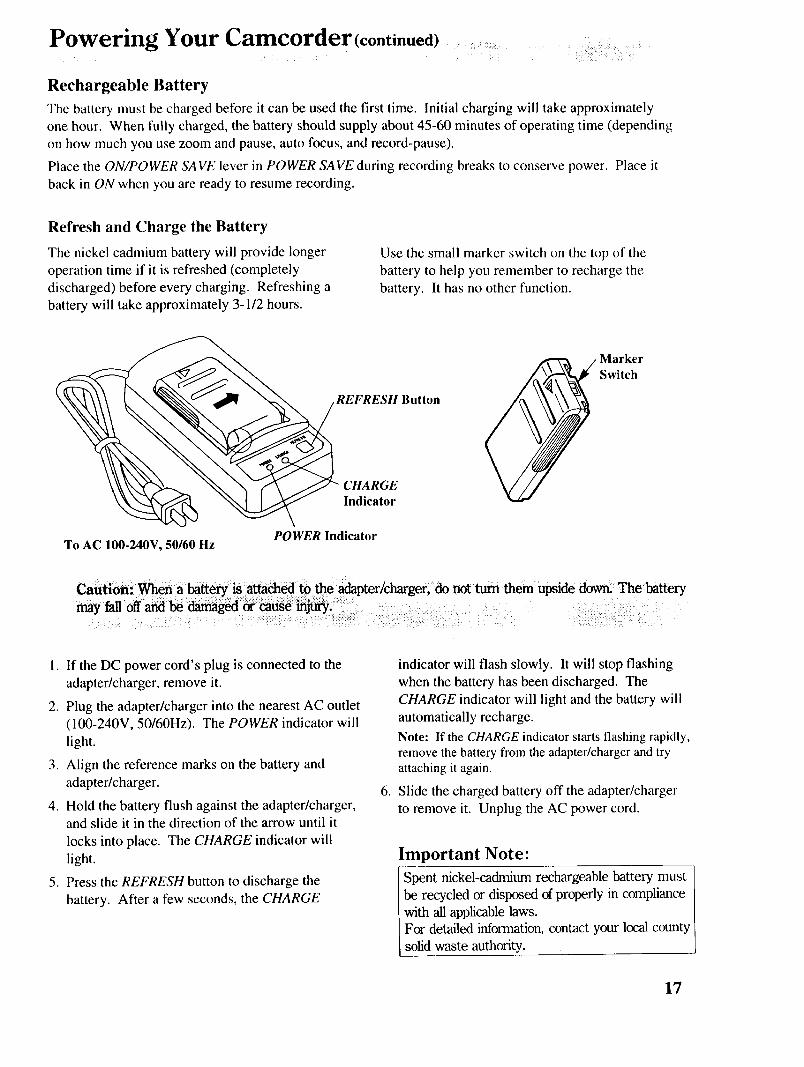
Rechargeable Battery
The battery must be charged before it can be used the first time. Initial charging will take approximately
one hour. When fully charged, the battery should supply about 45-60 minutes of operating time (depending
on how much you use zoom and pause, auto focus, and record-pause).
Place the ON/POWER SAVE lever in POWER SAVE during recording breaks to conserve power. Place it
back in ON when you are ready to resume recording.
Refresh and Charge the Battery
The nickel cadmium battery will provide longer
operation time if it is refreshed (completely
discharged) before every charging. Refreshing a
battery will take approximately 3-1/2 hours.
Use the small marker switch on the top of the
battery to help you remember to recharge the
battery. It has no other function.
REFRESH Button
MarkerSwitch
CHARGEIndicator
To AC 100-240V, 50/60 HzPOWER Indicator
Caution: When a battery:is attach_ to the adapter/charger;"do not t_ them: upside down: The battery
1. If the DC power cord's plug is connected to the
adapter/charger, remove it.
2. Plug the adapter/charger into the nearest AC outlet
(100-240V, 50/60Hz). The POWER indicator will
light.
3. Align the reference marks on the battery and
adapter/charger.
4. Hold the battery flush against the adapter/charger,and slide it in the direction of the arrow until it
locks into place. The CHARGE indicator will
light.
5. Press the REFRESH button to discharge the
battery. After a few seconds, the CHARGE
.
indicator will flash slowly. It will stop flashing
when the battery has been discharged. The
CHARGE indicator will light and the battery will
automatically recharge.
Note: If the CHARGE indicator starts flashing rapidly,
remove the battery from the adapter/charger and tryattaching it again.
Slide the charged battery off the adapter/charger
to remove it. Unplug the AC power cord.
Important Note:
Spent nickel-cadmium rechargeable battery must ]
be recycled or disposed of properly in compliance /
with all applicable laws. [
For detailed information, contact your local county /solid waste authority. [
17

Rechargeable Battery (continued)
AlignReference
BATTERY EjectLever
WARNING:NICKELCADMIUM BATTERYMUST BE DISPOSED
OFPROPERLY. ....
Attach the Charged Battery
1. If the DC power cord's plug is attached to the
camcorder, remove it.
2. Align the reference marks on the battery andcamcorder.
3. Hold the battery flush against the camcorder, andslide it in the direction of the arrow.
4. Slide the camcorder's POWER switch to CAM,
and place the ON/POWER SAVE lever ON.
Remove the Battery
1. Slide and hold the BATTERYeject lever on the
camcorder while sliding the battery to the leftand off the camcorder.
Battery Safety Precautions ....
Do not short _ebattery's te_in_s! :'
Do not attempt to disassemble or modify the
battery. There are no user-serviceable partsinside.
adapterlchargers and €_mc6rders. :
Low Battery Warning _ :, :: ::
The low battery warning (_1) appears when battery
power is low. Recharge the battery or use the
adapter/charger to power the camcorder.
Low Battery Warningin Viewfinder
Caution: The eamcorder will shut off
when the battery reaches empty_ The
battery should still eject the cassette
when you press the EJECT button. If it
does not, do not attempt to force the
cassette compartment open. This will
damage the camcorder.
18

Optional RCA DCC05 Car Cord Adapter/Charger
This adapter/charger allows you to power your camcorder from the cigarette lighter socket of a car,
truck, or RV. It converts 24- and 12-volts to a 6-volt output. It can also charge the battery that
came with your camcorder and the AV8MM (long play) battery.
Consult the instructions enclosed with the DCC05 for complete operation information.
Using the RCA DCC05 Car Cord Adapter/Charger to Power the Camcorder
Lighter Socket
I IN 6.5 V Jack
I. Remove battery if it is attached to the camcorder
or car cord adapter/charger.
2. Plug one end of the DC power cord into the DC
OUT jack on the car cord adapter/charger and the
other end into the DC IN 6.5 V jack on the back ofthe camcorder.
3. Insert the DCC05's plug into the vehicle's
cigarette lighter socket. The POWER indicator on
the DCC05 will light.
Cautions: The DCC05 is designed to be used only
with vehicles having negative ground electrical
systems .........................................................................................................................
Do not use any other car cord with this camcorder.
Other car cords may damage your camcorder.
Using the RCA DCC05 Car Cord Adapter/Charger to Charge the Battery
Cigarette Lighter So__
I. Remove DC power cord if it is attached.
2. Attach the battery as shown.
3. Insert the DCC05's plug into the cigarette
lighter socket. The POWER indicator on theDCC05 will light.
19

We recommend RCA cassettes be used with your camcorder. Use of poor quality or damaged tapes cancontaminate the video heads, resulting in snow or no picture during playback. Head cleaning is not coveredunder warranty. It is considered normal maintenance. Playing a new RCA tape for approximately 30minutes will often satisfactorily clean the heads and improve your picture.
Insert and Remove Cassettes
OPEN Button -- Tab
Window
Press Hereto Close
1. Attach a power supply to the camcorder.
2. Slide the OPEN button and completely open the
cassette compartment cover.
3. Press the EJECT button to open the cassette
compartment. Insert or remove the cassette.
Caution: Insert the cassette with the safety
tab facing up and the tape Window facing out.
The cassette should slide easily in the
compartment. DO n0t:force the cassette.
4. Gently press on the area labeled PUSH to close
the cassette compartment door.
5. After the cassette compartment is fully retracted,
close the cassette compartment cover.
Erase Protection-Safety Tab ......................:_,_: : :::: : ::: : :: ::::::::: : : ::
You can use your video cassettes over and over again. To erase a previous recording, just record over it.
Safety Ta
To Prevent Erasure -
Close Safety Tab(Expose Red)
To Record Again -Open Safety Tab(Red Disappears)
Recording and Playback Speeds and Times
The camcorder records in standard speed (SP). The
chart shows the maximum SP recording times forsome popular 8mm cassettes.
The camcorder can play back tapes in standard
speed (SP) or long play (LP) speed. The playback
speed is automatically selected by the camcorder.
The LP indicator appears in the electronic
viewfinder when the camcorder is playing back atape recorded in LP.
Cassette Recording Time•, ii_
P6-15 15 Minutes
P6-20 20 Minutes
P6-45 45 Minutes
P6-60 60 Minutes
P6-90 90 Minutes
P6-120 2 Hours
P6-150 2 1/2 Hours
20
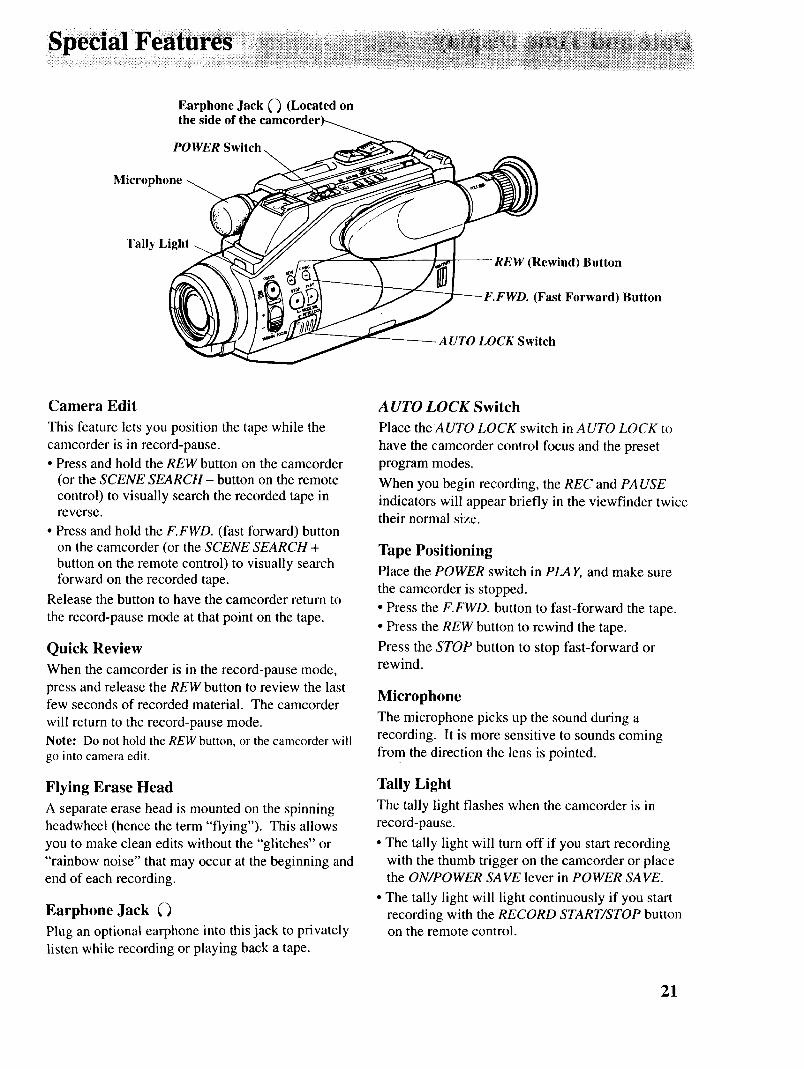
Earphone Jack (] (Located onthe side
POWER Switch
Microphone
Tally Light
(Rewind) Button
WD. (Fast Forward) Button
AUTO LOCK Switch
Camera Edit
This feature lets you position the tape while the
camcorder is in record-pause.
• Press and hold the REW button on the camcorder
(or the SCENE SEARCH - button on the remote
control) to visually search the recorded tape inreverse.
• Press and hold the F.FWD. (fast forward) button
on the camcorder (or the SCENE SEARCH +button on the remote control) to visually searchforward on the recorded tape.
Release the button to have the camcorder return to
the record-pause mode at that point on the tape.
Quick Review
When the camcorder is in the record-pause mode,
press and release the REW button to review the lastfew seconds of recorded material. The camcorder
will return to the record-pause mode.
Note: Do not hold the REW button, or the camcorder willgo into camera edit.
Flying Erase Head
A separate erase head is mounted on the spinning
headwheel (hence the term "flying"). This allows
you to make clean edits without the "glitches" or
"rainbow noise" that may occur at the beginning and
end of each recording.
Earphone Jack ()
Plug an optional earphone into this jack to privately
listen while recording or playing back a tape.
AUTO LOCK Switch
Place the AUTO LOCK switch in AUTO LOCK to
have the camcorder control focus and the preset
program modes.
When you begin recording, the REC and PA USE
indicators will appear briefly in the viewfinder twicetheir normal size.
Tape Positioning
Place the POWER switch in PLAY, and make sure
the camcorder is stopped.
• Press the F.FWD. button to fast-forward the tape.
• Press the REW button to rewind the tape.
Press the STOP button to stop fast-forward orrewind.
Microphone
The microphone picks up the sound during a
recording. It is more sensitive to sounds coming
from the direction the lens is pointed.
Tally Light
The tally light flashes when the camcorder is in
record-pause.
• The tally light will turn off if you start recording
with the thumb trigger on the camcorder or placethe ON/POWER SAVE lever in POWER SA VE.
• The tally light will light continuously if you start
recording with the RECORD START/STOP buttonon the remote control.
21

Date and
ADJ. (Adjust)Button
DA TE/TIMEButton
Cell Compartment
CellHolder
Display in Viewfinder
AM 12:00:00\1/
1 . I .1993
MDei__- _ l
Hours andAM or PM
Minutes
--Seconds
Install the Lithium Cell for Time and Date Display
l. Pull out the cell holder.
2. Insert the cell with the "+" terminal up.
3. Replace the cell holder.
Note: The lithium cell should last about one
year. When it expires, the date display shows"'88:88". Reset the date and time after
replacing the cell.
Cautions: Lithium cell battery. Must be disposed of properly.Never handle punctured or leaking cells. May cause hui'_ or pe_s0n_l
injury. _:_ _!,:!:,__._.%:_:: _:_ _. _ii_ _,_ _:._ _,,Keep out of the hafids of Children. Can cause death or mju_"it €swallowed, If swallowed, consult a physician immediately for : ::_'_:.!_emergency treatment. ::./_.,._:._.i.:i:_:.__,:,_:..:: ._,___,_:_._:::__ ::i _:_:::::_i:.:_,:,:_ii_The lithium cell used in this d_vice _a_t :expl_ r_:ulting:]n a :fi_ _r:chemical burn if mistreated. Do not re_hal:ge,disassemble, heat above212°F (100° C), or incineratelNever use metallic tweezers to hold the cell, aiid neversfiort ci_i_':_the+ and - sides of the battery..::: :,:.::i _::_:_i
Set and Record the Time and Date ...............
Record the Time and Date
Whenever time and date or date appear in the
viewfinder, it will be recorded on the tape.
Press the DATE,'TIME button to display andremove the time and date.
Press ........... To Display in Viewfinder :i
DATE/TIME : and Record on the Tape .....Button
.............. i
Press Once Date Only
Press Again Date and Time
Press Again Neither Date nor Time
Set the Time and Date
1. Install the lithium cell as described above.
2. Attach a power supply to the camcorder. Pressand hold the small button on the POWER switch
while you slide it to CAM. Place the ON/POWERSAVE lever in ON.
3. Use a straightened paper clip or pen to press andhold the ADJ. (adjust) button for about one second.
The reset date (1.1. 1993) and time (AM
12:00:00) will appear in the viewfinder.
4. The month will flash. Repeatedly press DATE/
TIME button until the correct month appears.
22
5. Then, press the ADJ. button. The flashing cursor
will move to the next part of the display.
6. Repeat steps 4 and 5 until you have entered the
correct month, day, year, hour including AM orPM, and minute.
. After setting the minutes, press the ADJ. button to
start the seconds. The seconds counter will start
with "00".
To correct the date or time after the clock has been
started, repeat steps 3-7.

The camcorder's viewfinder is a miniature black-and-white monitor that displays the picture seen by thecamcorder. The viewfinder can also be used for viewing the tape during playback.
Caution: When carrying the camcorder with the shoulder strap, rotate the viewfinder down. This helps
prevent possible damage to the viewfinder from bumping against your body as you move.
Viewfinder in Operating Position(PULL here to extend viewfinder.)
EyepieceFocusControl
Eyepiece Focus Control
The eyepiece focus control lets you set the focus ofthe viewfinder for your personal vision. If you weareyeglasses, you can probably operate the camcorderwithout them.
The eyepiece focus control does not affect the focusof the picture actually recorded by the camcorder.
To adjust the focus, follow the steps below.
1. Pull the viewfinder out into operating position.
2. Turn the eyepiece focus control until you clearlyfocus on one of the viewfinder displays (suchas date).
Tilt Adjustment ............................................ ...........................................................................................,..... _.......................................•..................................................................... ...................................................................................................................
For convenient viewing, the viewfinder can be raised approximately 90 °.
c-"
Caution: Do not force the viewfinder to rOtat_
:completely _u_fid! _i_ Will d_age _e_hd_r
and/or the eamcorder, .....: _ :_
CieaningtheViewfinder _:::' ................... ...........
To clean the viewfinder, follow the steps below.
....1 2 3
1. Fully extend the viewfinder,
and then push it back slightly.
2. Rotate the eyecupcounterclockwise toremove it.
3. Use an optional air blower,available from most camerastores, to clean the viewFmder.
23

• 'ii_i_iiiiiiiiii_i!:¸ O L_ii_iiii;i_?!!i!¸¸¸:̧ !!%!_ii_!i!_i_i_!_ii_i_ii_i_i_ii:iii_i!_;_i_i_i_iiii_!;ii_i_iii_i_iii_iii;i_i;i_;i_i_i;i_)_ii!ii_i_i_iiii_i_iiiiii_ii!!i_i_iiiiii;i_i;_i_iiiiii_i_ii_i_ii_iiii_i_;_i_i_iL_i!i_i_i_iii_ii_ii_ii_i_2!_i¸i_,!iiii_;i!:ii:ii_i_;: _:!_;_i_i_ii_!i_i_iii_i_i_!_;_;_!ii_ii_i_iii_i_:i_i_i_i_;_i_ii_i_ii_i!_,i_ii_i_i_i_iii_ii_ii_i_!_i_i_i_:_!__iiiii, ...................,,,,:_,,..................._::,,,_ _ _:_:_;:_:_,:_i,_;_;_!;_i_i__i_i_i_i @i_i_,/i_i_:ii_i_i_ii_iii!ii_iiiil_ :_i_i_i_'i_i_i_!'_)_
(_ LP Display
(_) Status Displays
(_) Preset ProgramMode Indicators
(_) Low BatteryWarning
(_) Dew, TAPE, andTAPE ENDIndicators
l-RE C LP M 1 :O0 :O0 /
MF-
L _J
AMI0: 0"151 I 1993
/(_) Time Counter withMemory Stop
q_) Manual Focus(MF, +, and-)Indicators
(_) CassetteIndicator
- _t,._)Time and DateDisplay
Displays in Viewfinder
®
LP Indicator
LP appears when you play back a tape recorded
in LP speed.
Status Displays
• REC appears when the camcorder is recording.
• PAUSE flashes when the camcorder is in
record-pause.
• FF appears when the tape is fast forwarding,
and REW appears when the tape is rewinding.
• STOP appears when the camcorder is stopped
during playback.
• PLAY appears when the camcorder is playing
back a tape.
• A larger REC or PAUSE briefly flashes below
the status display area when you start or stop
recording to let you know that the AUTOLOCK switch is in AUTO LOCK.
• These displays are not recorded on the tape.
Preset Program Mode Indicators
• Repeatedly press the MODE SEL. button to
select one of the camcorder's preset programmodes. The AUTO LOCK switch must be outof AUTO LOCK.
®
• The indicator for the mode selected will appear
in the viewfinder. No indicator appears whenauto mode is selected.
• The indicator is not recorded on the tape.
• Details are on page 27.
Low Battery Warning
• The low battery warning appears when it is time
to recharge the battery pack.
• This indicator is not recorded on the tape.
Dew _], TAPE and TAPE END Indicators
• The dew indicator appears when excessivemoisture is in the camcorder or cassette. The
camcorder's buttons will not operate except to
eject the cassette. Press the EJECT button andremove the cassette from the camcorder. Place
the camcorder in a warm, dry area until the
indicator disappears (approximately one hour).
When it disappears, the camcorder will operate.
• TAPE appears when approximately five
minutes of recording time is left on the tape.
• TAPE END appears when the end of the tape is
reached during recording.
24(continued on next page)

P Y g
(_ Time Counter with Memory Stop
The time counter appears here during recording
and playback.• Press the COUNTER RESET button to reset the
counter to "0:00:00" when you start recording
or playing back a tape.
• Press the COUNTER MEM (memory) button to
turn memory stop on or off. An M appears in
front of the time counter when memory stop ison.
• These displays are not recorded when they
appear.
• Details are on page 28.
(9 Manual Focus Indicators
• Press the FOCUS ON/OFF button to turn off
auto focus and focus manually. The AUTOLOCK switch must be out of AUTO LOCK.
The MF indicator will appear in the viewfinder
during manual focus.
• MF+ or MF- will appear when using theMANUAL FOCUS - or + button.
• This display is not recorded when it appears.
• Press the FOCUS ON/OFF button again to
return to auto focus. No indicator appears
when using auto focus.
® Cassette Indicator
• [_ appears if there is no cassette in the
camcorder or if you try to record on a cassette
that has its safety tab closed.
• [_ appears if there is moisture in the cassette.
_Time and Date Display
• Press the DATE/TIME button to display or
remove the time and date (or date) from the
viewfinder after they are set. The POWERswitch must be in CAM.
• This display will be recorded on the tape
whenever it appears.
• "88:88" appears if the time and date have not
been set or when the clock battery is not
installed correctly or needs replacing.
• Details are on page 22.
!!!:i!i:iii_:i!r_.
i!:ii:?i:'_i
_iiiiiii_:ili:ilil
iii_:,_iiiii_:2iiil
ili:iii!iiii_i!i_
_ii:!:i:i:i:i2i_i,;:
_iiiiiiiiii!'_i_iil
_iiiiiii_ii!i_ii!ii
_!i_,.i:'iiiii_ii!iilii_iii_!_i_iiiiiiii!
_iiiii_ii_iiiii?i!i!ii_iliiii_ili:il
ii!iiiii_iii!i_!_ii
_i!i!ii_iiii:i!!!i!!
!_!:;:ii)ii;:2i[ii_iiiiiiii:i_ii:il}il_
iiiiiii_!i:iiii?iiii:ii
Power Zoom
FOCUS ON/OFFButton
A UTO LOCKSwitch
MANUAL FOCUS + and -Button
Auto Focus
If you want the camcorder to focus for you
automatically, set the AUTO LOCK switch toA UTO LOCK.
The camcorder will automatically focus on any
subject three feet or more from the lens. For a
subject closer than three feet, press "W" to change
to wide-angle where the subject will be in focus.
Manual Focus
Certain conditions require manual focusing.
• When taping two subjects - one near and onedistant.
• When taping subjects in very low light.
• When taping a horizontally striped subject.
• When taping subjects with little or no contrast.
To focus manually.
1. Slide the AUTO LOCK switch to AUTO LOCK.
2. Press power zoom button "T" and zoom in on the
subject.
3. Press the FOCUS ON/OFF button to select
manual focus. MF will appear in the viewfinder.
4. Press the + or - side of the MANUAL FOCUS +/-
button to adjust the focus.
• MF+ will appear in the viewfinder when
focusing in the + direction.
• MF- will appear in the viewfinder when
focusing in the - direction.
5. Use the power zoom buttons to select desired
zooming range.
Note: When the POWER switch is OFF, focus will resetto auto when power is restored. Manual focus will remainselected when you place the ON/POWER SAVE lever inPOWER SAVE and then restore power by placing it ON.
26

The camcorder has several preset program modes for particular recording situations. It will automatically set
shutter speed, white balance, and iris. Manual or auto-focus can be used during any of these modes.
Sports ModeIndicators
Display in Viewfinder
MODE SEL. (Select) Button
To select a preset program mode1. Place the camcorder in record-pause.2. Slide the AUTO LOCK switch to AUTO LOCK.
3. Repeatedly press the MODE SEL. (select) buttonto select the mode that best fits the conditions.
See the chart below to decide which mode to use.
Notes: If you want the camcorder to remember the mode
you selected during recording breaks, place theON/POWER SAVE lever in POWER SA VE. The settingswill automatically return to auto if the power is turned off
using the POWER switch.
Auto focus will automatically reset whenever you select anew preset program mode.
Mode
Auto mode
Sports
Auto highspeed shutter
Close-up
Low Light
Flickerless
Shutter Speed
1/60 second.
1/60 - 1/250 second.
(depending onbrightness)
1/250 ~ 1/10,000
second (depending
on brighlness)
!/60 second
1/60 second
1/100 second
Indicator
None
b!
W
Auto-Focus Area
Normal
Center Frame Area
Only(9 feet and farther)
Normal
2/5 inch~78 inches
Normal
Recording Conditions
Use under normal conditions.
For filming sporting events, football games, etc• Colors may change if this mode is used
indoors with fluorescent lighting.
For capturing fast movements such as a golfswing, tennis swing, etc,• Colors may change if this mode is used
indoors with fluorescent lighting.
For filming subjects, such as flowers or insects,at a short distance.
• This mode automatically sets the zoom to thewide-angle position and focus to about 2inches from the lens. The focus can then be
adjusted on any subject in a range of 2/5 inchto 78 inches from the lens.
For best results when filming indoors, underlow light conditions.• If the camcorder makes too many focus
adjustments, this may indicate that the subject
When recording in a foreign country under
fluorescent lighting that uses 50 Hz. electriccurrent (some parts of Europe and Asia).
27
Normal
is too bright. In this case select the auto modeshown above or use manual focus.

Thetimecounterdisplayshowstheactualtimeelapsedwhenrecordingorplayingbackatape.Thetimecounterquicklylocatestheendof recordedsegments.Notethereadingwhenyouarefinishedrecordingorplayingbackatape.Beforeyoustartto recordor playbackatape,presstheCOUNTER RESET button to setthe counter to "0:00:00".
For example, you recorded a 10-minute segment. Later, you want to locate the end of your recording. Insertthe cassette and fast-forward the tape until the time counter reads "0:10:00".
COUNTERRESET Button
COUNTER MEM (Memory) Button
COUNTERMEMORYButton
J
c._ {=:] t=_
[=]{::l{=l
COUNTER
RESETButton
Memory-Stop Feature
The memory-stop feature helps you locate a certain
point on the tape. When memory stop is turned on,
the tape will stop automatically during rewind or fastforward when the time counter reaches "M 0:00:00".
1. Press the COUNTER MEM (memory) button to
turn on the memory-stop feature. An "M"
appears in front of the time counter.
Time Counter
with Memory-Stop FeatureTurned on
._rM 0:00:00
Seconds
Minutes
Hours
4. Make sure the POWER switch is in the PLAY
position, and then press the REW (rewind) button.
The tape will rewind to the time counter readingof "M O:00: 00".
Notes: The corresponding buttons on the remote controlcan be used to operate the camcorder.
If you rewind the tape farther back than a counter readingof "0:00:00", a minus will appear in front of the counter.
Display in Viewfinder
2. Locate the place on the tape you want to return to
and press the COUNTER RESET button to set thetime counter to "M 0:00:00".
3. Continue to record or play the tape. When you
want to return to the place you marked, press the
thumb trigger to stop recording or the STOP
button to stop playing back the tape.
28

• Make a video recording of your home and contents
to store in a safe place in case of fire or theft.
• Practice recording under a variety of lighting
conditions. This will help you respond quickly.
• Do not move the camcorder rapidly from side-to-
side while recording. A steady, gradual "pan"
avoids blurring and "jitter".
• Use the viewfinder to make sure the camcorder is
level while recording or the scenes will appear"tilted".
• Do not bump or tap the camcorder's microphone
while recording because this sound will berecorded.
• Be aware of video and audio backgrounds.
Background details barely noticed while you are
taping may show up as visual "clutter".
Background noises (especially TV sets, radios,
household appliances, traffic sounds, etc.) can
detract from the sound you want to record.
Check the focus before you start recording. Use
your camcorder's zoom to help you focus
manually. Zoom in on your subject and adjust the
focus until you see a clear image in the viewfinder.Then zoom back to where you want to record. If
the subject-to-camcorder distance does not change,
the subject will remain in sharp focus over the
entire zoom range.
Avoid long "still" shots of landmarks and scenic
attractions. Recordings are more interesting if they
include people and details. "Local color" givestravel videos lasting appeal. Consider recording afamiliar or landmark scene from an unfamiliar
vantage point for added interest. Check the
lighting before starting to record.
Try to make sure indoor scenes are well-lit. This
improves picture quality and color reproduction.
Include close-up shots of individuals when taping
family outings or group functions.
Holding The Camcorder
• To film at different angles, raise the viewfinder
90 °.
• Hold the camcorder horizontally. Keep your feet
slightly apart and upper arms close to your body.
• Standing against a wall may give your recordings
more stability.
• When possible, rest your elbows on a table or other
stable surface to help keep the camcorder steady.
• Use an optional tripod or monopod for
stable images.
Traveling Tips
• Write down your camcorder's serial number and
keep it separate from the camcorder when
traveling. If your camcorder is lost or stolen, you
will be able to identify it.
• Use extra care to avoid damage to your camcorder
and accessories when operating them at a beach or
pool. Spray, sand, and dust should be avoided. If
your lens has been exposed to the elements, clean
it only with proper lens cleaning supplies.
Carry your camcorder in a carrying case when
traveling. See page 4 for a case especially
designed for this camcorder. An ordinary suitcase
or carry bag does not offer the protection your
camcorder needs. Treat your camcorder as carry-
on luggage to protect it from rough handling.
Make sure you have any plug adapters you may
need before taking your camcorder to other
countries. Consult your RCA dealer for advice.
29

Camcorder Care and Storage
Keep dust and grit from entering the camcorder's
cassette door. They are abrasive and causeexcessive wear both to the camcorder's
recording/playback heads and cassettes.
• Always replace the lens cap on the lens when thecamcorder is not in use.
• When the camcorder is not in use, always remove
the cassette andAC adapter/charger or battery.
• The camcorder can be damaged by improper
storage or handling. Do not subject the camcorder
to swinging, shaking, or dropping.
• Do not touch the lens with your fingers. The oil
from your skin can damage the lens. Always use
lens-cleaning tissue and commercially prepared
cleaning solution designed for use on camera lens.
Improper cleaning may scratch the lens.
Before handling your camcorder, make sure your
hands and face are free from any chemical
products such as suntan lotion, as it may damagethe finish.
Do not operate the camcorder for extended periods
in temperatures below 40°F (4°C) or above 95°F(35°C). Do not store the camcorder in
temperatures below -22°F (-30°C) or above 149°F(65°C).
Do not operate the camcorder in extremely humidenvironments.
Do not aim your camcorder at the sun or other
bright objects.
Do not leave your camcorder in direct sunlight.
Doing so could permanently damage the
camcorder's internal parts.
Rechargeable Battery Care and Storage .......................................................................................................................................................................................................................................................................................
Do not operate the battery at temperatures below
14°F (-10°C) or above 95°F (35°C). The battery
may be damaged if operated at temperatures above
122°F (50°C). Operation time will decrease at
extremely low temperatures.
• Store the battery at normal room temperature.
• The battery should be charged at a temperature of41 °F-95°F (5°C-35°C) to prevent damage.
• After repeated chargings and use, the operation
time will gradually decrease. When operation time
becomes too short to be useful, it is time to replace
the battery.
Cassette Care and Storage
• When you are finished with a cassette, rewind it,
remove it from the camcorder, and label it.• Keep the cassette away from strong magnetic fields
such as electric motors and other devices.
• Do not touch or cover the small holes in the cas-
sette or use cassettes with damaged or spliced tape.
• Do not use a cassette if it has been damaged or
exposed to moisture.
• Store cassettes vertically in their protective boxesat normal room temperatures. Excessive heat or
cold may damage your cassettes.
• Close the safety tab to prevent accidental erasure.
30

Viewfinder playback is a way to watch tapes in black and white using the camcorder. To hear the sound on
the tape, connect an optional earphone to the earphone O jack.
Earphone Jack (Located on side)EJECT Button (Located undercassette compartment cover)
POWER (CAM/OFF/PLA Y)
REW (Rewind)
Still (ll) Button
F.FWD. Button
PLAY Button
STOP Button
To play back a tape through the viewfinder.
1. Slide the POWER switch to PLAY.
2. Insert the cassette you want to play back.
3. Press the PLAY button.
• During playback, press the still (ll) button to
"stop the action" and view one frame of the tape.
Press the still (ll) button again (or the PLAY
button) to return to normal playback.
Caution: Still is designed for momentary
interruptions and should not be used for an
extended period of time. If the camcorderremains in the still mode for more than five
minutes, it will automatically move the tape
away from the spinning heads to prevent
excessive tape wear.
• During playback, press and hold the F.FWD.
(fast forward) or REW (rewind) button if you
want to visually search the tape in forward orreverse. Release the button to return to normal
playback.
4. Press the STOP button when you are finished.
Notes: The corresponding buttons on the remote controlwill operate the camcorder.
The camcorder can play back tapes recorded in SP or LPspeed. The LP indicator appears in the electronicviewfinder when an LP tape is being played.
During still and search operations, it is normal for streaksto appear in the picture.
The sound is muted during special playback operations.
31
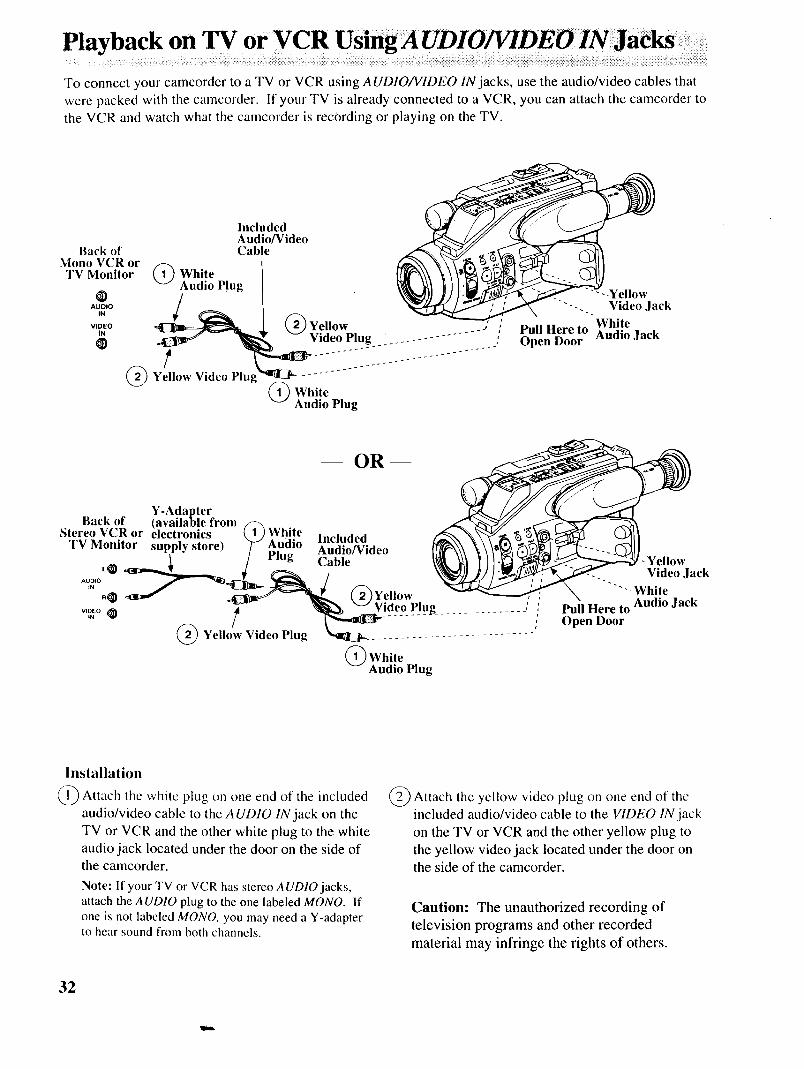
To connect your camcorder to a TV or VCR using AUDIO/VIDEO IN jacks, use the audio/video cables that
were packed with the camcorder. If your TV is already connected to a VCR, you can attach the camcorder to
the VCR mad watch what the camcorder is recording or playing on the TV.
IncludedAudio/Video
Back ot' CableMono VCR orTV Monitor (1) White
Audio Plug@
AUDIO
IN
VIDEOtN
@
tYellow Video Plu
sYellow .... ;Video Plug .............. ,
WhiteAudio Plug
.Yellow"'--.. Video Jack
WhitePull Here to Audio JackOpen Door
OR -m
Y-AdapterBack ot' (available from
Stereo VCR or electronics ( 1 ) White l.oh a.a
TV Monitor supply store) "_ pAUudiO_lu'_lioU/_C/deo
L_ _ ¢ g Cable
R@ __ (2)Yellow
Y !1 'w VIeow Video Plug _ ............................. '
(_) WhiteAudio Plug
- YellowVideo Jack
"'-WhiteAudio JackPull Here to
Open Door
Installation
(_ Attach tile white plug on one cud of the included
audio/video cable to the AUDIO IN jack on the
TV or VCR and the other white plug to the white
audio jack located under the door on the side ofthe camcorder.
Note: If your TV or VCR has stereo AUDIO jacks,
attach the AUDIO plug to the one labeled MONO. Ifone is not labeled MONO, you may need a Y-adapterto hear sound from both channels.
Attach the yellow plug on onevideo end of the
included audio/video cable to the VIDEO IN jack
on the TV or VCR and the other yellow plug to
the yellow video jack located under the door onthe side of the camcorder.
Caution: The unauthorized recording of
television programs and other recorded
material may infringe the rights of others.
32
Playback Operation and How to CopyTapes on the VCR
I. A. Camcorder connected directly to TV monitor:
Turn on the TV and tune it to the video inputchannel.
B. Camcorder connected to VCR that is already
connected to TV: Turn on VCR and place it in
the "line" or "camera mode". (If your VCRdoes not have a "line" or "camera mode",
consult the VCR owner's manual.) Operate the
TV as you normally do to see the signal
coming from the VCR.
2. Attach a power supply and slide the camcorder's
POWER switch to PLAY. Insert the cassette you
want to playback.
3. Press the PLAY button to begin playback.
• During playback, press the still (11)button to
"stop the action" and view one frame of the
tape. Press the still (11)button again (or the
PLAY button) to return to normal playback.
Caution: Still is designed for momentary
interruptions, and should not be used for
extended time periods. If the camcorderremains in the still mode for more than five _
minutes, the camcorder will automatically
move the tape away from the spinning heads
to prevent excessive tape wear.
• During playback, press and hold the F.FWD.(fast forward) or REW (rewind) bfltton if you
want to visually search the tape in forward orreverse. Release the button to return to normal
playback.
4. To copy what the camcorder is playing, place a
blank cassette in the VCR, and press the VCR'sRECORD button.
5. Press the STOP button when you are finished.
Viewing What the Camcorder is Seeing
(or Recording)
i. A. Camcorder connected directly to TV: Turn on
the TV, and tune it to the video input channel.
B. Camcorder connected to VCR that is already
connected to TV: Turn on VCR and place it in
the "line" or "camera mode". (If your VCRdoes not have a "line" or "camera mode",
consult the VCR owner's manual.) Operate
the TV as you normally do to see the signal
coming from the VCR.
2. Attach a power supply and slide the camcorder'sPOWER switch to CAM. Place the ON/POWER
SAVE lever in ON, and insert the cassette you
want to record on.
Note; When the camcorder is used as a camera, turn thcTV's volume down to prevent a high-pitched squealcaused by feedback.
3. Press the camcorder's thumb trigger (or theremote control's RECORD START/STOP button)
to begin recording. You can watch what the
camcorder is seeing (or recording) on the TVscreen.
See the Camcorder's displays on the TV.
• Press the DISPLAY button on the remote control
to see the viewfinder displays on the TV screen.
• Press the DISPLAY button again to remove the
displays.
Notes: The corresponding buttons on the remote controlcan be used to operate the camcorder.
The camcorder can play back tapes recorded in SP or LPspeed. The LP indicator appears in the viewfinder whenan LP tape is played.
During still and search operations, it is normal for streaksto appear in the picture.
The sound is muted during special playback operations.
33

To connect your camcorder to a TV without audio and video inputs, you need an optional CRF800 RF output
adapter and coaxial RF cable as shown.
Output Jacks(Located behind door)
Optional CoaxialRF Cable*(such as AH065G _
or AH066G)
CHANNEL
75 -7 '_x300 _--_ Back ofrl'VOptional
Ohm Transformer* '_'_(such as AH011) "_\ "
Back of TV
VHF Antenna
(_ Optional CRF800
J RF Output Adapter*
VHF AntennaOptional 300-75Ohm Transformer*(such as 193983)
Installation
(_ Disconnect the VHF antenna from your TV.Connect the antenna to the VHF IN connector on
the optional CRF800 RF output adapter if youleave the adapter connected to the TV.
Note: If your VHF antenna is the fiat twin-lead typeattached by two screws, you will need an optional300-75 ohm transformer, such as 193983.
Attach one end of the coaxial RF cable to the
VHF OUT connector on the RF output adapter
and the other end to the VHF input on your TV.
Note: If your TV has screw terminals, you may needan optional 75-300 ohm transformer, such as AH011.
Attach output adapter's plug tothe RF the
output jacks located behind the door on the sideof the camcorder.
*Optional accessories are available from your dealer or elecmmics supply store. Mail order form is on page 5.
34

PlaybaCkona TV withoutAu$o/Videohpu ( ontinuea),
Playback Operation
1. Set the CHANNEL 4CH/3CH switch on the RF
output adapter to 4CH or 3CH.
2. Turn on the TV, and tune it to channel 3 or 4.
3. Attach a power supply, and slide the camcorder's
POWER switch to PLA Y. Insert the cassette you
want to play back.
4. Press the PLAY button to begin playback.
• During playback, press the still (!l) button to"stop the action" and view one frame of the
tape. Press the still (11) button again (or thePLAY button) to return to normal playback.
Caution: Still is designed for momentary
interruptions, and should not be used for
extended time periods. If the camcorderremains in the still mode for more than five
minutes, the camcorder will automatically
move the tape away from the spinning heads
to prevent excessive tape wear.
.
• During playback, press and hold the F.FWD.
(fast forward) or REW (rewind) button if you
want to visually search the tape in forward orreverse. Release the button to return to normal
playback.
Press the STOP button when you are finished.
Viewing What the Camcorder Is Recording
1. Turn on the TV and tune it to channel 3 or 4.
Note: When the camcorder is used as a camera, turn
the TV' s volume down to prevent a high-pitchedsqueal caused by feedback.
2. Set the CHANNEL switch on the RF output
adapter to the same channel you selected onthe TV.
. Attach a power supply and slide the camcorder's
POWER switch to CAM. Insert the cassette youwant to record on. Make sure the ON/POWER
SAVE lever is ON. Press the thumb trigger on the
camcorder (or the RECORD START/STOP button
on the remote control) to start recording. You
can watch what you are recording on the TVscreen.
See the Camcorder's displays on the TV.
• Press the DISPLAY button on the remotecontrol
to see the viewfinder displays on the TV screen.
• Press the DISPLAY button again to remove the
displays.
Normal TV Viewing
You can leave the RF output adapter hooked up to
the TV. Disconnect the adapter's plug from the
camcorder or turn off the camcorder's power.
Notes: The corresponding buttons on the remote controlcan be used to operate the camcorder.
The camcorder can play back tapes recorded in SP or LP
speed. The LP indicator appears in the viewfinder whenan LP tape is played.
During still and search operations, it is normal for streaksto appear in the picture.
The sound is muted during special playback operations.
Note to Cable TV Installer
This reminder is provided to call your attention to Article820-40 of the National Electrical Code (Section 54 ofCanadian Electrical Code, Part I), that provides guidelinesfor proper grounding and, in particular, specifies that thecable ground shall be connected to the grounding systemof the building as close to the point of cable entry aspractical.
35

Trouble C1
Troubles sometimes are caused by simple "faults" that you can easily correct without the help of a service
technician by first checking a few basic remedies.
Before you call or take your camcorder to an Authorized RCA Compact Camcorder Servicenter, look below
for the type of trouble you are experiencing. Then perform the simple checks and adjustments listed for thattrouble.
Trouble
No power
Won't record or playback
i
I
Checks and Adjustments .... : :
• ON/POWER SAVE lever in pOWER SAVE position. Place lever in ON
position.
• If using battery, it may need to be recharged.
• If using AC adapter/charger, make sure it is plugged into a workingoutlet.
t! • If using AC adapter/charger, make sure it is plugged into a working
outlet.
• If dew indicator (_) appears in the viewfinder, there is moisture in thecamcorder. Remove the cassette from the camcorder and let it dry
naturally.
• There may be no cassette in the camcorder.
• Try ejecting and re-inserting the cassette.
• The cassette tape may be broken, try another cassette.
• You may have reached the end of the cassette, try rewinding it.
Won't playback • POWER switch must be in PLA Y position.
Won't record Safety tab has been closed. (See page 20.)
POWER switch must be in CAM (camera) position.
ON/POWER SAVE lever must be in ON position.
No picture in vicwfmder
Tape stops during rewind orfast forward
• Remove lens cap.
• ON/POWER SAVE lever must be in ON position when POWER switch is
in CAM (camera). position.
• Time-counter memory may be on. Whenever an "M" appears with the
time-counter display, the camcorder will stop rewinding (or fast
forwarding) when counter reads "M 0:00.'00". Press the REW or F.FWD.
button again to continue rewinding or fast Jorwarding, or press
COUNTER MEM (memory) bntton to turn off memory-stop feature.
Camcordcr remains in "stopaction" (play-pause) mode
• Press the still (11) (or PLA Y) button to return to normal playback.
36

TroUble i i_ec_ hnd Adj ustmentsI , _%_ _,_,_,_,_,_,...... .... , i_ii_!_ii!_i_iiii!i_!i_i_!ii,_i_iii_i!_,!_!_i_!_!IIiiii!!_!i!ii _iiliii_i_iii_,i_?,_i,i_i_,i_i_iii_,_i_!!ill,_,_iiiiiiiii!_ilii!i!iiiiliPoor auto-focus operation • Make sure AUTO LOCK switch is in the AUTO LOCK position.
• Scene is dark. Auto-focus may not work under this condition. Seepage26
for details on manual focus.
• Lens is smudged, and image appears unfocused.
• Viewfinder eyepiece focus is misadjusted. (See page 23.)
Picture is too dark or • Select the best preset program mode for the recording situation.
subject too dark. See page 27.
Viewfinder displays areout of focus
Date and/time (or date)
were recorded on tape
Date and/or time are
incorrect
Remote control
will not operatecamcorder
• Try adjusting eyepiece focus control. See page 23.
• Pull electronic viewfinder out to the extended operating position.
• Date and time or date will be recorded on tape whenever they appear in theviewfinder.
• Press DATE/TIME btitton to remove them from viewfinder when recording.
• Clock cell may need replacing. See page 22.
• Date and/or time may need to be set. See page 22.
• Aim remote control at remote control sensor on camcorder.
• Remote control batteries may need replacing.
• If POWER switch is in CAM position, the ON/POWER SAVE lever must be
in ON position for camcorder to operate.
• POWER switch must be in CAM or PLAY position for camcorder to
operate. ..• Camcorder's remote control sensor is exposed to direct sunlight or strong
artificial light. This may interfere with operation of camcorder by remotecontrol.
37

General
Power requirement: 6VDC
Power consumption: 5.2 W
Weight: 1.7 lbs. (780g)Dimensions: 4-3/5"(W) x 4-3/5"(H) x
_117 x 120 x 259mm)IO-I/5"(L)
apparatus set out in the Radio Interference
Regulations' of the Canadian Department of _:__::_I:_I!I:!_
Video Recorder Section
Format: 8ram
Record/Playback System:
Two video record/playback heads
One flying erase head
Headwheel Cylinder Diameter: 40 mm
Video Signal: EIA Standard NTSC Color
Camera Section
Scanning: 525 Lines/60 Fields/30 Frames
Image Sensor: 1/3" high-resoltition,
solid-state CCD Imager
Tripod Mount: One 1/4" threaded holeLens: f1.8
8:1 (6-48mm)Diameteri 37 mm
Earphone Jack: Monaural 8 ohm mini jack
All features _d spedfications _e
This equipment has been tested and found to complywith the limits for a Class B digital device, pursuantto Part 15 of the FCCRules. These limits are
designed to provide reasonable protection againstharmful interference in a residential installation.
This equipment generates, uses, and can radiate
radio frequency energy and, if not installed and used
in accordance with the instructions, may causeharmful interference to radio communications.
However, there is no guarantee that interference will
not occur in a particular installation. If this
eqtfipment does cause harmful interference to radio
or television reception, which can be determined byturning the equipment off and on, the user is
encouraged to try to correct the interference by oneor more of the following measures:
• Reorient or relocate the receiving antenna.
• Increase the separation between the equipment andreceiver.
• Connect the equipment into an outlet on a circuitdifferent from that to which the receiver is
connected.
• Consult the dealer or an experienced radio/TV
technician for help.
This device complies with Part 15 of the FCC Rules.
Operation is subject to the following two conditions:
( 1) This device may not cause harmful interference,
and (2) this device must accept any interference
received, including interference that may cause
undesired operation.
Changes or modifications not expressly approved by
Thomson Consumer Electronics, Inc. may void theuser's authority to operate this camcorder.
38

What your warranty covers:
• Any defect in material or workmanship.
• 90 days for labor charges.
• One year for parts.
The warranty period for rental units bcgins with thefirst rental.
What we will do:
• Pay any Authorized RCA Compact Camcorder
Servicenter the labor charges to repair yourcamcorder.
• Pay any Authorized RCA Compact CamcorderServicenter for the new or, at our option, rebuilt
replacement parts required to repair your "camcorder.
How you get service:
• Check with your RCA Dealer or call1-800-336-1900 for the Authorized RCA Compact
Camcorder Servicenter nearest you. State that you
have an RCA 8 millimeter camcorder.
If an Authorized RCA Compai:t Camcorder
Servicenter is conveniently near you:
• Take your camcorder to the Authorized RCA
Compact Camcorder Servicenter of your choice.
• Show the Servicenter Representative your sales
receipt or other evidence of purchase date.
• Pick up your camcorder when repairs are
completed.
If an Authorized RCA Compact Cameorder
Servicenter is not located conveniently near you:
• Pack the camcorder so that it will not be damaged
during shipping. (We recommend using the
original carton and packing materials.) Include
any cables and other accessories originallyfurnished with the camcorder.
• Include in the camcorder carton (1) a copy of your
sales receipt or other evidence of purchase date,
(2) your name and address, and (3) a brief
description of the problem.
• Ship the camcorder to an Authorized RCA
Compact Camcorder Servicenter.
• Pay any charges billed to you by the Servicenter
for service not covered by the warranty.
What your warranty does not cover:
• Customer instruction. (Your owner's manual
clearly describes how to install, adjust, and operate
your camcorder. Any additional information
should be obtained fiom your Dealer.)
• Installation and related adjustments.
• Cleaning of video/audio heads.
• Damage from misuse or neglect.
• Batteries for clock or other features.
• A camcorder that has been modified or
incorporated into other products or is used for
institutional or other commercial purposes.
• A camcorder purchased or serviced outsidethe USA.
How state law relates to this warranty:
• This warranty gives you specific legal rights, and
you also may have other rights that vary from stateto state.
Product registration:
• Please complete and mail the product registration
card packed with your camcorder. It will make it
easier to contact you should it ever be necessary.
The return of the card is not required for warranty
coverage.
If you purchased your camcorder in Canada:
• The Canadian warranty applies in place of this
warranty.
39

Accessories, Included ............................................. 8
Accessories, Optional ........................................ :.4-7
Accessory Shoe ..................................................... 12
Accessory, Order Form ........................................ 5-6
Adapter/Charger, Safety
Instructions ............................... Inside Front Cover
Adapter/Charger, Using ........................................ 16
ADJ. (Adjust) Button ....................................... 13,22
Attaching the Shoulder Strap .................................. 9
AUTO LOCK Switch ......................... 11,.12,21,26,27
Auto Focus ................................... ;........................ 26
Auto High-Speed Shutter Mode ............................ 27
Auto Mode .............................................. , ............. 27
Batteries, Remote Control ..................................... 14
BA TIER Y Eject Lever ...................................... 12,18
Battery Safety Precautions ................. ................... 18
Battery Warning ............................................... 18,24
Battery, Care and Storage ..................................... 30
Battery, Using Rechargeable ........................... 17-18CAM/OFF/PLA Y POWER Switch ................... 11-12
Camcorder, Powering ...................................... 16-19
Camcorder, Turning On ........................................ 11
Camcorder, Unpacking ........................................... 8
Car Cord, Optional ................... :............................ 19
Care and Maintenance ........................................... 30
Care and Storage of the Battery ............................ 30
Cassette Care and Storage ..................................... 30
Cassette Compartment ................................ 10,13,20
cassettes, Inserting and Removing ................ 1.10,20
Charging the Battery ............................................. 17
Cleaning the Viewfinder ....................................... 23
Clock Cell Compartment ................................. 12,22
Close-Up Mode ..................................................... 27
Compact Camcorder Limited Warranty ................ 39
Connection, TV with AUDIO/VIDEO
Jacks ............................................................... 32-33
Connection, TV without Audio/Video
Inputs ............................................................. 34-35
Contents ................................................. Front Cover
Copying Tapes ................................................. 32-33
COUNTER MEM (Memory) Button ...... 13,24-25,28
COUNTER MEMORY Button .......... 14-15,24-25,28
COUNTER RESET Button .......... 13,14-15,24-25,28
Date and Time Display ............................... 22,24-25
Date and Time, Recording .................................... 22
4O
Date and Time, Setting ......................................... 22
DA TE/TIME Butt.on .................................... 13,22,25
DC IN 6.5V Jaek ._....................................... 13,16,19
DC Power Cord .................................................. 8,16
Design Specifications ............................................ 38
Dew Indicator ................................................... 11,24
DISPLA Y Button .................................... 14-15,33,35
Displays in Viewfinder .................................... 24-25
Earphone Jack ........................................ l 1,13,21,31
EJECT Button ............................................. 10,13,20
Electronic Viewfinder, Adjusting ......................... 23
Erase Protection .................................................. ..20
Eyepiece Focus Control .............................. 11,12,23
F.FWD. (Fast Forward)
Button ................................... 12,14-15,21,31,33,35
FF Display ......................... . .......... :......... :............. 24
First-Time Operation ......................................... 8-13
Flickerless Mode ........................................... _....... 27
Flying Erase Head ................................................. 21
FOCUS ON/OFF Button ............................ 12,25,26
Focusing Your Camcorder .................................... 26
Hand Strap ........................................................ 10,13
Important Safeguards ........................................... 2-3
Important Safety Instructions ..... Inside Front Cover
Inserting and Removing Cassettes ........................ 20
Lens .................................................................. 12,30
Lens Cap .......................................................... 10,13
Limited Warranty.... ............................................ ..39
Low Level Battery Warning ............................. .'...18
Low Light Mode ................................................... 27
LP Tape Speed Display ......................................... 24
Maintenance and Care ............................ .." ........... 30
Making Better Videos ........................................... 29
MANUAL FOCUS + and - Button ........ 12,24-25,26
Manual Focus (MF, MF+, and MF-)
Indicators .................................................. 24-25,26
Memory Stop Indicator ............................... 24-25,28
Memory-Stop Feature ........................................... 28
Microphone ...................................................... 12,21
MODE SEL. Button .................................... 12,24,27
ON/POWER SAVE Lever ............................ 11,13,17
OPEN Button .............................................. 10,13,20
Operation, First-Time ........................................ 8- | 3
Optional Accessories ........................................... 4-7
Optional Car Cord ................................................. 19

Index (continued)
Order Form, Accessory ........................................ 5-6
Output Jacks (Yellow Video, DC, and
White Audio) ............................................ 12,32,34
PA USE Display ..................................................... 24
PLAY Button ........................... 12,14-15,24,31,33,35
PLAY Display ........................................................ 24
Playback ........................................................... 31-35
Playback on a TV with AUDIO/VIDEO IN
Jacks ............................................................... 32-33
Playback on a TV without Audio/Video
lnputs ................................. :........................... 34-35
Playback, First ....................................................... 12
.Playback, Viewfinder ............................................ 31
Positioning the Tape ............................................. 21
POWER CAM/OFF/PLA Y Switch ................... 11,12
POWER SA VE/ON Lever .... i.......................... 13,17
Power Zooming ............................ . ........................ 25
Powering the Camcorder ................................. 16-19
Preset Program Indicators ................................ 24,27
Preset Program Modes ..................................... 24,27
Problem Solving .............................................. 36-37
Product Registration ................... Inside Front Cover
Program Preset Modes ..................................... 24,27
Quick Review ................................................ ........ 21
RCA Video Cassettes ....................................... 20,30
REC Display .......................................................... 24
REC START/STOP Button (Thumb Trigger)... 11,13
RECORD START/STOP Button ..................... ,. 14-15
Recording Speed and Times ................................. 20
Recording Steps, First-Time .............................. 8-13
Recording Tips ...................................................... 29
Recording, First ..................................................... 11
Refreshing the Battery .......................................... 17
Registration Card ........................ Inside Front Cover
Remote Control ................................................ 14-15
Review, Quick ....................................................... 21
REW (Rewind) Button ............ 12,14-15,21,31,33,35
REW Display ......................................................... 24
Safeguards, Important .......................................... 2-3
Safety Tab ............................................................. 20
Safety Instructions for AC
Adapter/Charger ....................... Inside Front Cover
Safety Instructions ...................... Inside Front Cover
Safety Precautions ................................................... 1
SCENE SEARCH + and - Buttons .............. 14-15,2 !
;!!_iiiiii:i!i%:.........._i_ i _iiiiiiiiiiii!ii!iiii_:iiii_iii:i_.....
;!!i!iiiii::iiiii:;_i,:_!;,i_i:ili!ii:i:,i,;iii:_i!:.,i:::ii:'.:!ili__..!ii,:ii.i
Setting the Timc and l)atc ..................................... 22
Shoulder Strap Rings ........................................... 9,13
Shoulder Strap, Attaching ....................................... 9
Solving Problems ............................................. 36-37
SP Speed ............................................................... 20
Special Features .................................................... 21
Specifications ........................................................ 38
Sports Mode .......................................................... 27
Status Displays ....................................................... 24
Still (11) Button ....................................... 12,31,33,35
STILL Button ............................. ...... 14-15,31,33,35
STOP Button ........................... 12,14-15,21,31,33,35
STOP Display ........................................................ 24
Storage ........................................................ i......... 30
T (Telephoto) Zoom Button .................................. 25
Table of Contents .................................. Front Cover
Tally Light ......................... . ................... 11,12,15,21TAPE END Indicator ............... ............. i................ 24
TAPE Indicator ........................... ........................... 24
Tape Copying .................................................. 32-33
Tape Positioning ................................................... 21
Things to Avoid ............................................... 29-30
Thumb Trigger ................................................. 11,13
Tilt Adjustment, Viewfinder ................................. 23
Time and Date Display ......................................... 22
Time and Date, Recording .................................... 22
Time and Date, Setting ......................................... 22
Time Counter Display ........... . .................... 24-25,28
Time Counter with Memory Stop Feature ............ 28
Tips, Recording ..................................................... 29
Tips, Traveling ........................................... _.......... 29
Tripod, Using .......................................................... 7
Trouble Checks ................................................ 36-37
Turning On the Camcorder ................................... 10
Unpacking the Camcorder .................................... 11
Video Cassettes ................................................ 20,30
Viewfinder ................................... 11,12,23,24-25,31
Viewfinder Displays ........................................ 24-25
Viewfinder Playback ............................................. 31
"qiewfinder, Cleaning ............................................ 23
W (Wide Angle) Zoom Button .............................. 25
Warranty ............................................................... 39
Zooming, Power .................................................... 25
41

ncH
Fol your nea['est Home
Entertainment Dealeror Authorized Servicentercall toll-free in the U.S.A.
1-800-336-1900
Thomson Consumer Electronics
600 N Sherman Dr, PO Box 1976
Indianapolis, IN 46206
©1993 Thomson Consumer Electronics, Inc.
Trademark(s) ® Registered
Marca(s) Registrada(s)
Printed in Japan
Part Number 93-Pro808-1
1AG61:::'1 P0046 - -