nicholas ch12 facilitated positional release
TRANSCRIPT
Print Preview12Facilitated Positional Release TechniquesTechnique PrinciplesFaci l i ta ted pos i t ional release (FPR) technique is a pat ient-pass ive, indi rect technique, and as
such, i t shares pr inc ip les with the other ind irect osteopath ic techniques, especia l ly myofascial
re lease, ba lanced l igamentous tension, and l igamentous ar t icu lar st ra in. I ts pos i t ioning is very
s imi lar to counters train and the in i t ia l indi rect pos i t ion ing for St i l l technique. The Educat ion
Counci l on Osteopath ic Pr inc ip les (ECOP) def ines FPR as “a system of ind irect myofascia l
re lease t reatment developed by Stanley Schiowi tz , DO. The component reg ion of the body is
placed in to a neut ra l posi t ion, d imin ishing t issue and jo in t tens ion in a l l p lanes and an
act ivat ing force (compress ion or torsion) is added” ( 1 ) . The pr imary goal o f th is technique is to
reduce abnormal muscle hyper ton ic i ty (super f ic ia l and deep) and restore lost mot ion to a
rest r icted ar t icu la t ion.
As with counterst ra in technique, the pr imary neurophys io logic mechanism affected by FPR is
thought to be the re la t ionship between Iα-af ferent and γ-ef ferent act iv i ty ( 1 ,2 ,3 ) . I f the
dysfunct ional reg ion is posi t ioned appropr ia te ly , the in tra fusal f ibers may return to normal
length, which in re turn decreases tension in the ext rafusal f ibers. This reduced tension in the
area of the muscle sp ind le fur ther decreases the Iα-af ferent impulses, which in turn cont inues
th is benef ic ia l interact ion, eventual ly a l lowing the muscles to achieve the ir normal length and
tone (4 ) . Other benef ic ia l aspects of th is form of t reatment may be related to the t reatment
posi t ion's secondary ef fects of improving lymphat ic and venous drainage and other b ioelectr ic
phenomena af fect ing f lu id dynamics and local metabol ic processes.
The pr inc ip les of posi t ion ing in th is technique are basic to indi rect t reatments, and therefore,
the physic ian wi l l at tempt to place the dysfunct ional segment, muscle, or o ther s tructure
toward i ts posi t ion of mot ion ease or reduced tens ion. This is done by f i rs t at tempt ing to p lace
the myofasc ia l or art icular dysfunct ion in a neut ra l pos i t ion, which Schiowitz descr ibes as
f lat ten ing the anteroposter ior spina l curve ( facets are in a pos i t ion between the beginning of
f lex ion and the beginning of extens ion) ( 3 ) . With a f lexed or extended dysfunct ion, the in i t ia l
posi t ioning is to f la t ten the anteroposter ior sp inal curve and f ind the neut ra l posi t ion wi th in the
dysfunct ion. This example is common to type I I dysfunct ions. Wi th type I dysfunct ions, less
anter ior and/or poster ior posi t ioning is necessary.
I f the pr imary focus is the t reatment of muscle hyper tonic i ty and tens ion (when there is no
predominant x- , y- , z -axis d iagnosis), the hyperton ic muscle is placed in a pos i t ion of ease of
tens ion. This is based on palpat ing the abnormal t issue textures and the ir response to
posi t ioning (3 ) . I f a dysfunct ional muscle is caus ing thoracic tens ion anter ior ly, f lexion is the
most probable posi t ion of ease. Poster ior thorac ic muscle hypertonic i ty commonly is
associated wi th an extended pos i t ion of ease ( 2 ) .
The major d iscr iminat ing factor we see in th is technique when comparing i t to the other indi rect
techniques is i ts re lease-enhancing mechanism . DiGiovanna and Schiowi tz descr ibe th is as a
faci l i ta t ing muscle force (1 ,3 ) . This may be a compress ion force, but i t can accommodate a l l
di rect ions of mot ion ease or d irect ions in which the muscle tens ion is reduced. Because of s ide
bending and rotat ional components in most dysfunct ions (spina l and ext remi ty) i t is general ly
necessary for the phys ic ian to add some form of torsion (s ide bending combined with ro tat ion)
force dur ing the pos i t ional component o f the technique. On achiev ing the proper pos i t ion of
ease wi th the fac i l i tat ing forces, the phys ic ian may also add a sl ight on-and-of f spr ing ing
(rocking) force. The physic ian holds the t reatment pos i t ion for 3 to 5 seconds, re turns the
pat ient to neut ra l (pret reatment posi t ion), and fo l lows by reassess ing the dysfunct ion using the
palpatory parameters for t issue texture changes, mot ion rest r ict ion, asymmetry, and
tenderness (sensi t iv i ty ) .
P.332
Technique ClassificationIndirectAs with al l ind irect techniques, the phys ic ian at tempts to pos i t ion the pat ient in the d irect ion
that reduces the myofasc ia l t issue tens ion or in the d irect ion of the mot ion f reedom.
Technique StylesMyofascial (Muscle Hypertonicity)To t reat a hyperton ic muscle with FPR, the phys ic ian f lat tens the sp inal curve in the reg ion or
segment to be t reated or in the ext remi t ies, adding compress ion toward the jo int . Then the
phys ic ian assesses for t issue texture changes (e.g. , tension, inelast ic i ty, bogginess) and
posi t ions the pat ient unt i l these dysfunct ional parameters are opt imal ly reduced. Next , the
phys ic ian adds the appropr ia te faci l i ta t ing forces (compress ion and torsion) and holds for 3 to
5 seconds, then returns the af fected area to a neutral posi t ion and reassesses. I t is
recommended to use this sty le in i t ia l ly when the physic ian has d i f f icu l ty determining the
pr imary component o f the dysfunct ion (myofasc ia l versus ar t icu lar) .
Articular (Intervertebral and Intersegmental x-, y-, z-Axis) DysfunctionIn art icu lar technique, the phys ic ian uses the palpatory c lues for pr imary in tersegmenta l ( jo in t)
dysfunct ions. These c lues are general ly t issue texture changes, restr ic t ion of mot ion,
asymmetr ic mot ion (may exhib i t symmetr ical ly reduced mot ion), end feel or jo in t f ree-play
qual i ta t ive changes, and pain. The phys ic ian s tarts by f la t ten ing the anteroposter ior spina l
curve of the region being treated. The dysfunct ional segment should then be pos i t ioned toward
the ease of mot ion in al l af fected planes. Next , the physic ian adds the appropr iate axial
faci l i ta t ing forces (compression and tors ion) , ho lds for 3 to 5 seconds, and br ings the af fected
area back to a neutral pos i t ion for reassessment .
IndicationMyofascia l or art icular somat ic dysfunct ion
Contraindications Moderate to severe jo int instabi l i ty
Herniated d isc where the pos i t ion ing could exacerbate the condi t ion
Moderate to severe intervertebra l foraminal s tenosis , especial ly in the presence of
radicu lar symptoms at the leve l to be treated i f the pos i t ioning could cause
exacerbat ion of the symptoms by further narrowing the foramen
Severe spra ins and s trains where the posi t ion ing may exacerbate the in jury
Certain congeni ta l anomal ies or condi t ions in which the pos i t ion needed to t reat the
dysfunct ion is not possible (e .g. , anky losis)
Vertebrobasi lar insuff ic iency
General Considerations and RulesThe physic ian must be able to make an accurate d iagnosis and when poss ib le to dist inguish
between a myofasc ia l and an art icular dysfunct ion. The anteroposter ior sp ina l curve is
f lat tened, and then a posi t ion of ease or a posi t ion that maximal ly reduces myofascial tens ion
is approached. A fac i l i tat ing force of compress ion combined wi th s ide bending and/or ro tat ion
( torsion) is appl ied for 3 to 5 seconds. A spr ing ing force may a lso be used.
Shorthand RulesPrimary Myofascial Dysfunction
Make d iagnosis ( t issue texture abnormal i ty) .
Flat ten the anteroposter ior sp ina l curve to reduce myofasc ia l tension.
Add a compression or torsional fac i l i ta t ing force.
Place the dysfunct ional myofascial s tructure in to i ts ease (shor tened, re laxed) posi t ion.
Hold for 3 to 5 seconds, then slowly re lease pressure whi le re turn ing to neutral .
The physic ian reassesses the dysfunct ional components ( t issue texture abnormal i ty,
asymmetry of posi t ion, rest r ict ion of mot ion, tenderness [TART] .
Primary Articular (x-, y-, z-axis) Type I and II Dysfunctions Make d iagnosis (e .g. , type I or I I ) .
Flat ten ( f lex or extend) the anteroposter ior curve in the sp ina l region of t reatment .
Add the fac i l i tat ing force (compress ion or tors ion) .
P.333

Move the dysfunct ional segment toward i ts f lexion or extension ease.
Move the dysfunct ional segment toward i ts s ide bending and rotat ional ease.
Hold for 3 to 5 seconds, then slowly re lease pressure whi le re turn ing to neutral .
Reassess the dysfunct ional components (TART).
P.334
Cervical Region: Right: Suboccipital Muscle Hypertonicity
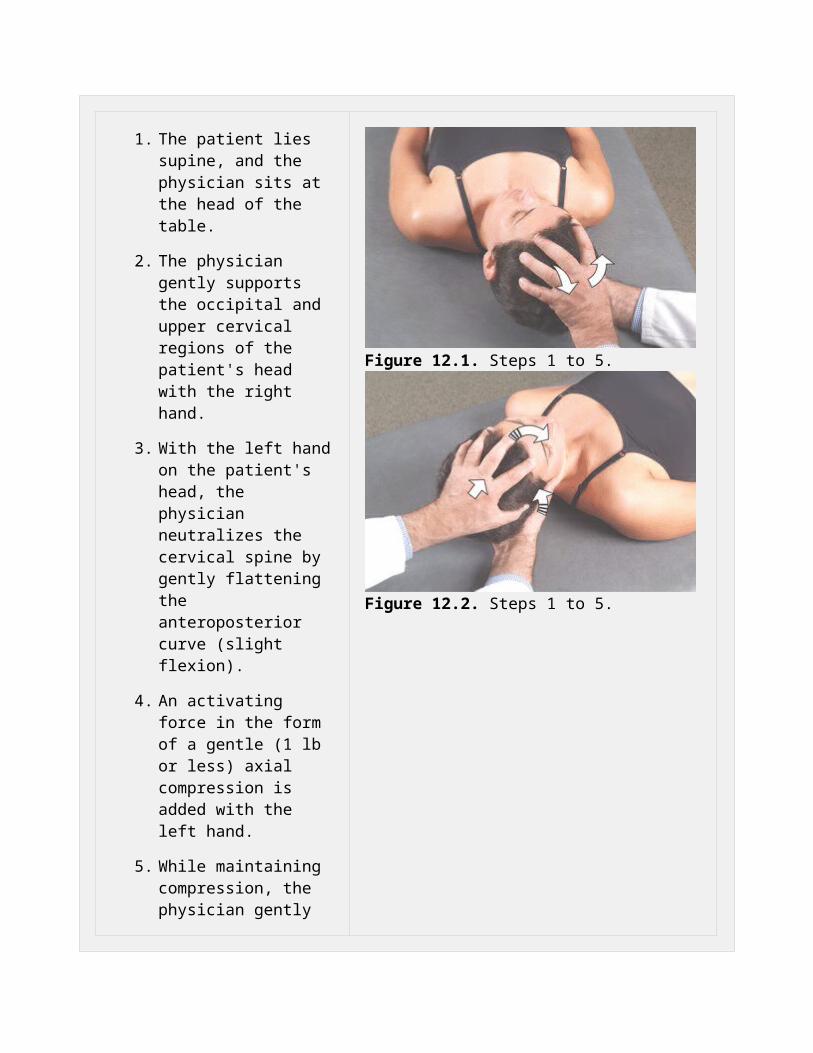
1. The patient lies supine, and the physician sits at the head of the table.
2. The physician gently supports the occipital and upper cervical regions of the patient's head with the right hand.
3. With the left hand on the patient's head, the physician neutralizes the cervical spine by gently flattening the anteroposterior curve (slight flexion).
4. An activating force in the form of a gentle (1 lb or less) axial compression is added with the left hand.
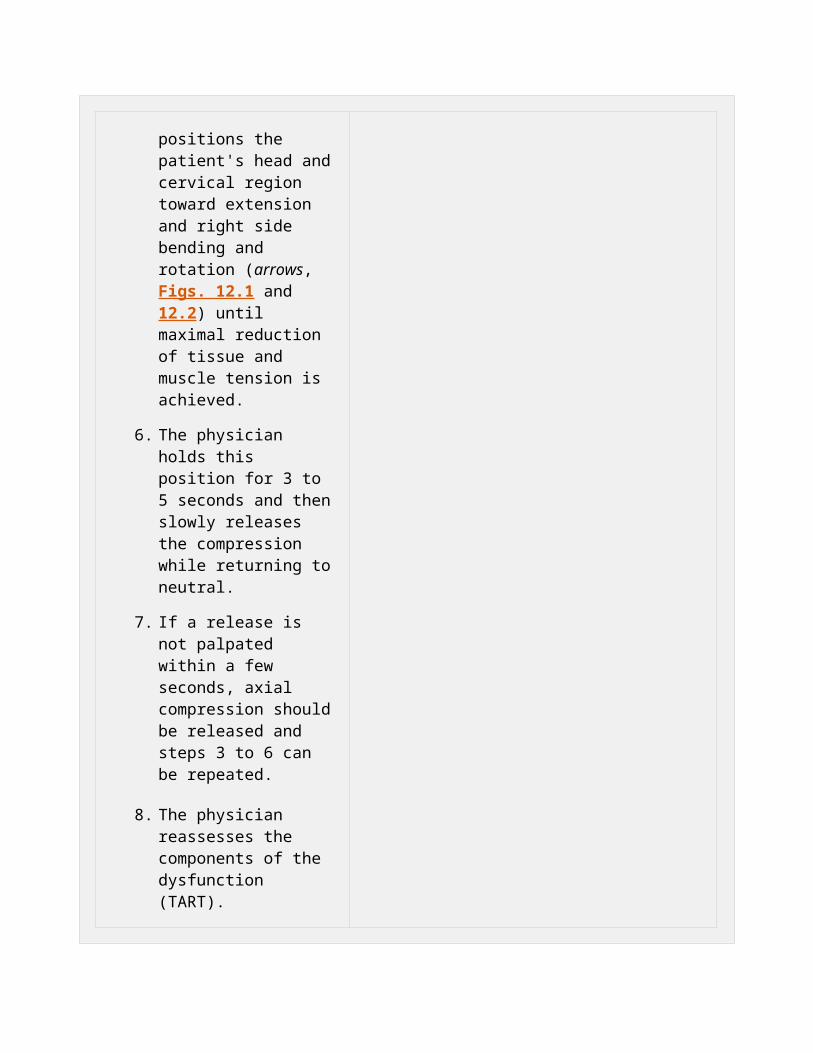
5. While maintaining compression, the physician gently positions the patient's head and cervical region toward extension and right side bending and
Figure 12.1. Steps 1 to 5.
Figure 12.2. Steps 1 to 5.
rotation (arrows, Figs. 12.1 and 12.2) until maximal reduction of tissue and muscle tension is achieved.
6. The physician holds this position for 3 to 5 seconds and then slowly releases the compression while returning to neutral.
7. If a release is not palpated within a few seconds, axial compression should be released and steps 3 to 6 can be repeated.
8. The physician reassesses the components of the dysfunction (TART).
P.335
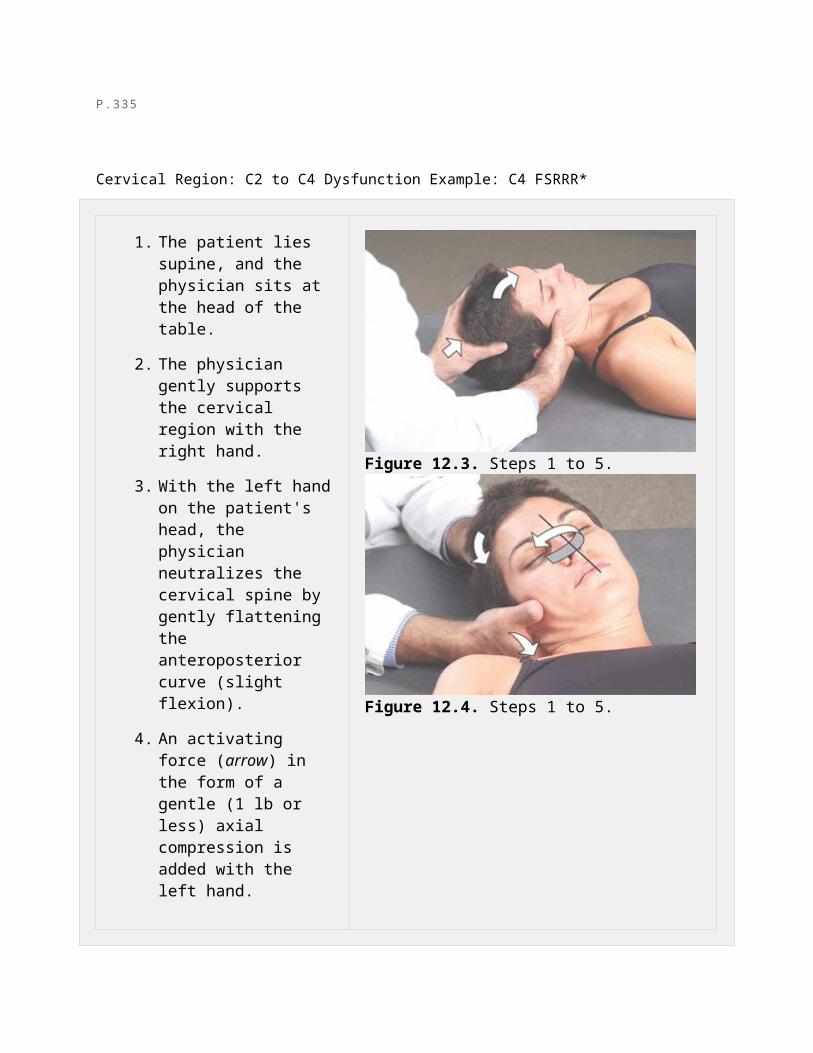
Cervical Region: C2 to C4 Dysfunction Example: C4 FSRRR*
1. The patient lies supine, and the physician sits at the head of the table.
2. The physician gently supports the cervical region with the right hand.
3. With the left hand on the patient's head, the physician neutralizes the cervical spine by gently flattening the anteroposterior curve (slight flexion).
Figure 12.3. Steps 1 to 5.
4. An activating force (arrow) in the form of a gentle (1 lb or less) axial compression is added with the left hand.
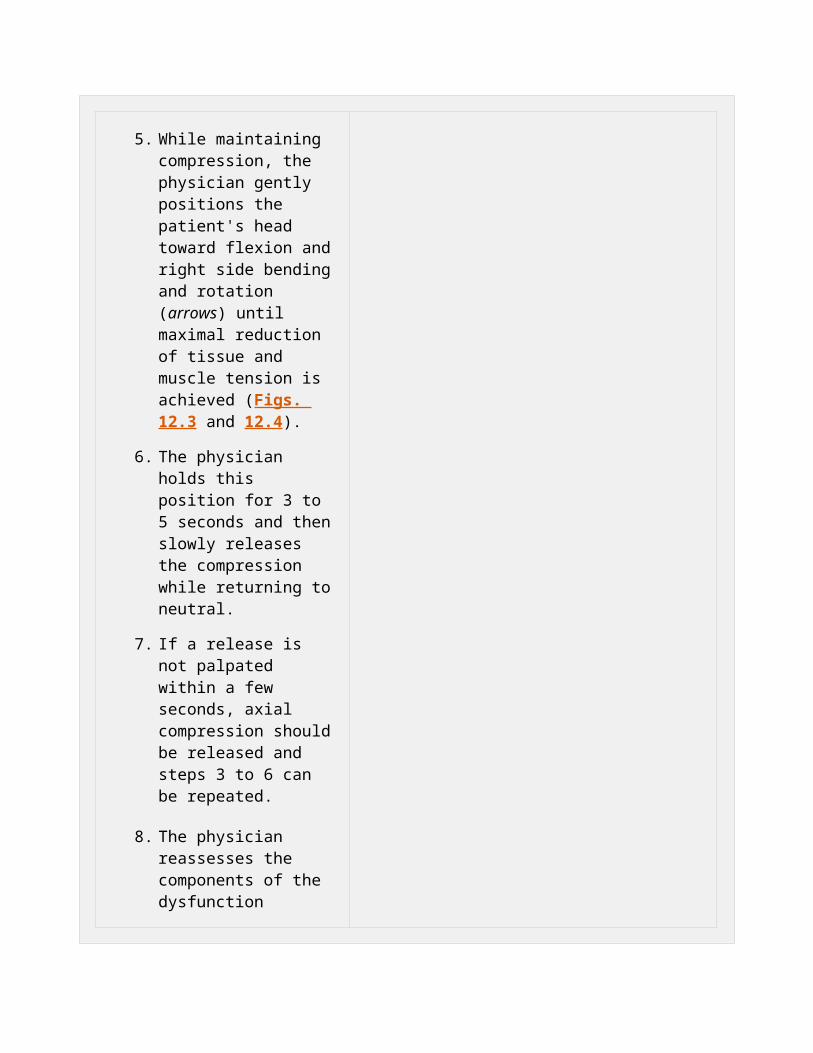
5. While maintaining compression, the physician gently positions the patient's head toward flexion and right side bending and rotation (arrows) until maximal reduction of tissue and muscle tension is achieved (Figs. 12.3 and 12.4).
6. The physician holds this position for 3 to 5 seconds and then slowly releases the compression while returning to neutral.
7. If a release is not palpated within a few seconds, axial compression should be released and steps 3 to 6 can be repeated.
8. The physician reassesses the components of the dysfunction (TART).
Figure 12.4. Steps 1 to 5.
P.336
Thoracic Region: T4 to T12 Dysfunctions Example: T6 ESRRR
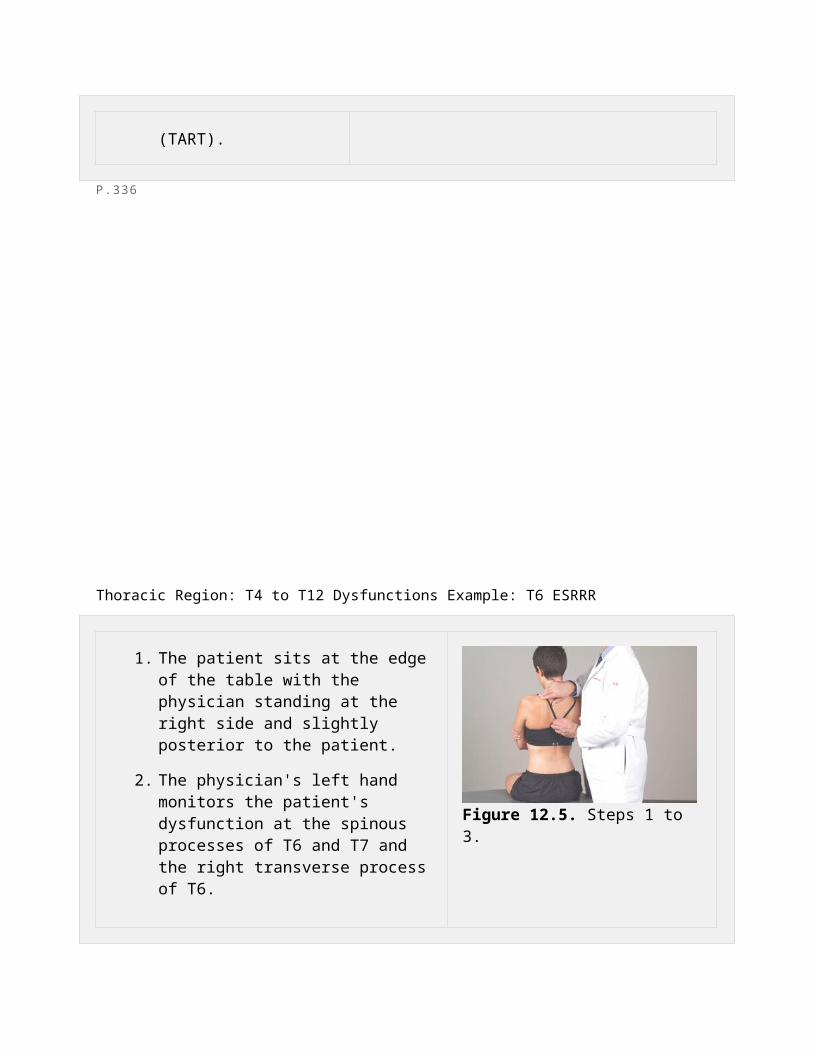
1. The patient sits at the edge of the table with the physician standing at the right side and slightly posterior to the patient.
2. The physician's left hand monitors the patient's dysfunction at the spinous processes of T6 and T7 and the right transverse process of T6.
3. The physician places the right forearm on the patient's upper right trapezius (shoulder girdle) with the remainder of the physician's right forearm and hand resting across the patient's upper back just behind the patient's neck (Fig. 12.5).
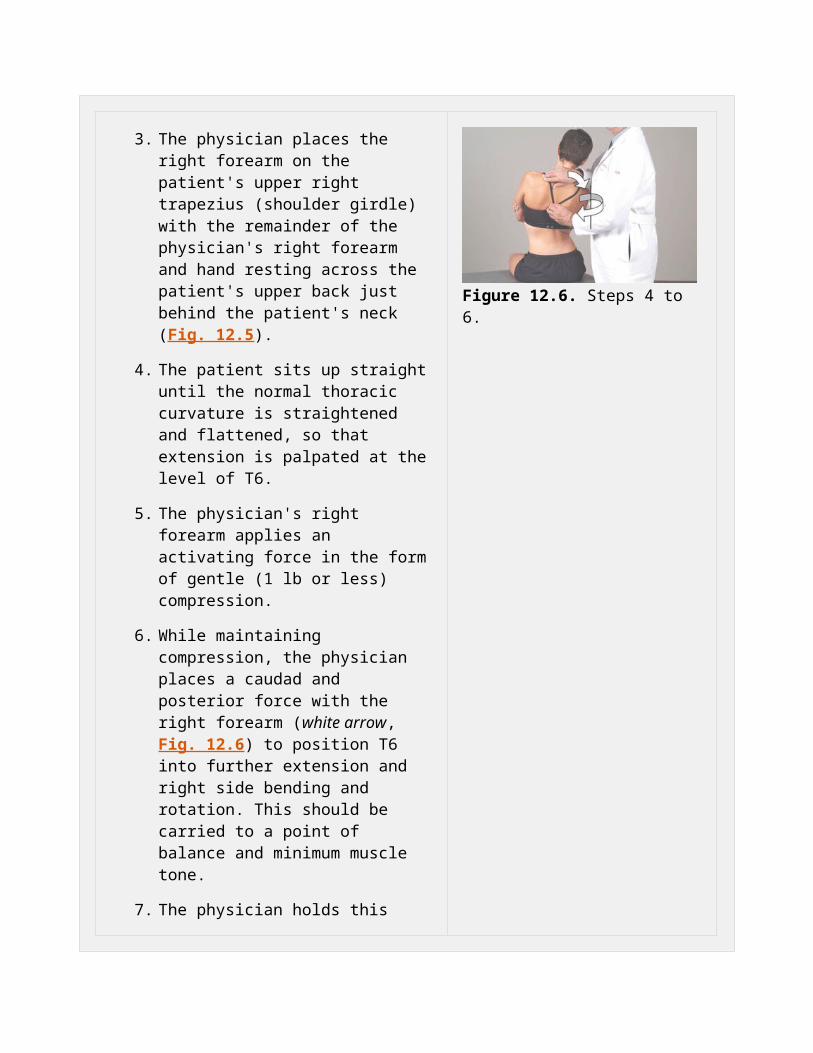
4. The patient sits up straight until the normal thoracic curvature is straightened and flattened, so that extension is palpated at the level of T6.
5. The physician's right forearm applies an activating force in the form of gentle (1 lb or less) compression.
6. While maintaining compression, the physician places a caudad and posterior force with the right forearm (white arrow, Fig. 12.6) to position T6 into further extension and right side bending and rotation. This should be carried to a point of balance and minimum muscle tone.
7. The physician holds this position for 3 to 5 seconds and then slowly releases the compression while returning to neutral.
Figure 12.5. Steps 1 to 3.
Figure 12.6. Steps 4 to 6.
8. If a release is not palpated within a few seconds, compression should be released and steps 3 to 6 can be repeated.
9. The physician reassesses the components of the dysfunction (TART).
P.337
Thoracic Region: Right-Sided Trapezius Muscle Hypertonicity
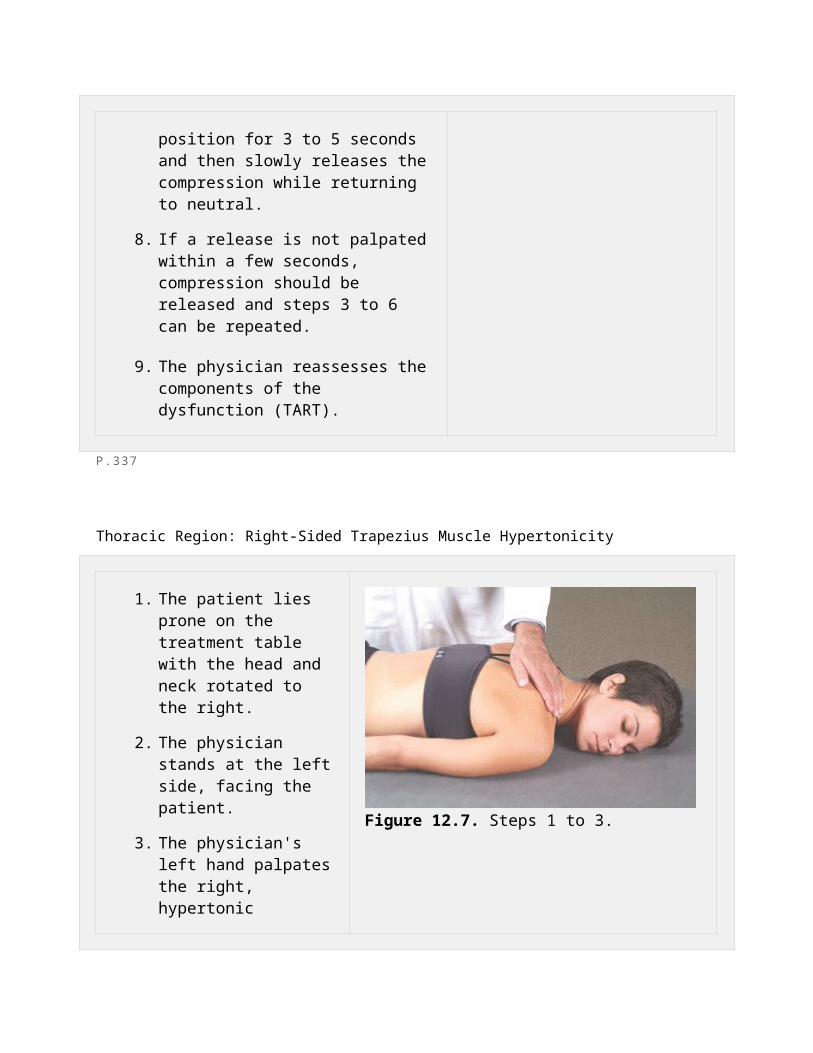
1. The patient lies prone on the treatment table with the head and neck rotated to the right.
2. The physician stands at the left side, facing the patient.
3. The physician's left hand palpates the right, hypertonic trapezius muscle (Fig. 12.7).
4. The physician's right hand reaches across the body of the patient and grasps the patient's right shoulder at the anterior deltoid and acromioclavicular region (Fig. 12.8).
5. The physician places a caudad and posterior force (white arrow, Fig. 12.9) to achieve a point of balance and minimal muscle tension in the right trapezius muscle.
6. On achieving the proper
Figure 12.7. Steps 1 to 3.
Figure 12.8. Step 4.
position, the physician's right hand applies an activating force (white arrow, Fig. 12.10) in the form of a gentle (1 lb or less) compression for 3 to 5 seconds.
7. If a release is not palpated within a few seconds, compression should be released and steps 3 to 6 can be repeated.
8. The physician reassesses the components of the dysfunction (TART).
Figure 12.9. Step 5.
Figure 12.10. Step 6.
P.338
Costal Region: Left First Rib Dysfunction, Posterior Elevation: Nonrespiratory Model, Soft-Tissue Effect
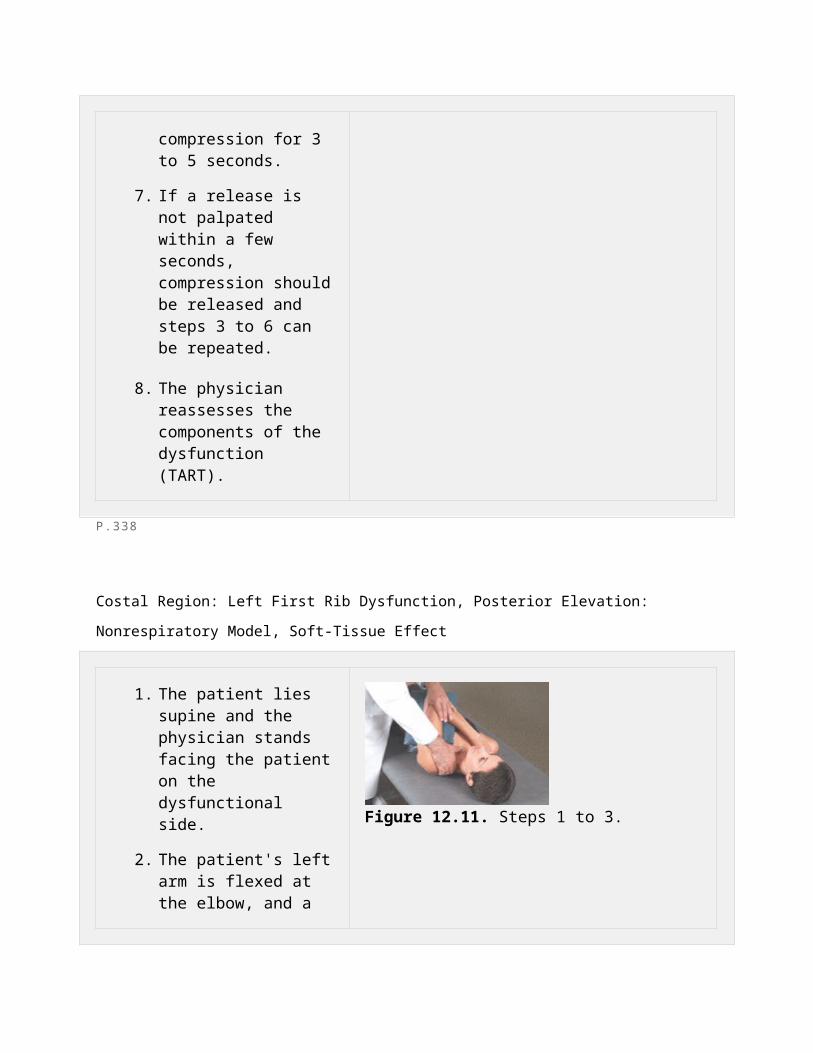
1. The patient lies supine and the physician stands facing the patient on the dysfunctional side.
2. The patient's left arm is flexed at the elbow, and a pillow or rolled towel is placed under the patient's
Figure 12.11. Steps 1 to 3.
upper arm.
3. The physician's left hand controls the olecranon process while the index and third fingers of the right hand palpate the posterior aspect of the first rib, monitoring for tissue texture changes (Fig. 12.11).
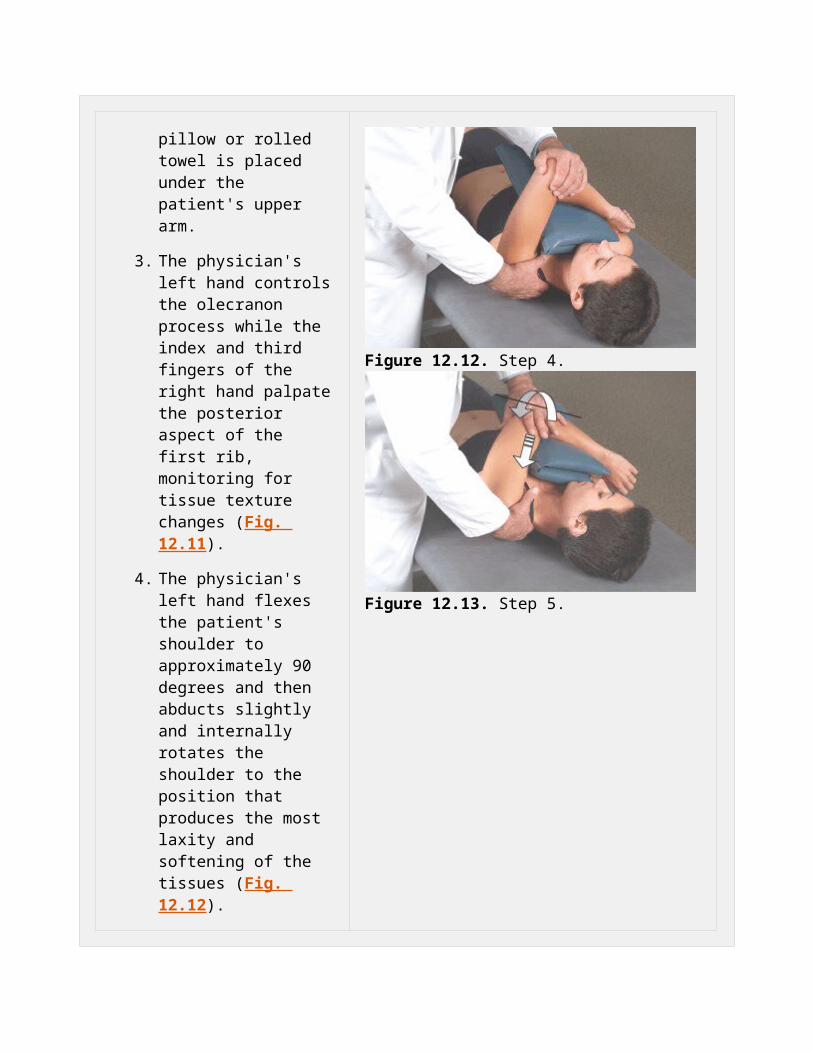
4. The physician's left hand flexes the patient's shoulder to approximately 90 degrees and then abducts slightly and internally rotates the shoulder to the position that produces the most laxity and softening of the tissues (Fig. 12.12).
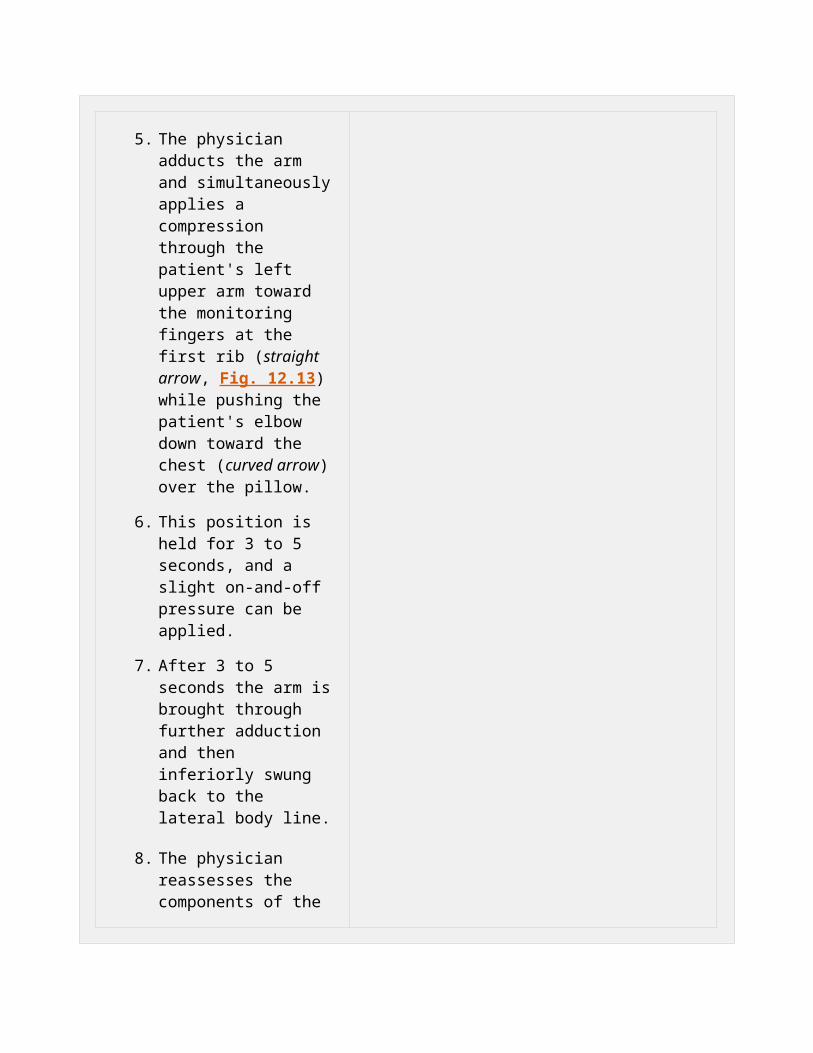
5. The physician adducts the arm and simultaneously applies a compression through the patient's left upper arm toward the monitoring fingers at the first rib (straight arrow, Fig. 12.13) while pushing the patient's elbow down toward the chest (curved arrow) over the pillow.
6. This position is held for 3 to 5 seconds, and a slight on-and-off pressure can be applied.
7. After 3 to 5 seconds the arm is brought through further adduction and then inferiorly swung back to
Figure 12.12. Step 4.
Figure 12.13. Step 5.
the lateral body line.
8. The physician reassesses the components of the dysfunction (TART).
P.339
Costal Region: Left Seventh Rib, Inhalation Dysfunction
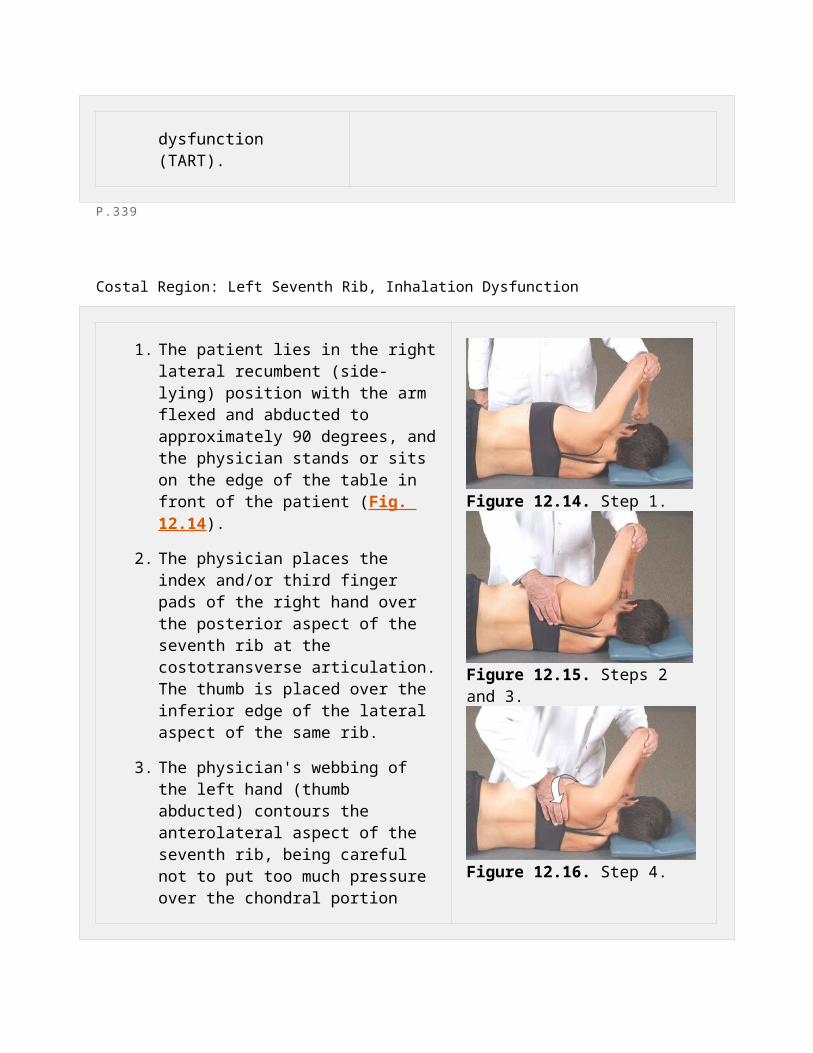
1. The patient lies in the right lateral recumbent (side-lying) position with the arm flexed and abducted to approximately 90 degrees, and the physician stands or sits on the edge of the table in front of the patient (Fig. 12.14).
2. The physician places the index and/or third finger pads of the right hand over the posterior aspect of the seventh rib at the costotransverse articulation. The thumb is placed over the inferior edge of the lateral aspect of the same rib.
3. The physician's webbing of the left hand (thumb abducted) contours the anterolateral aspect of the seventh rib, being careful not to put too much pressure over the chondral portion (Fig. 12.15).
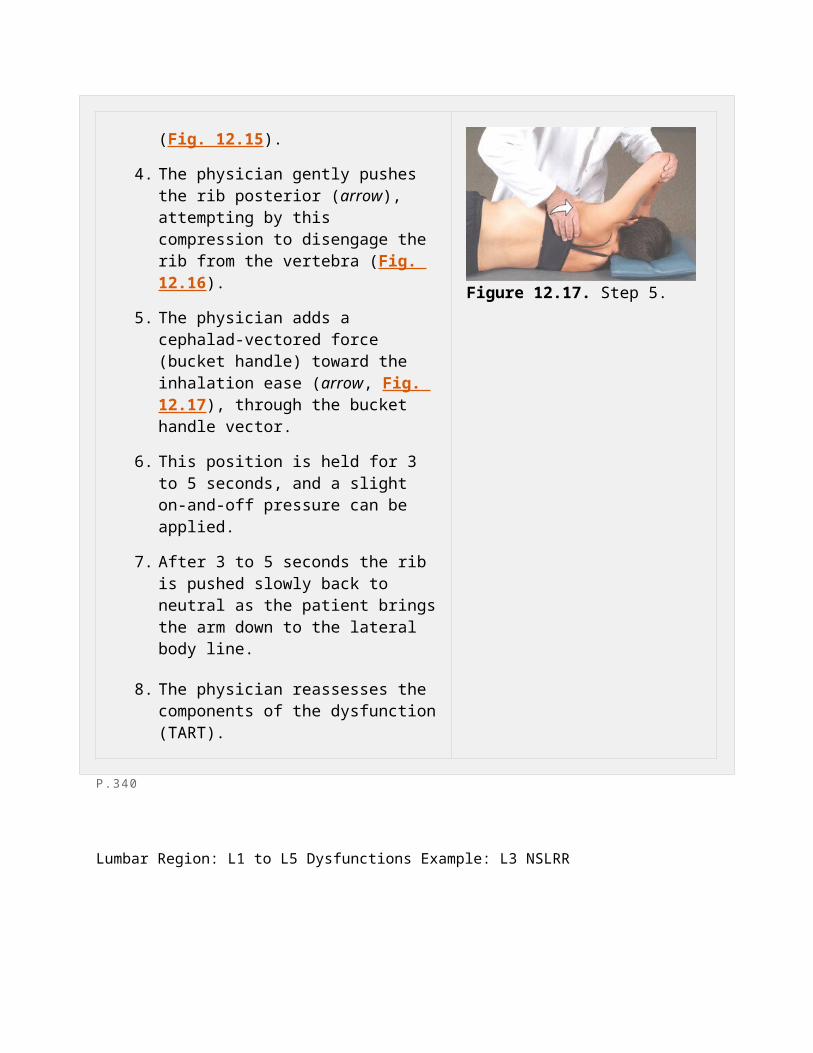
4. The physician gently pushes the rib posterior (arrow), attempting by this compression to disengage the rib from the vertebra (Fig. 12.16).
5. The physician adds a cephalad-vectored force (bucket handle) toward the inhalation ease (arrow, Fig. 12.17), through the bucket handle vector.
6. This position is held for 3 to 5 seconds,
Figure 12.14. Step 1.
Figure 12.15. Steps 2 and 3.
Figure 12.16. Step 4.
and a slight on-and-off pressure can be applied.
7. After 3 to 5 seconds the rib is pushed slowly back to neutral as the patient brings the arm down to the lateral body line.
8. The physician reassesses the components of the dysfunction (TART).
Figure 12.17. Step 5.
P.340
Lumbar Region: L1 to L5 Dysfunctions Example: L3 NSLRR
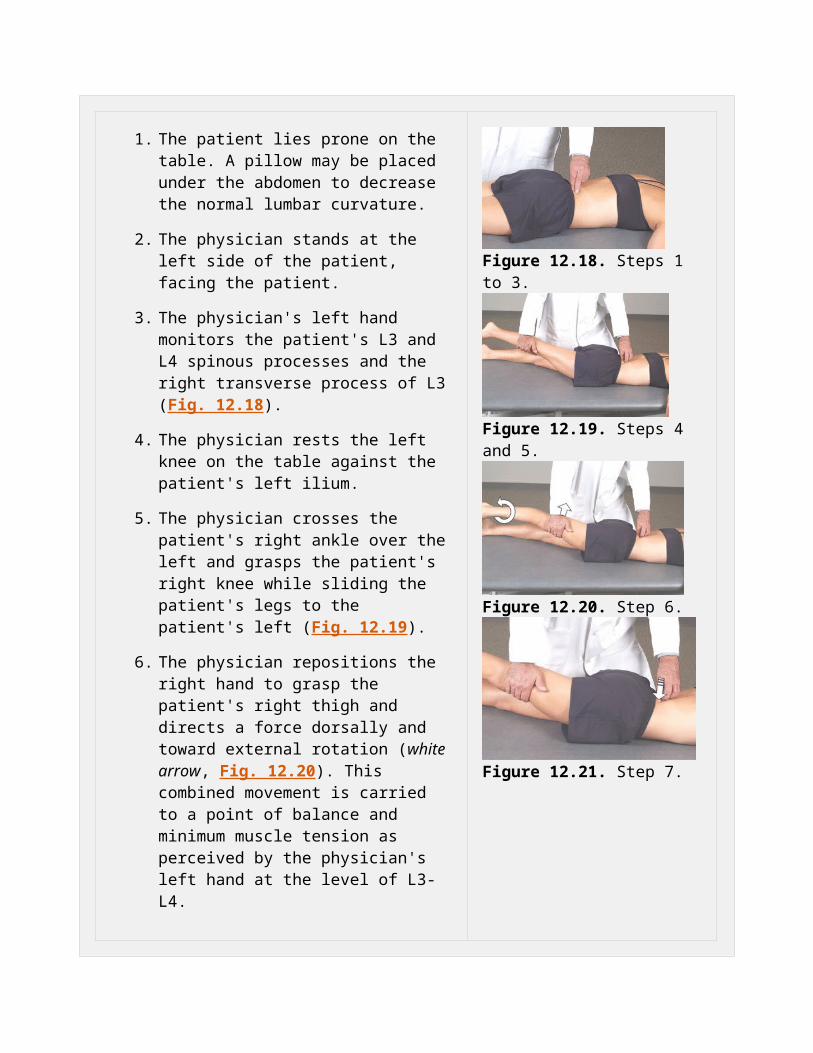
1. The patient lies prone on the table. A pillow may be placed under the abdomen to decrease the normal lumbar curvature.
2. The physician stands at the left side of the patient, facing the patient.
3. The physician's left hand monitors the patient's L3 and L4 spinous processes and the right transverse process of L3 (Fig. 12.18).
4. The physician rests the left knee on the table against the patient's left ilium.
5. The physician crosses the patient's right ankle over the left and grasps the patient's right knee while sliding the patient's legs to the patient's left (Fig. 12.19).
6. The physician repositions the right hand to grasp the patient's right thigh and directs a force dorsally and toward external rotation (white arrow, Fig. 12.20). This combined movement is carried to a point of balance and minimum muscle tension as perceived by the physician's left hand at the level of L3-L4.
Figure 12.18. Steps 1 to 3.
Figure 12.19. Steps 4 and 5.
Figure 12.20. Step 6.

7. On achieving the proper position, the physician's left hand (arrow, Fig. 12.21) applies an activating force over the right transverse process of L4 in the form of a gentle (1 lb or less) axial compression for 3 to 5 seconds.
8. If a release is not palpated within a few seconds, compression should be released and steps 3 to 7 can be repeated.
9. The physician reassesses the components of the dysfunction (TART).
Figure 12.21. Step 7.
P.341
Lumbar Region: L1 to L5 Dysfunctions Example: L4 FSRRR
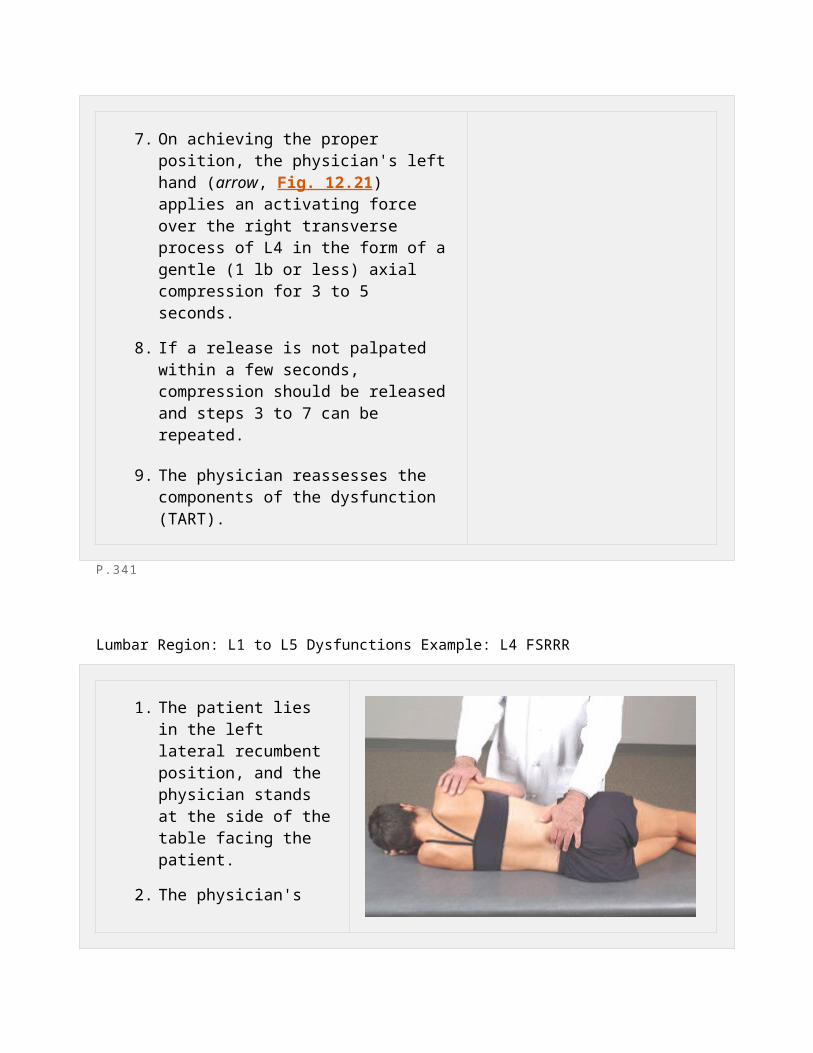
1. The patient lies in the left lateral recumbent position, and the physician stands at the side of the table facing the patient.
2. The physician's right forearm and hand control the patient's right anterolateral chest wall, and the left forearm and hand control the right pelvic and lumbar region (Fig. 12.22).
3. The physician's right index and third finger pads monitor and control the transverse processes of L4 while the left index and third finger pads monitor and control the transverse
Figure 12.22. Steps 1 and 2.
processes of L5 (Fig. 12.23).
4. The physician gently flexes the patient's hips until L4 is fully flexed on L5.
5. The physician carefully pushes the patient's right shoulder posteriorly until L4 is engaged and rotates farther to the right on L5.
6. The physician then gently pushes the patient's pelvic and lumbar region anteriorly until L5 is fully engaged and rotated to the left under L4.
7. The patient inhales and exhales fully. On exhalation, the physician, with both the forearms and fingers on the transverse processes, increases the force through the same set of rotational vectors (curved arrows, Fig. 12.24), simultaneously approximating the forearms (straight arrows), thereby producing increased side bending right.
8. On achieving the proper position, the physician applies an activating force (arrows, Fig. 12.25) in the form of a gentle (1 lb or less) axial compression for 3 to 5 seconds with the finger pads.
Figure 12.23. Step 3.
Figure 12.24. Steps 4 to 7.
Figure 12.25. Step 8.
9. If a release is not palpated within a few seconds, compression should be released, and steps 3 to 8 can be repeated.
10. The physician reassesses the components of the dysfunction (TART).
P.342
Lumbar Region: Left-Sided Erector Spinae Muscle Hypertonicity
1. The patient lies prone on the treatment table. A pillow may be placed under the abdomen to decrease the normal lumbar curvature. The physician faces the patient on the left.
2. Using the left hand, the physician monitors the patient's dysfunctional erector spinae hypertonicity (Fig. 12.26).
3. The physician's left knee is placed on the table against the patient's left ilium.
4. The physician crosses the patient's right ankle over the patient's left ankle and grasps the patient's right knee, sliding both of the patient's legs to the left (Fig. 12.27).
Figure 12.26. Steps 1 and 2.
Figure 12.27. Steps 3 and 4.
5. The physician repositions the right hand to grasp the patient's right thigh and directs a force dorsally and toward external rotation (white arrows, Fig. 12.28). This combined movement should be carried to a point of balance and minimum muscle tone as perceived by the physician's left hand.
6. On achieving the proper positioning, the physician's left hand applies an activating force (white arrow, Fig. 12.29) in the form of a gentle (1 lb or less) axial compression for 3 to 5 seconds.
7. If a release is not palpated within a few seconds, compression should be released, and steps 3 to 6 can be repeated.
8. The physician reassesses the components of the dysfunction (TART).
Figure 12.28. Step 5.
Figure 12.29. Step 6.
P.343
Pelvic Region: Left Posterior Innominate Dysfunction
1. The patient lies in the right lateral recumbent position, and the physician stands in front of the patient at the side of the table.
2. The physician's right arm reaches under the patient's left thigh and abducts it to approximately 30 degrees. The physician controls the leg with this arm and the shoulder (Fig. 12.30).
3. The physician's left hand is placed palm down over the superior edge of the iliac crest, with the thumb controlling the anterior superior iliac spine (ASIS) and the hand controlling the superior edge of the iliac crest.
4. The physician's right hand is placed over the posterior iliac crest and posterior superior iliac spine (PSIS) with the forearm on the posterolateral aspect of the greater trochanter (Fig. 12.31).
5. The physician adds a posterior-vectored force with a slight arc (right-turn direction) with the left hand (down arrow) as the right hand and forearm pull inferiorly and anteriorly (up arrow) (Fig. 12.32).
6. As the pelvis rotates posteriorly, the physician
Figure 12.30. Steps 1 and 2.
Figure 12.31. Steps 3 and 4.
Figure 12.32. Step 5.
adds a compressive force (1 lb or less) toward the table (arrow, Fig. 12.33) to approximate the sacroiliac joint surfaces.
7. This position is held for 3 to 5 seconds, and a gentle on-and-off pressure can be applied.
8. If a release is not palpated within a few seconds, compression should be released, and steps 3 to 8 can be repeated.
9. The physician reassesses the components of the dysfunction (TART).
Figure 12.33. Step 6.
P.344
Pelvic Region: Left Anterior Innominate Dysfunction
1. The patient lies in the right lateral recumbent position, and the physician stands in front of the patient at the side of the table.
2. The physician's right arm reaches under the patient's left thigh and abducts it to approximately 30 to 40 degrees. The physician controls the leg with this arm and the shoulder (Fig. 12.34).
3. The physician places the
Figure 12.34. Steps 1 and 2.
left hand palm down over the superior edge of the iliac crest with the thumb controlling the ASIS and the hand controlling the superior edge of the iliac crest.
4. The pad of physician's right index finger is placed over the posterior iliac crest at the level of the PSIS with the heel of the right hand at the level of the ischial tuberosity (Fig. 12.35).
5. The physician adds an anterior vectored force (arrow, Fig. 12.36) with a slight arc (left-turn direction) with the right hand as the left hand pulls superiorly and anteriorly.
6. As the pelvis rotates anteriorly, the physician adds a compressive force (1 lb or less) toward the table (arrow, Fig. 12.37) to approximate the sacroiliac joint surfaces.
7. This position is held for 3 to 5 seconds, and a gentle on-and-off pressure can be applied.
8. If a release is not palpated within a few seconds, compression should be released and steps 3 to 7 can be repeated.
Figure 12.35. Steps 3 and 4.
Figure 12.36. Step 5.
Figure 12.37. Step 6.
9. The physician reassesses the components of the dysfunction (TART).
P.345