noisy learning: loud but fun music education activities · 2013-02-16 · string jingle bells or...
TRANSCRIPT

Noisy Learning: Loud but Fun MusicEducation Activities
By:Catherine Schmidt-Jones


Noisy Learning: Loud but Fun MusicEducation Activities
By:Catherine Schmidt-Jones
Online:< http://cnx.org/content/col10222/1.7/ >
C O N N E X I O N S
Rice University, Houston, Texas

This selection and arrangement of content as a collection is copyrighted by Catherine Schmidt-Jones. It is licensed
under the Creative Commons Attribution 1.0 license (http://creativecommons.org/licenses/by/1.0).
Collection structure revised: May 17, 2007
PDF generated: February 15, 2013
For copyright and attribution information for the modules contained in this collection, see p. 62.

Table of Contents
1 Sound and Instruments1.1 Percussion Fast and Cheap . . . . . . . . . . . . . . . . . . . . . . . . . . . . . . . . . . . . . . . . . . . . . . . . . . . . . . . . . . . . . . . . . . 11.2 Sound and Music Activities . . . . . . . . . . . . . . . . . . . . . . . . . . . . . . . . . . . . . . . . . . . . . . . . . . . . . . . . . . . . . . . . . . 41.3 Consonance and Dissonance Activities . . . . . . . . . . . . . . . . . . . . . . . . . . . . . . . . . . . . . . . . . . . . . . . . . . . . . . 14
2 Rhythm, Tempo, and Dynamics
2.1 Music Conducting: Classroom Activities . . . . . . . . . . . . . . . . . . . . . . . . . . . . . . . . . . . . . . . . . . . . . . . . . . . . 212.2 A Tempo Activity . . . . . . . . . . . . . . . . . . . . . . . . . . . . . . . . . . . . . . . . . . . . . . . . . . . . . . . . . . . . . . . . . . . . . . . . . . 262.3 A Musical Dynamics Activity . . . . . . . . . . . . . . . . . . . . . . . . . . . . . . . . . . . . . . . . . . . . . . . . . . . . . . . . . . . . . . . 272.4 A Musical Accent Activity . . . . . . . . . . . . . . . . . . . . . . . . . . . . . . . . . . . . . . . . . . . . . . . . . . . . . . . . . . . . . . . . . . 292.5 Simple Rhythm Activities . . . . . . . . . . . . . . . . . . . . . . . . . . . . . . . . . . . . . . . . . . . . . . . . . . . . . . . . . . . . . . . . . . 33
3 Music and Culture3.1 Message Drums . . . . . . . . . . . . . . . . . . . . . . . . . . . . . . . . . . . . . . . . . . . . . . . . . . . . . . . . . . . . . . . . . . . . . . . . . . . . 373.2 Talking Drums . . . . . . . . . . . . . . . . . . . . . . . . . . . . . . . . . . . . . . . . . . . . . . . . . . . . . . . . . . . . . . . . . . . . . . . . . . . . . 413.3 Caribbean Music: Calypso and Found Percussion . . . . . . . . . . . . . . . . . . . . . . . . . . . . . . . . . . . . . . . . . . . 48
Index . . . . . . . . . . . . . . . . . . . . . . . . . . . . . . . . . . . . . . . . . . . . . . . . . . . . . . . . . . . . . . . . . . . . . . . . . . . . . . . . . . . . . . . . . . . . . . . . 60Attributions . . . . . . . . . . . . . . . . . . . . . . . . . . . . . . . . . . . . . . . . . . . . . . . . . . . . . . . . . . . . . . . . . . . . . . . . . . . . . . . . . . . . . . . . . 62

iv
Available for free at Connexions <http://cnx.org/content/col10222/1.7>

Chapter 1
Sound and Instruments
1.1 Percussion Fast and Cheap1
Making a musical instrument can be an exciting, rewarding, major project. But it doesn't have to be! Hereare some suggestions for quick, cheap, and easy ways to make "musical instruments" for your family orstudents, for music classes, informal concerts, or just exploration. If you need some inspiration to get intothe right spirit, I strongly recommend watching a video of a performance by "Stomp," for example StompPlungers2 or Stomp Kitchen3 . If you would like even more ideas on making your own instruments, TheMudcat Cafe4 had many good, relatively easy suggestions as of this writing. In fact many books and websitesinclude suggestions for homemade instruments, ranging from the very simple, to elaborate projects that canproduce impressive instruments. The suggestions below fall in the "very simple" category.
Body Percussion
• Hand claps• Hand rubs• Finger snaps• Foot stomps• Foot shu�es• Knee or thigh slaps• Chest, tummy, and shoulder slaps• Tongue clicks - see how many di�erent sounds you can make this way!• Finger �icks against a cheek - again, you can get very di�erent sounds depending on what you are
doing with your mouth
Drumsticks - Di�erent drumsticks or beaters will give the same "instrument" many di�erentsounds.
• Hands, �ngers, thumbs• Sticks, pens, pencils, rulers• Short lengths of dowel or bamboo• For a "brushed percussion" sound, use a kitchen basting brush, a scrubbing brush, a large, sti� paint
brush, or wire brush• Spoons
1This content is available online at <http://cnx.org/content/m11889/1.11/>.2http://www.youtube.com/watch?v=9mtdEH43r2s3http://www.youtube.com/watch?v=XXD76CSpfc04http://www.mudcat.org/kids/
Available for free at Connexions <http://cnx.org/content/col10222/1.7>
1

2 CHAPTER 1. SOUND AND INSTRUMENTS
Beaters - Secure one of the following onto the end of a stick, a pencil, or a short length of1/2" dowel.
• A cork• A large wooden bead• Wrap many rubber bands around one end of the stick• A rubber ball or "superball"• Wrap one end of the stick, or wrap the bead or ball, with yarn or string• Wrap felt or cloth around the end of the stick, or around the bead or ball
Drums - Real drums (instruments in which you beat on a thin, taut membrane) are quitesophisticated, di�cult-to-construct instruments. Here are some easy stand-ins.
• Empty plastic milk jugs• Upside-down pails, buckets, basins, or large cans• Empty plastic tubs (like margarine or ice cream tubs) with the lids on - usually, the bigger the tub,
the better.• Lid or bottom (or both) of a large, empty co�ee can• A sheet of canvas, plastic, plastic wrap, plastic bag, rubber, wrapping paper, waxed paper, or poster
board stretched very taut over the lip of a wooden bowl or a clay �owerpot, held in place by strongtape, heavy rubber bands, or strong cord. Most "drums" made in this way will be much more delicatethan real drums.
• The bottom of an empty cylindrical oatmeal box• Don't forget the traditional favorite: pots and pans• Two of any of these in di�erent sizes is a set of bongos
Fillers for Shakers - Di�erent �llers can make very di�erent sounds. Some will last betterthan others, and some will be messier to work with than others. You may want to seal yourshakers once you have made them.
• Dry rice, noodles, or beans• Unpopped popcorn• Beads or sequins of any size (di�erent sizes and kinds will make di�erent sounds)• Nuts or seeds• Pebbles• Sand or salt• Bottle caps (If you can make holes in the bottle caps you can also string them together to make rattles
or tambourines.)
Containers for shakers or maracas - To turn your shaker into a maraca, make a hole in thecontainer, put a stick, pencil, or short length of 1/2" dowel into the hole, and tape it together.
• Paper bag or plastic bag• Plastic Easter egg• Empty plastic tubs with lids• Dried gourd - very authentic and easy to grow in many places• Hollow balls, for example tennis balls and plastic "softballs" - you'll have to make a hole in them to
�ll them; so you might as well make maracas• Some seed pods come already �lled with dried seeds and make great shakers• Make your own with papier-mache.
Cymbals, Gongs, Bells and Triangles - The trick to getting a good sound out of these instru-ments is to let them vibrate freely. Don't touch the part that is supposed to "ring" with your
Available for free at Connexions <http://cnx.org/content/col10222/1.7>

3
�ngers or anything soft. Hold it by a handle, hang it from a piece of string (make a hole inthe object, or tape the string to it), or set it on a hard surface.
• Metal bowls that are a single curved surface (with no extra rim on the bottom to steady them) makegreat gongs. Set them on a hard surface. For a really cool e�ect, try swirling a very small amount ofwater in the bowl and strike it while the water is still swirling.
• A metal clothes hanger• Trash can lids or pot lids• Metal pie plate• Hung �owerpots (use a soft beater)• The chimes from a windchime• Hammer large nails to di�erent depths in a piece of lumber. Use another large nail as a beater to strike
the nails in the wood.• For home-made wood blocks or marimba, rest hardwood boards or pieces of bamboo of di�erent lengths
across two other pieces of lumber.• String jingle bells or bottle caps on yarn, ribbon, or string to make hand, ankle, or wrist jingles.
Guiros and Washboards - These instruments are played by scraping a hard stick or beateracross the corrugations.
• Heavy corrugated cardboard• Wrap and glue heavy string around a short piece of 1" dowel.• Cheese grater• Saw, �le, whittle, or cut notches into a piece of dowel or 1X1 lumber, or a thick stick. Notch spacing
should be on the order of 1/8"-1/4".• Sandpaper
Sticks and Clicks
• Stamping stick - A large, thick stick can be played by "stamping" it on the �oor or in a bucket orbasin.
• Claves - Cut two short lengths of dowel, lumber, or sticks (about 1" diameter, and about 6" long) tobeat against each other. Smooth, hard wood gives the best sound. Make the sound more resonant byholding one clave cupped lightly in one hand while hitting it with the other.
• Play thick pieces of bamboo as you would claves, or hang them and play them like gongs.• Pencils and wooden spoons can also be played like claves, but the sound will be much softer.• Finger Castanets - tie one button onto the thumb, and another onto the middle �nger. Or use the
halves of a walnut shell or small metal jar lids• Hand Castanets - loosely hold two spoons close together, back-to-back, in one hand, and swing them
against the other hand to make them click.• Shake keys on a key ring, or click them against the palm of the hand.
Not Percussion
• The easiest way to get a "string" sound is to stretch rubber bands between �ngers, nails, or thumbtacks,or around tubs or boxes. An old-fashioned wash tub bass, made using a small metal tub, broom handle,and thick string, is fairly easy to construct.
• Blow across the lip of a glass jug or bottle.• The easiest "wind instrument" to make is a kazoo, which you play by humming into it. Use a square
of waxed paper or tissue paper, and either rubber-band it onto one end of a cardboard tube or fold itover the teeth of a small comb.
• You can make a simple "horn" or "trumpet" by taping a tin funnel to the end of a yard or two ofgarden hose, plastic pool tubing, or any other �exible tubing about 1" in diameter, but getting a soundout of your instrument may require a real mouthpiece and someone who knows how to play a brassinstrument.
Available for free at Connexions <http://cnx.org/content/col10222/1.7>

4 CHAPTER 1. SOUND AND INSTRUMENTS
Looking for something to do with your percussion? Try:
• Simple Rhythm Activities (Section 2.5)• Talking Drums (Section 3.2)• Message Drums (Section 3.1)• Calypso and Found Percussion (Section 3.3)• Conducting Activities (Section 2.1)• A Dynamics Activity (Section 2.3)• An Accent Activity (Section 2.4)• Sound and Music (Section 1.2) has suggestions for very simple "instruments" that demonstrate prin-
ciples of acoustics.
1.2 Sound and Music Activities5
1.2.1 Introduction
Di�erent musical instruments produce sounds in very di�erent ways, but all of them take advantage ofsome of the fundamental properties of sound - the physics of sound - to make a variety of interesting andpleasant sounds. You will �nd here a Strings Activity (Section 1.2.3: Strings Activity), Wind InstrumentActivity (Section 1.2.4: Wind Instruments Activity), Percussion Activity (Section 1.2.5: Percussion Activity),and Resonance Activity (Section 1.2.6: Instrument Body Activities), as well as worksheets (Figure 1.1)appropriate for younger students. All of these explore some basic concepts (Section 1.2.2: Terms andConcepts) of sound wave physics (acoustics) while demonstrating how various musical instruments producesounds.
Goals and Standards
• Goals - The student will develop an understanding of the physical (scienti�c) causes of musical sounds,and be able to use appropriate scienti�c and/or musical terminology to discuss the variety of possiblemusical sounds.
• Music Standards Addressed - National Standards for Music Education6 standard 8 (understandingrelationships between music, the other arts, and disciplines outside the arts)
• Other Subjects Addressed - In encouraging active exploration of the e�ects of physics on music andmusical instruments, these activities also address National Science Education Standards7 in physicalscience and in science and technology.
• Grade Level - 3-8• Student Prerequisites - If younger students are not ready to conduct their own lightly-supervised
investigations, these activities should be done as full-classroom demonstrations.• Teacher Expertise - Teacher expertise in music is not necessary to present this activity. The teacher
should be familiar and comfortable with basic acoustics terms and concepts (see Acoustics for MusicTheory8).
• Time Requirements - Reserve one (approximately 45-minute) class period for each activ-ity/discussion, and one class period to �nish discussions, draw conclusions, do worksheets, and reinforceterms and concepts. If you have a longer period of time and a large area to work in, you may want toset up each experiment as a "work station" and have student groups move from one station to another.
You can do any one or any combination of the activities. While doing them, introduce whichever of theterms and concepts you think will bene�t your students. You can either use only the scienti�c terms, or onlythe musical terms, or both. To reinforce the concepts and terms with younger students, follow the activities
5This content is available online at <http://cnx.org/content/m11063/2.15/>.6http://musiced.nafme.org/resources/national-standards-for-music-education/7http://www.nap.edu/readingroom/books/nses/overview.html#content8"Acoustics for Music Theory" <http://cnx.org/content/m13246/latest/>
Available for free at Connexions <http://cnx.org/content/col10222/1.7>

5
with the worksheets in the Terms and Concepts (Section 1.2.2: Terms and Concepts) section below. Forolder students, present the relevant information from Frequency, Wavelength, and Pitch9, Amplitude andDynamics10, and Transverse and Longitudinal Waves11, and include the worksheet and handout from TalkingAbout Sound and Music12.
1.2.2 Terms and Concepts
During or after your activities, introduce the following terms and concepts to the students. Worksheetsto help you do this with younger students are available here as PDF �les: Terms Worksheet13, MatchingWorksheet14, Answer sheet15. (Or you may copy the �gures (Figure 1.1).) With younger students, you mayalso want to study Sound and Ears16. For older students, use the worksheet and handout in Talking AboutSound and Music17. For more detailed information on this subject, you may also see Talking about Soundand Music18, Frequency, Wavelength, and Pitch19, Amplitude and Dynamics20, Transverse and LongitudinalWaves21, Standing Waves and Musical Instruments22, Standing Waves and Wind Instruments23, or Acousticsfor Music Theory24. Use the discussion questions during and after the activities to help the students reachconclusions about their investigations.
Terms and Concepts
• Sound Waves - When something vibrates, it makes a sound. The vibrations travel out in all directionsfrom the "something" in the same way that ripples travel out from a pebble that has been droppedin water. But instead of being waves of water, these are waves of vibrations of air: sound waves.Because it is the air itself that is vibrating, sound waves, unlike water waves, are invisible.
• Frequency - or Pitch - Think of water waves again. They can be close together or far apart. Ifthey are close together, there are more of them; they are more frequent. Frequency is the term thatscientists and engineers use to describe how many pulses of a sound wave arrive at your ear in onesecond. Musicians use the term pitch. A sound with a higher frequency (more waves) has a higherpitch, and sounds higher.
• Amplitude - or Dynamic Level - Water waves can also be great, big, tall waves, or small ripples.The size of a wave is called its amplitude. In sound waves, the bigger the wave, the louder the soundis. Musicians call the loudness of a sound its dynamic level.
9"Frequency, Wavelength, and Pitch" <http://cnx.org/content/m11060/latest/>10"Sound Amplitude and Musical Dynamics" <http://cnx.org/content/m12372/latest/>11"Transverse and Longitudinal Waves" <http://cnx.org/content/m12378/latest/>12"Talking about Sound and Music" <http://cnx.org/content/m12373/latest/>13See the �le at <http://cnx.org/content/m11063/latest/soundhandout.pdf>14See the �le at <http://cnx.org/content/m11063/latest/soundhandout2.pdf>15See the �le at <http://cnx.org/content/m11063/latest/soundhandout3.pdf>16"Sound and Ears" <http://cnx.org/content/m12365/latest/>17"Talking about Sound and Music" <http://cnx.org/content/m12373/latest/>18"Talking about Sound and Music" <http://cnx.org/content/m12373/latest/>19"Frequency, Wavelength, and Pitch" <http://cnx.org/content/m11060/latest/>20"Sound Amplitude and Musical Dynamics" <http://cnx.org/content/m12372/latest/>21"Transverse and Longitudinal Waves" <http://cnx.org/content/m12378/latest/>22"Standing Waves and Musical Instruments" <http://cnx.org/content/m12413/latest/>23"Standing Waves and Wind Instruments" <http://cnx.org/content/m12589/latest/>24"Acoustics for Music Theory" <http://cnx.org/content/m13246/latest/>
Available for free at Connexions <http://cnx.org/content/col10222/1.7>

6 CHAPTER 1. SOUND AND INSTRUMENTS
Figure 1.1
Available for free at Connexions <http://cnx.org/content/col10222/1.7>

7
Figure 1.2
Available for free at Connexions <http://cnx.org/content/col10222/1.7>

8 CHAPTER 1. SOUND AND INSTRUMENTS
Figure 1.3
Available for free at Connexions <http://cnx.org/content/col10222/1.7>

9
1.2.3 Strings Activity
Objectives and Assessment
• Objectives - The student will construct a simpli�ed version of a stringed instrument, using rubberbands as strings, and will use the instrument to explore the e�ects of various string characteristics onfrequency and amplitude.
• Evaluation - Assess student learning using worksheets or answers to discussion questions.
Materials and Preparation
• Most students will be able to do this experiment alone or in small groups. If you do not want studentsworking with thumbtacks, plan to use boxes or pans as instrument bodies.
• You will need lots of rubber bands, as many di�erent lengths and thicknesses and tightnesses as youcan �nd. If you are using boxes, the rubber bands must be long enough to stretch around a box.
• You will also need either small, sturdy cardboard or plastic boxes or containers, with or without lids,OR pieces (about 8" X 10" or so) of thick, �at cardboard, OR square or rectangular baking pans, onefor each student or group.
• If you are using �at cardboard, you will also need thumbtacks or push pins.• If you are using a lidded box, pencils, pens, or other objects approximately the size and shape of a
pencil (a couple for each instrument) will be useful.• You may want scissors that are strong enough to cut the cardboard or plastic.• If a stringed-instrument player is available for a show-and-tell, you may want to include this after
the activity, to demonstrate and reinforce some of the main points. Any stringed instrument (guitar,violin, harp, etc.) will do.
• For older or more independent students, you may want to make copies of the discussion questions.25
Figure 1.4
Procedure25See the �le at <http://cnx.org/content/m11063/latest/StringQuestions.pdf>
Available for free at Connexions <http://cnx.org/content/col10222/1.7>

10 CHAPTER 1. SOUND AND INSTRUMENTS
1. Each student or group should choose a variety of rubber bands (3-6, depending on the size of their"instruments") to start with.
2. If you are using �at cardboard, stretch each rubber band between two thumbtacks so that it is tightenough to give a particular pitch.
3. If using a box or baking pan, stretch the rubber bands around the box or pan.4. Have the students pluck each rubber band separately and listen carefully to the "twang". They are
listening for which ones sound higher and which sound lower.5. To try many di�erent thicknesses and tightnesses, students can trade rubber bands with each other or
trade o� from the central pile if there are enough.6. Students with the thumbtack instruments can vary length and tightness by changing the distance
between the thumbtacks.7. Students with box or pan instruments can vary tightness by pulling on the rubber band at the side of
the box while plucking it at the top. Students with lidded box instruments can vary length by slippinga pencil under each end of the rubber bands on the top of the box and then varying the distancebetween the pencils, or even holding the rubber band down tightly with a �nger between the pencils,in the same way as a real string player.
8. Students with box instruments can also see if the body of the instrument makes any di�erence to thesound. Can they play the instrument with the lid o� and with it on? Does cutting a hole in the lidchange the sound? Does it make it easier to play? Does adding the pencils change the sound or make iteasier to play? Do di�erent boxes make a di�erent sound with the same rubber bands? Do cardboardboxes sound di�erent from plastic ones?
9. Ask younger students the discussion questions while they are experimenting. Allow them to check andanswer immediately. Summarize the answers for them on the board, or remind them and let them writethem down when they are done experimenting. Give older students a list of the discussion questionsbefore they begin.
Discussion Questions
• Do thicker rubber band "strings" sound higher or lower than thinner ones? (Answer: thicker shouldsound lower.)
• Do tighter strings sound higher or lower than looser ones? (Tighter should sound higher.)• Do shorter strings sound higher or lower than longer ones? (Shorter should sound higher.)• Do there seem to be di�erences in how loud and soft or how dull or clear a string sounds? If so, what
seems to cause those di�erences?• What determines whether the sound of a string is loud or soft?• What happens to the sound if they pluck with one �nger while touching the string lightly with another
�nger? (No "twang"; the touch stops the vibrations.) If their instrument design allows it, whathappens when they hold the string tightly down against the instrument and then pluck it? (Theshorter vibrating length should give a higher pitch.)
• After their experiments, can they explain what happens when a player holds a string down with a�nger? What if the same string is held down in a di�erent spot?
• Based on their observations, do the students feel they could tell which strings of an instrument are thelow strings just by looking at them closely? (For an extra activity, arrange for them to try this with areal instrument.)
• Can the students come up with possible reasons why the thickness, length, and tightness of a stringa�ect its frequency/pitch in the way that they do? (For example, why does a shorter string have ahigher frequency/pitch?) (It may help on length to remind them that the longer the waves are, theless frequent they will be.)
1.2.4 Wind Instruments Activity
Objectives and Assessment
Available for free at Connexions <http://cnx.org/content/col10222/1.7>

11
• Objectives - The student will explore the e�ects of air column size (and shape) on the frequency andamplitude of standing waves in the air column, using empty glass bottles, and water if necessary tovary air column size.
• Evaluation - Assess student learning using worksheets or answers to discussion questions.
Materials and Preparation
• If you do not want your students working with glass jugs and water, plan to do this as a demonstration.• You will need several narrow-necked bottles, all the same size and shape OR several narrow-necked
bottles of varying sizes and shapes. Bottles should be empty and clean. Make sure before the classbegins that your bottles give a clear, reasonably loud sound when you blow across the top of them. Ifnecessary, practice getting a sound. Large glass jugs with an inner lip diameter of approximately oneinch work well.
• If using bottles of the same size, you will also need water to �ll them to varying depths. If you areusing this approach, food coloring is very useful to clearly show the depth of the water.
• If plastic recorders are available to your students, or a player of a woodwind26 or brass27 instrumentis available for a show-and-tell, they can be used for an extra demonstration.
• For older or more independent students, you may want to make copies of the discussion questions.28
Figure 1.5
Procedure
1. If using same-size bottles and water, �ll each bottle to a di�erent depth (for example, an inch in onebottle, two inches in another, three inches in a third and so on). If you have food coloring, add a fewdrops to the water in each bottle so it is easy to see the depths.
2. Make the air in a bottle vibrate by blowing steadily across the top of the bottle.3. "Play" each bottle in turn, and arrange them in order from the highest sound to the lowest.4. If you have the time and inclination, you can even try to "tune" the bottles by adding or pouring out
water.
26"Orchestral Instruments": Section Woodwinds <http://cnx.org/content/m11897/latest/#s12>27"Orchestral Instruments": Section Brass <http://cnx.org/content/m11897/latest/#s13>28See the �le at <http://cnx.org/content/m11063/latest/WindQuestions.pdf>
Available for free at Connexions <http://cnx.org/content/col10222/1.7>

12 CHAPTER 1. SOUND AND INSTRUMENTS
5. If recorders or a wind instrument are available, demonstrate how covering and uncovering the holes onthe instrument changes the pitch. Explain that the main vibration in the instrument is happening inthe air inside the instrument (just like the air in the bottles), in between the mouthpiece and the �rsthole that the air can escape from..
Discussion Questions
• If using bottles of di�erent shapes and sizes, how does the size of the bottle a�ect the pitch/frequency?Does the shape of the bottle seem to a�ect it?
• Does the size and shape of the bottle seem to a�ect anything else, like the loudness of the sound orthe tone quality?
• What do you think explains these e�ects?• If using water in bottles, how does the amount of water a�ect the pitch/frequency? Why? (You may
need to remind the students that it is the air in the bottle that is vibrating; more water means asmaller space for the air; smaller space means shorter waves and higher frequency/pitch).
• How is a bottle "instrument" the same as a wind29 instrument, and how is it di�erent?• If demonstrating with instruments: How does opening and closing the holes of the instruments change
the pitch? Why? (Answer: the shorter the distance between the mouthpiece and the �rst open hole,the shorter the waves and the higher the pitch/frequency. Opening and closing other holes furtherdown the instrument from the �rst open hole may have no discernible e�ect - they are not changingthe length of the vibrating column of air - or if they are a�ecting the vibrating air a little, they maychange the sound enough to make it more or less in tune.) If a brass instrument is used, what is thee�ect of opening a valve or extending the slide? (Opening valves actually lengthens the instrument,by opening up extra tubing, lowering the pitch.)
1.2.5 Percussion Activity
Objectives and Assessment
• Objectives - The student will assist in constructing a "found objects" chime, and will use the instru-ment to explore the e�ects of various object characteristics on frequency and amplitude.
• Evaluation - Assess student learning using worksheets or answers to discussion questions.
Materials and Preparation
• Each working group will need a dowel, rod, or small beam, around 4-6 feet long, held at both endsabout �ve feet o� the ground.
• Each group will need a variety of objects of di�erent sizes and materials. Forks, spoons, spatulas,rulers, wind chimes, lengths of chain, lengths of pipe or bamboo or tubing, are all easy to line up belowthe dowel because they are long and thin. Objects that have holes or handles (slotted spoons, pan lids)making it easier to keep them tied on, are also a good idea. Objects that are metal, hardwood, hardplastic, hollow, and/or made in a single piece are most likely to make easy-to-hear, interesting sounds.
• It may be easier to answer some of the discussion question if some of the objects are similar objects ina variety of sizes, for example small medium and large metal spoons.
• You will need enough string to hang the objects from the dowels, and may need tape to keep theobjects on the string. Keep in mind, though, that tape will probably dampen the vibrations of theobject so that it won't "ring" as long.
• You will need something the students can use to strike the objects; a wooden spoon, short stick, penor pencil, or ruler. Or they can experiment with using di�erent objects as "drumsticks". Which dothe students prefer and why?
29"Wind Instruments: Some Basics" <http://cnx.org/content/m12364/latest/>
Available for free at Connexions <http://cnx.org/content/col10222/1.7>
13
• For older or more independent students, you may want to make copies of the discussion questions.30
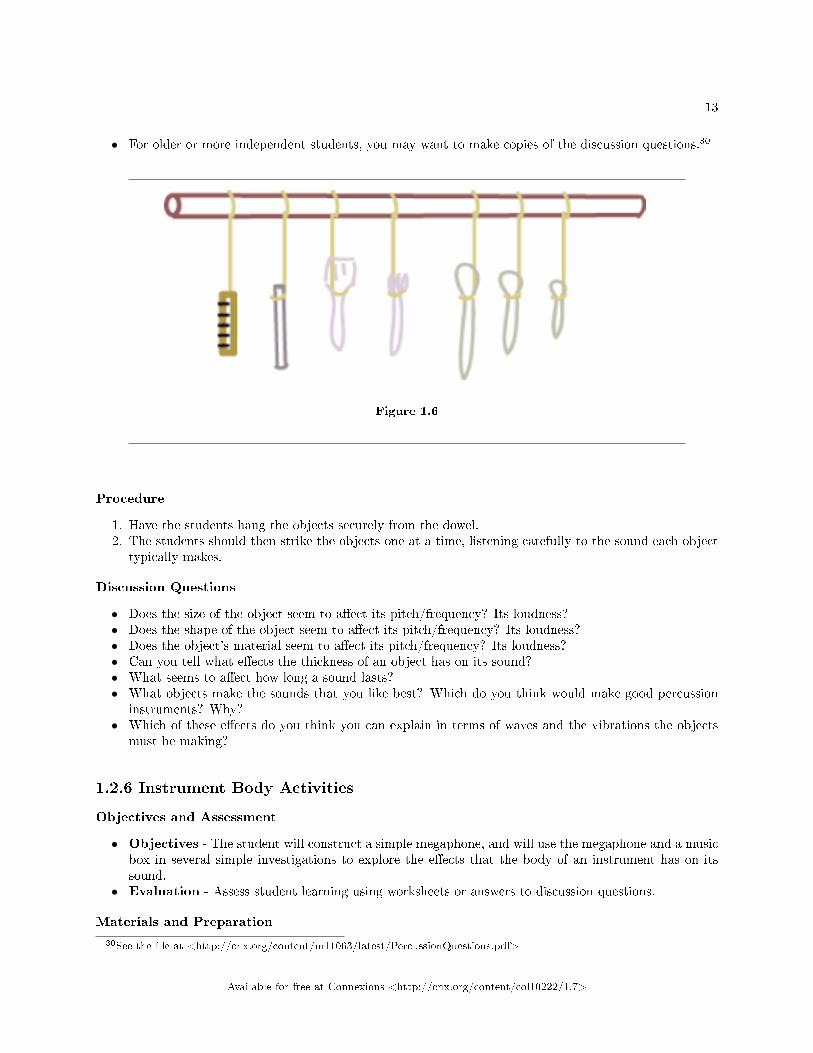
Figure 1.6
Procedure
1. Have the students hang the objects securely from the dowel.2. The students should then strike the objects one at a time, listening carefully to the sound each object
typically makes.
Discussion Questions
• Does the size of the object seem to a�ect its pitch/frequency? Its loudness?• Does the shape of the object seem to a�ect its pitch/frequency? Its loudness?• Does the object's material seem to a�ect its pitch/frequency? Its loudness?• Can you tell what e�ects the thickness of an object has on its sound?• What seems to a�ect how long a sound lasts?• What objects make the sounds that you like best? Which do you think would make good percussion
instruments? Why?• Which of these e�ects do you think you can explain in terms of waves and the vibrations the objects
must be making?
1.2.6 Instrument Body Activities
Objectives and Assessment
• Objectives - The student will construct a simple megaphone, and will use the megaphone and a musicbox in several simple investigations to explore the e�ects that the body of an instrument has on itssound.
• Evaluation - Assess student learning using worksheets or answers to discussion questions.
Materials and Preparation
30See the �le at <http://cnx.org/content/m11063/latest/PercussionQuestions.pdf>
Available for free at Connexions <http://cnx.org/content/col10222/1.7>
14 CHAPTER 1. SOUND AND INSTRUMENTS
• Decide whether each step of this investigation will be a teacher demonstration or an individual orsmall-group activity.
• You will need a music box.• You will need several large, �at surfaces of di�erent types of materials - di�erent types of wood and
metal as well as plastic and softer surfaces will be particularly instructive. A box or drawer made ofhardwood is optional.
• You will also need large sheets of paper, construction paper, newspaper, soft, pliable plastic or foamor poster board, and some tape, OR a megaphone. If you have a variety of megaphone materials, havedi�erent students use di�erent materials to see if material choice a�ects the sound.
• For older or more independent students, you may want to make copies of the discussion questions.31
Procedure
1. Wind the music box and let everyone listen to it while holding it in your hand.2. Place the box on di�erent surfaces and listen to the di�erence it makes in the sound. Continue to wind
it as necessary to hear a long example of each surface. If you can, place the music box inside a woodenbox or drawer.
3. If you do not have a real megaphone to demonstrate, let the students make their own megaphones byrolling the paper into a cone shape, open at both ends. Tape it if necessary to hold the shape.
4. Let them talk or sing into their megaphones and otherwise experiment with how the megaphone changessounds. Experiment with di�erent megaphone sizes and shapes (narrow or widely �aring).
Discussion Questions
• What e�ect does each surface have on the sound from the music box? What is causing these e�ects?(Answer: some surfaces will vibrate with the music box if they are touching. See Resonance32.)
• Why do instruments have bodies; why aren't they just a bunch of strings or a reed or a membrane tobeat on?
• Why would an instrument maker choose to make an instrument body out of wood (like a violin orpiano)? Why might metal be chosen (as in brass and many percussion instruments)? Of the othermaterials you experimented with, would you make instruments out of them? What kind of instrumentwith each material? Why?
• How does a megaphone shape change a sound? Does it matter whether the megaphone is narrow or�aring?
• How do you think the megaphones would have changed if they had been made of wood or of metal?• Would a violin sound louder if you were sitting right in front of it or next to it? What about a trumpet?
What's the di�erence?• Based on your observations, what do you think the shape of the instrument does to the sound of a tuba,
trumpet, trombone, clarinet, or saxophone? What about �utes and bassoons (which do not �are)?
1.3 Consonance and Dissonance Activities33
1.3.1 Introduction
Below are lesson plans for four activities that are designed to allow students to explore the concepts ofconsonance and dissonance in music. Activity 1 (Section 1.3.2: Activity 1: Finding Consonant and DissonantNotes) and Activity 2 (Section 1.3.3: Activity 2: Hearing Consonance and Dissonance in Recorded Music)introduce the concepts and allow the students to practice listening for and naming consonance and dissonance.Activity 3 (Section 1.3.4: Activity 3: Improvising Consonant or Dissonant Harmony on Instruments) allows
31See the �le at <http://cnx.org/content/m11063/latest/InstrumentQuestions.pdf>32"Resonance and Musical Instruments" <http://cnx.org/content/m13537/latest/>33This content is available online at <http://cnx.org/content/m11999/1.10/>.
Available for free at Connexions <http://cnx.org/content/col10222/1.7>

15
students who are pro�cient on a musical instrument to use this knowledge to improvise harmonies which aredeliberately consonant or dissonant. Activity 4 (Section 1.3.5: Activity 4: Relating These Terms to OtherDisciplines) helps the students draw comparisons to similar concepts in other disciplines.
Consonance and dissonance are musical terms that have speci�c, slightly technical meanings, but thebasic idea is one that can be grasped even by young children: Musical notes that sound good together arecalled consonant; notes that seem to clash, or sound unpleasant together, are called dissonant. (If youwould like to �nd out more, please see Consonance and Dissonance34.)
Notes that are not in tune with each other are dissonant, of course, but even two notes that are tunedcorrectly may not sound good when they are played at the same time. Consonance depends partly on thephysics of sound (see Harmonic Series35 and Tuning Systems36 for more information). But it also dependspartly on the musical traditions of a particular culture (the technical meanings of the words come from theWestern37 music tradition), and partly just on personal tastes.
1.3.2 Activity 1: Finding Consonant and Dissonant Notes
Goals and Standards
• Goals - The student will practice identifying two simultaneous pitches as either "consonant" or "dis-sonant".
• Objectives - After an introduction to the concepts, the students will play, or listen to, two simultaneouspitches, and will vote on which sound consonant and which dissonant.
• Music Standards Addressed - National Standards for Music Education38 standard 6 (listening to,analyzing, and describing music).
• Grade Level - K-12 (adaptable)• Student Prerequisites - none• Teacher Expertise - Teacher expertise in music is not necessary to present this activity at its most
basic level. To lead more advanced students in a more involved discussion of consonance, dissonance,intervals39, and resolution40, the teacher must be familiar with Western music theory.
• Time Requirements - This activity is very �exible, time-wise. It can be easily combined withactivities 2 (Section 1.3.3: Activity 2: Hearing Consonance and Dissonance in Recorded Music) and 4(Section 1.3.5: Activity 4: Relating These Terms to Other Disciplines) to �ll a single (approximately45-minute) class period.
• Evaluation - Assess student learning by evaluating participation in the class discussion and "voting",or by orally quizzing each student on whether a note combination is consonant or dissonant.
• Follow-up - Help commit this lesson to long-term memory, by continuing to ask, throughout the restof the school year, questions about the consonance or dissonance of music that they are listening to orlearning.
Materials and Preparation
• You'll need an instrument to play on. The ideal instrument for this activity is one that the students areallowed to play, that makes speci�c pitched notes (preferably with little need to tune) for the children toexperiment with, and on whcih you can see visually how "far apart" two notes are (i.e. how many othernotes are in between them). A piano or electronic keyboard are ideal. Other possibilities: recorders,classrooms xylophones, metallophones, or bells. If the students cannot play, arrange a demonstrationin which they can easily see how "far apart" the notes are (their interval41).
34"Consonance and Dissonance" <http://cnx.org/content/m11953/latest/>35"Harmonic Series" <http://cnx.org/content/m11118/latest/>36"Tuning Systems" <http://cnx.org/content/m11639/latest/>37"What Kind of Music is That?" <http://cnx.org/content/m11421/latest/>38http://musiced.nafme.org/resources/national-standards-for-music-education/39"Interval" <http://cnx.org/content/m10867/latest/>40"Consonance and Dissonance" <http://cnx.org/content/m11953/latest/#p0h>41"Interval" <http://cnx.org/content/m10867/latest/>
Available for free at Connexions <http://cnx.org/content/col10222/1.7>
16 CHAPTER 1. SOUND AND INSTRUMENTS
• Prepare a simple, age-appropriate explanation of consonance and dissonance42. You may want to beready with some examples; play with the instrument ahead of time to �nd some combinations that you�nd clearly consonant or clearly dissonant.
Procedure
1. Give your explanation and examples.2. If at all possible, let the children take turns playing combinations of any two or three notes. If you
cannot let the students play the instrument, you play di�erent combinations for them.3. Let them vote on what sounds consonant or dissonant. If they can't decide, play the same combination
several times. The entire class may agree in most cases, but allow disagreement for personal taste.4. Students who are older or more musically experienced may want to turn this into an experiment of
sorts; if notes are right next to each other, do they sound dissonant? What if there is one note inbetween them? Two in between them? And so on. What if they are very far apart?
5. Musically experienced students may also be encouraged to �nd a satisfying resolution43 to a dissonance.Discuss and demonstrate resolutions on the instrument.
1.3.3 Activity 2: Hearing Consonance and Dissonance in Recorded Music
Goals and Standards
• Goals - The student will practice identifying aural musical examples as "consonant" or "dissonant".• Objectives - After an introduction to the concepts, the students will listen to a variety of recorded
examples of music. The students will identify which pieces have more or less dissonance and will discussthe e�ects of the dissonance on the music.
• Music Standards Addressed - National Standards for Music Education44 standard 6 (listening to,analyzing, and describing music).
• Grade Level - K-12 (adaptable)• Student Prerequisites - Preceding this activity with Activity 1, above, or some introduction to
consonance and dissonance45, is strongly recommended.• Teacher Expertise - Training as a music teacher is not necessary to present this activity. The teacher
must be able to easily identify dissonance in recorded music.• Time Requirements - Depends on number and length of recorded examples.• Evaluation - Assess student learning by evaluating participation in the class discussion or by orally
quizzing each student on whether a short recorded excerpt contains dissonance.• Follow-up - Help commit this lesson to long-term memory, by continuing to ask, throughout the rest
of the school year, questions about the consonance or dissonance of music that they are listening to orlearning.
• Extensions - For advanced music students, discuss whether music from particular eras, cultures, orgenres, tends to sound consonant or dissonant. Ask them to identify unknown recordings as belongingto a particular era, culture, or genre, based at least partly on the consonance or dissonance of themusic. With this extension, National Standards for Music Education46 standard 9 (understandingmusic in relation to history and culture) is addressed.
Materials and Preparation
• You'll need a CD or audio tape player.
42"Consonance and Dissonance" <http://cnx.org/content/m11953/latest/>43"Consonance and Dissonance" <http://cnx.org/content/m11953/latest/#p0h>44http://musiced.nafme.org/resources/national-standards-for-music-education/45"Consonance and Dissonance" <http://cnx.org/content/m11953/latest/>46http://www.menc.org/publication/books/standards.htm
Available for free at Connexions <http://cnx.org/content/col10222/1.7>
17
• Gather some examples of music from di�erent periods (Classical, Modern, Baroque...) and/or di�erentstyles (Modern art music, jazz, folk, pop...) or cultures (European, Indian, Indonesian...). Try to haveat least a few pieces with quite a bit of dissonance. (Twentieth-century art music, modern jazz, andmovie music are probably the easiest places to �nd this; try Igor Stravinsky, Charles Ives, TheloniousMonk, or Charles Mingus, for example, or the sound tracks from scary or dramatic movies.)
• Have the recordings ready to play at appropriate places in the music, or know the track numbers forthe pieces you intend to play.
Procedure
1. If possible, this activity should be done after Activity 1 (Section 1.3.2: Activity 1: Finding Consonantand Dissonant Notes). If that is not possible, begin this activity with an explanation of the terms.
2. Play short excerpts from your selections.3. As the students are listening, have them raise their hands when they hear dissonance.4. After several samples, have a discussion. Which types of music had more or less dissonance. Did some
seem to have none at all? What adjectives (like "happy" or "creepy" or "exciting" or "annoying")would they use to describe each piece? What emotional e�ects do they think dissonance has on a pieceof music?
5. Older or more musically experienced students may be asked: is the dissonance resolved47, or is it just"left hanging"? How long does it take to resolve the dissonance? What does this do to the feeling oftension and relaxation in the music?
1.3.4 Activity 3: Improvising Consonant or Dissonant Harmony on Instruments
Goals and Standards
• Goals - The student will practice choosing consonant intervals for improvised or composed harmonies.• Objectives - After an introduction to the concepts, the students will take turns playing a melody and
improvising a harmony to the melody by �nding consonant intervals for each note of the melody.• Music Standards Addressed - National Standards for Music Education48 standards 2 (performing
on instruments, alone and with others, a varied repertoire of music), 3 (improvising melodies, variations,and accompaniments), 4 (composing and arranging music within speci�ed guidelines), 6 (listening to,analyzing, and describing music), and 7 (evaluating music and music performances).
• Grade Level - 4-12• Student Prerequisites - The students must be able to play, smoothly, accurately, and in tune, simple
single-note lines on the instruments used in the activity.• Teacher Expertise - The teacher must be able to conduct and direct the playing, and help the
students �nd consonant harmonies.• Time Requirements - Depends on number of students, and their comfort level with the activity.
Can easily take one full class period.• Evaluation - Assess student ability to �nd and play consonant intervals.• Follow-up - Throughout the rest of the school year, continue to challenge the students to harmonize
simple melodies by �nding consonant intervals.• Adaptations - Students who do not play an instrument, but who are comfortable singing, may be
asked to sing consonant intervals against a known melody.• Extensions - Ask advanced music students to compose, write down, and perform consonant har-
monies, or to quickly improvise and play harmonies to a new tune. Very advanced students should beencouraged to compose lines using good voice leading.
Materials and Preparation
47"Consonance and Dissonance" <http://cnx.org/content/m11953/latest/#p0h>48http://musiced.nafme.org/resources/national-standards-for-music-education/
Available for free at Connexions <http://cnx.org/content/col10222/1.7>

18 CHAPTER 1. SOUND AND INSTRUMENTS
• The students will need access to instruments in the classroom. Instruments with �xed tuning (keyboard,xylophone, bells, for example) are ideal. If the students play other instruments (band or orchestralinstruments, for example) well enough that tuning will not be an issue, that will also work well.
• Choose a melody to harmonize, and teach it to all of the students before the class period reserved forthis activity. This activity works best if the students can play the melody as a solo with con�dence.A slow melody will allow students more time to choose a note for the harmony.
• Also have the students do Activity 1 (Section 1.3.2: Activity 1: Finding Consonant and DissonantNotes) before this activity. While doing Activity 1, help the class prepare a list of speci�c suggestionsfor �nding notes that will be consonant with a given note. (Rules that they can discover, like "avoidthe note right next to it", are ideal.)
Procedure
1. Remind the students of what they discovered about where to �nd consonant notes. Go over the listprepared by the class during Activity 1.
2. Have the students "warm up" by playing the melody you have chosen. You may want to further"warm up" their readiness to improvise a harmony by allowing them to experiment (on a keyboard,for example) to �nd notes that go with the notes of the melody; or by having some students play thenotes of the melody one note at a time, while other students are allowed to "search for" consonantpitches.
3. Students take turns playing melody or harmony. On each turn, one or a few (not too many) studentsplay the melody while one student plays a di�erent note to "harmonize".
4. Depending on the students' maturity, con�dence level, and ability to do this in a spirit of explorationand cooperation rather than critique and embarrassment, you may ask the students who are not playingto raise their hands either when they hear a consonance or when they hear a dissonance. If you addthis element, you may want to remind the students that dissonance is acceptable in many styles ofmusic, or point out that resolving49 dissonances is an important element in keeping music interestingand exciting. You may even want to challenge students to play dissonances deliberately.
1.3.5 Activity 4: Relating These Terms to Other Disciplines
Goals and Standards
• Goals - The students will become more comfortable with a general use of the terms, and use them tomake connections and parallels between disciplines.
• Objectives - In a class discussion, the students will use the concepts "consonant" and "dissonant" todraw appropriate parallels between music and other disciplines and to categorize and draw appropriateinferences within each discipline. A written essay summarizing the discussion and/or giving personalopinions on the subject, can be assigned.
• Music Standards Addressed - National Standards for Music Education50 standard 8 (understandingrelationships between music, the other arts, and disciplines outside the arts).
• Other Subjects Addressed - Depending on the subject matter, this activity may also address goalsand standards in social studies or language arts.
• Grade Level - K-12 (adaptable)• Student Prerequisites - The students should already be familiar with the terms in their musical
context.• Teacher Expertise - Teacher expertise in music is not necessary to present this activity.• Time Requirements - 10-30 minutes, depending on the depth and breadth of the discussion, and
student interest and engagement.
49"Consonance and Dissonance" <http://cnx.org/content/m11953/latest/#p0h>50http://musiced.nafme.org/resources/national-standards-for-music-education/
Available for free at Connexions <http://cnx.org/content/col10222/1.7>

19
• Evaluation - Assess student learning by evaluating participation in the discussion or grading writtenessays.
• Follow-up - Throughout the rest of the school year, continue to use the terms "consonant" and"dissonant" whenever appropriate.
Materials and Preparation
• Choose a non-music area in which the students have already discussed the concepts of things whichdo or do not go together well, or initiate such a discussion during an appropriate class period. Somesuggestions: color usage in the visual arts; ingredients in cooking; anomalies (the avoidance of, or thedeliberate use of things that are "out of place") in the visual or performance arts or literature; oreven, in social studies, the cultural "consonance" or "dissonance" that occurs when people do or donot behave in similar ways or expected ways.
Procedure
1. Remind the students of both of the previous discussions (of musical consonance and dissonance and alsoof the non-music subject). Encourage them to summarize some of the key points of both discussions.
2. Ask the students to draw comparisons between the two subjects. In the non-music subject, whatmight the students label "consonant" or "dissonant"? Why? What is the e�ect of "consonance" or"dissonance" in the other subject? Is dissonance used deliberately and why? Is it avoided and why? Inwhat ways is this similar or di�erent to consonance and dissonance in music? Are there any elementsthat are similar to the resolution51 of dissonance in music?
3. Have the students summarize the discussion. This may be an in-class summary of the main points ofthe discussion, or it may be a written essay including the student's personal opinions or conclusions aswell as the main points of the discussion.
51"Consonance and Dissonance" <http://cnx.org/content/m11953/latest/#p0h>
Available for free at Connexions <http://cnx.org/content/col10222/1.7>

20 CHAPTER 1. SOUND AND INSTRUMENTS
Available for free at Connexions <http://cnx.org/content/col10222/1.7>

Chapter 2
Rhythm, Tempo, and Dynamics
2.1 Music Conducting: Classroom Activities1
2.1.1 Introduction
Please see Conducting2 for an introduction to standard conducting techniques. The activities presented here,Watching the Conductor (Section 2.1.2.1: Watching the Conductor), Keeping a Steady Beat (Section 2.1.2.2:Keeping a Steady Beat), The Conductor Shows the Beat (Section 2.1.2.3: The Conductor Shows the Beat),The Conductor Counts the Measure (Section 2.1.2.4: The Conductor Counts the Measure), and The Con-ductor Gives Cues (Section 2.1.2.5: The Conductor Gives Cues), simplify the concept and procedures ofconducting a group of musicians, so that even fairly young students can take turns "being in charge".
Goals and Assessment
• Goals - The student will become familiar with the function of the conductor in a large ensemble. Thestudent will demonstrate leadership skills and understanding of standard music performance practices,by conducting a large group, using appropriate motions based on a simpli�cation of standard conductingtechnique, and will demonstrate ability to actively cooperate in a musical performance by following,with a group, a simpli�ed conducting technique, and playing a percussion part at the appropriate time.
• Grade Level - K-12 (adaptable)• Time Requirements - Each student should get a chance to conduct every activity, so time require-
ments depend somewhat on the number of students. Unless the class is very large, one (approximately45-minute) class period should be su�cient for each activity. The activities may also be used as 5-minute warm-ups to other music activities or as active breaks from desk-centered work. If you planto use them in this way, have just one student conduct each time you do the activity, keeping track ofwhich students have already conducted each one.
• Student Prerequisites - The activities are ordered from simplest to most complex. Do as many asyou like up to the point that they become too complex for your students, but it is recommended thatyou do them in order, as each activity builds on the skills developed in the previous one. To do the �rstactivity, students should be able to accurately mimic a rhythm, and should be able to independentlyclap a steady beat. (See Rhythm Activities (Section 2.5) if they need to practice these skills.)
• Teacher Expertise - The teacher should be familiar with basic conducting practices (see Conduct-ing3), and able to evaluate the students' success in conducting, staying on the beat, and producingcorrect rhythms.
• Music Standards Addressed - National Standards for Music Education4 standard 9 (understanding
1This content is available online at <http://cnx.org/content/m11031/2.15/>.2"Conducting" <http://cnx.org/content/m12404/latest/>3"Conducting" <http://cnx.org/content/m12404/latest/>4http://musiced.nafme.org/resources/national-standards-for-music-education/
Available for free at Connexions <http://cnx.org/content/col10222/1.7>
21

22 CHAPTER 2. RHYTHM, TEMPO, AND DYNAMICS
music in relation to history and culture, which includes awareness of the role of various musicians ina performance). Some activities also explore one of the most common ways of expressing meter5, acritical concept for understanding time signature6, addressing standards 5 (reading and notating music)and 6 (listening to, analyzing, and describing music). The activities also heighten awareness of a basiccomponent of good ensemble performance, encouraging ability to critique performances knowledgeably(standard 7, evaluating music and music performances).
• Other Subjects Addressed - The activities also address National Dance Standards7 standard 1(includes ability to move to a beat and respond to changes in tempo).
• Follow-up - You can continue to help students develop an appreciation for conducting, meter, andgood performance practice, by continuing to allow students a chance to conduct their classmates.
• Evaluation - Assess students both on their performance as "conductor", performing the correct mo-tions in the correct order with a steady beat, and their accuracy, as a "musician", in following theconductor and playing "on the beat".
Skills Developed in Conducting and Following a Conductor
• Music Appreciation - Understanding the purpose of conducting• Music Skills and Concepts - Rhythm, Meter, Tempo, Steady beat• Math Concepts - Counting, Grouping, Subdivision (in time) into Equal Parts (fractions)• Physical Skills - Large Motor Coordination, Ear/Hand/Eye Coordination• Social Skills - For the "conductor", leadership; for "musicians", following directions, paying attention,
actively cooperating in a group
Materials and Preparation
• You will need a place and time when your classroom can be noisy. Children like this exercise, but it'sonly fun if they can be loud.
• You will also need something that can be the "Conductor's Baton". A short pointer or long pencil(preferably not sharp) will do.
• Both conductor and musicians will need objects, at around belly height, to beat time on. Desks, chairbacks, or stacks of books will do. Modern conductors do not ordinarily make an audible sound whenthey conduct. In the earliest days of the orchestra, however, conducting did often involve beatingloudly on the �oor with a stick, and conductors (particularly teaching conductors) will still beat timealoud if they feel the ensemble is not watching the beat closely enough. This type of conducting willbe easier for young children to follow.
• Some of the activities will require the students to have various instruments. Percussion is easiest; usewhatever is available - drums, hand cymbals, maracas, jingle bells - or make or improvise your owninstruments. (See Percussion Fast and Cheap (Section 1.1).)
2.1.2 Activities
2.1.2.1 Watching the Conductor
Objectives
• The student who is designated conductor will improvise a simple clapped or conducted rhythm andperform it in such a way that it is easy to anticipate and follow.
• The other students will pay careful attention to the designated conductor, clapping or playing on apercussion instrument at the same time.
5"Meter in Music" <http://cnx.org/content/m12405/latest/>6"Time Signature" <http://cnx.org/content/m10956/latest/>7http://www.pecentral.org/lessonideas/dance/dancestandards.html
Available for free at Connexions <http://cnx.org/content/col10222/1.7>

23
Procedure
1. Setup: All students should be standing facing the conductor, who is standing facing them. Anyinstruments they will need or objects they will be beating on with a baton should be in front of them,within easy reach, at about belly height.
2. For this exercise only, the conductor does not have to keep a steady rhythm. The conductor clapswhenever he or she likes. Encourage surprising rhythms, but discourage the conductor from "fakingout" the other students. A gesture that looks like the beginning of a clap should always be followedthrough with a clap. This is a cooperative game, not a competitive one. All the students - conductorand "orchestra" alike - should be praised when the claps all sound at the same time.
3. The other students watch the conductor closely, and try to make their clap sound at exactly the sametime as the conductor's.
4. Point out how loud and impressive it is when all the claps sound together.5. To prepare for the rest of the activities, you can repeat the procedure with all the students beating on
something (producing an audible sound) with "batons", or with the conductor beating with a batonand the others clapping or playing drums, bells, etc. Batons should be in the right hand.
2.1.2.2 Keeping a Steady Beat
Objectives
• The student who is designated conductor will clap and then conduct an audible steady beat.• The other students will cooperate in keeping the beat chosen by the designated conductor, by clapping
or playing on the indicated beat.
Procedure
1. Same setup. This time the conductor claps, then beats with the baton, a steady beat, which everybodyfollows as closely as possible.
2. Point out how much easier it is to anticipate the next clap when the beat is steady. The children shouldbe listening for that "big clap" that sounds when they are all together.
3. Encourage di�erent conductors to pick di�erent tempos. The tempo8 is how fast or slow the beat isgoing. Discourage accidental changes of tempo. Beats that unintentionally get faster and faster, calledrushing, or slower and slower, called dragging, are considered poor musicianship (unless the musicspeci�cally calls for changes in tempo such as accelerando).
2.1.2.3 The Conductor Shows the Beat
Objectives
• The student who is designated conductor will conduct a steady beat using only a visual signal, as instandard conducting technique.
• The other students will keep the beat chosen by the designated conductor, by watching the conductorcarefully and clapping or playing on the indicated beat.
Procedure
1. Same setup. Same procedure as previous activity, except the conductor beats on air at belly height,making no sound, rather than on an object.
2. Point out that the beat is easier to see if it remains a quick, bouncing motion as if they are still beatingon something.
3. The "orchestra" still claps or makes sound when the conductor's "beat" hits the bottom, the same asbefore. Tell the students that this is called playing on the downbeat.
8"Tempo" <http://cnx.org/content/m11648/latest/>
Available for free at Connexions <http://cnx.org/content/col10222/1.7>

24 CHAPTER 2. RHYTHM, TEMPO, AND DYNAMICS
2.1.2.4 The Conductor Counts the Measure
Objectives and Extensions
• Objectives for Designated Conductor - The student will conduct an audible steady beat, demon-strating a particular meter by using movements based on standard conducting technique.
• Objectives for other students - As a group, the students will keep the beat chosen by the designatedconductor, and perform di�erent sounds for each beat of the meter.
• Extensions - The following instructions are for a very simplistic style of conducting that relies mostlyon sound for cues to convey the beat and meter. A real conductor working with trained musicians doesnot audibly beat out the time (except when frustrated). If you have older or more advanced studentswho are ready to conduct and be conducted using visual cues only, you may use the instructions atConducting9 as a guide.
Introduction
• Ask the students if they have ever heard a conductor or band leader count o� at the beginning of apiece of music. ("A-one-and-a-two-and-a-one-two-three-four", for example)
• Tell the students that music is divided into very short sections called bars or measures10. Each bar isonly a few beats11 long, usually two, three, or four beats. This helps everyone keep track of where theyare in the music. If you listen to the music, you can hear the bars and count along, one-two-three-one-two-three, or one-two-three-four-one-two-three-four. (For activities on listening for meter, see MusicalMeter Activities12.)
• Tell the students that one of the conductor's main jobs is to show with the baton which beat (of themeasure) is presently being performed.
Procedure for Measures of Two Beats
1. Same setup, with an object for conductor to beat on. The "orchestra" claps or plays on instruments.2. The conductor holds the baton in the right hand.3. The conductor beats measures, one-two-one-two-one-two, making two di�erent kinds of motions:4. On "one", the baton starts in front of the conductor (baton tip approximately in front of the middle
of the chest), beats on the object, and bounces o� to the right.5. On "two", the baton starts o� to the right (baton tip approximately in front of the right shoulder),
beats on the object and bounces up to end up right in front of the conductor again.6. Point out how easy this makes it for the orchestra to keep track of where they are in the measure.
Have them clap on one and stomp on two. Or divide the class into two sections. One section claps onone, the other claps or stomps on two. Or drums play on one, bells on two, etc.
7. Once the conductors get used to the di�erent motions, take away the object and have them "beat" inthe air again.
Procedure for Measures of Three Beats
1. Same setup, but with three objects for the conductor to beat time on, one directly in front, and onein front and slightly to the conductor's right, one in front and slightly to the conductor's left.
2. Beat "one" is on the object in front of the conductor.3. Beat "two" is on the object to the conductor's left.4. Beat "three" is on the object to the conductor's right.5. This time, divide the class into three groups, or have the class do three di�erent things on the di�erent
beats (clap, stomp, and slap thighs, for example).
9"Conducting" <http://cnx.org/content/m12404/latest/>10"Time Signature": Section Beats and Measures <http://cnx.org/content/m10956/latest/#s1>11"Time Signature": Section Beats and Measures <http://cnx.org/content/m10956/latest/#s1>12"Musical Meter Activities" <http://cnx.org/content/m13616/latest/>
Available for free at Connexions <http://cnx.org/content/col10222/1.7>

25
6. Again, if the exercise is successful, repeat it with the conductor "beating" in the air rather than onobjects.
2.1.2.5 The Conductor Gives Cues
Objectives
• The student who is designated conductor will conduct the meter with the right hand while givingspecial cues with the left.
• The other students will watch the designated conductor carefully, playing the appropriate sound foreach beat in the meter, or responding to left-hand cues.
Procedure
1. If you have older students who can handle all of the above and still want more, add cues.2. Tell the students that with the left hand the conductor does other things like telling people to play
louder or softer and giving cues.3. Tell your students: holding the left hand out palm up means "louder"; holding it out palm down means
"softer".4. Let them experiment with this while conducting in two or three.5. Tell your students that, with the left hand, the conductor may also give cues to people who don't play
very often, like the cymbal or gong player, in case they have lost count of the measures.6. Give a couple of students special instruments and tell them only to play when the conductor cues them
by pointing at them with the left hand. Point out that, when giving cues, it is very helpful to makeeye contact and to point with a dramatic gesture so that the players are not caught by surprise.
7. Rotate both the conducting and the special instruments so that everyone gets a chance both to givecues and to respond to cues.
2.1.3 Extensions and Related Activities
• Attend a conducted band, orchestra, or choir concert.• View a video or television program of a concert in which the conductor can be seen at least some of
the time.• Following the concert or video, discuss what the students noticed the conductor doing or not doing.
Was a baton used or the hands? Pointing? Eye contact? Body language? Vocal cues? If the programincluded pieces conducted by di�erent people, did they notice di�erences in conducting style?
• Before the students attend the performance or watch the tape, tell them you will ask for a critique ofthe conducting aspects of the performance. Suggest that they listen for whether the ensemble playsprecisely together, and watch the players and conductor for signs of visual communication. Was theregood communication between the conductor and the performers? Did the ensemble have any problemsplaying "together"? Did the problems appear to be caused by inattention in the players? Errors orambiguity in the conducting? Lack of familiarity with, or di�culty performing, the music? Was anynoticeable attempt made to "regroup"? If the ensemble did a very good job of playing together withprecision, what practices did the students notice that might have helped them stay together so well?Were there any visual indications that they were together, such as breathing or moving at the sametime? This can be either a class discussion or an unusual essay assignment.
• Invite a local group of musicians that uses a conductor to perform for your class. Give the conductora chance to demonstrate and talk about what he or she does. Or invite just the conductor to conductyour class using the proper motions rather than beating on objects. Conductors of local amateur oryouth music groups, or students of conducting or of music education at a local music school, may beparticularly willing to do this for you.
Available for free at Connexions <http://cnx.org/content/col10222/1.7>

26 CHAPTER 2. RHYTHM, TEMPO, AND DYNAMICS
2.2 A Tempo Activity13
An introduction to the concept of tempo, and lists of terms, can be found in Tempo14. To introduce theconcept and some common tempo indications to younger students, try the following activity.
Goals and Standards
• Goals - The student will become familiar with the most common tempo terms and respond appro-priately when asked to perform at a speci�c tempo indication, or to name a tempo indication for aperformance just given or heard.
• Grade Level - The activity is designed for grades 3-8, but may be adapted for older or youngerstudents as appropriate.
• Student Prerequisites - Whether singing, singing with gestures, dancing, or playing instruments,students should be able to perform the piece(s) adequately before doing this activity. Choose piecesand performance modes that are comfortable, so that the students can concentrate on tempo.
• Teacher Expertise - Teacher expertise in music is not necessary to present this activity. The teachershould be familiar and comfortable with the terms and concepts regarding tempo15, and should becomfortable leading the performance at various tempos.
• Time Requirements - If you wish to spend an entire class period on the activity, make certain youhave enough pieces and tempos, and include the discussion of metronomes. A short demonstration oftempos will only take 15-20 minutes, or you can use the activity as a very short (just one piece, one ortwo tempos, each time) 5-minute warm-up to music class or active break from desk work.
• Music Standards Addressed - National Standards for Music Education16 standards 1 (singing,alone and with others, a varied repertoire of music) or 2 (performing on instruments, alone and withothers, a varied repertoire of music), and 6 (listening to, analyzing, and describing music).
• Other Subjects Addressed - The activity also addresses National Dance Standards17 standard 1(identifying and demonstrating movement elements and skills in performing dance).
• Objectives - The students will learn the meaning of the common tempo indications chosen by theteacher. As a group, the students will perform at least one piece (singing, singing with gestures,dancing, or playing instruments) at di�erent tempos that are appropriate for the tempo markings theyare learning. Given a piece and a tempo, the student will choose an appropriate tempo marking todescribe it.
• Evaluation - Assess students on ability to maintain a steady beat at di�erent tempos and on knowledgeof tempo terms. To test knowledge following the activity, either ask individual students to indicate(by clapping a beat, for example), what speed they would choose given a certain tempo marking, orask them to name an appropriate tempo while they listen to a recorded piece of music.
• Follow-up - Help commit this lesson to long-term memory, by continuing to ask, through the restof the school year, "what tempo term would you use to describe the song we just sang?" and similarquestions.
Materials and Preparation
• Decide which tempo indications (see Tempo18) you would like the students to learn.• Choose a simple song, song with gestures and dance steps, or dance, or a piece of instrumental music.
(Or you may wish to choose more than one.) Choose pieces the students already know, or teach themthe one(s) you have chosen before doing this activity.
• If you are going to discuss metronome markings, bring a metronome to class.
13This content is available online at <http://cnx.org/content/m14180/1.10/>.14"Tempo" <http://cnx.org/content/m11648/latest/>15"Tempo" <http://cnx.org/content/m11648/latest/>16http://musiced.nafme.org/resources/national-standards-for-music-education/17http://www.pecentral.org/lessonideas/dance/dancestandards.html18"Tempo" <http://cnx.org/content/m11648/latest/>
Available for free at Connexions <http://cnx.org/content/col10222/1.7>

27
• If you are going to test the students following the activity using recordings, choose a variety of record-ings.
Procedure
• Write your chosen terms and their meanings on the board, or give the students a handout with theterms, and go over them with the students.
• Have them sing, play, or dance the chosen piece(s) at di�erent tempos (allegro, largo, vivo, etc.).Include variations in the tempo, such as accelerando if you like.
• If you are using more than one piece for this activity, try each piece at several di�erent tempos. Youmay choose a "tempo marking", or have students take turns suggesting them. Have the studentsvote, or reach a consensus on, an appropriate actual tempo for each tempo indication suggested (withdirection from you as necessary), and after trying several, have them vote on the best tempo markingfor each piece.
• Most children love to play with metronomes. If there is one available, you may also want to discussmetronome markings. Try each chosen piece at several di�erent metronome markings suggested bythe students, and then ask them to choose a metronome marking for each piece. Discuss which tempomarking (allegro, largo, vivo, andante, etc.) they would assign that metronome marking for that piece.They may also enjoy trying to guess at which number the metronome was set.
Activity Extensions for Advanced Students
• Have the students learn a variety of the less common tempo terms.• Help them explore what it means for a piece to feel fast or slow. Find recordings of (or have the students
perform) di�erent pieces that have the same tempo marking but noticeably di�erent actual tempos.(Use a metronome to determine actual tempos.) Discuss the possible reasons for the di�erences. Arethey cultural or historical? Are they a�ected by the style or genre of the music, the rhythms or thenumber of notes per beat?
2.3 A Musical Dynamics Activity19
Practicing dynamics on a particular instrument requires control and technique, but simply learning aboutdynamics is an invitation to make noise, so this is a fun concept to introduce to young children. Practicingdynamics away from one's instrument can also be useful for young players who �nd it di�cult to rememberto play with dynamics and good tone quality because they are still mastering rhythms and �ngerings.
Goals and Standards
• Grade Level - Intended for grades 3-8; adaptable for younger or older as appropriate.• Student Prerequisites - Students should be able to sing, well and comfortably, the songs chosen.• Teacher Expertise - Teacher expertise in music is not necessary to present this activity. The teacher
should be familiar with the terms and concepts regarding dynamics20 and comfortable leading thesinging.
• Time Requirements - If you want to give everyone a chance to "conduct", have a variety of severalsongs ready to sing, and plan to use an entire class period. Otherwise, the discussion and activitycan be done in about twenty minutes. Once the concepts are introduced, you may use it as a short(5-minute) warm-up to other music activities or break from desk work.
• Goals - The student will learn standard terms for musical dynamics, explore using dynamics, andpractice singing musically and with control at a variety of di�erent dynamic levels.
19This content is available online at <http://cnx.org/content/m13463/1.10/>.20"Dynamics and Accents in Music" <http://cnx.org/content/m11649/latest/>
Available for free at Connexions <http://cnx.org/content/col10222/1.7>

28 CHAPTER 2. RHYTHM, TEMPO, AND DYNAMICS
• Objectives - The student will learn the terms used to indicate musical dynamics and will sing familiarsongs with a group, at a variety of dynamic levels, responding �rst to verbal instructions from theteacher and then to hand signals from a "conductor". Following the activity, the student will be ableto de�ne common dynamics terms in simple English (e.g. forte is "loud") and respond to verbal orhand signals with appropriate dynamics.
• Music Standards Addressed - National Standards for Music Education21 standards 1 (singing,alone and with others, a varied repertoire of music) and 6 (listening to, analyzing, and describingmusic).
• Evaluation - Assess students on achievement of many di�erent dynamics while still singing with goodtone, and on ability to follow conductor's dynamic directions. Following the activity, you may test thestudents, verbally or on paper, on the meaning of dynamics terms.
• Follow-up - Throughout the rest of the year, continue to ask for appropriate dynamics, using thecorrect terms, whenever the students sing or play an instrument.
• Adaptations - For students who have trouble singing, you may adapt this activity to have them recite,speak, or make noise on simple percussion instruments (Section 1.1) at di�erent dynamic levels.
• Extensions - For more advanced music students, have the students memorize a short piece on aninstrument and practice responding quickly to instructions or signals to play at di�erent dynamiclevels. Teach the students notation for dynamics and ask them to play or sing, individually, a simplepiece with no written dynamics, adding dynamics to make the performance more musical, interestingand dramatic. On the written part, have them add the (properly notated) dynamics that they areusing.
Materials and Preparation
• Choose a song or songs that the students already know, or teach them one that is easy for them. Anysong will do, although one with some dramatics that suggest dynamics may be more fun. Choose asong that is reasonably short, or else do the verses at di�erent dynamic levels.
• Familiarize yourself with any dynamics22 terms that you are planning on introducing to the students.You may use this PDF �le23 as a handout if you would like to give the students a copy of the terms.(If you can't get the PDF �le, you may use the �gure below (Figure 2.1: Common Dynamic Levels).)
Procedure
1. Tell your students that music can be loud or quiet or in between. Introduce any of the terms you wishyour students to learn, or simply continue to talk about loud, quiet, and medium.
2. Sing the song together quietly (mezzo piano). Sing it again (or the next verse) even more quietly(piano). Encourage them to continue to project voiced (not whispered) notes with clear, sustainedpitch24 as they get softer. Repeat until they are practically whispering; how many di�erent levels ofquiet can they get while still sounding good?
3. Repeat the previous step with mezzo forte, forte, and so on. Encourage them to sing with sustained,controlled notes as they get louder. How many di�erent levels of loudness can they get before they aresimply shouting?
4. The next step will need a "conductor". You can conduct, but if there is time, let the students taketurns conducting. Choose a conductor and demonstrate some typical conducting signals: hand heldhigher with palm up means louder, hand held lower with palm held down means quieter, hand movingup or down means gradually louder or quieter. The conductor in this activity does not have toconduct the beats!
5. Repeat the song again, or choose a di�erent song if you're bored. This time, have the conductor varythe level of loudness during the verse. Try suddenly loud and suddenly quiet as well as gradually
21http://musiced.nafme.org/resources/national-standards-for-music-education/22"Dynamics and Accents in Music" <http://cnx.org/content/m11649/latest/>23See the �le at <http://cnx.org/content/m13463/latest/pf.pdf>24"Pitch: Sharp, Flat, and Natural Notes" <http://cnx.org/content/m10943/latest/>
Available for free at Connexions <http://cnx.org/content/col10222/1.7>

29
getting louder and quieter. For younger students, let them have fun with this and be silly. With olderstudents, ask them to experiment with using the dynamics to make the song prettier or more exciting,dramatic, or interesting.
Common Dynamic Levels
Figure 2.1
2.4 A Musical Accent Activity25
See Dynamics and Accents in Music26 for introductory information on musical accents. The proper methodfor performing an accent varies greatly between di�erent types of instruments and styles of music, and canpresent quite a challenge for the young instrumentalist. By temporarily separating reading from concernson how to properly perform accents on a speci�c instrument, this activity simpli�es the task of readingand performing "accents", allowing an intermediate success that can translate into con�dence in performingaccents correctly.
Goals and Evaluation
25This content is available online at <http://cnx.org/content/m13462/1.11/>.26"Dynamics and Accents in Music" <http://cnx.org/content/m11649/latest/#p0d>
Available for free at Connexions <http://cnx.org/content/col10222/1.7>

30 CHAPTER 2. RHYTHM, TEMPO, AND DYNAMICS
• Goals - The goal of the activity is to introduce students to the concept of musical accents and to helpbeginning instrumentalists practice reading and performing accents.
• Objectives - The student will read notated rhythms - of gradually increasing complexity - that includeaccented notes, and perform them accurately as a simple percussion piece, either individually or witha group.
• Grade Level - This activity is designed for students in grades 4-8, but may be used by younger orolder students who are at the appropriate level of musical awareness.
• Student Prerequisites - The students should be able to accurately and easily read and perform therhythms in the exercises used.
• Teacher Expertise - The teacher should be able to read music well and must be able to act as thegroup "conductor" during this activity.
• Time Requirements - Unless you have many rhythm/accent examples prepared, this activity takesless than twenty minutes. Once the concepts are introduced, it can also be used as a very short (lessthan �ve minute) warm-up to other music activities or as a quick break from desk work.
• Music Standards Addressed - National Standards for Music Education27 standard 5 (reading andnotating music).
• Adaptations - To introduce the concept of accents to very young or non-reading students, simplyalter the lesson plan to have the students echo short, simple rhythms with accents that are performedfor them. This "listening and performing" activity may also be included along with the activity asdescribed.
• Extensions - Following the activity, musically experienced students may be asked to write out shortexercises similar to the ones they have already done. Share them by copying them or having thestudents write them so that the entire class can see them (on a board, for example). Let the classtry the student-written exercises. Or let them trade papers with each other and perform each other'schallenges as solos.
• Evaluation - Assess students on ability to read and perform rhythms and accents accurately andconsistently, either with the group or individually in a "test" performance. If students can perform atthe desired level of complexity, they are ready to practice performing accents in the proper manneron real instruments. If they cannot, have them continue to do this activity regularly over a period ofweeks or months, starting with easier rhythms and gradually introducing more complexity, alternatingwith lessons on playing accents correctly.
Materials and Preparation
1. Prepare your board or a handout by reproducing the rhythms and accents below and/or making upyour own, based on your students' age and musical training. You can copy this PDF �le28, or use the�gure below (Figure 2.2: Accent Activity Suggested Rhythms) to make a handout. If you want anactivity that will last longer, make up more lines at the correct di�culty level for your students.
2. Level I is for students who are younger and have little or no musical training. Level II is for studentswho have learned to read music. Level III is even more challenging.
3. Decide how the rhythms will be performed. Students can play on drums or other percussion instru-ments, if available, or play on a single pitch29 on any instrument. You may also use body percussion orother simple percussion techniques (see Percussion Fast and Cheap (Section 1.1)); for example clappingon regular notes and stomping, slapping thighs, or just clapping louder on accented notes; or slappingthe table (or a thigh) with one hand for regular notes and both hands for accented notes.
4. Gather or make any instruments or equipment the students will need.
Procedure
27http://musiced.nafme.org/resources/national-standards-for-music-education/28See the �le at <http://cnx.org/content/m13462/latest/accentactiv.pdf>29"Pitch: Sharp, Flat, and Natural Notes" <http://cnx.org/content/m10943/latest/>
Available for free at Connexions <http://cnx.org/content/col10222/1.7>
31
1. Explain that accented notes are louder than the notes around them. Show them an accent on theboard or handout. Notes with an accent mark should be louder. Explain how you want regular andaccented notes to be performed in this activity. (See number 3 of "Preparation".)
2. Before starting each rhythm, you must establish a steady beat, in order to get everyone to start atthe same time and the same tempo30. Clap four times before the students begin, or count steadilyand crisply, "One, two, three, go", or use any method of "counting o�" that your students are alreadyaccustomed to.
3. Start with a slow beat. Do one rhythm at a time, all together as a group. For more of a challengefor older students, speed up the tempo, or ask them to perform rhythms alone, either after they haveheard them, or sight-reading.
30"Tempo" <http://cnx.org/content/m11648/latest/>
Available for free at Connexions <http://cnx.org/content/col10222/1.7>
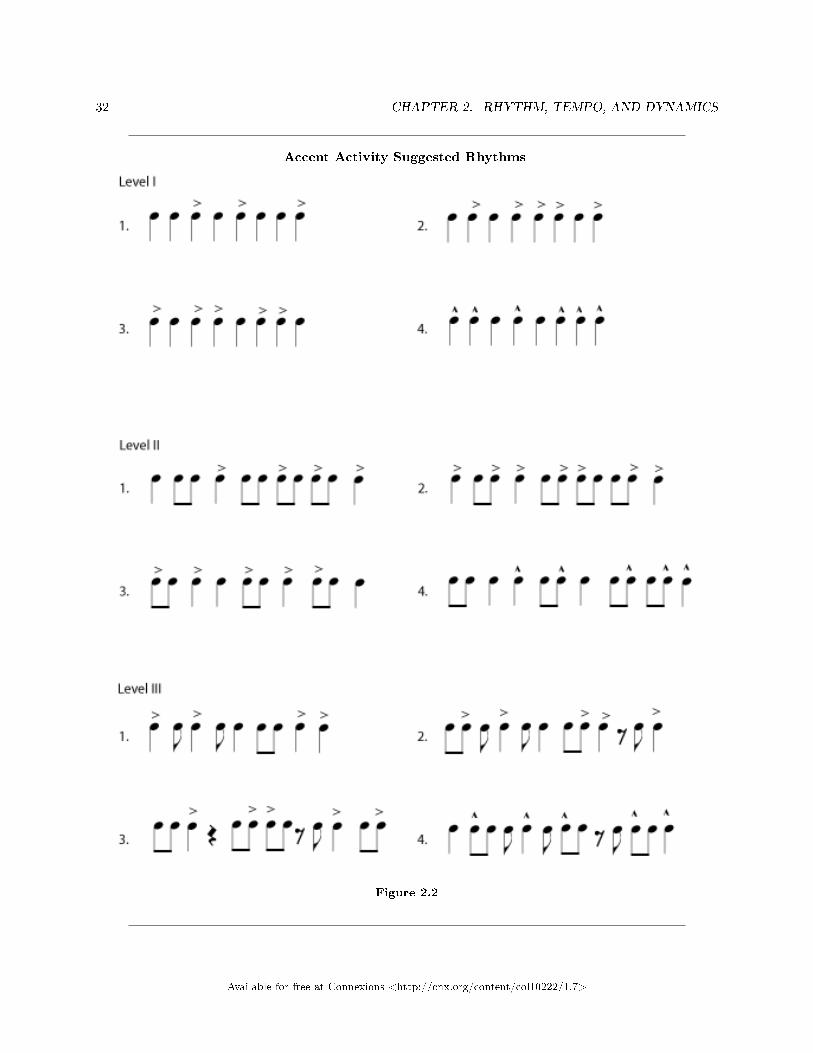
32 CHAPTER 2. RHYTHM, TEMPO, AND DYNAMICS
Accent Activity Suggested Rhythms
Figure 2.2
Available for free at Connexions <http://cnx.org/content/col10222/1.7>
33
2.5 Simple Rhythm Activities31
Here are three simple classroom activities that promote accuracy in two areas (rhythms and keeping time)that are fundamental for good musical performance: Rhythm Imitations (Section 2.5.1: Activity 1: RhythmImitations), Karaoke Percussion (Section 2.5.2: Activity 2: Karaoke Percussion), and No Karaoke Percussion(Section 2.5.3: Activity 3: No Karaoke Percussion). The activities can also be used to develop awareness ofthe e�ect of percussion and rhythm on musical styles.
Goals and Standards
• Grade Level - K-12 (adaptable for a wide range of ages and musical experience)• Student Prerequisites - Any student who can clap along with a steady beat is ready for these
activities. The activities will still have value for older students with more musical experience if therhythms are su�ciently complex and/or a discussion of musical styles is included.
• Teacher Expertise - Teacher training in music education is not necessary to present this activity,but the teacher should be capable of presenting rhythms accurately and consistently. (See Rhythm32
and Meter33.)• Music Standards Addressed - National Standards for Music Education34 standard 2 (performing
on instruments, alone and with others, a varied repertoire of music). If the Karaoke activities includea discussion of percussion backgrounds as an element of style, this also addresses music standards 6(listening to, analyzing, and describing music) and 9 (understanding music in relation to history andculture). If the students are reading written rhythms, standard 5 (reading and notating music) is alsoaddressed.
• Evaluation - For assessment, decide on a level of rhythmic complexity that the student should beable to achieve in echoing rhythms or in playing a consistent, independent percussion part, then assesswhether the student is succeeding at that level. If not, these activities may be repeated throughoutthe school year, with gradual increases in complexity as the students get more practice.
• Follow-up - Help develop basic rhythmic skills in the students by continuing to give them, throughoutthe school year, simple rhythm parts to accompany music they are learning, and continuing to askthem to echo speci�c rhythms, particularly rhythms that they are learning to read or perform.
2.5.1 Activity 1: Rhythm Imitations
Objectives
• Time Requirements - This activity works best as a short (5-15 minute) class warm-up done oftenin preparation for other musical activities (such as singing, playing instruments, or doing the activitiesbelow).
• Objectives - The student will perform speci�c rhythms accurately, either while reading them orimmediately after hearing them.
Materials and Preparation
• No preparation is necessary if you want the students to copy heard rhythms.• If you want the students to read written rhythms, write some short rhythmic �gures, beginning with
very simple rhythms and gradually adding complexity, or �nd some music with rhythms of the appro-priate complexity. Any single-line music will do for this; students should be encouraged to be capableof ignoring the melodic information, when asked to convey only the rhythmic information in the line.
Procedure31This content is available online at <http://cnx.org/content/m14258/1.12/>.32"Rhythm" <http://cnx.org/content/m11646/latest/>33"Meter in Music" <http://cnx.org/content/m12405/latest/>34http://musiced.nafme.org/resources/national-standards-for-music-education/
Available for free at Connexions <http://cnx.org/content/col10222/1.7>

34 CHAPTER 2. RHYTHM, TEMPO, AND DYNAMICS
• Clap (or play on a rhythm instrument) any short rhythm (or, for students learning to read music, havethe student read a written rhythm).
• Have a student clap or play the same rhythm back to you, at the same speed.• For students who �nd this challenging (or if you have di�culty deciding whether or not they echoed
your rhythm correctly), keep the rhythms short and simple. For students who do well, give themlonger, more challenging rhythms to echo.
Variations
1. Make the rhythm a collection of claps, stomps, and other sounds. (Keep it short unless the studentsare quite good at it.) Have the student copy it using the correct sounds.
2. Make the rhythm a collection of sounds on any percussion instruments you have available. (SeePercussion Fast and Cheap (Section 1.1) for suggestions.)
3. Make this a game, with students taking turns imitating your rhythm (change it often). Students haveto sit down if they miss a rhythm, and the last student standing wins.
4. Let the students have their turn making up short rhythms for each other to imitate.5. If you don't have very many students, you can make this a game in which each student gets more and
more di�cult rhythms until they miss one. Keep track of how many each student got correct beforethey missed.
6. If you want the students to echo the rhythms as a group rather than individually, you will probablyneed to "count o�" for them. Count 2 or 4 beats before you start your rhythm, and then give themexactly the same count to start theirs.
2.5.2 Activity 2: Karaoke Percussion
Objectives
• Time Requirements - Allow one (approximately 45-minute) class period if it will take the studentssome time to learn their rhythms. If the students can learn the rhythms very quickly, this activitycan be done as a 5-15-minute warm-up before other music activities, or as an active break betweendesk-work sessions.
• Objectives - The student will perform a rhythmic ostinato (suitable to the student's age and musicalexperience) as an accompaniment to a recording, keeping an accurate rhythm and beat.
Materials and Preparation
• Be prepared for a noisy activity.• Have percussion instruments ready for the class to use or have the class make their own instruments
ahead of time. (See Percussion Fast and Cheap (Section 1.1).) Don't forget the possibilities of "foundpercussion" (pots, lids, spoons, pencils, books, etc.) and "body percussion" (claps, slaps, �nger snaps,stomps, etc.).
• Select music that you will be adding karaoke percussion to. Cheerful, fast-tempo music that yourstudents enjoy is best. If you are going to include a discussion of percussion as an element of style,make sure you include music from a variety of styles (for example, various kinds of pop, rock, jazz, andworld music). Have your tape or CD player ready, and have tapes ready at the correct spot or knowCD track numbers.
• Unless you will have the students invent the rhythms to be played, you may want to decide on themahead of time. Use rhythms of appropriate complexity: for beginners, this may be simply playing onthe beat, playing o� the beat (harder!), playing only on alternate beats or only on the �rst or last beatof a measure; experienced students will want something more complex and interesting.
Procedure
Available for free at Connexions <http://cnx.org/content/col10222/1.7>

35
• Usually you add the vocal parts when doing karaoke, but in this activity, the class is going to addpercussion parts. For very young children, this will probably mean simply adding noise. That is �ne,although you can encourage them to add the noise on the beat or only during certain phrases in themusic.
• Encourage older students to add a particular repetitive rhythm to the music. Beginners may all needto be on the same rhythm. More musically experienced students may each be given a di�erent rhythm.
• Have the students listen to the song �rst. Have them clap along, so that they feel the basic beat ofthe music. Children with some musical experience may be able to identify rhythms that are alreadybeing emphasized in the music. Encourage older, musically experienced students to come up with asteady, patterned rhythm that �ts the music. For other students, teach them the rhythms that youhave decided on, by letting them play each rhythm with you.
• As much as possible, students should play di�erent, complementary rhythms, instead of all playingthe same rhythm. This activity is most fun for small groups, with each student having a di�erentinstrument and rhythm so that everybody is contributing a unique sound. Break a larger class intosmall groups of students learning (or agreeing on and practicing) the same rhythm on the same typeof instrument. If possible, break the class into smaller performing groups (with one student from eachrhythm group) once the rhythms are learned, and allow the groups to perform for each other, givingeach student a chance to play their rhythm independently.
• Let the students experiment and settle on their rhythms with the music playing, then have a "perfor-mance" with everybody doing their chosen rhythms. This is even more e�ective if students enter oneat a time (you can point to a student when it is her turn to enter) and then steadily continue theirchosen rhythm as more students enter.
• Students with some musical sophistication will enjoy the challenge of adding percussion in a "stylisti-cally appropriate" way. Work with the students to come up with "percussion tracks" for several piecesin very di�erent styles. Discuss di�erences in choice of instruments and in rhythms for the di�erentstyles.
2.5.3 Activity 3: No Karaoke Percussion
• Time Requirements - If it will take some time to teach all the students their parts, allow one(approximately 45-minute) class period. If the students will learn and perform their rhythms quickly,use this as a 5-15-minute class warm-up before other music activities, or as an active break betweendesk-work sessions.
• Objectives - The student will perform a rhythmic ostinato that complements other rhythmic ostinatosbeing performed simultaneously, keeping accurate rhythm and a steady beat.
• Extension - Musically experienced students who succeed at this activity can be asked to provide bothpercussion and vocal parts for a song, with no recorded support. (You may want to provide piano orother accompaniment.) Have the students decide on a variety of rhythmic ostinatos to accompany asong that they know well. Have them sing and play the rhythm parts at the same time.
Materials and Preparation
• If your students have a strong sense of rhythm, they can do this no-background-music version of theactivity.
• Provide each student with a percussion instrument, or let them decide on their own "found" or "body"percussion.
• Decide whether you will provide and teach the rhythms, or let the students come up with their own,or use the same rhythms they have been playing in the previous activity.
Procedure
• Designate one student with a fairly loud instrument as the beat keeper. This student establishes thebeat and plays steadily on the beat during the entire session.
Available for free at Connexions <http://cnx.org/content/col10222/1.7>

36 CHAPTER 2. RHYTHM, TEMPO, AND DYNAMICS
• Other students enter one at a time, steadily playing their rhythms, to produce a complex rhythmicostinato. If they do this well, the result should sound like the background rhythm track to a pop, rock,or Latin tune.
• Once all students have been playing for some time, the beat keeper can end the session. Or, for moreof a challenge, the beat keeper can name a student, who must then play a di�erent rhythm.
• For students ready for a challenge, teach them, or ask them to come up with, several very di�erent"percussion tracks" (using di�erent instruments and di�erent rhythms and meters). After playing eachostinato for some time, ask the students what style or genre of music it might be used for. Can theyidentify the elements (instruments? a particular rhythm? meter?) that most strongly suggests thatstyle or genre?
2.5.4 Other Rhythm Activities Available
You can �nd other activities that explore various aspects of rhythm in Music Conducting: Classroom Activi-ties (Section 2.1), A Tempo Activity (Section 2.2), Musical Meter Activities35, Talking Drums (Section 3.2),and Message Drums (Section 3.1). For more about reading rhythms, see Duration: Note Length36, Duration:Rest Lengths37 and Time Signature38.
35"Musical Meter Activities" <http://cnx.org/content/m13616/latest/>36"Duration: Note Lengths in Written Music" <http://cnx.org/content/m10945/latest/>37"Duration: Rest Length" <http://cnx.org/content/m11887/latest/>38"Time Signature" <http://cnx.org/content/m10956/latest/>
Available for free at Connexions <http://cnx.org/content/col10222/1.7>

Chapter 3
Music and Culture
3.1 Message Drums1
3.1.1 Introduction and Overview
Message drums are actually large slit gongs (p. 38), usually constructed from hollowed-out logs, thatare used to send messages over considerable distances. This lesson plan, suitable for a wide range of ages,includes an explanation and discussion of message drums, and an activity demonstrating how they are used.It is a cross-discipline lesson, appropriate for a music class unit on percussion or instrument traditionsaround the world, a social studies unit on world cultures (message drums were independently invented inseveral di�erent places, including Africa, Asia, and the Americas), a language arts unit on the history ofcommunication or a poetry unit on the rhythm of language, or a science/math unit on codes and messages.
Goals and Standards
• Grade Level - K-12 (adaptable)• Student Prerequisites - Students must be able to cooperate to accomplish goals in small groups
with minimal supervision. (If they cannot, see "Adaptations".)• Teacher Expertise - Teacher expertise in music is not necessary to present this activity.• Time Requirements - One (approximately 45-minute) class period for the presentation and activity.• Goals - The student will learn how and why message drums have been used in several cultures around
the world.• Objectives - The class will discuss various forms of pre-electronic-era long-distance messages and
draw conclusions about why a culture might choose one form over another. Small groups of studentswill each develop a code consisting of several messages that can be sent using two drum pitches, andwill demonstrate their code to the class by using it to successfully send messages across a classroom.
• Music Standards Addressed - National Standards for Music Education2 standards 8 (understandingrelationships between music, the other arts, and disciplines outside the arts) and 9 (understanding musicin relation to history and culture).
• Other Subjects Addressed - The activity also addresses National Standards in the Social Studies3
standards 1 (culture), 2 (time, continuity and change), 3 (people, places and environments), and 8(science, technology, and society), and National Standards for the English Language Arts4 standard 9(Students develop an understanding of and respect for diversity in language use, patterns, and dialectsacross cultures, ethnic groups, geographic regions, and social roles).
1This content is available online at <http://cnx.org/content/m11422/1.11/>.2http://musiced.nafme.org/resources/national-standards-for-music-education/3http://www.socialstudies.org/standards/strands/4http://www.ncte.org/standards
Available for free at Connexions <http://cnx.org/content/col10222/1.7>
37

38 CHAPTER 3. MUSIC AND CULTURE
• Evaluation - Base assessment on discussion and activity participation, and on each group's successin developing and using a code according to the given parameters.
• Adaptations - If the students cannot cooperate in small groups with minimal supervision, do theactivity as a class instead.
3.1.2 Message Drums
3.1.2.1 Introducing the Subject
Give young students copies of the Slit Gong Message Drum5 handout. If possible, show students a pictureof a real message drum from a book or website. (As of this writing, there were useful photos at Art-Paci�c6
and Papua New Guinea - BUAI Digital Information Project7 .)Tell your students: Before telephones and email, before cars, planes, trains, television, radio, or even
telegraph, sending messages quickly across a distance was not easy. Di�erent cultures solved this problemin di�erent ways.
Have the students brainstorm to see how many of these old methods of communicating they can name.Some possibilities they may come up with, or you can suggest if they have trouble naming any: specialrunners or pony-express-style riders; signal towers, signal �res, smoke signals, semaphore, and of course,message drums. Ask them what geographical constraints might make one method better than another, andwhy. For example, which would be better on a �at, open prairie? In an area with mountains, hills, or largerivers? In a heavily forested area? (If they are having trouble deciding, ask them to imagine that they areon a mountain top or an open prairie or in a thick rain forest. Would it be easy to see a signal �re? Couldthey �nd a big log to make a drum? How easy would things be for a runner or fast pony?)
Tell your students: Several cultures around the world discovered a way to send messages that could beheard over great distances. These cultures lived in places where very big trees grew. People in di�erent partsof Africa, Asia, the Paci�c Rim, and the Americas sent messages using drums made out of huge logs. Theywould take a log from a large tree; the bigger the log, the bigger its sound would be and the farther it couldbe heard. A long slit would be cut in the side of the log, and the log would be hollowed out through theslit, leaving wooden ledges, or lips, on each side of the slit. If they wanted the drum to be able to make alower note and a higher note, they would hollow it out more under one lip than under the other. To playmessages, they beat on the drum's lips with sticks, beating out rhythms of high and low notes.
These giant log drums are sometimes called "talking drums", but they are completely di�erent from thefamous talking drums (Section 3.2) of western Africa. Technically speaking, the message-sending logs are notdrums at all, since they do not have a thin skin or membrane that vibrates when they are beaten. Instead,when an edge of the slit is beaten, the entire log vibrates like a big cylinder-shaped gong, so musicologistscall this type of instrument a slit gong.
Each culture that used these slit gongs developed a message "language". The villages that used thedrums would agree on a sort of code of drum "sentences". In some cultures, the drum message sounded likea real sentence, but without the words. For example, "the river is �ooding" might sound like "da-DUM-da-da-DUM-da". To keep messages from sounding too much alike, they sometimes used very long, descriptivesentences to translate into their drum language. Messages could be relayed from village to village, but if themessage travelled to an area where a di�erent language was spoken, it might not be understood anymore.
After this introductory discussion, you may ask young students to draw on and color the Message Drumhandout. You can get a PDF �le of the handout here8. It is also included as a �gure at the end of thismodule, but using the PDF �le will give a nicer-looking handout. Give the following suggestions: Finish thepicture on the handout by �lling in details. Use your imagination. Many message drums have carvings ofanimals or of a face at each end. They are played by someone using a big stick or beater. Often there aresmall stands under each end of the drum to keep it o� of the ground and let it vibrate more freely. Many
5See the �le at <http://cnx.org/content/m11422/latest/messagedrums1.pdf>6http://www.art-paci�c.com/artifacts/nuguinea/ramu/riverlow.htm7http://www.pngbuai.com/600technology/information/waigani/drums/WS97-sec7-Norman2.html8See the �le at <http://cnx.org/content/m11422/latest/messagedrums1.pdf>
Available for free at Connexions <http://cnx.org/content/col10222/1.7>
39
message drums are kept in a shed so that they don't get rained on. Add some of these details and then coloryour picture.
You may also want to do "The Rhythms of Language" activity from Talking Drums (Section 3.2.5:Activity: The Rhythms of Language) and/or the "Make a Drum Code" activity below.
3.1.2.2 Activity: Make a Drum Code
Materials and Preparation
• Be prepared for a noisy activity!• Each group will need pencils and paper.• You will need something to drum on and something to drum with. The class can take turns with one
set of "drums" in order to reduce the noise level. Or each group can have its own drums, so that theycan practice and test possible message codes. A wooden "tongue drum" is ideal, since this is basicallya small box version of a slit gong, but any drums that can produce two or three di�erent pitches (aset of bongos for example) will do. Homemade percussion (e.g. drumming on two di�erent sized potswith a wooden spoon) is �ne, too. For more ideas, see Percussion Fast and Cheap (Section 1.1).
Prodedure
1. Tell the class to imagine that they live in small villages a few miles apart. There are no telephones,radios, email, or TV. Usually, if they want to talk to their friends in the next village, they have towalk there to do it. But sometimes they might just want to send a message that their friends will getright away. They need to develop a code that both villages know. Suggest keeping the codes short andsimple for clarity, and remind them that there are two ways to make messages sound di�erent fromeach other: using the two di�erent notes and making the rhythm di�erent.
2. Have the class brainstorm about messages that might be useful to send. Emergency messages like"send the doctor", news like "strangers have arrived", and everyday messages like "I'll be home late"are all acceptable.
3. Divide the class into small groups (3 to 6 students per group).4. Each group is to develop a code of three to ten messages. (You decide the number, based on age,
attention span, and class period length.) They decide which messages they would like to be able tosend, and what rhythm stands for each message. Have older children invent a way to write the codedown so that they can remember it.
5. After a suitable period of time, reassemble the class. Give each group a chance to show o� theirmessage code. When it is a group's turn, they split into message senders and receivers, on oppositesides of the room. (Let them take turns if there is time.) For older students, make sure both groupshave a copy of their written code as a reminder. You stand with the senders and point to or whisperwhich message they should send. Have them beat the message on the drum(s) and see if the receiverscan name the message correctly.
3.1.3 Further Study and Suggested Resources
• The wooden "tongue drum" is a smaller version of the slit gong. It is popular enough that you maybe able to �nd it in a music store that specializes in percussion or even in a souvenir shop. Or see ifyou can get a local percussionist or a member of the percussion section of a local ensemble or nearbyhigh school to demonstrate one for your class.
Available for free at Connexions <http://cnx.org/content/col10222/1.7>
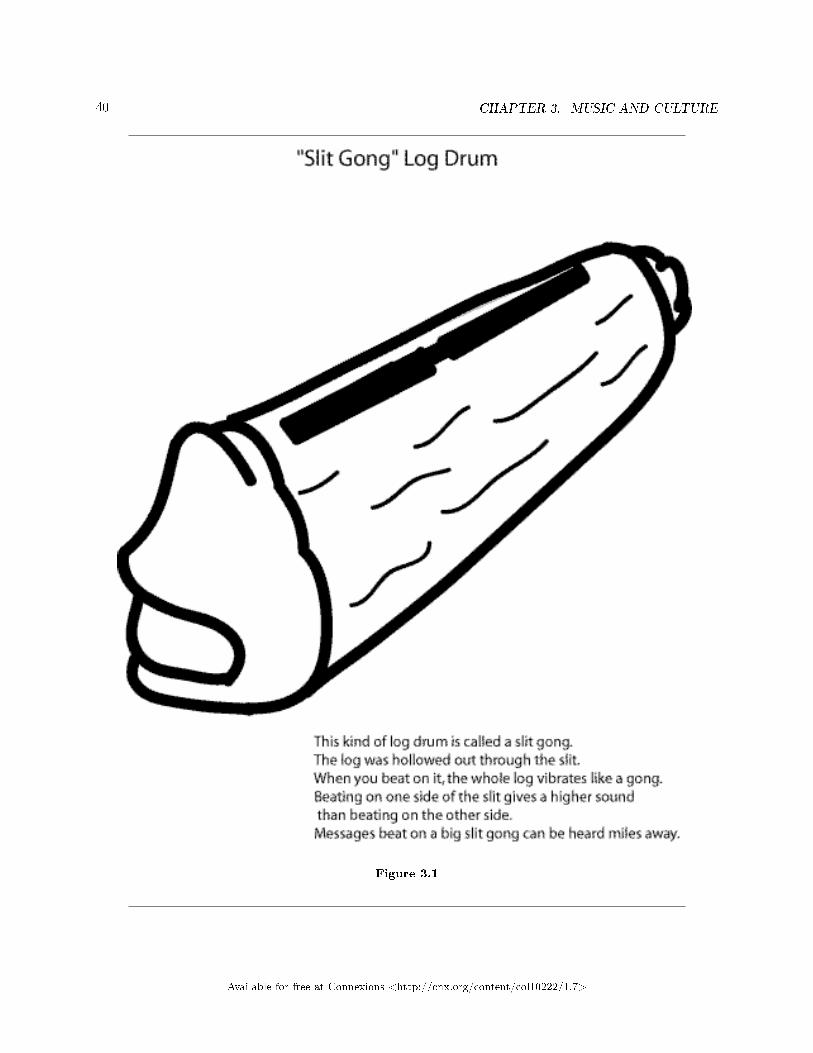
40 CHAPTER 3. MUSIC AND CULTURE
Figure 3.1
Available for free at Connexions <http://cnx.org/content/col10222/1.7>

41
3.2 Talking Drums9
Here are discussion points (p. 41) and four classroom activities designed to accompany an introductionto West African talking drums: Stretching Raises the Pitch (Section 3.2.2: Activity: Stretching Raises thePitch), Tonal Languages (Section 3.2.3: Activity: Tonal Languages), Talking Kazoos (Section 3.2.4: Activity:Talking Kazoos), and The Rhythms of Language (Section 3.2.5: Activity: The Rhythms of Language). Youmay do any or all of the activities, in any order, either during or following the discussion.
Goals and Requirements
• Goals - The student will understand and be able to de�ne, describe, or demonstrate: tonal language,talking drum, message drum, the relationship between talking drums and tonal language, and how tochange the pitch of a drum.
• Grade Level - K-12 (adaptable)• Student Prerequisites - none• Teacher Expertise - Teacher expertise in music is not necessary to present this activity.• Time Requirements - The discussion with a single activity or with minimal demonstrations of each
concept can be done in one (approximately 45-minute) class period. For more complete explorationof the activities, or to include presentation of a book or a demonstration by a guest, allow two classperiods.
3.2.1 Introducing the Subject
Materials and Preparation
• For younger students, make copies of the handout. It is available as a PDF �le10 or below (Figure 3.2),as a �gure. (The PDF �le will give a nicer-looking handout.)
• A globe, map of the world, or map of Africa would be useful as a visual aid.• If you are going to use rubber bands or a guest percussionist to do the Stretching Raises the Pitch
(Section 3.2.2: Activity: Stretching Raises the Pitch) demonstration, you may want to be prepared todo this during your discussion.
• If you are going to have someone demonstrate a tonal language, or have a picture book, photos, or soundclips of talking drums to share (see below (Section 3.2.6: Further Study and Suggested Resources)),you may also want have these ready to present during the discussion.
• If you want young students to color the handout during or after your discussion, have their crayons ormarkers available.
If appropriate, give each student a copy of the "Talking Drums" handout. If possible, present photos, videos,or audio clips (see below (p. 46)).
Tell the students: Some people confuse talking drums with message drums, but they are actually some-thing completely di�erent. Message drums (Section 3.1), or slit gongs, are huge log drums that can be heardmiles away, and their messages are usually in some kind of code, although the code may be based on spokensentences. Message drums were invented independently by several di�erent cultures around the world. Someother cultures also invented a kind of "waisted drum" (in Korea and India, for example), but only westernAfrica has "talking drums".
note: If it is appropriate, you may want to present Message Drums (Section 3.1) to your classbefore you cover talking drums.
Tell the students: Talking drums are not made from big logs. They are a kind of drum called a waisteddrum. They are called "waisted" because they have an hourglass shape, with a "waist" in the middle, just
9This content is available online at <http://cnx.org/content/m11872/1.11/>.10See the �le at <http://cnx.org/content/m11872/latest/talkingdrum1.pdf>
Available for free at Connexions <http://cnx.org/content/col10222/1.7>
42 CHAPTER 3. MUSIC AND CULTURE
like a person's body has a waist in the middle. Skins are stretched over the ends of the drum, held in placeby many cords. When the cords are tightened, the skin gets pulled tighter and the sound of the drum getshigher. When the cords are relaxed, the sound goes lower. The player holds the drum between his upperarm and left side and uses his arm to squeeze and relax the cords while he is striking the drum with a curvedstick in his right hand.
note: You may want to present the activity (see Stretching Raises the Pitch (Section 3.2.2:Activity: Stretching Raises the Pitch)) at this point in the discussion.
If you have a world map or globe, help the students locate western Africa and speci�cally the countriesGhana and Nigeria. Tell the students: The peoples of western Africa, for example the Ashanti people ofGhana and the Yoruba people of Nigeria (both of which have talking drums) speak tonal languages. Englishis not a tonal language. The word "hat" means something you put on your head. If your voice rises whileyou say "hat", it might sound as if you are asking a question. If your voice falls, it might sound as if you arequite certain of the hat. If your voice rises and then falls, it might sound as if the hat surprises you. If yourvoice stays even, it might sound as if the hat bores you. But in every case you are talking about somethingthat goes on your head.
If English were a tonal language, though, saying the syllable "hat" while your voice rises might meansomething you put on your head; saying it while your voice falls might mean something you put on your feet.Saying it while your voice rises and then falls might mean "come here", and saying it evenly might mean ananimal with long ears that hops. Some words in some African dialects are so precisely tonal that you couldwrite out the notes for a particular word on a musical sta�.
note: If you have invited a speaker of a tonal language for a demonstration, this is the bestpoint in the discussion for it. You may also do the Tonal Languages (Section 3.2.3: Activity: TonalLanguages) activity at this point, or save it for immediately following the discussion.
Tell your students: So imagine the player of the talking drum. Using his left arm, he can control veryprecisely the tone of each syllable of his talking drum. What comes out of the drum is not the alphabetsounds of the words, but all the other things that go into a phrase - lengths, rhythms, pitches, rising andfalling syllables. In a very tonal language, that is enough. The people who speak the same dialect as thedrummer will be able to hear what his drum is saying. But, of course, if they are from a village that speakswith a di�erent accent, they may not be able to understand his drum at all!
note: At this point you can do some of the activities below, or the "Make a Drum Code" activityfrom Message Drums (Section 3.1), or share any books or sound recordings you have.
3.2.2 Activity: Stretching Raises the Pitch
Objectives and Standards
• Objectives - Using either rubber bands or available musical instruments, the students will demonstrateor attend a demonstration of the basic acoustics principle that the stretching and tightening causedby pulling on a vibrating object raises its pitch11. (For a more complete demonstration project, seeSound and Music (Section 1.2)).
• Music Standards Addressed - National Standards for Music Education12 standard 8 (understandingrelationships between music, the other arts, and disciplines outside the arts).
• Other Subjects Addressed - The activity also addresses National Science Education Standards13
in physical science, science and technology, and science in personal and social perspective.
11"Pitch: Sharp, Flat, and Natural Notes" <http://cnx.org/content/m10943/latest/>12http://musiced.nafme.org/resources/national-standards-for-music-education/13http://www.nap.edu/readingroom/books/nses/overview.html#content
Available for free at Connexions <http://cnx.org/content/col10222/1.7>
43
• Evaluation - Assess student learning by evaluating class participation or asking relevant questions inan oral review or on a written test: e.g. "How can you make a drum sound higher?"
Your students may appreciate a demonstration that stretching and relaxing an "instrument" will raise andlower its pitch. Consider doing one of the following:
• The simplest way to demonstrate this is with rubber bands. Let one student stretch a rubber bandbetween two �ngers while another student plucks it. Listen to the sound the rubber band makes; thetighter it is stretched, the higher the sound. If it is stretched or relaxed quickly immediately afterbeing plucked, you may even be able to hear the pitch slide up or down, just like it does in a talkingdrum.
• Many hobby books on making musical instruments include instructions for making a drum with astretched head held in place by strings. If it is made of good materials, you should be able to changethe pitch of such a drum by tightening or loosening the strings. Pursue this only if you are interestedin a major class project which will require speci�c materials and take several hours.
• You may be able to get a local band director or percussionist to bring in some drums with heads thatcan be tightened and loosened to change the pitch. Ask for a demonstration, and an explanation ofthe methods of tightening and loosening drum heads. Many percussionists won't have a waisted drum,but many other drums (such as orchestral tympani) are also "tunable".
• The basic idea can also be demonstrated with any stringed instrument (guitar, violin, banjo, cello,etc.): as you turn the tuning peg you are winding or unwinding the string, making it tighter or looser.
3.2.3 Activity: Tonal Languages
Objectives and Standards
• Objectives - Students will actively participate in a demonstration of how tonality a�ects meaningeven in a nontonal language, by demonstrating and explaining how di�erent in�ections cause slightdi�erences in the meaning of a short word or phrase in English.
• Music Standards Addressed - National Standards for Music Education14 standards 8 (understand-ing relationships between music, the other arts, and disciplines outside the arts) and 9 (understandingmusic in relation to history and culture).
• Other Subjects Addressed - The activity also addresses National Standards in the Social Studies15
standard 1 (culture), and National Standards for the English Language Arts16 standards 4 (Studentsadjust their use of spoken, written, and visual language (e.g., conventions, style, vocabulary) to com-municate e�ectively with a variety of audiences and for di�erent purposes.) and 9 (Students developan understanding of and respect for diversity in language use, patterns, and dialects across cultures,ethnic groups, geographic regions, and social roles).
• Evaluation - Assess student learning by evaluating class participation or asking relevant questions inan oral review or on a written test: e.g. "What is a tonal language?"
• Adaptations - For best comprehension, this activity should be presented to students using their nativelanguage, dialect, and accent. The teacher should adjust the activity accordingly.
English is not a tonal language, so it can be di�cult for English speakers to appreciate how importantin�ection is in tonal languages. Here is a short activity that can help and requires no materials or preparation.
Procedure
1. Have students try saying the word "here" in many di�erent ways: slowly or crisply, with the voicerising, falling, monotone, rising and then falling, etc. Which one means "Do you want it here?" Which
14http://musiced.nafme.org/resources/national-standards-for-music-education/15http://www.socialstudies.org/standards/strands/16http://www.ncte.org/standards
Available for free at Connexions <http://cnx.org/content/col10222/1.7>

44 CHAPTER 3. MUSIC AND CULTURE
means "Yes, I want it here!". Do di�erent tones seem to mean "You called my name and I'm present"or "Are you looking for me? I'm over here" or "Ha ha, you never spotted me. Here I am!" Can theydiscover other "here"'s that seem to mean di�erent things?
2. They can try the same game with other words: "there", "this", "that", "what", "OK", "cool", "hey","now", "dude", etc. Can the students think of other words or short phrases that work well as demon-strations?
3. Have the students pretend that they are hearing someone call them from a long distance away. Whatdoes it sound like? Do their voices adopt a kind of sing-song quality in which the last syllable soundsabout a minor third lower than the rest of the name? This is close to the type of sounds in some tonallanguages.
4. Can the students imagine an adult saying "bye bye" or "what a smart little girl" or "that's a no-no,sweetie" to a little baby? Can they imagine an excited preacher singing out "Amen!" or "Do youbelieve?" What does it sound like? These are also times when English can sound a little like a tonallanguage.
3.2.4 Activity: Talking Kazoos
Objectives and Standards
• Objectives - Students will construct simple kazoos or use commercially-made kazoos. Students usethe kazoos, or humming, to try to convey meaning using only the rhythm and in�ection of a sentence.
• Music Standards Addressed - National Standards for Music Education17 standard 8 (understandingrelationships between music, the other arts, and disciplines outside the arts) and 9 (understanding musicin relation to history and culture).
• Other Subjects Addressed - The activity also addresses National Standards in the Social Studies18
standard 1 (culture), and National Standards for the English Language Arts19 standards 4 (Studentsadjust their use of spoken, written, and visual language (e.g., conventions, style, vocabulary) to com-municate e�ectively with a variety of audiences and for di�erent purposes.) and 9 (Students developan understanding of and respect for diversity in language use, patterns, and dialects across cultures,ethnic groups, geographic regions, and social roles).
• Evaluation - Assess student learning by evaluating class participation and success in communicatingand guessing phrases.
Making a talking drum would be a serious undertaking, and most other instruments don't have the abilityto change pitch as quickly as the human voice does. You can have the students experiment with the idea oftalking without words by having them take turns humming a phrase and trying to guess what was hummed.For example, one student might hum "My name is Alexander" by making all the sounds that he would whenhe says that phrase, but with his mouth closed. Or, if you have enough time, make "talking kazoos."
Materials and Preparation
• One pocket comb per player• Tissue paper• Or use commercially made kazoos
Procedure
1. For each kazoo, cut out of tissue paper a rectangle with a length slightly longer than the comb and awidth slightly wider than twice the width of the comb.
2. Fold the tissue paper in half over the teeth of the comb.
17http://musiced.nafme.org/resources/national-standards-for-music-education/18http://www.socialstudies.org/standards/strands/19http://www.ncte.org/standards
Available for free at Connexions <http://cnx.org/content/col10222/1.7>

45
3. Holding the tissue paper in place over both sides of the comb, play the kazoo by placing the lips lightlyagainst the tissue paper and humming.
4. Encourage the students to use common and easily recognizable phrases (for example, an expressionor slang phrase that is very popular at the moment), and to put as much expression as possible intothe phrase. Explain that the goal is to communicate, not to stump their audience. When a phrase issuccessfully guessed, the student that hummed it has succeeded.
5. Using the kazoos, the students take turns humming familiar phrases to each other and trying to guessthe phrase based simply on its rhythm and in�ections.
3.2.5 Activity: The Rhythms of Language
Objectives and Standards
• Objectives - Using body percussion or simple drums provided or made for the purpose, the studentwill turn the rhythm of a given sentence into a two-toned drum rhythm.
• Music Standards Addressed - National Standards for Music Education20 standard 8 (understandingrelationships between music, the other arts, and disciplines outside the arts) and 9 (understanding musicin relation to history and culture).
• Other Subjects Addressed - The activity also addresses National Standards in the Social Studies21
standard 1 (culture), and National Standards for the English Language Arts22 standards 4 (Studentsadjust their use of spoken, written, and visual language (e.g., conventions, style, vocabulary) to com-municate e�ectively with a variety of audiences and for di�erent purposes.) and 9 (Students developan understanding of and respect for diversity in language use, patterns, and dialects across cultures,ethnic groups, geographic regions, and social roles).
• Evaluation - Assess student learning by evaluating class participation.
Tonal in�ections are not the only part of language that talking drums mimic. In any language, words,phrases and sentences have a natural rhythm. Here is an activity that helps students appreciate the rhythmof language. For a more complete exploration of this concept, see the activity in Message Drums (Section 3.1).
Materials and Preparation
• This activity can be done with any two drums that sound di�erent from each other. You can use toydrums, real drums, or homemade drums.
• Or turn ordinary objects into drums (pots, bowls, desks, books) and drumsticks (pencils, rulers, sticks).See Percussion Fast and Cheap (Section 1.1) for other suggestions.
• Or if you do not want to bother with drums, use clapping, �nger-snapping, thigh slapping, stomping,or other "body percussion."
Procedure
1. If necessary, introduce or review the concept of strong and weak syllables.2. Assign one drum or sound (e.g. clapping) for strong syllables, and one drum or sound (e.g. �nger
snapping) for weak syllables.3. Let the students take turns.4. One student says a sentence. Encourage long, creative sentences. ("I wish we could have pizza for
lunch today" rather than "I want pizza".)5. Another student beats or claps out the rhythm of the sentence (da-DUM-da-da-da-DUM-da-da-DUM-
da-da). Encourage them to mimic the natural rhythm of the sentence as much as possible. After oneperson has played the rhythm, see if the entire group can "play" the sentence together.
20http://musiced.nafme.org/resources/national-standards-for-music-education/21http://www.socialstudies.org/standards/strands/22http://www.ncte.org/standards
Available for free at Connexions <http://cnx.org/content/col10222/1.7>

46 CHAPTER 3. MUSIC AND CULTURE
6. Ask the students: Is there a particular length or type of sentence that is easiest to turn into a rhythmthat everyone can agree on? Do the rhythms of the sentences sound alike or di�erent? If two sentencessound too much alike, what could be done to make them sound di�erent?
7. If you are also studying poetry, try this activity with poetry. Can the students identify meter, linelength, and poem type just from drum rhythms?
3.2.6 Further Study and Suggested Resources
• If a picture book is appropriate for your students, consider sharing with them Talking Drums of Africa
by Christine Price (Charles Scribner's Sons, 1973). Featuring the Ashanti people of Ghana and theYoruba of Nigeria, it explains how the drums are put together, how they are used, how they "talk",and the part they play in the culture.
• If any members of the class speak a tonal language (Chinese, for example), or if a parent or other adultis available for a demonstration, ask them to help the class with a show-and-tell that demonstrateshow the meaning of words in their language changes with in�ection.
• At the time of this writing, photos and sound clips of talking drums could be found at the web site ofthe Nigerian Talking Drum Ensemble23 .
23http://www.nitade.com/
Available for free at Connexions <http://cnx.org/content/col10222/1.7>

47
Figure 3.2
Available for free at Connexions <http://cnx.org/content/col10222/1.7>

48 CHAPTER 3. MUSIC AND CULTURE
3.3 Caribbean Music: Calypso and Found Percussion24
3.3.1 Introduction and Overview
Calypso is a style of music that developed in the West Indies, the islands of the Caribbean. It began inTrinidad, and spread through the islands, in�uencing many other popular styles of music, in the West Indies,the U.S., and around the world. This module includes several ideas for presenting Calypso to young students.
Use this lesson for:
• Music class - Make and play percussion instruments, and/or sing and play percussion using typicalCaribbean rhythms.
• Music concert - Learn the songs (with percussion accompaniment) for a performance, particularly amulticultural concert.
• Social studies class - Do any of the activities, as part of a unit on West Indies cultures, cultures of theAmericas, history of the Caribbean or of the Americas, African-American history, or African-Americanmusic.
• Creative writing - Do the "Introduction to Calypso", and then have the students write somecalypso-style lyrics.
This module includes several di�erent activities, all related to Calypso music. There is a short Introductionto Calypso music (Section 3.3.2: An Introduction to Calypso), songs (Section 3.3.5: Songs with CalypsoRhythms) to sing with calypso-style rhythms, a "found percussion" activity (Section 3.3.3: "Found Per-cussion"), Calypso-style rhythms (Section 3.3.4: Calypso Rhythms) to play on percussion, and a creativewriting activity (Section 3.3.6: Writing Calypso Lyrics). Choose whichever are appropriate for your class;doing all of them will probably require at least �ve class periods. There are also suggestions for �ndingrecordings (Section 3.3.7: Listening to Calypso) to listen to.
3.3.2 An Introduction to Calypso
Goals and Standards
• Goals - Following the presentation, students should be able to correctly identify photos, drawings,and audio recordings of steel drums, locate Trinidad and Tobago on a world map or globe, and givean age-appropriate description of the history of calypso music.
• Objectives - The students will listen to steel drum, calypso, and/or calypso-style music, look atphotos, drawings or videos of steel drums, locate Trinidad and Tobago on a map, and listen to alecture on the history of calypso music.
• Grade Level - K-12 (adaptable)• Student Prerequisites - none• Teacher Expertise - Teacher expertise in music is not necessary to present this activity.• Time Requirements - 10-20 minutes. Can be combined with one or more of the activities below to
�ll one (approximately 45-minute) class period.• Evaluation - Assess student learning by including questions covering the material in a unit test, or
by quizzing the students orally following the activities.• Music Standards Addressed -National Standards for Music Education25 standard 9 (understanding
music in relation to history and culture).• Other Subjects Addressed - The activity also addresses National Council for the Social Studies26
standard 1 (culture) and 9 (global connections).
24This content is available online at <http://cnx.org/content/m11688/1.10/>.25http://musiced.nafme.org/resources/national-standards-for-music-education/26http://www.socialstudies.org/standards/strands/
Available for free at Connexions <http://cnx.org/content/col10222/1.7>

49
• Extensions - If at all possible, the lecture should be followed by at least one of the activities below,or a similar activity that makes the information more concrete and memorable. Older students maybe asked to do independent research on the subject.
Materials and Preparation
• You will need a globe, world map, or map of the Americas.• Have an audio player and some CDs or tapes for the children to hear. See below (Section 3.3.7:
Listening to Calypso) for a list of suggestions.• Have the tapes ready to play at the right spot, or know the CD track numbers.• Pictures of steel pan drums or of steelbands, or video of a steelband performance, would be a useful
visual aid. (You may use the drawing included here if you like.) Even better, contact any steelbandsin your area to see if they would be willing to send a member or two for a demonstration. Withyounger students, you may also want to include pictures of the islands in your presentation while youare talking, to help focus their attention.
Steel Pan Drum
Figure 3.3: Today's steel pan drum is crafted by a skilled instrument maker, but it retains the basicshape of an upside-down oil drum with its bottom specially shaped to produce a variety of notes.
Procedure
1. Ask the students if they can name any kinds of (U.S.) American music that were strongly in�uencedby African music. There are many right answers to this question: blues, gospel, soul, and jazz, as wellas newer African-American styles such as rap, and, in fact, most rock and pop styles.
2. Tell the students that Africans were also brought to many Central American, South American, andCaribbean countries. Whether or not your discussion also includes the cruelty and injustice involvedwill depend on the age and maturity of your students and how much you have already covered thissubject. You don't want to use this lesson to introduce the horrors of slavery, but if they alreadyunderstand what was going on, you can point out some of the in�uences this had on the music. Thereis also a large Indian population on Trinidad, the result of plantation owners encouraging immigration
Available for free at Connexions <http://cnx.org/content/col10222/1.7>
50 CHAPTER 3. MUSIC AND CULTURE
from India (as replacement workers when they were forced to free their slaves) using misleading promisesthat led to a kind of indentured servitude. Again, this may be more information than your class needs,or it may be appropriate and relevant to their studies.
3. Help the students �nd Trinidad on a map or globe. Tell them: Today Trinidad is part of a smallcountry called "Trinidad and Tobago". (You can also help them �nd the smaller island of Tobago ifyou like.) But this island was once owned by Spain, and then by England, and many people came to theislands from India and France as well as west Africa. (Have them locate western Africa, India, England,Spain, and France on a map or globe). And all of those people brought their favorite traditions andfavorite songs and music with them. When they settled on Trinidad, they heard each other's music,and eventually the African-Trinidadians invented a kind of music that sounded a little bit African anda little bit European but was also uniquely Trinidadian.
4. Play some of the music you have chosen for them.5. Tell the students: Calypso began as a type of protest music. African-Trinidadians in the eighteen-
hundreds were not allowed to talk as they worked, but they were allowed to sing. Many of the songleaders became very good at improvising words to songs in order to comment on the news of the day.("The Banana Boat Song [Day-O]" of Harry Belafonte fame is the type of call-and-response work songthat this could be done with.) Calypso songs also had improvised words that commented on the latestnews and sometimes on life in general, but they were more clearly protest songs that often featuredsarcasm and wit. The subversive nature of the music alarmed the authorities, who in 1884, in an e�ortto stop it, banned the playing of skin drums. That hardly stopped the Calypsonians; they just madeinstruments out of bamboo instead. Bamboo makes a nice sound with a de�nite pitch27 when you hit itwith a stick; the bigger and longer the piece of bamboo, the lower the sound. (See Sound, Physics, andMusic28 for more information, or Sound and Music (Section 1.2) for activities related to this.) So thecalypso players cut many di�erent lengths of bamboo and formed what they called tamboo bamboobands. The government then banned the playing of bamboo tubes, claiming that the bands encouragedviolence, but the Calypsonians still kept playing. Their bands had always included instruments otherthan skin drums or bamboo: stringed instruments, for example, and maracas, and bottle-and-spoon.But in the 1930's they began to make drums out of metal objects.
6. If you have any pictures or even a real pan drum for the students to look at, this is the best time toshow them.
7. Tell the students: The calypso bands didn't just pick up pots and pans and beat on them. Whatthey did was �nd useful objects and work on them until they became musical instruments. At �rst,the musicians made their own instruments, often out of the bottoms (the pans) of metal shippingcontainers, paint cans, and garbage cans. A good instrument maker could often shape a pan so thatit would play di�erent pitches when it was hit in di�erent spots. By the end of the 1930's therewere bands made up only of pans: steelbands. During the Second World War, empty 55-gallon oildrums became widely available on the island. The now-professional instrument makers perfected theirtechnique, making and selling pan drums that could play an entire scale and that could specialize inplaying melody29, harmony30, bass31, or rhythm32.
note: The steel drum is the only acoustic (non-electric) instrument invented in the twentiethcentury.
In the 1950's, the unique sound of calypso became widely known and popular around the world,particularly in the U.S. Today the steel pan is the national instrument of Trinidad and Tobago, andthere are o�cial calypso competitions every year. People of all races enjoy and perform the music.Strings, saxes, clarinets, trumpets, tin whistles and percussion are all popular instruments at thecompetitions, although not as popular as the steel pans. And the focus of genuine calypso is still on
27"Pitch: Sharp, Flat, and Natural Notes" <http://cnx.org/content/m10943/latest/>28"Frequency, Wavelength, and Pitch" <http://cnx.org/content/m11060/latest/>29"Melody" <http://cnx.org/content/m11647/latest/>30"Harmony" <http://cnx.org/content/m11654/latest/>31"Harmony": Accompaniment <http://cnx.org/content/m11654/latest/#l0c>32"Rhythm" <http://cnx.org/content/m11646/latest/>
Available for free at Connexions <http://cnx.org/content/col10222/1.7>
51
improvising clever, humorous, and topical lyrics that still often poke fun at the rich and the powerful.But the sounds and rhythms of calypso can be heard in many other places, too: in movies, jazz, dancemusic, and in other, newer Caribbean music styles.
8. At this point, you can ask your guest for a demonstration, or play some more calypso-style recordingsfor them (to focus their attention, ask them if they can guess what types of instruments they arehearing), and/or introduce the related activities you will be doing.
3.3.3 "Found Percussion"
Goals and Standards
• Goals - Students will make musical instruments, with a variety of pitches, from found objects.• Objectives - Students will bring from home a variety of discarded objects that make interesting sounds
when struck. The students will sort the found objects by type and use them, alone or in groups, toassemble collections of similar objects (or similar-sounding objects) with di�erent sizes, that can beused to play three-pitch33 percussion parts. Each student or group will demonstrate their �nishedpercussion instrument to the class and/or use it in the following activities.
• Grade Level - K-12 (adaptable)• Student Prerequisites - none• Teacher Expertise - Teacher expertise in music is not necessary to present this activity.• Time Requirements - One (approximately 45-minute) class period.• Evaluation - Evaluate neatness, cooperation, and visual presentation, according to your usual rubric
for craft activities, as well as student success in constructing an "instrument" with three similar soundsof di�erent pitch.
• Music Standards Addressed - National Standards for Music Education34 standard 9 (understandingmusic in relation to history and culture).
• Other Subjects Addressed - The activity also addresses National Council for the Social Studies35
standard 1 (culture).• Extensions - Older, gifted, or ambitious students may want to design and make instruments tuned to
make speci�c pitches (more like an actual steel drum, mbira, or xylophone), that could be used to playa melody, from found objects. Encourage them to �nd objects that ring with clear, de�nite pitches(nails, rake tines, bamboo sticks, blocks of hard wood, metal bowls, and heavy cardboard tubes aresome possibilities), and help them research easy ways to tune the objects.
Materials and Preparation
• Plan ahead to give your students plenty of time to �nd and bring in "found" objects that they can useto make instruments. Suggest that they look for discardable objects that have a nice or interestingsound. Send home notes of explanation if necessary. Possible suggestions (depending on how muchand what type of work you will want them doing in class): clean, empty metal cans of all sizes, with nosharp edges; clean, empty plastic tubs and lids of all sizes; pieces of bamboo or dowels, cut (at homeby a parent) into various short lengths; small pieces of hardwood lumber; empty cardboard tubes frompaper towel and wrapping paper rolls, or sturdy cardboard containers such as oatmeal boxes. You may�nd further ideas in Percussion Fast and Cheap (Section 1.1) or Sound and Music (Section 1.2).
• You may want to have calypso music to play in the background as they are working on their instruments.• Be prepared for a noisy activity.• Optional: If a messy activity is OK, you may want to supply, or have the students supply: some
dry beans or beads for maraca-type sounds; sticky clay, plaster, water, or sand to "tune" the objects,and/or art supplies to decorate the instruments.
33"Pitch: Sharp, Flat, and Natural Notes" <http://cnx.org/content/m10943/latest/>34http://musiced.nafme.org/resources/national-standards-for-music-education/35http://www.socialstudies.org/standards/strands/
Available for free at Connexions <http://cnx.org/content/col10222/1.7>

52 CHAPTER 3. MUSIC AND CULTURE
• You may also want to supply string and/or strong scissors and tape.• The students will need beaters or drumsticks to play the instruments with. Rulers, heavy pencils,
wooden spoons, real drumsticks, short dowels, or pieces of bamboo are all possibilities. You can supplythese, have the students supply them, or use whatever happens to be at hand.
Procedure
1. Tell your students that since the 1950's, calypso music has mostly been played on professionally craftedinstruments, including trumpets, saxophones, clarinets, guitars, and drum sets, as well as the tradi-tional steel pan drum. But in its early days, Calypso was often played on instruments that peoplemade from things they could �nd, including bamboo tubes, paint cans, shipping cans, garbage cans,and oil drums (big metal barrels that oil was stored or shipped in). Make sure they understand thatthe objects generally were not played as they were found, but were turned into instruments by themusicians.
2. Depending on how many objects are available, you may want to pool the materials and have thestudents work in groups, or let them trade or select objects if they are working alone. Each student orgroup should try to gather a collection of similar objects, for example plastic tubs of various sizes.
3. Have the students experiment with "playing" each of their objects. Do some sound higher than theothers? Can they get more than one sound from the same object? Can they arrange the objects fromlowest to highest sound? If they all sound the same, can they change the pitches of some of them,by cutting the cardboard tubes for example. If you don't mind the mess and the instruments are notgoing to be permanent, they can try tuning containers by sticking clay or tape to them, or �lling themwith water, sand, or plaster.
4. One group may prefer to make maracas of di�erent sizes and pitches, by �lling some containers withdried beans; prevent some messes by sealing the containers with strong tape once they have a soundthat they like.
5. Have the students experiment: Do their objects give their best sound when they are held in the hand?Hung from a string? Put on a desk? Taped to a board? Laid across two two boards or dowels withsome space beneath them? Tapped with �ngers or with another object, or slapped against a thigh orthe heel of a hand?
6. Once they have decided on their objects and decided how best to play them, have them assembletheir �nal instrument from at least three di�erently-pitched objects and give a demonstration to theclass. You may want to use some of their instruments to accompany a song (Section 3.3.5: Songs withCalypso Rhythms) or to play calypso rhythms (Section 3.3.4: Calypso Rhythms).
3.3.4 Calypso Rhythms
Goals and Standards
• Goals - Students will learn to perform calypso-style rhythms.• Objectives - Students will listen to and imitate one or more calypso-style rhythms. Students will
perform rhythms as a group, either all playing the same rhythm, or playing a variety of rhythms atthe same time. Students will display good musicianship by keeping a steady beat, keeping to the samebeat as the group, and playing rhythms accurately.
• Grade Level - K-12 (adaptable)• Student Prerequisites - none• Teacher Expertise - The teacher or an assistant must be able to accurately demonstrate the rhythms
and lead the class in playing them. If the students will be playing more than one rhythm at a time,the teacher should be comfortable leading simple percussion ensembles.
• Time Requirements - Only a few minutes to learn each rhythm• Evaluation - Evaluate students on participation as well as rhythmic accuracy.
Available for free at Connexions <http://cnx.org/content/col10222/1.7>
53
• Music Standards Addressed - National Standards for Music Education36 standards 2 (performingon instruments, alone and with others, a varied repertoire of music) and 9 (understanding music inrelation to history and culture).
• Other Subjects Addressed - The activity also addresses National Council for the Social Studies37
standard 1 (culture).
Materials and Preparation
• Review the rhythms below. If you are not a musician, listen to the recordings and make sure you candemonstrate the rhythms accurately.
• Decide how many, and which ones, you will teach to the class. Plan to teach younger, musicallyinexperienced students only a single rhythm. Plan to teach older, musically experienced students avariety of rhythms.
• Decide what will be used to play the rhythms. Some possibilities: They may use instruments they havemade, assembled, (see above (Section 3.3.3: "Found Percussion")), or been given, or body percussion(see Percussion Fast and Cheap (Section 1.1)). Arrange for the desired instruments to be availableduring the class period, and plan for a noisy activity.
• Decide what the �nal performance experience will be. Some possibilities: They may play the rhythmsalone, to accompany a recording, or to accompany a song that they sing (see below (Section 3.3.5:Songs with Calypso Rhythms)), either in class, or as part of a formal performance.
Procedure
1. If they are going to make their own percussion instruments (Section 3.3.3: "Found Percussion"), dothat activity �rst.
2. Demonstrate one of the rhythms. Have the students echo the rhythm, either individually or as a group.(To help groups start together, count crisply and steadily, "One, two three, go...")
3. If the students learn the rhythm easily, introduce a new one.4. If the students learn more than one rhythm easily and accurately, divide them into groups, assigning
one rhythm to each group, and see if the class can play di�erent rhythms simultaneously.5. After an appropriate amount of practice time, have the class use the rhythms) to accompany a recording,
or to accompany a song that they have learned. Younger or musically inexperienced students may needto be divided into "singers" and "rhythm section". If so, give each student a chance to do both.
36http://musiced.nafme.org/resources/national-standards-for-music-education/37http://www.socialstudies.org/standards/strands/
Available for free at Connexions <http://cnx.org/content/col10222/1.7>
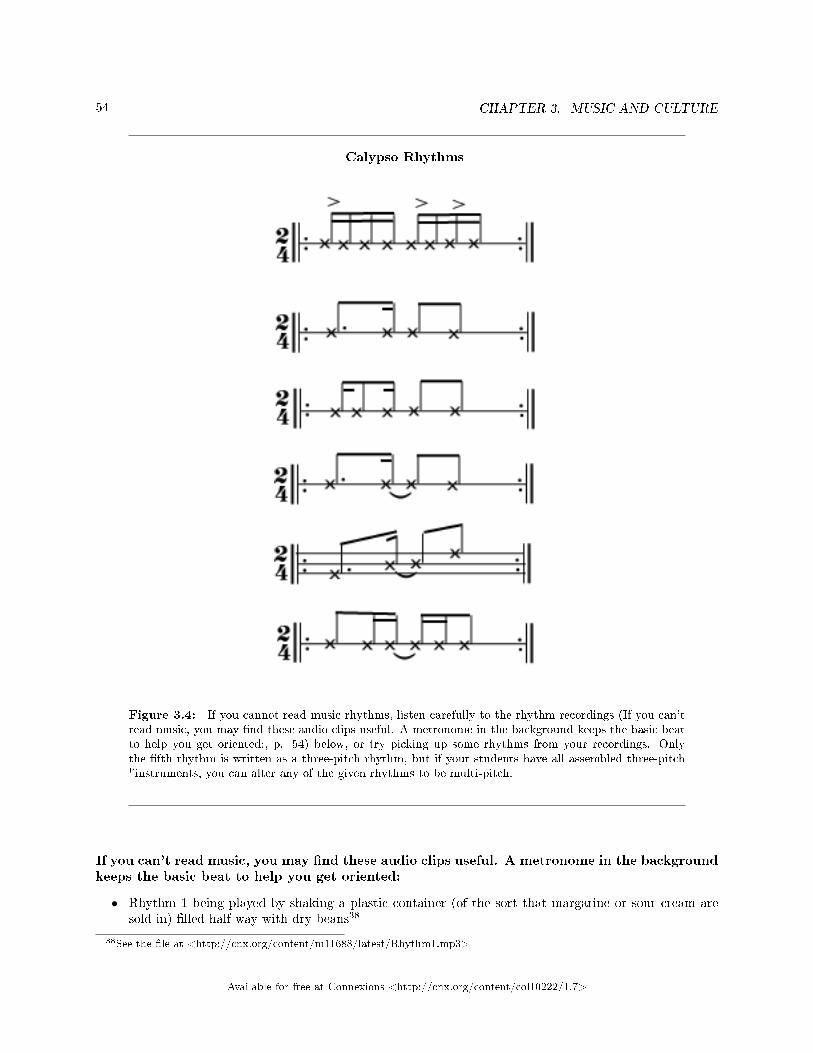
54 CHAPTER 3. MUSIC AND CULTURE
Calypso Rhythms
Figure 3.4: If you cannot read music rhythms, listen carefully to the rhythm recordings (If you can'tread music, you may �nd these audio clips useful. A metronome in the background keeps the basic beatto help you get oriented:, p. 54) below, or try picking up some rhythms from your recordings. Onlythe �fth rhythm is written as a three-pitch rhythm, but if your students have all assembled three-pitch"instruments, you can alter any of the given rhythms to be multi-pitch.
If you can't read music, you may �nd these audio clips useful. A metronome in the backgroundkeeps the basic beat to help you get oriented:
• Rhythm 1 being played by shaking a plastic container (of the sort that margarine or sour cream aresold in) �lled half-way with dry beans38
38See the �le at <http://cnx.org/content/m11688/latest/Rhythm1.mp3>
Available for free at Connexions <http://cnx.org/content/col10222/1.7>
55
• Rhythm 2 being played by hitting the bottom of an empty box of oats (the cylinder-shaped cardboardtype of box)39
• Rhythm 3 being played by beating an empty cardboard tube (this one had had wrapping paper on it)against the heel of a hand.40
• Rhythm 4 being played by shaking a can of nuts.41
• Rhythm 5 being played by beating with a pen on the lids of three di�erent sizes of empty plasticcontainers.42
• Rhythm 6 being played by tapping on the lid of a plastic container with dry beans in it, for a sort ofsnare e�ect.43
3.3.5 Songs with Calypso Rhythms
Goals and Standards
• Goals - Students will sing a song using calypso-style rhythms.• Objectives - Students will learn either a traditional Caribbean tune or a tune that has calypso-style
rhythms, and will sing it as a group.• Grade Level - K-12 (adaptable)• Student Prerequisites - none• Teacher Expertise - The teacher or an assistant should be able both to lead the singing and to
provide or lead the accompaniment. Note that a rhythm-only accompaniment, or rhythm and guitar,would be very appropriate. If you feel you cannot lead singing-with-percussion, you may simply havethe students sing (and play) along with a recording.
• Time Requirements - Because of rhythmic complexity, it may take students longer to learn thesetunes than standard children's songs.
• Evaluation - Evaluate students on participation as well as accurate pitch and rhythm.• Music Standards Addressed - National Standards for Music Education44 standards 1 (singing,
alone and with others, a varied repertoire of music), and 9 (understanding music in relation to historyand culture).
• Other Subjects Addressed - The activity also addresses National Council for the Social Studies45
standard 1 (culture).
Materials and Preparation
• Choose a song or two with Calypso-type rhythms to teach to the class. You may want to use one of thesongs you have found a recording of. Some songs that are traditionally associated with a calypso-styleperformance and are often found in songbooks and recordings for children include: "The Banana BoatSong (Day-O)", "Matilda", "Jamaica Farewell", "Sloop John B", "Tingalayo", and "Brown Girl in theRing". Or you may use the songs provided here, Caroline46 and Marianina47. Please note that theseare not traditional Caribbean tunes; instead, so that you may feel free to copy them, they are tunesthat are in the public domain48 (in the U.S.) that have been altered slightly in order to give a strongCalypso feeling to the rhythms. If you can't open the PDFs, the songs are also available as �guresbelow (Figure 3.5). (Readers who have access to a version of a genuine Caribbean tune that is clearlyin the public domain are invited to contact the author.)
39See the �le at <http://cnx.org/content/m11688/latest/Rhythm2.mp3>40See the �le at <http://cnx.org/content/m11688/latest/Rhythm3.mp3>41See the �le at <http://cnx.org/content/m11688/latest/Rhythm4.mp3>42See the �le at <http://cnx.org/content/m11688/latest/Rhythm5.mp3>43See the �le at <http://cnx.org/content/m11688/latest/Rhythm6.mp3>44http://musiced.nafme.org/resources/national-standards-for-music-education/45http://www.socialstudies.org/standards/strands/46See the �le at <http://cnx.org/content/m11688/latest/Caroline.pdf>47See the �le at <http://cnx.org/content/m11688/latest/Marianina.pdf>48"Public Domain Music in Connexions Music Activities" <http://cnx.org/content/m22967/latest/#Caroline>
Available for free at Connexions <http://cnx.org/content/col10222/1.7>

56 CHAPTER 3. MUSIC AND CULTURE
• Become familiar enough with the song(s) that you will be able to teach and lead them with con�dence.If you need to hear the tunes in order to learn them, you can listen to Marianina49 and Caroline50.
• Arrange for accompaniment, by yourself, a friend, or the students themselves. Accompaniment isimportant to get a "calypso" sound. Piano is not ideal; but a keyboard that has a marimba orother percussion setting might do. Guitar, string bass, and/or winds (even recorders) in whatevercombination is better. In either case, try to include at least some percussion; or you may consider apercussion-only accompaniment.
• Have enough copies available, as needed, of the words, music, and accompaniment parts.
Procedure
1. If they are going to make their own percussion instruments (Section 3.3.3: "Found Percussion"), dothat activity �rst.
2. If students are providing the accompaniment, assign parts and rehearse the instrumentalists. Thecalypso rhythms (Section 3.3.4: Calypso Rhythms) above should work as accompaniment to just aboutany appropriate song you choose. Several short rehearsals usually work better than one long one.
3. Meanwhile, start teaching everyone the song. This may also take several sessions. You can listen hereto the melodies of Caroline51 and Marianina52 if you need to.
4. Add the accompaniment to the singing for the �nal rehearsals. Even if the song is not a part of aconcert, try to �nd an audience for a �nal "performance".
3.3.6 Writing Calypso Lyrics
Materials and Preparation
• If you'd like to emphasize the creative, improvisatory nature of real calypso, and your students are upfor the challenge, consider having them write a bit of calypso themselves.
• Choose a simple tune that the students are familiar with, either a song that they have learned in class(see above (Section 3.3.5: Songs with Calypso Rhythms)), or one of the tunes that you have a recordingof. Tunes associated with calypso are preferable, but not necessary.
• If the students do not already know the tune very well, play the recording for them often, or work withthem on singing it.
Procedure
1. Remind the students that traditional calypso singers improvise the words of their songs. That meansthey make them up right on the spot, as they are singing, only a few minutes after they �nd out whattheir song is supposed to be about. At the big calypso contest in Trinidad every year, they often use astandard melody and make up funny, clever songs about something that has been in the news recentlyor something that they have noticed about life. The songs are often complaint or protest songs aboutthings that they think should be changed.
2. Tell the students they do not have to make up the words as they are singing. They can have some timeto think about it and make up the words and write them down. Tell them which tune you are goingto use and remind them of it by playing it for them or letting them sing it together.
3. Ask the students to make up new words to go with the tune. Their song could be a humorous complaintabout something they would like changed (longer recesses, or being allowed to have a dog, for example),or it can be a funny commentary on something that has happened recently, at school (a game they'velearned in P.E.), at home ("what happened to my missing homework assignment"), or in the news (anescape at the zoo, or a heavy snowfall, for example). If necessary, remind them that being mean orpersonal is not funny.
49See the �le at <http://cnx.org/content/m11688/latest/Marianina.MID>50See the �le at <http://cnx.org/content/m11688/latest/Caroline.MID>51See the �le at <http://cnx.org/content/m11688/latest/Caroline.mid>52See the �le at <http://cnx.org/content/m11688/latest/Marianina.MID>
Available for free at Connexions <http://cnx.org/content/col10222/1.7>

57
4. You may let them work in groups or alone.5. If necessary, check the words of each song before you allow it to be performed.6. Allow groups to perform their song together. Brave individuals can sing their songs by themselves, or
you may make copies so that the class can sing each other's songs together.7. If there are any particularly clever or humorous songs, you may want to consider sharing them in a
performance for parents or for the school.
3.3.7 Listening to Calypso
Genuine calypso is not that popular outside the islands; you will probably not �nd it at your local libraryor CD store. But steelband music, or even just a calypso-style sound is easier to �nd.
Listening Suggestions
• Many children will already be familiar with the tunes "Under the Sea" and "Kiss the Girl" fromDisney's The Little Mermaid.
• Some collections of songs for children (particularly multicultural collections) include calypso-soundingversions of songs like "Tingalayo", "Matilda", "The Banana Boat Song (Day-O)", and "Brown Girl inthe Ring".
• Harry Belafonte's performances, while not genuine improvised calypso, contributed greatly to the �rstbig craze for the calypso sound in the U.S. They are still relatively easy to �nd.
• Steelband albums marketed to tourists (for example Steel Drum Classics "Best of the Best", producedby Barefoot Records and C and B Studio) are also not genuine calypso, but most of them do have theright sound.
• If you want some examples of the real thing, check with your favorite music recording distributors.
3.3.8 Songs to Use
These tunes are not from Trinidad. So that it is easy to copy and use them in the classroom and concerts,tunes that are in the public domain53 (in the U.S.) have been altered slightly in order to give a strongCalypso feeling to the rhythms. (Readers who have access to a version of a genuine Caribbean tune that isclearly in the public domain are invited to contact the author.)
53"Public Domain Music in Connexions Music Activities" <http://cnx.org/content/m22967/latest/#Caroline>
Available for free at Connexions <http://cnx.org/content/col10222/1.7>

58 CHAPTER 3. MUSIC AND CULTURE
Figure 3.5
Available for free at Connexions <http://cnx.org/content/col10222/1.7>
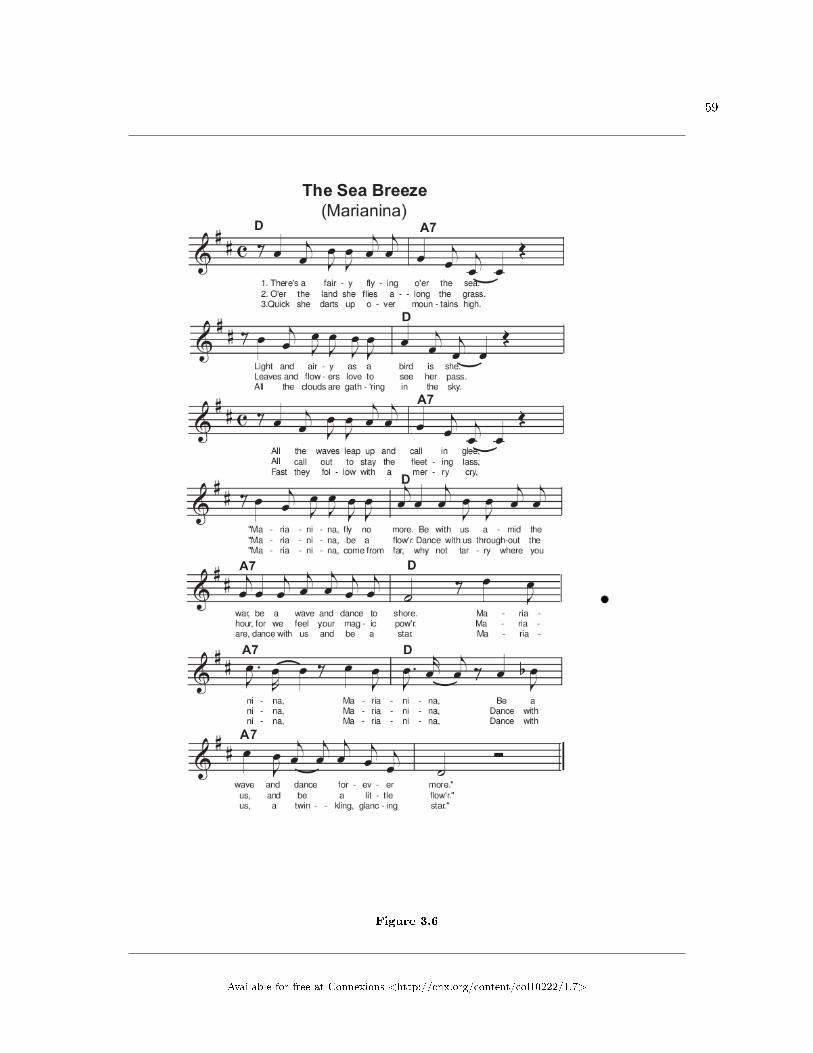
59
Figure 3.6
Available for free at Connexions <http://cnx.org/content/col10222/1.7>

60 INDEX
Index of Keywords and Terms
Keywords are listed by the section with that keyword (page numbers are in parentheses). Keywordsdo not necessarily appear in the text of the page. They are merely associated with that section. Ex.apples, � 1.1 (1) Terms are referenced by the page they appear on. Ex. apples, 1
A accents, � 2.4(29)acoustics, � 1.2(4), 4activity, � 1.2(4), � 1.3(14), � 2.3(27), � 2.5(33)Africa, � 3.1(37), � 3.2(41)amplitude, � 1.2(4), 5
B band leader, � 2.1(21)bars, 24beat, � 2.1(21)brass, � 1.2(4)
C Caribbean, � 3.3(48)codes, � 3.1(37)communication, � 3.1(37), � 3.2(41)conduct, � 2.1(21)conducting, � 2.1(21)conductor, � 2.1(21)consonance, � 1.3(14), 15consonant, � 1.3(14), 15cymbals, � 1.1(1)
D dissonance, � 1.3(14), 15dissonant, � 1.3(14), 15dragging, 23drums, � 1.1(1), � 3.1(37), � 3.2(41)dynamic level, 5dynamics, � 1.2(4), � 2.3(27), � 2.4(29)
F frequency, � 1.2(4), 5
G gongs, � 1.1(1)
L leadership, � 2.1(21)lesson plan, � 1.2(4), � 1.3(14), � 2.5(33)
M maracas, � 1.1(1)message drums, � 3.1(37), 37messages, � 3.1(37)meter, � 2.1(21)metronome, � 2.2(26)multicultural, � 3.3(48)music, � 1.2(4), � 2.1(21), � 2.2(26), � 2.3(27),� 2.4(29), � 2.5(33), � 3.1(37)
musical instruments, � 1.2(4)
N national dance standard 1, � 2.1(21), � 2.2(26)national English standard 4, � 3.2(41)national English standard 9, � 3.2(41)national music standard 1, � 2.2(26), � 2.3(27)national music standard 2, � 1.3(14), � 2.2(26),� 2.5(33)national music standard 3, � 1.3(14)national music standard 4, � 1.3(14)national music standard 5, � 2.1(21), � 2.4(29),� 2.5(33)national music standard 6, � 1.3(14), � 2.1(21),� 2.3(27), � 2.5(33)national music standard 7, � 1.3(14), � 2.1(21)national music standard 8, � 1.2(4), � 1.3(14),� 3.2(41)national music standard 9, � 2.5(33), � 3.2(41)national science standard physical science,� 1.2(4)national science standard science andtechnology, � 1.2(4)national social studies standard 1, � 3.2(41)
P pan band, � 3.3(48)pans, 50percussion, � 1.1(1), � 1.2(4), � 2.5(33),� 3.1(37), � 3.2(41)performance, � 2.1(21)physics, � 1.2(4)pitch, � 1.2(4), 5playing on the downbeat, 23
R rattles, � 1.1(1)resonance, � 1.2(4)rhythm, � 2.1(21), � 2.4(29), � 2.5(33)rushing, 23
S slit gong, 38sound waves, � 1.2(4), 5steel drum, � 3.3(48)steel pan, � 3.3(48)
Available for free at Connexions <http://cnx.org/content/col10222/1.7>

INDEX 61
steelband, � 3.3(48)steelbands, 50strings, � 1.2(4)
T talking drums, � 3.2(41)tamboo bamboo, 50tempo, � 2.2(26)
Trinidad, � 3.3(48)
W waisted drum, 41waisted drums, � 3.2(41)West Africa, � 3.2(41)West Indies, � 3.3(48)woodwinds, � 1.2(4)
Available for free at Connexions <http://cnx.org/content/col10222/1.7>

62 ATTRIBUTIONS
Attributions
Collection: Noisy Learning: Loud but Fun Music Education Activities
Edited by: Catherine Schmidt-JonesURL: http://cnx.org/content/col10222/1.7/License: http://creativecommons.org/licenses/by/1.0
Module: "Percussion Fast and Cheap"By: Catherine Schmidt-JonesURL: http://cnx.org/content/m11889/1.11/Pages: 1-4Copyright: Catherine Schmidt-JonesLicense: http://creativecommons.org/licenses/by/3.0/
Module: "Sound and Music Activities"By: Catherine Schmidt-JonesURL: http://cnx.org/content/m11063/2.15/Pages: 4-14Copyright: Catherine Schmidt-JonesLicense: http://creativecommons.org/licenses/by/3.0/
Module: "Consonance and Dissonance Activities"By: Catherine Schmidt-JonesURL: http://cnx.org/content/m11999/1.10/Pages: 14-19Copyright: Catherine Schmidt-JonesLicense: http://creativecommons.org/licenses/by/3.0/
Module: "Music Conducting: Classroom Activities"By: Catherine Schmidt-JonesURL: http://cnx.org/content/m11031/2.15/Pages: 21-25Copyright: Catherine Schmidt-JonesLicense: http://creativecommons.org/licenses/by/3.0/
Module: "A Tempo Activity"By: Catherine Schmidt-JonesURL: http://cnx.org/content/m14180/1.10/Pages: 26-27Copyright: Catherine Schmidt-JonesLicense: http://creativecommons.org/licenses/by/3.0/
Module: "A Musical Dynamics Activity"By: Catherine Schmidt-JonesURL: http://cnx.org/content/m13463/1.10/Pages: 27-29Copyright: Catherine Schmidt-JonesLicense: http://creativecommons.org/licenses/by/3.0/
Available for free at Connexions <http://cnx.org/content/col10222/1.7>
ATTRIBUTIONS 63
Module: "A Musical Accent Activity"By: Catherine Schmidt-JonesURL: http://cnx.org/content/m13462/1.11/Pages: 29-33Copyright: Catherine Schmidt-JonesLicense: http://creativecommons.org/licenses/by/3.0/
Module: "Simple Rhythm Activities"By: Catherine Schmidt-JonesURL: http://cnx.org/content/m14258/1.12/Pages: 33-36Copyright: Catherine Schmidt-JonesLicense: http://creativecommons.org/licenses/by/3.0/
Module: "Message Drums"By: Catherine Schmidt-JonesURL: http://cnx.org/content/m11422/1.11/Pages: 37-40Copyright: Catherine Schmidt-JonesLicense: http://creativecommons.org/licenses/by/3.0/
Module: "Talking Drums"By: Catherine Schmidt-JonesURL: http://cnx.org/content/m11872/1.11/Pages: 41-47Copyright: Catherine Schmidt-JonesLicense: http://creativecommons.org/licenses/by/3.0/
Module: "Caribbean Music: Calypso and Found Percussion"By: Catherine Schmidt-JonesURL: http://cnx.org/content/m11688/1.10/Pages: 48-60Copyright: Catherine Schmidt-JonesLicense: http://creativecommons.org/licenses/by/3.0/
Available for free at Connexions <http://cnx.org/content/col10222/1.7>
Noisy Learning: Loud but Fun Music Education ActivitiesThe activities in this course are designed for children preschool or elementary school age. Some introducebasic music concepts; others focus on music of a particular culture. All encourage noise and activity, so theymake excellent breaks from desk work, but be sure you are not disturbing the class down the hall!
About ConnexionsSince 1999, Connexions has been pioneering a global system where anyone can create course materials andmake them fully accessible and easily reusable free of charge. We are a Web-based authoring, teaching andlearning environment open to anyone interested in education, including students, teachers, professors andlifelong learners. We connect ideas and facilitate educational communities.
Connexions's modular, interactive courses are in use worldwide by universities, community colleges, K-12schools, distance learners, and lifelong learners. Connexions materials are in many languages, includingEnglish, Spanish, Chinese, Japanese, Italian, Vietnamese, French, Portuguese, and Thai. Connexions is partof an exciting new information distribution system that allows for Print on Demand Books. Connexionshas partnered with innovative on-demand publisher QOOP to accelerate the delivery of printed coursematerials and textbooks into classrooms worldwide at lower prices than traditional academic publishers.