nourish point-of-sales system id form - gst boces
TRANSCRIPT

Nourish Point-Of-Sales System
Updated June 23, 2020 pg. 1
ID Form
The Cashier Login form displays the first time the Breakfast or Lunch button is selected
for the day. The keys on the monitor must be used to enter a cashier login. The cashier
login can be either the name or initials of the cashier. Click Enter.
*If Breakfast or Lunch is accidentally selected, simply click the Cancel button*
The background of the ID Meal form appears in two colors
Yellow for breakfast
Blue for lunch
To display an account, enter the account number in the ID# field and select the Enter
key on the keyboard.

Nourish Point-Of-Sales System
Updated June 23, 2020 pg. 2
Account Form
The student grade will appear in one of three different colors:
• Paid students = red background
• Reduced students = yellow background
• Free students = green background
Notes for Snacks or Allergies will appear below the student name and ID number.
Menu Selection
For districts using NutriKids, the menu will appear with entrée items in pink and the ‘two
sides’ options in yellow.
If the customer is not getting a meal, select the No Meal button to display all items.
Entree
&
Nourish Point-Of-Sales System
Updated June 23, 2020 pg. 3
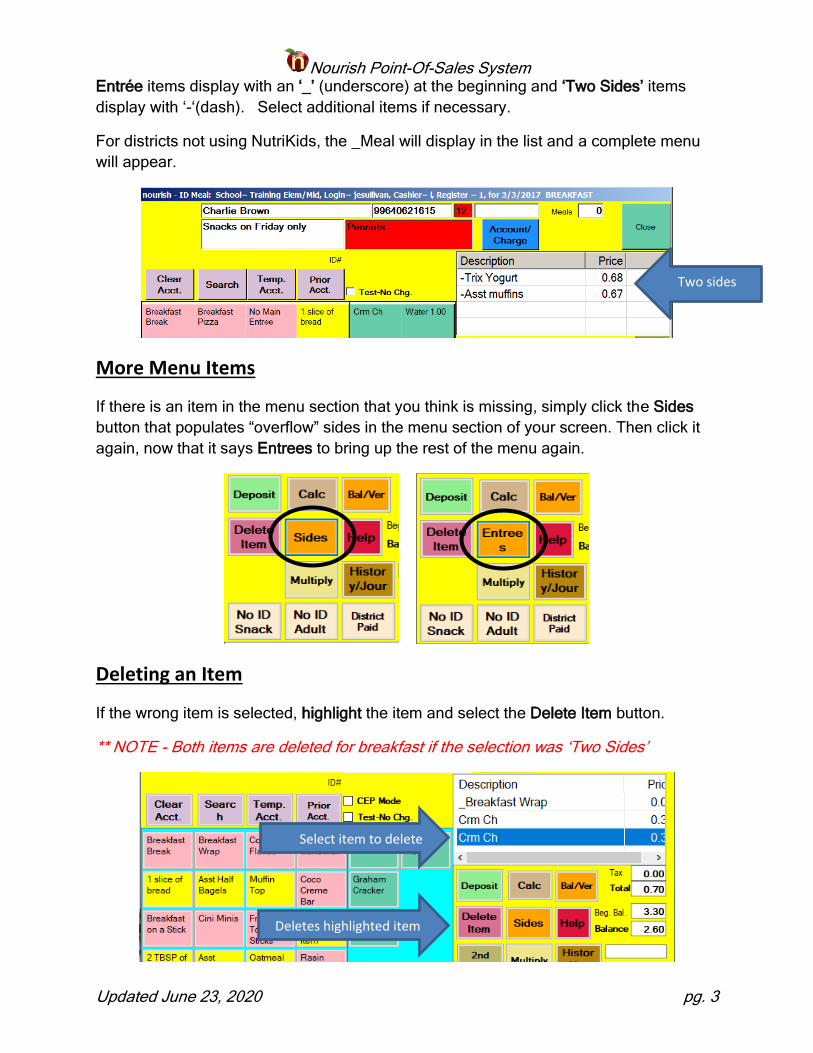
Entrée items display with an ‘_’ (underscore) at the beginning and ‘Two Sides’ items
display with ‘-‘(dash). Select additional items if necessary.
For districts not using NutriKids, the _Meal will display in the list and a complete menu
will appear.
More Menu Items
If there is an item in the menu section that you think is missing, simply click the Sides
button that populates “overflow” sides in the menu section of your screen. Then click it
again, now that it says Entrees to bring up the rest of the menu again.
Deleting an Item
If the wrong item is selected, highlight the item and select the Delete Item button.
** NOTE - Both items are deleted for breakfast if the selection was ‘Two Sides’
Select item to delete
Two sides
Deletes highlighted item

Nourish Point-Of-Sales System
Updated June 23, 2020 pg. 4
Account Charge
Once all items are displayed, select the Account/Charge button to complete transaction.
Deleting Purchased Items
Items previously purchased at the register for the meal service display at the bottom
right. If necessary, select an item to delete.
Select the Delete Item button if the item is to be deleted. Select the Cancel button if not.
Previous purchases

Nourish Point-Of-Sales System
Updated June 23, 2020 pg. 5
Search Button
Select the Search button to begin a search.
Using the on-screen keyboard, begin typing the name. As accounts are found, they will
display on the right sorted by ID # and on the left by name. As soon as the desired
account is displayed, select it.
The name sort defaults to last name, first name. You can search by first name, last
name if you check the first last radio button.
For customers from another school within the same district, select the Search District
check box and then begin typing the name.
Select the Close/Cancel button if you don’t need to search for an account.

Nourish Point-Of-Sales System
Updated June 23, 2020 pg. 6
Temp. Acct. Button
Selecting the Temp Acct. button allows the creation of a temporary account.
Type the letters of the last name using the on-screen keyboard.
Once the last name has been entered, select the Submit Last Name button.
The updated form displays the last name. Type the first name using the on-screen
keyboard.
Once the first name has been entered, select the Submit First Name button.
The updated form displays both the last name and the first name entered.
If necessary select Update Last Name or Update First Name to correct spelling.
Once the last and first names are correct, select the account type (Free, Reduced, Paid
or Adult).

Nourish Point-Of-Sales System
Updated June 23, 2020 pg. 7
When the Free, Reduced or Paid option is selected the following form displays.
Select the grade level from the dropdown, then select Create Account.
The ID Form then appears and you are ready to complete the transaction.

Nourish Point-Of-Sales System
Updated June 23, 2020 pg. 8
Deposit Button
To make a deposit into the customer account, bring up the account and select the
Deposit button, then select either Check or Cash.
Cash Deposit Button
For Cash Transactions
Enter the dollar amount using the on-screen keypad or use quick keys in pre-determined
amounts of $5.00, $10.00, $20.00 or $25.00, ect.
Verify the amount is correct and select Save/Submit.

Nourish Point-Of-Sales System
Updated June 23, 2020 pg. 9
Check Deposit Button
For Check Transactions
Enter the check number in the top portion and the check amount in the bottom portion.
Enter the dollar amount using the on-screen keypad or use quick keys in pre-determined
amounts of $5.00, $10.00, $20.00 or $25.00, ect.
Verify the check number and amount are correct and select Save/Submit.
Deposit Button
If a previous deposit has already been made the deposit amount will display.
The cashier has two options
• The first option (Delete Deposit Amount and enter correct amount)
removes the prior deposit amount from the account balance. The new
amount entered will then be the deposit total and will be added to the
existing account balance.
• The second option (Leave Deposit Amount – adding additional money)
leaves the prior deposit amount in the account balance and increases the
account balance by the new amount entered at this time.
This update can also be done for check deposits.
Check#
Check Amount
Prior deposit amount

Nourish Point-Of-Sales System
Updated June 23, 2020 pg. 10
Calc Button
The Calc button calculates the amount of change due the customer. The Amount Due
automatically displays. Use the on-screen keypad to input the amount of the payment
then select Calculate to generate the change amount owed to customer.
Once the change has been provided to the customer, select Close.
Select Deposit to enter the amount of the purchase and then select Account/Charge to
complete the transaction.
2nd Meal Button
The 2nd Meal button is for students who are purchasing a 2nd full meal. Select 2nd Meal
and then select the item from the menu.
Select Account/Charge to complete the transaction.

Nourish Point-Of-Sales System
Updated June 23, 2020 pg. 11
Multiply Button
The Multiply button is used for the purchase of several of the same items, money from
the vending machines or for a large purchase amount.
Select Multiple Items, Vending, Other or the item from the list. If the Other option is
selected, a Description must be entered at the bottom left.
Using the on-screen keypad enter the Quantity at the top then enter the Price at the
bottom. Select Calculate. If the amount is correct, select Submit to return to the ID Form.
Select Account/Charge to complete the transaction.
Hist/Jrnl Button
The grid at the top displays the transactions for this register’s meal service. Select the
gray box to the left of the desired account name to return to the student transaction.
The bottom grid displays a two week history for the selected account.
Select Close to exit the History/Journal screen.
For Other

Nourish Point-Of-Sales System
Updated June 23, 2020 pg. 12
No ID Snack Button
The No ID Snack button is for student purchases. Select No Id Snack then select the
items. Select Cash to complete the transaction.
No ID Adult Button
The No ID Adult button is for adult purchases. Select No Id Adult then Select Menu and
select the items. Select Cash to complete the transaction.
DistPaid Button
The DistPaid button is used for any customers for whom the district will pay food service
expenses. Example Custodians, maintenance staff, grandparents.
Select DistPaid then select the items. Select Charge to complete the transaction.
Nourish Point-Of-Sales System
Updated June 23, 2020 pg. 13
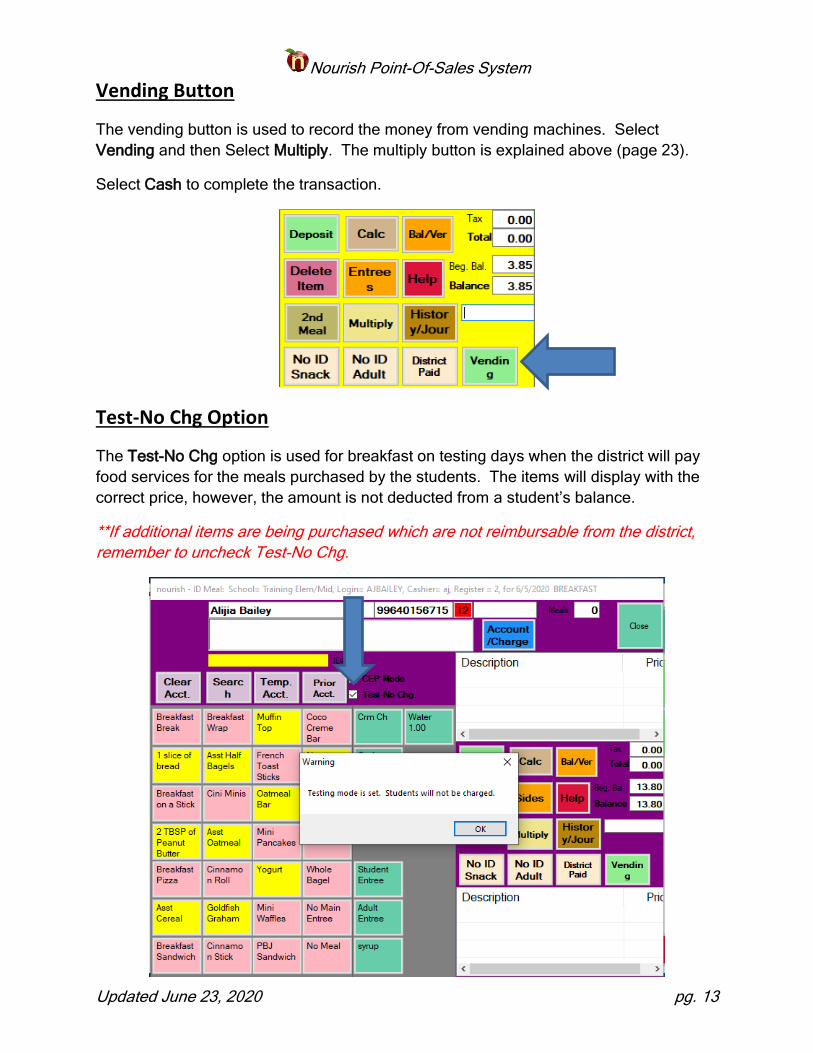
Vending Button
The vending button is used to record the money from vending machines. Select
Vending and then Select Multiply. The multiply button is explained above (page 23).
Select Cash to complete the transaction.
Test-No Chg Option
The Test-No Chg option is used for breakfast on testing days when the district will pay
food services for the meals purchased by the students. The items will display with the
correct price, however, the amount is not deducted from a student’s balance.
**If additional items are being purchased which are not reimbursable from the district,
remember to uncheck Test-No Chg.