novapro uhd jr - novastar · control pc. xi'an novastar tech co., ltd. novapro uhd jr...
TRANSCRIPT

NovaPro UHD Jr
All-in-One Controller
Document Version: V1.0.1
Document Number: NS160000452
User Manual XI'A
N NOVAST
AR TECH CO., L
TD.

Copyright © 2019 Xi’an NovaStar Tech Co., Ltd. All Rights Reserved.
No part of this document may be copied, reproduced, extracted or transmitted in any form or by any means
without the prior written consent of Xi’an NovaStar Tech Co., Ltd.
Trademark
is a trademark of Xi’an NovaStar Tech Co., Ltd.
Statement
You are welcome to use the product of Xi’an NovaStar Tech Co., Ltd. (hereinafter referred to as NovaStar).
This document is intended to help you understand and use the product. For accuracy and reliability,
NovaStar may make improvements and/or changes to this document at any time and without notice. If you
experience any problems in use or have any suggestions, please contact us via contact information given
in document. We will do our best to solve any issues, as well as evaluate and implement any suggestions.
XI'AN N
OVASTAR TE
CH CO., LTD
.

NovaPro UHD Jr All-in-One Controller
User Manual Preface
www.novastar.tech ii
Change History
Version Hardware Version
Release Date
Description
V1.0.1 V1.0.2.0 2019-07-10 Updated the connections picture in Image Mosaic.
Added the description of HDMI LOOP supporting only 1 level of device cascading.
V1.0.0 V1.0.2.0 2019-06-06 First release
XI'AN N
OVASTAR TE
CH CO., LTD
.

NovaPro UHD Jr All-in-One Controller
User Manual Contents
www.novastar.tech iii
Contents
Change History .................................................................................................................. ii
1 Overview .......................................................................................................................... 1
2 Appearance ..................................................................................................................... 2
2.1 Front Panel .................................................................................................................................................. 2
2.2 Rear Panel ................................................................................................................................................... 3
3 Applications .................................................................................................................... 6
4 Home Screen ................................................................................................................... 7
5 Menu Operations............................................................................................................. 9
5.1 Screen Brightness ....................................................................................................................................... 9
5.2 Screen Settings ......................................................................................................................................... 10
5.2.1 Quick Configuration ................................................................................................................................ 10
5.2.2 Advanced Configuration .......................................................................................................................... 11
5.2.3 Save to RV Card ...................................................................................................................................... 11
5.2.4 More Settings ........................................................................................................................................... 11
5.3 Layer Settings ............................................................................................................................................ 14
5.3.1 Main Layer and PIP ................................................................................................................................ 15
5.3.2 Layout ..................................................................................................................................................... 16
5.3.3 BKG ........................................................................................................................................................ 17
5.4 Input Settings ............................................................................................................................................. 18
5.4.1 Input Source ........................................................................................................................................... 18
5.4.2 Setting Input Source Resolution ............................................................................................................. 18
5.4.3 DVI Mosaic ............................................................................................................................................. 20
5.5 Image Mosaic ............................................................................................................................................ 21
5.6 Preset Settings .......................................................................................................................................... 23
5.7 Display Control .......................................................................................................................................... 23
5.8 Advanced Functions .................................................................................................................................. 24
5.8.1 HDR ........................................................................................................................................................ 24
5.8.2 Low Latency ............................................................................................................................................ 25
5.8.3 OPT Mode .............................................................................................................................................. 25
5.8.4 Self-Test .................................................................................................................................................. 27
5.9 General Settings ........................................................................................................................................ 27
5.9.1 Hot Backup ............................................................................................................................................. 27
5.9.2 Synchronization ...................................................................................................................................... 27
XI'AN N
OVASTAR TE
CH CO., LTD
.

NovaPro UHD Jr All-in-One Controller
User Manual Contents
www.novastar.tech iv
5.9.3 Fn ............................................................................................................................................................ 28
5.9.4 Output Frame Rate ................................................................................................................................. 28
5.9.5 Return to Home ...................................................................................................................................... 28
5.9.6 Factory Reset ......................................................................................................................................... 28
5.9.7 About Us ................................................................................................................................................. 28
5.10 Partial Reset ............................................................................................................................................ 28
5.11 Communication Settings .......................................................................................................................... 28
5.11.1 Communication Mode ........................................................................................................................... 28
5.11.2 Network Settings ................................................................................................................................... 29
5.12 Working Mode .......................................................................................................................................... 30
5.13 Langugage ............................................................................................................................................... 30
6 Specifications ............................................................................................................... 31
XI'AN N
OVASTAR TE
CH CO., LTD
.

NovaPro UHD Jr All-in-One Controller
User Manual 1 Overview
www.novastar.tech 1
1 Overview
The NovaPro UHD Jr is a NovaStar's new all-in-one controller that features excellent video processing capabilities, sending card functions and LED screen configurations. The NovaPro UHD Jr provides a variety of video input connectors, supporting full HD 4K×2K@60Hz image processing and sending capabilities. Besides, NovaPro UHD Jr supports 8K×1K@60Hz ultra-high resolution settings.
With the help of smart control software V-Can from Novastar, the NovaPro UHD Jr can enable richer image mosaic effects and faster and easier operations.
The NovaPro UHD Jr can send the processed video to the LED screen via Neutrik Ethernet ports and optical fiber ports. Thanks to its powerful video processing capabilities and sending functions, the NovaPro UHD Jr is well suited for stage control systems, conference sites, activities, exhibition sites and other high-end rental applications as well as fine-pitch LED displays.
XI'AN N
OVASTAR TE
CH CO., LTD
.

NovaPro UHD Jr All-in-One Controller
User Manual 2 Appearance
www.novastar.tech 2
2 Appearance
2.1 Front Panel
Button Description
Power button Power on: Press the button to power on the device.
Power off: Hold down the button to pop up a dialog box, then
rotate the knob to select Yes and press the knob to power off
the device.
USB-B For PC connection for debugging
Input source buttons Input source switching buttons
Press the button to switch the input source for the main layer,
and hold down the button to switch the input source for the
PIP.
Button indicators are used to indicate the working status of
the input source signal.
− White, always on: Input source is not used, and no input signal is accessed.
− Blue, fast flashing: Input source is used, but no input signal is accessed.
− Blue, slow flashing: Input source is not used, but input signal is accessed.
− Blue, always on: Input source is used, and input
XI'AN N
OVASTAR TE
CH CO., LTD
.

NovaPro UHD Jr All-in-One Controller
User Manual 2 Appearance
www.novastar.tech 3
signal is accessed.
TFT screen Display the current device status and settings menu.
Knob On the home screen, press the knob to enter the operation
menu screen.
On the operation menu screen, rotate the knob to select a
menu item, and press the knob to confirm the selection or
enter the submenu.
When a menu item with parameters is selected, you can
rotate the knob to adjust the parameters. Please note that
after adjustment, you need to press the knob again to
confirm the adjustment.
ESC button Press the button to exit the current menu or cancel the
operation.
Function buttons PIP: Enable/Disable PIP.
SCALE: Enable/Disable full screen function for main layer.
DVI MOSAIC: Switch to DVI mosaic input source. Press it to
switch the input source of main layer, while hold it down to
switch the input source of PIP. Main layer and PIP can be set
according to your preference.
FN: This is a custom function button. The function can be
customized to Synchronization, Freeze, Black Out, Test
Pattern, Quick Configuration, Image Quality and Preset
Settings. It is Synchronization by default.
2.2 Rear Panel
Input
Connector Quantity Description
DVI 4 Four DVIs are all single-link DVI connectors by
default.
− 4 × DVI inputs
− Each DVI: Input resolution up to 1920×1200@60Hz, downward compatible
− 4 DVI input sources constitute 1 input source (DVI MOSAIC).
XI'AN N
OVASTAR TE
CH CO., LTD
.
NovaPro UHD Jr All-in-One Controller
User Manual 2 Appearance
www.novastar.tech 4
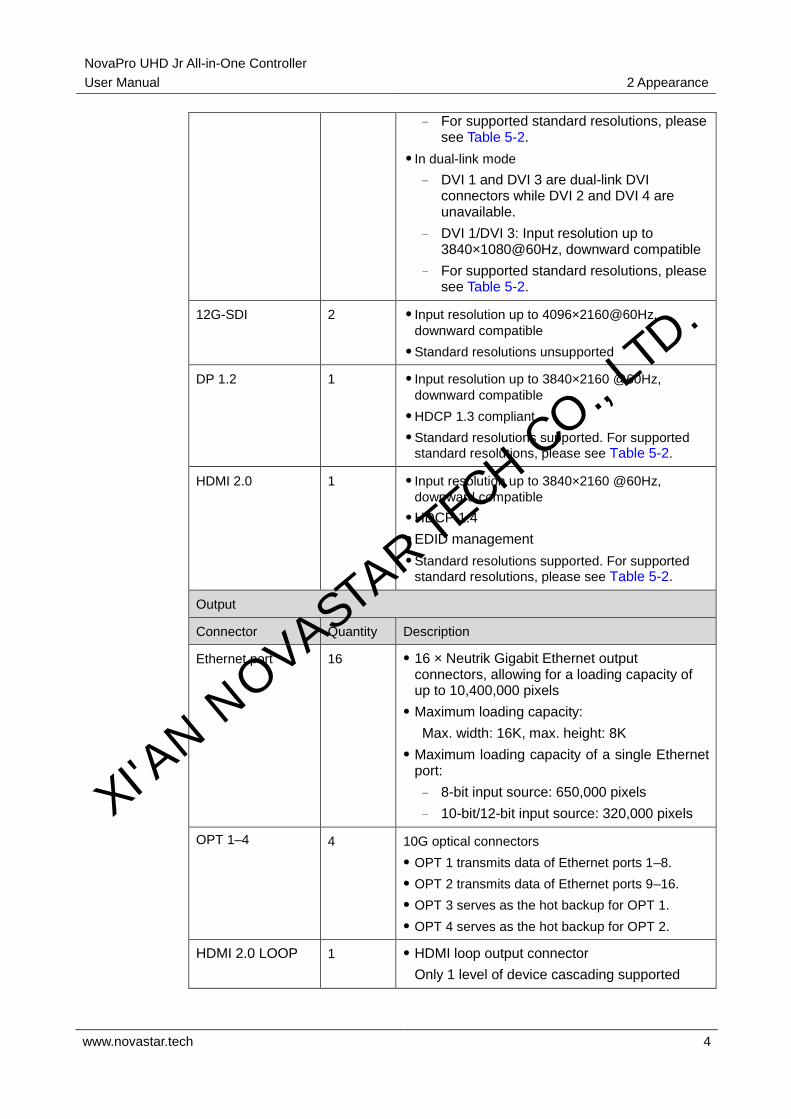
− For supported standard resolutions, please see Table 5-2.
In dual-link mode
− DVI 1 and DVI 3 are dual-link DVI connectors while DVI 2 and DVI 4 are unavailable.
− DVI 1/DVI 3: Input resolution up to 3840×1080@60Hz, downward compatible
− For supported standard resolutions, please see Table 5-2.
12G-SDI 2 Input resolution up to 4096×2160@60Hz,
downward compatible
Standard resolutions unsupported
DP 1.2 1 Input resolution up to 3840×2160 @60Hz,
downward compatible
HDCP 1.3 compliant
Standard resolutions supported. For supported
standard resolutions, please see Table 5-2.
HDMI 2.0 1 Input resolution up to 3840×2160 @60Hz,
downward compatible
HDCP 1.4
EDID management
Standard resolutions supported. For supported
standard resolutions, please see Table 5-2.
Output
Connector Quantity Description
Ethernet port 16 16 × Neutrik Gigabit Ethernet output connectors, allowing for a loading capacity of up to 10,400,000 pixels
Maximum loading capacity:
Max. width: 16K, max. height: 8K
Maximum loading capacity of a single Ethernet port:
− 8-bit input source: 650,000 pixels
− 10-bit/12-bit input source: 320,000 pixels
OPT 1–4 4 10G optical connectors
OPT 1 transmits data of Ethernet ports 1–8.
OPT 2 transmits data of Ethernet ports 9–16.
OPT 3 serves as the hot backup for OPT 1.
OPT 4 serves as the hot backup for OPT 2.
HDMI 2.0 LOOP 1 HDMI loop output connector
Only 1 level of device cascading supported
XI'AN N
OVASTAR TE
CH CO., LTD
.

NovaPro UHD Jr All-in-One Controller
User Manual 2 Appearance
www.novastar.tech 5
HDCP 1.4
EDID management
12G-SDI LOOP 2 SDI loop output connectors
MONITOR 1 HDMI connector for output monitoring
Resolution up to 1920×1080@60Hz
Control
Connector Quantity Description
ETHERNET 1 Connect to the PC for communication, or connect to
the Web for device control.
USB (Type-B) 1 Connect to the PC for device control.
Used as the input connector to connect a
NovaPro UHD Jr unit for image mosaic
USB (Type-A) 1 Used as the output connector to connect a NovaPro
UHD Jr unit for image mosaic
GENLOCK IN-
LOOP
1 Connect to a synchronization signal to synchronize
all the connected NovaPro UHD Jr units.
RS232 1 Connect to the control device.
XI'AN N
OVASTAR TE
CH CO., LTD
.

NovaPro UHD Jr All-in-One Controller
User Manual 3 Applications
www.novastar.tech 6
3 Applications
XI'AN N
OVASTAR TE
CH CO., LTD
.

NovaPro UHD Jr All-in-One Controller
User Manual 4 Home Screen
www.novastar.tech 7
4 Home Screen
Figure 4-1 Home screen
Area Icon Description
A
Denotes the layer is active and displays the layer input source name and resolution.
Denotes the layer is inactive.
B Displays the resolution and frame rate of the configured screen.
C
Displays the screen brightness.
D The device is in video controller mode and this Ethernet port is connected.
This Ethernet port is not connected.
The device is in fiber converter mode and this Ethernet port is connected.
This Ethernet port is connected and serves as the output backup port.
XI'AN N
OVASTAR TE
CH CO., LTD
.

NovaPro UHD Jr All-in-One Controller
User Manual 4 Home Screen
www.novastar.tech 8
E
The OPT mode is set to Hot Backup, optical fiber ports 3/4 backup the data of optical fiber ports 1/2.
The OPT mode is set to Copy, optical fiber ports 3/4 copy the data of optical fiber ports 1/2.
F
Synchronization The Genlock function is turned on.
The Genlock function is turned off.
The Genlock function is waiting to be turned on.
The Genlock function is not turned on successfully.
Display control The LED screen displays the black screen.
The LED screen displays the selected test pattern.
The LED screen displays the current input source normally.
The output image is frozen.
BKG
The BKG function is turned on.
The BKG function is turned off.
Communication The current device communication mode is USB Preferred.
The current device communication mode is LAN Preferred.
The current device is not connected to the control PC.
XI'AN N
OVASTAR TE
CH CO., LTD
.

NovaPro UHD Jr All-in-One Controller
User Manual 5 Menu Operations
www.novastar.tech 9
5 Menu Operations
Button descriptions:
Knob
On the home screen, pressing the knob enters the operation menu screen.
On the operation menu screen, rotate the knob to select a menu item, and press the knob to confirm the selection or enter the submenu.
When a menu item with parameters is selected, you can rotate the knob to adjust the parameters. Please note that after adjustment, you need to press the knob again to confirm the adjustment.
ESC: Press the button to exit the current menu or cancel the operation.
5.1 Screen Brightness
You can adjust the screen brightness in an eye-friendly way according to the current ambient brightness. Besides, appropriate adjustment of screen brightness can extend the service life of the LED screen.
Figure 5-1 Screen brightness
Step 1 Press the knob to enter the device menu.
Step 2 Select Screen Brightness and press the knob to confirm the selection.
Step 3 Rotate the knob to adjust the brightness value, and the LED screen will display the effect in real-time. Then press the knob to apply the set brightness when you are satisfied with it.
XI'AN N
OVASTAR TE
CH CO., LTD
.

NovaPro UHD Jr All-in-One Controller
User Manual 5 Menu Operations
www.novastar.tech 10
5.2 Screen Settings
You can configure the screen to make it display the whole image correctly.
The options are Quick Configuration and Advance Configuration.
5.2.1 Quick Configuration
Preconditions
LED screen must be a regular screen.
Cabinets of the screen must be regular cabinets with the same resolution.
The following data flow settings are supported. During data flow settings, you must ensure that the physical connection of each port is along the same direction and downward to next one.
During data flow settings, you must ensure that the Ethernet Port 1 is at the beginning position of the whole physical connection.
Procedure
Step 1 Power on the LED screen.
Step 2 Rotate the knob to choose Screen Settings > Quick Configuration, and press it to enter its submenu.
Figure 5-2 Quick configuration
Step 3 Set Cabinet Row Qty and Cabinet Column Qty according to the actual row and column quantities of the cabinets.
Step 4 Rotate the knob to Port 1 Cabinet Qty to set the quantity of the cabinets loaded by Ethernet port 1.
Step 5 Rotate the knob to Data Flow (Front View) and press it, then select an appropriate physical connection mode of the cabinets.
During data flow settings, you can view the real-time effects of different data flow settings on LED display by rotating the knob. When you are satisfied with the LED
XI'AN N
OVASTAR TE
CH CO., LTD
.

NovaPro UHD Jr All-in-One Controller
User Manual 5 Menu Operations
www.novastar.tech 11
display image, press the knob to save the settings; when you are not satisfied, press ESC button to exit the current operation and the settings will not be saved.
5.2.2 Advanced Configuration
You can set the cabinet row and column quantities, horizontal offset, vertical offset and data flow of the cabinets loaded by a single Ethernet port.
Procedure
Step 1 Press the knob to enter the device menu.
Step 2 Rotate the knob to choose Screen Settings > Advanced Configuration, and press it to enter its submenu.
Step 3 Turn on the advanced configuration function, and then set the cabinet row and column quantities, horizontal offset, vertical offset and data flow for the target Ethernet port.
Figure 5-3 Advanced configuration
5.2.3 Save to RV Card
You can send and save the screen configuration to the receiving card. The configuration data will not be lost after the device is powered off.
5.2.4 More Settings
Step 1 Press the knob to enter the device menu.
Step 2 Rotate the knob to choose Screen Settings > More Settings, and press it to enter its submenu.
Mapping
You can turn on this function to display the sequence numbers of Ethernet ports and cabinets.
XI'AN N
OVASTAR TE
CH CO., LTD
.

NovaPro UHD Jr All-in-One Controller
User Manual 5 Menu Operations
www.novastar.tech 12
Figure 5-4 Mapping
Example: "P:05" stands for the Ethernet port number and "#001" stands for the cabinet number.
Note:
The receiving card employed by the system must support the Mapping function.
Load RCFGx Files
After the LED screen is powered on, if a certain cabinet or the entire LED screen is not lit, you can load the receiving card configuration files (namely RCFGx files) that have been configured on NovaLCT software to the NovaPro UHD Jr.
Step 1 On NovaLCT, after you have configured the screen, click Save to File to save the configuration file to PC.
XI'AN N
OVASTAR TE
CH CO., LTD
.

NovaPro UHD Jr All-in-One Controller
User Manual 5 Menu Operations
www.novastar.tech 13
Figure 5-5 Save receiving card configuration file
Step 2 On NovaLCT, choose Tools > Controller Cabinet Configuration File Import, click Add Configuration File and select the configuration file you have saved to PC in Step 1.
Figure 5-6 Importing controller cabinet configuration file
Step 3 Review the configuration file name and click Save the Change to HW to save the configuration file to the NovaPro UHD Jr.
XI'AN N
OVASTAR TE
CH CO., LTD
.

NovaPro UHD Jr All-in-One Controller
User Manual 5 Menu Operations
www.novastar.tech 14
Figure 5-7 Saving configuration file to NovaPro UHD Jr
Note:
The configuration file for irregular cabinet is not supported.
LED Screen Color
You can adjust the screen color and the LED screen will display the effect in real-time.
Table 5-1 Screen color parameters
Parameter Description
Color temperature You can set the color to Standard, Cool, Warm and Custom. Custom allows you to adjust individual R, G or B value.
Gamma The range is 1.0–4.0 and the stepping is 0.1.
Figure 5-8 Color temperature effect
5.3 Layer Settings
Step 1 Press the knob to enter the device menu.
XI'AN N
OVASTAR TE
CH CO., LTD
.

NovaPro UHD Jr All-in-One Controller
User Manual 5 Menu Operations
www.novastar.tech 15
Step 2 Rotate the knob to select Layer Settings and press the knob to enter the layer settings screen where you can set the followings.
Main layer
PIP
Layout
BKG
5.3.1 Main Layer and PIP
Menu Description
Status The status of the selected layer: On and Off
Note: Press the PIP button in FUNCTION area on the device front panel to enter the PIP settings screen and turn on the PIP.
Input Source
The input source of the layer
Note: Press the input source button in SOURCE area on the device front panel to select the input source for the main layer, and hold down the button to select the input source for the PIP.
Scaling Mode
The options are Full Screen, Pixel to Pixel and Custom.
H Width The horizontal width of the layer
The default value for the main layer and PIP is 1920 and 800 respectively. The range is 64–32768.
V Height The vertical height of the layer
The default value for the main layer and PIP is 1080 and 600 respectively. The range is 64–32768.
Initial X The initial horizontal coordinate of the layer
Initial Y The initial vertical coordinate of the layer
Input Crop The function of cropping the input source image and displaying it in full screen
Status: You can turn on or turn off this function for the selected layer.
H Width: The horizontal width of the current input source. If no input source is detected, the default value is 1920.
V Height: The vertical height of the current input source. If no input source is detected, the default value is 1080.
Initial X: The horizontal initial coordinate of the cropped part upon the current input source. The range is 0–horizontal width of input source and the default value is 0.
Initial Y: The vertical initial coordinate of the cropped part upon the current input source. The range is 0–vertical height of input source and the default value is 0.
Priority The layer priority. The options are 1 and 2.
1: Send the layer to the back.
XI'AN N
OVASTAR TE
CH CO., LTD
.

NovaPro UHD Jr All-in-One Controller
User Manual 5 Menu Operations
www.novastar.tech 16
2: Bring to the layer to the front.
Reset Reset all the layer parameters to default settings.
Figure 5-9 Layer parameter descriptions
Figure 5-10 Input crop
5.3.2 Layout
The NovaPro UHD Jr supports 10 layer layouts.
P: PIP
M: Main layer
Layout Description
Custom layout
The PIP is located at the top left corner of the main layer.
XI'AN N
OVASTAR TE
CH CO., LTD
.

NovaPro UHD Jr All-in-One Controller
User Manual 5 Menu Operations
www.novastar.tech 17
Layout Description
The PIP is located at the bottom left corner of the main layer.
The PIP is located at the top right corner of the main layer.
The PIP is located at the bottom right corner of the main layer.
The PIP is located at the center of the main layer.
The PIP is located at the left of the main layer.
The PIP is located at the right of the main layer.
The PIP is located at the top of the main layer.
The PIP is located at the bottom of the main layer.
Note;
For , , or layout, the aspect ratio of the main layer and PIP is not kept. The main layer and PIP together fill the screen according to the selected layout.
5.3.3 BKG
You can set the background for the displayed image. The BKG is located at the back.
Menu Description
Status The status of the BKG: On and Off (default)
Type The options area Pure Color and Image.
Pure Color BKG You can adjust the individual R, G or B value to set a pure color BKG.
Capture Source: Select an input source.
Save To: Set the save location of the captured image. The options include BKG 1 / BKG 2 / BKG 3 / BKG 4.
Apply: Save the captured image to the selected save location. At most 4 BKG images are supported.
XI'AN N
OVASTAR TE
CH CO., LTD
.

NovaPro UHD Jr All-in-One Controller
User Manual 5 Menu Operations
www.novastar.tech 18
Figure 5-11 Capturing input source image
5.4 Input Settings
5.4.1 Input Source
The NovaPro UHD Jr supports DP, HDMI, SDI-1, SDI-2 and DVI input connectors.
Rotate the knob to select the desired input source and press the knob to enter the input source resolution menu.
Figure 5-12 Selecting input source
5.4.2 Setting Input Source Resolution
You can adjust the resolution and frame rate of the input source through the following two ways.
Standard resolution
Custom resolution XI'AN N
OVASTAR TE
CH CO., LTD
.

NovaPro UHD Jr All-in-One Controller
User Manual 5 Menu Operations
www.novastar.tech 19
Figure 5-13 Setting input source resolution
Note:
SDI input source does not support resolution settings.
Standard Resolution
You can select a standard resolution and frame rate. Then rotate the knob to select Apply and press the knob to make the settings take effect.
Figure 5-14 Standard resolution
Table 5-2 Standard connector resolutions
Standard resolutions DP 1.2 HDMI 2.0 Dual-DVI Single-DVI
1024×768@ (48/50/59.94/60/75/85) Hz √ √ √ √
1280×720@ (23.98/24/25/29.97/30/48/50/59.94/60) Hz
√ √ √ √
1280×1024@ (48/50/59.94/60/75/85) Hz √ √ √ √
1364×768@ (50/59.94/60) Hz √
1366×768@ (50/59.94/60) Hz √ √ √
1440×900@ (60/75/85) Hz √ √ √ √
1600×1200@ (48/50/59.94/60) Hz √ √ √ √
1680×1050@60Hz √ √ √ √
1920×1080@ (23.98/24/25/29.97/30/48/50/59.94/60) Hz
√ √ √ √
1920×1200@ (50/59.94/60) Hz √ √ √ √
XI'AN N
OVASTAR TE
CH CO., LTD
.

NovaPro UHD Jr All-in-One Controller
User Manual 5 Menu Operations
www.novastar.tech 20
2048×1080@ (30/48/50/59.94/60) Hz √ √ √ √
2048×1152@ (30/60) Hz √ √ √ √
2560×1080@ (50/59.94/60) Hz √ √ √
2560×1600@ (50/59.94/60) Hz √ √ √
2560×1600@120Hz √ √
3840×1080@30Hz √ √ √ √
3840×1080@ (50/59.94/60) Hz √ √ √
3840×1080@120Hz √ √
3840×2160@ (23.98/24/25/29.97/30) Hz √ √ √
3840×2160@ (50/59.94/60) Hz √ √
Custom Resolution
Rotate the knob to set a custom width, height and frame rate. Then rotate the knob to select Apply and press the knob to make the settings take effect. If you do not press the knob, the settings will not take effect.
Figure 5-15 Custom resolution
5.4.3 DVI Mosaic
Step 1 Rotate the knob to choose Input Settings > DVI.
Step 2 Rotate the knob to set the DVI input mode as Single Link or Dual Link. The connector working mode is shown in below.
Figure 5-16 Single link mode
XI'AN N
OVASTAR TE
CH CO., LTD
.

NovaPro UHD Jr All-in-One Controller
User Manual 5 Menu Operations
www.novastar.tech 21
Figure 5-17 Dual link mode
Step 3 In single link mode, the resolutions of DVI 1, 2, 3 and 4 are adjusted together. In dual link mode, the resolutions of DVI 1 and 3 are adjusted together. For resolution adjustment, please refer to 5.4.2 Setting Input Source Resolution.
Step 4 Rotate the knob to select DVI Mosaic and press the knob to enter the DVI mosaic settings menu.
Menu Description
Layout Set the mosaic layout for 4 DVI connectors.
Single link mode supports 7 layouts: , , , ,
, and .
Dual link mode supports 2 layouts: and .
Width Adjust the width of the individual mosaic area.
Single link: The default width is 1920 and the range is 64–2048.
Dual link: The default width is 3840 and the range is 64–4096.
Height Adjust the height of the individual mosaic area.
Single link: The default width is 1080 and the range is 64–1200.
Dual link: The default width is 1080and the range is 64–2160.
Apply Make the settings take effect.
Note:
Only one interlaced SDI input is supported in DVI mosaic mode of four connectors.
5.5 Image Mosaic
When the pixel count of the LED screen is larger than the loading capacity of a single NovaPro UHD Jr unit, the image mosaic function is required. The total loading capacity of all cascaded NovaPro UHD Jr units equals to the total pixel count of the LED screen.
XI'AN N
OVASTAR TE
CH CO., LTD
.

NovaPro UHD Jr All-in-One Controller
User Manual 5 Menu Operations
www.novastar.tech 22
Figure 5-18 Image mosaic parameters
Example: If the pixel count of the LED screen is 7680×4320 which exceeds the loading capacity of a single NovaPro UHD Jr unit, 4 NovaPro UHD Jr units are used together for image mosaic. The connections are shown in the below figure.
Figure 5-19 Connections
Table 5-3 Parameter settings
Device No. Load Area Width
Load Area Height
Load Area Initial X
Load Area Initial Y
1 3840 2160 3840 0
2 3840 2160 0 0
3 3840 2160 0 2160
4 3840 2160 3840 2160
XI'AN N
OVASTAR TE
CH CO., LTD
.

NovaPro UHD Jr All-in-One Controller
User Manual 5 Menu Operations
www.novastar.tech 23
5.6 Preset Settings
The NovaPro UHD Jr supports 10 user presets. User can save, load and clear the configured presets.
Step 1 Rotate the knob to select Preset Settings and press the knob to enter the submenu.
Step 2 Rotate the knob to select the desired preset and press the knob to pop up a dialog box. In the box, four preset operations are provided: Save, Load, Clear or Copy To.
Figure 5-20 Preset operations
Save: Save the current layer layout and settings to the target preset.
Load: Load the selected preset to current lay layout.
Clear: Clear all the contents in the selected preset.
Copy To: Copy the current preset to the target preset.
Note:
If the target preset has data, Copy To operation will overwrite the existing data in the preset.
You can also press the number button on the front panel to quickly load a preset. For example, press the button 1 to load 1-Preset 1 and press the button 2 to load 2-Preset 2, and so on.
5.7 Display Control
This function is used to control the display. You can set the display to go black, display a test pattern, or go to normal display. You can also set the transition effect and effect duration.
Step 1 Press the knob to enter the device menu.
Step 2 Rotate the knob to select Display Control and press the knob to enter the display control screen where you can set the followings.
Normal: Display the content of current input source normally.
Freeze: Freeze the current frame of the output image.
Black Out: Make the screen go black.
Test Pattern: Test the display effect and working status of the LED screen. Test patterns include Pure Color, Gradient, Grid, Brightness, Spacing and Speed.
XI'AN N
OVASTAR TE
CH CO., LTD
.

NovaPro UHD Jr All-in-One Controller
User Manual 5 Menu Operations
www.novastar.tech 24
Image Color: Adjust the color of the output image and the LED screen will display the effect in real-time.
Table 5-4 Image color parameters
Menu Description
Brightness The range is 0–100 and the stepping is 1.
Contrast The range is 0–100 and the stepping is 1.
Saturation The range is 0–100 and the stepping is 1.
Hue The range is -180–180 and the stepping is 1.
Transition Effect: Set the transition effect when switching the input source. Fade effect is supported.
Effect Duration: Set the duration of the transition effect. The range is 0.5s–2s and the default setting is 0.5s.
5.8 Advanced Functions
Advanced functions include HDR, low latency, OPT mode and self-test settings.
5.8.1 HDR
HDR is the abbreviation for High-Dynamic Range. HDR function can greatly enhance the display image quality, allowing for a more clear and vivid image when the device is used together with NovaStar A8s/A10s Plus receiving cards.
Figure 5-21 System architecture
XI'AN N
OVASTAR TE
CH CO., LTD
.

NovaPro UHD Jr All-in-One Controller
User Manual 5 Menu Operations
www.novastar.tech 25
Figure 5-22 HDR effect
Step 1 Choose Advanced Functions > HDR > Status to enable the HDR function.
Step 2 Rotate the knob to adjust the value of each parameter to improve the image quality.
Menu Description
Peak Screen Brightness Adjust the screen brightness under normal operation. The range is 100–1000 and the default setting is 1000.
Ambient Brightness Display the ambient brightness. The range is 0–200 and the default setting is 30.
Low Grayscale Mode The range is 0–50 and the default setting is 15.
Step 3 (Optional) Select Reset to reset all the parameters to default values.
Note:
Only HDR10 input source is supported.
When HDR function is enabled, the output loading capacity will be reduced by 50%.
5.8.2 Low Latency
Low latency reduces the input source signal latency from input to output image of the NovaPro UHD Jr. This function can reduce the latency from sending card to receiving card by 2 frames when the device is used together with NovaStar Armor series receiving cards.
Note:
The loading width of a single Ethernet port should be no greater than 512 pixels when low latency function is used.
The supported Armor series receiving cards include A8, A8s, A9s and A10s Plus.
5.8.3 OPT Mode
The NovaPro UHD Jr supports two OPT modes: Hot Backup (default) and Copy.
Hot Backup: Optical fiber ports 3/4 backup the data of optical fiber ports 1/2.
Copy: Optical fiber ports 3/4 copy the data of optical fiber ports 1/2.
Hot Backup
Step 1 Perform the hardware connections for hot backup mode.
XI'AN N
OVASTAR TE
CH CO., LTD
.

NovaPro UHD Jr All-in-One Controller
User Manual 5 Menu Operations
www.novastar.tech 26
Figure 5-23 Connections for hot backup mode
Step 2 Choose Advanced Functions > OPT Mode > Hot Backup to set the OPT mode as hot backup.
Copy
Step 1 Perform the hardware connections for copy mode.
Figure 5-24 Connections for copy mode
Step 2 Choose Advanced Functions > OPT Mode > Copy to set the OPT mode as copy.
XI'AN N
OVASTAR TE
CH CO., LTD
.
NovaPro UHD Jr All-in-One Controller
User Manual 5 Menu Operations
www.novastar.tech 27
5.8.4 Self-Test
You can test the device by yourself when the device fails, then feedback the result to NovaStar.
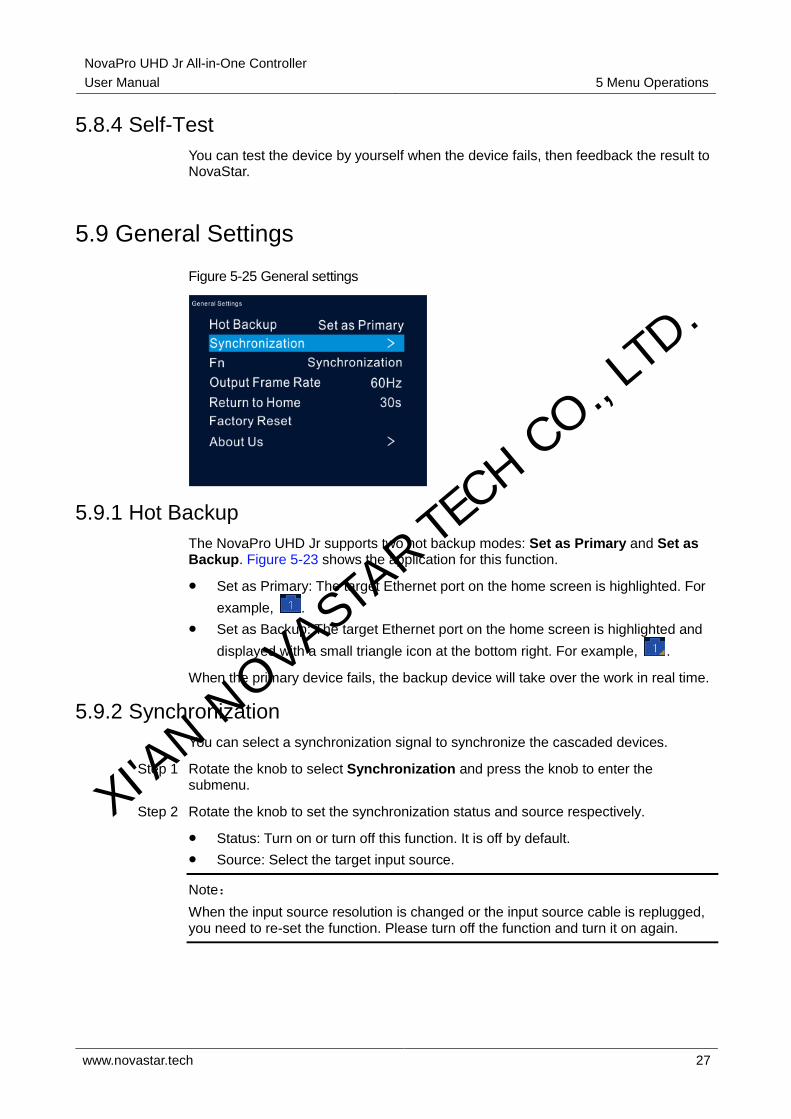
5.9 General Settings
Figure 5-25 General settings
5.9.1 Hot Backup
The NovaPro UHD Jr supports two hot backup modes: Set as Primary and Set as Backup. Figure 5-23 shows the application for this function.
Set as Primary: The target Ethernet port on the home screen is highlighted. For
example, .
Set as Backup: The target Ethernet port on the home screen is highlighted and
displayed with a small triangle icon at the bottom right. For example, .
When the primary device fails, the backup device will take over the work in real time.
5.9.2 Synchronization
You can select a synchronization signal to synchronize the cascaded devices.
Step 1 Rotate the knob to select Synchronization and press the knob to enter the submenu.
Step 2 Rotate the knob to set the synchronization status and source respectively.
Status: Turn on or turn off this function. It is off by default.
Source: Select the target input source.
Note:
When the input source resolution is changed or the input source cable is replugged, you need to re-set the function. Please turn off the function and turn it on again.
XI'AN N
OVASTAR TE
CH CO., LTD
.

NovaPro UHD Jr All-in-One Controller
User Manual 5 Menu Operations
www.novastar.tech 28
5.9.3 Fn
The Fn button on the device front panel can be customized to a Synchronization, Preset Settings, Freeze, Black Out, Test Pattern, Quick Configuration, Image Color, Main Layer or Priority shortcut button.
5.9.4 Output Frame Rate
You can set the output frame rate of the image output by Ethernet port. The range is 23.98 Hz–120 Hz and the default setting is 60 Hz.
5.9.5 Return to Home
You can set the period of time during which the system stays at the current page before returning to the homepage automatically when there is no operation performed. The default setting is 60s and the maximum value is 3600s.
5.9.6 Factory Reset
You can reset all user data on the device to factory settings.
5.9.7 About Us
You can view the following information.
Device hardware version
Company website (www.novastar.tech)
Email address ([email protected])
5.10 Partial Reset
You can keep the saved parameters and reset the unsaved parameters to factory settings.
The unsaved parameters include renaming, loading RCFGx files, BKG image files, preset parameters, Fn button settings, IP & mask parameters and language settings.
5.11 Communication Settings
5.11.1 Communication Mode
The device is connected to the PC via both USB port and Ethernet port. The communication modes include USB Preferred and LAN Preferred.
XI'AN N
OVASTAR TE
CH CO., LTD
.

NovaPro UHD Jr All-in-One Controller
User Manual 5 Menu Operations
www.novastar.tech 29
Figure 5-26 Communication mode
When USB Preferred is selected, the device communicates with the PC via USB port by preference.
When LAN Preferred is selected, the device communicates with the PC via Ethernet port by preference.
5.11.2 Network Settings
The network setting modes include Manual and Auto.
Manual: Set the device IP address and subnet mask manually.
Auto: The device reads the network parameters automatically.
Reset: Reset the parameters to defaults.
Figure 5-27 Network settings
Note:
1. When communicating with the control PC, the device and control PC must be on the same LAN.
2. The IP address of current device cannot conflict with IP addresses of other devices.
XI'AN N
OVASTAR TE
CH CO., LTD
.

NovaPro UHD Jr All-in-One Controller
User Manual 5 Menu Operations
www.novastar.tech 30
5.12 Working Mode
The NovaPro UHD Jr can work as a Video Controller (default) or Fiber Converter.
Step 1 Press the knob to enter the device menu.
Step 2 Rotate the knob to select Working Mode and press the knob to enter the working mode screen to select a desired mode.
Video Controller: Both Ethernet ports and optical fiber ports are used for output.
Fiber Converter: Optical fiber ports are used for input, and Ethernet ports are used for output.
Figure 5-28 Video controller mode
Figure 5-29 Fiber converter mode
5.13 Langugage
The NovaPro UHD Jr supports both Chinese and English. You can freely switch to either language.
XI'AN N
OVASTAR TE
CH CO., LTD
.

NovaPro UHD Jr All-in-One Controller
User Manual 6 Specifications
www.novastar.tech 31
6 Specifications
Overall Specifications
Type Description
Power connector AC100-240V~, 50/60Hz
Operating temperature 0°C–50°C
Dimensions 482.6 mm × 396.5 mm × 139.0 mm
Overall power consumption 70 W
Net weight 6.3 kg
Packing dimensions 615.0 mm × 290.0 mm × 525.0 mm
XI'AN N
OVASTAR TE
CH CO., LTD
.