numbers - highland woodworking · 2016-01-16 · carving the guilloche with carving tool #6, set in...
TRANSCRIPT
The term, guilloche, is of French ori-gin and describes a decorationwhich can be found widely in
ancient Greece and Rome. A typical guilloche design is formed by
two or more bands, which are interwovento form a repetitive pattern. In many casesthe bands are interspersed with otherdesigns, colours or textures. The samebasic elements of guilloche also feature
strongly in Celtic, Anglo Saxon andearly Scandinavian decorative arts,producing in some cases extremelyelaborate and complex patterns.
The principles of guilloche canalso be found in Islamic andMoorish artwork and these wererefined extensively during therenaissance, drawing on classicalmedieval and Moorish influences.
We see these designs decoratingEnglish furniture dating from the16th century onwards. At first, thedecoration was simply carved.However, it was later painted andinlaid into the fine furnishing of theGeorgian period.
Guilloche can be found in manydifferent guises — it is the continu-ous interwoven bands or ribbonsthat are the defining feature. Thedecoration can be used to decoraterails, mouldings, panels or turneditems such as bowls or spindles.
Guilloche Panel For this example of guilloche, I
recommend using a piece of tim-ber, 450mm x 150mm x 20mm.This particular style and designmight typically be found carvedinto Oak but feel free to experimentwith any Australian native speciesthat carves nicely.
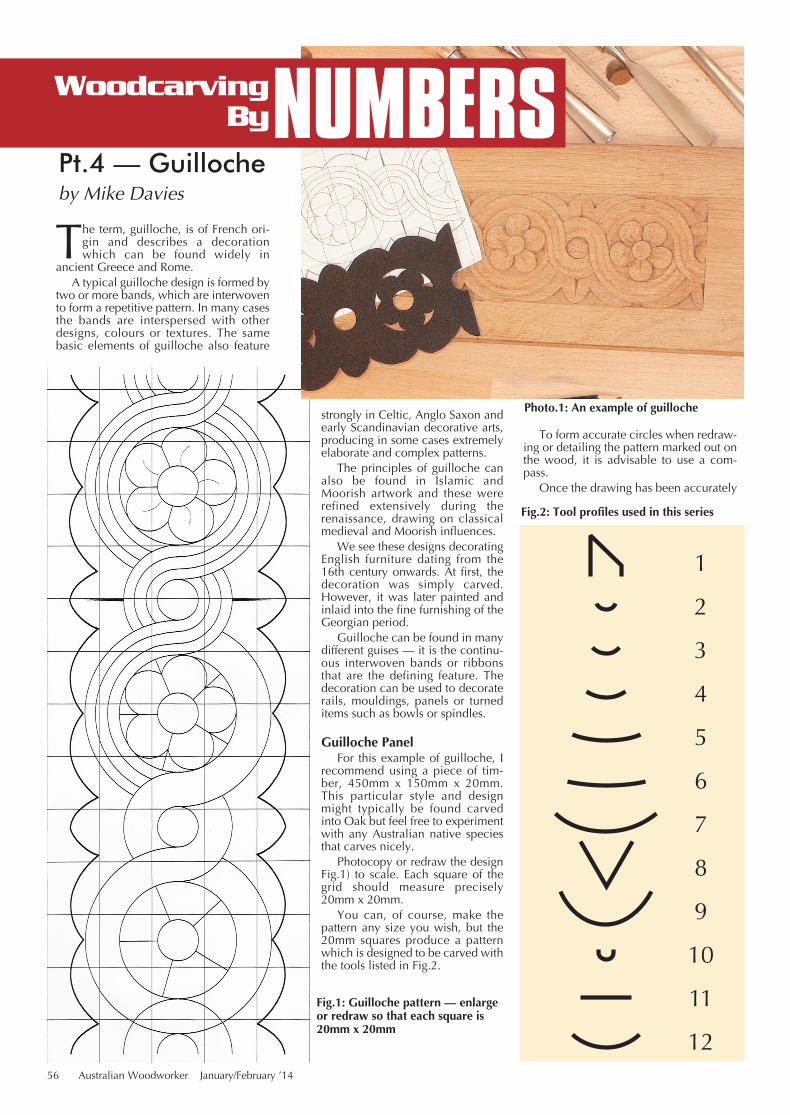
Photocopy or redraw the designFig.1) to scale. Each square of thegrid should measure precisely20mm x 20mm.
You can, of course, make thepattern any size you wish, but the20mm squares produce a patternwhich is designed to be carved withthe tools listed in Fig.2.
To form accurate circles when redraw-ing or detailing the pattern marked out onthe wood, it is advisable to use a com-pass.
Once the drawing has been accurately
Fig.1: Guilloche pattern — enlargeor redraw so that each square is20mm x 20mm
Fig.2: Tool profiles used in this series
NUMBERSPt.4 — Guillocheby Mike Davies
Woodcarving By
Photo.1: An example of guilloche
56 Australian Woodworker January/February ’14
173Davies carving.qxd 18/12/2013 12:49 PM Page 1
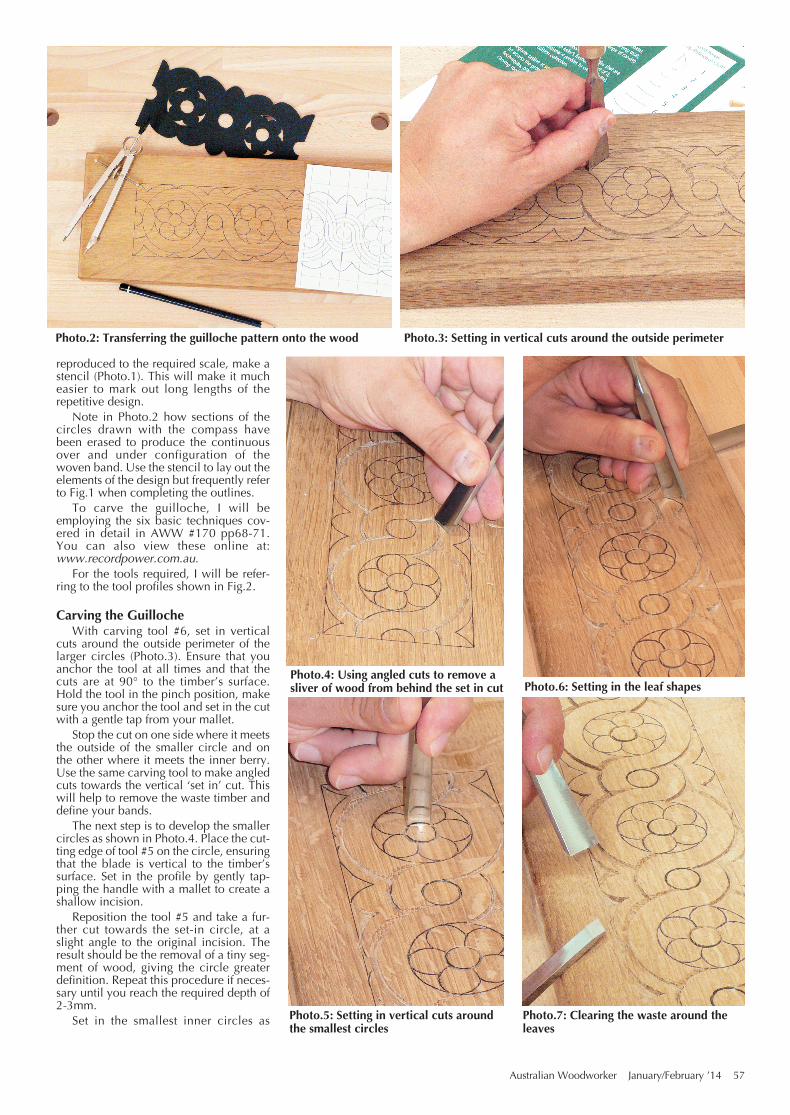
reproduced to the required scale, make astencil (Photo.1). This will make it mucheasier to mark out long lengths of therepetitive design.
Note in Photo.2 how sections of thecircles drawn with the compass havebeen erased to produce the continuousover and under configuration of thewoven band. Use the stencil to lay out theelements of the design but frequently referto Fig.1 when completing the outlines.
To carve the guilloche, I will beemploying the six basic techniques cov-ered in detail in AWW #170 pp68-71.You can also view these online at:www.recordpower.com.au.
For the tools required, I will be refer-ring to the tool profiles shown in Fig.2.
Carving the GuillocheWith carving tool #6, set in vertical
cuts around the outside perimeter of thelarger circles (Photo.3). Ensure that youanchor the tool at all times and that thecuts are at 90° to the timber’s surface.Hold the tool in the pinch position, makesure you anchor the tool and set in the cutwith a gentle tap from your mallet.
Stop the cut on one side where it meetsthe outside of the smaller circle and onthe other where it meets the inner berry.Use the same carving tool to make angledcuts towards the vertical ‘set in’ cut. Thiswill help to remove the waste timber anddefine your bands.
The next step is to develop the smallercircles as shown in Photo.4. Place the cut-ting edge of tool #5 on the circle, ensuringthat the blade is vertical to the timber’ssurface. Set in the profile by gently tap-ping the handle with a mallet to create ashallow incision.
Reposition the tool #5 and take a fur-ther cut towards the set-in circle, at aslight angle to the original incision. Theresult should be the removal of a tiny seg-ment of wood, giving the circle greaterdefinition. Repeat this procedure if neces-sary until you reach the required depth of2-3mm.
Set in the smallest inner circles as
Photo.2: Transferring the guilloche pattern onto the wood
Photo.4: Using angled cuts to remove asliver of wood from behind the set in cut
Photo.5: Setting in vertical cuts aroundthe smallest circles
Photo.7: Clearing the waste around theleaves
Photo.6: Setting in the leaf shapes
Photo.3: Setting in vertical cuts around the outside perimeter
Australian Woodworker January/February ’14 57
173Davies carving.qxd 18/12/2013 12:50 PM Page 2
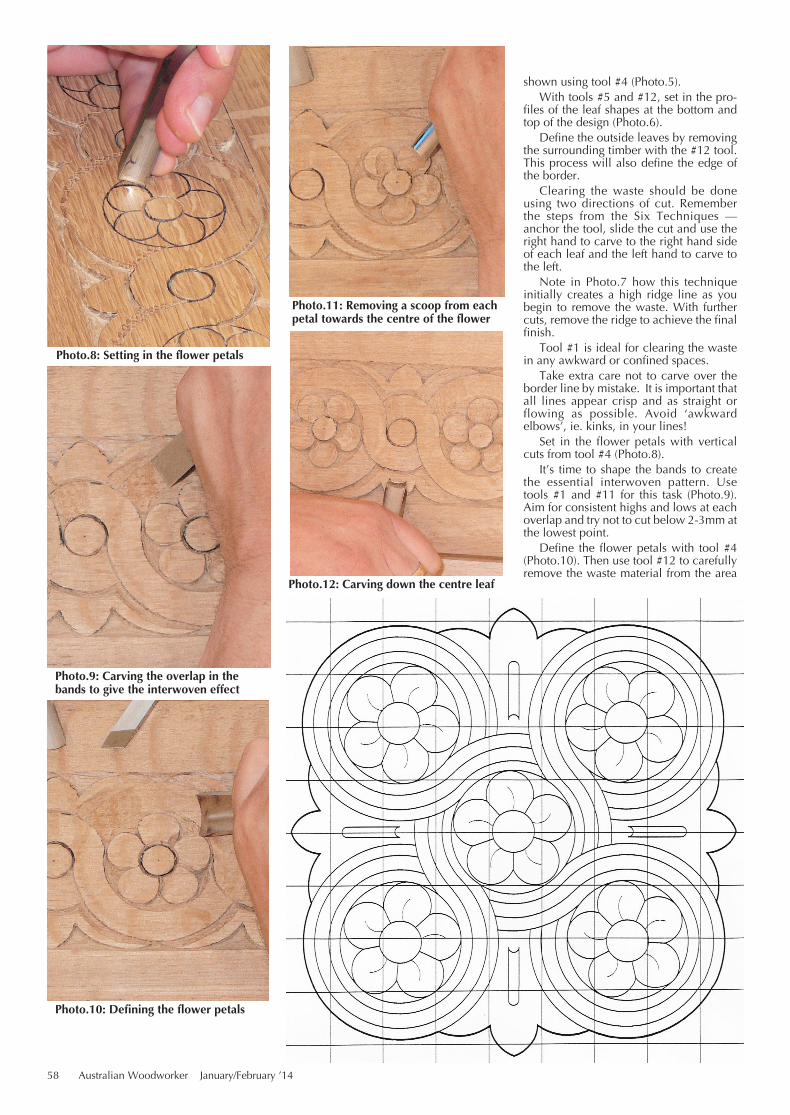
shown using tool #4 (Photo.5).With tools #5 and #12, set in the pro-
files of the leaf shapes at the bottom andtop of the design (Photo.6).
Define the outside leaves by removingthe surrounding timber with the #12 tool.This process will also define the edge ofthe border.
Clearing the waste should be doneusing two directions of cut. Rememberthe steps from the Six Techniques —anchor the tool, slide the cut and use theright hand to carve to the right hand sideof each leaf and the left hand to carve tothe left.
Note in Photo.7 how this techniqueinitially creates a high ridge line as youbegin to remove the waste. With furthercuts, remove the ridge to achieve the finalfinish.
Tool #1 is ideal for clearing the wastein any awkward or confined spaces.
Take extra care not to carve over theborder line by mistake. It is important thatall lines appear crisp and as straight orflowing as possible. Avoid ‘awkwardelbows’, ie. kinks, in your lines!
Set in the flower petals with verticalcuts from tool #4 (Photo.8).
It’s time to shape the bands to createthe essential interwoven pattern. Usetools #1 and #11 for this task (Photo.9).Aim for consistent highs and lows at eachoverlap and try not to cut below 2-3mm atthe lowest point.
Define the flower petals with tool #4(Photo.10). Then use tool #12 to carefullyremove the waste material from the area
Photo.10: Defining the flower petals
Photo.8: Setting in the flower petals
Photo.11: Removing a scoop from eachpetal towards the centre of the flower
Photo.9: Carving the overlap in thebands to give the interwoven effect
Photo.12: Carving down the centre leaf
58 Australian Woodworker January/February ’14
173Davies carving.qxd 18/12/2013 12:51 PM Page 3
surrounding each petal. The procedure isthe same as that used for the leaf shapesalong the border.
To define the petals further, make asingle cut for each petal, sliding the cut-ting edge of tool #4 so that it follows itsown radius to form a uniform fan effect. Aslicing cut should then be made on theright hand of each incision to give the illu-sion that the petals are overlapping eachother.
With tool #4 take a small scoop out ofeach petal towards the flower’s centre(Photo.11). Return to the leaves and finishshaping them. In Photo.12 you can seehow the curved shape of each leaf hasbeen carved down towards the perimeterof the larger circles, using tools #5 and#6. Gradually carve down the centreleaves towards the edges of the smallercircles using tool #4.
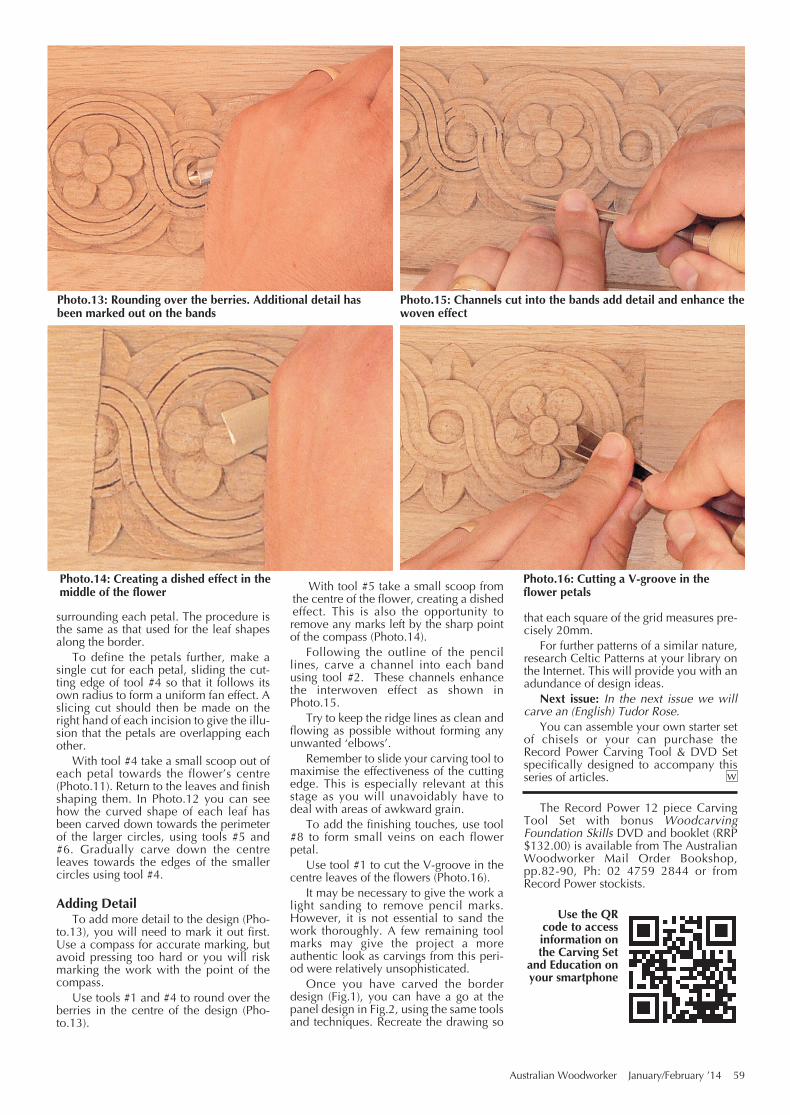
Adding DetailTo add more detail to the design (Pho-
to.13), you will need to mark it out first.Use a compass for accurate marking, butavoid pressing too hard or you will riskmarking the work with the point of thecompass.
Use tools #1 and #4 to round over theberries in the centre of the design (Pho-to.13).
With tool #5 take a small scoop fromthe centre of the flower, creating a dishedeffect. This is also the opportunity toremove any marks left by the sharp pointof the compass (Photo.14).
Following the outline of the pencillines, carve a channel into each bandusing tool #2. These channels enhancethe interwoven effect as shown inPhoto.15.
Try to keep the ridge lines as clean andflowing as possible without forming anyunwanted ‘elbows’.
Remember to slide your carving tool tomaximise the effectiveness of the cuttingedge. This is especially relevant at thisstage as you will unavoidably have todeal with areas of awkward grain.
To add the finishing touches, use tool#8 to form small veins on each flowerpetal.
Use tool #1 to cut the V-groove in thecentre leaves of the flowers (Photo.16).
It may be necessary to give the work alight sanding to remove pencil marks.However, it is not essential to sand thework thoroughly. A few remaining toolmarks may give the project a moreauthentic look as carvings from this peri-od were relatively unsophisticated.
Once you have carved the borderdesign (Fig.1), you can have a go at thepanel design in Fig.2, using the same toolsand techniques. Recreate the drawing so
that each square of the grid measures pre-cisely 20mm.
For further patterns of a similar nature,research Celtic Patterns at your library onthe Internet. This will provide you with anadundance of design ideas.
Next issue: In the next issue we willcarve an (English) Tudor Rose.
You can assemble your own starter setof chisels or your can purchase theRecord Power Carving Tool & DVD Setspecifically designed to accompany thisseries of articles.
The Record Power 12 piece CarvingTool Set with bonus WoodcarvingFoundation Skills DVD and booklet (RRP$132.00) is available from The AustralianWoodworker Mail Order Bookshop,pp.82-90, Ph: 02 4759 2844 or fromRecord Power stockists.
Use the QRcode to accessinformation onthe Carving Set
and Education onyour smartphone
Photo.14: Creating a dished effect in themiddle of the flower
Photo.15: Channels cut into the bands add detail and enhance thewoven effect
Photo.16: Cutting a V-groove in theflower petals
Photo.13: Rounding over the berries. Additional detail hasbeen marked out on the bands
Australian Woodworker January/February ’14 59
w
173Davies carving.qxd 18/12/2013 12:52 PM Page 4