nvision report instructions -...
TRANSCRIPT

QUICK REFERENCE GUIDE
nVision Report Instructions
June 15, 2012
NVISION Report Instructions
To run an nVision Report, navigate to “Define Report Book.” This is the run control page for nVision Reporting.
Navigation: Reporting Tools, PS/nVision, Define Report Book
1 | P a g e - Q u i c k R e f e r e n c e G u i d e

You must use the Run Control ID KK_REC01. Click the Search button to display all the existing run controls. If KK_REC01 has not already been created, click the “Add a New Value” tab and add it.
If KK_REC01 already exists in your Search Results, click it to open the Run Control page.
If KK_REC01 is the only Run Control ID created, SWIFT will automatically jump to the next screen.
2 | P a g e - Q u i c k R e f e r e n c e G u i d e

Use the run control page to begin setting the parameters for the report:
1. The business unit will always be MN001.
Note: This not the functional business unit representing your agency. It is the State’s GL business unit.
2. For the daily receipts report you will need to add one line, with the Report ID in the format, KK_(your
agency abbreviation)(sequence); example KK_B4203.
Note: You will be assigned a Report ID in your name. Be sure to use the correct Report ID.
3. Select the “As Of Date” to identify the end (or to) date for the report. The “from” date will be selected from
prompt tabs within the view. You may need to change the dropdown selection to “Specify.”
4. Save the run control.
5. Click the View button on line KK_MMB01 to choose your first set of criteria.
3 | P a g e - Q u i c k R e f e r e n c e G u i d e

The first page is the nVision Report Request page. This page will open in a new tab or browser window.
1. Change the “As Of Reporting Date” to match the date you entered on the Report Book run control page.
2. Click the Query Prompts tab.
4 | P a g e - Q u i c k R e f e r e n c e G u i d e

There are ten Query Prompts that must be set before you run the report. If you have run the report before, and you saved the prompt settings, those values will appear in the prompt fields. If you’ve never run the report before, or you need to change the prompts, you’ll need to go through and set the values for each of the ten prompts. Sometimes it’s a good idea to go through them anyway, just to make sure they are set the way you want them.
The query prompts set the values that will be used by the underlying queries to build the report. To change any values on this page, click the “Update Parameters” link. You should enter any changes here instead of on the actual prompts page.
The first query, KK_REC07, only requires the business unit. Enter the “To” and “From” business unit values in the fields. It is recommended that you restrict the query to a single business unit.
Click the OK button to return to the KK_REC07 query prompt page.
Click the “Show next row” icon to move through the prompts.
5 | P a g e - Q u i c k R e f e r e n c e G u i d e

The second query is called KK_REC06. The prompts for this query require the business unit and a date. This date represents the “From” date for the report. Earlier, on the Run Control page, you entered the “To” date. In this example, the “To” date was 06/30/2012.
Click the “Update Parameters” link.
Enter the business unit and date. One reason to use the “Update Parameters” page to enter the query prompt values is to make sure the dates are in the correct format. Click the calendar icon to open the date selection window. Click to change the month and year and then click on the date. SWIFT will load the date into the field in the correct format.
For this example, you are entering a “From” date of July 1, 2011.
Note the date format in this field. This is the usual format for dates in SWIFT.
Click the OK button to return to the KK_REC06 query prompt page.
6 | P a g e - Q u i c k R e f e r e n c e G u i d e
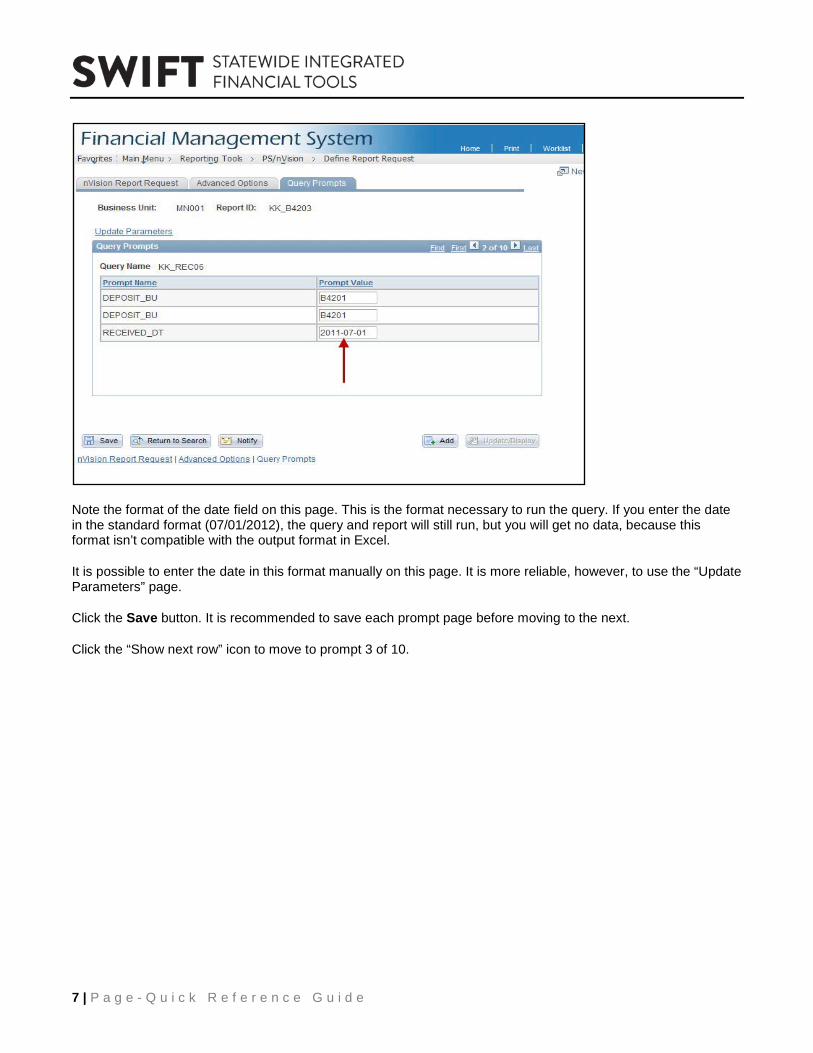
Note the format of the date field on this page. This is the format necessary to run the query. If you enter the date in the standard format (07/01/2012), the query and report will still run, but you will get no data, because this format isn’t compatible with the output format in Excel.
It is possible to enter the date in this format manually on this page. It is more reliable, however, to use the “Update Parameters” page.
Click the Save button. It is recommended to save each prompt page before moving to the next.
Click the “Show next row” icon to move to prompt 3 of 10.
7 | P a g e - Q u i c k R e f e r e n c e G u i d e

The remaining eight prompt pages all appear the same. They point to different queries, but the prompts each query requires are the same.
Here is a reference showing each of the queries and what it retrieves for the final report:
Click the “Update Parameters” link to edit the prompts for query KK_REC05.
8 | P a g e - Q u i c k R e f e r e n c e G u i d e

The fields for this and the remaining queries are “From” and “To” Approp ID and “From” and “To” Dept ID, as well as a From Date. Notice that the Approp ID and Dept ID fields are labeled “Source,” indicating this query is retrieving data from a source application.
You can enter a range of Approp ID values. Be careful, though. The broader you set the prompts the more data will be pulled into the report. There is a maximum of 65,000 lines for the output, and it’s possible that a range that is too broad will crash by generating too many lines of data. This example shows a single value, so the report will show data for that Approp ID only.
You can also enter a range of Dept ID values. Within a single Approp ID, a broad range of Dept IDs will not generate too many lines. If you want to include all possible values in the range for Dept ID, you should enter the “From” and “To” as shown in the example. Because Dept IDs are alphanumeric, entering the range “B4200000 through B42ZZZZZ will include all values. You should not use wildcards.
Use the calendar icon to select the date. This date must be the same for all query prompts in order to get consistent data in the report.
Click the OK button to return to the KK_REC05 prompts page.
9 | P a g e - Q u i c k R e f e r e n c e G u i d e

Use the “Show next row” icon to navigate through the prompts, using the “Update Parameters” page to enter the Approp ID and Dept ID ranges and the From Date. These be the same for all queries.
10 | P a g e - Q u i c k R e f e r e n c e G u i d e

The final four queries retrieve Commitment Control Application data. The format of the prompts remains the same, however.
11 | P a g e - Q u i c k R e f e r e n c e G u i d e

Note that on the Update Parameters page for query KK_REC01D, the Approp ID and Dept ID fields are labeled “KK” indicating that Commitment Control data is retrieved.
Enter the same ranges for the Approp ID and Dept ID, and the same From Date you used on the previous prompts, using the calendar icon .
Click the OK button to return to the KK_REC01D query prompts page.
Use the Show next row icon to navigate through all ten prompts. Use the Update Parameters page to enter the values for all prompts.
It is recommended to navigate back through all the query prompts pages from 10 back to 1 to make sure the values are all consistent. Use the “Show previous row” icon . If you find an error you can just fix it using the Update Parameters page for that set of prompts.
When all query prompts are correct, simply close the tab or window that you are working in and return to the Report Book run control page.
12 | P a g e - Q u i c k R e f e r e n c e G u i d e

Click the Run button to access the Process Schedule Request page.
Leave all of the defaults on this page. If you click OK, the report will be queued to run immediately. It may not run right away, depending on other jobs and the general system load.
You can schedule the report to run at a later time by changing the Run Date and Run Time fields. It’s best to run the report after 2 PM when there is less other activity going on.
When your date and time are correct, click the OK button to run or queue the report.
13 | P a g e - Q u i c k R e f e r e n c e G u i d e

SWIFT returns you to the Report Book run control page.
Note the Process Instance below the Run button. You’ll need this when you go to view the report. You can use this number to troubleshoot if the report doesn’t run for some reason.
To track the report and confirm that it ran successfully, click the “Process Monitor” link.
14 | P a g e - Q u i c k R e f e r e n c e G u i d e

The Process Monitor page shows any processes you have run in the past. It might include other reports or other processes from different modules.
1. You can change how far back SWIFT goes to look for processes by changing the dropdowns and
entering a number value. The default is “Last 1 Days.” This example has been changed to “Last 5 Days.”
The options include All, Days, Hours, Minutes, or Years. You can also enter a range of dates. If you know
the Process Instance, you can enter that to show only that process. Click the Refresh button after making
any changes to display the new list.
2. Check the Run Status and Distribution Status. If the run status is Queued or Processing, the distribution
status will be N/A. You need to wait until the run status is Success and the distribution status is Posted.
3. Click the Refresh button until your process distribution status is “Posted.” Then click the “Go back to
Report Book Definition” link.
On the Report Book run control page, click the “Report Manager” link.
15 | P a g e - Q u i c k R e f e r e n c e G u i d e

1. Click the “Administration” tab.
2. Look for your Process Instance. There may be multiple reports, even some with the same file name. The
only way to be sure you are accessing the one you want is by the Process Instance.
3. Click the “Details” link.
1. Check the file size. If your report ran correctly and contains data, it should be a big file. If this is a small
number, like 500 bytes, for example, there was an error in running the report.
2. The report file name will be [your report ID]_[your user ID].xls. In this example, it is
KK_4203_01135035.xls.
Click the report file name to open the report in Excel. You’ll see the standard Excel file open dialog box:
16 | P a g e - Q u i c k R e f e r e n c e G u i d e

Click “Open.”
You’ll probably get a warning message from Excel:
This is because the report is output in Excel 2003, while most state computers are loaded with Excel 2010. Click “Yes.”
17 | P a g e - Q u i c k R e f e r e n c e G u i d e

Your report will open in Excel.
You can print the report or save it with a different file name.
If you lose the report file, or make a change that you can’t recover, you can always go back to the Report Manager page and download the file again. This is a copy of the original version that is stored in SWIFT.
18 | P a g e - Q u i c k R e f e r e n c e G u i d e