o2.co.uk mobile broadband user guide x230d - my...
TRANSCRIPT
o2.co.ukTelefónica UK Limited, 260 Bath Road, Slough, Berks, SL1 4DX. Registered in England and Wales No.1743099. That’s also the address for our registered office. All the information’s correct at the time of going to print, June 2013. O2CN1493N 06/13. Read our mobile broadband Ts & Cs at o2.co.uk/terms.
0682
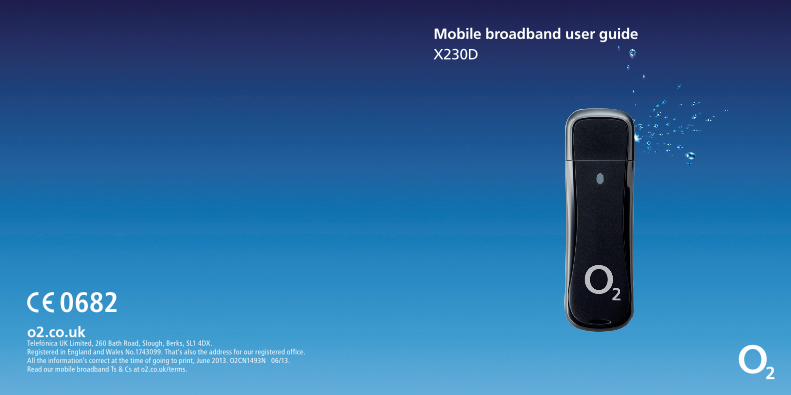
Mobile broadband user guide X230D
What’s mobile broadband? Mobile broadband lets you use the internet when you’re out and about.
30 day Happiness GuaranteeWe offer a 30 day Happiness Guarantee. If you’re unhappy with our mobile broadband, we’ll refund you, just return the dongle within
30 days from when you bought it.
Getting started
Coverage ......................................................... 1
Keep your number safe ................................. 1
Putting in the sim............................................2
What the light on your dongle means .........3
Windows
Setting up mobile broadband ....................... 4
Mac
Setting up mobile broadband ......................14
Ways to pay and help
Pay & Go .........................................................20
Buying internet access...............................20
Checking your balance and usage ...........24
Pay Monthly ...................................................24
Checking your bill .....................................24
Checking your data usage .......................25
Using mobile broadband abroad ................28
Ways to connect to the internet .................29
Mobile broadband ....................................29
Home wifi .................................................. 31
Public wifi hotspots...................................32
Text messages ............................................... 33
Mobile broadband not working? ............. 36
Safety and use ..............................................38
Warranty statement ....................................41
Contents
21
Getting startedCoverage
We want you to get the most out of your mobile broadband service. A weak signal may mean you’re in a poor coverage area.
To check your coverage and for support, go online to www.o2.co.uk/coveragechecker or send ‘CHECK’ followed by the postcode where you are to 61202 from your mobile phone (e.g. CHECK SL1 4DX).
Keep your number safe
It’s a good idea to save your mobile broadband number in your phone’s address book. You’ll find it on the card you popped your sim out of (and on your dispatch note, if you bought it online). You’ll need it to use wifi or to call our customer services team for help.
If you’re on Pay & Go, you’ll also need your number to buy data (and a credit or debit card).
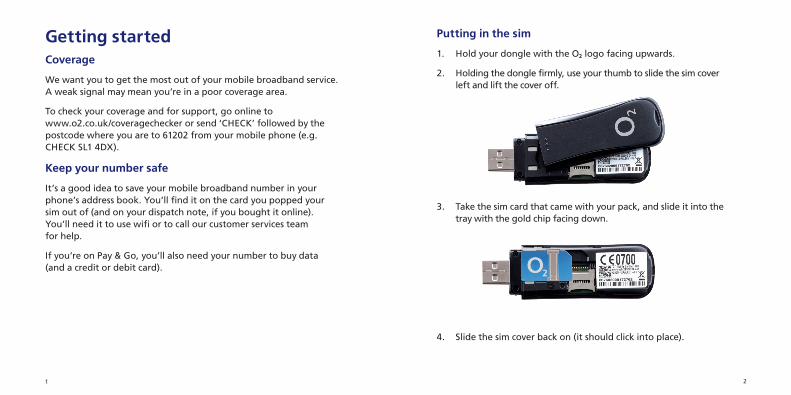
Putting in the sim
1. Hold your dongle with the ø logo facing upwards.
2. Holding the dongle firmly, use your thumb to slide the sim cover left and lift the cover off.
3. Take the sim card that came with your pack, and slide it into the tray with the gold chip facing down.
4. Slide the sim cover back on (it should click into place).
43
WindowsSetting up mobile broadband
What you need
– Windows XP (Service Pack 3), Windows Vista (Service Pack 2), Windows 7 or Windows 8
– Hard Disk Space: 50MB
– Internet Explorer 6.0 or higher (we recommend you upgrade to the latest version)
– 32-bit and 64-bit full support
Tip: If you are using a work’s computer you may need to speak to your I.T. department for help with installation.
Connection Manager – Here to help
To use mobile broadband with your computer you have
to install Connection Manager (you’ll find it on the dongle).
Connection Manager:
– Looks after all your internet connections
– Automatically connects you to the fastest network available
– Connects you to public wifi hotspots through ø wifi.
– Helps you keep track of your data usage on the ø mobile
broadband network
Win
do
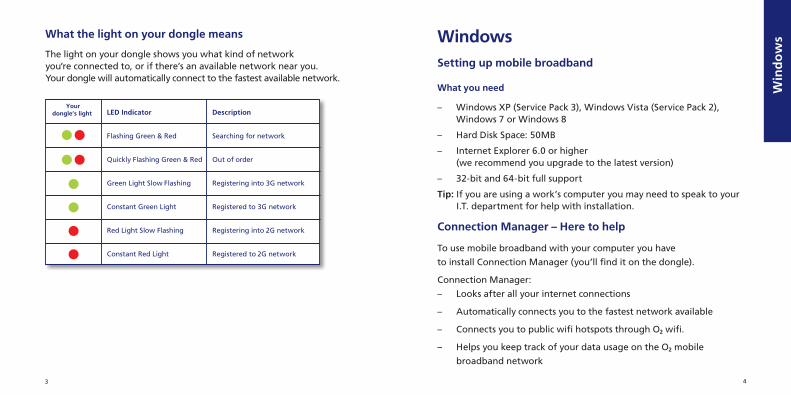
wsWhat the light on your dongle means
The light on your dongle shows you what kind of network you’re connected to, or if there’s an available network near you. Your dongle will automatically connect to the fastest available network.
LED Indicator Description
Flashing Green & Red Searching for network
Quickly Flashing Green & Red Out of order
Green Light Slow Flashing Registering into 3G network
Constant Green Light Registered to 3G network
Red Light Slow Flashing Registering into 2G network
Constant Red Light Registered to 2G network
65
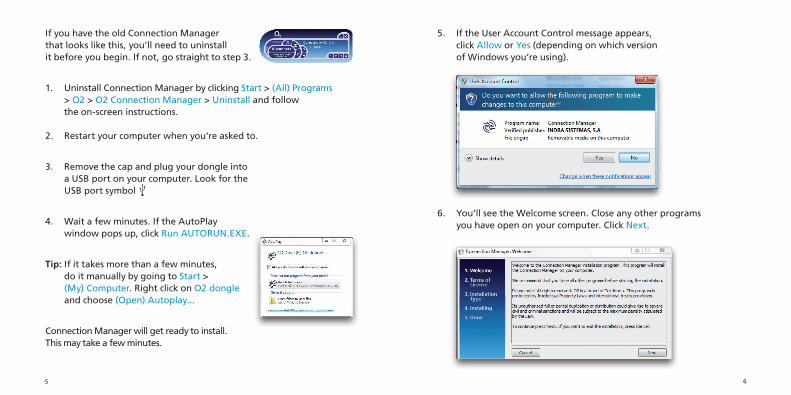
If you have the old Connection Manager that looks like this, you’ll need to uninstall it before you begin. If not, go straight to step 3.
1. Uninstall Connection Manager by clicking Start > (All) Programs > O2 > O2 Connection Manager > Uninstall and follow the on-screen instructions. 2. Restart your computer when you’re asked to.
3. Remove the cap and plug your dongle into a USB port on your computer. Look for the USB port symbol
4. Wait a few minutes. If the AutoPlay window pops up, click Run AUTORUN.EXE.
Tip: If it takes more than a few minutes, do it manually by going to Start > (My) Computer. Right click on O2 dongle and choose (Open) Autoplay...
Connection Manager will get ready to install. This may take a few minutes.
5. If the User Account Control message appears, click Allow or Yes (depending on which version of Windows you’re using).
6. You’ll see the Welcome screen. Close any other programs you have open on your computer. Click Next.
87
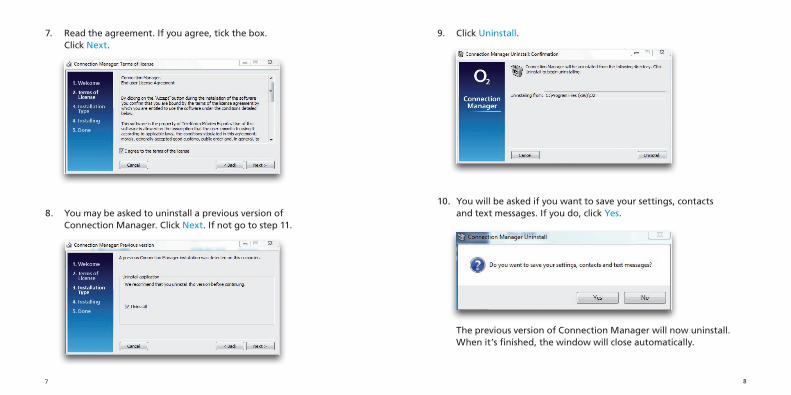
7. Read the agreement. If you agree, tick the box. Click Next.
8. You may be asked to uninstall a previous version of
Connection Manager. Click Next. If not go to step 11.
9. Click Uninstall.
10. You will be asked if you want to save your settings, contacts
and text messages. If you do, click Yes.
The previous version of Connection Manager will now uninstall. When it’s finished, the window will close automatically.
109
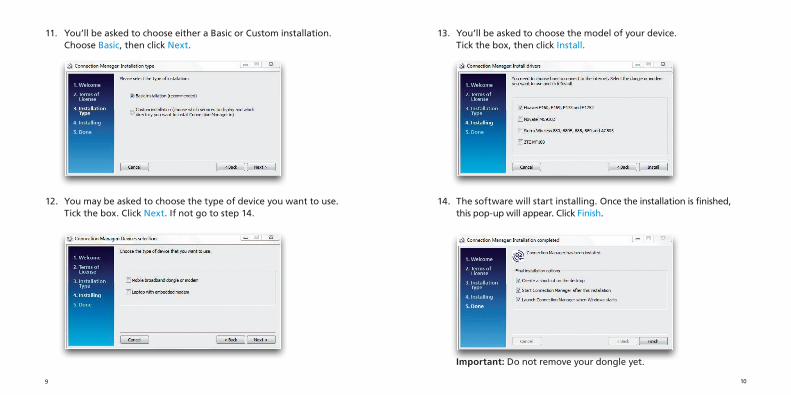
11. You’ll be asked to choose either a Basic or Custom installation. Choose Basic, then click Next.
12. You may be asked to choose the type of device you want to use. Tick the box. Click Next. If not go to step 14.
13. You’ll be asked to choose the model of your device. Tick the box, then click Install.
14. The software will start installing. Once the installation is finished, this pop-up will appear. Click Finish.
Important: Do not remove your dongle yet.
1211
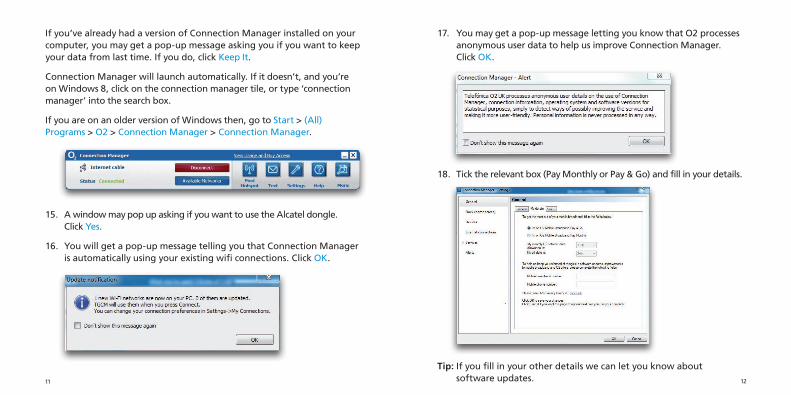
If you’ve already had a version of Connection Manager installed on your computer, you may get a pop-up message asking you if you want to keep your data from last time. If you do, click Keep It.
Connection Manager will launch automatically. If it doesn’t, and you’re on Windows 8, click on the connection manager tile, or type ‘connection manager’ into the search box.
If you are on an older version of Windows then, go to Start > (All) Programs > O2 > Connection Manager > Connection Manager.
15. A window may pop up asking if you want to use the Alcatel dongle.
Click Yes.
16. You will get a pop-up message telling you that Connection Manager is automatically using your existing wifi connections. Click OK.
17. You may get a pop-up message letting you know that O2 processes anonymous user data to help us improve Connection Manager. Click OK.
18. Tick the relevant box (Pay Monthly or Pay & Go) and fill in your details.
Tip: If you fill in your other details we can let you know about software updates.
1413
If you’re on Pay Monthly, fill in your bill date so Connection Manager can work out how much data you’ve used. Your monthly bill date will be the date of your email or the date written on your bill (if you asked for a paper copy). Go to page 24 for more details.
19. Click OK. Your software is now installed.
If you’re on Pay Monthly, you’re now ready to connect to the internet. Go to page 29 for more details. If you’re on Pay & Go, you might need to buy internet access first. Follow the steps on page 20 to find out how.
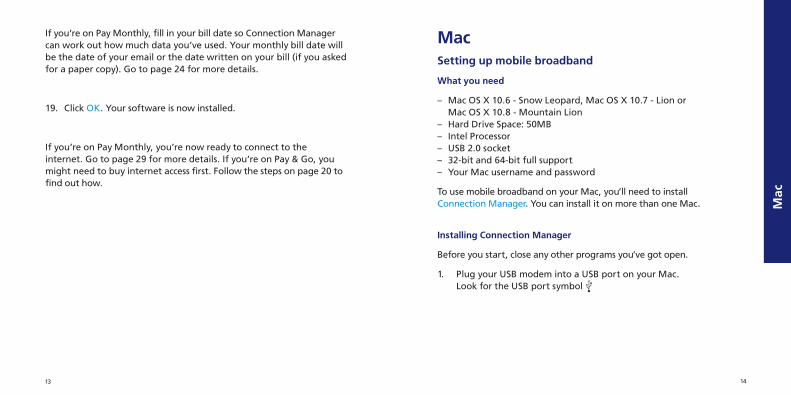
MacSetting up mobile broadband
What you need
– Mac OS X 10.6 - Snow Leopard, Mac OS X 10.7 - Lion or Mac OS X 10.8 - Mountain Lion – Hard Drive Space: 50MB – Intel Processor – USB 2.0 socket – 32-bit and 64-bit full support – Your Mac username and password
To use mobile broadband on your Mac, you’ll need to install Connection Manager. You can install it on more than one Mac.
Installing Connection Manager
Before you start, close any other programs you’ve got open.
1. Plug your USB modem into a USB port on your Mac. Look for the USB port symbol
Mac
1615
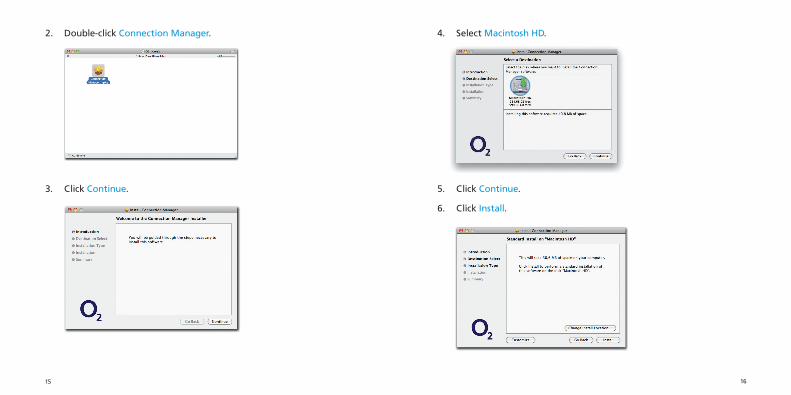
2. Double-click Connection Manager.
3. Click Continue.
4. Select Macintosh HD.
5. Click Continue.
6. Click Install.
1817
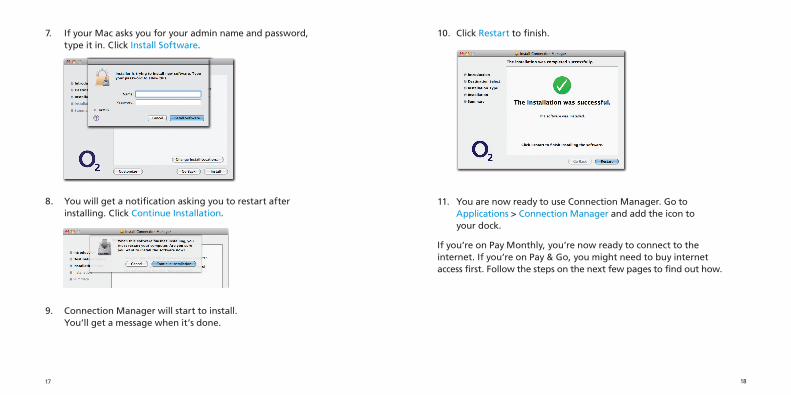
7. If your Mac asks you for your admin name and password, type it in. Click Install Software.
8. You will get a notification asking you to restart after installing. Click Continue Installation.
9. Connection Manager will start to install. You’ll get a message when it’s done.
10. Click Restart to finish.
11. You are now ready to use Connection Manager. Go to Applications > Connection Manager and add the icon to your dock.
If you’re on Pay Monthly, you’re now ready to connect to the internet. If you’re on Pay & Go, you might need to buy internet access first. Follow the steps on the next few pages to find out how.
2019
Ways to pay & help
Pay & GoYou can buy mobile broadband access with a Visa, MasterCard or Switch/Maestro. You won’t be charged for going to the website to buy what you need.
Data comes in daily or monthly allowances. When you use up your data allowance, or your time runs out (whichever happens first), you’ll need to buy more. You can run out of data before you run out of time.
Buying internet access
1. Go to the mobile broadband access website
You can also get to this page by clicking View Usage & Buy Access in Connection Manager. Or open your internet browser and go to mbb.o2.co.uk
Tip: You’ll need to be able to connect to the internet in order to do this. Go to page 29 for ways to connect.
Way
s to
pay
& h
elp
2221
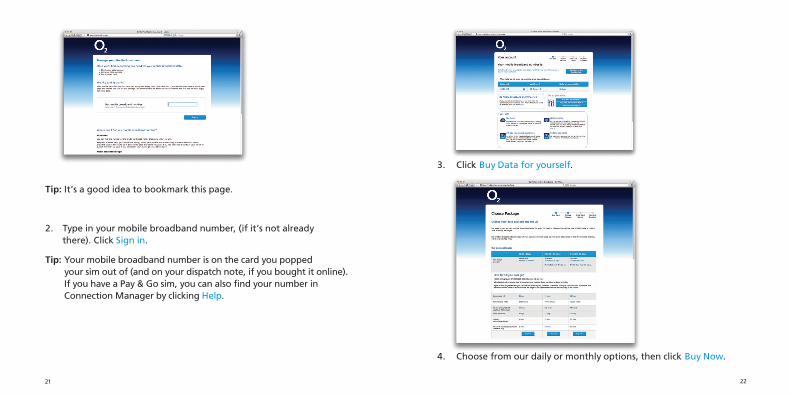
Tip: It’s a good idea to bookmark this page.
2. Type in your mobile broadband number, (if it’s not already there). Click Sign in.
Tip: Your mobile broadband number is on the card you popped your sim out of (and on your dispatch note, if you bought it online). If you have a Pay & Go sim, you can also find your number in Connection Manager by clicking Help.
3. Click Buy Data for yourself.
4. Choose from our daily or monthly options, then click Buy Now.
2423
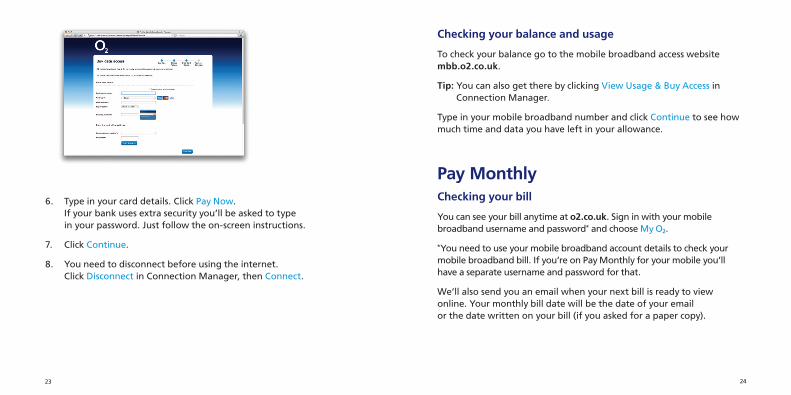
6. Type in your card details. Click Pay Now. If your bank uses extra security you’ll be asked to type in your password. Just follow the on-screen instructions.
7. Click Continue.
8. You need to disconnect before using the internet. Click Disconnect in Connection Manager, then Connect.
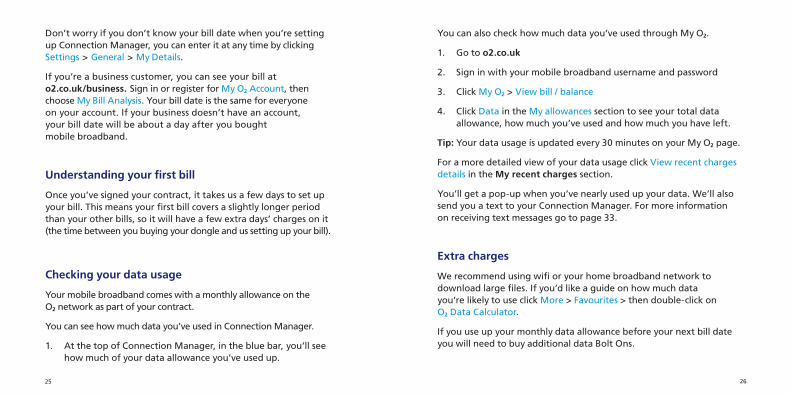
Checking your balance and usage
To check your balance go to the mobile broadband access website mbb.o2.co.uk.
Tip: You can also get there by clicking View Usage & Buy Access in Connection Manager.
Type in your mobile broadband number and click Continue to see how much time and data you have left in your allowance.
Pay MonthlyChecking your bill
You can see your bill anytime at o2.co.uk. Sign in with your mobile broadband username and password* and choose My ø.
*You need to use your mobile broadband account details to check your mobile broadband bill. If you’re on Pay Monthly for your mobile you’ll have a separate username and password for that.
We’ll also send you an email when your next bill is ready to view online. Your monthly bill date will be the date of your email or the date written on your bill (if you asked for a paper copy).
2625
Don’t worry if you don’t know your bill date when you’re setting up Connection Manager, you can enter it at any time by clicking Settings > General > My Details.
If you’re a business customer, you can see your bill at o2.co.uk/business. Sign in or register for My ø Account, then choose My Bill Analysis. Your bill date is the same for everyone on your account. If your business doesn’t have an account, your bill date will be about a day after you bought mobile broadband.
Understanding your first bill
Once you’ve signed your contract, it takes us a few days to set up your bill. This means your first bill covers a slightly longer period than your other bills, so it will have a few extra days’ charges on it (the time between you buying your dongle and us setting up your bill).
Checking your data usage
Your mobile broadband comes with a monthly allowance on the ø network as part of your contract.
You can see how much data you’ve used in Connection Manager.
1. At the top of Connection Manager, in the blue bar, you’ll see how much of your data allowance you’ve used up.
You can also check how much data you’ve used through My ø.
1. Go to o2.co.uk
2. Sign in with your mobile broadband username and password
3. Click My ø > View bill / balance
4. Click Data in the My allowances section to see your total data allowance, how much you’ve used and how much you have left.
Tip: Your data usage is updated every 30 minutes on your My ø page.
For a more detailed view of your data usage click View recent charges details in the My recent charges section.
You’ll get a pop-up when you’ve nearly used up your data. We’ll also send you a text to your Connection Manager. For more information on receiving text messages go to page 33.
Extra charges
We recommend using wifi or your home broadband network to download large files. If you’d like a guide on how much data you’re likely to use click More > Favourites > then double-click on ø Data Calculator.
If you use up your monthly data allowance before your next bill date you will need to buy additional data Bolt Ons.
2827
1. Go to o2.co.uk
2. Sign in with your mobile broadband username and password
3. Click My ø > View bill / balance
4. Click Data in the My allowances section and then click Manage Bolt Ons > Add Bolt Ons
5. Choose from our one-off or monthly data Bolt On options, then click Add to basket
6. Click Go ahead to confirm your selection and then tick the Terms and Conditions box. Click Continue – I’m happy with my Bolt Ons to finish.
If you choose not to buy additional data Bolt Ons, you can still use mobile broadband but at a much slower speed until your next bill date.
Tip: Some of our older Pay Monthly mobile broadband tariffs do not allow additional data Bolt Ons. When you exceed your monthly data allowance you will be charged for any extra data you use. Please call us on 0844 809 0202 if you are unsure which mobile broadband tariff you have.
Using mobile broadband abroadIf you’re on Pay Monthly, you can use your mobile broadband in over 100 countries. But remember, roaming charges are outside your monthly allowance, and it can be expensive to use mobile broadband abroad. You can see the exact costs at o2international.co.uk. If you’re on Pay & Go, you can’t use your dongle abroad.
If you’re a non-business customer, we’ve put a bar on your dongle which stops you using it abroad. This is to stop you getting any surprises on your bill. To lift it, call 0870 241 0202 or fill out the form on o2.co.uk/mobilebroadbandroaming. We can also tell you about the latest charges and any Bolt Ons that might save you money.Business customers can use their mobile broadband abroad straight away.
If you’d like to add a data roaming Bolt On, fill out the form on o2.co.uk/mobilebroadbandroaming or call us on 0870 241 0202 (or 0800 977 7337 for business customers).
3029
Ways to connect to the internetMobile broadband Mobile broadband – uses the ø mobile network to connect to the internet. You can connect anywhere, as long as there’s ø mobile coverage. Check your coverage at o2.co.uk/coveragechecker
If your dongle is plugged in and wifi isn’t available, Connection Manager will automatically connect you to mobile broadband.
If it doesn’t automatically connect, or you want to connect manually, here’s how:
1. Double-click the Connection Manager icon or, for Windows 8 customers, the Connection Manager tile on your desktop.
Tip: You can also open Connection Manager by going to:
On a Windows 8 computer:
Push windows key ( ) to display the start screen to display start screen > type ‘Connection Manager’, make sure that below the search window you’ve selected ‘apps’ > double click Connection Manager icon.
On an older Windows computer: Start > (All) Programs > O2 > Connection Manager > Connection
Manager.
On a Mac: Applications > Connection Manager.
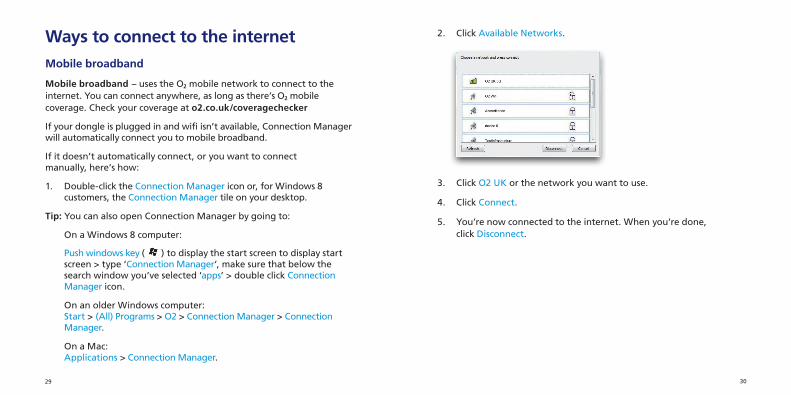
2. Click Available Networks.
3. Click O2 UK or the network you want to use.
4. Click Connect.
5. You’re now connected to the internet. When you’re done, click Disconnect.
3231
Home wifi
Home wifi – uses your home broadband connection. If your home broadband has a wireless router, Connection Manager can automatically connect to it – you just need to:
1. Click Available Networks.
2. Double-click the name of your network.
3. Type in your security key. Click OK.
Tip: Wifi is the fastest way to connect to the internet. And it doesn’t use up any of your data allowance.
Important: To use wifi on your computer, it needs a built-in wireless card or a USB wifi adapter. Most computers have one.
Connection Manager helps you manage your wifi connections. If you already use wifi on your computer, it will import your existing network settings and connect you to them automatically.
If you’re on Windows XP, make sure you have Service Pack 2 or 3.
Public wifi hotspots
Public wifi hotspots – are wireless networks.
The first time you connect to a public wifi hotspot, you may be asked to register.
ø Wifi You can get free wifi access at thousands of ø Wifi hotspots across the country giving you fast internet, apps and more. Using wifi also means that you save your 3G data allowance for when you need it.
Once you’ve registered to use ø Wifi, we’ll automatically sign you in whenever you’re near a hotspot. There’s no usernames, no passwords. Just fast, reliable, easy to use internet for free.
To find your nearest ø Wifi hotspot go to: o2wifi.co.uk/hotspots

3433
Text MessagesWhen you’re on the ø mobile network, you can send and receive texts from Connection Manager using your mobile broadband number, GSM/GPRS/EDGE also work. You’ll need to plug in your dongle to do this.
Important: If you’re on Pay & Go, you can receive texts but not send them.
When you get a new text
You’ll get a pop-up at the bottom of your screen.
To read your texts
1. Click the in Connection Manager.
2. Click the Inbox tab to see your texts.
3. Click on any text you want to read. Unread messages will be in bold.
To send a text
1. Click the in Connection Manager.
2. Choose the New message tab.
3. In the To box, type in the number you want to text. Or choose one of your Contacts by double-clicking their name.
4. Write your message in the Message box.
5. Click Send.
6. Click OK.
Tip: If you want to know when your text has been delivered, tick Send delivery report.
Texts you’ve sent will be saved in the Sent tab.
Tip: To import your contacts from Outlook or Outlook Express, click the More icon > Contacts > Import. Choose which program you want to import your contacts from. Click Next. It may take a few minutes to import all your contacts.
3635
Text Notification
If you’re a Pay Monthly customer, we’ll send you a text to let you know when you’ve nearly used up your data.
How much does it cost?
Receiving texts is free. To find out what it costs to send them, check the mobile broadband support pages (o2.co.uk/support).
Important: Sending and receiving messages when you’re abroad is more expensive. See o2international.co.uk for more details.
Mobile broadband not working? If you’re having problems installing your mobile broadband, try one or more of these steps:
Check the sim card
Take out the sim card and wipe it with a dry cloth. When you put it back in the sim card tray, make sure the gold chip is facing down.
You can check the sim card works by trying it in an ø mobile phone. If it doesn’t work in that either, call us on 0844 847 0202 if you’re on Pay Monthly or 0844 809 0222 if you’re on Pay & Go.
Move the computer
Move your computer to a different place. Something might be interfering with the mobile broadband signal.
3837
Safety and useWe recommend that you read this chapter carefully before using the USB-Modem. The manufacturer disclaims any liability for damage, which may result as a consequence of improper use of the USB-Modem or of use contrary to the instructions contained herein.
Traffic Safety When driving, do not use the USB-Modem.• When switched on, the USB-Modem emits electromagnetic waves that can interfere with the vehicle’s electronic systems such as ABS anti-lock brakes or airbags. To ensure that there is no problem, do not place the USB-Modem on top of the dashboard or within an airbag deployment area.• Check with your car dealer or the car manufacturer to make sure that the dashboard is adequately shielded from modem RF energy.
Conditions of Use• Switch the USB-Modem off before boarding an aircraft.• Switch the USB-Modem off when you are in health care facilities, except in designated areas. As with many other types of equipment now in regular use, the USB-Modem can interfere with other electrical or electronic devices, or equipment-using radio frequencies.• Switch the USB-Modem off when you are near gas or flammable liquids. Strictly obey all signs and instructions posted in a fuel depot, petrol station, chemical plant, or in any potentially explosive atmosphere.• When the USB-Modem is switched on, it should be kept at least 15 cm from any medical device such as a pacemaker, a hearing aid or insulin pump, etc. • Do not let children use the USB-Modem without supervision.• When replacing the cover, please note that the USB-Modem may contain substances that could create an allergic reaction.• Always handle the USB-Modem with care and keep it in a clean and dust-free place.• Do not allow the USB-Modem to be exposed to adverse weather or environmental conditions (moisture, humidity, rain, infiltration of liquids, dust, sea air, etc). The manufacturer’s recommended operating temperature range is -25°C to +55°C. • Do not open, dismantle or attempt to repair the USB-Modem yourself.• Do not drop, throw or bend the USB-Modem.• Do not paint it.
WEEE ApprovalThe USB-Modem is in compliance with the essential requirements and other relevant provisions of the Waste Electrical and Electronic Equipment Directive 2002/96/EC (WEEE Directive).
RoHs ApprovalThe USB-Modem is in compliance with the restriction of the use of certain hazardous substances in electrical and electronic equipment Directive 2002/95/EC (RoHs Directive).
Re-install Connection Manager
Installing Connection Manager again can help if there were problems the first time around.
Windows
If the User Account Control message appears, click Allow or Yes (depending on which version of Windows you’re using).
To uninstall Connection Manager from Windows 8 – right click on Connection Manager tile and click Uninstall, or Click Windows key + X > Control Panel > Programs and Features >Uninstall
Uninstall Connection Manager first by clicking Start > (All) Programs > O2 > Connection Manager > Uninstall and follow the instructions.
Restart your computer. Re-install and try a different USB port on your computer, in case one port isn’t working.
Mac
Restart your Mac. Re-install and try a different USB port on your Mac, in case one port isn’t working.
If you’re still having problems setting up, go to o2.co.uk/mobilebroadband/help or call us on 0844 809 0202 (or 0800 977 7337 for business customers).
Tip: You’ll find FAQs and a glossary at o2.co.uk/mobilebroadband
4039
Radio WavesProof of compliance with international standards (ICNIRP) or with European Directive 1999/5/EC (R&TTE) is required of all modem models before they can be put on the market. The protection of the health and safety for the user and any other person is an essential requirement of these standards or this directive.THIS DEVICE MEETS INTERNATIONAL GUIDELINES FOR EXPOSURE TO RADIO WAVES.The USB-Modem is a radio transmitter and receiver. It is designed not to exceed the limits for exposure to radio waves (radio frequency electromagnetic fields) recommended by international guidelines. The guidelines were developed by an independent scientific organization (ICNIRP) and include a substantial safety margin designed to assure the safety of all persons, regardless of age and health.The radio wave exposure guidelines use a unit of measurement known as the Specific Absorption Rate, or SAR. The SAR limit for mobile devices is 2 W/kg. Tests for SAR are conducted using standard operating positions with the device transmitting at its highest certified power level in all tested frequency bands. The highest SAR values under the ICNIRP guidelines for this device model are:
During use, the actual SAR values for this device are usually well below the values stated above. This is because, for purposes of system efficiency and to minimize interference on the network, the operating power of your mobile device is automatically decreased when full power is not needed for the call. The lower the power output of the device, the lower its SAR value.Body-worn SAR testing has been carried out at a separation distance of 5mm. To meet RF exposure guidelines during body-worn operation, the device should be positioned at least this distance away from the body. If you are not using an approved accessory ensure that whatever product is used is free of any metal and that it positions the phone the indicated distance away from the body.The World Health Organization has stated that present scientific information does not indicate the need for any special precautions for the use of mobile devices. They recommend that if you are interested in further reducing your exposure then you can easily do so by limiting your usage or keep the device away from the head and body.For more information you can go to www.alcatelonetouch.com Additional information about electromagnetic fields and public health are available on the following site: http://www.who.int/peh-emfThe USB-Modem is equipped with a built-in antenna. For optimal operation, you should avoid touching it or degrading it.
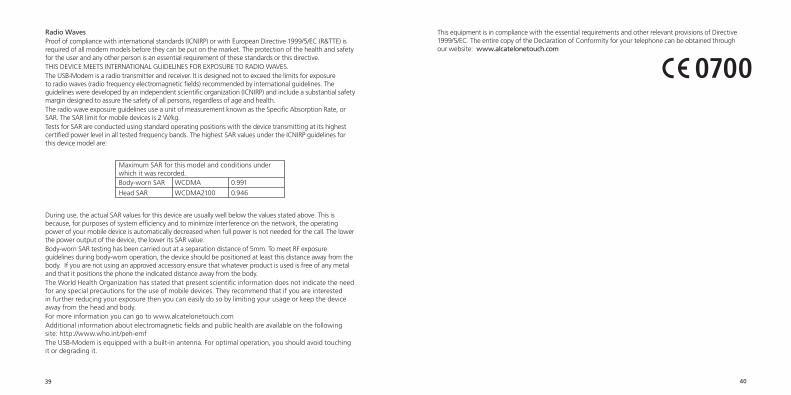
This equipment is in compliance with the essential requirements and other relevant provisions of Directive 1999/5/EC. The entire copy of the Declaration of Conformity for your telephone can be obtained through our website: www.alcatelonetouch.com
0700
4241
Warranty statementThis Limited Warranty shall apply to the Mobile Broadband dongle (“Device”) including all accessories contained within the original ø box (“Accessories”). Hereafter “the Products” means the Device and/or the Accessories as the context requires. ø warrants that the Products are free of defects in materials and workmanship at the time of its original purchase (“Limited Warranty”). This Limited Warranty is subject to the following terms and conditions:
1. This Limited Warranty is given only to the original purchaser of the Products “Customer”). It shall neither exclude nor limit a) any statutory rights of the Customer or b) any of the Customer’s rights against the seller/dealer of the Product
2. For the purposes of the Device, a twenty four (24) month period commencing on the date of pur-chase of the Device by end user customer; and for the purposes of the Accessories, a six (6) month period commencing on the date of purchase of the accompanying Device by end user customer (“the Warranty Period”).
3. This Limited Warranty may not be sold-on, assigned, transferred or given to any subsequent purchaser or acquirer of the Products. This Limited Warranty is only valid and enforceable by those Customers who have purchased the Products in the UK.
4. Throughout the Warranty Period ø or its authorised agent will, at their discretion, without charge and subject to Clause 7 repair or replace any defective Products. Repair or replacement may involve the use of functionally equivalent reconditioned unit. ø will return repaired Products or replacement Products to the Customer in good working condition. All replaced faulty parts or components will become the property of ø.
5. If ø repairs or replaces any Products, the repaired or replaced Products shall continue to be warranted for the remaining time of the original Warranty Period or for three (3) months from the date of repair or replacement, whichever is longer.
6. Before returning any Device, you are responsible for ensuring that you back up data and remove any personal information from the Device. ø is not responsible for any loss of data or removable storage media.
7. THIS WARRANTY SHALL NOT APPLY IN THE FOLLOWING CIRCUMSTANCES:
a. ø or its authorised agent was not notified by the Customer of the defect within fourteen (14) days after the appearance of the defect within the Warranty Period; or
b. the Products were not returned to ø or its authorised service agent within (30) days after the appearance of the defect within the Warranty Period; or
c. deterioration of the Products due to normal wear and tear; or
d. use other than in accordance with the user manual; rough handling; exposure to moisture; dampness or extreme thermal or environmental conditions or a rapid change in such conditions; corrosion; oxidation; unauthorised modifications or connections; unauthorised opening or repair; repair by use of unauthorised spare parts; accidents; forces of nature; or other actions beyond the reasonable control of ø (including but not limited to deficiencies in consumable parts, such as batteries which all by their nature have a limited lifetime, and breakage or damage to the camera lens) unless the defect was caused directly by defects in materials or workmanship. This Limited Warranty does not cover physical damage to the surface of the Products including cracks or scratches on the LCD screen or camera lens; or
e. the Product serial number or IMEI number has been removed, defaced, altered or is illegible; or
f. the defect was caused by a defective function of the cellular network; or
g. the defeat was caused by the fact that the Products were used with or connected to an accessory not approved or provided by ø or used in other than its intended use and where it can be shown by ø that such defect is not the fault of the Products.
h. repairs performed by service centres that have not been authorised by ø.
8. In the event of Product failure, the customer should take the following actions:
a. Refer to the user manual in order to identify and possibly correct the problem.
b. If the problem cannot be resolved by reference to the user manual the Customer should return the Product to the place where it was purchased.
9. THIS LIMITED WARRANTY STATES THE ENTIRE WARRANTY GIVEN BY ø TO THE CUSTOMER. IN NO EVENT SHALL ø BE LIABLE FOR INCIDENTAL OR CONSEQUENTIAL LOSSES OR DAMAGES OF ANY NATURE WHATSOEVER, INCLUDING BUT NOT LIMITED TO LOST PROFITS OR COMMERCIAL LOSS, TO THE FULLEST EXTENT THAT THOSE LOSSES OR DAMAGES CAN BE DISCLAIMED BY LAW. ø does not exclude or limit liability for personal injury or death resulting from its own negligence.
This Limited Warranty does not affect the Customer’s statutory rights in law specific to the country of purchase, such rights remain protected. If you purchased the Products in the UK, this Limited Warranty is given to you by Telefónica UK Limited registered office 260 Bath Road, Slough, Berkshire, SL1 4DX, UK.

4443