océ ds10 - files.oceusa.comfiles.oceusa.com/media/assets/pdfs/tss/external/ds10_ds60/... ·...
TRANSCRIPT

Océ DS10
Operator’s manual

Copyright
© 2002, Océ-Technologies B.V. Venlo, The Netherlands All rights reserved. No part of this work may be reproduced, copied, adapted, or transmitted in any form or by any means without written permission from Océ.
Océ-Technologies B.V. makes no representation or warranties with respect to the contents hereof and specifically disclaims any implied warranties of merchantability or fitness for any particular purpose. Further, Océ-Technologies B.V. reserves the right to revise this publication and to make changes from time to time in the content hereof without obligation to notify any person of such revision or changes.
Code number 7218983Edition 08-2002
Océ-Technologies B.V.
US
TrademarksProducts in this manual are referred to by their trade names. In most, if not all cases, these designations are claimed as trademarks or registered trademarks of their respective companies.

Table of Contents 3
Table of Contents
Chapter 1 Getting StartedAbout the available documentation 6The system concept 7About the TWAIN driver 9The Océ DS10 configuration 10Turning on the Océ DS10 13Shutting down the Océ DS10 16
Chapter 2 The scan function (TWAIN driver)Scan documents 18
Make a simple scan 18Stop a scan 22The scan operation parameters 23Placing paper on the glass plate or in the ADF 33Using the zoom function 36Optimizing exposure settings 41Scanning special originals and non-standard size originals 44
Handling errors on the Océ DS10 45Handling errors on the scanner 45Resolve original errors on the scanner 48
Customizing the TWAIN driver 49Customizing the TWAIN user interface 49Work with TWAIN scan profiles 53
Chapter 3 Key operator tasksAccess the Settings Editor 58
Access the Océ DS10 Settings Editor in key operator mode 58Change the PIN code for the key operator 61
Adjust the Océ DS10 63Set the preferred scan paper sizes 63Define the paper size detection preferences 66Restore the factory default settings 68Set the date and time 71Change the key operator telephone number 73Change the Océ telephone number 75
Energy settings 77Set the low power mode timer 77

4 Operator’s manual
Restart the controller 79Get the information 81
Read the scan counter 81Read the serial number 83Display the software version 85Save the configuration report 89Save the system log file 91Set and save the trace log 93
Chapter 4 System administrator tasksAccess the Settings Editor 98
Access the Océ DS10 Settings Editor in system administrator mode 98Change the PIN code for the system administrator 101
The scanner configuration 103Adjust the network and scanner properties 103Test the network (TCP/IP) connection 110Read the MAC address 112Upgrade the controller software 114
Appendix A Overview and tables 117Product specifications 118Originals that can be used 119
Appendix B Miscellaneous 121Notation conventions 122Reader’s comment sheet 123Addresses of local Océ organizations 125

5
Océ DS10
User manual
Chapter 1 Getting Started

6 Operator’s manual
About the available documentation
Introduction
Documentation setThe documentation set for the Océ DS10 consists of the following items:
[1] Documentation set
[1] Documentation set
Note: When the manual or help file mentions the controller, it is referring to the Océ Smart Imager inside the scanner.
User types and tasks
In the documentation set, you will find information on operator, key operator and system administrator tasks for the Océ DS10.
The operator tasks include scanning documents.
An important task of the key operator is maintenance and configuration of the system.■ customize settings, restore factory default settings■ specify reset, power management related settings■ retrieve system settings, configuration and counters■ save configuration, logging and error reports
An important task of the system administrator is configuration of the network connection to the system.■ define the scanner network identification■ specify TCP/IP related settings
Document Description
Operator's manual Describes the operator's scanning tasks, as well as the configuration and maintenance tasks for the key opera-tor and system administrator.
TWAIN driver on-line help
Supplies help for the TWAIN driver user/operator when the TWAIN driver is active.

Getting Started 7
The system concept
Introduction
The Océ DS10 is a stand-alone scan device. The main characteristics of Océ DS10 are: - original-handling capabilities (5.5 x 8.5" - 11 x 17", 1-sided/2-sided, but no mixed sets).- scan speed (54 8.5x11" images per minute).- page images are automatically optimized through Image Logic.- double sheet detection.- B/W output.The Océ DS10 delivers TIFF images in either 300 dpi (optimized for viewing) or 600 dpi, optimized either for Océ Copy Press-based printers such as the Océ 31x5/DPS400, or for Océ DemandStream-type printers.The Océ DS10 incorporates a controller that runs Windows 2000. The Océ DS10 can only be operated through a driver, developed for and supplied with the system. This driver can be invoked by any application that supports TWAIN, which is a global standard for capturing images.The scan application must run on the Océ DS10 controller.
The controller
The figure below shows the scanner and the controller inside. The controller holds all the software for controlling the Océ DS10 system.
[1] The controller inside the scanner
[1] The controller inside the scanner

8 Operator’s manual
On the controller, you will find the following software:■ The application for initiating a scan.■ The TWAIN driver.■ The Settings editor, a web-based application used to change system settings
on the scanner.[2] The controller software
[2] The controller software
The Océ DS10 system allows you to activate a scan-process using a TWAIN driver.
The driver is started by a software application, and as with a printer driver, you can control the scan operation by setting the appropriate values in the TWAIN driver windows.
The images you scan become available in the originating software application. This software application is responsible for the storage to disk of the scanned images. The data format (e.g. TIFF or PDF) and post process (e.g. print) can be defined in the software application also.

Getting Started 9
About the TWAIN driver
Introduction
What is TWAIN?TWAIN defines a standard software protocol and application programming interface (API) that supports communication between software applications and imaging devices (the source of the data).
Note: The commands for scanning using TWAIN vary, depending on the program you use. Check your program’s documentation for more information about how that software works with TWAIN.
[3] The TWAIN driver for the Océ DS10
[3] The TWAIN driver for the Océ DS10
Use TWAIN to scan photos, drawings, or images of text to a document. When you scan text using TWAIN, the resulting text appears as an image, not as editable text.

10 Operator’s manual
The Océ DS10 configuration
Introduction
The Océ DS10 consists of the following parts:■ a stand-alone scanner■ the controller■ a standard monitor, keyboard and mouse■ system software.

Getting Started 11
The scanner[4] The scanner
[4] The scanner
[2] The parts of the scanner
[2] The parts of the scanner
The automatic document feeder on the scanner handles 1-sided originals and 2-sided originals. The automatic document feeder can hold 50 sheets of 8.5x11" paper (20 lb. bond) or 35 sheets of 11x17" paper (20 lb. bond).
Part Function
1 Automatic document feeder
Feed a stack of originals. Originals can be sets of documents, but also single-sheet doc-uments like letters and forms.
2 Glass plate Scan special, non-standard and damaged originals.
3 Original receiving tray
Receives the originals that come from the automatic document feeder.
4 Key for future imple-mentation
No function in this release.
5 Handle Opens the automatic document feeder when placing an original on the glass plate.

12 Operator’s manual
The controller
Inside the scanner behind the right-hand door, you will find the controller. This is a controller that contains all the high-level system software (scanner control, the TWAIN software and the scan-application software).
To configure and maintain the Océ DS10, the controller contains a web-based application that is called the Settings Editor.If you are the key operator or the system administrator, you can logon to the Settings Editor with an assigned PIN code. The Settings Editor enables you to change the settings for the performance of the whole system.
Monitor, keyboard and mouse
MonitorThe video/graphics-board of the controller supports a minimum screen resolution of 1024 x 768 and a maximum screen resolution of 1600 x 1200.The monitor is a SVGA Display (analog or DVI).
MouseThe type of mouse connected to the system is PS2.
KeyboardThe type of keyboard connected to the system is PS2.
Only components that are supported by Windows 2000 Professional are allowed.
System software
The following software is installed on the controller inside the scanner:■ Windows 2000 Professional Operation System.■ A web-based application for changing key operator and system
administrator settings.■ The Océ developed TWAIN driver for scan-control and error handling,
running under Windows 2000.■ The scan-application software.

Getting Started 13
Turning on the Océ DS10
Introduction[5] The scanner
[5] The scanner
The scanner has the following switches and buttons: You can find these on the right-hand side of the scanner.■ Power switch ( )
The power switch at the rear of the right-hand side cuts and connects the power to the scanner and the controller. When you press the power switch ( ), the controller will also be turned on or off.
■ On/Off button with orange and green LED ( )The On/Off button at the front of the right-hand side allows you to toggle the status of the scanner between the stand-by and low power modes. This is only possible if the scanner power switch ( ) is in position ’1’ and the startup phase is completed.
■ Key switch (at the front of the right-hand side)If you want to prevent any person from switching on the machine, you can take the key out and leave the switch in the OFF position. If you take out the key and leave the switch in the ON position, any person can turn on the machine.
Inside the scanner, behind the right-hand door, you will find the controller. This is a controller that contains all the high-level system software (scanner control, the TWAIN software and the scan-application software).

14 Operator’s manual
If you start a scan and the Océ DS10 TWAIN driver is not ready, you will receive the following messages:■ 'scanner initializing', wait a few moments.■ 'Scanner is off. Turn scanner on.'
How to turn on the Océ DS10
1 Press the power switch ( ) on the scanner.The controller starts up.
2 Press the power switch on the monitor.3 The Windows 2000 operating system is displayed.
After a few minutes the Océ DS10 logo appears on the screen.[6] Startup logo
[6] Startup logo
When this screen disappears, it takes about one minute before the controller is ready.
4 When the controller is ready, you can press the On/Off button ( ) on the scanner. The LED in the On/Off button changes to green.The Océ DS10 is ready to scan.

Getting Started 15
How to activate the Océ DS10 from low power mode
1 Press the On/Off button ( ) on the scanner. The LED in the On/Off button changes to green or
2 Start a scan using the TWAIN driver.

16 Operator’s manual
Shutting down the Océ DS10
Introduction
This chapter describes how to shut down the complete Océ DS10 system. Therefore, you must follow the Windows 2000 shut down procedure to shut down the controller and eventually the complete system.
Attention: Follow the Windows 2000 shut down procedure before you shut down the Océ DS10 with the power switch ( ) on the scanner.
Illustration[7] Shut down the Océ DS10
[7] Shut down the Océ DS10
How to shut down the Océ DS10
1 Click ’Start’ or press CTRL+ALT+DELETE.2 Click ’Shut Down’. 3 In the ’What do you want the computer to do?’ list, click ’Shut down’.
Note: Important Do not turn off your Océ DS10 until a message appears that tells you that it is safe to do so. Windows 2000 stores important data in memory while the system is running, and needs to write the data to the hard disk before you turn off the Océ DS10. After the data is saved, Windows 2000 notifies you that it is okay to turn off the Océ DS10.
4 Press the power switch ( ) on the scanner.
17
Océ DS10
User manual
Chapter 2 The scan function (TWAIN driver)
18 Operator’s manual
Scan documents
Make a simple scan
Introduction
The TWAIN driver enables you to change several parameters before you start a scan. When you want to make a simple scan, without changing zoom, resolution or exposure parameters, you only have to define the settings for the original document (1-sided or 2-sided, original size, sheet orientation and content orientation). The procedures below show the definition of a glass plate scan (1-sided, 8.5x11", landscape) and an automatic document feeder scan (example 2-sided, 8.5x11", portrait).
Before you begin
Use the automatic document feeder or the glass plate to make a scan.
When you start a scan.■ Remove all staples from your originals.■ Remove the paper clips.■ Make sure that the originals in the automatic document feeder have the
same size.■ Make sure that the originals are not curled.

The scan function (TWAIN driver) 19
Illustration[8] Paper input glass plate
[8] Paper input glass plate

20 Operator’s manual
How to scan from the glass plate (example in introduction)
1 Put the original face down and in readable form in the upper left-hand corner on the glass plate (see ‘Placing paper on the glass plate or in the ADF’ on page 33).
2 Select the command in the software application to start the scan. This action activates the TWAIN driver.
3 You can select one of the five preferred scan paper sizes or define the size of the long edge and short edge separately.Select the size of the original, 8.5x11", in the 'Paper input glass plate' section.
4 Define the orientation of the original on the glass plate by selecting 'Vertical' or 'Horizontal'.See the feedback on the screen to ensure the right orientation of the original.
5 Select 'Landscape' for the 'Content orientation' in the 'Original' section.Content orientation indicates the reading direction of the original (portrait or landscape).Note: In case of a glass plate scan, ’1-sided’ in the ’Original’ section is selected automatically.
6 Click the start button at the bottom of the screen of the TWAIN driver to start the scan.
Illustration[9] Paper input ADF
[9] Paper input ADF

The scan function (TWAIN driver) 21
How to scan from the automatic document feeder (example in introduction)
1 Put the originals face down and in readable form into the automatic document feeder, (see ‘Placing paper on the glass plate or in the ADF’ on page 33).
2 Select the command in the software application to start the scan. This action activates the TWAIN driver.
3 The size of the original in the 'Paper input ADF' is automatically set to 8.5x11". The automatic document feeder detects the size and sheet orientation of the originals (only standard paper sizes).The 'Paper input ADF' section in the TWAIN driver becomes active because you put originals into the automatic document feeder.Note: Do not place more than 50 8.5x11", 20 lb. bond sheets at a time. It is possible to reload originals during the scanning process.
4 Select '2-sided' and the correct 'Binding edge' in the 'Original' section.The binding edge describes whether you flip the pages on the long edge or on the short edge when you read the original document.
5 Select 'Portrait' for the 'Content orientation' in the 'Original' section.Content orientation indicates the reading direction of the original (portrait or landscape).
6 Click the start button at the bottom of the screen of the TWAIN driver to start the scan.

22 Operator’s manual
Stop a scan
Introduction
The situation can occur that you need to stop a scan (e.g. you scan a document and you find out that you defined 1-sided for a 2-sided document).
Before you begin
You have started a scan by clicking the start icon in the TWAIN driver screen.
How to stop a scan
1 You click the stop icon in the TWAIN driver screen.2 The scanner stops the scan process immediately.3 A message appears that asks you to ’Cancel the scan’ or ’Resume the scan’.4 Select ’Cancel the scan’.5 Remove the remaining originals from the automatic document feeder.6 Remove the scanned originals from the original receiving tray.
Note: There is no physical stop button on the scanner.
Result
The originals that are scanned remain available in the software application that you use to process the scanned originals.
Continue as follows.■ Process the scanned originals.■ Discard the scanned originals and start a new scan.

The scan function (TWAIN driver) 23
The scan operation parameters
Introduction
To control the scanner, you use the TWAIN driver. This driver enables you to change all the scan parameters and after that, you can start the scan with the start button in the driver.You can only control the scanner through the TWAIN driver. The Océ DS10 has no operator panel.
When the TWAIN driver is active, you see a window that contains the scan parameters at the left-hand side and a preview pane at the right-hand side. At the bottom of the window you see the start and stop buttons and the area that shows the number of scanned images. To change the default behavior of the TWAIN driver (see ‘Customizing the TWAIN user interface’ on page 49) or (see ‘Work with TWAIN scan profiles’ on page 53).
The following parameters can be defined.

24 Operator’s manual
Original section[10] Original section
[10] Original section
Menu differences 1-sided and 2-sided.■ For a 1-sided original, you only define the ’Content orientation’. ■ For a 2-sided original, you must define the ’Binding edge’ of the original to
be scanned and the ’Content orientation’.
Sides and bindingThe first setting indicates that the original must be scanned on 1 side (front).

The scan function (TWAIN driver) 25
The second setting indicates that the original must be scanned on 2 sides (front and back). There are 2 binding settings, short edge and long edge. These settings indicate how the information on the front and back side of the 2-sided original is positioned.
[3] Sides and binding
[3] Sides and binding
Parameter Description Illustration
’1-sided:’ Make a scan of the front of the origi-nal.
’2-sided: short edge’
Make a scan of the front and the back of the original.- 2-sided portrait document with a short edge binding
Make a scan of the front and the back of the original.- 2-sided landscape document with a short edge binding
’2-sided: long edge’
Make a scan of the front and the back of the original.- 2-sided portrait document with a long edge binding
Make a scan of the front and the back of the original.- 2-sided landscape document with a long edge binding

26 Operator’s manual
Content orientationThe ’Content orientation’ indicates how the information is positioned on the original. The content orientation indicates the reading direction of the original.Originals can be formatted in a portrait style or a landscape style.
[4] Content orientation
[4] Content orientation
Paper input ADF section[11] Paper input ADF
[11] Paper input ADF
Original sizeWhen you put the originals in the automatic document feeder, face down and in readable form (see ‘Placing paper on the glass plate or in the ADF’ on page 33), the paper input indicates that the automatic document feeder is used.
Parameter Description Illustration
Portrait: The long edge of the page is held vertically and the short edge horizontally when you read the page.
Landscape: The long edge of the page is held horizontally and the short edge vertically when you read the page.

The scan function (TWAIN driver) 27
The ’Paper input ADF’ section automatically shows the detected paper size in the automatic document feeder. The ’Paper input glass plate’ section is not visible. The automatic document feeder detects the size, and feed direction of the originals. You can not change the size and the feed direction by hand.
You can only use the automatic document feeder to scan standard paper sizes.
Note: A scan can only contain one paper size.Note: Do not place more than 50 originals at a time. It is possible to reload originals during the scanning process.
Paper input glass plate section[12] Paper input glass plate
[12] Paper input glass plate
When you use the glass plate, the paper input indicates that the glass plate is used. The ’Paper input glass plate’ section will show the size and sheet orientation that you select. The ’Paper input ADF’ is not visible.

28 Operator’s manual
Original sizeTo make a scan from the glass plate, place the original face down in the upper left-hand corner on the glass plate and define the size of the original (see ‘Placing paper on the glass plate or in the ADF’ on page 33).
You can use the glass plate to scan non-standard paper sizes.
Select a pre-defined scan paper size in the 'Size' combo box or select 'User defined'. When you select 'User defined', you can enter the size of the 'Short edge' and the 'Long edge' of the original in the entry fields. Select the measurement units from the drop down list.The list of pre-defined scan paper sizes is defined in the Settings Editor.
Sheet orientationIndicate how the original is positioned on the glass plate with the sheet orientation setting. Place the long edge of the original in a vertical position or place the long edge of the original in a horizontal position.
[5] Sheet orientation
[5] Sheet orientation
Parameter Description Illustration
Vertical: The long edge of an original is placed vertically on the glass plate.
Horizon-tal:
The long edge of an original is placed horizontally on the glass plate.

The scan function (TWAIN driver) 29
Zoom section[13] Zoom
[13] Zoom
To change the zoom factor, select a pre-defined percentage or enter the desired value directly in the combo box (range 25 - 400%).
Note: The list of pre-defined zoom factors depends on the configuration of the machine (US or Rest Of World).

30 Operator’s manual
Resolution section[14] Resolution
[14] Resolution
This setting defines the number of dots per inch and is related to the scan quality of a scanned original and the file size of the resulting image.
[6] Resolution parameters
[6] Resolution parameters
Parameters Description
600 dpi: Select this option to make a scan that is suitable for e.g. Océ DemandStream printer.
600 dpi Océ Copy Press:
Select this option to make a scan that is suitable for an Océ network printing system that uses the principle of 'Océ Copy Press'. e.g. Océ 31x5, Océ 8400 series, Océ DPS400.
300 dpi archive: This setting generates a smaller file, which is more convenient for storage purposes.

The scan function (TWAIN driver) 31
Exposure section[15] Exposure
[15] Exposure
The Océ DS10 has a sophisticated method for measuring the darkness of the original. In this scan method the scanner makes a distinction between dark areas and light areas on the original. The exposure settings allow you to control the exposure of dark and light areas of the original separately. If an area on the original is dark gray and you want it to be black, move the pointer of the dark areas to the (-) left. If an area on the original is light gray and you want it to be white, move the pointer of the light areas to the (+) right.
[7] Exposure parameters
[7] Exposure parameters
Possible values for light and dark exposure corrections are: -3, -2, -1, 0, +1, +2, +3.
Parameter Description
Light: To make light areas lighter, move the pointer to the right.To make light areas darker, move the pointer to the left.
Dark: To make dark areas darker, move the pointer to the left.To make dark areas lighter, move the pointer to the right.

32 Operator’s manual
Double sheet detection section[16] Double sheet detection
[16] Double sheet detection
’On’. This is the default setting. The system checks for separations of two or more originals in the automatic document feeder.
’Off’. The system does not check for double sheet separations in the automatic document feeder. In this setting mode, paste-up originals can be scanned in the automatic document feeder.When the system detects a double sheet, an ORE is reported. You must open the upper left cover and remove the originals. Load the remaining originals again.
Note: This setting is grayed out when you scan from the glass plate.
The scan function (TWAIN driver) 33
Placing paper on the glass plate or in the ADF
Definition
The procedures that describe the methods of scanning documents from the glass plate or from the automatic document feeder, mention the following:■ Put the original face down and in readable form in the upper left-hand
corner on the glass plate.■ Put the originals face down and in readable form into the automatic
document feeder.
This paragraph explains the way you should position originals on the glass plate and feed originals into the automatic document feeder.
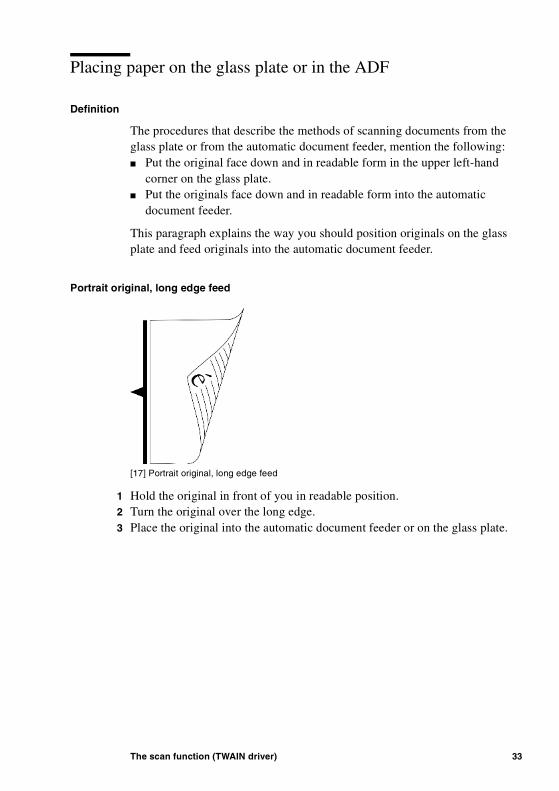
Portrait original, long edge feed[17] Portrait original, long edge feed
[17] Portrait original, long edge feed
1 Hold the original in front of you in readable position.2 Turn the original over the long edge. 3 Place the original into the automatic document feeder or on the glass plate.

34 Operator’s manual
Portrait original, short edge feed[18] Portrait original, short edge feed
[18] Portrait original, short edge feed
1 Hold the original in front of you in readable position.2 Rotate the original 90 degrees counter-clockwise.3 Turn the original over the long edge. 4 Place it into the automatic document feeder or on the glass plate.
Landscape original, short edge feed[19] Landscape original, short edge feed
[19] Landscape original, short edge feed
1 Hold the original in front of you in readable position.2 Turn the original over the short edge. 3 Place it into the automatic document feeder or on the glass plate.
Note: If you are scanning an original in which the long edge size is greater than the vertical glass plate size, you must always use a short edge feed. Long edge feed does not fit into the automatic document feeder.
The scan function (TWAIN driver) 35
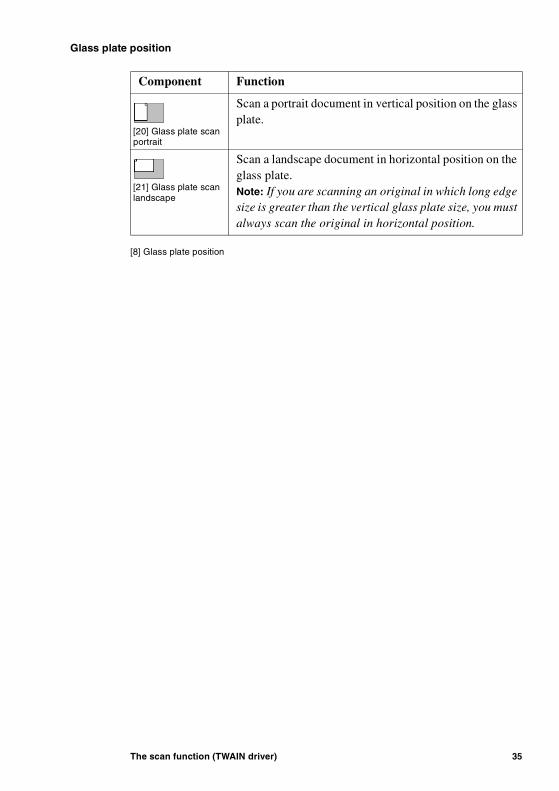
Glass plate position[8] Glass plate position
[8] Glass plate position
Component Function[20] Glass plate scan
portrait
[20] Glass plate scan portrait
Scan a portrait document in vertical position on the glass plate.
[21] Glass plate scan
landscape
[21] Glass plate scan landscape
Scan a landscape document in horizontal position on the glass plate.Note: If you are scanning an original in which long edge size is greater than the vertical glass plate size, you must always scan the original in horizontal position.

36 Operator’s manual
Using the zoom function
Introduction
The zoom function for the originals in the automatic document feeder is different from the zoom function for the originals on the glass plate.
[9] Zoom behavior
[9] Zoom behavior
The zoom behavior is described in the following procedures:
How to zoom from the automatic document feeder
1 Put the originals face down and in readable form into the automatic document feeder, (see ‘Placing paper on the glass plate or in the ADF’ on page 33).
2 Select the command in the software application to start the scan. This action activates the TWAIN driver.
3 Define the 'Original' settings.4 Change the zoom factor in the 'Zoom' section.
This zoom function allows you to either set the zoom factor to pre-defined values or to decrease or increase the zoom factor in steps of 1%.To change the zoom factor, select a pre-defined percentage or enter the desired value in the combo box.
5 Click the start button at the bottom of the screen of the TWAIN driver to start the scan.
Original Starting point of the zoom function
Automatic document feeder
Center
Glass plate Upper left-hand corner
The scan function (TWAIN driver) 37
Result
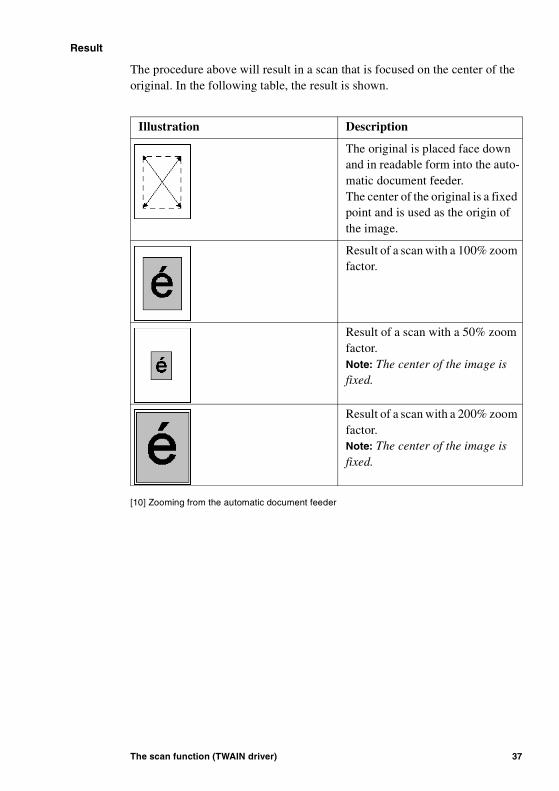
The procedure above will result in a scan that is focused on the center of the original. In the following table, the result is shown.
[10] Zooming from the automatic document feeder
[10] Zooming from the automatic document feeder
Illustration Description
The original is placed face down and in readable form into the auto-matic document feeder.The center of the original is a fixed point and is used as the origin of the image.
Result of a scan with a 100% zoom factor.
Result of a scan with a 50% zoom factor.Note: The center of the image is fixed.
Result of a scan with a 200% zoom factor.Note: The center of the image is fixed.

38 Operator’s manual
How to zoom from the glass plate
1 Put the original face down and in readable form in the upper left-hand corner on the glass plate, (see ‘Placing paper on the glass plate or in the ADF’ on page 33).
2 Select the command in the software application to start the scan. This action activates the TWAIN driver.
3 Define the 'Original' settings.4 Change the zoom factor in the 'Zoom' section.
This zoom function allows you to either set the zoom factor to pre-defined values or to decrease or increase the zoom factor in steps of 1%.To change the zoom factor, select a pre-defined percentage or enter the desired value in the combo box.
5 Click the start button at the bottom of the screen of the TWAIN driver to start the scan.
Result
The procedure above will result in a scan that is focused on the upper right-hand corner of the original (upper left-hand corner of the glass plate). In the following table, the result is shown.
[11] Zooming from the glass plate
Illustration Description
The original is placed face down and in readable form in the upper left-hand corner on the glass plate.The upper left-hand corner of the glass plate is a fixed point and is used as the origin of the image.
Result of a scan with a 100% zoom factor.

The scan function (TWAIN driver) 39
[11] Zooming from the glass plate
ExampleIn the following paragraph you see the difference between a 200% scan from the glass plate and a 200% scan from the ADF.
The first illustration shows the original.
[22] zoom 100%
[22] zoom 100%
This illustration shows a 200% zoom from the glass plate.Zoom area in the upper right-hand corner of the original.
[23] zoom 200% glass plate
[23] zoom 200% glass plate
Result of a scan with a 50% zoom factor.Note: The upper right-hand corner of the image is fixed.
Result of a scan with a 200% zoom factor.Note: The upper right-hand corner of the image is fixed.
Illustration Description

40 Operator’s manual
This illustration shows a 200% zoom from the ADF.Zoom area in the middle of the original.
[24] zoom 200% ADF
[24] zoom 200% ADF

The scan function (TWAIN driver) 41
Optimizing exposure settings
Introduction
The Océ DS10 has a sophisticated method for measuring the darkness of the original. In this scan method the scanner makes a distinction between dark areas and light areas on the original. The exposure settings allow you to control the exposure of dark and light areas of the original separately. If an area on the original is dark gray and you want it to be black, move the pointer of the dark areas to the (-) left. If an area on the original is light gray and you want it to be white, move the pointer of the light areas to the (+) right.
[12] Exposure parameters
[12] Exposure parameters
In the following example a red original with a black 'Océ DS10' text is used to explain the exposure function. The result of this scan will be a completely black and white scan.
[25] Example red original with black text
[25] Example red original with black text
Parameter Description
Light: To make light areas lighter, move the pointer to the right.To make light areas darker, move the pointer to the left.
Dark: To make dark areas darker, move the pointer to the left.To make dark areas lighter, move the pointer to the right.
42 Operator’s manual
How to optimize the exposure settings (1)
1 Put the originals face down and in readable form into the automatic document feeder (see ‘Placing paper on the glass plate or in the ADF’ on page 33).
2 Select the command in the software application to scan. This action activates the TWAIN driver.
3 Define the 'Original' settings.4 Make sure that the exposure values are set to 0 for the light and dark exposure.
Possible values for light and dark exposure corrections are: -3, -2, -1, 0, +1, +2, +3.
5 Click the start button at the bottom of the screen of the TWAIN driver to start the scan.
Result
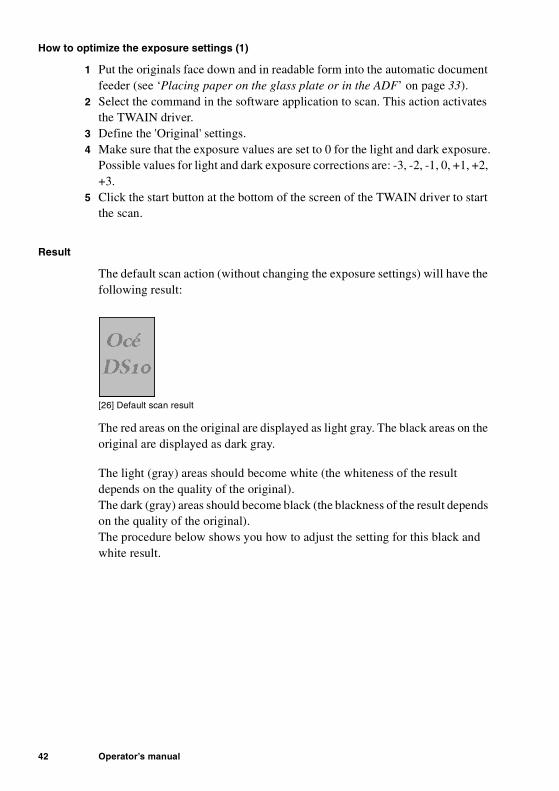
The default scan action (without changing the exposure settings) will have the following result:
[26] Default scan result
[26] Default scan result
The red areas on the original are displayed as light gray. The black areas on the original are displayed as dark gray.
The light (gray) areas should become white (the whiteness of the result depends on the quality of the original).The dark (gray) areas should become black (the blackness of the result depends on the quality of the original).The procedure below shows you how to adjust the setting for this black and white result.

The scan function (TWAIN driver) 43
How to optimize the exposure settings (2)
1 Put the originals face down and in readable form into the automatic document feeder (see ‘Placing paper on the glass plate or in the ADF’ on page 33).
2 Select the command in the software application to scan. This action activates the TWAIN driver.
3 Define the 'Original' settings.4 Open the 'Exposure' section.5 Move the pointer for light areas to the right (+3).6 Move the pointer for dark areas to the left (-3).7 Click the start button at the bottom of the screen of the TWAIN driver to start
the scan.
Result
The optimized scan action (with changed exposure settings) will have the following result.
[27] Optimizing scan results
[27] Optimizing scan results

44 Operator’s manual
Scanning special originals and non-standard size originals
Introduction
Special originals can cause problems in the automatic document feeder. Scan special originals from the glass plate. Special originals are the following:
■ Pages from a bound original like a book or a magazine■ Damaged or curled originals■ Non-standard size originals.
To scan an non-standard size original, you must enter the dimensions of the original in the TWAIN driver. (see ‘Make a simple scan’ on page 18)
Note: Paste-up originals are not special originals. Paste-up originals can be handled by the automatic document feeder when you disable the double sheet detection. (see ‘The scan operation parameters’ on page 23)Look for the subsection 'Double sheet detection' in this paragraph.
Before you begin
1 Open the scanner cover.2 Put the original face down, and in horizontal or vertical orientation on the glass
plate (in readable form). Note: Put the original in the upper left-hand corner on the glass plate.
How to scan special originals
1 Select the command in the software application to start the scan. This action activates the TWAIN driver.
2 Specify the scan settings in the ’Glass plate scan’ section of the TWAIN driver. See Making a simple scan
3 Click the start button at the bottom of the screen of the TWAIN driver to start the scan job.

The scan function (TWAIN driver) 45
Handling errors on the Océ DS10
Handling errors on the scanner
Introduction
There are three types of errors that can occur on the Océ DS10. ■ ORE (operator recoverable error)
You must resolve the error locations before the scanner can continue. After the error locations are resolved, the Océ DS10 will automatically continue with the active scan unless the operator has to perform an additional activity (e.g. reload remaining originals). You can continue the scan activities on the scanner (the scanner is ready to use), after this error occurs.
■ MRE (machine recoverable error)After this message the scanner goes to low power mode. You only need to turn on the scanner again. Follow the instructions on the screen.
■ PE (permanent error)If the scanner has a permanent error, the scanner stops. An error screen indicates that service is required. Only a service technician can resolve the error and remove the message.
Error handlers
There are two features that help you to resolve an error and that warn you if attention is needed. These features are the screen messages and the error screen.
Screen messages A message shows you which areas you must inspect to find the error. A drawing or photo shows you how to correct the error. After you corrected the error, the error screen disappears and the Océ DS10 starts to scan.
46 Operator’s manual
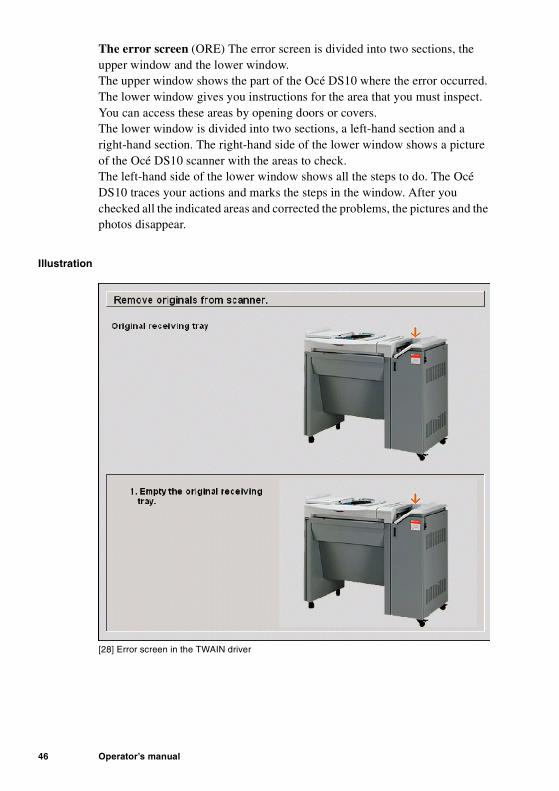
The error screen (ORE) The error screen is divided into two sections, the upper window and the lower window. The upper window shows the part of the Océ DS10 where the error occurred. The lower window gives you instructions for the area that you must inspect. You can access these areas by opening doors or covers.The lower window is divided into two sections, a left-hand section and a right-hand section. The right-hand side of the lower window shows a picture of the Océ DS10 scanner with the areas to check. The left-hand side of the lower window shows all the steps to do. The Océ DS10 traces your actions and marks the steps in the window. After you checked all the indicated areas and corrected the problems, the pictures and the photos disappear.
Illustration[28] Error screen in the TWAIN driver
[28] Error screen in the TWAIN driver

The scan function (TWAIN driver) 47
What happens if an error occurs?
1 The system reports ’Error occurred’.2 The screen displays a message (if visible). 3 You are asked to wait for more instructions. 4 The Océ DS10 stops to feed sheets from the input tray of the automatic
document feeder when a scan error occurs.

48 Operator’s manual
Resolve original errors on the scanner
Introduction
The scan process stops if an error occurs in the automatic document feeder. An error screen appears on your workstation. The Océ DS10 moves all correctly scanned sheets to the original receiving tray. The error screen displays a photo or picture with the areas that you must inspect. The lower part of the screen shows instructions.
If the error is solved and you have reloaded the remaining originals, the system continues the job that was scanning before the error.
Double sheet detection on the scannerIf the system detects any double sheets (2 or more originals separated at one time), the input of the originals stops. An error appears on the screen. The messages on the screen explain what you must do.
You can turn ON and OFF the Double sheet detection in the TWAIN driver. ■ ON
a separation of two or more originals at one time will result in an ORE, e.g. 'Remove all originals'.
■ OFFa separation of two or more originals is not detected.
How to clear an original jam on the Océ DS10
1 Read the information on the screen. 2 Follow the instructions. 3 Reload the remaining originals that did not reach the original receiving tray.

The scan function (TWAIN driver) 49
Customizing the TWAIN driver
Customizing the TWAIN user interface
Introduction
The TWAIN driver remembers the settings of the TWAIN user interface. When you close and reopen the software application, the TWAIN driver uses the settings that you used last.
If you prefer to create personalized scan settings, you can create and save up to 10 user profiles in which you define the preferred scan settings (not the user interface settings), (see ‘Work with TWAIN scan profiles’ on page 53).
Note: It may occur that the TWAIN driver will not revert to the settings last used. The software application you use, may overrule the customized TWAIN driver settings.
Purpose
The ability to customize the TWAIN user interface allows the user to change the following: ■ The parameters in the sections (you can store these parameters in a profile).■ The order of the sections.■ The status of the sections (opened or closed). ■ The status of the preview pane (hidden or displayed).
Note: The customized parameters can be reused for other scans in the active software application. You can also save the parameters into profiles so that you can use these parameters in other software applications as well. (see ‘Work with TWAIN scan profiles’ on page 53)

50 Operator’s manual
How to customize the parameters of a section
1 Open the ’Original’ section by clicking the arrow icon in the title bar of the section. Proceed to select the required parameters.[29] TWAIN user interface
[29] TWAIN user interface
2 Select ’2-sided long edge’ to indicate that you want to make a scan of the front and back of the original (the binding edge of the original is long edge).
3 Select ’Portrait’ to indicate the ’Content orientation’ of the original.

The scan function (TWAIN driver) 51
How to customize the order of the sections
1 For example, you need to move the ’zoom’ section.[30] Default order of the sections
[30] Default order of the sections
Click and hold the mouse button on the title bar of the ’Zoom’ section you want to move to another position.
2 Drag the ’Zoom’ section to the new position above the other sections and drop it.
3 Repeat step 1 and 2 for the other sections to reorder.
Result
The result will be the following.
[31] Move the Zoom section to top
[31] Move the Zoom section to top

52 Operator’s manual
How to customize the status of the sections
1 Click the arrow button in the tool bar of the ’Resolution’ section to collapse the section.
2 Click the arrow button again to expand the ’Resolution’ section. 3 Expand only those sections that are important to you. This action decreases the
need to scroll to a minimum.
Illustration[32] Open the preview pane
[32] Open the preview pane
How to customize the status of the preview pane
1 Click the ’View’ menu. 2 Select ’Preview’ to display the preview pane.
The preview pane of the user interface gives you feedback on the status of the scan. The preview pane displays the original that is scanned.
3 Repeat step 1 and 2 to close the preview pane again.

The scan function (TWAIN driver) 53
Work with TWAIN scan profiles
Introduction
In the TWAIN driver you can change the scan parameters for a scan. If you start a scan, the last used scan settings are active in the TWAIN driver.
■ You are still working in the same originating application (without closing the application). The settings of the last scan, made in the TWAIN driver are restored again.e.g. You are scanning 11x17" originals from the glass plate. Every next scan you make, the original size in the TWAIN driver is set to 11x17".
■ You start the originating application again (you closed the application). The TWAIN driver also restores the last used settings.In a scan profile you can store specific preferred scan settings.
You can save and delete scan profiles. You can store up to 10 scan profiles. In a scan profile, information such as 1-sided, landscape, zoom 100% etc. is stored.
In the ’File’ menu you can select ■ ’Load the default scan settings’ to restore the default parameters back into
the TWAIN driver.■ ’Print scan settings...’ to print the current parameter settings and the current
profile name.
The current profile is listed in the scan profile combo box and in the TWAIN driver title bar. Select a profile in the profile drop down box to change the current profile.

54 Operator’s manual
Illustration[33] TWAIN driver profile selection
[33] TWAIN driver profile selection
How to save a scan profile
1 Make your scan settings (e.g. 1-sided, landscape, zoom 100% etc.).2 Enter the profile name in the ’Scan profiles’ combo box.3 Select the diskette icon ( ).4 Click ’OK’ to save the profile.
How to load a scan profile
1 Select a profile in the profile drop down box.2 Click ’OK’ to load the profile.
How to change a scan profile
1 Select a profile in the profile drop down box.2 Make your scan settings.3 Select the diskette icon ( ).
The ’Save profile’ dialog appears.4 Click ’OK’ to overwrite the existing profile.

The scan function (TWAIN driver) 55
How to delete a scan profile
1 Select a profile in the profile drop down box.2 Click ’Cancel’ to select the profile without loading the profile.3 Select the delete icon ( ).
The ’Delete profile’ dialog appears.4 Click ’OK’ to delete the profile.
Note: You can also delete the current profile. Click the delete icon ( ) to delete the profile and confirm the action.

56 Operator’s manual

57
Océ DS10
User manual
Chapter 3 Key operator tasks

58 Operator’s manual
Access the Settings Editor
Access the Océ DS10 Settings Editor in key operator mode
Introduction
The Océ DS10 Settings Editor is an application that is available to you if you are responsible for special administrative tasks on the Océ DS10.
To access the key operator mode of the Océ DS10 Settings Editor, you need the special key operator PIN code.
The Océ DS10 Settings Editor is a web based application on the controller that you can access through a standard web browser. The supported web browsers are for example MS Internet Explorer 4.0, 5.0 and 5.5 in combination with Windows 9x, NT4 or Windows 2000.
When to do
To change some of the standard scanner settings, you can use the options of the Océ DS10 Settings Editor.
Note: If the initial network configuration is not correct, no person can connect to the controller to change the settings or to print. Note: More than one session of the Océ DS10 Settings Editor can be active at the same time.

Key operator tasks 59
Illustration[34] General logon screen
[34] General logon screen[35] Logon screen Océ DS10 Settings Editor
[35] Logon screen Océ DS10 Settings Editor

60 Operator’s manual
How to access the Océ DS10 Settings Editor in key operator mode
1 Start your web browser (e.g. Internet Explorer). 2 Enter the URL to connect to the Océ DS10 Settings Editor in the key operator
mode, URL = http://<hostname>/kos (The host name describes the Océ DS10 name on the TCP/IP network). You now see the logon page of the Océ DS10 Settings Editor. (see figure) Note: A URL (Uniform Resource Locator) is the address of a file (resource) accessible on the Internet. The type of resource depends on the Internet application protocol. The URL contains the name of the protocol required to access the resource, a domain name that identifies a specific computer on the Internet, and a hierarchical description of a file location on the computer.
3 Select the key operator mode to enter. 4 Enter the special PIN code.
Note: If you enter an incorrect PIN code, an encrypted code appears on the logon screen. If you do not remember your PIN code, call the Help desk. The encrypted code enables the Help desk to return your PIN code.
5 Press 'Enter' or click 'Send'.
Note: You can view the settings for the system administrator when you logged on as key operator. Select ’View settings for SA’ to activate the view mode for SA settings (you can not change settings).
Key operator tasks 61
Change the PIN code for the key operator
Introduction
Océ supplies the Océ DS10 with a default PIN code for the key operator.
The PIN code for the key operator consists of 0 to 5 digits. To assign a new PIN code, you enter the Océ DS10 Settings Editor in the key operator mode.
Before you begin
Start the Océ DS10 Settings Editor in your web browser in the key operator mode. To start Océ DS10 Settings Editor, (see ‘Access the Océ DS10 Settings Editor in system administrator mode’ on page 98)
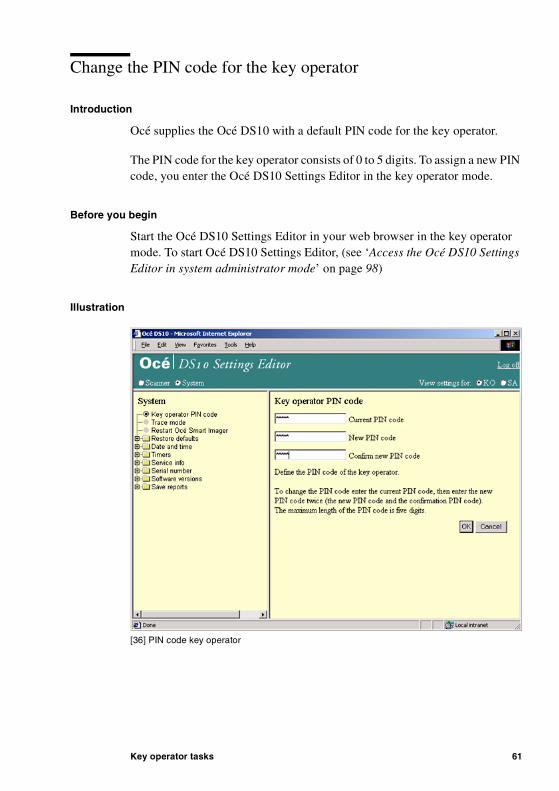
Illustration[36] PIN code key operator
[36] PIN code key operator

62 Operator’s manual
How to change the PIN code for the key operator
1 Select 'System' in the title bar of the Océ DS10 Settings Editor. 2 Select 'Key operator PIN code'. 3 Enter the current PIN code in the 'Current PIN code' box. 4 Enter the new PIN code in the 'New PIN code' box. (maximum 5 digits)5 To confirm the new PIN code, enter the new PIN code again in the 'Confirm
new PIN code' box. 6 Click the 'OK' button to apply the changes.
Use this new PIN code the next time you log on.

Key operator tasks 63
Adjust the Océ DS10
Set the preferred scan paper sizes
Introduction
The Océ DS10 Settings Editor allows you to select a maximum of 5 preferred paper sizes from a list, to use on the scanner.When you make a scan a picklist, that contains the preferred paper sizes, appears in the TWAIN driver 'Original size' section.Select one of these preferred paper sizes to define the size of the original on the glass plate (The Océ DS10 can not detect the paper size of originals on the glass plate). The automatic document feeder recognizes the paper size automatically.The factory default selection in this list is A4, A3 and A5 (Europe) or US Standard, Letter Standard, Legal and Ledger (USA).
The following procedure explains how to select the paper size in the Océ DS10 Settings Editor.
Before you begin
Start the Océ DS10 Settings Editor in your web browser in the key operator mode. (see ‘Access the Océ DS10 Settings Editor in key operator mode’ on page 58)

64 Operator’s manual
Illustration[37] Select the preferred scan paper sizes
[37] Select the preferred scan paper sizes

Key operator tasks 65
How to set the preferred paper sizes
1 Select 'Scan unit' in the title bar of the Océ DS10 Settings Editor. 2 Select 'Originals'.3 Select 'Preferred scan paper sizes'. 4 Check the paper sizes you need in the check boxes. (maximum 5)5 Click the 'OK' button to apply the changes.
[38] The list of preferred paper sizes
[38] The list of preferred paper sizes

66 Operator’s manual
Define the paper size detection preferences
Introduction
The automatic document feeder automatically detects the size and the feed direction of the originals.However, the automatic detection can not detect a difference between some paper sizes (e.g. Legal Standard and Legal). In a paper group, you find 2 paper sizes. The automatic detection can not decide what paper size to select within a paper group. You define what paper size the scanner must select in such case. See the table below.
[13] Paper groups
[13] Paper groups
Before you begin
Start the Océ DS10 Settings Editor in your web browser in the key operator mode. (see ‘Access the Océ DS10 Settings Editor in key operator mode’ on page 58)
Paper group
Paper sizes Default
1 B5, Letter Government B5
2 Letter Standard, Legal Government Letter Stan-dard
3 Legal, Legal Standard Legal Standard
4 US Government, Commercial US Govern-ment

Key operator tasks 67
Illustration[39] Define paper size detection preferences
[39] Define paper size detection preferences
How to define the paper size detection preferences
1 Select 'Scan unit' in the title bar of the Océ DS10 Settings Editor. 2 Select 'Originals'. 3 Select 'Paper groups'. 4 Check the radio buttons of the paper sizes you prefer (1 in each group). 5 Click the 'OK' button to apply the changes.

68 Operator’s manual
Restore the factory default settings
Introduction
Océ defines the default settings of the Océ DS10. These settings are the factory default settings. An example of a factory default setting is the energy save setting for the key operator.
You can adapt the factory settings, according to your company or department requirements.
These changed settings are the company settings. Use this procedure to change the settings back to the factory defaults for the key operator and for the system administrator. (System administrator mode includes all network settings)
When to do
■ Use these options to restore the factory defaults for the key operator or the system administrator of the Océ DS10 scanner.
Before you begin
Start the Océ DS10 Settings Editor in your web browser in the system administrator mode or the key operator mode. To start Océ DS10 Settings Editor, (see ‘Access the Océ DS10 Settings Editor in key operator mode’ on page 58) or (see ‘Access the Océ DS10 Settings Editor in system administrator mode’ on page 98)
Note: Restarting the system is required to apply the new settings. Note: If you restore the network default settings, you change the initial network settings. You might not be able to reach the Océ DS10 scanner with these new settings after restarting the system.
Attention: Remember that after you install the factory defaults back to your Océ DS10 scanner, you lose ALL the previous scanner settings.
Key operator tasks 69
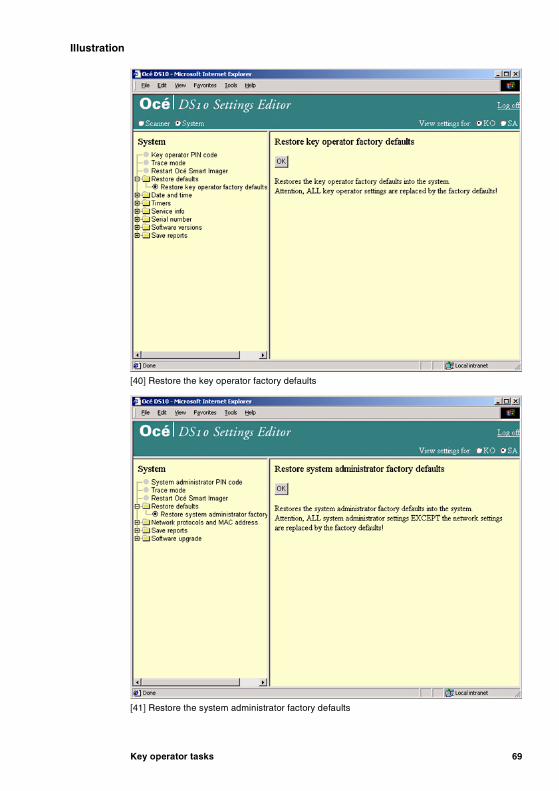
Illustration[40] Restore the key operator factory defaults
[40] Restore the key operator factory defaults[41] Restore the system administrator factory defaults
[41] Restore the system administrator factory defaults

70 Operator’s manual
How to restore the factory default settings
1 Click ’Restore defaults’ and select ’Restore factory defaults’. 2 Click the ’OK’ button to apply the changes.

Key operator tasks 71
Set the date and time
Introduction
The Océ DS10 Settings Editor allows you to change the current date and time for the scanner. The status report function and the log function use this information in the report that you save. This procedure teaches you to use a remote workstation to change the date and time of the scanner.
When to do
The scanner date or time is not your current local date and time.
Before you begin
Start the Océ DS10 Settings Editor on your web browser in the key operator mode. To start Océ DS10 Settings Editor, (see ‘Access the Océ DS10 Settings Editor in key operator mode’ on page 58)
Illustration[42] Set the date and time
[42] Set the date and time

72 Operator’s manual
How to set the date and time
1 Select 'System' in the title bar of the Océ DS10 Settings Editor. 2 Select 'Date and Time' two times. 3 Enter the current time in the upper text box. (hh:mm:ss)4 Select the month, day and year in the drop down list box below the time text
box. 5 Click the 'OK' button to apply the changes.

Key operator tasks 73
Change the key operator telephone number
Introduction
If the Océ DS10 needs key operator support, the system gives you the instruction to call the key operator. The Océ DS10 Settings Editor allows you when you are the key operator, to enter the telephone number.
This telephone number appears in the configuration report.
When to do
■ The telephone number of the key operator changes or a new key operator is in charge, change the telephone number in the Océ DS10 Settings Editor.
Before you begin
Start the Océ DS10 Settings Editor in your web browser in the key operator mode. To start theOcé DS10 Settings Editor, (see ‘Access the Océ DS10 Settings Editor in system administrator mode’ on page 98)

74 Operator’s manual
Illustration[43] Enter the key operator telephone number
[43] Enter the key operator telephone number
How to change the key operator telephone number
1 Select 'System' in the title bar of the Océ DS10 Settings Editor. 2 Click 'Service info'. 3 Select 'Key operator telephone number'. 4 Enter the telephone number in the 'Key operator telephone number' text box. 5 Click the 'OK' button to apply the changes.

Key operator tasks 75
Change the Océ telephone number
Introduction
If you have to call the local Océ department, you can find the Océ telephone number in the Océ DS10 Settings Editor. The key operator can enter the number of the nearest Océ department. This telephone number appears in the configuration report.
Before you begin
Start the Océ DS10 Settings Editor in your web browser in the key operator mode. To start theOcé DS10 Settings Editor, (see ‘Access the Océ DS10 Settings Editor in key operator mode’ on page 58)
Illustration[44] Enter the Océ telephone number
[44] Enter the Océ telephone number

76 Operator’s manual
How to change the Océ telephone number
1 Select 'System' in the title bar of the Océ DS10 Settings Editor. 2 Click 'Service info'. 3 Select 'Océ telephone number'. 4 Enter the telephone number in the 'Océ telephone number' text box. 5 Click the 'OK' button to apply the changes.

Key operator tasks 77
Energy settings
Set the low power mode timer
Introduction
The controller can request the scanner to go to the energy save mode.■ The scanner can go into low power mode.■ The controller cannot go into low power mode.
Low power mode time The interval between the last action of the scanner and the moment the Océ DS10 turns to low power mode.The Océ DS10 turns to low power mode when the 'Low power mode timer' expires (period of no activity on the scanner). The default value of the low power mode timer is 15 minutes. You cannot manually put the Océ DS10 into low power mode.
When to do
■ Change the timer settings when the factory settings cause problems to the productivity.
Before you begin
Start the Océ DS10 Settings Editor on your web browser in the key operator mode. To start Océ DS10 Settings Editor, (see ‘Access the Océ DS10 Settings Editor in key operator mode’ on page 58)

78 Operator’s manual
Illustration[45] The low power mode timer
[45] The low power mode timer
How to set the low power mode timer
1 Select 'System' in the title bar of the Océ DS10 Settings Editor. 2 Click 'Timers'. 3 Select 'Low power mode timer'. 4 Enter the time in minutes in the 'Low power mode timer' box. (default is 15
minutes)5 Click the 'OK' button to apply the changes.

Key operator tasks 79
Restart the controller
Introduction
When you change some settings in the Océ DS10 Settings Editor, the software may ask you to restart the controller. A restart activates the new changed settings.
You can restart the controller if you use the Océ DS10 Settings Editor. Follow the procedure below to restart the controller.
Before you begin
Start the Océ DS10 Settings Editor in your web browser in key operator mode or system administrator mode. To start Océ DS10 Settings Editor, (see ‘Access the Océ DS10 Settings Editor in key operator mode’ on page 58).
Illustration[46] Restart the controller
[46] Restart the controller

80 Operator’s manual
How to restart the controller
1 Select 'System' in the title bar of the Océ DS10 Settings Editor. 2 Select 'Restart Océ Smart Imager'. 3 Click 'OK' to restart the controller.4 The Smart Imager restarts. The system goes into sleep mode.5 Go to the Océ DS10.6 Press the On/Off button ( ) on the scanner.
The system is ready for use.

Key operator tasks 81
Get the information
Read the scan counter
Introduction
The Océ DS10 Settings Editor enables you to read the scan counter. Use this function to display the number of scans, made on the Océ DS10.
The scan counter records all scan activities from the Automatic document feeder or glass plate of the Océ DS10.
Before you begin
To read the counter: Start the Océ DS10 Settings Editor in your web browser in key operator mode. To start theOcé DS10 Settings Editor, (see ‘Access the Océ DS10 Settings Editor in key operator mode’ on page 58)
Note: You can not reset the scan counter.

82 Operator’s manual
Illustration[47] The scan counter
[47] The scan counter
How to read the scan counter
1 Select 'Scan unit' in the title bar of the Océ DS10 Settings Editor. 2 Click 'Counters'. 3 Select 'Scan counter'.4 The value of the scan counter appears in the right window.

Key operator tasks 83
Read the serial number
Introduction
If you call service, the service employee can ask you for the serial number of your Océ DS10. You can find this number in the Océ DS10 Settings Editor. You can not change this number.
Before you begin
Start the Océ DS10 Settings Editor in your web browser in key operator mode. To start Océ DS10 Settings Editor, (see ‘Access the Océ DS10 Settings Editor in key operator mode’ on page 58)
Illustration[48] The serial number of the Océ DS10
[48] The serial number of the Océ DS10

84 Operator’s manual
How to check the serial numbers
1 Select 'System' in the title bar of the Océ DS10 Settings Editor. 2 Click 'Serial number'. 3 Select 'Serial number'. 4 The serial number of your Océ DS10 appears in the right window.

Key operator tasks 85
Display the software version
Introduction
The Océ DS10 Settings Editor enables you to read the versions of the installed software on the Océ DS10.You can display the software version of the following items.
[14] Software versions
[14] Software versions
These settings are read only. You find the procedures to display the software versions in this chapter.
When to do
■ If you call the service department, a service employee can ask you for these software version numbers.
Before you begin
Start the Océ DS10 Settings Editor in your web browser in key operator mode. To start Océ DS10 Settings Editor, (see ‘Access the Océ DS10 Settings Editor in key operator mode’ on page 58)
Software Description
scan unit main software
The embedded software of the scanner.
scan unit IP soft-ware
The embedded Image Processing software of the scan-ner.
Océ DS10 sys-tem
The version of the complete system, including all units.
software of the controller
The version of the controller release.
controller operat-ing system soft-ware
The version of the operating system that runs on the con-troller.

86 Operator’s manual
Illustration[49] The scan unit main software version
[49] The scan unit main software version
How to show the scanner main software version
1 Select 'Scan unit' in the title bar of the Océ DS10 Settings Editor. 2 Click 'Software versions'. 3 Select 'Scan unit main software version'.4 The version of the software appears in the right window.

Key operator tasks 87
Illustration[50] The scan unit Image Processing software version
[50] The scan unit Image Processing software version
How to show the scanner IP software version
1 Select 'Scan unit' in the title bar of the Océ DS10 Settings Editor. 2 Click 'Software versions'. 3 Select 'Scan unit IP software version'. 4 The version of the software appears in the right window.

88 Operator’s manual
Illustration[51] The Oce Smart Imager and operating system software version
[51] The Oce Smart Imager and operating system software version
How to show the software version of the controller
1 Select 'System' in the title bar of the Océ DS10 Settings Editor. 2 Click 'Software versions'. 3 Select 'System version', 'Océ Smart Imager version' or 'Océ Smart Imager
operating system'. 4 The version of the software appears in the right window.

Key operator tasks 89
Save the configuration report
Introduction
The configuration report contains the information about the hardware and the software configuration of the Océ DS10. The report also contains information about the network settings of your Océ DS10.
To store the report in a digital form, save the report. The Océ service department can ask you to send this report to help in solving problems. The controller stores the report in PDF format.
The PDF files which the controller generates include a reference to the Aladdin package:
This document is generated with Aladdin Ghostscript, on the basis of the Aladdin Free Public License.
When to do
To correct problems or for example to archive current settings, you can save all the configuration settings of your Océ DS10 in the configuration report.
Before you begin
Start the Océ DS10 Settings Editor in your web browser in key operator mode or system administrator mode. To start Océ DS10 Settings Editor, (see ‘Access the Océ DS10 Settings Editor in key operator mode’ on page 58) or (see ‘Access the Océ DS10 Settings Editor in system administrator mode’ on page 98)

90 Operator’s manual
Illustration[52] Save the configuration report
[52] Save the configuration report
How to save the configuration report
1 Select 'System' in the title bar of the Océ DS10 Settings Editor. 2 Click 'Save reports'.3 Select 'Save configuration report'. 4 Click the 'OK' button to save the report to your local computer. 5 Click on the link 'download configuration report file' to start the download of
the report.6 Select the download location on your computer to save the file.

Key operator tasks 91
Save the system log file
Introduction
The Océ DS10 stores the system log file on the local hard disk of the key operator's computer or system administrator's computer. The system stores the errors of users, like bad input data, incorrect user commands or missing licenses in the system log file.
The messages in the system log file can help to indicate possible causes for the malfunctions or bad performance of the controller.
In the following procedure you learn how to save (in PDF format) the system log file.
The PDF files which the controller generates include a reference to the Aladdin package:
This document is generated with Aladdin Ghostscript, on the basis of the Aladdin Free Public License.
When to do
To find the information about malfunctions or bad performance of your Océ DS10, you can consult the system log file.
Before you begin
Start the Océ DS10 Settings Editor in your web browser in key operator mode or system administrator mode. To start Océ DS10 Settings Editor, (see ‘Access the Océ DS10 Settings Editor in key operator mode’ on page 58) or (see ‘Access the Océ DS10 Settings Editor in system administrator mode’ on page 98)

92 Operator’s manual
Illustration[53] Save the system log file
[53] Save the system log file
How to save the system log file.
1 Select 'System' in the title bar of the Océ DS10 Settings Editor. 2 Click 'Save reports'.3 Select 'Save system log'. 4 Click the 'OK' button to save the file to your local computer. 5 Click on the link 'download system log file' to start the download. 6 Select the download location on your computer to save the file.
Key operator tasks 93
Set and save the trace log
Introduction
The controller supports a trace function. If you use this trace function, the controller generates a log file. You can indicate the mode of the trace function. ’Off’ indicates that the controller generates no trace file. Select one of the two other modes ’Basic’ or ’Detailed’ to make the controller create a trace file.
The ’Detailed’ mode generates a larger file and contains more information than the ’Basic’ mode. The service department can use this file to correct the problems of the Océ DS10.
You can generate a copy of the trace file on your local PC. Océ service technicians can ask you to generate the trace file to help them to correct problems.
The PDF files which the controller generates include a reference to the Aladdin package:
This document is generated with Aladdin Ghostscript, on the basis of the Aladdin Free Public License.
Note: Restart the controller to activate the new trace mode.
When to do
When the Océ DS10 causes problems or malfunctions, the service technician can use the trace file to find the problem. Run the Océ DS10 in the right trace mode before you call the help desk. Océ service technicians can ask for this file.
Before you begin
Start the Océ DS10 Settings Editor in your web browser in the key operator mode or in the system administrator mode. To start Océ DS10 Settings Editor, (see ‘Access the Océ DS10 Settings Editor in key operator mode’ on page 58) or (see ‘Access the Océ DS10 Settings Editor in system administrator mode’ on page 98)

94 Operator’s manual
Illustration[54] Set the trace mode
[54] Set the trace mode
How to set the trace mode.
1 Select 'System' in the title bar of the Océ DS10 Settings Editor. 2 Click 'Trace mode'.3 Select the trace mode 'Off', 'Basic' or 'Detailed'. 4 Click the 'OK' button to apply the changes.

Key operator tasks 95
Illustration[55] Save the trace log file
[55] Save the trace log file
How to save the trace log file.
1 Select 'System' in the title bar of the Océ DS10 Settings Editor. 2 Click 'Save reports'.3 Select 'Save trace log'. 4 Click the 'OK' button to save the file to your local computer. 5 Click on the link 'download trace log file' to start the download. 6 Select the download location on your computer to save the file.

96 Operator’s manual

97
Océ DS10
User manual
Chapter 4 System administrator tasks
98 Operator’s manual
Access the Settings Editor
Access the Océ DS10 Settings Editor in system administrator mode
Introduction
The Océ DS10 Settings Editor is an application that is available to you
■ if you are responsible for the network configuration. ■ if you provide maintenance to the Océ DS10.
To access the system administrator mode of the Océ DS10 Settings Editor, you need the special system administrator PIN code.
The Océ DS10 Settings Editor is a web based application on the controller that you can access through a standard web browser. The supported web browsers are for example MS Internet Explorer 4.0, 5.0 and 5.5 in combination with Windows 9x, NT4 or Windows 2000.
When to do
To configure and maintain the scanner, you can use the options of the Océ DS10 Settings Editor.
Note: If the initial network configuration is not correct, no person can connect to the controller to change the settings or to print. Note: More than one session of the Océ DS10 Settings Editor can be active at the same time.

System administrator tasks 99
Illustration[56] General logon screen
[56] General logon screen[57] Logon screen Océ DS10 Settings Editor for the key operator
[57] Logon screen Océ DS10 Settings Editor for the key operator

100 Operator’s manual
How to access the Océ DS10 Settings Editor in system administrator mode
1 Start your web browser. (Internet Explorer)2 Enter the URL to connect to the Océ DS10 Settings Editor in the system
administrator mode, URL = http://<hostname>/sas (The host name describes the Océ DS10 name on the TCP/IP network). You now see the logon page of the Océ DS10 Settings Editor, (see figure 56).
3 Select the system administrator mode to enter. 4 Enter the special PIN code.
Note: If you enter an incorrect PIN code, an encrypted code appears on the logon screen. If you do not remember your PIN code, call the Help desk. The encrypted code enables the Help desk to return your PIN code.
5 Press the 'Enter' key or click 'Send' to confirm.
Note: A URL (Uniform Resource Locator) is the address of a file (resource) accessible on the Internet. The type of resource depends on the Internet application protocol. The URL contains the name of the protocol required to access the resource, a domain name that identifies a specific computer on the Internet, and a hierarchical description of a file location on the computer. Note: You can view the settings for the key operator when you logged on as system administrator. Select ’View settings for KO’ to activate the view mode for KO settings (you cannot change settings).

System administrator tasks 101
Change the PIN code for the system administrator
Introduction
Océ supplies the Océ DS10 with the default PIN code for the system administrator.
The PIN code for the system administrator consists of 0 to 5 digits. To assign a new PIN code, you enter the Océ DS10 Settings Editor in the system administrator mode.
Before you begin
Start the Océ DS10 Settings Editor in your web browser in the system administrator mode. To start Océ DS10 Settings Editor, (see ‘Access the Océ DS10 Settings Editor in system administrator mode’ on page 98)
Illustration[58] PIN code system administrator
[58] PIN code system administrator

102 Operator’s manual
How to change the PIN code for the system administrator
1 Select ’System administrator PIN code’. 2 Enter the current PIN code in the ’Current PIN code’ box.3 Enter the new PIN code in the ’New PIN code’ box (maximum 5 digits). 4 To confirm the new PIN code, enter the new PIN code again in the ’Confirm
new PIN code’ box.5 Click the ’OK’ button to apply the changes.
Use this new PIN code the next time you log on.

System administrator tasks 103
The scanner configuration
Adjust the network and scanner properties
Introduction
The system administrator is responsible for the connection of the Océ DS10 to the network. You can set several scanner identification settings, like scanner name, IP address, default gateway and Subnet mask.
You can change the IP settings manually or you can enable DHCP to make the controller detect the IP settings (your network has to support DHCP).
[15] Network and scanner properties
Identification setting
DHCP You can select the method to receive the IP settings. The DHCP protocol allows the server to detect the IP settings automatically. Possible values are■ 'Enable'■ 'Disable'
Default value is set to 'Enable'.
Host name (scan-ner description)
The host name describes the Océ DS10 name on the TCP/IP network. Make sure that: ■ you use not more than 15 characters.■ you select the characters from the list: a-z; A-Z; 0-9; -. ■ if you use a hyphen, put the hyphen in the name, not
at the begin or at the end.
IP address The physical address of the controller connected to the TCP/IP network. The controller must have a unique IP address within your network. The IP address has four sets of numbers separated by pe-riods. The default IP address is 192.1.1.1Note: If you enable DHCP, this setting is read-only.

104 Operator’s manual
[15] Network and scanner properties
Note: To activate the new IP settings you must restart the Océ DS10.
When to do
■ Before you use the scanner, make sure that you complete these TCP/IP settings to connect to the Océ DS10 to the network.
Before you begin
Start the Océ DS10 Settings Editor in your web browser in the system administrator mode. To start theOcé DS10 Settings Editor, (see ‘Access the Océ DS10 Settings Editor in system administrator mode’ on page 98)
Attention: If you change any of the settings above, you can only access the controller through these new settings. If you make the wrong settings, you cannot reach the Océ DS10 on the network (you cannot start the Océ DS10 Settings Editor). You have to call for service.
Attention: If you change the TCP/IP settings, you must restart the Océ DS10 to activate the new settings. If you do not complete all TCP/IP settings before this restart, you cannot reach the Océ DS10 on the network (you cannot start the Océ DS10 Settings Editor). You have to call for service.
Subnet mask A method to divide the networks into smaller groups, or subnets (segments). The mask is a binary pattern that matches the IP address. The controller compares the subnet mask with a network address number. Default value is 255.255.255.0Note: If you enable DHCP, this setting is read-only.
Default gateway The physical address on this subnet of the default gate-way connected to the TCP/IP network. Default value is 192.1.1.2Note: If you enable DHCP, this setting is read-only.
Identification setting

System administrator tasks 105
Illustration[59] Enable DHCP
[59] Enable DHCP
How to enable DHCP for automatic detection of the IP settings
1 Click ’Network protocols and MAC address’.2 Click ’TCP/IP protocol’. 3 Select ’DHCP’. 4 Select ’Enable’ to apply the DHCP protocol or ’Disable’ to do the IP settings
manually.5 Click the ’OK’ button to apply the changes.

106 Operator’s manual
Illustration[60] Change the host name
[60] Change the host name
How to change the host name
1 Click ’Network protocols and MAC address’. 2 Click ’TCP/IP protocol’. 3 Select ’Host name’.4 Enter the name to describe the Océ DS10 on the network.
Note: For the host name standards, (see ‘Introduction’).5 Click the ’OK’ button to apply the changes.
Note: (see ‘Test the network (TCP/IP) connection’ on page 110) to test the IP settings.

System administrator tasks 107
Illustration[61] Change the IP address
[61] Change the IP address
How to change the IP address
1 Click ’Network protocols and MAC address’. 2 Click ’TCP/IP protocol’. 3 Select ’IP address’. 4 Enter the 'IP address' to change the physical address of the Océ DS10 on the
network. 5 Click the 'OK' button to apply the changes.
Note: (see ‘Test the network (TCP/IP) connection’ on page 110) to test the IP settings.
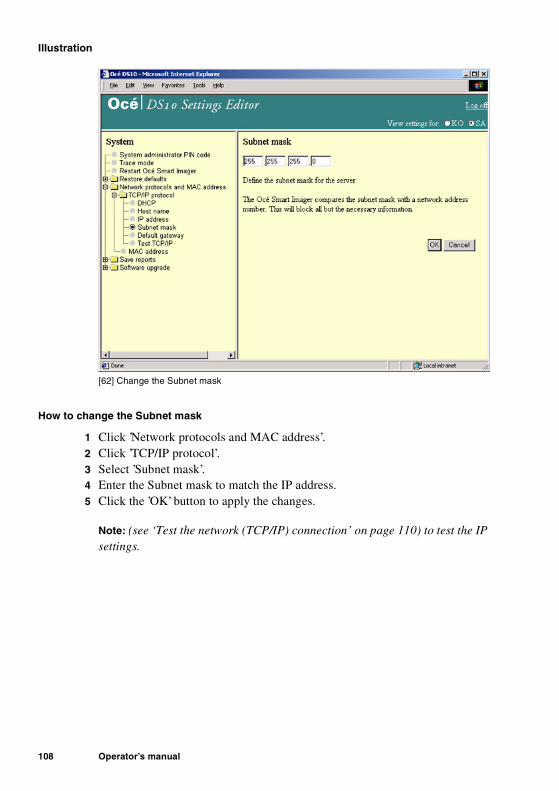
108 Operator’s manual
Illustration[62] Change the Subnet mask
[62] Change the Subnet mask
How to change the Subnet mask
1 Click ’Network protocols and MAC address’. 2 Click ’TCP/IP protocol’. 3 Select ’Subnet mask’. 4 Enter the Subnet mask to match the IP address. 5 Click the ’OK’ button to apply the changes.
Note: (see ‘Test the network (TCP/IP) connection’ on page 110) to test the IP settings.

System administrator tasks 109
Illustration[63] Change the default gateway address
[63] Change the default gateway address
How to change the default gateway address
1 Click ’Network protocols and MAC address’. 2 Click ’TCP/IP protocol’. 3 Select ’Default gateway’. 4 Enter the IP address of the default gateway. 5 Click the ’OK’ button to apply the changes.

110 Operator’s manual
Test the network (TCP/IP) connection
Introduction
You can test the connection of the Océ DS10 to the network with the PING (Packet INternet Groper) method. This method uses an Internet utility to detect if the physical IP address is reachable. PING tests a network connection (PING sends a packet and waits for a response) and detects errors.The system administrator can perform this test to check the network connection.
Before you begin
Start the Océ DS10 Settings Editor in your web browser in the system administrator mode. To start Océ DS10 Settings Editor, (see ‘Access the Océ DS10 Settings Editor in system administrator mode’ on page 98)
Illustration[64] Test the TCP/IP connection
[64] Test the TCP/IP connection
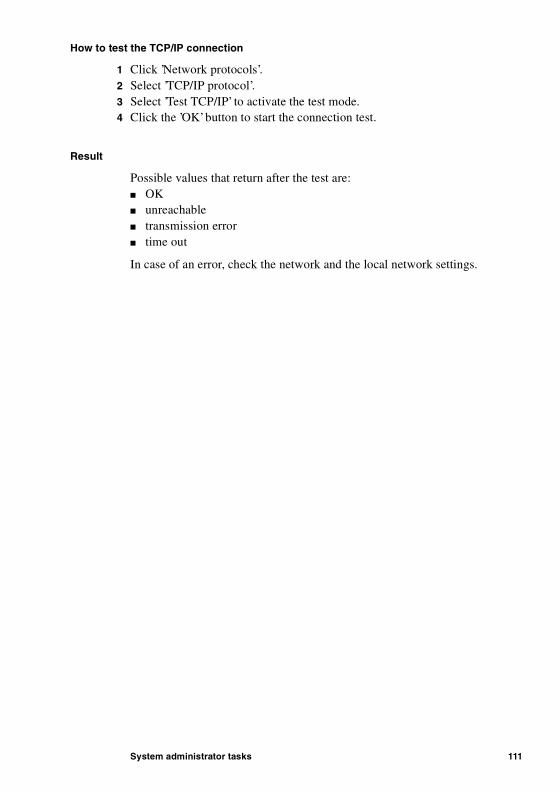
System administrator tasks 111
How to test the TCP/IP connection
1 Click ’Network protocols’.2 Select ’TCP/IP protocol’.3 Select ’Test TCP/IP’ to activate the test mode.4 Click the ’OK’ button to start the connection test.
Result
Possible values that return after the test are:■ OK ■ unreachable ■ transmission error ■ time out
In case of an error, check the network and the local network settings.

112 Operator’s manual
Read the MAC address
Introduction
To configure the controller in your network environment, it may be necessary to know the MAC address of the controller.The MAC (Media Access Control) address is your controller’s unique hardware number.
Note: The MAC address is read-only.
Before you begin
Start the Océ DS10 Settings Editor in your web browser in the system administrator mode. To start theOcé DS10 Settings Editor, (see ‘Access the Océ DS10 Settings Editor in system administrator mode’ on page 98)
Illustration[65] Read the MAC address
[65] Read the MAC address

System administrator tasks 113
How to read the MAC address
1 Click ’Network protocols and MAC address’. 2 Select ’MAC address’. 3 The MAC address of your Océ DS10 appears in the right window.
114 Operator’s manual
Upgrade the controller software
Introduction
The system administrator is responsible for the upgrade of the controller software. You will receive a new software CD-ROM from your Océ representative. The CD-ROM will go through the upgrade process automatically.
When to do
To install new releases or updates of the controller software, use the procedure below.
Before you begin
Start the Océ DS10 Settings Editor in your web browser in the system administrator mode. To start theOcé DS10 Settings Editor, (see ‘Access the Océ DS10 Settings Editor in system administrator mode’ on page 98)

System administrator tasks 115
Illustration[66] Upgrade the controller software
[66] Upgrade the controller software
How to upgrade the controller software
1 Click ’Software upgrade’.2 Click ’Upgrade software’.3 Insert the CD-ROM into the CD-ROM drive.4 Click the ’OK’ button to start the upgrade.

116 Operator’s manual

117
Océ DS10
User manual
Appendix AOverview and tables
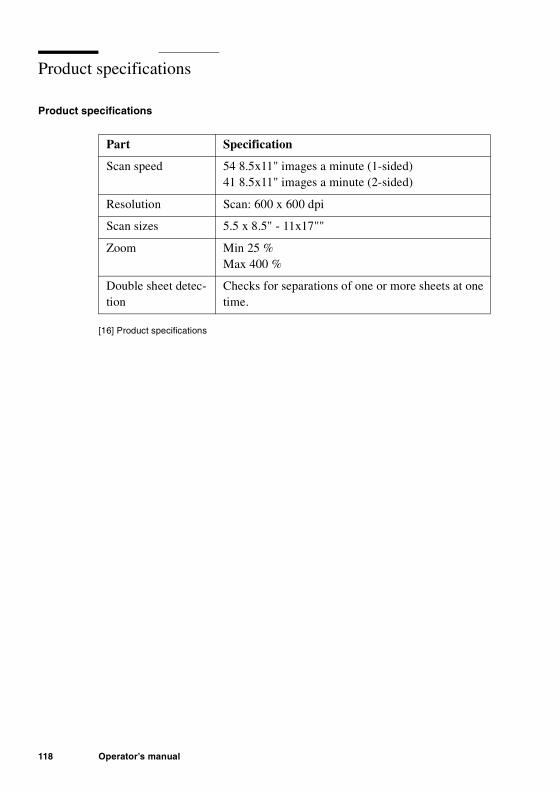
118 Operator’s manual
Product specifications
Product specifications[16] Product specifications
[16] Product specifications
Part Specification
Scan speed 54 8.5x11" images a minute (1-sided)41 8.5x11" images a minute (2-sided)
Resolution Scan: 600 x 600 dpi
Scan sizes 5.5 x 8.5" - 11x17""
Zoom Min 25 %Max 400 %
Double sheet detec-tion
Checks for separations of one or more sheets at one time.

Overview and tables 119
Originals that can be used
Note: Do not put transparent originals into the automatic document feeder.
Originals Specifications
Original sizes Glass plate max. 297 x 432 mm
Automatic document feeder
min. 127 x 203 mmmax. 297 x 432 mm
Original weight Glass plate any weight (max. 10 kg)
Automatic document feeder
50 sheets of 80 g/m2
Note: You can reload originals during the scan.
Original type Glass plate any type of original
Automatic document feeder
not damaged, 1-sided and 2-sided originals with a light curl

120 Operator’s manual

121
Océ DS10
User manual
Appendix BMiscellaneous

122 Operator’s manual
Notation conventions
Definition
There are a number of notation conventions used in this manual. This consistent style enables you to quickly become familiar with the use of this manual and consequently the Océ DS10.
Attention gettersThere are several types of information to which we draw your attention. This information is classified as follows:
Note: In a Note, information is given about matters which ensure the proper functioning of the machine or application, but useful advice concerning its operation may also be given.
Attention: The information that follows Attention is given to prevent something (your copy or original, the copier or printer, data files etc.) being damaged.
Caution: The information that follows Caution is given to prevent you suffering personal injury.
Description
Each section or subsection contains a description of the feature or operation identified in the title. It might also include possible applications, as well as any guidelines that you should bear in mind.
Procedures
A description is followed by a procedure. A procedure always begins with a phrase which briefly describes the procedure, followed by a series of numbered steps that take you, step by step, through all phases of performing the operation.
Figures and tables
Figures and tables are titled and numbered sequentially throughout this manual. Figures include pictures of product components, screendumps, examples, and diagrams of concepts discussed in the description.

Miscellaneous 123
Reader’s comment sheet
Questions
Have you found this manual to be accurate? O YesO No
Could you operate the product after reading this manual? O YesO No
Does this manual provide enough background information? O YesO No
Is the format of this manual convenient in size, readability and arrangement (page layout, chapter order, etc.)?O YesO No
Could you find the information you were looking for? O AlwaysO Most of the timesO SometimesO Not at all
What did you use to find the required information? O Table of contentsO Index
Are you satisfied with this manual?O YesO No
Thank you for evaluating this manual.If you have other comments or concerns, please explain or suggest improvements overleaf or on a separate sheet.
7218983

124 Operator’s manual
Comments:------------------------------------------------------------------------------------------------------------------------------------------------------------------------------------------------------------------------------------------------------------------------------------------------------------------------------------------------------------------------------------------------------------------------------------------------------------------------------------------------------------------------------------------------------------------------Date:
This reader’s comment sheet is completed by: (If you prefer to remain unknown, please at least fill in your occupation)
Name:
Occupation:
Company:
Phone:
Address:
City:
Country:
Please return this sheet to:
Océ-Technologies B.V.For the attention of ITC User Documentation. P.O. Box 101,5900 MA VenloThe Netherlands
Send your comments by E-mail to: [email protected]
For the addresses of local Océ organizations see: www.oce.com

Miscellaneous 125
Addresses of local Océ organizations
Océ-Australia Ltd.P.O. Box 363Ferntree Gully MDCVIC 3165Australia
Océ-Italia S.p.A.Strada Padana Superiore 2/B20063 Cernusco sul Naviglio (MI)Italia
Océ-Österreich GmbHPostfach 951233 ViennaAustria
Océ Systems (Malaysia Sdn. Bhd.)#3.01, Level 3, Wisma AcademyLot 4A, Jalan 19/146300 Petalig JayaMalaysia
Océ-Belgium N.V./S.A.Avenue J. Bordetlaan 321140 BrusselsBelgium
Océ-Nederland B.V.P.O.Box 8005201 AV 's-HertogenboschThe Netherlands
Océ-Brasil Comércio e Industria Lt-da. Caixa Postal 318701060-970 Sao Paulo, SPBrazil
Océ Norge A/SPostboks 53, Grefsen0409 Oslo 4Norway
Océ-Canada Inc.4711 Yonge Street, Suite 1100Toronto, Ontario M2N 6K8Canada
Océ-Poland Ltd.ul. Łopuszaska 5302-232 WarszawaPoland
Océ Office Equipment (Beijing) Co Ltd.Xu Mu ChengChaoyang DistrictBeijing 100028China
Océ-Lima Mayer S.A.Av. José Gomes Ferreira, 11Ed. Atlas II Miraflores1495 AlgésPortugal
Océ-Česká republika s.r.o.Hanusova 1814021 Praha 4Pankrác,Czech Republic
Océ (Far East) Pte. Ltd./Océ (Singapore) Pte. Ltd.,#03-00 Wisma Gulab190 MacPherson RoadSingapore 348548
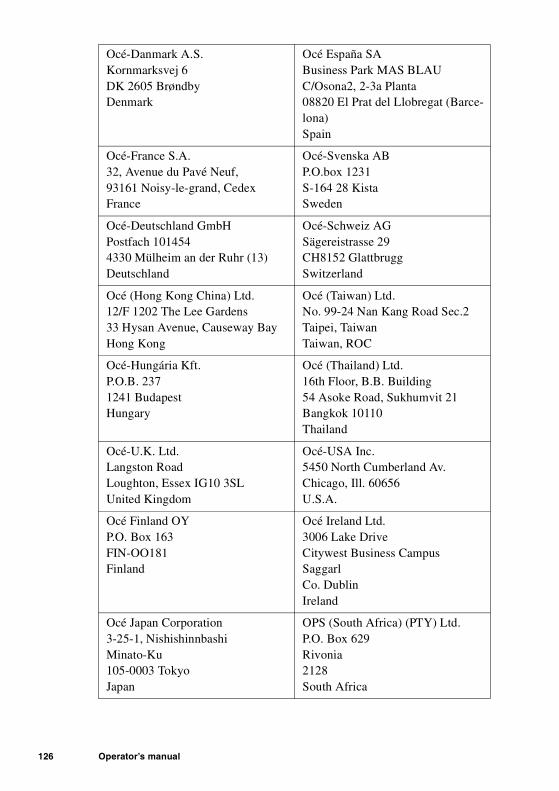
126 Operator’s manual
Océ-Danmark A.S.Kornmarksvej 6DK 2605 BrøndbyDenmark
Océ España SABusiness Park MAS BLAUC/Osona2, 2-3a Planta08820 El Prat del Llobregat (Barce-lona)Spain
Océ-France S.A.32, Avenue du Pavé Neuf,93161 Noisy-le-grand, CedexFrance
Océ-Svenska ABP.O.box 1231S-164 28 KistaSweden
Océ-Deutschland GmbHPostfach 1014544330 Mülheim an der Ruhr (13)Deutschland
Océ-Schweiz AGSägereistrasse 29CH8152 GlattbruggSwitzerland
Océ (Hong Kong China) Ltd.12/F 1202 The Lee Gardens33 Hysan Avenue, Causeway BayHong Kong
Océ (Taiwan) Ltd.No. 99-24 Nan Kang Road Sec.2Taipei, TaiwanTaiwan, ROC
Océ-Hungária Kft. P.O.B. 2371241 BudapestHungary
Océ (Thailand) Ltd.16th Floor, B.B. Building54 Asoke Road, Sukhumvit 21Bangkok 10110Thailand
Océ-U.K. Ltd.Langston RoadLoughton, Essex IG10 3SLUnited Kingdom
Océ-USA Inc.5450 North Cumberland Av.Chicago, Ill. 60656U.S.A.
Océ Finland OYP.O. Box 163FIN-OO181Finland
Océ Ireland Ltd.3006 Lake DriveCitywest Business CampusSaggarlCo. DublinIreland
Océ Japan Corporation3-25-1, NishishinnbashiMinato-Ku105-0003 TokyoJapan
OPS (South Africa) (PTY) Ltd.P.O. Box 629Rivonia2128South Africa

Index 127
Index
AActivate the Océ DS10 15archive 30Automatic IP detection 105
BBinding edge 21black and white result 42
Ccan operation parameters 23change a scan profile 54change the PIN code 61, 101configuration report 89configure
default gateway 109DHCP 105host name 106IP address 107subnet mask 108
configure and maintain the scanner 98Content orientation 21content orientation 24control the exposure 31controller 12customize the TWAIN user interface
order of the sections 51status of the preview pane 52status of the sections 52
customize TWAIN user interfacesection parameters 50
Ddate 71date and time 71default gateway 103defaults 68delete a scan profile 55display the preview pane 52documentation set 6Double sheet detection 48double sheet detection section 32Download configuration report file 90Download system log file 92
EEnable DHCP 105encrypted code 60encrypted PIN code 100Error occurred 45Error screen 45Errors
MRE 45ORE 45PE 45
exposure parameters 31exposure section 31exposure settings 43
Fface down 21factory default settings 68
energy save setting 68factory defaults 70
GGlass plate position 35glass plate scan 20

128 Operator’s manual
HHandle errors 45host name 103
IImage Logic 7incorrect PIN code 60IP address 103
Kkey operator 6key operator mode 58key operator telephone number 73Key switch 13keyboard 12
LLED in the On/Off button 14load a scan profile 54Load the default scan settings 53Logon as key operator 58Logon as system administrator 98logon screen 58long edge feed 33Low power mode 15low power mode 77low power mode timer 77
MMAC address 113machine number 83machine recoverable error 45main characteristics 7measure the darkness 41Media Access Control 112monitor 12mouse 12
NNetwork and scanner properties 103new PIN code 102new releases or updates 114new software CD-ROM 114
OOcé Copy Press 30Océ telephone number 75On/Off button 13operator 6operator manual 6operator recoverable error 45optimize exposure 42order of the sections 49original errors on the scanner 48original face down 33original jam 48original section 24original size 26, 27Original sizes 119Original type 119Original weight 119originals 65
Ppaper group 66Paper input ADF 21paper input ADF 26paper input ADF section 26Paper input glass plate 20paper input glass plate 27paper input glass plate section 27paper size detection preferences 66paste-up originals 32permanent error 45PIN code
key operator 61Power switch 13preferred scan paper sizes 63preview pane 52Print scan settings... 53

Index 129
Product specifications 118profile
delete 54, 55load 54save 54
Rreadable form 33reload originals 21Resolution 118resolution section 30Restart the controller 80Restart the system 80Restore defaults 70Restore factory defaults 70
SSave
configuration report 89save
system log file 91save a scan profile 54Save reports 90, 92Save trace log 95scan
how to stop a scan 22special originals 44
scan counter 81Scan sizes 118Scan speed 118scan speed 7scanner 11serial number 83service call 75Set the date and time 71set the preferred paper sizes 65settings editor 7, 12short edge feed 34
landscape original 34Shut down procedure 16Shut down the controller 16Shutdown the system 16sides and binding 24
simple scan 18size detection preferences 67size of originals 63software version 85
controller 85controller operating system 85Image Processing software 85Océ DS10 system 85scan unit 85scanner 85
special originals 44standard monitor 10Startup logo 14stop a scan 22subnet mask 103system administrator 6system administrator mode 98, 101system log file 91system software 10
Ttelephone number 73, 75test connection 110Test TCP/IP 111test TCP/IP 110test the network 110the controller software 7TIFF images 7time 71time out 111timer 77trace function 93Trace mode 94
Basic 94Detailed 94Off 94
trace mode 93transmission error 111Turn on the Océ DS10 14TWAIN
double sheet detection section 32exposure section 31original section 24paper input ADF section 26paper input glass plate section 27resolution section 30

130 Operator’s manual
zoom section 29TWAIN driver 12TWAIN driver on-line help 6TWAIN scan profiles 53
Uunreachable 111Upgrade the controller software 114URL 100user interface settings 49user tasks 6
Wwhat is TWAIN 9
ZZoom 118zoom 36
ADF 36glass plate 38
Zoom behavior 36zoom factors 29zoom function 29zoom section 29