oceans of energy - noaa ocean explorer
TRANSCRIPT

131
The NOAA Ship Okeanos Explorer Education Materials Collection oceanexplorer.noaa.gov
Section 4: Key Topic – EnergySection 4: Key Topic – Energy
NOAA Ship Okeanos Explorer: America’s Ship for Ocean Exploration. Image credit: NOAA. For more information, see the following Web site:http://oceanexplorer.noaa.gov/okeanos/welcome.html
Ocean Explorationand Research
FocusOcean energy
Grade Level7-8 (Physical Science/Earth Science)
Focus QuestionWhat forms of energy are found in the ocean, and how might these be used by humans?
Learning Objectives• Students will describe forms of energy.• Students will explain how different forms of energy are used by humans.• Students will explain at least three ways that energy can be obtained from the
ocean.
Materials• Copies of Ocean Energy Investigation Guide, one for each student group• Copies of the Micro-Hydro Electric Generators Construction Guide, one for each
student group• Materials for constructing Micro-Hydro Electric Generators (For each student
group):• 3.8 liter (1 gal) plastic jug (a rectangular jug used for cooking oil, orange juice
or antifreeze is better than a square jug)• 6 or 8 plastic spoons• 90 m (300 ft) enameled magnet wire, 26 gauge or 30 gauge (inexpensive
sources include Adapt Industries (http://adaptengineering.com/wiresize.htm)and the Electronic Goldmine (http://www.goldmine-elec.com/; check listingsfor solenoids and relays that can usually be opened to gain access to coils thatcontain many feet of magnet wire)
• Lego® bricks (order from http://shop.lego.com/en-US/Pick-A-Brick-11998;alternate sources include http://www.bricklink.com/; http://www.peeron.com/)2 – cross axles, 80 mm long (Lego® part number 3707)3 – wheel rim, 18 mm diameter x 14 mm, with cross (Lego® part number55982)2 – wheels with spokes, 56 mm diameter (Lego® part number 55817)2 – bush for cross axle (Lego® Technic part number 3713)
Oceans of Energy

132
Volume 1: Why Do We Explore?Key Topic: Energy - Oceans of Energy (7-8)
The NOAA Ship Okeanos Explorer Education Materials Collectionoceanexplorer.noaa.gov
(depending upon the size of your plastic jug, you may also need one or two additional 80 mm cross axles and two axle connectors, Lego® Technic part number 6538c)
• 1 – Piece of floral foam cut to the same diameter as the wheels with spokes• Foamcore, approximately 9 inches x 12 inches• 4 - Ceramic or rare earth magnets (Radio Shack Part Number 64-1883 or
equivalent)• 4- brass paper fasteners, 2.5 cm (1 in) long• Safety glasses, 1 pair for each student
• Tools and Supplies that may be shared among student groups:• Inexpensive multimeter capable of measuring 0.1 volt AC (e.g. Extech MN15A)• 2 - Jumper cables (Radio Shack Part Number 278-1157 or equivalent)• Vinyl electrical tape• Ruler• Awl, ice pick, or 3-1/2 inch nail• Hot glue gun • Glue sticks• Spray glue or rubber cement• Utility knife• Pencil sharpener• Felt tip marker• Magnetic compass (optional)• Wire cutters (diagonal side-cutting type)• Gloves• 1 sheet sandpaper, 100 grit or finer
Mention of commercial names does not imply endorsement by NOAA.
Audiovisual Materials• (Optional) Images of ocean energy technologies (see Learning Procedure Step 1)
or computer projector
Teaching TimeTwo or three 45-minute class periods, plus time for student research and hands-on activity
Seating ArrangementFive groups of two to four students
Maximum Number of Students32
Key Words and ConceptsEnergySalinity gradient energyWave energyTidal energyCurrent energyThermal energy
Background InformationNOTE: Explanations and procedures in this lesson are written at a level appropriate to professional educators. In presenting and discussing this material with students,
Solar energyWind energyGeothermalOTECMethane hydrates

133
Volume 1: Why Do We Explore?Key Topic: Energy - Oceans of Energy (7-8)
The NOAA Ship Okeanos Explorer Education Materials Collectionoceanexplorer.noaa.gov
educators may need to adapt the language and instructional approach to styles that are best suited to specific student groups.
The ocean is Earth’s largest collector and storage system for solar energy, as well as the environment that receives a great deal of the heat energy produced by the Earth itself. The energy contained in Earth’s ocean is enormous; a small fraction could power the world. Yet, humans presently use almost none of this energy.
Ocean energy exists in several forms, including heat energy, mechanical (motion) energy, and chemical energy. Methane hydrates are one example of an abundant potential energy source that is virtually untapped. Hydrothermal vents and undersea volcanoes are manifestations of geothermal energy that may also have significant potential for human use. Because Earth’s ocean is 95% unexplored, there are almost certainly yet-to-be-discovered areas that are particularly promising as sites for harvesting one or more forms of ocean energy. The mission of the NOAA Ship Okeanos Explorer is not specifically targeted toward developing ocean energy, but the ship’s voyages of exploration will gather new information including undiscovered geologic formations, temperature gradients, currents, and geothermal processes that will contribute directly to efforts to enhance our use of ocean energy resources. Diving Deeper, page 26, provides an overview of ocean energy resources and some of the technologies being developed to harvest them.
This lesson guides student investigations into various forms of ocean energy and some of the technologies used to capture this energy for human use.
Learning Procedure1. To prepare for this lesson:
• Review introductory information on the NOAA Ship Okeanos Explorer at http://oceanexplorer.noaa.gov/okeanos/welcome.html. You may also want to consider having students complete some or all of the lesson, To Boldly Go….• Review the Learning Procedure steps, procedures on the Ocean Energy
Investigation Guide, and information in Appendix 1.• Assemble materials, tools, and supplies for the Micro-Hydro Generator
Construction activity. Depending upon your students’ manual dexterity and level of maturity, you may want to do some of the cutting and drilling in advance or recruit parent volunteers to assist with this preparation.
• You may want to download images of various ocean energy technologies from the Web sites cited in Appendix 1, or bookmark these sites if you are using a computer projection system.
2. Provide each student group with a copy of the Ocean Energy Investigation Guide, and have them complete Questions 1 and 2 (you may want to assign this as homework in a prior class). Briefly discuss the definition of energy as the ability to do work. Be sure students understand that this definition includes stored (potential) energy as well as working (kinetic) energy. Briefly discuss the various forms of energy. Students may have encountered some variation in terms and descriptions depending upon their specific research sources. For example, the term “mechanical energy” is sometimes confined to potential energy of objects under tension, while the kinetic energy of objects in motion is described as “motion energy.” Key points include:• Thermal Energy (Heat) – kinetic energy of vibration and movement of atoms
and molecules within substances; increasing thermal energy causes atoms and molecules to move and collide more rapidly
Methane hydrate looks like ice, but as the “ice” melts it releases methane gas which can be a fuel source. Image credit: Gary Klinkhammer, OSU-COAS

134
Volume 1: Why Do We Explore?Key Topic: Energy - Oceans of Energy (7-8)
The NOAA Ship Okeanos Explorer Education Materials Collectionoceanexplorer.noaa.gov
• Radiant Energy (including Light, Radio Waves, Microwaves, and X-rays) – kinetic energy of electromagnetic waves; some definitions refer to radiant energy as the kinetic energy of a stream of photons, since some properties of electromagnetic waves resemble properties of particles; according to quantum field theory, both definitions are correct
• Mechanical Energy – potential energy stored in objects by tension, such as compressed springs and stretched rubber bands; kinetic energy in moving objects and substances
• Electrical Energy -- kinetic energy of electrons moving through a conductor• Chemical Energy -- potential energy stored in the bonds of atoms and
molecules• Nuclear Energy – potential energy stored in the nucleus of an atom • Gravitational Energy – potential energy stored in an object that may be
accelerated by a gravitational force; if an object is raised above Earth’s surface it may be accelerated by Earth’s gravity; gravitational energy increases with increasing height and/or mass of the object
• Sound Energy – kinetic energy moving through a substance (such as air or water) in waves causing the substance to vibrate
Be sure students understand that our experience with energy frequently involves conversions between these forms. For example, when we use electrical energy in a battery, that energy results from a conversion of chemical energy in the components of the battery to electrical energy of electrons moving through a circuit. Similarly, when we feel heat from the sun, we are experiencing a conversion of electromagnetic energy from the sun to thermal energy in the atoms and molecules of our bodies. In the latter example, there actually are additional conversions involved in our “feeling” the heat: the thermal energy in our bodies is converted to chemical energy in nerves that causes a series of chemical reactions that eventually cause our brain to perceive the heat.
You may also want to remind students about the First and Second Laws of Thermodynamics:
First: Energy can be changed from one form to another, but cannot be created or destroyed.
Second: Converting one form of energy into another form always involves a loss of usable energy.
Make sure students understand that the electricity we use is a secondary source of energy (sometimes referred to as an “energy carrier”). Since we are not presently able to capture and control natural sources of electricity (e.g., lightning), we have to use another energy source to make electricity. The chemical energy of coal and petroleum fuels, the mechanical energy of moving water or wind, and the nuclear energy of radioactive materials are common primary energy sources that are converted into electrical energy. The reason for doing this is that it is much easier to move electricity than it is to move coal, wind, or nuclear fuels. Point out that the problem of how to capture, control, and distribute energy from a given source is a key issue in developing new energy sources for human activities. Hydrogen is another energy carrier that is being considered for storing and transporting excess energy produced from offshore ocean energy sources such as wind, solar, and waves (http://ocsenergy.anl.gov/guide/hydrogen/index.cfm).
Iceworms (Hesiocaeca methanicola) infest a piece of orange methane hydrate at 540 m depth in the Gulf of Mexico. During the Paleocene epoch, lower sea levels could have led to huge releases of methane from frozen hydrates and contributed to global warming. Today, methane hydrates may be growing unstable due to warmer ocean temperatures. Image credit: Ian MacDonald.http://oceanexplorer.noaa.gov/explorations/06mexico/background/plan/media/iceworms_600.jpg

135
Volume 1: Why Do We Explore?Key Topic: Energy - Oceans of Energy (7-8)
The NOAA Ship Okeanos Explorer Education Materials Collectionoceanexplorer.noaa.gov
3. Briefly discuss the mission of NOAA Ship Okeanos Explorer, highlighting the fact that 95% of Earth’s ocean is unexplored, and the potential importance of ocean exploration to major issues facing our society. Brainstorm various sources of energy that may be found on and in the ocean, and record these on a list that is visible to the students. Ideally, the list will eventually include:
Salinity Gradient (Osmotic) EnergyWave EnergyTidal EnergyCurrent EnergyThermal EnergySolar EnergyWind EnergyHybridsMethane Hydrates
It is not very likely that students will mention all of these; that’s okay, just leave unmentioned sources off the list for now. For each energy source on their list, have students discuss how the energy might be captured, controlled, and distributed in a useful form. In many cases, this will involve converting the energy to electricity. Briefly review the basic process through which most electricity is produced:
The fundamental principle underlying electricity generators was discovered in 1831 by Michael Faraday: When a magnet is moved inside a coil of wire, an electrical current flows in the wire. The basic parts of a generator are a series of insulated coils of wire arranged to form a stationary cylinder, a magnet that rotates inside the cylinder, and a source of energy (because electricity is a SECONDARY energy source) to rotate the magnet. Steam turbines, internal-combustion engines, gas combustion turbines, water turbines, and wind turbines are the most common devices used to rotate the magnets in electricity generators. Steam turbine power plants powered by coal and nuclear energy produce about 70% of the electricity used in the United States. These plants are about 35% efficient, which means that for every 100 units of primary energy consumed by the generator, only 35 units are converted to usable electricity.
Assign one or more ocean energy sources from the complete list (above) to each student group. Provide each group with a copy of the Ocean Energy Investigation Guide. You may also want to provide some of the references cited in Step 1, or allow students to discover them on their own—a Web search on “ocean energy” will produce most of these and millions of others (no kidding!). Have students complete the remaining questions on the Investigation Guide, as well as the Micro-Hydro Electric Generator activity.
Note: Students may also mention biomass as a potential form of ocean energy. Marine algae have been cultivated for centuries as food, and a variety of projects have been proposed that use seaweed as a feedstock for biofuels and electricity generation (biopower). Only a few small-scale projects have actually been implemented, and biomass is not normally included in discussions of ocean energy. Even so, marine biomass may prove to be important on a local scale, and you may want to add this to the list.
136
The NOAA Ship Okeanos Explorer Education Materials Collectionoceanexplorer.noaa.gov
Volume 1: Why Do We Explore?Inquiry Topic: Energy - Oceans of Energy (7-8)
4. Have each student group present the results of their investigations, then lead a discussion of which ocean energy technologies appear to be most promising. Students should realize that energy storage and distribution are major issues for all of these technologies. Ask students whether there are other types of “energy carriers” that may be useful in addition to electricity and hydrogen. If a hint is needed, suggest considering the various forms of energy discussed in Step 2; could one or more of these provide an alternative energy carrier? A land-based example is using wind power to pump water into an elevated reservoir, so that it can be released in a controlled way through an electricity-generating turbine when electricity is needed.
The BRIDGE Connectionhttp://www2.vims.edu/bridge/DATA.cfm?Bridge_Location=archive1005.html – An activity guide: Waves – An Alternative Energy Source
The “Me” ConnectionHave students write a brief essay describing how they might use alternative energy resources to significantly reduce their personal consumption of energy derived from fossil fuels.
Connections to Other SubjectsEnglish/Language Arts, Mathematics, Social Studies
AssessmentStudents’ responses to Investigation Guide questions and class discussions provide opportunities for assessment.
Extensions1. Follow events aboard the Okeanos Explorer at http://oceanexplorer.noaa.gov/
okeanos/welcome.html.2. Visit http://www.re-energy.ca for additional hands-on renewable energy projects.3. Visit http://www.simplemotor.com/, a site originally established by an 11th grade
student to share his investigations into easy-to-build electric motors.
Multimedia Discovery Missionshttp://www.learningdemo.com/noaa/ Click on the links to Lesson 11 for
interactive multimedia presentations and Learning Activities on Energy from the Oceans
Other Relevant Lesson Plans from NOAA’s Ocean Exploration Program(All of the following Lesson Plans are targeted toward grades 7-8)Friendly Volcanoes (Submarine Ring of Fire 2004 Expedition)http://oceanexplorer.noaa.gov/explorations/04fire/background/edu/media/RoF.
friendlyvol.pdfFocus: Ecological impacts of volcanism in the Mariana Islands (Life Science/Earth Science)
Students will describe at least three beneficial impacts of volcanic activity on marine ecosystems and will explain the overall tectonic processes that cause volcanic activity along the Mariana Arc.

137
The NOAA Ship Okeanos Explorer Education Materials Collectionoceanexplorer.noaa.gov
Volume 1: Why Do We Explore?Inquiry Topic: Energy - Oceans of Energy (7-8)
How Does Your Magma Grow?(from the 2005 GalAPAGos: Where Ridge Meets Hotspot Expedition)http://oceanexplorer.noaa.gov/explorations/05galapagos/background/edu/
media/05galapagos_magma.pdfFocus: Hot spots and midocean ridges (Physical Science)
Students will identify types of plate boundaries associated with movement of the Earth’s tectonic plates, compare and contrast volcanic activity associated with spreading centers and hot spots, describe processes which resulted in the formation of the Galapagos Islands, and describe processes that produce hydrothermal vents.
It’s Going to Blow Up! (from the New Zealand American Submarine Ring of Fire 2005 Expedition)http://oceanexplorer.noaa.gov/explorations/05fire/background/edu/media/
rof05_explosive.pdf Focus: Volcanism on the Pacific Ring of Fire (Earth Science)
Students will be able to describe the processes that produce the “Submarine Ring of Fire,” explain the factors that contribute to explosive volcanic eruptions, identify at least three benefits that humans derive from volcanism, describe the primary risks posed by volcanic activity in the United States, and will be able to identify the volcano within the continental U.S. that is considered most dangerous.
Other ResourcesSee page 217 for Other Resources.
Next Generation Science StandardsLesson plans developed for Volume 1 are correlated with Ocean Literacy EssentialPrinciples and Fundamental Concepts as indicated in the back of this book.Additionally, a separate online document illustrates individual lesson support forthe Performance Expectations and three dimensions of the Next Generation ScienceStandards and associated Common Core State Standards for Mathematics and forEnglish Language Arts & Literacy. This information is provided to educators asa context or point of departure for addressing particular standards and does notnecessarily mean that any lesson fully develops a particular standard, principleor concept. Please see: http://oceanexplorer.noaa.gov/okeanos/edu/collection/wdwe_ngss.pdf.
Send Us Your FeedbackWe value your feedback on this lesson, including how you use it in your formal/informal education settings.Please send your comments to: [email protected]
For More InformationPaula Keener, Director, Education ProgramsNOAA Office of Ocean Exploration and ResearchHollings Marine Laboratory331 Fort Johnson Road, Charleston SC 29412843.762.8818 843.762.8737 (fax)[email protected]
AcknowledgmentsProduced by Mel Goodwin, PhD, Marine Biologist and Science Writer, Charleston, SC for NOAA. Design/layout: Coastal Images Graphic Design, Charleston, SC. If reproducing this lesson, please cite NOAA as the source, and provide the following URL: http://oceanexplorer.noaa.gov
138
The NOAA Ship Okeanos Explorer Education Materials Collectionoceanexplorer.noaa.gov
Volume 1: Why Do We Explore?Key Topic: Energy - Oceans of Energy (7-8)
Ocean Energy Investigation GuideBackground Research
1. What is the definition of energy?
2. List and briefly describe eight different forms of energy.
3. Your teacher will assign your group one or more ocean energy resources to investigate. Your research should include:
Assigned energy resource:
• Identification of the type of energy involved (radiant, mechanical, etc.);
• A description of technologies that can be used to capture energy from this resource;

139
The NOAA Ship Okeanos Explorer Education Materials Collectionoceanexplorer.noaa.gov
Volume 1: Why Do We Explore?Key Topic: Energy - Oceans of Energy (7-8)
• Information about installations that are proposed or are actually using these technologies to obtain energy; and
• Identification of major problems or obstacles to obtaining useful energy from this resource.
4. What kind of information might be obtained by the NOAA Ship Okeanos Explorer from unexplored areas in Earth’s ocean that could enhance understanding and potential development of this ocean energy resource?
140
The NOAA Ship Okeanos Explorer Education Materials Collectionoceanexplorer.noaa.gov
Volume 1: Why Do We Explore?Key Topic: Energy - Oceans of Energy (7-8)
Micro-Hydro Electric Generator Construction Guide
Read ALL of the directions before beginning construction.When a magnet is moved inside a coil of wire, an electrical current flows in the wire. The basic parts of a generator are a series of insulated coils of wire, one or more magnets, and a source of energy to rotate the coils or the magnets. The generator you are about to build consists of four coils that remain stationary (called the stator), four magnets that rotate around the coils (called the rotor), and a paddle wheel that can capture the energy of falling water.
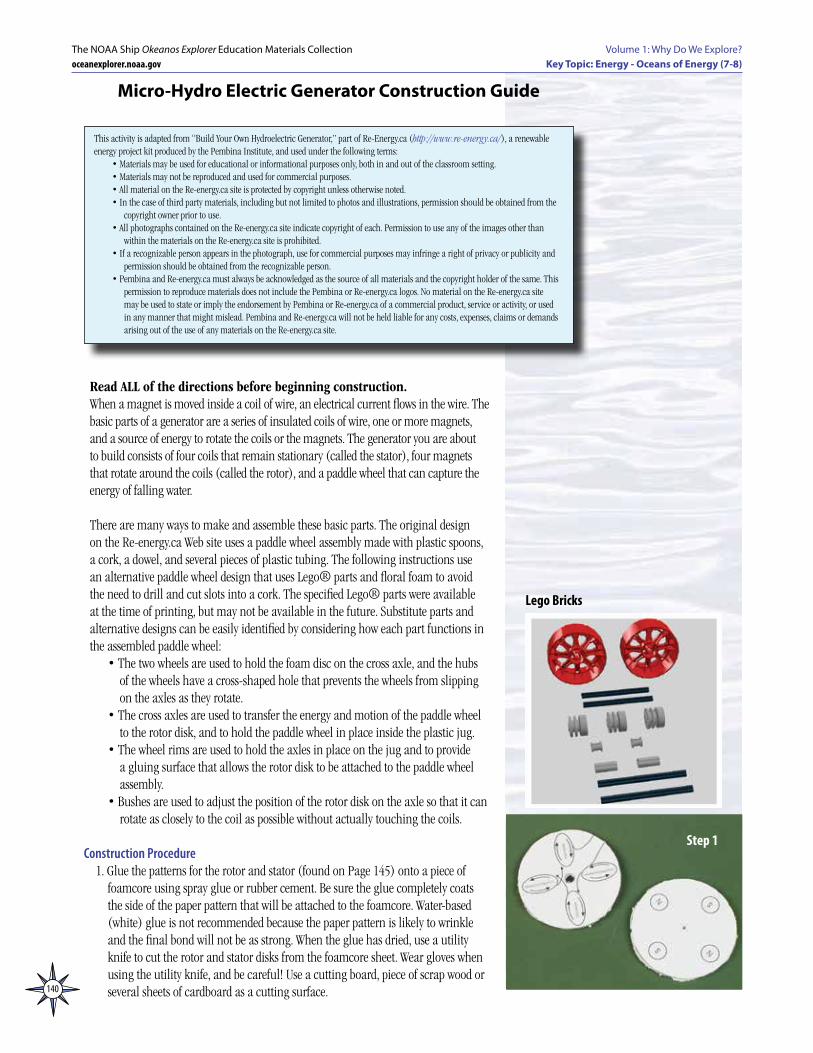
There are many ways to make and assemble these basic parts. The original design on the Re-energy.ca Web site uses a paddle wheel assembly made with plastic spoons, a cork, a dowel, and several pieces of plastic tubing. The following instructions use an alternative paddle wheel design that uses Lego® parts and floral foam to avoid the need to drill and cut slots into a cork. The specified Lego® parts were available at the time of printing, but may not be available in the future. Substitute parts and alternative designs can be easily identified by considering how each part functions in the assembled paddle wheel:
• The two wheels are used to hold the foam disc on the cross axle, and the hubs of the wheels have a cross-shaped hole that prevents the wheels from slipping on the axles as they rotate.
• The cross axles are used to transfer the energy and motion of the paddle wheel to the rotor disk, and to hold the paddle wheel in place inside the plastic jug.
• The wheel rims are used to hold the axles in place on the jug and to provide a gluing surface that allows the rotor disk to be attached to the paddle wheel assembly.
• Bushes are used to adjust the position of the rotor disk on the axle so that it can rotate as closely to the coil as possible without actually touching the coils.
Construction Procedure1. Glue the patterns for the rotor and stator (found on Page 145) onto a piece of
foamcore using spray glue or rubber cement. Be sure the glue completely coats the side of the paper pattern that will be attached to the foamcore. Water-based (white) glue is not recommended because the paper pattern is likely to wrinkle and the final bond will not be as strong. When the glue has dried, use a utility knife to cut the rotor and stator disks from the foamcore sheet. Wear gloves when using the utility knife, and be careful! Use a cutting board, piece of scrap wood or several sheets of cardboard as a cutting surface.
This activity is adapted from “Build Your Own Hydroelectric Generator,” part of Re-Energy.ca (http://www.re-energy.ca/), a renewable energy project kit produced by the Pembina Institute, and used under the following terms:
• Materials may be used for educational or informational purposes only, both in and out of the classroom setting.• Materials may not be reproduced and used for commercial purposes.• All material on the Re-energy.ca site is protected by copyright unless otherwise noted.• In the case of third party materials, including but not limited to photos and illustrations, permission should be obtained from the
copyright owner prior to use.• All photographs contained on the Re-energy.ca site indicate copyright of each. Permission to use any of the images other than
within the materials on the Re-energy.ca site is prohibited.• If a recognizable person appears in the photograph, use for commercial purposes may infringe a right of privacy or publicity and
permission should be obtained from the recognizable person.• Pembina and Re-energy.ca must always be acknowledged as the source of all materials and the copyright holder of the same. This
permission to reproduce materials does not include the Pembina or Re-energy.ca logos. No material on the Re-energy.ca site may be used to state or imply the endorsement by Pembina or Re-energy.ca of a commercial product, service or activity, or used in any manner that might mislead. Pembina and Re-energy.ca will not be held liable for any costs, expenses, claims or demands arising out of the use of any materials on the Re-energy.ca site.
Step 1
Lego Bricks
141
The NOAA Ship Okeanos Explorer Education Materials Collectionoceanexplorer.noaa.gov
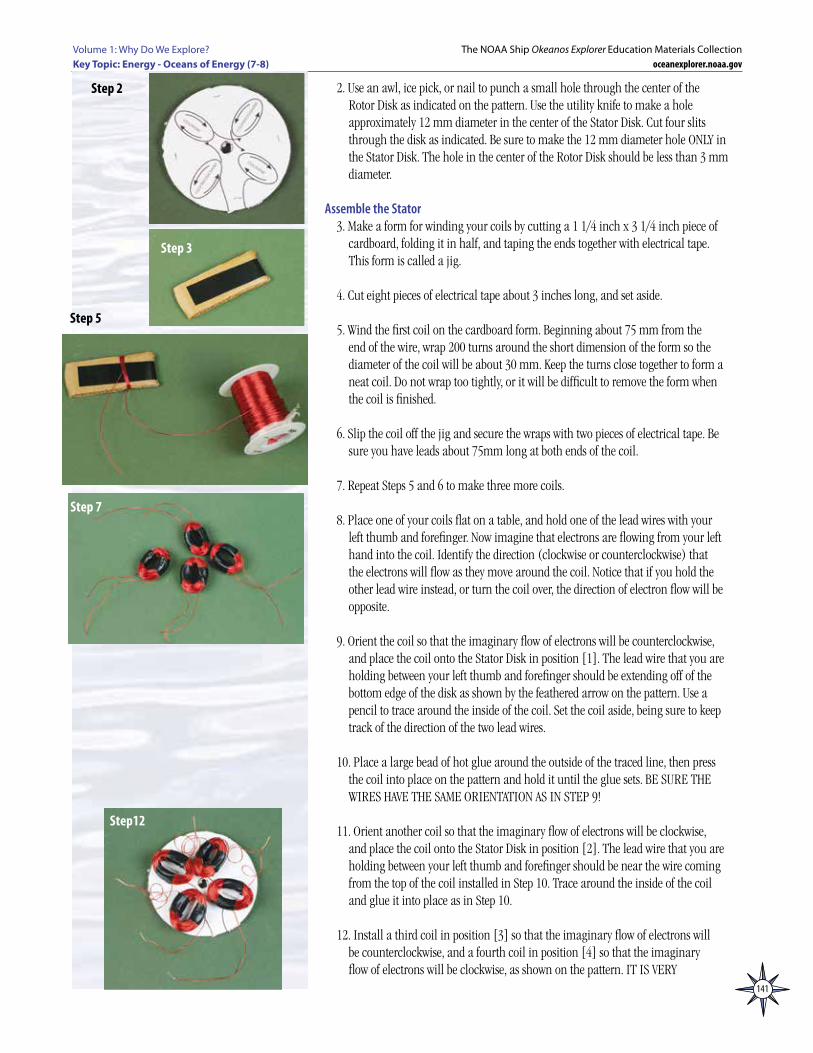
2. Use an awl, ice pick, or nail to punch a small hole through the center of the Rotor Disk as indicated on the pattern. Use the utility knife to make a hole approximately 12 mm diameter in the center of the Stator Disk. Cut four slits through the disk as indicated. Be sure to make the 12 mm diameter hole ONLY in the Stator Disk. The hole in the center of the Rotor Disk should be less than 3 mm diameter.
Assemble the Stator3. Make a form for winding your coils by cutting a 1 1/4 inch x 3 1/4 inch piece of
cardboard, folding it in half, and taping the ends together with electrical tape. This form is called a jig.
4. Cut eight pieces of electrical tape about 3 inches long, and set aside.
5. Wind the first coil on the cardboard form. Beginning about 75 mm from the end of the wire, wrap 200 turns around the short dimension of the form so the diameter of the coil will be about 30 mm. Keep the turns close together to form a neat coil. Do not wrap too tightly, or it will be difficult to remove the form when the coil is finished.
6. Slip the coil off the jig and secure the wraps with two pieces of electrical tape. Be sure you have leads about 75mm long at both ends of the coil.
7. Repeat Steps 5 and 6 to make three more coils.
8. Place one of your coils flat on a table, and hold one of the lead wires with your left thumb and forefinger. Now imagine that electrons are flowing from your left hand into the coil. Identify the direction (clockwise or counterclockwise) that the electrons will flow as they move around the coil. Notice that if you hold the other lead wire instead, or turn the coil over, the direction of electron flow will be opposite.
9. Orient the coil so that the imaginary flow of electrons will be counterclockwise, and place the coil onto the Stator Disk in position [1]. The lead wire that you are holding between your left thumb and forefinger should be extending off of the bottom edge of the disk as shown by the feathered arrow on the pattern. Use a pencil to trace around the inside of the coil. Set the coil aside, being sure to keep track of the direction of the two lead wires.
10. Place a large bead of hot glue around the outside of the traced line, then press the coil into place on the pattern and hold it until the glue sets. BE SURE THE WIRES HAVE THE SAME ORIENTATION AS IN STEP 9!
11. Orient another coil so that the imaginary flow of electrons will be clockwise, and place the coil onto the Stator Disk in position [2]. The lead wire that you are holding between your left thumb and forefinger should be near the wire coming from the top of the coil installed in Step 10. Trace around the inside of the coil and glue it into place as in Step 10.
12. Install a third coil in position [3] so that the imaginary flow of electrons will be counterclockwise, and a fourth coil in position [4] so that the imaginary flow of electrons will be clockwise, as shown on the pattern. IT IS VERY
Step 7
Step12
Volume 1: Why Do We Explore?Key Topic: Energy - Oceans of Energy (7-8)
Step 2
Step 3
Step 5

142
The NOAA Ship Okeanos Explorer Education Materials Collectionoceanexplorer.noaa.gov
Volume 1: Why Do We Explore?Key Topic: Energy - Oceans of Energy (7-8)
IMPORTANT THAT THE COILS ALTERNATE BETWEEN CLOCKWISE AND COUNTERCLOCKWISE!
13. When you are sure you have arranged the coils correctly, trim the lead wires between adjacent coils so that they are about 3 cm long. Do not cut the lead wires extending from the bottom of the Stator; these should still be about 75 mm long.
14. Use a small piece of sandpaper to remove about 18 mm of the enamel insulation from the ends of all lead wires. Connect adjacent coils by twisting the bare ends of the lead wires together. Be sure to leave two leads unconnected as shown on the pattern and in the photograph. Cover the twisted connections with short pieces of electrical tape.
15. Check your connections: Set your multimeter to measure resistance (ohms) and connect the leads of the multimeter to the two free ends of the stator coil assembly. If your connections are good, the resistance should be very low (about 10 ohms or less). If the resistance is very large, two or more of the connections are not good, probably because the enamel insulation was not completely removed from the ends of the wires. Note that this test does not check whether you have correctly arranged the coils with alternating clockwise-counterclockwise windings.
Assemble the Rotor16. Use a magnetic compass to determine the north and south pole of each magnet.
Mark the polarity on the appropriate faces of each magnet. If you don’t have a magnetic compass handy, just arrange your magnets so they are stuck together. The faces of each pair of magnets that are stuck together have opposite polarity, so you can arbitrarily label the face of one magnet “N” and the face of the other magnet “S.” Continue this process until all magnets in the stack are labeled. For the generator, the important thing is that the magnets are arranged on the Rotor Disk so that alternating north and south poles are facing up.
17. Attach the magnets to the Rotor Disk as indicated on the pattern. Put a small glob of glue onto the pattern, then press the magnet into place. Be sure you have alternating north and south poles facing up.
Assemble the Paddle Wheel18. Place the piece of floral foam between the two wheels with spokes so that all
three pieces are concentric. Insert one of the cross axles through all three pieces.
19. Mark six or eight insertion points on the floral foam using the spokes of the wheels as a guide.
20. Use wire cutters to cut the handles off of six or eight plastic spoons, depending upon the number of insertion points marked in Step 19. (Wear eye protection!) Leave about 10 mm of the handle attached to the bowl of each spoon. For brittle plastics, the best cuts are made by using the wire cutters to nick the edge of the handle. This will cause the plastic to crack across the entire width of the handle.
21. Insert the spoons into the floral foam at the marked points. Push the spoons in until the bowl of the spoon meets the foam.
Step 18
Step 14
Step 15
143
Volume 1: Why Do We Explore?Key Topic: Energy - Oceans of Energy (7-8)
The NOAA Ship Okeanos Explorer Education Materials Collectionoceanexplorer.noaa.gov
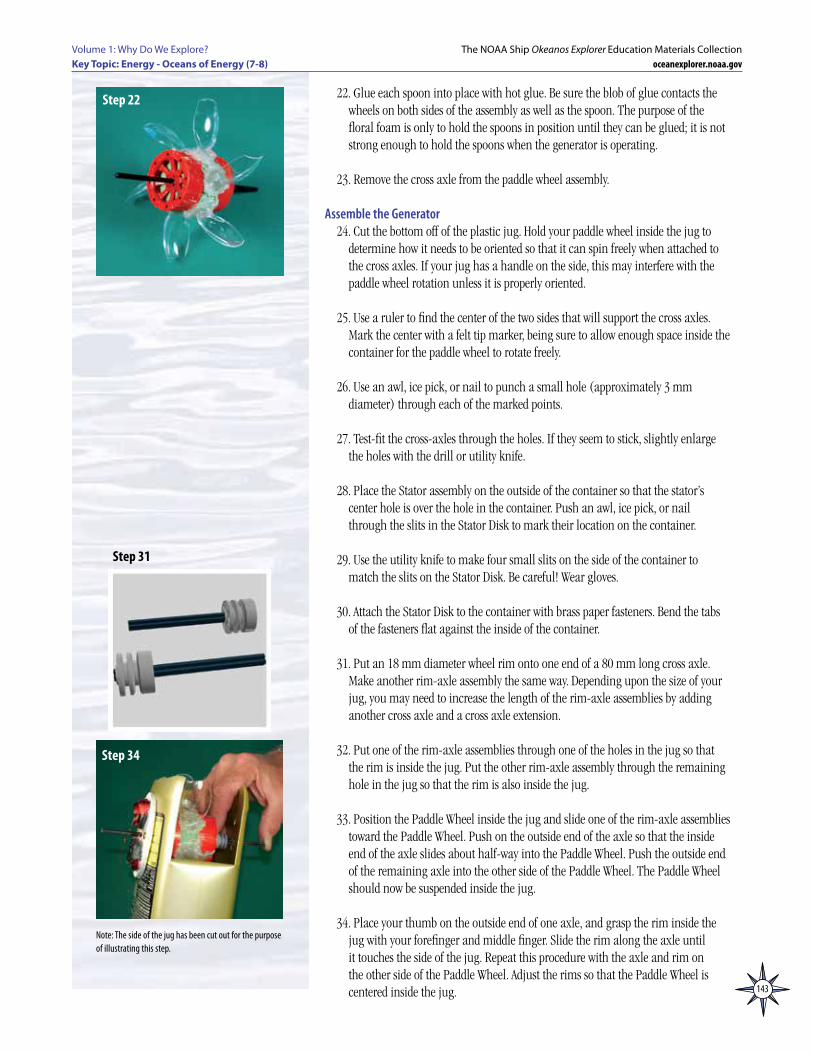
22. Glue each spoon into place with hot glue. Be sure the blob of glue contacts the wheels on both sides of the assembly as well as the spoon. The purpose of the floral foam is only to hold the spoons in position until they can be glued; it is not strong enough to hold the spoons when the generator is operating.
23. Remove the cross axle from the paddle wheel assembly.
Assemble the Generator24. Cut the bottom off of the plastic jug. Hold your paddle wheel inside the jug to
determine how it needs to be oriented so that it can spin freely when attached to the cross axles. If your jug has a handle on the side, this may interfere with the paddle wheel rotation unless it is properly oriented.
25. Use a ruler to find the center of the two sides that will support the cross axles. Mark the center with a felt tip marker, being sure to allow enough space inside the container for the paddle wheel to rotate freely.
26. Use an awl, ice pick, or nail to punch a small hole (approximately 3 mm diameter) through each of the marked points.
27. Test-fit the cross-axles through the holes. If they seem to stick, slightly enlarge the holes with the drill or utility knife.
28. Place the Stator assembly on the outside of the container so that the stator’s center hole is over the hole in the container. Push an awl, ice pick, or nail through the slits in the Stator Disk to mark their location on the container.
29. Use the utility knife to make four small slits on the side of the container to match the slits on the Stator Disk. Be careful! Wear gloves.
30. Attach the Stator Disk to the container with brass paper fasteners. Bend the tabs of the fasteners flat against the inside of the container.
31. Put an 18 mm diameter wheel rim onto one end of a 80 mm long cross axle. Make another rim-axle assembly the same way. Depending upon the size of your jug, you may need to increase the length of the rim-axle assemblies by adding another cross axle and a cross axle extension.
32. Put one of the rim-axle assemblies through one of the holes in the jug so that the rim is inside the jug. Put the other rim-axle assembly through the remaining hole in the jug so that the rim is also inside the jug.
33. Position the Paddle Wheel inside the jug and slide one of the rim-axle assemblies toward the Paddle Wheel. Push on the outside end of the axle so that the inside end of the axle slides about half-way into the Paddle Wheel. Push the outside end of the remaining axle into the other side of the Paddle Wheel. The Paddle Wheel should now be suspended inside the jug.
34. Place your thumb on the outside end of one axle, and grasp the rim inside the jug with your forefinger and middle finger. Slide the rim along the axle until it touches the side of the jug. Repeat this procedure with the axle and rim on the other side of the Paddle Wheel. Adjust the rims so that the Paddle Wheel is centered inside the jug.
Step 31
Step 22
Step 34
Note: The side of the jug has been cut out for the purpose of illustrating this step.

144
The NOAA Ship Okeanos Explorer Education Materials Collectionoceanexplorer.noaa.gov
Volume 1: Why Do We Explore?Key Topic: Energy - Oceans of Energy (7-8)
35. Put a bush on the cross axle on the side of the jug without the Stator Disk, and push the bush along the axle until it touches the side of the jug.
36. Slide a 18 mm diameter wheel rim onto the other cross axle, then slide the Rotor Disk onto the cross axle so that the magnets face the Stator coils and are about 6 mm or less away from the coils.
37. Adjust the Rotor Disk so that it spins without wobbling and without having any of the magnets hit the coils. Use another wheel rim to hold the Rotor Disk in this position. Once you have tested your generator (Step 38), you may want to use some hot glue to hold the pieces of the Rotor axle assembly in their proper positions.
Test Your Generator!38. Place your assembled generator under a faucet so the water will hit the spoons and turn on the
water. The rotor should spin rapidly. Set your multimeter to measure AC volts, and connect the leads of the multimeter to the two free ends of the stator coil assembly. Measure the voltage produced by your generator.
How It WorksWhen a coil of wire moves through a magnetic field, an electric current is produced in the coil. If you hold the coil in your right hand with your fingers curled around it, so that your fingers point in the direction of the magnetic field, your thumb will point in the direction of conventional current flow. This is called the Right Hand Thumb Rule.
The basic principle that makes the generator work is called Faraday’s Law, which states that a changing magnetic field will induce a voltage in a coil of wire. The voltage is proportional to the number of turns on the coil and the rate at which the magnetic field changes. So, more coils and/or faster rate of change means higher voltage. The “changing” part is key; if the magnetic field doesn’t change, there’s no voltage. This is why we have to arrange the magnets so that they alternate between north and south poles facing up, and why we have to spin the rotor. When the rotor spins, the magnetic field at any point under the rotor is constantly changing, and the direction of the magnetic field switches back and forth as north and south poles pass overhead. The faster the spin, the more voltage we get.
The direction of current flow in the coils is related to the direction of the magnetic field from the magnets. So, as north and south poles pass over the coil, the direction of the magnetic field switches back and forth, and this causes the direction of the current flowing in the coil to also switch back and forth. Since the magnets are arranged so that north and south poles alternate on the rotor, the direction of current flowing in any coil is always opposite to the direction of current flowing in the coils on either side.
If we arrange the coils so their windings are all clockwise, then at any instant the current will be flowing in one direction in two of the coils and the current in the other two coils will be flowing in the opposite direction; so the currents in the four coils will cancel each other out and there is no net current flow. As the rotor turns, the currents reverse, but there are still two coils with currents flowing in one direction while the other two coils have currents flowing in the opposite direction; so no net current flows out of the generator.
But if we alternate clockwise coils with counterclockwise coils, the direction of the currents flowing through the coils is the same, so we have a current flow! As the magnets pass over the coils, the direction of the current flow goes back and forth, so we get alternating (AC) current.
Step 35
Step 36
Step 37

145
The NOAA Ship Okeanos Explorer Education Materials Collectionoceanexplorer.noaa.gov
The NOAA Ship Okeanos Explorer Education Materials CollectionKey Topic: Climate Change – Oceans of Energy (7-8)
[2]CLOCKWISE
[4]CLOCKWISE
[3]
COUNTERCLOCKWISE
[1]
COUNTERCLOCKWISE
S
S
NN
Rotor Pattern
Stator Pattern
SLIT
SLIT
SLIT
SLIT
Stator Pattern
Rotor Pattern

146
Volume 1: Why Do We Explore?Key Topic: Energy - Oceans of Energy (7-8)
Notes:
The NOAA Ship Okeanos Explorer Education Materials Collectionoceanexplorer.noaa.gov