office cleaning (introduction to professional cleaning ... · pdf file© daniels...
TRANSCRIPT
© Daniels Associates/Hospitality Institute of Australasia (v12.1) P a g e | 1
Office Cleaning (Introduction to Professional Cleaning) -
Course Notes
Course Overview
In this course we are going to look at why we clean commercial buildings and the skills required to clean (the
how to). This course covers the core competencies in cleaning any type of facility from an office to a school,
university, hotel, hospital, retirement village or just about any other type of building or facility. Before
introducing you to the “how to skills” we would like you to understand the history of cleaning and the “why do
we” of commercial cleaning.
This course covers (3) three basic commercial cleaning competency units (subjects) broken down into the
following sections:
Section 1 - Introduction
Section 2 - Delivering quality commercial cleaning services
Section 3 - Identify condition of the building
Section 4 - Set-up area, equipment and chemicals
Section 5 - Cleaning offices, furniture, fixtures and fittings
Section 6 - Bathroom/Restroom cleaning
Section 7 - Emptying and removing waste
Section 8 - Clean & store equipment
This course covers all required knowledge content for the following competency units:
CPPCLO2015A Maintain furniture, fittings and room dressing
CPPCLO2017A Clean wet areas
CPPCLO2019A Sort and remove waste and recyclable materials

© Daniels Associates/Hospitality Institute of Australasia (v12.1) P a g e | 2
Table of contents
Section 1 - Introduction
1.2 A Brief History of Cleaning
1.3 Cleaning in the Twentieth Century
1.4 The professional cleaner
1.5 Cleaning methods and procedures
Section 2 - Delivering quality commercial cleaning services
2.1 Introduction
2.2 How do we cleaning effectively in a limited amount of time?
2.3 Planning your cleaning
2.4 The MUST do’s of Cleaning
2.5 The SHOULD do’s of cleaning
2.6 Routine versus Periodic cleaning
Section 3 - Identify condition of the building
3.1 Common soils
3.2 Role of detergents in cleaning
3.3 Cleaning with microfibre
3.4 Cleaning floors with micro-fibre products
Section 4 - Set-up area, equipment and chemicals
4.1 Organise access for cleaning
4.2 Using barricades and warning signs
4.3 Cleaning equipment, chemicals and PPE
4.4 The Cleaner’s Trolley
4.5 Safety problems with electrical equipment
4.6 Preparing chemicals & PPE
Section 5 - Cleaning offices, furniture, fixtures and fittings
5.1 How to Clean and Dress a Room
5.2 Cleaning methods
5.3 Hong assesses the meeting room
5.4 Hong removes rubbish and litter
5.5 Hong dusts and spot cleans
5.6 Hong dresses the area
Section 6 - Bathroom/Restroom cleaning
6.1 Introduction to microbes (germs)
6.2 How germs enter the body
6.3 Hand Washing
6.4 Cleaning and germs (microbes)
6.5 We are cleaning, not disinfecting
6.6 Colour coding
6.7 Contaminated sharps & needles
6.8 Bathroom cleaning chemicals
© Daniels Associates/Hospitality Institute of Australasia (v12.1) P a g e | 3
6.9 Bathroom Odours – Where they are found
6.10 Bathroom cleaning procedures
6.11 Hong assesses the bathroom room
6.12 Hong cleans the toilets and urinals
6.13 Hong cleans the hand basins mirrors and surrounds
6.14 Hong dresses the restroom
6.15 Weekly clean
6.16 Hongs Restroom Pulse Points – Commonly missed areas
Section 7 - Emptying and removing waste
7.1 Introduction to waste removal
7.2 Health and Safety risks associated with waste
7.3 Odours from waste
7.4 Identification and reporting of hazardous waste
7.5 Equipment
7.6 Different work sites have different requirements
7.7 Mechanical lifting
7.8 Waste Segregation and Recycling:
7.9 Recycled Waste
7.10 Clinical Waste
7.11 Liquid Waste
Section 8 - Clean & store equipment
8.1 Dress the Area, clean and store equipment
8.2 Cleaning and storing equipment
8.3 Dispose of used chemical solutions
8.4 Prepare for the next shift
© Daniels Associates/Hospitality Institute of Australasia (v12.1) P a g e | 4
Section 1 - Introduction
When you finish this section you will understand:
A Brief History of Cleaning
Cleaning in the Twentieth Century
The professional cleaner
Cleaning methods and procedures
© Daniels Associates/Hospitality Institute of Australasia (v12.1) P a g e | 5
1.2 A Brief History of Cleaning
Cleaning our environment (our homes and places of work) is not something new. From the beginning of time,
humans have worked to arrange their environment for the sake of survival.
About 4000 years ago, humans discovered they could grow plants and raise animals and would not have to
move every few days to find food. At this time in history, buildings began to appear that were designed to last
a while.
One of the first environmental management practices in early human settlements was to cover all their garbage
on the floor with a fresh layer of dirt or mud.
About 3000 years ago, humans in settlements learned the advantages of having a garbage pit outside their
home. The pit left more living space inside and people no longer had to live and sleep on the garbage.
About 200 years ago, we discovered basic cleaning (sanitation) was important in controlling rats and mice and
their germs, especially in buildings where people spent most of their time. Then we discovered germs spread,
especially when people are in contact with each other in dirty cities.
The first modern environmental managers were called ‘sanitarians’ - they were cleaners. They sanitized
environments by reducing the contaminants in them to levels that would not harm human health.
Some of their first successes came when they designed and developed cleaning programs for boarding houses,
hospitals, schools, and prisons in 18th century London.
1.3 Cleaning in the Twentieth Century
From the early 1900’s cleaning and sanitation focused on controlling diseases that spread from one person to
another.
After World War II, the western world saw the rapid development of the middle class and with it a range of
home appliances; one of which was the vacuum cleaner.
Today, we buy smart phones, i-pads, computers and LCD televisions; but in the 1950’s and 1960’s we started
buying Hoover vacuum cleaners.
At the same time detergent manufactures such as Johnson Wax were developing and improving floor waxes
and air fresheners to make our homes look and smell nice.
In the 1970’s many western countries, including Australia started to ban smoking from offices and other work
environments. As we all know today, second hand smoke is harmful to people’s health.
Smoking also contributed a large amount of ash, oils and greasy-tars to the air which settled on office furniture
and fixtures. From a cleaner’s perspective, banning smoking indoors significantly reduced the amount of
cleaning required in an office building.
In the late 1980’s and early 1990’s we started to seriously look at cleaning as a contribution to our good health
and not just the way a building looked.

© Daniels Associates/Hospitality Institute of Australasia (v12.1) P a g e | 6
1.4 The professional cleaner
As a professional cleaner, we need to understand our cleaning can have a positive contribution to people’s
health. When we clean properly, with the correct chemicals and equipment we not only remove dust and dirt,
we also remove germs and other indoor pollutants.
Cleaning should be simple. We should look cleaning from two very simple points of view:
(i) Removing pollutants from inside the building and placing theses pollutants outside the building; and
(ii) Minimising the introduction of new pollutants into the building when we clean.
The late 1990’s and early 2000’s saw the introduction of green cleaning. In 2007, a book titled “Green Cleaning
for Dummies” provided a step by step process for companies to introduce green cleaning systems.
What the Professional Cleaner Should Know
If our cleaning services are to be professional, we have to understand “how to clean” and “why we are
cleaning”. In this introduction we have already covered the basics of why we clean. The remainder of this
course will be devoted to how we clean.
1.5 Cleaning methods and procedures
Methods and procedures are at the heart of professional cleaning.
The way we deliver our cleaning services sets us apart from domestic (home) cleaning and makes our activities
special.
The processes involved in most routine cleaning tasks are generally straight forward and involve the regular
cleaning of hard floors and carpet floors, furniture, fixtures and fittings, bathrooms and waste removal. During
this course we be looking at the how’s and why’s of general cleaning tasks which could also be referred to as
office cleaning.
In this course we may make reference to office cleaning procedures , however, the same theory and practice
applies to most cleaning situations including schools, universities, offices, hospitals, aged care homes and
retirement villages.
William Shakespeare’s laws of cleaning
No one remembers a clean bathroom but everyone remembers a dirty bathroom
Remember where the bosses park their cars; route walked to their offices and most importantly THEIR
OFFICES!
– Quotes from William Shakespeare, a cleaner from Phoenix Arizona.
© Daniels Associates/Hospitality Institute of Australasia (v12.1) P a g e | 7
Section 2 - Delivering quality commercial cleaning services
In this section we will discuss commercial cleaning and how we clean efficiently (productively) and effectively.
This section reviews how you put all your individual cleaning knowledge together as a skilled cleaning
professional.
When you finish this section you will understand:
Introduction
How do we cleaning effectively in a limited amount of time?
Planning your cleaning
The MUST do’s of Cleaning
The SHOULD do’s of cleaning
Routine versus Periodic cleaning
© Daniels Associates/Hospitality Institute of Australasia (v12.1) P a g e | 8
2.1 Introduction
The cleaning tasks involved in office cleaning are no different to cleaning our homes. We clean floors, dust
surfaces, spot clean (to remove finger prints and marks), remove waste (hopefully we separate and recycle our
waste) and clean bathrooms.
The big difference between cleaning your home and a commercial office is the size of the area being and the
limited amount of time we have to complete this cleaning. We simply do not have the time (and the client does
not want to pay the money) to clean everything on a daily basis.
Herein lies the secrets to effective commercial cleaning.
2.2 How do we cleaning effectively in a limited amount of time?
Firstly, let’s take a look at our cleaning equipment and chemicals
We must have the right cleaning tools, equipment and chemicals.
We must select the right tools for the job.
Secondly, we need to take a look at how we can provide quality professional cleaning in a minimum amount of
time. Even with the right tools and equipment we need to understand the fundamentals of commercial
cleaning.
We all know there is not enough time to clean everything, every time we clean. So this means if you clean
the same things every day, then you also miss the same things every day, resulting in poor quality
cleaning.
The secret to commercial cleaning is rotating cleaning tasks each day! If we cannot clean everything each
day, then we must rotate our cleaning tasks across the working week, and some of these tasks across a
working month. That means you do a small amount of some of these cleaning tasks each day.
However, there are certain things you must do EVERY day.
2.3 Planning your cleaning
When you start cleaning in a new building it may take a few weeks to properly understand the best way to
clean the building. After a short period of time you will get to know the dirty people and the clean people in the
building; who eats at their table, what they eat and how much rubbish they generate.
There are a number of office cleaning tasks that need to be planned into your daily routine and over a 1-2
week period you should cover all areas of your office cleaning.
Some of these tasks include:
Spot cleaning fixtures and fittings: These are the places we all touch such as door knobs, light
switches, hand rails and other places we are likely to put our hands.
Dusting: Whilst dust falls every day, it takes time for it to become visible on a surface. Most cleaning
specifications require dusting once or twice a week. Dusting an office can take a lot of time and the
cleaning specification does not automatically provide an addition few hours for dusting on a weekly basis.
We must plan dusting into our daily cleaning routine and do a little bit each day and hopefully over a week
cover the entire office.
© Daniels Associates/Hospitality Institute of Australasia (v12.1) P a g e | 9
High dusting: High dusting generally covers anything above 1.5-1.8 metres or about head height for most
of us. We cannot see this dust so we should not clean these areas as often. A quality cleaning specification
should allow for high cleaning once or twice per month.
Planning and managing your time
Do not walk around an area more than once. Remember, every time you walk around a building, remove waste
or return to your storeroom to refill chemicals and consumables you are wasting valuable time, and most
cleaning contracts do not have this time to spare.
Make sure you have everything you need on your cleaners trolley before starting your shift. Divide your area
into smaller areas and complete all your cleaning tasks in that area before moving onto the next area.
2.4 The MUST do’s of Cleaning
As a minimum standard you MUST complete the following cleaning tasks on a daily basis (or every time you
clean):
Empty all waste bins and remove waste to designated bins or area.
Spot vacuum litter from carpeted floors and spot clean hard floors to remove marks, dust and dirt.
Spot clean bathrooms and replenish bathroom supplies.
Spot clean high profile and important areas of the building such as entrance doors.
If you fail to complete any of these tasks you have a very high likelihood (chance) of generating a complaint.
Repeated failures will ensure your company loses the cleaning contract.
2.5 The SHOULD do’s of cleaning
Apart from the must do there are a number of tasks you SHOULD complete each day to maintain a MINIMUM
acceptable standard of cleaning. These being:
Detail vacuum all high traffic carpeted floors to remove visible litter and dirt.
Make sure you always pay particular attention to the boss’s office and the person in charge of the cleaning
contracts office.
Detail clean all high profile entrances, lobbies etc. This includes cleaning floors, cleaning door glass and
entrance glass, cleaning outside entrances and vacuuming entrance matting.
Spot cleaning tables and desks to remove coffee and food spills and stains.
Detail clean toilets, wash hand basins and clean mirrors in bathrooms.
Spot clean kitchens and activity areas.
You should complete a small amount of dusting each week so that over a period of 1-2 weeks all areas are
dusted
If you fail to complete any of these tasks it may not generate a complaint on the first occasion, however
repeated failure to perform these cleaning tasks will generate complaints.
© Daniels Associates/Hospitality Institute of Australasia (v12.1) P a g e | 10
2.6 Routine versus Periodic cleaning
Periodic cleaning is also called Restorative or Project Cleaning. Over a period of time carpets, hard floors,
furniture, air-conditioning ducts and ceiling surfaces and fittings build-up dust and soil. This soil is not removed
by our routine cleaning procedures.
The frequency of periodic cleaning should be detailed in the buildings cleaning specification.
Special time is allocated to perform these cleaning tasks. These cleaning tasks are often performed by specially
trained project cleaning teams.
Additional Information (not required for assessment)
Greasy and oily films are tracked into a building on people’s shoes, trolleys or by activities being conducted in
the area. Oils may be slowly deposited onto ceiling surfaces, fixtures and fittings from cooking and other
activities and can be circulated throughout a building by the air-conditioning system.
Levels of soiling and types of soils will vary throughout a building based on the usage of the area and amount
of foot traffic. These areas may include administration offices, reception areas and sales counters, lunch rooms
and bathrooms to name a few.
The frequency of periodic cleaning should be detailed in the buildings cleaning specification. This schedule
should vary based on level of traffic and soiling.

© Daniels Associates/Hospitality Institute of Australasia (v12.1) P a g e | 11
Section 3 - Identify condition of the building
In this section we will discuss different types of soils; introduce you to the theory of cleaning and how soils are
removed from surfaces.
When you finish this section you will understand:
Different types of soils found in commercial buildings
Role of detergents in cleaning and removing soil
Introduction to soil and stain removal theory
Introduction to microfibre cleaning cloths and mops
© Daniels Associates/Hospitality Institute of Australasia (v12.1) P a g e | 12
3.1 Common soils
Common soils found in commercial buildings can be divided into two categories.
Loose soils, which are generally removed by dry cleaning procedures including, vacuuming, dust mopping,
dusting and sweeping. Loose soils include:
litter (could include paper, paper clips, leaves etc.)
dust (very small pieces of dirt small enough to float through the air)
dirt (larger pieces of dirt; walked into a building on people’s shoes).
The second type of soils are called “In-ground soils”, which are generally bound to a surface by “oily and
greasy films”. These types of soils require wet cleaning with a detergent to remove the sticky soils from
surfaces being cleaned.
In-ground soils include:
stains (marks on floors and office furniture from coffee, beverages and food)
oily soils and greases (tracked onto the floor by footwear)
scratches (which may be permanent or removable)
spillages (marks on floors and furniture where liquid has spilled).
3.2 Role of detergents in cleaning
Cleaning detergents contain various ingredients to breakdown oily films, assisting in their removal from
surfaces. The theory of cleaning with a detergent involves four separate processes that work together to
remove oily soils. These being;
Temperature
Agitation
Chemicals - detergent
Time – detergent
Cleaning dishes in the kitchen sink is a simple example of all four (4) cleaning processes at work.
We add a dish washing detergent to our warm to hot water.
We use a wash cloth to scrub plates and cooking utensils; this being the agitation.
We soak dirty pots for some time before scrubbing; this being the time.
Temperature: Increasing the temperature will assist in dissolving oily soils. When cleaning dishes we
understand the combination of detergent and heat improves cleaning performance.
Agitation: Agitating or scrubbing a stain will assist in breaking-up the material to improve removal. Agitation is
the most common process used in cleaning. We use agitation to vacuum, dust, clean bathrooms, scrub toilets,
mop floors and just about every other cleaning task we perform.

© Daniels Associates/Hospitality Institute of Australasia (v12.1) P a g e | 13
Chemicals – Detergents: Chemicals are used to breakdown stains. The use of chemicals in office cleaning is
mostly confined to the bathroom.
In bathrooms, we use toilet bowl cleaners, floor cleaners and spray and wipe detergents.
When cleaning administration areas we may use spray and wipe (only to remove difficult stains), window
cleaners to remove marks, floor detergents on hard floors and stain removers on carpets.
Time: Soil removal can be improved by providing a chemical time to work. One example is using a toilet bowl
cleaner. We apply the toilet bowl cleaner to a toilet, then clean the rest of the bathroom before scrubbing the
toilet, hence providing time for the chemical to work.
3.3 Cleaning with microfibre
What is microfibre?
Microfibres are so thin (100 times thinner than a single strand of human hair) that when they are woven
together they create a surface area 40 times more than that of a regular cleaning cloth.
Micro-fibre cleaning cloths are generally made of two different fibres. One for soaking up oil (called Polyester)
and the other for soaking up water (called Nylon).
Ordinary cleaning towels move or push dirt and dust from one place to another – but microfibre lifts or scoops
the dirt and stores the dirt particles in the cloth, until it is washed.
Microfibre can absorb up to seven times its weight in water.
Microfibre cloths are also extremely durable. They can be washed up to 300+ times and still maintain their
effectiveness.
Most soils are quickly removed with microfibre, leaving a clean, streak-free surface.
3.4 Cleaning floors with micro-fibre products
Cleaning with a micro-fibre flat mop can reduce floor cleaning times by 30% or more when compared to
traditional poly-cotton mopping systems. Some of the advantages of microfibre flat mops over traditional
cleaning systems include:
Microfibre flat mops cover a larger area than a normal mops so floors can be cleaned faster.
Micro-fibre flat mops are lighter and easier to use compared to tradition mopping systems.

© Daniels Associates/Hospitality Institute of Australasia (v12.1) P a g e | 14
Section 4 - Set-up area, equipment and chemicals
In this section we will discuss setting up your site for cleaning.
When you finish this section you will understand:
How to organise your access
Which power points are suitable to use
Reporting
How to use barricades and warning signs
Cleaning equipment, chemicals and PPE
The cleaner’s trolley
Safety problems with electrical equipment
Preparing chemicals & PPE
© Daniels Associates/Hospitality Institute of Australasia (v12.1) P a g e | 15
4.1 Organise access for cleaning
Before you start cleaning, make sure you have access to all parts of the area to be cleaned.
Most routine cleaning duties do not require moving furniture. You should only move chairs when cleaning
under desks.
You may need to clean around heavy items such as filing cabinets and bookshelves.
Check with the site manager or client before you disconnect and move electrical items, such as computers.
Which power points are suitable to use
Check with the site manager or client before you plug any cleaning equipment into a power point.
Some power points are only suitable for highly specialised electrical equipment, such as computers.
4.2 Using barricades and warning signs
When cleaning floors and bathrooms during working hours you may need to block access to an area until the
floor is clean and dry. This is particularly the case when cleaning bathrooms. Use barricades or warning signs
to prevent people from walking on WET floors. Place warning signs at the entrances and/or exits of the area
you are cleaning.
Reporting
You are in a position to notice existing damage to the work site. Any damage should be reported to your
supervisor immediately.
You are also in a position to notice if changes to cleaning tasks or additional cleaning activities would better
meet your client’s needs. If you think your cleaning specification requires changing you should discuss this with
your supervisor.
© Daniels Associates/Hospitality Institute of Australasia (v12.1) P a g e | 16
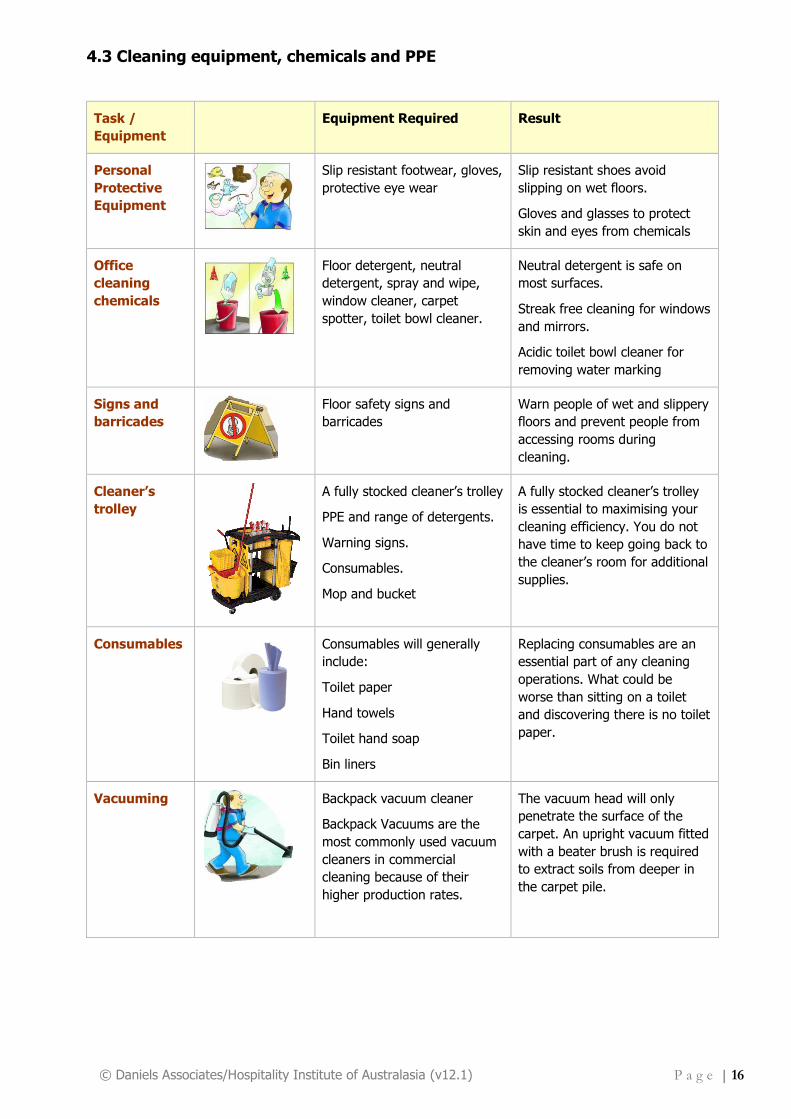
4.3 Cleaning equipment, chemicals and PPE
Task /
Equipment
Equipment Required Result
Personal
Protective
Equipment
Slip resistant footwear, gloves,
protective eye wear
Slip resistant shoes avoid
slipping on wet floors.
Gloves and glasses to protect
skin and eyes from chemicals
Office
cleaning
chemicals
Floor detergent, neutral
detergent, spray and wipe,
window cleaner, carpet
spotter, toilet bowl cleaner.
Neutral detergent is safe on
most surfaces.
Streak free cleaning for windows
and mirrors.
Acidic toilet bowl cleaner for
removing water marking
Signs and
barricades
Floor safety signs and
barricades
Warn people of wet and slippery
floors and prevent people from
accessing rooms during
cleaning.
Cleaner’s
trolley
A fully stocked cleaner’s trolley
PPE and range of detergents.
Warning signs.
Consumables.
Mop and bucket
A fully stocked cleaner’s trolley
is essential to maximising your
cleaning efficiency. You do not
have time to keep going back to
the cleaner’s room for additional
supplies.
Consumables
Consumables will generally
include:
Toilet paper
Hand towels
Toilet hand soap
Bin liners
Replacing consumables are an
essential part of any cleaning
operations. What could be
worse than sitting on a toilet
and discovering there is no toilet
paper.
Vacuuming
Backpack vacuum cleaner
Backpack Vacuums are the
most commonly used vacuum
cleaners in commercial
cleaning because of their
higher production rates.
The vacuum head will only
penetrate the surface of the
carpet. An upright vacuum fitted
with a beater brush is required
to extract soils from deeper in
the carpet pile.
© Daniels Associates/Hospitality Institute of Australasia (v12.1) P a g e | 17
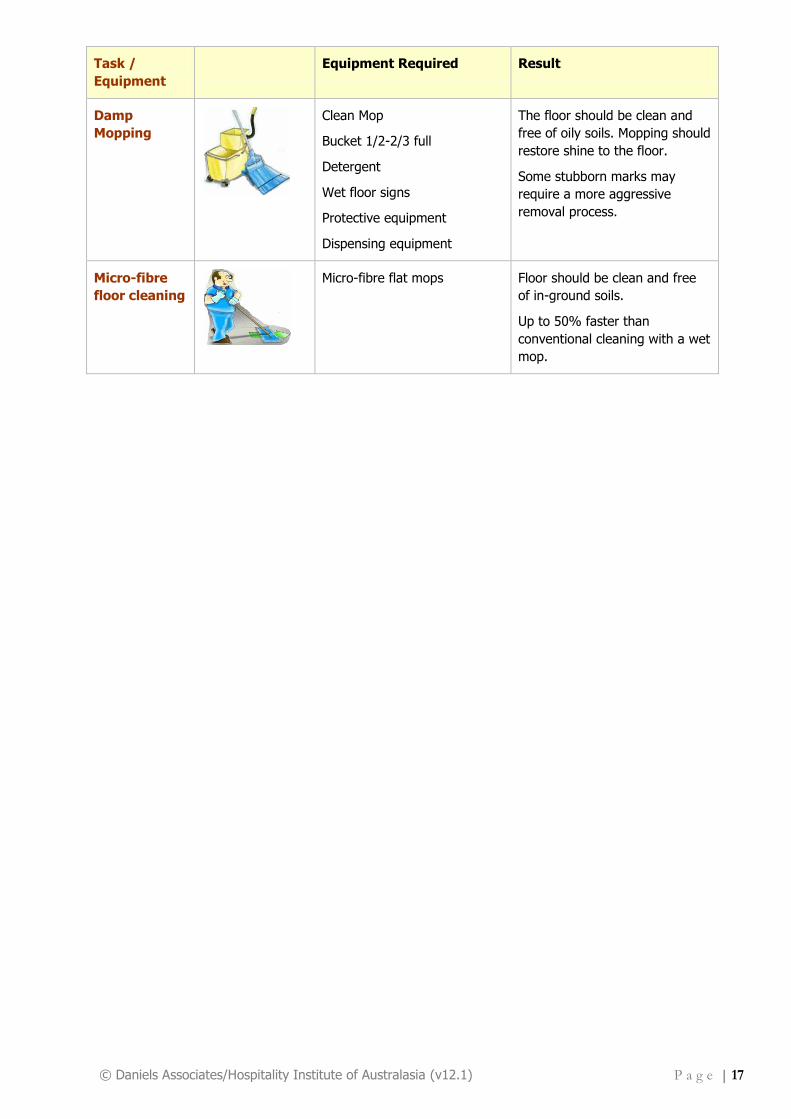
Task /
Equipment
Equipment Required Result
Damp
Mopping
Clean Mop
Bucket 1/2-2/3 full
Detergent
Wet floor signs
Protective equipment
Dispensing equipment
The floor should be clean and
free of oily soils. Mopping should
restore shine to the floor.
Some stubborn marks may
require a more aggressive
removal process.
Micro-fibre
floor cleaning
Micro-fibre flat mops Floor should be clean and free
of in-ground soils.
Up to 50% faster than
conventional cleaning with a wet
mop.
© Daniels Associates/Hospitality Institute of Australasia (v12.1) P a g e | 18
4.4 The Cleaner’s Trolley
A fully stocked cleaner’s trolley will help you clean efficiently. You do not have time to keep going back to the
cleaner’s room for additional supplies. The chemicals, equipment and consumable required on a cleaner’s
trolley will vary depending upon the type of facility being cleaned. However as a general rule your cleaner’s
trolley should have the following items:
Safety equipment:
Floor safety signs
Personal Protective Equipment (PPE); gloves and protective eye wear.
Cleaning Chemicals:
Neutral detergent – safe on all surfaces
Window cleaner/ streak free spray and wipe
Toilet bowl cleaner
Additional chemicals may include carpet spotters, polishes, disinfectants, air-fresheners.
Consumables:
Waste bin liners
Toilet paper
Paper hand towels
Hand soap for toilets.
Equipment:
Cleaning cloths and microfibre cloths
High dusting tools
Mop and bucket (optional – requires large trolley)
Micro-fibre floor mops
Vacuum cleaner (optional – requires large trolley).
4.5 Safety problems with electrical equipment
Before commencing any cleaning you should check all your equipment is in good working order. Faulty cleaning
equipment must NOT be used.
You should check electrical equipment before using it each day and after using it each day.
Some of the problems you should look for include:
Leads, plugs and electrical wiring - look for cuts, fraying and exposed wires
Excessive vibration
Excessive noise from the motor or gearbox
Vacuum system not working.
Make sure your electrical equipment has a current electrical tag.
© Daniels Associates/Hospitality Institute of Australasia (v12.1) P a g e | 19
4.6 Preparing chemicals & PPE
Only use detergents specifically designed for the surfaces you are cleaning.
Always read the Safety Data Sheet (SDS) for the chemical you are using. It will give you information
about: What protective clothing to wear; first aid information; properties of the chemical; and health
hazard information; storage and transport information.
Read the label for instructions to dilute and use the detergent.
Wear gloves and protective eye wear when diluting concentrated chemicals.
Pour the amount of chemical you need from the chemical bottle into a well-labelled measuring cup. Never
tip or pour directly from the container.

© Daniels Associates/Hospitality Institute of Australasia (v12.1) P a g e | 20
Section 5 - Cleaning offices, furniture, fixtures and fittings
In this section we will discuss the processes and procedures for cleaning and dressing offices. The word
“dressing “ refers to leaving the office looking clean and tidy and returning any furniture to its appropriate
location i.e. placing chairs neatly under desks or tables when you have finished cleaning.
As part of our office cleaning review we will look at a cleaner called Hong and her procedures for cleaning a
meeting room.
When you finish this section you will understand:
How to Clean and Dress a Room
Cleaning methods
Case Study - Dusting surfaces, damp wiping furniture and spot cleaning surfaces.
© Daniels Associates/Hospitality Institute of Australasia (v12.1) P a g e | 21
5.1 How to Clean and Dress a Room
Office cleaning generally involves cleaning furniture and fittings. This can be broken down into:
General office furniture which may include:
Chairs; desks, work stations; coffee tables; computers; desks; filing cabinets; sofas; tables; table lamps;
telephone handsets; waste bins.
Additional furniture may include: picture frames; bookcases and show cases; whiteboards, meeting room
equipment etc.
Fittings include things that are fixed to walls, ceiling or floors and may include:
Low reach fittings (fittings below shoulder height): light switches; doors; door handles; shelves; blinds;
curtains; wall lamps.
High reach fittings (fittings above shoulder height): air-conditioning vents; ceiling fans; recessed lights etc.
How you clean furniture and fittings depends on their use and materials they are made from; for example
whether they are glass or vinyl, metal or plastic, leather or fabric upholstery. Each of these will be discussed in
more detail throughout this course.
5.2 Cleaning methods
You clean different pieces of furniture and fittings in different ways. The five main methods of cleaning
furniture and fittings are:
Dusting (routine cleaning)
Spot clean (routine cleaning)
Damp wipe/dry wipe (routine cleaning)
Vacuuming floors (routine cleaning)
Polishing boardroom tables and high quality furnishings (periodically)
Vacuum—upholstered chairs and fabric chairs are vacuumed to remove dust, particularly in the crevasses’
and corners (periodically).
The majority of office cleaning tasks involve, dusting, spot cleaning, damp or dry wiping and vacuuming floors.
Dusting surfaces, damp wiping furniture and spot cleaning surfaces
Now that you have assessed the area to be cleaned and set up the necessary equipment it is now time to clean
the area.
Below is a Case Study (an example) of a situation involving a cleaner named Hong who works in a large office
building.
Every day she cleans the meeting room on the third floor. She must maintain (look after) the furniture and
fittings in the meeting room and before she finishes, she must dress the meeting room (make sure it is clean
and tidy).

© Daniels Associates/Hospitality Institute of Australasia (v12.1) P a g e | 22
5.3 Hong assesses the meeting room
Before Hong cleans the meeting room, she assesses (looks at and plans how to clean) the room.
Hong makes sure she knows:
How to clean each piece of furniture and each fitting
The type of cleaning agents to use
How much cleaning agent to use and how to apply it
The type of equipment to use; and
The protective clothing she needs to wear.
If Hong doesn’t know any of these things, she asks her supervisor.
She checks where the power points are. She needs to know this so she can connect (plug in) her vacuum
cleaner. She also needs to know where the power points are so she does not accidentally turn off something
while she is cleaning, for example a computer or other electrical equipment.
Before Hong starts cleaning she does the following:
Hong washes and dries her hands thoroughly then puts on her gloves.
She checks the room is not in use. Sometimes meetings take longer than they should. If she cannot clean
the room, she tells her supervisor or she goes on to her next cleaning job and returns to clean the room
when the meeting has finished.
5.4 Hong removes rubbish and litter
When Hong cleans the meeting room, the first thing she does is remove rubbish and litter (loose rubbish).
Hong:
Empties rubbish bins
Spot cleans marks on bins with a neutral detergent
Replaces bin liners (only when dirty).
5.5 Hong dusts and spot cleans
Hong dusts the:
Routine dusting includes:
front of the filing cabinet
conference table
chairs and coffee table.
Periodic dusting includes:
window sills
book shelves
top of the filing cabinet
venetian blinds.
© Daniels Associates/Hospitality Institute of Australasia (v12.1) P a g e | 23
While Hong is dusting the chairs, she pushes them away from the conference table. This makes it easier to
vacuum under the table later.
Note: In many cleaning situations Hong will not have the time to perform all these tasks on a daily basis and
may rotate through some of the tasks over a period of weeks.
Then Hong dusts, spot cleans, damp wipes and dry wipes. She cleans the highest things first and the lowest
things last.
Hong spot cleans and damp wipes
spot cleans marks left by cups on the glass coffee table
spot cleans and damp wipes the chairs (including the legs and arms)
damp wipes the coffee table with a lint-free cloth and window cleaner
If Hong finds spots or stains that are difficult to remove, she reports them to her supervisor.
Hong vacuums
Hong vacuums around and under furniture and fittings. You will learn more about vacuuming in the course
“Introduction to Carpet Cleaning”.
5.6 Hong dresses the area
When Hong finishes vacuuming, she makes sure the furniture and fittings are back where they belong. This is
called dressing an area.
Hong:
places the chairs around the conference table
puts the dried flowers in the middle of the conference table; and
straightens up the magazines on the coffee table.
Hong does a final check
She makes sure:
there are no spots, marks or smears on any of furniture, fittings or surfaces
the chairs are in the right place
the flowers are in the right place.
Hong finishes work
When Hong finishes work she:
washes and dries her equipment and cleaning cloths
puts her equipment away in the cleaning storage area
puts cleaning chemicals away in a lockable cupboard in the cleaning storage area
washes and dries her gloves carefully before putting them away; and
washes and dries her hands thoroughly to remove any germs.

© Daniels Associates/Hospitality Institute of Australasia (v12.1) P a g e | 24
Section 6 - Bathroom/Restroom cleaning
In this section we will firstly discuss the role of microbes (germs) in causing disease; the importance of
cleaning in controlling microbes; hand-washing; understanding bathroom cleaning chemicals and colour coding.
We will then take a look at our cleaner Hong and review her procedures for cleaning a bathroom. Finally we
will take a look at restroom pulse points and the reasons for bad odours (smells).
When you finish this section you will understand:
Introduction to microbes
Hand Washing
Some common microbes
Cleaning and microbes
Contaminated Sharps & Syringes
Bathroom cleaning chemicals
Bathroom cleaning procedures
Hong dresses the restroom
Hongs Restroom Pulse Points.
Famous Quote
No one remembers a clean bathroom but everyone remembers a dirty bathroom.
– a quote from William Shakespeare, a cleaner from Phoenix Arizona.

© Daniels Associates/Hospitality Institute of Australasia (v12.1) P a g e | 25
6.1 Introduction to microbes (germs)
Microbe is a term used to describe tiny organisms that individually are too small to be seen with your eyes.
Microbes include bacteria, fungi and viruses as the most common types of microbes.
Microbes are everywhere. There are more of microbes on a person's hand than there are people on the entire
planet! Microbes are in the air we breathe, the ground we walk on, the food we eat - they're even inside us!
Most of the microbes in our world perform important functions that that help us in so many ways.
Unfortunately some microbes can also be dangerous and cause disease.
In this section we will briefly discuss some of the common microbes that are dangerous to our health.
For the rest of this section we will refer to microbes as germs.
6.2 How germs enter the body
Many human illnesses are caused by germs (disease-causing) bacteria or viruses. To cause disease, these
germs must find a way to enter our body. The most common ways the dangerous germs can enter the body
are from:
Cuts and grazes exposing open sores
Needle stick injuries
Contaminated food or water
Close contact with an infected person
Contact with the faeces of an infected person
Breathing in the exhaled droplets when an infected person coughs or sneezes
Indirectly, by touching contaminated surfaces – such as taps, toilet handles, toys and nappies.
6.3 Hand Washing
Hand Washing is EXTREMELY important to stop spreading germs when we clean.
We all carry millions of germs on our hands. Most are harmless, but you can pick up some that cause illnesses,
such as colds, flu, diarrhea and some of the germs may actually kill people in-particular very young children
(child care and kindergarten), very old people (Aged Care and retirement homes) and people who are very sick
(hospitals, healthcare and medical facilities).
We can also pick up germs from objects, such as doorknobs and stair railings and being touched by other
people who do not wash their hands when they should. Think about all the things you touch each day and how
many people may have touched them before you.
Remember: Your hands, clothes and body are full of germs. Each day you enter the work environment you
bring with you many germs that may be harmful to other people, particular if you work in a hospital, aged care
or child care facility. So Remember to Wash Your Hands before you start. Also remember to ALWAYS wash
your hands:
After going to the bathroom
Before eating
After eating
After removing your gloves
© Daniels Associates/Hospitality Institute of Australasia (v12.1) P a g e | 26
When you have finished work
In accordance with your organisation’s hygiene or infection control procedures in health care and aged
care facilities.
6.4 Cleaning and germs (microbes)
Cleaning with simple soap and water kills some germs (microbes), but more importantly it is designed to
reduce the level of germs on a daily basis to a safe level.
Our role in cleaning is to reduce the number of germs and by doing so, keep the building occupants healthy.
However, if we do not clean properly we will fail to remove germs and we may actually spread an infection and
make people sick.
How could our cleaning procedures spread germs and make people sick?
Using dirty cleaning equipment and in particular dirty cleaning cloths and dirty mops and buckets can spread
infections from one room or bathroom to another room. We can reduce the chances of our cleaning from
spreading infection if we:
Change our cleaning cloths regularly and launder/wash them at the end of each shift.
Rinse or change our mops and change our bucket water regularly.
Health care and aged care require mops to be laundered/ washed each day after use.
Some clients such as food handlers, hospitals, aged care and child care will have procedures to prevent the
spread of infections. Refer to the short course “Infection control for cleaning” for more information on
infection control practices.
Failing to clean an area properly, or not cleaning an area according to specification, could increase the chances
of dangerous germs multiplying and spreading.
6.5 We are cleaning, not disinfecting
Remember we are cleaning not disinfecting: Our role in cleaning is to reduce the number of germs on the
surfaces we are cleaning.
We should only use disinfectants for special applications such as sanitising kitchen surfaces when preparing and
when performing an infectious clean in a hospital, aged care, crime scene or similar environments. We do not
use disinfectants when cleaning bathrooms.
What is a disinfectant? Disinfection is designed to kill germs. To kill germs we must firstly clean the surface
to remove all the dirt. If the surface is not cleaned first, the disinfectant will NOT kill the germs.
IMPORTANT POINT: All disinfectants take time to work. Most disinfectants take 10 minutes to kill germs.
This means if you simply wipe a surface with a disinfectant you will not kill all the germs.
© Daniels Associates/Hospitality Institute of Australasia (v12.1) P a g e | 27
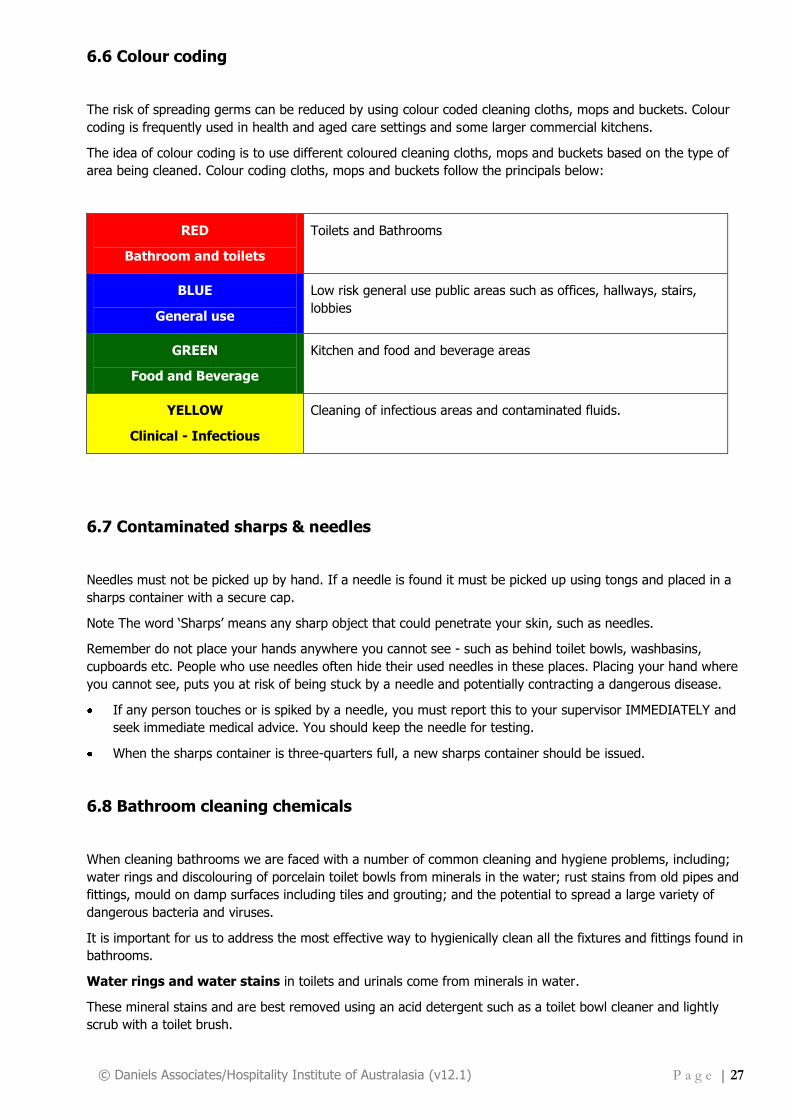
6.6 Colour coding
The risk of spreading germs can be reduced by using colour coded cleaning cloths, mops and buckets. Colour
coding is frequently used in health and aged care settings and some larger commercial kitchens.
The idea of colour coding is to use different coloured cleaning cloths, mops and buckets based on the type of
area being cleaned. Colour coding cloths, mops and buckets follow the principals below:
RED
Bathroom and toilets
Toilets and Bathrooms
BLUE
General use
Low risk general use public areas such as offices, hallways, stairs,
lobbies
GREEN
Food and Beverage
Kitchen and food and beverage areas
YELLOW
Clinical - Infectious
Cleaning of infectious areas and contaminated fluids.
6.7 Contaminated sharps & needles
Needles must not be picked up by hand. If a needle is found it must be picked up using tongs and placed in a
sharps container with a secure cap.
Note The word ‘Sharps’ means any sharp object that could penetrate your skin, such as needles.
Remember do not place your hands anywhere you cannot see - such as behind toilet bowls, washbasins,
cupboards etc. People who use needles often hide their used needles in these places. Placing your hand where
you cannot see, puts you at risk of being stuck by a needle and potentially contracting a dangerous disease.
If any person touches or is spiked by a needle, you must report this to your supervisor IMMEDIATELY and
seek immediate medical advice. You should keep the needle for testing.
When the sharps container is three-quarters full, a new sharps container should be issued.
6.8 Bathroom cleaning chemicals
When cleaning bathrooms we are faced with a number of common cleaning and hygiene problems, including;
water rings and discolouring of porcelain toilet bowls from minerals in the water; rust stains from old pipes and
fittings, mould on damp surfaces including tiles and grouting; and the potential to spread a large variety of
dangerous bacteria and viruses.
It is important for us to address the most effective way to hygienically clean all the fixtures and fittings found in
bathrooms.
Water rings and water stains in toilets and urinals come from minerals in water.
These mineral stains and are best removed using an acid detergent such as a toilet bowl cleaner and lightly
scrub with a toilet brush.
© Daniels Associates/Hospitality Institute of Australasia (v12.1) P a g e | 28
Rust stains often require the use of stronger acids to completely remove these stains. Additional personal
protective equipment is required when using strong acids; including a full face shield and chemical resistant
gloves.
Mould is most effectively removed with chlorine bleach. However chlorine bleach has a strong odour and
can react with other chemicals to give off dangerous chlorine gas. For this reason bleach is banned in many
workplaces. Mould can also be removed using a mildly acidic detergent (toilet bowl cleaner) and light scrubbing
with a mildly abrasive cloth.
Clean soiled floors requires use of a floor detergent. Allow time to dry before letting people back into the
bathroom. If the floor is still wet it will attract dirt from peoples shoes and re-soil (become dirty) immediately.
Mixing Chemicals – never mix chemicals. Never mix bleach with another detergent and in-particular, never
mix bleach with an acidic detergent because it will produce toxic chlorine gas.
6.9 Bathroom Odours – Where they are found
Many cleaning professionals misunderstand the source of persistent bathroom odours. Failure to understand
sources of such odours can result in client complaints and leave your company looking unprofessional.
Most bathroom odours come from either the floor drain or the urinal drain.
Modern cleaning methods minimise the use of water and over a period of time the u-bend in the floor drain can
dry out, allowing odours from the sewerage pipe to enter the bathroom. This simple solution is to pour 5-10
litres of water down the floor drain on a weekly basis.
Over a period of time urinal drains can become covered in urine crystals. To remove the build-up of urine
crystals the drain cap must be removed and the pipe scrubbed with toilet bowl cleaner and a toilet brush.
6.10 Bathroom cleaning procedures
Following is a Case Study (an example) of a situation involving a cleaner named Hong who works in a large
office building. Every day she cleans the bathrooms on the third floor. She must maintain (look after) the
bathroom, replenish supplies and dress the bathroom after cleaning (make sure it is clean and tidy).
Hong checks the bathroom for health and safety hazards
Note: To prevent infection, you should have separate cleaning cloths and cleaning equipment for toilets and
bathrooms.
Hong checks the bathroom for health and safety hazards including:
Needles—check behind toilets and cisterns with your scraper. DO NOT PUT YOUR HAND WHERE YOU
CAN’T SEE;
Body fluids—blood, vomit, faeces;
Leaking water—taps, toilets, under basins;
Electrical faults—broken switches, lights, exposed wires; (Report electrical faults immediately. DO NOT
WORK WHERE THERE ARE EXPOSED WIRES. YOU COULD GET KILLED!); and
Breakage—mirrors, windows and other fittings.
You should report all breakages and faults immediately.

© Daniels Associates/Hospitality Institute of Australasia (v12.1) P a g e | 29
6.11 Hong assesses the bathroom room
Before Hong cleans the bathroom, she assesses (looks at and plans how to clean) the area. As part of her
planning, Hong should NEVER close the bathroom for cleaning during peak periods such a lunch hour.
Hong does the following things:
She checks the bathroom is not in use. If someone is using the bathroom she waits until they finish and
have left the bathroom.
Hong barricades the bathroom entrance. Hong has a sign communicating the bathroom is closed for
cleaning and should re-open in 10 minutes.
Hong washes and dries her hands thoroughly then puts on her gloves.
Hong has the appropriate cleaning chemicals, consumables and equipment to clean the bathroom
including:
Cleaning Chemicals:
Neutral floor detergent; window cleaner and toilet bowl cleaner.
Consumables:
Waste bin liners
Toilet paper, paper hand towels and hand soap.
Equipment:
Cleaning cloths and microfiber cloths
Mop and bucket for cleaning the floor.
6.12 Hong cleans the toilets and urinals
Hong’s first cleaning task is to pour toilet bowl cleaner around the inside of each toilet bowl. Hong leaves
the toilet cleaner time to clean and continues with her other cleaning duties.
Hong replaces the empty toilet rolls, spot cleans partitions and the toilet roll holder.
Hong always checks behind the toilet door – she remembers her clients are looking at the back of the door
when they sit on the toilet.
Hong wipes pedestals (outside of toilet bowls), both sides of seats and lid. She works from the cleanest
areas to the dirtiest areas of the toilet with her cleaning cloth – that is she cleans the tops and flush
buttons before cleaning the rim and seat to minimise the spreading of microbes (germs). Note: Wiping the
dirty area first – such as the rim may spread germs to cleaner areas such as flush buttons.
After detailing the toilet she scrubs inside the toilet bowls and the underside of rims with a toilet brush and
she remembers to clean under the “S” bend.
Hong uses a circular motion when scrubbing the toilet to avoid splashing.
When finished she flushes the toilets.

© Daniels Associates/Hospitality Institute of Australasia (v12.1) P a g e | 30
6.13 Hong cleans the hand basins mirrors and surrounds
Hong refills the hand towel dispensers and liquid soap dispensers. She completes this task first because if
she drips any soap, she will remove it when cleaning the basins and counter.
Hong cleans the mirrors using lint-free cloth and window cleaner (remember the corners! no streaks); she
cleans and wipe around basins with an appropriate detergent; she cleans the taps, and soap dispensers.
Hong then wipes dry the taps and soap dispensers with a dry cloth.
Did you know one of the dirtiest parts of the bathroom are the soap dispenser buttons? Think about it;
after we have done our business in the toilet the first place we go with our dirty hands is the soap
dispenser! So make sure you cleaning the soap dispensers and in-particular the buttons!
Clean ALL high contact surfaces: It is important to clean all high contact surfaces. High contact
surfaces are surfaces that people touch regularly including tap handles, soap dispenser, towel dispensers,
hand dryer buttons, toilet flush buttons and door push plates and handles.
Remember: High contact surfaces can spread diseases if not cleaned properly.
Hong replaces consumables as she cleans
Hong replaces toilet rolls when cleaning the toilets; she replaces/refills hand towels and soap when
cleaning the hand basins.
Hong removes rubbish and litter
Empties waste bins
Spot cleans spots or marks on bins
Replaces bin liners (only when soiled).
6.14 Hong dresses the restroom
When dressing the bathroom Hong does the following:
She makes sure there are no streaks on mirrors, walls or doors; taps and faucets are polished
She makes sure all consumables have been replaced, for example there is soap at every basin
She sprays room freshener around the room (only if required as part of cleaning specification).
The last task Hong does is mop the floor
Hong cleans the floor last because she will leave foot marks from her shoes on a wet floor.
Hong removed as much water from the mop as possible to help the floor dry quickly.
The floor should be clean and streak free when finished.
Hong replaces the mop and bucket water on a regular basis.
If people are waiting to use the bathroom Hong may also dry the floor using her dust mop.
© Daniels Associates/Hospitality Institute of Australasia (v12.1) P a g e | 31
6.15 Weekly clean
Hong remembers to detail clean the bathroom on a weekly basis or as required in the cleaning schedule
Hong damp wipes horizontal surfaces and ledges including tops of partitions and mirrors on a weekly basis
Hong cleans high surfaces using a duster with an extension pole. For best results she uses a vacuum
cleaner fitted with an extension pole
Hong wipes the bottom wall tile with a damp cloth to remove dirty mop marks.
6.16 Hongs Restroom Pulse Points – Commonly missed areas
When reviewing bathroom cleaning quality we should think about hygienic cleaning and what the client sees
and touches when they visit a bathroom. With this in mind, the list below highlights some of the common
problems often overlooked or not cleaned to required standards.
1. Toilets – clean the underside of bowl, including back of the bowl.
2. Toilet – clean mop marks around base of bowl.
3. Urinal – cleaning underside of bowl.
4. Urinal – remove water or rust marks from running water.
5. Walls – clean mop marks on base/edge tiles on a weekly basis with a damp cloth.
6. Partitions - spot cleaning of marks and dusting of horizontal surfaces.
7. Taps – watermarks and stains on taps.
8. Basin – remove build-up of water staining and soap scum.
9. Mirrors – make sure you remove marks and streaks at tops of mirrors, (higher reach areas).
10. Floors – detail clean around urinals. You may need to scrub with an acidic detergent and brush.
11. Floors – soil build-up may require scrubbing on monthly basis depending upon degree of soil build-up.

© Daniels Associates/Hospitality Institute of Australasia (v12.1) P a g e | 32
Section 7 - Emptying and removing waste
In this section we will review basic waste removal procedures including equipment used in waste removal,
health and safety considerations, and types of waste generated in different environments; waste segregation
and recycling.
When you finish this section you will understand:
Introduction to waste removal
Health and Safety risks associated with waste
Odours from waste
Identification and reporting of hazardous waste
Equipment
Different work sites have different requirements
Waste Segregation and Recycling

© Daniels Associates/Hospitality Institute of Australasia (v12.1) P a g e | 33
7.1 Introduction to waste removal
In almost every cleaning job you do, you will have to remove rubbish and litter – it is one of the must do tasks
in all cleaning operations.
Areas that are not cleaned of rubbish will generate immediate complaints. They look untidy, they have an
unpleasant odour, they are a health and safety hazard and a potential fire hazard.
Waste removal is a normal part of general cleaning duties and is performed at the same time other cleaning
tasks are performed. In most cleaning operations the waste will be transferred to a waste bin or bag on your
cleaner’s trolley.
When collecting larger volumes of waste such as in shopping centres and public spaces, waste removal will be
a separate cleaning task. This waste will generally be collected in large mobile bins (on wheels).
What you need to get started
Before you get started, you need to check your equipment and ensure the protective clothing is suitable for the
type of rubbish/waste you are removing.
Your personal protective equipment (PPE) should include gloves and safety shoes. The type of gloves you wear
will depend upon the type of waste you are handling.
Gloves are required;
to prevent the possible spread of infections
prevent cutting your hands when handling sharp waste such as broken glass or other sharp objects
prevent your skin coming into contact with hazardous chemicals.
7.2 Health and Safety risks associated with waste
There are a number of reasons why it is important to collect and dispose of rubbish regularly.
Regularly removing rubbish keeps the cleaning site looking clean and tidy.
Rubbish has an unpleasant odour (smell), so it is important it is removed regularly.
Rubbish has germs which can cause infection.
Sometimes waste can be toxic (poisonous or very harmful). For example if it contains hazardous
chemicals, or heavy metals from electronic equipment.
Rubbish can cause injury, for example someone might cut themselves on broken glass.
Rubbish can cause infections (from contaminated waste) and injuries such as cuts from sharp objects and
broken glass.
Potentially harmful bacteria can grow extremely quickly in food waste. Food waste should be removed on a
daily basis to prevent the possible spread of germs, unpleasant odours and to prevent pest infestations.
You should never overload a garbage bin because:
o the garbage may fall from the bin causing a health and safety problem and possible slip / trip hazard
o the bin may be too heavy and potentially cause a manual handling injury when moving and transferring
the waste.
© Daniels Associates/Hospitality Institute of Australasia (v12.1) P a g e | 34
7.3 Odours from waste
Garbage often smells because it contains decaying foods such as meat or vegetables and other contaminated
waste such as baby nappies. As meat decays, it attracts bacteria (germs) that feed on the meat. Vegetables
also can rot and germs feed on the vegetables, warming up the garbage bag. As more gasses and liquids are
produced, the bag may blow-up.
Rats and flies attracted by rotting garbage can pose a health threat and can spread dangerous germs.
Eliminate odours for waste bins
The most obvious thing to do is remove waste before it starts to decay (rot) and smell. Remember food waste
in garbage will decay quicker in warmer weather and may therefore require more frequent removal in warmer
months to minimise odours.
The most effective way to remove offensive (bad) odours and germs from garbage bins is to wash the bins
with warm or hot water using an appropriate detergent.
For larger bins and skips they may require pressure washing.
If the odour remains, the bin may require a second clean.
7.4 Identification and reporting of hazardous waste
All hazardous waste must be collected and sorted according to your company policies and procedures,
particularly in relation to the PPE you should wear. If you are unsure how to handle any waste, or are
concerned it is hazardous you must report this to your work site supervisor. Hazardous waste includes:
Used needles and syringes
Body fluids including blood, vomit, urine and faeces
Toxic chemicals
Toxic materials from used batteries, light globes and old electrical devices
Broken glass.
Remember never use your hand to squash/push rubbish down in a rubbish bin – there may be something sharp
such as broken glass or a syringe under the rubbish and you could get cut or jabbed/stuck with the needle.
ALWAYS WEAR GLOVES WHEN HANDLING WASTE MATERIAL.
ALWAYS report hazardous waste to your supervisor.

© Daniels Associates/Hospitality Institute of Australasia (v12.1) P a g e | 35
7.5 Equipment
The equipment used to pick up rubbish includes:
Long handled brush and dust pan
Dust mop
Broom
Rubbish bins-240 litre
Rubbish containers on trolleys
Rubbish receptacles; and
Rubbish bin liners-various types.
The equipment used to prevent needle sharps injuries includes:
Sharps container (non-reusable)
Tongs
Heavy duty rubber gloves; and
Safety footwear.
Equipment used to empty rubbish containers includes:
Electric hoists
Electric tipping devices; and
Trucks with hydraulic lifting and tipping mechanisms.
Bin liners are used on many office bins to prevent the bin becoming dirty. Bin liners need to be replaced
regularly to minimise the build up of odour and microbes and keep the bins hygienically clean.
© Daniels Associates/Hospitality Institute of Australasia (v12.1) P a g e | 36
7.6 Different work sites have different requirements
In large offices:
Some office workers empty their own desk bins daily
Most desk bins are emptied by night cleaners; and
Bulk rubbish is collected from the waste management area daily, usually very early in the morning.
In small offices:
Some office workers empty their own desk bins daily
Small desk bins are emptied daily by night cleaners or as arranged; and
Private contractors collect recyclable rubbish from the collection area weekly or as arranged.
In shopping centres:
Rubbish bins within the public areas are emptied when necessary - during busy times such as lunch breaks,
this could be every half hour
The frequency depends on the time of day and the area in the shopping centre - your supervisor/employer
will tell you how often this should be for the area where you are working
Rubbish is collected from the waste management area of shopping centres once per day, usually very late
at night or very early in the morning.
In schools:
Students may empty some bins during the day
Staff room bins may be emptied daily or as arranged
Rubbish is generally taken to an area especially set aside for sorting for recycling; and
Large metal bins are provided by an outside contractor who collects and replaces them as requested by the
school.
In factories:
In some areas within very large factories, rubbish is collected regularly throughout the day, particularly in
food processing factories
In average sized factories, rubbish generally is removed within the building daily, unless otherwise asked;
and
This could include toxic waste and other dangerous materials.

© Daniels Associates/Hospitality Institute of Australasia (v12.1) P a g e | 37
7.7 Mechanical lifting
Often, when you collect rubbish, you will put it into a special bag on the end of your cleaning trolley. But what
do you do when the bag is full? You might put it on another trolley and when the trolley or bin is full, take it to
the waste management area.
In the disposal area there is a large disposal container that all of the general (not sorted) rubbish goes into. It
might be a compactor, a dump master, a very large waste bin or a truck.
Often there is a mechanical lifting device in the disposal area which is there to help you empty the bin or trolley
into the disposal container.
If you have a heavy waste bin and there is no mechanical lifting device available you should break the load into
smaller loads so it does not pose a risk of hurting your back.
7.8 Waste segregation and recycling:
The purpose of segregating waste is for waste recycling & separating hazardous waste from non-hazardous
waste.
Many cleaning sites have separate rubbish containers for different types of rubbish.
Usually the containers are different colours, such as yellow for sharps, or they have symbols (pictures) on them
showing what they are for.
It is important to understand the different types of waste you are working with for both health and safety
reasons and environmental reasons. Some of the different waste classifications you will encounter are covered
below.
Office waste generally consists of recycled paper and general waste that is considered non-hazardous.
General Waste (non-hazardous waste)
Any on-hazardous waste which is not capable of being composted, recycled, reprocessed or re-used. This
includes:
Non-recyclable plastics
Used paper towels
Non-recyclable paper and cardboards
Foods scraps, food wrappers and food packaging
7.9 Recycled waste
Recycled waste includes any items which are composed of materials or components, capable of being reused.
Office paper is the most common recycled waste in commercial buildings. The office employees should
separate office paper. Many offices have recycle bins for their office paper.
Other recyclable materials include cardboard and paper packaging materials, aluminium cans, glass bottles and
jars, plastic bottles and recyclable plastic packaging materials.
Organic Waste
This includes wood, garden, food (vegetable) waste.
© Daniels Associates/Hospitality Institute of Australasia (v12.1) P a g e | 38
7.10 Clinical Waste
Generally encountered in hospitals, medical centres, healthcare and aged care environments. Clinical waste
contains the following types of waste:
Sharps;
Human tissue (excluding hair, teeth and nails);
Bulk body fluids and blood; and
Visibly blood stained body fluids and visibly blood stained disposable material and equipment.
Sharps: Are any object capable of inflicting a penetrating injury (breaking the skin) which may or may not be
contaminated with blood and or body substances. This includes needles and any other sharp objects or
instruments used in medical procedures.
7.11 Liquid waste
Liquid wastes are defined in the Waste Regulation. These wastes include grease trap waste, used lubricating oil
and waste normally discharged to the sewer.
Chemical Waste
Chemical waste includes Hazardous and Dangerous chemicals, including:
Hazardous cleaning chemicals
Paints, solvents and oils
Fluorescent lamps and energy-saving light bulbs
Batteries.
Electronic Waste includes:
Recycled computers, monitors and printers
Televisions, CD and DVD recorders
Mobile phones.
© Daniels Associates/Hospitality Institute of Australasia (v12.1) P a g e | 39
Section 8 - Clean & store equipment
When you finish this section you will understand how to:
Restore room to its original condition
Cleaning and storing equipment
Dispose of chemicals correctly
Prepare for the next shift
© Daniels Associates/Hospitality Institute of Australasia (v12.1) P a g e | 40
8.1 Dress the Area, clean and store equipment
When you finish this section you will understand how to:
Restore room to its original condition
Rubbish disposal procedure
Restore room to its original condition
Once cleaning is complete, it is important to restore the room to its original condition. If you have moved any
furniture such as chairs, place these back where they belong. Do not drag, pull or push furniture across a hard
floor as it may scratch and damage the floor.
Ask for help to move heavy furniture.
Rubbish disposal procedure
There are different ways of disposing of rubbish at different sites. If you are unsure of the correct waste
disposal techniques check with your supervisor. Hopefully most of the clients you work for will have waste
separation and recycling programs.
These waste disposal procedures may include separating paper, plastic bottles, food waste and general waste.
8.2 Cleaning and storing equipment
When you have finished cleaning you must clean your equipment according to manufacturer’s
recommendations.
Cleaning and storing your equipment properly will:
Help equipment last longer – for example damps mops and rot and fall apart.
Prevent contamination by thoroughly cleaning and drying all equipment.
Prevent the growth of bacteria by cleaning, storing and drying equipment properly.
Reduces cost because equipment last longer.
Return all equipment, chemicals and PPE to your cleaners room and store all materials in an organised,
accessible (easy to reach) manner.
Not only will items be easier to find but you will also reduce the risk of injury to yourself or others caused by
poorly stored and dirty equipment.
Clean your equipment in the cleaner’s room or an area with a sink and running water that is away from public
areas. Before you start, wash your hands and put on gloves.
Buckets: Wipe buckets and rinse them with hot water and detergent until all soil marks are gone. Store upside
down on the sink in your cleaners’ room.
Replace mops according to infection control guidelines and launder dirty mops on a daily basis.
© Daniels Associates/Hospitality Institute of Australasia (v12.1) P a g e | 41
Spray bottles: Wipe spray bottles with a cloth and detergent to remove soil marks, then rinse with cold
water. Place them in a position to dry.
Dust mop: Use the vacuum cleaner to clean your dust mop. Run the hand nozzle up and down the head to
remove as much dust as you can.
Cleaning cloths: Ideally cleaning cloths should be laundered after each use, or be disposable.
Scourers and scrubbing brushes: Wash scourers and scrubbing brushes in detergent and hot water, then
place them in a position where they can dry.
Vacuum cleaners
Check vacuum cleaner dirt bags regularly to avoid overfilling. Dispose of full bags carefully without spilling, and
replace with clean bags. Avoid reusing paper bags. Clean vacuum cleaner filters and cleaning heads regularly.
Accumulation of dust may reduce the performance of the machine.
8.3 Dispose of used chemical solutions
Once you have finished using a diluted chemical solution, dispose of it safely.
Never pour it back into its original container. If you do this you may transfer soil and bacteria to the
concentrated chemical.
Some chemicals, such as detergents, can be poured down a cleaners sink. Others, which may be harmful
to the environment, need special disposal. They may need to be bottled and sent to an approved location.
Always read the Safety Data Sheet (SDS) or the manufacturer’s instructions before disposing of chemicals.
8.4 Prepare for the next shift
Prepare all of the equipment so that it is ready for the next shift. It should be clean and in working order so
that there is no risk of safety or hygiene problems for yourself or for others.
Make sure you do the following:
Check cleaning equipment and report any faults;
Check equipment is cleaned and stored properly;
Check chemical containers for cracks or leaks; make sure they are closed properly and that you can easily
read chemical labels;
Dispose of waste chemicals, waste water and solid waste safely and according to company policy;
Always wash gloves in warm water and detergent, and rinse thoroughly before removing them. Take them
off and place them where they can dry easily; and
Always wash your hands well with detergent and warm water; rinse them in clean water and dry with a
hand towel or hand dryer.